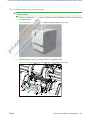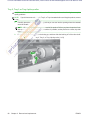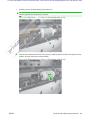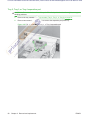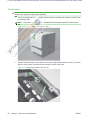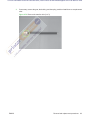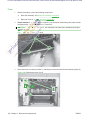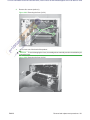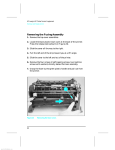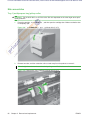
1
For more information on the HP LaserJet P3010 | P3015 visit us at www.PrinterSupplies.com or call 800-551-1943
Main assemblies
Tray 1 (multipurpose tray) pickup roller
CAUTION: Do not touch the surface of the roller. Skin oils deposited on the roller might cause printquality problems.
1.
Press the cartridge-door
e-door
or rrelease
elea
el
as
se
e bu
b
button,
utton, and
a then open the cartridge door. Make sure that the door
is completely open.
60
0 Remove
Remo
Re
move
mo
ove
ve tthe
he T
he
ray 1 (M
ra
MP tray) pickup roller (1 of 2)
Figure 2-60
Tray
(MP
2.
Release two tabs, and then rotate the roller out and away from the product to remove it.
TIP: It might be easier to release the tabs by using a small flat blade screwdriver.
Figure 2-61 Remove the Tray 1 (MP tray) pickup roller (2 of 2)
86
Chapter 2 Removal and replacement
ENWW
For more information on the HP LaserJet P3010 | P3015 visit us at www.PrinterSupplies.com or call 800-551-1943
Tray 1 (multipurpose tray) separation pad
CAUTION: Do not touch the surface of the pad. Skin oils deposited on the roller might cause paperhandling problems.
1.
Press the cartridge-door
or release button, and then open the cartridge door. Make sure that the door
is completely open.
Remo
ove
ve tth
he
h
e Tray
Tra
ray 1 (multip
Figure 2-62 Remove
the
(multipurpose tray) separation pad (1 of 2)
2.
Release two tabs (callout 1), and then remove the separation pad.
Figure 2-63 Remove the Tray 1 (multipurpose tray) separation pad (2 of 2)
1
ENWW
Removal and replacement procedures
87
For more information on the HP LaserJet P3010 | P3015 visit us at www.PrinterSupplies.com or call 800-551-1943
Tray 2, Tray 3, or Tray 4 pickup roller
CAUTION: Do not touch the surface of the roller. Skin oils deposited on the roller might cause printquality problems.
NOTE: If you did not remove
e the Tray 2
2, Tray 3, or Tray 4 cassette before servicing the product, remove
it now.
1.
Carefully place the
he pr
product
rod
oduc
uc
ct ffr
front-side
ron
ontt-si
siide up, sso that you can see into the opening where the cassette
alled.
would be installed.
NOTE: Debr
Debris
ris can
can
a s
scr
scratch
crrat
atch
h or damage
dama
ma
m
age the back of the product. Before you place the product frontp, rem
mov
ove any
an
ny debris
debr
debr
de
briis from
m the
tth
he work
wo surface. If possible, set the product on a clean, dry cloth
side up,
remove
nt s
scr
crat
cr
ratch
atch
at
chin
in
ng and
and da
am
ma
age.
to prevent
scratching
damage.
2.
Rele
Release
ease
ase th
the
e ro
rroller
oller
lller
er bushi
bushing,
in
ng
g, rotat
rotate the busing up, and then slide the bushing off of the roller shaft.
F
Fi
igu
gure
e2
-64
-6
64 Remo
ove
ve tthe
he T
Figure
2-64
Remove
Tray 2, Tray 3, or Tray 4 pickup roller (1 of 3)
88
Chapter 2 Removal and replacement
ENWW
For more information on the HP LaserJet P3010 | P3015 visit us at www.PrinterSupplies.com or call 800-551-1943
3.
Carefully remove the black-plastic guard (callout 1).
CAUTION: The guard is partially retained by the bushing removed in the previous step. Do not
lose the guard when the bushing is removed.
Figure 2-65 Remove the Tray 2
2, Tray 3, or Tray 4 pickup roller (2 of 3)
1
4.
4.
S
Slide the roller toward the left side of the product, rotate the right end of the roller away from the
product, and then remove the roller assembly.
Figure 2-66 Remove the Tray 2, Tray 3, or Tray 4 pickup roller (3 of 3)
ENWW
Removal and replacement procedures
89
For more information on the HP LaserJet P3010 | P3015 visit us at www.PrinterSupplies.com or call 800-551-1943
Tray 2, Tray 3, or Tray 4 separation pad
CAUTION: Do not touch the surface of the pad. Skin oils deposited on the roller might cause paperhandling problems.
1.
Remove the tray cassette.
te. See Tra
Tray cassette (Tray 2, Tray 3, or Tray 4) on page 54.
2.
s (cal
allo
lllo
out 1
)),, a
nd the
nd
Remove two screws
(callout
1),
and
then remove the separation pad (callout 2).
ove
ve tthe
he
eT
ray 2,
ra
ray
2, Tray 3, or Tray 4 separation pad
Figure 2-67 Remo
Remove
Tray
2
1
90
Chapter 2 Removal and replacement
ENWW
For more information on the HP LaserJet P3010 | P3015 visit us at www.PrinterSupplies.com or call 800-551-1943
Transfer roller
CAUTION: Do not touch the black-sponge portion of the transfer roller. Skin oils deposited on the
transfer roller might cause print-quality problems.
1.
Press the cartridge-door release bu
button, and then open the cartridge door. Make sure that the door
is completely open.
NOTE: If you did
id not
ot rrem
remove
em
mo
ov
ve the
the print ca
cartridge before servicing the product, remove it now.
Figure 2-70
0 Remove
Re
emo
ove
e tthe
he
h
e transfer
tra
rans
ns roller (1 of 3)
nsfer
2.
Release two tabs (callout 1) at the left end of the roller, slightly lift the end of the roller up, and then
slide the roller (callout 2) toward the left to release it. Remove the roller.
Figure 2-71 Remove the transfer roller (2 of 3)
1
2
92
Chapter 2 Removal and replacement
ENWW
For more information on the HP LaserJet P3010 | P3015 visit us at www.PrinterSupplies.com or call 800-551-1943
3.
If necessary, remove the gear, the bushing, and the spring, and then install them on a replacement
roller.
Figure 2-72 Remove the transfer roller (3 of 3)
ENWW
Removal and replacement procedures
93
For more information on the HP LaserJet P3010 | P3015 visit us at www.PrinterSupplies.com or call 800-551-1943
Fuser
1.
2.
Before proceeding, remove the following components:
ł
Rear-door assembly. See Rear-door assembly on page 62.
ł
Right-rear
Ri
ig
gh
htt-re
r a cover on page 68.
Right-rear cover. See R
R
ele
lea
as
se tw
ttwo
wo tabs ((callout 1) on the duplex media-feed guide, and then slide
Duplex models only: Re
Release
rd the
eb
bac
ac
ck of
of tthe
he
h
ep
roduct to remove it.
the guide toward
back
product
Reinstallation
ati
tion
on
n tip
tiip
p Make
Ma
ak
ke
e ssure
ure that
at both
at
both tabs
ta snap back into place when reinstalling the duplex
media-feed
guide.
feed g
uide
ui
e.
Figure
gure
gu
e2
2-81
-8
81 Remove
Re
Remo
emo
m ve the fuser
fus
us
u
se
err (1 o
of 4)
1
3.
Disconnect three connectors (callout 1), and release one wire harness from the retainer (callout 2).
Figure 2-82 Remove the fuser (2 of 4)
1
2
100 Chapter 2 Removal and replacement
ENWW
For more information on the HP LaserJet P3010 | P3015 visit us at www.PrinterSupplies.com or call 800-551-1943
4.
Remove four screws (callout 1).
Figure 2-83 Removing the fuser (3 of 4)
1
5..
5
Pu
Pull
ulll tthe
he fuser out of the back of the product.
CAUTION: To avoid damaging the fuser, the cartridge-door assembly must be closed before you
C
CA
remove the fuser.
Figure 2-84 Removing the fuser (4 of 4)
ENWW
Removal and replacement procedures 101