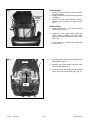
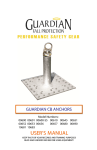
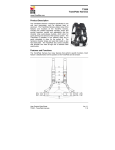
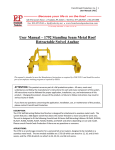
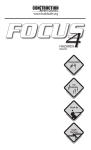
1
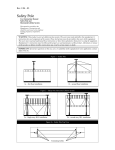
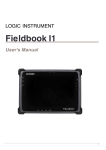
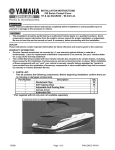
INSTALLATION INSTRUCTIONS
Camo Seat Cover Set (Front)
16B-F470B-V0
FX-4
This installation should be performed by an authorized Yamaha dealer or a qualified mechanic.
Some components require information from the
Model’s Service Manual for proper installation or
adjustment. Be sure to have the Service Manual
on hand, if necessary, before proceeding with the
installation.
Please
read and understand these instructions
DEALER:
completely before installation to avoid possible
injury to yourself or damage to the accessory or
vehicle.
DEALER:
These instructions contain important information for future reference and must be given to the customer.
WARRANTY INFORMATION:
•
Genuine Yamaha accessories are covered by a one year limited warranty against defects in material or
workmanship. Labor for replacement of defective components is not covered. See your Yamaha dealer for a
copy of the warranty statement.
•
The Limited Warranty provided with new Yamaha vehicles has exclusions for certain failures, including those
caused by competition or racing use (except YZ and WR motorcycle models) as well as by abnormal strain or
abuse. While installation of these components will not “void” your vehicle’s warranty, specific failures adjudged
by Yamaha to have resulted from the installation of accessory components or other modifications, or from
competition use (except YZ and WR motorcycle models), may not be covered by warranty or Yamaha Extended
Service.
PARTS LIST:
This kit contains the following components. Before beginning installation, confirm there are no missing or damaged
components.
Item
Part Number
Description
Qty
-16B-F470B-V0
Camo Seat Cover Set (Front)
-c
*
Seat Cover (Left/Right)
2
d
*
Headrest Cover
2
* Part supplied with kit only and not available separately.
c
4/2009
20090065
d
1 of 3
16B-F472B-V0_1
Fig. 1
PREPARATION:
1. Place FX-4 on a secure level surface and set
the parking brake.
2. Clean all mounting surfaces before beginning
installation.
3. Remove the rider and passenger seat assemblies (refer to Owner’s or Service Manual).
FEED CENTER
STRAPS
THROUGH
HOLE
c
INSTALLATION:
1. Place the seat cover c over the front part of
the driver’s seat (Fig. 1).
2. Locate the center straps and connect the
Velcro® halves together. Feed the straps
through the center seat hole as shown in Figures 1 & 2.
3. Fit the seat cover c around the bottom and
top of the seat.
4. Turn the seat up side down and locate the Drings shown in Figure 2.
Fig. 2
D-RINGS
c
5. Separate the center straps and route them
through the D-rings (Fig. 2).
6. Cinch the center straps tight and connect the
Velcro® halves to secure the D-rings. (Fig .2).
CENTER
STRAP
CENTER
STRAP
CENTER
HOLE
4/2009
20090065
2 of 3
16B-F472B-V0_1
Fig. 3
7. Insert upper strap through the hole at the
base of the headrest (Fig. 3).
UPPER STRAP
THROUGH
HOLE
8. Route the lower straps under the seat release
mechanism as shown in Figure 3.
D-RINGS
9. Feed the lower straps through the D-rings on
the upper straps and cinch tight to secure the
seat cover in place (Fig. 3).
SEAT RELEASE
MECHANISM
LOWER
STRAPS
10. Place the headrest cover d onto the driver’s
seat headrest and connect the Velcro® halves
to secure it in place (Fig. 4).
Fig. 4
d
11. Reinstall the driver’s seat (refer to Owner’s or
Service Manual).
12. Repeat steps 1-10 to install the seat cover c
and the headrest d onto the passenger seat.
13. Reinstall the passenger seat (refer to Owner’s
or Service Manual)
CARE AND CLEANING:
Do not machine wash or dry. Wash using only
cold water and avoid using harsh detergents.
Hang to dry.
CUSTOMER SERVICE:
For further information, see your Yamaha dealer.
ESTIMATED TIME TO INSTALL: 0.3 HRS
4/2009
20090065
3 of 3
16B-F472B-V0_1