1
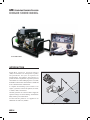
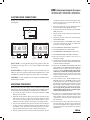
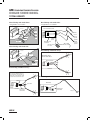
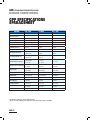
3INCETHELEADERINEFFECTIVESAFEANDRELIABLEPRODUCTSFORFISHERIESCONSERVATION +NOWLEDGEABLEBIOLOGISTSDEPENDUPON3MITH2OOTEQUIPMENT USER'S MANUAL GPP 5.0, 7.5 & 9.0 (Gas Powered Pulsator) Portable Electrofishers w/ Kohler Generator #09461 GPP: Generator Powered pulsator KOHLER shore model Contents Introduction......................................................................... 1 Unpacking........................................................................... 2 Choosing a Location........................................................... 2 Power Supply Controls....................................................... 3 Electrofisher Controls......................................................... 3 Electrofisher Connections................................................... 4 Operating Procedure........................................................... 4 Typical Hookups................................................................. 5 Maintenance........................................................................ 6 GPP Specifications Spreadsheet.......................................... 7 Electrofisher Control Panel............................................... 12 Electrofishing Safety....................................................... 10 Preventing Electrical Shock.............................................. 12 Planning For Safety........................................................... 13 Do's & Don'ts . ................................................................. 14 Introduction to Electrofishing........................................... 15 Types of Current............................................................... 17 Electrode Design............................................................... 18 Field Techniques............................................................... 22 Electrofishing Reference & Training Materials................ 23 Troubleshooting............................................................... 26 Warranty Information........................................................ 36 Items manufactured by companies other than Smith-Root carry the original manufactures warranty. Please contact product manufacturer for return instructions. All Smith-Root, Inc. manufactured products are covered by a one year warranty. 09461 Rev.0 GPP- 2006 © Smith-Root, Inc. Vancouver, WA - USA • 2006 GPP: Generator Powered pulsator KOHLER shore model 5.0 / 7.5 / 9.0 GPP Combo Package Includes the Following: Model 5.0 GPP 7.5 GP 9.0 GPP Quantity Description Line Number 1........................................ 5.0 GPP Control Box...................................................................... 3420 1........................................ 5.0 GPP Generator......................................................................... 4666 1........................................ Output Cable................................................................................. 3415 1........................................ Single Foot Switch w/15 ft. Cable & Plug...................................... 3309 2........................................ Electrofisher Certification............................................................... 5465 1........................................ 7.5 GPP Control Box...................................................................... 3421 1........................................ 7.5 GPP Generator......................................................................... 4667 1........................................ Single Foot Switch w/15 ft. Cable & Plug...................................... 3309 1........................................ 7.5 GPP Cathode Cable................................................................. 3416 2........................................ 7.5 GPP Anode Cables................................................................... 2962 2........................................ Electrofisher Certification............................................................... 5465 1........................................ 9.0 GPP Control Box...................................................................... 3867 1........................................ 9.0 GPP Generator......................................................................... 4668 1........................................ Single Foot Switch w/15 ft. Cable & Plug...................................... 3309 1........................................ 9.0 GPP Cathode Cable................................................................. 6050 2........................................ 9.0 GPP Anode Cables................................................................... 7976 2........................................ Electrofisher Certification............................................................... 5465 GPP-II 2006 GPP: Generator Powered pulsator KOHLER shore model A 7.5 GPP Combo INTRODUCTION Smith-Root Generator Powered Pulsator (GPP) electrofishers are unsurpassed in quality and performance. Our years of experience in manufacturing electrofishers has helped us to produce the most complete line of generator powered electrofishers ever offered. Ranging from 1.5 to 9kW, Smith-Root manufactures electrofishers to handle all fresh or brackish water conductivities. A complete electrofishing system consists of an engine, a generator, an electronic pulsator, an anode, a cathode, cables, and switches. Our GPP generators are custom-wound to supply the optimum voltages for electrofishing, and eliminate bulky and hot power transformers. All electrofisher pulsators are supplied in an aluminum case with carry handles. A typical shore hook-up with electrode pole and control box. GPP- 2006 GPP: Generator Powered pulsator KOHLER shore model Unpacking Carefully remove the GPP and its power supply from the shipping container and examine closely for shipping damage. If any parts are missing or the unit is damaged, notify the transportation company and immediately file a claim for the amount of damage. Record the model and serial number of your electrofisher in the spaces provided below: Where natural ventilation is inadequate install a fan to boost circulation. Model Number_ _______________________________________ EXHAUST. Whenever an engine is used indoors, the exhaust must be vented to the outside. Exhaust from a gas engine is extremely poisonous, containing carbon monoxide, an invisible odorless gas that can cause unconsciousness or death. Serial Number_________________________________________ When ordering parts, always include the power supply model and serial number located on the unit’s nameplate. This is essential to ensure the correct replacement part is shipped to you. Please keep this manual and refer to it when making adjustments or ordering parts. Additional copies are available for a nominal charge from your distributor. Choosing a Location In choosing the best location for your GPP, the following factors should be taken into consideration: FIRE HAZARDS. Locate the power supply at least 3 feet (1 meter) away from buildings or structures. Keep the power supply away from flammable trash, rags, lubricants, and explosives. Do not use the power supply near any forest, brush, or grassland unless the exhaust system is equipped with a spark arrestor that is effective. Have a fire extinguisher accessible. SECURITY. Choose a location where everyone, especially children, can be kept away, to protect them from burns and electrical shocks. Take precautions to prevent unqualified personnel from tampering with or attempting to operate the power supply. CONFINED SPACE. Restricted air flow can cause overheating and damage the engine and generator. Operation in an enclosed compartment is also a fire hazard and is not authorized. AUXILIARY WIRING. Use sufficiently thick insulated wire to hook up to the auxiliary windings. The gauge depends on the length of the wire, the voltage drop, and the amount and kind of load. Consult a competent electrician and national and local codes. GROUNDING. If grounding is called for in local codes, or radio interference necessitates it, drive a 3/4 or 1 inch pipe into the ground as close to the unit as possible. This pipe must penetrate moist earth. To the pipe connect a ground clamp and run a No.10 wire from it to the battery negative terminal on the control panel, or to the generator ground stud. Do not connect to a water pipe or a ground used by a radio system. When used in boats, ensure that generator frame is grounded to boat hull. This will prevent a shock during an electrical failure. SURFACE. Choose a level surface. If the power supply is tilted, fuel spillage may result. MOISTURE. Do not stand the unit in water or on wet ground. Protect electrical equipment from excessive moisture that will cause deterioration of the insulation and may result in short circuits. DIRT. Install the unit in a clean location. Abrasive materials such as dust, sand, or lint cause excessive wear to both engine parts and generator parts. Grass and leaves are a fire hazard. GPP- 2006 GPP: Generator Powered pulsator KOHLER shore model Power Supply Controls GENERATOR. Your GPP is powered by a specially manufactured gas-powered generator. The generator is wound so that the output voltages are taken directly from the generator, eliminating the need for a transformer or voltage-doubler. The generator has a self-excited revolving field. The stationary Stator has a separate excitation winding, and multiple windings to supply AC power. 12 VAC terminals on the generator provide up to 500 watts of 12 volts AC power on each circuit. This will run 12 volt lights, or with an external rectifier will recharge batteries. The 5.0, 7.5 and 9.0 GPP have two output circuits. ENGINE. This instruction book covers mainly the electrofisher and the generator, but not the engine. Please read all instructions in the engine manufacturer’s manual. The engine manufacturer has established an excellent worldwide service organization. Engine service is probably available from an authorized engine dealer near you: check your Yellow Pages. ENGINE GOVERNOR. The engine must be run at 3600 rpm to supply the power it was designed to produce. The governor on the engine holds the speed as nearly constant as possible. The governor is set at the proper speed in the factory. Do not adjust the governor without proper tools. VOLTAGE VARIATION. All engines slow down when a load is applied. When the electrical load on the generator is increased, the engine speed drops. This results in a lower voltage when the generator is loaded to its full capacity than when running unloaded. GPP- 2006 FREQUENCY VARIATION. The AC frequency is around 60 cycles per second. The inevitable variations in engine speed produce slight variations in the AC frequency.MODIFICATIONS to the power supply that are not authorized may impair the function and safety of the unit. Electrofisher Controls MODE selects the type of output pulses. The DC output is fast-rising slow-falling pulses. The DC pulse rate is selectable in PULSES PER SECOND. For AC output the switches must be in the AC position and in the 120 pps position. All other positions will give a pulsed DC. The AC frequency is fixed at 60 cycles per second. Note the 2.5, 5.0, and 7.5 GPPs can produce AC output, but AC is not available on the 9.0 GPP. RANGE selects the output voltage range, or switches the output OFF. PERCENT OF RANGE limits the peak voltage of the pulses to a percentage of whatever RANGE was selected above. Pulse width is also automatically adjusted between 5 and 1 millisecond pulse duration. HIGH VOLTAGE indicates when voltage is present on output power terminals. ENUNCIATOR VOLUME controls the audio alarm that indicates an output voltage. OUTPUT CURRENT METER shows the current flowing between the anode and cathode in amps. LOW RANGE indicates that the RANGE switch should be moved to the LOW position. For 7.5 and 9.0 GPPs follow the output table. TIME IN SECONDS records the actual shocking time. It counts only when high voltage is applied. The timer helps evaluate capture effectiveness. The counter can be reset to zero by pushing the small red button on front panel. EMERGENCY SHUTDOWN provides a local override of remote switches. GPP: Generator Powered pulsator KOHLER shore model Electrofisher Connections Hookup your electrofisher using the receptacles on the back panel. See diagrams: overfill the tank. Leave half an inch of the top of the tank to allow space for expansion. Make sure the fuel cap is tightly closed. 5. If fuel was spilled, wipe it away carefully. Wait until the fuel has dried before starting the engine. 6. Connect the Anode and Cathode to the OUTPUT PWR receptacle/s 5.0 GPP '00AND'00 #ONTROL PINFEMALE /UTPUTPOWER PINFEMALE 7. Plug the remote control cable (foot switch) into the 4-pin receptacle. 8. Attach the generator cable/s into the male plug/s labeled INPUT PWR. )NPUTPOWER PINMALE 9. On the Electrofisher set the MODE selector switch to the desired mode. If you are not sure which mode you desire, start with 120 pps DC. 10.Set the PERCENT OF RANGE to the minimum. 11. Set the RANGE selector switch to LOW. '00 '00 '00 '00 12.Set EMERGENCY SHUTDOWN switch to ON 13. Set the ENUNCIATOR VOLUME to midrange. #ONTROL PINFEMALE /UTPUTPOWER PINFEMALE )NPUTPOWER PINMALE #ONTROL PINFEMALE /UTPUTPOWER PINFEMALE )NPUTPOWER PINMALE INPUT PWR is a seven-pin male plug for the generator cable. The 5.0 GPP uses one plug. The 7.5 two, and 9.0 GPP has three input power plugs. OUTPUT PWR is a female receptacle for the electrodes. The 5.0 GPP uses only one receptacle for both anode and cathode. The 7.5 and 9.0 GPPs have separate receptacles for anode, anode 2, and cathode. CONTROL is a 4-pin receptacle for the remote switch that actuates the main output circuits. Operating Procedure Before operating the power supply, remove wristwatch, rings and any other jewelry. Do not operate the power supply while smoking. Do not operate while under the influence of alcohol, drugs or medication. 1. First check the engine oil level. Consult your Generator's OEM Manual. Do not overfill. 2. Refuel the engine outdoors. Keep away from any open flame, pilot light, furnace, heater, or clothes dryer. Stop the engine and allow it to cool prior to refueling. Never fuel the engine while it is hot or running to avoid fire, explosion, bodily injury, or property damage. 3. Use gas with a minimum rating of 85 octane. Do not use leaded gas because it produces combustion deposits that may shorten the life of the exhaust system. Do not mix oil with the gasoline. Use a clean, properly marked and approved safety container for storing fuel. 4. Fill the gasoline tank with clean fresh unleaded gasoline. Do not 14.Place the anode and cathode in the water, not touching each other. 15.Activate the remote control switch. The high voltage indicator lamp and audio alarm should both come on and the ammeter will deflect. 16.Deactivate the REMOTE CONTROL SWITCH while adjusting the PERCENT OF RANGE and RANGE selector switches to achieve optimum response by the fish. Damage to the range selector switch may result from switching under load. Experimentation will be required to learn what mode and voltage settings are best for various water conditions and types of fish. 17.If the ammeter shows LOW RANGE and the RANGE selector is in the HIGH position, switch to the LOW position. The low voltage windings on the generator are capable of delivering more current than the high voltage windings. If erratic operation occurs in the high range, switch to the low range. Do not operate the generator above the power ranges indicated on the meter, or possible engine and generator damage may occur. 18.If you have a 7.5 or 9.0 GPP, and have been running it hard, run it for another five minutes under no load before shutting it down. This allows the electrical components to cool-down slowly, extending their life considerably. 19.To avoid burns or fires let the power supply cool before transporting. Keep the engine horizontal to prevent fuel spillage. Do not support the power supply from the top of the frame for any extended period of time. GPP- 2006 GPP: Generator Powered pulsator KOHLER shore model Typical Hookups Shore Hookup with Anode Poles* Boat Hookup with Anode Poles* Not applicable to 7.5 or 9.0 GPP’s Not applicable to 7.5 or 9.0 GPP’s * * Non-conductive boat hull GPP Electrofisher B -6 CB R Anode pole #1 Input from Generator Anode pole #2 optional Cathode options Stake cathode (buried in ground) Anode pole #3 optional Pulsator Power supply Rat tail cathode /NE#ATHODE"OOM ANDONE!NODE"OOM Metal plate cathode in the water. IN USE Boat Hookup with Boom Arrays ANODE #1 OFF CATHODE RCB-6B JUNCTION BOX SMITH-ROOT INC. VANCOUVER WA. '00ELECTROFISHER Input from &OOTSWITCH Rat tail cathode #ATHODE IN USE ANODE #3 GPP Electrofisher OFF ANODE #2 RCB-6BStake cathode (buried in ground) #ATHODE /NE#ATHODE"OOM ANDONE!NODE"OOM Cathode options Extension cable 0OWERSUPPLY IN USE Diamond anode Rat tail cathode Anode pole with 6’ cord and 11" anode ring 6" anode ring RCB-6B JUNCTION BOX OFF SMITH-ROOT INC. VANCOUVER WA. ANODE #1 &OOTSWITCH !NODE RCB-6B 0OWERSUPPLY Boat Hookup with Boom Arrays Extension cable 4WO!NODE"OOMS WITHTHEBOATASTHE#ATHODE "OATHULL !NODE )FYOUHAVEANALUMINUMHULLYOUCAN USETHEHULLASTHECATHODEBUT)FYOUR HULLISMADEOFOTHERMATERIALSAMETAL CATHODEMUSTBEATTACHEDTOTHEBOAT !NODE Boat Hookup with Prod Pole Whisker anode Diamond anode 6" anode ring Anode pole with 6’ cord and 11" anode ring 4WO!NODE"OOMS WITHTHEBOATASTHE#ATHODE #ATHODE )FYOUHAVEANALUMINUMHULLYOUCAN Metal hull boat USETHEHULLASTHECATHODEBUT)FYOUR HULLISMADEOFOTHERMATERIALSAMETAL CATHODEMUSTBEATTACHEDTOTHEBOAT &OOTSWITCH '00 5NIT "OATHULL CATHODE '00ELECTROFISHER Metal plate cathode in the water. Prod pole 0OWER SUPPLY ANODE #2 OFF "OATHULL IN USE ANODE #3 Single foot switch Whisker anode Anode pole #3 optional Metal plate cathode on hull bottom Shore Hookup with Prode Pole Generator Anode pole #2 optional Cathode options Metal plate cathode in the water. Anode poles always have their own switch on the handle Anode pole #1 RCB-6B "OOM )NTERCONNECT *UNCTION"OX Power supply Pulsator#ATHODE Foot switch !NODE Boat hull is used as the cathode Prod pole !NODE &OOTSWITCH 0OWER SUPPLY '00 5NIT "OATHULL "OOM )NTERCONNECT *UNCTION"OX !NODE 2006 DFS-6’ Double foot switch ON GPP- Prod pole with 15’ cord and 11" anode ring Output controlled by foot switch. ON SFS-6’ or SFS-15’ Single foot switch FHS-6’ Foot/Hand switch GPP: Generator Powered pulsator KOHLER shore model Maintenance For more specific instructions regarding the maintenance and proper operation of your generator, please consult your Kohler OEM Manual. Before cleaning or inspecting make certain all moving parts have stopped. Disconnect the spark plug wire and keep the wire away from the plug to prevent accidental starting. Do not put hands, feet, tools or other objects near rotating parts. Always wear eye protection. 1. CHANGE ENGINE OIL after first five hours of operation. Thereafter, change oil every 25 hours of operation. 2. SERVICE AIR CLEANER. Clean and re-oil the precleaner at three month intervals, or every 25 hours, whichever occurs first. Remove paper cartridge yearly, or every 100 hours, whichever occurs first and clean by tapping gently on a flat surface. Replace if very dirty. Keep hands and face away from the carburetor when the air cleaner is removed. A sudden backfire can cause serious burns. 3. CLEAN COOLING SYSTEM yearly or every 100 hours, whichever occurs first. 4. SPARK PLUG. Consult your Generator's OEM Manual. 5. FUEL. Every 250 hours replace the in-line fuel filter or clean the screen and bowl. 6. CHECK GUARDS. Operate the power supply only with the guards and shields in place and working correctly. If rotating parts are left exposed they are hazardous. 7. MUFFLER. Inspect periodically and replace if necessary. Do not operate the power supply without a muffler. Inspect spark arrestor screen every 50 hours and replace if damaged. 8. INSPECT GENERATOR BRUSHES after every 1,000 to 1,500 hours of operation and replace when worn to 3/8 inch (1cm) or less. Consult OEM Manual regarding removal of Brushes. Replace brushes in the same position. Always replace brushes in sets. GPP- 2006 GPP: Generator Powered pulsator KOHLER shore model GPP Specifications Spreadsheet MODEL 5.0 - GPP 7.5 GPP 9.0 - GPP 5,000 7,500 9,000 12 volt AC 2 @ 500 W 2 @ 500 W 2 @ 500 W Output Pulse Modes Pulsed Pulsed Pulsed Conductivity microSiemens/cc Rated Output Power Rated Output Max. Current Auxiliary Power * DC Output Peak volt AC Output RMS volt Output Pulse Frequency Output Current Metering High voltage Output Indicator Output and Safety Control Seconds Timer LCD Display Cooling Method Output Connectors Pulsator Weight 10-5,500 16 amp 42 amp AC & DC 0-500 V Low 0-1000 V High 0-350 V Low 0-700 V High 7.5, 15, 30 60& 120 Hz AC & DC 0-25 amp Panel Lamp & Audio Tone Foot Switch & Panel Switch 10-11,000 62 amp 42 amp AC & DC 0-1000 in 4 steps 0-700 V in 4 steps 7.5, 15, 30 2006 150 amp 42 amp DC 0-680 V in 4 steps N/A 7.5, 15, 30 60 & 120 Hz AC & DC 60 & 120 Hz AC & DC & Audio Tone & Audo Tone 0-199 amp Panel Lamp Foot Switch & Panel Switch 0-199 amp Panel Lamp Foot Switch Panel Switch 0-999999 0-999999 0-999999 Convection Convection Fan Cooled 20 lbs. 30 lbs. 35 lbs. CPC with 15" Cable CPC with 15" Cable Specification subject to change without notice. * Note: 12 volts auxiliary power subtracts from Electrofisher power available. GPP- 100-25,000 POS. CAM CONN. 15" Cable GPP: Generator Powered pulsator KOHLER shore model Electrofisher Control Panel 2!.'% 4)-%).3%#/.$3 %,%#42/&)3(%2 /54054#522%.4 -/$% %-%2'%.#93(54$/7. ,/7 ()'( !# /&& $# -/$%,'00%,%#42/&)3(%2 -%$)5- $# 0%2#%.4!'%/& ()'( %.5-#)!4/26/,5-% 2!.'% $# !# 3-)4(2//4).# 6!.#/56%27! /&& 3%2)!,./ $# $# $# 05,3%30%23%#/.$ ()'(6/,4!'%).$ -/$% ELECTROFISHER CONTROLS 1 - RANGE: Selects the output voltage range between high and low or switches the output to OFF. 2 - TIME IN SECONDS: Records the actual shocking time. It counts only when high voltage is applied. 3 - EMERGENCY SHUTDOWN: provides a local override of remote foot switches. 4 - OUTPUT CURRENT: this meter shows the current flowing between the anode and cathode in amps. 5 - MODE: Selects the type of output pulses, AC, DC or OFF (Caution!: The position of this switch should not be changed when current is flowing i.e. foot switches engaged!). 6 - LOW RANGE: Indicates that the RANGE switch should be moved to the LOW position. For 7.5 and 9.0 GPPs, follow the output table. Damage to the range selector switch may result from switching under load. 7 - PERCENT OF RANGE: Adjusts the output pulses to a percent of the selected range, i.e. high/low. Pulse width is also automatically adjusted between 6 and 1 millisecond pulse duration. 8 - HIGH VOLTAGE: Red indicator lamp shows when voltage is present on output power terminals. 9 - PULSES PER SECOND: Selects the number of pulses in the output wave form. GPP- 2006 Electrofishing Safety & Principles Since 1964, the leader in effective, safe, and reliable products for fisheries conservation. Knowledgeable field biologists depend upon Smith-Root equipment. electrofishing principles Contents: Electrofishing Safety & Principles Electrofishing Safely Safe fishing......................................................................................................................................10 Preventing electrical shock..............................................................................................................12 Planning for safety...........................................................................................................................13 Do's & Don'ts...................................................................................................................................14 Electrofishing Principles Introduction to electrofishing...........................................................................................................15 Types of current...............................................................................................................................17 Electrode design...............................................................................................................................18 Field techniques...............................................................................................................................22 References........................................................................................................................................23 © 2006 Smith-Root, Inc. Vancouver, WA - USA 11 2006 www.smith-root.com electrofishing principles ELECTRICAL SHOCK Electrofishing Safety SAFE FISHING Electrofishing equipment uses voltages and currents that can be lethal to humans. The operators must always keep in mind that the chance of receiving an electrical shock is multiplied in or near water. Using an electrofisher is like using a firearm: if used properly and with good judgment it is perfectly safe; lose respect for it and you can lose your life! Electrical equipment used in a moist field environment is always subject to deterioration that could lead to dangerous electrical shock. Field equipment is also subjected to vibration and impact during transporting and while in operation. Often equipment shared by different crews does not receive proper maintenance or a complete checkout. Follow the safety guidelines, and use good common sense to handle unforeseen circumstances. All personnel involved in electrofishing should be taught the fundamentals of electricity, and have an understanding of the safety requirements. The most important factor in electrofishing efficiency and safety is the training and experience of the crew. At least two members of the crew should be qualified to administer cardiopulmonary resuscitation. As opportunities arise, all crew members should attend a course in basic life-support training. 2006 It is the current that passes through the human body that does the damage. The voltage is relevant, because it is the force that “pushes” the current through the body. Experiments show that 20 to 500 Hz AC current is more dangerous than DC, or higher frequencies of AC. The voltages used by electrofishing gear cause death by one of three means: Ventricular Fibrillation Ventricular fibrillation is uncoordinated contraction of the muscles of the heart. The heart quivers rather than beats. Electrical current through the chest can cause this condition. Once a person goes into ventricular fibrillation, the only way to stop the quivering is to use a defibrillator that applies a pulse shock to the chest to restore heart rhythm. Cardiopulmonary resuscitation may help to keep a victim alive until he can be defibrillated. Respiratory Arrest The respiratory center is at the base of the skull. Thus, shocks to the head can cause the breathing to stop. Artificial respiration by the mouth-tomouth method should be used in this case. Asphyxia Asphyxia is caused by contraction of the chest muscles. 12 www.smith-root.com electrofishing principles When a current is above a certain level, a person cannot let go of an electrically hot wire. Currents above this level may not cause ventricular fibrillation, but may be enough to cause contraction of the chest muscles. If the current is not stopped, or the victim is not removed from the point of electrical contact, asphyxia will result. Artificial respiration or cardiopulmonary resuscitation may be necessary. To prevent electrical shock all electrical equipment should be carefully inspected before each field operation. With all electrical equipment in good operating condition, and all insulation, junction boxes, bonding, and connections intact, there is much less danger of receiving an electrical shock. Preventing Electrical Shock Electricity needs to have a complete electrical circuit in order for current to flow. The only way that you can get shocked is if you become the electrical conductor to complete the circuit. The current flows from the cathode to the anode through the water. The water is the electrical conductor. If you touched both the anode and the cathode you would become an electrical conductor and complete the circuit path and get a severe electrical shock. If you were to touch only one of the electrodes, you would not complete the electrical circuit and not get shocked. WARNING: Touching any electrode is not recommended. Unless all conductive objects you come into contact with are connected to the same electrode, you will be shocked to find a current path that is not obvious, e.g., the water, or the boat. Preventing electrical shock means preventing electrical current from entering and flowing through parts of the body. The skin is a partial but variable barrier, because it offers resistance to the passage of electrical current. Tough skin has more resistance than tender skin, and dry skin more then wet skin. But tough dry skin alone does not offer enough protection for electrofishing. Rubber lineman’s gloves, rated 5,000V minimum should always be worn. Even while wearing rubber gloves and waders, never touch an electrode while the circuit is energized. Do not work on the electrical system while the generator is running. Do not enter the water while the current is on during boom shocking operations. A severe electrical shock from electrofishing gear may result in the need for artificial respiration; therefore it is imperative that no one ever works alone. Planning For Safety 1. Never electrofish alone! A minimum of two properly trained people are required for every electrofishing crew. 2. A crew leader shall be appointed for all electrofishing. The crew leader is responsible for the safety of the crew, and the enforcement of all safety regulations. 3. The crew leader, and at least one additional crew member, shall receive training in cardiopulmonary resuscitation (CPR), and First Aid. 4. All electrofishing personnel shall receive training in fundamentals of electricity and safety. 5. Check your electrofisher before each operation, to ensure that it is in good working order. 6. Turn off your electrofisher before making any connections or part replacements. 7. When not in use, and when transporting the unit, disconnect the power supply. 8. Check that the electrofisher gives an audible signal when there is voltage present at the anode. 9. Do not make any field modifications to your electrofisher without written approval from the manufacturer or a qualified electrical engineer. 10.Use only dip nets with insulated handles. 11. Wear personnel flotation devices. 12.Wear lineman’s gloves, rated 5,000V minimum. 13.Never reach into the water in vicinity of an electrode, even if rubber gloves are being worn. 14.Take frequent breaks. Stress and fatigue endanger the crew. 13 2006 www.smith-root.com electrofishing principles Backpack Safety 1. B efore each operation, check that the frame emergency release is in working order and check that the tilt switch shuts off power if the unit is tipped more than 45° 2.Wear hip boots or chest-high waders, with non-skid soles. 3.Wear polarized sunglasses to help you detect subsurface hazards and obstacles. Beware of turbid water that can hide unseen sub-surface obstacles and sudden drop-offs. 4.Shut off your electrofisher before entering or leaving a stream. 5. D o not operate an anode pole when carrying a backpack unit weighing more than 20 pounds when in hazardous conditions. 6. If you get water in boots, waders, or gloves, stop work immediately and get dry clothing 7.Operate slowly and carefully. Footing in most streams is poor, and most falls often occur when operators are hurrying. Do's & Don'ts Do’s: 1. Always be sure that all personnel are clear of the electrodes before turning on the power. 2. K now how to administer first aid treatment for electrical shock. 3. Wear flotation devices. 4. Have electrical circuits checked only by qualified technicians. 5. Disconnect the power supply when the electrofisher is not in use. Don’ts: 1. Don’t electrofish alone! 2. Don’t continue to electrofish if your boots or gloves get wet inside. 3. Don’t operate an electrofisher if you have had any prior heart ailments. 4. Don’t operate generators without covers or screens. 5. Don’t operate generators without a spark arrester. Boat Safety 1.Ground the generator to the boat hull. 2.Be sure that all the metal parts on the boat are bonded to each other electrically. 3.Run all cables through electrical conduit, or use a heavy-duty rubber-covered cord recommended for wet locations. 4.Make all electrical connections in water-tight junction boxes. 5.Each dip netter should have his own foot switch to control the output. The switch should be wired in series with the emergency off switch of the boat operator. 6.When wading with a boat, even in shallow water, chest waders should be worn. An operator may trip, end up in a kneeling or sitting position in the water and receive a shock. 7. A ll crew members must be alert Operators who control the power switch must be constantly aware of the netters in the electrical field. 14 2006 www.smith-root.com electrofishing principles Introduction to Electrofishing For many years it has been known that fish react to electric current passed through water. Electricity was first used for fishing in 1863 when a British patent was granted. Major efforts to apply electricity as a tool in fisheries management did not occur until after 1950. Since then detailed studies have been made on the physiological effects of electricity on aquatic organisms. factors: voltage, electrode shape, water conductivity, water temperature, conductivity of the stream bed, fish’s distance, size, species, and time in the field. If these environmental factors are too far out of line, poor electrofishing will result. To some extent, the effects of changes in water conductivity may be compensated for by changing the output voltage. RESPONSE OF FISH TO ELECTRICITY WATER CONDUCTIVITY To collect fish by electrical means we must create an electrified zone of sufficient amplitude to stun fish. In the basic electrofishing circuit, shown in Figure 1, a current is passed between submerged electrodes. A fish between these electrodes forms part of a closed circuit and some current flows through its body. The effectiveness of the electrofisher is affected by nine Figure 1. The basic electrofishing circuit. Voltage Source Water Electrical Field Electrode Electrode The conductivity of the water and that of the fish’s flesh are the factors that affect electrofishing most. The conductivity of water depends on the quantity of dissolved salts and minerals in the water. The conductivity of potable waters in the United States ranges from 20 to 2,000 microSiemens/cc. Sufficient current at realistic power levels will flow through water in this range to electrofish successfully. Figure 2 illustrates the field patterns caused by the presence of a fish in water. In (a) no distortion is caused by the presence of the fish. In low conductivity water, (b), the distortion of the electric field is such that the voltage near the fish is less than it was before the fish was present. The reverse is true in (c) where the water conductivity is more than that of the fish. In this case the distortion is caused by the current concentrating in the water surrounding the fish. In both (b) and (c) not as much power is transferred into the fish’s body as in (a). Figure 2. Electric field patterns caused by fish. 5.3V 2V 8V 0 1 2 3 4 5 6 7 8 9 10 0 1 2 3 4 5 6 7 8 9 10 0 1 2 3 4 5 6 7 8 9 10 Volts Volts b. Fish more conductive c. Water more conductive Volts 53mm 100mm a. Equal conductivities 15 2006 www.smith-root.com electrofishing principles LOW CONDUCTIVITY WATER Distilled water is a very good insulator. It has a conductivity range of 0.5 to 5.0 microSiemens/cc. If a normal voltage is applied in distilled water, very little current will flow. Power flow is too low to be effective for electrofishing. The current passing through a fish decreases as the power flow decreases. To get the same response from fish, the current can be maintained by either increasing the voltage, or by keeping the resistance low. If a higher voltage is used, up to 1,200 volts may be necessary. High voltages create three problems, special electrical equipment is required, safety is reduced for the operators, and conditions are lethal for fish close to electrodes. The resistance can be kept low by increasing the size of the electrodes. The only limitations to this are the availability of larger electrodes, and the weight of electrode that can be handled by the operator. HIGH CONDUCTIVITY WATER High conductivity is over 2,000 microSiemens/cc. If a high voltage is applied, most current will flow easily through the water and the fish will hardly be affected. The electric current follows the path of least resistance and bypasses the fish completely. Therefore use low voltages and high currents. Currents as high as 60 amps are common, the limiting factor being the rating of the power-supply. Some brackish water and industrial waste water have conductivities over 10,000 microSiemens/cc. Here smaller power-supplies are unable to deliver enough power to stun fish. Waters in this range can only be electrofished effectively with the larger model GPPs. The Smith-Root 7.5 GPP outputs 62 amps through 8 gauge stranded cables. This unit can stun large fish in the interface between fresh and salt water. For example, Striped Bass can be stunned for taking brood stock. Theoretically high conductivity could be dealt with by using smaller electrodes, but this would reduce the range and also create damaging current densities near the anode. FISH CONDUCTIVITY A fish will receive the maximum shock through its body when the conductivity of the water is the same as the conductivity of the fish’s flesh. Unfortunately, this is rarely the case. Fish flesh conductivity ranges from 500 to 1,500 microSiemens/cc. Each species has a different conductivity. This affects their susceptibility to electric current. Conductivities for some fish species are: Trout 1,220 microSiemens/cc Perch 1,089 microSiemens/cc Carp 870 microSiemens/cc Grudgeon 814 microSiemens/cc E. Halsband - Vilbert 1967 FISH SIZE Among fish of the same species, the larger fish are more sensitive to electrical currents. Fish absorb power as a function of body surface area. This is important to remember if you are shocking for small fish and large fish are also present. The large fish are going to receive a much greater shock than the small fish. TEMPERATURE Water conductivity and effective fish conductivity increase with higher temperature. Conductivities reported for Carp: 5° 372 microSiemens/cc 10°543 microSiemens/cc 15°714 microSiemens/cc 20°1,026 microSiemens/cc 25°1,969 microSiemens/cc Whitney and Pierce 1957 SUBSTRATE Certain bottom substrates will conduct electrical current. These weaken the electric field in the water, making fish capture less effective. ADJUSTING THE VOLTAGE By adjusting the output voltage, the effects of the water’s conductivity on electrofishing can be reduced. The current flowing through the water is directly related to the voltage applied. The higher the voltage, the greater the current will be. 16 2006 www.smith-root.com electrofishing principles an electrical field strong enough to stun it. Being stunned is called galvanonarcosis. The severe muscle contractions caused by AC do not occur, and the fish recover much faster. Mortality rate is much lower with direct current. PULSED DIRECT CURRENT When adjusting the output voltage the major consideration is the power being used. This is especially true for battery powered electrofishers. Power is equal to the voltage multiplied by the current. When figuring the power for an electrofisher, the fact that it is usually putting out pulsed DC must be taken into consideration. The instantaneous power during a pulse may be quite high, but if the electrofisher is only producing pulses at a 25% duty cycle, the average power would be approximately 25% of the instantaneous power. Even greater anode attraction is possible with pulsed direct current. Pulsed direct current is made by interrupting steady DC with an electronically controlled switch. The switch gives several on-off pulses per second. The number of pulses per second (pulse frequency) and the on time (pulse width) have different effects on different species of fish. In a pulsed DC field a fish’s body flexes with each pulse, and returns to normal between pulses. This flexing and straightening accentuates the involuntary swimming towards the anode, called galvanotaxis. + off on off on off 0 straight flexed straight flexed straight Types of Current Galvanotaxis: In pulsed DC a fish's body flexes with each pulse. ALTERNATING CURRENT Alternating Current (AC) is an electrical current in which the direction of current flow reverses a number of times per second. In an AC field, the fish takes a position transverse to the electrical field lines and attempts to face the anode and cathode successively, in rhythm with the AC cycle. When the field strength increases, tetany occurs, and the fish is stunned. Strong contractions of the body muscles make the fish feel rigid. At high voltages, the larger fish may be killed, the muscular contractions being so severe that vertebrae are fractured and the brain damaged. Hence AC electrofishing is only successful with small fish in low conductivity water . DIRECT CURRENT Direct Current (DC) is the term given to electrical current that flows only in one direction. The current flows from the negative electrode (cathode) to the positive electrode (anode). The reaction of fish to direct current is quite different from their reaction to alternating current. The first reaction of the fish is to turn toward the anode and start to swim toward it until it reaches Smith-Root Programmable Output Waveforms give you complete control over your electrofisher output. This patented method of synthesizing waveforms makes it possible to produce virtually any waveform, so you can select the one that is safest for the fish. POW allows you to create narrow pulses to achieve the same results as wide pulses. Narrower pulses put less power into the water. This has three benefits: you have less chance of damage to the fish, your battery or fuel lasts longer, and you can work in very conductive water that overloads conventional electrofishers. RESPONSE OF FISH TO DC FIELDS An electric field in water can be considered to have three separate areas. The outer peripheral area is a weak field that the fish is indifferent to. The next area, closer to the electrodes, has a stronger electrical field, but not enough to stun the fish. In this area, the involuntary swimming action will occur and the fish will swim towards the anode. The innermost area has the strongest electrical field, and the fish within it are immobilized. Zone of Indifference When electrofishing first starts fish are usually hiding up to three meters away, so high power is required to attract them out of hiding. But as the fish nears the anode, high power can injure it. 17 2006 www.smith-root.com electrofishing principles Voltage across fish 6.25 Field Intensity, V/cm 6.25 Distance from anode, m 1.2 9.5 18 30 50 280 12.5 22 40 70 120 400 1.0 0.8 0.6 0.4 0.2 0.0 As the fish nears the anode it receives a very high head-to-tail voltage. Zone of Potential Fish Injury Electrode Design Fish close to the anode receive a very high head-to-tail voltage. Most fish injuries occur within half a meter from the anode. This is called the Zone of potential fish injury. We can minimize the injury by reducing the time the electricity is turned on . Duty-Cycle The way in which voltage and current distribute around electrofisher electrodes is complex. Figure 4 shows the field pattern created by a pair of closely spaced ring electrodes, and the voltage gradient between them. Note that the current density and voltage gradient are highest near the electrodes. Duty-cycle is the percent of on-time. It is a product of the pulse width and the pulse frequency. The duty-cycle can be lowered in three ways: by reducing the pulse width, by reducing the pulse frequency, or by using gated bursts, where the power is off for a period between each burst of pulses. Fish close to an anode with a low duty-cycle are far less likely to be injured than with a high duty-cycle. The dimensions of the electrodes are very important in determining the voltage distribution around electrofisher electrodes. Figure 5 compares a 10cm and a 20cm ring anode carrying 200 volts in open water. The cathode dimension is considered to be infinite. Note that the 20cm anode reaches out much Fish Attraction to Anode Limited Galvanotaxis 3.0m Zone of Potential Injury Good Galvanotaxis 2.0m DISTANCE 1.0m 0.5m 60 40 Duty Cycle Anode DUTY CYCLE % 50 30 20 10 0 0 2 4 6 Varying Width Pulses ON 2006 OFF Varying Frequency Pulses ON TIME 8 10 12 14 18 www.smith-root.com electrofishing principles further, producing a 33 volt potential at 1.2 meter. But the 10cm anode produces the same potential at only 0.6 meter from the electrode. Figure 6 further illustrates the effect of electrode diameter. The voltage is applied head-to-tail to a 20cm long fish. The applied voltage is 200 volts with 10cm and 20cm diameter ring-electrodes. Note that the 20cm electrode reaches out farther, producing 7 volts head-to-tail between 1.0 and 1.2 meter from the electrode; as opposed to only 4 volts for the smaller electrode at the same distance. Note also that the voltage the fish receives closer to the electrode is less for the larger electrode (100 volts instead of 144 volts). Larger electrode thus offers two advantages: greater range, and lower maximum gradient. One drawback is that a larger electrode also has greater circuit loading, and thus draws more current for the same voltage (twice as much for the double size electrode). Thus, a larger electrode requires a larger generator. This dictates Current lines a practical upper limit on electrode size for a given generator and water conductivity. Except for this limitation, the larger the electrode, the better the fishing effectiveness and the easier it is on the fish. Figure 7 shows that larger electrodes increase the fish collection area. The shaded areas have a voltage gradient between 0.12 and 1.2 volts per cm, and are suitable for electrofishing. The applied voltage is 300 volts. ELECTRODE BEHAVIOR 1. Larger electrodes have lower resistance, need more current at given voltage, reach out farther, and have lower maximum voltage gradient. 1r 10cm 2r 3r 4r 5r 200 100 66 50 volts 40 33 volts 20cm 200 100 66 50 40 33 1r 2r 3r 4r 5r Constant voltage lines 0.0 1.2 0.2 0.4 0.6 0.8 1.0 Distance from electrode centers (meters) Figure 5. Comparison of two sizes of anode. 1r 10cm 2r 3r 4r 200 100 66 50 40 5r 6r 7r 8r 9r 10r 33 28 volts 25 22 20 18 4 144 Electrode Voltage 100 200 20cm 44 16 100 66 1r 0.4 volts 10 7 50 40 33 2r 3r 4r 5r 0.6 0.8 1.0 1.2 Gradient 0.0 0.2 Distance Distance from electrode centers (meters) Figure 4. The field pattern, and the variation of gradient between two electrodes. Figure 6. Comparison of effects of two sizes of anode. 19 2006 www.smith-root.com electrofishing principles 0.0 0.2 0.4 0.6 0.8 1.0 1.2 1.4 1.6 1.8 2.0 2.2 Distance from electrode centers (meters) Figure 7. Larger anodes increase the fishing area. 2. Small electrodes pose a hazard to fish because of high current density and voltage gradient. 3. Electrodes placed farther apart use less current, but the savings are not large. 4. The resistance of an electrode varies in direct proportion to water resistivity. RING ELECTRODES 1. Once spacing exceeds 10 radii, the distance between electrodes is insignificant. 2. The region affected by the electrode is limited to 5 to 10 radii. 3 Electrode resistance is primarily dependent on electrode radius, and varies in inverse proportion to radius. 4. For ring electrodes, the cross section diameter of the ring material is of little importance. If the ratio of cross section diameter to ring radius is held constant, resistance varies inversely with ring radius. CATHODES In electrofishing it is desirable to have a high voltage gradient around the anode, and a low voltage gradient around the cathode. Figure 8 shows variation of voltage, as a function of the distance from the fishing anode, for three types of cathode. It shows that it is advantageous to have the potential of the water as near as possible to that of the cathode. 550 500 450 400 350 300 250 Cathode Indentical to anode: 600V, 6.3kW 200 150 100 50 0.5m2 grid cathode: 350V, 3.7kW 10m2 wire netting cathode: 310V, 3.2kW 00 2 4 6 44 46 Distance from center of anode (meters) 48 cathode 2 16.63m 60cm gradient zone 12.57m Sufficient 2 35cm anode Electrode diameter 10.18m2 20cm Total voltage 2 6.16m 10cm The required voltage is reduced by diminishing the resistance of the cathode field. This compensates for the reduced resistance so that the current does not vary. The power consumption is directly proportional to the voltage used. One advantage of a large cathode is that the risk of accidental electrocution is much reduced. A large cathode has very low potential with respect to the soil and the water around it. The resistance between the cathode and the water is halved each time the surface of the cathode is doubled. For example, a 100 square foot cathode would need another 100 square foot added to pass from 9 to 4.5 ohm. However a cathode larger than 100 square feet would be inconvenient to handle for shore-side electrofishing. Figure 9 compares small and a large cathodes. With a standard grid cathode, the anode voltage falls distinctly from 324 to 265 volts when using two anodes. However with a very large wire netting cathode efficiency falls only slightly from 324 to 302 volts when using two anodes. For shore-side operations, the cathode surface presents the least resistance when it is divided into several parts placed several meters apart. An electrode is more effective when its form is least concentrated. For example, a 3'x12' strip is more effective than a square of 6'x6'. Figure 8. Variation of voltage for three kinds of anode. 20 2006 www.smith-root.com Total potential (volts) Figure 10 illustrates the variation in both voltage and gradient between the electrodes. Whenever possible, the cathode should be placed in parts of the stream that you do not wish to fish, or even in parts completely separated from the stream itself. The anode should never be allowed to come close to where the cathode is located. standard 0.5m2 grid cathode Large wirenetting cathode a. one anode b. two anodes c. one anode d. two anodes 35 90 35 50 9 90 9 50 between anode and cathode 125 85 99 59 Potential difference volts between cathode and water 126 185 32 54 between anode and water total 324 450 265 450 324 326 302 356 resistance ohms of cathode of anode field Current amps Power kilowatts 3.6 1.62 5.9 2.38 3.6 1.28 2.5 200 2.0 1.5 100 Potential 1.0 Gradient 0.5 2 4 46 48 Distance from center of anode (meters) Figure 10. Variation of potential and gradient. Cathode Anode 00 Boat Cathodes Many aluminum electrofishing boats use the boat hull as the cathode and the boom electrodes as the anode. This is perfectly safe as long as you never come in contact with the anode and complete the electrical circuit. The National Safety Council in their data sheet #1-696-85 does not recommend using the boat hull as the cathode, but we have yet to hear of any accidents occurring because of it. Figure 11 shows a Smith-Root tote barge designed for stream wading operations. Note the large cathode plate attached to the bottom of the fiberglass hull. The anode is a pair of ring electrodes about 28cm (11") in diameter mounted on fiberglass poles. With this arrangement, the resistance of the anode pair is four times the 3.5 3.0 300 Potential gradient (volts/cm) electrofishing principles Figure 10. Variation of potential and gradient. The situation could be further improved by enlarging the cathode, but a point of diminishing returns is reached. Doubling the cathode size would halve the cathode resistance and give an 8 to 1 ratio between anode and cathode resistance. Now 88% of the voltage would appear at the anode. This is only an 8% improvement, and is not worth the additional physical problems associated with the larger cathode. The SR-6 field tested with two 28cm anodes and a voltage of 240 volts, showed good fishing effectiveness in 400 microSiemens/cc conductivity with a current of 3 to 4 amperes. In lower conductivities of 40 microSiemens/cc, a current of 1 to 1.5 amp is effective. This data may serve as a useful benchmark to judge whether a unit is operating under conditions such that fish should be caught. If the electrical performance is close to this reference point, and fish are not being caught, it is safe to conclude there are few fish in the area. 6.0 2.15 Resistivity of the water in all cases=143µmho/cm 9. Comparison of two sizes of cathode. FigureFigure 9. Comparison of two sizes of cathode. cathode resistance. Thus, four times as much voltage appears in the anode field as in the cathode field, and consequently 80% of the applied voltage appears at each electrode. Figure 11. Bottom mounted cathode plate on SR-6. 21 2006 www.smith-root.com electrofishing principles Field Techniques An operator engaged in electrofishing must wade or float, depending upon the depth and swiftness of the water. WADING In shallow slow-moving waters the operators can wade and probe the anode into likely fish habitat. Wading upstream eliminates the effects of turbidity caused by bottom sediment. Furthermore, if collections are for food habitat study, stunned prey are not swept downstream and consumed by predators. Fish that manage to escape are often captured a short distance downstream. Closing a stream with seine nets at each end of the study area helps prevent the loss of stunned and frightened fish. BOATS Boat electrofishers are used in lakes and in streams that are too deep or swift to wade. Boats have the advantage of being able to carry large generators and holding tanks for the stunned fish. Electrofishing boats typically have two insulated booms extending from the bow. From the end of the booms electrodes hang into the water. Usually one boom is used as the anode and the other as the cathode. The boat operator guides the boat while the electrofishing crew activates the electrofisher when approaching likely habitat. CLARITY AND DEPTH Clarity of the water limits the ease of capturing fish. The length of the dip net handles and the visibility of the fish limit the depth of effective electrofishing. In general, waters over ten feet deep cannot be sampled effectively. For daytime fishing polarized sunglasses help in locating stunned fish. VEGETATION Aquatic vegetation grows better from certain substrates and can hinder electrofishing by fouling electrodes and entangling stunned fish. WATER VELOCITY Electrofishing in flowing water is not as effective as in still water, since fish are swept away from the electric field and netting is more difficult. Also, it is more difficult to see a fish in fast flowing water, and operators can loose their footing. Flows greater than 5 feet per second usually produce poor electrofishing efficiencies. NIGHT FISHING Electrofishing at night with lights is five to ten times more effective than daytime fishing, especially in lakes. In streams the reflection of the spotlight on the ruffled surface makes the fish difficult to see. Boats have flood lights on the bow to attract the fish and to help locate stunned fish. SURPRISE Collecting can be enhanced by introducing the element of surprise through intermittent fishing. The intensity of the anode’s peripheral field often frightens fish, causing them to bolt and hide. Do not work with the power on continuously, but turn it on only in likely habitats. Fish can be enticed from under areas of heavy cover or ice by inserting a portable anode, turning the power on, and withdrawing the anode slowly and smoothly. Fish will follow the anode, under the influence of galvanotaxis, into the open where they can be netted. 22 2006 www.smith-root.com electrofishing principles Electrofishing Reference & Training Materials References The following are books, research papers, and other references on various aspects of electrofishing. The ideas and findings presented in them form the basis for much of the current practice in electrofishing. 1. Bryan R. Cowdell and Richard A. Valdez, 1994 “Effects of Pulsed DC Electrofishing on Adult Roundtail Chub from the Colorado River in Colorado,” North American Journal of Fisheries Management. Vol. 14 7. D. E. Snyder and S. A. Johnson, 1991 “Indexed Bibliography of Electrofishing Literature,” Larval Fish Laboratory, Colorado State University, Fort Collins, Colorado. 2. I. G. Cowx and P. Lamarque, 1990, “Fishing With Electricity—Applications in Freshwater Fisheries Management,” Fishing News Books, Blackwell Scientific Publications Ltd. lSBN 0-85238-167-0 8. M. Burridge and G. Goodchild, 1988 “A Bibliography of Electrofishing,” Ministry of Natural Resources, Fisheries Branch, Queen’s Park, Toronto, Ontario, Canada. 3. L. G. Cowx, 1990 “Developments in Electrofishing,” Fishing News Books, Blackwell Scientific Publications Ltd. lSBN 0-85238-166-2 4. N.G. Sharber and S.W. Carothers, 1988 “Influence of Electrofishing Pulse Shape on Spinal Injuries in Adult Rainbow Trout,” North American Journal of Fisheries Management. 8: 117-122 5. Michael A. Bozek and Frank J. Rahel, 1991 “Comparison of Streamside Visual Counts to Electrofishing Estimates of Colorado River Cutthroat Trout Fry and Adults,” North American Journal of Fisheries Management. Vol. 11 9. Alec G. Maule and Matthew G. Mesa, 1994 “Efficacy of Electrofishing to Assess Plasma Cortisol Concentration in Juvenile Chinook Salmon passing Hydroelectric Dams on the Columbia River,” North American Journal of Fisheries Management. Vol. 14 10. N.G. Sharber, S.W. Carothers, J.P. Sharber, J.C. DeVos, D.A. House, 1994 “Reducing Electrofishing-Induced Injury of Rainbow Trout,” North American Journal of Fisheries Management. 14 11. Jeffery C. Barnet and Gary D. Grossman, 1988 “Effects of Direct Current Electrofishing on the Mottled Sculpin,” North American Journal of Fisheries Management. Vol. 8 6. D. W. Novotny and G. R. Priegel, 1971 “A Guideline for Portable Direct Current Electrofishing Systems,” Technical Bulletin No. 5l, Department of Natural Resources, Madison, Wisconsin 23 2006 www.smith-root.com NOTES GPP Troubleshooting KOHLER shore model Contents Check Generator AC Voltages.......................................... 27 Test for Continuity and High Voltage Output................... 28 Test GPP Control Box....................................................... 29 Test GPP Control Box- Cont. . ......................................... 30 Building a Test Load......................................................... 31 5.0 GPP Wiring Diagram.................................................. 32 7.5 GPP Wiring Diagram.................................................. 33 9.0 GPP Wiring Diagram.................................................. 34 GPP Troubleshooting KOHLER shore model PROBLEM: NO OUTPUT FROM GPP ELECTROFISHER Procedure A: Check Generator 12 AC Voltages (all models) GPP Electrofishers have two 500-watt accessory 12 Volt AC windings. • Set the GPP Control Box Voltage range switch to off. Adjust generator engine speed to 3600 RPM using a vibrating tachometer which is available at most small engine shops. • Check the 12 Volts AC using an AC Voltmeter (See Fig. A.1). They should read approx.14.5 Volts, 60Hz. -5.0 GPP Only: • Check the 12 Volts AC on the output V Fig. A.1 connector. Pairs: 5 & 6 (See Fig. A.2). If the Voltages are OK, go to procedure B. 2 5 4 7 If 12 Volts AC are not present, check winding resistances per table on wiring diagrams (pgs. 32-33). 1 3 6 5 6 Fig. A.2 ! ! IMPORTANT! ! ! High Voltages are present when Generator is running. Only qualified personnel should attempt High Voltage measurements. We suggest forming a barricade around the test area and posting appropriate High Voltage warning signs. 27 www.smith-root.com GPP Troubleshooting KOHLER shore model ! ! IMPORTANT! ! ! High Voltages are present when Generator is running. Only qualified personnel should attempt High Voltage measurements. We suggest forming a barricade around the test area and posting appropriate High Voltage warning signs. Procedure B: Test for Continuity and High Voltage AC Output SHUT DOWN GENERATOR! Check all the connector pairs resistance to Generator ground. 5.0 GPP: 7.5 GPP: 9.0 GPP: 2 5 1 & 2 / 3 & 4 (See Fig. B.1) 1 & 2 / 3 & 4 / 5 & 6 (See Fig. B.2) 1 & 2 / 3 & 4 / 5 & 6 (See Fig. B.3) 4 3 7 6 1&2 All of the pairs should show open or high resistance (>0.5 Meg-ohm). • Next, check insulation between winding pairs. If resistance measures low, the wire or generator insulation is bad. 1 3&4 Fig. B.1 5.0 GPP 1&2 3&4 • With generator running, check for High Voltage on 2 generator connectors. (See wiring diagrams at the end of this document). 5 7 9.0 GPP: Check each of the Voltage terminal pairs on both of the output connectors for approximately 67 Volts RMS AC. Pairs: 1 & 2, 3 & 4 and 5 & 6 (See Fig. B.3). Also, check for 115 Volts RMS AC on the smaller 2-pin connector. If the Voltages are OKAY, go to procedure C. 3 6 5&6 5.0 GPP: Check each of the High Voltage terminal pairs on the output connector for aprx. 360 Volts RMS AC. Pairs: 1 & 2 and 3 & 4 (See Fig. B.1). 7.5 GPP: Check each of the Voltage terminal pairs on both of the output connectors for approximately 115 Volts RMS AC. Pairs: 1 & 2, 3 & 4 and 5 & 6 (See Fig. B.2). 1 4 7.5 GPP Fig. B.2 1&2 3&4 2 5 4 7 5&6 Fig. B.3 1 3 6 1&3 3 9.0 GPP 1 4 2 28 www.smith-root.com GPP Troubleshooting KOHLER shore model Procedure C: Test GPP Control Box Fig. C.1 A A D B C 4-Pin male plug as seen from end B C Fig. C.2 Fig. C.3 Connector Fig. C.4 29 www.smith-root.com 5 Amp Fast-Blow Fuse Audio Alarm Bd. Audio Alarm board is located on inside chassis of 5.0 GPP, and on inside of rear panel on 7.5 and 9.0. Observe correct Connector orientation when reattaching. • Test a single or dual foot switch pedal using an ohmmeter. Carefully connect the ohmmeter connectors to pins (A & B) on the 4-Pin male plug. Use care to not allow the ohmmeter connectors to touch when connecting them to the pins on the 4-Pin male plug. (See Fig.C.1). • The ohmmeter should measure OPEN ohms with the switch off and ZERO ohms with the switch on. If it does not you may have a broken wire or a bad switch inside the pedal. If foot switch is inoperative, return to Smith-Root, Inc. for service. Test dual foot switches with an ohmmeter using the same method as shown above. Connect the ohmmeter to pins (A & B) on the 4-Pin connector for switch #1 and to pins (C & D) for switch #2 (See Fig. C.1). • Connect the generator to GPP Control Box. • Connect the foot switch to GPP Control Box. • Connect a test load to output cables (see Procedure E). WARNING! Keep all personnel clear of the Test Load while the generator is running! • Switch mode switch to 120 PPS. • Turn Percent of Range to 50%. • Switch the output Voltage selector to low range. • Switch the “Emergency Shutdown Switch” to OFF position (See Fig. C.2, A). • Start the generator. • Switch the “Emergency Shutdown Switch” to ON position (See Fig. C.2, B). • Press the foot switches. • The red light (See Fig. C.2, C) on the front panel should now be illuminated and the amp meter should indicate amperage. • If the red light is not illuminated and the amp meter indicates no amperage: • Turn the generator off. • Check the light bulb. • Check the Fuse on the GPP main circuit board (See Fig. C.3). Replace fuse if blown. A blown fuse may indicate a short in the Audio Alarm. Disconnect the Audio Alarm (See Fig. C.4) before retesting. Return to start of Procedure C. If Red light and amp meter indicates output go to Procedure D. GPP Troubleshooting KOHLER shore model Procedure D: Test GPP Control Box • Maintain GPP settings from Procedure C. • Start the generator. • Press foot switches. • When the Red Light (See Fig. D.1, A) is illuminated, the “Current Meter” (See Fig. D.1, B) should show amperage and the “Seconds Counter” (See Fig. D.1, C) should be counting. • If there is no display in the seconds counter, replace the “N” cell batteries in the counter *(See Fig. D.2). • Adjusting the “Percent of Range” (See Fig. D.1, D) up to 100% will increase the amperage shown on the Current Meter. • Set the “Percent of Range” to 50%. • Switch the “Mode” switch (See Fig. D.1, G) from 120 PPS to 60 PPS. The amperage should drop by half. CAUTION: Never switch the Voltage Range while the output is ON. • Retest settings in the high range. D F B A Fig. D.1 Counter Module battery compartment accessible from back of control panel + NOTE: If output current is absent return the Control Box to Smith-Root, Inc. * The “N” cell batteries should be replaced EVERY five years (See Fig. D.2). C + Fig. D.2 30 www.smith-root.com GPP Troubleshooting KOHLER shore model ! IMPORTANT! ! ! ! Danger! High Voltage is present during test load procedure. Every effort should be made to keep all personnel away from test load bucket. It may be necessary to form a barricade around testing area and post appropriate signs warning of High Voltage. Procedure E: Build a Test Load WARNING – KEEP ALL PERSONNEL CLEAR OF TEST LOAD WHILE GENERATOR RUNNING. • Construct a test load using a plastic bucket with the metal handle removed (Fig. E.1). • Connect the test load to the GPP Electrofisher as shown (Fig. E.2). • Add tap water to the bucket. • Set the “Mode Switches” on the GPP Control Box to AC & 120 PPS/ 60 AC. • Start the generator. • Control the GPP output with the “Emergency Shut Down” switch or Foot switch. • By turning the “Percent of Range” control up to 100% and checking the amp meter on the GPP Control Box, the correct load can be determined. See below: Maximum GPP Amperage (2.5 - 5.0) Model High Low 2.5 4 Amps 8 Amps 8 Amps 16 Amps 5.0 AC 120 V DC 170 V Amperage 62.5 A 240 V 340 V 31.3 A 360 V 500 V 20.8 A 720 V 60 V 1000 V 85 V 10.4 A 150 A 120 V 170 V 75 A 240 V 340 V 37.5 A 480 V 680 V 18.8 A • The amp meter will increase to the maximum as you turn up the “Percent of Range”. • The load may be increased by slowly adding table salt to the water in the bucket. • If the load is too great for the range selected, the GPP will operate erratically. • If the amp meter starts to show a decrease in amps or is erratic as the “Percent of Range” nears 100% the generator is over-loading. The water may need to be changed, or decrease the portions of electrodes immersed in the water. www.smith-root.com Aluminum Plate Water From Anode Plastic Bucket Fig. E.1 Maximum GPP Amperage (7.5 - 9.0) Model 7.5 9.0 31 From Cathode Output Plug of GPP Fig. E.2 Ring Lugs bolted to Plates GPP Troubleshooting KOHLER shore model 5.0 GPP Generator Stator Wiring All Wires to GPP Connector14 Ga. 12 11 10 350V 2.4 Ohms 9 8 7 14 Ga. 6 5 4 350V 2.4 Ohms 3 2 1 12VAC 0.2 Ohms 12VAC 0.2 Ohms 10 Ga. 12V Connectors 2 5 1 3 4 7 6 GPP Connector 12V Connectors 5.0 GPP Generator Terminals 1 - 2 = 115 Volts @ 883 VA Respectively through 11 - 12 = 115 Volts @ 883 VA (Pairings of Odd # on Left & Even # on Right.) Ground Output @ Binding Posts Black wires 12 Volts @ 500 VA White wires 12 Volts @ 500 VA Voltage Regulation Windings B1 to B2 0.2 Ohms 55 to 33 2.7 Ohms 44 to 33 Rotor to Brushes 6.2 Ohms 3.7 Ohms See Kohler OEM Manual TP-5985 and Kohler Service Manual TP-5986 for additional information 32 www.smith-root.com GPP Troubleshooting KOHLER shore model 7.5 GPP Generator Stator Wiring *All Wires to GPP Connectors14 Ga. 12 115V 0.8 Ohms 11 10 115V 9 0.8 Ohms 8 7 115V 0.8 Ohms 6 115V 5 4 0.8 Ohms 115V 3 2 0.8 Ohms 115V 1 0.8 Ohms 12VAC 0.2 Ohms 12VAC 0.2 Ohms 2 5 10 Ga. 12V Connectors 1 4 3 7 6 GPP Connector 2 5 1 3 4 7 6 GPP Connector 12V Connectors Ground Voltage Regulation Windings 7.5 GPP Generator Terminals 1 - 2 = 115 Volts @ 1250 VA Respectively through 11 - 12 = 115 Volts @ 1250 VA (Pairings of Odd # on Left & Even # on Right.) 33 www.smith-root.com Output @ Binding Posts Black wires 12 Volts @ 500 VA White wires 12 Volts @ 500 VA B1 to B2 0.2 Ohms 55 to 33 2.7 Ohms 44 to 33 Rotor to Brushes 6.2 Ohms 3.7 Ohms See Kohler OEM Manual TP-5985 and Kohler Service Manual TP-5986 for additional information GPP Troubleshooting KOHLER shore model 9.0 GPP Generator Stator Wiring *All Wires to GPP Connectors12 Ga. 12 67V 11 10 67V 9 8 67V 7 6 67V 5 4 67V 3 2 67V 1 88 110VAC 89 2 12VAC 5 12VAC 10 Ga. 1 4 3 7 6 GPP Connector 12V Connectors 2 5 1 3 4 7 6 GPP Connector 12V Connectors 3 1 2 4 4-Pin Connector Ground Voltage Regulation Windings 9.0 GPP Generator Terminals 1 - 2 = 67 Volts @ 1500 VA Respectively through 11 - 12 = 67 Volts @ 1500 VA Output @ Binding Posts Black wires 12 Volts @ 500 VA White wires 12 Volts @ 500 VA (Pairings of Odd # on Left & Even # on Right.) 4-Pin Connector 110 Volts AC B1 to B2 0.2 Ohms 55 to 33 2.7 Ohms 44 to 33 Rotor to Brushes 6.2 Ohms 3.7 Ohms See Kohler OEM Manual TP-5985 and Kohler Service Manual TP-5986 for additional information 34 www.smith-root.com MAINTENANCE NOTES WARRANTY Smith-Root, Inc. original products have a 1-Year Limited Warranty. Smith-Root, Inc. warrants that it’s Products are free from defects in material and workmanship that result in Product failure during normal usage, according to the following terms and conditions: 1. The limited warranty for the Product extends for the length of ownership beginning on the date of the purchase of the Product by the original purchaser (“Consumer”) of the Product and is not assignable or transferable to any subsequent purchaser or user. 2. The limited warranty extends only to Consumers who purchase the Product from Smith-Root, Inc. or an authorized distributor. 3. During the 1-year limited warranty period, Smith-Root, Inc. will repair, or replace, at Smith-Root, Inc.’s sole option, any defective parts, or any parts that will not properly operate for their intended use with new or refurbished replacement items if such repair or replacement is needed because of product malfunction or failure during normal usage. No charge will be made to the Consumer for any such parts. Smith-Root, Inc. will also pay for the labor charges incurred by Smith-Root, Inc. in repairing or replacing the defective parts. The limited warranty does not cover defects in appearance, cosmetic, labels or structural items, including framing, and any non-operative parts. Smith-Root, Inc.’s limit of liability under the limited warranty shall be the actual cash value of the Product at the time the Consumer returns the Product for repair, determined by the price paid by the Consumer for the Product less a reasonable amount for usage. SmithRoot, Inc. shall not be liable for any other losses or damages. These remedies are the Consumer’s exclusive remedies for breach of warranty. 4. Upon request from Smith-Root, Inc., the Consumer must prove the date of the original purchase of the Product by a dated bill of sale or dated itemized receipt. 5. The Consumer shall bear the cost of shipping the Product to Smith-Root, Inc. Smith-Root, Inc. shall bear the cost of shipping the Product back to the Consumer after the completion of service under this limited warranty. 6. The Consumer shall have no coverage or benefits under this limited warranty if any of the following conditions are applicable: a) The Product has been subjected to abnormal use, abnormal conditions, improper storage, exposure to moisture or dampness, unauthorized modifications, unauthorized connections, unauthorized repair, misuse, neglect, abuse, accident, alteration, improper installation, or other acts which are not the fault of SmithRoot, Inc., including damage caused by shipping. b) The product has been damaged from external causes such as collision with an object, or from fire, flooding, sand, dirt, windstorm, lightening, earthquake or damage from exposure to weather conditions, an Act of God, or battery leakage, theft, blown fuse, or improper use of any electrical source, or damage caused by the connection to other products not recommended for interconnection by Smith-Root, Inc. c) Smith-Root, Inc. was not advised in writing by the Consumer of the alleged defect or malfunction of the Product within fifteen (15) days after the expiration of the applicable limited warranty period. d) The Product serial number plate or the accessory data code has been removed, defaced or altered. 7. If a problem develops during the limited warranty period, the Consumer shall take the following step-by-step procedure: a) The Consumer shall return the Product to Smith-Root, Inc. for repair or replacement processing. b) The Consumer contacts the Customer Service Department at Smith-Root, Inc., at the number listed on the bottom of this page, for repair or replacement processing. c) The Consumer shall ship the Product prepaid and insured. Expenses related to removing the Product from an installation are not covered under this limited warranty. d) The Consumer will be billed for any parts or labor charges not covered by this limited warranty. The Consumer will be responsible for any expenses related to reinstallation of the Product. e) Smith-Root, Inc. will repair the Product under the limited warranty within 30 days after receipt of the Product. If Smith-Root, Inc. cannot perform repairs covered under this limited warranty within 30 days, or after a reasonable number of attempts to repair the same defect, Smith-Root, Inc. at its sole option, will provide a replacement Product or refund the purchase price of the Product less a reasonable amount for usage. f) If the Product is returned during the limited warranty period, but the problem with the Product is not covered under the terms and conditions of this limited warranty, the Consumer will be notified and given an estimate of the charges the Consumer must pay to have the Product repaired, with all shipping charges billed to the Consumer. If the estimate is refused, the Product will be returned freight collect. If the Product is returned after the expiration of the limited warranty period, Smith-Root, Inc.’s normal service policies shall apply and the Consumer will be responsible for all shipping charges. 8. The Product consists of newly assembled equipment that may contain used components that have been reprocessed to allow machine compliance with Product performance and reliability specifications. 9. ANY IMPLIED WARRANTY OF MERCHANTABILITY, OR FITNESS FOR A PARTICULAR PURPOSE OR USE, SHALL BE LIMITED TO THE DURATION OF THE FOREGOING LIMITED WRITTEN WARRANTY. OTHERWISE, THE FOREGOING LIMITED WARRANTY IS THE CONSUMER’S SOLE AND EXCLUSIVE REMEDY AND IS IN LIEU OF ALL OTHER WARRANTIES, EXPRESS OR IMPLIED. SMITH-ROOT, INC. SHALL NOT BE LIABLE FOR SPECIAL, INCIDENTAL OR CONSEQUENTIAL DAMAGES, INCLUDING BUT NOT LIMITED TO LOSS OF ANTICIPATED BENEFITS OR PROFITS, LOSS OF SAVINGS OR REVENUE, PUNITIVE DAMAGES, LOSS OF USE OF THE PRODUCT OR ANY ASSOCIATED EQUIPMENT, COST OF CAPITAL, COST OF ANY SUBSTITUTE EQUIPMENT OR FACILITIES, DOWNTIME, THE CLAIMS OF ANY THIRD PARTIES, INCLUDING CUSTOMERS, AND INJURY TO PROPERTY, RESULTING FROM THE PURCHASE OR USE OF THE PRODUCT OR ARISING FROM BREACH OF THE WARRANTY, BREACH OF CONTRACT, NEGLIGENCE, STRICT TORT, OR ANY OTHER LEGAL OR EQUITABLE THEORY, EVEN IF SMITH-ROOT, INC. KNEW OF THE LIKELIHOOD OF SUCH DAMAGES. SMITH-ROOT, INC. SHALL NOT BE LIABLE FOR DELAY IN RENDERING SERVICE UNDER THE LIMITED WARRANTY, OR LOSS OF USE DURING THE PERIOD THAT THE PRODUCT IS BEING REPAIRED. 10. Some states do not allow limitation of how long an implied warranty lasts, so the above warranty limitation may not apply to you (the Consumer). Some states do not allow the exclusion or limitation of incidental and consequential damages, so certain of the above limitations or exclusions may not apply to you (the Consumer). This limited warranty gives the Consumer specific legal rights and the Consumer may also have other rights which vary from state to state. 11. Smith-Root, Inc. neither assumes nor authorizes any authorized service center or any other person or entity to assume for it any other obligation or liability beyond that which is expressly provided for in this limited warranty including the provider or seller of any extended warranty or service agreement. 12. This is the entire warranty between the Smith-Root, Inc. and the Consumer, and supercedes all prior and contemporaneous agreements or understandings, oral or written, relating to the Product, and no representation, promise or condition not contained herein shall modify these terms. 13. This limited warranty allocates the risk of failure of the Product between the Consumer and Smith-Root, Inc. The allocation is recognized by the Consumer and is reflected in the purchase price. 14. Questions concerning this limited warranty may be directed to: Smith-Root, Inc. 14014 NE Salmon Creek Ave. Vancouver WA, 98686 *Smith-Root, Inc. is a registered trademark of Smith-Root, Inc.