1
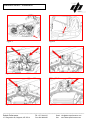
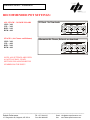
P/N FI-1251ST Patent Numbers: 7,000,599 & 7,124,742 Electronic Jet Kit Instructions Thank you for choosing the Techlusion Electronic Jet Kit, the TFI. This TFI model is ONLY usable for the following Harley Davidson models: 2007-2013 Sportster Models (883 and 1200) This product is a great fit for stock bikes and also along with exhaust and intake mods. This is an Electronic Jet Kit. Like jet kits in the past, the more you modify, the more responsibility you take in getting your fuel curve right. Go to www.DobeckPerformance.com will help you obtain better high horsepower tuning. Due to the complexity of the newer motorcycles, dealer install may be required. If you have any questions during installation or tuning please call tech support. Toll Free: 877-764-3337 USA: 406-388-2377 Business Hours: 8am-5pm MST Monday-Friday INSTALLATION PREP Install Time: 60 minutes Required Tools for: Disconnecting the negative terminal of the battery Removing your seat Loosening and propping up the fuel tank Fuel Adjustments (small flat screwdriver) __________________________________________________________________________________________ Dobeck Performance 157 Progressive Dr, Belgrade, MT 59714 Ph: 877-764-3337 Fax: 406-388-2455 Email: [email protected] Site: www.DobeckPerformance.com Electronic Jet Kit Instructions INSTALLATION 1. Before installing the TFI you must first disconnect the negative lead from the battery. 2. Determine a location for the TFI unit. We suggest left side top of battery under the frame. 3. Making sure that your motorcycle is cold (be sure to disconnect the fuel line using the quick disconnect feature on the fuel fitting, DO NOT UNSCREW THE FITTING) and remove the rear tank mounting bolt (under the seat) loosen and lift up the fuel tank (make sure not to come in contact with the steering with the front of the fuel tank when propping it up). You will need something to hold the fuel tank up (block of wood or a towel) from the frame to gain access to the injectors. 4. Underneath the fuel tank you will locate the fuel injectors. (See the service manual for help if needed) The injectors are mounted in O rings. This allows them to be rotated in the throttle body without further disassembly. From the left side of the bike, rotate the injectors toward you enough to gain access to the locks on the injector connectors. 5. Disconnect the factory injector connectors from the fuel injectors and replace with the TFI injector connectors from the TFI unit. The stock rear injector lead is tagged with a label (REAR) and MUST connect, through the TFI harness, to the rear injector. When completed, rotate the injectors to locate the connectors to a near verticle position, to provide clearance for the fuel hose. It is a good idea to make sure there is a little slack in the harness to prevent engine vibration from damaging/breaking the wiring at the connectors. 6. The front factory O2 connector is cable tied to the left front frame downtube near the oil filter area. Follow the lead from the O2 sensor in the front exhaust pipe. Disconnect the sensor and plug the TFI bypass into the wiring harness. Cable tie the harness back to the frame tube as necessary. 7. The rear factory O2 connector is located on the frame behind the rear cylinder. Again, follow the lead from the rear O2 sensor, disconnect it and install the TFI bypass. The O2 sensors are no longer required. 8. Replace the fuel tank. (Making sure that all bolts are in place and fuel connections are correct). 9. Connect the TFI ground lead to the negative terminal of the battery along with the factory ground lead. (see owners’ manual for help if needed) 10. With the rubber plug removed from the TFI, turn the motorcycle key switch to the “ON” position. As the bikes electrical system goes through initial start up mode you “may” see LED’s flashing on the TFI for a few seconds then go out, this is normal. 11. Start the motorcycle. The green LED should now be on steady and the yellow will flash rapidly for up to 15 seconds, and then go out. If the green or red LEDs continue flashing after startup please refer to the “TFI” section in the troubleshooting guide. __________________________________________________________________________________________ Dobeck Performance 157 Progressive Dr, Belgrade, MT 59714 Ph: 877-764-3337 Fax: 406-388-2455 Email: [email protected] Site: www.dobeckperformance.com Electronic Jet Kit Instructions Tuning – For reference, the pots are numbered from left to right on the TFI POT #1 - GREEN LED: AIR FUEL MIXTURE SCREW ADJUSTMENT With the TFI installed, bike fully warmed up, and screwdriver in hand, locate the GREEN LED and the first pot, which is right below it. Using the throttle, raise the RPM to a high idle or about 2000 RPM. Once there, slowly turn the green pot clockwise from the 1:00 position (off) until you achieve the highest RPM and smoothest running sound (like a mixture screw on a carburetor). You should find the best setting between 2:30 and 4:00 o’clock. If you turn the green pot clockwise and the engine does not accept any more fuel (RPM drops when adding fuel) you may have one or more of these problems (See troubleshooting Motorcycle). POT #2 – YELLOW LED ACCELERATION FUEL ADJUSTMENT Anytime the LED is on, this pot is adding fuel. In neutral raise the RPM slowly up through the mid range and see no yellow LED. However, opening the throttle quickly from idle you “should” see the yellow LED come on. Fine tuning: Start with the suggested setting and then add one clock position at a time until the bike says too much (hesitation) then back off 2 clock positions, if adding makes it worse go opposite direction. The yellow pot adds its fuel below 70% of maximum RPM. If no yellow LED there is not enough load to turn it on. At that point the street or dyno will be able to show the difference. POT #3 – RED LED: MAIN FUEL ADJUSTMENT The TFI adds about 5 points of main jet fuel with every clock position. For example, one clock position is the same as 150 to 155 main jets. Fine tuning: Start with the suggested setting and then add one clock position at a time until the bike says too much (hesitation) then back off 1 clock position, if adding makes it worse go opposite direction. The red pot adds most of its fuel above 70% of maximum RPM. POT #4 – RPM SWITCH POINTS – SERVES TWO PURPOSES 1 - SETS RPM THE RED LED (main jet fuel) TURNS ON. One clock position is roughly 1000 RPM. This pot should be set to about 70% of redline. (For example: Harley Softail redlines at 5600 rpm and 4000 is roughly 70% of redline which would be 4:00 o’clock). Verify setting by raising the RPM in neutral, look for GREEN and YELLOW LEDs to shut off and the red to turn on at the chosen RPM. Refer to suggested settings if you have no tachometer. 2 – SHUTS OFF IDLE FUEL. In some cases modified engines can produce a richer than normal idle mixture. 1:00 o’clock through 6:00 o’clock sets RPM that the RED LED (main jet fuel) turns on. When the 4th pot is turned to 7:00 o’clock the software is instructed NOT to add fuel until 1250 RPM. Also, when setting the 4th pot at 7:00 o’clock the software automatically defaults to 4000 RPM (internally) as the RPM for the RED LED (main jet fuel) to turn on. Some vehicles modifications with Techlusion Inc. products must not be used on public roads and in some cases may be restricted to close course competition. Those products not identified as US EPA legal are intended for off-road or marine applications only. Not intended for use on emission controlled vehicles. __________________________________________________________________________________________ Dobeck Performance 157 Progressive Dr, Belgrade, MT 59714 Ph: 877-764-3337 Fax: 406-388-2455 Email: [email protected] Site: www.dobeckperformance.com Electronic Jet Kit Instructions TROUBLESHOOTING Motorcycle Fuel injected bikes all have the same exact fuel curve and is corrected everyday by the on board weather station. Nothing is leaner than a stock fuel injection map. With our box installes and the bike fully warmed up, if you slowly turn on the green pot and the engine does not accept any more fuel (RPM drops when adding fuel) then you “may” have one or more of these problems: 1. Engine not fully warmed up. 2. A vacuum leak on the intake. 3. High lift cams affecting map at light loads and low RPM. 4. The loss of TPS and ECU sync. 5. Cylinder head temp sensor malfunction. NOTE: The listed problems are ordered from most common to least common TFI If just the GREEN or RED LEDs “FLASH” after startup or no LEDs are visible or bike doesn’t start then please confirm/check connections and retry. If you still experience a problem call tech support. If needed call tech support. Toll Free: 877-764-3337 USA: 406-388-2377 Business Hours: 8am-5pm MST Monday-Friday POOR MILEAGE Solution: 1. Check your GREEN POT setting. This setting is generally responsible for 90% of your mileage. In the hundreds of installs performed, we have never gone beyond the 4:00 o’clock setting. Try backing down the green setting slightly. You can slightly lower the yellow and red settings also. 2. RPM pot adjusted too low. Make sure the RED LED is turning on no lower than 70-75% of the maximum rpm. NOTE: Some engine setups can dictate a higher or lower setting on the RPM pot. 3. Make sure your engine passes the 2000-RPM test at the beginning of the “Tuning” chapter. If you still have mileage issues call tech support for further assistance. __________________________________________________________________________________________ Dobeck Performance 157 Progressive Dr, Belgrade, MT 59714 Ph: 877-764-3337 Fax: 406-388-2455 Email: [email protected] Site: www.dobeckperformance.com Electronic Jet Kit Instructions Figure 2 Figure 1 Figure 3 Figure 4 Figure 5 Figure 6 __________________________________________________________________________________________ Dobeck Performance 157 Progressive Dr, Belgrade, MT 59714 Ph: 877-764-3337 Fax: 406-388-2455 Email: [email protected] Site: www.dobeckperformance.com Electronic Jet Kit Instructions RECOMMENDED POT SETTINGS: ALL STOCK – NO DOWNLOADS GRN: 3:00 YEL: 3:00 RED: 1:00 RPM: 4:00 All Stock - No Downloads STAGE 1 (Air Cleaner and Exhaust) GRN: 3:00 YEL: 4:00 RED: 2:00 RPM: 4:00 Aftermarket Air Cleaner, Exhaust- no download NOTE: ALL SETTINGS ARE GIVEN AS ACTUAL WALL CLOCK SETTINGS. PLEASE IGNORE THE NUMBERS ON THE POTS!! __________________________________________________________________________________________ Dobeck Performance 157 Progressive Dr, Belgrade, MT 59714 Ph: 877-764-3337 Fax: 406-388-2455 Email: [email protected] Site: www.dobeckperformance.com Electronic Jet Kit Instructions Techlusion Corporation dba Dobeck Performance warrants that this product carries a warranty for 2 years from date of purchase against original defects in materials and workmanship to the original purchaser. Should this product fail to perform for either of the above reasons, Techlusion will repair or replace it with an equivalent product at no charge except for postage. To obtain the benefits of this warranty, the purchaser must first call Techlusion to obtain a Return Merchandise Authorization (RMA) number. The purchaser can then send the product with proof of purchase date to: Dobeck Performance Attn: Warranty Department 157 Progressive Drive Belgrade, MT 59714 Toll Free: 877-764-3337 USA: 406-388-2377 Business Hours: 8am-5pm MST Monday-Friday __________________________________________________________________________________________ Dobeck Performance 157 Progressive Dr, Belgrade, MT 59714 Ph: 877-764-3337 Fax: 406-388-2455 Email: [email protected] Site: www.dobeckperformance.com