1
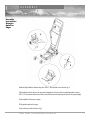
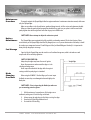
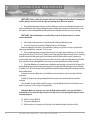
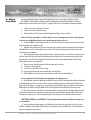
Olympia
Gasoline
Edger
W arra n ty
Welcome to the Olympia Advantage
The entire Olympia's Product line is designed and built to exacting standard to provide trouble free performance. Like
all mechanical equipment however, trouble free performance requires a complete maintenance and proper operating
procedures to be followed. Failure to follow a complete and on-going maintenance program will invalidate the Resurfice
Corp. warranty on the Olympia Edger.
Purchaser:
........................................................................................................................................................................
Address:
........................................................................................................................................................................
........................................................................................................................................................................
........................................................................................................................................................................
........................................................................................................................................................................
Model:
........................................................................................................................................................................
Serial Number: ........................................................................................................................................................................
Date Delivered: ........................................................................................................................................................................
We have included a maintenance log form at the back of this manual to assist you in maintaining a permanent record of the
maintenance carried out on the Olympia Edger.
The illustrations and product information contained in this manual were current at the time of publication. In order to
continue Resurfice Corp.'s development of its technology, Resurfice Corp. reserves the right to change designs, models and
specifications without notice and without liability for such changes.
Resurfice Corp. warrants the components of your Olympia Edger against defects in material and workmanship, for two full
years from the date of delivery.
The engine for your Olympia Edger is a 6 hp Briggs & Stratton. To validate it's warranty it must be placed on an ongoing
maintenance program as outline in the engine manual included with the Olympia Edger.
For the continued safe, economic operation and to validate the Resurfice Corp. warranty, the over all maintenance and
operation of your Olympia Edger must strictly follow the guideline outlined in this manual.
Resurfice Corp. or an authorized dealer must first authorize all warranty repairs.
No warranty on this machine will be honored by Resurfice Corp. other than that stated above.
WHAT EVERY ICE RESURFACER SHOULD BE
i
T able of C o n te n ts
For Safe
Operation
The OLYMPIA™ Gasoline Edger is intended for use, only by people who have a basic knowledge of motorized
equipment operation and maintenance. Resurfice Corp. cannot accept responsibility for any accidents that occur as a
result of operation or maintenance of the machine .
Operating conditions vary widely and Resurfice Corp. cannot predict these varying conditions, and it is therefore
the user's responsibility to determine the appropriate settings in the operation of the OLYMPIA™ Gasoline Edger.
Each OLYMPIA™ Gasoline Edger is shipped with a variety of built-in safety devices. To prevent the occurrence of such
accidents, all operators and maintenance personnel that deal with the machine must carefully read the manuals supplied
by Resurfice Corp. and Briggs & Stratton, before attempting to operate and maintain the OLYMPIA Gasoline Edger.
Because there are many "things that cannot be done" and "things that must not be done" when using the
OLYMPIA™ Gasoline Edger, it is impossible to cover it all in the OLYMPIA™ Gasoline Edger manual. Assume that
something is impossible or unsuitable unless the manual specifically states that it can be done.
The following manual is customized for the OLYMPIA™ Gasoline Edger. It provides detailed information
regarding the following:
1 - DELIVERY PROCEDURE
Assembly Procedure................................................................................................................................ 1
2 - OPERATING PROCEDURE
Gasoline Edger Overview......................................................................................................................... 2
Blade Inspection and Replacement Procedures....................................................................................... 5
Maintenance Program............................................................................................................................. 5
Edger Operational Procedure.................................................................................................................. 7
3 - PARTS LIST..................................................................................................................................................... 8
Please make use of this material when operating and maintaining the OLYMPIA™ Gasoline Edger.
Fundamental safety information is high lighted throughout the manual.
All cautions on operation must be strictly observed when operating the machine, carrying out maintenance work,
and storing the equipment. Failure to observe the fundamental safety information can cause accidents in which the
operator or other personnel that deal with the OLYMPIA™ Gasoline Edger are seriously injured, or the machine is
damaged. All personnel that deal with the machine must carefully read and thoroughly understand the information
in the following pages before attempting to operate or maintain the OLYMPIA™ Gasoline Edger.
ii
O L Y M P I A M I L L E NN I U M – T H E N E W S T A N D A R D
1
A ssembly
Assembly
Instructions
Olympia
Gasoline
Edger
A
B
C
Attach the Edger handle to the base using three 3/8" x 1" bolts and lock nuts as shown in fig. A
Place the Depth Selection Lever in the top position. Attach the tie rod end to the lower adjusting bracket using the
3/8 x 1 1/4 bolt, washer and lock nut as shown in fig. B (Please note the adjusting rod is preset to the proper length)
Check and add oil if necessary to engine.
Fill the gasoline tank on the engine.
Connect the electric leads as shown in fig. C
WHAT EVERY ICE RESURFACER SHOULD BE
1
2
Gasoline
fueled
Olympia
Edger
Overview
O perati n g P rocedure
WARNING!
All operators of the Olympia Edger must read and familiarize themselves with this parts and service manual. Particular
attention must be paid to the Briggs and Stratton operating and maintenance manual supplied with the Olympia Edger.
Maintenance log must be completed for safe operation and to retain warranty coverage the Olympia Edger must be
properly maintained and in safe working order. If problems occur the edger is to be turned off immediately, and removed
from service until the equipment has been properly repaired and tested.
Prior to each edging operation you must
1. Remove the spark plug wire to prevent accidental starting of the engine.
2. Check that the carbide cutting blades are securely fastened and not damaged.
3. If the blades are damaged remove them and replace them with new blades as per the blade replacement
procedure. (see page 3)
4. Replace the spark plug wire.
Always make sure the arena ventilation system is on and operating properly
prior to starting the Olympia edger.
Always make sure the ice is clear of both members of the public and arena
staff prior to operating the edger.
Safety Glasses, (steel toed) safety boots with proper grips, and proper
ear protection gear must be worn by all staff during edging operation.
2
O L Y M P I A M I L L E NN I U M – T H E N E W S T A N D A R D
Assembly
WHAT EVERY ICE RESURFACER SHOULD BE
3
2
O perati n g P rocedure
Safe
Operation
of Gasoline
fueled
Olympia
Edger
SAFETY WARNING: If the following instructions are not followed it can result in a fire or an
explosion can occur causing personal injury
Operating
Safe Guards
Olympia
Edger
1. DO NOT start or operate the edger when an odor of gasoline is present or other explosive conditions exist.
2. Make sure the edger muffler is in place and operating properly.
3. Carry out periodic inspections of the muffler, clean away any debris or combustible material from the
muffler area. Replace the muffler when necessary. A defective muffler can permit an increased exhaust noise level.
4. Never operate the edger if the air cleaner or cover directly over the carburetor air intake is removed.
5. DO NOT choke the carburetor to stop the engine.
6. NEVER tamper with the preset governor springs, governor links, nor make any adjustment to the factory
engine speed presets.
7. DO NOT touch the mufflers, cylinders or fins as contact may cause burns.
8. Dirt or debris in the cooling fans or governor parts can adversely affect engine performance. Turn off
engine, let cool and then clean with a non-flammable brush.
9. Prior to starting the edger, check to make sure the blade is properly in place. A loose blade or no blade
can cause a sever kickback, making sure to remove the spark plug wire prior to checking.
10. Always keep hands and feet clear of moving parts.
11. If manual start is necessary always pull starter cord rapidly to avoid kickback.
Refueling
Olympia
Edger
1. Always shut down the motor of the edger and allow the engine to cool for at least two minutes before
adding any gasoline to the fuel tank.
2. In it situation where gasoline is spilled, move the edger away from the spill to a safe, vented area and do not
create any source of ignition until the gasoline has evaporated and the fumes have been exhausted out of the area.
3. Do not attempt to fill the edger while the engine is running.
4. Allow the engine time to cool off before refueling.
5. Refuel the gasoline fueled Olympia Edger outdoors or in a well ventilated refueling area.
6. When transporting the edger or when not in use, make sure the fuel supply valve is fully closed to
prevent the possibility of fuel leaking from the carburetor.
7. When servicing or checking the edger, first remove the wire from the spark plug or remove the spark plug.
8. DO NOT tilt the edger over at any time. This will prevent oil from draining into the carburetor or exhaust.
9. Never fill above 75% of the capacity of fuel tank.
4
NEVER RUN THE Olympia Gasoline FUELED EDGER IN AN ENCLOSED AREA. Gasoline engine
exhaust contains carbon monoxide, an odorless and deadly poison.
O L Y M P I A M I L L E NN I U M – T H E N E W S T A N D A R D
Maintenance
Procedure
To properly maintain the Olympia Edger follow the engine manufacturer’s maintenance instruction manual, which came
with your Olympia Edger.
Make sure you adhere to the oil specifications, grade and change intervals, air filter service and replacement schedule.
When you replace the spark plug at the appropriate scheduled time, make sure you replace it with the same kind of
spark plug that came with the engine and insure that the gap is set to 0.030 inches.
SAFETY NOTE: Never attempt to adjust the carburetor system!
Battery
Maintenance
The Olympia Edger comes equipped with a fully recyclable, non-hazardous material 12-volt electric battery. Please
note the battery on the Olympia Edger should be fully charged prior to use. To prevent deterioration of the battery it should
be stored at room temperature between 15 and 24 degrees Celsius (or 60 and 80 degrees Farenheit). It is important the
battery be fully charged prior to storage.
Fuel Storage
Spare fuel for the Olympia Edger must be stored in a well-ventilated storage area, which is safe and secure and
complies with all fire and safety regulations.
SAFETY IS YOUR FIRST JOB:
Always keep the edger away from all sources of ignition.
Never allow operators to smoke around the edger or in the
refueling and storage areas.
Never inspect the underside of the edger while the engine is
running or while the spark plug wire is attached.
Blade
Changing
Procedure
Before using the OLYMPIA™ Gasoline Edger you first must inspect
the blades to ensure they are undamaged and secured tightly to the
blade plate.
SAFETY NOTE: Prior to inspecting the blade tips make sure
you are wearing protective gloves.
(1.6 mm)
1. With the assistance of a second person, lift the edger onto a
workbench, making sure to lift with the legs not the back.
2. Always remove the spark plug wire first before servicing the edger.
3. Remove the Oil Drain Plug and drain the oil.
4. Re-install the Oil Drain Plug.
WHAT EVERY ICE RESURFACER SHOULD BE
5
2
O perati n g P rocedure
SAFETY NOTE: Failure to follow this procedure will result in oil leaking from the carburetor saturating the
air filter, making it very hard to start the edger and requiring the air filter to be replaced.
5. Rotate the blade plate and visually inspect each of the blade tips to ensure they are undamaged, sharp and securely
tighten to the blade plate. If the blade tip is damaged, the edger will vibrate and you will get an uneven finish on the ice. Even
more important, a loose or damaged blade tip could seperate from the blade plate and cause serious injury or damage.
SAFETY NOTE: Most blade damage is caused by hitting screws in the dasher boards or ice surface
entrance threshholds.
6. When a blade needs replacement, first undo the four bolts holding the blade plate in place.
7. On a work surface loosen the two bolts holding the blade tip to the blade plate.
Remove the damaged tip and replace it with a new blade tip, making sure to position it correctly on the plate before
tightening the holding bolts to a maximum 11 ft. lbs of torque.
8. Using a straight edge along the opening in the cutting side of the edger, adjust the blade tips in or out along the
slotted guides until they are 1/16 of an inch (1.6 mm) from the straight edge. Hand tighten and check clearance. Positioning
the blade tip beyond the blade guard casing will cause damage to both the blade tip and the boards. To maintain the
consistent edging, make sure the blade tips are the same distance from the outer edge of the blade guard casing. To double
check, measure an existing undamaged blade for the proper measurement and adjust the new blade accordingly.
9. On the eight blade plate, we recommend every second blade be inset by moving it to the back of the slide groove. The
alternate blade tips are positioned correctly by measuring from the outer edge of the blade guard casing to the tip of the blade.
It should be 1/16" to 1/8" inside the edge. Positioning the blade tip beyond the blade guard casing will cause damage to both the
blade tip and the boards.
To maintain the consistent edging, make sure the blade tips are the same distance from the outer edge of the blade
guard casing.
To double check, measure an existing undamaged blade for the proper measurement and adjust the new blade
accordingly.
When the blades are inspected and replaced if necessary, re-attach the blade plate with the four bolts making sure to
tighten to a maximum 11 ft. lbs. of torque on the grade 8 bolts.
Safety Note: Make sure you do not over torque the blade attachment bolts. It can cause the blade to
break and fly out from under the edger. Because of the high velocity of the spinning blade plate this can be
extremely dangerous.
10. Refill the oil using 10W/30 oil
11. Reconnect the spark plug wire.
12. With the assistance of a second person lift the edger off the workbench and place it back onto the floor.
6
O L Y M P I A M I L L E NN I U M – T H E N E W S T A N D A R D
Ice Edging
Proceedure
Once the egder blades have been inspected and replaced if necessary, you are ready to edge the ice surface.
The OLYMPIA™ Gasoline Edger is designed to remove ice build up along the boards and level the ice surface. Ice
buildup extends from the board into the ice surface. To properly level the ice we recommend the following proceedure:
1.
2.
3.
Check to ensure there is adequate fuel in tank.
Check the oil level and top up if necessary.
With the blades in the "Up" position, push the Olympia Hand Edger onto the ice surface.
Safety first: Before entering the ice surface make sure you are wearing steel toed boots, safety googles
or glasses, and studded slip on boot covers to provide proper traction on the ice.
4. Push the OLYMPIA™ Gasoline Edger onto the ice surface. Securely close the entrance door and ensure that all the
other entrance doors are closed and secured.
5. Walk the entire circumference of the ice surface examining the board surfaces for protruding screws and materials
embedded into the ice and / or boards. Remove any such debris. This will prevent damage to the edger, the boards and
most importantly to the operator.
6. After completing the board inspection walk around the circumference of the rink a second time, examining the ice
surface for high spots. Using a felt tip pen, mark the beginning of a high spot with a line and an arrow pointing forward
along the high spot. At the end of the high spot mark another line and an arrow pointing backwards. This will clearly
indicate where you have to spot edge the ice.
7. Move the remote choke lever forward to choke the engine prior to starting.
8. Compress the safety handle bar.
9. Turn the key on the handle to start the engine.
10. Once the engine has started, return the choke lever to the off position
11. With the blades in the fully up positon push the edger forward to the first marked high spot.
It is very important to keep the edger moving thoughout the edging process.
12. When the edger is against the board and you reach the first arrow, lower the cutting blades by pushing the lock button
on the blade height control lever to release it and lower the cutter asembly by pushing the lever downward. The blades will
begin to cut into the high spot , removing the ice. As you reach the end of the high spot, push in the control button on top of the
blade height lever and pull up to bring the blades off the ice surface. Repeat this until each high spot has been removed.
13. Once the high spots are removed do a second lap around the ice circumference. Move the edger against the boards
with the blades spinning in the raised position. Now, moving forward, push the blade height control lever until the cutter
assembly starts cutting a thin cut of the ice. Maintaining that cut level, edge the entire circumference of the ice surface.
SAFETY NOTE: NEVER move the OLYMPIA™ Gasoline Edger backward when the blades are moving or try
to cut backwards.
14. After completing the edging operation, pull the blade level lever back to the top position in order to fully raise
the blades. (Damage to the cutting tips, blade arm and /or crankshaft may occur if the blade arm is not fully raised prior to
starting and stopping the edger engine.)
WHAT EVERY ICE RESURFACER SHOULD BE
7
3
PARTS LIST
Edger Electric
Start
Ignition
Switch
8
Ref# Part #
1
55-10165
2
55-10160
Descritption
Electric Start Key
Electric Start Switch
OEM #
63-8360
46-5780
O L Y M P I A M I L L E NN I U M – T H E N E W S T A N D A R D
Electrical
System
Ref#
1
2
3
4
5
6
7
Part #
55-10165
55-4000
49-30120
55-10155
55-10150
49-33115
55-500
Descritption
Electric Key Start
Edger Handle
Socket Cap Screw 10/24 x 3/4
Electric Start Battery Case
Electric Start Battery
Locknut-Nylon 10-24
6HP Intek Engine & Electric St.
OEM #
63-8360
Model 5
Lawnboy 95-3017
Lawnboy 55-7520
10-24 Nylon Insert Locknut
121607-0227-E1
WHAT EVERY ICE RESURFACER SHOULD BE
9
3
Control Arm
10
PARTS LIST
Ref# Part #
1
55-5120
2
10-120
C18291600318
3
55-5100
4
55-5110
5
50-51925
6
49-30550
1-1/4
7
25-51855
8
49-33600
9
49-37800
10
49-19035
11
49-33500
12
49-36300
13
55-3300
14
49-30050
15
55-3210
16
49-33555
17
49-33235
18
55-3100
19
5-3200
20
55-3150
O L Y M P I A M I L L E NN I U M – T H E N E W S T A N D A R D
Descritption
Depth Selector Handle Knob
Gear Shift Spring
Depth Selector Rod
Depth Selector Handle
Stripper Bolt 1/2 x 1-1/4
Hex Hd Bolt 3/8 x 1-1/4 OEM #
3/8 - 16 x
Rod End
VCW6
Hex Hd Nut 3/8 - 24
Split Pin 1/4 x 1-1/2
Grease Fitting 1/4 - 28 Straight
Locknut - Nylon 3/8 - 16
Flat Washer 1/2 SAE
Depth Adjustment Rod
Stripper Bolt 3/8 x 3/8
Engine Mount Connecting Bar
Hex Jam Nut 3/8-16
Hex Jam Nut 5/16-18
Engine Mount
Back Engine Mount Depth Adj.
Front Engine Mount Depth Adj.
Under Carriage
Ref#
1
2
3
4
5
6
7
8
9
10
11
12
13
14
Part #
55-500
55-3100
49-33555
55-1000
55-3000
49-30200
49-36170
50-51975
49-30150
49-36100
55-25355
50-51760
49-36250
49-30560
Descritption
6HP Intek Engine & Electric St.
Engine Mount
Hex Jam Nut 3/8 –16
Rubber Wheel 4"
Edger Base
Hex Hd Cap Screw 1/4 x 3/4
Lock Washer 1/4
Bottom Hub
Hex Hd. Bolt 1/4 x 1/2
Flat Washer 1/4 hole
Bottom Plate 12" - 8 Blade
Edger Blade
Flat Washer 3/8
Hex Hd Bolt 3/8 x 1 1/4
OEM #
121607-0227-E1
Model 5
100SRP
Model 5
1/4 - 20 x 3/4
1/4 - 20 x 1/2
3/16 flat Washer – Zinc
3/8 – 24 x 1 1/4
WHAT EVERY ICE RESURFACER SHOULD BE
11
3
Gasoline Fuel
System
12
PARTS LIST
Ref#
1
2
3
4
5
6
7
8
9
Part #
55-4000
55-4500
55-2000
55-9010
49-30245
37-60120
49-33200
55-2050
55-500
O L Y M P I A M I L L E NN I U M – T H E N E W S T A N D A R D
Descritption
Edger Handle
Safety Shut-off Bar
Pivot Stop
Throttle Cable
Hex Hd Bolt 1/4 x 1 1/2
1/4" Tube Clamp
Locknut Nylon 1/4 - 20
Brake Cable
6 HP Intek Engine &
Electric St.
OEM #
92-5412
93-4186
1/4 - 20 x 1 1/2 HCS
GANGC2 766321
98-7147
121607-0227-E1
4
MAINTENANCE LOG
Maintenance Log
To assist you in maintaining a permanent record of your maintenance program for your new Olympia, keep track of all
maintenance performed in the following log.
Copy this form for additional pages as needed.
Date
Hours of Operation
Maintenance Performed
..............................................................................................................................................................................
..............................................................................................................................................................................
..............................................................................................................................................................................
..............................................................................................................................................................................
..............................................................................................................................................................................
..............................................................................................................................................................................
..............................................................................................................................................................................
..............................................................................................................................................................................
..............................................................................................................................................................................
..............................................................................................................................................................................
..............................................................................................................................................................................
..............................................................................................................................................................................
..............................................................................................................................................................................
..............................................................................................................................................................................
..............................................................................................................................................................................
..............................................................................................................................................................................
..............................................................................................................................................................................
..............................................................................................................................................................................
..............................................................................................................................................................................
..............................................................................................................................................................................
..............................................................................................................................................................................
..............................................................................................................................................................................
..............................................................................................................................................................................
..............................................................................................................................................................................
..............................................................................................................................................................................
..............................................................................................................................................................................
..............................................................................................................................................................................
..............................................................................................................................................................................
..............................................................................................................................................................................
..............................................................................................................................................................................
WHAT EVERY ICE RESURFACER SHOULD BE
13