1
PERSONAL PAPERLESS
DOCUMENT MANAGER v2
SUPPORT
DOCUMENTATION
It is the reader's responsibility when discussing the information contained
within this document to maintain a level of confidentiality that is in the best
interest of Ricoh Americas Corporation and its member companies.
NO PART OF THIS DOCUMENT MAY BE REPRODUCED IN ANY
FASHION AND DISTRIBUTED WITHOUT THE PRIOR
PERMISSION OF RICOH AMERICAS CORPORATION.
All product names, domain names or product illustrations, including
desktop images, used in this document are trademarks, registered
trademarks or the property of their respective companies.
They are used throughout this book in an informational or editorial fashion
only and for the benefit of such companies. No such use, or the use of
any trade name, or web site is intended to convey endorsement or other
affiliation with Ricoh products.
© 2011 RICOH Americas Corporation. All rights reserved.
WARNING
The Service Manual contains information
regarding service techniques, procedures,
processes and spare parts of office equipment
distributed by Ricoh Americas Corporation.
Users of this manual should be either service
trained or certified by successfully completing a
Ricoh Technical Training Program.
Untrained and uncertified users utilizing
information contained in this service manual to
repair or modify Ricoh equipment risk personal
injury, damage to property or loss of warranty
protection.
Ricoh Americas Corporation
This page intentionally left blank.
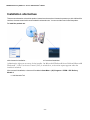
Personal Paperless Document
Manager v2
Getting Started Guide
Personal Paperless Document Manager 2 – Getting Started Guide
Getting started with Personal Paperless Document
Manager v2
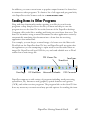
Personal Paperless Document Manager v2 consists of server-side and client-side components.
This document provides quick instructions for installing the client-side software associated with
Personal Paperless Document Manager v2.
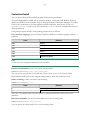
n
PPDM Desktop Module 12 (desktop component; displayed on screen as PaperPort)
n
PPDM OCR Module 17 (desktop component; displayed on screen as OmniPage)
n
PPDM PDF Converter Module 7 (desktop component)
n
DesktopDeliveryPSP 10 (desktop component)
n
PPDM PSP Delivery Module 3 (server component; shipped on a separate CD)
Note:
Personal Paperless Document Manager v2 products, including PPDM Desktop Module, PPDM OCR
Module, PPDM PDF Converter Module, DesktopDeliveryPSP and PPDM PSP Delivery Module (with
device clients) are translated into English, French, Italian, German, Spanish, and Brazilian Portuguese.
These products are designed to work with an operating system that is properly configured with the
corresponding language. Use of these products with operating systems that are configured with nonsupported languages is not recommended or supported.
Nuance Communications, Inc.
1 Wayside Road
Burlington, MA 01803-4609
© 2010 Nuance Communications, Inc. All rights reserved.
© 2010 Ricoh Americas Corporation. All rights reserved.
Printed in the United States of America.
Nuance and the Nuance logo are trademarks or registered trademarks of Nuance
Communications, Inc. or its affiliates in the United States and other countries.
Windows® is a trademark of Microsoft Corporation in the United States and/or other countries.
Other product names and images used in this guide may be trademarks or registered trademarks
of their respective companies and are hereby acknowledged.
-1-
Personal Paperless Document Manager 2 – Getting Started Guide
Product documentation
Personal Paperless Document Manager v2 is shipped with the following documentation:
n
n
n
Getting Started Guide: this guide. Consult it for product overview and installation
information.
DesktopDeliveryPSP Guide: this is a separate PDF (located at the
PPDMDesktopDelivery folder on the desktop disk). It contains information on
DesktopDeliveryPSP usage.
Server Administrator’s Guide: this PDF can be found in the DOCS folder on the server
disk. Consult it for comprehensive technical information as well as for the administrator
installation of the server component.
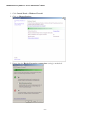
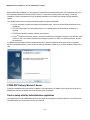
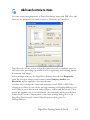
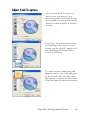
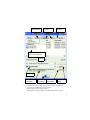
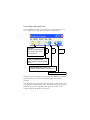
Installing Personal Paperless Document Manager v2
To install the desktop-side components of Personal Paperless Document Manager v2, you need
Administrator rights on the target computer. For instructions on how to install the server-side
components, refer to the Server Administrators Guide located on the server CD.
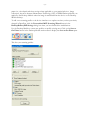
The installation disk contains multiple localized versions of the associated software. To begin,
select the language appropriate for your installation. This displays a second dialog box that
enables you to Start installation or Browse CD.
Before starting installation, you can specify which components you want to install. Components
previously installed from the disk are marked with a green checkmark on the right. Then specify
a common installation directory for all components.
In the next screen, you must accept the License Agreement to proceed with the installation.
Note:
If you install DesktopDeliveryPSP as part of the above procedure the program behavior will still need to be
configured through the DesktopDeliveryPSP Settings dialog for proper functioning. Alternatively, you can
configure the application at install-time. To do so, exclude DesktopDeliveryPSP installation from the above
procedure (unmark its checkbox) and install it separately with command-line parameters. For detailed
guidelines, see the DesktopDeliveryPSP documentation in the PPDMDesktopDeliveryPSP folder on the
disk.
A Personal Paperless Document Manager v2 silent install launches installing each desktop
component without user intervention. Users are informed of installation progress by progress
monitor and application screens. PDF Converter Module will be installed automatically if you
install either Desktop Module or OCR Module.
You will need to remove Nuance and ScanSoft PDF Products, as well as PaperPort and
OmniPage before Personal Paperless Document Manager v2 can be installed.
-2-
Personal Paperless Document Manager 2 – Getting Started Guide
Note:
On some systems, before the setup program continues with component installation, a Windows Installer
program launches to update necessary system files. After these files are installed, a message appears
instructing you to reboot your system. When Windows restarts, the installation automatically continues.
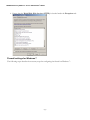
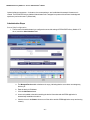
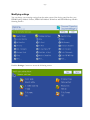
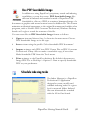
Finishing the installation
As the final step of the installation, the product gets activated silently, provided that the serial
number has been entered precisely.
After the installation, DesktopDeliveryPSP is inactive and you must configure it for proper
functioning. Right-click on its icon in the system tray and choose the Settings command. The
DesktopDeliveryPSP Settings dialog appears. Use this to configure the program.
DesktopDeliveryPSP is designed to monitor
n
n
n
a specified folder on a networked file server or local drive for incoming scanned images
and/or
an email inbox and/or
Multifunction Printers/Copiers using the PSP Server for Personalized MFP Scanning
functionality.
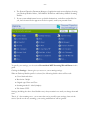
Refer to the DesktopDeliveryPSP PDF document (available from the Start Menu, under (All)
Programs > PPDM > Desktop Module 12), for information about setting up and using
DesktopDeliveryPSP.
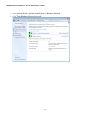
Uninstalling Personal Paperless Document Manager v2
To uninstall the desktop-side components of Personal Paperless Document Manager v2, you can
use either of the following options:
n
n
Use the uninstaller provided with the product (only available if the PPDM Desktop
Module is installed). You can do this via the Uninstall PPDM link in the Start Menu,
under (All) Programs > PPDM.
Locate and remove the components via Add/Remove Programs, preferably in the
following order:
1. DesktopDeliveryPSP
2. PPDM Desktop Module
3. PaperPort Image Printer
4. RSSolo
5. PPDM OCR Module
6. PPDM PDF Converter Module
- 3 -
END-USER LICENSE AGREEMENT
The software and materials provided with this agreement are licensed,
not sold, and are available for use only under the terms of this license
agreement. Please read this agreement carefully. By downloading,
installing, copying, or otherwise using the software, you agree to be
bound by the terms and conditions of this agreement and become a party
to this agreement. If you do not agree with all of the terms and conditions
of this agreement, do not download, install, copy or otherwise use the
software.
This Nuance Communications, Inc. (“Nuance”) End User License
Agreement (“Agreement”) accompanies a Nuance software product in
machine-executable binary code and related explanatory written materials
(“Software”). The term “Software” shall also include any modified
versions, updates or upgrades of the Software that may be licensed to
you (“Licensee”) by Nuance, but does not include source code for the
Nuance software product. You may install and use such a modified
version, update, or upgrade of the Software only if you have a validly
licensed full version of the Software being modified, updated, or
upgraded. If you download, install, copy, or otherwise use such a
modified version, update, or upgrade of the Software, then this
Agreement terminates as to the previous version of the Software, and you
have a license only to such modified version, update, or upgrade of the
Software under the terms of this Agreement. The Software is licensed to
you, Licensee, as the end user, subject to all of the terms and conditions
of this Agreement.
LICENSE GRANT. Subject to the terms and conditions of this
Agreement, Nuance grants Licensee a non-exclusive and nontransferable license only to: (a) install and use for personal or internal
business purposes one copy of the Software on a single computer;
(b) install and use for personal or internal business purposes one copy of
the Software on either a single portable computer or a single home
computer, provided that such copy is not used concurrently with the copy
in section (a) above; (c) make a single copy of the Software solely for
archival purposes; and (d) store or install a copy of the Software on a
storage device such as a network server, used only to install or run the
Software on your other computers over an internal network, provided that
you acquire and dedicate a separate license for each separate computer
on which the Software is installed, run or otherwise accessed from the
storage device. A single license for the Software does not allow you to
share the Software or use it concurrently on different computers or for
others other than the Licensee to access, install, download, copy or
otherwise use the functionality of the Software.
MULTIPLE LICENSE PACK. If Licensee has purchased a Multiple
License Pack, Licensee may make additional copies of the Software not
to exceed the number of licenses purchased. Licensee may use each
copy solely in the manner specified in this Agreement.
ACTIVATION. According to its discretion, Nuance may include features in
the Software to prevent unlicensed use of the Software. You agree that
Nuance may do so. In particular, use of the Software may require that
Licensee activate the Software through the Internet (this process may be
more fully described during the installation set up of the Software). During
such activation, Nuance may collect certain non-personal technical
information from your computer concerning your computer or network.
You agree that Nuance may do so. You may be required to reactivate the
Software if you modify your computer hardware or the Software.
NOTIFICATIONS. According to Nuance’s discretion, the Software may
contain a component that will automatically activate your Internet browser
and attempt to initiate a connection through the Internet to a website
maintained by Nuance that contains notification information related to the
Software. This connection may be made using the Internet connections
and telephone lines under your control. From time to time, you may
receive notices about the Software or other information through this
Internet connection. By installing the Software on your computer, you
hereby consent to have the Software initiate a connection through the
Internet to Nuance’s website, to use your resources to connect to such
website, and to receive notices about the Software and other information
through this Internet connection.
RESTRICTIONS. Except as otherwise expressly permitted in this
Agreement, Licensee may not: (a) reproduce or copy any of the Software;
(b) modify or create any derivative works of the Software, including
translation or localization; (c) decompile, disassemble, reverse engineer,
or otherwise attempt to derive the source code for the Software;
(d) redistribute, encumber, sell, rent, lease, sublicense, or otherwise
transfer rights to the Software; (e) remove or alter any trademark, logo,
copyright or other proprietary notices, legends, symbols or labels in the
Software; (f) without Nuance’s prior written consent (which may be given
or withheld in Nuance’s sole discretion) either (1) provide service bureau
services using the Software, or (2) otherwise enter into an agreement with
a third party to use the Software on such third party’s behalf for the
primary purpose of obviating the third party’s need to license the Software
itself; or (g) copy the printed materials accompanying the Software. As
between Licensee and Nuance, any changes to, modifications to, or
derivative works of the Software shall become the exclusive property of
Nuance.
TERMINATION. Without prejudice to any other rights, Nuance may
terminate this Agreement if Licensee breaches any of its terms and
conditions. Upon termination, Licensee shall destroy all copies of the
Software.
PROPRIETARY RIGHTS. Title, ownership rights, and intellectual
property rights in the Software shall remain in Nuance and/or its suppliers
or licensors. Licensee acknowledges such ownership and intellectual
property rights and will not take any action to jeopardize, limit or interfere
in any manner with Nuance’s or its suppliers’ or licensors’ ownership of or
rights with respect to the Software. The Software is protected by copyright
and other intellectual property laws and by international treaties.
DISCLAIMER OF WARRANTY. THE SOFTWARE (INCLUDING
WITHOUT LIMITATION THE RELATED DOCUMENTATION) IS
PROVIDED ON AN “AS IS” BASIS, WITHOUT WARRANTY OF ANY
KIND, INCLUDING WITHOUT LIMITATION THE WARRANTIES THAT IT
IS FREE OF DEFECTS, MERCHANTABLE, FIT FOR A PARTICULAR
PURPOSE OR NON-INFRINGING. THE ENTIRE RISK AS TO THE
QUALITY AND PERFORMANCE OF THE SOFTWARE IS BORNE BY
LICENSEE. SHOULD THE SOFTWARE PROVE DEFECTIVE IN ANY
RESPECT, LICENSEE AND NOT NUANCE OR ITS SUPPLIERS,
LICENSORS OR RESELLERS ASSUMES THE ENTIRE COST OF ANY
SERVICE AND REPAIR. THIS DISCLAIMER OF WARRANTY
CONSTITUTES AN ESSENTIAL PART OF THIS AGREEMENT. NO USE
OF THE SOFTWARE IS AUTHORIZED HEREUNDER EXCEPT UNDER
THIS DISCLAIMER. SOME STATES OR JURISDICTIONS DO NOT
ALLOW THE EXCLUSION OF IMPLIED WARRANTIES OR
LIMITATIONS ON HOW LONG AN IMPLIED WARRANTY MAY LAST,
SO THE ABOVE LIMITATIONS MAY NOT APPLY TO YOU.
LIMITATION OF LIABILITY. TO THE MAXIMUM EXTENT PERMITTED
BY APPLICABLE LAW, IN NO EVENT WILL NUANCE OR ITS
SUPPLIERS OR LICENSORS BE LIABLE FOR ANY INDIRECT,
SPECIAL, INCIDENTAL OR CONSEQUENTIAL DAMAGES ARISING
OUT OF THE USE OF OR INABILITY TO USE THE SOFTWARE,
INCLUDING, WITHOUT LIMITATION, DAMAGES FOR LOSS OF
GOODWILL, WORK STOPPAGE, COMPUTER FAILURE OR
MALFUNCTION, OR ANY AND ALL OTHER COMMERCIAL DAMAGES
OR LOSSES, EVEN IF ADVISED OF THE POSSIBILITY THEREOF,
AND REGARDLESS OF THE LEGAL OR EQUITABLE THEORY
(CONTRACT, TORT OR OTHERWISE) UPON WHICH THE CLAIM IS
BASED. IN ANY CASE, NUANCE’S AND ITS SUPPLIERS’ AND
LICENSORS’ ENTIRE LIABILITY UNDER ANY PROVISION OF THIS
Nuance Communications, Inc. End User License Agreement Revised October, 2010
AGREEMENT SHALL NOT EXCEED IN THE AGGREGATE THE SUM
OF THE FEES LICENSEE PAID FOR THIS LICENSE (IF ANY), WITH
THE EXCEPTION OF DEATH OR PERSONAL INJURY CAUSED BY
THE NEGLIGENCE OF NUANCE TO THE EXTENT APPLICABLE LAW
PROHIBITS THE LIMITATION OF DAMAGES IN SUCH CASES. SOME
JURISDICTIONS DO NOT ALLOW THE EXCLUSION OR LIMITATION
OF INCIDENTAL OR CONSEQUENTIAL DAMAGES, SO THIS
EXCLUSION AND LIMITATION MAY NOT BE APPLICABLE.
EXPORT CONTROL. Licensee agrees to comply with all applicable
export laws and restrictions and regulations of the United States of
America or foreign agencies or authorities, and not to export or re-export
the Software in violation of any such restrictions, laws or regulations, or
without all necessary approvals.
U.S. GOVERNMENT END USERS. This Section applies to all
acquisitions of the Software by or for the government of the United States
of America (“government”) or by any prime contractor or subcontractor (at
any tier) under any contract, grant, cooperative agreement, or other
activity with the government. By accepting delivery of the Software, the
government hereby agrees that this software qualifies as “commercial”
computer software within the meaning of the acquisition regulation(s)
applicable to the procurement. The terms and conditions of this
Agreement shall pertain to the government’s use and disclosure of the
Software and shall supersede any conflicting contractual terms or
conditions. If this Agreement fails to meet the government’s needs or is
inconsistent in any respect with the federal law of the United States of
America, the government agrees to return the Software, unused, to
Nuance. The following additional statement applies only to acquisitions
governed by DFARS Subpart 227.4 (October 1988): “Restricted Rights—
Use, duplication, and disclosure by the Government is subject to
restrictions as set forth in subparagraph (c)(1)(ii) of the Rights in
Technical Data and Computer Software clause at DFARS 252.227-7013
(Oct. 1988).” In the event any of the above referenced agency
regulations is amended or replaced, the equivalent successor regulation
shall apply instead.
GENERAL. This Agreement constitutes the entire agreement between
the parties concerning the subject matter hereof. This Agreement may be
amended only by a writing signed by both parties. Except to the extent, if
any, applicable law requires otherwise, this Agreement shall be governed
by the laws of the Commonwealth of Massachusetts, United States of
America, excluding its conflict of law provisions. Unless otherwise agreed
in writing, all disputes relating to this Agreement (excepting any dispute
relating to Nuance’s or its licensors’ or suppliers’ intellectual property
rights) shall be subject to final and binding arbitration in Boston,
Massachusetts, United States of America under the auspices of a single
arbitrator pursuant to the commercial arbitration rules of the American
Arbitration Association then in effect, with the losing party paying all costs
of arbitration. This Agreement shall not be governed by the United
Nations Convention on Contracts for the International Sale of Goods. If
any provision in this Agreement should be held illegal or unenforceable
by a court having jurisdiction, such provision shall be modified to the
extent necessary to render it enforceable without losing its intent, or
severed from this Agreement if no such modification is possible, and the
other provisions of this Agreement shall remain in full force and effect.
The controlling language of this Agreement is English. The Licensee
agrees to bear any and all costs of interpreters if necessary. If Licensee
has received a translation into another language, it has been provided for
Licensee’s convenience only. A waiver by either party of any term or
condition of this Agreement or any breach thereof, in any one instance,
shall not waive such term or condition or any subsequent breach thereof.
The provisions of this Agreement that require or contemplate
performance after the expiration or termination of this Agreement shall be
enforceable notwithstanding such expiration or termination. Licensee may
not assign or otherwise transfer by operation of law or otherwise this
Agreement or any rights or obligations herein except to an acquirer of
Licensee’s business in the case of a merger or the sale of all or
substantially all of Licensee’s assets to such acquirer. This Agreement
shall be binding upon and shall inure to the benefit of the parties, their
successors and permitted assigns. The relationship between Nuance and
Licensee is that of independent contractors and neither Licensee nor its
agents shall have any authority to bind Nuance in any way. If any dispute
arises under this Agreement, the prevailing party shall be reimbursed by
the other party for any and all legal fees and costs associated therewith.
The headings to the sections of this Agreement are used for convenience
only and shall have no substantive meaning. Nuance may use Licensee’s
name in any customer reference list or in any press release issued by
Nuance regarding the licensing of the Software.
LICENSEE OUTSIDE THE U.S. If Licensee is located outside the U.S.,
then the provisions of this Section shall apply. (a) Les parties aux
présentés confirment leur volonté que cette convention de même que
tous les documents y compris tout avis qui s’y rattaché, soient redigés en
langue anglaise. (Translation: “The parties confirm that this Agreement
and all related documentation is and will be in the English language.”)
(b) Licensee is responsible for complying with any local laws in its
jurisdiction which might affect its right to import, export or use the
Software, and Licensee represents that it has complied with any
regulations or registration procedures required by applicable law to make
this license enforceable.
COUNTRY UNIQUE TERMS. For licenses granted outside of the United
States or Canada, the following terms are in addition to, or replace or
modify the referenced terms above. All terms above that are not changed
by these amendments remain unchanged and in effect.
Governing Law. The phrase "this Agreement shall be governed by the
laws of the Commonwealth of Massachusetts." is replaced as follows
"This Agreement shall be governed by the laws of Belgium."
© 2010 Nuance Communications. All Rights Reserved. Nuance and the
Nuance logo are trademarks or registered trademarks of Nuance
Communications, Inc. or its affiliates in the United States and/or other
countries.
Nuance Communications, Inc. End User License Agreement Revised October, 2010
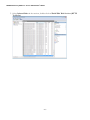
SERVER ADMINISTRATOR’S GUIDE
Welcome
3
System Requirements
4
Installing Prerequisites
5
Pre-Installation Device Configuration
6
Setting up the Network Environment
7
IP Addresses and Host Names
7
Configuring IIS on Windows 2008 Server
7
Configuring IIS on Windows 7
8
Firewall settings
8
Firewall settings for Windows XP and Windows Server 2003
9
Firewall settings for Windows Server 2008
11
Firewall settings for Windows 7
13
Creating temporary storage for scanned media files
17
Providing SMB access to Temporary Storage
17
Checking SMB access
20
Authentication
21
Installation alternatives
22
Interactive Installation
23
PPDM PSP Delivery Module 3 Server
24
Service setup with the Administration application
24
Steps to launch the Administration Tool
25
Using the Administration Tool
25
Customized installation (advanced)
38
Extract product files to a specific folder
38
Set-up Web Services in IIS web site
38
Check the correct setup of Web Services in IIS
45
Changing server IP address after setup
45
Troubleshooting tips
47
JAVA path configuration
47
Logging
47
Typical errors
49
PPDM PSP Delivery Module 3 – Server Administrator’s Guide
Welcome
Welcome and thank you for choosing our software. This document will give you guidance on how to install the product. It
covers the following areas:
n
System Requirements
n
Setting up Network Environment
n
Interactive Installation
n
Setting up the Personal Paperless Document Manager v2 (abbreviated as PPDM) application with the
Administration Tool
n
Customized installation (advanced)
n
Installer command-line parameters
n
Troubleshooting tips
This Guide shows screenshots made under Microsoft® Windows® 7. The appearance may vary under other Operating
Systems.
-3-
PPDM PSP Delivery Module 3 – Server Administrator’s Guide
System Requirements
To install the software, your system has to meet the following requirements:
n
n
Operating system: Microsoft® Windows® XP Professional SP3 (32-bit), Microsoft® Windows® 2003 Server SP2
(32-bit or 64-bit), Microsoft® Windows® 2008 Server SP2 (32-bit or 64-bit) or Microsoft® Windows® 7 (32-bit or
64-bit).
Microsoft Internet Information Services (IIS) 5.1, 6.0, 7.0 (only on Microsoft® Windows® 2008 Server), or 7.5
(only on Microsoft® Window® 7), installed with "World Wide Web Services".
n
Microsoft® Internet Explorer 7.0 or later.
n
Java Runtime Environment™ (JRE) version 1.5 or later.
The following prerequisite is offered during installation:
n
Microsoft® .NET Framework version 2.0 Service Pack 1.
-4-
PPDM PSP Delivery Module 3 – Server Administrator’s Guide
Installing Prerequisites
Availability of system prerequisites:
n
n
n
n
Microsoft® Internet Information Services (IIS) 5.1, or 6.0 is available from the Microsoft® Windows® installation
CD.
Microsoft® Internet Explorer 7.0 or later.
Microsoft® .NET Framework version 2.0 SP1 is available in the prerequisites folder of PPDM PSP Delivery
Module 3 installation package or from Windows Update.
JavaTM Runtime Environment (JRE) version 1.5 or later is available in the prerequisites folder of PPDM PSP
Delivery Module 3 installation package (JRE 1.6.21) or from http://java.sun.com/javase/downloads.
Install prerequisites as instructed in the documentation of the individual components.
Notes:
n
n
n
Microsoft® Windows® XP Home Edition is not supported, because Microsoft® Internet Information Services is
not a part of this operating system.
If IIS is installed after the .NET 2.0 Framework installation, the framework registration into IIS might not be
performed correctly. See the troubleshooting tips on how to fix this problem.
We recommend checking that IIS is installed and working properly before starting the customized installation of
PPDM PSP Delivery Module 3. For interactive installation, IIS is a prerequisite.
-5-
PPDM PSP Delivery Module 3 – Server Administrator’s Guide
Pre-Installation Device Configuration
We recommend that you use a static IP address for the device. Descriptions in this guide are based on such a scenario.
Before installing and using PPDM PSP Delivery Module 3 you need to make sure that Embedded Software Architecture
(ESA) also known as Java™ Platform are installed on the device. This is included in the firmware of some Ricoh
devices (no separate installation is required). Other devices do require the installation of Embedded Software
Architecture. For details consult your device documentation. For more detailed instructions check the Embedded
Software Architecture Installation Manual.
Ricoh SDK/J 2.xx devices which do not conform to SDK/J version 2.09 or later will require an SD card upgrade to
support remote software installation and configuration. Contact your Ricoh representative to obtain a device upgrade if
needed.
Note:
If the IP address of a device changes, re-register the device in the PPDM server using the Admin Tool.
-6-
PPDM PSP Delivery Module 3 – Server Administrator’s Guide
Setting up the Network Environment
To utilize the full functionality of the product, you have to identify a file server in your network that is accessible via
SMB. (This file server can also be used as a PPDM PSP Delivery Module 3 server).
We recommend that you install the product to a server with a static IP address. The following description is based on
such a scenario.
Note:
If the IP address of the server is changed, you have to change it in the PPDM PSP Delivery Module 3 also (see section
“Changing server IP address after setup”). Additionally, all devices should be re-registered in the PPDM server using the
Admin Tool to update the new IP address.
The configuration steps presented here describe the Windows, IIS and SMB based process. If you are using the product
on a different system, consult your product distributor.
IP Addresses and Host Names
PPDM PSP Delivery Module 3 supports IP addresses as well as host names. In general, you are free to use either for
identifying the device, server, etc. However, there are cases when host names cannot be properly resolved (e.g. clients,
the server, the device(s) are in different workgroups, etc). In such scenarios use IP addresses when:
n
Installing the server.
n
Accessing the Administration Tool.
n
Setting the repository parameters in the Administration Tool.
n
Specifying the Server in DesktopDeliveryPSP.
Configuring IIS on Windows 2008 Server (2003 Server is similar)
The following describes how to configure IIS on Windows 2008 Server. For 2003 Server see Microsoft's web site.
1. Click Start > Server Manager.
2. Under the Server Manager root node click Role .
3. Under Roles Summary click Add Role.
4. In the Add Roles Wizard choose the Select Server Roles page.
5. Click Web Server (IIS) and accept all required features.
6. Click Next twice.
7. On the Select Role Services page click ASP.NET under Application Development and accept all required role
services.
8. On the same page select Windows Authentication under Security.
9. Select IIS 6 Metabase Compatibility under IIS 6 Management Compatibility.
10. Click Next.
-7-
PPDM PSP Delivery Module 3 – Server Administrator’s Guide
11. Click Install.
12. When the installation completes click Close to close the Wizard.
On Windows Server 2008 64-bit systems, the default option should be used for 32-bit enablement. To do this perform the
following steps:
1. Choose Control Panel > Administrative Tools > Internet Information Services (IIS) Manager from the
Start Menu.
2. Select the default application pool (usually <COMPUTER>/Application Pools/DefaultAppPool).
3. Right-click the default application pool and select Advanced Settings….
4. Set the Enable 32-Bit Applications option to False.
5. Press OK.
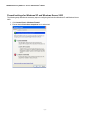
Configuring IIS on Windows 7 (Windows XP is similar.)
The following describe the steps to install and configure IIS on Win 7. For Windows XP, refer to Microsoft's web site.
1. To open the Windows Features dialog box, click Start, and then click Control Panel.
2. In the Control Panel, click Programs (Programs and Features in Classic View).
3. Click Turn Windows features on and off.
4. You may receive the Windows Security warning. Click Allow to continue.
5. Select Internet Information Services to choose the default features for installation.
6. Expand Internet Information Services. Additional categories of IIS features are displayed.
7. Select IIS 6 Metabase Compatibility under Web Management Tools\IIS 6 Management Compatibility.
8. Select Windows Authentication under World Wide Web Service\Security.
9. Click OK to install features.
10. The progress indicator appears.
11. When the installation completes, the Windows Features dialog box closes, and the Control Panel is
displayed (Programs and Features in Classic View).
On Windows 7 64-bit systems, the default option should be used for 32-bit enablement. To do this, perform the following
steps:
1. Choose Control Panel > Administrative Tools > Internet Information Services (IIS) Manager from the
Start Menu.
2. Select the default application pool (usually <COMPUTER>/Application Pools/DefaultAppPool).
3. Right-click the default application pool and select Advanced Settings… .
4. Set the Enable 32-Bit Applications option to False.
5. Press OK.
Firewall settings
The following sections contain instructions on how to configure the firewall on various Windows systems.
-8-
PPDM PSP Delivery Module 3 – Server Administrator’s Guide
Firewall settings for Windows XP and Windows Server 2003
The following steps describe the necessary steps for configuring the firewall on Windows XP and Windows Server
2003:
1. Click Control Panel > Windows Firewall.
2. Ensure that the Don't allow exceptions box is unchecked.
-9-
PPDM PSP Delivery Module 3 – Server Administrator’s Guide
3. On the Exceptions tab, click Add Port.
4. Enter World Wide Web Services (HTTP) as the name, and 80 as the port number.
- 10 -
PPDM PSP Delivery Module 3 – Server Administrator’s Guide
5. Click OK.
Firewall settings for Windows Server 2008
The following steps describe the necessary steps for configuring the firewall on Windows Server 2008:
- 11 -
PPDM PSP Delivery Module 3 – Server Administrator’s Guide
1. Click Control Panel > Windows Firewall.
2. Click on Change Settings.
3. Ensure that the Block all incoming connections setting is unchecked.
- 12 -
PPDM PSP Delivery Module 3 – Server Administrator’s Guide
4. Ensure that the World Wide Web Services (HTTP) is checked under the Exceptions tab.
Firewall settings for Windows 7
The following steps describe the necessary steps for configuring the firewall on Windows 7:
- 13 -
PPDM PSP Delivery Module 3 – Server Administrator’s Guide
1. Click Control Panel > System and Security > Windows Firewall.
2. Click Turn Windows Firewall on or off.
- 14 -
PPDM PSP Delivery Module 3 – Server Administrator’s Guide
3. Ensure that Block all incoming connections is unchecked. Depending on the network used, this
option can be found under Home or work network or Public network.
4. Click Advanced settings on the Windows Firewall screen.
- 15 -
PPDM PSP Delivery Module 3 – Server Administrator’s Guide
5. Select Inbound Rules in the treeview, double-click on World Wide Web Services (HTTP
Traffic-In).
- 16 -
PPDM PSP Delivery Module 3 – Server Administrator’s Guide
6. Ensure that the Enabled checkbox is checked and Allow the connection is selected.
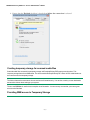
Creating temporary storage for scanned media files
Scanned media files are stored in a temporary storage until DesktopDeliveryPSP starts processing them. This
temporary storage has to be an SMB share. The device and the DesktopDeliveryPSP clients will use a dedicated user
account to access the temporary storage.
Note:
The folder, share and account names in next sections are illustrations only. You are free to make your own destination
and account choices when setting up your system.
The account PSPUser is used in these examples as an illustration. You can use any account that you want to grant
access to the file share.
Providing SMB access to Temporary Storage
Note:
- 17 -
PPDM PSP Delivery Module 3 – Server Administrator’s Guide
Make sure you first disable the folder option Simple file sharing (recommended) in Folder settings on Windows XP.
(To learn more about advanced folder settings refer to your operating system manual.) Without enabling advanced file
sharing you will not see some dialog boxes referenced in the following section.The server file system must be NTFS.
To provide SMB access to Temporary Storage:
1. Open Windows Explorer and browse to the folder you want to use as the temporary storage. We will use the
c:\temp\TemporaryStorage folder in this example.
2. Click File > Properties and select the Sharing tab then press the Advanced Sharing… button. (On Windows
XP and Windows Server 2003 click File > Sharing and Security...).
3. Turn on the Share this folder option on the Sharing pane
4. Enter the following parameters:
l
Share name: TemporaryStorage
l
Comment: Temporary media storage
5. Click the Permissions... button.
6. Click the Add… button.
7. Turn on Full Control for the PSPUser account. In our example PSPUser is a dedicated account that will be used
by the device and the DesktopDeliveryPSP clients to access the TemporaryStorage.
- 18 -
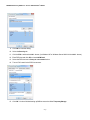
PPDM PSP Delivery Module 3 – Server Administrator’s Guide
9. Click OK to close this dialog.
10. Select the Security tab.
11. Click the Edit.. and then the Add... button. (On Windows XP or Windows Server 2003 click the Add... button.)
12. Enter PSPUser and click OK to close Add Wizard.
13. Select the PSPUser item in Group or user names list box.
14. Turn on Full Control for the PSPUser account.
15. Click OK. You have finished setting up SMB access to the folder TemporaryStorage.
- 19 -
PPDM PSP Delivery Module 3 – Server Administrator’s Guide
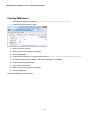
Checking SMB access
1. Open Windows Explorer and navigate to \\<<your computer name>>\TemporaryStorage.
2. Create a new folder and name it Test.
3. Copy a file into this directory.
4. Make sure you do not get any error messages.
5. Delete the Test folder.
6. Choose another computer in your network and navigate to \\<<your computer name>>\TemporaryStorage.
7. Provide the PSPUser account details – user name and password – if prompted.
8. Create a new folder (name it Test).
9. Copy a file into this directory.
10. Make sure you do not get any error messages.
11. Delete the Test folder.
Your SMB configuration is now complete.
- 20 -
PPDM PSP Delivery Module 3 – Server Administrator’s Guide
Authentication
If you require authentication functionality on your device (in order to setup a more secure working environment), an
authentication module provided by Ricoh should be uploaded to the MFP devices. More detailed information can be
from the Windows Authentication Service Installation and Configuration Guide found in this manual.
- 21 -
PPDM PSP Delivery Module 3 – Server Administrator’s Guide
Installation alternatives
There are two alternatives to install the product: interactive and customized. Interactive presents you with a Wizard-like
interface, whereas customized is recommended for advanced users. You can use either one to install the product.
To install the product use:
either Interactive installation…
or Customized Installation.
Administrative rights are necessary for the installer. On Microsoft® Windows® Server 2008 and Microsoft®
Windows® 7, if the User Access Control (UAC) is switched on, an elevation request appears when the
installer is launched.
After successful installation, a shortcut will be added to Start Menu > (All) Programs > PPDM > PSP Delivery
Module 3:
n
Administration Tool
- 22 -
PPDM PSP Delivery Module 3 – Server Administrator’s Guide
Interactive Installation
Tips before starting:
- It is recommended to take notes about each installation step to make it easier to restore your system or to roll back
installation in case of a failure.
- Interactive product installation will create a virtual directory in IIS called PPDM, overwriting any existing ones with the
same name.
How to start the installation
1. To start the installation, launch AutoRun.exe.
2. On the first screen, select the language.
3. Select the components, then click Start installation.
- 23 -
PPDM PSP Delivery Module 3 – Server Administrator’s Guide
Before starting the installation, you can check the components to be installed. Microsoft® .NET Framework version 2.0
SP1 and JavaTM Runtime Environment (JRE) version 1.5 or later are required for proper functioning. Turn off the
installation of these component only if they are already installed on your machine (for example, through Windows
update).
The installer checks for the necessary prerequisites before component installation:
n
n
n
n
If IIS is not present, it reports the problem and installation stops. You have to install IIS and restart the server
installation.
The .NET component is not checked and inactive, if it is already present on the computer, otherwise it is
checked.
The PPDM component is always checked, and is inactive.
If JavaTM Runtime Environment version 1.5 or later is present on the computer, the option is not selected, and is
inactive. If JRE 1.4 or earlier is present on the computer (or there is no JRE), it is checked by default, and can
be unchecked.
A separate installer program for each component launches. Follow the installation instructions for each component.
When the installation finishes, you can choose to check the Windows Installer log, if you have Windows Installer 4.5 or
later.
PPDM PSP Delivery Module 3 Server
During the installation make sure that the “IP address” is the same as the “IP Address” on the “Web Site” tab in the IIS
Management Console (for details see section Checking your IIS settings).
Service setup with the Administration application
Your application server and SMB shared folder are now ready to be registered to the Ricoh devices. First collect some
information about your network and your device to proceed:
- 24 -
PPDM PSP Delivery Module 3 – Server Administrator’s Guide
Device properties:
IP address: ...................... (e.g.: 10.140.24.30)
Application server properties:
IP address (or name): ......... (e.g.: 10.140.1.1, or rocket)
Administration Tool URL: ....(e.g.: http://10.140.1.1/PPDM/admin)
File server properties:
IP address (or name): ...........(e.g.: 10.140.1.1, or rocket)
SMB share path: ..................(e.g.: \\rocket\TemporaryStorage)
All examples are illustrations only and have to be replaced with your own environment settings.
Steps to launch the Administration Tool
To launch the Administration tool:
1. Choose Start Menu > (All) Programs > PPDM > PSP Delivery Module 3 > Administration Tool or type the
Administration Tool URL (http://10.140.1.1/PPDM/admin) into a browser. If IIS is not permitted to serve
dynamic content, you may get HTTP Error 404 - File or Directory not found. For guidelines on how to
resolve this problem, see http://support.microsoft.com/kb/315122.
2. Depending on your network security settings, an authentication dialog may display. Log in as an administrator
(the administration task involves modification of local files).
3. Select your interface language from the following: English, French, Italian, German, Portuguese or Spanish.
Using the Administration Tool
In the following section, we present a typical use case of this tool for system administrators.
This is only a working example to walk you through the most commonly used steps. Your actual administration activity
is likely to differ from the one you find here.
Example Scenario
Suppose that your company purchases or rents one or more devices. A single device is usually enough for small and
medium size businesses, while larger organizations might need several more devices.
The device(s) are delivered and set up by an external expert with the help of the company’s IT expert. This way, the IT
professional will know the IP address and administrator login information.
- 25 -
PPDM PSP Delivery Module 3 – Server Administrator’s Guide
Optional software components – for instance, the current package – are installed and the network infrastructure is
created. The PPDM PSP Delivery Module 3 administrator role is assigned to a person with sufficient knowledge and
experience (can be the same IT professional).
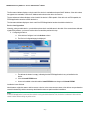
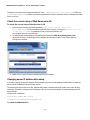
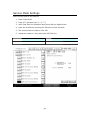
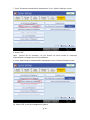
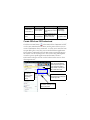
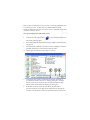
Administration Steps
Serv er Side C onfiguration
1. The first task of the administrator is to configure the server side settings of PPDM PSP Delivery Module 3. To
do so, launch the Administration Tool.
a. The Managed Devices table at the bottom is empty, indicating that the server does not manage any
devices yet.
b. Enter the device’s IP Address.
c. Click the Add Device button.
d. A new row is added to the table containing the device information and the PPDM application is
automatically installed on the device.
e. Check the icons in the Status column to see if the device and the PPDM application are up and running
correctly.
- 26 -
PPDM PSP Delivery Module 3 – Server Administrator’s Guide
The first status indicator displays a check mark if the device is reachable at the specified IP Address. If the device does
not appear to be reachable, check the IP Address and make sure the device is turned on.
The second status indicator displays a check mark if the device is ESA capable. If the device is not ESA capable, the
PPDM application cannot be used on the device.
The last status indicator displays a check mark if the PPDM application has been installed on the device.
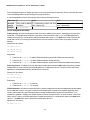
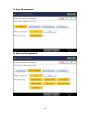
D evice C onfiguration
Normally, when you add a device, you should see three check mark indicators in the table. If the second status indicator
signals ESA problems, you have to resolve them first and then perform this step.
2. Configuring the device.
a. Click the blue Configure icon in the Actions column.
b. The Device Configuration page is displayed.
c. The table at the bottom is empty, indicating that the PPDM application is not yet installed on the
device.
d. Click the Install PPDM button.
e. A new row is added to the table and the Install PPDM button changes to Uninstall PPDM.
Installation is now finished.
Administrators might also want to add or remove a device. In the most common cases a few devices are purchased or
rented simultaneously and the necessary administration tasks are performed after installation.
Note:
If the PPDM application is removed from a device using the Administration Tool, the device is rebooted. Wait until the
reboot finishes before taking any other action.
- 27 -
PPDM PSP Delivery Module 3 – Server Administrator’s Guide
A dding N ew D evices
To set up additional devices manually, the administrator has to go through the following steps again:
1. Click the Devices tab (at the top).
2. Enter the device IP Address.
3. Click the Add Device button.
4. A new row is added to the table with the device information and the PPDM application is automatically installed
on the device.
5. Check the icons in the Status column to see if the device and the PPDM application are up and running
correctly.
If automatic installation was not successful, or if you want to uninstall the PPDM application from the device, proceed
as follows:
6. Click the Configure icon (the blue wrench in the Actions column) associated with the new device.
7. The Device Configuration page is displayed with the IP Address and name of the new device.
8. Click the Install PPDM button.
9. A new row is added to the table and the Install PPDM button changes to Uninstall PPDM.
R emoving D evices
To remove a device:
1. Go to the Devices page (choose the Devices tab at the top) and click the Delete icon in the Actions column.
2. The device is removed from the system and the PPDM application is automatically uninstalled from the device.
3. The table at the bottom is updated to reflect this change.
U ninstalling The PPD M A pplication From A D evice
To uninstall the PPDM application from a device, do this:
1. Go to the Devices page (choose the Devices tab at the top) and click the Configure icon in the Actions column.
2. The Device configuration page is displayed.
3. Click the Uninstall PPDM button.
4. The application gets uninstalled from the device.
The table at the bottom is updated to reflect this change.
Managing Multiple D evices
When handling several devices, it is more convenient to utilize comma-separated text files – filled with device
parameters – to carry out the following device management tasks:
n
Adding several devices.
n
Removing several devices.
n
Installing / uninstalling the PPDM application on several devices.
- 28 -
PPDM PSP Delivery Module 3 – Server Administrator’s Guide
Device management tasks are lengthy processes, so they are performed asynchronously. During such tasks the status
icons in the Managed Devices table changes to a progress indicator.
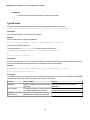
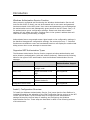
A comma-separated text file for such purposes has to have the following structure:
Field name IP
Start
Install
Accepted
value(s)
String, valid IP address 1, 0 (representing "Install" and "Unin- 1, 0 (representing "Start" and "Do not
of a device
stall", respectively)
start", respectively)
Example
100.255.23.45
1
1
Device management task details
Adding devices: All fields are required and used. Devices are added one-by-one and – depending on the value of the
Install field – PPDM application installation is also done. If the Install field's value is 1 (i.e. the PPDM application is
installed on the device), it is automatically started if the Start field's value is 1. The Start field's value is ignored if the
Install field's value is 0. Processing continues with the next row in the file in case of errors (for example, invalid IP
address).
Sample CSV file content:
10.140.1.15,1,1
10.140.24.34,0,0
10.140.24.32,1,0
Explanation:
1. The device at 10.140.1.15 is added. PPDM installation is performed. PPDM starts automatically.
2. The device at 10.140.24.34 is added. PPDM installation is not performed.
3. The device at 10.140.24.32 is added. PPDM installation is performed. PPDM does not start automatically.
Removing devices: IP Address is the only required and used field (the Install and Start fields are ignored). Currently
managed devices are enumerated and matched against the IP addresses in the file. If a match is found, the PPDM
application is uninstalled automatically and the device is removed.
Sample CSV file content:
10.140.1.15,0,0
10.140.24.34,0,0
Explanation:
1. The device at 10.140.1.15 is removed
2. The device at 10.140.24.34 is removed
PPDM Installation: All fields are required and used. Currently managed devices are enumerated and matched against
the IP Addresses in the file. If a match is found, the PPDM application is installed or uninstalled, depending on the
content of the Install field. If the PPDM application is already installed and the content of the Install field is 1, the
installation is updated. If PPDM is not installed and the content of the Install field is 0, no action is taken. If the Install
field's value is 1 (that is, the PPDM application is installed on the device), it is automatically started if the Start field's
value is 1. The Start field's value is ignored if the Install field's value is 0.
Sample CSV file content:
10.140.1.15,1,1
- 29 -
PPDM PSP Delivery Module 3 – Server Administrator’s Guide
10.140.1.15,1,0
10.140.24.34,0,0
Explanation:
1. PPDM is installed on the device at 10.140.1.15. PPDM starts automatically.
2. PPDM is installed on the device at 10.140.1.15. PPDM does not start automatically.
3. PPDM is uninstalled from the device at 10.140.24.34.
The result of each batch operation is a log file that is accessible from the Administration Tool.
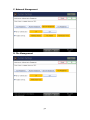
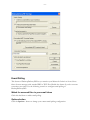
Setting The D evice W orking Folder
3. The next step is to set the working folder of the device. This is where images will temporarily be stored:
a. Click the Repository tab (at the top).
b. The Repository page is displayed.
c. Enter the information of a shared folder along with an account that the device and the
DesktopDeliveryPSP clients will use to reach this location.
d. Click the Store Settings button.
Initial server administration is done and the system is ready to work.
Important!
For full functionality, client side installation is also required.
- 30 -
PPDM PSP Delivery Module 3 – Server Administrator’s Guide
R epository C hanges
File transfer location changes are not quite frequent (c.f. email system changes within an organization). However, the
Administration Tool gives you the option to do this.
To change the file transfer location:
1. Click the Repository tab (at the top).
2. Change the parameters.
3. Click the Store Settings button.
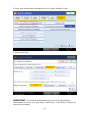
U ser Management
Administrators are usually not required to manage user lists, because clients are able to automatically register
themselves and use the system without any administrator interaction.
On the other hand, we provide an administration tool to add/remove users and user groups to/from the system.
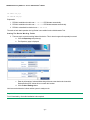
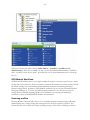
Adding users
1. Click the Users tab (at the top).
2. The User Management page is displayed with the list of already registered (manually by the administrator or
automatically by the clients themselves) users.
3. To add a single user manually:
a. Pick the Add users manually option.
b. The page changes to this:
- 31 -
PPDM PSP Delivery Module 3 – Server Administrator’s Guide
c. Enter user information.
d. Click the Add User button.
e. The page reverts to the user list.
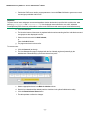
4. To add several users:
a. Pick the Add users from LDAP option.
b. The page changes to this:
- 32 -
PPDM PSP Delivery Module 3 – Server Administrator’s Guide
c. Provide the LDAP server and its access parameters. Leave the Filter field blank to get access to each
user and group available within LDAP.
Important!
The same sets of users and groups are returned regardless whether the domain is specified with or without the .com
suffix (e.g. exampledomain and exampledomain.com). Use the domain name without the .com suffix, otherwise
DesktopDeliveryPSP clients may not be able to connect to the PSP Server and users may not be identified correctly.
d. Click the List button.
e. The list at the bottom of the screen is populated with the entries matching the filter. Individual users and
user groups are also displayed in the list.
f. Select several users and click Add Selected,
or
Press the Add All button.
g. The page reverts back to the user list.
To remove users:
a. Click the Users tab (at the top).
b. The User Management page is displayed with the list of already registered (manually by the
administrator or automatically by the clients themselves) users.
c. Mark the appropriate boxes in the Mark for deletion column.
d. Decide if user data should be deleted (mark the checkbox in the yellow field below the table).
e. Click the Delete Selected Users button.
f. The table updates to reflect the changes.
- 33 -
PPDM PSP Delivery Module 3 – Server Administrator’s Guide
D isplaying A C ustomiz ed Message To U nregistered U sers
1. Click the Users tab (at the top).
2. Enter your customized text in the Message area. You might want to include details, such as how to get the
client software, whom users should contact in case they need access to the PPDM application, etc.
3. Click the Save button.
Your customized message is going to be displayed on the device panel for users who are not registered on the server.
Sorting login names on the device panel
1. Click the Users tab (at the top).
2. Set the order for displaying user names on the device panel.
3. Click the Apply button.
- 34 -
PPDM PSP Delivery Module 3 – Server Administrator’s Guide
D efaults
Administrators are usually not required to manage user settings, because users are able to customize the device screen
using their own destination folders and scanning preferences through the Personalized MFP Scanning Wizard. On the
other hand, we provide an administration tool to add/remove default folders, workflows and profiles.
Important!
These defaults will appear on the device screen - below the users' own items.
This happens in the following cases if the user:
l
Restarts DesktopDeliveryPSP.
l
Updates the user's own preferences through the Wizard.
l
Selects the Refresh defaults item from the context menu of the DesktopDeliveryPSP system tray icon.
Default folders
Use comma-separated text files – filled with folder information – to specify destination folders for all users. These
comma-separated text files have to have the following structure
Field name
Path
Display name
Accepted
value(s)
String, full path of a folder
String, short display name of the path as it will appear on the
device's main screen
Example
Q:\Year2009\Common\Accounting Accounting
To create default destination folders (administrator’s tasks)
1. Create the comma-separated text file, containing the full path and the display name of the destination folders.
2. Click the Defaults tab (at the top)
- 35 -
PPDM PSP Delivery Module 3 – Server Administrator’s Guide
3. Click the Browse button in the Default Folders section, next to Folders file.
4. Select the comma-separated text file in the File Open dialog and click OK.
5. Click the Upload File button in the Default Folders section.
6. The file is uploaded, processed and the default folders are displayed.
Sample CSV file content:
C:\temp,MyTemp
Q:\Year2009\Common\Accounting,Accounting[MyDocuments]\ScannedFiles,Scanned files
Explanation
1. The user will see the MyTemp item on the device screen. If this item is selected, the scanned document is
delivered into the C:\temp folder on the user's machine.
2. The user will see the Accounting item on the device screen. If this item is selected, the scanned document is
delivered into the Q:\Year2009\Common\Accounting folder on the user's computer.
3. The user will see the Scanned files item on the device screen. If this item is selected, the scanned document is
delivered into the C:\Documents and Settings\<User>\My Documents\Scanned files folder on the user's
PC. The [MyDocuments] meta tag should be used when the administrator wants to use a path within the user's
own My Documents folder. (This meta tag is resolved on the user's machine locally).
Important!
If there are special, accented (e.g. ô, ÿ…) characters in the folder names, the CSV file has to be saved in Unicode
format or with UTF8 encoding. Otherwise neither the device nor the DDPSP client might be able to properly display
and/or use the folder name.
Default workflows
Use OmniPage to create workflows available for all users on their machines.
Note:
Workflows of OmniPage 16 or earlier versions are not compatible with OmniPage 17.
To create default workflows as an administrator
1. Create one or more workflows in OmniPage and export them to a location accessible through the Administration
tool.
2. Click the Defaults tab (at the top).
3. Click the Browse button in the Default Workflows section, next to Workflow file.
4. Select the workflow file in the File Open dialog and click OK.
5. Click the Upload File button in the Default Workflows section
6. The file is uploaded, processed and the default workflow is displayed.
7. Workflow files can be uploaded one-by-one. If you have more workflows to upload, repeat the above steps.
Sample:
- 36 -
PPDM PSP Delivery Module 3 – Server Administrator’s Guide
The administrator uses the Workflow Assistant in OmniPage (Tools menu/Workflow Assistant item) to create a
workflow, with steps necessary to handle an invoice. The workflow is exported from OmniPage (Tools menu/Workflows
item) as Invoice, and then uploaded to the server through the Administration Tool. The user will see the Invoice item on
the device screen. If this item is selected, the scanned document is loaded into OmniPage on the user's machine and
processed using the Invoice workflow.
Default profiles
As an administrator, use PaperPort to create profiles available for all users on their own machines.
To create profiles
1. Create one or more profiles in PaperPort.
2. Close PaperPort.
3. Copy the profiles.xml file to a location accessible through the Administration tool from:
l
l
XP, 2003 Server: C:\Documents and Settings\All Users\Application
Data\Nuance\PaperPort\12\ folder.
Vista and later: C:\ProgramData\Nuance\PaperPort\12\ folder.
4. Click the Defaults tab (at the top).
5. Click the Browse button in the Default Profiles section, next to Profiles file.
6. Select Profiles.xml in the File Open dialog and click OK.
7. Click the Upload File button in the Default Profiles section. The file is now uploaded, processed and the
default profiles are displayed.
Sample:
The administrator uses PaperPort to create profiles (e.g. ColorScan, LowResBW…), containing the scanning
parameters, image processing and destination format options. The profiles are uploaded to the server through the
Administration Tool. The user will see the ColorScan, LowResBW… items on the device screen. If an item is selected,
the document is scanned and processed, as described in the profile.
- 37 -
PPDM PSP Delivery Module 3 – Server Administrator’s Guide
Customized installation (advanced)
Customized installation is recommended for advanced administrators. To install the product this way, complete the
following steps:
Important!
It is an imperative that all prerequisites are already installed before you perform the following steps.
Extract product files to a specific folder
Use the following command line to extract application files to a dedicated folder:
msiexec.exe /i "PSPServer.msi" IIS=0 SERVERIPADDRESS="???.???.???.???:??"
INSTALLDIR="?:\????"
Installer Command-line Parameters
IIS
Interaction with IIS.
IIS=0: Extract into a specific folder and do not interact with IIS.
IIS=1: Extract into a specific folder and interact with IIS to register the virtual folders.
SERVERIPADDRESS
INSTALLDIR
PREREQ_IIS_
INSTALLEDONPORT80
You need to specify the IP address of the computer and a port number.
Destination folder for product files.
Interactive installation may fail with the following error: Check if your IIS is
configured to listen at port 80. To install the application without
this check refers to the Server Administrator's Guide. Installation
will now abort. Use this command line parameter to disable the check.
REMOVESETTINGS=””
By using this parameter, you can keep your setting files when uninstalling or removing the product.
If SERVERIPADDRESS is specified, the appropriate files will be replaced with the ones containing the specified IP
address. Otherwise, you have to modify some files manually after installation: these are listed in the next section. If you
do not specify a server IP address and port number, the name of your computer will be used by default.
When PREREQ_IIS_INSTALLEDONPORT80=“2” is specified, the IIS settings are not examined and the Check if your
IIS is configured to listen at port 80.
To install the application without this, check refer to
the Server Administrator's Guide. Installation will now abort. error message is suppressed.
It is also a good practice to turn on installer logging and to check the log file after installation. We suggest consulting the
Windows Installer documentation on the lvx* <log file> command line parameter and its usage.
Set-up Web Services in IIS web site
The following is applicable for IIS 5.1, or 6.0:
1. Create a base virtual directory
- 38 -
PPDM PSP Delivery Module 3 – Server Administrator’s Guide
1. Click the Windows Start menu then choose Control Panel > Administrative Tools > Internet
Information Services.
2. Select <COMPUTER>/Web Sites/Default Web Site.
3. Click: Action > New > Virtual Directory...
4. The Virtual Directory Wizard appears. Set up your virtual directory with the following parameters:
l
l
l
Alias: PPDM
Directory: C:\Program Files\PPDM\PSP Delivery Module 3 (or the directory you have specified in
the INSTALLDIR property)
Permissions for this directory: (read, run scripts (such as ASP) and browse checked; write, execute
(such as ISAPI applications or CGI) unchecked)
5. Click Finish to complete the Wizard.
6. Select the new virtual directory.
7. Click Actions > Properties. The Virtual directory properties dialog appears.
8. Select the Low (IIS Process) Application protection option.
9. Click OK.
2. Create a virtual directory for product administration
1. Select the PPDM virtual directory.
2. Click Action > New > Virtual Directory...
The Virtual Directory Wizard appears. Set up your virtual directory with the following parameters:
l
l
l
Alias: admin
Directory: C:\Program Files\PPDM\PSP Delivery Module 3\admin (or the directory you have
specified in the INSTALLDIR property)
Permissions for this directory:
n Read, run scripts (such as ASP), execute (such as ISAPI applications or CGI) and write
checked.
n
Browse unchecked.
3. Click Finish to complete the Wizard.
4. Select this new PPDM\admin virtual directory.
5. Click Actions > Properties. The virtual directory properties dialog appears.
6. Select the Directory Security pane.
7. Click the Edit button under the Anonymous access and authentication control section. The
Authentication Methods dialog displays.
8. Uncheck the Anonymous access checkbox.
- 39 -
PPDM PSP Delivery Module 3 – Server Administrator’s Guide
9. Check the Integrated Windows authentication checkbox.
10. Click OK to close the Authentication Methods dialog.
11. Select the ASP.NET pane.
12. Choose 2.0.50727 in the ASP.NET version combo box.
13. Click OK to finish setup.
14. Select the new virtual directory.
15. Click Actions > Properties. The virtual directory properties dialog appears.
16. Select the Low (IIS Process) application protection option.
17. Click OK.
3. Create the PPDM UI virtual directory
1. Select the PPDM virtual directory.
2. Click Action > New > Virtual Directory...
The Virtual directory wizard displays. Set up your virtual directory with the following parameters:
- 40 -
PPDM PSP Delivery Module 3 – Server Administrator’s Guide
l
l
l
Alias: UI
Directory: C:\Program Files\PPDM\PSP Delivery Module 3\UI (or the directory you have specified
in the INSTALLDIR property)
Permissions for this directory:
Read, run scripts (such as ASP) execute (such as ISAPI applications or CGI) and write checked
Browse unchecked
3. Click Finish to complete the Wizard.
4. Select the PPDM\UI virtual directory.
5. Click Action > Properties. The UI Properties dialog appears.
6. Select the Directory Security pane.
7. Click the Edit button under the Anonymous access and authentication control section. The
Authentication Methods dialog displays.
8. Mark the Anonymous access checkbox.
9. Mark the Integrated Windows authentication checkbox.
10. Click OK to close the Authentication Methods dialog.
11. Select the Documents pane.
12. Click the Add button.
13. Enter Index.aspx and click OK.
14. Select the ASP.NET pane.
15. Choose 2.0.50727 in the ASP.NET version combo box.
16. Click OK to complete setup.
17. Select the new virtual directory.
18. Click Actions > Properties. The Virtual directory properties dialog appears.
19. Select the Low (IIS Process) Application protection option.
20. Click OK.
- 41 -
PPDM PSP Delivery Module 3 – Server Administrator’s Guide
The following is applicable for IIS 7.0 or 7.5:
1. Set .NET version for the Application Pool.
1. Start IIS Administration Console: Click the Windows Start menu then choose Control Panel >
Administrative Tools > Internet Information Services.
2. Select <<Computer name>>(<<current user>>)\Application Tools.
3. Select the Application Pool you with to use and select the Basic Settings… from the Actions menu.
4. Check that the .NET Framework version is .NET Framework v2.0.50727.
2. Create a base web application.
1. Select Sites/Default Web Site.
2. Right click on it and select Add Application….
3. The Add Application dialog appears. Set up your web application with the following parameters:
l
l
Alias: PPDM
Physical path: C:\Program Files\PPDM\PSP Delivery Module 3 (or the directory you have
specified in the INSTALLDIR property)
4. Click OK to complete the web application creation.
- 42 -
PPDM PSP Delivery Module 3 – Server Administrator’s Guide
3. Create a web application for product administration.
1. Select the PPDM web application.
2. Right click on it and select Add Application….
3. The Add Application dialog appears. Set up your web application with the following parameters::
l
l
Alias: ADMIN
Physical path: C:\Program Files\PPDM\PSP Delivery Module 3\admin (or the directory you have
specified in the INSTALLDIR property)
4. Click OK to complete the web application creation.
5. Select this new PPDM\ADMIN web application.
6. In the Features View part of the screen double click on the Authentication icon.
- 43 -
PPDM PSP Delivery Module 3 – Server Administrator’s Guide
4. Disable the Anonymous Authentication option.
5. Enable the Windows Authentication option.
4. Create the PPDM UI web application.
1. Select the PPDM web application.
2. Right click on it and select Add Application….
3. The Add Application dialog appears. Set up your web application with the following parameters:
l
l
Alias: UI
Physical path: C:\Program Files\PPDM\PSP Delivery Module 3\UI (or the directory you have
specified in the INSTALLDIR property)
4. Click OK to complete the web application creation..
5. Select this new PPDM\UI web application.
6. In the Features View part of the screen double click on the Authentication icon.
7. Enable the Anonymous Authentication option.
8. Enable the Windows Authentication option.
- 44 -
PPDM PSP Delivery Module 3 – Server Administrator’s Guide
The product will create run-time application data files in the <<Common Application Data>>\Nuance\PPDM folder (e.g.
C:\ProgramData\Nuance\PPDM). Make sure that the application has access to this folder and can create directories and
files in it run time.
Check the correct setup of Web Services in IIS
To check the correct setup of Web Services in IIS
1. Open a browser and enter the following address: http://<<your site IP>>:<<your site
port>>/PPDM/admin. If IIS is not permitted to serve dynamic content, you may get HTTP Error 404 - File
or Directory not found. For guidelines on how to resolve this problem, see
http://support.microsoft.com/kb/315122.
2. An authentication window displays. Authenticate yourself and the PSP Server Management Portal
application will launch. UI language can be changed to the following: English, French, Italian, German,
Portuguese or Spanish.
3. Make sure you receive no error messages and close your browser.
Changing server IP address after setup
If you did not specify the server IP Address during installation you have to make additional modifications to regain the
services of the PPDM PSP Delivery Module 3 server.
The following list of files reference a URL. Obsolete URLs have to be replaced with the correct ones in each of them.
Although it is possible to change server IP addresses this way, it is not recommended. Consider reinstalling the PSP
Server instead.
The files to be modified are:
<installdir>/admin/Web.Config
<installdir>/UI/RXOP/ppdm.zip/ppdm.dalp
To update the PPDM.DALP file
- 45 -
PPDM PSP Delivery Module 3 – Server Administrator’s Guide
1. Step into the installation folder (C:\Program Files\PPDM\PSP Delivery Module 3 by default).
2. Step into the UI\RXOP sub folder within the install folder.
3. Extract the content of PPDM.zip into a temporary folder.
4. Open the extracted PPDM.DALP file in a text editor.
5. Locate the <application-desc> element.
6. Locate the first <argument> within the <application-desc> element. Update the URL with the server's IP
address.
7. Save the PPDM.DALP file.
8. Compress the content of the temporary folder and save it as PPDM.zip into the UI\RXOP sub folder of the
installation folder, overwriting the original PPDM.zip file. It is a good practice to create a backup copy of
PPDM.zip before overwriting it with the modified content!
9. (Re)install the PPDM application to the device using the Administration Tool.
- 46 -
PPDM PSP Delivery Module 3 – Server Administrator’s Guide
Troubleshooting tips
JAVA path configuration
The installation of the PPDM PSP Delivery Module 3 application onto the device requires Java™ Runtime Environment
(JRE) version 1.5 or later being installed and the corresponding Java.exe being accessible for the Administration Tool. If
these preconditions are not met, the PPDM PSP Delivery Module 3 server installer displays a warning and the
Administration Tool reports an error.
Depending on the configuration of the server machine (e.g. a different Java-based application requires a different JRE
version on the same machine) these requirements might conflict with those of other applications, therefore the
Administration Tool allows the administrator to specify where to look for Java.exe.
To specify where the Administration Tool should look for Java.exe, perform the following steps:
1. Open the installation folder (C:\Program Files\PPDM\PSP Delivery Module 3 by default).
2. Open the UI sub folder within the installation folder.
3. Open the web.config file in a text editor.
4. Locate the <add key="JavaPath" value=""/> element.
5. Modify the value so that it points to a folder where Java.exe – corresponding to JRE version 1.5 or later – is
located.
6. Save the web.config file.
Whenever the administrator starts installing or uninstalling the PPDM application – either manually or in batch mode –
the Administration Tool will check the value of the JavaPath key in the web.config file. If this value is:
n
not empty: the Administration Tool will use Java.exe from the specified folder.
n
empty: the Administration Tool will assume that a proper version of Java.exe is on the PATH.
In either case, the version information of Java.exe will also be checked before starting the installation or un-installation
of the PPDM application.
Logging
Administrators can collect PPDM log information through:
n
Ricoh's Remote Log Sender application. Consult the device documentation on how to install and use this tool.
n
The PPDM applications own logging infrastructure.
The following section describes the necessary steps to turn on PPDM logging.
1. Uninstall the PPDM application from the device using the Administration tool.
2. Open the installation folder (C:\Program Files\PPDM\PSP Delivery Module 3 by default).
3. Open the UI\RXOP sub folder within the installation folder.
4. Extract the content of PPDM.zip into a temporary folder (for example, C:\temp\ppdm).
5. Open the extracted PPDM.DALP file (for example, C:\temp\ppdm\ppdm.dalp) in a text editor.
6. Locate the <application-desc> element.
- 47 -
PPDM PSP Delivery Module 3 – Server Administrator’s Guide
7. Locate the 5th <argument> within the <application-desc> element. Change its value to trace, info or none,
depending on the required level of logging:
a. trace: verbose logging, default after installation
b. info: moderate logging
c. none: no logging at all
8. Locate the 6th <argument> within the <application-desc> element. Change its value to telnet, file,
systemout or none, depending on the required logging method:
d. telnet: log messages are sent to the standard output stream and to the output stream of a server socket which
listens on the port specified in the 7th <argument>.
e. file: log messages are sent to the standard output stream and to a file that can be downloaded by a server
socket listening on the port specified the 7th <argument>.
f. systemout: log messages are sent to the standard output stream only.
g. none: no logging at all, default after installation.
9. Locate the 7th <argument> within the <application-desc> element. Change its value (default value is 1000
after installation) to a port to be used for telnet or file logging. This argument is ignored if logging is set to
systemout or none.
10. Save the PPDM.DALP file.
11. Compress the content of the temporary folder and save it as PPDM.zip into the UI\RXOP sub folder of the
installation folder, overwriting the original PPDM.zip file. It is a good practice to create a backup copy of
PPDM.zip before overwriting it with the modified content!
12. Install the PPDM application to the device using the Administration tool.
Getting access to log information depends on what logging method is specified. If the 6th <argument> is set to:
n
n
Telnet
l
Launch HyperTerminal (or any other telnet client).
l
Create a new connection.
l
Select TCP/IP protocol.
l
Set the IP Address to that of the device.
l
Use the port number that was specified as the 7th <argument> in the PPDM.DALP file.
l
Launch the PPDM application on the device.
l
Connect through HyperTerminal.
l
Examine the log information in the terminal window.
l
Launch Internet Explorer (or any other browser).
File
l
l
Enter the URL http://<IP address>:<Port number>/, where <IP address> is that of the device and
<Port number> is the 7th <argument> in the PPDM.DALP file.
Download the log file.
- 48 -
PPDM PSP Delivery Module 3 – Server Administrator’s Guide
n
Systemout
l
Use the Remote Log Sender application to collect log information.
Typical errors
The following section presents typical error scenarios with suggestions on how to solve them.
Error: The interactive installer alerts you that IIS is not installed.
Description:
IIS is a prerequisite, but it is not found on the computer.
Solution:
Install IIS and restart the interactive installation.
Error: Installation Order Conflict (.NET Framework 2.0 and IIS)
Server Error in '/PPDM' Application.
The current identity (<machine name>\ASPNET) does not have write access to:
C:\WINDOWS\Microsoft.NET\Framework\v2.0.50727\Temporary ASP.NET Files
or
Failed to access IIS metabase
Description:
If IIS is installed after the .NET 2.0 Framework installation, the framework registration into IIS is not performed correctly.
In this case an additional manual registration step is needed to avoid the error message.
Solution:
C:\WINDOWS\Microsoft.NET\Framework\v2.0.50727>aspnet_regiis -i -enable
Error: installer error message
Description:
The installer displays error messages if one of the installation prerequisites is missing, or if a virtual folder named PPDM
already exists in Microsoft® Internet Information Service setup. List of errors:
Condition
Error message
Solution
AdminUser
Product installation requires administrator
privileges.
Log in as an administrator to install the
application.
Not Version9X
The application does not support Windows Install the application on a supported operating
9.x and Windows 2000 OS versions.
system with the latest service pack (see below).
PREREQ_DOTNET20_ Microsoft® .NET Framework Version 2.0
INSTALLED = 1
Redistributable Package is not installed.
- 49 -
Install this prerequisite.
PPDM PSP Delivery Module 3 – Server Administrator’s Guide
PREREQ_ IIS_ INSTAL- Installation checks if IIS is configured to
LEDONPORT80 = 1 or listen at port 80.
PREREQ_ IIS_ INSTALLEDONPORT80 = 2
To disable the check, use this command-line
parameter: PREREQ_IIS_INSTALLEDONPORT80
VersionNT <> 501 or
ServicePackLevel>=3
Service Pack 3 is not installed on Windows Install Service Pack 3 for Windows XP.
XP.
VersionNT <> 502 or
ServicePackLevel>=2
Service Pack 2 is not installed on Windows Install Service Pack 2 for Windows 2003 Server.
2003 Server.
VersionNT <> 600 or
ServicePackLevel>=2
Service Pack 2 is not installed on Windows Install Service Pack 2 for Windows 2008 Server.
2008 Server.
JavaVersionInstalled >= Java Runtime Environment 1.5+ is not
1.5
installed.
Install Java Runtime Environment 1.5 or later.
PREREQ_IIS_
INSTALLED=1
Microsoft® Internet Information Service is
not installed.
Install IIS.
PREREQ_IIS_PATH_
OCCUPIED=0
A virtual folder named PPDM exists in
Microsoft® Internet Information Service
setup.
Remove this folder.
Error: The Administration Tool does not display
Description:
On launch, the following error message is displayed: HTTP Error 404 - File or Directory not found.
Solution:
You need to permit IIS to serve dynamic content. For guidelines on how to resolve this problem, see
http://support.microsoft.com/kb/315122.
In addition to Active Server Pages, you also need to set ASP.NET to Allow.
Error: Administration Tool action buttons do not work
Description:
Such a situation may occur if Active Scripting is disabled in your Internet settings. On Windows Server 2003 or 2008,
the default setting is Disable.
Solution:
Add the Administration Tool to the trusted zone,
or
Enable Active Scripting.
Using Internet Explorer under Windows Server 2003 or 2008, it implies the following steps:
1. Launch Internet Explorer.
2. Choose Internet Options… in the Tools menu.
3. Go to the Security tab .
4. Select Zones > Internet.
- 50 -
PPDM PSP Delivery Module 3 – Server Administrator’s Guide
5. Click the Custom Level… button.
6. Choose Scripting > Active scripting and select the radio button Enable.
Error: Status warnings in the Managed Devices table (Devices panel of the
Administration Tool).
If the application is unable to communicate with the device properly, the Status column displays question marks and/or
error signals.
Solutions in possible scenarios:
The second and third icons are question marks: check if Extended Feature dialog can be accessed through device LCD
display. Install ESA Java™ Platform.
Error: The second status indicator in the Administration Tool displays a negative
mark (instead of a check mark) after a successful installation.
Description:
This display glitch (a known issue) may occur when PPDM is installed on some more recent device models.
Solution:
PPDM functionality is not affected; therefore no user or administrator action is required.
© 2010 Ricoh Americas Corporation. All rights reserved.
- 51 -
This page intentionally left blank.
NETWORK INSTALLATION GUIDE
Personal Paperless Document Manager v2
Network Installation Guide
Document version 1.0
This document provides instructions for installing the software associated with Personal Paperless Document Manager v2 in a network environment.
Note:
Personal Paperless Document Manager products, including PPDM OCR Module, PPDM Desktop Module,
PPDM PDF Converter Module and DesktopDeliveryPSP are translated into English, French, Italian,
German, Spanish and Brazilian Portuguese. These products are designed to work with an operating
system that is properly configured with the corresponding language. Use of these products with operating
systems that are configured with non-supported languages is not recommended or supported.
Ricoh Americas Corporation
Nuance Communications, Inc
1 Wayside Road
Burlington, MA 01803-4609
© 2011 Ricoh Americas Corporation and Nuance Communications, Inc. All rights reserved.
Nuance and the Nuance logo are trademarks or registered trademarks of Nuance Communications, Inc. in
the United States and other countries.
Windows® is a trademark of Microsoft Corporation in the United States and/or other countries. Other product names and images used in this guide may be trademarks or registered trademarks of their respective
companies and are hereby acknowledged.
Personal Paperless Document Manager v2
Network Installation Guide
Introduction
4
Software components
5
Creating administrative images
6
Creating administrative images for the prerequisites
7
Installation order
8
Distributing administrative images - Active Directory
9
Distributing administrative images - The Command Line and msiexec
10
Removing installed components
11
Introduction
This guide provides instructions for installing the software associated with Personal Paperless Document
Manager v2 in a network environment.
Personal Paperless Document Manager v2 is referred to as PPDMv2 in this document.
Targeted users are administrators, Information Technology specialists or programmers who set up or
perform network installations. It assumes the reader is familiar with Microsoft Windows 2003/2008 Server
with Active Directory, in addition to program package setup, advertising and distribution.
Network installation enables a network administrator to manage and distribute software applications
without the need to visit each client system.
The target client machines include Windows XP SP3, Windows Vista SP2 and Windows 7. Both 32-bit and
64-bit operating systems are supported.
If you are upgrading and you have any previous versions of the PPDM software components on client
systems, uninstall them first and proceed with the installation only after that.
In the installation sequence, administrative images of the applications (the PPDMv2 components) should
be created on the server first. Then the server must be configured to automatically distribute the created
administrative images to client computers.
Software components
Software components of the PPDM v2 CD-ROM
Software component
1 PPDM Desktop Module 12
2 PPDM OCR Module 17
3 PPDM PDF Converter Module 7
4 DesktopDeliveryPSP 10
5 PaperPort Image Printer
6 RealSpeak Solo
Any combination of these products on the CD-ROM can be installed under the following limitations:
1. To ensure full functionality of PPDM Desktop Module 12, PaperPort Image Printer must also be
installed.
2. To ensure full functionality of PPDM Desktop Module 12 and PPDM OCR Module 17, PPDM PDF
Converter Module 7 must also be installed.
3. To ensure full functionality of PPDM OCR Module 17 and PPDM PDF Converter Module 7,
RealSpeak Solo must also be installed.
4. To install DesktopDeliveryPSP 10, you must install PPDM Desktop Module 12 first.
These components require the presence of certain system components also referred to as Prerequisites.
These are the Microsoft Visual C++ 2005 and 2008 Redistributables and the MS XML4 SP3 Parser.
Note that the PaperPort Image Printer and the PPDM PDF Converter Module 7 components have both a
32-bit and a 64-bit version.
Important!
PPDM Desktop Module 12, PPDM OCR Module 17, and PPDM PDF Converter Module 7 are copy
protected components and require activation on the client machines after installation.
Creating administrative images
To distribute the software components of PPDMv2, the administrative images of the components should
be created in a shared network folder on the publishing server first.
The administrative installation does not install any program files, instead it creates an administrative image
by extracting the necessary files into a network location specified during the installation. This location is
also known as a Distribution Point.
To create an administrative image for components:
1. Create a shared network folder where you put the administrative images (.msi files) you want to
distribute.
2. Set permissions on the share to allow access to the administrative images.
3. Use the table below to locate components and their installer on the PPDMv2 CD-ROM.
4. Run the administrative installation (SETUP /a) of each component you want to install to copy the
files to the distribution point.
5. During the administrative installation, specify a target folder for the administrative image.
6. During the administrative installation of the PPDM Desktop Module 12, the PPDM OCR Module
17, and the PPDM PDF Converter Module 7 you will be asked to enter the serial number, and an
admin.mst transform file is created containing this serial number. Use this admin.mst file together
with the .msi file for installation from the distribution point.
Note that these components require product activation on the client machine.
7. During the administrative installation, <LANGID>.mst language transform files are created (if
applicable). Use the table below to find the appropriate <LANGID>.mst file and use it together with
the .msi file for installation from the distribution point.
Software components and their installer locations
Software component
Installer location on the PPDMv2 CD-ROM
1
PPDM Desktop Module 12
PPDM Desktop Module 12
2
PPDM OCR Module 17
PPDM OCR Module 17
3
PPDM PDF Converter Module 7
PPDM PDF Converter Module 7
4
DesktopDeliveryPSP 10
PPDM DesktopDeliveryPSP 10
5
PaperPort Image Printer
PPImgPrinter
6
RealSpeak Solo
RealSpeakSOLO
Note:
PPDM PDF Converter Module 7 and PaperPort Image Printer have 32- and 64-bit versions. They are
located at the folders <System32 or System64>, respectively. Use the ones appropriate for your target
operating system.
Language transform files
Language transform file
Language
1033.mst
English
1036.mst
French
1034.mst
Spanish
1046.mst
Brazilian Portuguese
1040.mst
Italian
1031.mst
German
Creating administrative images for the prerequisites
The software components of PPDMv2 require the presence of certain system components, also referred to
as Prerequisites.
These prerequisites are the Microsoft Visual C++ 2005 and 2008 Redistributables and the MS XML 4 SP3
Parser. You can find them on the PPDMv2 CD-ROM under the Prerequisite folder (the 64-bit components
are located under the System64 subfolder).
Microsoft Visual C ++ 2005 R edistributable
32-bit systems:
1. Run vcredist_x86.exe /t:”<full_path32>” /c to copy the files to the distribution point.
2. Use the unpacked vcredist.msi for product distribution.
64-bit systems:
1. Complete the installation of vcredist_x86.exe as described in the previous step, then repeat it for
the 64-bit component.
2. To do this, run vcredist_x64.exe /t:”<full_path64>” /c.
Microsoft Visual C ++ 2008 R edistributable
32-bit systems
1. Run vcredist9_x86.exe /a to copy the files to the distribution point.
2. Use the unpacked VC_RED.MSI for product installation.
64-bit systems
1. Complete the installation of vcredist9_x86.exe as described in the previous step, then repeat it
for the 64-bit component.
2. To do this, run vcredist9_x64.exe /a.
MSXML 4.0 Parser
Copy the Msxml4-SP3.msi file as administrative image to the distribution point.
Installation order
Before starting to install any component of PPDMv2, ensure that the relevant prerequisites are installed on
the target computer.
Once the redistributable packages are installed, the different components can be installed in any
combination.
Preferred installation order of components
Software component
Installer
1
Microsoft Visual C++ 2005 and 2008
Redistributables
vcredist.msi, VC_RED.MSI
2
MSXML4-SP3 Parser
Msxml4-SP3.msi
3
PPDM Desktop Module 12
PPDM Desktop Module 12.msi
4
PPDM OCR Module 17
PPDM OCR Module 17.msi
5
DesktopDeliveryPSP 10
DesktopDeliveryPSP.msi
6
PaperPort Image Printer
PaperPort Image Printer.msi or PaperPort Image Printer64bit.msi
7
PPDM PDF Converter Module 7
PPDM PDF Converter Module 7.msi
8
RealSpeak Solo
RSSolo.msi
Distributing administrative images - Active Directory
Active Directory is a feature of Windows Server. Group Policy, a component of Active Directory enables an
administrator to automatically distribute programs (administrative images) to client computers or users.
There are three methods to distribute programs by Group Policy:
n
Publish to Users,
n
Assign to Users, and
n
Assign to Computers.
The software components of PPDMv2 support the Assign to Computers method only. If you assign the
program to a computer, it is installed when the computer starts, and it is available to all users who log on to
the computer.
To automatically assign the administrative images of the software components of PPDMv2 to client
computers using Group Policy, see the following Microsoft Knowledge Base article:
816102 HOW TO: Use Group Policy to Remotely Install Software in Windows Server 2003 and in
Windows Server 2008.
Distributing administrative images - The Command Line and msiexec
You can install the administrative images of the software components of PPDMv2 to client computers
using command line and Microsoft Installer (MSI) commands.
If the installer of any software component supports more than one UI languages, and a non-English
installation is needed, one of the language transform files must also be specified in the command line
(presented as <LANGID.mst> here). For example, to specify a German installation, use the following
transforms tag: TRANSFORMS="1031.mst".
Note:
For more information on the TRANSFORMS parameter, see here.
For more information on the ALLUSERS parameter, see here.
The admin.mst transform file is required for the command lines of the PPDM Desktop Module 12, PPDM
OCR Module 17, and PPDM PDF Converter Module 7.
n
To install PPDM Desktop Module 12, use the following command line:
MSIEXEC /i "PPDM Desktop Module 12.msi" TRANSFORMS=admin.mst;<LANGID.mst>
ALLUSERS=<depending on your environment> /qn
n
To install PPDM OCR Module 17, use the following command line:
MSIEXEC /i "PPDM OCR Module 17.msi" TRANSFORMS=admin.mst;<LANGID.mst>
ALLUSERS=<depending on your environment> /qn
n
To install DesktopDeliveryPSP 10, use the following command line:
MSIEXEC /i "DesktopDeliveryPSP.msi" TRANSFORMS=<LANGID.mst> ALLUSERS=<depending
on your environment> [<other_install_params>] /qn
Where the optional <other_install_params> parameters can be used to customize
DesktopDeliveryPSP at its install time. For a more detailed list of the optional parameters, see the
Customized Install section of the DesktopDeliveryPSP Guide.
n
To install the PaperPort Image Printer, use the following command line:
MSIEXEC /i "PaperPort Image Printer.msi" ALLUSERS=<depending on your
environment> TRANSFORMS=<LANGID.mst> /qn
n
To install PPDM PDF Converter Module 7, use the following command line:
MSIEXEC /i "PPDM PDF Converter Module 7.msi" TRANSFORMS=admin.mst;<LANGID.mst>
ALLUSERS=<depending on your environment> /qn
n
To install RealSpeak Solo, use the following command line:
MSIEXEC /i "RSSolo.msi" ALLUSERS=<depending on your environment> /qn
Removing installed components
To automatically remove installed software components of PPDMv2 from client computers using Group
Policy, see the following Microsoft Knowledge Base article:
816102 HOW TO: Use Group Policy to Remotely Install Software in Windows Server 2003 and in
Windows Server 2008.
To remove installed software components using Microsoft Installer (MSI), use the following command line:
msiexec /x <Product Code> /qn
Where the <Product Code> of PPDMv2 software components are the following:
Common in all releases
Software component
Product Code
DesktopDeliveryPSP 10
{D870CDB7-4449-4E77-A956-C2B2B21828BA}
PaperPort Image Printer (32-bit)
{6EF2FDAB-7FBF-4AB9-92CD-594BDDB6A56B}
PaperPort Image Printer (64-bit)
{715CAACC-579B-4831-A5F4-A83A8DE3EFE2}
RealSpeak Solo
{4CCBA8CA-4819-4C09-A2FA-42CD5168AEC7}
English-only release
Software component
Product Code
PPDM Desktop Module 12
{705FEB18-CE5F-4F9B-AC95-984AF3A0146E}
PPDM OCR Module 17
{22255452-EA70-4912-AD18-1DA9AE412D1B}
PPDM PDF Converter Module 7 (32-bit)
{9CE191C4-B9E0-4FE5-B66E-17883C4E4E29}
PPDM PDF Converter Module 7 (64-bit)
{AC054B17-81B4-486F-8137-E421635ED8A4}
French and Spanish releases
Software component
Product Code
PPDM Desktop Module 12
{37A9D163-474F-423F-867F-0D1AA9016578}
PPDM OCR Module 17
{501B04B9-7922-4F9A-99EB-FDAC4065CFF8}
PPDM PDF Converter Module 7 (32-bit)
{BD9C72BC-9786-4CF2-81ED-CD359F2AAC47}
PPDM PDF Converter Module 7 (64-bit)
{C6303194-2687-4469-875E-D775689FF2EC}
Brazilian Portuguese, Italian, and German release
Software component
Product Code
PPDM Desktop Module 12
{C88E603C-62B8-48C5-8CD1-745C5E8F4294}
PPDM OCR Module 17
{A279B88C-D331-4694-87F5-34E513408257}
PPDM PDF Converter Module 7 (32-bit)
{DB57AFDA-D6AB-4E44-A764-E40D3BA30EEE}
PPDM PDF Converter Module 7 (64-bit)
{EC85B042-A061-4ABC-9351-E45EFD616513}
This page intentionally left blank.
Windows Authentication Service
Installation and Configuration Guide
Introduction
Windows Authorization Service Function
When properly configured and functioning the Windows Authentication Service will
lock the entire MFP so that it can not be accessed until a user name and password
has been entered via the MFP panel. User names and passwords are verified against
the authorization server and subsequently grant access to the MFP Panel. See p. 13
for authentication server configuration settings. Please note that authorization
settings will only affect new users. Existing users in the system’s address book will
retain their existing functionality privileges.
Authenticated users are granted access rights based on the configuration settings in
the Machine Management configuration settings. See screen shot on p. 7. Selected
functions are available to users and unselected functions will display an unauthorized
dialog screen when a user attempts to access them.
Supported MFP Authorization Types
The Windows Authorization Service function supports windows authentication and
active directory authentication (with and without Kerberos). Please see the following
table for the types of MFP authorization that the Windows Authentication Service
supports.
MFP Authorization
note
Windows
Authentication Support
User Code Auth
Locks the whole MFP with
a single code
Not Supported
Basic Auth
Users are stored on the
MFP
Not Supported
Windows Auth
NTLM
Supported
LDAP Auth
Active Directory with and
without Kerberos
Supported
Integration Server Auth
Not Supported
Install / Configuration Overview
To Install the Windows Authentication Service, first insure that the Java Platform is
installed followed by the activation of the SDK Certification Device service on the MFP
via the Service Mode. The MFP should then be configured with authentication
settings followed by the final step of installing and configuring the Windows
Authentication Service. These steps are described in detail in the following sections
of this document.
p. 2
Installation Requirements
Supported Devices
This is a partial listing. Refer to the PPDM v2 Product Support Guide and
TSRC website (www.tscweb.net) for current MFP supported devices.
Java CVM 4.x:
Model
Aficio MP 4000/5000
Aficio MP 2550/3350
Aficio MP C6000/C7500
Java CVM 2.x:
Model
Aficio
Aficio
Aficio
Aficio
Aficio
Aficio
MP
MP
MP
MP
MP
MP
C3500/C4500
C2500/C3000/C2000
9000/1100/1350
Pro 906EX/Pro 1106EX/Pro 1356EX
5500/6500/7500
6000/7000/8000
Server:
Model
Version
Windows 2003 Server
standard
p. 3
Installing the Java Platform
1. Power Off the machine
2.
Insert Java CVM card described in the previous section into Slot 3 of the
machine.
3. Power On the machine
4. Wait 5 minutes for all the components to be automatically installed
5. Power-cycle the MFP, wait another 5 minutes for all the modules to be loaded
6. Press ‘User Tool’ , then press ‘Extended Feature Settings’ to verify the
following components are installed and running correctly:
The auto installed components are:
JavaTM Platform
p. 4
Service Mode Settings
Enter Service Mode of the machine
1. Press ‘Clear Mode’
2. Press 107 [Number keys ‘1’, ‘0’, ‘7’]
3. Hold ‘Clear Stop’ till Operation Panel shows Service Mode Screen.
4. press the # Hard Key and Copy SP Soft Key to Enter SP Mode
5. The service code to modify is 5401-230
6. change the value to 0 by pressing the 230 Soft Key
p. 5
MFP System Settings
1. Press ‘User Tools’ Hard Key
2. Press ‘System Settings’ Soft key
3. Press ‘Administrator Tools’
4. Press ‘Administrator Authentication Management’
Select ‘Admin Authentication’ to ‘On’ & Select all ‘Available Settings’ in each screen
p. 6
A. User Management
B. Machine Management
p. 7
C. Network Management
D. File Management
p. 8
5. Press ‘User Authentication Management’ from ‘System Settings’ screen.
6. Select ‘LDAP Auth’
IMPORTANT: The Windows Authentication Service will provide Windows
authentication; however, you must select « LDAP Auth » on the MFP to configure the
internal login manager.
p. 9
9. Exit from ‘User Tools’, after pressing ‘Ok’.
10. Power Cycle the machine [Wait for 5 Minutes for the machine to be ready to use]
p. 10
Windows Authentication Service Install and
Configuration
Pre Conditions
•
Active Directory and Kerberos should be setup and working per Microsoft
documentation.
•
The MFP must be configured with the authentication settings described in the
above section
•
Please uninstall any existing previous versions of the Windows Authentication
Service before any re-installation attempts. Re-installing over an existing
installation will fail.
•
Any install of the Windows Authentication Service using Web Image Monitor
must be performed on the Internet Explorer browser. The Fierefox browser
will not be able to upload the servlets to the MFP.
Installation using Web Image Monitor
After the MFP has been configured the installation of the Windows Authentication
Service will begin with the install of rxconf component followed by the Windows
Authenticator component. Please note that the rxconf component must be installed
before the windows authenticator component.
Rxconf
1. Log into the MFP’s Web Image Monitor’s Interface as the Administrator.
2.
Click on the Configuration link from the Left Navigation Bar to display
the Configuration page
3.
Click on the Install link under the Extended Feature Settings section
4.
Select the Local File radio button and click on the Browse button to
display the Choose File window
5.
Navigate to the location where the
Ricoh_Americas_Corporation_rxconfServlet-2.x.x.zip file is, select it
and click on the Open button
6.
Click on the Display Extended Feature List button
7.
Select the Device HDD option in the “Install to” drop down menu under
the Installation Target Setting section
8.
Set the Auto Start radio button to the On position
9.
Select the radio button for the Configurator application in the Extended
Features List section
10. Click the Install link to install the application
p. 11
11. Click OK on the confirmation page to confirm the installation
12. Navigate back to the Configuration page and select the Startup Setting
link under the Extended Feature Settings section
13. Verify that the Configurator application is in the applications list and
select it using the radio button
14. With the application selected via the radio button click the Start Up/Stop
button to start the application
15. Verify the application has started up in the Status column of the
applications list - the status should display the text Starting Up
16. Continue the installation process by installing the Windows Authenticator
component outlined in the next section
Windows Authenticator
1.
Navigate back to the Configuration page to begin the Windows
Authenticator installation
2.
Click on the Install link under the Extended Feature Settings section
3.
Select the Local File radio button and click on the Browse button to
display the Choose File window.
4.
Navigate to the location where the
Ricoh_Americas_Corporation_WindowsAuthenticator-1.x.zip file is,
select it and click on the Open button.
5.
Click on the Display Extended Feature List button
6.
Select the Device HDD option in the “Install to” drop down menu under
the Installation Target Setting section
7.
Set the Auto Start radio button to the On position
8.
Select the radio button for the WindowsAuthenticator application in the
Extended Features List section
9.
Click the Install link to install the application
10. Click OK on the confirmation page to confirm the installation
11. Navigate back to the Configuration page and select the Startup Setting
link under the Extended Feature Settings section
12. Verify that the WindowsAuthenticator application is in the applications
list and select it using the radio button
13. With the application selected via the radio button click the Start Up/Stop
button to start the application
14. Verify the application has started up in the Status column of the
applications list – the status should display the text Starting Up
15. Continue to configure the servlets as outlined in the Configuration
section
p. 12
Configuration
If you wish to use Simple Authentication please follow the Simple Authentication
steps outlined below. For Kerberos Authentication follow the Kerberos configuration
steps.
Windows Authentication (NTLM)
1.
Open a browser and load http://<ip address>:8080/aaa
2. Allow 2-3 minutes for the page to display
3.
Select the Windows Authentication (NTLM) radio option
4.
Enter the host name in the Host text field
5.
Enter the Domain name in the Domain field
6.
Enter the MFP Admin password in the MFP Admin password text field
and click the Set Authentication Settings button – note that the default
admin password on MFP’s is “ricoh” if it has not already been set
7. Close the browser
Active Directory with Simple Authentication (LDAP)
1.
Open a browser and load http://<ip address>:8080/aaa
2. Allow 2-3 minutes for the page to display
3.
Select the Active Directory with Simple Authentication (LDAP) radio
option
4.
Enter the host name in the Host text field
5.
Enter the Domain name in the Domain field
6.
Enter the MFP Admin password in the MFP Admin password text field
and click the Set Authentication Settings button – note that the default
admin password on MFP’s is “ricoh” if it has not already been set
7. Close the browser
Active Directory with Kerberos Authentication (Kerberos + LDAP)
1.
Open a browser and load http://<ip address>:8080/aaa
2. Allow 2-3 minutes for the page to display
3.
Select the Active Directory with Kerberos Authentication (Kerberos
+ LDAP) radio option
4.
Enter a kdc value in the Key Distribution Center: text field
5.
Enter the realm in the Realm: text field
6.
Enter the MFP Admin password in the MFP Admin password text field
and click the Set Authentication Settings button – note that the default
admin password on MFP’s is “ricoh” if it has not already been set
p. 13
7. Close the browser
Un-installation of the Windows Authentication Service
The uninstall procedure begins with stopping the components if they are running and
removing them from the MFP. Please note that the windows authenticator must be
removed before rxconf.
1. Log into the MFP’s Web Image Monitor’s Interface as the Administrator.
2.
Click on the Configuration link from the Left Navigation Bar to display
the Configuration page
3.
Click on the Startup Setting link under the Extended Feature Settings
section
4.
Select the radio button for the WindowsAuthenticator application in the
Extended Features List section and click the Start Up/Stop button to
stop the application
5.
Navigate back to the Configuration Page and click on the Uninstall link
under the Extended Feature Settings section
6.
Select the radio button for the WindowsAuthenticator application in the
Extended Features List section and click the Uninstall button
7.
Navigate back to the Configuration Page and click on the Startup
Setting link under the Extended Feature Settings section
8.
Select the radio button for the Configurator application in the Extended
Features List section and click the Start Up/Stop button to stop the
application
9.
Navigate back to the Configuration Page and click on the Uninstall link
under the Extended Feature Settings section
10. Select the radio button for the Configurator application in the Extended
Features List section and click the Uninstall button
11. Navigate back to the Configuration Page and click on the Home link in
the top left navigation menu
12. Click on the Reset device to restart the MFP
p. 14
Un-installation of the Java Platform
1. Press ‘User Tools’ Hard Key
2. Press ‘System Settings’ Soft key
3. Press ‘Administrator Tools’
4. Press ‘Administrator Authentication Management’
5. Press ‘User Authentication Management’ from ‘System Settings’ screen.
6. Select “Off”
p. 15
7. Press ‘Enhanced Authentication Management’ from ‘System Settings’ screen.
8. Select “Off”
Note: Should not be necessary, as you should not have turned on enhanced
Authentication management during installation.
9. Press ‘Administrator Authentication Management’ from ‘System Settings’ screen.
10. Select “Off” to all the management options
p. 16
11. Exit from ‘User Tools’, after pressing ‘Ok’.
12. Press ‘User Tool’ , then press ‘Extended Feature Settings’
13. Press ‘Uninstall’ , then press each of the following components and follows the
on-screen instructions to uninstall (no need to reboot MFP in between):
JavaTM Platform
14. After un-install all the above components, power off the MFP
15. Remove SD card
16. Power on MFP
p. 17
Troubleshooting
General
•
MFP Network Settings, IP Address, Mask, Gateway and DNS Settings
need to be configured correctly
Active Directory with Kerberos Authentication
•
There can not be more than a five minute time difference between the
KDC server (win 2003) and the client (MFP) and the both need to be
configured to have the same time zone
•
A reverse lookup entry must exist on DNS for the KDC server
p. 18
Personal Paperless Document
Manager v2
DesktopDeliveryPSP
-1-
About this product
Personal Paperless Document Manager v2 includes DesktopDeliveryPSP, which is designed to
work in any combination of the following ways:
n
n
n
It can monitor a specified folder on a networked file server or local drive for incoming
scanned images and transfer them to your local PaperPort Desktop.
It can monitor email inboxes for attachments
It can receive files from select Multifunction Printer/Copiers using the PSP Server for
Personalized MFP Scanning functionality.
After you install the Personal Paperless Document Manager v2 family of software components,
including DesktopDeliveryPSP, you must restart your computer. When you do,
DesktopDeliveryPSP is displayed with an icon in the system tray on the Windows task bar. To
properly use the product, however, it has to be configured and enabled after installation and
restart.
The icon has indicator lights at the bottom, representing the status of email polling, folder
watching and Personalized MFP Scanning by means of different colors: dark green - monitoring;
light green - processing; grey - inactive; red - error.
Right-click on the DesktopDeliveryPSP icon in the Windows system tray to display the
DesktopDeliveryPSP menu with the following commands:
n
Get Now
n
Use Defaults
n
Refresh Defaults
n
Settings
n
View Log
n
About
n
Close
Settings command
Before using DesktopDeliveryPSP it has to be configured through the “DesktopDeliveryPSP
Settings” dialog.
Once you have installed the program it starts up along with your PC and resides in the system
tray.
To configure DesktopDeliveryPSP right-click the DesktopDeliveryPSP icon to display its menu.
Then click the Settings command to display a dialog box of all the DesktopDeliveryPSP
controls:
-2-
E-mail Polling
This feature of DesktopDeliveryPSP lets you monitor your Microsoft Outlook or Lotus Notes
inbox for new messages with attached PDF or TIFF files. Disable the feature if you do not want
to monitor your email. Use the following controls to configure email polling of
DesktopDeliveryPSP.
Watch for scanned files in your email inbox
Click this checkbox to enable email polling.
Options button
Click the Options... button to change your current email polling configuration.
-3-
If you have both Microsoft Outlook and Lotus Notes installed on your system, the following
dialog box is displayed, enabling you to choose between the two mail clients. Click OK to
confirm your choice, or Cancel to close the dialog.
In case of Microsoft Outlook, the Choose Profile dialog box displays, enabling you to choose
the Microsoft Outlook profile whose inbox you want DesktopDeliveryPSP to monitor. Select
your Microsoft Outlook profile and click OK.
In the DesktopDeliveryPSP Settings dialog, you will see your Microsoft Outlook profile name
displayed in the relevant field.
For Microsoft Outlook U sers:
Microsoft Outlook 2003 and 2007 users cannot enable email monitoring or choose a Microsoft
Outlook profile unless Collaboration Data Objects is installed and enabled for Microsoft
Outlook. DesktopDeliveryPSP displays an error message if they attempt to do so.
For Microsoft Outlook 2010, Collaboration Data Objects is not required.
To install Collaboration Data Objects for Microsoft Outlook 2003, you need the Microsoft
Office 2003 installation CD, and from there, follow the steps below:
1. Choose Custom installation
2. Choose Detailed installation options for each application
3. Select and enable the installation of the Collaboration Data Objects.
Microsoft Outlook 2007 users can download and install Collaboration Data Objects from
Microsoft’s Download Center.
-4-
For more information about Collaboration Data Objects, see your Microsoft Outlook
documentation.
For Lotus N otes U sers:
If you set Lotus Notes as the mail client for DesktopDeliveryPSP to watch, you have to specify
your password. If you leave the Save password checkbox empty you will have to give it again
every time DesktopDeliveryPSP starts. If you click the checkbox, your password will be stored
in an encrypted format and will not be prompted for again.
Note that if Lotus Notes is installed, but is not configured properly, or not set for any users,
email polling will not work, and DesktopDeliveryPSP will display an error message (during
configuring the program) or the left-hand side light indicator in the program icon will turn red
(during monitoring).
Folder Polling
Enable this setting to monitor a specified folder on a networked file server or local drive for
incoming scanned images generated by a Ricoh device.
Watch Document Repository Folder
Click this checkbox in the DesktopDeliveryPSP Settings dialog to enable
DesktopDeliveryPSP to monitor the folder of your choice.
Browse Button
Click the Browse... button to locate and select the folder you want DesktopDeliveryPSP to
monitor. Browse to the network server that contains the folder to be watched; select the folder
and click OK.
DesktopDeliveryPSP can periodically monitor this folder to see if any scanned images are placed
there by the Ricoh system.
Warning: we strongly recommend that you do not choose the same folder that is used for
Personalized MFP Scanning.
Transfer documents to
To specify where DesktopDeliveryPSP is to place the retrieved files, click Browse and choose a
PaperPort folder. If the target folder has folder notes (subject, author, and keywords) then these
will be applied to the files delivered by DesktopDeliveryPSP. The PaperPort folder selected in
the Transfer Documents to section is not used by the Personalized MFP Scanning function.
Interval for checking
To set how often the watched folder or monitored inbox will be checked, select a setting from
the “Interval for checking” list box. This interval is also used by the Personalized MFP Scanning
functionality to process the documents you scanned remotely. The following choices are
available from the list box:
n
1, 2, 5, 10, or 30 seconds
n
1, 2, 3, 5, 10, 30, or 60 minutes
-5-
In addition to the above values, you could also select Never. In this case DesktopDeliveryPSP
will continue running but watching is suspended.
Use Defaults Button
To restore default Watch Settings for DesktopDeliveryPSP, click the Use Defaults button. This
restores the default watch interval (30 seconds).
Note:
If you have configured default parameter values during installation, Use Defaults restores those values.
For details, see Customized Install.
Get Now Button
Click the Get Now button if you wish to scan the folder or inbox of your choice immediately.
DesktopDeliveryPSP does the monitoring on whichever component is checked.
In either case, the relevant signal of the DesktopDeliveryPSP icon on the system tray changes to
“Processing” state (light green).
DesktopDeliveryPSP places the new items appearing in the watched folder or inbox on the
PaperPort desktop and launches the PaperPort application - unless you have specified “Don’t run
PaperPort“ in the DesktopDeliveryPSP Settings dialog.
When documents are retrieved Setting
Now that you have set the DesktopDeliveryPSP repository folder and the watch interval, specify
the behavior you prefer for document retrieval. The “When documents are retrieved” setting
offers three choices described in the following table:
Select this setting:
To get this result:
Run PaperPort in a window
Every time DesktopDeliveryPSP detects a new document in
the folder, on the PSP Server and/or inbox being watched, it
places it in PaperPort, which is then opened on your
Windows desktop. It then purges the original scanned
document from the folder or PSP Server being watched. If it
brings a PDF or TIFF email attachment to the PaperPort
desktop, the original email message remains in the email
inbox but its status will switch to “Read”.
Run PaperPort minimized
Same as above, but PaperPort runs minimized. (Later, when
you open PaperPort, all scanned documents will be on the
PaperPort desktop.)
Don’t run PaperPort
Documents are transferred into the target folder, but are not
placed on the PaperPort desktop until you launch PaperPort.
If DesktopDeliveryPSP is watching a folder or polling email,
the target folder is set under Transfer documents to. If the
PSP Server is watched, the target folder is set on the device
panel.
-6-
Personalized MFP Scanning
Personalized MFP Scanning is the ability to change the control panel on supported Multifunction
Printers/Copiers so that it becomes customized with your own destination folders and scanning
preferences. DesktopDeliveryPSP displays PPDM Desktop Module folders and scanning profiles
as well as the document conversion workflows of PPDM OCR Module stored on your local
computer and allows you to "push" these settings to the control panel of the Multifunction
Printer/Copier through the PPDM PSP Delivery Module.
When you identify yourself to the MFP through a log-in screen it will automatically change the
control panel to reflect your personal folder destinations and scanning preferences. The PPDM
PSP Delivery Module requires DesktopDeliveryPSP on your local machine and the ability to
control the MFP through a specially designed software interface. On select Ricoh machines this
ability is referred to as the Ricoh Embedded Software Architecture (ESA) for Java™ embedded
Multifunction Devices.
Use the following server for Personalized MFP Scanning
Use this option to enable the Personalized MFP Scanning functionality.
Server Button
Click the Server button to change the PPDM PSP Delivery Module used for the Personalized
MFP Scanning functionality.
For information on available servers, contact your system administrator.
Personalized MFP Scanning Wizard Button
Click this button to display the Personalized MFP Scanning Wizard. This lets you collect and
transfer information from your computer to the remote scanning device (MFP). This information
includes PPDM Desktop Module Scanning Profiles, PPDM Desktop Module Folders and PPDM
OCR Module Workflows.
Note:
After changing the repository settings on the server side, you have to run the Scanning Wizard again to
reacquire the proper settings on the client side.
-7-
The left side of the Wizard always displays the Desktop Module folders, Desktop Module
Scanning Profiles and OCR Module Workflows on your computer.
The right side of the Wizard shows the marked items that will be shown on the device panel.
These items change dynamically reflecting modifications on the left: marking or unmarking
folders, profiles or workflows. Newly marked items are added to the bottom of the table. To
change item order, use the buttons Up and Down.
The device panel has limited space, so long folder, profile and workflow names may get truncated
when added to the table. To change (truncated) names, use the Rename button. Predefined
items ("Current Desktop" or "none") cannot be moved or renamed.
You can use the Device panel dropdown list at the bottom to match the on-screen display of
the table with that of the device panel type. This way you can have a preview of how your items
will look like on different devices.
When you select table items, the corresponding folder, profile or workflow gets selected on the
left. When you change the selected folder, profile or workflow on the left, the corresponding
item gets selected in the table (provided that it is marked).
If you mark too many items (folders, scanning profiles or workflows) on the left to fit into the
limited space of the device panel, a special item appears in the table: More…. This will also be
added to the list on the device panel. Push More… on the device panel to access items that are
listed in light grey under More.. on your screen.
-8-
The last list item in the table is always Other folders / workflows / profiles (set by
Administrator). These are to remind you that you may find additional destinations, workflows
and / or profiles on the device panel - provided that your system administrator has set them up
for you.
OCR Module Workflows
OCR Module Workflows allow you to apply multiple document conversion options into a single
setting that can be pushed to the device panel as a button. Document conversion options include
file format settings, conversion methods and additional document destination preferences.
Scanner setting choices available in OCR Module workflows are not used by Personal Paperless
Document Manager v2. To create selectable scanner preferences you will need to create or
modify Desktop Module Scanning Profiles. For information on creating and modifying
workflows, consult your PPDM OCR Module documentation.
Scanning profiles
Desktop Module Scanner Profiles allow you to combine multiple scanning settings and image
enhancements into a single setting that can be pushed to the device panel as a button. The
Scanner Profiles will override the default scanning settings of the device including resolution,
-9-
paper size, color depth and other settings where applicable to your particular device. Image
corrections, known as Scanner Enhancement Technology (SET) in PPDM Desktop Module, are
applied by the Desktop Module when the image is transferred from the device to the Desktop
Module desktop.
To add a new scanning profile to the device interface or to update one that you have previously
changed in PaperPort, click the Personalized MFP Scanning Wizard button in the
DesktopDeliveryPSP Settings dialog box when you have finished the modifications.
Use the Desktop Module to create new profiles or modify existing ones. Click on the Scan or
Get Photo button in the Desktop Module main toolbar to display the Scan or Get Photo pane.
This lists your scanning profiles.
- 10 -
For more information on scanning profiles, consult your PPDM Desktop Module
documentation.
PaperPort PSP Virtual Scanner
Desktop Module is designed to handle (create, modify or delete) scanning profiles for local
scanners. If you do not have a scanner connected to your machine, use the Desktop Module PSP
Virtual Scanner tool to work with scanning profiles. It is automatically installed along with
DesktopDeliveryPSP.
The Virtual Scanner is a tool for scanning profile management. It is not intended for scanning - a
STOP sign (along with explanation text) reminds you of this, when you try the operation.
OK Button
Click OK in the DesktopDeliveryPSP Settings dialog box to confirm DesktopDeliveryPSP
settings.
Context menu commands
The following commands are available through the context menu.
Get Now
Use this command for the same purpose as the corresponding button in the DesktopDeliveryPSP
Settings dialog. For details, see the Get Now button.
Use Defaults
Use this command for the same purpose as the corresponding button in the DesktopDeliveryPSP
Settings dialog. For details, see the Use Defaults button.
Refresh Defaults
If your system administrator has set up default destinations, workflows or profiles for you, they
will not appear on the device panel until you restart DesktopDeliveryPSP or use this command
to refresh these defaults.
View Log
To get information about program events, right-click the DesktopDeliveryPSP icon, then choose
the View Log command. Click OK to close this panel or the Clear Log button to delete your
current list of events.
- 11 -
About
To get version and copyright information about DesktopDeliveryPSP, right-click the
DesktopDeliveryPSP icon to display its menu. Click the About command. You can also select
About... from the DesktopDeliveryPSP Settings dialog. Click OK to close the About window.
Close
To close DesktopDeliveryPSP, right-click the DesktopDeliveryPSP icon to display its menu.
Click the Close command. After selecting this, the program displays the following message:
Closing DesktopDeliveryPSP disables the automatic placement of Network Scanner
documents into your PaperPort. Do you wish to close the DesktopDeliveryPSP now?
Select
Yes to close, or No to cancel.
Using DesktopDeliveryPSP via a remote device
First, consult your device manual or system administrator on how to access custom applications
on the device. Typically, it is done as follows:
1.
Press the Other Function (
) hardware button on the device.
2. If Personal Paperless Document Manager v2 does not start immediately, press the
ScanToPPDM button on the device panel to launch it. In case there is no
ScanToPPDM button displayed, Personal Paperless Document Manager v2 has not been
set up yet, so you need to:
1.
Press the User Tools/Counter/Inquiry (
User Tools/Counter/Inquiry screen.
) hardware button to display the
2. Press the Extended Feature Settings button at the bottom left of the device
screen to display the Extended Feature Settings Menu screen.
3. Press the Extended Feature Settings button on the device screen to display the
Extended Feature Settings screen.
4. Locate the extended feature and launch it.
5. Press the Exit button on the device screen to close the Extended Feature
Settings screen.
6. Press the Exit button on the device screen again to close the User
Tools/Counters/Enquiry screen.
7. Press the Other Function hardware button on the device again.
3. If authentication is turned off (that is, you did not have to type in your user name and
password beforehand), at this point you will need to select your name from the list of
registered users and press the Login button.
- 12 -
4. The Personal Paperless Document Manager v2 application main screen displays showing
your Desktop Module folders, OCR Module Workflows and Desktop Module Scanning
Profiles.
5. If your system administrator has set up default destinations, workflows and profiles for
you, these items will also appear on the device panel, under your personal items.
To specify your settings, see the section Personalized MFP Scanning Wizard Button in this
guide.
Clicking the Settings... button gives you access to your scanning settings.
When no Desktop Module profile is selected, the following default values will be used:
n
Color: black-and-white
n
Resolution: 300dpi
n
Original type: Photo and Text
n
Scanning method: 1-sided (simplex)
n
File format: TIFF.
Settings (including the above listed default ones) always remain in use until you change them and
scan.
That is, if - after scanning once - you re-enter the service, modify some settings, then exit the
service (but do not do any scanning), your setting modifications will be ignored.
- 13 -
Modifying settings
You can change your scanning settings from the main screen of the device panel that lists your
PPDM Desktop Module Folders, PPDM OCR Module Workflows and PPDM Desktop Module
Scanning Profiles.
Push the Settings... button to access the following screen:
- 14 -
Depending on the capabilities of the device you are using, some options may not be available.
For instance, if your device can only scan black-and-white, the Color mode option is not
available.
Also, if you are using a specific PPDM Desktop Module Profile, you will not be able to change
some of its presets (e.g. file format and file name) here. You can only do this by modifying the
profile itself: launch PPDM Desktop Module on your machine, update the profile and then
publish it to the device again through the Wizard.
You can adjust scan settings in the following categories:
n
Color Mode
n
Resolution
n
Original Type
n
Scanning Method
n
File Format and
n
File Name.
Scanning profiles may contain settings that are not supported by the device in use. In such cases,
the following warning message is displayed on the main screen of the device panel: “Ready to
Scan your job (with device-specific re-adjustments)”. This can imply two scenarios:
You attempted scanning grayscale or color on a black-and-white device. > Color Mode will
switch to black-and-white and all other scan settings remain unchanged.
You tried scanning at an unsupported resolution. > The closest matching value will be used.
Other Information about DesktopDeliveryPSP
Now that you have specified the DesktopDeliveryPSP watch folder, watch interval, monitored
inbox and PPDM Desktop Module behavior and Personalized Scanning Server, here is some
other information about DesktopDeliveryPSP.
n
n
n
n
User-specific watch folder. Only one user and one application is able to watch a
specific folder at any time.
Supported client operating systems. Microsoft Windows XP SP3, Vista (32 and 64bit versions), Windows 7 (32-bit and 64-bit versions).
Supported email clients. Microsoft Outlook 2003, 2007, and 2010; Lotus Notes 7.x
and 8.x.
Supported image file formats. DesktopDeliveryPSP supports the following file
formats:
l
JPEG
l
PDF
l
TIFF
- 15 -
Customized Install
You can define DesktopDeliveryPSP program defaults during installation.
To install DesktopDeliveryPSP with customized defaults, install only OCR Module, Desktop
Module and PDF Converter Module with the Personal Paperless Document Manager v2 installer.
Uncheck the installation of the DesktopDeliveryPSP component, then browse to the PPDM
DesktopDeliveryPSP 10folder on the CD, and launch setup.exe from the command line with the
desired parameters.
Configuration options and the corresponding parameters are as follows:
User interface language: specify the DesktopDeliveryPSP user interface language with the /L
parameter.
Value
Behavior
1033
English
1031
German
1034
Spanish
1036
French
1040
Italian
1046
Brazilian Portuguese
Note:
You can only select languages supported by your installation.
Default watched folder: specify the default watched folder
Parameter: WATCHFOLDER=<path_to_the_folder_name>
You can specify any path here, provided that you have write access to the chosen folder.
DesktopDeliveryPSP path syntax supports mapped drives and UNC standards as well.
Folder watching: enable or disable folder watching
Parameter: FOLDERWATCH=[0...1] .
Value
Behavior
0
disable folder watching (factory default)
1
enable folder watching
The value 1 is accepted only if you also specify a valid watched folder via the WATCHFOLDER
parameter.
Default email profile: specify the default Microsoft Outlook email profile
Parameter: EMAILPROFILE=<email_profile>
You can specify the email profile to be used for email polling.
- 16 -
Note:
Email polling cannot be configured during install time for Lotus Notes.
Email polling: enable or disable email polling
Parameter: EMAILWATCH=[0...1].
Value
Behavior
0
disable email polling (factory default)
1
enable email polling
The value 1 is accepted only if you also specify a valid email profile to watch via the
EMAILPROFILE parameter.
Personalized MFP Scanning Server: specify the default Personalized MFP Scanning Server.
Parameter: PSPSRVDEF=<server
name or IP Address>
Specify the PSP Server here, provided that it is installed. <server
include the leading \\.
name or IP Address>
must not
Personalized MFP Scanning:enable or disable the collaboration with the PSP Server.
Parameter: PSPSRVWATCH=[0...1].
Allow configuring MFP Scanning:enable or disable modification of the PSP server settings.
Parameter: PSPALLOWCONFIG=[0...1]. The default is 1 (enabled).
This parameter should be used only in conjunction with the PSPSRVDEF and PSPSRVWATCH
parameters.
Watch interval: define the default watch interval
Parameter: POLINT=[1...13]
Value
Watch interval
1
1 sec
2
2 secs
3
5 secs
4
10 secs
5
30 secs (factory default)
6
1 min
7
2 mins
8
3 mins
9
5 mins
10
10 mins
11
30 mins
12
60 mins
13
"Never"
- 17 -
PaperPort behavior: set default PaperPort behavior: “Run PaperPort in a Window”; “Run
PaperPort Minimized” or “Don’t run PaperPort”.
Parameter: PPACTION=[0...2]
Value
PaperPort behavior
0
“Run PaperPort in a Window” (factory default)
1
“Run PaperPort Minimzed”
2
“Don’t run PaperPort”
Example 1: Installing DesktopDeliveryPSP to watch the folder ’Documents’ on the P drive
with German user interface:
setup.exe /L1031 /v”WATCHFOLDER=P:\Documents FOLDERWATCH=1"
Example 2: Installing DesktopDeliveryPSP to watch the folder ’repository’ on the server
’global’, with English user interface. Watch interval is 3 minutes, and PaperPort is launched
minimized:
setup.exe /L1033 /v”FOLDERWATCH=1 PPACTION=2 WATCHFOLDER=\”\\global\repository\”
POLINT=8"
Example 3: Installing DesktopDeliveryPSP to poll the Microsoft Outlook inbox with the email
profile ’MyProfile’ set:
setup.exe /v”EMAILPROFILE=MyProfile EMAILWATCH=1"
Example 4: Installing DesktopDeliveryPSP Professional to use 'PSPTestServer' as the
Personalized MFP Scanning server
setup.exe /L1033 /v"PSPSRVDEF=PSPTestServer PSPSRVWATCH=1"
Note:
All parameters not specified in the examples above will take their factory default values.
PPDM Desktop Module 12
This page intentionally left blank.
Release Notes for PPDM Desktop Module 12
Version 12.1
English version
Copyright © 2003-2010 Nuance Communications, Inc.
www.nuance.com
Last modified: November 9, 2010
For Personal Paperless Document Manager v2, the product names PaperPort, PaperPort
Professional and Desktop Module are used interchangeably.
Please read this document for late-breaking or detailed information about Nuance PaperPort 12
that could not be included in its other documentation. It relates to both PaperPort 12 Professional
PaperPort 12 versions of the product. In the rest of this document, the name PaperPort 12 is
used for both versions unless Professional is used in the name. Up-to-date information and a
knowledge base are available on the PaperPort support web page
(http://www.nuance.com/imaging/support/default.asp). You can access this directly from inside
PaperPort 12, using the Product Information button in the Help ribbon.
These release notes discuss the following main topics:
Minimum System Requirements
Installation and Uninstallation
Scanner Support
Known issues
Third-party licenses
Minimum System Requirements
To install and run PaperPort 12, your Windows-compatible PC must meet or exceed the following
requirements:
• A computer with an Intel® Pentium®, newer or equivalent processor.
• Microsoft Windows XP (32-bit) SP3 or above, Windows Vista SP2 or above, Windows 7
• Microsoft Internet Explorer 6.0 or above
• 512 MB of memory (RAM), 1GB recommended
• 500 MB of free hard disk space for application files plus 20 MB working space during
installation
• SVGA monitor with 256 colors, but preferably 16-bit color (called Medium Color in XP and
Vista) and at least 800 x 600 pixel resolutions
• Windows-compatible pointing device
• CD-ROM drive for installation
• A compatible scanner with its own scanner driver software, if you plan to scan
documents. See the Scanner Guide at Nuance's web site www.nuance.com for a list of
supported scanners.
• Web connection (with IE 6.0 or above). Web access is needed for product registration,
activation, Scanner Wizard database updating and obtaining live updates for the program
If your computer does not meet all of these requirements, the installation will continue, though
some features might not work on your system. Please ensure that you have the most recent
Windows Service Pack available.
Installation and Uninstallation
Before you install or uninstall PaperPort 12, exit from any open applications so that only
Windows is running. There should be no applications listed in the task bar other than Windows
Explorer.
Upgrading from PaperPort 12 to PaperPort 12 Professional
Before installing PaperPort 12 Professional, please uninstall the following components from your
computer:
• PaperPort 12
• PDF Viewer Plus
• PaperPort Image Printer
Installing PaperPort 12
The installation program provides easy step-by-step instructions. Follow the guidance on each
screen to install the software. Installation and un-installation require Administrator rights.
PaperPort installation comprises three elements that are installed in a single process:
• PaperPort program (also includes ImageViewer, ScanDirect and Scanner Setup Wizard)
• PDF Viewer Plus (in PaperPort Professional this includes PDF Create)
• PaperPort Image Printer
PDF Viewer Plus is not installed if the top-line Nuance product PDF Converter Professional is
detected on the computer (version 5 or above) because it provides all the functionality of PDF
Viewer Plus, and much more additionally.
To install PaperPort, launch the Autorun executable, select an installation language if offered,
accept or change the program location. The program location must be a local folder on your
computer. If PDF Viewer Plus is to be installed, you have two checkmarks:
Set Nuance PDF as your default viewer for Windows and Internet Explorer
This sets PDF Viewer Plus as your system default PDF viewer. PDF files on the PaperPort
desktop are by default opened in a Nuance PDF product. If you select this option, PDF files
that are double-clicked anywhere on your system will open in PDF Viewer Plus.
Install all Nuance PDF button and menu application add-ins
This places a Nuance PDF ribbon or toolbar in Microsoft Word, Excel, PowerPoint, Outlook
and Internet and Windows Explorer and Corel WordPerfect, allowing PDF Create to make
PDF files from the current document or mail attachment or web page. Go to Control Panel
Add/Remove programs to later enable or disable these add-ins individually.
Autorun then starts the installers of the software components. PaperPort installer offers a
Compete or a Custom installation. Choose Custom only if you want to add your own folders to the
supplied PaperPort Desktop folders during installation.
Activating PaperPort
Most versions of PaperPort 12 and the associated PDF Viewer Plus require activation. For
activation and deactivation you need web access. You will be invited to activate the product at the
end of installation. Choose from automatic or manual activation. The recommended choice is
automatic; then PaperPort and the PDF Viewer (with PDF Create for the Professional product)
are activated together. Provided your serial number is found at its storage location and has been
correctly entered, no user interaction is required and no personal information is transmitted.
Manual activation requires interaction and the two programs must be activated separately.
If you do not activate the product at installation time, you will be invited to do this each time you
invoke the program. PaperPort 12 and the PDF Viewer can be launched only five times without
activation.
Activating PaperPort 12 on a computer without an established Internet connection
If you install PaperPort 12 on a computer on without an Internet connection, when you launch
PaperPort, the activation wizard will appear. PaperPort can be activated if there is separate
machine that is connected to the internet. Select the option to activate manually. The serial
number and the machine fingerprint will appear. Go to the website
http://activation.scansoft.com/us/ on the machine with an internet connection; enter your product
serial number and computer fingerprint to generate an activation key. Write down the activation
key that is generated, return to the machine without the internet connection and enter the
activation key into the manual activation dialog.
Invalid serial number message when activating PaperPort:
If an “Invalid serial number” message appears during activation, the serial number may have
been keyed improperly or it could be an invalid serial number. Refer to the serial number on the
back of the CD-ROM sleeve to ensure that all characters were entered in the proper order. If
PaperPort was ordered as a download, the serial number should appear in the confirmation
email.
For additional help, go to the following website: http://activation.scansoft.com/us/help/
Registering PaperPort 12
At the end of installation, you will be asked to fill out an electronic form to register your copy of
PaperPort 12. If you decide not to, you will be prompted again seven days later.
Registering PaperPort 12 on a computer without an Internet connection
If you install PaperPort 12 on a computer without an Internet connection, you should choose the
option 'Print registration form'. This opens the form as an HTML page with some items already
filled. Please fill in the remaining items then print it. You can print it to a physical printer and send
the form to Nuance by fax or by regular email.
Uninstalling PaperPort
For a full uninstallation, the three PaperPort components should be removed, one after the other,
in any order. The components are
• PaperPort 12
• PDF Viewer Plus
• PaperPort Image Printer
Removing only the Image Printer and/or the PDF Viewer will cause PaperPort to function
incorrectly.
To uninstall PaperPort from your computer:
1. Select Add/Remove Programs from the Control Panel.
2. Select Nuance PaperPort 12.
3. Click Remove to uninstall the program.
4. Repeat this for the remaining 2 components.
5. A computer re-start might be needed to complete the removal.
A de-activation step is performed at the start of un-installation, allowing you to reinstall the
program later without re-activation problems. De-activation and re-activation require web access.
Failed uninstallation
Should the uninstallation of PaperPort 12 or PDF Viewer Plus fail for any reason, you can clean
up your system from all references to these products by using our Remover.exe application. This
application can be found on the PaperPort product CD-ROM in the folder PaperPort\Utility (for
PaperPort 12) or in the PDFViewer\Utility folder (for PDF Viewer Plus).
After running this utility, reboot the machine and the component will be uninstalled.
Note: On a machine with restricted user rights, log into the machine with administrator rights
before running this utility.
Launch PaperPort
You should launch the main PaperPort application at least once after installation, before
attempting to use other PaperPort application (such as Image Viewer, or ScanDirect).
Scanner Support
Install your scanner before you install PaperPort 12
Your scanner must be working independently of the program prior to connecting it to PaperPort
12. Scanners to be used by PaperPort 12 should be installed according to the scanner
manufacturer’s specifications. Please consult the documentation that came with your scanner for
information.
TWAIN and WIA drivers
PaperPort 12 supports scanners that are controlled by TWAIN or WIA (Windows Image
Acquisition) scanner drivers. PaperPort 12 supports any fully TWAIN- or WIA-compliant scanner
or other input device that can supply at least a binary (black-and-white) image in a supported
resolution (200 to 600 dots per inch).
The recommended maximum scan resolution is 400 dpi.
If any scanning problem occurs with PaperPort, first please test whether you are able to scan into
another scanner-enabled imaging application. Use the Windows Paint application to test WIA,
and any imaging application from some other vendor to test TWAIN.
ISIS drivers
In addition to scanning via TWAIN or WIA, PaperPort 12.1 also supports ISIS-scanning.
If any scanning problem occurs with PaperPort, first please test whether you are able to scan into
another ISIS supported application.
Scanner Setup Wizard
PaperPort 12 includes a Scanner Setup Wizard that will automatically test and optimize your
scanner for use with PaperPort 12. You can find its shortcut next to that of PaperPort 12 in the
Windows Start menu. You can also launch it at any time by choosing the Select button on the
„Scan or Get Photo” pane (Scan Settings on the Desktop ribbon). The Scanner Setup Wizard is
launched automatically after installation when you first attempt to scan. This ensures that your
scanner is optimized before you start scanning documents.
Using more than one scanner in PaperPort
If you have more than one scanner installed on your computer, you may use the Scanner Setup
Wizard to use those scanners with PaperPort. Select button on the „Scan or Get Photo” pane
(Scan Settings on the Desktop ribbon).
Scanner compatibility
Since scanners change frequently, please refer to http://support.nuance.com/compatibility for the
most recent information about PaperPort and scanner compatibility. If you are having problems
with your scanner, please contact the scanner manufacturer for assistance. Often, scanner
manufacturers provide web sites that provide the latest scanner drivers, answers to frequently
asked questions, and other information about their products.
Known issues
Using the new user interface
For guidance on using the new tab and ribbon user-interface, please see the help topic “Elements
of the user interface”.
Known issues with PDF image editing in PDF Viewer Plus
Editing an image in PDF files in Image Viewer has some limitations; this has been primarily
designed for simple image-only PDF files. More complex PDF files may yield unexpected results.
If you do not know the origin of your PDF file and you get unexpected results when editing
images embedded in a PDF it is a complex PDF with image effects already applied.
•
•
•
•
In PDF Viewer, selecting an area of an image and choosing Edit Image is not working.
Instead, you should select the whole image and double-click it to initiate the image
editing of the embedded image in question.
PDF files with overlapping objects are not supported for image editing.
When clipping path is applied to an image (in order to hide portions of the image while
displaying), after editing the clipping path is lost and the entire image will be displayed.
For PDF files with certain image transformation matrixes, the image editing operation
might result in improperly updated or rotated image in the PDF file.
Use of Annotations on PDF files
If you intend to use annotations on PDF files of any kind we suggest doing so in the new PDF
Viewer Plus. The annotations in the ImageView and ImageViewer are primarily to add text or
notes to image files. Annotations on images (jpg, bmp, etc.) will become permanently applied to
the image.
Image editing in PDF Converter Professional 6
When using PDF Converter Professional 6, image editing is started in a slightly different way than
in PDF Viewer. Instead of the “Select Image” tool, you should use the "Touch-up Object" tool to
select the object. Then the shortcut menu offers “Edit image”.
Third-party licenses
For third-party licenses, please see the legal section of the PaperPort Help.
This page intentionally left blank.
Welcome!
Nuance® PaperPort® is a desktop document management software
package that helps you scan, organize, access, share, and manage both
your paper and digital documents on your personal computer. The
PaperPort desktop provides large, clear thumbnails that allow you to
visually organize, retrieve, assemble and use all your documents including
scanned paper, photographs, word processing files, spreadsheets, and PDF
files.
What’s New in PaperPort 12?
PaperPort 12 includes a number of valuable new features to help you
manage your documents.
•
Improved PDF performance: PDF files can now be opened more
speedily and displayed in PDF Viewer Plus, a newly developed Nuance
PDF handling application that is fully compatible with Adobe Acrobat.
PDF Viewer Plus opens files much faster than the general-purpose
ImageViewer (also available in PaperPort 12), reducing memory
requirements and permitting smaller file sizes. The new viewer
optimizes the rendering resolution for each element on the page
yielding a cleaner display and optimum print resolution.
1
•
Enhanced PDF features: PDF Viewer Plus provides a wide range of
new PDF features including improved annotations, and dynamic or
transparent stamps. Images within a PDF document processed by PDF
Viewer Plus can be sent to the ImageViewer where they can be
enhanced using SET tools, with the modified image returned to the PDF.
You can fill and e-mail PDF forms and create new ones, either from
scratch or by using an updated FormTyper to instantly make any static
form fillable. It is now integrated into the PDF Viewer Plus and uses
Logical Form Recognition® technology to detect the form elements and
also allows their properties to be managed better than ever before.
Searchable PDF files are available through Scanner Profiles, through a
right click “Save As” operation on the PaperPort Desktop, or directly in
the PDF Viewer Plus application. This makes the content of your
scanned paper documents or image files accessible to search engines
such as Windows Desktop Search or Google.
•
Tab-and-ribbon User Interface: PaperPort 12 is now easier to use
because all the program features are presented on a set of tabbed
ribbon style toolbars with controls placed in functional groups. We've
also added the new "Scan Now" button so you can scan with one click
without having to change to the scanner settings view. A customizable
Quick Access Toolbar appears above the ribbon toolbars so you can put
your most frequently used features in one easy-to-find place.
•
More accurate OCR: OCR (Optical Character Recognition) scanning
accuracy has been significantly increased over previous versions; this
improvement is reflected in greater success when searching the content
of Searchable PDF file archives. Language settings can now be applied
to Optical Character Recognition to provide even greater accuracy in all
supported languages.
•
Folder Colors: The number of colors available for distinguishing folders
rises from 9 to 29.
•
Digital camera input: The Send To Bar options for text applications
have been updated to include a PaperPort OCR option for digital camera
correction. It is now possible to take a picture of a document and
accurately convert it into a text document with this feature. This is done
by applying special 3D-deskewing algorithms that flatten page images
and correct distortions thereby increasing the accuracy of the resulting
text document.
2
•
Making PaperPort more reliable: Sometimes PDF files may
become corrupted so that they can no longer be opened. In these
cases PaperPort may not be able to generate a desktop thumbnail
and this may prevent PaperPort from launching properly. A new
utility program CheckPPFolders.exe is supplied in the PaperPort
program folder. Run this program to identify and remove any corrupt
files so that PaperPort will work properly.
•
How-to-Guides: The program offers an updated series of
illustrated ’mini-guides’ showing typical tasks and processes,
providing quick access to program areas and relevant Help topics.
The How-to-Guides can be switched on in the Help section of the
tabbed ribbon.
The following new and key features are available only in PaperPort
Professional 12:
•
Folder Management: You can now automatically create multiple
folders by importing a list of folder names from a text file. This
option is available when you right-click on any folder.
•
New features in PDF Viewer Plus and PDF Create Assistant:
You can create industry-standard text based PDF documents from
any application directly with a “right-click” through the Windows or
PaperPort Desktops (up to PDF version 1.7), using the PDF Create
Assistant or by printing directly from any application with the PDF
Create printer driver. Additionally you can create PDF packages,
batch create PDF files and much more using the PDF Create
Assistant.
A table in the PDF Viewer Help (in the section on PDF creation)
summarizes which options and targets are available.
•
Support for SharePoint: PaperPort Professional 12 is able to
communicate with the Microsoft SharePoint Services 2003,
SharePoint Portal 2003, SharePoint Services 2007 and SharePoint
Server 2007 document management systems: get files from there,
process them as desired, and then save the results by sending the
output files back through the Send To Bar. ScanDirect supports
scanning to PDF with the results directed to SharePoint.
3
•
Unlimited Scan Profiles: You can freely create and configure new
Scan Profiles, or remove unwanted ones.
•
PDF-MRC High Compression: Create scanned color PDF files that
are up to 8 times smaller than regular scanned documents.
•
Professional Capture Assistant: The Capture Assistant displays
thumbnails of pages as they are scanned. After scanning, you can
re-order or rotate pages or add blank separator pages. When you
are done, you can specify subject, author and keywords for your
items.
Closer integration with other Nuance products:
o If you have Nuance® OmniPage® on your system, PaperPort
cooperates with it more closely than ever, providing cutting-edge
OCR page recognition services and high-level PDF creation.
o PaperPort Professional 12 comes with integrated PDF Create
enabling you to create smaller text-based PDF files from
applications and assemble PDF files quickly and easily from a
variety of source documents.
PaperPort is also supplied in Special Editions to selected scanner manufacturers and other
resellers. The feature set in these editions may vary, in line with each vendor's requirements.
Learning to use PaperPort
To help you learn how to use PaperPort, you’ll find a wealth of
information in our:
•
PaperPort How-to-Guides
•
PaperPort Help
•
Getting Started Guide
•
PaperPort Release Notes
•
Nuance Knowledge Base
4
Know all the tips and tricks!
The PaperPort Help includes comprehensive information on features,
concepts, tunable options, and step-by-step procedures.
Help is available at all times. Just click PaperPort Help on the Help
ribbon. PDF Viewer Plus has its own help system which describes how
to view, annotate and work with PDF files. It includes help on the PDF
creation available in PaperPort Professional using Nuance PDF Create,
either by direct conversion or via the PDF Create Assistant.
Get started instantly
The PaperPort How-to-Guides offer you a quick start in key program
areas, including scanning, assembling documents, enhancing images
and more. Access them from the Help ribbon.
Read all about what you can do
Read the Getting Started Guide to find out what you can do with
PaperPort. This guide provides an overview of all PaperPort features.
Use the Help ribbon to view the guide as a PDF file.
Understand all the important details
The PaperPort Release Notes provide important information about this
software release of PaperPort. Use it to reference system requirements,
installation steps, and resolutions to known issues. You can find it in the
Samples folder that is provided with PaperPort or you can access it on
the PaperPort Help ribbon at any time.
Discover a wealth of information on the Nuance web site
The Nuance web site provides a wealth of information about your
PaperPort software, including Frequently Asked Questions, Technical
Notes, software updates, and more! Refer to the PaperPort Knowledge
Base for information related to a particular concern or to find answers
to a specific question.
To launch your web browser and go directly to the Nuance web site,
select Nuance on the Web on the Help ribbon.
5
Thank you for using PaperPort software!
www.nuance.com
Copyright © 2009 Nuance Communications, Inc. All rights reserved. Subject to change without
prior notice. Nuance, the Nuance logo, ScanSoft, PaperPort, ScanDirect, SET, DesktopDelivery,
and OmniPage are registered trademarks or trademarks of Nuance Communications, Inc. or its
affiliates in the United States of America and/or other countries. All other trademarks are the
property of their respective owners.
6
Powered by
Personal Paperless
Document Manager
v2
Quick Reference Guide
L
E G A L
N
O T I C E S
Copyright © 2010 Nuance Communications, Inc. All rights reserved. No part of this
publication may be transmitted, transcribed, reproduced, stored in any retrieval system or
translated into any language or computer language in any form or by any means, mechanical,
electronic, magnetic, optical, chemical, manual, or otherwise, without prior written consent
from Nuance Communications, Inc., 1 Wayside Road, Burlington, Massachusetts 018034609, U.S.A. The software described in this book is furnished under license and may be used
or copied only in accordance with the terms of such license.
I M P O R T A N T N O TIC E
Nuance Communications, Inc. provides this publication “AS IS” without warranty of any
kind, either express or implied, including but not limited to the implied warranties of
merchantability or fitness for a particular purpose. Some states or jurisdictions do not allow
disclaimer of express or implied warranties in certain transactions; therefore, this statement
may not apply to you. Nuance reserves the right to revise this publication and to make
changes from time to time in the content hereof without obligation of Nuance to notify any
person of such revision or changes.
T R AD E M A R K S A N D C R E D I T S
Nuance, the Nuance logo, All-in-One Search, DesktopDelivery, FormTyper, OmniPage,
PaperPort, Productivity Without Boundaries, ScanDirect, ScanSoft, and SET are trademarks or
registered trademarks of Nuance Communications, Inc. or its affiliates in the United States
and/or other countries. Microsoft, Excel, MSN, Outlook, PowerPoint, and Windows are
either registered trademarks or trademarks of Microsoft Corporation in the United States and/
or other countries. Intel and Pentium are trademarks or registered trademarks of Intel
Corporation or its subsidiaries in the United States and other countries. Adobe, Acrobat and
Photoshop are either registered trademarks or trademarks of Adobe Systems Incorporated in
the United States and/or other countries. Google is a trademark of Google, Inc. WordPerfect
is a trademark or registered trademark of Corel Corporation and/or its subsidiaries in Canada,
the United States and/or other countries. The Verity logo is a trademark or registered
trademark of Verity, Inc. in the United States and/or other countries. All other trademarks
referenced herein are the property of their respective owners.
Outside In ® Viewer Technology © copyright 1998 Stellent Chicago, Inc. All rights reserved.
The word verification, spelling and hyphenation portions of this product, as detailed in the
legal section of the Help system, are based in part on Proximity Linguistic Technology from
Franklin Electronic Publishers, Inc. All rights reserved. This product was developed using
Kakadu software, and is based in part on the work of the Independent JPEG Group. This
software is based in part on the Zlib Compression Library and the work of Colosseum
Builders.
Nuance Communications, Inc.
1 Wayside Road, Burlington, Massachusetts 01803-4609, U.S.A.
Nuance Communications International BVBA
Guldensporenpark 32, Building D, BE-9820 Merelbeke, Belgium
PaperPort 12 Getting Started Guide, January, 2010
C O N T E N T S
5
Welcome to PaperPort
Installing PaperPort
Activating PaperPort
Registration
Learning PaperPort
Technical Support
What’s new in PaperPort 12?
5
6
7
7
8
9
12
Getting to Know PaperPort
The PaperPort desktop
The PaperPort Ribbon
PaperPort items
The Folders pane
PaperPort item thumbnails
PaperPort page thumbnails
Two-part desktop
The Image View window
Customizable Quick Access Toolbar
PDF Viewer Plus
21
Acquiring Items
Scan to the PaperPort desktop
Set up your scanner with PaperPort
Using Scan Profiles
Print to PaperPort
Capture web pages
Add PaperPort folders
Use DesktopDelivery
Import pictures from your camera
Touching Up Images
Enhancing Images Manually
Edit multiple images
12
13
13
14
15
17
17
19
20
20
21
22
22
23
23
24
25
25
26
29
29
PaperPort Getting Started Guide
iii
Annotating Pages
Annotation tools
30
30
Protecting Items
32
Filing Items
32
Add search criteria to items
Finding Items
Find items by their properties
Find words in an item
Add items to the All-in-One Search index
Use the All-in-One Search pane
Use PDF Searchable Image
Schedule indexing tasks
34
35
35
36
36
37
38
38
Sharing Files
39
Sending Items to Other Programs
40
Use OmniPage with PaperPort
Customize the Send To bar
Adjust Send To options
Converting Items
Convert items to image formats
Assembling documents
Convert images to text
41
41
42
43
43
43
44
Filling Forms
44
PDF File Support
45
Creating PDF Documents
Creating PDF Documents with PDF Create
47
47
Using ScanDirect
49
Uninstalling PaperPort
50
iv
Contents
Welcome to PaperPort
Welcome to the Nuance® PaperPort® Getting Started Guide. It is supplied as a PDF
file, suitable for use with screen readers. If you print it to paper, we recommend
double-sided printing with two pages per sheet.
PaperPort provides the easiest way to turn paper into organized digital documents
that everybody in an office can quickly find and use. PaperPort works with
scanners, multifunction printers, and networked digital copiers to turn paper
documents into digital documents. It then helps you to manage them along with all
other electronic documents in one convenient and easy-to-use filing system.
PaperPort’s large, clear item thumbnails allow you to visually organize, retrieve and
use your scanned documents, including Word files, spreadsheets, PDF files and
even digital photos. PaperPort’s Scanner Enhancement Technology tools ensure
that scanned documents will look great while the annotation tools let you add notes
and highlights to any scanned image.
Accompanying programs
PaperPort 12 includes a PaperPort image printer, a ScanDirect application
(described later), a Scanner Setup Wizard, an ImageViewer application (for viewing
and working with page images in a window separate from PaperPort) and PDF
Viewer Plus (for viewing and working with PDF files). In PaperPort Professional
12, the PDF Viewer Plus includes Nuance PDF Create, providing high-level
support for PDF creation from a wide variety of source files.
Installing PaperPort
You can install PaperPort from a CD or from the Web. The installation program
provides easy step-by-step instructions. Follow the guidance on each screen to
install the software. Installation and un-installation require Administrator rights.
PaperPort Getting Started Guide
5
PaperPort installation comprises three elements that are installed in a single process:
•
•
•
PaperPort program (includes ImageViewer, Scan Direct and Wizard)
PDF Viewer Plus (in PaperPort Professional this includes PDF Create.)
PaperPort image printer.
PDF Viewer Plus is not installed if the top-line Nuance product PDF Converter
Professional is detected on the computer (version 5.3 or above) because it provides
all the functionality of PDF Viewer Plus, and much more additionally.
Click Autorun, select an installation language, accept or change the program
location. If PDF Viewer Plus/Create is to be installed, you have two checkmarks:
Set Nuance PDF as your default viewer for Windows and Internet Explorer
This sets PDF Viewer Plus as your system default PDF viewer. PDF files on the
PaperPort desktop are by default opened in a Nuance PDF product. If you select
this option, PDF files that are double-clicked anywhere on your system will open in
PDF Viewer Plus.
Install all Nuance PDF button and menu application add-ins
This places a Nuance PDF ribbon or toolbar in Microsoft Word, Excel,
PowerPoint, Outlook and Internet and Windows Explorer and Corel WordPerfect,
allowing PDF Create to make PDF files from the current document or mail
attachment or web page. Go to Control Panel Add/Remove programs to later
enable or disable these add-ins individually.
Autorun then starts the installer. It offers a Complete or a Custom installation.
Choose Custom only if you want to add your own folders to the supplied PaperPort
folders during installation. You can add folders later (see page 24).
Activating PaperPort
Most versions of PaperPort 12 and the associated PDF Viewer Plus require
activation. For activation and deactivation you need web access. You will be invited
to activate the product at the end of installation. Choose from automatic or manual
activation. The recommended choice is automatic; then PaperPort and the PDF
Viewer (with PDF Create for the Professional product) are activated together.
Provided your serial number is found at its storage location and has been correctly
PaperPort Getting Started Guide
6
entered, no user interaction is required and no personal information is transmitted.
Manual activation requires interaction and the two programs must be activated
separately.
If you do not activate the product at installation time, you will be invited to do this
each time you invoke the program. PaperPort 12.0 and the PDF Viewer can be
launched only five times without activation.
Registration
Registration enables you to take full advantage of Nuance® product support and to
receive notifications of product updates.
When you finish installing PaperPort, you are prompted to register online. If you
want to update your registration information, you can always go to the Nuance web
site at http://www.nuance.com.
Learning PaperPort
This guide introduces you to PaperPort and shows you how PaperPort can help you
manage your information. Additional sources of information to help you learn how
to use PaperPort include a comprehensive Help system, the How-to-Guides,
Release Notes, and the Nuance web site. Access these from the Help ribbon.
Using this Guide
This guide is written with the assumption that you know how to work in the
Microsoft® Windows® environment. Please refer to your Windows documentation
if you have questions about how to use dialog boxes, menu commands, scroll bars,
drag and drop functionality, shortcut menus, and so on.
Using Help
The PaperPort Help includes detailed information on features, settings, and
procedures. Help is available from the PaperPort Help ribbon.
PaperPort Getting Started Guide
7
Additional technical support, including technical notes, software updates, product
information and product support issues and more is available also from the
PaperPort Help ribbon.
PDF Viewer Plus, and also PDF Converter Professional, have their own Help
systems that include guidance on PDF creation.
Using release notes
PaperPort Release Notes provide important information about this release of the
program. This document is included on the installation CD, from the PaperPort
Help ribbon, and as a sample document on the PaperPort desktop.
Technical Support
Nuance offers both complimentary and fee-based technical support options
designed to meet your individual needs. Our services offer person-to-person
telephone and e-mail technical support. We also offer self-service, 24-hour access
to our Knowledge Base.
Visit http://www.nuance.com for information about your support policy, local
support contacts, and product updates. Before contacting Nuance, be sure to read
the user documentation and review the Release Notes.
Minimum System Requirements
A computer with an Intel® Pentium® or higher processor
Microsoft Windows XP 32-bit with SP3 or above, Windows Vista 32-bit and 64-bit
with SP2 or above, Windows 7 (32- and 64-bit versions)
Microsoft Internet Explorer 6.0 or above
512 MB of memory (RAM), 1 GB recommended
500 MB of free hard disk space for application files plus 20 MB working space
during installation
SVGA monitor with 256 colors, but preferably 16-bit color (called Medium Color
in XP and Vista) and at least 800 x 600 pixel resolution
Windows-compatible pointing device
PaperPort Getting Started Guide
8
CD-ROM drive for installation, or suitable web access for download
Web connection (with IE 6 or above) for activation and web updates
Performance and speed will be enhanced if your computer’s processor, memory,
and available disk space exceed minimum requirements. This is especially true
when handling very large color image and PDF files.
What’s new in PaperPort 12?
PaperPort 12 includes a number of valuable new features to help you manage your
documents.
Improved PDF performance
PDF files can be opened more speedily and displayed in PDF Viewer Plus, a newly
developed Nuance PDF handling application that is fully compatible with Adobe
Acrobat. PDF Viewer Plus opens files much faster than the general-purpose
ImageViewer, reducing memory requirements and permitting smaller file sizes. The
new viewer optimizes the rendering resolution for each element on the page
yielding a cleaner display and optimum print resolution. PDF Viewer Plus has its
own Help system.
Enhanced support for PDF files
PDF Viewer Plus provides a wide range of new PDF features including improved
annotations and dynamic or transparent stamps. Images within a PDF document
processed by PDF Viewer Plus can be sent to the ImageViewer to be enhanced
using SET tools, with the modified image returned to the PDF.
Fill and e-mail PDF forms and create new ones, either from scratch or by using an
updated FormTyper integrated into PDF Viewer Plus to instantly make any static
form fillable.
It uses Logical Form RecognitionTM technology to detect the form elements and
also allows their properties to be managed better than ever before.
PaperPort Getting Started Guide
9
Searchable PDF files are now available through Scanner Profiles, through a right
click ‘Save As’ operation on the PaperPort Desktop, or directly in PDF Viewer Plus.
This makes the content of your scanned paper documents or image files accessible
to search engines such as Windows Desktop Search or Google.
Tab-and-ribbon User Interface
PaperPort 12 is now easier to use because all the program features are presented on
a set of tabbed ribbon style toolbars with controls placed in functional groups.
We've also added the new ‘Scan Now’ button so you can scan with one click
without having to change to the scanner settings view. A customizable Quick
Access Toolbar appears above the ribbon toolbars so you can put your most
frequently used features in one easy-to-find place. Accelerator keys allow command
activation from the keyboard; press the Alt key to see the accelerator values.
Background, panel and ribbon colors can be customized.
More accurate OCR
OCR (Optical Character Recognition) scanning accuracy has been significantly
increased; this is reflected in greater success when searching the content of
Searchable PDF file archives. Language settings can now be applied to Optical
Character Recognition to provide even greater accuracy in all supported languages.
Digital camera input
The Send To bar options for text applications have been updated to include a
PaperPort OCR option for digital camera correction. It is now possible to take a
picture of a document and accurately convert it into a text document. This is done
by applying special 3D-deskewing algorithms that flatten page images and correct
distortions to increase the accuracy of the resulting text document.
Making PaperPort more reliable
Sometimes PDF files may become corrupted so that they can no longer be opened.
In these cases PaperPort may not be able to generate a desktop thumbnail and this
may prevent PaperPort from launching properly. A new utility program
CheckPPFolders.exe is supplied in the PaperPort program folder, along with a
short Help file. Run this program to identify and remove any corrupt files so that
PaperPort will work properly.
PaperPort Getting Started Guide
10
The following advanced features are available only in PaperPort
Professional 12:
Folder Management
You can now automatically create multiple folders by importing a list of folder
names from a text file. This option is available when you right-click on any folder.
See the Help topic About PaperPort folders for the required syntax.
New features in PDF Viewer Plus and PDF Create Assistant
You can create industry-standard text-based PDF documents from any application
directly with a right-click through the Windows or PaperPort Desktops (up to PDF
version 1.7), using the PDF Create Assistant or by printing directly from any
application with the printer driver called ‘ScanSoft PDF Create!’ Additionally you
can create PDF packages, batch create PDF files and much more using the PDF
Create Assistant. A table in the Help topic About creating PDF files summarizes
which starting places, inputs, options and targets are available.
Support for SharePoint
PaperPort Professional 12 is able to communicate with the Microsoft SharePoint
Services 2003, SharePoint Portal 2003, SharePoint Services 2007 and SharePoint
Server 2007 document management systems: get files from there, process them as
desired, and then save the results by sending the output files back through the Send
To bar. ScanDirect supports scanning to PDF with the results directed to
SharePoint.
PaperPort is also supplied in Special Editions to selected scanner manufacturers and other
resellers. The feature set in these editions may vary, in line with each vendor’s requirements.
PaperPort Getting Started Guide
11
Getting to Know PaperPort
This section introduces you to the different parts of PaperPort. Refer to
the PaperPort Help for detailed information about all these topics.
The PaperPort desktop
The PaperPort desktop appears with the Folders pane when you first start the
program. It displays the documents in the chosen folder as thumbnails and
provides tools to manage them. PaperPort offers all the tools necessary to
organize, find, and use documents and images. Choose Options from the
Desktop ribbon and go to the Desktop panel to choose a color scheme for
the desktop and its elements.
Ribbons with command buttons
Desktop
showing item
thumbnails
Function Pane
showing folders
The Function pane can present:
Folders
Scan Settings
Thumbnails
All-in-One Search
Properties
•
•
•
•
•
Access to
other pages
in this multipage item
Image item
thumbnail
Text item
thumbnail
Send To bar
PaperPort Getting Started Guide
12
The PaperPort Ribbon
PaperPort 12 and ImageViewer have a
modernized tab and ribbon interface.
The main elements are:
1. The PaperPort button
2. Quick Access Toolbar (see page 20)
3. Tab
4. Ribbon associated with the tab
5. Group inside the ribbon
6. Button within the group
7. A button drop-down list.
PaperPort items
The documents and photographs you acquire in PaperPort are called items.
There are two types of items: image items and text items.
•
Image items are scanned documents, photographs, drawings and
other digital items in an image format, such as PDF Image, PDF
Searchable, JPEG, TIFF, or PaperPort Image (.max) files. They can be
scanned, copied or imported into the PaperPort desktop.
Text items are documents that contain editable text, such as Word
(.doc), HTML, and Excel files, and are created by word processing and
other text-based applications. Normal PDF files are considered to be
text items.
Image items when double-clicked open by default in Image View that offers
many image-handling tools, including the SET tools. Go to Options >
Desktop to change this behavior. You can choose ImageViewer; this offers
the same functionality as Image View, but in a separate window so you can
still view the PaperPort desktop as you edit the chosen item. This is specially
useful in a dual-screen environment. You can also choose to open the item in
the application associated with the file type.
•
Getting to Know PaperPort
13
You can use any flavor of PDF file: PDF Image, PDF Searchable, and PDF
Formatted Text and Graphics (PDF Normal) with PaperPort. PDF files by
default open in PDF Viewer Plus or (if available) PDF Converter
Professional. These Nuance programs are optimized for handling, annotating
and editing PDF files. Go to Options > Desktop to change this behavior.
You can open PDF Image or PDF Searchable files in ImageViewer in order
to use the SET tools to improve the quality of PDF-image only items.
You can quickly send an item to another program without leaving the
PaperPort program. Just drag an item onto the link icon in the Send To bar at
the bottom of the desktop. PaperPort supports a wide variety of programs
including word processing, spreadsheet, fax, Internet e-mail, graphics, optical
character recognition (OCR), and online services programs.
PaperPort includes a My PaperPort Documents folder with a subfolder
Samples, containing items to demonstrate some of the types of items you
can keep on the PaperPort desktop.
You can also use PaperPort to view non-PaperPort items that reside on your
computer. Simply copy or move the document file or photo into a PaperPort
folder.
The Folders pane
The Folders pane presents a hierarchical view of your
PaperPort folders, similar to the view you see in Windows
Explorer. Use the Folder Tools to access its commands
quickly.
PaperPort installs a PaperPort folder named My
PaperPort Documents into your My Documents folder.
If you are using a multi-user system, each user has their
own My PaperPort Documents folder.
The My PaperPort Documents folder contains several subfolders whose
names – such as Articles, Business Cards, Photographs, and Receipts –
illustrate the different ways you can organize your items in PaperPort.
The Samples folder contains sample documents and photographs to help you
get started using PaperPort.
PaperPort Getting Started Guide
14
When you have acquired your own PaperPort items, you do not have to use
the My PaperPort Document folder to store them. You can add other local
and network folders to PaperPort’s Folder View. You can also delete the My
PaperPort Documents folder, but your PaperPort structure must contain at
least one folder.
To show or hide the Folders pane, click the Folders button on the Desktop
ribbon. With the desktop split, Folders panes can be displayed for each
Workspace.
PaperPort item thumbnails
There are two kinds of thumbnails in PaperPort: item and
page thumbnails. Each item thumbnail is a small, graphic
representation of your document or photo. Page
thumbnails show pages of image items and PDF files in the
Page Thumbnails pane both on your PaperPort desktop
and in the ImageViewer.
One quick way to locate your PaperPort items is to visually browse through
the item thumbnails on your PaperPort desktop. Thumbnails show you
what’s in a document without having to open it. Thumbnails also give you the
ability to scroll through the pages of a document without opening it.
PaperPort shows large, clear thumbnails of all your documents and photos,
including:
•
Scanned pages and photos
•
Photos from your digital camera
•
Image files in formats such as BMP, TIFF, JPEG, GIF, and MAX
•
Microsoft Word, PowerPoint®, Excel®, Word PerfectTM , and other
documents created in popular software programs
•
PDF documents
•
PDF Image items
•
HTML documents
Getting to Know PaperPort
15
Each item thumbnail appears with an icon that identifies the program in
which it was created or is currently associated. This makes it easy and
convenient to quickly see and find all the different types of items on your
computer.
Click on a thumbnail to see image attributes:
A small
icon indicates that the Read-only attribute is set for that item.
A small
icon indicates that the image has annotations.
Multi-page image items show
to let you scroll through the pages even
with the Page Thumbnails pane closed.
Before you can work with an item, you must first select its thumbnail on the
PaperPort desktop. A red border appears around an item to indicate that it is
selected. Multiple selections are possible. While working with item
thumbnails, you can:
•
Drag a thumbnail to reposition it on the PaperPort desktop.
•
Drag a thumbnail to a folder to move the item to that folder.
•
Drag a thumbnail to another open Workspace to move the item to
that open folder.
•
Double-click a thumbnail to view the item.
•
Press the Ctrl key and double-click a thumbnail to open the item in its
source program.
•
Right-click a thumbnail to display the item’s shortcut menu.
•
Drag a thumbnail to the Send To bar to send a copy of the item to
another program.
Using item thumbnails on the PaperPort desktop, you can also easily combine
individual PaperPort Image items or PDF Image items into multi-page items.
This feature is useful as an organizational tool if you are using a scanner that
can only scan a page as a separate item.
PaperPort Getting Started Guide
16
PaperPort page thumbnails
The Page Thumbnails pane on the PaperPort desktop and in ImageViewer
displays thumbnails for multi-page image items. Select a multi-page item, then
click the Thumbnail button on the Desktop ribbon. Page-level operations
can be done quickly without having to open the files. The first three items
listed below are available for all image files. The remainder are available for
PDF files (both on the PaperPort desktop and in ImageViewer or PDF
Viewer Plus) and MAX files (PaperPort desktop only). You can:
•
Enlarge or reduce thumbnail size.
•
Copy and move selected pages to a Workspace as separate PDF files.
•
Copy and move pages between documents open in different panes.
•
Copy, paste, cut, delete and reorder pages.
•
Insert new pages at a certain location in the document.
•
Append new pages at the end.
The Page Thumbnail view of a secure PDF is only available by supplying its
password.
Two-part desktop
When you first start PaperPort Professional 12, the desktop
appears split into two Workspaces – top and bottom. This
layout gives you a better oversight necessary to organize and combine your
documents more effectively even in a cross-folder fashion. Right-click the
active Workspace or use the Change View button to change the way of
viewing. If you work with documents containing multiple pages, you can use
the corresponding function pane to view page thumbnails without having to
open the given document. You can also use these desktop areas to view your
folders, or the properties of the selected item. To remove the desktop split,
open the Desktop menu, and uncheck the Split Desktop menu item or click
the Split Desktop icon.
Getting to Know PaperPort
17
You can also bookmark the Workspaces of your choice by using the
Bookmark Workspace command from the Desktop menu. To manage
them, use the Organize Bookmarks command. Getting to a frequently used
Workspace is just a mouseclick away, since they are all displayed in the same
list.
Function pane
showing page
thumbnails
Active
Workspace
Desktop split
Inactive
Workspace
Function pane
showing
folders
Send To bar
PaperPort Getting Started Guide
18
The Image View window
To view an image item in the Image View window, double-click its thumbnail
in Desktop view, or choose Open with Image View on the Desktop ribbon
or from its shortcut menu. By default PDF files appear in PDF Viewer Plus,
not in Image View.
The Image View window allows you to take a closer look at your items and to
touch up and annotate them. You can also enlarge or reduce the view for easy
reading. Use the SET tools to enhance the current page image. Use the Page
Thumbnails pane to edit your document at page level.
Select
Area
button
Return to Desktop button,
by default on the Quick
Access Toolbar
(also on the View ribbon)
SET tools on the
Page ribbon
Current page
displayed in
large size,
ready for
enhancement
or annotating
Page Thumbnails Pane displays
one thumbnail for each page in
the document
Getting to Know PaperPort
19
Customizable Quick Access Toolbar
PaperPort’s buttons are placed on different ribbons according to their
functionality. You can place frequently used buttons on the Quick Access
Toolbar in PaperPort and also in ImageViewer. Right-click within the ribbons
area and choose Customize Quick Access Toolbar.
Choose the ribbon
whose buttons you
want to add
Set toolbar
button order
More available buttons
Add/remove buttons
Buttons currently visible
PDF Viewer Plus
PDF files on the PaperPort desktop when double-clicked appear by default in
the new PDF Viewer Plus. You can drag other files onto the PDF Viewer
Plus icon in the Send To bar (see page 40) to have a copy converted to PDF
and opened in the PDF Viewer. The first page appears in the main screen
area; a navigator panel on the left shows page thumbnails or form controls
and a comments panel can be displayed along the bottom of the screen. An
organizer panel on the right offers stamps. The PDF annotation tools are
described on page 31. If an image-only PDF enters the PDF Viewer, the
program may offer to make it searchable. If not, choose Make Searchable
PDF from the Tools menu.
Active PDF forms can be filled in directly in PDF Viewer Plus. Static forms,
for instance ones scanned to PaperPort, can be turned into fillable forms by
using FormTyper, as described on page 44.
PDF files opened from the PaperPort desktop return there when you finish
editing or annotating them with all the updates included.
PaperPort Getting Started Guide
20
Acquiring Items
There are many ways to bring images and documents into PaperPort so that
you can use PaperPort’s viewing, editing, annotation, indexing, OCR, and file
management tools. For example, you can:
•
•
•
•
•
Scan photos, pages, and other images on a scanning device.
•
•
•
Acquire photos from a digital camera.
Add folders to PaperPort that already contain images and documents.
Import files from other programs on your computer.
Print documents from other programs to the PaperPort desktop.
Drag or cut-and-paste images and documents from Windows
Explorer, or other programs to the PaperPort desktop.
Bring files into PaperPort Professional 12 using DesktopDelivery.
Capture snapshots of web pages, using a supplied but separate utility
that runs on Windows XP.
Scan to the PaperPort desktop
PaperPort is designed to work with TWAIN- and WIAcompatible scanners.
Click the Scan Settings button to display the Scan or Get
Photo pane. Choose a scan profile. Profiles are optimized
for typical scanning tasks.
Then choose between using the native interface of the
scanner or utilizing the new Scanner Settings pane of
PaperPort for best scanning results. To use the interface of
the scanner driver, mark the checkbox Display scanner
dialog box. Leaving it empty will put the scanned item
onto the active Workspace.
Turn on the Capture Assistant to add subject, author and keywords to items
and (in PaperPort Professional) to view and control scanning progress.
Acquiring Items
21
When the scan is complete, you will see your item on the PaperPort desktop.
If your scanner does not use a TWAIN or WIA device driver, use the program that
came with your scanner to scan items. Then, copy or move the scanned items to
PaperPort. Refer to the PaperPort Help for more information about scanning.
PaperPort makes it easy to scan pages as separate items or as a multi-page
item. To scan and collate two-sided pages on your ADF scanner, flip the
pages when prompted, click Scan Other Side, and PaperPort will
automatically scan and collate the pages in the correct order.
You can also use your scanner device buttons to scan directly into PaperPort.
Open the Windows system Control Panel, choose Scanners and Cameras,
choose an event in the Events tab, and assign PaperPort to it.
You can also use a high-speed, networked scanner to scan items to a networked
folder and then add the folder to PaperPort. Use DesktopDelivery (available in
PaperPort Professional 12) to monitor folders for incoming scanned images.
Set up your scanner with PaperPort
Before using PaperPort for scanning, your scanner should
be installed with its own scanner driver software and tested
for correct functionality. Scanner driver software is not
included with PaperPort.
Properly installed and correctly functioning scanners are
immediately available in PaperPort by clicking the Select
button, and choosing one in the Available Scanners
dialog.
If you are not satisfied for your scan results, you can run
the PaperPort Scanner Setup Wizard from the Start menu,
under the program group PaperPort 12.0.
Using Scan Profiles
PaperPort comes with scan profiles optimized for typical scanning tasks.
Choose Black and White, Grayscale or Color Document, Color Photograph
or Color Searchable PDF Document.
PaperPort Getting Started Guide
22
Scan profile panels have the following tabs:
•
•
•
•
Profile: displays the currently used scan profile.
SET: define what enhancements you would like to run automatically.
Output: set file format and automatically suffixed file names.
Scan: adjust scan settings: mode, resolution, size, orientation, filter
color, brightness and contrast
In PaperPort Professional 12, you can also add new profiles, or remove
existing ones. This edition of the program contains an extra scan profile:
Color PDF-MRC High Compression. MRC is a technology that lets you
make much smaller PDF files.
Print to PaperPort
To bring items in from other programs, print them to the PaperPort desktop
as PDF Image, PDF Searchable or PaperPort Image (.max) items. The default
is PDF Image; go to Desktop > Options > Item to change it. This lets you
quickly import spreadsheets, pictures, database files, word processing files,
and other files into PaperPort as items on the PaperPort desktop. This works
through the File menu (or equivalent) in the source application; choose Print
to PaperPort or choose Print, then choose PaperPort Image Printer.
With PaperPort Professional, you can use PDF Create add-in buttons in
Office applications to make a PDF from the current document or attachment
in the Formatted Text & Graphics (PDF Normal) format. Do this also by
choosing Print and selecting the printer named ScanSoft PDF Create!.
Choose Print in your web browser to create print-formatted views of web
pages. The printer PaperPort Image Printer gives you MAX, PDF Image or
PDF Searchable files, the ScanSoft Printer gives you Normal PDF.
In all cases, PaperPort is launched if not running and the PDF file is placed
on the current desktop.
Capture web pages
You can use Web Capture to capture web pages on the Internet as PaperPort
Image items or PDF Image items on your PaperPort desktop. These items
function as convenient pointers to your favorite web sites.
Acquiring Items
23
Once you capture a web page, you can view it, archive it, go to the actual web
page on the Internet (MAX items only), or index the content of captured web
pages. This program is installed along with PaperPort, but is not integrated
into it. Go to the program folder and run PPwebcapture.exe. It functions
only on the Windows XP operating system. A short Help file is available at
the same location.
Use the Print to PaperPort feature to create print-formatted views of web pages,
which can also be added to the All-in-One Search index for searching by text
content.
Add PaperPort folders
PaperPort provides an easy-to-use filing system for
organizing your items and sharing them with others. In
the Folders pane, you can:
• Add existing folders on your computer to the
Folders pane.
• Create new folders, mapped network drives
and folders on external attached devices.
Initially, the Folders pane shows a set of folders designed to help you get
started using PaperPort. You can move or delete these folders whenever you
prefer. If you choose a custom installation, you can add your own folders at
that time.
Any time later, you can add folders already on your computer to the Folders
pane, including network folders and folders on external devices attached to
your computer. Documents within these folders are then available for use
within PaperPort.
Refer to the PaperPort Help for more information about adding and using
PaperPort folders.
Use Folder Notes to assign the same file information to all PDF or MAX files
arriving in a folder of your choice through scanning or DesktopDelivery.
PaperPort Getting Started Guide
24
Use DesktopDelivery
DesktopDelivery (PaperPort Professional 12 only) monitors
network or local folders for incoming files of specified types (PDF, TIFF,
JPEG and MAX). It can also monitor e-mail folders for attachments. It
imports these files to specified PaperPort DesktopDelivery folders (i.e.
PaperPort folders designated to receive files from a monitored folder outside
PaperPort). Right-click on any PaperPort folder and select DesktopDelivery
from the shortcut menu.
Monitored e-mail inbox folder
Monitored folder
You can auto-add item properties to PDF and MAX files entering the
selected DesktopDelivery folder. Refer to the PaperPort How-to-Guides or
Help for details.
Import pictures from your camera
To bring digital photos on the PaperPort desktop, first plug your camera in. If
your device is displayed as a drive you can start acquiring your files. If your
camera does not support this kind of operation, and its driver is installed
properly, its TWAIN or WIA interface will display enabling you to import
images from it.
Do not edit the images on your camera in place – not all editing produces the
desired result first time. Instead, bring your files into PaperPort and use the SET
tools to enhance them.
Acquiring Items
25
Touching Up Images
When you display an image item in the Image View
window, PaperPort provides several tools you can use
to adjust or improve your image.
For example, you can straighten a scanned page,
lighten an underexposed photograph that is too dark,
adjust the color in a color picture, remove ‘dirt spots’
from a document page, clear shadows and spots from
page edges, or sharpen fuzzy pictures. In addition, you can rotate an item,
remove stray dots, enhance lines, remove red eye, and crop part of an image.
Some SET Tools are primarily designed for photo, or image enhancement,
while others (shaded) help you prepare items containing text for Optical
Character Recognition (OCR). In the Image View window the Page ribbon
contains the SET tools to modify the current page. Some of these tools are
also available on the PaperPort desktop for use with all pages in the selected
item. The availability is shown like this:
P = Image View or ImageViewer (Page ribbon) to change the current page only.
PI = Also on PaperPort desktop (Item ribbon) to change all pages in selected item(s).
PM = Also in PaperPort desktop shortcut menu to change all pages in selected item(s).
PS = Also available in a Scanning Profile to modify all incoming images.
Scanner Enhancement Technology tools
Select Area Use the Select Area tool to select part of an image
you want to cut, copy, or delete with commands on
(P)
the Page ribbon or shortcut menu. Use it to select
part of an image for cropping, using the Remove
Red Eye, Erase Inside or Erase Outside tools.
Rotate
(PI)
Click the Rotate tool to rotate the selected page ot
item 90 degrees to the left, right or by 180 degrees.
Straighten
an image
Sometimes a document is crooked when scanned.
When this occurs, you can use the Straighten (P)
and Auto-Straighten (PSI) tools to adjust it.
Straightening lines of text in a black-and-white
image file will yield better OCR results.
PaperPort Getting Started Guide
26
Autoenhance
(PSI)
The Auto-Enhance feature adjusts the brightness
and contrast, color, and tint of an image or item.
PaperPort analyzes the image and tries to correct
whatever is wrong with it.
Enhance
an image
(P)
You can manually adjust your image using the
Enhance tool. It lets you change brightness,
contrast, color and tint values and choose the best
result from nine candidates, as shown on page 29.
Sharpen
an image
(P)
Select the Sharpen tool to adjust the sharpness of
a blurry picture or blur a sharp image for special
effect.
Remove
red eye
(P)
The Remove Red Eye tool helps you to remove
the red-eye effect from a selected part of a picture.
Red Eye may occur when photographing people or
animals in low light or with a flash.
Remove
part of
an image
Use the Selection tool to define the part you want to
keep and use the Crop tool (PS) to remove the
remainder. Select the Eraser tool (P) to erase an
image area that you draw over with the pointer.
Resize
(PSI)
Resize an image or item and/or change its resolution
or define these settings for a scanning profile.
(Colors can also be converted or inverted).
Remove
stray dots
(PM)
Scanned images sometimes include dots or speckles.
The Remove Stray Dots tool automatically finds
and removes such ‘dirt’ from a page. Use it for better
OCR results on black-and-white images.
Improve
lines
(PM)
The Improve Lines tool (for black-and-white
images) darkens lines and connects broken lines in a
table or form to appear darker and straighter. The
use of this tool will render better recognition results.
Erase
outside
(PS)
Use this tool to clear shadows and spots from page
edges to improve OCR performance. Called Erase
Edges in the Scan profile. There is also an Erase
Inside tool (P).
Touching Up Images
27
Set white
point (P)
Click this tool, then click on a light color in the
image that will become the white point. See below.
Set black
point
(P)
Click this tool, then click on a dark color in the
image that will become the black point. The colors
chosen for the new white and black points are
displayed on the Status bar.
Click this tool to apply the new black and white
points to the current image (P) or item (I). If the
result is not acceptable, undo your changes and pick
new values.
Apply
current
black and
white
points
N
e
po w b
in lac
t
k
de
fa
ul
t
de
fa
ul
N t
ew
po w
in hi
t te
Changing the black and white points
You can do this to improve image quality by removing the very dark and
overexposed areas. All colors lighter than your chosen new white point will
become white. All colors darker than your chosen new black point are set
to black. A typical use for this is to remove a shaded gray background in a
document you want to OCR. Select one of the darker gray pixels from the
background and apply it as the white point. Then the background will
become white. Changing black and white points for a color photo will
typically increase its contrast, but may also change color values.
Before:
After:
You can apply new black and white points to individual images, as
described. You can also apply them as an auto-enhancement to all new
pages scanned with a given scan profile.
PaperPort Getting Started Guide
28
Enhancing Images Manually
Choose Enhance from the Page ribbon in Image View to receive nine
candidate variants of your picture. Adjust brighness and contrast, color, or
tint, then double-click the desired image. It is placed in the center and
becomes the new original. The first original remains and can be reset.
Click to finish
enhancing
Current selection
Choose to modify
Brightness & Contrast
Color
Tint
Slider for less
or more
Original image
(with reset)
Edit multiple images
The ability to process items as a group is often referred to as batch
processing. PaperPort provides batch processing features so that you can
quickly enhance, modify, or rotate multiple image items in a single operation.
Select one or more image items on the desktop, and then, on the Item ribbon,
choose the desired command. See the Help for more information.
Touching Up Images
29
Annotating Pages
PaperPort includes a collection of annotation tools that allow you to mark up
scanned documents with information you would like to keep with that
document. PDF files are best annotated in the supplied Nuance PDF
product. PaperPort Image (.max) files and all other image items must be
annotated in Image View or ImageViewer, but remember that you can drag
any of these files onto the Nuance PDF product icon on the Send To bar to
have them converted to PDF Image or PDF Searchable, ready to be
annotated or otherwise edited.
In PDF and PaperPort Image (.max) files, annotations are editable, meaning
that you can reposition, change, remove them, or edit textual content
whenever you want. On other types of image items, such as JPEG and
Windows Bitmap files, annotations become a permanent part of the image
when you save the item. For item types that cannot accept annotations,
PaperPort automatically disables the annotation tools.
Using PaperPort’s annotation tools, you can add notes and text, highlight text,
draw lines and arrows, or stamp a picture onto an image item.
It is easy to send a document with annotations to people without PaperPort
by using the PDF Image or PDF Searchable format. The recipient only has to
double click on the e-mail attachment they receive from you and they will see
the document in the system default PDF viewer – annotations intact.
Annotation tools
You can select an annotation tool from the Annotation ribbon whenever you
display an image item in the Image View window. Use commands in the
Annotation Settings group to change properties for future annotations
created with that tool. This does not affect existing annotations. To turn off
any annotation tool, click a different one – the Select Annotation tool is
usually the best for this. See a detailed list of these tools in Help.
We detail here the annotation tools available in PDF Viewer Plus for use with
PDF files.
PaperPort Getting Started Guide
30
Use the following commands in PDF Viewer Plus:
Hand
Select this tool and click in an annotation to move,
cut, copy, or resize it on the page. Double-click on a
note or text box to edit its text. Right-click on a
selected annotation to change its status or properties.
Note
Want to give yourself a reminder? Select the Note
tool and add a resizable note much like a sticky note
that you write on and then stick on paper
documents. You can shrink the note to an icon.
Right-click to access note properties. Double-click to
re-open the note.
Text Box
Adding a text label to your images is simple with the
Text tool. Select this tool to enter text whose
properties you can set in Edit > Preferences >
Comment.
Highlight
Use the Highlighter tool to highlight selected text
on the page or in a text box, just as you might use a
highlighting pen on paper.
Pencil
The Pencil tool lets you draw freehand lines on the
page.
Line
Select Line tool to draw straight lines; right-click and
choose properties to make arrows and further
format the line.
Stamp
The Stamp tool lets you paste supplied stamps or
bitmapped images of your choice on the page, much
like using a rubber stamp.
Annotating Pages
31
Protecting Items
In PaperPort Professional 12, you can adjust the security level
of your PDF files (supported up to format 1.7). When you
create a new PDF from existing ones (for example, by copying
a thumbnail of a page onto a Workspace) its security settings
will be the same as those of the original one. Newly created
PDF files will be generated according to the default PDF
security settings in PaperPort, as specified on the Item ribbon.
There are two types of passwords in the program. The open password
restricts document accessibility: you can only open it by supplying the
password when prompted. The permissions password allows users to define
how the document may be used. If it is not specified, further use of the file is
possible without any restrictions.
Filing Items
A key to organizing items in PaperPort is filing items in appropriate folders.
You can drag and drop items from one folder to another or from the
PaperPort desktop into any folder you want. You can specify search criteria to
help you find your items later. Moving and copying items between folders is
also possible in split view across Workspaces. The name of each item appears
below the thumbnail in thumbnail view. In a multi-page item, the name
appears below the individual page names.
Using the Folder Manager dialog box, you can add,
remove, move, and rename PaperPort folders. You
can change the color of a folder icon to one that
helps you organize your items. You may also add,
remove, move, and rename any folder in Windows
Explorer that is viewed with the PaperPort folder structure. These changes
will be automatically reflected in PaperPort.
In the Folders pane, you can drag and drop, copy or move subfolders and
their content to other subfolders or PaperPort folders, create or delete
subfolders; or add Folder Notes. Sharing and Security, and DesktopDelivery
adjustments can also be directly made for each folder shortcut menu.
PaperPort Getting Started Guide
32
The Back button makes it easy to step through the ordered history
of folders you recently visited one by one – functioning similarly to
Internet Explorer – enhancing quick backward navigation for both
Workspaces independently of each other.
You can add notes to folders that are relevant to their content. A
customer name, telephone number, date of birth, project ID,
e-mail address are typical examples.
When scanning or using DesktopDelivery, this information can be
automatically added to all PDF or MAX files entering this folder, so it is
easier to search for them with the PaperPort All-in-One Search or other
search utilities.
Folder Notes are automatically added only if you checkmark ‘Automatically
add keywords from Folder Notes’ in the Output panel of the Scan Settings
dialog box or (in PaperPort Professional for DesktopDelivery) in the Folder
Properties dialog box.
In PaperPort Professional, you can quickly import a set of folders plus any
content by listing them in a plain text file with precisely this structure:
*** PaperPort ***
Foldername1
Foldername2
Foldername2/subfoldername2a
Foldername2/subfoldername2b
Foldername3
...etc.
Right-click in the Folders pane and choose Import Folder Structure to select
the text file.
Filing Items
33
Add search criteria to items
You can assign item properties to PaperPort Image items and PDF files, and
then use the properties as search criteria to find items in PaperPort.
PaperPort also allows you to assign the same keywords to multiple items at
the same time, providing a powerful tool for organizing and locating similar
documents and images.
Select multiple items on the PaperPort desktop, then choose Properties
from the shortcut menu; words entered under Subject, Author and
Keywords will be applied to all selected items.
Another way to assign the same item properties to all PDF or MAX files
arriving in a folder of your choice through scanning or DesktopDelivery is to
use Folder Notes. Enter words under Subject, Author and Keywords. These
words are applied only if you checkmark ‘Automatically add keywords from
Folder Notes’ in the Output panel of the Scan Settings dialog box or (in
PaperPort Professional) in the Folder Properties dialog box for
DeskopDelivery.
PaperPort Getting Started Guide
34
Finding Items
PaperPort provides features to help you find your PaperPort items. You can
quickly find an item by visually browsing through thumbnails on your
PaperPort desktop.
When you have many folders and items, PaperPort provides more powerful
capabilities with All-in-One Search.
All-in-One Search provides many options for specifying where and what to
look for when finding an item, including indexed text content. This
information is referred to as search criteria.
You can look for items by:
•
•
Item properties (File search)
Text content (Index search)
Find items by their properties
You can search for any type of item by its item name.
You can also search for PDF and PaperPort Image (.max) files by item
properties, such as keywords and subject information.
When you search by item properties, turn off the ’Use All-in-One Search
index’ checkmark, then specify criteria as follows:
•
•
•
•
•
•
Name – item name (not necessarily that of the file).
Author – as defined under Item properties.
Keywords – as defined under Item properties.
Comments – as defined under ’Subject’ under Item Properties.
Annotations – Notes or text labels added to PDF or MAX files.
URL – The link texts of captured web pages.
The Author, Keywords, Comments and URL are available for PDF or
MAX files only.
Finding Items
35
Find words in an item
To search for words within an item, you need to add the item to the
All-in-One Search index and select Use All-in-One index. When you search
using the index, you can find items that have been indexed by their
properties, or text content, or both.
Specify search limits:
• all files in current folder but not its sub-folders
• current folder plus sub-folders
• all PaperPort folders and sub-folders.
Define search precision:
• Exact match finds words and common endings: search look finds looks,
looked, etc.
• Approximate match finds as above and more: search look might find
lock or luck.
When the search is complete, results are displayed – each as one row of a
table. Select one and click the View Text button to see your search phrase
occurrences in their context. Click the Copy Text button to extract text from
the file and place it onto the Clipboard. Right-click a result file and choose
‘Open’ to launch the document in its associated application. ‘Open
Containing Folder’ switches to the file’s folder with the file selected.
To filter search results using file information, turn on the relevant checkboxes under Name, author, keywords and specify search text here as well.
Add items to the All-in-One Search index
The All-in-One Search index uses PaperPort’s OCR software to extract and
copy textual content from your items, and creates a database of the words or
phrases in those items, much like the index of a book. Item properties, such
as name and author, are also added to the index. Although creating an index
is time consuming, searching for items in the index may be much faster than
searching file by file.
Using PaperPort Options available from the PaperPort button, you can
specify whether you want All-in-One Search to run automatically each time
you add a new item or modify an existing item. You can also set how long
PaperPort should wait before starting the update process.
PaperPort Getting Started Guide
36
If you prefer, you can manually update the All-in-One Search index for all
items, a single item, or all items in one or more folders. It is good practice to
update the All-in-One Search index on a regular basis to shorten the length of
time required to complete the process.
Use the Index Manager in PaperPort Professional 12 to create and schedule
indexing tasks on a regular basis. For quick access to your regular indexing
processes, launch the Index Manager directly from the All-in-One Search pane.
Use the All-in-One Search pane
Use the All-in-One Search pane to enter search criteria and
select options for finding your PaperPort items.
A file search is based on item properties only. You enter
the item properties in the Name, author, keywords box.
An index search references PaperPort’s All-in-One Search
index to find item properties or actual text contained
within an item. You enter the item properties in the Name,
author, keywords box and the text content in the
Containing indexed text box.
To do an index search without a file search, enter a string in the Containing
indexed text edit box and clear all six file search checkmarks.
To do a file search without an index search, turn off the Use All-in-One index
checkmark and enter a string in the Name, author, keywords edit box, select
as many of the six file search checkmarks as desired.
To do a file and index search on a single search string, turn on Use All-inOne Index, enter the string in the Containing indexed text edit box, make
sure the Name, author, keywords edit box is empty and turn on as many file
search checkmarks as desired. The search returns a list of all items that match
the search string, either in file contents or file information.
To do a combined file and index search, turn on Use All-in-One Index, enter
a string in the Containing indexed text edit box, enter a string (same or
different) in the Name, author, keywords edit box and turn on as many file
search checkmarks as desired. The search returns a list of all items that
contain the specified string or strings in both the file contents and the file
information. In other words, you are likely to find few occurrences.
Finding Items
37
Use PDF Searchable Image
In addition to using PaperPort’s proprietary search and indexing
capabilities, you can also create PDF Searchable Image files
that can be indexed and searched outside of PaperPort. PDF
Searchable is a flavor of PDF; it contains a bitmapped image of a
document or graphic with textual content stored as hidden text. This format
maintains an identical appearance to the original document and enables other
programs, such as Nuance PDF Converter Professional, Windows Desktop
Search or Google to search the contents of the file.
You can create files in PDF Searchable Image format as follows:
•
Open an item and choose Save As from its shortcut menu. Choose
PDF Searchable Image as its file type.
•
Scan an item using the profile ‘Color Searchable PDF document’.
•
Import an image-only PDF into PDF Viewer Plus or PDF Converter
Professional. It may offer to make a searchable copy; if not select
Make Searchable PDF from the Tools menu.
•
Print an image to the PaperPort desktop. By default it becomes an
Image PDF. Go to Desktop > Options > Item to specify Searchable
PDF as your preference.
Schedule indexing tasks
The Index Manager is a PaperPort
Professional 12 application
designed to create, modify and
schedule indexing tasks for a given
local or network folder. Indexed
files can afterwards be searched
with the All-in-One Search.
PaperPort Getting Started Guide
38
For new tasks you can set which folder to browse (local or network) with
subfolders included or excluded, set timing and recurrence (duration, pattern
and range), activate and deactivate a task, pause its completion, or skip a task
occurrence. In the program settings dialog box, you can specify how and
when the Index Manager should stop.
Sharing Files
PaperPort provides many tools to make it easy for you to share files, images,
and documents with friends, colleagues, and business associates.
These tools are built into the program and are readily available on different
ribbons for quick access whenever you need them.
To help you share your items with others, PaperPort makes it easy to:
E-mail items to others, simply by dragging the items to your
favorite e-mail program on the PaperPort Send To bar.
Scan or convert items to the PDF format, the ever-popular
file-sharing format considered by many as the industry
standard for document distribution.
Access shared folders located on your local or wide area
network, by adding the folders to your PaperPort Folder
pane.
Access Sharing and Security settings directly from the folder
shortcut menu.
With PaperPort, it is simple to set up a
shared folder on a server or a PC that
can act as a central repository for all
important office documents. Each
PaperPort client can connect to that
folder and use PaperPort’s document
management features and paper
handling tools to find and use
documents instantly.
Sharing Files
39
In addition, you can convert items to popular output formats for shared use
in numerous other programs. To obtain a list of all supported program links,
visit PaperPort at the Nuance web site at www.nuance.com.
Sending Items to Other Programs
Drag and drop functionality makes opening your files in your favorite
programs a snap. Simply choose the file you want and drop it onto the
program icon on the Send To bar at the bottom of the PaperPort desktop.
Common office tasks like e-mailing and faxing are now faster than ever. The
Send To bar makes using scanned documents in other applications easier by
automatically translating the document into a form that the receiving
application can understand.
For example, you can drop a scanned image of a letter onto the Microsoft
Word link on the PaperPort Send To bar, and PaperPort will recognize that
the application you are attempting to open needs a text file rather than an
image file. PaperPort will run OCR for you, and send editable text to Word
rather than a static image file.
PDF Viewer Plus
OmniPage
OP Workflows
FormTyper
SharePoint
Microsoft Outlook®
PDF Converter
PaperPort supports a wide variety of programs including word processing,
spreadsheet, fax, Internet e-mail, graphics, optical character recognition
(OCR), and online services programs. The program link on the Send To bar
does any necessary conversion and may provide options for sending the item.
PaperPort Getting Started Guide
40
Use OmniPage with PaperPort
If PaperPort exists on a computer with OmniPage, its OCR services become
available and amplify the power of PaperPort. You can choose an OCR
program by right clicking on a text application's PaperPort link, selecting
Send To Options and then selecting OmniPage as the OCR package, instead
of the always available PaperPort OCR.
With OmniPage you can:
•
Instantly convert paper into usable Microsoft Office documents.
•
Turn PDF files into editable documents while retaining their layout.
•
Automatically process images from network MFPs and scanners.
•
Scan and convert documents into XML, PDF, TIFF and more.
•
Share documents using e-mail, Web, XML and e-Books.
• Use OmniPage workflows for instant but effective control
over document conversions.
Customize the Send To bar
You can change the way program icons appear on the Send To bar in a
number of ways. Specifically, you can add programs, and remove or rearrange
program icons. Refer to the PaperPort Help for details.
Sending Items to Other Programs
41
Adjust Send To options
You can tune Send To options to
specify how you want to use a
certain program on the Send To bar.
For example, you can specify the file
format in which PaperPort will save
an item.
If you have the professional version
of OmniPage 14 or above on your
system, use the Send To options for
the OmniPage Workflows link to
choose a workflow.
To e-mail an item, simply drag and
drop the item to your e-mail program
on the Send To bar. Use the e-mail
link options to specify the file format
of the attachments and other options.
PaperPort Getting Started Guide
42
Converting Items
Using PaperPort, you can convert scanned documents and text items to
image formats, and convert images back to text.
Convert items to image formats
You can convert scanned documents and text items to image formats.
The Save As command allows you to save image items to any of a variety of
standard image formats including PDF, JPEG, and TIFF, as well as the native
PaperPort Image format (.max).
You can convert text items and image items to PaperPort Image items (.max)
using the Duplicate as PaperPort Image command. The Duplicate as
PDF Item command allows you to convert text items to PDF Image items.
In PaperPort Professional 12, you can also convert text items such as Word
documents, to PDF Formatted Text & Graphics format using PDF Create.
By selecting more than one item, you can convert multiple items to a new
format at the same time. Refer to Help for details.
Assembling documents
You can assemble documents by combining them. The files to be selected
need to be in a single folder and selected in the order you want them in the
stack. Click the arrow next to Combine Items and choose one of the
available combinations:
•
Combine into PDF Stack: Each original page becomes one PDF
page with no resizing.
•
Combine into Multi-item PDF Pages, Resize to fit: This resizes
the contributing items and always places four original pages onto a
single PDF page.
•
Combine into Multi-item PDF Pages, Maintain original sizes:
This places as many original pages onto each PDF page as it can.
•
Combine into Thumbnail PDF Page: This creates thumbnails of all
item pages and fits as many as possible on a PDF page.
Converting Items
43
The original items remain in their original file types.
Combining usually takes more time than stacking because of PDF generation.
PaperPort Professional can additionally combine text items. To convert a text item,
the application that created it must be available on your system.
Convert images to text
You can convert scanned documents to text by a simple drag and drop of the
thumbnail to your word processor program. PaperPort automatically
processes your scanned document using PaperPort’s OCR software, launches
your word processing program, and loads the scanned text into a document
ready for editing. PaperPort also allows you to copy text from part of an
image item for use in a text editing, word processing, or spreadsheet
program. The OCR software processes the text and copies it to the Windows
Clipboard. Open the program in which you want to insert the text, and use
Paste to paste the text in a file.
Filling Forms
Active PDF forms can be filled using your PDF product. Choose
the Hand tool and step through the form fields using Tab or arrow
keys, making choices and entering texts. Help and the How-toGuides list all the possible form control types.
FormTyperTM is a PaperPort program that enables you to fill in static forms,
such as insurance forms, registration cards, and medical forms, that you scan
to the PaperPort desktop.
You simply drag a form from the PaperPort desktop to the FormTyper
program on the Send To bar. The form is converted to PDF if necessary and
opened in your Nuance PDF product. FormTyper automatically analyzes the
form, recognizes the blank areas in which data can be entered, and creates
blank fields for the data. FormTyper can detect edit boxes and checkmarks.
Now, you can quickly type and tab to each field. You can also quickly
reposition edit box or checkmark fields, insert new fields, and remove fields
as necessary. After you enter data and complete the form, save the form to
the PaperPort desktop so that you can print or e-mail the form in its entirety
with its completed data.
PaperPort Getting Started Guide
44
If you have a pre-printed form, choose Form Fields Only in the Print dialog
box to print your responses directly onto the form.
PDF File Support
PDF Flavors
PDF (Portable Document Format) files are often classified into
three different types, commonly called flavors:
•
•
•
PDF Image
PDF Searchable Image
PDF Formatted Text & Graphics (PDF Normal)
Opening PDF files
PaperPort can open and display PDF files of all three flavors. PDF files by
default open in PDF Viewer Plus or (if available) in PDF Converter
Professional. They can be opened as PDF Image in ImageViewer. Protected
files can be accessed by giving the correct password. Security limitations are
respected and can be changed if you can provide the Permissions password.
PDF page operations
In PaperPort you can insert or append pages from one PDF file to another
and also stack a set of PDF files into a single one. With pages of different
flavors, the program determines a single flavor for the resulting file. You can
unstack one or all pages from a multi-page PDF file to get one PDF per page.
Combining items into a PDF file
You can combine a wide range of image items into a single target PDF. All
combined items remain in their original locations and file types. In PaperPort
Professional text items can also be combined.
Annotating PDF files
You can add notes, highlights and graphic items like arrows to PDF pages of
any flavor as annotations. These do not become part of the real PDF page,
but exist on a separate layers so they can be viewed, moved, changed or
deleted in PaperPort or other PDF viewing and editing programs. Annotation
can be done in ImageViewer or your PDF product.
PDF File Support
45
Modifying PDF files
Use SET tools to improve the appearance of PDF pages or prepare them for
more successful text recognition (OCR). See page 26 and the Help topic:
About enhancing pages and images. To modify the real text content in a PDF file,
or change its color or attributes, you need a PDF editor such as Nuance PDF
Converter Professional.
Extracting text from PDF files
The Copy Text command finds text in PDF files and places it onto the
Clipboard as plain text, running OCR if necessary. The command View Text
does the same, but displays the text in a PaperPort window. You can choose
to have these texts stored or not; if not it is regenerated each time the
command is used. Send PDF files to word processor programs on the Send
To bar. This delivers editable text with a defined level of formatting, using
OCR if necessary. See the Help topics: To convert scanned documents to text and
Output options for the target program.
Adding document information to PDF files for searching
You can define an item name, author, subject and keywords to a PDF file and
also assign page names to each page to help in searching. See the Help topic:
Assigning properties to PaperPort Image and PDF files and Item properties. The
All-in-One search finds words in this document information for one or more
PDF files. You can search through document information only, through text
content only, or both, with different search strings for each search type.
Indexing via the Index Manager makes full text searches much faster.
Saving PDF files to other file types
You can save PDF files to a range of image file types and to XPS files. See
Help: About saving timage items. A multi-page PDF results in a single file when a
multi-page file type is selected, otherwise each PDF page becomes a separate
file.
Adding PDF files to Windows Desktop Search
Go to Desktop > Options > Advanced to enable or disable PaperPort as the
agent for handling PDF files in Windows Desktop Search.
For more information see Help: About PDF files and About creating PDF files.
PaperPort Getting Started Guide
46
Creating PDF Documents
Create PDF Image files from other applications
In Desktop > Options > Items check that PDF and not MAX is selected as
the target file type; choose between PDF Image ans PDF Searchable. Then
open a source file in a suitable application and choose Print, typically from
the File menu. Choose PaperPort Image Printer and make print settings, e.g.
black-and-white versus color conversion. See the Help topic About the
PaperPort print driver and Printing to PDF from other applications.
Create PDF Searchable files from scanning
Open a scanning profile and set the PDF file type in the Output panel or
choose the supplied profile Color Searchable PDF Document. See the
Help topic Modifying Scan Profiles. Use the profile to generate PDF files.
Create a PDF from an existing PDF, XPS or image item
Right-click on a PDF file and choose Duplicate Item, Duplicate Current Page
or Save As. The flavor of a source PDF is retained for the copy. Right click
on an image item and choose Duplicate as PDF or Save As. When you
double-click an XPS file so that it opens in PDF Viewer Plus, a copy is
automatically created as a PDF file, ready to be modified and saved.
Creating PDF Documents with PDF Create
Nuance® PDF Create lets you create PDF files from one or
more source documents. The PDF files will be viewable,
printable, searchable and editable.
How to Start PDF Creation
You can start PDF creation from different locations:
•
•
•
from the Start menu through the Create Assistant
from Windows Explorer or from your desktop using a shortcut menu
from Microsoft Word, Excel, PowerPoint, Outlook or Internet
Explorer using a toolbar or the PDF Create menu items or the
Nuance PDF ribbon.
PDF File Support
47
The Help topic About creating PDF files details all the possible starting points
for PDF creation and the available choices.
You can create one or more of these PDF flavors, depending upon your
version of PaperPort software. Refer to the PaperPort Help for additional
details.
This table lists which features are available for creating each type of PDF in
PaperPort 12 and PaperPort Professional 12:
Format
PaperPort 12
PDF Image
Scan or Get Photo
Print to PaperPort
Save As
(Web Capture)
PDF Searchable Image
Scan or Get Photo
Print to PaperPort
Save As
(Web Capture)
PDF Formatted Text
& Graphics
Scan or Get Photo
PaperPort
Professional 12
Scan or Get Photo
Print to PaperPort
Save As
(Web Capture)
Duplicate Item
Scan or Get Photo
Print to PaperPort
Save As
(Web Capture)
Duplicate Item
Scan or Get Photo
Print to PaperPort
Duplicate Item
Duplicate as PDF
Web Capture must be run outside PaperPort. See page 23.
Duplicate item transmits the PDF flavor of the original to the copy.
Duplicate as PDF accepts non-PDF files as input.
How to Get Help for PDF Create
Nuance PDF Create has a comprehensive HTML Help system. Access it
through the Help system in PDF Viewer Plus or PDF Converter Professional
or through the PDF Create menu in Microsoft Word, Excel or PowerPoint.
Press F1 to open Help at the topic describing the currently open panel.
PaperPort Getting Started Guide
48
Using ScanDirect
ScanDirectTM is a PaperPort program that enables you to scan
items and send them directly to PaperPort or other programs on
your computer without first running PaperPort.
ScanDirect runs as a separate program from the Windows Start Menu and
displays the ScanDirect bar.
Click for options
Scan
Single or multiple pages
Scan to PaperPort
desktop
Scroll right for more icons
ScanDirect bar with icons for
all scanning targets
Using ScanDirect, you can scan an item and immediately send it to either:
•
A program on the ScanDirect Send To bar – Icons on the ScanDirect
bar represent the programs that are linked to PaperPort and to
ScanDirect. To scan and then send an item to a certain program, click
the program icon, and then scan the item. ScanDirect will
automatically start that program when the scan is complete.
•
The PaperPort desktop – To scan and then work with the item in
PaperPort, click the PaperPort icon, and then scan the item. When the
scan is complete, PaperPort starts and displays the item in PaperPort.
You can then use all of PaperPort's features on the item.
When ScanDirect is used to scan to other programs it always works through
the scanner’s own user interface; the scan profiles in PaperPort are not used.
When ScanDirect is used to scan items to the PaperPort desktop, the output
is determined by the output setting for the previous scan: if it created an
image item, the current scan will also do this, and if it created a text-type
document (such as DOC, XLS, WPD, TXT or CSV) the current scan will
create a PDF Image, which you can make searchable, as already described.
In PaperPort Professional, you can scan items directly to Microsoft
SharePoint.
Using ScanDirect
49
Uninstalling PaperPort
For a full uninstallation, three PaperPort components should be removed,
one after the other, in any order. The components are PaperPort 12,
PaperPort Image Printer and PDF Viewer Plus. Removing only the image
printer and/or the PDF Viewer will cause PaperPort to function incorrectly.
1. Select Add/Remove Programs from the Control Panel.
2. Select Nuance PaperPort 12.0.
3. Click Remove to uninstall the program.
4. Repeat this for the remaining components.
5. A computer re-start is needed to complete the removal.
A de-activation step is performed at the start of un-installation, allowing you
to reinstall the program later without re-activation problems. De-activation
and re-activation require web access.
PaperPort is protected by the following US patents and foreign counterparts:
6,262,732; 5,077,807; 5,235,651; 5,261,009; 5,278,918; 5,278,920; 5,347,595;
5,381,489; 5,436,983; 5,657,397; 5,778,092; 5,862,259; 6,038,342 and 6,047,251.
PaperPort Getting Started Guide
50
If you cannot resolve a problem
•
Read the Troubleshooting tips in the PPDM Desktop Module online help.
•
Read the PPDM Desktop Module Release Notes. On the PPDM Desktop Module Help
menu, click Release Notes.
•
Read the Troubleshooting documentation provided with your scanner or digital camera.
•
Refer to the latest product support information at www.nuance.com.
The web site provides information as well as third-party programs that work with PPDM
Desktop Module. You can download support for linked programs for use on the PPDM
Desktop Module Send To bar, view a list of supported scanners, and find answers to many
frequently asked questions about using your PPDM Desktop Module software.
If you are still having a problem, please contact the manufacturer of the hardware or software with
which you received this application.
This page intentionally left blank.
PPDM OCR Module 17
This page intentionally left blank.
Powered by
Personal Paperless
Document Manager
v2
Quick Reference Guide
LEGAL NOTICES
Copyright © 2009 Nuance Communications, Inc. All rights reserved. No part of this
publication may be transmitted, transcribed, reproduced, stored in any retrieval
system or translated into any language or computer language in any form or by any
means, mechanical, electronic, magnetic, optical, chemical, manual, or otherwise,
without prior written consent from Nuance Communications, Inc., 1 Wayside Road,
Burlington, Massachusetts 01803-4609.
The software described in this book is furnished under license and may be used or
copied only in accordance with the terms of such license.
IMPORTANT NOTICE
Nuance Communications, Inc. provides this publication "As Is" without warranty of
any kind, either express or implied, including but not limited to the implied
warranties of merchantability or fitness for a particular purpose. Some states or
jurisdictions do not allow disclaimer of express or implied warranties in certain
transactions; therefore, this statement may not apply to you. Nuance reserves the
right to revise this publication and to make changes from time to time in the content
hereof without obligation of Nuance to notify any person of such revision or changes.
TRADEMARKS AND CREDITS
Nuance, ScanSoft, OmniPage, PaperPort, True Page, Direct OCR, Logical Form Recognition,
RealSpeak are registered trademarks or trademarks of Nuance Communications, Inc.,
in the United States of America and/or other countries. All other company names or
product names referenced herein may be the trademarks of their respective holders.
THIRD PARTY LICENSES/NOTICES
Please see acknowledgements/notices at the end of this guide.
Nuance Communications, Inc.
1 Wayside Road
Burlington, MA 01803-4609
U.S.A.
Nuance Communications International BVBA
International Headquarters
Guldensporenpark 32
Building D
BE-9820 Merelbeke
Belgium
C
O N T E N T S
WELCOME
5
New features in OmniPage 17
INSTALLATION
AND SETUP
System requirements
Installing OmniPage
Setting up your scanner with OmniPage
How to start the program
Registering your software
Activating OmniPage
Uninstalling the software
USING OMNIPAGE
DOCUMENTS
Processing methods
Defining the source of page images
Describing the layout of the document
Preprocessing Images
Zones and backgrounds
PROOFING
11
11
12
14
16
17
18
18
20
OmniPage Documents
The OmniPage Desktop and Views
Basic Processing Steps
How to use OmniPage with PaperPort
PROCESSING
7
20
21
28
29
30
30
34
40
42
48
AND EDITING
56
The editor display and formatting levels
Proofreading OCR results
Verifying text
The Character Map
56
57
58
59
OmniPage 17 User’s Guide
3
User dictionaries
Languages
Training
Text and image editing
On-the-fly editing
Marking and redacting
Reading text aloud
Creating and editing forms
SAVING
60
61
63
66
68
69
70
71
75
AND EXPORTING
Saving and Exporting
Saving original images
Saving recognition results
Sending pages by mail
Sending to Kindle
Other export targets
75
76
77
83
83
85
WORKFLOWS
86
Workflow Assistant
Batch Manager
Creating new jobs
Watched folders
Watched mailboxes
Barcode processing
File-it Assistant
TECHNICAL
89
91
92
97
98
99
101
103
INFORMATION
Troubleshooting
Supported file types
103
107
INDEX
109
Contents
4
Welcome
Welcome to this OmniPage® 17 text recognition program, and thank
you for choosing our software! The following documentation has
been provided to help you get started and give you an overview of
the program.
This User’s Guide
This guide introduces you to using OmniPage 17. It includes
installation and setup instructions, a description of the program’s
commands and working areas, task-oriented instructions, ways to
customize and control processing, and technical information.
Descriptions are based on the Windows VistaTM operating system.
In line with Nuance’s environmental policy, the Guide is supplied as
a PDF file only. To have a printed copy on normal sized paper, we
recommend double-sided printing with two pages per sheet.
This guide is written with the assumption that you know how to
work in the Microsoft Windows environment. Please refer to your
Windows documentation if you have questions about how to use
dialog boxes, menu commands, scroll bars, drag and drop
functionality, shortcut menus, and so on.
We also assume you are familiar with your scanner and its
supporting software, and that the scanner is installed and working
correctly before it is setup with OmniPage 17. Please refer to the
scanner’s own documentation as necessary.
Welcome
5
How-to-Guides
The How-to-Guides can be accessed from the Help menu. They are
a series of mini-guides that help you get started easily by providing
concise overviews of key program areas, such as getting input,
image improvement, zoning, recognition, editing, proofreading, new
features, and the like.
Electronic Help
OmniPage Help contains information on features, settings, and
procedures. It also has a comprehensive glossary, with its own
alphabetical index and a table of contents. The HTML help system
has been designed for quick and easy information retrieval. Help is
available after you install OmniPage.
Comprehensive context-sensitive help aims to provide just
enough assistance to let you keep working without delay.
It is available from dialog boxes. Press F1 in any dialog box
to access it, or click the help button if the dialog box has one.
Readme File
The Readme file contains last-minute information about the
software. Please read it before using OmniPage. To open this HTML
file, choose Readme in the OmniPage Installer or afterwards in the
Help menu.
Scanning and other information
The Nuance® web site at www.nuance.com provides timely
information on the program. The Scanner Guide
(http://www.nuance.com/scannerguide/) contains up-dated
information about supported scanners and related issues; Nuance
tests the 25 most widely used scanner models. Access Nuance’s web
site from the OmniPage 17 Installer or afterwards from the Help
menu.
Welcome
6
Tech Notes
The web site at www.nuance.com contains Tech Notes on
commonly reported issues using OmniPage 17. Web pages may also
offer assistance on the installation process and troubleshooting.
New features in OmniPage 17
If you are upgrading from version 16, you benefit from the following
innovations. Click the links to for more information.
•
Asian recognition: OCR services are provided for
Japanese, Korean, Simplified Chinese and Traditional
Chinese, with support for both horizontal and vertical text
flow and embedded English texts. Results can be viewed
and verified in the Text Editor. See “Asian language
recognition” on page 61.
•
Vertical non-Asian texts: Auto-detection of vertical texts
in two rotations functions inside table cells and anywhere
on PDF or XPS pages, and in certain cases on other image
file types. New tools allow vertical text zones to be drawn
manually. Texts display vertically and can be edited in the
Text Editor, using the True Page® formatting level. In other
levels the texts are displayed horizontally. See “Automatic
zoning” on page 48. and See “Zone types and properties”
on page 49.
•
Easy Loader: This provides a Windows Explorer-like
display of the file system in one of the OmniPage windows,
to keep files visible during your work and deliver full
Explorer functionality, yielding quick file selections; a
dialog box with a lock facility lets a file set be built up
before loading starts. With Quick Convert View it allows
New features in OmniPage 17 7
not only fast file loading but also 'one-click' total
processing: load > recognize > save. See “Input via Easy
Loader” on page 36.
•
Expanded ECM support: New links are available to
Hummingbird from OpenText and iManage from
Interwoven. When using SharePoint, the server, login and
password information must be provided only once per
session, and is offered in each subsequent session.
•
Improved support for Office 2007: The Direct OCR
buttons now appear on a separate Nuance OCR tab
instead of being mixed with all other Add-Ins.
•
More robust batch processing: The Batch Manager
automatically skips files that cannot be processed –
including those blocked by password requirements –
without stopping the main flow of work. The Job results
window indicates which files were not processed.
•
Running: The program’s launch speed is increased and
performance is considerably improved on multi-core
computers. Support for quad-core machines is introduced.
•
Linking workflows to scanner buttons: OmniPage
functions and workflows can be associated with scanner
buttons, so the whole pre-processing, recognition and
storage of documents can be launched from the scanner.
See “Scanning to OmniPage and workflows” on page 39.
•
Output to Kindle: The new Kindle Assistant lets you
create workflows to send recognition results to a Kindle
account at Amazon and receive them displayed on a Kindle
device registered with that account. See “Sending to
Kindle” on page 83.
New features in OmniPage 17 8
•
Other improvements: Advances to image pre-processing
provide better layout retention and overall accuracy –
particularly in XPS files and document-to-document
conversions. HD photo (JPEG XR) image loading is now
supported. Integration with Microsoft Word, Excel and
PowerPoint is enhanced. Linearized PDF files can be
created, so they are optimized for faster web viewing.
Form layout description is now available in Quick Convert
View.
New features in OmniPage 16
If you are upgrading from version 15, you will also benefit from the
following innovations:
•
Three screen views: Choose from Classic (as in OmniPage
15), Flexible and Quick Convert View (all main controls on
a single panel). See Chapter 3, page 21.
•
Multiple documents: In Classic or Flexible View you can
have two or more documents open at one time, for easy
cross-document editing.
•
Digital camera processing: perform OCR on digital
camera images with special algorithms. See Chapter 3,
page 35.
•
2007 programs: OmniPage supports the latest Word and
Excel inside Office 2007 (DOCX and XLSX), and also
provides links for SharePoint 2007 and Outlook 2007.
•
PDF Enhancements: these include support for PDF
version 1.6, faster processing speed, higher accuracy,
improved output quality, and the MRC high compression
technology for certain PDF flavors.
•
Legal documents: OmniPage offers high-quality handling
and recognition of legal documents.
New features in OmniPage 17 9
•
Customizable shortcut menus in Windows Explorer:
send image files or PDFs directly to major Windows
programs, process them with your own workflows, or use
the Convert Now Wizard for easy conversion control.
•
General improvements: these include faster processing,
better quality output page layout (font matching, table
detection, etc.); and a new, intuitive Workflow Assistant.
Key features unique to OmniPage Professional.
•
Extracting data from filled forms: A workflow step
allows data to be extracted from sets of forms and
exported to databases, based on a PDF form template. The
forms can be active PDF forms, static forms in a range of
image formats or scanned paper forms.
•
Marking and redacting: Text can be highlighted,
struckout or redacted (made unreadable) in the Text
Editor. Redacting is useful for legal documents or for those
with confidential content.
•
File-it Assistant: A more efficient aid for creating and
using barcode cover page workflows. These allow for
automatic processing and storage of documents driven by
the push of just one scanner button.
A more complete list of features, and the differences between
various OmniPage versions appears in Help.
This icon is used throughout the guide to denote features
that are available only in OmniPage Professional 17.
OmniPage 17 is supplied in Enterprise versions for network use. It is
also supplied in Special Editions for selected scanner manufacturers
and other resellers. The feature set in these editions may vary, in line
with each vendor's requirements.
New features in OmniPage 17 10
Installation and setup
This chapter provides information on installing and starting
OmniPage.
System requirements
The minimum requirements to install and run OmniPage 17 are:
•
A computer with an Intel® Pentium® III processor or
equivalent. Dual-core or Quad-core support recommended.
•
Windows® XP 32-bit (from Service Pack 3) with 400 MHz
processor, or Windows® VistaTM 32-bit (SP1) or 64-bit
(SP1) with a 1 GHz processor.
•
256MB of memory (RAM), 1GB recommended for
advanced performance.
•
230MB of free hard disk space for application and sample
files plus 70MB working space during installation.
Additionally:
•
170MB for all Nuance RealSpeak® modules
(80MB for RealSpeak® Solo American English
language module, additional 9-11MB per
RealSpeak Solo other language modules)
•
95MB for Nuance PDF Create! (Supplied with
OmniPage Professional 17 only).
150MB for PaperPort® (Supplied with OmniPage
Professional 17 only).
1024x768 pixel color monitor with 16-bit color or greater
video card.
•
•
•
A sound card and speaker for reading text aloud.
Chapter 1
Installation and setup 11
•
A CD-ROM drive for installation or web access suitable
for download.
•
A Windows compatible pointing device.
•
2 megapixel digital camera or higher for digital camera text
capture. See Help for details.
•
A compatible scanner with its own scanner driver
software, if you plan to scan documents. See the Scanner
Guide at Nuance’s web site (www.nuance.com) for a list of
supported scanners.
•
Web access is needed for product activation and
registration, Scanner Wizard database updating and
obtaining live updates for the program.
•
East Asian language handling must be installed in the
operating system to view Japanese, Chinese or Korean
documents. (Control Panel / Regional and Language
Options).
•
To save DOCX and XPSX files (for Microsoft Office 2007
Word and Excel) or to load and save XPS files (XML Paper
Specification), you should have or install Microsoft .NET
Framework 3.0. The link to the Microsoft download page
can be found in the Release Notes, or in the application
About box, if enabled under Options / General.
Alternatively, click the OmniPage .Net Framework balloon
tooltip.
Installing OmniPage
OmniPage 17’s installation program takes you through installation
with instructions on every screen.
Before installing OmniPage:
•
Close all other applications, especially anti-virus
programs.
•
Log into your computer with administrator privileges.
Chapter 1
Installing OmniPage 12
•
If you own a previous version of OmniPage, or if you are
upgrading from demonstration software or an OmniPage
Special Edition, you must uninstall that product first.
To install OmniPage:
1. Download the program file and choose Run when the
download is completed, or insert the OmniPage CD-ROM in
your CD-ROM drive. The installation program should start
automatically. If it does not start, locate your CD-ROM drive in
Windows Explorer and double-click the Autorun.exe program
at the top-level of the CD-ROM.
2. Choose a language to use during installation. Accept the EndUser License Agreement and enter the serial number you
receive by e-mail or find on the CD envelope.
3. Choose a complete or a custom installation. A complete
installation installs all RealSpeakTM Text-to-Speech language
modules (currently 9). Custom installation lets you exclude or
add modules. To exclude a module, click its down arrow and
select ‘This feature will not be available’.
4. Follow the instructions on each screen to install the software.
All files needed for scanning are copied automatically during
installation.
Unless deselcted in the OmniPage Professional installation, Nuance
PDF Create 5 installation starts as soon the installation of
OmniPage is completed. Document-to-document conversions
depend on PDF Create being present.
OmniPage Professional is supplied with a complimentary copy of
the Nuance PaperPort® document management product. This must
be installed separately and has its own system requirements.
Chapter 1
Installing OmniPage 13
Setting up your scanner with OmniPage
All files needed for scanner setup and support are copied
automatically during the program’s installation, but no scanner
setup occurs at installation time. Before using OmniPage 17 for
scanning, your scanner should be installed with its own scanner
driver software and tested for correct functionality. Scanner driver
software is not included with OmniPage.
Scanner setup is done through the Scanner Setup Wizard.
You can start this yourself, as described below. Otherwise,
it appears when you first attempt to perform scanning.
Proceed as follows:
•
•
Choose Start > All Programs > Nuance > OmniPage 17 >
Scanner Setup Wizard
or click the Setup button in the Scanner panel of the
Options dialog box.
or choose Scan in the Get Page drop-down list in the
OmniPage Toolbox and click the Get Page button.
The Scanner Setup Wizard starts. If you have a web
connection, the first panel invites you to update the
scanner database supplied with the wizard. Choose Yes or
No and click on Next.
•
Choose ‘Select and test scanner or digital camera’, then
click Next. If you have a single installed scanner, it
appears, along with any scanners previously set up with
OmniPage. If the required scanner is not listed, click Add
Scanner... .
•
You see a list of all detected scanner drivers in the
checkmarked categories. This can include network
devices. Select one and click OK. To install a second device,
you must run the Scanner Wizard again.
Chapter 1
Setting up your scanner with OmniPage 14
•
The wizard reports whether the chosen scanner model
already has settings in the scanner database. If it does, you
do not need to test it. If it does not, you should test it. Click
on Next.
•
If you chose not to test, click Finish. If you chose testing,
click Next to have the scanner connection tested. If the
connection is in order, you see a menu of further tests.
Choose which testing steps you want to run. The Basic test
scan is recommended.
•
By default OmniPage uses its own scanning interface,
located in the Scanner panel of the Options dialog box. If
you want to use your scanner’s own interface instead,
choose Advanced settings... and select this. Click Hint
editor... and choose Edit hints... only if you are experienced
in configuring scanners or have been advised by Technical
Support to do so.
•
Click Next to start the tests. For the Basic scan test, insert
a test page into your scanner. The wizard will scan using
your scanner manufacturer’s software. Click on Next. Your
scanner’s native user-interface will appear.
•
Click on Scan to begin the sample scan.
•
If necessary, click on Missing Image… or Improper
Orientation... and make the appropriate selections.
•
Once the image appears correctly in the window, click on
Next.
•
Move through the remaining requested tests, following the
instructions on the screen.
•
When all the requested tests have been completed
successfully, the Scanner Wizard reports and invites you
to click on Finish.
•
You have successfully configured your scanner to work
with OmniPage 17!
Chapter 1
Setting up your scanner with OmniPage 15
To change the scanner settings at a later time, or to setup or remove
a scanner, reopen the Scanner Setup Wizard from the Windows
Start menu or from the Scanner panel of the Options dialog box.
To test and repair an improperly functioning scanner, open the
wizard and select ‘Test the current scanner or digital camera’ in the
second panel, then work through the procedure described above,
maybe using advice received from Technical Support.
To specify a different default scanner, open the wizard to reach the
list of setup scanners. Move the highlight to the desired scanner and
be sure to close the wizard with Finish.
To get updated settings for your current scanner, open the wizard,
request a fresh database download in the first screen, then choose
‘Use current settings with current device’, click Next and then
Finish.
How to start the program
To start OmniPage 17 do one of the following:
•
Click Start in the Windows taskbar and choose All
Programs > Nuance > OmniPage 17 > OmniPage
[Professional] 17.
•Double-click the OmniPage icon in the
program’s installation folder or on the Windows
desktop if placed there.
•Double-click an OmniPage Document (OPD)
icon or file name; the clicked document is loaded
into the program. See “OmniPage Documents” in
the next chapter.
•
Right click one or more image file icons or file names for a
shortcut menu. Select Open With... OmniPage application.
The images are loaded into the program.
Chapter 1
How to start the program 16
On opening, OmniPage’s title screen is displayed and then a view
selection panel. OmniPage has three basic view types. For details,
see The OmniPage Desktop and Views in the next chapter. It
provides an introduction to the program’s main working areas.
There are several ways of running the program with a limited
interface:
•
Use the Batch Manager program. Click Start in the
Windows taskbar and choose All Programs > Nuance >
OmniPage 17 > OmniPage Batch Manager. See the
Workflows chapter.
•
Click Acquire Text from the File menu of an application
registered with the Direct OCR™ facility. See “How to set
up Direct OCR” in the Processing Documents chapter.
•
Right-click on one or more image file icons or file names in
Wndows Explorer for a shortcut menu. Select OmniPage
17 and choose a target format, or the Convert Now Wizard
or a workflow from its sub-menu. The files will be
processed according to the workflow instructions. See the
Workflows chapter.
•
•
Click the OmniPage Agent icon
on the taskbar.
Choose a workflow to start the program and run the
workflow.
Use OmniPage 17 with Nuance’s PaperPort document
management product, to add OCR services. See “How to
use OmniPage with PaperPort” in the Using OmniPage
chapter.
Registering your software
Nuance’s online registration runs at the end of installation. Please
ensure web access is available. We provide an easy electronic form
that can be completed in less than five minutes. When the form is
filled, click Submit. If you did not register the software during
Chapter 1
Registering your software 17
installation, you will be periodically invited to register later. You
can go to www.nuance.com to register online. Click on Support and
from the main support screen choose Register in the left-hand
column. For a statement on the use of your registration data, please
see Nuance’s Privacy Policy.
Activating OmniPage
You will be invited to activate the product at the end of installation.
Please ensure that web access is available. Provided your serial
number is found at its storage location and has been correctly
entered, no user interaction is required and no personal information
is transmitted. If you do not activate the product at installation
time, you will be invited to do this each time you invoke the
program. OmniPage 17 can be launched only five times without
activation. We recommend Automatic Activation.
Uninstalling the software
Sometimes uninstalling and then reinstalling OmniPage will solve a
problem. The OmniPage Uninstall program will not remove files
containing recognition results or any of the following user-created
files:
Zone templates (*.zon)
Image enhancement templates (*.ipp)
Training files (*.otn)
User dictionaries (*.ud)
OmniPage Documents (*.opd)
Job files (*.opj)
Workflow files (*.xwf)
To uninstall you must be logged into your computer with
administrator privileges.
Chapter 1
Activating OmniPage 18
To uninstall or reinstall OmniPage:
•
Close OmniPage.
•
Click Start in the Windows taskbar and choose the
Control Panel and then Uninstall a program (in earlier
Windows versions: Add/Remove Programs).
•
Select OmniPage and click Uninstall (in earlier Windows
versions: Remove).
•
Click Yes in the dialog box that appears to confirm
removal.
•
Select Yes to restart your computer immediately, or No if
you plan to restart later.
•
Follow instructions until the process is finished.
When you uninstall OmniPage, the link to your scanner is also
uninstalled. You must setup your scanner again with OmniPage if
you reinstall the program. All RealSpeak modules that were
installed with the program will also be uninstalled.
With OmniPage 17 Professional, Nuance PDF Create 5 and
PaperPort must be uninstalled separately.
Chapter 1
Uninstalling the software 19
Using OmniPage
OmniPage 17 uses optical character recognition (OCR)
technology to transform text from scanned pages or image files into
editable text for use in your favorite computer applications.
In addition to text recognition, OmniPage can retain the following
elements and attributes of a document through the OCR process.
Graphics (photos, logos)
Form elements (checkboxes, radio buttons, text fields)
Text formatting (character and paragraph)
Page formatting (column structures, table formats, headings,
placing of graphics).
Documents in OmniPage
A document in OmniPage consists of one image for each document
page. After you perform OCR, the document will also contain
recognized text, displayed in the Text Editor, possibly along with
graphics, tables and form elements.
OmniPage Documents
An OmniPage Document (.opd) contains the original page
images (optionally pre-processed) with any zones placed
on them. After recognition, the OPD also contains the
recognition results.
An OmniPage Document can contain an embedded user dictionary,
training file, zone template file, or an image enhancement template
file. This can increase file size considerably but makes the OPD
Chapter 2
Using OmniPage 20
more portable. To embed a file, open the relevant dialog box from
the Tools menu, select the desired file and click Embed. Use the
Extract button to get a local copy of an embedded file inside an OPD
you have received.
When you open an OmniPage Document, its settings are applied,
replacing those existing in the program.
The OmniPage Desktop and Views
OmniPage comes with three different views to suit your task.
•
Classic View - This view has a similar look and feel to
previous versions of OmniPage.
•
Flexible View - This view provides an alternate layout of
the OmniPage function panels stacked in a tabbed view to
give each panel more space.
•
Quick Convert View - This view is designed for quick and
easy document conversion without having to learn a lot.
The most important conversion options are clearly visible
on one screen.
Use the Window menu to switch between views and to save your
own custom view (see later). On starting a new session you
receive the view and screen arrangement that was in force when the
program was last closed.
Program Panels
OmniPage has seven panels that can be docked (tabbed or tiled),
floated, resized, minimized and restored separately: Thumbnails,
Page Image, Text Editor, Document Manager, Easy Loader,
Workflow Status, and Help. To float a panel double-click its title
bar or tab. To restore the floating panel to its previous docked
Chapter 2
The OmniPage Desktop and Views
21
position, double-click its title bar. To dock it to a new location, drag
it to an edge. A purple rectangle shows the docking position release the mouse button to dock it. To move a floating panel
without docking displays, keep CTRL pushed while dragging. To
see all possible docking positions one after the other (tiles and
tabs), drag the panel over the OmniPage main window, holding
down the left mouse button and pressing the spacebar repeatedly.
When the desired location shows purple, release the mouse button.
Classic View
In Classic View, the default OmniPage Desktop has four main tiled
working areas, separated by splitters: the Document Manager, the
Page Image, Thumbnails and the Text Editor. The Page Image has
an Image toolbar and the Text Editor has a Formatting toolbar.
Standard
Toolbar
OmniPage
Toolbox
Formatting toolbar
Thumbnails
Image
toolbar
Chapter 2
Document
Manager
Page Image
Text Editor
The OmniPage Desktop and Views
22
OmniPage toolbox: This Toolbox lets you drive the processing.
Thumbnails panel: This displays page thumbnails.
Document Manager: This provides an overview of your document
with a table. Each row represents one page. Columns present
statistical or status information for each page, and (where
appropriate) document totals.
Page Image: This displays the image of the current page with its
zones. When a page is displayed, the Image toolbar is available.
Text Editor: Displays recognition results from the current page.
Panels can be re-arranged freely - horizontally or vertically; use the
Window menu to open the Easy Loader, Workflow Status or Help
panels. Panels can be minimized or closed, but not tabbed. To
restore the default Classic View appearance, choose Reset Current
View in the Window menu.
Flexible View
Use this view to set up the OmniPage workspace so that it fits your
task optimally. By default all panels appear. There are five tabs: Page
Image (including Thumbnails), Text Editor, Easy Loader,
Workflow Status and Help. The Document Manager appears in a
horizontal panel at the base of the working area. You can undock,
move, minimize, group or close panels as already described. Drag a
tab onto the working area to convert it to a Classic-type tiled panel.
Drag it back to the tab bar to revert to a tabbed panel, or use the
Spacebar as already described. If panels are grouped, the tab name
shows the active one. To restore the default Flexible View
appearance, choose Reset Current View in the Window menu.
Easy Loader provides a Windows Explorer type file listing and
functionality that can remain open during the session, allowing
quick file selection and assembly (see Chapter 4, page 36).
Chapter 2
The OmniPage Desktop and Views
23
Suggested scenarios:
Maximizing workspace (single screen)
Load a document. Open the panels you
want to use. Grab them by their
captions one by one, and drag them so
that they dock behind the active one as
tabs. You can also dock Help to avoid
handling two separate windows.
Working with recognition results (single screen)
Load a document and have it recognized.
Close all panels except the Document
Manager and the Text Editor. Maximize
both horizontally, scale down the
Document Manager and dock it to the
top or bottom. You can now step
through the pages double-clicking them
one by one in the Document Manager,
inspecting recognition results in the Text Editor. The number of
suspect words and reject characters in the Document Manager will
help you identify problematic pages.
Handling large documents (dual-screen)
Load the document you want to work
on. Move its Thumbnail View to your
second monitor and maximize it for a
large scale overview of your document
and far more space for thumbnail
operations.
Chapter 2
The OmniPage Desktop and Views
24
Verifying (dual-screen)
Place the Page Image on one screen and
the Text Editor on the other. This gives
you more space for editing and proofing.
The Page Image is always available for
verifying recognition and for performing
on-the-fly zoning and editing.
The scenarios presented above are only examples to give you
an idea of what you can do in Flexible View.
Quick Convert View
Use the Quick Convert View for fast recognition and saving. You
can switch to Quick View only when you have no opened document
and it can handle only one input file and one output document at a
time. The picture shows the default appearance.
Page Image
panel title
Processing
buttons
Quick
Convert
toolbar
Quick
Convert
Options on
toggled tab
with Easy
Loader
Quick Convert Options:
document source and layout
output text format, formatting level
output folder and file name
saving options
page range
Chapter 2
Page Image
The OmniPage Desktop and Views
25
The Easy Loader is by default on a tab that toggles with the Quick
Convert Options panel. A Help panel can be added, but further
panels are not available in this view. You can change tabs to
separate panels and minimize them, as in other views.
After loading a file, you should convert it before loading the next
file. When an image conversion is finished, you do not need to
explicitly close the image; just load a new file.
The Easy Loader in Quick View provides an additional feature: ‘oneclick’ processing. Choose the Easy Loader sub-menu in the Process
menu and choose either Load Files or Get and Convert. When the
latter is chosen, multiple files can be selected – these files are
loaded, recognized and saved using the current settings. For this,
set the output file names to be the same as the source file names.
See Chapter 4, page 36 and Help for detail.
The Quick View Page Image panel includes the Quick Convert
toolbar, offering the most useful image handling operations. To
access advanced functionality, such as image file saving, SET tools,
on-the-fly zoning, zone reordering and manual zone drawing for
vertical text, a different view should be used.
Custom views
For a custom view, arrange the panels and toolbars as you wish,
then choose Window > Custom Views > Manage. Click Add and
name your view. Your screen layouts will be displayed in the
Custom Views submenu with a checkmark beside the active one.
Resetting to a default is not available for custom views.
Changing views
Use the Window menu to change views. Panels are shown or
hidden and arranged as they were when the chosen view was last
Chapter 2
The OmniPage Desktop and Views
26
used. The Help topic on display remains unchanged regardless of
view. Easy Loader retains its file location regardless of view and the
Workflow Status continues to display information on the last
workflow run. On program restart, Help displays the Welcome
topic, Easy Loader the default folder location and Workflow status
is empty.
The Toolbars
The program has eleven main toolbars. Use the View menu to show,
hide or customize them. Status bar texts at the bottom edge of the
OmniPage program window explain the purpose of all tools.
Standard toolbar: Performs basic functions.
Image toolbar: Performs image, zoning and table operations. Three
of its tool groups can now be handled separately (mini-toolbars):
•
Zones toolbar: Offers zoning tools.
•
Rotate toolbar: Provides rotating tools.
•
Table toolbar: Inserts, moves and removes row and column
dividers.
Formatting toolbar: Formats recognized text in the Text Editor.
Verifier toolbar: Controls the location and appearance of the
verifier.
Reorder toolbar: Modifies the order of elements in recognized
pages.
Mark Text toolbar: Performs text marking and redacting.
Form Drawing toolbar: Creates new form elements.
Form Arrangement toolbar: Arranges and aligns form elements.
All toolbars can be moved and customized in each view to your
particular needs, including use of a secondary monitor.
Chapter 2
The OmniPage Desktop and Views
27
The Form toolbars and the Mark Text toolbar (for details
see Chapter 4, page 69) appear only in OmniPage
Professional 17.
Basic Processing Steps
There are three ways of handling documents: with automatic,
manual or workflow processing. The basic steps for all processing
methods are broadly the same:
1. Bring a set of images into OmniPage. You can scan a
paper document with or without an Automatic
Document Feeder (ADF) or load one or more image
files.
2. Perform OCR to generate editable text. After OCR,
you can check and correct errors in the document using
the OCR Proofreader and edit the document in the
Text Editor.
3. Export the document to the desired location. You can
save your document to a specified file name and type,
place it on the Clipboard, send it as a mail attachment
or publish it. You can save the same document repeatedly to
different destinations, different file types, with different settings
and levels of formatting.
Using OmniPage, you can choose from the following processing
methods: Automatic, Manual, Combined, or Workflow. You can
start recognition from other applications, using Direct OCR and can
also schedule processing to run at a later time.
Processing methods are detailed in the next chapter and in Help.
Settings
The Options dialog box is the central location for OmniPage
settings. Access it from the Standard toolbar or the Tools
menu. Context-sensitive help provides information on each setting.
Chapter 2
Basic Processing Steps
28
How to use OmniPage with PaperPort
The PaperPort® program is a paper management
software product from Nuance. It lets you link
pages with suitable applications. Pages can contain
pictures, text or both. If PaperPort exists on a
computer with OmniPage, its OCR services
become available and amplify the power of
PaperPort. You can choose an OCR program by
right-clicking on a text application’s PaperPort
link, selecting Preferences and then selecting
OmniPage 17 as the OCR package. OCR settings
can be specified, as with Direct OCR.
PaperPort provides the easiest way to turn paper into organized
digital documents that everybody in an office can quickly find and
use. PaperPort works with scanners, multifunction printers, and
networked digital copiers to turn paper documents into digital
documents. It then helps you to manage them along with all other
electronic documents in one convenient and easy-to-use filing
system.
PaperPort’s large, clear item thumbnails allow you to visually
organize, retrieve and use your scanned documents, including
Word files, spreadsheets, PDF files and even digital photos.
PaperPort’s Scanner Enhancement Technology tools ensure that
scanned documents will look great while the annotation tools let
you add notes and highlights to any scanned image.
PaperPort is included in the OmniPage Professional
package. For application information, refer to
PaperPort’s own documentation. PaperPort must be
installed and uninstalled separately from OmniPage.
Chapter 2
How to use OmniPage with PaperPort
29
Processing documents
This tutorial chapter describes different ways you can process
a document and also provides information on key parts of
this processing.
Processing methods
Using OmniPage, you can choose from the following processing
methods:
Automatic
A fast and easy way to process documents is to
let OmniPage do it automatically for you. Select
settings in the Options dialog box and in the
OmniPage Toolbox drop-down lists and then click Start. It will take
each page through the whole process from beginning to end, when
possible running in parallel. It will typically auto-zone the pages.
Manual
Manual processing gives you more precise
control over the way your pages are handled.
You can process the document page-by-page
with different settings for each page. The
program also stops between each step:
acquiring images, performing recognition,
exporting. This lets you, for instance, draw
zones manually or change recognition language(s). You start each
step by clicking the three buttons on the OmniPage Toolbox.
Chapter 3
Processing documents 30
1. Use button one to get a set of images.
2. Manually zone pages where you want to process only part of
the page or if you want to give precise zoning instructions. Use
ignore backgrounds or zones to exclude areas from processing.
Use process backgrounds or zones to specify areas to be autozoned.
3. Use button two to have the pages recognized.
4. Do proofing and editing as desired.
5. Use button three to save your results.
The default for manual processing is to have all entered pages
automatically selected. This way you can have all new pages
recognized by a single mouse click. You can remove this default in
the Process panel of the Options dialog box.
Combined
You can process a document automatically and view results in the
Text Editor. If most pages are in order, but a few have not turned
out as expected, you can switch to manual processing to adjust
settings and re-recognize just those problem pages. Alternatively,
you can acquire images with manual processing, draw zones on
some or all of them, and then send all pages to automatic processing
by pressing the Start button and choosing to process existing pages.
Workflow
A workflow consists of a series of steps and their
settings. Typically it will include a recognition step,
but it does not have to. It does not have to conform
to the 1-2-3 pattern of traditional processing. Workflows are listed
in the Workflow drop-down list – sample workflows plus any you
create. Workflows allow you to handle recurring tasks more
efficiently, because all the steps and their settings are pre-defined.
You can choose to place the OmniPage Agent icon on your taskbar.
Chapter 3
Processing methods 31
Its shortcut menu lists your workflows. Click a workflow to launch
OmniPage and have it run.
Let the Workflow Assistant guide you in creating new workflows.
It provides a choice of steps and the settings they need. Click Next
after each step to add another one. You can use the Assistant just to
get more guidance when doing automatic processing. See
“Workflow Assistant” in Chapter 4, page 89.
At a later time
You can schedule OCR jobs or other processing jobs in
OmniPage Batch Manager to be performed
automatically at a later time, when you may not even be
present at your computer. This is done through the
Batch Manager. It does not matter if your computer is turned off after
the job is set up, so long as it is running at job start time. If you are
scanning pages, your scanner must be functioning at job start time,
with the pages loaded in the ADF.
When you choose New Job, first the Job Wizard, and then the
Workflow Assistant appears - the latter with a slightly modified set
of choices and settings. In the first panel of the Job Wizard, you
define your job type and name your job; next you are to specify a
starting time, a recurring job or watched folder instructions.
A job incorporates a workflow with timing instructions added. See
“Batch Manager” in Chapter 4, page 91.
Processing from other applications
You can use the Direct OCR™ feature to call on the recognition
services of OmniPage while you work in the following applications:
Microsoft Office XP or higher, Corel WordPerfect 12 or X3. First
you must check the Enable Direct OCR check box under
Tools > Options > General. Then, two buttons in Office 2007's
Chapter 3
Processing methods 32
Nuance OCR tab, or in an OmniPage toolbar open the door to OCR
facilities.
How to set up Direct OCR
Start the application you want connected to OmniPage. Start
OmniPage, open the Options dialog box at the General panel and
select Enable Direct OCR.
In the target application, use the
Acquire Text Settings button
in the OmniPage toolbar (in Office 2007 go to the Nuance OCR
tab). Select options in the following panels:
•
OCR: languages, dictionaries, layout, fonts.
•
Process: Image pre-processing, choices for PDF opening,
feature retention.
•
Output format: Set a formatting level
•
Direct OCR: Automatic or manual zoning, perform or
skip proofing, image source.
•
Scanner: Set-up or change scanner settings.
These function for future Direct OCR work until you change them
again; they are not applied when OmniPage is used on its own.
How to use Direct OCR
1. Open your application and work in a document. To acquire
recognition results from scanned pages, place them correctly in
the scanner.
2. Use the OmniPage toolbar button
Acquire Text Settings
or the same item in the target application’s File menu (or the
Nuance OCR tab in Office 2007) to review your recognition
settings, if necessary; the Direct OCR panel lets you specify
input from scanner, image file or digital camera image files.
Chapter 3
Processing methods 33
3. Use the OmniPage toolbar button
Acquire Text or the
same item in the File menu (use the Nuance OCR tab in Office
2007) to acquire images from the specified source.
4. If you selected Draw zones automatically in the Direct OCR panel
of the Options dialog box, under Acquire Text Settings,
recognition proceeds immediately.
5. If Draw zones automatically is not selected, each page image will
be presented to you, allowing you to draw zones manually.
Click the Perform OCR button to continue with recognition.
6. If proofing was specified, this follows recognition. Then the
recognized text is placed at the cursor position in your
application, with the formatting level specified in the Output
Format panel under Acquire Text Settings.
Defining the source of page images
There are three possible image sources: from image files, from a
digital camera and from a scanner. There are two main types of
scanners: flatbed or sheetfed. A scanner may have a built-in or
added Automatic Document Feeder (ADF), which makes it easier to
scan multi-page documents. The images from scanned documents
can be input directly into OmniPage or may be saved with the
scanner’s own software to an image file, which OmniPage can later
open.
Input from image files
You can create image files from your own scanner, or receive them
by e-mail or as fax files. OmniPage 17 can open a wide range of image
file types. Select Load Files in the Get Pages drop-down list. Files are
specified in the Load Files dialog box. This appears when you start
automatic processing. In manual processing, click the Get Page
Chapter 3
Defining the source of page images 34
button or use the Process menu. The lower part of the dialog box
provides advanced settings, and can be shown or hidden.
The minimum width or height for an image file is 16 by 16 pixels; the
maximum is 8400 pixels (71cm or 28 inches at the resolution 201 to
600 dpi). See Help for pixel limits.
You can govern how PDF files are opened under Tools / Options /
Process: open with the text layer or as image, import tag
information to assist layout retention and whether to use PDF fonts
or the mapped system fonts.
In OmniPage Professional 17, files can also be imported
from FTP locations, Microsoft SharePoint 2003 and 2007,
Hummingbird, iManage and ODMA-compliant sources.
Input from digital camera
You can bring digital camera photos of documents for
recognition into OmniPage. First, make sure that your
device driver is installed properly. Then connect the
camera and download images. Click Load Digital Camera Files in
the Get Page drop-down list. If you use this, 3D Deskew, resolution
enhancement and straightening text lines are automatically
performed on images. You can also do manual 3D deskewing, see the
section “Image Enhancement tools” later in this Chapter.
To acquire digital camera photos containing text from Direct OCR
or PaperPort, mark the Load as digital camera image checkbox. The
above mentioned automatic enhancements will apply.
For tips and advice on working with digital camera images see the
How-to-Guides and Help.
Chapter 3
Defining the source of page images 35
Input via Easy Loader
This provides the Windows Explorer interface in an OmniPage
window. In Flexible and Quick Views it appears by default. Choose
Easy Loader in the Window menu to add it to Classic View or to
show or hide it in other views. It lets you browse your whole file
system and efficiently select files to be loaded into OmniPage.
Choose Process / Easy Loader / Folder to view files as Lists,
Thumbnails, Tiles, Icons (arranged as desired) or Details, as you do
in Explorer. The Loader can remain displayed as you work.
Easy Loader is driven from the Process menu. Instead of selecting
files to send them straight to OmniPage you can choose Queue
Window to get a dialog box with a lock. Turn the lock on to build
up and re-order a list of files, maybe coming from different folders.
The lock applies to all files collected to enter the currently open
document. When the list is ready, turn the lock off to start loading.
If the lock is off from the start, files are listed only if they are
selected faster than OmniPage can load them. Practically, you can
load a few files, send them to recognition and while that is
underway, build up the rest of the input list.
Turning on the menu item Show/hide Queue Window automatically
causes the window to appear whenever files are listed but not yet
loaded and to be closed as soon as the list is empty.
Easy Loader can be used in Classic and Flexible Views to compile
files for multiple documents. Engage the lock, make document 1
active and collect files. Then make document 2 active and collect its
files, and so on. When all is ready, remove the lock. Each document
has its own lock, but the Process menu offers Lock all and Unlock all
to lock or release all files destined for all documents. You can
remove selected files with Delete, or all files in the current
document’s list with Delete All or Clear in the Process menu. Use
Clear all to clear all files destined for all open documents. See a
tutorial in Help on loading files for multiple documents.
Chapter 3
Defining the source of page images 36
Easy Loader is available as a panel in Quick Convert View. The
Process menu has two commands unique to Quick View.
•
Get and Convert offers 'one-button' processing - files are
loaded, passed through recognition and saved to files using
existing settings. Only in this case, multiple file selection is
allowed with Quick View; the result is one output
document for each input file – before starting you should
choose under Output file name Same as the source file name.
•
Load Files performs file loading without recognition, as in
other views. In Quick View it allows only one file to be
loaded at a time - it should be processed before selecting a
new input file. In this case the Queue Window and its lock
play no useful role.
Easy Loader can process digital camera images. Set this in the Quick
Convert Options panel before invoking Easy Loader. If Scan is set as
input, this setting is temporarily ignored and pages are loaded as
normal (non-camera) images.
All Windows Explorer functionality is available in Easy Loader. For
instance, you can also select files and use the shortcut menu item
OmniPage 17 to send them via background processing to MS Excel,
MS Word, PDF, RTF, Text and WordPerfect. Existing settings are
used and by default generated files are placed in the input folder.
Use the Convert Now Wizard to access basic settings, such as
whether or not to view results in the target application. This wizard
lets you do immediate conversions or call the Workflow Assistant
to access all settings, for instance to change target file names and
locations. This shortcut menu item also offers all workflows that
have image file input.
Chapter 3
Defining the source of page images 37
Input from scanner
You must have a functioning, supported scanner correctly installed
with OmniPage 17. You have a choice of scanning modes. In making
your choice, there are two main considerations:
•
Which type of output do you want in your export
document?
•
Which mode will yield best OCR accuracy?
Scan black and white
Select this to scan in black-and-white. Black-and-white
images can be scanned and handled quicker than others
and occupy less disk space.
Scan grayscale
Select this to use grayscale scanning. For best OCR
accuracy, use this for pages with varying or low
contrast (not much difference between light and dark)
and with text on colored or shaded backgrounds.
Scan color
Select this to scan in color. This will function only with
color scanners. Choose this if you want colored
graphics, texts or backgrounds in the output document.
For OCR accuracy, it offers no more benefit than
grayscale scanning, but will require much more time,
memory resources and disk space.
Brightness and contrast
Good brightness and contrast settings play an important role in
OCR accuracy. Set these in the Scanner panel of the Options dialog
box or in your scanner’s interface. After loading an image, check its
appearance. If characters are thick and touching, lighten the
brightness. If characters are thin and broken, darken it. Then rescan
Chapter 3
Defining the source of page images 38
the page. If your scanning results are still not satisfactory, open the
scanned image in the Image Enhancement window to edit it using a
range of different tools.
Scanning with an ADF
The best way to scan multi-page documents is with an Automatic
Document Feeder (ADF). Simply load pages in the correct order
into the ADF. You can scan double-sided documents with an ADF.
A duplex scanner will manage this automatically.
Scanning without an ADF
Using OmniPage’s scanner interface, you can scan multi-page
documents efficiently from a flatbed scanner, even without an ADF.
Select Automatically scan pages in the Scanner panel of the Options
dialog box, and define a pause value in seconds. Then the scanner
will make scanning passes automatically, pausing between each
scan by the defined number of seconds, giving you time to place the
next page.
Scanning to OmniPage and workflows
Go to Tools / Options / Scanners to choose an action to be
performed when a button on your local scanner is pushed. This can
be simple scanning resulting in images loaded into OmniPage. It is
also possible to select a scanner-based workflow from those you
have created or choose to be prompted to select a workflow
whenever the button is pressed. Use the Control Panel button to
associate OmniPage with a scanner event (a scanner button being
pressed). Then a button press launches OmniPage, runs the
workflow and sends the results to the defined target, with or
without interaction.
In OmniPage Professional this feature can also be used to initiate
barcode-driven workflows (see Chapter 4, page 93).
Chapter 3
Defining the source of page images 39
Document-to-document conversion
In OmniPage Professional 17 you can open not only
image files, but also documents created in wordprocessing and similar applications. Supported file
types include .doc, .xls, .ppt, .rtf, .wpd and others. Click the Load
Files button in the OmniPage Toolbox or select the Load Files
command under Get Page, in the File menu. In the Load Files
dialog box, choose Documents. When you are finished, you can
choose from a wide variety of document file types for saving. These
conversions require Nuance PDF Create to be installed.
Describing the layout of the document
Before starting recognition you are requested to describe the layout
of the incoming pages to assist the auto-zoning process. When you
do automatic processing, auto-zoning always runs unless you
specify a template that does not contain a process zone or
background. When you do manual processing, auto-zoning
sometimes runs. See online Help: When does auto-zoning run? Here are
your input description choices:
Automatic
Choose this to let the program make all auto-zoning
decisions. It decides whether text is in columns or not,
whether an item is a graphic or text to be recognized and
whether to place tables or not.
Single column, no table
Choose this setting if your pages contain only one column of
text and no table. Business letters or pages from a book are
normally like this.
Chapter 3
Describing the layout of the document 40
Multiple columns, no table
Choose this if some of your pages contain text in columns
and you want this decolumnized or kept in separate
columns, similar to the original layout.
Single column with table
Choose this if your page contains only one column of text
and a table.
Spreadsheet
Choose this if your whole page consists of a table which you
want to export to a spreadsheet program, or have treated as
single table.
Form
Choose this if your whole page consists of a form and you
want form elements auto-recognized. After recognition, you
can modify form element properties, create new ones, or edit
form layout. This option is available in OmniPage
Professional 17 only.
Legal pleading
Choose this to recognize legal documents. Legal headers are
detected and removed. Choose to have pleading numbers
retained or dropped.
Custom
Choose this for maximum control over auto-zoning. You can
prevent or encourage the detection of columns, graphics and
tables. Make your settings in the OCR panel of the Options
dialog box.
Chapter 3
Describing the layout of the document 41
Template
Choose a zone template file if you wish to have its
background value, zones and properties applied to all
acquired pages from now on. The template zones are also
applied to the current page, replacing any existing zones.
If auto-zoning yielded unexpected recognition results, use manual
processing to rezone individual pages and re-recognize them.
Preprocessing Images
To improve OCR results, you can enhance your images before
zoning and recognition using the Image Enhancement tools. To
open the Image Enhancement window, click the SET - Enhance
Image button in the Image Toolbar, or click Tools and choose SET Enhance Image. You can also build Image Enhancement steps into
your workflows by choosing the Enhance Images step.
The input for Image Enhancement is the Primary image.
We must distinguish three types of image:
Original image: The image created by your scanner or contained in
a file before it enters the program.
Primary image: The state of the original image after it has been
loaded into OmniPage, possibly modified by automatic or manual
pre-processing operations.
OCR image: A black-and-white image derived from the primary
image, optimized for good OCR results.
Some tools affect the Primary image, others the OCR image. Be sure
you know which image you are editing.
Good brightness and contrast settings play an important role in
OCR accuracy. Set these in the Scanner panel of the Options dialog
box or in your scanner’s interface. The diagram illustrates an
optimum brightness setting. After loading an image, check its
Chapter 3
Preprocessing Images 42
appearance. If characters are thick and touching, lighten the
brightness. If characters are thin and broken, darken it. Use the
OCR Brightness tool to optimize the image.
Unsuitable
Tolerable
Good
Best
Good
Tolerable
Unsuitable
Image Enhancement Tools
The Image Enhancement tools can also be used to edit images to
save and use them as image files. Note that some these tools work
on the Primary image, others on the one used for OCR (OCR
image). Click the Primary/OCR Image button in the Image
Enhancement window, to see the current state of either image.
The Image Enhancement window has two panels. The left panel
shows the starting image. Your changes are shown in the right
preview panel. When you click Accept, the right image is moved to
the left panel to become the new starting image for further
enhancement.
Chapter 3
Preprocessing Images 43
The following tools are accessible on the toolbar; their usage is
detailed as follows:
P - affects Primary image only.
O - affects OCR image only.
PO - can be applied to either the Primary or OCR image (or both)
P+O - a single action is applied to both the Primary and OCR image.
P/O - affects both images.
WH - applies to whole images only.
AR - can be applied to selected image areas.
Pointer (F5) - the Pointer is a neutral tool carrying out
different operations under different circumstances (for
example, to pick a color for the Fill operation, or to catch the
deskew line.) PO.
Zoom (F6) - click the tool then use the left mouse button to
zoom in on your image or the right mouse button to zoom out.
You can also use the mouse wheel for zooming in and out even in the inactive view. In the active view the "+" and "-"
buttons serve the same purpose. P+O. WH.
Select Area (F7) - click this, then on a tool that can work on a
page area (marked AR) and draw your selection on the image.
Image enhancement tools by default work on the whole page.
Selection has three modes (in the View menu): Normal,
Additive, and Subtractive. PO. AR.
Primary/OCR Image - click this tool to switch between the
primary and the OCR image in the active view. Primary
images can be of any image mode, while an OCR image is its
black-and-white version, generated purely for OCR purposes.
P/O. WH.
Chapter 3
Preprocessing Images 44
Synchronize Views - click this tool to zoom and scroll the
inactive view to the same zoom value and scroll position as
the active view. To make the inactive view dynamically follow
the focus of the active one, click View then choose the Keep
Synchronized command. PO. WH.
The following SET tools allow you to modify image contents:
Brightness and Contrast - click this tool to adjust the
brightness and contrast of your primary image or a selected
part of it. Use the sliders in the tool area to achieve the desired
effect. P. AR.
Hue / Saturation / Lightness - click this tool then use the
sliders to modify the hue, saturation and lightness of your
primary image. P. AR.
Crop - to use only a part of your image, click the Select Area
tool, then the Crop tool and select the area to keep – the rest
of the image will be removed. P+O. WH > AR
Rotate - click this tool to rotate (by 90, 180 or 270 degrees)
and/or flip your image. P+O. WH.
Despeckle - click this tool to remove stray dots from your
image. Despeckle works on the OCR image at 4 levels of
severity. You can also use this tool not to remove noise from
the page but to strengthen letter outlines: to do this mark the
checkbox Inverse despeckling. O. AR.
OCR Brightness - use this tool the set Brightness and
Contrast of your OCR image. See the diagram of optimum
brightness under Preprocessing Images above. O. AR.
Dropout color - click this tool and select Red, Green, Blue or
choose a color from the primary image with the Select Area
tool. Sections of the scanned image in this color will be set
transparent. The tool has its effect on the OCR image. P/O. WH.
Chapter 3
Preprocessing Images 45
Resolution - use this tool to decrease the resolution of your
primary image in percentages. Note that you cannot adjust a
resolution higher than that of the original one. P. WH.
Deskew - sometimes pages are scanned crookedly. To
straighten the lines of text manually, use the Deskew tool.
(Auto-deskew is also available in the Process panel of
Options.) P+O. WH.
3D Deskew - use this tool to remove perspective distortion
from digital camera images. This is particularly useful when
you want to check the results of automatic 3D Deskew or you
prefer to do 3D deskew manually after a Load Files step. P+O.
WH.
Fill - use this tool to apply a color to the image or a selected
part of it. PO. AR.
3D Deskew works by snapping the distorted image to a grid. All
you need to do is to manually straighten this grid, and image
coordinates will follow - see illustration below (before - after 3D
Deskew).
Using Image Enhancement History
To commit or undo your image edits (one by one or all the steps),
use the History panel in the Image Enhancement window. Once you
have modified the original image, its preview displays the changes,
Chapter 3
Preprocessing Images 46
but they are not done until you click the Apply button next to the
History list. Modifications not added to the History by clicking the
Add button will not be applied.
Any time you want to see what output a certain step resulted in,
double click it in the History list.
To discard changes you have performed with a given tool, but before
applying it, select the step in the list, then click the Reset button.
To restore the image as it was before you started the current
enhancement session, click the Discard all changes button.
Saving and applying templates
If you have a number of similar images to enhance, you can build up
a list of enhancement steps to apply to all of them.
To create and store an image enhancement template, first bring an
image file into the Image Enhancement window, then carry out your
preprocessing steps and add them to the History clicking the Apply
button. When you are done, choose Save Enhancement Template
from the File menu. Browse to your preferred destination and save
the template file (with the extension .ipp).
To carry out the set of modifications saved in the template file on
another image, simply open the new image in the Image
Enhancement window and choose Load Enhancement Template
from the File menu.
Image Enhancement in Workflows
To incorporate image enhancement in a workflow
choose its icon in the Workflow Assistant. The
following options are available:
Display images for manual enhancement - during the execution of a
workflow, each loaded image will be displayed for manual editing.
Chapter 3
Preprocessing Images 47
Apply enhancement template - an already saved enhancement
template will be applied automatically to the image while being
processed by the workflow.
Apply enhancement template and display - the workflow will apply
the selected image enhancement template, and will also display the
image so that you can make further edits to it.
Zones and backgrounds
Zones define areas on the page to be processed or ignored. Zones are
rectangular or irregular, with vertical and horizontal sides. Page
images in a document have a background value: process or ignore
(the latter is more typical). Background values can be changed with
the tools shown. Zones can be drawn on page backgrounds with
the tools shown under Zone Types and Properties (see later).
Process areas (in process zones or backgrounds) are auto-zoned
when they are sent to recognition.
Ignore areas (in ignore zones or backgrounds) are dropped from
processing. No text is recognized and no image is transferred.
Automatic zoning
Automatic zoning allows the program to detect blocks of text,
headings, pictures and other elements on a page and draw zones to
enclose them.
You can Auto-zone a whole page or a part of it. Automatically
drawn zones and template zones have solid borders. Manually
drawn or modified zones have dotted borders.
Auto-zone a page background
Acquire a page. It appears with a process background. Draw a
zone. The background changes to ignore. Draw text, table or
graphic zones to enclose areas you want manually zoned. Click the
Chapter 3
Zones and backgrounds 48
Process background tool (shown) to set a process background.
Draw ignore zones over parts of the page you do not need. After
recognition the page will return with an ignore background and
new zones round all elements found on the background.
Auto-zoning vertical text
If you set Japanese, Korean or Chinese as the recognition language,
auto-zoning will find text blocks and detect the text direction.
Vertical Asian text appears horizontally in the Text Editor, but can
be exported as vertical - see Chapter 4, page 61.
Auto-zoning detects vertical texts in non-Asian languages in table
cells and anywhere on Normal PDF or XPS pages. Multi-line
detection is possible in these cases.
For image-only PDF and XPS files, and for all other image file or
scanner input, auto-detection works with the following conditions:
•
It must be only a single line of text
•
It must be on the left or right of a diagram or picture or
•
It must be situated on the left or right edge of the page - it
does not have to extend over the full height of the page.
Vertical text outside tables can be manually zoned, as described
below. This allows multiple vertical lines to be handled correctly.
Vertical texts can be viewed and edited with a vertical cursor in the
Text Editor using True Page. In other formatting levels the text is
placed horizontally.
Zone types and properties
Each zone has a zone type. Zones containing text can also have a
zone contents setting: alphanumeric or numeric. The zone type and
zone contents together constitute the zone properties. Right-click
in a zone for a shortcut menu allowing you to change the zone’s
Chapter 3
Zones and backgrounds 49
properties. Select multiple zones with Shift+clicks to change their
properties in one move.
The Image toolbar provides zone drawing tools, one for each type.
Process zone
Use this to draw a process zone, to define a page area where
auto-zoning will run. After recognition, this zone will be
replaced by one or more zones with automatically
determined zone types.
Ignore zone
Use this to draw an ignore zone, to define a page area you do
not want transferred to the Text Editor.
Text zone
Use this to draw a text zone. Draw it over a single block of
text. Zone contents will be treated as flowing text, without
columns being found. Use it for texts using the Latin, Greek
or Cyrillic alphabets and for horizontal texts in the Asian
languages.
Vertical Asian text zone
Use this to draw text zones for vertical text in Japanese or
Chinese. Zones should be rectangular.
Vertical left-rotated text zone
Use this to draw text zones for vertical text that is left
rotated (non-Asian languages only). The zones should be
rectangular.
Vertical right-rotated text zone
Use this to draw a text zone for vertical text that is right
rotated (non-Asian languages only). The zones should be
rectangular.
Chapter 3
Zones and backgrounds 50
Table zone
Use this to have the zone contents treated as a table. Table
grids can be automatically detected, or placed manually.
Table zones should be rectangular. Vertical texts in tables
cannot be zoned manually – they can be auto-detected in
gridded tables.
Graphic zone
Use this to enclose a picture, diagram, drawing, signature or
anything you want transferred to the Text Editor as an
embedded image, and not as recognized text.
Form zone
Use this to enclose an area of your document containing
form elements such as a checkbox, radio button, text field or
anything you want transferred to the Text Editor as a form
element. Afterwards, in True Page, you can edit form layout,
and modify the properties of form elements. Form zones are
available in OmniPage Professional 17 only.
Working with zones
The Image toolbar provides zone editing tools.
Grouped tools can be undocked/floated an redocked as a separate mini toolbar for
convenience. One is always selected. When you
no longer want the service of a tool, click a different tool. Some tools
on this toolbar are grouped. If docked as a single tool, only the last
selected tool from the group is visible. To select a visible tool,
click it.
To draw a single zone select the zone drawing tool of the desired
type, then click and drag the cursor.
Chapter 3
Zones and backgrounds 51
To resize a zone, select it by clicking in it, move the cursor to a side
or corner, catch a handle and move it to the desired location. It
cannot overlap another zone.
To make an irregular zone by addition draw a partially overlapping
zone of the same type.
To join two zones of the same type draw an overlapping zone of the
same type (drawn zones on the left, resulting zone on the right).
To make an irregular zone by subtraction draw an overlapping zone
of the same type as the background.
To split a zone draw a splitting zone of the same type as the
background.
A full set of zoning diagrams appear in Help.
When you draw a new zone that partly overlaps an existing zone of
a different type, it does not really overlap it; the new zone replaces
the overlapped part of the existing zone.
The following zone types are prohibited:
Speed zoning lets you do manual zoning quickly. Activate the zone
selection cursor, then move the cursor over the page image. Shaded
areas will appear showing the auto-detected zones. Double-click to
transform a shaded area into a zone.
Chapter 3
Zones and backgrounds 52
Table grids in the image
After automatic processing you may see table zones placed
on a page. They are denoted with a table zone icon in the
top left corner of the zone. To change a rectangular zone to
or from a table zone, use its shortcut menu. You can also
draw table type zones, but they must remain rectangular.
You draw or move table dividers to determine where
gridlines will appear when the table is placed in the Text
Editor. You can draw or resize a table zone (provided it
stays rectangular) to discard unneeded columns or rows
from the outer edges of a table.
Using the table tools you can insert row and column dividers; move
and remove dividers. Click the Place/Remove all dividers tool to
have dividers in a table auto-detected and placed.
You can specify line formatting for table borders and grids from a
shortcut menu. You will have greater choice for editing borders and
shading in the Text Editor after recognition.
Using zone templates
A template contains a page background value and a set of zones and
their properties, stored in a file. A zone template file can be loaded
to have template zones used during recognition. Load a template file
in the Layout Description drop-down list or from the Tools menu.
You can browse to network locations to load templates created by
others.
When you load a template, its background and zones are placed:
•
on the current page, replacing any zones already there
•
on all further acquired pages
•
on pre-existing pages sent to (re-)recognition without any
zones.
Chapter 3
Zones and backgrounds 53
With manual processing the template zones in the first two cases
can be viewed and modified before recognition.
With automatic processing the template zones can be viewed and
modified only after recognition.
With workflow processing, use the zone images step. This
combines two steps: load templates and manual zoning. To use a
zone template, click the Add button in the appropriate panel of the
Workflow Assistant, and select the zone template file to use. Then
make your choice between displaying images for manual zoning;
applying the zone template; or applying it and display the images.
Templates accept ignore and process zones and backgrounds. They
can therefore be useful to define which parts of the pages to process
with auto-zoning, and which parts to ignore. Process zones or
process background areas from a template may be replaced during
recognition by a set of smaller zones; specific zone types will be
assigned to these zones.
How to save a zone template
Select a background value and prepare zones on a page. Check their
locations and properties. Click Zone Template... in the Tools menu.
In the dialog box, select [zones on page] and click Save, then assign a
name and optionally a different path. Choose a network location to
share the template file. Click OK. The new zone template remains
loaded.
How to modify a zone template
Load the template and acquire a suitable image with manual
processing. The template zones appear. Modify the zones and/or
properties as desired. Open the Zone Template Files dialog box.
The current template is selected. Click Save and then Close.
Chapter 3
Zones and backgrounds 54
How to unload a template
Select a non-template setting in the Layout Description drop-down
list. The template zones are not removed from the current or
existing pages, but template zones will no longer be used for future
processing. You can also open the Zone Template Files dialog box,
select [none] and click the Set As Current button. In this case, the
layout description setting returns to Automatic.
How to replace one template with another
Select a different template in the Layout Description drop-down
list, or open the Zone Template Files dialog box, select the desired
template and click the Set As Current button. Zones from the new
template are applied to the current page, replacing any existing
zones. They are also applied as explained above.
How to remove a template file
Open the Zone Template Files dialog box. Select a template and
click the Remove button. Zones already placed by this template are
not removed. Template files can be deleted only from the operating
system.
How to include a template file in an OPD
Open a document, then click Tools and choose Zone Template.
Select the one you want to include and click Embed. Then save the
document to the OPD format. This means the template will travel
with the OPD if it is sent to a new location. When the OPD file is
opened later, the included zone template will be shown in the Zone
Template Files dialog box as [embedded] and can be saved to a new
named template file at the new location by using the Extract
button.
Chapter 3
Zones and backgrounds 55
Proofing and editing
Recognition results are placed in the Text Editor. These can be
recognized texts, tables, forms and embedded graphics. This
WYSIWYG (What You See Is What You Get) editor is detailed in
this chapter. Asian text handling is in some respects different from
other languages. See “Asian language recognition” on page 61.
The editor display and formatting levels
The Text Editor displays recognized texts and can mark words that
were suspected during recognition with red, wavy underlines. They
are displayed with red characters in the OCR Proofreader.
A word may be suspect because it was not found in any active
dictionary: standard, user or professional. It may also be suspect as a
result of the OCR process, even if it is found in the dictionary. If the
uncertainty stems from certain characters in the word, these are
shown with a yellow highlight, both in the Editor and the OCR
Proofreader.
Choose to have non-dictionary words marked or not in the Proofing
panel of the Options dialog box. All markers can be shown or
hidden as selected in the Text Editor panel of the Options dialog
box. You can also show or hide non-printing characters and header/
footer indicators. The Text Editor panel also lets you define a unit of
measurement for the program and a word wrap setting for use in all
Text Editor formatting levels except Plain Text.
OmniPage 17 can display pages with three levels of formatting. You
can switch freely between them with the three buttons at the
bottom left of the Text Editor or from the View menu.
Chapter 4
Proofing and editing 56
Plain Text
This displays plain decolumnized left-aligned text in a single
font and font size, with the same line breaks as in the original
document.
Formatted Text
This displays decolumnized text with font and paragraph
styling.
True Page
True Page® tries to conserve as much of the formatting of the
original document as possible. Character and paragraph styling
is retained. Reading order can be displayed by arrows.
Proofreading OCR results
After a page is recognized, the recognition results appear in the
Text Editor. Proofreading starts automatically if that was requested
in the Proofing panel of the Options dialog box. You can start
proofing manually any time. Work as follows:
1. Click the Proofread OCR tool in the Standard toolbar, or
choose Proofread OCR... in the Tools menu.
2. Proofing starts from the current page, but skips text already
proofed. If a suspected error is detected, the OCR Proofreader
dialog box colors the suspect word in its context, adds a yellow
highlight to any suspect characters and provides a picture of
how the word originally looked in the image. The explanation
says ‘Suspect word’ or ‘Non-dictionary word’.
3. If the recognized word is correct, click Ignore or Ignore All to
move to the next suspect word. Click Add to add it to the
current user dictionary and move to the next suspect word.
Chapter 4
Proofreading OCR results 57
4. If the recognized word is not correct, modify the word in the
Edit panel or select a dictionary suggestion. Click Change or
Change All to implement the change and move to the next
suspect word. Click Add to add the changed word to the
current user dictionary and move to the next suspect word.
5. Color markers are removed from words in the Text Editor as
they are proofread. You can switch to the Text Editor during
proofing to make corrections there. Use the Resume button to
restart proofing. Click Page Ready to skip to the next page and
Document Ready or Close to stop proofreading before the end
of the document is reached.
6. A page is marked with the proofed icon
on its thumbnail
and in the Document Manager if proofing ran to the end of the
page. Choose Recheck Current Page... from the Tools menu to
re-proof a page.
Verifying text
After performing OCR, you can compare any part of the recognized
text against the corresponding part of the original image, to verify
that the text was recognized correctly.
The verifier tool is in the Formatting toolbar. The verifier can
also be controlled from the Tools menu. Hover the cursor
over a verifier display to obtain the verifier toolbar. Use it as
follows:
How much context for
dynamic verifier?
• one word
• three words (current + neighbors)
• whole image line
zoom in/out
Chapter 4
Verifying text 58
To turn the Verifier on, click the Verifier tool or press F9. To turn it
off, click the Verifier tool again, press F9 again, or press Esc.
A full list of verifier keyboard shortcuts is available in Help.
The Character Map
The Character Map is a dockable tool giving you aid in
proofing. It is used for essentially two purposes:
•
to insert characters during proofing and editing that are
not or not easily accessible from your keyboard. In this
respect, it is very similar to the system Character Map.
•
to show all characters validated by the current recognition
languages.
To access the Character Map, click its button in the Formatting
Toolbar, or choose Character Map from the View menu and click
Show.
Under the Character Map menu item, you can also choose to display
recent characters only, or different character sets (by default only
two are displayed). Asian characters are not supported.
You can access the Character Map in other ways, such as:
•
Click Tools > Options and choose the OCR tab. Click the
Additional Characters button to select characters to be
included in proofing. Similarly, you can modify the Reject
Character by using the Character Map.
•
Select Train Character under the Tools menu. Click the
(...) button beside the Correct field.
•
Select Train Character from the shortcut menu of a
suspect or non-dictionary word in the Text Editor.
Chapter 4
The Character Map 59
User dictionaries
The program has built-in dictionaries for many languages. These
assist during recognition and may offer suggestions during proofing.
They can be supplemented by user dictionaries. You can save any
number of user dictionaries, but only one can be loaded at a time. A
dictionary called Custom is the default user dictionary for
Microsoft Word.
Starting a user dictionary
Click Add in the OCR Proofreader dialog box with no user dictionary
loaded or open the User Dictionary Files dialog box from the Tools
menu and click New.
Loading or unloading a user dictionary
Do this from the OCR panel of the Options dialog box or from the
User Dictionary Files dialog box.
Editing or removing a user dictionary
Add words by loading a user dictionary and then clicking Add in the
OCR Proofreader dialog box. You can add and delete words by
clicking Edit in the User Dictionary Files dialog box. You can also
import words from OmniPage user dictionaries (*.ud). While editing
a user dictionary, you can import a word list from a plain text file to
add words to the dictionary quickly. Each word must be on a
separate line with no punctuation at the start or end of the word. The
Remove button lets you remove the selected user dictionary from the
list.
To embed a user dictionary in an OmniPage Document, load your
input file, choose Tools > User Dictionary; select the user dictionary
you want to use, click Embed, and name it. Then save to the file type
OmniPage Document.
Chapter 4
User dictionaries 60
Languages
The program can read over 120 languages with multiple alphabets:
Latin, Greek, Cyrillic, Chinese, Japanese and Korean. See the full
language list in the OCR panel of the Options dialog box. It shows
which languages have dictionary support. A listing is also provided
on the Nuance web site.
In addition to user dictionaries, specialized dictionaries are
available for certain professions (currently medical, legal and
financial) for some languages. See the list and make selections in the
OCR panel of the Options dialog box.
Asian language recognition
Four languages with Asian alphabets are supported: Japanese,
Korean, Traditional Chinese and Simplified Chinese. The ideal font
size for body text is 12 points, scanned at 300 dpi, resulting in
characters with around 48 x 48 pixels. Minimum is 30 x 30, that is
10.5 points at 300 dpi. For smaller characters, 400 dpi should be
used. Asian texts can be horizontal (left-to-right) or vertical (topto-bottom, right-to-left). Operating systems supported by
OmniPage 17 can handle Asian languages, but if East Asian language
support was not selected during system install, it must be added
from Control Panel / Regional and Language Settings / Languages /
Supplemental language support / Install files for East Asian
languages. You may be required to insert a Windows system disk.
The four Asian languages are listed alphabetically with the others in
the Options/OCR panel. You should select only one of these
languages at a time and avoid a multiple selection with other
languages. Asian OCR can handle short embedded English texts
without English being explicitly set; this is not designed for longer
English texts or for texts in other Western languages. Vertical text
is typical in Japanese and Chinese - English may be embedded there
Chapter 4
Languages 61
in different orientations. The program can handle these; in the
output they appear right-rotated.
Beside the language list the option Verify language choices invokes
automatic language detection that warns of differences between a
detected language and the language setting. It works at page-level
and identifies four categories: Japanese, Chinese, Korean and nonAsian. It cannot distinguish between Traditional and Simplified
Chinese or between non-Asian languages. The last category means
Japanese, Chinese or Korean characters were not detected.
Verification takes place during image pre-processing, so the
required recognition language must be set before image loading.
Auto-layout and auto-zoning are recommended for Asian pages.
This places all detected texts into text zones; by choosing an Asian
recognition language you set Asian OCR to run in these zones and
that can automatically detect and transmit the text direction,
coping with mixed areas of horizontal and vertical texts on a page.
However, the zoning tool
lets you force vertical Asian
recognition by manual zoning. Please draw rectangular zones with
this tool. To manually zone horizontal Asian text, use the usual text
zone type. Do not use the two other vertical-text tools on Asian
texts. Drawing a vertical Asian zone does not automatically enable
an Asian language, nor influence the language auto-detection.
Digital camera images are accepted for Asian languages. However,
the automatic 3D deskew algorithm is unlikely to be useful certainly not for vertical texts. Preferably use the standard image
loading command and perform manual 3D deskewing with the
relevant SET tool if required. In general, SET tools can be used on
Asian images.
Recognized Asian pages appear in the Text Editor, provided your
system has support for East Asian languages - always with
horizontal text direction. There is no need to specify Asian fonts
Chapter 4
Languages 62
under Options/OCR, a default font is automatically applied typically Arial Unicode MS. Other Asian-capable fonts on your
system can be chosen in the Text Editor. Editor support allows text
viewing and verifying - Formatted Text is recommended as
formatting level. Large-scale editing and spell-checking are better
done in the target application. Proofing, training and dictionary
support are not available for Asian texts. Therefore, prior to
performing Asian OCR, go to the Proofing panel under Options and
disable dictionary word marking, automatic proofreading and
IntelliTrain and ensure that no training file is loaded. Redaction can
be applied to Asian texts, either by selection or searching. The
workflow step Form Data Extraction should not be applied to
Asian pages.
Typical output converters for Asian texts are RTF, Microsoft Word,
Searchable PDF or XPS. The text direction will be as detected
during pre-processing. Changes made in the Text Editor - where
text is horizontal - will be exported, also to vertical text. Plain Text
converters are available (Unicode TXT, Notepad) but here text
direction will always be horizontal.
Training
Training is the process of changing the OCR solutions assigned to
character shapes in the image. It is useful for uniformly degraded
documents or when an unusual typeface is used throughout a
document. OmniPage 17 offers two types of training: manual
training and automatic training (IntelliTrain). Data coming from
both types of training are combined and available for saving to a
training file.
When you leave a page on which training data was generated, you
will be asked how to apply it to other existing pages in the
document.
Chapter 4
Training 63
Manual training
To do manual training, place the insertion point in front of the
character you want to train, or select a group of characters (up to
one word) and choose Train Character... from the Tools menu or the
shortcut menu. You will see an enlarged view of the character(s) to
be trained, along with the current OCR solution. Change this to the
desired solution and click OK. The program takes this training and
examines the rest of the page. If it finds candidate words to change,
the Check Training dialog box lists these. Incorrect words should
be re-trained before the list is approved.
IntelliTrain
IntelliTrain is an automated form of training. It takes input from the
corrections you make during proofing. When you make a change, it
remembers the character shape involved, and your proofing change.
It searches other similar character shapes in the document,
especially in suspect words. It assesses whether to apply the user
correction or not.
You can turn IntelliTrain on or off in the Proofing panel of the
Options dialog box. IntelliTrain remembers the training data it
collects, and adds it to any manual training you have done. This
training can be saved to a training file for future use with similar
documents.
For examples of IntelliTrain, see Help.
Training files
Whenever you close a document or switch to another one when
unsaved training data exists, a dialog box appears allowing you to
save it. To save a training file into an OPD, load it from Tools >
Training File, click Embed, and save to the file type OmniPage
Document.
Chapter 4
Training 64
Saving training to file, loading, editing and unloading training files
are all done in the Training Files dialog box.
Unsaved training can be edited in the Edit Training dialog box, an
asterisk is displayed in the title bar in place of a training file name.
Save it in the Training Files dialog box.
A training file can be also edited; its name appears in the title bar. If
it has unsaved training added to it, an asterisk appears after its
name. Both the unsaved and the modified training are saved when
you close the dialog box.
The Edit Training dialog box displays frames containing a character
shape and an OCR solution assigned to that shape. Click a frame to
select it. Then you can delete it with the Delete key, or change the
assignation. Use arrow keys to move to the next or previous frame.
You are
editing your
unsaved
training.
This frame has
been deleted.
To undelete it,
select it again
and press the
Delete key.
This frame is
selected.
Top part: image shape.
Bottom part: OCR
Chapter 4
Double-click frame or
press Enter to change its
OCR solution.
Training 65
Text and image editing
OmniPage has a WYSIWYG Text Editor, providing many editing
facilities. These work very similarly to those in leading word
processors.
Editing character attributes
In all formatting levels except Plain Text, you can change the font
type, size and attributes (bold, italic, underlined) for selected text.
Editing paragraph attributes
In all formatting levels except Plain Text, you can change the
alignment of selected paragraphs and apply bulleting to paragraphs.
Paragraph styles
Paragraph styles are auto-detected during recognition. A list of styles
is built up and presented in a selection box on the left of the
Formatting toolbar. Use this to assign a style to selected paragraphs.
Graphics
You can edit the contents of a selected graphic if you have an image
editor in your computer. Click Edit Picture With in the Format
menu. Here you can choose to use the image editor associated with
BMP files in your Windows system, and load the graphic.
Alternatively, you can use the Choose Program... item to select
another program. This will replace the Default Image Editor item.
Edit the graphic, then close the editor to have it re-embedded in the
Text Editor. Do not change the graphic’s size, resolution or type,
because this will prevent the re-embedding. You can also edit images
before recognition using the Image Enhancement tools.
Tables
Tables are displayed in the Text Editor in grids. Move the cursor into
a table area. It changes appearance, allowing you to move gridlines.
You can also use the Text Editor’s rulers to modify a table. Modify the
Chapter 4
Text and image editing 66
placement of text in table cells with the alignment buttons in the
Formatting toolbar and the tab controls in the ruler.
Hyperlinks
Web page and e-mail addresses can be detected and placed as links in
recognized text. Choose Hyperlink... in the Format menu to edit an
existing link or create a new one.
Editing in True Page
Page elements are contained in text boxes, table boxes and picture
boxes. These usually correspond to text, table and graphic zones in
the image. Click inside an element to see the box border; they have
the same coloring as the corresponding zones. The Help topic True
Page provides details on the operations summarized here.
Frames have gray borders and enclose one or more boxes. They are
placed when a visible border is detected in an image. Format frame
and table borders and shading with a shortcut menu or by choosing
Table... in the Format menu. Text box shading can be specified from
its shortcut menu.
Multicolumn areas have orange borders and enclose one or more
boxes. They are auto-detected and show which text will be treated
as flowing columns when exported with the Flowing Page
formatting level.
Reading order can be displayed and changed. Click the Show
reading order tool in the Formatting toolbar to have the order
shown by arrows. Click again to remove the arrows.
Click the Change reading order tool for a set of reordering
buttons in place of the Formatting toolbar. A changed order is
applied in the formatting levels Plain Text and Formatted
Text. It modifies the way the cursor moves through a page
when it is exported as True Page.
Chapter 4
Text and image editing 67
On-the-fly editing
This allows you to modify a recognized page through re-zoning,
without having to re-process the whole page. When on-the-fly
editing is enabled, zone changes (deleting, drawing, resizing,
changing type) immediately make changes in the recognized page.
Conversely, when you modify elements in the Text Editor’s True
Page formatting level, this changes the zones on that page.
Two linked tools on the Image toolbar control on-the-fly zoning.
One of these tools is always active whenever no recognition is in
progress.
Click this to activate on-the-fly editing. The red signal shows
there are no stored zoning changes.
Click this to turn on-the-fly editing off. Your zoning changes
are stored; the on-the-fly tool displays a green signal to show
there are stored changes. To activate these changes, do one of
the following:
Click the on-the-fly tool with a green signal. The zoning
changes will cause changes in the Text Editor.
Click the Perform OCR button to have the whole page
(re)recognized, including your zone changes.
For details on how changes are handled in on-the-fly zoning and their
effects in the Text Editor, see On-the-fly processing in Help.
Chapter 4
On-the-fly editing 68
Marking and redacting
The Mark Text toolbar gives you tools to
mark (highlight or strike-out); and to
redact text. Use the View menu to have
this toolbar displayed. You can float or
dock this tool group. Each tool has its
equivalent menu item in the Format menu
or the Text Editor shortcut menu.
Redacting is blacking out confidential information. It is unreadable
and unsearchable. To mark and redact text manually, click the
Mark for Redacting tool and use its cursor to select all the text parts
you want to redact. They appear with a gray highlight. When you
are ready, click the Redact Document tool. Choose to do redaction
in a copy (safer) or the original document. If you choose to redact a
copy, both the copy and the original remain open in OmniPage,
ready to be saved.
WARNING: If you redact the original document, you cannot
retrieve the information you have blacked out.
To find and redact text by searching, select Find and Mark Text
from the Edit menu to display the Find, Replace and Mark Text
dialog box. Search for text to be marked for redaction. Step through
all occurrences and decide for each case whether to redact
immediately or mark for redaction. In the latter case, perform the
redaction by choosing Close and Redact Document in the Mark
Text dialog box or later click the Redact Document button.
You can apply highlighting and striking out either by selection or
searching.
Chapter 4
Marking and redacting 69
Reading text aloud
The Nuance RealSpeak® speech facility is provided for the visually
impaired, but it can also be useful to anyone during text checking
and verification. The speaking is controlled by movements of the
insertion point in the Text Editor which can be mouse or keyboard
driven.
To hear text:
Use these keys:
One character at a time, forward or
back
Right or left arrow. Letter, number or
punctuation names are spoken.
Current word
Ctrl + Numpad 1
One word to the right
Ctrl + right arrow
One word to the left
Ctrl + left arrow
A single line
Place the insertion point in the line
Next line
Down arrow
Previous line
Up arrow
Current sentence
Ctrl + Numpad 2
From insertion point to end of
sentence
Ctrl + Numpad 6
From start of sentence to insertion
point
Ctrl + Numpad 4
Current page
Ctrl + Numpad 3
From top of current page to
insertion point
Ctrl + Home
From insertion point to end of
current page
Ctrl + End
Chapter 4
Reading text aloud 70
Previous, next or any page
Ctrl + PgUp, PgDown or navigation
buttons
Typed characters
Each typed character is pronounced
separately.
The Text-to-Speech facility is enabled or disabled with the Tools
menu item Speech Mode or with the F10 key. A second menu item
Speech Settings... allows you to select a voice (for example, male or
female for a given language), a reading speed and the volume. You
must ensure the language selection is appropriate for the text you
want to hear.
You also have the following keyboard controls:
To do this:
Use this:
Pause/Resume
Ctrl + Numpad 5
Set speed higher
Ctrl + Numpad +
Set speed lower
Ctrl + Numpad –
Restore speed
Ctrl + Numpad *
All speech systems will be installed with OmniPage 17 if you choose
a complete installation. If you perform a custom installation, you
can choose the languages you need.
Creating and editing forms
You can bring paper or static electronic forms (distributed
mainly as PDF in an office environment) into OmniPage
Professional 17, recognize them and edit their content,
layout or both - in True Page. Draw form zones over the
relevant areas of your image before recognition, or choose Form as
recognition layout, then use the two toolbars: Form Drawing and
Chapter 4
Creating and editing forms 71
Form Arrangement to make modifications and produce a fillable
form and save it in the following formats: PDF, RTF, or XSN
(Microsoft Office InfoPath 2003 format). Static forms can be saved
to HTML. OmniPage Professional 17 uses the Logical Form
RecognitionTM technology to create fillable forms from static ones.
Please note that OmniPage supports form creation and editing,
however the tools available here are not designed to fill in forms.
The Form Drawing Toolbar
This is a dockable toolbar, displayed in the Text Editor that allows
you to create a range of form elements using the following tools:
Selection: Click this tool to be able to select, move, or resize
elements in your form.
Text: Use the text tool to add fixed text descriptions on your
form such as titles, labels and headers.
Line: The Line tool is mainly used in layout design: click it and
draw lines to separate distinct sections in your form.
Rectangle: Click this tool to create rectangles in your form for
design purposes.
Graphic: Use this tool to select areas of your form that are to be
treated as graphics.
Fill text: Click this tool to create fillable text fields. These are
fields where you want people to enter text.
Comb: Use this tool to create a text field consisting of boxes.
This is typically used for information such as ZIP codes.
Checkbox: Click this tool and draw Checkboxes - typically for
Yes/No questions and marking one or more choices.
Circle text: Its function is similar to the Checkbox element
(above): the Circle text tool creates elements that get encircled
when selected.
Chapter 4
Creating and editing forms 72
Table: This tool creates tables in your form.
You can also create form elements by right-clicking an existing form
element in your recognized form, and choose the Insert Form Object
menu item.
The Form Arrangement Toolbar
The tools on this toolbar can be used to line up form elements or to
set which one is on top of the others when they overlap. This latter
function is useful for example if you want to create a background
graphic design for your form.
To set the order of overlapping elements, use the
“Bring to Front” and “Send to Back” buttons.
To align the right/left, top/bottom edges or the centers of the
selected form elements
horizontally - use the horizontal alignment tools
vertically - use the vertical arrangement tools.
The commands of the Form Arrangement toolbar are also accessible
from the shortcut menu of any form element.
Editing Form object properties
To edit a form object directly select it then right-click the given
element to display its shortcut menu. You can edit the appearance
or the properties of any form element here. Use the following
commands:
Form Object Appearance - use the tabs Borders, Shading and
Shadow to design the look of your form elements in a similar way as
you would do in a text-editing application.
Chapter 4
Creating and editing forms 73
Form Object Properties - this command gives you access to the
element properties such as size, position, name. Properties
dynamically vary depending on what type of element you select.
Extracting Form Data
Form data extraction (FDE) is a workflow step. Data is
extracted from elements such as fillable fields, check boxes,
and option buttons. FDE is a simplified implementation of
the full Logical Form Recognition technology.
To create a workflow that contains form data extraction:
• Define the processing input and its settings. Input types
include: image PDF, PDF form, image files and forms
scanned from paper.
• Choose Extract Form Data in place of recognition, and
specify its settings. Set an active PDF form as template. It
can be single or multi-page, filled or unfilled. The program
determines the location and type of the form fields based
on this form template.
• Finish the workflow with a saving step.
OmniPage will extract data from incoming forms, using the
specified template. Export is to a comma-separated value text file
(.csv) ready to be loaded into a spreadsheet.
Once you select Form Data Extraction in a workflow, only saving
steps will follow.
Chapter 4
Creating and editing forms 74
Saving and exporting
Once you have acquired at least one image for a document,
you can export the image to file. Once you have recognized at least
one page, you can export recognition results. After further
recognition you can save a single page, selected pages or the whole
document by saving to file, copying to Clipboard or sending to a
mailing application. Saving as an OmniPage Document is always
possible. OmniPage provides comprehensive support for Office
2007 applications and formats, so long as you have Microsoft .NET
Framework 3.0 installed.
A document remains in OmniPage after export. This allows you to
save, copy or send its pages repeatedly, for example with different
formatting levels, using different file types, names or locations. You
can also add or re-recognize pages or modify the recognized text.
With automatic processing and in Batch Manager jobs, you specify
where to save first before processing starts.
A workflow may contain one or more saving steps, even to different
targets (for instance, to file and to mail). A Batch Manager job must
contain at least one saving step. See Chapter 6, page 91,
“Workflows”.
Saving and Exporting
If you want to work with your document again in OmniPage in a
later session, save it as an OmniPage Document. This is a special
output file type. It saves the original images together with the
recognition results, settings and training.
Exporting is done through button 3 on the OmniPage Toolbox. It
lists available export targets. Some appear only if access to the
Chapter 5
Saving and exporting 75
target is detected on your computer. Select the desired target then
click the Export Results button to begin export. You can also
perform exporting through the Process menu.
Saving original images
You can save original images to disk in a wide variety of file types
with or without image enhancement (using the Image
Enhancement Tools).
1. Choose Save to File in the Export Results drop-down list. In
the dialog box that appears, select Image under Save as.
2. Choose a folder location and a file type. Type in a file name.
3. Select to save the selected zone image(s) only, the current page
image, selected page images or all images in the document. For
multiple zones or multiple pages, you can have all images in a
single multi-page image file, providing you set TIFF, MAX,
DCX, JB2 or Image-only PDF or XPS as file type. Otherwise
each image is placed in a separate file. OmniPage adds
numerical suffixes to the file name you provide, to generate
unique file names.
4. Click Options... if you want to specify a saving mode (blackand-white, grayscale, color or ‘As is’), a maximum resolution
and other settings. For TIFF files, you specify the compression
method here.
5. Click OK to save the image(s) as specified. Zones and
recognized text are not saved with the file.
Chapter 5
Saving original images 76
Saving recognition results
You can save recognized pages to disk in a wide variety of file types.
1. Choose Export Results... in the File menu, or click the Export
Results button in the OmniPage Toolbox with Save to File
selected in the drop-down list.
2. The Save to File dialog box appears. Select Text under Save as.
3. Select a folder location and a file type for your document. Select
a page range, file options, naming options and a formatting level
for the document. See “Selecting a formatting level” on this
page.
4. Type in a file name. Click Options... if you want to specify
precise settings for the export. See “Selecting converter
options” later in this chapter.
5. Click OK. The document is saved to disk as specified. If View
Result is selected, the exported file will appear in its target
application; that is the one associated with the selected file
type in your Windows system or in the advanced saving
options for your selected file type converter.
Selecting a formatting level
The formatting level for export is defined at export time, in the
saving dialog box (Save to File, Copy to Clipboard, Send in Mail or
other dialog box). Three of the levels correspond to the format
views of the same name in the Text Editor. However, the level to be
applied for saving is independent of the formatting view displayed
in the Text Editor. When exporting to file or mail, first specify a file
type. This determines which formatting levels are available.
Chapter 5
Saving recognition results 77
The formatting levels are:
Plain Text
This exports plain decolumnized left-aligned text in a
single font and font size. When exporting to Text or
Unicode file types, graphics and tables are not
supported. You can export plain text to nearly all file
types and target applications; in these cases graphics,
tables and bullets can be retained.
Formatted Text
This exports decolumnized text with font and
paragraph styling, along with graphics and tables.
This is available for nearly all file types.
Flowing Page
This keeps the original layout of the pages, including
columns. This is done wherever possible with column
and indent settings, not with text boxes or frames.
Text will then flow from one column to the other,
which does not happen when text boxes are used.
True Page
This keeps the original layout of the pages, including
columns. This is done with text, picture and table
boxes and frames. This is offered only for target
applications capable of handling these. True Page
formatting is the only choice for XML export and for
all PDF export, except to the file type ‘PDF Edited’.
Spreadsheet
This exports recognition results in tabular form,
suitable for use in spreadsheet applications. This
places each document page onto a separate
worksheet.
Chapter 5
Saving recognition results 78
When exporting to Microsoft Excel, 'Spreadsheet' is good for saving
whole-page tables. Prefer 'Formatted Text' if your document
contains smaller tables: each table will be placed on a separate
worksheet with non-table parts placed in an index worksheet with
hyperlinks to each relevant worksheet
Selecting converter options
Click the Options... button in a saving dialog box to have precise
control over the export. This brings up a dialog box with the name
of the converter associated with the current file type. It presents a
series of options tailored to this file type. First, confirm or change
the formatting level, because this influences which other options are
presented. Select options as desired. Help details how to do this.
To make changes apply to all future export done with the given
converter, select the checkmark Make changes permanent. If this is not
selected, changes are applied to the current export only and are not
saved for future use. Export settings can be changed and saved
without a document save – choose Tools/Saving Preferences... .
Using multiple converters
Multiple converters allow you to export to two or more file types in
one export step. Choose Multiple in the saving dialog box:
To make your own multiple converter, open the Saving Preferences
dialog box from the Tools menu. Choose the heading Multiple
converters. Select a converter and click Create from... . This will
make a copy of the selected converter that you can freely modify
without overwriting the original one.
The new converter appears in the list. Select it and click Options...
to specify its settings. You receive a list of all text converters,
Chapter 5
Saving recognition results 79
followed by all image converters. Checkmark the desired ones.
Optionally specify sub-folder paths for each file type.
You can save pages with different formatting levels or file options to
the different file types, as defined in their simple converters. A few
saving operations cannot be done with multiple converters. These
are:
Saving OmniPage Documents
Use a workflow with two saving steps, or perform two separate
saves.
Saving to two targets
For instance, you cannot use a multiple converter to save a
document to file and also send it in mail. Use a workflow with two
saving steps, or perform two separate saves.
Saving different page ranges
You cannot save different page ranges to different file types, because
only one set of selected pages can exist at saving time. For the same
reason, a single workflow cannot be used either. Perform two
separate saves or use two workflows.
Saving to PDF
You have five choices when saving to Portable Document Format
(PDF) files. The first four are presented as Text converters, the last
one is listed among the Image converters.
PDF (Normal):
Pages are exported as they appeared in the Text Editor in True Page
view. The PDF file can be viewed and searched in a PDF viewer and
edited in a PDF editor.
PDF Edited:
Use this if you have made significant editing changes in the
recognition results. You have three formatting level choices,
Chapter 5
Saving recognition results 80
including True Page. The PDF file can be viewed, searched and
edited.
PDF Searchable Image (formerly PDF Image on Text):
The PDF file is viewable only and cannot be modified in a PDF
editor. The original images are exported, but there is a linked text
file behind each image, so the text can be searched. A found word is
highlighted in the image.
PDF with image substitutes:
As for PDF (Normal), but words containing reject and suspect
characters have image overlays, so these uncertain words display as
they were in the original document. The PDF file can be viewed,
searched and edited.
PDF Image (formerly PDF, image only):
The original images are exported. The PDF file is viewable only and
cannot be modified in a PDF editor and text cannot be searched.
Besides the above flavors, you can use other parameters in defining
your PDF output by clicking Options:
PDF 1.6
Save to PDF version 1.6 for enhanced security, markup and
attachment embedding functionality.
PDF/A
Choose to create PDF/A compliant files to be confident that files
display identically regardless of the computer environment and
remain readable even after many years of technological evolution.
Tagged PDF
Create a tagged PDF file to preserve its structure. This will ensure
logical reading order, correct table structure and more.
Chapter 5
Saving recognition results 81
PDF MRC
Use this high compression technology for good quality and smaller
file size. Available for color and grayscale PDF Images or PDF
Searchable Images.
Linearized PDF
Choose this to create PDF files optimized for fast loading and
display when embedded in web pages.
Password protection
In OmniPage Professional you can set a type and level of encryption
and then define an Open password and/or a Permissions password
for PDF files.
A smaller range of choices is available for saving to XPS files,
provided that you have Microsoft .NET Framework 3.0 installed.
Converting from PDF
To extract text content from a PDF file, load it into OmniPage,
recognize it, and save the results to a text format.
A variety of outputs is also available from a PDF file shortcut menu:
Word, Excel, RTF, WordPerfect or text. For more options, use the
Convert Now Wizard.
Creating PDF files from other applications
The Nuance PDF Create product supplied with OmniPage
Professional provides the ability to create Normal PDF files from
documents in any print-capable application on your system. Click
File / Print and select the printer ScanSoft PDF Create! Adjust
properties as desired and click OK and supply a file name and
location. If View resulting PDF is selected, your default PDF viewer
displays the result.
Chapter 5
Saving recognition results 82
Sending pages by mail
You can send page images or recognized pages as one or more files
attached to a mail message if you have installed a MAPI-compliant
mail application, such as Microsoft Outlook. To send pages by
e-mail:
• With automatic processing, select Send in Mail as the
setting in the Export Results drop-down list on the
OmniPage Toolbox. The Export Options dialog box
appears as soon as the last available page in the document
is recognized or proofed. After export options are
specified, an empty mail message appears with file(s)
attached - add recipients and message text as desired.
• With manual processing, select Send in Mail as the setting
in the Export Results drop-down list and then click its
button. The Export Options dialog box appears
immediately and then the mail message with the
attachment(s).
• Workflows and jobs accept a Send in Mail export step, but
they require the recipients and message text to be specified
as workflow settings, so the workflow can be run
unattended.
Sending to Kindle
A Kindle reader is an electronic book product from Amazon. The
Kindle Assistant in the Tools menu lets you create a simple
workflow that sends recognition results to a Kindle account at
Amazon; these results are optimized for reader display and appear
on the Kindle device registered to that account.
To prepare a Kindle workflow:
1. Have your Kindle reader and its associated e-mail address on
hand.
Chapter 5
Sending pages by mail 83
2. Choose Kindle Assistant in the Tools menu.
3. Type in a name for the new workflow.
4. Choose a document source: Scan, Load files or Load digital
camera files. With file input, you will be prompted to choose
input files when the workflow starts running.
5. Enter the e-mail address linked to your Kindle reader.
6. Provide a name for the output file. All recognition results enter
a single file.
7. Choose Save to save the workflow for later use, or Save and Run
to immediately run the workflow and transfer its results to
your Kindle device.
This simple workflow has three steps: acquire images, perform
OCR and send to Kindle. All settings take either default values or
values optimized for Kindle.
When you run the Kindle Assistant for the first time, a customized
output converter is created, called 'Kindle Document'. It converts
colored items to grayscale, pictures to 72 dpi and sets Formatted
Text to remove any columns. This converter is then available for
later processing - with or without workflows.
You can modify the Kindle workflow using the Workflow
Assistant, to add other steps and change settings. For instance you
can specify a page range or add more saving steps, so the file is not
only sent to Kindle, but also saved to file with different settings (for
instance with Flowing Page and color retention). Take care not to
make modifications that are unsuitable for Kindle - e.g. creating
multiple output files, setting non-supported languages etc.
You can also compile workflows targeting Kindle with the
Workflow Assistant; set a Send in Mail step, choose the Kindle
output converter in its settings and enter the Kindle e-mail address.
You can do the same without using a workflow by choosing Send in
Mail in the Export results drop-down list.
Chapter 5
Sending to Kindle 84
Other export targets
Turn recognized text into an audio wave file for later listening,
using Nuance RealSpeak. A multiple converter is useful for this,
allowing you to save the document to file and generate the wave file
in one saving step. You must specify the reading language in the
converter options for the wave file type.
In OmniPage Professional 17 you can export files to other
targets. You can save files to a central server (an FTP site),
to Microsoft SharePoint 2003 and 2007, to Hummingbird
(Open Text) or iManage (Interwoven). Exporting choices are made
in the Export Options dialog box. When you click OK you are
directed to FTP or SharePoint log-in and invited to specify the
required path.
When using SharePoint, the server, login and password information
must be provided only once per session, and it is offered in each
subsequent session.
If an ODMA-compliant Document Management System (DMS) is
detected in your computing environment, it will be offered. If you
have access to more than one DMS, the system default will apply.
The ODMA server must be pre-configured to accept the file types to
be exported from OmniPage Professional, as defined by their
extensions.
See Help for more information on these targets.
Chapter 5
Other export targets 85
Workflows
A workflow contains a series of processing steps and their settings.
It can be saved for repeated use whenever you have a task needing
the same processing. Workflows usually begin with a scanning or
loading step, but they can also start from the document currently
open in OmniPage. After that, they do not have to conform to the
traditional 1-2-3 processing pattern. Usually a workflow will
include a recognition step, but this is not compulsory. For instance,
page images can be saved to image files in a different file type or to
an OmniPage Document. With or without OCR, any number of
saving steps are possible, even to different targets, each with their
own export settings.
Workflows are designed for efficient whole-document processing.
They can also handle recognizing or saving single or selected pages
from a document.
Some workflows run without user interaction. Workflows needing
interaction are those with a manual image enhancement step, a
manual zoning step, a proofing/editing step, the ones when runtime prompting is requested for input or output file names and
paths, or scanning workflows prompting for more pages.
Batch Manager jobs are closely related to workflows. Jobs are
created in the Job Wizard which uses the Workflow Assistant in
the creation process. Jobs run workflows according to the job
parameters (mostly timing instructions) and it is more typical for
them to run unattended.
Chapter 6
Workflows 86
Sample workflows
Sample workflows are provided with OmniPage 17 to offer you
typical work processes. Choose one in the Workflow drop-down
list at the left side of the OmniPage Toolbox.
Click the Workflow Assistant button
see its steps and settings.
in the Standard toolbar to
Running workflows
Here is how to run a sample workflow or one you have created:
1. If your workflow takes input from scanner, place your
document in its ADF or its first page on the scanner bed.
2. Select the desired workflow from the
Workflow drop-down list.
3. Press the Start button. The OmniPage Toolbox displays the
steps in the workflow and acts as a progress monitor. The
Workflow Status panel shows progress in more detail. To stop
the workflow before it completes, press the Stop button.
4. If run-time input selection is specified, the Load Files dialog
box awaits your choice of files.
5. If you requested a step requiring interaction (image
enhancement, manual zoning, or proofing) the program
presents pages for attention.
6. When a page is enhanced, zoned or proofed,
click the Page Ready button in the Toolbox or
appropriate dialog box to move to the next
page.
7. When the last page is enhanced, zoned or
proofed, or when you no longer want to do
zoning or proofing, press the appropriate
Chapter 6
Workflows 87
Document Ready button on the Toolbox. Any pages without
zones will be auto-zoned.
8. The After Completion menu under Process / Workflows gives
you three options to end a workflow. You can choose to close
the document, close OmniPage, or shut down your computer.
These settings are typically applied if the workflow runs
unattended - if your workflow is so, remember to include a
saving step.
You can also run workflows from an OmniPage Agent icon
on the Windows taskbar. Right-click it for a shortcut menu listing
your workflows. Select one to run it. OmniPage will be launched if
necessary. If it is running with a document loaded, the Start
Workflow dialog box displays where you can choose what to
process from the current document: only the Workflow-defined
pages, all pages, selected pages, or the current page.
If you do not see the OmniPage Agent icon, enable it in the General
panel of the Options dialog box or choose Start > All Programs >
Nuance OmniPage 17 > OmniPage Agent.
You can launch some workflows from your desktop, from Windows
Explorer or the Easy Loader. Right click on an image file icon or file
name for a shortcut menu. Multiple file selection is possible. Choose
OmniPage 17 and a workflow name from the sub-menu. This submenu also provides quick access to six target formats using default
settings: Word, Excel, PDF, RTF, TXT and WordPerfect. To
customize which workflows you would like to see here, click the
Add and Remove Workflows menu item. Only workflows with runtime prompting for input files are listed here.
Pressing Stop while a workflow is running pauses it. Click Start to
resume processing. If you pause a workflow, maybe do some manual
processing, and then save the document as an OmniPage Document,
when you later open that OmniPage Document, the interrupted
workflow will resume.
Chapter 6
Workflows 88
Workflow Assistant
This allows you to create and modify workflows. The Job Wizard
also uses this to create or modify workflows that jobs execute - see
the next section. The Assistant offers one or more steps, each with a
drop-down list. This left panel of the Workflow Assistant dialog
box lets you build your workflow.
.
This shows the
steps you have
chosen.
This drop-down list
shows the possible
steps at any given
workflow position.
Use this to add a new step
to your workflow.
Specify settings for
the current step here.
Click the Close button to delete a workflow step.
All subsequent, dependent steps will also be removed.
To change a step, click this arrow and select
from the ones in the drop-down list.
Chapter 6
Workflow Assistant 89
At any moment in the process, the Assistant drop-down menu
offers all steps that are logically possible at that point.
In OmniPage 17 Professional, additional steps are available: Extract
Form Data and Mark Text.
Creating workflows
Select New Workflow... in the Workflow drop-down list, or
from the Process menu. Or click the Workflow Assistant
button in the Standard toolbar when no workflow is selected.
The opening Assistant panel offers two starting points:
Choose Fresh Start to begin with no steps in the workflow diagram
on the right. Accept or change the default workflow name. Then
click Next and choose your first step. Choose an image loading step
that can take input from file, scanner or digital camera files. Specify
settings on the right. Then move on to build your workflow: it can
include a variety of different steps. When done, click Finish.
Choose Existing Workflows to see a list of existing workflows.
These are the sample workflows plus any you have created. Select
one as source. Its steps will appear in the workflow diagram on the
right. Enter a name for your new workflow. Click Next to proceed;
modify its steps and settings as described in the next section. The
changed settings apply to the new workflow only and are not
written back to the workflow used as the source. Any changed
settings enter the new workflow, but do not affect the settings in
the program. Finally, select Finish to complete your new workflow.
Chapter 6
Workflow Assistant 90
Modifying workflows
Select the workflow you want to modify in the Workflow
drop-down list and click the Workflow Assistant button in
the standard toolbar. Or choose Workflows... in the Tools
menu, select the desired workflow and click Modify... . The first
panel of the Workflow Assistant appears with the workflow
loaded. Click the icon in the workflow diagram that represents the
step you want to modify. Click the downward pointing arrow
under the icon to replace this step with another one. Continue
modifying steps and/or settings as desired. Remember that deleting
or modifying a step may result in later, dependent steps being
removed. Click Next to replace removed steps or to add new ones.
Click Finish to confirm the changes to your workflow.
After creating or modifying a workflow, you must either run a
workflow or select the 1-2-3 item in the Workflow drop-down list,
to return to normal processing.
Workflow to Kindle
The Kindle Assistant in the Tools menu helps you create a simple
workflow that will accept input, perform OCR and send the results
in a suitable format to a Kindle account at Amazon; it will then
appear on the Kindle device registered to that account. See “Sending
to Kindle” on page 83.
Batch Manager
The Batch Manager is a separate but integrated program
to let you create jobs to be processed immediately, or at
some time in the future. By choosing steps carefully, you
can set up jobs that can run unattended. A job executes a
Chapter 6
Batch Manager 91
workflow according to the job settings. Jobs are created in the Job
Wizard.
In OmniPage Professional 17 you have the following
additional Batch Manager capabilities:
•
•
•
•
•
Setting job timing and recurrence
Folder watching for incoming image files
E-mail inbox watching for incoming attachments
(Outlook and Lotus Notes)
E-mail notification of job completion to specified
recipients
Driving workflows with barcodes.
Creating new jobs
Open the Batch Manager from the Process Menu or from your
system, by choosing Start > All Programs > Nuance OmniPage 17 >
OmniPage Batch Manager or from the OmniPage Agent on the
taskbar.
Creating a job is basically timing a workflow. To do this,
start the Batch Manager (as described above) and click the
Create Job icon or choose Create Job from the File menu.
The Job Wizard starts. First you need to define your job type. You
can create five different types, instances of two basic categories:
Normal and Watch type.
Normal and Watch type jobs may have a recurrence pattern. The
latter are tailored to monitor a specified folder or e-mail inbox for
incoming images to be processed in OmniPage. A specific type
within this category is Barcode cover page jobs, where barcode
cover pages are used to identify which workflow to carry out.
Chapter 6
Creating new jobs 92
Normal job: Set starting time and specify or create the
Workflow to be run. If you select ‘Do not start now’ use the
Activate button in the Batch Manager to start it.
Job types available in OmniPage Professional 17 only:
Barcode cover page job: This is a special type of folder
watching job (see below). It monitors a folder for incoming
barcode pages, then processes subsequently incoming
images with the workflow identified by the barcode. For
details, see Barcode processing later in this chapter.
Folder watching job: Select this job type and browse to the
folder(s) to be watched for incoming image files.
Outlook mailbox watching job: This job watches an
Outlook e-mail inbox for incoming image attachments of
a specified type.
Lotus Notes mailbox watching job: Same as above, but a
Lotus Notes inbox is watched.
Name your job and click Next.
The next panel shows Start and Stop Options. Specify Start and
End Time, set whether input files are to be deleted or saved when
the job is completed. If you have a job requiring user interaction,
choose whether to allow it or not with the checkmark Run job without
any prompts. This lets you run such jobs in two ways, avoiding the
need to create two jobs. If you plan to be at the computer as the job
runs, de-select the checkmark. If you want to run the job without
being present, select the checkmark. Then only automatic image
enhancement will run, auto-zoning will replace manual zoning and
proofing is skipped. In this case you must ensure that the input and
saving file sets and locations are pre-defined.
In OmniPage Professional you can set a recurrency pattern and
request e-mail notification when the job is completed.
Chapter 6
Creating new jobs 93
From the next panel onwards, you can construct your job (except
for barcode cover page jobs) as you normally do with Workflows.
Set your starting point (Fresh Start or Existing Workflows) and
proceed as described in the Workflows topic.
The Options dialog box in the Batch Manager is in the Tools menu.
Its General panel has an option Enable OmniPage Agent on system tray at
system startup. By default it is on. It must remain selected for jobs to
run at their scheduled time. The option is provided so it is possible
to prevent all jobs from running without having to disable them
individually. Its state also governs the running of barcode cover
page jobs.
The General panel lets you limit the number of pages allowed in an
output document, even if the file option Create one file for all pages is
selected. When the limit is reached, a new file is started,
distinguished by a numerical suffix.
Click Finish to confirm job creation.
Modifying jobs
Jobs with an inactive status can be modified. Select the job
in the left panel of the Batch Manager and choose Modify
from the Edit menu or click the Modify Job button. First,
modify timing instructions as desired. Then the Workflow
Assistant appears with the workflow steps and settings loaded.
Make the desired changes as already described for workflows. See
“Modifying workflows” above.
Chapter 6
Creating new jobs 94
Managing and running jobs
This is done with the Batch Manager. It has two panels. The left
panel lists each job, its next run, status and history. The status is:
Waiting:
Scheduled but job start time is in the future.
Running:
Processing is currently underway.
Watching:
Watching is in progress but there is no processing.
Inactive:
Created with timing instruction: Do not start now; or
any deactivated jobs.
Expired:
Scheduled job but start time is in the past.
Collecting:
Watching in progress but the job is waiting for all
incoming files to arrive.
Paused:
User has paused the job and not yet resumed it.
Closing:
Watch type job is saving its result.
Starting:
The status right before Running. Displays when a
job is just being started or when more jobs are about
to run than the number of jobs Batch Manager can
simultaneously run.
Click on a job and a step-by-step analysis of all pages in the job
appears in the right panel. It shows where input was taken from,
the page status and where output was directed to. Click on a plus
icon to see more information about the page. Click on a minus icon
to hide details. For jobs with the error or warning status, the listing
shows which pages failed or what problems occurred.
Activate Job in the File menu serves to activate any inactive
job immediately.
Deactivate Job in the File menu deactivates any active job. If
the job is running, this will stop it before deactivating.
Choose this to close a Watch type job immediately to save its
result.
Chapter 6
Creating new jobs 95
Stop Job in the File menu stops a job with status Starting,
Running, or Paused.
Pause Job is available for jobs with status Running or
Starting. To modify such a job’s timing instructions you must
stop it.
Resume Job lets the job continue from its state when it was
paused.
Delete Job in the Edit menu serves to delete the currently
selected job. Only Inactive jobs can be deleted.
Rename Job serves to modify the name of any job.
Use the Edit menu to send a copy of a job’s status report to
Clipboard.
Use Save OPD As... in the File menu to save any intermediate result
of a paused job to an OPD file.
To remove data files click Edit, then choose Clear Occurrence. This
removes files storing the reporting data from the current occurrence
of the current job. Clear All Occurrences removes all data for all job
occurrences of the selected job. These two options are useful to free
disk space, but cleared occurrences cannot be viewed any more, so
use these with caution.
The Workflow viewer
The Workflow viewer, as displayed in the Workflow Status panel,
is integrated into the Batch Manager to the right of the list of your
jobs. Use it to get comprehensive and detailed information about
the processing of each occurrence of the job. The viewer shows the
process in a step-by-step fashion - following the steps of the
workflow. It displays input and output page information at each
stage, allowing you to quickly view any page. Job results are marked
by icons. Drop-down lists give you information about processing
steps.
Chapter 6
Creating new jobs 96
Watched folders
In OmniPage Professional 17, you can specify watched
folders and e-mail inboxes (Outlook and Lotus Notes) as job
input. These allow processing to be started automatically
whenever image files are placed in pre-defined folders or
arrive into inboxes as e-mail attachments. This is useful to
have sets of files with predictable content arriving from
remote locations processed automatically on arrival, even if no-one
is in attendance. Typically these are reports or form-like documents
that are delivered repeatedly or at recurring intervals, for example
each week or month.
To use this facility, prepare a set of folders or e-mail folders to be
watched. You should not use these folders for other purposes, not
even for barcode cover page jobs. When setting up such a job,
choose Folder watching job, name it and click Next. In the dialog
box that appears, browse to the folders.
Add a watched
folder to the list
using this Browse for
Folder dialog box.
Specify an image
file type.
Add the desired folders and file types (one type or all types). Click
the checkbox in front of your selected folder to include its
subfolders as well. To enable a number of file types, add the Folder
Chapter 6
Watched folders 97
repeatedly, once for each type. Add a checkmark to watch
subfolders of the selected folder as well.
When you reach the next panel of the Job Wizard, you set the
timing instructions: a starting time and an end time for the
watching to occur. You can specify recurrences, for instance to have
the folder(s) watched only during your lunch hour (Start 12.15, End
13.05) every Monday, Wednesday and Friday, or overnight in the
last three days of each month, when you keep your computer
running to collect and process monthly reports arriving from afar.
When files enter a watched folder, the program waits for
approximately the interval specified in Batch Manager Options for
more files to arrive in order to process them together. When files
cease to arrive, processing starts.
To finish the watching early, choose Deactivate Job. Then you can
modify the job freely.
Watched mailboxes
In OmniPage Professional 17, you can specify watched
mailboxes as job input. These allow processing to be
started automatically whenever image files of specified
file types are placed in pre-defined e-mail folders. This
is useful to have sets of files with predictable content
arriving processed automatically on arrival, even if noone is in attendance.
The program supports watching Microsoft Outlook and Lotus
Notes mailboxes.
Chapter 6
Watched mailboxes 98
Barcode processing
In OmniPage Professional 17, you can run workflows (sets
of steps and their settings) using barcode cover pages that
define which workflow should run. A barcode cover page
identifies a workflow (with workflow identifier, workflow
name and workflow steps) and contains information on
workflow creation (name of the creator, date of creation,
etc.). Note that barcode processing cannot be recurrent.
There are two ways of doing barcode processing:
Scanner input:
Workflow processing is driven by placing the cover page on top of a
document to be scanned and pushing the scanner's Start button.
Image file input:
Job processing is driven by copying the barcode cover page image
into a watched folder that will receive the document images to be
processed.
For scanner input you have to
1. Create a workflow that contains the processing steps you need
with Scan Images as first step.
2. Print a barcode page that identifies the workflow.
3. Start barcode processing from the scanner.
To scan with a barcode page:
1. Place the barcode cover page on the top of the document in the
ADF.
2. Press the Start button on the scanner.
Chapter 6
Barcode processing 99
3. Select “Barcode cover page workflow” as Scanner button
default action on the Scanner tab of Options. You can also set it
to Prompt for workflow. In this case, a dialog box appears with the
available choices: Scanning, Barcode cover page workflow, and
all scanning workflows.
All available pages will be processed by the specified workflow, or
until a new barcode page is encountered. The result will be saved as
specified by the workflow.
For image input you must create a barcode cover page job.
A barcode cover page job uses a special kind of watched folder.
Always use a separate folder for barcode processing. The starting
time for the workflow is defined by the moment the barcode cover
page enters a watched folder.
For a barcode cover page job processing you need to
1. Create a workflow that contains the processing steps you need.
Select Load Files as input with “Select files for loading each
time this workflow is started” selected.
2. Save a barcode cover page that identifies the workflow.
3. Define timing instructions for barcode folder watching in the
Batch Manager by creating a barcode cover page job.
To process with a barcode cover page job:
1. Make sure that the job is running at the required time.
2. The folder is being monitored and the workflow will be started
as soon as a barcode cover page is placed in the specified
watched folder.
3. The workflow will process image files arriving in the folder
after the cover page.
Chapter 6
Barcode processing 100
4. The workflow will be completed at the specified end time of
the job, or each time a new barcode cover page is detected.
You can copy the barcode cover page image and the image files into
the watched barcode folder yourself, or direct others to do this. You
can also place just a barcode cover page image file in the watched
folder, then have a network scanner make and send image files
there.
File-it Assistant
The File-it Assistant lets you create scanning workflows for
repeated document conversion tasks. The Assistant is for scanning
jobs that require no user interaction during the processing. In a
typical scenario operators at a scanning station prepare documents,
applying the appropriate barcode cover page to each, without
needing to know anything about the later processing or destination
of the documents, because all that is pre-determined. Associate a
button on your scanner with OmniPage (see Chapter 3 under
Scanning) and print a barcode cover page to identify your
workflow. As a result, you can scan, convert and save without
interaction beyond pressing the scanner button.
Create the workflow:
1. Select File-it Assistant from the Tools menu.
2. Name your workflow, choose an output file type, location and
file name.
3. Review and optionally change the workflow settings.
4. Print the barcode cover page.
5. Associate OmniPage with a scanner button (must be done only
once) in the Control Panel. See “Scanning to OmniPage and
workflows” on page 39.
Chapter 6
File-it Assistant 101
Use the workflow:
1. Place the printed barcode cover page on top of a document in
your scanner.
2. Push the OmniPage-associated scanner button. The document
will be converted using steps and settings from the referenced
workflow and sent to the location you defined.
It is possible to use barcode cover pages stored as image files to
drive jobs from watched folders. Such jobs permit interactive steps
like manual zoning and proofing that are not available via the File-it
Assistant.
Chapter 6
File-it Assistant 102
Technical information
This chapter provides troubleshooting and other technical
information about using OmniPage 17. Please also read the Readme
file and other help topics, or visit the Nuance web pages.
Troubleshooting
Although OmniPage is designed to be easy to use, problems
sometimes occur. Many of the error messages contain selfexplanatory descriptions of what to do – check connections, close
other applications to free up memory, and so on.
Please see your Windows documentation or OmniPage Help for
information on optimizing your system and application
performance.
Supported file formats are listed here, Help provides more detail.
Solutions to try first
Try these solutions if you experience problems starting or using
OmniPage:
•
Make sure that your system meets all the listed
requirements. See the Installation and setup chapter.
•
Make sure that your scanner is plugged in and that all
cable connections are secure.
•
Visit the support section of Nuance’s web site at
www.nuance.com. It contains Tech Notes on commonly
reported issues using OmniPage. Our web pages may also
offer assistance on the installation process and
troubleshooting.
Chapter 7
Technical information 103
•
•
•
•
Use the software that came with your scanner to verify
that the scanner works properly before using it with
OmniPage.
Make sure you have the correct drivers for your scanner,
printer, and video card. Visit Nuance’s web page through
the Help menu and consult its scanner section for more
information.
Defragment your hard disk. See Windows online Help for
more information.
Uninstall and reinstall OmniPage, as described in the
section, “Uninstalling the software” in the Installation and
setup chapter.
Testing OmniPage
Restarting Windows XP or Vista in its safe mode allows you to test
OmniPage on a simplified system. This is recommended when you
cannot resolve crashing problems or if OmniPage has stopped
running altogether. See Windows online Help for more information.
To test OmniPage in safe mode:
1. Restart your computer in safe mode by pressing F8
immediately after you see the ‘Starting Windows’ message.
2. Launch OmniPage and try performing OCR on an image. Use a
known image file, for instance one of the supplied sample image
files.
• If OmniPage does not launch or run properly in safe mode,
then there may be a problem with the installation.
Uninstall and reinstall OmniPage, and then run it in
Windows safe mode.
Chapter 7
Troubleshooting 104
• If OmniPage runs in safe mode, then a device driver on
your system may be interfering with OmniPage operation.
Troubleshoot the problem by restarting Windows in
Step-by-Step Confirmation mode. See Windows online
Help for more information.
Text does not get recognized properly
Try these solutions if any part of the original document is not
converted to text properly during OCR:
•
Look at the page image and ensure that all text areas are
enclosed by text zones. If an area is not enclosed by a zone,
it is generally ignored during OCR. See the section on
creating and modifying zones, in the “Processing
documents” Chapter.
•
Make sure text zones are identified correctly. Reidentify
zone types and contents, if necessary, and perform OCR on
the document again. See “Zone types and properties” in the
“Processing documents” Chapter.
•
Be sure you do not have an unsuitable template loaded by
mistake. If zone borders cut through text, recognition is
impaired.
•
Adjust the brightness and contrast sliders in the Scanner
panel of the Options dialog box. You may need to
experiment with different settings combinations to get the
desired results.
•
Use the Image Enhancement Tools to optimize your image
for OCR.
•
Check the resolution of the original image. Hover the
cursor over a page thumbnail for a popup display. If the
resolution is significantly above or below 300 dpi,
recognition is likely to suffer.
Chapter 7
Troubleshooting 105
•
•
•
•
•
•
Make sure the correct document languages are selected in
the OCR panel of the Options dialog box. Only languages
included in the document should be selected. In particular,
setting an Asian language for non-Asian texts (and vice
versa) is likely to produce unusable results.
Recognition results in Japanese, Korean and Chinese can
be viewed and saved only if your system has East Asian
language support. See “Asian language recognition” on
page 61.
Turn IntelliTrain on and make some proofing corrections.
This is most likely to help with stylized fonts or uniformly
degraded documents. If IntelliTrain was running, try
turning it off – on some types of degraded documents it
may not be able to help. See “IntelliTrain” on page 64.
Do some manual training, or edit existing training to
remove unsuccessful training.
If you use True Page as the Text Editor formatting level or
for export, recognized text is put into text boxes or frames.
Some text may be hidden if a text box is too small. To view
the text, place the cursor in the text box and use the arrow
keys on your keyboard to scroll to the top, bottom, left, or
right of the box.
Check the glass, mirrors, and lenses on your scanner for
dust, smudges or scratches. Clean if necessary.
Problems with fax recognition
Try these solutions to improve OCR accuracy on fax images:
•
Ask senders to use clean, original documents if possible.
•
Ask senders to select Fine or Best mode when they send
you a fax. This produces a resolution of 200 x 200 dpi.
Chapter 7
Troubleshooting 106
•
Ask senders to transmit files directly to your computer via
fax modem if you both have one. You can save fax images as
image files and then load them into OmniPage. See “Input
from image files” in the Processing documents Chapter.
System or performance problems during OCR
Try these solutions if a crash occurs during OCR or if processing
takes a very long time:
•
Check image quality. Consult your scanner documentation
on ways to improve the quality of scanned images.
•
Break complex page images (lots of text and graphics or
elaborate formatting) into smaller jobs. Draw zones
manually or modify automatically created zones and
perform OCR on one page area at a time. See “Working
with zones” in the Processing documents Chapter.
•
Restart Windows XP or Vista in safe mode and test
OmniPage by performing OCR on the included sample
image files.
If you are performing multiple tasks at once, such as recognizing
and printing, OCR may take longer.
Supported file types
Supported image file formats for loading are TIFF, PCX, DCX, BMP,
JPEG, JB2, JP2, GIF, PNG, XIFF, MAX, PDF, XPS and HD Photo.
Supported file types for saving recognition results as text are:
HTML 3.2, 4.0
Microsoft Excel 97, 2000, XP, 2003, 2007
Microsoft PowerPoint 97
Microsoft Publisher 98
Microsoft Word 97, 2000, XP, 2003 (WordML), 2007
Chapter 7
Supported file types 107
OmniPage Documents
PDF (Normal), Edited, with image on text, with image
substitutes
RTF Word 6.0/95, RTF Word 97, RTF Word 2000, RTF 2000
ExactWord
WordPad
WordPerfect 12, X3
Text, Text with line breaks, Text - Formatted, Text - Comma
Separated
Unicode Text, Unicode Text with line breaks, Unicode Text Formatted, Unicode Text - Comma Separated
Wave Audio Converter (to save recognized text being read aloud)
In OmniPage Professional 17 there is also support for:
eBook, Microsoft InfoPath (for forms), Microsoft Reader, and XML.
Chapter 7
Supported file types 108
Index
Click a page number to
jump to the referenced
item.
(E) = Image Enhancement tool
(F) = Form handling tool
Symbols
.NET Framework 3.0 12, 82
Numerics
3D deskew 46
A
Accuracy
improvement 38, 63, 105
influence of brightness 38
influence of despeckling 45
influence of training 63
scanning influence 38
Acquire Text menu items 33
Activating OmniPage 18
Adding
attachments to mail 83
to zones 52
training to training files 65
words to user dictionary 58
workflow steps 91
Additive area selection (E) 44
ADF 34, 39
Advanced saving options 79
Advice on problems 103
Agent to start OmniPage 17, 88
Alphanumeric zones 50
Amazon Kindle 83
Area definition for SET tools 44
Arial Unicode MS 63
Asian language recognition 61
Asian texts, vertical 49
Assigning OmniPage to scanner buttons
39
Attachments to mail 83
Auto-detect layout 40
Automatic Document Feeder (ADF) 34,
39
Automatic training 64
Auto-sending by mail 83
Auto-zoning 40
Auto-zoning vertical text 49
B
Backgrounds for zoning 48
Barcode processing 99
Basic processing steps 21
Batch Manager 91
Black-and-white
images 76
scanning 38
Blacking out confidential words 69
Bold text 66
Boxes 67
Boxes for recognized text 106
Brightness 38, 105
Brightness / Contrast (E) 45
Bring to Front tool (F) 73
C
Changing
part of a page 68
OmniPage 17 User’s Guide
109
reading order 67
views 21, 26
Changing workflows 91
Character attributes 66
Character Map 59
Characters, suspect 56
Checkbox tool (F) 72
Checking OCR results 58
Chinese 61
Circle text tool (F) 72
Classic View 21, 22
Clipboard
sending recognition results 75
Color
images 76
markers 58
scanning 38
Color dropout for forms 45
Coloring image areas 46
Comb tool (F) 72
Comparing recognized words with originals 58
Composition of workflows 86
Contrast 38, 105
Contrast / Brightness (E) 45
Convert Now Wizard 37, 82, 83
Converters multiple 79
Converting from PDF 82, 83
Converting image files 88
Copying to Clipboard 75
Cover pages for barcode processing 99
Creating
new workflows from existing ones 90
training data 65
workflows 90
Crookedly scanned pages 46
Crop (E) 45
Ctrl to avoid panel redocking 21
Custom Layout 41
Custom views 26
Customizing export converters 79
D
Decreasing image resolution 46
Deleting
jobs 96
training files 65
user dictionaries 60
Describing document layout 40
Deskew (E) 46
Deskewing digital camera images 46
Desktop 21
Desktop launching of workflows 88
Despeckle (E) 45
Dictionaries 58
Digital camera input 35, 46
Direct OCR 32
Disabling job running 94
Disk space 11
DMS 85
Docking panels 21
Docking position display 21
Document Layout, Form 41
Document Manager 21, 22
Document Ready button 87
Documents
double-sided 39
exporting 75
in OmniPage 20
layout description 40
saving 75
sending to Clipboard 75
with varied layout 40
Document-to-document conversion 40
OmniPage 17 User’s Guide
110
DOCX Word 2007 support 12
Dot removal from images 45
Double-sided documents 39
Drawing zones in Direct OCR 34
Dropout color (E) 45
Dropping graphics from export 77
Dual screens 24
Duplex scanners 39
Dynamic verifier 58
E
East Asian language support 12, 61
Easy Loader 21, 23, 36
Easy Loader in Quick View 26, 37
Editing
character attributes 66
form objects 73
graphics 66
in True Page 67
on-the-fly 68
paragraph attributes 66
PDF output 81
recognized text 66
tables 53, 66
training files 65
user dictionaries 60
vertical texts 49
Editor
formatting levels 56
E-mail notification of job completion 92
Embedding items in OPDs 20
Embedding templates in OPD files 54
Enabling OmniPage taskbar icon 88
Encryption for PDF 82
English embedded in Asian texts 61
Error messages from jobs 95, 96
Excel 2007 (XLSX) 12, 107
Existing workflow as new workflow
source 90
Explorer, loading files from 37, 88
Export converters 79
Export Results button 77
Exporting
graphics 77
in Flowing Page 78
in True Page 78
repeated 75
to Clipboard 75
to file 77
to Kindle 83
to mail 83
to PDF 81
Extracting form data 74
Extracting items from OPDs 20
Extracting text from PDF files 83
F
Fast recognition and saving 25
Fax recognition 106
Features, new 7
File-it Assistant 101
Files
as export target 76
as image source 34
retained on uninstall 18
separation options 77
types for export 77
Fill (E) 46
Fill text tool (F) 72
Financial dictionaries 61
Finding
non-dictionary words 57
suspect words 57
Finishing
OmniPage 17 User’s Guide
111
proofing in a workflow 87
workflows 90
zoning in a workflow 87
Flexible View 21, 23
Flipping images 45
Floating panels 21
Flowing Page 78
Form Arrangement toolbar 73
Form data, extracting 74
Form drawing toolbar 72
Form objects, editing 73
Form processing with dropout 45
Form zone 51
Formatted Text 57
Formatted Text view 78
Formatting levels 57, 77
Formatted Text 57
Plain Text 56
True Page 57
Formatting toolbar 21
Frames 67, 78, 106
Framework 3.0 (.NET) 12
Fresh start for new workflow 90
FTP sites 85
G
Get and Convert 37
Graphic tool (F) 72
Graphic zones 51
Graphics
editing 66
in export 77
Grayscale
images 76
scanning 38
Grouping elements 67
H
Header/footer indicators 56
Hearing texts read aloud 71
Help display 21, 27
Hiding / showing markers 56
Highlighting text 69
History of image enhancement 46
Horizontal alignment tools (F) 73
Hue / Saturation (E) 45
Hummingbird 85
Hyperlinks 67
I
Ignore backgrounds 48
Ignore zones 51
Image enhancement
history 46
in workflows 47
tools 43
Image files
conversion 88
input 34
reading order 34
samples 104
Image panel 21
Image requirements 35
Image toolbar 21
Images
backgrounds 48
black-and-white 76
color 76
cropping 45
deskewing 46
editing 66
flipping 45
grayscale 76
quality 39
OmniPage 17 User’s Guide
112
resolution 46, 76, 105
rotating 45
saving 76
size requirements 35
substitutes in PDF 81
iManage 85
Improving accuracy 38, 64, 105
Increasing memory 105
Input
from digital camera 35
from image files 34
from PDF files 34
from scanners 38
via Easy Loader 36
Installing
OmniPage 12
scanners 14
IntelliTrain 64, 106
Interactive job steps 93
Italic text 66
J
Japanese 61
Jobs
disabling 94
error messages 95, 96
managing 95, 96
modifying 94
notification of completion 92
page limit 94
recurrent 98
running 95, 96
running without prompts 93
status 95, 96
timing instructions 98
Joining zones 52
K
Kindle 8, 83
Korean 61
L
Language choices verified 62
Languages 61, 106
Launch
target application 77
workflows from desktop 88
Layout description 40
Layout retention 57
Layout, auto-detect 40
Legal dictionaries 58, 61
Legal documents 41
Letter outline strengthening 45
Levels of formatting 57
Line tool (F) 72
Linearized PDF 82
Links to web pages 67
Loading
Image Enhancement templates 47
image files 34
images from Windows Explorer 37
images with Easy Loader 26, 36
training files 65
user dictionaries 60
zone templates 42, 53
Lotus Notes 92, 93, 98
M
Mail 83
Mailbox watching 98
Managing jobs 95, 96
Manual 3D deskewing 46
Manual deskewing 46
Manual training 64
Manual zoning 48
OmniPage 17 User’s Guide
113
Marked words in Editor 56
Markers 56, 58
Marking text 69
Maximising workspace 24
Maximum image sizes 35
Medical dictionaries 58, 61
Memory requirements 11, 105
Microsoft .NET Framework 75, 82
Microsoft Outlook 83, 92, 93, 98
Microsoft Word, opening PDF files in 82
Minimum image sizes 35
Minimum system requirements 11
Modifying
image quality 42
jobs 94
tables 53, 66
zone templates 54
zones 51
Modifying workflows 91
MRC compression 82
MS Word 2007 support 12
Multicolumn areas 67
Multi-page image files 76
Multiple column pages 41
Multiple converters 79
N
New features 7
Noise removal from images 45
Non-dictionary words 56
Non-printing characters 56
Notification of job completion 92
Numeric zones 50
O
OCR
Batch Manager 91
checking OCR results 58
Direct OCR 32
poor performance in 107
proofreading results 57
settings for Direct OCR 32
OCR Brightness (E) 45
OCR image 42
OCR/Primary image (E) 44
ODMA 85
OmniPage
activating 18
assigning to scanner buttons 39
documents in 20
earlier versions 12
installing 12
new features 10
reinstalling 18
starting 14
testing 104
uninstalling 18
OmniPage Agent 17, 88
OmniPage desktop 21
OmniPage desktop views 21
OmniPage Documents 20
saving as 75
OmniPage Professional 10
OmniPage Toolbox 22
OmniPage Workflow Starter 17, 88
One-button processing 26, 37, 39
On-the-fly editing 68
OPD files
embedding items 20
extracting items 20
template embedding 54
Opening image files 34
Operating system requirements 12
Optimized PDF for web display 82
Optimizing brightness 38
OmniPage 17 User’s Guide
114
Options dialog box 28
Options for proofing 57
Options for saving 79
Order of page elements 67
Original image 42
Original image saving 76
Outlook 92, 93, 98
Overview of processing steps 21
P
Page Image panel 21
Page limit for jobs 94
Page Ready button 87
Pages
deskewing 46
multi-page image files 76
navigation 22
sending as mail 83
sending to Clipboard 75
Panels 21
PaperPort 19, 29
Paragraph
editing attributes 66
styles 66, 77
Passwords for PDF 82
Pausing workflows 88
PDF converting from/to 82
PDF Edited 80
PDF file input 34
PDF flavors 80
PDF linearized 82
PDF to MS Word 83
Pending pages 68
Performance problems during OCR 107
Pixel sizes for images 35
Plain Text in Editor 56, 78
Plain Text view 78
Pleading numbers 41
Pointer (E) 44
PowerPoint 2007 (PPTX) 107
Preprocessing images 42
Primary image 42
Primary/OCR Image (E) 44
Problems with faxes 106
Process backgrounds 48
Process zones 51
Processing
basic steps of 21
from other applications 32
manual 32
step-by-step 32
steps, overview 21
with workflows 87
Professional dictionaries 58, 61
Professional version 10
Program panels 21
Progress reports from workflows 96
Prohibited zone shapes 52
Proofing
in a workflow 87
options 57
Properties of zones 49
Purpose of training 63
Purpose of workflows 86
Q
Quality of images 39
Quick Convert View 21, 25
Quick Convert View with Easy Loader
26, 37
R
Reading order 67
Reading text aloud with RealSpeak 70
Recognition
OmniPage 17 User’s Guide
115
accuracy 39, 63, 105
languages 61, 106
problems with faxes 106
saving results 77
speeding up 106
Rectangle tool (F) 72
Recurrent jobs 93, 98
Redacting text 69
Redocking panels 21
Reducing image area 45
Registration 17
Reinstalling OmniPage 18
Removing image edges 45
Removing noise from images 45
Removing workflow steps 91
Removing zone templates 54
Repeated exporting 75
Replacing zone templates 54
Requirements for Asian language support 12
Requirements for input images 35
Resetting views 23
Resolution 76, 105
Resolution (E) 46
Retaining paragraph styles 77
Re-training 64
Rotate (E) 45
Running
Batch Manager jobs 94
jobs without prompts 93
workflows 87
S
Safe mode 104
Sample image files 104
Saturation / Hue (E) 45
Saving
and launching 77
as OmniPage Document 75
documents 75
options 79
original images 76
PDF files 80
recognition results 77
text 77
to file 76
to mail 83
to multiple file types 79
training files 65
user dictionaries 60
zone templates 54
Saving and applying Image Enhancement templates 47
Scanners 106
drivers 15
duplex 39
setting up 14
Scanning 38
input from 38
pictures 38
to workflows 39, 101
Wizard 14
Scheduled processing 91
Searchable PDF 81
Searching PDF output 81
Select Area (E) 44
Selection tool (F) 72
Send to Back tool (F) 73
Sending
pages by mail 83
to Clipboard 75
to Kindle 83
SET tools 43
defining an area 44
OmniPage 17 User’s Guide
116
Setting up a scanner 14
Setting up Direct OCR 33
Settings
Acquire Text 33
for Direct OCR 33
Options dialog box 28
zone types 53
Settings for workflows 89
SharePoint 85
Simplified UI 25
Single-column pages with tables 41
Sizes for input images 35
Skipping interactive job steps 93
Slow recognition 107
Smart folders 97, 98
Solutions for poor performance 103
Specialized dictionaries 61
Speed zoning 52
Spreadsheet pages 41
Standard toolbar 22
Starting a user dictionary 60
Starting Batch Manager 92
Starting the program 14
Status of jobs 95, 96
Step-by-step processing 21
Steps for workflows 89
Stopping workflows 88
Storing zoning changes 68
Straightening pages 46
Strengthening letter outlines 45
Striking out text 69
Subtractive area selection (E) 44
Suggestions in proofing 58
Suspect words 56
Synchronize views (E) 45
System or performance problems during
OCR 107
System requirements 11
T
Tabbed panels 21
Table tool (F) 73
Table zones 51
Tables
editing 66
editing dividers 53
in single column pages 41
in Text Editor 66
removing dividers 53
rows in 53
zones 51, 53
Taskbar workflow icon 88
Technical information 103
Template zones 42, 53, 105
Template, form 74
Templates in OPDs 54
Testing OmniPage 104
Text direction 49, 62
Text Editor 21, 56, 66
Text saving 77
Text tool (F) 72
Text-to-Speech facility 71
Thumbnails 21, 22
Tiled panels 21
Timing of jobs 98
Toolbar docking / floating 58
Toolbars 27
Training 63
automatic (IntelliTrain) 64
manual 64
training files 65
Troubleshooting 103
True Page 57
True Page editing 67
OmniPage 17 User’s Guide
117
True Page export 78
TWAIN scanner drivers 15
Types of zones 49
U
Underlined text 66
Undocking panels 21
Ungrouping elements 67
Uninstalling the software 18
Unloading
training files 65
user dictionaries 60
zone templates 54
URLs 67
User dictionaries 57, 60
User interaction in workflows 87
Using Direct OCR 33
V
Verifying language choices 62
Verifying text 58
Vertical arrangement tools (F) 73
Vertical dictionaries 61
Vertical text 61
Vertical text, auto-zoning 49
Viewing input or output files 96
Viewing vertical texts 49
Viewing workflow progress 96
Views 21
changing 21, 26
Classic 22
Custom 26
Flexible 23
Quick Convert 25
resetting 23
using Window menu 23
W
Warning messages from jobs 96
Watched folders 97, 98
Watched mailboxes 98
Web access for activation 12
Web display with PDF files 82
Web page links 67
Window menu for view control 23
Windows Explorer 37, 88
Wizard for direct conversions 37, 83
Wizard for scanner setup 14
Word 2007 (DOCX) 107
Word files as input 40
Workflow Assistant 32, 89
Workflow Status 21, 27, 96
Workflow viewer 96
Workflows
composition 86
creating 90
finishing 90
for form data extraction 74
image enhancement steps 47
pausing and stopping 88
running 87
started from scanner 39
steps and settings 89
taskbar icon 88
user interaction 87
viewing status 96
Working with zones 51
Workspace management 24
X
XPS 12, 82, 107
XPSX Excel 2007 12
Z
Zones 50
OmniPage 17 User’s Guide
118
adding to 52
alphanumeric 50
changing types 51
deleting templates 53
graphic 51
ignore 51
in Direct OCR 34
irregular 52
joining 52
manual 48, 105, 107
modifying templates 53
numeric 50
process 51
prohibited shapes 52
properties 49
replacing templates 54
saving templates 54
table 51, 53
templates 42, 53, 105
types 49, 105
unloading templates 55
vertical Asian text 62
working with 51
Zoning in a workflow 87
Zoning on-the-fly 68
Zoom (E) 44
Zooming displays 22, 58
OmniPage 17 User’s Guide
119
THIRD PARTY LICENSES/NOTICES
The word verification, spelling and hyphenation portions of this product are based in
part on Proximity Linguistic Technology. The Proximity Hyphenation System ©
Copyright 1988. All Rights Reserved. Franklin Electronic Publishers, Inc.
The Proximity/Merriam-Webster American English Linguibases. © Copyright 1982,
1983, 1987, 1988 Merriam-Webster Inc. © Copyright 1982, 1983, 1987, 1988 Franklin
Electronic Publishers, Inc. Words are checked against the 116,000, 80,821, 92,641,
106713, 118,533, 91928, 103,792, 130,690, and 140,713 word Proximity/MerriamWebster Linguibases. The Proximity/Collins British English Linguibases. ©
Copyright 1985 William Collins Sons & Co. Ltd. Legal and Medical Supplements ©
Copyright 1982 Merriam-Webster Inc. © Copyright 1982, 1985 Franklin Electronic
Publishers, Inc. Words are checked against the 80,307, 90,406, 105,785, and 115,784
word Proximity/Collins Linguibases. The Proximity/Collins French, German,
Italian, Portuguese (Brazilian), Portuguese (Continental), Spanish Linguibases. ©
Copyright 1984, 1985, 1986, 1988 William Collins Sons & Co. Ltd. © Copyright 1984,
1985, 1986, 1988 Franklin Electronic Publishers, Inc. Words are checked against the
136,771, 150,893, 178,839, 207,119, 212,565, and 194,393 word Proximity/Collins
Linguibases. The Proximity/Van Dale Dutch Lingubase. © Copyright 1987 Van Dale
Lexicografie bv. © Copyright 1987 Franklin Electronic Publishers, Inc. Words are
checked against the 119,614 word Proximity/Van Dale Linguibase. The Proximity/
Munksgaard Danish Linguibase. © Copyright 1988 Munksgaard International
Publishers Ltd. © Copyright 1988 Franklin Electronic Publishers, Inc. Words are
checked against the 113,000 word Proximity/Munksgaard Linguibase. The
Proximity/IDE Norwegian and Swedish Linguibases. © Copyright 1988 IDE a.s. ©
Copyright 1988 Franklin Electronic Publishers, Inc. Words are checked against the
126,123 and 150,000 word Proximity/IDE Linguibases.
INSO/Vantage Research dictionaries: International CorrectSpell ™ spelling
correction system © 1993 by Lernout & Hauspie.
Slovenian Speller Database, copyright © 2002 Ambeis d.o.o.
Esperanto dictionary based on compilation by Toon Witkam and Stefan MacGill.
Asian OCR capabilities are jointly developed by the Beijing Wintone Information
Technology Corporation Ltd and Nuance Communications, Inc. All rights reserved.
International Components for Unicode (ICU) project Copyright © 1995-2009
International Business Machines Corporation and others.
This software is based, in part, on the work of the Independent JPEG Group, and
Colosseum Builders, Inc.
OmniPage 17 User’s Guide
120
The Independent JPEG Group's software, copyright © 1991-1995, Thomas G. Lane.
Portions of this software are copyright © 2006 The FreeType Project
<www.freetype.org>. All rights reserved. FreeType 2.3.1, Turner, Wilhelm, Lemberg.
Zlib copyright © 1995-1998 Jean-loup Gailly and Mark Adler.
This product was developed using Kakadu software.
Export Options dialog controls from Allan Nielsen, Supergrid control, copyright ©
1999.
This product includes software developed by the OpenSSL project <http://
www.openssl.org/> with software written by Eric Young and Tim Hudson.
Part of this software is derived from the RSA Data Security Inc. MD5 Message-Digest
Algorithm.
AES encryption/decryption for PDF © 2001, Dr Brian Gladman, Worcester, UK.
Amazon's Kindle 2 copyright ©1999-2009.
Components for Asian font handling: copyright © 2009 Adobe Systems Incorporated.
All rights reserved.
Some integration and other components: © 2009 Microsoft Corp. All rights reserved.
PDF creation: ©1993-2009 Zeon Corporation. All Rights Reserved
RealSpeak™ Solo 2002-2009 Nuance Communications, Inc. All rights reserved
OmniPage is protected by one or more of the following United States Patents:
4,700,400; 4,754,489; 4,773,099; 4,918,740; 5,046,114; 5,060,277; 5,077,807; 5,131,053;
5,133,023; 5,235,651; 5,261,009; 5,278,918; 5,278,920; 5,347,595; 5,381,489; 5,436,983;
5,657,397; 5,778,092; 5,862,259; 6,038,342; 6,047,251
© Nuance Communications, Inc., 2009.
All rights reserved. Subject to change without prior notice.
OmniPage 17 User’s Guide
121
This page intentionally left blank.
PPDM PDF Converter
Module 7
This page intentionally left blank.
This Guide shows screen pictures made with Windows® XP. The
appearance may vary under other Operating Systems.
2
Why are PDF files popular?
The Portable Document Format has become a de-facto standard for
document exchange across platforms and computing environments.
More than 200 million PDF documents are posted on the World Wide
Web. Key benefits that have driven this popularity are:
• Integrity: PDF files look like the original documents they were
created from. They conserve their appearance after sharing regardless of platform, operating system, installed fonts or local
settings on each computer or device.
• File size: In many cases, PDF files can be more compact than their
source documents - ideal for file transfer.
• Security: PDF files can be digitally signed and password protected
to prevent unauthorized changes.
• Sharing: While the basic document content can be frozen,
commenting and mark-up tools allow collective authoring and
document review.
What PDF Professional does for you
Nuance® PDF Converter Professional 7 from Nuance Communications
Inc., offers the full circle of functionality for handling PDF files. It can
unlock and open PDF files up to version 1.7 for viewing, editing,
annotation and re-assembly. It can create PDF files from versions 1.3 to
1.7 (PDF/A format is also supported). It can unlock PDF files for
repurposing in other applications.
This professional product has three parts for creating, editing and
unlocking PDF files. These are all installed and activated with a single
procedure.
3
Create PDF Files
Nuance® PDF Create 7 lets you create PDF files from a wide
range of file types. The Print dialog box in your print-capable
applications will offer a printer named ScanSoft PDF Create!
The PDF Create Assistant lets you compile a list of files generated by
different applications. You can also create PDFs from XPS files.
Each file can be converted to a separate PDF file, or they can be
combined, overlaid or packaged into a single file. When working in
Microsoft® WordTM, Excel®, or PowerPoint you can call on the program
to create a PDF file directly from your current document. During
conversions hyperlinks and comments can be transferred and you can set
bookmarks to be generated from the structure of the Word document,
each worksheet in Excel or for each slide in a PowerPoint presentation.
Document information (metadata) can also be transferred. When
working in Microsoft Outlook® or Lotus Notes®, message attachments
can be saved as PDF files. As you write a new message or a reply, you can
choose a non-PDF file from your computer to have it converted to PDF
and attached.
The program can create PDF files in versions 1.3 to 1.7 and PDF/A.
Files can be protected by passwords and can include watermarks.
Compression and font settings give you control over PDF file size and
appearance.
Edit PDF Files
Nuance PDF Converter Professional gives you extensive control
over your PDF files through an easy-to-use browsing and
reading interface. You can edit pages and documents, annotate
and review them, adjust document security, sign your documents and
more. PDF documents can be compiled from different sources and pages
can be rearranged. The program delivers a powerful document
management system: use it to create archives from related documents to
index and search them later. Alternatively, in the Enterprise edition, you
can access different document management systems through the
application: use them to store or archive your PDF documents.
4
Export PDF Files
Nuance® PDF Converter 7 lets you unlock PDF and XPS files to
edit them as Microsoft® WordTM, Microsoft® Excel®, Microsoft®
PowerPoint®, Corel® WordPerfectTM, and generic RTF files. It
also lets you open PDFor XPS files directly from these and other
applications, edit them and save them in the appropriate file type. It
converts PDF files up to and including version 1.7. Encrypted PDF files
can be opened if the required password is provided.
Installation and Activation
PDF Converter Professional 7 detects previous versions and components
and prompts for your confirmation to remove them. You should have
administrator rights on the computer to install and activate the program.
You need web access for activation.
1.
Insert the CD-ROM in your CD-ROM drive
The installation program will start automatically. If it does not, locate
your CD-ROM drive in Microsoft® Windows® Explorer and
double-click the program's AutoRun.exe file. Select a language for
installation. The InstallShield® Wizard will appear.
(If you have downloaded the program from the Nuance web site,
double-click its autorun.exe file.)
2.
License and Serial Number
You must accept the license agreement in order to proceed. You must
enter a serial number. You will find this on the CD sleeve or on the
Nuance web site, or a reseller’s site at the download location.
Some resellers let you see the serial number at a later time, by returning
to your purchase order. Be sure to keep the serial number in a safe place;
it is fully checked only during product activation and is also needed for
any re-installations.
Serial numbers never include the letter “O”, always use zero.
5
3. Location and Setup Type
The installer offers a default location for the program. Accept it or define
a different one. Select Complete or Custom Setup. Choose Custom to
accept or decline installation of the PDF unlocking component. Choose
Custom also to enable or disable the integration of PDF Converter and
PDF Create in other programs. By default, all the programs offered in the
PDF Converter Professional Integration panels of the InstallShield
Wizard will be enabled. (You can change integration settings later by
choosing the program under Add or Remove Programs in the Control
Panel and clicking Change and then Repair.)
4. Click Finish
Registration runs at the end of installation. Select Register Online to
establish a connection to the Nuance web site. We provide an easy
electronic form that can be completed in a few moments. When the form
is filled, click Submit. If you decide not to register or to be reminded
later, you can go to http://www.nuance.com to register online any time
later. Click on Support and from the main support screen choose
Product Registration. For a statement on the use of your registration
data, please see Nuance's Privacy Policy.
5. Activate
You will be invited to activate the product at the end of installation.
Please ensure that web access is available. Provided your serial number is
found at its storage location and has been correctly entered, no user
interaction is required and no personal information is transmitted. If you
do not activate the product at installation time, you will be invited to do
this each time you invoke the program. PDF Converter Professional
creates PDF files with a trial watermark on each page if you use it
without activation. If you ignore the first five activation prompts, you must
activate products separately and manually - a much more time-consuming process.
You will be allowed to re-install the program a reasonable number of
times without having re-activation problems, because un-installation
includes a de-activation step. The serial number is needed for reinstallation and web access is needed for de-activation and re-activation.
6
For registration and activation troubleshooting see the Nuance
Knowledge Base at http://knowledgebase.nuance.com/.
Note: Keep the serial number of earlier versions, to retain the option of installing
them on a different computer.
How to Get Help
This guide is available in a PDF file on the CD and after installation in the
program folder. It can also be accessed from the About panel. When the
program is delivered electronically, this PDF is available at the download
site and is included in the download.
Nuance PDF Converter Professional has a comprehensive HTML Help
system. Use the Help Menu to open it at its Introduction.
Press F1 to open Help: typically at the topic describing the
currently open panel. Some dialog boxes have Help buttons.
A Release Notes file with latest information is available on the CD and in
the program folder. The Nuance web site offers program information,
with a regularly updated knowledge base and user forums.
Note: System requirements are presented on the product box and in Help.
Starting the Program
Choose Nuance PDF Professional 7 from the Windows Start Menu. This
offers the following items:
Choose this to convert PDF files to
freely editable documents.
Choose this to start the main
program and edit PDF files.
Choose this to create PDF files from
one or more source files.
7
Create PDF Files
Overview of creating PDF files
PDF Creation can be done from the following locations as described in
the table and the following sections:
Location
Source files
Conversion method
Direct conversion from
One or more local or
clipboard, scanner or files.
PDF Professional File
DMS files, scanner or
Create Assistant to create,
menu or File toolbar clipboard
combine or overlay files.
Print dialog boxes
Individual settings. A page
Current document in
range can typically be
the calling application
specified
Windows Start Menu
(plus optionally desktop, One or more local or
DMS files
quick load bar and
system tray)
Target
PDF Professional as
current PDF
document
Pre-defined or via
Save As
Create Assistant, using
User defined. To local
profiles; page ranges are not
file, to e-mail or both
supported
Windows Explorer
shortcut menu
One or more whole
local files
Direct conversion using a
Pre-defined or via
chosen profile and assembly Save As to local file,
instruction
to e-mail or both
Microsoft Word
(Create PDF button)
Whole current Word
file
Direct conversion with current
settings. Word and general Via Save As to local
file, to e-mail or both
settings can be accessed
from Word
Microsoft Excel
(Create PDF button)
Current Excel
workbook or
worksheet
Direct conversion with current
Via Save As to local
settings (can be accessed
file, to e-mail or both
from Excel)
Microsoft PowerPoint
Whole current
2007(Create PDF
presentation
button)
Direct conversion with current
Via Save As to local
settings (can be accessed
file, to e-mail or both
from PowerPoint)
Direct conversion of all
One or more
attachments or with a
Microsoft Outlook
attachments to a mail
selection box. Settings can
and Lotus Notes (out)
message
be accessed
8
Pre-defined or via
Save As to a local file
Location
Source files
Conversion method
Microsoft Outlook
and Lotus Notes (in)
One or more files on
the local computer
Direct conversion using
PDF attached to
current settings (no access to
current message
settings)
Target
Microsoft Internet
Explorer
Direct conversion with current
Current web page or a
Via Save As to local
settings. Settings can be
link to another page
file, to e-mail or both
accessed from Explorer
Create PDFs from PDF Professional
Click the New PDF button
in the Main toolbar of PDF Professional,
or select New PDF from the File menu. See the picture below. You can
create a blank PDF or choose From File... to select one or more files from
an Open dialog box, even if they were created in different applications.
The next three commands lead to the PDF Create Assistant giving you
full control over the creation process. You can also drag-and-drop files
created in a print-capable application onto the PDF Converter
Professional workspace. In this case the behavior is the same as when
choosing From File... .
Direct conversion using the existing
settings from the ScanSoft PDF
Create! Properties dialog box that
you can access from File/Print.
Multiple selection is possible; one
PDF is created for each file.
Direct conversion
from the active
clipboard contents
using existing
settings.
These commands work through the
Create Assistant where settings are
made through profiles.
Direct conversion via scanner’s
own interface; multi-page input via
ADF may be possible.
9
Create PDFs from Print dialogs
The Print dialog box appearing in your print-capable applications will
include a PDF Create printer. Load a file you want to make a PDF from,
then select File/Print. Select ScanSoft PDF Create! as the name of your
printer. Specify a page range and other settings as desired. One PDF file
is created; the number of copies value is ignored. Click Properties to
check or change PDF Create settings. Click OK to start the creation. By
default the Save As dialog appears, but you can give automated saving
instructions under Properties/PDF Settings.
Use the PDF Create Assistant
The Assistant is called from the Windows Start menu. It lets you
compile a list of files to be converted. These files may have been created
in different applications. Choose to combine the files in the given order
to create a single PDF file or have each file converted separately. You can
package a set of files into a single PDF. Files can also be overlaid for the
conversion. The Assistant lets you use profiles to control the PDF
creation. Profiles contain a group of settings designed for a particular
outcome. The program includes seven profiles; you can create more for
your own needs. Help explains how to do this.
10
Remove selected
files from the list
Move selected files
up or down
Remove all files
from the list
Drag and drop input files onto this
area, or use the Add button
Assembly
instruction*
Select a profile
This displays current
saving settings
Click to start
PDF creation
Click to change
saving settings
Change profile
settings
* other assembly instructions are:
• Combine files into a single PDF (in listed order and ability to
generate a bookmark for each input file)
• Overlay files (with overlay options)
• Package files as PDFs inside a container PDF (with options)
11
Click the Profiles... button to change settings for any profile, or to create
a new profile based on an existing one.
1. Select a profile
here
Select a profile,
click this to name a
new profile based
on it, then change
settings and save it
with OK.
2. Make
selections here
Click this to delete
the selected profile
after a warning.
3. Specify settings
for each selection
here
Click this to restore
default settings for
the selected profile.
Access settings for
MRC compression
and creating
searchable PDF files.
For information on making tagged or searchable PDF files, and the
benefits of applying MRC compression, see Help.
Click OK to have the selected profile applied, with the settings you
specified.
Then press the Create button
in the Assistant. The Print Info
dialog box appears, listing the input and output files and showing the
conversion status. Double-click any PDF name to view the created PDF.
12
Create PDFs from Windows Explorer
Right click on a single file. The shortcut menu includes:
Choose a profile from the first item's sub menu. The current settings for
that profile will be used for the PDF creation. Click Edit… to modify
profile settings or create a new one before PDF creation. The second item
shows the current saving instruction. Click on it to set a different
instruction.
If you select a group of files and right click, the shortcut menu includes:
Choose the first option and then a profile to create one PDF from each
selected file. To generate a single PDF, choose to combine, overlay or
package the files along with a profile. The last option displays the
current saving instruction. Click it to change this.
Create PDFs from Microsoft Word
1.
Open the Word document.
2.
Select Create PDF from the Nuance PDF menu or click
. In
Word 2007 or 2010 you can find this in the Nuance PDF tab.
3.
Accept or change the default target folder and file name in the Save
As dialog box that appears.
13
4.
Optionally, add document information (keywords etc.) or choose
Embed Metadata (see below).
5.
Click
to create a PDF and attach a copy of it to an e-mail
message.
The Nuance PDF Settings for Word dialog box
This can be accessed from a toolbar button
or an item in the Nuance
PDF menu. (In Word 2007 you can find this in the Nuance PDF tab.) It
lets you define settings that are applicable only when creating a PDF
from a Word document. Define which paragraph styles in the Word
document should be converted to bookmarks in the PDF, which
comments should be transferred, how hyperlinks should appear, and
which items should be tagged, if any. Choose Embed Metadata to
transfer document information (subject, author, keywords...) from the
Word document into the PDF. Use the Advanced panel to access the full
range of PDF creation settings.
Create PDFs from Microsoft Excel
and PowerPoint
1.
Open the Excel file or PowerPoint presentation.
2.
3.
Select Create PDF from the Nuance PDF menu or click
.
Accept or change the default target folder and file name in the Save
As dialog box that appears.
4.
To create a PDF and attach a copy of it to an e-mail, click
5.
To change creation properties, click
.
You can choose whether or not to have comments and hyperlinks
transferred to the PDF and bookmarks created. In Excel each
worksheet becomes a bookmark and in PowerPoint each slide.
Choose Embed Metadata to transfer document information from
the source document into the PDF.
14
.
Create PDFs in mailing applications
A new toolbar is added to Microsoft Outlook and Lotus Notes (versions
7.0 and 8.5).
1.
Click
to convert the attachments in the current message to PDF
and save them to a defined folder.
2.
Click
to access settings. Choose to have all attachments
converted in the background and sent to the last used folder, or to
be able to choose which attachments to convert and to change the
target folder.
3.
Click
in the Nuance toolbar in a new message or a reply
window to choose one or more files from your computer to be
converted to PDF and attached to the message.
NOTE: If you do not see the buttons
in Word, Excel or
PowerPoint, go to View > Toolbars and select Nuance PDF.
Create PDFs from Internet Explorer
1. Open a web page you want to capture as a PDF.
2. Click the Create PDF button
and choose to make a PDF from
the web page, or to add its content to an existing PDF, or to create a
PDF and attach it to a new empty message in your default e-mail
program (Outlook or Lotus Notes).
The button's drop-down list also lets you access creation options. To
make a PDF from a web page linked to the current one, right-click on the
link and choose Create PDF file from the content of the link.
15
ScanSoft PDF Create! Properties dialog box
This gives you full control over conversions done without using the PDF
Create Assistant. In the General panel you define page size, orientation,
resolution for the PDF, choose whether or not to view it after creation
and choose a grayscale or color PDF. The PDF Settings panel lets you
define the PDF version, control font embedding, set compression types
and severity, define passwords and add watermarks. It gives you choices
for naming the created PDF file(s) and defining properties such as title,
author, subject and keywords. The created file(s) can also be directed as
attachments to an E-mail message, ready for distribution.
The ScanSoft PDF Create! Properties dialog box can be accessed from the
Print dialog box in your applications. When working from the Create
Assistant or Windows Explorer, these settings are made through the
profiles. If you need to access these settings from Microsoft Word,
choose File/Print instead of the Create PDF button.
How to overlay PDF files
Overlay options let you place artwork or other fixed items onto just the
first page of your PDF files, together with items that change from file to
file. Overlay example for a cover page:
Single-page file with
repeated elements
+ Page 1 of a multi- =
page document
Cover page of
resulting PDF file
To have this result, deselect the option 'Repeat the last page of the
shortest document for page overlay'.
You can also use an overlay to add a company logo or other fixed item to
every page of PDF files you create. To do this select the option named
above. For more information on overlay choices, please consult Help.
16
How to package files
A package is a single PDF file that contains a set of PDF files. Packages
help you group related files, making it easier to send them by e-mail.
To package a set of files, maybe of differing file types, select them in the
PDF Create Assistant. Choose packaging as the assembly instruction.
Click Options to choose which cover page to use: a Create Assistant
Template or the first listed file.
Click the Create button
transmitted into the package.
to have PDF files created or
To open a PDF package you must use a recent PDF viewer or editor, such
as Nuance PDF Converter Professional 5 or 6. All files in the package are
listed, you can open and save each one separately. With Nuance PDF
Converter Professional 4 and older PDF viewers/editors, the files are
indicated as attachments.
SharePoint and other DMS support
Microsoft SharePoint is supported by PDF Create inside PDF Converter
Enterprise 7, through a set of dialog boxes that can be accessed from the
Add button menu item Open from DMS. Other Document Management
Systems (Hummingbird, Worksite, DocsOPEN, LiveLink) can be
accessed directly through their own interfaces. See Help for detail, and
System Requirements for the full DMS listing. Created PDF files can be
stored in SharePoint or other systems by choosing Save to DMS as target
in the Destination Settings dialog box.
Inside SharePoint, Hummingbird Enterprise and Interwoven Worksite
it is possible to choose a non-PDF file, open its shortcut menu to call on
PDF Create to make a PDF from it and place it in the same location, with
the same file name. It is also possible to select a non-PDF file from the
computer's file system and have it converted to PDF and placed in the
DMS at the current or a defined location.
17
Edit PDF Files
The main screen areas of PDF Converter Professional are as shown
below:
To view and edit PDF files.
Choose Document Assembly
in the View menu for multipage editing and vieweing.
Navigation panels:
Attachments
Bookmarks
Comments
Destinations
Form Controls
Model tree
Pages
Signatures
Tags
Organizer panels:
Clip Art
Envelope
Security
Sign/Certify
Stamps
Watermarks
PDF Converter Professional groups its controls in several toolbars. You
can undock these and drag them into your working area. Here we
present the main toolbars, in some cases describing the individual tools
from left to right. You can customize toolbars to show or hide buttons.
18
File toolbar
Use the drop-down list of the
PDF Converter tool to
unlock the current PDF
targeting a selected format
and processing mode.
For details see the Export
PDF Files section later in
this guide.
This toolbar presents basic operations,
such as creating, opening, saving,
printing, e-mailing, and searching PDF
files; or adding them to your favorites.
Scan buttons offer enhanced Scan-toPDF functionality, including a Scan
Inbox in PDF Converter Enterprise 7.
Standard toolbar
Hand: Use this tool for PDF viewing and scrolling. Selection tools let you
select pieces of text and document areas.
Select text: Select a text block for editing its properties, exporting, etc.
Select image: Select an image for editing its properties, exporting, etc.
Select area: Select an area for copying or converting its content to an
editable format.
Select object: Use this to modify object properties and alignment.
Link: Use this to define a rectangle that will become a hyperlink.
Crop: Draw a rectangle to define the area to remain after cropping;
double-click in it to set cropping instructions.
Touch-up text: Make limited text edits, even over multiple
lines of text.
Touch-up object: Select objects to move, resize, rotate, group or
prioritize them. To modify tag data, select an object, right-click for a
shortcut menu and choose Properties/Tag.
19
Form Tools toolbar
Use this toolbar when working with forms. You can add the displayed
form controls to a PDF form. Other tools enable you to highlight or reset
form fields and set the tab order.
FormTyper: Use this (the last button on the right) to have form
elements detected and automatically activated so you turn a static
PDF into a fillable form.
Comments toolbar
Note: Add a note to the PDF; note conversations are possible when PDF
files are shared. Sort notes by author, type, date and more.
Text Box: Click this to add a text box above the other content on the
PDF page.
Callout: Add customizable callouts to your document.
Text Markup: Use different markup tools on the selected text.
Highlight: Select from the shown highlighting tools.
Attach: Attach a file or a sound file to the PDF with an icon at a
specified location.
Drawing: Draw different shapes on the page. Use a shortcut menu to
signal ‘complete’ when drawing multi-sided shapes.
Security toolbar
Security panel: Click this to set passwords and other security measures
for the PDF.
Digital Signatures: Sign or certify your document; custom signature
schemes and signature time stamping are available.
Mark Redaction: Black out confidential information in your text
(available only in the Enterprise version - see below).
20
Advanced toolbar
Use this toolbar to include movies, sounds, 3D files or Silverlight
content in your PDF. You can view and edit 3D files.
Imposition: (right-most button): Prepare the PDF for DTP-style
physical printing.
Measure toolbar
Use this toolbar to measure dimensions inside elements in the PDF,
whose scale you can define.
Document Assembly
To edit page contents or perform page operations while viewing several
pages, activate Document Assembly view in the View menu or by
clicking the Document Assembly button at the bottom of your screen.
The Document Assembly toolbar lets you insert, extract, delete and
renumber pages; split your current document; or work with headers and
footers (create, update or remove them). This view shows small-sized
pages, not static thumbnails, so comments can be placed and text
selections copied to other pages, even in other documents.
The right-most button is new: Page Assembly. It avoids the need to open
multiple instances of the program ti insert pages from a set of
documents. Each document is displayed in a tab, using page thumbnails.
This lets you view documents and drag-and-drop the desired pages into
the target document. A wide variety of file types are supported,
conversion to PDF takes place when required.
21
Document Security
To modify the security settings for your document, click Document >
Document Properties and choose the Security tab. This will always
display your current settings. You can choose to protect your document
by passwords or Certificate security at different levels.
Searching and Indexing Documents
You can carry out text searches in the currently open PDF, all PDFs in a
given folder or on a pre-built index file. Searches can be done using a
single string, multiple search strings, patterns or masks. Use the
Organizer to specify the search criteria. A PDF Index file (.zpi) is a
searchable archive of PDF documents. Click Document > Indexing to
create a new index, modify an existing one or to work with embedded
indexes.
Windows Desktop Search
Microsoft offers a Windows Desktop Search facility, to search through
files of different types in specified folders. PDF Converter Professional
provides WDS with the added benefit of including PDF files in these
searches - this includes image-only PDFs.
Reading Text Aloud
Use the command Read PDF in the Tools menu to have the PDF text
read aloud. Choose the current, next or previous paragraph or page or
the whole remaining document. Choose Properties to set the rate and
volume. You can also save the PDF text to a sound file in the wav format.
This facility is powered by the Nuance RealSpeak Solo Text-to-Speech
engine.
PDF Optimizer
Optimize your PDF to best fit its purpose. Click Tools > Optimize PDF
and specify target requirements such as fast web view, object and image
compression, scanned page settings, font embedding and more. You can
also add tags to PDF files, to have their logical structure (paragraphs,
titles, pictures, tables, cells, etc.) identified and logged.
22
PDF Printing
In addition to the usual print choices you can choose to print the PDF
with or without comments. You can also print form fields only, allowing
you to print an empty form, fill it electronically, and then print your
responses onto the empty form. The Imposition tools lets you to prepare
PDF pages for physical printing.
Table of Contents
Insert a Table of Contents in your document, based on bookmarks. Open
the bookmark panel, set bookmarks and their ranking, then choose
Table of Contents from the bookmark panel's shortcut menu. The TOC
is useful when the PDF is physically printed and bookmarks are no
longer available.
PDF Document comparison
This lets you compare two PDF files with similar content - typically an
earlier and later version of one document. Access this from the
Document menu, then choose to see a visual or a textual comparison,
with a side-by-side or combined presentation. The latter shows only one
document and marks object or text changes: new text is underlined
while deleted text appears in a marker tooltip.
PDF to Word Document comparison
PDF Professional is able to compare a PDF file with a particular version
of a Word file; typically this will be the file the PDF was made from. It
can show which changes were made since the PDF was created. The
comparison is made within Word, the result can be displayed in a
temporary file that you can save if required.
PDF splitting
You can split large PDF files into a set of smaller ones so they are easier to
distribute. Access this from the Document menu and choose splitting
criteria: by file size, blank pages, number of pages, bookmarks, document
structure, etc. You can also extract pages by criteria that you specify.
23
PDF portfolios
Portfolios let you collect a set of documents relating to a particular topic
for convenient distribution. PDF Professional provides this by extending
the previous PDF Create support for packages. A portfolio is superior to
a package because it can contain documents of differing file types (all
documents in a package must be PDF files) as well as folders and folder
structures. Support for displaying non-PDF pages is added.
Package PDF files
PDF Create lets you select a set of files and have their copies grouped in a
single PDF package file. Any non-PDF files you select enter the package
as PDF files. To include non-PDF files in a package in their original
format, open a package, open a PDF inside it, and attach these files. You
can add a cover page to the package. Help explains how different PDF
programs let you use and unpack received packages.
Place files in an Envelope
This is similar to packaging files, but in this case the files become
attachments to the enclosing PDF and keep their original file types.
An envelope file acts as a cover page.
Archive E-mail
PDF Professional lets you archive selected e-mails and e-mail
folders. You can choose to create a single PDF from each message,
merge all selected archive items into one PDF (each message
will be bookmarked inside it), or package the selected items. Message
attachments keep their original file types.
Batch processing
This lets you build a series of commands and their settings into a named
and stored sequence, letting you efficiently apply pre-defined processing
to groups of PDF files repeatedly, by just running a sequence. Input and
output file names and locations can be predefined or enquired run-time
and output can be to non-PDF file types. It is also possible to run a batch
processing sequence on all PDF files currently open in PDF Professional.
In that case the output is always PDF and it replaces the input files
inside the program.
24
Other new features
Support is introduced for PDF layers; this is useful in working with
archtectural plans and in preparing PDF files for delivery to printing
houses. Document flattening allows annotations to be removed or
converted to document objects. Integration of the program in internet
browsers is expanded to Google Chrome and Apple Safari.
The following features are provided only in the Enterprise
edition, along with Enterprise documentation for network
administrators:
Legal Support
Legal stamps are available, along with Bates stamping and CaseMap
support for legal offices. Choose Inspect Document in the Document
menu to select items to be removed from a file, such as comments,
bookmarks, hidden text, embedded indexes or sensitive metadata like
the author's name or the file history.
SharePoint and DMS support
The program supports the following Document Management Systems:
Micorsoft SharePoint, Interwoven WorkSite, Hummingbird Enterprise,
Hummingbird DocsOpen and LiveLink. See System Requirements in
Help. The ability to create PDF files from or inside DM Systems is
documented at the end the PDF Create section of this guide. The ability
to unlock PDF or XPS files is similarly documented at the end the PDF
Converter section. A menu item and a toolbar are added to PDF
Professional for each detected DM system, allowing you to open PDF
files from the DMS, save PDF files to DMS, access the DMS document
properties, extract or instert pages to or from the DMS or select a file of
any type from the DMS to have it attached to the current PDF document.
Commands from PDF Professional are also available inside SharePoint,
Hummingbird Enterprise and Interwoven Worksite.
25
Redaction
Document text confidentiality is achieved by redaction - the blacking
out of pieces of text or images. Select text or images to be marked for
redaction with the Redact tool in the Document menu or the Security
toolbar. This menu also allows marking for redaction by searching. The
program finds all occurrences of a given text string in the document,
letting you review them and choose which will be marked for redaction.
Use the Apply redaction menu item or button to have all marked items
(whether resulting from searches or selection) blacked out permanently.
When a redacted document is saved, the program always offers Save As,
because you should save the redacted file to a new name. The original file
remains with the redacted items marked but still readable.
Warnings:
• Be aware that once a file is saved with redacted items, there is no
way of restoring the removed content – it can neither be viewed
nor found by searching.
• If text to be redacted contains typing errors, maybe some sensitive
data will not be removed by searching. We suggest that you
always check a search-redacted document manually before
releasing it.
26
Export PDF Files
Starting the Program
To make the services of PDF Converter easy to call on, it can be started
from several locations, as described in the following overview table and
procedures.
Location
Source PDF/XPS
Conversion
method
Target
PDF Professional File/
Current PDF in PDF
Save As menu or
button or Tools/Launch Professional
PDF Converter
Converter Assistant or
Direct Conversion with
User defined
chosen mode and target
Windows Start Menu
Local or DMS files
Converter Assistant
User defined
Microsoft Word
(Open PDF/XPS
button)
One local file
Converter Assistant
Microsoft Word
Microsoft Word
(File Open)
Local files
Converter Assistant
Direct Conversion
Microsoft Word
Microsoft Word
Corel WordPerfect
One local file
Converter Assistant
WordPerfect
Microsoft Excel
One local file
Converter Assistant
Excel
Microsoft PowerPoint
2007
One local file
Converter Assistant
PowerPoint
2007
Windows Explorer
One local file
Converter Assistant
Direct Conversion
User defined
As last set
Microsoft Outlook
One or more mail
attachments
Converter Assistant
Direct Conversion
User defined
As last set
Lotus Notes
One or more mail
attachments
Converter Assistant
Direct Conversion
User defined
As last set
Microsoft Internet
Explorer
One web link
Converter Assistant
User defined
Mozilla FireFox
One web link
Converter Assistant
User defined
27
Exporting PDF from the Professional program
XPS Document
Word Document
Word Form
Excel Spreadsheet
PowerPoint Presentation
WordPerfect Document
MRC PDF
The component that lets you
export the content of PDF files to
editable formats is called PDF
Converter. Access it from the
Convert PDF button in the File
toolbar. Choose a direct
conversion to be performed with
current settings for the selected
mode or choose the last item to
open the PDF Converter
Assistant for full control.
Searchable PDF
Unicode Text
Convert Area
Launch PDF Converter
You can also perform direct conversions by selecting the Save As
command from the File menu. You can extract and save only text
from the document or save the file as image.
With the Convert Area tool, you can use the Select Area tool to define an
area of interest in a page for PDF Professional to convert its content to an
editable format. This lets you, for instance, select a table and send it to
Excel without the rest of the page or select the precise content to
become a single PowerPoint slide.
Conversion between PDF and XPS file formats is also supported.
28
The PDF Converter Assistant
Start this from the Windows Start Menu. The Assistant lets you prepare
and control conversions. Its Full view shows you a preview of PDF and
XPS files to be converted and lets you set page ranges. The panel on the
right lists all files selected for conversion; icons show loading or
conversion status. Help explains the meanings of the icons.
PDF Converter offers four levels of control:
Quick View:
This allows quick conversions using current settings for everything
beyond four basic choices.
Full View:
This presents the same four buttons from Quick View, but also displays
page previews and offers all settings that influence the conversions.
Choose a mode to see its settings. Choose a target (or click the Output
tool when there is no choice) to set saving options. Full view lists all files
in the current conversion session along with status information for each
of them.
Left View:
This appears when PDF Converter is called from inside a target
application. Then only a single file can be converted, so just the left
preview panel and its controls are needed. Click a button or use the View
menu to change the contents of the left panel.
No Assistant:
From starting places where the input file and target are pre-defined, you
can by-pass the Assistant altogether and perform a direct conversion
using existing settings. See Starting the Program from other places.
29
Converting with Quick View
Choose Quick View in the View menu. Then your conversions are an
easy 4-step process, using current settings for everything else:
1. File Open:
Select one or more PDF/XPS files
or drag and drop them onto the
Quick View window.
Mode
Tool
Output
Tool
Convert All
Tool
2. Choose a processing mode:
Standard Document, Legal, Spreadsheet
or Form.
3. Choose a target: Microsoft Word, Excel,
PowerPoint, Corel WordPerfect or Rich Text Format.
4. Start the conversion.
During conversion, the buttons are grayed. If View Result in the Output
Options panel is selected, the converted file appears in its target
program.
Turn off the Quick View toggle in the View menu to return to Full view
to see the processing summary, inspect and change settings or view page
previews. If you close the program with Quick View active, it will
reappear when the program is next started.
30
Converting with Full View
Here is the Assistant in Full View. Three sample files are loaded, the
sample form is displayed in the Preview panel on the left.
Restore
preview
Open
files
Select conversion mode
and target and display
their settings
Convert
selected file
Remove files
from list
Move files
up or down
in the file
list
Convert all
listed files
Preview panel
showing current page
of selected file
List of loaded or
converted files.
Icons show file
status. You can add
files by drag-anddrop.
View source
or result file of
selected item.
This icon shows
that the page has
a text layer.
Pages without a
text layer display
this icon:
Preview each page of your
PDF/XPS using these
navigation buttons.
Specify a page range here. By
default all pages are converted.
31
Starting the Program from other places
To make the services of PDF Converter easy to call on, it can be started
from several locations, as described in the following procedures:
The Windows Start Menu
Choose PDF Converter Assistant from the Nuance PDF Professional 6
group in Programs or All Programs. All conversions started from the
Start menu use the PDF Converter Assistant. It allows you to name input
PDF or XPS files from your local computer or a Document Management
System and decide how to handle output files. Display of the created file
is optional.
The Open PDF/XPS button in a Microsoft Word Toolbar
1.
Use the Open PDF/XPS button
in a Microsoft Word toolbar
or the Open PDF/XPS… item in the Word File menu to call an Open
dialog box with PDF selected as file type. In Word 2007 go to the
Nuance PDF tab, or access the File menu via the Office button.
2.
Choose a single PDF or XPS file, browsing if necessary. Click Open.
3.
The Converter Assistant preview panel displays the first page of the
input file. View other pages and set a page range if desired.
4.
Select the processing mode with the Mode tool or from the Options
Menu. This calls the settings panel for the chosen mode. Make
settings as desired.
5.
Click the Output tool or select Word Document (the only possible
target) in the Options menu to select saving options including
whether to save to Office 2007 or to earlier versions.
6.
Press
to start conversion, with a progress monitor. The
resulting file is displayed in Microsoft Word ready for editing.
32
Note: In Office versions before 2007, if you do not see the Open PDF/XPS button
in a toolbar, go to View > Toolbars and select Nuance PDF, or open the
Preferences dialog box of the PDF Converter Assistant to enable Microsoft Word
integration and restart Word.
The Open Dialog Box in Microsoft Word
1.
Click Word's File Open button
File menu and click Open...
or go to the Microsoft Word
2.
Select PDF (Portable Document Format) (*.pdf) or XPS in the Files
of type box.
3.
Select the PDF or XPS file you want to convert. Multiple selection is
possible; then files are converted one after the other.
4.
Click Open. (The picture shows steps 2, 3 and 4.)
5.
Conversion starts with or without the Converter Assistant, as
specified in the PDF Converter 7.0 Settings dialog box, found in
Word's Tools menu. In Word 2007 and 2010, the PDF Settings
button in the Nuance PDF tab displays the dialog box.
6.
If the PDF Converter Assistant is enabled, the PDF/XPS is
previewed and you can change mode settings before starting the
conversion. If the PDF Converter Assistant is disabled, conversion
33
starts immediately, using the existing settings for the pre-defined
mode.
7.
Converted, editable documents are displayed in Microsoft Word.
8.
A converted document will display as if it were still the PDF or XPS
file. You must save it as a Word document with the command Save
As.... If you use Save or Close without saving, you will lose either
the converted document or the original file. The program warns you
of this:
WordPerfect
Use the Open PDF/XPS item in the File menu of WordPerfect. Select a
single PDF file and click Open. View pages in the PDF Converter
Assistant in Left view. Set a page range if desired. Select a mode
(standard or legal document) and its settings. Set output settings. Click
the Convert All button. The resulting file is displayed in WordPerfect,
ready for editing.
Microsoft Excel
Use the Open PDF/XPS button
in a Microsoft Excel toolbar or the
Open PDF/XPS item in the File menu. For Excel 2007 or 2010, see above
under Word 2007. Select a PDF or XPS file and click Open. View the
PDF in the PDF Converter Assistant left view. Set a page range if desired.
Click the Spreadsheet button (the only possible mode) to set conversion
options, (including one worksheet per table or per page). Set output
settings. Click the Convert All button. The resulting file is displayed in
Microsoft Excel ready for editing.
34
Microsoft PowerPoint 2007 or 2010
Use the Open PDF/XPS button
in the Nuance ribbon. Select a
single PDF or XPS file with content suitable for a slide presentation and
click Open. Select settings and a page range if desired. Click the Convert
All button; the converted file appears in PowerPoint 2007 or 2010. To
view it in older PowerPoint versions you will need a Microsoft Office
compatibility pack.
Windows Explorer
1.
Right-click on a PDF or XPS icon or file name in Windows Explorer
or a PDF or XPS icon on your desktop.
2.
Choose a conversion mode and target from the shortcut menu. If you
choose to use the Assistant, you make these choices in its Preview
panel.
Microsoft Outlook
1.
Click the
Settings button in the Nuance PDF for Outlook
toolbar or the equivalent item in the Nuance PDF menu. Choose to
use the Converter Assistant or perform a direct conversion to a
target you choose. Specify whether all PDF/XPS attachments should
be converted, or request a file list so you can select which files to
convert. These settings apply to all conversions until changed.
2.
Select a message with one or more PDF or XPS file attachments.
3.
Click the PDF Converter button
in the
Outlook toolbar or in the message toolbar. In Outlook 2007, use the
Nuance PDF tab in the message window.
35
4.
If you requested prompting, select which attachments to convert in
the Attached files list dialog box. Click OK.
5.
PDF Converter Assistant appears if you requested this. Preview
pages, specify a page range if desired, adjust settings including the
saving instructions and click Convert All. If you requested a direct
conversion, a progress monitor appears and the file is saved to the
predefined location with the same name as the source file.
The procedure is the same in Lotus Notes (v. 7.0 or 8.5).
Microsoft Internet Explorer and Mozilla Firefox
1.
Right-click on a hyperlink leading to a PDF or XPS file.
2.
Choose Open with Nuance PDF Converter 7.0.
3.
The Assistant downloads and converts the file.
Processing modes and outputs
Choose from four processing modes, depending on the content of the
PDF/XPS file to be converted and the type of output you want. Here are
your choices:
Mode
Output
Standard Document
Word
Word 2007
Legal Document
Word
Word 2007
36
PowerPoint 2007
WordPerfect
RTF
WordPerfect
RTF
Mode
Output
Spreadsheet
Excel
Excel 2007
Forms
Word
Word 2007
RTF
The settings for each mode are displayed on the left panel of the
Assistant when you make a mode selection. The values are stored
separately for each mode - this includes the image-only processing and
graphic handling options that are common to all modes.
The output settings are displayed in the left panel when you make an
output selection. The settings are the same for all targets and only one
set of values is stored for use with all saving.
Create Word or Excel 2007 output files by selecting the checkbox
'Generate Office 2007 output' in the appropriate output panel.
PowerPoint output is always for Office 2007; a downloadable plug-in
from Microsoft extends this to Office 2003. See Help.
Next we summarize the choices unique to each mode.
Standard Document conversions
Choose how the layout should be maintained:
• True Page® places all elements in text boxes or frames.
• Flowing Column uses text boxes and frames only when necessary,
allowing body text to flow from one column to another.
Legal conversions
Choose to retain or drop legal-specific features:
37
• Pleading numbers - these typically appear in left margins to define
line numbers.
• Images - these are typically stamps, seals, signatures or
company logos.
Spreadsheet conversions
This mode can be used for PDF files containing partly or mainly tables.
Choose what should be placed in each Excel Worksheet:
• Per Page: Each page from the PDF will enter a separate
worksheet. This will happen even if page content is not tabular;
you can specify a page range to exclude unneeded pages.
• Per Table: Each detected table is converted and placed in a
separate worksheet. All content not detected as a table is placed in
a separate worksheet at the end. The detected tables do not appear
here, but are replaced by hyperlinks leading to the relevant
worksheet table.
• Per Document: All content destined for a single output document
will be transferred to a single sheet. This is useful for handling
tables which extend over several pages.
When you do Standard Document conversions, tables in the PDF
become tables in the output file.
Form conversions
This uses Logical Form Recognition™ technology to detect form
elements and convert them correctly. Choose from:
• No form controls: The result will be a fillable form with static
form elements. You can use form handling tools in the target
application to modify the form design.
• Create form controls: The result will be a fillable and editable
form. You can change field labels and modify the form design.
38
Handling Mixed Input Files
Files often have mixed content: flowing text, tables and forms. In many
cases you can process these files with the setting Standard Document
and receive good results. For more precise control, your can use page
ranges to separate forms and tables and convert them separately. For
example, to best unlock a file with two pages of illustrated text, followed
by a one-page table you want to do calculations on, and finally a
three-page form - convert pages 1 and 2 as Standard Document, page 3 as
Spreadsheet and pages 4-6 as Form.
How do PDF files work?
PDF files display texts correctly wherever they are viewed because they
carry their typographic information with them. Fonts in the document
are embedded in the PDF file and are used after distribution to
reconstruct the document. The display does not depend on the needed
font files being available on the viewing machine, nor on the language of
its operating system.
PDF documents present their pages as images. They can be marked-up
and commented, but the ability to change the basic text is limited. Most
PDF files can be searched, because the file has two layers. There is an
image layer that is presented on-screen. Behind that there is usually a
text layer that can be matched to the characters displayed on the screen.
Display layer
Text layer
39
When the starting point for a PDF file is a set of images, or a scanning
process, this text layer is not present and the result is an image-only
PDF. When the starting point is an editable document, the text layer can
be created and the PDF is called 'Normal' or 'Searchable'. The creator of a
PDF can require provision of a password to allow access the text layer.
How does PDF Converter work?
PDF Converter has the ability to perform Optical Character Recognition
(OCR). This is the process of extracting text from an image. It does not
need to use OCR to unlock PDF or XPS files with an accessible text layer
- it must capture the page layout and arrange the given text and other
elements correctly on each page in the new document.
Optical Character Recognition (OCR) is normally used only for input
pages without an accessible text layer or when non-standard character
encoding is detected, but you can require it for any conversion under
Processing Options in the Converter Assistant.
Handling Image-only Pages
Pages without a text layer are a special case for conversion. You can
decide how the program should handle these pages: convert them with
the built-in Optical Character Recognition (OCR), transfer them as
images to the target document or skip them. You can require inspection
of the first pages (up to ten) in files you open. Optionally, you can set
conversion to be stopped, if no text-layer pages are detected.
If you have Nuance® OmniPage®, you can use this to have more control
over the recognition process.
Language Support
PDF Converter supports over 100 languages, including Danish, Dutch,
English, Finnish, French, German, Italian, Norwegian, Polish,
Portuguese, Spanish and Swedish. The program can convert
multi-lingual documents. A full list of supported languages is provided
in Help. Correct language choice is important for converting image-only
40
pages and handling non-standard encoding. A new choice is Auto-detect
which is designed for unattended processing where input image-only
PDFs might be in different languages. This examines each PDF and
assigns a language to it, choosing from the 22 languages with dictionary
support.
SharePoint and other DMS support
The is available for the program when it is supplied as part of PDF
Converter Enterprise 7. PDF or XPS files can be opened from Microsoft
SharePoint through a set of dialog boxes incorporated in PDF Converter,
accessed from the File menu item Open from SharePoint. Other
detected Document Management Systems (Hummingbird, Worksite,
DocsOPEN, LiveLink) also have a menu item; they can be accessed
directly through their own interfaces. See Help for detail. Converted files
can be stored in SharePoint or other systems with the Store in Document
Management System section in the Output Options panel.
Inside SharePoint, Hummingbird Enterprise and Interwoven Worksite
it is possible to choose a single PDF or an XPS file, call the Converter
Assistant to have it converted and directed to a location on the local
computer, or returned to the DMS.
XPS File Support
The support for XPS files provided by the members of the PDF product
family is as follows:
Professional
Create
Converter
XPS to PDF
Yes
Yes
No
PDF to XPS
Yes
No
No
Yes
No
Yes
Unlock XPS
(XPS to Word, etc.)
41
These last two topics relate to PDF Converter Professional.
Web Updates
Select Automatic Web Updates under the Help menu to be informed
whenever a program update is available for any of the three components.
You can also get the latest program updates directly from the Help menu.
Please ensure that web access is available.
Un-installation
1.
Select Add/Remove Programs from the Control Panel. Under
Vista, select Programs and Features from the Control Panel.
2.
Select Nuance PDF Professional 7.0.
3.
Click Remove to uninstall the program or Change to auto-repair it.
This removes all three components of PDF Converter Professional.
A de-activation step is performed at the start of uninstallation, allowing
you to reinstall the program later without re-activation problems.
De-activation requires web access.
www.nuance.com
Copyright © 2010 Nuance Communications, Inc. All rights reserved. Subject to change without prior
notice. Nuance, the Nuance logo, Logical Form Recognition, OmniPage, and True Page are
trademarks or registered trademarks of Nuance Communications, Inc. or its affiliates in the United
States of America and/or other countries. All other trademarks are the property of their respective
owners.
This software is protected by US and International patents and copyright laws.
The word verification, spelling and hyphenation portions of this product are based in part on Proximity
Linguistic Technology. The Proximity Hyphenation System © Copyright 1988. All Rights Reserved.
Franklin Electronic Publishers, Inc. See the detailed acknowledgment in Help. INSO/ Vantage
Research dictionaries: International CorrectSpell ™ spelling correction system © 1993 by Lernout &
Hauspie. The software accompanying this document is based, in part, on the work of the Independent
JPEG Group, Colosseum Builders, Inc., and the FreeType Team. The software was developed using
Kakadu software and the Zlib compression library. AES encryption/decryption copyright © 2001, Dr
Brian Gladman, Worcester, UK. This product includes elements developed by the OpenSSL project
(http://www.openssl.org), including software written by Eric Young and Tim Hudson.
42
This page intentionally left blank.