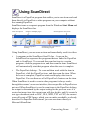
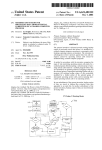
1
Getting Started Guide
L E G AL
N O TI CE S
Copyright © 2013 Nuance Communications, Inc. All rights reserved. No part of this
publication may be transmitted, transcribed, reproduced, stored in any retrieval system or
translated into any language or computer language in any form or by any means,
mechanical, electronic, magnetic, optical, chemical, manual, or otherwise, without prior
written consent from Nuance Communications, Inc., 1 Wayside Road, Burlington,
Massachusetts 01803-4609, U.S.A. The software described in this book is furnished under
license and may be used or copied only in accordance with the terms of such license.
I M P OR T AN T N O T I C E
Nuance Communications, Inc. provides this publication “AS IS” without warranty of any
kind, either express or implied, including but not limited to the implied warranties of
merchantability or fitness for a particular purpose. Some states or jurisdictions do not
allow disclaimer of express or implied warranties in certain transactions; therefore, this
statement may not apply to you. Nuance reserves the right to revise this publication and to
make changes from time to time in the content hereof without obligation of Nuance to
notify any person of such revision or changes.
T RA D EM AR K S A ND C RED I T S
Please see the listing at the end of this Guide.
E ND -U S E R L I C E NS E A G RE E M E N T
Please see this text via the About PaperPort panel, accessible from the Help ribbon.
Nuance Communications, Inc.
1 Wayside Road, Burlington, Massachusetts 01803-4609, U.S.A.
Nuance Communications International BVBA
Guldensporenpark 32, Building D, BE-9820 Merelbeke, Belgium
LID145/120213
PaperPort 14 Getting Started Guide, February 2013
C O NT E N T S
Welcome to PaperPort
5
Installing PaperPort
Activating PaperPort
Registration
Learning PaperPort
Using this Guide
Technical Support
Minimum System Requirements
What’s new in PaperPort 14
Key features
Getting to Know PaperPort
6
7
7
8
8
9
9
10
11
14
The PaperPort desktop
The PaperPort Ribbon
PaperPort items
The Folders pane
PaperPort item thumbnails
PaperPort page thumbnails
Two-part desktop
Bookmarks
The Image View window
Customizable Quick Access Toolbar
PDF Viewer Plus
Acquiring Items
14
15
15
17
18
20
21
21
23
24
24
25
Scan to the PaperPort desktop
Set up your scanner with PaperPort
Using Scan Profiles
Print to PaperPort
Capture web pages
Add PaperPort folders
Use DesktopDelivery
Import pictures from your camera
25
26
27
27
28
28
29
30
PaperPort Getting Started Guide
iii
Touching Up Images
30
Edit multiple images
35
Annotating Pages
36
Annotation tools
36
Protecting Items
Add search criteria to items
Finding Items
Find items by their properties
Find words in an item
Add items to the All-in-One Search index
Use the All-in-One Search pane
Schedule Indexing Tasks
Sharing Files
Connecting to the Cloud
Sending Items to Other Programs
Customize the Send To bar
Converting Items
Convert items to image formats
Stacking documents
Combining documents
Convert images to text
Filling Forms
PDF File Support
Creating PDF Documents
Creating PDF Documents with PDF Create
Using ScanDirect
38
40
41
41
42
42
43
45
45
46
47
48
50
50
50
50
51
51
52
55
55
57
Uninstalling PaperPort
58
Trademarks and Credits
59
Contents
iv
Welcome to PaperPort
Welcome to the Nuance® PaperPort® Getting Started Guide. It is supplied as a
PDF file, suitable for use with screen readers. If you print it to paper, we
recommend double-sided printing with two pages per sheet.
PaperPort provides the easiest way to turn paper into organized digital
documents that everybody in an office can quickly find and use. PaperPort
works with scanners, multifunction printers, and networked digital copiers to
turn paper documents into digital documents. It then helps you to manage them
along with all other electronic documents in one convenient and easy-to-use
filing system.
PaperPort’s large, clear item thumbnails allow you to visually organize, retrieve
and use your scanned documents, including Word files, spreadsheets, PDF files
and even digital photos. PaperPort’s Scanner Enhancement Technology (SETTM)
tools ensure that scanned documents will look great while the annotation tools
let you add notes and highlights to any scanned image.
Accompanying programs
PaperPort 14 includes a PaperPort Image Printer, a ScanDirectTM application,
(described later), a Scanner Setup Wizard, an ImageViewer application (for
viewing and working with page images in a window separate from PaperPort)
and PDF Viewer Plus (for viewing and working with PDF files).
Added components are the Nuance Cloud Connector for accessing other cloud
sites and a MAX file to PDF Converter.
In PaperPort Professional, the PDF Viewer Plus includes Nuance PDF Create,
providing high-level support for PDF creation from a wide variety of source
files.
PaperPort Getting Started Guide
5
Installing PaperPort
You can install PaperPort from a CD, a DVD, or from the web. The installation
program provides easy step-by-step instructions. Follow the guidance on each
screen to install the software. Installation and un-installation require
Administrator rights. PaperPort installation comprises five elements that are
installed in a single process:
•
PaperPort program (includes ImageViewer, ScanDirect, MAX to PDF
Converter, an Evernote® connector and the Scanning Wizard)
•
Nuance PDF Viewer Plus (in PaperPort Professional this includes Nuance
PDF Create)
•
•
PaperPort Image Printer
Nuance Cloud Connector (optional install)
PDF Viewer Plus is not installed if the top-line Nuance product PDF Converter
Professional® is detected on the computer (version 6 or above) because it
provides all the functionality of PDF Viewer Plus, and much more additionally.
The latest PDF Viewer Plus cannot co-exist with Nuance PDF Converter
Professional 5 or below, you must choose which program to keep. To use an old
PDF Converter Professional with PaperPort, it must be the application
associated to PDF files in your Windows® system, and PaperPort must be set to
open PDF files with that associated program (see page 52).
To install PaperPort and its key components:
1. Click Autorun.
2. Select an installation language and click Start installation.
3. Accept or change the program folder location, fill out Customer Information
and click Next. Read and accept the terms in the license agreement.
4. Autorun then starts the InstallShield Wizard. It offers a Complete or a
Custom installation. Choose Custom only if you want to add your own
folders to the supplied PaperPort folders during installation. You can add
folders later (see page 28).
PaperPort Getting Started Guide
6
If PDF Viewer Plus/Create is to be installed, the following checkmarks appear:
Set Nuance PDF as your default viewer for Windows and Internet Explorer
This sets PDF Viewer Plus as your system default PDF viewer. PDF files on the
PaperPort desktop are by default opened in a Nuance PDF product. If you select
this option, PDF files that are double-clicked anywhere on your system will open
in PDF Viewer Plus.
Install all Nuance PDF button and menu application add-ins
This choice appears only in PaperPort Professional. It places a Nuance PDF
ribbon or toolbar in Microsoft® Word, Excel®, PowerPoint®, Outlook®, Internet
Explorer®, Windows® Explorer and Corel® WordPerfectTM, allowing PDF Create
to make PDF files from the current document or mail attachment or web page. In
Windows XP, go to Control Panel, then Add or Remove Programs to later
enable or disable these add-ins individually (in Windows Vista, Windows 7 and
Windows 8, go to Control Panel, then Programs and Features).
Install the Nuance Cloud Connector
This optional application provides convenient file transfer to and from the most
popular web-based storage sites. By default it is not installed.
Activating PaperPort
Most versions of PaperPort 14 require activation. For activation and deactivation
you need web access. You will be invited to activate the product at the end of
installation. Choose from automatic or manual activation. The recommended
choice is automatic. Provided your serial number is found at its storage location
and has been correctly entered, no user interaction is required and no personal
information is transmitted. If you do not activate the product at installation time,
you will be invited to do this each time you invoke the program. PaperPort 14
can be launched only a limited number of times without activation.
Registration
Registration enables you to take full advantage of Nuance product support and to
receive notifications of product updates.
PaperPort Getting Started Guide
7
When you finish installing PaperPort, you are prompted to register online. If you
want to update your registration information, you can always go to the Nuance
web site at http://www.nuance.com .
Learning PaperPort
This guide introduces you to PaperPort and shows you how PaperPort can help
you manage your information. Additional sources of information to help you
learn how to use PaperPort include a comprehensive Help system, the How-toGuides, Release Notes, and the Nuance web site. Access these from the Help
ribbon.
Using this Guide
This guide is written with the assumption that you know how to work in the
Microsoft Windows environment. Refer to your Windows documentation if you
have questions about how to use dialog boxes, menu commands, scroll bars,
drag and drop functionality, shortcut menus, and so on.
Using Help
The PaperPort Help includes detailed information on features, settings, and
procedures. Help is available from the PaperPort Help ribbon.
Additional technical support, including technical notes, software updates,
product information and product support issues and more is available also from
the PaperPort Help ribbon.
PDF Viewer Plus, and also PDF Converter Professional, have their own Help
systems that include guidance on PDF creation.
Using release notes
PaperPort Release Notes provide important information about this release of the
program. This document is included on the installation CD or DVD, from the
PaperPort Help ribbon, and as a sample document on the PaperPort desktop.
PaperPort Getting Started Guide
8
Technical Support
Nuance offers both complimentary and fee-based technical support options
designed to meet your individual needs. Our services offer person-to-person
telephone and e-mail technical support. We also offer self-service, 24-hour
access to our Knowledge Base.
Visit http://www.nuance.com for information about your support policy, local
support contacts, and product updates. Before contacting Nuance, be sure to read
the user documentation and review the Release Notes.
Minimum System Requirements
• Minimum hardware requirements:
― Intel® Pentium® compatible or higher processor
― 1 GB of memory (RAM)
― 1.4 GB of free hard disk space for application files, installation and system
updates
― Windows-compatible pointing device
― 1024 x 768 resolution display with 16-bit (High Color) or higher
― A compatible scanner with its own scanner driver software
• Supported operating systems:
― Windows XP 32-bit with SP3 or above
― Windows Vista 32-bit and 64-bit with SP2 or above
― Windows 7 in 32-bit and 64-bit versions
― Windows 8 in 32-bit and 64-bit versions
• Supported web browsers:
― Internet Explorer® 7 or above
― Firefox® 3.6, 7 and 8
― ChromeTM current version
PaperPort Getting Started Guide
9
A CD-ROM or DVD-ROM drive is needed for installation. Web access is
needed for online activation, product registration, Scanner Wizard database
updating, technical support and obtaining live updates for the program.
Performance and speed will be enhanced if your computer’s processor,
memory, and available disk space exceed minimum requirements. This is
especially true when handling very large color image and PDF files.
What’s new in PaperPort 14
PaperPort 14 includes a number of valuable new features to help you manage
your documents:
Nuance Cloud Connector
This service connects your computer and PaperPort with other popular webbased storage sites, including Microsoft SkyDrive®, GoogleDocsTM, Box®,
multiple FTP sites, and many more. The Connector can integrate directly with
Microsoft Windows providing easy drag-and-drop access directly to cloud
services. The Nuance Cloud Connector is also upgradeable to a more featurerich version of the product called Gladinet® Cloud Desktop Pro. This enhanced
version adds additional functionality for using cloud services with automatic
backup and file synchronization.
Evernote Connector
The Send To bar offers a link to the Evernote® web storage facility, so that
PaperPort items can be transferred to this Cloud service.
Bookmark Web Pages
In addition to the ability to bookmark workspaces, PaperPort Professional allows
favorite web pages to be bookmarked so they can be accessed with a single click.
The bookmarks supplied with your default browser also appear in PaperPort.
PaperPort Getting Started Guide
10
Windows Shortcut menu inside PaperPort
Choose at installation time whether to allow the Windows shortcut menu for
files of particular types to be available in the item’s PaperPort shortcut menu.
New SET tools
Manual despeckling with a wide choice of algorithms yield better black-andwhile images for optimum Optical Character Recognition (OCR) results.
New edge cleaning tools include automated punch-hole removal, auto-cropping
pages, and border cleaning.
Access recently scanned and viewed documents
New controls in the Desktop ribbon or in a Windows 7 and Windows 8 Jump
Lists let you quickly home in on documents that were recently viewed or
created.
Key features
High-quality PDF performance
PDF files can be opened quickly and displayed in PDF Viewer Plus, a Nuance
PDF handling application that is fully compatible with all leading PDF creation
products. PDF Viewer Plus opens files faster than the general-purpose
ImageViewer, reducing memory requirements and permitting smaller file sizes.
The viewer optimizes the rendering resolution for each element on the page
yielding a cleaner display and optimum print resolution.
PDF Viewer Plus provides annotations and dynamic or transparent stamps.
Images within a PDF document processed by PDF Viewer Plus can be sent to the
ImageViewer to be enhanced using SET tools, with the modified image returned
to the PDF.
Fill and e-mail PDF forms and create new ones, either from scratch or using
FormTyper in PDF Viewer Plus to instantly make any static form fillable. It uses
Logical Form RecognitionTM technology to detect the form elements and also
allows their properties to be managed efficiently.
PaperPort Getting Started Guide
11
Searchable PDF files are available through Scanning Profiles, through a rightclick Save As operation on the PaperPort Desktop, or directly in PDF Viewer
Plus. This makes the content of your scanned paper documents or image files
accessible to search engines such as Windows Desktop Search or Google.
Accurate OCR
Language settings can be applied to Optical Character Recognition to increase
accuracy in all supported languages.
Digital camera input
It is possible to take a picture of a document with a digital camera and accurately
convert it into a text document. This is done by applying special 3D-deskewing
algorithms that flatten page images and correct distortions to increase the
accuracy of the resulting text document.
Making PaperPort more reliable
Sometimes PDF files may become corrupted so that they can no longer be
opened. In these cases PaperPort may not be able to generate a desktop
thumbnail and this may prevent PaperPort from launching properly.
A utility program CheckPPFolders.exe is supplied in the PaperPort program
folder, along with a short Help file. Run this program to identify and remove any
corrupt files so that PaperPort will work properly.
The following advanced features are available only in PaperPort
Professional:
Folder Management
You can automatically create multiple folders by importing a list of folder names
from a text file. This option is available when you right-click on any folder. See
the Help topic: About PaperPort folders for the required syntax.
PaperPort Getting Started Guide
12
PDF Create Assistant
You can create industry-standard text-based PDF documents from any
application directly with a right-click through the Windows or PaperPort
Desktops (up to PDF version 1.7), using the PDF Create Assistant or by printing
directly from any application with the printer driver called ScanSoft PDF
Create! You can create PDF packages, batch create PDF files and much more
using the PDF Create Assistant. A table in the Help topic: About creating PDF
files summarizes which starting places, inputs, options and targets are available.
Support for SharePoint®
PaperPort Professional is able to communicate with the Microsoft SharePoint
Services 2003, SharePoint Portal 2003, SharePoint Services 2007 and
SharePoint Server 2007 document management systems: get files from there,
process them as desired, and then save the results by sending the output files
back through the Send To bar. ScanDirect supports scanning to PDF with the
results directed to SharePoint.
PaperPort is also supplied in Special Editions to selected scanner manufacturers and other
resellers. The feature set in these editions may vary, in line with each vendor’s requirements.
PaperPort Getting Started Guide
13
Getting to Know PaperPort
This section introduces you to the different parts of PaperPort. Refer to
the PaperPort Help for detailed information about all these topics.
The PaperPort desktop
The PaperPort desktop appears with the Folders pane when you first start
the program. It displays the documents in the chosen folder as thumbnails
and provides tools to manage them. PaperPort offers all the tools necessary
to organize, find, and use documents and images. Choose Options from
the Desktop ribbon and go to the Desktop panel to choose a color scheme
for the desktop and its elements.
Ribbons with command buttons
Desktop
showing item
thumbnails
Function Pane
showing folders
The Function pane can present:
Folders
Scan Settings
Thumbnails
All-in-One Search
Properties
•
•
•
•
•
Access to
other pages in
this multipage item
Image item
thumbnail
Text item
thumbnail
Send To bar
PaperPort Getting Started Guide
14
The PaperPort Ribbon
PaperPort 14 and ImageViewer have a
modern tab and ribbon interface. The
main elements are:
1. The PaperPort button
2. Quick Access Toolbar (see page 24)
3. Tab
4. Ribbon associated with the tab
5. Group inside the ribbon
6. Button within the group
7. A button drop-down list.
PaperPort items
The documents and photographs you acquire in PaperPort are called items.
There are two types of items: image items and text items.
•
Image items are scanned documents, photographs, drawings and
other digital items in an image format, such as PDF Image, PDF
Searchable, JPEG, TIFF, or PaperPort Image files (these MAX files
are read-only). They can be scanned, copied or imported into the
PaperPort desktop.
•
Text items are documents that contain editable text, such as Word
(.doc), HTML, and Excel files, and are created by word processing
and other text-based applications. Normal PDF files are considered
to be text items.
Image items when double-clicked open by default in Image View that
offers many image-handling tools, including the SET tools. Go to
Options, then Desktop to change this behavior. You can choose
ImageViewer; this offers the same functionality as Image View, but in a
separate window so you can still view the PaperPort desktop as you edit
the chosen item. This is especially useful in a dual-screen environment.
You can also choose to open the item in the application associated with the
file type.
Getting to Know PaperPort
15
You can use any flavor of PDF file: PDF Image, PDF Searchable, and PDF
Formatted Text and Graphics (PDF Normal) with PaperPort. PDF files by
default open in PDF Viewer Plus or (if available) PDF Converter
Professional. Go to Options, then Desktop to change this behavior. You
can open PDF Image or PDF Searchable files in ImageViewer in order to
use the SET tools to improve the quality of PDF image-only items.
Use PaperPort to view non-PaperPort items that reside on your computer.
Simply copy or move the document file or photo into a PaperPort folder.
You can quickly send an item to another program without leaving the
PaperPort program. Just drag an item onto the link icon in the Send To bar
at the bottom of the desktop. PaperPort supports a wide variety of
programs including word processing, spreadsheet, fax, e-mail, graphics,
optical character recognition (OCR), and online services programs.
The MAX to PDF converter
MAX files have long been the proprietary PaperPort image item format.
This functionality has now been taken over by the universal PDF file type.
In PaperPort 14, MAX files retain limited functionality: they can be
viewed page-by-page but cannot be annotated, stacked or otherwise edited.
Metadata (author, subject, keywords...) cannot be added in
PaperPort 14, only already existing texts remain. In other words, MAX
files are now read-only.
Therefore, Nuance offers a Wizard-like program to convert MAX files to
PDF. Find the MAX to PDF converter in the PaperPort sub-menu in the
Windows Start menu. It can create PDF Image or PDF Searchable files by
running OCR on text in the MAX file. The converter allows annotations to
be transferred to the resulting PDF. Language choices are available
separately for the MAX file content and for its annotations. The converter
can automatically find all MAX files within your PaperPort folders.
MAX files can be detected and imported into PaperPort Professional by
DesktopDeliveryTM. They can be exported to some other programs (for
instance to mailing applications, or to OmniPage for OCR).
PaperPort Getting Started Guide
16
The Folders pane
The Folders pane presents a hierarchical view of your
PaperPort folders, similar to the view you see in
Windows Explorer. Use the Folder Tools to access its
commands quickly.
PaperPort installs a PaperPort folder named My PaperPort Documents
into your My Documents folder. If you are using a multi-user system,
each user has their own My PaperPort Documents folder.
The My PaperPort Documents folder contains several subfolders whose
names – such as Articles, Business Cards, Photographs, and Receipts –
illustrate the different ways you can organize your items in PaperPort.
The Samples folder contains sample documents and photographs to help
you get started using PaperPort. This Getting Started Guide is placed in the
Samples folder as a read-only PDF file. We recommend you copy the item
and remove the read-only property from the copy if you want a text file
(PDF Normal) for experimentation.
Choose Folders
to view the Folders pane to view the pre-supplied
folders. Select a folder, right-click and choose Create New Folder to add
an empty subfolder with a name and color you choose. You can use the
Folder Manager to add existing folders and sub-folders from your file
system. This lets you set up a different view of folders than exists on your
computer – tailoring it to work you will do via PaperPort.
on the Tools ribbon or right-click in the
Choose Folder Manager
Folders pane and choose Folder Manager. Click Add and browse to an
existing folders or sub-folder. They are added as top-level folders to the
PaperPort desktop along with their sub-folders and content. For instance, if
you chose C:\MyReports\Fourth Quarter, this appears in
PaperPort as Fourth Quarter on C. To later see the full path of an added
folder, right-click and choose Properties.
Right-click on a folder to change folder color, add folder notes, create new
sub-folders, and (in PaperPort Professional) set DesktopDelivery options.
Getting to Know PaperPort
17
The Folder Manager lets you rename, remove and reorder the top-level
folders it manages. This does not affect the names, locations or existence
of those mapped folders in your computer. Sub-folders that you rename or
reorder which were not added using the Folder Manager are really
renamed or moved in your system.
Deleting folders
Any sub-folder in PaperPort can be deleted using its shortcut menu or the
Delete key. This means it disappears from PaperPort and also from your
computer's disk system. Any sub-folders of the chosen folder are also
deleted. A warning message asks you to confirm this deletion. Only toplevel folders cannot be deleted inside PaperPort. The folder My
PaperPort Documents is a sub-folder.
Removing folders
Any folder or sub-folder added to PaperPort via the Folder Manager
becomes a top-level folder and it can be later removed using the Folder
Manager again. This means it disappears from PaperPort but remains on
your computer’s disk system. When a top-level folder is removed, all its
sub-folders are also removed.
PaperPort item thumbnails
There are two kinds of thumbnails in PaperPort: item and
page thumbnails. Each item thumbnail is a small, graphic
representation of your document or photo. Page
thumbnails show pages of image items and PDF files in
the Page Thumbnails pane both on your PaperPort
desktop and in the ImageViewer.
One quick way to locate your PaperPort items is to visually browse
through the item thumbnails on your PaperPort desktop. Thumbnails show
you what’s in a document without having to open it. Thumbnails give you
the ability to scroll through the pages of a document without opening it.
PaperPort Getting Started Guide
18
PaperPort shows large, clear thumbnails of all your documents and photos,
including:
• Scanned pages and photos
• Photos from your digital camera
• Image files in formats such as BMP, TIFF, JPEG, GIF, and MAX
(read-only)
• Microsoft Word, PowerPoint, Excel, Corel WordPerfect, and other
documents created in popular software programs
• PDF documents
• PDF Image items
• HTML documents
Each item thumbnail appears with an icon that identifies the program in
which it was created or is currently associated.
Click on a thumbnail to see image attributes:
indicates that the Read-only attribute is set for that item.
indicates that the image has annotations.
icon information on author, keywords, tips and features.
indicates that the PDF file has searchable text.
Multi-page image items (TIFF, DCX, PDF, MAX, etc.) show
to let
you scroll through the pages even with the Page Thumbnails pane closed.
Before you can work with an item, you must first select its thumbnail on
the PaperPort desktop. A red border appears around an item to indicate
that it is selected. Multiple selections are possible. While working with
item thumbnails, you can:
•
Drag a thumbnail to reposition it on the PaperPort desktop.
•
Drag a thumbnail to a folder to move the item to that folder.
•
Drag a thumbnail to another open Workspace to move the item to
that open folder.
Getting to Know PaperPort
19
•
Double-click a thumbnail to view the item.
•
Press the Ctrl key and double-click a thumbnail to open the item in
its source program.
•
Right-click a thumbnail to display the item’s shortcut menu.
•
Drag a thumbnail to the Send To bar to send a copy of the item to
another program.
•
Right-click a thumbnail and select Save Thumbnail to save a
thumbnail image as a separate image file (JPEG, PNG, TIFF and
BMP formats supported).
Using item thumbnails on the PaperPort desktop, you can also easily
combine individual PaperPort Image items or PDF Image items into multipage items. This feature is useful as an organizational tool if you are using
a scanner that can only scan a page as a separate item.
If you are not seeing thumbnails, right-click in the Workspace or use the
Change View button and choose Thumbnails. Other choices are large or
small icons, a list or a list with details.
PaperPort page thumbnails
The Page Thumbnails pane on the PaperPort desktop and in ImageViewer
displays thumbnails for multi-page image items. Select a multi-page image
item, then click the Thumbnail button on the Desktop ribbon. Page-level
operations can be done quickly without having to open the files. You can:
•
Enlarge or reduce thumbnail size
(all image items and PDF files of all flavors).
•
Copy selected pages to a Workspace as separate PDF files
(from all non-PDF image items)
•
Move selected pages to a Workspace as separate PDF files
(from all non-PDF image items except MAX files)
•
Copy and move pages between documents open in different panes.
(from all image items except MAX files)
PaperPort Getting Started Guide
20
The following operations are available for PDF files, on the PaperPort
desktop or in PDF Viewer Plus:
•
Copy, paste, cut, delete and reorder pages.
•
Insert new pages at a certain location in the document.
•
Append new pages at the end.
The Page Thumbnail view of a secure PDF is only available by supplying its
password.
Two-part desktop
When you first start PaperPort Professional, the desktop appears split into
two Workspaces – top and bottom. This layout gives you a better oversight
necessary to organize and combine your documents more effectively even
in a cross-folder fashion. Commands always relate to the currently active
desktop.
If the Desktop is not split, select Split Desktop from the View group in the
Desktop ribbon. Click it again to remove the split.
If you work with documents containing multiple pages, you can use the
corresponding function pane to view page thumbnails without having to
open the given document. You can also use these desktop areas to view
your folders, or the properties of the selected item.
Bookmarks
You can bookmark the Workspaces of your choice by using the Bookmark
Workspace command from the Workspace group in the Desktop ribbon.
To manage workspace bookmarks, use the Organize Bookmarks
command. Getting to a frequently used Workspace is just a mouse click
away, since they are all displayed in the same list. Other buttons in the
group let you return quickly to recently open or scanned items.
Getting to Know PaperPort
21
You can also bookmark favorite web pages, using the web bookmarks in
the Extras group of the Tools ribbon. The delivery bookmarks in your
default browser are already added, select a new web page and click the
button to bookmark it.
The following picture shows a split desktop:
Function pane
showing page
thumbnails
Active
Workspace
Desktop split
Inactive
Workspace
Function pane
showing
folders
Send To bar
PaperPort Getting Started Guide
22
The Image View window
To view an image item in the Image View window, double-click its
thumbnail in Desktop view, or choose Open with Image View on the
Desktop ribbon or from its shortcut menu. By default PDF files appear in
PDF Viewer Plus, not in Image View.
The Image View window allows you to take a closer look at your items
and to touch up and annotate them. You can also enlarge or reduce the
view for easy reading. Use the SET tools to enhance the current page
image. Use the Page Thumbnails pane to edit your document at page level.
Select
Area
button
Return to Desktop button,
by default on the Quick
Access Toolbar
(also on the View ribbon)
SET tools on the
Page ribbon
Current page
displayed in
large size, ready
for
enhancement or
annotating
Page Thumbnails Pane displays
one thumbnail for each page in the
document
Getting to Know PaperPort
23
Customizable Quick Access Toolbar
PaperPort’s buttons are placed on different ribbons according to their
functionality. You can place frequently used buttons on the Quick Access
Toolbar in PaperPort and also in ImageViewer. Right-click within the
ribbons area and choose Customize Quick Access Toolbar.
Choose the ribbon
whose buttons you
want to add
Set toolbar
button order
More available buttons
Add/remove buttons
Buttons currently visible
PDF Viewer Plus
PDF files on the PaperPort desktop when double-clicked appear by default
in PDF Viewer Plus. You can drag other files onto the PDF Viewer Plus
icon in the Send To bar (see page 47) to have a copy converted to PDF and
opened in the PDF Viewer. The first page appears in the main screen area;
a navigator panel on the left shows page thumbnails or form controls and a
comments panel can be displayed along the bottom of the screen. An
organizer panel on the right offers stamps. The PDF annotation tools are
described on page 37. If an image-only PDF enters the PDF Viewer, the
program may offer to make it searchable. If not, choose Make Searchable
PDF from the Tools menu.
Active PDF forms can be filled in directly in PDF Viewer Plus. Static
forms, for instance ones scanned to PaperPort, can be turned into fillable
forms by using FormTyper, as described on page 51.
PDF files opened from the PaperPort desktop return there when you finish
editing or annotating them with all the updates included.
PaperPort Getting Started Guide
24
Acquiring Items
There are many ways to bring images and documents into PaperPort so
that you can use PaperPort’s viewing, editing, annotation, indexing, OCR,
and file management tools. For example, you can:
•
•
Scan photos, pages, and other images on a scanning device.
•
•
•
•
Import files from other programs on your computer.
•
•
•
Acquire photos from a digital camera.
Add folders to PaperPort that already contain images and
documents.
Download files from web storage sites via Nuance Cloud Connector.
Print documents from other programs to the PaperPort desktop.
Drag or cut-and-paste images and documents from Windows
Explorer, or other programs to the PaperPort desktop.
Bring files into PaperPort Professional using DesktopDelivery.
Print web pages to PDF files for use in PaperPort.
Scan to the PaperPort desktop
PaperPort is designed to work with TWAIN-, WIA-,
and ISIS-compatible scanners.
Click the Scan Settings button to display the Scan or
Get Photo pane. Choose a scan profile. Profiles are
optimized for typical scanning tasks.
Then choose between using the native interface of the
scanner or utilizing the new Scanner Settings pane of
PaperPort for best scanning results. To use the interface
of the scanner driver, mark the checkbox Display
scanner dialog box. Leaving it empty will put the
scanned item onto the active Workspace.
Turn on the Capture Assistant to add subject, author and keywords to items
and (in PaperPort Professional) to view and control scanning progress.
Acquiring Items
25
When the scan is complete, you will see your item on the PaperPort
desktop.
If your scanner does not use a TWAIN, WIA or ISIS device driver, use the
program that came with your scanner to scan items. Then, copy or move the
scanned items to PaperPort. Refer to the PaperPort Help for more information
about scanning.
PaperPort makes it easy to scan pages as separate items or as a multi-page
item. To scan and collate two-sided pages on your ADF scanner, flip the
pages when prompted, click Scan Other Side, and PaperPort will
automatically scan and collate the pages in the correct order.
You can also use your scanner device buttons to scan directly into
PaperPort. Open the Windows system, choose Scanners and Cameras,
choose an event in the Events tab, and assign PaperPort to it.
You can also use a high-speed, networked scanner to scan items to a networked
folder and then add the folder to PaperPort. Use DesktopDelivery (available in
PaperPort Professional) to monitor folders for incoming scanned images.
Set up your scanner with PaperPort
Before using PaperPort for scanning, your scanner
should be installed with its own scanner driver software
and tested for correct functionality. Scanner driver
software is not included with PaperPort.
Properly installed and correctly functioning scanners are
immediately available in PaperPort by clicking the
Select button, and choosing one in the Available
Scanners dialog.
If you are not satisfied for your scan results, you can run the PaperPort
Scanner Setup Wizard from the Start menu, under the program group
PaperPort 14.
PaperPort Getting Started Guide
26
Using Scan Profiles
PaperPort comes with scan profiles optimized for typical scanning tasks.
Choose Black and White, Grayscale or Color Document, Color
Photograph, Color Searchable PDF Document, or Color PDF-MRC High
Compression.
Scan profile panels have the following tabs:
•
•
•
•
Profile: Displays the currently used scan profile.
SET: Define enhancements to be run automatically.
Output: Set file format and automatically suffixed file names.
Scan: Adjust scan settings: mode, resolution, size, orientation, filter
color, brightness and contrast.
In PaperPort Professional, you can add new profiles, or remove existing
ones. This edition of the program contains an extra scan profile: Color
PDF-MRC High Compression. MRC is a technology that lets you make
smaller PDF files, especially in documents with colored backgrounds.
Print to PaperPort
To bring items in from other programs, print them to the PaperPort desktop
as PDF Image or PDF Searchable. The default is PDF Image; go to
Desktop, then Options and Item to change it. This lets you quickly import
spreadsheets, pictures, database files, word processing files, and other files
into PaperPort as PDF items on the PaperPort desktop. This works through
the File menu (or equivalent) in the source application; choose Print to
PaperPort or choose Print, then choose PaperPort Image Printer.
With PaperPort Professional, you can use PDF Create add-in buttons in
Office applications to make a PDF from the current document or
attachment in the Formatted Text & Graphics (PDF Normal) format. Do
this also by choosing Print and selecting ScanSoft PDF Create! as the
printer name. Choose Print in your web browser to create print-formatted
views of web pages. The printer called PaperPort Image Printer gives
you PDF Image or PDF Searchable files, the ScanSoft Printer gives you
Normal PDF.
In all cases, PaperPort is launched if not running and the PDF file is placed
on the current desktop.
Acquiring Items
27
Capture web pages
Capture web pages from the Internet and save them as PDF items on the
PaperPort desktop.
This Web Capture program is installed with PaperPort, but is not
integrated into it, since it functions only on the Windows XP operating
system. Go to the program folder and double-click PPwebcap.exe. It
places an icon on the system tray; use its shortcut menu to access settings
(for instance to specify PDF image or PDF searchable) and to capture web
pages – either whole pages or the visible area.
Use the Print to PaperPort feature to create searchable PDF files from web pages,
so they can be added to the All-in-One SearchTM index for finding items by text
content. This means of capturing web pages is available under all operating
systems.
Add PaperPort folders
PaperPort provides an easy-to-use filing system for
organizing your items and sharing them with others.
In the Folders pane, you can:
• Add existing folders on your computer to the Folders pane.
• Create new folders, mapped network drives and folders on
external attached devices.
Initially, the Folders pane shows a set of folders designed to help you get
started using PaperPort. You can move or delete these folders whenever
you prefer. If you choose a custom installation, you can add your own
folders at that time.
Any time later, you use the Folder Manager to add folders already on your
computer to the Folders pane, including network folders and folders on
external devices attached to your computer. Documents within these
folders are then available for use within PaperPort.
PaperPort Getting Started Guide
28
Refer to the PaperPort Help for more information about adding and using
PaperPort folders.
Use Folder Notes to assign the same file information to all PDF files arriving in a
folder of your choice through scanning or DesktopDelivery.
Use DesktopDelivery
DesktopDelivery (PaperPort Professional only) monitors network or local
folders for incoming files of specified types (PDF, TIFF, JPEG and MAX).
It can also monitor e-mail folders for attachments. It imports these files to
specified PaperPort DesktopDelivery folders (i.e. PaperPort folders
designated to receive files from a monitored folder outside PaperPort).
Right-click on any PaperPort folder and select DesktopDelivery from the
shortcut menu.
Automatically applied Folder Notes
to password protected documents
Monitored e-mail Inbox folder
Monitored folder
You can apply Folder Notes to password protected documents and monitor
e-mail inbox folders and network or local folder. Refer to the PaperPort
Help for details.
Acquiring Items
29
Import pictures from your camera
To bring digital photos on the PaperPort desktop, first plug your camera in.
If your device is displayed as a drive you can start acquiring your files. If
your camera does not support this kind of operation, and its driver is
installed properly, its TWAIN, WIA or ISIS interface will display enabling
you to import images from it.
Do not edit the images on your camera in place – not all editing produces the
desired result first time. Instead, bring your files into PaperPort and use the SET
tools to enhance them.
Touching Up Images
When you display an image item in the Image View
or ImageViewer window, PaperPort provides tools
you can use to adjust or improve your image.
For example, you can straighten a scanned page,
lighten an underexposed photograph that is too dark,
adjust the color in a color picture, remove ‘dirt
spots’ from a document page, clear shadows and spots from page edges, or
sharpen fuzzy pictures. In addition, you can rotate an item, remove stray
dots, enhance lines, remove red eye, and crop part of an image.
Some SET Tools are primarily designed for photo, or image enhancement,
while others (shaded) help you prepare items containing text for Optical
Character Recognition (OCR).
In the Image View window the Page ribbon contains the SET tools to
modify the current page. Some of these tools are also available on the
PaperPort desktop for use with all pages in the selected item.
PaperPort Getting Started Guide
30
Scanner Enhancement Technology tools
The availability is shown like this:
P = Image View or ImageViewer (Page ribbon) to change the current page only.
PI = Also on PaperPort desktop (Item ribbon) to change all pages in selected item(s).
PM = Also in PaperPort desktop shortcut menu to change all pages in selected item(s).
PS = Also available in a Scanning Profile to modify all incoming images.
Select Area
(P)
Use the Select Area tool to select part of an
image you want to cut, copy, or delete with
commands on the Page ribbon or shortcut menu.
Use it to select part of an image for cropping,
using the Remove Red Eye, Erase Inside or
Erase Outside tools.
Rotate
(PI)
Click the Rotate tool to rotate the selected page
or item 90 degrees to the left, right or by 180
degrees.
Straighten
an image
Sometimes a document is crooked when
scanned. When this occurs, you can use the
Straighten (P) and Auto-Straighten (PSI) tools
to adjust it. Straightening lines of text in a
black-and-white image file will yield better
OCR results.
Auto-enhance The Auto-Enhance feature adjusts the
(PSI)
brightness and contrast, color, and tint of an
image or item. PaperPort analyzes the image
and tries to correct whatever is wrong with it.
Touching Up Images
31
Enhance
an image
(P)
You can manually adjust your image using the
Enhance tool. It lets you change brightness,
contrast, color and tint values and choose the
best result from nine candidates, as shown on
page 33.
Sharpen
an image
(P)
Select the Sharpen tool to adjust the sharpness
of a blurry picture or blur a sharp image for
special effect.
Remove
red eye
(P)
The Remove Red Eye tool helps you to remove
the red-eye effect from a selected part of a
picture. Red Eye may occur when photographing people or animals in low light or with
a flash.
Remove
part of
an image
Use the Selection tool to define the part you want
to keep and use the Crop tool (PS) to remove the
remainder. Select the Eraser tool (P) to erase an
image area that you draw over with the pointer.
Resize
(PSI)
Resize an image or item and/or change its
resolution or define these settings for a scanning
profile. (Colors can also be converted or
inverted).
Remove
stray dots
(PM)
Scanned images sometimes include dots or
speckles. The Stray Dots tool automatically finds
and removes such ‘dirt’ from a page. Use it for
better OCR results on black-and-white images.
Improve lines The Improve Lines tool (for black-and-white
(PM)
images) darkens lines and connects broken lines
in a table or form to appear darker and straighter.
The use of this tool will render better recognition
results.
Erase
outside
(PS)
Use this tool to clear shadows and spots from
page edges to improve OCR performance. Called
Erase Edges in the Scan profile. There is also an
Erase Inside tool (P).
PaperPort Getting Started Guide
32
Invert colors
Use this tool to change the image to inverted
color values. (PMI)
Convert color Use this tool to change color images to grayscale,
halftone or black-and-white. (PMI)
Punch-hole
removal
Remove hole marks from page sides, replacing
them with the background color. (PMIS)
Auto-Crop
This tool crops images according to pixel settings
you provide. (PMIS)
Black border
cleaning
This tool removes scanning shadows from page
margins. (PMIS)
Despeckle
This tool cleans black-and-white images using a
chosen despeckling type. (PMI)
Set white
point (P)
Click this tool, then click on a light color in the
image that will become the white point. See
below.
Set black
point
(P)
Click this tool, then click on a dark color in the
image that will become the black point. The
colors chosen for the new white and black points
are displayed on the Status bar.
Apply current Click this tool to apply the new black and white
black and
points to the current image (P) or item (I). If the
white
result is not acceptable, undo your changes and
points
pick new values.
Change black and white points to improve image quality by removing the
dark and overexposed areas. All colors lighter than a chosen white point
will become white. All colors darker than a chosen new black point are set
to black.
Touching Up Images
33
N
ew
po bl
in ac
t k
de
fa
ul
t
de
fa
ul
t
N
ew
po w
in hit
t e
A typical use for this is to remove a shaded gray background in a
document you want to OCR. Select one of the darker gray pixels from the
background and apply it as the white point. Then the background will
become white. Changing black and white points for a color photo will
typically increase its contrast, but may also change color values.
Before:
After:
You can apply new black and white points to individual images, as
described. You can also apply them as an auto-enhancement to all new
pages scanned with a given scan profile.
Convert Color choices
Color
Grayscale
Halftone
Black-and-white
PaperPort Getting Started Guide
34
Enhancing Images Manually
Choose Enhance from the Page ribbon in Image View to receive nine
candidate variants of your picture. Adjust brightness and contrast, color, or
tint, then double-click the desired image. It is placed in the center and
becomes the new original. The first original remains and can be reset.
Click to finish
enhancing
Current selection
Choose to modify Brightness
& Contrast, Color, and Tint
Slider for less or
more
Original image (with
reset)
Edit multiple images
The ability to process items as a group is often referred to as batch
processing. PaperPort provides batch processing features so that you can
quickly enhance, modify, or rotate multiple image items in a single
operation. Select one or more image items on the desktop, and then, on the
Item ribbon, choose the desired command. See the Help for more
information.
Touching Up Images
35
Annotating Pages
PaperPort includes a collection of annotation tools that allow you to mark
up scanned documents with information you would like to keep with that
document. For a wider offering of PDF annotation tools use the supplied
Nuance PDF product. All other image items must be annotated in Image
View or ImageViewer, but remember that you can drag any of these files
onto the Nuance PDF product icon on the Send To bar to have them
converted to PDF Image or PDF Searchable, ready to be annotated or
otherwise edited.
In PDF files, annotations are editable, meaning that you can reposition,
change, remove them, or edit textual content whenever you want. On other
types of image items, such as JPEG and Windows Bitmap files,
annotations become a permanent part of the image when you save the
item. For item types that cannot accept annotations, PaperPort
automatically disables the annotation tools.
Using PaperPort’s annotation tools, you can add notes and text, highlight
text, draw lines and arrows, or stamp a picture onto an image item.
It is easy to send a document with annotations to people without PaperPort
by using the PDF Image or PDF Searchable format. The recipient only has
to double-click on the e-mail attachment they receive from you and they
will see the document in the system default PDF viewer – annotations
intact.
Annotation tools
You can select an annotation tool from the Annotation ribbon whenever
you display an image item in the Image View window. Use commands in
the Annotation Settings group to change properties for future annotations
created with that tool. This does not affect existing annotations. To turn off
any annotation tool, click a different one – the Select Annotation tool is
usually the best for this. See a detailed list of these tools in Help.
We detail here the annotation tools available in PDF Viewer Plus for use
with PDF files.
PaperPort Getting Started Guide
36
Use the following commands in PDF Viewer Plus:
Hand
Select this tool and click in an annotation to move,
cut, copy, or resize it on the page. Double-click on
a note or text box to edit its text. Right-click on a
selected annotation to change its status or
properties.
Note
Want to give yourself a reminder? Select the Note
tool and add a resizable note much like a sticky
note that you write on and then stick on paper
documents. You can shrink the note to an icon.
Right-click to access note properties. Double-click
to re-open the note.
Text Box
Adding a text label to your images is simple with
the Text tool. Select this tool to enter text whose
properties you can set in Edit, then Preferences
and Comment.
Highlight
Use the Highlighter tool to highlight selected text
on the page or in a text box, just as you might use a
highlighting pen on paper.
Pencil
The Pencil tool lets you draw freehand lines on the
page.
Line
Select Line tool to draw straight lines; right-click
and choose properties to make arrows and further
format the line.
Stamp
The Stamp tool lets you paste supplied stamps or
bitmapped images of your choice on the page,
much like using a rubber stamp.
Annotating Pages
37
Protecting Items
In PaperPort Professional, you can adjust the security level of
your PDF files (supported up to format 1.7). When you create a
new PDF from existing ones (for example, by copying a
thumbnail of a page onto a Workspace) its security settings will be the
same as those of the original one. Newly created PDF files will be
generated according to the default PDF security settings in PaperPort, as
specified on the Item ribbon.
There are two types of passwords in the program. The open password
restricts document accessibility: you can only open it by supplying the
password when prompted. The permissions password allows users to
define how the document may be used. If it is not specified, further use of
the file is possible without any restrictions.
Filing Items
A key to organizing items in PaperPort is filing items in appropriate
folders. You can drag and drop items from one folder to another or from
the PaperPort desktop into any folder you want. You can specify search
criteria to help you find your items later.
Moving and copying items between folders is also possible in split view
across Workspaces. The name of each item appears below the thumbnail in
thumbnail view. In a multi-page item, the name appears below the
individual page names.
Using the Folder Manager dialog box, you can
add, remove, move, and rename PaperPort
folders. You can change the color of a folder
icon to one that helps you organize your items.
You may also add, remove, move, and rename any folder in Windows
Explorer that is viewed with the PaperPort folder structure. These changes
will be automatically reflected in PaperPort.
PaperPort Getting Started Guide
38
In the Folders pane, you can drag and drop, copy or move subfolders and
their content to other subfolders or PaperPort folders, create or delete
subfolders; or add Folder Notes. Sharing and Security, and
DesktopDelivery adjustments can also be directly made for each folder
shortcut menu.
The Back button makes it easy to step through the ordered
history of folders you recently visited one by one – functioning
similarly to Internet Explorer – enhancing quick backward
navigation for both Workspaces independently of each other.
You can add notes to folders that are relevant to their content. A
customer name, telephone number, date of birth, project ID,
e-mail address are typical examples.
When scanning or using DesktopDelivery, this information can be
automatically added to all PDF files entering this folder, so it is easier to
search for them with the PaperPort All-in-One Search or other search
utilities.
Folder Notes are added only if you checkmark Automatically apply
Folder Notes in the Output panel of the Scan Settings dialog box or (in
PaperPort Professional for DesktopDelivery) in the Folder Properties
dialog box.
In PaperPort Professional, you can quickly import a set of folders plus any
content by listing them in a plain text file with precisely this structure:
*** PaperPort ***
Foldername1
Foldername2
Foldername2/subfoldername2a
Foldername2/subfoldername2b
Foldername3
...etc.
Note how a top-level folder name must be listed in a separate line, with
each of the desired sub-folders in a separate line.
Right-click in the Folders pane and choose Import Folder Structure to
select the text file.
Protecting Items
39
Add search criteria to items
You can assign item properties to PaperPort Image items and PDF files,
and then use the properties as search criteria to find items in PaperPort.
PaperPort also allows you to assign the same keywords to multiple items at
the same time, providing a powerful tool for organizing and locating
similar documents and images.
Select multiple items on the PaperPort desktop, then choose Properties
from the shortcut menu; words entered under Subject, Author and
Keywords will be applied to all selected items.
Another way to assign the same item properties to all PDF files arriving in
a folder of your choice through scanning or DesktopDelivery is to use
Folder Notes. Enter words under Subject, Author and Keywords. These
words are applied only if you checkmark Automatically apply Folder
Notes in the Output panel of the Scan Settings dialog box or (in PaperPort
Professional) in the Folder Properties dialog box for DeskopDelivery.
PaperPort Getting Started Guide
40
Finding Items
PaperPort provides features to help you find your PaperPort items. You
can quickly find an item by visually browsing through thumbnails on your
PaperPort desktop.
When you have many folders and items, PaperPort provides more
powerful capabilities with All-in-One Search. This provides many options
for specifying where and what to look for when finding an item, including
indexed text content. This information is referred to as search criteria.
You can look for items by:
•
•
Item properties (File search)
Text content (Index search)
Find items by their properties
You can search for any type of item by its item name.
You can also search for PDF and PaperPort Image (.max) files by item
properties, such as keywords and subject information.
When you search by item properties, turn off the Use All-in-One Search
index checkmark, then specify criteria as follows:
•
•
•
•
•
•
Name – item name (not necessarily that of the file).
Author – as defined under Item properties.
Keywords – as defined under Item properties.
Comments – as defined under Subject under Item Properties.
Annotations – Notes or text labels added to PDF files.
URL – The link texts of captured web pages.
The Author, Keywords, Comments and URL are available for PDF or
MAX files only. PaperPort 14 does not let you add metadata to MAX files; only
metadata placed in an earlier version is available.
Finding Items
41
Find words in an item
To search for words within an item, you need to add the item to the
All-in-One Search index and select Use All-in-One index. When you
search using the index, you can find items that have been indexed by their
properties, or text content, or both.
Specify search limits:
• all files in current folder but not its sub-folders
• current folder plus sub-folders
• all PaperPort folders and sub-folders.
Define search precision:
• Exact match finds words and common endings: search look finds
looks, looked, etc.
• Approximate match finds as above and more: search look might
find lock or luck.
When the search is complete, results are displayed – each as one row of a
table. Select one and click the View Text button to see your search phrase
occurrences in their context. Click the Copy Text button to extract text
from the file and place it onto the Clipboard. Right-click a result file and
choose Open to launch the document in its associated application. Open
Containing Folder switches to the file’s folder with the file selected.
To filter search results using file information, turn on the relevant checkboxes under Name, author, keywords and specify search text here as
well.
Add items to the All-in-One Search index
The All-in-One Search index uses PaperPort’s OCR software to extract
and copy textual content from your items, and creates a database of the
words or phrases in those items, much like the index of a book. Item
properties, such as name and author, are also added to the index. Although
creating an index is time consuming, searching for items in the index may
be much faster than searching file by file.
PaperPort Getting Started Guide
42
Using PaperPort Options available from the PaperPort button, you can
specify whether you want All-in-One Search to run automatically each
time you add a new item or modify an existing item. You can also set how
long PaperPort should wait before starting the update process.
If you prefer, you can manually update the All-in-One Search index for all
items, a single item, or all items in one or more folders. It is good practice
to update the All-in-One Search index on a regular basis to shorten the
length of time required to complete the process.
Use the Index Manager in PaperPort Professional to create and schedule
indexing tasks on a regular basis. For quick access to your regular indexing
processes, launch the Index Manager directly from the All-in-One Search pane.
Use the All-in-One Search pane
Use the All-in-One Search pane to enter
search criteria and select options for finding
your PaperPort items.
You can refine your search criteria by
specifying the scope of the search in the Find
box (1), defining where to look for the item or
items in the Look in box (2) and choosing
between Exact match and Approximate (3).
A file search is based on item properties only.
You enter the item properties in the Name,
author, keywords box (5).
An index search references PaperPort’s Allin-One Search index to find item properties or
actual text contained within an item. You
enter the item properties in the Name,
author, keywords box and the text content in
the Containing indexed text box (4).
To do an index search without a file search, enter a string in the
Containing indexed text edit box and clear all six file search checkmarks.
To do a file search without an index search, turn off the Utilize All-in-One
index checkmark (7) and enter a string in the Name, author, keywords
edit box, select as many of the six file search checkmarks (6) as desired.
Finding Items
43
To do a file and index search on a single search string, turn on Use All-inOne index, enter the string in the Containing indexed text edit box, make
sure the Name, author, keywords edit box is empty and turn on as many
file search checkmarks as desired. The search returns a list of all items that
match the search string, either in file contents or file information.
To do a combined file and index search, turn on Use All-in-One index,
enter a string in the Containing indexed text edit box, enter a string (same
or different) in the Name, author, keywords edit box and turn on as many
file search checkmarks as desired. The search returns a list of all items that
contain the specified string or strings in both the file contents and the file
information. In other words, you are likely to find few occurrences.
Use PDF Searchable Image
In addition to using PaperPort’s proprietary search and indexing
capabilities, you can also create PDF Searchable Image files that can be
indexed and searched outside of PaperPort. PDF Searchable is a flavor of
PDF; it contains a bitmapped image of a document or graphic with textual
content stored as hidden text. This format maintains an identical
appearance to the original document and enables other programs, such as
Nuance PDF Converter Professional, Windows Desktop Search or Google
to search the contents of the file.
You can create files in PDF Searchable Image format as follows:
•
Open an item and choose Save As from its shortcut menu. Choose
PDF Searchable Image as its file type.
•
Scan an item using the profile Color Searchable PDF document.
•
Import an image-only PDF into PDF Viewer Plus or PDF
Converter Professional. It may offer to make a searchable copy; if
not select Make Searchable PDF from the Tools menu.
•
Print an image to the PaperPort desktop. By default it becomes an
Image PDF. Go to Desktop, then Options and Item to specify
Searchable PDF as your preference.
PaperPort Getting Started Guide
44
Schedule Indexing Tasks
The Index Manager is a PaperPort
Professional application designed to
create, modify and schedule
indexing tasks for a given local or
network folder. Indexed files can
afterwards be searched with the Allin-One Search.
For new tasks you can set which folder to browse (local or network) with
subfolders included or excluded, set timing and recurrence (duration,
pattern and range), activate and deactivate a task, pause its completion, or
skip a task occurrence. In the program settings dialog box, you can specify
how and when the Index Manager should stop.
Sharing Files
PaperPort provides many tools to make it easy for you to share files,
images, and documents with friends, colleagues, and business associates.
These tools are built into the program and are readily available on different
ribbons for quick access whenever you need them.
To help you share your items with others, PaperPort makes it easy to:
E-mail items to others, simply by dragging the items to
your favorite e-mail program on the PaperPort Send To bar.
Scan or convert items to the PDF format, the ever-popular
file-sharing format considered by many as the industry
standard for document distribution.
Access shared folders located on your local or wide area
network, by adding the folders to your PaperPort Folder
pane.
Access Sharing and Security settings directly from the
folder shortcut menu.
Finding Items
45
Access a number of cloud services including Microsoft
SkyDrive, GoogleDocs, Box, FTP sites, and many more.
With PaperPort, it is simple to set up a
shared folder on a server, web storage
sites, or a PC that can act as a central
repository for all important office
documents. Each PaperPort client can
connect to that folder and use
PaperPort’s document management
features and paper handling tools to find and use documents instantly.
In addition, you can convert items to popular output formats for shared use
in numerous other programs. To obtain a list of all supported program
links, visit PaperPort at the Nuance web site at http://www.nuance.com .
Connecting to the Cloud
PaperPort 14 introduces support for Cloud computing – accessing and
working with web-based storage sites for programs, documents and data.
Nuance Cloud Connector
This is a self-standing program delivered with all variants of PaperPort,
whose installation is optional. When installed, it can be started from the
Nuance Cloud Connector group in the Windows Start menu. It provides
access to other popular storage sites in the Cloud, including Microsoft
SkyDrive, GoogleDocs, Box, multiple FTP sites, and many more. Its
interface lets you establish connections from your file system to and from
chosen Cloud sites; it also manages passwords and log-in data.
Evernote Connector
This is a new connector inside PaperPort 14, appearing as an icon on the
Send To bar. This allows files to be dragged onto the icon so their copies
are transferred to the Evernote storage site. Send To options can be used to
specify access data.
PaperPort Getting Started Guide
46
Sending Items to Other Programs
Drag and drop functionality makes opening your files in your favorite
programs a snap. Simply choose the file you want and drop it onto the
program icon on the Send To bar at the bottom of the PaperPort desktop.
Common office tasks like e-mailing and faxing are now faster than ever.
The Send To bar makes using scanned documents in other applications
easier by automatically translating the document into a form that the
receiving application can understand.
For example, you can drop a scanned image of a letter onto the Microsoft
Word link on the PaperPort Send To bar, and PaperPort will recognize that
the application you are attempting to open needs a text file rather than an
image file. PaperPort will run OCR for you, and send editable text to Word
rather than a static image file.
PDF Viewer Plus
OmniPage
OP Workflows
FormTyper
SharePoint
Microsoft Outlook
PDF Converter
PaperPort supports a wide variety of programs including word processing,
spreadsheet, fax, Internet e-mail, graphics, optical character recognition
(OCR), and online services programs. The program link on the Send To
bar does any necessary conversion and may provide options for sending
the item.
Sending Items to Other Programs
47
Use OmniPage with PaperPort
If PaperPort exists on a computer with OmniPage, its OCR services
become available and amplify the power of PaperPort. You can choose
an OCR program by right-clicking on a text application's PaperPort link,
selecting Send To Options and then selecting OmniPage as the OCR
package, instead of the always available PaperPort OCR.
With OmniPage you can:
•
Instantly convert paper into usable Microsoft Office documents.
•
Turn PDF files into editable documents while retaining their layout.
•
Automatically process images from network MFPs and scanners.
•
Scan and convert documents into XML, PDF, TIFF and more.
•
Share documents using e-mail, web, Cloud Connector, XML and ebooks.
•
Use OmniPage Workflows
over document conversions.
for instant but effective control
Customize the Send To bar
You can change the way program icons appear on the Send To bar in a
number of ways. Specifically, you can add programs, and remove or
rearrange program icons. Refer to the PaperPort Help for details.
PaperPort Getting Started Guide
48
Adjust Send To options
You can tune Send To options to
specify how you want to use a
certain program on the Send To
bar. For example, you can
specify the file format in which
PaperPort will save an item.
If you have the professional
version of OmniPage 16 or
above on your system, use the
Send To options for the
OmniPage Workflows link to
choose a workflow.
To e-mail an item, simply drag
and drop the item to your e-mail
program on the Send To bar. Use
the e-mail link options to specify
the file format of the attachments
and other options.
Sending Items to Other Programs
49
Converting Items
Using PaperPort, you can convert scanned documents and text items to
image formats, and convert images back to text.
Convert items to image formats
You can convert scanned documents and text items to image formats.
The Save As command allows you to save image items to any of a variety
of standard image formats including PDF, JPEG, and TIFF.
The Duplicate Item command makes a copy of the item, conserving its
original file type.
The Duplicate as PDF Item command allows you to convert text items to
PDF Image items.
In PaperPort Professional, you can also convert text items such as Word
documents, to PDF Formatted Text & Graphics format using PDF Create.
By selecting more than one item, you can convert multiple items to a new
format at the same time. Refer to Help for details.
Stacking documents
You can assemble a set of PDF files by stacking them into a single PDF.
You can unstack the current page or all pages from a multi-page PDF file.
When all pages are unstacked, the result is a set of single-page PDF files,
uniquely identified by a set of numerical suffixes. When stacking and
unstacking, the original PDF files or pages do not remain. To stack files,
use drag-and-drop or select the desired files, right click and choose Stack.
Similarly, use a shortcut menu to unstack a PDF file.
Combining documents
You can assemble documents by combining them. The files to be
combined need to be in a single folder and selected in the order you want
them in the stack. Click the arrow next to Combine Items in the Stack
group of the Item ribbon, and choose one of the combinations:
PaperPort Getting Started Guide
50
•
Combine into PDF Stack: Each original page becomes one PDF
page with no resizing.
•
Combine into Multi-item PDF Pages, Resize to fit: This resizes
the contributing items and always places four original pages onto a
single PDF page.
•
Combine into Multi-item PDF Pages, Maintain original sizes:
This places as many original pages onto each PDF page as it can.
•
Combine into Thumbnail PDF Page: This creates thumbnails of
all item pages and fits as many as possible on a PDF page.
The original items remain in their original file types.
Combining usually takes more time than stacking because of PDF generation.
PaperPort Professional can additionally combine text items. To convert a text
item, the application that created it must be available on your system.
Convert images to text
You can convert scanned documents to text by a simple drag-and-drop of
the thumbnail to your word processor program. PaperPort automatically
processes your scanned document using PaperPort’s OCR software,
launches your word processing program, and loads the scanned text into a
document ready for editing. PaperPort also allows you to copy text from
part of an image item for use in a text editing, word processing, or
spreadsheet program. The OCR software processes the text and copies it to
the Windows Clipboard. Open the program in which you want to insert the
text, and use Paste to paste the text in a file.
Filling Forms
Active PDF forms can be filled using your PDF product. Choose the Hand
tool and step through the form fields using Tab or arrow keys, making
choices and entering texts. Help and the How-to-Guides list all the
possible form control types.
Converting Items
51
FormTyper is a PaperPort program that enables you to fill in static forms,
such as insurance forms, registration cards, and medical forms, that you
scan to the PaperPort desktop.
You simply drag a form from the PaperPort desktop to the FormTyper
program on the Send To bar. The form is converted to PDF if necessary
and opened in your Nuance PDF product. FormTyper automatically
analyzes the form, recognizes the blank areas in which data can be entered,
and creates blank fields for the data. FormTyper can detect edit boxes and
checkmarks.
Now, you can quickly type and tab to each field. You can also quickly
reposition edit box or checkmark fields, insert new fields, and remove
fields as necessary. After you enter data and complete the form, save the
form to the PaperPort desktop so that you can print or e-mail the form in
its entirety with its completed data.
If you have a pre-printed form, choose Form Fields Only in the Print
dialog box to print your responses directly onto the form.
PDF File Support
PDF Flavors
Portable Document Format (PDF) files are often classified into three
different types, commonly called flavors:
• PDF Image
• PDF Searchable Image
• PDF Formatted Text & Graphics (PDF Normal)
Opening PDF files
PaperPort can open and display PDF files of all three flavors. PDF files by
default open in PDF Viewer Plus or (if available) in PDF Converter
Professional, versions 6 or 7.
The following further options are available in the Desktop panel of the
Options dialog box:
• Image View (to apply image enhancement tools in a PaperPort
window)
PaperPort Getting Started Guide
52
•
ImageViewer (to apply these SET tools in a separate program
window)
• Program associated with file type (your system application for PDF
files)
You need to choose the last option if you use version 5 or earlier of PDF
Converter Professional as your PDF program.
Protected files can be accessed by giving the correct password. Security
limitations are respected and can be changed if you can provide the
Permissions password.
PDF page operations
In PaperPort you can insert or append pages from one PDF file to another
and also stack a set of PDF files into a single one. With pages of different
flavors, the program determines a single flavor for the resulting file. You
can unstack one or all pages from a multi-page PDF file to get one PDF
per page.
Combining items into a PDF file
You can combine a wide range of image items into a single target PDF. All
combined items remain in their original locations and file types. In
PaperPort Professional text items can also be combined.
Annotating PDF files
You can add notes, highlights and graphic items like arrows to PDF pages
of any flavor as annotations. These do not become part of the real PDF
page, but exist on separate layers so they can be viewed, moved, changed
or deleted in PaperPort or other PDF viewing and editing programs.
Annotation can be done in ImageViewer or your PDF product.
Modifying PDF files
Use SET tools to improve the appearance of PDF pages or prepare them
for more successful text recognition (OCR). See page 30 and the Help
topic: About enhancing pages and images. To modify the real text content
in a PDF file, or change its color or attributes, you need a PDF editor such
as Nuance PDF Converter Professional.
Converting Items
53
Extracting text from PDF files
The Copy Text command finds text in PDF files and places it onto the
Clipboard as plain text, running OCR if necessary. The command View
Text does the same, but displays the text in a PaperPort window. You can
choose to have these texts stored or not; if not it is regenerated each time
the command is used. Send PDF files to word processor programs on the
Send To bar. This delivers editable text with a defined level of formatting,
using OCR if necessary.
See the Help topics: To convert scanned documents to text and Output
options for the target program.
Adding document information to PDF files for searching
You can define an item name, author, subject and keywords to a PDF file
and also assign page names to each page to help in searching. See the Help
topic: Assigning properties to PaperPort Image and PDF files and Item
properties.
The All-in-One search finds words in this document information for one or
more PDF files. You can search through document information only,
through text content only, or both, with different search strings for each
search type. Indexing via the Index Manager makes full text searches
much faster.
Saving PDF files to other file types
You can save PDF files to a range of image file types and to XPS files. See
Help: Saving to other formats. A multi-page PDF results in a single file
when a multi-page file type is selected, otherwise each PDF page becomes
a separate file.
Adding PDF files to Windows Desktop Search
Go to Desktop, then Options and Advanced to enable or disable
PaperPort as the agent for handling PDF files in Windows Desktop Search.
See the Help topics: About PDF files and PDF file support.
PaperPort Getting Started Guide
54
Creating PDF Documents
Create PDF Image files from other applications
In Desktop, then Options and Items choose between PDF Image and
PDF Searchable Image. Then open a source file in a suitable application
and choose Print, typically from the File menu. Choose PaperPort Image
Printer and make print settings, e.g. black-and-white versus color
conversion. See the Help topic: About the PaperPort print driver and
Printing to PDF from other applications.
Create PDF Searchable files from scanning
Open a scanning profile and set the PDF file type in the Output panel or
choose the supplied profile Color Searchable PDF Document. See the
Help topic: Modifying Scan Profiles. Use the profile to generate PDF files.
Create a PDF from an existing PDF, XPS or image item
Right-click on a PDF file and choose Duplicate Item, Duplicate Current
Page or Save As. The flavor of a source PDF is retained for the copy.
Right-click on an image item and choose Duplicate as PDF or Save As
and choose PDF as file type. When you double-click an XPS file so that it
opens in PDF Viewer Plus, a copy is automatically created as a PDF file,
ready to be modified and saved.
Creating PDF Documents with PDF Create
Nuance PDF Create lets you create PDF files from one or more source
documents. The PDF files will be viewable, printable, searchable and
editable.
How to Start PDF Creation
You can start PDF creation from different locations:
•
•
from the Start menu through the Create Assistant
from Windows Explorer or from your desktop using a shortcut
menu
Converting Items
55
•
from Microsoft Word, Excel, PowerPoint, Outlook or Internet
Explorer using a toolbar or the PDF Create menu items or the
Nuance PDF ribbon.
The Help topic: About creating PDF files details all the possible starting
points for PDF creation and the available choices.
How to Get Help for PDF Create
Nuance PDF Create has a comprehensive HTML Help system. Access it
through the Help system in PDF Viewer Plus or PDF Converter
Professional or through the PDF Create menu in Microsoft Word, Excel or
PowerPoint. Press F1 to open Help at the topic describing the currently
open panel. You can create one or more of these PDF flavors, depending
upon your version of PaperPort software. Refer to the PaperPort Help for
additional details. This table lists which features are available for creating
each type of PDF in PaperPort 14 and PaperPort Professional 14:
Format
PaperPort 14
PDF Image
Scan or Get Photo
Print to PaperPort
Save As
(Web Capture)
PDF Searchable Image
Scan or Get Photo
Print to PaperPort
Save As
(Web Capture)
PDF Formatted Text
& Graphics
(Normal PDF)
Scan or Get Photo
PaperPort
Professional 14
Scan or Get Photo
Print to PaperPort
Save As
(Web Capture)
Duplicate Item
Scan or Get Photo
Print to PaperPort
Save As
(Web Capture)
Duplicate Item
Scan or Get Photo
Print to PaperPort
Duplicate Item
Duplicate as PDF
Web Capture must be run outside PaperPort. See page 28.
Duplicate item transmits the PDF flavor of the original to the copy.
Duplicate as PDF accepts non-PDF files as input.
PaperPort Getting Started Guide
56
Using ScanDirect
ScanDirect is a PaperPort program that enables you to scan items and send
them directly to PaperPort or other programs on your computer without
first running PaperPort.
ScanDirect runs as a separate program from the Windows Start Menu and
displays the ScanDirect bar.
Click for options
Scan
Single or multiple pages
Scan to PaperPort
desktop
Scroll right for more icons
ScanDirect bar with icons for
all scanning targets
Using ScanDirect, you can scan an item and immediately send it to either:
•
A program on the ScanDirect Send To bar – Icons on the
ScanDirect bar represent the programs that are linked to PaperPort
and to ScanDirect. To scan and then send an item to a certain
program, click the program icon, and then scan the item. ScanDirect
will automatically start that program when the scan is complete.
•
The PaperPort desktop – To scan and then work with the item in
PaperPort, click the PaperPort icon, and then scan the item. When
the scan is complete, PaperPort starts and displays the item in
PaperPort. You can then use all of PaperPort's features on the item.
When ScanDirect is used to scan to other programs it always works
through the scanner’s own user interface; the scan profiles in PaperPort are
not used. When ScanDirect is used to scan items to the PaperPort desktop,
the output is determined by the output setting for the previous scan: if it
created an image item, the current scan will also do this, and if it created a
text-type document (such as DOC, XLS, WPD, TXT or CSV) the current
scan will create a PDF Image, which you can make searchable, as already
described. In PaperPort Professional, you can scan items directly to
Microsoft SharePoint.
Converting Items
57
Uninstalling PaperPort
For a full uninstallation, all PaperPort components should be removed one
after the other. The components are as follows: Nuance Cloud Connector
(optional component), Nuance PDF Create (only in PaperPort
Professional), Nuance PDF Viewer Plus, PaperPort Image Printer and
Nuance PaperPort 14.
Removing only one or more of the following components: Image Printer,
PDF Viewer Plus or PDF Create will cause PaperPort to function
incorrectly.
For example (and not limited to the following functionalities): PDF
Viewer affects FormTyper, PDF Create affects the save and combine to
PDF functionality in PaperPort.
To uninstall PaperPort and its key components:
1. In Windows XP, go to Control Panel, then Add or Remove
Programs (in Windows Vista, Windows 7 and Windows 8, go to
Control Panel, then Programs and Features).
2. Select Nuance PaperPort 14.
3. Click Remove to uninstall the program.
4. Repeat this for the remaining components.
5. A computer restart is needed to complete the removal.
A deactivation step is performed at the start of uninstallation, allowing you
to reinstall the program later without reactivation problems. Deactivation
and reactivation require web access.
PaperPort Getting Started Guide
58
Trademarks and Credits
Nuance®, the Nuance logo, All-in-One SearchTM, DesktopDeliveryTM, FormTyperTM,
OmniPage®, PaperPort®, PDF Converter®, PDF Converter Professional®, ScanDirectTM,
ScanSoftTM, Logical Form RecognitionTM and SETTM are trademarks or registered
trademarks of Nuance Communications, Inc. or its affiliates in the United States and/or
other countries.
Outside In Viewer, copyright (c) 1991, 2010 Oracle. All rights reserved. Outside In
Content Access, copyright (c) 1991, 2010 Oracle. All rights reserved. The word
verification, spelling and hyphenation portions of this product, as detailed in the legal
section of the Help system, are based in part on Proximity Linguistic Technology from
Franklin Electronic Publishers, Inc. All rights reserved. This product was developed using
Kakadu software, and is based in part on the work of the Independent JPEG Group. This
software is based in part on the Zlib Compression Library and the work of Colosseum
Builders.
This application was developed using LEADTOOLS, copyright (c) 1991-2007 LEAD
Technologies, Inc. All rights reserved.
MSXML binary files. Use of the software is subject to the conditions and disclaimers
contained in the MSDN CODE GALLERY BINARY LICENSE available at http://
code.msdn.microsoft.com/MSXML/Project/License.aspx .
Microsoft: HD Photo 1.0. Use of the software is subject to the conditions and disclaimers
contained in the Microsoft Corporation Technical Documentation License Agreement for
the specification "HD Photo" available at http://msdn.microsoft.com/en-us/windows/
hardware/gg463400.aspx .
Microsoft CAPICOM 2 - INSTALLATION AND USE RIGHTS. You may install and use
any number of copies of the software on your devices running validly licensed copies of
Windows 2000, Windows XP, Windows Vista, or Windows Server 2003.
FreeType 2.3.1. The FreeType Project is copyright (c) 1996-2000 by David Turner, Robert
Wilhelm, and Werner Lemberg. All rights reserved except as specified in the license found
at http://freetype.sourceforge.net/index2.html .
Zlib. Source code files for Zlib were obtained by LICENSOR from Jean-loup Gailly and
Mark Adler at www.Zlib.net. Copyright (c) 1995-2010 Jean-loup Gailly and Mark Adler.
Use of Zlib is subject to the conditions and disclaimers contained in the license available at
http://www.zlib.net/zlib_license.html .
The Independent JPEG Group's software. Copyright (c) 1991-1998 by Thomas G. Lane.
Use of the Independent JPEG Group’s software is subject to the conditions and disclaimers
contained in the license available at http://www.xstandard.com/1D1B6C13-7BB6-4FA8A1F9-EC1E32577D26/license-ijg.txt .
Trademarks and Credits
59
JBIG2 license - Copyright (c) 1990, 1991, 1992, 1993 Cornell University. All Rights
Reserved. Copyright (c) 1991, 1992 Xerox Corporation. All Rights Reserved. Use,
reproduction, preparation of derivative works, and distribution of this software is
permitted. Any copy of this software or of any derivative work must include both the
above copyright notices of Cornell University and Xerox Corporation and this paragraph.
Any distribution of this software or derivative works must comply with all applicable
United States export control laws. This software is made available AS IS, and XEROX
CORPORATION DISCLAIMS ALL WARRANTIES, EXPRESS OR IMPLIED,
INCLUDING WITHOUT LIMITATION THE IMPLIED WARRANTIES OF
MERCHANTABILITY AND FITNESS FOR A PARTICULAR PURPOSE, AND
NOTWITHSTANDING ANY OTHER PROVISION CONTAINED HEREIN, ANY
LIABILITY FOR DAMAGES RESULTING FROM THE SOFTWARE OR ITS USE IS
EXPRESSLY DISCLAIMED, WHETHER ARISING IN CONTRACT, TORT
(INCLUDING NEGLIGENCE) OR STRICT LIABILITY, EVEN IF XEROX
CORPORATION IS ADVISED OF THE POSSIBILITY OF SUCH DAMAGES.
Contributing Authors Group - Copyright (c) 1995 Alexander Lehmann. This software is
provided 'as-is', without any express or implied warranty. In no event will the authors be
held liable for any damages arising from the use of this software. Permission is granted to
anyone to use this software for any purpose, including commercial applications (see
below), and to alter it and redistribute it freely, subject to the following restrictions:
1. The origin of this software must not be misrepresented; you must not claim that
you wrote the original software. If you use this software in a product, an acknowledgment
in the product documentation would be appreciated but is not required.
2. Altered source versions must be plainly marked as such, and must not be
misrepresented as being the original software.
3. This notice may not be removed or altered from any source distribution.
4. Binary only distributions of the software must include the file README with the
copyright statement. You are welcome to add a copyright statement for your modifications
and a contact address, though.
Apache Components. Copyright (c) 1999-2003. The Apache Software Foundation. All
rights reserved. The following names may not be used to endorse or promote products
derived from the Apache licensed software without prior written permission: Apache
Cocoon, Apache Software Foundation, Ant, Jakarta, Apache Avalon, Avalon Excalibur,
Avalon Framework, Batik, The Jakarta Project, Commons, FOP, Apache POI, JakartaRegexp, Log4j, LogKit, Apache Lucene, Xalan, Tomcat, Struts, Velocity, Xerces, Axis,
Jakarta-Oro, xml-commons, and WSIF. Products derived from this software may not be
called “Apache”, nor may “Apache” appear in the product name, without prior written
permission. Software is further subject to the conditions and disclaimers listed in Apache
Software License v.1.1. found at http://www.apache.org .
Javascript Engine. Source code files for Mozilla's Firefox Browser contained in the
Javascript Engine were obtained by LICENSOR from Mozilla.org. Such source code files
have not been modified by LICENSOR. Use of the Javascript Engine by LICENSEE is
subject to the conditions and disclaimers in the Mozilla Public License, Version 1.1 found
at http://www.mozilla.org/MPL/MPL-1.1.html .
PaperPort Getting Started Guide
60
LCMS. Marti Maria. Additional information is available at http://www.littlecms.com . Use
of this software is subject to the conditions and disclaimers contained in the license
available at http://www.opensource.org/licenses/mit-license.php .
Mozilla Public License. Subject to the Mozilla Public License Version 1.1 (the
“License”); these files may not be used except in compliance with the License. Javascript
Engine. Source code files for Mozilla's Firefox Browser contained in the Javascript
Engine were obtained by LICENSOR from Mozilla.org. Such source code files have not
been modified by LICENSOR. Use of the Javascript Engine by LICENSEE is subject to
the conditions and disclaimers in the Mozilla Public License, Version 1.1 found at http://
www.mozilla.org/MPL/MPL-1.1.html .
Copyright notice for the Evernote component
Copyright (c) 2007-2009 by Evernote Corporation, All rights reserved.
Use of the source code and binary libraries included in this package is permitted under the
following terms: Redistribution and use in source and binary forms, with or without
modification, are permitted provided that the following conditions are met:
Redistributions of source code must retain the above copyright notice, this list of
conditions and the following disclaimer.
Redistributions in binary form must reproduce the above copyright notice, this list of
conditions and the following disclaimer in the documentation and/or other materials
provided with the distribution.
THIS SOFTWARE IS PROVIDED BY THE AUTHOR "AS IS" AND ANY EXPRESS
OR IMPLIED WARRANTIES, INCLUDING, BUT NOT LIMITED TO, THE IMPLIED
WARRANTIES OF MERCHANTABILITY AND FITNESS FOR A PARTICULAR
PURPOSE ARE DISCLAIMED. IN NO EVENT SHALL THE AUTHOR BE LIABLE
FOR ANY DIRECT, INDIRECT, INCIDENTAL, SPECIAL, EXEMPLARY, OR
CONSEQUENTIAL DAMAGES (INCLUDING, BUT NOT LIMITED TO,
PROCUREMENT OF SUBSTITUTE GOODS OR SERVICES; LOSS OF USE, DATA,
OR PROFITS; OR BUSINESS INTERRUPTION) HOWEVER CAUSED AND ON
ANY THEORY OF LIABILITY, WHETHER IN CONTRACT, STRICT LIABILITY, OR
TORT (INCLUDING NEGLIGENCE OR OTHERWISE) ARISING IN ANY WAY OUT
OF THE USE OF THIS SOFTWARE, EVEN IF ADVISED OF THE POSSIBILITY OF
SUCH DAMAGE.
All other trademarks referenced herein are the property of their respective owners.
Trademarks and Credits
61