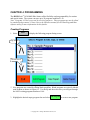
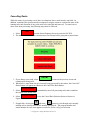
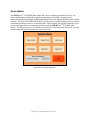
1
SHUR/Stain™3030 H&E Slide Stainer Catalog # SS-3030-120, SS-3030-220 Operator’s Manual Version 2.1, April 2013 © Copyright 2013 Triangle Biomedical Sciences, Inc. TABLE OF CONTENTS INTRODUCTION .......................................................................................................................... 4 Warranty Information ................................................................................................................. 4 Definition of Various Symbols ................................................................................................... 5 CHAPTER 1 INTRODUCING THE SHUR/Stain™ 3030 H&E SLIDE STAINER ..................... 6 Product Description .................................................................................................................... 6 Functional Description of Parts .................................................................................................. 7 CHAPTER 2 SPECIFICATIONS ................................................................................................ 11 Electrical Characteristics .......................................................................................................... 11 Physical Characteristics ............................................................................................................ 11 Environmental Conditions ........................................................................................................ 12 Installation Category ................................................................................................................. 12 Pollution Degree ....................................................................................................................... 12 CHAPTER 3 INSTALLATION INSTRUCTIONS ..................................................................... 13 Safety Instructions .................................................................................................................... 14 Inspection .................................................................................................................................. 20 Components Checklist .............................................................................................................. 20 Installation Procedures .............................................................................................................. 20 Display Installation Procedure .................................................................................................. 21 Fume Shield Installation Procedure .......................................................................................... 24 Tap Water Supply Connection .................................................................................................. 27 Operating the SHUR/Stain™ 3030 H&E Slide Stainer ........................................................... 27 Set-Up Procedure ............................................................................................................................... 27 Operating Procedure........................................................................................................................... 28 Shutdown Procedure .......................................................................................................................... 28 Welcome Screen ....................................................................................................................... 28 Changing Default Settings ........................................................................................................ 31 Time Settings ..................................................................................................................................... 32 Agitation Setup................................................................................................................................... 33 Temperature and Flow Adjustments .................................................................................................. 34 Security and Passwords ...................................................................................................................... 35 CHAPTER 4 PROGRAMMING .................................................................................................. 37 Creating Programs .................................................................................................................... 37 Editing Programs ...................................................................................................................... 44 Deleting Programs .................................................................................................................... 46 Copying Programs .................................................................................................................... 46 Importing and Exporting Programs .......................................................................................... 46 CHAPTER 5 RUNNING PROGRAMS ....................................................................................... 48 Loading Racks .......................................................................................................................... 48 Run Time Status Display .......................................................................................................... 50 Unloading Racks ....................................................................................................................... 51 Cancelling Racks ...................................................................................................................... 52 Running Multiple Racks ........................................................................................................... 54 CHAPTER 6 CLEANING INSTRUCTIONS .............................................................................. 55 General Information .................................................................................................................. 55 Cleaning Procedures ................................................................................................................. 56 © Copyright 2013 Triangle Biomedical Sciences, Inc. CHAPTER 7 ROUTINE MAINTENANCE ................................................................................ 57 Charcoal Filter Replacement..................................................................................................... 58 Service Mode ............................................................................................................................ 59 CHAPTER 8 TROUBLESHOOTING GUIDE ............................................................................ 60 CHAPTER 9 SPARE PARTS AND ACCESSORIES ................................................................. 61 © Copyright 2013 Triangle Biomedical Sciences, Inc. INTRODUCTION Warranty Information Triangle Biomedical Sciences’ (TBS) SHUR/Stain™ 3030 H&E Slide Stainer products are warranted against defects in materials and workmanship, under their prescribed use and operating conditions, for a period of twelve months from the date of shipment. TBS will repair or replace products that prove to be defective within the warranty period without charge when shipped prepaid to the TBS office. If the product is not registered by filling out and sending the warranty card to TBS Instruments, it will be warranted for a period of twelve months from its manufacturing date. Warranty Exceptions ♦ Consumables – bulbs, fuses, and other items of an expendable nature are not covered under this agreement. ♦ User’s failure to provide ample electrical power at constant voltage, consistent with the specifications of the product. ♦ Scratches, dents, and similar surface finish damage during normal use of the system are not covered under this agreement. ♦ Misuse and unauthorized repairs or alterations are not covered under this agreement. ♦ Acts of nature such as lightning strikes and floods are not covered and should be covered under owner’s separate insurance policy. All TBS products are sold on the condition that they be used and disposed of only within the scope of currently recognized, critical standards related to human health and the physical environment. EXCEPT FOR THE WARRANTY ABOVE, TBS MAKES NO OTHER WARRANTY OF ANY KIND WITH REGARD TO ITS PRODUCTS WHETHER EXPRESS, ARISING BY OPERATION OF LAW, OR IMPLIED BY COURSE OF DEALING, USAGE OF TRADE, OR OTHERWISE, INCLUDING WITHOUT LIMITATION THE IMPLIED WARRANTIES OF MERCHANTABILITY AND FITNESS FOR A PARTICULAR PURPOSE. TBS SHALL NOT IN ANY CIRCUMSTANCE BE LIABLE FOR ANY SPECIAL, INDIRECT, INCIDENTAL, OR CONSEQUENTIAL DAMAGES. Contact our Customer Service Department for more information regarding your warranty. Customer Service Department Triangle Biomedical Sciences, Inc. 3014 Croasdaile Drive Durham, NC 27705 Phone: (919) 384-9393 © Copyright 2013 Triangle Biomedical Sciences, Inc. Definition of Various Symbols Attention: This Symbol on the instrument and in the manual showing the warning triangle indicate that the correct operating instructions (as defined in this manual) must be followed when operating or replacing the item marked. Failure to adhere to these instructions may result in an accident, personal injury, damage to the instrument or accessory equipment. Caution: Electric Shock Hazard. Disconnect Line Cord before Servicing. Refer Servicing to Qualified Service Personnel. To avoid the risk of injury from electric shock, do not open this enclosure. Biohazard. Samples processed on this instrument may be biohazard. Use proper procedures and safety procedures to handle biohazard. Hot Surface. Surfaces may be very hot to the touch. Some instrument surfaces, which become hot during operation are marked with this warning label. DO NOT TOUCH THESE SURFACES. Touching these surfaces may cause burns. Flammable Liquids. Handle flammable liquids with care. Ensure that there are no open flames or sources of sparks or flames near these liquids. Ensure that they do not get hot such that they can emit noxious fumes. Handle and dispose these liquids based on the manufacturer’s recommendations and follow the local regulations for disposal. Alternating current symbol. Protective Conductor Terminal Symbol. For the safety of the operator, ensure that the earth ground is always connected at this terminal. Power Supply ON indication. Push the Power ON/OFF switch in the direction marked with this symbol to turn the unit power on. Power Supply OFF indication. Push the Power ON/OFF switch in the direction marked with this symbol to turn the unit power off. © Copyright 2013 Triangle Biomedical Sciences, Inc. CHAPTER 1 Introducing the SHUR/Stain™ 3030 H&E Slide Stainer Intended Use: SHUR/Stain™ 3030 H&E Slide Stainer is an automated H & E stainer designed for use in Histology/Anatomical Pathology laboratories as a stand-alone bench top unit for staining surgical histology, pathology, cytology and hematology samples on slides. It is designed for staining of thin sections of tissue specimens and or of cytology or hematology samples (e.g. blood smears) mounted on microscope slides. The instrument must be operated only according to the instructions contained in this manual and for only for its intended use as defined above. Any other use of the instrument is considered improper and voids the warranty! Qualification of Personnel: The SHUR/Stain™ 3030 H&E Slide Stainer continuous load slide stainer may be operated only by trained laboratory personnel who are trained to handle biological samples that can be infectious, are trained to handle the flammable reagents. The instrument may be operated only according to the instructions contained in this manual. Product Description The SHUR/Stain™ 3030 H&E Slide Stainer continuous load slide stainer offers flexibility and programmability for routine and special stains of samples mounted on glass slides. This bench top unit contains 30 stations. Specific functions of some of these stations are as follows. Station Number 30 How Many 1 Function* Load Station 21, 22 2 Unload Stations 5, 6, 7, 8 4 Rinse Stations, Manual Flow Control with common inlet 9 10, 20 1 2 Rinse Station, Manual Flow Control with an independent inlet Heating Stations *It should be noted that all the heating stations and rinse stations can be configured as reagent stations. The stations are numbered from left to right and from the back row to the front row. Stations 1-10 are located in the back row, stations 11-20 are in the middle row, and 21-30 are located in the front row. This manual covers information about initial set up, programming test protocols, and slide staining processing operations only. The details of the functions to be performed by the qualified service technicians are provided in the Service Manual (Part # A12536). The operator interface is quite intuitive. However, several sample tasks are described to minimize the learning curve. Due to the continuous improvement of the product software, it is possible that some of the newer product features are not described in this version of the manual or they may operate differently. If you have any questions or comments about the information provided in this manual, please contact our Customer Service Department at 919-384-9393or send an e-mail to [email protected]. © Copyright 2013 Triangle Biomedical Sciences, Inc. Functional Description of Parts (Refer to Figure 1: SHUR/Stain™ 3030 H&E Slide Stainer Front View, Figure 2: SHUR/Stain™ 3030 H&E Slide Stainer Functional Areas and Figure 3: SHUR/Stain™ 3030 H&E Slide Stainer Rear View) The SHUR/Stain™ 3030 H&E Slide Stainer has the following functional areas. Reagent Stations: Rinse Stations: Stations 1-4, 11-19, 23-29 Stations 5-8 with a common water inlet and station 9 with a separate water inlet. Load Stations: Station 30 Unload Stations: Stations 21 and 22 Flow Control Valves: Flow Control Valves can control the flow rate of the rinse water. Each rinse station has its own dedicated valve. The water flow can be completely shut off to any station if you desire to use it as a regular reagent station. Heating Stations: Stations 10 and 20 are used for heating the slides. The heater at the heating station will not turn ON if you select ambient temperature for a given program step in the heating station. This will allow you to use the heating station as a regular reagent station. Up/Down Mechanism: The slide rack mounts on the bracket mounted on this mechanism. At times, this mechanism is referred to as Z-axis mechanism also. In / Out Mechanism: The up/down mechanism mounts on this mechanism. At times, this mechanism is referred to as Y-axis mechanism also. Charcoal Filter: The charcoal filter is located behind the top bezel. To access the filter, press the bezel release button (located in the center, below the bezel) and lower the bezel. The charcoal filter is located at the left. Computer /Display: The Active Matrix LCD Display provides the information about the status of the system. With the touchpad on the display, you can program, run and maintain the unit with ease. Rinse Water Inlets: There are two water inlets in the rear of the unit. Looking from the back of the unit, the inlet located to the extreme right feeds water to stations 5, 6 7 and 8 simultaneously. When a slide rack is programmed to be in any of these stations, the water will flow through all the stations. The second inlet to the left of this common inlet feeds only to station 9. This allows you to use DI water, distilled water or any other specialized buffer to be fed in only one station while using tap water for all other rinses. Drain Connection: You can use standard 1-1/4” drain pipe from your local hardware store to provide proper drainage of the rinse water and any spills. Please do ensure that the drain water flows freely to the sink and the drain plumbing is free of kinks and is always at a level below the stainer bottom. Power Inlet: AC Power connection with a grounded power cable is made here. © Copyright 2013 Triangle Biomedical Sciences, Inc. Bezel Door for Charcoal Filter Computer and Display Unload Drawer 2 Station 22 Unload Drawer 1 Station 21 Load Drawer Station 30 Power Switch Figure 1: SHUR/Stain™ 3030 H&E Slide Stainer Front View © Copyright 2013 Triangle Biomedical Sciences, Inc. Rinse Station with an Independent Water Inlet Heating Station 1 Heating Station 2 4 Rinse Stations With Manual Flow Control Up / Down Mechanism Flow Control Valves In / Out Mechanism Pick Up Arm Figure 2: SHUR/Stain™ 3030 H&E Slide Stainer Functional Areas © Copyright 2013 Triangle Biomedical Sciences, Inc. Rinse Water Inlet, Feeds Stations 5-8 Drain Connection, Accepts 1-1/4” PVC Drain Pipe Rinse Water Inlet, Feeds Station 9 only. Power Inlet: Connect Grounded Power Cord Here Figure 3: SHUR/Stain™ 3030 H&E Slide Stainer Rear View © Copyright 2013 Triangle Biomedical Sciences, Inc. CHAPTER 2 SPECIFICATIONS Electrical Characteristics Power Input Voltage: Current: AC, 100-120 volts (+/- 10%) or 230 volts (+/- 10%) (Factory set for either 100-120 volts or 230 volts operation, NOT user changeable), 50 or 60 Hz 10 Amps max (RMS) for 100-120 volts input, 6 Amps max (RMS) for 230 volts input 1200 watts max Power: Fuse Rating 10 Amp x 250 volts Time Delay (Slo-Blo) fuse for 100-120 volts units 6.3 Amp x 250 volts Time Delay (Slo-Blo) fuse for 230 volts units Display/Programmability Display: Active matrix TFT 6.5” display Screen: Resistive touch pad Number of programs: 50 Number of steps/program: 50 Physical Characteristics Dimensions Stainer without Fume Shield Width: 37.5" (95 cm) Depth: 30" (76 cm) Height: 26" (65 cm) Stainer with Fume Shield Width: 39" (99 cm) Depth: 30" (76 cm) Height: 26" (65 cm) Weight Actual Weight: 125 lbs (57 kg) Capacity Number of Stations: Number of Rinse Stations: Rinse Water Flow Control: Number of Rinse Water Inlets: Number of Load Station: Number of Unload Stations: Reagent Container Volume: Slide Carrier Capacity: Drying Station Temp. Range: Water Inlet Pressure Maximum Pressure: 30 5 (user selectable) Separate manual control for each Rinse Station 2 (one for Stations 5, 6, 7 & 8; one for station 9) 1 2 350 ml 30 slides 40o C – 70o C 65 PSI © Copyright 2013 Triangle Biomedical Sciences, Inc. Environmental Conditions All SHUR/Stain™ 3030 H&E Slide Stainer products are laboratory instruments and should be used in Medical/Histo-Pathology laboratory environments with the following conditions. Ambient Temperature: Relative Humidity: Ambient Pressure: Altitude: 62 o F to 90 o F (17 o C to 32o C). 20-80% non-condensing. 29”-31” (740-790 mm) of Hg Less than 6500 feet (Less than 2000 meters) Installation Category In reference to Installation category as defined in UL 61010-1 standard, SHUR/Stain™ 3030 H&E Slide Stainer products are categorized as Category II systems. Pollution Degree In reference to Pollution Degree as defined in UL 61010-1 standard, SHUR/Stain™ 3030 H&E Slide Stainer products are categorized as Pollution Degree 2 systems. © Copyright 2013 Triangle Biomedical Sciences, Inc. CHAPTER 3 INSTALLATION INSTRUCTIONS Make sure to comply with safety instructions and warnings in this chapter. Make sure to read these instructions, even if you are already familiar with the operation and use of other SHUR/Stain™ 3030 H&E Slide Stainer products. This instruction manual includes important information related to the operating safety and maintenance of the instrument and it is an important part of the product. This instrument has been built and tested in accordance with the following safety regulations on electrical measuring, control, regulating and laboratory devices. In order to maintain this condition and to ensure safe operation, the operator must observe the instructions and warnings contained in this instruction manual. Note: If additional requirements on accident prevention and environmental protection exist in the country of operation, this instruction manual must be supplemented by appropriate instructions to ensure compliance with such requirements. Note: Material safety data sheets can be obtained from the supplier of the chemicals. They are also available on the Internet: http://www.msdsonline.com. Attention, The protective devices on both instrument and accessories may neither be removed nor modified. Only authorized and qualified service personnel may repair the instrument and access the instrument’s internal components. © Copyright 2013 Triangle Biomedical Sciences, Inc. Safety Instructions Before beginning the operation of this unit, please read the following in its entirety: Please read all the instructions and retain this manual for future reference. Follow all warnings and instructions marked on the instrument. 1. Read Instructions All the safety and operating instructions must be read before the instrument is operated. 2. Retain Instructions The safety and operating instructions must be retained for future reference. 3. Read Warnings All warnings on the instrument and in the operating manual must be followed. 4. Follow Instructions All operating and use instructions must be followed. 5. Additional Instructions: If additional instructions are required for accident prevention and environmental protection based on the location of the instrument operation (e.g local regulations, laws and lab procedures and practices) this manual must be supplemented by appropriate instructions to ensure the compliance with these additional requirements. 6. Attachments Do not use any attachments not recommended by the product manufacturer as they may cause hazards, damage the instrument and void the warranty. 7. Accessories Do not use any accessories not recommended by the product manufacturer as they may damage the instrument and void the warranty. 8. Power Sources This product must be operated from the type of power source indicated on the marking label and the instructions. 9. Grounding This product is equipped with a grounded three-wire plug. The instruments must be connected to a grounded outlet for the safety. 10. Power-Cord Protection Power-supply cords should be routed so that they are not likely to be walked on or pinched by items placed upon or against them. Pay particular attention to cords at plugs, receptacles, and the point where they exit the instrument. 11. Location of the Stainer Locate the Stainer in well ventilated area and away from the wall. 12. Access to the Power Inlet and the Power Off Switch Ensure that the Power Inlet and the Power Off switch are easily accessible at all times while the Stainer power is turned on. 13. Overloading Do not overload wall outlets and extension cords as this can result in a risk of fire or electric shock. 14. Servicing Do not attempt to service this instrument yourself as opening or removing covers may expose you to dangerous voltage or other hazards. Refer all servicing to qualified service personnel. © Copyright 2013 Triangle Biomedical Sciences, Inc. 15. Replacement Parts When replacement parts are required, be sure the service technician has used replacement parts specified by the manufacturer. Unauthorized substitutions may result in fire, electric shock or other hazards and void any existing warranty. 16. Material Safety Data Sheets (MSDS): Obtain, review and retain the MSDS for the reagents used from the manufacturers of the reagents. Follow the safety precautions and disposal recommendations provided in MSDS. Additional Safety Instructions to prevent injury from the moving mechanism For safe operation of the unit, for the safety of the operator and other personnel in the vicinity of the unit and for the laboratory safety the following safety measures must be implemented. Do not obstruct the mechanism with hand arm or any other body parts while the unit is powered on. Do not place any sample slide racks into any processing reagent stations. Always load the slide racks through the Load Drawer of the system. Do not remove any sample slide racks from any processing reagent stations. Always wait until the slide racks are delivered tone of the Unload Drawers of the system. Turn the power off while changing or replenishing the reagents. Turn the power off while cleaning the Stainer. In addition to the above measures, the installation of the optional fume shield and keeping it closed during the processing runs will provide additional protection against accidental injury by the moving mechanism. Additional Safety Instructions to handle the samples, chemicals and reagents For safe operation of the unit, for the safety of the operator and other personnel in the vicinity of the unit and for the laboratory safety the following safety measures must be implemented. Keep the Stainer and the reagents away from the open flames. Do not smoke near the Stainer or the reagents. To minimize the exposure to the toxic fumes of the reagents, place the Stainer under a fume hood. To minimize the exposure to the toxic fumes of the reagents, you can also use the optional fume shield. Using the optional fume shield will help redirect the fumes towards the internal charcoal filter. To minimize the exposure to the toxic fumes of the reagents, you can also connect an optional hose to the exhaust port of the unit located in the rear top left hand corner and locate the other end of the hose under a fume hood. Warning! Use caution when handling solvents! Make sure the premises are adequately ventilated! Explosion hazard! Avoid spillage while filling and/or changing the reagents. Wipe away any spilled reagents immediately. In case of long-term exposure, the instrument surfaces are only conditionally resistant to solvents. While the Stainer is not in use, keep the reagent containers covered with the Reagent Container Lids provided with the Stainer. Do not eat, drink or smoke near the Stainer. © Copyright 2013 Triangle Biomedical Sciences, Inc. Follow general laboratory safety procedures and practices for handling organic solvents. Follow general laboratory safety procedures and practices for handling samples to process from Biohazard handling perspective. Before shipping the stainer fro any purpose, always decontaminate following general laboratory safety procedures and practices for handling samples to process from Biohazard handling perspective. For safe operation, for the safety of the operator and other personnel in the vicinity of the unit and for the laboratory safety, protective gloves should be worn by the operator since the operator could be contact with potentially infectious substances Follow reagent manufacturer’s guidance for safely handling the reagents. Comply with your local and national regulations for the disposal of the reagents and the waste. Warnings The safety devices installed in this instrument by the manufacturer only constitute the basis for accident prevention. Primarily responsible for accident-free operation is above all the institution which owns the instrument and, in addition, the designated personnel who operates, services or repairs the instrument. To ensure trouble-free operation of the instrument, make sure to comply with the following instructions and warnings. Warnings – Markings on the instrument itself Attention, Markings on the instrument showing the warning triangle indicate that the correct operating instructions (as defined in this manual) must be followed when operating or replacing the item marked. Failure to adhere to these instructions may result in an accident, personal injury, damage to the instrument or accessory equipment. Some instrument surfaces, which become hot during operation are marked with this warning label. DO NOT TOUCH THESE SURFACES. Touching these surfaces may cause burns. © Copyright 2013 Triangle Biomedical Sciences, Inc. Warning – Transport and Installation • Attention, The instrument may only be transported in an upright position. • Four people are needed to lift/carry the instrument. • Install the instrument on an even laboratory bench which must be absolutely level and can support 220 lbs (100 Kg) weight. • Do not expose the instrument to direct sunlight (windows). • The instrument MUST be connected to an earthed mains power outlet socket. The instrument must not be connected to an extension cord without protective earth conductor. • The instrument will automatically adjust to the required voltage and frequency at the place of installation. • If new ovens are installed, they must be adjusted to the voltage and frequency required at the installation site. • The instrument must be set up in a well ventilated area, free from any ignition sources. • The chemicals to be used in the SHUR/Stain™ 3030 H&E Slide Stainer are both flammable and noxious. Do not operate the instrument in rooms with explosion hazard. • If there is a significant difference in temperature between the warehousing and the installation site of the instrument and if at the same time there is a high air humidity level, condensation water may form. In this case, a waiting period of at least two hours must be observed before the instrument is switched on. Failure to adhere to this waiting period may result in damage to the instrument. © Copyright 2013 Triangle Biomedical Sciences, Inc. ` Warning – Handling reagents • Attention, Be careful when handling solvents! • Always wear rubber gloves and safety goggles when handling the chemicals used in this instrument. • Reagents used for tissue infiltration can be both toxic and/or flammable. • Dispose of waste solvents with care according to local regulations and the waste management policy of the company or institution. • DO NOT PLACE ANY REAGENT AT THE HEATING STATIONS (station 10 and station 20). Always use the heating container provided with the stainer in stations 10 and 20. Make sure that the open side of the heating containers is facing towards the right side of the stainer such that hot air from the heaters can heat the slides and the air flow is not restricted. • To minimize the risk of fire and explosion, place xylene and alcohol containers as far away from stations 10 and 20 as possible. Warnings – Operating the instrument • Attention, the SHUR/Stain™ 3030 H&E Slide Stainer may only be operated by trained laboratory personnel, according to its designated use and per the present instruction manual. • In case of emergency switch off mains and unplug the power chord. • While working with reagents (filling/emptying the reagent stations, working on the instrument while the lid/s is/are open) appropriate protective gear (lab coat, gloves, safety goggles) must be worn. • Make sure to operate the instrument either with the activated carbon filter or with the exhaust air hose. Even when the instrument is operated according to its designated use, hazardous solvent fumes develop, which are damaging to the operator’s health and do also pose a risk of fire! • Risk of fire, when working with an open flame (Bunsen burner) immediately next to the instrument (solvent fumes)! Therefore, keep a safety distance of 2 meters! • If a staining program is to be interrupted for an extended period of time, do not leave any slide racks in the tap water stations, in order to prevent them from drying out. © Copyright 2013 Triangle Biomedical Sciences, Inc. Warnings – Cleaning and maintenance • Attention, Prior to each maintenance and/or cleaning, switch the instrument off and disconnect mains power. Do not clean the instrument with solvents containing acetone or xylene. No liquid may be spilled into the internal components of the instrument – neither during operation nor during cleaning. • When working with cleaning detergents, comply with all safety instruction by the manufacturer of the product and the laboratory management policy. • Wash the regent stations in the dishwasher at a temperature of max. +65oC (149oF). Use a standard detergent for laboratory dishwashers. • At any rate avoid washing the stations at higher temperatures, as the stations may become deformed! • Spilled solvents (reagents) have to be wiped away immediately! In case of long-term exposure, the lid surfaces are only conditionally resistant to solvents! • To clean the lids, and housing, use mild household detergents; -see safety instruction above for non-appropriate ingredients! • Caution with sequences which involve an oven at the initial step. • In this case the loading unit, out of which the specimen holder is removed via the transport arm, must NOT be filled with an inflammable reagent (e.g. xylene). • As the oven temperature is up to 80oC (176oF), the reagent may ignite and cause damage to the device and to the samples. • For the same reason, steps conducted INSIDE an oven must never be carried out from a reagent station with inflammable reagents. © Copyright 2013 Triangle Biomedical Sciences, Inc. Inspection • • • The SHUR/Stain™ 3030 H&E Slide Stainer is carefully quality controlled prior to shipping. The highest quality packaging materials have been used to ensure that the equipment is well protected during shipping. Please follow these inspection instructions carefully. Carefully inspect the outer carton for any visible damage. If any damage is noticed, contact the shipping carrier and file a damage report before unpacking the stainer. Failure to report visible damage may forfeit any claims for internal damages. Inspect the system for any visible damage. If any shipping damage is visible, retain all packing material intact with the stainer and file a claim with the final carrier. Discarding any packaging materials prior to the carrier’s inspection may void any shipper liability. Components Checklist Each SHUR/Stain™ 3030 H&E Slide Stainer comes with the following components. If an item is missing, please contact TBS Customer Service immediately at (919) 384-9393. Item SHUR/Stain 3030 H&E Slide Stainer Power cord Operator’s Manual with Warranty Registration Card Reagent Containers Reagent Container Lids Drying vessels (for heater station) Slide Rack Computer (to be installed to the Stainer by the user) Charcoal Filter (Pre-installed) ™ Quantity 1 1 1 23 23 2 2 1 1 Installation Procedures 1. Follow the instructions provided as “SAFEGUARDS” and “INSPECTION” procedures. 2. Remove the SHUR/Stain™ 3030 H&E Slide Stainer from the wooden crate and place on the countertop. 3. Remove all packaging materials. 4. Ensure that all the tie wraps have been removed and the mechanism is free to move. 5. Install the Computer. 6. Connect the power cord to the stainer and plug the power cord into an electrical outlet. 7. The software necessary to run the SHUR/Stain™ 3030 H&E Slide Stainer comes pre-installed. 8. Turn the power switch in the back of the unit. 9. Now the Stainer can be turned on by operating the switch located in the front on the lower right hand side. © Copyright 2013 Triangle Biomedical Sciences, Inc. Display Installation Procedure Identify display arm and computer display board as shown in Figure 4. Display Arm Figure 4: Unit without computer display board. (A) (B) Figure 5: Computer display board as shipped. Front (A) and back (B) faces are shown. © Copyright 2013 Triangle Biomedical Sciences, Inc. Remove cover from computer as shown in Figure 6. Figure 6 Install computer on the unit using knob as shown in Figure 7. Knob Figure 7 Make connections as shown in Figure 8. USB Ports (x2) Ref only Port 1 Not used Power Connector Communication Connector (Port 2) Figure 8 © Copyright 2013 Triangle Biomedical Sciences, Inc. Reinstall cover. Pass wire through computer cover slot as shown in Figure 9. Slot to pass wires Figure 9 Unit with correctly mounted computer display board is shown below (Figure 10). Figure 10 © Copyright 2013 Triangle Biomedical Sciences, Inc. Fume Shield Installation Procedure The fume shield assembly has five major components as shown in Figure 11 below. Hardware to assemble these parts is either provided in a separate plastic bag or already installed on the components. Top Panel Left Panel Right Panel Back Panel Fume Shield Figure 11 The assembly involves the following steps. Step 1: Connect Top Panel to Right and Left Panels. (Figure 2) Step 2: Attach Fume Shield to the handle bars on the panels. Step 3: Remove the Retaining Screws. Step 4: Slide the Fume Shield Assembly over the unit. Step 5: Install the Back Panel Step 1: Connect Top panel to Right and Left Panels: Place the Top panel on a clean, flat surface, preferably over a bubble wrap or some foam. Note the orientation of the front of the Top Panel in reference to the Right and Left Panels as shown in Figure 12. Right Panel Front Beveled Edge Locations for Nuts Back Edge, Straight Top Panel Figure 12 Attach Right panel and Left Panel to the Top panel. The Nylon Insert Nuts (10-32 thread) are installed on the top panel. Remove the nuts with 3/8” socket driver or a wrench and secure the Right and Left Panels with the nuts. © Copyright 2013 Triangle Biomedical Sciences, Inc. Step 2: Attach Fume Shield to the handle bars on the panels: Attach the Fume Shield to the Handle Bars using 8-32 x ¾” long screws. The screws are supplied in a plastic bag that is attached to the handle of the Fume Shield (Figure 13). Figure 13 Step 3: Remove the Retaining Screws Two retaining screws are holding the fume shield down during shipping (Figure 14). These screws must be removed before the fume shield is installed over the unit (Figure 15). Remove the retaining screws before installation as shown by the red arrows. Figure 14 Retaining Screw Use 3/16” Allen key to remove it Figure 15 © Copyright 2013 Triangle Biomedical Sciences, Inc. Step 4: Slide the Fume Shield Assembly over the Unit Loosen the screw that holds the display (Figure 16A). Turn the display away from the unit such that the fume shield can be slid from the front (Figure 16B). Slide the fume shield over the unit from the front. Keep the display and display arm outside of the fume shield. Align fume shield over the front of the unit and slide directly backwards. Loosen screw to turn display as shown by the red arrow. Turn display such that fume shield may be slid over unit from the front. (A) Figure 16 (B) Step 5: Install the Back Panel Hand tighten screws shown on the left. Next, hand tighten screws shown on the right. Use a screwdriver to tighten all four screws. NOTE: The flange along the back plate must be oriented towards the top of the unit. The flange is highlighted in yellow below (Figure 17). The flange, as highlighted in yellow below, must be oriented towards the top of the unit. Figure 17 Manually align the center of the front of the fume shield with the center of the front of the unit. Secure the display in the desired position. © Copyright 2013 Triangle Biomedical Sciences, Inc. Tap Water Supply Connection The manufacturer recommends installing a sediment filter between the water outlet and SHUR/Stain™ 3030 H&E Slide Stainer, to guarantee that the instrument is only operated with clean water. If you are not sure about the quality of the water supply, you can order a water inlet hose with a built in line filter (P/N A12542) or can install an external filter. NOTE: This filter insert must be checked and cleaned regularly. If the filter insert is very dirty it must be replaced. Connecting the tap water inlet hose: Note: You may need additional adapters and/or fittings to make the water connections. Please consult your in-house plumbing expert or the sales person for any additional fittings that you may need. 1. There are two water inlets on the rear panel of the stainer. One inlet feeds station 9 only and the other inlet feeds station 5, 6, 7 and 8 simultaneously. 2. Two identical water inlet hoses are provided with the stainer. 3. Unpack the tap water inlet hose. One end of the hose is open without any fitting and there is a quick disconnect fitting attached at the second end. 4. Keep the water supply turned off. 5. Attach appropriate adapter to the water faucet such that it has a ¼” barbed fitting output. 6. Attach the open ended tubing to the barbed fitting at the faucet. 7. Attach the quick disconnect fitting to the stainer. You may have to push down the disconnect latch tab on the fitting on the stainer. 8. Make the connection with the second hose by following the same procedure. 9. Next connect the drain outlet to the suitable waste collection drain/tub. Ensure that you connect the waste drain according to your local regulations for disposal of the chemical/biological waste. NOTE: When installing the drain hose, always make sure that there is a sufficient descending gradient from the outlet (connection piece) on the instrument to the drain pipe! Operating the SHUR/Stain™ 3030 H&E Slide Stainer Set-Up Procedure 1. Load appropriate reagents in the reagent vessels at stations 1-5, 11-19 and 23-29. Load Xylene, Xylene substitute or water, as appropriate; at unload stations 21 and 22. 2. 3. Make an appropriate drain connection from the drain fitting in the rear of the unit to a sink. Make sure you follow your local regulations for draining the various chemicals. 4. Ensure that the drain line is not kinked and is at a level below the drain fitting from the system. 5. Pour about 2 liters of water in one of the rinse stations and ensure that the water drains from the unit without any restrictions. 6. Connect water supply in the rear of the unit for rinse stations. Turn on the water supply. 7. 8. You are ready to use the Stainer. © Copyright 2013 Triangle Biomedical Sciences, Inc. Operating Procedure 1. Turn ON the Stainer by operating the power switch located in the front on the lower righthand side. Attention, The instrument MUST be connected to an earthed mains power outlet socket. It is recommended that the SHUR/Stain™ 3030 be plugged into a wall socket that has Ground Fault Circuit Interruption (GFCI) protection – as an additional electrical safeguard. 2. 3. 4. 5. 6. 7. 8. 9. Once the Stainer initializes the Mechanisms, follow the procedures described in the later sections of this manual to set up various Staining Protocols. Remove all the lids from the reagent vessels. Remove all slide racks (if any are present) from the Stainer. Do not forget to check the Unload Drawers. Ensure that proper reagents are loaded in the Stainer at proper locations for the protocols that you will be running. Now you can load the slides in a Slide Rack, open the Load Drawer, install the rack in the drawer and close the drawer. The program Selection Screen will automatically appear on the Display. Select the desired program and press RUN. Once the rack has been picked up from the Load Drawer, you can add another rack for processing. When the staining is completed, the Stainer will put the processed rack in the selected Unload Drawer. Open the Unload Drawer with the rack, remove the rack and close the drawer. Failure to remove the processed rack in a timely manner may delay the processing of the other racks. Shutdown Procedure 1. Once all racks are processed for the day, remove them all from the Unload Drawers. 2. Shut off the water supply. 3. You can remove the reagent vessels and store them in a refrigerator, or you can leave them in the Stainer. You can place the lids over the reagent vessels to minimize the evaporation or you can leave the vessels uncovered. As you prefer. Make sure that you load the refreshed reagents next time you use the stainer and remove all the lids before starting the next processing run. 4. You can leave the Stainer ON overnight or you can choose to power it down. Welcome Screen After powering up the SHUR/Stain™ 3030 H&E Slide Stainer, the following screens are displayed in order. Please wait until all the initialization steps have been completed before attempting to use the stainer. © Copyright 2013 Triangle Biomedical Sciences, Inc. (A) (B) Figure 0-18: Startup (A) and Stainer Initialization (B) Manually inspect the stainer to ensure that all stations are free from slide carriers, then select OK to continue as shown in Figure 0-19 on the next page. Figure 0-19: Welcome Confirmation Screen © Copyright 2013 Triangle Biomedical Sciences, Inc. The following Main Menu screen will be displayed (Figure 0-20). Proper operation of the system can by achieved by making selections from this and the software screens that follow. To make a selection, press upon the desired button with a stylus. Figure 0-20: Stainer Software Main Menu © Copyright 2013 Triangle Biomedical Sciences, Inc. Changing Default Settings The SHUR/Stain™ 3030 H&E Slide Stainer software offers a user-friendly Operator Interface to set-up and run the stainer. To select different functions, locate the necessary button on the LCD screen. To make a selection, gently press upon the button with your finger or a touch-screen stylus (stylus not provided). The display prompts the user about what options are available and how to select one of those options at all times. Please refer to the section of documentation for each feature for more information on the user interface screens and options offered to the end user. Figure 0-21: Utility Main Menu Screen © Copyright 2013 Triangle Biomedical Sciences, Inc. Time Settings To change the current date and time for stainer display and logging purposes, edit the time and date fields as shown in Figure 0-22. The plus and minus sign buttons that appear above and below the hours, minutes, month, day, and year fields allow you to modify the values. Please be aware that the time value is displayed in 24 hour format. Select the Accept button to save the settings or Cancel to ignore the changes. Figure 0-22: Time Settings Screen © Copyright 2013 Triangle Biomedical Sciences, Inc. Agitation Setup To change the number of dips performed during agitation operations, edit the number as shown in Figure 0-23. The plus and minus buttons that appear above and below the dips per station number can be selected to modify the desired value. Select the Accept button to save the setting or Cancel to ignore the changes. Figure 0-23: Agitation Setup Screen © Copyright 2013 Triangle Biomedical Sciences, Inc. Temperature and Flow Adjustments To change the temperature and flow control adjustment settings, edit the values as shown in Figure 0-24. The temperature adjustment controls appear at the top, with a separate setting for each temperature station (Station 10 and Station 20). The value can be set in the range from negative to positive five using the plus and minus buttons. The "-Test-" area for each temperature station can be used to turn on and off the heater for each station and physically test the stainer for accuracy. The adjustment value is added to the temperature requested by each program that utilizes station 10 or 20 during processing. The default value for each adjustment setting is zero. The flow control adjustment works in a similar way except it accepts a positive or negative percent value from -10 to +10. The setting applies only to the variable flow control station which is Station 9. The test controls can be used to turn on and off the flow valve at a standard value and physically test the stainer for accuracy. The adjustment value is used during rack processing to add or subtract a percentage of the program specified flow control for Station 9. Figure 0-24: Temperature and Flow Adjustment Screen © Copyright 2013 Triangle Biomedical Sciences, Inc. Security and Passwords Operation of the stainer can be limited by implementing a password security scheme. With the password featured turned on, a valid password will be required to access the following screens from the Main Menu: • • • Edit Utility Service By default, the password is set to "0000" which turns off the password entry screen. While viewing the Utility menu screen, the "Change Password" button can be selected to modify the current password. The password can be set to a maximum of 25 characters and is not case sensitive. Once the password is set, the password entry screen as shown in Figure 0-25 appears to allow password entry. The "Edit Password Text" button can be selected to view the onscreen keyboard for character entry. Figure 0-25: Enter Password Screen © Copyright 2013 Triangle Biomedical Sciences, Inc. Accept After selecting the button, the password entered will be validated and access to the requested screen will be allowed or denied as appropriate. The change password screen is shown in Figure 0-26 and requires that you enter the current password to change the password to a new value. Figure 0-26: Change Password Screen © Copyright 2013 Triangle Biomedical Sciences, Inc. CHAPTER 4 PROGRAMMING The SHUR/Stain™ 3030 H&E Slide Stainer offers flexibility and programmability for routine and special stains. The system can store up to 50 programs numbered 1-50. Note: Programs 41-50 are reserved for servicing purposes. These programs may not be edited by unauthorized personnel. Please refer to the operators manual for the HistoProgramEditor software utility for more information on this feature. Creating Programs 1. Select EDIT to display the following program listing screen. Up Arrow Down Arrow Figure 0-1: Select Program Screen 2. New programs are created by editing blank programs. Blank programs are typically labeled with hyphens as shown in Figure 0-1. Use the up and down arrow keys to navigate through the list of existing programs numbered 1-40. 3. Highlight the desired empty program slot and select Edit Program © Copyright 2013 Triangle Biomedical Sciences, Inc. to create a new program. Edit Program Name as shown in Figure 0-7: Program Steps Summary 4. To name the program, select Screen. An onscreen keypad as shown in Figure 0-2 will appear. Figure 0-2: Onscreen Keypad CAPS ON CAPS OFF 5. Enter the name of the program. Use the and buttons to switch between the uppercase keypad and the lowercase keypad while entering the desired program name. Accept 6. When the desired program name has been entered, select Add New Step to save. 7. To add the first step of the program, select . The following screen will appear with the step number clearly labeled in the heading as shown in Figure 0-3. © Copyright 2013 Triangle Biomedical Sciences, Inc. Current Step Number Show Next Step Show Previous Step Figure 0-3: Editing Program Steps Screen 8. The station at which the process is performed can be programmed under “Station #.” The programmed station number can be incremented or decremented by pressing the + and - buttons until the desired station number is displayed. Stations are numbered in the following way: Note: The following station numbers apply when the operator is facing the front of machine. Figure 0-4: Station Numbering Station Features: Samples are loaded at Load Station 30 and can be unloaded at Unload Stations 21 or Unload Station 22. The station number, time at station, agitation, criticality of a process can be programmed for all programmable stations (Stations 1-20, 23-29). The rinse stations are located at Stations 5-9. Station 9 has a separate water feed inlet and Stations 5-8 are fed from one common inlet. The temperature can be controlled for processes that occur at Heat Stations 10 and 20. Carrier pick up speed can be programmed for processes that occur at Stations 1-9, 1119, and 23-30. © Copyright 2013 Triangle Biomedical Sciences, Inc. 9. The duration for which the process is performed can be programmed under “Time at Station (m:s).” Duration time refers to the time for which the sample is completely submerged in the station vessel. The programmed time can be incremented or decremented by pressing the + - and buttons until the desired time number is displayed. The duration time is displayed as “minutes:seconds.” NOTE: Actual duration time may exceed programmed duration time when multiple programs are run simultaneously. See Running Multiple Racks for more information. Note: The time can be incremented or decremented more quickly by selecting and holding the stylus on the plus or minus button, and released when the desired value is reached. 10. Carrier Pickup Speed refers to the speed at which the carrier is removed from the reagent containing station vessel. Desired carrier pick up speed settings may be programmed by appropriately selecting the “Normal” or “Fast” radio button that appears under the corresponding headings. 11. Agitation is a feature that relies on the carrier to move the slide rack in an up and down motion to ensure even stain distribution based on the agitation setting. Agitation can be turned on or off for a station by selected the "Yes" or "No" radio button. 12. Criticality is a feature that ensures a rack is not left submerged in a station for longer than the specified duration time. If the step is flagged as critical by selecting the "Yes" radio button, the duration will not be extended to accommodate multiple rack processing. 13. The temperature can be programmed under “Temperature (deg C)” for processes that take place at Heating Stations 10 and 20 (See Figure 0-5). Temperature refers to the temperature of air located in the station vessel. The programmed temperature can be incremented or + - and decremented by pressing the buttons until the desired temperature is displayed. The temperature is programmed as degrees Celsius and ranges from 40 to 70. © Copyright 2013 Triangle Biomedical Sciences, Inc. Figure 0-5: Heating Station Step Setting 14. The flow rate can be programmed under “Flow Rate (mL/min)” for processes that take place at Rinse Station 9. Flow rate refers to the rate of water flow at the variable flow control station. The programmed flow rate can be incremented or decremented by pressing the + - and buttons until the desired flow rate is displayed. The flow rate is programmed as milliliters per minute and can be set from 0 to 2000 in 500 mL/min increments. It should be noted that the software controlled Flow Rate Adjustment for Station 9 is an optional feature and may not be present in all models. NOTE: The flow rate can be manually adjusted for processes that take place at Stations 5-8 with a screwdriver. (Screwdriver not provided.) © Copyright 2013 Triangle Biomedical Sciences, Inc. Figure 0-6: Flow Control Station Step Setting Add Next Step 15. To add another step, select . A new Editing Program Steps Screen will appear with an incremented Step Number and default settings. Follow Steps 8-13 to program newly added steps. 16. To browse through and edit each of the defined program steps, use the buttons to display the previous and next step where applicable. < and > arrow Save and Exit 17. Once all desired steps have been programmed, select similar to the screen shown in Figure 0-7 will be displayed. © Copyright 2013 Triangle Biomedical Sciences, Inc. . A summary screen Figure 0-7: Program Steps Summary Screen 18. Racks may be unloaded at Station 21 and 22. To program the station at which racks are Unload Station unloaded, select from the Program Steps Summary Screen. The following screen shown in Figure 0-8 will be displayed. NOTE: Racks are by default unloaded at Station 21 unless otherwise specified. © Copyright 2013 Triangle Biomedical Sciences, Inc. Figure 0-8: Unload Station Selection Screen 19. To program Station 21 as the unloading station, select Station 21 . Station 22 To program Station 22 as the unloading station, select . The system automatically returns to the previous screen after a selection has been made. 20. After reviewing the program summary, select Main Menu or Exit Without Saving Save and Exit to save changes and return to to cancel and lose all changes. Editing Programs EDIT 1. To edit a program, select from the Main Menu. 2. Use the up and down arrow keys (Figure 0-1) to navigate through the list of existing programs. Highlight the program to be edited. 3. When the desired program is highlighted, select Edit Program Name Edit Program . from the Program Steps Summary Screen. 4. To rename the program, select A keypad as shown in Figure 0-2 will appear onscreen. Delete the current name of the © Copyright 2013 Triangle Biomedical Sciences, Inc. program by selecting Clear All . Type in the desired name of the program and select Accept to save. Edit Step 5. To edit a process, highlight the desired step number and select . The “Editing Program Steps Screen” as shown in Figure 0-3 will be displayed. Change the appropriate settings by following Steps 8-13 of the Creating Programs section. Once all Finish desired steps have been edited, select to return to the previous screen. 6. To insert a process prior to an existing step, navigate through the list of programmed steps using the up and down arrow keys. Highlight the step that occurs after the one to be added and select Insert New Step to add and edit the new step. Once all desired settings Finish have been programmed, select to return to the previous screen. 7. To add a process after a programmed step, navigate through the list of programmed steps using the up and down arrow keys. Highlight the step that occurs before the one to be added and select Add New Step to add and edit the new step. Once all the desired Finish settings have been programmed, select to return to previous screen. 8. To delete a process, navigate through the list of programmed steps using the up and down Delete Step arrow keys. Highlight the step to be deleted and select to be asked to confirm the permanent step removal. 9. After making all the necessary changes, review the Program Steps Summary Screen to ensure the entire program definition is correct. 10. Select Save and Exit to save changes and return to Main Menu. Exit Without Saving 11. Select to discard changes and return to Main Menu. You will receive a discard changes confirmation message to verify the request to exit without saving. Note: Programs numbered 41-50 cannot be edited using the SHUR/Stain™ 3030 H&E Slide Stainer software. They can only be viewed in the editor and not modified. These programs are created and edited by using the HistoProgramEditor Windows application software. See the section on Importing and Exporting Programs for additional information. © Copyright 2013 Triangle Biomedical Sciences, Inc. Deleting Programs 1. To delete a program, select EDIT from the Main Menu. 2. Navigate through the list of programs using the up the program to be deleted is highlighted. 3. Select 4. Select Delete Program /\ and down \/ arrow keys until and confirm the operation by selecting “Yes” when prompted. Exit to return to Main Menu. Copying Programs EDIT 1. To copy a program, select from the Main Menu. 2. Navigate through the list of programs using the up and down arrow keys until the program to be copied is highlighted. 3. Select Copy Program . /\ 4. Navigate through the list of programs using the up and down the desired blank slot to copy the program to is highlighted. \/ arrow keys until Accept Location 5. Select to perform the copy operation. 6. A keypad as shown in Figure 0-2 will automatically be displayed. Delete the name of the original program by selecting Clear All and name the duplicated program using the Accept onscreen keypad. After entering the desired name, select to save. 7. A summary of the copied program with its newly programmed name will be displayed. 8. Select Save and Exit to save changes and return to Main Menu. Importing and Exporting Programs The Utilities menu contains two buttons that allow the import and export of programs to and from the stainer (see Figure 0-21). Please note the import and export operations are advanced features and are recommended only for the person who is the SHUR/Stain™ 3030 H&E Slide Stainer administrator. © Copyright 2013 Triangle Biomedical Sciences, Inc. Export Programs Select to output the current set of programs from the stainer to an attached USB key. An error message will appear if a valid USB Key is not plugged into the stainer. The purpose of exporting programs from the SHUR/Stain™ 3030 H&E Slide Stainer is to edit them on a Windows PC computer and share programs with multiple units. Please refer to the instructions for the HistoProgramEditor external program for details on how to edit programs on a PC and transfer those programs from a computer to one or more SS-3030 stainers. After editing the programs on a PC using the HistoProgramEditor, attach the USB Key to the Import Programs stainer and select . The program definition files will automatically be ™ imported to the SHUR/Stain 3030 H&E Slide Stainer and will replace your current set of programs. *Please be cautious when importing programs since any changes to the current set of stainer programs since the last export will be lost upon import. © Copyright 2013 Triangle Biomedical Sciences, Inc. CHAPTER 5 RUNNING PROGRAMS The primary purpose of the SHUR/Stain™ 3030 H&E Slide Stainer is to process slide racks using a predefined program. Each program follows a series of steps to move racks from station to station according to schedule and station processing parameters. Loading Racks 1. The first step in running a program is to insert a rack of slides to be processed into the Load Station (Station 30) as shown in Figure 0-1. 2. Make sure to open the drawer fully, properly insert the rack, and fully close the drawer. 3. The Program Selection Screen appears with the list of the most recently run programs as shown in Figure 0-2. VIEW OTHER SELECTIONS to view the 4. If you wish to select a program which is not listed, select next group of defined programs. You may need to select this button multiple times to cycle through all the program names. + - and minus 5. You can also use the plus buttons to select the first step number to process if you do not want to start at the first step of the program. 6. When you have located the program to run and have selected it, the program name will appear at the top of the screen. RUN THIS PROGRAM 7. Select programdefinition. 8. If you change your mind, select the to start the processing of the new rack using the selected EXIT button to return to the Main Menu. Figure 0-1: Loading a new Rack for Processing in the Load Drawer © Copyright 2013 Triangle Biomedical Sciences, Inc. Figure 0-2: Program Selection Screen © Copyright 2013 Triangle Biomedical Sciences, Inc. Run Time Status Display While programs are running, the screen in Figure 0-3 appears to show the status of each SHUR/Stain™ 3030 H&E Slide Stainer station while displaying monitoring information and providing a stop button. The top of the display shows a line by line log of the actions taken by the stainer to process racks in each station in real time. This information can be used to monitor the previous steps taken for a rack that is processing and shows rack movement, heating station temperature, and rinse station flow rate. In addition, the log lists when a scheduled rack will begin processing along with any notification or error conditions that occur during stainer operation. SS-3030 Log Display Station 1 is Occupied Figure 0-3: Stainer Running Screen The stations numbered 1 to 30 appear as they do in the physical stainer with the addition of color coding to indicate the state and purpose of each station. Stations 5 to 9 are highlighted in light blue to indicate the are the rinse stations with Station 9 offering variable flow control. Stations 10 and 20 are highlighted in orange to signify they are the heating stations. In addition, the current temperature in degrees Celsius is listed for each of these stations. Stations 30, 21, and 22 are green in color and represent the one load station and two unload stations. Finally, each station that is occupied by a rack is filled with a color that is unique to each rack in progress. This can help to visualize which stations are occupied and follow each rack as they move from station to station according to the program. © Copyright 2013 Triangle Biomedical Sciences, Inc. To view detailed information on a rack of slides currently being processed, hold your stylus on the icon of the station in question for a couple of seconds. If that station currently holds a rack of slides, a popup window will momentarily appear at the top of the screen. This “Rack Status Popup Display”, shown in Figure 0-4 displays five items of information. The STATION NUMBER appears at the left of this window, while the PROGRAM NUMBER and the STEP NUMBER appear at the right, and the RACK NUMBER and the TIME REMAINING in this step appear in the center. Figure 0-4: Rack Status Popup Display Unloading Racks When a rack has completed processing as determined by the steps in the selected program, it will be dropped off in the designated unload station (Station 21 or Station 22). The stainer will beep once and the Stainer Running Screen will show the unload station icon as flashing. This is the indication to remove the rack from the stainer as soon as possible. It is necessary to remove a rack from each unload station quickly in order to allow subsequent racks to be processed successfully. If an unload station is occupied when a rack is scheduled to be sent to that station, the stainer will start beeping and pause all operations until there is user intervention. Once the drawer is cleared of the rack and the unload drawer is closed, the beeping and flashing will stop and processing will automatically continue. © Copyright 2013 Triangle Biomedical Sciences, Inc. Cancelling Racks While the stainer is processing a rack, there are situations when a rack must be cancelled. In addition, sometimes the operator needs to temporarily stop the stainer to evaluate the state of the running racks and determine if any racks need to be cancelled and removed. To cancel one or more racks from processing, the following steps must be followed. STOP 1. Select from the Stainer Running Screen to pause the SS-3030. 2. The stainer will continue its current motion if necessary before going into a paused state. Figure 0-5: Cancel Rack Option Screen RESUME 3. If you change your mind, select to return to the previous screen and continue processing racks. 4. When there is more than one rack currently being processed by the stainer, the Cancel All Racks button will appear in addition to the Cancel One Rack button. Cancel All Racks 5. Select to immediately cancel all processing racks and re-initialize the stainer to the startup state. Cancel One Rack 6. Select Figure 0-6. to view the Cancel Rack Selection Screen as shown in + - and minus 7. If applicable, use the plus buttons to cycle through each currently running rack so that the desired rack number is displayed. The program number and station number for each rack appears in order for you to verify your selection. © Copyright 2013 Triangle Biomedical Sciences, Inc. 8. Based on which unload stations are not occupied, select whether to move the cancelled Unload 21 rack to unload station or to manually remove the rack from the stainer. Unload 22 Proceed , or select None Cancel 9. Select the button to complete the cancellation or the button to return to the previous screen. 10. If you chose to manually remove the rack, you must open the stainer and remove the cancelled rack from its station when prompted and before resuming processing. Figure 0-6: Cancel Rack Selection Screen © Copyright 2013 Triangle Biomedical Sciences, Inc. Running Multiple Racks The SHUR/Stain™ 3030 H&E Slide Stainer is designed to run multiple slide racks at the same time and optimizes a schedule to process all running racks as quickly as possible. The following guidelines apply when running multiple racks in the stainer simultaneously. • • • • You must wait until a rack is picked up from the Load Station and dropped off in the station designated by the first step of the selected program before inserting a new rack into the Load Station. When a rack is already running and a new slide rack is inserted into the Load Station, the software must determine the optimal schedule to run all racks simultaneously. This processing may take several seconds so a "Please Wait…" message will appear on the screen. Please note that the stainer will finish any current motions before the scheduling calculation begins. When a new slide rack is inserted and the stainer is in the middle of processing an existing rack in a station marked as critical (Step Criticality=Yes), the scheduling of the new rack will be delayed. Once the existing rack has exited the critical station the new rack will be scheduled as usual. Running multiple racks at the same time is more efficient than waiting until each rack is completed before starting the next one. However there are situations when there is insufficient time to process additional racks and not adversely affect the racks already in progress. In those situations the new rack may not start processing immediately or it may cause the existing set of racks to take longer to complete each of their programs. It is recommended that each user analyze the set of programs that will be run and the desired throughput to determine the maximize number of racks to run at one time. © Copyright 2013 Triangle Biomedical Sciences, Inc. CHAPTER 6 CLEANING INSTRUCTIONS Prior to cleaning the instrument, always switch off mains and unplug the power cord! When handling cleaning detergents, follow the instruction of the manufacturer and make sure all laboratory regulations in force in your country are complied with. Dispose of used reagents according to the laboratory regulations in force in your country and your local area. Immediately wipe away spilled solvents (reagents). Solvent resistance of the lid surfaces is limited if exposed to solvents for a lengthy period of time. Do not use any of the following for cleaning the outside surfaces of the instrument: alcohol, detergents containing alcohol (window cleaner), abrasive cleaning powders, solvents containing acetone or xylene. No liquid may come into contact with the electrical connections or spill into the interior of the instrument and/or the transport arm. General Information DO NOT use the stainer for purposes other than its designed function DO turn off the stainer when it is not in use. DO switch off the stainer before removing plug DO practice good housekeeping and maintain the instrument in a clean condition DO NOT use excessive amounts of solvent for cleaning DO NOT use metal scrapper to scrape off any residue on different surfaces DO ensure that replacement fuses are of the correct specification © Copyright 2013 Triangle Biomedical Sciences, Inc. Cleaning Procedures SHUR/Stain™ 3030 H&E Slide Stainer system is designed to properly function under recommended settings. Please use the following instructions and cleaning procedures carefully. Disconnect line cord from stainer when cleaning. The stainer should always be disconnected from the mains power supply when cleaning, particularly if flammable solvents are used. Use only minimal quantities of cleaning solvent (such as glass cleaner, 10% bleach solution, etc.) on an absorbent cloth. Do NOT use Xylene and Xylene substitute as well as other decolorizing agents that can attack paint, plastic and other insulating materials. Do not use excessive amount of cleaning agent while wiping down the surfaces. Periodically clean the Rinse Containers and the drain areas of the Stainer with 10% diluted bleach solution to minimize any growth of fungus. Interior: Remove the reagent vessels. Clean the stainless-steel inner walls with a regular cleaner and rinse with water. Transfer arm: The transfer arm contains sensitive electronic components. Therefore do not clean with any liquid but simply wipe down with a slightly moistened cloth. Outside surfaces: Clean the painted outside surface with a mild detergent and subsequently wipe down with a moistened cloth. Do not use any solvents for cleaning the outside surfaces TFT touch screen: Use a commercial screen cleaner for cleaning the touch screen. Use as directed by the manufacturer. Reagent vessels: Clean the wash and reagent vessels in the laboratory dishwasher at maximum +65oC. Use a standard laboratory dishwasher detergent. The vessels may not be exposed to temperatures any higher than 65oC (e.g. do not clean in industrial dishwashers, which run at a temperature of 85oC), as the stations might become deformed! Drain outlet/hose: From time to time check the waste water drain hose for accumulated dirt, particularly for algae. Clean whenever necessary. To prevent the growth of bacteria, the drain system may be flushed with 5% sodium hypochlorite. Metal parts may, however, not be exposed to this solution for a lengthy period of time (e.g. overnight). Therefore, rinse with abundant water after cleaning with sodium hypochlorite. Slide racks: Clean with household or laboratory cleaners, as needed. Oven: Regularly check the drying containers at the heating stations for paraffin residues and clean, if necessary. © Copyright 2013 Triangle Biomedical Sciences, Inc. CHAPTER 7 ROUTINE MAINTENANCE The instrument is virtually maintenance-free in operation. However, to ensure smooth operation of the instrument over many years, the manufacturer recommends: Have the instrument inspected once per year by a qualified service engineer authorized by manufacturer. Replace charcoal filter every three months. (Charcoal filter replacement protocol is outlined on the following page.) At the end of the warranty period, enter into a service contract. For more information, please contact your local technical service center. A manufacturer suggested preventative maintenance schedule is outlined in the table below. PREVENTATIVE MAINTENANCE SCHEDULE Maintenance Activity Clean the TFT screen with a lint-free cloth. Follow the manufacturer’s instructions when using screen cleaner. Clean outside surfaces of instrument and lid with soft cloth. Use cleaning detergent, if necessary. Remove and clean the reagent vessels. A dishwasher up to 65oC can be used. Check waste water hose for accumulated dirt and clean, if necessary. Remove paraffin residues from paraffin collecting tray(s) of the oven(s). Check strainer (if installed) in tap water inlet hose for accumulated dirt and clean, if necessary. Check air vent holes of fans for dust. Clean if necessary. Check the tap water inlet hose connection for damage. If necessary, replace the gasket. Replace activated carbon filter. Check electrical connections at rear panel of instrument. Daily Weekly Monthly X X © Copyright 2013 Triangle Biomedical Sciences, Inc. X X X X X X X X Charcoal Filter Replacement We recommend that you replace the charcoal filter every three months or at more appropriate interval based on your usage of the system. The charcoal filter is located behind the top bezel. To access the filter, press the bezel release button (located in the center, below the bezel) and lower the bezel. The charcoal filter is located at the left. Refer to Figure 0-1. Push button to release the bezel Figure 0-1: Charcoal Filter behind top left bezel © Copyright 2013 Triangle Biomedical Sciences, Inc. Charcoal Filer behind the bezel Service Mode The SHUR/Stain™ 3030 H&E Slide Stainer has a Service Menu as pictured in Figure 0-2 to allow trained support technicians to perform maintenance in the field. Improper use of commands and the functionality available through this mode can damage the Stainer and void the warranty. DO NOT USE SERVICE MODE if you do not have proper training to operate various commands available to exercise various functions. Please contact your support technician if you are experiencing software or instrument problems with the SHUR/Stain™ 3030 H&E Slide Stainer. The following screen is available to test and service the stainer and can only be accessed from the Main Menu after entering the correct password. Figure 0-2: Service Menu Screen © Copyright 2013 Triangle Biomedical Sciences, Inc. CHAPTER 8 TROUBLESHOOTING GUIDE No. 1 2 3 Symptom Probable Cause Power Switches Not in the ON positions Suggested Actions Ensure that the power cord is plugged in at the outlet as well as in the rear of the unit. Turn ON the power switch in the rear of the unit as well as in the front of the unit. Check that the green power-on indicator is ON on the front switch. Blown Fuse Check the fuses and replace any blown fuse with a fuse of the same rating. Investigate the cause for overload and correct the problem before re-starting the system. Display power interrupted Check the 5 volt circuit breaker behind the bezel of the upper enclosure and reset it, if necessary. Replace the computer if necessary. Contact an Authorized Service Technician to repair the system No Power to Z Axis Check that the circuit breakers for 5 volts and 24 volts behind the bezel of the upper enclosure are not tripped. Reset if necessary. Communication between host and the Z-axis controller Obstruction in the mechanism, mechanism does not move freely Contact an Authorized Service Technician to repair the system Remove any obstructions Contact an Authorized Service Technician to repair the system Contact an Authorized Service Technician to repair the system Contact an Authorized Service Technician to repair the system Contact an Authorized Service Technician to repair the system Contact an Authorized Service Technician to repair the system Follow the same procedures as described above for Z-axis Contact an Authorized Service Technician to repair the system Check that the circuit breakers for 5 volts and 24 volts behind the bezel of the upper enclosure are not tripped. Reset if necessary Contact an Authorized Service Technician to repair the system The unit does not power up Display does not power up Z-axis does not initialize or move Defective PCB Comment Defective Motor Broken Belt 4 Y-axis does not initialize or move 5 X-axis does not initialize or move Limit sensor prevents movement in one direction Follow the same procedures as described above for Z-axis Defective PCB No Power to X Axis Communication between host and the X-axis controller not working © Copyright 2013 Triangle Biomedical Sciences, Inc. No. 5 6 7 8 Symptom Probable Cause Defective Motor or Encoder Broken Belt X-axis does not initialize or move Obstruction in the mechanism, mechanism does not move freely Water does not flow at rinse stations (stations 5-8) Limit sensor prevents movement in one direction Water supply is not turned ON Loose rinse valve connections Defective Valve Water not turned ON Loose proportional valve connections Defective valve Defective PCB Tripped circuit breaker Communication between host and the temperature controller not working Defective Heater Defective Blower Defective Temperature Sensor Temperature sensor positioned incorrectly Water does not flow properly at Station 9 Heating Station does not heat properly Suggested Actions Contact an Authorized Service Technician to repair the system Contact an Authorized Service Technician to repair the system Remove any obstructions Contact an Authorized Service Technician to repair the system Contact an Authorized Service Technician to repair the system Turn on the water supply Ensure the connectors are secured properly Contact an Authorized Service Technician to repair the system Turn on the water supply Ensure the connectors are secured properly Contact an Authorized Service Technician to repair the system Replace the Main PCB Check the circuit breakers for the heaters and blowers. They are located behind the bezel which covers the front of the AC Drawer Assembly. Contact an Authorized Service Technician to repair the system Contact an Authorized Service Technician to repair the system Contact an Authorized Service Technician to repair the system Contact an Authorized Service Technician to repair the system Contact an Authorized Service Technician to repair the system CHAPTER 9 SPARE PARTS AND ACCESSORIES Item Description Reagent Vessels & Lids (8ea/pk) Slide Rack (1ea/pk) Operator Manual Service Manual Water Inlet Hose with In-Line Filter Heater Station Vessel Rinse Station Vessel without fittings Charcoal Filter 3-Position Vessel Carrier 4-Position Vessel Carrier Fume Shield Exhaust Hose, 10ft. long Part No. A12540 A12541 A12537 A12636 A12542 A12543 A12544 A12637 A12545 A12547 E12633 L12623 © Copyright 2013 Triangle Biomedical Sciences, Inc.