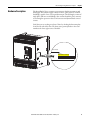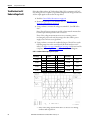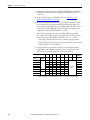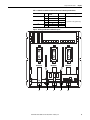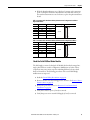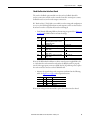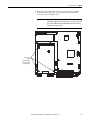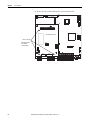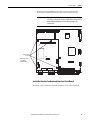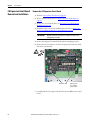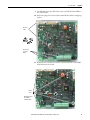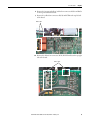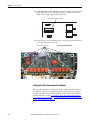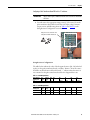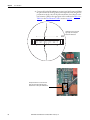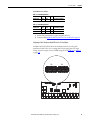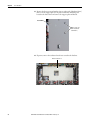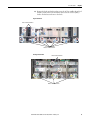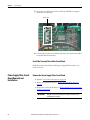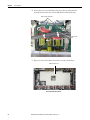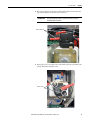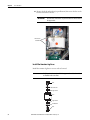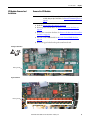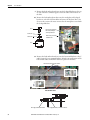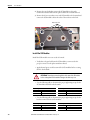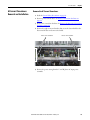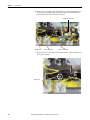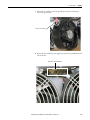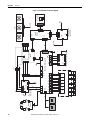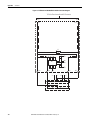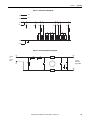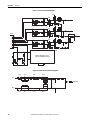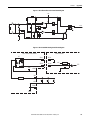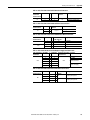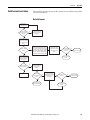
1
Hardware Service Manual
PowerFlex Digital DC Drive - Frame C
150…500 Hp (112…373 kW)
Important User Information
Solid-state equipment has operational characteristics differing from those of electromechanical equipment. Safety
Guidelines for the Application, Installation and Maintenance of Solid State Controls (publication SGI-1.1 available from
your local Rockwell Automation sales office or online at http://www.rockwellautomation.com/literature/) describes some
important differences between solid-state equipment and hard-wired electromechanical devices. Because of this difference,
and also because of the wide variety of uses for solid-state equipment, all persons responsible for applying this equipment
must satisfy themselves that each intended application of this equipment is acceptable.
In no event will Rockwell Automation, Inc. be responsible or liable for indirect or consequential damages resulting from
the use or application of this equipment.
The examples and diagrams in this manual are included solely for illustrative purposes. Because of the many variables and
requirements associated with any particular installation, Rockwell Automation, Inc. cannot assume responsibility or
liability for actual use based on the examples and diagrams.
No patent liability is assumed by Rockwell Automation, Inc. with respect to use of information, circuits, equipment, or
software described in this manual.
Reproduction of the contents of this manual, in whole or in part, without written permission of Rockwell Automation,
Inc., is prohibited.
Throughout this manual, when necessary, we use notes to make you aware of safety considerations.
WARNING: Identifies information about practices or circumstances that can cause an explosion in a hazardous
environment, which may lead to personal injury or death, property damage, or economic loss.
ATTENTION: Identifies information about practices or circumstances that can lead to personal injury or death,
property damage, or economic loss. Attentions help you identify a hazard, avoid a hazard, and recognize the
consequence
SHOCK HAZARD: Labels may be on or inside the equipment, for example, a drive or motor, to alert people that
dangerous voltage may be present.
BURN HAZARD: Labels may be on or inside the equipment, for example, a drive or motor, to alert people that
surfaces may reach dangerous temperatures.
IMPORTANT
Identifies information that is critical for successful application and understanding of the product.
Allen-Bradley, DriveTools SP, DriveExecutive, DriveExplorer and DriveObserver, PowerFlex, Rockwell Automation, and TechConnect are trademarks of Rockwell Automation, Inc.
Trademarks not belonging to Rockwell Automation are property of their respective companies.
Table of Contents
Preface
About This Publication. . . . . . . . . . . . . . . . . . . . . . . . . . . . . . . . . . . . . . . . . . . . . 7
Who Should Use this Manual . . . . . . . . . . . . . . . . . . . . . . . . . . . . . . . . . . . . . . . 7
Additional Resources . . . . . . . . . . . . . . . . . . . . . . . . . . . . . . . . . . . . . . . . . . . . . . . 7
Chapter 1
Before You Begin Testing,
Maintenance or Repairs
Introduction. . . . . . . . . . . . . . . . . . . . . . . . . . . . . . . . . . . . . . . . . . . . . . . . . . . . . . . 9
General Safety Precautions . . . . . . . . . . . . . . . . . . . . . . . . . . . . . . . . . . . . . . . . 10
Hardware Description. . . . . . . . . . . . . . . . . . . . . . . . . . . . . . . . . . . . . . . . . . . . 11
Commonly Used Tools . . . . . . . . . . . . . . . . . . . . . . . . . . . . . . . . . . . . . . . . . . . 12
Service Tools. . . . . . . . . . . . . . . . . . . . . . . . . . . . . . . . . . . . . . . . . . . . . . . . . 12
Software Tools . . . . . . . . . . . . . . . . . . . . . . . . . . . . . . . . . . . . . . . . . . . . . . . 12
Chapter 2
Component Test Procedures
Introduction. . . . . . . . . . . . . . . . . . . . . . . . . . . . . . . . . . . . . . . . . . . . . . . . . . . . .
Save the Parameter Configuration . . . . . . . . . . . . . . . . . . . . . . . . . . . . . . . . .
Save to a HIM Set . . . . . . . . . . . . . . . . . . . . . . . . . . . . . . . . . . . . . . . . . . . .
Download Parameters to an Offline Node File . . . . . . . . . . . . . . . . . .
Visual Component Inspection . . . . . . . . . . . . . . . . . . . . . . . . . . . . . . . . . . . .
Troubleshoot a Control Power Supply Failure . . . . . . . . . . . . . . . . . . . . . .
Testing the Switching Power Supply and Pulse Transformer
Boards. . . . . . . . . . . . . . . . . . . . . . . . . . . . . . . . . . . . . . . . . . . . . . . . . . . . . . .
Testing the Control and Field Board Connections . . . . . . . . . . . . . .
Troubleshoot an AC Undervoltage Fault. . . . . . . . . . . . . . . . . . . . . . . . . . .
Troubleshoot an Armature Bridge Failure . . . . . . . . . . . . . . . . . . . . . . . . . .
Troubleshoot a Field Current Loss Fault . . . . . . . . . . . . . . . . . . . . . . . . . . .
Low or Incorrect Field Current . . . . . . . . . . . . . . . . . . . . . . . . . . . . . . . .
No Field Current. . . . . . . . . . . . . . . . . . . . . . . . . . . . . . . . . . . . . . . . . . . . .
Power Component Test Procedures . . . . . . . . . . . . . . . . . . . . . . . . . . . . . . .
Check the Armature SCR Modules . . . . . . . . . . . . . . . . . . . . . . . . . . . .
Check the Pulse Transformer Board . . . . . . . . . . . . . . . . . . . . . . . . . . .
Check the Field SCR/Dual Diode Module . . . . . . . . . . . . . . . . . . . . .
Speed Feedback Device Tests. . . . . . . . . . . . . . . . . . . . . . . . . . . . . . . . . . . . . .
Check the Encoder . . . . . . . . . . . . . . . . . . . . . . . . . . . . . . . . . . . . . . . . . . .
Check the DC Tachometer . . . . . . . . . . . . . . . . . . . . . . . . . . . . . . . . . . .
Check the Resolver Interface Board . . . . . . . . . . . . . . . . . . . . . . . . . . . .
Thermistors and Thermal Switches . . . . . . . . . . . . . . . . . . . . . . . . . . . . . . . .
Relay Outputs . . . . . . . . . . . . . . . . . . . . . . . . . . . . . . . . . . . . . . . . . . . . . . . . . . .
Create a Fault Report. . . . . . . . . . . . . . . . . . . . . . . . . . . . . . . . . . . . . . . . . . . . .
What You Need When You Call Tech Support . . . . . . . . . . . . . . . . . . . .
Rockwell Automation Publication 20P-TG003A-EN-P - February 2012
13
14
14
14
15
15
16
17
20
21
23
23
25
27
27
32
33
36
36
36
37
39
39
40
40
3
Table of Contents
Chapter 3
Access Procedures
4
Remove Power from the Drive. . . . . . . . . . . . . . . . . . . . . . . . . . . . . . . . . . . . .
DPI / HIM Assembly Removal and Installation. . . . . . . . . . . . . . . . . . . . .
Remove the DPI/HIM Assembly . . . . . . . . . . . . . . . . . . . . . . . . . . . . . .
Install the DPI / HIM Assembly . . . . . . . . . . . . . . . . . . . . . . . . . . . . . . .
Protective Cover Removal and Installation . . . . . . . . . . . . . . . . . . . . . . . . .
Remove the Protective Covers from the Drive. . . . . . . . . . . . . . . . . . .
Install the Protective Covers on the Drive. . . . . . . . . . . . . . . . . . . . . . .
Field Circuit Fuses Removal and Installation . . . . . . . . . . . . . . . . . . . . . . .
Remove the Field Circuit Fuses . . . . . . . . . . . . . . . . . . . . . . . . . . . . . . . .
Install the Field Circuit Fuses . . . . . . . . . . . . . . . . . . . . . . . . . . . . . . . . . .
Communication Adapter and EMI Shield Removal and Installation . .
Remove the Communication Adapter and EMI Shield. . . . . . . . . . .
Install the Communication Adapter and EMI Shield . . . . . . . . . . . .
Resolver Feedback and Interface Circuit Board Removal and
Installation . . . . . . . . . . . . . . . . . . . . . . . . . . . . . . . . . . . . . . . . . . . . . . . . . . . . . .
Remove the Resolver Feedback and Interface Circuit Boards . . . . .
Install the Resolver Feedback and Interface Circuit Boards . . . . . . .
I/O Expansion Circuit Board Removal and Installation. . . . . . . . . . . . . .
Remove the I/O Expansion Circuit Board . . . . . . . . . . . . . . . . . . . . . .
Install the I/O Expansion Circuit Board . . . . . . . . . . . . . . . . . . . . . . . .
115V AC to 24V DC I/O Converter Circuit Board Removal and
Installation . . . . . . . . . . . . . . . . . . . . . . . . . . . . . . . . . . . . . . . . . . . . . . . . . . . . . .
Remove the 115V AC to 24V DC I/O Converter Circuit Board .
Install the 115V AC to 24V DC I/O Converter Circuit Board . . .
Control Circuit Board Removal and Installation . . . . . . . . . . . . . . . . . . . .
Remove the Control Circuit Board. . . . . . . . . . . . . . . . . . . . . . . . . . . . .
Install the Control Circuit Board . . . . . . . . . . . . . . . . . . . . . . . . . . . . . .
Control EMI Shield Removal and Closure. . . . . . . . . . . . . . . . . . . . . . . . . .
Move the Control EMI Shield . . . . . . . . . . . . . . . . . . . . . . . . . . . . . . . . .
Install the Control EMI Shield. . . . . . . . . . . . . . . . . . . . . . . . . . . . . . . . .
Switching Power Supply Circuit Board Fuse Removal and Installation
Remove the Fuses on the Switching Power Supply Circuit Board .
Install the Fuses on the Switching Power Supply Circuit Board . . .
Switching Power Supply Circuit Board Removal and Installation . . . . .
Remove the Switching Power Supply Circuit Board . . . . . . . . . . . . .
Install the Switching Power Supply Circuit Board . . . . . . . . . . . . . . .
Pulse Transformer Circuit Board Removal and Installation . . . . . . . . . .
Remove the Pulse Transformer Circuit Board . . . . . . . . . . . . . . . . . . .
Configure the Pulse Transformer Circuit Board . . . . . . . . . . . . . . . . .
Install the Pulse Transformer Circuit Board. . . . . . . . . . . . . . . . . . . . .
Field Power Circuit Board Removal and Installation . . . . . . . . . . . . . . . .
Remove the Field Power Circuit Board . . . . . . . . . . . . . . . . . . . . . . . . .
Install the Field Power Circuit Board . . . . . . . . . . . . . . . . . . . . . . . . . . .
Field SCR and Dual Diode Module Removal and Installation . . . . . . . .
Remove the Field SCR and Dual Diode Module. . . . . . . . . . . . . . . . .
Install the Field SCR and Dual Diode Module . . . . . . . . . . . . . . . . . .
Rockwell Automation Publication 20P-TG003A-EN-P - February 2012
42
42
42
43
43
43
45
45
45
45
46
46
47
48
48
51
52
52
53
54
54
55
55
55
58
58
58
59
60
60
60
61
61
62
62
62
66
70
71
71
72
72
72
73
Table of Contents
AC Line Snubber Circuit Board and Resistors Removal and
Installation . . . . . . . . . . . . . . . . . . . . . . . . . . . . . . . . . . . . . . . . . . . . . . . . . . . . . . 74
Remove the AC Line Snubber Circuit Board and Resistors . . . . . . 74
Install the AC Line Snubber Circuit Board and Resistors . . . . . . . . 81
Transient Noise Filter Circuit Board Fuses Removal and Installation . 81
Remove the Fuses on the Transient Noise Filter Circuit Board . . . 81
Install the Fuses on the Transient Noise Filter Circuit Board . . . . . 82
Transient Noise Filter Circuit Board Removal and Installation . . . . . . 82
Remove the Transient Noise Filter Circuit Board . . . . . . . . . . . . . . . 82
Install the Transient Noise Filter Circuit Board . . . . . . . . . . . . . . . . . 86
Power Supply Filter Circuit Board Removal and Installation. . . . . . . . . 86
Remove the Power Supply Filter Circuit Board . . . . . . . . . . . . . . . . . 86
Install the Power Supply Filter Circuit Board . . . . . . . . . . . . . . . . . . . 88
Armature Leg Fuses Removal and Installation . . . . . . . . . . . . . . . . . . . . . . 89
Remove the Armature Leg Fuses . . . . . . . . . . . . . . . . . . . . . . . . . . . . . . . 89
Install the Armature Leg Fuses. . . . . . . . . . . . . . . . . . . . . . . . . . . . . . . . . 92
SCR Modules Removal and Installation. . . . . . . . . . . . . . . . . . . . . . . . . . . . 93
Remove the SCR Modules . . . . . . . . . . . . . . . . . . . . . . . . . . . . . . . . . . . . 93
Install the SCR Modules . . . . . . . . . . . . . . . . . . . . . . . . . . . . . . . . . . . . . 100
AC Current Transducers Removal and Installation . . . . . . . . . . . . . . . . 101
Remove the AC Current Transducers . . . . . . . . . . . . . . . . . . . . . . . . . 101
Install the AC Current Transducers . . . . . . . . . . . . . . . . . . . . . . . . . . 107
Bimetal Thermostats Removal and Installation . . . . . . . . . . . . . . . . . . . . 107
Remove the Bimetal Thermostats . . . . . . . . . . . . . . . . . . . . . . . . . . . . . 107
Install the Bimetal Thermostats . . . . . . . . . . . . . . . . . . . . . . . . . . . . . . 115
Cooling Fans Removal and Installation . . . . . . . . . . . . . . . . . . . . . . . . . . . 115
Remove the Cooling Fans . . . . . . . . . . . . . . . . . . . . . . . . . . . . . . . . . . . . 115
Install the Cooling Fans. . . . . . . . . . . . . . . . . . . . . . . . . . . . . . . . . . . . . . 118
Chapter 4
Start-Up After Repair
Test With the Motor, Without a Mechanical Load . . . . . . . . . . . . . . . . 119
Appendix A
Schematics
List of Schematic Diagrams . . . . . . . . . . . . . . . . . . . . . . . . . . . . . . . . . . . . . . 121
Appendix B
Board Layouts and Connections
List of Board Layouts . . . . . . . . . . . . . . . . . . . . . . . . . . . . . . . . . . . . . . . . . . . .
Pulse Transformer Board . . . . . . . . . . . . . . . . . . . . . . . . . . . . . . . . . . . . . . . .
Switching Power Supply Board . . . . . . . . . . . . . . . . . . . . . . . . . . . . . . . . . . .
Control Board . . . . . . . . . . . . . . . . . . . . . . . . . . . . . . . . . . . . . . . . . . . . . . . . . .
Field Power Board. . . . . . . . . . . . . . . . . . . . . . . . . . . . . . . . . . . . . . . . . . . . . . .
Rockwell Automation Publication 20P-TG003A-EN-P - February 2012
129
130
133
134
135
5
Table of Contents
Appendix C
Flow Charts
List of Flow Charts . . . . . . . . . . . . . . . . . . . . . . . . . . . . . . . . . . . . . . . . . . . . . .
Control Power Supply Failure . . . . . . . . . . . . . . . . . . . . . . . . . . . . . . . . . . . .
Field Current Loss Failure. . . . . . . . . . . . . . . . . . . . . . . . . . . . . . . . . . . . . . . .
No Field Current . . . . . . . . . . . . . . . . . . . . . . . . . . . . . . . . . . . . . . . . . . . .
Low or Incorrect Field Current . . . . . . . . . . . . . . . . . . . . . . . . . . . . . . .
Index
6
Rockwell Automation Publication 20P-TG003A-EN-P - February 2012
137
138
139
139
140
Preface
About This Publication
This manual contains hardware service information for frame C PowerFlex DC
drives only. It is highly recommended that you obtain a copy of the PowerFlex
Digital DC Drive User Manual, publication 20P-UM001, which contains fault/
alarm and programming information to assist you in troubleshooting drive errors
and determining if repairs are necessary.
Who Should Use this Manual
This manual is intended for qualified service personnel responsible for
troubleshooting and repairing PowerFlex DC drives. You should have previous
experience with, and basic understanding of, electrical terminology, procedures,
required troubleshooting equipment, equipment protection procedures and
methods, and safety precautions.
Additional Resources
Additional drive service and software or firmware support information is
available on the Allen-Bradley Drives Service and Support website: http://
www.ab.com/support/ abdrives/.
A complete list of spare parts for PowerFlex DC drives is available on the AllenBradley web site at: www.ab.com/support/abdrives/powerflexdc/
PowerFlex_DC_Released_Parts.pdf
The following table lists publications that provide general drive information:
Title
Preventive Maintenance of Industrial Control and Drive System Equipment
Safety Guidelines for the Application, Installation and Maintenance of Solid State Control
A Global Reference Guide for Reading Schematic Diagrams
Guarding Against Electrostatic Damage
Publication
DRIVES-TD001
SGI-1.1
100-2.10
8000-4.5.2
You can view or download publications at http://
www.rockwellautomation.com/literature/. To order paper copies of technical
documentation, contact your local Rockwell Automation distributor or sales
representative.
Rockwell Automation Publication 20P-TG003A-EN-P - February 2012
7
Preface
Notes:
8
Rockwell Automation Publication 20P-TG003A-EN-P - February 2012
Chapter
1
Before You Begin Testing, Maintenance or
Repairs
Introduction
This chapter provides information you should know before you begin tests,
maintenance or repairs on drive components.
Topic
Page
General Safety Precautions
10
Hardware Description
11
Commonly Used Tools
12
Rockwell Automation Publication 20P-TG003A-EN-P - February 2012
9
Chapter 1
Before You Begin Testing, Maintenance or Repairs
General Safety Precautions
Read the following precautions before you begin testing components, performing
maintenance or repairing the drive.
ATTENTION: Only qualified personnel familiar with DC drives and associated
machinery should plan or implement the installation, start-up and subsequent
maintenance of the system. Failure to comply may result in personal injury and/
or equipment damage.
ATTENTION: This drive contains ESD (Electrostatic Discharge) sensitive parts and
assemblies. Static control precautions are required when installing, testing,
servicing or repairing this assembly. Component damage may result if ESD
control procedures are not followed. If you are not familiar with static control
procedures, reference A-B publication 8000-4.5.2, “Guarding Against
Electrostatic Damage” or any other applicable ESD protection handbook.
ATTENTION: Severe injury or death can result from electrical shock, burn, or
unintended actuation of controlled equipment. Hazardous voltages may exist in
the drive enclosure even with the circuit breaker in the off position.
Recommended practice is to disconnect and lock out control equipment from
power sources. If it is necessary to work in the vicinity of energized equipment,
the safety related work practices of NFPA 70E, Electrical Safety Requirements for
Employee Workplaces, must be followed. DO NOT work alone on energized
equipment.
ATTENTION: Potentially fatal voltages may result from improper usage of an
oscilloscope and other test equipment. The oscilloscope chassis may be at a
potentially fatal voltage if not properly grounded. If an oscilloscope is used to
measure high voltage waveforms, use only a dual channel oscilloscope in the
differential mode with X 100 probes. It is recommended that the oscilloscope be
used in the A minus B Quasi-differential mode with the oscilloscope chassis
correctly grounded to an earth ground.
ATTENTION: Remove power before making or breaking cable connections. When
you remove or insert a cable connector with power applied, an electrical arc may
occur. An electrical arc can cause personal injury or property damage by:
• sending an erroneous signal to your system’s field devices, causing unintended
machine motion
• causing an explosion in a hazardous environment
Electrical arcing causes excessive wear to contacts on both the module and its
mating connector. Worn contacts may create electrical resistance.
ATTENTION: HOT surfaces can cause severe burns. Do not touch the heatsink
surface during operation of the drive. After disconnecting power allow time for
cooling.
10
Rockwell Automation Publication 20P-TG003A-EN-P - February 2012
Before You Begin Testing, Maintenance or Repairs
Hardware Description
Chapter 1
The PowerFlex DC drive contains a power structure that has an armature and
field supply. The armature supply consists of a three–phase, full wave rectified,
dual bridge, capable of two or four quadrant output. The field supply consists of
single phase, full wave rectified bridge. Also associated with the power structure
are incoming line protection devices and contactor and dynamic brake control
circuits.
Verify that you are working on a frame C drive by checking the data nameplate
located on the side of the drive. The frame size is printed just above the serial
number in the lower right corner of the label.
.0/0.5A 1 Phase
Frame: C
Serial Number: C13D0092
Rockwell Automation Publication 20P-TG003A-EN-P - February 2012
11
Chapter 1
Before You Begin Testing, Maintenance or Repairs
Commonly Used Tools
Service Tools
This list of basic service tools which will cover needs of tools for repair and
maintenance measurements.
Item
Digital Multimeter
Oscilloscope
Current clamp
Soldering station
Torque wrench
Torque wrench
box wrench
socket extension
Wrench
Wire cutter
Nose pliers
Crimping tools
Angle wrench
Screw drivers:
Flat nose
Hexalobular
Phillips®
Hexagonal wrench
ESD-protected place of work
ESD-protective clothing
Details
Digital multimeter, capable of ac and dc voltage, continuity, resistance and
forward diode bias tests. Fluke model 87 III or equivalent (recommended).
Portable, digitizing, dual channel scope, with isolation
3x drive rated armature current output
Soldering / de soldering
1...12 N•m
6...50 N•m
7 mm, 8 mm, 10 mm, 13 mm, 17 mm, 19 mm, 22 mm
230 mm
7 mm, 8 mm, 10 mm, 13 mm, 17 mm, 19 mm, 22 mm
For cable terminals 1.5...240
7x2 mm
T15, T20, T25
#1, 2, 3
#4, 5, 6
Working surface, floor covering, seat and ground connections
Wrist wrap, shoes, overall clothing (coat)
Phillips® is a registered trademark of Phillips Screw Company.
Software Tools
DriveTools™ SP, DriveExecutive, DriveExplorer™ and DriveObserver™ are software
tools for uploading, downloading and monitoring system parameters.
12
Rockwell Automation Publication 20P-TG003A-EN-P - February 2012
Chapter
2
Component Test Procedures
Introduction
This chapter provides general procedures for inspecting and testing the major
components of the drive and includes recommendations for repairs. Due to the
technical nature of this product and the variety of possible applications, not all
possible fault conditions and troubleshooting solutions can be described in this
manual.
Topic
Page
Save the Parameter Configuration
14
Visual Component Inspection
15
Troubleshoot a Control Power Supply Failure
15
Troubleshoot an AC Undervoltage Fault
20
Troubleshoot an Armature Bridge Failure
21
Troubleshoot a Field Current Loss Fault
23
Power Component Test Procedures
27
Speed Feedback Device Tests
36
Thermistors and Thermal Switches
39
Relay Outputs
39
Create a Fault Report
40
What You Need When You Call Tech Support
40
IMPORTANT
Using the diagnostic tests in this chapter should only be performed by
qualified personnel and only when other corrective actions have failed. All
tests assume that the control board connections have been properly made.
For common drive symptoms and corrective actions and fault troubleshooting
information, see Chapter 4 “Troubleshooting” in the PowerFlex Digital DC Drive
User Manual, publication 20P-UM001.
Rockwell Automation Publication 20P-TG003A-EN-P - February 2012
13
Chapter 2
Component Test Procedures
Save the Parameter
Configuration
It is recommended that you save the drive and communication adapter parameter
configuration to a HIM Set or by up loading the drive and adapter parameters to
an offline node file using DriveExecutive™ before performing any service or
testing on the drive. HIM sets are files stored in permanent nonvolatile HIM
memory.
Save to a HIM Set
Complete these steps to save the drive and adapter parameters to a HIM set.
1. On the HIM, access the Memory Storage menu.
2. Select the HIM CopyCat menu and press
3. Select Device -> HIM and press
.
.
4. Do one of the following:
• If there are no existing HIM Sets, enter a name using the
buttons to select the desired characters and press
• If there is an existing HIM Set, press
using the
.
to overwrite it, or select No
button and use the
the desired characters. Then press
and
and
buttons to select
.
The HIM Set will be saved to nonvolatile memory.
Download Parameters to an Offline Node File
You can save all drive and adapter parameters in the drive to an offline database
file on your computer using DriveExecutive. An offline node file (*.dno) contains
all information about the node, including the necessary databases.
1. From the Drive menu, select Upload from Drive or click the upload
button
on the toolbar.
2. Click Yes to confirm the operation, which cannot be undone.
3. If you are not connected to a drive, the Connect to Drive dialog displays.
Select the drive to which you want to connect and click OK.
4. A dialog displays the status of the upload operation. Click Cancel to
cancel the operation.
14
Rockwell Automation Publication 20P-TG003A-EN-P - February 2012
Component Test Procedures
Visual Component Inspection
Chapter 2
Visually inspect the drive circuit boards and power components before energizing
the drive for any of the component test procedures.
1. Read the General Safety Precautions on page 10.
2. Remove power from the drive. See Remove Power from the Drive on
page 42.
3. Remove the protective covers and lower the control EMI shield when
necessary. See Remove the Protective Covers from the Drive on page 43
and Move the Control EMI Shield on page 58.
4. Check components for burn marks, breakage or foil delamination on all
circuit boards.
Replace any of these components without further testing if they show
evidence of burn marks, breakage or foil delamination.
Troubleshoot a Control
Power Supply Failure
If a drive Power Failure fault (F3) has occurred and the drive is inoperable via the
HIM or other means of control, compete the steps below to determine where the
control power failure has occurred.
1. Read the General Safety Precautions on page 10.
2. Remove the protective covers from the drive. See Remove the Protective
Covers from the Drive on page 43.
3. Measure the signal voltage at the testpoints on the control board as
indicated in the following table.
Name
Testpoint
XY5
XY6
XY7
XY12
XY10
XY11
For Testpoint Location
See…
Figure 1 on page 18
Figure 1 on page 18
Figure 2 on page 19
Figure 1 on page 18
Figure 1 on page 18
Figure 1 on page 18
Associated ConnectorPin
XA-1 / XA-3 / XA-5
XA-2 / XA-4 / XA-6
XA-2 / XA-4 / XA-6
XA-9 / XA-10
XA-11 / XA-12
XA-13 / XA-14
+ 5V
GNDD
GNDD
+15V
GNDA
-15 V
Description
+5V digital supply
+5V digital supply ground
+5V digital supply ground
+15V analog supply
15V analog supply ground
-15V analog supply
+24V
GNDV
XY8
XY9
Figure 1 on page 18
Figure 1 on page 18
XA-16
XA-15
+24V terminal block
+24V terminal block ground
+5VEXP
+12VEXP
0VEXP
+5VEXP
+12VEXP
0VEXP
Figure 2 on page 19
Figure 2 on page 19
Figure 2 on page 19
XP3-1 / XP3-2 / XP3-3
XP3-4 / XP3-5
XP3-7 / XP3-8 / XP3-9
+5V for DPI expansion
+12V for DPI expansion
DPI expansion ground
Note: For a flow chart version of the steps that follow, see Control Power Supply
Failure on page 138.
Rockwell Automation Publication 20P-TG003A-EN-P - February 2012
15
Chapter 2
Component Test Procedures
4. If any of the signals in the table above is incorrect or missing, verify that
either 115 VAC or 230 VAC voltage is present at terminals U2 and V2
(control circuit power input).
• If the voltage is present and correct, continue with step 5 below.
• If the voltage is incorrect or missing, remove control power and verify
the wiring and power source to U2, V2 and correct any problems. Test
the voltage level again to verify that it is correct. If the voltage is correct,
but the drive is still inoperable, continue with step 5 below.
5. Remove AC control power from terminals U2 and V2 and remove and test
the fuses (F1 and F2) on the switching power supply board. See Switching
Power Supply Circuit Board Fuse Removal and Installation on page 60 for
fuse location.
• If the fuse is blown, continue with step 6 below.
• If the fuse is not blown, replace the switching power supply board.
6. Replace the fuse on the switching power supply board. See Switching
Power Supply Circuit Board Fuse Removal and Installation on page 60.
7. Disconnect the cable at connector XA on the control board. See Figure 27
on page 134 for location of connector XA.
8. Apply AC control power to the drive.
• If the fuse blows, continue with Testing the Switching Power Supply
and Pulse Transformer Boards below.
• If the fuse does not blow, continue with Testing the Control and Field
Board Connections on page 17.
Testing the Switching Power Supply and Pulse Transformer Boards
1. Remove power from the drive.
2. Replace the fuses on the switching power supply board. See Switching
Power Supply Circuit Board Fuse Removal and Installation on page 60.
3. Remove the switching power supply board from the drive. See Switching
Power Supply Circuit Board Removal and Installation on page 61.
4. Reapply power to the switching power supply board only.
• If the power supply fuses do not blow, continue with step 5 below.
• If the power supply fuses blow, replace the switching power supply
board.
5. Remove all incoming AC voltage from the drive.
6. Check all external wiring connected to the pulse transformer board,
including the motor PTC if used, for a possible short circuit condition.
Repair any short circuit conditions if found.
7. If no short circuit conditions exist, replace the pulse transformer board.
16
Rockwell Automation Publication 20P-TG003A-EN-P - February 2012
Component Test Procedures
Chapter 2
Testing the Control and Field Board Connections
1. Using an ohmmeter, check all input and output wiring on terminals 1…40
on terminal blocks TB1 and TB2 on the control board for a possible short
circuit condition. Repair any short circuit conditions if found.
2. If an encoder and/or tachometer is used, use an ohmmeter to check all
wiring on the respective terminals for a possible short circuit condition.
Repair any short circuit conditions if found.
3. Remove the cables from connector XR and XFCD on the control board
and use an ohmmeter to check between all voltage test points and
common on the control board for possible short circuit conditions. The
ohmmeter measurements should be greater than 200 kΩ . If any low
resistance measurements are found, replace the control board.
4. Using an ohmmeter, measure between pins 1 and 2 and pins 3 and 2 on the
XFCD cable connector. The resistance measurement for both tests should
be greater than 200 kΩ . If a lower resistance value is measured, replace
field board.
Rockwell Automation Publication 20P-TG003A-EN-P - February 2012
17
Chapter 2
Component Test Procedures
Figure 1 - Control Board Testpoints - Upper Left
XY18
XY17
XY22
XY21
XY19
XY8
XY9
XY10
XY12
XY11 XY6 XY5
XY20
S15
1
2
3
4
5
6
7
8
1
2
3
4
S3
S2
S1
S0
5
6
7
8
S14
RST
ACT
RUN
PWR
ON
1
S12 S18
S20
2
S4
3
ON
4
5
S11
6
S21
7
S9
S10
8
21 22 23 24 25 26 27 28 29 30 31 32 33 34 35 36 37 38 39 40
- A B C+
-
A
B
C +
ENC_5 ENC_12
A+ A- B+ B- Z+ Z- COM +V
21 22 23 24 25 26 27 28 29 30
1
18
Rockwell Automation Publication 20P-TG003A-EN-P - February 2012
31 32 33 34 35 36 37 38 39 40
1 2 3 4 5 6 7 8 9 10 11 12 13 14 15 16 17 18 19 20
A+ A- B+ B- Z+ Z- COM +V
2
3
4
5
6
7
8
9 10
11 12 13 14 15 16 17 18 19 20
DEBUG
Component Test Procedures
Chapter 2
Figure 2 - Control Board Testpoints - Upper Right
XY7
+5VEXP
0VEXP
+12VEXP
S15
1
2
3
4
5
6
7
8
1
2
3
4
S3
S2
S1
S0
5
6
7
8
S14
RST
ACT
RUN
PWR
ON
1
S12 S18
S20
2
S4
3
ON
4
5
S11
6
S21
7
S9
S10
8
21 22 23 24 25 26 27 28 29 30 31 32 33 34 35 36 37 38 39 40
- A B C+
-
A
B
C +
ENC_5 ENC_12
A+ A- B+ B- Z+ Z- COM +V
21 22 23 24 25 26 27 28 29 30
31 32 33 34 35 36 37 38 39 40
DEBUG
1 2 3 4 5 6 7 8 9 10 11 12 13 14 15 16 17 18 19 20
A+ A- B+ B- Z+ Z- COM +V
1
2
3
4
5
6
7
8
9 10
11 12 13 14 15 16 17 18 19 20
Rockwell Automation Publication 20P-TG003A-EN-P - February 2012
19
Chapter 2
Component Test Procedures
Troubleshoot an AC
Undervoltage Fault
If the drive faults with an AC Undervoltage Fault (F4), or parameter 466 [AC
Line Voltage] does not equal the expected incoming AC line voltage, measure the
AC line input signals as directed in the steps below.
1. Read the General Safety Precautions on page 10.
2. Remove the protective covers from the drive. See Protective Cover
Removal and Installation on page 43.
3. Using a voltmeter, measure the voltage at terminals U, V, and W of the
drive.
Note: If an AC input contactor is used, the voltage must be measured on
both the input and output sides of the contactor.
If any of the voltage measurements is incorrect or missing, remove
incoming AC power and verify the wiring to the drive and the power
supply source and correct any problems.
4. Using a voltmeter, measure the combined voltages of the AC lines on the
following testpoints on the control board (all waveforms have a 2.5V
offset). See Figure 1 on page 18 and Figure 2 on page 19 for location of the
testpoints. Also, see Figure 14 on page 123 for a schematic diagram.
Table 1 - Combined AC Line Input Signal Testpoints
Incoming AC
Line Voltage
240 VAC
480 VAC
575 VAC
690 VAC
Phases
V and U
V and W
V and U
V and W
V and U
V and W
V and U
V and W
Measure From
Testpoint
XY22
XY21
XY22
XY21
XY22
XY21
XY22
XY21
… To Testpoint
…
…
…
…
…
…
…
…
XY18
XY18
XY18
XY18
XY18
XY18
XY18
XY18
Peak to Peak
Measurement
RMS Measurement
1.42 VAC
0.500 V
2.95 VAC
1.040 V
2.85 VAC
1.007 V
3.45 VAC
1.220 V
• If any of the voltage measurements above are incorrect or missing,
continue with step 5 below.
20
Rockwell Automation Publication 20P-TG003A-EN-P - February 2012
Component Test Procedures
Chapter 2
• If the voltage measurements above are correct but the value of
parameter 466 [AC Line Voltage] is incorrect, replace the control
board.
5. Remove the ribbon cable connected to XR on the control board and pulse
transformer board and test the continuity of the cable using the
measurements in Table 25 on page 132.
If the measurements on the XR cable are correct, replace the pulse
transformer board.
Troubleshoot an Armature
Bridge Failure
If the drive is running unstable or faults with an Overcurrent Fault (F13) an
armature bridge failure may have occurred. All of the signals going to and coming
from the SCR bridges are transmitted via the ribbon cable connected to XR on
the control board and can be measured at these points. See Figure 27 on page 134
for location of the XR connector on the control board.
Note: If using an AC input contactor, this step requires that the cable remain
connected to the XR connector on the control board and that an adapter be used
to measure these signals.
1. Read the General Safety Precautions on page 10.
2. Remove the protective covers from the drive. See Protective Cover
Removal and Installation on page 43.
3. If using a DC output contactor, disconnect the cable from XR on the
control board and measure the signal for each SCR gate as indicated in the
table below:
Signal Name
IT1
IT2
IT3
IT4
IT5
IT6
MN
MP
XR Cable Pin
27
29
31
21
23
25
33
34
Gate
Note
MP MN
G1 G04
G2 G05
G3 G06
G4 G01
G5 G02
G6 G03
–
– Negative bridge MN - active when high (+5V)
–
– Positive bridge MP - active when high (+5V)
Rockwell Automation Publication 20P-TG003A-EN-P - February 2012
21
Chapter 2
Component Test Procedures
Figure 3, Figure 4, and Figure 5 below are examples representing gate
pulse, current and voltage signal measurements taken on an SCR. In the
figures below:
– The current signal is taken on the testpoint XY17 (+2.5V offset;
+0.6V=Drive size current).
– The voltage signal is taken on the testpoint XY19 (+2.5V offset).
– The ground signal is taken on either testpoint XY10 or XY18.
Figure 3 - Good SCR Gate Pulse and Armature Current Signals Example
5V
0V
XY19
Figure 4 - Good SCR Armature Voltage and Motor Current Signal Example
XY17
XY19
22
Rockwell Automation Publication 20P-TG003A-EN-P - February 2012
Component Test Procedures
Chapter 2
A malfunctioning thyristor is connected to the relative gate. For example, if the
tested signal is at XR25 and the positive bridge is active (MP high) from the
following figure you can deduce that SCR connected to gate G6 is open.
Figure 5 - Open Thyristor Example
5V
0V
XY19
Troubleshoot a Field Current
Loss Fault
If the drive faults with a “Field Current Loss” fault (F6) and there is low or
incorrect field current present at the motor, as seen in parameter 351 [Field
Current], complete the steps in Low or Incorrect Field Current below. If the drive
faults with a “Field Current Loss” fault (F6) and there is no field current present
at the motor, as seen in parameter 351 [Field Current], complete the steps in No
Field Current on page 25.
Low or Incorrect Field Current
Note: For a flow chart version of these steps, see Low or Incorrect Field Current
on page 140.
1. Read the General Safety Precautions on page 10.
2. Verify the actual value of parameter 351 [Field Current] by measuring the
DC motor field current using a DC clamp.
3. Verify that the drive rated field bridge current is set correctly in parameter
374 [Drv Fld Brdg Cur] and DIP switch S14 is configured to correctly
(according to the instructions in the PowerFlex Digital DC Drive User
Manual, publication 20P-UM001) and make any necessary corrections.
See Control Board on page 134 for DIP switch location.
Rockwell Automation Publication 20P-TG003A-EN-P - February 2012
23
Chapter 2
Component Test Procedures
4. Verify that the value of parameter 280 [Nom Mtr Fld Amps] matches the
rated field current value on motor nameplate and make any necessary
corrections.
5. Remove the protective covers from the drive. See Protective Cover
Removal and Installation on page 43.
6. Measure the field current signal on the green LA-LB terminal located on
the control board: LA is the ground and LB is field current signal. The
measured value of the field current at LA-LB should be equal to the value
of parameter 374 [Drv Fld Brdg Cur]. If these values are equivalent, the
voltage across these terminals should be 1.66 VDC.
Note: For lower field current values, the voltage will be proportional.
For example, if the field is set up for 2 A and the motor is rated for 1.5 A,
the measurement at LA-LB will be 1.245 VDC (1.5 / x = 2 / 1.66).
• If the voltage measurement is incorrect, continue with step 7 below.
• If the voltage measurement is correct, but the “Field Current Loss” fault
still exists, replace the control board.
7. Using an ohmmeter, measure the resistance across terminals LA-LB to
verify that the value equals the equivalent resistance as indicated in the
table below (set with DIP switch S14 on the control board).
Switch ohms:
Field Current
Scale
1A
2A
3A
5A
10 A
13 A
17 A
20 A
168.5 333.3 182
Equivalent
Resistance
S14-1 S14-2 S14-3 S14-4 S14-5 S14-6 S14-7 S14-8 Ohms
Field
Supply
10 A
OFF
OFF
OFF
OFF
ON
14 A
ON
20 A
OFF
ON
OFF
OFF
OFF
ON
OFF
OFF
ON
OFF
OFF
OFF
OFF
OFF
OFF
OFF
ON
ON
36.4
845
1668
OFF
OFF
OFF
OFF
OFF
OFF
OFF
OFF
OFF
ON
ON
OFF
OFF
ON
ON
OFF
ON
OFF
ON
OFF
OFF
ON
ON
ON
3333
–
Not used
(OFF)
1668
845
560.9
333.3
168.5
129.6
97.3
83.1
• If the resistance measurement is incorrect, replace the field board.
24
Rockwell Automation Publication 20P-TG003A-EN-P - February 2012
Component Test Procedures
Chapter 2
No Field Current
Note: For a flow chart version of these steps, see No Field Current on page 139.
1. Read the General Safety Precautions on page 10.
2. Remove the protective covers from the drive. See Protective Cover
Removal and Installation on page 43.
3. Verify that the correct AC voltage is present at terminals U1 and V1 at the
top of the field fuse holder mounted on the control panel. See Figure 16 on
page 124 for a schematic diagram.
• If the voltage is correct, continue with step 4 below.
• If the voltage is incorrect or missing, remove power from the drive and
verify the wiring to the drive and the power supply source and correct
any problems. Test the voltage level again to verify that it is correct. If
the voltage is correct, but the fault persists or parameter 351 [Field
Current] is incorrect, continue with step 4 below.
4. Remove AC power to the drive and check the fuses at FU1 and FV1. See
Remove Power from the Drive on page 42.
• If the fuses are blown, complete the steps in Test Field Wiring and
Voltage Signals on page 25.
• If the fuses are not blown, complete the steps in Test Field Control
Signals on page 25.
Test Field Wiring and Voltage Signals
1. Test the resistance of the motor field wiring and motor field for possible
short circuits.
• If there are no short circuits, continue with step 2 below.
• If a short circuit exists, correct any problems.
2. Check the field SCR/dual diode module for a short circuit condition. See
Check the Field SCR/Dual Diode Module on page 33.
• If there are no short circuits, continue with step 3 below.
• If a short circuit exists, replace the field SCR/dual diode module.
3. Replace the field fuses at FU1 and FV1 and apply power to the drive.
4. If the field fuses blow, replace the field board.
Test Field Control Signals
1. Disconnect the cable from connector XR on the control board and
measure the U1-V1 voltage synchronization signal at pin 11 on the cable.
See Figure 27 on page 134 for location of the XR connector on the control
board.
Rockwell Automation Publication 20P-TG003A-EN-P - February 2012
25
Chapter 2
Component Test Procedures
This signal is a square wave signal with a 90° lag phase displacement
compared to the AC voltage signal.
2. Measure the gate signals at pins XR-1 and XR-2 on the cable. The figure
below displays the following signals from top to bottom:
Channel
Signal
1
U1-V1 Sync
4
Ie - LEM current feedback signal taken on LA-LB terminal
2
ITF1 pulse
3
ITF2 pulse
U1-V1 Sync
LA-LB
ITF1 Pulse
ITF2 Pulse
• If the gate signals are missing, replace the control board.
• If the gate signals are present, replace the field board.
26
Rockwell Automation Publication 20P-TG003A-EN-P - February 2012
Component Test Procedures
Power Component Test
Procedures
Chapter 2
Check the Armature SCR Modules
The PowerFlex DC drive armature supply consists of three (non-regenerative
drives) or six (regenerative drives) SCR modules mounted on heat sinks within
the legs assemblies. A malfunction of any of these devices will be indicated by
either an Overcurrent fault (F13), blown or tripped incoming protection devices,
or erratic motor operation. The following procedure can be used if an armature
bridge component malfunction is suspected.
1. Read the General Safety Precautions on page 10.
2. Remove and lock-out all incoming power for the drive. See Remove Power
from the Drive on page 42.
3. Verify that contactor power (if used) is removed.
4. Verify that power to an external field supply (if used) is removed.
5. Check the anode to cathode junction of each SCR. With a digital
multimeter set to Ohms, measure the resistance across the SCRs (lead
orientation is not critical).
• For regenerative drives, see Table 2 on page 28 and Figure 6 on page 28.
• For non-regenerative drives, see Table 3 on page 29 and Figure 7 on
page 29.
If a low resistance is detected, determine which SCR module(s) is/are
damaged based on the tables below and replace that module(s). See SCR
Modules Removal and Installation on page 93.
Rockwell Automation Publication 20P-TG003A-EN-P - February 2012
27
Chapter 2
Component Test Procedures
Table 2 - SCR Anode to Cathode Junction Measurements for Regenerative Drives
On SCR Module…
1
SCR…
1
4
2
5
3
6
01
04
02
05
03
06
2
3
01
02
03
Measure from
Terminal…
U
U
V
V
W
W
U
U
V
V
W
W
To Terminal… Nominal meter reading:
C
D
C
D
C
D
C
D
C
D
C
D
“open circuit” or “megaOhms” range
Figure 6 - Regenerative Drive SCR Module Layout
SCR
Module 1
SCR
Module 01
SCR
Module 2
SCR
Module 02
D
C
U
U
28
SCR
Module 3
V
C
V
Rockwell Automation Publication 20P-TG003A-EN-P - February 2012
W
D
W
SCR
Module 03
Component Test Procedures
Chapter 2
Table 3 - SCR Anode to Cathode Junction Measurements for Non-Regenerative Drives
On SCR Module…
01
02
03
SCR… Measure from
Terminal…
01
U
04
U
02
V
05
V
03
W
06
W
To Terminal… Nominal meter reading:
C
D
C
D
C
D
“open circuit” or “megaohms” range
Figure 7 - Non-Regenerative Drive SCR Module Layout
SCR
Module 01
SCR
Module 02
D
C
U
U
SCR
Module 03
V
C
V
Rockwell Automation Publication 20P-TG003A-EN-P - February 2012
W
D
W
29
Chapter 2
Component Test Procedures
6. Check the gate to cathode junction of each SCR. With a digital
multimeter set to Ohms, measure the resistance of each SCR junction.
• For regenerative drives, see Table 4 and Figure 8 below.
• For non-regenerative drives, see Table 5 on page 31 and Figure 9 on
page 31.
If a measurement is outside of the range specified in the table, or if one
reading deviates significantly from the majority, then module replacement
may be necessary. See SCR Modules Removal and Installation on page 93v.
Table 4 - SCR Gate to Cathode Junction measurements for Regenerative Drives
On SCR Module…
1
2
3
01
02
03
SCR… Measure from …
1
Pin 5
4
Pin 6
2
Pin 5
5
Pin 6
3
Pin 5
6
Pin 6
01
Pin 6
04
Pin 5
02
Pin 6
05
Pin 5
03
Pin 6
06
Pin 5
To…
Pin 4
Pin 7
Pin 4
Pin 7
Pin 4
Pin 7
Pin 7
Pin 4
Pin 7
Pin 4
Pin 7
Pin 4
Nominal meter reading:
5…20 Ω(1)
(1) The actual reading varies depending upon the SCR manufacturer. Verify that the actual measured value is consistent
for all SCRs.
Figure 8 - SCR Gate Lead Connection Pinouts for Regenerative Drives
Gate Lead
Connectors
SCR
Module 1
SCR
Module 01
SCR
Module 2
Gate Lead
Pinouts
SCR
Module 02
Front of Drive
4
5
7
6
Drive Heatsink
Top View of SCR Module
30
Rockwell Automation Publication 20P-TG003A-EN-P - February 2012
SCR
Module 3
SCR
Module 03
Component Test Procedures
Chapter 2
Table 5 - SCR Gate to Cathode Junction Measurements for Non-Regenerative Drives
On SCR Module…
01
02
03
SCR…
01
04
02
05
03
06
Measure from …
Pin 6
Pin 5
Pin 6
Pin 5
Pin 6
Pin 5
To…
Pin 7
Pin 4
Pin 7
Pin 4
Pin 7
Pin 4
Nominal meter reading:
5…20 Ω(1)
(1) The actual reading varies depending upon the SCR manufacturer. Verify that the actual measured value is consistent
for all SCRs.
Figure 9 - SCR Gate Lead Connection Pinouts for Non-Regenerative Drives
Gate Lead
Connectors
SCR
Module 01
SCR
Module 02
Gate Lead
Pinouts
SCR
Module 03
Front of Drive
4
5
7
6
Drive Heatsink
Top View of SCR Module
Rockwell Automation Publication 20P-TG003A-EN-P - February 2012
31
Chapter 2
Component Test Procedures
Check the Pulse Transformer Board
The armature pulse transformer circuit board contains an isolated gate firing
circuit and also provides dv/dt protection for the armature SCR modules. A
malfunction of these devices will be indicated by either an Overcurrent fault
(F13), blown or tripped incoming protection devices or erratic motor operation.
Use the following procedure if a malfunction in this circuitry is suspected.
1. Read the General Safety Precautions on page 10.
2. Remove power from the drive. See Remove Power from the Drive on
page 42.
3. Remove the pulse transformer board (see Pulse Transformer Circuit Board
Removal and Installation on page 62).
4. With a digital multimeter set for a “continuity check”, measure each
connection point on the pulse transformer board listed in the tables below.
See Figure 25 on page 130 for connector locations.
If any of the actual measurements are out of tolerance, replace the pulse
transformer board.
Table 6 - Armature Pulse/Snubber Circuit Measurements for Regenerative Drives
For SCR
1
4
2
5
3
6
01
04
02
05
03
06
Measure From To . . .
...
KG1
XY-4
KG4
XY-1
KG2
XY-5
KG5
XY-2
KG3
XY-6
KG6
XY-3
KG01
XY-1
KG04
XY-4
KG02
XY-2
KG05
XY-5
KG03
XY-3
KG06
XY-6
Meter reading:
“open circuit”
Connector XY Pinout
10
.
.
.
.
.
1
Table 7 - Armature Pulse/Snubber Circuit Measurements for Non-Regenerative Drives
For SCR
01
04
02
05
03
06
32
Measure From To . . .
...
KG01
XY-1
KG04
XY-4
KG02
XY-2
KG05
XY-5
KG03
XY-3
KG06
XY-6
Meter reading:
“open circuit”
Rockwell Automation Publication 20P-TG003A-EN-P - February 2012
Connector XY Pinout
10
.
.
.
.
.
1
Component Test Procedures
Chapter 2
5. With the digital multimeter set to “diode test”, measure each connection
point on the pulse transformer board listed in the tables below. If any of
the actual measurements are out of tolerance, replace the pulse transformer
board.
Table 8 - Armature Pulse Transformer Primary Measurements for Regenerative and NonRegenerative Drives
For SCR
1/01
4/04
2/02
5/05
3/03
6/06
(+) Meter Lead
XY-8
XY-8
XY-8
XY-8
XY-8
XY-8
(-) Meter Lead
XY-1
XY-4
XY-2
XY-5
XY-3
XY-6
Meter reading:
Connector XY Pinout
10
.
.
.
.
.
1
0.41 Ω
Table 9 - Armature Pulse Transformer Primary Measurements for Regenerative Drives
For SCR
1
4
2
5
3
6
(+) Meter Lead
XY-7
XY-7
XY-7
XY-7
XY-7
XY-7
(-) Meter Lead
XY-1
XY-4
XY-2
XY-5
XY-3
XY-6
Meter reading:
Connector XY Pinout
0.41 Ω
10
.
.
.
.
.
1
Check the Field SCR/Dual Diode Module
The field supply consists of a dual pack SCR/dual diode module arranged in a
single–phase full wave rectifier configuration. Malfunction of either of these
components may cause various responses including field and velocity related
faults, or blown fuses. The following procedures can be used if field bridge
malfunctions are suspected.
1. Read the General Safety Precautions on page 10.
2. Remove and lock-out all incoming power to the drive. See Remove Power
from the Drive on page 42.
3. Remove the protective covers. See Protective Cover Removal and
Installation on page 43.
4. Verify that contactor power (if used) is removed.
5. Verify that power to an external field supply (if used) is removed.
Rockwell Automation Publication 20P-TG003A-EN-P - February 2012
33
Chapter 2
Component Test Procedures
6. Check the anode to cathode junction of the field SCR/dual diode module.
With the digital multimeter set to “diode test”, measure the resistance
across the modules. See Table 10 and Figure 10 below.
If a low resistance is detected, replace the modules. See Field SCR and
Dual Diode Module Removal and Installation on page 72.
If a measurement results in an “infinity” reading, check the fuses at FU1
and FV1 on the control panel to determine if they are open. See Figure 11
on page 35.
Table 10 - Field SCR/Dual Diode Module Anode to Cathode Junction Measurements
(+) Meter Lead
Terminal
U1
U1
V1
V1
C1
C1
C1
D1
D1
(-) Meter Lead
Terminal
C1
D1
C1
D1
D1
U1
V1
C1
U1
Nominal meter reading:
“open” or ∞
“open” or ∞
“open” or ∞
“open” or ∞
“open” or ∞
“open” or ∞
0.50V
0.50V
0.45V
Figure 10 - Field Terminal Block Location
W phase - AC input terminal
D1 C1 U1 V1
34
Rockwell Automation Publication 20P-TG003A-EN-P - February 2012
Component Test Procedures
Chapter 2
Figure 11 - Field Fuses Location
The field fuses are located on the control EMI shield next to the control board
7. Remove the cable from connector XP on the pulse transformer circuit
board. See Figure 25 on page 130 for connector location.
8. Check the gate cathode junction of the field SCR/dual diode module.
With the digital multimeter set to “diode test” measure the resistance
across the modules (lead orientation is not critical). See Table 11 below.
If a low resistance is detected, replace the SCR/dual diode module. See
Field SCR and Dual Diode Module Removal and Installation on page 72.
Table 11 - SCR/Dual Diode Module Gate Cathode Junction Measurements
Measure from…
XP1
XP3
To…
XP2
XP4
Nominal meter reading:
10…20 Ω
Rockwell Automation Publication 20P-TG003A-EN-P - February 2012
35
Chapter 2
Component Test Procedures
Speed Feedback Device Tests Check the Encoder
The encoder feedback device provides a dual channel quadrature output
waveform and requires that the output be differential line drivers at +5 or
+12…15V signal levels. The encoder power supply voltage and input selection is
controlled by DIP switch S21 on the control board (see “DIP Switch and Jumper
Settings” in the PowerFlex Digital DC Drive User Manual, publication 20PUM001). The encoder power supply from the drive can be measured from +V
(+) to COM (-) with a digital multimeter. If S21 is set to ENC_5, the voltage
level should be +2.5…5.4V. If S21 is set to ENC_12, the voltage level should be
+5.4V…15.2V. For reference, see Figure 19 on page 126 for a schematic diagram.
The Channel A and Channel B are square wave type outputs that are 90 degrees
out of phase. When rotating in the counter clockwise direction, as viewed from
the commutator end, Channel A leads Channel B. Each differential channel has
an inverted and non–inverted signal.
Power for the encoder is provided internally and is capable of 200mA of current
with a current foldback feature that protects the power supply should the current
draw exceed 200mA. If different power supply requirements exist for the chosen
feedback device, the supply must be provided external to the drive.
The frequency is proportional to speed and the pulse rate of the encoder, referred
to as the “Pulse/Rev” rating on the nameplate. The speed of the motor can be
calculated by: Speed (RPM) = [Frequency (Hz) x 60]/[Pulses/Revolution].
Check the DC Tachometer
• Verify that DIP switch S4 on the control board is set to the correct input
voltage of the DC analog tachometer. See “DIP Switch and Jumper
Settings” in the PowerFlex Digital DC Drive User Manual, publication
20P-UM001. Also, see Figure 20 on page 126 for a circuit diagram.
• The analog tach signal is fine scaled using parameter 562 [Anlg Tach
Gain].
• See “Drive Reference and Feedback Scaling” in Appendix C of the
PowerFlex Digital DC Drive User Manual, publication 20P-UM001, for
more information.
36
Rockwell Automation Publication 20P-TG003A-EN-P - February 2012
Component Test Procedures
Chapter 2
Check the Resolver Interface Board
The resolver feedback option module uses the resolver feedback board for
resolver connections, and the resolver interface board for external power, status,
feedback board reset, and encoder output connections.
If a “Resolver Error” (F93) fault occurs and the resolver wiring and configuration
are correct, the following LED indicators and testpoints on the resolver interface
board can be used to verify that the board is not damaged.
• Verify that the following LEDs are functioning as expected. See Figure 12
on page 38 for LED locations and switch settings.
LED
Code
D3
LED
Color
Red
D10
D11
D12
Green
Green
Blue
D16
Yellow
D18
Green
D26
Red
On State
Off State
24V overload (fuse F1 blown). This fuse is 24V supply is OK.
self-resetting when it returns to normal
operating temperature.
12V supply is OK.
Loss of 12V power.
Resolver feedback board voltage is OK.
Voltage error on resolver feedback board.
Switch S1 is set to +24V for encoder signal S1 is not set for +24V.
output on TB2.
Switch S1 is set to +12V for encoder signal S1 is not set for +12V.
output on TB2.
Switch S1 is set to +5V for encoder signal S1 is not set for +5V.
output on TB2.
Resolver feedback board is in reset mode. Resolver feedback board not in reset mode.
If any of the LEDs that should turn on when control power is applied fail to do
so, verify that the resolver interface and resolver feedback boards are properly
seated on the appropriate connectors (XRE, P2, P3). If problems persist, replace
the resolver interface and/or resolver feedback board.
• Measure the signal voltage at the testpoints as indicated in the following
table. See Figure 12 on page 38 for testpoint locations.
Testpoint
+12V
-12V
+24V_VI
+5V
to
…
…
…
…
Testpoint
0V12
0V12
0V24
0V5
Measurement
12V DC ±5%
-12V DC ±5%
24V DC ±5%
5V DC ±5%
If any of the voltage measurements fails, replace the resolver interface board.
Rockwell Automation Publication 20P-TG003A-EN-P - February 2012
37
Chapter 2
Component Test Procedures
Figure 12 - Resolver Interface Board Testpoint Locations
+12V
+12V
-12V
-12V
P2
P3
D10
D10
0V12
0V12
+5V
+5V
0V5
0V5
D26
D26
+24V_VI
0V24
D11
+24V_VI
D11
D3
D3
+VR
0V24
F1
S1 +5V pos.
S1 +12V pos.
S1 +24V pos.
D16
D12
S2 Internal supply pos.
S2 External supply pos.
D12 D16 D18
D18
S1
S2
TB1
38
TB2
Rockwell Automation Publication 20P-TG003A-EN-P - February 2012
Component Test Procedures
Thermistors and Thermal
Switches
Chapter 2
Motor overheating is detected by an external, user-supplied themistor (PTC) or
thermal switch connected to terminals 78 and 79 on the control power terminal
block on the lower, right corner of the pulse transformer circuit board. See
Figure 25 on page 130 for terminal block location.
Motor overheating is typically identified by a “Motor Over Temp” fault (F16).
See “Fault Descriptions” in Chapter 4 of the PowerFlex Digital DC Drive User
Manual, publication 20P-UM001 for details. See Figure 21 on page 127 for a
circuit diagram.
• If a thermal switch is used, a 1 kΩ resistor must be placed in series between
the switch and either terminal 78 or 79.
• If neither a thermistor (PTC) or a thermal switch is installed, a 1 kΩ
resistor must be connected between terminals 78 and 79.
The drive heatsink temperature is monitored by a bimetal thermostat connected
directly to the heatsink. When the heatsink temperature is too high, a “Heatsink
OvrTemp” fault (F8) occurs. See “Fault Descriptions” in Chapter 4 of the
PowerFlex Digital DC Drive User Manual, publication 20P-UM001 for details.
See Figure 22 on page 127 for a circuit diagram.
During normal operation, 1.6V DC is present between terminal 78 and drive
common. When an open circuit exists between terminals 78 and 79, 24V DC
will be present at terminal 78 to drive common. If the 24V is missing, the pulse
transformer board may need replacement.
Relay Outputs
Terminals 35 and 36 and 75 and 76 are N.O. relay outputs. The relay output
between terminals 35 and 36 is configured with parameter 1392 [Relay Out 1
Sel]. The relay output between terminals 75 and 76 is configured with parameter
629 [Relay Out 2 Sel]. See “Using Contactors” in Chapter 1 of the PowerFlex
Digital DC Drive User Manual, publication 20P-UM001, for more information.
The “Main Contactor” fault (F10) indicates a problems related to a contactor
used with the drive. See “Fault Descriptions” in Chapter 4 of the PowerFlex
Digital DC Drive User Manual, publication 20P-UM001 for details.
Rockwell Automation Publication 20P-TG003A-EN-P - February 2012
39
Chapter 2
Component Test Procedures
Create a Fault Report
Complete fault reports are critical for analysis and repair of modules returned to
the factory.
At a minimum, perform and record the following:
• Record the contents of the fault queue (faults and times of occurrence).
See the PowerFlex Digital DC Drive User Manual, publication 20PUM001, for detailed Fault and Alarm codes and descriptions.
• Make a record of any burn marks on the printed circuit boards, cabling,
bus bars, and SCR modules
• Make a record of any liquid and condensation marks on the printed circuit
boards, components and mechanical parts
• Make a record of the amount of dust and other additional particles on the
drive and drive components
• Make a record of any mechanical damage to the drive and drive
components
• Record the size and type of main fuses
• Record any other important marks and damage
What You Need When You
Call Tech Support
When you contact Technical Support, please be prepared to provide the
following information:
• Order number
• Product catalog number and drives series number (if applicable)
• Product serial number
• Firmware revision level
• Most recent fault code
• Your application
You can use the table below to record the data provided in each PowerFlex DC
drive parameter listed.
Param(s)
1349
Name
Status1 at Fault
1350
Status2 at Fault
1351-1360
Fault x Code
1361-1370
Fault x Time
1371
Fault Arm Amps
1372
Fault Speed
1373
Fault Field Amps
1374
Fault Voltage
40
Description
Parameter Data
Captures and displays Par 381 [Drive Status 1] bit pattern at the time
of the last fault.
Captures and displays Par 382 [Drive Status 2] bit pattern at the time
of the last fault.
A code that represents the fault that tripped the drive. The codes will
appear in these parameters in the order they occur (i.e., [Fault 1
Code] = the most recent fault).
The time between initial drive power up and the occurrence of the
associated trip fault.
Captures and displays the armature current (as a percentage of rated
current) at the time of the last fault.
Captures and displays the output speed (rpm) of the drive at the time
of the last fault.
Captures and displays the field current (as a percentage of rated
current) at the time of the last fault.
Captures and displays the armature voltage at the time of the last
fault.
Rockwell Automation Publication 20P-TG003A-EN-P - February 2012
Chapter
3
Access Procedures
Topic
Page
Remove Power from the Drive
42
DPI / HIM Assembly Removal and Installation
42
Protective Cover Removal and Installation
43
Field Circuit Fuses Removal and Installation
45
Communication Adapter and EMI Shield Removal and Installation
46
Resolver Feedback and Interface Circuit Board Removal and Installation
48
I/O Expansion Circuit Board Removal and Installation
52
115V AC to 24V DC I/O Converter Circuit Board Removal and Installation
54
Control Circuit Board Removal and Installation
55
Control EMI Shield Removal and Closure
58
Switching Power Supply Circuit Board Fuse Removal and Installation
60
Switching Power Supply Circuit Board Removal and Installation
61
Pulse Transformer Circuit Board Removal and Installation
62
Field Power Circuit Board Removal and Installation
71
Field SCR and Dual Diode Module Removal and Installation
72
AC Line Snubber Circuit Board and Resistors Removal and Installation
74
Transient Noise Filter Circuit Board Fuses Removal and Installation
81
Transient Noise Filter Circuit Board Removal and Installation
82
Power Supply Filter Circuit Board Removal and Installation
86
Armature Leg Fuses Removal and Installation
89
SCR Modules Removal and Installation
93
AC Current Transducers Removal and Installation
101
Bimetal Thermostats Removal and Installation
107
Cooling Fans Removal and Installation
115
Rockwell Automation Publication 20P-TG003A-EN-P - February 2012
41
Chapter 3
Access Procedures
Remove Power from the
Drive
ATTENTION: Remove power before making or breaking cable connections.
When you remove or insert a cable connector with power applied, an electrical
arc may occur. An electrical arc can cause personal injury or property damage by:
• sending an erroneous signal to your system’s field devices, causing unintended
machine motion
• causing an explosion in a hazardous environment
Electrical arcing causes excessive wear to contacts on both the module and its
mating connector. Worn contacts may create electrical resistance.
1. Remove and lock-out all incoming power to the drive.
L1
L2
L3
I
O
DPI / HIM Assembly Removal Remove the DPI/HIM Assembly
and Installation
1. Read the General Safety Precautions on page 10.
2. Remove power from the drive. See Remove Power from the Drive on
page 42.
3. Disconnect the DPI cable from the HIM assembly.
4. Remove the screw that secures the DPI / HIM assembly to the drive.
5. Carefully remove the DPI / HIM assembly from the cover and disconnect
the cable from the DPI connector on the back side of the assembly.
Remove screw
Tightening torque:
0.8 N•m (7 lb•in)
Disconnect DPI cable
42
Rockwell Automation Publication 20P-TG003A-EN-P - February 2012
Access Procedures
Chapter 3
Install the DPI / HIM Assembly
Install the DPI / HIM assembly in reverse order of removal.
Protective Cover Removal
and Installation
Remove the Protective Covers from the Drive
1. Read the General Safety Precautions on page 10.
2. Remove power from the drive. See Remove Power from the Drive on
page 42.
3. Disconnect the DPI cable from the HIM assembly.
4. Loosen, but do not remove, the screws that secure the bottom cover to the
drive, then slide the cover down and off the drive chassis.
=
PORT
MOD
NET A
NET B
STS
Disconnect DPI cable
Tightening torque:
0.8 N•m (7 lb•in)
Tightening torque:
0.8 N•m (7 lb•in)
Rockwell Automation Publication 20P-TG003A-EN-P - February 2012
43
Chapter 3
Access Procedures
5. Loosen, but do not remove, the screws that secure the top cover to the
drive, then slide the cover up and off the drive chassis.
The HIM assembly is connected via a cable to the control board and
therefore will not pull free from the drive until disconnected. See step 5
below for instructions.
IMPORTANT
PORT
MOD
NET A
NET B
STS
Tightening torque:
0.8 N•m (7 lb•in)
Tightening torque:
0.8 N•m (7 lb•in)
FU1
FV1
D
C
U
V
W
6. Disconnect the HIM communication cable from the connector on the
upper right corner of the control board and set the cover aside.
Pull tabs out to
disconnect cable.
44
Rockwell Automation Publication 20P-TG003A-EN-P - February 2012
Access Procedures
Chapter 3
Install the Protective Covers on the Drive
Install the protective covers in the reverse order of removal.
Field Circuit Fuses Removal
and Installation
Remove the Field Circuit Fuses
1. Read the General Safety Precautions on page 10.
2. Remove power from the drive. See Remove Power from the Drive on
page 42.
3. Remove the lower protective cover only from the drive. See Protective
Cover Removal and Installation on page 43.
4. On the control EMI shield, unscrew the fuse holders and remove the
existing fuses from the holders.
=
Unscrew fuse caps and
remove fuses
Control EMI shield
Install the Field Circuit Fuses
Install the field circuit fuses in the reverse order of removal.
Rockwell Automation Publication 20P-TG003A-EN-P - February 2012
45
Chapter 3
Access Procedures
Communication Adapter
and EMI Shield Removal
and Installation
Remove the Communication Adapter and EMI Shield
1. Read the General Safety Precautions on page 10.
2. Remove power from the drive. See Remove Power from the Drive on
page 42.
3. Remove the Protective Covers from the drive. See Protective Cover
Removal and Installation on page 43.
4. Disconnect the interface cable from the communication adapter and set it
aside.
5. Disconnect any network cables from the adapter and set them aside.
Disconnect interface cable
Disconnect network cables
6. Remove the four screws and washers that secure the communication
adapter to the EMI shield and remove the adapter.
Remove four
screws and
washers
Tightening torque:
0.9 N•m (8.0 lb•in)
46
Rockwell Automation Publication 20P-TG003A-EN-P - February 2012
Access Procedures
Chapter 3
7. Remove the three screws and washers that secure the EMI shield to the
standoffs on the control board and remove the EMI shield.
Remove three screws and washers
Tightening torque:
1.0 N•m (8.9 lb•in)
8. Remove the three standoffs and washers from the control board.
Remove three standoffs
and washers
Tightening torque:
1.0 N•m (8.9 lb•in)
Install the Communication Adapter and EMI Shield
Install the communication adapter and EMI shield in reverse order of removal.
Rockwell Automation Publication 20P-TG003A-EN-P - February 2012
47
Chapter 3
Access Procedures
Remove the Resolver Feedback and Interface Circuit Boards
Resolver Feedback and
Interface Circuit Board
Removal and Installation
1. Read the General Safety Precautions on page 10.
2. Remove power from the drive. See Remove Power from the Drive on
page 42.
3. Remove the protective covers from the drive. See Remove the Protective
Covers from the Drive on page 43.
Mark all connections and wires before removal to avoid incorrect
wiring during reassembly.
IMPORTANT
4. Disconnect the plug-in terminal blocks from the resolver feedback and
resolver interface boards.
XR
=
XA
XP3
P4
P2
P3
P2
P3
S1
S15
Resolver feedback board
XRE
S1
S2
TB1
P1
TB2
Remove terminal blocks
48
Rockwell Automation Publication 20P-TG003A-EN-P - February 2012
Access Procedures
Chapter 3
5. Remove the three hexalobular screws that secure the resolver feedback
board to the stand-offs on the resolver interface board and carefully
remove the resolver feedback board.
The resolver feedback board is connected to the resolver interface
board below it via stacker connector pins at connectors P2 and P3. Lift
the resolver feedback board straight up during removal to avoid any
damage to the connector pins.
IMPORTANT
XR
XA
XP3
P4
J1
J2
P2
P3
S15
Remove screws
and board
XRE
P1
Tightening torque
for re-assembly is
0.7 N•m (6.2 lb•in)
XFCD
S1
S4
S21
TB1
P1
TB2
Rockwell Automation Publication 20P-TG003A-EN-P - February 2012
49
Chapter 3
Access Procedures
6. Remove the three stand-offs from the resolver interface board.
XR
XA
XP3
P2
P3
S15
Resolver interface board
Remove stand-offs
XRE
XRE
Tightening torque for
re-assembly is
0.7 N•m (6.2 lb•in)
XFCD
S1
S4
S2
S21
TB1
50
TB2
Rockwell Automation Publication 20P-TG003A-EN-P - February 2012
Access Procedures
Chapter 3
7. Remove the four hexalobular screws that secure the resolver interface
board to the control board and remove the resolver interface board.
The resolver interface board is connected to the control board below it
via a stacker connector pin at connector XRE. Lift the resolver interface
board straight up during removal to avoid any damage to the
connector pin.
IMPORTANT
XR
XA
XP3
P2
P3
S15
Remove screws
and board
XRE
XRE
Tightening torque for
re-assembly is
0.7 N•m (6.2 lb•in)
XFCD
S1
S4
S2
S21
TB1
TB2
Install the Resolver Feedback and Interface Circuit Boards
Install the resolver feedback and interface boards in reverse order of removal.
Rockwell Automation Publication 20P-TG003A-EN-P - February 2012
51
Chapter 3
Access Procedures
I/O Expansion Circuit Board
Removal and Installation
Remove the I/O Expansion Circuit Board
1. Read the General Safety Precautions on page 10.
2. Remove power from the drive. See Remove Power from the Drive on
page 42.
3. Remove the covers from the drive. See Protective Cover Removal and
Installation on page 43.
4. If installed, remove the resolver feedback option board. See Remove the
Resolver Feedback and Interface Circuit Boards on page 48.
IMPORTANT
Mark all connections and wires before removal to avoid incorrect
wiring during reassembly.
5. Remove the plug-in I/O terminal blocks with the wiring kept in place.
6. Remove the two screws that secure the I/O expansion board to the standoffs on the control board.
=
Remove two screws
Tightening torque
for re-assembly is
1.0 N•m (8.9 lb•in)
7. Carefully pull the I/O expansion board off connector XBB on the control
board.
52
Rockwell Automation Publication 20P-TG003A-EN-P - February 2012
Access Procedures
Chapter 3
8. Remove the two stand-offs and washers from the control board.
Remove two stand-offs and washers
Tightening torque for re-assembly is
1.0 N•m (8.9 lb•in)
9. Install one screw in the lower left corner of the control circuit board.
Install screw
Tightening torque for re-assembly is
1.0 N•m (8.9 lb•in)
Install the I/O Expansion Circuit Board
Install the I/O expansion board in reverse order of removal.
Rockwell Automation Publication 20P-TG003A-EN-P - February 2012
53
Chapter 3
Access Procedures
115V AC to 24V DC I/O
Converter Circuit Board
Removal and Installation
Remove the 115V AC to 24V DC I/O Converter Circuit Board
1. Read the General Safety Precautions on page 10.
2. Remove power from the drive. See Remove Power from the Drive on
page 42.
3. Remove the covers from the drive. See Remove the Protective Covers from
the Drive on page 43.
IMPORTANT
Mark all connections and wires before removal to avoid incorrect
wiring during reassembly.
4. Remove the plug-in I/O terminal block with the wiring kept in place.
5. Remove the two screws that secure the I/O converter board to the standoffs on the control board and remove the I/O converter board.
=
Remove two screws
Tightening torque for re-assembly is
1.0 N•m (8.9 lb•in)
6. Remove the two stand-offs and washers from the control board.
Remove two stand-offs and washers
54
Rockwell Automation Publication 20P-TG003A-EN-P - February 2012
Tightening torque for re-assembly is
1.0 N•m (8.9 lb•in)
Access Procedures
Chapter 3
Install the 115V AC to 24V DC I/O Converter Circuit Board
Install the 115V AC to 24V DC I/O converter board in reverse order of removal.
Control Circuit Board
Removal and Installation
Remove the Control Circuit Board
1. Save the drive and adapter parameter configuration to a HIM set or by
down loading the drive and adapter parameters to an offline database file
using DriveExecutive. Refer to the PowerFlex DC Digital Drive User
Manual, publication 20P-UM001, for information on using the HIM or
the on-line help provided with DriveExecutive for more information on
HIM Sets or using the HIM.
2. Read the General Safety Precautions on page 10.
3. Remove power from the drive. See Remove Power from the Drive on
page 42.
4. Remove the protective covers from the drive. See Remove the Protective
Covers from the Drive on page 43.
5. Remove the communication adapter and EMI shield from the control
board. See Remove the Communication Adapter and EMI Shield on
page 46.
6. If present, remove the I/O expansion circuit board. See Remove the I/O
Expansion Circuit Board on page 52.
7. If present, remove the 115V AC to 24V DC I/O converter circuit board.
See Remove the 115V AC to 24V DC I/O Converter Circuit Board on
page 54.
8. Record all switch and jumper settings on the control board. Refer to the
PowerFlex DC Digital Drive User Manual, publication 20P-UM001, for
more information.
Rockwell Automation Publication 20P-TG003A-EN-P - February 2012
55
Chapter 3
Access Procedures
Jumper/ Function
Switch
S4
Configures the input voltage of the DC analog tachometer.
S9
Configures the input signal of Analog Input 1 (terminals 1 and 2):
Note: The input signal type must also be programmed accordingly using Par 71
[Anlg In1 Config].
S10
Configures the input signal of Analog Input 2 (terminal 3 and 4):
Note: The input signal type must also be programmed accordingly using Par 76
[Anlg In2 Config].
S11
Configures the input signal of Analog Input 3 (terminals 5 and 6):
Note: The input signal type must also be programmed accordingly using Par 81
[Anlg In3 Config].
S14
Field current resistors setting.
In addition, the value selected with switch S14 must be entered in Par 374 [Rated
Field Curr] in the control software when the drive is commissioned.
S15
S20
S21
S14-1 =
S14-2 =
S14-3 =
S14-4 =
S14-5 =
S14-6 =
S14-7 = (not used)
S14-8 = (not used)
Configuration of the control circuit board to the appropriate drive size. This value is S15-1 =
set to the appropriate size at the factory.
S15-2 =
S15-3 =
S15-4 =
S15-5 =
S15-6 =
S15-7 =
S15-8 =
Monitoring of the Z channel of the Digital Encoder on connector XE2:
Off Position
Z-channel monitored
On Position
Z-channel not monitored
The S20 setting should match the value selected in Par 652 [Encoder Err Chk] (for
example, if S20 = “Off”, then Par 652 = 1 “Enabled”).
Encoder power supply voltage and input adaptation selection:
Note: When control power is supplied to the drive, the appropriate LED lights to
indicate the selection of the switch.
ENC_5
+5 V encoder (+2.5…5.4V input range)
ENC_12
+12…15 V encoder (+5.4V…15.2V input range)
IMPORTANT
56
Setting
Mark all connections and wires before removal to avoid incorrect
wiring during reassembly.
Rockwell Automation Publication 20P-TG003A-EN-P - February 2012
Access Procedures
Chapter 3
9. Carefully disconnect the cables from connectors XFCD, XA and XR on
the control board.
10. Remove the plug-in I/O and control terminal blocks with the wiring kept
in place.
Disconnect
cables
=
Disconnect I/O
and control
wiring
11. Remove the five screws that secure the control board to the control EMI
shield and remove the board.
Remove
screws
Tightening torque for
re-assembly is
1.0 N•m (8.9 lb•in)
Rockwell Automation Publication 20P-TG003A-EN-P - February 2012
57
Chapter 3
Access Procedures
Install the Control Circuit Board
Install the control board in reverse order of removal.
Control EMI Shield Removal
and Closure
Move the Control EMI Shield
You must move the control EMI shield that holds the control board in order to
access other components within the drive.
1. Read the General Safety Precautions on page 10.
2. Remove power from the drive. See Remove Power from the Drive on
page 42.
3. Remove the covers from the drive. See Remove the Protective Covers from
the Drive on page 43.
4. Carefully disconnect the cables from connectors XFCD and XR on the
control board.
=
Disconnect
cables
58
Rockwell Automation Publication 20P-TG003A-EN-P - February 2012
Access Procedures
Chapter 3
5. Loosen the two captive screws at the top of the control EMI shield and
partially lower the shield. The shield will not open to its full extent due to
a cable connection between the switching power supply board and the
pulse transformer board.
Loosen screws
6. Disconnect the cable from connector XSW on the switching power supply
board and lower the control EMI shield until it rests on the drive chassis.
IMPORTANT
If the drive is not in a vertical position, the control EMI shield will not
stay open without a means of restraint.
Remove cable
Install the Control EMI Shield
Install the control EMI shield in reverse order of removal.
Rockwell Automation Publication 20P-TG003A-EN-P - February 2012
59
Chapter 3
Access Procedures
Switching Power Supply Circuit
Board Fuse Removal and
Installation
Remove the Fuses on the Switching Power Supply Circuit Board
1. Read the General Safety Precautions on page 10.
2. Remove power from the drive. See Remove Power from the Drive on
page 42.
3. Remove the covers from the drive. See Remove the Protective Covers from
the Drive on page 43.
4. Move the control EMI shield. See Move the Control EMI Shield on
page 58.
5. Remove the two fuses on the switching power supply board by inserting a
screwdriver in the slot on the top of the fuse, carefully pushing down and
turning the fuse counterclockwise. When the fuse holder releases, remove
the holder and fuse.
Remove fuses from holders
Install the Fuses on the Switching Power Supply Circuit Board
Install the fuses on the switching power supply board in reverse order of removal.
IMPORTANT
Insert the 3.15A 250V fuse in the fuse holder designated F1. Insert the 2.5A
250V fuse in the fuse holder designated F2.
F1 = 3.15A
250V fuse
60
Rockwell Automation Publication 20P-TG003A-EN-P - February 2012
F2 = 2.5A
250V fuse
Access Procedures
Switching Power Supply
Circuit Board Removal and
Installation
Chapter 3
Remove the Switching Power Supply Circuit Board
1. Read the General Safety Precautions on page 10.
2. Remove power from the drive. See Remove Power from the Drive on
page 42.
3. Remove the covers from the drive. See Remove the Protective Covers from
the Drive on page 43.
4. Move the control EMI shield. See Move the Control EMI Shield on
page 58.
5. Disconnect the cables from connector XA and XUV on the switching
power supply board.
IMPORTANT
Mark all connections and wires before removal to avoid incorrect
wiring during reassembly.
6. If present, disconnect the jumper from terminals SA-SB.
IMPORTANT
Be sure to replace the jumper between terminals SA-SB if using 115V
AC control input power when installing a new switching power supply
board.
Disconnect cables and wiring
Rockwell Automation Publication 20P-TG003A-EN-P - February 2012
61
Chapter 3
Access Procedures
7. Remove the six screws and washers that secure the board to the control
EMI shield and remove the board.
IMPORTANT
DO NOT remove the isolation shield below the board, unless it is
damaged and you are replacing it with a new sheet.
Remove six screws and washers
Install the Switching Power Supply Circuit Board
Install the switching power supply board in reverse order of removal.
Pulse Transformer Circuit
Board Removal and
Installation
Remove the Pulse Transformer Circuit Board
1. Read the General Safety Precautions on page 10.
2. Remove power from the drive. See Remove Power from the Drive on
page 42.
3. Remove the covers from the drive. See Remove the Protective Covers from
the Drive on page 43.
4. Move the control EMI shield. See Move the Control EMI Shield on
page 58.
62
Rockwell Automation Publication 20P-TG003A-EN-P - February 2012
Access Procedures
Chapter 3
5. Remove the four screws (two on either side of the drive frame) that secure
the slotted air flow plate to the top of the drive and remove the plate.
Air flow plate
Remove four screws
Screws shown removed
IMPORTANT
Mark all connections and wires before removal to avoid incorrect
wiring during reassembly.
Rockwell Automation Publication 20P-TG003A-EN-P - February 2012
63
Chapter 3
Access Procedures
6. Remove the appropriate gate leads:
• For non-regenerative drives, remove each pair of (orange and yellow)
gate lead cables from connectors KG1…KG6 and push each lead
through the appropriate opening in the board.
• For regenerative drive, remove each pair of (orange and yellow) gate
lead cables from connectors KG01…KG06 and KG1…KG6 and push
each lead through the appropriate opening in the board.
IMPORTANT
Carefully remove the gate leads by grasping the connector. DO NOT pull
the gate leads off by pulling on the wires.
7. Remove the cable from connector XTA at the bottom center of the board.
Non-Regenerative Drive
=
Remove cable
Remove gate leads
Regenerative Drive
Remove cable
Remove gate leads
64
Rockwell Automation Publication 20P-TG003A-EN-P - February 2012
Access Procedures
Chapter 3
8. Remove the (orange and yellow) cables from connectors K1G1 and K2G2
on the top left side of the board.
9. Remove the cables from connectors X4, X5 and XTM at the top left side
of the board.
Remove cables
10. Remove the cables from connectors XCD, XUVW and X3 at the top right
side of the board.
Remove cables
Rockwell Automation Publication 20P-TG003A-EN-P - February 2012
65
Chapter 3
Access Procedures
11. For Pulse Transformer boards with an armature voltage feedback terminal
block, FIR3-XX, rev. “M” and higher, remove the cable from connector
XCD_I0 on the upper right corner of the board.
Remove cable from XCD_IO connector
PE
PE1
TO6
XCD_IO
T6
XCD
KGO6
KG6
12. Remove the six screws and washers that secure the pulse transformer board
to the drive and remove the board.
Remove screws and washers
Note: Regenerative Drive Shown
Configure the Pulse Transformer Circuit Board
The new pulse transformer circuit board must be configured to match the drive
size (armature output current and HP rating). The steps required to configure
the pulse transformer board are different based on the revision code of the pulse
transformer board. See either, Configuring a Pulse Transformer Board FIR3-xx
Rev. “L” and Lower on page 67, or Configuring a Pulse Transformer Board FIR3xx Rev. “M” and Higher on page 69.
66
Rockwell Automation Publication 20P-TG003A-EN-P - February 2012
Access Procedures
Chapter 3
Configuring a Pulse Transformer Board FIR3-xx Rev. “L” and Lower
IMPORTANT
This procedure requires a multimeter that measures resistance to thousandths
of an ohm.
1. Cut and remove the appropriate sizing resistor(s) (if necessary) from the
pulse transformer board based on the drive AC input voltage, armature
output current, and HP rating shown in Table 12 and Table 13 in the
Sizing Resistors Configuration section below.
Sizing resistors are located in the center
of the pulse transformer circuit board.
=
Sizing Resistors Configuration
The tables below indicate the value of the designated resistor (R1…R5) when left
in place on the pulse transformer board, or indicate “Remove” when the resistor
should be cut off and removed from the board. “–” indicates that this resistor is
not contained on the pulse transformer board for the designated drive size.
Table 12 - 230V AC Input Drives
Drive Current
Rating Code
521
DC
Amps
521
AC Line
Amps
426
HP
R1
R2
R3
R4
R5
150
–
Remove
5.36Ω
5.36Ω
5.36Ω
HP
R1
R2
R3
R4
R5
300
400
–
–
Remove
5.36Ω
5.36Ω
5.36Ω
5.36Ω
5.36Ω
5.36Ω
5.36Ω
Table 13 - 460V AC Input Drives
Drive Current
Rating Code
495
667
DC
Amps
495
667
AC Line
Amps
404.4
544.9
Rockwell Automation Publication 20P-TG003A-EN-P - February 2012
67
Chapter 3
Access Procedures
2. Connect the leads of the multimeter to pins 13 and 14 of connector XR on
the pulse transformer board (polarity is not important) and, using the TA
potentiometer in the center of the pulse transformer circuit board, set the
total resistance (RTA) to the appropriate value as indicated in Table 14 or
Table 15 in the Total Resistance Values section on page 69.
The XR connector is located on the
upper right corner of the pulse
transformer circuit board.
2 . . . . . . . . . . . . . 14 . . . . . . . . . . . . . . . . . . . 34
1 . . . . . . . . . . . . . .13 . . . . . . . . . . . . . . . . . . . . 33
The TA potentiometer is located on the lower
right corner of the pulse transformer circuit
board next to the control power terminal block.
68
Rockwell Automation Publication 20P-TG003A-EN-P - February 2012
XR
Access Procedures
Chapter 3
Total Resistance Values
Table 14 - 230V AC Input Drives
Drive Current
Rating Code
521
DC
Amps
521
AC Line
Amps
426
HP
Set RTA Value Using TA
Potentiometer (Ohms)
4.699
150
Table 15 - 460V AC Input Drives
Drive Current
Rating Code
495
667
DC
Amps
495
667
AC Line
Amps
404.4
544.9
HP
Set RTA Value Using TA
Potentiometer (Ohms)
4.945
3.67
300
400
3. Seal the TA potentiometer in place using RV (silicon).
4. Continue with Install the Pulse Transformer Circuit Board on page 70.
Configuring a Pulse Transformer Board FIR3-xx Rev. “M” and Higher
Set DIP switches S3 and S4 (shown in the illustration below) on the pulse
transformer board to the correct settings based on the appropriate AC input
voltage, armature output current, and HP rating shown in Table 16 or Table 17
on page 70.
S4
S3
1
1
XTM
X4
XR
X5
XCD_IO
XSW
XCT
XUVW
XCD
XP2
TR2
X3
XP1
XI2CA
S4
S3
XY
TR1
1
TR3
1
XTA
TO1
T1
KGO1
KG1
T4
KG4
TO4
KGO4
TO2
KGO2
T2
KG2
Rockwell Automation Publication 20P-TG003A-EN-P - February 2012
T5
KG5
TO5
KGO5
TO3
KGO3
T3
KG3
T6
KG6
TO6
KGO6
69
Chapter 3
Access Procedures
IMPORTANT
A blank cell below a switch in the tables below indicate that the setting is
“OFF”.
Table 16 - 230V AC Input Drives
Drive Current DC AC Line HP
Rating Code Amps Amps
521
70
521
700
426
571
DIP Switch S3
DIP Switch S4
S3-1 S3-2 S3-3 S3-4 S3-5 S3-6 S3-7 S3-8 S4-1 S4-2 S4-3 S4-4 S4-5 S4-6 S4-7 S4-8
150 ON
ON
ON
ON
200
ON
ON
ON
ON
Table 17 - 460V AC Input Drives
Drive Current DC AC Line
Rating Code Amps Amps
495
667
495
667
404.4
544.9
HP
DIP Switch S3
DIP Switch S4
S3-1 S3-2 S3-3 S3-4 S3-5 S3-6 S3-7 S3-8 S4-1 S4-2 S4-3 S4-4 S4-5 S4-6 S4-7 S4-8
300
ON
ON
ON
ON
400
ON
ON
ON
ON
Table 18 - 575V AC Input Drives
Drive Current DC AC Line
Rating Code Amps Amps
540
675
540
675
441.2
551.5
HP
DIP Switch S3
DIP Switch S4
S3-1 S3-2 S3-3 S3-4 S3-5 S3-6 S3-7 S3-8 S4-1 S4-2 S4-3 S4-4 S4-5 S4-6 S4-7 S4-8
400
ON
ON
ON
ON
500 ON
ON
ON
ON
Table 19 - 690V AC Input Drives
Drive Current DC AC Line
Rating Code Amps Amps
452
565
452
565
369
462
HP
DIP Switch S3
DIP Switch S4
S3-1 S3-2 S3-3 S3-4 S3-5 S3-6 S3-7 S3-8 S4-1 S4-2 S4-3 S4-4 S4-5 S4-6 S4-7 S4-8
400 ON
ON
ON
ON
500 ON
ON
ON
ON
Install the Pulse Transformer Circuit Board
Install the new pulse transformer board in reverse order of removal.
• Inspect the existing connection cables for burn marks, cracks or loose
connectors. If necessary, replace the cables connected to connector X3, X4,
X5, XCD, XR, XSW, XTA and XUVW on the pulse transformer board
with the new cables provided.
• Inspect the existing gate lead cables for burn marks, cracks or loose
connectors. If necessary, replace the gate lead cables with the new cables
provided.
ATTENTION: Each gate lead cable must be connected to the exact connector
from which it was removed on the pulse transformer circuit board or damage to
the drive may occur.
70
Rockwell Automation Publication 20P-TG003A-EN-P - February 2012
Access Procedures
Field Power Circuit Board
Removal and Installation
Chapter 3
Remove the Field Power Circuit Board
1. Read the General Safety Precautions on page 10.
2. Remove power from the drive. See Remove Power from the Drive on
page 42.
3. Remove the covers from the drive. See Remove the Protective Covers from
the Drive on page 43.
4. Move the control EMI shield. See Move the Control EMI Shield on
page 58).
IMPORTANT
Mark all connections and wires before removal to avoid incorrect
wiring during reassembly.
5. Remove the cables from connectors X3 and XFCD on the board.
6. Remove the seven screws, washers and wire leads (connections 2V1, 2U1
and 2C1 and one unmarked) from the board and remove the board from
the drive.
Remove cable
Remove screws and
washers
Remove screws and
washers
Remove cable
Rockwell Automation Publication 20P-TG003A-EN-P - February 2012
71
Chapter 3
Access Procedures
Install the Field Power Circuit Board
Install the field power board in reverse order of removal.
• Tightening torque for the screws connecting the field power board to the
field SCR and dual diode modules is 2.5…4.0 N•m (22…35 lb•in).
Field SCR and Dual Diode
Module Removal and
Installation
Remove the Field SCR and Dual Diode Module
1. Read the General Safety Precautions on page 10.
2. Remove power from the drive. See Remove Power from the Drive on
page 42.
3. Remove the covers from the drive. See Remove the Protective Covers from
the Drive on page 43.
4. Move the control EMI shield. See Move the Control EMI Shield on
page 58.
5. Remove the field power circuit board. See Remove the Field Power Circuit
Board on page 71.
IMPORTANT
Mark all connections and wires before removal to avoid incorrect
wiring during reassembly.
6. Remove the (orange and yellow) cables from connectors K1G1 and K2G2
on the top left side of the pulse transformer board.
Remove cables
72
Rockwell Automation Publication 20P-TG003A-EN-P - February 2012
Access Procedures
Chapter 3
7. Remove the two screws and washers that secure each module to the
heatsink and remove the modules from the drive.
Remove screws and
washers
Install the Field SCR and Dual Diode Module
Install the field SCR and dual diode module in reverse order of removal.
• Apply thermal grease to the bottom of the SCR and dual diode modules
before securing them to the heatsink.
ATTENTION: Thermal grease must be applied to the bottom of the SCR and dual
diode modules before securing them to the heatsink or damage to the drive may
occur.
• Tightening torque for the screws connecting the field SCR and dual diode
modules to the heatsink and the screws connecting the field board to the
field SCR and dual diode modules is 2.5…4.0 N•m (22…35 lb•in).
Rockwell Automation Publication 20P-TG003A-EN-P - February 2012
73
Chapter 3
Access Procedures
AC Line Snubber Circuit Board Remove the AC Line Snubber Circuit Board and Resistors
and Resistors Removal and
1. Read the General Safety Precautions on page 10.
Installation
2. Remove power from the drive. See Remove Power from the Drive on
page 42.
3. Remove the covers from the drive. See Remove the Protective Covers from
the Drive on page 43.
4. Move the control EMI shield. See Move the Control EMI Shield on
page 58.
Disconnect and Remove the Pulse Transformer and Field Power Circuit Boards
You must remove the pulse transformer and field power circuit boards in order to
replace the AC line snubber circuit board and resistors.
5. Remove the four screws that secure the slotted air flow plate to the top of
the drive and remove the plate.
IMPORTANT
74
Mark all connections and wires before removal to avoid incorrect
wiring during reassembly.
Rockwell Automation Publication 20P-TG003A-EN-P - February 2012
Access Procedures
Chapter 3
6. Remove the appropriate gate leads:
• For non-regenerative drives, remove each pair of (orange and yellow)
gate lead cables from connectors KG1…KG6 and push each lead
through the appropriate opening in the board.
• For regenerative drive, remove each pair of (orange and yellow) gate
lead cables from connectors KG01…KG06 and KG1…KG6 and push
each lead through the appropriate opening in the board.
IMPORTANT
Carefully remove the gate leads by grasping the connector. DO NOT pull
the gate leads off by pulling on the wires.
7. Remove the cable from connector XTA at the bottom center of the pulse
transformer board.
Non-Regenerative Drive
=
Remove cable
Remove gate
leads
Regenerative Drive
Remove cable
Remove gate
leads
Rockwell Automation Publication 20P-TG003A-EN-P - February 2012
75
Chapter 3
Access Procedures
8. Remove the (orange and yellow) cables from connectors K1G1 and K2G2
on the top left side of the pulse transformer board.
9. Remove the cables from connectors XTM, X4 and X5 at the top left side
of the pulse transformer board.
Remove cables
10. Remove the cables from connectors XCD, XUVW and X3 at the top right
side of the pulse transformer board.
Remove cables
11. Remove the cables from connectors X3 and XFCD on the field power
board.
76
Rockwell Automation Publication 20P-TG003A-EN-P - February 2012
Access Procedures
Chapter 3
12. Remove the four screws and washers that secure the wire leads
(connections 2V1, 2U1 and 2C1 and one unmarked) from the field power
board and set the wires aside.
Remove cable
Remove screws,
washers and wires
Remove screws,
washers and wires
Remove cable
Rockwell Automation Publication 20P-TG003A-EN-P - February 2012
77
Chapter 3
Access Procedures
13. Remove the four screws and washers (two on either side of the drive frame)
that secure the support plate for the pulse transformer and field power
boards to the drive frame and remove the support plate and boards.
Front of Drive
Remove screws and
washers (both sides
of drive frame)
14. If present, remove the isolation sheet that is secured to the bus bars.
Remove isolation sheet.
78
Rockwell Automation Publication 20P-TG003A-EN-P - February 2012
Access Procedures
Chapter 3
15. Remove the bolts and washers that secure the AC line snubber board (red
and blue) leads and screws and washers that secure the resistor (black)
leads to the bus bars and remove the leads.
Regenerative Drive
Remove bolts and washers
Remove screws and washers
Non-Regenerative Drive
Remove bolts and washers
Remove screws and washers
Rockwell Automation Publication 20P-TG003A-EN-P - February 2012
79
Chapter 3
Access Procedures
16. Remove the three screws and washers that secure the AC line snubber
board to the drive frame and remove the board.
Remove screws and washers
17. Remove the two screws that secure each resistor (six total) to the drive
frame and remove the resistors from the drive.
Remove screws
80
Rockwell Automation Publication 20P-TG003A-EN-P - February 2012
Access Procedures
Chapter 3
Install the AC Line Snubber Circuit Board and Resistors
Install the AC line snubber board and resistors in reverse order of removal.
• Apply thermal grease to the bottom of the resistors before securing them to
the heatsink.
ATTENTION: Thermal grease must be applied to the bottom of the resistors
before securing them to the heatsink or damage to the drive may occur.
• Tightening torque for the screws connecting the field board to the field
SCR and dual diode modules is 2.5…4.0 N•m (22…35 lb•in).
Transient Noise Filter Circuit Remove the Fuses on the Transient Noise Filter Circuit Board
Board Fuses Removal and
1. Read the General Safety Precautions on page 10.
Installation
2. Remove power from the drive. See Remove Power from the Drive on
page 42.
3. Remove the covers from the drive. See Remove the Protective Covers from
the Drive on page 43.
4. Move the control EMI shield. See Move the Control EMI Shield on
page 58.
Rockwell Automation Publication 20P-TG003A-EN-P - February 2012
81
Chapter 3
Access Procedures
5. Carefully remove the three fuses from the fuse holders on the transient
noise filter board.
Remove fuses
Back side of
Control EMI
shield
Install the Fuses on the Transient Noise Filter Circuit Board
Install the fuses on the transient noise filter board in reverse order of removal.
Transient Noise Filter Circuit Remove the Transient Noise Filter Circuit Board
Board Removal and
1. Read the General Safety Precautions on page 10.
Installation
2. Remove power from the drive. See Remove Power from the Drive on
page 42.
3. Remove the covers from the drive. See Remove the Protective Covers from
the Drive on page 43.
IMPORTANT
Mark all connections and wires before removal to avoid incorrect
wiring during reassembly.
4. Remove the ground wire from the PE ground stud on the drive frame.
82
Rockwell Automation Publication 20P-TG003A-EN-P - February 2012
Access Procedures
Chapter 3
5. Remove the screw that secures the black lead from connection U on the
transient noise filter board to the U phase power terminal, and remove the
lead.
Transient Noise
Filter board
PE ground stud
Remove ground wire
Remove screw and wire
6. Remove the two screws and washers that secure the bottom of the
transient noise filter board to the drive
.
Remove screws and washers
Rockwell Automation Publication 20P-TG003A-EN-P - February 2012
83
Chapter 3
Access Procedures
7. Remove the two screws and washers that secure the bottom of the power
supply filter circuit board to the drive.
Remove screws and washers
8. Move the control EMI shield. See Move the Control EMI Shield on
page 58.
9. Remove the wires that connect to the back of the control terminals on the
power supply filter board.
10. Remove the two screws and washers that secure the top of the power
supply filter board to the drive and carefully lift the board.
Remove screw and washer
Remove screw and washer
Remove wires
84
Rockwell Automation Publication 20P-TG003A-EN-P - February 2012
Access Procedures
Chapter 3
11. Remove the two screws and washers that secure the top of the transient
noise filter board to the drive and carefully lift the board off the drive.
Remove screws and washers
Remove cable
ties
12. Remove the screws and washers that secure the black leads from
connections V and W on the transient noise filter board to power
terminals V and W, respectively, and remove the leads.
Remove screws, washers and leads
Rockwell Automation Publication 20P-TG003A-EN-P - February 2012
85
Chapter 3
Access Procedures
13. Disconnect the cables from connector XCD and XUVW on the pulse
transformer circuit board.
Remove cables
14. Cut the cable ties that secure all cables and remove the transient noise filter
board and cables from the drive.
Install the Transient Noise Filter Circuit Board
Install the transient noise filter board and power supply filter board in reverse
order of removal.
Power Supply Filter Circuit
Board Removal and
Installation
Remove the Power Supply Filter Circuit Board
1. Read the General Safety Precautions on page 10.
2. Remove power from the drive. See Remove Power from the Drive on
page 42.
3. Remove the covers from the drive. See Remove the Protective Covers from
the Drive on page 43.
IMPORTANT
86
Mark all connections and wires before removal to avoid incorrect
wiring during reassembly.
Rockwell Automation Publication 20P-TG003A-EN-P - February 2012
Access Procedures
Chapter 3
4. Remove all wires from the bottom of the terminal blocks on the power
supply filter board.
5. Remove the two screws and washers that secure the bottom of the power
supply filter board to the drive.
Remove wires, screws and washers
6. Move the control EMI shield. See Move the Control EMI Shield on
page 58.
7. Disconnect the wires from connectors X5, XTM, and XUV on the power
supply filter board.
Remove connections
Rockwell Automation Publication 20P-TG003A-EN-P - February 2012
87
Chapter 3
Access Procedures
8. Remove all connections from the top of the terminal blocks on the power
supply filter board.
9. Remove the two screws and washers that secure the top of the power
supply filter board to the drive and remove the board from the drive.
Remove screw and washer
Remove screw and washer
Remove wires
Install the Power Supply Filter Circuit Board
Install the power supply filter board in reverse order of removal.
88
Rockwell Automation Publication 20P-TG003A-EN-P - February 2012
Access Procedures
Chapter 3
Armature Leg Fuses Removal Remove the Armature Leg Fuses
and Installation
Note: This procedure requires the use of a 17mm open ended wrench.
1. Read the General Safety Precautions on page 10.
2. Remove power from the drive. See Remove Power from the Drive on
page 42.
3. Remove the covers from the drive. See Remove the Protective Covers from
the Drive on page 43.
IMPORTANT
It is necessary to remove the transient noise filter circuit board in order
to remove the fuses from the V phase input bus bars.
4. Remove the two screws and washers that secure the bottom of the
transient noise filter board to the drive.
Remove screws and washers
5. Move the control EMI shield. See Move the Control EMI Shield on
page 58.
Rockwell Automation Publication 20P-TG003A-EN-P - February 2012
89
Chapter 3
Access Procedures
6. Remove the two screws and washers that secure the top of the transient
noise filter board to the drive and carefully lift the board off the drive.
Remove screws and washers
Remove cable
ties
7. If present, remove the isolation sheet that is secured to the bus bars.
Remove isolation sheet.
Note: Regenerative Drive Shown
90
Rockwell Automation Publication 20P-TG003A-EN-P - February 2012
Access Procedures
Chapter 3
8. If necessary, disconnect the wire leads from the switches mounted on the
top of the Armature circuit fuses (two each fuse).
IMPORTANT
Note the numbered position of each wire on the fuse for proper
installation of the new fuses.
Remove wire leads
9. Remove the two screws that secure each switch to the fuse and remove the
switch. Retain the switch for reuse.
Remove screws
Rockwell Automation Publication 20P-TG003A-EN-P - February 2012
91
Chapter 3
Access Procedures
10. Remove the bolts and washers (top and bottom) that secure the fuse to the
bus bars and remove the fuse.
IMPORTANT
Note the order of the washers as you remove them in order to install in
the proper order.
Remove bolts
and washers
Install the Armature Leg Fuses
Install the armature leg fuses in reverse order of removal.
IMPORTANT
Verify that the washers are installed in the proper order and that the switches
are installed on the correct fuse.
Bolt
Lock washer
Large washer
Fuse
Large washer
Small washer
Bolt
92
Rockwell Automation Publication 20P-TG003A-EN-P - February 2012
Access Procedures
SCR Modules Removal and
Installation
Chapter 3
Remove the SCR Modules
IMPORTANT
It is recommended that you replace the armature leg fuses for each pair of SCR
modules that you replace in the drive. See Remove the Armature Leg Fuses on
page 89.
1. Read the General Safety Precautions on page 10.
2. Remove power from the drive. See Remove Power from the Drive on
page 42.
3. Remove the covers from the drive. See Remove the Protective Covers from
the Drive on page 43.
4. Move the control EMI shield. See Move the Control EMI Shield on
page 58.
5. Remove the gate leads from the pulse transformer board.
Non-Regenerative Drive
=
Remove gate leads
Regenerative Drive
Remove gate leads
Rockwell Automation Publication 20P-TG003A-EN-P - February 2012
93
Chapter 3
Access Procedures
6. If present, remove the isolation sheet that is secured to the bus bars.
Remove isolation sheet.
Note: Regenerative Drive Shown
7. Remove the bus bars in order to access the SCR modules in the drive:
• For regenerative drives, see Remove the Bus Bars from a Regenerative
Drive on page 95.
• For non-regenerative drives, see Remove the Bus Bars from a NonRegenerative Drive on page 97.
94
Rockwell Automation Publication 20P-TG003A-EN-P - February 2012
Access Procedures
Chapter 3
Remove the Bus Bars from a Regenerative Drive
8. Remove the six bolts and washers that secure the intermediate bus bars to
the U and W phase AC input and DC output (terminals C and D) bus
bars. Note the size and location of the bolts and the order in which the
washers are placed on the bolts.
Remove bolts
and washers
Remove bolts
and washers
Bolt Size and Washer Order
Left to right, two (2)
nuts, lock washers
and flat washers
Bolt (30mm long)
Flat washer
Left to right, two (2) bolts (40mm
long) and flat washers
Flat washer
Lock washer
Nut
Nut
Lock washer
Flat washer
Flat washer
Bolt (30mm long)
Left to right, two (2) flat
washers and bolts
(40mm long)
Left to right, two (2) flat
washers, lock washers
and nuts
Rockwell Automation Publication 20P-TG003A-EN-P - February 2012
95
Chapter 3
Access Procedures
9. Remove the bolt (24 mm long) and washers that secure the L-shaped bus
bars to the top of each of the six armature leg fuses. Note the order of the
washers on the bolt.
Remove bolt (24 mm long), lock
washer and flat washer
Bolt (24 mm long)
Lock washer
Flat washer
Fuse
10. Remove the bolts (24mm long) and washers that secure the L-shaped bus
bars to each of the SCR modules and remove the bus bars. Note: You do
not need to remove the wires connected to the metal plate secured with
the L-shaped bus bar.
Remove 24mm
long bolts and
washers
Leave wires in
place
96
Rockwell Automation Publication 20P-TG003A-EN-P - February 2012
Access Procedures
Chapter 3
11. Remove the four bolts and washers that secure the horizontal bus bars to
the SCR modules and remove the bus bars. Note the order of the washers
on the bolts and the position of he bus bars.
Remove bolts
Remove bolts
Continue with Remove the SCR Modules on page 99.
Remove the Bus Bars from a Non-Regenerative Drive
8. Remove the nuts and washers that secure the wires (red and blue) from the
AC line snubber board to the bus bars and remove the wires.
Remove nuts, washers and wires
Rockwell Automation Publication 20P-TG003A-EN-P - February 2012
97
Chapter 3
Access Procedures
9. Remove the bolts and washers that secure the L-shaped bus bars to the top
of each of the three armature leg fuses. Note the order of the washers on
the bolt.
10. Remove the bolts and washers that secure the metal plate and L-shaped
bus bars to each of the SCR modules and remove the bus bars. Note: You
do not need to remove the wires connected to the metal plate secured with
the L-shaped bus bar.
Bolt
Remove bolt, lock washer,
flat washer, metal plate
and L-shaped bus bar
Lock washer
Remove bolt, lock washer
and flat washer
Flat washer
Fuse
11. Remove the bolts and washers that secure the horizontal bus bars to the C
and D (vertical) power terminal bus bars. Note the size and location of the
bolts and the order in which the washers are placed on the bolts.
Remove bolts, lock washers, flat washers
Bolt and Washer Order
Left to right, bolts and flat washers
98
Left to right, flat washers, lock washers and nuts
Rockwell Automation Publication 20P-TG003A-EN-P - February 2012
Access Procedures
Chapter 3
12. Remove the bolts and washers that secure the horizontal bus bars to the
SCR modules and remove the bus bars.
Remove bolts and washers and bus bars
Continue with Remove the SCR Modules below.
Remove the SCR Modules
1. Remove the remaining bolts, washers, and metal plates (for regenerative
drives only) from the tops of the SCR modules. Note the order of the
washers on the bolts.
Note: Regenerative drive shown.
Remove bolts and metal plates
Bolt (32 mm long)
Lock washer
Flat washer
SCR Module
IMPORTANT
Mark all connections and wires before removal to avoid incorrect
wiring during reassembly.
Rockwell Automation Publication 20P-TG003A-EN-P - February 2012
99
Chapter 3
Access Procedures
2. Remove the gate leads that connect the SCR modules to the pulse
transformer circuit board from the pulse transformer circuit board end.
3. Remove the four screws that secure each SCR module to the heatsink and
remove the SCR modules. Note the order of the washers on the bolt.
Remove four screws
Install the SCR Modules
Install the SCR modules in reverse order of removal.
• Verify that each gate lead from the SCR modules is connected to the
proper connector on the pulse transformer board.
• Apply thermal grease to the bottom of the SCR modules before securing
them to the heatsink.
ATTENTION: Thermal grease must be applied to the bottom of the SCR modules
before securing them to the heatsink or damage to the drive may occur.
• Use the following table to determine the proper tightening torque for the
SCR modules installed on the heatsink:
230V AC Input
Part Number
SK-20P-S727F
SK-20P-S770F
Final Torque
4.5…5.5 N•m (40…48.7 lb•in)
6 Nm (53 lb•in)
460V AC Input
Part Number
SK-20P-S737F
SK-20P-S771F
Final Torque
4.5…5.5 N•m (40…48.7 lb•in)
6 N•m (53 lb•in)
• Use the following table to determine the proper tightening torque for the
bus bars connected to the SCR modules:
230V AC Input
Part Number
SK-20P-S727F
SK-20P-S770F
100
Final Torque
11…13 N•m (97.4…115 lb•in)
11…13 N•m (97.4…115 lb•in)
460V AC Input
Part Number
SK-20P-S737F
SK-20P-S771F
Rockwell Automation Publication 20P-TG003A-EN-P - February 2012
Final Torque
11…13 N•m (97.4…115 lb•in)
11…13 N•m (97.4…115 lb•in)
Access Procedures
AC Current Transducers
Removal and Installation
Chapter 3
Remove the AC Current Transducers
1. Read the General Safety Precautions on page 10.
2. Remove power from the drive. See Remove Power from the Drive on
page 42.
3. Remove the covers from the drive. See Remove the Protective Covers from
the Drive on page 43.
4. Remove the eight screws and washers that secure the Lexan shields to the
bottom of the drive and remove the shields.
Remove screws and washers
Remove screws and washers
5. Remove the power wiring from the U and W phase AC input power
terminals.
Rockwell Automation Publication 20P-TG003A-EN-P - February 2012
101
Chapter 3
Access Procedures
6. Remove the screws that secure the ground wires to the PE terminal (from
the transient noise filter board) and U phase power terminal (from the
pulse transformer board) and remove the wires.
Transient noise filter board
PE ground stud
Remove ground wire
Remove screw and wire
7. Remove the lower screw that secures the left side AC current transducer to
the U phase terminal.
Remove screw
102
Rockwell Automation Publication 20P-TG003A-EN-P - February 2012
Access Procedures
Chapter 3
8. Remove the two screws that secure the bottom of the power supply filter
circuit board to the drive.
Power supply
filter board
Remove screws
9. Move the control EMI shield. See Move the Control EMI Shield on
page 58.
10. Remove the two screws and washers that secure the top of the power
supply filter board to the drive and carefully lift the board to gain access to
the ground wire connected to the W phase power terminal (see next step).
Remove screw and washer
Rockwell Automation Publication 20P-TG003A-EN-P - February 2012
Remove screw and washer
103
Chapter 3
Access Procedures
11. Temporarily lift the EMI shield and remove the screw that secures the
ground wire (from the pulse transformer board) to W phase power
terminal and remove the wire.
Remove screw and wire
12. Remove the lower screw that secures the right side AC current transducer
to the W phase power terminal.
Remove screw and wire
104
Rockwell Automation Publication 20P-TG003A-EN-P - February 2012
Access Procedures
Chapter 3
13. Move the EMI shield to the lowered position and remove the nuts and
washers that secure the wires (red and white) to each of the AC current
transducers and remove the wires.
IMPORTANT
Note the color and location of each lead to ensure that each wire is
properly connected during installation.
Remove
nuts,
washers
and wires
Note: Left AC current transducer of regenerative drive shown.
14. Remove the upper screw that secures each of the AC current transducer to
the U phase power terminal.
Remove
screw
Note: Left AC current transducer of regenerative drive shown.
Rockwell Automation Publication 20P-TG003A-EN-P - February 2012
105
Chapter 3
Access Procedures
15. Remove the bolt(s) and washer(s) that secure the U and W phase power
terminals to the L-shaped bus bar/fuse.
• For regenerative drives only, remove the two bolts and washers that
secure the U and W phase power terminals to the L-shaped bus bars
connected to the fuses and while pulling the U and W phase power
terminals down toward the bottom of the drive, slide the AC current
transducers off of the terminal bus bars and out of the drive.
Regenerative drive
Remove bolts,
washers and
terminal
Slide AC current
transducers off of bar
• For Non-Regenerative drives only, remove the bolt and washers that
secure the U and W phase power terminals to the internal armature fuse
and while pulling the U and W phase power terminals up and into the
drive, slide the AC current transducers off of the terminal bus bars and
out of the drive.
Non-Regenerative drive
Remove bolts,
washers and terminal
Slide AC Current
Transducers off of bar
106
Rockwell Automation Publication 20P-TG003A-EN-P - February 2012
Access Procedures
Chapter 3
Install the AC Current Transducers
Install the AC current transducers in reverse order of removal.
IMPORTANT
Note the color and location of the signal wires to ensure that each wire is
properly connected during installation. The wires connected to the left CT are
red and white and the wires connected to the right CT are blue and black.
Right AC Current Transducer
Left AC Current Transducer
Right CT - blue and
black wires
Left CT - red and
white wires
Bimetal Thermostats
Removal and Installation
Remove the Bimetal Thermostats
1. Read the General Safety Precautions on page 10.
2. Remove power from the drive. See Remove Power from the Drive on
page 42.
3. Remove the covers from the drive. See Remove the Protective Covers from
the Drive on page 43.
4. Move the control EMI shield. See Move the Control EMI Shield on
page 58.
Rockwell Automation Publication 20P-TG003A-EN-P - February 2012
107
Chapter 3
Access Procedures
5. If present, remove the isolation sheet that is secured to the bus bars.
Remove isolation sheet.
IMPORTANT
You must remove the bus bars and, for regenerative drives, one SCR
module from each pair, for non-regenerative drives, all SCR modules, in
order to easily access and remove the bimetal thermostats.
6. Remove the bus bars in order to access the bimetal thermostats in the
drive:
• For regenerative drives, refer to Remove the Bus Bars from a
Regenerative Drive on page 3-109.
• For non-regenerative drives, refer to Remove the Bus Bars from a NonRegenerative Drive on page 3-111.
108
Rockwell Automation Publication 20P-TG003A-EN-P - February 2012
Access Procedures
Chapter 3
Remove the Bus Bars from a Regenerative Drive
7. Remove the six bolts and corresponding washers that secure the
intermediate bus bars to the U and W phase AC input and DC output
(terminals C and D) bus bars. Note the size and location of the bolts and
the order in which the washers are placed on the bolts.
Remove bolts
and washers
Remove bolts
and washers
Bolt Size and Washer Order
Left to right, two (2)
nuts, lock washers
and flat washers
Bolt (30mm long)
Flat washer
Left to right, two (2) bolts (40mm
long) and flat washers
Flat washer
Lock washer
Nut
Nut
Lock washer
Flat washer
Flat washer
Bolt (30mm long)
Left to right, two (2) flat
washers and bolts
(40mm long)
Left to right, two (2) flat
washers, lock washers
and nuts
Rockwell Automation Publication 20P-TG003A-EN-P - February 2012
109
Chapter 3
Access Procedures
8. Remove the bolt (24 mm long) and washers that secure the L-shaped bus
bars to the top of each of the six internal armature leg fuses. Note the order
of the washers on the bolt.
Remove bolt (24 mm long), lock
washer and flat washer
Bolt (24 mm long)
Lock washer
Flat washer
Fuse
9. Remove the bolts (24mm long) and washers that secure the L-shaped bus
bars to each of the SCR modules and remove the bus bars. Note: You do
not need to remove the wires connected to the metal plate secured with
the L-shaped bus bar.
Remove 24mm
long bolts and
washers
Leave wires in
place
110
Rockwell Automation Publication 20P-TG003A-EN-P - February 2012
Access Procedures
Chapter 3
10. Remove the four bolts and washers that secure the horizontal bus bars to
the SCR modules and remove the bus bars. Note the order of the washers
on the bolts and the position of the bus bars.
Remove bolts
Remove bolts
Continue with Remove the SCR Modules and Bimetal Thermostats on page 3113.
Remove the Bus Bars from a Non-Regenerative Drive
7. Remove the nuts and washers that secure the wires (red and blue) from the
AC line snubber board to the bus bars and remove the wires.
Remove nuts, washers and wires
Rockwell Automation Publication 20P-TG003A-EN-P - February 2012
111
Chapter 3
Access Procedures
8. Remove the bolts and washers that secure the L-shaped bus bars to the top
of each of the three internal armature leg fuses. Note the order of the
washers on the bolt.
9. Remove the bolts and washers that secure the metal plate and L-shaped
bus bars to each of the SCR modules and remove the bus bars. Note: You
do not need to remove the wires connected to the metal plate secured with
the L-shaped bus bar.
Remove bolt, lock washer,
flat washer, metal plate and
L-shaped bus bar
Bolt
Lock washer
Remove bolt, lock washer
and flat washer
Flat washer
Fuse
10. Remove the bolts and washers that secure the horizontal bus bars to the C
and D (vertical) power terminal bus bars. Note the size and location of the
bolts and the order in which the washers are placed on the bolts.
Remove bolts, lock washers, flat washers
Bolt and Washer Order
Left to right, bolts and flat washers
112
Left to right, flat washers, lock washers and nuts
Rockwell Automation Publication 20P-TG003A-EN-P - February 2012
Access Procedures
Chapter 3
11. Remove the bolts and washers that secure the horizontal bus bars to the
SCR modules and remove the bus bars.
Remove bolts and washers and bus bars
Continue with Remove the SCR Modules and Bimetal Thermostats below.
Remove the SCR Modules and Bimetal Thermostats
1. Remove the remaining bolts, washers and metal plates (for regenerative
drives only) from the tops of the SCR modules. Note the order of the
washers on the bolts.
Note: Regenerative drive shown.
Remove bolts and metal plates
Bolt (32 mm long)
Lock washer
Flat washer
SCR Module
IMPORTANT
Mark all connections and wires before removal to avoid incorrect
wiring during reassembly.
2. Remove the gate leads that connect the SCR modules to the pulse
transformer circuit board from the pulse transformer circuit board end.
Rockwell Automation Publication 20P-TG003A-EN-P - February 2012
113
Chapter 3
Access Procedures
3. Remove the four screws that secure each SCR module to the heatsink and
remove the SCR modules. Note the order of the washers on the bolt.
Remove four screws
4. Remove the wires connected to the bimetal thermostats from connector
X4 on the pulse transformer circuit board.
5. Remove the solder from the connections on the two leads of the bimetal
thermostats.
6. Remove the bimetal thermostats from the heatsinks by unscrewing them at
the base.
Remove solder and
bimetal thermostats
114
Rockwell Automation Publication 20P-TG003A-EN-P - February 2012
Access Procedures
Chapter 3
Install the Bimetal Thermostats
Install the bimetal thermostats in reverse order of removal.
• Apply thermal grease to the bottom of the bimetal thermostats before
securing them to the heatsink.
ATTENTION: Thermal grease must be applied to the bottom of the bimetal
thermostats before securing them to the heatsink or damage to the drive may
occur.
• Use the following table to determine the proper tightening torque for the
screws that secure the SCR modules to the heatsink:
230V AC Input
Drive Current
Rating Code
521
460V AC Input
Drive Current
Rating Code
495
667
DC Amps
AC Line Amps
HP
Final Torque
521
426
150
6 N•m (53 lb•in)
DC Amps
AC Line Amps
HP
Final Torque
495
667
404.4
544.9
300
400
4.5…5.5 N•m (40…48.7 lb•in)
6 N•m (53 lb•in)
• Use the following table to determine the proper tightening torque for the
bolts that secure the bus bars to the SCR modules:
230V AC Input
Drive Current
Rating Code
521
460V AC Input
Drive Current
Rating Code
495
667
Cooling Fans Removal and
Installation
DC Amps
AC Line Amps
HP
Final Torque
521
426
150
11…13 N•m (97.4…115 lb•in)
DC Amps
AC Line Amps
HP
Final Torque
495
667
404.4
544.9
300
400
11…13 N•m (97.4…115 lb•in)
Remove the Cooling Fans
1. Read the General Safety Precautions on page 10.
2. Remove power from the drive. See Remove Power from the Drive on
page 42.
3. Remove the covers from the drive. See Remove the Protective Covers from
the Drive on page 43.
4. Move the control EMI shield. See Move the Control EMI Shield on
page 58.
Rockwell Automation Publication 20P-TG003A-EN-P - February 2012
115
Chapter 3
Access Procedures
5. Locate the cooling fan terminal block and loosen the screws that secure the
fan power supply wires to the terminal block. The cooling fan terminal
block is located below the internal armature leg fuses and between the
phase V and W AC input bus bars.
Terminal C of DC output
Phase V bus bar
Loosen screws
Armature leg fuse
Phase W bus bar
6. At the bottom of the drive, remove the two screws that secure the fan to
the drive frame and pull the fan away from the drive.
Remove screws
116
Rockwell Automation Publication 20P-TG003A-EN-P - February 2012
Access Procedures
Chapter 3
7. Remove the screw that secures the ground wire to the fan chassis and
remove the ground wire.
Remove screw and wire
8. Remove the loosened fan power supply wires from the terminal block and
remove the fan.
Remove wires from terminal block
Rockwell Automation Publication 20P-TG003A-EN-P - February 2012
117
Chapter 3
Access Procedures
Install the Cooling Fans
Install the cooling fans in reverse order of removal.
118
Rockwell Automation Publication 20P-TG003A-EN-P - February 2012
Chapter
4
Start-Up After Repair
Before applying power to a repaired drive, perform the following tests:
• Check the Armature SCR Modules on page 27
• Check the Field SCR/Dual Diode Module on page 33
• Complete the Test With the Motor, Without a Mechanical Load below.
Test With the Motor, Without
a Mechanical Load
This test allows you to measure several operating parameters and diagnose
problems without connecting the motor to its mechanical load.
This procedure requires a HIM to configure and autotune the drive. If you prefer,
you can use the DriveExplorer™ or DriveExecutive™ software.
ATTENTION: Power must be applied to the drive to perform the following startup procedure. Some of the voltages present are at incoming line potential. To
avoid electric shock hazard or damage to equipment, only qualified service
personnel should perform the following procedure. Thoroughly read and
understand the procedure before beginning. If an event does not occur while
performing this procedure, Do Not Proceed. Remove Power including user
supplied control voltages. User supplied voltages may exist even when main AC
power is not applied to then drive. Correct the malfunction before continuing.
1. Verify that the input power wiring and grounding is connected.
2. Verify that the motor cables are connected.
3. Verify that the motor load is disconnected.
4. Verify that the control board DIP switches are set correctly. See Install the
Control Circuit Board on page 58 for more information.
5. Apply power to the control circuits (terminals U2 and V2) of the drive.
6. Verify that the following parameter values are set correctly:
• 45 [Max Ref Speed] is set to the motor nameplate base speed.
• 162 [Max Feedback Spd] is set to the motor nameplate base speed.
• 175 [Rated Motor Volt] is set to the motor rated nameplate armature
voltage.
• 179 [Nom Mtr Arm Amps] is set to the rated motor nameplate
armature current.
Rockwell Automation Publication 20P-TG003A-EN-P - February 2012
119
Chapter 4
Start-Up After Repair
• 280 [Nom Mtr Fld Amps] is set to the rated motor nameplate field
current.
• 374 [Drv Fld Brdg Amps] is set to the rated current of the field bridge
regulator
7. Energize the drive.
8. Measure the field current and verify that the value is reflected in parameter
234 [Fld Current Pct].
9. Run the following applicable Autotune procedures detailed in Chapter 2
of the PowerFlex Digital DC Drive User Manual, publication 20PUM001.
• Tune the Current Regulator
• Verify Motor Rotation Direction and Run Feedback Polarity Checks. If
parameter 414 [Fdbk Device Type] is set to 3 “Armature”, set parameter
107 [Speed Zero Level] to a minimum value of 10% of base motor
speed.
• Configure the Speed Feedback Parameters
• Tune the Speed Regulator
10. Make configuration changes that allow the HIM to issue start and speed
commands.
11. Start the drive, by pressing
(the start button).
If the drive will not start, verify that you have correctly installed any
replacement components.
If any faults are displayed on the HIM, refer to Chapter 4 Troubleshooting in the PowerFlex Digital DC Drive User Manual,
publication 20P-UM001.
12. Increase the speed command from zero to base speed, by pressing
(the up button).
13. Measure the output voltage and verify that it is reflected in parameter 233
[Output Voltage].
14. Measure the armature current and verify that the value is reflected in
parameter 199 [Arm Current Pct].
15. Stop the drive, by pressing
(the stop button).
16. If these measurements are correct, re-configure the drive to suit the
application. Refer to Chapters 1 and 2 of the PowerFlex Digital DC Drive
User Manual, publication 20P-UM001 for assistance.
If any of these measurements are incorrect, repeat steps 8…15. If the
measurements are still incorrect, repeat the appropriate procedures in
Chapter 2 - Component Test Procedures beginning on page 13.
120
Rockwell Automation Publication 20P-TG003A-EN-P - February 2012
Appendix
A
Schematics
List of Schematic Diagrams
Topic
Figure 13 - Circuit Board Interconnection Diagram
Figure 14 - AC Line Measurement Points Diagram
Figure 15 - Power Feedback Connections Diagram
Figure 16 - Field Board and SCR/Dual Diode Module Connections Diagram
Figure 17 - Field Control Circuit Diagram
Figure 18 - Control Circuit Input Power Diagram
Figure 19 - Encoder Control Circuit Diagram
Figure 20 - DC Tachometer Control Circuit Diagram
Figure 21 - Motor Thermal Protection Control Circuit Diagram
Figure 22 - Drive Heatsink Monitoring Control Circuit Diagram
Figure 23 - Contactor Control Relays Control Circuit Diagram
Figure 24 - AC Line Snubber Circuit
Rockwell Automation Publication 20P-TG003A-EN-P - February 2012
Page
122
123
123
124
125
125
126
126
127
127
128
128
121
122
TA
Bimetal
Thermostats
T
T
TA
PE
T1
U
T2
K G
XTA
C
T3
Rockwell Automation Publication 20P-TG003A-EN-P - February 2012
V
T4
K G
T5
D
T6
W
2D1
2C1
X3
X3
XUVW
V W
1U 1V 1W
PE
U V W
U
XR
PE
XFCD
Transient Noise Filter Board
DC
1D 1C
DC
D1
2U1
Field Snubber
Board
2D1
2C1
2V1
Pulse Transformer Board
K G
K G
XSW
K G
FV1
K K XCD_I0 1C2 1D2
G G
1 2
K G
U3 V3
C1
T7
FU1
X4 X5 XTM
Power Supply
Filter Board
XUV
U1 D1 V1
XUV
X5 XTM
FAN
XSW
D1
XA
XA
XUV
Switching Power
Supply Board
XV
XSW
XR
XP3
Control
Board
XFCD
Fans
FAN
Drive Cover
XUV
XP3
Human Interface Module
(20-HIM-Ax)
Appendix A
Schematics
Figure 13 - Circuit Board Interconnection Diagram
T
Schematics
Appendix A
Figure 14 - AC Line Measurement Points Diagram
XY-22
XR-15 U
100K
-
+15V
+
-15V
XR-16
+15
-15
XY-21
V
100K
+15
-
+
XR-17 W
-15
XY-18
100K
Figure 15 - Power Feedback Connections Diagram
W
V
U
D
C
F1
XR15
1W
1W
1W
1W
1W
1W
1W
1W
1W
1W
1W
1W
1W
1W
F2
XR16
F3
XR17
1W
1W
1W
1W
1W
1W
1W
1W
1W
1W
1W
1W
1W
1W
1W
1W
1W
1W
1W
1W
1W
XR19
XR18
S9
PE
PE
Rockwell Automation Publication 20P-TG003A-EN-P - February 2012
123
Appendix A
Schematics
Figure 16 - Field Board and SCR/Dual Diode Module Connections Diagram
To Pulse Transformer Board X3 Connector
1U1
1V1
X3-1
470k
470k
470k
470k
470k
470k
470k
470k
X3-2
V1
100R
100R
XFCD-3
TA1
N
M
P
XFCD-2
XFCD-4
XFCD-1
2U1
2D1
D1
XP1-1
124
2C1
XP1-2
Rockwell Automation Publication 20P-TG003A-EN-P - February 2012
XP2-1
XP2-2
2V1
Schematics
Appendix A
Figure 17 - Field Control Circuit Diagram
+15 V
XFCD-1
-15 V
XFCD-3
XFCD-4
S14-7
S14-6 S14-5
S14-4 S14-3 S14-2
S14-1
47.5
1000
1000
1000
1800
1800
1800
1800
1800
1800
845
1000
845
120
S14-8
1210
LB
XFCD-2
LA
Figure 18 - Control Circuit Input Power Diagram
230 VAC
or
115 VAC
Input
U2
1C2
To Switch
Mode Power
Supply (SMPS)
V2
1D2
Rockwell Automation Publication 20P-TG003A-EN-P - February 2012
125
Appendix A
Schematics
Figure 19 - Encoder Control Circuit Diagram
+5V
+5V
S21
+5V
+5V
+5V
S21
ENC
1
2
3
4
5
6
7
8
+5V
A+
AB+
BZ+
ZCOM
+V
+5V
+5V
S21
+5V
+24V
Voltage Regulator and
Current Feedback Circuit
5V
12V
S21
Figure 20 - DC Tachometer Control Circuit Diagram
S4-8
S4-7
S4-6
S4-5
M3 TACHOP
M3 +
S4-1
126
S2
S4-3
S4-4
Rockwell Automation Publication 20P-TG003A-EN-P - February 2012
Schematics
Appendix A
Figure 21 - Motor Thermal Protection Control Circuit Diagram
+15V
78
1K
XR-32
0VI
79
Figure 22 - Drive Heatsink Monitoring Control Circuit Diagram
Pulse Transformer Board
U7
Control Board
XR-12
XR-12
XR-10
XR-10
+5V
OTS
+24V
XSW-1
X4-1
X4-2
XSW-2
0V24
Rockwell Automation Publication 20P-TG003A-EN-P - February 2012
127
Appendix A
Schematics
Figure 23 - Contactor Control Relays Control Circuit Diagram
0V24
XR
U6
U2
S1
XR
XR
XR
K7
7
6
5
4
K8
+24V
35
36
75
76
Figure 24 - AC Line Snubber Circuit
U
R1
V
R2
R
W
R3
R
R4
R
2U2
3U2
R5
R
2V2
3V2
2W2
3W2
C
AC Line Snubber Board
128
Rockwell Automation Publication 20P-TG003A-EN-P - February 2012
D
C
R6
R
R
D
Appendix
B
Board Layouts and Connections
List of Board Layouts
The following images and tables detail the connection points for the frame C
PowerFlex DC drive circuit boards and components.
For a Schematic Diagram on…
Pulse Transformer Board Layout
Pulse Transformer Board to Current Transducers Connections
Pulse Transformer Board to Bimetal Thermostats Connections
Pulse Transformer Board to Field SCR/Dual Diode Module Connections
Pulse Transformer Board to Current Transducers Connections
Pulse Transformer Board to Field Power Board Connections
Pulse Transformer Board to Control Board Connections
Switching Power Supply Board Layout
Switching Power Supply Board to Control Board Connections
Control Board Layout
Control Board to Field Board Connections
Field Power Board Layout
Power Supply Filter Board Layout
Power Supply Filter Board to Pulse Transformer Board Connections
Power Supply Filter Board to Switching Power Supply Board Connections
Power Supply Filter Board to Fan Connections
Transient Noise Filter Board Layout
Transient Noise Board to Pulse Transformer Board Connections
Rockwell Automation Publication 20P-TG003A-EN-P - February 2012
See Page…
130
131
131
131
131
131
132
133
133
134
132
135
135
135
135
136
136
136
129
Appendix B
Board Layouts and Connections
Pulse Transformer Board
Figure 25 - Pulse Transformer Board Layout
FIR3-xx Rev. “M” and Higher
FIR3-xx Rev. “L” and Lower
PE
PE1
T06
KG06
KGO6
TO6
XCD_IO
K G
X3
KG6
T6
1
KG6
T6
XCD
K G
KG3
T3
KG3
T3
XUVW
K G
XCD
T03
XUVW
C
KG03
X3
KGO3
TO3
K G
D
W
V
U
T05
KG05
KG5
T5
TR3
KG5
T5
K G
XTA
KGO5
TO5
K G
1
33
34
XTA
1
TA
T2
KG2
S4
KG2
XR
1
T2
K G
XR
T02
TO2
S3
KGO2
KG02
1
XCT
X5
1
2
K G
KG04
TO4
XY
KGO4
X4
1
T04
X5
KG4
X4
1
1
6
T4
XSW
XI2CA
1
K G
T1
1
XTM
K G
XY
T4
KG4
XSW
KG1
T1
KG1
XTM
K G
TR2
TR1
T01
TR2
KG01
TR1
TO1
XP2
XP1
K G
K2
130
G2
K1
G1
XP2
Rockwell Automation Publication 20P-TG003A-EN-P - February 2012
XP1
KGO1
Board Layouts and Connections
Appendix B
Table 20 - Pulse Transformer Board to Field Power Board Connections
Pulse
Pin Number
Transformer
Board Connector
1
X3
2
to Pin Number
...
...
Field Power Board Description
Connector
1
2
X3
1U1 field sync signal (from U1)
1V1field sync signal (from V1)
Table 21 - Pulse Transformer Board to Bimetal Thermostats Connections
Pulse Transformer Pin Number to Bimetal Thermostat
Board Connector
Terminals
1
...
X4
e1, e2, e3
2
...
Description
+24V supply
24V common
Table 22 - Pulse Transformer Board to Field SCR/Dual Diode Module Connections
Pulse Transformer
Board Connector
XP1
XP2
Pin Number
1
2
1
2
to Field SCR/Dual Diode
Module Connector
...
G1
...
K1
...
G2
...
K2
Description
Gate signal G1
Common cathode
Gate signal G2
Common cathode
Table 23 - Pulse Transformer Board to Switching Power Supply Board Connections
Pulse Transformer Pin Number to Pin Number Switching Power Supply
Board Point
Board Connector
1
...
1
2
...
2
3
...
3
XSW
XSW
4
...
4
5
...
5
6
...
6
Description
+24V supply
24V common
Internal 18V common
Internal +18V supply
Table 24 - Pulse Transformer Board to Current Transducers Connections
Pulse Transformer Pin Number
Board Connector
1
2
XTA
3
4
Lead
Red
White
Black
Blue
to Current Transducer Description
Terminals
...
TA-U
Secondary side CT phase U
...
...
TA-V
Secondary side CT phase W
...
Rockwell Automation Publication 20P-TG003A-EN-P - February 2012
131
Appendix B
Board Layouts and Connections
Table 25 - Pulse Transformer Board to Control Board Connections
Pulse Transformer
Board Connector
XR
Pin
Number
to
Pin
Number
Control Board
Connector
XR
Description
1
…
1
Gate signal G1 field SCR1
2
…
2
Gate signal G2 field SCR2
3
…
3
0V (GNDP)
4
…
4
Relay output 35-36 command
5
…
5
Relay output 75-76 command
6
…
6
2Q/4Q selection signal
7
…
7
0V (GNDP)
8
…
8
I armature = 0 signal
9
…
9
0V (GNDP)
10
…
10
Heatsink overtemperature
11
…
11
Digital U1-V1 sync signal
12
…
12
0V (GNDP)
13
…
13
CT burden signal
14
…
14
0V (GND)
15
…
15
Reduced U sync signal
16
…
16
Reduced V sync signal
17
…
17
Reduced W sync signal
18
…
18
Reduced C (armature) signal
19
…
19
Reduced D (armature) signal
20
…
20
0V (GNDP)
21
…
21
Gate signal SCR 4/01
22
…
22
0V (GNDP)
23
…
23
Gate signal SCR 5/02
24
…
24
0V (GNDP)
25
…
25
Gate signal SCR 6/03
26
…
26
WH1 (not used, grounded)
27
…
27
Gate signal SCR 1/04
28
…
28
WL1 (not used, grounded)
29
…
29
Gate signal SCR 2/05
30
…
30
0V (GNDP)
31
…
31
Gate signal SCR 3/06
32
…
32
Motor overtemperature
33
…
33
Enable reverse (MN) power bridge
34
…
34
Enable forward (MP) power bridge
For connector X5 and XTM signals, see Table 28 - Power Supply Filter Board to
Pulse Transformer Board Connections on page 135.
For connector XCD and XUVW signals, see Table 31 - Transient Noise Board to
Pulse Transformer Board Connections on page 136.
132
Rockwell Automation Publication 20P-TG003A-EN-P - February 2012
Board Layouts and Connections
Switching Power Supply
Board
Appendix B
Figure 26 - Switching Power Supply Board Layout
XV
XUV
SB SA
F1
F2
XA
Table 26 - Switching Power Supply Board to Control Board Connections
Switching Power Pin Number
Supply Board
Connector
XA
1
2
3
4
5
6
7
8
9
10
11
12
13
14
15
16
to Pin Number
...
...
...
...
...
...
...
...
...
...
...
...
...
...
...
...
Control Board
Connector
1
2
3
4
5
6
7
8
9
10
11
12
13
14
15
16
Rockwell Automation Publication 20P-TG003A-EN-P - February 2012
XA
Description
+5V
5V common
+5V
5V common
+5V
5V common
–
+15V
15V common
-15V
24V common
+24V
133
Appendix B
Board Layouts and Connections
Control Board
Figure 27 - Control Board Layout
XR
XA
To DPI board on
HIM Bezel
S15
1
2
3
4
5
6
7
8
1
2
3
4
S3
S2
S1
S0
5
6
7
8
XFCD
S14
RST
ACT
RUN
PWR
S18
S20
2
S12
1
ON
3
4
S11
5
S4
6
S9
7
S21
S10
8
21 22 23 24 25 26 27 28 29 30 31 32 33 34 35 36 37 38 39 40
- A B C+
-
A
B
C +
ENC_5 ENC_12
A+ A- B+ B- Z+ Z- COM +V
21 22 23 24 25 26 27 28 29 30
31 32 33 34 35 36 37 38 39 40
1 2 3 4 5 6 7 8 9 10
11 12 13 14 15 16 17 18 19 20
1
11 12 13 14 15 16 17 18 19 20
DEBUG
A+ A- B+ B- Z+ Z- COM +V
2
3
4
5
6
7
8
9 10
Table 27 - Control Board to Field Board Connections
Control Board
Connector
XFCD
Pin Number
1
2
3
4
to Pin Number
...
...
...
...
Field Board
Connector
1
2
3
4
XFCD
Description
+15V
15V Common
-15V
Field CT burden resistors
For connector XA signals, see Table 26 - Switching Power Supply Board to
Control Board Connections on page 133.
134
Rockwell Automation Publication 20P-TG003A-EN-P - February 2012
Board Layouts and Connections
Figure 28 - Field Power Board Layout
1
X3
2V1
2U1
2C1
2C1
2D1
2D1
1
TA1
XFCD
Field Power Board
Appendix B
For connector X3 signal, see Table 20 - Pulse Transformer Board to Field Power
Board Connections on page 131. For connector XFCD signal, see Table 27 Control Board to Field Board Connections on page 134.
Figure 29 - Power Supply Filter Board Layout
X5
1
XUV
XTM
1U3 1V3
D1 C1 U1 V1
81 82
35 36 75 76 78 79 U2 V2 PE
U3 V3
Table 28 - Power Supply Filter Board to Pulse Transformer Board Connections
Power Supply
Filter Board
Connector
X5
XTM
Pin Number
1
2
3
4
1
2
to Pin Number
...
...
...
...
...
...
Pulse Transformer Description
Board Connector
1
2
3
4
1
2
24V common
X5
XTM
+24V supply
(not used)
250V AC maximum (from motor PTC)
Table 29 - Power Supply Filter Board to Switching Power Supply Board Connections
Power Supply
Filter Board
Connector
XUV
Pin Number
1
2
3
4
to Pin Number
...
...
...
...
Switching Power
Supply Board
Connector
1
2
3
4
Rockwell Automation Publication 20P-TG003A-EN-P - February 2012
Description
Single phase 115V / 230V AC
XUV
(Not used)
Single phase 115V / 230V AC
135
Appendix B
Board Layouts and Connections
Table 30 - Power Supply Filter Board to Fan Connections
Power Supply
Filter Board
Connector
1V3, 1U3
to Fan Terminal Description
Block
...
–
Single phase 115V / 230V AC
Figure 30 - Transient Noise Filter Board Layout
1U
1W
1V
F1
F2
F3
V
U
C
W
D
Table 31 - Transient Noise Board to Pulse Transformer Board Connections
Transient Noise Filter
Board Connector
1U
1V
1W
C
D
136
to Pin Number
...
...
...
...
...
1
2
3
1
2
Pulse Transformer
Board Connector
XUVW
XCD
Rockwell Automation Publication 20P-TG003A-EN-P - February 2012
Description
Phase U signal
Phase V signal
Phase W signal
Armature C signal
Armature D signal
Appendix
C
Flow Charts
List of Flow Charts
The following pages contain flow chart versions of troubleshooting procedures
contained in Chapter 2 - Component Test Procedures.
Topic
Control Power Supply Failure
Field Current Loss Failure
Rockwell Automation Publication 20P-TG003A-EN-P - February 2012
Page
138
139
137
Appendix C
Flow Charts
Control Power Supply Failure
This chart presents the steps for troubleshooting a Power Failure fault (F3).
Measure the
voltage at
terminals U2, V2.
Is the correct
voltage present at
U2, V2?
No
Verify the wiring and
power source to U2,
V2 and correct any
problems.
Yes
Remove AC control
power and remove
and test the fuse (F1)
at the top of the drive.
Is the fuse blown?
No
Replace the switching
power supply board
and apply AC control
power.
No
Is the drive
operational?
Replace the
control board
Yes
Replace the fuse,
disconnect the cable
from connector XA on
the control board, and
apply AC control
power.
Is the fuse blown?
Use an ohmmeter to
No verify that all terminals
on the control board
terminal blocks are
not short circuited.
No
Are terminals
short circuited?
Yes
Yes
Remove power from
the drive and replace
the fuse on the
switching power
supply board.
Remove cable from
connector XR on
control board and
ohmmeter all voltage
testpoints and
commons to verify no
short circuits (values
should be > 200
kohm).
Remove cable from
connector XFCD on
the control board and
ohmmeter between
pins 1 and 2 and 3
and 2 on cable to
verify no short circuits
(values should be >
200 kohm).
Apply power to the
switching power
supply board only.
Yes
Replace the
control board.
Repair short circuits.
Remove the switching
power supply board
from the drive.
Any values lower
than 200 kohms?
Yes
Replace the field
board.
Is the fuse blown?
Yes
Replace the
switching power
supply board.
No
Remove all power
from the drive.
Check all external
wiring to the pulse
transformer board,
including the motor
PTC if used for a short
circuit condition.
Any short circuits?
Yes
138
No
No
Any values lower
than 200 kohm?
Replace the pulse
transformer board.
Repair the short
circuits.
Rockwell Automation Publication 20P-TG003A-EN-P - February 2012
No
Flow Charts
Appendix C
The charts below presents the steps in flow chart form for troubleshooting a Field
Current Loss fault (F6).
Field Current Loss Failure
No Field Current
Measure the
voltage at
terminals U1, V1.
Is the correct
voltage present at
U1, V1?
No
Verify the wiring and
power source to U1,
V1 and correct any
problems.
Yes
Remove AC power
and remove and test
the fuses (FU1, FV1)
at the bottom of the
drive.
Are the fuses
blown?
No
Disconnect cable from XR on the
control board and measure the U1V1 voltage synchronization signal
at pin 11 on the cable. This signal
should be a square wave signal
with a 90° lag phase displacement
compared to the AC voltage signal.
Measure the gate
signals at pins XR-1
and XR-2 on the
cable.
Are the signals
present and
correct?
Replace the
control board.
Yes
Yes
Test the resistance of
the motor field wiring
and motor field for
short circuits.
Are terminals
short circuited?
No
Replace the field
board.
No
Check the field SCR/
dual diode module for
a short circuit
condition.
Yes
Repair short circuits.
Does a short
circuit condition
exist?
No
Replace the field
fuses at FU1 and FV1
and apply power to
the drive.
Are the fuses
blown?
Yes
Replace the SCR/
dual diode module.
No
Replace the
control board.
Yes
Replace the field
board.
Rockwell Automation Publication 20P-TG003A-EN-P - February 2012
139
Appendix C
Flow Charts
Low or Incorrect Field Current
Verify Par 351 [Field
Current] value using
DC clamp to measure
the DC motor field
current.
Verify drive rated field
bridge current is set
correctly in Par 374
[Drv Fld Brdg Cur] and
DIP switch S14 is
configured to match.
Verify Par 280 [Nom
Mtr Fld Amps] value
matches the rated
field current value on
motor nameplate.
Measure field current
signal at LA-LB
terminal located on
control board. This
value should be equal
to the value of Par
374 [Drv Fld Brdg
Cur]. If these values
are equivalent, the
voltage across
terminals LA-LB
should be 1.66 VDC.
Is voltage
measurement
correct?
Yes
No
Using an ohmmeter,
measure the
resistance across
terminals LA-LB to
verify that the value
equals the equivalent
resistance set with
DIP switch S14.
Replace the control
board.
140
Rockwell Automation Publication 20P-TG003A-EN-P - February 2012
Is resistance
measurement
correct?
Yes
No
Replace the field
board.
Index
A
AC current transducers
install 107
remove 101
AC line snubber board and resistors
install 81
remove 74
armature bridge failure
troubleshoot 21
armature leg fuses
install 92
remove 89
armature SCR modules
test 27
B
bimetal thermostats
install 115
remove 107
C
circuit board
connections 129
layouts 129
communication adapter and EMI shield
install 47
remove 46
components
inspection 15
configure
pulse transformer board 66
sizing resistors 67
contactor fault 39
control circuit board
install 58
remove 55
control EMI shield
move 58
control power supply
failure 15
cooling fans
install 118
remove 115
E
Electrostatic Discharge Precaution 10
encoder
test 36
F
fault
field current loss 23
heatsink overtemperature 39
main contactor 39
overcurrent 21
power failture 15
fault report
create 40
field circuit fuses
install 45
remove 45
field current loss fault 23
field power board
install 72
remove 71
field SCR and dual diode module
install 73
remove 72
field SCR/dual diode module
test 33
frame size 11
H
hardware description 11
heatsink overtemperature
fault 39
I
I/O converter circuit board
install 55
remove 54
I/O expansion circuit board
install 53
remove 52
inspection
visual 15
D
DC analog tachometer
test 36
DIP switches
S3, S4 69
download parameter configuration 14
DPI/HIM assembly
install 43
remove 42
Rockwell Automation Publication 20P-TG003A-EN-P - February 2012
141
Index
install
AC current transducers 107
AC line snubber board and resistors 81
armature leg fuses 92
bimetal thermostats 115
communication adapter and EMI shield 47
control circuit board 58
cooling fans 118
DPI/HIM assembly 43
field circuit fuses 45
field power board 72
field SCR and dual diode module 73
I/O converter circuit board 55
I/O expansion circuit board 53
power supply filter board 88
protective covers 45
pulse transformer board 70
resolver feedback circuit board 51
resolver interface circuit board 51
SCR modules 100
switching power supply board 62
switching power supply board fuses 60
transient noise filter board 86
transient noise filter board fuses 82
M
motor overheating 39
move
control EMI shield 58
O
outputs
relay 39
overcurrent fault 21
overtemperature
heatsink 39
P
parameter configuration
download 14
save 14
power failure fault 15
power supply filter board
install 88
remove 86
protective covers
install 45
remove 43
PTC 39
pulse transformer board
configure 66
install 70
remove 62
test 32
142
Rockwell Automation Publication 20P-TG003A-EN-P - February 2012
R
relay outputs 39
remove
AC current transducers 101
AC line snubber board and resistors 74
armature leg fuses 89
bimetal thermostats 107
communication adapter and EMI shield 46
control circuit board 55
cooling fans 115
DPI/HIM assembly 42
field circuit fuses 45
field power board 71
field SCR and dual diode module 72
I/O converter circuit board 54
I/O expansion circuit board 52
power supply filter board 86
protective covers 43
pulse transformer board 62
resolver feedback circuit board 48
resolver interface circuit board 48
SCR modules 93
switching power supply board 61
switching power supply board fuses 60
transient noise filter board 82
transient noise filter board fuses 81
resolver feedback circuit board
install 51
remove 48
resolver interface circuit board
install 51
remove 48
S
safety precautions 10
save parameter configuration 14
schematic diagrams 121
SCR modules
install 100
remove 93
service tools 12
setting
DIP switches (S3, S4) 69
sizing resistors
configure 67
total resistance values 69
software tools 12
switching power supply board
install 62
remove 61
switching power supply board fuses
install 60
remove 60
Index
T
technical support
calling 40
test
armature SCR modules 27
DC analog tachometer 36
encoder 36
field SCR/dual diode module 33
pulse transformer board 32
testpoints
locations 18, 19
thermal switch 39
thermistor 39
tools
service 12
software 12
total resistance values
sizing resistors 69
transient noise filter board
install 86
remove 82
transient noise filter board fuses
install 82
remove 81
troubleshoot
armature bridge failure 21
field current loss 23
overcurrent fault 21
power failure fault 15
V
visual inspection 15
Rockwell Automation Publication 20P-TG003A-EN-P - February 2012
143
Index
144
Rockwell Automation Publication 20P-TG003A-EN-P - February 2012
Rockwell Automation Support
Rockwell Automation provides technical information on the Web to assist you in using its products.
At http://www.rockwellautomation.com/support/, you can find technical manuals, a knowledge base of FAQs, technical and
application notes, sample code and links to software service packs, and a MySupport feature that you can customize to
make the best use of these tools.
For an additional level of technical phone support for installation, configuration, and troubleshooting, we offer
TechConnectSM support programs. For more information, contact your local distributor or Rockwell Automation
representative, or visit http://www.rockwellautomation.com/support/.
Installation Assistance
If you experience a problem within the first 24 hours of installation, review the information that is contained in this
manual. You can contact Customer Support for initial help in getting your product up and running.
United States or Canada
1.440.646.3434
Outside United States or Canada
Use the Worldwide Locator at http://www.rockwellautomation.com/support/americas/phone_en.html, or contact your local Rockwell
Automation representative.
New Product Satisfaction Return
Rockwell Automation tests all of its products to ensure that they are fully operational when shipped from the
manufacturing facility. However, if your product is not functioning and needs to be returned, follow these procedures.
United States
Contact your distributor. You must provide a Customer Support case number (call the phone number above to obtain one) to your
distributor to complete the return process.
Outside United States
Please contact your local Rockwell Automation representative for the return procedure.
Documentation Feedback
Your comments will help us serve your documentation needs better. If you have any suggestions on how to improve this
document, complete this form, publication RA-DU002, available at http://www.rockwellautomation.com/literature/.
Rockwell Otomasyon Ticaret A.Ş., Kar Plaza İş Merkezi E Blok Kat:6 34752 İçerenköy, İstanbul, Tel: +90 (216) 5698400
www.rockwel lautomation.com
Power, Control and Information Solutions Headquarters
Americas: Rockwell Automation, 1201 South Second Street, Milwaukee, WI 53204-2496 USA, Tel: (1) 414.382.2000, Fax: (1) 414.382.4444
Europe/Middle East/Africa: Rockwell Automation NV, Pegasus Park, De Kleetlaan 12a, 1831 Diegem, Belgium, Tel: (32) 2 663 0600, Fax: (32) 2 663 0640
Asia Pacific: Rockwell Automation, Level 14, Core F, Cyberport 3, 100 Cyberport Road, Hong Kong, Tel: (852) 2887 4788, Fax: (852) 2508 1846
Publication 20P-TG003A-EN-P - February 2012
Copyright © 2012 Rockwell Automation, Inc. All rights reserved. Printed in the U.S.A.