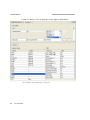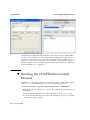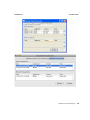
1
Java Platform Micro Edition
Software Development Kit
TM
Version 3.0, Mac OS
Sun Microsystems, Inc.
www.sun.com
Part No. 122009
December 2009
[email protected]
Copyright © 2009 Sun Microsystems, Inc., 4150 Network Circle, Santa Clara, California 95054, U.S.A. All rights reserved.
Sun Microsystems, Inc. has intellectual property rights relating to technology embodied in the product that is described in this document. In
particular, and without limitation, these intellectual property rights may include one or more of the U.S. patents listed at
http://www.sun.com/patents and one or more additional patents or pending patent applications in the U.S. and in other countries.
U.S. Government Rights - Commercial software. Government users are subject to the Sun Microsystems, Inc. standard license agreement and
applicable provisions of the FAR and its supplements. Use is subject to license terms.
This distribution may include materials developed by third parties.
Sun, Sun Microsystems, the Sun logo, Java, JavaFX, Java 2D, J2SE, Java SE, J2ME, Java ME, Javadoc, JavaTest, JAR, JDK, NetBeans, phoneME,
and Solaris are trademarks or registered trademarks of Sun Microsystems, Inc. or its subsidiaries in the U.S. and other countries.
Products covered by and information contained in this service manual are controlled by U.S. Export Control laws and may be subject to the
export or import laws in other countries. Nuclear, missile, chemical biological weapons or nuclear maritime end uses or end users, whether
direct or indirect, are strictly prohibited. Export or reexport to countries subject to U.S. embargo or to entities identified on U.S. export exclusion
lists, including, but not limited to, the denied persons and specially designated nationals lists is strictly prohibited.
DOCUMENTATION IS PROVIDED "AS IS" AND ALL EXPRESS OR IMPLIED CONDITIONS, REPRESENTATIONS AND WARRANTIES,
INCLUDING ANY IMPLIED WARRANTY OF MERCHANTABILITY, FITNESS FOR A PARTICULAR PURPOSE OR NON-INFRINGEMENT,
ARE DISCLAIMED, EXCEPT TO THE EXTENT THAT SUCH DISCLAIMERS ARE HELD TO BE LEGALLY INVALID.
Copyright © 2009 Sun Microsystems, Inc., 4150 Network Circle, Santa Clara, California 95054, États-Unis. Tous droits réservés.
Sun Microsystems, Inc. détient les droits de propriété intellectuels relatifs à la technologie incorporée dans le produit qui est décrit dans ce
document. En particulier, et ce sans limitation, ces droits de propriété intellectuelle peuvent inclure un ou plus des brevets américains listés à
l'adresse http://www.sun.com/patents et un ou les brevets supplémentaires ou les applications de brevet en attente aux États - Unis et dans
d'autres pays.
Utilisation est soumise aux termes du contrat de licence.
Cette distribution peut inclure des éléments développés par des tiers.
Sun, Sun Microsystems, le logo Sun, Java, JavaFX, J2SE, Java 2D, Java SE, J2ME, Java ME, Javadoc, JavaTest, JAR, JDK, NetBeans, phoneME, and
Solaris sont des marques de fabrique ou des marques déposées enregistrées de Sun Microsystems, Inc., ou ses filiales, aux États-Unis et dans
d'autres pays.
Les produits qui font l'objet de ce manuel d'entretien et les informations qu'il contient sont régis par la législation américaine en matière de
contrôle des exportations et peuvent être soumis au droit d'autres pays dans le domaine des exportations et importations. Les utilisations
finales, ou utilisateurs finaux, pour des armes nucléaires, des missiles, des armes biologiques et chimiques ou du nucléaire maritime,
directement ou indirectement, sont strictement interdites. Les exportations ou réexportations vers des pays sous embargo des États-Unis, ou
vers des entités figurant sur les listes d'exclusion d'exportation américaines, y compris, mais de maniéré non exclusive, la liste de personnes qui
font objet d'un ordre de ne pas participer, d'une façon directe ou indirecte, aux exportations de des produits ou des services qui sont régi par la
législation américaine sur le contrôlé des exportations et la liste de ressortissants spécifiquement désignes, sont rigoureusement interdites.
LA DOCUMENTATION EST FOURNIE "EN L'ÉTAT" ET TOUTES AUTRES CONDITIONS, DÉCLARATIONS ET GARANTIES EXPRESSES
OU TACITES SONT FORMELLEMENT EXCLUES, DANS LA MESURE AUTORISÉE PAR LA LOI APPLICABLE, Y COMPRIS NOTAMMENT
TOUTE GARANTIE IMPLICITE RELATIVE À LA QUALITÉ MARCHANDE, À L'APTITUDE À UNE UTILISATION PARTICULIÈRE OU À
L'ABSENCE DE CONTREFAÇON.
Contents
Getting Started
1
Quick Start
1
Tips for Legacy Toolkit Users
Features
2
5
Emulation Platforms
5
CLDC and MIDP Stack
JavaFX Platform
6
7
Managing Java Platforms
7
Java ME Platforms (CLDC and MIDP)
8
Support for Third-Party Emulators and Real Devices
Automatic Update
9
Managing Plugins
9
Available Plugins
Downloaded
Plugin Settings
10
10
Installed Plugins
▼
10
11
Install a Plugin Globally
Editing Options
Edit Menu
11
12
12
Using Keymap Profiles
▼
8
Create a Keymap Profile
13
13
iii
Using Sample Projects
Running a Project
15
15
Troubleshooting
17
Sample Project Overview
17
Configuring the Web Browser and Proxy Settings
Resolving Reference Problems
20
Running MIDP and CLDC Sample Projects
Running the Demos Sample Project
Colors
22
Properties
Http
23
23
FontTestlet
Stock
24
24
Tickets
25
ManyBalls
26
MiniColor
26
Chooser
27
HttpExample
HttpView
27
28
PushExample
28
Running FPDemo
28
Running Games
28
Running Network Demo
Socket Demo
29
Datagram Demo
Running PhotoAlbum
Running UIDemo
Java ME SDK Help • December 2009
30
30
Creating and Editing Projects
iv
29
33
29
22
21
19
Project Types
34
CLDC Projects
34
The Project Wizard
34
Project Template Page
35
Name and Location Page
35
WTK MIDP Project Location
36
Platform Selection Page (MIDP)
▼
Create a CLDC Project
Working With Projects
View Project Files
37
37
38
Create a New MIDlet
▼
36
39
Import a Legacy MIDP Project
Add Files to a Project
Search Project Files
40
41
41
Viewing and Editing Project Properties
General Project Properties
Platform Selection
43
43
44
Editing Application Descriptor Properties
MIDP Attributes
45
▼
Add an Attribute
46
▼
Edit an Attribute
46
▼
Remove an Attribute
MIDlets
45
46
46
▼
Add a MIDlet
47
▼
Edit a MIDlet
47
▼
Remove a MIDLet
▼
Change MIDlet Display Order
Push Registry
47
47
48
Contents
v
▼
Add a Push Registry Entry
48
▼
Edit a Push Registry Entry
48
▼
Remove a Push Registry Entry
▼
Change Push Registry Display Order
API Permissions
▼
49
49
Configuring Ant
Compiling
50
51
Adding Libraries and Resources
51
Creating JAR and JAD Files (Packaging)
Obfuscating
Signing
49
49
Adding Permission Requests
Building a Project
48
52
52
53
Exporting a Key
Running Settings
53
54
MIDP Project Run Options
54
Running Projects in the Emulator
57
Emulating Devices
57
The Device Manager on Windows
The Device Manager on Mac OS
57
58
Adding Devices With the Device Wizard (Mac OS)
Viewing Device Properties
59
Platform Properties
60
Device Information
61
Device Properties
61
Setting Device Properties
Opening a Serial Port
61
62
Running a Project from the Device Selector
vi
Java ME SDK Help • December 2009
63
59
Running Projects Simultaneously on a Single Device
Emulator Options
64
Adding a Device Instance
66
Searching the WURFL Device Database
▼
Search for Devices
67
67
WURFL Search Filtering
69
Finding Files in the Multiple User Environment
Switching Users
User Directories
72
73
Profiling Applications
75
Saving Profiler Data
75
Loading Profiler Data
78
Saving Customized Snapshots and Images
Loading a Customized Snapshot
Network Monitoring
Sort Messages
81
82
83
Monitor Network Traffic
Filter Messages
71
71
Installation Directories
▼
64
83
85
85
Save and Load Network Monitor Information
Clear the Message Tree
Lightweight UI Toolkit
86
87
89
LWUIT and the Java ME SDK
89
Create a Resource Bundle and Add It to the Build Process
Resource Types
90
90
Add a Different LWUIT Library
91
Contents
vii
Security and MIDlet Signing
Security Domains
93
94
Setting Security Domains
95
Specify the Security Domain for an Emulator
Specify the Security Domain for a Project
Signing a Project
▼
95
95
95
Sign a CLDC Project With a Key Pair
Managing Keystores and Key Pairs
96
96
Working With Keystores and Key Pairs
▼
Create a Keystore
▼
Add an Existing Keystore
▼
Create a New Key Pair
▼
Remove a Key Pair
▼
Import an Existing Key Pair
Managing Root Certificates
97
97
98
98
99
99
100
CLDC Emulation on a Windows Mobile Device
101
▼
CLDC Emulator Installation for a Device Running Windows Mobile
▼
Manually Deploy an Application to a Device
▼
Install and Run an Application From the Command Line
102
111
112
Installing CLDC Emulation on a Windows Mobile Emulator (Windows Only)
113
▼
CLDC Installation for Windows Mobile
On-device Debugging
▼
On-device Debugging Procedure
▼
Wireless Debugging Procedure
125
Attach a Command Line Debugger
126
▼
viii
123
Attach a Graphical Debugger
Java ME SDK Help • December 2009
123
127
113
▼
Sample CLDC Debugging Session
Command Line Reference
Launch the SDK
127
131
131
Run the Device Manager
132
Manage Device Addresses (device-address)
Emulator Command Line Options
MIDlet Options
132
133
134
Debugging and Tracing Options
135
Build a Project from the Command Line
Check Prerequisites
137
Compile Class Files
137
Preverify Class Files
137
136
Packaging a MIDLet Suite (JAR and JAD)
Command Line Security Features
139
Change the Default Protection Domain
Sign MIDlet Suites (jadtool)
140
140
Manage Certificates (MEKeyTool)
Generate Stubs (wscompile)
138
141
143
Virtual Machine Memory Profiler (Java Heap Memory Observe Tool)
▼
Run the Java Heap Memory Observe Tool
Heap Snapshot Elements
Logs
144
145
146
147
Log Location
147
Device Manager Logs
147
Device Instance Logs
148
JSR Support
149
JCP APIs
150
Contents
ix
JSR 75: PDA Optional Packages
FileConnection API
PIM API
153
153
155
Running PDAPDemo
Browsing Files
The PIM API
155
156
157
JSR 82: Bluetooth and OBEX Support
161
Bluetooth Simulation Environment
Running the Bluetooth Demo
161
JSR 135: Mobile Media API Support
Media Types
161
163
163
Adaptive Multi-Rate (AMR) Content
Media Capture (Windows Only)
MMAPI MIDlet Behavior
Ring Tones
165
Ring Tone Formats
Running AudioDemo
Simple Tones
168
Simple Player
168
165
165
167
Running MMAPIDemos
167
170
Attributes for MobileMediaAPI
JSR 172: Web Services Support
171
173
▼
Generating Stub Files from WSDL Descriptors
▼
Creating a New Mobile Web Service Client
Run JSR172Demo
x
164
165
Download Ring Tones
Video
164
Java ME SDK Help • December 2009
175
174
173
JSR 177: Smart Card Security (SATSA)
Card Slots in the Emulator
Adjusting Access Control
177
177
178
Specifying PIN Properties
179
Specifying Application Permissions
Access Control File Example
JSR 179: Location API Support
179
181
185
Setting the Emulator’s Location at Runtime
Running the CityGuide Sample Project
JSR 180: SIP Communications
187
191
Understanding the SIP Registrar and Proxy
Running SIPDemo
Choosing a Graphics Mode
Immediate Mode
193
193
193
194
Quality Versus Speed
194
Content for Mobile 3D Graphics
Running Demo3D Samples
Life3D
195
195
195
RetainedMode
PogoRoo
191
192
JSR 184: Mobile 3D Graphics
Retained Mode
185
196
196
JSR 205: Wireless Messaging API (WMA) Support
197
Using the WMA Console to Send and Receive Messages
Launching the WMA Console
WMA Console Interface
197
197
198
Contents
xi
Emulator Phone Numbers
199
Sending a Text SMS Message
199
Sending a Binary SMS Message
199
Sending Text or Binary CBS Messages
Sending MMS Messages
199
199
Receiving Messages in the WMA Console
▼
Running WMADemo
▼
Sending Messages from WMA Console to an Emulator
Running WMA Tool
smsreceive
cbssend
201
202
mmsreceive
smssend
200
202
cbsreceive
203
203
203
mmssend
204
JSR 211: Content Handler API (CHAPI)
▼
Using Content Handlers
207
207
Defining Content Handler Properties
Defining Content Handler Actions
▼
209
209
Running the CHAPIDemo Content Browser
JSR 226: Scalable 2D Vector Graphics
Running SVGDemo
SVG Browser
214
Play SVG Animation
214
214
Create SVG Image from Scratch
Bouncing Balls
Java ME SDK Help • December 2009
213
213
Render SVG Image
xii
200
215
215
210
201
Optimized Menu
215
Picture Decorator
216
Location Based Service
Running SVGContactList
218
218
JSR 229: Payment API Support
221
Running the Payment Console
Running JBricks
221
222
JSR 238: Mobile Internationalization API (MIA)
▼
Setting the Emulator’s Locale
Using the Resource Manager
Working With Locales
225
226
226
Working With Resource Files
Working With Resources
Running i18nDemo
226
227
227
JSR 256: Mobile Sensor API Support
Creating a Mobile Sensor Project
Using a Mobile Sensor Project
Creating a Sensor Script File
▼
SensorBrowser
▼
Marbles
Index
225
231
231
232
233
234
235
237
Contents
xiii
xiv
Java ME SDK Help • December 2009
JAVA ME SDK HELP
Getting Started
The Java Platform Micro Edition Software Development Kit is a natural starting point
for learning and using Java ME technology. The focus of this user interface is
emulation and deployment. Using this simple yet powerful tool you can create, edit,
compile, package, and sign an application. After testing your application in the Java
ME Platform SDK emulation environment, you can move to deploying and
debugging on a real device.
This SDK provides supporting tools and sample implementations for the latest in
Java ME technology. The SDK provides support for the Connected Limited Device
Configuration (CLDC) and many optional packages. In addition it allows you to run
JavaFX™ distributions in the SDK framework.
■
“Quick Start” on page 1
■
“Tips for Legacy Toolkit Users” on page 2
Quick Start
The Java ME Platform SDK offers an intuitive user interface. These tips offer some
hints for getting started as quickly as possible.
■
Access the documentation. The online help is the primary documentation for the
SDK. Many windows and dialogs feature a help button that opens
context-sensitive help in the help viewer.
To view PDF or HTML versions of the help, go to the Applications directory, select
Java_ME_SDK_3.0, and choose Show Package Contents from the context menu.
Go to /Contents/Resources/docs.
Select Help > Help Contents to open the JavaHelp Online Help viewer. You can
also type F1. Remember to use the search capability and the index to help you find
topics.
Note – If you require a larger font size, the help topics are also available as a
printable PDF and a set of HTML files.
December 2009
1
JAVA ME SDK HELP
GETTING STARTED
■
Run sample projects. Running sample projects is a good way to become familiar
with the SDK.
See “Running a Project” on page 15 for a general overview of how to run a project.
■
See the Projects View and the Files view for a visual overview of the logical and
physical layout of a project. When viewing items in the tree, use the context menu
(right-click) to see the available actions. See “Working With Projects” on page 37.
■
A project has a default device platform property that is used if you run from the
toolbar (the green arrow), the Run menu, or the project’s context menu.
You can run an application on different devices without resetting the main project
or changing the default device in the project properties.
■
The emulator is a remote process, and once it has started it is a separate process
from the build process running in the SDK. Stopping the build process or closing
a project does not affect the application running in the emulator. You must be sure
to terminate the application (the emulator can remain open). See “Running a
Project” on page 15.
The SDK provides two unique instances for most devices. For example,
DefaultCldcPhone1 and DefaultCldcPhone2 are the same except for the phone
number. This means you can perform tests that require two devices (messaging,
for example) without customization. If you want to run more than two emulators
you can easily make a copy that preserves the settings you require. See “Adding a
Device Instance” on page 66.
Related Information
■
“Create a CLDC Project” on page 37
■
“Working With Projects” on page 37
■
“Tips for Legacy Toolkit Users” on page 2
Tips for Legacy Toolkit Users
If you used the Sun Java Wireless Toolkit for CLDC or the CDC Toolkit in the past,
the advice in “Quick Start” on page 1 still applies because although the user interface
is quite different, the project concept is similar. These tips apply legacy terms and
ideas to the SDK.
■
2
December 2009
Runtime focus is less on the project and more on device capabilities and the
emulation process.
DECEMBER 2009
JAVA ME SDK HELP
In legacy toolkits you had to be careful to match the platforms, the APIs, and the
capability of the output device. The SDK matches project requirements and device
capabilities for you, so mismatches do not occur.
As mentioned in the “Quick Start” on page 1, clicking the green arrow runs the
main project. You can right-click any project and select run.
In the device selector you can test many devices without changing the project
properties. Right-click any device and choose Run. Only projects that are
compatible with the device are show in the context menu.
■
Import applications from legacy toolkits to SDK projects. The installation of the
legacy toolkit must exist.
See “WTK MIDP Project Location” on page 36.
■
Toolkit settings are Application Descriptors in the SDK. Right-click on a project
and select Properties. Choose the Application Descriptor category.
■
Toolkit utilities are generally accessible from the Tools menu in the SDK.
For example, the WMA console, profiling tools, monitoring tools and more can be
started from the SDK Tools menu.
■
The emulator is familiar, but there are some fundamental differences.
It’s important to realize that the emulator is now a remote process, and once it has
started it is independent of the build process running in the SDK. Stopping the
build process or closing a project does not affect the application running in the
emulator. You must be sure to terminate the application (the emulator can remain
open). For more on this, see “Running a Project” on page 15.
In the Wireless Toolkit you could simultaneously run multiple versions of a device
because the toolkit would increment the phone number automatically each time
you launched a project. Because the emulator is now a remote process, the phone
number is a property that must be set explicitly for the device instance.
The SDK provides two unique instances for most devices. For example,
DefaultCldcPhone1 and DefaultCldcPhone2 are the same except for the phone
number. This means you can perform tests that require two devices (messaging,
for example) without customization. If you want to run more than two emulators
you can easily make a copy that preserves the settings you require. See “Adding a
Device Instance” on page 66.
The emulator has additional display functionality. See “Emulator Options” on
page 64.
Related Information
■
“Quick Start” on page 1
■
“Working With Projects” on page 37
Getting Started
3
JAVA ME SDK HELP
4
December 2009
GETTING STARTED
JAVA ME SDK HELP
Features
The SDK supports technology platforms, also called stacks. This version supports the
CLDC and MIDP Stack, as discussed in “Emulation Platforms” on page 5. In
addition, it supplies the JavaFX runtime, as discussed in “JavaFX Platform” on
page 7.
The SDK IDE provides a simple source file editor. You customize the key mappings
as described in “Create a Keymap Profile” on page 13.
A project runs on a particular emulation platform. The device manager determines
whether a device is appropriate for your project based on the platform, the APIs your
application uses, and a set of device properties. If you run an application and an
appropriate emulator or device is already running, the SDK automatically installs
and runs your application. You don’t have to launch the emulator over and over.
On all operating system platforms, you can use the SDK to deploy to a real device
using a wireless connection.
On the Windows platform, the SDK supports integration with devices running
Windows Mobile and third-party emulators. You can use the SDK to deploy to a real
device and perform on-device debugging.
Related Information
■
“CLDC and MIDP Stack” on page 6
■
“Editing Options” on page 12
■
“Working With Projects” on page 37
■
see the topic “JCP APIs”
Emulation Platforms
An emulator simulates the execution of an application on one or more target devices.
December 2009
5
JAVA ME SDK HELP
FEATURES
An emulation platform allows you to understand the user experience for an
application and test basic portability. For example, a platform enables you to run
applications on several sample devices with different features, such as screen size,
keyboard, runtime profile and other characteristics.
The Java ME Platform SDK emulation platform is CLDC with MIDP.
Related Information
■
“CLDC and MIDP Stack” on page 6
■
“JavaFX Platform” on page 7
CLDC and MIDP Stack
CLDC/MIDP applications conform to both the Connected Limited Device
Configuration and Mobile Information Device Profile (MIDP). The CLDC/MIDP
stack is based on the open source phoneME™ Feature project at
(https://phoneme.dev.java.net).
■
CLDC 1.1 and MIDP 2.1
■
Optimized Mobile Service Architecture (MSA) stack with extensions (JSR 248)
■
Java Technology for the Wireless Industry (JTWI) stack (JSR 185)
■
All the JSRs listed in the table “Supported JCP APIs.”
CLDC/MIDP applications are targeted for devices that typically have the following
capabilities:
■
A 16-bit or 32-bit processor with a clock speed of 16MHz or higher
■
At least 160 KB of non-volatile memory allocated for the CLDC libraries and
virtual machine
■
At least 192 KB of total memory available for the Java platform
■
Low power consumption, often operating on battery power
■
Connectivity to some kind of network, often with a wireless, intermittent
connection and limited bandwidth
Typical devices might be cellular phones, pagers, low-end personal organizers, and
machine-to-machine equipment. In addition, CLDC can also be deployed in home
appliances, TV set-top boxes, and point-of-sale terminals.
Related Information
■
6
December 2009
“Create a CLDC Project” on page 37
DECEMBER 2009
JAVA ME SDK HELP
JavaFX Platform
The SDK can run a JavaFX application in JAD or JAR form. The SDK does not
support creating or compiling JavaFX projects. The NetBeans™ IDE, combined with
the JavaFX SDK, supports JavaFX application development with full editor support,
draggable components, and more. Download the development environment from
(http://www.javafx.com/).
When your application is complete, you can use the Java ME SDK to run its JAD or
JAR file on an emulator or device. In the Device Selector, right-click on a device and
select Run JAR or JAD... from the context menu, then browse to select the file.
Related Information
■
http://www.javafx.com.
Managing Java Platforms
To view the Java Platform Manager, select Tools > Java Platforms. Alternatively,
right-click on a project, choose Properties from the context menu, select Platform, and
select the Manage Emulators button.
The Java Platform Manager is a tool for managing different versions of the Java
Development Kit (JDK) and customizing Java platforms that your applications
depend on. You can add source files and Javadoc™ documents to the existing
platforms. For Java ME purposes, the platforms are emulators or SDK platforms for
mobile devices.
Features
7
JAVA ME SDK HELP
FEATURES
The Java ME Platform SDK pre-registers J2ME™ (CLDC and MIDP) and Java™ SE
(the JDK serves as the default platform).
See “Java ME Platforms (CLDC and MIDP)” on page 8.
Java ME Platforms (CLDC and MIDP)
To view the Java Platform Manager, select Tools > Java Platforms. The Java ME
platform supports CLDC projects. This platform also serves to run JavaFX projects.
Devices. View all the CLDC devices (including JavaFX devices) that the Device
Manager has discovered. Click Refresh to reconfigure the platform and refresh the
list.
Sources. Add JAR files or source files to the Sources tab to register source code.
Javadoc. Add Javadoc documentation to support any new classes or sources files you
have added.
Tools & Extensions. View the tools and extensions for this platform.
See “JavaFX Platform” on page 7.
Support for Third-Party Emulators and
Real Devices
Having an emulator does not eliminate the need to test your application on actual
target devices. An emulator can only approximate a device’s user interface,
functionality, and performance. For example, an emulator may not accurately
simulate processing speed, so an application may run faster or slower on a target
device than it does on an emulator.
Java ME SDK simplifies deployment to and debugging on real devices running the
Sun Java runtime. This version supports Windows Mobile platform devices, and
includes a bundled Java runtime for Windows Mobile devices.
On Windows, the Microsoft Device Emulator is an example of third-party emulator
integration. It means you can deploy applications to Microsoft Device Emulator as
easily as you can run on the SDK’s built-in emulators. This promotes consistent
behavior between applications running on the Microsoft Device emulator and
8
December 2009
DECEMBER 2009
JAVA ME SDK HELP
applications running on a device running Windows mobile. See the topics “CLDC
Emulator Installation for a Device Running Windows Mobile” on page 102 and
“CLDC Installation for Windows Mobile” on page 113.
On Mac OS there is no integration with the Microsoft Device Emulator, but you can
install and debug applications on a real device. See “CLDC Emulator Installation for
a Device Running Windows Mobile” on page 102, “Adding Devices With the Device
Wizard (Mac OS)” on page 59, and “Wireless Debugging Procedure” on page 125.
Automatic Update
The Java ME SDK supports automatic updating of individual plugins. The same
mechanism can be used to update the entire SDK.
If you have an active Internet connection, the Plugins Manager checks to see whether
new plugins or new versions of existing plugins are available. When updates are
found you see a notification from the update indicator at the lower right corner of the
user interface.
You do not have to wait for a notification. You can select Tools > Plugins and select
the Available Plugins tab to see the most current results.
See “Managing Plugins” on page 9 and “Install a Plugin Globally” on page 11.
Managing Plugins
When you install or update a plugin using the Plugins Manager, the SDK places the
plugin .jar file and documents in your user directory. See “User Directories” on
page 73.
1. Choose Tools > Plugins from the main menu to open the Plugins Manager.
2. Click the Available Plugins tab to display plugins that are available but not
installed.
Features
9
JAVA ME SDK HELP
FEATURES
3. In the left pane, select the plugins you want to add and click Install.
4. Complete the pages in the installer to download and install the plugin.
See “Available Plugins” on page 10, “Downloaded” on page 10, “Installed Plugins”
on page 10 and “Plugin Settings” on page 11.
Available Plugins
To access this tab, select Tools > Plugins to open the Plugins Manager, then select the
Available Plugins tab. To check the update center and refresh the list of available
plugins, click Reload Catalog.
Downloaded
To access this tab, select Tools > Plugins to open the Plugins Manager, then select the
Downloaded tab. The left pane displays the manually downloaded plugins that you
can install. The right pane displays a description of the selected plugin.
Click Add Plugins to use the file browser to add any plugins that you downloaded to
your local system. To install the plugin, select the Install checkbox for the plugin and
click Install.
Installed Plugins
To access this tab, select Tools > Plugins to open the Plugins Manager, then select the
Installed tab. The left pane displays a list of the installed plugins. The active column
displays the state of the selected plugin.
The plugin is installed and activated.
The plugin is installed but deactivated.
The SDK needs to be restarted to fully deactivate the plugin.
10
December 2009
DECEMBER 2009
JAVA ME SDK HELP
When you select a plugin in the left pane, the description of the plugin is displayed
in the right pane. You can activate and deactivate installed plugins in the right pane.
A deactivated plugin is not loaded on SDK startup. If a plugin is deactivated, it still
exists on your local system and you can reactivate the plugin without downloading it
again.
An installed plugin can be active or inactive. If a listed plugin is inactive, you might
need to install additional plugins to use the plugin.
If you want to completely remove a plugin from your local system, select the
checkbox for the plugin in the left pane and then click Uninstall.
Plugin Settings
To access this tab, select Tools > Plugins to open the Plugins Manager, then select the
Settings tab. This tab displays the default update center for the SDK - the Java ME
SDK Toolbar Update Center.
By default the Plugins Manager checks for updates once per week, as determined by
the Check Interval selection. You can select a different interval from the dropdown
list.
Click the Add button to Add an update center URL.
Click the Proxy Settings button to edit the proxy settings to allow access to update
centers.
Force install into shared directories determines whether the plugin is installed for
an individual user or all users in the multiple user environment. If the box is
unchecked (default) the plugin is only installed for the user. If it is checked, the
installation is global, as described in “Install a Plugin Globally” on page 11.
▼ Install a Plugin Globally
By default the SDK installation is a multiple user environment, as described in “User
Directories” on page 73. The typical plugin installation, described in “Managing
Plugins” on page 9, affects only your user directory. To install a plugin globally you
must have write access to the SDK installation directory.
1. Choose Tools > Plugins to open the Plugins Manager.
2. Click the Settings tab and then select Force install into shared directories.
3. Click the Available Plugins tab, select the Install checkbox for the plugin and
click Install. You can also install manually downloaded plugins in the
Downloaded tab.
Features
11
JAVA ME SDK HELP
FEATURES
4. Follow the wizard instructions to complete the installation of the plugin.
5. Restart the SDK to activate the new plugin, if necessary.
The SDK places .jar files and docs for globally installed plugins in the SDK
installation directory instead of in an individual user directory.
Editing Options
The Edit menu provides basic editing functions for project sources. Editing tasks and
other menu options are mapped to keystroke sequences (shortcuts). See “Edit Menu”
on page 12 and “Using Keymap Profiles” on page 13. Shortcuts are defined in a
keymap profile. You can edit a default profile to re-map shortcuts, or you can create
your own keymap profile as described in “Create a Keymap Profile” on page 13.
Edit Menu
The menu options are fully enabled when a source file is open and has focus.
Command
Windows
Mac OS
Action
Copy
Ctrl-C
Cmd-C
Copies the current selection to the clipboard.
Cut
Ctrl-X
Cmd-X
Deletes the current selection and places it on the clipboard.
Delete
Delete
Backspace
Deletes the current selection.
Find
Ctrl-F
Cmd-F
Finds a text string (opens Find box).
Find in Projects
Ctrl-Shift-F
Cmd+Shift+F
Finds specified text, object names, object types within
projects.
Find Next
F3
F3
Finds next instance of found text.
Find Previous
Shift-F3
Cmd-Shift-G
Finds previous instance of found text.
Find Selection
Ctrl-F3
Ctrl-F3
Finds instances of the current selection.
Find Usages
Alt-F7
Ctrl-F7
Finds usages and subtypes of selected code.
Paste
Ctrl-V
Cmd-V
Pastes the contents of the clipboard into the insertion point.
Paste Formatted
Ctrl-Shift-V Cmd-Shift-V
Pastes the formatted contents of the clipboard into the
insertion point.
Redo
Ctrl-Y
Reverses (one at a time) a series of Undo commands. The
Redo button in the toolbar does the same.
12
December 2009
Cmd-Y
DECEMBER 2009
JAVA ME SDK HELP
Command
Windows
Mac OS
Action
Replace
Ctrl-H
Cmd-R
Finds a string of text and replaces it with the string specified
(opens the Find and Replace dialog box).
Replace in Projects Ctrl-Shift-H Cmd+Shif+H
Replaces text, object names, object types within projects.
Select All
Ctrl-A
Cmd+A
Selects everything in the current document or window.
Undo
Ctrl-Z
Cmd-Z
Reverses (one at a time) a series of editor actions, except
Save. The Undo button in the toolbar does the same.
Using Keymap Profiles
You can use the predefined profiles, modify profiles, or create your own keymap
profile as described in “Create a Keymap Profile” on page 13.
Action
OS
Procedure
Switch profiles
Windows:
Mac OS:
Select Tools > Options.
Select Java ME SDK > Preferences.
1. Click Keymap.
2. Select a Profile from the Profile menu and click OK.
Restore default
profile
Windows:
Mac OS:
Select Tools > Options.
Select Java ME SDK > Preferences.
1. Click Manage Profiles
2. Select a Profile and click Restore Defaults.
3. Click OK.
Import or export
profile
Windows:
Mac OS:
Select Tools > Options.
Select Java ME SDK > Preferences.
1. Click Manage Profiles
2. Select Export or Import.
3. Click OK.
▼ Create a Keymap Profile
A profile determines the mapping for single keys and keyboard shortcuts.
To set the keyboard shortcuts follow this procedure.
Features
13
JAVA ME SDK HELP
FEATURES
1. Open the Options window.
On Windows, select Tools > Options.
On Mac OS, select Java ME SDK > Preferences.
2. Click the Manage Profiles button.
3. Select the profile that you want to modify and click Duplicate.
4. Type a name in the Create New Profile dialog box.
Click OK.
5. Type a name in the Create New Profile dialog box.
Click OK.
6. Select the new profile from the Profile dropdown list.
7. Modify an action’s shortcut as follows:
■
Select an action in the list.
■
Double-click the shortcut to modify or add a shortcut.
As you press the key sequence, the correct syntax for that sequence
automatically appears in the text field. For example, if you simultaneously hold
down the Alt key, the Control key, and the J key, "Alt+Ctrl+J" appears.
To use a Backspace or Tab key in the shortcut, click the ellipsis button (...) and
select the desired key. You can only specify a keyboard shortcut that is not
being used by another command.
8. Click OK to close the Options window.
14
December 2009
JAVA ME SDK HELP
Using Sample Projects
The Java ME Platform SDK sample projects introduce you to the emulator’s API
features and the SDK features, tools, and utilities that support the various APIs.
These features can help you customize the sample projects or create applications of
your own.
The source code for every demonstration application is available in the installation’s
/apps directory. Subdirectories contain projects, and each project has a src directory
that contains Java programming language source code.
For example, if the SDK is installed in installdir, the source code for the SMS sender
MIDlet (example.sms.SMSSend) in WMADemo resides in the following location:
Windows:
installdir\apps\WMADemo\src\example\sms\SMSSend.java
Mac OS:
Applications/Contents/Resources/apps/WMADemo/src/example/sms/SMS
Send.java
For instructions or running projects, see the following topics:
■
“Running a Project” on page 15
■
“Troubleshooting” on page 17
■
“Sample Project Overview” on page 17
■
“Configuring the Web Browser and Proxy Settings” on page 19
■
“Resolving Reference Problems” on page 20
■
“Running MIDP and CLDC Sample Projects” on page 21
Running a Project
To run a sample project, go to the Start Page tab and single-click a sample project
name. The project opens in the Project window and starts running in the emulator.
December 2009
15
JAVA ME SDK HELP
USING SAMPLE PROJECTS
Note – If you can’t see the Project window choose Window > Projects. To see
console output, select Window > Output > Output.
Follow these steps to run a your own projects.
1. Select File > Open Project, and browse to select a project.
The project is added to the Projects window.
2. To run a project, right-click the project and select Run from the context menu.
To run the main project (which is shown in bold text in the Projects window),
click the green Run button. To set a project as main, right-click the project name
and select Set as Main Project.
To run the project on a different device, choose the device in the Device Selector
window. Right-click on a device and select Run Project from the context menu.
Pull right to see a listing of open projects. Projects that cannot run on the current
device are grayed out.
The device emulator window opens with the demo application running.
3. As the sample project runs, you might need to press one of the soft keys below
the screen on the left or right side.
You use soft keys to install or launch an application, open a menu, exit, or
perform some other action. Some demos include these instructions in the
application.
For instructions on running samples, see TABLE: MIDP/CLDC Sample Projects
on page 18.
4. When you are finished viewing the application, go to the emulator’s Application
menu and select Exit to close the emulator and stop the execution of the project’s
build script.
16
December 2009
DECEMBER 2009
JAVA ME SDK HELP
Note – Once the emulator is launched, it is an independent process. Pressing the red
stop button in the Output window terminates the build script, but it does not close
the emulator. Likewise, closing the SDK user interface does not affect the emulator. In
the emulator, select Application > Exit to ensure that both the emulator process and
the project build process close.
Troubleshooting
Sometimes even a “known good“ application, such as a sample project, does not run
successfully. The problem is usually your environment.
■
Some demonstrations require specific setup and instructions. For example, if a
sample uses web services and you are behind a firewall, you must configure the
emulator’s proxy server settings or web access will fail. See “Configuring the Web
Browser and Proxy Settings” on page 19.
■
If an application must run over the air (OTA), the SDK automatically installs it in
the device instance.
MIDlet Suites use runMIDlet to perform the installation.
Windows:
installdir\runtimes\cldc-hi-javafx\bin\runMidlet.exe
Mac OS:
Applications/Contents/Resources/runtimes/cldc-hi-javafx/bin/runMidlet
Consider configuring your antivirus software to exclude runMidlet from
checking.
Sample Project Overview
The Java ME Platform SDK includes demonstration applications that highlight some
of the technologies and APIs that are supported by the emulator.
Most demonstration applications are simple to run. “Running a Project” on page 15
contains instructions for running most demonstrations. Sample projects usually have
some additional operation instructions.
Using Sample Projects
17
JAVA ME SDK HELP
USING SAMPLE PROJECTS
TABLE: MIDP/CLDC Sample Projects on page 18 lists all the MIDP/CLDC
demonstration applications that are included in this release.
MIDP/CLDC Sample Projects
TABLE:
Sample
Optional Package Description
AudioDemo
MMAPI 1.1
Demonstrates audio capabilities, including
mixing and playing audio with an
animation.
“Running AudioDemo” on
page 167
BluetoothDemo
JSR 82
Demonstrates device discovery and data
exchange using Bluetooth.
“Running the Bluetooth
Demo” on page 161
CHAPIDemo
JSR 211
A content viewer that also uses
MediaHandler.
“Running the
CHAPIDemo Content
Browser” on page 210
CityGuide
JSR 179
A city map that displays landmarks based
on the current location.
“Running the CityGuide
Sample Project” on
page 187
Demos
MIDP 2.0
Includes various examples: animation, color, “Running the Demos
networking, finance, and others.
Sample Project” on page 22
FPDemo
CLDC 1.1
Simple floating point calculator.
“Running FPDemo” on
page 28
Demo3D
JSR 184
IncludesLife3D, retainedmode, and
PogoRoo.
“Running Demo3D
Samples” on page 195
Games
MIDP 2.0
Includes TilePuzzle, WormGame, and
PushPuzzle.
“Running Games” on
page 28.
I18nDemo
JSR 238
Includes string sorting, number formatting,
and a phrase translator.
“Running i18nDemo” on
page 227
JBricks
JSR 229
A game that uses the Payment API for
buying extra lives or levels.
“Running JBricks” on
page 222
JSR172Demo
JSR 172
Demonstrates how to use the JSR 172 API to “Run JSR172Demo” on
connect to a web service from a MIDlet.
page 175
LWUITDemo
N/A
Demonstrates LWUIT features.
http://lwuit.dev.jav
a.net/
MMAPIDemos
MMAPI
Demonstrates MMAPI features, including
tone sequences, MIDI playback, sampled
audio playback, and video.
“Running MMAPIDemos”
on page 167
Multimedia
MMAPI
Demonstrates different video playback
formats.
“Video” on page 170
NetworkDemo
MIDP 2.0
Demonstrates how to use datagrams and
serial connections.
“Socket Demo” on page 29
and “Datagram Demo” on
page 29
18
December 2009
Instructions
DECEMBER 2009
TABLE:
JAVA ME SDK HELP
MIDP/CLDC Sample Projects (Continued)
Sample
Optional Package Description
Instructions
PDAPDemo
JSR 75
Demonstrates how to manipulate contacts,
calendar items, and to-do items.
Demonstrates accessing local files.
“Running PDAPDemo” on
page 155
PhotoAlbum
MIDP 2.0
Demonstrates a variety of image formats.
“Running PhotoAlbum”
on page 30
Sensors
JSR 256
The SensorBrowser and Marbles game
demonstrate sensor input.
“SensorBrowser” on
page 234 and “Marbles” on
page 235
SIPDemo
JSR 180
Simple message exchange using SIP.
“Running SIPDemo” on
page 192
SVGContactList
JSR 226
Uses SVG to create a contact list displayed
with different skins.
“Running
SVGContactList” on
page 218
SVGDemo
JSR 226
Uses different SVG rendering techniques.
“Running SVGDemo” on
page 213
UIDemo
MIDP 2.0
Showcases the breadth of MIDP 2.0’s user
interface capabilities.
“Running UIDemo” on
page 30
WMADemo
WMA 2.0
Shows how to send and receive SMS, CBS,
and MMS messages.
“Running WMADemo” on
page 200
XMLAPIDemo
JSR 280
Uses DOM and STAX APIs to create an XML Follow the instructions the
application provides.
sample and SAX, DOM and StAX APIs to
parse the sample.
Configuring the Web Browser and Proxy
Settings
If you are behind a firewall you might need to configure the proxy server so that
MIDP applications using web services can succeed.
Note – CDC emulators do not work through a proxy. Communications such as
downloading images from the Internet fail on CDC emulators.
The settings are typically the same as those you are using in your web browser.
1. Select Tools > Options.
Using Sample Projects
19
JAVA ME SDK HELP
USING SAMPLE PROJECTS
2. Select the General options icon.
3. In the Web Browser field, choose the browser that will be affected by these proxy
settings. Click Edit to add or remove a browser from the dropdown list.
4. Choose a Proxy Setting:
■
No Proxy
■
Use System Proxy Settings
■
Manual Proxy Settings
To set the HTTP Proxy, fill in the proxy server address field and the port
number.
The HTTP Proxy is the host name or numeric IP address of the proxy server to
use to connect to HTTP and FTP sites. The Proxy Port is the port number of the
proxy server.
To set the HTTPS or Socks proxy, click More and fill out the Advanced Proxy
Options form.
Resolving Reference Problems
Sometimes when you open a project you can see it has a reference warning. In the
Projects tab the project name is red, and the icon shows a warning symbol, as seen
below:
Usually this warning means the project refers to a file or library that cannot be found.
Right-click on the project and choose Resolve Reference Problems.
20
December 2009
DECEMBER 2009
JAVA ME SDK HELP
The window displays the missing file, the problem, and a possible solution. In this
case the project probably used a literal path to the file keystore.ks. Clicking the
Resolve... button opens a file browser so you can find the missing keystore file. The
default location is as follows:
Windows
installdir\runtimes\cldc-hi-javafx\lib
Mac OS
installdir/runtimes/cldc-hi-javafx/lib
Locate and select the file. You receive confirmation that the problem is resolved, and
you can now click Close.
Running MIDP and CLDC Sample
Projects
This topic gathers MIDP and CLDC samples that aren’t discussed with specific JSRs.
■
“Running the Demos Sample Project” on page 22
■
“Running FPDemo” on page 28
■
“Running Games” on page 28
Using Sample Projects
21
JAVA ME SDK HELP
USING SAMPLE PROJECTS
■
“Running Network Demo” on page 29
■
“Running PhotoAlbum” on page 30
■
“Running UIDemo” on page 30
For other CLDC demos, see TABLE: MIDP/CLDC Sample Projects on page 18.
Running the Demos Sample Project
This demo contains several MIDlets that highlight different MIDP features.
■
“Colors” on page 22
■
“Properties” on page 23
■
“Http” on page 23
■
“FontTestlet” on page 24
■
“Stock” on page 24
■
“Tickets” on page 25
■
“ManyBalls” on page 26
■
“MiniColor” on page 26
■
“Chooser” on page 27
■
“HttpExample” on page 27
■
“HttpView” on page 28
■
“PushExample” on page 28
Colors
This application displays a large horizontal rectangle that runs the width of the
screen. Below, ten small vertical rectangles span the screen. Finally, three horizontal
color bars indicate values for blue, green, and red (RGB). Values are expressed as
decimal (0-255) or hexadecimal (00-ff) based on the first menu selection.
22
■
To select a vertical bar to change, use the up navigation arrow to move to the color
bars. Use the right navigation arrow to highlight a color bar. The large rectangle
becomes the color of the selected bar.
■
Use the up or down selection arrows to choose the value to change (red, green, or
blue). Use the left or right arrow keys to increase or decrease the selected value.
The second menu item allows you to jump in increments of 4 (Fine) or 32 (coarse).
■
You can change the color on any or all of the vertical bars.
December 2009
DECEMBER 2009
JAVA ME SDK HELP
Properties
This MIDlet displays your system property values. The output is similar to the
following values:
Free Memory = 2333444
Total Memory = 4194304
microedition.configuration = “CLDC-1.1“
microedition.profiles = “MIDP-2.1“
microedition.platform = “j2me“
microedition.platform = “en-US“
microedition.platform = “IS08859_1“
Http
This test application uses an HTTP connection to request a web page. The request is
issued with HTTP protocol GET or POST methods. If the HEAD method is used, the
head properties are read from the request.
Preparing to Run the Demo
Before beginning, examine your settings as follows.
■
Right-click on Demos and select Properties.
■
Select the Running category.
■
Select Regular Execution.
Check Specify the Security Domain and select Maximum.
■
Click OK.
■
If you are using a proxy server, you must configure the emulator’s proxy server
settings as described in “Configuring the Web Browser and Proxy Settings” on
page 19. The HTTP version must be 1.1.
■
If you are running antivirus software, you might need to create a rule that allows
this MIDlet to allow connections to and from a specific web site. See
“Troubleshooting” on page 17.
Running the Demo
Launch the Http MIDlet. To test, choose the Menu soft key and choose Get, Post, or
Head to test the selected URL.
Http Test returns the information it is able to obtain. If the information fills the screen
use the down arrow to scroll to the end. The amount of information depends on the
type of request and on the amount of META information the page provides. To
provide body information or content, the page must declare CONTENT-LENGTH as
described in RFC 2616.
Using Sample Projects
23
JAVA ME SDK HELP
USING SAMPLE PROJECTS
Using Menu Options
Use the Menu soft key for the following actions.
■
Choose 2 to GET information from the selected page.
■
Choose 3 to obtain the POST information from the selected page.
■
Choose 4 to display the HEAD attributes for the page.
■
Choose 5 to bring up the current list of web pages. You can chose a new page or
add your own page to the list. To specify a new URL, choose the Add soft button,
then select the Menu soft button and choose OK. The screen displays http://.
Type in the rest of the URL, making sure to end with a slash (/). For example
http://www.internetnews.com/. Press the OK soft button. The Http Test
screen shows your new URL and prompts for an action.
FontTestlet
This MIDlet shows the various fonts available: Proportional, Regular, Regular Italic,
Bold Plain, and Bold Italic. Choose 1 or 2 from the menu to toggle between the
system font (sans serif) and the monospace font.
Stock
Like the Http demonstration, This sample uses an HTTP connection to obtain
information. Use the same preparation steps as “Http” on page 23.
Run the Demos project and launch the Stock MIDlet.
By default, the screen displays an empty ticker bar at the top. Below the ticker, the
menu list shows four applications: Stock Tracker, What If? Alerts, and Settings. You
must add stock symbols before you can use the first three applications.
Add Stock Symbols to the Ticker
To add a stock symbol to the ticker, use the navigation arrows to select Settings.
Select Add Stock.
The display prompts you to enter a stock symbol. Type JAVA and select the Done soft
key. The stock you added and its current value is now displayed in the ticker. Add a
few more stock symbols, such as IBM and HPQ.
Change the Update Interval
By default the update interval is 15 minutes. Select Updates to change the interval.
Use the navigation arrows to select one of Continuous, 15 minutes, 30 minutes, one
hour, or three hours. Select the Done soft key.
24
December 2009
DECEMBER 2009
JAVA ME SDK HELP
Remove a Stock
Select Remove a Stock. You see a list of the stocks you have added. Use the
navigation keys to select one or more stocks to remove. Choose the Done soft key.
Stock Tracker
Stock Tracker displays a list of the stocks you added and their current values. Stock
tracker displays additional information about the selected stock, for example, the last
trade and the high and low values.
Choose a stock and press Select.
What If?
What If? is an application that asks for the original purchase price and the number of
shares you own. It calculates your profit or loss based on the current price.
Select a stock symbol.
Enter the purchase price and the number of shares, then press Calc.
Alerts
This application sends you a notification when the price changes to a value you
specify.
From the main menu, select Alerts.
Select Add.
Choose a Stock. The screen prompts, “Alert me when a stock reaches”. Enter
an integer.
The alert is placed on the Current Alerts list. To remove an alert, press Remove and
select the alert. Choose the Done soft key.
When the value is reached you will hear a ring and receive a message. For example,
Symbol has reached your price point of $value and is currently trading at
$current_value. Once the alert is triggered it disappears from the Current Alerts list.
Tickets
This demonstrates how an online ticket auction application might behave. The home
screen displays a ticket ticker across the top. The Choose a Band field displays Alanis
Morrisette by default.
To select a band, highlight the band name and press Select. Use the down arrow to
highlight a different band, moby, for example, then press Select. The available
auction appears.
Using Sample Projects
25
JAVA ME SDK HELP
USING SAMPLE PROJECTS
To make a bid, select the Menu soft key and choose 2. Use the arrow keys to move
from field to field. Fill out each field. Select the Next soft key. The application asks
you to confirm your bid. Use the arrow keys to highlight Submit then press Select.
You receive a Confirmation number. Click Bands to return to the welcome page.
To set an alert, select the Menu soft key and choose 3. Use the navigation arrows to
move to the field and type in a value higher than the current bid. Select the Save soft
key. You are returned to the welcome page. You can trigger the alert by making a bid
that exceeds your alert value. Your settings determine how often the application
checks for changes, so the alert may not sound for a few minutes.
To add a band, select the Menu soft key and choose 4. Type in a band name or a
comma-separated list of names. Choose the Save soft key. After confirmation you are
returned to the welcome page. The added band(s) are displayed in the Choose a
Band drop-down menu.
Note, this is only a demonstration. To fully describe the band you must edit the
following file:
Mac OS
installdir/apps/Demos/src/example/auction/NewTicketAuction.java
Windows
installdir\apps\Demos\src\example\auction\NewTicketAuction.java.
To remove a band, select the Menu soft key and choose 5. Navigate to a band then
choose Select to mark the check box. You can select multiple bands. Choose the Save
soft key.
To display the current settings for ticker display, updates, alert volume, and date,
select the Menu soft key and choose 6. If desired, use the arrow keys and the select
key to change these values. Choose the Save soft key.
ManyBalls
This MIDlet starts with one ball traveling the screen. Use the up and down arrows to
accelerate or decelerate the ball speed (fps). Use the right or left arrows to increase or
decrease the number of balls.
MiniColor
This MIDlet sets an RGB value. Use navigation keys to change color values.
26
December 2009
DECEMBER 2009
JAVA ME SDK HELP
Keyboard controls work as you would expect. First cursor up or down to highlight a
color, and then use left and right keys to lower and raise the value of the selected
color.
The virtual keyboard requires an extra step to select each control before you can
change its value. In virtual mode, use the navigation keys to highlight a virtual
control, then press select to activate the control.
1. Click the Virtual soft key.
The application displays a 4-way control.
The up and down keys select a color. The left and right keys lower and raise the
value of the selected color.
Use keyboard navigation keys to choose a control on the display, then press Select.
2. Select the first bar (blue).
A white box surrounds the selected color.
Blue and has a value of 0 so you don’t see any blue yet.
3. Choose the right control and press select.
Each click raises the value by 32.
Chooser
The Chooser application uses a variety of controls to change text color, background
color, and fonts.
■
Choose Menu > Text Color. Change the color as described for MiniColor and select
the OK soft button.
■
Choose Menu > Background Color. Change the color as described for MiniColor
and select the OK soft button.
■
Choose Menu > Fonts. You can change the font Face, Style, and Size.
Cursor up and down to highlight a property, then select. The left and right keys
jump between lists. Up and down keys move item by item.
Click OK to continue.
HttpExample
This sample makes an HTTP communication. A popup confirms the transaction was
successful.
Using Sample Projects
27
JAVA ME SDK HELP
USING SAMPLE PROJECTS
HttpView
This application displays a predefined URL. You can also enter a new URL.
■
Launch the HttpView application.
■
Select Menu > 2 to get the contents of the URL.
■
Select Menu > 6 to view application instructions.
PushExample
This application simulates a feed. As soon as you connect, you receive and display a
graphic. Select Done to continue.
Running FPDemo
FPDemo is a simple floating point calculator.
1. Enter a number in the first field.
2. To choose an operator, highlight the drop-down list and click to select. Cursor
down to highlight an operator, then click to make a selection.
3. Enter a second value.
4. Press the Calc soft button to calculate the result.
Running Games
This application features three games: TilePuzzle, WormGame, and PushPuzzle.
TilePuzzle. The desired result, “Rate your mind pal“ is shown first. From the soft
Menu, select 1, Start. The scrambled puzzle is displayed. The arrow keys move the
empty space, displacing tiles accordingly. From the menu you can Reset, or change
options.
WormGame. From the soft Menu, select 1, Launch. Use the arrow keys to move the
worm to the green box without touching the edge of the window. Once the game is
launched, use the soft menu to change game options.
PushPuzzle. Use the blue ball to push the orange boxes into the red squares in the
fewest number of moves.
28
December 2009
DECEMBER 2009
JAVA ME SDK HELP
Running Network Demo
This demo has two MIDlets: Socket Demo and Datagram Demo. Each demo requires
you to run two emulator instances so that you can emulate the server and client
relationship. For example, run the demo on DefaultCldcMsaPhone1 and
DefaultCldcMsaPhone2.
Socket Demo
In this application one emulator acts as the socket server, and the other as the socket
client.
1. In the first emulator, launch the application, then select the Server peer. Choose
Start. The emulator explains that the demo wants to send and receive data over
the network and it might ask, “Is it OK to use network?” Choose Yes. The Socket
Server displays a screen that indicates it is waiting for a connection.
2. In the second emulator, launch the application, select the Client peer, then choose
Start. The emulator explains that the demo wants to send and receive data over
the network and it might ask, “Is it OK to use network?” Choose Yes. The Socket
Client displays a screen that indicates it is connected to the server. Use the down
navigation arrow to highlight the Send box. Type a message in the Send box, then
choose the Send soft key.
For example, in the client, type Hello Server In the Send box. Choose the Send
soft key. The emulator activates a blue light during the transmission.
3. On the emulator running the Socket Server, the Status reads: Message received
- Hello Server. You can use the down arrow to move to the Send box and type
a reply. For example, Hello Client, I heard you. Select Send.
4. Back in the Socket Client, the status shows the message received from the server.
Until you send a new message, the Send box contains the previous message you
sent.
Datagram Demo
This demo is similar to Socket Demo. Run two instances of the emulator. One acts as
the datagram server, and the other as the datagram client.
1. In the first emulator, launch Datagram Demo, then select the Server peer. Choose
Start. The emulator explains that the demo wants to send and receive data over
the network and it might ask, “Is it OK to use network?“ Choose Yes. Initially, the
Datagram Server status is Waiting for connection, and the Send box is
empty.
Using Sample Projects
29
JAVA ME SDK HELP
USING SAMPLE PROJECTS
2. In the second emulator, launch Datagram Demo, select the Client peer, then
choose Start. The emulator explains that the demo wants to send and receive data
over the network and it might ask, “Is it OK to use network?“ Choose Yes. The
Datagram Client status is: Connected to server. Use the down navigation
arrow to highlight the Send box. Type a message in the Send box, then choose the
Send soft key. For example, type Hello datagram server.
3. On the emulator running the Datagram Server, the Status displays: Message
received - Hello datagram server. You can use the down arrow to move
to the Send box and type a reply to the client.
4. In the Datagram Client, the status field displays the message received from the
server. The Send box contains the last message you sent.
Running PhotoAlbum
The PhotoAlbum demo displays both static and animated images. When you are
displaying an image, you can use the Options soft menu to change the borders. If the
image is animated, you can change the speed of the playback.
Running UIDemo
UIDemo showcases a variety of MIDP user interface element implementations. Most
elements have some interactive capability (navigate and select) and some allow
keypad or keyboard input.
Input interaction is similar across demos. You can choose items from lists or type in
data.
This demo implements three list selection methods:
■
Exclusive (radio buttons)
■
Multiple (check boxes)
■
Pop-Up (a drop list).
When entering data, you can use the soft menu to apply one of the following input
types to text boxes and fields (note, some elements do not use all input types). When
a field is selected, the soft Menu label displays Qwerty. Open the menu and you see
the input types numbered 1 through 5.
1. Qwerty. Any character on the keyboard
2. 123. Any numeral
3. ABC. Any letter
30
December 2009
DECEMBER 2009
JAVA ME SDK HELP
4. Predict. Predicts next character based on prior input
5. Symbols. Opens a list of symbols; click to make a selection.
6. Virtual. Click on a virtual keyboard to enter data.
The Qwerty, 123, and ABC categories act as filters. For example, if you assign 123 to
a field and you type “abc”, nothing is entered in the field.
CustomItem. This demo features text fields, and text fields in table form. To type in
the table, select a cell, then click to open a text entry panel and type your input. From
the menu, select OK.
StringItem. Displays labels, a hyperlink, and a button. The soft menu action varies
depending on the selected element.
Gauge. Interactive, non-interactive, indefinite and incremental gauges.
Alert. Uses pop-ups to display alerts. Set the alarm type and the length of the
timeout from drop lists. Select the alert type and select the Show soft button.
ChoiceGroup. Radio buttons, check boxes, and pop-ups on one screen.
List. Select exclusive, implicit, or multiple to display the list type on a subsequent
screen.
TextBox. Use text fields, radio buttons, check boxes, and pop-ups. Select a text box
type and press the Show button.
TextField. Text fields with the six input types
DateField. Set date and time using drop lists.
Ticker. A scrolling ticker.
Using Sample Projects
31
JAVA ME SDK HELP
32
December 2009
USING SAMPLE PROJECTS
JAVA ME SDK HELP
Creating and Editing Projects
A project is a group of files comprising a single application. Files include source files,
resource files, XML configuration files, automatically generated Apache Ant build
files, and a properties file.
When a project is created, the SDK performs these tasks:
■
Creates a source tree you can examine in the “Working With Projects” on page 37
or “View Project Files” on page 38.
■
Sets the emulator platform for the project.
■
Sets the project run and compile-time classpaths.
■
Creates a build script that contains actions for running, compiling, debugging, and
building Javadoc. The build process is controlled by project properties, as
described in “Building a Project” on page 49.
Java ME SDK and NetBeans create their project infrastructure directly on top of
Apache Ant. Java ME SDK projects can be opened and edited in NetBeans, and
vice-versa. With the Ant infrastructure in place, you can build and run your projects
within the SDK or from the command line.
The SDK provides two views of the project:
■
The Projects window provides a logical view of the project.
■
The Files window displays a physical view of the project.
Project settings are controlled in the project Properties window. Typically, you
right-click on an item or subitem in a tree (a project, a file, or a device) and select
Properties.
Related Information
December 2009
■
“Create a CLDC Project” on page 37
■
“Build a Project from the Command Line” on page 136
33
JAVA ME SDK HELP
CREATING AND EDITING PROJECTS
Project Types
The CLDC/MIDP platform implements the Mobile Information Device Profile and
Connected Limited Device Configuration (JSRs 118 and 139). See “CLDC Projects” on
page 34.
CLDC Projects
A MIDP application (a MIDlet), is deployed as a MIDlet suite. A MIDlet suite is
distributed as a Java archive (JAR) file and a Java Application Descriptor (JAD) file.
The JAR file includes the Java classes for each MIDlet in the suite, Java classes shared
between MIDlets, resource files, and other supporting files. The JAR file also includes
a manifest describing the JAR contents and specifying attributes the application
management software (AMS) uses to identify and install the MIDlet suite.
The JAD file contains attributes that allow the AMS to identify, retrieve, and install
the MIDlets in a project. The SDK automatically creates JAD and JAR files when you
build the project.
When the application is run, the name of the main application class is passed to the
Java virtual machine. This class must include a method named main() that handles
the application’s class loading, object creation, and method execution. The project
manages its own life cycle and system resource needs. When the main() method
exits, the application terminates.
See “Create a CLDC Project” on page 37, “Working With Projects” on page 37, and
“View Project Files” on page 38.
The Project Wizard
The project provides a basic infrastructure for development. You provide source files,
resource files, and project settings as needed. The SDK provides a wizard for creating
new projects quickly and easily using an application template. Most project
properties can be edited later by changing the project properties.
Related Information
■
34
December 2009
“General Project Properties” on page 43
DECEMBER 2009
JAVA ME SDK HELP
■
“Platform Selection” on page 44
■
“Editing Application Descriptor Properties” on page 45
■
“Building a Project” on page 49
■
“Running Settings” on page 54
Project Template Page
This is the first page in the New Project wizard.
For MIDP the project options are as follows:
■
MIDP Application. Create a new MIDP application in a CLDC/MIDP project.
■
LWUIT Application. Create a LWUIT application in a CLDC/MIDP project. By
default creates a supplies a preconfigured version of the LWUIT 1.2.1 library.
■
Import Wireless Toolkit Project. Create a project by importing a Sun Java Wireless
Toolkit project from an existing toolkit installation.
See “Create a CLDC Project” on page 37.
Name and Location Page
Use this form to enter project information. This form is the second page in the New
Project wizard. The name and location cannot be changed, but you can view a
project’s name and location.
Project Name. Enter a project name. If you are importing an existing project this field
is pre-populated with the old filename prefixed.
Project Location. The default location is:
Windows
C:\Documents and Settings\user\My Documents\JavaMESDKProjects
Mac OS
/Users/uname/JavaMESDKProjects.
Project Folder. The Project Folder value is extrapolated from Project Name and
Project Location.
Set as Main Project. Check this box to make the project the Main Project when it is
first opened. The Main project is automatically the focus of all actions initiated from
the user interface (for example, the actions on the Run menu, which provide the same
functionality as clicking icons on the main tool bar).
Creating and Editing Projects
35
JAVA ME SDK HELP
CREATING AND EDITING PROJECTS
Create Hello MIDlet. This check box is only visible for a new MIDP project. It inserts
sample MIDlet code as a template for your development. You can compile and run
the MIDlet immediately.
WTK MIDP Project Location
To see this form, start the New Project wizard and select Import Wireless Toolkit
Project.
WTK Location. Browse to select the location of your Sun Java Wireless Toolkit
installation. Choose the installation directory.
Detected Applications. When the WTK Location is selected the Detected
Applications window displays the available projects. Highlight a project, and click
Next.
See “Import a Legacy MIDP Project” on page 40.
Platform Selection Page (MIDP)
You can view this form in the New Project wizard, or in the Projects view. Right-click
a project, select Properties, and select Platform.
These settings help you test how your project runs on devices with different
capabilities. Your choice of device limits your choice of Device Configuration, Device
Profile, and Optional Packages (if applicable).
Emulator Platform. In the New Project wizard this field is predetermined.
Device. Select a device. Only devices appropriate for the platform appear in the
Device drop-down menu. The device selection determines the remaining options.
Device Configuration. Select a CLDC version.
Device Profile. Select a MIDP version. The available selections are determined by the
Device Configuration.
Optional Packages. This pane is visible when you are viewing an existing project.
You can check or uncheck optional packages to approximate device capabilities.
See “Create a CLDC Project” on page 37.
36
December 2009
DECEMBER 2009
JAVA ME SDK HELP
▼ Create a CLDC Project
1. Select File > New Project.
The New Project wizard opens. Java ME SDK is the only category.
2. Follow the prompts in the New Project wizard, consulting Help if necessary.
3. To run the new project, follow the steps in “Running a Project” on page 15,
except select your new project instead of a sample project.
4. Be sure to exit or close the application when you are finished.
Once the emulator is launched, it runs as an independent process. Pressing the red
stop button in the SDK user interface or closing the SDK does not stop the
application running in the emulator.
Applications usually provide a way to terminate. For example, most of the
samples offer an Exit soft key, or an option in the soft menu. You can close the
application and leave the emulator running (so you do not have to wait for the
emulator to open the next time you run the project).
If you want to close the emulator and stop the project build process, select
Application > Exit.
Working With Projects
The logical view of the project, shown in the Projects window, provides a hierarchy
of sources and resources. Right-click on the project node to see actions related to the
project.
New. Opens a form to build a new object for the current project. The new object is
placed in the project’s file structure by default, but you can control the file name and
location. The possible objects are dependent on the currently selected project. For
example, if the project is CLDC, the options are MIDlet, Java class, Java package, or
Java interface. Selecting New > Other allows you to add different types of files to the
project. For a sample procedure, see “Generating Stub Files from WSDL Descriptors”
on page 173.
Build. Builds a distribution Java archive (JAR) file. The build process is controlled by
project properties, as described in “Building a Project” on page 49.
Clean & Build. Cleans, then builds a distribution JAR file.
Creating and Editing Projects
37
JAVA ME SDK HELP
CREATING AND EDITING PROJECTS
Clean. Cleans the build files.
Run. Runs the project with the default device, as specified on the Platform property
page. See “Platform Selection” on page 44.
Set as Main Project. Make the current project the new main project. Toolbar actions,
such as clicking the green Run button, act upon the main project by default.
Close. Close the current project. Be sure that any processes are stopped, as closing a
project might not stop the emulator.
The Source Packages node encapsulates all the Java packages in the project.
Right-click on the Source Packages node and choose New to add a new MIDlet to
your application.
The Resources node encapsulates all resources and libraries of the active
configuration. Right-click the Resources node to add Projects, JARs, folders, and
libraries as resources for your application. You cannot add or remove inherited
resources.
Related Information
■
“View Project Files” on page 38
■
“Create a CLDC Project” on page 37
■
“Import a Legacy MIDP Project” on page 40
View Project Files
The Files window displays a physical view of all project files. Right-click to view
project properties or choose an action related to the project.
build. The output directory for the compiled classes listed below. This directory also
contains manifest.mf, the manifest file that will be added to the JAR file.
38
■
compiled. Contains all compiled classes.
■
obfuscated. Holds the obfuscated versions of the class files.
■
preprocessed. Holds the source files after they are preprocessed. The files will
differ from the original source files if you are using project configurations.
■
preverified. Holds the preverified versions of the class files. These files are
packaged into your project’s distribution JAR.
■
preverifysrc. Versions of the source files before they are preverified.
December 2009
DECEMBER 2009
JAVA ME SDK HELP
dist. The output directory of packaged build outputs (JAR files and JAD files). The
dist directory also contains generated Javadoc documentation.
lib. Contains libraries you have added to the project. See “Adding Libraries and
Resources” on page 51.
nbproject. The directory that contains the project Ant script and other metadata.This
directory contains the following files:
■
build-impl.xml. The SDK-generated Ant script. Do not edit build-impl.xml
directly. Always override its targets in build.xml.
■
private/private.properties. Properties that are defined for you alone. If
you are sharing the project, any properties you define in this file are not checked
in with other project metadata and are only applied to your SDK installation.
■
project.properties. Ant properties used to configure the Ant script. This file
is automatically updated when you configure the project’s properties. Manual
editing is possible, but it is not recommended.
■
project.xml and genfiles.properties. Generated metadata files. It is
possible to edit project.xml manually, but it is not recommended. Do not edit
genfiles.properties.
res. Resource files you have added to the project. See “Adding Libraries and
Resources” on page 51.
src. The project source files.
build.xml. The build script. This build script only contains an import statement that
imports targets from nbproject/build-impl.xml. Use the build.xml to
override targets from build-impl.xml or to create new targets.
See also: “Create a CLDC Project” on page 37.
Related Information
■
“Create a CLDC Project” on page 37
■
“Import a Legacy MIDP Project” on page 40
Create a New MIDlet
To create a new MIDlet from the Files view, right-click a project and select New >
MIDlet. With this form you can specify the name of the MIDlet and its location
within the selected project.
MIDlet Name. The name of the new MIDP class.
Creating and Editing Projects
39
JAVA ME SDK HELP
CREATING AND EDITING PROJECTS
Midlet Class Name. The name that users see when the application runs on a device.
MIDlet Icon. The path to an icon associated with the MIDlet. Users see the icon
when the application runs on a device.
Project. Displays the name of the project.
Package. Specifies the location of the MIDlet class. You can select an existing package
from the drop down menu, or type in the name of a new package. The new package
is created along with the class.
Created File. Displays the name and location of the MIDlet.
When the new MIDlet is created the SDK automatically adds it to the project’s
Application Descriptor File.
▼ Import a Legacy MIDP Project
If you created a project using the Sun Java Wireless Toolkit for CLDC on Windows or
Linux you can import your MIDlets into Java ME SDK projects. You can also use this
procedure to create a project based upon a legacy sample project.
1. Select File > New Project.
2. In the Projects area, select Import Wireless Toolkit project. Click Next.
3. Specify the WTK project location.
Use browse to open the directory containing the legacy project.
4. Select a project and click Next.
5. Supply the Project Name, Location, and Folder for the new project.
Note that the default name, project name and folder name are based on the name
of the project you are importing. Click Next.
6. Select the Platform type, the default device, and the configuration and profile, if
applicable. Click Finish.
Your new project opens in the Projects window.
7. If the legacy project used signing, you must configure the signing properties as
described in “Managing Keystores and Key Pairs” on page 96.
40
December 2009
DECEMBER 2009
JAVA ME SDK HELP
Add Files to a Project
For all projects, right-click to use the context menu to add files to a project. Using this
method places files in the proper location in project source or resources.
To add a MIDlet, Java class, Java package, Java interface or Other files, right-click the
project name or the Source Packages node, choose New, and select the file type.
To add files by format (Project, JAR, Folder, Library) right-click the Resources node
and select a format. See “Adding Libraries and Resources” on page 51.
Search Project Files
To search a project’s files, right-click on the project and select Find...
The Find in Files utility supports searching a project’s file contents or file names. The
search input fields supports simple text matching and regular expressions.
Containing Text. The string you are looking for. If File Name Patterns is empty, all
files are searched.
File Name Patterns. The files you are searching in. If the Containing Text field is
empty you get a listing of files that match the pattern.
The Options Whole Words, Match Case, and Regular Expression further restrict the
search. Regular Expression Constructs are fully explained in:
http://java.sun.com/javase/6/docs/api/java/util/regex/Pattern.html#sum
Creating and Editing Projects
41
JAVA ME SDK HELP
42
December 2009
CREATING AND EDITING PROJECTS
JAVA ME SDK HELP
Viewing and Editing Project
Properties
All projects have properties. Some properties, such as the project’s name and location
cannot be changed, but other properties can be freely edited as work on your project
progresses. To view or edit a project’s properties, right-click the project node and
select Properties. In the resulting window, you can view and customize the project
properties. See the following topics:
■
“General Project Properties” on page 43
■
“Platform Selection” on page 44
■
“Editing Application Descriptor Properties” on page 45
■
“Building a Project” on page 49
■
“Running Settings” on page 54
General Project Properties
To view the General property page, right-click on a project, choose Properties, and
select the General category. The general properties page displays basic project
properties. You can set application versioning here, but all other values cannot be
edited.
The project name, folder, and source location are set when the project is created. The
Application Version Number field displays the version number of the current build.
Application Versioning
The Application Version Counter field displays the next version number to be used.
The default advance is 0.0.1. To advance the number beyond this, use the dropdown
menu to select a new digit, or enter the value into the field. For example, changing
the value to 3 results in a build number of 0.0.3. Changing the value to 100 results in
the version number 0.1.0.
December 2009
43
JAVA ME SDK HELP
VIEWING AND EDITING PROJECT PROPERTIES
Required Projects
This area displays projects you have added to this project. It might be a dependent
project or an external library.
Related Information
■
“Adding Libraries and Resources” on page 51
Platform Selection
An emulator platform simulates the execution of an application on one or more
target devices. To view this property page, right-click on a project and choose
Properties and select the Platform category.
Platform types are listed in the Select Platform Type dropdown. The emulator
platform is supplied based on the platform type.
Select a platform type from the dropdown menu.
By default, the devices in the device menu are also suitable for the platform type and
emulator platform. The device you select is the default device for this project. It is
used whenever you use the Run command. Your device selection influences the
Device Configuration and Device Profile options, and the available optional
packages.
For CLDC, select the optional packages you want to include in this project. The
selected APIs are automatically added to the project’s classpath.
Related Information
■
44
December 2009
“Create a CLDC Project” on page 37
DECEMBER 2009
JAVA ME SDK HELP
Editing Application Descriptor
Properties
To view this property page, right-click on a project, choose Properties, and select the
Application Descriptor category. The Application Descriptor properties page enables
adding, editing, or deleting project attributes. See the Related Information topics.
Related Information
■
“MIDP Attributes” on page 45
■
“MIDlets” on page 46
■
“Push Registry” on page 48
■
“API Permissions” on page 49
■
“Using Content Handlers” on page 207
MIDP Attributes
To view this property page, right-click on a MIDP project and choose Properties.
Select the Application Descriptor category, and select the Attributes tab.
The General Attributes table lists the attributes currently contained in the JAD and
JAR manifest files:
Type. Lists whether the attribute is required or optional.
Name. The name of the attribute.
Value. The values for each attribute.
To avoid errors in verification:
■
Make sure all required attributes have a defined value.
■
Do not begin user-defined attribute keys with MIDlet- or MicroEdition-.
Related Information
■
“Edit an Attribute” on page 46, and “Add an Attribute” on page 46
Viewing and Editing Project Properties
45
JAVA ME SDK HELP
VIEWING AND EDITING PROJECT PROPERTIES
▼ Add an Attribute
Follow these steps to add an attribute.
1. Click Add... to open the Add Attribute window.
2. Choose an attribute from the Name combo box, or delete the current entry and
add your own custom entry.
Note – Do not begin a user-defined attribute name with MIDlet- or
MicroEdition-.
3. Enter a value for the attribute.
4. Click OK.
▼ Edit an Attribute
1. Select an attribute.
2. Click Edit... to open the Edit Attribute window.
3. Enter a value for the attribute.
4. Click OK.
Related Information
API permissions, Push Registry Entries, and API Permissions have their own
property pages.
■
“MIDlets” on page 46
■
“Signing” on page 53
▼ Remove an Attribute
●
Select an Attribute and click Remove to delete it from the list.
MIDlets
To view this page, right-click on a project and choose Properties. Select the
Application Descriptor category, and select the MIDlets tab.
46
December 2009
DECEMBER 2009
JAVA ME SDK HELP
The MIDlets table lists the MIDlets contained in the suite and the following
properties:
Name. The displayable name of the MIDlet that the user sees when the MIDlet is run
on a mobile device.
Class. The Java class for the MIDlet.
Icon. An icon (a .png file), representing the MIDlet that the user sees when the
MIDlet is run on a mobile device.
▼ Add a MIDlet
1. Click Add... to open the Add MIDlet window.
The window lists the MIDLets available in the project.
2. Enter a name, then select a MIDlet class from the dropdown menu.
You can also choose an icon for the MIDlet from the MIDlet icon dropdown menu.
3. Click OK.
▼ Edit a MIDlet
1. Select a MIDlet.
2. Click Edit... to open the Edit MIDlet window.
3. Enter a value for the attribute.
4. Click OK. The revised values are listed in the table.
▼ Remove a MIDLet
●
Select a MIDlet and click Remove to delete it from the list.
▼ Change MIDlet Display Order
The list order determines the order in which the MIDlets are displayed.
●
Select a MIDLet and select Move Up or Move Down to change its position.
Viewing and Editing Project Properties
47
JAVA ME SDK HELP
VIEWING AND EDITING PROJECT PROPERTIES
Push Registry
To view this page, right-click on a project and choose Properties. Select the
Application Descriptor category, and select the Push Registry tab.
See also “Add a Push Registry Entry” on page 48, “Edit a Push Registry Entry” on
page 48, “Remove a Push Registry Entry” on page 48, and “Change Push Registry
Display Order” on page 49.
▼ Add a Push Registry Entry
1. Click Add... to open the Add Push Registry window.
2. Enter Class Name, Sender IP, and Connection String values.
■
Class Name. The MIDlet's class name.
■
Sender IP. A valid sender that can launch the associated MIDlet. If the value is
the wildcard (*), connections from any source are accepted. If datagram or
socket connections are used, the value of Allowed Sender can be a numeric IP
address.
■
Connection String. A connection string that identifies the connection protocol
and port number.
3. Click OK.
The new values are listed in the table. A push registration key is automatically
generated and shown as an attribute in the MIDlet suite's Java Application
Descriptor (JAD) file.
▼ Edit a Push Registry Entry
●
To make use of the Push Registry, you must also have permission to access the
Push Registry API, javax.microedition.io.PushRegistry. API
permission, are handled in the API Permissions property page (“API
Permissions” on page 49).
▼ Remove a Push Registry Entry
●
48
December 2009
Select an entry and click Remove to delete it from the list.
DECEMBER 2009
JAVA ME SDK HELP
▼ Change Push Registry Display Order
●
The list order determines the order in which the MIDlets are displayed. Select
an entry and select Move Up or Move Down to change its position.
API Permissions
These properties set permission attributes for protected APIs called by the MIDlet
suite. To view this property page, right-click on a project and choose API
Permissions. Select the Application Descriptor category, and select the Attributes tab.
See “Adding Permission Requests” on page 49.
▼ Adding Permission Requests
1. Click the Add Button.
The API Permission for API dialog opens.
2. Choose an API from the dropdown list or enter an API into the combo box and
click OK.
3. (Optional) In the Requested Permissions table, check the Required box if you
want installation to fail in the event that permission cannot be granted.
Related Information
For more information, see Security for MIDP Applications in the MIDP 2.0 (JSR 118)
specification, available at:
http://developers.sun.com/techtopics/mobility/midp/articles/push
reg/.
Building a Project
When you build a project, the SDK compiles the source files and generates the
packaged build output (a JAR file) for your project. You can build the main project
and all of its required projects, or build any project individually.
In general you do not need to build the project or compile individual classes to run
the project. By default, the SDK automatically compiles classes when you save them.
You can use properties to modify the following build tasks:
Viewing and Editing Project Properties
49
JAVA ME SDK HELP
VIEWING AND EDITING PROJECT PROPERTIES
■
“Compiling” on page 51
■
“Adding Libraries and Resources” on page 51
■
“Obfuscating” on page 52
■
“Creating JAR and JAD Files (Packaging)” on page 52
■
“Signing” on page 53
Configuring Ant
Windows: To view this form, select Tools > Options, select Miscellaneous, and click
the Ant tab.
Mac OS: To view this form, select Java ME Platform SDK > Preferences, click
Miscellaneous, and click the Ant tab.
Ant Home. The installation directory of the Ant executable the SDK uses. To change
Ant versions, type the full path to a new Ant installation directory in this field or
click Browse to find the location. You can only switch between versions 1.5.3 and
higher of Ant.
The Ant installation directory must contain a lib/ subdirectory which contains the
ant.jar binary. For example, for the standard Ant 1.7.1 release, the Ant installation
directory is ant/lib/apache-ant-1.7.1. If you enter a directory that does not
match this structure, the SDK gives you an error.
You can also specify the following options:
Save All Modified Files Before Running Ant. If selected, saves all unsaved files in
the SDK before running Ant. It is recommended to leave this property selected
because modifications to files in the SDK are not recognized by Ant unless they are
first saved to disk.
Reuse Output Tabs from Finished Processes. If selected, writes Ant output to a
single Output window tab, deleting the output from the previous process. If not
selected, opens a new tab for each Ant process.
Always Show Output. If selected, the SDK displays the Output window for all Ant
processes. If not selected, raises the Output window tab only if the Ant output
requires user input or contains a hyperlink. Output that contains hyperlinks usually
denotes an error or warning.
Verbosity Level. Sets the amount of compilation output. Set the verbosity lower to
suppress informational messages or higher to get more detailed information.
Classpath. Contains binaries and libraries that are added to Ant’s classpath. Click
Add Directory or Add JAR/ZIP to open the Classpath Editor.
50
December 2009
DECEMBER 2009
JAVA ME SDK HELP
Properties. Configures custom properties to pass to an Ant script each time you call
Ant. Click Manage Properties to edit the properties in the property editor. This
property is similar to the Ant command-line option, -Dkey=value. The following
default properties are available:
${build.compiler.emacs}. Setting this property to true enables Emacs-compatible
error messages.
Compiling
To view this property page, right-click on a project and choose Properties. In the
Properties window Build category, choose Compiling.
This page enables you to set the following options:
Generate Debugging Info. If checked, the compiler generates line numbers and
source files information. This is the -g option in javac. If unchecked, no debugging
information is generated (the -g:none option in javac).
Compile with Optimization. If checked, the compiled application is optimized for
execution. This is the -O option in javac. Optimizing can slow down compilation,
produce larger class files, and make the program difficult to debug.
Report Uses of Deprecated APIs. If checked, the compiler lists each use or override
of a deprecated member or class. This is the -deprecated option in javac. If
unchecked, the compiler shows only the names of source files that use or override
deprecated members or classes.
Encoding. Overrides default encoding used by preprocessor and compiler. The
default value is the default encoding used by your VM.
Adding Libraries and Resources
To view this property page, right-click on a project and choose Properties. In the
Properties window Build category, choose Libraries and Resources.
This page allows you to add a dependent project, libraries, and other supporting files
to the current project.
Add Project. The JAR file produced by another project, as well as the associated
source files and Javadoc documentation. Adding this item to a classpath sets up a
dependency between the current project and the selected JAR file.
Viewing and Editing Project Properties
51
JAVA ME SDK HELP
VIEWING AND EDITING PROJECT PROPERTIES
Add Library. A Library is a collection of JAR files or folders with compiled classes,
which can optionally have associated source files and Javadoc documentation. If the
Package checkbox is checked the library is included in the application’s JAR file. If it
is not checked, the library is copied into the lib directory.
Add JAR file. A JAR file created by another project.
Add Folder. The root of a package or directory containing files.
Once a library or resource is added, it is visible in the Libraries and Resources table,
which reflects the order of the libraries and resources in the classpath. To change the
order in the classpath, select the listing and click Move Up or Move Down. You can
also remove libraries and resources from this page.
Each row in the table has a Package check box. If Package is checked, the library or
resource is bundled and added to the project JAR file. If Package is not checked, the
library or resource is copied to the /lib subdirectory at build time.
Creating JAR and JAD Files (Packaging)
To view this property page, right-click on a project and choose Properties. In the
Properties window Build category, choose Creating JAR.
You can set the following options:
JAD File Name. Name of the JAD file created by the project sources. The file name
must have a .jad extension.
JAR File Name. Name of the JAR file created by the project sources. The file name
must have a .jar extension.
Compress JAR. If checked, the JAR file is compressed.
Obfuscating
To view this property page, right-click on a project and choose Properties. In the
Properties window Build category, choose Obfuscating.
The Java ME SDK works with the ProGuard obfuscator. To use the obfuscator, you
must download proguard.jar from http://proguard.sourceforge.net and
place the JAR file in the proguard directory in the Java ME SDK installation.
Windows
install-dir\toolbar\mobility8\external\proguard\
Mac OS
52
December 2009
DECEMBER 2009
JAVA ME SDK HELP
Java_ME_SDK_3.0.app/Contents/Resources/javamesdk/mobility8/external/proguard
You can find more details about command parameters for this obfuscator on the
ProGuard web site.
Use the Obfuscation properties page to set the level of obfuscation for project files.
Move the Obfuscation slider to set the level. The Level Description window describes
the impact each level has.
You can add more obfuscation parameters in the Additional Obfuscation Settings
window.
Signing
To view this property page, right-click on a project and choose Properties. In the
Properties window Build category, choose Signing. These properties allow you to
enable signing and assign key pairs to a CLDC project. See “Security Domains” on
page 94.
Sign Distribution. Check this box to enable signing for the MIDlet suite. If it is
unchecked, this page is disabled.
Keystore. A file that stores one or more key pairs as a keystore (.ks) file. The
dropdown menu lists all available keystores. Click the Unlock button to unlock a
keystore for use.
Alias. A name assigned to a key pair within a keystore. The dropdown menu lists the
aliases available for the selected keystore. Click the Unlock button to unlock a key
pair for use.
The Certificate Details window provides information about the certificate assigned to
the key pair.
Click Open Keystores Manager to manage keystores and key pairs. See “Managing
Keystores and Key Pairs” on page 96 and “Exporting a Key” on page 53.
Exporting a Key
To view this dialog, right-click on a project and choose Properties. In the Properties
window Build category, choose Signing and click Export key into Java ME
SDK/Platform/Emulator. Or, Select Tools > Keystores, then select a keystore and a
key, and click Export.
The Export window has the following components:
Viewing and Editing Project Properties
53
JAVA ME SDK HELP
VIEWING AND EDITING PROJECT PROPERTIES
Keystore File. Displays the name of the keystore file to which the key pair belongs.
This field cannot be edited.
Key Pair Alias. The name given to the key pair within the keystore. This field cannot
be edited.
Certificate Details. Displays the details of the certificate of the key to be exported.
Emulator. The drop-down menu lists all the device emulators available. See “Security
Domains” on page 94.
Security Domain. Enables you to select a security domain for the key pair. The menu
lists all domains supported by the selected emulator platform.
Keys Registered in the Platform. Lists all keys that have been registered in the
selected platform. Click to select the key you want to export.
Delete Key. Deletes a selected key from the Keys Registered in the Emulator
window.
Export. Exports the selected key to the selected emulator. The export button is
enabled if it is possible to export the key. If a specific key is installed it cannot be
installed again.
Running Settings
To view this property page, right-click on a project and choose Properties. In the
Properties window, choose Running. The options shown depend on the platform. See
“MIDP Project Run Options” on page 54.
MIDP Project Run Options
To set emulator command line options for a MIDP project, type in the command line
switches. See “Emulator Command Line Options” on page 133.
54
December 2009
DECEMBER 2009
JAVA ME SDK HELP
For CLDC projects, the Regular execution button is enabled by default. This means
the setting for “Specify the Security Domain“ applies when the project is run on an
emulator. It does not apply for OTA provisioning or an external emulator platform.
If you do not check Specify the Security Domain the project runs with the default
that was assigned when the project was created. If you check the box, you can select
a domain from the dropdown list. See “Security Domains” on page 94 and “Specify
the Security Domain for a Project” on page 95.
Viewing and Editing Project Properties
55
JAVA ME SDK HELP
56
December 2009
VIEWING AND EDITING PROJECT PROPERTIES
JAVA ME SDK HELP
Running Projects in the Emulator
The Java ME Platform SDK emulator simulates a MIDP device on your desktop
computer. The emulator does not represent a specific device, but it provides correct
implementations of its supported APIs. The SDK uses the device manager to detect
devices and displays the available devices in the Device Selector window. See “Run
the Device Manager” on page 132.
The Java ME Platform SDK provides default devices with Sun skins. A skin is a thin
layer on top of the emulator implementation that defines the appearance, screen
characteristics, and input controls.
If the Device Selector window is not visible, select Window > Device Selector.
Related Information
■
“Viewing Device Properties” on page 59
■
“Setting Device Properties” on page 61
Emulating Devices
The emulator runs applications on an emulated device or a real device. Before you
can run an application from the SDK, the Device Manager, which manages both
emulated and real devices, must be running. When the Java ME Platform SDK runs,
the Device Manager automatically launches and starts detecting devices. The default
devices shipped with the SDK are automatically found and displayed in the Device
Selector window.
The Device Manager on Windows
The Device Manager is a service and you can see it running in your Windows system
tray. In the task manager, the process is labeled device-manager.exe.
December 2009
57
JAVA ME SDK HELP
RUNNING PROJECTS IN THE EMULATOR
The Device Manager icon looks like this:
You can right-click on the icon and select Exit to stop the service.
The Device Manager on Mac OS
When the Device Manager is running you can see its icon on the right side of the
system tool bar
If the Device Manager Icon is Not Visible In the Toolbar
The Device Manager icon is available in the toolbar if you are running with Java 1.6.
If you are using Java 1.5, the Device Manager runs, but its icon cannot be displayed
in the system toolbar. To stop the device manager you must kill its process from a
console window. For example, use the ps command to find the device manager
process (if you are not familiar with ps, type man ps at the command prompt).
ps -aef | grep device-manager
Observe the process IDs (the above output has been shortened to fit) and use them as
arguments for the kill command. For example:
kill 18219 18221
Adding Devices With the Device Wizard (Mac OS)
If you use an external device, the SDK doesn’t automatically know about it. Use the
Add Device wizard to supply an IP address, and the Device Manager will search that
location for all instances of Java. In the Device Selector, click the Add a Device icon to
launch the wizard.
58
December 2009
DECEMBER 2009
JAVA ME SDK HELP
Step 1: Set the device location. Enter the IP address of the device and click Next.
Step 2: Device detection. Choose a verbosity level. You can change the verbosity
dynamically.
Device detection starts. Notifications are written to the text pane. Progress messages
are black, successful detection is green, and failure is red.
The Device Manager performs the same task as the Add Device Wizard. To launch
the device manager, click the
Enter an IP address and click Add. Addresses are
tested as they are added. Progress messages are black, successful detection is green,
and failure is red.
Related Information
■
“Platform Properties” on page 60
■
“Device Information” on page 61
■
“Device Properties” on page 61
■
“Emulator Command Line Options” on page 133
■
“Run the Device Manager” on page 132
Viewing Device Properties
The Device Selector window lists all available devices grouped by platform. If this
window is not visible, select Windows > Device Selector.
If no Java ME platform is registered in the toolbar, the Device Selector displays a
node labeled No Device Found. If you see this message at startup, it typically means
device discovery is incomplete and you just need to wait a few seconds.
The following graphic shows Windows on the left, and Mac OS on the right.
Running Projects in the Emulator
59
JAVA ME SDK HELP
RUNNING PROJECTS IN THE EMULATOR
Each sub node represents an emulator skin for a device. Two instances are provided
for some CLDC devices, for example, DefaultCldcPhone1 and DefaultCldcPhone2.
These devices have the same capabilities but unique phone numbers, making it easy
for you to test communication between two devices. If you need another device
instance, see “Adding a Device Instance” on page 66.
For Device names, see TABLE: Device Names on page 74. The properties for each
device skin are stored in XML files in your user work directory. See TABLE: File
Locations on page 73.
See also: “Platform Properties” on page 60, “Device Information” on page 61, and
“Device Properties” on page 61
Platform Properties
To view platform properties from the device selector, right-click on the platform node
(for example, CLDC or CDC) and select Properties. The platform properties display
in a separate window.
If you have selected Window > Properties, the Properties window is, by default,
docked in the upper right portion of the user interface. Selecting a node in the Project
or Files trees causes any available properties to be displayed.
60
December 2009
DECEMBER 2009
JAVA ME SDK HELP
Device Information
In the Device Selector window, right-click on a device node and select Device
Information. The Device Information tab in the Main window displays a picture of
the device and displays details, supported hardware capabilities, keyboard support,
supported media formats, and the supported runtimes.
Device Properties
In the Device Selector window, right-click on the platform node and select Properties.
The device properties display in a separate window.
If you have selected Window > Properties, the Properties window is docked in the
SDK. Selecting any node causes its properties to be displayed.
See “Setting Device Properties” on page 61.
Setting Device Properties
In the Device Selector Window, right-click on a device and select Properties. Any
properties shown in gray font cannot be changed. You can adjust the device
properties shown in black.
Debug Port. The debugging port number. A default is supplied but it can be
changed.
Enable Profiler. Check this box to enable profiling. This is a CPU snapshot collected
during emulation. See “Saving Profiler Data” on page 75.
If you want a profile of the Java Heap contents during the virtual machine execution,
see “Virtual Machine Memory Profiler (Java Heap Memory Observe Tool)” on
page 144.
Enable Network Monitor. Check this box to enable the network monitor.
Phone Number. You can set the phone number to any appropriate sequence,
considering country codes, area codes, and so forth. If you reset this value, the
setting applies to future instances.
The number is a base value for the selected device.
Running Projects in the Emulator
61
JAVA ME SDK HELP
RUNNING PROJECTS IN THE EMULATOR
Heapsize. The heap is the memory allocated on a device to store your applications’s
objects. The Heapsize property is the maximum heap size for the emulator. You can
choose a new maximum size from the dropdown menu.
Security Domain. Select a security setting from the dropdown menu. See “Security
Domains” on page 94. Applies to CLDC and JavaFX platforms.
Locale. Type in the locale as defined in the MIDP 2.0 specification:
(http://jcp.org/en/jsr/detail?id=118)
Opening a Serial Port
In application code, you can use Connector.open(“comm:COM1“) to open a port
on the device.
Windows
On Windows, you can open a serial port such as COM1 or COM2.
Mac OS
Mac hardware does not have serial ports. Java ME SDK emulates a serial port named
COM1 for each default device. When your application connects to COM1, you can
emulate interaction with the serial port by reading from and writing to the serial
file:
/Users/uname/Library/Application Support/javame-sdk/3.0/work/device/serial
The serial file is a symbolic link to a pseudo terminal that is virtually connected to
the device under COM1. When the emulator encounters the call to open the port the
serial file is instantiated. When the connection is closed the serial file is removed.
Running a Project from the Device
Selector
The SDK determines which open projects are suitable for a device. Right-click on the
device and select a project from the context menu. If projects are not suitable they are
displayed in gray font.
Windows
62
December 2009
DECEMBER 2009
JAVA ME SDK HELP
Mac OS
You can also launch the emulator to run a project from the command line, as
explained in “Emulator Command Line Options” on page 77.
Running Projects Simultaneously on a
Single Device
CLDC-based devices are capable of running multiple virtual machines.You can test
this behavior in the emulator. Be sure the output window is visible in the SDK (select
Window > Output > Output). To test this feature, follow these steps:
1. Open the sample projects Games and AudioDemo.
2. In the device selector, choose an MSA-compliant device and run Games. When the
emulator launches run AudioDemo on the same device.
As each MIDlet loads, the AMS automatically installs it.
Running Projects in the Emulator
63
JAVA ME SDK HELP
RUNNING PROJECTS IN THE EMULATOR
3. In AudioDemo, launch the Audio Player, and play the JavaOne theme.
Select AudioPlayer, then from the soft menu, select 1, Launch. Select JavaOne
Theme and press the Play soft button.
4. In the emulator, choose Application > AMS Home, or press F4.
Select SunSamples - Games. From the soft menu, select 1, Open. The music
continues to play while you are able to simultaneously launch and play games.
5. Select Application > AMS Home, or press F4. Highlight AudioSamples, and from
the soft menu, select 2, Bring to foreground. Press the Pause soft key. The music
stops playing.
6. Select Application > AMS Home, or press F4. Highlight AudioSamples and from
the soft menu, select 1, Open. Select Bouncing Ball from the list and from the soft
menu, select 1, Launch. Select MIDI background and press the Play soft button.
7. Select Application > AMS Home, or press F4. Select Application > Switch Running
MIDlet. Select Audio Player and select Switch to. You can press the Play soft
button to resume the Audio Player.
Emulator Options
The emulator has Application, View, and Help menus.
The Application menu is only populated for CLDC and JavaFX platforms. The
Application options are as follows:
Option
Accelerator
Description
AMS Home
F4
Exit the current application and return to the Application
Management Software home.
Change Locale
64
This option only works with localized MIDlets.
Enter a locale identifier. The format is similar to Java SE 6, as
follows:
2-letter-lang-code separator 2-letter-country-code
For example, en-US, cs-CZ, zh-CN, ja-JP. The separator can
be a dash or an underscore.
Resume
F6
Resume a suspended application.
Suspend
F5
Pause a running application.
December 2009
DECEMBER 2009
JAVA ME SDK HELP
Option
Accelerator
Description
Switch Running
MIDlet
F7
When you have multiple MIDlets running, toggle between
them. You see a list of running MIDlets and you can chose
the one you want to view.
Exit
Close the emulator process and stop the build process (or
processes).
The View menu is available in full to CLDC and JavaFX platforms.
Option
Description
Always On Top
Keeps the emulator in the foreground. This is especially useful when you
are running multiple emulator instances and you want to see them all
and send messages between devices.
External Events
Generator
The external events generator is a utility for simulating external file
systems or applications communicating with the application running on
the emulator. Inputs can come from a script file on your PC or they can
be injected based on your interaction with a user interface.
The external events generator provides a tab to support JSR
implementations that require external event emulation: File Connection
(75), Location (179), Payment (229), and Sensors (256). See
“FileConnection API” on page 153, “Running the CityGuide Sample
Project” on page 187, “Running JBricks” on page 222, “Using a Mobile
Sensor Project” on page 232.
Orientation
Choose a degree of rotation (0, 90, 180, or 270 degrees clockwise from the
0 position) or, rotate clockwise by 90 degrees from the last position (F8)
or counterclockwise by 90 degrees (F9). On Mac OS, the F9 key is is used
to show all applications. To reliably rotate counter-clockwise you should
remap the counterclockwise rotation to a different key. See the topic
“Create a Keymap Profile” on page 13.
Adding a Device Instance
As described in “Viewing Device Properties” on page 59, a particular device
emulator can have more than one instance, and each instance is differentiated by a
number appended to the emulator name, as seen in TABLE: Device Names on
page 74. Each device instance is stored in a numbered directory. See TABLE: File
Locations on page 73.
To create your own instance, follow these steps:
1. Close the Java ME Platform SDK.
Running Projects in the Emulator
65
JAVA ME SDK HELP
RUNNING PROJECTS IN THE EMULATOR
2. In the device-adapter directory (see TABLE: File Locations on page 73), copy a
numbered directory and rename it with the next number in the sequence, for
example, 12 (see TABLE: Device Names on page 74).
3. In the copied directory, open the properties.xml file and change the name
property string to a unique name.
You can also change the values in device.properties.
4. In the system tray, right-click on the Device Manager icon and select Exit from the
context menu.
5. Start the Java ME Platform SDK.
In the Device Selector you see a new node named Other. All your custom devices are
listed here. To assign this device to a project, right-click the project, select Properties,
and choose Platform. Your instance appears in the Device drop list.
You can also edit the device adaptor to create a new instance. For example, to create
a second instance of the ClamshellCldcPhone, follow these steps:
1. Go to the device adapter directory (see TABLE: File Locations on page 73).
2. Make a copy of 1.bean, and name it 2.bean.
3. Edit 2.bean to change the device number to 2. For example,
ClamshellCldcPhone2.
4. Exit the SDK and exit the Device Manager.
5. Start the SDK. ClamshellCldcPhone2 is listed in the Other category.
66
December 2009
JAVA ME SDK HELP
Searching the WURFL Device
Database
The Wireless Universal Resource File (WURFL) is an XML file that acts as a global
database of mobile device capabilities. WURFL is an open source project at
(http://wurfl.sourceforge.net/). The WURFL DB
((http://www.wurflpro.com/)) is a web-based interface that allows WURFL
contributors to add or change device information in the WURFL.
The SDK uses a WURFL module to discover devices based on API support or on
physical characteristics such as physical memory size or display size.
See: “WURFL Search Filtering” on page 69 and “Search for Devices” on page 67.
▼ Search for Devices
1. Select Tools > Device Database Search.
The WURFL Device Search tab opens in the main window.
2. Check Use Filter to see search options.
If you do not check Use Filter, all devices in the database are listed. See “WURFL
Search Filtering” on page 69.
3. Make a selection from the dropdown menu on the left.
If applicable, the center dropdown displays a list of conditions. The menu on the
right displays a value.
4. To add another search criteria, click the + button.
Click the - button to remove a search setting.
5. Click the Search button.
The search returns devices that match all the chosen criteria. The results are not
case sensitive.
December 2009
67
JAVA ME SDK HELP
SEARCHING THE WURFL DEVICE DATABASE
6. Click on a device to view its properties on the right, as shown below.
See “WURFL Search Filtering” on page 69.
68
December 2009
DECEMBER 2009
JAVA ME SDK HELP
WURFL Search Filtering
As discussed in “Search for Devices” on page 67, you can use the filter to set search
constraints. If Use Filter is not checked all devices are listed. If Use Filter is checked,
you must set at least one constraint.
Supported Properties
This utility searches on a predefined list of constraints that have corresponding
properties in the Java ME Platform SDK.
■
Supported APIs
You can check the APIs you want. Note, checking an API does not exclude APIs
that are not checked.
■
MIDP 1.0, MIDP 2.0
■
CLDC 1.0, CLDC 1.1
■
MMAPI 1.0, MMAPI 1.1
■
WMAPI 1.0, WMAPI 1.1, WMAPI 2.0
■
Bluetooth API
■
3D API
■
Localization API
■
Vendor
■
Device
■
Resolution Width/Height
The device resolution.
■
Maximum Image Width/Height
The maximum image size that the device can display.
■
Physical Memory Size
The built-in memory size.
■
Heap Size
Memory limit in bytes at runtime.
■
Number of Colors
The number or colors the device’s display supports.
■
Supports Wi-Fi
■
Supported Image Formats
Check the image type. Unchecked types might still be supported.
Searching the WURFL Device Database
69
JAVA ME SDK HELP
SEARCHING THE WURFL DEVICE DATABASE
■
bmp
■
jpeg
■
gif
To see the full list of WURFL constraints, go to:
(http://wurfl.sourceforge.net/help_doc.php).
See also “Search for Devices” on page 67.
70
December 2009
JAVA ME SDK HELP
Finding Files in the Multiple User
Environment
The Java ME Platform SDK can be installed on a system running a supported
operating system version. All users with an account on the host machine can access
the SDK. This feature is called the Multiple User Environment.
Note – The Multiple User Environment supports access from several accounts. It
does not support multiple users accessing the SDK simultaneously. See “Switching
Users” on page 71.
To support multiple users the SDK creates an installation directory that is used as a
source for copying. This document uses the variable work to represent the SDK
working directory and installdir to represent the installation directory. Each user’s
personal files are maintained in a separate working directory named javame-sdk
that has a subdirectory for each version installed.
■
“Installation Directories” on page 72
■
“User Directories” on page 73
To locate logs, see “Log Location” on page 147, “Device Manager Logs” on page 147,
and “Device Instance Logs” on page 148.
Switching Users
Multiple users cannot run the SDK simultaneously, but, you can run the SDK from
different user accounts on the SDK host machine. When you switch users, you must
close the SDK and exit the Device Manager, as described in “Emulating Devices” on
page 57. A different user can then launch the SDK and own all processes.
December 2009
71
JAVA ME SDK HELP
FINDING FILES IN THE MULTIPLE USER ENVIRONMENT
Installation Directories
The Java ME SDK installation directory structure conforms to the Universal
Emulator Interface Specification, version 1.0.2. This structure is
recognized by all IDEs and other tools that work with the UEI. The installation
directory has the following structure:
■
■
apps. Contains examples for supported platforms:
■
BD-J: BdjGunBunny (Windows only)
■
CDC and AGUI: AGUIJava2DDemo and AGUISwingSet2 (Windows only).
■
CLDC and MIDP: all other applications.
bin. The bin directory contains the following command line tools. The default
location of the bin directory is:
Mac OS
/Applications/Java_ME_SDK_3.0.app/Contents/Resources/bin
Windows
installdir\bin
– device-manager. The device manager is a component that must be running
when you work with Java ME Platform SDK. After installation it starts as a
service, and it will automatically restart every time your computer restarts. See
“Emulating Devices” on page 57.
– device-address is a tool for viewing, adding, and removing devices that the
SDK is not able to discover automatically. See “Manage Device Addresses
(device-address)” on page 132.
– emulator. UEI compliant emulator. See “Emulator Command Line Options”
on page 133.
– jadtool. Tool for signing MIDlets. See “Sign MIDlet Suites (jadtool)” on
page 140.
– mekeytool. Management of ME keystores. See “Sign MIDlet Suites
(jadtool)” on page 140.
– payment-console. Minimalistic console for viewing payment transactions.
An equivalent tool exists in the Java ME SDK user interface.
– preverify. The Java ME preverifier.
– resourcesmanager. A tool for managing JSR 238 resource bundles. An
equivalent tool exists in the Java ME Platform SDK user interface.
– runBDJ. Run a BD-J project in a player (BDJ for Windows only).
– wma-tool. A command line tool for sending and receiving SMS, CBS, and
MMS messages. See “Running WMA Tool” on page 201.
72
December 2009
DECEMBER 2009
JAVA ME SDK HELP
– wscompile. Compiles of stubs and skeletons for JSR 172. See “Generate Stubs
(wscompile)” on page 143.
■
docs. Release documentation.
■
lib. JSR JAR files for compilation.
■
on-device. Windows Mobile Java Runtime for ARM.
■
toolbar. A simple development environment.
User Directories
This documentation sometimes uses user.home to represent the root location of user
files. For a list of user file locations, see TABLE: File Locations on page 73. The
default locations are as follows:
Windows
C:\Documents and Settings\user\Application Data
On Windows, if you do not remember the location you specified, select Help > About
in the main window.
Mac OS
/Users/uname/Library/Application Support/
TABLE:
File Locations
Files / OS
Description / Default Location
Default user
file root
The javame-sdk directory contains device instances and session information. If you delete
this directory, it will be recreated automatically when the device manager is restarted.
Windows
C:\Documents and Settings\user\Application Data\javame-sdk
Mac OS
/Users/uname/Library/Application Support/javame-sdk
Projects
Default project location.
Windows
C:\Documents and Settings\User\My Documents\JavaMESDKProjects
Mac OS
/Users/uname/JavaMESDKProjects
Device work
Device working directories (see TABLE: Device Names on page 74).
Windows
C:\Documents and Settings\user\Application Data\javame-sdk\3.0\work
Mac OS
/Users/uname/Library/Application Support/javame-sdk/3.0/work
Finding Files in the Multiple User Environment
73
JAVA ME SDK HELP
FINDING FILES IN THE MULTIPLE USER ENVIRONMENT
File Locations (Continued)
TABLE:
Files / OS
Description / Default Location
Device adapters Device instances (device definitions). You can make a copy of a device instance, as described
in “Adding a Device Instance” on page 66.
Windows
installdir\toolkit-lib\process\device-manager\device-adapter
Mac OS
installdir/toolkit-lib/process/device-manager/device-adapter
User Interface
Properties and configuration files for the graphical user interface.
Windows
C:\Documents and Settings\user\Application Data\javame-sdk\toolbar\3.0
Mac OS
/Users/uname/Library/Application Support/javame-sdk/toolbar/3.0
Profiling Data
Data saved from profiling sessions.
Windows
C:\Documents and Settings\user\Application Data\javame-sdk\3.0\work\
device\data.prof
Mac OS
/Users/uname/Library/Application Support/javame-sdk/3.0/work/device/data.prof
TABLE:
Device Names
Windows
Mac OS
Device
Platform
0
0
ClamshellCldcPhone1
CLDC
DefaultCdcPbpPhone1
CDC
1
74
2
1
DefaultCldcJtwiPhone1
CLDC
3
2
DefaultCldcJtwiPhone2
CLDC
4
DefaultCldcMsaPhone1
CLDC
5
DefaultCldcMsaPhone2
CLDC
6
3
DefaultCldcPhone1
CLDC
7
4
DefaultCldcPhone2
CLDC
8
DefaultCdcPbpPhone
CDC
9
SunVgaAGUIPhone1
CDC
10
SunVgaCdcPhone1
CDC
Java FX
11
5
DefaultFxPhone1
12
6
Default FXTouchPhone1 Java FX
December 2009
JAVA ME SDK HELP
Profiling Applications
The profiler keeps track of every method in your application. For a particular
emulation session, it figures out how much time was spent in each method and how
many times each method was called.
The SDK supports offline profiling. Data is collected during the emulation session.
After you close the emulator a profiler data snapshot is written to a .prof file you
can load and view in the SDK. As you view the snapshot you can investigate
particular methods or classes and save a customized snapshot (a .nps file).
Note – This feature might slow the execution of your application.
Continue to:
■
“Saving Profiler Data” on page 75
■
“Loading Profiler Data” on page 78
■
“Saving Customized Snapshots and Images” on page 81
■
“Loading a Customized Snapshot” on page 82
Saving Profiler Data
Follow these steps to enable data collection:
1. Ensure that the heap size is at least 4MB. The profiler maintains a large amount of
data, so profiled MIDLets place greater demands on the heap. To check the heap
size, go to the Device Selector window, right-click on a device and choose
Properties. If and provide a larger heap size. See “Setting Device Properties” on
page 61.
2. In the Device Selector window, right-click on a device and choose Properties.
3. Check the Enable Profiler option, and note the location of the profiler output file.
December 2009
75
JAVA ME SDK HELP
PROFILING APPLICATIONS
You can also edit the device.properties file to set profiler.enabled to
true. The properties file is located in the device instance directory, as described in
TABLE: File Locations on page 73. The device number corresponds to a device in
the device selector, as discussed in TABLE: Device Names on page 74.
Enabling the Profiler (Mac OS)
Enabling the Profiler (Windows)
76
December 2009
DECEMBER 2009
JAVA ME SDK HELP
Note – It’s helpful to display the output window. If it is not open, select Window >
Output > Output.
4. Start your application.
Interact with your application as you normally would.
5. Exit the application (the MIDlet suite) and return to the AMS.
The profile data snapshot is saved and is loaded automatically and displayed in a
tab labeled CPU:time, where time is the time the snapshot was saved. The SDK
reports the location of the profile data in the Output window
See “Loading Profiler Data” on page 78.
Profiling Applications
77
JAVA ME SDK HELP
PROFILING APPLICATIONS
Loading Profiler Data
When the data.prof file is saved it is displayed immediately (“Saving Profiler
Data” on page 75). The data can also be manually loaded at a later time.
Follow these steps to retrieve profile data:
1. In the main window menu, select Tools >Import Java ME SDK Snapshot...
2. Choose the data.prof file. For the default location, see TABLE: File Locations on
page 73.
In the main window, the Profiler opens in its own tab labeled CPU:time.
Note – The profiling values obtained from the emulator do not reflect actual values
on a real device.
78
December 2009
DECEMBER 2009
JAVA ME SDK HELP
Profiler Tab (Windows)
Profiling Applications
79
JAVA ME SDK HELP
PROFILING APPLICATIONS
Profiler Tab (Mac OS)
You can change the granularity of the results. In the toolbar at the top of the tab,
make a selection from the View menu.
Method Level View (default). Results are displayed according to the fully-qualified
method names.
Class Level View. Results for all methods of the same class are aggregated in a single
entry.
Package Level View. All methods of classes that belong to the same package are
aggregated.
Click any column label to sort based on its values. To remove a column from the
display, click the table icon above the scroll bar and uncheck the column name.
The above screenshot shows a view that combines the Call Tree and Hot Spots. Click
the tabs along the bottom to see different views:
Call Tree. This tab displays a call tree showing the method call chain and the
time/number of invocations for executing threads and methods in each context. (A
context is a unique chain of method calls leading to the method’s invocation.)
80
December 2009
DECEMBER 2009
JAVA ME SDK HELP
Hot Spots. This tab shows the total execution time and number of invocations for
each method, irrespective of the context. It also includes the Method Name Filter
Field, which filters based on the first column. To select the filtering parameters, click
the filter icon and choose from the menu.
Enter a search string in the filter field. You can enter multiple values separated by
spaces. To apply the filter, click the green check. To restore the unfiltered data, clear
the filter field by clicking the red symbol.
Combined.This tab displays the Call Tree information in the upper part of the
window and the Hot Spot data in the lower part.
Info. This tab displays the time the snapshot was taken, where it is saved, and the
configuration of the profiling session.
You can right-click a profiling result to access additional utilities. The actions you see
depend upon the currently selected view.
■
Show Subtree. Displays the subtree for the selected method.
■
Show Back Traces. Displays the back traces for the selected method.
■
Find in Hot Spots. Displays the selected class or method in the Hot Spots tab.
Related Information
■
“Saving Profiler Data” on page 75
■
“Loading Profiler Data” on page 78
■
“Saving Customized Snapshots and Images” on page 81
Saving Customized Snapshots and
Images
When viewing profiler data (“Loading Profiler Data” on page 78) you might isolate
portions of the data you want to inspect later. You can take a snapshot of your
current view at any time and import the snapshot later on.
Profiling Applications
81
JAVA ME SDK HELP
PROFILING APPLICATIONS
Click the Save Snapshot to Custom File icon and specify a location for the snapshot
file. The default snapshot extension is .nps, and the default location is:
Windows
C:\Documents and Settings\user\My Documents
Mac OS
/Users/uname
To create a bitmap image of the profile data, click the Save current view to image
icon. The default format is .png (portable networks graphic file).
Loading a Customized Snapshot
Follow these steps to load a customized profiler snapshot. The snapshot opens in its
own tab in the main window labeled CPU:time.
1. In the main window toolbar, select Tools >Load Profiler Snapshot...
2. Choose a customized snapshot (.nps file).
Windows
C:\Documents and Settings\user\My Documents
Mac OS
/Users/uname
82
December 2009
JAVA ME SDK HELP
Network Monitoring
MIDP applications, at a minimum, are capable of HTTP network connections, but
many other types of network connections are also possible. The network monitor
provides a convenient way to see the information your application is sending and
receiving on the network. This is helpful if you are debugging network interactions
or looking for ways to optimize network traffic.
Networking monitoring works for emulators only (it is not supported for real
devices).
■
“Monitor Network Traffic” on page 83
■
“Filter Messages” on page 85
■
“Sort Messages” on page 85
■
“Save and Load Network Monitor Information” on page 86
■
“Clear the Message Tree” on page 87
▼ Monitor Network Traffic
1. In the Device Selector window, right-click on a device and choose Properties.
2. Check the Enable Network Monitor option. When you next run an application
on the device, the network monitor opens.
You can also edit the device.properties file to set netmon.enabled to true.
The properties file is located in the device instance directory, as described in
TABLE: File Locations on page 73.
3. Start your application.
When the application makes any type of network connection, information about
the connection is captured and displayed.
December 2009
83
JAVA ME SDK HELP
NETWORK MONITORING
The top frame displays a list of messages. Click a message to display its details in
the bottom frame.
In the Hex View, message bodies are shown as raw hexadecimal values with the
equivalent text. To avoid memory issues, the Hex view is currently limited to 16kB
of data.
84
December 2009
DECEMBER 2009
JAVA ME SDK HELP
Note – You can examine messages that are still in the process of being sent.
Incomplete messages are indicated by bold highlighting in the message tree.
Related Information
■
“Filter Messages” on page 85
■
“Sort Messages” on page 85
■
“Save and Load Network Monitor Information” on page 86
■
“Clear the Message Tree” on page 87
Filter Messages
Filters are useful for examining some subset of the total network traffic.
■
In the [Select Devices] list check only the devices you want to view.
■
In the [Select Protocols] list check only the protocols you want to view. The
supported protocols are datagram, socket, http, and https.
■
Click the magnifying glass in the Network Monitor toolbar to search for a specific
string in the data in the Phone or URL columns.
Related Information
■
“Filter Messages” on page 85
■
“Sort Messages” on page 85
■
“Save and Load Network Monitor Information” on page 86
■
“Clear the Message Tree” on page 87
Sort Messages
To arrange the message tree in a particular order, click on the Sort By combo box and
choose a criteria.
Time. Messages are sorted in chronological order of time sent or received.
URL. Messages are sorted by URL address. Multiple messages with the same address
are sorted by time.
Network Monitoring
85
JAVA ME SDK HELP
NETWORK MONITORING
Connection. Messages are sorted by communication connection. Messages using the
same connection are sorted by time. This sort type enables you to see messages
grouped by requests and their associated responses.
Note – Sorting parameters are dependent on the message protocol you choose. For
instance, sorting by time is not relevant for socket messages.
Related Information
■
“Monitor Network Traffic” on page 83
■
“Filter Messages” on page 85
■
“Save and Load Network Monitor Information” on page 86
■
“Clear the Message Tree” on page 87
Save and Load Network Monitor
Information
To save your network monitor session, click the disk icon in the Network Monitor
toolbar.
Choose a file name. This file name will be used for all the network monitor saves you
make in this Java ME SDK session. The default file extension is .nmd (network
monitor data). The default directory is:
Windows
C:\Documents and Settings\user\My Documents
Mac OS
/Users/uname
To load a network monitor session, choose Tools > Load Network Monitor
Snapshot... and browse to the data you saved.
Note – To avoid memory issues, the Hex view display is currently limited to 16kB of
data.
86
December 2009
DECEMBER 2009
JAVA ME SDK HELP
Related Information
■
“Monitor Network Traffic” on page 83
■
“Filter Messages” on page 85
■
“Sort Messages” on page 85
■
“Clear the Message Tree” on page 87
Clear the Message Tree
To remove all messages from the network monitor choose the clear icon (the broom
icon on the right of the Network Monitor tool bar).
Related Information
■
“Monitor Network Traffic” on page 83
■
“Filter Messages” on page 85
■
“Sort Messages” on page 85
■
“Save and Load Network Monitor Information” on page 86
Network Monitoring
87
JAVA ME SDK HELP
88
December 2009
NETWORK MONITORING
JAVA ME SDK HELP
Lightweight UI Toolkit
The Lightweight UI Toolkit (LWUIT) is a lightweight widget library inspired by
Swing but designed for constrained devices such as mobile phones and set-top boxes.
Lightweight UI Toolkit supports pluggable theme-ability, a component and container
hierarchy, and abstraction of the underlying GUI toolkit. The term lightweight
indicates that the widgets in the library draw their state in Java source without native
peer rendering.
LWUIT is an open source project whose source is available at
https://lwuit.dev.java.net. For more information see the Lightweight UI
Toolkit Developer’s Guide. LWUIT binaries can be downloaded from
http://java.sun.com/javame/technology/lwuit.
Java ME SDK 3.0 ships with the LWUIT 1.2.1 library. As an open source project,
LWUIT has an independent release schedule, consequently, the LWUIT open source
project might contain newer libraries and newer documentation. You can add a
newer version of the LWUIT library as described in “Add a Different LWUIT
Library” on page 91.
See the following topics:
■
“LWUIT and the Java ME SDK” on page 89
■
“Create a Resource Bundle and Add It to the Build Process” on page 90
■
“Resource Types” on page 90
■
“Add a Different LWUIT Library” on page 91
LWUIT and the Java ME SDK
LWUIT supports the following resource elements: images, animation, bitmap fonts,
localization bundles, and themes. Resources are delivered as a bundle - a binary file
that can be loaded and used on the device. Java ME Platform SDK supports LWUIT
with an integrated Resource Manager for creating and maintaining resource bundles.
The LWUIT tools and the tools JavaME SDK provide for LWUIT are not identical.
The Java ME SDK uses a build and Apache Ant tasks to create resource bundles.
December 2009
89
JAVA ME SDK HELP
LIGHTWEIGHT UI TOOLKIT
Note – Currently LWUIT projects must be built with Java 1.6.
Create a Resource Bundle and Add It to the Build
Process
The Resource Manager is a graphical tool for creating resource bundles and adding
them to the build process.
1. Select a project that contains the LWUIT libraries. In the project tree, Locate the
LWUIT Resources node.
2. To add a resource bundle, right-click LWUIT Resources and select Add Bundle
from the context menu.
3. Enter a bundle name and click OK.
You are ready to add resources to the new bundle.
4. Select a resource, and select Windows > Properties to view and edit the resource.
Resources you edit or create are added to the bundle. See “Resource Types” on
page 90 for a brief description of the resources you can use.
Resource Types
This topic briefly summarizes resource types. Resources are fully described in the
Lightweight UI Toolkit Developer’s Guide for version 1.2.1.
JPG and PNG files. The file name can be changed and you can choose to pack the file
to save space.
Animations. GIF files. You just supply a name.
Font. The font is created from a font on your system - for example, Arial or Courier.
In the event that the font you choose is missing, you can choose a system font as a
backup. Default system fonts are: Dialog, DialogInput, Monospaced, Serif, and
SansSerif.
Note – The Lightweight UI Toolkit Developer’s Guide describes choosing between a
font in a file, or system fonts. This does not apply to the Java ME SDK Resource
Manager, which uses only system fonts.
90
December 2009
DECEMBER 2009
JAVA ME SDK HELP
Localization. Choose the main localization bundle, for example,
foobar.properties. This main bundle is then added with a "default" ID. Other
locales are added with their proper ID. For example, foobar_en_GB.properties
is added with the ID en_GB. Unfortunately this resource must be recreated in the
resource manager when more locales are added (or removed).
Theme. Adds the .conf theme file. See the Lightweight UI Toolkit Developer’s Guide.
Add a Different LWUIT Library
The LWUIT library can be added to any MIDP Project.
1. Right-click on a project and select Properties.
2. In the Build category, select Libraries & Resources, and click the Add Library...
button.
3. In the Add Libraries window, select LWUIT and click Add Library.
You can see the package under Libraries and Resources.
Lightweight UI Toolkit
91
JAVA ME SDK HELP
92
December 2009
LIGHTWEIGHT UI TOOLKIT
JAVA ME SDK HELP
Security and MIDlet Signing
The Java ME Platform SDK supports the security policies and domains defined by
both JSR 185 (Java Technology for the Wireless Industry or JTWI) and JSR 248
(Mobile Service Architecture or MSA). The SDK provides tools to sign MIDlet suites,
manage keys, and manage root certificates. The security domains are further
described in “Security Domains” on page 94.
MIDP 2.0 (JSR 118) includes a comprehensive security model based on protection
domains. MIDlet suites are installed into a protection domain that determines access
to protected functions. The MIDP 2.0 specification also includes a recommended
practice for using public key cryptography to verify and authenticate MIDlet suites.
The general process to create a cryptographically signed MIDlet suite is as follows:
1. The MIDlet author, probably a software company, buys a signing key pair from a
certificate authority (the CA).
2. The author signs the MIDlet suite with the signing key pair and distributes their
certificate with the MIDlet suite.
3. When the MIDlet suite is installed on the emulator or on a device, the
implementation verifies the author’s certificate using its own copy of the CA’s root
certificate. Then it uses the author’s certificate to verify the signature on the
MIDlet suite.
4. After verification, the device or emulator installs the MIDlet suite into the security
domain that is associated with the CA’s root certificate.
For definitive information, consult the MIDP 2.0 specification. For an overview of
MIDlet signing using the Java ME Platform SDK, read the article Understanding MIDP
2.0's Security Architecture, which is available at
http://developers.sun.com/techtopics/mobility/midp/articles/perm
issions/.
If you need more background on public key cryptography, try the article MIDP
Application Security 1: Design Concerns and Cryptography, which is available at
http://developers.sun.com/techtopics/mobility/midp/articles/secu
rity1/. See the following topics:
December 2009
■
“Security Domains” on page 94
■
“Setting Security Domains” on page 95
93
JAVA ME SDK HELP
SECURITY AND MIDLET SIGNING
■
“Signing a Project” on page 95
■
“Managing Keystores and Key Pairs” on page 96
■
“Managing Root Certificates” on page 100
Security Domains
The SDK supports five security domains for MSA:
unidentified_third_party. Provides a high level of security for applications
whose origins and authenticity cannot be determined. The user is prompted
frequently when the application attempts a sensitive operation.
identified_third_party. Intended for MIDlets whose origins were determined
using cryptographic certificates. Permissions are not granted automatically, but the
user is prompted less often than for the unidentified_third_party domain.
manufacturer. Intended for MIDlet suites whose credentials originate from the
manufacturer’s root certificate.
minimum. All permissions are denied to MIDlets in this domain.
maximum. All permissions are granted to MIDlets in this domain. Maximum is the
default setting.
The SDK includes four JTWI security domains:
untrusted - Provides a high level of security for applications whose origins and
authenticity cannot be determined. The user is prompted frequently when the
application attempts a sensitive operation.
trusted - All permissions are granted to MIDlets in this domain.
minimum - All permissions are denied to MIDlets in this domain.
maximum - All permissions are granted to MIDlets in this domain (equivalent to
trusted.) Maximum is the default value.
94
December 2009
DECEMBER 2009
JAVA ME SDK HELP
Setting Security Domains
In the SDK, when you use Run via OTA your packaged MIDlet suite is installed
directly into the emulator where it is placed in a security domain. The emulator uses
public key cryptography to determine the appropriate security domain.
■
If the MIDlet suite is not signed, it is placed in the default security domain.
■
If the MIDlet is signed, it is placed in the protection domain that is associated with
the root certificate of the signing key’s certificate chain. See “Signing a Project” on
page 95.
Specify the Security Domain for an Emulator
1. In the Device Selection window, right-click on the device and select Properties.
2. Find the Security Domain setting and make a selection from the context menu.
The SDK knows the runtimes the device can support and supplies only possible
domains. The default for both MSA and JTWI is Maximum. See the topic “Setting
Device Properties“.
Specify the Security Domain for a Project
1. Right-click on a project and select Properties.
2. In the Category area, select Running (the green triangle).
3. Select Regular Execution and check the Security domain box.
In this context regular execution means you are running in the emulator, as
opposed to running OTA.
4. Select the domain from the drop-down menu.
Signing a Project
Devices use signing information to check an application's source and validity before
allowing it to access protected APIs. For test purposes, you can create a signing key
pair to sign an application. The keys are as follows:
Security and MIDlet Signing
95
JAVA ME SDK HELP
SECURITY AND MIDLET SIGNING
■
A private key that is used to create a digital signature, or certificate.
■
A public key that anyone can use to verify the authenticity of the digital signature.
You can create a key pair with the Keystores Manager as described in “Managing
Keystores and Key Pairs” on page 96.
▼ Sign a CLDC Project With a Key Pair
1. Right-click on a project and select Properties.
2. From the Build hierarchy, select Signing.
3. Check the Sign Distribution checkbox.
4. Choose a keystore from the Keystores drop-down menu, or click Open
Keystores Manager to create a new keystore.
The Certificate Details area displays the Alias, Subject, Issuer, and validity dates
for the selected keystore.
5. Choose a key pair alias from the drop-down menu.
A keystore might be accessed by several key pairs, each with a different alias. If
you prefer to use a unique key pair, select Open Keystores Manager and create a
new key pair. See “Create a Keystore” on page 97.
6. Click OK.
Related Information
“Signing” on page 53
Managing Keystores and Key Pairs
For test purposes, you can create a signing key pair to sign a MIDLet. The Keystores
Manager administers this task, as described in the remainder of this topic.The key
pair consists of two keys:
96
■
A private key that is used to create a digital signature, or certificate.
■
A public key that can be used by anyone to verify the authenticity of the
signature.
December 2009
DECEMBER 2009
JAVA ME SDK HELP
To deploy on a device, you must obtain a signing key pair from a certificate authority
recognized by the device. You can also import keys from an existing Java SE platform
keystore.
The following topics describe the user interface:
■
“Security Domains” on page 94
■
“Create a New Key Pair” on page 98
■
“Remove a Key Pair” on page 99
■
“Import an Existing Key Pair” on page 99
You can also use the command line tools described in “Command Line Security
Features” on page 139.
Working With Keystores and Key Pairs
The Keystores Manager handles creating and using keystores. The keystores known
to the Keystores Manager are listed when you sign a project, as described in
“Signing” on page 53.
Keystores contain key pairs, which you can also manage from this dialog. You must
select a keystore to access the key pair tools.
■
“Security Domains” on page 94
■
“Create a New Key Pair” on page 98
■
“Remove a Key Pair” on page 99
■
“Import an Existing Key Pair” on page 99
▼ Create a Keystore
1. Select Tools > Keystores.
The Keystores Manager opens.
2. Click Add Keystore.
The Add Keystores window opens.
3. Choose Create Keystore.
Security and MIDlet Signing
97
JAVA ME SDK HELP
SECURITY AND MIDLET SIGNING
4. Supply a name, location, and password.
Windows
C:\Documents and Settings\user\My Documents
Mac OS
/Users/uname
5. Click OK.
The new keystore appears in the Keystores list.
▼ Add an Existing Keystore
1. Select Tools > Keystores.
The Keystores Manager opens.
2. Click Add Keystore.
The Add Keystores window opens.
3. Choose Add Existing Keystore.
4. Browse to the location of the keystore and select the keystore file. Click OK.
Windows
C:\Documents and Settings\user\My Documents
Mac OS
/Users/uname
5. Click OK.
The new keystore appears in the Keystores list.
▼ Create a New Key Pair
1. Select Tools > Keystores.
The Keystores Manager opens.
2. Select a Keystore in the Keystores area on the left.
If you prefer a different keystore, select Add Keystore to create a new keystore or
add an existing keystore.
3. Click the New button.
98
December 2009
DECEMBER 2009
JAVA ME SDK HELP
4. Fill in the Create Key Pair dialog.
You must provide an alias to refer to this key pair.
The six Certificate Details fields are provisionally optional. You must complete at
least one field.
Key Pair Alias. The name used to refer to this key pair.
Common Name. Common name of a person, such as "Jane Smith"
Organization Unit. Department or division name, such as "Development"
Organization Name. Large organization name, such as "Sun Microsystems Inc."
Locality Name. Locality (city) name, such as "Santa Clara"
State Name. State or province name, such as "California"
Country. Two-letter country code, such as "US"
The password is optional. If you do provide a password, it must have at least six
characters.
5. Click OK.
The new key is displayed in the Keys area under its alias. You can now select this
keypair when you sign a project. See “Signing a Project” on page 95.
▼ Remove a Key Pair
1. Select Tools > Keystores.
2. In the Keys area, click on a Key Pair.
3. Select Delete.
▼ Import an Existing Key Pair
If you have keys in a Java SE platform keystore that you would like to use for MIDlet
signing, you can import the signing keys to the Java ME SDK.
1. Select Tools > Keystores.
2. Click Add Keystores.
The Add Keystores window opens.
3. Click Add Existing Keystore.
4. Browse to the keystore location.
5. Click OK.
Security and MIDlet Signing
99
JAVA ME SDK HELP
SECURITY AND MIDLET SIGNING
Managing Root Certificates
The Java ME Platform SDK command line tools described in “Manage Certificates
(MEKeyTool)” on page 141 manage the emulator’s list of root certificates.
Real devices have similar lists of root certificates, although you typically cannot
modify them. When you deploy your application on a real device, you must use
signing keys issued by a certificate authority whose root certificate is present on the
device. This makes it possible for the device to verify your application.
Each emulator instance has its own _main.ks file located in its appdb directory.
The micro keystore, _main.mks resides in the following directory.
Windows
installdir\runtimes\cldc-hi\appdb\_main.mks
Mac OS
installdir/runtimes/cldc-hi/appdb/_main.mks
This directory also contains keystore.ks and serverkeystore.ks. You can use
the -import option to import certificates from these keystores as described in
“Manage Certificates (MEKeyTool)” on page 141.
100
December 2009
JAVA ME SDK HELP
CLDC Emulation on a Windows
Mobile Device
The Java ME Platform SDK includes a sample virtual machine that runs on Windows
mobile devices. In your installation home, see
on-device/winmobile-arm/sun-java-cldc-emu.cab.
This runtime is for evaluation and testing, so it can only be deployed from the SDK.
This topic describes how to install Sun Java CLDC Emulation software on a Windows
Mobile device, and make it available to the Java ME Platform SDK software. In this
scenario the device is connected to a host running Windows, and Microsoft
ActiveSync maintains the connection.
If you are using the SDK on Mac OS (no ActiveSync available), you can use a
wireless connection to connect to the runtime once it is installed on a Windows
Mobile device.
Related Information
December 2009
■
“CLDC Emulator Installation for a Device Running Windows Mobile” on page 102
■
“Install and Run an Application From the Command Line” on page 112
■
“Manually Deploy an Application to a Device” on page 111
■
“Install and Run an Application From the Command Line” on page 112
■
“On-device Debugging Procedure” on page 123
■
“Wireless Debugging Procedure” on page 125
■
Windows users, see “Emulating Devices” on page 57
■
Mac OS users, see “Adding Devices With the Device Wizard (Mac OS)” on page 59
101
JAVA ME SDK HELP
CLDC EMULATION ON A WINDOWS MOBILE DEVICE
▼ CLDC Emulator Installation for a
Device Running Windows Mobile
This shows describes a sample installation using the Windows platform and
Microsoft ActiveSync. This procedure can be adapted for Mac OS; download device
synchronization software for Mac OS, and use it in place of ActiveSync.
1. Connect the device to your host computer and register it with ActiveSync. If you
are using Mac OS, use an alternate tool.
2. Make a copy of the Sun Java CLDC Emulation Installation CAB file.
a. Navigate to JavaMESdkHome/on-device/winmobile-arm.
b. Copy sun-java-cldc-emu.cab.
3. Paste the CAB file into the device root directory.
a. In Windows Explorer, open Mobile Device.
b. Open My Windows Mobile-Based Device.
102
December 2009
DECEMBER 2009
JAVA ME SDK HELP
c. Open the Edit menu.
d. Click Paste to insert the CAB file.
4. Run the File Explorer on your device.
CLDC Emulation on a Windows Mobile Device
103
JAVA ME SDK HELP
CLDC EMULATION ON A WINDOWS MOBILE DEVICE
a. Open the Start menu.
b. Click Programs.
c. Click File Explorer.
104
December 2009
DECEMBER 2009
JAVA ME SDK HELP
5. Start the CAB installation on the device.
a. Open the Show menu.
b. Select My Device.
CLDC Emulation on a Windows Mobile Device
105
JAVA ME SDK HELP
CLDC EMULATION ON A WINDOWS MOBILE DEVICE
c. Click on the sun-java-cldc-emu.cab file.
6. If asked during the installation, install the application on the device.
7. Wait for the installation to finish.
8. You can delete the CAB file after the installation is complete.
a. Press on sun-java-cldc-emu.cab label until the context menu opens.
b. Click Delete.
106
December 2009
DECEMBER 2009
JAVA ME SDK HELP
9. Run the Sun Java CLDC Emulation on the device.
a. Open Start menu.
b. Click Programs.
CLDC Emulation on a Windows Mobile Device
107
JAVA ME SDK HELP
CLDC EMULATION ON A WINDOWS MOBILE DEVICE
c. Click Sun Java CLDC EMU.
108
December 2009
DECEMBER 2009
JAVA ME SDK HELP
10. Wait for the Sun Java CLDC Emulation to start.
CLDC Emulation on a Windows Mobile Device
109
JAVA ME SDK HELP
110
December 2009
CLDC EMULATION ON A WINDOWS MOBILE DEVICE
DECEMBER 2009
JAVA ME SDK HELP
11. Confirm the connection to the device.
Windows:
Allow up to 30 seconds (the default value) for Java ME SDK to recognize the
connected device and the Sun Java CLDC emulation software.
Mac OS:
To add the device, see “Adding Devices With the Device Wizard (Mac OS)” on
page 59. You can test the connection as described in “Wireless Debugging
Procedure” on page 125, Step 7.
The Detected Device
When the device is recognized a new device with the name,
CldcWinceEmunumber (for example, CldcWinceEmu1) should appear in the
Device Selector window, and the output from the command emulator.exe
-Xquery should also be displayed.
You can select this device as a target device in the user interface. If you run the
emulator from the command line it can be used as an argument. For example:
emulator -Xdevice:CldcWinceEmu1 ...
Related Information
“Sample CLDC Debugging Session” on page 127
“Emulating Devices” on page 57
▼ Manually Deploy an Application to a
Device
Follow these steps to install and run an application on a device.
1. Deploy the application
This entails copying an application’s JAD and JAR files to the device. Go to your
project’s /dist directory and copy the JAD and JAR files to the device.
2. Install the application.
On the device, locate the files you copied and select the JAD file.
CLDC Emulation on a Windows Mobile Device
111
JAVA ME SDK HELP
CLDC EMULATION ON A WINDOWS MOBILE DEVICE
3. Choose the location.
You are asked to choose the folder that will contain the application files. You see
an “application already installed message“ if the application was installed before.
You can overwrite the old installation.
When the installation is complete you have the option to launch the installation. If
you choose No you will return to the Application Management System screen.
▼ Install and Run an Application From
the Command Line
These instructions assume you can detect the device.
1. From the command line use -Xdevice to specify the real device you installed.
For example:
/Applications/Java_ME_SDK_3.0.app/Contents/Resources/bin/emulator
-Xdevice:CldcWinceEmu1 -Xdescriptor:JAD-file-location
2. Use the -Xjam argument to install an application:
emulator -Xdevice:CldcWinceEmu1 -Xjam:install=JAD-file-location
3. The installed application can be invoked with its storage name or storage
number (the ID). Find the ID as follows:
emulator -Xdevice:CldcWinceEmu1 -Xjam:list
4. Call the installed application as follows:
emulator -Xdevice:CldcWinceEmu1 -Xjam:run=storage-name|storage-number
112
December 2009
JAVA ME SDK HELP
Installing CLDC Emulation on a
Windows Mobile Emulator
(Windows Only)
“CLDC Installation for Windows Mobile” on page 113 describes how to install the
Sun Java CLDC platform binary for the ARM processor into the Windows Mobile
Emulator. This emulator runs on a Windows host.
▼ CLDC Installation for Windows Mobile
1. Download and install Microsoft Device Emulator with device images for
Windows Mobile 6.
2. Download and install Microsoft Virtual PC.
Note – Installs virtual switch driver required for emulated network adapters.
3. Run Windows Mobile 6 Professional Emulator and bind its emulated NE2000
Network Adapter to a desktop network card.
December 2009
113
JAVA ME SDK HELP
INSTALLING CLDC EMULATION ON A WINDOWS MOBILE EMULATOR (WINDOWS ONLY)
– Consult the Microsoft device emulator documentation for instructions.
– Don’t use ActiveSync for networking (cradling the emulator).
4. Write down the IP address of the emulator.
Open the Start menu on the emulator, click Settings, click Connections, click
Network Cards, Click NE2000 Compatible Ethernet Driver.
114
December 2009
DECEMBER 2009
JAVA ME SDK HELP
5. Open Emulator Properties
a. Open the File menu.
b. Click Configure.
Installing CLDC Emulation on a Windows Mobile Emulator (Windows Only)
115
JAVA ME SDK HELP
INSTALLING CLDC EMULATION ON A WINDOWS MOBILE EMULATOR (WINDOWS ONLY)
6. Set JavaMESdkHome\on-device\winmobile-arm as a shared folder.
a. Browse to JavaMESdkHome\on-device\winmobile-arm.
b. Click OK.
116
December 2009
DECEMBER 2009
JAVA ME SDK HELP
7. Run File Explorer on the emulator.
a. Open Start menu.
b. Click Programs.
Installing CLDC Emulation on a Windows Mobile Emulator (Windows Only)
117
JAVA ME SDK HELP
INSTALLING CLDC EMULATION ON A WINDOWS MOBILE EMULATOR (WINDOWS ONLY)
c. Click File Explorer.
118
December 2009
DECEMBER 2009
JAVA ME SDK HELP
8. Start the Sun Java CLDC Emulation CAB file installation.
a. Open Show menu.
b. Select Storage Card.
Installing CLDC Emulation on a Windows Mobile Emulator (Windows Only)
119
JAVA ME SDK HELP
INSTALLING CLDC EMULATION ON A WINDOWS MOBILE EMULATOR (WINDOWS ONLY)
c. Click on the sun-java-cldc-emu.cab file.
120
December 2009
DECEMBER 2009
JAVA ME SDK HELP
9. Finish the installation and run the Sun Java CLDC Emulation.
Note – See “CLDC Emulator Installation for a Device Running Windows Mobile” on
page 102.
Installing CLDC Emulation on a Windows Mobile Emulator (Windows Only)
121
JAVA ME SDK HELP
INSTALLING CLDC EMULATION ON A WINDOWS MOBILE EMULATOR (WINDOWS ONLY)
10. Use the installdir/bin/device-address tool to register the emulator IP address
in the SDK. See Manage Device Addresses (device-address).
a. Execute the following command to ensure the SDK registers the emulator:
device-address.exe add ip address
address should be the IP address written down in step 4.
b. After the device registers the emulator the device selector window should
display the device as CldcWinceEmunumber and it should also appear in the
output when you issue the emulator.exe -Xquery command.
122
December 2009
JAVA ME SDK HELP
On-device Debugging
This section discusses the on-device debugging process for CLDC and CDC. When a
project is run in debug mode, a graphical debugger or a command line debugger can
be attached so that you can set and remove breakpoints.
■
“On-device Debugging Procedure” on page 123
■
“Wireless Debugging Procedure” on page 125
■
“Attach a Command Line Debugger” on page 126
■
“Attach a Graphical Debugger” on page 127
■
“Sample CLDC Debugging Session” on page 127
▼ On-device Debugging Procedure
This procedure describes on-device debugging on a Windows Mobile device
connected to a host running Windows. Before starting this procedure ensure your
environment is properly configured, as follows:
December 2009
■
Integrate the device as described in “CLDC Emulator Installation for a Device
Running Windows Mobile” on page 102.
■
Confirm the device is connected and that it appears in the Device Selector
window.
■
If the output console is not visible, select Window > Output > Output to open it.
■
If the project you want to debug is not main, right-click and select Set as Main
Project.
■
In the project Properties window, select the Platform category and set the device to
match the device that has the CLDC emulator installed.
■
Only one debug process can run on a port. In the device selector, right-click on a
device and look for the Debug Port property. By default the port number is 51307.
If you are debugging on 51307 and you wish to debug an additional project, you
must run on a different device and change its port number property.
123
JAVA ME SDK HELP
ON-DEVICE DEBUGGING
This procedure features command line debugging, but you can use a graphical
debugger in a similar fashion.
1. Select the project you want to debug and select Run > Run Project in Debug
Mode or click the Run Main Project in Debug mode icon on the toolbar.
The first time you debug you see this dialog:
2. Make note of the debugging port for the device, and click OK.
If you suppress this dialog you can still get the port number from the Output
window. Look for the message “Starting emulator with port number
port-number”.
The application is now deployed and started on the connected device. You are
ready to attach a debugger.
Related Information
124
■
“On-device Debugging Procedure” on page 123
■
“Attach a Command Line Debugger” on page 126
December 2009
DECEMBER 2009
JAVA ME SDK HELP
■
“Attach a Graphical Debugger” on page 127
■
“Sample CLDC Debugging Session” on page 127
▼ Wireless Debugging Procedure
If you have a Windows Mobile device that supports Wi-Fi and a Wi-Fi enabled
computer or wireless router, you can debug an application without a physical
connection. Install the Java ME runtime on the device as described in “CLDC
Emulator Installation for a Device Running Windows Mobile” on page 102.
Note, multiple phones can be connected simultaneously.
1. Make sure that your computer is running and somehow accessible via Wi-Fi.
There is no difference between plugging it into Wi-Fi enabled router and starting
an ad-hoc network on the computer.
2. On the device, turn on Wi-Fi, then find its IP address and write it down.
This can be different for different vendors and models, so check the
documentation shipped with your device. A good point to start your search might
be START > Settings > Connections > WLAN Settings > Connection Status.
3. On the host, run one of the following commands to ensure that the computer
can access the device:
ping device-ip
tracert device-ip
4. Start the Sun Java CLDC Emulator runtime. See “CLDC Emulator Installation for
a Device Running Windows Mobile” on page 102, Step 9 through Step 11.
5. In a command window, go to /bin. Type:
Windows
device-address.exe add ip device-ip
Mac OS
installdir/Contents/Resources/bin/device-address add ip device-ip
If you use a wireless router you can probably configure its DHCP server to always
assign the same IP address to your device. If you can, you don’t need to run the
device-address command every time because your device will be detected and
added to the wireless network.
On-device Debugging
125
JAVA ME SDK HELP
ON-DEVICE DEBUGGING
6. Wait a few seconds, then check for the newly connected device:
Windows
emulator.exe -Xquery
Mac OS
installdir/Contents/Resources/bin/emulator -Xquery
Xquery returns the device name. You can also start the SDK user interface and
look for the new device in the Device Selector panel.
7. Test the connection.
The device should work like any other device or emulator. From the /bin
directory, try these commands to install a MIDlet on the device:
Windows
emulator.exe -Xdescriptor:C:\Java_ME_platform_SDK_3.0\apps\Games\dist\Games.jad
-Xdevice:device-name-from-Xquery
Mac OS
emulator -Xdescriptor:../apps/Games/dist/Games.jad -Xdevice:device-name-from-Xquery
8. Start the project in Debug Mode, as described in “On-device Debugging
Procedure” on page 123.
9. Test debugging.
See the debugging procedures in “Attach a Graphical Debugger” on page 127 and
“Sample CLDC Debugging Session” on page 127.
Attach a Command Line Debugger
Start the application on the connected device as described in “Wireless Debugging
Procedure” on page 125. Attach the Java debugger (jdb) from the command line as
follows:
jdb -connect com.sun.jdi.SocketAttach:port=51307
The above command assumes the host is 127.0.0.1 (localhost), and the debugging
port is still set to the default of 51307. If you changed the device’s port number
property, enter that value.
Related Information
■
126
December 2009
“Wireless Debugging Procedure” on page 125
DECEMBER 2009
JAVA ME SDK HELP
■
“Attach a Command Line Debugger” on page 126
■
“Attach a Graphical Debugger” on page 127
■
“Sample CLDC Debugging Session” on page 127
▼ Attach a Graphical Debugger
This procedure describes how to attach the NetBeans graphical Java debugger
(JPDA).
1. If you want to set line breakpoints, open the project you deployed on the
connected device in NetBeans.
2. Select Debug > Attach Debugger.
3. In the Attach window, choose Java Debugger from the Debugger list, and
choose SocketAttach from the Connector list.
You are prompted for connection settings:
■
Transport: your choice
■
Host: localhost, or leave as is
■
Port: the port number of the device running in debug mode.
4. Click OK.
The NetBeans debuggertries to connect.
Related Information
■
“Attach a Command Line Debugger” on page 126
■
“Sample CLDC Debugging Session” on page 127
▼ Sample CLDC Debugging Session
This procedure provides instructions for running the FPDemo sample project on a
device running Windows Mobile. You can use this procedure with any CLDC project.
1. In the Java ME Platform SDK, select File > Open Sample Project > FPDemo.
2. In the Projects window, right-click on FPDemo and select Properties.
On-device Debugging
127
JAVA ME SDK HELP
ON-DEVICE DEBUGGING
3. Choose the Platform category. From the Device drop-down menu, select the
name of the connected device. Click OK.
4. Select FPDemo and select Run > Run Project in Debug Mode, or click the Run
Main Project in Debug mode icon on the toolbar.
5. Open a terminal window.
6. Start jdb with the following command:
Windows
jdb -sourcepath installdir\apps\FPDemo\src -connect com.sun.jdi.SocketAttach:hostname=
127.0.0.1,port=port-number
Mac OS
jdb -sourcepath installdir/Contents/Resources/apps/FPDemo/src -connect
com.sun.jdi.SocketAttach:hostname=127.0.0.1,port=port-number
In this case the port number is 51307 to match the default debugging port number.
7. Set the breakpoint at the place where the demo handles its menu commands:
stop in calculator.CalculatorMIDlet.commandAction
8. In the FPDemo application, enter two numbers, choose an operation, and
invoke the Calc command.
The debugger displays the place where the execution stops.
9. To step through the source past the point where the result is calculated, use the
next command pass the following line:
res = n1 <op> n2;
Type next to continue.
10. Check that the input and the calculated values are correct:
eval n1
eval n2
eval n
11. Override the calculated value as follows:
set res = new-value
Type next to continue.
12. Clear the breakpoint as follows:
clear calculator.CalculatorMIDlet.commandAction
128
December 2009
DECEMBER 2009
JAVA ME SDK HELP
13. Let the application continue:
cont
You can see that the application displays the overridden result.
14. Exit the debugger:
exit
15. Exit FPDemo.
Related Information
■
“On-device Debugging Procedure” on page 123
■
“Attach a Command Line Debugger” on page 126
■
“Attach a Graphical Debugger” on page 127
On-device Debugging
129
JAVA ME SDK HELP
130
December 2009
ON-DEVICE DEBUGGING
JAVA ME SDK HELP
Command Line Reference
This topic describes how to operate the Java ME Platform SDK from the command
line and details the command line tools required to build and run an application.
■
“Launch the SDK” on page 131
■
“Run the Device Manager” on page 132
■
“Manage Device Addresses (device-address)” on page 132
■
“Emulator Command Line Options” on page 133
■
“Build a Project from the Command Line” on page 136
■
“Packaging a MIDLet Suite (JAR and JAD)” on page 138
■
“Command Line Security Features” on page 139
■
“Generate Stubs (wscompile)” on page 143
■
“Virtual Machine Memory Profiler (Java Heap Memory Observe Tool)” on
page 144
Launch the SDK
The SDK can be launched from the command line as follows:
Windows
installdir/toolbar/bin/Java_platform_ME_SDK.exe
You can use the --fontsize argument to change the user interface fonts at startup.
For example:
installdir/toolbar/bin/Java_platform_ME_SDK.exe --fontsize 18
This setting does not affect the font size of the JavaHelp contents.
Mac OS
open installdir/Java_ME_SDK_3.0.app
December 2009
131
JAVA ME SDK HELP
COMMAND LINE REFERENCE
Run the Device Manager
The device manager is a component that runs as a service. It detects devices (real or
emulated) that conform to the Universal Emulator Interface
Specification (http://java.sun.com/j2me/docs/uei_specs.pdf), version
1.0.2. The Device Manager automatically restarts every time you use the SDK. You
can manually launch the device manager from a script or a command line.
device-manager Command
TABLE:
OS
Command
Windows installdir/bin/device-manager.exe
Mac OS
installdir/Contents/Resources/bin/device-address
To see this path, right-click the Java ME SDK 3.0 application and select Show Package Contents.
To see a log of activities, launch the device manager with the -XenableOutput
option.
Manage Device Addresses
(device-address)
installdir/bin/device-address is a tool for viewing, adding, and removing
devices that the SDK is not able to discover automatically. The Microsoft device
emulator is an example of such a device. The syntax is:
device-address Command
TABLE:
OS
Command
Windows installdir/bin/device-address.exe
Mac OS
installdir/Contents/Resources/bin/device-address
To see this path, right-click the Java ME SDK 3.0 application and select Show Package Contents.
Possible commands are as follows. Note, ip is currently the only supported address type.
add address_type address Add the specified address.
132
December 2009
DECEMBER 2009
TABLE:
OS
JAVA ME SDK HELP
device-address Command (Continued)
Command
del address_type address Delete the specified address.
list
List all address types.
list address_type
List the specified address type.
For example, the following command adds a device:
installdir/bin/device-address.exe add ip 192.168.1.2
Emulator Command Line Options
You can launch the emulator independent of the GUI using bin/emulator. The
syntax is as follows:
emulator options
TABLE:
OS
emulator Command
Command
Windows installdir\bin\emulator.exe
Mac OS
installdir/Contents/Resources/bin/device-address
To see this path, right-click the Java ME SDK 3.0 application and select Show Package Contents.
The general options are as follows:
-classpath path
-cp path
Specifies a search path for application classes. The path consists of
directories, ZIP files, and JAR files separated by colons.
-Dproperty=value
Sets a system property value.
-help
Display a list of valid options.
-version
Display version information about the emulator.
-Xdevice:instance-name
Run an application on the emulator using the given device instance
name.
-Xquery
Print emulator skin information on the standard output stream and exit
immediately. The information includes the skin name, screen size, and
other capabilities.
Command Line Reference
133
JAVA ME SDK HELP
COMMAND LINE REFERENCE
This is a simple example of running the emulator from the command line:
Windows
emulator.exe -Xdescriptor:C:\Java_ME_platform_SDK_3.0\apps\Games\dist\Games.jad
Mac OS
emulator -Xdescriptor:../apps/Games/dist/Games.jad
emulator also supports “MIDlet Options” on page 134, and “Debugging and
Tracing Options” on page 135.
MIDlet Options
Options for running MIDlets in the emulator are as follows:
■
-Xautotest:JAD-file-URL
Run in autotest mode. This option installs a MIDlet suite from a URL, runs it,
removes it, and repeats the process. The purpose is to run test compatibility kits
(TCKs) with the emulator, using a test harness such as JT Harness, JavaTest™
or Java Device Test Suite (JDTS). For example:
emulator -Xautotest:http://localhost:8080/test/getNextApp.jad
Given the above command, -Xautotest causes the emulator to repeatedly
install, run, and remove the first MIDlet from the MIDlet suite provided through
the HTTP URL. Once the emulator starts, it queries the test harness, which then
downloads and installs the TCK MIDletAgent.
■
-Xdescriptor:jad-file
Install a MIDlet, run it, and uninstall it after it finishes.
■
-Xdomain:domain-name
Set the MIDlet suite’s security domain.
The Xjam argument runs an application remotely using the Application Management
Software (AMS) to run OTA provisioning. If no application is specified with the
argument, the graphical AMS is run.
■
-Xjam[:=<JAD-file-url> |force|list|storageNames| run=
[<storageNames>|<StorageNumber>]|remove=[<storage name>|<storage number>
| all]]
Installs the application with the specified JAD file onto a device.
■
134
December 2009
force. If an existing application has the same storage name as the application
to be installed, force removes the existing application before installing the
new application.
DECEMBER 2009
JAVA ME SDK HELP
■
■
list. List all the applications installed on the device and exit. The list is
written to standard output before the emulator exits.
■
storageNames. List all applications installed on the device. The list is written
to standard output before the emulator exits. Each line contains one storage
name in numerical order. The list contains only the name so the order is
important. For example the first storage name must be storage number 1.
-Xjam:run=[<storage-name> | <storage-number>]
Run a previously installed application. The application is specified by its valid
storage name or storage number.
■
-Xjam:remove=[<storage-name> | <storage-number> | all]
Remove a previously installed application. The application is identified by its
valid storage name or storage number. If all is supplied, all previously installed
applications are removed.
■
transient=jad-file-url
If specified, transient is an alias for installing, running, and removing the
application with the specified JAD file.
This example illustrates OTA installation:
emulator -Xjam:install=http://www.myserver.com/apps/MyApp.jad
-Xdevice:DefaultCldcMsaPhone2
The above command returns the ID of the installed application. Once you obtain the
ID you can run it with: emulator=Xjam:run=ID
See also “Emulator Command Line Options” on page 133 and “Debugging and
Tracing Options” on page 135.
Debugging and Tracing Options
You can use the following options with the emulator for debugging and tracing
CLDC projects.
You can use the following options with the emulator for debugging and tracing
CLDC and CDC projects.
■
-Xdebug
Enable runtime debugging. The -Xrunjdwp option must be called to support
-Xdebug.
■
-Xrunjdwp:debug-settings
Start a Java debug wire protocol session, as specified by a list of comma-separated
debug settings. Both -Xrunjdwp and -Xdebug must be called.
Command Line Reference
135
JAVA ME SDK HELP
COMMAND LINE REFERENCE
Valid debug settings include the following:
■
transport=transport-mechanism - Transport mechanism used to communicate
with the debugger. The only transport mechanism supported is dt_socket.
■
address=host:port - Transport address for the debugger connection. If host is
omitted, localhost is assumed to be the host machine.
■
server={y|n} - Starts the debug agent as a server. The debugger must connect
to the port specified. The possible values are y and n. Currently, only y is
supported (the emulator must act as a server).
■
suspend={y|n} - The possible values are y and n.
When suspend is set to n, the application starts immediately and the debugger
can be attached at any time during its run.
When suspend is set to y, the application does not start until a debugger
attaches to the debugging port and sends a resume command. This means that
an application can be debugged from the very beginning.
■
-Xverbose:trace-options
Display trace output, as specified by a list of comma-separated options, as follows:
■
gc - Trace garbage collection
■
class - Trace class loading
■
all - Use all tracing options
Windows:
This example shows debugging :
emulator.exe -Xdevice:DefaultCldcMsaPhone2 -Xdebug
-Xrunjdwp:transport=dt_socket, suspend=y,server=y,address=51307
-Xdescriptor:C:\Java_ME_platform_SDK_3.0\appps\Games\dist\Games.jad
See also “MIDlet Options” on page 134 and “Emulator Command Line Options” on
page 133.
Build a Project from the Command Line
In the user interface, building a project is a single step. Behind the scenes, however,
there are two steps. First, Java source files are compiled into Java class files. Next, the
class files are preverified, which means they are prepared for the CLDC VM. See the
following topics:
136
■
“Check Prerequisites” on page 137
■
“Compile Class Files” on page 137
December 2009
DECEMBER 2009
JAVA ME SDK HELP
■
“Preverify Class Files” on page 137
Check Prerequisites
Before building and running an application from the command line, verify that you
have a version no earlier than 1.5 of the Java SE software development kit. Make sure
the jar command is in your path. To find the version of the development kit, run
java -version at the command line.
Compile Class Files
Use the javac compiler from the Java SE development kit to compile Java source
files. You can use the existing Java ME Platform SDK project directory structure. Use
the -bootclasspath option to tell the compiler to use the MIDP APIs, and use the
-d option to tell the compiler where to put the compiled class files.
The following example demonstrates how you might compile a MIDP 2.0
application, taking source files from the src directory and placing the class files in
the tmpclasses directory. Newlines have been added for clarity.
javac -target 1.3 -source 1.3
-bootclasspath ../../lib/cldc_10.jar;../../lib/midp2.0.jar
-d tmpclasses
src/*.java
For more information on javac, consult the Java SE documentation.
Preverify Class Files
The next step is to preverify the class files. The bin directory of the Java ME Platform
SDK includes the preverify utility. The syntax for the preverify command is as
follows:
preverify files | directories
Some of the options are as follows:
-classpath classpath
Specify the directories or JAR files (given as a semicolon-delimited
list) from which classes are loaded.
Command Line Reference
137
JAVA ME SDK HELP
COMMAND LINE REFERENCE
-d output-directory
Specify the target directory for the output classes. This directory
must exist before preverifying. If this option is not used, the
preverifier places the classes in a directory called output.
Following the example for compiling, use the following command to verify the
compiled class files. As before, newlines are added for clarity.
Windows
preverify.exe
-classpath ..\..\lib\cldcapi10.jar;..\..\lib\midpapi20.jar
-d classes
tmpclasses
Mac OS and Linux
preverify
-classpath ../../lib/cldc_10.jar;../../lib/midp2.0.jar
-d classes
tmpclasses
As a result of this command, preverified class files are placed in the classes
directory. If your application uses WMA, MMAPI, or other versions of CLDC or
MIDP, be sure to include the relevant .jar files in the classpath.
Packaging a MIDLet Suite (JAR and JAD)
To package a MIDlet suite manually you must create a manifest file, an application
JAR file, and finally, a MIDlet descriptor (also known as a Java Application
Descriptor or JAD).
Create a manifest file containing the appropriate attributes as specified in the MIDP
specification. You can use any text editor to create the manifest file. For example, a
manifest might have the following contents:
MIDlet-1: My MIDlet, MyMIDlet.png, MyMIDlet
MIDlet-Name: MyMIDlet
MIDlet-Vendor: My Organization
MIDlet-Version: 1.0
MicroEdition-Configuration: CLDC-1.1
MicroEdition-Profile: MIDP-2.1
138
December 2009
DECEMBER 2009
JAVA ME SDK HELP
Create a JAR file containing the manifest as well as the suite’s class and resource files.
To create the JAR file, use the jar tool that comes with the Java SE software
development kit. The syntax is as follows:
jar cfm file manifest -C class-directory . -C resource-directory .
The arguments are as follows:
■
file - JAR file to create.
■
manifest - Manifest file for the MIDlets.
■
class-directory - Directory containing the application’s classes.
■
resource-directory - Directory containing the application’s resources.
For example, to create a JAR file named MyApp.jar whose classes are in the
classes directory and resources are in the res directory, use the following
command:
jar cfm MyApp.jar MANIFEST.MF -C classes . -C res .
Create a JAD file containing the appropriate attributes as specified in the MIDP
specification. You can use any text editor to create the JAD file. This file must have
the extension .jad.
Note – You must set the MIDlet-Jar-Size entry to the size of the JAR file created
in the previous step.
For example, a JAD file might have the following contents:
MIDlet-Name: MyMIDlet
MIDlet-Vendor: My Organization
MIDlet-Version: 1.0
MIDlet-Jar-URL: MyApp.jar
MIDlet-Jar-Size: 24601
Command Line Security Features
The full spectrum of the Java ME Platform SDK’s security features are also available
from the command line. You can adjust the emulator’s default protection domain,
sign MIDlet suites, and manage certificates.
■
“Change the Default Protection Domain” on page 140
■
“Sign MIDlet Suites (jadtool)” on page 140
Command Line Reference
139
JAVA ME SDK HELP
COMMAND LINE REFERENCE
■
“Manage Certificates (MEKeyTool)” on page 141
Change the Default Protection Domain
To adjust the emulator’s default protection domain, use the following option with the
emulator command:
-Xdomain:domain-type
Assigns a security domain to the MIDlet suite. Enter an appropriate security domain
as described in “Security Domains” on page 94. For example, -Xdomain:maximum.
Sign MIDlet Suites (jadtool)
jadtool is a command-line interface for signing MIDlet suites using public key
cryptography according to the MIDP 2.0 specification. Signing a MIDlet suite is the
process of adding the signer certificates and the digital signature of the JAR file to a
JAD file. jadtool is also capable of signing payment update (JPP) files.
jadtool only uses certificates and keys from Java SE platform keystores. Java SE
software provides keytool, the command-line tool to manage Java SE platform
keystores.
jadtool is packaged in a JAR file. To run it, open a command prompt, change the
current directory to installdir/bin, and enter the following command:
jadtool command
The commands are as follows:
■
-help
Prints the usage instructions for jadtool.
■
-addcert -alias alias [-keystore keystore]
[-storepass password] [-storetype PKCS11]
[-certnum number] [-chainnum number] [-encoding encoding]
-inputjad | inputjpp input-file
-outputjad | outputjpp output-file
Adds the certificate of the key pair from the given keystore to the JAD file or JPP
file.
■
140
December 2009
-addjarsig [-jarfile <filename>] -keypass <password> -alias <key
alias> -storepass <password> [-keystore <none|keystore>]
[-storetype <PKCS11>] [-encoding <encoding>] -inputjad <filename>
-outputjad <filename>
DECEMBER 2009
JAVA ME SDK HELP
Adds the digital signature of the given JAR file to the specified JAD file. The
default value for -jarfile is the MIDlet-Jar-URL property in the JAD file.
■
-showcert [([-certnum <number>] [-chainnum <number>]) | [-all]]
[-encoding <encoding>]
-inputjad filename | -inputjpp <filename>
Displays information about certificates in JAD and JPP files.
■
-addjppsig -keypass <password> -alias <key alias>
[-storepass <password>]
[-keystore <none|keystore>]
[-storetype <PKCS11>] [-encoding <encoding>]
-inputjpp <filename> -outputjpp <filename>
Adds a digital signature of the input JPP file to the specified output JPP file.
The default values are as follows:
■
-encoding - UTF-8
■
-jarfile - MIDlet-Jar-URL property in the JAD file
■
-keystore - $HOME/.keystore
■
-certnum - 1
■
-chainnum - 1
Manage Certificates (MEKeyTool)
MEKeyTool manages the public keys of certificate authorities (CAs), making it
functionally similar to the keytool utility that comes with the Java SE SDK. The keys
can be used to facilitate secure HTTP communication over SSL (HTTPS).
Before using MEKeyTool, you must first have access to a Java Cryptography
Extension keystore. You can create one using the Java SE keytool utility.
Windows
http://java.sun.com/javase/6/docs/technotes/tools/windows/keytoo
l.html
Mac OS and Linux
http://java.sun.com/javase/6/docs/technotes/tools/solaris/keytoo
l.html
Command Line Reference
141
JAVA ME SDK HELP
COMMAND LINE REFERENCE
To run MEKeyTool, open a command prompt, change the current directory to
installdir/bin, and enter the following command:
Windows: installdir\bin\mekeytool.exe -command
Mac OS:
installdir/Contents/Resources/bin/mekeytool -command
The command keywords follow.
The Java ME Platform SDK contains a default ME keystore called _main.ks, which
is located in:
installdir/Contents/Resources/bin/runtimes/cldc-hi-javafx/appdb
This keystore includes all the certificates that exist in the default Java SE platform
keystore that comes with the Java SE installation.
Also, each emulator instance has its own _main.ks file located in
userhome/javame-sdk/3.0/work/emulator-instance-id/appdb.If you do not specify
a value for MEkeystore, a new key is added to the default ME key for this emulator
instance.
If you do not specify a value for -keystore, the default keystore is used:
Windows
C:\Documents and Settings\user\.keystore.ks
Mac OS
/Users/uname/.keystore.ks
■
-help
Prints the usage instructions for MEKeyTool.
■
-import -alias alias [-keystore JCEkeystore][-MEkeystore filename]
[-storepass storepass]
-domain domain-name
Imports a public key into the ME keystore from the given JCE keystore using the
given Java Cryptography Extension keystore password. and the default Java
Cryptography Extension keystore is user.home/.keystore.
■
-list [-MEkeystore filename]
Lists the keys in the ME keystore, including the owner and validity period for
each.
■
-delete (-owner owner | -number key-number)[-MEkeystore filename]
Deletes a key from the given ME keystore with the given owner.
142
December 2009
DECEMBER 2009
JAVA ME SDK HELP
Generate Stubs (wscompile)
Mobile clients can use the Stub Generator to access web services. The wscompile tool
generates stubs, ties, serializers, and WSDL files used in Java API for XML (JAX) RPC
clients and services. The tool reads a configuration file, that specifies either a WSDL
file, a model file, or a compiled service endpoint interface. The syntax for the stub
generator command is as follows:
wscompile [options] configuration-files
TABLE: wscompile Options on page 143 lists the wscompile options:
TABLE:
wscompile Options
Option
Description
-d output directory
Specifies where to place generated output files
-f:features
Enables the given features
-features:features
Same as -f:features
-g
Generates debugging info
-gen
Same as -gen:client
-gen:client
Generates client artifacts (stubs, etc.)
-httpproxy:host:port
Specifies a HTTP proxy server (port defaults to 8080)
-import
Generates interfaces and value types only
-model file
Writes the internal model to the given file
-O
Optimizes generated code
-s directory
Specifies where to place generated source files
-verbose
Outputs messages about what the compiler is doing
-version
Prints version information
-cldc1.0
Sets the CLDC version to 1.0 (default). Float and double
become String.
-cldc1.1
Sets the CLDC version to 1.1 (float and double are OK)
-cldc1.0info
Shows all CLDC 1.0 information and warning messages.
Note – Exactly one -gen option must be specified. The -f option requires a
comma-separated list of features.
Command Line Reference
143
JAVA ME SDK HELP
COMMAND LINE REFERENCE
TABLE: Command Supported Features (-f) for wscompile on page 144 lists the
features (delimited by commas) that can follow the -f option. The wscompile tool
reads a WSDL file, compiled service endpoint interface (SEI), or model file as input.
The Type of File column indicates which of these files can be used with a particular
feature.
TABLE:
Command Supported Features (-f) for wscompile
Option
Description
Type of File
explicitcontext
Turns on explicit service context mapping
WSDL
nodatabinding
Turns off data binding for literal encoding
WSDL
noencodedtypes
Turns off encoding type information
WSDL, SEI, model
nomultirefs
Turns off support for multiple references
WSDL, SEI, model
novalidation
Turns off full validation of imported WSDL WSDL
documents
searchschema
Searches schema aggressively for subtypes WSDL
serializeinterfaces
Turns on direct serialization of interface
types
wsi
Enables WSI-Basic Profile features (default) WSDL
resolveidref
Resolves xsd:IDREF
WSDL
nounwrap
No unwrap.
WSDL
WSDL, SEI, model
Examples
wscompile -gen -d generated config.xml
wscompile -gen -f:nounwrap -O -cldc1.1 -d generated config.xml
Virtual Machine Memory Profiler (Java
Heap Memory Observe Tool)
The Java Heap Memory Observe Tool (also known as the Heap Walker) records
detailed information about the Java heap at a specific point in the virtual machine
execution. It collects and displays:
144
■
global pointers
■
data for all objects (classes, sizes, addresses and references)
■
addresses for all roots
December 2009
DECEMBER 2009
JAVA ME SDK HELP
■
names of all classes
Please note the following:
■
The memory profiler uses the same connection technology as the Java
debugger(see “On-device Debugging Procedure”). Because they use the same
transport layer, the memory profiler and Java debugger cannot be used
simultaneously.
Note – For the memory profiler, the Xrunjdwp -suspend option must be set to n.
■
The memory monitor slows down your application startup because every object
created is recorded.
■
The memory usage you observe with the emulator is not exactly the same as
memory usage on a real device. Remember, the emulator does not represent a real
device, it is just one possible implementation of its supported APIs.
See also: “Run the Java Heap Memory Observe Tool” on page 145
▼ Run the Java Heap Memory Observe Tool
The Java Heap Memory Observe tool is launched from the command line.
1. Start the emulator from the bin directory and open a sample application:
Windows
emulator.exe -Xdevice:DefaultCldcPhone1 -Xdebug
-Xrunjdwp:transport=dt_socket,suspend=n,server=y,address=51307
-Xdescriptor:C:\Java_ME_platform_SDK_3.0\apps\Games\dist\
Games.jad -Xdomain:maximum
Mac OS
./emulator -Xdevice:DefaultCldcPhone1 -Xdebug
-Xrunjdwp:transport=dt_socket,suspend=n,server=y,address=51307
-Xdescriptor:../apps/Games/dist/Games.jad -Xdomain:maximum
2. In a separate command window, start the memory profiler from the bin
directory. The port number must match the address in the Xrunjdwp call:
memory-profiler -host 127.0.0.1 -port 51307
The profiler window opens.
3. Click the Connect button and wait for the profiler to attach to the process. It
may take several seconds. After the connection, press Resume.
Command Line Reference
145
JAVA ME SDK HELP
COMMAND LINE REFERENCE
4. To take a snapshot of the heap, click the Pause button on the bottom right.
The virtual machine is suspended while the profiler collects the snapshot
information. The memory panel is then repopulated and the Resume button
becomes active.
See “Heap Snapshot Elements” on page 146.
Heap Snapshot Elements
The memory monitor elements are as follows:
memory panel - At the top of the window you see a grid of rectangles representing
memory blocks. This is the memory panel. The key on the top right indicates the
meaning of each graphical image. For example, blocks that are completely black are
at 100% utilization. Clicking a single block opens a dialog showing all the objects in
that block.
loaded classes - A list of loaded classes is displayed in the lower-left corner.
Choosing a class from the list causes the location of all objects in the class to be
displayed in class objects list immediately to the right.
class objects - The class objects list is populated when you select a class from the list
of loaded classes. Select an object to see the class details. These include the address of
the object, its type, and all references to and from the object. If the object is live, the
“Show path from the root” button is enabled. Clicking this button opens the Path
from the Root window, which displays dependencies that prevent this object from
being garbage collected.
statistics - At the bottom right of the Memory Observer window, click the Statistics
button to see a table showing the information for each class. Some objects are internal
to the virtual machine. For each class, you see the Object number, size of all objects in
the heap, the average size of the object, the percentage of the heap used by the
selected class, the percentage of objects live in the selected class, and the percentage
of objects that are in the old generation.
See “Virtual Machine Memory Profiler (Java Heap Memory Observe Tool)” on
page 144 and “Run the Java Heap Memory Observe Tool” on page 145.
146
December 2009
JAVA ME SDK HELP
Logs
Java ME Platform SDK uses the log4j logging facility to manage three types of logs:
■
“Log Location” on page 147
■
“Device Manager Logs” on page 147
■
“Device Instance Logs” on page 148
Log Location
The default location for the messages log is:
Windows
C:\Documents and Settings\user\Application Data\javame-sdk\toolbar\3.0\var\log
Mac OS
/Users/uname/Library/Application Support/javame-sdk/toolbar/3.0/var/log
Device Manager Logs
The device manager log is placed into:
Windows
C:\Documents and Settings\user\Application Data\javame-sdk\toolbar\3.0\var\log\
device-manager
Mac OS
/Users/uname/Library/Application Support/javame-sdk/3.0/log/device-manager.log
Logging levels can be configured in the following XML file:
December 2009
147
JAVA ME SDK HELP
LOGS
Windows
installdir\toolkit-lib\process\device-manager\conf\log4j.xml
Mac OS
installdir/Contents/Resources/toolkit-lib/emulator/generic/core/conf/log4j.xml
A priority value for the categories com.sun or VM can be set to the following levels:
ERROR, WARN, INFO, DEBUG, TRACE (ordered from least to most verbose).
<category name="com.sun">
<priority value="DEBUG"/>
<appender-ref ref="CONSOLE-ALL"/>
<appender-ref ref="FILE"/>
</category>
<category name="VM">
<priority value="INFO"/>
<appender-ref ref="CONSOLE-ALL"/>
<appender-ref ref="FILE"/>
</category>
Device Instance Logs
Each device (or emulator) instance writes its own log into its directory. See TABLE:
Device Names on page 74 to correlate the directory number and the device name.
Windows
C:\Documents and Settings\user\Application Data\javame-sdk\version\work\
emulator-instance\device.log
Mac OS
/Users/uname/Library/Application Support/javame-sdk/3.0/work/
emulator-instance/device.log
The verbosity of the device instance log is controlled by the log4j.xml file, as
described in “Device Manager Logs” on page 147.
A priority value for the categories com.sun or VM can be set to the following levels:
ERROR, WARN, INFO, DEBUG, TRACE (ordered from least to most verbose. The
verbosity of the device instance log is controlled by log4j.xml, as described in
“Device Manager Logs” on page 147.
148
December 2009
JAVA ME SDK HELP
JSR Support
The Java ME Platform SDK supports many standard Application Programming
Interfaces (APIs) defined through the Java Community Process (JCP) program. JCP
APIs are often referred to as JSRs, named after the Java Specification Request process.
See TABLE: Supported JCP APIs on page 150 for a full list of supported APIs. The
Java ME SDK provides documentation describing how certain APIs are implemented
in the SDK. Many supported APIs do not require special implementation
considerations, so they are not discussed in this help set.
The CLDC/MIDP platform is based on the Mobile Information Device Profile and
Connected Limited Device Configuration (JSRs 118 and 139).
JSRs that are not part of the platform are referred to as “optional packages.“All
optional packages are supported on the CLDC/MIDP Platform on Windows.
The Mac OS CLDC version does not support the following JSRs or features.
■
JSR 234 (Advanced Media API)
■
JSR 239 (Java Binding for OpenGL ES API)
■
The CDC Platform
The CDC platform is implemented to support Advanced Graphics and User Interface
Optional Package for the J2ME Platform, Personal Basis Profile 1.1, and the Connected
Device Configuration (JSRs 209, 217 and 218).
The CDC platform does not support JSR 239 (Java Binding for OpenGL ES API,
and JSR 280 (XML API for Java ME).
December 2009
149
JAVA ME SDK HELP
JSR SUPPORT
JCP APIs
TABLE:
Supported JCP APIs
JSR, API
Name, URL
JSR 75, PIM and File
PDA Optional Packages for the J2ME Platform
(http://jcp.org/en/jsr/detail?id=75)
JSR 82, Bluetooth and OBEX Java APIs for Bluetooth
(http://jcp.org/en/jsr/detail?id=82)
150
JSR 118, MIDP 2.0
Mobile Information Device Profile
(http://jcp.org/en/jsr/detail?id=118)
JSR 135, MMAPI 1.1
Mobile Media API
(http://jcp.org/en/jsr/detail?id=135)
JSR 139, CLDC 1.1
Connected Limited Device Configuration
(http://jcp.org/en/jsr/detail?id=139)
JSR 172, Web Services
J2ME Web Services Specification
(http://jcp.org/en/jsr/detail?id=172)
JSR 177, SATSA
Security and Trust Services API for Java ME
(http://jcp.org/en/jsr/detail?id=177)
JSR 179, Location
Location API for Java ME
(http://jcp.org/en/jsr/detail?id=179)
JSR 180, SIP
SIP API for Java ME
(http://jcp.org/en/jsr/detail?id=180)
JSR 184, 3D Graphics
Mobile 3D Graphics API for J2ME
(http://jcp.org/en/jsr/detail?id=184)
JSR 185, JTWI 1.0
Java Technology for the Wireless Industry
(http://jcp.org/en/jsr/detail?id=185)
JSR 205, WMA 2.0
Wireless Messaging API
(http://jcp.org/en/jsr/detail?id=205)
JSR 209, AGUI 1.0
Windows only
Advanced Graphics and User Interface Optional Package for the
J2ME Platform
(http://www.jcp.org/en/jsr/detail?id=209)
JSR 211, CHAPI
Content Handler API
(http://jcp.org/en/jsr/detail?id=211)
JSR 217, PBP 1.1
Windows only
Personal Basis Profile 1.1
(http://www.jcp.org/en/jsr/detail?id=218)
December 2009
DECEMBER 2009
JAVA ME SDK HELP
TABLE:
Supported JCP APIs (Continued)
JSR, API
Name, URL
JSR 218, CDC
Windows only
Connected Device Configuration
(http://jcp.org/en/jsr/detail?id=218)
JSR 226, SVG
Scalable 2D Vector Graphics API for J2ME
(http://jcp.org/en/jsr/detail?id=226)
JSR 229, Payment
Payment API
(http://jcp.org/en/jsr/detail?id=229)
JSR 234, AMMS
Windows only
Advanced Multimedia Supplements
(http://jcp.org/en/jsr/detail?id=234)
JSR 238, MIA
Mobile Internationalization API
(http://jcp.org/en/jsr/detail?id=238)
JSR 239
Windows only
Java Binding for OpenGL ES API
(http://jcp.org/en/jsr/detail?id=239)
JSR 248, MSA 1.0
Windows only
Mobile Service Architecture
(http://jcp.org/en/jsr/detail?id=248)
JSR 256
Mobile Sensor API
(http://jcp.org/en/jsr/detail?id=256)
JSR 280, XML API
XML API for Java ME
(http://jcp.org/en/jsr/detail?id=280)
JSR Support
151
JAVA ME SDK HELP
152
December 2009
JSR SUPPORT
JAVA ME SDK HELP
JSR 75: PDA Optional Packages
The Java ME Platform SDK supports JSR 75, the PDA Optional Packages (PDAP) for
the J2ME Platform. JSR 75 includes two independent APIs:
■
The FileConnection optional package allows MIDlets access to a local device file
system.
■
The Personal Information Management (PIM) optional package includes APIs for
manipulating contact lists (address book), calendars, and to-do lists.
This chapter describes how the Java ME Platform SDK implements the
FileConnection and PIM APIs.
FileConnection API
On a real device, the FileConnection API typically provides access to files stored in
the device’s memory or on a memory card.
In the Java ME Platform SDK emulator, the FileConnection API enables MIDlets to
access files stored on your computer’s hard disk.
The files that can be accessed using FileConnection are stored in the following
subdirectory:
Windows
Documents and Settings\User\Application Support\javame-sdk\3.0\work\emulator-instance\
appdb\filesystem
Mac OS
User/Application Support/javame-sdk/3.0/work/emulator-instance/appdb/filesystem
For example, the DefaultCldcPhone1 emulator instance comes with a root
directory installed called root1, which contains a Readme file and an empty
directory named photos.
December 2009
153
JAVA ME SDK HELP
JSR 75: PDA OPTIONAL PACKAGES
Each subdirectory of filesystem is called a root. The Java ME Platform SDK
provides a mechanism for managing roots. While the emulator is running, choose
View > External Events Generator from the emulator window’s menu. A utility
window opens. Click the File Connection tab.
In the File Connection panel you can mount, unmount, or delete filesystem roots.
Mounted roots are displayed in the top list, and unmounted roots are moved to the
bottom list. Mounted root directories and their subdirectories are available to
applications using the FileConnection API. Unmounted roots can be remounted in
the future.
154
■
To add a new empty filesystem root directory, click Mount Empty and fill in a
name for the directory.
■
To mount a copy of an existing directory, click Mount Copy, and browse to choose
a directory you want to copy. When the File System Root Entry dialog opens, enter
the name for this root. A deep copy of the selected directory is placed into the
emulator’s filesystem with the specified root name.
December 2009
DECEMBER 2009
JAVA ME SDK HELP
■
To make a directory inaccessible to the FileConnection API, select it in the list and
click Unmount. The selected root is unmounted and moved to the Unmounted
roots list.
■
To completely remove a mounted directory, select it and click Unmount & Delete.
■
To remount an unmounted directory, select it and click Remount. The root is
moved to the mounted roots list.
■
To delete an unmounted directory, select it and click Delete. The selected root is
removed from the list.
PIM API
The Java ME Platform SDK emulator stores contact, calendar, and to-do information
in standard files on your desktop computer’s hard disk. All information is stored in:
Windows
Documents and Settings\User\Application Support\javame-sdk\3.0\work\emulator-instance\
appdb\PIM
Mac OS
User/Application Support/javame-sdk/3.0/work/emulator-instance/appdb/PIM
Each device instance has its own data. Lists are stored in subdirectories of the
contacts, events, and todo directories. For example, a contact list called Contacts
is contained in /appdb/PIM/Contacts:
Inside the list directory, items are stored in vCard (.vcs) or vCalendar (.vcf) format
(see (http://www.imc.org/pdi/)). Contacts are stored in vCard format, while
calendar and to-do items are both stored in vCalendar format.
Running PDAPDemo
PDAPDemo shows how to use the PIM and FileConnection APIs that are part of the
JSR 75 specification.
JSR 75: PDA Optional Packages
155
JAVA ME SDK HELP
JSR 75: PDA OPTIONAL PACKAGES
Browsing Files
To run the file browser, you’ll need to give the MIDlet appropriate security
authorization, if you have not already done so. Right-click on your project, choose
Properties, and select Specify the Security Domain. If necessary, select the maximum
domain and press OK.
Now open and run the PDAPDemo project. Launch the FileBrowser MIDlet. You see
a directory listing, and you can browse through the available directories and files. By
default there is one directory, root1. This directory is located at:
Windows
Documents and Settings\User\Application Support\javame-sdk\3.0\work\instance\appdb\
filesystem\root1
Mac OS
Users/uname/Application Support/javame-sdk/3.0/work/emulator-instance/filesystem/root1
Select the directory and press the View soft button to enter it.
The directories photos and private are empty by default. You can add files and
root directories and they will be visible to the JSR 75 File API. (This demo shows a
README and some JPEGs that were added to the local photos directory.)
156
December 2009
DECEMBER 2009
JAVA ME SDK HELP
Using the Menu commands you can view a file or see its properties. Try selecting the
file and choosing Properties or View from the menu.
The PIM API
The JSR75 PIM APIs example demonstrates how to access personal information, like
contact lists, calendars, and to-do lists. After you launch the example, choose a type
of list from the main menu.
In this example application, each type of list works the same way and each list type
contains a single list. For example, if you choose Contact Lists, there is a single
contact list called Contacts. Event Lists contains a single list called Events, and To Do
Lists contains a single list named To Do.
JSR 75: PDA Optional Packages
157
JAVA ME SDK HELP
JSR 75: PDA OPTIONAL PACKAGES
Once you've selected a list type and chosen the specific list, you can view all the
items in the list. If this is the first time you've run the example, the list is probably
empty.
To add an item, choose New from the menu. The application prompts you for a
Formatted Name for the item. You can add more data fields to this item using option
3, Add Field, in the menu. You see a list of field names. Pick as many as you like. You
can fill in the field at any time.
158
December 2009
DECEMBER 2009
JAVA ME SDK HELP
To save the list item, choose Commit (option 5) from the menu.
To return to the list, choose the Back command. You'll see the item you just created in
the list.
The items that you create are stored in standard vCard or vCalendar format in the
device/pim directory.
The PIM API allows for exporting contact, calender, and to-do items in a standard
format. The exact format depends on the list type. When you are viewing an item in
any list, the menu contains a command for viewing the exported item.
For example, when you are viewing a contact list item, the menu contains Show
vCard. When you choose this command, the exported item is shown on the screen.
Calendar items and to-do items both get exported as vCalendar.
JSR 75: PDA Optional Packages
159
JAVA ME SDK HELP
160
December 2009
JSR 75: PDA OPTIONAL PACKAGES
JAVA ME SDK HELP
JSR 82: Bluetooth and OBEX Support
The Java ME Platform SDK emulator supports JSR 82, the Java APIs for
Bluetooth. The emulator is fully compliant with version 1.1 of the specification,
which describes integration with the push registry. JSR 82 includes two independent
APIs:
■
The Bluetooth API provides an interface to Bluetooth wireless networking,
including device discovery and data exchange.
■
The OBEX API allows applications to use the Object Exchange (OBEX) protocol
over Bluetooth or other communication channels.
This chapter describes how the Java ME Platform SDK implements the Bluetooth and
OBEX APIs.
Bluetooth Simulation Environment
The Java ME Platform SDK emulator enables you to develop and test applications
that use Bluetooth without having actual Bluetooth hardware. The SDK simulates a
Bluetooth environment for running emulators. Multiple emulator instances can
discover each other and exchange data using the Bluetooth API.
For an example, see “Running the Bluetooth Demo” on page 161.
Running the Bluetooth Demo
This application contains MIDlets that demonstrate the use of JSR 82’s Bluetooth API.
It shows how images can be transferred between devices using Bluetooth.
You must run two emulator instances to see this process, and each device must have
a different phone number.
December 2009
161
JAVA ME SDK HELP
JSR 82: BLUETOOTH AND OBEX SUPPORT
For example, use DefaultCldcMsaPhone1 to launch Bluetooth Demo, then choose
Server. The emulator asks you if you want to allow a Bluetooth connection. Choose
Yes. The server starts and displays a list of images. At the beginning, none of the
images are available on the Bluetooth network
Select the images you want to make available.
From the menu choose Publish image (or type or click 1). The icon color changes
from purple to green, indicating it is published.
Use DefaultCldcMsaPhone2 to launch Bluetooth Demo, then select Client. The
MIDlet tells you it’s ready to search for images. Click the Find soft button. The
MIDlet finds the other emulator and get a list of images from it. Select one from the
list and choose Load.
162
■
If you are running the demonstration in a trusted protection domain, the image is
transferred using simulated Bluetooth and is shown on the client emulator.
■
If you are not running in a trusted protection domain, the first emulator (the
server) displays a prompt asking if you want to authorize the connection from the
client. Choose Yes. The image is displayed in the client emulator.
December 2009
JAVA ME SDK HELP
JSR 135: Mobile Media API Support
JSR 135, the Mobile Media API (MMAPI), provides a standard API for rendering and
capturing time-based media, like audio or video. The API is designed to be flexible
with respect to the media formats, protocols, and features supported by various
devices. See the following topics:
■
“Media Types” on page 163
■
“Media Capture (Windows Only)” on page 164
■
“Adaptive Multi-Rate (AMR) Content” on page 164
■
“MMAPI MIDlet Behavior” on page 165
■
“Ring Tones” on page 165
■
■
“Download Ring Tones” on page 165
■
“Ring Tone Formats” on page 165
“Running MMAPIDemos” on page 167
■
“Running AudioDemo” on page 167
■
“Running MMAPIDemos” on page 167
For information on programming with MMAPI, see the following articles:
Mobile Media API Overview:
(http://developers.sun.com/techtopics/mobility/apis/articles/mma
pi_overview/)
The J2ME Mobile Media API: (http://www.jcp.org/en/jsr/detail?id=135)
Media Types
The emulator’s MMAPI implementation supports the following media types.
December 2009
MIME Type
Description
audio/amr
Adaptive Multi-Rate
163
JAVA ME SDK HELP
JSR 135: MOBILE MEDIA API SUPPORT
MIME Type
Description
audio/midi
MIDI files
audio/mpeg
MP3 files
audio/sp-midi
Scalable Polyphony MIDI
audio/x-tone-seq
MIDP 2.0 tone sequence
audio/x-wav
WAV PCM sampled audio
image/gif
GIF 89a (animated GIF)
video/3gpp
Third generation mobile broadband with video
video/mpeg
MPEG video
video/quicktime
Video capture
Adaptive Multi-Rate (AMR) Content
The Java ME Platform SDK simulates support for Adaptive Multi-Rate (AMR)
content (http://www.ietf.org/rfc/rfc3267.txt). Although the Java ME
Platform SDK cannot decode AMR content, the implementation returns a player for
AMR content when requested.
On Windows, AMR files are converted to regular WAVE files and passed to Qsound.
Because the Windows version interfaces with the 3GPP implementation, you do not
have to do anything to get AMR files to play.
Media Capture (Windows Only)
The Java ME Platform SDK emulator supports audio and video capture. Audio
capture is supported by using the capture capabilities of the system upon which the
emulator runs.
Video capture is supported by simulating a camera input.
Consult the MobileMediaAPI example application for details and source code that
demonstrates how to capture audio and video.
164
December 2009
DECEMBER 2009
JAVA ME SDK HELP
MMAPI MIDlet Behavior
MIDlets have a lifecycle that is defined in the MIDP specification. MIDlets can be
paused by events such as incoming phone calls. A well-behaved MIDlet releases
important device resources when it is paused and reallocates or restarts those
resources when the MIDlet is resumed. In the MMAPI arena, stop any Players that
are rendering content when a MIDlet is paused.
The Java ME Platform SDK prints a message to the console if you pause a MIDlet and
it does not stop its running Players. You can test this feature using the Pausing
Audio Test MIDlet in the MobileMediaAPI demonstration application.
The warning message is printed only once for each running emulator.
Ring Tones
MMAPI can be used to play ring tones, as demonstrated in “Simple Tones” on
page 168 and “Simple Player” on page 168. The ring tone formats mentioned here are
in common use. You can download ring tones or create your own.
Download Ring Tones
Ring tone files can be downloaded from many internet sites, including the following:
■
http://www.surgeryofsound.co.uk/
■
http://www.convertyourtone.com/
■
http://www.phonezoo.com
Ring Tone Formats
This section provides samples of several formats
■
RTTTL, the Ringing Tones text transfer language format, is explained at
http://www.convertyourtone.com/rtttl.html
■
Nokia Composer
This is a rendition of Beethoven’s 9th symphony in Nokia Composer format:
JSR 135: Mobile Media API Support
165
JAVA ME SDK HELP
JSR 135: MOBILE MEDIA API SUPPORT
16g1,16g1,16g1,4#d1,16f1,16f1,16f1,4d1,16g1,16g1,16g1,16#d1,
16#g1,16#g1,16#g1,16g1,16#d2,16#d2,16#d2,4c2,16g1,16g1,16g1,
16d1,16#g1,16#g1,16#g1, 16g1,16f2,16f2,16f2,4d2
■
Ericsson Composer
Beethoven’s Minuet in G:
a b + c b + c b + c b + C p + d a B p + c g A
p f g a g a g a g A p b f G p a e F
Beethoven’s 9th symphony theme:
f f f # C # d # d # d C p f f f # c # f #f # f f +# c + #
c + # c # A ff f c # f # f # f f + # d + # d + # d
■
Siemens Composer Format
Inspector Gadget theme:
C2(1/8) D2(1/16) Dis2(1/8) F2(1/16) G2(1/8)
P(1/16) Dis2(1/8) P(1/16) Fis2(1/8) P(1/16)
D2(1/8) P(1/16) F2(1/8) P(1/16) Dis2(1/8)
P(1/16) C2(1/8) D2(1/16) Dis2(1/8) F2(1/16)
G2(1/8) P(1/16) C3(1/8) P(1/16) B2(1/2) P(1/4)
C2(1/8) D2(1/16) Dis2(1/8) F2(1/16) G2(1/8) P(1/16)
Dis2(1/8) P(1/16) Fis2(1/8) P(1/16) D2(1/8) P(1/16)
F2(1/8) P(1/16) Dis2(1/8) P(1/16) C3(1/8) B2(1/16)
Ais2(1/8) A2(1/16) Gis2(1/2) G2(1/8) P(1/16) C3(1/2)
■
Motorola Composer
Beethoven’s 9th symphony:
4 F2 F2 F2 C#4 D#2 D#2 D#2 C4 R2 F2 F2 F2 C#2 F#2 F#2
F#2 F2 C#+2 C#+2 C#+2 A#4 F2 F2 F2 C2 F#2 F#2 F#2 F2
D#+2 D#+2 D#+2
■
Panasonic Composer
Beethoven’s 9th symphony:
444** 444** 444** 1111* 4444** 4444** 4444** 111*
0** 444** 444** 444** 1111** 4444** 4444** 4444**
444** 11** 11** 11** 6666* 444** 444** 444** 111**
4444** 4444** 4444** 444** 22** 22** 22**
■
166
December 2009
Sony Composer
DECEMBER 2009
JAVA ME SDK HELP
Beethoven’s 9th sympony:
444****444****444****111#*****444#****444#****444#****
111*****(JD)0000444****444****444****111#****444#****
444#****444#****444****11#****11#****11#****666#*****
444****444****444****111****444#****444#****
444#****444****22#****22#****22#****
Running AudioDemo
Demonstrates audio capabilities, including mixing and playing audio with an
animation. Select a MIDlet from the list, and from the menu, select 1, Launch.
■
Audio Player.
Select a sound clip and press the Play soft button. Click Back to return to the list of
clips.
■
Bouncing Ball. Select No Background and press the Play soft button. Two balls
randomly bounce in the screen, emitting a tone whenever they contact a wall.
Wave background, tone seq background, and MIDI background play the same
two-ball audio visual sequence with the additional audio background.
■
Mix Demo shows that different audio formats can play simultaneously. Select a
MIDlet and press the Play soft button.
Tone+Wav - The audio clip starts playing and the Tone soft button is displayed.
Press the Tone button to hear a tone playing over the original audio clip.
Tone+ToneSeq - The audio clip starts playing and the Tone soft button is
displayed. Press the Tone button to hear a tone playing over the original audio
clip.
ToneSeq+Wav - The tone sequence and the wav sequence play simultaneously.
Press the Pause soft button to interrupt, and press Play to resume.
Running MMAPIDemos
The MMAPIDemos application contains four MIDlets that showcase the SDK’s
multimedia capabilities:
JSR 135: Mobile Media API Support
167
JAVA ME SDK HELP
JSR 135: MOBILE MEDIA API SUPPORT
Simple Tones
Simple Tones demonstrates how to use interactive synthetic tones. Select a sample,
then click Play on the lower right.
■
Short Single Tone and Long Single Tone use Manager.playTone() to play tones
with different pitch.
■
Short MIDI event plays a chord on the interactive MIDI device (locator
"device://midi"). The shortMidiEvent() method of MIDIControl is used
to trigger the notes of the chord.
■
To run the MMAPI Drummer demo, click or type number keys (0-9). Each number
plays a different sound.
Simple Player
The Simple Player application demonstrates the range of audio and video capabilities
of the emulator. It includes sample files in a variety of formats and can play files
from the emulator's persistent storage or from HTTP URLs.
The player portion uses a generic javax.microedition.media.Player interface.
The player displays duration, media time, and controls for running the media file. If
metadata is available in a file, the player enables you to view the information, such as
author and title. In the case of MIDI files, if karaoke text is present in the file, it
displays on the screen during play. Graphical user interface controls can be viewed
on the display screen if applicable. You can access these controls by selecting one of
the media samples in Simple Player, then pressing the Menu button to view and
select the desired command.
Select Simple Player then click Launch. The demo includes the following media
samples:
168
■
Bong plays a short WAV file. You can adjust certain playback features, as
described later in this document. The display shows the duration of the sound in
minutes:seconds:tenths of a second, for example 00:17:5. This audio sample is a
resource file in the MIDlet suite JAR file.
■
MIDI Scale plays a sample musical scale. The display shows the title of the
selected music file, the duration of the song, the elapsed time during playback,
and the current tempo in beats per minute (bpm). This MIDI file is stored in the
MIDlet suite JAR file.
■
Simple Ring Tone plays a short sequence of Beethoven's Fifth Symphony. The
display shows the title of the selected music file, the duration of the song, the
elapsed time in seconds and tenths of a second during playback, and the current
tempo in beats per minute (bpm). This ringtone file (.jts format) is stored in the
MIDlet suite JAR file.
December 2009
DECEMBER 2009
JAVA ME SDK HELP
■
WAV Music plays a brief audio file. The display shows the title of the audio file,
the duration of the audio the elapsed time during playback, and the playback rate
in percent. This WAV file is retrieved from an HTTP server.
■
MIDI Scale plays a MIDI file that is retrieved from an HTTP server.
■
The Animated GIF example shows an animated GIF that counts from 1 to 5. The
file is stored in the MIDlet suite JAR file.
■
Audio Capture from a default device lets you capture audio from a microphone or
connected device. The sound is captured and played back on the speaker. To avoid
feedback, use a headset.
■
Video Capture Simulation simulates viewing input video such as might be
possible on a device equipped with a camera.
■
MPEG1 Video [http]. Plays an MPEG video found at
http://java.sun.com/products/java-media/mma/media/test-mpeg.mp
g.
■
[enter URL] allows you to play back media files from arbitrary HTTP servers.
Type a valid URL (for example,
http://java.sun.com/products/java-media/mma/media/test-wav.mpg
) at the insertion point and click OK to play a file. If you want to open an HTTP
directory from which to select media, be sure to add a slash to the end of the URL.
In addition, Simple Player parses ring tones in Ringing Tones text transfer language
(RTTTL). See http://www.convertyourtone.com/rtttl.html for information
on RTTTL.
The Simple Player includes a common set of commands that control media playback.
The commands are available from the Simple Player menu, and some have associated
keypad buttons. TABLE: Simple Player Commands on page 169 describes these
commands, their availability, and their keypad equivalents. The commands may or
may not be available depending on the media type that Simple Player is playing.
Note that a short list of commands and the corresponding keypad buttons is
available in the Simple Player application itself. Just choose the Quick Help
command from the menu.
TABLE:
Simple Player Commands
Command
Menu
Item
Mute/Unmute
1
Play
2
Volume
3
Increases or decreases loudness.
META Data
4
Displays information provided by the media file such as
copyright information, title, and track list.
Description
Turns off sound but the file continues to play. This command
toggles to Unmute.
JSR 135: Mobile Media API Support
169
JAVA ME SDK HELP
JSR 135: MOBILE MEDIA API SUPPORT
TABLE:
Simple Player Commands (Continued)
Menu
Item
Description
Stop in 5
seconds
5
Pauses the audio play in five seconds when set during playback.
Loopmode
6
Rate
7
Alters the rate of speed of playback.
Tempo
8
Increases or decreases the tempo of the tone sequence or MIDI
file.
Pitch
9
Lowers or raises the notes in a MIDI file.
Command
Skip Forward
Skips forward five percent of the duration of the media file. The
sound track syncs to the video
Skip Backward
Skips backward five percent of the duration of the media file.
The sound track syncs to the video.
Rewind
Returns to the start time of the audio playback.
Quick Help
Displays a list of commands and keypad buttons.
Video
The Video application illustrates how the emulator is capable of playing animated
GIF files and capturing video. On a real device with a camera, video capture can be
used to show the user what the camera sees.
Animated GIFs and video capture can be implemented using either a Form Item or
a Canvas. The Video demonstration includes all the possibilities. Animated GIF Form [jar] shows an animated GIF as a Form Item. The form also includes some
information about the playback, including the current time. Choose the Snapshot
command to take a snapshot of the running animation. The snapshot will be placed
in the form following the animated GIF.
170
■
Animated GIF - Canvas [jar] shows an animated GIF in a Canvas. A simple
indicator shows the progress through the animation. Choose Snapshot to get a still
image of the current appearance. The snapshot is shown briefly, then the display
goes back to the animation.
■
Video Capture - Form simulates capturing video from a camera or other source
and showing it as an Item in a Form. Choose the Snapshot command to take a
snapshot of the captured video. The snapshot will be placed in the form following
the video capture.
December 2009
DECEMBER 2009
JAVA ME SDK HELP
■
Video Capture - Canvas simulates capturing video from a camera or other source
and showing it in a Canvas. Choose Snapshot to get a still image of the current
appearance. The snapshot is shown briefly, then the display goes back to the video
capture.
■
MPEG1 Video - Form, MPEG1 Video - Canvas
The MPEG1 applications obtain MPEGs from the web, so if you are behind a
firewall, you must configure the emulator’s proxy server settings, as described in
the topic “Configuring the Web Browser and Proxy Settings” on page 19.
When you play the demo, expect to wait a few seconds while the demo obtains the
data. The MPEG1 demos have the same behavior as Video Capture - Form and
Video Capture - Canvas, respectively.
Attributes for MobileMediaAPI
The MobileMediaAPI applications have the following editable attributes.
Right-click on the project and select Properties. Select Application Descriptor and
view the Attributes tab.
TABLE:
Descriptions of MMAPI-specific MIDlet attributes
Attribute
Description
PlayerTitle-n
Name of the nth media title to be played back by the Simple Player
MIDlet.
PlayerURL-n
Location of the nth media title, PlayerTitle-n, to be played back
by the Simple Player MIDlet.
VideoTest-n
The name of the nth media title to be played back by the Video
application.
VideoTest-URLn
Location of the nth media title, VideoTest-n, to be played back
by the Video application.
JSR 135: Mobile Media API Support
171
JAVA ME SDK HELP
172
December 2009
JSR 135: MOBILE MEDIA API SUPPORT
JAVA ME SDK HELP
JSR 172: Web Services Support
The Java ME Platform SDK emulator supports JSR 172, the J2ME Web Services
Specification. JSR 172 provides APIs for accessing web services from mobile
applications. It also includes an API for parsing XML documents.
See also:
“Generating Stub Files from WSDL Descriptors” on page 173
“Creating a New Mobile Web Service Client” on page 174
“Run JSR172Demo” on page 175
▼ Generating Stub Files from WSDL
Descriptors
The Java ME Platform SDK provides a stub generator that automates creating source
code for accessing web services that conform to the J2ME Web Services Specification.
You can add stubs to any MIDP application. The following is a general procedure for
adding stubs:
1. In the Projects window, expand the tree for a project.
2. Right-click on the Source Packages node and select New > Other.
3. In the Categories pane select Other, and in the File Types area choose Mobile
Webservice Client.
4. In the Generate J2ME Webservice Stub page, you can either:
■
Click Running Web Service and enter the URL for the WSDL
■
Click Specify the Local filename for the retrieved WSDL and browse to a file on
your system.
In either case, you must enter a Package name, then click Finish. The new package
appears in the project and includes an interface file and a stub file.
December 2009
173
JAVA ME SDK HELP
JSR 172: WEB SERVICES SUPPORT
5. You can now edit your source files to call the content the stub provides, then
build and run.
See “Creating a New Mobile Web Service Client” on page 174 for a step by step
process, or see “Run JSR172Demo” on page 175 and view the demo source files.
▼ Creating a New Mobile Web Service
Client
This sample procedure creates a new project and adds a web service client.
However, you can add a web service client to any MIDP project, it does not have to
be new.
1. Select File > New Project, choose MIDP application, and click Next. Name your
project and ensure Create Hello MIDlet is checked. Click Finish.
2. Right-click on the new project’s Source Packages node and select New > Other.
3. In the Categories pane select Other, and in the File Types area choose Mobile
Webservice Client.
4. In the Generate J2ME Webservice Stub page:
■
Click Running Web Service and in the WSDL URL field, enter:
http://www.xmlme.com/WSShakespeare.asmx?WSDL
■
In the Package field, enter testws. This is the package name.
Click Finish. The new package appears in Source Packages and includes
Shakespeare.java and Shakespeare_Stub.java.
5. Edit HelloMIDlet.java as follows:
■
At the beginning, add the following import declaration:
import testws.*
■
Locate the startApp() method and replace its contents with the following
code:
String text;
Shakespeare s = new Shakespeare_Stub();
try
{
text = s.GetSpeech("Romeo");
}catch(java.rmi.RemoteException rex)
{
174
December 2009
DECEMBER 2009
JAVA ME SDK HELP
text = "error";
System.out.println(rex.getMessage());
}
TextBox t = new TextBox("Hello", text, 2048, 0);
t.addCommand(exitCommand);
t.setCommandListener(this);
display.setCurrent(t);
6. Build and run the project. You see a quote from Shakespeare’s Romeo and Juliet
on the device screen.
You can vary the above procedure to use a local WSDL file. Open the following
web page in a browser:
http://www.xmlme.com/WSShakespeare.asmx?WSDL
Save it to a local file. For example, c:\ws\WSShakespeare.wsdl. Follow the
procedure above, except at Step 4, specify the local file name.
Run JSR172Demo
JSR172Demo shows how to access a web service from a MIDlet. The web service is
already running on an Internet server, and it conforms to the J2ME Web Services
Specification.
If you are using a proxy server, you must configure the emulator’s proxy server
settings as described in “Configuring the Web Browser and Proxy Settings” on
page 19. Build and run the example.
JSR172Demo contains a single MIDlet named Server Script. Launch it and follow the
prompts. You can browse through simulated news headlines, all of which are
retrieved from the web service.
JSR 172: Web Services Support
175
JAVA ME SDK HELP
176
December 2009
JSR 172: WEB SERVICES SUPPORT
JAVA ME SDK HELP
JSR 177: Smart Card Security
(SATSA)
The Security and Trust Services APIs (SATSA) provide smart card access and
cryptographic capabilities to applications running on small devices. JSR 177 (the
SATSA specification) defines four distinct APIs as optional packages:
■
SATSA-APDU - Enables applications to communicate with smart card
applications using a low-level protocol.
■
SATSA-JCRMI - Provides an alternate method for communicating with smart
card applications using a remote object protocol.
■
SATSA-PKI -Enables applications to use a smart card to digitally sign data and
manage user certificates.
■
SATSA-CRYPTO - A general-purpose cryptographic API that supports message
digests, digital signatures, and ciphers.
The Java ME Platform SDK emulator fully supports SATSA. This topic describes how
you can use the Java ME Platform SDK to work with SATSA in your own
applications.
For a more general introduction to SATSA and using smart cards with small devices,
see the SATSA Developer’s Guide, which is available at
(http://java.sun.com/j2me/docs/satsa-dg/).
If you need to develop your own Java Card applications, download the Java Card
Development Kit, available at (http://java.sun.com/products/javacard/).
This kit is Windows. The Mac OS version is still under development.
Card Slots in the Emulator
Real SATSA devices are likely to have one or more slots that house smart cards.
Applications that use SATSA to communicate with smart cards need to specify a slot
and a card application.
December 2009
177
JAVA ME SDK HELP
JSR 177: SMART CARD SECURITY (SATSA)
The Java ME Platform SDK emulator is not a real device and, therefore, does not
have physical slots for smart cards. Instead, it communicates with a smart card
application using a socket protocol. The other end of the socket might be a smart card
simulator or it might be a proxy that talks with real smart card hardware.
The Java ME Platform SDK emulator includes two simulated smart card slots. Each
slot has an associated socket that represents one end of the protocol that is used to
communicate with smart card applications.
The default ports are 9025 for slot 0 and 9026 for slot 1. These port defaults are a
property of the device. To alter the defaults, go to the device directory:
Windows
user.home\Application Data\javame-sdk\3.0\directory-number
Mac OS
Users/uname/Library/Application Support/javame-sdk/3.0/work/emulator-instance
Edit the device.properties file and modify this line:
runtime.internal.com.sun.io.j2me.apdu.hostsandports =
localhost:9025,localhost:9026
Adjusting Access Control
Access control permissions and PIN properties can be specified in text files. When
the first APDU or Java Card RMI connection is established, the implementation reads
the ACL and PIN data from the acl_slot-number in the workdir\emulator-instance\
appdb directory. For example, an access control file for slot 0 might be:
Windows
Documents and Settings\User\Application Support\javame-sdk\3.0\work\emulator-instance\
appdb\acl_0
Mac OS
Users/uname/Application Support/javame-sdk/3.0/work/emulator-instance/appdb/acl_0
If the file is absent or contains errors, the access control verification for this slot is
disabled.
The file can contain information about PIN properties and application permissions.
178
December 2009
DECEMBER 2009
JAVA ME SDK HELP
Specifying PIN Properties
PIN properties are represented by a pin_data record in the access control file.
pin_data {
id number
label string
type
min
max
stored
reference
pad
flag
bcd | ascii | utf | half-nibble | iso
minLength
maxLength
storedLength
byte
byte - optional
case-sensitive | change-disabled | unblock-disabled
needs-padding | disable-allowed | unblockingPIN
}
Specifying Application Permissions
Application permissions are defined in access control file (acf) records. The record
format is as follows:
acf AID fnumbers separated by blanks {
ace {
root CA name
...
apdu {
eight numbers separated by blanks
...
}
...
jcrmi {
classes {
classname
...
}
hashModifier string
methods {
method name and signatiure
...
}
}
...
pin_apdu {
id number
JSR 177: Smart Card Security (SATSA)
179
JAVA ME SDK HELP
JSR 177: SMART CARD SECURITY (SATSA)
verify | change | disable | enable | unblock
four hexadecimal numbers
...
}
...
pin_jcrmi {
id number
verify | change | disable | enable | unblock
method name and signature
...
}
...
}
...
}
The acf record is an Access Control File. The AID after acf identifies the
application. A missing AID indicates that the entry applies to all applications. The
acf record can contain ace records. If there are no ace records, access to an
application is restricted by this acf.
The ace record is an Access Control Entry. It can contain root, apdu, jcrmi,
pin_apdu, and pin_jcrmi records.
The root record contains one CA name. If the MIDlet suite was authorized using a
certificate issued by this CA, this ace grants access to this MIDlet. A missing root
field indicates that the ace applies to all identified parties. One principal is described
by one line. This line must contain only the word root and the principal name, for
example:
root CN=thehost;OU=JCT;O=dummy CA;L=Santa Clara;ST=CA;C=US
The apdu or jcrmi record describes an APDU or Java Card RMI permission. A
missing permission record indicates that all operations are allowed.
An APDU permission contains one or more sequences of eight hexadecimal values,
separated by blanks. The first four bytes describe the APDU command and the other
four bytes are the mask, for example:
apdu {
0 20
80 20
}
180
December 2009
0 82 0 20
0 0 ff ff
0 82
0 0
DECEMBER 2009
JAVA ME SDK HELP
The Java Card RMI permission contains information about the hash modifier
(optional), class list, and method list (optional). If the list of methods is empty, an
application is allowed to invoke all the remote methods of interfaces in the list of
classes, for example:
jcrmi {
classes {
com.sun.javacard.samples.RMIDemo.Purse
}
hashModifier zzz
methods {
debit(S)V
setAccountNumber([B)V
getAccountNumber()[B
}
}
All the numbers are hexadecimal. Tabulation, blank, CR, and LF symbols are used as
separators. Separators can be omitted before and after symbols { and }.
The pin_apdu and pin_jcrmi records contain information necessary for PIN entry
methods, which is the PIN identifier and APDU command headers, or remote
method names.
Access Control File Example
pin_data {
label
Unblock pin
id
44
type
utf
min
4
stored
8
max
8
reference 33
pad
ff
flag
needs-padding
yflag
unblockingPIN
}
pin_data {
label
Main pin
id
55
type
half-nibble
min
4
stored
8
max
8
JSR 177: Smart Card Security (SATSA)
181
JAVA ME SDK HELP
reference
pad
flag
flag
JSR 177: SMART CARD SECURITY (SATSA)
12
ff
disable-allowed
needs-padding
}
acf a0 0 0 0 62 ff 1 {
ace {
root CN=thehost;OU=JCT;O=dummy CA;L=Santa Clara;ST=CA;C=US
pin_jcrmi {
id 55
verify enterPIN([B)S
change changePIN([B[B)S
disable disablePIN([B)S
enable enablePIN([B)S
unblock unblockPIN([B[B)S
}
}
}
acf a0 0 0 0 62 ee 1 {
ace {
root CN=thehost;OU=JCT;O=dummy CA;L=Santa Clara;ST=CA;C=US
pin_apdu {
id 55
verify 1 2 3 1
change 4 3 2 2
disable 1 1 1 3
enable 5 5 5 4
unblock 7 7 7 5
}
}
}
acf a0 0 0 0 62 3 1 c 8 1 {
ace {
root CN=thehost;OU=JCT;O=dummy CA;L=Santa Clara;ST=CA;C=US
jcrmi {
classes {
com.sun.javacard.samples.RMIDemo.Purse
}
hashModifier xxx
methods {
setAccountNumber([B)V
getBalance()S
credit(S)V
182
December 2009
DECEMBER 2009
JAVA ME SDK HELP
}
}
}
ace {
jcrmi {
classes {
com.sun.javacard.samples.RMIDemo.Purse
}
debit(S)V
getAccountNumber()[B
}
}
}
}
acf a0 00 00 00 62 03 01 0c 02 01 {
ace {
root CN=thehost;OU=JCT;O=dummy CA;L=Santa Clara;ST=CA;C=US
apdu {
0 20 0 82 0 20 0 82
80 20 0 0 ff ff 0 0
}
apdu {
80 22 0 0 ff ff 0 0
}
}
}
acf a0 00 00 00 62 03 01 0c 02 01 {
ace {
apdu {
0 20 0 82 ff ff ff ff
}
}
}
acf a0 00 00 00 62 03 01 0c 06 01 {
ace {
apdu {
0 20 0 82 ff ff ff ff
}
}
}
JSR 177: Smart Card Security (SATSA)
183
JAVA ME SDK HELP
184
December 2009
JSR 177: SMART CARD SECURITY (SATSA)
JAVA ME SDK HELP
JSR 179: Location API Support
The JSR 179 Location API gives applications the opportunity to use a device’s
location capabilities. For example, some devices include Global Positioning System
(GPS) hardware. Other devices might be able to receive location information from the
wireless network. The Location API provides a standard interface to location
information, regardless of the underlying technique.
In the Location API, a location provider encapsulates a positioning method and
supplies information about the device’s location. The application requests a provider
by specifying required criteria, such as the desired accuracy and response time. If an
appropriate implementation is available, the application can use it to obtain
information about the device’s physical location.
The Java ME Platform SDK includes a simulated location provider. You can use the
emulator’s External Events Generator to specify where the emulator should think it
is located. In addition, you can configure the properties of the provider itself, and
you can manage a database of landmarks.
Setting the Emulator’s Location at
Runtime
You can specify the simulated location of the emulator while it is running. To do this,
choose View > External Events Generator from the emulator window’s menu. Click
the Location tab.
December 2009
185
JAVA ME SDK HELP
JSR 179: LOCATION API SUPPORT
In the Location area of the tab, you can fill in values for the latitude, longitude,
altitude, speed, and course. Applications that use the Location API can retrieve these
values as the location of the emulator.
For more elaborate testing, you can set up a location script that describes motion
over time. Location scripts are XML files consisting of a list of locations, called
waypoints, and associated times. The Java ME Platform SDK determines the current
186
December 2009
DECEMBER 2009
JAVA ME SDK HELP
location of the emulator by interpolating between the points in the location script.
Here, for example, is a simple location script that specifies a starting point (time=
"0") and moves to a new point in ten seconds:
<waypoints>
<waypoint time="0"
latitude="14" longitude="50" altitude="310" />
<waypoint time="10000"
latitude="14.5" longitude="50.1" altitude="215" />
</waypoints>
The altitude measurement is in meters, and the time values are in milliseconds.
Use a text editor to create your location script. You can load it into the external event
window by pressing the Browse button next to the Script field. Immediately below
are controls for playing, pausing, stopping, and moving to the beginning and end of
the location script. You can also drag the time slider to a particular point.
Some devices are also capable of measuring their orientation. To make this kind of
information available to your application, change the State field in the Orientation
box to Supported and fill in values for azimuth, pitch, and roll. The Magnetic
Orientation checkbox indicates whether the azimuth and pitch measurements are
relative to the Earth’s magnetic field or relative to true north and gravity.
To test how your application handles unexpected conditions, try changing the State
field in the Location Provider box to Temporarily Unavailable or Out of Service.
When your application attempts to retrieve the emulator’s location, an exception is
thrown and you can see how your application responds.
Running the CityGuide Sample Project
CityGuide demonstrates how to use the Location API (JSR 179). It shows a walker’s
current position superimposed on a city map. The walker moves around the city and
landmarks are highlighted and identified as the walker approaches. In this demo we
get the walker’s location from an XML script named citywalk.xml (the event file)
that submits the device location information.
Because location prompts occur frequently, it is best to run this demonstration in
manufacturer (trusted) mode, as explained in “Security Domains” on page 94. In the
user interface, right-click on your project and select the Running category. Select
Specify the Security Domain, and select manufacturer or maximum.
Open and run the CityGuide project. In the emulator, launch the CityGuide MIDlet.
Click Next to view the map page.
JSR 179: Location API Support
187
JAVA ME SDK HELP
JSR 179: LOCATION API SUPPORT
Choose View > External Events Generator from the emulator window menu. On the
Location tab click the browse button. Select the following event file:
installdir\apps\CityGuide\citywalk.xml.
Windows:
installdir\apps\CityGuide\citywalk.xml
Mac OS:
installdir/Contents/Resources/apps/CityGuide/citywalk.xml
The player buttons at the bottom of the window are now active. Press the green play
button (right-pointing triangle) to run the script.
The display shows four types of landmarks: restaurants, museums, shops, and
theaters. To adjust the landmark display, open the soft menu and choose the Settings
command.
Use the navigation keys to highlight a category, then use Select to check or uncheck
an item.
When you are near a landmark (shown highlighted on the map), open the soft menu
and choose the Detail command to see more information.
188
December 2009
DECEMBER 2009
JAVA ME SDK HELP
JSR 179: Location API Support
189
JAVA ME SDK HELP
190
December 2009
JSR 179: LOCATION API SUPPORT
JSR 180: SIP Communications
The Java ME Platform SDK supports the SIP API for J2ME (JSR 180) with a proxy
server, registrar, and network monitor support.
Session Initiation Protocol (SIP) is defined by RFC 3261, available at
(http://www.ietf.org/rfc/rfc3261.txt).
SIP provides a standard way for applications to set up communications. The
application determines what communication actually takes place. SIP can be used to
set up instant messaging, text chat, voice chat, video conferencing, or other types of
sessions.
Understanding the SIP Registrar and
Proxy
A SIP registrar enables client applications to associate a user name with a specific
network address. Client registration informs the SIP proxy server that the client
exists.
A SIP proxy server is an entry point into a larger network of proxy servers. SIP
messages that arrive at one proxy are routed to an appropriate destination, which is
usually another proxy server or an end point, such as a desktop computer or a
mobile device. Although SIP messages can be sent directly between devices, they are
usually routed through a proxy server.
For example, suppose Diggory wants to start a video conference with Polly. Polly is
on the road and her mobile phone sends a message to a registrar that associates her
name with the mobile phone’s network address. When Diggory tries to set up the
video conference with Polly, his application uses SIP to ask the registrar for Polly’s
current network location.
191
Running SIPDemo
This application is a very simple example of using SIP (JSR 180) to communicate
directly between two devices. Usually devices will use SIP with a proxy server to set
up direct communications of some kind.
To see how SIPDemo works, run two instances of the emulator. In the first, choose
Receive message. You can use the default port, 5070, and choose Receive. The first
emulator is now listening for incoming messages.
In the second emulator, choose Send message. Fill in values for the recipient, port
number, subject, and message, or accept the defaults, and choose Send. Your message
will be displayed in the first emulator. The first emulator’s response is displayed in
the second emulator.
Try it again with the network monitor turned on. You can see the communication
between the emulators in the network monitor SIP tab.
192
Java ME SDK Help • December 2009
JAVA ME SDK HELP
JSR 184: Mobile 3D Graphics
The Mobile 3D Graphics API for J2ME, (JSR 184) provides 3D graphics capabilities
with a low-level API and a high-level scene graph API. This chapter provides a brief
overview and general guidelines for working with JSR 184.
JSR 184 is a specification that defines the Mobile 3D Graphics (M3G) API for the
J2ME. This API provides 3D functionality in a compact package that’s appropriate for
CLDC/MIDP devices. The API provides two methods for displaying 3D graphics
content:
The immediate mode API makes it possible for applications to directly create and
manipulate 3D elements.
Layered on top of this is a scene graph API, also called retained mode, that makes it
possible to load and display entire 3D scenes that are designed ahead of time.
For more information, consult the JSR 184 specification at
(http://jcp.org/en/jsr/detail?id=184).
Choosing a Graphics Mode
Applications are free to use whichever approach is most appropriate or to use a
combination of the retained mode and immediate mode APIs.
JSR 184 provides a standard API for CLDC/MIDP devices, enabling a new
generation of 3D applications. The immediate mode API, in turn, is compatible with
OpenGL ES, a standard lightweight API for 3D graphics. See
(http://khronos.org/) for more information on OpenGL ES.
Immediate Mode
Immediate mode is appropriate for applications that generate 3D graphics content
algorithmically, such as scientific visualizations or statistical graphs. The application
creates 3D objects and manipulates them directly.
December 2009
193
JAVA ME SDK HELP
JSR 184: MOBILE 3D GRAPHICS
For an example of immediate mode, see the Life3D MIDlet in the Demo3D example
application.
Retained Mode
Most applications, particularly games, use the retained mode or scene graph API. In
this approach, a graphic designer or artist uses 3D modeling software to create a
scene graph. The scene graph is saved in the JSR 184 file format. The scene graph file
is bundled with the application. At runtime, the application uses the scene graph API
to load and display the file.
Applications can manipulate parts of a loaded scene graph to animate characters or
create other effects. The basic strategy is to do as much work as possible in the
modeling software. At runtime, the application can grab and manipulate parts of the
scene graph, which can also include paths for animation or other effects.
For an example of retained mode, see the retainedmode MIDlet in the Demo3D
example application.
Quality Versus Speed
One of the challenges of MIDP development is the constrained environment of
typical devices. Compared to desktop computers, MIDP devices have slow
processors and little memory. These challenges extend into the arena of 3D graphics.
To accommodate a wide variety of implementations, the JSR 184 specification
provides various mechanisms to make the display of a 3D scene as efficient as
possible.
One approach is scoping, a technique where you tell the 3D graphics implementation
when objects are not going to interact with each other. For example, if you defined a
scene graph for a house, you could use scoping to specify that the light in the
basement doesn’t affect the appearance of the bedroom on the second floor. Scoping
simplifies the implementation’s task because it reduces the number of calculations
required to show a scene.
In general, the best way to improve the rendering speed of 3D scenes is to make
some compromises in quality. The Mobile 3D Graphics API includes rendering hints
so that applications can suggest how the implementation can compromise quality to
improve rendering speed.
194
December 2009
DECEMBER 2009
JAVA ME SDK HELP
Content for Mobile 3D Graphics
Most mobile 3D applications use scene graphs in resource files to describe objects,
scenes, and characters. Usually it is not programmers but graphic designers or artists
who create the scene graphs, using standard 3D modeling tools.
Several vendors offer tools for authoring content and converting files to the JSR 184
format.
Because it is relatively difficult to create and manipulate 3D graphics content in an
application using the immediate mode API, most applications rely as much as
possible on a scene graph file. By putting as much as possible into the scene graph
file at design time, the application’s job at runtime is considerably simplified.
Running Demo3D Samples
Demo3D contains MIDlets that demonstrate JSR 184 features.
Life3D
Life3D implements the popular Game of Life in three dimensions. Live cells are
represented by cubes. Each cell has 26 possible neighbors (including diagonals). For
each step of the animation, cells with fewer than four neighbors die of loneliness,
while cells with more than five neighbors die of overcrowding. An empty cell with
exactly four neighbors becomes a new live cell.
The view of the playing board rotates slowly so you can view the board from all
angles.
The keypad buttons in TABLE: Controls for Life3D on page 195 provide control over
the game.
TABLE:
Controls for Life3D
Button
Description
0
Pause the animation.
1
Resume the animation at its default speed.
2
Speed up the animation.
JSR 184: Mobile 3D Graphics
195
JAVA ME SDK HELP
JSR 184: MOBILE 3D GRAPHICS
TABLE:
Controls for Life3D (Continued)
Button
Description
3
Slow down the animation.
4
Choose the previous preset configuration from an arbitrary list. The name of the
configuration is shown at the top of the screen.
5
Choose the next preset configuration from the list.
*
Generate a random configuration and animate until it stabilizes or dies. If it dies,
generate a new random configuration.
The source code for this example can be found at:
Windows
installdir\apps\Demo3D\src\com\superscape\m3g\wtksamples\life3d\Life3D.java.
Mac OS
installdir/Contents/Resources/apps/Demo3D/src/com/superscape/m3g/wtksamples/life3d/Li
fe3D.java.
RetainedMode
The RetainedMode MIDlet plays a scene file that shows a skateboarder in an
endless loop.
PogoRoo
PogoRoo displays a kangaroo bouncing up and down on a pogo stick. To steer the
kangaroo, use the arrow keys. Press up to go forward, down to go backward, and left
and right to change direction. You might need to hold down the key to see an effect.
196
December 2009
JAVA ME SDK HELP
JSR 205: Wireless Messaging API
(WMA) Support
The Java ME Platform SDK supports the Wireless Messaging API (WMA) with a
sophisticated simulation environment. WMA 1.1 (JSR 120) enables MIDlets to send
and receive Short Message Service (SMS) or Cell Broadcast Service (CBS) messages.
WMA 2.0 (JSR 205) includes support for MMS messages as well.
This chapter describes the tools you can use to develop WMA applications. It begins
by showing how to configure the emulator’s support of WMA. Next, it describes the
WMA console, a tool for testing WMA applications.
Many of the tasks in this topic can also be accomplished from the command line. See
“Running WMA Tool” on page 201 and “Running WMADemo” on page 200.
Using the WMA Console to Send and
Receive Messages
The WMA console is a tool that enables you to send messages to and receive
messages from applications that use JSRs 120 or 205. You can, for example, use the
WMA console to send SMS messages to a MIDlet running on the emulator.
See “WMA Console Interface” on page 198.
Launching the WMA Console
To launch the WMA console, select Tools > WMA Console. If the WMA Output
window is not visible, select Window > Output > WMA Console Output.
Note, WMA console operations can also be performed from the command line. See
the topic “Running WMA Tool” on page 201.
December 2009
197
JAVA ME SDK HELP
JSR 205: WIRELESS MESSAGING API (WMA) SUPPORT
WMA Console Interface
To view this interface, select Tools > WMA Console. If the WMA Output window is
not visible, select Window > Output > WMA Console Output.
The WMA Console user interface has a tab for sending messages and an output
window that displays incoming messages.
As shown here, the console has a phone number, and it is displayed as part of the
WMA console tab label.
To set the phone number, select Tools > Options > Miscellaneous. On the WMA
Console tab, edit the Assigned Phone Number field and click OK. If the number is
available it is assigned to the console immediately. If the number is in use it is
assigned to the console the next time you restart the SDK.
198
December 2009
DECEMBER 2009
JAVA ME SDK HELP
Emulator Phone Numbers
Each running instance of the emulator has a simulated phone number that is shown
in the emulator window. The phone numbers are important because they are used as
addresses for WMA messages.
Sending a Text SMS Message
To send a text SMS message, click Send SMS. The send window appears.
The window automatically lists the phone numbers of all running emulator
instances. Select one or more destinations and enter a port number if you wish. Type
your message and click Send.
Sending a Binary SMS Message
To send the contents of a file as a binary message, click Send SMS to bring up the
send window. Click the Binary SMS tab.
Selecting recipients is the same as for sending text SMS messages. You can type in the
path of a file directly, or click Browse to open a file chooser.
Sending Text or Binary CBS Messages
Sending CBS messages is similar to sending SMS messages except that you don’t
need to choose recipients. To send a text or binary CBS message, click Send CBS in
the WMA console. Specify a message identifier and enter the content of your
message.
Sending MMS Messages
MMS messages consist of one or more files, usually images or sounds. An MMS
message can be sent to multiple recipients. To send an MMS message from the WMA
console, click the Send MMS button.
The window for composing MMS messages has two tabs, one for recipients and one
for content. On the Header tab, begin by filling in a subject and recipient.
To add more recipients, click the Add button. For example, to send a message to a
running emulator whose number is 5550001, type 5550001 in the To field.
JSR 205: Wireless Messaging API (WMA) Support
199
JAVA ME SDK HELP
JSR 205: WIRELESS MESSAGING API (WMA) SUPPORT
To remove a recipient, first select its line, then click Remove.
To add optional media files (Parts) to the message, click the Parts tab and click Add.
Most media files will have information to fill the Content Location, Content ID,
Mime-Type (text/plain for simple MMS), and Encoding fields, but you can edit these
fields as well.
To remove a part, select it and press Remove.
Receiving Messages in the WMA Console
The WMA console window has its own phone number displayed on the WMA
Console tab. You can send messages from your applications running on the emulator
to the WMA console.
Received messages are displayed in the WMA output window.
▼ Running WMADemo
The WMADemo sample project shows how to send and receive SMS, CBS, and MMS
messages.
The Java ME Platform SDK offers a flexible emulation environment to support
messaging. Messages can be exchanged between emulator instances and can be
generated or received using the WMA console utility.
Because this sample makes use of the push registry, you can't see all of its features
just by using the Run button. Use the Run via OTA feature to install the application
into the emulator in a process that mirrors how applications are installed on real
devices.
In this demo you send messages between the demo application running on the
emulator and the WMA console. Using the WMA console to send messages to the
emulator exercises the push registry.
1. To launch the console choose Tools > WMA Console.
2. Click on the Send SMS button in the WMA console window. Choose the
number that corresponds to the emulator, probably 123456789. If you're not sure
what number the emulator is using, look for a number above the emulator
screen. Choose the number in the SMS message window, then fill in a port
number of 50000. Type your text message in the Message field and click on
Send.
200
December 2009
DECEMBER 2009
JAVA ME SDK HELP
3. The emulator asks if it can launch the WMADemo application. You might receive
several permission requests based on your firewall settings.
Choose Yes. The SMSReceive MIDlet is launched and immediately displays the
incoming SMS message.
▼ Sending Messages from WMA Console
to an Emulator
If you are attempting to send text messages to WMADemo using the WMA console
specify the following port numbers:
■
For SMS specify the port number 50000.
■
For MMS messages, use example.mms.MMSDemo as the application ID. This
information is part of the Application Descriptor. To view it, right-click on the
WMA Demo project and select properties. In the properties window, select the
Application Description category and view the Push Registry tab.
For example, to send an MMS message from the WMA console to the emulator, make
sure that WMADemo has been installed using Run via OTA.
1. Launch the demo and choose MMS Receive.
2. In the WMA console, click on Send MMS to open the MMS composition
window. Fill in a message subject, the application ID example.mms.MMSDemo,
and the telephone number of the running emulator.
3. Click on the Parts tab. The WMA console allows you to select files from your
hard disk to send as parts of the MMS message. Click Add to add a file to the
message. Use the file browser to find the file you want to send and click OK.
4. Click on Send to send the message.
The image and its information are displayed.
Running WMA Tool
To send and receive SMS, CBS, and MMS messages from the command line, use
Windows
JSR 205: Wireless Messaging API (WMA) Support
201
JAVA ME SDK HELP
JSR 205: WIRELESS MESSAGING API (WMA) SUPPORT
installdir/bin/wma-tool
Mac OS
installdir/Contents/Resources/bin/wma-tool
The device manager must be running before you launch wma-tool.
When the tool is started, it outputs the phone number it is using.
Each protocol has send and receive commands. The requested command is passed to
the tool as a first argument. Possibilities are:
■
receive
■
smsreceive - receives SMS messages
■
cbsreceive - receives CBS messages
■
mmsreceive - receives MMS messages
■
smssend - sends SMS message
■
cbssend - sends CBS message
■
mmssend - sends MMS message
The *send commands send the specified message and exit. The *receive commands
print incoming messages until they are explicitly stopped.
Each command has its own arguments.
smsreceive
smsreceive [-o outputDir] [-t timeout] [-q]
-o outputDir. Store binary contents to outputDir.
-t timeout. Non-interactive mode, waits only timeout seconds for messages.
-f Store text contents as files instead of printing them.
-q Quiet mode.
cbsreceive
cbsreceive [-o outputDir] [-t timeout] [-q]
-o outputDir. Store binary contents to outputDir.
-t timeout. Non-interactive mode, waits only timeout seconds for messages.
202
December 2009
DECEMBER 2009
JAVA ME SDK HELP
-f Store text contents as files instead of printing them.
-q Quiet mode.
mmsreceive
mmsreceive [-o outputDir] [-t timeout] [-q]
-o outputDir. Store binary contents to outputDir.
-t timeout. Non-interactive mode, waits only timeout seconds for messages.
-f Store text contents as files instead of printing them.
-q Quiet mode.
smssend
smssend target_phone target_port message_content
target_phone
Phone number of the target phone. Mandatory first argument.
target_port
Port of the target phone. Mandatory second argument.
message_content
Mandatory third argument. Can have one of these two forms:
■
text: text of the text message
■
-f file: sends content of the specified file as a binary message.
cbssend
cbssend message_id message_content
message_id
ID of the message. Mandatory first argument.
message_content
Mandatory second argument. Can have one of these two forms:
■
text: text of the text message
JSR 205: Wireless Messaging API (WMA) Support
203
JAVA ME SDK HELP
JSR 205: WIRELESS MESSAGING API (WMA) SUPPORT
■
-f file: sends content of the specified file as a binary message.
mmssend
mmssend <application id> <subject>
[-to <target phone>]* [-cc <target phone>]* [-bcc <target phone>]*
[-part { <part_from_file> | <part_from_text> } ]*
Each part is defined by name=value pairs delimited by the colon separator ":" on Mac
OS and the semicolon “;“ separator on Windows. To create part_from_file, define the
following variables.
file
File to send as a message part.
mimeType
Mime type of the file.
To create part_from_text, define the following variable:
text
Text to send as a message part. mimeType will be set to text/plain.
-to target_phone
“to” target phone number. Any number of these options can be used.
-cc target_phone
“cc” target phone number. Any number of these options can be used.
-bcc target_phone
“bcc” target phone number. Any number of these options can be used.
Part from Text Options
On Windows, separate options with semicolons. On Mac OS, separate the options
with a colon.
Windows: -part contentId=content ID;encoding=encoding;text=text
Mac OS: -part contentId=content ID:encoding=encoding:text=text
Appends text part to the message. Any number of these arguments can be used.
Contains the following options:
204
December 2009
■
content ID: content ID of this message part
■
encoding: Sent text encoding. Only relevant for "text/plain. " Mime type defaults
to UTF8.
DECEMBER 2009
JAVA ME SDK HELP
Part from File Options
Windows: -part mimeType=mime type;contentId=content ID;file=file name
Mac OS: -part mimeType=mime type:contentId=content ID:file=file name
Appends binary part to the message with content loaded from the given file. Any
number of these arguments can be used. On Windows, separate the options with a
semicolon. On Mac OS, separate the options with a colon. Contains the following
options:
■
content id: content ID of this message part
■
mime type: mime type of this message part
■
file name: file with content of this message part
■
fileEncoding: Encoding of text in the file, only relevant for "text/plain", only
applies if the file argument is present. Defaults to the value of the encoding
variable.
Example:
mmssend MyAppId MySubject -to 987654321
-part text="text part" -part file=Duke.png:mimeType=image/png
JSR 205: Wireless Messaging API (WMA) Support
205
JAVA ME SDK HELP
206
December 2009
JSR 205: WIRELESS MESSAGING API (WMA) SUPPORT
JAVA ME SDK HELP
JSR 211: Content Handler API
(CHAPI)
JSR 211 defines the Content Handler API (CHAPI). The basic concept idea is that
MIDlets can be launched in response to incoming content (files). Modern mobile
phones can receive content using SMS, infrared, Bluetooth, e-mail, and other
methods. Most content has an associated content type. CHAPI specifies a system by
which MIDlets can be launched in response to specific types of content.
In the Java ME Platform SDK Content Handlers are integrated in a project as
application descriptors. Content Handlers you define are packaged with the
application.
See “Using Content Handlers” on page 207 and “Running the CHAPIDemo Content
Browser” on page 210.
▼ Using Content Handlers
Follow these steps to work with content handlers.
1. In the Projects window, right-click a project name and choose Properties from
the context menu.
2. In the Category pane, select Application Descriptor, and click the Content
Handlers tab.
On Mac OS you might need to scroll the tabs to the right to see the Content
Handlers tab.
3. In the Content Handlers table, each line in the list represents the settings for a
content handler.
As shown below, two content handlers have been configured, one for TextViewer
and one for ImageViewer. The Windows tab is on the top, and the Mac OS version
on the bottom.
December 2009
207
JAVA ME SDK HELP
JSR 211: CONTENT HANDLER API (CHAPI)
■
To create a new content handler, press Add, or to edit an existing content
handler, press Edit. Both actions open the Content Handler Properties window.
See “Defining Content Handler Properties” on page 209.
■
To adjust the order of the content handlers, select one and using the Move Up
and Move Down buttons. To remove a content handler from the list, select it
and press Remove.
Related Information
208
■
“Defining Content Handler Properties” on page 209
■
“Running the CHAPIDemo Content Browser” on page 210
December 2009
DECEMBER 2009
JAVA ME SDK HELP
Defining Content Handler Properties
In the Projects window, right-click on a project and choose Properties from the
context menu. In the Category pane, select Application Descriptor, and click the
Content Handler tab. Pressing Add or Edit opens the Content Handler Properties
window.
■
In the Class field, choose a class name from the dropdown menu.
■
ID is an identification string that can be used to invoke a content handler and
control access.
■
In Content types, list the content types for which this content handler is
responsible. Use Add Type and Remove to manage the list.
■
In Suffixes, provide a list of URL suffixes that act as a substitute for an explicit
content type.
■
In Access allowed to, list IDs for content handlers that are allowed access to this
content handler. If the list is empty, access to this content handler is granted to
every content handler.
Defining Content Handler Actions
Content handler actions give invoking applications a choice about how to handle
content. An Action is associated with an existing content handler. An image viewer
content handler, for example, might include an action for viewing the image at its
original size and another action that makes the image fill the available screen space.
In the Projects window, right-click on a project and choose Properties from the
context menu. In the Category pane, select Application Descriptor, and click the
Content Handler tab. Press Add or Edit to open the Content Handler Properties
window and click on the Actions tab, as shown here.
JSR 211: Content Handler API (CHAPI)
209
JAVA ME SDK HELP
JSR 211: CONTENT HANDLER API (CHAPI)
The Actions list contains the internal names of the actions for this content handler.
Locales is a list of all the locales for which human-readable action names will be
provided. Localized actions is a grid which contains the human-readable action
names for various locales. Each locale is represented by a row, while the actions are
listed as columns. You can see all the human-readable action names for a particular
locale by reading across a single row.
▼ Running the CHAPIDemo Content
Browser
This demo is a content browser that takes advantage of the content handler registry.
it allows you to view different types of content from different sources.
1. In the user interface, select File > Open Sample Project > CHAPIDemo.
In the device selector, right-click on a device, select Run Project OTA, and choose
CHAPIDemo.
210
December 2009
■
You are asked to enter the password for the keystore. Type: keystorepwd
■
You are asked to enter the password for the “dummyca“ key pair alias within
the keystore. Type: keypwd
DECEMBER 2009
JAVA ME SDK HELP
■
On the Favorite Links page, choose CHAPI Demo. Press the menu soft button
and choose 1, Go.
The Text Viewer displays a Media Player URL and links to various media files.
2. Select Duke.png. Use the arrows to highlight the link, then select the file. Using
CHAPI, the ImageViewer MIDlet runs and displays the Duke image. Select the
Back soft key to return to the Text Viewer.
3. Install the Media Player to view media.
■
Select the URL http:handlers/MediaHandler.jad.
Select the Menu soft button and select item 1, Go.
■
The application asks, “Are you sure you want to install Media Handler?“ Select
the Install soft key. For the rest of this demo, click Install if you are asked for
confirmation.
The installation finishes and you return to the Text Viewer.
4. View different media files.
Select a URL from the list, select the Menu soft button and select item 1, Go.
JSR 211: Content Handler API (CHAPI)
211
JAVA ME SDK HELP
212
December 2009
JSR 211: CONTENT HANDLER API (CHAPI)
JAVA ME SDK HELP
JSR 226: Scalable 2D Vector Graphics
JSR 226, Scalable 2D Vector Graphics for J2ME, supports rendering sophisticated and
interactive 2D content.
Scalable Vector Graphics (SVG) is a standard defined by the World Wide Web
Consortium. It is an XML grammar for describing rich, interactive 2D graphics.
The Scalable Vector Graphics (SVG) 1.1 specification (available at
(http://www.w3.org/TR/SVG11/)) defines a language for describing
two-dimensional graphics in XML.
SVG Tiny (SVGT) is a subset of SVG that is appropriate for small devices such as
mobile phones. See (http://www.w3.org/TR/SVGMobile/). SVGT is a compact,
yet powerful, XML format for describing rich, interactive, and animated 2D content.
Graphical elements can be logically grouped and identified by the SVG markup.
Java ME applications using SVG content can create graphical effects that adapt to the
display resolution and form factor of the user's display.
SVG images can be animated in two ways. One is to use declarative animation, as
illustrated in “Play SVG Animation” on page 214. The other is to repeatedly modify
the SVG image parameters (such as color or position), through API calls.
While it is possible to produce SVG content with a text editor, most people prefer to
use an authoring tool. Here are two possibilities:
■
Ikivo Animator - (http://www.ikivo.com/animator/)
■
Adobe Illustrator (http://www.adobe.com/products/illustrator/main.html)
Running SVGDemo
This project contains MIDlets that demonstrate different ways to load manipulate,
render, and play SVG content.
December 2009
213
JAVA ME SDK HELP
JSR 226: SCALABLE 2D VECTOR GRAPHICS
SVG Browser
The SVGBrowser MIDlet displays SVG files residing in the phone file system. Before
running this demo, place an SVG file in your device skin’s file structure at:
Windows
device\appdb\filesystem\root1
Mac OS
device/appdb/filesystem/root1
For your device location, see TABLE: File Locations on page 73 and TABLE: Device
Names on page 74. Launch the demo. The application displays the contents of
root1. Select your SVG file and choose the Open soft key.
Render SVG Image
Render SVG Image loads an SVG image from a file and renders it. Looking at the
demo code you can see that the image is sized on the fly to exactly fit the display
area. The output is clear and sharp.
Play SVG Animation
This application plays an SVG animation depicting a Halloween greeting card. Press
8 to pause, 5 to start or resume, and 0 to stop.
The SVG file contains a description of how the various image elements evolve over
time to provide this short animation.
In the following code sample, the JSR 226 javax.microedition.m2g.SVGImage
class is used to load the SVG resource. Then, the
javax.microedition.m2g.SVGAnimator class can take all the complexity of SVG
animations and provides a java.awt.Component or javax.swing.JComponent
which plays the animation. The SVGAnimator class provides methods to play, pause
and stop the animation.
import javax.microedition.m2g.ScalableGraphics;
import javax.microedition.m2g.SVGImage;
...
String svgURI = ...;
SVGImage svgImage = (SVGImage) SVGImage.createImage(svgURI, null);
SVGAnimator svgAnimator = SVGAnimator.createAnimator(svgImage);
214
December 2009
DECEMBER 2009
JAVA ME SDK HELP
// If running a JSE applet, the target component is a JComponent.
JComponent svgAnimationComponent = (JComponent)
svgAnimator.getTargetComponent();
...
svgAnimator.play();
...
svgAnimator.pause();
...
svgAnimator.stop();
Create SVG Image from Scratch
This demo builds an image using API calls. It creates an empty SVGImage, populates
it with a graphical content, and then displays that content.
Bouncing Balls
Bouncing Balls plays an SVG animation. Press 8 to play, 5 to start, and 0 to stop. If
you press 8, pressing 5 resumes the animation. If you press 0, pressing 5 starts the
animation from the beginning.
Optimized Menu
In this demo, selected icons have a yellow border. As you move to a new icon, it
becomes selected and the previous icon flips to the unselected state. If you navigate
off the icon grid, selection loops around. That is, if the last icon in a row is selected,
moving right selects the first icon in the same row.
This demo illustrates the flexibility that combining UI markup and Java offers: a rich
set of functionality (graphics, animations, high-end 2D rendering) and flexibility in
graphic manipulation, pre-rendering or playing.
In this example, a graphic artist delivered an SVG animation defining the transition
state for the menu icons, from the unselected state to the selected state. The program
renders each icon's animation sequence separately into off-screen buffers (for faster
rendering later on), using the JSR 226 API.
With buffering, the MIDlet is able to adapt to the device display resolution (because
the graphics are defined in SVG format) and still retain the speed of bitmap
rendering. In addition, the MIDlet is still leveraging the SVG animation capabilities.
JSR 226: Scalable 2D Vector Graphics
215
JAVA ME SDK HELP
JSR 226: SCALABLE 2D VECTOR GRAPHICS
The task of defining the look of the menu items and their animation effect (the job of
the graphic artist and designer) is cleanly separated from the task of displaying the
menu and starting actions based on menu selection (the job of the developer). The
two can vary independently as long as both the artist and the developer observe the
SVG document structure conventions.
Picture Decorator
In this sample you use the phone keys to add decorations to a photograph. The key
values are:
1
key shrink
2
key next picture
3
key grow
4
key help
5
key horizontal flip
6
ley vertical flip
7
key rotate counter-clockwise
8
key previous picture
9
key rotate clockwise
#
display picker options
This demo provides 16 pictures for you to decorate.
Use the 2 and 8 keys to page forward and back through the photos.
To decorate, press # to display the picker. Use the arrow keys to highlight a graphic
object. The highlighted object is enlarged. Press Select to choose the current graphic
or press the arrow keys to highlight a different graphic. Press Select again to add the
graphic to the photo. When the decoration is added you see a red + on the graphic.
This means it is selected and can be moved, resized, and manipulated.
216
December 2009
DECEMBER 2009
JAVA ME SDK HELP
Use the navigation arrows to move the graphic. Use 1 to shrink the graphic, and 3 to
enlarge the graphic. Use 5 or 6 to flip, and 7 or 9 to rotate. When you are satisfied
with the position, press Select. Note that a green triangle appears. This is a cursor.
Use the navigation keys to move the green triangle around the picture. When the
cursor is over an object it is highlighted with a red box. Press Select. The red +
indicates the object is selected.
To remove a decoration (a property), select an object, then click the Menu soft key.
Press 2 to remove a property.
Location Based Service
Launch the application. A splash screen (also used as the help) appears. The initial
view is a map of your itinerary - a walk through San Francisco. The bay (in blue) is
on the right of your screen. Press 1 to start following the itinerary. The application
JSR 226: Scalable 2D Vector Graphics
217
JAVA ME SDK HELP
JSR 226: SCALABLE 2D VECTOR GRAPHICS
zooms in on your location on the map. Turn-by-turn directions appear in white boxes
on the horizontal axis. While the itinerary is running, Press 7 to rotate the map
counter-clockwise. Note, the map rotates and the text now appears on the vertical
axis. Press 7 again to restore the default orientation. Press 4 to display the help
screen.
Running SVGContactList
This application uses different skins to display the same contact list information and
a news banner. The skins have different colors and fonts.
Select SVGContactlist(skin 1) or SVGContactlist(skin 2), then click Launch.
Use the up and down arrows to navigate the list of contacts. The highlighted name is
marked with a special character (a > or a dot) and is displayed in a larger font.
218
December 2009
DECEMBER 2009
JAVA ME SDK HELP
Press the select button to see more information for the highlighted name.
Press select again to return to the contact list.
JSR 226: Scalable 2D Vector Graphics
219
JAVA ME SDK HELP
220
December 2009
JSR 226: SCALABLE 2D VECTOR GRAPHICS
JAVA ME SDK HELP
JSR 229: Payment API Support
JSR 229, the Payment API, enables applications to make payments on behalf of their
users. The Payment API supports different payment mechanisms through payment
adapters. A device that implements the Payment API has one or more adapters.
MIDlet suites use descriptor attributes to specify what types of payment adapters
they can use.
The Java ME SDK implements the Payment API with a sample payment adapter that
simulates both Premium Priced SMS (PPSMS) and credit card payments. In addition,
the SDK makes it easy to set the necessary attributes in the MIDlet’s descriptor and
JAR file manifest. Finally, a payment console enables you to easily track payments
made or attempted by an application.
Because the Payment API is closely tied to provisioning and external device payment
mechanisms, and because payments can only succeed in a trusted protection domain,
always test and debug your Payment API applications using the Run via OTA
feature.
■
“Running the Payment Console” on page 221
■
“Running JBricks” on page 222
Running the Payment Console
The Payment Console is a simple monitoring tool that displays payment related
transactions sent from a mobile application using the Payment API (JSR 229). The
payment console monitors Payment Update File requests and Premium Priced SMS
payments.
The Payment Console is implemented as an Http server running within the Device
Manager process. The root for the Http server is installdir/apps.
Note – The Device Manager must be running before you launch the Payment
Console.
December 2009
221
JAVA ME SDK HELP
JSR 229: PAYMENT API SUPPORT
To launch the Payment Console, select Tools > Payment Console.
You can also launch the Payment console from the command line:
Payment Console Command
TABLE:
OS
Command
Windows installdir/bin/payment-console.exe
Mac OS
installdir/Contents/Resources/bin/payment-console
To see this path, right-click the Java ME SDK 3.0 application and select Show Package Contents.
To close the Payment Console, right-click anywhere in the console and choose Close.
Running JBricks
JBricks is a game that demonstrates the use of the JSR 229 Payment API. The game
itself resembles Breakout or Arkanoid. In JBricks, you can buy another life or a new
game level. Behind the scenes, the Payment API handles the details.
To see how JBricks uses the Payment API, choose either Buy Life or Buy Level
from the game’s main menu. Next, choose whether you want to buy a single life or
three lives for a reduced price.
To view your transactions in the emulator, select View > External Events Generator
and click on the Payment Transactions tab. Transactions for this specific instance of
the emulator are displayed.
222
December 2009
DECEMBER 2009
JAVA ME SDK HELP
JSR 229: Payment API Support
223
JAVA ME SDK HELP
JSR 229: PAYMENT API SUPPORT
In addition, you can view all transactions passing through the SDK’s payment
system. Choose File > Utilities, then select Payment Console. A transaction in the
console looks something like the following:
PSP Console running, using phone number +5550001.
PSP Server running at https://localhost:-1
Received Payment Request from 127.0.0.1
Credit card issued by: VISA
Credit Card type: 0
Credit Card Number: 4111111111111111
Credit Card Holder: Jonathan Knudsen
Feature ID: 3_lives
Credit Card Verification Number (CCV): 123
Payload: null
Response to 127.0.0.1
HTTP/1.1 200 OK
Content-Length: 0
Pay-Response: SUCCESSFUL
Pay-Timestamp: 1156282954734
224
December 2009
JAVA ME SDK HELP
JSR 238: Mobile Internationalization
API (MIA)
JSR 238, the Mobile Internationalization API, is designed for applications that are to
be displayed in multiple languages and used in multiple countries. The combination
of country (or region) and language is a locale.
The central concept of JSR 238 is a resource, which is a string, image, or other object
that is suitable for a particular locale. For example, an application that is to be
distributed in Europe might include resources for Italian-speaking people living in
Italy, Italian-speaking people living in Switzerland, Spanish-speaking people living
in Spain and so on.
Resources are stored in files in a format defined in JSR 238. The resource files are
bundled as part of the MIDlet suite JAR file. The Java ME Platform SDK provides a
resource manager that simplifies the job of creating and maintaining resource files.
▼ Setting the Emulator’s Locale
Alternatively, while the emulator is running, select Application > Change Locale and
type in the locale you want to use.
You can change an emulator’s locale from the Device Selector.
1. Right-click on a device and choose Properties.
2. In the Properties window, find the Locale property and click ... to open the
Locale window.
3. Select the locale from the dropdown list.
December 2009
225
JAVA ME SDK HELP
JSR 238: MOBILE INTERNATIONALIZATION API (MIA)
Using the Resource Manager
To launch the resource manager, select a project, then choose Tools > i18n Resources
Manager.
All the resources for the selected project are displayed in the Resource Manager. See
the sample project i18nDemo described in “Running i18nDemo” on page 227.
See also: “Working With Locales” on page 226 and “Working With Resource Files” on
page 226.
Working With Locales
Locales are represented as folders under the top-level global node. The locale
directories contain resource files which, in turn, hold the actual resources that can be
used by the application.
Locales are represented by standard language and country codes as described in the
MIDP 2.0 specification. For example, pt-BR represents Portuguese-speaking people
living in Brazil.
■
To add a locale, right-click on the top-level global node and choose Add Locale.
Choose the locale from the combo box, or type it directly, and click OK.
■
To rename a locale, right-click the locale directory and choose Rename.
■
To remove a locale and all its contained resource files, right-click the locale
directory and choose Delete.
Working With Resource Files
Resource files can be global (at the top level) or specific to a locale.
226
■
To create a new global resource file, right-click the top-level global directory and
choose Add new resource file. Choose a name for the file.
■
To rename a resource file, right-click the file and choose Rename.
■
You can copy, cut, and paste entire resource files. Right-click a file and choose
Copy or Cut. Then right-click the locale directory (or the top-level global) and
choose Paste.
■
To remove a resource file, right-click the file and choose Delete.
December 2009
DECEMBER 2009
JAVA ME SDK HELP
Working With Resources
Click on a resource file to display its contents.
■
■
To add an image or another type of binary data, click the Add button.
■
In the Configure New Resource window, select Add string resource.
■
Browse to select the file you want to add.
■
The automatically supplied Identifier value can be changed.
■
Click OK to add the resource.
To edit a resource, double-click in the resource field.
■
For strings you can edit an existing value.
■
Double-clicking a binary file opens a file chooser.
Running i18nDemo
This MIDlet suite demonstrates the JSR 238 Mobile Internationalization API. The
MIDlets String Comparator and Formatter show how to sort strings and display
numbers appropriately for different locales. The third MIDlet, MicroLexicon, is a
small phrase translator that comes in handy if you need to ask for a beer in Prague,
Herzliya, Beijing, Milan, or several other locations.
JSR 238: Mobile Internationalization API (MIA)
227
JAVA ME SDK HELP
JSR 238: MOBILE INTERNATIONALIZATION API (MIA)
Note – The default fonts for the Java ME Platform SDK do not support Chinese and
Japanese. To use these languages, follow these steps before running this demo:
1. Install a True Type font that supports Chinese or Japanese.
2. Modify installdir\toolkit-lib\devices\skin-directory\conf\skin.properties
to specify that font.
To run a MIDlet, highlight the MIDlet, then use the Launch soft button to run the
MIDlet.
String Comparator
The String Comparator MIDlet demonstrates how strings (city names) are sorted
differently depending on locale. Launch the MIDlet. Use the Menu soft button to
view the menu. Click or Type 2 to select Sort - default, and the list is sorted
alphabetically. Click or Type 3 to select Sort - slovak. It’s easy to see the difference in
the cities that begin with the letter Z, with and without the mark on top. Click Exit to
return to the list of MIDlets.
Formatter
The second MIDlet, Formatter, simply displays times and numbers formatted for
different locales. Click next to view all four screens. Click Exit to return to the list of
MIDlets.
MicroLexicon
The final MIDlet, MicroLexicon, translates phrases from one language to another
language. To set the source language, follow the steps in “Setting the Emulator’s
Locale” on page 225.
To select the target language from the list, use the navigation arrows to highlight
Choose Language. Click the Select button to view the language drop down. Use the
navigation arrows to choose a language and then click Select. Click the Next soft
button.
MicroLexicon displays a list of phrases. Highlight one and press the Select button on
the emulator.
MicroLexicon displays the flag of the target language and the translated phrase.
MicroLexicon is powered by MIDlet resources. To understand how you can use the
Java ME Platform SDK to localize an application, choose Tools > i18n Resources
Manager. All the resources, both text and images, used by MicroLexicon, appear. You
can edit the resources and run MicroLexicon again to see what happens.
228
December 2009
DECEMBER 2009
JAVA ME SDK HELP
To practice creating and editing resources, see “Working With Resource Files” on
page 226.
The resources are stored in the project’s JAR file.
JSR 238: Mobile Internationalization API (MIA)
229
JAVA ME SDK HELP
230
December 2009
JSR 238: MOBILE INTERNATIONALIZATION API (MIA)
JAVA ME SDK HELP
JSR 256: Mobile Sensor API Support
The JSR 256 Mobile Sensor API allows Java ME application developers to fetch data
from sensors. A sensor is any measurement data source. Sensors can vary from
physical sensors such as magnetometers and accelerometers to virtual sensors that
combine and manipulate the data they have received from various kinds of physical
sensors. An example of a virtual sensor might be a level sensor indicating the
remaining charge in a battery or a field intensity sensor that measures the reception
level of the mobile network signal in a mobile phone.
JSR 256 supports many different types of sensor connection (wired, wireless,
embedded and more) but this SDK release only provides preconfigured support for
sensors embedded in the device.
The SDK GUI provides sensor simulation. The emulator’s External Events Generator
Sensors tab allows you to run a script that simulates sensor data.
You can use the custom API available with the SDK to create a custom sensor
implementation with additional capabilities and support for different connection
types.
The Sensors demonstration has two MIDlets, SensorBrowser and Marbles that
demonstrate the SDK’s implementation of the Mobile Sensor API. Use the Run via
OTA feature to install the application into the emulator.
Creating a Mobile Sensor Project
To use this API, create a project with the target platform Custom. You must select
MIDP 2.0 or higher and CLDC 1.1 before you can select the Mobile Sensor API
optional package.
To set permissions, click the Settings button and choose the Permissions icon.
A sensor project freely detects sensors, but this does not imply you can get data from
the sensors you find. You might need to explicitly set permissions in your project so
you can interact with certain sensors.
December 2009
231
JAVA ME SDK HELP
JSR 256: MOBILE SENSOR API SUPPORT
The following permissions work with the preconfigured embedded sensors shipped
with the SDK:
javax.microedition.io.Connector.sensor
■
Required to open a sensor connection and start measuring data.
javax.microedition.sensor.ProtectedSensor
■
Required to access a protected sensor.
javax.microedition.sensor.PrivateSensor
■
Required to access a private sensor.
A sensor is private or protected if the sensor’s security property has the value private
or protected. The security property is an example of a sensor property you might
create for yourself in your own sensor configuration. You can create your own
optional properties using com.sun.javame.sensorN.proplist and
com.sun.javame.sensorN.prop.any_name, where N is the sensor number and
any_name is the name of your property. The security sensor property was created as
follows:
# add security into proplist
com.sun.javame.sensor<N>.proplist: security
# add security property value
com.sun.javame.sensor<N>.prop.security: private
Using a Mobile Sensor Project
A Sensor project can be installed over the air. In the emulator window, select View >
External Events Generator, and select the Sensors tab. In this tab you can view all
sensors currently available in the emulator, with the sensor ID, name, and
availability. If the sensor supports change to availability you can click on the check
box to change it. As mentioned earlier, the provided implementation does not
support availability change, but a custom implementation you create might do so.
When you select a sensor row the bottom of the dialog displays any custom sensor
controls. For example, the acceleration sensor, has three channels: axis_x, axis_y, and
axis_z. Each channel has a slider that changes the current channel value, and an edit
box you can use to input a value. The channel unit label is displayed on the far right.
Under the channels there is script player control that allows you to play sensor value
events from a script file of the format discussed in “Creating a Sensor Script File” on
page 233. See “SensorBrowser” on page 234 for a description of how to use the
Sensors demo.
232
December 2009
DECEMBER 2009
JAVA ME SDK HELP
Creating a Sensor Script File
To simulate sensor inputs, provide a sensor script. The file format is as follows:
<sensors>
<value time="0">
<channel id="0" value="0" />
<channel id="1" value="0" />
</value>
<value time="100">
<sensor active="false"/>
</value>
<value time="100">
<channel id="0" value="-50" />
<channel id="1" value="10" />
<sensor active="true"/>
</value>
</sensors>
The file installdir/apps/Sensors/marbles.xml is an example of a sensor script
file. The attributes are as follows:
■
The attribute time in the value tag is the delay from the previous command in
milliseconds.
■
The channel tag sets the value of the channel with the specified id value, to
value. The channel ignores the id if the value of id is not specified or if the value
is out of the channel range.
■
The sensor tag is a true or false value that makes the sensor available or
unavailable. The pre-configured sensors provided with this release are embedded,
so they cannot be deactivated. If you configure your own sensor that is not
embedded, it will be possible to deactivate it.
▼ SensorBrowser
The SensorBrowser application displays the sensor detail information for reach
channel defined for the demo.
1. In the emulator select SensorBrowser and use the soft key to select Launch the
application.
The emulator displays a list of sensors.
JSR 256: Mobile Sensor API Support
233
JAVA ME SDK HELP
JSR 256: MOBILE SENSOR API SUPPORT
2. Use the navigation keys to highlight a sensor, then use the soft key to select
Detail.
For example, the following screen shows the details for the acceleration sensor.
Click Back, then click Exit to return to the application menu.
▼ Marbles
This demonstration uses the Marbles game to provide visual feedback for sensor
inputs provided in a script.
1. From the application menu select Marbles and use the soft key to launch the
application.
2. In the emulator, select View > External Events Generator, and select the Sensors
tab.
The emulator displays a list of the sensors in this application.
3. Click the Browse button and choose the following file:
installdir/apps/Sensors/marbles.xml.
234
December 2009
DECEMBER 2009
JAVA ME SDK HELP
4. Observe the movement of the marbles on the emulator screen. On the external
events screen you can see the sliders move as the script runs. You can use the
familiar controls to play, pause, and stop the script.
JSR 256: Mobile Sensor API Support
235
JAVA ME SDK HELP
236
December 2009
JSR 256: MOBILE SENSOR API SUPPORT
Index
A
E
AMR, 164
AMS, 34
application versioning, 43
autoupdate, 9
B
editing commands, 12
emulator, 5, 6, 57
default protection domain, 140
skins, 59
emulator phone number, 199
export profiles, 13
Bluetooth, 161
building (command line), 136
F
C
FileConnection API, 153
Files window, 38
font size, 1, 131
CBS message, sending, 199
certificate management, 100
-classpath option, 137
CLDC and MIDP stack, 6
command line operations, 131
command path, 137
Common Name, 99
content handler, 207
actions, 209
properties, 209
D
debug port, 61
debugging
from command line, 135
options, 135
demonstrations, 17
device
information, 61
device manager, 5, 132
device wizard, 59
device-address tool, 122
G
generating stub from command line, 143
H
heap size, 62, 69
-help option, 133
hex view, 84
I
immediate mode, 193
-import command, 142
import profiles, 13
J
J2ME Web Services Specification, 173
JAD file, 34
creating, 52
JadTool, 140
JAR file, 34
add, 52
creating and compressing, 52
Java Cryptography Extension (JCE) keystore, 141
237
JavaFX platform, 7
javame-sdk, 73
JavaMESDKProjects, 73
JCP, 149
JSR, 149
JSR 75, 153
JSR 82, 161
JSR 118, 93
JSR 120, 197
JSR 135, 163
JSR 172, 173, 175
JSR 177, 177
JSR 179, 185, 187
JSR 180, 191, 192
JSR 184, 193, 195
JSR 185, 93
JSR 205, 197
JSR 211, 210
JSR 229, 221, 222
JSR 238, 225, 227
JSR 248, 93
JSR 256, 231
JSR 75, 155, 157
JTWI security domains, 94
K
key
exporting, 53
key management, 96
key pair
alias, 99
creating, 98
importing, 99
keymap profile, 12, 13
keystore, JCE, 141
keystore.ks, 21
keytool utility, 141
L
locale, 62
Location API, 185
logical view, 37
logs, 147
LWUIT, 89
238
Java ME SDK Help • December 2009
M
M3G, 193
managing certificates from command line, 141
manifest file, 138
MEKeyTool, 141
messages log, 147
messages tree sorting, 85
method profiling, 75
MIA, 225
MMAPI, 163, 167
Mobile 3D Graphics API, 193
Mobile Internationalization API, 225
Mobile Media API, 163
Mobile Media API (MMAPI), 163
capture, 164
mobile sensor, 231
Mobile Sensors API, 231
MSA security domains, 94
multiple user environment, 71
N
network monitor, 61
filtering, 85
sorting messages, 85
network monitoring, 83
O
OBEX, 161
obfuscate project, 52
Organization Name, 99
Organization Unit, 99
P
packaging, 52
packaging using command line, 139
Payment API, 221, 222
PDA Optional Packages, 153
PDAP, 153
permissions, 95
Personal Information Management (PIM) API, 153
phone number, 62
PhoneME Advanced, 6
physical view, 38
PIM API, 155
port
debug, 61
preverifying, 136
example from command line, 138
profiler, 61, 75
ProGuard obfuscator, 53
project, 33
add, 51
build, 37
clean, 38
clean and build, 37
close, 38
import, 40
new, 37
run, 38
set as main, 38
settings, 33
Projects window, 37
properties
device, 61
enable profiler, 75
platform, 60
searchable in WURFL, 69
protection domains, 93
proxy server settings, 17
R
reference problem, 20
resolve reference problem, 20
resource, 90
resource bundle, 90
resources, 38
restore profiles, 13
retained mode, 194
ring tones, 165
roots in the FileConnection API, 154
run options, 133
Run via OTA, 95
S
SATSA, 177
Scalable 2D Vector Graphics API, 213
scene graph, 193
SDK, running from command line, 131
sensor, 231
sensor security, 232
serial port, 62
settings, 3, 33
signed MIDlet suites, 93
signing MIDlet suites, 95, 140
SIP API, 191
SMS binary message, sending, 199
SMS text message, sending, 199
source packages, 38
State Name, 99
stub generator for web services, 173
SVG, 213
SVGDemo, 213
SVGT, 213
switch profiles, 13
switch users, 71
T
toolbar, running from the command line, 131
tracing options, 136
U
UEI, 72
user switching, 71
user.home, 73
utilities, 3
V
-version option, 133
versioning applications, 43
W
Web Services specification, 173
web services, stub generator, 173
Wireless Messaging API, 197
WMA, 197
WMA console, 197
wscompile, 143
WURFL, 67
X
-Xdebug option, 135
-Xquery option, 136
-Xrunjdwp option, 135
Index
239
-Xverbose option, 136
240
Java ME SDK Help • December 2009