1
User’s Guide
Wireless Toolkit, Version 2.1
Java™ 2 Platform, Micro Edition
Sun Microsystems, Inc.
4150 Network Circle
Santa Clara, CA 95054
U.S.A. 650-960-1300
December 2003
Copyright © 2003 Sun Microsystems, Inc., 4150 Network Circle, Santa Clara, California 95054, U.S.A. All rights reserved.
Sun Microsystems, Inc. has intellectual property rights relating to technology embodied in the product that is described in this
document. In particular, and without limitation, these intellectual property rights may include one or more of the U.S. patents listed
at http://www.sun.com/patents and one or more additional patents or pending patent applications in the U.S. and in other
countries.
U.S. Government Rights - Commercial software. Government users are subject to the Sun Microsystems, Inc. standard license
agreement and applicable provisions of the FAR and its supplements.
Sun, Sun Microsystems, the Sun logo, Java, Solaris, Sun[tm] ONE Studio, Java 2 Platform, Micro Edition, Wireless Toolkit, J2SE, JDK,
and the Java Coffee Cup logo are trademarks or registered trademarks of Sun Microsystems, Inc. in the U.S. and other countries.
UNIX is a registered trademark in the U.S. and other countries, exclusively licensed through X/Open Company, Ltd.
The Adobe® logo is a registered trademark of Adobe Systems, Incorporated.
Products covered by and information contained in this service manual are controlled by U.S. Export Control laws and may be subject
to the export or import laws in other countries. Nuclear, missile, chemical biological weapons or nuclear maritime end uses or end
users, whether direct or indirect, are strictly prohibited. Export or reexport to countries subject to U.S. embargo or to entities
identified on U.S. export exclusion lists, including, but not limited to, the denied persons and specially designated nationals lists is
strictly prohibited.
DOCUMENTATION IS PROVIDED "AS IS" AND ALL EXPRESS OR IMPLIED CONDITIONS, REPRESENTATIONS AND
WARRANTIES, INCLUDING ANY IMPLIED WARRANTY OF MERCHANTABILITY, FITNESS FOR A PARTICULAR PURPOSE
OR NON-INFRINGEMENT, ARE DISCLAIMED, EXCEPT TO THE EXTENT THAT SUCH DISCLAIMERS ARE HELD TO BE
LEGALLY INVALID.
Copyright © 2003 Sun Microsystems, Inc., 4150 Network Circle, Santa Clara, California 95054, Etats-Unis. Tous droits réservés.
Sun Microsystems, Inc. a les droits de propriété intellectuels relatants à la technologie incorporée dans le produit qui est décrit dans
ce document. En particulier, et sans la limitation, ces droits de propriété intellectuels peuvent inclure un ou plus des brevets
américains énumérés à http://www.sun.com/patents et un ou les brevets plus supplémentaires ou les applications de brevet
en attente dans les Etats - Unis et dans les autres pays.
Sun, Sun Microsystems, le logo Sun, Java, Solaris, Sun[tm] ONE Studio, Java 2 Platform, Micro Edition, Wireless Toolkit, J2SE, JDK et
le logo Java Coffee Cup sont des marques de fabrique ou des marques déposées de Sun Microsystems, Inc. aux Etats-Unis et dans
d’autres pays.
UNIX est une marque déposée aux Etats-Unis et dans d’autres pays et licenciée exlusivement par X/Open Company, Ltd.
Le logo Adobe® est une marque déposée de Adobe Systems, Incorporated.
Les produits qui font l’objet de ce manuel d’entretien et les informations qu’il contient sont régis par la législation américaine en
matière de contrôle des exportations et peuvent être soumis au droit d’autres pays dans le domaine des exportations et importations.
Les utilisations finales, ou utilisateurs finaux, pour des armes nucléaires, des missiles, des armes biologiques et chimiques ou du
nucléaire maritime, directement ou indirectement, sont strictement interdites. Les exportations ou réexportations vers des pays sous
embargo des États-Unis, ou vers des entités figurant sur les listes d’exclusion d’exportation américaines, y compris, mais de manière
non exclusive, la liste de personnes qui font objet d’un ordre de ne pas participer, d’une façon directe ou indirecte, aux exportations
des produits ou des services qui sont régi par la législation américaine en matière de contrôle des exportations et la liste de
ressortissants spécifiquement désignés, sont rigoureusement interdites.
LA DOCUMENTATION EST FOURNIE "EN L’ÉTAT" ET TOUTES AUTRES CONDITIONS, DECLARATIONS ET GARANTIES
EXPRESSES OU TACITES SONT FORMELLEMENT EXCLUES, DANS LA MESURE AUTORISEE PAR LA LOI APPLICABLE, Y
COMPRIS NOTAMMENT TOUTE GARANTIE IMPLICITE RELATIVE A LA QUALITE MARCHANDE, A L’APTITUDE A UNE
UTILISATION PARTICULIERE OU A L’ABSENCE DE CONTREFAÇON.
Please
Contents
Preface
1.
xv
Introduction to the Wireless Toolkit
Overview of Java Technology
for the Wireless Industry
Related Documentation
1
1
2
Features of the Wireless Toolkit
2
Compiling, Preverifying, and Debugging
Packaging
2
3
Running MIDlet Suites
3
Authenticating and Authorizing MIDlets
Performance Tuning
3
4
Memory and Network Monitoring
Working With the Emulator
4
4
Internationalization Features of the
Wireless Toolkit 5
Providing Access to J2ME Web Services
Operating From the Command-Line
Application Demos
2.
5
5
6
Developing and Running Applications
Developing Applications
7
7
Running Applications Remotely
8
Contents
iii
Packaging
8
Signing MIDlet Suites
9
Running in OTA Provisioning Mode
3.
Operating with KToolbar
Navigating in KToolbar
KToolbar Projects
9
11
12
12
Creating a New Project
13
Opening an Existing Project
Editing MIDlet Suite Attributes
15
15
Modifying MIDlet Suite Attributes
15
Modifying User-Defined Attributes
16
Adding User-Defined Attributes
16
Removing User-Defined Attributes
Modifying MIDlet-Specific Attributes
16
16
Adding MIDlet-Specific Attributes
17
Removing MIDlet-Specific Attributes
Adding MIDlets
17
Changing the Order of the MIDlets
Adding a Push Registry
Adding API Permissions
17
19
Removing API Permissions
20
Compiling and Preverifying a Project
Running a Project Locally
Debugging
Packaging
21
21
21
Cleaning Up Project Files
22
22
Obtaining a ByteCode Obfuscator
Signing MIDlet Suites From KToolbar
Running in OTA Provisioning Mode
iv
17
Wireless Toolkit Basic Customization Guide • December 2003
23
24
24
17
Using Class Libraries
24
External Libraries for a Specific Project
External Libraries for All Projects
25
25
Using the Stub Connector to Access J2ME Web Services
25
Setting Emulator Preferences and Using Emulator Utilities
Customizing KToolbar
27
Setting the Application Directory
27
Setting the javac Encoding Property
27
Working with Revision Control Systems
4.
27
Performance Tuning and Monitoring Applications
Profiling Your Application
Profiling Data Display
30
30
Saving and Examining Profiling Information
Examining Memory Usage
29
29
Viewing Profiling Information
31
32
Viewing Memory Usage
33
Memory Monitor Data Display
34
Saving and Examining Memory Usage Information
Monitoring Network Traffic
36
Network Monitor Data Displays
37
38
Disabling Filtering
Sorting Messages
39
39
Saving and Examining a Networking Session
Clearing the Message Tree
Managing Device Speed
35
36
Viewing Network Traffic
Filtering Messages
26
40
40
40
Setting Graphics Performance
41
Setting VM Speed Parameters
42
Contents
v
Setting Network Speed Parameters
5.
Working With the Emulator
Example Devices
42
43
43
Device Characteristics
44
Pausing and Resuming a MIDlet
44
DefaultColorPhone and DefaultGrayPhone
MediaControlSkin
QwertyDevice
Inputting Text
44
46
46
48
Using the Device to Input Text
Preferences and Utilities
48
48
DefaultEmulator Preferences
49
Setting the Web Proxy
49
Choosing an HTTP Version
50
Setting Performance Parameters
50
Enabling Monitoring and Tracing
Setting the Heap Size
50
51
Setting the Storage Directory
Setting WMA Parameters
51
51
Setting Optional Multimedia Formats and Features
Specifying a Security Domain Type
DefaultEmulator Utilities
53
Monitoring Memory Usage
53
Monitoring Network Traffic
54
Wireless Messaging
52
52
Cleaning Device Storage
Profiling Methods
54
54
Signing MIDlet Suites and Managing Certificates
Using a Stub Connector to Access Web Services
vi
52
Wireless Toolkit Basic Customization Guide • December 2003
54
55
6.
Using Security Features in the Wireless Toolkit
Signing MIDlet Suites
57
57
Creating a New Key Pair and Signing a MIDlet Suite
58
Importing a Key Pair and Signing the MIDlet Suite
Deleting an Alias
61
Managing Default Emulator Certificates
Viewing Certificates
61
61
Importing Certificates
62
Importing From the J2SE Keystore
62
Importing From a Certificate Authority
63
Managing Certificates in Other Keystores
Deleting Certificates
7.
60
63
63
Wireless Messaging with the Wireless Toolkit
Getting Started With WMA Emulation
65
66
Sending a Text SMS Message From the
WMA Console 66
Sending a Binary SMS Message
Sending a CBS Message
Setting WMA Preferences
8.
69
69
69
Testing Application Provisioning
71
Deploying Applications on a Web Server
Deploying Applications Remotely
A.
MIDlet Attributes
B.
MIDlet Demonstration
71
72
73
77
Demonstrating MIDlet Suites Deployed on a Local Disk
Demonstrating MIDlet Suites Deployed on a Web Site
C.
Internationalization
77
78
79
Locale Setting for the Wireless Toolkit
79
Contents
vii
Emulated Locale
80
Character Encodings
D.
80
Java Compiler Encoding Setting
81
Font Support in the Default Emulator
81
Command Line Utilities
Preliminary Checks
83
83
Selecting a Default Device
83
Accessing Preferences and Utilities
Using the Stub Generator
Options
86
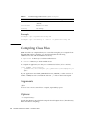
Compiling Class Files
Arguments
Example
86
86
86
87
Preverifying Classes
Arguments
Options
84
84
Example
Options
84
87
87
87
Example
88
Packaging a MIDlet suite
88
Creating a Manifest File
88
Creating an Application JAR File
Arguments
89
Creating an Application JAD File
Example
89
89
Running the Emulator
90
General Options
90
Running Options
90
Tracing and Debugging Options
viii
88
Wireless Toolkit Basic Customization Guide • December 2003
91
Emulator Preferences Setting Option
Emulator Domain Setting Option
Certificate Manager Utility
Usage
95
95
MIDlet Suite Signing Utility
96
96
Commands
Index
94
95
Commands
Usage
92
96
99
Contents
ix
x
Wireless Toolkit Basic Customization Guide • December 2003
Figures
FIGURE 1
Packaging and Signing a MIDlet Suite
FIGURE 2
KToolbar Main Window 11
FIGURE 3
Console Output After Creating a Project
FIGURE 4
Settings API Selection Tab 14
FIGURE 5
Project Settings Required Tab Dialog
FIGURE 6
Sample of a Push Registry
FIGURE 7
API Permissions Selection Dialog Box
FIGURE 8
Console Output After Packaging
FIGURE 9
Stub Generator Dialog
FIGURE 10 Profiler Window
13
15
18
20
23
26
31
FIGURE 11 Memory Monitor Window
FIGURE 12 Memory Monitor Graph
33
34
FIGURE 13 Memory Monitor Objects Table
FIGURE 14 Message Key and Value Pair
FIGURE 15 Message Body
8
35
37
38
FIGURE 16 Performance Settings
41
FIGURE 17 Default Color Phone Device and Default Gray Phone Device
45
FIGURE 18 MediaControlSkin Device 46
FIGURE 19 Qwerty Handheld Device
47
FIGURE 20 DefaultEmulator Preferences Dialog
FIGURE 21 DefaultEmulator Utilities Window
49
53
xi
FIGURE 22 Keystore File Generator
59
FIGURE 23 Alias List Displaying Alias for Newly Created Key Pair
FIGURE 24 Alias List Dialog Box
60
FIGURE 25 Certificate Details 62
FIGURE 26 WMA Console Window
67
FIGURE 27 Send a Message - SMS Dialog Box
xii
Wireless Toolkit User’s Guide • December 2003
68
59
Tables
TABLE 1
Project File Organization
12
TABLE 2
Filter Settings for Network Protocols
TABLE 3
Example Devices
TABLE 4
Selected Device Characteristics
TABLE 5
Pound ('#') and Asterisk ('*') Key Functions
TABLE 6
MIDlet Attributes
TABLE 7
Options for the wscompile Command
TABLE 8
Command Supported Features (-f) for wscompile
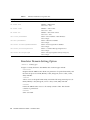
TABLE 9
Emulator Preferences Properties List
39
43
44
48
73
84
85
92
xiii
xiv
Wireless Toolkit User’s Guide • December 2003
Preface
The Java™ 2 Platform, Micro Edition, Wireless Toolkit User’s Guide describes how to
work with the J2ME™ Wireless Toolkit and its components.
Who Should Use This Book
This guide is intended for developers creating MIDP applications with the J2ME
Wireless Toolkit. This document assumes that you are familiar with Java
programming, Mobile Information Device Profile (MIDP), and the Connected
Limited Device Configuration (CLDC).
xv
How This Book Is Organized
This guide contains the following chapters and appendixes:
Chapter 1 introduces the J2ME Wireless Toolkit and the MIDlet development
features it provides.
Chapter 2 describes the development processes for creating and running MIDlets.
This chapter explains the differences between running an application locally and
running it remotely and when, in the development cycle, to use each means of
execution.
Chapter 3 explains how to perform basic programming operations with KToolbar,
such as compiling, preverifying, debugging, tracing, and packaging. This chapter
also explains how to implement security protocols, how to set the Push Registry,
how to generate a stub connector, and how to set MIDlet permissions through the
J2ME Wireless Toolkit.
Chapter 4 describes the performance tuning features: profiling, memory
monitoring, network monitoring, and speed emulation.
Chapter 5 describes the example devices and demo applications provided by the
Wireless Toolkit. This chapter also explains how to input text to the devices, how to
set device preferences, and how to access the device utilities.
Chapter 6 describes how to sign MIDlet suites and manage certificates with
security utilities provided with the J2ME Wireless Toolkit.
Chapter 7 describes support for running and testing wireless messaging
applications in the Wireless Toolkit.
Chapter 8 describes how to test and demonstrate the over the air initiated
provisioning process.
Appendix A lists and describes MIDlet attributes.
Appendix B describes how to demonstrate MIDlets for non-development purposes.
Appendix C describes internationalization features in the Wireless Toolkit.
Appendix D explains how to use the command line utilities to perform basic
development operations and to manage certificates and sign MIDlet suites in the
Wireless Toolkit. This chapter includes an example of stepping through a basic
development cycle working from the command line.
Using Operating System Commands
This document may not contain information on basic UNIX® or Microsoft
Windows commands and procedures such as opening a terminal window,
changing directories, and setting environment variables. See the software
documentation that you received with your system for this information.
xvi
Wireless Toolkit User’s Guide • December 2003
Typographic Conventions
Typeface
Meaning
Examples
AaBbCc123
The names of commands, files,
and directories; on-screen
computer output
Edit your .login file.
Use ls -a to list all files.
% You have mail.
AaBbCc123
What you type, when
contrasted with on-screen
computer output
% su
Password:
AaBbCc123
Book titles, new words or terms,
words to be emphasized
Read Chapter 6 in the User’s Guide.
These are called class options.
You must be superuser to do this.
Command-line variable; replace
with a real name or value
To delete a file, type rm filename.
Variable file names and
directories.
These files are located under the
{j2mewtk.dir}\apps\{demo_name}\bin
\ directory where {j2mewtk.dir} is the
installation directory of the J2ME
Wireless Toolkit and {demo_name} is
the name of one of the demo
applications.
{AaBbCc.dir}
Shell Prompts
Shell
Prompt
Microsoft Windows
<directory>
Preface
xvii
Related Documentation
Topic
Title
Customizing the J2ME Wireless Toolkit
J2ME™ Wireless Toolkit Basic Customization Guide
J2ME Wireless Toolkit Release Notes
J2ME™ Wireless Toolkit Release Notes
MIDP - JSR 37
Mobile Information Device Profile for the J2ME™
Platform
MIDP - JSR 118
Mobile Information Device Profile 2.0
CLDC - JSR 30, JSR 139
J2ME™ Connected Limited Device Configuration
WMA - JSR 120
Wireless Messaging API (WMA) for Java™ 2 Micro
Edition
MMAPI - JSR 135
Mobile Media API
JTWI - JSR 185
Java Technology for the Wireless Industry
J2ME Web Services JSR 172
J2ME™ Web Services Specification
Accessing Sun Documentation Online
The Java Developer ConnectionSM web site enables you to access Java™ platform
technical documentation on the Web.
http://developer.java.sun.com/developer/infodocs/
Sun Welcomes Your Comments
We are interested in improving our documentation and welcome your comments
and suggestions. You can email your comments to us at:
[email protected]
xviii
Wireless Toolkit User’s Guide • December 2003
CHAPTER
1
Introduction to the Wireless Toolkit
The Java™ 2 Platform, Micro Edition (J2ME™), Wireless Toolkit User’s Guide describes
how to work with the Wireless Toolkit and its components.
The J2ME Wireless Toolkit version 2.1 supports development of applications
compliant with the Java Technology for the Wireless Industry, Java Specification
Request (JSR-185). The J2ME Wireless Toolkit version 2.1 also includes support for
J2ME Web Services (JSR-172).
Overview of Java Technology
for the Wireless Industry
Java Technology for the Wireless Industry clarifies how the various technologies
associated with the J2ME Connected Limited Device Configuration (CLDC) and
Mobile Information Device Profile (MIDP) work together to form a complete Java™
Runtime Environment (JRE). The environment enables the deployment of end-toend solutions on mobile phones and other mobile information devices.
The Java Technology for the Wireless Industry Roadmap 1 provides an outline of
common functionality that software developers can use to develop applications for
JSR-185 compliant devices. The specification requires certain component
technologies, namely, CLDC 1.0, MIDP 2.0 and Wireless Messaging API (WMA) 1.1
(JSR-120). Version 1.0 of the Java Technology for the Wireless Industry
conditionally requires other component technologies, such as CLDC 1.1 and Mobile
Media API (MMAPI) 1.1, depending on the functionality of your application. For
more information about Java Technology for the Wireless Industry, see
http://java.sun.com/products/jtwi.
The implementation of the Java Technology for the Wireless Industry is the
Wireless Toolkit version 2.1, which supports CLDC 1.1, MIDP 2.0, WMA 1.1, and
MMAPI 1.1. You can still use the Wireless Toolkit, version 2.1 to develop
applications that use CLDC 1.0 or MIDP 1.0.
1
Related Documentation
This document assumes that you are familiar with Java programming, MIDP 2.0
and the Connected Limited Device Configuration (CLDC). This document also
assumes familiarity with the Mobile Media API (MMAPI) and the Wireless
Messaging API (WMA) for those developing wireless messaging applications or
applications that make use of multimedia. You can find more information about the
topics described in this chapter at the following URLs:
■
■
■
■
■
■
MIDP — http://java.sun.com/products/midp
CLDC — http://java.sun.com/products/cldc
MMAPI — http://java.sun.com/products/mmapi
WMA — http://java.sun.com/products/wma
J2ME Web Services — http://jcp.org/en/jsr/detail?id=172
Java Technology for the Wireless Industry —
http://java.sun.com/products/jtwi/
Features of the Wireless Toolkit
The KToolbar, included with the J2ME Wireless Toolkit, is a minimal development
environment with a Graphical User Interface (GUI) for compiling, packaging, and
executing MIDP applications. The only other tools you need are a third-party
editor for your Java source files and a debugger.
An IDE compatible with the J2ME Wireless Toolkit, such as the Sun™ Open Net
Environment (Sun ONE) Studio IDE, provides even more convenience. For
example, when you use the Wireless Toolkit within an IDE, you can edit, compile,
package, and execute or debug MIDP applications, all within the same
environment. For a list of IDEs that are compatible with the Wireless Toolkit, see
the Java™ 2 Platform, Micro Edition, Wireless Toolkit web page at
http://java.sun.com/products/j2mewtoolkit/.
When working with the J2ME Wireless Toolkit in standalone mode, you work
mainly through the KToolbar. The features available to help you create, modify,
and test your MIDlet suite are described briefly in the following sections.
Compiling, Preverifying, and Debugging
When you compile MIDlets through the KToolbar (or an IDE compatible with the
toolkit), your source files are compiled using the Java™ 2 Platform, Standard
Edition (J2SE™) SDK compiler. Preverification of the compiled files is done with the
Preverifier that prepares class and JAR files and class directories. Preverification
takes place automatically for you immediately after compilation. You can debug
2
Wireless Toolkit User’s Guide • December 2003
applications within the environment using the Emulator, which simulates the
execution of the application on various devices. For more information on how to
compile, preverify, and debug files using KToolbar, see Chapter 3, “Operating with
KToolbar.”
Packaging
You can package your MIDlet suite from the KToolbar or with a compatible IDE.
The KToolbar gives you the choice of creating a standard package or creating an
obfuscated package that produces a smaller JAR file by reducing the size of the
classes in the suite through the obfuscation process.
For more information on packaging and obfuscated packaging, see Chapter 2,
“Developing and Running Applications.” For information on how to package
applications using the KToolbar, see Chapter 3, “Operating with KToolbar.”
Running MIDlet Suites
Running a MIDlet suite on the emulator can be done either locally (running
directly from the classpath without packaging) to see the application perform
immediately after a build or remotely through Over-The-Air (OTA) provisioning
(emulation of the application provisioning and installation from the server to the
device).
For a description on different ways to run your application, see Chapter 2,
“Developing and Running Applications.” For information on testing your
applications with OTA provisioning or remotely from a web server, see Chapter 8,
“Testing Application Provisioning.”
Authenticating and Authorizing MIDlets
You can create trusted applications that have permission to use protected APIs. You
can request permission to access network protocol APIs through the Project
Settings dialog box from the KToolbar. You can sign your MIDlet suite and assign a
security domain that defines the suite’s authorization level with the Sign MIDlet
Suite window.
For information on signing a MIDlet suite, see Chapter 6, “Using Security Features
in the Wireless Toolkit.”
Chapter 1
Introduction to the Wireless Toolkit
3
Performance Tuning
The Wireless Toolkit’s Profiler enables you to optimize the performance of your
MIDlet suite by determining where bottlenecks might be occurring during runtime.
You can improve the execution time of your MIDlet suite by examining the time
spent in method calls, the number of times a method is called during runtime, and
the amount of time a method runs compared to the overall runtime of the
application.
You can also adjust the performance speed of your application in the Performance
panel of the Project Settings dialog box. Setting the speed features does not
demonstrate how your application would run on an actual device; however, by
adjusting the speed emulation parameters, you can achieve a better
representational performance of your application on a device.
For information on how to use the Profiler and how to manage device speed, see
Chapter 4, “Performance Tuning and Monitoring Applications.”
Memory and Network Monitoring
The Wireless Toolkit provides you with tools to examine and analyze memory
usage by your application and network transmissions between your device and the
network. You can get an overall view of memory usage during runtime of your
application and get a breakdown of memory usage per object to see where in the
application you can optimize memory usage.
With the Network Monitor, you can examine network transmissions for several
types of network protocols.
For information on how to use the Memory and Network Monitors, see Chapter 4,
“Performance Tuning and Monitoring Applications.”
Working With the Emulator
The J2ME Wireless Toolkit comes with a selection of emulated devices for you to
run and test your applications on. Representations of mobile devices are available
from the Device list on the KToolbar. Java Technology for the Wireless Industry
defines the technologies to be included in compliant phones. These technologies
include CLDC, MIDP, MMAPI, and WMA.
You can set the functionality for an emulated device through the Preferences
window. You can also start various emulator utilities such as the Profiler, the
Network Monitor, the Memory Monitor, and the Certificate Manager from the
Utilities window. For more information on the Emulator, see Chapter 5, “Working
With the Emulator.”
4
Wireless Toolkit User’s Guide • December 2003
For information on examining applications that you develop that use network
protocols or wireless messaging, see Chapter 4, “Performance Tuning and
Monitoring Applications.”
To test applications that use wireless messaging, the Wireless Toolkit provides the
WMA console, which you can use to send and receive binary and text SMS
messages. You can also use the console to broadcast CBS messages to devices. For
more information about the WMA console, see Chapter 7, “Wireless Messaging
with the Wireless Toolkit.”
Internationalization Features of the
Wireless Toolkit
You can run the Wireless Toolkit and display your application in your desired
language by setting the locale properties of the Wireless Toolkit and the Emulator.
You can also change the character encoding setting for the device MIDP
environment and for the Java compiler. For more information on
internationalization, see Appendix C, “Internationalization.”
Providing Access to J2ME Web Services
You can generate a stub connector to access J2ME Web Services from the KToolbar.
The Emulator is compliant with the J2ME Web Services specification. The Stub
Generator is created using a Web Service Descriptor Language file (WDSL),
provided by the user. You can launch the stub generator from the KToolbar using
the File menu’s Utilities option, from the Project menu, or you can run it from the
command line. See Appendix D, “Command Line Utilities” for more information
Operating From the Command-Line
Many of the basic development operations available from the KToolbar can also be
performed at the command line such as compiling and preverifying, creating
manifest files, JAR and JAD files, running emulators, tracing and debugging,
invoking the Stub Generator, and using the Application Management System. You
can also sign MIDlet suites and manage certificates from the command line. See
Appendix D, “Command Line Utilities” for more information.
Chapter 1
Introduction to the Wireless Toolkit
5
Application Demos
The Wireless Toolkit comes with the several demo applications, which can all be
run in the Emulator. You can select a demo application from the Open Project list
from the KToolbar. For information on the demo applications, see the Application
Demos page in the {j2mewtk.dir}\docs directory.
6
Wireless Toolkit User’s Guide • December 2003
CHAPTER
2
Developing and Running
Applications
This chapter describes the MIDP application development life cycle in the context
of working with the Wireless Toolkit and the ways in which you can run an
application (MIDlet suite) during its development cycle:
■
Running Locally - Immediate execution of the application after compilation and
preverification have taken place. You run your MIDlet directly from the
classpath without going through the packaging process.
■
Running with OTA Provisioning - Execution of the mature application. The
MIDlets have been packaged into a MIDlet suite containing JAD, JAR, and
manifest files which have undergone a packaging validation process. The
MIDlet suite is deployed from a provisioning server in accordance with MIDP
2.0 specification and downloaded to the emulated device.
Developing Applications
Developing an application usually involves the following steps:
1. Edit>Build>Run Locally. In this step, initial development of MIDlets takes
place. This step is repeated until the application reaches a mature state. In this
step, packaging of the MIDlets does not occur. You can select an emulated
device from the KToolbar and run the application immediately.
For information on how to build, run, and debug using the KToolbar, see
Chapter 3, “Operating with KToolbar.”
2. Packaging>Run Remotely. In this step, additional verification and testing to
simulate the downloading and running of the application on a device occurs.
For information on what is involved with packaging and running an application
remotely, see the following section, “Running Applications Remotely.”
3. Run on actual device. Your application development is complete at this step.
7
Running Applications Remotely
Once your application is in a stable state, you are ready to see how your
application performs in a more realistic environment, that is the downloading and
running of your application onto a mobile device from a browser or server.
At this point, you will want to run your application using Over-The-Air (OTA)
provisioning. The J2ME Wireless Toolkit simulates OTA provisioning, that allows
you to test the functionality of your application and demonstrate the full
provisioning process of your MIDlet suite from a web server to a device. With
simulated OTA provisioning in the Wireless Toolkit, the MIDlet suite is packaged
in the JAR and JAD format, deployed to the provisioning server, and downloaded
to an emulated device.
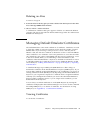
To run using OTA provisioning, you need to package your MIDlets into a MIDlet
suite, and sign the MIDlet suite if authentication is required:
Preverified
.class files
Application resources
(text, images, ...)
Packaging/
Obfuscated
Packaging
MIDlet attributes to JAR
and manifest files
Sign MIDlet
Suite
(Optional)
FIGURE 1
Packaging and Signing a MIDlet Suite
Packaging
MIDP applications, or MIDlets, are packaged into a MIDlet suite, a grouping of
MIDlets that can share resources at runtime.
A MIDlet suite includes:
■
A Java Application Descriptor (JAD) file. This file contains a predefined set of
attributes that allows the device application management software to identify,
retrieve, and install the MIDlets.
■
A Java Archive (JAR) file. The JAR file contains Java classes for each MIDlet in
the suite and Java classes that are shared between MIDlets. The JAR file also
contains resource files used by the MIDlets and a manifest file.
For more information on what attributes can be added to the JAD and manifest
files, see Appendix A, “MIDlet Attributes.”
8
Wireless Toolkit User’s Guide • December 2003
A package validation process, which occurs during OTA provisioning, checks for
consistency in content between the JAD, JAR, and manifest files.
Development environments such as KToolbar and the Sun ONE Studio 4, Mobile
Edition automate the packaging of MIDlet suites and ensure the correct packaging
of the JAR and JAD files. (For information on how to package applications using
KToolbar, see “Packaging” on page 22 in Chapter 3, “Operating with KToolbar.”
Packaging Obfuscated ByteCode
An optional feature provided by the J2ME Wireless Toolkit is the ability to build an
obfuscated package. In addition to protecting your source code, the obfuscation
process reduces the size of the classes resulting in smaller JAR files. For
information on creating packages and obfuscated packages, see “Packaging” on
page 22 in Chapter 3, “Operating with KToolbar.”
Signing MIDlet Suites
An optional step after packaging, is signing the MIDlet suite. The signing process
creates a digital signature for the MIDlet suite’s JAR file, and adds it to the JAD
file. To facilitate the signing process, you can start the process immediately by
running the Sign command from the KToolbar’s Project menu. For more
information on security features in the Wireless Toolkit and signing a MIDlet suite,
see Chapter 6, “Using Security Features in the Wireless Toolkit.”
Running in OTA Provisioning Mode
When you are ready to test the behavior of your MIDlet suite, you can run the
application in provisioning mode directly from the KToolbar. Running an
application through provisioning differs from running an application directly on
the emulated device in several ways. The following MIDP 2.0 features can be tested
only when using OTA provisioning:
■
Package validation. Validation is checked whenever an application is
downloaded onto a device.
■
Setting permissions to access sensitive APIs.
■
Authentication of a MIDlet suite.
■
Push functionality.
By choosing the Run via OTA command from the KToolbar’s Project menu, you can
run your application in such a way as to simulate deployment from a web server.
The command starts a default emulator device with a graphical Application
Management System (AMS) already started and ready to install your application.
In addition, if authentication is required, you can run the Sign command from the
Project menu to perform the signing process for your MIDlet suite.
Chapter 2
Developing and Running Applications
9
To run your application in OTA provisioning mode:
1. Choose Project -> Run via OTA.
The Emulator appears.
2. Click the Apps button and then choose Launch from the Menu.
The URL of the application is displayed.
3. Select Go from the Menu.
For information on entering text in the Emulator, see “Inputting Text” on page 48.
The AMS attempts to install the application described by the JAD file.
For information on OTA provisioning, see "Over The Air User Initiated
Provisioning Specification," in the MIDP 2.0 specification at
http://java.sun.com/products/midp.
For information on deploying and testing your applications with a real web server,
see Chapter 8, “Testing Application Provisioning.”
10
Wireless Toolkit User’s Guide • December 2003
CHAPTER
3
Operating with KToolbar
KToolbar is a minimal development environment for developing MIDlet suites.
From the KToolbar, you can:
■
■
■
■
■
■
■
Create a new project or open an existing one
Select the target platform and API set for your project
Build, run, and debug your MIDlet
Fine tune your MIDlet application
Generate a stub connector to access J2ME Web Services
Package your project files
Modify the attributes of your MIDlet suite
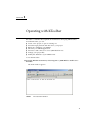
To run the KToolbar:
● From the Windows Start menu, select Programs -> J2ME Wireless Toolkit 2.1 ->
KToolbar.
The main window appears:
FIGURE 2
KToolbar Main Window
11
Navigating in KToolbar
You can navigate through KToolbar windows (the main window, Profiling,
Memory Monitor, and Network Monitor windows) using the Tab and arrow keys.
Mnemonics on menus and buttons provide you with alternative means to initiating
commands. A mnemonic is the underlined letter that corresponds to the keyboard
key to press in conjunction with the Alt key to activate a command or to navigate
to a component in the window.
You can press the Tab key to bring the focus to a particular component of a
window and then use the arrow keys to manipulate that component.
KToolbar Projects
A KToolbar project is associated with a MIDlet suite. The project contains the
suite’s source, resource, and binary files, as well as the JAD and manifest files that
contain the suite’s attributes.
Project files are located in project subdirectories under the Wireless Toolkit’s
installation directory, {j2mewtk.dir}. The following table shows how files are
organized within the directory for the project, {project.name}:
TABLE 1
12
Project File Organization
Directory
Description
{j2mewtk.dir}\apps\{project.name}
Contains all source, resource, and binary
files of the project
{j2mewtk.dir}\apps\{project.name}\bin
Contains the JAR, JAD, and unpacked
manifest files.
{j2mewtk.dir}\apps\{project.name}\lib
Contains external class libraries, in JAR or
ZIP format for a specific project.
{j2mewtk.dir}\apps\{project.name}\res
Contains all the resource files.
{j2mewtk.dir}\apps\{project.name}\src
Contains all the source files.
{j2mewtk.dir}\apps\lib
Contains external class libraries, in JAR or
ZIP format for all KToolbar projects.
Wireless Toolkit User’s Guide • December 2003
Note – Adding external class libraries to a project increases the size of the MIDlet
suite’s JAR file. Large JAR files take longer to load onto a device, and might be
unusable on devices with low memory.
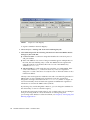
Creating a New Project
To create a new project:
1. Choose File -> New Project from the menu or click New Project on the toolbar.
The New Project dialog appears.
2. Type the name of the project in the Project Name field, and the name of the main
MIDlet class in the MIDlet Class Name field.
For example, you might call the project, newproject, and the MIDlet class might
be myTest.Hello.
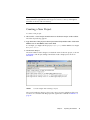
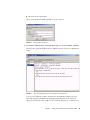
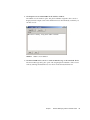
3. Click Create Project.
The main window’s title changes to include the name of the new project, as shown
in FIGURE 3. The Project Settings API Selection tab is displayed as shown in
FIGURE 4.
FIGURE 3
Console Output After Creating a Project
The console indicates where to place your source, resource, and library files. The
locations are consistent with the project file organization outlined in TABLE 1 on
page 12.
Chapter 3
Operating with KToolbar
13
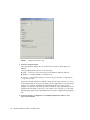
FIGURE 4
Settings API Selection Tab
4. Select the Target Platform.
The target platform defines the set of APIs that are used for developing your
MIDlet.
The target platform may be one of the following:
■
■
■
JTWI — conforms to Java Technology for the Wireless Industry (JSR-185).
MIDP1.0 — includes MIDP 1.0 and CLDC 1.0
Custom — user defined settings, you can select project profile, configurations,
and various APIs.
The project settings information and tabs change based on the selection you choose
for the target platform. Some project settings are not applicable for a selected target
platform. For example, the MIDP 1.0 target platform does not support Push
Registry or Permissions, therefore the tabs are disabled. All project settings tabs are
updated with information relevant to your selection. For example, if you selected
the JTWI target platform, the MicroEdition-Profile value is updated in the Required
tab.
5. Select the Profiles, Configurations, and Additional/Optional APIs for your
project and click OK.
14
Wireless Toolkit User’s Guide • December 2003
Opening an Existing Project
To open an existing project:
1. Choose File -> Open Project from the menu or click Open Project on the toolbar.
The Open Project dialog appears with a list of projects.
2. Double-click the project, or choose the project and click Open Project.
The main window’s title changes to include the name of the project.
Editing MIDlet Suite Attributes
This section explains how to use the project settings dialog to modify a MIDlet
suite’s attributes. Use the project settings dialog box, shown in FIGURE 4, to edit a
MIDlet suite’s project settings.
To open the Settings dialog box for the current project:
● Choose Project -> Settings from the KToolbar menu or click the Settings button.
Modifying MIDlet Suite Attributes
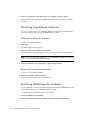
To change a required, optional, or user-defined MIDlet suite attribute:
1. Click the Required, Optional, or User Defined tab.
The required, optional, or user-defined attributes and their current values are
displayed depending on which tab you clicked.
FIGURE 5
Project Settings Required Tab Dialog
Chapter 3
Operating with KToolbar
15
2. Click on an attribute’s value field, make your changes, and press Enter.
For more information about the attributes themselves, see Appendix A, “MIDlet
Attributes.”
Modifying User-Defined Attributes
You can also add or remove user-defined attributes through the User Defined tab in
the Project Settings dialog box in the J2ME Wireless Toolkit.
Adding User-Defined Attributes
To add a user-defined attribute:
1. Click Add.
The Add Property dialog appears.
2. Enter the name of the attribute and click OK.
The Add Property dialog disappears, and a new entry is created for the attribute.
Note – Do not use the prefix “MIDlet-” for a user-defined attribute. This format is
reserved for system-defined MIDlet attributes.
3. Click the attribute’s value field, enter a value, and press Enter.
Removing User-Defined Attributes
To remove a user-defined attribute:
● Select the attribute, and click Remove.
Press Yes when KToolbar asks for confirmation.
Modifying MIDlet-Specific Attributes
You can edit, add, or remove user-defined attributes through the MIDlets tab in the
project settings dialog box in the J2ME Wireless Toolkit.
To edit an individual MIDlet’s name, icon, and class:
1. Choose the MIDlet and click Edit.
2. Make your changes in the Enter MIDlet Details dialog box and click OK.
16
Wireless Toolkit User’s Guide • December 2003
Adding MIDlet-Specific Attributes
To add a MIDlet-specific attribute:
1. Click Add.
2. Enter the MIDlet’s name and attributes in the Enter MIDlet Details dialog box,
and click OK.
A new entry is created for the MIDlet.
Removing MIDlet-Specific Attributes
To remove a set of MIDlet-n attributes specific to a particular MIDlet:
● Select the attribute, and click Remove.
Press Yes when KToolbar asks for confirmation.
Adding MIDlets
To add a MIDlet to your project:
1. Select Add.
2. Enter the MIDlet Details and click OK.
The new MIDlet is added with a consecutive key.
Changing the Order of the MIDlets
To change the order of the MIDlets in the suite (that is, the order in which they are
listed when you launch the suite):
● Select a MIDlet to move, and click Move Up or Move Down.
When you move the MIDlet, its number in the sequence is updated automatically.
Adding a Push Registry
You can add and remove push registry attributes for MIDlets with the Push
Registry tab in the project settings dialog box:
Chapter 3
Operating with KToolbar
17
FIGURE 6
Sample of a Push Registry
To register a MIDlet in the Push Registry:
1. Choose Project -> Settings and click on the Push Registry tab.
2. Click Add and provide the following information in the Enter MIDlet Details
dialog box, then click OK:
■
Connection URL. A connection string that identifies the connection protocol
and port number.
■
Class. The MIDlet’s class name. If the given MIDlet appears multiple times in
the suite, the first matching entry is used. The MIDlet must be registered in
either the JAD file or the manifest file with a record of the MIDlet’s key
attributes (MIDlet-<n>).
■
Allowed Sender. A valid sender that can launch the associated MIDlet. If the
value is the wildcard, “*”, connections from any source are accepted. If
datagram or socket connections are used, the value of Allowed Sender can be a
numeric IP address.
The Key is the Push registration attribute name and is automatically generated. A
MIDlet suite can have multiple push registrations. Each key (registration)
designation is unique and of the form MIDlet-Push-<n>, where <n> begins at 1
and is incrementally increased with each registration. MIDlet Push registration
information is stored in the MIDlet suite’s JAD file.
By selecting a key and clicking Edit or Remove, you can change the attributes for
the selected key or remove it from the registry.
Note that the push registry functionality is only available when you are running in
OTA provisioning mode. For more information on running using OTA
provisioning in the Wireless Toolkit environment, see Chapter 2, “Developing and
Running Applications.”
18
Wireless Toolkit User’s Guide • December 2003
Adding API Permissions
For your MIDlet suite to operate, it might need to access certain protected APIs. A
request for permission to access these APIs is required. You can set the
MIDlet-Permissions and MIDlet-Permissions-Opt attributes from the
Permissions panel of the Project Settings dialog box.
To specify which APIs the current MIDlet suite can access:
1. Choose Project -> Settings and click the Permissions tab.
2. Click Add for either required (MIDlet-Permissions) or optional (MIDletPermissions-Opt).
The Permission API selection dialog box opens from which you can select the API
permission to add. Shift+click to add multiple APIs at once.
Chapter 3
Operating with KToolbar
19
FIGURE 7
API Permissions Selection Dialog Box
Permissions have the same naming structure as a Java class. For instance,
javax.microedition.io.Connector.http is the permission for the HTTP
protocol. To make use of the Push Registry, you must have permission to access the
Push Registry API, javax.microedition.io.PushRegistry.
Removing API Permissions
To remove API permissions:
● Select the API you want to remove and click Remove.
You are asked to confirm your request.
20
Wireless Toolkit User’s Guide • December 2003
Compiling and Preverifying a Project
The KToolbar compiles and preverifies source code in one sequence.
To compile and preverify your source code:
● Choose Project ->Build or click Build on the toolbar.
The sources are compiled against the MIDP and CLDC APIs, as well as any
libraries in the project’s lib\ folder and the Wireless Toolkit’s \apps\lib\ folder.
Note – The Java classes are compiled with debugging information. In the
packaging stage the Java classes are compiled without debugging information.
The classpath for compilation and preverification are based on the project's API
selection. The preverifier is selected based on the version of the CLDC selected by
the user. Compilation and preverification, can also be performed from the
command line. For more information, see Appendix D, “Command Line Utilities.”
Running a Project Locally
Once you have built your application, you can run it immediately from the
KToolbar.
To run the current MIDlet suite in the Emulator using the KToolbar:
1. (Optional) Use the Device menu to select the device to be emulated.
The list displays the devices available for the loaded application.
2. Choose Project -> Run or click Run on the toolbar.
The Emulator appears, running your MIDlet suite. The console displays system
and trace output as a MIDlet suite executes.
For information on running a project locally versus remotely, see Chapter 2,
“Developing and Running Applications.”
Debugging
You can debug an application from within the KToolbar by connecting to remote
debugging facilities, such as an IDE debugger.
Chapter 3
Operating with KToolbar
21
To debug an application under KToolbar:
1. Choose Project -> Debug.
The dialog asks you to enter a TCP/IP port number which the external debugger
uses to connect to the emulator.
2. Enter a TCP/IP port and click Debug.
In most cases you can use the default value, but you should use another value if
another application is using this port, or if you encounter problems connecting to
the emulator from the debugger.
The emulator begins running in debugging mode, and waits for a connection from
a debugger.
3. Start the remote debugger and attach it to the TCP/IP port you specified.
Make sure to set the remote debugger to run in remote mode and to use TCP/IP.
For more information, consult the debugger’s documentation.
Cleaning Up Project Files
To remove obsolete or unnecessary files in your project directory:
● Choose Project -> Clean.
The Clean command deletes all temporary and class files in the current project
directory.
Packaging
You can create a package of your project files or create an obfuscated package that
reduces the size of the Java bytecode, resulting in a smaller JAR file and possibly
faster download times. Another benefit to creating an obfuscated package is to
protect your code from possible decompilation.
To build a package:
● Choose Project -> Package -> Create Package or Create Obfuscated Package.
Choosing Create Package creates a standard .jar file. When the classes are
packaged, they are compiled without debugging information to reduce the size of
the JAR file.
Choosing Create Obfuscated Package creates a .jar file of smaller size than a
standard .jar file. Specifically how the contents of your package are obfuscated is
dependent on the type of obfuscation tool you choose to use. When creating an
22
Wireless Toolkit User’s Guide • December 2003
obfuscated package, preverification is done after the code has been obfuscated
rather than immediately after compilation. To use this feature, you must already
have a bytecode obfuscator that is supported by the KToolbar.
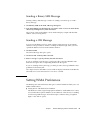
A progress bar appears when packaging begins. When the packaging finishes, the
output display indicates where the JAR and JAD files have been placed.
FIGURE 8
Console Output After Packaging
Obtaining a ByteCode Obfuscator
The Wireless Toolkit does not provide a bytecode obfuscator. It does, however,
contain a plug-in for the ProGuard bytecode obfuscator.
To get the ProGuard bytecode obfuscator JAR:
1. Go to http://proguard.sourceforge.net/.
2. Download the latest version of the proguard.zip file.
3. Extract the proguard.jar file from the .ZIP file into the Wireless Toolkit’s bin
directory: {j2mewtk.dir}\bin.
If you choose to use a bytecode obfuscator other than ProGuard, you must
implement the plug-in yourself. See the Wireless Toolkit Basic Customization Guide for
an example of how to implement a bytecode obfuscator plug-in.
Note – If your code uses the Class.forName() method to load classes, you may
need to provide and use a script file as described in the following optional step.
4. Save your script file under the project’s main directory and add the following
key/value pair:
Chapter 3
Operating with KToolbar
23
obfuscate.script.name: FileName
to the ktools.properties file located under WTK_HOME/wtklib/Windows
directory. FileName is the name of your script file,
For more information about using script file formats, see the Proguard
documentation.
Signing MIDlet Suites From KToolbar
After packaging the application, you can sign your MIDlet suite if needed by
choosing the Sign command from the KToolbar’s Project menu. For information on
signing MIDlet suites, see Chapter 6, “Using Security Features in the Wireless
Toolkit.”
Running in OTA Provisioning Mode
When your MIDlets are packaged (and signed if needed), you can emulate OTA
provisioning and run your application by choosing the Run via OTA command
from the KToolbar’s Project menu. A graphical AMS is started and you can
simulate the downloading and execution of your application from a web server.
Running in OTA provisioning mode, enables you to test certain MIDP 2.0 features
such as package validation, MIDlet suite authentication, and push functionality.
For information on running using OTA provisioning in the Wireless Toolkit, see
Chapter 2, “Developing and Running Applications.” For alternative ways of
running in OTA provisioning mode, see Chapter 8, “Testing Application
Provisioning.”
Using Class Libraries
KToolbar enables you to build projects from source and resource files. You may
want to use a class library for which you do not have source files. This section
shows you how to build a project using an external class library.
Be cautious when including external class libraries. Adding unnecessary class
libraries to a project increases both the time needed to package it and the size of the
resulting MIDlet suite JAR file. A large JAR file increases the time needed to load
the MIDlet suite, and could prevent it from running on devices with low memory.
24
Wireless Toolkit User’s Guide • December 2003
Class libraries for use with KToolbar should be compatible with the CLDC and
MIDP APIs and should be packaged in .jar or .zip format. KToolbar provides
ways for you to develop applications using class libraries, both on a per project and
on a global basis.
External Libraries for a Specific Project
To add class libraries to a KToolbar project:
1. Locate the directory containing your application (refer to TABLE 1 on page 12).
The application’s directory contains a subdirectory, lib.
2. Place the JAR or ZIP file containing the class library into this subdirectory.
For example, if you installed the J2ME Wireless Toolkit in C:\wtk21 and your
application is called ExampleMIDlet, the class library would go in the directory,
C:\wtk21\apps\ExampleMIDlet\lib. When you build, run, debug, and
package your project, the class files in the lib directory are used.
External Libraries for All Projects
You can also define class libraries to be available for all projects that you develop
with KToolbar. To do this, place the JAR or ZIP files containing the classes in the
subdirectory apps\lib of the directory in which you installed the J2ME Wireless
Toolkit. For example, if you installed the Wireless Toolkit in C:\wtk21, you would
place the class libraries in C:\wtk21\apps\lib. Class libraries in the apps\lib
directory are used for all projects.
Note – Class libraries for a particular project can import classes and resources
from any general library as well as specific libraries. Class libraries for projects in
general can only import classes and resources from general class libraries.
Using the Stub Connector to Access
J2ME Web Services
You can generate a stub connector to access Web Services from the KToolbar. The
Emulator is compliant with the J2ME Web Services Specification (JSR-172). The
stubs are created using a Web Service Descriptor Language file.You can also
generate a stub connector from the command line. See Appendix D, “Command
Line Utilities.”
Chapter 3
Operating with KToolbar
25
To generate a stub connector:
1. Choose Project -> Stub Generator or select File ->Utilities -> Stub Generator.
2. Enter or browse to the URL or location of the WSDL File and click OK.
The Output Path is the location where the Stub Generator will place the generated
files.
The Output Path and the CLDC version default to the project settings if you
generate a stub connector from the Project menu, as shown in FIGURE 9. Both
options are from the KToolbar.
3. Enter the Output Package Name.
The Output Package name is the package name that the stub will be generated in.
FIGURE 9
Stub Generator Dialog
Setting Emulator Preferences and Using
Emulator Utilities
You can access the Emulator’s Preferences and Utilities tools through the KToolbar
menu.
To access the Emulator Preferences tool:
● Choose Edit -> Preferences.
To access the Emulator Utilities tool:
26
Wireless Toolkit User’s Guide • December 2003
● Choose File -> Utilities.
For more information on using the Emulator Utilities and Preferences tools, see
“Preferences and Utilities” on page 48 in Chapter 5, “Working With the Emulator.”
Customizing KToolbar
KToolbar includes some advanced configuration options. You can use these options
by editing the file {j2mewtk.dir}\wtklib\Windows\ktools.properties. To see
the effects of your changes, restart KToolbar.
Setting the Application Directory
By default, the J2ME Wireless Toolkit stores MIDP applications in directories under
{j2mewtk.dir}\apps. You can change this by adding a line to ktools.properties
of the following form:
kvem.apps.dir: <application_directory>
Any backslash ('\') characters in the directory’s path should be preceded by
another backslash. Also, the directory’s path should not contain any spaces.
For example, to set the application directory to D:\dev\midlets, you would use:
kvem.apps.dir: D:\\dev\\midlets
Setting the javac Encoding Property
By default, the Java compiler uses the encoding set in the J2SE environment that
you are running. For information on how to override the default source file
encoding, see “Java Compiler Encoding Setting” on page 81 in Appendix C,
“Internationalization.”
Working with Revision Control Systems
Using the filterRevisionControl property, you can configure KToolbar to recognize
and ignore auxiliary files created by the SCCS, RCS and CVS revision control
systems.
To recognize and ignore auxiliary files, include the following line in
ktools.properties:
kvem.filterRevisionControl: true
Chapter 3
Operating with KToolbar
27
As a result, you prevent KToolbar from treating revision control files as source and
resource files. For example, KToolbar would treat a file named
src\SCCS\s.MyClass.java as being an SCCS revision control file and not a Java
source file.
28
Wireless Toolkit User’s Guide • December 2003
CHAPTER
4
Performance Tuning and
Monitoring Applications
You can examine various aspects of the MIDlet applications you created with the
J2ME Wireless Toolkit to identify where you can improve the efficiency and speed
of your MIDlet. The Wireless Toolkit includes the following features that enable
you to optimize the performance of your MIDlet:
■
Profiler. Enables you to examine the execution time and the frequency of use of
the methods in your application.
■
Memory Monitor. Enables you to examine memory usage in your application.
■
Network Monitor. Lets you monitor transmissions between your device and the
network. You can monitor transmissions of various network protocols, such as
data packets, message streams, or message dialogs in addition to HTTP and
HTTPS. You also have access to the wireless messaging protocols, SMS and CBS.
■
Speed Emulation. Enables you to adjust drawing speed to refine graphics
rendering. Speed Emulation also enables you to adjust the speed of byte code
execution and data transfer across the network to give you a sense of how
quickly your application runs on a device.
Note – Turning on multiple performance features simultaneously can adversely
affect the data collected by slowing down application execution. For more accurate
results, try enabling one performance feature per data collection.
Profiling Your Application
You can examine the method execution time with the Profiler utility. The Profiler
collects data from an emulator during runtime. By seeing how much time a method
takes to execute, you can see where potential problems, such as bottlenecks, might
exist in the application.
The Profiler window displays two types of method information:
29
■
Method relationships shown in a hierarchical list called the Call Graph.
■
Execution time and the number of times a method and its descendants were
called during runtime.
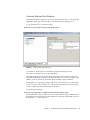
Viewing Profiling Information
To obtain profiling information, follow these steps:
1. Make sure that Enable Profiling is checked in the Monitor tab of the Preferences
dialog box.
(Optional) Check Show System Classes if you want to display the system classes. If
unchecked, most system classes are hidden and ignored. Some system classes
might be left visible to highlight lengthy execution time. Hiding the system class
information helps you to see application class-specific information. You should
hide the system classes information while you are developing your application.
2. Run your application and then quit.
When you quit the application, the Profiler window opens displaying information
collected during execution.
Note – The profiling values obtained from an emulation do not reflect actual
values on a real device, even though a real device skin might be used.
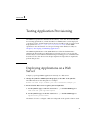
Profiling Data Display
In the Call Graph tree, you see folders for top-level methods. Opening a method’s
folder displays the methods called by it. Selecting a method in the tree shows the
profiling information for it and all the methods called by it. Selecting <root>
displays profiling information for all methods in the program.
30
Wireless Toolkit User’s Guide • December 2003
FIGURE 10
Profiler Window
The table displays rows of methods. For each method, you can see its:
■
Name. The fully qualified name of the method.
■
Count. The number of times the method was called during execution.
■
Cycles. The execution time, in seconds, of a method (does not include the
execution time of methods called by that method).
■
%Cycles. The percentage of time spent on a method’s execution in respect to the
time the entire program ran (does not include the execution time of methods
called by that method).
■
Count With Children. The number of times the method and its descendants were
called during execution.
■
%Count With Children. The percentage time spent running the method and all
of its descendants in respect to the time the entire program ran.
Click on the column titles in the table to sort the display. Clicking on Name sorts
the methods in alphabetical order. Clicking Count, Cycles, %Cycles, Count with
Children, or %Count with Children sorts the information in ascending order.
Clicking on the column title again resorts the information in descending order.
Saving and Examining Profiling Information
You can save profiling information in two ways:
Chapter 4
Performance Tuning and Monitoring Applications
31
■
■
Save it for later examination through the Profiler
Save it for examination through an external tool, such as a spreadsheet
To save profiling information so you can it examine later using the Profiler:
● Click Save or choose File -> Save.
You are prompted to save the information to a file with a .prf extension.
To save the data and examine it with an external tool:
● Right-click on the desired lines of data and click Save Selected Lines (or choose
File -> Save Selected Lines).
You are prompted to save the information to a file with a .txt extension.
Note – You will not be able to load these (.txt) files back into the Profiler.
Examining Memory Usage
Another area to check for optimization is memory usage. The Memory Monitor
Extension feature enables you to see how much memory is used by your
application during runtime and to see a breakdown of the amount of memory
usage per object.
32
Wireless Toolkit User’s Guide • December 2003
FIGURE 11
Memory Monitor Window
Viewing Memory Usage
To obtain memory usage information, follow these steps:
1. Make sure that you have enabled the Memory Monitor in the Monitor tab of the
Preferences dialog box.
(Optional) If you want to set the heap size, click the Storage tab in the Preferences
dialog box and enter a value. Setting the heap size is not required to use memory
monitoring.
(Optional) If you want to determine the required amount of memory during
runtime, turn on Excessive GC mode. When turned on, garbage collection is run
every time an object is about to be allocated.
2. Run your application.
(Optional) Click Run GC in the Memory Monitor Extension window to have
garbage collection performed at anytime while the application is running.
Note – The memory usage values obtained from an emulation do not reflect actual
memory usage on a real device, even though a real device skin might be used. The
Memory Monitor merely provides you with possible indicators of excessive
memory use for the emulation.
Chapter 4
Performance Tuning and Monitoring Applications
33
Memory Monitor Data Display
The Memory Monitor displays usage information in two tabbed panes:
FIGURE 12
■
Graph. The Memory Usage graph displays:
■
■
■
34
Memory Monitor Graph
Current. The current amount of memory used by the application.
Maximum. The maximum amount of memory used since program execution
began. Denoted in the graph by a broken red line.
■
Objects. The number of objects in the heap.
■
Used. The amount of memory used.
■
Free. The amount of unused memory available.
■
Total. The total amount of memory available at startup.
Objects. The Object Monitor breaks down the information into a table format
that shows you:
■
Name. The name of each class examined for memory usage.
■
Live. The number of instances of an object in the heap.
■
Total. The total number of class objects allocated at startup.
■
Total Size. The total amount of memory used by the class’ live objects.
Wireless Toolkit User’s Guide • December 2003
■
Average Size. The average amount of memory used by a class live object with
respect to the total size.
FIGURE 13
Memory Monitor Objects Table
Click on the column titles in the table to sort the display. Clicking on Name sorts
the classes in alphabetical order. Clicking Live, Total, Total Size, or Average Size
sorts the information in that column from ascending to descending value.
Selecting a class in the Name column displays a hierarchical list of that class’
methods and the percentage of memory used by the objects allocated by that
method and the methods called by it in the pane to the right of the table. Click Find
to locate a specific method. The Objects table is dynamically updated during
program execution; however, the method list is not. Click Refresh to update the
display of percentage of usage information.
Saving and Examining Memory Usage
Information
You can save memory usage information and examine it later by:
1. Choosing File -> Save in the Memory Monitor and providing a filename.
Chapter 4
Performance Tuning and Monitoring Applications
35
2. Click Open Session in the Memory Monitor’s toolbar and select the file you
want.
To examine previously saved information from the KToolbar:
● Click Open Session under Memory Monitor in the Utilities window and select
the file want.
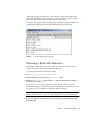
Monitoring Network Traffic
One of the many uses of a MIDP application is to get or send information. By
monitoring the network traffic generated by your application, you can obtain
information you might need to improve or fix communication with a server and
optimize network usage. The Network Monitor enables you to monitor the
following network protocols:
■
■
■
■
■
■
■
HTTP and HTTPS
datagrams
sockets
secure socket layers (SSL)
comm
SMS
CBS
Demonstration applications for the following network protocols are available from
the Open Project dialog box:
■
■
■
HTTP and HTTPS demos are included in the demos application.
Socket, Comm, and Datagram demos are included in the NetworkDemo
application.
SMS and CBS demos are included in the SMSDemo application.
Viewing Network Traffic
To turn on network monitoring automatically when your application runs or to
choose a specific proxy type, follow these steps:
1. Make sure that you have enabled the Network Monitor in the Monitor tab of the
Preferences dialog box.
2. Run your application.
The Network Monitor window opens when you start your application.
36
Wireless Toolkit User’s Guide • December 2003
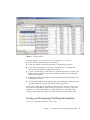
Network Monitor Data Displays
The Network Monitor displays a list of messages that were sent or received by the
application. Messages are broken down into their header and body, if any.
To see information for a specific message:
● Select a root message in the message display pane.
FIGURE 14
Message Key and Value Pair
An asterisk (*) in the protocol tab indicates which network protocol has
information to display if it is not the selected tab.
The field summary, shown in the right panel of the monitor. All protocols have a
URL field. Depending on the protocol, the URL field can contain, for example, URL
address, protocol, baud rate, hostname, phone number, and port number.
The properties of a message are displayed in key and value pairs in a table format.
You can view the entire contents of a value by choosing that value and viewing it
in the scrollable text field at the bottom of the pane.
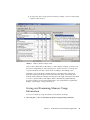
To see the message body:
● Select a message body or fragment in the message display pane.
The hexadecimal values and the text value for the entire message are displayed in
the right panel of the monitor window. Bytes that cannot be represented as text are
denoted by a “.” in the text pane.
Chapter 4
Performance Tuning and Monitoring Applications
37
FIGURE 15
Message Body
Note – You can examine messages that are still in the process of being sent.
Incomplete messages are indicated by bold highlighting in the message tree.
You can reorganize or narrow the messages displayed by setting filters or by
sorting message by type. See the sections, “Filtering Messages” on page 38” and
“Sorting Messages” on page 39.
Filtering Messages
To examine a specific set of messages, you can set filters in the Network Monitor.
Only those messages that fall within the filter settings are displayed in the message
tree. Filter Settings are specific to the network protocol used.
1. Choose Edit -> Filter Settings or click the Filter Settings button in the toolbar.
38
Wireless Toolkit User’s Guide • December 2003
2. Change one or all of the filter settings in the Message Filter dialog box:
TABLE 2
Filter Settings for Network Protocols
Network Protocol
Filter Settings
HTTP/HTTPS
• URL--The URL for the messages you want to see in the URL text field.
• Status Line--The status type of message you want to examine, in the Network
Monitor Status Line text field.
• Header Text--A specific header in the Header Text text field.
• Body Text--A character string for the specific text in the body of the messages you
want to examine in the Body Text text field.
SMS/CBS
• Protocol--Either an SMS or CBS transmissions or both.
• Type--Text or binary message.
• Direction--Input and output indicators with chronological designations.
• From--Phone and port number of origin.
• To--Phone and port number of destination.
• Content--A character string for the specific text in the body of the messages you
want to examine in the Body Text text field.
Socket/SSL/
Datagram/Comm
• URL--The URL for the messages you want to see in the URL text field.
• Content--A character string for the specific text in the body of the messages you
want to examine in the Body Text text field.
Disabling Filtering
To disable message filtering so that all messages are displayed:
● Click the Filter checkbox in the Network Monitor’s button bar.
Redisplay the complete set of messages in the Network Monitor’s message tree.
Sorting Messages
To arrange the messages in the message tree in a particular order:
● Open the Sort By combo box (click the Down arrow) and select one of the sort
criteria:
■
■
■
Time. Messages are sorted in chronological order of time sent or received.
URL. Messages are sorted by URL address. Multiple messages with the same
address are sorted by time.
Connection. Messages are sorted by communication connection. Messages
using the same connection are sorted by time. This sort type enables you to
see messages grouped by requests and their associated responses.
Sorting parameters are dependent on the message protocol you choose. For
instance, sorting by time is not relevant for message using the Socket protocol.
Chapter 4
Performance Tuning and Monitoring Applications
39
Saving and Examining a Networking Session
You can save information about a networking session and examine it later by:
1. Choosing File -> Save in the Network Monitor and providing a filename.
Examining Saved Messages
2. Choose File -> Open in the Network Monitor and select the file you want from
the file chooser.
To examine previously saved message information from the KToolbar:
● Click Open Session under Network Monitor in the Utilities window and select
the file you want.
Clearing the Message Tree
To remove the list of message in the message tree:
● Choose Edit -> Clear or click Clear in the Network Monitor toolbar.
Managing Device Speed
If the application you develop has a graphical user interface (GUI), the time
required to draw the GUI on the screen is critical to the overall usability of the
application. Another critical time factor is knowing the speed at which your
application runs on a device. The VM emulation speed approximates the slower
running speed of an application on a device. How quickly an application is able to
transmit information to the network is another performance factor The Wireless
Toolkit lets you modify both graphic speed emulation, VM speed emulation, and
the speed of the network throughput.
The intent of the speed emulation features is to enable you to scale down the
performance of some of the emulator subsystems to better reflect performance on a
real device. Developing the application in a slower performance environment
enables you to monitor and optimize the code of low-end devices. It is not the
purpose of the speed emulation features to accurately emulate a specific device.
40
Wireless Toolkit User’s Guide • December 2003
FIGURE 16
Performance Settings
Setting Graphics Performance
To optimize GUI display capabilities, you should adjust both the Graphics
primitive latency speed and the Refresh mode:
● Change the graphic rendering and repaint rates and run your application.
Graphics primitive latency. The span of time in milliseconds for a graphic element
to appear once the request is sent.
Display refresh mode. The number of times per second a device’s screen is
updated. There are three refresh modes:
■
■
■
Double Buffer mode implements double buffering where a graphic is first
rendered to an off screen buffer and then copied to the screen.
Immediate mode renders the graphic directly to the screen.
Periodic mode lets you set the frequency in frames per second that the screen
is refreshed.
Vary the settings to find the ones that produce the fastest rendering with the least
amount of flickering in your application.
Chapter 4
Performance Tuning and Monitoring Applications
41
Setting VM Speed Parameters
When running an emulation of a MIDlet, you cannot get an accurate demonstration
of real time application execution speed. The emulation runs much faster than an
application on an actual device. You can, however, adjust the VM speed emulation
in the Wireless Toolkit to approximate the slower speed of a device on which the
application might run.
Note – Setting the VM speed parameters does not emulate real device speed, even
though a real device skin might be used.
To set the VM speed emulation, which is the amount of Java byte code that is
executed per second:
● Click the Enable VM speed emulation checkbox and move the slider to the
desired rate of speed and run your application.
Setting Network Speed Parameters
Sometimes an application’s performance is hindered by the speed of the network.
To see how your application performs on a slow network, you can vary the
network speed parameter. To set the rate at which the application transmits
information to the network:
● Click the Enable network throughput emulation checkbox, select the desired rate
of speed from the combo box and run your application.
Note – Setting the network throughput speed does not emulate actual network
transmission speed.
42
Wireless Toolkit User’s Guide • December 2003
CHAPTER
5
Working With the Emulator
The Emulator shows, on your computer, how your MIDP applications operate on a
variety of mobile devices. Consequently, you can test your applications using the
same platform you use to develop them, and defer testing on real devices until
later in the development process.
It must be emphasized that having an Emulator does not represent a specific device
thus it does not completely free you from testing on your target devices.
Example Devices
The J2ME Wireless Toolkit includes emulations of various example devices. They
all support the MIDP, MMAPI,WMA, CLDC, J2ME Web Services, and Java
Technology for the Wireless Industry specifications. The default emulated device is
DefaultColorPhone. You can select one of the other devices from the Device
drop-down list on the KToolbar.
TABLE 3
Example Devices
Tag
Description
DefaultColorPhone
Generic telephone with a color display.
DefaultGrayPhone
Generic telephone with a gray-scale display.
MediaControlSkin
Generic telephone with audio and video playback controls.
QwertyDevice
Generic handheld device using Qwerty style keyboard.
This section describes the devices in more detail, and how to input text on these
devices. For information about how to add more device definitions to the Emulator,
see the J2ME Wireless Toolkit Basic Customization Guide, which comes with the J2ME
Wireless Toolkit.
43
Device Characteristics
The emulated devices, such as DefaultColorPhone, are generic examples of
devices that implement MIDP. The following table shows in more detail how the
emulated devices differ.
TABLE 4
Selected Device Characteristics
Device Tag
Display
Resolution
Color Support
Input
Mechanism(s)
Number of
Soft Buttons
DefaultColorPhone
180x208
256 colors
ITU-T keypad
2
DefaultGrayPhone
180x208
256 shades of gray
ITU-T keypad
2
MediaControlSkin
180x208
256 colors
ITU-T keypad
2
QwertyDevice
640x240
256 colors
Qwerty keyboard
2
Special
Keys
MENU, Shift,
Ctrl, Char
Pausing and Resuming a MIDlet
When your application is running on an emulated device, you can use the Pause
and Resume commands on each device to simulate a phone event. The commands
enable you to interrupt a running application and resume its execution afterwards.
Choosing MIDlet -> Pause simulates an incoming call alert and stops an
application during runtime. Choosing MIDlet -> Resume continues the application
at the moment it was paused.
DefaultColorPhone and DefaultGrayPhone
The DefaultColorPhone device is a generic device representing a MIDP-enabled
cellular phone with a color screen. The DefaultGrayPhone is identical in all
aspects except for its screen, which is grayscale.
44
Wireless Toolkit User’s Guide • December 2003
FIGURE 17
Default Color Phone Device and Default Gray Phone Device
The interface for both devices includes:
■
■
■
■
■
Buttons for the digits from 0 to 9, as well as pound and asterisk keys.
Two soft buttons.
A directional keypad, including a SELECT button in the center.
A CLEAR button for text operations.
SHIFT and SPACE buttons.
Command menus are displayed by clicking the soft button Menu when it is
displayed. The other soft button can still be used while the menu is displayed. The
keys 7, 9, pound and asterisk are used for the game actions A, B, C and D. SELECT
is used for the game action FIRE.
Chapter 5
Working With the Emulator
45
MediaControlSkin
The MediaControlSkin is identical in function to the DefaultColorPhone and
DefaultGrayPhone. This particular skin has a keypad that displays audio and
video playback controls that can be used when running the mmademo.
FIGURE 18
MediaControlSkin Device
For information on the audio and video controls and the mmademo, see the
“MMADemo and MediaControlSkin” document in the {j2mewtk.dir}\docs
directory.
QwertyDevice
The QwertyDevice emulates a generic handheld device that uses a Qwerty style
keyboard. The emulation does not represent accurately the look-and-feel of a
specific handheld device. The intent of this emulation is to demonstrate the J2ME
Wireless Toolkit’s support for devices that use Qwerty style keyboards.
46
Wireless Toolkit User’s Guide • December 2003
FIGURE 19
Qwerty Handheld Device
This device has the following keys:
■
Keys for the letters from A to Z in a QWERTY keyboard, the digits from 0 to 9,
and various other symbols.
■
Up, Down, Left, and Right directional keys surrounding a Select key, on the
bottom right of the device.
■
A MENU button to show and hide the command menu.
■
A BACKSPACE key on the right side of the keyboard, next to the P key.
■
An ENTER/NEWLINE key on the right side of the keyboard, next to the L key.
■
A SPACE bar.
■
Shift and Char keys for changing the effect of key presses when entering text.
Note – The Ctrl key has no effect.
The device also has POWER, SEND, and END buttons. The A, B, C, and D keys are
used for the matching game actions. SPACE is used for the game action FIRE.
Chapter 5
Working With the Emulator
47
Inputting Text
When a MIDP application needs character input from the user, it displays a text
box. For each of the bundled devices, you can enter text into this box using the
buttons in the interface of the device or the keyboard of your computer.
Using the Device to Input Text
You can use the keypad of the DefaultColorPhone, DefaultGrayPhone, and
the QwertyDevice devices to input text. The functions of the pound ('#') and
asterisk ('*') keys vary depending on the type of input being requested:
TABLE 5
Pound ('#') and Asterisk ('*') Key Functions
Input type
Pound key function
Asterisk key function
Phone number
Pound ('#')
Asterisk ('*')
Numeric
Minus sign ('-')
None
All other types
Switches input mode
between upper case,
lower case, numeric and
symbol mode.
Space
See the API documentation for javax.microedition.lcdui.TextField for
details on MIDP input constraints.
Preferences and Utilities
The Preferences and Utilities tools enable you to set attributes or tools specific to
the default emulator devices, DefaultColorPhone, DefaultGrayPhone,
MediaControlSkin, and the QwertyDevice.
You can use the Preferences and Utilities tools from within a development
environment, such as KToolbar. You can access the Utilities tools from the
KToolbar’s File menu. You can access the Preferences tools from the KToolbar’s
Edit menu.
Alternatively, you can use the tools from the Microsoft Windows Start menu.To
start the Preferences tool from the Microsoft Windows Start menu:
● From the Windows Start menu, select Programs -> J2ME Wireless Toolkit 2.1 ->
Preferences.
48
Wireless Toolkit User’s Guide • December 2003
To run the Utilities tool:
● From the Windows Start menu select Programs -> J2ME Wireless Toolkit 2.1 ->
Utilities.
If you are using the Wireless Toolkit with an IDE, see the documentation on the
IDE you are using for information on how to access the Preferences and Utilities
tools.
DefaultEmulator Preferences
Use the DefaultEmulator Preferences dialog box to configure the
DefaultEmulator devices.
To open the Preferences dialog box:
● Choose Edit -> Preferences.
FIGURE 20
DefaultEmulator Preferences Dialog
Setting the Web Proxy
If you want to run Java applications that require Web connections, and if such
connections can be made only through a proxy server (when the Web server is on
the other side of a firewall, for example), then you need to configure the Emulator
with proxy server information.
Chapter 5
Working With the Emulator
49
To specify proxy information for HTTP connections in the Network Configuration
tab:
● Type the name of the HTTP proxy server and its port number in the HTTP text
fields.
To specify proxy information for HTTPS connections:
● Type the name of the HTTPS server and its port number in the Security Server
and Port text fields.
If you are unsure about the correct proxy settings, ask your system administrator.
Choosing an HTTP Version
The Wireless Toolkit provides you with two versions of HTTP to work with.
Version 1.0 is provided for development purposes only. The MIDP specification
requires that HTTP version 1.1 is supported. Selecting version 1.0 in the Network
Configuration tab of the Preferences dialog box disables some of the version 1.1
features, such as chunking messages and providing a persistent connection to
enable you to work with servers that do not support version 1.1.
Setting Performance Parameters
You can adjust the drawing and refresh speed for your application, its network
speed parameters, and the VM speed emulation from the Performance tab of the
Preferences dialog box. See “Managing Device Speed” on page 40 in Chapter 4,
“Performance Tuning and Monitoring Applications” for information on setting
these attributes.
Enabling Monitoring and Tracing
You can enable one or more of the performance monitoring features, memory
monitoring, network monitoring, and method profiling from the Monitor tab of the
Preferences dialog box. For details about these features, see Chapter 4,
“Performance Tuning and Monitoring Applications.”
From the Monitor tab, you can also configure the Emulator to trace certain types of
events:
50
■
Garbage collection. The trace output indicates when garbage collection occurs,
as well as the number of bytes collected and the total heap size.
■
Class loading. The trace output displays the name of every non-system class as
it is created and initialized.
■
Method calls. The trace output has an entry for each method call, recording the
name of the method and the object on which it was invoked.
Wireless Toolkit User’s Guide • December 2003
Note – The output from method calls is verbose and may cause your application to
run slowly.
■
Exceptions. The trace output includes a record of every exception that is thrown,
including those that are thrown and caught by system classes. The system
classes are hidden and ignored unless you check Show System Classes.
To enable (or disable) tracing of any of these events, check (or uncheck) the
corresponding boxes in the Monitor tab in the Preferences dialog box.
Setting the Heap Size
You can specify the amount of heap memory to make available to MIDP
applications in the Storage tab. To set the heap size:
● Type a value in the Heap Size field (in kilobytes).
The default value is 500 kilobytes. Acceptable values are between 32Kb and 64
Mbytes.
Setting the Storage Directory
You can specify a storage directory in the Storage tab of the Preferences dialog box
prior to running your MIDlet.
To set the storage directory:
1. Type the name of the directory in which you want to store information the next
time you run the emulator.
The directory is created under the appdb directory. A database (.db) file is created
and placed in the specified directory. The default directory location is
{j2mewtk.dir}\appdb\<device_name>. The Wireless Toolkit automatically
allocates different storage directories for different emulated devices.
2. Type a value in the Storage size field (in kilobytes) to set the maximum size of
the file.
Setting WMA Parameters
The WMA panel of the Preferences dialog box enables you to set WMA messaging
related features, such as:
■
■
Setting Device and SMSC Phone Numbers
Specifying Message Delivery Parameters
For information about these parameters and how to set them, see “Setting WMA
Preferences” on page 69 in Chapter 7, “Wireless Messaging with the Wireless
Toolkit.”
Chapter 5
Working With the Emulator
51
Setting Optional Multimedia Formats and Features
You can choose which multimedia features and formats you want supported for
your multimedia application from the Media tab of the Preferences window. You
can select one or all of the following formats: WAV audio, MIDI, or Video. You can
also select one or all of the following optional features: Audio Mixing, Audio
Record, Audio Capture, or MIDI Tones.
Specifying a Security Domain Type
A security domain enables the identification of MIDlets by their origin. Only one
domain type can be assigned to a MIDlet suite. These settings are relevant when
you are running your application locally. These settings not relevant when running
using OTA provisioning where the security status is determined by the signing of
the MIDlet suite.
To specify a security domain type from the Security tab in the Preferences dialog
box:
● Select a domain type from the combo box
Once your MIDlet suite has been built and packaged, see “Signing MIDlet Suites”
on page 57 in Chapter 6, “Using Security Features in the Wireless Toolkit” for
information on signing a MIDlet suite.
For information on permissions and security domains, see the MIDP 2.0
Specification at http://java.sun.com/products/midp.
DefaultEmulator Utilities
You can use the DefaultEmulator Utilities window to run the DefaultEmulator’s
utilities.
To open the Utilities window:
● Choose File -> Utilities.
52
Wireless Toolkit User’s Guide • December 2003
FIGURE 21
DefaultEmulator Utilities Window
Cleaning Device Storage
The DefaultEmulator simulates a client device’s local storage by maintaining
small database files on your computer. To erase these database files, click Clean
Database.
Monitoring Memory Usage
You can view memory usage from a previously saved session to see where a
bottleneck in your application’s performance might be occurring by reviewing its
memory usage during runtime. The Memory Monitor provides several kinds of
memory usage information, such as the amount of memory that live class objects
use during program execution. For information on how to use the Memory
Monitor, see “Examining Memory Usage” on page 32 in Chapter 4, “Performance
Tuning and Monitoring Applications.”
Chapter 5
Working With the Emulator
53
Monitoring Network Traffic
You can use the DefaultEmulator to simulate the transmission of messages to
and from a device and the internet. You can open a saved monitoring session to
examine details about previous transmission simulations. For information on how
to use the Memory Monitor, see “Monitoring Network Traffic” on page 36 in
Chapter 4, “Performance Tuning and Monitoring Applications.”
Profiling Methods
The Profiler collects data from the DefaultEmulator during runtime. By seeing how
much time a method takes to execute from a saved profiling session, you can see
what areas of your application could be slowing down execution time. For
information on examining profiling information, see “Profiling Your Application”
on page 29, in Chapter 4, “Performance Tuning and Monitoring Applications.”
Wireless Messaging
You can test your messaging MIDlet with the WMA console. You can send a
message in either text or binary form using either the Short Message Service (SMS)
or Cell Broadcast Service (CBS) from the WMA Console window to an emulated
device. For information on sending SMS and CBS message, see. For information on
monitoring SMS and CBS message connections, see Chapter 7, “Wireless Messaging
with the Wireless Toolkit.”
Signing MIDlet Suites and Managing Certificates
You can use the security features to facilitate the signing process for your MIDlet
suite. You can select a certificate of authentication for a public key from the J2SE
Keystore or import a certificate obtained from a certificate authority (CA) and copy
the certificate to the J2ME keystore. When you sign a MIDlet suite, the signing tool
copies the certificate into the specified JAD for you. The JAR file’s digital signature
is automatically stored in the JAD file for you as well.
You can maintain the list of certificates in the J2ME Keystore through the J2ME
Certificate Manager. The manager enables you to view information about the
selected certificate in the J2ME Keystore. You can check the validation period for a
specific certificate, import a certificate from the J2SE Keystore, and delete expired
certificates from the J2ME Keystore.
For information on how to use the security features, see “Signing MIDlet Suites” on
page 57 in Chapter 6, “Using Security Features in the Wireless Toolkit.”
54
Wireless Toolkit User’s Guide • December 2003
Using a Stub Connector to Access Web Services
The implementation of Web Services for J2ME technology clients is based on J2ME
Web Services (JSR-172). You can use the KToolbar Stub Generator to generate a stub
connector for J2ME Web Services. You will need to provide an XML configuration
file that contains a Web Services Descriptor Language (WSDL) file. We recommend
that you place the XML file in the {j2mewtk.dir}\apps\<project_name>
directory.
For information on how to use the Stub Generator to access J2ME Web Services, see
“Using the Stub Connector to Access J2ME Web Services” on page 25” in Chapter 3,
“Operating with KToolbar.”
Chapter 5
Working With the Emulator
55
56
Wireless Toolkit User’s Guide • December 2003
CHAPTER
6
Using Security Features in the
Wireless Toolkit
The J2ME Wireless Toolkit incorporates the enhanced security features provided in
MIDP 2.0 and provides you with tools to facilitate using these new security
features. These improved security features provide you with:
■
■
■
■
A means of signing applications
The availability of different levels of secure domains
Authenticating the sender of applications through the use of certificates
A means to trust the integrity of the applications received by a device
Signing MIDlet Suites
Once you have built and packaged your MIDlet suite, you can use the security
utilities provided by the J2ME Wireless Toolkit to sign it. The J2ME Wireless Toolkit
enables you to either sign a MIDlet suite with an existing public and private key
pair or with a new key pair that you generate. Each key pair is associated with a
certificate. Assigning a security domain to the certificate, designates the level of
trust the certificate holder has to access protected APIs and the level of access to
those APIs.
MIDlet suites can be assigned one of the following domain types:
■
Untrusted - A MIDlet suite for which the origin and the integrity of the JAR file
cannot be trusted by the device (for example, unsigned MIDlet suites).
■
Trusted - A MIDlet suite with a JAR file that is both signed with a certificate
chain that the device can verify and has not been tampered with.
■
Minimum - A security domain where all permissions to protected APIs are
denied, including access to push functionality and network protocols.
■
Maximum - Same as trusted. A security domain where all permissions to access
protected APIs for push functionality and network protocols are allowed.
57
The signing process is ordinarily a complex procedure involving the keytool utility,
JADtool, and the MEKeytool. The toolkit’s security utilities consist of graphical
user interfaces that call on these tools for you. It enables you to complete the entire
signing process without having to resort to command-line utilities. With the
security utilities, you can:
■
Create a new key pair and specify an alias.
■
Copy the certificate for an existing key pair in the J2SE Keystore to the J2ME
Keystore.
■
Add a key pair’s certificate to the MIDlet suite’s JAD file.
■
Digitally sign the MIDlet suite’s JAR file and add the signature to the JAD file.
■
Delete an obsolete certificate.
When a key pair is created in the J2ME Wireless Toolkit, the certificate is stored in
the ME keystore file.
For a thorough description of the MIDP 2.0 security model, see the MIDP 2.0
specification at http://java.sun.com/products/midp.
Creating a New Key Pair and Signing a MIDlet
Suite
If you need to create a key pair, you can use the New Key Pair dialog box to
generate one. You must specify an alias, distinguished name, and organization. The
utility then creates a public and private key that are referenced by the alias. The
key pair is stored in a keystore. A certificate for the key pair is also generated and
you are asked to specify a security domain to be associated with the certificate. The
certificate associated with the key pair is then automatically imported to the
DefaultEmulator’s keystore. You can then sign the MIDlet suite.
Note – The ability to create a key pair and sign a MIDlet within the Wireless
Toolkit environment is for testing purposes only. The signing feature is a
simulation and not an actual event. When you run your application on an actual
device, you must obtain a valid certificate from a certificate authority recognized
by your device.
To create a new key pair:
1. Choose Project -> Sign in the KToolbar.
The Sign MIDlet Suite window opens. Another way to open the Sign MIDlet Suite
window is to choose File -> Utilities and click the Sign MIDlet button.
2. Click New Key Pair in the Sign MIDlet Suite window and provide the following
information in the New Key Pair generator dialog box:
■
■
58
An alias to be referenced for the new key pair.
The name of the server storing the keystore to contain the key pair.
Wireless Toolkit User’s Guide • December 2003
■
The name of the organization.
These are the minimum fields required to create a key pair.
FIGURE 22
Keystore File Generator
3. Click Create, then specify a security domain type to associate with the certificate.
The key pair is generated and the alias is added to the list of aliases in alphabetical
order:
FIGURE 23
Alias List Displaying Alias for Newly Created Key Pair
You can view certificate and key information in the J2SE Key Details pane. The
information displayed includes the distinguished name (DN) of the certificate
subject and issuer, the serial number of the certificate, the period of validation for
Chapter 6
Using Security Features in the Wireless Toolkit
59
the certificate, the cryptographic algorithm used, and the certificate authorizer’s
digital signature. A copy of the certificate is automatically stored in the Default
Emulator’s keystore.
4. Click Sign MIDlet Suite and then choose the MIDlet suite’s JAD file from the
file chooser.
The certificate is copied to the .jad file. The JAR file is digitally signed. A
confirmation dialog box appears when the signing is successful. If the signing was
not successful, an error dialog box appears with a brief message briefly stating why
the signing could not take place.
Note – The behavior of the device running the application (MIDlet suite with
signed JAD and JAR files) can be seen only when deploying the application
over-the-air (OTA) using the Application Management System.
Importing a Key Pair and Signing the MIDlet
Suite
You can sign a MIDlet suite with an existing key pair:
1. Click Import Key Pair in the Sign MIDlet Suite window and choose the keystore
file from the file chooser.
2. Enter the password to access the keystore.
3. Select the desired alias from the keystore’s list of aliases:
FIGURE 24
Alias List Dialog Box
4. Enter an alias to reference the certificate.
5. Select a security domain to associate with the certificate.
6. Click Sign MIDlet Suite in the Sign MIDlet Suite window and choose the
MIDlet suite’s JAD file from the file chooser.
A confirmation dialog box appears when the signing is successful. If the signing
was not successful, an error dialog box appears with a brief message briefly stating
why the signing could not take place.
60
Wireless Toolkit User’s Guide • December 2003
Deleting an Alias
To remove a key pair:
1. Select the alias for the key pair you want to delete from the keystore in the Alias
List of the Sign MIDlet Suite window.
2. Choose Action -> Delete Selection.
A confirmation of deletion dialog box appears. Click Yes to continue the deletion
operation. The alias is removed from the list and the key pair the alias referenced is
deleted from the keystore.
Managing Default Emulator Certificates
The Default Emulator comes with a default set of certificates. Certificates are used
to check the validity of network connections and to check the validity of signed
MIDlet suites. If you are using a secure protocol to access a web site, such as
HTTPS or SSL, the web site’s certificate is checked to see if it is valid. The MIDlet
suite’s certificate is also checked to see if it has permission to access the site. If the
site’s certificate is not valid or if the MIDlet suite does not have permission, access
to the site is denied. When you are simulating a network transmission, the
certificates in the Default Emulator’s keystore are checked. For information on how
to add API permissions for network protocols for use within the Wireless Toolkit
environment, see “Adding API Permissions” on page 19 in Chapter 3, “Operating
with KToolbar.”
A Certificate Manager is provided by the J2ME Wireless Toolkit to help you
maintain the certificates in the Default Emulator’s keystore (J2ME keystore). If you
want to add a certificate to the Default Emulator’s set of certificates, you can use an
existing certificate from the J2SE Keystore by importing it to the Default Emulator’s
keystore or you can generate a request for a certificate from a recognized certificate
authority (CA) and import the certificate you receive into the Default Emulator’s
keystore. When a certificate expires or you no longer need a certificate, you can
delete them from the keystore.
You can always see which certificates are in the J2ME Keystore by viewing the
certificates list displayed in the Certificate Manager. You can also use the command
line utility, MEKeyTool, to see the list of certificates. For information on using
MEKeyTool, see Appendix D, “Command Line Utilities.”
Viewing Certificates
To see the list of certificates:
Chapter 6
Using Security Features in the Wireless Toolkit
61
1. Choose File -> Utilities and click the Manage Certificates button in the Utilities
dialog box.
The J2ME Certificate Manager window opens showing the certificates contained in
the J2ME Keystore file.
2. Select a certificate in the list to see its key information in the J2ME Key Details
pane.
FIGURE 25
Certificate Details
Importing Certificates
You can import a certificate from a J2SE Keystore into the J2ME Keystore or you
can generate a request for a certificate from a recognized certificate authority (CA)
and import the certificate you receive into the J2ME Keystore.
To open the Certificate Manager:
● Choose File -> Utilities and click the Manage Certificates button.
Importing From the J2SE Keystore
To import a certificate from a J2SE Keystore using the Certificate Manager:
1. Choose Action -> Import J2SE Certificate.
62
Wireless Toolkit User’s Guide • December 2003
2. Specify a security domain to associate with the certificate to be imported.
3. Choose a keystore file from the file chooser.
The default keystore file is keystore.sks.
4. Enter the password in the password dialog box to access the keystore.
The password for the default keystore is password.
5. Select the alias for the certificate in the Alias List in the Select alias dialog box.
The certificate is appended to the list of certificates in the J2ME Keystore. You can
select the certificate to view its key information in the J2ME Key Details pane.
Importing From a Certificate Authority
To obtain a certificate from a CA, you must generate a request for the certificate.
Once you have received the certificate, you can import it to the Default Emulator’s
keystore through the Certificate Manager.
To import a new certificate that you received from a CA:
1. Click Import Certificate and choose a certificate from the file chooser.
The certificate has a .cer extension.
2. Select the security domain from the Enter security domain dialog box.
The certificate is copied to the Default Emulator’s keystore (J2ME keystore) and
appended to the list of certificates in the Certificate Manager. You can select the
certificate to view its key information in the J2ME Key Details pane.
Managing Certificates in Other Keystores
If you have certificates in more than one keystore file in the J2ME keystore, you can
open a specific keystore file from the Certificate Manger to view the certificates in
that keystore. You can also use the Certificate Manager to delete certificates in that
keystore file.
To open another keystore:
● Click Open Keystore and select a keystore file from the file chooser.
Use the Delete Selection command in the Action menu to delete the selected
certificate.
Deleting Certificates
You can use the Delete function in the J2ME Certificate Manager to delete a
certificate in the J2ME Keystore.
To remove a certificate:
Chapter 6
Using Security Features in the Wireless Toolkit
63
1. Select the desired certificate in the J2ME Certificate Manager window.
Hold down the Shift key to select multiple certificates to delete.
2. Choose Action -> Delete Selection.
A confirmation of deletion dialog box appears. Click yes to continue the deletion
operation.
Note – Certificates have a fixed period of validation. If you are replacing an
expired certificate for a valid one with the same serial number, the outdated
certificate must be removed first.
64
Wireless Toolkit User’s Guide • December 2003
CHAPTER
7
Wireless Messaging with the
Wireless Toolkit
The Wireless Messaging API (WMA) is supported by the J2ME Wireless Toolkit.
With WMA, you can send brief text or binary messages by means of a wireless
connection to one or to multiple mobile devices. The WMA supports Short
Message Service (SMS) and Cell Broadcast Service (CBS) messaging. With SMS, you
can have peer to peer messaging or client to server messaging. CBS enables
messages to be broadcast to multiple devices connected to a cell or a network of
cells simultaneously.
You can develop and test applications that use SMS and CBS messaging. To help
you develop and test SMS and CBS messaging applications, the Wireless Toolkit
provides you with:
■
Client to client messaging emulation enabling you to send messages between
multiple emulators simultaneously
■
The ability to create applications that use WMA messaging and emulate the
running of those applications
■
A WMA console that enables you to send and receive SMS text or binary
messages to an emulated device and broadcast CBS text or binary messages to
multiple emulators running simultaneously
■
The ability to create WMA push registry entries
■
WMA attributes that you can set in the Preferences dialog box to customize the
phone numbers assigned to emulators, to specify an SMSC phone number, and
to performance test your WMA applications
■
A network monitor to examine transmissions of SMS and CBS messages
■
A J2SE-based API that provides a mechanism to plug J2SE programs into the
internal emulated wireless messaging environment of the Wireless Toolkit.
See the WMA specification at http://java.sun.com/products/wma for
information about wireless messaging.
65
Getting Started With WMA Emulation
Use the WMA console to develop and test your messaging applications. You can
send text or binary messages in either SMS or CBS mode to one or more emulated
devices. You can use the console as a server with the emulated device acting as the
client. The next section walks you through using the WMA console to test your
messaging application. One way to familiarize yourself with the WMA console is
to run the SMSDemo application included with the Wireless Toolkit (select it from
the Open Project list), which uses WMA messaging. You can find a walk through of
the SMSDemo application in the {j2mewtk.dir}\docs directory.
Before using the console, go through the following checklist for preparatory
procedures that apply:
■
Make sure the WMA API is available for use during the session. Go to Edit ->
Preferences and click the API Availability tab and make sure the WMA API
option is checked.
■
If you want to simulate running using OTA provisioning, run using OTA
directly from the KToolbar by choosing the Run via OTA command in the
Project menu after you have packaged your project.
■
If you need to sign you application and will be running in OTA provisioning
mode, check that the permissions settings for your project include the
appropriate set of the following permissions relevant to your application:
■
■
■
■
■
■
■
javax.microedition.io.Push Registry
javax.microedition.io.Connector.sms
javax.microedition.io.Connector.cbs
javax.wireless.messaging.sms.send
javax.wireless.messaging.sms.receive
javax.wireless.messaging.cbs.receive
If you want to simulate real time delays in message transmission, make sure you
have set the Message Fragment Loss and Message Delivery Delay attributes in
the WMA panel of the Preferences dialog box. See “Setting WMA Parameters”
on page 51 in Chapter 5, “Working With the Emulator” for information on
setting WMA performance parameters.
See “Adding API Permissions” on page 19 in Chapter 3, “Operating with
KToolbar” for information on setting MIDlet permissions.
Sending a Text SMS Message From the
WMA Console
You can send a text SMS message to a running emulated device from the WMA
console by following these steps:
66
Wireless Toolkit User’s Guide • December 2003
1. Click Open Console under WMA in the Utilities window.
The WMA console window opens. The phone number assigned to the console is
displayed in the output screen. This number increases incrementally each time you
run the console.
FIGURE 26
WMA Console Window
2. Click Send SMS in the console to send an SMS message to the emulated device.
The Send a Message dialog box opens. The assigned phone numbers of the console
and any running emulated devices are shown in the Selected Clients list:
Chapter 7
Wireless Messaging with the Wireless Toolkit
67
FIGURE 27
Send a Message - SMS Dialog Box
Each time you run an emulated device, a phone number is assigned to it and added
to the Selected Clients list.
3. Select the client number from the list and type the client’s port number in the
Port text field.
By specifying a port number for an SMS message, you are designating a specific
application or communication channel to receive or send your message through.
Omitting the port number means that the message is sent directly to the client
device. Since MIDlets can only receive SMS messages with a port number specified,
you need to enter a port number.
For information on restrictions on port numbers for SMS messages, see the WMA
specification at http://java.sun.com/products/wma.
4. Type a brief message in the Message field and click Send.
For maximum message length, consult the Wireless Messaging API. Maximum
message (payload) length is dependent on the type of encoding used among other
factors. If your message exceeds the allowable limit, an error message is displayed
in the console’s output screen.
For a description of the SMS Demo application, see the “SMSDemo Application”
document in the {j2mewtk.dir}\docs directory.
68
Wireless Toolkit User’s Guide • December 2003
Sending a Binary SMS Message
Sending a binary SMS message is similar to sending a text message. To send a
binary message:
1. Click Binary SMS in the Send a Message dialog box.
2. Type the pathname for the binary file you want to send or select one from the file
chooser by clicking Browse, then click Send.
The Console screen in the WMA console window displays output with the URL
address of the receiving device.
Sending a CBS Message
You can use the WMA console to send a CBS broadcast message to all running
emulators. The procedure is similar to sending an SMS message. After you have
opened the WMA console from the Utilities window:
1. Click Send CBS.
The Send a Message dialog box opens.
2. Click Text CBS or Binary CBS as desired.
3. Enter a message or specify a binary file and click Send.
If you are sending a text message, you must provide a message identifier and a
brief text message in the corresponding fields in the dialog box.
If you are sending a binary message, you must provide a message identifier and a
pathname for the binary file.
The output screen in the WMA console window displays information whether the
information was sent and received or if an error occurred.
Setting WMA Preferences
The WMA panel of the Preferences dialog box contains fields that enable you to set
WMA-related features.
■
Setting Device and SMSC Phone Numbers
The Wireless Toolkit assigns unique phone numbers to emulated devices as they
are launched. These phone numbers are the addresses of the devices for sending
and receiving SMS messages. Each field accepts a numeric string of eighteen
digits or less with no spaces.
Chapter 7
Wireless Messaging with the Wireless Toolkit
69
■
■
■
■
At times, you might want to specify that the next emulator you launch should
have a specific phone number. You might want to do this if you are
developing a MIDlet that assumes it has a specific phone number. You can
specify this phone number in the "Phone Number of Next Emulator" field.
The WMA specification provides a mechanism for the MIDlet to discover the
phone number of the SMSC that services the telephone. While there is no real
SMSC within the emulated environment, you may specify this phone number
in the "SMSC Phone Number" field.
The default first assigned phone number is 5550000. In locales outside the
United States, you might want to change this number to conform to local
phone number conventions. You can specify the first phone number that is
assigned to an emulator in the "First Assigned Phone Number" field.
Specifying Message Delivery Parameters
The Wireless Messaging API specification provides automatic fragmentation and
reassembly of messages that are too long to be sent in a single SMS message. The
maximum size of a singe SMS fragment is determined by the content type and
encoding of the message body. The Wireless Toolkit’s emulators automatically
fragment longer messages into individual pieces. All the individual pieces are
delivered to the destination address. The recipient automatically reassembles the
fragments into the whole message before returning it to the MIDlet.
Many factors contribute to the actual delivery time of a message You can use the
following parameters to simulate the real-world constraints on message
delivery:
■
■
70
While in practice SMS message delivery is relatively reliable, there is no
guarantee that all messages or message fragments will be delivered. You can
simulate the random loss of message fragments using the "Random Message
Fragment Loss" slider.
The Message Fragment Delivery Delay represents the time it takes for the
wireless network to deliver SMS messages from source to destination. Delays
might occur in the real world if a recipient is very distant or is shut off. You
can simulate the delay in transmission by specifying the Message Fragment
Delivery Delay time (in milliseconds).
Wireless Toolkit User’s Guide • December 2003
CHAPTER
8
Testing Application Provisioning
The MIDP 2.0 specification includes the document, "Over The Air User Initiated
Provisioning Specification," which describes how MIDlet suites can be deployed
over-the-air (OTA), and the functions that a device should provide to support such
deployments. See http://java.sun.com/products/midp for the MIDP
specification. For information on OTA provisioning in the Wireless Toolkit, see
Chapter 2, “Developing and Running Applications.”
The MIDP implementation of the J2ME Wireless Toolkit’s default Emulator
emulates the device behavior during the provisioning process. You can use this
functionality to test and demonstrate the full provisioning process of MIDlet suites
from the server to the device. This chapter explains the steps that are required to
perform this process.
Deploying Applications on a Web
Server
To deploy a packaged MIDP application remotely on a Web server:
1. Change the JAD file’s MIDlet-Jar-URL property to the URL of the JAR file.
The URL must be an absolute path. For example:
MIDlet-Jar-URL: http://mumble.java.sun.com/midlets/example.jar
2. Ensure that the Web server recognizes JAD and JAR files:
a. For the JAD file type, set the file extension to .jad and the MIME type to
text/vnd.sun.j2me.app-descriptor.
b. For the JAR file type, set the file extension to .jar and the MIME type to
application/java-archive.
The details of how to configure a Web server depend on the specific software used.
71
Deploying Applications Remotely
J2ME-enabled devices include an Application Management System (AMS) for
downloading, installing, and configuring J2ME applications. The Emulator has an
example AMS that you can use to demonstrate how a user would obtain and
manage your application. The example AMS supports network delivery of
applications, according to the recommended practice for MIDP (see “Over The Air
User Initiated Specification” in the MIDP 2.0 specification for a description of
recommended practices).
You can use the AMS in one of the following ways:
■
Perform a single operation from the command line with the AMS option:
■
From the Microsoft Windows Start menu:
Select Programs -> J2ME Wireless Toolkit 2.1 -> OTA Provisioning.
■
From the command line:
At the command prompt, change to the {j2mewtk.dir}\bin directory and type
emulator -Xjam at the prompt.
For more information on performing single operations through the command
line, see Appendix D, “Command Line Utilities.”
■
Emulate the process using the AMS graphical user interface
Note – You can emulate running in OTA provisioning mode within the Wireless
Toolkit environment. For more information, see Chapter 2, “Developing and
Running Applications.”
72
Wireless Toolkit User’s Guide • December 2003
APPENDIX
A
MIDlet Attributes
This appendix lists and describes the MIDlet attributes, and specifies which
attributes go into a suite’s manifest and JAD files.
Note – When you work under a development environment, the attributes are
automatically placed in the appropriate files. When you use the command line, you
must place them manually.
TABLE 6
Attribute Name
MIDlet Attributes
Attribute Description
Attribute File
MIDlet-Name
The name of the MIDlet suite that identifies the MIDlets to
the user.
JAD and
manifest
MIDlet-Version
The version number of the MIDlet suite. The format is
<major>.<minor>.<micro> as described in the Java
Product Versioning Specification. It can be used by the
application management software for install and upgrade
purposes, as well as for communication with the user.
JAD and
manifest
MIDlet-Vendor
The organization that provides the MIDlet suite.
JAD and
manifest
MIDlet-Jar-URL
The URL from which the JAR file can be loaded.
JAD
MIDlet-Jar-Size
The number of bytes in the JAR file. A development
environment should automatically generate this field
when the JAR file is built (and prevent it from being
edited by the user).
JAD
MicroEdition-Profile
The J2ME profile required, using the same format and
value as the system property microedition.profiles.
For the MIDP 2.0 release, the content of this field must be
MIDP-2.0.
manifest
Required Attributes
73
TABLE 6
MIDlet Attributes
Attribute Name
Attribute Description
Attribute File
MicroEditionConfiguration
The J2ME Configuration required using the same format
and value as the system property
microedition.configuration.
manifest
MIDlet-Icon
The name of a PNG file within the JAR file used to
represent the MIDlet suite. It is the icon used by the Java
Application Management System to identify the suite.
JAD and/
or manifest
MIDlet-Description
The description of the MIDlet suite.
JAD and/
or manifest
MIDlet-Info-URL
A URL for information further describing the MIDlet
suite.
JAD and/
or manifest
MIDlet-Data-Size
The minimum number of bytes of persistent data required
by the MIDlet. The device may provide additional storage
according to its own policy. The default is zero.
JAD and/
or manifest
MIDlet-Delete-Confirm
A text message provided to the user when prompted to
confirm deletion of the MIDlet suite.
MIDlet-Delete-Notify
The URL to which a POST request is sent to report
deletion of the MIDlet suite.
MIDlet-Install-Notify
The URL to which a POST request is sent to confirm
successful installation of this MIDlet suite.
<User-Defined Attributes>
User-defined attributes relating to specific MIDlets. See
Table X for a list of user-defined attributes for MMAPI
MIDlets
JAD
The name, icon, and class of the nth MIDlet in the JAR file.
The lowest value of <n> must be 1 and consecutive
ordinals must be used.
The MIDlet’s name identifies it to the user.
The MIDlet’s icon is specified by the name of a PNG
image within the JAR.
The MIDlet’s class is specified by the name of a class that
extends MIDlet and has a public no-argument
constructor.
manifest
Optional Attributes
MIDlet-n Attributes
MIDlet-<n>
74
Wireless Toolkit User’s Guide • December 2003
TABLE 6
MIDlet Attributes
Attribute Name
Attribute Description
Attribute File
MIDlet-Push-<n>
The connection URL, class, and allowed sender of the nth
MIDlet in the JAR file. The lowest value of <n> must be 1
and consecutive ordinals must be used.
The MIDlet’s connection URL identifies the connection
protocol and port number.
The MIDlet’s class name. If the given MIDlet appears
multiple times in the suite, the first matching entry is
used.
The allowed sender is a valid sender that can launch the
associated MIDlet.
JAD
MIDlet-Permissions
Permissions for required APIs, which are APIs that the
MIDlet suite must have access to in order to function.
Permissions have the same naming structure as a Java
class, for example,
javax.microedition.io.Connector.http
JAD and
manifest
MIDlet-Permissions-Opt
Permissions for non-required APIs, which are APIs that
are not essential for the MIDlet suite to function. The
MIDlet suite is able to run with reduced functionality.
Permissions have the same naming structure as a Java
class, for example,
javax.microedition.io.Connector.http
JAD and
manifest
Appendix A
MIDlet Attributes
75
76
Wireless Toolkit User’s Guide • December 2003
APPENDIX
B
MIDlet Demonstration
The primary purpose of the J2ME Wireless Toolkit is to enable you to develop a
MIDlet suite. You can also use it to demonstrate MIDlets for non-development
purposes. You can use the J2ME Wireless Toolkit to demonstrate MIDlet suites that
are deployed either on a web site or on a local disk without having to perform
unnecessary development steps. You should be aware that by running an
application in the Wireless Toolkit environment, you are running a simulation,
meaning you do not have the full behavior of the Application Management System,
such as domain checking and push registration for example.
Note – If you are not doing actual development with the J2ME Wireless Toolkit,
and are only running demonstrations of your MIDlet suite, you are not required to
have the J2SE SDK. You can run with only the JRE instead.
Demonstrating MIDlet Suites Deployed
on a Local Disk
To demonstrate your application, double-click its JAD file. Alternately, you can use
these steps:
1. From the Windows Start menu, select Programs -> J2ME Wireless Toolkit 2.1 ->
Run MIDP Application ...
The Select A JAD File to Run dialog box appears.
2. Select the JAD file of the application you want to run, and press Run.
The Emulator appears.
77
Demonstrating MIDlet Suites Deployed
on a Web Site
The J2ME Wireless Toolkit enables you to execute a MIDlet suite with the toolkit’s
emulators by visiting the URL of the MIDlet suite’s JAD file in a Web browser. The
MIDlet suite must be deployed on a Web server.
To deploy a MIDP application on a Web server:
1. Change the JAD file’s MIDlet-Jar-URL property to the URL of the JAR file.
This URL must be absolute. For example:
MIDlet-Jar-URL: http://mumble.java.sun.com/midlets/example.jar
2. Ensure that the Web server recognizes JAD and JAR files:
a. For the JAD file type, set the file extension to .jad and the MIME type to
text/vnd.sun.j2me.app-descriptor.
b. For the JAR file type, set the file extension to .jar and the MIME type to
application/java-archive.
Note – The details of how to configure a Web server depend on the specific
software used.
To run the MIDP application from the Web server:
● Go to the URL of the JAD file in a Web browser.
The Emulator appears.
78
Wireless Toolkit User’s Guide • December 2003
APPENDIX
C
Internationalization
This appendix describes setting the language displayed in the J2ME Wireless
Toolkit and the localization setting of the emulation environment.
Locale Setting for the Wireless Toolkit
A locale is a geographic or political region or community that shares the same
language, customs, or cultural convention. In software, a locale is a collection of
files, data, and code, which contains the information necessary to adapt software to
a specific geographical location.
Some operations are locale-sensitive and require a specified locale to tailor
information for users, such as:
■
■
Messages displayed to the user
Fonts used or other writing-specific information
By default, all KToolbar strings, that is, the entire User Interface (UI), are displayed
in the language of the supported platform’s locale.
For example, Japanese characters can be displayed in the KToolbar running on a
Japanese Windows 2000 machine, provided that the correct localized J2ME Wireless
Toolkit supplement has been downloaded and installed over the Wireless Toolkit.
You can set the wtk.locale property to have the KToolbar displayed in a
specified locale’s language. For example, you can have the toolkit running on a
Japanese Windows NT machine but still have the KToolbar display shown in
English by setting the locale property to en-US, and making sure that the proper
supplement has been downloaded and installed over the J2ME Wireless Toolkit.
The wtk.locale property should be placed in the
{j2mewtk.dir}\wtklib\Windows\ktools.properties file.
79
Emulated Locale
The microedition.locale property is the MIDP system property that defines
the current locale of the device, which is null by default. For the J2ME Wireless
Toolkit Default Emulator, this value is automatically set to the default locale for the
J2SE environment you are running. For example:
■
If you are running in an English system in the US, the microedition.locale
is set to en-US.
■
If you are running in a French system, the microedition.locale is set to
fr-FR.
For information on microedition.locale, see section 4.2, System Properties, in
the JSR-37 Mobile Information Device Profile specification at
http://jcp.org/aboutJava/communityprocess/final/jsr037/
index.html.
You can override the default value by adding the microedition.locale
property to the file {j2mewtk.dir}\wtklib\Windows\ktools.properties file
and define the property as desired, as shown in the following examples:
microedition.locale=en-US
microedition.locale=null
For details on setting a default locale, see the J2ME Wireless Toolkit Basic
Customization Guide.
Character Encodings
The CLDC system property, microedition.encoding, defines the default
character encoding name of the device MIDP environment. In the J2ME Wireless
Toolkit Default Emulator environment, this property is set according to the
underlying window system you are using. The property’s value is set to the default
encoding for the J2SE environment running on the same window system. For
example, in an English window system, the encoding setting is
microedition.encoding=ISO8859_1
You can override the default value by adding the microedition.locale
property to the {j2mewtk.dir}\wtklib\Windows\ktools.properties file. For
example, if you want to use UTF-8 as the default setting, you can set the property
in the {j2mewtk.dir}\wtklib\Windows\ktools.properties file as follows:
microedition.encoding=UTF-8
For more information on character encoding, see section 6.9.2, Property support in
the JSR-30 J2ME Connected, Limited Device Configuration specification at
80
Wireless Toolkit User’s Guide • December 2003
http://jcp.org/aboutJava/communityprocess/final/jsr030/
index.html.
Note – All the J2SE encoders are available in the emulated environment. See the
J2ME Wireless Toolkit Basic Customization Guide for information on how to limit the
list of available encoders for a specific device.
Java Compiler Encoding Setting
The javac.encoding property determines the encoding used by the javac
compiler to compile your source files. The property’s value is set to the default
encoding for the J2SE environment running on the same window system.
You can override the default value by adding the javac.encoding property to
the {j2mewtk.dir}\wtklib\Windows\ktools.properties file. For example, if
you are running in an English system but find you need to compile a Japanese
resource bundle, you can specify a Japanese character set, such as:
javac.encoding=EUCJIS
Font Support in the Default Emulator
The default fonts that are used in the emulated environment are set according to
the underlying window system locale. By default, the MIDP environment fonts are
mapped to the default J2SE environment Java fonts. These fonts usually support all
the characters that are required by the current window’s locale.
You can override these fonts to support other characters that are not supported by
the default fonts. See the J2ME Wireless Toolkit Basic Customization Guide for
information on how to configure them.
Appendix C
Internationalization
81
82
Wireless Toolkit User’s Guide • December 2003
APPENDIX
D
Command Line Utilities
This appendix describes how to operate the J2ME Wireless Toolkit tools from the
command line and details the steps required to build and run an application. It also
describes the J2ME Wireless Toolkit’s certificate manager utility, called MEKeyTool
(Mobile Equipment KeyTool) and the MIDlet signing utility, called JAD Tool (Java
Application Descriptor Tool).
Preliminary Checks
Before building and running an application from the command line, verify that you
have a version no earlier than 1.4.2 of the J2SE SDK. Run the jar.exe command
(make sure the command is in your PATH) and then run java -version at the
command line to verify that the version of the J2SE SDK that is actually being used
is 1.4.2.
For more examples, see the files build.bat and run.bat in the bin\ directories
of the demonstration applications. You can find these files under the
{j2mewtk.dir}\apps\{demo_name}\bin\ directory where {j2mewtk.dir} is the
installation directory of the J2ME Wireless Toolkit and {demo_name} is the name of
one of the demo applications.
Selecting a Default Device
If you do not specify which device to emulate, the Emulator uses the default
device, DefaultColorPhone, when you run a MIDlet.
To change the default emulated device:
1. From the Windows Start menu, select Programs -> J2ME Wireless Toolkit 2.1 ->
Default Device Selection.
The Default Device Selection dialog appears with a menu of devices.
83
2. Select the device from the menu, and press OK.
The next time you run a MIDlet, it will be emulated on the device you have chosen.
Accessing Preferences and Utilities
To access the Preferences and Utilities tools described in Chapter 5, “Working With
the Emulator” and Chapter 4, “Performance Tuning and Monitoring Applications”
from the command line, type the following commands at the prompt:
{j2mewtk.dir}\bin\prefs.exe
{j2mewtk.dir}\bin\utils.exe
Using the Stub Generator
J2ME Clients can use the Stub Generator to access web services. The wscompile
tool generates stubs, ties, serializers, and WSDL files used in JAX-RPC clients and
services. The tool reads a configuration file, which specifies either a WSDL file, a
model file, or a compiled service endpoint interface.
The syntax for the stub generator command is as follows:
wscompile [options] configuration_files
Options
TABLE 7
84
Options for the wscompile Command
Option
Description
-d <output directory>
specify where to place generated output files
-f:<features>
enable the given features
-features:<features>
same as -f:<features>
-g
generate debugging info
-gen
same as -gen:client
-gen:client
generate client artifacts (stubs, etc.)
Wireless Toolkit User’s Guide • December 2003
TABLE 7
Options for the wscompile Command
Option
Description
httpproxy:<host>:<p
ort>
specify a HTTP proxy server (port defaults to 8080)
-import
generate interfaces and value types only
-model <file>
write the internal model to the given file
-O
optimize generated code
-s <directory>
specify where to place generated source files
-verbose
output messages about what the compiler is doing
-version
print version information
-cldc1.0
Set the CLDC version to 1.0 (default) (float and double become
String)
-cldc1.1
Set the CLDC version to 1.1 (float and double are ok)
-cldc1.0info
Show all CLDC 1.0 info/warning messages.
Note – Exactly one -gen option must be specified. The -f option requires a
comma-separated list of features.
TABLE 8 lists the features (delimited by commas) that may follow the -f option.
The wscompile tool reads a WSDL file, compiled service endpoint interface (SEI),
or model file as input. The Type of File column indicates which of these files can be
used with a particular feature.
TABLE 8
Command Supported Features (-f) for wscompile
Option
Description
Type of File
explicitcontext
turn on explicit service context mapping
WSDL
nodatabinding
turn off data binding for literal encoding
WSDL
noencodedtypes
turn off encoding type information
WSDL, SEI, model
nomultirefs
turn off support for multiple references
WSDL, SEI, model
novalidation
turn off full validation of imported
WSDL documents
WSDL
searchschema
search schema aggressively for subtypes
WSDL
serializeinterface
s
turn on direct serialization of interface
types
WSDL, SEI, model
Appendix D
Command Line Utilities
85
TABLE 8
Command Supported Features (-f) for wscompile
Option
Description
wsi
enable WSI-Basic Profile features
(default)
resolveidref
Resolve xsd:IDREF
nounwrap
No unwrap.
Type of File
Example
wscompile -gen -d generated config.xml
wscompile -gen -f:nounwrap -O -cldc1.1 -d generated config.xml
Compiling Class Files
J2ME class files are compiled from Java source files using the javac compiler from
the J2SE SDK. Before compiling, you should verify that the following
subdirectories exist and create them if necessary:
1. tmpclasses. A directory to hold unverified classes.
2. classes. A directory to hold verified classes.
To compile an application, use the javac command as follows (all on one line):
javac [options] -bootclasspath
{j2mewtk.dir}\lib\cldcapi10.jar;{j2mewtk.dir}\lib\midpapi20.jar
<files>
If your application uses WMA, J2ME Web Services, MMAPI, or other versions of
CLDC or MIDP, be sure to include the relevant .jar files in the bootclasspath.
Arguments
<files>
A list of one or more source files to compile, separated by spaces.
Options
-d <output directory>
Specify the directory into which the compiler should output classes. (This directory
must exist before compiling.)
86
Wireless Toolkit User’s Guide • December 2003
Example
To compile all the source files of a CLDC 1.0, MIDP 2.0 MIDlet located in the src
directory (but not its subdirectories) and place the resulting class files into the
directory tmpclasses, use the following command:
javac -d tmpclasses -bootclasspath
c:\wtk21\lib\cldcapi10.jar;c:\wtk21\lib\midpapi20.jar
-classpath tmpclasses;classes src\*.java
The tmpclasses directory is used to store the compiled classes while they are not yet
verified. After verification has been performed, the preverifier stores the classes in
the classes directory. For more information about the javac command, see the J2SE
SDK documentation.
Preverifying Classes
To preverify application classes, use the preverify command that comes with the
J2ME Wireless Toolkit. The syntax for the preverify command is as follows:
preverify [options] <files | directories>
You can find the preverify application in the {j2mewtk.dir}\bin directory.
Arguments
<files | directories>
A list of one or more files or directories to preverify, separated by spaces.
Options
-classpath <classpath>
Specify the directories or JAR files (given as a semicolon-delimited list) from which
classes are loaded.
-d <output directory>
Specify the directory into which the preverifier should output classes. (This
directory must exist before preverifying.) If this option is not used, the preverifier
places the classes in a directory called output.
Appendix D
Command Line Utilities
87
Example
Following the example in the previous section, after compiling the source files, use
the following command:
preverify -classpath
c:\wtk21\lib\cldcapi10.jar;c:\wtk21\lib\midpapi20.jar -d
classes tmpclasses
As a result of this command, pre-verified versions of the class files are placed in the
classes directory. If your application uses WMA, J2ME Web Services, MMAPI, or
other versions of CLDC or MIDP, be sure to include the relevant .jar files in the
classpath.
Packaging a MIDlet suite
To package a MIDlet suite, you must first create a manifest file, then create an
application JAR file, and finally, an application JAD file.
Creating a Manifest File
Create a manifest file containing the appropriate attributes as specified in
Appendix A, “MIDlet Attributes.”
You can use any plain text editor to create the manifest file. A manifest might have
the following contents, for example:
MIDlet-1: My MIDlet, MyMIDlet.png, MyMIDlet
MIDlet-Name: MyMIDlet
MIDlet-Vendor: My Organization
MIDlet-Version: 1.0
MicroEdition-Configuration: CLDC-1.0
MicroEdition-Profile: MIDP-2.0
Creating an Application JAR File
Create a JAR file containing the manifest as well as the suite’s class and resource
files.
● To create the JAR file, use the JAR tool that comes with the J2SE SDK. The
syntax is as follows:
jar cfm <file> <manifest> -C <class_directory> . -C <resource_directory> .
88
Wireless Toolkit User’s Guide • December 2003
Arguments
<file>
The JAR file to create.
<manifest>
The manifest file for the MIDlets.
<class_directory>
The directory containing the application’s classes.
<resource_directory>
The directory containing the application’s resources.
Example
To create a JAR file named MyApp.jar whose classes are in the classes directory
and resources are in the res directory, use the following command:
jar cfm MyApp.jar MANIFEST.MF -C classes . -C res .
Creating an Application JAD File
Create a JAD file containing the appropriate attributes as specified in Appendix A,
“MIDlet Attributes.” You can use any plain text editor to create the JAD file. This
file must have the extension .jad.
Note – You need to set the MIDlet-Jar-Size entry to the size of the JAR file created
in the previous step.
Example
A JAD file might have the following contents, for example:
MIDlet-Name: MyMIDlet
MIDlet-Vendor: My Organization
MIDlet-Version: 1.0
MIDlet-Jar-URL: MyApp.jar
MIDlet-Jar-Size: 24601
Appendix D
Command Line Utilities
89
Running the Emulator
You can run the Emulator from the command line using the emulator command.
Your current directory should be the bin\ subdirectory of the directory where you
installed the Wireless Toolkit, for example, C:\wtk21\bin. The syntax for the
emulator command is as follows (all on one line):
emulator [options]
General Options
-help
Display a list of valid options.
-version
Display version information about the emulator.
-Xquery
Print device information on the standard output stream and exit immediately. The
information includes, but is not limited to, device name, device screen size, and
other device capabilities.
Running Options
-Xdevice:<device_name>
Run an application on the device specified by the given device name. (For a list of
device names, see TABLE 3 on page 43 in Chapter 5, “Working With the Emulator.”
-Xdescriptor:<jad_file>
Run an application locally using the given JAD file.
-classpath <classpath>
Specify the classpath for libraries required to run the application. Use this option
when running an application locally.
-D <runtime_property>
Set the HTTP and HTTPS proxy servers. Valid properties include:
com.sun.midp.io.http.proxy=<proxy host>:<proxy port>
90
Wireless Toolkit User’s Guide • December 2003
-Xjam:<command>=<application>
Run an application remotely using the Application Management System (AMS) to
run using OTA provisioning. If no application is specified with the argument, the
graphical AMS is run.
install=<jad_file_url> | force | list | storageNames|
Install the application with the specified JAD file onto a device.
run=[<storage_name> | <storage_number>]
Run a previously installed application. The application is specified by its valid
storage name or storage number.
remove=[<storage_name> | <storage_number> | all]
Remove a previously installed application. The application is specified by its
valid storage name or storage number. Specifying all, all previously installed
applications are removed.
transient=<jad_file_url>]
Install, run, and remove the application with the specified JAD file. Specifying
transient causes the application to be installed and run and then removed
three times.
Tracing and Debugging Options
-Xverbose:<trace_options>
Display trace output, as specified by a list of comma-separated options:
class
Trace class loading.
gc
Trace garbage collection.
all
Use all tracing options.
-Xdebug
Enable runtime debugging. The -Xrunjdwp option must also be used.
Appendix D
Command Line Utilities
91
-Xrunjdwp:<debug_settings>
Start a JDWP debug session, as specified by a list of comma-separated debug
settings. The -Xdebug option must also be used. Valid debug settings include:
transport=<transport_mechanism>
The transport mechanism used to communicate with the debugger. The only
transport mechanism supported is dt_socket.
address=<host:port>
The transport address for the debugger connection. You can omit providing a
host. If host is omitted, localhost is assumed to be the host machine.
server=y|n
Start the debug agent as a server. The debugger must connect to the port
specified. The possible values are y and n. Currently, only y is supported (the
Emulator must act as a server).
Emulator Preferences Setting Option
-Xprefs:<filename>
Set the Emulator preferences to the values in the given property file. The filename
you provide should be the full path name of a property file, which is used to
override the values in the Preferences dialog box. The property file can contain the
following properties:
TABLE 9
Emulator Preferences Properties List
Property Name
Property Description and Legal Values
http.version
Network Configuration > HTTP Version
Value: HTTP/1.1 | HTTP/1.0
http.proxyHost
Network Configuration > HTTP Address
Value: hostname
http.proxyPort
Network Configuration > HTTP Port
Value: integer
https.proxyHost
Network Configuration > HTTPS Address
Value: hostname
https.proxyPort
Network Configuration > HTTPS Port
Value: integer
kvem.memory.monitor.enable
Monitor > Enable memory monitor
Value: true | false
kvem.netmon.comm.enable
Monitor > Enable Comm monitoring
Value: true | false
92
Wireless Toolkit User’s Guide • December 2003
TABLE 9
Emulator Preferences Properties List
Property Name
Property Description and Legal Values
kvem.netmon.datagram.enable
Monitor > Enable Datagram monitoring
Value: true | false
kvem.netmon.http.enable
Monitor > Enable HTTP monitoring
Value: true | false
kvem.netmon.https.enable
Monitor > Enable HTTPS monitoring
Value: true | false
kvem.netmon.socket.enable
Monitor > Enable Socket monitoring
Value: true | false
kvem.netmon.ssl.enable
Monitor > Enable SSL monitoring
Value: true | false
kvem.profiler.enable
Monitor > Enable profiling
Value: true | false
netspeed.bitpersecond
Performance > bits/sec combo box
Value: integer
netspeed.enableSpeedEmulation
Performance > Enable network throughput
emulation
Value: true | false
screen.graphicsLatency
Performance > Graphics primitives latency
Value: integer
screen.refresh.mode
Performance > Display refresh (radio button)
Value: default | immediate | periodic
screen.refresh.rate
Performance > Display refresh (slider)
Value: integer
vmspeed.bytecodespermilli
Performance > Enable VM speed
emulation (check box)
Value: integer
vmspeed.enableEmulation
Performance > Enable VM speed emulation (slider)
Value: true | false
storage.root
Storage > Storage root directory
Value: String (relative path to appdb)
storage.size
Storage > Storage size
Value: integer
mm.control.capture
MMedia > Audio Capture
Value: true | false
mm.control.midi
MMedia > MIDI tones
Value: true | false
mm.control.mixing
MMedia > Audio Mixing
Value: true | false
mm.control.record
MMedia > Audio Record
Value: true | false
Appendix D
Command Line Utilities
93
TABLE 9
Emulator Preferences Properties List
Property Name
Property Description and Legal Values
mm.control.volume
Value: true | false
mm.format.midi
MMedia > MIDI format
Value: true | false
mm.format.video
MMedia > Video format
Value: true | false
mm.format.wav
MMedia > WAV Audio format
Value: true | false
wma.client.phoneNumber
WMA > Phone Number of Next Emulator
Value: integer
wma.smsc.phoneNumber
WMA > SMS Phone Number
Value: integer
wma.server.firstAssignedPhoneNumber
WMA > First Assigned Phone Number
Value: integer
wma.server.percentFragmentLoss
WMA > % Random Message Fragment Loss
Value: integer
wma.server.deliveryDelayMS
WMA > Message Fragment Delivery Delay (ms)
Value: integer
Emulator Domain Setting Option
-Xdomain <domain_type>
Assigns a security domain to the MIDlet suite. Domain types include:
untrusted
Requires that the MIDlet suite obtain user permission for push functionality and
the network protocols: HTTP, HTTPS, socket, datagram, server socket, comm,
SMS, and CBS.
trusted
Allows access to the push functionality and all the following network protocols:
HTTP, HTTPS, socket, datagram, server socket, comm, SMS, and CBS.
minimum
Denies the MIDlet suite access to all security sensitive APIs. This domain
contains no permissions.
maximum
Same as trusted.
94
Wireless Toolkit User’s Guide • December 2003
Certificate Manager Utility
The MEKeyTool manages the public keys of certificate authorities (CAs), making it
functionally similar to the keytool utility that comes with the Java 2 SDK,
Standard Edition. The keys can be used to facilitate secure HTTP communication
over SSL (HTTPS).
Before using MEKeyTool, you must first have access to a Java Cryptography
Extension (JCE) keystore. You can create one using the J2SE keytool utility, see
http://java.sun.com/j2se/1.4/docs/tooldocs/win32/keytool.html
for more information.
Usage
The MEKeyTool utility is packaged in a JAR file. To run it, open a command
prompt, change the current directory to {j2mewtk.dir}\bin, and enter the
following command:
java –jar MEKeyTool.jar <command>
Commands
-help
Print the usage instructions for MEKeyTool.
-delete [-MEkeystore <MEkeystore>] -owner <owner>
Delete a key from the given ME keystore with the given owner. The default ME
keystore is {j2mewtk.dir}\appdb\_main.ks.
-import -alias <alias> [-MEkeystore <MEkeystore>] [-keystore
<JCEkeystore>] [-storepass <storepass>] -domain <domain_name>
Import a public key into the given ME keystore from the given JCE keystore using
the given JCE keystore password. The default ME keystore is
{j2mewtk.dir}\appdb\_main.ks and the default JCE keystore is
{user.home}\.keystore.
-list [-MEkeystore <MEkeystore>]
List the keys in the given ME keystore, including the owner and validity period for
each. The default ME keystore is {j2mewtk.dir}\appdb\_main.ks.
Appendix D
Command Line Utilities
95
Note – The J2ME Wireless Toolkit contains a default ME keystore called
_main.ks, which is located in the appdb\ subdirectory. This keystore includes all
the certificates that exist in the default J2SE keystore, which comes with the J2SE
JDKTM installation.
MIDlet Suite Signing Utility
The JADTool is a command-line interface for signing MIDlet suites using public
key cryptography according to the MIDP 2.0 specification. Signing a MIDlet suite is
the process of adding the signer certificates and the digital signature of the JAR file
to a JAD file.
The JADTool only uses certificates and keys from J2SE keystores. The J2SE provides
the command-line tool to manage J2SE keystores.
Usage
The JADTool utility is packaged in a JAR file. To run it, open a command prompt,
change the current directory to {j2mewtk.dir}\bin, and enter the following
command:
java –jar JADTool.jar <command>
Commands
-help
Print the usage instructions for JADTool.
-addcert -keystore <keystore> -alias <alias> -storepass <password>
[-certnum <number>] [-chainnum <number>] -inputjad <input_jadfile> outputjad <output_jadfile>
Add the certificate of the key pair from the given keystore to the JAD file. The
default ME keystore is {j2mewtk.dir}\appdb\_main.ks.
-addjarsig -jarfile <jarfile> -keystore <keystore> -alias <alias> storepass <password> -keypass <password> -inputjad <input_jadfile> outputjad <output_jadfile>
Add the digital signature of the given JAR file to the specified JAD file. The default
value for -jarfile is the MIDlet-Jar-URL property in the JAD file. The default
ME keystore is {j2mewtk.dir}\appdb\_main.ks.
96
Wireless Toolkit User’s Guide • December 2003
-showcert [([-certnum <number>] [-chainnum <number>]) |-all [encoding <encoding>] -inputjad <filename>
Display the list of certificates in the given JAD file.
The default value for:
■
■
■
■
■
-encoding is UTF-8
-jarfile is the MIDlet-Jar-URL property in the JAD
-keystore is $HOME/.keystore
-certnum is 1
-chainnum is 1
Appendix D
Command Line Utilities
97
98
Wireless Toolkit User’s Guide • December 2003
Index
A
advanced configuration options, 27
API permissions
removing, 20
selecting, 19
Application Management System (AMS)
running remotely deployed application, 72
applications
running remotely, 71
applications directory, setting, 27
C
Call Graph, 30
CBS messages, sending, 69
Cell Broadcast Service (CBS), 65
Certificate Manager, 61
certificate manager utility, 83
certificates
copying to J2ME Keystore, 60
default set, 61
deleting, 63
generating, 58
importing, 62
importing from a CA, 63
managing in other keystores, 63
viewing, 61
character encodings, 80
class libraries
adding to a project, 25
defining for all projects, 25
external, 24
-classpath option, 87
command line operations, 83
command path, 83
compiling
example from command line, 87
from KToolbar, 21
from the command line, 86
Connected, Limited Device Configuration
specification, 80
creating a new key pair, 58
D
database files, cleaning, 53
debugging
from command line, 91
from KToolbar, 21
debugging options, 91
default device, setting, 83
Default Emulator’s keystore, 61
DefaultColorPhone
interface, 44
DefaultColorPhone
description, 43
DefaultEmulator, 48
configuring HTTP connections, 50
configuring HTTPS connections, 50
DefaultGrayPhone
description, 43
interface, 44
demo applications, 6
device categories
DefaultEmulator, 48
device characteristics, table of, 44
device storage, cleaning, 53
drawing speed, setting, 41
E
emulator command, 90
emulators
default font support, 81
demonstrating applications, 77
device characteristics, 44
99
entering text, 48
language support, 79
limitations, 43
running remotely deployed applications, 72
example devices, 43
external class libraries, 24
F
font support, 81
G
generating stub from command line, 84
Graphics primitive latency, 41
H
heap size, setting, 51
-help option, 90
HTTP connections
configuring for Default Emulator, 50
HTTP/HTTPS connections
filtering messages, 38
HTTPS connections, configuring for
DefaultEmulator, 50
K
key pair
creating, 58
key pair generator, 58
keystore.sks, 63
keystores, 58
keytool utility, 95
KToolBar
cleaning project files from, 22
generating a stub connector, 25
navigating in, 12
opening window, 11
project directories, 12
KToolbar
advanced configuration options, 27
compiling from, 21
debugging from, 21
packaging from, 22
preverifying from, 21
running from, 21
ktools.properties, 27
ktools.properties file, 79
M
I
-import command, 95
inbound connections, list of, 17
J
J2ME Certificate Manager, 62
J2ME keystore, 58, 61
J2ME Web Services
providing access to, 5
J2SE keystore, 58
JADTool
running from command line, 96
Java Application Descriptor (JAD) file, 8
Java Archive (JAR) file, 8
Java Cryptography Extension (JCE) keystore, 95
javac command, 86
100
javax.microedition.io.Connector.http,
20
javax.microedition.io.PushRegistry, 20
Wireless Toolkit User’s Guide • December 2003
managing certificates from command line, 95
managing device speed, 40
manifest file, creating, 88
maximum domain, 57
MediaControlSkin
description, 43
interface, 46
MEkeystore, 58
MEKeyTool
running from command line, 95
Memory Monitor, 32
data display, 34
viewing information, 33
memory usage, 32
saving, 35
memory usage graph, 34
message delivery parameters, setting, 70
message fragments, 70
messages
clearing from Network Monitor, 40
filtering, 39
sorting, 39
microedition.encoding property, 80
microedition.locale property, 80
MicroEdition-Configurationattribute, 74
MicroEdition-Profileattribute, 73
MIDlet attributes
MIDlet, 74
MIDlet-Permissions, 75
MIDlet-Permissions-Opt, 75
MIDlet-Push, 75
MIDlet suites
signing, 57
signing process, 58
trusted, 57
untrusted, 57
MIDletattribute, 74
MIDlet-Data-Sizeattribute, 74
MIDlet-Delete-Confirmattribute, 74
MIDlet-Descriptionattribute, 74
MIDlet-Iconattribute, 74
MIDlet-Info-URLattribute, 74
MIDlet-Install-Notifyattribute, 74
MIDlet-Jar-Sizeattribute, 73
MIDlet-Jar-URLattribute, 73
MIDlet-Nameattribute, 73
MIDlet-Permissionsattribute, 75
MIDlet-Permissions-Optattribute, 75
MIDlet-Pushattribute, 75
MIDlets
adding specific properties, 17
adding user defined properties, 16
attributes, table of, 73
changing order of MIDlets, 17
cleaning project files, 22
compiling, 21
creating obfuscated package, 22
debugging, 21
defined, 8
deploying on a web server, 78
deploying on local disk, 77
editing attributes, 16
editing project settings, 15
modifying specific properties, 16
packaging, 22
preverifying source code, 21
removing specific properties, 17
removing user defined properties, 16
running applications, 21
MIDlet-Vendorattribute, 73
MIDlet-Versionattribute, 73
MIDP application development diagram, 7
minimum domain, 57
Mobile Equipment KeyTool(MEKeyTool), 83
Mobile Information Device Profile
specification, 80
N
Network Monitor, 36
clearing messages, 40
data display, 37
disabling filtering, 39
examining saved messages, 40
filtering messages, 38
saving message files, 40
sorting messages, 39
viewing information, 36
network protocols, 36
network sessions
saving, 40
network speed parameter, setting, 42
New key pair dialog box, 58
O
obfuscated package, creating, 22
obfuscated packages, 9
Object Monitor, 34
Optional attributes
MIDlet-Data-Size, 74
MIDlet-Delete-Confirm, 74
MIDlet-Description, 74
MIDlet-Icon, 74
MIDlet-Info-URL, 74
MIDlet-Install-Notify, 74
Over the Air (OTA) provisioning, 71
P
packaging
creating obfuscated package, 22
example from command line, 89
Index
101
from KToolbar, 22
MIDP applications, 8
project files, 22
packaging from command line, 88
performance tuning features, 29
Preferences tool, 48
accessing, 26
accessing from command line, 84
Performance tab, 41
setting drawing speed, 41
setting heap size, 51
setting refresh speed, 41
setting the Web proxy, 49
tracing events, 50
preverify command, 87
preverifying
example from command line, 88
from KToolbar, 21
from the command line, 87
Profiler, 29
Call Graph, 30
data display, 30
saving information, 32
viewing information, 30
ProGuard code obfuscator, 23
project directories, 12
project files
removing, 22
projects
creating, 13
opening, 15
properties
adding user defined, 16
modifying MIDlets, 15, 16
removing user defined, 16
Push Registry
creating, 18
setting, 17
Q
QwertyDevice
description, 43
interface, 46
S
security domain
maximum, 52
minimum, 52
specifying, 52
trusted, 52
untrusted, 52
security utilities, 57
Short Message Service (SMS), 65
signing process, 58
Stub Generator, 5
XML configuration file, 25
T
text, entering in emulator, 48
tracing events
class loading, 50
exceptions, 50
garbage collection, 50
method calls, 50
tracing options, 91
trusted MIDlet suite, 57
U
R
refresh modes, 41
102
refresh speed, setting, 41
remotely-deployed applications, 71
Required attributes
MicroEdition-Configuration, 74
MicroEdition-Profile, 73
MIDlet-Jar-Size, 73
MIDlet-Jar-URL, 73
MIDlet-Name, 73
MIDlet-Vendor, 73
MIDlet-Version, 73
revision control files, 28
Revision Control System (RCS), 27
RevisionControl property, 27
run options, 90
running
from command line, 90
from KToolbar, 21
Wireless Toolkit User’s Guide • December 2003
untrusted MIDlet suite, 57
Utilities tool, 48
accessing from the command line, 84
cleaning the database, 53
Utilities tool, accessing, 26
V
-version optopn, 90
VM emulation speed, 40
VM speed emulation
setting, 42
W
Web proxy, setting for DefaultEmulator, 49
Web Service Descriptor Language file, 5
Wireless Messaging API (WMA), 65
Wireless Toolkit
certificate manager utility, 83
debugging, 2
demo applications, 6
list of sample devices, 43
packaging, 8
running, 2
running from command line, 83
setting a default device, 83
Wireless Toolkit, setting locale, 79
WMA console, 65
WMA preferences, setting, 51, 69
wscompile tool, 84
wtk.locale property, 79
X
-Xdebug option, 91
XML configuration file
Stub Generator, 25
-Xquery option, 91
-Xrunjdwp option, 92
-Xverbose option, 91
Index
103
104
Wireless Toolkit User’s Guide • December 2003