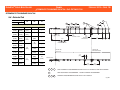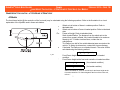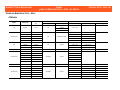
1
FRAMES
GENERAL FRAME INFORMATION
All Models
Introduction
The frame is the structure that carries and supports the rated load under anticipated driving conditions and secures the major components of a
vehicle in their relative positions. The frame assembly consists of two sidemembers and depending upon the length of the frame, five or more
crossmembers.u01
General Frame Recommendations
It is very important that the frame be inspected periodically for cracks, buckling, crossmember loosening or other damage that may cause
eventual failure of the frame. Additional inspections should be made whenever the chassis has been overloaded or involved in an accident. An
alignment check IS NOT SUFFICIENT since local cracks, crossmember loosening or sidemember buckling will not necessarily cause
misalignment.
On reinforced sidemember sections, when cracks exist in either of the sidemember sections, the members must be separated for repair. After
separation follow the procedures for non-reinforced sections. The two sidemember sections MUST NOT be welded together. After the weld
repairs, the sections should be reinforced with the appropriate section and re-assembled with mounting bolts tightened to SAE Grade 8 torque
levels.
Drilling or Notching
Sidemembers should not be drilled or notched without approval from Navistar Engineering. Do not exceed the maximum allowable
sidemember hole size in the unrestricted zones. For illustrations, see the Frame Drilling Restrictions later in this book.
Welding or Flame Cutting
Welding or flame cutting of the frame components is unacceptable because of the associated loss of fatigue strength. This restriction applies
not only to the heat-treated components, but also the high strength low alloy (HSLA) and low carbon steel components.
DURASTAR® SERIES BODY BUILDER
FRAMES
GENERAL FRAME INFORMATION - ALL MODELS
FEBRUARY 2015 — PAGE 83
DURASTAR® SERIES BODY BUILDER
FRAMES
FEBRUARY 2015 — PAGE 84
GENERAL FRAME INFORMATION - ALL MODELS
Exceptions to this are cases with Navistar Engineering approval or for repair operations as described in this service manual section.
TO AVOID SERIOUS PERSONAL INJURY, DEATH OR POSSIBLE ENGINE DAMAGE, WHEN WELDING OR USING AN ACETYLENE TORCH ALWAYS WEAR WELDING
GOGGLES AND GLOVES. INSURE THAT ACETYLENE AND OXYGEN TANKS ARE SEPARATED BY A METAL SHIELD AND ARE CHAINED TO A CART. DO NOT WELD OR
HEAT AREAS NEAR FUEL TANKS OR FUEL LINES. UTILIZE PROPER SHIELDING AROUND HYDRAULIC LINES.
Reinforcement to Increase Capacity
Reinforcement of the chassis frame to support either additional loading or concentrated loading does not increase vehicle load carrying
capacity unless it has been fully verified that all other vehicle components, such as the brake system, steering system, suspension system, etc.
can properly and safely support the increased loading.
Increase in Local Stress
In any modification of the chassis frame, the addition of holes, reinforcements, welds, clamps, splices, etc., may cause an increase in the local
stress in the frame at the point of the modification, THEREFORE CAUSING A STRESS CONCENTRATION IN THE FRAME SIDEMEMBER(S).
These local stress concentrations can significantly affect the life of the chassis frame. The specific effect which the stress concentrator will
have on the life of the chassis frame is influenced by the location of the stress concentration, the frequency and severity of the loading, and the
magnitude of stress concentration.
Deviation from the repair procedures in this section may void manufacturer's warranty.
Identification of Frame Rail Material
International® chassis are manufactured with frame rails of different alloy steels and some are heat-treated. Each material must be handled in a
specific manner to assure maximum service life; therefore, the frame material must be determined before attempting repair or modification.
International chassis are presently manufactured with frame rails of:
• High strength low alloy (HSLA) steel (50,000, 60,000 and 80,000 PSI yield strength)
• Heat treated steel (110,000 and 120,000 psi yield strength).
Each type has different repair procedures. The frame rail material can be determined by inspecting the frame and consulting the dealer vehicle
lineset ticket and the sales data book.
Heat-treated rails are marked on the inside of the section with a decal which cautions against welding, flame cutting or the addition of holes in
critical zones. These practices are restricted for all frame rails, however, HEAT-TREATED rails are much more sensitive to these alterations.
Frame Damage
The major sources of frame damage are accidents, overloading the vehicle, and local overstressing due to a variety of causes. In accident cases,
the reasons for the damage are readily apparent. Such damage may often be repaired by:
• Straightening and reinforcing the frame.
• Repairing the damaged area and reinforcing the frame sidemember.
• Replacing the frame sidemembers and crossmembers.
Damage to the chassis frame, such as a crack in the frame sidemember or crossmember, which is not associated with impact damage, may be an
indication of overloading the vehicle. Damage to the chassis frame may also be an indication of the creation of locally high stresses due to
operating conditions or equipment mounting practices. Examples of overloading are:
1. Exceeding either the gross vehicle weight rating (GVWR) or the gross axle weight rating (GAWR) (loading the frame beyond its design
capacity).
2. Uneven load distribution.
3. Improper fifth wheel settings.
4. Using the vehicle in operating conditions or with equipment it was not designed for.
Examples of creation of locally high stresses are:
1. Mounting bodies or equipment in a manner that causes stress concentrations and/or abrasive wear in either the flange or web portion of
the sidemember.
2. Improper modification or repair of frame components.
3. Equipment which is susceptible to resonant vibration due to excess flexibility of its mounting.
Frame damage may also be caused by corrosion resulting from the contact between dissimilar metals.
Damage to the chassis frame, which is not associated with impact damage, should not be repaired until the cause of the damage has been
determined and corrective actions taken to prevent re-occurrence of the non-impact damage.
DURASTAR® SERIES BODY BUILDER
FRAMES
GENERAL FRAME INFORMATION - ALL MODELS
FEBRUARY 2015 — PAGE 85
DURASTAR® SERIES BODY BUILDER
FRAMES
FEBRUARY 2015 — PAGE 86
GENERAL FRAME INFORMATION - ALL MODELS
Welding and Reinforcement
The guidelines below deal with the general procedures for weld repair and reinforcement. Because of the many variables associated with these
repairs, it is recommended that your field service representative be consulted prior to undertaking the repair. This will also help to determine
whether a specific set of recommendations has already been developed for the case in question.
The essential elements of repairing the sidemembers are the restoring of BOTH the shape and local strength so that the load capacity is at least
as good as before the damage occurred. The sidemembers may look like new, but may have local strength reduction due to small cracks or
material strength reduction. Even if the frame has acceptable alignment and there is no gross deformation, local deformations may reduce the
strength in the area to be weld repaired. Examples of this are local bulges in the web (vertical portion) of the section and buckling of the flanges.
These local deformations must be repaired by straightening before proceeding with the weld repair.
Welding Precautions
When welding on any vehicle, care must be taken to prevent damage to the electronic components. Vehicles with ELECTRONIC ENGINE
CONTROL SYSTEMS require additional precautions.
CAUTION:
On any vehicle, disconnect both the positive and negative battery cables from the battery before welding
on the vehicle. Attach the welder ground cable as close as possible to the part being welded.
TO AVOID SERIOUS PERSONAL INJURY, DEATH OR POSSIBLE ENGINE DAMAGE, WHEN WELDING OR USING AN ACETYLENE TORCH ALWAYS WEAR WELDING
GOGGLES AND GLOVES. INSURE THAT ACETYLENE AND OXYGEN TANKS ARE SEPARATED BY A METAL SHIELD AND ARE CHAINED TO A CART. DO NOT WELD
OR HEAT AREAS NEAR FUEL TANKS OR FUEL LINES. UTILIZE PROPER SHIELDING AROUND HYDRAULIC LINES.
With an electronic engine controller (such as Celect), do not connect the ground cable to the control module(s) or the cooling plate. To protect
the control module(s), it is mandatory to remove all connectors going to the control modules.
The following is a general guideline for the steel frames:
Welding of the HSLA (50,000, 60,000 and 80,000 PSI yield strength) steel side member and the heat-treated (110,000 and 120,000 PSI yield
strength) steel sidemember involves a significant reduction in the strength of the frame in the heat affected zones of the weldment. This means
that the frame in the welded region is no longer capable of carrying the same load or stress as the original section.
To restore the strength of the frame rails after welding, the welded area must be reinforced using reinforcements as indicated in “Repair and
Reinforcement Recommended Procedures”.
Welding must be done properly to make an effective repair. Therefore, only those who are properly trained and qualified should perform the
welding repairs in this section.
Reinforcement
Reinforcements (Figure 2.1 ) to increase load capacity are generally “full length”. The actual length of the reinforcement varies with the model.
Shorter, (approximately 7') rear suspension tandem liner reinforcements are available for some tractor models. Inverted “L” and “C” channel
reinforcements are available for most models. For models which do not have reinforcements necessary to contact Sales Engineering to obtain
reinforcement recommendations.
STANDARD
SIDEMEMBER SECTION
HEAVY DUTY
SIDEMEMBER SECTION
L-REINFORCEMENT
SIDEMEMBER SECTION
C-REINFORCEMENT
SIDEMEMBER SECTION
01_0011
Figure 2.1 Frame Rails and Reinforcements (Typical)
These reinforcements are generally installed on the outside of the sidemember, although certain models require “C” channel reinforcements
installed to the inside of the sidemember. Contact your International® Truck dealer regarding the required type of reinforcement.
Depending on model application, there will be other parts affected, such as spring brackets for example, which are bolted to the flange as well
as the web of the sidemember. To maintain proper alignment of the springs, these brackets may require replacement with new brackets
designed to accept the reinforcements. These brackets are available through your International Truck dealer parts department.
NOTE:When an inside reinforcement is added, the lengths of the crossmembers will be affected.
DURASTAR® SERIES BODY BUILDER
FRAMES
GENERAL FRAME INFORMATION - ALL MODELS
FEBRUARY 2015 — PAGE 87
DURASTAR® SERIES BODY BUILDER
FRAMES
FEBRUARY 2015 — PAGE 88
GENERAL FRAME INFORMATION - ALL MODELS
Reinforcement Attachment
THE REINFORCEMENTS MUST NEVER BE WELDED TO THE ORIGINAL CHASSIS SIDEMEMBERS. High strength SAE Grade 8 bolts are to be used to
fasten the reinforcement to the sidemember. Existing bolt holes in the sidemembers should be used whenever possible.
NOTE:The reinforcements should be bolted to the chassis frame using high strength SAE Grade 8 bolts not less than 0.5 inch (13 mm) in
diameter (refer to “Bolt and Torque Information”).
Corrosion
If aluminum and steel are allowed to come into direct contact with each other, a galvanic cell can be formed. In order for the cell to form, the
dissimilar metals must be in direct contact and an electrolyte, such as moisture, must be present. Aluminum is anodic with respect to steel and will
corrode when in the presence of steel. Corrosion of aluminum frame crossmembers will reduce the load carrying capacity of the frame member
and may eventually lead to the failure of the frame.
To prevent the formation of a galvanic cell, isolation techniques such as non-conductive or barrier type spacers or sealers must be used so that
the steel and aluminum are not in direct contact.
It is recommended that a sealer, such as Tectyl 400C or equivalent, be painted onto the surface of both the aluminum and steel, as well as on the
washers under the head of the bolts and nuts.
Frame Alignment
The frame must be properly aligned as this affects body, axle and suspension mounting. If the vehicle has been involved in an accident or has
been overloaded, it is recommended that the frame be checked for proper alignment.
Pre-Alignment Inspection
Before checking alignment, park vehicle on level ground and set parking brake. Inspect frame assembly for loose parts, welds, cracks and
bends. Be sure to make all necessary repairs before attempting to check frame alignment.
Method of Checking Frame Alignment
A satisfactory method of checking the frame and axle alignment, particularly when a body and cab is on a chassis, is to:
1. Place a plumb bob against the point of measurement. All measurements must be taken with the plumb bob positioned against bare metal.
2. Tack or tape pieces of paper to the floor directly under each point of measurement on the chassis as indicated by the letter “K” in
Figure 2.2.
01_0012
Figure 2.2 Centerline of Chassis
Method of Checking
After each measurement point has been carefully marked on the floor, proceed as follows:
1.
Locate centerline of chassis by measuring front and rear end widths, using marks on floor.
If frame widths are within specification, draw centerline on floor, the full length of the chassis and continue with step 2.
If frame widths are out of specification, lay out centerline as follows:
DURASTAR® SERIES BODY BUILDER
FRAMES
GENERAL FRAME INFORMATION - ALL MODELS
FEBRUARY 2015 — PAGE 89
DURASTAR® SERIES BODY BUILDER
FRAMES
FEBRUARY 2015 — PAGE 90
GENERAL FRAME INFORMATION - ALL MODELS
Centerline can be drawn through the intersection of any one pair of equal diagonals (A-A, B-B, C-C, D-D) and center point of one end of
frame or through points of intersection of any two pairs of equal diagonals.
2. Measure distance from centerline to opposite points marked over entire length of frame. Measurements should not vary more than 0.12
inch (3.0 mm) at any point.
3. Measuring diagonals (A-A, B-B, C-C, D-D) will indicate point where misalignment occurs. If diagonals in each pair are within 0.12 inch
(3.0 mm), that part of the frame included between points of measurement may be considered in satisfactory alignment. These diagonals
should intersect within 0.12 inch (3.0 mm) of the centerline.
If the diagonals are not within specification, try loosening and re-tightening all cross-members. Then re-check alignment. Refer to the “Bolt
Torque Chart (Phosphate and Oil Coated)”. If frame is still out of alignment, the vehicle must be taken to a suitable frame alignment
establishment to confirm frame misalignment. If misalignment is confirmed, suitable measures must be taken to repair the damage.
SIDE ELEVATION DIMENSIONS
Dimensions for side elevation of the frame should be checked at the points indicated and should not vary more than 0.12 inch (3.0 mm) from
side to side. (They will differ fore and aft due to typical frame rake.)
Axle Alignment With Frame
After determining that the frame is properly aligned, the axle alignment with the frame should be checked by comparing diagonals.
If necessary, adjust axle-to-frame alignment.
Frame Straightening
NOTE:
Frame straightening should only be performed by a qualified frame alignment facility. Under no circumstance should frame alignment
be performed by inexperienced or unqualified service personnel.
DO NOT USE HEAT TO STRAIGHTEN.
Use of heat is not recommended when straightening heat-treated frame sidemembers. Heat will weaken these frame members, consequently,
all straightening should be done at room temperature. Add reinforcement per section if heat straightening is done.
Frame members which are bent or buckled sufficiently to show cracks or weakness after straightening should be replaced or reinforced. HEATTREATED FRAME MEMBERS MUST NOT BE INTERMIXED WITH NON-HEAT-TREATED MEMBERS.
If one sidemember is to be replaced, the new member must match the former frame member in both cross-section and material strength.
Repair and Reinforcement Recommended Procedures
In some cases of frame damage, the sidemembers must be replaced rather than repaired. Examples of this are:
1. When sidemember cracks caused complete separation or a visible deformation of the section.
2. When the sidemembers are extensively deformed. Consult with your field service representative and frame repair specialists if in doubt.
Preparation of Frame for Repair
Bevel Crack to Weld
To assure complete weld penetration, bevel the crack from one side when welding from one side. Bevel the crack from both sides when
welding from both sides. The existing crack in the sidemember must be entirely removed (Figure 2.3). Widen the crack its full length to 1/8
inch (3 mm). If required, a rubber backed disc grinder or high speed steel burr may be used.
Clean Surface to Weld
Surfaces to be welded and surfaces adjacent to the weld must be free of loose scale, slag, rust, grease, moisture, paint or other material that
could contribute to poor quality welds.
1. FRAME RAIL
2. WIDEN CRACK
3. BEVEL EDGES
Figure 2.3 Preparing For Weld Repair
DURASTAR® SERIES BODY BUILDER
01_0013
FRAMES
GENERAL FRAME INFORMATION - ALL MODELS
FEBRUARY 2015 — PAGE 91
DURASTAR® SERIES BODY BUILDER
FRAMES
FEBRUARY 2015 — PAGE 92
GENERAL FRAME INFORMATION - ALL MODELS
Welding
Electric arc-welding is recommended for repair of steel frames. The shielded arc method should be used because the heat generated during
welding is localized and burning of material is minimized using this method. Additional advantages are that the finished weld can be ground
flush and drilled as necessary.
Shielded metal arc welding (SMAW); gas metal arc welding (GMAW), also known as metal inert gas (MIG) welding; gas tungsten arc welding
(GTAW), also known as tungsten inert gas (TIG) welding; or flux cored arc welding (FCAW) are recommended methods for repair of steel
frame members.
TO AVOID SERIOUS PERSONAL INJURY, DEATH OR POSSIBLE ENGINE DAMAGE, WHEN WELDING OR USING AN ACETYLENE TORCH ALWAYS WEAR WELDING
GOGGLES AND GLOVES. INSURE THAT ACETYLENE AND OXYGEN TANKS ARE SEPARATED BY A METAL SHIELD AND ARE CHAINED TO A CART. DO NOT WELD OR
HEAT AREAS NEAR FUEL TANKS OR FUEL LINES. UTILIZE PROPER SHIELDING AROUND HYDRAULIC LINES.
General Recommendations
IMPORTANT: To properly perform the repair procedure, the following rules must be observed:
All Steel Sidemembers
1. Welding should not be performed when surfaces are wet or exposed to rain, snow, high wind or when repair personnel are exposed to
inclement conditions. Frames exposed to inclement weather must be thoroughly cleaned and dried before the repair is made.
2. Surface areas and edges to be joined must be clean and free of oil, grease, loose scale, rust, moisture, paint or other material that could
contribute to poor quality welds.
3.
Always avoid craters, notching and undercutting.
4.
Peen new welds prior to grinding to relieve stresses caused by shrinkage.
5. Grind all welds flush with the surrounding surfaces. Use a coarse grinder followed by smooth grind at 90° to the crack direction to
remove all of the coarse grind marks.
6. Inspect the weld repaired area carefully after grinding. Grind out any remaining cracks, notches or undercuts and repeat the finishing
and inspections.
7. For welding cracks to the edge of the sidemember flange, locate a run-off block at the edge as in to obtain a continuous weld without
undercuts. After welding, the run-off block should be cut off and the weld should be ground and inspected as in steps 5 and 6 above.
8. Weld to the edges of the holes: The weld should continue into the hole to form a plug weld with a copper chill block on the opposite side
to help form the plug. The weld should then be finished as in steps 5 and 6 above and redrilled. Chamfer the hole edges. If the hole was
open and unused, install a Grade 8 bolt to help attach the weld repair reinforcement.
INVISIBLE ULTRAVIOLET AND INFRARED RAYS EMITTED IN WELDING CAN INJURE UNPROTECTED EYES AND SKIN. PROTECTION SUCH AS WELDER'S HELMET
WITH DARK COLORED FILTER LENSES OF THE PROPER DENSITY MUST BE USED. GTAW OR TIG WELDING WILL PRODUCE INTENSE RADIATION, THEREFORE,
FILTER PLATE LENSES OF THE DEEPEST SHADE PROVIDING ADEQUATE VISIBILITY ARE RECOMMENDED. IT IS STRONGLY RECOMMENDED THAT PERSONS
WORKING IN THE WELD AREA WEAR FLASH SAFETY GOGGLES. ALSO WEAR PROTECTIVE CLOTHING.
9. Electrodes: Only low hydrogen electrodes should be used. These should be purchased in hermetically sealed containers or dried for two
hours at a temperature between 450° F (232° C) and 500° F (260° C).
After drying, the electrodes should be stored in an oven at a temperature of at least 250° F (121° C). If exposed to the atmosphere for more
than four (4) hours, the electrodes should be dried before use. ANY MOISTURE INTRODUCED INTO THE WELD COULD DEVELOP POROSITY OR
EMBRITTLEMENT, LEADING TO FURTHER CRACKING. Welding procedures will vary among different frame materials. Outlined below are
recommendations for welding of the various types of frames.
1. Preheat the frame member along the prepared weld joint to 500 to 600° F (260 to 316° C). Insure the area is clean and any moisture
present is eliminated.
2.
Permit heated area to cool to 200° F (93° C) or below before welding is started. The weld repair area must be clean before welding.
3. Either alternating current or direct current reversed polarity, combined with a short arc and beading or narrow weave technique, may be
used. Direct current reversed polarity is recommended.
4.
Slag should be removed after each pass and an interpass temperature of 200° F (93° C) should be maintained.
5.
Grind smooth and flush with surrounding sidemember material. Grind the weld in a direction that is 90° to crack direction (Figure 2.4 D).
6.
Add reinforcement.
DURASTAR® SERIES BODY BUILDER
FRAMES
GENERAL FRAME INFORMATION - ALL MODELS
FEBRUARY 2015 — PAGE 93
DURASTAR® SERIES BODY BUILDER
FRAMES
FEBRUARY 2015 — PAGE 94
GENERAL FRAME INFORMATION - ALL MODELS
1.
2.
3.
4.
5.
6.
Figure 2.4 Use of Chill Strip
V-GROOVE INTO SOUND METAL
COPPER CHILL STRIP
FRAME RAIL
V-GROOVE
CRACK
WELD-GROUND FLUSH WITH
FRAME, GRIND IN LONGITUDINAL
DIRECTION OF SIDEMEMBER
01_0014
High Strength Low Alloy Steel Frames (50,000, 60,000 and 80,000 PSI Yield Strength)
Any of the electric arc methods previously described may be used. The choice of a suitable electrode or wire depends somewhat upon the
equipment available for welding and the method selected.
The SMAW and the GMAW methods are preferred for welding the HSLA frames. The use of low hydrogen electrodes is recommended.
Refer to Table 2.1 for selection of recommended electrodes and wires, or refer to A.W.S. A.5 standard available from www.aws.org for
equivalent strength electrodes, wires or rods and power leads to be used in the welding methods. The double V-notch weld preparation
using the weld procedure shown in Figure 2.4 is the preferred welding method.
Table 2.1 Recommended Electrodes and Wires
RECOMMENDED ELECTRODE AND WIRE
MATERIAL STRENGTH PSI
SMAW
GMAW
50,000
E7018
E70S-3
60,000
–
E70S-1B
80,000
E8018
E80S-D2
Amperage and voltage recommendations for welding are shown in Table 2.2 and Table 2.3
Table 2.2 SMAW Method (HSLA Frames)
POSITION
ELECTRODE SIZES
INCH
WELDING CURRENT
AMPERES
VOLTS
SPEED
(INCH/MIN.)
Flat
.125
–
–
–
Horizontal and Vertical
.125
110/140
20/14
24
Table 2.3 GMAW Method (HSLA Frames)
POSITION
ELECTRODE SIZES
INCH
WELDING CURRENT
AMPERES
VOLTS
SPEED
(INCH/MIN.)
Flat
.035
–
–
350/400
Horizontal and Vertical
.035
190/220
20/30
350/400
7. Preheat frame rail along the weld joint to 500 to 600° F (260 to 316° C) to insure any moisture present is eliminated and to prevent too
rapid cooling of weld metal.
8.
Direct current, reversed polarity is preferred. Weld using a short arc and a beading or narrow weave technique.
9.
Slag should be removed after each pass and an interpass temperature of 200° F (93° C) should be maintained.
10. Grind smooth and flush with surrounding sidemember material. Grind the weld in a direction that is at 90° to crack direction (Figure 2.4 D).
11. Add reinforcement.
DURASTAR® SERIES BODY BUILDER
FRAMES
GENERAL FRAME INFORMATION - ALL MODELS
FEBRUARY 2015 — PAGE 95
DURASTAR® SERIES BODY BUILDER
FRAMES
FEBRUARY 2015 — PAGE 96
GENERAL FRAME INFORMATION - ALL MODELS
Heat Treated Frames (110,000 and 120,000 PSI Yield Strength)
When welding Heat Treated Frames (110,000 PSI and 120,000 Yield Strength), use low hydrogen electrodes which have superior crack
resistance and notch toughness similar to AWS-E-11018. This type electrode should be stored in a moisture-free container to avoid porosity
during welding.
Amperage and voltage recommendations for welding are shown in Table 2.4.
Table 2.4 SMAW Method (Heat-treated Frames)
POSITION
AMPERES
VOLTAGE
Downhand
130/140
21/23
Overhead
130/140
21/23
Vertical Up
110/120
22/24
A heavy copper “chill” strip should be clamped to the rail side away from the groove to help control the temperature and cooling rate during
welding (Figure 2.4). Short lengths of discarded heavy copper electrical bus bars make suitable chill strips.
Preheat the frame rail along the crack area to 500-600° F (260-316° C). Either alternating current or direct current reversed polarity,
combined with a short arc and a beading or narrow weave technique may be used. Direct current reversed polarity is recommended.
Slag should be removed after each pass and an interpass temperature of 200° F (93° C) should be maintained. Grind smooth and flush with
surrounding sidemember material, in a direction that is parallel to the longitudinal axis of the sidemember (Figure 2.4 D).
A V-groove is ground from the side opposite the repair and the procedure outlined above repeated. “Chill” strips should be used whenever
possible. The V-groove ground on the opposite side of the repair should be deep enough to enter the sound metal of the first weld repair as
shown in Figure 2.4 C.
Reinforcement
The strength of the sidemember in the weld joint repair region has been reduced by welding and this region must be reinforced sufficiently to
insure that the service life of the frame is not shortened. Reinforcement of the frame after welding is intended to reduce the stresses in the weld
repair region to a lower level than was previously permitted. Improper drilling will also reduce the strength of the sidemembers. Refer to
“Drilling or Notching”.
THE TYPE, LENGTH, MATERIAL AND ATTACHMENT TECHNIQUES FOR REINFORCEMENTS VARY WITH THE TYPE AND LOCATION OF THE CRACK AND WITH
THE LOADING CONDITIONS ASSOCIATED WITH THE CRACK. It is not practical to give specific recommendations for all cases of frame cracking,
therefore the various types of reinforcements are identified with general descriptions of their applications and installation procedures. To aid in
making the distinctions between the more critical flange area and the less critical web area, critical zones are defined as shown (Figure 2.5 D).
SEE FRAME DRILLING DIAGRAMS
IN SPECIFIC MODEL BOOKS FOR
MINIMAL VA
VALUE
LUE FOR A AND B
SEE FRAME DRILLING DIAGRAMS
IN SPECIFIC MODEL BOOKS FOR
MINIMAL VA
VALUE
LUE FOR A AND B
01_0015
Figure 2.5 Reinforcement Application
DURASTAR® SERIES BODY BUILDER
FRAMES
GENERAL FRAME INFORMATION - ALL MODELS
FEBRUARY 2015 — PAGE 97
DURASTAR® SERIES BODY BUILDER
FRAMES
FEBRUARY 2015 — PAGE 98
GENERAL FRAME INFORMATION - ALL MODELS
Cracks which occur in the critical zones have a greater probability of growing vertically through the section, and the reduced strength after weld
repair necessitates a more substantial reinforcement.
These guidelines potentially affect the structural integrity of the frame assembly and are intended for those who have the equipment and
experience required to qualify as frame repair specialists.
General Weld Repair Reinforcement Procedures
1. The thickness and material strength of the local plate, “L” and channel reinforcements should match the section being reinforced.
2. The corners of the reinforcements which will be in contact with the sidemember along the reinforcement edges must be chamfered to
prevent damage to the sidemember.
3. All sidemember reinforcements must be bolted to the web section within the zone shown in the frame drilling guidelines in the specific
model body builder book. The bolts must be of SAE Grade 8 or better, with integral flanges or with hardened flat washers and must be tightened
to Grade 8 levels.
4. Crossmember modification or replacement may be required if the reinforcement is on the same side as the crossmember.
5. Consider the potential effects of the reinforcements on the various components mounted to the frame. Check clearances for suspension,
wiring, plumbing and other controls.
6. For attachment of reinforcements, use existing bolts wherever this is practical.
7. The weld repaired area of the sidemember and all of the reinforcement should be primed and painted before reinforcement installation. For
corrosive environments, additional treatment of the interface may be needed.
Full Length Channel Weld Repair Reinforcements
“Full length” channel reinforcements are available through International® dealers for most models. The actual length, starting location and
ending location vary from model to model. Different length reinforcements may also be available.
When applied as a repair reinforcement, these reinforcements DO NOT increase the load capacity of the vehicle. Their advantage in this case
is their availability. A disadvantage of this type is that it is likely to affect more of the components which mount to the frame. In some cases this
disadvantage may be offset by cutting the full length reinforcement to create a local reinforcement.
Recommended Applications
1. Cases of repair of vertical cracks in either the top or bottom flanges at very low mileage.
2.
Cases in which the weld repair is accompanied by extensive straightening of heat treated sidemembers.
Full Length “L” Weld Repair Reinforcements
Steps 1 and 2 above also apply to the full length “L” reinforcements available from International. All of these are the inverted “L” type and are
designed for installation on the outside of the sidemember section (except 9000 Series) (Figure 2.5 A).
Recommended Applications
This type of reinforcement is recommended for cases of cracking at very low mileage where a web crack has extended beyond the range for
a flat plate reinforcement but ends short of the bend radius. It is also applicable to cases in which the cracking is accompanied by flange
buckling.
Application Procedures
1. For custom-fabricated full length “L” reinforcements, the section should be oriented up or down so that the flange is on the same side as
the damaged area.
2.
For maximum strength the flange should be on the outside of the section.
3.
Follow the general recommendations above for attachment of the reinforcement.
Local Channel Weld Repair Reinforcements
This type of reinforcement must be custom-fabricated either by cutting lengths from “full length” reinforcements or by forming from flat stock
(Figure 2.5 B).
Recommended Applications
1. Cases in which the weld repair extends into the sidemember flange after substantial service life.
2. Cases accompanied by extensive abrasive wear of the sidemember section. In these cases the length of the wear area should be added
to the length recommendations below.
Application Procedures
1. The channel should be installed on the outside of the section for greater strength.
2. Figure 2.5 B gives recommended dimensional data and attachment specifications for a typical installation. Holes drilled for the
attachment must be within the frame drilling guidelines in the specific model body builder book.
DURASTAR® SERIES BODY BUILDER
FRAMES
GENERAL FRAME INFORMATION - ALL MODELS
FEBRUARY 2015 — PAGE 99
DURASTAR® SERIES BODY BUILDER
FRAMES
FEBRUARY 2015 — PAGE 100
GENERAL FRAME INFORMATION - ALL MODELS
Local “L” or Inverted “L” Weld Repair Reinforcements
This type of reinforcement is also generally custom-fabricated. It has a greater tendency to loosen than a channel reinforcement because, for
vertical deflections of the frame assembly, it tends to bend about an axis different from that of the main sidemember section. Because of this its
length and/or attachment specifications are typically greater than for the channel type.
Recommended Applications
This type of reinforcement is recommended for cases in which the weld repair is confined to the web of the section but extends beyond the
application zone of the flat plate reinforcements shown in Figure 2.5 D.
Application Procedures
1. Figure 2.5 A shows a typical installation for an “L” reinforcement on the inside of a sidemember section along with minimum
recommended dimensions.
2.
The flange of the reinforcement should be oriented up or down so that flange is on the same side as the damaged area.
3.
For maximum strength the reinforcement should be installed on the outside of the sidemember section.
Flat Plate Weld Repair Reinforcements
This reinforcement is intended for the less critical, web portion of the sidemember section where typical cracking is due to local stresses which
tend to “diaphragm” or “dish” the web without creating appreciable stresses for overall bending of the section. Typical crack patterns radiate out
from the edge of a mounting bracket or crossmember or from a hole in the web. Cracks which radiate from a web hole occupied by a fastener
are frequently an indication of a defective joint, whether by the loosening of the fastener or poor joint design (Figure 2.5 C).
Recommended Applications
The flat plate reinforcements are recommended for weld repairs in which the weld does not extend beyond the zone defined in Figure 2.5 D.
Application Procedures
1. A typical installation is shown in Figure 2.5 C. The length and height of the plate will vary with the size of the weld repair area. In general
it should be such that it will accommodate an array of reinforcement attachment bolts at a typical 3 to 5 inch (76 to 127 mm) spacing all around
the weld repair area.
2.
The plate should generally be installed on the side opposite the component which transferred the local bending load into the web.
3. The edges of the plate should be staggered with respect to the edges of other relatively stiff web mounted components to avoid the
creation of stress concentrations.
Bolt and Torque Information
Most frames are assembled with bolts and nuts. Others are riveted. BOLTS MUST ALWAYS BE USED WHEN ATTACHING A REINFORCEMENT. Rivets
should be replaced by bolts as required when the frame is repaired and reinforced.
In bolted joints, the majority of the load is transferred by frictional force or clamping force between the members of the joint. The bolts must be
properly tightened to develop and maintain the desired clamping force. Operation of the joint with loose or improperly tightened bolts can lead to
failure of the joint. The bolts and nuts should be inspected periodically to insure that proper torque is maintained.
Bolts of high strength material conforming to SAE Grade 8 bolts should be used on all frames. For installation of reinforcements, 0.5 inch (13 mm)
diameter flange head bolts are recommended. The SAE Grade 8 bolt is identified by six radial line markings on the head of the bolt (Figure 2.6).
Nuts must be Grade 8 flange type.
1.
2.
SAE GRADE 5 BOLTS ARE
IDENTIFIED BY 3 RADIAL
LINES
SAE GRADE 8 BOLTS ARE
IDENTIFIED BY 6 RADIAL
LINES
Figure 2.6 Bolt Identification
01_0016
These bolts, 0.5 inch (13 mm) diameter flange head type, should be tightened to 110 to 120 ft-lbs. (149 to 163 Nm) based on new bolts and nuts
lubricated with engine oil. Whenever possible, hold the bolt and tighten the nut.
If frame components are aluminum, flange head bolts and nuts, or bolts with hardened flat washers must be used. If modification or repair
requires replacement of existing bolts with new bolts or bolts of a greater length, the old flange head nuts should not be used with new standard
bolts.
Careful consideration is given to the number, location and sizes of frame bolt holes in the design of a vehicle. The number, location and sizes of
additional bolt holes put in the frame subsequent to manufacture of the vehicle can adversely affect frame strength. The adverse effect of
additional bolt holes can be minimized by following the guidelines.
DURASTAR® SERIES BODY BUILDER
FRAMES
GENERAL FRAME INFORMATION - ALL MODELS
FEBRUARY 2015 — PAGE 101
DURASTAR® SERIES BODY BUILDER
FRAMES
FEBRUARY 2015 — PAGE 102
GENERAL FRAME INFORMATION - ALL MODELS
Huckbolt Fasteners (HP 8)
Huckbolt HP 8 fasteners are used in various positions in frame rail construction. Advantages to this style fastener are consistent clamp load
and a high resistance to loosening due to vibration. The need to recheck fastener torque is eliminated.
Figure 2.7 Huckbolt Fasteners
01_0017
Removal
The swaged collar cannot be unscrewed due to the locking grooves on the HP 8 fastener. Removal requires a Huck Collar Cutter or the
collar can be split with an air chisel while supporting the opposite side of the collar. When the collar is split, the fastener can be driven out
with a punch.
Figure 2.8 Collar Can Be
Split With an Air Chisel
01_0018
CAUTION:
The HP 8 fastener is not intended for re-use. To do so can result in damage to the vehicle frame or components attached to the
frame.
CAUTION:
In the event that Huck fasteners are removed, in order to retain the same joint integrity, it is strongly recommended that new Huck
fasteners be used for attachment/reattachment of components.
Installation
NOTE: Huckbolt HP 8 fasteners cannot be installed without Huck installation equipment.
1.
Install the HP 8 fastener into the component and frame hole.
2.
Place the collar over the fastener pintail (See Figure 2.9)
Figure 2.9 Place Collar Over
Fastener Pintail
DURASTAR® SERIES BODY BUILDER
01_0019
FRAMES
GENERAL FRAME INFORMATION - ALL MODELS
FEBRUARY 2015 — PAGE 103
DURASTAR® SERIES BODY BUILDER
FRAMES
FEBRUARY 2015 — PAGE 104
GENERAL FRAME INFORMATION - ALL MODELS
3.
Place the Huck installation tool over the HP 8 fastener pintail (See Figure 2.10)
2
Figure 2.10 Place Installation Tool
Over Fastener Pintail
4.
01_0020
Activate the Huck installation tool.
NOTE:The Huck installation tool creates a pulling force on the fastener, seating the bolt head and closing the gap between the mating
surfaces. The collar is swaged into the pintail locking grooves developing clamping force (See Figure 2.11). As pulling forces further
increase, the body of the fastener separates at the breakneck (See Figure 2.12), completing installation.
Figure 2.11 Clamping Force is Developed
01_0021
Figure 2.12 Body of Fastener Separates at Breakneck
01_0022
Huck-Spin Fasteners
Description
Huck-Spin fasteners are used in various positions in frame rail construction. The installed fastener has a collar that is cold-worked or swaged
over the grooved pin Figure 2.13. Advantages to this style fastener are consistent clamp load and a high resistance to loosening due to
vibration. The need to recheck fastener torque is eliminated.
Figure 2.13 Huck-Spin Collar
DURASTAR® SERIES BODY BUILDER
01_0023
FRAMES
GENERAL FRAME INFORMATION - ALL MODELS
FEBRUARY 2015 — PAGE 105
DURASTAR® SERIES BODY BUILDER
FRAMES
FEBRUARY 2015 — PAGE 106
GENERAL FRAME INFORMATION - ALL MODELS
Remove
The collar cannot be removed by twisting or hammering. The collar must be cut longitudinally to the extent of the swaged section. This can be
accomplished with a small wheel grinder (Figure 2.14).
Figure 2.14 Cutting Collar
with Wheel Grinder
Drilling on opposite sides of the collar may also be used (Figure 2.15).
01_0024
Figure 2.15 Drilling
the Collar
01_0025
Another method of splitting the collar is to chisel the walls of the collar (Figure 2.16).
Figure 2.16 Using a
Chisel to Split the
Collar
DURASTAR® SERIES BODY BUILDER
01_0026
FRAMES
GENERAL FRAME INFORMATION - ALL MODELS
FEBRUARY 2015 — PAGE 107
DURASTAR® SERIES BODY BUILDER
FRAMES
FEBRUARY 2015 — PAGE 108
GENERAL FRAME INFORMATION - ALL MODELS
When the collar has been opened over the length of the swaged portion on two opposite sides (Figure 2.17), the fastener can be removed.
The fastener may need to be hammered to remove the collar.
Figure 2.17 Collar
with Reliefs for
Removal
01_0027
In the event the collar doesn't come loose, use a chisel or suitable tool to peel the collar sections back (Figure 2.18).
Figure 2.18 Collar Peeled
Back to Assist Removal
01_0028
The fastener will come free when sufficient collar material has been pulled away (Figure 2.19).
Figure 2.19 Fastener Removed
01_0029
Install
The Huck-Spin is installed by spinning the collar onto the fastener. The pulling action of the Huck-Spin installation tool swages the collar into
the grooves of the fastener and then automatically disengages from the fastener (Figure 2.20).
Figure 2.20 Huck-Spin Installation
DURASTAR® SERIES BODY BUILDER
01_0030
FRAMES
GENERAL FRAME INFORMATION - ALL MODELS
FEBRUARY 2015 — PAGE 109
DURASTAR® SERIES BODY BUILDER
FRAMES
FEBRUARY 2015 — PAGE 110
GENERAL FRAME INFORMATION - ALL MODELS
Special Service Tools
Hydraulic Unit – Model No. 940
Used for removal and installation of the Huck Bolt.
Figure 2.21 Hydraulic Unit
01_0031
Nose Assembly Tool
Figure 2.22 Nose Assembly Tool
01_0032
Table 2.5 Nose Assembly Tool
DURASTAR® SERIES BODY BUILDER
DESCRIPTION
TOOL NUMBER
For 1/2 Dia. Fastener
99-1484
For 5/8 Dia. Fastener
99-1481
FRAMES
GENERAL FRAME INFORMATION - ALL MODELS
FEBRUARY 2015 — PAGE 111
DURASTAR® SERIES BODY BUILDER
FRAMES
FEBRUARY 2015 — PAGE 112
GENERAL FRAME INFORMATION - ALL MODELS
Hydraulic Installation Tool
Figure 2.23 Hydraulic
Installation Tool
01_0033
Table 2.6 Hydraulic Installation Tool
DESCRIPTION
TOOL NUMBER
For 1/2 Dia. Fasteners
557
For 5/8 Dia. Fasteners
585
Collar Removal Tool
Table 2.7 Collar Removal Tool
DESCRIPTION
TOOL NUMBER
For 1/2 Dia. Fasteners
516
For 5/8 Dia. Fasteners
520
ORDER TOOLS FROM:
Huck International, Inc.
Phone: (800) 431-3091
P.O. Box 2270, One Corporate Drive
Phone: (914) 331-7300
Kingston, NY 12401
Fax: (914) 334-7333
Aftermarket Modifications
Cutting the frame behind the rear axle to shorten the frame is acceptable. Mechanical cutting or sawing is preferred to torch cutting. Whenever it
is necessary to cut the frame, the sidemember should be cut at an angle of 90° to the longitudinal axis.
For information on cutting of the frames to lengthen the frames or modify the wheelbase, refer to “Wheelbase Alterations”.
Where mounting angles are to be welded to fifth wheel assemblies, refer to fifth wheel manufacturer's recommendations.
In some cases, specialized equipment such as hoists, winches, lifts, snowplows, pusher and tag axles are added to the vehicle by distributors,
installers or dealers. Unless otherwise specified by the customer at the time of assembly, the vehicle is generally equipped with a standard
chassis frame and the manufacturer has not made special allowances for the special equipment which is being added.
The addition or installation of this special equipment on the vehicle can significantly affect the loading of the chassis frame. In some cases, it may
be necessary to reinforce the frame. Care must be exercised to insure that the gross vehicle weight rating (GVWR) and/or the gross axle weight
ratings (GAWR) are not exceeded.
Installation of this special equipment may involve State and Federal requirements which affect vehicle certification for noise emissions, exhaust
emissions, brake requirements, lighting system requirements, etc. The specialized equipment installer is responsible for the safety and durability
of their product and, in addition, is responsible to insure that the equipment and its installation comply with all applicable State and Federal
Department of Transportation requirements and OSHA regulations.
Addition of specialized equipment may have a significant effect on other vehicle components, such as the brake system, steering system,
suspension system, etc. Simple reinforcement of the chassis frame may not be adequate to provide safe operation of the vehicle.
In any modification of the chassis frame, the addition of holes, reinforcements, welds, clamps, splices, etc. may cause an increase in the local
stress in the frame at the point of the modification. These local stress concentrations can significantly affect the life of the chassis frame. The
specific effect which the stress concentrator will have on the life of the chassis frame is influenced by the location of the stress concentration, the
frequency and severity of the loading, and the type of stress concentration. Any modification of the frame may void the manufacturer's warranty.
Refer to “Welding and Reinforcement” information.
DURASTAR® SERIES BODY BUILDER
FRAMES
GENERAL FRAME INFORMATION - ALL MODELS
FEBRUARY 2015 — PAGE 113
DURASTAR® SERIES BODY BUILDER
FRAMES
FEBRUARY 2015 — PAGE 114
GENERAL FRAME INFORMATION - ALL MODELS
45°
WELD AS SHOWN
CUT AT 45° ANGLE
Figure 2.24 Frames – Preparation of Joint for Welding Extension
01_0034
LENGTH
OF FRAME
LENGTH
OF FRAME
Correct Grind Direction, Correct Grind Depth
Correct Grind Direction, Incorrect Grind Depth
LENGTH
OF FRAME
LENGTH
OF FRAME
Incorrect Grind Direction, Correct Grind Depth
Incorrect Grind Direction, Incorrect Grind Depth
Figure 2.25 Cross-sectional Views Showing Correct and Incorrect Methods of Finishing the Joint
01_0035
Wheelbase Alterations
Shortening or lengthening a wheelbase is an added expense for the customer. Therefore, it is often to the customer's benefit to order a chassis
from the factory with the desired wheelbase rather than to alter the wheelbase of the chassis on-site.
The preferred method for altering the wheelbase is to slide the rear axle forward or rearward as required. Invariably, this requires the lengthening
or shortening of air lines, brake lines, electrical lines, and driveline. Extreme care should be taken in the modification of the air lines, brake lines,
electrical lines and driveline to insure that they operate as reliably as those with which the vehicle was manufactured.
If the wheelbase is lengthened, a reinforcement may be required. Consult your International® dealer before lengthening the wheelbase.
In those instances when it is necessary to cut and weld the frame to alter the wheelbase, the frame must be reinforced with a channel-type
reinforcement of the same strength as the original frame material in the area where the frame has been cut, extending at least two feet on either
side of the cut and bolted as specified in Figure 2.5 D shown earlier in this section.
If the frame was built with both a main frame and a reinforcement, the reinforcement should be removed before cutting the main frame. IT IS
ESSENTIAL THAT A NEW ONE-PIECE OUTER CHANNEL REINFORCEMENT BE OBTAINED RATHER THAN CUTTING AND RE-USING THE ORIGINAL
REINFORCEMENT. The original frame should also be reinforced with an inner channel reinforcement, extending at least two feet beyond the cut(s)
on either side of the cut(s). The reinforcement must be of the same material as the original frame. Blank and pre-punched chassis channel
reinforcements are available through your dealer parts department.
On both medium and high strength aluminum frames, RE-WELDING TO LENGTHEN THE FRAME IS NOT RECOMMENDED. Refer to “Reinforcement” and
“Reinforcement Attachment” for additional information.
DURASTAR® SERIES BODY BUILDER
FRAMES
GENERAL FRAME INFORMATION - ALL MODELS
FEBRUARY 2015 — PAGE 115
DURASTAR® SERIES BODY BUILDER
FRAMES
FRAME RAIL CROSS-SECTIONS - ALL MODELS
FEBRUARY 2015 — PAGE 116
FRAME RAIL CROSS-SECTIONS
ALL MODELS
3.062"
3.062"
3.062"
3.092"
3.892"
3.610"
3.580"
.312"
10.813"
.495"
9.125"
9.125"
10.125"
10.250"
10.250"
10.125"
.312"
10.125"
.312"
.312"
.375"
.312"
.375"
.312"
3.580"
01CAB
01CAA
01_0053
01CAE / 01CEK
01CAD
01CAC
01_0055
01_0054
01CAG / 01CEL
01_0057
01_0056
01CAH / 01CEM
01CAE / 01GBP
01_0059
01_0058
01_0086
Side Rail & Reinforcement Descriptions [2]
Frame Key
Code
Dimensions (inches)
01CAA
Depth
Width
9.125
3.062
Yield Strength
Nominal (psi)
Material #
80,000
B
Section Modulus [1]
(inches3)
Thickness
Maximum
Straight Channel Side Rail – Kick-Up at Rear Suspension Rearward [3]
0.312
Resisting Bending Moment
(In.-Lbs.)
Nominal
Maximum
Design
11.47
10.74
917,600
859,200
917,600
859,200
Straight Channel Side Rail
01CAB
9.125
3.062
0.312
80,000
B
11.47
10.74
01CAC
10.125
3.062
0.312
50,000
B
13.31
12.64
665,500
632,000
01CAD
10.250
3.092
0.375
80,000
B
15.94
15.14
1,275,200
1,211,200
01CAE, 01CEK[4]
10.125
3.580
0.312
120,000
C
14.85
14.18
1,782,000
1,701,600
[4]
01CAG, 01CEL
10.250
3.610
0.375
120,000
C
17.79
16.98
2,134,800
2,037,600
01CAH, 01CEM[4]
10.375
3.705
0.438
120,000
C
21.05
20.11
2,526,000
2,413,200
01CAE
01GBP
10.125
10.813
3.580
3.892
29.84
3,806,400
3,580,800
Straight Channel Side Rail with Outer “C”Channel Reinforcement
0.312
0.312
120,000
120,000
C
C
31.72
NOTES:
B = High Strength Low Alloy Steel
C = Heat Treated Alloy Steel
[1]=Section Modulus: Nominal – Calculated using design dimensions; indicates the design load capacity of the frame
Maximum Tolerance – All frame dimensions are at maximum tolerance; used by some competitors as advertised values.
[2]=Reinforcement dimensions and specifications are shown in italics
[3]=Rail depth given is for base rail… depth of kick-up in AF section is 6.495"
[4]=33,000-lb GVWR only
DURASTAR® SERIES BODY BUILDER
FRAMES
FRAME RAIL CROSS-SECTIONS - ALL MODELS
FEBRUARY 2015 — PAGE 117
DURASTAR® SERIES BODY BUILDER
FRAMES
INTERMEDIATE CROSSMEMBER LOCATION - LP AND 4x2 - STANDARD CAB
FEBRUARY 2015 — PAGE 118
INTERMEDIATE CROSSMEMBER LOCATION
LP and 4x2 - Standard Cab
Wheelbase Range
Min
AX
Max
BX [3]
G
CX
A
Inches (Millimeters)
up to 138 (3500)
[1]
–
–
–
140
(3550)
156
(3950)
19
(489)
–
–
158
(4000)
169
(4300)
28
(713)
–
–
171
(4350)
183
(4650)
37
(937)
–
185
(4700)
195
(4950)
43 (1161) [1]
– [1]
197
(5000)
211
(5350)
213
(5400)
224
(5700)
226
(5750)
236
(6000)
238
(6050)
254
(6450)
256
(6500)
266
(6750)
268
(6800)
280
(7100)
282
(7150)
293
(7450)
295
(7500)
307
(7800)
309
(7850)
321
(8150)
323
(8200)
331
(8400)
With I6 Engines
19
(489) [2]
35
28 (713)
[2]
(896) [2]
44
(1120)
8.2
(209)
TO BACK OF CAB
G
H
J
TO CENTER LINE
FRONT SPRING EYE
CENTER LINE
REAR AXLE
AF
WB
10.6
–
30.9
29.3
10.6
8.4
–
–
[2]
KICK-UP RAIL
L
LP MODELS
S
– [1]
44 (1120) [2]
29.9
44
(1120)
62
(1568)
62
(1568)
BETWEEN FRAME
RAILS
CX
–
53
(1344)
37
(937)
BX
E
STRAIGHT RAIL
L
62 (1568) [1]
35 (896)
92.1
(2339)
CENTER LINE
FRONT AXLE
53
(1344)
46 (1161) [1]
25.0
(635)
–
35
(896)
37
(937)
AX
C
B
33.5
(851)
F
D
G
A B
[2] With V8 Engines, 4x2 Models only
C
SINGLE STAMPED CROSSMEMBER MOUNTED WITH FLAT FLANGE UP AND WEB FORWARD
D
REAR SUSPENSION CROSSMEMBER
E
WITH STRAIGHT RAILS − SINGLE STAMPED CROSSMEMBER MOUNTED WITH FLAT FLANGE
DOWN AND WEB FORWARD. WITH KICK-UP RAILS − C-CHANNEL AF CROSSMEMBER
F
71
(1792)
28.3
G
WITH STRAIGHT RAILS − SINGLE STAMPED CROSSMEMBER MOUNTED WITH FLAT FLANGE
DOWN AND WEB FORWARD
01_0060
INTERMEDIATE CROSSMEMBER LOCATION
4x2 - Standard Cab with Staggered Fuel Tanks
Wheelbase Range
Min
Max
AX
BX [3]
CX
Inches (Millimeters)
up to 138 (3500)
–
–
–
140
(3550)
169
(4300)
22
(567)
–
–
171
(4350)
183
(4650)
31
(791)
–
–
–
27
(695)
–
–
185
(4700)
195
(4950)
40
(1015)
–
–
197
(5000)
211
(5350)
41
(1042)
–
212
(5400)
236
(6000)
59
(1490)
–
238
(6050)
254
(6450)
256
(6500)
266
(6750)
268
(6800)
280
(7100)
282
(7150)
293
(7450)
295
(7500)
307
(7800)
309
(7850)
321
(8150)
323
(8200)
331
(8400)
177
(4500)[1
]
31
(791)
40
(1015)
67
(1714)
(1266)
–
44
(1120)
59
(1490)
62
(1568)
31
(791)
67
(1714)
71
(1792)
[1] With 04WZA
durastar_ddcrossmember
DURASTAR® SERIES BODY BUILDER
FRAMES
FEBRUARY 2015 — PAGE 119
INTERMEDIATE CROSSMEMBER LOCATION - 4x2 - STANDARD CAB WITH STAGGERED FUEL TANKS
DURASTAR® SERIES BODY BUILDER
FRAMES
INTERMEDIATE CROSSMEMBER LOCATION - LP AND 4x2 - EXTENDED CAB
FEBRUARY 2015 — PAGE 120
INTERMEDIATE CROSSMEMBER LOCATION
LP and 4x2 - Extended Cab
Wheelbase Range
Min
Max
AX
BX
G
CX
A
Inches (Millimeters)
up to 169 (4300)
AX
–
–
–
171
(4350)
183
(4650)
11
(277)
–
–
185
(4700)
195
(4950)
20 (501) [1]
–
–
197
(5000)
211
(5350)
213
(5400)
224
(5700)
226
(5750)
236
(6000)
238
(6050)
254
(6450)
256
(6500)
266
(6750)
268
(6800)
280
(7100)
282
(7150)
293
(7450)
295
(7500)
307
(7800)
309
(7850)
311
(7900)
[1]
With I6 Engines
[2]
With V8 Engines
29 (725) [2]
35
(896)
53
(1344)
20 (501) [1]
62 (1568) [1]
[2]
44 (1120) [2]
44
(1120)
11
(277)
118.1
(3000)
TO CENTER LINE
FRONT SPRING EYE
–
CENTER LINE
FRONT AXLE
11
(277)
37 (949)
25.0
(635)
B
C
BX
G
H
J
CENTER LINE
REAR AXLE
AF
WB
10.6
STRAIGHT RAIL
–
KICK-UP RAIL
LP MODELS
44
(1120)
8.4
10.6
29.9
28.3
G
A
53
(1344)
29.3
30.9
–
62
(1568)
20
(501)
33.5
(851)
BETWEEN
FRAME RAILS
E
7.8
(197)
TO BACK OF CAB
53
(1344)
62
(1568)
F
D
CX
B
D
SINGLE STAMPED CROSSMEMBER MOUNTED WITH FLAT FLANGE UP AND WEB FORWARD
REAR SUSPENSION CROSSMEMBER
E
F
C
G
WITH STRAIGHT RAILS − SINGLE STAMPED CROSSMEMBER MOUNTED WITH FLAT FLANGE
DOWN AND WEB FORWARD. WITH KICK-UP RAILS − C-CHANNEL AF CROSSMEMBER
WITH STRAIGHT RAILS − SINGLE STAMPED CROSSMEMBER MOUNTED WITH FLAT FLANGE
DOWN AND WEB FORWARD
01_0061
INTERMEDIATE CROSSMEMBER LOCATION
4x2 - Extended Cab with Staggered Fuel Tanks
Wheelbase Range
Min
Max
AX
BX
CX
Inches (Millimeters)
up to 169 (4300)
–
–
–
171
(4350)
195
(4950)
–
–
197
(5000)
211
(5350)
32
(818)
–
213
(5400)
236
(6000)
50
(1266)
–
238
(6050)
254
(6450)
67
(1714)
–
256
(6500)
266
(6750)
268
(6800)
280
(7100)
282
(7150)
293
(7450)
295
(7500)
307
(7800)
59
(1490)
309
(7850)
311
(7900)
68
(1714)
14
(355)
41
(1042)
44
(1120)
50
(1266)
62
(1568
53
(1344)
durastar_ddcrossmember
DURASTAR® SERIES BODY BUILDER
FRAMES
FEBRUARY 2015 — PAGE 121
INTERMEDIATE CROSSMEMBER LOCATION - 4x2 - EXTENDED CAB WITH STAGGERED FUEL TANKS
DURASTAR® SERIES BODY BUILDER
FRAMES
INTERMEDIATE CROSSMEMBER LOCATION - LP AND 4x2 - CREW CAB
FEBRUARY 2015 — PAGE 122
INTERMEDIATE CROSSMEMBER LOCATION
LP and 4x2 - Crew Cab
Wheelbase Range
Min
Max
AX
G
BX
B
up to 183 (4650)
–
185
(4700)
195
(5000)
19
(494)
–
197
(5050)
211
(5350)
28
(718)
–
213
(5400)
224
(5700)
37
(942)
–
226
(5750)
236
(6100)
55
(1390)
–
238
(6150)
254
(6450)
19
(494)
266
(6750)
37
(942)
268
(6800)
280
(7100)
46
(1166)
282
(7150)
293
(7450)
295
(7500)
321
(8150)
55
(1390)
25.0
(635)
136.0
(3455)
33.5
(851)
BETWEEN
FRAME RAILS
E
BX
AX
–
256
(6500)
D
A
Inches (Millimeters)
F
8.0
(204)
G
H
TO BACK OF CAB
J
TO CENTER LINE
FRONT SPRING EYE
CENTER LINE
FRONT AXLE
CENTER LINE
REAR AXLE
AF
WB
10.6
44
(1120)
STRAIGHT RAIL
53
(1344)
KICK-UP RAIL
LP MODELS
62
(1568)
30.9
29.3
10.6
8.4
29.9
28.3
G
A
B
D
REAR SUSPENSION CROSSMEMBER
WITH STRAIGHT RAILS − SINGLE STAMPED CROSSMEMBER MOUNTED WITH FLAT FLANGE
DOWN AND WEB FORWARD. WITH KICK-UP RAILS − C-CHANNEL AF CROSSMEMBER
E
F
SINGLE STAMPED CROSSMEMBER MOUNTED WITH FLAT FLANGE UP AND WEB FORWARD
G
WITH STRAIGHT RAILS − SINGLE STAMPED CROSSMEMBER MOUNTED WITH FLAT FLANGE DOWN AND
WEB FORWARD
01_0062
INTERMEDIATE CROSSMEMBER LOCATION
4x2 - Crew Cab with Staggered Fuel Tanks
Wheelbase Range
Min
Max
AX
BX
Inches (Millimeters)
up to 183 (4650)
–
–
185
(4700)
195
(5000)
19
(494)
–
197
(5050)
211
(5350)
28
(718)
–
213
(5400)
224
(5700)
37
(942)
–
226
(5750)
236
(6100)
55
(1390)
–
238
(6150)
254
(6450)
19
(494)
256
(6500)
266
(6750)
37
(942)
268
(6800)
280
(7100)
46
(1166)
282
(7150)
293
(7450)
295
(7500)
321
(8150)
55
(1390)
44
(1120)
53
(1344)
62
(1568)
durastar_ddcrossmember
DURASTAR® SERIES BODY BUILDER
FRAMES
FEBRUARY 2015 — PAGE 123
INTERMEDIATE CROSSMEMBER LOCATION - 4x2 - CREW CAB WITH STAGGERED FUEL TANKS
DURASTAR® SERIES BODY BUILDER
FRAMES
INTERMEDIATE CROSSMEMBER LOCATION - 6x4 - STANDARD CAB
FEBRUARY 2015 — PAGE 124
INTERMEDIATE CROSSMEMBER LOCATION
6x4 - Standard Cab
Wheelbase Range
Min
Max
AX
BX
CX
G
C
F
D
Inches (Millimeters)
up to 158 (4000)
B
A
AX
–
–
–
160
(4050)
197
(5000)
19
(489)
–
–
199
(5050)
211
(5350)
37
(937)
–
–
213
(5400)
224
(5700)
46
(1161)
–
–
226
(5750)
238
(6050)
35
(896)
–
240
(6100)
252
(6400)
254
(6450)
266
(6750)
268
(6800)
280
(7100)
282
(7150)
37
(937)
+
293
(7450)
62
(1568)
26
(672)
295
(7500)
307
(7800)
35
(896)
309
(7850)
321
(8150)
323
(8200)
331
(8400)
53
(1344)
8.2
(209)
TO BACK OF CAB
33.5
(851)
BETWEEN FRAME
RAILS
92.1
(2340)
TO CENTER LINE
FRONT SPRING EYE
CENTER LINE
FRONT AXLE
–
–
44
(1120)
25.0
(635)
G
H
J
–
53
(1344)
37
(937)
E
CX
+
44
(1120)
46
(1161)
BX
CENTER LINE
REAR SUSPENSION
AF
WB
11.6
(295)
STRAIGHT RAIL
+ +
53.8
(1367)
53
(1344)
A
62
(1568)
B
C
SINGLE STAMPED CROSSMEMBER MOUNTED WITH FLAT FLANGE UP AND WEB FORWARD
REAR SUSPENSION CROSSMEMBER − DOUBLE STAMPED CROSSMEMBER
D
E
49.2
(1249)
F
G
STAMPED CROSSMEMBER MOUNTED WITH FLAT FLANGE UP
01_0063
INTERMEDIATE CROSSMEMBER LOCATION
6x4 - Standard Cab with Staggered Fuel Tanks
Wheelbase
Range
Min
AX
BX
CX
Max
Inches (Millimeters)
up to 157 (4000)
–
–
–
160
(4050)
197
(5000)
23
(567)
–
–
199
(5050)
211
(5350)
31
(791)
–
–
213
(5400)
224
(5700)
40
(1015)
–
–
226
(5750)
238
(6050)
41
(1042)
–
240
(6100)
252
(6400)
254
(6450)
266
(6750)
268
(6800)
280
(7100)
282
(7150)
31
(791)
50
(1266)
40
(1015)
–
–
59
(1490)
–
293
(7450)
67
(1714)
26
(672)
295
(7500)
307
(7800)
41
(1042)
309
(7850)
321
(8150)
323
(8200)
331
(8400)
31
(791)
50
(1266)
59
(1490)
53
(1344)
62
(1568)
durastar_ddcrossmember
DURASTAR® SERIES BODY BUILDER
FRAMES
FEBRUARY 2015 — PAGE 125
INTERMEDIATE CROSSMEMBER LOCATION - 6x4 - STANDARD CAB WITH STAGGERED FUEL TANKS
DURASTAR® SERIES BODY BUILDER
FRAMES
INTERMEDIATE CROSSMEMBER LOCATION - 6x4 - EXTENDED CAB
FEBRUARY 2015 — PAGE 126
INTERMEDIATE CROSSMEMBER LOCATION
6x4 - Extended Cab
Wheelbase Range
Min
Max
AX
BX
G
CX
A
Inches (Millimeters)
up to 197 (5000)
–
–
–
199
(5050)
211
(5350)
11
(277)
–
–
213
(5400)
224
(5700)
20
(501)
–
–
226
(5750)
238
(6050)
240
(6100)
252
(6400)
254
(6450)
266
(6750)
268
(6800)
280
(7100)
282
(7150)
11
(277)
35
(896)
BX
E
CX
+
+
7.8
(197)
TO BACK OF CAB
25.0
(635)
–
293
(7450)
62
(1568)
26
(672)
295
(7500)
307
(7800)
35
(896)
309
(7850)
321
(8150)
323
(8200)
331
(8400)
53
(1344)
G
H
J
–
–
44
(1120)
33.5
(851)
BETWEEN
FRAME RAILS
3000
TO CENTER LINE
FRONT SPRING EYE
–
53
(1344)
11
(277)
C
118.1
44
(1120)
20
(501)
AX
B
F
D
53
(1344)
CENTER LINE
REAR SUSPENSION
AF
CENTER LINE
FRONT AXLE
WB
11.6
(295)
STRAIGHT RAIL
+ +
62
(1568)
53.8
(1367)
A
B
C
SINGLE STAMPED CROSSMEMBER MOUNTED WITH FLAT FLANGE UP AND WEB FORWARD
REAR SUSPENSION CROSSMEMBER − DOUBLE STAMPED CROSSMEMBER
D
E
49.2
(1249)
F
G
STAMPED CROSSMEMBER MOUNTED WITH FLAT FLANGE UP
01_0064
INTERMEDIATE CROSSMEMBER LOCATION
6x4 - Extended Cab with Staggered Fuel Tanks
Wheelbase
Range
Min
AX
BX
CX
Max
Inches (Millimeters)
up to 224
(5700)
–
–
226
(5750)
238
(6050)
32
(818)
–
240
(6100)
252
(6400)
41
(1042)
–
254
(6450)
266
(6750)
50
(1266)
–
268
(6800)
280
(7100)
59
(1490)
–
282
(7150)
293
(7450)
67
(1714)
26
(672)
295
(7500)
307
(7800)
32
(818)
309
(7850)
321
(8150)
41
(1042)
323
(8200)
331
(8400)
50
(1266)
14
(355)
53
(1344)
62
(1568)
durastar_ddcrossmember
DURASTAR® SERIES BODY BUILDER
FRAMES
FEBRUARY 2015 — PAGE 127
INTERMEDIATE CROSSMEMBER LOCATION - 6x4 - EXTENDED CAB WITH STAGGERED FUEL TANKS
DURASTAR® SERIES BODY BUILDER
FRAMES
INTERMEDIATE CROSSMEMBER LOCATION - 6x4 - CREW CAB
FEBRUARY 2015 — PAGE 128
INTERMEDIATE CROSSMEMBER LOCATION
6x4 - Crew Cab
Wheelbase Range
Min
Max
AX
G
BX
B
up to 211 (5350)
–
226
(5750)
238
(6050)
240
(6100)
252
(6400)
37
(942)
254
(6450)
266
(6750)
46
(1166)
–
268
(6800)
280
(7100)
55
(1390)
26
(672)
282
(7150)
293
(7450)
295
(7500)
307
(7800)
309
(7850)
321
(8150)
37
(942)
BX
AX
224
(5700)
28
(718)
33.5
(851)
BETWEEN
FRAME RAILS
E
–
213
(5400)
28
(718)
D
A
Inches (Millimeters)
F
–
25.0
(635)
–
136.0
(3455)
8.0
(204)
G
H
TO BACK OF CAB
J
TO CENTER LINE
FRONT SPRING EYE
–
CENTER LINE
FRONT AXLE
CENTER LINE
REAR AXLE
AF
WB
10.6
STRAIGHT RAIL
44
(1120)
53
(1344)
KICK-UP RAIL
LP MODELS
30.9
29.3
10.6
8.4
29.9
28.3
G
A
B
D
REAR SUSPENSION CROSSMEMBER
WITH STRAIGHT RAILS − SINGLE STAMPED CROSSMEMBER MOUNTED WITH FLAT FLANGE
DOWN AND WEB FORWARD. WITH KICK-UP RAILS − C-CHANNEL AF CROSSMEMBER
E
F
SINGLE STAMPED CROSSMEMBER MOUNTED WITH FLAT FLANGE UP AND WEB FORWARD
G
WITH STRAIGHT RAILS − SINGLE STAMPED CROSSMEMBER MOUNTED WITH FLAT FLANGE DOWN AND
WEB FORWARD
01_0060
INTERMEDIATE CROSSMEMBER LOCATION
6x4 - Crew Cab with Staggered Fuel Tanks
Wheelbase Range
Min
Max
AX
BX
Inches (Millimeters)
up to 211 (5350)
–
–
213
(5400)
224
(5700)
226
(5750)
238
(6050)
240
(6100)
252
(6400)
37
(942)
–
254
(6450)
266
(6750)
46
(1166)
–
268
(6800)
280
(7100)
55
(1390)
26
(672)
282
(7150)
293
(7450)
295
(7500)
307
(7800)
309
(7850)
321
(8150)
28
(718)
28
(718)
37
(942)
–
–
44
(1120)
53
(1344)
durastar_ddcrossmember
DURASTAR® SERIES BODY BUILDER
FRAMES
FEBRUARY 2015 — PAGE 129
INTERMEDIATE CROSSMEMBER LOCATION - 6x4 - CREW CAB WITH STAGGERED FUEL TANKS
DURASTAR® SERIES BODY BUILDER
FRAMES
AF CROSSMEMBER LOCATIONS - LP AND 4X2
FEBRUARY 2015 — PAGE 130
AF CROSSMEMBER LOCATIONS
LP and 4x2
WITH STRAIGHT RAILS
G
AF Range
Crossmember
Min
G
Max
H
J
A
Inches (Millimeters)
1
85
(2150)
2
116
(2950)
3
AX
–
175
(4450)
53
(1338)
BX
E
BETWEEN FRAME
RAILS
CX
–
–
31 (800)
144
(3650)
C
B
33.5
(851)
F
D
25.0
(635)
92.1
(2339)
31 (800)
CENTER LINE
FRONT AXLE
8.2
(209)
TO BACK OF CAB
G
H
J
TO CENTER LINE
FRONT SPRING EYE
CENTER LINE
REAR AXLE
AF
WB
10.6
WITH LP RAILS
Crossmember
1
STRAIGHT RAIL
L
AF
G
30.9
29.3
10.6
8.4
Inches (Millimeters)
96
(2450)
51
(1298)
KICK-UP RAIL
L
LP MODELS
S
29.9
28.3
G
A B
C
SINGLE STAMPED CROSSMEMBER MOUNTED WITH FLAT FLANGE UP AND WEB FORWARD
D
REAR SUSPENSION CROSSMEMBER
E
WITH STRAIGHT RAILS − SINGLE STAMPED CROSSMEMBER MOUNTED WITH FLAT FLANGE
DOWN AND WEB FORWARD. WITH KICK-UP RAILS − C-CHANNEL AF CROSSMEMBER
F
G
WITH STRAIGHT RAILS − SINGLE STAMPED CROSSMEMBER MOUNTED WITH FLAT FLANGE
DOWN AND WEB FORWARD
01_0060
AF CROSSMEMBER LOCATIONS
6x4
WITH 52” SPREAD SUSPENSION
Crossmember
Min
B
A
AF Range
G
Max
H
G
C
J
F
D
AX
BX
E
CX
Inches (Millimeters)
1
104
(2650)
2
134
(3400)
3
+
–
–
+
175
(4450)
72
(1838)
163
(4150)
25.0
(635)
–
30 (750)
30 (750)
CENTER LINE
FRONT AXLE
Max
G
H
112
(2650)
2
142
(3600)
3
171
(4350)
J
STRAIGHT RAIL
+ +
–
175
(4450)
H
11.6
(295)
J
Inches (Millimeters)
1
G
CENTER LINE
REAR SUSPENSION
AF
WB
AF Range
Min
33.5
(851)
BETWEEN FRAME
RAILS
92.1
(2340)
TO CENTER LINE
FRONT SPRING EYE
WITH 55” AND 60” SPREAD SUSPENSION
Crossmember
8.2
(209)
TO BACK OF CAB
80
(2038)
–
–
53.8
(1367)
A
B
C
30 (750)
30 (750)
SINGLE STAMPED CROSSMEMBER MOUNTED WITH FLAT FLANGE UP AND WEB FORWARD
REAR SUSPENSION CROSSMEMBER − DOUBLE STAMPED CROSSMEMBER
D
E
49.2
(1249)
F
G
STAMPED CROSSMEMBER MOUNTED WITH FLAT FLANGE UP
01_0063
DURASTAR® SERIES BODY BUILDER
FRAMES
AF CROSSMEMBER LOCATIONS - 6X4
FEBRUARY 2015 — PAGE 131
DURASTAR® SERIES BODY BUILDER
FRAMES
CROSSMEMBERS - ALL MODELS
FEBRUARY 2015 — PAGE 132
CROSSMEMBERS
All Models
3.2
(81)
1.9
(48)
3.8
(97)
3.2
(81)
+
5.8
(147)
33.5
(851)
3.0
(76)
11.6
(295)
5.8
(147)
8.4
(214)
4.8
(122)
1.9
(48)
4.6
(117)
33.5
(851)
8.1
(206)
SINGLE STAMPED CROSSMEMBER
DOUBLE STAMPED CROSSMEMBER
1.4
(36)
33.5
(851)
2.4
(62)
25.0
(635)
4.3
(108)
16.2
(412)
6.8
(173)
5.9
(149) 2.4
(60)
.374 MATL THK
(9)
4.8
(122)
END FACE FLAT AREA
10.1
(257)
6.7
(170)
REAR CAB MOUNTING CROSSMEMBER
.9
(24)
2.4
(61)
1.7
(42)
2.4
(61)
4.8
(122)
3.8
(96)
1.9
(4.8)
7.6
(192)
01_0066
Crossmembers With Tapered Rails
LP
5.0
(127)
1.2
(30)
8.4
(213)
7.4
(188)
33.5
(851)
33.5
(851)
3.2
(82)
6.8
(173)
31.5
(800)
4.6
(117)
.8
(20)
.7
(17)
5.3
(135)
1.3
(33)
3.0
(76)
2.2
(56)
26.7
(678)
4.8
(122)
6.0
(152)
3.0
(76)
5.4
(137)
1.2
(30)
1.2
(29)
“C” CHANNEL REAR SUSPENSION CROSSMEMBER
“C” CHANNEL AF CROSSMEMBER
01_0067
DURASTAR® SERIES BODY BUILDER
FRAMES
CROSSMEMBERS WITH TAPERED RAILS - LP
FEBRUARY 2015 — PAGE 133
DURASTAR® SERIES BODY BUILDER
FRAMES
FRAME DRILLING GUIDELINES - ALL MODELS
FEBRUARY 2015 — PAGE 134
FRAME DRILLING GUIDELINES
All Models
The drilling of the frame sidemember presents no unusual difficulty. Standard high speed steel drills of good quality will serve provided they are
sharpened properly and not overheated during sharpening or use.
Hole Location Guidelines
1.
Never drill holes into the restricted areas of the frame rails. Refer to diagrams on the following pages.
2.
Use existing holes whenever possible.
3.
Maintain a minimum of 0.75 inch (19 mm) of material between holes.
4.
There should not be more than three holes located on a vertical line.
5.
Bolt holes should be no larger than is required for the size of bolts being used, in no instance larger than 11/16 (.688 inch).
6.
If reinforcements are used, avoid drilling holes closer than 2.0 inches (51 mm) from the ends of the reinforcement.
7.
Bolts must be periodically checked to insure that the proper torque and clamping force is maintained.
8.
Never drill any holes in the flanges of the frame rail.
FRAME DRILLING RESTRICTIONS
4300 4x2, 4400 4x2 and 6x4
Straight Rails/Straight Trucks
1.6
(41)
1.6
(41)
10.0
(254)
2.0
(51)
NO DRILL ZONE
C
C
CENTERLINE
REAR SUSPENSION
CENTERLINE
OF DRILLED HOLES
2.0
(51)
SECTION C − C
01_0068
DURASTAR® SERIES BODY BUILDER
FRAMES
FRAME DRILLING RESTRICTIONS - 4300 4X2, 4400 4X2 AND 6X4
FEBRUARY 2015 — PAGE 135
DURASTAR® SERIES BODY BUILDER
FRAMES
FRAME DRILLING RESTRICTIONS - LP
FEBRUARY 2015 — PAGE 136
FRAME DRILLING RESTRICTIONS
LP
Tapered Rails
1.5
(38)
NO DRILL ZONE
1.5
(38)
10.0
(254)
2.0
B (51)
D
D
CENTERLINE
REAR SUSPENSION
1.5
(38) C
CENTERLINE
OF DRILLED HOLES
B OR C
SECTION D − D
01_0069
MAXIMUM WHEELBASE FRAME STRETCHING
All Models
Frames – Maximum Wheelbase Figures For Changing Wheelbase
Frame Code
Frame Description
Maximum Frame
GVW Rating (Lbs)
Maximum Front Axle/Susp.
Capacity (Lbs)
Maximum Wheelbase
01CAA
5/16" x 9 1/8" Tapered Rail
80 psi Yield Strength
29,000
8,000
254
01CAB
5/16" x 9 1/8" Straight Rail
80 psi Yield Strength
25,999
25,999
01CAC
5/16" x 10 1/8" Straight Rail
50 psi Yield Strength
29,000
32,900
32,900
01CAD
01CAE/01CEK
01CAG/01CEL
01CAH/01CEM
01CAE w/01GBP
3/8" x 10 1/4" Straight Rail
80 psi Yield Strength
5/16" x 10 1/8" Straight Rail
120 psi Yield Strength
3/8" x 10 1/4" Straight Rail
120 psi Yield Strength
7/16" x 10 3/8" Straight Rail
120 psi Yield Strength
5/16" x 10 1/8" Straight Rail with 5/16” x 10-13/16”
Outer “C” Channel Reinforcement
120 psi Yield Strength
8,000
285
10,000/12,000
262
8,000
311
10,000/12,000
293
8,000
285
10,000
260
12,000
171
10,000
311
12,000
272
33,000
10,000
260
38,000
12,000
171
50,000
10,000
283
52,000
12,000
238
54,000
14,000
167
50,000
10,000
311
52,000
12,000
266
54,000
14,000
230
50,000
10,000
311
52,000
12,000
293
54,000
14,000
256
54,000
14,000
311
Contact your local International dealer for approval if your wheelbase or axle load exceeds the values given.
See General Frame information – Aftermarket Modifications, earlier in this section.
DURASTAR® SERIES BODY BUILDER
FRAMES
MAXIMUM WHEELBASE FRAME STRETCHING - ALL MODELS
FEBRUARY 2015 — PAGE 137
DURASTAR® SERIES BODY BUILDER
FRAMES
FEBRUARY 2015 — PAGE 138
FRAME HEIGHT CALCULATION – AT CENTERLINE OF FRONT AXLE - ALL MODELS
FRAME HEIGHT CALCULATION – AT CENTERLINE OF FRONT AXLE
All Models
The front frame height (@ the centerline of the front axle) may be calculated using the following equations. Refer to the illustration for a visual
explanation of the symbols used in these calculations.
Df =
′
′
Wheel axis to bottom of frame in unladen position. Refer to
tabulated data.
Df′ = Wheel axis to bottom of frame in loaded position. Refer to tabulated
data.
F=
Frame rail height. Refer to tabulated data.
SLR = Static Loaded Radius. The distance from the wheel axis to the
ground for a properly inflated, fully loaded (loaded to its maximum
capacity) tire. To obtain tire dimensions, contact the tire
manufacturer.
R1 =
Tire Radius (one half of tire outside diameter) NOT mounted on the
vehicle. To obtain tire dimensions, contact the tire manufacturer.
Calculated Tire Radius on an unloaded chassis. The value of R2 is
R2 =
calculated using the following method.
R 2 = R 1 – .2 ( R 1 – SLR )
01_0071
Y=
Y′=
Front Frame Height at the front axle centerline in unloaded
condition.
Front Frame Height at the front axle centerline in loaded condition.
Y = Df + R2 + F
Y′ = D f ′ + SLR + F
NOTE:
(for unloaded condition)
(for loaded condition)
Values calculated for Y and Y′ are strictly for the frame height at the
front axle centerline. For frame heights at the front of the frame rail,
refer to “FRAME HEIGHT CALCULATION – AT FRONT AND REAR
RAIL ENDS”.
FRAME HEIGHT DATA – FRONT
All Models
Front Suspension
Type
Parabolic
*
Spindle To Bottom Of Frame
Capacity
Code
8,000-lb
03ADA
9,000-lb
03AGW
10,000-lb
03ADB
Model
Unloaded – Dr
Loaded – Dr′
LP
4x2
5.5"
4.5"
X
X
12.4”
12.2”
6.6”
5.6”
X
X
7.1"
5.5"
X
X
12.4”
11.5”
11,000-lb
03AGE
7.1”
5.5”
X
12,000-lb
03ADC
7.5"
5.6"
X
13,000-lb
03AGS
7.1”
5.5”
X
14,000-lb
03ADD
7.4"
5.7"
X
14,600-lb
03AGT
7.58”
6.1”
X
6x4
Top of standard frame in model
Adjust dimensions for optional frame reinforcements – See Frame Section
Frame Code
Frame Description
Frame Rail
Height (F)
01CAA
5/16" x 9 1/8" Tapered Rail – 80 psi Yield Strength
9.125"
01CAB
5/16" x 9 1/8" Straight Rail – 80 psi Yield Strength
9.125"
01CAC
5/16" x 10 1/8" Straight Rail – 50 psi Yield Strength
10.125"
01CAD
3/8" x 10 1/4" Straight Rail – 80 psi Yield Strength
10.250"
01CAE/01CEK
5/16" x 10 1/8" Straight Rail – 120 psi Yield Strength
10.125"
01CAG/01CEL
3/8" x 10 1/4" Straight Rail – 120 psi Yield Strength
10.250"
01CAH/01CEM
7/16" x 10 3/8" Straight Rail – 120 psi Yield Strength
10.375"
DURASTAR® SERIES BODY BUILDER
FRAMES
FRAME HEIGHT DATA – FRONT - ALL MODELS
FEBRUARY 2015 — PAGE 139
DURASTAR® SERIES BODY BUILDER
FRAMES
FEBRUARY 2015 — PAGE 140
FRAME HEIGHT CALCULATION – AT CENTERLINE OF REAR AXLE - ALL MODELS
FRAME HEIGHT CALCULATION – AT CENTERLINE OF REAR AXLE
All Models
The rear frame height (@ the centerline of the rear axle) may be calculated using the following equations. Refer to the illustration for a visual
explanation of the symbols used in these calculations.
Dr =
D r′ =
′
′
F=
SLR =
R1 =
01_0072
R2 =
Wheel axis to bottom of frame in unladen position. Refer to tabulated
data.
Wheel axis to bottom of frame in loaded position. Refer to tabulated
data.
Frame rail height. Refer to tabulated data.
Static Loaded Radius. The distance from the wheel axis to the ground
for a properly inflated, fully loaded (loaded to its maximum capacity)
tire. To obtain tire dimensions, contact the tire manufacturer.
Tire Radius (one half of tire outside diameter) NOT mounted on the
vehicle. To obtain tire dimensions, contact the tire manufacturer.
Calculated Tire Radius on an unloaded chassis. The value of R2 is
calculated using the following method.
R 2 = R 1 – .2 ( R 1 – SLR )
Z=
Rear Frame Height at the rear axle centerline in unloaded condition.
Z′=
Rear Frame Height at the rear axle centerline in loaded condition.
Z = Dr + R2 + F
Z′ = D r ′ + SLR + F
NOTE:
(for unloaded condition)
(for loaded condition)
Values calculated for Z and Z′ are strictly for the frame height at the rear
axle centerline. For frame heights at the rear of the frame rail, refer to
“FRAME HEIGHT CALCULATION – AT FRONT AND REAR RAIL ENDS”.
BUMP HEIGHTS – REAR
All Models
“Bump Height” refers to the maximum distance of the tires above the side rails as the rear axle of the truck travels over an object. Bump Heights are
important in the selection of truck bodies since it may be necessary to incorporate wheelwells into the body floor to allow adequate clearance for tire
travel.
STRAIGHT BUMP HEIGHT IS USED WHEN BOTH SETS OF WHEELS TRAVEL OVER AN
OBJECT AT THE SAME TIME, SUCH AS A PARKING LOT SPEED BUMP.
COCKED BUMP HEIGHT REFERS TO THE CONDITION THAT EXISTS WHEN ONLY ONE SET
— AN EXAMPLE OF THIS WOULD BE
CLIMBING OVER A CURB WHEN TURNING A CORNER. THE COCKED BUMP HEIGHT
CHARTS PRESENTED HERE ASSUME A 7° DEFLECTION FROM HORIZONTAL.
OF REAR WHEELS TRAVELS OVER AN OBJECT
01_0073
DR″=
R1 =
F=
01_0074
Wheel Axis to bottom of frame in straight bump position. Refer to tabulated data.
Tire radius (one-half of tire outside diameter) NOT mounted on the vehicle. To obtain tire dimensions, contact the tire manufacturer.
Frame Rail Height.
Straight Bump Height = R1 - Dr″ - F
Cocked Bump Height = Straight Bump Height + 3.5 In.
DURASTAR® SERIES BODY BUILDER
FRAMES
BUMP HEIGHTS – REAR - ALL MODELS
FEBRUARY 2015 — PAGE 141
DURASTAR® SERIES BODY BUILDER
FRAMES
FRAME AND BUMP HEIGHT DATA – REAR - ALL MODELS
FEBRUARY 2015 — PAGE 142
FRAME AND BUMP HEIGHT DATA – REAR
All Models
Rear Suspension
Model
Frame Code
Frame Rail Height
(F)
Type
LP
01CAA
9.125"
Air
01CAC
10.125"
Spindle to Bottom of Sidemember
Capacity
Unloaded – Dr
Loaded – Dr′
Bump – Dr″
4.31" ± .25"
–
–
9.26" ± .25"
9.26" ± .25"
12,000
15,500
18,500
4x2 (non-LP)
6x4
LP
4x2 (non-LP)
LP
4x2 (non-LP)
01CAD
10.250"
01CAE
10.125"
Air
20,000 to 23,000
9.38" ± .25"
9.38" ± .25"
9.26" ± .25"
9.26" ± .25"
01CAG
10.250"
9.38" ± .25"
9.38" ± .25"
01CAH
10.375"
9.51" ± .25"
9.51" ± .25"
01CAE
10.125"
01CAG
10.250"
01CAH
10.375"
01CAA
9.125"
Air
40,000
Vari-Rate
13,500
9.26" ± .25"
9.26" ± .25"
9.38" ± .25"
9.38" ± .25"
9.51" ± .25"
6.6" ± .50"
3.75" ± .50"
1.9" ± .50"
–
–
01CAB
9.125"
7.31" ± .50"
10.125"
8.31" ± .50"
10.250"
01CAE
10.125"
Vari-Rate
13,500
–
9.51" ± .25"
01CAC
01CAD
–
8.43" ± .50"
8.31" ± .50"
01CAG
10.250"
8.43" ± .50"
01CAH
10.375"
8.56" ± .50"
01CAA
9.125"
6.66" ± .50"
4.01" ± .50"
1.81" ± .50"
01CAB
9.125"
6.37"
3.79"
1.59"
01CAC
10.125"
7.37"
4.79"
2.59"
01CAD
10.250"
7.49"
4.92"
2.72"
Vari-Rate
Vari-Rate
15,500
15,500
01CAE
10.125"
7.37"
4.79"
2.59"
01CAG
10.250"
7.49"
4.92"
2.72"
01CAH
10.375"
7.62"
5.04"
2.84"
FRAME AND BUMP HEIGHT DATA – REAR (CONTINUED)
Rear Suspension
Spindle to Bottom of Sidemember
Model
Frame Code
Frame Rail Height
(F)
Type
Capacity
Unloaded – Dr
Loaded – Dr′
LP
01CAA
9.125"
Vari-Rate
18,500
7.78"
4.48"
2.2"
01CAB
9.125"
7.81"
5.03"
2.83"
01CAC
10.125"
8.81"
6.03"
3.83"
01CAD
10.250"
8.93"
6.16"
3.96"
8.81"
6.03"
3.83"
8.93"
6.16"
3.96"
9.06"
6.28"
4.08"
8.125"
4.75"
2.5"
4x2 (non-LP)
LP
4x2 (non-LP)
4x2 (non-LP)
01CAE
10.125"
01CAG
10.250"
01CAH
10.375"
01CAA
9.125"
Vari-Rate
Vari-Rate
18,500
20,000
Bump – Dr″
01CAB
9.125"
8.26" ± .50"
5.31"
3.13"
01CAC
10.125"
9.26" ± .50"
6.31"
4.13"
01CAD
10.250"
9.38" ± .50"
6.44"
4.26"
01CAE
10.125"
9.26" ± .50"
6.31"
4.13"
Vari-Rate
20,000
01CAG
10.250"
9.38" ± .50"
6.44"
4.26"
01CAH
10.375"
9.51" ± .50"
6.56"
4.38"
9.68"
6.13"
3.93"
9.81"
6.26"
4.06"
9.68"
6.13"
3.93"
01CAB
9.125”
01CAC
10.125"
01CAD
10.250"
01CAE
10.125"
Vari-Rate
23,500
01CAG
10.250"
9.81"
6.26"
4.06"
01CAH
10.375"
9.93"
6.38"
4.18"
DURASTAR® SERIES BODY BUILDER
FRAMES
FRAME AND BUMP HEIGHT DATA – REAR - ALL MODELS
FEBRUARY 2015 — PAGE 143
DURASTAR® SERIES BODY BUILDER
FRAMES
FRAME AND BUMP HEIGHT DATA – REAR - ALL MODELS
FEBRUARY 2015 — PAGE 144
FRAME AND BUMP HEIGHT DATA – REAR (CONTINUED)
Model
4x2 (non-LP)
4x2 (non LP)
6x4
6x4
6x4
Frame Code
Frame Rail Height
(F)
Rear Suspension
Type
Spindle to Bottom of Sidemember
Capacity
Unloaded – Dr
Loaded – Dr′
Bump – Dr″
01CAD
10.250"
10.18"
6.24"
4.24"
01CAE
10.125"
10.06"
6.12"
4.12"
01CAG
10.250"
10.18"
6.24"
4.24"
01CAH
10.375”
10.43”
6.49”
4.49”
01CAE
10.125”
01CAE
10.125”
10.88" ± .50"
9.50" ± .50"
8.10" ± .50"
11.03" ± .50"
9.63" ± .50"
8.23" ± .50"
11.15" ± .50"
9.75" ± .50"
8.35" ± .50"
01CAG
10.250”
01CAH
10.375”
01CAE
10.125"
01CAG
10.250"
01CAH
10.375"
01CAE
10.125”
Vari-Rate
31,000
Chalmers 1030
30,000
Multileaf
34,000
Multileaf
40,000
Walking Beam
40,000
46,000
FRAME HEIGHT CALCULATION – AT FRONT AND REAR RAIL ENDS
All Models
Now that we have learned to calculate the frame height at both the front and rear axle centerlines, we can determine the frame height values at both
rail ends.
′
′
′
′
FIRST WE MUST DETERMINE THE RAKE OF THE FRAME (I.E., THE SLOPE OF THE FRAME
FROM FRONT END TO REAR END). IF THE FRONT END OF THE FRAME IS HIGHER THAN
THE REAR END (I.E., Y>Z OR Y′>Z′) THEN THE TRUCK IS SAID TO HAVE A NEGATIVE
RAKE. IN THIS SITUATION, THE EQUATIONS FOR DETERMINING THE FRAME HEIGHT AT
THE RAIL ENDS ARE:
Frame Height @ Front End of Rail:
Y–Z
FG = Y + ⎛ --------------- x BA⎞
⎝ WB
⎠
Y′ – Z′
FG′ = Y′ + ⎛ ------------------- x BA⎞
⎝ WB
⎠
Frame Height @ Front End of Rail:
(FOR UNLOADED CONDITION)
(FOR LOADED CONDITION)
Frame Height @ Rear End of Rail:
RG = Z
–
–Z
⎛Y
--------------- x AF⎞
⎝ WB
⎠
Y′ – Z′
RG′ = Z′ – ⎛ ------------------- x AF⎞
⎝ WB
⎠
FOR SITUATIONS WHERE THE RAKE IS POSITIVE (I.E., Y<Z OR Y′<Z′) THE EQUATIONS
FOR DETERMINING FRAME HEIGHT AT THE RAIL ENDS ARE:
Z–Y
FG = Y – ⎛ --------------- x BA⎞
⎝ WB
⎠
Z′ – Y′
FG′ = Y′ – ⎛ ------------------- x BA⎞
⎝ WB
⎠
(FOR UNLOADED CONDITION)
(FOR LOADED CONDITION)
Frame Height @ Rear End of Rail:
(FOR UNLOADED CONDITION)
(FOR LOADED CONDITION)
Z–Y
RG = Z + ⎛ --------------- x AF⎞
⎝ WB
⎠
Z′ – Y′
RG′ = Z′ + ⎛ ------------------- x AF⎞
⎝ WB
⎠
(FOR UNLOADED CONDITION)
(FOR LOADED CONDITION)
DURASTAR® SERIES BODY BUILDER
FRAMES
FEBRUARY 2015 — PAGE 145
FRAME HEIGHT CALCULATION – AT FRONT AND REAR RAIL ENDS - ALL MODELS
DURASTAR® SERIES BODY BUILDER
FRAMES
FRONT BUMPER AND TOW HOOKS - 4300 AND LP
FEBRUARY 2015 — PAGE 146
FRONT BUMPER AND TOW HOOKS
4300 and LP
Front Aero Bumper (01LLD) and Front Tow Hooks (01570)
2.8 (70)
2.8 (70)
51.6
(1311)
7.5
(190)
CHASSIS
2.8
(70)
2.8
(70)
RIGHT SIDE
1.5 (38)
LEFT SIDE
46.3
(1176)
STD AERO
BUMPER 01LLD
29.6
(751)
1.5 (38)
2.5 (62)
1.5 (38)
10.9
(278)
9.3
(235)
3.8
(97)
20.5
(521
3.8
(97) 10.9
(278)
2.6
(67)
2.6
(67)
15.0
(381)
FRONT SPRING EYE
01_0076
FRONT BUMPER AND TOW HOOKS
4400
Front Aero Bumper (01LLD) and Front Tow Hooks (01570)
2.8
(70)
2.8
58.6
(1487)
(70)
CHASSIS
7.5
(190)
2.8
(70)
2.8
(70)
RIGHT SIDE
7.5
(190)
46.3
(1176)
LEFT SIDE
29.6
(751)
1.5
(38)
10.9
(278)
1.5
(38)
1.5
(38)
1.5
(38)
3.8
(97)
20.5
(521)
3.8
(97)
2.6
(67)
FRONT XMBR
STD AERO
BUMPER 01LLD
10.9
(278)
2.6
(67)
15
(381)
FRONT SPRING EYE
01_0237
DURASTAR® SERIES BODY BUILDER
FRAMES
FRONT BUMPER AND TOW HOOKS - 4400
FEBRUARY 2015 — PAGE 147
DURASTAR® SERIES BODY BUILDER
FRAMES
FRONT BUMPER, TOW HOOKS AND EXTENSIONS - 4300 AND LP
FEBRUARY 2015 — PAGE 148
Front Bumper, Tow Hooks and Extensions
4300 and LP
Swept Back Front Bumper (01LLA), Front Tow Hook (01570) and Bolt-On Front Frame Extension (01WDR)
30.7
(779)
1.7 (42)
4.2 (107)
4.2
2.8
25.9
(659)
20.7
(526)
(105
(70)
3.3 (83)
2.8 (70)
2.2 (57)
43.9
(1115)
30.4
(772)
CHASSIS
2.8
(70)
2.8
30.4
(772)
(70)
RIGHT SIDE
LEFT SIDE
47.4
(104)
.9
(22)
6.9
(175)
8.4
(212)
1.4
(34)
1.0
(25)
6.9
(175)
34.6
(879)
30.3
(770)
30 Degree Swept Back
Bumper 01LLA
10.4
(265)
3.8 (97)
35.3
(89.6)
FRONT SPRING EYE
01_0077
FRONT BUMPER, TOW HOOKS AND EXTENSIONS
4400
Swept Back Front Bumper (01LLA), Front Tow Hook (01570) and Bolt-On Front Frame Extension (01WDR)
20.7
(526)
1.7
(42)
30.7
(779)
4.2
(107)
2.8
(70)
30.7
(779)
4.2
2.8 (105)
(70)
3.3 (83)
30.4
(772)
CHASSIS
42.5
(1081)
2.2 (57)
2.8
(70)
2.8
(70)
47.4
(1204)
30.4
(772)
LEFT SIDE
RIGHT SIDE
35.3
(896)
20.7
(526)
30 DEGREE SWEPT BACK
BUMPER 01LLA
0.9
(22)
8.4
(212)
8.4
(212)
6.9
(175)
10.4
(265)
0.9
(22)
6.9
(175)
FRONT CROSSMEMBER
3.8
(97)
35.3
(896)
FRONT SPRING EYE
01_0238
DURASTAR® SERIES BODY BUILDER
FRAMES
FRONT BUMPER, TOW HOOKS AND EXTENSIONS - 4400
FEBRUARY 2015 — PAGE 149
DURASTAR® SERIES BODY BUILDER
FRAMES
TIRE CARRIER - ALL MODELS
FEBRUARY 2015 — PAGE 150
TIRE CARRIER
All Models
CL
REAR AXLE
A
31.5
(800)
15.9
(404)
37.6
(954)
4.6
(116)
20.9
(530)
14.6
(371)
47.0
(1194)
01_0078
Dimensions From Rear Axle Centerline
Suspension
A
All 4x2
40.6" (1030)
6x4 52" Air/4-Spring
59.8" (1520)
6x4 55", 60" Air
63.9" (1622)
OVERHANG LIMITS FOR REFUSE /RECYCLER BODIES
LP
Dump, and other similar pivoting bodies, impose a great deal of stress on the frame rails in the rear suspension area. The body installer has the
responsibility for determining the pivot pin load and for establishing operating guidelines to prevent exceeding this load.
The limits shown in this chart are for equal loading on both sidemembers, i.e. the center of gravity of the raised body is ideally centered and the
chassis is on solid, level ground. If the center of gravity is laterally offset due either to uneven loading, uneven ground, or both, the bending moment
on one of the rails could increase substantially. For this reason the body installer should derate the overhang limits to account for the lateral shift if
either of these factors apply.
“P” (-lb)
6,000
8,000
10,000
12,000
14,000
Overhang Limit, “L” (in.)
LP – 80,000 PSI
Steel Leaf Springs
Air Suspension
95
82
68
59
52
90
71
61
53
47
01_0079
DURASTAR® SERIES BODY BUILDER
FRAMES
OVERHANG LIMITS FOR REFUSE /RECYCLER BODIES - LP
FEBRUARY 2015 — PAGE 151
DURASTAR® SERIES BODY BUILDER
FRAMES
OVERHANG LIMITS FOR REFUSE /RECYCLER BODIES - LP
FEBRUARY 2015 — PAGE 152