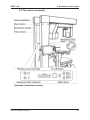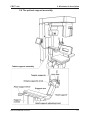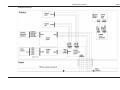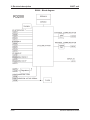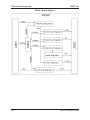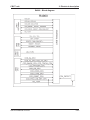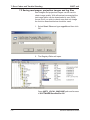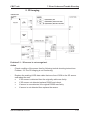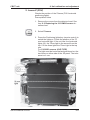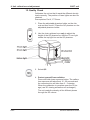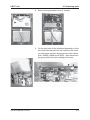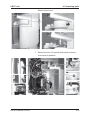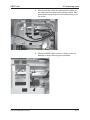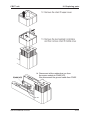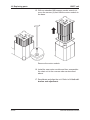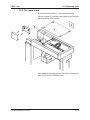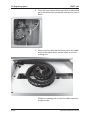
1
SCANORA 3D
Cone Beam 3D Imaging System
Service Manual
Number 203025 rev. 3 (2011-01)
CBCT unit
SCANORA 3D
Cone Beam 3D Dental Imaging System
Service Manual
Medical Device Directive
93/42/EEC
Number 203025 rev. 3 (2011-01)
Manufactured by SOREDEX
Nahkelantie 160,Tuusula
P.O. BOX 148
FI-04301 Tuusula
Finland
Tel. +358 (0)10 270 2000
Fax. + 358 9 701 5261
Service Manual 203025
iii
CBCT unit
Version history
Version number
Date released
Changes / Additions
Rev 1
2008 - 10
Draft version for VTT
Rev 2
2009 - 05
Manual updated for customer use.
Rev 3
2011 - 01
PCB updated and part replacement added
Soredex endeavours to produce product documentation that is accurate and
up to date. However, our policy of continual product development may result in
changes to products that are not reflected in the product documentation. Therefore, this document should not be regarded as an infallible guide to current product specifications. Soredex maintains the right to make changes and alterations
without prior notice.
iv
Service Manual 203025
CBCT unit
Contents
1. The CBCT unit service manual .................................................. 1-1
1.1 Introduction .............................................................................................. 1-1
1.2 The CBCT unit.......................................................................................... 1-1
1.3 Associated documentation ....................................................................... 1-1
1.4 Service precautions and warnings ........................................................... 1-2
Servicing precautions .............................................................................. 1-2
Warning - Radiation Safety ..................................................................... 1-2
Warning - Mechanical safety ................................................................... 1-3
Warning - Electrical Safety ...................................................................... 1-3
Caution - Electrostatic discharge............................................................. 1-4
Warning - Explosion hazard .................................................................... 1-5
Warning - Cleaning the unit ..................................................................... 1-5
1.5 Unauthorized Modifications ...................................................................... 1-5
1.6 Disclaimer ................................................................................................ 1-6
1.7 Disposal ................................................................................................... 1-6
2. Mechanical description .............................................................. 2-1
2.1 Main parts and assemblies ...................................................................... 2-1
2.2 The column assembly .............................................................................. 2-3
2.3 The rotating unit ....................................................................................... 2-5
2.4 The patient support assembly .................................................................. 2-7
2.5 The chair assembly .................................................................................. 2-9
2.6 Unit movements and motors .................................................................. 2-11
C-movement (Collimator) ...................................................................... 2-11
D-movement (Panoramic detector) (Optional) ...................................... 2-11
R-movement (Rotating unit) .................................................................. 2-11
S-movement (Slit).................................................................................. 2-12
X-movement (Rotating unit) .................................................................. 2-12
J-movement (Patient support assembly) ............................................... 2-13
Y-movement (Chair) .............................................................................. 2-13
Z-movement (Chair) .............................................................................. 2-13
Service Manual 203025
v
CBCT unit
3. Electrical description .................................................................. 3-1
3.1 Electric component location ..................................................................... 3-1
Circuit boards .......................................................................................... 3-1
Other electric devices .............................................................................. 3-2
3.2 List of circuit boards and electric devices................................................. 3-3
3.4 Schematic diagrams................................................................................. 3-7
Fuse guide............................................................................................... 3-7
Signalling 1 .............................................................................................. 3-8
Signalling 2 .............................................................................................. 3-9
Low power wiring 1................................................................................ 3-10
Low power wiring 2................................................................................ 3-11
Mains power wiring 1............................................................................. 3-12
Mains power wiring 2............................................................................. 3-13
3.5 Circuit board descriptions....................................................................... 3-15
R3100 Power supply ............................................................................. 3-15
R3200 CPU (Central Processing Unit) .................................................. 3-18
R3300 IO1 (Input/Output 1) ................................................................... 3-21
R3400 IO2 (Input/Output 2 Board) ........................................................ 3-24
R3500 CCD Power supply .................................................................... 3-27
R3700 X-ray Power supply.................................................................... 3-29
R3800 X-ray generator .......................................................................... 3-31
R3900 Mains connector ........................................................................ 3-34
R4000 Connector .................................................................................. 3-36
R4100 Rotator opto ............................................................................... 3-37
R4200 Opto sensor ............................................................................... 3-38
R4300 Remote control .......................................................................... 3-39
N4600 Opto sensor ............................................................................... 3-40
R4700 3D panel power supply .............................................................. 3-41
R4800 Chin rest opto ............................................................................ 3-43
R4900 Panorama interface ................................................................... 3-44
R5000 Extension Board ........................................................................ 3-46
R5100 3-phase stepper driver ............................................................... 3-47
R5200 ESD Protection .......................................................................... 3-48
R5300 Panel raw power supply............................................................. 3-49
R5400 Z-limit switch interface board ..................................................... 3-50
3D detector (CMOS).............................................................................. 3-51
Ethernet switch/router ........................................................................... 3-51
Panoramic detector (CCD) .................................................................... 3-52
vi
Service Manual 203025
CBCT unit
4. Firmware description .................................................................. 4-1
4.1 Overview .................................................................................................. 4-1
4.2 Detailed View ........................................................................................... 4-2
R3200 CPU ............................................................................................. 4-2
Boot software ........................................................................................................... 4-2
Main software ........................................................................................................... 4-2
R3300 IO1 software ................................................................................ 4-2
R3400 IO2 software ................................................................................ 4-2
GUI software ........................................................................................... 4-2
4.3 Operating modes...................................................................................... 4-3
Imaging mode.......................................................................................... 4-3
Test mode ................................................................................................ 4-3
Test mode activation/deactivation ............................................................................ 4-3
4.4 Firmware states........................................................................................ 4-4
R3200 states ........................................................................................... 4-4
Init (initialization) state.............................................................................................. 4-5
Idle state................................................................................................................... 4-5
Select (program select) state ................................................................................... 4-5
Ready state .............................................................................................................. 4-5
Exposure state ......................................................................................................... 4-6
Transfer (image transfer) state ................................................................................. 4-6
Error state ................................................................................................................ 4-6
Service state ............................................................................................................ 4-6
Off (Emergency) state .............................................................................................. 4-7
4.5 Generator modes ..................................................................................... 4-7
4.6 Firmware updating in the field .................................................................. 4-7
5. Imaging sequence ....................................................................... 5-1
5.1 Powering up the Unit – Init ....................................................................... 5-1
5.2 Positioning the Patient ............................................................................. 5-1
5.3 Exposure Start - no X-rays ....................................................................... 5-2
5.4 Exposure Sequence ................................................................................. 5-3
5.5 Exposure sequence errors ....................................................................... 5-3
5.6 Exposure End........................................................................................... 5-4
Service Manual 203025
vii
CBCT unit
6. The s2terminal ............................................................................. 6-1
6.1 Opening the s2terminal and connecting to the unit .................................. 6-1
6.2 Accessing the service commands - xh ..................................................... 6-2
Unlisted service commands .................................................................... 6-6
Description of the unit states ................................................................... 6-6
Description of the unit commands ........................................................... 6-8
6.3 Downloading raw images - xi ................................................................... 6-9
6.3 Updating firmware .................................................................................. 6-12
Core updates - gui, r3200, 3300, 3400.................................................. 6-12
Updating the main firmware - xf ............................................................ 6-14
7. Error Codes and Trouble Shooting ........................................... 7-1
7.1 Initial actions ............................................................................................ 7-1
Error Codes ............................................................................................. 7-1
Restarting the unit ................................................................................... 7-1
Image transfer ......................................................................................... 7-1
7.2 Saving raw images, projection images and log files ................................ 7-2
7.3 Checking the unit ..................................................................................... 7-4
Diagnosing faults with the s2terminal ...................................................... 7-4
Checking circuit boards ........................................................................... 7-5
Checking cables and connectors ............................................................ 7-5
7.4 Error code descriptions ............................................................................ 7-6
Error 100 ................................................................................................. 7-6
Error 101 ................................................................................................. 7-6
Error 200 ................................................................................................. 7-7
Error 201 ................................................................................................. 7-7
Error 202 ................................................................................................. 7-8
Error 1 ..................................................................................................... 7-8
Error 2 ................................................................................................... 7-10
Error 3 ................................................................................................... 7-10
Error 4 ................................................................................................... 7-10
Error 5 ................................................................................................... 7-10
Error 6 ................................................................................................... 7-11
Error 7 ................................................................................................... 7-11
Error 8 ................................................................................................... 7-13
Error 9 ................................................................................................... 7-14
Error 12 ................................................................................................. 7-14
viii
Service Manual 203025
CBCT unit
Error 13 ................................................................................................. 7-15
Error 14 ................................................................................................. 7-15
Error 15 ................................................................................................. 7-16
Error 16 ................................................................................................ 7-17
Error 17 ................................................................................................. 7-18
Error 18 ................................................................................................. 7-19
Error 19 ................................................................................................. 7-19
Error 20 ................................................................................................. 7-19
Error 21 ................................................................................................. 7-20
Error 22 ................................................................................................. 7-21
Error 23 ................................................................................................. 7-21
Error 24 ................................................................................................. 7-22
Error 25 ................................................................................................. 7-22
Error 26 ................................................................................................. 7-22
Error 27 ................................................................................................. 7-23
Error 28 ................................................................................................. 7-23
Error 29 ................................................................................................. 7-23
Error 30 ................................................................................................. 7-24
Error 31 ................................................................................................. 7-24
Error 32 ................................................................................................. 7-24
Error (no number) .................................................................................. 7-24
Start up error ......................................................................................... 7-25
7.5 Trouble shooting..................................................................................... 7-26
1. Internal and external LANs ................................................................ 7-26
Problem 1.1 - No connection to the workstation (WS) .........................................7-26
Problem 1.2 - Connection to workstation breaks from time to time. ........................7-27
Problem 1.3 - No connection to R3300, R3400 or GUI PC (internal bus failure).....7-27
Problem 1.4 - No connection to R3300....................................................................7-28
Problem 1.5 - No connections to R3400. .................................................................7-28
Problem 1.6 - No connections to the GUI PC .........................................................7-28
2. Power distribution (mains) ................................................................. 7-29
Problem 2.1 - Nothing happens when the unit is switched ON................................7-29
Problem 2.2 - Chair does not move up or down. .....................................................7-30
Problem 2.3 - GUI PC not working. .........................................................................7-30
Problem 2.4 - No X-rays. .........................................................................................7-30
Service Manual 203025
ix
CBCT unit
3. Power distribution (low voltages)....................................................... 7-31
Problem 3.1 - The GUI starts but nothing else happens when the unit is switched ON...................7-31
Problem 3.2 - No X-, R-, Detector swap or collimator movement. ...........................7-32
Problem 3.3 - Slit motor is not functioning. ..............................................................7-32
Problem 3.4 - No Y-, J- movements. ........................................................................7-32
Problem 3.5 - The panorama imaging not functioning. ............................................7-33
Problem 3.6 - The 3D imaging is not functioning. ....................................................7-33
Problem 3.7 - R3200, R3300 or R3400 does not operate. ......................................7-34
4. Panoramic imaging............................................................................ 7-35
Problem 4.1 - CCD sensor is not recognized. .........................................................7-35
Problem 4.2 - Image is messy .................................................................................7-36
Problem 4.3 - 3D-Image is too dark or light. ............................................................7-36
Problem 4.4 - Image is completely clear. .................................................................7-36
5. 3D imaging ........................................................................................ 7-37
Problem 5.1 - 3D sensor is not recognized..............................................................7-37
Problem 5.2 - Generally poor image. .......................................................................7-38
Problem 5.3 - Horizontal bars in projection image. ..................................................7-38
Problem 5.4 - Gray scale reduced. ..........................................................................7-38
Problem 5.5 - Shadows in the projection image. .....................................................7-38
6. Exposure control ............................................................................... 7-39
Problem 6.1 - Exposure does not start when exposure switch is pressed. .............7-39
Problem 6.2 - Exposure sequence starts but no X-rays ..........................................7-40
7. X-Ray generation .............................................................................. 7-42
Problem 7.1 - No X-rays. .........................................................................................7-42
Problem 7.2 - Wrong dose generated (too dark or light images). ............................7-43
8. Motion control (general) .................................................................... 7-45
X-movements .........................................................................................................7-46
Y-movements .........................................................................................................7-46
D-movements (Detector) ........................................................................................7-47
J-movements (chin rest).........................................................................................7-47
C-movements (collimator) ......................................................................................7-48
S-movements (slit) .................................................................................................7-48
9. Z-motion control (chair) ..................................................................... 7-49
Problem 9.1 - Chair does not move up or down. .....................................................7-49
Problem 9.2 - Chair moves in one direction only. ...................................................7-50
x
Service Manual 203025
CBCT unit
8. Unit calibration and adjustment ................................................ 8-1
8.1 Introduction .............................................................................................. 8-1
8.2 Alignment a Quality Assurance tools ........................................................ 8-2
8.3 Preparing for calibration ........................................................................... 8-3
8.4 The calibration sequence ......................................................................... 8-6
8.5 When to calibrate the unit ........................................................................ 8-8
8.6 The Calibration and adjustment procedure .............................................. 8-9
1. Tube calibration, Preheat and mA (Current) ........................................ 8-9
2. Lasers Z (FOV).................................................................................. 8-11
Adjusting the Z - lasers ..........................................................................................8-14
3. Detector x position............................................................................. 8-15
Adjusting DetX .......................................................................................................8-18
4. Geometry calibration ......................................................................... 8-19
5. Lasers X and Y .................................................................................. 8-21
6. Collimator Y position ......................................................................... 8-22
Adjusting the collimator ..........................................................................................8-24
7. Slit X position .................................................................................... 8-25
Adjusting the collimator ..........................................................................................8-27
8. Collimator X CT ................................................................................. 8-28
9. CCD X position .................................................................................. 8-30
Adjusting the panoramic detector...........................................................................8-32
10. Slit size ............................................................................................ 8-33
11. Collimator X panorama .................................................................... 8-35
12. CCD pixels ...................................................................................... 8-37
13. Pixel calibration ............................................................................... 8-39
14. CCD EPS ........................................................................................ 8-41
15. Quality Check .................................................................................. 8-42
16. Dose calibrations ............................................................................. 8-45
8.7 The Panoramic QA procedure (Optional) ............................................... 8-47
Service Manual 203025
xi
CBCT unit
9. Maintenance procedure .............................................................. 9-1
9.1 Calibration and adjustment ...................................................................... 9-1
9.2 Ground test ............................................................................................. 9-1
9.3 DAP calibration ........................................................................................ 9-1
9.4 Motor movements .................................................................................... 9-2
9.5 Position detectors..................................................................................... 9-2
9.6 Mains power supply cable ........................................................................ 9-2
9.7 Tubehead ................................................................................................. 9-2
9.8 Covers and Labels ................................................................................... 9-2
9.9 Fire risk .................................................................................................... 9-2
10. Replacing parts ....................................................................... 10-1
10.1 The tubehead. ...................................................................................... 10-1
10.2 The 3-D CMOS sensor ......................................................................... 10-6
10.3 The panoramic CCD sensor ............................................................... 10-14
10.4 The chair motor .................................................................................. 10-16
10.5 The cable track ................................................................................... 10-23
10.6 GUI PC ............................................................................................... 10-26
xii
Service Manual 203025
CBCT unit
1. The CBCT unit service manual
1. The CBCT unit service manual
1.1 Introduction
This manual describes how to troubleshoot and service the 3D cone beam computerized tomography x-ray
unit (the CBCT unit).
1.2 The CBCT unit
The CBCT unit is a cone beam computerized tomography x-ray system intended to take digital images of
the dentomaxillofacial complex.
It uses a CMOS flat panel detector to acquire 3D images and an optional CCD sensor to acquire panoramic images.
The device must only be used and operated by dentist
and other qualified healthcare professionals.
The device must only be used for the purpose for
which it is intended.
USA only
Caution: Federal law restricts this device to sale by or
on the order of a dentist or other qualified healthcare
professional.
1.3 Associated documentation
Service Manual 203025
-
The user’s manual supplied with the CBCT unit.
-
The installation and set -up manual supplied with
the CBCT unit.
-
The user’s manual supplied with the Scanora
Workstation software.
-
The user’s manual supplied with the 3D viewing
software.
1-1
1. The CBCT unit service manual
CBCT unit
1.4 Service precautions and warnings
Servicing precautions
Only personnel trained and approved by the manufacturer of the unit are allowed to service the unit.
Before attempting to service the device make sure that
you know how to operate it. Read the user’s manual.
Read and familiarize yourself with the warnings and
precautions listed in the user’s Manual.
Only use original spare parts from the manufacturer
when repairing the device or replacing parts.
The unit is factory set to operate using a 230 - 240
±10% VAC power supply. Never connect the unit to a
power supply different to the voltage marked on the
unit.
Warning - Radiation Safety
Before servicing the unit familiarize yourself with local
and national radiation safety standards and requirements relating to x-ray equipment.
When taking test exposures take all adequate precautions to protect yourself from radiation. Stand behind a
suitable radiation shield positioned at least two metres
(six feet) from the unit.
1-2
Service Manual 203025
CBCT unit
1. The CBCT unit service manual
Warning - Mechanical safety
Disconnect the unit from the main power supply before
removing any covers.
Disconnect the unit from the main power supply before
repairing or replacing mechanical parts or installing
accessories.
Be careful when operating the unit not to get body
parts or clothing trapped between moving parts.
During operation some surfaces and components may
become hot. Take precautions to avoid burning yourself.
The aperture plate in the collimator is made of lead
(Pb) which is toxic. Do not touch it with your bare
hands.
Do not open the tubehead. There are no serviceable
parts, mechanical or electrical, inside the tubehead.
Warning - Electrical Safety
Disconnect the unit from the main power supply before
replacing circuit boards or other electrical components.
If there are capacitors on a circuit board or electrical
device wait ten (10) minutes, after disconnecting the
unit from the power supply, before handling the board
or device.
If you have to leave the unit unattended with covers
removed during servicing or maintenance, disconnect
the unit from main power supply so that anyone who
inadvertently touches the unit does not receive an
electric shock.
This unit should only be used in areas that are provided with a protective earth connection to ensure an
equipotential ground connection.
Service Manual 203025
1-3
1. The CBCT unit service manual
CBCT unit
Caution - Electrostatic discharge
Electrostatic Discharge (ESD) can damage or destroy
electronic components.
When servicing the device take precautions to avoid
electrostatic build up and discharge (ESD). Follow the
recommendations for the prevention of ESD that are
used in the country in which you are working. If no
recommendations are available follow the guide lines
below.
Leave all new or replacement circuit boards and
electrical parts in their protective packaging until the
boards are needed.
Before handling circuit boards and electrical parts
make sure that any static electricity charge that has
built up in you body is discharged.
When handling circuit boards hold them by their edges
and do not touch any connectors or components.
When examining and checking circuit boards use an
elastic wrist wrap which is connected to a ground point
through a 1 Mohm current limiting cable. For a ground
point use water pipes, radiators or other objects that
are known to be connected to the ground. Also use a
cable to connect the unit to the same ground potential
as the wrist wrap.
If an antistatic mat is used, connect the wrist wrap to
the mat and the mat to the ground potential.
Wash the wrist wrap and check that it is in good condition frequently.
1-4
Service Manual 203025
CBCT unit
1. The CBCT unit service manual
Warning - Explosion hazard
Some disinfectants and cleaning agents may vaporize
to form an explosive vapour. If such disinfectants and
cleaning agents are used the vapour should be allowed to disperse before switching the unit on.
Warning - Cleaning the unit
Switch the unit off and disconnect it from the main
power supply before cleaning or disinfecting the unit.
Refer also to the User’s manual for additional information.
1.5 Unauthorized Modifications
Unauthorized changes or modifications to any part of
the unit or its equipment can have hazardous consequences. Changes or modifications must not be made
unless specifically authorized by the manufacturer.
When properly assembled with a compatible beamlimiting device, the diagnostic source assembly will
fully meet the United States of America Federal Performance Standards for Diagnostic X-Ray Systems and
Their Components (21 CFR 1020. 30-32) provided no
components or parts are removed from the unit and
no unauthorized adjustments are made to the beamlimiting device or tube housing assembly.
Never remove or remanufacture any part of the tubehead assembly or beam-limiting device.
Never adjust any part of the beam-limiting device unless under the direction of the manufacturer or their
authorized distributor.
Service Manual 203025
1-5
1. The CBCT unit service manual
CBCT unit
1.6 Disclaimer
The manufacturer shall have no liability for consequential damages, personal injury, loss, damage or
expense directly or indirectly arising from the use of its
products. No agent, distributor or other party is authorized to make any warranty or other liability on behalf of
the manufacturer with respect to its products.
1.7 Disposal
At the end of useful service life of the device, its spare
parts, its replacement parts and its accessories make
sure that you follow all local, national and international
regulations regarding the correct and safe disposal
and/or recycling of the device, its spare parts, its replacement parts and its accessories.
The device, its spare parts, its replacement parts and
its accessories may include parts that are made of or
include materials that are non-environmentally friendly
or hazardous. These parts must be disposed of in accordance with all local, national and international regulations regarding the disposal of non-environmentally
friendly or hazardous materials.
Hazardous materials and parts that are made of or
contain these materials:
LEAD
Tubehead housing, collimator, circuit boards.
TUBEHEAD OIL
Inside tubehead.
CESIUM IODIDE (CsI)
CMOS sensor, CCD sensor.
1-6
Service Manual 203025
CBCT unit
2. Mechanical description
2. Mechanical description
2.1 Main parts and assemblies
Service Manual 203025
2-1
2. Mechanical description
CBCT unit
The Unit comprised a base on which is mounted a
chair assembly and a column assembly.
Attached to the top of the column assembly there is
the upper shelf.
Attached to the underside of the upper shelf is the
rotating unit.
Fixed to the side of the chair assembly there is the patient support assembly, which supports the patient’s
head when the patient is seated in the chair.
The control panel, for operating the unit, is attached
to the front of the column assembly (refer to the user’s
manual for a description of the control panel).
A holder attached to the side of the control panel holds
the remote control. This is used to position the patient (refer to the user’s manual for a description of the
remote control).
The exposure button is attached to the side of the
column.
A PC with MDD compliant dental imaging software and
3D viewing software is connected to the unit via an
Ethernet cable.
2-2
Service Manual 203025
CBCT unit
2. Mechanical description
2.2 The column assembly
Service Manual 203025
2-3
2. Mechanical description
CBCT unit
The column assembly comprises a front column
and a rear column. An emergency stop knob is located on the “chair side” of the front column. Between
the front and rear columns is the electronics cabinet
which houses the HD and circuit boards are located.
The on/off switch for the unit, the main fuses and the
exposure switch and remote control connectors
are located on the underside of the electronics cabinet.
2-4
Service Manual 203025
CBCT unit
2. Mechanical description
2.3 The rotating unit
Service Manual 203025
2-5
2. Mechanical description
CBCT unit
The rotating unit is attached to the upper shelf. The
rotating unit comprises the tubehead assembly and
the detector head. In the top of the rotating unit there
is a stepper motor which rotates the rotating unit during the imaging procedure.
A motor in the upper shelf moves the rotating unit to
the left or right to position it for the required imaging
program.
The detector head comprises the 3D (CMOS) flat panel and, if the unit is a 3D pan version, the pan (CCD)
sensor will be attached to the side of the 3D detector.
When the pan program is selected, the pan sensor
automatically rotates forward to the correct position.
There are six positioning light in the rotating unit, four
for 3D images and (OPTIONAL) two for panoramic.
There is one patient position light in the upper shelf
that is used for both 3D and panoramic images.
2-6
Service Manual 203025
CBCT unit
2. Mechanical description
2.4 The patient support assembly
Service Manual 203025
2-7
2. Mechanical description
CBCT unit
The patient support assembly is attached to the side
of the chair assembly. The patient support assembly
comprises a support column which can be driven up
and down to position the angle of the patient head.
Mounted on top of the support column is the support
arm which can be rotated away from the unit to allow
patient entry and exit. The support arm is locked in
position with the head support lever.
Attached to the support arm is the head support that
can be manually adjusted backwards and forwards
with the head support adjusting knob.
At the top of the head support there is the chin rest.
Various patient positioning accessories can be attached to the chin rest to support the patient’s head.
On both sides of the chinrest there are temple supports that can be manually closed, to support the
patients head, with the temple supports knob.
2-8
Service Manual 203025
CBCT unit
2. Mechanical description
2.5 The chair assembly
Service Manual 203025
2-9
2. Mechanical description
CBCT unit
The chair assembly comprises the chair base and
the chair. A motor in the chair base adjusts the height
of the chair so that the patient can be positioned in the
vertical direction.
The chair comprised the seat, the back rest, the arm
rests, which can be lifted up to allow patient entry and
exit, and the leg rests.
A motor in the seat allows the patient to be positioned
in the backwards forwards direction.
The back rest positioning knob at the rear of the
chair allows the position of the backrest to be adjusted
for different size patients.
The seat and backrest upholstery are attached to the
chair assembly using hook-loop (Velcro) tape.
An optional seat cushion is available to position children at the correct height.
2-10
Service Manual 203025
CBCT unit
2. Mechanical description
2.6 Unit movements and motors
C-movement (Collimator)
Collimator.
Adjusts the position of the collimator.
Used for the different imaging programs.
Motor: Stepper, inside the tubehead assembly.
D-movement (Panoramic detector) (Optional)
Rotates the panoramic detector into the panoramic
exposure position.
Motor: Stepper, inside the detector head.
R-movement (Rotating unit)
Rotating unit.
Rotating movement of the rotating unit.
Used to take exposures.
Motor: stepper, in the top of the rotating unit.
Service Manual 203025
2-11
2. Mechanical description
CBCT unit
S-movement (Slit)
The beam limiting device slit
Adjusts the width of the beam limiting device slit.
Used for the different imaging programs
Motor: Stepper, inside the tubehead assembly.
X-movement (Rotating unit)
Rotating unit.
Left / right movement of the rotating unit. Used to
move the rotating unit during patient positioning
Motor: Stepper, under in the top shelf.
2-12
Service Manual 203025
CBCT unit
2. Mechanical description
J-movement (Patient support assembly)
Patient support assembly.
Up / down movement of the patient support assembly.
Used to adjust the angle of the patient’s head.
Motor: DC, in the chinrest support.
Y-movement (Chair)
Chair.
Backwards / forwards movement of the patient chair.
Used to position the patient in the backwards/forwards
direction.
Motor: Stepper, under the seat.
Z-movement (Chair)
Chair.
Up / down movement of the chair.
Used to position the patient vertically.
Motor: AC in the chair base.
Service Manual 203025
2-13
2. Mechanical description
2-14
CBCT unit
Service Manual 203025
CBCT unit
3. Electrical description
3. Electrical description
3.1 Electric component location
Circuit boards
Service Manual 203025
3-1
3. Electrical description
CBCT unit
Other electric devices
3-2
Service Manual 203025
CBCT unit
3. Electrical description
3.2 List of circuit boards and electric devices
Service Manual 203025
-
R3100 Power supply
Type - power supply, low power
Location - electronics cabinet.
-
R3200 CPU
Type - logic. Includes an FPGA integrated circuit
and embedded SW.
Location - rotating unit (detector head).
-
R3300 IO1
Type - logic. Includes an FPGA integrated circuit
and embedded SW.
Location - rotating unit (top part).
-
R3400 IO2
Type - logic. Includes an FPGA integrated circuit
and embedded SW.
Location - base.
-
R3500 CCD power supply
Type - power supply, low power
Location - rotating unit (detector head).
-
R3700 X-ray power supply
Type - power supply, high power
Location - rotating unit (tubehead assembly).
-
R3800 X-ray generator
Type - power supply, high power
Location - rotating unit (tubehead assembly).
-
R3900 Mains connector
Location - electronics cabinet.
Type - satellite connector board.
-
R4000 Connector
Type - satellite connector board.
Location - rotating unit (detector head).
-
R4100 Rotator opto
Type - satellite board.
Location - rotating unit (top part)
3-3
3. Electrical description
3-4
CBCT unit
-
2 x R4200 Opto sensor
Type - satellite board.
Location - rotating unit (tubehead assembly)
Location - rotating unit (detector head)
-
R4300 Remote control
Type - satellite board.
Location - front column, it is connected to the electronics cabinet.
-
2 x N4600 Opto sensor
Type - satellite board.
Location - upper shelf
Location - chair
-
R4700 3D panel power supply
Type - power supply, low power
Location - rotating unit (detector head).
-
R4800 Chin rest opto
Type - satellite board.
Location - patient support assembly.
-
2 x R4900 Panorama interface
Type - satellite connector board
Location - rotating unit (detector head).
-
R5000 Extension Board
Type - satellite board
Location - Rotating unit (detector head).
-
4 x R5100 3-phase stepper driver
Type - satellite board.
Location - rotating unit (top part).
Location - upper shelf.
Location - rotating unit (tubehead assembly).
Location - rotating unit (detector head).
-
R5200 ESD Protection
Type - satellite connector board.
Location - electronics cabinet.
-
R5300 Panel raw power supply
Type - power supply, low power
Location - electronics cabinet.
Service Manual 203025
CBCT unit
Service Manual 203025
3. Electrical description
-
R5400 Z-limit interface board
Type - satellite board
Location - Rotating unit (detector head).
Only used with units that have chair assemblies
with three cables and R3400 IO2 version 5 and
below.
-
3D-detector (CMOS)
Location - rotating unit (detector head).
-
J-motor (Chin rest - DC)
Location - patient support assembly.
-
C-motor (Collimator)
Location - rotating unit (tubehead assembly).
-
Detector swapping motor
Location - rotating unit (detector head).
Type - satellite connector board.
-
D-motor (Panoramic detector)
Location - rotating unit (detector head).
-
Emergency stop button
Location - front column.
-
Ethernet switch/router
Location - electronics cabinet.
-
Exposure switch
Location - front column (it is connected to the electronics cabinet).
-
Generator fan/filter
Location - rotating unit (tubehead assembly).
-
GUI PC
Third-party GUI PC board. It communicates via the
internal Ethernet.
Location - electronics cabinet.
-
GUI PC Power Supply
Location - electronics cabinet.
-
GUI touch panel monitor
Location - front column.
3-5
3. Electrical description
3-6
CBCT unit
-
Mains filter
Location - base.
-
Mains transformer
Location - electronics cabinet.
-
Panoramic detector (CCD) (optional)
Location - rotating unit (detector head).
-
Panoramic focal trough laser
Location - rotating unit (detector head).
-
Panoramic Z-laser
Location - rotating unit (detector head).
-
Positioning lasers, FOV-bottom, FOV-top (two,
three or four depending on model), FOV-center
(sagittal plane).
Location - rotating unit.
-
R-motor (Rotation)
Location - rotating unit (top part).
-
S-motor (Slit)
Location - rotating unit (tubehead assembly).
-
Warning light connector
Location - base.
-
X-motor (3-phase stepper)
Location - upper shelf.
-
X-positioning (coronal plane)
Location - upper shelf.
-
X-ray tube
Location - rotating unit (tubehead assembly).
-
Y-motor (3-phase stepper)
Location - chair
-
Z-movement encoder (single phase)
Location - chair
-
Z-movement motor (ac)
Location - chair
Service Manual 203025
CBCT
3. Electrical description
3.4 Schematic diagrams
Fuse guide
Service Manual 203025
3-7
3. Electrical description
CBCT
Signalling 1
3-8
Service Manual 203025
CBCT
3. Electrical description
Signalling 2
Service Manual 203025
3-9
3. Electrical description
CBCT
Low power wiring 1
3-10
Service Manual 203025
CBCT
3. Electrical description
Low power wiring 2
Service Manual 203025
3-11
3. Electrical description
CBCT
Mains power wiring 1
3-12
Service Manual 203025
CBCT
3. Electrical description
Mains power wiring 2
Service Manual 203025
3-13
3. Electrical description
3-14
CBCT
Service Manual 203025
CBCT unit
3. Electrical description
3.5 Circuit board descriptions
R3100 Power supply
R3100 DESCRIPTION:
The main function is to generate the voltages needed
for internal operation of the unit. It also has also a
shutdown feature that can switch the +24V off as well
as control the mains relay located in the electronics
cabinet.
The input voltage comes from the mains transformer.
Input AC voltages are rectified and regulated by a linear regulator or a switcher regulator. Power shutdown
is implemented by controlling the enable/switch off
input of the +24V regulator.
R3100 LOCATION:
In the electronics cabinet.
R3100 INPUTS:
24Vac, mainly for motors
12Vac, for Ethernet switch
12Vac, for logic and for 3D-panel digital power
R3100 OUTPUTS:
+24Vdc for the stepper, DC motors and the CCD power supply.
+8Vdc for 3D sensor power supply
+7.5Vdc for the Ethernet switch
+5Vdc for the logic boards
R3100 FUSES:
F1
T0.75A 250V
F2
F3A 250V
F3
T2A 250V
F4
T6.3A 250V
F5
T5A 250V
All fuses are UL approved.
When replacing fuses ALWAYS use the same type, rating and size.
Service Manual 203025
3-15
3. Electrical description
D20
+24Vdc_raw.
D21
+12Vdc_dig.
D22
+12Vdc_esw.
D23
+24V
D25
+5Vdc
D26
+7.5Vdc.
D27
+8Vdc_dig.
D28
+24Vdc.
TP1
TP2
GND
GND_DIG.
3-16
CBCT unit
R3100 INDICATOR LEDS:
Raw voltage for motors and logic boards.
On = Voltage OK.
Raw voltage for panel power supply.
On = Voltage OK.
Raw voltage for Ethernet switch.
On = Voltage OK.
Input voltage for motors,
On=Voltage OK
Output voltage for logic boards.
On = Voltage OK.
Output voltage for Ethernet switch.
On = Voltage OK.
Output voltage for panel power supply.
On = Voltage OK.
Output voltage for motors.
On = Voltage OK.
R3100 TEST PINS:
For +24Vdc, +12Vdc, +7.5Vdc and +5Vdc.
Ground reference for +8Vdc_dig.
Service Manual 203025
CBCT unit
3. Electrical description
R3100 - Block Diagram
Service Manual 203025
3-17
3. Electrical description
CBCT unit
R3200 CPU (Central Processing Unit)
R3200 DESCRIPTION:
Controls the main functions of the unit. Monitors and
control the status of Detector Power Supply.
Includes an FPGA integrated circuit and embedded
SW.
R3200 LOCATION:
In the detector side of the rotating unit.
R3200 CONTROL FUNCTIONS:
System control.
1Gb Ethernet for external communications.
100Mb Ethernet for internal communications.
3D-image grabbing.
Panorama image grabbing.
Image buffering in the DDRAM memory.
Rotation control signalling.
Y-motion control signalling.
Slit motor control signalling.
R3200 FUSES:
None
R3200 INDICATOR LEDS:
R3200 REL 3 and below
Giga Ethernet status LEDs:
D1
Duplex mode
D2
1GB
D3
100MB
D4
10MB
D5
Link activity
100M Ethernet status LEDs:
D6
100MB
D7
Link activity
D8
Duplex mode
D9
10MB
3-18
Service Manual 203025
CBCT unit
3. Electrical description
Internal power status LEDs:
D11
+5V input OK
D13
+1.25V OK
D14
+1.2V PLL OK
D15
+1.8V OK
D16
+2.5V OK
D17
+2.1V OK
R3200 REL 4 and above
Giga Ethernet status LEDs:
D1
Duplex mode
D2
1GB
D3
100MB
D4
10MB
D5
Link activity
100M Ethernet status LEDs:
D6
100MB
D7
Link activity
D8
Link OK
Motor power status LEDs:
D9
+24V switched ON
D10
+5V switched ON
Internal power status LEDs:
D11
+5V input OK
D13
+1.25V OK
D14
+1.2V PLL OK
D15
+1.8V OK
D16
+2.5V OK
R3200 TEST PINS:
None
Service Manual 203025
3-19
3. Electrical description
CBCT unit
R3200 - Block diagram
3-20
Service Manual 203025
CBCT unit
3. Electrical description
R3300 IO1 (Input/Output 1)
R3300 DESCRIPTION:
Drives the stepper motors and includes electronics for
controlling the X-ray generator.
Includes an FPGA integrated circuit and embedded
SW.
R3300 LOCATION:
In the top part of the rotating unit.
R3300 FUNCTIONS:
100Mb Ethernet for internal communication.
Detector motor control signalling.
X-motor control signalling.
Collimator motor control signalling.
Slit motor driving.
Position laser driving.
Exposure button interface.
X-ray generator control.
X-ray back-up timer.
X-ray warning alarm.
Rotation encoder (dual phase).
R3300 INPUTS:
+24Vdc, mainly for motors
+5V, for logic
R3300 FUSES:
None
R3300 INDICATOR LEDS:
NOTE:
Not all indicator LEDs on rev 2 and earlier of this board
are the same as on rev 3 and later.
Common for both revisions
D1
+28V for motors (glowing means OK)
D3
+1.25V
D4
+3.3V
D500
Exposure enabled
D501
Preheat enabled
D502
X-ray enabled
Service Manual 203025
3-21
3. Electrical description
CBCT unit
Used only with the R3300 rev 2 and earlier
D6
Duplex mode
(on=full duplex, off = half duplex)
D7
10Bbit link (on = 10Mb mode activated)
D8
ACT ivity
(blink = traffic)
D9
100Mbit link (on = 100Mb mode activated)
Used on the R3300 rev 3 and later
D10
LINK
(light = link ok)
D11
ACT
(blink = traffic)
D12
SPEED
(on = 100MB)
R3300 TEST PINS:
TP6
Not for service use
TP7
GND
TP10
GND
TP11
POWGND
TP12
GND
TP13
GND
TP14
GND
3-22
Service Manual 203025
CBCT unit
3. Electrical description
R3300 - Block diagram
Service Manual 203025
3-23
3. Electrical description
CBCT unit
R3400 IO2 (Input/Output 2 Board)
WARNING!
Dangerous mains voltage on part of this board.
The dangerous part is marked with crosshatched
lines. LA1 also indicates when there is live voltage
on the board.
COMPATIBILITY NOTES:
Release 5 and below of R3400 need R5400.
Release 6 and above of R3400 do not need R5400.
R3400 DESCRIPTION:
Includes an FPGA integrated circuit and embedded
SW.
Drives the AC-motor located in chair. The movement of
the Z-motion is monitored by a magnetic HAL element
(mounted to the motor) and high/low limit switches
(inside of the chair lift mechanism).
The operation of external IO2 board is controlled via
the internal Ethernet.
R3400 LOCATION:
In the front part of the base.
R3400 FUNCTIONS:
100Mb Ethernet for internal communication.
Remote control interface.
Emergency stop interface.
Z-motor safety logic and motor driving.
Chin motor driving.
Chin motor encoder (dual phase).
Y-motor driving.
R3400 FUSES:
F1
T5A 250V, 6 x 32
R3400 INDICATOR LIGHT:
LA1
Light indicates dangerous voltage (mains)
ON = DANGER: mains voltage present
OFF = No voltage
3-24
Service Manual 203025
CBCT unit
3. Electrical description
R3400 INDICATOR LEDS:
R3400 rel 5 and below
D1
3.3V
D2
1.25V
D3
Ethernet Speed (On=10MB)
D4
Ethernet Duplex mode
D5
Ethernet Transferring Activities
D6
Ethernet Speed (On=100MB)
D15
Z-UP
D16
Z-DOWN
D18
Z-ENA
R3400 rel 6 and above
D1
3.3V
D2
1.25V
D3
Exposure switch pressed indicator
D4
Z-ENA_ETH
D5
Z-DOWN_ETH
D6
Z-UP_ETH
D15
Z-UP
D16
Z-DOWN
D18
Z-ENA
D20
Ethernet LINK OK
D21
Ethernet Speed (On=100MB, Off=10MB)
D22
Ethernet Transferring Activities
D30
Z-LOW LIMIT
D31
Z-UPPER LIMIT
R3400 TEST PINS:
TP1
GND
TP3
+3V3
Service Manual 203025
3-25
3. Electrical description
CBCT unit
R3400 - Block diagram
3-26
Service Manual 203025
CBCT unit
3. Electrical description
R3500 CCD Power supply
R3500 DESCRIPTION:
Generates low power supply voltages for the panoramic CCD sensor.
R3500 LOCATION:
In the detector head.
R3500 CONTROLS:
CCD power enable from the R3200 CPU.
R3500 INPUTS:
+24Vdc, mainly for motors
+5V, for logic
R3500 OUTPUTS:
-9Vdc
+3Vdc
+3.3Vdc
+5Vdc
+15Vdc
R3500 FUSES:
None.
R3500 INDICATOR LEDS:
D9
+3V3
D10
+15VA
D11
+3VA
D12
9VA
D13
5.1V
R3500 TEST PINS:
TP1
GND
TP2
GND
TP3
GND
TP4
GND
Service Manual 203025
3-27
3. Electrical description
CBCT unit
R3500 - Block diagram
3-28
Service Manual 203025
CBCT unit
3. Electrical description
R3700 X-ray Power supply
WARNING!
Dangerous mains voltage on part of this board.
LA1 also indicates when there is live voltage on
the board.
R3700 DESCRIPTION:
Generates the voltages for the R3800 X-ray Generator.
R3700 LOCATION:
In the tubehead assembly.
R3700 FUSES:
F1
T2A 250V
F2
FF8A 500V
F3
T1A 250V
R3700 INDICATOR LIGHTS:
LA1
Light indicates dangerous voltage (mains)
ON = DANGER: Mains voltage present
OFF = No voltage
R3700 INDICATOR LEDS:
D13
+27V5
R3700 TEST PINS:
None.
Service Manual 203025
3-29
3. Electrical description
CBCT unit
R3700 - Block diagram
3-30
Service Manual 203025
CBCT unit
3. Electrical description
R3800 X-ray generator
WARNING!
Dangerous mains voltage on part of this board.
The dangerous part is marked with crosshatched
lines. LA1 also indicates when there is live voltage
on the board.
R3800 DESCRIPTION
The board has two main functions.
To generate 360Vp-p AC voltage for tubehead from
the mains supply voltage, 230 VAC, and to generate
the filament voltage for the tubehead and the feedback
signals.
R3800 LOCATION:
In the tubehead assembly.
R3800 FUSES:
None.
R3800 INDICATOR LIGHT:
LA1
Light indicates dangerous voltage (mains)
ON = DANGER: mains voltage present
OFF = No voltage
R3800 INDICATOR LEDS:
D1
FIV Filament power supply.
D2
+15V
D3
PREH
D30
HVGND
D31
EXP (3D flashing, pan constant)
D32
FAIL
Service Manual 203025
3-31
3. Electrical description
CBCT unit
R3800 TEST PINS:
Warning!
Test pins TP1-TP4 have galvanic connection to mains voltage!
TP1
TP2
TP3
TP2)
TP4
TP5
TP6
TP7
TP8
TP9
TP10
TP11
TP12
TP13
TP14
TP15
TP16
3-32
15V
HVGND
FETAD
+15V when power is on (TP1 to TP2)
Pulses appear when taking exposure, approx. 15Vpp (TP3 to
FETBC
Pulses appear when taking exposure, approx.
15Vpp (TP4 to TP2)
FAN OVERRIDE (Not in use)
EXPENA Controls radiation, 0 = radiation OFF, approx. +15V=radiation ON
KVFB
Feedback from tube voltage, scale 1V=20kV exp ON
KVREF
Reference voltage for tube voltage, scale 1V=20kV exp ON
Not for service use
GND
Ground point, similar to TP16, for TP5-TP15 measurements
PREHREF Reference voltage for mA preheat, varies from 1.2V to 1.8V
MAREF Reference voltage for tube current, 3.7V->8mA. 2.5V->15mA
MAFB
Feedback from tube current, 3.56V->8mA, 2.2V->15mA
Not for service use
PREHEAT_FB
Approx. 500mV during preheat sequence
GND
Service Manual 203025
CBCT unit
3. Electrical description
R3800 - Block diagram
Service Manual 203025
3-33
3. Electrical description
CBCT unit
R3900 Mains connector
WARNING!
Dangerous mains voltage on part of this board.
The dangerous part is marked with crosshatched
lines. H1 also indicates when there is live voltage
on the board.
R3900 DESCRIPTION:
The main function is to distribute AC voltage from the
mains switch (main power supply) to the:
- mains transformer
- to R3400 IO2
- to R3700 X-ray power supply
- to GUI PC power supply (some versions are non isolated and some are isolated)
It is also used as a connector board for EXP signal and
a relay for the warning light.
R3900 LOCATION:
In the electronics cabinet.
R3900 FUSES:
F1
T2A/250V 6 x 32
F2
Unused
H1
Mains Voltage
R3900 INDICATOR LIGHT:
Indicates the existence of the mains voltage.
Off = Voltage less than 65V
On = DANGER! Voltage more than 65V
R3900 INDICATOR LEDS:
None.
TP1
3-34
Ground
R3900 TEST PINS:
Test point for secondary side grounding.
NOTE!
Not suitable for measuring the mains side grounding.
Service Manual 203025
CBCT unit
3. Electrical description
R3900 - Block diagram
Service Manual 203025
3-35
3. Electrical description
CBCT unit
R4000 Connector
R4000 DESCRIPTION:
Distributes the low DC supply signals to R3200 CPU,
R3300 IO1 and R3500 CCD power supply.
R4000 LOCATION:
In the detector head.
R4000 FUSES:
None.
R4000 INDICATOR LEDS:
None.
R4000 TEST PINS:
None.
R4000 - Block diagram
3-36
Service Manual 203025
CBCT unit
3. Electrical description
R4100 Rotator opto
R4100 DESCRIPTION:
There are four of these boards in the unit. They monitor the position of rotating unit motor.
R4100 LOCATION:
In the top part of the rotating unit.
R4100 FUSES:
None.
R4100 INDICATOR LEDS:
None.
R4100 TEST PINS:
None.
R4100 - Block diagram
Service Manual 203025
3-37
3. Electrical description
CBCT unit
R4200 Opto sensor
R4200 DESCRIPTION:
There are two of these boards in the unit. One monitors the position of collimator motor and the other the
detector motor.
R4200 LOCATION:
One in the tubehead assembly.
One in the detector head of the rotator for the detector
swap.
R4200 FUSES:
None.
R4200 INDICATOR LEDS:
None.
R4200 TEST PINS:
None.
R4200 - Block diagram
3-38
Service Manual 203025
CBCT unit
3. Electrical description
R4300 Remote control
R4300 DESCRIPTION:
The control used by the user to operate the unit.
R4300 LOCATION:
In the remote control.
R4300 FUSES:
None.
R4300 INDICATOR LEDS:
None.
R4300 TEST PINS:
None.
R4300 - Block diagram
Service Manual 203025
3-39
3. Electrical description
CBCT unit
N4600 Opto sensor
N4600 DESCRIPTION:
There are two of these boards in the unit. One monitors the position of Y-motor and the other the position
of the of X-motor. The board comprises three optical
switches that generate sensor signals.
N4600 LOCATION:
One in the upper shelf.
One in the chair base.
N4600 FUSES:
None.
N4600 INDICATOR LEDS:
None.
N4600 TEST PINS:
None.
3-40
Service Manual 203025
CBCT unit
3. Electrical description
R4700 3D panel power supply
R4700 DESCRIPTION:
Generates the low voltages for the 3D sensor.
The board regulates the voltages, 8V analog to 5V
analog and 8V digital to 5V digital. There are also
output/enables in the circuit. One is external and one
is internal. The external O/E is connected to the 5V
digital regulation circuit and internal O/E is connected
from the 5V digital output to the 5V analog enable.
R4700 LOCATION:
In the detector head.
R4700 CONTROLS:
Panel power enable from the R3200 CPU
R4700 INPUTS:
+8Vdc (digital side)
+8Vdc (analog side)
R4700 OUTPUTS:
+5Vdc (digital side)
+5Vdc (analog side)
R4700 FUSES:
None.
R4700 INDICATOR LEDS:
D3
+5V Dig
D4
+5V Ana
R4700 TEST PINS:
D4
+5V Ana
Service Manual 203025
3-41
3. Electrical description
CBCT unit
R4700 - Block diagram
3-42
Service Manual 203025
CBCT unit
3. Electrical description
R4800 Chin rest opto
R4800 DESCRIPTION:
It monitors the position of the patient support assembly
motor. The board comprises two optical switches that
generate sensor signals.
R4800 LOCATION:
In the patient support assembly.
R4800 FUSES:
None.
R4800 INDICATOR LEDS:
None.
R4800 TEST PINS:
None.
R4800 - Block diagram
Service Manual 203025
3-43
3. Electrical description
CBCT unit
R4900 Panorama interface
R4900 DESCRIPTION:
There are two of these boards in the unit. They serve
as an interface between the panoramic sensor and
R3200 CPU.
R4900 LOCATION:
Both are in the detector head one in the pan sensor
arm and the other attached to the R3200 CPU.
R4900 FUSES:
None
R4900 INDICATOR LEDS:
None
R4900 TEST PINS:
None
3-44
Service Manual 203025
CBCT unit
3. Electrical description
R4900 - Block diagram
Service Manual 203025
3-45
3. Electrical description
CBCT unit
R5000 Extension Board
R5000 DESCRIPTION:
Includes circuitry for detecting the condition of the line
voltage and also has an interface for X-position optos
(from the N4600)
R5000 LOCATION:
Attached to R3300.
R5000 FUSES:
None
R5000 INDICATOR LEDS:
None.
R5000 TEST PINS:
None
R5000 - Block diagram
3-46
Service Manual 203025
CBCT unit
3. Electrical description
R5100 3-phase stepper driver
R5100 DESCRIPTION:
There are four of these boards in the unit. The inputs
are current driven and connected to the logic boards
R3200 CPU and R3300 IO1.
R5100 LOCATION:
One in the detector head, one in the tubehead assembly, one in the upper shelf, one in the upper part of the
rotating unit.
R5100 FUSES:
None.
R5100 INDICATOR LEDS:
D1
+5V
D2
+28V
R5100 TEST PINS:
NOTE:
Some earlier versions of this board did not have
test pins.
GND
Vref
clk
ENA
R5100 - Block diagram
Service Manual 203025
3-47
3. Electrical description
CBCT unit
R5200 ESD Protection
R5200 DESCRIPTION:
Transforms the connector formats. ESD protection is
also on this board
R5200 LOCATION:
In the electronics cabinet.
R5200 FUSES:
None.
R5200 INDICATOR LEDS:
None.
R5200 TEST PINS:
None
R5200 - Block diagram
3-48
Service Manual 203025
CBCT unit
3. Electrical description
R5300 Panel raw power supply
R5300 DESCRIPTION:
Generates +8V low voltage for the analog side of the
3D sensor power chain.
NOTE! The +8V is distributed to the R4700 3D panel
power supply, which re-regulates it down to +5V and
distributes the voltage to the 3D sensor.
R5300 LOCATION:
In the electronics cabinet.
R5300 INPUTS:
12Vac
R5300 OUTPUTS:
+8Vdc (analog side)
R5300 FUSES:
F1
T2A/250V 6 x 32
R5300 INDICATOR LEDS:
H1
12Vac
H2
+8VDL analog
R5300 TEST PINS:
None.
R5300 - Block diagram
Service Manual 203025
3-49
3. Electrical description
CBCT unit
R5400 Z-limit switch interface board
R5400 DESCRIPTION:
Z-limit switch interface between chair lift and R3400
IO2.
COMPATIBILITY NOTES:
R5400 is only USED with:
-
R3400 IO2 release 5 and below and units that
have chair assemblies with 3 cables.
R5400 is NOT USED with:
-
R3400 IO2 release 6 and above and units that
have chair assemblies with 3 cables.
-
units that have chair assemblies with 2 cables.
R5400 LOCATION:
Attached to R3400 IO2
R5400 INPUTS:
Limit switch input from Chair
Y-opto inputs
R5400 OUTPUTS:
Z-limit switch status to R3400 IO2
Y-opto signalling passed to R3400 IO2
R5400 FUSES:
None.
R5400 INDICATOR LIGHTS:
H1
Lower limit,
On = limit reached
H2
Upper limit,
On = limit reached
R5400 TEST PINS:
None.
3-50
Service Manual 203025
CBCT unit
3. Electrical description
3D detector (CMOS)
PURPOSE:
3D image acquisition.
LOCATION:
Rotating unit (detector head)
FUSES:
None.
INDICATOR LEDS:
None.
Ethernet switch/router
PURPOSE:
Ethernet signalling
LOCATION:
In the electronics cabinet.
FUSES:
None.
INDICATOR LEDS:
D1 - D5
OFF = no connection
ON = link connection OK (no traffic)
FLASH = link connection OK (traffic)
Service Manual 203025
3-51
3. Electrical description
CBCT unit
Panoramic detector (CCD)
PURPOSE:
Panoramic image acquisition.
LOCATION:
Rotating unit (detector head)
FUSES:
None.
INDICATOR LEDS:
On the rear of the CCD sensor there are a number
LEDs that indicate the status of the panoramic detector
(CCD).
-
3-52
CCD status LED (three colour)
It indicates that the CCD is connected, all the software has been downloaded and it is ready to take
and image.
Green, in stand-by mode (power signal not active).
Green flashing, mode conflict, e.g. a pan exposure has been selected but the CCD sensor is not
in the correct position.
Yellow, image capture mode (power on).
Red, in position but not yet ready, SW is being
loaded.
Red flashing, fatal SW error / communication routine failure after an image has been taken.
NOTE:
The LED will flash red when in the service mode.
Service Manual 203025
CBCT unit
3. Electrical description
-
CCD TxD and CCD RxD LEDs (yellow) serial
communication. In normal operation they flash
intermittently.
They indicate communication activity. If CCD RxD
is off (passive CCD sensor), CCD TxD will also be
off. If CCD TxD is off, CCD RxD is on and the CCD
status LED flashes during and after image capture
it indicates that the CCD sensor tried to receive
the image, but the transmit communication routine
failed.
-
Power Supply LEDs (yellow) indicate the different
voltages required by the CCD sensor. The IC in the
CCD sensor monitors the voltages and activates
the LEDs accordingly. The software set limits for
the various supply voltages. The LEDs come on
during image capture.
LED 1. +3.3V and +1.8V LEDs
Supply voltages for the CCD clock controlling FPGA. The +3.3V is generated in DIB from
VCC_+5V.
The +1.8V step down is generated in camera
board from +3.3V (from DIB).
LIMITS:
+3.3V between +3.0 and +3.6V
+1.8V between +1.71V and +1.89V.
LED 2. Analog +5V LED
DIB generates this voltage from VSP_+5V
Supply voltage for AD-converters
LIMITS
between +4.5V and +5.5V
LED 3. +15V, +3V and –9V LED
DIB generates these voltages from VAP_+18V
CCD gate voltages
LIMITS:
+15V between +13.5V to +16.5V
+3V between +2.4V and +3.6V
-9V between -9.92V and -9.17V
Service Manual 203025
3-53
3. Electrical description
CBCT unit
Another required voltage is cam_permanent_+5V
(signal name on the DIB board). It is used to power
the IC. If this voltage is missing all the LEDs will be
off.
3-54
-
TDI clk LED (yellow). Indicates that the clocking
frequency of CCD is available.
LED Off - TDI frequency is between 0...50Hz
LED On - TDI frequency is between 100 Hz...1kHz
LED Flashing - TDI frequency is between
50...100Hz or above 1kHz.
-
Image LED (yellow). Indicates pimage/cimage signal activity. It tells detector A/D-converter to sample
image data according to the TDI frequency.
-
Power LED (yellow) Indicates that ppower/cpower
signal is active. Switching regulators of DIB board
are enabled after ppower/cpower signal becoming
active.
Service Manual 203025
CBCT unit
4. Firmware description
4. Firmware description
4.1 Overview
The firmware is located on four components:
-
R3200 CPU, main control, image acquisition, Ethernet interface
-
R3300 IO1, rotating unit movements and X-ray
control
-
R3400 IO2, chair control
-
GUI (the internal PC), user interface, calibration
data.
Communication between the IO boards and GUI is via
an internal 100 Base - T Ethernet connection.
Service Manual 203025
4-1
4. Firmware description
CBCT unit
4.2 Detailed View
R3200 CPU
Executes the main and boot SW of the unit.
Boot software
Loads the main firmware into the RAM and starts it.
Handles the initial unit firmware loading and boot mode
updates.
Main software
Controls and coordinates unit movements, exposure,
image acquisition and transfer.
The image data acquired during image capture are
stored in the internal memory of the unit. After image acquisition the image data are transferred to the
workstation using the external 1000 Base - T Ethernet
UDP/IP Ethernet.
It also handles multiple connections and up to five clients (drivers, S2Terminal or replicate PC GUIs) can be
connected to the unit via the external Ethernet .
It also offers firmware upgrade services for itself and
software upgrade for GUI. It also offers core (FW) update service for R3300 IO1 and R3400 IO2 as there is
no direct connection from the driver of the S2Terminal
to these two boards.
R3300 IO1 software
Controls noncritical movements, X-ray generator IO
etc.
R3400 IO2 software
Controls noncritical movements, IO, lights etc. Communicates with CPU over a 100Base-T interface.
GUI software
Holds the unit calibration data that is transferred to the
R3200 CPU during start up.
4-2
Service Manual 203025
CBCT unit
4. Firmware description
4.3 Operating modes
Imaging mode
The usual operation mode. X-ray imaging is allowed
when patient study is started.
Test mode
Same as the normal imaging mode, except that the Xray generator is disabled.
The image is grabbed but not sent to the driver.
Tests the imaging chain.
CAUTION
Using this mode will delete the last image taken (temporarily stored in the unit memory) making it nonrecoverable.
Useful when problems with movements, image grabbing etc. need to be investigated.
Test mode activation/deactivation
Using the GUI
Activated from GUI by touching the ‘T’ key.
The T icon on the GUI will change to the active state.
Deactivate by touching the ‘T’ key again.
Using the s2terminal
Activate by entering the command: ‘testmode 1’.
Deactivate by entering the command: ‘testmode 0’
Service Manual 203025
4-3
4. Firmware description
CBCT unit
4.4 Firmware states
IO cards only have one state. The IO cards wait for
commands from the main CPU. After they receive a
command they execute the command and send an
acknowledgment of its execution to the main CPU.
CPU board (R3200) has several states that perform
various checks during operation of the system.
R3200 states
R3200 control state machine has the following states:
- Init (Initialization)
- Idle
- Select (Program select)
- Ready
- Exposure
- Transfer (Image transfer)
- Error
- Error Service
- Off (emergency stop!)
4-4
Service Manual 203025
CBCT unit
4. Firmware description
Init (initialization) state
During the initialization state the unit carried out several initializations and checks as follows:
- detects the IO boards
- initializes the generator
- initializes the collimator
- initializes the image buffer and calibration data
- checks states of the detectors
- checks the state of the exposure button
- initializes the movements
Most of the essential functionality of the unit is tested
during the initialization state.
Note, however, the x-ray generator is not tested.
Idle state
The unit is waiting for an examination to be started by
the driver.
The service state can be entered during this state
The unit will enter the error state if a system error occurs.
Select (program select) state
The unit initializes the selected program and enters the
ready state when system is ready to take an exposure.
If the examination is ended, the unit will return to the
idle state.
The unit will enter the error state if a system error occurs.
Ready state
The unit is waiting for the exposure button to be
pressed. Once it notices that the button has been
pressed the exposure state is entered.
If the exposure program is changed when the unit is in
the ready state, the unit will revert to the select state.
The unit will enter the error state if a system error occurs.
Service Manual 203025
4-5
4. Firmware description
CBCT unit
Exposure state
The unit carries out the selected exposure program
and, when completed, proceeds to the transfer (image
transfer) state.
The exposure button is monitored during the exposure.
Rotation and detector movements are also monitored.
If a fatal error occurs and no image has been captured the unit will enter the error state. If an image has
been captured the unit will enter the transfer state
and transfer the image to PC and then enter the error
state.
Transfer (image transfer) state
The unit waits for the image transfer to be completed.
Any calibration actions are handled if the exposure
program was a calibration program.
The exposure counter is updated.
After the driver has received the image it releases it.
It makes sure that exposure button is released and
after it has been the unit returns to the select state.
Error state
The unit will enter the error state whenever a system error is encountered. Movements and x-rays are
stopped as a precaution. The error log is updated.
Service state may be entered using the s2terminal for
further diagnosis.
Service state
The service state (s2terminal) is entered by giving the
service command when the unit is in the error state or
idle state.
4-6
Service Manual 203025
CBCT unit
4. Firmware description
Off (Emergency) state
The emergency stop button status is active by the
R3400 IO2.
The main R3200 CPU continuously polls the status of
R3400 IO2 during normal operation.
If the emergency stop button is pressed it halts the
system and blocks normal control of the unit. Only the
GUI and Driver status messages are handled.
The GUI will notify the user that the button has been
activated.
When the emergency stop button is released, the control firmware is restarted from scratch.
4.5 Generator modes
There are two generator modes:
-
Pulsed mode for cone beam imaging
-
Constant exposure for panoramic imaging
4.6 Firmware updating in the field
Refer to s2terminal section for information on how to
do this
Service Manual 203025
4-7
4. Firmware description
4-8
CBCT unit
Service Manual 203025
CBCT unit
5. Imaging sequence
5. Imaging sequence
5.1 Powering up the Unit – Init
The unit initializes itself and then waits for the GUI
PC to start up (it does not wait for PC or any optional
remote GUI to respond).
Calibration data is transferred from the GUI PC to the
R3200 CPU.
Encoders and movements are initialized – the user
needs to press and hold down the chair down button
(Z) until the initialization is complete.
The motor commands are from R3200 CPU and the
pulses from R3300 IO1 and R3400 IO2.
5.2 Positioning the Patient
The motors are powered up.
GUI display is activated if it is in energy save mode.
Return button is enabled so the unit can be driven to
the PIO position.
Service Manual 203025
5-1
5. Imaging sequence
CBCT unit
When the unit is in the PIO position the rest of the
buttons on the remote control are enabled and can be
used to move the chair, chin rest and rotating unit ( X
and Z) to position the patient.
The detector for the exposure program selected, 3D or
pan, is powered on. If the panoramic mode is selected
the panoramic detector is only enabled during imaging.
5.3 Exposure Start - no X-rays
The X-ray tube preheat current is enabled for a few
seconds before the exposure starts.
Movements R-rotation, C-collimator, S-slit, and for pan
exposure Y-chair , D-detector are started after preheat
is enabled.
When the rotating unit passes the home optoswitch all
the other optoswitches are activated and synchronized
to the position of the home optoswitch.
Immediately after home position frame grabbing is
started – first 20 dark images (slightly under 1s, depending on size of FOV) are taken without X-rays.
5-2
Service Manual 203025
CBCT unit
5. Imaging sequence
5.4 Exposure Sequence
X-rays ON (time depends on FOV) – no data grabbing.
X-rays OFF (time depends on FOV) – data grabbing
performed.
The pulsing sequence is repeated for the specified
number of frames that the FOV volume comprises
– 225, 250, 300, 375 or 450 depending on the FOV
selected.
5.5 Exposure sequence errors
The exposure sequence is stopped if:
-
The rotating unit touches the patient so that its
movement does not follow the predetermined path
-
Exposure switch is released
-
X-ray generator fails
-
If 3D sensor stops delivering data (frame grabbing
failure)
If more than 2/3 of the total number of images are
captured after an error occurs, the 3D volume will be
generated regardless of the system failure.
If less than 2/3 of the images are captured no image
will be produced.
In the event of a CPU failure the parallel backup timer
cuts off the radiation within 110% of predetermined
exposure time.
Service Manual 203025
5-3
5. Imaging sequence
CBCT unit
5.6 Exposure End
Disable X-Rays.
Decelerate movements.
Allow return and chair down movements.
5-4
Service Manual 203025
CBCT unit
6. The s2terminal and service functions
6. The s2terminal
The s2terminal service terminal application is a software tool that allows the operation of the unit to be
checked, tested and configured and firmware to be
upgraded.
6.1 Opening the s2terminal and connecting to the unit
1. If a patient study is open close it so that the s2terminal can communicate with the unit.
2. Connect the PC in which the s2terminal is installed
to the unit and switch the PC and unit on.
3. Open the Command Prompt. (Start\Programs\
Accessories).
4. In the Command prompt key in cd, space and then
the path where the s2terminal application is installed (e.g. c:\program files\s2terminal).
__________________________________________________________________
cd c:\program files\s2terminal
__________________________________________________________________
Press ENTER.
5. Key in s2terminal, space and then the IP address
of the unit. (On the unit GUI touch the settings button then the i button to display the IP address).
__________________________________________________________________
s2terminal 10.208.6.101
__________________________________________________________________
Press ENTER to open the s2terminal and make a
connection to the unit.
Service Manual 203025
6-1
6. The s2terminal and service functions
CBCT unit
The s2terminal version number will appear together with a list of main commands.
__________________________________________________________________
---- S2 Terminal Help ---------------------------------------xh
help
xi
receive image from the device
xr
reserve device
xq
quit
-------------------------------------------------------------__________________________________________________________________
Software and firmware version numbers will appear after the list of main commands.
6.2 Accessing the service commands - xh
The service commands allow the operation of the unit
to be checked, tested and configured.
IMPORTANT NOTE:
The unit must be in the service state to access the
service commands.
1. To determine the current state of the unit key in the
state command status r.
__________________________________________________________________
status r
__________________________________________________________________
Press ENTER and the current state of the unit will
appear on the display, for example INIT.
__________________________________________________________________
INIT
__________________________________________________________________
The other possible unit states are, IDLE, SELECT,
READY, TRANSFER and ERROR.
A detailed description of the all the unit states is
given in section Description of the unit states.
6-2
Service Manual 203025
CBCT unit
6. The s2terminal and service functions
2. If the unit is in either the IDLE or ERROR state you
can go directly to the SERVICE state by keying in
the service command.
__________________________________________________________________
SERVICE
_______________________________________________________________
Press ENTER to enter the SERVICE state.
If the unit is in the INIT state:
go from INIT > IDLE, use cancel command,
then IDLE > SERVICE, use service command.
If the unit is in the SELECT state:
go from SELECT > IDLE, use status command,
then IDLE > SERVICE, use service command.
If the unit is in the READY state:
go from READY > IDLE, use status command,
then IDLE > SERVICE, use service command.
If the unit is in the TRANSFER state:
go from TRANSFER > SELECT, use discard command, then from SELECT > IDLE, status command and finally from IDLE > SERVICE, service
command.
Service Manual 203025
6-3
6. The s2terminal and service functions
CBCT unit
CAUTION:
The reset command will change the state of the
unit from any state to INIT.
Note, however, this command will delete any image in the unit CPU. If you wish to download the
image use the xi command, described later, before
using the reset command.
A detailed description of the unit commands is
given in section Description of unit commands.
3. Key in help and then press ENTER.
__________________________________________________________________
help
__________________________________________________________________
A list of service commands will appear.
__________________________________________________________________
calclear
Clears completed calibrations flags
cancel
Bypasses initializations on startup.
clients
Displays connected client applications.
conf
Displays configuration parameters.
counter
Displays the number of exposures taken.
datatxdelay Sets packet delay on image transfer.
drivemotor Drives the selected motor to desired position.
endstudy
If enabled, ends the patient study after cone beam exposure
help
Lists service commands/gives detailed help [command])
indicator
Sets or clears service/QA reminder messages or period.
ip
Configures the IP address of the external Ethernet interface.
log
Displays the log entries.
login
Displays unit’s firmware version information
logsign
Adds a comment to the log
memtest
Performs a memory test on image memory area.
pantest
Grabs a panoramic image with test pattern.
patient
Starts fake study without using driver
status
Displays unit’s status information.
systemstatus Displays status of all optos, micro switches and encoders.
__________________________________________________________________
NOTE:
This list may vary from unit to unit.
6-4
Service Manual 203025
CBCT unit
6. The s2terminal and service functions
4. To display help information for a service command
key in help, space, the name of the service command and then press ENTER.
For example calclear.
__________________________________________________________________
help calclear
__________________________________________________________________
Help instructions for that service command will appear.
__________________________________________________________________
help calclear
Clears completed calibration flags based on what parts of the unit
have been replaced, adjusted or other way serviced.
The unit’s GUI will then show on the calibration program screen
which calibration programs need to be run again.
Usage: calclear [all|ccd|chair|collimator|frame|generator|
rotatingunit|panel|panel_psu|tubehead]
all
: clear all flags
ccd
: clears flags related to panoramic CCD camera
chair
: clears flags related to chair and chin rest
collimator
: clears flags related to collimator assembly
frame
: clears flags related to unit’s frame
generator
: clears flags related to X-Ray generator
rotatingunit : clears flags related to rotating unit
panel
: clears flags related to CMOS (3D) flat panel
panel_psu
: clears flags related to CMOS panel’s power supply
tubehead
: clears flags related to X-Ray tube head
Multiple items can be cleared by issuing the command multiple times.
__________________________________________________________________
The help information describes the different options for the service command selected.
5. To exit SERVICE key in exit, then xq and then
press ENTER to close the s2terminal.
__________________________________________________________________
xq
_________________________________________________________
Service Manual 203025
6-5
6. The s2terminal and service functions
CBCT unit
Unlisted service commands
There are several other useful service commands the
are not listed in the main help menu.
These are:
__________________________________________________________________
demomode
Sets the unit to the demonstration mode.
laserxl
Sets the usage of the lasers.
nomove
Toggles imaging movements on and off.
rotbelttest Tests rotating unit’s belt.
__________________________________________________________________
Description of the unit states
INIT
The initialization has been partially completed. The unit
is waiting for the chair down button to be pressed (a
message requesting this will appear on the GUI).
IDLE
The unit is ready to start an examination and is waiting
for image capture, from the dental imaging software,
to be activated (a message requesting t his will appear
on the GUI).
SELECT
The imaging program and technique factors can be
selected. When the RETURN key is pressed, to drive
the rotating unit to the ready position, the unit will enter
the next state, ready.
READY
The unit is ready to take an exposure. The text READY
will appear on the GUI.
EXPOSURE
The unit will enter this state when the exposure switch
is pressed and held down. The unit will enter the next
state when the exposure button is released after the
exposure is complete.
6-6
Service Manual 203025
CBCT unit
6. The s2terminal and service functions
TRANSFER_CHECK
The image is being transferred from the unit to the PC.
Note that image transfer already starts during exposure.
SERVICE
The only state from which the service commands can
be accessed.
ERROR
The unit will enter this state if it malfunctions. An error
message will appear on the unit GUI and the s2terminal if it is connected.
OFF
Indicates that firmware upgrades have been completed
and the unit must be restarted for the upgrades to be
activated.
Service Manual 203025
6-7
6. The s2terminal and service functions
CBCT unit
Description of the unit commands
cancel
Changes the state of the unit from init to idle so that
you do not have to press and hold down the chair
down button during start up to complete the second
part of the unit initialization.
NOTE:
If this command is selected immediately after the unit
is switched on, the unit may enter the error state and
not the idle state. This is because the chair and chin
rest are not in their correct initialized positions (chair,
lowest position and chinrest at the midpoint of its travel). Manually complete the initialization process (press
and hold down the chair down key) whenever the unit
is switched off and then on again to ensure that the
unit will enter the idle state.
patient
Changes the state of the unit from idle to select so
that you do not have to activate image capture to take
an image.
service
Changes the state of the unit from idle or error to the
service state so that the service commands can be
accessed.
exit
Changes the state of the unit from service to init.
reset
Changes the state of the unit from any state to the init
state. This command reboots the firmware (not core)
on R3200 CPU.
CAUTION:
Any image in the CPU will be deleted.
status
Changes the state of the unit from ready or select to
idle.
6-8
Service Manual 203025
CBCT unit
6. The s2terminal and service functions
discard
Changes the state of the unit from transfer to select.
This command ignores any image in the CPU (the image is NOT deleted). The image can be retrieved using
the retrieve last image command (initiated using the
GUI) or xi (described later).
clients
Shows how many client applications are connected
to the unit, for example, the s2terminal and the dental
imaging software and which of them has reserved thet
unit.
login
Shows the firmware and core versions installed in the
unit and the serial number of the unit.
6.3 Downloading raw images - xi
This command allows the last image taken by the unit
to be downloaded from the unit memory in DCM (DICOM) format. This image can be used to check image
quality.
NOTE:
If you wish to download more than one image in raw
format refer to section 7.2 Saving raw images, projection images and log files.
1. Disable (no image capture) or close the dental
imaging program in the PC(s) connected to the unit
to ensure that the s2terminal has reserved the unit.
2. In the main s2terminal folder create a subfolder
and name it imageseries.
NOTE:
If you also create a darkseries subfolder dark images will be will be automatically stored there.
Service Manual 203025
6-9
6. The s2terminal and service functions
CBCT unit
3. Key in xr and press the ENTER key so that the
s2terminal reserves the unit.
__________________________________________________________________
xr
Mode RESERVED
__________________________________________________________________
The text RESERVE will appear which indicates
that the s2terminal is now active and can communicate with the unit.
NOTE:
If you wish to take an test image release the s2terminal so that the unit is free to work normally.
Key in xr and then press ENTER.
________________________________________
xr
Mode NORMAL
________________________________________
The text NORMAL will appear which indicates that
the s2terminal has been released.
Select the patient service command (Starts fake
study without using driver),
________________________________________
patient
________________________________________
and take a test image.
After taking an image key in xr and then press
ENTER.
_______________________________________
xr
Mode RESERVE
________________________________________
The text RESERVE will appear which indicates
that the s2terminal is now active again.
6-10
Service Manual 203025
CBCT unit
6. The s2terminal and service functions
4. Key in xi and the press ENTER.
__________________________________________________________________
xi
__________________________________________________________________
The last image taken by the unit will be downloaded from the unit memory in the previously created
subfolder .
Note that if the image is a panoramic it will be
saved in the s2terminal folder and NOT the imageseries subfolder.
Image will be saved in DCM (DICOM) format. The
saved image can be opened with the dental imaging software or image viewers such as ImageJ or
IrfanView.
NOTE:
If the unit was switched off after the last image was
taken the image will be lost.
5. Key in xq and then press ENTER.
__________________________________________________________________
xq
__________________________________________________________________
Service Manual 203025
6-11
6. The s2terminal and service functions
CBCT unit
6.3 Updating firmware
Core updates - gui, r3200, 3300, 3400
1. Make sure that the unit is switched on and ready to
take an exposure (refer to user’s manual).
2. If an s2terminal folder has not already been created in the PC connected to the unit, create one.
3. Copy the update firmware (and s2terminal if has
not been previously installed) into the new folder.
The update names are:
gui.pof
r3200.pof
r3300.pof
r3400.pof
cbctfw.srec (command xf)
4. Key in xr to reserve the unit.
__________________________________________________________________
xr
Mode RESERVE
__________________________________________________________________
5. Key in xh to open the firmware update commands.
__________________________________________________________________
---- S2 Terminal Help ---------------------------------------------xh
help
xi
receive image from the device
xr
reserve device
xq
quit
--- Unit specific commands -----------------------------------xcc <r3200:r3300:r3400:gui> core update
xf
firmware update
----------------------------------------------------------------------------__________________________________________________________________
6-12
Service Manual 203025
CBCT unit
6. The s2terminal and service functions
6. Key in the device to be update, for example xcc
r3200, and then press ENTER.
__________________________________________________________________
xcc r3200
__________________________________________________________________
IMPORTANT NOTE:
If you are updating the firmware in ALL the devices
the updates MUST be carried out in the following
order:
<xcc gui>
updates the GUI on the embedded PC (gui.pof).
<xcc r3400>
updates the FPGA core and the embedded software on R3400 (r3400.pof)
<xcc r3300>
updates FPGA core and the embedded software
on R3300 (r3300.pof).
<xcc r3200>
updates the FPGA core and Boot SW on R3200,
the main CPU (r3200.pof).
During the upload the transfer information will appear in the s2terminal window.
If you have problems with any of the updates DO
NOT switch the unit off. Repeat the upgrade.
7. After you have completed the upgrade(s) wait for
the unit to reboot itself and then restart the unit.
NOTE:
The upgrades will only come into effect after the
unit has been restarted.
8. Use the login command to verify that the updating
was successful. With the GUI update the new version number will appear on the unit display when
the updated has been completed.
Service Manual 203025
6-13
6. The s2terminal and service functions
CBCT unit
Updating the main firmware - xf
VERY IMPORTANT:
Updating the main firmware (xf) MUST be carried out
when the unit is in the boot mode.
To enter the boot mode the task described next MUST
be carried out within a certain time period.
READ THE FOLLOWING INSTRUCTIONS BEFORE
STARTING THE TASK
1. Switch the unit on and wait until the following text
appears.
__________________________________________________________________
CBCT R3200 boot 2.14.1929>
__________________________________________________________________
Type in the word safe (the letters will appear between the count down times) and then press ENTER. The text Staying in boot mode will appear.
__________________________________________________________________
CBCT R3200 boot 2.14.1929> . . . 6 . . 5sa . . . 4fe
Staying in boot mode
__________________________________________________________________
If you do not type the word safe quickly enough
(before the count down time period ends) the unit
will continue to start up and WILL NOT enter the
boot mode. If this happens, restart the unit and try
again.
WARNING:
Make absolutely sure that you are in the boot
mode before proceeding. The text “Staying in
the boot mode” confirms this. If the unit is NOT
in the boot mode the following steps may corrupt the flash memory.
6-14
Service Manual 203025
CBCT unit
6. The s2terminal and service functions
2. Key in xh to open the firmware update commands.
__________________________________________________________________
---- S2 Terminal Help ---------------------------------------xh
help
xi
receive image from the device
xr
reserve device
xq
quit
--- Unit specific commands -----------------------------------xcc <r3200:r3300:r3400:gui> core update
xf
firmware update
-------------------------------------------------------------__________________________________________________________________
3. Then key in xf and then press ENTER.
__________________________________________________________________
xf
__________________________________________________________________
NOTE:
If a message appears asking you to switch the unit
off, ignore the message, press any key and then
retype xf and press ENTER.
#############################################################
#
# Unit must be restarted after core update ...
#
During the upload the transfer information will appear in the s2terminal window.
The xf command updates the main embedded
software on R3200, the main CPU (cbctfw.srec).
The xf update will be activated immediately after it
has been updated.
4. Use the login command to verify that the updating
was successful.
Service Manual 203025
6-15
6. The s2terminal and service functions
6-16
CBCT unit
Service Manual 203025
CBCT unit
7. Error Codes and Trouble Shooting
7. Error Codes and Trouble Shooting
7.1 Initial actions
Error Codes
When an error code appears on the display the unit
will stop working and cannot be operated while the error code is on the display.
Restarting the unit
If an error code appears or the unit fails to operate in
the way described in the user’s manual, switch the
unit off, wait for a few seconds and then switch the
unit on again. If the error code reappears or unit still
does not operate correctly, follow the troubleshooting
procedures described here to identify and correct the
problem.
Image transfer
If an image is not transferred successfully to the PC,
close and then reopen the dental imaging software
and/or restart the PC.
DO NOT restart the unit as this will erase any image
that is stored in the unit memory and this retrievable
image will be lost.
Service Manual 203025
7-1
7. Error Codes and Trouble Shooting
CBCT unit
7.2 Saving raw images, projection images and log files
Raw images and projection images can be used to
check image quality. With s2terminal command xi the
last image taken can be downloaded in raw (DCM)
format, but if you wish to check more that one image
the function described below should be used.
1. Select Start / Run and type regedit and then click
OK.
2. The Registry Editor will open.
Open HKEY_LOCAL_MACHINE path and browse
to SOFTWARE\Soredex\Dxr120.
7-2
Service Manual 203025
CBCT unit
7. Error Codes and Trouble Shooting
3. To save raw images, click the right-hand side of
Registry Editor panel with the right-hand mouse
button and select New-> DWORD value and name
it SaveRaw.
4. Double click the SaveRaw name and enter Value
Data in the Edit DWORD Value dialog.
SaveRaw values are:
0: save no raw images
1: save the last image taken with each program
2: save every image (consumes a lot of disk
space)
The raw images are saved into the folder BasePath\Raw.
Base bath can be found from BasePath string or
Scanora 4.xx / Tools / CBCT Cone Beam Setting /
Device / Work folder.
5. To save projection files, click the right-hand side
of Registry Editor panel with the right-hand mouse
button and select New-> DWORD value and name
it SaveBin.
6. Double click the SaveBin name and enter Value
Data in the Edit DWORD Value dialog.
SaveBin values are:
0: save no projection image
2: save every image (consumes a lot of disk
space)
The projection images are saved into the folder
BasePath\Proj.
Base bath can be found from BasePath string or
Scanora 4.xx / Tools / CBCT Cone Beam Setting /
Device / Work folder
Service Manual 203025
7-3
7. Error Codes and Trouble Shooting
CBCT unit
7. To save log files, click the right-hand side of Registry Editor panel with the right-hand mouse button and select New-> DWORD value and name it
LogL.
8. Double click the LogL name and enter Value Data
in the Edit DWORD Value dialog.
LogL values are:
0: save no log files
2: save driver error messages
4: save error messages and event tracing messages (consumes a lot of disk space)
The log files are saved into the BasePath folder,
with extension .log.
Base bath can be found from BasePath string or
Scanora 4.xx / Tools / CBCT Cone Beam Setting /
Device / Work folder
7.3 Checking the unit
Diagnosing faults with the s2terminal
The s2terminal includes commands that allow the operation of the unit to be checked.
Unit service commands:
-
systemstatus, allows the functionality of the optosensors, switches and micro switches to be
checked.
-
drivemotor x (x = the motor name), allows the
operation of the different motors to be checked.
-
pantest, takes a panoramic image of a text pattern. This will allow you to check if the pan (CCD)
sensor is working.
s2terminal command:
-
Downloading raw image - xi, downloads the last
image taken by the unit.
Refer to section, 6. The s2terminal and service functions.
7-4
Service Manual 203025
CBCT unit
7. Error Codes and Trouble Shooting
Checking circuit boards
Circuit boards cannot be repaired in the field. Some
boards have fuses that can be replaced. However, if a
board is faulty, replace it.
On most of the circuit boards there are indicator LEDs
(D) and test pins (TP), that allow the operation of the
board to be checked and/or tested. The LEDs and test
pins for each circuit board are described in the section
Electrical Description.
Use a digital multimeter (DMM) when checking boards.
DANGER HIGH VOLTAGE:
R3400 IO2, R3700 X-ray power supply, R3800 X-ray
generator and R3900 Mains connector include high
voltage indicator lamps (Glim). When a high voltage
lamp is on it indicates that high voltage is present.
DO NOT touch the board until the high voltage has
dissipated and the lamp has gone out.
CAUTION:
When handling circuit boards take all necessary precautions to prevent the build up of static electricity and
possible static damage to the boards.
Checking cables and connectors
Visually check cables for mechanical damage, cuts,
damaged insulation and bad twists. If a cable is damaged in any way replace it.
If there is no obvious mechanical damage to a cable
but you think that it may be faulty, use a digital multimeter (DMM) to check the resistance of the different
wires within the cable. An undamaged wire will have
close to no resistance (>0 ohm), a damaged wire will
have a high resistance value.
Make sure that all cables are correctly and securely
attached to their respective connectors. Connectors
must not be loose or misaligned. If the connector has a
locking mechanism make sure that it is locked.
Service Manual 203025
7-5
7. Error Codes and Trouble Shooting
CBCT unit
If you find a loose or misaligned connector, disconnect
it and check for bent, broken or missing pins. If there
is damage that can be easily repaired, for example
straightening a bent pin, repair the damage and reconnect the connector. If the damage cannot be repaired
replace the cable.
Note that if the connector on the corresponding board
is also damaged, the board may also have to be replaced.
7.4 Error code descriptions
Error 100
Internal Communication bus error.
CAUSE A
GUI PC cannot communicate with R3200 CPU.
SOLUTION A
i.
Check the Ethernet switch/router. If it is faulty replace it.
ii. Check R3200 CPU. Replace if faulty.
iii. Replace the internal LAN cable.
Error 101
Incorrect internal message format.
CAUSE A
GUI and CPU firmware not compatible.
SOLUTION A
Update the GUI firmware.
7-6
Service Manual 203025
CBCT unit
7. Error Codes and Trouble Shooting
Error 200
Exposure button is pressed.
CAUSE A
Exposure button in stuck down, shorted or broken.
SOLUTION A
Check the exposure switch with a DMM, replace if
faulty.
CAUSE B
R3900 Mains connector or R3300 IO1 (or R3400 IO2
in some models) is defective.
SOLUTION B
i.
Check R3900 Mains connector. Replace if faulty.
ii. Check the cable between R3900 Mains connector
and R3300 IO1 (or R3400 IO2 in some models).
Replace if faulty.
iii. Check R3300 IO1(R3400 IO2). Replace if faulty.
iv. Replace the cable between R3300 IO1 (or R3400
IO2 in some models) and the exposure switch.
Error 201
Emergency stop button is pressed.
CAUSE A
The emergency stop button is activated. R3200 CPU
detects that the emergency stop button has been
pressed down.
SOLUTION A
Release emergency stop button.
CAUSE B
The emergency stop button is shorted.
SOLUTION B
Check the switch operation with DMM, replace if faulty.
CAUSE C
R3400 IO2 is defective
SOLUTION C
Check R3400 IO2, replace if faulty.
Service Manual 203025
7-7
7. Error Codes and Trouble Shooting
CBCT unit
Error 202
Chin rest safety stops not working (encoder malfunction).
Unit can still be used but take great care when positioning patients.
CAUSE
J-Motor encode failed
SOLUTION
i.
Check the wiring between the J-motor and R4800
Chin rest opto. Replace if faulty.
ii. Check R4800 Chin rest opto, replace if faulty.
iii. Replace the J-motor / patient support assembly.
If you replace the patient support assembly you
must carry out the Geometry Calibration (4). See 9
Calibration and adjustment.
Error 1
Home position of rotating unit was not found.
(The PIO position)
CAUSE A
R3200 CPU does not receive the correct information
from rotating position sensor N4100.
SOLUTION A
Check 1:
Switch unit off (30 seconds) and back on again and
see if the rotating unit moves during initialization.
Check 2:
Use the s2terminal service program to check sensor
and motor operation.
7-8
Service Manual 203025
CBCT unit
7. Error Codes and Trouble Shooting
Rotating unit does not rotate
i.
Check that R5100 3-phase stepper driver is receiving power, the D1 and D2 LED’s must be on. If not
check the low power schematic to locate the problem.
ii. Check the wiring between the R-motor and R5100
3-phase stepper driver. Replace if faulty.
iii. Check the wiring between R3200 CPU and R5100
3-phase stepper driver (J3204-J5101). Replace if
faulty
iv. Check R5100 3-phase stepper driver, replace if
faulty.
v. Check R3200 CPU, replace if faulty.
vi. Replace the R-motor (rotation).
Rotating unit rotates but cannot find its correct
position
i.
Check the wiring between R4100 Rotator opto and
R3300 IO1. Replace if faulty.
ii. Check R4100 Rotator opto. Replace if faulty.
iii. Check rotation microswitch (system status s2terminal). Replace if faulty.
iv. Replace R3300 IO1 board.
CAUSE B
Belt(s) slipping.
SOLUTION B
Clean belt(s) and pulleys and adjust belt tension.
Service Manual 203025
7-9
7. Error Codes and Trouble Shooting
CBCT unit
Error 2
Start position of rotating unit was not found.
CAUSE and SOLUTION
Same as Error 1.
Error 3
Acceleration of rotating unit was too slow.
CAUSE A
Belt(s) slipping.
SOLUTION A
Clean belt(s) and pulleys and adjust belt tension.
CAUSE B
R3200 CPU does not receive the correct information
from rotating position sensor N4100.
SOLUTION B
i.
Check the wiring between R4100 Rotator opto and
R3300 IO1. Replace if faulty.
ii. Check R4100 Rotator opto. Replace if faulty.
Error 4
The rotating unit optosensor was not found.
CAUSE and SOLUTION
Same as Error 1.
Error 5
Exposure was taking too long and timeout occurred.
CAUSE
R3200 CPU has received back-up timer “active” signal
from R3300 IO1.
SOLUTION
i.
Check R3300 IO1. Replace if faulty
ii. Check cable between R3200 CPU and R3300 IO1.
Replace if faulty.
iii. Replace R3200 CPU.
7-10
Service Manual 203025
CBCT unit
7. Error Codes and Trouble Shooting
Error 6
X-Ray generator failed.
CAUSE
The generator protection circuit has been activated.
SOLUTION
i.
Check R3800 X-ray generator. Replace if faulty.
ii. Check R3300 IO1. Replace if faulty.
iii. Check R3700 X-ray power supply. Replace if faulty.
iv. Check generator cabling. Replace if faulty.
v. Replace tubehead.
Error 7
Collimator motor failed.
CAUSE A
Collimator movement stopped by mechanical part(s).
SOLUTION A
Select different programs and take images in the test
mode (no X-rays) and check collimator movement.
Correct any mechanical problems.
CAUSE B
R3200 CPU does not get the correct information from
R4200 Collimator opto.
SOLUTION B
Check 1:
Switch unit off (30 seconds) and back on again and
see if the collimator moves during initialization.
Check 2:
Use the s2terminal service program to check sensor
and motor operation.
Service Manual 203025
7-11
7. Error Codes and Trouble Shooting
CBCT unit
Collimator does not move
i.
Check that R5100 3-phase stepper driver, that
drives the collimator, is receiving power, the +5V
and +28V LED’s must be on. If not check the low
power schematic to locate the problem.
ii. Check the wiring between the C-motor and R5100
3-phase stepper driver. Replace if faulty.
iii. Check the wiring between R3300 IO1 and R5100
3-phase stepper driver (J3311-J5101). Replace if
faulty
iv. Check R5100 3-phase stepper driver, replace if
faulty.
v. Check R3300 IO1, replace if faulty.
vi. Replace the C-motor (Collimator).
Collimator moves but cannot find its correct position
i.
Check the wiring between R4200 Collimator opto
and R3300 IO1, (J4201-J3316). Replace if faulty.
ii. Check R4200 Collimator opto. Replace if faulty.
Iii. Replace R3300 IO1 board.
7-12
Service Manual 203025
CBCT unit
7. Error Codes and Trouble Shooting
Error 8
Collimator slit motor failed.
CAUSE A
Slit movement stopped by mechanical part(s).
SOLUTION A
Select different programs and take images in the test
mode (no X-rays) and check slit movement. Correct
any mechanical problems.
CAUSE B
R3200 CPU does not get the correct information from
R4200 Collimator opto.
SOLUTION B
Check 1:
Switch unit off (30 seconds) and back on again and
see if the slit moves during initialization.
Check 2:
Use the s2terminal service program to check sensor
and motor operation.
Slit does not move
i.
Check the wiring between the S-motor and R3300
IO1. Replace if faulty.
ii. Check the wiring between R3200 CPU and R3300
IO1 (J3202-J3303). Replace if faulty
iii. Check R3300 IO1, replace if faulty.
iv. Check R3200 CPU, replace if faulty.
v. Replace the S-motor (Slit).
Collimator moves but cannot find its correct position
i.
Check the wiring between R4200 Collimator opto
and R3300 IO1, (J4201-J3316). Replace if faulty.
ii. Check R4200 Collimator opto. Replace if faulty.
Iii. Replace R3300 IO1 board.
Service Manual 203025
7-13
7. Error Codes and Trouble Shooting
CBCT unit
Error 9
R3300 IO1 is not functioning.
CAUSE
R3200 CPU cannot communicate with R3300 IO1.
SOLUTION
i.
Check the power LED on switch/router. If it is off,
check R3100 Power supply and/or the cable between the R3100 Power supply and the switch/
router. Replace either or both if faulty.
If the power LED is on check the Ethernet switch/
router, replace if faulty.
ii. Check R3300 IO1, replace if faulty.
iii. Replace Internal Ethernet cable.
Error 12
R3400 IO2 card is not functioning.
CAUSE
R3200 CPU cannot communicate with R3400 IO2.
SOLUTION
i.
Check the power LED on switch/router. If it is off,
check R3100 Power supply and/or the cable between the R3100 Power supply and the switch/
router. Replace either or both if faulty.
If the power LED is on check the Ethernet switch/
router, replace if faulty.
ii. Check R3400 IO2, replace if faulty.
iii. Replace Internal Ethernet cable.
7-14
Service Manual 203025
CBCT unit
7. Error Codes and Trouble Shooting
Error 13
Configuration data was lost.
CAUSE
R3200 CPU flash memory corrupted.
SOLUTION
Replace R3200 CPU and then recalibrate the unit.
Error 14
Home position of X-motor was not found.
CAUSE
R3200 CPU does not get correct information from
N4600 Opto sensor.
SOLUTION
Check 1:
Switch unit off (30 seconds) and back on again and
see if the rotating unit moves during initialization.
Check 2:
Use the s2terminal service program to check sensor
and motor operation.
Rotating unit does not move
i.
Check that R5100 3-phase stepper driver is receiving power, the +5V and +28V LED’s must be on.
If not check the low power schematic to locate the
problem.
ii. Check the wiring between the X-motor and R5100
3-phase stepper driver. Replace if faulty.
iii. Check the wiring between R3300 IO1 and R5100
3-phase stepper driver (J3313-J5100). Replace if
faulty
iv. Check R5100 3-phase stepper driver, replace if
faulty.
v. Check R3300 IO1, replace if faulty.
vi. Replace the X-motor.
Service Manual 203025
7-15
7. Error Codes and Trouble Shooting
CBCT unit
Rotating unit moves but cannot find its correct
position
i.
Check the wiring between N4600 Y-opto sensor
and R5000 Extension Board (J4601-J5003). Replace if faulty.
ii. Check the wiring between R5000 Extension Board
and R3300 IO1 (J5004-J3308). Replace if faulty.
iii. Check R4600 Opto sensor, replace if faulty.
iv. Check R5000 Extension Board, replace if faulty.
v. Replace R3300 IO1 board.
Error 15
Home position of Y-motor was not found.
CAUSE
R3200 CPU does not receive correct information from
N4600 Y-optosensor.
SOLUTION
Check 1:
Switch unit off (30 seconds) and back on again and
see if the rotating unit moves during initialization.
Check 2:
Use the s2terminal service program to check sensor
and motor operation.
The seat does not move
i.
Check the wiring between the Y-motor and R3400
IO2. Replace if faulty.
ii. Check the wiring between R3200 CPU and R3400
IO2 (J3203-J3402). Replace if faulty
iii. Check R3400 IO2, replace if faulty.
iv. Check R3200 CPU, replace if faulty.
v. Replace the Y-motor (chair).
7-16
Service Manual 203025
CBCT unit
7. Error Codes and Trouble Shooting
The seat moves but cannot find its correct position
i.
Check the wiring between N4600 Y-opto sensor
and R3400 IO2 (J4601-J3406). Replace if faulty.
ii. Check R4600 Opto sensor, replace if faulty.
iii. Replace R3400 IO2 board.
Error 16
(NOTE: with GUI version 1.5 this error is 34)
CCD power failure.
CAUSE
R3200 CPU is not receiving data from the pan (CCD)
detector.
SOLUTION A - power supply
i.
Check power LED’s on the pan (CCD) detector
during power up for the correct voltages (see section Electrical description - Panoramic detector
for LED descriptions).
ii. Check wiring between R3500 CCD power supply
and the pan (CCD) sensor (J3502-X191). Replace
if faulty.
SOLUTION B - data wiring
i.
Check wiring between the pan (CCD) detector and
R4900 Panorama interface (X190-J4901). Replace
if faulty.
ii. Check the wiring between the two R4900 Panorama interface boards (J4902 - J4902). Replace if
faulty
iii. Check the connector between R4900 Panorama
interface and R3200 CPU (J4904-J3208). Replace
if faulty.
iv. Check both of the R4900 Panorama interface
boards. Replace if either or both are faulty.
Service Manual 203025
7-17
7. Error Codes and Trouble Shooting
CBCT unit
v. Check the R3200 CPU, replace if faulty.
vi. Replace the pan (CCD) detector.
If you replace the pan (CCD) detector you must
carry out the following calibrations:
- 11. Collimator X panorama,
- 9. CCD X position,
- 12. CCD pixels,
- 14. CCD EPS,
- Dose calibrations, 16 to 19 are optional. See 9
Calibration and adjustment.
Error 17
Configuration of CCD failed.
CAUSE
The data from the pan (CCD) sensor to R3200 CPU is
corrupted or cannot be received.
SOLUTION
i.
Check wiring between the pan (CCD) detector and
R4900 Panorama interface (X190-J4901). Replace
if faulty.
ii. Check the wiring between the two R4900 Panorama interface boards (J4902 - J4902). Replace if
faulty
iii. Check the connector between R4900 Panorama
interface and R3200 CPU (J4904-J3208). Replace
if faulty.
iv. Check both of the R4900 Panorama interface
boards. Replace if either or both are faulty.
v. Check the R3200 CPU, replace if faulty.
vi. Replace the pan (CCD) detector.
If you replace the pan (CCD) detector you must
carry out the following calibrations:
- 11. Collimator X panorama,
- 9. CCD X position,
- 12. CCD pixels,
- 14. CCD EPS,
- Dose calibrations, 16 to 19 are optional. See 9
Calibration and adjustment.
7-18
Service Manual 203025
CBCT unit
7. Error Codes and Trouble Shooting
Error 18
Incorrect number of CCD scanned lines.
CAUSE
R3200 CPU is not receiving enough data from the pan
(CCD) sensor
SOLUTION
Same as Error 17.
Error 19
DMA (Direct Memory Access) of the CCD failed.
CAUSE
R3200 CPU internal error
SOLUTION
Same as Error 17.
Error 20
CCD detector motor timeout.
CAUSE
R3200 CPU does not receive the correct information
from R4200 Collimator opto and does not read the
position microswitch status.
SOLUTION
Check 1:
Use the s2terminal service program to check microswitch operation. If microswitch does not operate replace it.
Pan detector does not move
i.
Use the s2terminal command “drivemotor” to check
that R5100 3-phase stepper driver is receiving
power, +5V and +28V LED’s are on. If not check
the low power schematic to locate the problem.
ii
Check wiring between D-motor and R5100
3-phase stepper driver. Replace if faulty.
iii Check wiring between R3300 IO1 and R5100
3-phase stepper driver (J3312-J5101). Replace if
faulty.
Service Manual 203025
7-19
7. Error Codes and Trouble Shooting
CBCT unit
iv Check the R5100 3-phase stepper driver, replace if
faulty.
v
Check R3300 IO1, replace if faulty.
vi Replace the D-motor.
Pan detector moves but cannot find the correct
position
i.
Check the belt tension.
ii. Check wiring between R4200 Detector opto and
R3300 IO1 (J4201-J3302). Replace if faulty.
iii. Check R4200 Detector opto, replace if faulty.
iv. Replace R3300 IO1.
Error 21
Calibration data receive timeout.
(This error may occur during the QA (Quality assurance) procedure. Use the s2terminal to check for this
error as it may not appear on the GUI).
CAUSE
The GUI PC does not send calibration data to R3200
CPU within the timeout period.
SOLUTION
i.
Check the cables between the GUI PC and R3200
CPU. Replace if faulty.
ii. The GUI PC not functioning. Replace. If you replace the GUI PC the unit must be completely
recalibrated. See 9 Calibration and adjustment.
7-20
Service Manual 203025
CBCT unit
7. Error Codes and Trouble Shooting
Error 22
DMA of 3D panel failed.
CAUSE
3D detector did not send picture data to R3200 CPU.
SOLUTION
i.
Check cable between the 3D (CMOS) detector and
R3200 CPU. Replace if faulty.
ii. Check cable between R4700 3D panel power supply and 3D detector. Replace if faulty.
iii. Check R4700 3D panel power supply, replace if
faulty.
iv. Check R3200 CPU, replace if faulty.
v. Replace the 3D detector. If you replace the pan
(CCD) detector you must carry out the following
calibrations:
3. Det X,
4. Geometry calibration,
6. Collimator y,
8. Collimator X CT,
10. Slit size,
11. Collimator X panorama,
12. CCD pixels,
15. Quality check
Dose calibrations, 16 to 19 are optional. See 9
Calibration and adjustment.
Error 23
Configuration data has corrupted.
CAUSE
The flash memory configuration data is missing or is
corrupted.
SOLUTION
Replace R3200 CPU and calibrate the unit again.
Service Manual 203025
7-21
7. Error Codes and Trouble Shooting
CBCT unit
Error 24
Voltage (kV) failure in R3800 X-ray generator.
CAUSE
The kV feedback from the generator to R3200 is not
within the tolerance.
SOLUTION
i.
Check the cable between R3300 IO1 and R3800
X-ray generator. Replace if faulty.
ii. Check R3300 IO1, replace if faulty.
iii. Check R3800 X-ray generator, replace if necessary.
Error 25
Current (mA) failure in R3800 X-ray generator.
CAUSE
The mA feedback from the generator to R3200 is not
within the tolerance.
SOLUTION
Same as Error 24.
Error 26
Preheat failure in R3800 X-ray generator.
CAUSE
The preheat feedback signal from the generator to
R3200 is not within the tolerance.
SOLUTION
Same as Error 24.
7-22
Service Manual 203025
CBCT unit
7. Error Codes and Trouble Shooting
Error 27
Rotation encoder failed.
CAUSE
R3300 IO1 does not receive signals from R4100 Rotator opto.
SOLUTION
i.
Check the wiring between R4100 Rotator opto and
R3300 IO1. Replace if faulty.
ii. Check R4100 Rotator opto. Replace if faulty.
ii. Replace R3300 IO1 board.
Error 28
Chair encoder failed
CAUSE
R3400 IO2 is not receiving signals from the Z-motor
encoder.
SOLUTION
i.
Check the wiring between the Z-motor and R3400
IO2 (J4601-J3406). Replace if faulty.
ii. Check R3400 IO2, replace if faulty.
iii. Replace the Z-motor (lifting unit).
Error 29
Error in TDI pulsing.
CAUSE
Software corrupted.
SOLUTION
Update R3200 CPU firmware
Service Manual 203025
7-23
7. Error Codes and Trouble Shooting
CBCT unit
Error 30
Firmware is corrupted.
CAUSE
The configuration flash memory is corrupted.
SOLUTION
i.
Update R3200 CPU firmware.
ii. If error message reappears, replace R3200 CPU
and then update the firmware if required.
Error 31
CPU memory test failed.
CAUSE
Memory module(s) faulty
SOLUTION
i.
Replace memory modules on R3200 CPU.
ii. If error message reappears, replace R3200 CPU
and then update the firmware if required.
Error 32
Z movement fail
CAUSE
R3400 IO2 is not receiving signals from the Z-motor
encoder.
SOLUTION
Same as Error 28.
Error (no number)
CAUSE
Old GUI version.
SOLUTION
Update the GUI software.
7-24
Service Manual 203025
CBCT unit
7. Error Codes and Trouble Shooting
Start up error
During boot up the GUI display freezes and only displays the GUI version, not the FW version.
When the Capture button in the imaging SW is
pressed the following message appears:
Cannot start capture because there is no connection between the driver and thet Cone Beam 3D
device.
CAUSE
Fuse F5 on R3100 blown.
Service Manual 203025
7-25
7. Error Codes and Trouble Shooting
CBCT unit
7.5 Trouble shooting
1. Internal and external LANs
Problem 1.1 - No connection to the workstation (WS)
Action
-
Check Ethernet connections from WS and/or local network.
o
Reconnect the Ethernet cable to the WS (or local switch/router)
-
Check condition of the External Ethernet cable.
o
Replace whole cable track in upper shelf if cable is broken.
-
Switch the unit off and connect the external 1GB Ethernet cable to the Service
PC, open the s2terminal and switch the unit on again. Check that the login information appears in the s2terminal.
o
If login info appears then the Ethernet Card in the WS is faulty or the software is corrupted or the network is misconfigured.
o
If the login info does not appear, then open the outer cover from the sensor side of the rotator.
>
Switch the unit on and check that R3200 is receiving power (see problem
3.7 R3200, R3300 or R3400 does not operate).
>
Connect the service PC directly to J3210 on R3200 using separate Ethernet cable. Reboot the unit and check that login info appears in the s2terminal.
>> If login info appears the external Ethernet cable is faulty. Replace the
whole cable track in upper shelf.
>> If login info does not appear then the R3200 is not programmed or
faulty. Replace R3200.
7-26
Service Manual 203025
CBCT unit
7. Error Codes and Trouble Shooting
Problem 1.2 - Connection to workstation breaks from time to time.
Action
-
Check Ethernet connections from WS (and/or local network)
o
Plug Ethernet cable back to the WS (or local switch/router)
-
Check condition of the External Ethernet cable.
o
Replace whole cable track in upper shelf if cable is faulty.
-
Open the outer cover from the sensor side of the rotator and connect separate
Ethernet cable from the WS to the J3210 on the R3200. Operate the unit normally, take some exposes, run the endurance test, etc.)
o
If no problem exists then the external Ethernet cable is faulty. Replace the
whole cable track in upper shelf.
o
If the problem persists then either the network card in the WS or R3200 is
faulty. First replace R3200 and operate the unit normally.
o
If problem still persists after replacing R3200, replace Network card in the
WS.
Problem 1.3 - No connection to R3300, R3400 or GUI PC (internal bus failure)
Action
-
Switch the unit and check that R3300, R3400 and the Ethernet switch are receiving power (see problem 3.7 R3200, R300 or R3400 does not operate.)
-
Check that the four activity LEDs on the Ethernet switch are flashing.
o
If not then replace Ethernet switch.
-
Check that ACT LED (D7) on R3200 is flashing.
-
If not then bypass the cable track in upper shelf by using separate Ethernet
cable between J3211, on R3200, and the Ethernet switch.
o
If connection restarts then the Ethernet cable between R3200 and switch
is faulty. Replace whole cable track in upper shelf.
o
If connection does restart, replace R3200.
Service Manual 203025
7-27
7. Error Codes and Trouble Shooting
CBCT unit
Problem 1.4 - No connection to R3300
Action
-
Switch the unit on and check that R3300 and the Ethernet switch receive power
(see problem 3.7 R3200, R300 or R3400 does not operate).
-
Move the Ethernet cable from R3300 to another port in the Ethernet switch and
reboot the unit.
o
If connection restarts then the switch is broken. Replace it.
-
Bypass cable track in upper shelf by using a separate Ethernet cable between
R3300 and the Ethernet switch. Reboot the unit.
o
If connection restarts then cable is faulty. Replace whole cable track in upper shelf.
o
If connection does not restart replace R3300.
Problem 1.5 - No connections to R3400.
Action
-
Same trouble shooting as Problem 1.4 - No connection to R3300.
Problem 1.6 - No connections to the GUI PC
Action
-
7-28
Same trouble shooting as Problem 1.4 - No connection to R3300.
Service Manual 203025
CBCT unit
7. Error Codes and Trouble Shooting
2. Power distribution (mains)
Problem 2.1 - Nothing happens when the unit is switched ON.
Action
-
Check that mains lead is plugged into the wall.
o
If not plug it in.
-
Check that mains is on.
o
If not contact you local power supply company for help.
-
Check Fuses F1 and F2.
o
If blown replace them.
-
Open electric cabinet and check that the lamp R3900 is on (or measure voltage
at connector J3904)
o
If there is voltage on R3900 measure secondary voltages from mains
transformer. If any of voltages are missing replace the transformer.
o
If there is no voltage follow mains power supply route from J3904 backward to the mains wall socket by measuring voltages at different connection points. Replace any component that are faulty.
Service Manual 203025
7-29
7. Error Codes and Trouble Shooting
CBCT unit
Problem 2.2 - Chair does not move up or down.
Action
-
Check fuse 1 on the R3400.
o
If blown replace it.
-
Check that lamp (LA1) on R3400 is glowing.
o
If not then check that J2007 is connected.
>
If connected then measure voltage at J2007.
>> If no voltage replace cable between J2007 and R3900.
>> If there is voltage replace cable between J2007 and J3411/J3412.
o
If lamp is glowing replace R3400.
-
If the R3400 has been replaced and chair still does not move, replace the chair
lift unit.
Problem 2.3 - GUI PC not working.
Action
-
Check that the mains cable is connected between R3900 and the GUI PC Power unit.
o
If not, connect the cable.
-
Check that there are low voltages (+5V and +12V) on the GUI PC power output
(red wire +5V, yellow +12V)
o
If there are no low voltages replace the GUI PC Power supply unit.
o
If there are low voltages replace the GUI PC unit.
Problem 2.4 - No X-rays.
Action
-
7-30
Check that lamp (LA1) on the R3700 (generator power) is glowing.
o
If not then check that there are voltages on the input of the generator filter.
>
If no voltages, replace the cable track in upper shelf.
>
If there are voltages, replace the filter.
o
If LA1 on R3700 is glowing check lamp (LA1) on R3800 (X-ray generator).
>
If LA1 on R3800 is not on then check fuses on the R3700 and replace
them if blown. If the fuses are ok then check cabling between J3703 and
J3802
>
If LA1 on R3800 is on then follow trouble shooting information in section 6
Exposure control.
Service Manual 203025
CBCT unit
7. Error Codes and Trouble Shooting
3. Power distribution (low voltages)
Problem 3.1 - The GUI starts but nothing else happens when the unit is switched ON.
Action
-
Check that all LEDs on R3100 are on.
o
If not check the fuses on the R3100.
>
If the fuses are blown, replace them.
>
If fuses are OK replace R3100.
>
If LEDs still don’t come on then follow trouble shooting procedure for Problem 2.1 - Nothing happens when the unit is switched ON.
o
If all the LEDs on R3100 are on, check that the +5V LED (D11) on R3200
is on.
>
If not then check that the +5V LED on R5100 (detector swap stepper driver
module) is on.
>> If on, replace the cable between J4002 and J3206 (CPU power cable).
>> If it is not on then replace the cable track in upper shelf.
>
If LED (D11) is on, replace R3200.
Service Manual 203025
7-31
7. Error Codes and Trouble Shooting
CBCT unit
Problem 3.2 - No X-, R-, Detector swap or collimator movement.
Action
-
Check +5V and +28V LED’s on the R5100 modules.
o
If both LED’s are on then refer to section 8. Motion control (general) for
information on what to do.
o
If +5V LED is off replace the cable between R5100 (J5101) and R3200 or
R3300.
o
If +28V LED is off check that +28V LED on R3100 is on.
>
If off replace the fuse on the R3100. If still of after replacing the fuse and
replace R3100.
>
If on check +28V LED’s on another R5100 module
>> If LED is on there replace cable track in upper shelf.
>> If LED is not on then check outgoing power cabling from R4000 and
replace if necessary.
o
If cabling is OK then replace R4000.
Problem 3.3 - Slit motor is not functioning.
Action
-
Check that +28V LED on R5100 is on.
o
If LED is on then follow trouble shooting instructions in section 8. Motion
control (general) for information on what to do.
o
If the LED is not on then follow the trouble shooting instructions in Problem: 3.2 No X-, R-, Detector swap or collimator movement.
Problem 3.4 - No Y-, J- movements.
Action
-
7-32
Check that there is +28V on R3400 by measuring the voltage from J3404, pins
1 and 2.
o
If the voltage is present then follow trouble shooting instructions in section
8. Motion control (general) for information on what to do.
o
If the voltage is not present check that +28V LED on R3100 is on.
>
If LED is not on check fuses.
>> If fuses are OK, then replace R3100.
>
If LED is on check cable between R3100 and R3400. Replace if faulty.
Service Manual 203025
CBCT unit
7. Error Codes and Trouble Shooting
Problem 3.5 - The panorama imaging not functioning.
Action
-
Switch the unit on, disconnect cable from J3503 on R3500 and check the LED’s
on R3500.
o
If all LED’s are on then measure voltages from the connector X191 on the
CCD sensor.
>
If the voltages are OK then replace CCD sensor.
>
If some of the voltages is missing then replace the cable between X191
and J3502.
o
If non of the LED’s are on then measure voltages at J3501.
>
If voltages are OK replace R3500.
>
If voltages are not OK then follow the trouble shooting instructions in Problem: 3.2 No X-, R-, Detector swap or collimator movement.
o
If some of the LED’s are not on replace R3500.
Problem 3.6 - The 3D imaging is not functioning.
Action
-
Launch the s2terminal, go to the service mode and select test mode (no Xrays) and no move ON. Type “autotest 1 c” into the s2terminal and check the
LEDs D3 and D4 on the R4700.
o
If both LEDs are on measure voltages at 3D sensor.
>
If either one of voltages is missing then replace the cable between R4700
and sensor.
>
If both voltages are present follow trouble shooting instructions for Problem 5.1 - 3D sensor is not recognized.
o
If both LED’s are off measure voltage from J4701, pins 4 and 5.
>
If voltage is present follow the trouble shooting instructions for Problem 5.1
- 3D sensor is not recognized.
>
If voltage is missing check +8V LED (D27) on R3100.
>> If LED is OFF check fuses or replace R3100 as required.
>> If LED is ON replace cable track in upper shelf.
Service Manual 203025
7-33
7. Error Codes and Trouble Shooting
o
>
>
CBCT unit
If LED D4 (+5V_ana) is not on then measure voltage from J4701, pins 1
and 2.
If voltage is present replace R4700.
If voltage is not present check LED H2 on the R5300.
>> If LED H2 is on replace the cable track in upper shelf.
>> If LED H2 off check fuse F1 on the R5300.
>>> If blown replace it.
>>> If fuse is OK check that LED H1 is on.
I> If on, replace R5300.
I> If not replace mains transformer.
Problem 3.7 - R3200, R3300 or R3400 does not operate.
Action
-
7-34
Switch the unit on and check the voltage indicator LEDs on the each board.
o
If any of LED’s on a board are not on replace the board.
Service Manual 203025
CBCT unit
7. Error Codes and Trouble Shooting
4. Panoramic imaging
Problem 4.1 - CCD sensor is not recognized.
Action
-
Check the condition of the power supply by following trouble shooting instructions Problem: 3.5 The panorama imaging not functioning.
-
Bypass the installed LVDS data cable by using a separate cable and connect it
between the two R4900 panorama interface boards (J4902 <-> J4902). Reboot
the unit.
o
If CCD sensor is recognized then replace original cable.
o
If CCD sensor is not recognized then replace the R4900 attached to
R3200 and reboot.
>
If CCD sensor is recognized then the replaced R4900 was faulty.
>
If CCD sensor is not recognized then replace R4900 assembled under the
CCD sensor arm and reboot.
>> If CCD sensor is recognized then the replaced R4900 was faulty.
>> If CCD sensor is not recognized then replace CCD sensor.
>>> If new CCD sensor is recognized then the replaced sensor +was
faulty.
>>> If new CCD sensor is not recognized replace R3200.
Service Manual 203025
7-35
7. Error Codes and Trouble Shooting
CBCT unit
Problem 4.2 - Image is messy
Action
-
Check condition of the power feed by following trouble shooting instruction
Problem: 3.5 The panorama imaging not functioning.
-
Use the s2terminal and select the service mode and then the test mode (no
Xray). Type pantest, which will grab a test image from the camera. Open .dcm
image (will be found same folder where s2terminal is located).
o
If test image is OK then check calibration.
>
If calibration is OK then replace CCD camera
>
If not OK then calibrate Scanora 3D.
o
If test image is poor then follow trouble shooting instruction Problem: 4.1
CCD sensor is not recognized.
Problem 4.3 - 3D-Image is too dark or light.
Action
-
If the 3D-image is also dark then follow trouble shooting instructions in 6. Exposure control.
Problem 4.4 - Image is completely clear.
Action
-
If the 3D-image is also fully light then follow trouble shooting instructions in 6.
Exposure control.
-
Check that slit-collimator is not closed.
o
If it is closed then recalibrate the unit.
-
Check that CCD sensor is positioned correctly.
o
Check that sensor is not damaged mechanically. If it is correct or replace
the damaged mechanical parts or replace the sensor.
o
Check that rotating unit moves correctly and stops at right home positions
by entering the service mode (s2terminal) typing the command drivemotor
d with parameters c or p (c=CT position, p=PAN position).
>
If motor does not move correctly follow trouble shooting instructions 8. Motion control (general)
7-36
Service Manual 203025
CBCT unit
7. Error Codes and Trouble Shooting
5. 3D imaging
Problem 5.1 - 3D sensor is not recognized.
Action
-
Check condition of the power feed by following trouble shooting instructions
Problem: 3.6 The 3D imaging is not functioning.
-
Replace the existing LVDS data cable that runs from J3208 to the 3D sensor
and reboot the unit.
o
If 3D sensor is detected then the originally cable was faulty.
o
If 3D sensor not detected replace R3200 and reboot.
>
If sensor is now detected, the original R3200 was faulty.
>
If sensor is not detected then replace the sensor.
Service Manual 203025
7-37
7. Error Codes and Trouble Shooting
CBCT unit
Problem 5.2 - Generally poor image.
Action
-
Check condition of the power feed by following trouble shooting instructions
Problem: 3.6 The 3D imaging is not functioning.
-
Check unit calibrations.
-
Follow instructions in instructions Problem 5.1 - 3D sensor is not recognized.
Replace parts one by one and take a 3D image of the phantom until you identify
the problem.
Problem 5.3 - Horizontal bars in projection image.
Action
-
Check 3D sensor grounding cables.
o
If OK then replace R4700.
Problem 5.4 - Gray scale reduced.
Action
-
Follow instructions in Problem 5.1 - 3D sensor is not recognized. Replace components one by one and take 3D images using the QC phantom to check image
quality.
Problem 5.5 - Shadows in the projection image.
Action
-
Check that CCD sensor is parked to the CT-position
o
If not then follow trouble shooting instruction Problem 4.4 - Image is completely clear , from the section “…CCD camera is positioned right”.
-
Check calibration
o
If calibration OK then check that collimators are open as they should be.
>
If not, follow trouble shooting guide instructions 8. Motion control (general)
7-38
Service Manual 203025
CBCT unit
7. Error Codes and Trouble Shooting
6. Exposure control
Problem 6.1 - Exposure does not start when exposure switch is pressed.
Action
-
Check condition of the power supply by following trouble shooting instructions
Problem 3.7 - R3200, R3300 or R3400 does not operate.
-
Set the unit to the standby mode, press exposure switch and check the status of
the X-RAY ENA LED on R3300 (D502).
o
If LED doesn’t come on when exposure switch is pressed then remove
connector J3306 and shortcut pins 1 and 2.
>
If the LED does not come on replace R3300.
>
If LED comes on replace J3306, remove J2002 from the vertical column
and shortcut pins 7 and 14.
>> If the LED does not come on replace cable track in upper shelf.
Service Manual 203025
7-39
7. Error Codes and Trouble Shooting
o
>
>
CBCT unit
>> If the LED comes on replace J2002 and remove J3905 from R3900 and
short cut pins 1 and 2.
>>> If the LED does not come on replace the cable between J2002 and
J3905
>>> If the LED comes on replace J3905 and remove J3907 from R3900
and short cut pins 1 and 2.
I> If the LED does not come on replace R3900
I> If the LED comes on replace external exposure switch.
If LED D502 lights then set unit to imaging mode (CT or Pan), disable
movements and check status of the PREH_ENA LED (D501)
If doesn’t come on after few seconds when exposure switch is pressed
then replace R3300.
If LED comes on then the exposure control is OK and beep sound should
be heard. If not then replace R3300.
Problem 6.2 - Exposure sequence starts but no X-rays
Action
-
Check condition of the power feed by following trouble shooting instruction
Problem 3.7 - R3200, R3300 or R3400 does not operate.
-
Set unit to imaging mode (CT or Pan), disable movements and the check status
of the PREH_ENA LED (D501).
o
If LED does not come on replace R3300.
o
If LED comes on then check that X-RAY ENA LED (D500) comes on
>
If X-RAY ENA LED come on then follow trouble shooting guide for X-ray
generation.
>
If does not come on measure the voltage during exposure from connector
J3303 pin 5.
>> If voltage goes above 2V replace R3300.
>> If voltage is near 0V measure voltage from connector J3202 pin 7.
>>> If voltage goes above 2V then check and if necessary replace
cable between J3303 and J3202.
>>> If voltage is near 0V then replace R3200.
7-40
Service Manual 203025
CBCT unit
Service Manual 203025
7. Error Codes and Trouble Shooting
7-41
7. Error Codes and Trouble Shooting
CBCT unit
7. X-Ray generation
Problem 7.1 - No X-rays.
Action
-
Check condition of the power supply by following trouble shooting instructions
for Problem 2.4 - No X-rays.
-
Check the condition of the exposure control by following trouble shooting instructions for Problem 6.2 - Exposure sequence starts but no X-rays.
-
Set the unit to imaging mode (CT or Pan), disable movements, press exposure
switch and check the status of the Preheat LED (D3) on the R3800
o
If it does not come on then check the condition of the cable between connectors J3314 and J3810.
>
If cable is faulty replaced it.
>
If cable is OK replace R3800.
o
If LED comes on then check status of the exposure LED (D31) on the
R3800
>
If LED does not come on then check condition of the cable between connectors J3314 and J3810
>> If cable is faulty replace it.
>> If cable is OK check to see if the FAIL LED has come on.
>>> If not replace R3800.
>>> If FAIL LED still does not come on replace tubehead.
7-42
Service Manual 203025
CBCT unit
7. Error Codes and Trouble Shooting
Problem 7.2 - Wrong dose generated (too dark or light images).
Action
-
Check condition of the power feed by following trouble shooting instructions in
Problem 2.4 - No X-rays.
-
Check that the unit has been calibrated.
Preheat check
-
Set the unit to the 3D imaging mode (type patient from s2terminal), adjust mA
settings from GUI and measure respective voltages from TP11 on R3800 (Preheat reference).
o
If voltages differ from below then replace R3300.
8mA <-> 1.54V
10mA <-> 1.59V
12.5mA <-> 1.65V
15mA <-> 1.70V
o
If not then set mA settings to 15mA and measure voltage from TP15 (preheat feedback) when exposure is taken.
>
If voltage is not 0.58V then replace R3800.
>> If it is still not 0.58V replace the tubehead.
mA check
-
Set the unit to the 3D imaging mode (type patient from s2terminal), adjust mA
settings from GUI and measure respective voltages from TP12 (mA reference).
o
If voltages differ from below then replace R3300.
8mA <-> 3.56V
10mA <-> 3.19V
12.5mA <-> 2.72V
15mA <-> 2.26V
o
If not then set mA settings to 15mA and measure the voltage from TP13
(mA feedback) when exposure switch is not pressed.
>
if voltage is not 5.0V replace R3800.
>
If voltage is close to 5.0V take an exposure and measure the voltage at
TP13.
>> If voltage is not about 4.3V then replace R3800.
>>> If it is still not about 4.3V, replace the tubehead.
>>> If voltage is around 4.3V then check the ribbon cable.
I> If faulty, replace it.
I> If cable is OK replace R3300.
Service Manual 203025
7-43
7. Error Codes and Trouble Shooting
CBCT unit
kV check
-
7-44
Select the following exposure parameters: standard resolution, 75 x 100 FOV,
15mA, 85kV and measure from voltage at TP8 (kV reference).
o
If voltage is not 0.92 - 0.93V remove cable from J3807 and do take the
same measurement from cable pin 5 (pin 16 is ground).
>
If voltage is 0.92 - 0.93V replace R3800.
>
If voltages is not 0.92 - 0.93V check the condition of the cable.
>> If cable is faulty replace it.
>> If cable is OK replace R3300.
o
If voltage is 0.92 - 0.93V measure voltage from TP7 (kV feedback from
tube)
>
If voltage is not 1.25 - 1.26V replace R3800.
If this does not solve the problem replace thet tubehead.
>
If voltage is 1.25 - 1.26V measure voltage from TP13 (mA feedback)
>> If voltage is not 0.58V replace R3800.
>>> If this does not solve the problem replace the tubehead
>>If voltage is 0.58V check condition of the ribbon cable
>>> If cable is faulty replace it
>>> If cable is OK replace R3300.
Service Manual 203025
CBCT unit
7. Error Codes and Trouble Shooting
8. Motion control (general)
There are five main reasons for motion control malfunctions:
- Mechanical malfunction
- Power supply problem
- Actuator malfunction
- Sensor malfunction
- Control malfunction
Mechanical malfunctions are easy to correct because in most cases they are
visible or audible. These malfunction are not described here.
In most cases it is recommended that you check the condition of power supplies first. The trouble shooting related the power distributions are described in
sections 2. Power distribution (mains) and 3. Power distribution (low voltages).
Basically checking the state of power indicators LED’s will indicate the state of
the power distribution.
Actuator malfunction can be caused by the motor or motor driver electronics.
To trouble shoot use the s2terminal command drivemotor with suitable parameters (s2terminal lists the parameters). If there is no motion replace the different
components, motor, electronics or cabling etc., one by one until the faulty component is located.
Sensor malfunctions can be solved in same way than actuator malfunctions.
Setting the unit to service mode and using s2terminal command systemstatus,
which will show status of all sensors (optos, micro switches, remote controller).
Trouble shooting is easy. Manually move the assembly and at the same time
follow the status changes of respective sensor. If the status does not change
replacing sensor or related cabling will fix the problem.
If none of above solves the problem then faulty item is one of logic boards
R3200, R3300 or R3400
No step-by-step trouble shooting guides for motion control (except for Z-motion), is included here because the motion problems are easy to solve with general guideline given above. However, the related block diagrams are included
here to help you determine which components actuate which motion.
Service Manual 203025
7-45
7. Error Codes and Trouble Shooting
CBCT unit
X-movements
Y-movements
7-46
Service Manual 203025
CBCT unit
7. Error Codes and Trouble Shooting
D-movements (Detector)
J-movements (chin rest)
Service Manual 203025
7-47
7. Error Codes and Trouble Shooting
CBCT unit
C-movements (collimator)
S-movements (slit)
7-48
Service Manual 203025
CBCT unit
7. Error Codes and Trouble Shooting
9. Z-motion control (chair)
Block diagram Z-motion
Problem 9.1 - Chair does not move up or down.
Action
-
Check the mains voltage distribution by following trouble shooting instruction for
Problem 2.2 - Chair does not move up or down.
-
Check low voltage distribution by following trouble shooting instruction for Problem 3.7 - R3200, R3300 or R3400 does not operate.
-
Check condition of the remote control with the s2terminal command systemstatus
o
If some of buttons do not change status then replace the remote control
>
If that does not fix the problem then check cable from the electric cabinet
to J3401. Replace if faulty.
>> If that does not fix the problem replace R3400.
o
If key statuses change then check that LED’s D16, D18 and D15 (down,
ena and up) come on when up or down keys are pressed.
>
If LED’s do not come on then replace R3400.
Service Manual 203025
7-49
7. Error Codes and Trouble Shooting
>
CBCT unit
If LED’s come on then measure voltage from connector J3413. Pins 1
and 2 are active when driven UP and pins 3 and 2 are active when driven
DOWN.
>> If there is mains voltage at the connector replace chair lift.
>> If there is no mains voltage replace R3400.
Problem 9.2 - Chair moves in one direction only.
Action
-
Check low voltage distribution by following trouble shooting instruction for Problem 3.7 - R3200, R3300 or R3400 does not operate.
-
Check that Z-limit indicator LED’s (D30=lower limit and D31=upper limit), according to the drive direction, are not on.
o
If a LED is on and the chair is not physically in the lower or upper limit position, then remove connector J3417 and measure resistance of the cable
(pins 1 and 4 are for upper limit switch, pins 3 and 6 are for lower limit
switch).
>
If resistance is more than 1 Kohm then replace chair lift.
>
If resistance is near 0 ohm then replace R3400 (or R5400)
o
If LEDs are not on, then check that D16, D18 and D15 (down, ena and up)
come on when chair up or down keys are pressed.
>
If they do not come on then replace R3400.
>
If they come on check if the Z-motor makes a “humming” noise when it is
driven in malfunctioning direction.
>> If it is make a “humming” noise replace R3400.
>> If not replace lift motor.
Important note
There are two versions of R3400.
Version 1. R3400 version 5 and below, has a separate R5400 limit interface board
attached to it.
Version 2. R3400 version 6 and above, does not have a seperate R5400 board. The
limit interface electronics from R5400 are integrated into R3400 . Use the following
table to reference designators used in trouble shooting guide to match corresponding
ones used in R5400.
R3400
R5400
7-50
D30
H1
D31
H2
J3417
J5404
Service Manual 203025
CBCT unit
8. Unit calibration and adjustment
8. Unit calibration and adjustment
8.1 Introduction
The unit calibration procedure helps to maintain the
image quality and maintain the correct operation of the
unit.
When carrying out the full or partial unit calibration procedure the calibration and check steps must be carried
out in the order in which they are listed.
With Calibrate steps the unit will automatically adjust
the unit to the optimum setting.
If a calibration step fails, it indicates that the unit cannot calibrate itself to the optimum setting and the unit
must be manually adjusted. After manually adjusting the unit repeat the calibration step. If the unit fails
again repeat the process until the unit passes the calibration step. After this, repeat the remaining calibration
steps.
With Check steps the unit does not automatically
adjust the unit. The unit must be manually adjusted if
required.
During the unit calibration procedure calibration data
is produced. This data is stored in the GUI. Also, 2D
calibration and preview images are produced. These
images will appear on the GUI and should be saved in
the dental imaging program.
IMPORTANT NOTE:
ONLY use the Seat Height adjusting keys on the remote control to adjust the height of the QC and 3D
phantoms. DO NOT use the head support height
adjusting keys.
Service Manual 203025
8-1
8. Unit calibration and adjustment
CBCT unit
8.2 Alignment a Quality Assurance tools
Geometry phantom
Quality assurance phantom
Ball and pin phantom (panoramic)
Levelling base
Copper filter
8-2
Service Manual 203025
CBCT unit
8. Unit calibration and adjustment
8.3 Preparing for calibration
1. Close the head support (rotate it towards the chair)
and lock it in position with the head support locking
lever.
2. Rotate the head support adjusting knob until the
head support is in the mid point of its travel. There
is a slight “resistance” when you reach this point.
3. Switch the PC and unit on (if the unit is on, restart
it). A message will appear on the unit control panel
asking you to press and hold the chair down button
to complete unit start up.
CAUTION: Crushing Danger!
Before pressing the chair down button remove all
objects, for example drawers, wheel chairs, stools
etc., from around the chair to avoid damage to the
unit or injury to people.
4. Press and hold the chair down key until the unit
stops moving. A message will then appear asking
you to select a patient and then start image capture.
5. PC: Open the s2terminal and reserve the unit,
command xr. (refer to the section s2terminal for
more information).
Service Manual 203025
8-3
8. Unit calibration and adjustment
CBCT unit
6. PC: Open the dental imaging software and then
open a new patient (card) where you can store the
calibration images, name it, for example, calibration. Refer to the user’s manual supplied with the
dental imaging software for information on opening
patient cards..
7. PC: Click the image capture. The image capture
window will open.
8. Touch the settings button on the unit display.
The settings page will appear.
9. Touch Service button.
8-4
Service Manual 203025
CBCT unit
8. Unit calibration and adjustment
The calibration display will appear.
NOTE:
When a calibration button text is black, it indicates
the calibration has not been carried out or has not
been successfully carried out.
When the text is grey it indicates that the calibration has been carried out.
Service Manual 203025
8-5
8. Unit calibration and adjustment
CBCT unit
8.4 The calibration sequence
1. Tube calibration, Preheat and mA (Current).
Calibrates the tubehead preheat and current.
2. Lasers Z (Horizontal FOV).
Checks the position of the Z-lasers.
3. Detector X position.
Checks the 3D sensor in horizontal direction.
4. Geometry calibration.
Checks the rotation geometry of the rotating unit.
5. Lasers (X and Y).
Checks the position of the X and Y-lasers.
6. Collimator Y position.
Checks the position of the 3D collimator in vertical
direction.
7. Slit X position.
Checks the collimator slit in the horizontal direction.
8. Collimator X CT.
Calibrates the 3D collimator horizontal position
and width check, both the small and large collimator.
9. CCD X position.
Checks the horizontal position and tilt of the panoramic sensor. (Panoramic version only).
10. Slit size.
Calibrates the slit opening size for the 3D FOVs.
8-6
Service Manual 203025
CBCT unit
8. Unit calibration and adjustment
11. Collimator X panorama.
Checks the height of the panoramic image.
(Panoramic version only).
12. CCD pixels.
Calibrates the panoramic sensor gain and dark
current. (Panoramic version only).
13. Pixel calibration.
Calibrates the 3D sensor gain and dark.
14. CCD EPS.
Checks the horizontal position of the panoramic
sensor. (Panoramic version only).
15. Quality Check.
Calibrates that the unit reads the different densities correctly. The positions of the laser lights can
also be manually checked.
Optional dose calibrations
The nominal DAP (Dose Area Product) value (factory
setting) is sufficient for normal use. However, if you
want a more accurate value measure the DAP value
using a DAP meter and then use this value instead.
16. Dose small.
Allows the dose to be selected for the small 3D
program.
17. Dose large.
Allows the dose to be selected for the large 3D
program.
18. Dose adult panorama.
Allows the dose to be selected for the adult pan
program. (Panoramic version only).
19. Dose child panorama.
Allows the dose to be selected for the child pan
program. (Panoramic version only).
Service Manual 203025
8-7
8. Unit calibration and adjustment
CBCT unit
8.5 When to calibrate the unit
The unit must be calibrated and, if necessary, adjusted
at regular intervals in accordance with national regulations regarding the use, maintenance and service of
dental x-ray devices that are in force in the country in
which the unit is installed.
In any event, the unit must be completely recalibrated
at least once a year. Dose calibrations, 16 to 19 are
optional.
The unit must also be fully or partially calibrated when
parts are replaced.
The calibration steps for the following replaced parts
are as follows:
1. Preheat
1. mA
2. Z lasers
3. Det X
4. CT Geom
5. Lasers
6. Col Y
7. Slit X
8. Col X CT
9. CCD X
10. Slit size
11. Col X Pan
12. CCD pix
13. Det pix
14. CCD ESP
15. QC
8-8
THA Rot
Unit
x
x
x
x
x
x
x
x
x
x
x
x
x
x
x
x
x
x
x
x
x
x
x
x
x
x
x
x
x
x
x
x
R3200 GUI
PC
x
x
x
x
x
x
x
x
x
x
x
x
x
x
x
x
x
x
x
x
x
x
x
x
x
x
x
x
x
x
x
x
3D
CCD Collim Lift
Panel
x
x
R3800 R3300
x
x
x
x
x
x
x
x
x
x
x
x
x
x
x
x
x
x
x
x
x
x
x
x
x
x
x
Service Manual 203025
CBCT unit
8. Unit calibration and adjustment
8.6 The Calibration and adjustment procedure
1. Tube calibration, Preheat and mA (Current)
Calibrates the tubehead preheat current and the mA.
Prerequisites: None.
1. Select Preheat.
2. Protect yourself from radiation.
Press and hold down exposure button. The calibration can take more than ten minutes to complete
and x-ray generation starts and stops several
times. Note that you MUST hold the exposure button down until the calibration is completed.
The calibration process can be followed on the
s2terminal window.
When the calibration is complete calibration values
will appear on the PC.
2. Press OK (unit display) once to accept the calibration data and a second time to return to the calibration menu.
If the calibration was successful the colour of the
Preheat button will have changed from black to
grey.
If the calibration was NOT successful the colour
of the Preheat button will remain black. Repeat the
calibration process. If it fails again replace R3800
X-ray generator and/or R3300 IO1 and or the tubehead.
Service Manual 203025
8-9
8. Unit calibration and adjustment
CBCT unit
3. Select mA
4. Protect yourself from radiation.
Repeat the procedure as described in preheat. The
procedure will last over seven minutes.When the calibration is complete calibration values
will appear on the PC.
Press OK (unit display) once to accept the calibration data and a second time to return to the calibration menu.
If the calibration was successful the colour of the
mA button will have changed from black to grey.
If the calibration was NOT successful the colour
of the mA button will remain black. Repeat the
calibration process. If it fails again replace R3800
X-ray generator and/or R3300 IO1 and or the tubehead.
After the successful completion of Preheat and mA
the X-ray electronics function correctly.
8-10
Service Manual 203025
CBCT unit
8. Unit calibration and adjustment
2. Lasers Z (FOV)
Checks the position of the Z-lasers (FOV horizontal
positioning lights).
Prerequisites: None
1. Remove the covers from the detector head. Section 11.2 Replacing the 3-D CMOS sensor describes how.
2. Select Z Lasers
3. Press the Positioning lights key (remote control) to
switch the lights on. Check the position of the 75
mm horizontal light. If the unit has four horizontal
lights (XL) the 75mm light is the second from the
top. If it has three lights the 75mm light is the top
one.
For C10322D sensors (OLD TYPE)
The light must be horizontal and positioned on the
two holes on either side of the 3D panel. The tolerance is ±1 mm.
Service Manual 203025
8-11
8. Unit calibration and adjustment
CBCT unit
For C10900D sensors (NEW TYPE)
The 75mm light must be horizontal and positioned
so that it strikes the top edges of the cutouts on
both sides of the detector frame that holds the 3D
panel in position. The tolerance is ±1 mm.
If the 75mm light is not in the right position light
and/or not level adjust the light until it is. Refer to
the next section, Adjusting the Z - lasers.
8-12
Service Manual 203025
CBCT unit
8. Unit calibration and adjustment
4. Place the adjustable phantom holder on the chin
rest and then level it. Place the QC phantom on the
adjustable phantom holder.
5. Use the chair up/down keys only to adjust the
height of the QC phantom so that the 75mm light
strikes the top light line on the QC phantom.
6. Check the position of the 60 mm and bottom lights.
Both beams must be horizontal and strike the appropriate lines on the QA phantom. Place a small
block of plastic on top of the phantom and check
the position of the top light. It must be horizontal
and 130mm from the bottom light
If any of the lights need to be adjusted, refer to the
next section, Adjusting the Z - lasers.
7. Briefly press the exposure button (NO X-RAYS
are generated) to acknowledge that the check has
been carried out.
NOTE:
If the exposure button is held down for too long,
error code 200 Exposure button pressed will
appear on the unit display. This will clear when the
exposure button is released.
Service Manual 203025
8-13
8. Unit calibration and adjustment
CBCT unit
Adjusting the Z - lasers
1. To adjust the horizontal laser(s) remove the covers
from the tubehead assembly. Section 11.1 Replacing the tubehead describes how.
2. Loosen the locking screw and the adjust the up/
down position with the adjusting screws and the
horizontal position by rotating the laser.
3. Tighten the locking screw and recheck the position
of the lasers.
8-14
Service Manual 203025
CBCT unit
8. Unit calibration and adjustment
3. Detector x position
Calibrates the position of the 3D detector in the horizontal direction. This ensures that the 3D detector is
correctly positioned in relation to the center of rotation.
Prerequisites: Preheat, mA (current), Lasers Z.
1. Place the adjustable phantom holder on the chin
rest and then level it. Place the 3D phantom on the
adjustable phantom holder.
NOTE:
Use the chair up/down keys only to adjust the
height of the 3D phantom. The horizontal lights will
strike the appropriate lines on the 3D phantom.
Use the FOV position keys to zero (0) the X and Y
coordinates that appear on the unit display.
2. Select Det X.
3. Protect yourself from radiation.
Press and hold down exposure button. The calibration will take about 30 seconds.
When the calibration is complete images must appear on the PC.
Service Manual 203025
8-15
8. Unit calibration and adjustment
CBCT unit
The calibration information that appears on the images is as follows:
–
8-16
detX (position of the 3D detector in the left/right
direction).
Passed is between 5.0 - 6.6 mm.
If Failed move the 3D detector to right or left (see
Adjusting DetX).
Service Manual 203025
CBCT unit
8. Unit calibration and adjustment
–
detTilt (how much the detector is tilted to the left or
right).
Passed is less than 0.5 mm.
If Failed adjust the tilt of the 3D detector (see Adjusting DetX).
–
xOffset and yOffset (the distance the 3D phantom
is away from the center of rotation).
Passed must be less than 1 mm.
If Failed repeat the calibration test. If it fails the
test again, check that the 3D phantom is correctly
positioned.
–
xTilt and yTilt (the amount the 3D phantom is
tilted).
Passed must be less than 5 mm (this value is not
stored but it is a prerequisite for successful 3D
geometry calibration).
If Failed check that the 3D phantom and the unit
are level (bubble level and the spirit level on the
upper shelf of the unit). Adjust if they are not.
–
Collimator Failed
The unexposed areas above and below the exposed area (collimator field) must be 3 mm or less.
If the amount is more, the vertical position of the
collimator must be adjusted later during step 6.
4. Briefly press the exposure button (NO X-RAYS
are generated) to acknowledge that the check has
been carried out.
Service Manual 203025
8-17
8. Unit calibration and adjustment
CBCT unit
Adjusting DetX
1. Loosen the six holding screws(6) that hold the 3D
sensor in position.
2. Use the two screws to the left of the 3D sensor to
adjust the detX (left/right) position of the 3D sensor
and detTilt (tilt) of the sensor.
NOTE:
If you adjust the 3D sensor recheck the Z lasers.
3. Tighten the holding screws and then carry out the
test again.
After the successful completion of DetX the 3D
sensor is correctly positioned in relation to the
center of rotation of the rotating unit.
8-18
Service Manual 203025
CBCT unit
8. Unit calibration and adjustment
4. Geometry calibration
C-arm and rotation geometry calibration.
Prerequisites: DetX.
1. Use and position the 3D phantom in the same way
as for the DetX calibration. Make sure that the
positioning lights strike the appropriate lines on the
3D phantom.
2. Select CT Geom.
3. Protect yourself from radiation.
Press and hold down the exposure button. After
the exposure has been completed the it will take
about five minutes for the geometry image to appear on the PC.
Service Manual 203025
8-19
8. Unit calibration and adjustment
CBCT unit
The calibration information that appears on the images is as follows:
–
CTQ (Critical To Quality).
Passed.
If Failed repeat the calibration. If it fails again, the
3D detector may be faulty.
–
FOV width.
Passed minimum size 145 mm.
If Failed the 3D detector must be readjusted (the
DetX calibration).
The detX and detTilt values on the image tell you
how much the 3D detector must be adjusted.
After readjusting the 3D detector repeat the DetX
calibration to make sure that it passes the calibration and then do the Geometry Calibration again
After the successful completion of CT Geom the
3D rotation movement is modelled and calibrated.
4. Briefly press the exposure button (NO X-RAYS
are generated) to acknowledge that the check has
been carried out.
8-20
Service Manual 203025
CBCT unit
8. Unit calibration and adjustment
5. Lasers X and Y
Checks the position of the X- and Y- lasers.
Prerequisites: CT Geom.
1. Use and position the 3D phantom in the same way
as for the DetX calibration. Make sure that the horizontal positioning lights strike the appropriate lines
on the 3D phantom.
2. Select Lasers
3. Press the Positioning lights key (remote control) to
switch the lights on. Check the position of the Xand Y-lasers
The light beams must be strike the appropriate
vertical lines on the 3D phantom.
Adjust the lasers if they are not correctly positioned.
4. Briefly press the exposure button (NO X-RAYS
are generated) to acknowledge that the check has
been carried out.
Service Manual 203025
8-21
8. Unit calibration and adjustment
CBCT unit
6. Collimator Y position
Checks the vertical position of the collimator assembly.
Prerequisites: 3D geometry.
1. Remove the 3D phantom and drive the chair down
to its lowest position.
2. Select ColY.
3. Protect yourself from radiation.
Press and hold down exposure button. The calibration exposure will take about 30 seconds.
When the calibration is complete images will appear on the PC.
8-22
Service Manual 203025
CBCT unit
8. Unit calibration and adjustment
The calibration information that appears on the images is as follows:
Service Manual 203025
–
FOV height.
Passed, must be more than 76 mm for the large
FOV and more than 60 mm for the small FOV.
If Failed adjust the top of the collimator. The
amount the collimator has to be adjusted will appear on the images (see Adjusting the collimator).
–
Collimator.
Passed.
If Failed adjust the height of the collimator. The
amount the collimator has to be adjusted will appear on the images (see Adjusting the collimator).
8-23
8. Unit calibration and adjustment
CBCT unit
Adjusting the collimator
1. Loosen the four (4) nuts, at the rear of the collimator.
2. For FOV height fail adjust the top of the collimator
with the adjusting screws.
For Collimator fail adjust the vertical position of
the complete collimator. Turning the screws clockwise will move the collimator down and counterclockwise will move the collimator up.
3. Retighten the nuts and repeat the calibration. Readjust if necessary.
After the successful completion of ColY the 3D collimator is correctly positioned in the Y-plane.
8-24
Service Manual 203025
CBCT unit
8. Unit calibration and adjustment
7. Slit X position
Checks the horizontal position of the 3D aperture.
Prerequisites: ColY.
1. The unit must be in the same position as for the
calibration test, ColY.
2. Select Slit X.
3. Protect yourself from radiation.
Press and hold down exposure button. The calibration exposure will take about 30 seconds.
When the calibration is complete images will appear on the PC.
The calibration information that appears on the images is as follows:
Service Manual 203025
–
slitX (3D aperture).
Passed, the center of the aperture must be positioned to within 0.11 mm.
If Failed move the slit to the right to make the (narrow) beam visible on the detector. The amount the
slit has to be adjusted will appear on the images
(see Adjusting the slit).
–
SlitSize Pan is positioned correctly when slitX is
Passed.
8-25
8. Unit calibration and adjustment
8-26
CBCT unit
Service Manual 203025
CBCT unit
8. Unit calibration and adjustment
Adjusting the collimator
1. Loosen the four (4) collimator holding screws.
2. Adjust the horizontal position with the adjusting
screw.
Move to right = counter clockwise
Move to left = clockwise
3. Retighten the holding screws and repeat the calibration. Readjust again if necessary.
After the successful completion of SlitX the slit is
correctly centered.
Service Manual 203025
8-27
8. Unit calibration and adjustment
CBCT unit
8. Collimator X CT
Calibrates the position of the 3D collimator horizontally.
Also checks the width of both the small and large collimators.
Prerequisites: SlitX
1. The unit must be in the same position as for the
calibration test, ColY.
2. Select Col X CT.
3. Protect yourself from radiation.
Press and hold down exposure button. The calibration exposure will take about 30 seconds.
When the calibration is complete images will appear on the PC.
The calibration information that appears on the images is as follows:
–
ColX_CT (3D collimator).
Passed, the left edge (seen from the tube) must
not be visible.
If Failed readjust ColY and repeat Col X CT calibration until it passes. No other adjustment is possible.
After the successful completion of Col X CT the
left-hand edge of the collimator is positioned correctly, when viewed from the tubehead.
8-28
Service Manual 203025
CBCT unit
Service Manual 203025
8. Unit calibration and adjustment
8-29
8. Unit calibration and adjustment
CBCT unit
9. CCD X position
Checks the position of the panoramic detector. Horizontal position and tilt.
Prerequisites: Col X CT.
1. The unit must be in the same position as for the
calibration test, ColY.
2. Select CCD X.
3. Protect yourself from radiation.
Press and hold down exposure button. The calibration exposure will take about 30 seconds.
When the calibration is complete images will appear on the PC.
The calibration information that appears on the images is as follows:
8-30
–
ccdX (pan detector position in the x-axis).
Passed, the detector must be positioned correctly
to within 0.2 mm.
If Failed the pan detector must be adjusted.
–
ccdTilt (pan detector tilt).
Passed, the detector tilt must be less than 0.5 mm.
If Failed the pan detector must be adjusted.
Service Manual 203025
CBCT unit
Service Manual 203025
8. Unit calibration and adjustment
8-31
8. Unit calibration and adjustment
CBCT unit
Adjusting the panoramic detector
1. Loosen the detector holding screws, at the top
of the detector, for the adjustment(s) you need to
make.
2. Adjust the position of the detector using the adjustment screws.
Clockwise = moves detector to the left.
Counterclockwise = moves detector to right
when looking at the active side of the detector.
3. Tighten the holding screws, recalibrate and readjust is necessary.
After successful calibration the panoramic detector
will be correctly positioned.
8-32
Service Manual 203025
CBCT unit
8. Unit calibration and adjustment
10. Slit size
Calibrates the slit size for the 3D FOVs.
Prerequisites: Col X CT.
1. The unit must be in the same position as for the
calibration test, ColY.
2. Select Slit size.
3. Protect yourself from radiation.
Press and hold down exposure button. The calibration exposure will take about 30 seconds.
When the calibration is complete images will appear on the PC.
The calibration information that appears on the images is as follows:
–
Service Manual 203025
SlitSize (size of the 3D slits).
Passed, the driver has traced the right-hand edge
of the slit and has automatically selected the width
of the each FOV.
If Failed, check that the slit is moving correctly.
Check/redo previous calibrations, Col X CT and
Slit X.
8-33
8. Unit calibration and adjustment
CBCT unit
The image shows slit opening for Large and Small
FOV.
The collimator edge (except the upper border) must
not be visible in the images.
When successfully completed the right-hand edge
of the radiation field is correct when viewed from the
tubehead.
8-34
Service Manual 203025
CBCT unit
8. Unit calibration and adjustment
11. Collimator X panorama
Calibrates the position of the panoramic collimator in
the vertical plane.
Prerequisites: Col X CT.
1. The unit must be in the same position as for the
calibration test, ColY.
2. Select Col X Pan.
3. Press the return key to drive the rotating unit to the
start position
4. Protect yourself from radiation.
Press and hold down exposure button. The calibration exposure will take about 30 seconds.
When the calibration is complete images will appear on the PC.
The calibration information that appears on the images is as follows:
–
Service Manual 203025
Adjustment_colX_PAN (position of the pan collimator).
Passed the collimator is in the right position.
If Failed, adjust Col Y (most likely the failure is
because the collimator is incorrectly positioned
vertically.
Refer to the failed X-ray image below. There must
be a black area below the lower right and left edges of the exposed area.
8-35
8. Unit calibration and adjustment
CBCT unit
The image shows apertures at the selected collimator positions.
After successful completion the panoramic collimation
is correctly positioned in vertical plane.
8-36
Service Manual 203025
CBCT unit
8. Unit calibration and adjustment
12. CCD pixels
Calibrates the panoramic detector gain and dark current.
Prerequisites: Col X Pan.
1. The unit must be in the same position as for the
calibration test, ColY.
2. Select CCD pixs.
3. Attach the 0.8 mm copper filter to the front of the
collimator.
4. Protect yourself from radiation.
Press and hold down exposure button. The calibration exposure will take about 30 seconds.
When the calibration is complete an image will appear on the PC.
The calibration information that appears on the images is as follows:
–
CT detector calibration
Signal level: xxxx Passed.
Dark levels: xx,xx Passed.
Uniformity xx Passed.
There must be no stripes on the image
If Failed, Cu filter not in position. Recheck CCD X,
and Slit size.
Service Manual 203025
8-37
8. Unit calibration and adjustment
CBCT unit
5. Remove the copper filter
After successful completed the gain file and dark
current compensation are correct.
8-38
Service Manual 203025
CBCT unit
8. Unit calibration and adjustment
13. Pixel calibration
Calibrates the 3D detector gain and dark current.
Precondition: Slit size.
1. The unit must be in the same position as for the
calibration test, ColY.
2. Select Det pix.
3. Protect yourself from radiation.
Press and hold down exposure button. The calibration exposure will take about 30 seconds.
When the calibration is complete an image will appear on the PC.
The calibration information that appears on the images is as follows:
–
CT detector calibration
CQT /Critical To Quality) xx Passed.
Field uniformity xxx Passed.
Signal level xxxx Passed.
Dark level xxx Passed.
The edge(s) of collimator must not be visible on the
edges of the image.
There must be no unexpected shadows.
Service Manual 203025
8-39
8. Unit calibration and adjustment
CBCT unit
After successful completion the 3D detector is calibrated, the X-ray field is uniform and the X-ray intensity
level is correct.
8-40
Service Manual 203025
CBCT unit
8. Unit calibration and adjustment
14. CCD EPS
Checks the horizontal position of the pan detector.
Precondition: CCD X.
1. The unit must be in the same position as for the
calibration test, ColY.
3. Press the return key.
2. Select CCD EPS.
3. Protect yourself from radiation.
Press and hold down exposure button. The calibration exposure will take about 30 seconds.
When the calibration is complete an image will appear on the PC.
–
To be correctly positioned (Passed) the exposed
area (black) must be in or near the middle of the
pan detector field. You must be able to see some
gray on both sides of the exposed (black) area.
If the beam is not in the correct horizontal position,
adjust the position of the panoramic detector CCD X position. If the beam is not correct vertical
position, adjust the position of the collimator - Collimator Y position.
After successful completion the pan detector is
positioned correctly.
Service Manual 203025
8-41
8. Unit calibration and adjustment
CBCT unit
15. Quality Check
Calibrates the unit so that it reads the different density
levels correctly. The position of laser lights can also be
checked.
Prerequisites: Det X, CT Geom.
1. Place the adjustable phantom holder on the chin
rest and then level it. Place the QC phantom on the
adjustable phantom holder.
2. Use the chair up/down keys only to adjust the
height of the QC phantom so that the 75 mm light
strikes the top light line on the QC phantom.
3. Select QC.
4. Protect yourself from radiation.
Press and hold down exposure button. The calibration exposure will take about 15 - 20 seconds and
the reconstruction will take from 3 - 5 minutes.
When the calibration is complete open the 3D image (use 3D viewing software such as ImageJ).
The unit reads the density at five different places
through the 3D volume.
8-42
Service Manual 203025
CBCT unit
8. Unit calibration and adjustment
5. The calibration information that appears on the image is as follows:
–
Service Manual 203025
Quality check
Passed. Measurements results will also appear.
If Failed, check that phantom is correctly positioned. Check that there is not shadow from the slit
on the image (check slit x, slit size and slit movement).
8-43
8. Unit calibration and adjustment
CBCT unit
NOTE:
When the position lights are correctly positioned you
will see a hole inside the bottom circle and cross hairs
inside the top circle when you scroll through the volume. This indicates that the phantom is vertical.
After successful completion the unit is able to read the
different densities correctly.
8-44
Service Manual 203025
CBCT unit
8. Unit calibration and adjustment
16. Dose calibrations
The Dose calibrations:
- 16 Dose small
- 17 Dose large
- 18 Dose adult pan
- 19 Dose child pan
are all carried out in the same way.
1. Select the Dose small program
2. Open Scanora 3.0 3D imaging program.
Service Manual 203025
8-45
8. Unit calibration and adjustment
CBCT unit
3. Protect yourself from radiation.
Press and hold down exposure button. The dose
calibration will take a few seconds.
The Enter Dose Value window will open.
Enter Dose value 260 in Dose mGycm field and
click OK.
4. Repeat the process for the:
-
17. Dose large.
Enter dose value:
High resolution large 530
-
18. Dose adult pan.
Enter dose value: 112
-
19. Dose child pan.
Enter dose value: 60
Note that these values are subject to change.
If you need more accurate values use a DAP meter
during the exposures to measure the exact DAP
value and then enter these values into the Dose
mGycm field.
8-46
Service Manual 203025
CBCT unit
8. Unit calibration and adjustment
8.7 The Panoramic QA procedure (Optional)
1. Start the system and select the adult panoramic
program as described in the user’s manual.
2. PC: Open a new patient card in which the QA
images can be stored and give it a name that will
make it easily identifiable, for example QA Test.
3. PC: Click the Image Capture button.
4. Touch the Panoramic button to select the Panoramic program mode.
5. Select the adult panoramic program.
60kv
6. Select the minimum exposure factors, 60kV and
4mA.
4mA
7. Push the temple supports towards the chair so that
the panoramic sensor will not hit them during the
exposure.
Service Manual 203025
8-47
8. Unit calibration and adjustment
CBCT unit
8. Place the adjustable phantom holder on the chin
rest and then level the holder using the levelling
screws on the under side. There is a spirit level on
top of the holder.
9. Place the panoramic ball and pin phantom on to
the adjustable phantom holder.
10. Press the Return key to drive the unit to the ready
position.
11. Press the lights key to switch the patient positioning lights on.
12. Position the panoramic ball and pin phantom so
that the midsagittal and focal trough light beams
strike the middle of the metal ball in the phantom.
The horizontal light must be positioned so that it
strikes the lower edge of the phantom.
8-48
Service Manual 203025
CBCT unit
8. Unit calibration and adjustment
13. Protect yourself from radiation by standing behind
a suitable x-ray radiation shield.
Press and hold down the exposure button. The
exposure will last about 15 seconds.
14. PC: Click the Abort Capture button.
15. PC: A preview image of the panoramic ball pin
phantom will appear on the unit display and then
the PC.
Use the measuring tools of the dental imaging program to check the image.
The ball in the center must be round (no more that
10% difference between the horizontal diameter
and the vertical diameter) and the distances from
the right-hand pin and the left-hand pin to the ball
must be the same within ± 0.5mm.
If the ball is round and the distances are the same,
the unit has passed the panoramic Quality Check
test.
Service Manual 203025
8-49
8. Unit calibration and adjustment
CBCT unit
16. If the ball is not round the chair must be moved
backwards or forwards until the ball until the ball is
round.
If the ball is longer in the vertical axis than the horizontal axis, move the chair backwards.
If the ball is longer in the horizontal axis the move
the chair forwards.
Check and readjust the positon of the chair until
the ball is round abd within the tolerance.
17. Now adjust the position of the focal trough light so
that it strikes the center of the ball.
18. Touch the End Study button to exit the test.
8-50
Service Manual 203025
CBCT unit
9. Maintenance procedure
9. Maintenance procedure
The maintenance procedure described below must be
carried out at regular intervals in accordance with national regulations regarding the use, maintenance and
of dental x-ray devices that are in force in the country
in which the unit is installed.
In any event, the maintenance procedure must be carried out least one a year.
When taking measurements that require a multimeter,
always use a calibrated digital multimeter (DMM).
9.1 Calibration and adjustment
Carry out the full calibration and adjustment procedure as described in the section 8. Unit calibration and
adjustment. Note that this procedure includes mA/kV
calibration
9.2 Ground test
Disconnect the unit from the mains before carrying out
the next test.
Check the safety ground continuity by measuring the
grounding resistance between the ground pin on the
connector of the mains power supply cable and any
metal part of the unit The resistance MUST be <0.2
ohm.
9.3 DAP calibration
If the unit is used in a country or place where the an
exact DAP value is required (not just nominal values),
measure the DAP values using a DAP meter of approved accuracy to measure the exact DAP values.
These values should then be used during Calibration
and adjustment.
DAP values
High resolution 3D, Large - 530
Adult panoramic - 112
Child Panoramic - 60
Service Manual 203025
9-1
9. Maintenance procedure
CBCT unit
9.4 Motor movements
Switch the unit off and then manually rotate the rotating unit to check that all the stepper motor move freely
and without any looseness.
In turn, press the position keys on the remote control
(chair - backwards/forwards; c-arm - left/right; chin rest
- up down; chair up/down) to check motor operation.
The motors must operate smoothly and without any
noise.
Switch the x-rays off and then take an exposure to
check that the motors used to take an exposure operate smoothly and without any noise.
If you suspect that any of the belts are loose tighten
them.
9.5 Position detectors
In turn, press the position keys on the remote control
(chair - backwards/forwards; c-arm - left/right; chin rest
- up down; chair up/down) to make sure that the unit
assemblies stop moving at the extreme limits of their
movement.
9.6 Mains power supply cable
Check the condition of mains power supply cable and
replace if it is damaged.
9.7 Tubehead
Make sure that oil is not leaking from the tubehead.
9.8 Covers and Labels
Check that all covers are correctly installed and in
good condition. Also check that all the labels are attached to the unit and that they are all legible.
9.9 Fire risk
WARNING: Disconnect the unit from the mains before
carrying out the next check.
Use a vacuum cleaner to remove all dust that has accumulated inside the unit to eliminate the risk of fire.
9-2
Service Manual 203025
CBCT unit
10. Replacing parts
10. Replacing parts
Before replacing any parts switch the unit off and
disconnect/disable the power supply.
10.1 The tubehead.
1. Loosen the four screws that hold the tubehead
back cover in position, two on top and two on the
bottom, and remove the cover.
2. Remove the four screws that hold the tubehead
front cover in position (two on the left and two on
the right).
Service Manual 203025
10-1
10. Replacing parts
CBCT unit
Remove the cover.
3 . On the rear side of the tubehead assembly disconnect connectors J3314 and J3314 from R3800
X-ray generator
10-2
Service Manual 203025
CBCT unit
10. Replacing parts
4. Remove the generator cover (4 screws).
5. On the front side of the tubehead assembly cut the
two cable ties that hold the two cables to the rotating unit frame and then disconnect the two cables
from R3800 (J3808 and R3809). Also disconnect
the ground lead from the rotating unit frame.
Service Manual 203025
10-3
10. Replacing parts
CBCT unit
6. On the front side of the tubehead assembly remove the two nuts that attached to the front of the
tubehead.
7. Remove the two screw that hold the tubehead to
the rotating unit frame. Pins hold the tubehead in
position after the screws have been removed. Pull
the tubehead backwards and off of the pins.
10-4
Service Manual 203025
CBCT unit
10. Replacing parts
8. Install the new tubehead. Reconnect all the cables.
IMPORTANT NOTE:
When replacing the two nuts on the front side of
the tubehead assembly DO NOT tighten then too
much. IF they are over tightened the screws in the
tubehead housing to which they are attached could
loosen and cause the tubehead to leak.
9. Calibrate the unit. Section ...
10. Replace all the covers.
Service Manual 203025
10-5
10. Replacing parts
CBCT unit
10.2 The 3-D CMOS sensor
1. Switch the power to the unit off and disconnect/disable the power supply.
2. Manually pull the rotating unit away from the column so that you can access the sensor head cover
screws.
3. Loosen the four (4) screws that hold the back sensor cover in position.
10-6
Service Manual 203025
CBCT unit
10. Replacing parts
Remove the cover.
4. Remove the stop plate and then rotate the pan
detector backwards so that you can access the two
(2) screws that hold the CCD upper cover in position.
Service Manual 203025
10-7
10. Replacing parts
CBCT unit
5. Remove the two (2) screws and lift off the CCD upper cover.
6. Remove the two (2) screws that hold the CCD rear
cover in position.
10-8
Service Manual 203025
CBCT unit
10. Replacing parts
Remove the cover.
7. Remove the six (6) screws that hold the sensor
front cover in position.
Service Manual 203025
10-9
10. Replacing parts
CBCT unit
Carefully remove the cover.
8. Disconnect the two cables from the CMOS sensor,
the cables go to R4700 - 3D panel power supply, and then remove the four (4) screws that hold
R4700 in position and lift it up slightly so that the
CMOS sensor assembly can be removed more
easily.
10-10
Service Manual 203025
CBCT unit
10. Replacing parts
9
The CMOS sensor is held in position with three
support strips. The upper and lower support bars
also allow the position of the CMOS sensor assembly to be adjusted. The middle support strip
serves as a safety bar so that the CMOS sensor
will remain in place when the other screws are removed. Remove the screws (A) from the upper and
lower support bars. Loosen the middle support bar
screws (B).
10. Slide the CMOS sensor assembly up and then
remove it.
Service Manual 203025
10-11
10. Replacing parts
CBCT unit
11. Remove the middle support bar from the back of
the faulty CMOS sensor assembly and attach it
loosely to the new CMOS assembly.
12. Attach the new CMOS sensor assembly to the
sensor frame. Make sure that the middle support
bar is located in the slot in the middle of the sensor
frame.
10-12
Service Manual 203025
CBCT unit
10. Replacing parts
13. Secure the CMOS sensor in position with the other
two support bars. Do not fully tighten the sensor
yet as the unit must be calibrated and aligned.
14. Connect all the connectors and reattach R4700 3D panel power supply.
15. Recalibrate and align the unit. Refer to 9. Unit calibration and adjustment.
16. Replace all the covers.
Service Manual 203025
10-13
10. Replacing parts
CBCT unit
10.3 The panoramic CCD sensor
1. Follow steps 1 - 6 in section 10.2 Replacing the
3-D CMOS sensor steps, to remove the covers
from the sensor side of the rotating unit.
2. Remove the CCD sensor cover (1) and then the
CCD sensor (2).
3. Install the new CCD sensor and replace the CCD
sensor cover.
10-14
Service Manual 203025
CBCT unit
10. Replacing parts
4. Recalibrate and align the unit. Refer to 9. Unit calibration and adjustment.
5. Replace all the covers.
CAUTION:
Before replacing the covers check that there are
no foreign objects or dirt on the optosensor actuator (disk plate) that could cause the optosensor to
malfunction.
Service Manual 203025
10-15
10. Replacing parts
CBCT unit
10.4 The chair motor
1. If the chair can still be operated, drive it to the lowest position.
If the chair cannot be operated, it must be manual
moved to its lowest position. This can be done
after steps 2 - 9 have been completed.
2. Remove the seat and backrest upholstery from the
chair. They can be simply pulled off as they are
held in position with hook-and-loop fasteners.
3. Remove the cover plate from the top of the chair (4
screws).
10-16
Service Manual 203025
CBCT unit
10. Replacing parts
4. Remove all the cable ties that hold the cables to
the chair and then disconnect all the cables. Also
remove the ferrite rings from the cables that go to
the motor.
5. Remove N4600 Opto sensor so that you do not
damage it when removing the seat base.
Service Manual 203025
10-17
10. Replacing parts
CBCT unit
6. Remove the backrest (1), the foot rest (2) and the
patient support arm (3).
7. Slide the seat backwards so that the cutout in the
seat mechanism is next to the hole through which
the cables are routed.
10-18
Service Manual 203025
CBCT unit
10. Replacing parts
8. Remove the six (6) screws that hold the seat
mechanism to the traction and guide brackets (3
for each bracket).
9. Lift the seat mechanism off the chair base.
If the chair has not already been driven to its lowest position it can be done now by rotating the
motor axle nut.
Service Manual 203025
10-19
10. Replacing parts
CBCT unit
10. Remove to the screws that hold the traction and
guide brackets in position (2 screws per bracket).
Also remove ground lead from the motor.
11. Remove the screws (2) that hold the cable harness
to the guide bracket.
Remove both the traction bracket and the guide
bracket.
10-20
Service Manual 203025
CBCT unit
Service Manual 203025
10. Replacing parts
10-21
10. Replacing parts
CBCT unit
15. With an extended M8 hexagon socket wrench remove the screws (4) that hold the motor module to
the base.
Remove the motor module.
16. Instal the new motor module and then reassemble
the chair unit in the reverse order as described
above.
17. Recalibrate and align the unit. Refer to 9. Unit calibration and adjustment.
10-22
Service Manual 203025
CBCT unit
10. Replacing parts
10.5 The cable track
1. Remove the top shelf (1), the inner and outer
corner covers (2) from the rear column and column
hatch from the rear column.
Also remove the inner covers from the rotating unit,
see 10.2 The 3-D CMOS sensor
Service Manual 203025
10-23
10. Replacing parts
CBCT unit
2. From the rear column disconnect all the cables that
go to the cable track (accessed through the column
hatch.
3. Remove the screws that hold one end of the cable
track to the upper shelf, and the other end to the
rotating unit.
Rotate the rotating unit to wind the cable track into
a tight bundle.
10-24
Service Manual 203025
CBCT unit
10. Replacing parts
4. From the under side of the rotating unit remove all
the cable ties that hold the cable track cables in
position. Also remove the two cable clamps and
the ground lead.
Disconnect all the cables.
5. Remove the cable track and cable from the upper
shelf.
6. Install the new cable track.
Service Manual 203025
10-25
10. Replacing parts
CBCT unit
10.6 GUI PC
1. Remove the main cover from the electronics cabinet (4 screws, two in top of the electronics cabinet
and two on the underside).
2. Unplug all the connectors and ground lead from
the GUI PC and then remove it from the electronics
cabinet, 5 Torx screws.
10-26
Service Manual 203025
CBCT unit
10. Replacing parts
3. Install the new GUI PC, reconnect all the cables,
the ground lead and then replace the cover.
Recalibrate and align the unit. Refer to 9. Unit calibration and adjustment.
Service Manual 203025
10-27