1
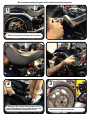
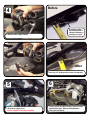
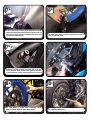
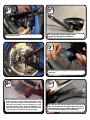
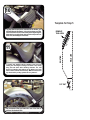
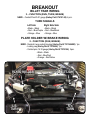
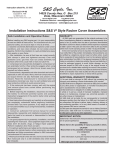
Heart Breaker 280 Conversion
Fits Breakout Model Softails
(Instruction)
We recommend that you mock up bike before you paint parts.
We also recommend that you lower the bike to achieve the desired look.
PARTS LIST
Heartbreaker 280 Conversion
nversion Includes:
Solo Seat
Struts
Fender
Steel Rock Guard
Light Brackets
Hardware
20mm Belt
Solo Seat
Left Rock Guard
Right Rock Guard
20mm Belt
17171 S. Western Ave., Gardena CA, 90247
Struts
Fender
Light Brackets Rock Guard Bolts
Strut and Fender Bolts
Ph: 310-822-2697 Fax: 310-822-3687
www.heartlandbiker.com
We recommend reading through the entire install process before beginning.
1
1. Remove the stock seat and disconnect the battery.
2
2. Disconnect the rear light wiring harness. Once the
plug is disconnected, you can unbolt the struts and
remove the strut/fender assembly as one unit.
3
3. Remove wheel and plastic splash guard.
4
Before
Grind down caliper
perch along this line
using the template on
last page as a guide.
4. Remove brake caliper bracket.
After
Leave only 1/4" at this point to ensure rim clearance.
5
5. Grind down caliper perch.
* Use the template on last page as a guide.
6
6. Remove Outer and Inner Primary Covers to install
supplied 20mm belt. *Refer to Harley Davidson
Factory Service Manual.
7a
7a. Now you will begin to install your Heart Breaker Conversion
starting with the Steel Rock Guard. Slide the left half of the rock
guard into the proper position. The Welded tabs should align
over the holes of the swingarn.
8b
8b. Install brake caliper bracket with supplied wheel spacers.
Spacers come with wheel.
7b
7b. With the hardware provided, screw each bolt in. You may
want to check the exact position before tightening. Use Blue
Loctite. Repeat step 5 & 6 to install right half of the rock guard.
8a
8a. Tape wheel to protect from scratching. Install
wheel at a slight angle to clear caliper perch.
8c
8c. Install rear wheel axle.
8d
8d. Install brake caliper.
9b
9b. First bolt the light to the light bracket.
(Always test lights before installation.)
9c
9c. Feed the wires through the small hole from the
inside out.
9a
9d
9a. The easiest way to assemble the fender and struts is off
the bike on a table. Using a soft cloth underneath, set the
fender upside down and lay out the struts next to it. Bolt
each strut to the fender. If you are planning to run rear
turn/brake indicators, now is the time to install them. The
wires for the turn signals are meant to rest inside the struts
in the “wire groove” and held in place by the fender.
9d. Push the wires into the channel on the inside of the
strut. You may want to use tape to hold wires in place
while bolting the strut to the fender. Make sure there is
no slack in the wire and that it is not pinched.
10
Template for Step 5
REMOVE
THIS AREA
EXISTING
11
11. Install new supplied seat by starting at the nose and
making sure the tongue is fitting in the frame. Then slowly
bring the seat down while checking clearance. The seat
should not interfere with anything in the battery box. Push
back of seat to activate the suction cup. Make sure the suction
cup release tab is pointing upwards for easy removal.”
CUT OUT
We recommend that you lower the rear of the bike to
achieve the desired look.
WELD LINE
CUT
TO L
I
screw each bolt in to the frame loosely. When tightening the
bolts start by snugging them down and then torque the rear
bolts first, followed by the front bolts.
NE
10. Now that the struts are mounted to the fender, you
will bolt them to the frame. Using the hardware provided,
BREAKOUT
BILLET TEAR WIRING
3 – FUNCTION (RUN, TURN, BRAKE)
NEED – Contact Pins 20-01 gauge (Harley Part # 74191-98) 6 pcs.
TURN SIGNALS
Left Side:
Right Side Side:
• Black – Black
• Black – Black
• Red – Blue/Purple • Red – Blue/Black
• Orange – Blue
• Orange – Blue
PLATE HOLDER W/ BRAKE WIRING
2 - FUNCTION (RUN, BRAKE)
NEED - Deutsch 6 way socket Housing (Harley Part # 72116-94BK) 1pc.
- Locking cap (Harley Part # 72156-94) 1pc.
- Contact pins 16-18 gauge (Harley Part # 72191-94) 3pcs.
• Black – Black
• Red – Blue/Red
• Orange – Red/Yellow
PLATE HOLDER
L/S
TURN
PLATE LIGHT
R/S
TURN