1
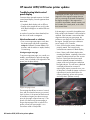
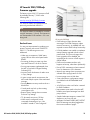
HP LaserJet printer product update
January 2005 • Issue 28
hp
Welcome to the HP LaserJet printer product update newsletter! We are now
shipping many of our new fall 2004 products in volume and have very few
problems to report at this time. Much work and effort went into the
development of these products and it looks as if our efforts have paid off.
Occasional introduction “hiccups” do occur, but we are working hard to
correct these swiftly. Thank you for your partnership with us in making these
products successful, and we hope you enjoy the information provided.
Inside . . .
HP LaserJet 2400 series printer updates....................................................................................... 2
Paper handling problems when printing from tray 2 .................................................................. 2
Persistent INSTALL BLACK TONER CARTRIDGE message ............................................................ 3
Printer will not power up......................................................................................................... 7
Improper cartridge seating creates pages with toner smear ........................................................ 8
HP LaserJet 4250/4350 series printer updates ............................................................................. 9
Troubleshooting blank control panel display ............................................................................. 9
Troubleshooting grinding gear noise from tray 3 ..................................................................... 10
Transfer block assembly not available .................................................................................... 10
New main motor and print cartridge motor part numbers ......................................................... 10
HP LaserJet 9000/9000L/9040/9050mfps updates .................................................................. 11
Service manual corrections ................................................................................................... 11
HP LaserJet 9040/9050mfp firmware upgrade....................................................................... 12
Slow printing issue............................................................................................................... 13
HP Color LaserJet 3550 series printer—service manual updates.................................................... 14
HP Color LaserJet 9500 series printer and 9500mfp updates ....................................................... 15
HP Color LaserJet 9500 series printer firmware upgrade .......................................................... 15
Disrupted image defect ........................................................................................................ 16
HP Color LaserJet 9850 series printer—defective drum potential sensors........................................ 17
Carbonless media drawer statements......................................................................................... 18
HP Restricted
HP LaserJet 2400 series printer updates
Paper handling problems when
printing from tray 2
Users may report one or more of the following
symptoms:
•
Tray 2 OPEN or EMPTY error messages on
the control panel display.
•
Tray 2 paper-level indicator (visible on the
front exterior of the tray) indicates there is no
paper even though paper is present in the
tray.
•
Tray 2 paper-level indicator indicates that
the tray is only partially full—even when
loaded with 250 sheets.
HP LaserJet 2420 printer
Solution
Some tray 2 paper handling problems may be
due to a dislodged paper-level indicator.
During shipping, the mechanical paper-level
indicator in tray 2 can move out of its proper
position inside the tray (see the photo below).
This can be corrected by slightly twisting the
tray.
Photo of dislodged paper-level indicator
The paper-level indicator clip in the photo
above is sitting on top of the paper lift plate
(metal plate). Instead, it should clip onto the
paper lift plate.
Holding the front of the tray in one hand and
the rear of the tray in the other, twist the tray
until the paper-level indicator falls into the
proper position.
HP LaserJet 2400 series printer updates
2
Persistent INSTALL BLACK TONER
CARTRIDGE message
Some HP LaserJet 2400 series printer users
may experience a persistent INSTALL BLACK
TONER CARTRIDGE message, even though an
HP black toner cartridge is installed. Other
users may experience dark pages (high toner
coverage), or thick, dark bands across a
printed page.
HP LaserJet 2430 printer
Serial numbers affected:
Starting serial number
Ending serial number
Description
CNB0000000
CNC0000000
JPB0000000
JPC0000000
BRB0000000
BRC0000000
CNDZ999999
CNFZ999999
JPDZ999999
JPFZ999999
BRDZ999999
BRFZ999999
China-manufactured 110V units
China-manufactured 220V units
Japan-manufactured 110V units
Japan-manufactured 220V units
Brazil-manufactured 110V units
Brazil-manufactured 220V units
Troubleshooting tips
Troubleshooting the persistent INSTALL BLACK
TONER CARTRIDGE message
1. Try reseating the print cartridge to resolve
the problem.
2. Test the print cartridge in another
HP LaserJet 2400 series printer
(if available).
3. Test the printer with another HP LaserJet
2400 series print cartridge (if available).
4. Remove the left side cover and inspect the
grounding contact lever (see instructions
under “Cause of problem—grounding
contact lever unhinged“ on page 4).
HP LaserJet 2400 series printer updates
Troubleshooting black, dark pages (high toner
coverage) or thick, dark bands across the page
1. Try reseating the print cartridge to resolve
the problem.
2. Test the print cartridge in another
HP LaserJet 2400 series printer
(if available).
3. Test the printer with another HP LaserJet
2400 series print cartridge (if available).
4. Remove the right cover and inspect the
formatter flat ribbon cable connection (the
middle-left side of the formatter as you face
it.)
5. Remove the left side cover and inspect the
grounding contact lever (see instructions
under “Cause of problem—grounding
contact lever unhinged“ on page 4).
3
Cause of problem—grounding contact
lever unhinged
Solution
If the lever is unhinged from the chassis, reseat
the grounding contact lever hinge and strap it
to the chassis using an ordinary nylon cable
tie. Currently, there is not a part number for the
nylon cable tie. When the part number has
been set up, we will update the service note. In
the meantime, please use a nylon cable tie that
conforms to the dimensions in the drawing and
table below.
The grounding contact lever may not make
proper contact if the lever becomes unhinged
from the chassis (see the photo below).
Source information:
Vendor
Product name
URL
Hellermann Tyton
MS Tie
www.hellermanntyton.com/HT/
netblast/pages/index.html
Grounding contact lever unhinged
Model number
T18R
Material
Nylon 661
Color
Creamy white
Tying
diameter
(Max) f mm
Dimensions (mm)
L
A
B
C
D
T
Tensile strength
(direction-loop)
N (kgf)
22
100
2.5
4.8
3.5
4.8
1.1
80.0 (8.16)
Service recommendations
We recommended you perform this service for
units with affected serial numbers that are
being serviced for any reason. This will prevent
dislodgement upon return to the customer or
any time in the future.
To identify whether or not a unit should receive
this service, follow steps one and two:
1. Verify that the serial numbers fall within the
range given for this issue (see page 3).
2. Look for a black dot on the serial number
sticker. If the dot is present, then this
service has already been provided.
1
Look for the black dot on the serial number
sticker
Nylon 66: poly hexamethylene adipamide
HP LaserJet 2400 series printer updates
4
Detailed work instructions
1. Remove the optional tray 3 assembly and
the toner cartridge.
4. Thread the cable tie through the hole in the
metal side plate.
2. Remove the left side cover, exercising care
with the latch on the lower rear of the
cover by pulling out on the lower rear back
cover (see the photo below). Refer to
pages 86 through 87 of the HP LaserJet
2400 series printer Service Manual for
detailed instructions on carefully removing
the left side cover.
Thread the cable tie
5. Loop the nylon cable tie under the bracket
on the chassis and around the vertical post
of the grounding contact lever, and fasten.
Remove the left side cover
3. Pre-bend the nylon cable tie.
Loop the cable tie
6. Pull the nylon cable tie tight and clip the
excess.
Pre-bend the cable tie
Pull the cable tie tight
HP LaserJet 2400 series printer updates
5
7. Reassemble the left side cover, exercising
care with the lower rear latch. You may
find it easier if the engine is lying on its
right side. See pages 86 through 87 of the
HP LaserJet 2400 series printer Service
Manual for detailed instructions on
carefully reassembling the left side cover.
9. Using a black, felt-tipped pen, please mark
the serial number sticker with a round,
black dot above the last character of the
serial number to indicate that this service
has been provided.
8. Solution verification:
–
–
You should no longer see the “Install Black
Toner Cartridge” message.
You should be able to produce a
configuration page of acceptable print
quality.
If the problem persists, troubleshoot for
power supply failure (see the HP LaserJet
2400 series printer Service Manual and
“Bad HVPS-Main Motor-Feed Guide = Unit
Exchange” Service Note for
troubleshooting and solution).
HP LaserJet 2400 series printer updates
Mark the serial number sticker
6
Printer will not power up
Some customers may report that their
HP LaserJet 2400 series printer is DOA
(defective on arrival) or DAW (defective after
working) and that the printer is not showing
any sign of powering up. These customers may
report hearing only a clicking noise and/or
sense the presence of overheated electronic
components. The serial number range of units
possibly affected are shown in the table below:
Starting serial
number
Ending serial
number
Description
CNB0000000
CNC0000000
JPB0000000
JPC0000000
BRB0000000
BRC0000000
CNDZ999999
CNFZ999999
JPDZ999999
JPFZ999999
BRDZ999999
BRFZ999999
China-manufactured 110V units
China-manufactured 220V units
Japan-manufactured 110V units
Japan-manufactured 220V units
Brazil-manufactured 110V units
Brazil-manufactured 220V units
Troubleshooting
1. Turn the printer off, then on again.
2. Check the power cord connections at the
printer and at the outlet.
3. If using a power surge protector, verify that
the power surge protector is on and
working.
5. Verify that the power supplied to the printer
is steady and meets printer specifications
as shown in the table below:
110-volt
models
110 to 127 volts
(+/- 10%) 50/60 Hz (+/- 2 Hz)
220-volt
models
220 to 240 volts
(+/- 10%) 50/60 Hz (+/- 2 Hz)
If the troubleshooting steps above do not
resolve the problem, return the unit to the
dealer.
If returning the unit to the dealer is not an
option, perform a unit exchange. See the table
below for unit exchange part numbers.
Note
The “no power” symptoms should not be
confused with “blank control panel display”
symptoms. If the control panel display is blank,
but other signs of life can be detected (such as
lit or blinking LEDs, motor rotation sounds, etc.)
refer to the HP LaserJet 2400 series printer
Service Manual and the Blank Display
Information-Only Service Note for
troubleshooting help.
4. Plug the printer into a different outlet and
power cycle the printer.
Unit exchange part numbers:
Product number
Description
Q5955A
220V
110V
220V
110V
220V
110V
220V
110V
220V
110V
220V
110V
220V
110V
220V
110V
Q5956A
Q5957A
Q5958A
Q5959A
Q5960A
Q5961A
Q5962A
Replacement
Replacement
Replacement
Replacement
Replacement
Replacement
Replacement
Replacement
Replacement
Replacement
Replacement
Replacement
Replacement
Replacement
Replacement
Replacement
Replacement
part number
for
for
for
for
for
for
for
for
for
for
for
for
for
for
for
for
HP LaserJet 2400 series printer updates
2410 base
2410 base
2420 base
2420 base
2420d
2420d
2420n
2420n
2420dn
2420dn
2430t
2430t
2430tn
2430tn
2430dtn
2430dtn
Q5955-69055
Q5955-69056
Q5956-69055
Q5956-69056
Q5957-69055
Q5957-69056
Q5958-69055
Q5958-69056
Q5959-69055
Q5959-69056
Q5960-69055
Q5960-69056
Q5961-69055
Q5961-69056
Q5962-69055
Q5962-69056
7
Improper cartridge seating
creates pages with toner smear
Customers may occasionally insert the toner
cartridge in such a way that it sits slightly
crooked—resulting in white pages with
smeared toner. While difficult to do so, this
problem may be reproduced by holding the
right side of the toner cartridge in your right
hand and inserting it crooked without “proper”
guidance, and seating it on the left side of the
unit.
What customers will see
Customers will see printed pages that are
mostly or completely devoid of any
recognizable character, letter or image. The
toner will appear to have been loosely formed
on the page and smeared during fusing.
Solution
Have the customer completely remove the toner
cartridge from the printer and re-install the
same cartridge by holding the left side of the
cartridge with the left hand and slowly
inserting the cartridge into the printer until it
seats firmly and confidently on the left side of
the printer.
If this does not fix the problem, have the
customer completely remove the toner cartridge
from the printer again and re-install the same
cartridge by holding the left side of the
cartridge with the left hand, and slowly
inserting it into the cartridge area guides. Then
allow gravity to pull the cartridge into the
printer. The cartridge should slide down the
guides with little or no effort. At this point, the
cartridge will appear slightly crooked, but if
the customer applies a moderate amount of
pressure with one finger to the left side of the
cartridge, the cartridge should snap into place
with a solid “chunk” sound.
White page with toner smear
HP LaserJet 2400 series printer updates
8
HP LaserJet 4250/4350 series printer updates
Troubleshooting blank control
panel display
Customers have reported instances of a blank
control panel display. Several symptoms have
been noted:
•
Completely black display with no LEDs on
•
Display menu prompts do not work, but the
blue/black backlight is on and the LEDs are
on solid
A couple of causes have been identified, but
this issue is still under investigation.
Noted workarounds or solutions
•
First, run an engine test page to verify that
the printer engine (all printer components
except the formatter, formatter DIMMs, EIO
products, and the stacker or stapler/stacker)
is functioning.
Printing an engine test page
To print an engine test page, use a small, nonmetallic, pointed object to press the test page
switch, which is located on the right side of the
printer (see the photo below).
Note
A damaged formatter might interfere with the
engine test. If the engine test page does not
print, try removing the formatter and perform
the engine test again. If this engine test is
successful, the problem is almost certainly with
the formatter, the control panel, or the cable
that connects them.
If the test page is successful, the problem most
likely resides in the formatter. It will need to be
replaced. If the formatter is removed and the
engine test does not print a test page, the
problem is most likely NOT the formatter but
the engine. Possible causes are a defective
power supply or DC Controller.
•
Next, ensure that the memory DIMMs are
properly seated. This has previously
corrected some instances of blank display.
•
Next, if there is still a blank display after
reseating the DIMMs, completely remove the
jumper from the pins and see if this corrects
the issue. Some cases have been noted
where a replaced formatter has had the
jumper on the two left side pins rather than
the right side pins. This will cause a blacked
out display and must be corrected. If
removing the jumper corrects the issue, turn
off the printer, reinstall the jumper on the two
right side pins (see the photo below for
correct positioning), power on the printer,
and verify that it operates correctly.
Engine test page switch
The test page should have a series of vertical
lines, and print from the last tray you printed
from. However, if the printer has been turned
off and then on again since the most recent
print job, the page will print from tray 2. The
printer will continuously print test pages as
long as the test-page switch is pressed. The
printer will not print a test page if it is in
PowerSave mode or Sleep mode.
HP LaserJet 4250/4350 series printer updates
Jumper in the correct position (on the right)
9
Troubleshooting grinding gear
noise from tray 3
Transfer block assembly not
available
A grinding noise has been noted on a few
HP LaserJet 4250/4350 series printers,
resulting from poor engagement between the
engine and the 500-sheet feeder. This has
predominantly been noted on tray 3.
The OEM does not offer a transfer block
assembly as a replaceable part for the
HP LaserJet 4250/4350 series printers.
The engine supplier believes the root cause of
this issue is a 0.3 mm shift in the average
height of the gear’s center line (because of the
location of the bend of the right side plate)
near the gear on the 500-sheet feeder. This
center line or “bump” controls the spacing
between the engine and the 500-sheet feeder
in the right front corner.
Solution or workaround
Series numbers for
countermeasure
CNBXB85427-85839
CNBXC07921-07930
CNBXD11623-11673
CNCXB00001 & later
CNCXC00001 & later
CNCXD00001 & later
CNBXG71095-71488
CNCXF00001 & later
CNCXG00001 & later
CNCXH00001 & later
The OEM (Original Engine Manufacturer) has
implemented a modification to the right side
plate to move the average height of the center
line down 0.3 mm. This adjustment increases
the center line of the gear to help with proper
engagement (see the table to the left for serial
numbers with the countermeasure
implemented). Additional countermeasures are
also under investigation.
Dismantling or splitting the engine frame to
replace this part may introduce new problems
or defects. In fact, repair procedures should
never require the engine frame or chassis to be
dismantled or split apart.
Resolution
HP recommends replacing the entire engine if
the transfer block assembly needs to be
replaced.
New main motor and print
cartridge motor part numbers
Because we have different suppliers for the
motors in the HP LaserJet 4250 and 4350
series printers, there are two different part
numbers for each motor. These part numbers
are as follows:
Description
Part number
This problem can also occur through shipping
damage, or the use of a work surface that
does not fully support the right front corner of
the printer and tray.
Main motor (M101)
10-pin
Cartridge motor
(M102) 8-pin
RK2-0272-000CN or RK20273-000CN
RK2-0274-000CN or RK20275-000CN
Check for proper support of the printer:
Background information
•
Turn the printer 90 degrees. If this corrects
the grinding problem, the work surface is
uneven. Correcting this condition will fix the
problem.
•
Raise the right front corner of the printer,
and wedge two thicknesses of the back of a
scratch pad under the printer. If this corrects
the grinding problem, the work surface is
uneven. Correcting this condition will fix the
problem.
If these workarounds do not stop the gear from
grinding, please replace the 500-sheet feeder.
Note
The “B” feeder part number (Q2440B) must be
ordered for this printer series.
HP LaserJet 4250/4350 series printer updates
The engine motors will often have
RK2-0273-000CN (main motor) and
RK2-0275-000CN (print cartridge motor) part
numbers. Replacement parts will be RK2-0272000CN (main motor) and RK2-0274-000CN
(print cartridge motor). Field, bench, or ASP
repair technicians may be confused by the fact
that the replacement part received is different
than the part number on the engine. Despite
the different part number, the part will still
work.
The correct motor can be distinguished by
whether it has an 8-pin or 10-pin connector.
(The main motor has a 10-pin connector, and
the print cartridge motor has an 8-pin
connector.)
10
HP LaserJet 9000/9000L/9040/9050mfps updates
Service manual corrections
Part number corrections for the combined
HP LaserJet 9000mfp/9000Lmfp/
9040mfp/9050mfp and HP Color LaserJet
9500mfp Scanner/ADF Service Manual have
been provided on the TechWeb site. You may
print new pages to replace pages 317-325 in
your service manual from the following URL:
For your convenience, we have provided a
summary of the part number corrections in the
table below.
http://techweb.boi.hp.com/Files/Manual/232
828656250000_scanner_manual_corrections.
doc
Parts
Product number
Q1312A
Service number
C8523-67902
Q2622-67901
C9147-67926
Q2635-67903
C9168-67906
C8523-67901
Q1312-60001
C8523-60101
Q2679-67901
Q3650-60001 then
will roll to
Q3650-67901
Q3726-60101
RG5-7780-000CN
RG5-5730-000CN
RG5-7778-000CN
RG5-5731-000CN
RG5-7779-000CN
Exchange number
C8519-69007
Description
Printer
Formatter assembly
Formatter assembly
Firmware DIMM
Firmware CompactFlash
Copy processor firmware 8 MB
Copy processor board
Copy connect card EIO
Copy connect cable
Copy processor EIO
Copy connect board assembly
HP LaserJet 9000mfp
HP LaserJet 9000Lmfp
HP LaserJet 9000/9000Lmfp
HP LaserJet 9040/9050mfp
HP LaserJet9000/9000Lmfp
HP LaserJet 9000/9000Lmfp
HP LaserJet 9000/9000Lmfp
HP LaserJet 9040/9050mfp
HP LaserJet 9040/9050mfp
Copy connect cable
DC Controller
Low-voltage power supply,
Low-voltage power supply,
Low-voltage power supply,
Low-voltage power supply,
HP LaserJet 9040/9050mfp
HP LaserJet 9040/9050mfp
HP LaserJet 9000/9000Lmfp
HP LaserJet 9040/9050mfp
HP LaserJet 9000/9000Lmfp
HP LaserJet 9040/9050mfp
110V
110V
220V
220V
Accessories
Product number
Service number
C9147A
C7843A
C9147-67926
C7843-67901
J7948-61001
5851-1828
Q3701-60002
RG5-6225-070CN
C8084A
Q5693A
C8532A
Q5693A
Exchange number
C8532-67902
Not orderable
HP LaserJet 9000/9000L/9040/9050mfps updates
Description
Printer
16 MB flash firmware DIMM
16 MB memory DIMM
Internal hard disk
Internal HDD cable
PCA, Fax modem card
Vertical transfer assembly
3,000 sheet stacker
8-bin mailbox
Duplexer
Finishing device
HP LaserJet 9000/9000Lmfp
HP LaserJet 9000/9000Lmfp
HP LaserJet 9040/9050mfp
HP LaserJet 9040/9050mfp
HP LaserJet 9040/9050mfp
HP LaserJet 9040/9050mfp
HP Color LaserJet 9500mfp
11
HP LaserJet 9040/9050mfp
firmware upgrade
The latest revision 08.0115. firmware roll will
be available February 7, 2005 at the
following URL:
www.hp.com/go/lj9050mfp_firmware
This firmware release incorporates all fixes
previously provided with 08.005.0.
Note
This firmware release is intended for use when
using HP Autostore v 3.0 only. This firmware is
not recommended if HP Autostore v 3.0 is not
being used.
•
LDAP lookup no longer functions after
executing a Find Send Gateways without
network connectivity. An NVRAM INIT was
required to restore LDAP lookup functionality.
•
HP Web Jetadmin was unable to complete a
remote firmware upgrade with the control
panel locked. This revision changes how
future upgrades will be handled, but
upgrading to this revision will still require a
manual reboot.
•
LDAP server hostname resolution only
happens at boot-up, rather than dynamically.
•
Device POP3 username size limit increased
from 16 characters to 256 characters.
•
Manual copy settings show two paper sizes
selected when copying Letter-R or A4-R.
•
Incorrect page counts in XML data.
•
Pressing Reset in text entry mode results in a
blank menu.
Some output device configuration settings
not reflected in the HP Embedded Web
Server.
•
Control panel may lock up when setting
custom paper sizes.
49.4C02 error when a null value is entered
for LDAP IP address.
•
Improvements were made in how the MFP
handles control panel messages from thirdparty solutions.
•
Simplex landscape images are rotated 180
degrees on any n-up copy job.
•
Automatic Document Feeder (ADF) OUTPUT
BIN FULL message was being triggered at
the incorrect number of pages.
Resolved issues
You may see improvements by updating your
printer’s firmware with revision 20050105
08.011.5. The following issues were
addressed:
•
Under rare circumstances, SNMP status
reports Off-Line while control panel reads
READY.
•
Processing job hang on paper out when
Input Auto-Continue is set to No Timeout.
•
Security improvements implemented when
the MFP is used with HP Digital Sending
Software (DSS).
•
Incorrect French localization of media sizes
in Copy Settings.
•
In some unique network environments, the
MFP sends multiple copies of the same email
message.
•
•
HP LaserJet 9050mfp
•
Restore Factory Settings does not restore
Exclusive Tray settings.
•
75 dpi emails are sent as 150 dpi.
•
When email is configured, but not
connected, the message is now “Not
Available” instead of “Not Configured.”
HP LaserJet 9000/9000L/9040/9050mfps updates
12
Resolved issues (continued)
•
Slow printing on certain jobs due to timing
issues.
•
Images are rotated 90 degrees when
copying small items from the glass.
•
EIO page is missing from printout when 3rdParty Configuration page is registered.
•
Job Mode ON and Authentication ON
causes jobs to be cancelled after inactivity
timeout.
•
65.12.99 error when trying to wake up the
printer from HP Web Jetadmin.
Enhancements provided with this firmware
revision
•
Mixed letter and legal originals can be
copied via the ADF.
•
The sender of an email can automatically be
copied on all messages. A configuration file,
available from HP support, enables this
function.
•
The Stop button can be used to cancel a fax.
•
Exclusive tray settings allow alternate tray
selection prompt to be disabled.
Analog fax accessory (Q3701A) firmware
revision: 2.32s
The following issues were resolved:
•
Fax country codes are added for Estonia,
Iceland, Japan, Latvia, Liechtenstein,
Lithuania, Morocco, and Slovenia.
•
The fax icon will not be enabled on the DSS
machine after DSS has been re-installed.
•
A fax job will fail if the default resolution is
changed to superfine after starting the job.
•
Faxes that couldn’t print, caused by paper
out for example, are lost on power cycle.
•
Truncated fax delivery emails in some
languages.
Note
No significant changes were made to any of
the other devices.
HP LaserJet 9000/9000L/9040/9050mfps updates
Firmware revisions for all devices included in
this firmware bundle:
Device
Firmware revision
HP LaserJet 9040mfp series
printers
08.011.5
Datecode:
20050105
08.011.5
03.42
HP 2000 sheet input tray
(C8531A)
HP Stacker
(C8084A)
HP Stacker/Stapler
(C8085A)
HP Multifunction finisher
(C8088B)
HP Multi-bin mailbox
(Q5693A)
HP Analog fax accessory
(Q3701A)
HP Embedded Jetdirect
HP Copy Processor Board
040820
040819
040827
040804
2.32s
V.28.46
0.188 (2.1)
Slow printing issue
HP is working to resolve a slow printing
problem with the HP LaserJet
9040mfp/9050mfp. The problem typically
occurs when switching to a different input tray.
The device begins printing at about 25 percent
of its normal speed. Once it starts printing
slowly from a tray, it tends to continue printing
slowly from that tray. Switching to another tray
will speed it up again. In copy jobs, switching
from the ADF to glass will speed it up again.
This problem may also occur on the
HP LaserJet 9050 series printer, but the issue is
still under investigation.
Workaround
Power cycle the MFP to resolve the issue. Do
not replace parts! The lab is investigating the
problem, which appears to be firmwarerelated.
13
HP Color LaserJet 3550 series printer—service manual
updates
The current HP Color LaserJet
3500/3550/3700 Service Manual incorrectly
states the service PIN part number, DC
Controller part number, and formatter part
number for the HP Color LaserJet 3550 printer.
The correct part numbers are given in the table
below.
HP Color LaserJet 3550
Correct part number
Service PIN
DC Controller
Formatter
10355004
RM1-0510-000CN
RM1-2324-000CN
HP Color LaserJet 3550 printer
HP Color LaserJet 3550 series printer—service manual updates
14
HP Color LaserJet 9500 series printer and 9500mfp updates
HP Color LaserJet 9500 series
printer firmware upgrade
The following issues have been resolved with
the latest revision 05.006.3 firmware roll,
which is now available at the following URL:
http://www.hp.com/go/lj9500_firmware
Resolved issues
You may see improvements by updating your
printer’s firmware with revision 20041024
05.006.3.
•
•
Receiving a 49.21 error when waking up
from Deep Sleep mode with Power Save set
to 1 minute.
When sending certain .PDF files directly to
the printer without the driver, images shift,
distort, have missing characters or do not
print correctly.
•
Event Log lists all 49.xx errors as “Image
Drum HV” when this was not the correct error
message.
•
HP Jetdirect page does not print when certain
third-party font or storage DIMMs are
installed.
HP Color LaserJet 9500 series printer
•
Image data is lost when printing from
Acrobat® with Auto-Rotate and Center not
checked.
•
On the Usage Page the Total (equivalent)
counts get reset to “0” when performing a
firmware upgrade to 5.005.3.
•
PJL code used for Media tray selection fails
when using the Direct PDF print path.
•
May receive a GELimitCheck—Operator-DO
error when using the Direct PDF print path.
Current firmware revisions for all devices
included in this firmware bundle are listed in the
table below.
Device
Firmware revision
Comments
HP Color LaserJet 9500
series printer
HP 2000-sheet input tray
(C8531A)
HP Stacker/Stapler
(C8085A)
05.006.3
Datecode: 20041024 05.006.3
03.42
See “Resolved issues” above.
HP Stacker
(C8084A)
040820
HP Multifunction finisher
(C8088A)
HP Multifunction finisher
(C8088B)
031010_R
040819
040827
HP Color LaserJet 9500 series printer and 9500mfp updates
Changed to lift sensor logic during continuous
printing to avoid reporting false lifting errors.
No major issues found. Minor changes have
occurred to this device to help with the
reliability of other products.
No major issues found. Minor changes have
occurred to this device to help with the
reliability of other products.
No changes have been made since the last
firmware release.
New revision of hardware C8088B. First time
released with this product.
15
Disrupted image defect
An unusual print defect called disrupted image
can occur with the HP Color LaserJet 9500mfp.
It is caused by the Image Transfer Belt (ITB), and
typically does not occur until many thousands of
pages have been printed.
•
Dots are very uniformly spaced, with the
distance between dots ranging from .5 to
4 mm.
•
There may be many lines of dots—30 or
more—on one page.
•
The dot pitch of each line on the page will
vary considerably.
The defect occurs in light halftone areas of all
colors, but is most noticeable in black.
Description of the disrupted image defect in the
scan direction (see the example below):
Description
•
Generally accompanies process direction
defect.
•
Rough, undefined marks that lie on a line in
the scan direction.
Description of the disrupted image defect in the
process direction (see the example below):
•
There are lines of small dots in the process
direction.
Solution
Replace the ITB (as part of the Image Transfer
Kit).
Scan direction
Process direction
Example of the disrupted image defect
HP Color LaserJet 9500 series printer and 9500mfp updates
16
HP Color LaserJet 9850 series printer—defective drum
potential sensors
Seventy-five units were shipped with an old
revision of the drum potential sensor (65AA228 1KC). This sensor was built using epoxy
glue. The epoxy glue may eventually break,
generating random service error messages (2911, 12, 13 or 14) because of false contact
between the sensor and its cable. These error
messages are directly related to the drum
potential value which is sensed and established
during the image stabilization process.
Solution
The new drum potential sensor is built with a
new process which does not contain epoxy glue
and ensures the proper connection of the sensor
and its cable. A new part number for the sensor
is available (part number 65AA-228 2KC). An
exchange part number (Q3225-69000) has
been set up in order to recover the defective
sensors from the field.
See the service note for this issue at the URL
below. The service note number is Q3225A-01.
http://snserver.mayfield.hp.com/ServiceNotes
/Snwebsite/default.asp
Upgrade the firmware
Firmware 43-0000 for PRCB determines drum
potential using a more precise detection
method. This new method significantly reduces
the occurrence of 29-11, 12, 13 and 14 error
messages. Upgrade the firmware to version
43-0000 for both PRCB and IMAGE for any
new installation and to any unit from the
installed base as soon as possible—especially
to those units experiencing 29 errors—to
properly troubleshoot the error condition and
find the root cause.
Note
It is very important to perform “Gamma
Adjustment from Key Operator Mode” right
after upgrading the firmware.
HP Color LaserJet 9850 series printer—defective drum potential sensors
The new drum potential sensor is identified by a
red dot
The new drum potential sensor (also known as
the HV detecting sensor) can be identified by a
red dot located in the middle of its PCA. See
the photo above.
Serial numbers affected
The table below shows the serial number
ranges of all the 75 serial numbers affected by
the defective drum potential sensor (product
number Q3225A). The serial numbers with C in
the fourth digit were shipped in America, and
the serial numbers with F in the fourth digit were
mainly shipped in Europe and Asia.
Starting serial number
Ending serial number
CNHCB-00001
CNHCB-00026
CNHFB-00001
CNHFB-00009
CNHFB-00024
CNHFB-00028
Individual serial numbers:
CNHFB-00035
CNHFB-00037
CNHFB-00038
CNHFB-00040
Individual serial numbers:
CNHFB-00044
CNHFB-00045
CNHFB-00047
CNHFB-00049
CNHCB-00024
CNHCB-00030
CNHFB-00007
CNHFB-00022
CNHFB-00026
CNHFB-00033
CNHFB-00042
CNHFB-00055
17
Carbonless media drawer statements
For customers asking about vendors
HP has tested the following 8.5 by 11 inch
carbonless media from Appleton’s Xero/Form II
with the HP LaserJet
4200/4300/4250/4345/4350 series printer:
How do we troubleshoot between an HP printer
issue and the carbonless media vendor issue?
Check the following first if you are experiencing
paper jams, mis-picks, or toner contamination:
•
Run a cleaning page. This should clear up
any printer quality issues and perhaps some
jamming issues.
•
If experiencing paper jams or mis-feeds try
running the carbonless media from a different
tray.
•
Make sure the printer and media is in a
supported environment (check the
temperature and humidity).
•
Make sure the trays and driver are set for
Plain Paper.
To learn more about Xero/Form II use on laser
printers, please watch the video at the following
URL:
•
Make sure the fuser mode is set to Normal.
•
Do not use the 5-hole punch carbonless
media in Tray 1.
http://media.hp.com/program.cfm?key=D11O
QN872O
•
A slight image streaking pattern may be
observed when a high-capacity toner
cartridge is nearing the end of its life and the
user is printing in continuous duplex mode.
Switch to a regular toner capacity print
cartridge, or alternate print jobs (simplex and
duplex).
•
To improve carbonless image transfer during
a duplex job, a light screen toner pattern
should be used when printing on the CB
(coated back) functional side.
Description
Part numbers
2-part RS
3-part RS
CB white singles
CFB white, canary, or pink singles
CF canary or pink singles
CFB white, 5-hole ¼ inch punched across top
4316
0466
0129
0481, 0156, and 0455
0245 and 0262
1083
If a printer and/or manufacturer is not listed
above, the paper has not been tested by HP
and is not qualified for use in HP LaserJet
printers.
For customers asking about
performance of carbonless media tested
by HP
Customers using carbonless media tested by HP
on the HP LaserJet 4200/4300/4250/
4345/4350 series printer may experience the
following:
•
Slightly higher jam frequency or multi-picks
than standard media due to the surface
coating on the media.
•
Toner particles on the page when starting up
the printer. We recommend running a
cleaning page every 500 pages or when
toner particles start occurring.
If customers call in with the above issues, please
see the provided troubleshooting steps.
Carbonless media drawer statements
Note
Duplexing on media with coated back (CB and
CFB) is not recommended due to higher levels
of contamination and multi-feed rates.
If the media is not imaging through the plies
after printing, perform the following:
•
When you are printing, ensure you are using
Reverse Sequence, and ensure you are
putting the media in the printer print side
down. The print side is shown on the ream
label.
18
•
•
We recommend running one form set through
the printer and then perform a “pencil check”
(write something on the top sheet and ensure
the image is going through). If not, the media
is not loaded properly.
For a video demonstration of how to load the
media properly, please access the following
URL:
http://media.hp.com/program.cfm?key=D11
OQN872O
The sheets need to be joined together to allow
the written image to go through to all plies.
Options include the following:
•
Jogging the sheets together and using
unfastened
•
Paper clip
•
Clip board
•
Hand staple
•
Printer staple unit
•
Fanapart Adhesive
To view a video demonstration on how to use
Fanapart Adhesive, please access the
following URL:
www.appletonideas.com/fanapartdemo
•
For a video demonstration showing the
various options for joining sheets into forms,
please access the following URL:
http://media.hp.com/program.cfm?key=D11
OQN872O
If the above troubleshooting steps do not help,
perform the following to determine if it is a
printer-caused issue or a carbonless mediacaused issue.
1. Run approximately 30 sheets of 20 lb bond
paper. If the issues clear up with this paper,
the carbonless media may be causing the
issues. Please contact the media vendor for
additional troubleshooting help.
For customers asking about
performance of carbonless media not
tested by HP
HP cannot comment on carbonless media not
tested by HP for a specific HP LaserJet printer.
Note that if HP has tested specific carbonless
media for one printer, this does not imply that it
will work with all HP LaserJet printers.
Note
Non-qualified carbonless media may contain
materials not designed to operate with a laser
printer. Qualified carbonless media has been
shown to withstand temperatures that media
used in these laser printers are exposed to: 200
degrees C (392 degrees F) for a tenth of a
second without damage to the printer or release
of any undesirable fumes.
For media vendors
For any vendor who is offering anything other
than Carbonless Media:
“HP is not qualifying ___________ media
manufacturers at this time, but thank you for
your inquiry.”
For a carbonless media vendor specifically:
“HP has been working with carbonless media
manufacturers in terms of qualifying their media
with our products. Please proceed to the thirdparty solutions web site at
www.hp.com/go/solutions. At this site there is
additional information about the various
partnering opportunities and how to apply.”
2. Replace the toner cartridge. If this clears up
the issue, the carbonless media may be
causing contamination on the OPC
(Organic Photo Conductor). Please contact
the media vendor for additional
troubleshooting help:
Appleton carbonless media customer support
Phone number
Email
Carbonless media drawer statements
1-800-922-1723
[email protected]
19
Acrobat is a trademark of Adobe Systems Incorporated. HP and the invent signature are trademarks of the Hewlett-Packard Company.
© Copyright 2005 Hewlett-Packard Development Company, L.P. The information contained herein is subject to change without
notice. The only warranties for HP products and services are set forth in the express warranty statements accompanying such
products and services. Nothing herein should be construed as constituting an additional warranty. HP shall not be liable for
technical or editorial errors or omissions contained herein.