1
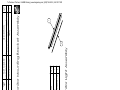
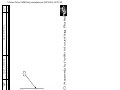
To Purchase This Item, Visit BMI Gaming | www.bmigaming.com | (800) 746-2255 | +561.391.7200 PAC‐MAN CHOMP MANIA™ Setup and Operations Manual COPYRIGHT 2013 NAMCO BANDAI GAMES INC. To Purchase This Item, Visit BMI Gaming | www.bmigaming.com | (800) 746-2255 | +561.391.7200 Safety OPERATION Before operating game, read this manual. Failure to properly install and operate this game could result in malfunction or accident. Operate the game in accordance with the manual. TRANSPORTING The cabinet is very heavy. Because the monitor is high, the cabinet is also very top‐heavy. Use appropriate care when moving or transporting cabinet. It contains fragile glass and electronic components. Avoid rough handling. HANDLING COMPONENTS Many components are extremely sensitive to handling, environmental and Electrostatic Discharge (ESD) events— especially the computer. Do not handle it roughly. Before servicing, call your distributor and inquire about the PC warranty. Use proper ESD procedures when servicing. Protect components from harmful environmental conditions, such as extreme temperatures, excessive moisture or other damaging effects. DISCONNECT POWER Always turn the power off and unplug the unit before servicing or making adjustments unless otherwise instructed. Installing or repairing components while power is on can damage the components and void the warranty. GROUNDING Avoid electrical shock. Do not plug in AC power until you have inspected and properly grounded the unit. Only plug into a grounded, three‐wire outlet. Do not use a “cheater” plug or cut off the ground pin on the line cord. ELECTRICAL SHOCKS There is no isolation transformer in the cabinet. Disconnect AC power before servicing. However, be aware that lethal voltages can remain in the electronic components even when AC power is disconnected. Use extreme caution when servicing. Verify that there is a working ground connection. If the unit sustains water damage, cease using it immediately and unplug AC power. MONITOR The monitor contains no user serviceable parts. Do not attempt to service the monitor. POWER SELECTOR Before installing game, ensure the voltage on the PC is set properly. There is a 115/230 VAC selector switch that must be set for the correct voltage for your site. Verify the fluorescent lamp rating. The rating must match the line voltage at the installation site. POWER CORD If the power cord is damaged or lost, replace it with an identical cord as supplied by the manufacturer or an authorized service agent. SURGE SUPRESSOR It is recommended that you plug your game’s power cord into a surge suppressor to help protect from power surges that may damage sensitive electronic components. COPYRIGHT 2013 NAMCO BANDAI GAMES INC. 2 To Purchase This Item, Visit BMI Gaming | www.bmigaming.com | (800) 746-2255 | +561.391.7200 PAC‐MAN CHOMP MANIA™ WATER AND OTHER LIQUID SOURCE Do not install game near sprinkler or other water jet sources. Do not use water jet to clean game. Keep minimum clearance behind game and wall for proper ventilation but also prevent access of liquid from spills and sprays from entering ventilation holes. CONNECTORS When servicing machine, ensure all connectors mate properly. If connectors do not slip in easily, do not force them. Connectors are often keyed and only connect one way. Check for correct orientation. COMPUTER The computer contains sensitive components, including a hard drive. Do not handle it roughly. Call your distributor before servicing its internal components. Ask about warranty information as it relates to the PC. Do not turn the PC power switch on or off. It should remain permanently in the ON position. Cycle AC power on or off with the cabinet power switch. A dongle has been inserted into one of the USB ports. This is required for game play. Do not remove the dongle except for troubleshooting purposes. FLUORESCENT TUBES A dropped fluorescent tube may break and implode. Shattered glass from the implosion can travel long distances and cause bodily injury. Use proper procedures when handling broken materials, as these items can contain hazardous material such as mercury or lead. HAZARD TO EPILEPTICS A small portion of the population has an epileptic condition that may cause seizures. Affected persons experience seizure while watching some television pictures or playing certain video games. People who have not had seizures may still have an undetected epileptic condition. If anyone in your family has experienced epilepsy symptoms (seizures or loss of awareness), consult your physical before using video games. While children play video games, a parent should observe. Be alert to the following symptoms: dizziness, altered vision, eye or muscle twitching, involuntary movements, loss of awareness, disorientation or convulsions. If you or your child experiences these symptoms, discontinue use immediately and consult your physician. MANUAL Keep this manual available and ready for use. If the game fails to function properly, turn off the machine and unplug the AC line cord. Contact your local distributor. Your warranty, when applicable, lasts 60 days from your purchase date. You may not reproduce this document or any of its contents without written authorization from Raw Thrills, Inc. or Play Mechanix™ Inc. SPECIFICATIONS For reasons such as performance, this product’s specifications may change without notice. Federal patent, copyright and other intellectual property laws protect the content, devices and design of the game and its equipment. COPYRIGHT 2013 NAMCO BANDAI GAMES INC. To Purchase This Item, Visit BMI Gaming | www.bmigaming.com | (800) 746-2255 | +561.391.7200 ProductSpecifications Electrical Power Temperature United States, international and Japan Inrush AC Current: 7 Amps Operating AC Current: 5/2.5 Amps Voltage: 115/230 VAC 50/60Hz 50° F to 104° F (10° C to 40° C) Dimensions Humidity Must not exceed 95% relative humidity Height: 98” (2.48 meters) Width: 30” (.76 meters) Depth: 32” (.81 meters) COPYRIGHT 2013 NAMCO BANDAI GAMES INC. 4 To Purchase This Item, Visit BMI Gaming | www.bmigaming.com | (800) 746-2255 | +561.391.7200 PAC‐MAN CHOMP MANIA™ Setup Unpack Materials 1. Place the shipping crates on a flat, stable surface. 2. Cut the banding straps and remove the cardboard lids. 3. Lift off the large cardboard containers surrounding the front pedestal and monitor assemblies and remove any shipping cleats. 4. Remove the coin door key from the coin return slot. 5. Open the top coin door. 6. Locate the keys for the back door and the cash box door. 7. Open the cash box door and remove the cash box. 8. Check for shipping damage to the following: Marquee and monitor Cabinet decals 9. Check the AC line cord for visible signs of damage. Pay particular attention to the plug and line cord insulation. Check Electrical Settings 1. 2. 3. 4. 5. 6. Verify the voltage in the nearest AC outlet. Verify the AC outlet ground connection is present and working. Open the back door of the monitor assembly. Near the AC power transformer, verify the voltage selector switch is set to correct AC voltage. Route the line cord so that the plug is near the AC outlet. Replace the back door of the monitor assembly. Startup Game 1. Plug in line cord to AC outlet. 2. Turn the power switch to ON. 3. Check that no component is excessively hot or emitting foul odors. If not, turn off AC power and disconnect line cord. Refer to the diagnostic section of this manual. COPYRIGHT 2013 NAMCO BANDAI GAMES INC. To Purchase This Item, Visit BMI Gaming | www.bmigaming.com | (800) 746-2255 | +561.391.7200 Diagnostics and Adjustments The Service Button Panel has four buttons, three of which can navigate the menu system. But it is easiest to navigate with a Start button and trigger/grenade. Volume UP TEST SERVICE Volume DOWN Service Panel TEST/BACK button enters diagnostic system. Either Start button or SELECT button selects the highlighted option. Service Panel VOL DOWN button or moves down through menu or setting choices. Service Panel VOL UP button or moves up through menu or setting choices. Highlight and select Exit to return to previous screen. An on‐screen message acknowledges changes or when you exit a selection without making a change. At the bottom of each screen there is a brief description of the menu option’s function. A complete description is available here for all menu functions. Instructions for completing your first calibration start on the next page. COPYRIGHT 2013 NAMCO BANDAI GAMES INC. 6 To Purchase This Item, Visit BMI Gaming | www.bmigaming.com | (800) 746-2255 | +561.391.7200 PAC‐MAN CHOMP MANIA™ Basic Functional Test On Initial Power Up See the Diagnostic Section for further information. 1. 2. 3. 4. 5. 6. 7. Enter the Switch Test menu and verify all switches function. Enter the Screen Test menu and verify that video is acceptable. Enter the Sound Test menu and verify the audio works and is not distorted. Enter the Coin Meter Test menu and verify the operation of the coin meter. Enter the Cabinet Lamps Test menu and verify that all cabinet lights work correctly. Enter the Watchdog Test menu, which reboots the game. Upon a successful reboot, you are ready to make adjustments to pricing, volume and other functions found in the Adjustments, Audits and Diagnostics section. COPYRIGHT 2013 NAMCO BANDAI GAMES INC. To Purchase This Item, Visit BMI Gaming | www.bmigaming.com | (800) 746-2255 | +561.391.7200 Adjustments,AuditsandDiagnostics Main Menu MAIN MENU DIAGNOSTICS COIN ADJUSTMENTS PAYOUT ADJUSTMENTS AUDITS COPY AUDITS TO USB VOLUME ATTRACT VOLUME ATTRACT MUSIC MODE TICKET TERMINOLOGY EXIT Main Menu Diagnostics Menu This menu allows all game functions to be verified or diagnosed. DIAGNOSTICS MENU SWITCH TEST MONITOR TEST SOUND TEST COIN / TICKET METER TEST TICKET DISPENSER TEST WATCHDOG TEST EXIT You can improve collections by periodically verifying proper game function and operation. COPYRIGHT 2013 NAMCO BANDAI GAMES INC. 8 To Purchase This Item, Visit BMI Gaming | www.bmigaming.com | (800) 746-2255 | +561.391.7200 PAC‐MAN CHOMP MANIA™ Main Menu Coin Adjustments Menu This allows customization of coin values, currency denominations, bill pulse and swipe credits. COIN ADJUSTMENT MENU CURRENCY TYPE COIN VALUE COIN TO PLAY COIN PER SWIP COIN PER SWIPE PULSE SWIPES/COINS Main Menu Payout Adjustments Menu This menu allows for customization of target payout percentage, ticket value. Changes will result in audits being reset. PAYOUT ADJUSTMENT SETTINGS PAYOUT PERCENTAGE TICKET VALUE TWO POINT TICKET COPYRIGHT 2013 NAMCO BANDAI GAMES INC. To Purchase This Item, Visit BMI Gaming | www.bmigaming.com | (800) 746-2255 | +561.391.7200 Main Menu Audits Menu Audit screens help assess game performance, find intermittent problems, decide whether to adjust game difficulty and free game award and help maximize game earnings. AUDITS SYSTEM AUDITS COIN AUDITS PAYOUT AUDITS GAME AUDITS EXIT Main Menu Resets RESETS MENU CLEAR COINS CLEAR TICKETS RESET AUDITS RESET ADJUSTMENTS FACTORY RESTORE CRC CHECK EXIT COPYRIGHT 2013 NAMCO BANDAI GAMES INC. 10 To Purchase This Item, Visit BMI Gaming | www.bmigaming.com | (800) 746-2255 | +561.391.7200 Maintenance Hard Drive Recovery Symptoms requiring hard drive recovery include File Test reports bad or missing files. Game fails to finish loading during startup. After resetting the AC power, an error is reported. You are prompted to insert a boot DVD. Erratic Game or Attract Mode. The following screen: WARNING! DATA Files Corrupted. (Game Operation May Become Unstable.) Use “Test” Switch to Enter Test Mode and Run “File Test” Press Start to Continue To identify corrupt files, press Test, choose System Test Menu and run the File Test. The only way to repair corrupt files is to recover the hard drive, as detailed below. COMPUTER The computer contains sensitive components, including a hard drive. Do not handle roughly. Call your distributor before servicing its internal components. Ask about warranty information as it relates to the PC. Do not use the PC on/off switch. Turn AC power on or off with the cabinet power switch. 1. With game and PC on, verify that the RIO board has power. If not, see Troubleshooting. 2. Open the Coin door. 3. Open the PC DVD‐ROM tray by reaching back to the PC and pressing the Open/Close button on the drive bay. 4. Insert the first of two restore DVDs (labeled Disc 1) into the tray. 5. Close the tray by pressing the Open/Close button again. 6. Turn cabinet power switch to OFF. Wait 30 seconds. COPYRIGHT 2013 NAMCO BANDAI GAMES INC. ϭϭ To Purchase This Item, Visit BMI Gaming | www.bmigaming.com | (800) 746-2255 | +561.391.7200 PAC‐MAN CHOMP MANIA™ 7. 8. 9. 10. 11. 12. 13. 14. 15. Turn cabinet power switch to ON. Recovery begins automatically when PC boots up. If recovery does not begin, check to ensure disc is inserted correctly and is not damaged. Initial software loading may take several minutes. Check progress periodically. Do not interrupt power or reset the game during recovery. At some point, the game will eject Disc 1 and prompt you to insert Disc 2. Swap discs and close the tray. When software has been loaded, a message indicates that restore is complete. When instructed to remove Disc 2, open DVD‐ROM drive tray and remove Disc 2. Turn cabinet power switch off. After 30 seconds, turn cabinet power switch on. Game will reboot and enter calibration mode. BIOS Settings/Power Management NOTICE The PC ships with correct BIOS settings. Making changes to the BIOS different from the description below may adversely affect game functions. This BIOS setting lets the PC automatically power up. With the setting enabled, the PC reboots when it detects AC power. This eliminates the need to manually turn the PC back on after power disruption. Do not use the PC on/off switch. Turn AC power on or off with the cabinet power switch. 1. 2. 3. 4. 5. Turn cabinet power switch off. Open rear of cabinet. Connect a USB keyboard to the PC. While holding the Delete key on the keyboard down, turn cabinet power switch on. When the BIOS menu screen appears, make the following adjustments. Feature .............................................................................. Set to Standard CMOS Feaures > Drive A .................................... [none] Standard CMOS Features > HALT ON ................................ [No Errors] Advanced BIOS Features > Boot Sequence ....................... 1st CD‐ROM 2nd Hard Disk Advanced BIOS Features > APIC Mode ............................. Disabled Advanced Chipset Features > Frame Buffer ..................... [16M] Advanced Chipset Features > PMU > CPU Frequency ...... [200.0] Power Management Setup > PWRON After PWR‐Fail ...... [On] 6. Follow instructions on screen to save and exit. 7. PC will reset and load the game. COPYRIGHT 2013 NAMCO BANDAI GAMES INC. To Purchase This Item, Visit BMI Gaming | www.bmigaming.com | (800) 746-2255 | +561.391.7200 PAC‐MAN CHOMP MANIA ELECTRICAL DIAGRAM AND MECHANICAL ILLUSTRATIONS COPYRIGHT 2013 NAMCO BANDAI GAMES INC. To Purchase This Item, Visit BMI Gaming | www.bmigaming.com | (800) 746-2255 | +561.391.7200 To Purchase This Item, Visit BMI Gaming | www.bmigaming.com | (800) 746-2255 | +561.391.7200 22 27 20 21 19 18 17 24 15 25 14 26 1 Pacman - 42" LCD (BOM on next page) 23 28 11 12 6 13 3 16 9 4 10 5 8 7 2 To Purchase This Item, Visit BMI Gaming | www.bmigaming.com | (800) 746-2255 | +561.391.7200 To Purchase This Item, Visit BMI Gaming | www.bmigaming.com | (800) 746-2255 | +561.391.7200 Pacman - 42" LCD: BOM ITEM NO. 1 2 3 4 5 6 7 PART NUMBER 601-00630-01 600-01110-01 601-00634-01 800-00001-00 820-00012-00 RIO-Hardware Assy 2-1-02-00-00-017 DESCRIPTION QTY. Pacman 42" LCD Cabinet McMaster-Carr: Black Handle (1646A16) Pacman - Lower Back Door (Assembled) 120mm Wire Fan Guard Cooling Fan(standard size): 12VDC, 3W, 80CFM RIO Assembly (with Mounting Plate) APS Power Supply (Bracket #90-AP188) Magnecraft - Solid State Relay - 6210AXXSZS-DC3 (6210DSX-1) (or approved equivalent PC) PC Wood Cleat Securing Nylon Strap Plate McMaster-Carr: Nylon Strap 0.075" Thick, 1" Width, Black (56" Length) McMaster-Carr: Plastic Buckle for Webbing NO Sew Squeeze-Release for 1" Wide Webbing Goldwood: 5.25", 8 Ohm Full Range Speaker Pacman - Perforated Speaker Grill Cover 1 2 2 2 1 1 1 8 800-00040-01 9 10 11 HP6005 601-00580-01 600-00891-01 12 87425K76 (56 length) 13 29705T86 14 15 2-1-10-00-00-000 600-01103-01 Monitor_Mounting_Bracket_&_ Pacman - Monitor Mounting Bracket Assembly Light_Assy Above_Monitor_Light_Bracket Pacman - Above Monitor Light Assembly _Assy 809-00004-01 42" LCD Assembly 606-00814-01 Pacman - Monitor Frame Translite 600-01048-01 Pacman - Monitor Glass 600-01053-01 Pacman - Monitor Glass Retainer (2) Foam_Tape_.125Tx.625wx28.4 Single Sided Foam Tape (1/8" Thick, 5/8" Wide, 28 375L 7/16" Long) 2-1-18-00-00-000 Goldwood: 8” Woofer, 4 Ohm, Poly-Mica Cone 800-00043-01 Happ: Ticket Dispenser Door Assembly 800-00005-01 Happ: Mid-Width Coin Door Assembly 810-00053-01 Test Service Button Assy PacPot_CP_Assy Pacman - Control Panel Assembly Pacman_Marquee_Assy Pacman - Marquee Assembly 16 17 18 19 20 21 22 23 24 25 26 27 28 1 1 2 2 2 2 2 1 2 1 1 1 1 2 2 1 1 1 1 1 1 6 3 1 500-00132-01 606-00815-01 600-01049-01 500-00129-02 4 5 6 7 7 2 LED Controller PCB Pacman - Marquee PETG Pacman - Marquee Translite LED Display Matrix PCB Pacman - Marquee Assembly 5 4 2" Diameter PVC Grommet Tape (65CM - 39 500-00093-01 (65CM) White Flexible LED LEDs) 3 603-00580-01 2 Pacman - Hinged Marquee Box DESCRIPTION 608-00164-01 PART NUMBER ITEM NO. 1 1 1 1 2 2 1 1 QTY. To Purchase This Item, Visit BMI Gaming | www.bmigaming.com | (800) 746-2255 | +561.391.7200 800-00042-01 2 Mounted_Joystick_Assy Pacman - CP Edge Glow RGB Flexible LED Tape (65CM - 39 LEDs) Happ: Jumbo Round With Locking Lampholder (6VDC Red LED), .187 Gold MS Pacman - Joystick Assembly DESCRIPTION 1 1 Happ: Super Joystick 4 Way W/ 43MM Yellow Bubbly Ball QTY. 1 2 Pacman - Control Panel Assembly 4 702-00052-00 3 DESCRIPTION 2 RGB Strip (65CM) 2 Pacman - Joystick Mounting Plate 4 603-00633-01 PART NUMBER Pacman - Joystick Assembly 600-01061-01 PART NUMBER ITEM NO. 1 1 3 ITEM NO. 1 1 1 1 1 QTY. To Purchase This Item, Visit BMI Gaming | www.bmigaming.com | (800) 746-2255 | +561.391.7200 RGB Strip (65CM) 2 2 RGB Strip (95CM) 600-01055-01 Pacman - Monitor Mounting Bracket RGB Flexible LED Tape (95CM - 57 LEDs) DESCRIPTION Pacman - Above Monitor Light Bracket RGB Flexible LED Tape (65CM - 39 LEDs) DESCRIPTION 1 1 QTY. 2 1 Pacman - Monitor Mounting Bracket Assembly 1 PART NUMBER Pacman - Above Monitor Light Assembly 600-01056-01 PART NUMBER 1 ITEM NO. 2 ITEM NO. 1 1 1 QTY. To Purchase This Item, Visit BMI Gaming | www.bmigaming.com | (800) 746-2255 | +561.391.7200 2 1 600-00513-01 500-00040-01 PART NUMBER RIO-Mounting plate Chassis RIO-board DESCRIPTION RIO Assembly (with Mounting Plate) ITEM NO. 1 2 1 1 QTY. To Purchase This Item, Visit BMI Gaming | www.bmigaming.com | (800) 746-2255 | +561.391.7200 To Purchase This Item, Visit BMI Gaming | www.bmigaming.com | (800) 746-2255 | +561.391.7200 PAC‐MAN CHOMP MANIA™ NOTES: COPYRIGHT 2013 NAMCO BANDAI GAMES INC.