1
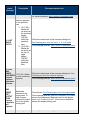
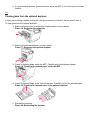
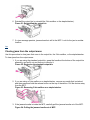
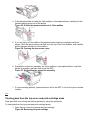
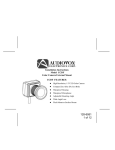
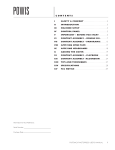
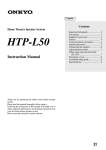
HP LaserJet 4345 MFP Series Printers - 13.XX Paper
Jam Error Message Information (Service Manual
Content)
Control-panel messages
Component test
Causes of persistent jams
Clearing jams from the tray 1 area
Clearing jams from the tray 2, 3, 4, or 5 areas
Clearing jams from the optional duplexer
Clearing jams from the output areas
Clearing jams from the top-cover and print-cartridge areas
Control-panel messages
The information in this document was pulled from the Service Manual. For additional troubleshooting
information see the Service Manual.
Control
panel
message
Description
13.JJ.NT
Media is jammed
JAM IN
in the envelope
ENVELOPE
feeder.
FEEDER
Recommended action
Remove the jammed media from the envelope feeder.
Follow the instructions in the onscreen dialog box. For
Clearing jams from the optional envelope-feeder area
please check the service manual .
Media is jammed
in the output bin.
13.JJ.NT
JAM IN
OUTPUT
BIN
Use this list to
determine the
exact location of
the jam:
13.12.07 =
The staple
cartridge
13.12.08 =
The output
bin paper
present
sensor
(media is
stuck)
1. Clear all jammed media.
2. Verify that the connector J50 on the dc controller
PCA is firmly seated.
3. Verify that the two connectors that are on the rear
of the reversing assembly are installed. See Figure
below .
Figure 1: Sensors on the reversing unit (top
side)
Control
panel
message
Description
13.12.09 =
The output
bin inlet
sensor
(media is
stuck)
13.12.10 =
The output
bin inlet
sensor
(media did
not reach
the sensor
at the
appropriate
time)
13.12.11 =
Media is
present in
the output
bin when
the MFP is
turned on.
13.31.00 =
Media is
jammed in
the
reversing
assembly.
Recommended action
1 - PS111, reversing-unit-jam sensor
2 - Connectors J140 and J1402
3 - PS110, reversing paper sensor
4 - PS109, paper-delivery sensor
4. Use the component diagnostic test to test three
motors: switchback motor, intermediate switchback
motor, output motor. See Component test .
5. Use the component diagnostic test to test two
solenoids: face-up/face-down solenoid (SL105)
and alienation solenoid (SL106). See Component
test .
6. Use the manual sensor test to test two sensors:
paper-delivery sensor PS109 (sensor “K”) and
reversing-paper sensor PS110 (sensor “H”). See
Figure below ). Also See Manual sensor test .
Figure 2: Sensors on the reversing unit (top
side
Control
panel
message
Description
Recommended action
1 - PS111, reversing-unit-jam sensor
2 - Connectors J140 and J1402
3 - PS110, reversing paper sensor
4 - PS109, paper-delivery sensor
7. If any of these components fail, replace the
reversing assembly. See Figure below.
Figure 3: Reversing assembly
13.03.00
JAM IN
TRAY 1
The tray 1 pickup
solenoid might be
defective.
Remove the jammed media from tray 1. Follow the
instructions in the onscreen dialog box. See Clearing
jams from the tray 1 area .
If the message persists, open the DIAGNOSTICS menu
and touch COMPONENT TEST. Run the test for MP
TRAY SOLENOID. If the solenoid is defective, replace it.
See Component test .
Control
panel
message
Description
Recommended action
For more information, See Causes of persistent jams .
Media is jammed
in the specified
tray.
13.JJ.NT
JAM IN
TRAY X
1. 13.01.00 =
Media did
not arrive at
the pre-feed
sensor
(PS102)
Follow the instructions in the onscreen dialog box.
within the
specified
See Clearing jams from the tray 2, 3, 4, or 5 areas .
time.
2. 13.02.00 = If the message persists, See Causes of persistent jams .
Media did
not arrive at
the top-ofpage
sensor
(PS103)
within the
specified
time.
13.JJ.NT
JAM
INSIDE
13.13.00 = Media
DUPLEXER
is stuck inside the
Remove
duplexer.
duplexer
from lower
left area
13.JJ.NT
JAM
INSIDE
LEFT
OUTPUT
AREA
Remove
output bin
and
duplexer
Media has
jammed in the
output area. To
clear the jam,
remove the output
bin or the duplex
printing unit.
13.JJ.NT
Media is jammed
Follow the instructions in the onscreen dialog box. See
Clearing jams from the optional duplexer .
If the message persists, See Causes of persistent jams .
Clear the jam. See Clearing jams from the output areas .
If the message persists, open the DIAGNOSTICS menu
and run the component diagnostic test for the duplex
motor. See Component test . If the motor is defective,
replace the duplex printing unit.
Clear the jam. See Clearing jams from the tray 2, 3, 4, or
Control
panel
message
JAM
INSIDE
RIGHT
ACCESS
DOOR
Open all
right
access
doors
ABOVE
tray X
Description
inside the jamaccess door for
the tray that is
indicated.
Recommended action
5 areas .
If the message persists, See Causes of persistent jams .
Media is jammed
in the top cover
area.
13.JJ.NT
JAM
INSIDE
TOP
COVER
AREA
13.02.00 =
Media is
stopped
under the
top-of-page
sensor
(PS103).
13.05.00 =
Media did
not arrive at
the fuserdelivery
sensor
(PS108)
within the
specified
time.
13.09–00 =
Media is
jammed
under the
reversing
paper
sensor
(PS110).
13.20.00 =
The prefeed sensor
(PS102),
the top-ofpage
Follow the instructions in the onscreen dialog box. See
Clearing jams from the top cover and print-cartridge areas
.
If the message persists, See Causes of persistent jams .
Control
panel
message
Description
Recommended action
sensor
(PS103), or
the fuserdelivery
sensor
(PS108)
detected
media
inside the
MFP when
it was
turned on.
13.21.00 =
The top
cover was
opened
during
printing, or
the topcover
switch
(SW101) is
defective.
13.31.00 =
Media did
not arrive at
the
reversing
paper
sensor
(PS110)
within the
specified
time.
13.33.00 =
Media did
not arrive at
the paperdelivery
sensor
(PS109)
within the
specified
time.
13.JJ.NT
JAM
Media is jammed
in the top cover
Follow the instructions in the onscreen dialog box. See
Clearing jams from the top cover and print-cartridge areas
Control
panel
message
INSIDE
TOP
COVER
AREA
Remove
print
cartridge
Description
Recommended action
area and you must .
remove the print
If the message persists, See Causes of persistent jams .
cartridge to clear
the jam.
13.JJ.NT
JAM
INSIDE
TRAY 2
AREA
Media is jammed
in tray 2.
13.JJ.NT
JAM
INSIDE
TRAY 2
RIGHT
ACCESS
DOOR
Media is jammed Follow the instructions in the onscreen dialog box. See
inside tray 2 in the Clearing jams from the tray 2, 3, 4, or 5 areas .
jam access door. If the message persists, See Causes of persistent jams .
13.JJ.NT
JAMS
INSIDE
TOP
COVER
AREA
Remove
print
cartridge
Media is jammed
in more than one
location inside the
top cover area.
Remove the print
cartridge in order
to clear the jams.
Follow the instructions in the onscreen dialog box. See
Clearing jams from the tray 2, 3, 4, or 5 areas .
If the message persists, See Causes of persistent jams .
Follow the instructions in the onscreen dialog box. See
Clearing jams from the top cover and print-cartridge areas
.
If the message persists, See Causes of persistent jams .
13.JJ.NT
PAPER
Media is jammed Follow the instructions in the onscreen dialog box. See
JAM OPEN inside one or more Clearing jams from the tray 2, 3, 4, or 5 areas .
INPUT
of the trays.
If the message persists, See Causes of persistent jams .
TRAYS
top
Component test
Use the component test to exercise individual parts one-at-a-time, so that you can determine the
cause of noise inside the MFP. For most of the components, observe or listen to the component in
order to verify that it is functioning as stated on the control-panel display.
For more information on General paper path and jam troubleshooting please check the service
manual .
top
Manual sensor test
The manual sensor test indicates the status of the sensors and switches in the MFP. On the control
panel display, each sensor is represented by a string of letters followed by a corresponding status for
each sensor. Except for the paper-size switches, a “0” next to the letter indicates that no media is
present or the switch is open. A “1” indicates that media is present or the switch is closed. For the
paper-size switches (SW102), the number ranges from 0 to 7 to indicate the state of the three
switches. Use Table below to associate the letters that appear on the control-panel display with the
switch or sensor that they represent. Note that both uppercase and lowercase letters are used.
Manual sensor test letter designations
Letter
Component
Letter
Component
A
Tray 5 paper feed
sensor
S
SW102: tray 2 paper-size switches (3
switches)
B
Tray 4 paper feed
sensor
T
Tray 3 jam-access-cover switch
C
Tray 3 paper feed
sensor
U
Tray 3 paper out sensor
D
PS106: paper-width
sensor
V
Tray 3 paper-stack surface sensor
E
PS102: pre-feed
sensor
W
Tray 3 paper-size switches (The
number ranges from 0 to 7 as for tray
2. See the entry for letter “S”.)
F
PS103: top-of-page
sensor
X
Tray 4 jam-access-cover switch
H
PS111: reverse-unit
paper sensor
Y
Tray 4 paper-out sensor
J
PS108: fuserdelivery sensor
Z
Tray 4 paper-stack surface sensor
K
PS109: delivery
paper sensor
a
Tray 4 paper size switches (The
number ranges from 0 to 7 as for tray
2. See the entry for letter “S”.)
Manual sensor test letter designations
Letter
Component
Letter
Component
L
PS104: output bin
full sensor
M
PS105: tray 1 paperc
present sensor
Tray 5 paper-out sensor
P
SW105: jam-accessd
cover switch
Tray 5 paper-stack surface sensor
Q
PS101: tray 2 papere
out sensor
Tray 5 paper size switches (The
number ranges from 0 to 7 as for tray
2. See the entry for letter “S”.)
R
PS107: tray 2 paperf
stack surface sensor
SW101: top-cover switch
b
Tray 5 jam-access cover switch
Causes of persistent jams
If jams recur persistently, an MFP component might be defective. Use the information in this section
to isolate and solve the problem.
Jams in the top-cover and print-cartridge area
Cause
Solution
The pre-transfer roller
in the registration
Replace the registration assembly.
assembly is dirty or
worn.
The transfer guide in
the registration
assembly might be
dirty or stuck.
1. If the transfer guide is dirty, clean it with a
soft, dry cloth.
2. Make sure that the springs at each end of the
transfer guide are adjusted correctly.
3. If the transfer guide is worn or damaged,
replace the registration assembly.
The top-of-pagesensor flag (PS103)
or the paper-width
sensor flag (PS106)
might be stuck.
1. Verify that the connector J87 on the dc
controller is correctly seated.
2. Run the manual sensor diagnostic test to
make sure that these sensors are operating
correctly. See Manual sensor test . The topof-page sensor is represented by letter “F,”
and the paper-width sensor is represented by
Cause
Solution
the letter “D.”
3. While running the manual sensor test, open
the top cover and move the sensor flags while
you observe the control-panel display. If the
sensors are operating correctly, the status
should change on the control panel. If the
status does not change, or you are unable to
move the flag, replace the sensor.
The transfer roller or Replace the rollers.
the feed rollers might NOTE: These rollers are part of the printer
be damaged.
maintenance kit.
The print cartridge
might be damaged.
Replace the print cartridge.
The dc controller
might be defective.
Replace the dc controller.
top
Clearing jams from the tray 1 area
Use this procedure to clear jams that occur in the tray 1 input area.
To clear jams from the tray 1 area:
1. Open the top cover, open tray 1, and remove the print cartridge.
Figure 4: Opening the top cover
2. Use the green handle to lift the paper-access plate.
Figure 5: Lifting the paper-access plate
3. Slowly pull any jammed media out of the MFP. Do not tear the media. If part of the sheet
has already been pulled into the MFP, follow the steps for Clearing jams from the topcover and print cartridge areas .
Figure 6: Pulling any jammed media out of the MFP
4. If jammed media is difficult to remove, remove the envelope-entrance cover. If media is
present, remove it.
Figure 7: Removing the envelope-entrance cover
5. Rotate the paper-release guide to check for additional jammed media underneath. If
jammed media is present, remove it.
Figure 8: Rotating the paper-release guide
6. Replace the envelope-entrance cover and close tray 1.
Figure 9: Replacing the envelope-entrance cover
7. Reinstall the print cartridge and close the top cover.
Figure 10: Reinstalling the print cartridge
8. If a jam message persists, jammed media is still in the MFP. Look for the jam in another
location.
top
Clearing jams from the tray 2, 3, 4, or 5 areas
Use this procedure to clear jams that occur in tray 2 or in the optional 500-sheet feeders.
To clear jams from tray 2, 3, 4, or 5 :
1. Pull the jam-access lever to open the jam-access cover.
Figure 11: Pulling the jam-access lever
2. Carefully pull out any jammed media from either the top or the bottom of the jam-access
area.
Figure 12: Pulling out any jammed media
3. Close the jam-access cover.
Figure 13: Closing the jam-access cover
4. Slide the tray completely out of the MFP, and remove any damaged media from the tray.
Figure 14: Removing any damaged media from the tray
5. Slide the tray into the MFP.
Figure 15: Sliding the tray into the MFP
6. If a jam message persists, jammed media is still in the MFP. Look for the jam in another
location.
top
Clearing jams from the optional duplexer
If a jam occurs during a duplex printing job, use this procedure to check for the jam and to clear it.
To clear jams from the optional duplexer :
1. Remove the output bin (or remove the stapler/stacker or the mailbox).
Figure 16: Removing the output bin
2. Remove the optional duplexer, and set it aside.
Figure 17: Removing the optional duplexer
3. Check for jammed paper inside the MFP. Carefully pull out the jammed paper.
Figure 18: Checking for jammed paper inside the MFP
4. Check for jammed paper in the optional duplexer. Carefully pull out the jammed paper.
Figure 19: Checking for jammed paper in the optional duplexer
5. Reinstall the duplexer.
Figure 20: Reinstalling the duplexer
6. Reinstall the output bin (or reinstall the 3-bin mailbox or the stapler/stacker).
Figure 21: Reinstalling the output bin
7. If a jam message persists, jammed media is still in the MFP. Look for the jam in another
location.
top
Clearing jams from the output areas
Use this procedure to clear jams that occur in the output bin, the 3-bin mailbox, or the stapler/stacker.
To clear jams from the output areas :
1. If you are using the standard output bin, grasp the handle at the bottom of the output-bin
assembly, and pull it out and then up to remove it.
Figure 22: Removing the standard output bin
2. If you are using a 3-bin mailbox or a stapler/stacker, remove any media that is stacked,
and then press and hold the release button on the top of the device. Pull the device away
from the MFP.
Figure 23: Removing 3-bin mailbox or a stapler/stacker
3. If the jammed media is inside the MFP, carefully pull the jammed media out of the MFP.
Figure 24: Pulling the jammed media out of MFP
4. If the jammed media is inside the 3-bin mailbox or the stapler/stacker, carefully pull the
jammed media up and out of the device.
Figure 25: Pulling the jammed media out of 3-bin mailbox
5. If you are using a 3-bin mailbox, the jammed media might be completely inside the
device. Open the jam-access cover that is on the top of the 3-bin mailbox, and carefully
pull the jammed media out of the mailbox.
Figure 26: Opening the jam-access cover
6. Reinstall the output-bin assembly, the 3-bin mailbox, or the stapler/stacker. Insert the
device at an angle, and then slide it into the MFP.
Figure 27: Reinstalling the output-bin assembly
7. If a jam message persists, jammed media is still in the MFP. Look for the jam in another
location.
top
Clearing jams from the top-cover and print-cartridge areas
Clear jams that occur during the printing process by using this procedure.
To clear jams from the top-cover and print-cartridge areas :
1. Open the top cover and remove the print cartridge.
Figure 28: Removing the print cartridge
CAUTION: To prevent damage to the print cartridge, do not expose it to light for
more than a few minutes. Cover the print cartridge with a sheet of paper while it is
outside of the MFP.
2. Use the green handle to lift the paper-access plate.
Figure 29: Lifting the paper-access plate
3. Slowly pull the jammed media out of the MFP. Do not tear the media.
Figure 30: Pulling the jammed media out of the MFP
4. If jammed media is difficult to remove, open and remove the envelope-entrance cover. If
media is present, remove it.
Figure 31: Removing the envelope-entrance cover
5. Rotate the paper-release guide to check for additional jammed media underneath. If
jammed media is present, remove it.
Figure 32: Rotating the paper-release guide
6. Replace the envelope-entrance cover and close tray 1.
Figure 33: Replacing the envelope-entrance cover
7. Reinstall the print cartridge and close the top cover.
Figure 34: Reinstalling the print cartridge
8. If a jam message persists, jammed media is still in the MFP. Look for the jam in another
location.
top