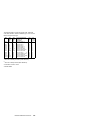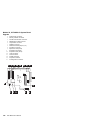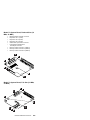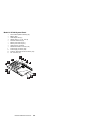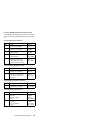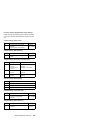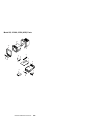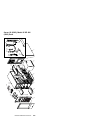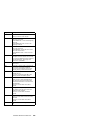
1
IBM Personal System/2
Hardware
Maintenance
Manual
October 1994
We Want Your Comments!
(Please see page 440)
S52G-9971-02
IBM Personal System/2
Hardware
Maintenance
Manual
October 1994
We Want Your Comments!
(Please see page 440)
IBM
S52G-9971-02
Note
Before using this information and the product it
supports, be sure to read the general information
under “Notices” on page 445.
Third Edition (October 1994)
The following paragraph does not apply to the United
Kingdom or any country where such provisions are
inconsistent with local law: INTERNATIONAL
BUSINESS MACHINES CORPORATION PROVIDES THIS
PUBLICATION “AS IS” WITHOUT WARRANTY OF ANY
KIND, EITHER EXPRESS OR IMPLIED, INCLUDING, BUT
NOT LIMITED TO, THE IMPLIED WARRANTIES OF
MERCHANTABILITY OR FITNESS FOR A PARTICULAR
PURPOSE. Some states do not allow disclaimer of
express or implied warranties in certain transactions,
therefore, this statement may not apply to you.
This publication could include technical inaccuracies or
typographical errors. Changes are periodically made to
the information herein; these changes will be incorporated
in new editions of the publication. IBM may make
improvements and/or changes in the product(s) and/or the
program(s) described in this publication at any time.
It is possible that this publication may contain reference to,
or information about, IBM products (machines and
programs), programming, or services that are not
announced in your country. Such references or
information must not be construed to mean that IBM
intends to announce such IBM products, programming, or
services in your country.
Requests for technical information about IBM products
should be made to your IBM authorized reseller or IBM
marketing representative.
Copyright International Business Machines
Corporation 1992, 1994. All rights reserved.
Note to U.S. Government users–Documentation related to
Restricted rights–Use, duplication, or disclosure is subject
to restrictions set forth in GSA ADP Schedule Contract
with IBM Corp.
ii
PS/2 Maintenance Manual
About This Manual
This manual contains service and reference information for
IBM* Personal System/2* desktop and floor-standing
computers.
The service section includes procedures for isolating
problems to a FRU, Symptom-to-FRU Indexes (AT*
Bus, Micro Channel*, and QAPlus/PRO**), related
service procedures, and an illustrated parts catalog.
The reference section includes safety information,
product descriptions, and general information about
system functions, and the Advanced Diagnostic tests.
This manual should be used along with the advanced
diagnostic tests to troubleshoot problems effectively.
Important
This manual is intended for trained servicers who are
familiar with PS/2 products. Before servicing a PS/2
product, be sure to review “Safety Information” on
page 365.
* Trademark of the IBM Corporation.
** QAPlus/PRO is a trademark of DiagSoft, Inc.
iii
Related Publications
The following publications are available from IBM or your
IBM Authorized Dealer.
For Information About
See Publication
Disk Array technology, RAID
Configuration Program
Configuring Your Disk Array
booklet (S82G-1506)
Installation Planning for
Personal System/2
computers
Personal System/2
Installation Planning and
Beyond (G41G-2927)
Installation Planning for
Advanced Personal
System/2 servers
Advanced PS/2 Servers
Planning and Selection
Guide (GG24-3927)
PS/ValuePoint* computers
IBM PS/ValuePoint HMM
(S61G-1423)
Laptop, Notebook, and
Portable computers
IBM Mobile Systems HMM
Volume 1 (S82G-1501)
ThinkPad* computers
IBM Mobile Systems HMM
Volume 2 (S82G-1502)
Monitors (Displays)
IBM Display HMM
- Vol. 1 (SA38-0053)
IBM Monitor HMM
- Vol. 1 (S68G-2484)
IBM Monitor HMM
- Vol. 2 (S71G-4197)
Obsolete Publications
This manual obsoletes these previous publications.
*
iv
Publication
Part, Form Number
PS/2 HMM
71G3716, S52G-9971
PS/2 HMM Supplement
71G6781, S71G-6781
PS/2 HMM Supplement
82G3782, S82G-3782
PS/2 HMM Supplement
82G3836, S82G-3836
PS/2 HMM Supplement
82G3896, S82G-3896
PS/2 OBI Supplement
83G7709, S83G-7709
PS/2 HMM Supplement
83G7836, S83G-7836
PS/2 HMM Supplement
83G7912, S83G-7912
PS/2 OBI Supplement
83G7917, S83G-7917
PS/2 HMM Supplement
83G8084, S83G-8084
PS/2 OBI Supplement
83G8092, S83G-8092
PS/2 OBI Supplement
83G8983, S83G-8983
Trademark of the IBM Corporation
PS/2 Maintenance Manual
Contents
Related Publications
Obsolete Publications
. . . . . . . . . . . . . . .
. . . . . . . . . . . . . . .
Hardware Maintenance Service
. . . . . . . .
FRU Replacement Strategy
. . . . . . . . .
Hard Disk Drive Replacement Strategy
. . . .
Introduction . . . . . . . . . . . . . . . . . . .
General Checkout (AT Bus) . . . . . . . . . . .
Memory Problems (8086 Computers) . . . . .
Memory Problems (80286 to 80486 Computers)
Memory Problems (PC Server - 8640)
. . . .
Installed Devices List
. . . . . . . . . . . .
Symptom-to-FRU Index (AT Bus)
. . . . . . . .
No-Beep Symptoms . . . . . . . . . . . . .
Beep Symptoms . . . . . . . . . . . . . . .
Miscellaneous Symptoms
. . . . . . . . . .
Numeric Error Codes . . . . . . . . . . . . .
General Checkout (Micro Channel) . . . . . . . .
Devices List . . . . . . . . . . . . . . . . .
Missing Non-SCSI Device
. . . . . . . . . .
Missing SCSI Device . . . . . . . . . . . . .
Missing SCSI and Non-SCSI Devices . . . . .
System Error Log
. . . . . . . . . . . . . .
Viewing the System Error Log . . . . . . .
Symptom-to-FRU Index (Micro Channel) . . . . .
No-Beep Symptoms . . . . . . . . . . . . .
Beep Symptoms . . . . . . . . . . . . . . .
Audio Symptoms
. . . . . . . . . . . . . .
Miscellaneous Symptoms
. . . . . . . . . .
Numeric Error Codes . . . . . . . . . . . . .
IML and IPL Errors
. . . . . . . . . . . . .
Checking Startup Sequence and Hard Disk Drive
General Checkout (QAPlus/PRO)
. . . . . . . .
PC Server (8640) Setup Utility
. . . . . . . .
Symptom-to-FRU Index (QAPlus/PRO) . . . . . .
No Beep Symptoms . . . . . . . . . . . . .
Beep Symptoms . . . . . . . . . . . . . . .
Error Codes . . . . . . . . . . . . . . . . .
Error Messages . . . . . . . . . . . . . . .
Miscellaneous Error Messages . . . . . . . .
Network Service Procedures . . . . . . . . . . .
Data Rate Switch Settings
. . . . . . . . . .
Testing the Token-Ring Adapter
. . . . . . .
Token-Ring POST Errors . . . . . . . . . . .
Testing the Ethernet Adapter . . . . . . . . .
Ethernet POST Errors
. . . . . . . . . . . .
Selecting Network Configuration Parameters
.
Network Configuration Errors . . . . . . . . .
ISA PS/ValuePoint 10BASE-T/10BASE2 Ethernet
Adapters . . . . . . . . . . . . . . . . . .
Copyright IBM Corp. 1994
.
.
.
.
.
.
.
.
.
.
.
.
.
.
.
.
.
.
.
.
.
.
.
.
.
.
.
.
.
.
.
.
.
.
.
.
.
.
.
.
.
.
.
.
iv
iv
1
1
1
2
3
6
9
10
11
12
12
13
13
15
19
23
24
24
25
25
25
26
27
29
30
30
33
55
56
59
60
61
62
63
64
66
72
74
74
74
79
81
85
87
89
. 90
v
ISA PS/ValuePoint Ethernet Adapter Features
Diskette . . . . . . . . . . . . . . . . . . .
ISA PS/ValuePoint Ethernet Adapter Configuration
Options
. . . . . . . . . . . . . . . . . . .
I/O Address
. . . . . . . . . . . . . . . .
IRQ Interrupt Levels
. . . . . . . . . . . .
ROM Address
. . . . . . . . . . . . . . .
Changing PS/ValuePoint ISA Adapter
Configuration . . . . . . . . . . . . . . .
PS/2 ServerGuard Adapter . . . . . . . . . . .
Cabling
. . . . . . . . . . . . . . . . . .
External DAA Cabling . . . . . . . . . . . .
DAA Cable Check
. . . . . . . . . . . . .
External Power Control Box Cabling . . . . .
ServerGuard Adapter Symptom-to-FRU Index
Wireless Network
. . . . . . . . . . . . . . .
ISA Bus Switch Settings
. . . . . . . . . .
ISA Mode Operations Parameters . . . . . .
Wireless LAN Utilities Diskette . . . . . . . .
Placement of Radio Modules
. . . . . . . .
Error Management Overview
. . . . . . .
Running Adapter Diagnostics
. . . . . . .
PCMCIA Credit Card Problems
. . . . . .
Interrupt Level or I/O Address Conflicts
. .
Checking the Base Configuration (OS/2
Environment) . . . . . . . . . . . . . .
LAPS Installation Problem . . . . . . . . .
Problem Resolution Worksheet
. . . . . .
Obtaining the Necessary Data . . . . . . .
Related Service Information . . . . . . . . . . .
ACPA/A Advanced Diagnostic Tests
. . . . .
Audio Output Tone (Tone)
. . . . . . . .
Microphone Input Loop (Loop) . . . . . . .
Microphone Gain Toggle (Toggle) . . . . .
CSD (DOS) Version Level Check . . . . . . .
CSD (OS/2) Version Level Check . . . . . . .
Combined FRUs Diagnostics . . . . . . . . .
Display Adapter 8514/A
. . . . . . . . . . .
Display Self-Test
. . . . . . . . . . . . . .
Display Considerations
. . . . . . . . . .
Fax/Modem Checkout
. . . . . . . . . . . .
How to Use a Symptom-to-FRU Index
. . . .
Error Code Format . . . . . . . . . . . .
Identifying Adapters
. . . . . . . . . . . . .
Keyboard Voltage Check . . . . . . . . . . .
Standard Connector
. . . . . . . . . . .
Memory-Module Kit Identification . . . . . . .
Memory Problems . . . . . . . . . . . . . .
Models 50, 55, 60, 65, 70, and 80 . . . . .
Models 53 (9553-xBx) 56, 57, 76, 77, 85, 90,
and 95 . . . . . . . . . . . . . . . . .
Determining Models 90/95 Processor Type .
Processor Board Matrix (90, 95) . . . . . .
Using the Low-Level Format Program
. . .
vi
PS/2 Maintenance Manual
90
90
90
91
91
91
92
93
93
93
94
95
97
97
97
99
99
100
100
101
102
102
104
104
105
107
108
108
108
108
108
108
108
109
110
111
112
114
115
122
123
123
123
125
125
125
126
126
129
Option Microprocessor Jumper (76, 77) . . .
OS/2 Problems during a New Installation
. .
OS/2 Trap Errors
. . . . . . . . . . . . .
PCMCIA Diagnostics (PS/2 E Model 33)
. .
PCMCIA Adapter Switch Settings . . . . . .
PCMCIA PC Card Lock Override . . . . . .
Printer Errors
. . . . . . . . . . . . . . .
Processor Board Installation (90, 95)
. . . .
Processor Boards with Diagnostic LEDs .
Processor Boards without Diagnostic LEDs
Processor Upgrade (Models 50/50Z/60 486SLC2) Switch Settings
. . . . . . . .
Processor Upgrade (Models 70/80 - 486DX33)
Switch Settings
. . . . . . . . . . . . .
Processor Upgrade (Model 70/80 - 486DX33 )
FRU Isolation
. . . . . . . . . . . . . .
Processor (Px) Label Cross-reference . . . .
Power Supply Voltage Check . . . . . . . .
Models 25, 25 SX, 25-286
. . . . . . .
Models 30, 30-286
. . . . . . . . . . .
Model 33 . . . . . . . . . . . . . . . .
Models 35, 40, 56, 57, 76, 77 . . . . . .
Models 50, 70
. . . . . . . . . . . . .
Model 55, PS/2 9553-xBx . . . . . . . .
Models 60, 65, 80
. . . . . . . . . . .
Model 90 . . . . . . . . . . . . . . . .
PC Server (8640) . . . . . . . . . . . .
PC Server 500 (Type 86XX) Power Supplies
Server 85, PS/2 9585-xKx, PS/2 9585-xNx,
Model 95, and 3511 . . . . . . . . . .
Model 3510
. . . . . . . . . . . . . .
Model 3532
. . . . . . . . . . . . . .
OBI DASD Hot Swap Storage Expansion
Enclosure
. . . . . . . . . . . . . .
Real-Time Clock Problems . . . . . . . . .
Remote Power-on Jumper (95) . . . . . . .
Running Automatic Configuration . . . . . .
ServerGuide CDs (Type 86XX) . . . . . . .
SCSI Controller on the System Board . . . .
SCSI Device Default Settings . . . . . . . .
Enable and Disable Settings
. . . . . .
Keep/Remove Settings
. . . . . . . . .
Changing the Settings
. . . . . . . . .
SCSI Diagnostic Tests . . . . . . . . . . .
SCSI ID (Using to Help Isolate Failures) . . .
Servicing LAN Stations (Workstations)
. . .
Software/Hardware Mismatch Problems . . .
Undetermined Problems
. . . . . . . . . .
VPD Codes Information
. . . . . . . . . .
Recording the Vital Product Data on a New
System Board
. . . . . . . . . . . .
System Board Locations . . . . . . . . . .
Model 25 System Board (Type 1)
. . . .
Model 25 System Board (Type 2)
. . . .
.
.
.
.
.
.
.
.
.
.
130
130
131
133
134
134
134
135
135
135
.
136
.
136
.
.
.
.
.
.
.
.
.
.
.
.
136
137
138
138
138
139
140
141
141
142
142
143
145
.
.
.
147
148
148
.
.
.
.
.
.
.
.
.
.
.
.
.
.
.
.
149
150
150
150
151
180
180
180
180
180
181
181
181
181
183
183
.
.
.
.
184
185
185
186
Contents
vii
Model 25-286 System Board
. . . . . . .
Model 25 SX System Board . . . . . . . .
Model 30 System Board
. . . . . . . . .
Model 30-286 System Board
. . . . . . .
Model 33 System Board
. . . . . . . . .
Model 35, 40 System Board . . . . . . . .
Model 50 System Board (Type 1)
. . . . .
Model 50 System Board (Type 2)
. . . . .
Models 50, 50Z 486SLC2 System Board
Upgrade
. . . . . . . . . . . . . . . .
Model 53 (9553-xBx) System Board . . . .
Model 55 System Board
. . . . . . . . .
Model 55 486SLC2 System Board Upgrade
Model 56, 57 (8556, 8557) System Board
.
Model 56, 57 (9556, 9557) System Board
.
Model 60 System Board
. . . . . . . . .
Model 65 System Board
. . . . . . . . .
Models 60, 65, and 80 486DX2 and 486DLC2
System Board Upgrade
. . . . . . . . .
Model 70 System Board, Reduced Size (16
MHz, 20 MHz)
. . . . . . . . . . . . .
Model 70 System Board, Full Size (16 MHz, 20
MHz) . . . . . . . . . . . . . . . . . .
Model 70 System Board (25 MHz) . . . . .
Model 70 486DX33 and 486DLC2 System
Board Upgrade . . . . . . . . . . . . .
Model 76, 77 (9576, 9577) System Board
.
Model 80 (041, 071, 111, 121, 311, 321)
System Board
. . . . . . . . . . . . .
Model 80 (A16, A21, A31) System Board
.
Server 85 (486) System Board
. . . . . .
PS/2 9585-xKx, and 9585-xNx System Board
Model 90 XP 486 System Board . . . . . .
Model 95 XP 486 System Board . . . . . .
Server 9595, 9595A
. . . . . . . . . . .
PC Server 486DX2 System Board . . . . .
PC Server Pentium System Board . . . . .
Parts Catalog . . . . . . . . . . . . . . . . . .
Model 25, 25-286, 25SX (8525) Parts . . . . .
Model 30 (8530) Parts . . . . . . . . . . . .
Model 30-286 (8530) Parts . . . . . . . . . .
Model 33 (9533) Parts . . . . . . . . . . . .
Model 35 (8535) Parts . . . . . . . . . . . .
Model 40 (8540) Parts . . . . . . . . . . . .
Model 50 (8550) Parts . . . . . . . . . . . .
Model 53 (9553) Parts . . . . . . . . . . . .
Model 55 (8555) SX Parts
. . . . . . . . . .
Model 56 (8556) Parts . . . . . . . . . . . .
Model 57 (8557) Parts . . . . . . . . . . . .
Model 60 (8560), 65 (8565), and 80 (8580) Parts
Model 70 (8570) Parts . . . . . . . . . . . .
Models 56, 76 (9556, 9576) Parts . . . . . . .
Models 57, 77, M57, M77 (9557, 9577) Parts
.
Model 90 (8590) Parts . . . . . . . . . . . .
viii
PS/2 Maintenance Manual
187
188
189
190
191
192
193
193
194
195
196
197
198
199
200
201
202
203
203
204
205
206
207
208
209
210
211
212
213
214
218
222
223
227
229
231
233
236
239
241
243
246
248
251
254
257
260
263
PC Server (8640) Parts
. . . . . . . . . . .
PC Server 500 (Type 86XX) Parts
. . . . . .
Server 85 (9585), Model 95 XP 486 (8595) Parts
Server 9595, PS/2 9585-xKx, and PS/2 9585-xNx
Parts
. . . . . . . . . . . . . . . . . . .
Server 9595A Parts
. . . . . . . . . . . . .
Model 3509 Parts
. . . . . . . . . . . . . .
Model 3510 Parts
. . . . . . . . . . . . . .
Model 3511 Parts
. . . . . . . . . . . . . .
Model 3532 Parts
. . . . . . . . . . . . . .
OBI DASD Hot Swap Storage Expansion
Enclosure Parts
. . . . . . . . . . . . . .
Common Parts . . . . . . . . . . . . . . . . .
486 DX, DX2, DLC2, SLC, SLC2 System Board
Upgrade Parts . . . . . . . . . . . . . . .
CD-ROM Drives . . . . . . . . . . . . . . .
Element Exchange Displays
. . . . . . . . .
External Diskette Drives
. . . . . . . . . . .
Keyboard/Mouse . . . . . . . . . . . . . . .
Miscellaneous Parts Kits . . . . . . . . . . .
Power Cords
. . . . . . . . . . . . . . . .
Rewritable Optical Drives . . . . . . . . . . .
ServerGuard Adapter Parts . . . . . . . . . .
SCSI Adapter Terminators . . . . . . . . . .
Tools and Miscellaneous . . . . . . . . . . .
Wireless LAN Adapter (ISA, Micro Channel Bus)
Wireless LAN Adapter (PCMCIA Type II)
. . .
Options and Adapters Matrix . . . . . . . . . . .
267
270
273
Hardware Maintenance Reference
. . . .
Safety Information
. . . . . . . . . . . .
General Safety
. . . . . . . . . . . .
Electrical Safety . . . . . . . . . . . .
Safety Inspection Guide
. . . . . . . .
Handling Electrostatic Discharge-Sensitive
Devices . . . . . . . . . . . . . . .
Grounding Requirements . . . . . . . .
Drive and Diskette Compatibility Matrix . . .
Hard Disk Drive Settings (ATA)
. . . . . .
Preparing a Hard Disk for Moving . . . .
Security
. . . . . . . . . . . . . . . . .
U-Bolt . . . . . . . . . . . . . . . . .
Cover Lock and Tamper-Evident Switches
Rear-Panel Security Option . . . . . . .
Passwords
. . . . . . . . . . . . . .
Removing a Power-On Password
. .
Additional Override Jumper Functions . .
Unattended Start Mode (Server Mode)
Override Jumpers on IML Systems
.
Privileged-Access Password
. . . . . .
Power-on Features
. . . . . . . . . .
System Features
. . . . . . . . . . . . .
Microprocessors . . . . . . . . . . . .
Processor Boards (70) . . . . . . . . .
277
280
285
287
289
291
293
295
295
296
297
298
298
300
304
305
306
308
308
309
310
311
.
.
.
.
.
.
.
.
.
.
.
.
.
.
.
363
365
365
366
368
.
.
.
.
.
.
.
.
.
.
.
.
.
.
.
.
.
.
.
.
.
.
.
.
.
.
.
.
.
.
.
.
.
.
.
.
.
.
.
.
.
.
.
.
.
.
.
.
.
.
.
.
.
.
.
.
.
369
369
370
371
374
375
375
375
375
376
376
378
378
378
378
380
380
380
380
Contents
ix
Processor Boards (90, 95) . . . . . . . . . .
NVRAM and NVRAM Extension
. . . . . . .
POST Overview . . . . . . . . . . . . . . .
POST and BIOS in ROM
. . . . . . . . .
POST and BIOS in IML . . . . . . . . . .
POST and BIOS in FLASH
. . . . . . . .
Errors during POST . . . . . . . . . . . .
Reference and Diagnostic Diskettes . . . . . .
Accessing System Programs and Starting
Diagnostic Tests . . . . . . . . . . . . . .
Replacing Hard Disk Drives That Have a
System Partition
. . . . . . . . . . . .
QAPlus/PRO Diagnostics . . . . . . . . . . .
Power-On Self-Test (POST) . . . . . . . .
POST Beep Codes . . . . . . . . . . . .
Test Programs . . . . . . . . . . . . . .
Error Messages
. . . . . . . . . . . . .
Return Codes
. . . . . . . . . . . . . .
Using the Test Programs . . . . . . . . . . .
Program Navigation . . . . . . . . . . . .
Using the First Letter of a Menu Choice
. .
Using the Function Keys
. . . . . . . . .
Command Line Options . . . . . . . . . .
Viewing the Test Groups
. . . . . . . . .
Scripting . . . . . . . . . . . . . . . . .
Changing Logical Unit Numbers . . . . . .
Test Group Specifications . . . . . . . . .
Starting the QAPlus/PRO Diagnostics Diskette
Module Testing Mode . . . . . . . . . . .
Running Selected Module Tests . . . . . .
Running All Selected Modules . . . . . . .
Changing Selected Tests in Test Groups . .
Running an Individual Test
. . . . . . . .
Stopping the Tests . . . . . . . . . . . .
Using the System Utilities . . . . . . . . . . . .
Formatting Diskettes
. . . . . . . . . . .
Using the Low-Level Format Program
. . .
When To Use the Low-Level Format Program
Preparing the Hard Disk Drive for Use . . .
File Editor
. . . . . . . . . . . . . . . .
File Edit Function Key Usage
. . . . . . .
QAPlus/PRO Diagnostics Control Keys
. .
Disk Array System . . . . . . . . . . . . . .
Storage Capacity . . . . . . . . . . . . .
Data Protection . . . . . . . . . . . . . .
Hot-Spare Drive
. . . . . . . . . . . . .
Hot-Spare Drive Replacement . . . . . . .
Bay IDs
. . . . . . . . . . . . . . . . .
Configuration . . . . . . . . . . . . . . .
Saving Disk Array Configuration to Diskette
Restoring the Disk Array Configuration . . .
Recording the Vital Product Data on a New
System Board
. . . . . . . . . . . . . . .
Upgradable POST and BIOS . . . . . . . . .
x
PS/2 Maintenance Manual
380
381
381
382
382
382
383
383
384
385
386
386
387
387
388
388
389
389
389
389
390
390
391
391
391
391
392
392
392
392
393
393
393
393
394
394
394
394
394
396
396
397
397
398
398
398
398
399
399
400
400
PCMCIA Adapter (Model 33) . . . . . . . .
Video . . . . . . . . . . . . . . . . . . .
Non-IBM Displays . . . . . . . . . . . . .
Serial Port . . . . . . . . . . . . . . . . .
Parallel Port . . . . . . . . . . . . . . . .
Supported Cables . . . . . . . . . . . . .
Diskette-Drive Controller . . . . . . . . . .
Keyboard and Pointing-Device Connectors
.
System Memory
. . . . . . . . . . . . . . .
System-Board Memory . . . . . . . . . . .
Memory-Expansion Adapters . . . . . . . .
Memory Errors . . . . . . . . . . . . . . .
Unique Memory Information (90, 95)
. . . .
Model 90 Memory . . . . . . . . . . . . .
Model 95 Memory . . . . . . . . . . . . .
Memory Configurations (90, 95)
. . . . . .
Error Detection (90, 95)
. . . . . . . . . .
Resolving Memory-Address Conflicts
. . . .
Changing the Software Configuration . . . .
Changing the System Configuration . . . . .
SCSI System Information
. . . . . . . . . . .
SCSI Hard Disk Drives and Devices
. . . .
Understanding SCSI ID Numbers . . . . . .
Selecting a SCSI ID . . . . . . . . . . . .
Setting a SCSI ID
. . . . . . . . . . . . .
SCSI ID Switch Settings
. . . . . . . .
SCSI ID Jumper Settings . . . . . . . .
2GB SCSI 16-Bit 68-Pin Hard Disk Drive ID
Switch Settings . . . . . . . . . . . .
Optical-Head Lens Cleaning Procedure . . .
Setting the Motor-Start Jumper . . . . . . .
Terminator Function . . . . . . . . . . . .
16-Bit AT Fast SCSI Adapter Switch Settings
Interrupt Settings
. . . . . . . . . . . . .
Memory Address Switch Settings . . . . . .
I/O Address . . . . . . . . . . . . . . . .
Internal Devices Attached to an Adapter .
External Devices Attached to an Adapter .
Terminators on SCSI Adapters
. . . . .
Terminators on System Boards
. . . . .
Selectable Drive-Startup Function . . . . . .
To Change the Startup Sequence . . . .
System-Unit Power Supplies . . . . . . . . . .
Power-Supply Features
. . . . . . . . . .
Operating Voltage Range . . . . . . . .
No-Load Operation . . . . . . . . . . .
Over-Current Protection . . . . . . . . .
Short-Circuit Protection . . . . . . . . .
Over-Voltage Protection . . . . . . . . .
Under-Voltage Protection . . . . . . . .
Automatic Restart
. . . . . . . . . . .
Power-Line Disturbances
. . . . . . . .
Surge Protection . . . . . . . . . . . .
Safety . . . . . . . . . . . . . . . . .
.
.
.
.
.
.
.
.
.
.
.
.
.
.
.
.
.
.
.
.
.
.
.
.
.
.
.
400
401
402
403
404
404
404
404
405
405
405
405
406
406
406
407
407
408
408
408
409
409
409
409
411
411
412
.
.
.
.
.
.
.
.
.
.
.
.
.
.
.
.
.
.
.
.
.
.
.
.
.
.
412
413
414
414
415
415
415
416
417
417
418
419
420
421
422
422
422
422
422
422
422
422
422
423
424
424
Contents
xi
Current Leakage . . . . . . . . . . . .
Reliability
. . . . . . . . . . . . . . .
Uninterruptible Power Devices . . . . . .
System Partition
. . . . . . . . . . . . . . .
Starting System Program Diagnostics . . . .
Updating the System Programs . . . . . . .
Upgrading the System Partition Version . . .
Backing up the System Partition
. . . . . .
Restoring the System Partition
. . . . . . .
Running Automatic Configuration . . . . . .
Recording a Customized Configuration
. . .
ASCII Terminals
. . . . . . . . . . . . . . .
ASCII Terminal Setup and Menu Selection
.
ASCII Terminal Configuration . . . . . . . .
Console Selection
. . . . . . . . . . .
Operation
. . . . . . . . . . . . . . .
Error Messages
. . . . . . . . . . . .
96 8N1 Error Message
. . . . . . . . .
System Error Log . . . . . . . . . . . . . . .
Viewing the Error Log
. . . . . . . . . . .
Types of Errors Detected . . . . . . . . . .
Application Program Errors
. . . . . . .
Processor Errors . . . . . . . . . . . .
System Memory Errors
. . . . . . . . .
Micro Channel Adapter Errors . . . . . .
Error Storage
. . . . . . . . . . . . . . .
Application
. . . . . . . . . . . . . . . .
Dumping Extended Diagnostic Data Information
PS/2 System Specifications
. . . . . . . . . .
PS/2 - AT Bus . . . . . . . . . . . . . . .
PS/2 - Micro Channel (Non IML)
. . . . . .
PS/2 - Micro Channel (IML)
. . . . . . . .
Acronyms, Abbreviations, and Terms . . . . . .
We Want Your Comments!
. . . . . . . . . .
Do You Need Technical References?
. . . . .
Problem Determination Tips . . . . . . . . . .
Phone Numbers, U.S. and Canada . . . . . . .
Notices . . . . . . . . . . . . . . . . . . . .
Trademarks . . . . . . . . . . . . . . . .
Index
xii
.
.
.
.
.
.
.
.
.
.
.
424
424
424
425
425
426
426
427
428
429
429
430
430
431
431
432
432
432
433
433
433
433
433
433
433
434
434
434
435
435
436
437
438
440
441
442
443
445
445
. . . . . . . . . . . . . . . . . . . . .
447
PS/2 Maintenance Manual
.
.
.
.
.
.
.
.
.
.
.
.
.
.
.
.
.
.
.
.
.
.
.
.
.
.
.
Hardware Maintenance Service
This part of the manual contains the general checkout
procedures, related service procedures, Symptom-to-FRU
indexes, and parts listings for PS/2 products.
Note: This manual and the diagnostic tests are intended
to test only IBM products. Non-IBM products of
any kind including adapter cards, accelerator
boards, options, or non-IBM devices, can give false
errors and invalid computer responses. If you
remove a non-IBM device and the symptom goes
away, the problem is with the device you removed.
Warning: The drives in the computer you are servicing
might have been rearranged or the drive startup sequence
changed. Be extremely careful during write operations
such as copying, saving, or formatting. Data or programs
can be overwritten if you select an incorrect drive.
FRU Replacement Strategy
Use the following strategy to prevent unnecessary FRU
replacement and service expense:
If you are instructed to replace a FRU and that does
not correct the problem, reinstall the original FRU
before you continue.
Some computer have both a processor board and a
system board. If you are instructed to replace either
the processor board or the system board, and the first
board that you replaced does not correct the problem,
reinstall the original board, then replace the other
(processor or system) board.
Note: Pressing down on the blue levers on the
Model 90/95 processor board does not fully
seat the processor board into the system
board connector. To ensure that the
processor board is fully seated, press down
firmly on the middle of the board until it is fully
seated.
If an adapter or device consists of more than one
FRU, an error code may be caused by any of the
FRUs. Before replacing the adapter or device,
remove the FRUs, one by one, to see if the
symptoms change. Replace only the FRU that
changed the symptoms.
Hard Disk Drive Replacement Strategy
Always try to run a low-level format before replacing a hard
disk drive (see “Using the Low-Level Format Program” on
page 129).
Copyright IBM Corp. 1994
1
Introduction
Before using the General Checkout procedures and
Symptom-to-FRU Indexes, read the following information.
The two types of PS/2 computers are:
At Bus
Micro Channel
Note
See “PS/2 System Specifications” on page 435 for a
description of IBM PS/2 Computers and their features.
Depending on the PS/2 model computer you are servicing,
you need to be familiar with the following diagnostic
procedures.
The three types of diagnostics are:
AT Bus Diagnostics
Micro Channel Diagnostics
QAPlus/PRO Diagnostics
The General Checkout procedures are:
“General Checkout (AT Bus)” on page 3
“General Checkout (Micro Channel)” on page 19
“General Checkout (QAPlus/PRO)” on page 59
The Symptom-to-FRU Indexes are:
“Symptom-to-FRU Index (AT Bus)” on page 12
“Symptom-to-FRU Index (Micro Channel)” on page 26
“Symptom-to-FRU Index (QAPlus/PRO)” on page 61
Important
Before running diagnostics, run a virus checking
program. If the computer you are servicing has been
infected with a PC virus, a virus checking program can
find the virus before it causes more damage.
2
PS/2 Maintenance Manual
General Checkout (AT Bus)
This general checkout procedure supports the following
PS/2 Models:
25, 25 SX, 25-286, 30, 30-286, 33, 35, 40, and 55.
Before using this checkout procedure, be sure to read
the information under “Introduction” on page 2.
001
1.
2.
3.
4.
5.
Power-off the computer and all external devices.
Check all cables and power cords.
Make sure there are no diskettes in the drives.
Power-on all external devices.
Power-on the computer.
DID YOU RECEIVE A POST ERROR CODE?
Yes No
002
Go to Step 014 on page 4.
003
IS THE ERROR 162?
Yes No
004
Go to Step 014 on page 4.
005
IS THE DIAGNOSTIC PROGRAM LOADED FROM THE
LAN?
Yes No
006
Insert the Advanced Diagnostics Diskette. Go to
Step 009.
007
– Load the diagnostic program from the server.
DID THE PROGRAM LOAD SUCCESSFULLY?
Yes No
008
If the problem occurred during the Remote Initial
Program Load (RIPL), replace the Network Adapter.
If it did not occur during RIPL, go to
“Symptom-to-FRU Index (AT Bus)” on page 12.
009
(Step 009 continues)
Hardware Maintenance Service
3
(CONTINUED)
009 (continued)
– Press Ctrl+Alt+Del and check for the following
responses:
1. One or two short beeps.
2. IBM logo screen appears.
DID YOU RECEIVE THE RESPONSES LISTED ABOVE?
Yes No
010
Go to “Symptom-to-FRU Index (AT Bus)” on
page 12. If that does not correct the problem, go to
“Undetermined Problems” on page 183.
011
– Press Enter.
HAS THE CONFIGURATION BEEN INTENTIONALLY
CHANGED?
Yes No
012
Type N, then go to Step 020 on page 5.
013
Type Y to run Automatic Configuration and verify the error
is no longer present. If you return to this point again, go to
Step 011 and type N.
014
IS THE DIAGNOSTIC PROGRAM LOADED FROM THE
LAN?
Yes No
015
Insert the Advanced Diagnostics Diskette. Go to
Step 018 on page 5.
016
– Load the diagnostic program from the server.
DID THE PROGRAM LOAD SUCCESSFULLY?
Yes No
017
If the problem occurred during the Remote Initial
Program Load (RIPL), replace the Network Adapter.
If it did not occur during RIPL, go to
“Symptom-to-FRU Index (AT Bus)” on page 12.
018
(Step 018 continues)
4
PS/2 Maintenance Manual
018 (continued)
– Press Ctrl+Alt+Del and check for the following
responses:
1. One or two short beeps.
2. IBM logo screen appears.
DID YOU RECEIVE THE RESPONSES LISTED ABOVE?
Yes No
019
Go to “Symptom-to-FRU Index (AT Bus)” on
page 12. If that does not correct the problem, go to
“Undetermined Problems” on page 183.
020
– Press Enter.
– Select test system.
– Select system checkout.
Go to “Related Service Information” on page 107 for:
Incorrect keyboard responses
Incorrect printer responses
Incorrect display responses (jittering, rolling,
shifting, or out of focus)
IS THE LIST OF INSTALLED DEVICES CORRECT?
Yes No
021
Go to “Installed Devices List” on page 11.
022
– Run the advanced diagnostic tests.
DID THE TESTS IDENTIFY A FAILURE?
Note: If the test stops and you cannot continue, replace
the last device being tested.
Yes
No
023
You may have an intermittent problem:
Check for damaged cables and connectors.
Reseat all adapters, drives, and modules.
Check the system unit fan for proper operation.
Start an error log using a DOS formatted
diskette and run the tests multiple times.
024
Follow the instructions on the display.
If that does not correct the problem, go to
“Symptom-to-FRU Index (AT Bus)” on page 12.
Hardware Maintenance Service
5
Memory Problems (8086 Computers)
Go to “Memory Problems (80286 to 80486 Computers)” on
page 9 for models: 25, 25 SX, 25 286, 30, 30 286, 33,
35, and 40.
PARITY CHECK 1 indicates that memory on the system
board has failed. If the system has a total of 512KB
memory installed (8525), replace the memory module
packages. If the system has a total of 640KB memory
installed and the address (number displayed below
PARITY CHECK 1) is less than 20000, replace the
optional memory modules (8525), or the system board
(8530). Otherwise, replace the memory module (8525) or
S1 and S2 (8530).
PARITY CHECK 2 indicates that an adapter memory
module has failed. Go to “Undetermined Problems” on
page 183.
001
Memory errors are displayed as:
AAAAAA BB CCCC 20X
To isolate a memory failure, answer the following
questions.
DID YOU RECEIVE A “205 MEMORY ERROR”
MESSAGE DURING POST OR WHEN RUNNING THE
MEMORY TESTS?
Yes No
002
Go to Step 011.
003
IS THE SYSTEM A TYPE 8530?
Yes No
004
Go to Step 006.
005
Replace the system board.
6
PS/2 Maintenance Manual
006
IS CCCC FOUR ZEROS (0000)?
Yes No
007
For any C in CCCC that is not zero, replace the
corresponding module as shown:
C
C
C
C
U35 U34 U22 U16
008
WAS THE SIXTH DIGIT IN AAAAAA 1, 3, 5, 7, 9, B, D,
or F?
Yes No
009
Replace memory module ZM1.
010
Replace memory module ZM2.
011
IS BB AN 01?
Yes No
012
IS CCCC FOUR ZEROS?
Yes No
013
ARE THE LAST TWO Cs IN CCCC ZEROS
(00)?
Yes No
014
Replace Memory Module Package 1
(8525) or S2 (8530).
015
Replace Memory Module Package 2 (8525) or
S1 (8530).
016
(Step 016 continues)
Hardware Maintenance Service
7
(CONTINUED)
016 (continued)
WAS THE SIXTH DIGIT IN AAAAAA 1, 3, 5, 7, 9,
B, C, D, OR F?
Yes No
017
Replace Memory Module Package 1 (8525) or
S2 (8530).
018
Replace Memory Module Package 2 (8525) or S1
(8530).
019
The adapter memory failed. Go to “Undetermined
Problems” on page 183.
8
PS/2 Maintenance Manual
Memory Problems (80286 to 80486
Computers)
001
1. Power-off the computer and wait 5 seconds.
If your model has a diskette drive, insert the
Advanced Diagnostics Diskette into the diskette
drive.
If not, contact the LAN administrator to load the
diagnostic program from the LAN.
2. Power-on the computer.
3. Make a note of any POST errors you receive.
(Disregard the 164 memory size errors.)
DID YOU RECEIVE A XXXXXX XXXX 201 POST
ERROR?
Yes No
002
Press F1 to continue.
– Run the memory tests. Use the RUN TESTS
ONE TIME option.
DID THE MEMORY TESTS COMPLETE WITHOUT
AN ERROR?
Yes No
003
Follow the instructions on the display.
004
Your computer memory is now functioning correctly.
If you suspect an intermittent problem, start an error
log using a DOS formatted diskette.
005
Note: Power-off the computer before removing or
replacing parts.
Press F1 to continue.
– Run the memory tests. Use the RUN TESTS ONE
TIME option. If you cannot run the memory test or the
test does not find a problem, use the following
procedure to find the problem.
1. Using a known good memory pack, exchange each
pack, one at a time, and repeat the memory
diagnostic test until you find the defective pack
(256KB and 1MB packs are not interchangeable).
Replace only the defective packs.
2. If all memory packs have been exchanged, and the
problem remains, replace the system board.
Hardware Maintenance Service
9
Memory Problems (PC Server - 8640)
The PC Server (8640) has four, 36-bit (72-pin) SIMM
sockets on the system board. The system board can
accommodate memory from 8MB up to 128MB (192MB on
some models).
The following are the memory requirements for the PC
Server computer:
At least two SIMM sockets must be filled. Start with
bank 0, then work your way up.
The SIMMs must be rated at 70NS or better.
Recommended that the SIMMs have tin-lead
contacts.
Banks 0 and 1 must have the same size memory
installed.
If memory is installed in banks 2 and 3, the memory
in banks 2 and 3 must be the same size.
10
PS/2 Maintenance Manual
Installed Devices List
If an adapter or device is missing from the Installed
Devices list and you are able to add it to the list, do so and
continue with the diagnostic tests.
If an adapter or device is missing from the installed
devices list and you cannot add it to the list, you might
have one of the following conditions:
The diagnostic code for the missing device is not on
your Advanced Diagnostics diskette.
The missing device is a 5.25-Inch External Diskette
Drive Adapter, or another unrecognizable adapter.
The missing device is defective.
The bus adapter is defective.
The adapter or device is not an IBM product.
If the number of drives installed in the computer differs
from the number shown in the installed devices list, an
error can occur during the diagnostic tests. Restart the
computer and correct the drive information in the Set
Configuration menu before running the diagnostic tests.
Warning
For some models, a customized setup configuration
(other than default settings) might exist on the
computer you are servicing. Running Automatic
Configuration can alter those settings. Note the
current configuration settings (using the View
Configuration option) and verify that the settings are in
place when service is complete.
Hardware Maintenance Service
11
Symptom-to-FRU Index (AT Bus)
This index supports the following PS/2 Models:
25, 25 SX, 25-286, 30, 30-286, 33, 35, 40, 55.
Always start with “General Checkout (AT Bus)” on
page 3.
For information on:
Go to:
Additional Service help. (For
example, voltage checks, or
0S/2 Trap errors)
“Related Service
Information” on page 107.
Possible software and
hardware mismatch
problems (not repairable by
replacing FRUs).
“Software/Hardware
Mismatch Problems” on
page 181.
Starting the System
Programs
“Starting System Program
Diagnostics” on page 425.
Erasing Power-On
Passwords
“Removing a Power-On
Password” on page 376.
Memory Address Conflicts
“Resolving
Memory-Address Conflicts”
on page 408.
No-Beep Symptoms
Symptom/Error
FRU/Action
No beep, power-on indicator
does not come on, and fan
does not run. (Check
voltage selector switch
setting)
1. Power Supply
No beep during POST
(Check voltage selector
switch setting)
1. System Board
2. Power Supply
3. Display Assembly
(8525)
4. Memory Module (8525)
5. Any Adapter
6. Bus Adapter
No beep, fan runs,
power-on indicator is on,
and computer hangs during
POST with a message
displayed.
1. System Board
2. Power Supply
No beep and the computer
is otherwise functional.
1. Speaker Assembly
12
PS/2 Maintenance Manual
Beep Symptoms
Symptom/Error
FRU/Action
One long and two short
beeps during POST
1. System Board
2. Display Adapter
More than one beep during
POST
1. System Board
2. Any Adapter
Continuous beep
1. System Board
Repeated short beeps
1. Keyboard
(stuck key?)
2. Keyboard Cable
3. System Board
†
If this symbol is shown next to an error (above), go to
“Related Service Information” on page 107.
‡
If this symbol is shown next to an error (above), go to
“Memory Problems (8086 Computers)” on page 6.
Miscellaneous Symptoms
Symptom/Error
FRU/Action
Blank or unreadable display
(Check display) †
1.
2.
3.
4.
5.
System Board
Power Supply
Display Adapter
Display Assembly
System Board Video
Cable
Other display problems
(Check display) †
1.
2.
3.
4.
System Board
Display Adapter
Display
System Board Video
Cable
Insert Diskette Icon
appears, or system enters
BASIC
1.
2.
3.
4.
Diskette Drive
System Board
Diskette Cable
Network Adapter
Bad Diskette Icon
1.
2.
3.
4.
Diskette
Diskette Drive
System Board
Diskette Cable
Incorrect memory size
during POST, or Parity
Check 1
(Check memory) ‡
1. System Board
Parity Check 2
(Check memory) ‡
1.
2.
3.
4.
Adapter Memory
Memory Adapter
Bus Adapter
System Board
†
If this symbol is shown next to an error (above), go to
“Related Service Information” on page 107.
‡
If this symbol is shown next to an error (above), go to
“Memory Problems (8086 Computers)” on page 6.
Hardware Maintenance Service
13
Symptom/Error
FRU/Action
Serial or Parallel port device
failure
1. Device (self test OK?)
2. System Board
3. Bus Adapter
XXXX ROM Error
1. Any Adapter
Some or all of the keys on
the keyboard do not work.
1. Keyboard
2. System Board
3. Keyboard Cable
Real Time Clock loses time.
(This is not always a
hardware failure. See
“Real-Time Clock Problems”
on page 150)
1. Bus Adapter
2. Clock Module
3. System Board
†
If this symbol is shown next to an error (above), go to
“Related Service Information” on page 107.
‡
If this symbol is shown next to an error (above), go to
“Memory Problems (8086 Computers)” on page 6.
14
PS/2 Maintenance Manual
Numeric Error Codes
Symptom/Error
FRU/Action
131XX
(Cassette wrap failure)
(Information only)
161, 163, 165
1.
2.
3.
4.
5.
Set Time and Date
Bus Adapter
Clock Module
Battery
System Board
162
1. Run Setup
Run Automatic
Configuration
2. Clock Module
3. System Board
162
(and unable to run
advanced diagnostics)
1. Diskette Drive
2. System Board
3. Diskette Drive Cable
164
(Check memory) ‡
1. Run Setup
Run Automatic
Configuration
2. System Board
199
1. Any Device
1XX
1. System Board
2XX
(Check memory) ‡
1. System Board
302
1. Is the Keylock
Locked?
2. Keylock Assembly
3. System Board
3XX
(not listed above)
1. Keyboard
2. System Board
3. Keyboard Cable
5XX
1. System Board
2. Display Adapter
602
1. System Board
2. Diskette Drive
3. Diskette Drive Cable
604, 662
1. Wrong Diskette Drive
Type
663
1. Wrong Media Type
6XX
(not listed above)
1.
2.
3.
4.
5.
Diskette Drive
External Drive Adapter
System Board
Power Supply
Display Assembly
(8525)
6. Diskette Drive Cable
†
If this symbol is shown next to an error (above), go to
“Related Service Information” on page 107.
‡
If this symbol is shown next to an error (above), go to
“Memory Problems (8086 Computers)” on page 6.
Hardware Maintenance Service
15
Symptom/Error
FRU/Action
7XX
1. Math Coprocessor
2. System Board
9XX †
1. Printer
2. System Board
1002
1. Alternate Parallel
Adapter-Jumpers
2. Alternate Parallel
Adapter
1047
1. 16 Bit AT SCSI Fast
Adapter
10XX
(not listed above)
1. Alternate Parallel
Adapter
2. Bus Adapter
11XX
1. System Board
1202
1. Alternate Serial
Adapter-Jumpers
2. Alternate Serial
Adapter
3. Bus Adapter
12XX
1. Alternate Serial
Adapter
2. Bus Adapter
13XX
1. Game Control
Adapter
2. Bus Adapter
14XX †
1. Printer
15XX
1. SDLC Adapter
2. Bus Adapter
16XXXX
1. 36/38 Workstation
Adapter
17XX
(Model 9533 systems may
produce false 1702 and
1713 error. If no other
symptoms are detected,
ignore these errors.)
1.
2.
3.
4.
5.
209X
1. Diskette Drive
2. Diskette Drive Cable
3. 16 Bit AT SCSI Fast
Adapter
20XX
(not listed above)
1. BSC Adapter
2. Bus Adapter
21XX
1. SCSI Device
2. 16 Bit AT SCSI Fast
Adapter
3. Alternate BSC Adapter
4. Bus Adapter
Hard Disk Drive
System Board
Hard Disk Cable
Power Supply
Display Assembly
(8525)
†
If this symbol is shown next to an error (above), go to
“Related Service Information” on page 107.
‡
If this symbol is shown next to an error (above), go to
“Memory Problems (8086 Computers)” on page 6.
16
PS/2 Maintenance Manual
Symptom/Error
FRU/Action
2401, 2402
(If screen colors change)
1. Display
2401, 2402
(If screen colors are OK)
1. System Board
2. Display
2409
1. Display
2410
1. System Board
2. Display
28XX
1. 3278/79 Adapter
2. Coaxial Cable
3. Bus Adapter
3015, 3040
1.
2.
3.
4.
5.
Network Attached?
LF Translator
Cable Problem
PC Network Adapter
Bus Adapter
30XX
1.
2.
3.
4.
PC Network Adapter
LF Translator
Cable Problem
Bus Adapter
3115, 3140
1. Network Attached?
2. LF Translator
3. Alternate PC
Network-Adapter
4. Cable Problem
5. Bus Adapter
31XX
1. Alternate PC
Network-Adapter
2. LF Translator
3. Cable Problem
4. Bus Adapter
36XX
1. GPIB Adapter
2. Bus Adapter
38XX
1. DAC Adapter
2. Bus Adapter
64XX
(See “Network Service
Procedures” on page 74)
1. Ethernet Adapter
74XX
1. Display Adapter
2. Bus Adapter
80XX
1. PCMCIA Adapter
84XX
1. Speech Adapter
2. Speech Control
Assembly
3. Bus Adapter
85XX
1. 2MB Exp. Memory
Adapter
2. Bus Adapter
†
If this symbol is shown next to an error (above), go to
“Related Service Information” on page 107.
‡
If this symbol is shown next to an error (above), go to
“Memory Problems (8086 Computers)” on page 6.
Hardware Maintenance Service
17
Symptom/Error
FRU/Action
86XX
1. Mouse
2. System Board
89XX
1. PC Music Adapter
2. MIDI Adapter Unit
3. Bus Adapter
106X1
1. Set Configuration
2. Ethernet Adapter
10635
1. Power-off the
computer, wait six
seconds; then
power-on the
computer.
2. Ethernet Adapter
10651, 10660
1. Check Cables
2. Ethernet Adapter
106XX
(not listed above)
(see “Network Service
Procedures” on page 74)
1. Ethernet Adapter
129XX
1. Processor Board
2. Cache Kit
3. System Board
166XX, 167XX
(See “Network Service
Procedures” on page 74)
1. Token Ring Adapter
2. System Board
3. Bus Adapter (if used)
243XX
1. System Board
027801XX to 027879XX
1. Personal Dictation
System Adapter
2. System Board
027880XX to 027889XX
1. External FRU
(Speaker, Microphone)
I999XXXX
(There is an optional SCSI
adapter installed)
1. Default Hard Disk
2. SCSI Adapter
3. SCSI Cable
†
If this symbol is shown next to an error (above), go to
“Related Service Information” on page 107.
‡
If this symbol is shown next to an error (above), go to
“Memory Problems (8086 Computers)” on page 6.
18
PS/2 Maintenance Manual
General Checkout (Micro Channel)
This general checkout procedure supports the following
PS/2 Models:
50, 55, 56, 57, M57, 60, 65, 70, 76, 77, M77, 80, 85,
90, and 95.
Before using this General Checkout procedure, be
sure to read the information under “Introduction” on
page 2.
001
–
–
–
–
–
–
Power-off the computer and all external devices.
Check all cables and power cords.
Make sure there are no diskettes in the drives.
Set all display controls to the middle position.
Power-on all external devices.
Power-on the computer.
Notes:
1. On some computers, two tamper-evident switches
are installed on the adapter guide located at the
lower-left front of the system unit frame. Both
switches must be in the “up” or “on” position to
supply power to the system. (Move the blue slider
up until it contacts the metal actuator arms of the
two switches. The switches “click” when activated.)
If the switches fail to activate, they must be
adjusted or replaced. To adjust the switches,
remove the adapter guide with the switches from
the system unit. Form the actuator arms so the
switches activate when the slider is moved up half
the distance of its travel.
2. If you get a POST error code, press the pause key
(while the error code is on the screen). Write down
any error codes that are displayed, then press F1
to continue.
3. If the computer hangs with a POST error, go to
“Symptom-to-FRU Index (Micro Channel)” on
page 26.
4. On some Model 95 computers, the customer has
the ability to suppress the Press F1 for Setup and
Diagnostics prompt. If the prompt does not to
appear, continue with this MAP.
– Check for the following responses:
1. One or two short beeps.
2. Readable instructions or the Main Menu.
DID YOU RECEIVE THE CORRECT RESPONSES?
Yes No
002
(Step 002 continues)
Hardware Maintenance Service
19
(CONTINUED)
002 (continued)
Find the failure symptom in the “Symptom-to-FRU
Index (Micro Channel)” on page 26.
003
ARE ANY EXTERNAL SCSI DEVICES ATTACHED TO
THE SYSTEM?
Yes No
004
Go to Step 007.
005
DID THE POWER-ON GOOD INDICATOR FOR ALL OF
THE EXTERNAL SCSI DEVICES COME ON?
Yes No
006
Check the voltages. Go to “Related Service
Information” on page 107.
007
DID YOU RECEIVE A POST ERROR CODE?
Yes No
008
Note: You might have an intermittent failure. Go to
“System Error Log” on page 25 to see if any
errors are logged. If no errors are logged, or
if the error log is not supported, go to Step
022 on page 22.
009
IS THE FIRST POST ERROR CODE 0106XXXX,
0166XXXX, OR 0167XXXX?
Yes No
010
Go to Step 012 on page 21.
011
There is a network communication problem. Go to
“Symptom-to-FRU Index (Micro Channel)” on page 26 and
find the error code. If you suspect another type of network
problem, or you just want to test the network adapter, go
to “Network Service Procedures” on page 74.
012
(Step 012 continues)
20
PS/2 Maintenance Manual
012 (continued)
DOES THE SYSTEM HAVE A SCSI ADAPTER OR
DEVICE INSTALLED OR CONNECTED EXTERNALLY?
Yes No
013
Go to Step 022 on page 22.
014
Go to Step 015.
015
IS THE FIRST POST ERROR CODE WITHIN THE
RANGE OF 02080000 190I TO 02470000 190I?
Important: If your error code is not in the range or is
not followed by a 190I, answer No.
Yes No
016
Go to Step 022 on page 22.
017
– Start the system programs.
Note: For instructions on starting the system programs,
see “Starting System Program Diagnostics” on
page 425.
– Verify the “Enable/Disable” settings are correct. (If you
are not familiar with these settings, see “SCSI Device
Default Settings” on page 180.)
Note: If you receive a warning on the screen regarding
the “Keep/ Remove” settings, follow the
instructions on the screen before continuing.
DID YOU HAVE TO CORRECT ANY OF THE
ENABLE/DISABLE SETTINGS?
Yes No
018
Go to “Symptom-to-FRU Index (Micro Channel)” on
page 26. Before replacing any SCSI devices, verify
there are no duplicate SCSI ID settings on the same
bus.
019
– Restart the computer (power-off, then on).
(Step 019 continues)
Hardware Maintenance Service
21
(CONTINUED)
019 (continued)
DID THE POST ERROR REMAIN?
Yes No
020
If you suspect another problem, or you want to run
System Checkout, go to Step 022.
021
Go to “Symptom-to-FRU Index (Micro Channel)” on
page 26.
022
– Start the system programs.
Note: For instructions on starting the system programs,
see “Starting System Program Diagnostics” on
page 425.
– If you are not at the Main Menu, follow the instructions
on the screen to advance to the Main Menu, then press
Ctrl+A and run system checkout.
Go to “Related Service Information” on page 107 for:
Undetermined Problems (computer hangs)
Incorrect keyboard responses
Incorrect printer responses
Incorrect display responses (jittering, rolling,
shifting, changing colors, or out of focus)
Note: If a minimum of 896KB of memory is not active,
the diagnostic tests cannot be loaded.
IS THE DEVICES LIST CORRECT?
Yes No
023
Go to “Devices List” on page 23. If that does not
correct the problem, go to “Undetermined Problems”
on page 183.
024
– Run the advanced diagnostic tests.
DID THE TESTS IDENTIFY A FAILURE?
Note: If the tests start but do not complete and you
cannot continue, replace the device that was being
tested.
Yes
No
025
Note: If you noticed an error symptom or if you
received any POST error codes when the
computer was powered-on, go to
22
PS/2 Maintenance Manual
“Symptom-to-FRU Index (Micro Channel)” on
page 26.
You might have an intermittent problem:
Check for damaged cables or connectors.
Reseat all adapters, drives, and modules.
Check the system fan.
Go to “Power Supply Voltage Check” on
page 138 to check voltages.
Start an error log and run the tests multiple
times.
If you did not find a problem, go to
“Undetermined Problems” on page 183.
026
Follow the instructions on the screen. If that does not
correct the problem, go to “Symptom-to-FRU Index (Micro
Channel)” on page 26.
Devices List
At the start of the diagnostic tests, the Devices List is
displayed. Normally, all adapters and devices installed in
the computer appear on the list.
If an adapter or device that appears on the list is not
installed in the computer, use the procedure in
“Undetermined Problems” on page 183 to find the
problem.
If an adapter or device that is installed in the
computer does not appear on the list, you have one
of the following conditions:
– The diagnostic (DGS) files for the missing device
are not loaded onto the System Partition (run
Copy an option diskette using the option
diskette).
– The SCSI controller failed (on the system board
or SCSI adapter).
– An unrecognizable adapter is installed.
– The missing device is defective or it requires an
additional diagnostic diskette or service manual.
– A defective adapter caused the device to
disappear from the list.
If you are sure that the DGS files are loaded and all the
options are supported, note which type of device (SCSI or
non-SCSI) is missing from the Devices List, then continue.
Hardware Maintenance Service
23
Missing Non-SCSI Device
If a non-SCSI device is missing from the list, replace it.
If more than one non-SCSI device is missing, isolate them
one at a time until you find the device causing the failure.
Note: If the number of diskette drives shown on the list is
incorrect, an error can occur during the tests. If
this is the case, restart the computer, select View
Configuration from the Set Configuration menu
and verify that the drive information is correct, then
continue testing.
Missing SCSI Device
Note: On some models with SCSI on the system board,
slot number 0 or 1 designates the logical position
for the SCSI controller. Diagnostics might instruct
you to replace the SCSI adapter in slot 0, or 1,
leading you to believe that a SCSI adapter is
missing. In that situation, replace the system board
(the SCSI controller is built into the board).
If a SCSI device is missing from the list, determine if the
missing device is connected to the SCSI controller on the
system board, or a SCSI adapter. Either the system board
or the SCSI adapter might be defective. Continue with the
following procedure.
1. Power-off the computer and disconnect any internal
and external SCSI devices from the computer (except
default drive 6, if installed).
2. If the device is connected to a SCSI adapter, install
the external terminator if no external SCSI devices
are attached (some SCSI adapters have both an
internal and an external terminator).
Notes:
a. Some system boards with SCSI have terminators
built in and do not require a terminator.
b. For more information, see “Terminator Function”
on page 414.
3. Power-on the computer and run Automatic
Configuration. If the SCSI adapter (or the SCSI
controller on the system board) is not on the Devices
List in Advanced Diagnostics, it is defective. If the
SCSI adapter (or the SCSI controller on the system
board) is on the list, run the SCSI adapter or SCSI
controller Advanced Diagnostic test.
4. If the SCSI adapter (or the SCSI controller on the
system board) fails the test, replace it. If it passes
the test, a different adapter or device might be
causing the problem; if this is the case, continue with
the next step.
24
PS/2 Maintenance Manual
5. Disconnect SCSI default drive 6, then re-run
Advanced Diagnostics. If the SCSI adapter or the
system board fails, replace the FRU. If the problem
is not found, continue with the next step.
6. Reconnect all the devices, then put all terminators
back in the same positions they were in before
service.
7. Use the procedure in “Undetermined Problems” on
page 183 to find the problem.
Missing SCSI and Non-SCSI Devices
If both types of devices are missing, see “Related Service
Information” on page 107 to find the problem.
System Error Log
If you are not familiar with the error log, refer to “System
Error Log” on page 433.
Notes:
1. On 90 and 95, only systems with a Type 3 processor
board (submodel codes 28, 29, 36, 37) support the
system error log.
2. After service, clear any noninformational errors from
the error log.
Viewing the System Error Log
1.
2.
3.
4.
Go to the Main Menu.
Select More Utilities.
Select Display system error log.
Follow the instructions on the screen.
Read the error log to see if any errors are stored. Use
that information to help determine what is causing the
failure.
If you cannot find the problem using the error log, run
diagnostics, if you have not already done so.
Hardware Maintenance Service
25
Symptom-to-FRU Index (Micro Channel)
This index supports the following PS/2 Models:
50, 55, 56, 57, 60, 65, 70, 76, 77, 80, 85, 90, and 95.
Always start with “General Checkout (Micro Channel)”
on page 19.
For information on:
Go to:
Additional service help.
(For example, voltage
checks, 0S/2 Trap errors,
or processor board
errors)
“Related Service Information”
on page 107.
Possible software and
hardware mismatch
problems. (not
repairable by replacing
FRUs)
“Software/Hardware Mismatch
Problems” on page 181.
Starting the System
Programs
“Starting System Program
Diagnostics” on page 425.
Erasing Power-On
Passwords
“Removing a Power-On
Password” on page 376.
Privileged Access
Password Jumper (9556,
9557)
“Privileged-Access Password”
on page 378.
Tamper Evident Switch
(9556, 9557)
“Security” on page 375.
Memory Address
Conflicts
“Resolving Memory-Address
Conflicts” on page 408.
Replacing the system
board does not correct
the problem, and a
removable processor is
installed.
“Processor Board Installation
(90, 95)” on page 135.
26
PS/2 Maintenance Manual
No-Beep Symptoms
Symptom/Error
FRU/Action
No beep, fan runs,
power-on LED lights,
memory may or may not
count, and blinking cursor
continuously loops.
1. Processor Cache
(90/95)
2. Processor Board
Memory count hangs during
POST.
(Check memory) †
1. System Board
Memory
2. Memory Option (if
installed)
3. System Board
4. Processor
No beep, power-on indicator
does not come on, and fan
does not run.
1. Adapter Guide/Switch
Assembly
2. Power Supply
3. Control/Speaker
Assembly
4. Processor Board
(90/95)
5. System Board
6. Any Device or Adapter
7. Bus Adapter
Important: On computers
with a tamper evident
switch, when the cover is
off, the switch must be in
the “up” or “on” position to
supply power to the
computer. Also, the switch
might be out of adjustment
(not making contact).
Remove the switch and
form the contacts. If this is
not the problem, see
“Undetermined Problems”
on page 183 †
No beep, fan runs, and
000215XX is displayed.
(Check memory) †
1. System Board
Memory
2. Processor Board
(90/95)
3. System Board
No beep, fan runs, and
000258XX is displayed.
(Check memory) †
1. System Board
No beep, fan runs,
power-on indicator is on,
and computer hangs during
POST with a message
displayed.
(See “Undetermined
Problems” on page 183)†
1. System Board
2. Processor Board
3. Power Supply
No beep and the computer
is otherwise functional.
1. Control/Speaker
Assembly
2. Processor Board
(90/95)
3. System Board
†
If this symbol is shown next to an error (above), go to
“Related Service Information” on page 107.
Hardware Maintenance Service
27
Symptom/Error
FRU/Action
No beep and the computer
is not functional.
(See “Undetermined
Problems” on page 183)†
1. System Board
2. Power Supply
No beep, fan runs,
power-on indicator is on,
and computer hangs during
POST with no message
displayed.
(See “Undetermined
Problems” on page 183)†
1. System Board
2. Processor Board
(90/95)
3. Any Device or Adapter
4. Bus Adapter
†
28
If this symbol is shown next to an error (above), go to
“Related Service Information” on page 107.
PS/2 Maintenance Manual
Beep Symptoms
Symptom/Error
FRU/Action
One long and one short
beep.
(Check display) †
1. Display Adapter
(any type)
2. System Board
3. Video Memory (if used)
4. Bus Adapter
5. Power Supply
One long and two short
beeps.
(Check display) †
1. Display Adapter
(any type)
2. Video Memory (if used)
3. System Board
4. Adapter Video Memory
5. Bus Adapter
6. ACPA/A Adapter
7. Power Supply
One or two beeps and a
blank or unreadable display,
or a blinking cursor.
(Check display) †
1. Display Adapter
(any type)
2. Video Memory (if used)
3. System Board
4. Adapter Video Memory
5. Display (any type)
6. Bus Adapter
7. ACPA/A Adapter
Continuous beep.
1. System Board
2. Power Supply
Continuous beep and a
blank display.
(Check display).
1. Display Adapter
2. Video Memory (if used)
3. System Board
One long and three short
beeps.
(Check display)
1. Display Adapter
2. Video Memory (if used)
3. System Board
Repeating short beeps.
(Check the keyboard for a
stuck key)
1. System Board
2. ACPA/A Adapter
†
If this symbol is shown next to an error (above), go to
“Related Service Information” on page 107.
Hardware Maintenance Service
29
Audio Symptoms
Symptom/Error
FRU/Action
Front microphone and front
headphone inoperative and
rear microphone, rear
headphone, and computer
beeps are working properly.
1. Control Panel
Assembly
2. Cable (system board to
control panel
assembly)
Front microphone, front
headphone, and computer
beeps inoperative and rear
microphone and rear
headphone are working
properly.
1. Control Panel
Assembly
2. Cable (system board to
control panel
assembly)
Distorted or missing audio
from control panel assembly
line outputs or headphone
jack.
1. ACPA/A Adapter
Front microphone
inoperative and rear
microphone works properly.
1. Control Panel
Assembly
2. ACPA/A Adapter
3. Cable (ACPA/A to
control panel
assembly)
Rear microphone
inoperative.
1. ACPA/A Adapter
2. Microphone
Audio from CD-ROM does
not play to the front
speaker, but plays to Line
Output.
1. Control Panel
Assembly
2. ACPA/A Adapter
3. Cable (ACPA/A to
control panel
assembly)
Audio from CD-ROM does
not play to the front speaker
or to Line Output.
1. CD-ROM
2. Cable (CD-ROM to
ACPA/A Adapter)
Miscellaneous Symptoms
Symptom/Error
FRU/Action
Drive letters changed
unexpectedly after installing
OS/2 or a SCSI adapter.
1. This is a normal
condition. Use the
configuration program
to change the drive
letters back to the
desired settings.
Intermittent failures.
(See “Undetermined
Problems” on page 183
before replacing FRUs) †
1. Power Supply
2. Power Supply Fans
3. Any Device or Adapter
Diskette drive LED stays on.
1. Diskette Drive
†
30
If this symbol is shown next to an error (above), go to
“Related Service Information” on page 107.
PS/2 Maintenance Manual
Symptom/Error
FRU/Action
Hard disk LED stays on.
1. Hard Disk Drive
2. System Board
Hard disk LED not working,
but computer is completely
functional.
1. Control/Speaker
Assembly
2. System Board
Reference Diskette does not
start.
1.
2.
3.
4.
Read / write errors on a
2.88MB diskette drive. (If
the drive was just installed,
either the computer has
down level IML code loaded
or that model does not
support a 2.88MB drive.)
1. Use View
configuration to
determine if the
diskette drive is listed
as a 2.88MB. If not,
the latest level
Reference Diskette
code must be loaded
onto the System
Partition.
Image Adapter/A Memory
Test failure indicated by
graphic representation of
adapter.
1. Memory Module
(shown in graphic)
IML image has been
updated and the Diskette
and F1 error prompt
appears on the screen.
1. Verify an operating
system has been
loaded onto the default
hard disk.
IML image has been
updated, the Diskette icon
appears on the display, and
a I99903XX appears on the
information panel (95).
1. Verify an operating
system has been
loaded onto the default
hard disk.
Internal Data/Fax modem
does not communicate with
a remote modem or a fax.
Note: Make sure the serial
device power option
is set to on in the
Set Features
program.
1. Check that setup
data defined by
communication
software is suitable
for communication.
2. Internal Data/Fax
Modem
3. System Board
Internal Data/Fax modem
does not respond to
software, and diagnostics
does not find no problem.
1. Check in power
configuration and verify
the modem is turned
on.
Program load error during
remote IPL from the file
server.
1. Network Adapter
Program loads from the
hard disk or a non system
disk or disk error (with the
Reference Diskette in drive
A).
1.
2.
3.
4.
†
Diskette Drive
System Board
Diskette Drive Cable
Reference Diskette
Diskette Drive
System Board
Power Supply
Reference Diskette
If this symbol is shown next to an error (above), go to
“Related Service Information” on page 107.
Hardware Maintenance Service
31
Symptom/Error
FRU/Action
No colors on a color display.
(Connect display to the VGA
port and run the Enhanced
VGA test to see if the
display is the problem)
1. Display (any type)
2. VGA terminator
Screen colors change.
1. Display (any type)
2. Display Adapter
3. System Board
One or more keys do not
work and the computer is
otherwise functional.
(Check keyboard) †
1. Keyboard
2. Keyboard Cable
3. System Board
Power supply appears to fail
at power-on, but if you
disconnect optional hard
disks, the problem goes
away (load problem). (See
“Setting the Motor-Start
Jumper” on page 414)
1. Motor Start Jumper
(Remove the motor
start start jumper from
one or more option
drives.)
Power-on indicator does
not come on, fan runs,
and computer is functional.
1. Control/Speaker
Assembly
Power-on indicator does
not come on, fan runs,
and computer is not
functional.
1. System Board
2. Power Supply
Power-on indicator does not
come on, fan not running,
and computer is not
functional.
(See “Undetermined
Problems” on page 183
before replacing FRUs) †
1. Power Supply
2. System Board
Operating system does not
work, or the system starts
up in BASIC. (See “IML
and IPL Errors” on page 55
before replacing FRUs)
1. Default Hard Disk
Drive
Real Time Clock loses time.
(This is not always a
hardware failure. See
“Real-Time Clock Problems”
on page 150)
1. Default Hard Disk
Drive
Computer cannot be
powered-off.
1. Control/Speaker
Assembly
2. System Board
3. Power Supply
†
32
If this symbol is shown next to an error (above), go to
“Related Service Information” on page 107.
PS/2 Maintenance Manual
Numeric Error Codes
Symptom/Error
FRU/Action
000101XX
(Interrupt failure. Possibly a
bad battery or processor)
1. Run Advanced
Diagnostics
2. 486DX33 Upgrade
(70/80)
000102XX
(ROM checksum or timer
error. Possibly a bad
battery or processor)
(If the battery was removed
while replacing the 80386
processor in a Model 70,
with a 486DX33 Processor
Upgrade (FRU Number
92F0436), remove the
486DX33 processor and
install the 80386 processor;
then, install the battery.
Configure the system and
re-install the 486DX33
processor without removing
the battery.)
1. Run Advanced
Diagnostics
2. 486DX33 Upgrade
(70/80)
00010300
(Checksum or timer error. If
it is a 20-MHz board, and
the processor is not a
487SX, the jumper must be
in positions 2 and 3) (487SX
is indicated on the
processor)
1. Processor Board
(90/95)
2. System Board
000102XX, 000103XX
000104XX, 000107XX
1. System Board
2. Processor Board
000105XX
(Command not accepted)
(Information only)
000106XX
(Converting logic test
failure)
1. Run Advanced
Diagnostics
000107XX, 000108XX
000109XX
(Interrupt or memory failure)
1. System Board
Memory
2. System Board
3. Processor Board
(90/95)
4. Any Adapter
5. Bus Adapter
00010XXX
1. System Board
000110XX
(Check memory) †
(For Model 95, also see
000201XY for socket
location list)
1. Memory Module Kit
2. System Board
†
If this symbol is shown next to an error (above), go to
“Related Service Information” on page 107.
Hardware Maintenance Service
33
Symptom/Error
FRU/Action
000111XX
1. Adapter Memory
2. Expansion Adapter
3. System Board
000112XX, 000113XX
(Possible timeout error)
1. System Board
2. Processor Board
(90/95)
000114XX
(ROM error)
1. Any Adapter
2. Bus Adapter
000115XX
(80386 protect mode failure,
or BIOS checksum error)
1. System Board
2. 486DX33 Upgrade
(70/80)
000116XX
(Possible read/write
problem)
1. Run Advanced
Diagnostics
2. 486DX33 Upgrade
(70/80)
000118XX
(Previously detected error.
Run Advanced Diagnostics)
1. System Board
Memory
2. Processor Board
(90/95)
000119XX
1. Run Automatic
Configuration
(2.88MB diskette drive
is installed but not
supported.)
2. System Board
00011XXX
(not listed above)
1. System Board
000120XX
(Possible processor
self test failure)
1. System Board
Processor Cache
(90/95)
Processor Board
(90/95)
000121XX
(A problem was detected
during memory remapping)
(Information only)
00012201, 00012202
00012203, 00012204
00012205, 00012206
00012207, 00012208
(Data error. Possible
system board failure)
1. Run Advanced
Diagnostics
000129XX
1. Processor Board
2. Cache Kit
3. System Board
00013000
(POST could not start the
operating system.
Operating system loaded?
Is the boot drive in the
selectable drive sequence?)
1. Check Drive Sequence
†
34
If this symbol is shown next to an error (above), go to
“Related Service Information” on page 107.
PS/2 Maintenance Manual
Symptom/Error
FRU/Action
00013001
(Security system is being
used, but the computer is
not totally secured because
there is a diskette drive in
the startup sequence)
1. Delete diskette drive
from the startup
sequence if so desired.
00013002
(Drive startup sequence is
corrupt or invalid)
1. Run Automatic
Configuration
Then reset the
selectable drive startup
sequence. If the
problem still exists,
replace the system
board.
00013003
(EEPROM could not be
read)
1. Run Automatic
Configuration
If the problem still
exists, replace the
system board.
000131XX
1. System Board
000132XX
(DMA extended registers
error)
1. Run Advanced
Diagnostics
000133XX
(DMA verify function error.
Logic failed)
1. Run Advanced
Diagnostics
000134XX
(DMA arbitration logic error)
1. Run Advanced
Diagnostics
00014905
1. System Board
2. Processor Board
00014908, 00014909
Before replacing any FRUs,
see “Cover Lock and
Tamper-Evident Switches”
on page 375
1. System Board
2. Tamper Evident
Switches
3. Keylock Assembly
000152XX
(Real time clock error.
(This is not always a
hardware failure. Also see
“Real-Time Clock Problems”
on page 150)
1. Run Advanced
Diagnostics
000156XX
(Security error. The covers
were removed without using
the key. The tamper
evident switch was tripped)
1. Start the system from
the Reference Diskette
(or server image) and
reconfigure the system.
2. Security Switch
Assembly
3. System Board
†
If this symbol is shown next to an error (above), go to
“Related Service Information” on page 107.
Hardware Maintenance Service
35
Symptom/Error
FRU/Action
000160XX
(System Board ID not
recognized. Possible
system board failure)
1. Run Advanced
Diagnostics
000161XX
1. Battery
2. Processor Board
(90/95)
3. System Board
4. Bus Adapter
CAUTION:
The lithium battery (IBM
part number 33F8354) in
your computer presents a
fire, explosion, or severe
burn risk. Use of another
battery could result in
ignition or explosion of
the battery.
000162XX
(Be sure all devices are
powered-on. (Check
Enable/Disable settings) †
Configuration changed? If
so, run Automatic
Configuration.
1. Any Device
2. Battery
00016300
(Date and time error)
1. Set Date and time
00016000, 00016400
00016500, 00016700
00016900
(If setting configuration,
date, and time does not
solve the problem, see
“Devices List” on page 23)
1. Set Configuration,
Features
2. System Board
000166XX
(Reseat all adapters)
1. Run Advanced
Diagnostics
000168XX
(Real time clock error. This
is not always a hardware
failure. Also see “Real-Time
Clock Problems” on
page 150)
1. Run Advanced
Diagnostics
000169XX
Processor configuration
error. (Run Automatic
Configuration, then verify
that the processor
configuration information is
correct before replacing
FRUs)
1. Processor Board
2. System Board
000170XX
(ASCII console setup
conflict error. The serial
port is disabled)
1. From “Set
Configuration,” select
“Change
Configuration,” and
enable the port.
†
36
If this symbol is shown next to an error (above), go to
“Related Service Information” on page 107.
PS/2 Maintenance Manual
Symptom/Error
FRU/Action
000171XX
1. Battery
2. Processor Board
(90/95)
3. System Board
4. Bus Adapter
000172XX
1. System Board
000173XX
(Possibly a weak battery)
1. Set
Configuration/Features
000174XX
(If the configuration has
been changed, run
Automatic Configuration.
Otherwise, run Advanced
Diagnostics) (Check “SCSI
Device Default Settings” on
page 180) †
1. Any Device
2. System Board
3. Bus Adapter
000175XX
(Security error. The system
board EEPROM failed)
1. System Board
000176XX
(Security error. The covers
were removed without using
the key. The tamper
evident switch was tripped)
1. Start the system from
the Reference Diskette
(or server image) and
reconfigure the system.
2. Security Switch
Assembly
3. System Board
000177XX, 000178XX
(Security error. Passwords
corrupted) Reset.
1. System Board
000179XX
(System error log might be
full)
1. Go into the log and
note the errors. Clear
the log, then run
Advanced Diagnostics
000181XX
(The computer requires a
network adapter for remote
IPL or a hard disk drive ID
of 6 LUN 0, for IML; neither
of these were detected)
1. Run Automatic
Configuration
2. Network Adapter
3. Hard Disk Drive
4. System Board
000182XX
(Privileged access password
(PAP) data is corrupted. To
restore it, move jumper
JMP2 to position “0” write
enabled).
000183XX
(Wrong password entered)
†
(Information only)
1. Enter the Privileged
access password
(PAP) instead of the
power-on password.
If this symbol is shown next to an error (above), go to
“Related Service Information” on page 107.
Hardware Maintenance Service
37
Symptom/Error
FRU/Action
000184XX
(Power-on password
corrupted)
1. User must reset the
password.
000185XX
(Selectable startup
sequence corrupted)
1. Run Select Startup
Sequence utility.
Reset user's chosen
startup sequence.
000186XX
(Security error. Hardware
failed)
1. System Board
000187XX
(Vital Product Data (VPD)
error. System serial number
information corrupted)
1. Select Set system
identification from the
Reference Diskette,
System Partition (or
server image) and type
the system serial
number. If problem
remains, suspect the
system board.
000188XX
(Vital Product Data (VPD)
error)
1. Run Automatic
Configuration
000189XX
(The wrong password was
entered 3 times. Clear the
system error log and restart
the system)
(Information only)
000191XX
(82385 cache test failed)
1. Run Advanced
Diagnostics
000194XX
1. System Board
Memory
2. Memory Riser Card
(90)
3. Memory Module Kit
000199XX
(User indicated configuration
is invalid)
1. Run the Flash Update
Utility
(PS/2 9553-xBx Only)
2. System Board
0001XXXX
(not listed above)
1. System Board
Processor Board
(90/95)
2. 486DX33 Upgrade
(70/80)
3. Any Adapter
4. Bus Adapter
000201XX to 000205XX
(Reseat System Board
Memory)
1. System Board
Memory
2. System Board
†
38
If this symbol is shown next to an error (above), go to
“Related Service Information” on page 107.
PS/2 Maintenance Manual
Symptom/Error
FRU/Action
00020XXY, 000217XY
(If the "Y" digit is in the
range "G" to "V", suspect
the model 90/95 processor
board first) †
(See page 126)
1. System Board
Memory
Memory Riser Card
(90)
Processor Board
(90/95)
2. System Board
000210XX, 000211XX
(Check memory) †
1. Processor Board
(90/95)
2. System Board Memory
3. Memory Riser Card
(90)
4. System Board
000214XX, 000215XX
000216XX, 000221XX
000226XX, 000240XX
000235XX, 000241XX
(Check memory. It might be
the wrong type or in the
wrong slot) †
1. System Board
Memory
Memory Riser Card
(90)
System Board
Processor Board
(90/95)
2. Bus Adapter
000225XX
(Check memory. It might be
the wrong type or wrong
speed) †
1. System Board
Memory
Memory Riser Card
(90)
System Board
Processor Board
(90/95)
2. Bus Adapter
000221XX
(ROM to RAM parity error)
1. System Board
000231XX
1. Expanded Memory
Option
00024300, 00024400
1. Processor Board
(90/95)
000245XX, 000246XX
(Check memory) †
1. Processor Board
2. Memory Riser Card
(90)
3. System Board
4. System Board Memory
00024700
1. Processor Board
(90/95)
000251XX
(Memory location changed
on the memory expansion
option)
00025200
†
(Information only)
1. Processor Board
(90/95)
2. System Board
If this symbol is shown next to an error (above), go to
“Related Service Information” on page 107.
Hardware Maintenance Service
39
Symptom/Error
FRU/Action
000253XX, 000254XX
1. Processor Cache
(90/95)
2. Processor Board
000255XX
(Check memory) †
1. System Board
Memory
2. System Board
00029000
(Unsupported memory
combination detected) †
1. Correct the
unsupported
combination of ECC
and parity memory
modules. Run
Automatic
Configuration, then
rerun Advanced
Diagnostics
000291XX, 000292XX
000293XX, 00029400
(Checksum value mismatch)
1. Run Automatic
Configuration then
rerun Advanced
Diagnostics
000295XX, 000296XX
(Check memory for an
unsupported configuration or
modules) †
1. System Board
Memory
00029800
(Checksum value mismatch)
1. System Board
Memory
Run Automatic
Configuration then
rerun Advanced
Diagnostics
0002XX00
(not listed above)
1. 486DX33 Upgrade
(70/80)
000301XX, 000302XX
1. Keyboard Cable
2. System Board
000303XX, 000304XX
1. System Board
2. Keyboard
3. Keyboard Cable
000305XX
(Keyboard voltage error. If
no fuse in system, replace
system board) †
1. Fuse
2. Keyboard Cable
000306XX
(Wrong Keyboard
Attached?)
1. Check for
Unsupported
Keyboard
000307XX
1. Keyboard
2. Keyboard Cable
000320XX
1. System Board
000401XX to 000405XX
1. System Board
0005XXXX
1. Display Adapter
(any type)
†
40
If this symbol is shown next to an error (above), go to
“Related Service Information” on page 107.
PS/2 Maintenance Manual
Symptom/Error
FRU/Action
000601XX
1. Defective Diskette
2. Diskette Drive
3. System Board
000602XX
(Invalid boot record)
1. Defective Diskette
000604XX
(Unsupported drive or cable.
Drive must be media sense
type)
1. Diskette Drive
2. System Board
3. Diskette Drive Cable
000605XX
(Diskette drive error)
1. Run Advanced
Diagnostics
000606XX, 000607XX
000610XX, 000621XX
000622XX, 000623XX
000624XX, 000630XX
000631XX, 000632XX
000633XX, 000640XX
000641XX, 000642XX
000643XX, 000650XX
000651XX, 000652XX
000653XX, 000654XX
000656XX, 000657XX
000658XX, 000659XX
000660XX
(Generally, these are media
errors. Try a known good
diskette. If the error
appears again, replace the
drive.
1. Diskette
2. Diskette Drive
3. System Board
000655XX
1. System Board
000662XX
(Wrong drive type installed)
(Information only)
000663XX
(Wrong media type in the
drive)
(Information only)
000668XX
1. Diskette Drive
0006XXXX
(not listed above)
1. Diskette Drive
2. System Board
3. Diskette Drive Cable
0007XXXX
For a 486 processor, erase
COPROC.DGS from the
backup Reference Diskette,
then restore the system
partition from the corrected
backup Reference Diskette.
Re-run Advanced
Diagnostics.
1. Math Coprocessor
2. 486DX33 Upgrade
(70/80)
3. System Board
00100203
1. System Board
†
If this symbol is shown next to an error (above), go to
“Related Service Information” on page 107.
Hardware Maintenance Service
41
Symptom/Error
FRU/Action
00110100
(Serial connector error,
possible system board
failure)
1. Run Advanced
Diagnostics
001101XX, 00110200
00110600, 00110800
00110900
1. System Board
2. Any Serial Device
00110700
1. Communications
Cable
2. System Board
001102XX
(Card selected feedback
error)
1. Run Advanced
Diagnostics
001103XX
(Port fails register check)
1. Run Advanced
Diagnostics
2. System Board
001106XX
(Serial option cannot
be turned off)
1. Run Advanced
Diagnostics
2. System Board
001107XX
1. Serial Device Cable
2. System Board
001110XX
(Register test failed)
1. Run Advanced
Diagnostics
2. System Board
001116XX
(16550 interrupt error)
1. Run Advanced
Diagnostics
001117XX
(Failed baud rate test)
1. Run Advanced
Diagnostics
0011XXXX
(not listed above)
(See “Power Supply Voltage
Check” on page 138 before
replacing system board) †
1. System Board
001201XX
(Check voltages) †
1. System Board
2. Any Serial Device
001202XX, 001206XX
001208XX, 001209XX
0012XXXX
1. Dual Async
Adapter/A
2. System Board
3. Any Serial Device
001207XX
1. Communications
Cable
2. Dual Async Adapter/A
00129020
(Disk cache error)
1. Cached Processor
Option
2. System Board
001301XX, 001302XX
1. Game Adapter
2. Joystick
001402XX
(Printer not ready)
†
42
(Information only)
If this symbol is shown next to an error (above), go to
“Related Service Information” on page 107.
PS/2 Maintenance Manual
Symptom/Error
FRU/Action
001403XX
(No paper error,
or interrupt failure)
(Information only)
001404XX
(System board timeout
failure)
1. Run Advanced
Diagnostics
001405XX
(Parallel adapter error)
1. Run Advanced
Diagnostics
001406XX
(Presence test error)
1. Run Advanced
Diagnostics
0014XX00
(not listed above)
(Check printer before
replacing system board) †
1. Printer
2. System Board
001701XX, 001703XX
001704XX, 001714XX
0017XXXX
(Not listed below)
1. Hard Disk Drive
2. Cable (ST506)
3. Hard Disk Adapter
(ST506)
4. System Board
5. Power Supply
001702XX
1. Hard Disk Adapter
001705XX, 001706XX
001707XX, 001708XX
001710XX, 001711XX
001712XX, 001713XX
001715XX, 001716XX
001717XX, 001726XX
001735XX, 001750XX
001751XX, 001752XX
001753XX, 001754XX
001755XX, 001757XX
001780XX, 001781XX
001782XX, 001790XX
001791XX
(Read/write problem. Be
sure the drive type is
supported. If it is, try a low
level format. If the error
continues, replace the hard
disk drive)
1. Format the Drive
2. Hard Disk Drive
00180100 to 00180700
1. System Board
00186XXX
1. Set
Configuration/Features
2. Battery
0018XXXX
(not listed above)
1. System Board
Expansion Unit
00240100, 00240200
(If screen colors change)
1. Display (any type)
00240100, 00240200
(If screen colors are OK)
1. System Board
2. Display (any type)
†
If this symbol is shown next to an error (above), go to
“Related Service Information” on page 107.
Hardware Maintenance Service
43
Symptom/Error
FRU/Action
00240900
1. Display (any type)
00241000
1. System Board
003015XX
(Check for missing wrap
or terminate plug on the
adapter)
1. Baseband Adapter
2. Baseband Cable
0037XXXX
(This is usually caused by
the SCSI controller built into
the system board)
1. System Board
2. Hard Disk Drive
3. Hard Disk Cable
004611XX, 004630XX
1. Multiport/2 Interface
Board
2. Multiport/2 Adapter
004612XX, 004613XX
004640XX, 004641XX
1. Memory Module
Package
2. Multiport/2 Adapter
00465000
1. Multiport Interface
Cable
0046XXXX
(not listed above)
1. Multiport/2 Adapter
2. Multiport/2 Interface
Board
3. Memory Module
Package
005600XX
1. Financial System
2. Controller Adapter
0062XXXX
1. 1st Store Loop
Adapter
2. Adapter Cable
0063XXXX
1. 2nd Store Loop
Adapter
2. Adapter Cable
0064XXXX
(See “Network Service
Procedures” on page 74)
1. Network Adapter
0071XXXX
1. Voice Adapter
0074XXXX
(Adapter jumper in the
correct position? See
“Display Adapter 8514/A” on
page 109)
1. 8514/A Display
Adapter
8514/A Memory
Module
2. System Board
007509XX
(Check display) †
1. Display Adapter
(any type)
2. Display (any type)
3. System Board
4. Video Memory
007510XX
(Check display) †
1. XGA Adapter
2. Video Memory
0076XXXX
1. Page Printer Adapter
0078XXXX
1. High Speed Adapter
†
44
If this symbol is shown next to an error (above), go to
“Related Service Information” on page 107.
PS/2 Maintenance Manual
Symptom/Error
FRU/Action
0079XXXX
1. 3117 Adapter
008001XX to 008012XX
(System Board Upgrade
Model 50, 55 Only)
1. Pointing Device
(Mouse)
2. System Board
00850XXX, 00851XXX
1. 80286 Memory Option
Adapter/A
2. System Board
00852XXX
1. Memory Module
Package on the
80286 Memory
Adapter/A
2. Adapter Memory
3. System Board
008601XX, 008602XX
1. Pointing Device
(Mouse)
2. System Board
008603XX, 008604XX
1. System Board
2. Pointing Device
(Mouse)
0089XXXX
1. Music Adapter
0091XXXX
1. Optical Drive
2. Adapter
0096XXXX
(This adapter has cache)
1. SCSI Adapter
2. Any SCSI Device
3. System Board
010001XX
(Multiprotocol Adapter/A
not found)
(Information only)
010002XX
(Card selected feedback
error)
1. Run Advanced
Diagnostics
010007XX
1. Communications
Cable
2. Multiprotocol Adapter/A
010008XX, 010009XX
1. Multiprotocol
Adapter/A
2. Any Serial Device
0100XXXX
(not listed above)
Multiprotocol
Adapter/A
1. System Board
2. Bus Adapter
0101102X, 0101106X
0101108X, 0101109X
1. Modem Adapter/A
2. Data/Fax Modem
3. Any Serial Device
†
If this symbol is shown next to an error (above), go to
“Related Service Information” on page 107.
Hardware Maintenance Service
45
Symptom/Error
010101XX,
010104XX,
010106XX,
010108XX,
010111XX,
010113XX,
010115XX,
FRU/Action
010102XX
010105XX
010107XX
010109XX
010112XX
010114XX
010116XX
1. Have the customer
verify that the correct
operating system
device drivers are
installed and
operational
2. Modem
010103XX, 010110XX
0101171X
1. System Board
2. Data/Fax Modem
010117XX
(not listed above)
1. Check system
speaker
2. Check PSTN cable
3. External DAA
(if installed)
4. Modem
010118XX
1. Run System
Diagnostics and
verify the correct
operation of the
modem slot
2. Modem
010119XX
1. Diagnostics detected
a non-IBM modem
2. Modem
010120XX
1. Check PSTN Cable
2. External DAA
(if installed)
3. Modem
010132XX,
010134XX,
010136XX,
010138XX,
010140XX,
010142XX,
010144XX,
010146XX,
010148XX,
010150XX,
010152XX
010133XX
010135XX
010137XX
010139XX
010141XX
010143XX
010145XX
010147XX
010149XX
010151XX
1. Modem
010153XX
1. Data/Fax Modem
2. System Board
0101XXXX
(not listed above)
1. Modem Adapter/A
2. Data/Fax Modem
3. System Board
010450XX, 010451XX
010490XX, 010491XX
010492XX, 010499XX
(Read/write error)
1. Run Advanced
Diagnostics
2. Riser Card (if installed)
3. Hard Disk Drive
4. System Board
010452XX
(Seek test error)
1. Run Advanced
Diagnostics
†
46
If this symbol is shown next to an error (above), go to
“Related Service Information” on page 107.
PS/2 Maintenance Manual
Symptom/Error
FRU/Action
010453XX
(Wrong drive type?)
(Information only)
010454XX
(Sector buffer test error)
1. Run Advanced
Diagnostics
010455XX, 010456XX
(Controller error)
1. Run Advanced
Diagnostics
010459XX
(Drive diagnostic command
error)
(Information only)
010461XX
(Drive format error)
1. Run Advanced
Diagnostics
010462XX
(Controller seek error)
1. Run Advanced
Diagnostics
010464XX
(Hard Drive read error)
1. Run Advanced
Diagnostics
010467XX
(Drive non fatal seek error)
1. Run Advanced
Diagnostics
010468XX
(Drive fatal seek error)
1. Run Advanced
Diagnostics
010469XX
(Drive soft error count
exceeded)
1. Run Advanced
Diagnostics
010470XX, 010471XX
010472XX
(Controller wrap error)
1. Run Advanced
Diagnostics
010473XX
(Corrupt data. Low level
format might be required)
(Information only)
010480XX
1. Hard Disk Drive
(ESDI)
2. Drive Cable
3. Controller
4. System Board
010481XX
(ESDI drive D seek error)
1. Run Advanced
Diagnostics
010482XX
(Drive select
acknowledgement bad)
1. Run Advanced
Diagnostics
010490XX, 010491XX
(Drive 0,1 read error)
1. Run Advanced
Diagnostics
2. Riser Card (if installed)
3. Hard Disk Drive
4. System Board
010499XX
(Drive controller error)
1. Run Advanced
Diagnostics
2. Riser Card (if installed)
3. Hard Disk Drive
4. System Board
†
If this symbol is shown next to an error (above), go to
“Related Service Information” on page 107.
Hardware Maintenance Service
47
Symptom/Error
FRU/Action
010483XX
1. Hard Disk Adapter
(ESDI)
2. System Board
0104XXXX
(not listed above)
1. Hard Disk Drive
2. Hard Disk Adapter
(ESDI)
3. Hard Disk Cable
4. Power Supply
0106XXXX
(See “Network Service
Procedures” on page 74)
1. Ethernet Network
Adapter/A
2. System Board
3. Bus Adapter
0107XXXX
1. 5.25-inch External
Diskette Drive
2. 5.25-inch Diskette
Drive Adapter/A
0109XXXX
(Check the adapter cables)
1. ActionMedia
Adapter/A
2. System Board
0112XXXX
(This adapter does not have
cache)
1. SCSI Adapter
2. Any SCSI Device
3. System Board
0119XXXX
1. 3119 Adapter
0121XXXX
1. 300/1200/2400
Modem/A
2. Any Serial Device
3. System Board
01290001 01290002
01290003 01290004
01290007 01290008
(Possibly a recoverable
processor board error)
1. Run Advanced
Diagnostics
01290050, 01290051
01290052, 01290053
01290054, 01290055
01290056
(Probably a fatal error)
1. Processor Board
2. System Board
01290100, 012902XX
01290400, 01290700
01290800
(Cache error)
1. Processor Board
2. System Board Cache
3. System Board
012903XX (Math
coprocessor error)
1. Math Coprocessor
2. Processor Board
01290XXX
(not listed above)
1. Processor Cache
(90/95)
2. Processor Board
3. System Board
†
48
If this symbol is shown next to an error (above), go to
“Related Service Information” on page 107.
PS/2 Maintenance Manual
Symptom/Error
FRU/Action
01291200, 01291300
01291400, 012915XX
012916XX, 01291800
01291900, 01294040
01294041
(Possible processor board
error)
1. Run Advanced
Diagnostics
01291700
(If it is a 20-MHz board, and
the processor is a 487SX,
the jumper must be in
positions 1 and 2) (487SX is
indicated on the processor)
1. Processor Board
(90/95)
01293000
(90/95 Processor board
EEPROM jumper is in the
wrong position)
1. Jumpered Incorrectly
2. Processor Board
01294042
(POST / BIOS EEPROM
error. Update diskette is
required)
1. Processor Board
01294400
(A hardware default interrupt
occurred)
1. Restart the system
then run advanced
diagnostics
01295050, 01295056
01295060, 01295061
01295070, 01295071
01295072, 01295073
01295074, 01295075
01295076, 01295077
01295078, 01295079
01295080, 01295081
01295082, 01295083
01295085, 01295086
01295087, 01295088
01295090, 01295091
01295094, 01295095
01295096, 01295097
(Processor board errors)
1. Restart the system
then run advanced
diagnostics
0129X300
(Busmaster arbitration error.
If more than one is installed,
remove them one at a time
to isolate the failure)
1. Busmaster Adapter
(90/95)
2. Processor Board
01299000
(VPD error; processor
board replaced? Processor
board serial number
detected does not match
serial number stored)
1. Run Automatic
Configuration
0136XXXX
1. ISDN Primary Rate
Adapter
2. System Board
†
If this symbol is shown next to an error (above), go to
“Related Service Information” on page 107.
Hardware Maintenance Service
49
Symptom/Error
FRU/Action
0137XXXX
1. System Board
0141XXXX
1. Realtime Interface
Coprocessor
Portmaster Adapter/A
0143XXXX
1. Japanese Display
Adapter
2. System Board
01471000, 014711XX
1. System Board
Display Adapter
(any type)
2. Adapter Video Memory
0148XX00
1. Display Adapter
(any type)
014901XX, 014902XX
01491XXX, 014922XX
1. Display Adapter
(any type)
2. System Board
3. Display (any type)
014932XX
1. External Display
(any type)
2. Display Adapter
(any type)
0152XXXX
1. XGA Display
Adapter/A
2. System Board
0161XXXX
1. FaxConcentrator
Adapter
0164XXXX
1. 120MB Internal Tape
Drive
2. Diskette Cable
3. System Board
016500XX
1. 6157 Tape
Attachment Adapter
016520XX, 016540XX
1. 6157 Streaming Tape
Drive
2. 6157 Tape Attachment
Adapter
0166XXXX, 0167XXXX
(See “Network Service
Procedures” on page 74)
1. Token-Ring Network
Adapter/A
2. System Board
3. Bus Adapter
018001XX
(18001 to 18029)
1. Wizard Adapter
2. Wizard Adapter
Memory
018031XX
(18031 to 18039)
1. Wizard Adapter Cable
018441XX
(Unsupported memory
module on 80386 adapter)
†
50
(Information only)
If this symbol is shown next to an error (above), go to
“Related Service Information” on page 107.
PS/2 Maintenance Manual
Symptom/Error
FRU/Action
018451XX
(Need to reconfigure.
Module changed on
on 80386 adapter)
(Information only)
0184XXXX
1. Enhanced 80386
Memory Adapter/A
0185XXXX
1. DBCS Japanese
Display Adapter/A
2. System Board
0194XXXX
1. Memory Module
package on the
2-8MB 80286 Memory
Adapter
2. Memory adapter
3. System Board
020001XX to
020003XX
1. Image Adapter/A
Image-I Adapter/A
2. Memory Module
DRAM, VRAM
020004XX
1. Memory Module
DRAM, VRAM
2. Image Adapter/A
Image-I Adapter/A
020005XX to
020010XX
1. Image Adapter/A
Image-I Adapter/A
2. Memory Module
DRAM, VRAM
0200XXXX
(not listed above)
1. Image Adapter/A
Image-I Adapter/A
2. Memory Module
DRAM, VRAM
3. System Board
020101XX to
020103XX
1. Printer/Scanner
Option
2. Image Adapter/A
3. Memory Module
DRAM, VRAM
020104XX
1. Memory Module
DRAM, VRAM
2. Printer/Scanner Option
3. Image Adapter/A
020105XX to
020110XX
1. Printer/Scanner
Option
2. Image Adapter/A
3. Memory Module
DRAM, VRAM
Image Adapter/A
Memory Test failure
indicated by graphic
representation of adapter
1. Replace memory
module
(shown in graphic)
†
If this symbol is shown next to an error (above), go to
“Related Service Information” on page 107.
Hardware Maintenance Service
51
Symptom/Error
FRU/Action
0206XXXX
1. SCSI-2 Adapter
2. Any SCSI Device
3. System Board
0208XXXX
(Verify that there are no
duplicate SCSI ID settings
on the same bus)
1. Any SCSI Device
0210XXXA (60MB)
0210XXXB (80MB)
0210XXXC (120MB)
0210XXXD (160MB)
0210XXXE (320MB)
0210XXXF (400MB)
0210XXXG (40MB)
0210XXXH (1GB)
0210XXXI (104MB)
0210XXXJ (212MB)
0210XXXM (2GB, 8 bit,
68-pin)
0210XXXN (540MB)
0210XXXO (1GB)
0210XXXQ (540MB)
0210XXXP (2GB, 8 bit,
50-pin)
0210XXXU (Size unknown)
(If it is an external device,
check the external voltages.
See “SCSI Diagnostic
Tests” on page 181 and
“SCSI ID (Using to Help
Isolate Failures)” on
page 181 before replacing
any FRUs) †
1. SCSI Hard Disk Drive
2. SCSI Adapter or the
SCSI controller built
into the system board.
3. SCSI Cable
4. SCSI ID Switch
(On some models)
0210XXXX
(Internal bus, size unknown)
1. SCSI Hard Disk Drive
2. SCSI Adapter or the
SCSI controller built
into the system board.
3. SCSI Cable
4. SCSI ID Switch (on
some models)
0210XXX1
(External bus, size
unknown)
The amber LED remains on.
1. Tape Drive
2. SCSI Cable (internal)
3. SCSI Adapter or the
SCSI controller built
into the system board.
The green “in use” LED fails
to come on.
1. Tape Drive
2. SCSI Adapter or the
SCSI controller built
into the system board.
3. SCSI Cable (internal)
SCSI Cable (external)
The tape is automatically
ejected from the drive.
1. Tape Cassette
2. Drive
†
52
If this symbol is shown next to an error (above), go to
“Related Service Information” on page 107.
PS/2 Maintenance Manual
Symptom/Error
FRU/Action
SCSI ID on the rotary switch
does not match the SCSI ID
set in configuration. (Verify
the drive switches inside the
cover are set to zero)
1. Rotary Switch Circuit
Board
2. Circuit Board Cable
3. Tape Drive
Tape sticks/breaks in the
drive.
(Verify that the tapes used
meet ANSI standard X3B5)
1. Tape Cassette
0212XXXX
1. SCSI Printer
2. Printer Cable
0213XXXX
1. SCSI Processor
0214XXXX
1. WORM Drive
0215XXXC
0215XXXD
0215XXXE
0215XXXU
(If it is an external device,
and the power-on LED is
off, check external voltages)
†
1. CD-ROM Drive I
CD-ROM Drive II
Enhanced CD-ROM
Drive II
Any CD-ROM Drive
2. SCSI Cable
3. SCSI Adapter or the
SCSI controller built
into the system board.
0216XXXX
1. Scanner
0217XXXX
(If it is an external device,
and the power-on LED is
off, check external voltages)
†
1. Rewritable Optical
Drive
2. SCSI Adapter or the
SCSI controller built
into the system board.
3. SCSI Cable
0218XXXX
(Check for multi CD
tray, or juke box)
1. Changer
0219XXXX
1. SCSI
Communications
Device
024201Y0, 024210Y0
(Be sure the wrap plug is
not missing)
1. ISDN/2 Adapter
2. ISDN/2 Wrap Plug
3. ISDN/2
Communications
Cable
0243XXXX
1. XGA-2 Display
Adapter
002460XX
1. 90MHz Processor
Upgrade (without
VRAM)
2. System Board
002461XX
1. 90MHz Processor
Upgrade (with 1MB
VRAM)
†
If this symbol is shown next to an error (above), go to
“Related Service Information” on page 107.
Hardware Maintenance Service
53
Symptom/Error
FRU/Action
0258XXXX
Video might have failed.
(Ensure that you are using
diagnostic files
XGAANI.DGS and
XGAPNI.DGS dated
03/06/93 or later before you
replace any FRUs. Earlier
files cause erroneous
errors.)
1. XGA-2 Display
Adapter
2. System Board
0259XXXX
1. SVGA Adapter
2. System Board
0260XXXX
1. System Board
2. Any SCSI Device
0270XXXX
1. RAID Adapter
Controller
2. System Board
0271XXXX
1. RAID Hard Disk Drive
2. System Board
0273XXXX
1. 1Mbps Micro Channel
Infrared LAN Adapter
027501XX, 027503XX
027506XX, 027507XX
1. ServerGuard Adapter
2. System Board
027502XX,
027510XX,
027533XX,
027536XX,
1. ServerGuard Adapter
027504XX
027511XX
027534XX
027537XX
027509XX
1. Remove redundant
ServerGuard
Adapters, run Auto
Configuration
program, then retest.
027512XX
1. WMSELF.DGS
diagnostics file
missing.
2. WMSELF.DGS
diagnostics file
incorrect.
027535XX
1. 3V Lithium Backup
Battery
2. ServerGuard Adapter
027554XX
1. Internal Temperature
out of range
2. ServerGuard Adapter
027555XX, 027556XX
1. ServerGuard Adapter
2. System Power Supply
027557XX
1. 7.2V NiCad Main
Battery Pack
2. ServerGuard Adapter
†
54
If this symbol is shown next to an error (above), go to
“Related Service Information” on page 107.
PS/2 Maintenance Manual
Symptom/Error
FRU/Action
027558XX, 027559XX
027560XX, 027561XX
1. PCMCIA Type II
Modem
2. ServerGuard Adapter
027562XX
1. External Power
Control Box not
connected
2. External Power Control
Box
3. ServerGuard Adapter
027563XX, 027564XX
1. External Power
Control Box
2. ServerGuard Adapter
0275XXXX
1. Update Diagnostic
Software
0279XXXX
1. Fast/Wide Streaming
RAID Adapter/A
(FRU No. 06H3059)
2. System Board
3. Signal Pass Through
Card (if installed)
I998009X
1. Restore System
Partition
I999XXXX
(This is usually not a
hardware failure. Go to
“IML and IPL Errors” on
page 55 before replacing
FRUs. Specific I999XXXX
error codes are listed after
“IML and IPL Errors”)
1. Default Hard Disk
Drive
2. Processor Board
(90/95)
3. SCSI Adapter
4. SCSI Cable
†
If this symbol is shown next to an error (above), go to
“Related Service Information” on page 107.
IML and IPL Errors
You are here because the system detects an Initial
Machine Load (IML) problem or an Initial Program Load
(IPL) problem. You can correct most of these errors
without replacing any FRUs. IML/IPL problems are
associated with the following:
An I999XXXX error is displayed.
The computer powered-on without a POST error, but
the operating system does not work.
The system starts up in BASIC.
IML and IPL errors can be caused by any of the following
conditions:
Invalid selectable drive startup sequence (the default
drive is not in the startup sequence)
Operating system not found
IML code not found
Hardware Maintenance Service
55
Related hardware failure (SCSI adapter, hard disk,
SCSI cable)
Unrelated hardware failure (misleading error code due
to another problem on the SCSI Bus).
Before replacing any FRUs, check the following.
Checking Startup Sequence and Hard
Disk Drive
1. Start the computer from the Reference Diskette and
select Set Features from the Main Menu.
2. Select Set Startup Sequence and see if the default
hard disk (usually drive 6) is in the startup sequence.
If you receive an error message, follow the
instructions on the screen, then return here.
3. If the default drive is in the startup sequence, exit
from the screen and the Main Menu, then go to step
5. If the default drive is not in the startup sequence,
follow the instructions on the screen, then continue
with step 4.
4. Remove the Reference Diskette, power-off the
computer, then power-on the computer. If the “F1”
(Insert Diskette) icon appears on the screen, this
means no operating system was found. Go to step 5.
If the “Not OK” icon appears on the screen, this
means that the system cannot access the System
Partition. Try updating the system programs. If you
need assistance, see “Updating the System
Programs” on page 426.
5. Either install an operating system on a device that is
in the startup sequence, or change the startup
sequence to include a device that has an operating
system, then power-on the computer, check for the
normal power-up sequence and then run the
advanced diagnostic tests. If the problem still exists,
suspect the SCSI controller, then the hard disk drive.
Note: If you are not able to correct the problem using the
IML and IPL Errors section, go to “Undetermined
Problems” on page 183.
Symptom/Error
FRU/Action
I999001X, I999002X
I999003X, I999004X
(The actions for these errors
are valid only when running
the system from the hard
disk)
56
PS/2 Maintenance Manual
1. Restore the System
Partition. If you need
assistance, see
“Restoring the System
Partition” on page 428.
Symptom/Error
FRU/Action
I9990053, I9990054
I9990056, I9990057
I9990059, I9990063
I9990067, I9990069
(The actions for these errors
are valid only when running
the system from the System
Diskettes)
1. Restart the computer
from the Reference
Diskette. If the same
error code appears, try
new System Diskettes.
I999006X
1. Power-off the
computer. Insert the
Reference Diskette,
toggle the override
jumper, then power-on
the computer. Then,
restore the System
Partition. If you need
assistance, see
“Restoring the System
Partition” on page 428.
I999007X, I999009X
(The actions for these errors
are valid only when running
the system from the hard
disk)
1. Restore the System
Partition. If you need
assistance, see
“Restoring the System
Partition” on page 428
I99900X1, I99900X2
I99900X3, I99900X4
I99900X6, I99900X7
I99900X9
(The actions for these errors
are valid only when running
the system from the System
Diskettes)
1. Restart the computer
from the Reference
Diskette. If the same
error code appears, try
new System Diskettes.
I99900X5
(Reference Diskette
recovery prevented)
1. Power-off the
computer, toggle the
power-on password
override jumper, then
power-on the
computer.
I9990301
(Boot routine unable to read
boot record. This is
probably a hardware failure)
1. Cable failure
2. Wrong Termination
3. SCSI
Adapter/Controller
4. Hard Disk
I9990302
(No operating system found
on the default SCSI hard
disk)
1. Install an operating
system.
2. Check for a valid
selectable startup
sequence.
I9990303
The IML code did not load
from the System Partition.
1. Restore the System
Partition. If you need
assistance, see
“Restoring the System
Partition” on page 428.
Hardware Maintenance Service
57
Symptom/Error
FRU/Action
I9990304
(No startable device found.
This error is on ASCII
consoles only)
1. No operating system
installed.
2. Selectable startup
sequence does not
contain the default
drive.
I9990305
(No startable device found)
1. No operating system
installed.
2. Selectable startup
sequence does not
contain the default
drive.
I9990306
(Invalid startup. Trying to
start from a CD ROM drive)
1. Restart the computer
from a startable
diskette or hard disk
drive.
I9990401
(Unauthorized access.
Type or erase
the power-on
password before
replacing FRUs)
1. System Board or
Processor Board
I9990402, I9990403
1. System Board or
Processor Board
Note: Whichever
contains the
system ROM
Note: Whichever
contains the
system ROM
I9990600, I9990607
I9990609
(Recovery prevented)
58
PS/2 Maintenance Manual
1. Power-off the
computer. Insert the
Reference Diskette,
toggle the override
jumper, then power-on
the computer. Then,
restore the System
Partition. If you need
assistance, see
“Restoring the System
Partition” on page 428.
General Checkout (QAPlus/PRO)
This general checkout procedure is for computers that are
supported by the QAPlus/PRO** Diagnostics test.
Diagnostic error messages appear when a test program
finds a problem with a hardware option. For the test
programs to properly determine if a test Passed, Failed, or
Aborted, the test programs check the error-return code at
test completion. (See “Return Codes” on page 388.)
For application program or operating system error
messages, refer to the information supplied with that
software package.
Notes
1. If multiple error codes are displayed, diagnose
the first error code displayed.
2. If the computer hangs with a POST error, go to
“Symptom-to-FRU Index (QAPlus/PRO)” on
page 61.
3. If the computer hangs and no error is displayed,
see “Undetermined Problems” on page 183.
4. If a device cannot be selected from the Module
Test menu, that device may be defective.
001
–
–
–
–
–
–
–
Power-off the computer and all external devices.
Check all cables and power cords.
Set all display controls to the middle position.
Insert the QAPlus/PRO Diagnostics diskette into drive A.
Power-on all external devices.
Power-on the computer.
Check for the following responses:
1. One beep.
2. Readable instructions or the Main Menu.
DID YOU RECEIVE THE CORRECT RESPONSES?
Yes No
002
Find the failure symptom in “Symptom-to-FRU Index
(QAPlus/PRO)” on page 61.
003
Run the Advanced Diagnostics Test. If necessary, refer to
“QAPlus/PRO Diagnostics” on page 386.
If you receive an error, go to “Symptom-to-FRU Index
(QAPlus/PRO)” on page 61.
** QAPlus/PRO is a trademark of DiagSoft, Inc.
Hardware Maintenance Service
59
PC Server (8640) Setup Utility
To use the PC Server (8640) Setup utility, do the following.
1. Power-on the computer.
2. During the POST memory test, press and then
release the spacebar; then press and release the
Ctrl+Alt+S keys simultaneously. Or, in a DOS full
screen, press then release the Ctrl+Alt+S keys
simultaneously (this key combination will not work in
an OS/2 DOS box.)
3. The “Standard System Parameters” screen will
appear.
4. Follow the instructions on the screen to view or
change the configuration.
5. Press Esc from any screen in the setup utility. The
“Exiting Setup” pop-up screen will appear.
6. Press F4 to save the configuration information and
restart the server.
Important
When configuring a PC Server (8640), you must
correctly exit the Setup utility to save the
configuration information.
If a configuration error occurs during POST, a
configuration error message appears before the
operating system loads. (Press F1 to bypass the
error.)
Do not start the Setup Utility while using the
EISA configuration program (diskette).
60
PS/2 Maintenance Manual
Symptom-to-FRU Index (QAPlus/PRO)
Always start with “General Checkout (QAPlus/PRO)” on
page 59.
The Symptom-to-FRU Index lists symptoms, errors, and
the possible causes. The most likely cause is listed first.
Use this index to help you decide which FRUs to have
available when servicing the computer.
In the following error codes, X can be any number or letter.
Note
For IBM devices not supported by the QAPlus/PRO
diagnostics code, refer to the manual for that device.
For information on:
Go to:
Additional service help.
(For example, voltage
checks, 0S/2 Trap errors,
or processor board
errors)
“Related Service Information”
on page 107
PC Server (8640) Setup
Utility information
“PC Server (8640) Setup
Utility” on page 60
Possible software and
hardware mismatch
problems. (Not
repairable by replacing
FRUs).
“Software/Hardware Mismatch
Problems” on page 181
Memory Address
Conflicts
“Resolving Memory-Address
Conflicts” on page 408
Replacing the system
board does not correct
the problem, and a
removable processor is
installed.
“Processor Board Installation
(90, 95)” on page 135
Hardware Maintenance Service
61
No Beep Symptoms
No Beep/Symptom
FRU/Action
No beep, fan runs, and
000215XX is displayed.
(Check memory)
1. System Board
Memory
2. Processor
3. System Board
No beep, fan runs, and
000258XX is displayed.
(Check memory)
1. System Board
No beep and the computer
is otherwise functional.
1. Speaker Assembly
2. Processor
3. System Board
No beep and the computer
is not functional
(See “Undetermined
Problems” on page 183.)
1. System Board
2. Power Supply
No beep, fan runs,
power-on LED lights,
memory may or may not
count, and blinking cursor
continuously loops.
1. Processor
2. System Board
No beep, power-on indicator
does not come on, and fan
does not run.
1.
2.
3.
4.
5.
No beep, fan runs,
power-on indicator is on,
and computer hangs during
POST.
(See “Undetermined
Problems” on page 183)
1. System Board
2. Processor
3. Power Supply
62
PS/2 Maintenance Manual
Switch Assembly
Power Supply
Processor
System Board
Any Device or Adapter
Beep Symptoms
Beeps symptoms are short tones or a series of short tones
separated by pauses (intervals without sound). (X can be
any number.)
Examples:
Beeps
Description
4
Four continuous beeps
1-2-X
One beep
A pause (or break)
Two beeps
A pause (or break)
Any number of beeps
Beep/Symptom
FRU/Action
4
1. Video Adapter
2. System Board
1-1-3
CMOS read/write error
1. Run Setup
2. System Board
1-1-4
ROM BIOS check error
1. System Board
1-2-X
DMA error
1. System Board
1-3-1
RAM refresh verification
error
1. System Board
1-3-X
(not listed above)
The first 64KB RAM module
failed.
1. Memory Module
2. System Board
1-4-X
An error was detected in the
first 64KB of RAM.
1. Memory Module
2. System Board
2-1-X
The first 64KB of RAM
failed.
1. Memory Module
2. System Board
2-2-X
The first 64KB of RAM
failed.
1. Memory Module
2. System Board
2-3-X
The first 64KB of RAM
failed.
1. Memory Module
2. System Board
2-4-X
The first 64KB of RAM
failed.
1. Memory Module
2. System Board
3-1-X
The DMA register failed.
1. System Board
3-2-4
The keyboard controller
failed.
1. System Board
2. Keyboard
Hardware Maintenance Service
63
Beep/Symptom
FRU/Action
3-3-4
Screen initialization failed.
1. Video Adapter
2. System Board
3. Display
3-4-1
The screen retrace test
detected an error.
1. Video Adapter
2. System Board
3. Display
3-4-2
POST is searching for video
ROM.
1. Video Adapter
2. System Board
Error Codes
Error Code/Symptom
FRU/Action
0000
SCSI Adapter not enabled.
1. Be sure the adapter
Device and Bus Master
fields are enabled in
the PCI configuration
program. Refer to the
documentation that
was shipped with the
computer.
002X
1. SCSI Adapter
008X
Check for proper installation
of SCSI terminators.
1. Check SCSI
terminators for
proper installation
2. SCSI Cable
3. SCSI Terminator
4. SCSI Device
5. SCSI Adapter
0115
Protected mode cannot be
enabled.
1. System Board
0164
POST detected a base
memory or expansion
memory size mismatch.
1. Run Setup and
ensure the memory
size is correct
2. Run the Expanded
Memory Diagnostic
tests.
0601
Diskette configuration error
1. Set Configuration
0610
Cannot find diskette
controller for drive A.
1. Diskette Drive
2. Diskette Drive Cable
3. Diskette Drive Adapter,
if installed
4. System Board
0612
Cannot find diskette
controller for drive B.
1. Diskette Drive
2. Diskette Drive Cable
3. Diskette Drive Adapter,
if installed
4. System Board
0616
Diskette drive reset failed.
1. Diskette Drive
Adapter
64
PS/2 Maintenance Manual
Error Code/Symptom
FRU/Action
0632
Diskette drive 0 seek failure
1. Diskette Drive A
0642
Diskette drive 1 seek failure
1. Diskette Drive B
0653
Diskette not formatted or
defective
1. Format diskette
2. Diskette
0655
Diskette drive controller
failed.
1. Diskette Drive
2. Diskette Drive Cable
3. Diskette Drive Adapter,
if installed
4. System Board
107X
Check for proper installation
of SCSI terminators.
1. Check SCSI
terminators for
proper installation
2. SCSI Cable
3. SCSI Terminator
4. SCSI Device
5. SCSI Adapter
1701
Hard disk drive failed.
Press F1 to restart the
system.
1. Hard Disk Drive
1702
Hard disk drive controller
error.
1. Hard Disk Drive
Adapter, if installed
2. System Board
1704
Hard disk drive configuration
error, controller failed.
1. Hard Disk Drive
Adapter, if installed
2. System Board
1715
The Hard Disk Drive
Configuration information is
not correct.
1. Run Setup and enter
the correct hard disk
drive information
1726
Hard disk drive read error
Press F1 to restart the
system.
1. Hard Disk Drive
182X
1. SCSI Adapter
190X
Ensure that each SCSI
device is properly installed
and powered-on.
1.
2.
3.
4.
1XXX
(not listed above)
1. SCSI Adapter
221X
Ensure that each SCSI
device is properly installed
and powered-on.
1.
2.
3.
4.
222X, 224X
1. SCSI Adapter
2401
The monochrome/color
switch is not set correctly.
1. Correct the switch
setting
2. Display Adapter
SCSI
SCSI
SCSI
SCSI
SCSI
SCSI
SCSI
SCSI
Cable
Terminator
Device
Adapter
Cable
Terminator
Device
Adapter
Hardware Maintenance Service
65
Error Code/Symptom
FRU/Action
3XXX
Check for proper installation
of SCSI terminators.
1. Check SCSI
terminators for
proper installation
2. SCSI Cable
3. SCSI Terminator
4. SCSI Device
5. SCSI Adapter
4XXX
Ensure that each SCSI
device is properly installed
and powered-on.
1.
2.
3.
4.
6XXX
1. SCSI Device
GP_COM
The serial port test detected
an error.
1. System Board
GP_FDU
The diskette drive test
detected an error.
1.
2.
3.
4.
GP_HDU
The hard disk drive test
detected an error.
1. Hard Disk Drive
2. Hard Disk Drive Cable
3. Hard Disk Drive
Adapter (if installed)
4. System Board
GP_KBD
The keyboard test detected
an error.
1. Keyboard
2. System Board
GP_MBD
The system board test
detected an error.
1. System Board
2. Processor
3. Real-Time Clock
Assembly
GP_MEM The memory test
detected an error.
1. Memory Module Kit
2. System Board
GP_PDV
The mouse test failed.
1. Mouse
2. System Board
GP_PRT
The printer test detected an
error.
1. Printer
2. System Board
3. Printer Cable
GP_VID
The video test detected an
error.
1. Video Adapter
2. System Board
3. Color Display
GRPCDR
The CD-ROM test detected
an error.
1. CD-ROM
SCSI
SCSI
SCSI
SCSI
Cable
Terminator
Device
Adapter
Diskette Drive
System Board
Diskette Drive Cable
Diskette
Error Messages
Error Message/Symptom
FRU/Action
Arithmetic Functions
Failed
An error was detected
during the CPU Test.
66
PS/2 Maintenance Manual
1. Microprocessor
2. System Board
Error Message/Symptom
FRU/Action
Base Memory Test Failed
An error was detected in
base memory.
1. Memory Module
2. System Board
Boot Sector Unreadable
A boot sector read error
was detected on the hard
disk drive.
1. Hard Disk Drive
2. Hard Disk Drive Cable
3. Hard Disk Drive
Adapter (if installed)
4. System Board
Bus Noise Test Failed
The RAM Test detected an
error in the memory bus.
1. Memory Module
2. System Board
Butterfly Cylinder Access
Test Failed
The Hard Disk Drive Test
detected mismatch between
the data read and the data
stored on the drive.
1. Hard Disk Drive
2. Hard Disk Drive Cable
3. Hard Disk Drive
Adapter (if installed)
4. System Board
Clock Stopped
The real-time clock has
stopped working.
1. Real-Time Clock
Assembly
2. System Board
CMOS Clock Test Failed
The Time and Date Settings
for CMOS and DOS do not
Match.
1. Real-Time Clock
Assembly
2. System Board
Controller Diagnostic Test
Failed
An error was detected while
testing the Hard Disk
Controller (Adapter).
1. Hard Disk Drive
Adapter (if installed)
2. Hard Disk Drive
3. System Board
Controller does not respond
to commands; no logical
drive installed.
1. RAID Adapter
2. System Board
Cylinder 0 errors
The test detected an error
reading the first cylinder of
the hard disk drive.
1. Hard Disk Drive
2. Hard Disk Drive
Adapter (if installed)
3. System Board
Device is Not Ready
Ready the Device...
or
Press Any Key
1. Ensure the device is
powered-on
2. Replace failing device
3. Device Adapter (if
installed)
4. System Board
Disk Error Encountered
Opening Output File Press
Any Key To Continue.
1. Hard Disk Drive
2. Hard Disk Drive
Adapter (if installed)
3. System Board
DMA #X Failed
The Main Components Test
detected an error while
testing the DMA controller.
1. System Board
Hardware Maintenance Service
67
Error Message/Symptom
FRU/Action
DMA Page Register Failed
An error was detected while
outputting all possible
values to the DMA Page
Register.
1. System Board
Drive (x) Media (y)
Mismatch
The capacity listed for the
drive in the File Allocation
Table ID does not match the
calculated capacity of the
drive.
1. Check diskette and
diskette drive
capacity.
2. Diskette Drive
3. System Board
Drive in channel X bay X
does not respond.
Installation stopped.
1. Replace the drive in
the bay indicated.
Error in video buffer. Bad
bits
The video memory test
failed.
1. Video Adapter
2. System Board
3. Display
Exception Interrupt In
Protected Mode Diags
Cannot Continue
Server error, all system
tests will stop. Remove one
adapter at a time until the
symptom goes away.
1. Any Adapter
2. System Board
3. Processor
Extended Memory Test
Failed
An error was detected in
Extended Memory.
1. Memory Module
2. System Board
Floppy Drive Failed
One or more diskette drives
failed.
1. Diskette Drive
2. System Board
3. Diskette Drive Cable
General Function Failed
Remove one adapter at a
time until the symptom goes
away.
1. Any Adapter
2. System Board
3. Processor
Hard Drives Failed
One or more of the Hard
Disk Drive tests detected an
error.
1. Hard Disk Drive
2. Hard Disk Drive
Adapter (if installed)
3. System Board
Incorrect DOS version
1. Ensure you are using
DOS version 3.0 or
higher.
INT Mask Register Failed
The INT Mask Register
tests detected an error.
1. Microprocessor
2. System Board
Invalid Date
The back-up clock and DOS
dates do not match.
1. Real-Time Clock
Assembly
2. System Board
68
PS/2 Maintenance Manual
Error Message/Symptom
FRU/Action
Invalid Time
The back-up clock and DOS
time of day settings do not
match.
1. Real-Time Clock
Assembly
2. System Board
Linear Cylinder Access
Test Failed
Hard disk drive error. The
redundancy check of the
sectors read does not match
the information on the drive.
1. Hard Disk Drive
2. Hard Disk Drive Cable
3. Hard Disk Drive
Adapter (if installed)
4. System Board
Logic Function Failed
The CPU Logic Test has
detected an error.
1. Microprocessor
2. System Board
Loopback Error
An error occurred during the
COM Port Test or Parallel
Port Test. (A wrap plug
must be installed to
successfully complete these
tests.)
1. System Board
2. Wrap Plug
Main Components Failed
A component failure was
detected on the system
board.
1. System Board
2. Processor
Memory test cannot run at
this location in memory
Not enough free memory
available to start the
memory test.
1. Memory Module
2. System Board
Missing QAPlus/PRO
Files(s)
One or more Diagnostic
support files are missing.
1. Diagnostic Diskette
NO LOOP-BACK PLUG.
Skipping External
loopback test
No wrap plug installed.
1. Install wrap plug on
the serial port, rerun
test.
2. System Board
Not ready
Printer not on-line or not
ready.
1.
2.
3.
4.
No 'type-amatic' repeat
(At least one repeat key
must be tested during this
test or an error will occur.)
The Type-amatic test
detected an error.
1. Keyboard
2. System Board
Not used by any standard
device
The IRQ is not currently
being used by a
non-standard device.
1. System Board
Ready Printer
Printer
Printer Cable
System Board
Hardware Maintenance Service
69
Error Message/Symptom
FRU/Action
Numeric Proc Failed
The NPU TEST detected an
error.
1. Microprocessor
2. System Board
Parallel Ports Failed
Test Report Summary
message.
1. System Board
Pass (N): ** Errors ** Drive
(X) Failed
The read/write test failed on
the diskette drive.
1. Diskette Drive
2. System Board
3. Diskette Drive Cable
Pass (N) Drive Not Ready
The diskette drive door is
open or defective.
1. Ensure diskette drive
is ready.
2. Diskette Drive
3. System Board
4. Diskette Drive Cable
Pass (N): Drive (X) Write
Protected or Unformatted
1. Insert a non-write
protected, formatted
diskette into the
diskette drive; the
rerun the test
2. Diskette Drive
3. System Board
4. Diskette Drive Cable
Pass (N): Unknown Media
Drive (X)
Diskette Drive Test error.
The File Allocation Table ID
on the diskette is invalid.
1.
2.
3.
4.
Diskette
Diskette Drive
System Board
Diskette Drive Cable
Place Hi-density Media in
Drive
The capacity of the diskette
installed in the diskette drive
is less then the capacity of
the drive.
1.
2.
3.
4.
Diskette
Diskette Drive
System Board
Diskette Drive Cable
Printer Failed
Ensure the printer is
powered-on and ready.
1. Printer
2. Printer Cable
3. System Board
Printer Fault
Ensure the printer is
powered-on and ready.
1. Printer
2. Printer Cable
3. System Board
Printer Not Selected
Ensure the printer is
powered-on and ready.
1. Printer
2. Printer Cable
3. System Board
Program or File
Not Found
Press Any Key
The diagnostics cannot find
the USER(N).COM file.
1. Diagnostic Diskette
2. Diskette Drive
3. System Board
Program Too Big To Fit In
Memory
Too many Terminate and
Stay Resident programs in
memory while loading
diagnostics.
1. Reboot the system
from the Diagnostic
Diskette
70
PS/2 Maintenance Manual
Error Message/Symptom
FRU/Action
QAPlus/PRO Cannot Be
Re-run Because Of Error
In Relocating Program
Diagnostics failed to
relocate the Diagnostics
Test programs so the
memory space it resides in
was not tested.
1. Diagnostic Diskette
2. Memory Module
3. System Board
RAM Memory Error in
Block n. Bad bits n
An error was detected in
RAM.
1. Memory Module
2. System Board
RAM Test Failed
Test Result Summary
message, Memory Test
failed.
1. Memory Module
2. System Board
Read error on cylinder n
Hard disk drive physical
format error.
1. Hard Disk Drive
2. Hard Disk Drive
Adapter (if installed)
3. System Board
Read Errors
Diskette drive read error.
1.
2.
3.
4.
Receive Error
Serial Port loopback test
error.
1. Serial Port Cable
2. System Board
Refresh Failure
The Diagnostics Test
detected an error while
testing the DMA controller's
RAM refresh cycle.
1. Memory Module
2. System Board
RTC Interrupt Failure
The Diagnostics Test cannot
detect the Real-Time clock
interrupt.
1. Real-Time Clock
Assembly
2. System Board
Serial Chip Error
COM Port error, general.
1. Serial Port Cable
2. System Board
Serial Compare Error
COM Port error, information
transmitted is not the same
as information received.
1. Serial Port Cable
2. System Board
Serial Time-out Error
COM Port error, time
interval is too long between
transmitted and received
data.
1. Serial Port Cable
2. System Board
Serious Memory Error —
Diags Cannot Continue
Memory Test error.
1. Memory Module
2. System Board
Sorry You Need A Mouse
The mouse or mouse driver
was not detected.
1. Mouse
2. System Board
Diskette
Diskette Drive
System Board
Diskette Drive Cable
Hardware Maintenance Service
71
Error Message/Symptom
FRU/Action
System Hangs
See “Undetermined
Problems” on page 183.
1. Any device
2. Any adapter
3. System Board
Too Many Errors — Test
Aborted
Too many errors, the
Diagnostics Test cannot
continue.
1. Microprocessor
2. System Board
Transmit Error
Internal or external serial
port loopback test failure.
1. Serial Port Cable
2. System Board
Video Adapter Failed
Test Result Summary,
displayed if "Fail" was at the
Quit/Fail/Pass menu of any
video test.
1. Video Adapter
2. System Board
3. Display
Write error on cylinder n
Hard disk drive write error.
1. Hard Disk Drive
2. Hard Disk Drive
Adapter (if installed)
Write Errors
Diskette drive write error.
1.
2.
3.
4.
Write Protected or
Unformatted
The diskette is Write
Protected or not formatted.
1. Insert a non-write
protected, formatted
diskette into the
diskette drive; then
rerun the test
2. Diskette Drive
3. System Board
4. Diskette Drive Cable
Diskette
Diskette Drive
System Board
Diskette Drive Cable
Miscellaneous Error Messages
Message/Symptom
FRU/Action
The Address Exceeds The
Size Of Your Memory
An invalid memory address
was entered. The
Diagnostics Tests display
this message during the
Locate Bad Chips option
under the interact menu if
an invalid memory address
was entered at the at the
"Enter Memory Address Of
Bad Chip" prompt.
72
PS/2 Maintenance Manual
1. Enter correct address
2. Memory Module
3. System Board
Message/Symptom
FRU/Action
That Number is Out Of
Range
An invalid bit number was
entered. The Diagnostics
Tests display this message
during the Locate Bad Chips
option under the interact
menu if an invalid bit
number was entered at the
"Enter the Bad Bit" prompt.
1. Enter correct number
2. Memory Module
3. System Board
You Cannot Delete the
Motherboard
The "Remove Board" option
was selected. The
Diagnostics Tests display
this message during the
Locate Bad Chips option
under the interact menu if
the "Remove Board" option
was selected while the
system board was
displayed.
1. Make the correct
selection
2. Memory Module
3. System Board
4. Processor
Hardware Maintenance Service
73
Network Service Procedures
The following section provides switch settings and testing
procedures for the Token-Ring and Ethernet network
adapters.
Note: For information about ISA PS/ValuePoint
10BASE-T/10BASE2 Ethernet Adapters, see “ISA
PS/ValuePoint 10BASE-T/10BASE2 Ethernet
Adapters” on page 90.
Data Rate Switch Settings
Switch 12 on the switch block indicates the mega bits per
second rate (4 Mbps or 16 Mbps) at which the adapter
transfers data to the network. Set the switches as shown
to match the data rate of the LAN segment.
Data Rate:
16 Mbps
Switch Block
Off
On
1
2
3
4
5
6
7
8
9 10 11 12
1
2
3
4
5
6
7
8
9 10 11 12
Off
Data Rate:
4 Mbps
On
Note: These switch settings apply to AT bus adapters
only. Micro Channel adapters do not have
switches.
Testing the Token-Ring Adapter
To test the Token-Ring adapter:
1. Locate the Token-Ring diskette that matches the
adapter in the computer you are servicing.
Note: Token-Ring Network Adapter/A has a plain
green dot on the rear of the adapter.
Token-Ring 16/4 Network Adapter/A has
“16/4” printed on the dot.
2. Insert the diskette in the diskette drive, then power-on
the computer. The Ring Diagnostic menu appears.
Note: If the computer is already on, type A:F1DIAG at
the DOS command prompt then press Enter
to load the Token-Ring Setup/Diagnostic
program.
3. Select Option 0 to test the primary Token-Ring
adapter, then press Enter. The adapter address will
be displayed for a few seconds before the diagnostics
are run.
The following is a list of possible error conditions that can
occur when the workstation is attempting to connect to the
network:
74
PS/2 Maintenance Manual
Problem
Action
AC—0040
0000 0000
Field appears
This field indicates that the adapter has
detected an internal error. Restart the
workstation.
If the problem remains, replace the
Token-Ring adapter. If the problem still
remains, replace the system board.
AE—166
XX—0011
Field appears
This field indicates that the workstation
contains two Token-Ring adapters. The
primary adapter shown here (166) could
not establish communication with the file
server. The reason is indicated by the XX
message and can be either BU or OP. (The
BU and OP were described previously)
Restart the workstation.
If the problem remains, replace the
Token-Ring adapter. If the problem still
remains, replace the system board.
BU—XXXX
Field appears
This field indicates errors that occur during
startup.
If a code other than
appears and the
field is highlighted, an error has occurred.
The following is a list of possible error
codes.
24— The shared RAM diagnostic
failed. Ensure that the RAM address
assigned for the Token-Ring adapter
does not conflict with other devices
installed in the workstation. (Refer to
“Selecting Network Configuration
Parameters” on page 87, if you need
additional information about the
configuration parameters.)
All other error codes— Replace the
Token-Ring adapter. If the problem
remains, replace the system board.
If the above items are correct, restart the
workstation.
If the problem remains, replace the
Token-Ring adapter. If the problem still
remains, replace the system board.
CE—0085
Field appears
This field indicates that a data rate
configuration error was found during
power-on self test.
To correct this error, go to “Data Rate
Switch Settings” on page 74 to match the
data rate of the LAN segment. (Refer to
“Selecting Network Configuration
Parameters” on page 87, if you need
additional information about the
configuration parameters.)
If the problem remains, replace the
Token-Ring adapter.
If the problem still remains, replace the
system board.
Hardware Maintenance Service
75
Problem
Action
ET—00:00:02
Field stops
incrementing
If the elapsed time indicator stops
incrementing, check that:
1. All cables and cords are properly
attached to the workstation.
2. The file server is operational.
3. The correct data rate is set for the
Token-Ring adapter.
If the above items are correct, restart the
workstation. If the problem remains,
replace the Token-Ring adapter. If the
problem still remains, replace the system
board.
OP—0000 XX
Field appears
flashing or is
highlighted
If a code other than
appears:
If the code is
11 or
2D and the
field is flashing:
1. Ensure that all cables and cords
are properly attached to the
workstation and network access
point.
2. Ensure that the file server is
available and fully operational.
If the code is
2E and the field is
highlighted, the adapter is configured
for a different data rate than the LAN
segment.
To correct this error, you must
manually change the data rate for the
network adapter. Refer to “Data
Rate Switch Settings” on page 74 to
match the data rate of the LAN
segment.
If the above items are correct and the
problem remains, replace the Token-Ring
adapter. If the problem still remains,
replace the system board.
PC—4020
Field appears
This field indicates that the adapter is not
functioning properly with the workstation.
In most cases, the screen will freeze and
this field will be highlighted because the
adapter cannot continue. Restart the
workstation.
If the problem remains, replace the
Token-Ring adapter. If the problem still
remains, replace the system board.
76
PS/2 Maintenance Manual
Problem
Action
RQ—XXXX
Field appears
and XXXX is
a value
greater than
10
A number greater than 10 indicates that
the file server is not present or is
overloaded.
1. Ensure that the file server is available
and fully operational.
2. Ensure that the address for the
Token-Ring adapter installed in the
workstation has been properly added
to the network software.
If the above items are correct and the
problem remains, replace the Token-Ring
adapter. If the problem still remains,
replace the system board.
RS—XXXX
Field appears
If this field appears in reverse video with a
code other than
, a ring error was
detected. The following is a list of
possible error codes where X can be any
number:
2
— The adapter has detected a
soft error condition. Restart the
workstation.
4XX or 8XX— Replace the
Token-Ring adapter. If the problem
remains, replace the system board.
X1XX— The Token-Ring adapter has
been removed from the ring. Ensure
that the correct adapter address was
added to the network software. If the
above item is correct and the
problem remains, replace the
Token-Ring adapter. If the problem
still remains, replace the system
board.
8 — One of the error log counters
has incremented past 256. Restart
the workstation.
4 or
6 — If the workstation is
the only computer connected to the
LAN, restart the workstation. If other
workstations are connected to the
LAN, run the Diagnostic Diskette (see
“Testing the Token-Ring Adapter” on
page 74) and select “Ring
Diagnostics” from the Main Menu.
If the problem remains, replace the
Token-Ring adapter. If the problem
still remains, replace the system
board.
All other error codes— run the
Diagnostic Diskette (see “Testing the
Token-Ring Adapter” on page 74)
and select “Ring Diagnostics” from
the Main Menu.
If the problem remains, replace the
Token-Ring adapter. If the problem
still remains, replace the system
board.
Hardware Maintenance Service
77
Problem
Action
SF—XXXX
Field appears
and XXXX is
a value
greater than
10
A number greater than 10 indicates that
the file server has been found, but is not
responding.
1. Ensure that the file server is available
and fully operational.
2. Ensure that the address for the
Token-Ring adapter installed in the
workstation has been properly added
to the network software.
If the above items are correct and the
problem remains, replace the Token-Ring
adapter. If the problem still remains,
replace the system board.
78
PS/2 Maintenance Manual
Token-Ring POST Errors
The following is a list of the Token-Ring adapter error
messages that might appear in the top-left corner of the
screen during POST. In this table, “X” represents a 6
(primary adapter) or a 7 (alternate adapter).
Message
Action
16X80
Invalid testing mode requested.
Restart the workstation.
If the problem remains, replace the
Token-Ring adapter.
16X81
The primary adapter was not found at the
specified base I/O address.
Ensure that a unique base I/O address
was assigned to the adapter.
If a unique base I/O address was
assigned to the adapter, restart the
workstation.
If the problem remains, replace the
Token-Ring adapter.
16X82
The alternate adapter was not found at
the specified base I/O address.
Ensure that a unique base I/O address
was assigned to the adapter.
If a unique base I/O address was
assigned to the adapter, restart the
workstation.
If the problem remains, replace the
Token-Ring adapter.
16X85
The adapter was not found at the
specified base I/O address.
Ensure that a unique base I/O address
was assigned to the adapter.
If a unique base I/O address was
assigned to the adapter, restart the
workstation.
If the problem remains, replace the
Token-Ring adapter.
16X90
Adapter Card Test failure.
Restart the workstation.
If the problem remains, replace the
Token-Ring adapter.
16X91
Open Phase Test failure.
Restart the workstation.
If the problem remains, replace the
Token-Ring adapter.
16X92
Computer problem.
Run Advanced Diagnostics.
Hardware Maintenance Service
79
Message
Action
16X93
Transmit/Receive Test failure.
The data received is not the same as the
data sent.
Check to see that:
1. The network is terminated correctly.
2. The network is connected correctly.
If the above items are correct, restart the
workstation.
If the problem remains, replace the
Token-Ring adapter.
16X99
General error.
Restart the workstation.
If the problem remains, replace the
Token-Ring adapter.
80
PS/2 Maintenance Manual
Testing the Ethernet Adapter
To test the Ethernet adapter:
1. Insert the feature diskette in the diskette drive, then
power-on the computer. The Ethernet
Setup/Diagnostic program will automatically load.
Note: If the computer is already on, type A:F1DIAG at
the DOS command prompt then press Enter
to load the Ethernet Setup/Diagnostic
program.
2. Select Option 2. Test the Adapter from the Main
Menu, then press Enter. The adapter address will be
displayed for a few seconds before the diagnostics
are run.
The following is a list of possible error conditions that can
occur when the workstation is attempting to connect to the
network:
Problem
Action
AC—0000
Field appears
This field indicates that the adapter has
detected an internal error.
If the code is
1, a soft error has
occurred. Restart the workstation.
If the code is
2, an unrecognized
interrupt was found. Ensure that a
unique interrupt level was assigned
to the network adapter (refer to
“Network Configuration Errors” on
page 89 for additional information).
If a unique interrupt level was
assigned, restart the workstation.
If the problem remains, replace the
Ethernet adapter.
CE—0085
Field appears
If a code other than
appears, a
configuration error was found during
POST.
Run the Automatic Configuration program
on the Starter Diskette image. Then
ensure that a non-conflicting ROM
address, RAM address, and interrupt level
were assigned to the network adapter
(refer to “Network Configuration Errors” on
page 89 for additional information).
If the problem remains, replace the
Ethernet adapter.
Hardware Maintenance Service
81
Problem
Action
ES—XXXX
Field appears
and remains
on the screen
This field indicates the network status
error messages. The following is a list of
possible error messages:
1: The network adapter stopped
the transmission because of
excessive collisions.
2: The network interface controller
cannot gain access to the bus.
4: The network adapter
transmitted data without deferring.
8: The data transmitted from the
network adapter collided, at least
once, with another workstation’s
transmission.
1 : The carrier sense was lost
during transmission.
2 : The multistation access unit
(MAU) failed to transmit a collision
signal after transmitting a packet.
4 : An “out of window”
(51.2-microsecond) collision
occurred.
1 : The receive buffer is full.
2 : The frame size is too large to
receive.
4 : Packets were received with
cyclic redundancy check (CRC)
errors.
8 : The incoming packet did not
end on a byte boundary; therefore,
the CRC did not match the last byte.
1
: First-in, first-out (FIFO) is not
serviced and is causing an overflow
during reception.
2
: A packet was missed because
the receive buffers were full.
These hexadecimal error messages all
reflect soft-error conditions. Under normal
circumstances, no action is required.
When several of these errors occur
simultaneously, they are ORed. For
example, if errors
1,
2,
4, and
8 occur simultaneously, an error code
of
F appears.
If the error code appears and remains on
the screen:
1. Restart the workstation.
2. Ensure that you have not exceeded
the number of devices that the
network can support.
If the above items are correct, restart the
workstation.
If the problem remains, replace the
Ethernet adapter.
82
PS/2 Maintenance Manual
Problem
Action
ET—00:00:02
Field stops
incrementing
If the elapsed time indicator stops
incrementing, check that:
1. All cables and cords are properly
attached to the workstation.
2. The address for the network adapter
was properly added to the network
software.
3. The adapter configuration (BNC/UTP)
is set properly.
4. The server is operational.
If the above items are correct, restart the
workstation.
If the problem remains, replace the
Ethernet adapter.
OP—XXXX
Field appears
If a code other than
appears, an
error has occurred during startup. The
following is a list of possible error
messages:
1: The network adapter was not
found. Check to see that:
1. The adapter is installed in the
workstation.
2. All cables and cords are
connected correctly to the
workstation and network-access
point.
3. The file server is available and
fully operational.
If the above items are correct,
restart the workstation.
If the problem remains, replace
the Ethernet adapter.
3: The shared RAM diagnostic
tests failed. Ensure that the RAM
address assigned for the network
adapter does not conflict with other
devices installed in the workstation.
Refer to “Network Configuration
Errors” on page 89 for additional
information and instructions.
4: The interrupt-request line for
the network adapter was not found.
Ensure that the interrupt level
assigned to the network adapter does
not conflict with other devices
installed in the workstation. Refer to
“Network Configuration Errors” on
page 89 for additional information
and instructions.
5 or
6: The adapter appears
defective. Run the test programs on
the Starter Diskette image.
If the problem remains, replace the
Ethernet adapter.
Hardware Maintenance Service
83
Problem
Action
RQ—XXXX
Field appears
and XXXX is
a value
greater than
000A
If a number greater than 000A appears,
the file server is not present or is
overloaded. Check that:
1. The server is available and fully
operational.
2. The address for the network adapter
was properly added to the network
software.
3. The adapter configuration (BNC/UTP)
is set properly.
If the above items are correct and the
problem remains, replace the Ethernet
adapter.
SF—XXXX
Field appears
and XXXX is
a value
greater than
000A
If a number greater than 000A appears,
the server was found, but is not
responding. Check that:
1. The server is available and fully
operational.
2. The address for the network adapter
was properly added to the network
software.
If the above items are correct and the
problem remains, replace the Ethernet
adapter.
84
PS/2 Maintenance Manual
Ethernet POST Errors
The following is a table of Ethernet adapter error
messages that might appear in the top-left corner of the
screen during POST.
Number
Action
06402
The adapter was not found. Check to see that
the adapter is installed correctly in the
workstation. If so, restart the workstation. If the
problem remains, replace the Ethernet adapter.
06405
The adapter was not found at the specified base
I/O address.
Ensure that a unique base I/O address was
assigned to the adapter. Refer to “Network
Configuration Errors” on page 89 for additional
information and instructions.
If a unique base I/O address was assigned to
the adapter, restart the workstation. If the
problem remains, replace the Ethernet adapter.
06406
06416
– or –
06417
ROM Test failure.
06406
LAN address ROM does not produce a
valid checksum.
06416
Adapter erasableprogrammable read-only memory
(EPROM) signature is not valid.
06417
Adapter EPROM checksum is not valid.
Check to see that a unique base ROM address
was assigned to the network adapter. Refer to
“Network Configuration Errors” on page 89 for
additional information and instructions.
If a unique ROM address was assigned to the
adapter, restart the workstation. If the problem
remains, replace the Ethernet adapter.
06411
RAM Test failure.
Ensure that a unique RAM address was
assigned to the adapter. Refer to “Network
Configuration Errors” on page 89 for additional
information and instructions.
If a unique RAM address was assigned to the
adapter, restart the workstation. If the problem
remains, replace the Ethernet adapter.
06412
Adapter Test failure.
Restart the workstation. If the problem remains,
replace the Ethernet adapter.
Hardware Maintenance Service
85
Number
Action
06418
06419
06420
06421
06422
06423
– or –
06424
Transmit/Receive Test failure.
06418
Loopback first-in, first-out (FIFO)
error.
06419
Loopback packet error.
06420
A cyclic redundancy check
(CRC) character was expected
but not generated.
06421
Loopback error.
06422
A good CRC was manually
appended to the loopback
packet, but the network interface
controller (NIC) logged a CRC
error.
06423
A bad CRC was manually
appended to the loopback
packet, but the NIC logged a
CRC error.
06424
A NIC accepted a packet whose
address did not match that of the
NIC.
The data received is not the same as data sent.
Check to see that:
1. The network is terminated correctly.
2. The network is connected correctly.
If the above items are correct, restart the
workstation. If the problem remains, replace the
Ethernet adapter.
06425
86
Interrupt not serviced.
Ensure that a unique interrupt level was
assigned to the adapter. Refer to “Network
Configuration Errors” on page 89 for additional
information and instructions.
If a unique interrupt level was assigned to the
adapter, restart the workstation. If the problem
remains, replace the Ethernet adapter.
PS/2 Maintenance Manual
Selecting Network Configuration
Parameters
The following configuration parameters are available for
the network adapter.
Interrupt Levels: The network adapter can use
interrupt levels 3, 4, 10, or 14. Many application
programs used with the network adapter require the
adapter to be set at a specific interrupt level.
When choosing the interrupt level for the network
adapter, you must consider the interrupt levels
allowed and required for each option installed in the
workstation and by all programs that will be used by
the workstation. Unless the options and programs
support interrupt sharing, no two options in the same
workstation can use the same interrupt level.
Adapter I/O Range: The network adapter can use
any of the following locations for the hexadecimal
base I/O address.
Table 1. Hexadecimal Base I/O Address
Locations
00800-0081F
01800-0181F
02800-0281F
03800-0381F
04800-0481F
05800-0581F
Read-Only Memory (ROM) Address Range: The
network adapter can use any of the following
locations for the hexadecimal base ROM address.
Table 2. Hexadecimal Base ROM Address
Locations
C8000-C9FFF
D0000-D1FFF
D8000-D9FFF
CA000-CBFFF
D2000-D3FFF
DA000-DBFFF
CC000-CDFFF
D4000-D5FFF
DC000-DDFFF
CE000-CFFFF
D6000-D7FFF
DE000-DFFFF
When other options, such as a memory-expansion
adapter, require addresses for sections of the
workstation memory, the ROM address for each
option must be set so that no two options in the same
workstation use the same ROM address.
Hardware Maintenance Service
87
Shared Random-Access Memory (RAM) Range:
The network adapter can have either 8KB or 16KB of
RAM. Any of the following locations can be used for
the hexadecimal base RAM address.
Table 3. RAM Locations for 8KB Window Check
C0000-C1FFF
CC000-CDFFF
D8000-D9FFF
C2000-C3FFF
CE000-CFFFF
DA000-DBFFF
C4000-C5FFF
D0000-D1FFF
DC000-DDFFF
C6000-C7FFF
D2000-D3FFF
DE000-DFFFF
C8000-C9FFF
D4000-D5FFF
CA000-CBFFF
D6000-D7FFF
Table 4. RAM Locations for 16KB Window
Check
C0000-C3FFF
CA000-CDFFF
D4000-D7FFF
C2000-C5FFF
CC000-CFFFF
D6000-D9FFF
C4000-C7FFF
CE000-D1FFF
D8000-DBFFF
C6000-C9FFF
D0000-D3FFF
DA000-DDFFF
C8000-CBFFF
D2000-D5FFF
DC000-DFFFF
Remote Program Load Option: This parameter
controls the remote IPL capability of the workstation.
It must be set to “Enabled” for the workstation to
receive remote IPL images. Do not set this
parameter to “Disabled” unless a hard disk drive that
contains an operating system and a network program
is installed in the workstation, or you have installed an
additional network adapter in the workstation.
88
PS/2 Maintenance Manual
Network Configuration Errors
If an error occurs during testing of the network adapter,
record the error message or number, then check to see
that the network adapter is configured so that no conflicts
exist. If a conflict exists, an asterisk (*) appears next to
the parameter on the Change Configuration panel.
Complete the following steps to check for conflicts:
1. Make the Starter Diskette or Reference Diskette
image available to the workstation.
2. Power-on the workstation and display.
3. Wait for the IBM logo screen to appear; then press
Enter.
4. Select Set configuration from the Main Menu of the
Starter Diskette or Reference Diskette image.
5. Select Change configuration from the next menu.
6. Page down to the configuration information for the
network adapter.
Note: Conflicts with interrupt levels might not be
indicated. Ensure that each device has a
unique interrupt level assigned.
7. Change the parameters if a conflict exists. (Refer to
“Selecting Network Configuration Parameters” on
page 87, if you need additional information about the
configuration parameters.)
8. If you corrected a conflict, run the test programs on
the Starter Diskette or Reference Diskette image
again.
If the problem remains, replace the network adapter. If the
problem still remains, replace the system board and
reinstall the original network adapter.
Hardware Maintenance Service
89
ISA PS/ValuePoint 10BASE-T/10BASE2
Ethernet Adapters
The IBM PS/ValuePoint ISA 10BASE-T/10BASE2 Ethernet
Adapters enable you to connect an Industry Standard
Architecture (ISA) AT bus computer family workstation to
an Ethernet local area network (LAN). The 10BASE-T
Ethernet Adapter has an unshielded twisted pair connector
and the 10BASE2 Ethernet Adapter has a bayonet
connector (BNC). Both adapters have a set of light
emitting diode (LED) indicator lights that represent the
following conditions:
POWER/TX (green) blinks during data transmission.
LINK/RX (green) blinks when data is being received,
and indicates the "link integrity signal" from the
twisted-pair hub is present.
COLLISION (yellow) indicates multiple concurrent
transmissions on the network.
JABBER (yellow) indicates data transmission is
interrupted to inhibit an abnormally long output data
stream (10BASE2 Ethernet Adapter only).
ISA PS/ValuePoint Ethernet Adapter
Features Diskette
The IBM PS/ValuePoint ISA Ethernet Adapter Features
Diskette contains device drivers and a setup/diagnostic
program for the Ethernet Adapter.
ISA PS/ValuePoint Ethernet Adapter
Configuration Options
Ensure that the adapter configuration does not conflict
with the system configuration or other adapters.
The I/O address, the IRQ interrupt levels, and the ROM
address can be changed. For additional information, see
“I/O Address,” “IRQ Interrupt Levels” on page 91 , and
“ROM Address” on page 91.
I/O Address: The PS/ValuePoint Ethernet Adapter
can use any of the following locations for the hexadecimal
base I/O address. The default is 300. The I/O address
must be set at 300 or 320 if the Novell Netware Device
Driver is used.
800
1800
2800
3800
300
320
90
PS/2 Maintenance Manual
IRQ Interrupt Levels:
The PS/ValuePoint Ethernet
Adapter can use interrupt levels 3, 4, 5, 9, or 11. The
default is 3. The IRQ interrupt level must be set at 3 if the
Novell Netware NE2000 Device Driver is used. If the
adapters and programs do not support interrupt sharing,
the adapters cannot use the same interrupt level.
ROM Address:
The PS/ValuePoint Ethernet Adapter
has 16KB of read-only memory (ROM). Any of the
following locations can be used for the hexadecimal ROM
address. The default is D0000-D3FFF.
C8000-CBFFF
D0000-D3FFF
D8000-DBFFF
CA000-CDFFF
D2000-D5FFF
DA000-DDFFF
CC000-CFFFF
D4000-D7FFF
DC000-DFFFF
CE000-D1FFF
D6000-D9FFF
Changing PS/ValuePoint ISA Adapter
Configuration
To change the PS/ValuePoint Ethernet Adapter
configuration, do the following.
1. Insert the Features Diskette in drive A, and power-on
the computer to start the Ethernet Setup/Diagnostic
program.
If the computer is already on, log off the network. If
OS/2 is installed, shutdown the system and insert the
Feature Diskette in drive A. Press and hold Ctrl+Alt
then press Del.
2. Select Option1. Set Adapter Configuration from the
Main Menu; then press Enter. The adapter address
is displayed.
3. Press Enter to continue to the Adapter Configuration
Menu. Follow the instructions to make specific
changes.
4. Press F10 to install the configuration changes.
Note: If two adapters are installed in the same computer,
the default setting on one of the adapters must be
changed. Ensure that no two adapters installed in
the same computer share the same settings.
Duplicate option settings will result in an error.
Hardware Maintenance Service
91
PS/2 ServerGuard Adapter
The ServerGuard Adapter has the following features:
Feature
Description
Microprocessor
16 MHz 80C186XL
Flash Memory
512KB
SRAM
256KB
NVRAM
8KB
Gate Array
Custom-control
Expansion Connectors
PCMCIA Type II (two)
Slot A (upper slot)
reserved for modem
Slot B (lower slot)
reserved
Main Battery Pack
7.2V dc NiCad
Backup Battery
3V Lithium
Other Features
Analog-to-digital
Converter
External Power Control
Box (plugs into the
ServerGuard Adapter)
The ServerGuard Adapter includes a PCMCIA Type II
Modem which has the following features. (The modem is
dedicated to the ServerGuard Adapter and is not
accessible by computer software.)
Feature
Description
Data Speed
2400 bits per second (bps)
DAA
Country specific
DAA to telephone jack cable
Country specific
Other Features
Modem to Data Access
Arrangement (DAA) cable
The ServerGuard Adapter is supported in the following
systems:
Machine Type
Model
7546
411, 640, 641
8580
All Models
8590
All Models
8595
All Models
9577
All Models
9585
All Models
9590
All Models
9595
All Models
92
PS/2 Maintenance Manual
Cabling
The Data Access Arrangement (DAA) provides access to a
local telephone system on the Public Switched Telephone
Network (PSTN).
The External Power Control Box (EPCB) connects
between the power connector on the computer, and an
electrical outlet.
External DAA Cabling
Refer to “ServerGuard Adapter Parts” on page 306 for the
external DAA for your country.
The following illustration shows the arrangement of the
cables when using an external DAA.
1
Flat end of DAA Cable to modem
2
MiniDIN end of DAA Cable to External DAA
3
External DAA
4
RJ-11 end of PSTN Cable to External DAA
5
Other end of PSTN Cable to telephone outlet
6
Telephone outlet
3
2
DAA Cable Check
The DAA cable, PSTN cable, and External DAA are wired
with pin 1 connected to pin 1, pin 2 connected to pin 2,
and etc.. A continuity check of the cables will determine if
the cables are good.
Hardware Maintenance Service
93
External Power Control Box Cabling
Connect the external power control box to both the
computer power supply connector and the ServerGuard
Adapter power control connector:
1
Power Control Cable to ServerGuard Adapter
2
Power Supply Cable to system unit
3
Power Supply Cable to electrical outlet
KO
94
PS/2 Maintenance Manual
ServerGuard Adapter Symptom-to-FRU
Index
Error codes and the FRUs that might be responsible for
the failure are listed below. The most-likely failing FRU is
listed first.
Symptom/Error
FRU/Action
No beep, power-on
indicator does not come
on, and fan does not run.
1. Press Master Override
Button on EPCB
2. External Power Control
Box
Note: Bypass External Power
Control Box by plugging
electrical outlet directly
into computer power
supply prior to replacing
FRU.
Power Status LED is off
during EPCB Diagnostic
test.
Symptom/Error
1. ServerGuard Adapter
2. External Power Control
Box
FRU/Action
027501XX, 027503XX
027506XX, 027507XX
1. ServerGuard Adapter
2. System Board
027502XX,
027510XX,
027533XX,
027536XX,
1. ServerGuard Adapter
027504XX
027511XX
027534XX
027537XX
027509XX
1. Remove redundant
ServerGuard Adapters,
run Auto Configuration
program, then retest.
027512XX
1. WMSELF.DGS
diagnostics file missing.
2. WMSELF.DGS
diagnostics file incorrect.
027535XX
1. 3V Lithium Backup
Battery.
2. ServerGuard Adapter
027554XX
1. Internal Temperature out
of range
2. ServerGuard Adapter
027555XX, 027556XX
1. ServerGuard Adapter
2. System Power Supply
027557XX
1. 7.2V NiCad Main Battery
Pack
2. ServerGuard Adapter
027558XX, 027559XX
027560XX, 027561XX
1. PCMCIA Type II Modem
2. ServerGuard Adapter
Hardware Maintenance Service
95
Symptom/Error
FRU/Action
027562XX
1. External Power Control
Box not connected
2. External Power Control
Box
3. ServerGuard Adapter
027563XX, 027564XX
1. External Power Control
Box
2. ServerGuard Adapter
0275XXXX
1. Update Diagnostic
Software
96
PS/2 Maintenance Manual
Wireless Network
This section provides information on the IBM Wireless
LAN. For additional help, refer to the user's guides for the
workstation you are using.
ISA Bus Switch Settings:
To install the adapter
in a computer with an ISA bus, set the dip switches as
shown below.
ISA Type Connector
0
1
1
2
3
4
5
6
7
8
Table 5. ISA Dip Switch Settings
Switch
1
2
3
4
5
6
7
8
Position
0
0
0
0
0
0
0
1
Important
Refer to the values shown on the ISA adapter, DO
NOT use the values shown on the switch.
The settings shown in Table 5 apply to most computer
configurations. The interrupt level used by the IBM
Wireless LAN adapter is determined by the position of
switches 5 and 6.
The IBM Wireless LAN adapter does not support
interrupt level sharing. Therefore, make sure that
no other adapter in the computer uses the same
interrupt level. If necessary, change the interrupt level
of the IBM Wireless LAN adapter.
If you want to use interrupt level 9 for the IBM
Wireless LAN adapter, make sure that no other
adapter in the computer uses interrupt level 2.
ISA Mode Operations Parameters:
The
following provides the possible values for ISA mode
operation parameters that you can select according to your
system configuration:
Input/Output (I/O) base address (this is used by the
Hardware Maintenance Service
97
computer to identify and communicate with each
individual adapter).
Table 6. I/O Base Address, ISA Mode
Switch Positions
1 2 3
I/O Base Address
000
86A0
100
96A0
010
A6A0
110
B6A0
001
C6A0
101
D6A0
011
E6A0
111
F6A0
RPL memory enable (this allows you to enable or
disable the RPL memory).
Table 7. RPL Memory Enable, ISA Mode
Switch Position
4
RPL Memory
0
Disabled
1
Enabled
Interrupt level (this establishes the priority by which
the adapter can interrupt the computer. The lowest
value is given the highest priority).
To use interrupt level 9 for the IBM Wireless LAN
adapter, make sure that no other adapter in your
computer uses interrupt level 2.
Table 8. Interrupt Level, ISA Mode
Switch Positions
5 6
Interrupt Level
00
9
10
10
01
11
11
15
Direct memory access (DMA) arbitration level (this
establishes the priority by which the adapter can
access the computer memory. The lowest value is
given the highest priority).
Table 9. DMA Arbitration Level, ISA Mode
98
Switch Positions
7 8
ISA DMA Level
00
0
10
1
01
3
11
Invalid
PS/2 Maintenance Manual
Wireless LAN Utilities Diskette:
To use the
utilities stored on the IBM Wireless LAN Utilities diskette,
you must add four lines to the CONFIG.SYS file on the
diskette. To do so, take the following steps:
1. Edit the CONFIG.SYS file supplied on the IBM
Wireless LAN Utilities diskette.
2. Copy the four lines of Card and Socket Services
DEVICE statements. These statements are
determined by the type of ThinkPad and are supplied
on the ThinkPad utilities diskette.
For example, in the DOS environment for an IBM
ThinkPad 720C computer, the four lines to copy might
be:
DEVICE=C:\IBMDSS 2.SYS
DEVICE=C:\IBMDOSCS.SYS
DEVICE=C:\DICRMU 2.SYS
DEVICE=C:\$ICPMDOS.SYS
Placement of Radio Modules:
The IBM
Wireless LAN adapter consists of an external unit and a
controller card or a PCMCIA Credit Card. The external
unit is called a radio module
The radio module contains the antenna. It is connected by
cable to the controller card or the PCMCIA Credit Card.
Considering that each base must be located at the center
of the cell it controls, cells should be arranged in a manner
to cover the site. the following guidelines for radio module
placement ensure reliable operation of the wireless
network.
Place all radio modules:
So that they are not hidden by metallic objects
Far from moving objects such as fans or metallic
doors
Away from radiation sources that emit in the 2.4GHz
frequency band such as microwave ovens.
In addition, place the base radio modules:
Above the average furniture height, at least 1.5m
above the floor
Above dividing panels, shelves and so on
At the center of the ceiling of a large room or corridor,
or at the intersection of two corridors.
Modern buildings having metallic partitions are very
common. IBM suggests that you install the base radio
modules in the ceiling of corridors. Radio waves used by
the IBM Wireless LAN are reflected along these partitions,
and enter into offices through the doors or glass parts.
Hardware Maintenance Service
99
Error Management Overview:
The IBM Wireless
LAN software processes the events occurring in each
base, such as:
Hardware errors on wireless LAN controller cards
Software errors during data transfer
Significant events such as adapter load completion.
These events are logged in two files:
IBMWLERL.LOG, which contains the most recent
events.
IBMWLERL.BAK, which contains older events.
In an OS/2 environment there is an additional file:
LANTRAN.LOG
All these events are listed in the manual, "Installing and
Operating Your Network" delivered with the product.
The most critical events are reported to the network
management system through simple network management
protocol (SNMP) traps, and can be displayed on the
network management station.
Using a network management system such as
NetView/6000* or NetWare Management system (NMS)
allows you to manage your network from a single point.
Running Adapter Diagnostics:
To run the
adapter diagnostics, do the following:
1. Insert the IBM Wireless LAN Utilities diskette in drive
A.
Note: If the workstation has a PCMCIA Type II slot,
make sure that you have correctly set up the IBM
Wireless LAN Utilities diskette (see section “Wireless
LAN Utilities Diskette” on page 99).
2. Restart the workstation as follows:
For an ISA computer, power-off the computer,
then power-on the computer.
or
For Micro Channel or computers with the
PCMCIA Type II slot, press Ctrl+Alt+Del.
3. Select Diagnostics Utilities from the main menu.
4. Wait for the diagnostics to complete and follow the
recommended action.
FRU numbers are available in “Wireless LAN Adapter
(ISA, Micro Channel Bus)” on page 309 and
“Wireless LAN Adapter (PCMCIA Type II)” on
page 310.
100
PS/2 Maintenance Manual
Note
If a hardware problem is not identified, see the
"Installing and Operating Your Network" manual (part
number 54G2072) for further information on
troubleshooting.
If the problem persists:
1. Note the resulting diagnostic message and code.
2. Go to “Problem Resolution Worksheet” on
page 104 and fill in the information on the
worksheet.
3. Then call your IBM service representative or your
dealer.
PCMCIA Credit Card Problems
Note
This section applies only to PCMCIA Type II slot DOS
and Windows** wireless workstations in a Netware**
environment.
If the PCMCIA Credit Card is not detected when you start
the computer, do the following.
If you use Card and Socket Services or only Socket
services, you can edit the CONFIG.SYS file and
comment out the Card and Socket Services device
statements (these statements are determined by the
type of computer).
Then press Ctrl+Alt+Del to restart the computer.
If the problem persists, refer to the following
procedure:
If you use neither Card and Socket Services, edit the
NET.CFG file and add:
/R :C
to the following statement:
Enabler c:\xxxx\IBMWLENA.EXE
where C
is a memory zone between C000 to EF00
in multiples of 100 and xxxx is the directory where
the IBM Wireless LAN has been installed, for
example, NWCLIENT.
Then press Ctrl+Alt+Del to restart the computer.
Note
If you are using only Socket Services you can edit the
CONFIG.SYS file and add the Card Services device
statement.
Hardware Maintenance Service
101
Interrupt Level or I/O Address Conflicts
Note.
This section applies only to PCMCIA Type II slot
wireless workstations.
Interrupt levels or I/O address conflicts may occur after you
install the IBM Wireless LAN software on a workstation.
If this happens, you can resolve the conflict by changing
the value of the interrupt level or the I/O address used by
the IBM Wireless LAN adapter. To do so, refer to the
following procedures:
In a Netware environment for DOS and Windows
workstations, edit the NET.CFG file and specify the
following statements:
– For Interupt level
int n
–
(n can be 3,4,5,7,9,10,11,12, or 15).
For I/O Address
port xxxx
(xxxx can be from 200 to 2FO, from 300 to 360,
or from 400 to FFE0 in multiples of 10).
In an OS/2 environment, for DOS and Windows
workstations, change these wireless adapter
parameters through the LAN Support Program
diskette.
Checking the Base Configuration (OS/2
Environment): To verify that all prerequisites have
been installed as defined by the configuration for your
base, refer to Table 10 on page 103.
If all the prerequisites have been installed, access LAPS
and verify the options, binds and parameters that were
selected during installation. If they are correct, you must
re-install.
102
PS/2 Maintenance Manual
TCP/IP
V2.0 (Network Manager is
WNM)
N/A
NTS/2 V1.0
V2.0 and CSD UN50382
N/A
Base Wired Stand alone
NTS/2 V1.0 with CSD
level 7020
NTS/2 V1.0
V2.0 and CSD UN50382
V2.0
Base Wired Lan Cell with
NAP
NTS/2 V1.0 with CSD
level 7020
NTS/2 V1.0
V2.0 and CSD UN50382
V2.0
Base Wired Lan Cell
without NAP
N/A
NTS/2 V1.0
V2.0 and CSD UN50382
V2.0
NAP only
Base Stand alone
TCP/IP Using Network
Management
NTS/2 V1.0
NTS/2 V1.0 with CSD
level 7020
Table 10. OS/2 Prerequisites for Base and NAP station
IBM IEEE 802.2
N/A
Prerequisites
IBM Wireless LAN Bridge
1. Install and bind TCP/IP with your device driver depending on your backbone adapter.
Note:
LAPS:
If you have a problem, check your IP connection. To do so, type ping xxxxx at the OS/2 prompt,
where xxxx is the value of an IP address of your network.
2. Bind IBM IEEE 802.2 with the device driver of your wireless adapter.
3. Bridged configuration:
a. Select the IBM Wireless Network adapter for Base with bridge from the adapter list. Bind with the IBM Wireless LAN Bridge.
b. Bind the IBM Wireless Network adapter with IBM IEEE 802.2.
c. Select the IBM Token ring Network Adapter from the adapter list. Bind with the IBM Wireless LAN Bridge.
Supervisor: Bridge option enabled.
103
Hardware Maintenance Service
Warning
IBM Wireless LAN bridge can not be installed on the
same computer as Routexpander/2 Source Routing
Bridge.
LAPS Installation Problem: If you cannot run the
IBM Wireless LAN because LAPS aborted during
installation, do not reboot the computer when prompted by
the instructions displayed on your screen. Go to the OS/2
Install directory and erase the file IBMLANLK.LST, then
restart your installation.
Problem Resolution Worksheet:
Before calling
your service representative, do the following.
1. Make a copy of the problem resolution worksheet.
2. Collect and fill in the information listed in the problem
resolution worksheet.
3. Collect the part numbers.
In the section following the worksheet, there is an
explanation of how to obtain the data requested.
You should answer the following questions:
Does the problem occur on only one wireless
workstation or on several?
If on several, are all the affected wireless
workstations in one cell?
Does the problem occur on only one base or on
several?
Are all bases in the IBM Wireless LAN affected?
The Problem Resolution worksheet is on the following
page.
104
PS/2 Maintenance Manual
Table 11. Problem Resolution Worksheet
Description of the problem
Level of IBM Wireless LAN
software.
Level of IBM Wireless LAN
microcode.
PS model and type
(see the documentation for
your computer)
Bus type (ISA, MCA, or PCMCIA)
(see the documentation for
your computer)
Disk type (ESDI or SCSI)
(see the documentation for
your computer)
Operating System and Level
Protocol stack used - level
and Type of application
(contact your network
administrator)
Information contained in
the error log files
IBMWLERL.LOG and
IBMWLERL.BAK (for bases)
LANTRAN.LOG for OS/2
environment
(copy the files onto a
diskette)
Any other significant
displayed messages
Network Configuration
Number of cells
Number of bases
Number of workstations
Type of backbone attachment
Obtaining the Necessary Data
1. Find the level of IBM Wireless LAN software:
In a NetWare environment (Base), type MODULE at
the server prompt on the system console and
note the information for the following modules:
– IBMWLCOM.NLM
– IBMWLNAP.NLM
– IBMWLWNC.NLM
– IBMWLWCA.NLM
– IBMWLERL.NLM
–
–
or
IBMWLPRX.NLM
and IBMWL.LAN
Hardware Maintenance Service
105
For all other environments, go to the directory
where you have installed your software and refer
to the following procedures:
– In a NetWare environment, for DOS and
Windows workstations, type IBMWLV1 and
note the information that you require.
– In an OS/2 environment, for DOS and
Windows workstations, type IBMWLV2 and
note the information that you require.
– In an OS/2 environment (base and OS/2
workstation), type SYSLEVEL and note the
information that you require.
2. Find the level of IBM Wireless LAN Microcode. To do
so, follow these steps:
a. Insert the IBM Wireless LAN Utilities diskette in
drive A.
b. Restart your workstation.
c. Select Diagnostic Utilities from the main menu.
d. When the first set of instruction panels is
displayed, press Enter.
e. When the second set of instruction panels is
displayed, access Adapter Vital Product and
note the Product Change Level.
106
PS/2 Maintenance Manual
Related Service Information
Important
The service procedures are designed to help you
isolate problems to a FRU. They are written with the
assumption that you have received model-specific
training on all PS/2 computers, or that you are familiar
with the computers, functions, terminology, and the
reference information provided in this manual.
ACPA/A Advanced Diagnostic Tests
. . . .
CSD (DOS) Version Level Check . . . . . .
CSD (OS/2) Version Level Check . . . . . .
Combined FRUs Diagnostics . . . . . . . .
Display Adapter 8514/A
. . . . . . . . . .
Display Self-Test
. . . . . . . . . . . . .
Fax/Modem Checkout
. . . . . . . . . . .
How to Use a Symptom-to-FRU Index
. . .
Identifying Adapters
. . . . . . . . . . . .
Keyboard Voltage Check . . . . . . . . . .
Memory-Module Kit Identification . . . . . .
Memory Problems . . . . . . . . . . . . .
Option Microprocessor Jumper (76, 77) . . .
OS/2 Problems during a New Installation
. .
OS/2 Trap Errors
. . . . . . . . . . . . .
PCMCIA Diagnostics (PS/2 E Model 33)
. .
PCMCIA Adapter Switch Settings . . . . . .
PCMCIA PC Card Lock Override . . . . . .
Printer Errors
. . . . . . . . . . . . . . .
Processor Board Installation (90, 95)
. . . .
Processor Upgrade (Models 50/50Z/60 486SLC2) Switch Settings
. . . . . . . .
Processor Upgrade (Models 70/80 - 486DX33)
Switch Settings
. . . . . . . . . . . . .
Processor Upgrade (Model 70/80 - 486DX33 )
FRU Isolation
. . . . . . . . . . . . . .
Processor (Px) Label Cross-reference . . . .
Power Supply Voltage Check . . . . . . . .
Real-Time Clock Problems . . . . . . . . .
Remote Power-on Jumper (95) . . . . . . .
Running Automatic Configuration . . . . . .
ServerGuide CDs (Type 86XX) . . . . . . .
Hardware Maintenance Service
.
.
.
.
.
.
.
.
.
.
.
.
.
.
.
.
.
.
.
.
108
108
108
108
109
110
112
114
122
123
123
125
130
130
131
133
134
134
134
135
.
136
.
136
.
.
.
.
.
.
.
136
137
138
150
150
150
151
107
ACPA/A Advanced Diagnostic Tests
To access the Advanced Diagnostic mode, select F2. The
diagnostic program consists of the following:
Audio Output Tone (Tone): Select this item from
the Main Menu to test the right and left audio output
channels of the control-panel assembly. The test allows
you to choose the frequency and amplitude of the tone.
To start the oscillator, select Oscillator Start or press
Alt+O. To change the frequency and amplitude of the
tone, select Change Oscillator Values or press Alt+V.
Microphone Input Loop (Loop):
Select this
item from the Main Menu to test the microphone input from
the audio adapter and control-panel assembly. To start
the test, select Mic into R and L Out or press Alt+Z.
Microphone Gain Toggle (Toggle): Select this
item to toggle between the high and low gain settings on
the audio adapter. To toggle between the settings, select
Mic Gain or press Alt+M.
CSD (DOS) Version Level Check
Many problems with DOS are fixed by Corrective Service
Diskettes (CSD). If you think that the problem you are
experiencing has been fixed by a CSD, check the CSD
version level.
To determine the CSD level on the computer you are
servicing, type VER at the DOS prompt, then press Enter.
CSD (OS/2) Version Level Check
To determine the OS/2 level on the computer you are
servicing, type SYSLEVEL at the OS/2 prompt, then press
Enter.
Combined FRUs Diagnostics
If an adapter or device consists of more than one FRU (for
example a card plugged into an adapter), an error code
might be caused by either FRU. Before you replace a
multi-FRU adapter or device, try removing or exchanging
each FRU, one by one, to help you determine the problem.
108
PS/2 Maintenance Manual
Display Adapter 8514/A
Use this illustration to determine the correct placement of
the jumper on the adapter.
Jumper Link
A
1
17
2
18
3
19
4
20
5
21
6
22
7
23
Module
Error
Error
Module
No.
Code
Code
No.
16
007460XX
31
007440XX
8
24
007441XX
30
007461XX
27
9
25
007442XX
29
007462XX
26
007443XX
28
007463XX
25
007444XX
22
007464XX
24
007445XX
21
007465XX
23
007446XX
18
007466XX
20
007447XX
17
007467XX
19
10
26
11
27
Extra
memory
installed
B
Extra
memory
not
installed
12
28
007448XX
32
007468XX
15
13
29
007449XX
14
007469XX
11
007450XX
13
007470XX
10
007451XX
12
007471XX
9
007452XX
6
007472XX
8
14
30
15
31
007453XX
5
007473XX
7
16
32
007454XX
2
007474XX
4
007455XX
1
007475XX
3
Hardware Maintenance Service
109
Display Self-Test
Before performing this test, be sure you are familiar with
the information under “Display Considerations” on
page 111.
Note
Before replacing a display, check the following:
8506 and 8508 displays must be connected to an
Image adapter.
63XX and 85XX systems support either 63XX or
85XX displays.
85XX systems with an XGA-2 adapter support
95XX displays.
95XX systems support either 63XX, 85XX, or
95XX displays.
If the screen is rolling, replace the display assembly. If
that does not correct the problem, replace FRUs in the
following order until the problem goes away:
1. Display adapter (any type)
2. System board
3. Bus adapter (if used)
If the screen is not rolling, do the following:
1.
2.
3.
4.
5.
Power-off the computer and display.
Disconnect the display signal cable.
Power-on the display.
Turn the contrast to its maximum position.
Turn the brightness control to the center position.
Check for the following conditions:
You should be able to vary the screen intensity by
adjusting the contrast and brightness controls.
The screen should be white or light gray, with a black
margin (test margin) on the screen.
Note: The location of the test margin varies with the
type of display. The test margin might be on
the top, bottom, or one or both sides.
If you do not see any test margin on the screen, replace
the display. If there is a test margin on the screen, replace
the FRUs, in the following order, until the problem goes
away:
Note: Certain adapter failures can cause video problems.
Before replacing any FRUs, remove any option
adapters to see if the problem disappears.
1.
2.
3.
4.
110
Display adapter (any type)
System board
Bus adapter (if display adapter is used)
Display
PS/2 Maintenance Manual
Display Considerations:
If you experience
problems with a PS/2 display and the Advanced Diagnostic
video test and the display self-tests do not indicate a
problem, consider the location of the display and any
surrounding devices. Certain fluctuating low-frequency
magnetic fields can cause the screen to distort, jitter, or
roll. These magnetic fields are generally present around
transformers, small appliances, and even nearby florescent
lighting fixtures. If you experience this problem, you might
have to move the device or the display. Displays that are
too close to each other (less than 12 inches) could cause
similar problems.
Note
Because of the differences in the Earth's magnetic
fields, displays are designed to be used in a specific
hemisphere. For example, if a display marketed for
use in the Southern Hemisphere is relocated to the
Northern Hemisphere, the colors will probably be
distorted. The parts catalog lists FRU numbers and
model numbers for Northern and Southern
Hemisphere displays.
You should avoid moving a color display while it is
powered-on. The movement can result in some screen
discolorations. If this happens, to correct the colors,
power-off the display for twenty minutes (the display
automatically degausses (demagnetizes) the screen after it
is off for twenty minutes).
It is possible for a display to cause diskette drive read/write
errors if the drive and the display are too close. Distance
between displays and diskette drives should be at least 3
inches.
Warning
You can damage the display or adapter if you do not
power-off the display and computer before connecting
or disconnecting the display cable. This is especially
important when using the XGA-2 subsystem because
displays of varied refresh rates are supported.
Reconnect the display cable before powering-on the
computer because the display type and the
appropriate refresh rate is determined during POST.
After POST, any display change is not detected.
Hardware Maintenance Service
111
Fax/Modem Checkout
001
– Power-off the computer.
– Ensure that the modem is installed correctly.
– Ensure that the public switch telephone network (PSTN)
cable and the data access arrangement (DAA) cable, if
installed, are connected correctly.
If you need to correct one of the above conditions, do so
now; then continue.
– Power-on the computer.
– Insert the IBM Data/FAX Modem diskette into the default
diskette drive.
– If you are servicing a High Speed Internal Data/Fax
Modem (Models FC3632 and FC3650), at the DOS
prompt (for example, A:\), type IBMDIAG; then press
Enter.
– If you are servicing a PCMCIA Data/FAX Modem
(Models FC3634 and FC3635), at the DOS prompt (for
example, A:\), type ESTDIAG; then press Enter.
– Follow the instructions on the screen. (If you need help,
press F1.)
DID THE DIAGNOSTIC TESTS DETECT AN ERROR?
Yes No
002
The diagnostic tests have completed successfully. If
you suspect a problem, go to Step 004.
003
Go to “Symptom-to-FRU Index (AT Bus)” on page 12.
004
– Check the PSTN cable and the DAA cable, if installed,
for continuity.
IS THE CABLE(S) GOOD?
Yes No
005
Replace the defective cable(s).
006
– Have the customer transmit a call.
WAS THE CALL TRANSMITTED SUCCESSFULLY?
Yes No
007
If installed, replace the external DAA. If you do not
have an external DAA installed, or replacing the
external DAA does not correct the problem, replace
the modem.
112
PS/2 Maintenance Manual
008
– Have the customer receive an incoming call on the
modem.
WAS THE INCOMING CALL RECEIVED?
Yes No
009
If installed, replace the external DAA. If you do not
have an external DAA installed, or replacing the
external DAA does not correct the problem, replace
the modem.
010
The diagnostic tests have completed successfully. If you
still suspect a problem that is not software related, replace
the External DAA; then replace the modem.
Hardware Maintenance Service
113
How to Use a Symptom-to-FRU Index
Always start with the General Checkout procedure. In the
MAP, you might be sent to the Symptom-to-FRU Index.
There, you will find a list error symptoms, error codes, and
the possible causes. The most-likely cause is always
listed first, and it is in bold type.
Another use for the Symptom-to-FRU Index is to help you
decide which FRUs to bring with you on a service call. Try
to get the customers POST error, or error symptom from
the dispatcher.
The MAP can send you to a Symptom-to-FRU Index under
various conditions. Listed below are the actions to take for
most conditions.
Symptom / Response
Information / Action
POST Error
(except I999 range)
Use the first error that
appears on the screen. If
multiple error codes appear,
diagnose them in the order
that they appear (the
multiple errors might be
false errors).
POST Error in the
I999XXXX Range
Refer to “IML and IPL
Errors” on page 55.
Any POST Error Plus an
Incorrect Audio Response
Diagnose the error code
first.
No POST Error
Refer to “Symptoms” in the
index.
System Starts Up in BASIC
Refer to “IML and IPL
Errors” on page 55.
Error Range is Not Listed
An additional service
package is required for the
device generating the error.
Refer to that service
package.
114
PS/2 Maintenance Manual
Error Code Format:
This section provides an
explanation of the encoded SCSI and non-SCSI Post error
codes and detailed information about each code.
Error messages are displayed on the screen as three, four,
five, eight, twelve or, thirteen digits. An “X” in an error
message can be any number. The shorter POST errors
are highlighted in the Symptom-to-FRU Index. Some digits
will represent different information for SCSI errors versus
non-SCSI errors.
The following figure shows which digits display the shorter
POST errors. The figure also defines additional SCSI
information.
Notes:
1. Non-IBM device error codes and documentation
supersede this list.
2. Duplicate SCSI ID settings will cause misleading error
symptoms or messages.
RDDDPLSCB QEET
Test state
Error code Extension
Qualifier
Bus ( =internal 1=external)
Capacity of the device
Slot number of the device
LUN (usually )
PUN (SCSI ID #)
Device Number
Reserved Digit (usually
)
As an example, if you have SCSI error code 021050A0,
each digit decodes as follows:
Digit
Information
0
Reserved digit (usually 0)
210
Device number 210 indicates hard disk
5
SCSI ID assigned is 5
0
Logical Unit Number (not used, usually 0)
A
The device capacity is 60MB (A = 60MB)
0
The device is connected to the internal bus
RDDD Codes for Adapters
RDDD
Device Type or Information
0037
SCSI on the system board
0096
SCSI adapter with cache
0112
SCSI adapter without cache
0206
SCSI-2 adapter
Hardware Maintenance Service
115
RDDD Codes for Devices
RDDD
Device Type or Information
0208
Unknown device type
0209
Direct access - removable media, and/or other
than 512 byte blocks
0210
Direct access - hard disk, 512 byte blocks
0211
Sequential access (tape)
0212
Printer
0213
Processor
0214
Write Once, Read Multiple (W.O.R.M.)
0215
Read only (CD-ROM)
0216
Scanner
0217
Optical memory (read/write optical disk)
0218
Changer (multiple tray CD-ROM)
0219
Communications
B Codes
B
Device Type or Information
0
Dual SCSI adapter (internal bus)
1
Dual SCSI adapter (external bus)
QEET 0000 Codes
Refer to this list if the “DDD” indicates an adapter, followed
by a QEET of 0000. For example, 01120100 0000.
PLSC
QEET
Information
0100
0000
On systems with NVRAM, SCSI setup
data not located, or the checksum did not
verify. On systems without NVRAM
(Model 50 for example), setup data must
be on the 1st hard disk.
0200
0000
Configuration error. No hard disk found
at PUN 6, LUN 0 for 161,162,165 system
error path. Might be an unsupported
configuration.
0300
0000
No space available in extended BIOS
data area for SCSI data table (possibly
too many adapters installed).
0400
0000
ROM modules not found on adapter (IML
based systems only). Running setup
might correct it.
0500
0000
ROM checksum error on 2nd 16K portion
of 32K ROM
0600
0000
ROM access control port error
QEET Errors (other than 0000)
116
PS/2 Maintenance Manual
These are specific “QEET” error codes (preceded by a
“DDD” indicating an adapter).
Note: A number in slot “S” indicates an error on the
adapter, (or device attached to the adapter) in slot
"S." If "S" is 0, suspect the system board.
QEET
Information
001x
8032/80188/80C186 ROM test failure
002x
Local RAM test failure
003x
Bad fuse, or bad termination, or local RAM address
failure on SCSI adapter if “RDDD” is 0112.
004x
Internal peripheral test failure
005x
Buffer control chip test failure, or LTB failed, (or
system-board SCSI failed if “RDDD” is 0037)
006x
Undefined error condition, or buffer RAM test failure
on SCSI adapter if “RDDD” is 0096
007x
System interface control chip test failure
008x
SCSI internal interface test failed
00Ax
SCSI external interface test failed
107x
Adapter hardware failure
10Cx
Command failed
10Ex
Command error (invalid command or parameter)
10Fx
Sequencing error
110x
Adapter internal error log contains entries.
(Reported if no other errors on adapter exist.)
180x
Time out
181x
Adapter busy error
182x
Unexpected interrupt presented by adapter
183x
Adapter register test failure
184x
Adapter reset failure
185x
Adapter buffer test failure (on cached adapters)
186x
Adapter reset count expired
187x
Adapter registers not cleared on reset
188x
Card ID in adapter microcode did not match ID in
POS registers
190x
Expected device did not respond
19Yx
DMA arbitration level conflict (Y = assigned
arbitration level)
220x
Adapter hardware error
221x
Global timeout on adapter (device did not respond)
222x
Adapter DMA error
223x
Adapter buffer defective
224x
Command aborted by adapter
301x
Invalid parameter in SCB
303x
Command not supported
Hardware Maintenance Service
117
QEET
Information
304x
Command aborted by system
305x
Command rejected (buffer not disabled)
306x
Command rejected (Adapter diagnostic failure)
307x
Format rejected
308x
Assign rejected (command in progress)
309x
Assign rejected (device already assigned)
30Ax
Command rejected (device not assigned)
30Bx
Command rejected (maximum LBA exceeded)
30Cx
Command rejected (16 bit card slot address range
exceeded)
313x
Invalid device for command
3FFx
Status not returned by adapter
401x
Recovered error (not an error condition)
402x
Device not ready
403x
Device medium error
404x
Device hardware error
405x
Illegal request for device
406x
Device unit attention would not clear
407x
Device data protect error
409x
Device vendor unique error
40Ax
Copy operation aborted by device
40Bx
Device command aborted
40Cx
Device search data command satisfied
40Dx
Device volume overview (residual data remains in
buffer)
40Ex
Device mismatch (source data did not match
medium data)
500x
Check condition on device, no sense data returned
501x
No index or sector
502x
Seek incomplete
503x
Write fault
504x
Drive not ready
505x
Drive not selected
506x
No track zero found
507x
Multiple drives selected
508x
Logical unit communication failure
509x
Head positioning error (track following error)
510x
CRC or ECC error on ID field
511x
Unrecoverable read error
512x
No address mark (ID field)
513x
No address mark (data field)
118
PS/2 Maintenance Manual
QEET
Information
514x
Record not found
515x
Seek error
516x
Data synchronization error
517x
Recoverable read (without ECC) error
518x
ECC recovered read error
519x
Defect list error
51Ax
Parameter overrun
51Bx
Synchronous transfer error
51Cx
Primary defect list not found
51Dx
Compare error
520x
Invalid command
521x
Illegal logical block address (LBA)
522x
Illegal function for device type
524x
Illegal command block field
525x
Invalid LUN
526x
Illegal field in parameter list
528x
Media changed
529x
Power-on or bus device reset occurred (not an
error)
52Ax
Mode select parameters changed (not an error)
531x
Medium format corrupted
532x
Defect spare location unavailable
540x
Device RAM failure
541x
Data path diagnostic failure
542x
Power-on diagnostic failure
543x
Message rejected
544x
Internal controller error
545x
Device was unable to reconnect
547x
Interface parity error
548x
Initiator detected error
549x
Illegal command or command out of sequence error
5F0x
Format in progress (not an error)
5F1x
Spinup in progress
601x
SCSI bus reset occurred
602x
SCSI interface fault
610x
Selection timeout error (device not available)
611x
Unexpected bus free
612x
Mandatory SCSI message rejected
613x
Invalid SCSI phase sequence
620x
Short length record error
702x
Device not ready (removable media devices)
Hardware Maintenance Service
119
QEET
Information
704x
Device not ready (non-removable media devices)
728x
Media changed error would not clear
731x
Medium format corrupted (format unit interrupted format must be issued again)
7F0x
Format in progress (prior format unit issued being
completed)
7F1x
Spinup in progress
Q Codes
All error codes with "Q" = 1 are developed using
information returned by either an adapter or device. The
"Q" value defines the origin of the "EE" code that is
reported. Error codes (EE) with "Q" = 4 or 5 may be
reported that are not listed here or can actually have a
definition other than that given, depending on the device.
“Q”
Information
2
Command error field of command complete status
block returned by the adapter
3
SCSI Status field of the command complete status
block or command error field values indicating
software problems (< 20H)
4
Sense key value returned by a device
5
Additional sense byte (byte 12) of sense information
from device
6
Device error code field of command complete status
block
7
Device errors not normally considered an error, but
considered an error based on when the code was
returned (medium corrupted error on device with
non-removable media)
Test Status Codes
“T”
Information
O
Not applicable for error code
A
Adapter initialization error)
B
Adapter reset
C
Adapter register test
D
Adapter buffer test phase 1 (on cached adapters)
E
Adapter buffer test phase 2 (on cached adapters)
F
Adapter buffer test phase 3 (on cached adapters)
G
Adapter buffer test phase 4 (on cached adapters)
H
Adapter (buffer enable, buffer size, retry, enable)
I
Device assignment sequence
J
Device not ready (initial unit attention clearing)
120
PS/2 Maintenance Manual
“T”
Information
K
Device reset
L
Device starting phase
M
Device in process of starting
N
Device block size determination
O
Device self-test
P
Device single block read (LBA)
Q
Device double block read (LBA)
S
Error occurred after device testing completed
Hardware Maintenance Service
121
Identifying Adapters
Adapters can usually be identified by examining the
adapter and looking for special chips, sockets or
connectors. I/O adapters can be identified by looking at
the number of pins in the I/O connector and the gender of
the connector.
“F” connectors (TV type) indicate a broadband network
adapter.
“BNC” connectors (mini-twistlock) indicate a 3270
emulation adapter or possibly, if it is an "AT Bus" adapter,
it could be a Cluster adapter. The 3270 adapter does not
have switches, the Cluster adapter does.
9-pin Male connectors usually indicate a serial port.
9-pin Female connectors usually are display adapters but
could also be Token Ring adapters, if it is an "AT Bus"
adapter. If it is a short card, it is a Token Ring. If it is a
long card, it is a display adapter. If the adapter is for the
Micro Channel, it is a Token Ring adapter. IBM does not
market 9-pin display adapter for Micro Channel systems.
15-pin Male (2 rows of pins) adapters are 5250 or 36/38
Emulation adapters. These two adapters are the same
and differ in name only, depending if it is an AT Bus or
Micro Channel adapter.
15-pin (3 rows of pins) Male connectors could be the
Page Printer adapter (double card) or an Ethernet (single
card), if it is a Micro Channel card, or it could be a game
adapter (short card) or a Page Printer adapter (double
card) if it is an AT Bus adapter.
15-pin (3 rows of pins) Female connectors, on an AT
bus, indicate a PS/2 display adapter. If it is a Micro
Channel adapter, it might be an 8514/A adapter (double
card with many sockets on the full-length daughter card),
an XGA* adapter, (single card with no sockets except for
the 8 memory modules), or an Image Adapter (two sets of
memory sockets and connectors for daughter cards).
25-pin Male connectors indicate some type of serial
adapter. It could be a multiprotocol adapter or a scanner
adapter. Many 25-pin connectors do not use all of the
pins. Some of the pins might be omitted on both adapters
and system board ports.
25-pin Female connectors indicate a parallel adapter.
*
Trademark of the IBM Corporation.
122
PS/2 Maintenance Manual
Keyboard Voltage Check
Note: If a mouse or other pointing device is attached,
remove it and see if the error symptom goes away.
If the symptom goes away, suspect that the mouse
or pointing device is defective.
Check the connector voltages at the keyboard end of the
cable (all voltages are plus or minus 5%).
Standard Connector
Pin
Voltage (Vdc)
1
+5.0
2
0 (Not Used)
3
Ground
4
+5.0
5
+5.0
6
0 (Not Used)
2 4 5 3 16
If the voltages are correct, replace the keyboard. If the
voltages are not correct, suspect the keyboard cable, then
the system board.
Memory-Module Kit Identification
Some early memory module kits are not labeled with a
FRU number. The following information provides methods
of identification.
There are four key identifiers:
1. The chip size: narrow or wide
2. The chip placement (horizontal, vertical, both, 1 side
or 2 sides)
3. The speed suffix shown on the individual chips
(7=70ns, 8=80ns, 85=85ns)
4. The module ID resistors (R1=85ns, R2=80ns)
Memory-Module Kit 1A and 1B
Kit 1A and 1B, show 10 or more chips mounted
horizontally, vertically or a mixed pattern. If there are
chips on one side of the board, it is 1MB. If there are
chips on both sides, it is 2MB. (A small number of 8MB
kits were also manufactured in this configuration.) The
suffix on the chip, for example, -8, -85 is important.
1A
1B
Hardware Maintenance Service
123
Memory-Module Kit 2L and 2R
Kit 2L shows 10 wide chips with resistors across the top,
but not on the end. If there are chips on one side, it is
4MB; two sides it is 8MB.
Kit 2R shows 9 or 10 chips per side, all mounted vertically.
If there are two resistor locations on the right end labeled
R1 and R2, it is 2MB. (R1 = 85ns, R2 = 80ns, R1 + R2 =
100ns.) There will either be 9 or 10 chips.
R1
R2
2R
2L
Memory-Module Kit 3
Kit 3 has 6 chips per side spaced evenly. If all the chips
are the same size, (3R) it is 1MB. If the two center chips
are smaller than the 4 outer chips, (3L) it is 4MB. These
could be any speed.
3L
3R
Memory-Module Kit 4A and 4B
Kit 4A and 4B are both 4MB. 4A has 6 closely spaced
chips on each side. There are no resistors, and it is 85ns
(there might be a tiny FRU number on the end chip.) 4B
shows the front and rear of another 4MB chip
configuration. There are 8 chips on the front, and 4 on the
rear.
FRU #
4A
4B
Front
124
Rear
PS/2 Maintenance Manual
Memory Problems
Models 50, 55, 60, 65, 70, and 80
Note: For other Models, see the following information.
Finding the Failing Memory
Note: Running customer diagnostic tests will deallocate
defective memory. After you replace defective
memory, run the memory diagnostic test to enable
the replacement memory. Then, restart the
computer and rerun the same test to validate the
installed memory-module kits.
Use the following procedure when you suspect a problem
with the system memory.
1. Run the advanced-memory diagnostic test. If the test
does not indicate which memory-module kit failed, or
if the system hangs, try running the test from the
System Diskettes. If you still cannot identify which
memory-module kit failed, return here and continue
with the next step.
Note: If a screen message appears, asking if you
have replaced a specific memory-module kit,
suspect that it is the failing kit.
2. Using a known-good kit, exchange each kit, one at a
time, and repeat the memory diagnostic test until you
find the defective kit. Replace only the defective kit.
If the kits are not the problem, suspect:
Riser Card (if used)
Memory Expansion Adapter (if used)
System Board
Models 53 (9553-xBx) 56, 57, 76, 77, 85, 90,
and 95
On these systems, the “X” digit of the POST error (for
example, 00020xXx), indicates the socket location.
Determining Failing Memory Location
“X”
digit
equals
56, 57
Socket
76, 77
Socket
90
Socket
85, 95
Socket
X=1
X=2
X=3
X=4
X=5
X=6
X=7
X=8
X=U
Mem
Mem
Mem
Mem
Mem
Mem
Mem
Mem
J1 (J11)
J3
J2
J4
J1 (J14)
J2
J3
J4
A1
B1
A2
B2
A3
B3
A4
B4
1
3
2
4
1
3
2
4
Unknown
When a mixture of 4MB, 8MB, and 16MB (or larger)
memory-module kits are installed in the 9585-xKx, and
Hardware Maintenance Service
125
9585-xNx computers, the smaller kits must be installed in
the higher-numbered connectors (A4/B4 is the highest),
and the larger kits in the lower-numbered connectors
(A1/B1 is the lowest).
Determining Memory Type, Size and Speed
The “Y” digit of the POST error (for example, 00020xxY),
indicates the type, size, and speed.
“Y”
digit
equals
Type
Size
Speed
Y=0
Y=1
Y=2
Y=4
Y=5
Y=6
Y=8
Y=9
Y=B
Y=C
Y=D
Y=E
Y=K
Y=Q
Y=R
Y=S
Y=T
Y=Z
Parity
Parity
Parity
Parity
Parity
Parity
Parity
Parity
Parity
Parity
Parity
Parity
ECC
ECC
ECC
ECC
ECC
Unknown
4MB
2MB
1MB
4MB
2MB
1MB
8MB
2MB
8MB
2MB
2MB
1MB
16MB
4MB
32MB
8MB
2MB
80ns
100ns
100ns
70ns
85ns
85ns
80ns
80ns
70ns
70ns
120ns
120ns
70ns
70ns
70ns
70ns
70ns
If you are still unable to determine which memory-module
kit failed, follow the isolation procedure under “Finding the
Failing Memory” on page 125.
Determining Models 90/95 Processor Type
On these models, memory operation differs with each type
of processor board (type 1, 2, or 3). Use any of the three
methods in the “Processor Board Matrix (90, 95)” to
determine which one it is, then continue with the
appropriate memory section.
Processor Board Matrix (90, 95)
1. Go to the Diagnostic Main Menu and select Display
revision levels (you might have to select More
utilities first). Note the submodel code displayed on
the screen. (The customer can use this screen to tell
you the submodel code.)
2. Read the FRU number printed near the card-edge of
the processor board.
3. Look for a second label (marked P1 - PC) to the right
of the front serial number of the system. The second
label indicates that the processor board has been
upgraded.
126
PS/2 Maintenance Manual
The following table converts the model code, submodel
code, FRU number, reference diskette type, or the second
label to the processor type.
Mod
Sub
Mod
90
Sub
Mod
95
Processor Board FRU
Number and
Description
2nd
Lab.
Ref
Disk
Type
0GX
0JX
0KX
0MX
0GX
0HX
0HX
0LX
0HX
0MX
0NX
0PX
0NX4
0PX4
2D
11
13
2B
2F
57
591
3F
5B2
29
43
45
N/A
N/A
2C
14
16
2A
2E
58
5A1
40
5C2
28
42
46
44
47
92F0049 486SX 20
64F0201 486 25
64F0198 486 33
92F0048 486 50
92F0065 487SX 20
92F0079 486SX 25
92F0079 486 SX251
92F0161 486DX2 25/50
92F0079 486 25/502
57F1597 486 50
61G2343 486DX2 33/663
92F0120 586DX2 66
61G2343 486DX2 33/663
92F0120 586DX2 66
-P1
P2
P3
P4
P5
P6
P7
P8
PA
PB
PE
PB
PE
1
1
1
1
1
2
2
2
2
3
4
4
4
4
1 Also has a 487SX processor (FRU 92F0100).
2 Also has a 486 processor (FRU 92F0147).
3 Has built-in Level 2 cache.
4 Model 9095A
Hardware Maintenance Service
127
Memory (Type 1 Processor Boards)
Only interleaved memory configurations are
supported. The system memory-module kits operate
in pairs. Each pair must be the same memory size,
speed, and type.
On the Model 90, the pairs are J1 & J3, J2 & J4, on
each riser card.
On the Model 95 the pairs are A1 & B1, A2 & B2, A3
& B3, A4 & B4, on the system board.
Only parity (70ns, 80ns and 85ns) kits are supported.
Minimum operating requirement is one pair of 1MB
kits. Total system memory capacity is 64MB.
Memory (Type 2 Processor Boards)
Interleaved and noninterleaved memory configurations
are supported. If the kits are installed in pairs of the
same memory size, speed, and type, the kits will run
in interleaved mode. Any other configuration is
supported, but will run in noninterleaved mode.
On the Model 90, the pairs are J1 & J3, J2 & J4, on
each riser card.
On the Model 95, the pairs are A1 & B1, A2 & B2, A3
& B3, A4 & B4, on the system board.
Only parity (70ns and 80ns) kits are supported.
Minimum operating requirement is one 2MB kit. Total
system memory capacity is 64MB.
Memory (Type 3 Processor Boards)
Only interleaved memory configurations are
supported. The system memory-module kits operate
in pairs. Each pair must be the same memory size,
speed, and type.
On the Model 90, the pairs are J1 & J3, J2 & J4, on
each riser card.
On the Model 95, the pairs are A1 & B1, A2 & B2, A3
& B3, A4 & B4, on the system board.
Parity (70ns, 80ns, and 85ns) or Error Correcting
Code (ECC) (70ns) kits are supported (but not a
combination of both). Minimum operating requirement
is one pair of 4MB ECC kits or one pair of 1MB parity
kits. Total system memory capacity is 64MB.
128
PS/2 Maintenance Manual
Using the Low-Level Format Program:
Warning: The advanced-diagnostic format program
(referred to as a low-level format), is different from the
operating system format program. The operating-system
format program will not erase the System Partition; the
low-level format program will. It also will erase the system
programs and completely clear the hard disk. If the hard
disk is working, make a backup copy of the System
Partition and all the files on the hard disk before you use
this program. (If you do not know how to make a backup
copy of the System Partition, see “Backing up the System
Partition” on page 427.) To backup all of the files, see the
operating system documentation. (It might take up to two
hours to run the low-level format program, depending on
the disk capacity.)
When to Run the Low-Level Format Program
There are three reasons to run this program:
1. You are installing software that requires a low-level
format.
2. You get recurring messages from the diagnostic tests
telling you to run the low-level format program on the
hard disk.
3. You want to try this as a last resort before replacing a
failing hard disk drive.
How to Run the Low-Level Format Program
1. Power-on the computer.
2. Start the system programs (as described in “Starting
System Program Diagnostics” on page 425).
3. When the Main Menu appears, press Ctrl+A.
4. When the Advanced Diagnostic Menu appears, select
Format Hard Disk. Then, follow the instructions on
the screen.
Preparing the Hard Disk for Use
When the low-level format program completes, you must
copy all the files to the hard disk. Before you can copy the
files, you must:
1. Create the System Partition (if the hard disk drive had
a System Partition) using the Restore the System
Partition utility program from the system programs on
the System Diskettes.
2. Format the hard disk using the operating system.
(The commands vary with the operating system.
Refer to the operating system manual for a
description of the program commands to use.)
3. Install the operating system.
You are now ready to reinstall the files.
Hardware Maintenance Service
129
Option Microprocessor Jumper (76, 77)
The speed jumper (labeled SPD) is on the system board
near the option microprocessor socket. The jumper
changes the speed of the option microprocessor (if
installed).
Note: Operating a microprocessor at a speed greater
than it is designed for can cause intermittent
problems.
The jumper settings are:
Speed
Jumper Settings
25MHz
Position jumper (SPD) over the middle and
rear pins.
33MHz
Position jumper (SPD) over the front and
middle pins.
OS/2 Problems during a New
Installation
If you have determined that you do not have a hardware
failure, and you cannot get the operating system to work,
assist the customer in recopying the OS/2 software to the
hard disk. If this is not a new installation, have the
customer order the replacement diskettes. If this is a
new installation and the customer does not have the
diskettes, order replacement diskettes by doing the
following:
1. Write down the machine type and serial number.
2. Call 1-800-342-6672 (weekdays 9 a.m. to 9 p.m.
eastern time).
3. Identify yourself as an IBM service representative or
IBM authorized servicer.
4. For OS/2 Version 2.0, request diskette package P/N
41G3329. For OS/2 Version 2.00.1, request diskette
package P/N 52G9973. The IBM telephone operator
will supply the correct package part number for later
versions of OS/2. (Supply the machine information
and shipping address for either package.)
After you receive the OS/2 diskettes, refer to the pamphlet
supplied with the diskettes for OS/2 installation
instructions.
The PS/2 diagnostic tests are intended to test only
IBM-marketed products. Products not marketed by IBM,
prototype cards, or modified options can give false errors
and invalid system responses.
Refer to the Hardware Maintenance Reference section of
this manual for any related PS/2 reference information.
130
PS/2 Maintenance Manual
OS/2 Trap Errors
The following information will be helpful in diagnosing trap
errors.
Error
Code
Information
0000
0001
See note 7 (Application software error, contact the
software vendor's support).
0002
See notes 4, 6, 8, and 9. Install CSDs, run
CHKDSK. Replace the defective memory.
0003
0004
0005
See note 7 (Application software error, contact the
software vendor's support).
0006
0007
0008
Check the memory. Run CHKDSK. Contact the
application software vendor's support.
0009
000A
000B
See note 7 (Application software error, contact the
software vendor's support).
000C
If “SYS1942” appears, contact the software
vendor's support. If “Exception in Device...”
appears, refer to note 4. Run CHKDSK. All other
messages: Run CHKDSK and check the memory.
If a 113 error appears, see ECA024.
000D
If “SYS1943 A Prog...” appears, contact the
software vendor's support.
If “Int Proc Error at 0220:3557” appears, set the
Token Ring to 16K RAM window, install CSD's.
If “double trap 000D” appears, install the latest
CSDs.
For all other messages or conditions, contact the
software vendor's support.
000E
See note 7 (Application software error, contact the
software vendor's support).
0010
Hardware of software error. Run diagnostics to
check math coprocessor. If diagnostics find no
problem, see note 7 (contact the software
vendor's support).
Notes:
1. Memory intensive operating systems such as OS/2*,
AIX*, or UNIX** based operating systems are capable
of revealing highly intermittent errors not detected by
diagnostics.
2. Highly intermittent errors might go undetected by
diagnostics tests. If no error occurs during the test,
multiple replacements of memory might be required to
resolve the problem.
* Trademark of the IBM Corporation.
** Trademark of UNIX System Laboratories, Inc.
Hardware Maintenance Service
131
3. Install all software updates. This applies to
applications and operating systems.
4. The enhanced memory adapter (FRU 34F2825) might
experience Trap 0002 errors if it does not have
diagonal resistors across U21-U24. See ECA042.
(The enhanced memory adapter has been redesigned
without resistors, so this note might not apply to the
computer you are servicing.)
5. Intermittent errors can be caused by outside sources
of static, noise, or power.
6. Trap 0002 can be caused by a memory or adapter
failure. Read the message details. It might be the
system board, system-board memory, or adapter.
7. Trap 000D errors are software errors. The customer
should contact the software vendor for possible
patches.
8. For 8570 systems, refer to ECA059, ECA051.
9. For 8580-AXX Models, see ECA051 for possible
system board replacement to correct Trap 002, NMI,
or DOS parity errors.
System Aid Diskette
A system aid diskette is now available for Trap 0002
errors. Dealers can download it from the Technical
Advisors Bulletin Board as file “TRAP2LOG.” The diskette
will read NVRAM and indicate which of four possible
sources caused the error. The four possible errors and
their causes are listed below.
Error
Code
Information
110
Usually a system-board memory error. If replacing
the memory does not fix the problem, suspect the
system board.
111
I/O Channel Check. Any adapter could cause this
error, but usually a memory adapter is the cause.
112
Watchdog Timeout. Could be hardware or
software. If replacing the system board does not fix
the problem, suspect the software.
113
DMA Timeout. Usually a software error, but
possibly a hardware failure (system board). If it is a
70-A21 with a 113 error, see ECA056, run
CHKDSK. Contact the software vendor for more
information.
If it is any other system with a 113 error, refer to
ECA023. Check the hardware.
132
PS/2 Maintenance Manual
PCMCIA Diagnostics (PS/2 E Model 33)
The PS/2 E Model 33 has a PCMCIA adapter that acts as
a bus from the system board to the option adapters.
If the computer has a problem, carefully remove and
reseat the riser card, any PC Cards, and the PCMCIA
adapter. If, after reseating these boards, you get an 80XX
error code, replace the PCMCIA adapter. For any other
symptom, continue with the steps below.
If you suspect a problem with the PCMCIA adapter, do the
following.
1. Power-off the computer.
2. Remove all option adapters from the four PCMCIA
adapter slots.
3. If you have a PCMCIA wrap plug, insert it into slot
one.
4. Insert the PS/2 E Type 9533 Advanced Diagnostics
diskette into drive A.
5. Power-on the computer and follow the instructions on
the screen.
If the PCMCIA adapter diagnostic tests find no problem,
suspect a PC Card option adapter connected to the
PCMCIA adapter. To test the PC Card, do the following.
1. Power-off the computer.
2. Insert the suspected PC Card into a rear slot in the
PCMCIA adapter.
3. Insert the appropriate PC Card diagnostics diskette
into drive A.
4. Power-on the computer and follow the instructions on
the screen.
If the PC Card option adapter diagnostic tests
find no problem, power-off the computer and
insert the PC Card into a front slot. Power-on
the computer. If the PC Card option adapter
diagnostic tests still find no problem, replace the
PCMCIA adapter.
If a PC Card option adapter fails in a front slot
and it did not fail in a rear slot, replace the
PCMCIA adapter.
If a PC Card fails in both a front and a rear slot,
replace the PC Card.
Note: Before you replace a PC Card, be sure its
application software and any required drivers are
installed correctly on the computer.
Hardware Maintenance Service
133
PCMCIA Adapter Switch Settings
Switches on the PCMCIA adapter must be set as shown
below.
S4
O
F
F
1
2
3
4
O
F
F
1
2
3
4
1
2
3
4
S1
O
F
F
S2
S3
PCMCIA PC Card Lock Override
PC Cards can be locked in place for security purposes
with the lock mechanism. Any of the four lock
mechanisms can be unlocked manually. To unlock a
locked mechanism, use a pen or pencil to press its lock
solenoid in the direction of the arrow shown below.
(Solenoids 1 and 3 are shown locked. Solenoids 2 and 4
are shown unlocked.)
4
3
1
2
Printer Errors
1. Make sure the printer is properly connected and
powered-on.
2. Run the printer self-test.
If the printer self-test does not run correctly, the problem is
in the printer. Refer to the printer service manual.
If the printer self-test runs correctly, continue.
If the printer is attached to any parallel port, press the
print screen key to print any screen text. If the printer
prints the screen, the problem is software related. If
the printer does not print the screen, continue.
Install a wrap plug on the parallel port and run the
advanced diagnostic tests to determine which FRU
failed.
134
PS/2 Maintenance Manual
If the advanced diagnostic tests (with the wrap plug
installed) do not detect a failure, replace the printer
cable. If that does not correct the problem, do one of
the following:
If the printer is attached to the parallel port on the
system board, replace the system board.
If the printer is attached to the parallel port on an
adapter, replace FRUs, in the following order, until the
problem goes away:
1. Adapter
2. System board
3. Bus adapter (if installed)
Processor Board Installation (90, 95)
Improper installation can cause hard to diagnose failures,
and simulate various error conditions. If the processor
board fails, you might want to try reseating it.
Note: Never use the blue levers (on the board), to initially
seat the board. The levers are intended to help
you remove the board.
To install a processor board correctly:
1. Align the board with the designated slot (not an
expansion slot).
2. Move the blue levers to the up (unlocked) position.
3. Firmly press the board into the slot until it snaps into
place.
4. Simultaneously, move the blue levers to the down
(locked) position.
Processor Boards with Diagnostic LEDs:
The 50-MHz Type 3 processor board in a 90/95 (submodel
code 28 and 29), has two LEDs; one in position CR1, and
one in CR2. During POST, CR1 should come on
momentarily and CR2 should stay off. If the LEDs work
any other way, suspect that the processor board is
defective. Use the LEDs to help differentiate between a
processor board or a system board failure. If you are
instructed to replace one of the boards, and the problem
still exists, replace the other board (also reinstall the first
board).
Processor Boards without Diagnostic
LEDs: If the processor board does not have LEDs, you
might not always be able to differentiate between
processor board and system board failures. If you are
instructed to replace one of the boards, and the problem
still exists, replace the other board (also reinstall the first
board).
Hardware Maintenance Service
135
Processor Upgrade (Models 50/50Z/60 486SLC2) Switch Settings
O
F
F
1
2
3
4
5
6
7
8
Use these switch settings for the Models 50, 50Z, and 60
only.
Processor Upgrade (Models 70/80 486DX33) Switch Settings
O
F
F
1
2
3
4
5
6
7
8
Use these switch settings for the Model 70 and Model 80
only.
Processor Upgrade (Model 70/80 486DX33 ) FRU Isolation
Note
Before running diagnostic tests, check that the
processor upgrade card is fully seated in the system
board and that the 80486 processor is fully seated in
the upgrade card.
1.
2.
3.
4.
Power-off the computer.
Insert the 70/80 Reference Diskette in drive A.
Power-on the computer.
Follow the instructions on the screen to test the
processor upgrade. If the tests cannot find a
problem, replace the processor upgrade with an
80386 processor from a new system board (or the
original 80386 processor, if available). If the failure
does not occur again, replace the processor upgrade
with a new one. If the failure does occur again,
replace the system board, and reinstall the original
processor upgrade. If the failure occurs again after
replacing the system board, replace the processor
upgrade also.
Note
Use the 80386 processor only to diagnose the
problem. If it came from the customer, be sure you
return it to them. If the processor came from a new
system board that you brought with you, and the
system board is not the problem, reinstall the
processor on the new system board before you return
it to stock. If the system board is the problem, return
the 80386 processor with the bad system board.
136
PS/2 Maintenance Manual
Processor (Px) Label Cross-reference
Upgraded systems should have a Px label placed on the
front cover of the system unit (to the right of the serial
number) at the time the system was upgraded. The
following matrix cross-references the Px label, a
description of the upgrade, and the upgrade FRU number.
Px
Label
Description
FRU
Number
P2
Models 50, 50Z 486SLC2 System Board
61G3502
P1
Model 50Z 486SLC2 Processor Upgrade
Card
71G2633
P1
Models 50, 60 486SLC2 Processor Upgrade
Card
71G2625
P2
Model 55 486SLC2 System Board
71G2602
P3
Models 60, 65, and 80 486DLC2 System
Board
71G2610
P2
Models 60, 65, and 80 486DX2 System
Board
71G2643
P1
Model 70 486DX33 Processor Upgrade Card
92F0436
P3
Model 70 486DLC2 System Board
71G2606
P2
Model 70 486DX33 System Board
71G2641
P1
Model 80 486DX33 Processor Upgrade Card
92F0437
Hardware Maintenance Service
137
Power Supply Voltage Check
If the power-on indicator is not on, and if the power-supply
fan is not running, check the power cord for proper
installation and continuity.
Note: Verify that the voltage-select switch (if applicable)
is set for the correct voltage.
If the power cord is OK, either the power supply is
defective or a defective device is causing the power supply
to shut off. Check the power supply voltages.
If the voltages are incorrect, replace the power supply. If
the voltages are correct, and the Symptom-to-FRU index
does not solve the problem, go to “Undetermined
Problems” on page 183.
Models 25, 25 SX, 25-286
Power Good 1
Ground 2
+12 Volts 3
-12 Volts 4
Ground 5
Ground 6
Ground 7
Ground 8
-5 Volts 9
+5 Volts 10
+5 Volts 11
+5 Volts 12
P7
Models 30, 30-286
138
Power Good
Ground
+ 12 Volts
- 12 Volts
Ground
Ground
1
2
3
4
5
6
Ground
Ground
- 5 Volts
+ 5 Volts
+ 5 Volts
+ 5 Volts
1
2
3
4
5
6
PS/2 Maintenance Manual
P3
P4
Model 33
If the power-on indicator is not on, check the power cord
for proper installation and continuity. (If the power-on
indicator is not on, but the computer is functioning
normally, replace the power switch/speaker assembly.)
1. Check for continuity between pins 4 and 6 (switch) on
P2.
2. If the switch is OK, short pin 4 to pin 6 on P2 and
check the power supply voltages.
4
1
P1
+Lead
Pin
−Lead
Pin
V dc
Minimum
V dc
Maximum
1, 2 (+.5 volts )
Ground
+3.75
+6.25
3, 4 (Ground)
Ground
7
1
P2
+Lead
Pin
−Lead
Pin
V dc
Minimum
V dc
Maximum
1, 2 (+12.0 volts)
Ground
+ 9.0
+15.0
3 (Power Good)
Ground
+ 2.4
+ 5.25
4 (On/Off Signal)
Ground
5 (−12.0 volts)
Ground
6 (Ground)
Ground
7 (−5 volts)
Ground
+ 1.0
3
− 9.0
− 15.0
−4.75
− 5.5
V dc
Minimum
V dc
Maximum
+3.75
+6.25
1
P3
+Lead
Pin
−Lead
Pin
1 (Ground)
Ground
2,3 (+5 volts)
Ground
Hardware Maintenance Service
139
Models 35, 40, 56, 57, 76, 77
1. Check for continuity between pins 4 and 6 (switch) on
P2.
2. If the switch is OK, short pin 4 to pin 6 on P2 and
check the power supply voltages.
4
1
P1
−Lead
Pin
+Lead
Pin
V dc
Minimum
V dc
Maximum
4
1
+3.75
+6.25
7
1
P2
−Lead
Pin
+Lead
Pin
V dc
Minimum
V dc
Maximum
6
1
+ 9.0
+15.0
3
Power Good
4
On/Off Signal
6
5
− 9.0
− 15.0
6
Ground
6
7
−4.75
− 5.5
1
4
Drive Connectors 1 Through 4
−Lead
Pin
+Lead
Pin
V dc
Minimum
V dc
Maximum
2
1
+ 9.0
+15.0
2, 3
Ground
3
4
+3.75
+6.25
140
PS/2 Maintenance Manual
Models 50, 70
1
15
3
2
Power Supply Connector
−Lead
Pin
+Lead
Pin
2
2
2
1
3
15
V dc
Minimum
V dc
Maximum
− 9.0
+15.0
+ 6.2
−15.0
+15.0
+ 6.2
Model 55, PS/2 9553-xBx
Power Good 1
Ground 2
+12 Volts 3
-12 Volts 4
Ground 5
Ground 6
Ground 7
Ground 8
-5 Volts 9
+5 Volts 10
+5 Volts 11
+5 Volts 12
Ground
Ground
+ 5 Volts
+ 5 Volts
+ 5 Sense
1
2
3
4
5
P7
P14
Hardware Maintenance Service
141
Models 60, 65, 80
9
3
2
1
ABCD
P4
P2
ABCD
P3
−Lead
Pin
+Lead
Pin
V dc
Minimum
V dc
Maximum
2
2
2
B
C
9
3
1
D
A
−9.0
+9.0
+3.7
+3.7
+9.0
−15.0
+15.0
+ 6.2
+ 6.2
+15.0
Model 90
Check the voltages with connectors P1 and P2 plugged
into the system board.
1
9
A B C D
Drive
Connector
P1/P2
+Lead
Pin
−Lead
Pin
1 (P1)
1 (P1)
2 (P2)
B
B
2-7 (P1)
8,9 (P1)
1 (P2)
D
A
V dc
Minimum
V dc
Maximum
+ 4.8
+11.5
−11.5
+ 4.8
+11.5
+ 5.25
+12.6
−12.6
+ 5.25
+12.6
There are two systems fans: one in the power supply, and
a second fan on the base. If the power supply fan does
not work, replace the power supply. If the second fan
does not work, replace it.
142
PS/2 Maintenance Manual
PC Server (8640)
Note: Verify that the voltage-select switch (if applicable)
is set for the correct voltage.
If the power-on indicator is not on, and if the power-supply
fan is not running, check the power cord for proper
installation and continuity.
If the power cord is OK, either the power supply is
defective or a defective device is causing the power supply
to shut off. Check the power supply voltages.
If the voltages are incorrect, replace the power supply. If
the voltages are correct, and the Symptom-to-FRU index
does not solve the problem, go to “Undetermined
Problems” on page 183.
Connector P1
6
1
−Lead
Pin
+Lead
Pin
5,
5,
5,
5,
1
2
3
4
6
6
6
6
V dc
Minimum
V dc
Maximum
Power Good
+4.8V
+11.52V
−10.8V
+5.25V
+12.60V
−13.2V
Connector P2
6
1
−Lead
Pin
+Lead
Pin
1,
1,
1,
1,
3
4
5
6
2
2
2
2
V dc
Minimum
V dc
Maximum
−4.5V
+4.8V
+4.8V
+4.8V
−5.5V
+5.25V
+5.25V
+5.25V
Continued on the next page.
Hardware Maintenance Service
143
PC Server (8640) continued
Connector P3
6
1
+Lead
Pin
−Lead
Pin
4, 5, 6
1, 2, 3
V dc
Minimum
V dc
Maximum
+4.8V
+5.25V
Connectors P4 and P6
1
−Lead
Pin
2, 3
2, 3
+Lead
Pin
1
4
4
V dc
Minimum
V dc
Maximum
+4.8V
+11.52V
+5.25V
+12.6V
Connectors P5, P7, and P8
1
−Lead
Pin
2, 3
2, 3
144
+Lead
Pin
1
4
4
V dc
Minimum
V dc
Maximum
+11.52V
+4.8V
+12.6V
+5.25V
PS/2 Maintenance Manual
PC Server 500 (Type 86XX) Power
Supplies: The Type 86XX computers are shipped with
a primary power supply. An additional or optional power
supply can be added to the computer. Connectors are
used to transfer the primary power supply voltages and
signals from the primary power supply to the optional
power supply. The following illustrations show how the two
power supplies are connected.
Caution
When replacing the primary power supply cover plate,
rotate the plate 180°. (This will leave an opening for
the primary power supply connector cable that
connects to the optional power supply.) Failure to do
so will cause the power supply connector cable to be
crimped when the plate is replaced.
Note
Tabs are located on the side of each power supply to
secure them together.
Primary Power Supply Voltages
If the voltages are correct, and the power supply fan runs,
the power supply is OK.
2
3
5
A B C D
Drive
Connector
1
4
7
Power-Supply Connector
−Lead
Pin
+Lead
Pin
5
5
5
B
B
3
4
7
D
A
V dc
Minimum
V dc
Maximum
+3.7
+9.0
−9.0
+3.7
+9.0
+ 6.2
+15.0
−15.0
+ 6.2
+15.0
Hardware Maintenance Service
145
Connectors P11, P12, and P13
1 2
−Lead
Pin
+Lead
Pin
2
1
V dc
Minimum
V dc
Maximum
+11.5
+12.6
Optional Power Supply Drive Connector Voltages
If the voltages are correct, and the power supply fan runs,
the power supply is OK.
A
−Lead
Pin
+Lead
Pin
B
B
D
A
B
C
D
V dc
Minimum
V dc
Maximum
+ 3.7
+ 9.0
+ 6.2
+15.0
If the power supply shuts down, or appears to fail at
power-on, you might have one of the following problems:
Too many devices are set to start instantly. See
“Setting the Motor-Start Jumper” on page 414.
There are too many large-capacity devices installed.
The nominal operating current of the devices installed
collectively exceeds the available current of the power
supply. See the “Personal System/2 Installation
Planning” guide (form number G41G-2927) for more
information.
Caution
Unplug the power cord and wait two minutes before
checking voltages to give the power supply capacitors
time to discharge.
On some models, there is an access-cover fan (to cool the
processor). If that fan does not work, you have one of the
following problems:
Verify the voltage-select switch (if applicable) is set
for the correct voltage.
No power to the fan: 12 V dc (±1.4 V dc) required at
the two fan cable pins on the base.
Defective J28 cable (check cable continuity)
Defective fan. (To test the fan, use a two-wire jumper
to connect the fan terminals to the cable pins on the
base.)
Defective system board.
146
PS/2 Maintenance Manual
Server 85, PS/2 9585-xKx, PS/2 9585-xNx,
Model 95, and 3511:
Some power supplies have a built-in test switch and LED
on the side of the power supply (there is no need to check
voltages). On those power supplies, disconnect the power
supply from the system board, and remove all cables
except the power cord. Power-on the power supply and
push the test button. If the LED lights up, and the power
supply fan runs, the power supply is OK.
On all other power supplies, short pin 1 to pin 2 and read
the voltages on the other pins. If the voltages are correct,
and the power supply fan runs, the power supply is OK.
2
3
5
A B C D
Drive
Connector
1
4
7
Power-Supply Connector
−Lead
Pin
+Lead
Pin
5
5
5
B
B
3
4
7
D
A
V dc
Minimum
V dc
Maximum
+3.7
+9.0
−9.0
+3.7
+9.0
+ 6.2
+15.0
−15.0
+ 6.2
+15.0
If the power supply shuts down, or appears to fail at
power-on, you might have one of the following problems:
Too many devices are set to start instantly. See
“Setting the Motor-Start Jumper” on page 414.
There are too many large-capacity devices installed.
The nominal operating current of the devices installed
collectively exceeds the available current of the power
supply. See the “Personal System/2 Installation
Planning” guide (form number G41G-2927) for more
information.
Caution
On Model 95 unplug the power cord and wait two
minutes before checking voltages to give the power
supply capacitors time to discharge.
On a Model 95, there is an access-cover fan (to cool the
processor). If that fan does not work, you have one of the
following problems:
No power to the fan: 12 V dc (±1.4 V dc) required at
the two fan cable pins on the base.
Defective J28 cable (check cable continuity)
Hardware Maintenance Service
147
Defective fan. (To test the fan, use a two-wire jumper
to connect the fan terminals to the cable pins on the
base.)
Defective system board.
Model 3510
−Lead
Pin
+Lead
Pin
B
C
D
A
V dc
Minimum
V dc
Maximum
+3.7
+9.0
+ 6.2
+15.0
Model 3532
A
−Lead
Pin
+Lead
Pin
B
C
D
A
148
B
C
D
V dc
Minimum
V dc
Maximum
+ 4.75
+11.40
+ 5.25
+12.60
PS/2 Maintenance Manual
OBI DASD Hot Swap Storage Expansion
Enclosure
If the power-on indicator is not on, and if the power-supply
fan is not running, check the power cord for proper
installation and continuity.
Note: Verify that the voltage-select switch (if applicable)
is set for the correct voltage.
If the power cord is OK, either the power supply is
defective or a defective device is causing the power supply
to shut off. Check the power supply voltages.
If the voltages are incorrect, replace the power supply. If
the voltages are correct, and the Symptom-to-FRU index
does not solve the problem, go to “Undetermined
Problems” on page 183.
Connector P3
1
−Lead
Pin
2, 3
2, 3
+Lead
Pin
4
1
4
V dc
Minimum
V dc
Maximum
+12.5V
+4.8V
+11.4
+5.3V
Connector P4
1
−Lead
Pin
2, 3
2, 3
+Lead
Pin
1
4
4
V dc
Minimum
V dc
Maximum
+12.5V
+4.8V
+11.4
+5.3V
Connectors P5, P5, P7, and P8
1
4
−Lead
Pin
2, 3
2, 3
+Lead
Pin
1
4
V dc
Minimum
V dc
Maximum
+12.5V
+4.8V
+11.4
+5.3V
Hardware Maintenance Service
149
Real-Time Clock Problems
The software time-of-day clock (real-time clock) will not
provide precise time under all circumstances. The clock is
interrupt driven. The accuracy of the clock varies with the
interrupt activity. Most likely, time variations are a result of
multiple interrupts (over a long period of time), rather than
a hardware failure. In circumstances where precise time is
required, an alternate time keeping device should be used.
Check the system date/time using the Reference Diskette
Set Features menu. If the date/time is accurate, the
problem is with the software.
Note: Some LAN software might update the time on the
workstation using the server time.
Remote Power-on Jumper (95)
Note: Not on all 95 systems.
The jumper (labeled JMP4) is on the system board near
the serial port. Set the jumper to position
for
direct-connect and leased-line modems. Set the jumper to
position 1 (default) for all other modems. For more
information see “Power-on Features” on page 380.
Running Automatic Configuration
Running Automatic Configuration might alter customized
configuration settings. Note the current settings using
View configuration. If the configuration was customized,
save it, then restore it to the customized settings after
service is complete.
150
PS/2 Maintenance Manual
ServerGuide CDs (Type 86XX)
SCSI Controller on the System Board .
SCSI Device Default Settings . . . . .
SCSI Diagnostic Tests . . . . . . . .
SCSI ID (Using to Help Isolate Failures)
Servicing LAN Stations (Workstations)
Software/Hardware Mismatch Problems
Undetermined Problems
. . . . . . .
VPD Codes Information
. . . . . . .
System Board Locations . . . . . . .
Parts Catalog . . . . . . . . . . . . . .
.
.
.
.
.
.
.
.
.
.
.
.
.
.
.
.
.
.
.
.
.
.
.
.
.
.
.
.
.
.
Hardware Maintenance Service
.
.
.
.
.
.
.
.
.
.
180
180
181
181
181
181
183
183
185
222
151
Using the CD-ROM Drive and ServerGuide: If
you are installing an operating system, it is important that
you read and understand the following information:
The ServerGuide CD contains SCSI (small computer
system interface) and SVGA (super video graphics
array) device drivers that will be automatically
installed if you install one of the operating systems
that are available in the CD package.
If you choose not to install one of the operating
systems that are available on the CDs, you still must
use the ServerGuide CD to create diskettes
containing the SCSI device drivers and SVGA video
device drivers. The device-driver diskettes that you
create will contain README files that explain how to
install these drivers and complete the installation
procedure.
A RAID (redundant array of inexpensive disks)
controller diskette must be created, from the
ServerGuide CD, for all disk-array models.
Note
Locate the ServerGuide CD. You will need the main
ServerGuide CD shortly after you power-on the server.
1. Power-on all external devices, then power-on the
server.
2. After the POST completes, press the CD-ROM
tray-release button. The CD-ROM tray extends out
approximately one inch from the server. Pull the tray
straight out until it stops.
Note
If the CD-ROM tray does not extend out, insert
the end of a paper clip into the manual
tray-release opening.
3. With the label information facing right, center and
place the main ServerGuide CD on the hub.
4. Push the CD-ROM tray back into the server.
5. Press F1 to restart the server. If the server does not
restart, press Ctrl+Alt+Del.
6. If the server is a disk-array model, or if you are
installing one of the operating systems available in
the ServerGuide package, select Start Here from the
Main Menu and follow the instructions on the screen.
If you are not installing an operating system from
ServerGuide, go to “Not Installing an Operating
System from ServerGuide.”
Not Installing an Operating System from
ServerGuide: If you are not installing one of the
operating systems available in the CD package, use the
152
PS/2 Maintenance Manual
following procedure to create the diskettes that you need
to complete the installation procedure:
1. Get the 1MB and 2MB, 3.5-inch diskettes that you will
use to create diskettes from the diskette images on
the main ServerGuide CD.
2. Select Utility Programs.
3. Select Diskette Factory.
4. Select IBM SVGA Support Diskettes, and follow the
instructions on the screen to create both video device
drivers diskettes.
5. The remaining steps depend on whether or not the
server is a disk-array model.
If the server is not a disk-array model, continue
with Diskette Factory and select IBM SCSI-2
Fast/Wide Support Diskette. Follow the
instructions on the screen to create a SCSI-2
device drivers diskette. When you are finished,
go to “Non-Disk-Array Models Only.”
If the server is a disk-array model, continue with
“Disk-Array Models Only.”
Disk-Array Models Only: Continue with Diskette
Factory:
1. Select IBM SCSI-2 Fast/Wide Streaming-RAID
Adapter/A Option Diskette. Follow the instructions
on the screen and create the IBM RAID controller
diskette.
2. Press the CD-ROM tray-release button to release the
tray from the server. Remove the CD from the
CD-ROM tray, and push the tray back into the server.
3. Go to “Configuring the Disk Array (Type 86XX)” on
page 154 and become familiar with that information;
then, do the following:
a. Follow the instructions to configure the disk array
(see “Starting the RAID Configuration Program”
on page 157).
b. Follow the instructions to back up the disk-array
configuration (see “Backing Up Your Disk-Array
Configuration” on page 170).
c. After you back up the disk array, follow the
instructions that came with the operating system
and install the operating system.
Non-Disk-Array Models Only: If the server is not a
disk-array model, do the following:
1. Press the CD-ROM tray-release button to release the
tray from the server.
2. Remove the CD from the tray, and push the tray back
into the server.
3. Follow the instructions that came with the operating
system and install the operating system.
Hardware Maintenance Service
153
Configuring the Disk Array (Type 86XX): The
following information applies only to disk array models.
Use this information to perform the tasks necessary to
configure, add, change, or delete one or more disk arrays.
If you did not create an IBM RAID controller diskette,
go to “Using the CD-ROM Drive and ServerGuide” on
page 152.
Familiarize yourself with the information contained in
this manual and the RAID (redundant array of
inexpensive disks) information in the User's
Reference shipped with the server.
Verify the disk-array configuration. The disk-array
model comes configured as one logical drive.
– To view the disk-array configuration, go to
“Viewing the RAID Configuration” on page 159
and select View Configuration from the Main
Menu.
– To create a disk array, go to “Creating a Disk
Array” on page 161.
Backup the disk-array configuration. See “Backing
Up Your Disk-Array Configuration” on page 170.
After you configure the disk array, you can complete setup
by installing an operating system (from the ServerGuide
compact disc that was shipped with the server or from the
diskettes that came with the operating system). To install
an operating system from the ServerGuide CD, go to
“Using the CD-ROM Drive and ServerGuide” on page 152.
RAID Technology: RAID is the technology of grouping
several hard disk drives in a server into an array that can
be defined as a single logical drive. This logical drive then
appears to the operating system as a single physical drive.
This grouping technique greatly enhances logical-drive
capacity and performance. In addition, if one of the
hard-disk drives fails (becomes defective the server
continues to run, with no operator intervention required, at
reduced performance. The defective drive can be replaced
without powering off the server (hot-swap). For more
information about hot-swappable hard disk drives, see
“Installing Internal Drives (Type 86XX)” on page 176.
Hard Disk Drive Capacities: With a server, it is
important to understand the implications of hard disk drive
capacities and how they influence the way you create disk
arrays.
Drives in the disk array can be of different capacities. For
example, if the model came with two 1GB hard disk drives
and you install a 2GB hard disk drive to create a RAID 5
disk array, the total capacity of the array is 3GB instead of
4GB. Therefore, when creating arrays it is wise to add
drives of equal capacity.
154
PS/2 Maintenance Manual
Additional Storage Capacity: When you add hard
disk drives to the server, you must configure a new disk
array before the drives can be used. You can either
reconfigure the existing disk array to include the capacity
offered with the added drives, or group the added drives
into their own array (see “Adding Drives to Create an
Additional Array” on page 162). You also can create an
array with only one drive.
The RAID Configuration Program Screens: When
you configure the disk array, or even just view its
configuration, you will be using the IBM RAID configuration
program on the IBM SCSI-2 Fast/Wide Streaming-RAID
Adapter/A Option Diskette (also called the IBM RAID
controller diskette). The following figure is a compilation of
many of the IBM RAID Controller Disk Array Configuration
(also called the IBM RAID configuration program) screens.
The list below the figure gives explanations of the
numbered areas of the figure.
1
4
2
3
5
6
1. This pop-up allows you to select the RAID level you
want to assign to the logical drive you are defining,
and it allows you to select the logical drive size. You
can enter the size, in megabytes, or you can accept
the default value shown.
When you need to confirm an action, the Confirm
pop-up appears in this area.
2. You can select any of the choices that appear on the
menus.
3. The Bay/Array selection list shows each bay in the
server (for each channel) numbered 1 through 7. The
abbreviation in the bay indicates the status of the
drive installed in the bay. Selections are made from
this list to determine which bays (hard disk drives) are
in the arrays. The letter to the right of the bay,
identifies the array in which the hard disk drive in that
bay is grouped.
Hardware Maintenance Service
155
Note
The Channel/Bay/Array area on the screen does
not reflect the physical configuration of the
server. The hard disk drives are installed in
horizontal banks of bays (in banks C, D, and E
there are 6 bays, numbered 1 through 6 from left
to right). See “Installing Internal Drives (Type
86XX)” on page 176 to see the physical location
of the hard disk drives.
4. The Array list shows you the array ID and the size (in
megabytes) of the array.
Note
The capacity (size) is shown in binary equivalent.
When a drive is being rebuilt, this area, along with the
Logical Drive list area, shows the progression of the
rebuilding process.
5. The Logical Drive list identifies the logical drive (for
example, A1), the size of the logical drive, the RAID
level assigned to the logical drive, the date it was
created, and the write policy.
The status of the logical drive also is shown. Good
means that all is well with the drive; Critical means
that you must replace the drive or do a rebuild
operation. (You will have received a message telling
you the drive is in a Critical state.) Offline means
that the logical drive is unrecoverable; the data in that
drive is lost.
When a drive is being rebuilt, this area, along with the
Array list area, shows the progression of the
rebuilding process.
Note
The capacity (size) is shown in binary equivalent.
During an initialization process, the Write Policy area
displays the percent initialized; during a
synchronization process, it displays the percent
synchronized.
6. The information area tells you the action you can
perform on this screen or pop-up.
156
PS/2 Maintenance Manual
Starting the RAID Configuration Program: You
can run the IBM RAID configuration program from diskette
or from the ServerGuide CD. It will be automatically
invoked from the ServerGuide CD if the disk array has
never been partitioned and if there is no user data present.
However, updated configuration information must be
written to diskette. If you have not yet created the IBM
SCSI-2 Fast/Wide Streaming-RAID Adapter/A Option
Diskette (RAID controller diskette), go to “Using the
CD-ROM Drive and ServerGuide” on page 152.
To start the RAID configuration program.
1. Insert the IBM RAID controller diskette into the
primary drive and power-on the server.
If the server is already on, press Ctrl+Alt+Del.
If you have more than one RAID adapter, you will get
an adapter selection screen. Otherwise, the Main
Menu appears.
RAID Program Keys
Key
Program Response
F1
Selects Help from any menu
Esc
Return to the previous screen or
to the previous work area of a
screen
Up ( ) and Down ( )
Arrows
Highlights the item to be selected
Enter
Selects the highlighted item
Main Menu Selections
Note
Whenever you make changes to the disk-array
configuration and select Exit, the Confirm pop-up
window will appear. You must select Yes to save and
activate the changes.
Selection
Program Response
Help
Provides additional information
View configuration:
Displays the existing disk array
configuration
Create/delete array:
Selects the drives, defines a
hot-spare drive for an array you
want to create, or to deletes an
existing array.
This selection also has choices
for defining a logical drive and
formatting a drive.
Hardware Maintenance Service
157
Selection
Program Response
Initialize/synchronize
array:
Select this choice after creating
an array to:
Set the drive to a
predetermined value.
For proper operation of RAID
levels 1 and 5.
Note: Any data existing on
the drive is
overwritten with
zeros, and the
corresponding parity
information is
initialized to the
correct value.
Initialize more than one
logical drive at a time.
Interrupt the initialization
process at any time by
pressing Esc.
Restart the initialization
process by pressing Enter
End the process by pressing
Esc again.
Synchronize logical
drive
Recomputes and rewrites the
parity data on the drive. You can
select this choice to recompute
parity data for RAID levels 1 and
5. This selection does not alter
data on the drive. The
synchronization process can be
done on multiple logical drives.
Rebuild device:
Rebuilds logical drives. The
rebuild operation is supported
only for RAID levels 1 and 5.
Advanced functions:
Changes the write policy (the way
data is written to the drive), to
saves your configuration
information to a diskette, restores
it from a diskette, or changes
RAID parameters. This choice
also allows you to do a low-level
format.
Drive information:
Displays information about the
SCSI devices (hard disk,
CD-ROM, tape, and so on)
connected to the RAID adapter.
Exit:
Leaves the Main Menu.
158
PS/2 Maintenance Manual
Viewing the RAID Configuration: Before creating or
changing a disk array, you can look at the current
configuration by selecting View Configuration from the
Main Menu of the RAID configuration program.
To view the disk-array configuration:
1. Start the RAID configuration program. See “Starting
the RAID Configuration Program” on page 157.
2. Select View configuration. The current disk-array
configuration information appears on the screen.
3. Press Enter to see the stripe order in the Bays
Occupied (Ch:Bay) field.
4. Press any key to continue.
5. Press Esc to return to the Main Menu.
Performing Common Tasks: The Create/Delete
Array menu of the RAID configuration program contains
the more common tasks for configuring disk arrays.
Procedures to complete these tasks are contained in this
section as follows:
“Defining a Hot-Spare Drive”
“Deleting a Disk Array” on page 160
“Creating a Disk Array” on page 161
“Defining Logical Drives” on page 162
Defining a Hot-Spare Drive: To define a drive as a
hot-spare drive:
1. Start the RAID configuration program. See “Starting
the RAID Configuration Program” on page 157.
2. Select Create/delete array from the Main Menu. The
Create/Delete Array screen appears.
3. Select Define hot-spare drive. The cursor will
become active in the Bay/Array selection list.
Note
Only SCSI hard disk drives are shown as RDY,
ONL, DDD, OFL, or HSP state. SCSI tape and
CD-ROM drives are not shown. They appear
when you select drive information. Refer to
“Bay/Array Selection List” on page 165 for the
drive status meanings.
The numbers shown on the left are the bay IDs. See
“Installing Internal Drives (Type 86XX)” on page 176
for an explanation of the bay IDs.
4. Use the Up Arrow ( ) key or the Down Arrow ( ) key
to highlight the RDY (ready) drive you want to define
as the hot spare; then press Enter. The RDY
changes to HSP (hot spare). You can press Enter
again to toggle between HSP and RDY.
5. Press Esc when you have finished. The cursor will
become active in the Create/Delete Array menu.
6. If you want to create a disk array, go to “Creating a
Disk Array” on page 161.
Hardware Maintenance Service
159
7. If you are finished:
a. Select Exit or press Esc. A pop-up window will
appear asking you to confirm your change.
Note
The changes you make are not saved until
you confirm them by selecting Yes in the
Confirm pop-up window.
b. Select No if you do not want the drive you
selected to be a hot spare; select Yes to define
it as a hot-spare drive.
c. Back up the disk-array configuration information
to diskette. Refer to “Backing Up Your
Disk-Array Configuration” on page 170 for
instructions.
Deleting a Disk Array: The last array created must
be the first deleted.
Warning
All the data and programs in the array are lost during
this procedure. Before proceeding, back up any data
and programs that you want to save.
To delete a disk array:
1. Start the RAID configuration program. See “Starting
the RAID Configuration Program” on page 157.
2. Select Create/delete array from the Main Menu.
3. Select Delete disk array from the Create/Delete
Array menu. The cursor will be active in the Array
list.
4. Review the Date Created column in the Logical Drive
list; then press the Up Arrow ( ) key or the Down
Arrow ( ) key to highlight the most recently defined
array.
5. Press Del. The Confirm pop-up window appears.
6. If you do not want to delete the array, select No. To
delete the array, select Yes.
Note
To use hard disks from the existing array when
creating a new array, you must confirm the
deletion of the existing array.
If a defective drive is still in a bay, the status shows a
blank bay, as though there is no drive in that bay. When
you replace the drive, the status will show RDY after you
reconfigure and select Yes in the Confirm pop-up window.
160
PS/2 Maintenance Manual
Note
In some operating systems, deleting an array and
associated logical drives might change the drive letters
assigned to the existing drives.
Creating a Disk Array: To create a disk array:
1. Start the RAID configuration program. See “Starting
the RAID Configuration Program” on page 157.
Note
To create an array using hard disks in an existing
array, refer to “Redefining Space in an Array” on
page 169.
2. Select Create/delete array from the Main Menu.
3. Select Create disk array from the Create/Delete
Array menu.
The cursor will be active in the Bay/Array selection
list.
Important
In the following step, when you press Enter to
select a drive for an array, you cannot deselect it
by pressing Enter again, as you can with the
hot-spare selection process. Carefully determine
which drives you want to include in the array
before beginning the selection process.
If you change your mind after selecting the drives
for an array, you can delete the array (by
selecting Delete disk array from the
Create/Delete Array menu) and begin again.
4. Select each drive you want in the array by using the
Up Arrow ( ) key or the Down Arrow ( ) key to
highlight the drive and then pressing Enter. As you
select each drive, the status will change from RDY
(Ready) to ONL (Online).
5. When you have selected all the drives you want to
include in the array, press Esc. The cursor will
become active in the menu.
6. If you have drives you did not use in this array and
you want to create another array, you can do one of
the following:
Define the logical drive or drives for this array;
then create another array and its logical drives.
See “Defining Logical Drives” on page 162.
Create another array now by repeating steps 2
through 5 in this procedure; then define logical
drives for both arrays.
Hardware Maintenance Service
161
Note
You must define at least one logical drive for
each created array before you can exit the
configuration program.
Continue with “Defining Logical Drives.”
Adding Drives to Create an Additional Array: To
add storage capacity to your server without disturbing
existing data:
1. Install the additional hard disk drive or drives. (See
“Installing Internal Drives (Type 86XX)” on page 176.)
2. Start the RAID configuration program. See “Starting
the RAID Configuration Program” on page 157.
3. Create a new disk array and define logical drives (see
“Creating a Disk Array” on page 161 for additional
information.
Defining Logical Drives: After you have created an
array, you must define a logical drive. (You cannot leave
the RAID configuration program until you define the logical
drives for any created arrays.)
To define a logical drive:
1. Select Define Logical drive from the Create/Delete
Array menu. The Create/Delete Array menu screen
appears; the cursor is active in the Array list.
2. Use the Up Arrow ( ) key or the Down Arrow ( ) key
to highlight the array you want to define; then press
Enter. The Select RAID Level pop-up window
appears, and the cursor is active in the window.
Note
The system automatically assigns RAID level 0 to
any logical drives defined in an array containing
only one hard disk drive. When this is the case,
the Select RAID Level pop-up window will not
appear.
If you have only two hard disk drives in the array, the
Select RAID Level pop-up window appears, but RAID
level 5 is not selectable because you need at least
three hard disk drives in an array to assign RAID
level 5 to one of the logical drives. You can define
more than one logical drive for your array. The only
restriction is that the maximum number of logical
drives you can define is eight.
3. Use the Up Arrow ( ) key or the Down Arrow ( ) key
to highlight the RAID level you want to assign to
these logical drives, then press Enter.
162
PS/2 Maintenance Manual
Note
Because the level you assign can influence the
space needed for the drive, you must assign a
RAID level before you enter the size of the
logical drive.
The Logical Drive list shows you the logical drive ID,
the size of each logical drive, the RAID level you
assigned to that logical drive, and the date that the
logical drive was created.
The status of the logical drive also is shown. Good
means that all is well with the drive. Critical means
that you must replace the hard disk drive or do a
rebuild operation. (You will have received a message
telling you what has happened to the drive.) Offline
means that the logical drive is unrecoverable; the
data on that drive is lost.
The Logical Drive Size pop-up window shows the
space in this array that is available for logical drives.
4. Type the size, in megabytes, that you want for the
logical drive; then press Enter. A pop-up window
appears asking you to confirm your action.
Information about the new logical drive appears in the
Logical Drive list.
Note
The size appearing in the Logical Drive list might
be different from the size you typed because it
appears in binary equivalent.
The size of a logical drive is determined by a number
of factors, but basically the size must be divisible by
the number of drives in the array.
Consider the following examples:
Example 1:
There are three 1GB drives in the array. You assign
RAID level 0 (which uses all the drives in the array
with no parity storage), and type “1000MB.” The
“Size (MB)” will be 999, which is the number closest
to and lower than 1000 that is divisible by 3.
Example 2:
There are three 1GB drives in the array, and you
assign RAID level 5. Data is striped across all three
drives in the array, but the space equivalent to that of
one drive is used for redundant storage. Therefore, if
you type “1000MB,” the “Size (MB)” remains 1000
because it is divisible by 2 (drives), which is the
space available for data.
If you do not use the entire array for this logical drive,
you can create another by assigning either the same
Hardware Maintenance Service
163
5.
6.
7.
8.
or a different RAID level for an additional logical drive.
You can have as many as eight logical drives among
four disk arrays.
To return to the Create/Delete Array menu, press
Esc. To define more logical drives, repeat steps 1
through 5 of this procedure.
To leave this screen, select Exit or press Esc. A
pop-up window appears asking you to confirm your
action.
To save your changes, select Yes. To maintain the
disk-array configuration that was in place before you
made changes, select No.
If you are using RAID level 1 or RAID level 5, you
must select Initialize logical drive for proper
operation. This sets the drive to a predetermined
state. Any data existing on the drive is overwritten
with zeros, and corresponding parity is initialized to
the correct value.
a. Select Initialize/synchronize array from the
Main Menu; then select Initialize logical drive.
b. Select the logical drives you want to initialize
from the Logical Drive list by pressing the
Spacebar (the selected drives will appear
highlighted). To start the initialization, press
Enter. A pop-up window appears asking you to
confirm your action.
Warning
If you select Yes in the Confirm pop-up
window, information in the logical drive will
be overwritten with zeros.
c. Select Yes to confirm that you want to initialize
this logical drive.
The initialization process begins, and you can
see its progress in the Pct. Int. (Percent
Initialized) column of the Logical Drive list.
d. To stop the initialization at any time, press Esc.
Then press Esc again to return to the menu, or
press Enter to continue initializing the drive.
9. To back up the disk-array configuration to diskette,
you will need a 3.5-inch formatted diskette. To back
up the disk-array configuration:
a. Select Advanced functions from the Main
Menu.
b. Select Backup config. to diskette.
Follow the instructions on the screen. A pop-up
window shows the default file name of CONFIG.
You can change the file name by typing over the
default. The Backup program will assign a
file-name extension of .dmc.
164
PS/2 Maintenance Manual
Drive Maintenance: The following section provides
information about status indicators for logical and hard disk
drives, and the results of a hard disk drive failure. It also
contains procedures for replacing defective drives and for
redefining the space in an array by replacing logical drives.
Obtaining Drive Status: To see the ID, capacity, and
other information about each of the hard disk drives
attached to the RAID adapter:
1. Start the RAID configuration program. See “Starting
the RAID Configuration Program” on page 157.
2. Select Drive information.
3. Use the Up Arrow ( ) key or the Down Arrow ( ) key
to highlight each of the drives shown in the Bay/Array
selection list. As a drive is highlighted, the
information for that drive is shown at the bottom of
the screen.
4. Press Esc to return to the Main Menu.
Note
The status of the hard disk drive determines the status
of the logical drives in the array in which the hard disk
is grouped.
Bay/Array Selection List: The status of the drives in
the Bay/Array selection list is defined as follows:
Status
Meaning
CDR
CD-ROM drive installed.
DDD
Defective. The drive is an online or
hot-spare drive that does not respond to
commands. (If a RDY drive is defective
or powered down, it shows an empty bay
(a blank status), not a DDD status).
FMT
Format. The drive is being reformatted.
HSP
Hot spare. The drive will replace a
similar drive that becomes defective in
real time. At that time, its status changes
to ONL, and its array association is
displayed.
OFL
Offline. The drive is a good drive that
has replaced a defective drive in a RAID
level 1 or level 5 array. It is associated
with an array, but does not contain any
valid data. The drive state remains OFL
during the rebuild phase.
Hardware Maintenance Service
165
Status
Meaning
ONL
Online. The drive is part of an array. If
this drive fails, logical drives defined in
the array in which this drive is grouped
will have a status of offline (if the logical
drive is assigned RAID level 0 with a
good status) or Critical (if the logical drive
is assigned RAID level 1 or level 5 with a
good status).
RDY
Ready. The drive is recognized by the
adapter and is available for definition.
TAP
Tape drive installed.
UFM
Unformatted. The drive requires a
low-level format before it can be used in
an array.
Blank Status
Any of the following circumstances can
cause the status area to be blank:
No hard disk drive is installed in that
bay.
The bay contains a hard disk drive,
but the drive is not inserted
correctly.
An array was deleted and a
defective drive is still in the bay.
A new drive was installed and the
configuration program has not been
restarted. (The status will change to
RDY when the RAID configuration
program is restarted.)
Results of a Hard Disk Drive Failure: Depending
on the circumstances, there can be several possible
results from a drive failure.
Example 1:
Only one hard disk drive fails.
A hot-spare drive is defined that is the same or
greater size than the failed drive.
The logical drives in the array are assigned RAID
level 1, level 5, or a combination of these two levels.
Then the hot spare will take over immediately.
Note
Data for logical drives assigned RAID levels 1 and 5 is
maintained; however, system performance will be
reduced. Hot-spare drive capability does not apply to
logical drives assigned RAID level 0.
Example 2:
Only one hard disk drive fails.
A hot-spare drive is not defined.
The logical drives in the array are assigned RAID
levels 1, 5, or a combination of these two levels.
166
PS/2 Maintenance Manual
Then no data will be lost, but the system will operate at
reduced performance until the defective drive is replaced
and rebuilt.
Example 3:
If more than one drive fails, all data is lost. Therefore, it is
important that you replace and rebuild a defective drive as
soon as possible.
Logical and Hard Disk Drive Status Indications:
The status of the hard disk drive determines the status of
the logical drives in the array in which the hard disk is
grouped.
A single hard disk drive failure (indicated by a DDD
status in the Bay/Array selection list) causes logical
drives in that array that are assigned levels 1 and 5 to
have a Critical status. Data remains in logical drives
with a Critical status, but you must replace the one
defective hard disk drive promptly, because if two
hard disk drives were to fail, all of the data in the
array would be lost.
After you install a new hard disk drive, the Replace
process changes the drive status from DDD to OFL if
there is a Critical logical drive. After the Rebuild
process, the hard disk drive status changes from OFL
to ONL.
A single or multiple hard disk drive failure causes
logical drives in that array that are assigned level 0 to
have an offline status. Data in logical drives with an
offline status is lost. However, with a multiple disk
drive failure, when the defective drives are part of the
same array, logical drives in that array will have an
offline status. This means that data is lost in all the
logical drives in that array, regardless of which RAID
level is assigned.
Replacing a Faulty Drive
Note
The hard disk drive indicator light will blink when the
drive has failed and needs to be replaced (DDD state
only).
To replace a faulty drive:
1. Start the RAID configuration program. See “Starting
the RAID Configuration Program” on page 157.
If the drive failed while the system was powered
down, a screen appears the next time the system is
powered on showing you which drive is defective.
2. If the drive is not damaged (for example, it is not
inserted correctly):
a. Power-off the system.
Hardware Maintenance Service
167
b. Correct the problem.
c. Remove the diskette or ServerGuide CD from
the drive.
d. Restart the system.
3. If the drive is defective:
a. Press Y (Yes) to reconfigure the system.
b. Press Ctrl+Alt+Del when instructed to restart the
system. The Main Menu appears.
c. Select Rebuild device.
At this point, the drive status shows DDD.
Warning
Removing the wrong hard disk drive can
cause loss of all data in the array.
d. Replace the defective drive. Refer to “Removing
a Drive from Bank C, D, or E” on page 178.
e. After you have replaced the drive, press Enter.
The system will reconfigure to include the drive,
and the drive's status will change to OFL.
f. Allow the system to complete the configuration
(the screen displays a completion message);
then select Rebuild drive.
g. Use the Up Arrow ( ) key or the Down Arrow ( )
key to highlight the OFL (offline) drive you want
to rebuild; then press Enter.
h.
i.
j.
k.
168
The progress of the rebuilding process appears
on the screen.
When the rebuilding process completes, press
Esc to return to the Main Menu. The new
configuration will be saved automatically.
Backup the new configuration (see “Backing Up
Your Disk-Array Configuration” on page 170).
Select Exit to end the RAID configuration
program.
Remove the diskette and press Ctrl+Alt+Del to
restart the system.
PS/2 Maintenance Manual
Redefining Space in an Array: You can redefine
space in a disk array in a number of ways. For example,
you can combine a number of small logical drives to create
a larger one or you can redefine the existing logical drive
into several smaller drives. Also, you can install additional
hard disk drives to create a larger logical drive than was
possible with the existing storage capacity.
One method to redefine space in an array is to change the
RAID level assigned to a logical drive. For example, if you
assigned RAID level 1 to a logical drive and then decided
you needed the capacity offered with RAID level 5, you
can use this procedure to replace the existing logical drive
with a logical drive assigned the new RAID level.
To redefine the space in a disk array, first you must delete
the array. The last disk array defined must be the first
deleted.
Warning
In all cases, when you delete an array, all the data
and programs in the array are lost.
If you have data and programs that you want to save, they
must be backed up and then restored. It is suggested you
use a high-speed backup device, such as a tape drive.
To redefine the space in an array:
1. Back up all data and programs in the array.
2. If needed, install additional hard disk drives.
Refer to the User's Reference for information about
selecting drive sizes.
3. Insert the IBM RAID controller diskette; then press
Ctrl+Alt+Del to start the RAID configuration program.
4. Delete the existing array:
a. Select Create/delete array from the Main Menu.
The Create/Delete Array menu will disappear.
b. Select Delete disk array. The cursor will be
active in the Bay/Array list.
c. Review the Logical Drive List Date Created
column; then press the Up Arrow ( ) key or the
Down Arrow ( ) key to highlight the most
recently defined array.
Note
You must delete disk arrays in descending
order; the last one created must be the first
one deleted.
d. Press Del. The Confirm pop-up window
appears.
Hardware Maintenance Service
169
Warning
All the data in the array will be lost during
this procedure. Be sure to back up all data
and programs that you want to save.
e. If you do not want to delete the array, select No.
To delete the array select, Yes.
Note
To use the hard disks from the existing
array when creating a new array, you must
confirm the deletion of the existing array.
After you make your selection, the Confirm
pop-up window will disappear, and the
cursor will be active in the menu.
5. If you want a drive defined as a hot spare, refer to
“Defining a Hot-Spare Drive” on page 159 for
step-by-step instructions.
6. Create a new disk array and define logical drives.
7.
8.
9.
10.
See “Creating a Disk Array” on page 161 for
instructions on creating a disk array and defining
logical drives.
After you have established the new array and logical
drive or drives, select Initialize/synchronize array
from the Main Menu; then select Initialize logical
drive to prepare the drives in the array to receive
data. This sets the drive to a predetermined state.
Any data existing in the drive is overwritten with
zeros, and corresponding parity is initialized to the
proper value.
Insert a 3.5-inch formatted diskette in the primary
drive, select Advanced functions from the Main
Menu; then select Backup config. to diskette.
Follow the instructions on the screen.
Exit the RAID configuration program by pressing Esc
or selecting Exit while on the Main Menu. A pop-up
window will appear asking you to confirm your action.
Reinstall your operating system and device drivers,
then restore your data and programs.
Advanced Functions: You can select several utilities
from the Advanced Functions menu. They include:
Backup configuration to diskette
Restore configuration to diskette
Change the write policy
Change the RAID parameters
Format a drive
Backing Up Your Disk-Array Configuration: The
RAID adapter maintains a record of the disk-array
configuration information in its EEPROM (electronically
erasable programmable read-only memory) module. The
disk-array configuration is vital information. To protect this
170
PS/2 Maintenance Manual
information, back up the information to diskette as soon as
you have completed your tasks. You need a blank,
formatted, 3.5-inch diskette.
To back up the disk-array configuration information to
diskette:
1. Label the blank diskette “Disk Array Configuration
Backup,” and date it.
2. Start the RAID configuration program. See “Starting
the RAID Configuration Program” on page 157.
3. Select Advanced functions from the Main Menu.
4. Select Backup config. to diskette.
5. Remove the RAID controller diskette from the drive
and insert the blank diskette.
6. Follow the instructions on the screen.
Restoring the Disk-Array Configuration: To
restore the disk-array configuration information in the RAID
adapter EEPROM module, use the RAID controller diskette
and an up-to-date Disk Array Configuration Backup
diskette.
Note
Because dynamic changes in the configuration of your
disk array occur due to hot-spare drive replacement or
other drive maintenance activity, the configuration
backup information on the diskette might be different
from that in the adapter. It is important that you back
up the disk-array configuration information frequently,
to keep the backup information on the diskette current.
To restore the RAID configuration information:
1. Insert the IBM RAID controller diskette into the
primary drive and power-on the system. If the system
already is on, press Ctrl+Alt+Del.
2. Select Advanced functions from the Main Menu.
3. Select Restore config. from diskette.
4. Follow the instructions on the screen.
Using the Advanced Functions: This section gives
the procedures for using the advanced functions, such as
changing the write policy, changing the RAID parameters,
and formatting a drive.
Warnings appear throughout this section to alert you to
potential loss of data and should be heeded before
answering yes to the confirmations requested by the RAID
configuration program.
Changing the Write Policy: When you configure a
logical drive, the RAID adapter automatically sets the write
policy to write-through (WT) mode, where the completion
status is sent after the data is written to the hard disk
drive. To improve performance, you can change this write
Hardware Maintenance Service
171
policy to write-back (WB) mode, where the completion
status is sent after the data is copied to cache memory,
but before the data is actually written to the storage
device.
Although you gain performance with write-back mode, it
creates a greater risk of losing data due to a power failure.
This is because the system gets a completion status
message when the data reaches cache memory, but
before data is actually written to the storage device.
To change the write policy:
1. Start the RAID configuration program. See “Starting
the RAID Configuration Program” on page 157.
2. Select Advanced functions from the Main Menu.
3. Select Change write policy from the Advanced
Functions menu. The cursor will be active in the
Logical Drive list.
4. Select the logical drive whose write policy you want to
change. The Advanced Functions screen appears.
Note
Your information might be different from that
shown in this screen.
The Logical Drive list shows you the logical drive ID,
the size in megabytes of each logical drive, the RAID
level you assigned to that logical drive, and the date
you created it.
The status of the logical drive is also shown. Good
means that all is well with the drive; Critical means
that you must replace the hard disk drive and rebuild
the logical drive. (You will have received a message
telling you what has happened to the drive.) Offline
means that the logical drive is unrecoverable; the
data in that drive is lost.
5. Locate the Wrt pol (Write Policy) field in the Logical
Drive list.
The write policy is shown as either WT (write-through,
which is the default setting) or WB (write-back).
6. Use the Up Arrow ( ) key or the Down Arrow ( ) key
to select the logical drive whose write policy you want
to change.
Warning
If you change the write policy to write-back, wait
at least 10 seconds after your last operation
before you power-off the server. It takes that
long for the system to move the data from the
cache memory to the storage device. Failure to
follow this practice can result in lost data.
7. Press Enter to change the write policy.
172
PS/2 Maintenance Manual
8.
9.
10.
11.
Notice that WT changes to WB. You can press Enter
to alternate between WT and WB.
When you have made your choice, press Esc to
return to the Advanced Functions menu.
Select Exit. The Confirm pop-up window appears
asking you to confirm your action.
To return the setting to its original state, select No.
To save your changes, select Yes.
Back up the disk-array configuration information to
diskette. Refer to “Backing Up Your Disk-Array
Configuration” on page 170 for more information.
Formatting Drives: You can perform a low-level
format on drives with RDY (ready), OFL (offline), or UNF
(unformatted) status.
Note
The Format drive choice on the Advanced Functions
menu provides a low-level format. If you install a new
hard disk drive that requires a standard format, use
the Format command provided by your operating
system.
The Format program works like the low-level format
program in the advanced diagnostics portion of the system
programs. It is provided in the IBM RAID configuration
program so that you can perform a low-level format on a
drive controlled by the RAID adapter.
To perform a low-level format:
1. Start the RAID configuration program. See “Starting
the RAID Configuration Program” on page 157.
2. Select Advanced functions from the Main Menu.
Warning
A low-level format erases all data and programs
from the drive.
3. Select Format drive. The low-level format program
starts.
4. Follow the instructions on the screen.
You can perform a low-level format on more than one
drive at a time.
Changing the RAID Parameters: You can change
the RAID parameters using the advanced functions by
selecting Change RAID parameters.
The default settings are:
Stripe unit size — 8K
The stripe unit size is the amount of data written on a
given disk before writing on the next disk. To
maximize the overall performance, this stripe unit
should be chosen such that the stripe-unit size is
Hardware Maintenance Service
173
close to the size of the system I/O request. The
default is set to 8K data bytes.
Warning
Once the stripe unit is chosen and data is stored
in the logical drives, the stripe unit cannot be
changed without destroying data in the logical
drives.
Rebuild priority — Equal.
Rebuild priority can be set to equal, high, or low.
When set to equal, the rebuild I/O request and
system I/O request get equal priority in the execution
order.
When set to high, the rebuild I/O request will get a
higher priority than a system I/O request. In a heavily
loaded system (with a high rate of system I/O
requests), the high-priority rebuild can significantly
reduce the disk rebuild time at the expense of
degraded handling of I/O requests.
When the rebuild priority is set to low, the rebuild I/O
requests can execute only if there is no pending
system I/O requests. In a moderate to heavily loaded
system, low rebuild priority will increase the disk
rebuild time significantly and provide better system
performance.
Note
Rebuild priority can be changed without affecting
data in the logical drives.
Parity placement — RA.
Warning
Once a parity placement scheme is chosen and
data stored, it cannot be changed without
destroying data.
Parity placement defines how parity is placed in the
disk array with respect to data. The following
illustration shows both the Left Symmetric (LS) and
Right Asymmetric (RA) parity placement in a
four-drive disk array. Here AAA, BBB, and CCC are
the data stripe units, and PP0 is the corresponding
parity. Similarly DDD, EEE, and FFF are the data
stripe units, and PP1 is the corresponding parity.
Right Asymmetric (RA)
Disk
1
PP
DDD
GGG
JJJ
174
Disk
2
AAA
PP1
HHH
KKK
Disk
3
BBB
EEE
PP2
LLL
Disk
4
CCC
FFF
III
PP3
PS/2 Maintenance Manual
Left Symmetric (LS)
Disk Disk Disk
1
2
3
4
AAA
BBB
CCC
EEE
FFF
PP1
III
PP2
GGG
PP3
JJJ
KKK
Disk
PP
DDD
HHH
LLL
In some situations you may want to try LS parity
placement to improve performance. The default
parity placement is RA.
Read ahead — On.
Normally the IBM SCSI-2 Fast/Wide Streaming-RAID
Adapter/A transfers data from disk to its local cache
in steps of stripe-unit size. This provides excellent
overall performance when workloads tend to be
sequential. However, if the workload is random and
system I/O requests are smaller than stripe-unit size,
reading ahead to the end of the stripe unit will result
in a wasted SCSI bus bandwidth and wasted disk
utilization. When read-ahead is set to Off, the size of
data transfer from the disk to local cache is equal to
the system I/O request size, and no read-ahead to
the end of the stripe unit is performed.
Notes
1. The Read-ahead setting can be changed without
destroying data in a logical drive.
2. When the configuration is saved on a diskette,
the RAID parameters are saved also.
Administration Monitoring Utilities: Several of the
operating systems that your server supports also support
(for disk-array models) RAID monitoring programs. The
monitoring programs are:
OS/2* RAID Controller Administration and Monitor
OS/2 RAID NetFinity*/Alert Manager
OS/2 RAID Controller Administration for NetWare**
IBM RAID Controller Administration for Banyan**
Vines**
These programs include many of the functions contained in
the IBM RAID configuration program, but unlike that
program, they reside on top of your operating system and
do not require you to start the program from a startable
diskette or from a startable compact disc. You can start
these programs from your active operating system
desktop.
Each of these monitoring programs allow you view the
RAID configuration, reconfigure the array when replacing a
defective drive, and perform tuning tasks such as changing
the write policy.
* Trademark of the IBM Corporation.
** NetWare is a trademark of Novell, Inc. Banyan and Vines are
trademarks of Banyan Systems Inc.
Hardware Maintenance Service
175
To monitor the drive status with OS/2, Novell** NetWare,
Microsoft** Windows**, and Banyan Vines, you must run
the administration programs. The RAID controller diskette
contains files that must be installed when you use OS/2,
NetWare, or Banyan Vines.
See the README file on the RAID controller diskette for
installation and usage instructions for OS/2 RAID
Controller Administration and Monitor, OS/2 RAID
Controller Administration for Netware, and IBM RAID
Controller Administration for Banyan Vines. For OS/2
RAID NetFinity Alert Manager, see the ServerGuide CD
documentation.
Drivers: The RAID adapter requires the installation of
device drivers. See the README file on the RAID
controller diskette for detailed instructions.
If you install OS/2 from the ServerGuide CD, the device
drivers will be installed automatically. If, however, you
install OS/2 from diskette, you will need to install the
device drivers. See the README file on the RAID
controller diskette.
Installing Internal Drives (Type 86XX): The Type
86XX server supports the following drive types:
Diskette
Hard disk
Rewritable optical disc
Tape
The server has hardware that lets you replace a failed
hard disk drive without powering-off the server. Therefore,
you have the advantage of continuing to operate your
system while a hard disk drive is removed or installed.
These drives are also known as hot-swappable drives.
Hot-swappable drives have a green LED that shines
through the knob on the tray containing the drive. If the
drive has a good electrical connection upon installation, the
LED illuminates. The LED blinks briefly during power-up,
and also blinks if the drive malfunctions.
Internal drives are installed in bays. A diskette drive and a
CD-ROM. drive are preinstalled in bay A in all models. A
removable CD storage compartment is shipped in bay B1.
You can install two drives in bay B. You can install
hot-swappable hard disk drives in banks C, D, and E only.
Banks C, D, and E each contain six bays. Bank C
supports up to six drives. However, the total number of
SCSI drives that you can install in bay B and bank C is six.
** Novell is a trademark of Novell, Inc. Microsoft and Windows are
trademarks of Microsoft Corporation.
176
PS/2 Maintenance Manual
The number of preinstalled hard disk drives in bank C
varies according to the model you purchased. You can
install up to six drives in bank D and up to six drives in
bank E.
Note
The bank letter-designations are located on both
vertical rails on the front of the server. The bay-slot
numbers are located on the top of bank C and the
bottom of bank E.
Open Bays
CD-ROM Drive(Bay A1)
Diskette Drive(Bay A2)
B1
B2
Bank C
Bays 1 - 6
Bank D
Bays 1 - 6
Open Bays
Bank E
Bays 1 - 6
A cover plate (sometimes called a bezel or face plate)
covers the front of bay B2 only. If you install a drive that
uses removable media (diskette, optical disc, tape), you
might install and adjust the cover plate after you install the
drive in bay B2.
Considerations
Bay A comes with one SCSI CD-ROM drive and one
3.5-inch, 2.88MB diskette drive.
Bay B supports:
– One 5.25-inch, full-high, removable-media or
non-removable-media device, or
– One 5.25-inch, half-high, removable-media
device and one 3.5-inch, half-high,
removable-media device, or
– Two 3.5-inch or two 5.25-inch, slim-high or
half-high, removable-media devices.
Note
Only one of the devices installed in bay B can be
a SCSI device.
Hardware Maintenance Service
177
You cannot install hot-swappable drives in bay B.
PC Server 500 supports eighteen 3.5-inch, slim-high,
hot-swappable hard disk drives, or nine 3.5-inch,
half-high hard disk drives in the bottom three banks
(C, D, and E).
Banks C, D, and E can accommodate six slim-high
drives or three half-high drives, or a combination of
both drive sizes. If you use a combination, remember
that one half-high drive uses the equivalent space of
two slim-high drives.
If you install drives in bank D or E, you will remove
the fan assembly on the rear of the server, install a
direct access storage device (DASD) backplane in
banks D and E, and install an optional 220-watt
power supply.
Each backplane has six connectors, to support up to
six hard disk drives.
Removing a Drive from Bank C, D, or E: Locate
the drive you are removing. You do not have to power-off
the server to remove a drive from banks C, D, and E.
Warning
If you are removing a failed hard disk drive that is part
of a disk array in bank C, D, or E, you must not
accidentally remove a good drive. Before you attempt
to remove a defective drive, thoroughly review the
information displayed on your server's screen to
determine the location of the failed drive. “Logical and
Hard Disk Drive Status Indications” on page 167
explains the codes that your server uses to indicate a
defective drive. When a hard disk drive fails, a
blinking green indicator light illuminates on the knob of
the drive tray. When a hard disk drive is good, a solid
green indicator light illuminates on the knob of the
drive tray.
If you partially or completely remove a good drive
instead of the defective one, your server might lose
valuable data. This situation is especially relevant if
you assigned RAID level 1 or 5 to the logical drives in
your disk array. However, the RAID controller can
rebuild the data you need, provided that certain
conditions are met. See “Starting the RAID
Configuration Program” on page 157 for more details.
If you have a non-disk-array model, an illuminated drive
tray knob means the drive is a good one. An unilluminated
drive tray knob means the drive is defective, or no power
is being supplied to the drive.
To remove a drive from bank C, D, or E, do the following
steps:
1. Find the drive you plan to remove.
178
PS/2 Maintenance Manual
2. If you have a disk-array model and a drive has failed,
ensure that you have selected the correct drive for
removal by verifying that the light on the tray's knob is
blinking.
3. Unlock the drive by turning the knob directly above it
90 degrees.
4. Disconnect the drive from the connector on the
backplane, by grasping the handle on the drive tray
and pulling the drive out of the server. Store the
drive in a safe place.
Note
If you have a disk-array model, you must
reconfigure your disk arrays after removing hard
disk drives. See “Starting the RAID Configuration
Program” on page 157 for details.
Hardware Maintenance Service
179
SCSI Controller on the System Board
On some models with SCSI on the system board, slot
number 0 or 1 designates the logical position for the SCSI
controller. Diagnostics might instruct you to replace the
SCSI adapter in slot 0, or 1, leading you to believe that a
SCSI adapter is missing. In that situation, replace the
system board (the SCSI controller is built into the board).
SCSI Device Default Settings
You are here with a 000174XX error or you want to check
the settings (defective devices can also cause incorrect
settings).
The optional settings are intended to let the user share
devices (usually external) between computers without
having to reconfigure the system each time the device is
moved. The settings apply to SCSI Presence Error
Reporting devices (such as SCSI tape drives and CD-ROM
drives and on some computers, hard disk drives). After a
device is in the configuration table, the default settings are
Enable and Keep. The only way to remove the device
from the configuration table is to manually remove it by
changing the settings. Running automatic configuration
will not remove it from the configuration.
Enable and Disable Settings:
If the user plans
to leave the device turned off, or share the device
periodically between different computers, that device
should be set to Disabled (on the computers that will share
the device). When disabled, the drive will remain in the
configuration but POST will not report a configuration error
when the device is removed. For example, before the user
temporarily removes a SCSI tape drive, the setting should
be changed to Disabled. When the device is reinstalled
and the user no longer chooses to share the device, the
setting should be changed back to Enabled.
Keep/Remove Settings: The only time that you
will see the Keep and Remove options is when the device
physically is disconnected from the computer. At that time,
you have the option of removing the device from the
configuration table by changing the setting to Remove.
Changing the Settings:
To change the settings,
do the following:
Select Set and View SCSI device configuration
from the Set configuration menu.
Select the appropriate device on the list.
Press F6 to change the settings.
Press F10 to save the changes (in configuration).
180
PS/2 Maintenance Manual
SCSI Diagnostic Tests
The diagnostic tests usually identify the failing device, but
because of the many dependencies, you can be misled by
an error code. It is important to understand that all
devices in a SCSI chain depend on an open line of
communication on the SCSI data bus. Certain conditions
can cause misleading error codes to appear. For example,
a short circuit in the bus arbitration logic on the system
board can inhibit communication between the system
board and a SCSI adapter. If this condition exists, the
error code that appears would indicate that the SCSI
adapter failed when the failure was really on the system
board.
SCSI ID (Using to Help Isolate Failures)
Each device on a SCSI chain has a unique SCSI ID. Use
the SCSI ID to help pinpoint which device is failing. For
more information see “Error Code Format” on page 115.
Servicing LAN Stations (Workstations)
Before you attempt to run the diagnostic tests on
computers with no diskette drive, have the LAN
administrator make the Diagnostic Diskette image available
and bootable from the server.
Software/Hardware Mismatch Problems
If a failure appears to be the result of a defective FRU, but
the diagnostic tests run error-free, there might be a
software and hardware mismatch. These problems might
be intermittent, and they can be difficult to diagnose.
If you are experiencing this type of problem, and the
operating system is of the “direct driver” variety, which
bypasses the BIOS interface, such as:
AIX
Netware**
SCO** XENIX**
Some “windowing” interfaces
Other Unix-based software
the most-likely cause of the problem is a mismatch
between the software and the hardware.
Applications that use the Multiprotocol Adapter/A, magnetic
tape drives, and some SCSI devices such as CD-ROM,
require direct software drivers. There is no BIOS interface
for these devices in PS/2 products.
** Netware is a trademark of Novell, Inc.
** SCO is a trademark of Santa Cruz Operations, Inc.
** XENIX is a trademark of the Microsoft Corporation.
Hardware Maintenance Service
181
The following information is provided to help you resolve
these problems:
Software/Hardware Compatibility
Direct-driver software is sensitive to variations in hardware
design. The resulting incompatibilities are usually
addressed with a revision (sometimes referred to as a
patch), to the direct-driver software. Make certain the
software is current and that all known revisions are
installed. The IBM on-line bulletin board (sometimes
referred to as PCPROD), and other software tools sources,
such as Novell Netware, should be referenced by the
software support personnel for any revisions provided by
the appropriate software vendor.
The most-likely cause of these types of problems, when
direct-driver software is involved, is the failure to obtain the
latest revisions from the software vendor.
Software Installation
It is very important to follow the vendor's installation
procedures. The software should not be migrated from
another system, unless the installation instructions indicate
that migration is supported (especially from a different
model in the product line).
Important
Migrating adapters from slower systems to faster
systems might cause problems. This is due to
device-specific, system-specific, or time-dependent
software code, that controls these devices.
Adapter and Software Compatibility
Hardware adapters for some operating systems must be
approved by the software vendor to be compatible with
that software. The approval is specific to the system,
adapter E.C. level, and the software version. Contact the
software vendor to confirm that system and adapter
configuration is supported by their software level. The
compatibility support is especially important for, (but not
limited to), all LAN adapters and RIPL applications.
Software Failures After a Hardware Change
After the initial installation, any changes in the hardware
configuration (addition or changes of adapters or features),
might result in computer failures and require the
reinstallation of the operating system or the software
revisions.
Specific hardware configuration changes (such as memory
address, interrupt level, or programmable option select),
might result in a computer failure if the software has
unique operating requirements.
182
PS/2 Maintenance Manual
Undetermined Problems
You are here because the diagnostic tests did not identify
the failure, the Devices List is incorrect, or the system is
inoperative.
Note
If you suspect a software mismatch is causing failures
(solid or intermittent), be sure to see
“Software/Hardware Mismatch Problems” on
page 181.
Check the power supply voltages. If the voltages are not
correct, replace the power supply. If the voltages are
correct, return here and do the following:
1. Power-off the computer.
2. Remove or disconnect the following (one at a time)
until you find the failure (power-on the computer and
reconfigure each time).
Any external devices
Surge suppressor device (on the computer)
Modem, printer, mouse, or non-IBM devices
Each adapter
Drives
Memory-Module Kits
Bus adapter
Math coprocessor (if installed)
Minimum operating requirements vary for each computer.
For example:
AT Bus computers require 256KB of memory.
Micro Channel computers require 1MB of memory.
IML drive in the drive startup sequence (IML systems
only).
If the computer is a workstation, (no drives), a default
hard disk drive is not required.
3. Power-on the computer. If the problem remains,
suspect the system board, then the processor board
in that order.
Note
If the problem goes away when you remove an
adapter from the bus adapter, and replacing that
adapter does not correct the problem, suspect the
system board, processor board, then the bus adapter
in that order.
VPD Codes Information
On 90 and 95, each processor board has a unique vital
product data (VPD) code stored in the nonvolatile memory
on the system board. After you change the processor
board, run “Automatic configuration” to store the new
processor board VPD code in nonvolatile memory.
Hardware Maintenance Service
183
On 56, 57, 76 and 77, each system board has a unique
vital product data (VPD) code stored in the nonvolatile
memory. After you replace the system board, run
“Automatic Configuration,” then select Set system
identification utility from the Reference Diskette, System
Partition (or server image) and input the system serial
number when prompted.
Recording the Vital Product Data on a New
System Board: The vital product data (serial
number, etc.) is stored in the EPROM on the system
board. On some IBM PS/2 system boards, the vital
product data (VPD) is rewritable. When replacing a
system board that has rewritable VPD, the system unit
serial number must be recorded on the new system board.
Use the following procedure to record the system unit
serial number on the new system board.
1. Power-on the computer.
2. During POST, press F1.
3. When the cursor moves to the lower left-hand corner,
press F1.
4. Select item 8 More Utilities.
5. Select item 4 Set System Identification.
6. Select item 1 Set System Identification.
7. Type the system unit serial number in the entry field;
then, press Enter.
The system unit serial number will be stored in the
EPROM on the system board.
To verify that the serial number is properly stored in the
EPROM, select View System Configuration.
184
PS/2 Maintenance Manual
System Board Locations
Model 25 System Board (Type 1)
Parallel port (J3)
Serial port (J5)
Pointing-device connector (J1)
Keyboard connector (J2)
Earphone connector
Keylock connector (J10)
Bus-adapter connector (J6)
Hard-disk-drive connector (J11)
Fan connector (J8)
Power connector (J7)
Display connector (J4)
Memory-module package 1
512KB memory (J9)
Memory-module package 2
Optional memory module ZM2
Optional memory module U34
Optional memory module U35
Optional memory module U22
Optional memory module U16
Optional memory module ZM1
8086 Microprocessor
Math coprocessor
Diskette connector (J12)
1
2
3
4
5
6
7
8
9
1
11
12
13
14
15
16
17
18
19
2
21
22
23
2
3
4
14
1
25
25
13
13
J3
14
3
5
1
J5
A01
B01
4 3
6 5
J1
4
6
1
J2
J10
2
40
5
6
J11
7
39
J8
J6
23
44
43
9
1
J12
8
J7
0
12
2 1
B40
A40
1 2
22
J4
13
14
2
2
J9
20
3
9
8
7
6
5
4
Hardware Maintenance Service
185
Model 25 System Board (Type 2)
Parallel port (J3)
Serial port (J5)
Pointing-device connector (J1)
Keyboard connector (J2)
Earphone connector
Keylock connector (J10)
Bus-adapter connector (J6)
Hard-disk-drive connector (J11)
Fan connector (J8)
Power connector (J7)
Display connector (J4)
Memory-module package 1
512KB memory (J9)
Memory-module package 2
Optional memory module U35
Optional memory module U34
Optional memory module U22
Optional memory module U16
Optional memory module ZM2
Optional memory module ZM1
8086 Microprocessor
Math coprocessor
Diskette connector (J12)
1
2
3
4
5
6
7
8
9
1
11
12
13
14
15
16
17
18
19
2
21
22
23
2
3
4
14
1
25
25
13
13
J3
14
3
5
1
J5
A01
B01
4 3
6 5
J1
4
6
1
J2
J10
2
J11
40
39
J8
J6
23
44
43
1
J12
J7
5
6
7
8
9
0
12
2 1
B40
A40
1 2
J4
22
13
14
2
2
J9
3
20
9
8
186
7
6
5
PS/2 Maintenance Manual
4
Model 25-286 System Board
1
2
3
4
5
6
7
8
9
1
11
12
13
14
15
16
Parallel port (J3)
Serial port (J5)
Bus-adapter connector (J6)
Pointing-device connector (J1)
Keyboard connector (J2)
Memory packs (J9)
Optional memory packs (J10)
Hard-disk drive connector (J11)
Power-supply connector (J7)
Power-supply connector (J14)
Display connector (J4)
Password-override connector (J13)
80286 Microprocessor connector
Clock module connector (ZM35)
Math coprocessor connector (ZM1)
Diskette-drive connector (J12)
2
3
4
5
6 7
8
16
9
0
A B
5
CD
4
3 2 1
2
3
Hardware Maintenance Service
187
Model 25 SX System Board
1
2
3
4
5
6
7
8
9
1
11
12
13
14
15
188
Parallel port
Pointing-device connector
Keyboard connector
Serial port
External display port (not on K00)
Hard-disk power connector
Power-supply connector (J12 & J13)
Diskette-drive connector
Internal display connector
Hard-disk drive connector
Memory-module connector
Math-coprocessor socket
Password-override connector (J2)
Clock-battery socket
Bus-adapter connector
PS/2 Maintenance Manual
Model 30 System Board
1
2
3
4
5
6
7
8
9
1
11
12
13
Display connector
Serial port
Bus-adapter connector
Parallel port
Pointing-device connector
Keyboard connector
Power-supply connector
8086 Microprocessor connector
Math-coprocessor connector
Keylock connector
Hard-disk drive connector
Diskette-drive connector
Memory-modules packages
2
3
4
5
6
7
8
9
0
3
2
Hardware Maintenance Service
189
Model 30-286 System Board
1
2
3
4
5
6
7
8
9
1
11
12
13
14
15
16
Parallel port (J3)
Serial port (J5)
Bus-adapter connector (J6)
Pointing-device connector (J1)
Keyboard connector (J2)
Memory packs (J9)
Optional memory packs (J10)
Hard-disk drive connector (J11)
Power-supply connector (J7)
Power-supply connector (J14)
Display connector (J4)
Password-override connector (J13)
80286 Microprocessor connector
Clock module connector (ZM35)
Math coprocessor connector (ZM1)
Diskette-drive connector (J12)
2
3
4
5
6 7
8
16
9
0
A B
5
CD
4
190
3 2 1
2
3
PS/2 Maintenance Manual
Model 33 System Board
Note: Some Model 35 and Model 40 computers use this
system board.
1
2
3
4
5
6
7
8
9
1
11
12
13
14
15
16
17
Display connector
Pointing-device connector
Keyboard connector
Parallel port
Serial port
Control connector (Control Assembly)
Power-supply connector (P2)
Power-supply connector (P1)
Diskette-drive connector
80387SX Math coprocessor connector
Hard-disk drive connector
Password-override connector (J20)
Bus-adapter connector
System board memory
Battery
Memory-module connector 2
Memory-module connector 1
Hardware Maintenance Service
191
Model 35, 40 System Board
Note: See Model 33 note.
1
2
3
4
5
6
7
8
9
1
11
12
13
14
15
16
17
Real-time clock-module connector
Pointing-device connector
Keyboard connector
Parallel port
Serial port
Display connector
Control connector (Control Assembly)
Power-supply connector (P2)
Power-supply connector (P1)
Diskette-drive connector
Hard-disk drive connector
Password-override connector (J14)
80387SX Math coprocessor connector
Bus-adapter connector
Memory-module connector 1
Memory-module connector 2
Memory-module connector 3
7
6
5
2
3
4
3
4
2
5
6
0
192
9
PS/2 Maintenance Manual
8
7
Model 50 System Board (Type 1)
1
2
3
4
5
6
7
8
9
1
Expansion slots
Extended video-adapter slot
Hard-disk-drive bus-adapter slot
Fuse
Fan-assembly connector
Memory-module package connectors
Diskette-drive bus-adapter slot
80286 Microprocessor
Battery/speaker assembly connector
80287 Math coprocessor connector
2
3
0
4
9
5
8
7
6
Model 50 System Board (Type 2)
Hardware Maintenance Service
193
Models 50, 50Z 486SLC2 System Board
Upgrade
Power-supply connector
Memory-module connectors
AT IDE hard disk drive connector
Diskette-drive cable connector
Coprocessor connector
Speaker connector
Password-override jumper (J11)
Processor connector
Expansion slots (16-bit)
Expansion slot (32-bit)
Expansion slots (16-bit)
Video connector
Serial connector
Parallel connector
Keyboard connector
Pointing-device connector
1
2
3
4
5
6
7
8
9
1
11
12
13
14
15
16
0
9
8
2
3
4
5
6
J11
2
7
194
6
5
PS/2 Maintenance Manual
4
3
Model 53 (9553-xBx) System Board
1
2
3
4
5
6
7
8
9
1
11
12
13
14
15
16
17
18
19
2
Display connector
Serial port
Parallel port
Pointing-device connector
Keyboard connector
Memory-module connector M3
Memory-module connector M2
Memory-module connector M1
Power-supply connector (J8)
Hard-disk drive in-use light (J7)
Privilege access password jumper
Password-override connector (J11)
Power-supply connector (J12)
Hard-disk drive power connector
Diskette-drive cable connector
Hard-disk drive cable connector
Math coprocessor connector
486SLC2 processor
Real-time clock module
Bus-adapter connector
Hardware Maintenance Service
195
Model 55 System Board
1
2
3
4
5
6
7
8
9
1
11
12
13
14
15
Display connector
Serial port
Parallel port
Pointing-device connector
Keyboard connector
Fuse
Power-supply connector (P7)
Power-supply connector (P14)
Memory-module connector 1
Memory-module connector 2
Diskette-drive connector
80387SX Math coprocessor connector
Real-time clock-module connector
2KB CMOS RAM extension connector1
Bus-adapter connector
2
3
4
5
6
5
7
4
8
3
9
0
2
1
May not be present on all system boards.
196
PS/2 Maintenance Manual
Model 55 486SLC2 System Board Upgrade
1
2
3
4
5
6
7
8
9
1
11
12
13
14
15
16
17
Power-supply connector (P7)
Password-override jumper (J11)
Power-supply connector (P14)
Hard-disk drive power connector
Memory-module connectors
AT IDE hard disk drive connector
Diskette-drive cable connector
Coprocessor connector
Processor connector
Bus-adapter connector
Video-memory connectors
CD-ROM connector
Video connector
Serial connector
Parallel connector
Keyboard connector
Pointing-device connector
3
4
5
6
7
2
2
3
4
0
5
6
7
9
8
Hardware Maintenance Service
197
Model 56, 57 (8556, 8557) System Board
1
2
3
4
5
6
7
8
9
1
11
12
13
14
15
16
17
18
19
Pointing-device connector
Keyboard connector
Parallel-port connector
Password-override connector (J18)
Serial-port connector
Display connector
External SCSI connector
SCSI terminator
Control-assembly connector
Power-supply connector P2
Internal SCSI connector
Power-supply connector P1
Diskette-drive connector
Math coprocessor connector
Video memory connectors
Bus-adapter connector
Memory-module connector 1 (MEM 1)
Memory-module connector 2 (MEM 2)
Memory-module connector 3 (MEM 3)
9
198
PS/2 Maintenance Manual
Model 56, 57 (9556, 9557) System Board
1
2
3
4
5
6
7
8
9
1O
11
12
13
14
15
16
17
18
19
2O
20
Pointing-device connector (J1)
Keyboard connector (J2)
Parallel-port connector (J3)
Override-jumper connector (JMP1)
Serial-port connector 1 (J4)
Privileged-access password Jumper
Serial-port connector 2 (J5)
Display connector (J7)
External SCSI connector (J6)
Internal SCSI connector (J16)
Control-panel connector (J19)
Power-supply connector P2 (J20)
Power-supply connector P1 (J18)
Diskette-drive connector (J21)
Math coprocessor connector (U35)
Bus-adapter connector (J13)
Cover lock switch connector (J23)
Memory-module connector 1 (MEM 1)
Memory-module connector 2 (MEM 2)
Memory-module connector 3 (MEM 3)
9
Hardware Maintenance Service
199
Model 60 System Board
1
2
3
4
5
6
7
8
9
1
11
12
13
14
Fuse
Power-supply cable connector
Diskette-drive cable connector
Memory-module package connectors
Battery/speaker assembly connector
80287 Math coprocessor connector
Expansion slots
Extended video-adapter slot
Hard-disk-drive adapter slot
Display connector
Serial connector
Parallel connector
Pointing-device connector
Keyboard connector
2
3
4
3
2
4
0
9
8
7
5
6
200
PS/2 Maintenance Manual
Model 65 System Board
1
2
3
4
5
6
7
8
9
1
11
12
13
14
15
16
Fuse
Power-supply connector
Real-time clock module connector
2KB CMOS RAM extension connector
Diskette drive connector
Memory-module-kit connector 1
Memory-module-kit connector 2
80387SX Math coprocessor socket
Speaker assembly connector
16-bit expansion slot
Video slot (slot 6)
Display connector
Serial connector
Parallel connector
Pointing-device connector
Keyboard connector
J15
J16
Hardware Maintenance Service
201
Models 60, 65, and 80 486DX2 and 486DLC2
System Board Upgrade
1
2
3
4
5
6
7
8
9
1
11
12
13
14
15
16
17
7
Expansion slots (32-bit)
Expansion slot (16-bit)
Expansion slots (video extension)
Expansion slots (32-bit)
Video connector
Serial connector
Memory connectors
Parallel connector
Pointing-device connector
Keyboard connector
Password-override jumper (J11)
Power-supply connector
Internal SCSI connector
Diskette-drive cable connector
Processor connector
Speed jumper (J9)
Speaker connector
J10
1
2
3
=33MHz
=25MHz
2
3
6
4
J9
5
5
6
7
8
4
J11
J4
J1
J2
3
202
PS/2 Maintenance Manual
2
9
0
Model 70 System Board, Reduced Size (16
MHz, 20 MHz)
Battery/speaker assembly connector
Expansion slot 1 (16-bit)
Expansion slot 2 (32-bit)
Expansion slot 3 (32-bit)
80387 Math coprocessor connector
Hard-disk and diskette-drive
bus-adapter connector
Memory-module connector 1 (MEM 1)
Memory-module connector 2 (MEM 2)
Memory-module connector 3 (MEM 3)
1
2
3
4
5
6
7
8
9
3
4
2
9
8
7
5
6
Model 70 System Board, Full Size (16 MHz,
20 MHz)
Hardware Maintenance Service
203
Model 70 System Board (25 MHz)
1
2
3
4
5
6
7
8
9
1
Battery/speaker assembly connector
Hard-disk and diskette-drive
bus-adapter connector
Expansion slot 1 (16-bit)
Expansion slot 2 (32-bit)
Expansion slot 3 (32-bit)
80387 Math coprocessor connector
Memory-module connector 4 (MEM 4)
Memory-module connector 3 (MEM 3)
Memory-module connector 2 (MEM 2)
Memory-module connector 1 (MEM 1)
3
4
5
2
0
204
9
8
6
7
PS/2 Maintenance Manual
Model 70 486DX33 and 486DLC2 System
Board Upgrade
1
2
3
4
5
6
7
8
9
1
11
Power-supply connector
Diskette-drive cable connector
Memory-module connectors
P23T Upgrade connectors
Password-override connector (J11)
Expansion slots
Video connector
Serial connector
Parallel connector
Pointing-device connector
Keyboard connector
7
8
9
0
J7
2
6
3
4
5
J11
Hardware Maintenance Service
205
Model 76, 77 (9576, 9577) System Board
1
2
3
4
5
6
7
8
9
1
11
12
13
14
15
2
Pointing-device connector (J1)
Keyboard connector (J2)
Parallel-port connector (J3)
Serial-port connector 1 (J4)
Serial-port connector 2 (J5)
Oscillator-select jumper (SPD)
(25 MHz systems only)
Option microprocessor socket (U49)
(25 MHz and 33 MHz systems only)
External SCSI connector (J6)
Internal SCSI connector (J7)
Control-panel connector (J19)
Power-supply connector P2 (J18)
Power-supply connector P1 (J17)
Diskette-drive connector (J21)
Bus-adapter connector (J13)
Password-override connector (JMP1)
3
4
5
6
7
8
9
0
2
5
206
4
PS/2 Maintenance Manual
3
Model 80 (041, 071, 111, 121, 311, 321)
System Board
1
2
3
4
5
6
7
8
9
1
11
12
13
14
Power-supply connector
Diskette-drive connector
Memory expansion kit connectors
Math-coprocessor connector
(8580-111, 121, 311, 321)
Battery/speaker connector
Math-coprocessor connector
(8580-041, 071)
16-bit expansion slot
32-bit expansion slot
Video slot (slot 6)
Display connector
Serial connector
Parallel connector
Pointing-device connector
Keyboard connector
2
4
3
J16
J15
3
2
4
0
9
5
6
8
7
Hardware Maintenance Service
207
Model 80 (A16, A21, A31) System Board
1
2
3
4
5
6
7
8
9
1
11
12
13
Power-supply connector
Diskette-drive connector
Memory expansion kit connectors
Math-coprocessor connector
Battery/speaker connector
16-bit expansion slot
32-bit expansion slot
Video slot (slot 6)
Display connector
Serial connector
Parallel connector
Pointing-device connector
Keyboard connector
2
3
2
J9
J8
3
0
4
9
8
5
7
6
208
PS/2 Maintenance Manual
Server 85 (486) System Board
1
2
3
4
5
6
7
8
9
1
11
12
13
14
15
32-bit expansion slots
(video extensions J9, J11)
Internal SCSI connector
External SCSI connector
Parallel port
Serial port
Pointing-device connector
Keyboard connector
Memory-module connectors
Recovery jumper (JMP5)
Power-supply connector
Optional-microprocessor socket
Diskette-drive cable connector
Power-on password override connector (JMP1)
Indicator-Panel connector
Battery
5
4
3
2
2
3
4
0
5
6
9
7
8
Hardware Maintenance Service
209
PS/2 9585-xKx, and 9585-xNx System Board
1
2
3
4
5
6
7
8
9
1
11
12
13
14
15
16
17
18
19
210
32-bit expansion slots
(video extensions J9, J11)
Internal SCSI connector
External SCSI connector
Parallel port
Remote power on jumper
Serial port
Pointing-device connector
Keyboard connector
Memory-module connectors
Tamper-evident connector
Power-supply connector
Processor
Cache connector
Diskette-drive cable connector
Password override connector (JMP1)
Control-panel connector
Battery
Privilege access password jumper
Server guard jumper (If a server guard is not
installed, the jumper must connect the two
pins closest to the control-panel connector.)
PS/2 Maintenance Manual
Model 90 XP 486 System Board
1
2
3
4
5
6
7
8
9
1
11
12
13
Power switch/speaker assembly (J2)
Battery (BT1)
SCSI adapter slot (J1)
Adapter slots (J1, J3, J4, and J6)
Processor-board slot (J8)
Memory-riser-card slot (J11)
Memory-riser-card slot (J14)
Video-memory connectors
Diskette-drive-cable connector (J15)
Power-supply connector (J25)
Power-supply connector (J26)
Power-on password override connector (J10)
Fan connector (J5)
4
5
3
6
7
2
8
3
2
9
0
Hardware Maintenance Service
211
Model 95 XP 486 System Board
1
2
3
4
5
6
7
8
9
1
11
12
13
32-bit expansion slots
(video extensions J9, J11)
Processor-board slot
Serial connector
Parallel connector
J28 connector (access cover fan)
Pointing-device connector
Keyboard connector
Memory-module connectors
Power-supply connector
Power-on password override jumper (J16)
Battery connector
Diskette-drive cable connector
Information-panel cable connector
On the 486SX 25Mhz system board, the math coprocessor
connector is located on the processor board.
3
2
2
0
3
9
4
:
5
6
7
8
212
PS/2 Maintenance Manual
Server 9595, 9595A
1
2
3
4
5
6
7
8
9
1
11
12
13
14
15
32-bit expansion slots
(video extensions J25, J27)
Processor slot
Parallel ports
Serial ports
Keyboard/Pointing-device connectors
Power-on Features jumper
Power-on Password override jumper
Memory-module connectors
Tamper-evident cable connector
Power Supply connector
Privilege Access Password jumper
Battery
Diskette-drive cable connector
Reserved (Pins 1 and 2 must be connected.)
Operator-panel cable connector
Hardware Maintenance Service
213
PC Server 486DX2 System Board
1
2
3
4
5
6
7
8
9
1
11
12
13
14
15
16
17
18
19
Memory connectors (U31, U32, U33, and
U34)
Processor socket
ISA-IDE hard disk drive LED connector
(W46)
PCI-IDE hard disk drive LED connector
(W39)
Power LED pins 1-3 (W12)
Speaker connector (J5)
EISA slots (J12, J13, J14, 15, and J16)
PCI slots (J18, J19, and J20)
Mouse port (J2)
PCI-IDE hard disk drive connector (J21)
Keyboard port (J1)
Serial port, COM1 (J11)
Power supply connector, P2 (J7)
Power supply connector, P1 (J6)
Serial port, COM2 (J10)
Parallel port (J8)
Diskette drive connector (J9)
Real-time clock socket
IDE 2 hard disk drive connector (J22)
Pin 1
214
PS/2 Maintenance Manual
PC Server 486DX2 System Board Jumper Settings
A label showing the following jumper locations is located
on the top of the base frame assembly inside the system
unit.
Jumper Settings (CPU Selection)
Jumper
Configuration
Setting
W2
486SX
All other CPUs (Default)
Pins 2-3
1-2 & 3-4
W3
P24T CPU
All others CPUs (Default)
Not installed
Installed
W16
25MHz
33MHz (Default)
Not installed
Installed
W20
25MHz
33MHz (Default)
Installed
Not installed
W33
DX4
DX4 internal double clock
468SX, DX2, DX, and DX4
internal clock tripler (Default)
Pins 1-2
Pins 2-3
Not installed
Jumper Settings (ISA IDE Selection)
Jumper
Configuration
Setting
W42
ISA IDE uses ISA IRQ 14
ISA IDE uses ISA IRQ 15
Pins 1-2
Pins 2-3
W43
ISA IDE uses DMA channel 6
ISA IDE uses DMA channel 7
ISA IDE uses P10 transfer
(Default)
Pins 1-2
Pins 2-3
Not installed
Jumper Settings (Keyboard Selection)
Jumper
Configuration
Setting
W10
PS/2 Mouse installed (Default)
PS/2 Mouse not installed
Installed
Not installed
Jumper Settings (Tag Selection)
Jumper
Configuration
Setting
W24
7-Bit Tag
8-Bit Tag
9-Bit Tag (Default)
Illegal
Not installed
Installed
Installed
Not installed
W26
7-Bit Tag
8-Bit Tag
9-Bit Tag (Default)
Illegal
Installed
Installed
Not Installed
Not installed
Hardware Maintenance Service
215
Jumper Settings (BIOS Mode)
Jumper
Configuration
Setting
W6
BIOS in normal mode (Default)
BIOS in boot recovery mode
Pins 2-3
Pins 1-2
Jumper Settings (DPU Selection)
Jumper
Configuration
Setting
W17
DPU generate parity
CPU generate parity
Pins 1-2
Pins 2-3
W18
DPU forces parity error
DPU does not force parity error
(Default)
Pins 1-2
Pins 2-3
Jumper Settings (PCI Ports)
Jumper
Configuration
J20
PCI #1 (master/slave shared with EISA slot J17)
J19
PCI #2 (master/slave)
J18
PCI #3 (master/slave)
Jumper Settings (PCI Compliant IRQ Jumper Header)
Jumper
Setting
J101
Open (Default)
Pin 2: Route to ISA IRQ1
Pin 3: Route to ISA IRQ3
Pin 4: Route to ISA IRQ4
Pin 5: Route to ISA IRQ5
Pin 6: Route to ISA IRQ6
Pin 7: Route to ISA IRQ7
Pin 8: Route to ISA IRQ8
Pin 9: Route to ISA IRQ9
Pin 10: Route to ISA IRQ10
Pin 11: Route to ISA IRQ11
Pin 12: Route to ISA IRQ12
Pin 13: Route to ISA IRQ14
Pin 14: Route to ISA IRQ15
Jumper Settings (Cache Selections)
Jumper
Configuration
Setting
W1
Secondary cache in write-through
mode
Secondary cache in write-back
mode (Default)
Pins 1-2
Pins 2-3
W4
Internal cache in write-through
mode (Default)
Internal cache in write-back mode
Not installed
Installed
W5
128KB of secondary cache
256KB of secondary cache
(Default)
Not installed
Installed
216
PS/2 Maintenance Manual
Jumper
Configuration
Setting
W21
Secondary cache not installed
Secondary cache installed
(Default)
Installed
Not installed
W22
128KB of secondary cache
256KB of secondary cache
(Default)
Installed
Not installed
W23
128KB of secondary cache
256KB of secondary cache
(Default)
Not installed
Installed
Jumper Settings (PCI IDE Selection)
Jumper
Configuration
Setting
W35
PCI IDE uses ISA IRQ 14
(Default)
PCI IDE does not use ISA IRQ 14
Installed
Not Installed
W37
PCI IDE uses PCI INTR_A
(Default)
PCI IDE does not use PCI
INTR_A (Default)
Installed
Not Installed
W38
PCI uses ISA IRQ 15
PCI does not use ISA IRQ 15
(Default)
Installed
Not Installed
Reserved Jumpers
Jumper
Setting
W8
W19
Installed
Installed
Hardware Maintenance Service
217
PC Server Pentium System Board
1
2
3
4
5
6
7
8
9
1
11
12
13
14
15
16
17
18
Memory connectors (J7, J8, J9, J10, J33,
and J34)
IDE hard disk drive LED connector (W10)
Power LED connector (W9)
Speaker connector (J11)
Processor socket
EISA slots (J23, J24, J25, J26, and J27)
PCI slots (J30, J31, and J32)
Mouse port (J15)
Keyboard port (J14)
Serial port, COM1 (J20)
Power supply connector P1 (J12)
Power supply connector, P2 (J17)
Serial port, COM2 (J21)
Parallel port (J18)
Real-time clock socket
Diskette drive connector (J19)
Power supply connector, P3 (J37)
IDE 2 hard disk drive connector (J22)
Pin 1
218
PS/2 Maintenance Manual
PC Server Pentium System Board Jumper Settings
A label showing the following jumper locations is located
on the top of the base frame assembly inside the system
unit.
Jumper Settings (Parity Check)
Jumper
Configuration
Setting
J1
Pentium parity check enabled
(Default)
Pentium parity check disabled
Installed
Not installed
Jumper Settings (DRQ Selection)
Jumper
Configuration
Setting
W14
DRQ6
DRQ7
Pins 1-2
Pins 2-3
Jumper Settings (Secondary Cache Selection)
Jumper
Configuration
Setting
J40
5 volts for the
Pentium
5.3 volts for the
Pentium
Installed: Jumper blocks
(all pins)
Installed: Power module
J41
5.3 volts for
ground
Installed: Power module
(ground)
J42
5.3 volts for
ground
Installed: Power module
(ground)
Selected Jumper Default Setting
Jumper
Default Setting
J3
Pins 2-3
J4
Pins 1-2
J35
Pins 1-2
Jumper Settings (Cache Selection)
Jumper
Configuration
Setting
J2
Pentium write-through cache
Pentium write-back cache
(Default)
Installed
Not installed
Jumper Settings (DACK Selection)
Jumper
Configuration
Setting
W16
DACK 6
DACK 7
Pins 1-2
Pins 2-3
Hardware Maintenance Service
219
Jumper Settings (Keyboard Selection)
Jumper
Configuration
Setting
W6
PS/2 Mouse installed (Default)
PS/2 Mouse not installed
Installed
Not installed
Jumper Settings (Clock Selection)
Jumper
Configuration
Setting
J5
66MHz clock speed (Default)
50MHz clock speed
Installed
Not installed
Jumper Settings (Pentium Clock Selection)
Jumper
Configuration
Setting
J6
Oscillator for U15 (Default)
Clock synthesizer
Pins 1-2
Pins 2-3
Jumper Settings (BIOS Mode)
Jumper
Configuration
Setting
W2
BIOS in boot recovery mode
BIOS in normal mode (Default)
Pins 1-2
Pins 2-3
Secondary Cache Selection
Configuration
J3
J4
J35
No secondary
cache
Pins 1-2
Pins 1-2
—
Reserved
Pins 1-2
Pins 2-3
—
256KB secondary
cache
Pins 2-3
Pins 1-2
Pins 1-2
512KB secondary
cache
Pins 2-3
Pins 2-3
Pins 2-3
Jumper W17 IRQ Selection
Selection
Redirect
Redirect
Redirect
Redirect
Redirect
Redirect
220
modified
modified
modified
modified
modified
modified
Setting
PCI
PCI
PCI
PCI
PCI
PCI
interrupt
interrupt
interrupt
interrupt
interrupt
interrupt
to
to
to
to
to
to
IRQ
IRQ
IRQ
IRQ
IRQ
IRQ
PS/2 Maintenance Manual
5
9
10
11
15
14
Pins
Pins
Pins
Pins
Pins
Pins
1-2
3-4
5-6
7-8
9-10
11-12
Reserved Jumpers
Jumper
Setting
W20
Pins 2-3
J5
Installed
J6
Pins 1-2
Hardware Maintenance Service
221
Parts Catalog
Warning
Follow “Handling Electrostatic Discharge-Sensitive
Devices” on page 369 before handling any electronic
parts.
Model 25, 25-286, 25SX (8525) Parts . . . . .
Model 30 (8530) Parts . . . . . . . . . . . .
Model 30-286 (8530) Parts . . . . . . . . . .
Model 33 (9533) Parts . . . . . . . . . . . .
Model 35 (8535) Parts . . . . . . . . . . . .
Model 40 (8540) Parts . . . . . . . . . . . .
Model 50 (8550) Parts . . . . . . . . . . . .
Model 53 (9553) Parts . . . . . . . . . . . .
Model 55 (8555) SX Parts
. . . . . . . . . .
Model 56 (8556) Parts . . . . . . . . . . . .
Model 57 (8557) Parts . . . . . . . . . . . .
Model 60 (8560), 65 (8565), and 80 (8580) Parts
Model 70 (8570) Parts . . . . . . . . . . . .
Models 56, 76 (9556, 9576) Parts . . . . . . .
Models 57, 77, M57, M77 (9557, 9577) Parts
.
Model 90 (8590) Parts . . . . . . . . . . . .
PC Server (8640) Parts
. . . . . . . . . . .
PC Server 500 (Type 86XX) Parts
. . . . . .
Server 85 (9585), Model 95 XP 486 (8595) Parts
Server 9595, PS/2 9585-xKx, and PS/2 9585-xNx
Parts
. . . . . . . . . . . . . . . . . . .
Server 9595A Parts
. . . . . . . . . . . . .
Model 3509 Parts
. . . . . . . . . . . . . .
Model 3510 Parts
. . . . . . . . . . . . . .
Model 3511 Parts
. . . . . . . . . . . . . .
Model 3532 Parts
. . . . . . . . . . . . . .
OBI DASD Hot Swap Storage Expansion
Enclosure Parts
. . . . . . . . . . . . . .
Common Parts . . . . . . . . . . . . . . . . .
486 DX, DX2, DLC2, SLC, SLC2 System Board
Upgrade Parts . . . . . . . . . . . . . . .
CD-ROM Drives . . . . . . . . . . . . . . .
Element Exchange Displays
. . . . . . . . .
External Diskette Drives
. . . . . . . . . . .
Keyboard/Mouse . . . . . . . . . . . . . . .
Miscellaneous Parts Kits . . . . . . . . . . .
Power Cords
. . . . . . . . . . . . . . . .
Rewritable Optical Drives . . . . . . . . . . .
ServerGuard Adapter Parts . . . . . . . . . .
SCSI Adapter Terminators . . . . . . . . . .
Tools and Miscellaneous . . . . . . . . . . .
Wireless LAN Adapter (ISA, Micro Channel Bus)
Wireless LAN Adapter (PCMCIA Type II)
. . .
Options and Adapters Matrix . . . . . . . . . . .
222
PS/2 Maintenance Manual
223
227
229
231
233
236
239
241
243
246
248
251
254
257
260
263
267
270
273
277
280
285
287
289
291
293
295
295
296
297
298
298
300
304
305
306
308
308
309
310
311
Model 25, 25-286, 25SX (8525) Parts
13
12
1
4
2
11
3
5
10
6
9
7
8
Hardware Maintenance Service
223
Index System Unit (25, 25-286, 25SX)
1
Top Cover
2
Audio Card Jack Assembly (25-286)
Clock Module (25-286)
Clock Battery (25SX)
Front Bezel/Logo (25) (R)
Logo Package (25) (R)
Rear Cover
3
Bracket, Bus Adapter (25SX only)
3
Bracket, Bus Adapter
Bracket, Center Rib
Bracket, Base Rear
4
Bus Adapter (25)
Bus Adapter Support
4
Bus Adapter (25-286)
4
Bus Adapter (25SX)
5
System Board (25)
Memory Module (64KB) (ZM1, ZM2)
Memory Module (64KB)
(U16, U22, U34, U35)
Memory Module (256KB)
8087 Math Coprocessor
80287 Math Coprocessor
5
System Board (25-286)
Memory Pack (256KB)
Memory Pack (1MB)
5
System Board, 1MB memory (25SX)
5
System Board, 4MB memory (25SX)
1MB Memory Module Kit (85ns)
2MB Memory Module Kit (70ns)
2MB Memory Module Kit (80ns)
2MB Memory Module Kit (85ns)
4MB Memory Module Kit (70ns)
8MB Memory Module Kit (70ns)
8MB Memory Module Kit (80ns)
6
Base Frame Assembly (25)
6
Base Frame Assembly (25-286, 25SX)
7
Tilt Assembly
Foot Assembly
8
Retainer - Base to Cover
I/O Panel (25 286)
I/O Panel (25SX)
Bracket, Center Rib
9
See DASD
10
Diskette Blank Bezel
11
(see DASD)
12
Cover - Front Bezel
13
Display Assembly (with logo)(25SX only)
115/230 V, Northern Hemisphere
13
Color Display Assembly (110/220V) (8525)
U.S. and Canada
13
Color Display Assembly (8525)
(Northern Hemisphere)
13
Color Display Assembly (8525)
(Southern Hemisphere)
13
Color Display Assembly (8525-286)
(110/220V) (Northern Hemisphere)
13
Color Display Assembly (8525-286)
(110/220V) (Southern Hemisphere)
224
PS/2 Maintenance Manual
00F2110
64F0184
8509237
33F8354
61X8908
00F2119
61X8916
96F7347
64F0220
64F0221
64F4100
00F2101
00F2118
64F0182
04G1631
96F7390
00F2120
00F2121
61X8906
61X8922
72X8528
96F7435
1497256
74X8637
42G2802
42G2803
90X8624
92F0102
92F0103
92F0104
92F0105
64F3606
64F3607
00F2104
64F0218
00F2105
00F2114
00F2134
64F0219
10G3698
64F0221
00F2117
00F2111
92F0692
00F2053
00F2056
00F2057
64F0181
64F0186
Index System Unit (25, 25-286, 25SX)
13
Monochrome Display Assembly
(110/220V) U.S. and Canada
13
Monochrome Display Assembly
(Northern Hemisphere)
13
Monochrome Display Assembly
(Southern Hemisphere)
Miscellaneous Parts Kit (see page 300)
Shipping Material
Index DASD (25)
9
720KB Diskette Drive (1/3 and 1/2 Ht. Kit.)2
Kit Includes: Cable Converter
Models 25 and 30 Diskette Drive Bezel
Diskette Drive Shipping Insert
Diskette Drive Shipping Insert
(Note: Order both inserts)
11
Diskette Drive Bezel (1/2 Ht.)2
Diskette Drive Cable (1/2 Ht.)2
Diskette Drive Shield (1/2 Ht.)2
11
Diskette Drive Bezel (1/3 Ht.)3
Diskette Drive Cable (1/3 Ht.)3
Diskette Drive Spacer (1/3 Ht.)3
20MB Hard Disk Drive
170MB Hard Disk Drive
245MB Hard Disk Drive
420MB Hard Disk Drive
Hard Disk Drive Cable (for 61X8929)
Hard Disk Drive Bezel, Keylock,
and Switch Assembly
00F2052
00F2054
00F2055
00F2113
00F2115
96F7678
60X5599
60X5600
00F2112
33F4949
33F4904
33F4947
33F4949
33F4948
61X8929
71G4958
61G3754
71G4930
78X9089
78X9088
Continued on next page.
Hardware Maintenance Service
225
Index DASD (25-286)
9
1.44MB Diskette Drive
11
Diskette Drive Bezel
Diskette Drive Cable
20MB Hard Disk Drive
30MB Hard Disk Drive
Terminator (for 6128279)
170MB Hard Disk Drive
245MB Hard Disk Drive
420MB Hard Disk Drive
Hard Disk Drive Cable
Tray, Hard Disk Support
Hard Disk Drive Bezel with Keylock
64F0162
00F2112
33F4949
6128285
6128279
92F0269
71G4958
61G3754
71G4930
64F0183
64F4101
64F0185
Index DASD (25 SX)
9
1.44MB Diskette Drive
Diskette Drive Cable
11
Diskette Drive Bezel
40MB Hard Disk Drive
80MB Hard Disk Drive
170MB Hard Disk Drive
170MB Hard Disk Drive
245MB Hard Disk Drive
420MB Hard Disk Drive
Hard Disk Drive Power Cable
Hard Disk Drive Signal Cable
Hard Disk Drive Mounting Tray
Hard Disk Drive Bezel with Cover Lock
64F0162
04G1632
00F2112
04G1630
92F0152
95F4728
71G4958
61G3754
71G4930
04G1618
04G1633
96F7344
64F0185
2
3
All 8525 systems below S/N ZZ999.
All 8525 systems above S/N 0100000.
226
PS/2 Maintenance Manual
Model 30 (8530) Parts
1
2
12
10
11
3
4
9
8
5
7
6
Hardware Maintenance Service
227
Index
1
2
3
4
5
6
7
9
10
10
11
12
System Unit (30)
Top Cover
Rear Cover
Base Frame Assembly (R)
Power Supply (120/220V)
Sliding Support Bracket
Support Bracket
Power Switch Link
Drive Cradle
Keylock Assembly
Power Switch
Front Bezel/Logo (R)
System Board5 (use if S/N not in note)
System Board5 (use if S/N in note)
System Board Clip
Memory Module Package (256KB)
8087 Math Coprocessor
Rubber Feet (Qty 4)
Miscellaneous Parts Kit (see page 302)
Bus Adapter
Bus Adapter Support
Shipping Carton
Index DASD (30)
720KB Diskette Drive (1/3 and 1/2 Ht. Kit.)6
Kit Includes: Cable Converter
Models 25 and 30 Diskette Drive Bezel
Diskette Drive Cable (1/2 Ht.)
8
Diskette Drive Bezel (1/2 Ht.)
Diskette Drive Cable (1/3 Ht.)6
8
Diskette Drive Bezel (1/3 Ht.)6
20MB Hard Disk Drive4
20MB Hard Disk Drive (All others)
30MB Hard Disk Drive
170MB Hard Disk Drive
245MB Hard Disk Drive
420MB Hard Disk Drive
Terminator (for 6128279)
8
Hard Disk Drive Bezel
Hard Disk Drive Cable (8530-001)
Hard Disk Drive Cable (8530-021)
4
61X8913
61X8916
61X8897
61X8905
61X8926
61X8914
61X8919
61X8909
61X8912
61X8918
61X8908
61X8907
33F8474
61X8933
61X8906
61X8922
61X8917
61X8915
61X8910
61X8911
72X7541
96F7678
61X8900
90X9299
34F0002
27F4230
6128285
61X8929
6128279
71G4958
61G3754
71G4930
92F0269
61X8904
27F4178
61X8903
All 8530-001 systems, and 8530-021 systems with S/N 2500000
to 2999999 and S/N 55AA001 to 55ZZ999.
5 All 8530-001 systems, 8530-002 systems with S/N 55A0001 to
55Z9999 and S/N 7000000 to 7499999, 8530-021 with S/N
2500000 to 2999999 and S/N 55AA001 to 55ZZ999.
6 All 8530-001 systems, 8530-002 systems with S/N 55A0001 to
55Z9999 and S/N 7000000 to 7499999, 8530-021 with S/N
2500000 to 2999999 and S/N 55AA001 to 55ZZ999.
228
PS/2 Maintenance Manual
Model 30-286 (8530) Parts
1
2
12
10
11
3
4
9
8
5
7
6
Hardware Maintenance Service
229
Index
1
2
3
4
5
6
7
8
9
10
11
12
System Unit (30-286)
Top Cover
Rear Cover
Base Frame Assembly (R)
Power Supply (120/230V)
Back Panel (I/O Panel)
Power Switch Link and Lever
Drive Cradle
Cover Lock Assembly
(see DASD)
Front Bezel (no Logo)
Front Cover Logo (R)
System Board (All Models)
Memory Pack (256KB)
Memory Pack (1MB)
System Board Clip
Clock Module
Bus Adapter
Bus Adapter Support
Support Bracket
Sliding Support Bracket
System Board Video Cable
80287 Math Coprocessor
Miscellaneous Parts Kit (see page 301)
Shipping Carton
Index DASD (30-286)
1.44MB Diskette Drive (1/2 Ht.)
(LED located above diskette-slot)
8
Blank Drive Bezel
8
Diskette Drive Bezel (1/2 Ht.)
(LED located below diskette-slot)
Drive A Cable (1/2 Ht.)
Drive B Cable (1/2 Ht.)
1.44MB Diskette Drive (1/3 Ht.)
8
Diskette Drive Bezel (1/3 Ht.)
Drive A Cable (1/3 Ht.)
Drive B Cable (1/3 Ht.)
Diskette Drive Slide (1/3 Ht.)
20MB Hard Disk Drive
30MB Hard Disk Drive
170MB Hard Disk Drive
245MB Hard Disk Drive
420MB Hard Disk Drive
Terminator (for 6128279)
45MB Hard Disk Drive
8
Hard Disk Drive Bezel
Hard Disk Drive Cable
230
PS/2 Maintenance Manual
27F4172
27F4174
27F4167
27F4166
27F4229
27F4168
27F4170
27F4169
27F4173
27F4249
10G4109
1497256
74X8637
61X8933
8509237
27F4164
27F4165
61X8914
61X8926
27F4163
72X8528
27F4171
83X9431
72X8523
72X7534
27F4175
27F4916
34F0001
64F0162
27F4230
27F4912
34F0000
27F4917
6128285
6128279
71G4958
61G3754
71G4930
92F0269
92F0016
27F4177
27F4178
Model 33 (9533) Parts
13
1
12
11
2
3
10
4
9
8
7
6
5
Hardware Maintenance Service
231
Index System Unit (33)
1
Top Cover
Key Lock
Floor Stand
2
PCMCIA Adapter
3
Riser Card
4
Power Supply
Power Cord (US)
5
Base Frame Assembly
6
System Board
Coprocessor Socket
Diskette Drive Cable
Hard Disk Drive Cable
Battery
7
4MB Memory Module Kit
7
8MB Memory Module Kit
8
Power Switch/Speaker Assembly
11
PC Card Socket Assembly
(Front or Rear)
12
Door
Blank Drive Bezel
Blank Bezel
Blank Bezel (PCMCIA)
13
Logo (R)
Miscellaneous Parts Kit
Token Ring Adapter (PC Card)
9
9
9
10
232
39G6572
39G6577
91F1028
40G1055
39G6435
39G6560
62X1045
39G6573
68G3034
10G3975
39G6570
39G6571
33F8354
92F0105
64F3606
39G6576
71G2883
39G6574
39G6578
39G6580
68G2549
39G6579
39G6575
73G2048
DASD
5MB Solid State Hardfile
10MB Solid State Hardfile
15MB Solid State Hardfile
40MB Hard Disk Drive (PCMCIA)
105MB Hard Disk Drive (PCMCIA)
PCMCIA Hard Disk Drive Carrying Case
120MB 2.5 in. Hard Disk Drive (IDE)
170MB 2.5" Hard Disk Drive (IDE)
340MB 2.5" Hard Disk Drive (IDE)
1.44MB 3.5 in.Diskette Drive (w/ bezel)
48G9899
48G9900
49G0000
92F0430
92F0429
92F0430
54G0135
84G1193
84G1195
49G2198
Keyboard & Mouse
Keyboard w/ Pointer
Num Key Pad
Num Key Pad Cable
Mouse (New Style)
61G2901
61G2903
1397482
33G5420
PS/2 Maintenance Manual
Model 35 (8535) Parts
1
16
17
18
15
2
14
13
3
12
11
10
4
9
8
7
6
5
Hardware Maintenance Service
233
Index System Unit (35)
1
Top Cover Assembly
2
Power Supply
3
Cover Screw (Thumbscrew)
4
Base Frame Assembly (R)
4
Base Frame Assembly (R)
(386SLC, 486SLC)
Rear Panel
Rear Panel (386 SLC, 486 SLC)
Cable Cover (386 SLC, 486 SLC)
5
Control Assembly
6
Speaker Assembly
7
Power Switch Button
8
Bus Adapter Support
8
Bus Adapter Support (386 SLC, 486 SLC)
11
Adapter Guide
12
Cable Shield, Control Assembly
12
Cable Shield, Control Assembly
(386 SLC, 486 SLC)
13
System Board (35 SX)
13
System Board (35 SLC)
13
System Board (35 386 SLC)
13
System Board (35 486 SLC)
Real-Time Clock Module
1MB Memory Module Kit (85ns)
2MB Memory Module Kit (85ns)
4MB Memory Module Kit
8MB Memory Module Kit (70ns)
8MB Memory Module Kit (80ns)
14
Bus Adapter
14
Bus Adapter (386 SLC, 486 SLC)
15
Retainer Plate
17
Front Cover Logo (R)
Model 35 SX
Model 35 LS
Model 35 SLC
Model 35 386 SLC
Model 35 486 SLC
18
Cover Lock
Pawl (for 92F0003)
Floor Stand
Miscellaneous Parts Kit (see page 303)
234
PS/2 Maintenance Manual
79F3448
79F3443
79F3463
79F3449
96F7781
79F3477
52G7918
96F7773
79F3446
79F3447
79F3460
79F3452
92F0239
79F3461
95F5607
96F7769
41G3948
96F7506
10G3966
10G3976
8509237
90X8624
92F0104
92F3337
64F3606
64F3607
79F3529
10G3967
79F3451
79F3457
79F3478
06G9825
92F0238
52G9334
92F0003
79F3459
79F3458
79F3471
Index
10
10
10
16
16
16
9
9
9
9
9
9
9
9
9
9
9
9
9
DASD (35)
1.44MB 3.5-Inch Diskette Drive
2.88MB 3.5-Inch Diskette Drive
2.88MB 3.5-Inch Diskette Drive
(with electronic eject)
Bezel (Bay 1, for 92F0132)
Bezel (Bay 2, for 92F0132)
3.5-Inch Diskette Drive Bezel (1/3 Ht.)
1.2MB 5.25-Inch Diskette Drive
Rail Kit (for 64F4102)
5.25-Inch Blank Bezel (1/3 Ht.)
5.25-Inch Diskette Drive Bezel (1/3 Ht.)
5.25-Inch Blank Bezel (1/2 Ht.)
Rewritable Optical Drive Bezel
Diskette Drive Cable
Diskette Drive Cable (386 SLC, 486 SLC)
40MB Hard Disk Drive (ATA/IDE)
80MB Hard Disk Drive (ATA/IDE)
80MB Hard Disk Drive (ATA/IDE)
104MB Hard Disk Drive (SCSI)
170MB Hard Disk Drive (ATA/IDE)
170MB Hard Disk Drive (ATA/IDE)
212MB Hard Disk Drive (ATA/IDE)
212MB Hard Disk Drive (SCSI)
245MB Hard Disk Drive (ATA/IDE)
245MB Hard Disk Drive (ATA/IDE)
340MB Hard Disk Drive (ATA/IDE)
420MB Hard Disk Drive (ATA/IDE)
527MB Hard Disk Drive (ATA/IDE)
Hard Disk Drive Bezel
Hard Disk Drive Cable
Hard Disk Drive Cable (Double)
Hard Disk Drive Cable (Bay 3)
85F0050
64F4148
92F0132
92F0146
92F0133
85F0093
64F4102
85F0041
79F3450
85F0068
85F0091
92F0159
79F3453
96F7768
64F4132
64F4133
92F0152
95F4748
95F4728
71G4958
93F0118
95F4749
61G3754
92F0403
92F0404
71G4930
92F0405
85F0091
79F3454
96F7780
96F7776
Hardware Maintenance Service
235
Model 40 (8540) Parts
2
1
22
21
20
19
18
17
16
15
3
14
13
12
4
5
10
11
8
9
6
7
236
PS/2 Maintenance Manual
Index System Unit (40)
1
Top Cover Assembly (without lock)
2
Rear Cover
2
Rear Cover (386 SLC, 486 SLC)
3
Power Supply
4
System Board (40 SX)
4
System Board (40 SLC)
4
System Board (40 386 SLC)
4
System Board (40 486 SLC)
Real-Time Clock Module
1MB Memory Module Kit
2MB Memory Module Kit
4MB Memory Module Kit
8MB Memory Module Kit (70ns)
8MB Memory Module Kit (80ns)
5
Rear Panel Assembly
5
Rear Panel Assembly
(386 SLC, 486 SLC)
Cable Cover (386 SLC, 486 SLC)
6
Bottom Cover Assembly
9
5.25-Inch Bay Drive Guides (2)
10
Base Frame Assembly (R)
11
Front Adapter Support Guide
12
Air Baffle Hinged Cover
13
Air Baffle Base
14
Bus Adapter/Support Bracket
14
Bus Adapter/Support Bracket
(386 SLC, 486 SLC)
15
Control Panel Assembly
16
3.5-Inch Blank Bezel (Bay 4)
Bezel Insert (for 85F0092)
17
5.25-Inch Louvered Bezel (Bay 3)
Bezel Insert (for 85F0094)
18
5.25-Inch Blank Bezel (Bay 2)
Rewritable Optical Drive Bezel
18
3.5-Inch Diskette Drive Bezel (Bay 2,3)
18
5.25-Inch Diskette Drive Bezel (Bay 2,3)
19
3.5-Inch Diskette Drive Bezel (Bay 1)
20
Retainer Plate
21
Cover Lock
22
Front Cover Logo, 40 SX (R)
22
Front Cover Logo, 40 SLC (R)
22
Front Cover Logo, 40 386 SLC (R)
22
Front Cover Logo, 40 486 SLC (R)
Pedestal
Miscellaneous Parts Kit (see page 303)
Shipping Carton
96F7640
85F0088
92F0240
92F0058
41G3948
96F7506
10G3966
10G3976
8509237
90X8624
92F0104
92F3337
64F3606
64F3607
92F0012
92F0240
92F0248
85F0086
92F0014
92F0011
92F0013
85F0084
85F0087
92F0107
10G3969
92F0002
85F0092
85F0095
85F0094
85F0096
85F0091
92F0159
85F0003
85F0091
85F0093
85F0098
92F0003
92F0001
96F7507
92F0241
92F0275
92F0000
92F0015
74F3571
Hardware Maintenance Service
237
Index
8
8
8
7
7
7
7
7
7
7
7
7
7
7
238
DASD (40)
1.44MB 3.5-Inch Diskette Drive
2.88MB 3.5-Inch Diskette Drive
2.88MB 3.5-Inch Diskette Drive
(with electronic eject)
Bezel (Bay 1, for 92F0132)
Bezel (Bay 2, for 92F0132)
1.2MB 5.25-Inch Diskette Drive
Rail Kit (for 64F4102)
Diskette Drive Cable
40MB Hard Disk Drive (ATA/IDE)
80MB Hard Disk Drive (ATA/IDE)
104MB Hard Disk Drive (SCSI)
170MB Hard Disk Drive (ATA/IDE)
170MB Hard Disk Drive (ATA/IDE)
212MB Hard Disk Drive (SCSI)
245MB Hard Disk Drive (ATA/IDE)
245MB Hard Disk Drive (ATA/IDE)
340MB Hard Disk Drive (ATA/IDE)
420MB Hard Disk Drive (ATA/IDE)
527MB Hard Disk Drive (ATA/IDE)
Hard Disk Drive Cable
Hard Disk Drive Cable (Dual-Connector)
Hard Disk Drive Cable (Tri-Connector)
Hard Disk Drive Mounting Tray
PS/2 Maintenance Manual
85F0050
64F4148
92F0132
92F0146
92F0133
64F4102
85F0041
85F0089
64F4132
92F0152
92F0152
95F4728
71G4958
93F0118
61G3754
92F0403
92F0404
71G4930
92F0405
85F0090
10G3972
85F0090
64F0141
Model 50 (8550) Parts
1
2
12
11
10
3
9
8
7
6
5
Hardware Maintenance Service
4
239
Index System Unit (50)
1
Top Cover
2
Fan Assembly
3
Support Structure
4
Power Supply
5
System Board (031, 061)
6
System Base (031, 061) (R)
6
System Base (021) (R)
7
System Board (021)
Fuse, 3 Amp (System Board)
512KB Memory Module (021)
1MB Memory Module (031, 061)
2MB Memory Module (031, 061)
486SLC System Board Upgrade
2MB Memory Module Kit (for 61G3502)
4MB Memory Module Kit (for 61G3502)
8MB Memory Module Kit (for 61G3502)
8
Battery/Speaker Assembly
9
Battery
10
Blank Drive Bezel
11
Drive Bezel Kit
12
Front Bezel/Logo (021) (R)
12
Front Bezel/Logo (031, 061) (R)
Cover Lock Assembly
Cover Lock Kit
80287 Coprocessor
Label Kit
Misc. Parts Kit (System) (see page 302)
Misc. Parts Kit (Options) (see page 302)
Shipping Carton
DASD (50)
1.44MB Diskette Drive
(Includes Bezel and Drive Slide)
1.44MB Diskette Drive Bus Adapter
20MB Hard Disk Drive (021)
20MB Hard Disk Drive Adapter (021)
30MB Hard Disk Drive (031)
Slide (included in 90X8628)
60MB Hard Disk Drive (061)
Hard Disk Drive Adapter (061)
Hard Disk Drive Bus Adapter (061)
160MB Hard Disk Drive
Slide (included in 90X8628)
Hard Disk Drive Slide Kit
80MB Hard Disk Drive (ATA/IDE)
170MB Hard Disk Drive (ATA/IDE)
245MB Hard Disk Drive (ATA/IDE)
340MB Hard Disk Drive (ATA/IDE)
Hard Disk Drive Ribbon Cable
(for 95F4728, 92F0403, 92F04040)
Hard Disk Drive Power Cable
(for 95F4728, 92F0403, 92F04040)
240
PS/2 Maintenance Manual
72X8501
72X8515
72X8504
90X9366
10G4005
90X9534
72X8592
72X8516
72X8561
72X8517
90X8624
92F0104
61G3502
92F0102
92F0105
64F3606
33F5950
72X8498
72X8531
15F7571
72X8502
15F7697
72X8512
72X8577
72X8528
72X8509
72X8525
72X8562
72X8590
64F0207
72X8524
72X8522
72X8505
6128287
6128294
90X9571
90X9441
56F8895
90X8628
54G0160
95F4728
92F0403
92F0404
71G2683
71G2684
Model 53 (9553) Parts
1
2
15
12
13
14
11
10
3
9
8
4
7
5
6
Hardware Maintenance Service
241
Index System Unit (9553-xBx)
1
Top Cover
2
Rear Cover
3
Base Frame
Rubber Feet
4
Power Supply
5
Power Switch Link
6
Key Lock
Parity Memory Module Kits:
2MB (70ns)
4MB (70ns)
8MB (70ns)
7
1.44MB Diskette Drive Assembly
Diskette Drive Cable
Blank Bezel
8
120MB Hard Disk Drive
8
250MB Hard Disk Drive
Hard Disk Drive Data Cable
Hard Disk Drive Power Cable
Hard Disk Drive LED
Hard Disk Drive LED Holder
9
Blank Bezel, Bottom
10
Front Cover w/o Logo
PS/2 53 Logo
PS/2 53LS Logo
11
Speaker
12
Speaker Guide
13
System Board
System Board Clip
Real Time Clock Module
14
Riser Card
15
Riser Card Bracket
Ethernet Adapter
Token Ring Adapter
Miscellaneous Parts Kit:
Nut (2)
Cover screw (2)
I/O panel screw (2)
3.5mm captive screw (2)
Fingerstock shield (3)
Fingerstock base shield (3)
Slide (1)
Standoff shaft (2)
3mm screw (5)
Ground power special bracket (1)
242
PS/2 Maintenance Manual
27F4172
27F4670
71G2671
61X8917
27F4166
27F4168
27F4169
92F0102
92F0105
64F3606
71G2673
71G2670
82G1791
92F0256
61G3754
71G2664
71G2684
71G2668
71G2672
71G2669
71G2665
71G2666
71G2667
27F4672
27F4673
71G5955
61X8933
06H3013
27F4666
27F4674
92F0046
74F9415
27F4171
Model 55 (8555) SX Parts
1
15
2
14
11
12
13
10
3
9
4
5
8
7
6
Hardware Maintenance Service
243
Index System Unit (55 SX)
1
Top Cover
2
Rear Cover
3
Base Frame Assembly (R)
4
Power Supply/Fan Assembly
5
Power Switch Link
6
Drive Cradle
7
Keylock Assembly
8
(see DASD)
9
Front Cover with Logo (R) (55 SX)
9
Front Cover with Logo (R) (55 LS)
10
Speaker
11
Speaker/Adapter Guide (no speaker)
12
System Board (55 SX)
12
System Board (55 LS, LT0, LE0)
Fuse, 3 Amp (System Board)
Real-Time Clock Module
2KB NV-RAM Module
1MB Memory Module Kit
2MB Memory Module Kit
4MB Memory Module Kit
80387SX Math Coprocessor, 16 MHz
486SLC System Board Upgrade
2MB Memory Module Kit (for 61G3502)
4MB Memory Module Kit (for 61G3502)
8MB Memory Module Kit (for 61G3502)
13
Bus Adapter (55 LS)
13
Bus Adapter (55 SX)
14
Bus Adapter Support
15
Adapter Support Panel
Adapter Bracket
Drive Grounding Bracket
Miscellaneous Parts Kit (see page 301)
Shipping Carton
244
PS/2 Maintenance Manual
27F4172
27F4670
27F4167
27F4166
27F4168
27F4170
27F4169
27F4677
33F8230
27F4672
27F4673
27F4667
57F3003
72X8561
8509237
64F0722
90X8624
92F0104
92F3337
33F8160
71G2602
92F0102
92F0105
64F3606
64F3732
27F4666
27F4674
27F4671
27F4674
33F8156
27F4171
83X9431
Index DASD (55 SX)
1.44MB Diskette Drive (1/3 Ht.)
Diskette Drive Slide (for 64F0162)
8
Diskette Drive Bezel
8
Blank Bezel
Drive A Cable
Drive B Cable
30MB Hard Disk Drive (DBA)
40MB Hard Disk Drive (DBA)
60MB Hard Disk Drive (DBA)
80MB Hard Disk Drive (DBA)
160MB Hard Disk Drive (DBA)
8
Hard Disk Drive Bezel (30MB, 40MB)
8
Hard Disk Drive Bezel
(60MB, 80MB, 160MB)
Hard Disk Drive Cable
80MB Hard Disk Drive (ATA/IDE)
170MB Hard Disk Drive (ATA/IDE)
170MB Hard Disk Drive (ATA/IDE)
245MB Hard Disk Drive (ATA/IDE)
245MB Hard Disk Drive (ATA/IDE)
340MB Hard Disk Drive (ATA/IDE)
420MB Hard Disk Drive (ATA/IDE)
Hard Disk Drive Ribbon Cable
(for 95F4728, 92F0403, 92F04040)
Hard Disk Drive Power Cable
(for 95F4728, 92F0403, 92F04040)
Original Hard Disk Drive Cable
64F0162
64F0156
27F4230
72X7534
27F4912
34F0000
64F4146
56F8896
85F0049
56F8892
56F8893
27F4177
27F4675
27F4669
54G0160
71G4958
95F4728
61G3754
92F0403
92F0404
71G4930
71G2662
71G2684
27F4669
Hardware Maintenance Service
245
Model 56 (8556) Parts
1
17
19
18
2
16
15
14
3
4
13
12
11
5
6
10
7
8
9
246
PS/2 Maintenance Manual
Index System Unit (56)
1
Top Cover Assembly (without lock)
2
Power Supply
3
Cover Screw (Thumbscrew)
4
Rear Panel
5
Base Frame Assembly (R)
6
Control Assembly
7
Bus Adapter Support
8
Speaker Assembly
9
Power Switch Button
12
Adapter Card Guide
13
Cable Shield, Control Assembly
14
System Board 20 MHz (no memory):
56 SX, 56 LS
56 SLC, 56 SLC LS
2MB Memory Module Kit (70ns)
4MB Memory Module Kit (70ns)
8MB Memory Module Kit (70ns)
Processor Options
386SLC
486SLC2
486SLC3 60/20MHz
15
Bus Adapter (with battery)
Battery
16
Retainer Plate
17
3.5-inch Diskette Drive Bezel (1/3 Ht.)
5.25-inch Blank Bezel (1/3 Ht.)
5.25-inch Blank Bezel (1/2 Ht.)
5.25-inch Diskette Drive Bezel (1/2 Ht.)
18
Cover Lock Assembly
Pawl (required for 92F0003)
19
Front Cover Logo (R):
56 SX
56 LS
56 SLC
56 SLC LS
Floor Stand
Cable Cover
Miscellaneous Parts Kit (see page 303)
Index DASD (56)
11
1.44MB 3.5-Inch Drive
11
2.88MB 3.5-Inch Drive
11
2.88MB 3.5-Inch Diskette Drive
(with electronic eject)
Bezel (Bay 1, for 92F0132)
Bezel (Bay 2, for 92F0132)
3.5-Inch Diskette Drive Tray
1.2MB 5.25-Inch Diskette Drive
Rail Kit (for 64F4102)
Diskette Drive Cable
10
40MB Hard Disk Drive (SCSI)
60MB Hard Disk Drive (SCSI)
80MB Hard Disk Drive (SCSI)
104MB Hard Disk Drive (SCSI)
120MB Hard Disk Drive (SCSI)
160MB Hard Disk Drive (SCSI)
212MB Hard Disk Drive (SCSI)
540MB Hard Disk Drive (SCSI)
1GB Hard Disk Drive (SCSI)
Hard Disk Drive Cable
79F3448
79F3443
79F3463
79F7208
79F7212
95F6018
79F7213
79F3447
79F3460
79F7218
95F5607
84F7994
85F0298
92F0102
92F0105
64F3606
92F0078
10G7103
61G2099
79F7210
33F8354
07G2858
85F0093
79F3450
85F0091
85F0068
92F0003
79F3459
79F7216
79F7217
06G6607
00G6609
79F3458
79F3462
79F7209
85F0050
64F4148
92F0132
92F0146
92F0133
85F0097
64F4102
85F0041
07G2857
56F8866
6128296
56F8854
95F4748
6128298
56F8851
95F4749
92F0406
92F0428
79F7214
Hardware Maintenance Service
247
Model 57 (8557) Parts
2
1
19
18
17
16
15
14
13
12
3
11
4
10
8
9
5
7
248
6
PS/2 Maintenance Manual
Index System Unit (57)
1
Top Cover Assembly (without lock)
2
Rear Panel Cover
3
Power Supply (197 Watt)
4
System Board (57 SX)
4
System Board (57 SLC, M57 SLC)
Processor Options
386SLC
486SLC2
486SLC3 60/20MHz
2MB Memory Module Kit (70ns)
4MB Memory Module Kit (70ns)
8MB Memory Module Kit (70ns)
5
Frame Assembly (R):
Type 1 (57 SX, 57 SLC)
Type 2 (M57 SLC)
6
(see DASD)
7
(see DASD)
8
Drive Tray for 3.5-Inch Drive (Bays 1,2,3)
9
5.25-Inch Bay Drive Guides (2)
10
Front Adapter Support Guide
11
Bus Adapter with Battery
Type 1 (mounting tab, early 8557 only)
Type 2 (2 mounting holes, later 57 & all M57)
Battery (3V Lithium)
12
Control Panel Assembly (57 SX, 57 SLC)
(with speaker, power switch, cable)
12
Control Panel Assembly (M57 SLC)
Control Panel Assembly
(with speaker and power switch)
Cable to System Board
Interposer (for connector P2)
Cable to ACPA/A
13
3.5-Inch Blank Bezel (Bay 4)
Bezel Insert for 85F0092
14
5.25-Inch Louvered Bezel (Bay 3)
Bezel Insert for 85F0094
Air Baffle - Fixed Disk Drive Bay 4C
15
5.25-Inch Blank Bezel (Bay 2)
15
3.5-Inch Diskette Drive Bezel (Bay 2,3)
15
5.25-Inch Diskette Drive Bezel (Bay 2,3)
15
CD-ROM Drive Bezel (Bay 2,3)
Rewritable Optical Drive Bezel
16
3.5-Inch Diskette Drive Bezel (Bay 1)
17
Retainer Plate
18
Cover Lock
19
Logo, 57 SX (R)
19
Logo, 57 SLC (R)
19
Logo, M57 SLC (R)
Pedestal
Miscellaneous Parts Kit (see page 303)
Shipping Carton
96F7640
92F0035
92F0058
84F7994
85F0298
92F0078
10G7103
61G2099
92F0102
92F0105
64F3606
92F0138
92F0040
85F0097
92F0014
92F0042
85F0056
41G3877
33F8354
92F0002
92F0109
92F0111
92F0110
92F0113
85F0092
85F0095
85F0094
85F0096
92F0251
85F0091
85F0003
64F4125
85F0008
92F0159
85F0093
85F0098
92F0003
92F0037
92F0136
92F0137
92F0000
92F0015
74F3571
Hardware Maintenance Service
249
Index DASD (57)
7
1.44MB Diskette Drive/Tray
7
2.88MB Diskette Drive/Tray
7
2.88MB 3.5-Inch Diskette Drive
(with electronic eject)
Bezel (Bay 1, for 92F0132)
Bezel (Bay 2, for 92F0132)
Diskette Drive Signal Cable
6
60MB Hard Disk Drive (SCSI)
6
80MB Hard Disk Drive (SCSI)
6
104MB Hard Disk Drive (SCSI)
6
120MB Hard Disk Drive (SCSI)
6
160MB Hard Disk Drive (SCSI)
6
212MB Hard Disk Drive (SCSI)
6
320MB Hard Disk Drive (SCSI)
6
400MB Hard Disk Drive (SCSI)
6
540MB Hard Disk Drive (SCSI)
6
1GB Hard Disk Drive (SCSI)
Hard Disk Drive Cable (57 SX, 57 SLC)
Hard Disk Drive Cable (57 SLC)
Hard Disk Slide
Cached Processor Option (57)
Cached Processor Option (with IBM386 SLC)
(P1 label attached near system serial number)
486SLC2 Processor Option
85F0050
64F4148
92F0132
92F0146
92F0133
85F0089
6128296
56F8854
95F4748
6128298
56F8851
95F4749
85F0011
85F0012
92F0406
92F0428
92F0036
96F7649
96F7775
92F0078
10G7103
Note: When you replace the system board in a system
with a Cached Processor Option, you must first
remove the math coprocessor socket from the
11 x 11 connector on the new system board.
250
PS/2 Maintenance Manual
19
18
20
17
16
10
9
8
11
7
12
13
6
14
15
5
2
1
3
4
Model 60 (8560), 65 (8565), and 80
(8580) Parts
Hardware Maintenance Service
251
Index System Unit (60, 65, 80)
1
Handle
72X8569
2
Front Bezel/Logo (R)
72X8549
3
(see DASD)
4
1/2 Ht. Diskette-Drive Bezel
72X8550
4
1/3 Ht. Diskette-Drive Bezel
34F0030
Blank Bezel for Diskette Drive
72X8535
5.25-Inch Diskette Drive Bezel
15F7915
5.25-Inch CD-ROM Drive
00G1959
Blank Bezel for 5.25-Inch Drive Bay
72X8560
Rewritable Optical Drive Bezel
92F0156
5.25-Inch CD-ROM Bezel (for 00G1959)
34F0044
5
Base Foot
72X8565
6
Battery/Speaker Assembly
33F5950
6
Battery/Speaker Assembly (8565)
57F1437
Battery
72X8498
7
Hard Disk Drive Support Structure
72X8527
Rear Mounting Plate (for 72X8527)
72X8563
8
Adapter
See “Options and Adapters Matrix” on page 311.
9
Cover (8580-311)
15F6801
9
Cover (8565 All Models)
64F0160
9
Cover (All Others)
72X8548
Cover-Lock Assembly
72X8557
Cover-Lock Kit
72X8572
10
(see DASD)
11
Hard Disk Drive Slide Tray (SCSI)
34F0031
12
Drive Support Structure (1/2 Ht. Drive)
72X8559
12
Drive Support Structure (1/3 Ht. Drive)
34F0032
13
System Board 10MHz (8560)
72X8538
256KB Memory Kit (for 72X8538)
61X8906
13
System Board 16MHz (8565)
92F0800
2MB Memory Kit (for 92F0800)
92F0104
4MB Memory Kit (for 92F0800)
92F3337
Real Time Clock Module
8509237
2KB NV-RAM Module
64F0722
13
System Board 16MHz (8580-041, 071)
33F8416
1MB Memory Kit (for 33F8416)
72X6670
13
System Board 20MHz
10G4148
(8580-081, 111, 121, 161, 311, 321)
2MB Memory Kit (for 92F0756)
92F0669
13
System Board 25MHz
85F0046
(8580-A21, A31, A61)
4MB Memory Kit (for 85F0046)
92F0106
Fuse 3A, System Board (8560, 8580)
72X8561
Math Coprocessors:
16 MHz (041, 071)
72X6673
20 MHz (081,111,121,161,311,321)
90X7393
25 MHz (A21, A31, A61)
15F7661
486DX33 Processor Upgrade
92F0437
14
Power Supply (All Models)
57F1600
15
System Base (8560) (R)
72X8593
15
System Base (8565) (R)
64F0159
15
System Base (8580) (R)
64F0158
Label Kit
72X6674
Misc. Parts Kit (System) (see page 302)
72X8578
Misc. Parts Kit (Options) (see page 302)
72X8579
Misc. Parts Kit (Memory) (see page 302)
72X7037
Misc. Parts Kit (Hardware Kit) (see page 302) 72X8580
Shipping Carton
72X8591
252
PS/2 Maintenance Manual
Index DASD (60, 65, 80)
3
1.44MB (1/2 Ht.) Diskette Drive
Diskette Drive Slide (for 72X8523)
3
1.44MB (1/3 Ht.) Diskette Drive
Diskette Drive Slide (for 64F0162)
10
44MB Hard Disk Drive (ST506)
(8560-041, 8580-041 only)
Fixed Disk Adapter (ST506)
(8560-041, 8580-041 only)
10
70MB Hard Disk Drive (ESDI)
10
115MB Hard Disk Drive (ESDI)
10
314MB Hard Disk Drive (ESDI)
Fixed Disk Adapter (ESDI)
10
60MB Hard Disk Drive (SCSI)
10
80MB Hard Disk Drive (SCSI)
10
120MB Hard Disk Drive (SCSI)
10
160MB Hard Disk Drive (SCSI)
10
320MB Hard Disk Drive (SCSI)
10
400MB Hard Disk Drive (SCSI)
10
540MB Hard Disk Drive (SCSI)
10
1GB Hard Disk Drive (SCSI)
Index DASD Cables (60, 65, 80)
16
1/3 Ht. Diskette Drive Cable
16
1/2 Ht. Diskette Drive Cable
Drive-Cable Retainer (1/2 Ht. Drive)
17
Power Cable (single)
17
Power Cable (dual)
18
Hard Disk Drive Ground Wire,
see Misc. Parts Kit (System)
19
1.2MB Internal Cable (for 15F6912)
19
Signal Cable Drive C (except SCSI)
19
Signal Cable Drive D (except SCSI)
20
Control Cable (except SCSI)
20
SCSI Signal Cable (Two Connector)
20
SCSI Signal Cable (Three Connector)
20
SCSI Signal Cable (Four Connector)
72X8523
72X8507
64F0162
64F0156
72X8541
72X8540
72X8519
90X7392
90X8745
92F0061
6128296
56F8854
6128298
56F8851
85F0011
85F0012
92F0406
92F0428
34F0036
72X8543
72X8573
72X8521
34F0034
15F6914
72X8545
72X8567
72X8542
64F0154
34F0035
64F0155
Hardware Maintenance Service
253
Model 70 (8570) Parts
1
9
8
7
6
2
3
5
4
254
PS/2 Maintenance Manual
Index
1
2
3
3
3
3
4
5
6
7
8
9
System Unit (70)
Top Cover
Support Structure
16 MHz Base Frame Assemblies (E61)
S/N 1500000 to 1999999,
2500000 to 2511499,
4000000 to 4499999,
7000000 to 7143999
S/N 2511500 to 2650000,
7144000 to 7999999,
DT5500A0001 to DT5500Z9999
23HBLTH to 23HXATL
20 MHz Base Frame Assemblies
(061,081,121,161)
S/N 500000 to 999999,
3500000 to 3999999,
5500000 to 5505499,
8000000 to 8006999,
9000000 to 9062999
S/N 5505500 to 5605500,
8007000 to 8999999,
9063000 to 9999999,
CF5500AA001 to CF5500ZZ999
23HXATM to 23KGVYA,
23KGVYK to 23LFGHC,
25 MHz, 80386 Base Frame Assembly
25 MHz, 80486 Base Frame Assembly
Power Supply/Fan Assembly
See System Boards
Battery/Speaker Assembly
(with attached cable)
Blank Drive Bezel
Cover Lock Assembly
Cover Lock Kit
Drive Bezel Kit
Front Bezel/Logo (R)
Battery
1MB Memory Module Kit (16 or 20 MHz)
2MB Memory Module Kit (16 or 20 MHz)
2MB Memory Module Kit (25 MHz)
80387 Coprocessor (16 MHz)
80387 Coprocessor (20 MHz)
80387 Coprocessor (25 MHz)
(80386 only)
System Boards (70)
Model E61, 16 MHz System Board
S/N 1500000 to 1999999,
2500000 to 2511499,
4000000 to 4499999,
7000000 to 7163999
90X9288
90X9289
90X9351
33F6065
90X9408
33F6064
15F8237
64F0134
90X8626
33F5950
72X8531
72X8512
72X8577
15F7571
15F7510
72X8498
90X8624
92F0104
92F0103
72X6673
90X7393
15F7661
96F7309
Hardware Maintenance Service
255
System Unit (70) (continued)
Model E61, 16 MHz System Board
S/N 2511500 to 2650000,
7144000 to 7999999,
DT5500A0001 to DT5500Z9999,
F001000 to F249999,
AAAAA to ABLTG,
BBBBB to BCMVH
Model E81, 16 MHz System Board
System Board
Models 061, 121, 20 MHz System Board
S/N 500000 to 999999,
3500000 to 3999999,
5500000 to 5505499,
8000000 to 8006999,
9000000 to 9075499
Models 061, 121, 20 MHz System Board
S/N 5505500 to 5605500,
8007000 to 8999999,
9075500 to 9999999,
CF5500AA001 to CF5500ZZ999
Models 081, 161, 20 MHz System Board
System Board
25-MHz System Board
Processor Board Standoffs (4)
Models A81, A61, A21, A16,
80386 System Board Assembly
System Board
Processor Board
Models B81, B61, B21, B16,
80486 System Board Assembly
System Board
Processor Board
Processor Board Removal Tool (for 64F0123)
486DX33 Processor Upgrade
486DX33 Processor Upgrade Board
Coprocessor Compatibility Plug
Socket Extender
Fuse, 3 Amp (All System Boards)
Label Kit
Snap Kit
Misc. Parts Kit (System) (see page 302)
Misc. Parts Kit (Options) (see page 302)
Shipping Carton
DASD (70)
Hard Disk/Diskette Drive Bus Adapter
1.44MB Diskette Drive (includes bezel)
Diskette Drive Slide
Note: The following hard disk drives include
the ESDI hard disk drive controller and slides.
60MB Hard Disk Drive (DBA)
80MB Hard Disk Drive (DBA)
Terminator (for 56F8894)
120MB Hard Disk Drive (DBA)
160MB Hard Disk Drive (DBA)
Hard Disk Drive Slide Kit
256
PS/2 Maintenance Manual
41G3984
41G3984
96F7308
41G3985
41G3985
15F7660
92F0580
15F7659
41G3979
64F0123
57F2859
92F0436
72X8561
72X8509
72X8526
72X8525
72X8562
72X8590
90X9287
64F0207
72X8507
6128294
56F8894
92F0269
6128291
56F8895
90X8628
Models 56, 76 (9556, 9576) Parts
3
2
1
15
4
14
6
5
7
13
8
12
11
9
10
16
17
18
Hardware Maintenance Service
257
Index System Unit (9556, 9576)
1
Cover Lock Assembly
92F0003
Pawl (required for 92F0003)
79F3459
2
Front Cover Logo (R)
9576 (PS/2 76 486)
92F0245
9576 (PS/2 76 486DX2)
92F0408
9556 (PS/2 56 486SLC2)
96F7770
9556 (PS/2 56LS 486SLC2)
96F7771
3
Top Cover Assembly (no lock)
92F0252
3
Top Cover Assembly (no lock), for models:
73G6059
56 with S/N YCW00 to YNR99 and YNT00 to YZN99
76 with S/N ATXDA to AXATL
Cover Screw (Thumbscrew)
79F3463
4
(see DASD)
5
Hard Disk Shelf
96F7776
6
Retainer Plate
33G8423
7
Power Supply (118 Watt)
79F3443
8
Rear Panel (9576)
52G7917
8
Rear Panel (9556)
52G7916
9
Base Frame Assembly (R)
96F7767
9
Base Frame Assembly (R) for models:
73G6062
56 with S/N YCW00 to YNR99 and YNT00 to YZN99
76 with S/N ATXDA to AXATL
Front Shield
73G6061
EMI Shield
73G6064
EMI Clip
73G6065
Cable Shield (top of bay)
95F5607
Tamper-Resistant Rear Cable-locking
Cover Assembly (option)
96F7773
10
(see DASD)
11
(see DASD)
12
Card Guide/Speaker Bracket (9576)
92F0244
12
Adapter Guide/Tamper-Evident
Switch Assembly (9556)
92F0243
13
System Boards (no memory)
486SLC2-25/50 MHz (9556)
39G6407
486SLC3-33/66 MHz (9556)
81G1658
486SLC3-33/66 MHz (9556LS)
81G1660
486SLC3-25/75 MHz (9556)
65G8615
486SX-33 MHz,
39G2668
for non-UltiMedia systems only (9576)
486SX-33 MHz (9576)
39G5698
486DX2-33/66 MHz, for
39G2669
non-UltiMedia systems only (9576)
486DX2-33/66 MHz (9576)
39G6086
Optional Microprocessors
P23T-25/50 MHz
92F0147
P23T-33/66 MHz
92F2582
2MB Memory Module Kit (70ns)
92F0102
4MB Memory Module Kit (70ns)
92F0105
8MB Memory Module Kit (70ns)
64F3606
Math Coprocessor Socket
10G3975
14
Bus Adapter (with battery) (9556)
79F7210
14
Bus Adapter (with battery) (9576)
87F4833
Battery
33F8354
15
Bus Adapter Support
96F7777
258
PS/2 Maintenance Manual
Index System Unit (9556, 9576)
16
Control Assembly
(Power Switch, Cable, Speaker)
Power Switch Button only
Audiovation Adapter
Floor Stand
Miscellaneous Parts Kit
Plastic Screw (1)
Steel screws (6)
I/O brackets (3)
Rubber Feet (4)
Clip (1)
Index DASD (9556, 9576)
10
Diskette Drive Tray
11
1.44MB 3.5-Inch Diskette Drive
11
2.88MB 3.5-Inch Diskette Drive
11
2.88MB 3.5-Inch Diskette Drive
(with electronic eject)
Bezel (Bay 1, for 92F0132)
Bezel (Bay 2, for 92F0132)
3.5-inch Bezel (Bay 1, for 73G6059)
5.25-inch Bezel (Bay 1, for 73G6059)
5.25-inch Bezel (Bay 2, for 73G6059)
Rewritable Optical Drive Bezel
DASD Guides for Drive Bays
1.2MB 5.25-Inch Diskette Drive
Rail Kit (for 64F4102)
(left/right rails, screws)
3.5-Inch Diskette Drive Bezel (Bay 1)
3.5-Inch Diskette Drive Bezel (Bay 2)
5.25-Inch Blank Bezel (Bay 1)
5.25-Inch Blank Bezel (Bay 2)
5.25-Inch Diskette Drive Bezel (Bay 2)
4
40MB Hard Disk Drive (SCSI)
4
60MB Hard Disk Drive (SCSI)
4
80MB Hard Disk Drive (SCSI)
4
104MB Hard Disk Drive (SCSI)
4
170MB Hard Disk Drive (SCSI)
4
212MB Hard Disk Drive (SCSI)
4
245MB Hard Disk Drive (SCSI)
4
340MB Hard Disk Drive (SCSI)
4
540MB Hard Disk Drive (SCSI)
4
540MB Hard Disk Drive (SCSI)
4
1GB Hard Disk Drive (SCSI)
600MB CD-ROM (SCSI)
17
Hard Disk Cable
18
Diskette Drive Cable
96F7769
79F3460
65G8863
79F3458
79F7209
85F0097
85F0050
64F4148
92F0132
92F0146
92F0133
73G6067
73G6068
73G6069
92F0159
92F0014
64F4102
85F0041
85F0093
85F0003
79F3450
85F0091
64F4125
56F8866
6128296
56F8854
95F4748
71G6550
95F4749
71G4875
71G6551
92F0406
61G3788
92F0428
92F0084
96F7766
96F7768
Hardware Maintenance Service
259
Models 57, 77, M57, M77 (9557, 9577)
Parts
4
3
1
2
18
17
16
15
5
14
13
12
11
6
10
8
9
7
19
22
260
PS/2 Maintenance Manual
20
21
Index System Unit (9557, 9577)
1
Cover Lock
2
Front Cover Logo (R)
PS/2 77 486
PS/2 77 486DX2
PS/2 M77 486
PS/2 M77 486DX2
PS/2 57 486SLC2
PS/2 M57 486SLC2
3
Top Cover Assembly (without lock)
4
Rear Panel Cover
Cover Assembly, Cable-Locking (option)
4
Rear Panel Cover (DV Model)
5
Power Supply (197 Watt)
6
Frame Assembly (R)
Cover (for underside of frame)
I/O Slot Assembly (rear of frame)
7
(see DASD)
8
(see DASD)
9
(see DASD)
10
Adapter Guide and TamperEvident Switch Assembly (9557)
10
Adapter Guide (9577)
11
Bus Adapter (9577)(with battery)
11
Bus Adapter (9557)(with battery)
Battery
12
System Boards (no memory)
486SLC2-25/50 MHz (9557)
486SLC3-33/66 MHz (9557)
486SX-33 MHz,
for non-UltiMedia systems only (9577)
486SX-33 MHz (9577)
486DX2-33/66 MHz,
for non-UltiMedia systems only (9577)
486DX2-33/66 MHz (9577)
Special Bid System Board
(for Pinnacle CD-ROM Bootable Systems)
Optional Microprocessors
P23T 25/50 MHz
P23T 33/66 MHz
2MB Memory Module Kit (70ns)
4MB Memory Module Kit (70ns)
8MB Memory Module Kit (70ns)
13
Control Assembly:
Assy - Without Volume Control
(Power Switch, Cable, Speaker)
Assy - With Volume Control
(Power Switch, with button,
Cable, and Speaker)
Pedestal
Miscellaneous Parts Kit (see page 303)
92F0003
92F0249
92F0272
92F0250
92F0250
96F7763
96F7764
96F7640
92F0247
92F0248
96F7755
92F0058
92F0138
85F0086
10G3971
96F7758
92F0042
87F4836
41G3877
33F8354
39G6407
65G8615
39G2668
39G5698
39G2669
39G6086
39G6444
92F0147
92F2582
92F0102
92F0105
64F3606
92F0002
41G3929
92F0000
92F0015
Hardware Maintenance Service
261
Index DASD (9557, 9577)
8
Drive Tray, 3.5-Inch Drive (Bays 1,2,3)
5.25-Inch Bay Drive Guides (2)
9
1.44MB Diskette Drive
9
2.88MB Diskette Drive
9
2.88MB 3.5-inch (with electronic eject)
3.5-inch Bezel (Bay 1, for 73G6059)
5.25-inch Bezel (Bay 1, for 73G6059)
5.25-inch Bezel (Bay 2, for 73G6059)
Bezel (Bay 1, for 92F0132)
Bezel (Bays 2 and 3, for 92F0132)
Diskette Drive Cable
1.2MB 5.25-Inch Diskette Drive
Rail Kit (for 64F4102)
(left/right rails, screws)
7
40MB Hard Disk Drive (SCSI)
7
60MB Hard Disk Drive (SCSI)
7
80MB Hard Disk Drive (SCSI)
7
104MB Hard Disk Drive (SCSI)
7
212MB Hard Disk Drive (SCSI)
7
320MB Hard Disk Drive (SCSI)
7
400MB Hard Disk Drive (SCSI)
7
540MB Hard Disk Drive (SCSI)
7
540MB Hard Disk Drive (SCSI)
7
1GB Hard Disk Drive (SCSI) (9577)
7
1GB Hard Disk Drive (SCSI)
Drive Cable (Three connector)
Drive Slide
14
3.5-Inch Blank Bezel (Bay 4)
Bezel Insert (for 85F0092)
15
5.25-Inch Louvered Bezel (Bay 3)
Bezel Insert (for 85F0094)
Air Baffle - Fixed Disk Drive Bay 4C
16
3.5-Inch Diskette Drive Bezel (Bay 2,3)
5.25-Inch Diskette Drive Bezel (Bay 2,3)
5.25-Inch Blank Bezel (Bay 2)
CD-ROM Drive Bezel (Bay 2,3)
Rewritable Optical Drive Bezel
17
3.5-Inch Diskette Drive Bezel (Bay 1)
18
Retainer Plate
19
Diskette Drive Cable
20
Hard Disk Drive Cable
56F8866
6128296
56F8854
95F4748
95F4749
85F0011
85F0012
92F0406
61G3788
92F0089
92F0428
96F7649
96F7775
85F0092
85F0095
85F0094
85F0096
92F0251
85F0003
64F4125
85F0091
85F0008
92F0159
85F0093
85F0098
96F7756
96F7649
Index Ultimedia (9557, 9577)
CD ROM
ACPA Adapter
ActionMedia II Adapter
ActionMedia II to Display Cable
21
Cable (Control Assy to Audio Card)
22
Cable (Control Assy to System Board)
Cable (ACPA to ActionMedia II)
92F0084
95F1256
69F9733
69F9737
92F0113
96F7762
42G2779
262
PS/2 Maintenance Manual
85F0097
92F0014
85F0050
64F4148
92F0132
73G6067
73G6068
73G6069
92F0146
92F0133
96F7756
64F4102
85F0041
Model 90 (8590) Parts
19
20
18
1
17
16
15
14
2
13
12
11
10
9
3
8
7
4
6
5
Hardware Maintenance Service
263
Index System Unit (90)
1
Top Cover
33F8350
Logo
33F8367
2
Power Supply
92F0088
Power Supply Bracket
64F4131
3
System Board (no memory)
64F3287
System-Board Memory-Module Kits:
Parity Memory-Module Kits:
1MB (85ns) (Type 1 & 3 Boards only)
90X8624
2MB (85ns) (Type 1 & 3 Boards only)
92F0104
2MB (70ns)
92F0102
2MB (80ns)
92F0103
4MB High-Reliability Parity SIMM (70ns)
71G6203
4MB (80ns)
92F3337
8MB High-Reliability Parity SIMM (70ns)
71G6204
8MB (80ns)
64F3607
ECC Memory-Module Kits:
4MB (70ns) (Type 3 Boards only)
92F0097
8MB (70ns) (Type 3 Boards only)
92F0098
4
Base Frame (R)
64F4116
Keylock Assembly
33F8353
5
(see DASD)
6
(see DASD)
7
Air Baffle (for 57F1597)
92F0134
Air Baffle (for all others)
64G4130
Adapter Card-Guide Assembly
33F8363
8
Base Fan
64F4128
9
Power Switch/Speaker assembly
33F8352
10,11
Memory-Riser Card
81F8823
12
Processor Board (With cache option connector)
80486 (25 MHz)
64F0201
80486 (33 MHz)
64F0198
80486DX2 (33/66 MHz)
92F0145
(runs internally at 66MHz)
256KB Cache 17ns
64F0199
(for 64F0201, 64F0198, 92F0145)
80486 (50 MHz)
92F0048
256KB Cache 12ns (for 92F0048)
92F0050
12
Processor Board (Without cache option connector)
80486SX 20 MHz
92F0049
80487SX 20 MHz
92F0065
80486SX 25 MHz
92F0079
(With Dual Processor Sockets)
Note:
See “20 and 25 Mhz Processor Boards” on page 284.
264
PS/2 Maintenance Manual
Index System Unit (90)
80487SX Microprocessor
(Extended Math Capability for 92F0079)
80486 25/50 MHz Overdrive Processor
(runs internally at 50 MHz)
(for 92F0079)
80486DX2 25/50 MHz
(runs internally at 50 MHz)
80486 50 MHz
(single socket, both boards
are one single FRU)
13
SCSI Adapter (with cache)
13
SCSI Adapter (without cache)
Terminator, External (for 85F0063)
Terminator, Internal (for 85F0063)
Terminator, Internal (for 85F0002)
Terminator in-line (for 320/400MB)
14
Memory-Riser-Card Support Bracket
Video-Memory Module
Battery
Label Kit
Miscellaneous Parts Kit (see page 301)
Shipping Carton
92F0100
92F0147
92F0161
57F1597
85F0063
85F0002
33F8464
34F0025
57F2870
92F0142
57F3029
75X5894
33F8354
33F8367
33F8370
74F3583
Hardware Maintenance Service
265
Index DASD (90)
6
1.44MB 3.5-Inch Diskette Drive
Drive Slide (for 64F0162)
6
2.88MB Drive (with slide)
(not supported on all early type 1 systems)
Drive Slide (for 64F0204)
5.25-Inch Diskette-Drive Bezel
5.25-Inch Hard Disk Drive Bezel
15
Bezel for Hard Disk Drive
16
3.5-Inch Diskette Drive Bezel
3.5-Inch Device Filler Bezel
17
Blank Bezel for 5.25-inch Drive Bay
18
Device Power Cable
18
Device Power Cable
(supports two devices)
19
SCSI Internal Cable
20
Diskette Drive Signal Cable
5
60MB Hard Disk Drive (SCSI)
5
80MB Hard Disk Drive (SCSI)
5
104MB Hard Disk Drive (SCSI)
5
120MB Hard Disk Drive (SCSI)
5
160MB Hard Disk Drive (SCSI)
5
212MB Hard Disk Drive (SCSI)
5
320MB Hard Disk Drive (SCSI)
5
400MB Hard Disk Drive (SCSI)
5
540MB Hard Disk Drive (SCSI)
5
540MB Hard Disk Drive (SCSI)
5
1GB Hard Disk Drive (SCSI)
5
2GB Hard Disk Drive (SCSI) (8-bit 50-pin)
5
2GB Hard Disk Drive (SCSI) (16-bit 68-pin)
EMC Bezel and Spring Shield
(for 92F0089)
Drive Slide (Model 90)
Drive Power Cable
Drive Power Cable (Two connector)
127MB Rewritable Optical Drive
Rewritable Optical Cartridge
Drive Mounting Slide (for 92F0167)
Tray with Bezel (for 92F0167)
CD-ROM I Drive Bezel
CD-ROM II Drive Bezel
Rewritable Optical Drive Bezel (B Bay)
Rewritable Optical Drive Bezel (D Bay)
Rewritable Optical Drive Bezel (Filler)
Large Ground Shield (Upper Bay)
Small Ground Shield (Upper Bay)
Ground Shield (Lower Bay)
266
PS/2 Maintenance Manual
64F0162
64F0156
64F0204
64F0156
33F8459
64F4104
33F8361
33F8360
64F4149
33F8362
33F8431
34F0014
64F4127
57F3030
6128296
56F8854
95F4748
6128298
56F8851
95F4749
85F0011
85F0012
92F0406
61G3788
92F0428
92F0440
92F0407
92F0407
85F0035
33F8431
34F0014
92F0167
38F8645
85F0022
85F0021
64F4122
92F0081
92F0157
92F0158
64F4149
85F0006
85F0005
85F0034
PC Server (8640) Parts
27
26
Hardware Maintenance Service
267
Index System Unit (PC Server)
1
Cover (Access/Rear Bezel)
2
3.5" Hard Disk Drive Tray(s) (1 each)
3
Base Frame Assembly
4
Bezel (Front)
5
Power Button (with spring)
6
Bezel (5.25" Blank)
7
Door (DASD with Lens)
8
Bezel (3.5" Blank)
9
Keylock Pawl and Rod
10
Keylock Assembly (with keys)
11
Speaker
12
Fan Assembly (with Connector)
13
Card Guide
14
Shield (3.5" EMC)
15
Pedestal
16
Drive Cage (3.5")
17
Diskette Drive (see DASD)
18
Hard Disk Drive (see DASD)
19
Power Supply (300W with Switch)
System Board, Pentium
(without Memory and Processor)
Processor Chip (Pentium 60MHz)
268
71G0764
06H2652
71G0032
71G0765
06H2191
71G0771
71G0767
71G0770
71G0769
33F8433
06H2649
06H2647
71G0757
71G0758
71G0763
71G0768
71G0044
71G0747
06H2680
System Board, 486
(without Memory and Processor)
Processor Chip (486DX2-66)
71G0033
4MB Memory SIMM (Parity)
8MB Memory SIMM (Parity)
16MB Memory SIMM (Parity)
32MB Memory SIMM (Parity)
L2 Cache Memory
486 Real-Time Clock (with Battery)
Pentium Real-Time Clock (with Battery)
486 Heat Sink (with Clip)
Pentium Heat Sink (with Clip)
Keyboard (with Cable)
Power Cord
SCSI-2 Fast PCI-Bus Adapter
Spring (I/O EMC)
SVGA Card (AP and EMEA only)
VGA Card
Miscellaneous Parts Kit
EMC Gasket Keyboard/Mouse (1 each)
EMC Ground Contacts (4 each)
I/O Blank (1 each)
Nut Screws 4-40 (2 each)
Power Switch Bracket (1 each)
Screws 6X32X5/16" (6 each)
Screws 3x8mm Plastite (3 each)
Screws 3mm Diskette Drive (2 each)
Screws 6-32 Hard Disk Drive (2 each)
System Board Edge Support (1 each)
73G3233
73G3234
60G2950
73G3235
92G7431
06H3397
06H3398
06H2179
06H2180
71G4646
62X1045
53G0382
71G0756
71G0031
71G0030
06H2182
PS/2 Maintenance Manual
06H2679
Index Cables (PC Server)
20
Cable (Power Good, with Green LED)
21
Cable (IDE Hard Disk Drive
Activity, with Amber LED)
22
Cable (SCSI Hard Disk Drive
Activity, with Amber LED)
23
Serial Cable
24
Parallel Cable
25
SCSI Cable Assembly (for 4 drives)
SCSI Cable Assembly (for 7 drives)
26
IDE Hard Disk Drive Cable (for 2 Drives)
27
Diskette Drive Signal Cable (with power)
Index DASD (PC Server)
Diskette Drives:
17
1.44MB Diskette Drive Assembly
17
1.2MB 5.25-Inch Diskette Drive Assembly
Hard Disk Drives:
18
270MB Hard Disk Drive (IDE)
18
364MB Hard Disk Drive (IDE)
18
527MB Hard Disk Drive (IDE)
18
728MB Hard Disk Drive (IDE)
18
540MB Hard Disk Drive (SCSI)
18
1GB Hard Disk Drive (SCSI)
18
2GB Hard Disk Drive (SCSI)
Enhanced Internal CD-ROM II Drive
06H2633
06H2637
06H3379
06H2165
06H2166
82G3626
06H2181
92F0424
92F0423
93F2361
64F4102
82G5926
82G5927
92F0405
82G5929
92F0406
92F0428
92F0407
92F0084
Hardware Maintenance Service
269
270
PS/2 Maintenance Manual
17
22
23
25
26
24
27
28
19
21
18
20
1
16
2
15
3
14
4
7
13
5
6
11
8
12
9
10
PC Server 500 (Type 86XX) Parts
Index System Unit (Type 86XX)
1
Base Frame
2
LED Information Display Assembly
3
System Board
(without Memory and Processor)
I/O Spring (bracket on system board)
Pentium 90MHz Processor Card
16MB ECC Memory SIMM
4
I/O Panel Die Cast
5
SCSI RAID Hard Disk Drive Adapter
5
SCSI Fast Wide Hard Disk Drive Adapter
6
Video Adapter
7
Fan Assembly
8
Fan Mounting Support (without Fans)
9
I/O Flex Plate
10
Right Side Door
Right Side Door Hinges
11
Pedestal Wheel (with Axle)
12
434 Watt Power Supply
13
Card Guide
14
Processor Card Support
15
Card Guide Support
16
Pedestal
17
Slim-Line CD ROM Drive
18
2.88MB Diskette Drive
19
1GB SCSI Hard Disk Drive
19
2GB SCSI Hard Disk Drive
20
DASD Hot Swap Tray Assembly (Wide)
DASD Hot Swap Backplane Assembly
DASD Hot Swap Cam Spring (Shaft and Knob)
DASD Mounting Plate
21
CD Storage Tray
22
Front Bezel (with Shield)
23
Keylock (with Keys)
24
DASD Door
25
IBM Logo (R)
26
5.25-Inch Drive Bezel (with Spacer)
27
Control Panel Bezel
28
Control Panel Card Assembly
Battery
Keyboard (with Cable)
Miscellaneous Parts Kit
C2 Spring (1 each)
EMI Ground Clips (4 each)
Hinge Screws 2 each)
Lock Pawl (1 each)
Planar Mounting Boss (2 each)
Screws (4 each)
Mouse
Power Cord
Speaker (with Bracket)
82G3593
06H3766
92F2623
06H3796
06H3739
96F9100
06H3593
06H3059
92F0160
71G0650
06H3407
82G3618
06H3594
82G3594
82G3600
82G3609
06H3596
82G3604
82G3959
82G3603
82G3608
06H2150
82G1888
06H3371
06H3372
06H3956
71G6291
06H5059
82G3602
06H5060
82G3595
82G3606
82G3596
82G3601
82G3599
06H3595
06H3755
33F8354
71G4646
82G3611
96F9258
62X1045
33F8444
Hardware Maintenance Service
271
Cables (Type 86XX)
1
3
2
4
5
6
7
Index Cables (Type 86XX)
1
DASD Status Cable
2
Planar/Control Panel Cable
3
System Status Cable (1X4)
4
Diskette Drive Signal Cable(with power)
5
CD ROM SCSI Cable (for 2 drives)
6
SCSI-Fast/Wide Cable (for 1 drive)
7
Hard Disk Drive Power Cable (for 1 drive)
C2 Cable (with Switch)
LED Display Cable
POS ID Select Cable (Wide)
06H5081
06H3406
06H3404
06H3405
06H3751
82G3613
82G3610
82G3612
06H6138
06H3957
Index Options (Type 86XX)
DASD Hot Swap Tray Assembly (Narrow)
POS ID Select Cable (Narrow)
220 Watt Power Supply Assembly
71G6292
06H3592
06H3237
272
PS/2 Maintenance Manual
25
12
11
10
13
9
8
15
16
14
7
17
18
6
19
5
20
4
21
22
23
24
3
2
26
31
1
27 28
29
30
Server 85 (9585), Model 95 XP 486
(8595) Parts
Hardware Maintenance Service
273
Index System Unit (85, 95)
1
Access Cover
Access Cover Fan
2
Rear Bezel (85)
2
Rear Bezel (95)
3
288 Watt Power Supply (85)
3
335 Watt Power Supply (95)
Power Supply Ground Strap
4
Pedestal with Plate (85)
4
Pedestal with Plate (95)
5
Drive Support Structure (85)
5
Drive Support Structure (95)
Ground spring (for 92F0280, 33F8421)
6
(see DASD)
7
(see DASD)
DASD Option Guide
8
Drive Retainer
9
Front Bezel
15
Indicator Panel Bezel (85)
16
Information Panel Bezel (95)
17
Indicator Panel Assembly (85)
18
(see DASD)
19
Information Panel Assembly (95)
Information Panel kit (95)
20
Base Frame (R) (85)
20
Base Frame (R) (95)
Keylock Assembly
(also order Parts Kit)
21
System Board Without Memory (85)
80486DX2-ODP 33/66-MHz
Microprocessor (85)
21
System Board Without Memory (95)
Battery
22
SCSI Adapter (with cache)
22
SCSI Adapter (Without cache)
Terminator, External (for 85F0063)
Terminator, Internal (for 85F0063)
Terminator, Internal (for 85F0002)
Terminator in-line (for 320/400MB)
23
Display Adapter (85)
(see Options and Adapters Matrix)
Adapter Guide (85)
24
Processor Boards (95)
(With cache option connector):
80486 (25 MHz)
80486 (33 MHz)
80486DX2 (33/66 MHz)
(runs internally at 66MHz)
256KB Cache 17ns
(for 64F0201, 64F0198, 92F0145)
80486 (50 MHz)
256KB Cache 12ns (for 92F0048)
24
Processor Boards
(Without cache option connector):
80486SX 20 MHz
80487SX 20 MHz
80486SX 25 MHz
274
PS/2 Maintenance Manual
33F8427
64F4115
92F0279
33F8419
92F2637
92F0051
33F8418
33F8422
64F0215
92F0280
33F8421
33F6853
33F8441
64F4135
64F4137
92F0281
33F8423
92F0277
33F8434
33F8442
92F0278
33F8417
33F8433
33F8435
92F0270
92F2582
33F5717
33F8354
85F0063
85F0002
33F8464
34F0025
57F2870
92F0142
33F8440
64F0201
64F0198
92F0145
64F0199
92F0048
92F0050
92F0049
92F0065
92F0079
Index System Unit (85, 95)
Note:
See “20 and 25 Mhz Processor Boards” on page 284.
80487SX Microprocessor
92F0100
(Extended Math Capability for 92F0079)
80486 25/50 MHz Overdrive Processor
92F0147
(runs internally at 50 MHz)
(for 92F0079)
80486DX2 25/50 MHz
92F0161
(runs internally at 50 MHz)
80486 50 MHz
57F1597
(single socket, both boards
are one single FRU)
Adapter Guide
33F8440
25
System-Board Memory-Module Kits
Parity Memory-Module Kits:
1MB (85ns) (95)
90X8624
(Type 1 & 3 Processor Boards)
2MB (85ns) (95)
92F0104
(Type 1 & 3 Processor Boards)
2MB (70ns) (85, 95)
92F0102
2MB (80ns) (95)
92F0103
4MB High-Reliability Parity SIMM (70ns)
71G6203
4MB (80ns) (95)
92F3337
8MB High-Reliability Parity SIMM (70ns)
71G6204
8MB (80ns) (95)
64F3607
ECC Memory-Module Kits:
4MB (70ns) (Type 3 Boards only) (95)
92F0097
8MB (70ns) (Type 3 Boards only) (95)
92F0098
26
Cover Fan Cable Assy
61G3824
28
Information Panel Cable (95)
33F8429
Indicator Panel Cable (85)
92F0239
Speaker
33F8444
I/O Shadowbox Ground Spring
(with thumbscrews)
92F0099
Miscellaneous Parts Kit (see page 301)
33F8435
Shipping Carton
74F3565
Index DASD (85, 95)
6
Hard Disk Drive Mounting Tray (85)
6
Hard Disk Drive Mounting Tray (95)
7
60MB Hard Disk Drive (SCSI)
7
80MB Hard Disk Drive (SCSI)
7
104MB Hard Disk Drive (SCSI)
7
120MB Hard Disk Drive (SCSI)
7
160MB Hard Disk Drive (SCSI)
7
212MB Hard Disk Drive (SCSI)
7
320MB Hard Disk Drive (SCSI)
7
400MB Hard Disk Drive (SCSI)
85F0013
64F0141
6128296
56F8854
95F4748
6128298
56F8851
95F4749
85F0011
85F0012
Hardware Maintenance Service
275
Index DASD (85, 95) continued
7
540MB Hard Disk Drive (SCSI)
7
540MB Hard Disk Drive (SCSI)
7
1GB Hard Disk Drive (SCSI)
7
1GB Hard Disk Drive (SCSI)
7
2GB Hard Disk Drive (SCSI) (8-bit 50-pin)
7
2GB Hard Disk Drive (SCSI) (16-bit 68-pin)
EMC Bezel and Spring Shield
(for 92F0089)
Drive Power Cable
Drive Power Cable (Two connector)
127MB Rewritable Optical Drive
Drive Mounting Slide (for 92F0167)
Tray with Bezel (for 92F0167)
Objective Lens Cleaner (for 92F0167)
Prism Lens Cleaner (for 92F0167)
10
DASD Bezel
11
DASD Bezel
12
DASD Bezel
2-Feature Bezel
5.25 Inch Diskette Drive Bezel
5.25 Framing Bezel
CD-ROM Drive I & II Bezel
Rewritable Optical Drive Bezel
13
Diskette Drive Blank Bezel
14
3.5-Inch Diskette Drive Bezel
3.5-Inch Device Filler Bezel
18
1.44MB 3.5-Inch Diskette Drive
Drive Slide (for 64F0162)
18
2.88MB Drive (with slide)
(not supported on all early type 1 systems)
Drive Slide (for 64F0204)
5.25-Inch Diskette Drive:
360KB External (4869-001)
360KB External (4869-501)
1.2MB External (4869-002)
1.2MB External (4869-502)
1.2MB Internal Drive (with rails)
1.2MB Rail kit (for 64F4102)
Slide kit (for 64F4102)
23
Power Cable (95) (for 64F4115)
27
Diskette Drive Signal Cable (85)
27
Diskette Drive Signal Cable (95)
29
SCSI Signal Cable (85)
30
SCSI Signal Cable (95)
31
Hard Disk Drive Power Cable
31
Hard Disk Drive Power Cable
(supports two devices)
276
PS/2 Maintenance Manual
92F0406
61G3788
92F0089
92F0428
92F0440
92F0407
92F0255
33F8431
34F0014
92F0167
85F0022
85F0021
38F8681
38F8682
64F4136
33F8425
33F8425
64F0168
64F4103
33F8459
64F0138
92F0155
71G5001
71G5000
64F4149
64F0162
64F0156
64F0204
64F0156
72X6759
72X6768
15F7993
15F7994
64F4102
85F0041
85F0040
64F4120
92F0283
33F8430
92F0282
33F8436
33F8431
34F0014
25
26
9
11 10
12
13
14
15
16
17
8
20
18
19
7
6
21
5
4
22
24
23
3
2
27
1
28
30
29
Server 9595, PS/2 9585-xKx, and PS/2
9585-xNx Parts
Hardware Maintenance Service
277
Index System Unit (9595, 9585-xKx, 9585-xNx)
1
Access Cover
Access Cover Fan
Access-Cover Fan Cable
2
Rear Bezel
I/O Shadowbox Ground Spring
(with thumbscrews)
3
400 Watt Power Supply
3
288 Watt Power Supply
(for 9585-xKx, 9585-xNx)
Power Supply Ground Strap
4
Pedestal (with plate)
5
Tamper-Evident Switch/Cable Assembly
6
Drive Support Structure
Ground Springs:
Left Spring
Right Spring
7
(see DASD)
8
(see DASD)
9
Drive Retainer
10
Tamper-Evident Linkage Assembly
11
Front Bezel
12
DASD Bezel (Small)
13, 14 DASD Bezel (Medium)
15
Blank Diskette Drive Bezel
16
3.5-Inch Diskette Drive Bezel
17
Operator Panel Bezel
17
Operator Panel Bezel
(for 9585-xKx, 9585-xNx)
18
Operator Panel Card Assembly
18
Operator Panel Card Assembly
(for 9585-xKx, 9585-xNx)
19
(see DASD)
20
(see DASD)
21
Base Frame (R)
22
System Board (No Memory)
22
System Board 486DX-33 w/SCSI
(No Memory) (for 9585-xKx)
22
System Board 486DX-33/66 w/SCSI
(No Memory) (for 9585-xNx)
L2 Cache, 128KB (for 61G2405)
L2 Cache, 256KB (for 61G2401)
23
SCSI-2 Adapter/A
23
SCSI Adapter 16>8 (for 9585-xKx, 9585-xNx)
24
ISO Display Adapter/A
(for 9585-xKx, 9585-xNx)
24
SVGA-NI Display Adapter/A
24
MGA Ultima /2/M/H Video
Graphics Adapter
25
Processor Boards:
80486DX2 33/66 MHz
Pentium 60 MHz
Pentium 66 MHz
Pentium 90 MHz
Speaker
Keylock Assembly
Battery
Adapter Guide
278
PS/2 Maintenance Manual
61G3533
61G3827
61G3824
61G3823
92F0099
92F0267
92F2637
33F8418
33F8422
61G3518
92F0280
33F6853
61G3528
61G3516
61G3519
61G3515
33F8425
64F4136
33F8437
33F8426
92F0281
61G3517
92F0259
61G3736
61G3822
92F2623
61G2405
61G2401
61G4098
61G4099
92F0160
61G3594
39G3298
71G4877
06H2928
61G2343
52G9362
92F0120
06H3739
33F8444
61G3825
33F8354
33F8440
Index System Unit (9595, 9585-xKx, 9585-xNx)
26
System Board Memory Module Kits
Parity Memory Module Kits:
2MB (70ns)
4MB High-Reliability Parity SIMM (70ns)
8MB High-Reliability Parity SIMM (70ns)
ECC Memory-Module Kits:
4MB (70ns)
8MB (70ns)
16MB (70ns)
27
(see DASD)
28
Operator Panel Cable
(connects to system board)
Operator Panel Cable
(connects to processor card)
Cable Cover (Option)
Cable Cover Lock/Plug (Option)
Misc. Parts Kit
I/O Bracket (1)
Cable Clamp (1)
Jumper (1)
Lock Pawl (1)
Standoff (1)
Plastic Screws (2)
Metal Screws (6)
Index DASD
DASD Guide
DASD Ground Spring
7
Drive Mounting Slide (for 92F0167)
8
540MB 1/3 Ht. Hard Disk Drive
8
1GB 1/3 Ht. Hard Disk Drive
Drive Power Cable (Two connector)
3.5-Inch 127MB Rewritable Optical Drive
2-Feature Bezel
5.25 Inch Diskette Drive Bezel
5.25 Framing Bezel
CD-ROM Drive I & II Bezel
Rewritable Optical Drive Bezel
3.5-Inch Device Filler Bezel
19
1.44MB 3.5-Inch Diskette Drive
Drive Slide (for 64F0162)
19
2.88MB Drive (with slide)
20
Hard Disk Drive Mounting Tray
27
Diskette Drive Signal Cable
Drive Slide (for 64F0204)
29
SCSI Signal Cable
30
Hard Disk Drive Power Cable
SCSI Internal Cable 8-Bit
(for 9585-xKx, 9585-xNx)
Multi-Drop Power Cable
92F0102
71G6203
71G6204
92F0097
92F0098
96F9100
92F0329
61G3817
61G3841
61G3842
33F8435
33F8441
96F9199
85F0022
92F0406
92F0428
34F0014
92F0167
64F0168
64F4103
33F8459
64F0138
85F0018
64F4149
64F0162
64F0156
64F0204
85F0013
92F0283
64F0156
92F0327
33F8431
61G3593
64F0197
Hardware Maintenance Service
279
280
PS/2 Maintenance Manual
15
14
13
11
12
16
17
18
10
20
19
8
9
21
7
6
22
5
4
23
27
26
25
24
3
2
1
28
Server 9595A Parts
Index System Unit (9595A)
1
Access Cover
2
Rear Bezel
3
400 Watt Power Supply
Power Supply Ground Strap
Power Cord
4
Pedestal (with plate)
5
Tamper-Evident Switch/Cable Assembly
6
Drive Support Structure
7
Hot Plug Rack (3 bay)
7
Hot Plug Rack (1 bay)
Microswitch Housing (for 61G3526, 61G3527)
Microswitch Assy (for 61G3526, 61G3527)
Microswitch Shaft (for 61G3526, 61G3527)
8
see DASD
9
Hot Plug Rack Rail
Hot Plug Adapter
Hot Plug Adapter Terminator
10
2.88MB Diskette Drive (with slide)
11, 16 DASD Bezel (medium)
12
Feature Bezel (small)
13
Drive Retainer
14
Tamper-Evident Linkage Assembly
15
Front Bezel
17
Diskette Drive Blank Bezel
18
3.5-Inch Diskette Drive Bezel
19
Operator Panel Card Assembly
Speaker
20
Operator Panel Bezel
21
DASD Tray Assembly (without drive/cable)
22
Base Frame (R)
23
System Board (without Memory)
Battery
24
SCSI Adapter for RAID Array Controller
25
SVGA-NI Display Adapter/A
26
Processor Boards
80486DX2-33/66 Processor
Pentium 60 MHz
Pentium 66 MHz
27
System-Board Memory-Module Kits
Parity Memory-Module Kits:
2MB (70ns)
4MB High-Reliability Parity SIMM (70ns)
8MB High-Reliability Parity SIMM (70ns)
ECC Memory-Module Kits:
4MB (70ns)
8MB (70ns)
16MB (70ns)
28
Access Cover Fan
Access-Cover Fan Cable
Keylock Assembly
Adapter Guide
61G3533
61G3823
92F0267
33F8418
62X1045
33F8422
61G3518
92F0280
61G3526
61G3527
61G3837
71G4981
61G3838
71G4982
61G3835
61G3836
64F0204
64F4136
33F8425
61G3516
61G3519
61G3515
71G5001
71G5000
92F0259
33F8444
61G3517
61G3832
61G3822
92F2623
33F8354
92F0335
71G4877
61G2343
52G9362
92F0120
92F0102
71G6203
71G6204
92F0097
92F0098
96F9100
61G3827
61G3824
61G3825
33F8440
Hardware Maintenance Service
281
Index System Unit (9595A)
Ground Springs:
Left Spring
Right Spring
I/O Shadowbox Ground Spring
(with thumbscrews)
DASD Ground Spring
Misc. Parts Kit
I/O Bracket (1)
Cable Clamp (1)
Jumper (1)
Retainer Gasket (1)
Lock Pawl (1)
Standoff (1)
Plastic Screws (2)
Metal Screws (6)
Cable Cover (Option)
Cable Cover Lock/Plug (Option)
Index DASD
2.88MB Diskette Drive (with slide)
Diskette Drive Cable (for 64F0204)
Diskette Drive Slide (1/3 Ht.)
540MB 1/3 Ht. Hard Disk Drive Assembly
Address Cable with tape (for 92F0406)
540MB 1/3 Ht. Hard Disk Drive Assembly
(with tray/cable)
8
1GB 1/3 Ht. Hard Disk Drive
Address Cable with tape (for 92F0428)
Blank Tray (for 92F0428)
1GB 1/3 Ht. Hard Disk Drive Assembly
(with tray/cable)
3.5-Inch 127MB Rewritable Optical Drive
Drive Mounting Slide (for 92F0167)
2-Feature Bezel
5.25 Inch Diskette Drive Bezel
5.25 Framing Bezel
CD-ROM Drive I & II Bezel
Rewritable Optical Drive Bezel
18
3.5-Inch Diskette Drive Bezel
282
PS/2 Maintenance Manual
33F6853
61G3528
92F0099
96F9199
33F8435
61G3841
61G3842
64F0204
92F0283
64F0156
92F0406
61G3833
61G3525
92F0428
61G3834
61G3832
61G3828
92F0167
85F0022
64F0168
64F4103
33F8459
64F0138
85F0018
33F8426
5
3
6
4
2
7
1
Index Cables (9595A)
1
SCSI Drive Cable Assembly (for 4 drives)
2
SCSI Drive Cable Assembly (for 3 drives)
3
Diskette Drive Signal Cable
4
Operator Panel Cable
(connects to system board)
5
Hard Disk Drive Power Cable (for 3 drives)
6
Hard Disk Drive Power Cable (for 4 drives)
7
Operator Panel Cable
(connects to processor card)
61G3524
61G3523
92F0283
92F0239
61G3521
61G3522
61G3817
Hardware Maintenance Service
283
20 and 25 Mhz Processor Boards: For SX models,
you can install an optional processor on a 20 or 25 MHz
processor board.
On the 20-MHz board (below left), the jumper 2 must be
in positions 1 and 2 if a 487SX processor is installed in
connector 3 . If there is not a 487SX processor in
connector 3 , the jumper must be in positions 2 and 3.
The 25-MHz processor board (below right) has a second
processor connector 3 for either an optional 487SX
processor (extended math capability) or an 80486SX 25/50
MHz processor. If you install an option processor in
connector 3 , of the 25 MHz board, you do not have to
remove the existing processor (it is overridden).
Carefully insert the tip of a screwdriver between the
processor and the connector edge and gently twist the
screwdriver (around all edges) until the processor raises
up.
When you reinstall the processor, align the beveled corner
1 with the beveled corner marked on the board.
1 23
2
3
284
PS/2 Maintenance Manual
3
Model 3509 Parts
1
ON
1
2
4
3
2
PH
ON
ES
VO
L.
BU
SY
EJ
EC
T
5
6
8
ON
1
2
7
Hardware Maintenance Service
285
Index Internal ISA CD-ROM
1
Adapter
2
Data Cable (40-wire ribbon cable)
3
Drive
4
Audio Cable
61G4110
61G4111
61G4109
61G4112
Index External ISA CD-ROM
5
Drive Enclosure
6
External Data Cable
7
Adapter
8
Drive
61G4113
61G4115
61G4114
61G4109
286
PS/2 Maintenance Manual
6
5
4
7
8
3
2
1
Model 3510 Parts
Hardware Maintenance Service
287
Index 3510 (Locking and Non-Locking Types)
1
External Cover (non-locking type)
(Includes Base, Tray,
Internal Cables, Phono Jack)
1
Top Cover (R) (locking type)
(Bezel, Logo, Keylock Assembly)
Keylock Assembly
2
Base (R) (for 85F0027)
(Label, Base Feet)
3
Power Supply (for 85F0027)
3
Power Supply (for 64F0135)
4
Hard Disk Drive Tray with Bezel
Tray Shield Enclosure Kit
Hard Disk Drive Cable
SCSI Remote Address Switch and Cable
Remote ID Switch Cable
Audio Card, Cable, Screws
5
Tray with Bezel (for 92F0167)
External CD-ROM (without rails)
Rail Kit (for 81F7930) Drive
CD-ROM Drive Assembly (WT)
Headphones (CD-ROM)
Cleaning Kit (CD-ROM)
(Disc Kit, Test Disc, Disc Caddy)
Disc Caddy
6
127MB Rewritable Optical Drive
7
Hard Disk Drive
60MB Hard Disk Drive (SCSI)
80MB Hard Disk Drive (SCSI)
104MB Hard Disk Drive (SCSI)
120MB Hard Disk Drive (SCSI)
160MB Hard Disk Drive (SCSI)
212MB Hard Disk Drive (SCSI)
320MB Hard Disk Drive (SCSI)
400MB Hard Disk Drive (SCSI)
540MB Hard Disk Drive (SCSI)
1GB Hard Disk Drive (9577) (SCSI)
1GB Hard Disk Drive (SCSI)
2GB Hard Disk Drive (SCSI)
SCSI-2 Fast/Wide Adapter/A
Upgrade Kit contains:
Back Cover Plate Assembly
(with 16-Bit, 68 pin connectors and cable)
8
Fan Assembly
Miscellaneous Parts Kit (see page 303)
System-to-Device Cable (60-to-50 pin)
Device-to-Device Cable (50-to-50 pin)
50-Pin Terminator
Power Cord
288
PS/2 Maintenance Manual
64F0135
85F0027
33F8433
85F0072
85F0051
85F0051
64F4108
92F0007
92F0009
64F4107
92F0086
92F0085
85F0021
81F7930
34F0041
34F0021
53F3610
59F3562
22F9419
92F0167
6128296
56F8854
95F4748
6128298
56F8851
95F4749
85F0011
85F0012
92F0406
92F0089
92F0428
92F0440
32G3920
92F0008
92F0010
34F0017
34F0018
92F0057
6952300
11
10
12
9
13
8
7
6
1
5
2
4
3
Model 3511 Parts
Hardware Maintenance Service
289
Index
1
2
3
4
4
5
6
7
8
9
9
9
9
9
9
9
9
9
9
9
9
10
11
12
13
290
3511 Storage Enclosure
Base Assembly
Rear Bezel
Cover Assembly
Rear Cover Plate
335 Watt Power Supply
400 Watt Power Supply
Power Switch Cable
Load Distribution Card
Pedestal Assembly
3.5 Inch Drive Tray
60MB Hard Disk Drive (SCSI)
80MB Hard Disk Drive (SCSI)
104MB Hard Disk Drive (SCSI)
120MB Hard Disk Drive (SCSI)
160MB Hard Disk Drive (SCSI)
212MB Hard Disk Drive (SCSI)
320MB Hard Disk Drive (SCSI)
400MB Hard Disk Drive (SCSI)
540MB Hard Disk Drive (SCSI)
1GB Hard Disk Drive (SCSI) (9577)
1GB Hard Disk Drive (SCSI)
2GB Hard Disk Drive (SCSI)
EMC Bezel/Spring Shield (for 92F0089)
Internal CD ROM (without rails)
Drive Bezel (for 81F7930)
Rewritable Optical Drive Bezel
SCSI Tape Drive (internal only)
SCSI Tape Drive (3532 only)
Framing Bezel (for 85F0055)
Rail Kit (for 85F0055)
Media Kit (Cleaning, Blank Tape)
Cleaning Tape
Blank Tape (Qty. 5)
Drive Retainer
Front Bezel
Power Switch Bezel Assembly
Power Switch / Speaker Assembly
Power Switch Kit (Plate, Knob)
Blank Bezel (for bays A and B)
Blank Bezel (for bay D-bottom)
Blank Bezel (for bays D-top and E)
Keylock Assembly
Option Device Guide
SCSI Cable
Device Power Cable (two devices)
Device Power Cable (three devices)
5.25-Inch Device Rail Kit
Rail Kit (for bays A and B)
Base Ground Strap
Base Ground Bracket
Miscellaneous Parts Kit (see page 301)
I/O Bracket Kit
System-to-Device Cable (50-to-60 pin)
Power Cord
PS/2 Maintenance Manual
33F8417
33F8419
33F8427
64F4121
92F0051
92F0267
64F0125
64F0139
64F0215
64F0141
6128296
56F8854
95F4748
6128298
56F8851
95F4749
85F0011
85F0012
92F0406
92F0089
92F0428
92F0440
92F0255
81F7930
64F0138
92F0159
85F0055
46G2320
64F4138
34F0041
59F3907
21F8593
21F8595
64F4135
64F4137
64F0131
64F0143
33F8442
33F8437
64F4136
33F8425
33F8433
33F8441
64F0127
34F0014
64F0197
33F8443
64F0152
33F8418
64F0129
33F8435
64F0196
34F0017
6952300
1
2
3
4
11
10
9
8
5
7
6
Model 3532 Parts
Hardware Maintenance Service
291
Index 3532 SCSI Tape Drive
1
Top Cover (R) (with Bezel, Logo)
Cover Screw
Cover Wrench
2
Base (R)
Base Foot Pad
3
SCSI Tape Drive (3532 only)
SCSI Tape Drive (internal only)
Drive Screw
4
Power Supply
Power Supply Screw
Power Supply Cable Toroid
5
Remote Address Switch Cable
6
Remote Address Switch Board
7
Rear Chassis (with Logo)
Rear Chassis Screw
8
SCSI Cable
SCSI Cable Screw
9
Drive Tray Cover
Drive Tray Cover Screw
Foam Spacer
10 Drive Fan Assembly
Drive Fan Screw
11 Drive Tray
Base Flat Washer
Base Star Washer
Drive Tray Screw
System-to-Device Cable
(60-to-50 pin, 3532 only)
Device-to-Device Cable
(50-to-50 pin, 3532 only)
Device-to-Device Cable (50-to-50 pin)
50-Pin Terminator
Power Cord
Media Kit (Cleaning, Blank Tape)
Cleaning Tape
Blank Tape (Qty. 5)
292
PS/2 Maintenance Manual
00G0988
42F6707
31F4220
42F6874
02G7413
46G2320
85F0055
0055726
00G2960
1621171
59F4585
42F7299
53F3872
02G7398
42F6707
53F3861
0251970
42F7270
1621170
71F0734
42F7300
0438553
53F3113
1091414
0060646
1621171
31F4221
31F4222
34F0018
92F0057
6952300
59F3907
21F8593
21F8595
OBI DASD Hot Swap Storage Expansion
Enclosure Parts
1
2
3
4
5
18
6
17
16
10
7
15
8
9
14
11
13
12
Hardware Maintenance Service
293
Index Hot Swap Storage Expansion Enclosure
1
200 Watt Power Supply
2
Hot Swap Rack (1 bay)
3
3-Tray Adapter (Top)
4
3-Tray Adapter (Bottom)
5
Cover Assembly
Keylock Assembly
6
Pedestal
7
Adapter Card Assembly, not Terminated
Adapter Card Assembly, Terminated
(bottom card for 71G0209))
8
Microswitch Shaft
(for 71G0208, 71G0209, and 61G3527)
Microswitch Housing (for 71G0208, 71G0209)
9
Hot Swap Rack Rail
10
Microswitch Cable Assembly
11
SCSI Cable Assembly
12
Drive Power Cable Assembly
13
Power-good Cable
14
68 Position Tray Assembly
15
1GB SCSI Fast/Wide Hard Disk
Drive Tray Address Cable
16
1GB SCSI Fast/Wide Hard Disk Drive
17
Fan Assembly
18
Base Frame Assembly
1-Meter External 68/68 Cable
Miscellaneous Parts Kit
Blank Bracket Screws (2)
EMC Springs (2)
Fan Mounting Screws (2)
Power Supply Mounting Screws (2)
Power Switch Mounting Screws (2)
Stand-off (2)
EMC Springs (2)
294
PS/2 Maintenance Manual
92F0411
61G3527
71G0208
71G0209
06H2605
61G2177
61G2174
61G3835
71G0216
61G3838
61G3837
71G4982
71G4981
06H2601
06H2602
06H3246
71G0212
71G0215
71G5040
71G0217
06H2604
06H3228
06H3241
Common Parts
486 DX, DX2, DLC2, SLC, SLC2 System
Board Upgrade Parts
System Unit (50, 50Z)
486SLC2 System Board Upgrade
486SLC2 Processor Upgrade Card (50)
486SLC2 Processor Upgrade Card (50Z)
2MB Memory Module
4MB Memory Module
4MB Memory Module (Industry Standard)
8MB Memory Module
16MB Memory Module
80MB Hard Disk Drive
170MB Hard Disk Drive
245MB Hard Disk Drive
340MB Hard Disk Drive
527MB Hard Disk Drive
Hard Disk Drive Ribbon Cable
Hard Disk Drive Power Cable
61G3502
71G2625
71G2633
92F0102
92F0105
73G3233
64F3606
60G2950
95F4721
95F4728
92F0403
92F0404
92F0405
71G2683
71G2684
System Unit (55)
486SLC2 System Board Upgrade
2MB Memory Module
4MB Memory Module
4MB Memory Module (Industry Standard)
8MB Memory Module
16MB Memory Module
80MB Hard Disk Drive
170MB Hard Disk Drive
245MB Hard Disk Drive
340MB Hard Disk Drive
527MB Hard Disk Drive
Hard Disk Drive Ribbon Cable
Hard Disk Drive Power Cable
Original Hard Disk Drive Cable
71G2602
92F0102
92F0105
73G3233
64F3606
60G2950
95F4721
95F4728
92F0403
92F0404
92F0405
71G2662
71G2684
71G2685
System Unit (60, 65, and 80)
486DX2 System Board Upgrade
486DLC2 System Board Upgrade
486SLC2 Processor Upgrade Card (60)
486DX33 Processor Upgrade Card (80)
71G2643
71G2610
71G2625
92F0437
System Unit (70)
486DX33 Processor Upgrade Card
486DX33 System Board Upgrade
486DLC2 System Board Upgrade
92F0436
71G2641
71G2606
Hardware Maintenance Service
295
CD-ROM Drives
Internal CD-ROM I Drive (eject button above slot)
Terminator Kit (for 81F7930)
Cleaning Kit (for 81F7930) (Disks, CD Caddy)
Internal CD-ROM II Drive
(With eject button below slot)
Enhanced Internal CD-ROM II Drive
(With eject button below slot)
Terminator Kit (for 92F0084)
Signal Cable
Power Cable
Remote ID Switch Cable (3510)
Audio Card, Cable, Screws (3510)
Grounding Bracket (8560/8565/8580)
Mounting Slide (8590)
CD-ROM Drive Bezel Assemblies
8557
8560/8565/8580
8590
8595
Media Kit (No Cleaning Necessary, for 92F0084)
(Test Disk, CD Caddy)
CD-ROM Parts:
Ground Spring (Model 95)
CD Caddy
Rail Kit (8560/8565/8580/3510)
Rail Kit (8557)
Headphones
296
PS/2 Maintenance Manual
81F7930
59F3530
59F3562
92F0084
61G1901
92F0082
34F0043
72X8521
92F0086
92F0085
85F0010
92F0162
85F0008
34F0044
92F0081
64F0138
31F4232
92F0087
22F9419
34F0041
85F0009
53F3610
Element Exchange Displays
8503 12-Inch Monochrome Display
110/120 V ac
220/240 V ac (Northern Hemisphere)
220/240 V ac (Southern Hemisphere)
Tilt/Swivel Stand
68X3045
68X3046
72X7878
68X3061
8504 12-Inch Monochrome Display
110/120 or 220/240 V ac (Universal Model)
220/240 V ac (Northern Hemisphere)
220/240 V ac (Southern Hemisphere)
Tilt/Swivel Stand
44F9807
44F9808
44F9809
44F9820
8506 17-Inch Monochrome Display (with Tilt/Swivel
110/125 V ac (US/Canada)
110/125 or 200/240 V ac (Northern Hemisphere)
110/125 or 220/240 V ac (Southern Hemisphere)
Stand)
39F8087
39F8088
39F8089
8507 19-Inch Monochrome Display
110/120 or 220/240 V ac (Universal Model)
110/125 or 200/240 V ac (Northern Hemisphere)
110/125 or 220/240 V ac (Southern Hemisphere)
6247808
6247843
6247842
8508 19-Inch Monochrome Display
110/125 V ac (US/Canada)
110/125 or 200/240 V ac (Northern Hemisphere)
110/125 or 220/240 V ac (Southern Hemisphere)
6247883
6247840
39F8068
8512 14-Inch Color Display
110/120 V ac (US/Canada)
220/240 V ac (Northern Hemisphere)
220/240 V ac (Southern Hemisphere)
Tilt/Swivel Stand
61X8924
61X8928
61X8927
61X8925
8513 12-Inch Color Display
110/120 V ac
220/240 V ac (Northern Hemisphere)
220/240 V ac (Southern Hemisphere)
Tilt/Swivel Stand
68X3088
72X7870
72X7877
68X3061
8514 16-Inch Color Display
110/120 V ac
220/240 V ac (Northern Hemisphere)
220/240 V ac (Southern Hemisphere)
Tilt/Swivel Stand
75X5945
75X5946
75X5947
75X5907
8515 14-Inch Color Display
90/137 V ac
220/240 V ac (Northern Hemisphere)
220/240 V ac (Equatorial)
220/240 V ac (Southern Hemisphere)
Tilt/Swivel Stand
07G4759
34G6628
07G4762
07G4763
38F3909
8516 Color Touch Display
110/120 V ac
220/240 V ac (Northern Hemisphere)
220/240 V ac (Southern Hemisphere)
44F9759
70F9129
70F9132
Hardware Maintenance Service
297
External Diskette Drives
5.25-Inch Diskette Drive:
360KB External (4869-001)
360KB External (4869-501)
1.2MB External (4869-002)
1.2MB External (4869-502)
5.25-Inch Drive Adapter
5.25-Inch Drive Adapter/A
5.25-Inch External Diskette Drive Cable
(from system board to adapter)
72X6759
72X6768
15X7993
15X7994
72X6757
15F7996
27F4211
Keyboard/Mouse
Keyboard Cable
Mouse
Mouse Ball and Pop-Off Retainer
Mouse Ball and Twist-Off Retainer
Mouse (New Style)
Mouse Retainer Ring
Mouse (3-Button)
Enhanced Keyboards (101/102 Key)
Arabic
Belgian
Canadian French
Cyrillic
Danish
Dutch
French
German
Greek
Hebrew
Italian
Latin American Spanish
Norwegian
Portuguese
Russian/Cyrillic
Spanish
Swedish/Finnish
Swiss
Swiss/French
Swiss/German
Turkish
U.K. English
U.S. English (E/ME/A use only)
U.S. English
Yugoslavian
298
PS/2 Maintenance Manual
72X8537
61X8923
33F8461
33F8462
33G5420
33G5417
51G9652
1391490
1391414
1392011
1393866
1391407
1391511
1391402
1391403
1393285
1391408
1393395
1392015
1391409
1391410
1395622
1391405
1391411
1391412
1395881
1395882
1393286
1391406
1396790
1392090
1393669
Optional Enhanced Keyboards (101/102 Key)
with PS/2 Style Cable
with AT Style Cable
with 25mm PS/2 Trackball
with 25mm Serial Trackball
59G7980
59G7981
59G7982
59G9757
Keybutton Kits (101/102 Key)
Keybutton Kits (R), Belgian
Keybutton Kits (R), Canadian French
Keybutton Kits (R), Danish
Keybutton Kits (R), Dutch
Keybutton Kits (R), French
Keybutton Kits (R), German
Keybutton Kits (R), Italian
Keybutton Kits (R), Norwegian
Keybutton Kits (R), Portuguese
Keybutton Kits (R), Spanish
Keybutton Kits (R), Spanish/Latin
Keybutton Kits (R), Swedish
Keybutton Kits (R), Swiss/French/German
Keybutton Kits (R), U.K. English
Keybutton Kits, U.S. English
1392033
1392032
1392026
1392034
6447047
6447048
6447049
1392028
1392029
6447050
1392035
1392030
1392031
6447046
6447045
Japanese Keyboard Type 2 (106 Key, DBCS Support)
Japanese Keyboard
94X1110
Keyboard Cable
94X1147
Space-Saving Keyboards (84/85 Key)
Canadian French
Spanish/Latin
U.S. English
Cable Assembly, External
1396046
1396047
1393290
1393082
Host-Connected Keyboards (122 Key)
Austrian/German
Belgian
Canadian French
Cyrillic
Danish
Dutch
French
Greek
Icelandic
Italian
Latin American Spanish
Norwegian
Portuguese
Spanish
Swedish/Finnish
Swiss/French
Swiss/German
Turkish
U.K. English
U.S. English (E/ME/A use only)
U.S. English
Yugoslavian
1396902
1396903
1397051
1396916
1396904
1396905
1396990
1396917
1396919
1396908
1397052
1396909
1396910
1396911
1396906
1396912
1396913
1396921
1396914
1397025
1397050
1396920
Hardware Maintenance Service
299
Miscellaneous Parts Kits
Miscellaneous Parts Kit:
3mm 5 x 5 screw w/washer (2)
3mm 5 x 12 screw w/washer (2)
3mm 5 x 8 screw (2)
3mm 0 x 8 system board screw (8)
3mm 0 x 8 CD support screw (2)
4mm 0 x 6 drive mounting screw (2)
5mm 0 x 10 tilt screw (2)
Feature slot bracket (1)
Feature card retainer (1)
Red poly bag (1)
Standoff w/washer (2)
Top cover screw (2)
Front foot pad (2)
Front foot clip (2)
Tilt leg spring (2)
00F2113
Miscellaneous Parts Kit:
Front rubber foot (1)
Rear rubber foot (1)
Cover strap (1)
Keyboard support (1)
Track bracket (1)
Safety cover (1)
DC-DC cap (1)
07G1409
Miscellaneous Parts Kit:
Rubber bumper (1)
07G1410
Screw and Spacer Kit:
3mm L8 screw (2)
4mm L4 screw (5)
2.5mm L4 screw (5)
2.5mm L12 screw (5)
2.5mm L18 screw (5)
2.5mm L5W screw (5)
2.5mm L5B screw (5)
2.5mm L5 screw (5)
Plastic spacer (1)
Plastic spacer B (1)
07G1411
Miscellaneous Parts Kit:
Diskette drive A bracket (1)
Diskette drive B bracket (1)
LCD right support bracket (1)
LCD left support bracket (1)
Hard disk drive bracket (1)
07G1743
300
PS/2 Maintenance Manual
Screw Kit:
2mm 5 x 4 black screw (10)
2mm 5 x 12 screw (10)
1mm 6 x 4 screw (10)
Tapping 2 x 4 screw (10)
2mm 5 x 8 black screw (10)
2mm 5 x 3 black screw (10)
Screw (10)
4-40 x 5 stud (20)
4-40 x 4.8 stud (10)
2mm 5 x 6 screw w/ washer (10)
2mm 5 x 5 screw (100)
Special screw (1)
2mm 0 x 5 (10)
3 x 4 screw (10)
07G1835
Miscellaneous Parts Kit:
Nut (2)
Cover screw (2)
I/O panel screw (2)
3.5mm captive screw (2)
Fingerstock shield (3)
Fingerstock base shield (3)
Slide (1)
Standoff shaft (2)
3mm screw (5)
Ground power special bracket (1)
27F4171
Miscellaneous Parts Kit:
Rubber foot (4)
8mm captive screw (4)
Captive screw (2)
3.5mm hex head screw (4)
3mm Plastite screw (4)
33F8370
Miscellaneous Parts Kit:
Screw (2)
Cable Cable clamp (1)
4mm screw (2)
Breakaway washer (1)
Pawl bracket (1)
Cable clamp (1)
Ground base spring (1)
I/O bracket (1)
PC board standoff (1)
Wing nut (1)
Ground spring (1)
33F8435
Hardware Maintenance Service
301
Miscellaneous Parts Kit:
Door bezel (1)
Screw (2)
39G6574
Miscellaneous Parts Kit:
Captive spring (4)
Lock slide (2)
Captive screw (4)
Shaft standoff (2)
61X8915
Miscellaneous Parts Kit:
2MB memory holder (2)
1MB memory card shield (1)
2MB memory card shield (1)
72X7037
Miscellaneous Parts Kit:
4mm metric screw (4)
Foot (2)
Screw (1)
Shaft standoff (2)
72X8525
Miscellaneous Parts Kit:
Blank diskette drive bezel (1)
72X8535
Miscellaneous Parts Kit:
I/O bracket (1)
Diskette drive retainer (1)
72X8562
Miscellaneous Parts Kit:
4mm screw (2)
Shaft standoff (2)
Hard disk drive ground strap (1)
Handle screw (2)
Baffle cover nut (6)
72X8578
Miscellaneous Parts Kit:
I/O bracket (1)
11.5 inch card holder (1)
Flat cable clip (1)
72X8579
Miscellaneous Parts Kit:
Captive fastener washer (1)
Knob assembly (4)
Captive cover screw (1)
Retainer fastener (1)
72X8580
302
PS/2 Maintenance Manual
Miscellaneous Parts Kit:
AT bracket (3)
3.5mm hex head screw (9)
Rubber foot (4)
Christmas clip (1)
79F3471
Miscellaneous Parts Kit:
Low cost screw (1)
3.5mm hex head screw (6)
MCA bracket (3)
Rubber foot (4)
Christmas clip (1)
79F7209
Miscellaneous Parts Kit:
Rubber foot (4)
Power knob (1)
Breakaway washer (1)
Pawl bracket (1)
Pallet package ground (1)
92F0010
Miscellaneous Parts Kit:
Thumbscrew (2)
Retainer clip (2)
Ground clip (3)
Bracket (5)
3.5mm steel screw (10)
I/O bracket (5)
Rubber foot (4)
Finger ground (3)
3mm screw (10)
92F0015
PS/2 Screw Kit:
6/32 x 1/4 screws (4)
Metric 3 x 5 screws (4)
Metric 3 x 8 screws (4)
Metric 3 x 10 screws (4)
Metric 3 x 12 screws (4)
Metric 3.5 x 6 screws (4)
Metric 4 x 4 screws (4)
Metric 4 x 8 screws (4)
Metric 4 x 9 screws (4)
Metric 4 x 10 screws (4)
ID jumper (6)
2 position jumper (6)
Shunt with tab jumper (6)
92F0141
Hardware Maintenance Service
303
Power Cords
1
1
2
3
4
5
6
7
8
9
10
Display Power Cord, for:
Colombia, U.S., Venezuela
System Unit Power Cord, for:
Colombia, U.S., Venezuela
System Unit Power Cord, for:
Hong Kong, Singapore, U.K.
System Unit Power Cord, for:
France, Germany, Spain
System Unit Power Cord, for:
Italy, Chile
System Unit Power Cord, for:
Australia, New Zealand, New Guinea,
Papua
System Unit Power Cord, for:
Denmark
System Unit Power Cord, for:
Israel
System Unit Power Cord, for:
Bangladesh, Pakistan, South Africa,
Sri Lanka
System Unit Power Cord, for:
Switzerland
System Unit Power Cord, for:
Thailand
System Unit Power Cord, for:
Japan
1
6
2
7
3
8
4
9
5
10
304
PS/2 Maintenance Manual
6952300
62X1045
14F0033
13F9979
14F0069
13F9940
13F9997
14F0087
14F0015
14F0051
1838574
79F2755
Rewritable Optical Drives
3.5-Inch Rewritable Optical Drive
Rewritable Optical Cartridge
Drive Mounting Slide (for 92F0167)
Tray with Bezel (for 92F0167)
Objective Lens Cleaner (for 92F0167)
Prism Lens Cleaner (for 92F0167)
3.5-Inch Enhanced Rewritable Optical Drive
Mounting Tray
Mounting Tray/Bezel (Model 3510)
Drive Bezel Assembly:
Model 8535, 8540, 8556, 8557, Bays 2, 3
Model 9556, 9576
Model 9557, 9577, Bays 2, 3
Model 8560, 8565, 8580
Model 8590, 9590 B-Bay
Model 8590, 9590 D-Bay
Model 8590, 9590 Filler
Model 3511, 8595, 9595
92F0167
38F8647
85F0022
85F0021
38F8681
38F8682
92F0167
92F0269
92F0268
92F0159
92F0159
92F0159
92F0156
92F0157
92F0158
64F4149
92F0155
Hardware Maintenance Service
305
ServerGuard Adapter Parts
Adapter, ServerGuard
61G3628
Battery, Backup (3V Lithium)
33F8354
Battery Pack, Main (7.2V NiCad) for:
Belgium
Brazil
Luxembourg
Netherlands
Taiwan
All other countries
82G4776
82G4776
82G4776
82G4776
82G4776
61G3629
Cable, External DAA-to-Modem
(All countries except Japan)
Cable, External DAA-to-PSTN for:
Australia
Austria
Belgium
Canada
Chile
China
Czechoslovakia
Denmark
Finland
France
Germany
Greece
Hong Kong
Hungary
Iceland
Ireland
Israel
Italy 58G4339
Japan
Luxembourg
Malaysia
Netherlands
Norway
New Zealand
Poland
Portugal
Romania
Singapore
South Africa
Spain
Sweden
Switzerland
Taiwan
United Kingdom
United States
Yugoslavia
306
PS/2 Maintenance Manual
92F0287
58G4343
58G4386
58G4346
43G3398
43G3398
58G4332
43G3398
58G4333
58G4334
58G4335
58G4347
43G3398
58G4332
43G3398
58G4336
43G3398
58G4338
48G9594
43G3398
43G3398
58G4340
58G4334
58G4332
43G3398
43G3398
43G3398
43G3398
58G4344
43G3398
58G4336
58G4348
43G3398
58G4345
43G3398
43G3398
DAA, External for:
Australia
Austria
Belgium
Canada
Chile
China
Czechoslovakia
Denmark
Finland
France
Germany
Greece
Hong Kong
Hungary
Iceland
Ireland
Israel
Italy 43G3408
Japan (incl. DAA-to-Modem cable)
Luxembourg
Malaysia
Netherlands
Norway
New Zealand
Poland
Portugal
Singapore
South Africa
Spain
Sweden
Switzerland
Taiwan
United Kingdom
United States
Yugoslavia
66G0902
54F0996
58X9868
43G3409
43G3410
43G3411
54F0763
54F0997
43G3392
54F0998
54F0999
54F0717
43G3416
43G3397
43G3413
43G3392
54F0515
External Power Control Box
71G6222
Modem, PCMCIA Type II for:
Japan
All other countries
66G0901
92F0289
43G3412
43G3399
43G3414
43G3392
58G4330
54F0693
54F0695
43G4302
54F0715
43G3396
43G3415
54F0720
54F0693
54F0763
43G4302
43G3407
43G3392
Hardware Maintenance Service
307
SCSI Adapter Terminators
Terminator, External (for 85F0063)
Terminator, Internal (for 85F0063)
Terminator, Internal (for 85F0002)
33F8464
34F0025
57F2870
Tools and Miscellaneous
Data Acquisition Distribution Panel
Data Migration Facility
Ethernet D-Shell Wrap Plug
Ethernet BNC T-Connector
Ethernet BNC 50-ohm Terminator
(2 required)
Grounding Wire Set
Hard Disk Drive Removal Tool
Keyboard Key Cap Removal Tool
Plastic Envelope (For Wrap Plug)
Processor Removal Tool (9577)
Screwdriver Kit
SCSI Terminator
(any SCSI device, space permitting)
SCSI Terminator Kit
(R-PAC Terminator Modules (3) for 40, 60,
80, 120, and 160MB SCSI Hard Disk Drives)
Snap Tool (for Snap Removal)
Speech Control Assembly
Video Memory Module Removal Tool
Video Memory Module Insertion Tool
Wrap Plug, ISDN Primary Rate Adapter
Wrap Plug, Tri-Connector
Wrap Plug (6157 Tape Attachment Adapter/A)
Wrap Plug (Token-Ring Network Adapter/A)
Wrap Plug (Realtime Interface
Co-Processor Multiport/2) 78-pin
Wrap Plug (for Multiport Interface Cable)
Direct Connect 25-pin, ports 0-1
Wrap Plug (for Multiport Interface Cable)
Direct Connect 25-pin, ports 2-7
308
PS/2 Maintenance Manual
61X1769
61X8936
85F0036
84F8207
85F0037
38F4684
64F4126
6110464
6138013
42G2565
95F3598
92F0142
92F0143
72X8547
61X1769
75X5893
07F2518
91F9161
72X8546
4178459
6165899
16F2478
6425494
09F1799
Wireless LAN Adapter (ISA, Micro
Channel Bus)
2
1
4
3
Index Wireless LAN (ISA, Micro Channel Bus)
1
Radio Module, Australia
1
Radio Module, EMEA (Non-Europe)
1
Radio Module, ETSI Countries
1
Radio Module, Hong Kong
1
Radio Module, Israel
1
Radio Module, Japan
1
Radio Module, Korea/New Zealand
1
Radio Module, Mexico
1
Radio Module, Singapore
1
Radio Module, US/Canada/Non-EMEA
2
IBM Wireless LAN Control Card
2
IBM Wireless LAN Control Card, No-Cipher
3
1.5 m cable
4
4 m cable
80G2708
80G2714
80G2702
80G2707
80G2710
80G2703
80G2704
80G2705
80G2709
80G2701
80G2700
80G2711
80G2713
54G2016
Hardware Maintenance Service
309
Wireless LAN Adapter (PCMCIA Type II)
ER
N
AP T
1
IRE
C
RE
LESS LA
CA
DIT RD AD
001
IB M
W
2
3
Index Wireless LAN (PCMCIA Type II)
1
Radio Module, Australia
1
Radio Module, EMEA (Non-Europe)
1
Radio Module, ETSI Countries
1
Radio Module, Hong Kong
1
Radio Module, Japan
1
Radio Module, Korea/New Zealand
1
Radio Module, Mexico
1
Radio Module, Singapore
1
Radio Module, US/Canada/Non-EMEA
2
IBM Wireless LAN Controller Card,
2
IBM Wireless LAN Controller Card, No-Cipher
3
0.4 m Cable
310
PS/2 Maintenance Manual
80G2733
80G2731
80G2727
80G2732
80G2728
80G2729
80G2730
80G2734
80G2726
80G2725
80G2736
80G2737
Options and Adapters Matrix
The following matrices provide listings of PS/2 computers
and the options and adapters that they support. The
options and adapters are listed according to function in the
following order:
Communication
Communication (Networking Systems)
Communication (Realtime Interface Options)
Display/Audio Options
Keyboard/Keypad/Mouse
Memory
Memory Options (for System Board Memory)
Miscellaneous Options
Multimedia
Storage Device (Adapter)
Storage Device (DASD)
Processor Options
System Board Memory (for Memory Options)
Locate the option or adapter in the left-hand column; then
refer across the table for the information you need.
Hardware Maintenance Service
311
312
PS/2 Maintenance Manual
–
Transceiver Stand
–
Transceiver Stand
–
Transceiver Stand
0266
–
External Transceiver
4-Slot PCMCIA Adapter Assembly (for ISA)
–
PCMCIA Adapter
2476
–
External Transceiver
1Mbps PCMCIA Infrared LAN Adapter (with external
Transceiver)
–
Micro Channel Adapter
2523
–
External Transceiver
1Mbps Micro Channel Infrared LAN Adapter (with external
Transceiver)
–
–
0934321
87G8979
87G9959
–
0934962
87G8980
87G8982
–
0934962
87G8980
87G8981
–
87G9749
–
2477
–
FRU
Number
2525
Feature
Number
ISA Adapter
1Mbps ISA Infrared LAN Adapter (with external Transceiver)
PCMCIA Adapter
1Mbps PCMCIA Infrared LAN Adapter (with Integrated
Transceiver)
Communication
72G0485
–
–
–
87G9740
–
–
–
87G9742
–
–
–
87G9741
–
87G9743
Option
Number
X
–
–
–
–
–
–
–
–
–
–
–
X
–
–
Industry Standard
Architecture (AT-Bus)
–
–
–
–
–
–
–
–
X
–
–
–
–
–
–
Micro Channel
Architecture
–
–
–
–
X
–
–
–
–
–
–
–
–
–
X
PCMCIA
5
–
–
–
3
–
–
–
3
–
–
–
3
–
3
Warranty
(Years)
Hardware Maintenance Service
313
–
–
300/1200/2400 Modem Adapter/A
Communications Cable (for 65X1253)
–
–
–
–
–
3270 Connection
3278/3279 Emulation Adapter
36/38 Emulation Adapter
Baseband Adapter
Baseband Cable
1349
–
300/1200 Modem Adapter/A
2400bps/9600bps PCMCIA Data/FAX Modem (with
Integrated DAA)
–
14.4kbps/14.4kbps External Data/Fax Modem (Model
7851-001)
2294
14.4kbps/14.4kbps External Data/FAX Modem (for ISA)
–
ISA Card
1341
–
14.4kbps/14.4kbps PCMCIA (with Integrated DAA)
–
Cable
Feature
Number
Bay Assembly
Communication
72X8107
72X8102
69X6294
53F6424
74F3464
73G9321
94X1540
65X1253
34F0006
92G8861
92G8860
73G9343
72G0484
72G0492
72G0483
FRU
Number
1501228
1501223
69X6279
53F6425
74F3465
73G7098
–
94X1755
6450349
92G7447
92G7446
73G7097
–
–
–
Option
Number
–
–
–
X
–
–
–
–
–
X
X
–
–
–
–
Industry Standard
Architecture (AT-Bus)
X
X
X
–
X
–
X
X
X
X
–
–
–
–
–
Micro Channel
Architecture
–
–
–
–
–
X
–
–
–
–
–
X
–
–
–
PCMCIA
1
1
1
1
1
5
1
1
1
5
5
5
–
–
–
Warranty
(Years)
314
PS/2 Maintenance Manual
–
Communications Adapter Cable
–
–
–
Ethernet ISA 10BASE-T Adapter (twisted-pair)
Ethernet Network Adapter (twisted-pair)
–
4330
–
Ethernet ISA 10BASE2 Adapter (bayonet)
10Base2 Cable (8" long)
Ethernet Credit Card Adapter II, 10Base2 (with cable)
10Base-T Cable (3m long)
4331
–
Ethernet Adapter/A
Ethernet Credit Card Adapter II, 10Base-T (with cable)
–
Enhanced 5250 Emulation Adapter
2296
–
Communications Cable (for 65X1253)
DSP Modem
–
Communications Cable (for 34F0006)
1014
–
Dual Async Adapter/A
–
Broadband Adapter
Feature
Number
Bisynchronous Communication Adapter
Communication
92F0045
92F0386
92F0387
92G9319
0934330
92G9320
0934331
92F0005
82G7061
92G5374
34F0008
8529274
94X1540
8285985
72X8106
8286098
FRU
Number
–
–
–
92G9319
0934330
92G9320
0934331
6451091
30F5383
92G5365
6451013
92G7515
1502067
–
–
1501222
1501204
Option
Number
X
X
X
–
–
–
–
–
X
X
–
X
–
–
–
X
Industry Standard
Architecture (AT-Bus)
–
–
–
–
–
–
–
X
–
–
X
–
X
X
X
–
Micro Channel
Architecture
–
–
–
–
X
–
X
–
–
–
–
–
–
–
–
–
PCMCIA
1
1
1
–
5
–
5
1
1
5
1
1
1
1
1
1
Warranty
(Years)
Hardware Maintenance Service
315
–
–
–
–
–
–
–
FaxConcentrator Adapter/A Cable
FDDI Fiber Base Adapter/A
FDDI Fiber Extender Adapter/A
FDDI Copper Base Adapter/A
FDDI Copper Extender Adapter/A
High Speed Card Kit (for 3117 System)
High Speed Card Kit (for 3118 System)
4213
ISA 14.4Kbps Data/Fax Modem with Wake-Up on Ring
–
8090
IBM Wireless LAN - Advanced
14.4 Modem-Wake-Up
8010
–
3280
–
IBM Wireless LAN - Advanced
10Base2 Cable (8" long MAM)
IBM Credit Card Adapter For Ethernet, 10Base2 (with cable)
10Base-T Cable (8" long MAM)
3290
–
IBM Credit Card Adapter For Ethernet, 10Base-T (with cable)
–
FaxConcentrator Adapter/A
Feature
Number
Ethernet Network Adapter (twisted-pair)
Communication
04H5788
–
80G0900
80G1000
0933264
0933280
92G9319
0933290
65X1900
65X1920
93F0348
93F0347
93F0346
93F0345
94X2527
94X2540
92F0046
FRU
Number
–
13H6686
80G0900
80G1000
0933264
0933280
92G9319
0933290
65X1905
65X1925
–
–
–
–
–
94X2530
6451136
Option
Number
–
X
–
X
–
–
–
–
–
–
–
–
–
–
–
–
–
Industry Standard
Architecture (AT-Bus)
–
–
–
X
–
–
–
–
X
X
X
X
X
X
X
X
X
Micro Channel
Architecture
–
–
X
–
–
X
–
X
–
–
–
–
–
–
–
–
–
PCMCIA
–
5
3
3
–
5
–
5
1
1
1
1
1
1
1
1
1
Warranty
(Years)
316
PS/2 Maintenance Manual
–
–
–
–
–
ISDN Cable Option (standard)
ISDN Cable Option (Germany)
ISDN Primary Rate Adapter
LAN Streamer Adapter
Leased Line Modem
–
Multiprotocol Adapter/A
–
–
–
PCMCIA Modem
DAA - US/Canada
DAA - UK
4214
–
115V AC Adapter
PCMCIA 14.4/14.4Kbps International Data/Fax Modem
–
Modem Enabler Card
3593
–
ISDN Interface Coprocessor/2 Model 2
Modem Enabler
–
2470
–
Feature
Number
ISDN Interface Coprocessor/2 Model 2
ISA Multiprotocol Communications Adapter
Wake-Up Cable
Communication
87G9382
87G9408
10H8601
–
85F0004
92G7587
92G7586
–
26F0724
92F8941
82G2656
07F8947
07F8946
45F7230
44F7244
73G3223
04H5934
FRU
Number
–
–
–
10H9355
6451003
–
–
92G7519
26F1862
92F8942
–
–
–
44F7728
44F7728
73G7099
–
Option
Number
–
–
–
–
–
–
–
–
–
–
–
–
–
–
X
X
–
Industry Standard
Architecture (AT-Bus)
–
–
–
–
X
–
–
–
X
X
X
X
X
X
–
–
–
Micro Channel
Architecture
–
–
–
X
–
–
–
–
–
–
–
–
–
–
–
–
–
PCMCIA
–
–
–
5
1
–
–
1
1
1
1
1
1
1
1
5
–
Warranty
(Years)
Hardware Maintenance Service
317
–
–
–
–
–
–
–
–
–
–
DAA - Finland
DAA - Italy
DAA - Netherlands
DAA - Norway
DAA - Denmark
DAA - Sweden
DAA - Australia
DAA - Portugal
DAA - New Zealand
DAA - Belgium
–
–
PC Network Adapter II
–
Audio Interface Module
PC Network Adapter
–
PCMCIA Card Assembly
3437
–
PCMCIA Multimedia Audio Adapter
–
DAA - Switzerland
Feature
Number
DAA - Germany
Communication
72X8105
8286171
87G9550
87G9549
–
10H9365
87G9406
87G9398
87G9404
87G9402
87G9396
87G9394
87G9392
87G9390
87G9388
87G9386
87G9384
FRU
Number
1501220
6450213
–
–
87G9748
–
–
–
–
–
–
–
–
–
–
–
–
Option
Number
X
X
–
–
–
–
–
–
–
–
–
–
–
–
–
–
–
Industry Standard
Architecture (AT-Bus)
–
–
–
–
–
–
–
–
–
–
–
–
–
–
–
–
–
Micro Channel
Architecture
–
–
–
–
X
–
–
–
–
–
–
–
–
–
–
–
–
PCMCIA
1
1
–
–
1
–
–
–
–
–
–
–
–
–
–
–
–
Warranty
(Years)
318
PS/2 Maintenance Manual
–
–
–
PhoneCommunicator Cable (Black-S)
PhoneCommunicator Cable (Beige-L)
PhoneCommunicator Cable (Beige-S)
–
–
–
–
–
S/370 Channel Emulator
S/370 Chan. Em. HMM & Disks (for 70X5061)
S/370 Channel Emulator Adapter/A
S/370 Chan. Em. Cable (for 06F3160, 70X5061)
S/370 MCA to Mainframe Connection
2473
–
PCMCIA to 9-Pin Serial Cable
PS/2 14.4kbps/14.4kbps Data/Fax Modem Adapter/A
–
PCMCIA RS232 Serial Adapter
2471
–
PhoneCommunicator Cable (Black-L)
PCMCIA RS232 Serial Adapter (with Cable)
–
PhoneCommunicator Adapter
3043
–
PS/2 Multiprotocol Adapter/A
–
PC Network Baseband Adapter
Feature
Number
PC Network Adapter Cable
Communication
12G8067
70X4865
06F3160
75X3256
70X5061
92G8867
87G9244
87G9243
–
85F0004
57F1264
57F1263
57F1262
57F1261
33F4846
72X8101
8286172
FRU
Number
–
–
1674899
–
6193413
92G7498
–
–
87G9250
92G7516
–
–
–
–
6450619
1501221
–
Option
Number
–
–
–
X
X
–
–
–
–
–
X
X
X
X
X
X
X
Industry Standard
Architecture (AT-Bus)
X
X
X
–
–
X
–
–
–
X
–
–
–
–
–
–
–
Micro Channel
Architecture
–
–
–
–
–
–
X
X
X
–
–
–
–
–
–
–
–
PCMCIA
1
1
1
1
1
5
–
5
5
1
1
1
1
1
1
1
1
Warranty
(Years)
Hardware Maintenance Service
319
–
–
–
–
–
–
–
Token-Ring 16/4 Adapter/A RPL Module
Token-Ring 16/4 Bus Master Adapter/A
Token-Ring 16/4 Adapter
Token-Ring RPL Module (for 93F0334)
Token-Ring Adapter
Token-Ring Adapter (with RPL Module)
Token-Ring Adapter/A
4836
–
Token-Ring 16/4 Adapter/A
Two Slot Front Access PCMCIA Adapter for ISA
–
–
4838
–
4856
–
4839
–
Feature
Number
Store Loop Adapter
Infrared Transceiver
Serial Infrared, for PCMCIA
Infrared Transceiver
Serial Infrared, for Micro Channel
Infrared Transceiver
Serial Infrared, for ISA
SDLC Adapter
Communication
–
25F7540
83X7839
16F0463
25F8887
93F0334
74F4149
74F9415
93F0331
34G1185
08H3740
08H3738
08H3739
08H3737
08H3739
08H3736
8286099
FRU
Number
81G4246
69X8138
–
25F9858
–
25F7367
74F4140
25F8887
74F9410
83X8187
–
08H3656
–
08H3655
–
08H3654
1501205
Option
Number
X
–
X
X
X
X
–
–
–
–
–
–
–
–
–
X
X
Industry Standard
Architecture (AT-Bus)
–
X
–
–
–
–
X
X
X
X
–
–
–
X
–
–
–
Micro Channel
Architecture
–
–
–
–
–
–
–
–
–
–
–
X
–
–
–
–
–
PCMCIA
5
1
1
1
1
1
1
1
1
1
–
3
–
3
–
3
1
Warranty
(Years)
320
PS/2 Maintenance Manual
–
Cable Kit
–
Cable Kit
V.32BIS DSP Data/Fax Modem
Token-Ring RPL Module (for 93F0334)
2296
–
83X9180
–
Drive Bay Assembly
RPL Module (for 25F7540)
–
MCA Card-2 Slot
4837
–
Two Slot Front Access PCMCIA Adapter for Micro Channel
–
Drive Bay Assembly
Feature
Number
ISA Card-2 Slot
Communication
92G7502
25F8887
–
81G4635
81G4633
81G4261
–
81G4635
81G4633
81G4632
FRU
Number
92G7501
–
25F8887
–
–
–
81G4256
–
–
–
Option
Number
X
X
–
–
–
–
–
–
–
–
Industry Standard
Architecture (AT-Bus)
–
–
X
–
–
–
X
–
–
–
Micro Channel
Architecture
–
–
–
–
–
–
–
–
–
–
PCMCIA
5
1
1
–
–
–
5
–
–
–
Warranty
(Years)
Hardware Maintenance Service
321
0615
4330
4331
7478
8072
0412
7462
–
Ethernet 10BASE2 Adapter
Ethernet CX II PCMCIA Adapter
Ethernet TrackPoint II PCMCIA Adapter
ISA Waverunner Adapter
Token Ring II PCMCIA Adapter
Token Ring EISA 16/4 Busmaster Adapter
Token Ring ISA-16 Adapter
Token Ring MAU Adapter
0149
0605
Token Ring Micro Channel Adapter
2812
Ethernet 10BASET Adapter
Feature
Number
3270 PCMCIA Adapter
Communication (Networking Systems)
74F9410
6091014
78G9645
63F0412
0933462
73G1393
0933290
0933280
92F0387
92F0386
0933315
FRU
Number
74F9410
6091014
73G2032
63F0412
0933462
73G1393
0934331
0934330
60G0615
60G0605
0933315
Option
Number
–
–
X
–
–
X
–
–
–
X
–
Industry Standard
Architecture (AT-Bus)
X
X
–
X
–
–
–
–
X
–
–
Micro Channel
Architecture
–
–
–
–
X
–
X
X
–
–
X
PCMCIA
1
1
5
1
5
1
5
5
5
5
5
Warranty
(Years)
322
PS/2 Maintenance Manual
–
–
–
–
–
–
–
–
–
–
–
–
–
–
–
–
–
1-Port V.35 Cable (Port 0 Only, Selectable)
4, 8 and 4/4 Elec Interface Brd Wrap Plug
4 Port RS-232-C / 4 Port RS-422-A Elec Interface Brd
4 Port RS-232-C Elec Interface Brd
4-port RS232-C Elec Interface Brd
6 Port Sync RS-232-C Elec Interface Brd
6 Port Sync Elec Interface Brd Wrap Plug
6-Port X.21 Cable (World Trade)
6-Port X.21 Cable Wrap Plug Port 0-5 (World Trade)
6-Port X.21 Interface Brd/A (World Trade)
6-Port V.35 Cable
6-Port V.35 Cable Wrap Plug Port 0-5
6-Port V.35 IB Wrap Plug
6-Port V.35 Interface Brd/A
8-Port Interface Cable
8 Port RS-232-C Elec Interface Brd
Feature
Number
1-Port X.21 Cable (Port 0 Only, Selectable)
Communication (Realtime Interface Options)
91F7974
53F2621
72F0164
72F0168
72F0167
72F1966
04G5500
85F0206
04G5501
15F8859
91F7963
09F1957
91F7976
91F7966
16F2478
57F2752
57F2751
FRU
Number
53F2610
–
–
–
–
–
–
–
–
–
–
–
09F1955
–
–
–
–
Option
Number
–
X
–
–
–
–
–
–
–
–
–
–
–
–
–
–
–
Industry Standard
Architecture (AT-Bus)
X
X
X
X
X
X
X
X
X
X
X
X
X
X
X
X
X
Micro Channel
Architecture
–
–
–
–
–
–
–
–
–
–
–
–
–
–
–
–
–
PCMCIA
1
1
1
1
1
1
1
1
1
1
1
1
1
1
1
1
1
Warranty
(Years)
Hardware Maintenance Service
323
–
–
–
–
–
–
–
–
–
–
–
–
–
–
–
–
–
8-Port RS-232 Interface Brd/A Wrap Plug
8 Port RS-422-A Elec Interface Brd
8-Port RS-422-A Interface Brd (IB)
8-Port RS-422 Interface Brd/A Wrap Plug
15-Pin Wrap Plug (V.35 Port 0 & 1, Selectable)
15-Pin Wrap Plug (X.21 Port 0, Selectable)
20-MA Current Loop Elec Interface Brd
25-Pin Wrap Plug (RS-232-C Port 0 - 3, Selectable)
25-Pin Wrap Plug (RS-422-A Port 0 & 2, Selectable)
34-Pin Wrap Plug (V.35 Port 0 Only, Selectable)
78-Pin Wrap Plug for Selectable IB
78-Pin Wrap Plug for X.21 IB (World Trade)
64BK X 1 Memory Module (for 16F2223)
128KB Realtime Interface Coprocessor
128KB Realtime Interface Coproc Multiport
256KB X 1 Memory Module (for 16F2223)
Feature
Number
8-Port RS-232-D Interface Brd (IB)
Communication (Realtime Interface Options)
76X1022
16F2223
60X8192
60X8200
85F0205
40F9902
71F0163
53F3886
40F9903
58X7288
40F9904
40F9900
57F0678
53F2615
15F8858
15F8848
53F2612
FRU
Number
–
00F5527
85X2710
–
–
–
–
–
–
–
–
–
–
–
–
–
–
Option
Number
X
X
X
X
–
–
–
–
–
X
–
–
X
X
–
X
X
Industry Standard
Architecture (AT-Bus)
–
–
–
–
X
X
X
X
X
–
X
X
X
X
X
X
X
Micro Channel
Architecture
–
–
–
–
–
–
–
–
–
–
–
–
–
–
–
–
–
PCMCIA
1
1
1
1
1
1
1
1
1
1
1
1
1
1
1
1
1
Warranty
(Years)
324
PS/2 Maintenance Manual
–
–
–
–
–
–
–
–
–
–
–
–
–
–
–
–
–
256KB Memory Module, for 44F7123
512KB Realtime Interface Coprocessor
512KB Memory Module (2 for p/n 09F1888)
512KB Realtime Interface Coproc Multiport/2
1MB Memory Module (2 for p/n 09F1962)
1MB Realtime Interface Coproc Multiport/2
Dir Conn 25-Pin Wrap Plug (RS-232-D Ops, Port 0-7)
Dir Conn 25-Pin Wrap Plug (RS-422-A Ops, Port 0-7)
Dir Conn 25-Pin Wrap Plug for Port 2-7
High-Speed Comm Card
Memory Module (64KB X 1), for 76X1013
Memory Module (256KB X 1), for 76X1013
Multiport Interface Cable
Parts Kit (Screws, Jumpers, etc.)
Realtime Interface Coproc Multiport Adapter Module
Realtime Interface Coproc Portmaster Adapter/A
Feature
Number
256KB Memory Module, for 04G5827
Communication (Realtime Interface Options)
53F2603
33F8967
67X1609
00F5524
76X1022
60X8200
04G5827
09F1799
33F8964
33F8985
09F1962
16F2265
09F1888
16F2267
76X1013
16F2267
10G6927
FRU
Number
53F2660
33F8971
–
00F5331
–
–
04G5835
–
–
–
–
–
16F2267
–
85X2706
–
–
Option
Number
–
X
X
X
X
X
–
–
–
–
–
–
–
–
X
–
–
Industry Standard
Architecture (AT-Bus)
X
–
–
X
–
–
X
X
X
X
X
X:
X
X
–
X
X
Micro Channel
Architecture
–
–
–
–
–
–
–
–
–
–
–
–
–
–
–
–
–
PCMCIA
1
1
1
1
1
1
1
1
1
1
1
1
1
1
1
1
1
Warranty
(Years)
Hardware Maintenance Service
325
–
–
–
–
–
–
–
–
–
–
–
–
–
–
–
–
–
Realtime Interface Coproc Wrap Plug
RS-232-C Elec Interface Brd
RS-232-C Dir Connect Wrap Plug
RS-232-C Dir Connect Cable
RS-232-C Dir Conn Wrap Plug (Port 0 & 1)
RS-232-C Dir Conn Wrap Plug (Port 0 - 3, Selectable)
RS-232-C Dir Conn Wrap Plug (Port 0 - 7)
RS-232-C Modem Attach Cable
RS-232-C Modem Attach Wrap Plug
RS-232-C Multiport Elec Interface Brd
RS-232-D OPs, Dir Conn 25-Pin Wrap Plug (Port 0-7)
RS-422-A 25-Pin Wrap Plug (Port 0 & 2, Selectable)
RS-422-A Elec Interface Brd
RS-422-A Multiport Elec Interface Brd
RS-422-A OPs, Dir Conn 25-Pin Wrap Plug (Port 0-7)
Selectable Cable
Feature
Number
Realtime Interface Coproc Wrap Plug
Communication (Realtime Interface Options)
53F2624
57F0089
09F1937
58X7286
53F3886
57F0888
09F1796
6425494
67X1247
09F1799
40F9003
6425494
67X1245
6425493
58X7285
6425492
16F2478
FRU
Number
–
–
–
–
–
–
–
–
–
–
–
–
–
–
–
–
–
Option
Number
X
X
X
X
X
X
X
X
X
X
X
X
X
X
X
X
X
Industry Standard
Architecture (AT-Bus)
X
–
–
–
–
–
–
–
–
–
–
X
–
–
–
–
–
Micro Channel
Architecture
–
–
–
–
–
–
–
–
–
–
–
–
–
–
–
–
–
PCMCIA
1
1
1
1
1
1
1
1
1
1
1
1
1
1
1
1
1
Warranty
(Years)
326
PS/2 Maintenance Manual
–
–
–
–
–
–
–
–
–
–
–
–
–
–
–
–
–
Selectable IB 78-Pin Wrap Plug
Surge Protection Adapter
Sync Interface Dir Conn 25-Pin Wrap Plug (Port 0-5)
Sync Interface Cable
V.24 Cable Option
V.24 Wrap Plug
V.35 15-Pin Wrap Plug (Port 0 & 1, Selectable)
V.35 Dir Conn 34 Pin Wrap Plug (Port 0 Only, Selectable)
V.35 Cable Option
V.35 Elec Interface Brd
V.35 Interface Conn Cable
V.35 Wrap Plug
V.35 Wrap Plug
X.21 15 Pin Wrap Plug (Port 0, Selectable)
X.21 Cable Option
X.21 Wrap Plug
Feature
Number
Selectable Interface Brd
Communication (Realtime Interface Options)
16F1890
16F1887
40F9904
6425496
16F1861
67X1249
58X7287
16F1889
71F0163
40F9900
16F1891
16F1888
15F8868
33F8968
53F2627
40F9902
84F7540
FRU
Number
–
–
–
–
–
–
–
–
–
–
–
–
–
–
–
–
–
Option
Number
–
–
X
X
–
X
X
–
X
X
–
–
–
–
X
X
X
Industry Standard
Architecture (AT-Bus)
X
X
–
–
X
–
–
X
–
–
X
X
X
X
X
–
X
Micro Channel
Architecture
–
–
–
–
–
–
–
–
–
–
–
–
–
–
–
–
–
PCMCIA
1
1
1
1
1
1
1
1
1
1
1
1
1
1
1
1
1
Warranty
(Years)
Hardware Maintenance Service
327
–
–
X.25 Interface Coproc 37-Pin Wrap Plug
Feature
Number
X.25 Interface Coproc/2, No Memory
Communication (Realtime Interface Options)
16F1884
44F7123
FRU
Number
–
16F1858
Option
Number
–
–
Industry Standard
Architecture (AT-Bus)
X
X
Micro Channel
Architecture
–
–
PCMCIA
1
1
Warranty
(Years)
328
PS/2 Maintenance Manual
–
Display Adapter (DBCS) (for Taiwan)
Image Adapter/A
–
–
–
Display Adapter, DBCS (for Japan)
Joystick
–
Memory Module (for 1887971)
–
–
Display Adapter 8514/A
Speaker Set
–
Display Adapter
–
–
ActionMedia II Display CD-ROM Cable
Audio Card
–
ActionMedia II Audio/Video Capture Cable
–
–
ActionMedia II Video Cable
CD-ROM Drive
–
ActionMedia II Capture Option
3596
–
High-End Audio Kit
–
ActionMedia II Display Adapter/A 2MB
Feature
Number
SCSI Micro Channel Adapter
Display/Audio Options
06G8224
92G7555
92G7581
92G7566
71G0297
–
07G0508
07G1459
1887708
1887971
1887743
69F9747
69F9736
69F9737
69F9735
69F9733
69F9731
FRU
Number
07F4400
–
–
–
–
92G7585
–
07G1450
1887989
1887972
1887744
–
–
–
69F9734
69F9732
69F9730
Option
Number
–
–
–
–
–
–
–
–
–
–
X
–
–
–
–
–
X
Industry Standard
Architecture
X
–
–
–
–
–
X
X
X
X
–
X
X
X
X
X
–
Micro Channel
Architecture
–
–
–
–
–
–
–
–
–
–
–
–
–
–
–
–
–
PCMCIA
1
–
–
–
–
1
1
1
1
1
1
1
1
1
1
1
1
Warranty
(Years)
Hardware Maintenance Service
329
–
–
Audio Card
Speaker Set
–
–
–
Audio Card
Speaker Set
Joystick
–
Screen Reader Adapter
–
Real Magic MPEG Board
–
–
Speaker Set
Personal Dictation Adapter (AT/ISA Bus)
–
CD-ROM Drive
3597
–
CD-ROM Drive
MPEG Pro-Motion Video Kit
3595
Mid-Range Audio Kit
–
–
CD-ROM Drive
M-Audio Capture/Playback Adapter/A
–
3594
Low-End Audio Kit
Feature
Number
Image-I Adapter/A
Display/Audio Options
33F4842
71G6641
06H4052
92G7529
92G7559
–
92G7555
92G7581
92G7565
71G0297
–
95F1256
92G7579
92G7565
71G0297
–
49G2716
FRU
Number
57F1588
–
–
–
–
06H4052
–
–
–
–
92G7584
92F3379
–
–
–
92G7583
–
Option
Number
X
X
–
–
–
–
–
–
–
–
–
–
–
–
–
–
–
Industry Standard
Architecture
–
–
–
–
–
–
–
–
–
–
–
X
–
–
–
–
X
Micro Channel
Architecture
–
–
–
–
–
–
–
–
–
–
–
–
–
–
–
–
–
PCMCIA
1
1
–
–
–
1
–
–
–
–
1
1
–
–
–
1
1
Warranty
(Years)
330
PS/2 Maintenance Manual
Feature
Number
–
–
–
–
–
Display/Audio Options
Screen Reader Keypad
Screen Reader Keypad Cable
XGA Display Adapter/A
Video-Memory Module for XGA (for 96F7657)
XGA-2 Display Adapter/A
87F4774
75X5894
96F7657
72X8537
1393515
FRU
Number
87F4773
–
75X5887
72X8537
1393515
Option
Number
–
–
–
X
X
Industry Standard
Architecture
X
X
X
X
X
Micro Channel
Architecture
–
–
–
–
–
PCMCIA
1
1
1
1
1
Warranty
(Years)
Hardware Maintenance Service
331
2290
2289
2287
2292
1943
2665
1948
2281
2671
2666
2285
2282
3056
101-Key Enhanced Keyboard (PS/2 Style)
101-Key Enhanced Keyboard with Trackball (AT Style)
101-Key Enhanced Keyboard with Trackball (PS/2 Style)
101-Key Enhanced Keyboard with TrackPoint II (PS Style)
Adjustable Keyboard - PS/AT Style
Monitor Miser
Enhanced Mouse
Enhanced Mouse II - (Black) PS Style Mouse Port
Enhanced Mouse II - (Pearl White) PS Style Mouse Port
Quiet Touch Numeric Keypad
Quiet Touch Keyboard with TrackPoint II
TrackPoint II Keyboard (Black) - PS Style
Feature
Number
101-Key Enhanced Keyboard (AT Style)
Keyboard/Keypad/Mouse
13H6710
92G7458
92G7459
06H4595
06H5095
92G7457
92G7460
13H6713
92G7461
92G7455
92G7456
92G7453
92G7454
FRU
Number
13H6705
92G7458
92G7459
13H6690
13H6714
92G7457
92G7460
13H6689
92G7461
92G7455
92G7456
92G7453
92G7454
Option
Number
X
–
X
X
X
–
X
X
–
–
X
–
X
Industry Standard
Architecture (AT-Bus)
X
X
X
X
X
X
X
X
X
X
–
X
–
Micro Channel
Architecture
–
–
–
–
–
–
–
–
–
–
–
–
–
PCMCIA
1
1
1
1
1
1
3
1
1
1
1
1
1
Warranty
(Years)
332
PS/2 Maintenance Manual
2113
2111
2109
2455
2112
2114
128KB L2 Cache Memory Upgrade (Write Back)
128KB L2 Cache Memory Upgrade (Write Back)
128KB L2 Cache Memory Upgrade (Write Thru)
256KB L2 Cache Memory(ValuePoint Computers only)
256KB L2 Cache Memory Upgrade (Write Back)
256KB L2 Cache Memory Upgrade (Write Back)
–
–
2106
2200
512KB Memory Module
512KB DRAM (Video)
0-8MB ISA Memory Expansion Adapter (16-Bit)
3865
512KB Memory Module
512KB 70ns Video Memory (256K x 16 DRAM: 40-Pin ZIP),
for PS/1 2133, 2155, and 2168 models
–
2454
128KB L2 Cache Memory (ValuePoint Computers only)
256KB X 1 Memory Module
3862
–
Feature
Number
128KB 15ns L2 Cache, for PS/1 2144 and 2168 models with
system board FRU 65G4152
64KB X 1 Memory Module
Memory
92G7433
72G3138
53F2656
53F2658
92G7550
76X1022
73G3231
92F0400
92G7431
92F0397
92F0399
73G3139
92G7430
92G7548
06X8200
FRU
Number
92G7215
92G7222
–
–
92G7551
–
92G7221
92G7219
92G7436
92G7216
92G7217
92G7220
92G7228
92G7547
–
Option
Number
X
X
–
X
X
X
X
X
X
X
X
X
–
X
X
Industry Standard
Architecture (AT-Bus)
–
–
X
–
–
–
–
–
–
–
–
–
X
–
–
Micro Channel
Architecture
–
–
–
–
–
–
–
–
–
–
–
–
–
–
–
PCMCIA
3
3
1
1
5
1
3
3
3
3
3
3
3
3
1
Warranty
(Years)
Hardware Maintenance Service
333
2119
2115
2MB Flash/1MB SRAM PCMCIA Memory (Combo Card)
2MB Flash PCMCIA Memory Card
2118
2094
2201
2091
2MB SRAM PCMCIA Memory Card
4MB 70ns 30-Pin Industry Standard SIMM
4MB 70ns 72-Pin Industry Standard SIMM
4MB 80ns 72-Pin IBM SIMM
–
2202
2MB 85ns 72-Pin IBM SIMM
2MB Memory Module
2087
2MB 70ns 72-Pin IBM SIMM
–
1MB Memory Module
2108
–
1MB Memory Module
1MB VRAM (Video)
2107
1MB DRAM (Video)
2117
2093
1MB SRAM PCMCIA Memory Card
2453
1MB 70ns 30-Pin Industry Standard SIMM
Feature
Number
1MB 60ns Video Memory (ValuePoint Computers only)
Memory
92F3337
73G3233
96F9289
0933155
53F2664
0932857
0933173
92F0104
92F0102
73G3236
0933152
53F2660
53F2662
60G2951
93F0058
92G7432
FRU
Number
92G7199
92G7201
92G7207
92G7230
–
92G7225
92G7231
92G7196
92G7198
92G7224
92G7229
–
–
92G7223
92G7197
92G7443
Option
Number
X
X
X
–
–
–
–
X
X
X
–
–
X
X
X
X
Industry Standard
Architecture (AT-Bus)
X
X
X
–
X
–
–
X
X
X
–
X
–
X
X
X
Micro Channel
Architecture
–
–
–
X
–
X
X
–
–
–
X
–
–
–
–
–
PCMCIA
5
5
5
3
1
3
3
5
5
3
3
1
1
3
5
3
Warranty
(Years)
334
PS/2 Maintenance Manual
3479
2116
2088
2190
2638
2098
2089
2208
2647
2637
2100
3480
2092
4MB Flash PCMCIA Memory Card
4MB 70ns 72-Pin IBM SIMM
4-14MB Micro Channel Memory Expansion Adapter (32-Bit)
8MB 60ns ECC Memory (1M x 72 DIMM: 3.5v, 168-Pin),
PowerPC 8642 models
8MB 70ns ECC 72-Pin IBM SIMM
8MB 70ns 72-Pin IBM SIMM
8MB 72-Pin Industry Standard SIMM
8MB 70ns 72-Pin Industry Standard SIMM (ValuePoint
Systems Only)
8MB 70NS 72-Pin Industry Standard SIMM (ValuePoint
Computers only)
8MB 70ns 168-Pin Industry Standard DIMM
8MB 70ns Non-parity Memory (1M x 32 SIMM: 72-Pin Au),
for PS/1 2144 and 2168 models
8MB 80ns 72-Pin IBM SIMM
Feature
Number
4MB 70ns Non-parity Memory (1M x 32 SIMM: 72-Pin Au),
for PS/1 2144 and 2168 models
Memory
64F3607
92G7542
73G3125
92G7521
92G7521
73G3234
64F3606
92F0098
92G7523
88F0075
92F0105
0932860
92G7540
FRU
Number
92G7428
92G7541
92G7211
92G7520
92G7520
92G7203
92G7202
92G7208
92G7522
92G7214
92G7200
92G7226
92G7539
Option
Number
X
X
X
X
X
X
X
X
X
–
X
–
X
Industry Standard
Architecture (AT-Bus)
X
–
X
–
–
X
X
X
–
X
X
–
–
Micro Channel
Architecture
–
–
–
–
–
–
–
–
–
–
–
X
–
PCMCIA
5
3
5
5
5
5
5
5
5
3
5
3
3
Warranty
(Years)
Hardware Maintenance Service
335
2640
2099
3483
2095
2096
2105
32MB 70ns ECC 72-Pin IBM SIMM
32MB 70ns Non-parity Memory (8M x 32 SIMM: 72-Pin Au),
for PS/1 2144 and 2168 models
32MB 70ns Tall 72-Pin Industry Standard SIMM
32MB 70ns Wide 72-Pin Industry Standard SIMM
32MB 70ns 168-Pin Industry Standard DIMM
2211
16MB 70ns 72-Pin Industry Standard SIMM
32MB 16ns ECC Memory (4M x 72 DIMM: 3.5v, 168-Pin),
PowerPC 8642 models
2097
16MB 70ns ECC 72-Pin IBM SIMM
3482
2104
16MB 70ns 168-Pin Industry Standard DIMM
16MB 70ns Non-parity Memory (4M x 32 SIMM: 72-Pin Au),
for PS/1 2144 and 2168 models
2639
Feature
Number
16MB 60ns ECC Memory (2M x 72 DIMM: 3.5v, 168-Pin),
PowerPC 8642 models
Memory
92G7429
73G3135
73G3235
92G7546
73G3136
92G7527
92G7544
60G2950
96F9100
73G3124
92G7525
FRU
Number
92G7213
92G7206
92G7205
92G7545
92G7210
92G7526
92G7543
92G7204
92G7209
92G7212
92G7524
Option
Number
X
X
X
X
X
X
X
X
X
X
X
Industry Standard
Architecture (AT-Bus)
X
X
X
–
X
–
–
X
X
X
–
Micro Channel
Architecture
–
–
–
–
–
–
–
–
–
–
–
PCMCIA
5
5
5
3
5
5
3
5
5
5
5
Warranty
(Years)
336
PS/2 Maintenance Manual
–
–
–
–
–
–
–
–
–
–
–
–
–
–
–
512KB Memory Module (for Type 1 - Model 50)
512KB Memory Module (for Type 2 - Model 50)
512KB Memory Module Kit (for 53F2603)
512KB Memory Module Kit (for 09F1888)
512KB Memory Module Kit (for Model 56)
0-8MB Expanded Memory Adapter/A (for 50, 55SX, 60, 65)
1MB Memory Module (for 1497253 & 30F5447)
1MB Memory Module (85ns, Type 2 & 15F8292)
1MB Memory Module Kit (for 53F2603)
2-8MB 80286 Memory Expansion Option (for 50, 55SX, 60,
65)
2-8MB 80386 Memory Expansion Adapter (for 70, 80)
2MB Memory Module Kit (85ns for 90X9556)
2MB Memory Expansion Adapter (for 25, 30)
2MB Memory Module Kit (Type 2 & 85F0480)
Feature
Number
256KB Memory Module (for 1497253 - Models 25, 30
30-286, 50, 55SX, and 57)
Memory Options (for System Board Memory)
90F8625
1497250
92F0104
90X9556
85F0480
53F2660
90X8624
74X8637
1497253
16F2226
16F2267
53F2656
10G4005
72X8517
1497256
FRU
Number
6450604
2685193
6450604
6450605
6450609
–
6450603
30F5360
1497259
–
–
–
–
–
30F5348
Option
Number
–
–
–
–
–
–
–
–
–
–
–
–
–
–
–
Industry Standard
Architecture
–
–
–
–
–
–
–
–
–
–
–
–
–
–
–
Micro Channel
Architecture
–
–
–
–
–
–
–
–
–
–
–
–
–
–
–
PCMCIA
1
1
1
1
1
1
1
1
1
1
1
1
1
1
1
Warranty
(Years)
Hardware Maintenance Service
337
–
–
–
–
–
–
–
–
–
–
–
–
–
–
–
2MB Memory Module Kit (85ns for 90X9556)
2MB Memory-Module Kit (70ns - for 56, 65, 85, 90, 95, 95A)
2MB Memory-Module Kit (80ns - for 25, 70, 85, 90, 95, 95A)
4MB Memory Module Kit (80ns - for 25, 35, 40, 50, 55SX 60,
85, 90, 95, 95A)
4MB Memory-Module Kit (70ns - for 56, 85, 90, 95, 95A)
4MB ECC Memory-Module Kit (70ns - for 85, 90, 95, 95A)
8MB Memory Module Kit (70ns - for 40, 56, 85, 90, 95, 95A)
8MB ECC Memory-Module Kit (70ns - for 85, 90, 95, 95A)
8MB Memory Module Kit (80ns - for 40, 85, 90, 95, 95A)
80286 Memory Expansion Adapter (for 50, 60, 65)
Memory Module (for 72X8532 - models 50, 65, 70)
80386 Memory Expansion Adapter (for 70, 80)
Memory Expansion Kit (for 72X6671 - for 70, 80)
Enhanced Memory Expansion Option (for 70, 80, 90)
Feature
Number
2MB Memory Module Kit (for 53F2603)
Memory Options (for System Board Memory)
88F0075
72X6672
72X6671
61X8906
72X8532
64F3607
92F0098
64F3606
92F0097
92F0105
92F3337
92F0103
92F0102
92F0104
53F2664
FRU
Number
–
6450372
6450367
6450345
6450344
6450129
–
6450130
–
6450128
87F9977
6450608
6450902
6450604
&nash.
Option
Number
–
–
–
–
–
–
–
–
–
–
–
–
–
–
–
Industry Standard
Architecture
–
–
–
–
–
–
–
–
–
–
–
–
–
–
–
Micro Channel
Architecture
–
–
–
–
–
–
–
–
–
–
–
–
–
–
–
PCMCIA
1
1
1
1
1
1
1
1
1
1
1
1
1
1
1
Warranty
(Years)
338
PS/2 Maintenance Manual
–
–
–
–
–
–
–
–
–
–
–
–
–
–
–
–
–
Bus Adapter
Bus Adapter
Bus Adapter (Model 001)
Bus Adapter (Model 001)
Data Acquisition Adapter (DAC)
Game Control Adapter
GPIB Adapter
Internal Tape Backup Unit
Adapter Cable, 34 pin (for 87F9787)
Formatted Blank Tape (for 87F9787)
Microphone (for UltiMedia* systems)
MIDI Adapter Unit
Multifunction Adapter
1MB Memory Module (for 1497253 & 30F5447)
PC Music Feature
Serial/Parallel Adapter
Feature
Number
6157 Tape Adapter
Miscellaneous Options
8286147
81X8620
74X8637
30F5447
81X8624
42G2783
30F5277
34F2717
87F9787
6181770
8529151
6181768
27F4164
27F4864
61X8910
00F2101
37F6718
FRU
Number
6450215
81X8630
30F5360
30F5364
–
–
–
–
30F5279
6451503
1501300
6451502
–
–
–
–
92X1458
Option
Number
X
X
X
X
X
–
X
–
X
X
X
X
X
X
X
X
–
Industry Standard
Architecture
–
–
–
–
–
X
X
X
X
–
–
–
–
–
–
–
X
Micro Channel
Architecture
–
–
–
–
–
–
–
–
–
–
–
–
–
–
–
–
–
PCMCIA
1
1
1
1
1
1
1
1
1
1
1
1
1
1
1
1
1
Warranty
(Years)
Hardware Maintenance Service
339
–
–
–
–
–
–
–
–
–
–
Serial Adapter Connector
Speech Adapter
SpeechViewer Adapter
Pageprinter Adapter
Printer Accessory Kit
Printer Cable
Print Service Adapter
Screw Kit (PS/2)
Tape Cover Plate
Feature
Number
Serial Adapter Cable
Miscellaneous Options
87F9767
92F0141
99F4371
8529214
1183003
75X8213
15F8511
61X8921
8286194
8286170
FRU
Number
–
–
–
1525612
–
75X8627
6450610
1501216
6450242
6450217
Option
Number
–
–
–
X
–
–
X
X
X
X
Industry Standard
Architecture
X
X
X
–
X
X
–
–
–
–
Micro Channel
Architecture
–
–
–
–
–
–
–
–
–
–
PCMCIA
1
1
1
1
1
1
1
1
1
1
Warranty
(Years)
340
PS/2 Maintenance Manual
–
Panasonic CD-ROM
–
–
–
Microphone
Speaker
Speaker Transformer (US)
–
–
Personal Dictation System Adapter
–
CD-ROM Drive
Personal Dictation System Adapter
–
Jazz16 Audio Card
2632
–
Audio/Data Cable
Jazz16 Upgrade Kit (ValuePoint only)
–
Jazz16 Audio Card
2631
–
ISA Adapter
Jazz16 Multimedia Audio Adapter (ValuePoint only)
2081
Audiovation Kit
2082
2080
Cables (MIDI Pack)
2079
Audiovation Micro Channel Adapter
Feature
Number
Audiovation ISA Adapter
Multimedia
71G6642
71G6641
61G4109
06H3086
–
06H3615
06H3614
06H3616
06H3085
06H3086
–
92G7466
61G4109
52G7224
–
65G8863
52G7224
FRU
Number
–
–
–
–
92G7531
–
–
–
–
–
92G7528
92G7466
–
–
92G7465
92G7464
92G7463
Option
Number
–
X
–
–
X
–
–
–
–
–
X
X
–
–
X
–
X
Industry Standard
Architecture (AT-Bus)
X
–
–
–
–
–
–
–
–
–
–
X
–
–
X
X
–
Micro Channel
Architecture
–
–
–
–
–
–
–
–
–
–
–
–
–
–
–
–
–
PCMCIA
1
1
–
–
1
–
–
–
–
–
1
1
–
–
1
1
1
Warranty
(Years)
Hardware Maintenance Service
341
–
–
–
–
–
–
–
–
Diskette Drive Bus Adapter
External Diskette Drive Adapter
Fixed Disk Adapter (Model 021 only, for 72X8522)
Fixed Disk Adapter (Model 021/061)
Fixed Disk Adapter (Model 021 only, for 6128294)
Fixed Disk and Diskette Drive Bus Adapter
Fixed Disk Adapter (ESDI)
Fixed Disk Adapter (ST506)
SCSI Micro Channel Adapter
Cable (Internal)
1966
–
1922
–
360KB External Diskette Adapter/A
SCSI-2 VL-Bus Adapter
–
1968
360KB or 1.2MB Diskette Adapter/A
1963
32-Bit SCSI Adapter
Feature
Number
16-Bit AT SCSI Adapter
Storage Device (Adapter)
85F0063
71G0711
71G0410
72X8540
92F0061
90X9287
90X9571
90X94410
72X8505
72X6757
72X8524
72X6758
15F7996
92F0160
82G4879
FRU
Number
70G8497
–
70G8482
–
–
–
–
–
–
6450244
–
6450245
6451007
70G8498
70G8496
Option
Number
–
–
X
–
–
–
–
–
–
X
–
–
–
–
X
Industry Standard
Architecture
X
–
–
X
X
X
X
X
X
–
X
X
X
X
–
Micro Channel
Architecture
–
–
–
–
–
–
–
–
–
–
–
–
–
–
–
PCMCIA
3
–
3
1
1
1
1
1
1
1
1
1
1
3
3
Warranty
(Years)
342
PS/2 Maintenance Manual
2084
3.5" 127MB External Rewritable Optical Drive
–
–
1.3GB Rewritable Optical Drive
Filter Assembly
–
3955
1.3GB External Rewritable Optical Drive (Type 3431, Model
705)
1GB Value AT Hard Disk Drive
–
Fan Assembly
2673
–
Circuit Card
1GB High Performance Fast/Wide SCSI-2 Hard Disk Drive
(EMEA only)
–
Cable Assembly
2543
–
External Power Supply
1GB AT Hard Disk Drive
–
127MB Rewritable Optical Drive
–
5095
3.5" 127MB External Rewritable Optical Drive (Type 3432,
Model 705)
1969
3.5" 2.88MB Diskette Drive
Feature
Number
3.5" 1.44MB Diskette Drive
Storage Device (DASD)
46G2251
61G9312
–
06H6111
06H3371
71G0666
49G6685
49G6683
49G6682
62G2919
66G7510
66G7510
66G7510
82G1887
93F2361
FRU
Number
–
–
62G2910
94G3183
94G3052
70G8512
–
–
–
–
–
62G2911
62G2908
32G4338
70G8499
Option
Number
X
X
X
X
–
X
X
X
X
X
X
X
X
X
X
Industry Standard
Architecture (AT-Bus)
X
X
X
–
–
X
X
X
X
X
X
X
X
–
X
Micro Channel
Architecture
–
–
–
–
–
–
–
–
–
–
–
–
–
–
–
PCMCIA
1
1
1
3
5
1
1
1
1
1
1
1
1
1
1
Warranty
(Years)
Hardware Maintenance Service
343
–
–
–
–
–
–
4MM Media Kit (DDS2)
– Cleaning Cartridge
– Data Cartridge
– Diagnostic Cartridge
Bezel Kit (3.5' Drive)
Cable (Power Cable for Server 95A)
1993
4/10GB 3.5" 4MM Digital Audio Tape (DAT) SCSI Option
–
2677
2GB High Performance Fast/Wide SCSI-2 Hard Disk Drive
4/10GB 3.5" DAT Tape Drive (SCSI)
2675
–
Cleaner
2GB High Performance Fast SCSI-2 Hard Disk Drive
–
Optical Drive
3484
230MB Optical Disk Drive, SCSI
–
Fan Assembly
2085
–
1.3GB Rewritable Optical Drive
–
Card Assembly
Feature
Number
Power Supply
Storage Device (DASD)
74G8335
8191271
8191146
8191160
21F8763
8191149
16G8456
–
06H3372
06H3370
66G7444
05H2005
–
49G6658
55F9421
55F9553
49G6654
FRU
Number
–
–
–
–
–
–
–
74G8632
94G3055
94G3054
–
–
05H2794
62G2929
–
–
–
Option
Number
–
–
–
–
–
–
–
X
–
–
–
–
–
X
X
X
X
Industry Standard
Architecture (AT-Bus)
–
–
–
–
–
–
–
X
–
–
–
–
–
X
X
X
X
Micro Channel
Architecture
–
–
–
–
–
–
–
–
–
–
–
–
–
–
–
–
–
PCMCIA
–
–
–
–
–
–
–
2
5
5
–
–
1
1
1
1
1
Warranty
(Years)
344
PS/2 Maintenance Manual
–
–
–
–
–
Bezel Kit (for Models 57, 77, 85, 90, 95, and 3511)
Bezel Kit (for Models 60 and 80)
Cable (Power Cable for Models 60 and 80)
Cable (SCSI Adapter 68 to 50-Pin)
1994
4/10GB 5.25" 4MM Digital Audio Tape (DAT) SCSI Option
4/10GB 5.25" DAT Tape Drive (SCSI)
2538
40MB PCMCIA Solid State File Card
–
Carrying Case
1962
40MB Hard Disk Drive (PCMCIA)
–
2537
30MB PCMCIA Solid State File Card
PCMCIA Hard Disk Drive Pull Tab
2536
20MB PCMCIA Solid State File Card
–
2535
10MB PCMCIA Solid State File Card
40MB Hard Disk Drive (PCMCIA)
2534
–
5MB PCMCIA Solid State File Card
–
Slide Assembly
Feature
Number
Micro Channel Card Handle
Storage Device (DASD)
92F0324
72X8521
55F9557
55F9554
16G8454
–
40G3176
92F0430
82G6124
71G6426
–
40G3175
40G3174
40G3173
40G3171
8191272
8191273
FRU
Number
–
–
–
–
–
74G8631
40G3170
–
–
–
70G8495
40G3169
40G3168
40G3167
40G3166
–
–
Option
Number
–
–
–
–
–
X
–
–
–
–
–
–
–
–
–
–
–
Industry Standard
Architecture (AT-Bus)
–
–
–
–
–
X
–
–
–
–
–
–
–
–
–
–
–
Micro Channel
Architecture
–
–
–
–
–
–
X
–
–
X
X
X
X
X
X
–
–
PCMCIA
–
–
–
–
–
2
1
–
–
1
1
1
1
1
1
–
–
Warranty
(Years)
Hardware Maintenance Service
345
–
–
–
–
–
– Data Cartridge
– Diagnostic Cartridge
Rail Kit (for Models 60, 80, 95, 3510, and 3511)
Rail Kit (for Models 57 and 77)
Slide Assembly (for Model 90)
92F0430
1928
7094
270MB IDE Hard Disk Drive
250 DualStor Internal Tape Backup Unit
82G7106
82G5926
71G6550
–
1920
170MB SCSI Hard Disk Drive
Carrying Case
82G6124
–
PCMCIA Hard Disk Drive Pull Tab
92F0429
–
–
82G1824
55F9563
55F9560
55F9559
8191146
8191160
21F8763
8191149
8191274
46G2330
FRU
Number
105MB Hard Disk Drive (PCMCIA)
5346
–
– Cleaning Cartridge
105MB Hard Disk Drive (PCMCIA)
–
4MM Media Kit
1970
–
5.25" 1.2MB Diskette Drive
–
Cable (SCSI ID Cable for Model 3510)
Feature
Number
Cable (SCSI Extender Cable for Models 60 and 80)
Storage Device (DASD)
82G7094
70G8487
70G8480
–
–
–
32G4199
70G8500
–
–
–
–
–
–
–
–
–
Option
Number
X
X
X
–
–
–
–
X
–
–
–
–
–
–
–
–
–
Industry Standard
Architecture (AT-Bus)
–
X
X
–
–
–
–
X
–
–
–
–
–
–
–
–
–
Micro Channel
Architecture
–
–
–
–
–
X
X
–
–
–
–
–
–
–
–
–
–
PCMCIA
2
2
2
–
–
1
1
1
–
–
–
–
–
–
–
–
–
Warranty
(Years)
346
PS/2 Maintenance Manual
–
–
Adapter/Cable Bracket
80MB Tape Cartridge
1929
3490
364MB IDE Hard Disk Drive
364MB Fast SCSI-2 Hard Disk Drive
PCMCIA Interface Card
527MB External PCMCIA Hard Disk Drive (Machine Type
3513, Model 527)
–
–
–
1921
340MB SCSI Hard Disk Drive
527MB Hard Disk Drive
3486
–
PCMCIA Interface Card
270MB Fast SCSI-2 Hard Disk Drive
–
364MB Hard Disk Drive
–
–
364MB External PCMCIA Hard Disk Drive (Machine Type
3513, Model 364)
–
34-Pin to Card Edge Connector
7092
Feature
Number
Bezel
250 DualStor PS/2 Installation Kit (contains DualStor
installation software for PS/2 computers)
Storage Device (DASD)
66G3353
–
66G3372
82G5931
82G5927
71G6551
82G5930
66G3353
66G3371
–
30F5277
92G5039
82G7108
82G7107
–
FRU
Number
–
66G3370
–
94G2440
70G8488
70G8481
94G2439
–
–
66G3369
–
–
–
–
82G7092
Option
Number
–
X
–
X
X
X
X
–
–
X
–
–
–
–
X
Industry Standard
Architecture (AT-Bus)
–
X
–
X
X
X
X
–
–
X
–
–
–
–
–
Micro Channel
Architecture
–
–
–
–
–
–
–
–
–
–
–
–
–
–
–
PCMCIA
–
2
–
2
2
2
2
–
–
2
–
–
–
–
1
Warranty
(Years)
Hardware Maintenance Service
347
2603
1GB SCSI Fast/Wide Hard Disk Drive Assembly (with 68
Position Tray Assembly)
–
–
Cable (Option-to-Option) (US)
Cable (Option-to-Option) (WT)
–
–
Cable (Internal SCSI)
Cable (AT SCSI Adapter) (US)
–
–
1.2GB 1/4" Tape Drive
1.2GB 1/4" Tape Drive (Model 3450-001)
–
1958
1GB SCSI-2 Hard Disk Drive
68 Position Tray Assembly
1989
728MB IDE Hard Disk Drive
–
3492
728MB Fast SCSI-2 Hard Disk Drive
–
3491
540MB Fast SCSI-2 Hard Disk Drive
1GB SCSI Fast/Wide Hard Disk Drive Address Cable
1952
1GB SCSI Fast/Wide Hard Disk Drive
1926
540MB SCSI Hard Disk Drive
Feature
Number
527MB IDE Hard Disk Drive
Storage Device (DASD)
32G0397
8191252
31F4222
74G8273
8191184
–
71G0212
71G0215
71G5040
–
92F0428
82G5929
82G5933
82G5932
92F0406
84G6108
FRU
Number
–
–
–
–
–
74G8630
–
–
–
70G9743
70G8492
70G8511
94G2442
94G2441
70G8491
70G8486
Option
Number
–
–
–
–
–
X
–
–
–
–
X
X
X
X
X
X
Industry Standard
Architecture (AT-Bus)
–
–
–
–
–
X
–
–
–
–
X
X
X
X
X
X
Micro Channel
Architecture
–
–
–
–
–
–
–
–
–
X
–
–
–
–
–
–
PCMCIA
–
–
–
–
–
1
–
–
–
5
5
2
2
2
2
2
Warranty
(Years)
348
PS/2 Maintenance Manual
–
–
–
–
–
–
–
–
–
–
–
–
–
–
–
–
–
Cable (SCSI Address)
Cable (System-to-50-Pin Standard Connector Option) (US)
Cable (System-to-50-Pin Standard Connector Option) (WT)
Cable (System-to-Option) (US)
Cable (System-to-Option) (WT)
Cable (System-to-SCSI-2 Fast/Wide Adapter) (US)
Cable (System-to-SCSI-2 Fast/Wide Adapter) (WT)
Chassis (with Feet)
Cover (Top)
Cradle
Fan
Foot Assembly (Chassis)
Guard (Fan)
Logo
Nut (Fan)
Power Supply
Feature
Number
Cable (AT SCSI Adapter) (WT)
Storage Device (DASD)
8191380
1622401
46G3984
55F9393
02G7413
55F9421
46G3962
74G8224
74G8274
74G8612
52G4231
8191251
31F4221
74G8529
74G8526
8191200
8191287
FRU
Number
–
–
–
–
–
–
–
–
–
–
–
–
–
–
–
–
–
Option
Number
–
–
–
–
–
–
–
–
–
–
–
–
–
–
–
–
–
Industry Standard
Architecture (AT-Bus)
–
–
–
–
–
–
–
–
–
–
–
–
–
–
–
–
–
Micro Channel
Architecture
–
–
–
–
–
–
–
–
–
–
–
–
–
–
–
–
–
PCMCIA
–
–
–
–
–
–
–
–
–
–
–
–
–
–
–
–
–
Warranty
(Years)
Hardware Maintenance Service
349
–
Test Tape
–
–
–
–
–
–
–
5GB 8mm Tape Drive
Cable (AT SCSI Adapter)
Cable (Internal SCSI)
Cable (Option-to-Option)
Cable (SCSI Address)
Cable (System-to-Option)
Cable (System-to-SCSI-2 Fast/Wide Adapter)
–
–
Terminator (Active 8-Bit)
5/10GB 8mm Tape Drive (Model 3445-001)
–
Washer (Fan)
1961
–
Toroid
2GB SCSI 16-Bit SCSI-2 Hard Disk Drive
–
Screw (SCSI connector)
1959
–
2GB SCSI 8-Bit SCSI-2 Hard Disk Drive
–
Screw (Fan)
Feature
Number
Screw
Storage Device (DASD)
52G4231
31F4221
8191200
31F4222
74G8273
32G0397
46G2542
–
92F0407
92F0440
21F8734
92F0057
1622344
59F4585
0251970
46G2698
46G2677
FRU
Number
–
–
–
–
–
–
–
74G8629
70G8494
70G8493
–
–
–
–
–
–
–
Option
Number
–
–
–
–
–
–
–
X
X
X
–
–
–
–
–
–
–
Industry Standard
Architecture (AT-Bus)
–
–
–
–
–
–
–
X
X
X
–
–
–
–
–
–
–
Micro Channel
Architecture
–
–
–
–
–
–
–
–
–
–
–
–
–
–
–
–
–
PCMCIA
–
–
–
–
–
–
–
1
5
5
–
–
–
–
–
–
–
Warranty
(Years)
350
PS/2 Maintenance Manual
Feature
Number
–
–
–
–
–
–
–
–
–
–
–
–
–
–
–
–
–
Storage Device (DASD)
Chassis (with Feet)
Cleaning Cartridge
Cover (Top)
Cradle
Data Cartridge
Fan
Foot Assembly (Chassis)
Guard (Fan)
Logo
Nut (Fan)
Power Supply
Screw
Screw (Fan)
Screw (SCSI Connector)
Terminator (Active 8-Bit)
Toroid
Washer (Fan)
1622344
59F4585
92F0057
0251970
46G2698
46G2677
8191380
1622401
46G2644
55F9393
02G7413
55F9421
21F8575
46G3962
74G8177
21F8593
74G8274
FRU
Number
–
–
–
–
–
–
–
–
–
–
–
–
–
–
–
–
–
Option
Number
–
–
–
–
–
–
–
–
–
–
–
–
–
–
–
–
–
Industry Standard
Architecture (AT-Bus)
–
–
–
–
–
–
–
–
–
–
–
–
–
–
–
–
–
Micro Channel
Architecture
–
–
–
–
–
–
–
–
–
–
–
–
–
–
–
–
–
PCMCIA
–
–
–
–
–
–
–
–
–
–
–
–
–
–
–
–
–
Warranty
(Years)
Hardware Maintenance Service
351
–
–
–
–
–
–
–
–
–
–
–
–
Bezel (for Model 95)
Cable (Power Cable for Models 60 and 80)
Cable (Remote Add Switch)
Cable (Signal Cable 60/80)
CD Caddy
Ground Bracket (for Models 60 and 80)
Grounding Springs
Headphones
Media Kit
Miscellaneous Parts Kit
Rail Kit (for Model 8585 and Models 3510)
Terminator/Jumper Kit
Base
–
–
–
Bezel (for Models 60, 65, and 80)
External Enhanced CD-ROM II (Type 3510, Model 705)
–
1983
Feature
Number
Bezel (for Models 40, 57, and 77)
Enhanced SCSI Internal CD-ROM II
Storage Device (DASD)
85F0072
–
92F0082
34F0041
92F0010
31F4232
53F3610
92F0087
85F0010
22F9419
34F0043
92F0086
72X8521
64F0138
34F0044
85F0008
61G1901
FRU
Number
–
70G8504
–
–
–
–
–
–
–
–
–
–
–
–
–
–
70G8503
Option
Number
–
X
–
–
–
–
–
–
–
–
–
–
–
–
–
–
X
Industry Standard
Architecture (AT-Bus)
–
X
–
–
–
–
–
–
–
–
–
–
–
–
–
–
X
Micro Channel
Architecture
–
–
–
–
–
–
–
–
–
–
–
–
–
–
–
–
–
PCMCIA
–
1
–
–
–
–
–
–
–
–
–
–
–
–
–
–
1
Warranty
(Years)
352
PS/2 Maintenance Manual
–
Fixed Disk Adapter (ST506)
–
Terminator/Jumper Kit
–
–
Rail Kit 8585/3510
Fixed Disk Adapter (ESDI)
–
Miscellaneous Parts Kit
–
–
Media Kit
Fixed Disk and Diskette Drive Bus Adapter
–
Headphones
–
–
CD-ROM II Drive
Fixed Disk Adapter (Model 021 only, for 6128294)
–
CD Caddy
–
–
Power Supply
Fixed Disk Adapter (Model 021/061)
–
External Cover
–
–
Fixed Disk Adapter (Model 021 only, for 72X8522)
–
Cable (Signal Cable)
Feature
Number
Cable (Remote Add Switch Cable)
Storage Device (DASD)
72X8540
92F0061
90X9287
90X9571
90X94410
72X8505
92F0082
34F0041
92F0010
31F4232
53F3610
61G1901
22F9419
85F0051
85F0027
92F0009
92F0086
FRU
Number
–
–
–
–
–
–
–
–
–
–
–
–
–
–
–
–
–
Option
Number
–
–
–
–
–
–
–
–
–
–
–
–
–
–
–
–
–
Industry Standard
Architecture (AT-Bus)
X
X
X
X
X
X
–
–
–
–
–
–
–
–
–
–
–
Micro Channel
Architecture
–
–
–
–
–
–
–
–
–
–
–
–
–
–
–
–
–
PCMCIA
1
1
1
1
1
1
–
–
–
–
–
–
–
–
–
–
–
Warranty
(Years)
Hardware Maintenance Service
353
–
Internal Adapter Card
–
–
External CD-ROM Enclosure
External Adapter Card
–
IDE Cable
–
–
CD-ROM Drive
Audio Cable
3588
–
Audio Cable
Internal SCSI 2X CD-ROM
–
CD-ROM Drive
3589
–
ISA CD-ROM Drive
IDE 2X CD-ROM Drive
–
Cable (External Drive)
–
–
Cable (Audio)
ISA External CD-ROM (Type 3509, Model 701)
–
1980
Cable (Data)
2084
ISA Internal CD-ROM Drive
Feature
Number
IBM 127MB Rewritable Optical Drive
Storage Device (DASD)
06H5053
88G4898
–
52G8749
06H2944
06H6152
–
61G4114
82G6461
61G4109
61G4115
–
61G4110
61G4112
61G4111
61G4109
66G7510
FRU
Number
–
–
94G2686
–
–
–
70G8519
–
–
–
–
70G8502
–
–
–
70G8501
62G2908
Option
Number
–
–
X
–
–
–
X
–
–
X
–
X
–
–
–
X
X
Industry Standard
Architecture (AT-Bus)
–
–
X
–
–
–
–
–
–
–
–
–
–
–
–
–
X
Micro Channel
Architecture
–
–
–
–
–
–
–
–
–
–
–
–
–
–
–
–
–
PCMCIA
–
–
1
–
–
–
1
–
–
–
–
1
–
–
–
1
1
Warranty
(Years)
354
PS/2 Maintenance Manual
–
–
–
–
SCSI Cable
Circuit Card
Fan
Cleaner
–
–
–
–
–
–
Optical Drive
Power Supply
SCSI Cable
Circuit Card
Fan
Cleaner
–
–
Power Supply
Model 3432 Optical Disk Drive, SCSI (EMEA/Latin America)
–
Optical Drive
–
–
Model 3432 Optical Disk Drive, SCSI (US/Canada)
–
Diagnostic CD
Feature
Number
Power Cable
Storage Device (DASD)
66G7444
49G6685
49G6683
49G6682
05H2785
05H2005
–
66G7444
49G6685
49G6683
49G6682
05H2785
05H2005
–
31F4232
33F8431
FRU
Number
–
–
–
–
–
–
05H3414
–
–
–
–
–
–
05H2784
–
–
Option
Number
–
–
–
–
–
–
–
–
–
–
–
–
–
–
–
–
Industry Standard
Architecture (AT-Bus)
–
–
–
–
–
–
–
–
–
–
–
–
–
–
–
–
Micro Channel
Architecture
–
–
–
–
–
–
–
–
–
–
–
–
–
–
–
–
PCMCIA
–
–
–
–
–
1
–
–
–
–
–
–
1
–
–
Warranty
(Years)
Hardware Maintenance Service
355
PS/2 Rewritable Optical Drive Installation Kit
2539
–
Bezel Shields (3), EMC Spring (1) (for Models 85, 95,
and 3511)
–
Bezel (for Model 90)
–
–
Slide (for Model 90)
Trays (for Models 85, 95, and 3511)
–
Bezel (for Models 40, 57, and 77)
0262
–
Tray (for Models 40, 57, and 77)
PS/2 Floor Standing Hard Disk Drive Kit
–
0261
PS/2 Desk Top Hard Disk Drive Kit
Slide (for Models 35, 40, 56, 57, 76 and 77)
0263
3590
Model 3510 Storage Enclosure Hard Disk Drive Kit B (for
Hard Disk Drive Options Numbers 94G2439, 94G2440,
94G2441, 94G2442)
PS/2 3510 Hard Disk Drive Kit (contains cables for 170MB,
340MB, 1.0GB, and 2.0GB Fast SCSI-2 Hard Disk Drives)
3590
Feature
Number
Model 3510 Storage Enclosure Hard Disk Drive Kit B (for
Hard Disk Drive Options Numbers 70G8480, 70G8481,
70G8492, 70G8493)
Storage Device (DASD)
–
92F0255
64F0141
–
85F0052
85F0035
85F0094
64F0141
96F7775
–
61G2390
06H4685
61G2390
FRU
Number
05H2762
–
–
70G8506
–
–
–
–
–
70G8505
70G8507
94G2648
94G2648
Option
Number
–
–
–
–
–
–
–
–
–
X
–
–
–
Industry Standard
Architecture (AT-Bus)
X
–
–
X
–
–
–
–
–
X
–
X
X
Micro Channel
Architecture
–
–
–
–
–
–
–
–
–
–
–
–
–
PCMCIA
1
–
–
1
–
–
–
–
–
1
1
1
1
Warranty
(Years)
356
PS/2 Maintenance Manual
–
–
–
–
–
–
–
–
SCSI External Cable (for 92F0330)
SCSI Internal Cable (for 92F0330)
SCSI Adapter/A (with Cache)
SCSI Adapter/A (without Cache)
SCSI Cable (internal)
SCSI-2 Fast/Wide Adapter/A
SCSI-2 Fast/Wide 16-Bit Internal Cable (68 to 68 pin) (for
92F0160)
SCSI-2 Fast/Wide 16-Bit Internal Cable (68 to 68 pin) (for
92F0160)
–
Rail Kit with Springs (Models 95 and 3511)
–
–
Rail Kit (Models 60, 65, and 80)
SCSI Fast Adapter (16 Bit AT)
–
Bezel (Models 95 and 3511)
–
–
Rewritable Optical Drive, 3.5-Inch
–
Bezel (Models 60, 65, and 80)
Feature
Number
Bezel (Models 40, 56, 57, and 77)
Storage Device (DASD)
61G3511
92F0327
92F0160
64F4127
85F0002
85F0063
37G0084
32G4089
92F0330
92F0167
85F0009
34F0041
64F0138
34F0044
85F0008
FRU
Number
32G3921
32G3922
6451280
–
6451109
6451133
–
–
–
6450162
–
–
–
–
–
Option
Number
–
–
–
–
–
–
X
X
X
–
–
–
–
–
–
Industry Standard
Architecture (AT-Bus)
X
X
X
X
X
X
–
–
–
X
–
–
–
–
–
Micro Channel
Architecture
–
–
–
–
–
–
–
–
–
–
–
–
–
–
–
PCMCIA
1
1
1
1
1
1
1
1
1
1
–
–
–
–
–
Warranty
(Years)
Hardware Maintenance Service
357
–
–
–
–
–
–
SCSI-2 Fast/Wide Card to SCSI Option Cable (68 to 50 pin,
Long) (for 92F0160)
SCSI-2 Fast/Wide Card to SCSI Option Cable (68 to 50 pin,
Short) (for 92F0160)
SCSI Option to SCSI Option Cable (50 to 50 pin, Short) (for
85F0063, 85F0002, 92F0160)
SCSI Internal Converter (16-bit to 8-bit, 68 to 50 pin) (for
92F0160)
SCSI Card to Option Cable (60 to 50 pin, Long) (for
85F0063, 85F0002)
SCSI-2 Card to Single Port SCSI Option Cable (68 to 50 pin,
Long) (for 92F0160)
–
SCSI-2 Fast/Wide Card to SCSI-2 Fast/Wide Option Cable
(68 to 68 pin, Long) (for 92F0160)
–
–
SCSI-2 Fast/Wide 8-Bit Internal Cable (50 to 50 pin) (for
85F0063, 85F0002, 92F0160)
SCSI-2 Fast/Wide Card to SCSI-2 Fast/Wide Option Cable
(68 to 68 pin, Short) (for 92F0160)
–
Feature
Number
SCSI-2 Fast/Wide 8-Bit Internal Cable (50 to 50 pin) (for
85F0063, 85F0002, 92F0160)
Storage Device (DASD)
71G2590
34F0017
92F0324
92F0325
92F0442
92F0321
92F0441
92F0326
61G3508
61G3005
FRU
Number
32G3099
32G4143
32G3925
32G3917
32G3916
32G3915
32G3914
32G3913
32G3097
32G3098
Option
Number
–
–
–
–
–
–
–
–
–
–
Industry Standard
Architecture (AT-Bus)
X
X
X
X
X
X
X
X
X
X
Micro Channel
Architecture
–
–
–
–
–
–
–
–
–
–
PCMCIA
1
1
1
1
1
1
1
1
1
1
Warranty
(Years)
358
PS/2 Maintenance Manual
–
–
–
–
–
–
–
–
–
SCSI-2 Fast/Wide 8-Bit Active Terminator (50 pin) (for
85F0063, 85F0002, 92F0160)
Optical Lens Cleaning Cartridge (for 92F0167)
Terminator (for 85F0002)
Terminator (for 92F0167)
Terminator, External (for 85F0063)
Terminator, Inline (space permitting)
Terminator, Internal (for 85F0063)
Terminator, Internal (for 85F0063)
Feature
Number
SCSI-2 Fast/Wide 16-Bit Active Terminator (68 pin) (for
92F0160)
Storage Device (DASD)
33F0478
92F0057
92F0142
33F8464
92F0269
57F2870
38F8681
92F0057
92F0432
FRU
Number
–
–
–
6451039
–
–
–
32G3919
32G3918
Option
Number
–
–
–
–
–
–
–
–
–
Industry Standard
Architecture (AT-Bus)
––
––
––
––
––
X
––
X
X
Micro Channel
Architecture
–
–
–
–
–
–
–
–
–
PCMCIA
1
1
1
1
1
1
1
1
1
Warranty
(Years)
Hardware Maintenance Service
359
–
–
–
–
–
–
–
–
–
–
486DX33 Processor Upgrade (for Model 80)
8087 Math Coprocessor (for models 25 and 30)
80287 Math Coprocessor (for models 35-286, 50, and 60)
80387SX Math Coprocessor, 16MHz (for 55SX, 65)
80387 Coprocessor, 16MHz (for Model 70)
80387 Coprocessor, 20MHz (for Model 70)
Adapter Cable 34 pin (for 87F9787)
Alt. microprocessor (Overdrive 25/50MHz - for 9576, 9577)
Alt. microprocessor (Overdrive 33/66MHz - for 85, 9576,
9577)
Feature
Number
486DX33 Processor Upgrade (for Model 70)
Processor Options
92F2582
92F0147
34F2717
90X7393
72X6673
33F8160
72X8528
61X8922
92F0437
92F0436
FRU
Number
–
–
–
6450378
6450369
27F4676
6450356
1501217
–
–
Option
Number
–
–
–
–
–
–
–
–
–
–
Industry Standard
Architecture
–
–
–
–
–
–
–
–
–
–
Micro Channel
Architecture
–
–
–
–
–
–
–
–
–
–
PCMCIA
1
1
1
1
1
1
1
1
1
1
Warranty
(Years)
360
PS/2 Maintenance Manual
–
–
–
–
–
–
–
–
–
–
–
–
–
64KB Memory Module (U16, U22, U34, U35 - for 25, 25-286,
25SX)
256KB Memory Module (for 25, 25-286, 25SX, 30, 60, 65,
80)
256KB Memory Pack (for 25, 25-286, 25SX, 30-286)
512KB Memory Module (for Model 50-021)
1MB Memory Kit (for 33F8416)
1MB Memory Pack (for 25, 25-286, 25SX, 30-286)
1MB Parity Memory Module Kit (85ns - for 25, 25-286, 25SX,
35, 40, 55SX, 80, 95)
1MB Parity Memory-Module Kit (85ns) (Model 95, Type 1 &
3 Processor Boards)
2MB Parity Memory Module Kit (70ns)
2MB Parity Memory Module Kit (80ns)
2MB Parity Memory Module Kit (85ns) (Type 1 & 3
Processor Boards)
2MB Memory Kit (for 92F0756)
Feature
Number
64KB Memory Module (ZM1, ZM2 - for 25, 25-286, 25SX)
System Board Memory (for Memory Options)
92F0669
92F0104
92F0103
92F0102
90X8624
90X8624
74X8637
72X6670
72X8517
1497256
61X8906
00F2121
00F2120
FRU
Number
–
–
–
–
–
–
–
–
–
–
–
–
–
Option
Number
–
X
X
X
–
–
–
–
–
–
–
–
–
Industry Standard
Architecture
–
X
X
X
–
–
–
–
–
–
–
–
–
Micro Channel
Architecture
–
–
–
–
–
–
–
–
–
–
–
–
–
PCMCIA
1
1
1
1
1
1
1
1
1
1
1
1
1
Warranty
(Years)
Hardware Maintenance Service
361
–
–
–
8MB Parity Memory Module Kit (80ns)
8MB ECC Memory-Module Kit (70ns) (Type 3 Boards only for Models 90, 95, and 95A)
16MB ECC Memory-Module Kit (70ns - for 95, 95A)
–
4MB Memory Kit (for 85F0046 - for Models 60, 65, and 80)
–
–
4MB Parity Memory Module Kit (70ns)
8MB Parity Memory Module Kit (70ns)
–
4MB ECC Memory-Module Kit (70ns) (Type 3 Boards only for Models 90, 95, and 95A)
–
–
4MB Parity Memory-Module Kit (80ns - for 90, 95)
4MB Memory Module Kit
Feature
Number
System Board Memory (for Memory Options)
92F0100
92F0098
64F3607
64F3606
92F3337
92F0106
92F0105
92F0097
87F9980
FRU
Number
–
–
–
–
–
–
–
–
–
Option
Number
–
–
X
X
X
–
X
–
–
Industry Standard
Architecture
–
X
X
X
X
–
X
–
–
Micro Channel
Architecture
–
–
–
–
–
–
–
–
–
PCMCIA
1
1
1
1
1
1
1
1
1
Warranty
(Years)
362
PS/2 Maintenance Manual
Hardware Maintenance Reference
Safety Information
. . . . . . . . . . . .
General Safety
. . . . . . . . . . . .
Electrical Safety . . . . . . . . . . . .
Safety Inspection Guide
. . . . . . . .
Handling Electrostatic Discharge-Sensitive
Devices . . . . . . . . . . . . . . .
Grounding Requirements . . . . . . . .
Drive and Diskette Compatibility Matrix . . .
Hard Disk Drive Settings (ATA)
. . . . . .
Preparing a Hard Disk for Moving . . . .
Security
. . . . . . . . . . . . . . . . .
U-Bolt . . . . . . . . . . . . . . . . .
Cover Lock and Tamper-Evident Switches
Rear-Panel Security Option . . . . . . .
Passwords
. . . . . . . . . . . . . .
Additional Override Jumper Functions . .
Privileged-Access Password
. . . . . .
Power-on Features
. . . . . . . . . .
System Features
. . . . . . . . . . . . .
Microprocessors . . . . . . . . . . . .
Processor Boards (70) . . . . . . . . .
Processor Boards (90, 95) . . . . . . .
NVRAM and NVRAM Extension
. . . .
POST Overview . . . . . . . . . . . .
Reference and Diagnostic Diskettes . . .
Accessing System Programs and Starting
Diagnostic Tests . . . . . . . . . . .
QAPlus/PRO Diagnostics . . . . . . . .
Using the Test Programs . . . . . . . .
Using the System Utilities . . . . . . . . .
Disk Array System . . . . . . . . . . .
Recording the Vital Product Data on a New
System Board
. . . . . . . . . . . .
Upgradable POST and BIOS . . . . . .
PCMCIA Adapter (Model 33) . . . . . .
Video . . . . . . . . . . . . . . . . .
Non-IBM Displays . . . . . . . . . . .
Serial Port . . . . . . . . . . . . . . .
Parallel Port . . . . . . . . . . . . . .
Supported Cables . . . . . . . . . . .
Diskette-Drive Controller . . . . . . . .
Keyboard and Pointing-Device Connectors
System Memory
. . . . . . . . . . . . .
System-Board Memory . . . . . . . . .
Memory-Expansion Adapters . . . . . .
Memory Errors . . . . . . . . . . . . .
Unique Memory Information (90, 95)
. .
Model 90 Memory . . . . . . . . . . .
Model 95 Memory . . . . . . . . . . .
Memory Configurations (90, 95)
. . . .
Error Detection (90, 95)
. . . . . . . .
Copyright IBM Corp. 1994
.
.
.
.
.
.
.
.
.
.
.
.
365
365
366
368
.
.
.
.
.
.
.
.
.
.
.
.
.
.
.
.
.
.
.
.
.
.
.
.
.
.
.
.
.
.
.
.
.
.
.
.
.
.
.
.
.
.
.
.
.
.
.
.
.
.
.
.
.
.
.
.
.
.
.
.
369
369
370
371
374
375
375
375
375
376
378
378
380
380
380
380
380
381
381
383
.
.
.
.
.
.
.
.
.
.
.
.
.
.
.
384
386
389
393
396
.
.
.
.
.
.
.
.
.
.
.
.
.
.
.
.
.
.
.
.
.
.
.
.
.
.
.
.
.
.
.
.
.
.
.
.
.
.
.
.
.
.
.
.
.
.
.
400
400
400
401
402
403
404
404
404
404
405
405
405
405
406
406
406
407
407
.
.
.
.
.
.
.
.
.
363
Resolving Memory-Address Conflicts
. . . .
Changing the Software Configuration . . . .
Changing the System Configuration . . . . .
SCSI System Information
. . . . . . . . . . .
SCSI Hard Disk Drives and Devices
. . . .
Understanding SCSI ID Numbers . . . . . .
Selecting a SCSI ID . . . . . . . . . . . .
Setting a SCSI ID
. . . . . . . . . . . . .
Optical-Head Lens Cleaning Procedure . . .
Setting the Motor-Start Jumper . . . . . . .
Terminator Function . . . . . . . . . . . .
16-Bit AT Fast SCSI Adapter Switch Settings
Interrupt Settings
. . . . . . . . . . . . .
Memory Address Switch Settings . . . . . .
I/O Address . . . . . . . . . . . . . . . .
Selectable Drive-Startup Function . . . . . .
System-Unit Power Supplies . . . . . . . . . .
Power-Supply Features
. . . . . . . . . .
System Partition
. . . . . . . . . . . . . . .
Starting System Program Diagnostics . . . .
Updating the System Programs . . . . . . .
Upgrading the System Partition Version . . .
Backing up the System Partition
. . . . . .
Restoring the System Partition
. . . . . . .
Running Automatic Configuration . . . . . .
Recording a Customized Configuration
. . .
ASCII Terminals
. . . . . . . . . . . . . . .
ASCII Terminal Setup and Menu Selection
.
ASCII Terminal Configuration . . . . . . . .
System Error Log . . . . . . . . . . . . . . .
Viewing the Error Log
. . . . . . . . . . .
Types of Errors Detected . . . . . . . . . .
Error Storage
. . . . . . . . . . . . . . .
Application
. . . . . . . . . . . . . . . .
Dumping Extended Diagnostic Data Information
PS/2 System Specifications
. . . . . . . . . .
PS/2 - AT Bus . . . . . . . . . . . . . . .
PS/2 - Micro Channel (Non IML)
. . . . . .
PS/2 - Micro Channel (IML)
. . . . . . . .
Acronyms, Abbreviations, and Terms . . . . . .
We Want Your Comments!
. . . . . . . . . .
Do You Need Technical References?
. . . . .
Problem Determination Tips . . . . . . . . . .
Phone Numbers, U.S. and Canada . . . . . . .
Notices . . . . . . . . . . . . . . . . . . . .
Trademarks . . . . . . . . . . . . . . . .
364
PS/2 Maintenance Manual
.
.
.
.
.
.
.
.
.
.
.
.
.
.
.
.
.
.
.
.
.
.
.
.
.
.
.
.
.
.
.
.
.
.
.
.
.
.
.
.
.
.
.
.
.
408
408
408
409
409
409
409
411
413
414
414
415
415
415
416
420
422
422
425
425
426
426
427
428
429
429
430
430
431
433
433
433
434
434
434
435
435
436
437
438
440
441
442
443
445
445
Safety Information
The following section contains the safety information that
you need to be familiar with before servicing a PS/2
product.
General Safety
Follow these rules to ensure general safety:
Observe good housekeeping in the area of the
machines during and after maintenance.
When lifting any heavy object:
1. Ensure you can stand safely without slipping.
2. Distribute the weight of the object equally
between your feet.
3. Use a slow lifting force. Never move suddenly
or twist when you attempt to lift.
4. Lift by standing or by pushing up with your leg
muscles; this action removes the strain from the
muscles in your back. Do not attempt to lift any
objects that weigh more than 16 kg (35 lb) or
objects that you think are too heavy for you.
Do not perform any action that causes hazards to the
customer, or that makes the equipment unsafe.
Before you start the machine, ensure that other
service representatives and the customer's personnel
are not in a hazardous position.
Place removed covers and other parts in a safe
place, away from all personnel, while you are
servicing the machine.
Keep your tool case away from walk areas so that
other people will not trip over it.
Do not wear loose clothing that can be trapped in the
moving parts of a machine. Ensure that your sleeves
are fastened or rolled up above your elbows. If your
hair is long, fasten it.
Insert the ends of your necktie or scarf inside clothing
or fasten it with a nonconductive clip, approximately 8
centimeters (3 inches) from the end.
Do not wear jewelry, chains, metal-frame eyeglasses,
or metal fasteners for your clothing.
Remember: Metal objects are excellent conductors.
Wear safety glasses when you are:
– Hammering
– Drilling
– Soldering
– Cutting wire
– Attaching springs
– Using solvents
– Working in any other conditions that might be
hazardous to your eyes
Hardware Maintenance Reference
365
After service, reinstall all safety shields, guards,
labels, and ground wires. Replace any safety device
that is worn or defective.
Reinstall all covers correctly before returning the
machine to the customer.
Electrical Safety
Observe the following rules when working on electrical
equipment:
Find the room emergency power-off (EPO) switch,
disconnecting switch, or electrical outlet. If an
electrical accident occurs, you can then operate the
switch or unplug the power cord quickly.
Do not work alone under hazardous conditions or
near equipment that has hazardous voltages.
Disconnect all power before:
– Performing a mechanical inspection
– Working near power supplies
– Removing or installing main units
Before you start to work on the machine, unplug the
power cord. If you cannot unplug it, ask the customer
to power-off the wall box that supplies power to the
machine and to lock the wall box in the off position.
If you need to work on a machine that has exposed
electrical circuits, observe the following precautions:
– Ensure that another person, familiar with the
power-off controls, is near you.
Remember: Another person must be there to
switch off the power, if necessary.
CAUTION:
Some hand tools have handles covered with
a soft material that does not insulate you
when working with live electrical currents.
Use only approved tools and testers.
–
–
Use only one hand when working with
powered-on electrical equipment; keep the other
hand in your pocket or behind your back.
Remember: There must be a complete circuit to
cause electrical shock. By observing the above
rule, you may prevent a current from passing
through your body.
When using testers, set the controls correctly
and use the approved probe leads and
accessories for that tester.
CAUTION:
Many customers have, near their equipment,
rubber floor mats that contain small
conductive fibers to decrease electrostatic
discharges. Do not use this type of mat to
protect yourself from electrical shock.
366
PS/2 Maintenance Manual
–
Stand on suitable rubber mats (obtained locally,
if necessary) to insulate you from grounds such
as metal floor strips and machine frames.
Observe the special safety precautions when you
work with very high voltages; these instructions are in
the safety sections of maintenance information. Use
extreme care when measuring high voltages.
Regularly inspect and maintain your electrical hand
tools for safe operational condition.
Do not use worn or broken tools and testers.
Never assume that power has been disconnected
from a circuit. First, check that it has been
powered-off.
Always look carefully for possible hazards in your
work area. Examples of these hazards are moist
floors, nongrounded power extension cables, power
surges, and missing safety grounds.
Do not touch live electrical circuits with the reflective
surface of a plastic dental mirror. The surface is
conductive; such touching can cause personal injury
and machine damage.
Do not service the following parts with the power on
when they are removed from their normal operating
places in a machine:
– Power supply units
– Pumps
– Blowers and fans
– Motor generators
and similar units. (This practice ensures correct
grounding of the units.)
If an electrical accident occurs:
– Use caution; do not become a victim
yourself.
– Switch off power.
– Send another person to get medical aid.
Hardware Maintenance Reference
367
Safety Inspection Guide
The intent of this inspection guide is to assist you in
identifying potentially unsafe conditions on these products.
Each machine, as it was designed and built, had required
safety items installed to protect users and service
personnel from injury. This guide addresses only those
items. However, good judgment should be used to identify
potential safety hazards due to attachment of non-IBM
features or options not covered by this inspection guide.
If any unsafe conditions are present, you must determine
how serious the apparent hazard could be and whether
you can continue without first correcting the problem.
Consider these conditions and the safety hazards they
present:
Electrical hazards, especially primary power (primary
voltage on the frame can cause serious or fatal
electrical shock).
Explosive hazards, such as a damaged CRT face or
bulging capacitor
Mechanical hazards, such as loose or missing
hardware
The guide consists of a series of steps presented in a
checklist. Begin the checks with the power off, and the
power cord disconnected.
Checklist:
1. Check exterior covers for damage (loose, broken, or
sharp edges).
2. Power-off the computer. Disconnect the power cord.
3. Check the power cord for:
a. A third-wire ground connector in good condition.
Use a meter to measure third-wire ground
continuity for 0.1 ohm or less between the
external ground pin and frame ground.
b. The power cord should be the appropriate type
as specified in “Parts Catalog” on page 222.
c. Insulation must not be frayed or worn.
4. Remove the cover.
5. Check for any obvious non-IBM alterations. Use
good judgment as to the safety of any non-IBM
alterations.
6. Check inside the unit for any obvious unsafe
conditions, such as metal filings, contamination, water
or other liquids, or signs of fire or smoke damage.
7. Check for worn, frayed, or pinched cables.
8. Check that the power-supply cover fasteners (screws
or rivets) have not been removed or tampered with.
368
PS/2 Maintenance Manual
Handling Electrostatic
Discharge-Sensitive Devices
Any computer part containing transistors or integrated
circuits (ICs) should be considered sensitive to electrostatic
discharge (ESD). ESD damage can occur when there is a
difference in charge between objects. Protect against ESD
damage by equalizing the charge so that the machine, the
part, the work mat, and the person handling the part are all
at the same charge.
Notes:
1. Use product-specific ESD procedures when they
exceed the requirements noted here.
2. Make sure that the ESD protective devices you use
have been certified (ISO 9000) as fully effective.
When handling ESD-sensitive parts:
Keep the parts in protective packages until they are
inserted into the product.
Avoid contact with other people.
Wear a grounded wrist strap against your skin to
eliminate static on your body.
Prevent the part from touching your clothing. Most
clothing is insulative and retains a charge even when
you are wearing a wrist strap.
Use the black side of a grounded work mat to provide
a static-free work surface. The mat is especially
useful when handling ESD-sensitive devices.
Select a grounding system, such as those listed
below, to provide protection that meets the specific
service requirement.
Note: The use of a grounding system is desirable
but not required to protect against ESD
damage.
–
–
–
Attach the ESD ground clip to any frame ground,
ground braid, or green-wire ground.
Use an ESD common ground or reference point
when working on a double-insulated or
battery-operated computer. You can use coax or
connector-outside shells on these computers.
Use the round ground-prong of the AC plug on
AC-operated computers.
Grounding Requirements
Electrical grounding of the PS/2 computer is required for
operator safety and correct computer function. Proper
grounding of the electrical outlet can be verified by a
certified electrician.
Hardware Maintenance Reference
369
Drive and Diskette Compatibility Matrix
The following table provides identification information for
3.5-inch diskette drives.
Diskette
Drive
Identifying
Mark
3.5-Inch - 1.44MB
3.5-Inch - 2.88MB
1.44 on the eject button
2.88 on the eject button
The following table provides compatibility information for
3.5-inch diskettes and 3.5-inch diskette drives.
Diskette
Capacity
1.44MB
Drive
2.88MB
Drive
1.0MB
2.0MB
4.0MB
Read/Write
Read/Write
Not Compatible
Read/Write
Read/Write
Read/Write
The following table provides identification information for
5.25-inch diskette drives.
Diskette
Drive
Identifying
Mark
5.25-Inch - 360KB (External)
5.25-Inch - 1.2MB (Internal)
Asterisk on bezel
1.2 on the eject button
The following table provides compatibility information for
5.25-inch diskettes and 5.25-inch diskette drives.
Diskette
Capacity
360KB
Drive
1.2MB
Drive
360KB
1.2MB
Read/Write
Not Compatible
Read/Write
Read/Write
Notes:
1. A 360KB diskette written to or formatted on a 1.2MB
drive can be read reliably only on a 1.2MB drive.
2. On some early 90 and 95 computers with a type 1
processor board installed, the system board used will
not support the 2.88MB diskette drive.
370
PS/2 Maintenance Manual
Hard Disk Drive Settings (ATA)
These drives have jumper, tab, or switch settings. Always
set the first drive to be the primary (master) drive 1 . If a
second drive is installed, set it to be the secondary (slave)
drive 2 .
Note: Do not move any other jumpers, tabs, or switches
on the drives.
40MB and 80MB ATA Drives with Jumpers
2
2
120MB ATA Drive with Jumpers
40MB ATA Drive with Switches
2
O
F
F
1
2
3
4
O
F
F
1
2
3
4
Hardware Maintenance Reference
371
80MB and 170MB ATA Drives with Tabs
80MB ATA Drive with Switches
O
F
F
1
2
3
1
O
F
F
2
3
4
4
2
120MB ATA Drive with Jumpers
372
PS/2 Maintenance Manual
170MB, 212MB, and 245MB ATA Drives with Jumpers
120MB, 170MB, 245MB, and 340MB ATA Drives with
Tabs
120MB, 170MB, 245MB, and 340MB ATA Drives with
Tabs
Hardware Maintenance Reference
373
170MB, 212MB, 245MB, 340MB, and 420MB ATA Drives
with Tabs
527MB ATA Drive with Jumpers
Preparing a Hard Disk for Moving
Before moving a model 25, 25 SX, 25-286, 30, 30-286, 35,
40, or 50 system unit, or removing the hard disk drive from
these systems for service, select Move the computer from
the Main Menu on the Starter Diskette or Reference
Diskette. This parks the heads of the hard disk drive to
help prevent damage to the drive. Head parking is
automatic on all other systems.
374
PS/2 Maintenance Manual
Security
There are several security features to help protect the
system, the internal hardware, and the information stored
on the hard disk.
U-Bolt
Some systems have two holes at the rear of the system to
allow a U-bolt to be used with a cable or chain to secure
the system to a desk or table.
Cover Lock and Tamper-Evident
Switches
Some systems have an electro-mechanical cover lock. In
the locked position, it mechanically prevents the cover from
being removed. If the covers are forced open, the
tamper-evident cover switches detect the intrusion. The
next time the computer is powered-on, POST displays a
message informing the user that the system covers have
been tampered with, and that you must run Automatic
configuration to continue.
Notes:
1. When the cover is removed, power is removed from
the computer. If you want to run the system with the
cover off, you must move the security switch to the
“up” or “on” position. (Move the blue slider up until it
contacts the metal actuator arms of the two switches.
The switches “click” when activated.) If the switches
fail to activate, they must be adjusted or replaced. To
adjust the switches, remove the adapter guide with
the switches from the system unit. Form the actuator
arms so the switches activate when the slider is
moved up half the distance of its travel.
2. If you received a 00014908 or 00014909, while
testing the system with the front bezel installed, do
the following.
a. Remove the side cover.
b. Install the front bezel.
c. While observing switch 1 (attached to the side of
the drive support structure), operate the keylock.
d. If operating the keylock does not fully operate
switch 1, replace the keylock assembly and
switch transfer assembly located inside the front
bezel.
Rear-Panel Security Option
If this option is installed on the system, it prevents cables
from being removed from the back of the system, and
prohibits connecting other systems or devices to unused
connectors on the back of the system.
Hardware Maintenance Reference
375
Passwords
Any combination of up to 7 alphanumeric characters (A–Z,
a–z, and 0–9) is supported.
Note: If the wrong password is typed three times, the
system logs an error in the system error log and
you cannot continue without restarting the system.
Removing a Power-On Password:
The
method used to erase a power-on password varies, and so
does the location of the password jumper (known as the
override jumper.) Make sure you either backup, or make
note of, the current configuration before you erase the
password. After service, follow the instructions on the
screen, and reset the date, time, and any customized
configuration data. (You can use Backup/Restore to save
it, or Automatic Configuration after service.)
To erase the power-on password, do the following:
Models 25, 30, 33, 35, 40, 56, 57, 76, 77, 85, 90, 95
Override Jumper
The override jumper is located on the system board.
System
Jumper
Location
Model 25 SX
J2
Models 25, 30 (286)
J13
Models 8535, 8540
J14
Models 9533, 9535,
9540
J20
Models 8556, 8557
J18
Models 9556, 9557,
9576, 9577, 9595
JMP1
Model 90
J10
Server 85, Model 95
J16
1. Power-off the computer and unplug the power cord.
2. Remove the system-unit cover.
3. Move the password jumper to connect the center pin
and the pin on the opposite end of the connector.
4. Power-on the computer. The system senses the
change in the jumper position and erases the
password. There is no need to move the jumper
back to the previous position.
376
PS/2 Maintenance Manual
Model 55 SX, 65 SX Override Jumper
1. Power-off the computer and unplug the power cord.
2. Remove the system-unit cover.
3. Locate the speaker cable and the connector that it
plugs into.
4. Unplug the speaker cable, turn it over (180°), and
plug it back in.
5. Power-on the computer. The system senses the
change in the connector position and erases the
password. There is no need to move the connector
back to the previous position.
Model 50, 60, 70, 80 Override Jumper
1. Power-off the computer and unplug the power cord.
2. Remove the system-unit cover.
3. If the speaker assembly has pins, short pins 2 and
3 together.
4. If the speaker assembly does not have pins, insert a
meter lead into connector 1 and short the other end
of the lead to frame ground.
With the assembly shorted, power-on the computer. This
erases the power-on password. Remove the short after
POST is finished.
3
2
Hardware Maintenance Reference
377
Additional Override Jumper Functions
The override jumper is most often used to erase a
power-on password. However, on IML systems, moving
the jumper also has the following effects on the system.
Unattended Start Mode (Server Mode)
If the Unattended Start Mode is activated, power-off the
computer, move the jumper; then power-on the computer.
The unattended start mode is deactivated. You must reset
the Unattended Start Mode. (Power-on password is
required to run in the Unattended Start Mode).
Override Jumpers on IML Systems
The Server 95A has no System Partition. It loads the
IML and POST from the EEPROM on the system
board or on the processor board. If a power-on
password is set and the Reference Diskette is in the
diskette drive, move the password override jumper;
then power-on the computer. The system default is
bypassed and the system loads the IML image from
the Reference Diskette. The next time you power-on
the computer, the IML and the POST load from the
EEPROM.
The Server 85 and Server 95 load the IML from the
EEPROM, but the POST is in the System Partition. If
a power-on password is set and the Reference
Diskette is in the diskette drive, move the password
override jumper; then power-on the computer. The
system default is bypassed and the system loads the
IML image from the Reference Diskette. The next
time you power-on the computer, the IML loads from
the EEPROM and the POST loads from the System
Partition.
All other IML systems system load the IML and the
POST from the System Partition. If a power-on
password is set and the Reference Diskette is in the
diskette drive, move the password override jumper;
then power-on the computer. The system default is
bypassed and the system loads the IML image from
the Reference Diskette. The next time you power-on
the computer, the IML loads from the System
Partition.
Privileged-Access Password
Note: The privileged-access password jumper is always
JMP2.
This is used with other security features to make the
system inoperative after a forced entry, until the password
is typed. It also overrides the power-on password, if
installed, and restricts access to the system programs.
You cannot erase or override the privileged-access
password. The user or the technical support person at the
378
PS/2 Maintenance Manual
account should have this password. If not, the only way to
gain access to the system programs is to replace the
system board at the customer's expense.
The system is shipped with the privileged-access password
feature disabled (no password is set). A jumper on the
system board must be moved before a privileged-access
password can be set for the first time. The jumper can
either be in the locked state or the change state.
The locked state prevents a privileged-access password
from being set, changed, or removed. This is the position
set at the factory. The jumper is in position 1 when it is in
the locked state.
The change state allows the privileged-access password to
be set, changed, or removed, using the system programs.
The jumper is in position 0 when it is in the change state.
The rules for setting the privileged-access password are
the same as the power-on password: any alphanumeric
combination of up to 7 characters (A–Z, a–z, and 0–9).
One important difference is that a privileged-access
password cannot be the same as the power-on password.
The privileged-access password provides several major
features:
Restricts access to the system programs.
Stops the system after a POST error.
Prohibits unauthorized modifications to the hardware.
Works with the tamper-evident cover switch to
prevent unauthorized operation after a forced entry.
Can be typed at the power-on password prompt to
override the power-on password.
When a privileged-access password is set, you have full
use of all the features except the system programs. If you
attempt to use the systems programs from the hard disk or
System Diskettes, the password prompt is displayed. The
correct privileged-access password must be typed before
the system programs will be loaded. This prevents anyone
who does not know the privileged-access password from
modifying the selectable drive-startup sequence, changing
the configuration information, or using any other part of the
system programs.
Under normal conditions, when an error or a change in the
hardware is found by POST, the system programs are
loaded automatically after the error code appears. When a
privileged-access password is set, the POST displays the
error code, and then displays the password prompt. The
system programs will not be loaded until the correct
privileged-access password is typed. This prevents
someone from making unauthorized modifications to the
system.
Hardware Maintenance Reference
379
Power-on Features
Some 95 server systems have power-on features. When
the jumper JMP4 on the system board is enabled, the
system can be turned on or off from a remote location or
at a specific time.
System Features
The following are features of PS/2 systems. Refer to
“PS/2 System Specifications” on page 435 to determine
what is supported on the system you are servicing.
Microprocessors
The microprocessor and math coprocessor are either
installed on the system board, or on a processor board
(explained below). It interprets and carries out instructions.
Microprocessor speed varies with the model. Some
systems have a second connector on the system board for
an optional microprocessor. An option microprocessor is
installed either to enhance speed, or to add extended math
capability to the system. Some systems have a jumper on
the system board that allows you to change the speed of
the microprocessor. Jumpers and options vary.
Processor Boards (70)
On 25-MHz model 70 systems, the microprocessor is on a
small horizontally mounted card (referred to as a processor
board), that plugs into the system board. This board also
has a connector for a math coprocessor. For other Model
70 systems, the microprocessor and math coprocessor
plug directly into a connector on the system board.
Note: The math coprocessor is a built-in feature of the
microprocessor on model 70 486 and model 70s
with a 486DX33 Processor Upgrade or a 486
Power Platform.
Processor Boards (90, 95)
The 90 and 95 systems have the microprocessor and other
components (usually found on the system board), installed
on the processor board. The processor board plugs into
the system board just like an adapter does, except it uses
a special connector (not one of the expansion slots). The
system requirements, functions, and diagnostics can differ
significantly depending on which type of processor board is
installed. The major components on the processor board
are:
System microprocessor
System clock
Direct memory access (DMA) controller
Memory controller
380
PS/2 Maintenance Manual
Note: Some processor boards have a built-in cache, and
others have a connector for an optional plug-in
cache.
The processor boards can be one of three types (type 1, 2
or 3). The type of processor board determines the
following:
Type of DMA controller installed (16 or 32-bit)
Type of memory error detection supported (ECC or
parity)
Type of memory configurations supported (interleaved
or noninterleaved)
The microprocessors used are 32-bit. They operate in the
real-address or virtual-address (protected) mode. The
amount of memory supported and the clock speed varies
with the processor board. If the processor board is not
seated correctly, intermittent errors can occur.
NVRAM and NVRAM Extension
Non-volatile random access memory (NVRAM) provides 64
bytes of storage. Fifty bytes are used to store system
configuration and security information. The real-time clock
uses the remaining 14 bytes to track the date, time, and
battery level. The NVRAM extension stores additional
configuration and system-status information.
The data stored in the NVRAM and NVRAM extension is
kept active by the battery when the computer is
powered-off. If the stored data is lost (because of a
depleted or removed battery), you can restore the data by
using one of the following methods:
If the user has a customized configuration that uses
settings other than the default, run Restore
configuration from the system programs.
If default configuration settings are used, run
Automatic configuration from the system programs.
POST Overview
The power-on self-test (POST) is a series of system tests
that verify the correct operation of the base system and
most options. The POST runs each time the computer is
powered-on. It compares the system configuration
information it detects with the configuration stored in the
NVRAM. The test time varies depending on the options
installed. The method used to store and control the POST
code varies with the system.
During power-on, POST performs basic functions such as:
Checking the basic system-board and processor
functions
Initializing the video function
Checking the memory subsystem
Checking the ports
Hardware Maintenance Reference
381
Verifying that the hard disk drive is functioning
Verifying that the code required in the System
Partition of the default hard disk is present (if System
Partition is required)
Verifying that the default diskette drive is functioning
Some adapters have ROM modules that contain extended
BIOS routines that work with the system POST.
Note: FLASH systems have a feature the customer can
use to automatically run a shorter, less-extensive
POST routine. In this mode, POST might not
detect a problem. This feature is called the Fast
Startup Mode. You can change this setting from
the Set Features screen of the system programs
Main Menu.
POST and BIOS in ROM: Some systems (such as
Model 50 and 60), have the POST and BIOS code
contained in a read only memory (ROM) module on the
system board.
POST and BIOS in IML:
Some systems (such as
Model 90 and 95), use Initial Machine Load (IML) to store
the power-on self-test (POST) and Basic Input/Output
System (BIOS) code.
In an IML system, some of this code is stored in ROM and
is used for preliminary testing during power-on, but the
balance of the POST and BIOS code, called the IML
image, is stored in a protected area of the default hard
disk called the System Partition. (The IML image is loaded
onto the default hard disk when the system is
manufactured.)
Note: On IML systems, if there is a power-on password
set, the system always loads the IML image from
the System Partition even if the Reference Diskette
is in the drive. To load IML from the Reference
Diskette, erase the power-on password.
POST and BIOS in FLASH: Some systems (such
as Server 85, Server 95, and Server 95A), have two
electronically erasable programmable read only memory
(EEPROM) modules, referred to as FLASH memory.
Depending on the model, these EEPROMs are either on
the processor board or on the system board. The
EEPROMs contain the POST and BIOS code. These
systems always load the POST and BIOS code from the
FLASH EEPROMS (POST and BIOS code does not reside
on the System Partition or on the Reference Diskette.)
FLASH allows POST and BIOS code to be updated
without replacing any hardware. This is done with an
update diskette. This diskette copies the new code to the
FLASH EEPROMs. Instructions are included with an
update diskette.
382
PS/2 Maintenance Manual
Note: If the customer installs an option that requires an
upgrade to the POST and BIOS information, have the
customer contact their Authorized IBM Dealer or Marketing
Representative, or call the IBM HelpCenter (U.S. and
Puerto Rico only) at 1-800-772-2227. They will receive,
free of charge, a set of upgrade diskettes for their system.
Errors during POST:
POST errors are displayed
as follows:
ROM and IML Systems: When POST detects a
problem on ROM and IML based systems, an eight-digit
error code appears.
FLASH Systems: When POST detects a problem on
FLASH systems, an eight-digit error code appears followed
by a short text message indicating the type of failure.
(These messages are generated from the code loaded into
FLASH at the time the system was manufactured.)
Notes:
1. Depending on the model, these EEPROMs are either
on the processor board or on the system board. The
EEPROMs contain the POST and BIOS code.
2. On FLASH systems, the system always loads the
POST and BIOS code from the FLASH EEPROMS
(POST and BIOS code does not reside on the
System Partition or on the Reference Diskette.)
3. On FLASH systems, POST and BIOS can be updated
without replacing any hardware. This is done with an
update diskette. This diskette copies the new code to
the FLASH EEPROMs. Instructions are included with
an update diskette.
If the customer installs an option that requires an
upgrade to the POST and BIOS information, have the
customer contact their Authorized IBM Dealer or
Marketing Representative, or call the IBM HelpCenter
(U.S. and Puerto Rico only) at 1-800-772-2227. They
will receive, free of charge, a set of upgrade diskettes
for their system.
Reference and Diagnostic Diskettes
These diskettes, commonly referred to as the System
Diskettes, contain the utility programs and the diagnostic
programs (customer and advanced).
FLASH and IML systems also have the exact same
programs stored in the System Partition. The preferred
method of operation is to run the programs from the
System Partition; however, if the default hard disk drive is
not working, you can run the programs from the System
Diskettes.
Hardware Maintenance Reference
383
Notes:
1. The Reference Diskette contains the system
programs, and the Diagnostic Diskette contains the
testing programs.
2. Some earlier Model 90 and Model 95 systems used
more than one type of Diagnostic Diskette depending
on the type (1, 2, or 3) of processor board installed in
the system. The latest release of Model 90/95
System Diskettes provides one combined Diagnostic
Diskette, and separate Reference Diskettes (one for
each type of processor board).
3. Server 95A is a disk array system; therefore, none of
the hard disks have a System Partition. You must
run diagnostics from the System Diskettes for the
base system, and from the IBM RAID Controller
diskette, for the disk array devices.
Accessing System Programs and
Starting Diagnostic Tests
The method used to access the system programs in order
to start the diagnostic tests varies with the system. After
you get to the system programs Main Menu, you can run
any of the utility programs or start diagnostic tests.
Starting Advanced Diagnostics on ROM Based
Systems:
1. Insert the Reference Diskette into diskette drive A.
2. Power-on the computer, and follow the instructions on
the screen until the System Programs Main Menu
appears.
3. Press Ctrl+A to select the advanced diagnostic mode.
The advanced diagnostics menu appears.
4. Select System Checkout from the advanced
diagnostics menu. Follow the instructions on the
screen to select your choice of tests.
Starting Advanced Diagnostics on IML Based
Systems:
1. Power-on the computer and wait for the C: prompt.
2. Press Ctr+Alt+Del and watch the cursor closely.
When the cursor moves to the upper-right corner of
the screen, press Ctr+Alt+Ins. The system programs
main menu appears.
3. Press Ctrl+A to select the advanced diagnostic mode.
The advanced diagnostics menu appears.
4. Select System Checkout from the advanced
diagnostics menu. Follow the instructions on the
screen to select your choice of tests.
Note: If you are using the System Diskettes, start the
Reference Diskette, and press Ctrl+A from the
Main Menu. When you select diagnostics, you will
be prompted when to insert the Diagnostic Diskette
(the Diagnostic Diskette itself is not bootable.)
384
PS/2 Maintenance Manual
Starting Advanced Diagnostics on FLASH Based
Systems:
1. Power-on the computer; the IBM logo screen
appears.
2. Press F1 when the F1 prompt appears at the bottom
of the screen. The System Programs main menu
appears. Follow the instructions on the screen to
select your choice of tests.
Starting Advanced Diagnostics on LAN
Workstations
1. Have the LAN administrator make the Reference and
Diagnostic programs available to you through the
server.
2. Press Ctrl+A to select the advanced diagnostic mode.
The advanced diagnostics menu appears. Follow the
instructions on the screen to select your choice of
tests.
Replacing Hard Disk Drives That Have a
System Partition
Important
When troubleshooting a failure involving a hard disk
drive with a System Partition (commonly referred to as
the default hard disk), be aware of the following.
On IML systems, if a power-on password is set, the
system always attempts to load the IML image (POST
and BIOS code) from the System Partition. The only
way to load IML from the Reference Diskette is to first
erase the power-on password. For example, if the
hard disk is dead, and a power-on password set, and
then you boot the Reference Diskette, you will get an
error. The system is trying to load IML from an
inoperable hard disk. To avoid this, you must first
erase the power-on password first. (If there is a
privileged-access password set, you do not need to
erase it, but you will be prompted to enter it.)
On FLASH systems, POST and BIOS code is
contained in the FLASH EEPROMS. Regardless of
the condition of the default hard disk, you will always
be able to load diagnostics from the Reference
Diskette.
On Model 90 and Model 95, be sure you have the
correct type of Reference Diskette (there is more than
one type).
(For a list of FLASH and IML systems, see “PS/2 System
Specifications” on page 435.)
After you replace the default hard disk drive, that is, the
drive with the System Partition, you must recopy all of the
Hardware Maintenance Reference
385
system programs onto the replacement hard disk. To
recopy the programs:
1. Start the system using the customer's backup copy of
the current System Partition.
2. Select Backup/Restore system programs from the
Main Menu.
3. Run the Restore the System Partition option to load
the IML image (if it is an IML system), the system
programs, and the customer and advanced diagnostic
programs onto the default hard disk drive.
Notes:
1. If the user's backup copy of the System Partition is
incomplete, you will not restore the entire System
Partition. If this occurs, after you have recopied the
IML image, get the option diskettes and use Copy an
option to recopy the option files onto the System
Partition.
2. If the IML image is loaded onto the hard disk, but the
operating system is not loaded, either the
Insert-Diskette icon, an I9990305, or a text message
appears on the screen.
QAPlus/PRO Diagnostics
The following tools are available to help identify and
resolve hardware-related problems:
Power-on self-test (POST)
POST Beep Codes
Test programs
Error messages
Diagnostics Diskette
Power-On Self-Test (POST): Each time you
power-on the system, it performs a series of tests that
check the operation of the system and some options. This
series of tests is called the power-on self-test, or POST.
POST does the following:
Checks some basic system-board operations
Checks the memory operation
Starts the video operation
Verifies that the diskette drives are working
Verifies that the hard disk drive is working
If the POST finishes without detecting any problems, a
single beep sounds and the first screen of your operating
system or application program appears.
If the POST detects a problem, an error message appears
on your screen. A single problem can cause several error
messages to appear. When you correct the cause of the
first error message, the other error messages probably will
not appear on the screen the next time you turn on the
system.
386
PS/2 Maintenance Manual
POST Beep Codes:
The Power On Self-Test
generates a beeping sound to indicate successful
completion of POST or to indicate that the tests detect an
error.
One beep and the appearance of text on the display
indicates successful completion of the POST. More than
one beep indicates that the POST detects an error.
Test Programs
The QAPlus/PRO test programs, developed by DiagSoft**
for IBM, are the primary method of testing the IBM
components of the system and some external devices.
The amount of time required to test all components
depends on the number of components. The more
optional adapters and devices you have attached to your
system, the longer the testing takes.
The test programs on the Diagnostic Diskette include the
following features:
Feature
Description
Advanced
Diagnostic
Tests
Identifies most problems associated with the
following major components:
Flexible
Test
Control
Allows you to:
System board
Hard disk drives
Diskette drives
CD-ROM drives
RAM
Serial and parallel ports
Video adapter
Printer
Keyboard
Mouse
Run groups of tests in batch
Specify parameters to use for each test
(for example, video modes, disk
cylinders, port addresses, and so on)
Specify the number of passes you want
to run (one to continuous)
Log the test results to a text dBase
(DBF) format file
Save all test settings for future use
View System Information
View the server's configuration
information. (For example, you can view
the IRQ/DMA assignments, memory
usage, device drivers, and so on.)
Select System Utilities
Run a low-level format also contains
system utilities.
Format a diskette
** DiagSoft is a trademark of DiagSoft, Inc.
Hardware Maintenance Reference
387
Error Messages: Messages generated by the
software—the operating system or application
programs—generally are text messages, but they also can
be numeric. Basically, there are five types of error
messages.
POST error messages
Diagnostic error messages
POST beep codes
Software generated messages.
Multiple messages
Error
Message
Description
POST
Error
Messages
Displayed when POST finds problems with
the hardware or detects a change in the
hardware configuration.
POST
Beep
Codes
Sounds emitted from the speaker if POST
finds a problem. One beep indicates POST
completed successfully. Multiple beeps
indicate a problem was found by the POST.
Diagnostic
Error
Messages
Displayed when a test program finds a
problem with a hardware option.
Software
Generated
Error
Messages
Displayed if a problem or conflict is found by
an application program, the operating system,
or both. For an explanation of these
messages, refer to the information supplied
with that software package.
Multiple
Messages
The first error that occurs can causes
additional errors. Follow the suggested
action of the first error displayed. In this
case, the system displays more than one
error message. Always follow the suggested
action instructions for the first error message
displayed.
Return Codes:
For the test programs to properly
determine if a test Passed, Failed, or Aborted, the test
programs check the error-return code at test completion.
To register the test properly in the test log, the test
programs must generate one of the following return codes:
Return
Code
Description
0
Indicates that the device passed its test.
1
Indicated that the device failed its test.
2 or
greater
Indicates that the test stopped or was
aborted.
388
PS/2 Maintenance Manual
Using the Test Programs
The test programs provide advanced functions and utilities
for power users and service or support professionals to
troubleshoot even the most difficult problems.
Program Navigation: You can maneuver within the
test programs by typing the first letter of a menu choice,
using the function keys, or using command-line options.
Using the First Letter of a Menu Choice
Throughout the test programs, pressing the first letter of an
option on a menu is the same as moving to that item with
the cursor and pressing Enter; however, this function is
not enabled on Test Group Screens.
Using the Function Keys
Use the following keys to maneuver throughout the test
programs:
Keys
Action
Enter
Select an item, run the test module, or run
the test
Down
Arrow ( )
Moves the cursor down
Up Arrow
( )
Moves the cursor up
F1
Calls up the appropriate Help information.
Use the up arrow key ( ) or the down arrow
key ( ) to scroll through the information.
Pressing F1 from within a Help screen
provides a help index from which you can
select different categories. One of the
important help categories is function key
usage. Pressing Esc exits Help and returns
to where you left off.
Esc
Go back to the previous menu
Additional functions are available in the Test Module
Selection screen and the Test Group screen using the
following keys:
Keys
Action
Tab
Move to test group (or move to parameters)
Spacebar
Toggle modules on/off (or toggle tests on/off)
F2
View test results log
F10
Local menu
+
Next logical unit number (for example, LUN 1,
LUN 2, and so on)
−
Previous logical unit number
Hardware Maintenance Reference
389
Command Line Options
The following Command Line Options are available when
initially starting the diagnostic program from within its
directory.
Type QAPLPRO/XXX (where /XXX represents one of the
following from the list below) then press Enter.
Command
Action
/B&W
The /B&W command line option forces the
program to load in Black and White
(Monochrome) mode, which is often more
readable on laptop computers.
/LOG=file
The /LOG=file command line option directs
the test programs to start using a specified
Error Log file.
/INT10
The /INT10 command line option forces the
test programs to use the BIOS for screen
writes.
/OXXX
The /OXXX command line option, where
XXX=test group (for example,
MBD/MEM/VID/HDU/FDU/KBD/COM/LPT,
and so on), omits the designated test group
from testing.
/USRCONFIG
=file
The /USERCONFIG=file command line
option tells the test programs to look for a
user diagnostic configuration file other than
the default USERDIAG.CFG.
/SCRIPT
=file[,R]
The /SCRIPT=file[,R] command line option
with the “,R” runs the selected script.
Please see “Scripting” on page 391 for a
description of scripting.
Note: You can use a “–” instead of a “/” as
the command line switch.
Viewing the Test Groups:
As you move the
cursor bar up or down in the Test Module Selection
window, the right hand screen changes to show the
attributes, parameters, and the selected tests of the
corresponding Test Group. The diamond “ ” mark
indicates a module selected for testing.
The indicated attributes are characteristics of the selected
test module that are used by the test programs to
determine which tests to run or how to run selected tests.
Attributes are also used to limit the allowable range of
parameters (for example, – ending cylinder).
Parameters are values you select to establish the scope of
tests. For example, you can select Extended Memory
testing parameters and limit the testing to a specific range
of test blocks by specifying the starting and ending
memory block. This might be appropriate if prior
experience indicates that problems are likely to exist in a
390
PS/2 Maintenance Manual
specific area of memory. By selecting these limiting
parameters, you reduce memory testing time.
Scripting: Scripting allows you to select specific
groups of tests, testing parameters, and options. Your
selection is saved for later use as a test Script. To set up
a test script, first select all the appropriate test groups and
specific tests you want to run from the Module Testing
section under Diagnostics. You should also select
appropriate testing parameters and options. See “Program
Navigation” on page 389, for instructions to save a test
script.
Changing Logical Unit Numbers:
In some
instances, you can have more than one logical unit number
(LUN) for a particular module. LUNs represent individual
devices within a test group or module. For example, you
might have two diskette drives or two hard disk drives; or,
you might have base, extended, shadow, and cache
memory installed in the computer. This configuration might
result in as many as four or five different LUNs in the
Memory Test Group. Or you might have base, extended,
shadow, and cache memory installed in the system which
might result in as many as four or five different LUNs in
the Memory Test Group.
From either the Module Test Menu or the Test Group
window, you can change to a different LUN (where
applicable) by pressing the plus (+) key (next LUN), or the
minus (−) key (previous LUN).
Test Group Specifications:
In the
upper-right-hand portion of the testing screen (or just the
upper portion if you switched to an individual test group
screen) are the specifications for the related test group.
Note: In the Hard Disk Test Group specification area, if a
software program was to compress your drive, the
indicated size is the compressed size of the logical
drive.
Starting the QAPlus/PRO Diagnostics
Diskette
1. Insert the QAPlus/PRO Diagnostics Diskette into drive
A.
2. Power-on the computer.
3. When the QAPlus/PRO Diagnostics Main Menu is
displayed, press Ctrl+A.
4. Select Diagnostics; then, press Enter.
5. Follow the instructions that appear on your screen. If
an error is displayed, go to “Symptom-to-FRU Index
(QAPlus/PRO)” on page 61.
Hardware Maintenance Reference
391
Module Testing Mode
If the test programs do not find a problem, or you want to
perform in-depth testing, the Module Testing mode
provides a method to run individual tests on a single
module. For example, you can run an individual test for
the diskette drive, or you can run groups of tests for
several modules.
In the Module Testing mode, you can define how many
times each test should run and how the test program
should log the errors.
To start the Module Testing mode:
1. Start the diagnostics diskette. See “Starting the
QAPlus/PRO Diagnostics Diskette” on page 391.
2. Select Diagnostic from the Main Menu.
3. Select Module Tests from the next menu.
4. Use the up and down arrow keys ( and ) to move
the highlight bar from one selection to the next.
5. Follow the instructions on the screen.
Note: As you scroll down the selection menu, the Test
Group window to the right changes to correspond
to the highlighted Module.
Running Selected Module Tests
To run all selected tests for a test group:
1. Use the up and down arrow keys ( and ) to move
the cursor to your selection.
2. Press Enter.
Note: A “ ” appears next to your selection.
Running All Selected Modules
To run all selected test modules:
1. Use the down arrow key ( ) to move the cursor to the
last choice, Run All Selected Modules.
2. Press Enter.
Note: A “ ” appears next to your selection.
Changing Selected Tests in Test Groups
To change selected tests in a Test Group:
1. In the Module Tests Menu, use the up and down
arrow keys ( and ) to move the cursor to your
selection.
2. Press Tab to move into the expanded Test Group
window.
3. Scroll to the test you want to select or deselect.
Warning: Items indicated by a directly adjacent “*”
(red text on color screens) are destructive tests.
4. Press the spacebar at the highlighted test to toggle
between select (indicated by a “ ”) and deselect.
392
PS/2 Maintenance Manual
Note: Pressing the first letter of a test does not
activate the test, unlike menu operation.
5. Press Enter.
Running an Individual Test
To run an individual test:
1. Use the up and down arrow keys ( and ) to move
to the highlighted bar to the test you want to run.
2. Press Enter to run the test.
Note: The results of the test appear in the
lower-right-hand Test Log window. Also, if
you enabled Test Logging, the results are
recorded in the Test Log.
3. When the test completes, press Esc to return to the
Test Group Menu.
Stopping the Tests: To stop running a specific test
or stop testing after you have started a test, press Esc
while the test is running. The test pauses at the first
possible opportunity, and the Skip/Abort Test Menu
appears with the following options:
Option
Action
Continue
The test program begins testing where it left
off.
Skip to
next test
The test program skips the current test, but
remaining tests for the selected Test Module
continue.
Skip to
next group
The test program skips the remaining tests in
the current test group.
Abort all
tests
The test program stops and returns to the
previous menu.
Using the System Utilities
The Diagnostic Diskette contains utilities for formatting
diskettes, performing a low-level format on a hard disk,
and editing.
Formatting Diskettes: To format a diskette within
the Diagnostic programs, select one of the following
options:
Format A:
high density — 1.44MB
Format A:
low density — 720KB
Format B:
high density — 1.44MB
Format B:
low density — 720KB
After selecting one of the above options to format a
diskette, follow the instructions that appear on the screen.
Hardware Maintenance Reference
393
Using the Low-Level Format Program:
Depending on the hard disk capacity, the Low-Level
Format program could take up to two hours.
When To Use the Low-Level Format
Program
Use the Low-Level Format program:
When you are installing software that requires a
low-level format
When you get recurring messages from the test
programs directing you to run the Low-Level Format
program on the hard disk
As a last resort before replacing a failing hard disk
drive
Preparing the Hard Disk Drive for Use:
When the Low-Level Format program is finished, restore to
the hard disk all the files that you previously backed up.
1. Partition the remainder of the hard disk for your
operating system. (The commands vary with the
operating system. Refer to your operating-system
manual for instructions.)
2. Format the hard disk using your operating system.
(The commands vary with the operating system.
Refer to your operating-system manual for
instructions.)
3. Install the operating system.
You are now ready to restore the files.
File Editor:
The File Editor is an ASCII text editor that
uses simple function key commands.
To access the File Editor:
1. Select File Editor from the Utility Menu; then press
Enter.
2. Insert a diskette into Drive A or Drive B before
selecting the file you want to edit, then select the file
you want to edit from the Files selection box.
3. Make your changes. The arrow keys move the
cursor, and the function keys perform search and
block editing functions. (See “File Edit Function Key
Usage.”)
4. When you are done, press F10 to update the file with
the changes you made, or press Esc to quit the
editing process without saving the changes.
File Edit Function Key Usage:
The following
information describes the function of the function keys and
keyboard keys when you are using the File Editor.
394
PS/2 Maintenance Manual
Key
Description
Arrows
Move the cursor to the place in the text
where you want to make changes.
Home
Press Home once, to move the cursor to the
start of the current line.
Press Home twice, to move to the beginning
of the file.
Press Home three times, to move to the
beginning of the file.
End
Press End once, to move the cursor to the
end of the current line.
Press End twice, to move the cursor to the
end of the current screen.
Press End three times, to move the end of
the file.
F2
Press F2. to be in search mode, You are
prompted to enter the search word or words
on a reverse highlighted line at the bottom of
the File Edit Screen. After typing in the
search word, press Enter.
F3
Press F3, to find the next occurrence of a
search word.
F4
Press F4, to mark the start of a block of text
(if you have not previously marked it).
If you previously marked the block of text,
pressing this key unmarks the text block.
F5
Press F5, to complete the block marking
(started with F4).
If you did not previously press F4 to start
marking a block of text, F5 is ignored.
F6
Press F6 while the cursor is within the active
block to move an active (marked) block of
text. Move the cursor to the new location
where the active block is to be moved, then
press F6 again.
If there is no active block of text, F6 is
ignored.
F7
To copy an active (marked) block of text to a
new location, move the cursor to the new
location and then press F7.
If there is no active block of text F7 is
ignored.
F8
To delete an active (marked) block of text,
move the cursor within the active block and
press F8.
If there is no active block of text, F8 is
ignored.
F10
Press F10, to save all changes and exit the
file.
Hardware Maintenance Reference
395
Notes:
1. Always make a backup copy on a self-starting
diskette of the AUTOEXEC.BAT and CONFIG.SYS
files before making any changes.
2. The default text editing mode of the File Editor is the
insert mode. To toggle between overtype and insert
modes, press Insert.
QAPlus/PRO Diagnostics Control Keys: The
following is a list of the QAPlus/PRO Diagnostics Control
Keys, when used and a description of the diagnostics
response.
Control
Keys
When Used
Diagnostics Response
Ctrl+A
Main Menu
Allows you to select test from
the sub menus that are
highlighted with red letters.
CAUTION:
If selected, these test will
erase the information stored
on the diskette or hard disk
drive.
Up and
Down
Arrow
Keys
Main Menu
Module Test
Menu
Test Group
Menu
Highlights an item you want to
select.
Space
Bar
Module Test
Menu
Test Group
Menu
Adds a diamond to the left of
the highlighted test. The test
will run when Run All
Selected is highlighted and
the Enter key is pressed.
Also removes the diamond to
the left of the item. The test
will not run when Run All
Selected is highlighted and
the Enter key is pressed.
Tab
Key
Main Menu
Module Test
Menu
Selects the additional test for
the menu you are in.
+/−
Keys
Test Group
Menu
Selects additional test. The
LUN displayed on the top right
Test Group Menu shows which
test is selected and how and
remain (example LUN 1 of 2).
Disk Array System
The IBM PS/2 Server 95A comes with an IBM RAID
Controller installed. This controller features the
implementation of RAID (redundant array of inexpensive
disks) technology.
In this manual, the word array is used to mean a
collection of hard disk drives over which data is striped.
396
PS/2 Maintenance Manual
Striping is the process of storing data across all the drives
that are installed in the array.
The IBM PS/2 Server 95A supports up to two different
arrays. Each array (collection of physical drives) is
recognized as one or more logical drives.
Before you remove and replace any SCSI devices in a
Server 95A, you should be familiar with disk array features
and technologies. Warning: If hard disk drives in the
disk array are not removed and replaced correctly, data in
the disk array could be lost.
To service the Server 95A, you should have the following
items shipped with the system:
Configuring Your Disk Array booklet
Micro Channel Computers Reference
IBM RAID Controller Diskette.
The programs on the Reference and Diagnostic
Diskettes do not affect devices attached to the RAID
controller. You only can view, manage, configure and
troubleshoot devices attached to the IBM RAID
Controller by using the IBM RAID Controller Diskette.
Server 95A Reference and Diagnostic Diskettes
Server 95A does not have a System Partition on any
of the hard disks; therefore, you must have a copy of
these diskettes to run diagnostics on the base
system.
Storage Capacity
The capacity shown and reported by the IBM RAID
Controller is the binary equivalent; that is, a 540MB hard
disk drive is shown on the Configuration screen as 520MB.
Data Protection
The IBM RAID Controller supports the following technology
levels. The amount of data protection varies with each
level.
Level 0
Does not allow for data redundancy and any
drive failure using level 0 will result in loss of
data.
Level 1
Duplicates data across all drives in the array.
Because the data is duplicated, the capacity of
the logical drive is reduced by 50 percent.
Level 5
Duplicates data and parity of data across all
drives in the array. The capacity of the logical
drive is figured by reducing the number of disk
drives by one and dividing that figure by the
number of drives in the array. For example, if 3
1GB disk drives configured to 1 array and 1
logical drive, 3 minus 1 equals 2, divided by 3
(the number of drives) equals 2/3, so the
Hardware Maintenance Reference
397
capacity of the logical drive (all the drives in the
array), when configured as level 5 is 2GB.
Hot-Spare Drive
The hot-spare drive is a drive in the system that the
customer has defined for automatic use in the event of a
drive failure. If a drive fails, the system automatically
switches to the hot-spare drive without loss of data. If the
system does not have a hot-spare drive, and you replace
the failed drive, the data on the failed drive is recreated
from the rest of the drives in the array. This drive must be
setup by the customer.
Note: When using the equations for determining the
capacity of the drives for level 1 and level 5 arrays,
the capacity of the hot-spare drive is not used.
Hot-Spare Drive Replacement
Note
It is not necessary to power-off the computer when
replacing the Hot-Spare drive in a Disk Array system.
To replace the drive, do the following.
1. Remove the front bezel.
2. Insert a small coin into the slot of the small knob
located on the left-hand side of the failing drive.
3. Turn the knob clockwise, one-quarter (¼) of the way;
then slide it to the left.
4. Pull the drive out of the computer.
5. Reverse this procedure to install the new drive.
Note: If the array was configured using level 0, the
information on the failed drive cannot be restored
to the new drive.
Bay IDs
Drives are marked with a bay ID when you insert them into
a bay. If a drive is removed and reinstalled in a different
bay, the system will alert you that you have a drive in an
incorrect bay and tell you which bay to use.
Configuration
The IBM RAID Controller Configuration Diskette is required
to configure the disk array. The Main Menu of the
configuration program provides the following choices:
Help
To see help for the choices on the screen.
View configuration
To see the existing disk array configuration.
Create or delete array
To select the drives for an array you want to
create, or to delete a previously created array.
398
PS/2 Maintenance Manual
Initialize or synchronize array
After establishing an array.
If you are using one or more drives that
have been previously used, select
Initialize logical drive to a
predetermined state. Any data existing
on the drive is altered.
If you do not want to alter the data on the
drive, select Synchronize logical drive to
recompute and rewrite the parity data on
the drive.
Rebuild device
To replace a failed drive and rebuild logical
drives (RAID levels 1 and 5).
Advanced functions
To change the way data is written to a drive.
Also used to save or restore a disk array
configuration to or from a diskette.
Drive information
To view information about the system's physical
drives.
Exit
To leave the Main Menu.
Saving Disk Array Configuration to Diskette
To back up the array configuration to diskette, do the
following.
1. Insert the RAID Controller Diskette into the primary
drive and press Ctrl+Alt+Del to start the IBM RAID
Configuration Program.
2. Select Advanced Functions from the Main Menu.
3. Select Save configuration to diskette.
4. Insert a 2MB 3.5-in diskette into drive A and follow
the instructions on the screen.
The file that contains the configuration is named
CONFIG.DMC.
Restoring the Disk Array Configuration
To restore the disk array configuration, do the following.
1. Insert the RAID Controller Diskette into the primary
drive and press Ctrl+Alt+Del to start the IBM RAID
Configuration Program.
2. Select Advanced Functions from the Main Menu.
3. Select Restore configuration from diskette; then
follow the instructions on the screen.
If the information on the backup diskette is not current, the
EPROM from the failed controller can be installed on the
new controller.
Hardware Maintenance Reference
399
Recording the Vital Product Data on a
New System Board
The vital product data (serial number, etc.) is stored in the
EPROM on the system board. On some IBM PS/2 system
boards, the vital product data (VPD) is rewritable. When
replacing a system board that has rewritable VPD, the
system unit serial number must be recorded on the new
system board. Use the following procedure to record the
system unit serial number on the new system board.
1. Power-on the computer.
2. During POST, press F1.
3. When the cursor moves to the lower left-hand corner,
press F1.
4. Select item 8 More Utilities.
5. Select item 4 Set System Identification.
6. Select item 1 Set System Identification.
7. Type the system unit serial number in the entry field;
then, press Enter.
The system unit serial number will be stored in the
EPROM on the system board.
To verify that the serial number is properly stored in the
EPROM, select View System Configuration.
Upgradable POST and BIOS
Server 85 and Server 95 and 95A have electronically
erasable programmable read only memory (EEPROM)
modules, (sometimes referred to as Flash memory) on the
system board. These modules contain the power-on
self-test (POST) routines and the Basic Input/Output
System (BIOS) instructions.
The customer can upgrade the POST and BIOS code by
loading a POST/BIOS Update Diskette. The customer
should follow the instructions included with the diskette to
copy the new information to the flash EEPROMs on the
system board.
Note: If the customer installs an option that requires an upgrade
to the POST and BIOS information, have the customer contact their
Authorized IBM Dealer or Marketing Representative, or call the IBM
HelpCenter (U.S. and Puerto Rico only) at 1-800-772-2227. They
will receive, free of charge, a set of upgrade diskettes for their
system.
PCMCIA Adapter (Model 33)
The (PCMCIA) adapter is an extension to the AT bus. The
PCMCIA card accepts adapters about the size and shape
of a credit card. These adapters, called PC Cards** have
**
Trademark of the Personal Computer Memory Card
International Association.
400
PS/2 Maintenance Manual
a thickness of 3.3 mm, 5.0 mm, or 10.5 mm. Available PC
Cards include Ethernet, Token Ring, modems, 3270
emulator, FAX, memory, solid state hardfiles, and hard
disk drives.
Two key elements of PCMCIA technology are Socket
Services and Card Services. Socket Services identifies
how many option slots are in the computer and detects the
insertion or removal of a PC card while the computer is
powered on. When a PC Card is inserted and detected,
Card Services immediately reconfigures the computer to
give the new PC Card access to the system memory,
interrupts, and other computer functions.
Video
The video subsystem is either on the system board or the
display adapter. The video subsystem operates in two
video modes:
VGA compatibility mode
XGA compatibility mode
Most display adapters support up to 1MB of video memory.
When the computer is powered-on, the graphics array is in
the VGA mode. In this mode, all alphanumeric text, and
the VGA all-points-addressable (APA) graphics modes are
supported. The maximum resolution in VGA compatibility
mode is 720 x 400 picture elements (PELS) in the text
mode, and 640 x 480 PELS in the graphics mode. A
maximum of 256 colors or 64 shades of gray are
supported in VGA mode. Composite video is not
supported.
The graphics array is in the XGA mode only when enabled
by the DOS Adapter Interface or other video device drivers
(example: Microsoft** Windows**, OS/2*, and Presentation
Manager* device drivers).
The XGA and XGA-2 works with monochrome and color,
analog, and direct-drive displays.
The following table shows how the amount of video
memory available affects the maximum color and
resolution.
* Trademark of the IBM Corporation.
** Trademark of the Microsoft Corporation.
Hardware Maintenance Reference
401
Video Memory
Resolution
Colors
Four modules (512KB)
640 x 480
or
1024 x 768
256
Eight modules (1MB)
640 x 480
or
1024 x 768
65536
16
256
The following are examples of the refresh rates supported
at the various resolutions that are available with XGA-2.
The software supplied with the XGA-2 subsystem
automatically sets IBM displays at the best resolution and
refresh rate possible with the hardware attached.
Resolution
Frame
Rate
(Hz)
Line
Rate
(KHz)
I/NI
640 x 480
60
31.6
NI
640 x 480
72
37.9
NI
640 x 480
72
37.8
NI
640 x 480
75
39.4
NI
800 x 600
56
35.2
NI
800 x 600
60
37.9
NI
800 x 600
72
48.1
NI
800 x 600
75
50.0
NI
1024 x 768
43.5
35.6
I
1024 x 768
60
48.4
NI
1024 x 768
70
57.0
NI
1024 x 768
70
56.5
NI
1024 x 768
72
58.1
NI
9517
1024 x 768
75
61.1
NI
9515
1280 x 1024
50
53.4
I
IBM
Display
Support
(Model)
7544,
8503,
8507,
8513,
8515,
8517,
7554,
8504,
8512,
8514,
8516,
8518
9515, 9517,
9518
8507, 8514,
8515, 8516,
7554, 8517
8517
Note: I= Interlaced NI = Non-Interlaced
Non-IBM Displays
Supported resolutions (see previous table), which are not
available on IBM displays, are available using some
non-IBM displays. These displays range in capability from
low-cost, low-function to high-cost, high function. Most of
402
PS/2 Maintenance Manual
these displays respond as an IBM 8514 display does when
used with the software supplied with the XGA-2. As a
result, IBM 8514 resolutions and refresh rates are used as
default.
The software supplied with the XGA-2 Display Adapter/A
or a computer with the IBM XGA-2 on the system board
allows you to override the default screen resolution. If you
do override with a resolution which does not meet, or
exceeds, the capability of the display attached,
unpredictable results can occur.
Warning: Some multisync displays might appear to
function correctly; however, damage may occur over time.
Notes:
1. You must only select resolutions which are suitable
for the display attached to the XGA-2 subsystem.
2. The use of the resolution override should be avoided
if the display attached to the XGA-2 subsystem is to
be changed frequently with displays of varying
characteristics.
The IBM XGA-2 subsystem, along with certain IBM
displays, computers, and some software, has been
certified to meet the International Standards Organizations
(ISO) standard 9241/3. IBM cannot guarantee that all
non-IBM displays attached to the XGA-2 subsystem on the
system board or an XGA-2 Display Adapter/A will provide
acceptable front of screen characteristics or meet other
health and safety standards.
Serial Port
Note: If you experience a problem with a non-IBM device
when attaching it to either the serial port, you might
need to go to the Change configuration screen of
the system programs and set the port DMA (direct
memory access) arbitration level to “Disabled.”
The serial ports are fully programmable and support
asynchronous communications. The D-shell connector
provides the signals to drive a device. The connected
device is identified by the system configuration as SERIAL
1 through SERIAL 8, depending on the model. Adapters
with serial ports can also be configured this way. Conflicts
occur with multiple communication lines if two or more
lines have the same address. Select the Set
configuration option from the system programs. Select
View configuration to verify that no lines are addressed
the same.
Note: If a conflict occurs, an asterisk appears next to the
conflicting address.
Hardware Maintenance Reference
403
Parallel Port
Note: If you experience a problem with a non-IBM device
when attaching it to either the parallel port, you
might need to go to the Change configuration
screen of the system programs and set the port
DMA (direct memory access) arbitration level to
“Disabled.”
The parallel ports allow the attachment of devices that
accept 8 bits of parallel data at standard
transistor-transistor logic (TTL) levels. The port has a
D-shell connector and is designed primarily for printers.
However, the port can be used as an input/output port for
any device or application that matches the input/output
capabilities of the port. When adapters with additional
parallel ports are installed, the system supports multiple
devices, each addressed separately as PARALLEL 1,
PARALLEL 2, PARALLEL 3, or PARALLEL 4, depending
on the model. Conflicts occur when using multiple
devices if two or more devices are addressed the same.
Select the Set configuration option from the system
programs. Select View configuration to verify that no
lines are addressed the same.
Note: If a conflict occurs, an asterisk appears next to the
conflicting address.
Supported Cables
Only IBM manufactured cables in the lengths supplied by
IBM are tested and supported on PS/2 systems. The
performance of non-IBM and locally fabricated cables are
the customer's or supplier's responsibility.
Using non-IBM cables on displays, serial, parallel,
keyboard, and mouse ports might cause unpredictable
problems.
Diskette-Drive Controller
The diskette-drive controller is on the system board. The
controller connects to the diskette drives through a cable.
Signals and voltages are supplied through the
diskette-drive cable that plugs into the connector.
Installing the wrong drive might cause intermittent
problems.
Keyboard and Pointing-Device
Connectors
The two 6-pin connectors on the rear of the system board
are for a keyboard and a pointing device (mouse). The
keyboard connector on most systems is marked on the
back panel of the system unit with a keyboard symbol.
The pointing device connector on most systems is marked
with a mouse symbol.
404
PS/2 Maintenance Manual
System Memory
The following section provides information about basic
memory operation. To determine the maximum memory
supported on the system you are servicing, refer to “PS/2
System Specifications” on page 435.
System-Board Memory
The amount and type of system-board memory varies from
model to model.
Memory-Expansion Adapters
In addition to system-board memory, many models support
additional memory on memory-expansion adapters. (The
only 486 system that supports memory expansion adapters
is the model 70 A21.) If a memory-expansion adapter is
installed in a system that does not support one, the system
might work, but the memory performance will be degraded.
Memory expansion adapters can be installed in any of the
expansion slots (16-bit or 32-bit depending on the model),
on the system board. Memory expansion kits are installed
on the memory-expansion adapters to achieve the desired
memory. The amount of memory expansion kits supported
varies with the option adapter. The amount of available
memory can be constrained by the hardware and the
operating system in use.
It is also important to understand that memory size and
speed requirements are based on the requirements of the
hardware that the memory module kit is plugged into. For
example, a system that requires 80ns memory on the
system board, might support memory adapters that require
85ns memory module kits. In that case, the memory on
the adapter runs at 85ns.
The system board does not have to be fully populated
before you add expansion memory, and each
memory-expansion adapter does not have to be filled to
capacity before you add another memory-expansion
adapter.
Memory Errors
Memory errors and how the memory blocks are
deallocated varies with the system. It is not necessary to
understand this to service the system; however, the
information is available in the model-specific Technical
Reference manuals.
Note: On some early PS/2 systems, a memory error is
not recoverable.
Hardware Maintenance Reference
405
Unique Memory Information (90, 95)
The 90 and 95 systems share some unique memory
operation.
Model 90 Memory
The figure below shows the location of the four
memory-module-kit connectors J4 to J1 on the Model 90
memory-riser cards. The riser cards plug into
system-board connectors J11 and J14.
The system supports up to 64MB of memory, but the
amount of memory accessed might be limited by the
operating system.
J4
J3
J2
J1
Model 95 Memory
The figure below shows the location of the
memory-module-kit connectors B1 to A4 on the Model 95
system board.
The system board has eight connectors for system-board
memory-module kits. The system supports up to 64MB of
memory on the system board, but the amount of memory
accessed might be limited by the operating system.
:
B1 B2 B3 B4 A1 A2 A3 A4
406
PS/2 Maintenance Manual
Whenever memory is added to or removed from the
system, run Automatic configuration from the Main Menu
of the system programs.
Note: If memory fails, and the customer runs diagnostics,
the defective memory is disabled. When you run
diagnostics, the system will indicate the amount of
memory that is enabled.
After the defective memory is replaced, run the advanced
diagnostic memory test to enable the replacement
memory.
Memory Configurations (90, 95)
Interleaved configurations require matched pairs of
memory-module kits. The size and the speed must
be the same for both memory-module kits in the pair,
but it can vary from pair to pair. The kits must be
installed in the following order: pair J1 & J3 (Model
90) or A1 & B1 (Model 95), then pair J2 & J4 (Model
90) or A2 & B2 (Model 95), and so forth. This
technique of addressing memory in pairs enhances
performance.
Noninterleaved configurations do not require matched
pairs of memory-module kits (the size and speed
does not have to be the same). Noninterleaved
memory runs less efficiently than interleaved memory,
but will function with mixed sizes of memory.
Error Detection (90, 95)
The systems use either parity or Error Correction Code
(ECC) to detect memory errors (but not a combination of
both on the same system board).
Memory that uses parity can detect (but not correct)
memory errors. If an error occurs during POST, an
error code is displayed. If an error occurs after
POST, the system halts.
Memory that uses ECC can detect and correct
memory errors. If an error occurs during or after
POST, the error is corrected without interfering with
the system operation. This error-correcting capability
will result in fewer memory-related service calls.
The memory configuration and the type of error detection
supported varies depending on which processor board
(type 1, 2 or 3) is installed.
Model 90 and 95 systems can be upgraded with a different
type of processor board than the type indicated from the
system serial and model number label. To verify which
board is installed in the system you are servicing, refer to
“Processor Board Matrix (90, 95)” on page 126.
Hardware Maintenance Reference
407
Resolving Memory-Address Conflicts
The automatic configuration program might change the
memory-address space used by some hardware and
software options. The new address might conflict with
addresses defined for use through the expanded memory
specification (EMS). (EMS memory is used only in the
DOS environment.)
If a memory conflict exists, one or more of the following
could occur:
The system cannot load the operating system.
The system is disabled.
An application does not operate or it returns an error.
Screen messages indicate that a memory-address
conflict exists.
You can resolve these conflicts in one of the following
ways:
Change the software configuration (primary method).
Change the system configuration (alternative method).
Changing the Software Configuration
The best method of resolving memory-address conflicts is
to change the software configuration by changing the
addresses defined by the EMS driver.
For conflicts caused by XMA2EMS (DOS 4.0) or EMM386
(DOS 5.0) in the CONFIG.SYS file, refer to the DOS
documentation. For conflicts caused by an
expanded-memory manager other than the one supplied
with DOS, refer to the memory manager documentation.
Note: To view the addresses used by the installed
hardware and software options, go to the Main
Menu, select Set configuration then select
Display memory map.
Changing the System Configuration
An alternative method of resolving memory-address
conflicts is to change the address of the conflicting
hardware option by selecting Change configuration from
the Set configuration program. Before changing adapter
addresses, identify the addresses used by the EMS driver.
Then set the adapter to addresses that do not conflict.
Note: These conflicts can occur because the automatic
configuration program sets up only the hardware.
It does not consider the operating system or
application requirements. If you run automatic
configuration after changing an address, the
addresses you changed will be set back to their
default values.
408
PS/2 Maintenance Manual
SCSI System Information
The following information pertains to systems that support
SCSI devices (refer to “PS/2 System Specifications” on
page 435).
SCSI Hard Disk Drives and Devices
Systems can be shipped with a Small Computer System
Interface (SCSI) function. The SCSI function can be on a
SCSI adapter, or built into the system board. The default
hard disk drive has the IML image preloaded in a protected
partition. Optional SCSI adapters can be installed in the
system. Each additional SCSI adapter can support up to
seven external SCSI devices.
The hard disk drives automatically position and lock the
read/write heads in nondata areas when the computer is
powered-off.
Understanding SCSI ID Numbers
Each SCSI device must be assigned, at the time of
installation, a unique SCSI identification number (SCSI ID).
The SCSI adapter or controller and the SCSI devices
attached to it are referred to as a SCSI chain (the system
can support more than one SCSI chain). When changing
drives, be sure to see “Terminator Function” on page 414.
Selecting a SCSI ID
The SCSI ID (6, 5, 4, 3, 2, 1, or 0) available for a device
depends on which IDs are already assigned to devices in
the same SCSI chain. For example, if there is already one
device in the SCSI chain assigned SCSI ID 6, no other
SCSI devices (in that chain) can be set to SCSI ID 6.
The ID you choose determines the priority of the device.
SCSI device IDs should be set as follows:
The SCSI adapter or controller is preset as SCSI ID 7
(highest priority).
A fixed-media read and write device, such as a hard
disk drive, should be assigned a high-priority ID such
as 6 or 5.
Note: The default drive with the IML code loaded is
usually SCSI ID 6.
Removable-media devices (CD-ROM, optical drive, or
a tape drive), should be assigned a priority ID of 4, 3,
2, 1, or 0 (an ID below the fixed-media devices).
Hardware Maintenance Reference
409
Typically, a low-priority or mid-priority device should not be
assigned a SCSI ID higher than a high-priority device.
At the time of installation, a SCSI device should be labeled
indicating the SCSI ID assigned to that device. If the
device is not labeled, or you need to verify the SCSI ID,
you can either decipher the jumper or switch settings
(explained later), or you can do the following:
1. Power-on the computer and access the Main Menu of
the system programs.
2. Select Set configuration from the Main Menu, then
select Set and view SCSI device configuration.
The SCSI ID for each installed SCSI device is
displayed on the line that begins with Device Address.
The ID appears in a set of two numbers separated by
a comma (for example: 6, ). The first number (in
this example: 6) is the ID assigned to the installed
SCSI device.
The ID for the SCSI adapter begins with the words
SCSI Address or SCSI Adapter Address.
If there are no devices connected to the SCSI
controller or adapter, the screen will show only the
location of the SCSI controller or adapter and the ID
assigned to it.
410
PS/2 Maintenance Manual
Setting a SCSI ID
SCSI devices have either switches or jumpers to set the
SCSI ID. All FRU hard disk drives are shipped preset to
SCSI ID 6. The type of hardware used and the location of
the jumpers or switches varies from device to device.
SCSI ID Switch Settings:
To set the SCSI ID on
a device that has switches, do the following:
Refer to the switches in the following figure.
Refer to the table to determine how the switches
should be set for the SCSI ID you selected.
Using a ballpoint pen, set switches 1 , 2 , and 3
accordingly.
Switch 4 is always set to “on.”
2 3 4
The table below shows how switches 1 , 2 , and 3 are
set for IDs 6 through 0.
Switches
Switches
SCSI ID 1 2 3 4
SCSI ID 1 2 3 4
6
2
5
1
4
0
3
Value
124
Value
124
Notes:
1. If present, switch 5 is always on, and switch 6 is
always off.
2. On external SCSI devices that have a rotary switch to
set the SCSI ID, set the switches or jumpers on the
FRU device inside the external cover to 0 (off) to
enable the rotary switch.
Hardware Maintenance Reference
411
SCSI ID Jumper Settings:
To set the SCSI ID on
a hard disk drive or CD-ROM with jumpers, do the
following:
Note: If you are servicing a 2GB Hard Disk Drive (SCSI)
(16-bit 68-pin), refer to “2GB SCSI 16-Bit 68-Pin
Hard Disk Drive ID Switch Settings.”
1. Position the device so that the single pin is in the 4th
position from the left. (The single pin might be in
either the upper or lower position.)
2
3
4
SCSI ID
2. Refer to the table below to position the hard disk
drive and CD-ROM jumpers for IDs 6 through 0.
SCSI
ID
6
Jumpers
1 2 3
:
5
4
3
SCSI
ID
:
2
:
1
:
0
Jumpers
1 2 3
:
:
:
:
:
:
:
:
2GB SCSI 16-Bit 68-Pin Hard Disk Drive ID
Switch Settings: To set the ID on the 2GB SCSI
16-Bit 68-Pin Hard Disk Drive do the following:
1. Position the drive as shown below.
412
PS/2 Maintenance Manual
2. Refer to the table below to position the hard disk
drive jumpers for IDs 15 to 0.
Note: The ID selected must be supported by the
system you are servicing.
SCSI
ID
1
Setting
2 3
7
Reserved
6
:
5
4
:
14
:
:
13
:
:
12
: :
11
:
1
0
:
1
Setting
2 3
4
15
:
3
2
SCSI
ID
4
:
:
10
:
:
:
9
:
: :
8
5 Motor Start Jumper (
= on
:
:
:
:
:
:
:
:
:
:
:
:
: = off )
Optical-Head Lens Cleaning Procedure
The LED flashes when the drive is reading data. During
normal operation, the LED flashes one to five times per
second. A speed of less than one per second indicates a
contaminated optical-head lens producing slow CD-ROM
drive operation or drive failure.
To clean the optical-head lens:
1. Insert the Cleaning Disk into the CD caddy.
2. Insert the CD caddy into the drive.
3. Allow the drive to run until the activity indicator stops
flashing.
4. Press and hold the eject button to remove the CD
caddy.
Hardware Maintenance Reference
413
Setting the Motor-Start Jumper
The jumper in position 5 (illustrated above) is the
motor-start jumper. If the jumper is installed, all hard disk
drive motors start instantly at power-on. If the jumper is
removed, POST starts the drives sequentially. Some
drives are shipped with the motor-start jumper installed (to
reduce POST time). If many large-capacity drives are
added to the computer, and they are set to start at
power-on, the power supply might shut down. If this
happens, it means that the total motor-start surge current
of a multiple drive startup exceeds the reserve-current
capacity of the power supply. You might have to remove
one or more motor-start jumpers.
Note: Non-IBM drives use either a jumper or a switch to
set the motor-start mode.
To set the SCSI ID on a Rewritable Optical Drive, do the
following:
1. Position the device so that the three position jumper
is at the lower-right corner.
2. Refer to the table below to position the Rewritable
Optical Drive jumpers for IDs 6 through 0.
SCSI
ID
Jumpers
1 2 3
6
:
5
:
4
3
SCSI
ID
:
:
Jumpers
1 2 3
2
:
1
:
:
:
0
:
:
:
:
Terminator Function
Even though the system can appear to be operating
correctly with or without terminators installed, it is not
actually operating correctly. The SCSI Bus can operate at
data rates up to 5MB per second. Because of the high
speed, the bus must be terminated properly, at both ends,
with resistors (terminators) or you eventually will have
problems.
If you do not terminate the SCSI bus correctly, you can
experience intermittent errors. For example, if a terminator
is missing, the result might be poor signal quality or
improper (higher) voltages. Intermittent errors can lead to
solid failures if the SCSI devices are exposed to
continuous excessive voltages.
If you have too many terminators installed, for example,
three internal hard disk drives, each with a terminator, the
result might be a drop in voltages to a point where devices
will not operate, or they operate intermittently.
414
PS/2 Maintenance Manual
16-Bit AT Fast SCSI Adapter Switch
Settings
2
3
4
5
6
7
IO-0
IRQ-1
IRQ-0
MEM-1
MEM-0
IO-1
1
IRQ-2
Switch Location
On Position
Off Position
1
2
3
IO-1
IO-0
IRQ-2
IRQ-1
IRQ-0
MEM-1
MEM-0
INTERNAL SCSI
S2
J2
EXTERNAL SCSI
SCSI
BUSY
LIGHT
J2
MANUFACTURED EXCLUSIVELY FOR IBM CORP
BY FUTURE DOMAIN CORP
Interrupt Settings
Interrupt switches are labeled IRQ-0, IRQ-1, and IRQ-2.
The default interrupt setting is IRQ-10.
IRQ-0
IRQ-1
IRQ-2
Interrupt Setting
Off
Off
Off
IRQ=3
On
Off
Off
IRQ=5
Off
On
Off
IRQ=10 (default)
On
On
Off
IRQ=11
Off
Off
On
IRQ disabled
On
Off
On
IRQ=14
Off
On
On
IRQ=15
On
On
On
IRQ disabled
Memory Address Switch Settings
Memory address switches are labeled MEM-0 and MEM-1.
The default memory range is 8K from hex CA000 to
CBFFF.
If you are using a memory manager, you must exclude the
adapter memory address range to avoid memory conflicts.
Refer to your memory manager instructions. For example,
Hardware Maintenance Reference
415
when using the DOS memory manager EMM386, the
following line in the CONFIG.SYS file excludes the adapter
default memory address:
DEVICE=EMM386.EXE X-CA
-CBFF
Switch settings for memory options are listed in the
following table.
MEM-0
MEM-1
Memory Setting
(Hex)
Off
Off
MEM=C800
On
Off
MEM=CA00 (default)
Off
On
MEM=CE00
On
On
MEM=DE00
I/O Address
I/O address switches are labeled IO-0 and IO-1. The
default I/O address range is hex 0140 to 014F.
IO-0
IO-1
I/O Address Setting
(Hex)
Off
Off
IO=140 (default)
On
Off
IO=150
Off
On
IO=160
On
On
IO=170
416
PS/2 Maintenance Manual
Internal Devices Attached to an Adapter:
Internal SCSI devices attach to a SCSI adapter through a
flat ribbon cable 1 . The system supports multiple internal
SCSI devices and uses a cable with multiple connectors.
If there is only one internal SCSI hard disk drive installed,
it is connected to the last connector on the cable.
Because that device is the last device in the SCSI chain, it
is the only internal SCSI device that requires a
terminator 2 .
Note: You might see a single in-line cable terminator, one
or more resistor terminators (in various sizes) that
unplug or slide out of the circuit board, or a pin
jumper on the circuit board. All terminators are
labeled T-RES. Leave any extra terminators with
the system.
External Devices Attached to an Adapter:
External SCSI devices are attached through a series of
cables outside the system. The first external device
attaches to the SCSI adapter port through a 60-pin to
50-pin cable 3 . Additional external SCSI devices link
together through a 50-pin to 50-pin cable 4 . The last
device in the chain requires a 50-pin block terminator 5
(in the lower connector).
Internal
Devices
External
Devices
SCSI Adapter
3
4
2
5
Hardware Maintenance Reference
417
Terminators on SCSI Adapters:
Termination for
SCSI adapters varies, depending on which type of adapter
is installed.
Note: Regardless of the SCSI adapter type used, the last
external device in the chain requires a 50-pin block
terminator.
Type 1 and Type 2 SCSI Adapters: The Type 1
SCSI adapter has a connector 1 (on one side) for a
20-pin terminator. Originally, only SCSI adapters without
pluggable cache used the 20-pin side terminator. The
newest level SCSI adapters use the 20-pin side terminator
whether they have pluggable cache or not. Type 1
adapters do not require any other adapter terminator.
The Type 2 SCSI adapter does not have a terminator on
the side. Instead, a 50-pin internal terminator 2 and a
60-pin external terminator 3 are used.
SCSI Device Configurations: SCSI Adapter
termination varies depending on whether the SCSI devices
attached are internal, external, or both.
Use the information below to determine terminator (T-RES)
requirements and locations.
2
Type 1
SCSI
Adapter
Type
Used
Only
Internal
Devices
Attached
3
Type 2
Only
External
Devices
Attached
Internal
and
External
Devices
Attached
T-RES
Location
(shown
above)
1
1
1
1
1
N/A
2
3
2
2
2
N/A
Table 12. Adapter Terminator Locations
418
PS/2 Maintenance Manual
Terminators on System Boards:
System
boards with a built-in SCSI controller on the system board,
either have removable or permanent (automatic)
resistor-type terminator on the system board. The
terminator is labeled T-RES.
Removable Terminators (8556, 8557)
If there is a built-in SCSI controller on the system board,
and there is a removable terminator on the system board,
that terminator serves the same purpose as an external
terminator on a SCSI adapter. On those systems, if an
external SCSI device is attached to the SCSI port on the
system board, the system-board terminator must be
removed. The last SCSI device in the chain attached to
that port, requires termination.
Non-Removable Terminators (9556, 9557, 9576, 9577)
If there is a built-in SCSI controller on the system board,
but there is not a removable terminator on the system
board, the terminator is built into the system board. The
SCSI controller termination function on these systems is
automatic. For example, if there is not an external SCSI
device connected to the system-board SCSI port, the
terminator is automatically enabled. If there is an external
SCSI device attached to the SCSI port on the system
board, the terminator is automatically disabled. Because
of this automatic function, you never need to install a
terminator on the system-board SCSI port (even when
there are no external SCSI devices attached). However,
you still need a terminator on the last device in a SCSI
chain (both internal and external). This is the same as on
any other system with an external SCSI device attached.
For example, if the system has two internal SCSI devices,
the last one on the cable requires termination. Another
example is if there are two external SCSI devices
attached, the last device in that chain requires termination.
All other SCSI devices must have the terminators
removed.
Hardware Maintenance Reference
419
Selectable Drive-Startup Function
The selectable drive-startup sequence allows the user to
control the startup sequence of the drives in the system.
Each time the computer is powered-on, it checks the
drives as it looks for the operating system. The order
which the system checks the drives is the drive-startup
sequence.
In most cases, there is no need to change the default
drive-startup sequence. However, if users are working
with multiple hard disk drives, multiple operating systems,
different size diskette drives, or they are planning to do
remote initial program load (RIPL) from a drive in a
network server, they might want to change the sequence.
The default sequence checks the primary diskette drive for
a startable diskette. If one is present, the operating
system or program is loaded from the diskette. If not, the
system checks the primary hard disk for an operating
system. If one is present, the operating system is loaded
from that hard disk drive. If not, the system displays either
the diskette and F1 prompts or the I9990305 error code.
If the system is started from a diskette, the drive containing
the diskette becomes drive A, regardless of the defined
sequence. The user can choose the startup order of up to
four drives, and also customize the startup sequence by
changing the order which the system checks the drives.
By making this change, the user decides which four drives
are the first drives to be checked, and also the order which
the system checks them. When the startup sequence is
changed, the drive letters might also be changed. The
operating system assigns the drive letters when the system
starts. The assignment of the subsequent drive names will
vary with the operating system or the device drivers used.
Warning: If the startup sequence is changed, you must be
extremely careful when you do write operations (such as
copying, saving, or formatting). The customer's data or
programs can be overwritten if you select the wrong drive.
420
PS/2 Maintenance Manual
To Change the Startup Sequence:
To change
the startup sequence, do the following:
1. Start the system programs from the hard disk.
2. Select Set features from the Main Menu.
3. Select Set startup sequence and follow the
instructions on the screen.
Example: Default Startup Sequence
The example below shows the default startup sequence for
the system.
Startup Number
Device
1.......[2.88MB 3.5-inch Diskette Drive ]
2.......[SCSI hard disk slot 1 (ID, LUN).:6, ]
3.......[Not selected]
4.......[Not selected]
Note: The selections and device types vary.
Example: Changing the Startup Sequence
Assume the following drives are installed in the system:
Diskette Drives
– 3.5-inch diskette drive (primary)
– 3.5-inch diskette drive (second)
– 5.25-inch diskette drive (third)
Hard Disk Drives
– 400MB hard disk drive (primary hard disk drive)
divided into two 200MB partitions.
If you want to start the system from a 3.5-inch diskette, a
5.25-inch diskette, or the hard disk drive, you can define
the startup sequence as follows:
Startup Number
Device
1.......[2.88MB 3.5-inch Diskette Drive ]
2.......[1.2MB 5.25-inch Diskette Drive 2]
3.......[SCSI hard disk slot 1 (ID, LUN).:6, ]
4.......[Not selected]
In this example, the system looks for a startable diskette in
the primary 3.5-inch diskette drive and then looks for a
startable diskette in the 5.25-inch diskette drive. If there is
not a startable diskette in either drive, the system loads the
operating system from the System Partition on the hard
disk drive.
Hardware Maintenance Reference
421
System-Unit Power Supplies
When the computer is powered-off for 8 seconds or more
and then powered-on, the power supply generates a
“power good” signal that resets system logic. The
presence of the “power good” signal turns on the green
power-on light on the front of the system indicating that the
power supply is functioning correctly.
Power-Supply Features
Most PS/2 power supplies support the following features.
Operating Voltage Range: PS/2 power supplies
can be operated continuously over the following ranges:
100V Range (90 to 137 VAC) and 200V Range (180 to
265 VAC) with a sine wave input with maximum 5% total
harmonic distortion.
On some models, the power supply automatically switches
to the required voltage, and on others, there is a manual
switch.
No-Load Operation:
All PS/2 power supplies are
designed to operate at No Output Load.
Over-Current Protection: All PS/2 power supplies
have output over-current protection. If more than a safe
current is pulled from any output on the power supply, the
power supply shuts down until the on/off switch is recycled.
Short-Circuit Protection:
All PS/2 power supplies
have protection from shorts being placed between an
output and ground, or between two outputs. This prevents
damage to the power supply if a fault occurs in the system.
The power supply shuts down until the on/off switch is
recycled.
Over-Voltage Protection: All PS/2 power supplies
have protection from output over-voltage. Before any
voltage exceeds 130% of its nominal value, the power
supply automatically shuts down until the on/off switch is
recycled.
Under-Voltage Protection: If any voltage drops
below its regulation range, the “power good” signal drops,
preventing any further processing in the system.
Automatic Restart:
Most PS/2 power supplies have
an automatic restart feature. This allows the power supply
to restart after an AC voltage power outage. Beginning
with products announced in October 1990, a 3 to 6 second
delay was added to enable all subsystems and peripherals
ample time to reset, prior to sequencing power back to the
system.
422
PS/2 Maintenance Manual
Power-Line Disturbances:
All PS/2 power
supplies have been tested for power-line disturbances.
Power supplies will stay in specification if any of the
following conditions occur:
A 20% below nominal voltage for 2 seconds repeated
10X with a 10% duty cycle (80V in 100V Range and
160V in 200V Range).
A 30% below nominal voltage for .5 seconds repeated
10X with a 10% duty cycle (70V in 100V Range and
140V in 200V Range).
A 15% above nominal voltage for 1 second repeated
10X with a 10% duty cycle (143V in 100V Range and
276V in 200V Range).
A 400Hz oscillatory, exponentially decaying
disturbance at the peak of the input line voltage. The
initial impulse of the disturbance will increase the
input voltage by an amount equal to the nominal line
voltage. This is performed 100 times at 3 second
intervals.
A pulse of 1.5X the peak input voltage superimposed
at the peak of the input voltage applied 100 times at 3
second intervals.
Power supplies will not be damaged if any of the following
occurs:
A 100% power outage of any duration
A brownout
A 2.5kV spike is applied to the AC input (for example,
a lightning strike, or a lightning simulation test).
Hardware Maintenance Reference
423
Surge Protection:
External surge suppressors are
not required on PS/2 systems. The systems are designed
to resist typical power surges. More severe surge levels
are possible, but the probability is quite low. A defective
external surge suppression device can cause intermittent
system failures. No design or performance standards have
been established for these devices and there is no easy
way to test them. If the system has undetectable
intermittent failures and there is a surge suppressor
installed, try operating the system without the surge
suppressor.
Safety:
All PS/2 power supplies are designed to world
safety requirements, such as UL, CSA, IEC, and Nordic.
Current Leakage:
All PS/2 power supplies have an
extremely low leakage-to-ground rating of 500 microamps.
This is especially important if you are using an outlet that
has a defective or missing ground line.
Reliability: PS/2 power supplies have demonstrated
field failures approaching 500 000 hours before failure.
Uninterruptible Power Devices:
Uninterruptible
power devices are designed to supply continuous power to
the system in the case of a power outage. They are
usually used only when the potential loss of data or use is
unacceptable.
Numerous devices of this type are available, but not all of
them produce an AC sine wave voltage. U.S. PS/2
systems require sine wave. If the uninterruptible power
device is defective or the wrong type, you might
experience a failure that is extremely difficult to diagnose.
424
PS/2 Maintenance Manual
System Partition
This section provides information regarding the programs
in the System Partition.
Notes:
1. If you are not familiar with the Reference and
Diagnostic Diskettes (System Diskettes), refer to
“Reference and Diagnostic Diskettes” on page 383.
2. The system diagnostics files on the Reference and
Diagnostic diskettes are also on the system partition.
The System Partition is a protected area of the hard disk.
It contains part of POST and BIOS (referred to as the IML
image). The information stored in the System Partition is
protected against accidental erasure or modification. The
user cannot access the System Partition through normal
operating-system Read and Write operations.
The System Partition also includes the system programs
and the customer and advanced diagnostic programs. The
partition is not affected when the drive is formatted using
the operating system format command. The partition is
erased if you use the advanced diagnostics format
program.
Using the system programs, you can update the system
programs, upgrade one version of the system partition with
another version, or backup, restore, or modify the system
partition.
Starting System Program Diagnostics
Start the system programs as follows:
On 9556, 9557 IML systems, power-on the computer
and watch the cursor on the screen. When the cursor
moves to the upper right corner, press Ctrl+Alt+Ins
to access the system programs on the hard disk.
Note: On some systems, two tamper-evident
switches are installed on the adapter guide
located at the lower-left front of the system
unit frame. Both switches must be in the “up”
or “on” position to supply power to the
computer. (Move the blue slider up until it
contacts the metal actuator arms of the two
switches. The switches “click” when
activated.) If the switches fail to activate, they
must be adjusted or replaced. To adjust the
switches, remove the adapter guide with the
switches from the system unit. Form the
actuator arms so the switches activate when
the slider is moved up half the distance of its
travel.
Hardware Maintenance Reference
425
On Server 95, Server 95A, and some Server 85
systems, power-on the computer and wait for the F1
prompt. Press F1 to start the system programs.
On all other IML systems, power-on the computer and
wait for the C: prompt. Press Ctrl+Alt+Del and watch
the cursor on the screen. When the cursor moves to
the upper right corner, press Ctrl+Alt+Ins to access
the system programs on the hard disk.
On systems without a diskette drive, or if the IML
hard disk failed, use the System Diskettes or the
user's backup copy of the System Partition.
On non-IML systems, insert the Reference Diskette in
drive A, start the system, and follow the instructions
on the screen to advance to the Main Menu of the
system programs.
On LAN workstations, access the Reference and
Diagnostic Diskette image from the server.
Note: To start the Advanced Diagnostics, press
Ctrl+A from the system programs Main Menu.
Updating the System Programs
You can update the system programs (sometimes referred
to as the IML image), without writing over anything else in
the System Partition. You would do this for the following
reasons:
A newer version Reference Diskette was released to
enhance or correct the code currently being used.
The IML image in the System Partition is corrupted,
and you want to recopy it to the System Partition.
Note: If the model-specific instructions sent with an IML
image update diskette vary from the instructions in
this manual, use the instructions supplied with the
update diskette.
1. Start the system from the Reference Diskette. Select
Update System Programs from the Main Menu and
wait for the program to complete.
2. Power-off the computer, remove the Reference
Diskette.
3. Power-on the computer, check for the normal
power-up sequence.
Note: If the default startup sequence was customized, be
sure that the customized settings are correct after
service is complete.
Upgrading the System Partition Version
Use the following instructions to upgrade the System
Partition from the current version to another version.
To upgrade the version level:
1. Follow the instructions in “Backing up the System
Partition” on page 427 to make a backup copy of the
System Partition.
426
PS/2 Maintenance Manual
2. Using the new level Reference Diskettes, follow the
instructions in “Restoring the System Partition” on
page 428 to restore the System Partition.
3. Remove the diskette in drive A, power-off the system,
then power-on the system. Go to the System
Partition main menu.
4. Select COPY AN OPTION and follow the instructions
on the screen. (When instructed to insert the Option
diskette, insert the backup copy of the Reference
Diskette instead.)
5. If the system you are servicing requires a two diskette
set, go to the System Partition main menu again.
Select COPY AN OPTION. (When instructed to insert
the Option diskette, insert the backup copy of the
Diagnostics Diskette instead.)
6. Go to the System Partition main menu again. Select
SET CONFIGURATION.
7. Select VIEW CONFIGURATION to check that the
selections shown are correct.
8. Press F3 to return to the Set Configuration menu.
9. Select BACKUP CONFIGURATION. Restart the
system when backup configuration is complete.
Backing up the System Partition
Use the following instructions to make a backup copy of
the System Partition.
To backup the System Partition:
1. Start the system programs. (See “Starting System
Program Diagnostics” on page 425 if you need
assistance.)
2. Select Backup/Restore system programs from the
Main Menu.
3. Select Backup the System Partition and follow the
instructions on the screen.
After making a backup, label the diskettes with the
following information:
Diskette name (“Reference Diskette,” and if the
system has a second diskette, “Diagnostic Diskette”
for the second diskette.)
Model number of the system (on the front of the
system)
Type number (1, 2, or 3) of the System Programs
from the Display Revision Level screen in the system
programs (type 1, 2, or 3 applies to Model 90, 95
only)
Version number of the system programs (from the
IBM logo screen when the system programs are
started.)
In some cases, you might receive a message during the
backup process informing you that the entire partition will
not fit on two diskettes (this is for two diskette systems
Hardware Maintenance Reference
427
only). This happens only if you have copied files from
many option diskettes to the System Partition. The only
files that might be missing from the backup diskettes are
those associated with some options. If you ever need to
restore the System Partition, you can do so by using the
two backup diskettes (Reference and Diagnostic) with the
Restore the System Partition program, then copy the
option diskettes using the Copy an Option Diskette
program.
Note: On the 90 and 95 systems with a Type 3 processor
board installed, when you make a backup copy of
the System Partition, certain files will not be loaded
to the backup copy. The following files will be
accessible only from the original Diagnostic
Diskette, not a backup copy of the System
Partition:
KP.COM
IDP.COM
DISK386.COM
RECV35.COM
UINSTALL.EXE
Restoring the System Partition
Use the following instructions to restore the System
Partition to a hard disk drive that you have just replaced.
Notes:
1. This process writes over anything that is in the
System Partition. Do not confuse this process with
“Updating the System Programs” on page 426.
2. Use the customer's backup copy of the System
Partition to restore the System Partition. If there is
not a backup copy, use the Reference Diskette (some
models also have a Diagnostic Diskette). You might
have to recopy option files to the System Partition if
they are not on the Reference Diskette.
To restore the System Partition:
1. Start the system programs. (See “Starting System
Program Diagnostics” on page 425 if you need
assistance.)
2. Select Backup/Restore system programs from the
Main Menu.
3. Select Restore the System Partition and follow the
instructions on the screen.
Be sure to reset any customized configuration or drive
startup information after replacing a defective hard disk
drive.
428
PS/2 Maintenance Manual
Running Automatic Configuration
Running Automatic Configuration might alter customized
configuration settings. Note the current settings using
View configuration. If the configuration was customized,
save it, then restore it to the customized settings after
service is complete.
Recording a Customized Configuration
If you want a copy of any customized configuration
information on the System Partition, do the following:
1. If a power-on password is set, remove it before you
start this procedure.
2. Power-on the computer (without a diskette in the
drive).
3. Wait for the POST to finish (system beeps). Press
Ctrl+Alt+Del. When the cursor moves to the top-right
corner of the screen, press Ctrl+Alt+Ins.
4. Select View configuration and use the Print Screen
function to print the current configuration.
5. Select Set and View SCSI configuration and use
the Print Screen function to print the current SCSI
configuration (SCSI device enable/disable settings).
6. If the user has changed the drive-startup sequence
(or if you are not sure if it has been changed), select
Set features from the Main Menu of the system
programs. Then select Set startup sequence and
press Enter.
7. An informational warning screen might appear. If so,
read the information and then press Enter.
8. Use the Print Screen function to print the current
selectable drive-startup sequence. Return to the
Main Menu of the system programs.
You now have a copy of the following information:
The customized configuration
The SCSI device settings
The selectable-drive startup sequence
7
Customized configuration: A system configuration that users
create using the change configuration feature of the system
programs. For example, the user might have changed the serial
port default value, or changed a token-ring address location.
Hardware Maintenance Reference
429
ASCII Terminals
The terminal attaches to the system board serial
connector. There are physical differences among the
ASCII terminals that affect the system setup.
Notes:
1. Not all systems support an ASCII terminal. (See
“PS/2 System Specifications” on page 435 for more
information.)
2. Not all operating systems will support an ASCII
terminal.
3. Beginners All-Purpose Symbolic Instruction Code
(BASIC) language is not supported when using an
ASCII terminal.
4. High-resolution graphics are not available when using
an ASCII terminal.
ASCII Terminal Setup and Menu
Selection
Use the setup instructions supplied with the ASCII
terminal. As you are using those instructions, you will
need to know the following information:
Use a null-modem cable or a null-modem connector
with the communication cable when attaching the
ASCII terminal to the serial connector on the
computer.
If the ASCII terminal has a test switch next to the
keyboard connector, make sure it is in the normal
position.
When you use the system programs to define the setup
values on the ASCII terminal, be sure the machine mode
matches the actual terminal you are installing. For
example, if you are installing a 3151 ASCII Display Station,
the Machine Mode on the Setup Menu must be set to
IBM3151. When the setup values correctly match the
terminal type, the machine is considered to be in the native
machine mode.
430
PS/2 Maintenance Manual
Set the Communication values on the terminal as follows:
Line Speed (bps)
Word Length (bits)
Parity
Stop Bit
96
8
No
1
Notes:
1. When using the system programs, do not install an
emulation cartridge unless it will support native
machine mode.
2. The terminals designed for countries where English is
not the native language must support the ISO
8859/1.2 code page. Some of the terminals require a
cartridge to support this code page. Check the
documentation supplied with the terminal to see if the
terminal requires a cartridge.
ASCII Terminal Configuration
When using an ASCII terminal, you must define the setup
values so that the terminal can correctly communicate with
the system.
Console Selection: The system has a Set Console
utility program that lets you tell the system you are using
an ASCII terminal.
Without the Set Console utility program, the system will
use the default values shown. The ASCII terminal values
must match these values. Complete the following steps to
use an ASCII terminal.
Before you make these selections in the Set Console utility
program, make sure that you have an ASCII terminal
attached to the system.
1. Start the system programs.
Note: If you start the system programs from an
ASCII terminal, power-on the terminal then the
system. Press and hold Ctrl. Then press and
release C+A+D. When the cursor moves to
the top-right corner of the screen, press
Ctrl+I.
2. Select Set features on the system programs Main
Menu.
3. Select Set console on the Set Features Menu.
4. Select ASCII terminal on the Set Console Menu.
The values must be:
Baud rate
Bits per character
Parity
Stop bits
96
8
None
1
Hardware Maintenance Reference
431
Note: These instructions assume that you have already
set the terminal to the same values described in
“ASCII Terminal Setup and Menu Selection” on
page 430.
Any time you change the ASCII terminal values, you also
must update the system values to match it. The baud rate
should always be 9600 or above. If you set the baud rate
below 9600, system performance will be slow.
Operation:
Some of the ASCII terminal operations are
listed below.
Communication
When using an ASCII terminal, the
communication parameters will
appear on the information panel (for
example 96-8N1). This information
is not an error message.
Configuration
When you run the system programs
or diagnostic programs from the
ASCII terminal, the terminal values
might change. Check the terminal
values. If they have changed, reset
them.
Utilities
To start the system programs when
using an ASCII terminal, follow the
instructions supplied with the
operating system. When the cursor
moves to the top-right corner of the
screen, press Ctrl+I.
Diagnostics
When an ASCII terminal is selected
as the system console, the following
will not appear on the diagnostic
installed device list:
Keyboard
Mouse
System board async port
Video displays
Error Messages: If you get a 161 or 173 error
during POST, the selection you made in the Set Console
utility program is no longer valid. When this happens, the
system will look for a video adapter. If it finds one, the
keyboard and display will be used as a console. If it does
not find one, the ASCII terminal will be used as a console.
96 8N1 Error Message:
This is not an error
message. An 96 8N1 message on the Model 95 console
indicates that the system is set to ASCII terminal mode. If
no ASCII terminal is attached, remove the battery, then
wait five minutes. Replace the battery and restart the
system.
432
PS/2 Maintenance Manual
System Error Log
Note: Not all 90 and 95 systems support the system error
log.
On these systems, the BIOS nonmaskable interrupt (NMI)
handler writes an entry to the error log each time an error
is detected.
Note: If the system halts during POST, nothing will be
logged.
Viewing the Error Log
To view the error log, start the system programs and select
More utilities from the Main Menu, then select Display
system error log. For any error that is displayed, help
screens guide you through the actions to take.
Types of Errors Detected
The error log can contain many different types of hardware
or application-program related errors. The most probable
cause of the failure is always indicated on the help screen.
Listed below are some common errors and causes that
might be displayed.
Application Program Errors
Watchdog timeout
DMA programming (some models)
Processor Errors
System parity
Cache
Voltage (on processor boards)
Processor board was changed (90, 95)
System Memory Errors
Parity memory
ECC memory (multi-bit) (90,95 Type 3 processor
boards)
ECC memory (single-bit trigger level) (90,95 Type 3
processor boards)
POST-detected memory
Micro Channel Adapter Errors
I/O Channel check
DMA timeout
On DMA timeout errors, note the arbitration level displayed
on the screen. Go to the “View configuration” screen and
see which device has that same arbitration level. Suspect
that device is defective.
Hardware Maintenance Reference
433
Error Storage
The error log stores up to three unique errors (for example
three parity errors at three different addresses). The
multiple log counter (on the screen) displays the number of
additional times each unique error occurred. You can
page forward or backward to view the stored error logs.
The date and time of the most recent occurrence also is
displayed. If POST finds that the error log has stored
three unique errors, POST displays a 00017900 error.
Note: If the system configuration is changed, the system
clears any logged errors associated with the
hardware that is changed. (For example, if the
memory configuration was changed, memory errors
are cleared from the error log). The conditions
under which errors are automatically cleared vary
with the type of hardware and the level of
microcode installed.
Application
If the system does not display a POST error, (or if
diagnostics run error-free) but you still suspect a problem,
look at the error log. If errors are detected, they are
displayed. Press the help key and follow the instructions
on the screen to help you determine what might be
causing the failure.
Dumping Extended Diagnostic Data
Information
In cases where the system appears to have an
undetectable intermittent failure, analyzing the extended
data information will help find the cause of the failure. The
support center might request that you dump this
information onto a diskette. Dump only the extended data
by request of the support center. To dump the extended
data, do the following:
1. Format a scratch 2MB diskette.
2. Restart the system from the Reference Diskette (do
not start from the System Partition or you will copy
the data to the System Partition).
3. From the Main Menu, select Set Configuration and
choose Change configuration.
4. Remove the Reference Diskette from the drive.
5. Insert the scratch 2MB diskette into the primary
diskette drive.
6. Press F10 (this starts the bit-dump and writes two
files onto the diskette).
7. After the screen message indicates that the process
is complete, remove the diskette from the drive and
insert the Reference Diskette.
8. Send the diskette to the support center that requested
it.
434
PS/2 Maintenance Manual
PS/2 System Specifications
The following tables contain the specifications for each
PS/2 model. The first table contains AT bus systems. The
second table contains Micro Channel Non-IML systems.
The third table contains Micro Channel IML systems.
(S/B = Slots/Bays SS = Selectable Startup)
PS/2 - AT Bus
Type
8525-001,4
8525-GXX
8525-LXX
8525-286,X0X
8525-286,X3X
8530-001
8530-002
8530-021
8530-286,E01
8530-286,E21
8530-286,E31
8530-286,E41
8535SX-040
8535SX-043
8535LS-24X
8535LS-14X
8540SX-040
8540SX-043
8540SX-045
8555-041
8555-061
8555-081
8555-LT0
8555-LE0
9533-DB7
9533-GB7
9533-GBX
9533-1BX
9533-2BX
Processor
8086-8
8086-8
8086-8
80286-10
80286-10
8086-8
8086-8
8086-8
80286-10
80286-10
80286-10
80286-10
386SX-20
386SX-20
386SX-20
366SX-20
386SX-20
386SX-20
386SX-20
386SX-16
386SX-16
386SX-16
386SX-16
386SX-16
486SLC2-25/50
486SLC2-25/50
486SLC2-25/50
486SLC2-25/50
486SLC2-25/50
Video
MCGA
MCGA
MCGA
VGA
VGA
MCGA
MCGA
MCGA
VGA
VGA
VGA
VGA
VGA
VGA
VGA
VGA
VGA
VGA
VGA
VGA
VGA
VGA
VGA
VGA
XGA2
XGA2
XGA2
XGA2
XGA2
S/B
2/2
2/2
2/2
2/2
2/2
3/2
3/2
3/2
3/2
3/2
3/2
3/2
3/2
3/2
3/2
3/2
5/4
5/4
5/4
3/2
3/2
3/2
3/2
3/2
4/2
4/2
4/2
4/2
4/2
Memory
512K/640K
512K/640K
640K/640K
1M/4M
1M/4M
640K 640K
640K/640K
640K/640K
1M/4M
1M/4M
1M/4M
1M/4M
2M/16M
2M/16M
2M/16M
2M/16M
2M/16M
2M/16M
2M/16M
4M/8M
2M/8M
4M/8M
4M/8M
4M/8M
8M/16M
8M/16M
8M/16M
8M/16M
8M/16M
SS
N
N
N
N
N
N
N
N
N
N
N
N
Y
Y
Y
Y
Y
Y
Y
N
N
N
N
N
N
N
N
N
N
Hardware Maintenance Reference
Hrd Dsk
None
None
None
None
30M
None
None
20M
None
20M
30M
45M
None
40M
None
None
None
40M
80M
40M
60M
80M
M/less
M/less
120M
120M
M/less
M/less
M/less
435
PS/2 - Micro Channel (Non IML)
Type
Processor
8550-021
80286-10
8550-031
80286-10
8550-061
80286-10
8555-031
386SX-16
8556-14X
386SX-20
8556-24X
386SX-20
8556-043
386SX-20
8556-045
386SX-20
8556-055
386SLC-20
8556-059
386SLC-20
8557-045
386SX-20
8557-049
386SX-20
8557-055
386SLC-20
8557-059
386SLC-20
8557-05F
386SLC-20
M57-255
386SLC-20
8560-041
80286-10
8560-071
80286-10
8565-061
386SX-16
8565-121
386SX-16
8565-321
386SX-16
8570-E61
80386-16
8570-061
80386-20
8570-081
80386-20
8570-121
80386-20
8570-161
80386-20
8570-A61
80386-25
8570-A16
80386-25
8570-A81
80386-25
8570-A21
80386-25
8570-B61
80486-25
8570-B21
80486-25
8570-B81
80486-25
8570-B16
80486-25
8580-041
80386-16
8580-071
80386-16
8580-111
80386-20
8580-311
80386-20
S/N below 23B3000:
8580-081
80386-20
S/N above 23B3000:
8580-081
80386-20
8580-121
80386-20
S/N below 23VN700:
8580-161
80386-20
S/N above 23VN700:
8580-121
80386-20
S/N below 9225000:
8580-321
80386-20
S/N above 9225000:
8580-321
80386-20
8580-A21
80386-25
8580-A16
80386-25
8580-A31
80386-25
436
Video
VGA
VGA
VGA
VGA
VGA
VGA
VGA
VGA
VGA
VGA
VGA
VGA
VGA
VGA
VGA
VGA
VGA
VGA
VGA
VGA
VGA
VGA
VGA
VGA
VGA
VGA
VGA
VGA
VGA
VGA
VGA
VGA
VGA
VGA
VGA
VGA
VGA
VGA
S/B
3/3
3/3
3/3
3/2
3/2
3/2
3/2
3/2
3/2
3/2
5/4
5/4
5/4
5/4
5/4
5/4
8/4
8/4
8/6
8/6
8/6
3/3
3/3
3/3
3/3
3/3
3/3
3/3
3/3
3/3
3/3
3/3
3/3
3/3
8/4
8/4
8/4
8/4
Memory
1M/1M
1M/2M
1M/2M
2M/8M
4M/16M
4M/16M
4M/16M
4M/16M
4M/16M
4M/16M
4M/16M
8M/16M
4M/16M
4M/16M
8M/16M
4M/16M
1M/1M
1M/1M
2M/8M
2M/8M
2M/8M
2M/6M
2M/6M
2M/6M
2M/6M
2M/6M
2M/8M
2M/8M
2M/8M
2M/8M
2M/8M
2M/8M
2M/8M
2M/8M
1M/2M
2M/2M
2M/4M
2M/4M
VGA
8/6
2M/4M
N
80M SCSI
VGA
VGA
8/6
8/6
4M/4M
2M/4M
N
N
80M SCSI
120M SCSI
VGA
8/6
2M/4M
N
160M SCSI
VGA
8/6
4M/4M
N
160M SCSI
VGA
8/6
2M/4M
N
320M SCSI
VGA
VGA
VGA
VGA
8/6
8/6
8/6
8/6
4M/4M
4M/8M
4M/8M
4M/8M
N
N
N
N
320M
120M
160M
320M
PS/2 Maintenance Manual
SS
N
N
N
N
Y
Y
Y
Y
Y
Y
Y
Y
Y
Y
Y
Y
N
N
N
N
N
N
N
N
N
N
N
N
N
N
N
N
N
N
N
N
N
N
Hrd Dsk
20M
30M
60M
30M
M/less
M/less
40M SCSI
80M SCSI
80M SCSI
160M SCSI
80M SCSI
160M SCSI
80M SCSI
160M SCSI
400M SCSI
80M SCSI
44M
70M
60M SCSI
120M SCSI
320M SCSI
60M
60M
80M
120M
160M
60M
160M
80M
120M
60M
120M
80M
160M
44M
70M
115M
314M
SCSI
SCSI
SCSI
SCSI
PS/2 - Micro Channel (IML)
Type
Processor
8590-0G5
486SX-20
8590-0G9
486SX-20
8590-0GF
486SX-20
8590-0H5
486SX-25
8590-0H9
486SX-25
S/N 23TXD00 to XPV99:
8590-0J5
80486-25
All other S/N:
8590-0J5
80486-25
S/N 23PAAA0 to RLTG9:
8590-0J9
80486-25
All other S/N:
8590-0J9
80486-25
8590-0JF
80486-25
S/N 23RLTH0 to TYKP9:
8590-0KD
80486-33
All other S/N:
8590-0KD
80486-33
8590-0KF
80486-33
8590-0L9
486-25/50
8590-0LF
486-25/50
8595-0G9
486SX-20
8595-0GF
486SX-20
8595-0H9
486SX-25
8595-0HF
486SX-25
S/N 23FPMAZ to GMBWY:
8595-0J9
80486-25
All other S/N:
8595-0J9
80486-25
8595-0JF
80486-25
8595-0KD
80486-33
8595-0L9
486-25/50
8595-0LF
486-25/50
8595-0MF
486-50
8595-0MT
486-50
9553-1BX
486SLC2-25/50
9553-2BX
486SLC2-25/50
9553-OB7
486SLC2-25/50
9553-OB8
486SLC2-25/50
9556-0B6
486SLC2-25/50
9556-0BA
486SLC2-25/50
9557-0B6
486SLC2-25/50
9557-0BA
486SLC2-25/50
9557-1BA
486SLC2-25/50
9576-0H6
486SX-25
9576-0U6
486SX-33
9576-0UA
486SX-33
9577-0UA
486SX-33
9577-0UF
486SX-33
9577-1UA
486SX-33
9577-0NA
486DX2-33/66
9577-0NF
486DX2-33/66
9577-1NA
486-33/66
9585-OKG
486DX-33
9585-OKT
486DX-33
9585-ONG
486DX-33/66
9585-ONT
486DX-33/66
9585-0X6
486SX-33
9585-0XA
486SX-33
9585-0XF
486SX-33
9595-0LF
486-25/50
9595-0MF
486-50
9595-0MT
486-50
9595-PQG
Pentium
(66MHz)
9595-PQT
Pentium
(66MHz)
Video
XGA
XGA
XGA
XGA
XGA
S/B
4/4
4/4
4/4
4/4
4/4
Memory
4M/64M
4M/64M
4M/64M
4M/64M
4M/64M
SS
Y
Y
Y
Y
Y
Hrd Dsk
80M SCSI
160M SCSI
400M SCSI
80M SCSI
160M SCSI
XGA
4/4
4M/64M
Y
80M SCSI
XGA
4/4
8M/64M
Y
80M SCSI
XGA
4/4
4M/64M
Y
160M SCSI
XGA
XGA
4/4
4/4
8M/64M
8M/64M
Y
Y
160M SCSI
400M SCSI
XGA
4/4
4M/64M
Y
320M SCSI
XGA
XGA
XGA
XGA
XGA
XGA
XGA
XGA
4/4
4/4
4/4
4/4
8/7
8/7
8/7
8/7
8M/64M
8M/64M
8M/64M
8M/64M
4M/64M
4M/64M
8M/64M
8M/64M
Y
Y
Y
Y
Y
Y
Y
Y
320M
400M
160M
400M
160M
400M
160M
400M
XGA
8/7
4M/64M
Y
160M SCSI
XGA
XGA
XGA
XGA
XGA
XGA
XGA
SVGA
SVGA
SVGA
SVGA
XGA
XGA
XGA
XGA
XGA
XGA2
XGA2
XGA2
XGA2
XGA2
XGA2
XGA2
XGA2
XGA2
SVGA
SVGA
SVGA
SVGA
SVGA
SVGA
SVGA
XGA2
XGA2
XGA2
MGA
8/7
8/7
8/7
8/7
8/7
8/7
8/7
3/3
3/3
3/3
3/3
3/3
3/3
5/4
5/4
4/4
3/3
3/3
3/3
5/4
5/4
5/4
5/4
5/4
4/4
8/7
8/7
8/7
8/7
8/7
8/7
8/7
8/7
8/7
8/7
8X7
Y
Y
Y
Y
Y
Y
Y
Y
Y
Y
Y
Y
Y
Y
Y
Y
Y
Y
Y
Y
Y
Y
Y
Y
Y
Y
Y
Y
Y
Y
Y
Y
Y
Y
Y
Y
160M SCSI
400M SCSI
320M SCSI
160M SCSI
400M SCSI
400M SCSI
1GB SCSI
Ethnernet
Token-Ring
120MB
250MB
104M SCSI
212M SCSI
104M SCSI
212M SCSI
212M SCSI
104M SCSI
104M SCSI
212M SCSI
212M SCSI
400M SCSI
212M SCSI
212M SCSI
400M SCSI
212M SCSI
540MB SCSI
1G SCSI
540MB SCSI
1G SCSI
104M SCSI
212M SCSI
400M SCSI
400M SCSI
400M SCSI
1GB SCSI
540MB SCSI
MGA
8X7
8M/64M
8M/64M
8M/64M
8M/64M
8M/64M
16M/64M
16M/64M
4M/16MB
4M/16MB
4M/16MB
4M/16MB
8M/16M
8M/16M
8M/16M
8M/16M
8M/16M
8M/32M
8M/32M
8M/32M
8M/32M
8M/32M
8M/32M
8M/32M
8M/32M
8M/32M
8M/256M
8M/256M
8M/256M
8M/256M
8M/64M
8M/64M
8M/64M
8M/64M
16M/64M
16M/64M
16M/256M
(ECC)
16M/256M
(ECC)
Y
1GB SCSI
Hardware Maintenance Reference
SCSI
SCSI
SCSI
SCSI
SCSI
SCSI
SCSI
SCSI
437
Acronyms, Abbreviations, and Terms
Term
Information
ACPA/A
ADP
Alt
ANSI
ARTIC
ASCII
Audio Capture and Playback Adapter
Automatic Data Processing
Alternate
American National Standards Institute
A Real Time Interface Coprocessor
American National Standard Code for Interface
Interchange
Advanced Technology (as in AT Bus)
AT Attached (as in AT Bus)
Audio Video Connection
Basic Input/Output System (Controls System
Resources)
Bits Per Second
Bytes Per Second
The International Telephone and Telegraph
Consultative Committee
Common Command Set
Common Complete Status Block
Compact Disc
CD Read Only Memory (stores data/audio)
Customer Engineer or Service Representative
Cyclic Redundancy Check
Cathode Ray Tube
Corrective Service Diskette
Color Graphics Adapter (See EGA, VGA, XGA)
Configuration Control Sub Board)
Cyclic Redundancy Check
Cathode Ray Tube
Canadian Standards Association
Corrective Service Diskette
Direct Access Storage Device (hard disk, diskette)
Direct Memory Access
Dynamic Random Access Memory
Engineering Change Announcement
Error Correction Code
Enhanced Graphics Adapter
Electrostatic Discharge
Enhanced Small Device Interface
Electrically Erasable Programmable Read Only
Memory
Energy Work Station
Field Replaceable Unit (replaceable part)
General Purpose Interface Bus (IEEE 348)
General Services Administration
Hardware Maintenance Manual
Hardware Maintenance Reference
Hardware Maintenance Service
Height
Integrated Drive Electronics
Integrated Circuit
Institute of Electrical and Electronics Engineers
International Electrotechnical Commission
Initial Machine Load
Initial Program Load
International Organization for Standardization
Integrated-Services Digital Network
Local Area Network
Local Block Address
AT
ATA
AVC
BIOS
bps
BPS
CCITT
CCS
CCSB
CD
CD-ROM
CE
CRC
CRT
CSD
CGA
CCSB
CRC
CRT
CSA
CSD
DASD
DMA
DRAM
ECA
ECC
EGA
ESD
ESDI
EEPROM
EWS
FRU
GPIB
GSA
HMM
HMR
HMS
Ht
IDE
IC
IEEE
IEC
IML
IPL
ISO
ISDN
LAN
LBA
438
PS/2 Maintenance Manual
Term
Information
LTB
LUN
MAP
MCGA
MCA
MHz
MIDI
MM
N/A
NDD
NMI
NSC
NVRAM
OEM
PCMCIA
Local Transfer Bus
Logical Unit Number (as in SCSI)
Maintenance Analysis Procedure
Modified Color Graphics Adapter (320 x 200 x 256)
Micro Channel Architecture (bus structure)
Mega hertz (millions of cycles per second)
Musical Instrument Digital Interface
Multimedia
Not Available or Not Applicable
National Distribution Division
Non-Maskable Interrupt
National Support Center
Non Volatile Random Access Memory
Original Equipment Manufacturer
Personal Computer Memory Card International
Association
Programmable Option Select
Physical Unit Number (as in SCSI)
Redundant Array of Inexpensive Disks (disk array
models)
Random Access Memory (read/write)
Red Green Blue (as in monitors)
Remote Initial Program Load
Read Only Memory
Sequential Access Storage Device (Tape)
Subsystem Control Block
Static Random Access Memory
Small Computer Systems Interface
SCSI Identification Number (assigned device
number)
Software Product Description
Service Representative
NDD Technical Advisor (See your Marketing
Representative)
Telecommunications Device for the Deaf
Underwriters Laboratory
Video Capture Adapter
Video Electronics Standards Association
Video Graphics Array (640x480x16)
Vital Product Data
Video Random Access Memory
Write Once, Read Many Media
Extended Graphics Array (1024 x 768 x 256)
Luminance/Chrominance Signal (Pertains to Video)
POS
PUN
RAID
RAM
RGB
RIPL
ROM
SASD
SCB
SRAM
SCSI
SCSI ID
SPD
SR
T/A
TDD
UL
VCA
VESA
VGA
VPD
VRAM
WORM
XGA
Y/C
Hardware Maintenance Reference
439
We Want Your Comments!
We want to know your opinion about this manual (part
number 83G8990). Your input will help us to improve our
publications.
Please photocopy this survey, complete it, and then fax it
to IBM HMM Survey at 407-982-9825 (USA).
Name
Phone Number
1. Do you like this manual?
Yes
No
2. What would you like to see added, changed, or
deleted in this manual?
3. What is your service experience level?
Novice
Average
Advanced
4. Which PS/2 systems do you service most?
Thanks in advance for your response!
440
PS/2 Maintenance Manual
Do You Need Technical References?
We have a wide range of hardware technical references
that provide in-depth information about IBM personal
computer products. Our Technical Reference Library
includes information about:
Micro Channel, Setup, and Subsystem Control Block
architectures
Common interfaces (including microprocessors,
system timers, parallel and serial port controllers,
keyboards and keystrokes, SCSI, DMA, video, and
more)
Specific Personal System/2 systems (including
system board connectors, jumpers, memory
subsystems, I/O subsystems, programming interfaces
and registers, and error codes)
Basic input/output system (BIOS)
Options and adapters
For a free catalog of our current offerings, please
photocopy this form, complete it, and then fax it to
Hardware Technical References at 407-982-9825 (USA).
I'd like a catalog of the IBM PC Company Hardware
Technical Reference library.
Name
Address
City
State
Zip
Hardware Maintenance Reference
441
Problem Determination Tips
Due to the variety of hardware and software combinations
that can be encountered, use the following information to
assist you in problem determination. If possible, have this
information available when requesting assistance from
Service Support and Engineering functions.
Machine type and model
Failure symptom
– What, when, where, single, or multiple systems?
– Is the failure repeatable?
– Has this configuration ever worked?
– If it has been working, what changes were made
prior to it failing?
Reference Diskette Version
– Type and revision level
Hardware configuration
– Print out (print screen) configuration from system
partition or Reference Diskette currently being
used.
Operating system software
– Type and revision level
– OS/2 SYSLEVEL Command
Software setup (appropriate to the software)
CONFIG.SYS
STARTUP.CMD
AUTOEXEC.BAT
Important
To eliminate confusion, identical systems are
considered identical only if they:
1. Are the exact machine type and models
2. Have the same adapters/attachments in the
same locations
3. Have the same address
jumpers/terminators/cabling
4. Have the same software versions and levels
5. Have the same Partition/Reference Diskette
(version)
6. Have the same configuration options set in the
system
7. Have the same setup for the operation system
control files (Config.Sys, Autoexec.bat,
Startup.Cmd., etc.)
Comparing the configuration and software set-up
(Config.sys, etc.) between “working and non-working”
systems will often lead to problem resolution.
442
PS/2 Maintenance Manual
Phone Numbers, U.S. and Canada
Before you place a call to the Support Center, refer to
“Problem Determination Tips” on page 442.
U.S. Authorized Dealers or Servicers
Number
Information
1-800-937-3737
1-800-426-2472
1-800-426-7763
1-800-IBM-DEAL
1-303-924-4015
1-800-237-5511
1-800-327-5711
1-800-426-1484
1-800-759-7483
1-800-342-6672
IBM Business Partner Education
IBM Customer Engineer Technical Support
IBM National Support Center
IBM PartnerLink Technical Support
IBM Part Number ID and look up
IBM Software Defect Support (CSDs)
IBM Software Ordering (service publications)
IBM Supplies Technical Hotline
IBM Warranty Claims Center
OS/2 Replacement Diskettes (problems during
new system installation)
U.S. Customers and Helpware Subscribers
Number
Information
1-800-426-8322
1-800-999-0052
1-407-982-6408
1-800-964-8523
1-800-772-2227
Customer Education Business Unit
Customized Operational Services
Developers Assistance (HW & SW)
End User Support
HelpCenter*
HelpLearn*
Customer Satisfaction Center
HelpCenter* (TDD/ASCII)
IBM Anti-Virus Services
IBM Authorized Dealer Referrals
IBM Bulletin Board
IBM Customer Satisfaction Center
(TDD/ASCII)
IBM Dealer Referral (typewriters/printers)
IBM Direct (supplies, education)
IBM Field Television Network
IBM Information Referral Service
IBM Service
IBM Technical Manuals
Multimedia Information Center
1-800-426-4238
1-800-742-2493
1-800-447-4700
1-404-835-6600
1-800-426-4238
1-800-426-2468
1-800-426-2468
1-800-282-0226
1-800-426-3333
1-800-IBM-SERV
1-800-426-7282
1-800-426-9402
(Ext. 150)
1-800-241-1620
1-800-742-2493
1-800-342-6672
1-800-237-5511
1-800-237-5511
1-303-924-4125
1-800-284-5933
1-914-962-0310
1-800-237-4824
Multimedia Support
Multivendor Consulting
OS/2 Information Line
OS/2 Support Center
OS/2 Support Line
Parts Information
Prodigy** Service (link problems)
Prodigy User Questions
PS/2 Trade-In Program
PS/2 Loan for Learning
PS/2 Lease from IBM Credit
* Trademark of the IBM Corporation.
** Trademark of the Prodigy Services Company.
Hardware Maintenance Reference
443
Number
Information
1-800-742-2943
1-800-547-1283
Solution Validation Lab
Technical Coordinator Program
SystemXtra* for Personal Systems
LAN Automated Distribution/2
OS/2 Bulletin Board
OS/2 Application Assistance Center
Technical Services, Boca Raton (fee)
Technical Support (typewriters/printers)
Technical Solutions Magazine
1-800-426-2622
1-606-323-3000
1-800-551-2832
IBM Canada Customer and Servicer Support
Number
Information
1-800-465-6600
(416) 474-6666
1-800-465-6666
1-800-263-2769
1-800-465-2222
(416) 443-5701
1-800-465-1234
1-800-465-7999
1-800-465-7999
1-800-263-2769
(514) 938-3022
(416) 492-1823
(416) 946-4255
(604) 664-6466
1-800-661-7768
1-800-465-1234
1-800-661-2131
(416) 443-5835
(416) 443-5778
1-800-465-2222
(416) 946-1333
Customer Relations
Customer Relations - Toronto
Customer Service Dispatch
Customer Service Parts
Customer Support Centre (ISC)
Customer Service Repair Centre
Helpcentre
HelpClub* Registration
IBM Direct
Parts Orders, Exchange or Emergency
PS Bulletin Board - Montreal
PS Bulletin Board - Toronto
PS Bulletin Board - Toronto
PS Bulletin Board - Vancouver
PS Marketing Support (PSMT)
Publications Ordering
Skill Dynamics* (Education)
Warranty Claim Fulfillment (Fax)
Warranty Claim Parts Enquiry
Warranty Provider Support Hotline
Warranty Provider Support - Toronto
We Want Your Comments!
Every effort has been made to provide complete and
accurate technical information in this manual.
However, if you find missing or inaccurate information,
please fax any comments, corrections, or suggestions
to 407-982-9825 (U.S.A.). Thank you.
*
Trademark of the IBM Corporation.
444
PS/2 Maintenance Manual
Notices
References in this publication to IBM products, programs,
or services do not imply that IBM intends to make these
available in all countries in which IBM operates. Any
reference to an IBM product, program or service is not
intended to state or imply that only IBM’s product,
program, or service may be used. Any functionally
equivalent product, program, or service that does not
infringe any of IBM’s intellectual property rights or other
legally protectable rights may be used instead of the IBM
product, program, or service. Evaluation and verification of
operation in conjunction with other products, programs, or
services, except those expressly designated by IBM, are
the user’s responsibility.
IBM may have patents or pending patent applications
covering subject matter in this document. The furnishing
of this document does not give you any license to these
patents. You can send license inquiries, in writing, to the
IBM Director of Licensing, IBM Corporation, 500 Columbus
Avenue, Thornwood NY 10594, U.S.A.
Trademarks
The following terms, denoted by an asterisk (*) in this
publication, are trademarks of the IBM Corporation in the
United States and/or other countries:
AIX
HelpClub
IBM
Personal System/2
Presentation Manager
ThinkPad
AT
HelpLearn
Micro Channel
Portmaster
PS/ValuePoint
UltiMedia
HelpCenter
HelpWare
OS/2
PS/2
SystemXtra
XGA
The following terms, denoted by a double asterisk (**) in
this publication, are trademarks of other companies:
80387SX
ActionMedia
Microsoft
Netware
Novell
PCMCIA
QAPlus
SCO
Triplett
UNIX
VESA
Windows
XENIX
Intel Corporation
Intel Corporation
Microsoft Corporation
Novell Corporation
Novell, Inc.
Personal Computer Memory
Card International Association
DiagSoft, Inc.
The Santa Cruz Operation, Inc.
Triplett Corporation
UNIX System Laboratories, Inc.
Video Electronics Standards Association
Microsoft Corporation
Microsoft Corporation
Hardware Maintenance Reference
445
446
PS/2 Maintenance Manual
Index
Special Characters
(IML) initial machine load
382
Numerics
1-800 phone numbers 443
10BASE-T/10BASE2 Ethernet adapters, ISA 90
20 and 25 mhz processor boards 284
25 SX, system board locations 188
25-286, parts (FRUs) 223
25-286, system board locations 187
25, parts (FRUs) 223
25, system board locations 185, 186
25SX, parts (FRUs) 223
30-286, parts (FRUs) 229
30-286, system board locations 190
30, parts (FRUs) 227
30, system board locations 189
33, parts (FRUs) 231
33, system board locations 191
35, parts (FRUs) 233
35, system board locations 192
3509, parts (FRUs) 285
3510, parts (FRUs) 287
3511, parts (FRUs) 289
3532, parts (FRUs) 291, 295
40 (8540), parts (FRUs) 236
40, system board locations 192
50 (8550), parts (FRUs) 239
50, 50Z system board (upgrades) locations 194
50, memory problems 125
50, system board locations 193
53 (9553-xBx), system board (upgrade)
locations 195
53 (9553), parts (FRUs) 241
55 SX (8555), parts (FRUs) 243
55, memory problems 125
55, system board (upgrade) locations 197
55, system board locations 196
56 (8556), parts (FRUs) 246
Copyright IBM Corp. 1994
447
56 (8556), system board locations 198
56 (9556), parts (FRUs) 257
56 (9556), system board locations 199
56, memory problems 125
57 (8557), parts (FRUs) 248
57 (8557), system board locations 198
57 (9557), system board locations 199
57 & M57 (9557), parts (FRUs) 260
57, memory problems 125
60 (8560), parts (FRUs) 251
60, 65, 80 system board (486DX2, 486DLC2
upgrades) locations 202
60, memory problems 125
60, system board locations 200
65 (8565), parts (FRUs) 251
65, memory problems 125
65, system board locations 201
70 , system board upgrade (486DX33, 486DLC2)
locations 205
70 (8570), parts (FRUs) 254
70, memory problems 125
70, processor boards 380
70, system board locations 203, 204
70/80 problems, 486DX33 processor upgrade 136
76 (9576), parts (FRUs) 257
76 (9576), system board locations 206
76, 77, option microprocessor jumper 130
76, memory problems 125
77 (9577), system board locations 206
77 & M77 (9577), parts (FRUs) 260
77, memory problems 125
80 (8580), parts (FRUs) 251
80, system board locations 207, 208
800 phone numbers 443
85 (9585) server, parts (FRUs) 273
85, memory problems 125
85, system board locations 209
8514/A, display adapter 109
90 (8590), parts (FRUs) 263
90, 95, error detection 407
90, 95, memory configurations 407
90, 95, processor board installation 135
90, 95, processor board matrix 126
448
PS/2 Maintenance Manual
90, 95, processor boards 380
90, 95, unique memory information 406
90, memory problems 125
90, system board locations 211
90/95, determining processor type 126
95 (9595) server, parts (FRUs) 277
95, memory problems 125
95, parts (FRUs) 273
95, remote power-on jumper 150
95, system board locations 212
95A disk array system 396
95A server, parts (FRUs) 280
96 8N1 error message 432
999XX errors 56
A
abbreviations, terms, and acronyms, 438
accessing system programs 384
accessing the system partition 384
ACPA/A advanced diagnostic tests 108
acronyms, abbreviations, and terms 438
adapter configuration options 90
adapters and options matrix 311
adapters, identifying 122
adapters, memory-expansion 405
additional override jumper functions 378
address, I/O 90
address, ROM 91
advanced diagnostic tests, starting 384
application program errors 433
arbitration level 403, 404
ASCII terminals
96 8N1 console message (95) 432
acronym 438
configuration 431
customer satisfaction 800 number 443
HelpCenter 800 number 443
messages, error 432
operation 432
setup and menu selection 430
terminals 430
AT bus, MAP 3
Index
449
AT bus, symptom-to-fru index 12
audio output tone 108
audio symptoms, Micro Channel 30
automatic configuration, running 150, 429
automatic restart 422
available video memory 401
B
backing up system partition 427
beep codes, POST 387
beep symptoms
beep, AT 13
beep, Micro Channel 29
no-beep, AT 12
no-beep, Micro Channel 27
before replacing FRUs 56
BIOS and POST in FLASH 382
BIOS and POST in IML 382
BIOS and POST in ROM 382
BIOS and POST, upgrading 400
C
cables, supported 404
catalog, parts (FRUs) 222
CD-ROM drives, parts 296
changing enabled/disabled settings 180
changing PS/ValuePoint ISA adapter
configuration 91
changing software configuration 408
changing system configuration 408
check point codes 383
checking hard disk drive 56
checking keyboard voltages 123
checking power supply voltages 138
checking startup sequence 56
checkout fax/modem 112
checkout procedures
AT bus 3
introduction 2
Micro Channel 19
cleaning CD-ROM optical lens 413
450
PS/2 Maintenance Manual
clock problems, real-time 150
code format, error 115
codes, CP 383
codes, numeric error (micro channel) 33
codes, numeric error, AT 15
codes, understanding VPD 183
combined FRUs, diagnosing 108
comments about this manual 444
common parts 295
communication menu 431
communication options 312
compatibility matrix, drive and diskette 370
compatibility mode, VGA 401
compatibility mode, XGA 401
complete system partition? 386
configuration
ASCII terminal 431
changing software 408
changing system 408
memory, 90, 95 407
network 89
recording customized 429
running automatic 150, 429
SCSI device 418
configuration options, adapter 90
configuration, changing PS/ValuePoint ISA
adapter 91
conflicts, memory-address 408
connector
keyboard 404
keyboard voltages 123
mouse 404
pointing device 404
considerations, display 111
console selection 431
controller on system board, SCSI 180
controller, diskette-drive 404
corrections to this manual 444
cover lock 375
cover-lock switches 375
CP codes 383
CSD version level, determining DOS 108
current leakage 424
Index
451
customized configuration, recording
429
D
data rate switch settings 74
data/fax modem diagnostics 112
default settings, SCSI device 180
description, systems 435
determining DOS CSD version level 108
determining failing memory location 125
determining OS/2 version level 108
determining processor type, 90/95 126
device configurations, SCSI 418
device default settings, SCSI 180
device, missing non-scsi 24
devices list, AT 11
devices list, Micro Channel 23
devices, handling discharge-sensitive 369
devices, SCSI hard disk drives 409
devices, uninterruptible power 424
diagnosing combined FRUs 108
diagnostic
LEDs, processor boards with 135
LEDs, processor boards without 135
PCMCIA (model 33) 133
procedures, network 74
tests, ACPA/A advanced 108
tests, SCSI 181
tests, starting advanced 384
diagnostics, starting system program 425
disable and enable settings 180
discharge-sensitive devices, handling 369
disk array system 396
array, disk 396
diskette and drive compatibility matrix 370
diskette drives, external, parts 298
diskette-drive controller 404
diskettes, system 383
display
adapter 8514/A 109
considerations 111
self-test 110
display-to-system compatibility 110
452
PS/2 Maintenance Manual
displays, non-IBM 402
displays, parts 297
displays, repairable 297
disturbances, power-line 423
DOS CSD version level, determining 108
drive and diskette compatibility matrix 370
drive-startup function, selectable 420
drives and devices, SCSI hard disk 409
drives, external diskette, parts 298
dumping extended diagnostic data information
434
E
EEPROM 382
electrical safety 366
electrostatic devices, handling 369
enable and disable settings 180
error
96 8N1 console message (95) 432
detection 90, 95 407
messages, ASCII terminal 432
storage 434
error codes
format 115
numeric (micro channel) 33
numeric, AT 15
error log, system 25, 433
error log, viewing 433
errors
999XX 56
application program 433
Ethernet POST 85
IML and IPL 55
memory 405
micro channel adapter 433
network configuration 89
OS/2 trap 131
POST 383
printer 134
processor 433
system memory 433
token ring POST 79
types detected 433
Index
453
errors in this manual 444
Ethernet adapter features diskette, ISA 90
Ethernet adapter, testing 81
Ethernet adapters, ISA 10BASE-T/10BASE2 90
Ethernet POST errors 85
exploded views
extended diagnostic data information, dumping 434
extension, NVRAM and NVRAM 381
external devices attached to adapter, SCSI 417
external diskette drive, parts 298
F
failed hard disk drive, system partition 385
failing memory location, determining 125
failing memory, finding 125
failures, using SCSI ID to isolate 181
fax number for corrections to this manual 444
fax/modem diagnostics 112
features
power-on 380
power-supply 422
PS/2 systems 380
features diskette, ISA Ethernet adapter 90
finding failing memory 125
FLASH memory 382
FLASH, text messages 383
format program, low-level 129
format, error code 115
FRU catalog 222
FRU replacement strategy 1
FRUs
See parts
FRUs, before replacing 56
FRUs, diagnosing combined 108
function, SCSI terminator 414
G
gain toggle, microphone 108
general safety 365
grounding requirements 369
guide, safety inspection 368
454
PS/2 Maintenance Manual
H
handling electrostatic discharge-sensitive
devices 369
hard disk drive
checking 56
head parking 374
jumper settings (ATA) 371
preparing for moving 374
replacing default hard disk drive 385
SCSI devices 409
switch settings (ATA) 371
hard disk replacement strategy 1
hardware maintenance reference 363
head parking, hard disk 374
help isolate failures, using SCSI ID 181
high speed modem diagnostics 112
hot-spare drive 398
array, disk 398
hot-spare drive replacement 398
how to change startup sequence 421
how to use symptom-to-FRU index 114
I
I/O address 90
I/O base address 87
IBM trademarks 445
ID numbers, understanding SCSI 409
ID, selecting SCSI 409
ID, setting SCSI 411
identifying adapters 122
identifying memory-module kits 123
IML and IPL errors 55
IML, override jumpers 378
information, related service 107
initial machine load (IML) 382
initial machine load errors 55
initial program load errors 55
input loop, microphone 108
inspection guide, safety 368
install processor board, 90, 95, 135
installation, OS/2 problems 130
Index
455
installed devices list, AT 11
installed devices list, Micro Channel 23
internal devices attached to adapter, SCSI 417
interrupt levels, IRQ 91
introduction, checkout procedures 2
IRQ interrupt levels 91
ISA PS/ValuePoint 10BASE-T/10BASE2 Ethernet
adapters 90
ISA PS/ValuePoint Ethernet adapter features
diskette 90
isolate failures, using SCSI ID 181
J
Japanese keyboards, parts 299
jumper, password override 376
jumpers
option microprocessor, 76, 77 130
override functions 378
remote power-on, 95 150
setting motor-start 414
settings, hard disk drive (ATA) 371
K
keep/remove enabled/disabled settings 180
keyboard
keyboard connector 404
keyboard connector and pointing-device
connector 404
keyboard voltages, checking 123
keyboards, parts 298
keybutton kits, parts 299
L
LAN workstations, servicing 181
leakage, current 424
LEDs, processor boards with diagnostic 135
LEDs, processor boards without diagnostic 135
lens cleaning procedure 413
level, determining DOS CSD version 108
level, determining OS/2 version 108
levels, IRQ interrupt 91
456
PS/2 Maintenance Manual
list, installed devices, AT 11
list, installed devices, Micro Channel 23
location, determining failing memory 125
locations, system board 185
lock, cover 375
lock, PCMCIA pc card override 134
log, system error 25, 433
loop, microphone input 108
low-level format program, using 129
M
MAPs
AT bus 3
memory problems (80286 to 80486) 9
memory problems (8086) 6
Micro Channel 19
matrix
drive and diskette compatibility 370
options and adapters 311
memory
address conflicts 408
configurations, 90, 95 407
determining type, size and speed 126
errors 405
errors, system 433
expansion adapters 405
finding failing 125
information, 90, 95 406
location, determining failing 125
MAP (80286 to 80486) 9
MAP (8086) 6
problems 125
system 405
system-board 405
type 1 processor boards 128
type 2 processor boards 128
type 3 processor boards 128
video 401
memory-module kit identification 123
memory, FLASH 382
menu selection, ASCII terminal setup 430
micro channel
adapter errors 433
Index
457
micro channel (continued)
checkout procedures & MAP 19
symptom-to-FRU index 26
microphone gain toggle 108
microphone input loop 108
microprocessor jumper option, 76, 77 130
microprocessors 380
miscellaneous
symptoms 30
mismatch problems, software/hardware 181
missing non-SCSI device 24
missing SCSI and non-SCSI devices 25
missing SCSI device 24
modem diagnostics 112
monitors, parts 297
motor-start jumper, setting 414
mouse connector 404
mouse, parts 298
moving, preparing hard disk 374
N
network
configuration errors 89
errors 89
service procedures 74
new installation, OS/2 problems 130
no-beep symptoms, AT 12
no-beep symptoms, Micro Channel 27
no-load operation 422
non-ibm displays 402
non-removable terminators 419
non-scsi device, missing 24
notices 445
numbers, phone, 1-800 443
numeric error codes (micro channel) 33
numeric error codes, AT 15
NVRAM and NVRAM extension 381
O
OBI DASD Hot Swap Storage Expansion Enclosure,
parts (FRUs) 293
458
PS/2 Maintenance Manual
operating voltage range 422
operation, ASCII terminal 432
operation, no-load 422
optical drive, SCSI ID 414
optical drives, rewritable, parts 305
optical lens cleaning 413
option microprocessor jumper, 76, 77
options
communication 312
options and adapters matrix 311
OS/2
determining version level 108
installation problems 130
trap errors 131
output tone, audio 108
over-current protection 422
over-voltage protection 422
override jumper 376
override jumper functions 378
override jumper, 50, 60, 70, 80 377
override jumper, 55 SX, 65 SX 377
override jumpers, IML systems 378
override, PCMCIA pc card lock 134
130
P
parallel port 404
parameters, selecting network configuration
parking head, hard disk 374
partition
backing up system 427
restoring system 428
system 425
upgrading system version 426
parts
CD-ROM drives 296
common 295
displays 297
external diskette drive 298
Japanese keyboards 299
keyboards 298
keybutton kits 299
miscellaneous parts kits 300
model 25, 25-286, 25SX (8525) 223
87
Index
459
parts (continued)
model 30 (8530) 227
model 30-286 (8530) 229
model 33 (9533) 231
model 35 (8535) 233
model 3509 285
model 3510 287
model 3511 289
model 3532 291
model 40 (8540) 236
model 50 (8550) 239
model 53 (9553) 241
model 55 SX (8555) 243
model 56 (8556) 246
model 56 (9556) 257
model 57 (8557) 248
model 57 & M57 (9557) 260
model 60 (8560) 251
model 65 (8565) 251
model 70 (8570) 254
model 76 (9576) 257
model 77 & M77 (9577) 260
model 80 (8580) 251
model 85 (9585) server 273
model 90 (8590) 263
model 95 (8595) 273
model 95 (9595) server 277
model 95A server 280
mouse 298
OBI DASD Hot Swap Storage Expansion
Enclosure 293
PC Server (8640) 267
PC Server 500 (86XX) 270
power cords 304
rewritable optical drives 305
SCSI adapter terminators 308
serverguard adapter 306
space-saving keyboards 299
system board upgrades 295
tools and miscellaneous 308
wireless LAN adapter 309
parts catalog 222
password
460
PS/2 Maintenance Manual
password override jumper 376
passwords
privileged-access 378
removing power-on 376
unattended start mode, server mode 378
PC cards 400
PC Server (8640), parts (FRUs) 267
PC Server 500 (86XX), parts (FRUs) 270
PCMCIA
adapter features 400
adapter switch settings 134
diagnostics 133
pc card lock override 134
PC cards 400
phone numbers, 1-800 443
pointing-device connector 404
port, parallel 404
port, serial 403
portables
POST
beep codes 387
errors 383
upgrading 400
POST and BIOS in FLASH 382
POST and BIOS in IML 382
POST and BIOS in ROM 382
POST and BIOS, upgrading 400
POST errors 383
POST errors, Ethernet 85
POST errors, token-ring 79
POST overview 381
POST, fast startup mode 382
power cords, parts 304
power devices, uninterruptible 424
power supplies, system-unit 422
power supply voltage check 138
power-line disturbances 423
power-on features 380
power-on jumper 95, remote 150
power-on password limitations 382
power-on password, removing 376
power-supply features 422
preparing hard disk for moving 374
Index
461
printer errors 134
privileged-access password 378
problems
70/80 486DX33 processor upgrade 136
during OS/2 installation 130
memory 125
real-time clock 150
software/hardware mismatch 181
undetermined 183
processor
errors 433
model 90, 95 126
processor boards
20 MHz and 25 MHz 284
installation, 90, 95 135
matrix, 90, 95 126
memory type 1 128
memory type 2 128
memory type 3 128
model 70 380
model 90, 95 380
with diagnostic LEDs 135
without diagnostic LEDs 135
processor type, 90/95 126
processor upgrade problems 70/80, 486DX33
program diagnostics, starting system 425
program errors, application 433
programs, updating system 426
protection
over-current 422
over-voltage 422
short-circuit 422
surge 424
under-voltage 422
PS/2 E diagnostics 133
PS/2 types, descriptions 435
PS/ValuePoint ISA adapter configuration,
changing 91
R
range, operating voltage 422
rate switch settings, data 74
462
PS/2 Maintenance Manual
136
real-time clock problems 150
rear-panel security option 375
recording customized configuration 429
reference section, this manual 363
refresh rates possible 402
related service information 107
reliability 424
remote power-on jumper 95 150
removable terminators 419
removals/replacements (portables)
removing power-on password 376
replacement strategy, FRU 1
replacement strategy, hard disk 1
replacing hard disk with a system partition 385
requirements, grounding 369
resolution possible 402
resolving memory-address conflicts 408
restart, automatic 422
restoring system partition 428
rewritable optical drive, SCSI ID 414
rewritable optical drives, parts 305
ROM 382
ROM address 91
running automatic configuration 150, 429
S
safety 424
electrical 366
general 365
information 365
inspection guide 368
SCSI
adapters, terminators 418
adapters, type 1 418
adapters, type 2 418
controller, system board 180
device configurations 418
device default settings 180
diagnostic tests 181
external devices attached to adapter
hard disk drives and devices 409
ID numbers, understanding 409
ID, jumper settings 412
417
Index
463
SCSI (continued)
ID, rewritable optical drive 414
ID, selecting 409
ID, setting 411
ID, switch settings 411
internal devices attached to adapter 417
missing device 24
SCSI and non-SCSI devices 25
SCSI ID (using ID to isolate failures) 181
system information 409
terminator function 414
terminator requirements 418
terminators on system boards 419
SCSI adapter terminators, parts 308
security 375
security option, rear-panel 375
selectable drive-startup function 420
selecting a SCSI ID 409
selecting network configuration parameters 87
selection, console 431
self-test, display 110
serial port 403
server 85, system board locations 209
serverguard adapter, parts (FRUs) 306
service information, related 107
service procedures
AT bus 3
introduction 2
Micro Channel 19
network 74
service section, this manual 1
servicing LAN workstations 181
settings
changing enabled/disabled 180
data rate switch 74
enable and disable 180
keep/remove enabled/disabled 180
motor-start jumper 414
SCSI ID 411
setup and menu selection, ASCII terminal 430
short-circuit protection 422
size, type, and speed, determining memory 126
software configuration, changing 408
464
PS/2 Maintenance Manual
software/hardware mismatch problems 181
space-saving keyboards, parts 299
misc. parts kits 300
specifications 435
speed, type, and size, determining memory 126
start mode (server mode), unattended 378
starting advanced diagnostic tests 384
starting diagnostics, system program 425
starting system program diagnostics 425
startup function, selectable drive 420
startup sequence, changing 421
startup sequence, checking 56
stations, servicing LAN 181
storage, error 434
strategy, FRU replacement 1
strategy, hard disk replacement 1
suggestions about this manual 444
supported cables 404
surge protection 424
switch settings
70/80 486DX33 processor 136
data rate 74
hard disk drive (ATA) 371
switches, tamper-evident 375
symptom-to-FRU index
AT bus 12
how to use 114
Micro Channel 26
symptoms
audio, Micro Channel 30
beep, AT 13
beep, Micro Channel 29
miscellaneous 30
miscellaneous, AT 13
no-beep, AT 12
no-beep, Micro Channel 27
system
configuration, changing 408
diskettes 383
error log 25, 433
features 380
memory 405
memory errors 433
program diagnostics, starting 425
Index
465
system (continued)
programs, updating 426
SCSI information 409
system board locations 185
system board, SCSI controller 180
system boards, SCSI terminators 419
system partition 382, 384
backing up 427
complete? 386
information 425
option files 386
restoring 428
upgrading version 426
system partition failures 385
system specifications 435
system-board memory 405
system-to-display compatibility 110
system-unit power supplies 422
T
tamper-evident switches 375
terminal configuration, ASCII 431
terminator requirements, SCSI 418
terminators
ASCII 430
function, SCSI 414
non-removable 419
on SCSI adapters 418
on system boards 419
removable 419
setup and menu selection, ASCII 430
terminators, SCSI adapter, parts 308
terms, acronyms, and abbreviations 438
test
ACPA/A advanced diagnostic 108
Ethernet adapter 81
SCSI diagnostic 181
starting advanced diagnostic 384
token-ring adapter 74
text messages, FLASH 383
the error code format 115
toggle, microphone gain 108
466
PS/2 Maintenance Manual
token-ring adapter, testing 74
token-ring POST errors 79
tone, audio output tone 108
tools and miscellaneous, parts 308
misc. tools and parts 308
trademarks, IBM 445
trademarks, other companies 445
trap errors, OS/2 131
type 1 processor boards, memory 128
type 1 SCSI adapters 418
type 2 processor boards, memory 128
type 2 SCSI adapters, 418
type 3 processor boards, memory 128
type of processor, 90/95 126
type, size and speed, determining memory
types of errors detected 433
126
U
u-bolt 375
unattended start mode 378
unattended start mode (server mode) 378
under-voltage protection 422
understanding SCSI ID numbers 409
understanding VPD codes 183
undetermined problems 183
uninterruptible power devices 424
unique memory information, 90, 95 406
updating FLASH 382
updating system programs 426
upgradable POST and BIOS 400
upgrading FLASH 382
upgrading POST and BIOS 400
upgrading the system partition version 426
V
version level, determining DOS CSD 108
version level, determining OS/2 108
version, upgrading system partition 426
VGA compatibility mode 401
video 401
video memory available 401
Index
467
viewing error log 25, 433
voltage range, operating 422
voltages, checking keyboard 123
voltages, checking power supply 138
VPD codes, understanding 183
W
wireless LAN adapter, parts (FRUs)
workstations, servicing LAN 181
X
XGA compatibility mode
468
401
PS/2 Maintenance Manual
309
IBM
Part Number: 83G8990
Printed in U.S.A.
S52G-9971- 2