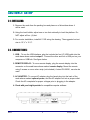
1
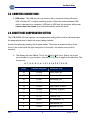
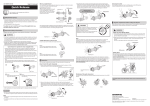
Service Manual
Operator Manual
Ultegra™ Bench Scale
SCB-R9000-14U
USB Powered
© 2009-2013 by Fairbanks Scales, Inc.
All rights reserved
51222
Revision 3 09/13
Amendment Record
Ultegra™ Bench Scale
SCB-R9000-14U USB Powered
51222
Manufactured by Fairbanks Scales Inc.
821 Locust
Kansas City, Missouri 64106
Created
09/2009
Revision 1
09/2009 New Product Release
Revision 2
07/2013 Corrected part numbers, added logos for NTEP, MC, and RoHS.
Revision 3
09/2013 New feature added of adjustable gravity compensation and updated manual
format.
Disclaimer
Every effort has been made to provide complete and accurate information in this manual. However, although
this manual may include a specifically identified warranty notice for the product, Fairbanks Scales makes no
representations or warranties with respect to the contents of this manual, and reserves the right to make changes
to this manual without notice when and as improvements are made.
© Copyright 2009-2013
This document contains proprietary information protected by copyright. All rights are reserved. No part of this
manual may be reproduced, copied, translated, or transmitted in any form or by any means without prior written
permission of the manufacturer.
09/13
2
51222 Rev. 3
TABLE OF CONTENTS
Section 1: General Information
1.1. Introduction...................................................................... 4
1.2. Description....................................................................... 4
Section 2: Setup
2.1. Installing......................................................................... 5
2.2. Connections..................................................................... 5
2.3. Computer Connections ................................................... 6
2.4. Gravity Use Compensation Setting................................. 6
Section 3: Using the Scale
3.1. Power-On......................................................................... 8
3.2. Keys ................................................................................ 8
3.3. Weighing ......................................................................... 9
Section 4: Customer Care
4.1. Cleaning.......................................................................... 10
4.2. Operator Instrument Prompts.......................................... 10
4.3. Troubleshooting............................................................... 10
Section 5: Specifications
5.1. Technical Specifications.................................................. 12
5.2. Environment.................................................................... 13
5.3. Accessories..................................................................... 13
Appendix I: USB Operation ........................................................ 14
09/13
3
51222 Rev. 3
SECTION 1: GENERAL INFORMATION
1.1. INTRODUCTION:
The Ultegra™ Bench Scale is a USB powered unit with a capacity of 150 lbs and is
constructed of ABS composite material. The scale may be placed on a desk, bench, or
used with an 'Insert' adapter to countersink into a counter-top. Units may be ordered with a
ball roller-deck surface.
1.2. DESCRIPTION:
This unit can be powered from any PC that is compliant with version USB
1.1 or later. This includes external hubs, either bus powered or self powered. The scale is
identified by a PC as a human interface device (HID) and operates with Windows 2000,
Windows XP or later. It also can be powered from a 5VDC AC adapter. A USB port is not
required when powered from an AC adapter.
09/13
•
NTEP Approved
•
Measurement Canada Approved
•
RoHS Compliant
4
51222 Rev. 3
SECTION 2: SETUP
2.1. INSTALLING:
1. Remove the scale from the packing box and place on a flat surface where it
will be used.
2. Using the level bubble, adjust one or two feet minimally to level the platform. Do
NOT adjust all four (4) feet.
3. For counter installation, install kit 21100 using the drawing. The suggested cut-out
size is 15 ¼" x 15 ¼".
2.2. CONNECTIONS:
1. USB - To use the USB interface, plug the included six foot (6') USB cable into the
scale base where marked output 1. Connect the other end into a USB port on your
computer or USB hub. See figure below.
2. REMOTE DISPLAY - To use a remote display, plug the remote display into the
connector on the scale base where marked remote display. Mount the remote
using 2 screws or use a velcro strip (not included). A stand PN 20301, can also be
used.
3. AC ADAPTER - To use an AC adapter, plug the barrel plug into the back of the
scale where marked optional power, and the AC adapter unit into a proper outlet.
Check the AC receptacle for proper voltages prior to plugging in the adapter.
4. Check with your freight provider for compatible computer software.
09/13
5
51222 Rev. 3
Section 2: Setup
2.3. COMPUTER CONNECTIONS:
1. USB setup: The USB port will only function with a computer utilizing Windows
2000, Windows XP, or higher operating system. When the scale-connected USB
cable is interfaced to a computer’s USB port or USB hub, the computer will prompt
a device has been found and it will automatically install the driver.
2.4. GRAVITY USE COMPENSATION SETTING
The SCB-R9000-14U has a gravity use compensation setting which must be set based upon
the geographical zone in which the scale is being installed.
Access this setting by pressing the Program button. The button is located looking at the
front of the scale inside the right rear portion of the scale. An access cover must be
removed.
1. The display will show GrU x. This is the Gravity Use Zone. Select the proper
zone number for your location. Use the [UNITS] key to toggle to the selection. The
choices are:
-8, -7, -6, -5, -4, -3, -2, -1, 0, 1, 2, 3, 4, 5, 6, 7, 8, 9, 10
09/13
Zone
Latitude (degrees)
Reference City
-8
68.659
Point Hope, AK
-7
64.929
Fairbanks, AK
-6
61.567
Anchorage, AK
-5
58.444
Fort Vermilion, Alberta
-4
55.485
High Prairie, Alberta
-3
52.638
Coventry, England
-2
49.865
Winnipeg, Manitoba
-1
47.137
Tacoma, WA
0
44.427
St. Johnsbury, VT
1
41.711
Des Moines, IA
2
38.963
Kansas City, MO
6
51222 Rev. 3
Section 2: Setup
Zone
Latitude (degrees)
Reference City
3
36.156
Tulsa, OK
4
33.257
Tuscaloosa, AL
5
30.223
Austin, TX
6
26.992
Navojoa, Mexico
7
23.467
Mazatlan, Mexico
8
19.476
Mexico City
9
14.622
Guatemala City
10
7.326
Bucaramanga, Colombia
Press the [ZERO] key to accept the choice selected and the display will indicate
AZt 0.5. Press the Program button to return to the weighing mode.
This completes setting the Gravity Use Zone setting.
09/13
7
51222 Rev. 3
SECTION 3: USING THE SCALE
3.1. POWER- ON:
Because the scale uses special low-power circuitry, no warm-up time is required. Weight
readings will be accurate as soon as the unit is powered on and set to zero.
When the unit is powered, the liquid crystal display (LCD) will show the software part
number and the revision followed by either "0.00", or "------". Dashes are displayed to
indicate the scale is registering a weight upon startup. Press the [ZERO] key to set the
display to “0.00” and start weighing.
3.2. KEYS:
The keys for operating the scale are located on the main display and on the remote
display.
50212-10
1. Pressing the [ZERO] key resets the display to indicate zero (0).
a. The zero range is set at 2% or 3.00 lbs when set for Canadian use
b. The zero range is set at 100 % or 150 lbs when set for USA use
2. The [ZERO] key function will be inhibited if the instrument detects any of the
following conditions:
a. Motion on the platform
b. An underload condition
c. An overload condition
d. Outside of programmed zero range
3. Pressing the [UNITS] key toggles the weighing units and the display 'indicators'
between "lb" to "kg". Verify the units you want to use by noting the arrow 'indicator'
on the display.
09/13
8
51222 Rev. 3
Section 3: Using the Scale
3.3. WEIGHING:
1. With the platform empty, press the [ZERO] key. The display will indicate zero
Note: The “C “ to the left of the “0.00” indicates true center of zero.
2. Check that the correct units are indicated; press the [UNITS] key to change to "lb"
or "kg".
3. Place the item to be weighed centered on the platform.
4. Read the Gross weight from the display.
50212-11
09/13
9
51222 Rev. 3
SECTION 4: CUSTOMER CARE
4.1. CLEANING:
Clean by wiping the scale assembly off with a damp cloth only. Do not use running water,
harsh chemicals, or allow liquids to drip onto the scale/display.
4.2. OPERATOR INSTRUMENT PROMPTS:
Prompt
Description
HiCAP
Load 150 lbs/ 68 kg or greater - over capacity.
LoCAP
Scale is below normal Zero range - under capacity.
“------”
Shown at startup. Indicates the scale is not within the center-of-zero
range. Press the [ZERO] key to go to weigh mode.
“ ---- ”
Shown at startup. Motion is preventing the scale from entering the
weigh mode
4.3. TROUBLESHOOTING - In the event the scale does not function properly, check the
following:
Problem
Possible Source / Remedy
No Display
Power OFF, plug disconnected, cord damage,
faulty USB port or AC adapter. IF you are using a remote display, check
the main display first, if it's OK then check the cable plug connection on
the remote.
Unplug then plug in the power cord to reset the program.
Incorrect Weight
Check platform for binding or rubbing, reposition scale so all sides are
clear. Ensure correct UNITS are displayed (lb or kg). For scales in counter
inserts, make sure there is nothing jammed around edges Remove load,
press the [ZERO] key to set the scale to “0.00”, then reweigh.
[ZERO] key will NOT reset zero
Motion on the platform, ensure that the platform is empty. Check platform
for binding or rubbing, reposition scale so all sides are clear. For scales in
counter inserts, make sure there is nothing jammed around edges.
Unplug then plug in the power cord to reset the program
09/13
10
51222 Rev. 3
Section 4: Customer Care
Problem
Possible Source / Remedy
Pushbuttons Will Not Operate
First unplug, then plug in the power cord to reset the program. IF you are
using a remote display, check the main display first, if it's OK then check the
cable and plug connection on the remote
Display Locked or Inoperative
First unplug, then plug in the power cord to reset the program . IF you are
using a remote display, check the main display first, if it's OK then check the
cable and plug connection on the remote.
Display Indicates "HiCAP
Weight on the platform exceeds 150 lbs, remove load.
No USB Output
Check that both cable end connectors are securely fastened. Check
the cable for damage. Check the Hub or USB port for problems.
09/13
11
51222 Rev. 3
SECTION 5: SPECIFICATIONS
5.1. TECHNICAL SPECIFICATIONS
1. Capacities: 150 lb/68 kg factory set
2. Rounding: Nearest division per NIST H-44
3. Weight Display: .27 inch LCD Display
4. Power On Lockout: Scale will display "------", when power is turned on and
weight is present. Press ZERO to establish zero reference.
5. Display update rate: 0.05 seconds.
6. Overcapacity Warning:
• Displays "HiCAP" for overcapacity
7. Motion Detection: Satisfies H-44 requirements
8. Power Failure Protection: Zero reference, programming, and calibrations are
retained if the instrument loses power
9. Load Cell Excitation: 3.3VDC
10. USB Cable Length: Type A/B, 6 feet in length
11. Indicators:
• lb, kg
12. Dimensions: Platform, Including Feet 14" x 14" x 2.5"
13. Auto Zero Tracking: Compensates for gradual buildup of material on
platform, factory set at 0.5 divisions
14. Power Requirements: 5VDC, USB or AC adapter
15. Approvals: NTEP CC# 98-198
MC# AM-5298
RoHS Compliant
09/13
12
51222 Rev. 3
Section 5: Specifications
5.2. ENVIRONMENT:
All equipment should be protected from direct sunlight.
• Relative Humidity 0% to 90% non-condensing.
• NOT suitable for water wash down.
5.3. ACCESSORIES:
1. Remote Display 29595C - (ACC-1520-1) 6.98"W x 3.48"H, 1.29”D, RJ45 cable and
two (2) function buttons.
2. AC Adapter 30015 - Input voltage range of 90 to 264 VAC, 47 to 63 Hz.
Output, 5VDC via 2.1mm barrel plug.
3. Counter Insert Kit 21100 - Allows the unit to be placed at slightly above a countertop for easier weighing. A remote display 29595 will be needed for display purposes.
4. Remote Display Stand 20301 - A 18" high stand for mounting the Remote
Display, ideal for counter-top applications.
09/13
13
51222 Rev. 3
APPENDIX I: USB OPERATION
:
A. OVERVIEW:
The Ultegra™ Bench Scale is a low power, full speed device. A low power USB
device draws less than 100mA. A full speed device operates at 12Mbits/s. It uses
default Windows drivers and is installed automatically upon first connection with a PC.
The maximum USB cable length is 5 meters unless a self powered hub is used to
extend the cable length.
When a PC goes into standby mode the scale is forced into a low power mode to
comply with USB specifications. At this time the scale displays “SLEEP “, which
remains until the PC resumes normal operation.
The device is displayed at the following location in Windows: Control Panel -->
System --> Hardware --> Device Manager There are two items displayed for the
unit, HID-compliant device and USB Human Interface Device.
The scale sends data to the PC using a Point of Sale (POS) format. A typical USB
report includes scale status, units and weight.
09/13
14
51222 Rev. 3
Manufactured by Fairbanks Scales, Inc.
821 Locust
Kansas City, Missouri 64106
www.fairbanks.com
ULTEGRA™ BENCH SCALE
OPERATOR MANUAL
DOCUMENT 51222