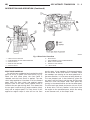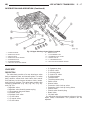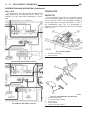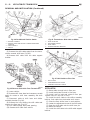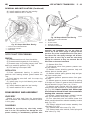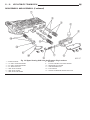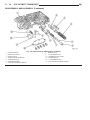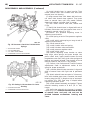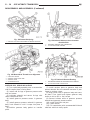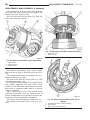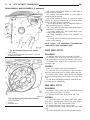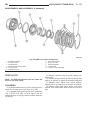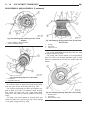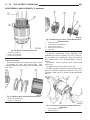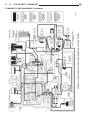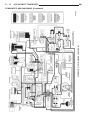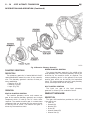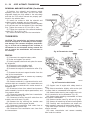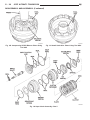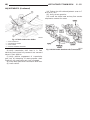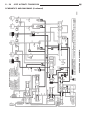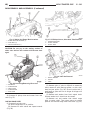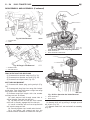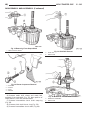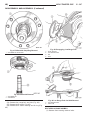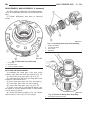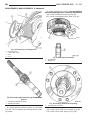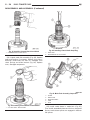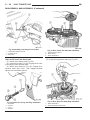
1
TRANSMISSION AND TRANSFER CASE
WJ
21 - 1
TRANSMISSION AND TRANSFER CASE
TABLE OF CONTENTS
page
page
42RE AUTOMATIC TRANSMISSION . . . . . . . . . . . . 1
45RFE AUTOMATIC TRANSMISSION . . . . . . . . . 181
NV242 TRANSFER CASE . . . . . . . . . . . . . . . . . . 275
NV247 TRANSFER CASE . . . . . . . . . . . . . . . . . . 308
42RE AUTOMATIC TRANSMISSION
TABLE OF CONTENTS
page
page
DESCRIPTION AND OPERATION
42RE AUTOMATIC TRANSMISSION. . . . . . . . . . . . 2
RECOMMENDED FLUID . . . . . . . . . . . . . . . . . . . 10
FLUID . . . . . . . . . . . . . . . . . . . . . . . . . . . . . . . . . 10
TORQUE CONVERTER . . . . . . . . . . . . . . . . . . . . 11
OIL PUMP . . . . . . . . . . . . . . . . . . . . . . . . . . . . . . 16
VALVE BODY . . . . . . . . . . . . . . . . . . . . . . . . . . . . 17
ACCUMULATOR. . . . . . . . . . . . . . . . . . . . . . . . . . 38
PISTONS . . . . . . . . . . . . . . . . . . . . . . . . . . . . . . . 39
FRONT CLUTCH . . . . . . . . . . . . . . . . . . . . . . . . . 42
REAR CLUTCH . . . . . . . . . . . . . . . . . . . . . . . . . . 43
OVERDRIVE CLUTCH . . . . . . . . . . . . . . . . . . . . . 44
OVERRUNNING CLUTCH . . . . . . . . . . . . . . . . . . 45
PLANETARY GEARSET . . . . . . . . . . . . . . . . . . . . 45
BANDS . . . . . . . . . . . . . . . . . . . . . . . . . . . . . . . . 45
SERVOS . . . . . . . . . . . . . . . . . . . . . . . . . . . . . . . 46
GEARSHIFT MECHANISM . . . . . . . . . . . . . . . . . . 47
CONVERTER DRAINBACK VALVE . . . . . . . . . . . . 47
POWERTRAIN CONTROL MODULE (PCM) . . . . . 47
ELECTRONIC GOVERNOR . . . . . . . . . . . . . . . . . 49
GOVERNOR PRESSURE CURVES . . . . . . . . . . . 50
OVERDRIVE OFF SWITCH . . . . . . . . . . . . . . . . . 51
BRAKE TRANSMISSION SHIFT INTERLOCK
MECHANISM. . . . . . . . . . . . . . . . . . . . . . . . . . . 51
DIAGNOSIS AND TESTING
AUTOMATIC TRANSMISSION DIAGNOSIS. . . . . . 51
EFFECTS OF INCORRECT FLUID LEVEL . . . . . . 51
CAUSES OF BURNT FLUID . . . . . . . . . . . . . . . . . 52
FLUID CONTAMINATION . . . . . . . . . . . . . . . . . . . 52
PRELIMINARY DIAGNOSIS . . . . . . . . . . . . . . . . . 53
PARK/NEUTRAL POSITION SWITCH . . . . . . . . . . 53
OVERDRIVE ELECTRICAL CONTROLS . . . . . . . . 53
BRAKE TRANSMISSION SHIFT INTERLOCK . . . . 53
GEARSHIFT CABLE . . . . . . . . . . . . . . . . . . . . . . . 54
THROTTLE VALVE CABLE . . . . . . . . . . . . . . . . . . 54
ROAD TESTING. . . . . . . . . . . . . . . . . . . . . . . . . . 54
ANALYZING ROAD TEST . . . . . . . . . . . . . . . . . . . 55
HYDRAULIC PRESSURE TEST . . . . . . . . . . . . . . 55
AIR TESTING TRANSMISSION CLUTCH AND
BAND OPERATION . . . . . . . . . . . . . . . . . . . . . . 57
CONVERTER HOUSING FLUID LEAK
DIAGNOSIS . . . . . . . . . . . . . . . . . . . . . . . . . . . 58
DIAGNOSIS TABLES AND CHARTS—RE
TRANSMISSION . . . . . . . . . . . . . . . . . . . . . . . . 59
SERVICE PROCEDURES
FLUID LEVEL CHECK . . . . . . . . . . . . . . . . . . . . . 72
FLUID AND FILTER REPLACEMENT . . . . . . . . . . 72
TRANSMISSION FILL PROCEDURE. . . . . . . . . . . 73
CONVERTER DRAINBACK CHECK VALVE
SERVICE . . . . . . . . . . . . . . . . . . . . . . . . . . . . . 74
OIL PUMP VOLUME CHECK . . . . . . . . . . . . . . . . 74
FLUSHING COOLERS AND TUBES . . . . . . . . . . . 74
ALUMINUM THREAD REPAIR . . . . . . . . . . . . . . . 75
REMOVAL AND INSTALLATION
TRANSMISSION. . . . . . . . . . . . . . . . . . . . . . . . . . 75
TORQUE CONVERTER . . . . . . . . . . . . . . . . . . . . 79
PARK/NEUTRAL POSITION SWITCH . . . . . . . . . . 79
GEARSHIFT CABLE . . . . . . . . . . . . . . . . . . . . . . . 79
SHIFTER . . . . . . . . . . . . . . . . . . . . . . . . . . . . . . . 81
BRAKE TRANSMISSION SHIFT INTERLOCK . . . . 83
GOVERNOR SOLENOID AND PRESSURE
SENSOR . . . . . . . . . . . . . . . . . . . . . . . . . . . . . . 84
VALVE BODY . . . . . . . . . . . . . . . . . . . . . . . . . . . . 84
OVERDRIVE UNIT . . . . . . . . . . . . . . . . . . . . . . . . 86
OVERDRIVE HOUSING BUSHING . . . . . . . . . . . . 88
OUTPUT SHAFT REAR BEARING . . . . . . . . . . . . 88
OUTPUT SHAFT FRONT BEARING . . . . . . . . . . . 89
DISASSEMBLY AND ASSEMBLY
VALVE BODY . . . . . . . . . . . . . . . . . . . . . . . . . . . . 89
TRANSMISSION. . . . . . . . . . . . . . . . . . . . . . . . . 109
OVERRUNNING CLUTCH CAM/OVERDRIVE
PISTON RETAINER . . . . . . . . . . . . . . . . . . . . . 120
21 - 2
42RE AUTOMATIC TRANSMISSION
FRONT SERVO PISTON . . . . . . . . . . . . . . . . .
REAR SERVO PISTON. . . . . . . . . . . . . . . . . . .
OIL PUMP AND REACTION SHAFT SUPPORT.
FRONT CLUTCH . . . . . . . . . . . . . . . . . . . . . . .
REAR CLUTCH . . . . . . . . . . . . . . . . . . . . . . . .
PLANETARY GEARTRAIN/OUTPUT SHAFT . . .
OVERDRIVE UNIT . . . . . . . . . . . . . . . . . . . . . .
CLEANING AND INSPECTION
VALVE BODY . . . . . . . . . . . . . . . . . . . . . . . . . .
TRANSMISSION. . . . . . . . . . . . . . . . . . . . . . . .
OVERRUNNING CLUTCH/LOW-REVERSE
DRUM/OVERDRIVE PISTON RETAINER . . . .
ACCUMULATOR. . . . . . . . . . . . . . . . . . . . . . . .
FRONT SERVO . . . . . . . . . . . . . . . . . . . . . . . .
REAR SERVO . . . . . . . . . . . . . . . . . . . . . . . . .
OIL PUMP AND REACTION SHAFT SUPPORT.
FRONT CLUTCH . . . . . . . . . . . . . . . . . . . . . . .
WJ
. 122
. 122
. 123
. 127
. 129
. 132
. 137
. 154
. 155
. 156
. 156
. 156
. 156
. 156
. 157
DESCRIPTION AND OPERATION
42RE AUTOMATIC TRANSMISSION
DESCRIPTION
The 42RE is a four speed fully automatic transmission (Fig. 1) with an electronic governor. The 42RE is
equipped with a lock-up clutch in the torque converter. First through third gear ranges are provided
by the clutches, bands, overrunning clutch, and planetary gear sets in the transmission. Fourth gear
range is provided by the overdrive unit that contains
an overdrive clutch, direct clutch, planetary gear set,
and overrunning clutch.
The transmission contains a front, rear, and direct
clutch which function as the input driving components. They also contain the kickdown (front) and the
low/reverse (rear) bands which, along with the over-
REAR CLUTCH . . . . . . . . . . . . . . . . . . . . . .
PLANETARY GEARTRAIN . . . . . . . . . . . . . .
OVERDRIVE UNIT . . . . . . . . . . . . . . . . . . . .
ADJUSTMENTS
BRAKE TRANSMISSION SHIFT INTERLOCK
TRANSMISSION THROTTLE VALVE CABLE
ADJUSTMENT. . . . . . . . . . . . . . . . . . . . . .
GEARSHIFT CABLE . . . . . . . . . . . . . . . . . . .
BAND ADJUSTMENTS . . . . . . . . . . . . . . . . .
VALVE BODY . . . . . . . . . . . . . . . . . . . . . . . .
SCHEMATICS AND DIAGRAMS
HYDRAULIC SCHEMATICS . . . . . . . . . . . . .
SPECIFICATIONS
TRANSMISSION. . . . . . . . . . . . . . . . . . . . . .
SPECIAL TOOLS
RE TRANSMISSIONS. . . . . . . . . . . . . . . . . .
. . . 158
. . . 158
. . . 158
. . . 159
.
.
.
.
.
.
.
.
. 159
. 161
. 162
. 162
. . . 164
. . . 176
. . . 177
running clutch and overdrive clutch, serve as the
holding components. The driving and holding components combine to select the necessary planetary gear
components, in the front, rear, or overdrive planetary
gear set, transfer the engine power from the input
shaft through to the output shaft.
The valve body is mounted to the lower side of the
transmission and contains the valves to control pressure regulation, fluid flow control, and clutch/band
application. The oil pump is mounted at the front of
the transmission and is driven by the torque converter hub. The pump supplies the oil pressure necessary for clutch/band actuation and transmission
lubrication.
The 42RE transmission is cooled by an integral
fluid cooler inside the radiator.
WJ
42RE AUTOMATIC TRANSMISSION
21 - 3
Fig. 1 42RE Transmission
DESCRIPTION AND OPERATION (Continued)
21 - 4
42RE AUTOMATIC TRANSMISSION
WJ
DESCRIPTION AND OPERATION (Continued)
1 – CONVERTER CLUTCH
2 – TORQUE CONVERTER
3 – OIL PUMP AND REACTION SHAFT SUPPORT ASSEMBLY
4 – FRONT BAND
5 – FRONT CLUTCH
6 – DRIVING SHELL
7 – REAR BAND
8 – TRANSMISSION OVERRUNNING CLUTCH
9 – OVERDRIVE UNIT
10 – PISTON RETAINER
11 – OVERDRIVE CLUTCH
12 – DIRECT CLUTCH
13 – INTERMEDIATE SHAFT
14 – FRONT BEARING
IDENTIFICATION
Transmission identification numbers are stamped
on the left side of the case just above the oil pan gasket surface (Fig. 2). Refer to this information when
ordering replacement parts.
Fig. 2 Transmission Part And Serial Number
Location
1 – PART NUMBER
2 – BUILD DATE
3 – SERIAL NUMBER
GEAR RATIOS
The 42RE gear ratios are:
• 1st 2.74:1
• 2nd 1.54:1
• 3rd 1.00:1
• 4th 0.69:1
• Rev. 2.21
15
16
17
18
19
20
21
22
23
24
25
26
27
28
–
–
–
–
–
–
–
–
–
–
–
–
–
–
HOUSING
REAR BEARING
OUTPUT SHAFT
SEAL
OVERDRIVE OVERRUNNING CLUTCH
OVERDRIVE PLANETARY GEAR
DIRECT CLUTCH SPRING
OVERDRIVE CLUTCH PISTON
VALVE BODY ASSEMBLY
FILTER
FRONT PLANETARY GEAR
REAR CLUTCH
TRANSMISSION
REAR PLANETARY GEAR
OPERATION
The application of each driving or holding component is controlled by the valve body based upon the
manual lever position and governor pressure. The
governor pressure is a variable pressure input to the
valve body and is one of the signals that a shift is
necessary. First through fourth gear are obtained by
selectively applying and releasing the different
clutches and bands. Engine power is thereby routed
to the various planetary gear assemblies which combine with the overrunning clutch assemblies to generate the different gear ratios. The torque converter
clutch is hydraulically applied and is released when
fluid is vented from the hydraulic circuit by the
torque converter control (TCC) solenoid on the valve
body. The torque converter clutch is controlled by the
Powertrain Control Module (PCM). The torque converter clutch engages in fourth gear, and in third
gear when the O/D switch is OFF, when the vehicle
is cruising on a level plane after the vehicle has
warmed up. The torque converter clutch will disengage momentarily when an increase in engine load is
sensed by the PCM, such as when the vehicle begins
to go uphill or the throttle pressure is increased. The
torque converter clutch feature increases fuel economy and reduces the transmission fluid temperature.
Since the overdrive clutch is applied in fourth gear
only and the direct clutch is applied in all ranges
except fourth gear, the transmission operation for
park, neutral, and first through third gear will be
described first. Once these powerflows are described,
the third to fourth shift sequence will be described.
42RE AUTOMATIC TRANSMISSION
WJ
21 - 5
DESCRIPTION AND OPERATION (Continued)
PARK POWERFLOW
As the engine is running and the crankshaft is
rotating, the flexplate and torque converter, which
are also bolted to it, are all rotating in a clockwise
direction as viewed from the front of the engine. The
notched hub of the torque converter is connected to
the oil pump’s internal gear, supplying the transmission with oil pressure. As the converter turns, it
turns the input shaft in a clockwise direction. As the
input shaft is rotating, the front clutch hub-rear
clutch retainer and all their associated parts are also
rotating, all being directly connected to the input
shaft. The power flow from the engine through the
front-clutch-hub and rear-clutch-retainer stops at the
rear-clutch-retainer. Therefore, no power flow to the
output shaft occurs because no clutches are applied.
The only mechanism in use at this time is the parking sprag (Fig. 3), which locks the parking gear on
the output shaft to the transmission case.
NEUTRAL POWERFLOW
With the gear selector in the neutral position (Fig.
4), the power flow of the transmission is essentially
the same as in the park position. The only operational difference is that the parking sprag has been
disengaged, unlocking the output shaft from the
transmission case and allowing it to move freely.
Fig. 4 Neutral Powerflow
1
2
3
4
5
Fig. 3 Park Powerflow
1 – LEVER ENGAGED FOR PARK
2 – PARK SPRAG
3 – OUTPUT SHAFT
–
–
–
–
–
LEVER DISENGAGED FOR NEUTRAL
PARK SPRAG
OUTPUT SHAFT
CAM
LEVER
21 - 6
42RE AUTOMATIC TRANSMISSION
WJ
DESCRIPTION AND OPERATION (Continued)
Fig. 5 Reverse Powerflow
1
2
3
4
–
–
–
–
FRONT CLUTCH ENGAGED
OUTPUT SHAFT
LOW/REVERSE BAND APPLIED
INPUT SHAFT
REVERSE POWERFLOW
When the gear selector is moved into the reverse
position (Fig. 5), the front clutch and the rear band
are applied. With the application of the front clutch,
engine torque is applied to the sun gear, turning it in
a clockwise direction. The clockwise rotation of the
sun gear causes the rear planet pinions to rotate
against engine rotation in a counterclockwise direction. The rear band is holding the low reverse drum,
which is splined to the rear carrier. Since the rear
carrier is being held, the torque from the planet pin-
5
6
7
8
–
–
–
–
OUTPUT SHAFT
INPUT SHAFT
FRONT CLUTCH ENGAGED
LOW/REVERSE BAND APPLIED
ions is transferred to the rear annulus gear, which is
splined to the output shaft. The output shaft in turn
rotates with the annulus gear in a counterclockwise
direction giving a reverse gear output. The entire
transmission of torque is applied to the rear planetary gearset only. Although there is torque input to
the front gearset through the sun gear, no other
member of the gearset is being held. During the
entire reverse stage of operation, the front planetary
gears are in an idling condition.
42RE AUTOMATIC TRANSMISSION
WJ
21 - 7
DESCRIPTION AND OPERATION (Continued)
Fig. 6 First Gear Powerflow
1
2
3
4
–
–
–
–
OUTPUT SHAFT
OVER-RUNNING CLUTCH HOLDING
REAR CLUTCH APPLIED
OUTPUT SHAFT
FIRST GEAR POWERFLOW
When the gearshift lever is moved into the drive
position the transmission goes into first gear (Fig. 6).
As soon as the transmission is shifted from park or
neutral to drive, the rear clutch applies, applying the
rear clutch pack to the front annulus gear. Engine
torque is now applied to the front annulus gear turning it in a clockwise direction. With the front annulus
gear turning in a clockwise direction, it causes the
front planets to turn in a clockwise direction. The
rotation of the front planets cause the sun to revolve
in a counterclockwise direction. The sun gear now
transfers its counterclockwise rotation to the rear
5
6
7
8
–
–
–
–
OVER-RUNNING CLUTCH HOLDING
INPUT SHAFT
REAR CLUTCH APPLIED
INPUT SHAFT
planets which rotate back in a clockwise direction.
With the rear annulus gear stationary, the rear
planet rotation on the annulus gear causes the rear
planet carrier to revolve in a counterclockwise direction. The rear planet carrier is splined into the lowreverse drum, and the low reverse drum is splined to
the inner race of the over-running clutch. With the
over-running clutch locked, the planet carrier is held,
and the resulting torque provided by the planet pinions is transferred to the rear annulus gear. The rear
annulus gear is splined to the output shaft and
rotated along with it (clockwise) in an underdrive
gear reduction mode.
21 - 8
42RE AUTOMATIC TRANSMISSION
WJ
DESCRIPTION AND OPERATION (Continued)
Fig. 7 Second Gear Powerflow
1
2
3
4
5
–
–
–
–
–
KICKDOWN BAND APPLIED
OUTPUT SHAFT
REAR CLUTCH ENGAGED
OUTPUT SHAFT
OVER-RUNNING CLUTCH FREE-WHEELING
SECOND GEAR POWERFLOW
In drive-second (Fig. 7), the same elements are
applied as in manual-second. Therefore, the power
flow will be the same, and both gears will be discussed as one in the same. In drive-second, the transmission has proceeded from first gear to its shift
point, and is shifting from first gear to second. The
second gear shift is obtained by keeping the rear
clutch applied and applying the front (kickdown)
band. The front band holds the front clutch retainer
that is locked to the sun gear driving shell. With the
rear clutch still applied, the input is still on the front
annulus gear turning it clockwise at engine speed.
6
7
8
9
–
–
–
–
INPUT SHAFT
REAR CLUTCH APPLIED
KICKDOWN BAND APPLIED
INPUT SHAFT
Now that the front band is holding the sun gear stationary, the annulus rotation causes the front planets
to rotate in a clockwise direction. The front carrier is
then also made to rotate in a clockwise direction but
at a reduced speed. This will transmit the torque to
the output shaft, which is directly connected to the
front planet carrier. The rear planetary annulus gear
will also be turning because it is directly splined to
the output shaft. All power flow has occurred in the
front planetary gear set during the drive-second
stage of operation, and now the over-running clutch,
in the rear of the transmission, is disengaged and
freewheeling on its hub.
42RE AUTOMATIC TRANSMISSION
WJ
21 - 9
DESCRIPTION AND OPERATION (Continued)
Fig. 8 Direct Drive Powerflow
1
2
3
4
5
–
–
–
–
–
FRONT CLUTCH APPLIED
OVER-RUNNING CLUTCH FREE-WHEELING
OUTPUT SHAFT
REAR CLUTCH APPLIED
OUTPUT SHAFT
DIRECT DRIVE POWERFLOW
The vehicle has accelerated and reached the shift
point for the 2–3 upshift into direct drive (Fig. 8).
When the shift takes place, the front band is
released, and the front clutch is applied. The rear
clutch stays applied as it has been in all the forward
gears. With the front clutch now applied, engine
torque is now on the front clutch retainer, which is
locked to the sun gear driving shell. This means that
the sun gear is now turning in engine rotation (clockwise) and at engine speed. The rear clutch is still
applied so engine torque is also still on the front
6 – INPUT SHAFT
7 – OVER-RUNNING CLUTCH FREE-WHEELING
8 – REAR CLUTCH APPLIED
9 – FRONT CLUTCH APPLIED
10 – INPUT SHAFT
annulus gear. If two members of the same planetary
set are driven, direct drive results. Therefore, when
two members are rotating at the same speed and in
the same direction, it is the same as being locked up.
The rear planetary set is also locked up, given the
sun gear is still the input, and the rear annulus gear
must turn with the output shaft. Both gears are
turning in the same direction and at the same speed.
The front and rear planet pinions do not turn at all
in direct drive. The only rotation is the input from
the engine to the connected parts, which are acting
as one common unit, to the output shaft.
21 - 10
42RE AUTOMATIC TRANSMISSION
WJ
DESCRIPTION AND OPERATION (Continued)
FOURTH GEAR POWERFLOW
Fourth gear overdrive range is electronically controlled and hydraulically activated. Various sensor
inputs are supplied to the powertrain control module
to operate the overdrive solenoid on the valve body.
The solenoid contains a check ball that opens and
closes a vent port in the 3-4 shift valve feed passage.
The overdrive solenoid (and check ball) are not energized in first, second, third, or reverse gear. The vent
port remains open, diverting line pressure from the
2-3 shift valve away from the 3-4 shift valve. The
overdrive control switch must be in the ON position
to transmit overdrive status to the PCM. A 3-4
upshift occurs only when the overdrive solenoid is
energized by the PCM. The PCM energizes the overdrive solenoid during the 3-4 upshift. This causes the
solenoid check ball to close the vent port allowing
line pressure from the 2-3 shift valve to act directly
on the 3-4 upshift valve. Line pressure on the 3-4
shift valve overcomes valve spring pressure moving
the valve to the upshift position. This action exposes
the feed passages to the 3-4 timing valve, 3-4 quick
fill valve, 3-4 accumulator, and ultimately to the
overdrive piston. Line pressure through the timing
valve moves the overdrive piston into contact with
the overdrive clutch. The direct clutch is disengaged
before the overdrive clutch is engaged. The boost
valve provides increased fluid apply pressure to the
overdrive clutch during 3-4 upshifts, and when accelerating in fourth gear. The 3-4 accumulator cushions
overdrive clutch engagement to smooth 3-4 upshifts.
The accumulator is charged at the same time as
apply pressure acts against the overdrive piston.
RECOMMENDED FLUID
NOTE: Refer to the Service Procedures section of
this Group for fluid level checking procedures.
FLUID TYPE
Mopart ATF Plus 3, Type 7176 automatic transmission fluid is the recommended fluid for Chrysler
automatic transmissions.
Dexron II fluid IS NOT recommended. Clutch
chatter can result from the use of improper
fluid.
FLUID ADDITIVES
Fluid additives other than Mopart approved fluorescent leak detection dyes are not to be used in this
transmission.
FLUID
NOTE: Refer to the maintenance schedules in
Group 0, Lubrication and Maintenance for the rec-
ommended maintenance (fluid/filter change) intervals for this transmission.
NOTE: Refer to Service Procedures in this group
for fluid level checking procedures.
DESCRIPTION
Mopart ATF Plus 3, Type 7176, automatic transmission fluid is the recommended fluid for DaimlerChrysler automatic transmissions.
Dexron II fluid IS NOT recommended. Clutch
chatter can result from the use of improper
fluid.
Mopart ATF Plus 3, Type 7176, automatic transmission fluid when new is red in color. The ATF is
dyed red so it can be identified from other fluids used
in the vehicle such as engine oil or antifreeze. The
red color is not permanent and is not an indicator of
fluid condition. As the vehicle is driven, the ATF will
begin to look darker in color and may eventually
become brown. This is normal. A dark brown/black
fluid accompanied with a burnt odor and/or deterioration in shift quality may indicate fluid deterioration or transmission component failure.
FLUID ADDITIVES
DaimlerChrysler strongly recommends against the
addition of any fluids to the transmission, other than
those automatic transmission fluids listed above.
Exceptions to this policy are the use of special dyes
to aid in detecting fluid leaks.
Various “special” additives and supplements exist
that claim to improve shift feel and/or quality. These
additives and others also claim to improve converter
clutch operation and inhibit overheating, oxidation,
varnish, and sludge. These claims have not been supported to the satisfaction of DaimlerChrysler and
these additives must not be used. The use of transmission “sealers” should also be avoided, since they
may adversely affect the integrity of transmission
seals.
OPERATION
The automatic transmission fluid is selected based
upon several qualities. The fluid must provide a high
level of protection for the internal components by
providing a lubricating film between adjacent metal
components. The fluid must also be thermally stable
so that it can maintain a consistent viscosity through
a large temperature range. If the viscosity stays constant through the temperature range of operation,
transmission operation and shift feel will remain consistent. Transmission fluid must also be a good conductor of heat. The fluid must absorb heat from the
internal transmission components and transfer that
heat to the transmission case.
42RE AUTOMATIC TRANSMISSION
WJ
DESCRIPTION AND OPERATION (Continued)
TORQUE CONVERTER
DESCRIPTION
The torque converter (Fig. 9) is a hydraulic device
that couples the engine crankshaft to the transmission. The torque converter consists of an outer shell
with an internal turbine, a stator, an overrunning
clutch, an impeller and an electronically applied converter clutch. The converter clutch provides reduced
engine speed and greater fuel economy when
engaged. Clutch engagement also provides reduced
transmission fluid temperatures. The converter
clutch engages in third gear. The torque converter
hub drives the transmission oil (fluid) pump.
The torque converter is a sealed, welded unit that
is not repairable and is serviced as an assembly.
CAUTION: The torque converter must be replaced if
a transmission failure resulted in large amounts of
metal or fiber contamination in the fluid. If the fluid
is contaminated, flush the fluid cooler and lines.
Fig. 9 Torque Converter Assembly
1
2
3
4
5
6
7
–
–
–
–
–
–
–
TURBINE
IMPELLER
HUB
STATOR
FRONT COVER
CONVERTER CLUTCH DISC
DRIVE PLATE
21 - 11
21 - 12
42RE AUTOMATIC TRANSMISSION
WJ
DESCRIPTION AND OPERATION (Continued)
Fig. 10 Impeller
1 – ENGINE FLEXPLATE
2 – OIL FLOW FROM IMPELLER SECTION INTO TURBINE
SECTION
3 – IMPELLER VANES AND COVER ARE INTEGRAL
IMPELLER
The impeller (Fig. 10) is an integral part of the
converter housing. The impeller consists of curved
blades placed radially along the inside of the housing
on the transmission side of the converter. As the converter housing is rotated by the engine, so is the
impeller, because they are one and the same and are
the driving member of the system.
4 – ENGINE ROTATION
5 – ENGINE ROTATION
42RE AUTOMATIC TRANSMISSION
WJ
DESCRIPTION AND OPERATION (Continued)
Fig. 11 Turbine
1 – TURBINE VANE
2 – ENGINE ROTATION
3 – INPUT SHAFT
TURBINE
The turbine (Fig. 11) is the output, or driven, member of the converter. The turbine is mounted within
the housing opposite the impeller, but is not attached
to the housing. The input shaft is inserted through
the center of the impeller and splined into the turbine. The design of the turbine is similar to the
impeller, except the blades of the turbine are curved
in the opposite direction.
4 – PORTION OF TORQUE CONVERTER COVER
5 – ENGINE ROTATION
6 – OIL FLOW WITHIN TURBINE SECTION
21 - 13
21 - 14
42RE AUTOMATIC TRANSMISSION
WJ
DESCRIPTION AND OPERATION (Continued)
STATOR
The stator assembly (Fig. 12) is mounted on a stationary shaft which is an integral part of the oil
pump. The stator is located between the impeller and
turbine within the torque converter case (Fig. 13).
The stator contains an over-running clutch, which
allows the stator to rotate only in a clockwise direction. When the stator is locked against the over-running clutch, the torque multiplication feature of the
torque converter is operational.
Fig. 13 Stator Location
1
2
3
4
–
–
–
–
STATOR
IMPELLER
FLUID FLOW
TURBINE
1
2
3
4
5
6
–
–
–
–
–
–
IMPELLER FRONT COVER
THRUST WASHER ASSEMBLY
IMPELLER
STATOR
TURBINE
FRICTION DISC
Fig. 12 Stator Components
1
2
3
4
–
–
–
–
CAM (OUTER RACE)
ROLLER
SPRING
INNER RACE
TORQUE CONVERTER CLUTCH (TCC)
The TCC (Fig. 14) was installed to improve the
efficiency of the torque converter that is lost to the
slippage of the fluid coupling. Although the fluid coupling provides smooth, shock–free power transfer, it
is natural for all fluid couplings to slip. If the impeller and turbine were mechanically locked together, a
zero slippage condition could be obtained. A hydraulic
piston was added to the turbine, and a friction material was added to the inside of the front cover to provide this mechanical lock-up.
OPERATION
The converter impeller (Fig. 15) (driving member),
which is integral to the converter housing and bolted
to the engine drive plate, rotates at engine speed.
The converter turbine (driven member), which reacts
from fluid pressure generated by the impeller, rotates
and turns the transmission input shaft.
Fig. 14 Torque Converter Clutch (TCC)
42RE AUTOMATIC TRANSMISSION
WJ
21 - 15
DESCRIPTION AND OPERATION (Continued)
Fig. 15 Torque Converter Fluid Operation
1 – APPLY PRESSURE
2 – THE PISTON MOVES SLIGHTLY FORWARD
TURBINE
As the fluid that was put into motion by the impeller blades strikes the blades of the turbine, some of
the energy and rotational force is transferred into the
turbine and the input shaft. This causes both of them
(turbine and input shaft) to rotate in a clockwise
direction following the impeller. As the fluid is leaving the trailing edges of the turbine’s blades it continues in a “hindering” direction back toward the
impeller. If the fluid is not redirected before it strikes
the impeller, it will strike the impeller in such a
direction that it would tend to slow it down.
STATOR
Torque multiplication is achieved by locking the
stator’s over-running clutch to its shaft (Fig. 16).
Under stall conditions (the turbine is stationary), the
oil leaving the turbine blades strikes the face of the
stator blades and tries to rotate them in a counterclockwise direction. When this happens the over–running clutch of the stator locks and holds the stator
from rotating. With the stator locked, the oil strikes
the stator blades and is redirected into a “helping”
direction before it enters the impeller. This circulation of oil from impeller to turbine, turbine to stator,
and stator to impeller, can produce a maximum
torque multiplication of about 2.4:1. As the turbine
begins to match the speed of the impeller, the fluid
3 – RELEASE PRESSURE
4 – THE PISTON MOVES SLIGHTLY REARWARD
that was hitting the stator in such as way as to
cause it to lock–up is no longer doing so. In this condition of operation, the stator begins to free wheel
and the converter acts as a fluid coupling.
Fig. 16 Stator Operation
1 – DIRECTION STATOR WILL FREE WHEEL DUE TO OIL
PUSHING ON BACKSIDE OF VANES
2 – FRONT OF ENGINE
3 – INCREASED ANGLE AS OIL STRIKES VANES
4 – DIRECTION STATOR IS LOCKED UP DUE TO OIL PUSHING
AGAINST STATOR VANES
21 - 16
42RE AUTOMATIC TRANSMISSION
WJ
DESCRIPTION AND OPERATION (Continued)
TORQUE CONVERTER CLUTCH (TCC)
In a standard torque converter, the impeller and
turbine are rotating at about the same speed and the
stator is freewheeling, providing no torque multiplication. By applying the turbine’s piston to the front
cover’s friction material, a total converter engagement can be obtained. The result of this engagement
is a direct 1:1 mechanical link between the engine
and the transmission.
Converter clutch engagement in third or fourth
gear range is controlled by sensor inputs to the powertrain control module. Inputs that determine clutch
engagement are: coolant temperature, engine rpm,
vehicle speed, throttle position, and manifold vacuum. The torque converter clutch is engaged by the
clutch solenoid on the valve body. The clutch can be
engaged in third and fourth gear ranges depending
on overdrive control switch position. If the overdrive
control switch is in the normal ON position, the
clutch will engage after the shift to fourth gear, and
above approximately 72 km/h (45 mph). If the control
switch is in the OFF position, the clutch will engage
after the shift to third gear, at approximately 56
km/h (35 mph) at light throttle.
OIL PUMP
DESCRIPTION
The oil pump (Fig. 17) is located in the pump housing inside the bell housing of the transmission case.
The oil pump consists of an inner and outer gear, a
housing, and a cover that also serves as the reaction
shaft support.
Fig. 17 Oil Pump Assembly
1
2
3
4
5
6
7
–
–
–
–
–
–
–
OIL SEAL
OIL PUMP BODY
VENT
REACTION SHAFT SUPPORT
INNER ROTOR
OUTER ROTOR
“O” RING
OPERATION
As the torque converter rotates, the converter hub
rotates the inner and outer gears. As the gears
rotate, the clearance between the gear teeth
increases in the crescent area, and creates a suction
at the inlet side of the pump. This suction draws
fluid through the pump inlet from the oil pan. As the
clearance between the gear teeth in the crescent area
decreases, it forces pressurized fluid into the pump
outlet and to the valve body.
42RE AUTOMATIC TRANSMISSION
WJ
21 - 17
DESCRIPTION AND OPERATION (Continued)
Fig. 18 Upper Housing Control Valve Locations
1
2
3
4
5
6
7
–
–
–
–
–
–
–
UPPER HOUSING
REGULATOR VALVE
SWITCH VALVE
REGULATOR VALVE SPRING
KICKDOWN VALVE
KICKDOWN DETENT
THROTTLE VALVE AND SPRING
VALVE BODY
DESCRIPTION
The valve body consists of a cast aluminum valve
body, a separator plate, and transfer plate. The valve
body contains valves and check balls that control
fluid delivery to the torque converter clutch, bands,
and frictional clutches. The valve body contains the
following components (Fig. 18), (Fig. 19), (Fig. 20),
and (Fig. 21):
• Regulator valve
• Regulator valve throttle pressure plug
• Line pressure plug and sleeve
• Kickdown valve
• Kickdown limit valve
• 1–2 shift valve
• 1–2 control valve
• 2–3 shift valve
8 – MANUAL VALVE
9 – 1–2 GOVERNOR PLUG
10 – GOVERNOR PLUG COVER
11 – THROTTLE PLUG
12 – 2–3 GOVERNOR PLUG
13 – SHUTTLE VALVE PRIMARY SPRING
• 2–3 governor plug
• 3–4 shift valve
• 3–4 timing valve
• 3–4 quick fill valve
• 3–4 accumulator
• Throttle valve
• Throttle pressure plug
• Switch valve
• Manual valve
• Converter clutch lock-up valve
• Converter clutch lock-up timing Valve
• Shuttle valve
• Shuttle valve throttle plug
• Boost Valve
• 10 check balls
By adjusting the spring pressure acting on the regulator valve, transmission line pressure can be
adjusted.
21 - 18
42RE AUTOMATIC TRANSMISSION
WJ
DESCRIPTION AND OPERATION (Continued)
Fig. 19 Shuttle and Boost Valve Locations
1
2
3
4
5
6
7
–
–
–
–
–
–
–
SPRING
RETAINER
BOOST VALVE
BOOST VALVE PLUG
SPRING GUIDES
E-CLIP
SHUTTLE VALVE SECONDARY SPRING
8 – SHUTTLE VALVE COVER
9 – SHUTTLE VALVE
10 – SHUTTLE VALVE PRIMARY SPRING
11 – GOVERNOR PLUG COVER
12 – THROTTLE PLUG
13 – UPPER HOUSING
14 – BOOST VALVE COVER
42RE AUTOMATIC TRANSMISSION
WJ
DESCRIPTION AND OPERATION (Continued)
Fig. 20 Upper Housing Shift Valve and Pressure Plug Locations
1
2
3
4
5
6
7
–
–
–
–
–
–
–
UPPER HOUSING
1–2 SHIFT VALVE AND SPRING
2–3 SHIFT VALVE AND SPRING
2–3 THROTTLE PLUG
LIMIT VALVE HOUSING
LIMIT VALVE COVER
LIMIT VALVE AND SPRING
8 – RETAINER
9 – 1–2 SHIFT CONTROL VALVE AND SPRING
10 – PRESSURE PLUG COVER
11 – LINE PRESSURE PLUG
12 – PLUG SLEEVE
13 – THROTTLE PRESSURE SPRING AND PLUG
21 - 19
21 - 20
42RE AUTOMATIC TRANSMISSION
WJ
DESCRIPTION AND OPERATION (Continued)
Fig. 21 Lower Housing Shift Valves and Springs
1 – 3-4 ACCUMULATOR HOUSING
2 – 3-4 SHIFT VALVE AND SPRING
3 – PLUG
4 – SPRING RETAINER
5 – CONVERTER CLUTCH VALVE AND SPRING
6 – CONVERTER CLUTCH TIMING VALVE AND SPRING
7 – OVERDRIVE SEPARATOR PLATE
8 – CASE CONNECTOR
9 – CONVERTER CLUTCH SOLENOID
10 – OVERDRIVE SOLENOID
11
12
13
14
15
16
17
18
19
20
–
–
–
–
–
–
–
–
–
–
TIMING VALVE COVER
PLUG
3-4 TIMING VALVE AND SPRING
LOWER HOUSING
ACCUMULATOR END PLATE
3-4 ACCUMULATOR PISTON AND SPRING
E-CLIP
3-4 QUICK FILL SPRING AND VALVE
SOLENOID GASKET
HARNESS
42RE AUTOMATIC TRANSMISSION
WJ
21 - 21
DESCRIPTION AND OPERATION (Continued)
Fig. 22 Regulator Valve in Park Position
OPERATION
NOTE: Refer to the Hydraulic Schematics for a
visual aid in determining valve location, operation
and design.
REGULATOR VALVE
The pressure regulator valve is needed to control
the hydraulic pressure within the system and reduce
the amount of heat produced in the fluid. The pressure regulator valve is located in the valve body near
the manual valve. The pressure regulator valve train
controls the maximum pressure in the lines by
metering the dumping of fluid back into the sump.
Regulated pressure is referred to as “line pressure.”
The regulator valve (Fig. 22) has a spring on one
end that pushes the valve to the left. This closes a
dump (vent) that is used to lower pressure. The closing of the dump will cause the oil pressure to
increase. Oil pressure on the opposite end of the
valve pushes the valve to the right, opening the
dump and lowering oil pressure. The result is spring
pressure working against oil pressure to maintain
the oil at specific pressures. With the engine running, fluid flows from the pump to the pressure regulator valve, manual valve, and the interconnected
circuits. As fluid is sent through passages to the regulator valve, the pressure pushes the valve to the
right against the large spring. It is also sent to the
reaction areas on the left side of the throttle pressure
plug and the line pressure plug. With the gear selector in the park position, fluid recirculates through
the regulator and manual valves back to the sump.
21 - 22
42RE AUTOMATIC TRANSMISSION
WJ
DESCRIPTION AND OPERATION (Continued)
Fig. 23 Regulator Valve in Neutral Position
Meanwhile, the torque converter is filled slowly. In
all other gear positions (Fig. 23), fluid flows between
two right side lands to the switch valve and torque
converter. At low pump speeds, the flow is controlled
by the pressure valve groove to reduce pressure to
the torque converter. After the torque converter and
switch valve fill with fluid, the switch valve becomes
the controlling metering device for torque converter
pressure. The regulator valve then begins to control
the line pressure for the other transmission circuits.
The balance of the fluid pressure pushing the valve
to the right and the spring pressure pushing to the
left determines the size of the metering passage at
land #2 (land #1 being at the far right of the valve in
the diagram). As fluid leaks past the land, it moves
into a groove connected to the filter or sump. As the
land meters the fluid to the sump, it causes the pressure to reduce and the spring decreases the size of
the metering passage. When the size of the metering
passage is reduced, the pressure rises again and the
size of the land is increased again. Pressure is regulated by this constant balance of hydraulic and
spring pressure.
42RE AUTOMATIC TRANSMISSION
WJ
21 - 23
DESCRIPTION AND OPERATION (Continued)
Fig. 24 Regulator Valve in Drive Position
The metering at land #2 establishes the line pressure throughout the transmission. It is varied according to changes in throttle position, engine speed, and
transmission condition within a range of 57–94 psi
(except in reverse) (Fig. 24). The regulated line pressure in reverse (Fig. 25) is held at much higher pressures than in the other gear positions: 145–280 psi.
The higher pressure for reverse is achieved by the
manual valve blocking the supply of line pressure to
the reaction area left of land #4. With this pressure
blocked, there is less area for pressure to act on to
balance the force of the spring on the right. This
allows line pressure to push the valve train to the
right, reducing the amount of fluid returned to the
pump’s inlet, increasing line pressure.
21 - 24
42RE AUTOMATIC TRANSMISSION
DESCRIPTION AND OPERATION (Continued)
Fig. 25 Regulator Valve in Reverse Position
WJ
42RE AUTOMATIC TRANSMISSION
WJ
21 - 25
DESCRIPTION AND OPERATION (Continued)
Fig. 26 Kickdown Valve–Wide Open Throttle
KICKDOWN VALVE
When the throttle valve is as far over to the left as
it can go, the maximum line pressure possible will
enter the throttle pressure circuit. In this case, throttle pressure will equal line pressure. With the kickdown valve (Fig. 26) pushed into the bore as far as it
will go, fluid initially flows through the annular
groove of the 2–3 shift valve (which will be in the
direct drive position to the right).
After passing the annular groove, the fluid is
routed to the spring end of the 2–3 shift valve. Fluid
pressure reacting on the area of land #1 overcomes
governor pressure, downshifting the 2–3 shift valve
into the kickdown, or second gear stage of operation.
The valve is held in the kickdown position by throttle
pressure routed from a seated check ball (#2). Again,
if vehicle speed is low enough, throttle pressure will
also push the 1–2 shift valve left to seat its governor
plug, and downshift to drive breakaway.
21 - 26
42RE AUTOMATIC TRANSMISSION
WJ
DESCRIPTION AND OPERATION (Continued)
KICKDOWN LIMIT VALVE
The purpose of the limit valve is to prevent a 3–2
downshift at higher speeds when a part–throttle
downshift is not desirable. At these higher speeds
only a full throttle 3–2 downshift will occur. At low
road speeds (Fig. 27) the limit valve does not come
into play and does not affect the downshifts. As the
vehicle’s speed increases (Fig. 28), the governor pressure also increases. The increased governor pressure
acts on the reaction area of the bottom land of the
limit valve overcoming the spring force trying to
push the valve toward the bottom of its bore. This
pushes the valve upward against the spring and bottoms the valve against the top of the housing. With
the valve bottomed against the housing, the throttle
pressure supplied to the valve will be closed off by
the bottom land of the limit valve. When the supply
of throttle pressure has been shut off, the 3–2 part
throttle downshift plug becomes inoperative, because
no pressure is acting on its reaction area.
1–2 SHIFT VALVE
The 1–2 shift valve assembly (Fig. 29), or mechanism, consists of: the 1–2 shift valve, governor plug,
and a spring on the end of the valve. After the manual valve has been placed into a forward gear range,
line pressure is directed to the 1–2 shift valve. As the
throttle is depressed, throttle pressure is applied to
the right side of the 1–2 shift valve assembly. With
throttle pressure applied to the right side of the
valve, there is now both spring pressure and throttle
pressure acting on the valve, holding it against the
governor plug. As the vehicle begins to move and
build speed, governor pressure is created and is
applied to the left of the valve at the governor plug.
Fig. 27 Kickdown Limit Valve-Low Speeds
Fig. 28 Kickdown Limit Valve-High Speeds
42RE AUTOMATIC TRANSMISSION
WJ
21 - 27
DESCRIPTION AND OPERATION (Continued)
Fig. 29 1–2 Shift Valve-Before Shift
When governor pressure builds to a point where it
can overcome the combined force of the spring and
throttle pressure on the other side of the valve, the
valve will begin to move over to the right. As the
valve moves to the right, the middle land of the valve
will close off the circuit supplying the throttle pressure to the right side of the valve. When the throttle
pressure is closed off, the valve will move even farther to the right, allowing line pressure to enter
another circuit and energize the front servo, applying
the front band (Fig. 30).
The governor plug serves a dual purpose:
• It allows the shift valves to move either left or
right, allowing both upshifts and downshifts.
• When in a manual selection position, it will be
hydraulically “blocked” into position so no upshift can
occur.
Fig. 30 1–2 Shift Valve-After Shift
21 - 28
42RE AUTOMATIC TRANSMISSION
WJ
DESCRIPTION AND OPERATION (Continued)
Fig. 31 1–2 Shift Control Valve
The physical blocking of the upshift while in the
manual “1” position is accomplished by the directing
of line pressure between both lands of the governor
plug. The line pressure reacts against the larger land
of the plug, pushing the plug back against the end
plate overcoming governor pressure. With the combination of the line pressure and spring pressure, the
valve cannot move, preventing any upshift.
1–2 SHIFT CONTROL VALVE
It contains a valve with four lands and a spring. It
is used as both a “relay” and “balanced” valve.
The valve has two specific operations (Fig. 31):
• Aid in quality of the 1–2 upshift.
• Aid in the quality and timing of the 3–2 kickdown ranges.
When the manual valve is set to the Drive position
and the transmission is in the first or second gear
range, 1–2 shift control or “modulated throttle pressure” is supplied to the middle of the accumulator
piston by the 1–2 shift control valve. During the 1–2
upshift, this pressure is used to control the kickdown
servo apply pressure that is needed to apply the kickdown and accumulator pistons. Thus, the 1–2 shift
point is “cushioned” and the quality is improved.
During a WOT kickdown, kickdown pressure is
applied between the kickdown valve and the 1–2
shift control valve. This additional pressure is
directed to the 1–2 shift control’s spring cavity, adding to the spring load on the valve. The result of this
increased “modulated” throttle pressure is a firmer
WOT upshift.
42RE AUTOMATIC TRANSMISSION
WJ
21 - 29
DESCRIPTION AND OPERATION (Continued)
Fig. 32 2–3 Shift Valve-Before Shift
2–3 SHIFT VALVE
The 2–3 shift valve mechanism (Fig. 32) consists of
the 2–3 shift valve, governor plug and spring, and a
throttle plug. After the 1–2 shift valve has completed
its operation and applied the front band, line pressure is directed to the 2–3 shift valve through the
connecting passages from the 1–2 shift valve. The
line pressure will then dead–end at land #2 until the
2–3 valve is ready to make its shift. Now that the
vehicle is in motion and under acceleration, there is
throttle pressure being applied to the spring side of
the valve and between lands #3 and #4.
As vehicle speed increases, governor pressure
increases proportionately, until it becomes great
enough to overcome the combined throttle and spring
pressure on the right side of the valve. When this
happens, the governor plug is forced against the shift
valve moving it to the right. The shift valve causes
land #4 to close the passage supplying throttle pressure to the 2–3 shift valve. Without throttle pressure
present in the circuit now, the governor plug will
push the valve over far enough to bottom the valve in
its bore. This allows land #2 to direct line pressure to
the front clutch.
21 - 30
42RE AUTOMATIC TRANSMISSION
DESCRIPTION AND OPERATION (Continued)
Fig. 33 2–3 Shift Valve-After Shift
After the shift (Fig. 33), line pressure is directed to
the land between the shift valve and the governor
plug, and to the release side of the kickdown servo.
This releases the front band and applies the front
clutch, shifting into third gear or direct drive. The
rear clutch remains applied, as it has been in the
other gears. During a manual “1” or manual “2” gear
selection, line pressure is sent between the two lands
of the 2–3 governor plug. This line pressure at the
governor plug locks the shift valve into the second
gear position, preventing an upshift into direct drive.
The theory for the blocking of the valve is the same
as that of the 1–2 shift valve.
WJ
42RE AUTOMATIC TRANSMISSION
WJ
DESCRIPTION AND OPERATION (Continued)
3–4 SHIFT VALVE
The PCM energizes the overdrive solenoid during
the 3-4 upshift (Fig. 34). This causes the solenoid
check ball to close the vent port allowing line pressure from the 2-3 shift valve to act directly on the 3-4
upshift valve. Line pressure on the 3-4 shift valve
overcomes valve spring pressure moving the valve to
the upshift position (Fig. 35). This action exposes the
feed passages to the 3-4 timing valve, 3-4 quick fill
valve, 3-4 accumulator, and ultimately to the overdrive piston.
Fig. 35 3–4 Shift Valve After Shift
Fig. 34 3–4 Shift Valve Before Shift
21 - 31
21 - 32
42RE AUTOMATIC TRANSMISSION
WJ
DESCRIPTION AND OPERATION (Continued)
3–4 TIMING VALVE
The 3-4 timing valve is moved by line pressure
coming through the 3-4 shift valve (Fig. 36). The timing valve holds the 2-3 shift valve in an upshift position. The purpose is to prevent the 2-3 valve from up
or downshifting before the 3-4 valve (Fig. 37).
Fig. 37 3–4 Timing Valve Allowing 3–2 Shift
Fig. 36 3–4 Timing Valve Allowing 4–3 Shift
42RE AUTOMATIC TRANSMISSION
WJ
DESCRIPTION AND OPERATION (Continued)
3–4 QUICK FILL VALVE
The 3-4 quick fill valve provides faster engagement
of the overdrive clutch during 3-4 upshifts. The valve
temporarily bypasses the clutch piston feed orifice at
the start of a 3-4 upshift (Fig. 39). This exposes a
larger passage into the piston retainer resulting in a
much faster clutch fill and apply sequence. The quick
fill valve does not bypass the regular clutch feed orifice throughout the 3-4 upshift. Instead, once a predetermined pressure develops within the clutch, the
valve closes the bypass. Clutch fill is then completed
through the regular feed orifice.
Fig. 39 3–4 Quick Fill Valve After Shift
Fig. 38 3–4 Quick Fill Valve Before Shift
21 - 33
21 - 34
42RE AUTOMATIC TRANSMISSION
WJ
DESCRIPTION AND OPERATION (Continued)
Fig. 40 Throttle Valve
THROTTLE VALVE
In all gear positions the throttle valve (Fig. 40) is
being supplied with line pressure. The throttle valve
meters and reduces the line pressure that now
becomes throttle pressure. The throttle valve is
moved by a spring and the kickdown valve, which is
mechanically connected to the throttle. The larger
the throttle opening, the higher the throttle pressure
(to a maximum of line pressure). The smaller the
throttle opening, the lower the throttle pressure (to a
minimum of zero at idle). As engine speed increases,
the increase in pump speed increases pump output.
The increase in pressure and volume must be regulated to maintain the balance within the transmission. To do this, throttle pressure is routed to the
reaction area on the right side of the throttle pressure plug (in the regulator valve).
The higher engine speed and line pressure would
open the vent too far and reduce line pressure too
much. Throttle pressure, which increases with engine
speed (throttle opening), is used to oppose the movement of the pressure valve to help control the metering passage at the vent. The throttle pressure is
combined with spring pressure to reduce the force of
the throttle pressure plug on the pressure valve. The
larger spring at the right closes the regulator valve
passage and maintains or increases line pressure.
The increased line pressure works against the reaction area of the line pressure plug and the reaction
area left of land #3 simultaneously moves the regulator valve train to the right and controls the metering passage.
The kickdown valve, along with the throttle valve,
serve to delay upshifts until the correct vehicle and
engine speed have been reached. It also controls
downshifts upon driver demand, or increased engine
load. If these valves were not in place, the shift
points would be at the same speed for all throttle
positions. The kickdown valve is actuated by a cam
connected to the throttle. This is accomplished
through either a linkage or a cable. The cam forces
the kickdown valve toward the throttle valve compressing the spring between them and moving the
throttle valve. As the throttle valve land starts to
uncover its port, line pressure is “metered” out into
the circuits and viewed as throttle pressure. This
increased throttle pressure is metered out into the
circuits it is applied to: the 1–2 and 2–3 shift valves.
When the throttle pressure is high enough, a 3–2
downshift will occur. If the vehicle speed is low
enough, a 2–1 downshift will occur.
42RE AUTOMATIC TRANSMISSION
WJ
21 - 35
DESCRIPTION AND OPERATION (Continued)
Fig. 41 Switch Valve-Torque Converter Unlocked
SWITCH VALVE
When the transmission is in Drive Second just
before the TCC application occurs (Fig. 41), the pressure regulator valve is supplying torque converter
pressure to the switch valve. The switch valve directs
this pressure through the transmission input shaft,
into the converter, through the converter, back out
between the input shaft and the reaction shaft, and
back up to the switch valve. From the switch valve,
the fluid pressure is directed to the transmission
cooler, and lubrication pressure returns from the
cooler to lubricate different portions of the transmission.
21 - 36
42RE AUTOMATIC TRANSMISSION
WJ
DESCRIPTION AND OPERATION (Continued)
Fig. 42 Switch Valve-Torque Converter Locked
Once the TCC control valve has moved to the left
(Fig. 42), line pressure is directed to the tip of the
switch valve, forcing the valve to the right. The
switch valve now vents oil from the front of the piston in the torque converter, and supplies line pressure to the (rear) apply side of the torque converter
piston. This pressure differential causes the piston to
apply against the friction material, cutting off any
further flow of line pressure oil. After the switch
valve is shuttled right allowing line pressure to
engage the TCC, torque converter pressure is
directed past the switch valve into the transmission
cooler and lubrication circuits.
42RE AUTOMATIC TRANSMISSION
WJ
21 - 37
DESCRIPTION AND OPERATION (Continued)
Fig. 43 Manual Valve
MANUAL VALVE
The manual valve (Fig. 43) is a relay valve. The
purpose of the manual valve is to direct fluid to the
correct circuit needed for a specific gear or driving
range. The manual valve, as the name implies, is
manually operated by the driver with a lever located
on the side of the valve body. The valve is connected
mechanically by either a cable or linkage to the gearshift mechanism. The valve is held in each of its
positions by a spring–loaded roller or ball that
engages the “roostercomb” of the manual valve.
CONVERTER CLUTCH LOCK-UP VALVE
The torque converter clutch (TCC) lock-up valve
controls the back (ON) side of the torque converter
clutch. When the PCM energizes the TCC solenoid to
engage the converter clutch piston, pressure is
applied to the TCC lock-up valve which moves to the
right and applies pressure to the torque converter
clutch.
CONVERTER CLUTCH LOCK-UP TIMING VALVE
The torque converter clutch (TCC) lock-up timing
valve is there to block any 4–3 downshift until the
TCC is completely unlocked and the clutch is disengaged.
SHUTTLE VALVE
The assembly is contained in a bore in the valve
body above the shift valves. When the manual valve
is positioned in the Drive range, throttle pressure
acts on the throttle plug of the shuttle valve (Fig. 31)
to move it against a spring, increasing the spring
force on the shuttle valve. During a part or full throttle 1–2 upshift, the throttle plug is bottomed by
throttle pressure, holding the shuttle valve to the
right against governor pressure, and opening a
by–pass circuit. The shuttle valve controls the quality of the kickdown shift by restricting the rate of
fluid discharge from the front clutch and servo
release circuits. During a 3–2 kickdown, fluid discharges through the shuttle by–pass circuit. When
the shuttle valve closes the by–pass circuit, fluid discharge is restricted and controlled for the application
of the front band. During a 2–3 “lift foot” upshift, the
shuttle valve by–passes the restriction to allow full
fluid flow through the by-pass groove for a faster
release of the band.
21 - 38
42RE AUTOMATIC TRANSMISSION
WJ
DESCRIPTION AND OPERATION (Continued)
BOOST VALVE
The boost valve (Fig. 44) provides increased fluid
apply pressure to the overdrive clutch during 3-4
upshifts (Fig. 45), and when accelerating in fourth
gear.
ACCUMULATOR
DESCRIPTION
The accumulator (Fig. 46) is a hydraulic device
that has the sole purpose of cushioning the application of a band or clutch. The accumulator consists of
a dual–land piston and a spring located in a bore in
the transmission case. The 3–4 accumulator is
located in a housing attached to the side of the valve
body (Fig. 47).
Fig. 46 Accumulator
1 – ACCUMULATOR PISTON
2 – PISTON SPRING
Fig. 44 Boost Valve Before Lock-up
Fig. 47 3–4 Accumulator and Housing
Fig. 45 Boost Valve After Lock-up
1
2
3
4
5
–
–
–
–
–
ACCUMULATOR PISTON
3–4 ACCUMULATOR HOUSING
TEFLON SEALS
PISTON SPRING
COVER PLATE AND SCREWS
WJ
42RE AUTOMATIC TRANSMISSION
21 - 39
DESCRIPTION AND OPERATION (Continued)
OPERATION
Both the accumulator and the 3–4 accumulator
function the same. Line pressure is directed between
the lands of the piston (Fig. 48), bottoming it against
the accumulator plate. The accumulator stays in this
position after the transmission is placed into a Drive
position. When the 1–2 upshift occurs (Fig. 49), line
pressure is directed to the large end of the piston and
then to the kickdown servo. As the line pressure
reaches the accumulator, the combination of spring
pressure and line pressure forces the piston away
from the accumulator plate. This causes a balanced
pressure situation, which results in a cushioned band
application. After the kickdown servo has become
immovable, line pressure will finish pushing the
accumulator up into its bore. When the large end of
the accumulator piston is seated in its bore, the band
or clutch is fully applied.
NOTE: The accumulator is shown in the inverted
position for illustrative purposes.
Fig. 49 Accumulator in Second Gear Position
1 – BOTTOM IN BORE
2 – SHUTTLE VALVE
PISTONS
DESCRIPTION
There are several sizes and types of pistons used in
an automatic transmission. Some pistons are used to
apply clutches, while others are used to apply bands.
They all have in common the fact that they are round
or circular in shape, located within a smooth walled
cylinder, which is closed at one end and converts fluid
pressure into mechanical movement. The fluid pressure exerted on the piston is contained within the system through the use of piston rings or seals.
OPERATION
Fig. 48 Accumulator in Neutral and Drive Positions
The principal which makes this operation possible
is known as Pascal’s Law. Pascal’s Law can be stated
as: “Pressure on a confined fluid is transmitted
equally in all directions and acts with equal force on
equal areas.”
21 - 40
42RE AUTOMATIC TRANSMISSION
WJ
DESCRIPTION AND OPERATION (Continued)
PRESSURE
Pressure (Fig. 50) is nothing more than force (lbs.)
divided by area (in. or ft.), or force per unit area.
Given a 100 lb. block and an area of 100 sq. in. on
the floor, the pressure exerted by the block is: 100
lbs. 100 in. or 1 pound per square inch, or PSI as it
is commonly referred to.
course, no pressure will be created if the fluid is not
confined. It will simply “leak” past the piston. There
must be a resistance to flow in order to create pressure. Piston sealing is extremely important in
hydraulic operation. Several kinds of seals are used
to accomplish this within a transmission. These
include but are not limited to O–rings, D–rings, lip
seals, sealing rings, or extremely close tolerances
between the piston and the cylinder wall. The force
exerted is downward (gravity), however, the principle
remains the same no matter which direction is taken.
The pressure created in the fluid is equal to the force
applied, divided by the piston area. If the force is 100
lbs., and the piston area is 10 sq. in., then the pressure created equals 10 PSI. Another interpretation of
Pascal’s Law is that regardless of container shape or
size, the pressure will be maintained throughout, as
long as the fluid is confined. In other words, the
pressure in the fluid is the same everywhere within
the container.
Fig. 50 Force and Pressure Relationship
PRESSURE ON A CONFINED FLUID
Pressure is exerted on a confined fluid (Fig. 51) by
applying a force to some given area in contact with
the fluid. A good example of this is a cylinder filled
with fluid and equipped with a piston that is closely
fitted to the cylinder wall. If a force is applied to the
piston, pressure will be developed in the fluid. Of
Fig. 51 Pressure on a Confined Fluid
42RE AUTOMATIC TRANSMISSION
WJ
21 - 41
DESCRIPTION AND OPERATION (Continued)
FORCE MULTIPLICATION
Using the 10 PSI example used in the illustration
(Fig. 52), a force of 1000 lbs. can be moved with a
force of only 100 lbs. The secret of force multiplication in hydraulic systems is the total fluid contact
area employed. The illustration, (Fig. 52), shows an
area that is ten times larger than the original area.
The pressure created with the smaller 100 lb. input
is 10 PSI. The concept “pressure is the same everywhere” means that the pressure underneath the
larger piston is also 10 PSI. Pressure is equal to the
force applied divided by the contact area. Therefore,
by means of simple algebra, the output force may be
found. This concept is extremely important, as it is
also used in the design and operation of all shift
valves and limiting valves in the valve body, as well
as the pistons, of the transmission, which activate
the clutches and bands. It is nothing more than
using a difference of area to create a difference in
pressure to move an object.
PISTON TRAVEL
The relationship between hydraulic lever and a
mechanical lever is the same. With a mechanical
lever it’s a weight–to–distance output rather than a
pressure–to–area output. Using the same forces and
areas as in the previous example, the smaller piston
(Fig. 53) has to move ten times the distance required
to move the larger piston one inch. Therefore, for
every inch the larger piston moves, the smaller piston moves ten inches. This principle is true in other
instances also. A common garage floor jack is a good
example. To raise a car weighing 2000 lbs., an effort
of only 100 lbs. may be required. For every inch the
car moves upward, the input piston at the jack handle must move 20 inches downward.
Fig. 52 Force Multiplication
Fig. 53 Piston Travel
21 - 42
42RE AUTOMATIC TRANSMISSION
WJ
DESCRIPTION AND OPERATION (Continued)
Fig. 54 Front Clutch
1
2
3
4
5
6
–
–
–
–
–
–
RETAINER HUB SEAL
CLUTCH PISTON
PISTON SPRING
SPRING RETAINER SNAP RING
CLUTCH DISCS
PRESSURE PLATE
FRONT CLUTCH
DESCRIPTION
The front clutch assembly (Fig. 54) is composed of
the front clutch retainer, pressure plate, four clutch
plates, four driving discs, piston, piston return
spring, return spring retainer, and snap rings. The
front clutch is the forwardmost component in the
transmission geartrain and is directly behind the oil
pump and is considered a driving component.
NOTE: The number of discs and plates may vary
with each engine and vehicle combination.
OPERATION
To apply the clutch, pressure is applied between
the clutch retainer and piston. The fluid pressure is
provided by the oil pump, transferred through the
control valves and passageways, and enters the
clutch through the hub of the reaction shaft support.
7 – SNAP RING (WAVED)
8 – CLUTCH PLATES
9 – SPRING RETAINER
10 – PISTON SEAL
11 – FRONT CLUTCH RETAINER
With pressure applied between the clutch retainer
and piston, the piston moves away from the clutch
retainer and compresses the clutch pack. This action
applies the clutch pack, allowing torque to flow
through the input shaft into the driving discs, and
into the clutch plates and pressure plate that are
lugged to the clutch retainer. The waved snap ring is
used to cushion the application of the clutch pack. In
some transmissions, the snap ring is selective and
used to adjust clutch pack clearance.
When pressure is released from the piston, the
spring returns the piston to its fully released position
and disengages the clutch. The release spring also
helps to cushion the application of the clutch assembly. When the clutch is in the process of being
released by the release spring, fluid flows through a
vent and one–way ball–check–valve located in the
clutch retainer. The check–valve is needed to eliminate the possibility of plate drag caused by centrifugal force acting on the residual fluid trapped in the
clutch piston retainer.
42RE AUTOMATIC TRANSMISSION
WJ
21 - 43
DESCRIPTION AND OPERATION (Continued)
Fig. 55 Rear Clutch
1
2
3
4
5
6
7
8
9
–
–
–
–
–
–
–
–
–
PISTON SPRING
REAR CLUTCH PISTON
CLUTCH PISTON SEALS
OUTPUT SHAFT THRUST WASHER (METAL)
INPUT SHAFT SNAP RING
REAR CLUTCH RETAINER
INPUT SHAFT
REAR CLUTCH THRUST WASHER (FIBER)
CLUTCH PACK SNAP RING (SELECTIVE)
REAR CLUTCH
DESCRIPTION
The rear clutch assembly (Fig. 55) is composed of
the rear clutch retainer, pressure plate, three clutch
plates, four driving discs, piston, Belleville spring,
and snap rings. The Belleville spring acts as a lever
to multiply the force applied on to it by the apply piston. The increased apply force on the rear clutch
pack, in comparison to the front clutch pack, is
needed to hold against the greater torque load
imposed onto the rear pack. The rear clutch is
directly behind the front clutch and is considered a
driving component.
NOTE: The number of discs and plates may vary
with each engine and vehicle combination.
10
11
12
13
14
15
16
17
–
–
–
–
–
–
–
–
TOP PRESSURE PLATE
CLUTCH DISCS (4)
BOTTOM PRESSURE PLATE
WAVE SPRING
CLUTCH PLATES (3)
RETAINER SEAL RING
SHAFT REAR SEAL RING (PLASTIC)
SHAFT FRONT SEAL RING (TEFLON)
OPERATION
To apply the clutch, pressure is applied between
the clutch retainer and piston. The fluid pressure is
provided by the oil pump, transferred through the
control valves and passageways, and enters the
clutch through the hub of the reaction shaft support.
With pressure applied between the clutch retainer
and piston, the piston moves away from the clutch
retainer and compresses the clutch pack. This action
applies the clutch pack, allowing torque to flow
through the input shaft into the driving discs, and
into the clutch plates and pressure plate that are
lugged to the clutch retainer. The waved snap ring is
used to cushion the application of the clutch pack. In
some transmissions, the snap ring is selective and
used to adjust clutch pack clearance.
21 - 44
42RE AUTOMATIC TRANSMISSION
WJ
DESCRIPTION AND OPERATION (Continued)
Fig. 56 Overdrive Clutch
1 – REACTION PLATE
When pressure is released from the piston, the
spring returns the piston to its fully released position
and disengages the clutch. The release spring also
helps to cushion the application of the clutch assembly. When the clutch is in the process of being
released by the release spring, fluid flows through a
vent and one–way ball–check–valve located in the
clutch retainer. The check–valve is needed to eliminate the possibility of plate drag caused by centrifugal force acting on the residual fluid trapped in the
clutch piston retainer.
OVERDRIVE CLUTCH
DESCRIPTION
The overdrive clutch (Fig. 56) is composed of the
pressure plate, two clutch plates, three holding discs,
overdrive piston retainer, piston, piston spacer, and
snap rings. The overdrive clutch is the forwardmost
component in the transmission overdrive unit and is
considered a holding component. The overdrive piston retainer, piston, and piston spacer are located on
the rear of the main transmission case.
NOTE: The number of discs and plates may vary
with each engine and vehicle combination.
OPERATION
To apply the clutch, pressure is applied between
the piston retainer and piston. The fluid pressure is
2 – PRESSURE PLATE
provided by the oil pump, transferred through the
control valves and passageways, and enters the
clutch through passages at the lower rear portion of
the valve body area. With pressure applied between
the piston retainer and piston, the piston moves
away from the piston retainer and compresses the
clutch pack. This action applies the clutch pack,
allowing torque to flow through the intermediate
shaft into the overdrive planetary gear set. The overdrive clutch discs are attached to the overdrive clutch
hub while the overdrive clutch plates, reaction plate,
and pressure plate are lugged to the overdrive housing. This allows the intermediate shaft to transfer
the engine torque to the planetary gear and overrunning clutch. This drives the planetary gear inside the
annulus, which is attached to the overdrive clutch
drum and output shaft, creating the desired gear
ratio. The waved snap ring is used to cushion the
application of the clutch pack.
42RE AUTOMATIC TRANSMISSION
WJ
21 - 45
DESCRIPTION AND OPERATION (Continued)
OVERRUNNING CLUTCH
DESCRIPTION
The overrunning clutch (Fig. 57) consists of an
inner race, an outer race (or cam), rollers and
springs, and the spring retainer. The number of rollers and springs depends on what transmission and
which overrunning clutch is being dealt with.
Fig. 58 Planetary Gearset
1
2
3
4
Fig. 57 Overrunning Clutch
1
2
3
4
5
–
–
–
–
–
OUTER RACE (CAM)
ROLLER
SPRING
SPRING RETAINER
INNER RACE (HUB)
–
–
–
–
ANNULUS GEAR
SUN GEAR
PLANET CARRIER
PLANET PINIONS (4)
• The sun gear which is at the center of the system.
• The planet carrier with planet pinion gears
which are free to rotate on their own shafts and are
in mesh with the sun gear.
• The annulus gear, which rotates around and is
in mesh with the planet pinion gears.
NOTE: The number of pinion gears does not affect
the gear ratio, only the duty rating.
OPERATION
As the inner race is rotated in a clockwise direction
(as viewed from the front of the transmission), the
race causes the rollers to roll toward the springs,
causing them to compress against their retainer. The
compression of the springs increases the clearance
between the rollers and cam. This increased clearance between the rollers and cam results in a freewheeling condition. When the inner race attempts to
rotate counterclockwise, the action causes the rollers
to roll in the same direction as the race, aided by the
pushing of the springs. As the rollers try to move in
the same direction as the inner race, they are
wedged between the inner and outer races due to the
design of the cam. In this condition, the clutch is
locked and acts as one unit.
OPERATION
With any given planetary gearset, several conditions must be met for power to be able to flow:
• One member must be held.
• Another member must be driven or used as an
input.
• The third member may be used as an output for
power flow.
• For direct drive to occur, two gear members in
the front planetary gearset must be driven.
NOTE: Gear ratios are dependent on the number of
teeth on the annulus and sun gears.
BANDS
PLANETARY GEARSET
DESCRIPTION
DESCRIPTION
The planetary gearsets (Fig. 58) are designated as
the front, rear, and overdrive planetary gear assemblies and located in such order. A simple planetary
gearset consists of three main members:
KICKDOWN (FRONT) BAND
The kickdown, or “front”, band (Fig. 59) holds the
common sun gear of the planetary gear sets. The
front (kickdown) band is made of steel, and faced on
its inner circumference with a friction–type lining.
21 - 46
42RE AUTOMATIC TRANSMISSION
WJ
DESCRIPTION AND OPERATION (Continued)
One end of the band is anchored to the transmission
case, and the other is acted on with a pushing force
by a servo piston. The front band is a single–wrap
design (the band does not completely encompass/
wrap the drum that it holds).
OPERATION
KICKDOWN (FRONT) BAND
The kickdown band holds the common sun gear of
the planetary gear sets by applying and holding the
front clutch retainer, which is splined to the sun gear
driving shell, and in turn splined directly to the sun
gear. The application of the band by the servo is typically done by an apply lever and link bar.
LOW/REVERSE (REAR) BAND
The rear band holds the rear planet carrier stationary by being mounted around and applied to the
low/reverse drum.
SERVOS
DESCRIPTION
Fig. 59 Front Band
1 – FRONT BAND
2 – TRANSMISSION HOUSING
KICKDOWN (FRONT) SERVO
The kickdown servo (Fig. 61) consists of a two–land
piston with an inner piston, a piston rod and guide,
and a return spring. The dual–land piston uses seal
rings on its outer diameters and an O–ring for the
inner piston.
LOW/REVERSE (REAR) BAND
The low/reverse band, or “rear”, band (Fig. 60) is
similar in appearance and operation to the front
band.
Fig. 61 Front Servo
1
2
3
4
5
6
7
Fig. 60 Rear Band
1 – REAR BAND
2 – BAND LINK
–
–
–
–
–
–
–
VENT
INNER PISTON
PISTON
SPRING
RELEASE PRESSURE
APPLY PRESSURE
PISTON ROD
LOW/REVERSE (REAR) SERVO
The rear (low/reverse) servo consists of a single
stage or diameter piston and a spring loaded plug.
The spring is used to cushion the application of the
rear (low/reverse) band.
WJ
42RE AUTOMATIC TRANSMISSION
21 - 47
DESCRIPTION AND OPERATION (Continued)
OPERATION
KICKDOWN (FRONT) SERVO
The application of the piston is accomplished by
applying pressure between the two lands of the piston. The pressure acts against the larger lower land
to push the piston downward, allowing the piston rod
to extend though its guide against the apply lever.
Release of the servo at the 2–3 upshift is accomplished by a combination of spring and line pressure,
acting on the bottom of the larger land of the piston.
The small piston is used to cushion the application of
the band by bleeding oil through a small orifice in
the larger piston. The release timing of the kickdown
servo is very important to obtain a smooth but firm
shift. The release has to be very quick, just as the
front clutch application is taking place. Otherwise,
engine runaway or a shift hesitation will occur. To
accomplish this, the band retains its holding capacity
until the front clutch is applied, giving a small
amount of overlap between them.
fourth gear range occurs only after the transmission
has completed the shift into D third gear range. No
further movement of the shift mechanism is required
to complete the 3-4 shift.
The fourth gear upshift occurs automatically when
the overdrive selector switch is in the ON position.
No upshift to fourth gear will occur if any of the following are true:
• The transmission fluid temperature is below 10°
C (50° F) or above 121° C (250° F).
• The shift to third is not yet complete.
• Vehicle speed is too low for the 3–4 shift to
occur.
• Battery temperature is below –5° C (23° F).
CONVERTER DRAINBACK VALVE
DESCRIPTION
The drainback valve is located in the transmission
cooler outlet (pressure) line.
OPERATION
LOW/REVERSE (REAR) SERVO
While in the de-energized state (no pressure
applied), the piston is held up in its bore by the piston spring. The plug is held down in its bore, in the
piston, by the plug spring. When pressure is applied
to the top of the piston, the plug is forced down in its
bore, taking up any clearance. As the piston moves, it
causes the plug spring to compress, and the piston
moves down over the plug. The piston continues to
move down until it hits the shoulder of the plug and
fully applies the band. The period of time from the
initial application, until the piston is against the
shoulder of the plug, represents a reduced shocking
of the band that cushions the shift.
The valve prevents fluid from draining from the
converter into the cooler and lines when the vehicle
is shut down for lengthy periods. Production valves
have a hose nipple at one end, while the opposite end
is threaded for a flare fitting. All valves have an
arrow (or similar mark) to indicate direction of flow
through the valve.
GEARSHIFT MECHANISM
OPERATION
DESCRIPTION
The gear shift mechanism provides six shift positions which are:
• Park (P)
• Reverse (R)
• Neutral (N)
• Drive (D)
• Manual second (2)
• Manual low (1)
OPERATION
Manual low (1) range provides first gear only.
Overrun braking is also provided in this range. Manual second (2) range provides first and second gear
only.
Drive range provides first, second third and overdrive fourth gear ranges. The shift into overdrive
POWERTRAIN CONTROL MODULE (PCM)
DESCRIPTION
The Powertrain Control Module (PCM) is located
in the engine compartment (Fig. 62). The PCM is
referred to as JTEC.
(1) Also refer to Modes of Operation.
The PCM operates the fuel system. The PCM is a
pre-programmed, triple microprocessor digital computer. It regulates ignition timing, air-fuel ratio,
emission control devices, charging system, certain
transmission features, speed control, air conditioning
compressor clutch engagement and idle speed. The
PCM can adapt its programming to meet changing
operating conditions.
The PCM receives input signals from various
switches and sensors. Based on these inputs, the
PCM regulates various engine and vehicle operations
through different system components. These components are referred to as Powertrain Control Module
(PCM) Outputs. The sensors and switches that provide inputs to the PCM are considered Powertrain
Control Module (PCM) Inputs.
21 - 48
42RE AUTOMATIC TRANSMISSION
WJ
DESCRIPTION AND OPERATION (Continued)
• Generator (battery voltage) output
• Ignition circuit sense (ignition switch in on/off/
crank/run position)
• Intake manifold air temperature sensor
• Leak detection pump (switch) sense (if equipped)
• Manifold absolute pressure (MAP) sensor
• Oil pressure
• Overdrive/override switch
• Oxygen sensors
• Park/neutral switch (auto. trans. only)
• Power ground
• Sensor return
• Signal ground
• Speed control multiplexed single wire input
• Throttle position sensor
• Transmission governor pressure sensor
• Transmission temperature sensor
• Vehicle speed (from ABS module)
Fig. 62 PCM Location
1 – PCM
2 – COOLANT TANK
The PCM adjusts ignition timing based upon
inputs it receives from sensors that react to: engine
rpm, manifold absolute pressure, engine coolant temperature, throttle position, transmission gear selection (automatic transmission), vehicle speed and the
brake switch.
The PCM adjusts idle speed based on inputs it
receives from sensors that react to: throttle position,
vehicle speed, transmission gear selection, engine
coolant temperature and from inputs it receives from
the air conditioning clutch switch and brake switch.
Based on inputs that it receives, the PCM adjusts
ignition coil dwell. The PCM also adjusts the generator charge rate through control of the generator
field and provides speed control operation.
NOTE: PCM Inputs:
•
•
•
•
•
•
•
•
•
•
•
•
•
A/C request
Auto shutdown (ASD) sense
Battery temperature
Battery voltage
Brake switch
J1850 bus circuits
Camshaft position sensor signal
Crankshaft position sensor
Data link connections for DRB scan tool
Engine coolant temperature sensor
Five volts (primary)
Five volts (secondary)
Fuel level
NOTE: PCM Outputs:
• A/C clutch relay
• Auto shutdown (ASD) relay
• J1850 (+/-) circuits for: speedometer, voltmeter,
fuel gauge, oil pressure gauge/lamp, engine temp.
gauge and speed control warn. lamp
• Data link connection for DRB scan tool
• EGR valve control solenoid (if equipped)
• EVAP canister purge solenoid
• Fuel injectors
• Fuel pump relay
• Generator field driver (-)
• Generator field driver (+)
• Generator lamp (if equipped)
• Idle air control (IAC) motor
• Ignition coil
• Leak detection pump
• Malfunction indicator lamp (Check engine lamp).
Driven through J1850 circuits.
• Overdrive indicator lamp (if equipped). Driven
through J1850 circuits.
• Oxygen sensor heater relays (if equipped).
• Radiator cooling fan relay (pulse width modulated)
• Speed control source
• Speed control vacuum solenoid
• Speed control vent solenoid
• Tachometer (if equipped). Driven through J1850
circuits.
• Transmission convertor clutch circuit
• Transmission 3–4 shift solenoid
• Transmission relay
• Transmission temperature lamp (if equipped)
• Transmission variable force solenoid
42RE AUTOMATIC TRANSMISSION
WJ
21 - 49
DESCRIPTION AND OPERATION (Continued)
ELECTRONIC GOVERNOR
DESCRIPTION
Governor pressure is controlled electronically. Components used for governor pressure control include:
• Governor body
• Valve body transfer plate
• Governor pressure solenoid valve
• Governor pressure sensor
• Fluid temperature thermistor
• Throttle position sensor (TPS)
• Transmission speed sensor
• Powertrain control module (PCM)
GOVERNOR PRESSURE SOLENOID VALVE
The solenoid valve is a duty-cycle solenoid which
regulates the governor pressure needed for upshifts
and downshifts. It is an electro-hydraulic device
located in the governor body on the valve body transfer plate (Fig. 63).
Fig. 64 Governor Pressure Sensor
1 – GOVERNOR BODY
2 – GOVERNOR PRESSURE SENSOR/TRANSMISSION FLUID
TEMPERATURE THERMISTOR
The thermistor is part of the governor pressure
sensor assembly and is immersed in transmission
fluid at all times.
TRANSMISSION SPEED SENSOR
The speed sensor (Fig. 65) is located in the overdrive gear case. The sensor is positioned over the
park gear and monitors transmission output shaft
rotating speed.
Fig. 63 Governor Pressure Solenoid Valve
1 – SOLENOID FILTER
2 – GOVERNOR PRESSURE SOLENOID
GOVERNOR PRESSURE SENSOR
The governor pressure sensor measures output
pressure of the governor pressure solenoid valve (Fig.
64).
GOVERNOR BODY AND TRANSFER PLATE
The transfer plate is designed to supply transmission line pressure to the governor pressure solenoid
valve and to return governor pressure.
The governor pressure solenoid valve is mounted in
the governor body. The body is bolted to the lower
side of the transfer plate (Fig. 64).
TRANSMISSION FLUID TEMPERATURE THERMISTOR
Transmission fluid temperature readings are supplied to the transmission control module by the thermistor. The temperature readings are used to control
engagement of the fourth gear overdrive clutch, the
converter clutch, and governor pressure. Normal
resistance value for the thermistor at room temperature is approximately 1000 ohms.
Fig. 65 Transmission Output Speed Sensor
1 – TRANSMISSION OUTPUT SHAFT SPEED SENSOR
2 – SEAL
OPERATION
Compensation is required for performance variations of two of the input devices. Though the slope of
the transfer functions is tightly controlled, offset may
vary due to various environmental factors or manufacturing tolerances.
The pressure transducer is affected by barometric
pressure as well as temperature. Calibration of the
zero pressure offset is required to compensate for
shifting output due to these factors.
Normal calibration will be performed when sump
temperature is above 50 degrees F, or in the absence
21 - 50
42RE AUTOMATIC TRANSMISSION
WJ
DESCRIPTION AND OPERATION (Continued)
of sump temperature data, after the first 10 minutes
of vehicle operation. Calibration of the pressure
transducer offset occurs each time the output shaft
speed falls below 200 RPM. Calibration shall be
repeated each 3 seconds the output shaft speed is
below 200 RPM. A.5 second pulse of 95% duty cycle
is applied to the governor pressure solenoid valve
and the transducer output is read during this pulse.
Averaging of the transducer signal is necessary to
reject electrical noise.
Under cold conditions (below 50 degrees F sump),
the governor pressure solenoid valve response may
be too slow to guarantee 0 psi during the .5 second
calibration pulse. Calibration pulses are continued
during this period, however the transducer output
valves are discarded. Transducer offset must be read
at key-on, under conditions which promote a stable
reading. This value is retained and becomes the offset during the “cold” period of operation.
GOVERNOR PRESSURE SOLENOID VALVE
The inlet side of the solenoid valve is exposed to
normal transmission line pressure. The outlet side of
the valve leads to the valve body governor circuit.
The solenoid valve regulates line pressure to produce governor pressure. The average current supplied to the solenoid controls governor pressure. One
amp current produces zero kPa/psi governor pressure. Zero amps sets the maximum governor pressure.
The powertrain control module (PCM) turns on the
trans control relay which supplies electrical power to
the solenoid valve. Operating voltage is 12 volts
(DC). The PCM controls the ground side of the solenoid using the governor pressure solenoid control circuit.
GOVERNOR PRESSURE SENSOR
The sensor output signal provides the necessary
feedback to the PCM. This feedback is needed to adequately control governor pressure.
GOVERNOR BODY AND TRANSFER PLATE
The transfer plate channels line pressure to the
solenoid valve through the governor body. It also
channels governor pressure from the solenoid valve
to the governor circuit. It is the solenoid valve that
develops the necessary governor pressure.
TRANSMISSION FLUID TEMPERATURE THERMISTOR
The PCM prevents engagement of the converter
clutch and overdrive clutch, when fluid temperature
is below approximately 10°C (50°F).
If fluid temperature exceeds 126°C (260°F), the
PCM causes a 4-3 downshift and engage the converter clutch. Engagement is according to the third
gear converter clutch engagement schedule.
The overdrive OFF lamp in the instrument panel
illuminates when the shift back to third occurs. The
transmission will not allow fourth gear operation
until fluid temperature decreases to approximately
110°C (230°F).
TRANSMISSION SPEED SENSOR
Speed sensor signals are triggered by the park
gear lugs as they rotate past the sensor pickup face.
Input signals from the sensor are sent to the transmission control module for processing. The vehicle
speed sensor also serves as a backup for the transmission speed sensor. Signals from this sensor are
shared with the powertrain control module.
GOVERNOR PRESSURE CURVES
DESCRIPTION
There are four governor pressure curves programmed into the transmission control module. The
different curves allow the control module to adjust
governor pressure for varying conditions. One curve
is used for operation when fluid temperature is at, or
below, –1°C (30°F). A second curve is used when fluid
temperature is at, or above, 10°C (50°F) during normal city or highway driving. A third curve is used
during wide-open throttle operation. The fourth curve
is used when driving with the transfer case in low
range.
OPERATION
LOW TRANSMISSION FLUID TEMPERATURE
When the transmission fluid is cold the conventional governor can delay shifts, resulting in higher
than normal shift speeds and harsh shifts. The electronically controlled low temperature governor pressure curve is higher than normal to make the
transmission shift at normal speeds and sooner. The
PCM uses a temperature sensor in the transmission
oil sump to determine when low temperature governor pressure is needed.
NORMAL OPERATION
Normal operation is refined through the increased
computing power of the PCM and through access to
data on engine operating conditions provided by the
PCM that were not available with the previous
stand-alone electronic module. This facilitated the
development of a load adaptive shift strategy - the
ability to alter the shift schedule in response to vehicle load condition. One manifestation of this capability is grade “hunting” prevention - the ability of the
transmission logic to delay an upshift on a grade if
the engine does not have sufficient power to maintain speed in the higher gear. The 3-2 downshift and
WJ
42RE AUTOMATIC TRANSMISSION
21 - 51
DESCRIPTION AND OPERATION (Continued)
the potential for hunting between gears occurs with a
heavily loaded vehicle or on steep grades. When
hunting occurs, it is very objectionable because shifts
are frequent and accompanied by large changes in
noise and acceleration.
WIDE OPEN THROTTLE OPERATION
In wide-open throttle (WOT) mode, adaptive memory in the PCM assures that up-shifts occur at the
preprogrammed optimum speed. WOT operation is
determined from the throttle position sensor, which
is also a part of the emission control system. The initial setting for the WOT upshift is below the optimum engine speed. As WOT shifts are repeated, the
PCM learns the time required to complete the shifts
by comparing the engine speed when the shifts occur
to the optimum speed. After each shift, the PCM
adjusts the shift point until the optimum speed is
reached. The PCM also considers vehicle loading,
grade and engine performance changes due to high
altitude in determining when to make WOT shifts. It
does this by measuring vehicle and engine acceleration and then factoring in the shift time.
TRANSFER CASE LOW RANGE OPERATION
On four-wheel drive vehicles operating in low
range, the engine can accelerate to its peak more
rapidly than in Normal range, resulting in delayed
shifts and undesirable engine “flare”. The low range
governor pressure curve is also higher than normal
to initiate upshifts sooner. The PCM compares electronic vehicle speed signal used by the speedometer
to the transmission output shaft speed signal to
determine when the transfer case is in low range.
OVERDRIVE OFF SWITCH
DESCRIPTION
The overdrive OFF (control) switch is located in
the shifter handle. The switch is a momentary contact device that signals the PCM to toggle current
status of the overdrive function.
OPERATION
At key-on, overdrive operation is allowed. Pressing
the switch once causes the overdrive OFF mode to be
entered and the overdrive OFF switch lamp to be
illuminated. Pressing the switch a second time
causes normal overdrive operation to be restored and
the overdrive lamp to be turned off. The overdrive
OFF mode defaults to ON after the ignition switch is
cycled OFF and ON. The normal position for the control switch is the ON position. The switch must be in
this position to energize the solenoid and allow a 3-4
upshift. The control switch indicator light illuminates
only when the overdrive switch is turned to the OFF
position, or when illuminated by the transmission
control module.
BRAKE TRANSMISSION SHIFT INTERLOCK
MECHANISM
DESCRIPTION
The Brake Transmission Shifter/Ignition Interlock
(BTSI), is a cable and solenoid operated system. It
interconnects the automatic transmission floor
mounted shifter to the steering column ignition
switch (Fig. 66).
OPERATION
The system locks the shifter into the PARK position. The interlock system is engaged whenever the
ignition switch is in the LOCK or ACCESSORY position. An additional electrically activated feature will
prevent shifting out of the PARK position unless the
brake pedal is depressed at least one-half an inch. A
magnetic holding device in line with the park lock
cable is energized when the ignition is in the RUN
position. When the key is in the RUN position and
the brake pedal is depressed, the shifter is unlocked
and will move into any position. The interlock system
also prevents the ignition switch from being turned
to the LOCK or ACCESSORY position, unless the
shifter is fully locked into the PARK position.
DIAGNOSIS AND TESTING
AUTOMATIC TRANSMISSION DIAGNOSIS
Automatic transmission problems can be a result of
poor engine performance, incorrect fluid level, incorrect linkage or cable adjustment, band or hydraulic
control pressure adjustments, hydraulic system malfunctions or electrical/mechanical component malfunctions. Begin diagnosis by checking the easily
accessible items such as: fluid level and condition,
linkage adjustments and electrical connections. A
road test will determine if further diagnosis is necessary.
EFFECTS OF INCORRECT FLUID LEVEL
A low fluid level allows the pump to take in air
along with the fluid. Air in the fluid will cause fluid
pressures to be low and develop slower than normal.
If the transmission is overfilled, the gears churn the
fluid into foam. This aerates the fluid and causing
the same conditions occurring with a low level. In
either case, air bubbles cause fluid overheating, oxidation and varnish buildup which interferes with
valve, clutch and servo operation. Foaming also
causes fluid expansion which can result in fluid overflow from the transmission vent or fill tube. Fluid
21 - 52
42RE AUTOMATIC TRANSMISSION
WJ
DIAGNOSIS AND TESTING (Continued)
Fig. 66 Ignition Interlock Cable
1 – SHIFT MECHANISM
2 – SHIFTER BTSI LEVER
3 – ADJUSTMENT CLIP
overflow can easily be mistaken for a leak if inspection is not careful.
CAUSES OF BURNT FLUID
Burnt, discolored fluid is a result of overheating
which has two primary causes.
(1) A result of restricted fluid flow through the
main and/or auxiliary cooler. This condition is usually the result of a faulty or improperly installed
drainback valve, a damaged main cooler, or severe
restrictions in the coolers and lines caused by debris
or kinked lines.
(2) Heavy duty operation with a vehicle not properly equipped for this type of operation. Trailer towing or similar high load operation will overheat the
transmission fluid if the vehicle is improperly
equipped. Such vehicles should have an auxiliary
transmission fluid cooler, a heavy duty cooling system, and the engine/axle ratio combination needed to
handle heavy loads.
FLUID CONTAMINATION
Transmission fluid contamination is generally a
result of:
• adding incorrect fluid
4 – STEERING COLUMN ASSEMBLY
5 – INTERLOCK CABLE
• failure to clean dipstick and fill tube when
checking level
• engine coolant entering the fluid
• internal failure that generates debris
• overheat that generates sludge (fluid breakdown)
• failure to reverse flush cooler and lines after
repair
• failure to replace contaminated converter after
repair
The use of non recommended fluids can result in
transmission failure. The usual results are erratic
shifts, slippage, abnormal wear and eventual failure
due to fluid breakdown and sludge formation. Avoid
this condition by using recommended fluids only.
The dipstick cap and fill tube should be wiped
clean before checking fluid level. Dirt, grease and
other foreign material on the cap and tube could fall
into the tube if not removed beforehand. Take the
time to wipe the cap and tube clean before withdrawing the dipstick.
Engine coolant in the transmission fluid is generally caused by a cooler malfunction. The only remedy
is to replace the radiator as the cooler in the radiator
is not a serviceable part. If coolant has circulated
WJ
42RE AUTOMATIC TRANSMISSION
21 - 53
DIAGNOSIS AND TESTING (Continued)
through the transmission for some time, an overhaul
may also be necessary; especially if shift problems
had developed.
The transmission cooler and lines should be
reverse flushed whenever a malfunction generates
sludge and/or debris. The torque converter should
also be replaced at the same time.
Failure to flush the cooler and lines will result in
recontamination. Flushing applies to auxiliary coolers as well. The torque converter should also be
replaced whenever a failure generates sludge and
debris. This is necessary because normal converter
flushing procedures will not remove all contaminants.
PRELIMINARY DIAGNOSIS
Two basic procedures are required. One procedure
for vehicles that are drivable and an alternate procedure for disabled vehicles (will not back up or move
forward).
VEHICLE IS DRIVEABLE
(1) Check for transmission fault codes using DRB
scan tool.
(2) Check fluid level and condition.
(3) Adjust throttle and gearshift linkage if complaint was based on delayed, erratic, or harsh shifts.
(4) Road test and note how transmission upshifts,
downshifts, and engages.
(5) Perform stall test if complaint is based on sluggish acceleration. Or, if abnormal throttle opening is
needed to maintain normal speeds with a properly
tuned engine.
(6) Perform hydraulic pressure test if shift problems were noted during road test.
(7) Perform air-pressure test to check clutch-band
operation.
VEHICLE IS DISABLED
(1) Check fluid level and condition.
(2) Check for broken or disconnected gearshift or
throttle linkage.
(3) Check for cracked, leaking cooler lines, or loose
or missing pressure-port plugs.
(4) Raise and support vehicle on safety stands,
start engine, shift transmission into gear, and note
following:
(a) If propeller shaft turns but wheels do not,
problem is with differential or axle shafts.
(b) If propeller shaft does not turn and transmission is noisy, stop engine. Remove oil pan, and
check for debris. If pan is clear, remove transmission and check for damaged drive plate, converter,
oil pump, or input shaft.
(c) If propeller shaft does not turn and transmission is not noisy, perform hydraulic-pressure test to
determine if problem is hydraulic or mechanical.
PARK/NEUTRAL POSITION SWITCH
The center terminal of the park/neutral position
switch is the starter-circuit terminal. It provides the
ground for the starter solenoid circuit through the
selector lever in PARK and NEUTRAL positions only.
The outer terminals on the switch are for the backup
lamp circuit.
SWITCH TEST
To test the switch, remove the wiring connector.
Test for continuity between the center terminal and
the transmission case. Continuity should exist only
when the transmission is in PARK or NEUTRAL.
Shift the transmission into REVERSE and test
continuity at the switch outer terminals. Continuity
should exist only when the transmission is in
REVERSE. Continuity should not exist between the
outer terminals and the case.
Check gearshift linkage adjustment before replacing a switch that tests faulty.
OVERDRIVE ELECTRICAL CONTROLS
The overdrive off switch, valve body solenoid, case
connectors and related wiring can all be tested with
a 12 volt test lamp or a volt/ohmmeter. Check continuity of each component when diagnosis indicates
this is necessary. Refer to Group 8W, Wiring Diagrams, for component locations and circuit information.
Switch and solenoid continuity should be checked
whenever the transmission fails to shift into fourth
gear range.
BRAKE TRANSMISSION SHIFT INTERLOCK
(1) Verify that the key can only be removed in the
PARK position
(2) When the shift lever is in PARK And the shift
handle pushbutton is in the “OUT” position, the ignition key cylinder should rotate freely from OFF to
LOCK. When the shifter is in any other gear or neutral position, the ignition key cylinder should not
rotate to the LOCK position.
(3) Shifting out of PARK should be possible when
the ignition key cylinder is in the OFF position.
(4) Shifting out of PARK should not be possible
while applying 25 lb. maximum handle pushbutton
force and ignition key cylinder is in the RUN or
START positions unless the foot brake pedal is
depressed approximately 1/2 inch (12 mm).
21 - 54
42RE AUTOMATIC TRANSMISSION
WJ
DIAGNOSIS AND TESTING (Continued)
Clutch And Band Application Chart
(5) Shifting out of PARK should not be possible
when the ignition key cylinder is in the ACCESSORY
or LOCK positions.
(6) Shifting between any gears, NEUTRAL or into
PARK may be done without depressing foot brake
pedal with ignition switch in RUN or START positions and vehicle stationary or in motion.
GEARSHIFT CABLE
(1) The floor shifter lever and gate positions
should be in alignment with all transmission PARK,
NEUTRAL, and gear detent positions.
(2) Engine starts must be possible with floor shift
lever in PARK or NEUTRAL gate positions only.
Engine starts must not be possible in any other gear
position.
(3) With floor shift lever handle push-button not
depressed and lever in:
(a) PARK position—Apply forward force on center of handle and remove pressure. Engine starts
must be possible.
(b) PARK position—Apply rearward force on center of handle and remove pressure. Engine starts
must be possible.
(c) NEUTRAL position—Normal position. Engine
starts must be possible.
(d) NEUTRAL position—Engine running and
brakes applied, apply forward force on center of
shift handle. Transmission shall not be able to shift
from neutral to reverse.
THROTTLE VALVE CABLE
Transmission throttle valve cable adjustment is
extremely important to proper operation. This adjustment positions the throttle valve, which controls shift
speed, quality, and part-throttle downshift sensitivity.
If cable setting is too loose, early shifts and slippage between shifts may occur. If the setting is too
tight, shifts may be delayed and part throttle downshifts may be very sensitive. Refer to the Adjustments section for the proper adjustment procedure.
ROAD TESTING
Before road testing, be sure the fluid level and control cable adjustments have been checked and
adjusted if necessary. Verify that diagnostic trouble
codes have been resolved.
Observe engine performance during the road test.
A poorly tuned engine will not allow accurate analysis of transmission operation.
Operate the transmission in all gear ranges. Check
for shift variations and engine flare which indicates
slippage. Note if shifts are harsh, spongy, delayed,
early, or if part throttle downshifts are sensitive.
Slippage indicated by engine flare, usually means
clutch, band or overrunning clutch problems. If the
condition is advanced, an overhaul will be necessary
to restore normal operation.
A slipping clutch or band can often be determined
by comparing which internal units are applied in the
various gear ranges. The Clutch and Band Application chart provides a basis for analyzing road test
results.
42RE AUTOMATIC TRANSMISSION
WJ
21 - 55
DIAGNOSIS AND TESTING (Continued)
ANALYZING ROAD TEST
Refer to the Clutch and Band Application chart
and note which elements are in use in the various
gear ranges.
Note that the rear clutch is applied in all forward
ranges (D, 2, 1). The transmission overrunning clutch
is applied in first gear (D, 2 and 1 ranges) only. The
rear band is applied in 1 and R range only.
Note that the overdrive clutch is applied only in
fourth gear and the overdrive direct clutch and overrunning clutch are applied in all ranges except fourth
gear.
For example: If slippage occurs in first gear in D
and 2 range but not in 1 range, the transmission
overrunning clutch is faulty. Similarly, if slippage
occurs in any two forward gears, the rear clutch is
slipping.
Applying the same method of analysis, note that
the front and rear clutches are applied simultaneously only in D range third and fourth gear. If the
transmission slips in third gear, either the front
clutch or the rear clutch is slipping.
If the transmission slips in fourth gear but not in
third gear, the overdrive clutch is slipping. By selecting another gear which does not use these clutches,
the slipping unit can be determined. For example, if
the transmission also slips in Reverse, the front
clutch is slipping. If the transmission does not slip in
Reverse, the rear clutch is slipping.
If slippage occurs during the 3-4 shift or only in
fourth gear, the overdrive clutch is slipping. Similarly, if the direct clutch were to fail, the transmission would lose both reverse gear and overrun
braking in 2 position (manual second gear).
If the transmission will not shift to fourth gear, the
control switch, overdrive solenoid or related wiring
may also be the problem cause.
This process of elimination can be used to identify
a slipping unit and check operation. Proper use of
the Clutch and Band Application Chart is the key.
Although road test analysis will help determine the
slipping unit, the actual cause of a malfunction usually cannot be determined until hydraulic and air
pressure tests are performed. Practically any condition can be caused by leaking hydraulic circuits or
sticking valves.
Unless a malfunction is obvious, such as no drive
in D range first gear, do not disassemble the transmission. Perform the hydraulic and air pressure tests
to help determine the probable cause.
HYDRAULIC PRESSURE TEST
Hydraulic test pressures range from a low of one
psi (6.895 kPa) governor pressure, to 300 psi (2068
kPa) at the rear servo pressure port in reverse.
An accurate tachometer and pressure test gauges
are required. Test Gauge C-3292 has a 100 psi range
and is used at the accumulator, governor, and front
servo ports. Test Gauge C-3293-SP has a 300 psi
range and is used at the rear servo and overdrive
ports where pressures exceed 100 psi.
Pressure Test Port Locations
Test ports are located at both sides of the transmission case (Fig. 67).
Line pressure is checked at the accumulator port
on the right side of the case. The front servo pressure
port is at the right side of the case just behind the
filler tube opening.
The rear servo and governor pressure ports are at
the right rear of the transmission case. The overdrive
clutch pressure port is at the left rear of the case.
Fig. 67 Pressure Test Port Locations
1
2
3
4
5
–
–
–
–
–
REAR SERVO TEST PORT
GOVERNOR TEST PORT
ACCUMULATOR TEST PORT
FRONT SERVO TEST PORT
OVERDRIVE CLUTCH TEST PORT
21 - 56
42RE AUTOMATIC TRANSMISSION
WJ
DIAGNOSIS AND TESTING (Continued)
Test One - Transmission In Manual Low
NOTE: This test checks pump output, pressure regulation, and condition of the rear clutch and servo
circuit. Both test gauges are required for this test.
(1) Connect tachometer to engine. Position tachometer so it can be observed from driver seat if helper
will be operating engine. Raise vehicle on hoist that
will allow rear wheels to rotate freely.
(2) Connect 100 psi Gauge C-3292 to accumulator
port. Then connect 300 psi Gauge C-3293-SP to rear
servo port.
(3) Disconnect throttle and gearshift cables from
levers on transmission valve body manual shaft.
(4) Have helper start and run engine at 1000 rpm.
(5) Move transmission shift lever fully forward
into 1 range.
(6) Gradually move transmission throttle lever
from full forward to full rearward position and note
pressures on both gauges:
• Line pressure at accumulator port should be
54-60 psi (372-414 kPa) with throttle lever forward
and gradually increase to 90-96 psi (621-662 kPa) as
throttle lever is moved rearward.
• Rear servo pressure should be same as line pressure within 3 psi (20.68 kPa).
Test Two—Transmission In 2 Range
NOTE: This test checks pump output, line pressure
and pressure regulation. Use 100 psi Test Gauge
C-3292 for this test.
(1) Leave vehicle in place on hoist and leave Test
Gauge C-3292 connected to accumulator port.
(2) Have helper start and run engine at 1000 rpm.
(3) Move transmission shift lever one detent rearward from full forward position. This is 2 range.
(4) Move transmission throttle lever from full forward to full rearward position and read pressure on
gauge.
(5) Line pressure should be 54-60 psi (372-414
kPa) with throttle lever forward and gradually
increase to 90-96 psi (621-662 kPa) as lever is moved
rearward.
Test Three—Transmission In D Range Third Gear
NOTE: This test checks pressure regulation and
condition of the clutch circuits. Both test gauges
are required for this test.
(1) Turn OD switch off.
(2) Leave vehicle on hoist and leave Gauge C-3292
in place at accumulator port.
(3) Move Gauge C-3293-SP over to front servo port
for this test.
(4) Have helper start and run engine at 1600 rpm
for this test.
(5) Move transmission shift lever two detents rearward from full forward position. This is D range.
(6) Read pressures on both gauges as transmission
throttle lever is gradually moved from full forward to
full rearward position:
• Line pressure at accumulator in D range third
gear, should be 54-60 psi (372-414 kPa) with throttle
lever forward and increase as lever is moved rearward.
• Front servo pressure in D range third gear,
should be within 3 psi (21 kPa) of line pressure up to
kickdown point.
Test Four—Transmission In Reverse
NOTE: This test checks pump output, pressure regulation and the front clutch and rear servo circuits.
Use 300 psi Test Gauge C-3293-SP for this test.
(1) Leave vehicle on hoist and leave gauge C-3292
in place at accumulator port.
(2) Move 300 psi Gauge C-3293-SP back to rear
servo port.
(3) Have helper start and run engine at 1600 rpm
for test.
(4) Move transmission shift lever four detents
rearward from full forward position. This is Reverse
range.
(5) Move transmission throttle lever fully forward
then fully rearward and note reading at Gauge
C-3293-SP.
(6) Pressure should be 145 - 175 psi (1000-1207
kPa) with throttle lever forward and increase to 230 280 psi (1586-1931 kPa) as lever is gradually moved
rearward.
Test Five—Governor Pressure
NOTE: This test checks governor operation by
measuring governor pressure response to changes
in vehicle speed. It is usually not necessary to
check governor operation unless shift speeds are
incorrect or if the transmission will not downshift.
The test should be performed on the road or on a
hoist that will allow the rear wheels to rotate freely.
(1) Move 100 psi Test Gauge C-3292 to governor
pressure port.
(2) Move transmission shift lever two detents rearward from full forward position. This is D range.
(3) Have helper start and run engine at curb idle
speed. Then firmly apply service brakes so wheels
will not rotate.
(4) Note governor pressure:
WJ
42RE AUTOMATIC TRANSMISSION
21 - 57
DIAGNOSIS AND TESTING (Continued)
• Governor pressure should be no more than 20.6
kPa (3 psi) at curb idle speed and wheels not rotating.
• If pressure exceeds 20.6 kPa (3 psi), a fault
exists in governor pressure control system.
(5) Release brakes, slowly increase engine speed,
and observe speedometer and pressure test gauge (do
not exceed 30 mph on speedometer). Governor pressure should increase in proportion to vehicle speed.
Or approximately 6.89 kPa (1 psi) for every 1 mph.
(6) Governor pressure rise should be smooth and
drop back to no more than 20.6 kPa (3 psi), after
engine returns to curb idle and brakes are applied to
prevent wheels from rotating.
(7) Compare results of pressure test with analysis
chart.
Test Six—Transmission In Overdrive Fourth Gear
NOTE: This test checks line pressure at the overdrive clutch in fourth gear range. Use 300 psi Test
Gauge C-3293-SP for this test. The test should be
performed on the road or on a chassis dyno.
(1) Remove tachometer; it is not needed for this
test.
(2) Move 300 psi Gauge to overdrive clutch pressure test port. Then remove other gauge and reinstall
test port plug.
(3) Lower vehicle.
(4) Turn OD switch on.
(5) Secure test gauge so it can be viewed from
drivers seat.
(6) Start engine and shift into D range.
(7) Increase vehicle speed gradually until 3-4 shift
occurs and note gauge pressure.
(8) Pressure should be 469-496 kPa (68-72 psi)
with closed throttle and increase to 620-827 kPa (90120 psi) at 1/2 to 3/4 throttle. Note that pressure can
increase to around 896 kPa (130 psi) at full throttle.
(9) Return to shop or move vehicle off chassis
dyno.
AIR TESTING TRANSMISSION CLUTCH AND
BAND OPERATION
Air-pressure testing can be used to check transmission front/rear clutch and band operation. The test
can be conducted with the transmission either in the
vehicle or on the work bench, as a final check, after
overhaul.
Air-pressure testing requires that the oil pan and
valve body be removed from the transmission. The
servo and clutch apply passages are shown (Fig. 68).
PRESSURE TEST ANALYSIS CHART
TEST CONDITION
INDICATION
Line pressure OK during
any one test
Pump and regulator
valve OK
Line pressure OK in R
but low in D, 2, 1
Leakage in rear clutch
area (seal rings, clutch
seals)
Pressure low in D Fourth
Gear Range
Overdrive clutch piston
seal, or check ball
problem
Pressure OK in 1, 2 but
low in D3 and R
Leakage in front clutch
area
Pressure OK in 2 but low
in R and 1
Leakage in rear servo
Front servo pressure low
in 2
Leakage in servo; broken
servo ring or cracked
servo piston
Pressure low in all
positions
Clogged filter, stuck
regulator valve, worn or
faulty pump, low oil level
Governor pressure too
high at idle speed
Governor pressure
solenoid valve system
fault. Refer to diagnostic
book.
Governor pressure low at
all mph figures
Faulty governor pressure
solenoid, transmission
control module, or
governor pressure
sensor
Lubrication pressure low
at all throttle positions
Clogged fluid cooler or
lines, seal rings leaking,
worn pump bushings,
pump, clutch retainer, or
clogged filter.
Line pressure high
Output shaft plugged,
sticky regulator valve
Line pressure low
Sticky regulator valve,
clogged filter, worn pump
Front Clutch Air Test
Place one or two fingers on the clutch housing and
apply air pressure through front clutch apply passage. Piston movement can be felt and a soft thump
heard as the clutch applies.
Rear Clutch Air Test
Place one or two fingers on the clutch housing and
apply air pressure through rear clutch apply passage.
Piston movement can be felt and a soft thump heard
as the clutch applies.
21 - 58
42RE AUTOMATIC TRANSMISSION
WJ
DIAGNOSIS AND TESTING (Continued)
sources. Through careful observation, a leak source
can be identified before removing the transmission
for repair. Pump seal leaks tend to move along the
drive hub and onto the rear of the converter. Pump
O-ring or pump body leaks follow the same path as a
seal leak (Fig. 69). Pump vent or pump attaching bolt
leaks are generally deposited on the inside of the
converter housing and not on the converter itself
(Fig. 69). Pump seal or gasket leaks usually travel
down the inside of the converter housing. Front band
lever pin plug leaks are generally deposited on the
housing and not on the converter.
Fig. 68 Air Pressure Test Passages
1 – LINE PRESSURE TO ACCUMULATOR
2 – REAR SERVO APPLY
3 – FRONT SERVO APPLY
4 – FRONT SERVO RELEASE
5 – PUMP SUCTION
6 – PUMP PRESSURE
7 – FRONT CLUTCH APPLY
8 – REAR CLUTCH APPLY
9 – TO TORQUE CONVERTOR
10 – TO COOLER
11 – FROM TORQUE CONVERTER
Front Servo Air Test
Apply air pressure to the front servo apply passage. The servo rod should extend and cause the
band to tighten around the drum. Spring pressure
should release the servo when air pressure is
removed.
Rear Servo Air Test
Apply air pressure to the rear servo apply passage.
The servo rod should extend and cause the band to
tighten around the drum. Spring pressure should
release the servo when air pressure is removed.
CONVERTER HOUSING FLUID LEAK
DIAGNOSIS
When diagnosing converter housing fluid leaks,
two items must be established before repair.
(1) Verify that a leak condition actually exists.
(2) Determined the true source of the leak.
Some suspected converter housing fluid leaks may
not be leaks at all. They may only be the result of
residual fluid in the converter housing, or excess
fluid spilled during factory fill or fill after repair.
Converter housing leaks have several potential
Fig. 69 Converter Housing Leak Paths
1
2
3
4
5
6
7
–
–
–
–
–
–
–
PUMP SEAL
PUMP VENT
PUMP BOLT
PUMP GASKET
CONVERTER HOUSING
CONVERTER
REAR MAIN SEAL LEAK
TORQUE CONVERTER LEAK POINTS
Possible sources of converter leaks are:
(1) Leaks at the weld joint around the outside
diameter weld (Fig. 70).
(2) Leaks at the converter hub weld (Fig. 70).
CONVERTER HOUSING AREA LEAK CORRECTION
(1) Remove converter.
(2) Tighten front band adjusting screw until band
is tight around front clutch retainer. This prevents
front/rear clutches from coming out when oil pump is
removed.
(3) Remove oil pump and remove pump seal.
Inspect pump housing drainback and vent holes for
obstructions. Clear holes with solvent and wire.
(4) Inspect pump bushing and converter hub. If
bushing is scored, replace it. If converter hub is
scored, either polish it with crocus cloth or replace
converter.
42RE AUTOMATIC TRANSMISSION
WJ
21 - 59
DIAGNOSIS AND TESTING (Continued)
(6) Loosen kickdown lever pin access plug three
turns. Apply Loctite 592, or Permatex No. 2 to plug
threads and tighten plug to 17 N·m (150 in. lbs.)
torque.
(7) Adjust front band.
(8) Lubricate pump seal and converter hub with
transmission fluid or petroleum jelly and install converter.
(9) Install transmission and converter housing
dust shield.
(10) Lower vehicle.
Fig. 70 Converter Leak Points—Typical
1
2
3
4
–
–
–
–
OUTSIDE DIAMETER WELD
TORQUE CONVERTER HUB WELD
STARTER RING GEAR
LUG
(5) Install new pump seal, O-ring, and gasket.
Replace oil pump if cracked, porous or damaged in
any way. Be sure to loosen the front band before
installing the oil pump, damage to the oil pump seal
may occur if the band is still tightened to the front
clutch retainer.
DIAGNOSIS TABLES AND CHARTS—RE
TRANSMISSION
The diagnosis charts provide additional reference
when diagnosing a transmission fault. The charts
provide general information on a variety of transmission, overdrive unit and converter clutch fault conditions.
The hydraulic flow charts in the Schematics and
Diagrams section of this group, outline fluid flow and
hydraulic circuitry. Circuit operation is provided for
neutral, third, fourth and reverse gear ranges. Normal working pressures are also supplied for each of
the gear ranges.
21 - 60
42RE AUTOMATIC TRANSMISSION
WJ
DIAGNOSIS AND TESTING (Continued)
DIAGNOSIS CHARTS
CONDITION
HARSH ENGAGEMENT
(FROM NEUTRAL TO
DRIVE OR REVERSE)
POSSIBLE CAUSES
CORRECTION
1. Fluid Level Low
1. Add Fluid
2. Throttle Linkage Misadjusted
2. Adjust linkage - setting may be too long.
3. Mount and Driveline Bolts Loose
3. Check engine mount, transmission
mount, propeller shaft, rear spring to body
bolts, rear control arms, crossmember and
axle bolt torque. Tighten loose bolts and
replace missing bolts.
4. U-Joint Worn/Broken
4. Remove propeller shaft and replace
U-Joint.
5. Axle Backlash Incorrect
5. Check per Service Manual. Correct as
needed.
6. Hydraulic Pressure Incorrect
6. Check pressure. Remove, overhaul or
adjust valve body as needed.
7. Band Misadjusted.
7. Adjust rear band.
8. Valve Body Check Balls Missing.
8. Inspect valve body for proper check ball
installation.
9. Axle Pinion Flange Loose.
9. Replace nut and check pinion threads
before installing new nut. Replace pinion
gear if threads are damaged.
10. Clutch, band or planetary
component damaged.
10. Remove, disassemble and repair
transmission as necessary.
11. Converter Clutch Faulty.
11. Replace converter and flush cooler and
line before installing new converter.
42RE AUTOMATIC TRANSMISSION
WJ
21 - 61
DIAGNOSIS AND TESTING (Continued)
CONDITION
DELAYED ENGAGEMENT
(FROM NEUTRAL TO
DRIVE OR REVERSE)
NO DRIVE RANGE
(REVERSE OK)
POSSIBLE CAUSES
CORRECTION
1. Fluid Level Low.
1. Correct level and check for leaks.
2. Filter Clogged.
2. Change filter.
3. Gearshift Linkage Misadjusted.
3. Adjust linkage and repair linkage if worn
or damaged.
4. Torque Converter Drain Back (Oil
drains from torque converter into
transmission sump)
4. If vehicle moves normally after 5
seconds after shifting into gear, no repair is
necessary. If longer, inspect pump bushing
for wear. Replace pump house.
5. Rear Band Misadjusted.
5. Adjust band.
6. Valve Body Filter Plugged.
6. Replace fluid and filter. If oil pan and old
fluid were full of clutch disc material and/or
metal particles, overhaul will be necessary.
7. Oil Pump Gears Worn/Damaged.
7. Remove transmission and replace oil
pump.
8. Governor Circuit and Solenoid
Valve Electrical Fault.
8. Test with DRB scan tool and repair as
required.
9. Hydraulic Pressure Incorrect.
9. Perform pressure test, remove
transmission and repair as needed.
10. Reaction Shaft Seal Rings
Worn/Broken.
10. Remove transmission, remove oil pump
and replace seal rings.
11. Rear Clutch/Input Shaft, Rear
Clutch Seal Rings Damaged.
11. Remove and disassemble transmission
and repair as necessary.
12. Regulator Valve Stuck.
12. Clean.
13. Cooler Plugged.
13. Transfer case failure can plug cooler.
1. Fluid Level Low.
1. Add fluid and check for leaks if drive is
restored.
2. Gearshift Linkage/Cable
Loose/Misadjusted.
2. Repair or replace linkage components.
3. Rear Clutch Burnt.
3. Remove and disassemble transmission
and rear clutch and seals. Repair/replace
worn or damaged parts as needed.
4. Valve Body Malfunction.
4. Remove and disassemble valve body.
Replace assembly if any valves or bores
are damaged.
5. Transmission Overrunning Clutch
Broken.
5. Remove and disassemble transmission.
Replace overrunning clutch.
6. Input Shaft Seal Rings Worn/
Damaged.
6. Remove and disassemble transmission.
Replace seal rings and any other worn or
damaged parts.
7. Front Planetary Failed Broken.
7. Remove and repair.
21 - 62
42RE AUTOMATIC TRANSMISSION
WJ
DIAGNOSIS AND TESTING (Continued)
CONDITION
NO DRIVE OR REVERSE
(VEHICLE WILL NOT
MOVE)
POSSIBLE CAUSES
CORRECTION
1. Fluid Level Low.
1. Add fluid and check for leaks if drive is
restored.
2. Gearshift Linkage/Cable
Loose/Misadjusted.
2. Inspect, adjust and reassemble linkage
as needed. Replace worn/damaged parts.
3. U-Joint/Axle/Transfer Case
Broken.
3. Perform preliminary inspection procedure
for vehicle that will not move. Refer to
procedure in diagnosis section.
4. Filter Plugged.
4. Remove and disassemble transmission.
Repair or replace failed components as
needed. Replace filter. If filter and fluid
contained clutch material or metal particles,
an overhaul may be necessary. Perform
lube flow test. Flush oil. Replace cooler as
necessary.
5. Oil Pump Damaged.
5. Perform pressure test to confirm low
pressure. Replace pump body assembly if
necessary.
6. Valve Body Malfunctioned.
6. Check and inspect valve body. Replace
valve body (as assembly) if any valve or
bore is damaged. Clean and reassemble
correctly if all parts are in good condition.
7. Transmission Internal Component
Damaged.
7. Remove and disassemble transmission.
Repair or replace failed components as
needed.
8. Park Sprag not Releasing - Check
Stall Speed, Worn/Damaged/Stuck.
8. Remove, disassemble, repair.
9. Torque Converter Damage.
9. Inspect and replace as required.
42RE AUTOMATIC TRANSMISSION
WJ
21 - 63
DIAGNOSIS AND TESTING (Continued)
CONDITION
SHIFTS DELAYED OR
ERRATIC (SHIFTS ALSO
HARSH AT TIMES)
NO REVERSE (D RANGES
OK)
HAS FIRST/REVERSE
ONLY (NO 1-2 OR 2-3
UPSHIFT)
POSSIBLE CAUSES
CORRECTION
1. Fluid Level Low/High.
1. Correct fluid level and check for leaks if
low.
2. Fluid Filter Clogged.
2. Replace filter. If filter and fluid contained
clutch material or metal particles, an
overhaul may be necessary. Perform lube
flow test.
3. Throttle Linkage Misadjusted.
3. Adjust linkage as described in service
section.
4. Throttle Linkage Binding.
4. Check cable for binding. Check for return
to closed throttle at transmission.
5. Gearshift Linkage/Cable
Misadjusted.
5. Adjust linkage/cable as described in
service section.
6. Clutch or Servo Failure.
6. Remove valve body and air test clutch,
and band servo operation. Disassemble
and repair transmission as needed.
7. Governor Circuit Electrical Fault.
7. Test using DRB scan tool and repair as
required.
8. Front Band Misadjusted.
8. Adjust band.
9. Pump Suction Passage Leak.
9. Check for excessive foam on dipstick
after normal driving. Check for loose pump
bolts, defective gasket. Replace pump
assembly if needed.
1. Gearshift Linkage/Cable
Misadjusted/Damaged.
1. Repair or replace linkage parts as
needed.
2. Park Sprag Sticking.
2. Replace overdrive annulus gear.
3. Rear Band Misadjusted/Worn.
3. Adjust band; replace.
4. Valve Body Malfunction.
4. Remove and service valve body. Replace
valve body if any valves or valve bores are
worn or damaged.
5. Rear Servo Malfunction.
5. Remove and disassemble transmission.
Replace worn/damaged servo parts as
necessary.
6. Direct Clutch in Overdrive Worn
6. Disassemble overdrive. Replace worn or
damaged parts.
7. Front Clutch Burnt.
7. Remove and disassemble transmission.
Replace worn, damaged clutch parts as
required.
1. Governor Circuit Electrical Fault.
1. Test using DRB scan tool and repair as
required.
2. Valve Body Malfunction.
2. Repair stuck 1-2 shift valve or governor
plug.
3. Front Servo/Kickdown Band
Damaged/Burned.
3. Repair/replace.
21 - 64
42RE AUTOMATIC TRANSMISSION
WJ
DIAGNOSIS AND TESTING (Continued)
CONDITION
MOVES IN 2ND OR 3RD
GEAR, ABRUPTLY
DOWNSHIFTS TO LOW
NO LOW GEAR (MOVES
IN 2ND OR 3RD GEAR
ONLY)
NO KICKDOWN OR
NORMAL DOWNSHIFT
STUCK IN LOW GEAR
(WILL NOT UPSHIFT)
POSSIBLE CAUSES
CORRECTION
1. Valve Body Malfunction.
1. Remove, clean and inspect. Look for
stuck 1-2 valve or governor plug.
2. Governor Valve Sticking.
2. Remove, clean and inspect. Replace
faulty parts.
1. Governor Valve Sticking.
1. Remove governor, clean, inspect and
repair as required.
2. Governor Circuit Electrical Fault.
2. Test with DRB scan tool and repair as
required.
3. Valve Body Malfunction.
3. Remove, clean and inspect. Look for
sticking 1-2 shift valve, 2-3 shift valve,
governor plug or broken springs.
4. Front Servo Piston Cocked in
Bore.
4. Inspect servo and repair as required.
5. Front Band Linkage Malfunction.
5. Inspect linkage and look for bind in
linkage.
1. Throttle Linkage Misadjusted.
1. Adjust linkage.
2. Accelerator Pedal Travel
Restricted.
2. Verify floor mat is not under pedal, repair
worn accelerator cable or bent brackets.
3. Valve Body Hydraulic Pressures
Too High or Too Low Due to Valve
Body Malfunction or Incorrect
Hydraulic Control Pressure
Adjustments.
3. Perform hydraulic pressure tests to
determine cause and repair as required.
Correct valve body pressure adjustments as
required.
4. Governor Circuit Electrical Fault.
4. Test with DRB scan tool and repair as
required.
5. Valve Body Malfunction.
5. Perform hydraulic pressure tests to
determine cause and repair as required.
Correct valve body pressure adjustments as
required.
6. TPS Malfunction.
6. Replace sensor, check with DRB scan
tool.
7. PCM Malfunction.
7. Check with DRB scan tool and replace if
required.
8. Valve Body Malfunction.
8. Repair sticking 1-2, 2-3 shift valves,
governor plugs, 3-4 solenoid, 3-4 shift
valve, 3-4 timing valve.
1. Throttle Linkage Misadjusted/
Stuck.
1. Adjust linkage and repair linkage if worn
or damaged. Check for binding cable or
missing return spring.
2. Gearshift Linkage Misadjusted.
2. Adjust linkage and repair linkage if worn
or damaged.
3. Governor Component Electrical
Fault.
3. Check operating pressures and test with
DRB scan tool, repair faulty component.
4. Front Band Out of Adjustment.
4. Adjust Band.
5. Clutch or Servo Malfunction.
5. Air pressure check operation of clutches
and bands. Repair faulty component.
42RE AUTOMATIC TRANSMISSION
WJ
21 - 65
DIAGNOSIS AND TESTING (Continued)
CONDITION
CREEPS IN NEUTRAL
BUZZING NOISE
SLIPS IN REVERSE ONLY
POSSIBLE CAUSES
CORRECTION
1. Gearshift Linkage Misadjusted.
1. Adjust linkage.
2. Rear Clutch Dragging/Warped.
2. Disassemble and repair.
3. Valve Body Malfunction.
3. Perform hydraulic pressure test to
determine cause and repair as required.
1. Fluid Level Low.
1. Add fluid and check for leaks.
2. Shift Cable Misassembled.
2. Route cable away from engine and bell
housing.
3. Valve Body Misassembled.
3. Remove, disassemble, inspect valve
body. Reassemble correctly if necessary.
Replace assembly if valves or springs are
damaged. Check for loose bolts or screws.
4. Pump Passages Leaking.
4. Check pump for porous casting, scores
on mating surfaces and excess rotor
clearance. Repair as required. Loose pump
bolts.
5. Cooling System Cooler Plugged.
5. Flow check cooler circuit. Repair as
needed.
6. Overrunning Clutch Damaged.
6. Replace clutch.
1. Fluid Level Low.
1. Add fluid and check for leaks.
2. Gearshift Linkage Misadjusted.
2. Adjust linkage.
3. Rear Band Misadjusted.
3. Adjust band.
4. Rear Band Worn.
4. Replace as required.
5. Overdrive Direct Clutch Worn.
5. Disassemble overdrive. Repair as
needed.
6. Hydraulic Pressure Too Low.
6. Perform hydraulic pressure tests to
determine cause.
7. Rear Servo Leaking.
7. Air pressure check clutch-servo operation
and repair as required.
8. Band Linkage Binding.
8. Inspect and repair as required.
21 - 66
42RE AUTOMATIC TRANSMISSION
WJ
DIAGNOSIS AND TESTING (Continued)
CONDITION
SLIPS IN FORWARD
DRIVE RANGES
POSSIBLE CAUSES
CORRECTION
1. Fluid Level Low.
1. Add fluid and check for leaks.
2. Fluid Foaming.
2. Check for high oil level, bad pump
gasket or seals, dirt between pump halves
and loose pump bolts. Replace pump if
necessary.
3. Throttle Linkage Misadjusted.
3. Adjust linkage.
4. Gearshift Linkage Misadjusted.
4. Adjust linkage.
5. Rear Clutch Worn.
5. Inspect and replace as needed.
6. Low Hydraulic Pressure Due to
Worn Pump, Incorrect Control
Pressure Adjustments, Valve Body
Warpage or Malfunction, Sticking,
Leaking Seal Rings, Clutch Seals
Leaking, Servo Leaks, Clogged Filter
or Cooler Lines.
6. Perform hydraulic and air pressure tests
to determine cause.
7. Rear Clutch Malfunction, Leaking
Seals or Worn Plates.
7. Air pressure check clutch-servo operation
and repair as required.
8. Overrunning Clutch Worn, Not
Holding (Slips in 1 Only).
8. Replace Clutch.
SLIPS IN LOW GEAR “D”
ONLY, BUT NO IN 1
POSITION
Overrunning Clutch Faulty.
Replace overrunning clutch.
GROWLING, GRATING OR
SCRAPING NOISES
1. Drive Plate Broken.
1. Replace.
2. Torque Converter Bolts Hitting
Dust Shield.
2. Dust shield bent. Replace or repair.
3. Planetary Gear Set Broken/
Seized.
3. Check for debris in oil pan and repair as
required.
4. Overrunning Clutch Worn/Broken.
4. Inspect and check for debris in oil pan.
Repair as required.
5. Oil Pump Components Scored/
Binding.
5. Remove, inspect and repair as required.
6. Output Shaft Bearing or Bushing
Damaged.
6. Remove, inspect and repair as required.
7. Clutch Operation Faulty.
7. Perform air pressure check and repair as
required.
8. Front and Rear Bands
Misadjusted.
8. Adjust bands.
42RE AUTOMATIC TRANSMISSION
WJ
21 - 67
DIAGNOSIS AND TESTING (Continued)
CONDITION
DRAGS OR LOCKS UP
NO 4-3 DOWNSHIFT
NO 4-3 DOWNSHIFT
WHEN CONTROL SWITCH
IS TURNED OFF
CLUNK NOISE FROM
DRIVELINE ON CLOSED
THROTTLE 4-3
DOWNSHIFT
POSSIBLE CAUSES
CORRECTION
1. Fluid Level Low.
1. Check and adjust level.
2. Clutch Dragging/Failed.
2. Air pressure check clutch operation and
repair as required.
3. Front or Rear Band Misadjusted.
3. Adjust bands.
4. Case Leaks Internally.
4. Check for leakage between passages in
case.
5. Servo Band or Linkage
Malfunction.
5. Air pressure check servo operation and
repair as required.
6. Overrunning Clutch Worn.
6. Remove and inspect clutch. Repair as
required.
7. Planetary Gears Broken.
7. Remove, inspect and repair as required
(look for debris in oil pan).
8. Converter Clutch Dragging.
8. Check for plugged cooler. Perform flow
check. Inspect pump for excessive side
clearance. Replace pump as required.
1. Circuit Wiring and/or Connectors
Shorted.
1. Test wiring and connectors with test lamp
and volt/ohmmeter. Repair wiring as
necessary. Replace connectors and/or
harnesses as required.
2. PCM Malfunction.
2. Check PCM operation with DRB scan
tool. Replace PCM only if faulty.
3. TPS Malfunction.
3. Check TPS with DRB scan tool at PCM.
4. Lockup Solenoid Not Venting.
4. Remove valve body and replace solenoid
assembly if plugged or shorted.
5. Overdrive Solenoid Not Venting.
5. Remove valve body and replace solenoid
if plugged or shorted.
6. Valve Body Valve Sticking.
6. Repair stuck 3-4 shift valve or lockup
timing valve.
1. Control Switch Open/Shorted.
1. Test and replace switch if faulty.
2. Overdrive Solenoid Connector
Shorted.
2. Test solenoids and replace if seized or
shorted.
3. PCM Malfunction.
3. Test with DRB scan tool. Replace PCM if
faulty.
4. Valve Body Stuck Valves.
4. Repair stuck 3-4, lockup or lockup timing
valve.
1. Transmission Fluid Low.
1. Add Fluid.
2. Throttle Cable Misadjusted.
2. Adjust cable.
3. Overdrive Clutch Select Spacer
Wrong Spacer.
3. Replace overdrive piston thrust plate
spacer.
21 - 68
42RE AUTOMATIC TRANSMISSION
WJ
DIAGNOSIS AND TESTING (Continued)
CONDITION
3-4 UPSHIFT OCCURS
IMMEDIATELY AFTER 2-3
SHIFT
WHINE/NOISE RELATED
TO ENGINE SPEED
POSSIBLE CAUSES
CORRECTION
1. Overdrive Solenoid Connector or
Wiring Shorted.
1. Test connector and wiring for loose
connections, shorts or ground and repair as
needed.
2. TPS Malfunction.
2. Test TPS and replace as necessary.
Check with DRB scan tool.
3. PCM Malfunction.
3. Test PCM with DRB scan tool and
replace controller if faulty.
4. Overdrive Solenoid Malfunction.
4. Replace solenoid.
5. Valve Body Malfunction.
5. Remove, disassemble, clean and inspect
valve body components. Make sure all
valves and plugs slide freely in bores.
Polish valves with crocus cloth if needed.
1. Fluid Level Low.
1. Add fluid and check for leaks.
2. Shift Cable Incorrect Routing.
2. Check shift cable for correct routing.
Should not touch engine or bell housing.
42RE AUTOMATIC TRANSMISSION
WJ
21 - 69
DIAGNOSIS AND TESTING (Continued)
CONDITION
NO 3-4 UPSHIFT
POSSIBLE CAUSES
CORRECTION
1. Dash O/D Switch In OFF Position.
1. Turn control switch to ON position.
2. Overdrive Circuit Fuse Blown.
2. Replace fuse. Determine why fuse failed
and repair as necessary (i.e., shorts or
grounds in circuit).
3. O/D Switch Wire Shorted/Open
Cut.
3. Check wires/connections with 12V test
lamp and voltmeter. Repair damaged or
loose wire/connection as necessary.
4. Distance or Coolant Sensor
Malfunction.
4. Check with DRB scan tool and repair or
replace as necessary.
5. TPS Malfunction.
5. Check with DRB scan tool and replace if
necessary.
6. Neutral Switch to PCM Wire
Shorted/Cut.
6. Test switch as described in service
section and replace if necessary. Engine no
start.
7. PCM Malfunction.
7. Check with DRB scan tool and replace if
necessary.
8. Overdrive Solenoid Shorted/Open.
8. Replace solenoid if shorted or open and
repair loose or damaged wires (DRB scan
tool).
9. Solenoid Feed Orifice in Valve
Body Blocked.
9. Remove, disassemble, and clean valve
body thoroughly. Check feed orifice.
10. Overdrive Clutch Failed.
10. Disassemble overdrive and repair as
needed.
11. Hydraulic Pressure Low.
11. Pressure test transmission to determine
cause.
12. Valve Body Valve Stuck.
12. Repair stuck 3-4 shift valve, 3-4 timing
valve.
13. O/D Piston Incorrect Spacer.
13. Remove unit, check end play and install
correct spacer.
14. Overdrive Piston Seal Failure.
14. Replace both seals.
15. O/D Check Valve/Orifice Failed.
15. Check for free movement and secure
assembly (in piston retainer). Check ball
bleed orifice.
21 - 70
42RE AUTOMATIC TRANSMISSION
WJ
DIAGNOSIS AND TESTING (Continued)
CONDITION
SLIPS IN OVERDRIVE
FOURTH GEAR
POSSIBLE CAUSES
CORRECTION
1. Fluid Level Low.
1. Add fluid and check for leaks.
2. Overdrive Clutch Pack Worn.
2. Remove overdrive unit and rebuild clutch
pack.
3. Overdrive Piston Retainer Bleed
Orifice Blown Out.
3. Disassemble transmission, remove
retainer and replace orifice.
4. Overdrive Piston or Seal
Malfunction.
4. Remove overdrive unit. Replace seals if
worn. Replace piston if damaged. If piston
retainer is damaged, remove and
disassemble the transmission.
5. 3-4 Shift Valve, Timing Valve or
Accumulator Malfunction.
5. Remove and overhaul valve body.
Replace accumulator seals. Make sure all
valves operate freely in bores and do not
bind or stick. Make sure valve body screws
are correctly tightened and separator plates
are properly positioned.
6. Overdrive Unit Thrust Bearing
Failure.
6. Disassemble overdrive unit and replace
thrust bearing (NO. 1 thrust bearing is
between overdrive piston and clutch hub;
NO. 2 thrust bearing is between the
planetary gear and the direct clutch spring
plate; NO. 3 thrust bearing is between
overrunning clutch hub and output shaft).
7. O/D Check Valve/Bleed Orifice
Failure.
7. Check for function/secure orifice insert in
O/D piston retainer.
1. Fluid Level Low.
1. Add fluid and check for leaks.
2. Throttle Valve Cable Misadjusted.
2. Adjust throttle valve cable.
3. Overdrive Clutch Pack Worn/
Burnt.
3. Remove unit and rebuild clutch pack.
4. TPS Faulty.
4. Test with DRB scan tool and replace as
necessary.
5. Overdrive Clutch Bleed Orifice
Plugged.
5. Disassemble transmission and replace
orifice.
6. Overdrive Solenoid or Wiring
Shorted/Open.
6. Test solenoid and check wiring for
loose/corroded connections or shorts/
grounds. Replace solenoid if faulty and
repair wiring if necessary.
7. Overdrive Excess Clearance.
7. Remove unit. Measure end play and
select proper spacer.
8. O/D Check Valve Missing or
Stuck.
8. Check for presence of check valve.
Repair or replace as required.
TORQUE CONVERTER
LOCKS UP IN SECOND
AND/OR THIRD GEAR
Lockup Solenoid, Relay or Wiring
Shorted/Open.
Test solenoid, relay and wiring for
continuity, shorts or grounds. Replace
solenoid and relay if faulty. Repair wiring
and connectors as necessary.
HARSH 1-2, 2-3, 3-4 OR
3-2 SHIFTS
Lockup Solenoid Malfunction.
Remove valve body and replace solenoid
assembly.
DELAYED 3-4 UPSHIFT
(SLOW TO ENGAGE)
42RE AUTOMATIC TRANSMISSION
WJ
21 - 71
DIAGNOSIS AND TESTING (Continued)
CONDITION
NO START IN PARK OR
NEUTRAL
NO REVERSE (OR SLIPS
IN REVERSE)
OIL LEAKS
POSSIBLE CAUSES
CORRECTION
1. Gearshift Linkage/Cable
Misadjusted.
1. Adjust linkage/cable.
2. Neutral Switch Wire Open/Cut.
2. Check continuity with test lamp. Repair
as required.
3. Neutral Switch Faulty.
3. Refer to service section for test and
replacement procedure.
4. Neutral Switch Connect Faulty.
4. Connectors spread open. Repair.
5. Valve Body Manual Lever
Assembly Bent/Worn/Broken.
5. Inspect lever assembly and replace if
damaged.
1. Direct Clutch Pack (front clutch)
Worn.
1. Disassemble unit and rebuild clutch
pack.
2. Rear Band Misadjusted.
2. Adjust band.
3. Front Clutch Malfunctioned/
Burned.
3. Air-pressure test clutch operation.
Remove and rebuild if necessary.
4. Overdrive Thrust Bearing Failure.
4. Disassemble geartrain and replace
bearings.
5. Direct Clutch Spring Collapsed/
Broken.
5. Remove and disassemble unit. Check
clutch position and replace spring.
1. Fluid Lines and Fittings Loose/
Leaks/Damaged.
1. Tighten fittings. If leaks persist, replace
fittings and lines if necessary.
2. Fill Tube (where tube enters case)
Leaks/Damaged.
2. Replace tube seal. Inspect tube for
cracks in fill tube.
3. Pressure Port Plug Loose
Loose/Damaged.
3. Tighten to correct torque. Replace plug
or reseal if leak persists.
4. Pan Gasket Leaks.
4. Tighten pan screws (150 in. lbs.). If leaks
persist, replace gasket.
5. Valve Body Manual Lever Shaft
Seal Leaks/Worn.
5. Replace shaft seal.
6. Rear Bearing Access Plate Leaks.
6. Replace gasket. Tighten screws.
7. Gasket Damaged or Bolts are
Loose.
7. Replace bolts or gasket or tighten both.
8. Adapter/Extension Gasket
Damaged Leaks/Damaged.
8. Replace gasket.
9. Neutral Switch Leaks/Damaged.
9. Replace switch and gasket.
10. Converter Housing Area Leaks.
10. Check for leaks at seal caused by worn
seal or burr on converter hub (cutting seal),
worn bushing, missing oil return, oil in front
pump housing or hole plugged. Check for
leaks past O-ring seal on pump or past
pump-to-case bolts; pump housing porous,
oil coming out vent due to overfill or leak
past front band shaft access plug.
11. Pump Seal Leaks/Worn/
Damaged.
11. Replace seal.
12. Torque Converter Weld
Leak/Cracked Hub.
12. Replace converter.
13. Case Porosity Leaks.
13. Replace case.
21 - 72
42RE AUTOMATIC TRANSMISSION
WJ
DIAGNOSIS AND TESTING (Continued)
CONDITION
NOISY OPERATION IN
FOURTH GEAR ONLY
POSSIBLE CAUSES
CORRECTION
1. Overdrive Clutch Discs, Plates or
Snap Rings Damaged.
1. Remove unit and rebuild clutch pack.
2. Overdrive Piston or Planetary
Thrust Bearing Damaged.
2. Remove and disassemble unit. Replace
either thrust bearing if damaged.
3. Output Shaft Bearings Scored/
Damaged.
3. Remove and disassemble unit. Replace
either bearing if damaged.
4. Planetary Gears Worn/Chipped.
4. Remove and overhaul overdrive unit.
5. Overdrive Unit Overrunning Clutch
Rollers Worn/Scored.
5. Remove and overhaul overdrive unit.
SERVICE PROCEDURES
FLUID LEVEL CHECK
Transmission fluid level should be checked monthly
under normal operation. If the vehicle is used for
trailer towing or similar heavy load hauling, check
fluid level and condition weekly. Fluid level is
checked with the engine running at curb idle speed,
the transmission in NEUTRAL and the transmission
fluid at normal operating temperature.
FLUID LEVEL CHECK PROCEDURE
(1) Transmission fluid must be at normal operating temperature for accurate fluid level check. Drive
vehicle if necessary to bring fluid temperature up to
normal hot operating temperature of 82°C (180°F).
(2) Position vehicle on level surface.
(3) Start and run engine at curb idle speed.
(4) Apply parking brakes.
(5) Shift transmission momentarily into all gear
ranges. Then shift transmission back to Neutral.
(6) Clean top of filler tube and dipstick to keep
dirt from entering tube.
(7) Remove dipstick (Fig. 71) and check fluid level
as follows:
(a) Correct acceptable level is in crosshatch area.
(b) Correct maximum level is to MAX arrow
mark.
(c) Incorrect level is at or below MIN line.
(d) If fluid is low, add only enough Mopart ATF
Plus 3 to restore correct level. Do not overfill.
CAUTION: Do not overfill the transmission. Overfilling may cause leakage out the pump vent which
can be mistaken for a pump seal leak. Overfilling
will also cause fluid aeration and foaming as the
excess fluid is picked up and churned by the gear
train. This will significantly reduce fluid life.
Fig. 71 Dipstick Fluid Level Marks—Typical
1 – DIPSTICK
2 – MAXIMUM CORRECT FLUID LEVEL
3 – ACCEPTABLE FLUID LEVEL
intervals. The service fluid fill after a filter change is
approximately 3.8 liters (4.0 quarts).
REMOVAL
(1) Hoist and support vehicle on safety stands.
(2) Place a large diameter shallow drain pan
beneath the transmission pan.
(3) Remove bolts holding front and sides of pan to
transmission (Fig. 72).
(4) Loosen bolts holding rear of pan to transmission.
(5) Slowly separate front of pan away from transmission allowing the fluid to drain into drain pan.
(6) Hold up pan and remove remaining bolt holding pan to transmission.
(7) While holding pan level, lower pan away from
transmission.
(8) Pour remaining fluid in pan into drain pan.
(9) Remove screws holding filter to valve body
(Fig. 73).
(10) Separate filter from valve body and pour fluid
in filter into drain pan.
(11) Dispose of used trans fluid and filter properly.
INSPECTION
FLUID AND FILTER REPLACEMENT
Refer to the Maintenance Schedules in Group 0,
Lubrication and Maintenance, for proper service
Inspect bottom of pan and magnet for excessive
amounts of metal or fiber contamination. A light
coating of clutch or band material on the bottom of
the pan does not indicate a problem unless accompa-
42RE AUTOMATIC TRANSMISSION
WJ
21 - 73
SERVICE PROCEDURES (Continued)
INSTALLATION
(1) Place replacement filter in position on valve
body.
(2) Install screws to hold filter to valve body (Fig.
73). Tighten screws to 4 N·m (35 in. lbs.) torque.
(3) Place new gasket in position on pan and install
pan on transmission.
(4) Place pan in position on transmission.
(5) Install screws to hold pan to transmission (Fig.
72). Tighten bolts to 17 N·m (150 in. lbs.) torque.
(6) Lower vehicle and fill transmission with
Mopart ATF Plus 3, type 7176 fluid.
TRANSMISSION FILL PROCEDURE
Fig. 72 Transmission Pan
1 – TRANSMISSION
2 – GASKET
3 – PAN
Fig. 73 Transmission Filter
1 – TRANSMISSION
2 – FILTER
nied by slipping condition or shift lag. If fluid and
pan are contaminated with excessive amounts or
debris, refer to the diagnosis section of this group.
Check the adjustment of the front and rear bands,
adjust if necessary.
CLEANING
(1) Using a suitable solvent, clean pan and magnet.
(2) Using a suitable gasket scraper, clean gasket
material from gasket surface of transmission case
and the gasket flange around the pan.
To avoid overfilling transmission after a fluid
change or overhaul, perform the following procedure:
(1) Remove dipstick and insert clean funnel in
transmission fill tube.
(2) Add following initial quantity of Mopart ATF
Plus 3 to transmission:
(a) If only fluid and filter were changed, add 3
pints (1-1/2 quarts) of ATF Plus 3 to transmission.
(b) If transmission was completely overhauled,
torque converter was replaced or drained, and
cooler was flushed, add 12 pints (6 quarts) of ATF
Plus 3 to transmission.
(3) Apply parking brakes.
(4) Start and run engine at normal curb idle
speed.
(5) Apply service brakes, shift transmission
through all gear ranges then back to NEUTRAL, set
parking brake, and leave engine running at curb idle
speed.
(6) Remove funnel, insert dipstick and check fluid
level. If level is low, add fluid to bring level to
MIN mark on dipstick. Check to see if the oil level
is equal on both sides of the dipstick. If one side is
noticably higher than the other, the dipstick has
picked up some oil from the dipstick tube. Allow the
oil to drain down the dipstick tube and re-check.
(7) Drive vehicle until transmission fluid is at normal operating temperature.
(8) With the engine running at curb idle speed, the
gear selector in NEUTRAL, and the parking brake
applied, check the transmission fluid level.
CAUTION: Do not overfill transmission, fluid foaming and shifting problems can result.
(9) Add fluid to bring level up to MAX arrow
mark.
When fluid level is correct, shut engine off, release
park brake, remove funnel, and install dipstick in fill
tube.
21 - 74
42RE AUTOMATIC TRANSMISSION
WJ
SERVICE PROCEDURES (Continued)
CONVERTER DRAINBACK CHECK VALVE
SERVICE
The converter drainback check valve is located in
the cooler outlet (pressure) line near the radiator
tank. The valve prevents fluid drainback when the
vehicle is parked for lengthy periods. The valve check
ball is spring loaded and has an opening pressure of
approximately 2 psi.
The valve is serviced as an assembly; it is not
repairable. Do not clean the valve if restricted, or
contaminated by sludge, or debris. If the valve fails,
or if a transmission malfunction occurs that generates significant amounts of sludge and/or clutch particles and metal shavings, the valve must be
replaced.
The valve must be removed whenever the cooler
and lines are reverse flushed. The valve can be flow
tested when necessary. The procedure is exactly the
same as for flow testing a cooler.
If the valve is restricted, installed backwards, or in
the wrong line, it will cause an overheating condition
and possible transmission failure.
CAUTION: The drainback valve is a one-way flow
device. It must be properly oriented in terms of flow
direction for the cooler to function properly. The
valve must be installed in the pressure line. Otherwise flow will be blocked and would cause an overheating condition and eventual transmission failure.
OIL PUMP VOLUME CHECK
Measuring the oil pump output volume will determine if sufficient oil flow to the transmission oil
cooler exists, and whether or not an internal transmission failure is present.
Verify that the transmission fluid is at the proper
level. Refer to the Fluid Level Check procedure in
this section. If necessary, fill the transmission to the
proper level with Mopart ATF+3, type 7176, Automatic Transmission Fluid.
(1) Disconnect the To cooler line at the cooler
inlet and place a collecting container under the disconnected line.
CAUTION: With the fluid set at the proper level,
fluid collection should not exceed (1) quart or internal damage to the transmission may occur.
(2) Run the engine at curb idle speed, with the
shift selector in neutral.
(3) If one quart of transmission fluid is collected in
the container in 20 seconds or less, oil pump flow vol-
ume is within acceptable limits. If fluid flow is intermittent, or it takes more than 20 seconds to collect
one quart of fluid, refer to the Hydraulic Pressure
tests in this section for further diagnosis.
(4) Re-connect the To cooler line to the transmission cooler inlet.
(5) Refill the transmission to proper level.
FLUSHING COOLERS AND TUBES
When a transmission failure has contaminated the
fluid, the oil cooler(s) must be flushed. The torque
converter must also be replaced. This will insure that
metal particles or sludged oil are not later transferred back into the reconditioned (or replaced) transmission.
The only recommended procedure for flushing coolers and lines is to use Tool 6906A Cooler Flusher.
WARNING: WEAR PROTECTIVE EYEWEAR THAT
MEETS THE REQUIREMENTS OF OSHA AND ANSI
Z87.1–1968. WEAR STANDARD INDUSTRIAL RUBBER GLOVES.
KEEP LIGHTED CIGARETTES, SPARKS, FLAMES,
AND OTHER IGNITION SOURCES AWAY FROM THE
AREA TO PREVENT THE IGNITION OF COMBUSTIBLE LIQUIDS AND GASES. KEEP A CLASS (B) FIRE
EXTINGUISHER IN THE AREA WHERE THE
FLUSHER WILL BE USED.
KEEP THE AREA WELL VENTILATED.
DO NOT LET FLUSHING SOLVENT COME IN CONTACT WITH YOUR EYES OR SKIN: IF EYE CONTAMINATION OCCURS, FLUSH EYES WITH WATER FOR
15 TO 20 SECONDS. REMOVE CONTAMINATED
CLOTHING AND WASH AFFECTED SKIN WITH
SOAP AND WATER. SEEK MEDICAL ATTENTION.
COOLER FLUSH USING TOOL 6906A
(1) Remove cover plate filler plug on Tool 6906A.
Fill reservoir 1/2 to 3/4 full of fresh flushing solution.
Flushing solvents are petroleum based solutions generally used to clean automatic transmission components. DO NOT use solvents containing acids, water,
gasoline, or any other corrosive liquids.
(2) Reinstall filler plug on Tool 6906A.
(3) Verify pump power switch is turned OFF. Connect red alligator clip to positive (+) battery post.
Connect black (-) alligator clip to a good ground.
(4) Disconnect the cooler lines at the transmission.
NOTE: When flushing transmission cooler and
lines, ALWAYS reverse flush.
WJ
42RE AUTOMATIC TRANSMISSION
21 - 75
SERVICE PROCEDURES (Continued)
NOTE: The converter drainback valve must be
removed and an appropriate replacement hose
installed to bridge the space between the transmission cooler line and the cooler fitting. Failure to
remove the drainback valve will prevent reverse
flushing the system. A suitable replacement hose
can be found in the adapter kit supplied with the
flushing tool.
CAUTION: The transmission and torque converter
must be removed as an assembly to avoid component damage. The converter driveplate, pump bushing, or oil seal can be damaged if the converter is
left attached to the driveplate during removal. Be
sure to remove the transmission and converter as
an assembly.
(5) Connect the BLUE pressure line to the OUTLET (From) cooler line.
(6) Connect the CLEAR return line to the INLET
(To) cooler line
(7) Turn pump ON for two to three minutes to
flush cooler(s) and lines.
(8) Turn pump OFF.
(9) Disconnect CLEAR suction line from reservoir
at cover plate. Disconnect CLEAR return line at
cover plate, and place it in a drain pan.
(10) Turn pump ON for 30 seconds to purge flushing solution from cooler and lines. Turn pump OFF.
(11) Place CLEAR suction line into a one quart
container of Mopart ATF Plus 3, type 7176 automatic
transmission fluid.
(12) Turn pump ON until all transmission fluid is
removed from the one quart container and lines. This
purges any residual cleaning solvent from the transmission cooler and lines. Turn pump OFF.
(13) Disconnect alligator clips from battery. Reconnect flusher lines to cover plate, and remove flushing
adapters from cooler lines.
REMOVAL
ALUMINUM THREAD REPAIR
Damaged or worn threads in the aluminum transmission case and valve body can be repaired by the
use of Heli-Coils, or equivalent. This repair consists
of drilling out the worn-out damaged threads. Then
tap the hole with a special Heli-Coil tap, or equivalent, and installing a Heli-Coil insert, or equivalent,
into the hole. This brings the hole back to its original
thread size.
Heli-Coil, or equivalent, tools and inserts are
readily available from most automotive parts suppliers.
(1) Disconnect battery negative cable.
(2) Disconnect and lower or remove necessary
exhaust components.
(3) Disconnect fluid cooler lines at transmission.
(4) Remove starter motor.
(5) Disconnect and remove crankshaft position sensor. Retain sensor attaching bolts.
CAUTION: The crankshaft position sensor will be
damaged if the transmission is removed, or
installed, while the sensor is still bolted to the
engine block, or transmission (4.0L only). To avoid
damage, be sure to remove the sensor before
removing the transmission.
(6) Remove the bolts holding the bell housing
brace to the transmission.
(7) Remove nut holding the bell housing brace to
the engine to transmission bending brace.
(8) Remove the bell housing brace from the transmission (Fig. 74).
(9) Remove the bolt holding the torque converter
cover to the transmission.
(10) Remove the torque converter cover from the
transmission.
REMOVAL AND INSTALLATION
TRANSMISSION
The overdrive unit can be removed and serviced
separately. It is not necessary to remove the entire
transmission assembly to perform overdrive unit
repairs.
If only the overdrive unit requires service, refer to
the overdrive unit removal and installation procedures.
Fig. 74 Bell Housing Brace and Converter Cover
(11) If transmission is being removed for overhaul,
remove transmission oil pan, drain fluid and reinstall
pan.
21 - 76
42RE AUTOMATIC TRANSMISSION
WJ
REMOVAL AND INSTALLATION (Continued)
(12) Remove fill tube bracket bolts and pull tube
out of transmission. Retain fill tube seal. On 4 x 4
models, it will also be necessary to remove bolt
attaching transfer case vent tube to converter housing.
(13) Rotate crankshaft in clockwise direction until
converter bolts are accessible. Then remove bolts one
at a time. Rotate crankshaft with socket wrench on
dampener bolt.
(14) Mark propeller shaft and axle yokes for
assembly alignment. Then disconnect and remove
propeller shaft. On 4 x 4 models, remove both propeller shafts.
(15) Disconnect wires from park/neutral position
switch and transmission solenoid.
(16) Disconnect gearshift cable from transmission
manual valve lever (Fig. 75).
Fig. 76 Throttle Valve Cable
Fig. 75 Transmission Shift Cable
Fig. 77 Transfer Case Shift Cable
(17) Disconnect throttle valve cable from transmission bracket and throttle valve lever (Fig. 76).
(18) Disconnect transfer case shift cable from the
transfer case shift lever (Fig. 77).
(19) Remove the clip securing the transfer case
shift cable into the cable support bracket.
(20) Disconnect transmission fluid cooler lines at
transmission fittings and clips.
(21) Support rear of engine with safety stand or
jack.
(22) Raise transmission slightly with service jack
to relieve load on crossmember and supports.
42RE AUTOMATIC TRANSMISSION
WJ
21 - 77
REMOVAL AND INSTALLATION (Continued)
(23) Remove bolts securing rear support and cushion to transmission and crossmember (Fig. 78).
(24) Remove bolts attaching crossmember to frame
and remove crossmember.
Fig. 80 Remove NV242 Transfer Case
(26) Remove bolts holding the upper transmission
bending braces to the torque converter housing and
the overdrive unit (Fig. 81).
(27) Remove all remaining converter housing bolts.
Fig. 78 Rear Transmission Crossmember
(25) Remove transfer case (Fig. 79) and (Fig. 80).
Fig. 81 Remove Upper Transmission Bending
Braces
Fig. 79 Remove NV247 Transfer Case
(28) Carefully work transmission and torque converter assembly rearward off engine block dowels.
(29) Hold torque converter in place during transmission removal.
(30) Lower transmission and remove assembly
from under the vehicle.
(31) To remove torque converter, carefully slide
torque converter out of the transmission.
21 - 78
42RE AUTOMATIC TRANSMISSION
WJ
REMOVAL AND INSTALLATION (Continued)
INSTALLATION
(1) Check torque converter hub and hub drive
notches for sharp edges burrs, scratches, or nicks.
Polish the hub and notches with 320/400 grit paper
and crocus cloth if necessary. The hub must be
smooth to avoid damaging pump seal at installation.
(2) Lubricate oil pump seal lip with transmission
fluid.
(3) Align converter and oil pump.
(4) Carefully insert converter in oil pump. Then
rotate converter back and forth until fully seated in
pump gears.
(5) Check converter seating with steel scale and
straightedge (Fig. 82). Surface of converter lugs
should be 1/2 in. to rear of straightedge when converter is fully seated.
(6) Temporarily secure converter with C-clamp.
Fig. 82 Typical Method Of Checking Converter
Seating
1 – SCALE
2 – STRAIGHTEDGE
(7) Position transmission on jack and secure it
with chains.
(8) Check condition of converter driveplate.
Replace the plate if cracked, distorted or damaged.
Also be sure transmission dowel pins are seated
in engine block and protrude far enough to
hold transmission in alignment.
(9) Apply a light coating of Mopart High Temp
grease to the torque converter hub pocket in the rear
of the crankshaft.
(10) Raise transmission and align converter with
drive plate and converter housing with engine block.
(11) Move transmission forward. Then raise, lower
or tilt transmission to align converter housing with
engine block dowels.
(12) Carefully work transmission forward and over
engine block dowels until converter hub is seated in
crankshaft.
(13) Install two bolts to attach converter housing
to engine.
(14) Install the upper transmission bending braces
to the torque converter housing and the overdrive
unit. Tighten the bolts to 41 N·m (30 ft. lbs.).
(15) Install remaining torque converter housing to
engine bolts. Tighten to 68 N·m (50 ft. lbs.).
(16) Install
rear
transmission
crossmember.
Tighten crossmember to frame bolts to 68 N·m (50 ft.
lbs.).
(17) Install rear support to transmission. Tighten
bolts to 47 N·m (35 ft. lbs.).
(18) Lower transmission onto crossmember and
install bolts attaching transmission mount to crossmember. Tighten clevis bracket to crossmember bolts
to 47 N·m (35 ft. lbs.). Tighten the clevis bracket to
rear support bolt to 68 N·m (50 ft. lbs.).
(19) Remove engine support fixture.
(20) Install crankshaft position sensor.
(21) Install new plastic retainer grommet on any
shift cable that was disconnected. Grommets should
not be reused. Use pry tool to remove rod from grommet and cut away old grommet. Use pliers to snap
new grommet into cable and to snap grommet onto
lever.
(22) Connect gearshift and throttle valve cable to
transmission.
(23) Connect wires to park/neutral position switch
and transmission solenoid connector. Be sure transmission harnesses are properly routed.
CAUTION: It is essential that correct length bolts
be used to attach the converter to the driveplate.
Bolts that are too long will damage the clutch surface inside the converter.
(24) Install torque converter-to-driveplate bolts.
Tighten bolts to 31 N·m (270 in. lbs.).
(25) Install converter housing access cover. Tighten
bolt to 23 N·m (200 in. lbs.).
(26) Install the bell housing brace to the torque
converter cover and the engine to transmission bending brace. Tighten the bolts and nut to 41 N·m (30 ft.
lbs.).
(27) Install starter motor and cooler line bracket.
(28) Connect cooler lines to transmission.
(29) Install transmission fill tube. Install new seal
on tube before installation.
(30) Install exhaust components.
(31) Install transfer case. Tighten transfer case
nuts to 35 N·m (26 ft. lbs.).
WJ
42RE AUTOMATIC TRANSMISSION
21 - 79
REMOVAL AND INSTALLATION (Continued)
(32) Install the transfer case shift cable to the
cable support bracket and the transfer case shift
lever.
(33) Align and connect propeller shaft(s).
(34) Adjust gearshift linkage and throttle valve
cable if necessary.
(35) Lower vehicle.
(36) Fill transmission with Mopart ATF Plus 3,
Type 7176 fluid.
should be 1/2 in. to rear of straightedge when converter is fully seated.
(7) If necessary, temporarily secure converter with
C-clamp attached to the converter housing.
(8) Install the transmission in the vehicle.
(9) Fill the transmission with the recommended
fluid.
TORQUE CONVERTER
REMOVAL
(1) Remove transmission and torque converter
from vehicle.
(2) Place a suitable drain pan under the converter
housing end of the transmission.
CAUTION: Verify that transmission is secure on the
lifting device or work surface, the center of gravity
of the transmission will shift when the torque converter is removed creating an unstable condition.
The torque converter is a heavy unit. Use caution
when separating the torque converter from the
transmission.
(3) Pull the torque converter forward until the center hub clears the oil pump seal.
(4) Separate the torque converter from the transmission.
INSTALLATION
Check converter hub and drive notches for sharp
edges, burrs, scratches, or nicks. Polish the hub and
notches with 320/400 grit paper or crocus cloth if necessary. The hub must be smooth to avoid damaging
the pump seal at installation. Check that the torque
converter hub o-ring on the 45RFE torque converter
hub is not damaged. Replace if necessary.
(1) Lubricate oil pump seal lip with transmission
fluid.
(2) Place torque converter in position on transmission.
CAUTION: Do not damage oil pump seal or bushing
while inserting torque converter into the front of the
transmission.
(3) Align torque converter to oil pump seal opening.
(4) Insert torque converter hub into oil pump.
(5) While pushing torque converter inward, rotate
converter until converter is fully seated in the oil
pump gears.
(6) Check converter seating with a scale and
straightedge (Fig. 83). Surface of converter lugs
Fig. 83 Checking Torque Converter Seating–Typical
1 – SCALE
2 – STRAIGHTEDGE
PARK/NEUTRAL POSITION SWITCH
REMOVAL
(1) Raise vehicle and position drain pan under
switch.
(2) Disconnect switch wires.
(3) Remove switch from case.
INSTALLATION
(1) Move shift lever to Park and Neutral positions.
Verify that switch operating lever fingers are centered in switch opening in case (Fig. 84).
(2) Install new seal on switch and install switch in
case. Tighten switch to 34 N·m (25 ft. lbs.) torque.
(3) Test continuity of new switch with 12V test
lamp.
(4) Connect switch wires and lower vehicle.
(5) Top off transmission fluid level.
GEARSHIFT CABLE
REMOVAL
(1) Shift transmission into Park.
(2) Raise vehicle.
21 - 80
42RE AUTOMATIC TRANSMISSION
WJ
REMOVAL AND INSTALLATION (Continued)
Fig. 84 Park/Neutral Position Switch
1 – NEUTRAL CONTACT
2 – MANUAL LEVER AND SWITCH PLUNGER IN REVERSE
POSITION
3 – PARK CONTACT
4 – SWITCH
Fig. 86 Transmission Shift Cable at Shifter
1
2
3
4
–
–
–
–
SHIFT LEVER PIN
ADJUSTMENT SCREW
SHIFT CABLE
SHIFTER ASSEMBLY BRACKET
(3) Remove the shift cable eyelet from the transmission manual shift lever (Fig. 85).
(4) Remove shift cable from the cable support
bracket.
Fig. 87 Shift Cables at Floor Pan
1 – SEAL PLATES
2 – TRANSMISSION SHIFT CABLE
3 – TRANSFER CASE SHIFT CABLE
Fig. 85 Remove Shift Cable From Transmission
(5) Lower vehicle.
(6) Remove shift lever bezel and necessary console
parts for access to shift lever assembly and shift
cable.
(7) Disconnect cable at shift lever and shifter
assembly bracket (Fig. 86).
(8) Remove the nuts holding the shift cable seal
plate to the floor pan (Fig. 87).
(9) Pull cable through floor panel opening.
(10) Remove shift cable from vehicle.
INSTALLATION
(1) Route cable through hole in floor pan.
(2) Install seal plate to studs in floor pan.
(3) Install nuts to hold seal plate to floor pan.
Tighten nuts to 7 N·m (65 in. lbs.).
(4) Install the shift cable to the shifter assembly
bracket. Push cable into the bracket until secure.
(5) Place the floor shifter lever in park position.
(6) Loosen the adjustment screw on the shift cable.
(7) Snap the shift cable onto the shift lever pin.
(8) Raise the vehicle.
(9) Install the shift cable to the shift cable support
bracket.
42RE AUTOMATIC TRANSMISSION
WJ
21 - 81
REMOVAL AND INSTALLATION (Continued)
(10) Shift the transmission into PARK. PARK is
the rearmost detent position on the transmission
manual shift lever.
(11) Snap the shift cable onto the transmission
manual shift lever.
(12) Lower vehicle.
(13) Verify that the shift lever is in the PARK position.
(14) Tighten the adjustment screw to 7 N·m (65 in.
lbs.).
(15) Verify correct shifter operation.
(16) Install shift lever bezel and any console parts
removed for access to shift lever assembly and shift
cable.
SHIFTER
REMOVAL
(1) Shift transmission into Park.
(2) Remove shift lever bezel and any necessary
console parts for access to shift lever assembly and
shifter cables.
(3) Disconnect the transmission shift cable at shift
lever and shifter assembly bracket (Fig. 88).
(4) Disconnect the brake transmission interlock
cable from the shifter BTSI lever and the shifter
assembly bracket.
(5) Disconnect the transfer case shift cable from
the transfer case shift lever pin (Fig. 90).
(6) Remove the clip holding the transfer case shift
cable to the shifter assembly bracket.
(7) Remove the transfer case shift cable from the
shifter assembly bracket.
(8) Disengage all wiring connectors from the
shifter assembly.
(9) Remove all nuts holding the shifter assembly to
the floor pan (Fig. 91).
(10) Remove the shifter assembly from the vehicle.
INSTALLATION
(1) Install shifter assembly onto the shifter assembly studs on the floor pan.
(2) Install the nuts to hold the shifter assembly
onto the floor pan. Tighten nuts to 28 N·m (250 in.
lbs.).
Fig. 88 Transmission Shift Cable at Shifter
1
2
3
4
–
–
–
–
SHIFT LEVER PIN
ADJUSTMENT SCREW
SHIFT CABLE
SHIFTER ASSEMBLY BRACKET
(3) Install wiring harness to the shifter assembly
bracket. Engage any wire connectors removed from
the shifter assembly.
(4) Install the transfer case shift cable to the
shifter assembly bracket. Install clip to hold cable to
the bracket.
(5) Snap the transfer case shift cable onto the
transfer case shift lever pin.
(6) Install the brake transmission interlock cable
into the shifter assembly bracket and into the shifter
BTSI lever.
(7) Install the shift cable to the shifter assembly
bracket. Push cable into the bracket until secure.
(8) Place the floor shifter lever in park position.
(9) Loosen the adjustment screw on the shift cable.
(10) Snap the shift cable onto the shift lever pin.
(11) Verify that the shift lever is in the PARK position.
(12) Tighten the adjustment screw to 7 N·m (65 in.
lbs.).
(13) Verify correct shifter operation.
(14) Install shift lever bezel and any console parts
removed for access to shift lever assembly and shift
cables.
21 - 82
42RE AUTOMATIC TRANSMISSION
WJ
REMOVAL AND INSTALLATION (Continued)
Fig. 89 Brake Transmission Interlock Cable
1 – SHIFT MECHANISM
2 – SHIFTER BTSI LEVER
3 – ADJUSTMENT CLIP
Fig. 90 Transfer Case Shift Cable
1
2
3
4
–
–
–
–
CLIP
SHIFTER
TRANSFER CASE SHIFT LEVER PIN
TRANSFER CASE SHIFT CABLE
4 – STEERING COLUMN ASSEMBLY
5 – INTERLOCK CABLE
Fig. 91 Shifter Assembly
1 – FLOOR PAN
2 – SHIFTER ASSEMBLY
42RE AUTOMATIC TRANSMISSION
WJ
21 - 83
REMOVAL AND INSTALLATION (Continued)
Fig. 92 Brake Transmission Shift Interlock
1 – SHIFT MECHANISM
2 – SHIFTER BTSI LEVER
3 – ADJUSTMENT CLIP
BRAKE TRANSMISSION SHIFT INTERLOCK
REMOVAL
(1) Lower the steering column.
(2) Remove the transmission shift interlock cable
from steering column (Fig. 92).
(3) Remove the center console and related trim.
Refer to Group 23, Body, for proper procedures.
(4) Disconnect the BTSI cable from the shift BTSI
lever and remove the cable from the shifter assembly
bracket.
(5) Disengage the wire connector at the solenoid
on the cable
(6) Release the BTSI cable from any remaining
clips.
(7) Remove BTSI cable from the vehicle.
INSTALLATION
NOTE: The gearshift cable must be secured into
position and properly adjusted before the installation of the Brake Transmission Interlock Cable
(BTSI).
4 – STEERING COLUMN ASSEMBLY
5 – INTERLOCK CABLE
(1) Snap the BTSI cable assembly into the steering
column.
(2) Snap BTSI cable solenoid tie strap into hole in
steering column tube.
(3) Engage the wiring connector from brake light
switch into BTSI cable solenoid housing.
(4) Route BTSI cable to the shifter mechanism.
(5) Install the BTSI cable end fitting into shifter
BTSI lever.
(6) Pull rearward on the BTSI cable housing and
install the cable housing into the shifter assembly
bracket.
(7) Place the ignition key cylinder in the LOCK
position.
(8) Snap BTSI cable adjuster ears into floor shifter
bracket and
(9) Push the cable adjuster lock clamp downward
to lock it.
(10) Install the center console and related trim.
Refer to Group 23, Body, for proper procedures.
(11) Test the BTSI cable operation.
21 - 84
42RE AUTOMATIC TRANSMISSION
WJ
REMOVAL AND INSTALLATION (Continued)
GOVERNOR SOLENOID AND PRESSURE
SENSOR
REMOVAL
(1) Hoist and support vehicle on safety stands.
(2) Remove transmission fluid pan and filter.
(3) Disengage wire connectors from pressure sensor and solenoid (Fig. 93).
(4) Remove screws holding pressure solenoid
retainer to governor body.
(5) Separate solenoid retainer from governor (Fig.
94).
(6) Pull solenoid from governor body (Fig. 95).
(7) Pull pressure sensor from governor body.
(8) Remove bolts holding governor body to valve
body.
(9) Separate governor body from valve body (Fig.
96).
(10) Remove governor body gasket.
Fig. 93 Governor Solenoid And Pressure Sensor
1 – PRESSURE SENSOR
2 – PRESSURE SOLENOID
3 – GOVERNOR
INSTALLATION
Before installing the pressure sensor and solenoid
in the governor body, replace O-ring seals, clean the
gasket surfaces and replace gasket.
(1) Place gasket in position on back of governor
body (Fig. 96).
(2) Place governor body in position on valve body.
(3) Install bolts to hold governor body to valve
body.
(4) Lubricate O-ring on pressure sensor with
transmission fluid.
(5) Align pressure sensor to bore in governor body.
(6) Push pressure sensor into governor body.
(7) Lubricate O-ring, on pressure solenoid, with
transmission fluid.
(8) Align pressure solenoid to bore in governor
body (Fig. 95).
(9) Push solenoid into governor body.
(10) Place solenoid retainer in position on governor
(Fig. 94).
(11) Install screws to hold pressure solenoid
retainer to governor body.
(12) Engage wire connectors into pressure sensor
and solenoid (Fig. 93).
(13) Install transmission fluid pan and (new) filter.
(14) Lower vehicle and road test to verify repair.
VALVE BODY
The valve body can be removed for service without
having to remove the transmission assembly.
The valve body can be disassembled for cleaning
and inspection of the individual components. Refer to
Disassembly and Assembly section for proper procedures.
The only replaceable valve body components are:
• Manual lever.
Fig. 94 Pressure Solenoid Retainer
1 – PRESSURE SOLENOID RETAINER
2 – GOVERNOR
• Manual lever washer, seal, E-clip, and shaft
seal.
• Manual lever detent ball.
• Throttle lever.
• Fluid filter.
• Pressure adjusting screw bracket.
• Governor pressure solenoid.
• Governor pressure sensor (includes transmission
temperature thermistor).
• Converter clutch/overdrive solenoid assembly
and harness.
• Governor housing gasket.
• Solenoid case connector O-rings.
The remaining valve body components are serviced
only as part of a complete valve body assembly.
42RE AUTOMATIC TRANSMISSION
WJ
21 - 85
REMOVAL AND INSTALLATION (Continued)
(10) Work manual lever shaft and electrical connector out of transmission case.
(11) Lower valve body, rotate valve body away
from case, pull park rod out of sprag, and remove
valve body (Fig. 98).
Fig. 95 Pressure Solenoid and O-ring
1 – PRESSURE SOLENOID
2 – O-RING
3 – GOVERNOR
Fig. 97 Transmission Case Connector
1 – SOLENOID CASE CONNECTOR
2 – PARK/NEUTRAL POSITION SWITCH CONNECTOR
TERMINAL
Fig. 96 Governor Body and Gasket
1 – GOVERNOR BODY
2 – GASKET
REMOVAL
(1) Shift transmission into NEUTRAL.
(2) Raise vehicle.
(3) Remove gearshift and throttle levers from shaft
of valve body manual lever.
(4) Disconnect wires at solenoid case connector
(Fig. 97).
(5) Position drain pan under transmission oil pan.
(6) Remove transmission oil pan and gasket.
(7) Remove fluid filter from valve body.
(8) Remove bolts attaching valve body to transmission case.
(9) Lower valve body enough to remove accumulator piston and springs.
Fig. 98 Valve Body
1
2
3
4
5
–
–
–
–
–
VALVE BODY
WIRE HARNESS
PARK ROD
GOVERNOR PRESSURE SOLENOID
GOVERNOR PRESSURE SENSOR
INSTALLATION
(1) Check condition of O-ring seals on valve body
harness connector (Fig. 99). Replace seals on connector body if cut or worn.
21 - 86
42RE AUTOMATIC TRANSMISSION
WJ
REMOVAL AND INSTALLATION (Continued)
(2) Check condition of manual lever shaft seal in
transmission case. Replace seal if lip is cut or worn.
Install new seal with 15/16 deep well socket (Fig.
100).
(3) Check condition of seals on accumulator piston
(Fig. 101). Install new piston seals, if necessary.
(4) Place valve body manual lever in low (1 position) so ball on park lock rod will be easier to install
in sprag.
(5) Lubricate shaft of manual lever with petroleum
jelly. This will ease inserting shaft through seal in
case.
(6) Lubricate seal rings on valve body harness connector with petroleum jelly.
(7) Position valve body in case and work end of
park lock rod into and through pawl sprag. Turn propeller shaft to align sprag and park lock teeth if necessary. The rod will click as it enters pawl. Move rod
to check engagement.
Fig. 99 Valve Body Harness Connector O-Ring Seal
1 – CONNECTOR O-RINGS
2 – VALVE BODY HARNESS CONNECTOR
3 – HARNESS
CAUTION: It is possible for the park rod to displace
into a cavity just above the pawl sprag during
installation. Make sure the rod is actually engaged
in the pawl and has not displaced into this cavity.
(8) Install accumulator springs and piston into
case. Then swing valve body over piston and outer
spring to hold it in place.
(9) Align accumulator piston and outer spring,
manual lever shaft and electrical connector in case.
(10) Then seat valve body in case and install one
or two bolts to hold valve body in place.
(11) Tighten valve body bolts alternately and
evenly to 11 N·m (100 in. lbs.) torque.
(12) Install new fluid filter on valve body. Tighten
filter screws to 4 N·m (35 in. lbs.) torque.
(13) Install throttle and gearshift levers on valve
body manual lever shaft.
(14) Check and adjust front and rear bands if necessary.
(15) Connect solenoid case connector wires.
(16) Install oil pan and new gasket. Tighten pan
bolts to 17 N·m (13 ft. lbs.) torque.
(17) Lower vehicle and fill transmission with
Mopart ATF Plus 3, type 7176 fluid.
(18) Check and adjust gearshift and throttle valve
cables, if necessary.
Fig. 100 Manual Lever Shaft Seal
1 – 15/16” SOCKET
2 – SEAL
OVERDRIVE UNIT
REMOVAL
(1) Shift transmission into Park.
(2) Raise vehicle.
(3) Remove transfer case, if equipped.
(4) Mark propeller shaft universal joint(s) and axle
pinion yoke, or the companion flange and flange
Fig. 101 Accumulator Piston Components
1
2
3
4
–
–
–
–
INNER SPRING
ACCUMULATOR PISTON
OUTER SPRING
SEAL RINGS
42RE AUTOMATIC TRANSMISSION
WJ
21 - 87
REMOVAL AND INSTALLATION (Continued)
yoke, for alignment reference at installation, if neccesary.
(5) Disconnect and remove the rear propeller shaft,
if necessary.
(6) Remove transmission oil pan, remove gasket,
drain oil and reinstall pan.
(7) If overdrive unit had malfunctioned, or if fluid
is contaminated, remove entire transmission. If diagnosis indicated overdrive problems only, remove just
the overdrive unit.
(8) Support transmission with transmission jack.
(9) Remove vehicle speed sensor.
(10) Remove bolts attaching overdrive unit to
transmission (Fig. 102).
CAUTION: Support the overdrive unit with a jack
before moving it rearward. This is necessary to prevent damaging the intermediate shaft. Do not allow
the shaft to support the entire weight of the overdrive unit.
(16) Examine fluid for clutch material or metal
fragments. If fluid contains these items, overhaul will
be necessary.
(17) If overdrive unit does not require any service,
leave alignment tool in position. Tool will prevent
accidental misalignment of planetary gear and overrunning clutch splines.
INSTALLATION
(1) Be sure overdrive unit Alignment Tool 6227-2
is fully seated before moving unit. If tool is not
seated and gear splines rotate out of alignment, overdrive unit will have to be disassembled in order to
realign splines.
(2) If overdrive piston retainer was not removed
during service and original case gasket is no longer
reusable, prepare new gasket by trimming it.
(3) Cut out old case gasket around piston retainer
with razor knife (Fig. 103).
(4) Use old gasket as template and trim new gasket to fit.
(5) Position new gasket over piston retainer and
on transmission case. Use petroleum jelly to hold
gasket in place if necessary. Do not use any type of
sealer to secure gasket. Use petroleum jelly only.
Fig. 102 Overdrive Unit Bolts
1 – OVERDRIVE UNIT
2 – ATTACHING BOLTS (7)
(11) Carefully work overdrive unit off intermediate
shaft. Do not tilt unit during removal. Keep it as
level as possible.
(12) If overdrive unit does not require service,
immediately insert Alignment Tool 6227-2 in splines
of planetary gear and overrunning clutch to prevent
splines from rotating out of alignment. If misalignment occurs, overdrive unit will have to be disassembled in order to realign splines.
(13) Remove and retain overdrive piston thrust
bearing. Bearing may remain on piston or in clutch
hub during removal.
(14) Position drain pan on workbench.
(15) Place overdrive unit over drain pan. Tilt unit
to drain residual fluid from case.
Fig. 103 Trimming Overdrive Case Gasket
1 – GASKET
2 – SHARP KNIFE
(6) Install selective spacer on intermediate shaft, if
removed. Spacer goes in groove just rearward of
shaft rear splines (Fig. 104).
(7) Install thrust bearing in overdrive unit sliding
hub. Use petroleum jelly to hold bearing in position.
CAUTION: Be sure the shoulder on the inside diameter of the bearing is facing forward.
21 - 88
42RE AUTOMATIC TRANSMISSION
WJ
REMOVAL AND INSTALLATION (Continued)
Fig. 104 Intermediate Shaft Selective Spacer
Location
1 – SELECTIVE SPACER
2 – SPACER GROOVE
3 – INTERMEDIATE SHAFT
Fig. 105 Bushing Removal—Typical
(8) Verify that splines in overdrive planetary gear
and overrunning clutch hub are aligned with Alignment Tool 6227-2. Overdrive unit cannot be installed
if splines are not aligned. If splines have rotated out
of alignment, unit will have to be disassembled to
realign splines.
(9) Carefully slide Alignment Tool 6227-2 out of
overdrive planetary gear and overrunning clutch
splines.
(10) Raise overdrive unit and carefully slide it
straight onto intermediate shaft. Insert park rod into
park lock reaction plug at same time. Avoid tilting
overdrive during installation as this could cause
planetary gear and overrunning clutch splines to
rotate out of alignment. If this occurs, it will be necessary to remove and disassemble overdrive unit to
realign splines.
(11) Work overdrive unit forward on intermediate
shaft until seated against transmission case.
(12) Install bolts attaching overdrive unit to transmission unit. Tighten bolts in diagonal pattern to 34
N·m (25 ft. lbs).
(13) Install speed sensor.
(14) Connect speed sensor and overdrive wires.
(15) Install the transfer case, if equipped.
(16) Align and install rear propeller shaft, if necessary.
OVERDRIVE HOUSING BUSHING
REMOVAL
(1) Remove overdrive housing yoke seal.
(2) Insert Remover 6957 into overdrive housing.
Tighten tool to bushing and remove bushing (Fig.
105).
INSTALLATION
(1) Align bushing oil hole with oil slot in overdrive
housing.
1 – REMOVER 6957
2 – EXTENSION HOUSING BUSHING
(2) Tap bushing into place with Installer 6951 and
Handle C-4171.
(3) Install new oil seal in housing using Seal
Installer C-3995–A (Fig. 106).
Fig. 106 Overdrive Housing Seal Installation
1 – SPECIAL TOOL C-3995–A OR C-3972–A
2 – SPECIAL TOOL C-4471
OUTPUT SHAFT REAR BEARING
REMOVAL
(1) Remove overdrive unit from the vehicle.
(2) Remove overdrive geartrain from housing.
(3) Remove snap ring holding output shaft rear
bearing into overdrive housing (Fig. 107).
(4) Using a suitable driver inserted through the
rear end of housing, drive bearing from housing.
INSTALLATION
(1) Place replacement bearing in position in housing.
(2) Using a suitable driver, drive bearing into
housing until the snap ring groove is visible.
(3) Install snap ring to hold bearing into housing
(Fig. 107).
42RE AUTOMATIC TRANSMISSION
WJ
21 - 89
REMOVAL AND INSTALLATION (Continued)
(4) Install overdrive geartrain into housing.
(5) Install overdrive unit in vehicle.
Fig. 108 Output Shaft Front Bearing
Fig. 107 Output Shaft Rear Bearing
1 – OUTPUT SHAFT REAR BEARING
2 – OVERDRIVE HOUSING
3 – SNAP RING
OUTPUT SHAFT FRONT BEARING
REMOVAL
(1) Remove overdrive unit from the vehicle.
(2) Remove overdrive geartrain from housing.
(3) Remove snap ring holding output shaft front
bearing to overdrive geartrain. (Fig. 108).
(4) Pull bearing from output shaft.
INSTALLATION
(1) Place replacement bearing in position on
geartrain with locating retainer groove toward the
rear.
(2) Push bearing onto shaft until the snap ring
groove is visible.
(3) Install snap ring to hold bearing onto output
shaft (Fig. 108).
(4) Install overdrive geartrain into housing.
(5) Install overdrive unit in vehicle.
DISASSEMBLY AND ASSEMBLY
VALVE BODY
Remove the valve body from the transmission,
refer to Removal and Installation procedures section
in this group.
DISASSEMBLY
CAUTION: Do not clamp any valve body component in a vise. This practice can damage the component resulting in unsatisfactory operation after
1
2
3
4
5
–
–
–
–
–
OUTPUT SHAFT FRONT BEARING
SNAP RING
OUTPUT SHAFT
GROOVE TO REAR
OVERDRIVE GEARTRAIN
assembly and installation. Do not use pliers to
remove any of the valves, plugs or springs and do
not force any of the components out or into place.
The valves and valve body housings will be damaged if force is used. Tag or mark the valve body
springs for reference as they are removed. Do not
allow them to become intermixed.
(1) Remove fluid filter.
(2) Disconnect wires from governor pressure sensor and solenoid.
(3) Remove screws attaching governor body and
retainer plate to transfer plate.
(4) Remove retainer plate, governor body and gasket from transfer plate.
(5) Remove governor pressure sensor from governor body
(6) Remove governor pressure solenoid by pulling
it straight out of bore in governor body. Remove and
discard solenoid O-rings if worn, cut, or torn.
(7) Remove small shoulder bolt that secures solenoid harness case connector to 3-4 accumulator housing (Fig. 109). Retain shoulder bolt. Either tape
it to harness or thread it back into accumulator
housing after connector removal.
(8) Unhook overdrive/converter solenoid harness
from 3-4 accumulator cover plate (Fig. 110).
(9) Turn valve body over and remove screws that
attach overdrive/converter solenoid assembly to valve
body (Fig. 111).
(10) Remove solenoid and harness assembly from
valve body (Fig. 112).
(11) Remove boost valve cover (Fig. 113).
(12) Remove boost valve retainer, valve spring and
boost valve (Fig. 114).
21 - 90
42RE AUTOMATIC TRANSMISSION
WJ
DISASSEMBLY AND ASSEMBLY (Continued)
Fig. 109 Solenoid Harness Case Connector
Shoulder Bolt
1 – SOLENOID HARNESS CASE CONNECTOR
2 – 3–4 ACCUMULATOR HOUSING
Fig. 111 Solenoid Assembly Screws
1 – OVERDRIVE/CONVERTER CLUTCH SOLENOID ASSEMBLY
2 – HARNESS
Fig. 110 Unhooking Solenoid Harness From
Accumulator Cover Plate
1 – OVERDRIVE/CONVERTER SOLENOID WIRE HARNESS
2 – 3–4 ACCUMULATOR COVER PLATE
Fig. 112 Solenoid Assembly
1
2
3
4
5
6
7
–
–
–
–
–
–
–
GOVERNOR SOLENOID WIRES
CONVERTER CLUTCH SOLENOID
SOLENOID SCREWS
GOVERNOR SENSOR WIRES
OVERDRIVE SOLENOID
HARNESS
CASE CONNECTOR
42RE AUTOMATIC TRANSMISSION
WJ
21 - 91
DISASSEMBLY AND ASSEMBLY (Continued)
(17) Position pencil magnet next to detent housing
to catch detent ball and spring. Then carefully
remove Retainer Tool 6583 and remove detent ball
and spring (Fig. 119).
(18) Remove screws attaching pressure adjusting
screw bracket to valve body and transfer plate (Fig.
120). Hold bracket firmly against spring tension
while removing last screw.
Fig. 113 Boost Valve Cover Location
1 – BOOST VALVE HOUSING AND COVER
2 – BOOST VALVE TUBE
Fig. 115 Detent Ball And Spring
1 – SPECIAL TOOL 6583 POSITIONED ON DETENT HOUSING
Fig. 114 Boost Valve Components
1
2
3
4
5
6
–
–
–
–
–
–
SPRING AND VALVE RETAINER
COVER SCREWS
BOOST VALVE COVER
BOOST VALVE PLUG
BOOST VALVE
BOOST VALVE SPRING
(13) Secure detent ball and spring with Retainer
Tool 6583 (Fig. 115).
(14) Remove park rod E-clip and separate rod from
manual lever (Fig. 116).
(15) Remove E-clip and washer that retains throttle lever shaft in manual lever (Fig. 117).
(16) Remove manual lever and throttle lever (Fig.
118). Rotate and lift manual lever off valve body and
throttle lever shaft. Then slide throttle lever out of
valve body.
Fig. 116 Park Rod
1 – MANUAL LEVER
2 – E-CLIP
3 – PARK ROD
21 - 92
42RE AUTOMATIC TRANSMISSION
WJ
DISASSEMBLY AND ASSEMBLY (Continued)
Fig. 117 Throttle Lever E-Clip And Washer
1 – THROTTLE LEVER SHAFT
2 – E-CLIP AND WASHER
3 – MANUAL SHAFT
Fig. 119 Detent Ball And Spring
1
2
3
4
–
–
–
–
DETENT HOUSING
DETENT SPRING
DETENT BALL
PENCIL MAGNET
1
2
3
4
5
–
–
–
–
–
T25 TORX BIT
REMOVE THESE SCREWS FIRST
BRACKET
BRACKET
REMOVE THIS SCREW LAST
Fig. 118 Manual And Throttle Lever
1 – PARK ROD
2 – MANUAL LEVER ASSEMBLY
3 – THROTTLE LEVER
(19) Remove adjusting screw bracket, line pressure
adjusting screw, pressure regulator valve spring and
switch valve spring (Fig. 121). Do not remove
throttle pressure adjusting screw from bracket
and do not disturb setting of either adjusting
screw during removal.
(20) Turn upper housing over and remove switch
valve, regulator valve and spring, and manual valve
(Fig. 122).
(21) Remove kickdown detent, kickdown valve, and
throttle valve and spring (Fig. 122).
(22) Loosen left-side 3-4 accumulator housing
attaching screw about 2-3 threads. Then remove center and right-side housing attaching screws (Fig.
123).
Fig. 120 Adjusting Screw Bracket Fastener
(23) Carefully rotate 3-4 accumulator housing
upward and remove 3-4 shift valve spring and converter clutch valve plug and spring (Fig. 124).
(24) Remove left-side screw and remove 3-4 accumulator housing from valve body (Fig. 125).
(25) Bend back tabs on boost valve tube brace (Fig.
126).
42RE AUTOMATIC TRANSMISSION
WJ
21 - 93
DISASSEMBLY AND ASSEMBLY (Continued)
Fig. 121 Adjusting Screw Bracket And Spring
1
2
3
4
5
–
–
–
–
–
SWITCH VALVE SPRING
LINE PRESSURE SCREW
THROTTLE PRESSURE ADJUSTING SCREW
ADJUSTING SCREW BRACKET
PRESSURE REGULATOR VALVE SPRING
1
2
3
4
5
6
7
–
–
–
–
–
–
–
UPPER HOUSING
REGULATOR VALVE
SWITCH VALVE
REGULATOR VALVE SPRING
KICKDOWN VALVE
KICKDOWN DETENT
THROTTLE VALVE AND SPRING
Fig. 123 Accumulator Housing Screw Locations
1 – LOOSEN THIS SCREW
2 – REMOVE THESE SCREWS
3 – 3–4 ACCUMULATOR HOUSING
Fig. 122 Upper Housing Control Valve Locations
8 – MANUAL VALVE
9 – 1–2 GOVERNOR PLUG
10 – GOVERNOR PLUG COVER
11 – THROTTLE PLUG
12 – 2–3 GOVERNOR PLUG
13 – SHUTTLE VALVE PRIMARY SPRING
21 - 94
42RE AUTOMATIC TRANSMISSION
WJ
DISASSEMBLY AND ASSEMBLY (Continued)
Fig. 126 Boost Valve Tube Brace
1 – BOOST VALVE TUBE
2 – TUBE BRACE (DOUBLE TAB)
Fig. 124 3-4 Shift And Converter Clutch Valve
Springs And Plug
1
2
3
4
–
–
–
–
ACCUMULATOR HOUSING
CONVERTER CLUTCH VALVE SPRING
CLUTCH VALVE PLUG
3–4 SHIFT VALVE SPRING
(26) Remove boost valve connecting tube (Fig.
127). Disengage tube from upper housing port first.
Then rock opposite end of tube back and forth to
work it out of lower housing.
CAUTION: Do not use tools to loosen or pry the
connecting tube out of the valve body housings.
Loosen and remove the tube by hand only.
(27) Turn valve body over so lower housing is facing upward (Fig. 128). In this position, the two check
balls in upper housing will remain in place and not
fall out when lower housing and separator plate are
removed.
(28) Remove screws attaching valve body lower
housing to upper housing and transfer plate (Fig.
128). Note position of boost valve tube brace for
assembly reference.
(29) Remove lower housing and overdrive separator plate from transfer plate (Fig. 128).
(30) Remove the ECE check ball from the transfer
plate (Fig. 129). The ECE check ball is approximately
4.8 mm (3/16 in.) in diameter.
(31) Remove transfer plate from upper housing
(Fig. 130).
Fig. 125 Accumulator Housing, Valve Springs And
Plug
1 – 3–4 SHIFT VALVE SPRING
2 – CONVERTER CLUTCH VALVE SPRING AND PLUG
3 – 3–4 ACCUMULATOR HOUSING
42RE AUTOMATIC TRANSMISSION
WJ
21 - 95
DISASSEMBLY AND ASSEMBLY (Continued)
(32) Turn transfer plate over so upper housing separator plate is facing upward.
(33) Remove upper housing separator plate from
transfer plate (Fig. 131). Note position of filter in
separator plate for assembly reference.
(34) Remove rear clutch and rear servo check balls
from transfer plate. Note check ball location for
assembly reference (Fig. 132).
Fig. 129 ECE Check Ball
Fig. 127 Boost Valve Tube
1
2
3
4
–
–
–
–
1 – ECE CHECK BALL (3/16”)
BOOST VALVE TUBE
LOWER HOUSING
DISENGAGE THIS END OF TUBE FIRST
UPPER HOUSING
Fig. 128 Lower Housing
1 – LOWER HOUSING
2 – OVERDRIVE SEPARATOR PLATE
3 – TRANSFER PLATE AND UPPER HOUSING
VALVE BODY UPPER HOUSING
(1) Note location of check balls in valve body upper
housing (Fig. 133). Then remove the one large diameter and the six smaller diameter check balls.
(2) Remove governor plug and shuttle valve covers
(Fig. 135).
Fig. 130 Transfer Plate
1 – UPPER HOUSING
2 – TRANSFER PLATE
(3) Remove E-clip that secures shuttle valve secondary spring on valve stem (Fig. 134).
(4) Remove throttle plug, primary spring, shuttle
valve, secondary spring, and spring guides (Fig. 135).
21 - 96
42RE AUTOMATIC TRANSMISSION
WJ
DISASSEMBLY AND ASSEMBLY (Continued)
(10) Remove 1-2 shift valve and spring (Fig. 136).
(11) Remove 2-3 shift valve and spring from valve
body (Fig. 136).
(12) Remove pressure plug cover (Fig. 136).
(13) Remove line pressure plug, sleeve, throttle
pressure plug and spring (Fig. 136).
Fig. 131 Upper Housing Separator Plate
1
2
3
4
–
–
–
–
TRANSFER PLATE
UPPER HOUSING SEPARATOR PLATE
FILTER SCREEN
BRACE
Fig. 133 Check Ball Locations In Upper Housing
1 – SMALL DIAMETER CHECK BALLS (6)
2 – LARGE DIAMETER CHECK BALL (1)
Fig. 132 Rear Clutch And Rear Servo Check Ball
Locations
1 – REAR CLUTCH CHECK BALL
2 – REAR SERVO CHECK BALL
3 – TRANSFER PLATE
(5) Remove boost valve retainer, spring and valve
if not previously removed.
(6) Remove throttle plug and 1-2 and 2-3 governor
plugs (Fig. 122).
(7) Turn upper housing around and remove limit
valve and shift valve covers (Fig. 136).
(8) Remove limit valve housing. Then remove
retainer, spring, limit valve, and 2-3 throttle plug
from limit valve housing (Fig. 136).
(9) Remove 1-2 shift control valve and spring (Fig.
136).
Fig. 134 Shuttle Valve E-Clip And Secondary Spring
Location
1 – E-CLIP
2 – SECONDARY SPRING AND GUIDES
3 – SHUTTLE VALVE
42RE AUTOMATIC TRANSMISSION
WJ
DISASSEMBLY AND ASSEMBLY (Continued)
Fig. 135 Shuttle And Boost Valve Components
1
2
3
4
5
6
7
–
–
–
–
–
–
–
SPRING
RETAINER
BOOST VALVE
BOOST VALVE PLUG
SPRING GUIDES
E-CLIP
SHUTTLE VALVE SECONDARY SPRING
8 – SHUTTLE VALVE COVER
9 – SHUTTLE VALVE
10 – SHUTTLE VALVE PRIMARY SPRING
11 – GOVERNOR PLUG COVER
12 – THROTTLE PLUG
13 – UPPER HOUSING
14 – BOOST VALVE COVER
21 - 97
21 - 98
42RE AUTOMATIC TRANSMISSION
WJ
DISASSEMBLY AND ASSEMBLY (Continued)
Fig. 136 Upper Housing Shift Valve And Pressure Plug Locations
1
2
3
4
5
6
7
–
–
–
–
–
–
–
UPPER HOUSING
1–2 SHIFT VALVE AND SPRING
2–3 SHIFT VALVE AND SPRING
2–3 THROTTLE PLUG
LIMIT VALVE HOUSING
LIMIT VALVE COVER
LIMIT VALVE AND SPRING
8 – RETAINER
9 – 1–2 SHIFT CONTROL VALVE AND SPRING
10 – PRESSURE PLUG COVER
11 – LINE PRESSURE PLUG
12 – PLUG SLEEVE
13 – THROTTLE PRESSURE SPRING AND PLUG
42RE AUTOMATIC TRANSMISSION
WJ
DISASSEMBLY AND ASSEMBLY (Continued)
Fig. 137 Lower Housing Shift Valves And Springs
1 – 3-4 ACCUMULATOR HOUSING
2 – 3-4 SHIFT VALVE AND SPRING
3 – PLUG
4 – SPRING RETAINER
5 – CONVERTER CLUTCH VALVE AND SPRING
6 – CONVERTER CLUTCH TIMING VALVE AND SPRING
7 – OVERDRIVE SEPARATOR PLATE
8 – CASE CONNECTOR
9 – CONVERTER CLUTCH SOLENOID
10 – OVERDRIVE SOLENOID
VALVE BODY LOWER HOUSING
(1) Remove timing valve cover.
(2) Remove 3-4 timing valve and spring.
(3) Remove 3-4 quick fill valve, spring and plug.
(4) Remove 3-4 shift valve and spring.
(5) Remove converter clutch valve, spring and plug
(Fig. 137).
(6) Remove converter clutch timing valve, retainer
and valve spring.
11
12
13
14
15
16
17
18
19
20
–
–
–
–
–
–
–
–
–
–
TIMING VALVE COVER
PLUG
3-4 TIMING VALVE AND SPRING
LOWER HOUSING
ACCUMULATOR END PLATE
3-4 ACCUMULATOR PISTON AND SPRING
E-CLIP
3-4 QUICK FILL SPRING AND VALVE
SOLENOID GASKET
HARNESS
21 - 99
21 - 100
42RE AUTOMATIC TRANSMISSION
WJ
DISASSEMBLY AND ASSEMBLY (Continued)
3-4 ACCUMULATOR HOUSING
(1) Remove end plate from housing.
(2) Remove piston spring.
(3) Remove piston. Remove and discard piston
seals (Fig. 138).
(2) Install 3-4 timing valve spring and valve in
lower housing.
(3) Install 3-4 quick fill valve in lower housing.
(4) Install 3-4 quick fill valve spring and plug in
housing.
(5) Install timing valve end plate. Tighten end
plate screws to 4 N·m (35 in. lbs.) torque.
3-4 ACCUMULATOR
(1) Lubricate accumulator piston, seals and housing piston bore with clean transmission fluid (Fig.
138).
(2) Install new seal rings on accumulator piston.
(3) Install piston and spring in housing.
(4) Install end plate on housing.
Fig. 138 Accumulator Housing Components
1
2
3
4
5
–
–
–
–
–
TRANSFER PLATE
(1) Install rear clutch and rear servo check balls in
transfer plate (Fig. 139).
(2) Install filter screen in upper housing separator
plate (Fig. 140).
(3) Align and position upper housing separator
plate on transfer plate (Fig. 141).
(4) Install brace plate (Fig. 141). Tighten brace
attaching screws to 4 N·m (35 in. lbs.) torque.
(5) Install remaining separator plate attaching
screws. Tighten screws to 4 N·m (35 in. lbs.) torque.
ACCUMULATOR PISTON
3–4 ACCUMULATOR HOUSING
TEFLON SEALS
PISTON SPRING
COVER PLATE AND SCREWS
ASSEMBLY
CAUTION: Do not force valves or plugs into place
during reassembly. If the valve body bores, valves
and plugs are free of distortion or burrs, the valve
body components should all slide into place easily.
In addition, do not overtighten the transfer plate
and valve body screws during reassembly. Overtightening can distort the housings resulting in
valve sticking, cross leakage and unsatisfactory
operation. Tighten valve body screws to recommended torque only.
LOWER HOUSING
(1) Lubricate valves, springs, and the housing
valve and plug bores with clean transmission fluid
(Fig. 137).
Fig. 139 Rear Clutch And Rear Servo Check Ball
Locations
1 – REAR CLUTCH CHECK BALL
2 – REAR SERVO CHECK BALL
3 – TRANSFER PLATE
42RE AUTOMATIC TRANSMISSION
WJ
21 - 101
DISASSEMBLY AND ASSEMBLY (Continued)
(5) Install lower housing on assembled transfer
plate and upper housing (Fig. 145).
(6) Install and start all valve body screws by hand
except for the screws to hold the boost valve tube
brace. Save those screws for later installation. Then
tighten screws evenly to 4 N·m (35 in. lbs.) torque.
Start at center and work out to sides when tightening screws (Fig. 145).
Fig. 140 Separator Plate Filter Screen Installation
1 – UPPER HOUSING SEPARATOR PLATE
2 – FILTER SCREEN
Fig. 142 Check Ball Locations In Upper Housing
1 – SMALL DIAMETER CHECK BALLS (6)
2 – LARGE DIAMETER CHECK BALL (1)
Fig. 141 Brace Plate
1 – BRACE
2 – TRANSFER PLATE
3 – SEPARATOR PLATE
UPPER AND LOWER HOUSING
(1) Position upper housing so internal passages
and check ball seats are facing upward. Then install
check balls in housing (Fig. 142). Eight check balls
are used. The single large check ball is approximately 8.7 mm (11/32 in.) diameter. The single small
check ball is approximately 4.8 mm (3/16 in.) in
diameter. The remaining 6 check balls are approximately 6.3 mm (1/4 in.) in diameter.
(2) Position assembled transfer plate and upper
housing separator plate on upper housing (Fig. 143).
Be sure filter screen is seated in proper housing
recess.
(3) Install the ECE check ball into the transfer
plate (Fig. 129). The ECE check ball is approximately
4.8 mm (3/16 in.) in diameter.
(4) Position lower housing separator plate on
transfer plate (Fig. 144).
Fig. 143 Installing Transfer Plate On Upper Housing
1 – FILTER SCREEN
2 – TRANSFER PLATE/SEPARATOR PLATE ASSEMBLY
3 – UPPER HOUSING
21 - 102
42RE AUTOMATIC TRANSMISSION
WJ
DISASSEMBLY AND ASSEMBLY (Continued)
Fig. 144 Lower Housing Separator Plate
1 – BE SURE TO ALIGN BORES
2 – TRANSFER PLATE
3 – LOWER HOUSING (OVERDRIVE) SEPARATOR PLATE
Fig. 145 Installing Lower Housing On Transfer Plate
And Upper Housing
1
2
3
4
–
–
–
–
VALVE BODY SCREWS (13)
LOWER HOUSING
UPPER HOUSING
TRANSFER PLATE
UPPER HOUSING VALVE AND PLUG
Refer to (Fig. 146), (Fig. 147) and (Fig. 148) to perform the following steps.
(1) Lubricate valves, plugs, springs with clean
transmission fluid.
(2) Assemble regulator valve line pressure plug,
sleeve, throttle plug and spring. Insert assembly in
upper housing and install cover plate. Tighten cover
plate screws to 4 N·m (35 in. lbs.) torque.
(3) Install 1-2 and 2-3 shift valves and springs.
(4) Install 1-2 shift control valve and spring.
(5) Install retainer, spring, limit valve, and 2-3
throttle plug from limit valve housing.
(6) Install limit valve housing and cover plate.
Tighten screws to 4 N·m (35 in. lbs.).
(7) Install shuttle valve as follows:
(a) Insert plastic guides in shuttle valve secondary spring and install spring on end of valve.
(b) Install shuttle valve into housing.
(c) Hold shuttle valve in place.
(d) Compress secondary spring and install E-clip
in groove at end of shuttle valve.
(e) Verify that spring and E-clip are properly
seated before proceeding.
(8) Install shuttle valve cover plate. Tighten cover
plate screws to 4 N·m (35 in. lbs.) torque.
(9) Install 1-2 and 2-3 valve governor plugs in
valve body.
(10) Install shuttle valve primary spring and
throttle plug.
(11) Align and install governor plug cover. Tighten
cover screws to 4 N·m (35 in. lbs.) torque.
42RE AUTOMATIC TRANSMISSION
WJ
DISASSEMBLY AND ASSEMBLY (Continued)
Fig. 146 Shuttle And Boost Valve Components
1
2
3
4
5
6
7
–
–
–
–
–
–
–
SPRING
RETAINER
BOOST VALVE
BOOST VALVE PLUG
SPRING GUIDES
E-CLIP
SHUTTLE VALVE SECONDARY SPRING
8 – SHUTTLE VALVE COVER
9 – SHUTTLE VALVE
10 – SHUTTLE VALVE PRIMARY SPRING
11 – GOVERNOR PLUG COVER
12 – THROTTLE PLUG
13 – UPPER HOUSING
14 – BOOST VALVE COVER
21 - 103
21 - 104
42RE AUTOMATIC TRANSMISSION
WJ
DISASSEMBLY AND ASSEMBLY (Continued)
Fig. 147 Upper Housing Control Valve Locations
1
2
3
4
5
6
7
–
–
–
–
–
–
–
UPPER HOUSING
REGULATOR VALVE
SWITCH VALVE
REGULATOR VALVE SPRING
KICKDOWN VALVE
KICKDOWN DETENT
THROTTLE VALVE AND SPRING
8 – MANUAL VALVE
9 – 1–2 GOVERNOR PLUG
10 – GOVERNOR PLUG COVER
11 – THROTTLE PLUG
12 – 2–3 GOVERNOR PLUG
13 – SHUTTLE VALVE PRIMARY SPRING
42RE AUTOMATIC TRANSMISSION
WJ
DISASSEMBLY AND ASSEMBLY (Continued)
Fig. 148 Upper Housing Shift Valve And Pressure Plug Locations
1
2
3
4
5
6
7
–
–
–
–
–
–
–
UPPER HOUSING
1–2 SHIFT VALVE AND SPRING
2–3 SHIFT VALVE AND SPRING
2–3 THROTTLE PLUG
LIMIT VALVE HOUSING
LIMIT VALVE COVER
LIMIT VALVE AND SPRING
8 – RETAINER
9 – 1–2 SHIFT CONTROL VALVE AND SPRING
10 – PRESSURE PLUG COVER
11 – LINE PRESSURE PLUG
12 – PLUG SLEEVE
13 – THROTTLE PRESSURE SPRING AND PLUG
21 - 105
21 - 106
42RE AUTOMATIC TRANSMISSION
WJ
DISASSEMBLY AND ASSEMBLY (Continued)
BOOST VALVE TUBE AND BRACE
(1) Position valve body assembly so lower housing
is facing upward (Fig. 149).
(2) Lubricate tube ends and housing ports with
transmission fluid or petroleum jelly.
(3) Start tube in lower housing port first. Then
swing tube downward and work opposite end of tube
into upper housing port (Fig. 149).
(4) Insert and seat each end of tube in housings.
(5) Slide tube brace under tube and into alignment
with valve body screw holes (Fig. 150).
(6) Install and finger tighten three screws that
secure tube brace to valve body housings (Fig. 150).
(7) Bend tube brace tabs up and against tube to
hold it in position (Fig. 151).
(8) Tighten all valve body housing screws to 4 N·m
(35 in. lbs.) torque after tube and brace are installed.
Tighten screws in diagonal pattern starting at center
and working outward.
Fig. 150 Boost Valve Tube And Brace
1 – BOOST VALVE TUBE
2 – TUBE BRACE
Fig. 149 Boost Valve Tube
1
2
3
4
–
–
–
–
BOOST VALVE TUBE
LOWER HOUSING
DISENGAGE THIS END OF TUBE FIRST
UPPER HOUSING
3-4 ACCUMULATOR
(1) Position converter clutch valve and 3-4 shift
valve springs in housing (Fig. 152).
(2) Loosely attach accumulator housing with rightside screw (Fig. 152). Install only one screw at this
time as accumulator must be free to pivot upward for
ease of installation.
(3) Install 3-4 shift valve and spring.
(4) Install converter clutch timing valve and
spring.
(5) Position plug on end of converter clutch valve
spring. Then compress and hold springs and plug in
place with fingers of one hand.
(6) Swing accumulator housing upward over valve
springs and plug.
Fig. 151 Securing Boost Valve Tube With Brace
Tabs
1 – BEND TABS UP AGAINST TUBE AS SHOWN
(7) Hold accumulator housing firmly in place and
install remaining two attaching screws. Be sure
springs and clutch valve plug are properly seated
(Fig. 153). Tighten screws to 4 N·m (35 in. lbs.).
VALVE BODY FINAL
(1) Install boost valve, valve spring, retainer and
cover plate. Tighten cover plate screws to 4 N·m (35
in. lbs.) torque.
(2) Insert manual lever detent spring in upper
housing.
(3) Position detent ball on end of spring. Then hold
detent ball and spring in detent housing with
Retainer Tool 6583 (Fig. 154).
42RE AUTOMATIC TRANSMISSION
WJ
21 - 107
DISASSEMBLY AND ASSEMBLY (Continued)
Fig. 152 Converter Clutch And 3-4 Shift Valve
Springs
1
2
3
4
–
–
–
–
RIGHT-SIDE SCREW
3–4 ACCUMULATOR
3–4 SHIFT VALVE SPRING
CONVERTER CLUTCH VALVE SPRING
Fig. 153 Seating 3-4 Accumulator On Lower
Housing
1 – ACCUMULATOR BOX
2 – CONVERTER CLUTCH VALVE PLUG
(4) Install throttle lever in upper housing. Then
install manual lever over throttle lever and start
manual lever into housing.
(5) Align manual lever with detent ball and manual valve. Hold throttle lever upward. Then press
down on manual lever until fully seated. Remove
detent ball retainer tool after lever is seated.
(6) Then install manual lever seal, washer and
E-clip.
(7) Verify that throttle lever is aligned with end of
kickdown valve stem and that manual lever arm is
engaged in manual valve (Fig. 155).
(8) Position line pressure adjusting screw in
adjusting screw bracket.
(9) Install spring on end of line pressure regulator
valve.
(10) Install switch valve spring on tang at end of
adjusting screw bracket.
(11) Install manual valve.
(12) Install throttle valve and spring.
(13) Install kickdown valve and detent.
(14) Install pressure regulator valve.
(15) Install switch valve.
(16) Position adjusting screw bracket on valve
body. Align valve springs and press bracket into
place. Install short, upper bracket screws first and
long bottom screw last. Verify that valve springs and
bracket are properly aligned. Then tighten all three
bracket screws to 4 N·m (35 in. lbs.) torque.
(17) Perform Line Pressure and Throttle Pressure
adjustments. Refer to adjustment section of this
group for proper procedures.
(18) Lubricate solenoid case connector O-rings and
shaft of manual lever with light coat of petroleum
jelly.
(19) Attach solenoid case connector to 3-4 accumulator with shoulder-type screw. Connector has small
locating tang that fits in dimple at top of accumulator housing (Fig. 156). Seat tang in dimple before
tightening connector screw.
(20) Install solenoid assembly and gasket. Tighten
solenoid attaching screws to 8 N·m (72 in. lbs.)
torque.
(21) Verify that solenoid wire harness is properly
routed (Fig. 157). Solenoid harness must be clear
of manual lever and park rod and not be
pinched between accumulator housing and
cover.
21 - 108
42RE AUTOMATIC TRANSMISSION
WJ
DISASSEMBLY AND ASSEMBLY (Continued)
Fig. 154 Detent Ball Spring
1 – SPECIAL TOOL 6583 POSITIONED ON DETENT HOUSING
Fig. 156 Solenoid Harness Case Connector
Shoulder Bolt
1 – SOLENOID HARNESS CASE CONNECTOR
2 – 3–4 ACCUMULATOR HOUSING
Fig. 155 Manual And Throttle Lever Alignment
1
2
3
4
–
–
–
–
THROTTLE LEVER
MANUAL LEVER VALVE ARM
MANUAL VALVE
KICKDOWN VALVE
GOVERNOR BODY, SENSOR AND SOLENOID
(1) Turn valve body assembly over so accumulator
side of transfer plate is facing down.
(2) Install new O-rings on governor pressure solenoid and sensor.
(3) Lubricate solenoid and sensor O-rings with
clean transmission fluid.
(4) Install governor pressure sensor in governor
body.
(5) Install governor pressure solenoid in governor
body. Push solenoid in until it snaps into place in
body.
(6) Position governor body gasket on transfer
plate.
Fig. 157 Solenoid Harness Routing
1 – OVERDRIVE/CONVERTER SOLENOID WIRE HARNESS
2 – 3–4 ACCUMULATOR COVER PLATE
(7) Install retainer plate on governor body and
around solenoid. Be sure solenoid connector is positioned in retainer cutout.
(8) Align screw holes in governor body and transfer plate. Then install and tighten governor body
screws to 4 N·m (35 in. lbs.) torque.
(9) Connect harness wires to governor pressure
solenoid and governor pressure sensor.
(10) Install fluid filter and pan.
(11) Lower vehicle.
(12) Fill transmission with recommended fluid and
road test vehicle to verify repair.
42RE AUTOMATIC TRANSMISSION
WJ
21 - 109
DISASSEMBLY AND ASSEMBLY (Continued)
TRANSMISSION
DISASSEMBLY
(1) Clean transmission exterior with steam gun or
with solvent. Wear eye protection during cleaning
operations.
(2) Place transmission in a vertical position.
(3) Measure and record input shaft end play readings.
(4) Remove shift and throttle levers from valve
body manual lever shaft.
(5) Place transmission in horizontal position.
(6) Remove transmission oil pan and gasket.
(7) Remove filter from valve body (Fig. 158). Keep
filter screws separate from other valve body screws.
Filter screws are longer and should be kept with filter.
Fig. 159 Valve Body Bolt Locations
1 – VALVE BODY BOLTS
2 – VALVE BODY BOLTS
Fig. 158 Oil Filter Removal
1 – OIL FILTER
2 – VALVE BODY
3 – FILTER SCREWS (2)
(8) Remove park/neutral position switch.
(9) Remove hex head bolts attaching valve body to
transmission case (Fig. 159). A total of 10 bolts are
used. Note different bolt lengths for assembly reference.
(10) Remove valve body assembly. Push valve body
harness connector out of case. Then work park rod
and valve body out of case (Fig. 160).
(11) Remove accumulator piston and inner and
outer springs (Fig. 161).
(12) Remove pump oil seal with suitable pry tool
or slide-hammer mounted screw.
(13) Loosen front band adjusting screw locknut 4-5
turns. Then tighten band adjusting screw until band
is tight around front clutch retainer. This prevents
front/rear clutches from coming out with pump and
possibly damaging clutch or pump components.
(14) Remove oil pump bolts.
Fig. 160 Valve Body Removal
1
2
3
4
5
–
–
–
–
–
GOVERNOR PRESSURE SENSOR
VALVE BODY
PARK ROD
ACCUMULATOR PISTON
GOVERNOR PRESSURE SOLENOID
(15) Thread bolts of Slide Hammer Tools C-3752
into threaded holes in pump body flange (Fig. 162).
21 - 110
42RE AUTOMATIC TRANSMISSION
WJ
DISASSEMBLY AND ASSEMBLY (Continued)
(19) Remove front band lever (Fig. 164).
(20) Remove front band lever shaft plug, if necessary, from converter housing.
(21) Remove front band lever shaft.
Fig. 161 Accumulator Piston And Springs
1 – ACCUMULATOR PISTON
2 – OUTER SPRING
3 – INNER SPRING
(16) Bump slide hammer weights outward to
remove pump and reaction shaft support assembly
from case (Fig. 162).
Fig. 163 Removing/Installing Front Band Strut
1 – BAND LEVER
2 – BAND STRUT
3 – FRONT BAND
Fig. 162 Removing Oil Pump And Reaction Shaft
Support Assembly
1 – OIL PUMP AND REACTION SHAFT SUPPORT ASSEMBLY
2 – SLIDE HAMMER TOOLS C-3752
(17) Loosen front band adjusting screw until band
is completely loose.
(18) Squeeze front band together and remove band
strut (Fig. 163).
Fig. 164 Removing/Installing Front Band Lever
1 – FRONT BAND LEVER
WJ
42RE AUTOMATIC TRANSMISSION
21 - 111
DISASSEMBLY AND ASSEMBLY (Continued)
(22) Remove front and rear clutch units as assembly. Grasp input shaft, hold clutch units together and
remove them from case (Fig. 165).
(23) Lift front clutch off rear clutch (Fig. 166). Set
clutch units aside for overhaul.
Fig. 166 Separating Front/Rear Clutch Assemblies
1 – FRONT CLUTCH
2 – REAR CLUTCH
Fig. 165 Removing Front/Rear Clutch Assemblies
1 – INPUT SHAFT
2 – FRONT CLUTCH
3 – REAR CLUTCH
(24) Remove intermediate shaft thrust washer
from front end of shaft or from rear clutch hub (Fig.
167).
(25) Remove output shaft thrust plate from intermediate shaft hub (Fig. 168).
(26) Slide front band off driving shell (Fig. 169)
and remove band from case.
(27) Remove planetary geartrain as assembly (Fig.
170). Support geartrain with both hands during
removal. Do not allow machined surfaces on intermediate shaft or overdrive piston retainer to become
nicked or scratched.
(28) If overdrive unit is not to be serviced, install
Alignment Shaft 6227-2 into the overdrive unit to
prevent misalignment of the overdrive clutches during service of main transmission components.
(29) Loosen rear band adjusting screw 4-5 turns.
(30) Remove low-reverse drum snap ring (Fig.
171).
Fig. 167 Removing Intermediate Shaft Thrust
Washer
1 – INTERMEDIATE SHAFT THRUST WASHER
2 – INPUT SHAFT
3 – REAR CLUTCH RETAINER HUB
21 - 112
42RE AUTOMATIC TRANSMISSION
WJ
DISASSEMBLY AND ASSEMBLY (Continued)
Fig. 168 Removing Intermediate Shaft Thrust Plate
1 – INTERMEDIATE SHAFT HUB
2 – INTERMEDIATE SHAFT THRUST PLATE
Fig. 170 Removing Planetary Geartrain And
Intermediate Shaft Assembly
1 – PLANETARY GEARTRAIN AND INTERMEDIATE SHAFT
ASSEMBLY
Fig. 169 Front Band Removal/Installation
1 – DRIVING SHELL
2 – FRONT BAND
Fig. 171 Removing Low-Reverse Drum Snap Ring
1 – LOW-REVERSE DRUM
2 – HUB OF OVERDRIVE PISTON RETAINER
3 – LOW-REVERSE DRUM SNAP RING
WJ
42RE AUTOMATIC TRANSMISSION
21 - 113
DISASSEMBLY AND ASSEMBLY (Continued)
(31) Remove low-reverse drum and reverse band.
(32) Remove overrunning clutch roller and spring
assembly as a unit (Fig. 172).
(33) Compress front servo rod guide about 1/8 inch
with Valve Spring Compressor C-3422-B (Fig. 173).
(34) Remove front servo rod guide snap ring.
Exercise caution when removing snap ring.
Servo bore can be scratched or nicked if care is
not exercised.
(35) Remove compressor tools and remove front
servo rod guide, spring and servo piston.
(36) Compress rear servo spring retainer about
1/16 inch with Valve Spring Compressor C-3422-B
(Fig. 174).
(37) Remove rear servo spring retainer snap ring.
Then remove compressor tools and remove rear servo
spring and piston.
(38) Inspect transmission components.
NOTE: TO SERVICE THE OVERRUNNING CLUTCH
CAM OR OVERDRIVE PISTON RETAINER, REFER
TO OVERRUNNING CLUTCH CAM SERVICE IN THIS
SECTION.
Fig. 172 Overrunning Clutch Assembly Removal
1 – OVERRUNNING CLUTCH CAM
2 – REAR BAND REACTION PIN
3 – OVERRUNNING CLUTCH ASSEMBLY
Fig. 174 Compressing Rear Servo Spring
1 – FRONT SERVO SNAP RING
2 – REAR SERVO SNAP RING
3 – SPECIAL TOOL
ASSEMBLY
Fig. 173 Compressing Front Servo Rod Guide
1 – SPRING COMPRESSOR TOOL C-3422-B
2 – ROD GUIDE SNAP RING
Do not allow dirt, grease, or foreign material to
enter the case or transmission components during
assembly. Keep the transmission case and components clean. Also make sure the tools and workbench
area used for assembly operations are equally clean.
Shop towels used for wiping off tools and hands
must be made from lint free material. Lint will stick
to transmission parts and could interfere with valve
operation, or even restrict fluid passages.
Lubricate the transmission components with
Mopart transmission fluid during reassembly. Use
Mopart Door Ease, or Ru-Glyde on seals and O-rings
to ease installation.
Petroleum jelly can also be used to hold thrust
washers, thrust plates and gaskets in position during
21 - 114
42RE AUTOMATIC TRANSMISSION
WJ
DISASSEMBLY AND ASSEMBLY (Continued)
assembly. However, do not use chassis grease, bearing grease, white grease, or similar lubricants on any
transmission part. These types of lubricants can
eventually block or restrict fluid passages and interfere with valve operation. Use petroleum jelly only.
Do not force parts into place. The transmission
components and subassemblies are easily installed by
hand when properly aligned.
If a part seems extremely difficult to install, it is
either misaligned or incorrectly assembled. Also verify that thrust washers, thrust plates and seal rings
are correctly positioned before assembly. These parts
can interfere with proper assembly if mis-positioned.
The planetary geartrain, front/rear clutch assemblies and oil pump are all much easier to install
when the transmission case is upright.
(1) Install rear servo piston, spring and retainer
(Fig. 175). Install spring on top of servo piston and
install retainer on top of spring.
(2) Install front servo piston assembly, servo
spring and rod guide (Fig. 176).
(3) Compress front/rear servo springs with Valve
Spring Compressor C-3422-B and install each servo
snap ring (Fig. 177).
Fig. 176 Front Servo Components
1
2
3
4
5
6
–
–
–
–
–
–
PISTON SEAL RINGS
SERVO PISTON
SNAP RING
ROD GUIDE
SPRING
ROD
Fig. 175 Rear Servo Components
1
2
3
4
5
–
–
–
–
–
SERVO PISTON
PISTON SPRING
SNAP RING
RETAINER
PISTON SEAL
Fig. 177 Compressing Front/Rear Servo Springs
1 – SPRING COMPRESSOR TOOL C-3422-B
2 – ROD GUIDE SNAP RING
42RE AUTOMATIC TRANSMISSION
WJ
21 - 115
DISASSEMBLY AND ASSEMBLY (Continued)
(4) Lubricate clutch cam rollers with transmission
fluid.
(5) Install rear band in case (Fig. 178). Be sure
twin lugs on band are seated against reaction pin.
Fig. 179 Installing Low-Reverse Drum
1 – REAR BAND
2 – LOW-REVERSE DRUM
Fig. 178 Rear Band Installation
1 – REAR BAND
(6) Install low-reverse drum and check overrunning clutch operation as follows:
(a) Lubricate overrunning clutch race (on drum
hub) with transmission fluid.
(b) Guide drum through rear band.
(c) Tilt drum slightly and start race (on drum
hub) into overrunning clutch rollers.
(d) Press drum rearward and turn it in clockwise direction until drum seats in overrunning
clutch (Fig. 179).
(e) Turn drum back and forth. Drum should
rotate freely in clockwise direction and lock
in counterclockwise direction (as viewed
from front of case).
(7) Install snap ring that secures low-reverse drum
to hub of overdrive piston retainer (Fig. 180).
(8) Install rear band lever and pivot pin (Fig. 181).
Align lever with pin bores in case and push pivot pin
into place.
(9) Install planetary geartrain assembly (Fig. 182).
(10) Install thrust plate on intermediate shaft hub
(Fig. 183). Use petroleum jelly to hold thrust plate in
place.
Fig. 180 Installing Low-Reverse Drum Retaining
Snap Ring
1 – LOW-REVERSE DRUM
2 – HUB OF OVERDRIVE PISTON RETAINER
3 – LOW-REVERSE DRUM SNAP RING
21 - 116
42RE AUTOMATIC TRANSMISSION
WJ
DISASSEMBLY AND ASSEMBLY (Continued)
(12) Install rear clutch thrust washer (Fig. 185).
Use additional petroleum jelly to hold washer in
place if necessary.
Fig. 181 Rear Band Lever And Pivot Pin Installation
1 – REAR BAND LEVER
2 – LEVER PIVOT PIN
Fig. 183 Installing Intermediate Shaft Thrust Plate
1 – INTERMEDIATE SHAFT HUB
2 – INTERMEDIATE SHAFT THRUST PLATE
Fig. 182 Installing Planetary Geartrain
1 – PLANETARY GEARTRAIN AND INTERMEDIATE SHAFT
ASSEMBLY
(11) Check seal ring on rear clutch retainer hub
and seal rings on input shaft (Fig. 184). Also verify
that shaft seal rings are installed in sequence shown.
Fig. 184 Input Shaft Seal Ring Location
1
2
3
4
–
–
–
–
INPUT SHAFT
TEFLON SEAL RING
METAL SEAL RING
REAR CLUTCH RETAINER
WJ
42RE AUTOMATIC TRANSMISSION
21 - 117
DISASSEMBLY AND ASSEMBLY (Continued)
Fig. 185 Installing Rear Clutch Thrust Washer
1 – REAR CLUTCH RETAINER
2 – REAR CLUTCH THRUST WASHER (FIBER)
(13) Align clutch discs in front clutch and install
front clutch on rear clutch (Fig. 186). Rotate front
clutch retainer back and forth until completely
seated on rear clutch retainer.
(14) Coat intermediate shaft thrust washer with
petroleum jelly. Then install washer in rear clutch
hub (Fig. 187). Use enough petroleum jelly to hold
washer in place. Be sure grooved side of washer
faces rearward (toward output shaft) as shown.
Also note that washer only fits one way in
clutch hub. Note thickness of this washer. It is a
select fit part and is used to control transmission end
play.
Fig. 186 Assembling Front And Rear Clutch Units
1 – TURN FRONT CLUTCH BACK & FORTH UNTIL SEATED
2 – REAR CLUTCH ASSEMBLY
Fig. 187 Installing Intermediate Shaft Thrust Plate
1 – INTERMEDIATE SHAFT THRUST WASHER
2 – INPUT SHAFT
3 – REAR CLUTCH RETAINER HUB
(15) Align drive teeth on rear clutch discs with
small screwdriver (Fig. 188). This makes installation
on front planetary easier.
(16) Raise front end of transmission upward as far
as possible and support case with wood blocks. Front/
rear clutch and oil pump assemblies are easier to
install if transmission is as close to upright position
as possible.
(17) Slide front band into case.
(18) Install front and rear clutch units as assembly
(Fig. 189). Align rear clutch with front annulus gear
and install assembly in driving shell. Be sure output shaft thrust washer and thrust plate are
not displaced during installation.
(19) Carefully work assembled clutches back and
forth to engage and seat rear clutch discs on front
annulus gear. Also be sure front clutch drive lugs are
fully engaged in slots of driving shell after installation.
(20) Assemble front band strut.
(21) Install front band adjuster, strut and adjusting screw (Fig. 190).
(22) Tighten band adjusting screw until band just
grips clutch retainer. Verify that front/rear clutches
are still seated before continuing.
(23) Check seal rings on reaction shaft support
hub. Verify that seal rings are hooked together and
that front clutch thrust washer is properly positioned
21 - 118
42RE AUTOMATIC TRANSMISSION
WJ
DISASSEMBLY AND ASSEMBLY (Continued)
Fig. 188 Aligning Rear Clutch Disc Lugs
1 – REAR CLUTCH DISCS
2 – USE SMALL SCREWDRIVER TO ALIGN CLUTCH DISC
TEETH
Fig. 190 Front Band Linkage Installation
1 – BAND LEVER
2 – BAND STRUT
3 – FRONT BAND
Fig. 191 Reaction Shaft Support Seal Rings And
Front Clutch Thrust Washer
1 – REACTION SHAFT SUPPORT HUB
2 – FRONT CLUTCH THRUST WASHER
3 – SEAL RINGS
Fig. 189 Installing Front/Rear Clutch Assemblies
1 – INPUT SHAFT
2 – FRONT CLUTCH
3 – REAR CLUTCH
(Fig. 191). Use petroleum jelly to hold thrust washer
in place if necessary.
(24) Lubricate oil pump body seal with petroleum
jelly. Lubricate pump shaft seal lip with petroleum
jelly.
(25) Thread two Pilot Stud Tools C-3288-B into
bolt holes in oil pump bore flange (Fig. 192).
(26) Align and install oil pump gasket (Fig. 192).
(27) Install oil pump (Fig. 193). Align and position
pump on pilot studs. Slide pump down studs and
work it into front clutch hub and case by hand. Then
install 2 or 3 pump bolts to hold pump in place.
(28) Remove pilot stud tools and install remaining
oil pump bolts. Tighten bolts alternately in diagonal
pattern to 20 N·m (15 ft. lbs.).
(29) Measure input shaft end play (Fig. 194).
NOTE: If end play is incorrect, transmission is
incorrectly assembled, or the intermediate shaft
thrust washer is incorrect. The intermediate shaft
thrust washer is selective.
WJ
42RE AUTOMATIC TRANSMISSION
21 - 119
DISASSEMBLY AND ASSEMBLY (Continued)
(d) Position the dial indicator plunger against a
flat spot on the oil pump and zero the dial indicator.
(e) Move input shaft in and out and record reading. End play should be 0.56 - 2.31 mm (0.022 0.091 in.). Adjust as necessary.
Fig. 192 Installing Pilot Studs And Oil Pump Gasket
1 – OIL PUMP GASKET
2 – PILOT STUD TOOLS C-3288–B
Fig. 194 Checking Input Shaft End Play
1 – TOOL 8266-8
2 – TOOL 8266-6
3 – TOOL C-3339
Fig. 193 Installing Oil Pump Assembly In Case
1 – OIL PUMP
2 – PILOT STUD TOOL
3 – PILOT STUD TOOL
(a) Attach Adapter 8266–6 to Handle 8266–8.
(b) Attach dial indicator C-3339 to Handle
8266–8.
(c) Install the assembled tool onto the input
shaft of the transmission and tighten the retaining
screw on Adapter 8266–6 to secure it to the input
shaft.
(30) Install accumulator piston and inner and
outer springs (Fig. 195).
(31) Verify that valve body solenoid harness is
secured in 3-4 accumulator housing cover plate.
(32) Install valve body as follows:
(a) Align and carefully insert park rod into pawl.
Rod will make click noise as it enters pawl. Move
rod slightly to check engagement.
(b) Align and seat valve body on case. Be sure
manual lever shaft and overdrive connector are
fully seated in case. Also be sure valve body wiring
is not pinched or kinked.
(c) Install and start all valve body attaching
bolts by hand. Then tighten bolts evenly, in a diagonal pattern to 12 N·m (105 in. lbs.) torque. Do
not overtighten valve body bolts. This could
result in distortion and cross leakage after
installation.
CAUTION: It is possible for the park rod to displace
into a cavity just above the pawl sprag during
installation. Make sure the rod is actually engaged
in the pawl and has not displaced into the cavity.
21 - 120
42RE AUTOMATIC TRANSMISSION
WJ
DISASSEMBLY AND ASSEMBLY (Continued)
Fig. 196 Installing Manual Lever Shaft Seal
1 – 15/16” SOCKET
2 – SEAL
Fig. 195 Accumulator Piston And Springs
1
2
3
4
5
–
–
–
–
–
GOVERNOR PRESSURE SENSOR
VALVE BODY
PARK ROD
ACCUMULATOR PISTON
GOVERNOR PRESSURE SOLENOID
(33) Install new filter on valve body. Tighten filter
screws to 4 N·m (35 in. lbs.).
(34) Adjust front and rear bands.
(35) Install seal on park/neutral position switch.
Then install and tighten switch to 34 N·m (25 ft.
lbs.).
(36) Install magnet in oil pan. Magnet goes on
small protrusion at corner of pan.
(37) Position new oil pan gasket on case and
install oil pan. Tighten pan bolts to 17 N·m (13 ft.
lbs.).
(38) Install new valve body manual shaft seal in
case (Fig. 196). Lubricate seal lip and manual shaft
with petroleum jelly. Start seal over shaft and into
case. Seat seal with 15/16 inch, deep well socket.
(39) Install throttle valve and shift selector levers
on valve body manual lever shaft.
OVERRUNNING CLUTCH CAM/OVERDRIVE
PISTON RETAINER
DISASSEMBLY
NOTE: TO SERVICE THE OVERRUNNING CLUTCH
CAM AND THE OVERDRIVE PISTON RETAINER,
THE TRANSMISSION GEARTRAIN AND OVERDRIVE
UNIT MUST BE REMOVED FROM THE TRANSMISSION.
(1) Remove the overdrive piston (Fig. 197).
(2) Remove the overdrive piston retainer bolts.
(3) Remove overdrive piston retainer.
(4) Remove case gasket.
(5) Mark the position of the overrunning clutch
cam in the case (Fig. 198).
(6) Remove the overrunning clutch cam bolts.
(7) Remove the overrunning clutch cam.
Fig. 197 Overdrive Piston Removal
1
2
3
4
–
–
–
–
OVERDRIVE CLUTCH PISTON
INTERMEDIATE SHAFT
SELECTIVE SPACER
PISTON RETAINER
ASSEMBLY
(1) Examine bolt holes in overrunning clutch cam.
Note that one hole is not threaded (Fig. 199). This
hole must align with blank area in clutch cam bolt
circle (Fig. 200). Mark hole location on clutch cam
and blank area in case with grease pencil, paint
stripe, or scribe mark for assembly reference.
42RE AUTOMATIC TRANSMISSION
WJ
21 - 121
DISASSEMBLY AND ASSEMBLY (Continued)
Fig. 198 Overrunning Clutch Cam Removal
1 – ALIGN MARKS IDENTIFYING NON-THREADED HOLE IN
CAM AND CASE
2 – OVERRUNNING CLUTCH ASSEMBLY
Fig. 200 Location Of Blank Area In Clutch Cam Bolt
Circle
1 – OVERRUNNING CLUTCH CAM SEAT IN CASE
2 – NON-THREADED HOLE IN CLUTCH CAM ALIGNS HERE
(BLANK AREA) OF SEAT
(2) Mark location of non-threaded hole in clutch
cam and blank area in bolt circle with grease pencil.
(3) Align and install overrunning clutch and cam
in case (Fig. 201). Be sure cam is correctly
installed. Bolt holes in cam are slightly countersunk on one side. Be sure this side of cam faces
rearward (toward piston retainer).
Fig. 201 Overrunning Clutch Installation
1 – ALIGN MARKS IDENTIFYING NON-THREADED HOLE IN
CAM AND CASE
2 – OVERRUNNING CLUTCH ASSEMBLY
Fig. 199 Location Of Non-Threaded Hole In Clutch
Cam
1 – NON-THREADED HOLE
2 – OVERRUNNING CLUTCH CAM
(4) Verify that non-threaded hole in clutch cam is
properly aligned. Check alignment by threading a
bolt into each bolt hole. Adjust clutch cam position if
necessary.
(5) Install and tighten overrunning clutch cam
bolts to 17 N·m (13 ft. lbs.) torque. Note that clutch
cam bolts are shorter than piston retainer bolts.
(6) Install new gasket at rear of transmission case.
Use petroleum jelly to hold gasket in place. Be sure
to align governor feed holes in gasket with feed passages in case (Fig. 202). Also install gasket before
overdrive piston retainer. Center hole in gasket is
smaller than retainer and cannot be installed over
retainer.
(7) Position overdrive piston retainer on transmission case and align bolt holes in retainer, gasket and
case (Fig. 203). Then install and tighten retainer
bolts to 17 N·m (13 ft. lbs.) torque.
(8) Install new seals on over drive piston.
(9) Stand transmission case upright on bellhousing.
21 - 122
42RE AUTOMATIC TRANSMISSION
WJ
DISASSEMBLY AND ASSEMBLY (Continued)
(10) Position Guide Ring 8114-1 on outer edge of
overdrive piston retainer.
(11) Position Seal Guide 8114-2 on inner edge of
overdrive piston retainer.
(12) Install overdrive piston in overdrive piston
retainer by: aligning locating lugs on overdrive piston
to the two mating holes in retainer.
(a) Aligning locating lugs on overdrive piston to
the two mating holes in retainer.
(b) Lubricate overdrive piston seals with Mopart
Door Ease, or equivalent.
(c) Install piston over Seal Guide 8114–2 and
inside Guide Ring 8114–1.
(d) Push overdrive piston into position in
retainer.
(e) Verify that the locating lugs entered the lug
bores in the retainer.
NOTE: INSTALL THE REMAINING TRANSMISSION
COMPONENTS AND OVERDRIVE UNIT.
Fig. 202 Installing/Aligning Case Gasket
1 – CASE GASKET
2 – BE SURE GOVERNOR TUBE FEED HOLES IN CASE AND
GASKET ARE ALIGNED
FRONT SERVO PISTON
DISASSEMBLY
(1) Remove seal ring from rod guide (Fig. 204).
(2) Remove small snap ring from servo piston rod.
Then remove piston rod, spring and washer from piston.
(3) Remove and discard servo component O-ring
and seal rings.
ASSEMBLY
Clean and inspect front servo components.
(1) Lubricate new O-ring and seal rings with petroleum jelly and install them on piston, guide and rod.
(2) Install rod in piston. Install spring and washer
on rod. Compress spring and install snap ring (Fig.
204).
(3) Set servo components aside for installation during transmission reassembly.
REAR SERVO PISTON
DISASSEMBLY
(1) Remove small snap ring and remove plug and
spring from servo piston (Fig. 205).
(2) Remove and discard servo piston seal ring.
Fig. 203 Aligning Overdrive Piston Retainer
1 – PISTON RETAINER
2 – GASKET
3 – RETAINER BOLTS
ASSEMBLY
(1) Lubricate piston and guide seals with petroleum jelly. Lubricate other servo parts with Mopart
ATF Plus 3, Type 7176, transmission fluid.
(2) Install new seal ring on servo piston.
(3) Assemble piston, plug, spring and new snap
ring.
(4) Lubricate piston seal lip with petroleum jelly.
42RE AUTOMATIC TRANSMISSION
WJ
21 - 123
DISASSEMBLY AND ASSEMBLY (Continued)
OIL PUMP AND REACTION SHAFT SUPPORT
DISASSEMBLY
(1) Remove seal ring from housing and reaction
shaft support (Fig. 206).
(2) Mark pump housing and support assembly for
alignment reference.
(3) Remove bolts attaching pump body to support
(Fig. 207).
Fig. 204 Front Servo
1 – PISTON RINGS
2 – SERVO PISTON
3 – O-RING
4 – SNAP RING
5 – PISTON ROD GUIDE
6 – SEAL RING
7 – SNAP RING
8 – SERVO SPRING
9 – WASHER
10 – SPRING
11 – PISTON ROD
Fig. 205 Rear Servo Components
1
2
3
4
5
6
7
8
–
–
–
–
–
–
–
–
SNAP RING
PISTON SEAL
PISTON PLUG
SPRING RETAINER
SNAP RING
PISTON SPRING
CUSHION SPRING
PISTON
Fig. 206 Removing Pump Seal Ring
1 – PUMP HOUSING SEAL RING
Fig. 207 Pump Support Bolts
1 – REACTION SHAFT SUPPORT
2 – PUMP
21 - 124
42RE AUTOMATIC TRANSMISSION
WJ
DISASSEMBLY AND ASSEMBLY (Continued)
(4) Separate support from pump housing (Fig.
208).
(5) Remove inner and outer gears from reaction
shaft support (Fig. 209).
(6) If pump seal was not removed during transmission disassembly, remove seal with punch and hammer.
(7) Remove front clutch thrust washer from support hub (Fig. 210).
Fig. 210 Support Hub Thrust Washer
1
2
3
4
–
–
–
–
BUSHING
REACTION SHAFT SUPPORT
THRUST WASHER
HUB
1
2
3
4
5
6
7
–
–
–
–
–
–
–
SPECIAL TOOL C-4171
SPECIAL TOOL SP-3551
BUSHING
SPECIAL TOOL SP-5117
BUSHING
SPECIAL TOOL C-4171
PUMP HOUSING
Fig. 208 Separating Pump Housing From Reaction
Shaft Support
1 – REACTION SHAFT SUPPORT
2 – PUMP HOUSING
Fig. 209 Pump Gear Removal
1 – REACTION SHAFT SUPPORT
2 – INNER GEAR
3 – OUTER GEAR
OIL PUMP BUSHING REPLACEMENT
(1) Remove pump bushing with Tool Handle
C-4171 and Bushing Remover SP-3551 from Tool Set
C-3887-J (Fig. 211).
(2) Install new pump bushing with Tool Handle
C-4171 and Bushing Installer SP-5117 (Fig. 211).
Bushing should be flush with pump housing bore.
(3) Stake new pump bushing in two places with
blunt punch (Fig. 212). Remove burrs from stake
points with knife blade afterward.
Fig. 211 Removing Oil Pump Bushing
REACTION SHAFT SUPPORT BUSHING REMOVAL
(1) Assemble Bushing Remover Tools SP-1191,
3633 and 5324 (Fig. 213). Do not clamp any part
of reaction shaft or support in vise.
42RE AUTOMATIC TRANSMISSION
WJ
21 - 125
DISASSEMBLY AND ASSEMBLY (Continued)
Fig. 212 Staking Oil Pump Bushing
1 – NARROW BLADE
2 – BLUNT PUNCH
3 – TWO STAKES
(2) Hold Cup Tool SP-3633 firmly against reaction
shaft and thread remover SP-5324 into bushing as
far as possible by hand. Then thread remover tool 3-4
additional turns into bushing with a wrench.
(3) Turn remover tool hex nut down against
remover cup to pull bushing from shaft. Clean all
chips from shaft after bushing removal.
(4) Lightly grip old bushing in vise or with pliers
and back remover tool out of bushing.
(5) Assemble Bushing Installer Tools C-4171 and
SP-5325 (Fig. 213).
(6) Slide new bushing onto Installer Tool SP-5325.
(7) Position reaction shaft support upright on a
clean smooth surface.
(8) Align bushing in bore. Then tap bushing into
place until Bushing Installer SP-5325 bottoms.
(9) Clean reaction shaft support thoroughly after
installing bushing.
Fig. 213 Replacing Reaction Shaft Support Bushing
1
2
3
4
5
6
7
–
–
–
–
–
–
–
SPECIAL TOOL SP-1191
SPECIAL TOOL SP-3633
SPECIAL TOOL C-4171
SPECIAL TOOL SP-5325
REACTION SHAFT
SPECIAL TOOL SP-5324
BUSHING
CAUTION: The pump inner gear is a one way fit.
The bore on one side of the gear inside diameter
(I.D.) is chamfered. Be sure the chamfered side
faces forward (to front of pump).
ASSEMBLY
(1) Lubricate gear bore in pump housing with
transmission fluid.
(2) Lubricate pump gears with transmission fluid.
(3) Support pump housing on wood blocks (Fig.
214).
(4) Install outer gear in pump housing (Fig. 214).
Gear can be installed either way (it is not a one-way
fit).
(5) Install pump inner gear (Fig. 215).
Fig. 214 Supporting Pump And Installing Outer Gear
1 – OUTER GEAR
2 – PUMP HOUSING
3 – WOOD BLOCKS
21 - 126
42RE AUTOMATIC TRANSMISSION
WJ
DISASSEMBLY AND ASSEMBLY (Continued)
Fig. 217 Assembling Reaction Shaft Support And
Pump Housing
Fig. 215 Pump Inner Gear Installation
1 – OUTER GEAR
2 – INNER GEAR
(6) Install new thrust washer on hub of reaction
shaft support. Lubricate washer with transmission
fluid or petroleum jelly.
(7) If reaction shaft seal rings are being replaced,
install new seal rings on support hub (Fig. 216).
Lubricate seal rings with transmission fluid or petroleum jelly after installation. Squeeze each ring until
ring ends are securely hooked together.
CAUTION: The reaction shaft support seal rings
will break if overspread, or twisted. If new rings are
being installed, spread them only enough for installation. Also be very sure the ring ends are securely
hooked together after installation. Otherwise, the
rings will either prevent pump installation, or break
during installation.
1 – PUMP HOUSING
2 – REACTION SHAFT SUPPORT
(10) Install all bolts that attach support to pump
housing. Then tighten bolts finger tight.
(11) Tighten support-to-pump bolts to required
torque as follows:
(a) Reverse pump assembly and install it in
transmission case. Position pump so bolts are facing out and are accessible.
(b) Secure pump assembly in case with 2 or 3
bolts, or with pilot studs.
(c) Tighten support-to-pump bolts to 20 N·m (15
ft. lbs.).
(d) Remove pump assembly from transmission
case.
(12) Install new oil seal in pump with Special Tool
C-4193 and Tool Handle C-4171 (Fig. 218). Be sure
seal lip faces inward.
(13) Install new seal ring around pump housing.
Be sure seal is properly seated in groove.
(14) Lubricate lip of pump oil seal and O-ring seal
with transmission fluid.
Fig. 216 Hub Seal Ring Position
1 – SEAL RINGS
2 – SUPPORT HUB
(8) Install reaction shaft support on pump housing
(Fig. 217).
(9) Align reaction support on pump housing. Use
alignment marks made at disassembly. Or, rotate
support until bolt holes in support and pump housing
are all aligned (holes are offset for one-way fit).
Fig. 218 Pump Oil Seal Installation
1 – PUMP BODY
2 – PUMP SEAL
3 – SPECIAL TOOL C-4193
42RE AUTOMATIC TRANSMISSION
WJ
21 - 127
DISASSEMBLY AND ASSEMBLY (Continued)
Fig. 219 42RE Front Clutch Components
1
2
3
4
5
6
–
–
–
–
–
–
RETAINER HUB SEAL
CLUTCH PISTON
PISTON SPRING
SPRING RETAINER SNAP RING
CLUTCH DISCS
PRESSURE PLATE
FRONT CLUTCH
NOTE: The 42RE transmission uses four plates and
discs for the front clutch.
DISASSEMBLY
(1) Remove waved snap ring and remove pressure
plate, clutch plates and clutch discs (Fig. 219).
(2) Compress clutch piston spring with Compressor
Tool C-3575-A (Fig. 220). Be sure legs of tool are
seated squarely on spring retainer before compressing spring.
7 – SNAP RING (WAVED)
8 – CLUTCH PLATES
9 – SPRING RETAINER
10 – PISTON SEAL
11 – FRONT CLUTCH RETAINER
(3) Remove retainer snap ring and remove compressor tool.
(4) Remove spring retainer and clutch spring. Note
position of retainer on spring for assembly reference.
(5) Remove clutch piston from clutch retainer.
Remove piston by rotating it up and out of retainer.
(6) Remove seals from clutch piston and clutch
retainer hub. Discard both seals as they are not reusable.
21 - 128
42RE AUTOMATIC TRANSMISSION
WJ
DISASSEMBLY AND ASSEMBLY (Continued)
Fig. 221 Front Clutch Piston Installation
1 – CLUTCH PISTON
2 – FRONT CLUTCH RETAINER
Fig. 220 Compressing Front Clutch Piston Spring
1
2
3
4
–
–
–
–
FRONT CLUTCH SPRING
COMPRESSOR TOOL C-3575–A
RETAINER SNAP RING
SPRING RETAINER
ASSEMBLY
(1) Soak clutch discs in transmission fluid while
assembling other clutch parts.
(2) Install new seals on piston and in hub of
retainer. Be sure lip of each seal faces interior of
clutch retainer.
(3) Lubricate lips of piston and retainer seals with
liberal quantity of Mopart Door Ease. Then lubricate
retainer hub, bore and piston with light coat of transmission fluid.
(4) Install clutch piston in retainer (Fig. 221). Use
twisting motion to seat piston in bottom of retainer.
Fig. 222 Clutch Piston Spring Installation
1 – RETAINER
2 – CLUTCH SPRING
3 – PISTON
CAUTION: Never push the clutch piston straight in.
This will fold the seals over causing leakage and
clutch slip.
(5) Position spring in clutch piston (Fig. 222).
(6) Position spring retainer on top of piston spring
(Fig. 223). Make sure retainer is properly
installed. Small raised tabs should be facing
upward. Semicircular lugs on underside of
retainer are for positioning retainer in spring.
(7) Compress piston spring and retainer with Compressor Tool C-3575-A (Fig. 220). Then install new
snap ring to secure spring retainer and spring.
(8) Install clutch plates and discs (Fig. 219).
Install steel plate then disc until all plates and discs
are installed. The front clutch uses 4 clutch discs and
plates in a 42RE transmission.
Fig. 223 Correct Spring Retainer Installed Position
1 – SMALL TABS ON RETAINER FACE UPWARD
(9) Install pressure plate and waved snap ring
(Fig. 219).
42RE AUTOMATIC TRANSMISSION
WJ
21 - 129
DISASSEMBLY AND ASSEMBLY (Continued)
Fig. 224 Rear Clutch Components
1
2
3
4
5
6
7
8
9
–
–
–
–
–
–
–
–
–
PISTON SPRING
REAR CLUTCH PISTON
CLUTCH PISTON SEALS
OUTPUT SHAFT THRUST WASHER (METAL)
INPUT SHAFT SNAP RING
REAR CLUTCH RETAINER
INPUT SHAFT
REAR CLUTCH THRUST WASHER (FIBER)
CLUTCH PACK SNAP RING (SELECTIVE)
Clearance should be 1.70 to 3.40 mm (0.067 to
0.134 in.). If clearance is incorrect, clutch discs,
plates, pressure plates and snap ring may have to be
changed.
REAR CLUTCH
DISASSEMBLY
(1) Remove fiber thrust washer from forward side
of clutch retainer.
(2) Remove input shaft front/rear seal rings.
(3) Remove selective clutch pack snap ring (Fig.
224).
10
11
12
13
14
15
16
17
–
–
–
–
–
–
–
–
TOP PRESSURE PLATE
CLUTCH DISCS (4)
BOTTOM PRESSURE PLATE
WAVE SPRING
CLUTCH PLATES (3)
RETAINER SEAL RING
SHAFT REAR SEAL RING (PLASTIC)
SHAFT FRONT SEAL RING (TEFLON)
(4) Remove top pressure plate, clutch discs, steel
plates, bottom pressure plate and wave snap ring
and wave spring (Fig. 224).
(5) Remove clutch piston with rotating motion.
(6) Remove and discard piston seals.
(7) Remove input shaft snap-ring (Fig. 225). It
may be necessary to press the input shaft in slightly
to relieve tension on the snap-ring
(8) Press input shaft out of retainer with shop
press and suitable size press tool. Use a suitably
sized press tool to support the retainer as close to the
input shaft as possible.
21 - 130
42RE AUTOMATIC TRANSMISSION
WJ
DISASSEMBLY AND ASSEMBLY (Continued)
(10) Install wave spring in retainer (Fig. 229). Be
sure spring is completely seated in retainer groove.
Fig. 225 Removing/Installing Input Shaft Snap-Ring
1 – REAR CLUTCH RETAINER
2 – INPUT SHAFT SNAP RING
3 – SNAP RING PLIERS
ASSEMBLY
(1) Soak clutch discs in transmission fluid while
assembling other clutch parts.
(2) Install new seal rings on clutch retainer hub
and input shaft if necessary (Fig. 226).
(a) Be sure clutch hub seal ring is fully seated in
groove and is not twisted.
(3) Lubricate splined end of input shaft and clutch
retainer with transmission fluid. Then press input
shaft into retainer. Use a suitably sized press tool to
support retainer as close to input shaft as possible.
(4) Install input shaft snap-ring (Fig. 225).
(5) Invert retainer and press input shaft in opposite direction until snap-ring is seated.
(6) Install new seals on clutch piston. Be sure lip
of each seal faces interior of clutch retainer.
(7) Lubricate lip of piston seals with generous
quantity of Mopart Door Ease. Then lubricate
retainer hub and bore with light coat of transmission
fluid.
(8) Install clutch piston in retainer. Use twisting
motion to seat piston in bottom of retainer. A thin
strip of plastic (about 0.020” thick), can be used to
guide seals into place if necessary.
CAUTION: Never push the clutch piston straight in.
This will fold the seals over causing leakage and
clutch slip. In addition, never use any type of metal
tool to help ease the piston seals into place. Metal
tools will cut, shave, or score the seals.
(9) Install piston spring in retainer and on top of
piston (Fig. 229). Concave side of spring faces downward (toward piston).
Fig. 226 Rear Clutch Retainer And Input Shaft Seal
Ring Installation
1 – REAR CLUTCH RETAINER HUB SEAL RING
2 – INPUT SHAFT SEAL RINGS
Fig. 227 Input Shaft Seal Ring Identification
1 – PLASTIC REAR SEAL RING
2 – TEFLON FRONT SEAL RING (SQUEEZE RING TOGETHER
SLIGHTLY BEFORE INSTALLATION FOR BETTER FIT)
42RE AUTOMATIC TRANSMISSION
WJ
21 - 131
DISASSEMBLY AND ASSEMBLY (Continued)
Fig. 228 Pressing Input Shaft Into Rear Clutch
Retainer
1 – INPUT SHAFT
2 – REAR CLUTCH RETAINER
3 – PRESS RAM
installed (4 discs and 3 plates are required) (Fig.
224).
(13) Install top pressure plate.
(14) Install selective snap ring. Be sure snap ring
is fully seated in retainer groove.
(15) Using a suitable gauge bar and dial indicator,
measure clutch pack clearance (Fig. 230).
(a) Position gauge bar across the clutch drum
with the dial indicator pointer on the pressure
plate (Fig. 230).
(b) Using two small screw drivers, lift the pressure plate and release it.
(c) Zero the dial indicator.
(d) Lift the pressure plate until it contacts the
snap-ring and record the dial indicator reading.
Clearance should be 0.559 - 0.914 mm (0.022 0.036 in.). If clearance is incorrect, steel plates, discs,
selective snap ring and pressure plates may have to
be changed.
The selective snap ring thicknesses are:
• .107–.109 in.
• .098–.100 in.
• .095–.097 in.
• .083–.085 in.
• .076–.078 in.
• .071–.073 in.
• .060–.062 in.
(16) Coat rear clutch thrust washer with petroleum jelly and install washer over input shaft and
into clutch retainer (Fig. 231). Use enough petroleum
jelly to hold washer in place.
(17) Set rear clutch aside for installation during
final assembly.
Fig. 229 Piston Spring/Wave Spring Position
1
2
3
4
–
–
–
–
REAR CLUTCH RETAINER
PISTON SPRING
WAVE SPRING
CLUTCH PISTON
(11) Install bottom pressure plate (Fig. 224).
Ridged side of plate faces downward (toward piston)
and flat side toward clutch pack.
(12) Install first clutch disc in retainer on top of
bottom pressure plate. Then install a clutch plate followed by a clutch disc until entire clutch pack is
Fig. 230 Checking Rear Clutch Pack Clearance
1
2
3
4
5
6
–
–
–
–
–
–
DIAL INDICATOR
PRESSURE PLATE
SNAP RING
STAND
REAR CLUTCH
GAUGE BAR
21 - 132
42RE AUTOMATIC TRANSMISSION
WJ
DISASSEMBLY AND ASSEMBLY (Continued)
Fig. 232 Front Annulus And Planetary Assembly
Removal
Fig. 231 Installing Rear Clutch Thrust Washer
1 – REAR CLUTCH RETAINER
2 – REAR CLUTCH THRUST WASHER
1 – DRIVING SHELL
2 – FRONT ANNULUS AND PLANETARY ASSEMBLY
3 – PLANETARY SNAP RING
PLANETARY GEARTRAIN/OUTPUT SHAFT
DISASSEMBLY
(1) Remove planetary snap ring (Fig. 232).
(2) Remove front annulus and planetary assembly
from driving shell (Fig. 232).
(3) Remove snap ring that retains front planetary
gear in annulus gear (Fig. 233).
(4) Remove tabbed thrust washer and tabbed
thrust plate from hub of front annulus (Fig. 234).
(5) Separate front annulus and planetary gears
(Fig. 234).
(6) Remove front planetary gear front thrust
washer from annulus gear hub.
(7) Separate and remove driving shell, rear planetary and rear annulus from output shaft (Fig. 235).
(8) Remove front planetary rear thrust washer
from driving shell.
(9) Remove tabbed thrust washers from rear planetary gear.
(10) Remove lock ring that retains sun gear in
driving shell. Then remove sun gear, spacer and
thrust plates.
ASSEMBLY
(1) Lubricate output shaft and planetary components with transmission fluid. Use petroleum jelly to
lubricate and hold thrust washers and plates in position.
Fig. 233 Front Planetary Snap Ring Removal
1 – FRONT ANNULUS GEAR
2 – PLANETARY SNAP RING
(2) Assemble rear annulus gear and support if disassembled. Be sure support snap ring is seated and
that shoulder-side of support faces rearward (Fig.
236).
(3) Install rear thrust washer on rear planetary
gear. Use enough petroleum jelly to hold washer in
place. Also be sure all four washer tabs are properly
engaged in gear slots.
(4) Install rear annulus over and onto rear planetary gear (Fig. 236).
(5) Install assembled rear planetary and annulus
gear on output shaft (Fig. 237). Verify that assembly
is fully seated on shaft.
42RE AUTOMATIC TRANSMISSION
WJ
21 - 133
DISASSEMBLY AND ASSEMBLY (Continued)
(7) Install spacer on sun gear (Fig. 239).
(8) Install thrust plate on sun gear (Fig. 240). Note
that driving shell thrust plates are interchangeable.
Use either plate on sun gear and at front/rear of
shell.
Fig. 234 Front Planetary And Annulus Gear
Disassembly
1
2
3
4
5
–
–
–
–
–
FRONT ANNULUS
THRUST WASHER
THRUST PLATE
FRONT THRUST WASHER
FRONT PLANETARY
Fig. 236 Assembling Rear Annulus And Planetary
Gear
1 – REAR ANNULUS GEAR
2 – TABBED THRUST WASHER
3 – REAR PLANETARY
Fig. 235 Removing Driving Shell, Rear Planetary
And Rear Annulus
1
2
3
4
–
–
–
–
REAR ANNULUS
REAR PLANETARY
DRIVING SHELL
OUTPUT SHAFT
(6) Install front thrust washer on rear planetary
gear (Fig. 238). Use enough petroleum jelly to hold
washer on gear. Be sure all four washer tabs are
seated in slots.
Fig. 237 Installing Rear Annulus And Planetary On
Output Shaft
1 – REAR ANNULUS AND PLANETARY GEAR ASSEMBLY
2 – OUTPUT SHAFT
21 - 134
42RE AUTOMATIC TRANSMISSION
WJ
DISASSEMBLY AND ASSEMBLY (Continued)
Fig. 238 Installing Rear Planetary Front Thrust
Washer
1 – FRONT TABBED THRUST WASHER
2 – REAR PLANETARY GEAR
Fig. 240 Installing Driving Shell Front Thrust Plate
On Sun Gear
1 – SPACER
2 – SUN GEAR
3 – THRUST PLATE
(12) Install assembled driving shell and sun gear
on output shaft (Fig. 244).
(13) Install rear thrust washer on front planetary
gear (Fig. 245). Use enough petroleum jelly to hold
washer in place and be sure all four washer tabs are
seated.
Fig. 239 Installing Spacer On Sun Gear
1 – SUN GEAR
2 – SUN GEAR SPACER
(9) Hold sun gear in place and install thrust plate
over sun gear at rear of driving shell (Fig. 241).
(10) Position wood block on bench and support sun
gear on block (Fig. 242). This makes it easier to align
and install sun gear lock ring. Keep wood block
handy as it will also be used for geartrain end play
check.
(11) Align rear thrust plate on driving shell and
install sun gear lock ring. Be sure ring is fully seated
in sun gear ring groove (Fig. 243).
Fig. 241 Installing Driving Shell Rear Thrust Plate
1 – DRIVING SHELL
2 – SUN GEAR
3 – REAR THRUST PLATE
42RE AUTOMATIC TRANSMISSION
WJ
21 - 135
DISASSEMBLY AND ASSEMBLY (Continued)
Fig. 242 Supporting Sun Gear On Wood Block
1 – SUN GEAR
2 – DRIVING SHELL
3 – WOOD BLOCK
Fig. 243 Installing Sun Gear Lock Ring
1
2
3
4
–
–
–
–
LOCK RING GROOVE
SUN GEAR LOCK RING
DRIVING SHELL
REAR THRUST PLATE
Fig. 244 Installing Assembled Sun Gear And Driving
Shell On Output Shaft
1 – SUN GEAR/DRIVING SHELL ASSEMBLY
2 – OUTPUT SHAFT
Fig. 245 Installing Rear Thrust Washer On Front
Planetary Gear
1 – FRONT PLANETARY GEAR
2 – REAR TABBED THRUST WASHER
21 - 136
42RE AUTOMATIC TRANSMISSION
WJ
DISASSEMBLY AND ASSEMBLY (Continued)
(14) Install front planetary gear on output shaft
and in driving shell (Fig. 246).
(15) Install front thrust washer on front planetary
gear. Use enough petroleum jelly to hold washer in
place and be sure all four washer tabs are seated.
(16) Assemble front annulus gear and support, if
necessary. Be sure support snap ring is seated.
(17) Install front annulus on front planetary (Fig.
246).
(18) Position thrust plate on front annulus gear
support (Fig. 247). Note that plate has two tabs
on it. These tabs fit in notches of annulus hub.
(19) Install thrust washer in front annulus (Fig.
248). Align flat on washer with flat on planetary
hub. Also be sure washer tab is facing up.
(20) Install front annulus snap ring (Fig. 249). Use
snap ring pliers to avoid distorting ring during
installation. Also be sure ring is fully seated.
(21) Install planetary selective snap ring with
snap ring pliers (Fig. 250). Be sure ring is fully
seated.
(22) Turn planetary geartrain assembly over so
driving shell is facing workbench. Then support
geartrain on wood block positioned under forward
end of output shaft. This allows geartrain components to move forward for accurate end play check.
(23) Check planetary geartrain end play with
feeler gauge (Fig. 251). Gauge goes between shoulder
on output shaft and end of rear annulus support.
(24) Geartrain end play should be 0.12 to 1.22 mm
(0.005 to 0.048 in.). If end play is incorrect, snap ring
(or thrust washers) may have to be replaced. Snap
ring is available in three different thicknesses for
adjustment purposes.
Fig. 246 Installing Front Planetary And Annulus
Gears
1 – FRONT PLANETARY GEAR
2 – FRONT THRUST WASHER
3 – FRONT ANNULUS GEAR
Fig. 247 Positioning Thrust Plate On Front Annulus
Support
1 – FRONT ANNULUS
2 – THRUST PLATE
Fig. 248 Installing Front Annulus Thrust Washer
1 – WASHER FLAT ALIGNS WITH FLAT ON PLANETARY HUB
2 – FRONT ANNULUS THRUST WASHER
3 – TAB FACES FRONT
Fig. 249 Installing Front Annulus Snap Ring
1 – SNAP RING PLIERS
2 – FRONT ANNULUS SNAP RING
WJ
42RE AUTOMATIC TRANSMISSION
21 - 137
DISASSEMBLY AND ASSEMBLY (Continued)
Fig. 250 Installing Planetary Selective Snap Ring
1 – SELECTIVE SNAP RING
2 – SNAP RING PLIERS
Fig. 252 Transmission Speed Sensor Removal/
Installation
1 – SOCKET AND WRENCH
2 – SPEED SENSOR
3 – O-RING
Fig. 251 Checking Planetary Geartrain End Play
1 – OUTPUT SHAFT
2 – REAR ANNULUS GEAR
3 – FEELER GAUGE
OVERDRIVE UNIT
DISASSEMBLY
(1) Remove transmission speed sensor and O-ring
seal from overdrive case (Fig. 252).
(2) Remove overdrive piston thrust bearing (Fig.
253).
Fig. 253 Overdrive Piston Thrust Bearing Removal/
Installation
1 – THRUST BEARING
2 – OVERDRIVE PISTON
3 – THRUST PLATE
21 - 138
42RE AUTOMATIC TRANSMISSION
WJ
DISASSEMBLY AND ASSEMBLY (Continued)
OVERDRIVE PISTON DISASSEMBLY
(1) Remove overdrive piston thrust plate (Fig.
254). Retain thrust plate. It is a select fit part and
may possibly be reused.
Fig. 256 Overdrive Piston Removal
1 – PISTON RETAINER
2 – OVERDRIVE PISTON
Fig. 254 Overdrive Piston Thrust Plate Removal/
Installation
1 – OVERDRIVE PISTON
2 – OVERDRIVE PISTON SPACER (SELECT FIT)
(2) Remove intermediate shaft spacer (Fig. 255).
Retain spacer. It is a select fit part and may possibly
be reused.
OVERDRIVE CLUTCH PACK DISASSEMBLY
(1) Remove overdrive clutch pack wire retaining
ring (Fig. 257).
(2) Remove overdrive clutch pack (Fig. 258).
NOTE: The 42RE transmission has three clutch
discs and two clutch plates.
(3) Note position of clutch pack components for
assembly reference (Fig. 259).
Fig. 255 Intermediate Shaft Spacer Location
1 – INTERMEDIATE SHAFT
2 – INTERMEDIATE SHAFT SPACER (SELECT FIT)
Fig. 257 Removing Overdrive Clutch Pack Retaining
Ring
1 – OVERDRIVE CLUTCH PACK RETAINING RING
(3) Remove overdrive piston from retainer (Fig.
256).
42RE AUTOMATIC TRANSMISSION
WJ
21 - 139
DISASSEMBLY AND ASSEMBLY (Continued)
Fig. 258 Overdrive Clutch Pack Removal
1 – OVERDRIVE CLUTCH PACK
Fig. 260 Overdrive Clutch Wave Spring Removal/
Installation
1 – WAVE SPRING
Fig. 261 Overdrive Clutch Reaction Snap Ring
Removal/Installation
1 – REACTION RING
2 – CLUTCH HUB
(3) Remove Torx head screws that attach access
cover and gasket to overdrive case (Fig. 262).
(4) Remove access cover and gasket (Fig. 263).
Fig. 259 42RE Overdrive Clutch Component
Position
1
2
3
4
5
–
–
–
–
–
PRESSURE PLATE (TO FRONT)
OVERDRIVE CLUTCH PACK
CLUTCH DISC (3)
CLUTCH PLATE (2)
REACTION PLATE (TO REAR)
OVERDRIVE GEARTRAIN DISASSEMBLY
(1) Remove overdrive clutch wave spring (Fig.
260).
(2) Remove overdrive clutch reaction snap ring
(Fig. 261). Note that snap ring is located in same
groove as wave spring.
Fig. 262 Access Cover Screw Removal/Installation
1 – TORX SCREWDRIVER (T25)
2 – ACCESS COVER SCREWS
21 - 140
42RE AUTOMATIC TRANSMISSION
WJ
DISASSEMBLY AND ASSEMBLY (Continued)
Fig. 263 Access Cover And Gasket Removal/
Installation
1 – ACCESS COVER AND GASKET
(5) Expand output shaft bearing snap ring with
expanding-type snap ring pliers. Then push output
shaft forward to release shaft bearing from locating
ring (Fig. 264).
Fig. 265 Removing Gear Case From Geartrain
Assembly
1 – GEARTRAIN ASSEMBLY
2 – GEAR CASE
Fig. 264 Releasing Bearing From Locating Ring
1 – EXPAND BEARING LOCATING RING WITH SNAP RING
PLIERS
2 – ACCESS HOLE
(6) Lift gear case up and off geartrain assembly
(Fig. 265).
(7) Remove snap ring that retains rear bearing on
output shaft.
(8) Remove rear bearing from output shaft (Fig.
266).
DIRECT CLUTCH, HUB AND SPRING DISASSEMBLY
WARNING: THE NEXT STEP IN DISASSEMBLY
INVOLVES COMPRESSING THE DIRECT CLUTCH
SPRING. IT IS EXTREMELY IMPORTANT THAT
PROPER EQUIPMENT BE USED TO COMPRESS
THE SPRING AS SPRING FORCE IS APPROXI-
Fig. 266 Rear Bearing Removal
1 – OUTPUT SHAFT
2 – REAR BEARING
3 – SNAP RING
MATELY 830 POUNDS. USE SPRING COMPRESSOR
TOOL 6227-1 AND A HYDRAULIC SHOP PRESS
WITH A MINIMUM RAM TRAVEL OF 5-6 INCHES.
THE PRESS MUST ALSO HAVE A BED THAT CAN
BE ADJUSTED UP OR DOWN AS REQUIRED.
RELEASE CLUTCH SPRING TENSION SLOWLY AND
COMPLETELY TO AVOID PERSONAL INJURY.
(1)
267).
(2)
(Fig.
press
press
Mount geartrain assembly in shop press (Fig.
Position Compressor Tool 6227-1 on clutch hub
267). Support output shaft flange with steel
plates as shown and center assembly under
ram.
42RE AUTOMATIC TRANSMISSION
WJ
21 - 141
DISASSEMBLY AND ASSEMBLY (Continued)
(3) Apply press pressure slowly. Compress hub and
spring far enough to expose clutch hub retaining ring
and relieve spring pressure on clutch pack snap ring
(Fig. 267).
(4) Remove direct clutch pack snap ring (Fig. 268).
(5) Remove direct clutch hub retaining ring (Fig.
269).
(6) Release press load slowly and completely (Fig.
270).
(7) Remove Special Tool 6227-1. Then remove
clutch pack from hub (Fig. 270).
Fig. 268 Direct Clutch Pack Snap Ring Removal
1
2
3
4
5
–
–
–
–
–
CLUTCH HUB
SPECIAL TOOL 6227–1
DIRECT CLUTCH PACK SNAP RING
PRESS PLATES
CLUTCH DRUM
Fig. 267 Geartrain Mounted In Shop Press
1
2
3
4
5
6
–
–
–
–
–
–
PRESS RAM
SPECIAL TOOL C-3995–A (OR SIMILAR TOOL)
CLUTCH HUB
PLATES
PRESS BED
SPECIAL TOOL 6227–1
Fig. 269 Direct Clutch Hub Retaining Ring Removal
1
2
3
4
–
–
–
–
SPECIAL TOOL 6227–1
CLUTCH HUB RETAINING RING
PRESS BED
PRESS PLATES
21 - 142
42RE AUTOMATIC TRANSMISSION
WJ
DISASSEMBLY AND ASSEMBLY (Continued)
Fig. 272 Removing Sun Gear, Thrust Bearing And
Planetary Gear
Fig. 270 Direct Clutch Pack Removal
1 – SPECIAL TOOL 6227–1
2 – DIRECT CLUTCH HUB
3 – DIRECT CLUTCH PACK
Geartrain Disassembly
(1) Remove direct clutch hub and spring (Fig. 271).
(2) Remove sun gear and spring plate. Then
remove planetary thrust bearing and planetary gear
(Fig. 272).
1
2
3
4
5
–
–
–
–
–
PLANETARY GEAR
PLANETARY THRUST BEARING
CLUTCH SPRING PLATE
SPRING PLATE SNAP RING
SUN GEAR
(3) Remove overrunning clutch assembly with
expanding type snap ring pliers (Fig. 273). Insert pliers into clutch hub. Expand pliers to grip hub splines
and remove clutch with counterclockwise, twisting
motion.
(4) Remove thrust bearing from overrunning
clutch hub.
(5) Remove overrunning clutch from hub.
(6) Mark position of annulus gear and direct clutch
drum for assembly alignment reference (Fig. 274).
Use small center punch or scriber to make alignment
marks.
Fig. 271 Direct Clutch Hub And Spring Removal
1 – DIRECT CLUTCH SPRING
2 – DIRECT CLUTCH HUB
Fig. 273 Overrunning Clutch Assembly Removal/
Installation
1 – OVERRUNNING CLUTCH
2 – NEEDLE BEARING
WJ
42RE AUTOMATIC TRANSMISSION
21 - 143
DISASSEMBLY AND ASSEMBLY (Continued)
Fig. 274 Marking Direct Clutch Drum And Annulus
Gear For Assembly Alignment
Fig. 276 Clutch Drum Outer Retaining Ring Removal
1 – OUTER RETAINING RING
1 – DIRECT CLUTCH DRUM
2 – HAMMER
3 – PUNCH
(7) Remove direct clutch drum rear retaining ring
(Fig. 275).
(8) Remove direct clutch drum outer retaining ring
(Fig. 276).
(9) Mark annulus gear and output shaft for assembly alignment reference (Fig. 277). Use punch or
scriber to mark gear and shaft.
Fig. 277 Marking Annulus Gear And Output Shaft
For Assembly Alignment
1 – OUTPUT SHAFT
2 – HAMMER
3 – PUNCH
Fig. 275 Clutch Drum Inner Retaining Ring Removal
1 – INNER RETAINING RING
2 – DIRECT CLUTCH DRUM
3 – ANNULUS GEAR
21 - 144
42RE AUTOMATIC TRANSMISSION
WJ
DISASSEMBLY AND ASSEMBLY (Continued)
(10) Remove snap ring that secures annulus gear
on output shaft (Fig. 278). Use two screwdrivers to
unseat and work snap ring out of groove as shown.
(11) Remove annulus gear from output shaft (Fig.
279). Use rawhide or plastic mallet to tap gear off
shaft.
GEAR CASE AND PARK LOCK DISASSEMBLY
(1) Remove locating ring from gear case.
(2) Remove park pawl shaft retaining bolt and
remove shaft, pawl and spring.
(3) Remove reaction plug snap ring and remove
reaction plug.
(4) Remove output shaft seal.
ASSEMBLY
GEARTRAIN AND DIRECT CLUTCH ASSEMBLY
(1) Soak direct clutch and overdrive clutch discs in
Mopart ATF Plus 3, type 7176, transmission fluid.
Allow discs to soak for 10-20 minutes.
(2) Install new pilot bushing and clutch hub bushing in output shaft if necessary (Fig. 280). Lubricate
bushings with petroleum jelly, or transmission fluid.
Fig. 278 Annulus Gear Snap Ring Removal
1 – OUTPUT SHAFT
2 – ANNULUS GEAR
3 – SNAP RING
Fig. 280 Output Shaft Pilot Bushing
1 – OUTPUT SHAFT HUB
2 – OVERRUNNING CLUTCH HUB BUSHING
3 – INTERMEDIATE SHAFT PILOT BUSHING
Fig. 279 Annulus Gear Removal
1 – OUTPUT SHAFT
2 – ANNULUS GEAR
(3) Install annulus gear on output shaft, if
removed. Then install annulus gear retaining snap
ring (Fig. 281).
(4) Align and install clutch drum on annulus gear
(Fig. 282). Be sure drum is engaged in annulus gear
lugs.
(5) Install clutch drum outer retaining ring (Fig.
282).
42RE AUTOMATIC TRANSMISSION
WJ
21 - 145
DISASSEMBLY AND ASSEMBLY (Continued)
(6) Slide clutch drum forward and install inner
retaining ring (Fig. 283).
(7) Install rear bearing and snap ring on output
shaft (Fig. 284). Be sure locating ring groove in bearing is toward rear.
Fig. 281 Annulus Gear Installation
1 – SNAP RING
2 – OUTPUT SHAFT FRONT BEARING
3 – ANNULUS GEAR
Fig. 283 Clutch Drum Inner Retaining Ring
Installation
1 – ANNULUS GEAR
2 – INNER SNAP RING
3 – CLUTCH DRUM
Fig. 282 Clutch Drum And Outer Retaining Ring
Installation
1 – ANNULUS GEAR
2 – OUTER SNAP RING
3 – CLUTCH DRUM
Fig. 284 Rear Bearing And Snap Ring Installation
1 – REAR BEARING
2 – SNAP RING
21 - 146
42RE AUTOMATIC TRANSMISSION
WJ
DISASSEMBLY AND ASSEMBLY (Continued)
(8) Install overrunning clutch on hub (Fig. 285).
Note that clutch only fits one way. Shoulder on
clutch should seat in small recess at edge of
hub.
(9) Install thrust bearing on overrunning clutch
hub. Use generous amount of petroleum jelly to hold
bearing in place for installation. Bearing fits one
way only. Be sure bearing is seated squarely
against hub. Reinstall bearing if it does not
seat squarely.
Fig. 285 Assembling Overrunning Clutch And Hub
1 – CLUTCH HUB
2 – OVERRUNNING CLUTCH
(10) Install overrunning clutch in output shaft
(Fig. 286). Insert snap ring pliers in hub splines.
Expand pliers to grip hub. Then install assembly
with counterclockwise, twisting motion.
(11) Install planetary gear in annulus gear (Fig.
287). Be sure planetary pinions are fully seated
in annulus gear before proceeding.
(12) Coat planetary thrust bearing and bearing
contact surface of spring plate with generous amount
of petroleum jelly. This will help hold bearing in
place during installation.
(13) Install planetary thrust bearing on sun gear
(Fig. 288). Slide bearing onto gear and seat it against
spring plate as shown. Bearing fits one way only.
If it does not seat squarely against spring plate,
remove and reposition bearing.
(14) Install assembled sun gear, spring plate and
thrust bearing (Fig. 289). Be sure sun gear and
thrust bearing are fully seated before proceeding.
(15) Mount assembled output shaft, annulus gear,
and clutch drum in shop press. Direct clutch spring,
hub and clutch pack are easier to install with assembly mounted in press.
Fig. 286 Overrunning Clutch Installation
1
2
3
4
5
6
–
–
–
–
–
–
CLUTCH DRUM
OVERRUNNING CLUTCH ASSEMBLY
EXPANDING-TYPE SNAP RING PLIERS
CLUTCH DRUM
ANNULUS GEAR
OVERRUNNING CLUTCH ASSEMBLY SEATED IN OUTPUT
SHAFT
Fig. 287 Planetary Gear Installation
1 – PLANETARY GEAR
2 – ANNULUS GEAR
42RE AUTOMATIC TRANSMISSION
WJ
21 - 147
DISASSEMBLY AND ASSEMBLY (Continued)
Fig. 288 Planetary Thrust Bearing Installation
1 – SPRING PLATE
2 – PLANETARY THRUST BEARING
3 – SUN GEAR
Fig. 290 Alignment Tool Installation
1
2
3
4
–
–
–
–
SPECIAL TOOL 6227–2
PRESS PLATES
ASSEMBLED DRUM AND ANNULUS GEAR
SUN GEAR
1
2
3
4
–
–
–
–
SPECIAL TOOL 6227–2
DIRECT CLUTCH SPRING
CLUTCH HUB
PRESS PLATES
Fig. 289 Sun Gear Installation
1 – SUN GEAR AND SPRING PLATE ASSEMBLY
(16) Align splines in hubs of planetary gear and
overrunning clutch with Alignment tool 6227-2 (Fig.
290). Insert tool through sun gear and into splines of
both hubs. Be sure alignment tool is fully seated
before proceeding.
(17) Install direct clutch spring (Fig. 291). Be sure
spring is properly seated on spring plate.
NOTE: The 42RE transmission has 6 direct clutch
discs and 5 clutch plates.
Fig. 291 Direct Clutch Spring Installation
21 - 148
42RE AUTOMATIC TRANSMISSION
WJ
DISASSEMBLY AND ASSEMBLY (Continued)
Fig. 292 42RE Direct Clutch Pack Components
1 – REACTION PLATE
(18) Assemble and install direct clutch pack on
hub as follows:
(a) Assemble clutch pack components (Fig. 292).
(b) Install direct clutch reaction plate on clutch
hub first. Note that one side of reaction plate
is counterbored. Be sure this side faces rearward. Splines at rear of hub are raised
slightly. Counterbore in plate fits over raised
splines. Plate should be flush with this end of
hub (Fig. 293).
2 – PRESSURE PLATE
(c) Install first clutch disc followed by a steel
plate until all discs and plates have been installed.
(d) Install pressure plate. This is last clutch
pack item to be installed. Be sure plate is
installed with shoulder side facing upward
(Fig. 294).
(19) Install clutch hub and clutch pack on direct
clutch spring (Fig. 295). Be sure hub is started on
sun gear splines before proceeding.
WJ
42RE AUTOMATIC TRANSMISSION
21 - 149
DISASSEMBLY AND ASSEMBLY (Continued)
Fig. 294 Correct Position Of Direct Clutch Pressure
Plate
1 – DIRECT CLUTCH PRESSURE PLATE
2 – CLUTCH PACK
3 – BE SURE SHOULDER SIDE OF PLATE FACES UPWARD
Fig. 293 Correct Position Of Direct Clutch Reaction
Plate
1 – REACTION PLATE COUNTERBORE
2 – DIRECT CLUTCH REACTION PLATE (FLUSH WITH END OF
HUB)
3 – CLUTCH HUB
WARNING: THE NEXT STEP IN GEARTRAIN
ASSEMBLY INVOLVES COMPRESSING THE DIRECT
CLUTCH HUB AND SPRING. IT IS EXTREMELY
IMPORTANT THAT PROPER EQUIPMENT BE USED
TO COMPRESS THE SPRING AS SPRING FORCE IS
APPROXIMATELY 830 POUNDS. USE COMPRESSOR TOOL C-6227-1 AND A HYDRAULIC-TYPE
SHOP PRESS WITH A MINIMUM RAM TRAVEL OF 6
INCHES. THE PRESS MUST ALSO HAVE A BED
THAT CAN BE ADJUSTED UP OR DOWN AS
REQUIRED. RELEASE CLUTCH SPRING TENSION
SLOWLY AND COMPLETELY TO AVOID PERSONAL
INJURY.
Fig. 295 Direct Clutch Pack And Clutch Hub
Installation
1 – CLUTCH HUB
2 – DIRECT CLUTCH PACK
3 – CLUTCH DRUM
21 - 150
42RE AUTOMATIC TRANSMISSION
WJ
DISASSEMBLY AND ASSEMBLY (Continued)
(20) Position Compressor Tool 6227-1 on clutch hub.
(21) Compress clutch hub and spring just enough
to place tension on hub and hold it in place.
(22) Slowly compress clutch hub and spring. Compress spring and hub only enough to expose ring
grooves for clutch pack snap ring and clutch hub
retaining ring.
(23) Realign clutch pack on hub and seat clutch
discs and plates in clutch drum.
(24) Install direct clutch pack snap ring (Fig. 296).
Be very sure snap ring is fully seated in clutch
drum ring groove.
(25) Install clutch hub retaining ring (Fig. 297).
Be very sure retaining ring is fully seated in
sun gear ring groove.
(26) Slowly release press ram, remove compressor
tools and remove geartrain assembly.
Fig. 297 Clutch Hub Retaining Ring Installation
1 – SPECIAL TOOL 6227–1
2 – CLUTCH HUB RETAINING RING
Fig. 298 Reaction Plug Locating Pin And Snap-Ring
Fig. 296 Direct Clutch Pack Snap Ring Installation
1 – REACTION PLUG SNAP RING (DO NOT OVERCOMPRESS
TO INSTALL)
2 – LOCATING PIN
3 – PARK LOCK REACTION PLUG
1 – SPECIAL TOOL 6227–1
2 – DIRECT CLUTCH PACK SNAP RING
GEAR CASE ASSEMBLY
(1) Position park pawl and spring in case and
install park pawl shaft. Verify that end of spring
with 90° bend is hooked to pawl and straight end of
spring is seated against case.
(2) Install pawl shaft retaining bolt. Tighten bolt
to 27 N·m (20 ft. lbs.) torque.
(3) Install park lock reaction plug. Note that plug
has locating pin at rear (Fig. 298). Be sure pin
is seated in hole in case before installing snap
ring.
(4) Install reaction plug snap-ring (Fig. 299). Compress snap ring only enough for installation; do
not distort it.
(5) Install new seal in gear case. On 4x4 gear case,
use Tool Handle C-4171 and Installer C-3860-A to
seat seal in case. On 4 x 2 gear case, use same Handle C-4171 and Installer C-3995-A to seat seal in
case.
Fig. 299 Reaction Plug And Snap-Ring Installation
1 – REACTION PLUG SNAP RING
2 – SNAP RING PLIERS
42RE AUTOMATIC TRANSMISSION
WJ
21 - 151
DISASSEMBLY AND ASSEMBLY (Continued)
(6) Verify that tab ends of rear bearing locating
ring extend into access hole in gear case (Fig. 300).
(7) Support geartrain on Tool 6227-1 (Fig. 301). Be
sure tool is securely seated in clutch hub.
(8) Install overdrive gear case on geartrain (Fig.
301).
Fig. 300 Correct Rear Bearing Locating Ring
Position
1 – CASE ACCESS HOLE
2 – TAB ENDS OF LOCATING RING
(9) Expand front bearing locating ring with snap
ring pliers (Fig. 302). Then slide case downward until
locating ring locks in bearing groove and release
snap ring.
(10) Install locating ring access cover and gasket
in overdrive unit case (Fig. 303).
Fig. 302 Seating Locating Ring In Rear Bearing
1 – EXPAND BEARING LOCATING RING WITH SNAP RING
PLIERS
2 – ACCESS HOLE
Fig. 303 Locating Ring Access Cover And Gasket
Installation
1 – TORX SCREWDRIVER (T25)
2 – ACCESS COVER SCREWS
Fig. 301 Overdrive Gear Case Installation
1 – GEARTRAIN ASSEMBLY
2 – GEAR CASE
21 - 152
42RE AUTOMATIC TRANSMISSION
WJ
DISASSEMBLY AND ASSEMBLY (Continued)
OVERDRIVE CLUTCH ASSEMBLY
(1) Install overdrive clutch reaction ring first.
Reaction ring is flat with notched ends (Fig. 304).
(2) Install wave spring on top of reaction ring (Fig.
305). Reaction ring and wave ring both fit in
same ring groove. Use screwdriver to seat each
ring securely in groove. Also ensure that the ends of
the two rings are offset from each other.
NOTE: The 42RE transmission has 3 overdrive
clutch discs and 2 plates.
(3) Assemble overdrive clutch pack (Fig. 306).
Fig. 305 Overdrive Clutch Wave Spring Installation
1 – WAVE SPRING
Fig. 304 Overdrive Clutch Reaction Ring Installation
1 – REACTION RING
2 – CLUTCH HUB
Fig. 306 42RE Overdrive Clutch Components
1 – REACTION PLATE
2 – PRESSURE PLATE
WJ
42RE AUTOMATIC TRANSMISSION
21 - 153
DISASSEMBLY AND ASSEMBLY (Continued)
(4) Install overdrive clutch reaction plate first.
(5) Install first clutch disc followed by first clutch
plate. Then install remaining clutch discs and plates
in same order.
(6) Install clutch pack pressure plate.
(7) Install clutch pack wire-type retaining ring
(Fig. 307).
Fig. 308 Shaft End Play Measurement
1 – SPECIAL TOOL 6312
2 – SPECIAL TOOL 6311
3 – SPECIAL TOOL C-4962
Fig. 307 Overdrive Clutch Pack Retaining Ring
Installation
1 – OVERDRIVE CLUTCH PACK RETAINING RING
INTERMEDIATE SHAFT SPACER SELECTION
(1) Place overdrive unit in vertical position. Mount
it on blocks, or in workbench with appropriate size
mounting hole cut into it. Be sure unit is facing
upward for access to direct clutch hub. Also be sure
output shaft is not loaded and internal components
are moved rearward for accurate measurement.
(2) Determine correct thickness intermediate shaft
spacer as follows:
(a) Insert Special Tool 6312 through sun gear,
planetary gear and into pilot bushing in output
shaft. Be sure tool bottoms against planetary
shoulder.
(b) Position Gauge Tool 6311 across face of overdrive case (Fig. 308). Then position Dial Caliper
C-4962 over gauge tool.
(c) Extend sliding scale of dial caliper downward
through gauge tool slot until scale contacts end of
Gauge Alignment Tool 6312. Lock scale in place.
Remove dial caliper tool and note distance measured (Fig. 308).
(d) Select proper thickness end play spacer from
spacer chart based on distance measured (Fig.
309).
(e) Remove Gauge Alignment Tool 6312.
OD THRUST PLATE SELECTION
(1) Place overdrive unit in vertical position. Mount
it on blocks, or in workbench with appropriate size
Fig. 309 Intermediate Shaft End Play Spacer
Selection
mounting hole cut into it. Be sure unit is facing
upward for access to direct clutch hub. Also be sure
output shaft is not loaded and internal components
are moved rearward for accurate measurement.
(2) Determine correct thickness overdrive piston
thrust plate as follows:
(a) Position Gauge Tool 6311 across face of overdrive case. Then position Dial Caliper C-4962 over
gauge tool (Fig. 310).
(b) Measure distance to clutch hub thrust bearing seat at four points 90° apart. Then average
measurements by adding them and dividing by 4.
(c) Select and install required thrust plate from
information in thrust plate chart (Fig. 311).
(3) Leave Alignment Tool 6227-2 in place. Tool will
keep planetary and clutch hub splines in alignment
until overdrive unit is ready for installation on transmission.
(4) Transmission speed sensor can be installed at
this time if desired. However, it is recommended that
sensor not be installed until after overdrive unit is
secured to transmission.
21 - 154
42RE AUTOMATIC TRANSMISSION
WJ
DISASSEMBLY AND ASSEMBLY (Continued)
(e) Verify that the locating lugs entered the lug
bores in the retainer.
(6) Install intermediate shaft spacer on intermediate shaft.
(7) Install overdrive piston thrust plate on overdrive piston.
(8) Install overdrive piston thrust bearing on overdrive piston.
(9) Install transmission speed sensor and O-ring
seal in overdrive case (Fig. 252).
CLEANING AND INSPECTION
VALVE BODY
Fig. 310 Overdrive Piston Thrust Plate Measurement
1 – SPECIAL TOOL 6311
2 – DIRECT CLUTCH HUB THRUST BEARING SEAT
3 – SPECIAL TOOL C-4962
Fig. 311 Overdrive Piston Thrust Plate Selection
OVERDRIVE PISTON ASSEMBLY
(1) Install new seals on over drive piston.
(2) Stand transmission case upright on bellhousing.
(3) Position Guide Ring 8114-1 on outer edge of
overdrive piston retainer.
(4) Position Seal Guide 8114-2 on inner edge of
overdrive piston retainer.
(5) Install overdrive piston in overdrive piston
retainer by: aligning locating lugs on overdrive piston
to the two mating holes in retainer.
(a) Aligning locating lugs on overdrive piston to
the two mating holes in retainer.
(b) Lubricate overdrive piston seals with Mopart
Door Ease, or equivalent.
(c) Install piston over Seal Guide 8114–2 and
inside Guide Ring 8114–1.
(d) Push overdrive piston into position in
retainer.
Clean the valve housings, valves, plugs, springs,
and separator plates with a standard parts cleaning
solution only. Do not use gasoline, kerosene, or any
type of caustic solution.
Do not immerse any of the electrical components in
cleaning solution. Clean the governor solenoid and
sensor and the dual solenoid and harness assembly
by wiping them off with dry shop towels only.
Dry all except the electrical parts with compressed
air. Make sure all passages are clean and free from
obstructions. Do not use rags or shop towels to
dry or wipe off valve body components. Lint
from these materials can stick to valve body
parts, interfere with valve operation, and clog
filters and fluid passages.
Wipe the governor pressure sensor and solenoid
valve with dry, lint free shop towels only. The O-rings
on the sensor and solenoid valve are the only serviceable components. Be sure the vent ports in the solenoid valve are open and not blocked by dirt or debris.
Replace the valve and/or sensor only when DRB scan
tool diagnosis indicates this is necessary. Or, if either
part has sustained physical damage (dented,
deformed, broken, etc.).
CAUTION: Do not turn the small screw at the end
of the solenoid valve for any reason. Turning the
screw in either direction will ruin solenoid calibration and result in solenoid failure. In addition, the
filter on the solenoid valve is NOT serviceable. Do
not try to remove the filter as this will damage the
valve housing.
Inspect the throttle and manual valve levers and
shafts. Do not attempt to straighten a bent shaft or
correct a loose lever. Replace these components if
worn, bent, loose or damaged in any way.
Inspect all of the valve body mating surfaces for
scratches, nicks, burrs, or distortion. Use a straightedge to check surface flatness. Minor scratches may
be removed with crocus cloth using only very light
pressure.
42RE AUTOMATIC TRANSMISSION
WJ
21 - 155
CLEANING AND INSPECTION (Continued)
Minor distortion of a valve body mating surface
may be corrected by smoothing the surface with a
sheet of crocus cloth. Position the crocus cloth on a
surface plate, sheet of plate glass or equally flat surface. If distortion is severe or any surfaces are
heavily scored, the valve body will have to be
replaced.
CAUTION: Many of the valves and plugs, such as
the throttle valve, shuttle valve plug, 1-2 shift valve
and 1-2 governor plug, are made of coated aluminum. Aluminum components are identified by the
dark color of the special coating applied to the surface (or by testing with a magnet). Do not sand aluminum valves or plugs under any circumstances.
This practice could damage the special coating
causing the valves/plugs to stick and bind.
Inspect the valves and plugs for scratches, burrs,
nicks, or scores. Minor surface scratches on steel
valves and plugs can be removed with crocus cloth
but do not round off the edges of the valve or
plug lands. Maintaining sharpness of these edges is
vitally important. The edges prevent foreign matter
from lodging between the valves and plugs and the
bore.
Inspect all the valve and plug bores in the valve
body. Use a penlight to view the bore interiors.
Replace the valve body if any bores are distorted or
scored. Inspect all of the valve body springs. The
springs must be free of distortion, warpage or broken
coils.
Check the two separator plates for distortion or
damage of any kind. Inspect the upper housing,
lower housing, 3-4 accumulator housing, and transfer
plate carefully. Be sure all fluid passages are clean
and clear. Check condition of the upper housing and
transfer plate check balls as well. The check balls
and ball seats must not be worn or damaged.
Trial fit each valve and plug in its bore to check
freedom of operation. When clean and dry, the valves
and plugs should drop freely into the bores.
Valve body bores do not change dimensionally with
use. If the valve body functioned correctly when new,
it will continue to operate properly after cleaning and
inspection. It should not be necessary to replace a
valve body assembly unless it is damaged in handling.
The only serviceable valve body components are
listed below. The remaining valve body components
are serviced only as part of a complete valve body
assembly. Serviceable parts are:
• dual solenoid and harness assembly
• solenoid gasket
• solenoid case connector O-rings and shoulder
bolt
• switch valve and spring
•
•
•
•
•
•
•
•
•
•
pressure adjusting screw and bracket assembly
throttle lever
manual lever and shaft seal
throttle lever shaft seal, washer, and E-clip
fluid filter and screws
detent ball and spring
valve body screws
governor pressure solenoid
governor pressure sensor and retaining clip
park lock rod and E-clip
TRANSMISSION
GENERAL INFORMATION
Inspect the transmission bushings during overhaul.
Bushing condition is important as worn, scored bushings contribute to low pressures, clutch slip and
accelerated wear of other components. However, do
not replace bushings as a matter of course. Replace
bushings only when they are actually worn, or
scored.
Use recommended tools to replace bushings. The
tools are sized and designed to remove, install, and
seat bushings correctly. The bushing replacement
tools are included in Bushing Tool Set C-3887-B.
Pre-sized service bushings are available for
replacement purposes. Only the sun gear bushings
are not serviced. Low cost of the sun gear assembly
makes it easier to simply replace the gear and bushings as an assembly.
Heli-Coil inserts can be used to repair damaged,
stripped or worn threads in aluminum parts. These
inserts are available from most automotive parts
suppliers. Stainless steel inserts are recommended.
The use of crocus cloth is permissible where necessary, providing it is used carefully. When used on
shafts, or valves, use extreme care to avoid rounding
off sharp edges. Sharp edges are vital as they prevent foreign matter from getting between the valve
and valve bore.
Do not reuse oil seals, gaskets, seal rings, or
O-rings during overhaul. Replace these parts as a
matter of course. Also do not reuse snap rings or
E-clips that are bent or distorted. Replace these parts
as well.
Lubricate transmission parts with Mopart ATF
Plus 3, Type 7176, transmission fluid during overhaul and assembly. Use petroleum jelly, Mopart Door
Ease, or Ru-Glyde to prelubricate seals, O-rings, and
thrust washers. Petroleum jelly can also be used to
hold parts in place during reassembly.
TRANSMISSION CASE CLEANING AND
INSPECTION
Clean the case in a solvent tank. Flush the case
bores and fluid passages thoroughly with solvent.
21 - 156
42RE AUTOMATIC TRANSMISSION
WJ
CLEANING AND INSPECTION (Continued)
Dry the case and all fluid passages with compressed
air. Be sure all solvent is removed from the case and
that all fluid passages are clear.
NOTE: Do not use shop towels or rags to dry the
case (or any other transmission component) unless
they are made from lint-free materials. Lint will stick
to case surfaces and transmission components and
circulate throughout the transmission after assembly. A sufficient quantity of lint can block fluid passages and interfere with valve body operation.
Inspect the case for cracks, porous spots, worn
bores, or damaged threads. Damaged threads can be
repaired with Helicoil thread inserts. However, the
case will have to be replaced if it exhibits any type of
damage or wear.
Lubricate the front band adjusting screw threads
with petroleum jelly and thread the screw part-way
into the case. Be sure the screw turns freely.
OVERRUNNING CLUTCH/LOW-REVERSE
DRUM/OVERDRIVE PISTON RETAINER
Clean the overrunning clutch assembly, clutch cam,
low-reverse drum, and overdrive piston retainer in
solvent. Dry them with compressed air after cleaning.
Inspect condition of each clutch part after cleaning.
Replace the overrunning clutch roller and spring
assembly if any rollers or springs are worn or damaged, or if the roller cage is distorted, or damaged.
Replace the cam if worn, cracked or damaged.
Replace the low-reverse drum if the clutch race,
roller surface or inside diameter is scored, worn or
damaged. Do not remove the clutch race from
the low-reverse drum under any circumstances.
Replace the drum and race as an assembly if
either component is damaged.
Examine the overdrive piston retainer carefully for
wear, cracks, scoring or other damage. Be sure the
retainer hub is a snug fit in the case and drum.
Replace the retainer if worn or damaged.
ACCUMULATOR
Inspect the accumulator piston and seal rings (Fig.
312). Replace the seal rings if worn or cut. Replace
the piston if chipped or cracked.
Check condition of the accumulator inner and
outer springs (Fig. 312). Replace the springs if the
coils are cracked, distorted or collapsed.
FRONT SERVO
Clean the servo piston components with solvent
and dry them with compressed air. Wipe the band
clean with lint free shop towels.
Fig. 312 Accumulator Components
1
2
3
4
–
–
–
–
INNER SPRING
ACCUMULATOR PISTON
OUTER SPRING
SEAL RINGS
Replace the front band if distorted, lining is
burned, flaking off, or worn to the point where the
grooves in the lining material are no longer visible.
Inspect the servo components. Replace the springs
if collapsed, distorted or broken. Replace the guide,
rod and piston if cracked, bent, or worn. Discard the
servo snap ring if distorted or warped.
Check the servo piston bore for wear. If the bore is
severely scored, or damaged, it will be necessary to
replace the case.
Replace any servo component if doubt exists about
condition. Do not reuse suspect parts.
REAR SERVO
Remove and discard the servo piston seal ring (Fig.
313). Then clean the servo components with solvent
and dry with compressed air. Replace either spring if
collapsed, distorted or broken. Replace the plug and
piston if cracked, bent, or worn. Discard the servo
snap rings and use a new ones at assembly.
OIL PUMP AND REACTION SHAFT SUPPORT
(1) Clean pump and support components with solvent and dry them with compressed air.
(2) Check condition of the seal rings and thrust
washer on the reaction shaft support. The seal rings
do not need to be replaced unless cracked, broken, or
severely worn.
(3) Inspect the pump and support components.
Replace the pump or support if the seal ring grooves
or machined surfaces are worn, scored, pitted, or
damaged. Replace the pump gears if pitted, worn
chipped, or damaged.
(4) Inspect the pump bushing. Then check the
reaction shaft support bushing. Replace either bushing only if heavily worn, scored or damaged. It is not
necessary to replace the bushings unless they are
actually damaged.
42RE AUTOMATIC TRANSMISSION
WJ
21 - 157
CLEANING AND INSPECTION (Continued)
Replace the clutch spring and spring retainer if
either is distorted, warped or broken.
Check the lug grooves in the clutch retainer. The
steel plates should slide freely in the slots. Replace
the retainer if the grooves are worn or damaged.
Check action of the check ball in the retainer (Fig.
314). The ball must move freely and not stick.
Fig. 313 Rear Servo Components
1
2
3
4
5
6
7
8
–
–
–
–
–
–
–
–
SNAP RING
PISTON SEAL
PISTON PLUG
SPRING RETAINER
SNAP RING
PISTON SPRING
CUSHION SPRING
PISTON
(5) Install the gears in the pump body and measure pump component clearances as follows:
(a) Clearance between outer gear and reaction
shaft housing should be 0.010 to 0.063 mm (0.0004
to 0.0025 in.). Clearance between inner gear and
reaction shaft housing should be 0.010 to 0.063
mm (0.0004 to 0.0025 in.). Both clearances can be
measured at the same time by:
(I) Installing the pump gears in the pump
housing.
(II) Position an appropriate piece of Plastigagey across both gears.
(III) Align the plastigage to a flat area on the
reaction shaft housing.
(IV) Install the reaction shaft to the pump
housing.
(V) Separate the reaction shaft housing from
the pump housing and measure the Plastigagey
following the instructions supplied with it.
(b) Clearance between inner gear tooth and
outer gear should be 0.08 to 0.19 mm (0.0035 to
0.0075 in.). Measure clearance with an appropriate
feeler gauge.
(c) Clearance between outer gear and pump
housing should also be 0.010 to 0.19 mm (0.0035 to
0.0075 in.). Measure clearance with an appropriate
feeler gauge.
NOTE: Inspect the clutch retainer bushings carefully (Fig. 315). The retainer bushings are NOT serviceable. It will be necessary to replace the retainer
if either bushing is scored, or worn.
Inspect the piston and retainer seal surfaces for
nicks or scratches. Minor scratches can be removed
with crocus cloth. However, replace the piston and/or
retainer if the seal surfaces are seriously scored.
Fig. 314 Front Clutch Piston Retainer Check Ball
Location
1 – RETAINER CHECK BALL
FRONT CLUTCH
Clean and inspect the front clutch components.
Replace the clutch discs if warped, worn, scored,
burned or charred, or if the facing is flaking off.
Replace the steel plates if heavily scored, warped, or
broken. Be sure the driving lugs on the plates are in
good condition. The lugs must not be bent, cracked or
damaged in any way.
Fig. 315 Retainer Bushing Location/Inspection
1 – FRONT CLUTCH RETAINER BUSHINGS (NONSERVICEABLE)
21 - 158
42RE AUTOMATIC TRANSMISSION
WJ
CLEANING AND INSPECTION (Continued)
REAR CLUTCH
Clean the clutch components with solvent and dry
them with compressed air. Do not use rags or shop
towels to dry any of the clutch parts. Lint from such
materials will adhere to component surfaces and
could restrict or block fluid passages after assembly.
Replace the clutch discs if warped, worn, scored,
burned/charred, the lugs are damaged, or if the facing is flaking off. Replace the top and bottom pressure plates if scored, warped, or cracked. Be sure the
driving lugs on the pressure and clutch plates are
also in good condition. The lugs must not be bent,
cracked or damaged in any way.
Replace the piston spring and wave spring if either
part is distorted, warped or broken.
Check the lug grooves in the clutch retainer. The
clutch and pressure plates should slide freely in the
slots. Replace the retainer if the grooves are worn or
damaged. Also check action of the check balls in the
retainer and piston. Each check ball must move
freely and not stick.
Replace the retainer bushing if worn, scored, or
doubt exists about bushing condition.
Inspect the piston and retainer seal surfaces for
nicks or scratches. Minor scratches can be removed
with crocus cloth. However, replace the piston and/or
retainer if the seal surfaces are seriously scored.
Check condition of the fiber thrust washer and
metal output shaft thrust washer. Replace either
washer if worn or damaged.
Check condition of the seal rings on the input shaft
and clutch retainer hub. Replace the seal rings only
if worn, distorted, or damaged. The input shaft front
seal ring is teflon with chamfered ends. The rear ring
is metal with interlocking ends.
Check the input shaft for wear, or damage. Replace
the shaft if worn, scored or damaged in any way.
PLANETARY GEARTRAIN
Clean the planetary components in solvent and dry
them with compressed air.
Check sun gear and driving shell condition.
Replace the gear if damaged or if the bushings are
scored or worn. The bushings are not serviceable.
Replace the driving shell if worn, cracked or damaged.
Replace planetary gear sets if gears, pinion pins, or
carrier are damaged in any way. Replace the annulus
gears and supports if either component is worn or
damaged.
Inspect the geartrain spacers, thrust plates, snap
rings, and thrust washers. Replace any of these parts
that are worn, distorted or damaged. Do not attempt
to reuse these parts.
The planetary gear thrust washers are different
sizes. The large diameter washers go on the front
planetary and the smaller washers go on the rear
planetary. All the washers have four locating tabs on
them. These tabs fit in the holes or slots provided in
each planetary gear.
Inspect the output shaft carefully. Pay particular
attention to the machined bushing/bearing surfaces
on the shaft and the governor valve shaft bore at the
shaft rear.
Replace the output shaft if the machined surfaces
are scored, pitted, or damaged in any way. Also
replace the shaft if the splines are damaged, or
exhibits cracks at any location (especially at the governor valve shaft bore).
The annulus gears can be removed from their supports if necessary. Just remove the snap rings and
separate the two parts when replacement is necessary. In addition, the annulus gear bushings can be
replaced if severely worn, or scored. However it is not
necessary to replace the bushings if they only exhibit
normal wear. Check bushing fit on the output shaft
to be sure.
OVERDRIVE UNIT
Clean the geartrain and case components with solvent. Dry all parts except the bearings with compressed air. Allow bearings to air dry.
Do not use shop towels for wiping parts dry unless
the towels are made from a lint-free material. A sufficient quantity of lint (from shop towels, cloths, rags,
etc.) could plug the transmission filter and fluid passages.
Discard the old case gasket and seals. Do not
attempt to salvage these parts. They are not reusable. Replace any of the overdrive unit snap rings if
distorted or damaged.
Minor nicks or scratches on components can be
smoothed with crocus cloth. However, do not attempt
to reduce severe scoring on any components with
abrasive materials. Replace severely scored components; do not try to salvage them.
Check condition of the park lock components and
the overdrive case.
Replace the case if cracked, scored, or damaged.
Replace the park lock pawl, plug, or spring if worn or
damaged. Be sure the bullet at the end of the park
lock rod is in good condition. Replace the rod if the
bullet is worn or the rod itself is bent or distorted.
Do not attempt to straighten the rod.
Check the bushings in the overdrive case. Replace
the bushings if severely scored or worn. Also replace
the case seal if loose, distorted, or damaged.
Examine the overdrive and direct clutch discs and
plates. Replace the discs if the facing is worn,
severely scored, or burned and flaking off. Replace
the clutch plates if worn, heavily scored, or cracked.
Check the lugs on the clutch plates for wear. The
WJ
42RE AUTOMATIC TRANSMISSION
21 - 159
CLEANING AND INSPECTION (Continued)
plates should slide freely in the drum. Replace the
plates or drum if binding occurs.
Check condition of the annulus gear, direct clutch
hub, clutch drum and clutch spring. Replace the gear,
hub and drum if worn or damaged. Replace the
spring if collapsed, distorted, or cracked.
Be sure the splines and lugs on the gear, drum and
hub are in good condition. The clutch plates and
discs should slide freely in these components.
Inspect the thrust bearings and spring plate.
Replace the plate if worn or scored. Replace the bearings if rough, noisy, brinnelled, or worn.
Inspect the planetary gear assembly and the sun
gear and bushings. If either the sun gear or the
bushings are damaged, replace the gear and bushings as an assembly. The gear and bushings are not
serviced separately.
The planetary carrier and pinions must be in good
condition. Also be sure the pinion pins are secure and
in good condition. Replace the carrier if worn or damaged.
Inspect the overrunning clutch and race. The race
surface should be smooth and free of scores. Replace
the overrunning clutch assembly or the race if either
assembly is worn or damaged in any way.
Inspect the output shaft and governor components.
Replace the shaft pilot bushing and inner bushing if
damaged. Replace either shaft bearing if rough or
noisy. Replace the bearing snap rings if distorted or
cracked.
Check the machined surfaces on the output shaft.
These surfaces should clean and smooth. Very minor
nicks or scratches can be smoothed with crocus cloth.
Replace the shaft if worn, scored or damaged in any
way.
Inspect the output shaft bushings. The small bushing is the intermediate shaft pilot bushing. The large
bushing is the overrunning clutch hub bushing.
Replace either bushing if scored, pitted, cracked, or
worn.
ADJUSTMENTS
BRAKE TRANSMISSION SHIFT INTERLOCK
The park interlock cable is part of the brake/shift
lever interlock system. Correct cable adjustment is
important to proper interlock operation. The gear
shift and park lock cables must both be correctly
adjusted in order to shift out of Park.
Park Interlock Cable Adjustment Procedure
(1) Shift the transmission into the PARK position.
(2) Turn ignition switch to LOCK position. Be
sure ignition key cylinder is in the LOCK position. Cable will not adjust correctly in any
other position.
(3) Remove shift lever bezel and floor console as
necessary for access to the brake transmission shift
interlock cable.
(4) Pull cable lock button up to release cable (Fig.
316).
(5) Pull cable rearward. Then release cable and
press lock button down until it snaps in place.
BTSI FUNCTION CHECK
(1) Verify removal of ignition key allowed in park
position only.
(2) When the shift lever is in park, and the shift
handle push-button is in the out position, the ignition key cylinder should rotate freely from off to lock.
When the shifter is in any other position, the ignition
key should not rotate from off to lock.
(3) Shifting out of park should be possible when
the ignition key cylinder is in the off position.
(4) Shifting out of park should not be possible
while applying 25 lb. max. handle push-button force,
and ignition key cylinder is in the run or start positions, unless the foot brake pedal is depressed
approximately 1/2 inch (12 mm).
(5) Shifting out of park should not be possible
when the ignition key cylinder is in the accessory or
lock position.
(6) Shifting between any gears neutral or park
may be done without depressing foot brake with ignition switch in run or start positions and vehicle stationary or in motion.
(7) The floor shifter lever and gate positions
should be in alignment with all transmission detent
positions.
(8) Engine starts must be possible with shifter
lever in park or neutral gate positions only. Engine
starts must not be possible in any other gate positions other than park or neutral.
(9) With shifter lever handle push-button not
depressed and lever detent in:
• PARK POSITION- apply forward force on center
of handle and remove pressure. Engine start must be
possible.
• PARK POSITION- apply rearward force on center of handle and remove pressure. Engine start
must be possible.
• NEUTRAL POSITION- engine start must be
possible.
• NEUTRAL POSITION, ENGINE RUNNING
AND BRAKES APPLIED- Apply forward force on
center of shift handle. Transmission should not be
able to shift into reverse detent.
TRANSMISSION THROTTLE VALVE CABLE
ADJUSTMENT
The transmission throttle valve is operated by a
cam on the throttle lever. The throttle lever is oper-
21 - 160
42RE AUTOMATIC TRANSMISSION
WJ
ADJUSTMENTS (Continued)
Fig. 316 Brake Transmission Shift Interlock Cable
1 – SHIFT MECHANISM
2 – SHIFTER BTSI LEVER
3 – ADJUSTMENT CLIP
4 – STEERING COLUMN ASSEMBLY
5 – INTERLOCK CABLE
ated by an adjustable cable (Fig. 317). The cable is
attached to an arm mounted on the throttle lever
shaft. A retaining clip at the engine-end of the cable
is removed to provide for cable adjustment. The
retaining clip is then installed back onto the throttle
valve cable to lock in the adjustment.
A correctly adjusted throttle valve cable will cause
the throttle lever on the transmission to move simultaneously with the throttle body lever from the idle
position. Proper adjustment will allow simultaneous
movement without causing the transmission throttle
lever to either move ahead of, or lag behind the lever
on the throttle body.
Checking Throttle Valve Cable Adjustment
(1) Turn ignition key to OFF position.
(2) Remove air cleaner.
(3) Verify that lever on throttle body is at curb idle
position. Then verify that transmission throttle lever
(Fig. 317) is also at idle (fully forward) position.
(4) Slide cable off attachment stud on throttle body
lever.
(5) Compare position of cable end to attachment
stud on throttle body lever:
Fig. 317 Throttle Valve Cable
• Cable end and attachment stud should be
aligned (or centered on one another) to within 1 mm
(0.039 in.) in either direction.
• If cable end and attachment stud are misaligned
(off center), cable will have to be adjusted as
described in Throttle Valve Cable Adjustment procedure.
42RE AUTOMATIC TRANSMISSION
WJ
21 - 161
ADJUSTMENTS (Continued)
(6) Reconnect cable end to attachment stud. Then
with aid of a helper, observe movement of transmission throttle lever and lever on throttle body.
• If both levers move simultaneously from idle to
half-throttle and back to idle position, adjustment is
correct.
• If transmission throttle lever moves ahead of, or
lags behind throttle body lever, cable adjustment will
be necessary. Or, if throttle body lever prevents
transmission lever from returning to closed position,
cable adjustment will be necessary.
Throttle Valve Cable Adjustment Procedure
(1) Turn ignition switch to OFF position.
(2) Remove air cleaner if necessary.
(3) Disconnect cable end from attachment stud.
Carefully slide cable off stud. Do not pry or pull
cable off.
(4) Verify that transmission throttle lever is in
fully closed position. Then be sure lever on throttle
body is at curb idle position.
(5) Insert a small screwdriver under edge of
retaining clip and remove retaining clip.
(6) Center cable end on attachment stud to within
1 mm (0.039 in.).
NOTE: Be sure that as the cable is pulled forward
and centered on the throttle lever stud, the cable
housing moves smoothly with the cable. Due to the
angle at which the cable housing enters the spring
housing, the cable housing may bind slightly and
create an incorrect adjustment.
(7) Install retaining clip onto cable housing.
(8) Check cable adjustment. Verify transmission
throttle lever and lever on throttle body move simultaneously.
Fig. 318 Shift Cable at the Shifter
1
2
3
4
–
–
–
–
SHIFT LEVER PIN
ADJUSTMENT SCREW
SHIFT CABLE
SHIFTER ASSEMBLY BRACKET
(5) Unsnap cable eyelet from transmission shift
lever (Fig. 319).
(6) Verify transmission shift lever is in Park
detent by moving lever fully rearward. Last rearward
detent is Park position.
(7) Verify positive engagement of transmission
park lock by attempting to rotate propeller shaft.
Shaft will not rotate when park lock is engaged.
(8) Snap cable eyelet onto transmission shift lever.
(9) Lower vehicle
(10) Tighten the shift cable adjustment screw to 7
N·m (65 in. lbs.).
(11) Verify correct operation.
(12) Install the shifter bezel and any floor console
components removed for access.
GEARSHIFT CABLE
Check adjustment by starting the engine in Park
and Neutral. Adjustment is OK if the engine starts
only in these positions. Adjustment is incorrect if the
engine starts in one but not both positions. If the
engine starts in any position other than Park or Neutral, or if the engine will not start at all, the park/
neutral position switch or TRS may be faulty.
Gearshift Adjustment Procedure
(1) Shift transmission into Park.
(2) Remove shift lever bezel and floor console as
necessary for access to the shift cable adjustment.
(3) Loosen the shift cable adjustment screw (Fig.
318).
(4) Raise vehicle.
Fig. 319 Shift Cable Attachment At Transmission
21 - 162
42RE AUTOMATIC TRANSMISSION
WJ
ADJUSTMENTS (Continued)
BAND ADJUSTMENTS
FRONT BAND ADJUSTMENT
The front (kickdown) band adjusting screw is
located on the left side of the transmission case
above the manual valve and throttle valve levers.
(1) Raise vehicle.
(2) Loosen band adjusting screw locknut (Fig. 320).
Then back locknut off 3-5 turns. Be sure adjusting
screw turns freely in case. Apply lubricant to screw
threads if necessary.
(3) Tighten band adjusting screw to 8 N·m (72 in.
lbs.) torque with Inch Pound Torque Wrench
C-3380-A, a 3-in. extension and appropriate Torxy
socket.
CAUTION: If Adapter C-3705 is needed to reach the
adjusting screw, tighten the screw to only 5 N·m
(47-50 in. lbs.) torque.
(4) Back off front band adjusting screw 3 turns.
(5) Hold adjuster screw in position and tighten
locknut to 41 N·m (30 ft. lbs.) torque.
(6) Lower vehicle.
Fig. 321 Rear Band Adjusting Screw Location
1 – ADJUSTING SCREW
2 – REAR BAND LEVER
3 – LOCKNUT
(6) Hold adjusting screw in place and tighten locknut to 34 N·m (25 ft. lbs.) torque.
(7) Position new gasket on oil pan and install pan
on transmission. Tighten pan bolts to 17 N·m (13 ft.
lbs.) torque.
(8) Lower vehicle and refill transmission with
Mopart ATF Plus 3, Type 7176 fluid.
VALVE BODY
CONTROL PRESSURE ADJUSTMENTS
Fig. 320 Front Band Adjustment Screw Location
1 – LOCK-NUT
2 – FRONT BAND ADJUSTER
REAR BAND ADJUSTMENT
The transmission oil pan must be removed for
access to the rear band adjusting screw.
(1) Raise vehicle.
(2) Remove transmission oil pan and drain fluid.
(3) Loosen band adjusting screw locknut 5-6 turns
(Fig. 321). Be sure adjusting screw turns freely in
lever.
(4) Tighten adjusting screw to 8 N·m (72 in. lbs.)
torque.
(5) Back off adjusting screw 4 turns.
There are two control pressure adjustments on the
valve body;
• Line Pressure
• Throttle Pressure
Line and throttle pressures are interdependent
because each affects shift quality and timing. As a
result, both adjustments must be performed properly
and in the correct sequence. Adjust line pressure first
and throttle pressure last.
LINE PRESSURE ADJUSTMENT
Measure distance from the valve body to the inner
edge of the adjusting screw with an accurate steel
scale (Fig. 322).
Distance should be 33.4 mm (1-5/16 in.).
If adjustment is required, turn the adjusting screw
in, or out, to obtain required distance setting.
NOTE: The 33.4 mm (1-5/16 in.) setting is an
approximate setting. Manufacturing tolerances may
make it necessary to vary from this dimension to
obtain desired pressure.
One complete turn of the adjusting screw changes
line pressure approximately 1-2/3 psi (9 kPa).
42RE AUTOMATIC TRANSMISSION
WJ
21 - 163
ADJUSTMENTS (Continued)
Turning the adjusting screw counterclockwise
increases pressure while turning the screw clockwise
decreases pressure.
Maintain pressure against kickdown valve spring.
Turn throttle lever stop screw until the screw head
touches throttle lever tang and the throttle lever cam
touches gauge tool.
NOTE: The kickdown valve spring must be fully
compressed and the kickdown valve completely
bottomed to obtain correct adjustment.
Fig. 322 Line Pressure Adjustment
1 – WRENCH
2 – 1–5/16 INCH
THROTTLE PRESSURE ADJUSTMENT
Insert Gauge Tool C-3763 between the throttle
lever cam and the kickdown valve stem (Fig. 323).
Push the gauge tool inward to compress the kickdown valve against the spring and bottom the throttle valve.
Fig. 323 Throttle Pressure Adjustment
1 – HEX WRENCH (IN THROTTLE LEVER ADJUSTING SCREW)
2 – SPECIAL TOOL C-3763 (POSITIONED BETWEEN THROTTLE
LEVER AND KICKDOWN VALVE)
21 - 164
42RE AUTOMATIC TRANSMISSION
WJ
SCHEMATICS AND DIAGRAMS
HYDRAULIC FLOW IN PARK
HYDRAULIC SCHEMATICS
WJ
42RE AUTOMATIC TRANSMISSION
21 - 165
HYDRAULIC FLOW IN NEUTRAL
SCHEMATICS AND DIAGRAMS (Continued)
21 - 166
42RE AUTOMATIC TRANSMISSION
WJ
HYDRAULIC FLOW IN REVERSE
SCHEMATICS AND DIAGRAMS (Continued)
WJ
42RE AUTOMATIC TRANSMISSION
21 - 167
HYDRAULIC FLOW IN DRIVE FIRST GEAR
SCHEMATICS AND DIAGRAMS (Continued)
21 - 168
42RE AUTOMATIC TRANSMISSION
WJ
HYDRAULIC FLOW IN DRIVE SECOND GEAR
SCHEMATICS AND DIAGRAMS (Continued)
WJ
42RE AUTOMATIC TRANSMISSION
21 - 169
HYDRAULIC FLOW IN DRIVE THIRD GEAR (CONVERTER CLUTCH NOT APPLIED)
SCHEMATICS AND DIAGRAMS (Continued)
21 - 170
42RE AUTOMATIC TRANSMISSION
WJ
HYDRAULIC FLOW IN DRIVE THIRD GEAR (CONVERTER CLUTCH APPLIED)
SCHEMATICS AND DIAGRAMS (Continued)
WJ
42RE AUTOMATIC TRANSMISSION
21 - 171
HYDRAULIC FLOW IN DRIVE FOURTH GEAR (CONVERTER CLUTCH NOT APPLIED)
SCHEMATICS AND DIAGRAMS (Continued)
21 - 172
42RE AUTOMATIC TRANSMISSION
WJ
HYDRAULIC FLOW IN DRIVE FOURTH GEAR (CONVERTER CLUTCH APPLIED)
SCHEMATICS AND DIAGRAMS (Continued)
WJ
42RE AUTOMATIC TRANSMISSION
21 - 173
HYDRAULIC FLOW IN MANUAL LOW (1)
SCHEMATICS AND DIAGRAMS (Continued)
21 - 174
42RE AUTOMATIC TRANSMISSION
WJ
HYDRAULIC FLOW IN MANUAL SECOND (2)
SCHEMATICS AND DIAGRAMS (Continued)
WJ
42RE AUTOMATIC TRANSMISSION
21 - 175
HYDRAULIC FLOW DURING FULL THROTTLE 3–2 DOWNSHIFT (PASSING GEAR)
SCHEMATICS AND DIAGRAMS (Continued)
21 - 176
42RE AUTOMATIC TRANSMISSION
WJ
SPECIFICATIONS
TORQUE
TRANSMISSION
DESCRIPTION
TORQUE
Fitting, cooler line at trans . . . . 18 N·m (13 ft. lbs.)
Bolt, torque convertor . . . . . . . . 31 N·m (23 ft. lbs.)
Bolt/nut, crossmember . . . . . . . . 68 N·m (50 ft. lbs.)
Bolt, driveplate to crankshaft . . 75 N·m (55 ft. lbs.)
Plug, front band reaction . . . . . 17 N·m (13 ft. lbs.)
Locknut, front band adj. . . . . . . 34 N·m (25 ft. lbs.)
Switch, park/neutral . . . . . . . . . 34 N·m (25 ft. lbs.)
Bolt, fluid pan . . . . . . . . . . . . . . 17 N·m (13 ft. lbs.)
Screws, fluid filter . . . . . . . . . . . 4 N·m (35 in. lbs.)
Bolt, oil pump . . . . . . . . . . . . . . 20 N·m (15 ft. lbs.)
Bolt, overrunning clutch cam . . 17 N·m (13 ft. lbs.)
Bolt, O/D to trans. . . . . . . . . . . . 34 N·m (25 ft. lbs.)
Bolt, O/D piston retainer . . . . . . 17 N·m (13 ft. lbs.)
Plug, pressure test port . . . . . . . 14 N·m (10 ft. lbs.)
Bolt, reaction shaft support . . . . 20 N·m (15 ft. lbs.)
Locknut, rear band . . . . . . . . . . 41 N·m (30 ft. lbs.)
Bolt. speedometer adapter . . . . . . 11 N·m (8 ft. lbs.)
Bolt, valve body to case . . . . . 12 N·m (100 in. lbs.)
Sensor, trans speed . . . . . . . . . . 27 N·m (20 ft. lbs.)
Screw, solenoid wiring connector . . . . . . . . . . 4 N·m
(35 in. lbs.)
Screw, solenoid to transfer plate . . . . . . . . . . 4 N·m
(35 in. lbs.)
GENERAL
Component
Metric
Inch
Planetary end play
0.127-1.22
mm
0.005-0.048
in.
Input shaft end play
0.56-2.31
mm
0.022-0.091
in.
Clutch pack clearance/
Front.
1.70-3.40
mm
0.067-0.134
in.
Clutch pack clearance/
Rear.
0.559-0.914
mm
0.022-0.036
in.
Front clutch
4 discs
Rear clutch
4 discs
Overdrive clutch
3 discs
Direct clutch
6 discs
42RE Band adjustment
from 72 in. lbs.
Front band
Back off 3 turns
Rear band
Back off 4 turns
Recommended fluid
MoparT ATF Plus 3,type
7176
GEAR RATIOS
•
•
•
•
•
1ST GEAR-2.74
2ND GEAR-1.54
3RD GEAR-1.00
4TH GEAR-0.69
REV. GEAR-2.21
42RE AUTOMATIC TRANSMISSION
WJ
21 - 177
SPECIFICATIONS (Continued)
THRUST WASHER/SPACER/SNAP RING DIMENSIONS
Component
Metric
Inch
Front clutch thrust washer (reaction shaft
support hub)
1.55 mm
0.061 in.
Rear clutch thrust washer (clutch retainer)
1.55 mm
0.061 in.
Intermediate shaft thrust plate (shaft hub pilot)
1.5-1.6 mm
0.060-0.063 in.
Output shaft thrust washer (rear clutch hub)
Select fit to set end play
Rear clutch pack snap ring
1.5 mm
0.060 in.
1.95 mm
0.076 in.
2.45 mm
0.098 in.
Planetary geartrain snap ring (at front of output shaft)
Select fit (three thicknesses avalible)
Overdrive piston thrust plate
Thrust plate and spacer are select fit. Refer to
size charts and selection procedures in
Overdrive Unit D&A procedures
Intermiediate shaft spacer
PRESSURE TEST
Overdrive clutch
Fourth gear only
Pressure should be 469-496 kPa (68-72 psi) with
closed throttle and increase to 620-896 kPa (90-130
psi) at 1/2 to 3/4 throttle.
Line pressure (at
accumulator)
Closed throttle
372-414 kPa (54-60 psi).
Front servo
Third gear only
No more than 21 kPa (3 psi) lower than line pressure.
Rear servo
1 range
No more than 21 kPa (3 psi) lower than line pressure.
R range
1103 kPa (160 psi) at idle, builds to 1862 kPa (270 psi)
at 1600 rpm.
D range closed throttle
Pressure should respond smoothly to changes in mph
and return to 0-7 kPa (0-1.5 psi) when stopped with
transmission in D, 1, 2. Pressure above 7 kPa (1.5 psi)
at stand still will prevent transmission from
downshifting.
Governor
SPECIAL TOOLS
RE TRANSMISSIONS
Gauge Bar—6311
Spring Compressor and Alignment Shaft—6227
21 - 178
42RE AUTOMATIC TRANSMISSION
WJ
SPECIAL TOOLS (Continued)
Extension Housing Pilot—C-3288-B
Puller, Slide Hammer—C-3752
Pressure Gauge—C-3292
Gauge, Throttle Setting—C-3763
Pressure Gauge—C-3293SP
Seal Installer—C-3860–A
Dial Indicator—C-3339
Seal Remover—C-3985-B
Spring Compressor—C-3422-B
42RE AUTOMATIC TRANSMISSION
WJ
21 - 179
SPECIAL TOOLS (Continued)
Installer—C-3995-A
Bushing Remover/Installer Set—C-3887-J
Nut, Bushing Remover—SP-1191, From kit C-3887-J
Universal Handle—C-4171
Cup, Bushing Remover—SP-3633, From kit C-3887-J
Seal Installer—C-4193-A
Remover, Bushing—SP-3551
Dial Caliper—C-4962
Installer, Bushing—SP-5117
21 - 180
42RE AUTOMATIC TRANSMISSION
WJ
SPECIAL TOOLS (Continued)
Remover, Bushing—SP-5324
Flusher—6906
Installer, Bushing—SP-5325
Compressor, Spring—C-3575-A
Installer—8114
Remover—6957
Gauge—6312
Installer—6951
Adapter—C-3705
Retainer—6583
45RFE AUTOMATIC TRANSMISSION
WJ
21 - 181
45RFE AUTOMATIC TRANSMISSION
TABLE OF CONTENTS
page
DESCRIPTION AND OPERATION
45RFE AUTOMATIC TRANSMISSION . . . . . .
FLUID . . . . . . . . . . . . . . . . . . . . . . . . . . . . .
TORQUE CONVERTER . . . . . . . . . . . . . . . .
ELECTRONICALLY MODULATED
CONVERTER CLUTCH ENGAGEMENT. . .
OIL PUMP . . . . . . . . . . . . . . . . . . . . . . . . . .
VALVE BODY . . . . . . . . . . . . . . . . . . . . . . . .
PISTONS . . . . . . . . . . . . . . . . . . . . . . . . . . .
INPUT CLUTCHES . . . . . . . . . . . . . . . . . . . .
HOLDING CLUTCHES . . . . . . . . . . . . . . . . .
PLANETARY GEARTRAIN . . . . . . . . . . . . . .
GEARSHIFT MECHANISM . . . . . . . . . . . . . .
OVERDRIVE OFF SWITCH . . . . . . . . . . . . .
BRAKE TRANSMISSION SHIFT INTERLOCK
MECHANISM. . . . . . . . . . . . . . . . . . . . . . .
TRANSMISSION CONTROL MODULE . . . . .
SOLENOID AND PRESSURE SWITCH
ASSEMBLY . . . . . . . . . . . . . . . . . . . . . . . .
BATTERY FEED (TCM). . . . . . . . . . . . . . . . .
TRANSMISSION CONTROL RELAY . . . . . . .
PRESSURE SWITCHES . . . . . . . . . . . . . . . .
INPUT AND OUTPUT SPEED SENSORS . . .
LINE PRESSURE CONTROL . . . . . . . . . . . .
THROTTLE POSITION SENSOR . . . . . . . . .
TRANSMISSION RANGE SENSOR. . . . . . . .
TRANSMISSION TEMPERATURE SENSOR .
SOLENOIDS. . . . . . . . . . . . . . . . . . . . . . . . .
SOLENOID SWITCH VALVE . . . . . . . . . . . . .
DIAGNOSIS AND TESTING
EFFECTS OF INCORRECT FLUID LEVEL . .
CAUSES OF BURNT FLUID . . . . . . . . . . . . .
FLUID CONTAMINATION . . . . . . . . . . . . . . .
45RFE AUTOMATIC TRANSMISSION
GENERAL DIAGNOSIS . . . . . . . . . . . . . . .
PRELIMINARY DIAGNOSIS . . . . . . . . . . . . .
BRAKE TRANSMISSION SHIFT INTERLOCK
GEARSHIFT CABLE . . . . . . . . . . . . . . . . . . .
ROAD TESTING . . . . . . . . . . . . . . . . . . . . . .
HYDRAULIC PRESSURE TEST . . . . . . . . . .
AIR TESTING TRANSMISSION CLUTCH
OPERATION . . . . . . . . . . . . . . . . . . . . . . .
CONVERTER HOUSING FLUID LEAK
DIAGNOSIS. . . . . . . . . . . . . . . . . . . . . . . .
SERVICE PROCEDURES
FLUID LEVEL CHECK . . . . . . . . . . . . . . . . .
. . . 182
. . . 183
. . . 183
.
.
.
.
.
.
.
.
.
.
.
.
.
.
.
.
.
.
. 188
. 188
. 190
. 192
. 194
. 196
. 198
. 198
. 199
. . . 199
. . . 200
.
.
.
.
.
.
.
.
.
.
.
.
.
.
.
.
.
.
.
.
.
.
. 203
. 203
. 203
. 203
. 204
. 204
. 204
. 204
. 205
. 205
. 205
. . . 205
. . . 206
. . . 206
.
.
.
.
.
.
.
.
.
.
.
.
. 206
. 206
. 207
. 207
. 207
. 208
. . . 209
. . . 210
. . . 210
page
FLUID AND FILTER REPLACEMENT . . . . . . . . . 211
TRANSMISSION FILL PROCEDURE. . . . . . . . . . 212
OIL PUMP VOLUME CHECK . . . . . . . . . . . . . . . 212
FLUSHING COOLERS AND TUBES . . . . . . . . . . 212
TRANSMISSION QUICK LEARN
PROCEDURE . . . . . . . . . . . . . . . . . . . . . . . . . 213
ALUMINUM THREAD REPAIR . . . . . . . . . . . . . . 213
REMOVAL AND INSTALLATION
INPUT SPEED SENSOR. . . . . . . . . . . . . . . . . . . 213
OUTPUT SPEED SENSOR . . . . . . . . . . . . . . . . . 214
LINE PRESSURE SENSOR . . . . . . . . . . . . . . . . 214
VALVE BODY . . . . . . . . . . . . . . . . . . . . . . . . . . . 214
SOLENOID AND PRESSURE SWITCH
ASSEMBLY . . . . . . . . . . . . . . . . . . . . . . . . . . . 215
TRANSMISSION. . . . . . . . . . . . . . . . . . . . . . . . . 216
TORQUE CONVERTER . . . . . . . . . . . . . . . . . . . 218
OIL PUMP FRONT SEAL . . . . . . . . . . . . . . . . . . 219
ADAPTER HOUSING SEAL . . . . . . . . . . . . . . . . 219
GEARSHIFT CABLE . . . . . . . . . . . . . . . . . . . . . . 219
SHIFTER . . . . . . . . . . . . . . . . . . . . . . . . . . . . . . 221
BRAKE TRANSMISSION SHIFT INTERLOCK . . . 222
DISASSEMBLY AND ASSEMBLY
TRANSMISSION. . . . . . . . . . . . . . . . . . . . . . . . . 223
VALVE BODY . . . . . . . . . . . . . . . . . . . . . . . . . . . 233
OIL PUMP . . . . . . . . . . . . . . . . . . . . . . . . . . . . . 235
INPUT CLUTCH ASSEMBLY . . . . . . . . . . . . . . . . 238
4C RETAINER/BULKHEAD . . . . . . . . . . . . . . . . . 242
PLANETARY GEAR SET . . . . . . . . . . . . . . . . . . 244
LOW/REVERSE CLUTCH . . . . . . . . . . . . . . . . . . 245
CLEANING AND INSPECTION
VALVE BODY . . . . . . . . . . . . . . . . . . . . . . . . . . . 247
TRANSMISSION. . . . . . . . . . . . . . . . . . . . . . . . . 248
LOW/REVERSE CLUTCH ASSEMBLY . . . . . . . . 249
ACCUMULATOR. . . . . . . . . . . . . . . . . . . . . . . . . 249
OIL PUMP AND REACTION SHAFT SUPPORT. . 249
PLANETARY GEARTRAIN . . . . . . . . . . . . . . . . . 249
ADJUSTMENTS
BRAKE TRANSMISSION SHIFT INTERLOCK . . . 249
GEARSHIFT CABLE . . . . . . . . . . . . . . . . . . . . . . 250
SCHEMATICS AND DIAGRAMS
HYDRAULIC SCHEMATICS . . . . . . . . . . . . . . . . 252
SPECIFICATIONS
TRANSMISSION. . . . . . . . . . . . . . . . . . . . . . . . . 271
SPECIAL TOOLS
45RFE TRANSMISSION . . . . . . . . . . . . . . . . . . . 271
21 - 182
45RFE AUTOMATIC TRANSMISSION
WJ
DESCRIPTION AND OPERATION
45RFE AUTOMATIC TRANSMISSION
DESCRIPTION
The 45RFE automatic transmission is a sophisticated, multi-range, electronically controlled transmission which combines optimized gear ratios for
responsive performance, state of the art efficiency
features and low NVH. Other features include driver
adaptive shifting and three planetary gear sets to
provide wide ratio capability with precise ratio steps
for optimum driveability. The three planetary gear
sets also make available a unique alternate second
gear ratio. The primary 2nd gear ratio fits between
1st and 3rd gears for normal through-gear accelerations. The alternate second gear ratio (2 prime)
allows smoother 4–2 kickdowns at high speeds to
provide 2nd gear passing performance over a wider
highway cruising range.
The hydraulic portion of the transmission consists
of the transmission fluid, fluid passages, hydraulic
valves, and various line pressure control components.
The primary mechanical components of the transmission consist of the following:
• Three multiple disc input clutches
• Three multiple disc holding clutches
• Five hydraulic accumulators
• Three planetary gear sets
• Dual Stage Hydraulic oil pump
• Valve body
• Solenoid pack
The TCM is the “heart” or “brain” of the electronic
control system and relies on information from various direct and indirect inputs (sensors, switches, etc.)
to determine driver demand and vehicle operating
conditions. With this information, the TCM can calculate and perform timely and quality shifts through
various output or control devices (solenoid pack,
transmission control relay, etc.).
TRANSMISSION IDENTIFICATION
Transmission identification numbers are stamped
on the left side of the case just above the oil pan gasket surface (Fig. 1). Refer to this information when
ordering replacement parts. A label is attached to the
transmission case above the stamped numbers. The
label gives additional information which may also be
necessary for identification purposes.
Fig. 1 Transmission Part And Serial Number
Location
GEAR RATIOS
The 45RFE gear ratios are:
1st . . . . . .
2nd . . . . .
2nd Prime
3rd . . . . .
4th . . . . . .
Reverse . .
.
.
.
.
.
.
.
.
.
.
.
.
.
.
.
.
.
.
.
.
.
.
.
.
.
.
.
.
.
.
.
.
.
.
.
.
.
.
.
.
.
.
.
.
.
.
.
.
.
.
.
.
.
.
.
.
.
.
.
.
.
.
.
.
.
.
.
.
.
.
.
.
.
.
.
.
.
.
.
.
.
.
.
.
.
.
.
.
.
.
.
.
.
.
.
.
.
.
.
.
.
.
.
.
.
.
.
.
.
.
.
.
.
.
.
.
.
.
.
.
.
.
.
.
.
.
.
.
.
.
.
.
.
.
.
.
.
.
.
.
.
.
.
.
.
.
.
.
.
.
.
.
.
.
.
.
.
.
.
.
.
.
3.00:1
1.67:1
1.50:1
1.00:1
0.75:1
3.00:1
OPERATION
The 45RFE offers full electronic control of all automatic up and downshifts, and features real-time
adaptive closed-loop shift and pressure control. Electronic shift and torque converter clutch controls help
protect the transmission from damage due to high
temperatures, which can occur under severe operating conditions. By altering shift schedules, line pressure, and converter clutch control, these controls
reduce heat generation and increase transmission
cooling.
To help reduce efficiency-robbing parasitic losses,
the transmission includes a dual-stage transmission
fluid pump with electronic output pressure control.
Under most driving conditions, pump output pressure greatly exceeds that which is needed to keep the
clutches applied. The 45RFE pump-pressure control
system monitors input torque and adjusts the pump
pressure accordingly. The primary stage of the pump
works continuously; the second stage is bypassed
when demand is low. The control system also monitors input and output speed and, if incipient clutch
slip is observed, the pressure control solenoid duty
cycle is varied, increasing pressure in proportion to
demand.
WJ
45RFE AUTOMATIC TRANSMISSION
21 - 183
DESCRIPTION AND OPERATION (Continued)
A high-travel torque converter damper assembly
allow earlier torque converter clutch engagement to
reduce slippage. Needle-type thrust bearings reduce
internal friction. The 45RFE is packaged in a onepiece die-cast aluminum case. To reduce NVH, the
case has high lateral, vertical and torsional stiffness.
It is also designed to maximize the benefit of the
structural dust cover that connects the bottom of the
bell housing to the engine bedplate, enhancing overall power train stiffness. Dual filters protect the
pump and other components. A pump return filter is
added to the customary main sump filter. Independent lubrication and cooler circuits assure ample
pressure for normal transmission operation even if
the cooler is obstructed or the fluid cannot flow due
to extremely low temperatures.
The hydraulic control system design (without electronic assist) provides the transmission with PARK,
REVERSE, NEUTRAL, SECOND, and THIRD gears,
based solely on driver shift lever selection. This
design allows the vehicle to be driven (in “limp-in”
mode) in the event of a electronic control system failure, or a situation that the Transmission Control
Module (TCM) recognizes as potentially damaging to
the transmission.
The TCM also performs certain self-diagnostic
functions and provides comprehensive information
(sensor data, DTC’s, etc.) which is helpful in proper
diagnosis and repair. This information can be viewed
with the DRB scan tool.
FLUID
NOTE: Refer to the maintenance schedules in
Group 0, Lubrication and Maintenance for the recommended maintenance (fluid/filter change) intervals for this transmission.
become brown. This is normal. A dark brown/black
fluid accompanied with a burnt odor and/or deterioration in shift quality may indicate fluid deterioration or transmission component failure.
FLUID ADDITIVES
DaimlerChrysler strongly recommends against the
addition of any fluids to the transmission, other than
those automatic transmission fluids listed above.
Exceptions to this policy are the use of special dyes
to aid in detecting fluid leaks.
Various “special” additives and supplements exist
that claim to improve shift feel and/or quality. These
additives and others also claim to improve converter
clutch operation and inhibit overheating, oxidation,
varnish, and sludge. These claims have not been supported to the satisfaction of DaimlerChrysler and
these additives must not be used. The use of transmission “sealers” should also be avoided, since they
may adversely affect the integrity of transmission
seals.
OPERATION
The automatic transmission fluid is selected based
upon several qualities. The fluid must provide a high
level of protection for the internal components by
providing a lubricating film between adjacent metal
components. The fluid must also be thermally stable
so that it can maintain a consistent viscosity through
a large temperature range. If the viscosity stays constant through the temperature range of operation,
transmission operation and shift feel will remain consistent. Transmission fluid must also be a good conductor of heat. The fluid must absorb heat from the
internal transmission components and transfer that
heat to the transmission case.
TORQUE CONVERTER
NOTE: Refer to Service Procedures in this group
for fluid level checking procedures.
DESCRIPTION
Mopart ATF Plus 3, Type 7176, automatic transmission fluid is the recommended fluid for DaimlerChrysler automatic transmissions.
Dexron II fluid IS NOT recommended. Clutch
chatter can result from the use of improper
fluid.
Mopart ATF Plus 3, Type 7176, automatic transmission fluid when new is red in color. The ATF is
dyed red so it can be identified from other fluids used
in the vehicle such as engine oil or antifreeze. The
red color is not permanent and is not an indicator of
fluid condition. As the vehicle is driven, the ATF will
begin to look darker in color and may eventually
DESCRIPTION
The torque converter (Fig. 2) is a hydraulic device
that couples the engine crankshaft to the transmission. The torque converter consists of an outer shell
with an internal turbine, a stator, an overrunning
clutch, an impeller and an electronically applied converter clutch. The converter clutch provides reduced
engine speed and greater fuel economy when
engaged. Clutch engagement also provides reduced
transmission fluid temperatures. The converter
clutch engages in third gear. The torque converter
hub drives the transmission oil (fluid) pump and contains an o-ring seal to better control oil flow.
The torque converter is a sealed, welded unit that
is not repairable and is serviced as an assembly.
21 - 184
45RFE AUTOMATIC TRANSMISSION
WJ
DESCRIPTION AND OPERATION (Continued)
CAUTION: The torque converter must be replaced if
a transmission failure resulted in large amounts of
metal or fiber contamination in the fluid. If the fluid
is contaminated, flush the fluid cooler and lines.
IMPELLER
The impeller (Fig. 3) is an integral part of the converter housing. The impeller consists of curved
blades placed radially along the inside of the housing
on the transmission side of the converter. As the converter housing is rotated by the engine, so is the
impeller, because they are one and the same and are
the driving member of the system.
TURBINE
The turbine (Fig. 4) is the output, or driven, member of the converter. The turbine is mounted within
the housing opposite the impeller, but is not attached
to the housing. The input shaft is inserted through
the center of the impeller and splined into the turbine. The design of the turbine is similar to the
Fig. 2 Torque Converter Assembly
impeller, except the blades of the turbine are curved
in the opposite direction.
Fig. 3 Impeller
1 – ENGINE FLEXPLATE
2 – OIL FLOW FROM IMPELLER SECTION INTO TURBINE
SECTION
3 – IMPELLER VANES AND COVER ARE INTEGRAL
4 – ENGINE ROTATION
5 – ENGINE ROTATION
45RFE AUTOMATIC TRANSMISSION
WJ
DESCRIPTION AND OPERATION (Continued)
Fig. 4 Turbine
1 – TURBINE VANE
2 – ENGINE ROTATION
3 – INPUT SHAFT
4 – PORTION OF TORQUE CONVERTER COVER
5 – ENGINE ROTATION
6 – OIL FLOW WITHIN TURBINE SECTION
21 - 185
21 - 186
45RFE AUTOMATIC TRANSMISSION
WJ
DESCRIPTION AND OPERATION (Continued)
STATOR
The stator assembly (Fig. 5) is mounted on a stationary shaft which is an integral part of the oil
pump. The stator is located between the impeller and
turbine within the torque converter case (Fig. 6). The
stator contains an over-running clutch, which allows
the stator to rotate only in a clockwise direction.
When the stator is locked against the over-running
clutch, the torque multiplication feature of the torque
converter is operational.
Fig. 6 Stator Location
1
2
3
4
–
–
–
–
STATOR
IMPELLER
FLUID FLOW
TURBINE
1
2
3
4
5
6
–
–
–
–
–
–
IMPELLER FRONT COVER
THRUST WASHER ASSEMBLY
IMPELLER
STATOR
TURBINE
FRICTION DISC
Fig. 5 Stator Components
1
2
3
4
–
–
–
–
CAM (OUTER RACE)
ROLLER
SPRING
INNER RACE
TORQUE CONVERTER CLUTCH (TCC)
The TCC (Fig. 7) was installed to improve the efficiency of the torque converter that is lost to the slippage of the fluid coupling. Although the fluid
coupling provides smooth, shock–free power transfer,
it is natural for all fluid couplings to slip. If the
impeller and turbine were mechanically locked
together, a zero slippage condition could be obtained.
A hydraulic piston was added to the turbine, and a
friction material was added to the inside of the front
cover to provide this mechanical lock-up.
OPERATION
The converter impeller (Fig. 8) (driving member),
which is integral to the converter housing and bolted
to the engine drive plate, rotates at engine speed.
The converter turbine (driven member), which reacts
from fluid pressure generated by the impeller, rotates
and turns the transmission input shaft.
TURBINE
As the fluid that was put into motion by the impeller blades strikes the blades of the turbine, some of
Fig. 7 Torque Converter Clutch (TCC)
45RFE AUTOMATIC TRANSMISSION
WJ
21 - 187
DESCRIPTION AND OPERATION (Continued)
Fig. 8 Torque Converter Fluid Operation
1 – APPLY PRESSURE
2 – THE PISTON MOVES SLIGHTLY FORWARD
the energy and rotational force is transferred into the
turbine and the input shaft. This causes both of them
(turbine and input shaft) to rotate in a clockwise
direction following the impeller. As the fluid is leaving the trailing edges of the turbine’s blades it continues in a “hindering” direction back toward the
impeller. If the fluid is not redirected before it strikes
the impeller, it will strike the impeller in such a
direction that it would tend to slow it down.
STATOR
Torque multiplication is achieved by locking the
stator’s over-running clutch to its shaft (Fig. 9).
Under stall conditions (the turbine is stationary), the
oil leaving the turbine blades strikes the face of the
stator blades and tries to rotate them in a counterclockwise direction. When this happens the over–running clutch of the stator locks and holds the stator
from rotating. With the stator locked, the oil strikes
the stator blades and is redirected into a “helping”
direction before it enters the impeller. This circulation of oil from impeller to turbine, turbine to stator,
and stator to impeller, can produce a maximum
torque multiplication of about 2.4:1. As the turbine
begins to match the speed of the impeller, the fluid
that was hitting the stator in such as way as to
cause it to lock–up is no longer doing so. In this con-
3 – RELEASE PRESSURE
4 – THE PISTON MOVES SLIGHTLY REARWARD
dition of operation, the stator begins to free wheel
and the converter acts as a fluid coupling.
Fig. 9 Stator Operation
1 – DIRECTION STATOR WILL FREE WHEEL DUE TO OIL
PUSHING ON BACKSIDE OF VANES
2 – FRONT OF ENGINE
3 – INCREASED ANGLE AS OIL STRIKES VANES
4 – DIRECTION STATOR IS LOCKED UP DUE TO OIL PUSHING
AGAINST STATOR VANES
21 - 188
45RFE AUTOMATIC TRANSMISSION
WJ
DESCRIPTION AND OPERATION (Continued)
TORQUE CONVERTER CLUTCH (TCC)
In a standard torque converter, the impeller and
turbine are rotating at about the same speed and the
stator is freewheeling, providing no torque multiplication. By applying the turbine’s piston to the front
cover’s friction material, a total converter engagement can be obtained. The result of this engagement
is a direct 1:1 mechanical link between the engine
and the transmission.
Converter clutch engagement in third or fourth
gear range is controlled by sensor inputs to the powertrain control module. Inputs that determine clutch
engagement are: coolant temperature, engine rpm,
vehicle speed, throttle position, and manifold vacuum. The torque converter clutch is engaged by the
clutch solenoid on the valve body. The clutch can be
engaged in third and fourth gear ranges depending
on overdrive control switch position. If the overdrive
control switch is in the normal ON position, the
clutch will engage after the shift to fourth gear, and
above approximately 72 km/h (45 mph). If the control
switch is in the OFF position, the clutch will engage
after the shift to third gear, at approximately 56
km/h (35 mph) at light throttle.
ELECTRONICALLY MODULATED CONVERTER
CLUTCH ENGAGEMENT
DESCRIPTION
In order to reduce heat build-up in the transmission and buffer the powertrain against torsional
vibrations, the TCM can duty cycle the L/R-CC Solenoid to achieve a smooth application of the torque
converter clutch. This function, referred to as Electronically Modulated Converter Clutch (EMCC) can
occur at various times depending on the following
variables:
• Shift lever position
• Current gear range
• Transmission fluid temperature
• Engine coolant temperature
• Input speed
• Throttle angle
• Engine speed
OPERATION
The TCM controls the torque converter by way of
internal logic software. The programming of the software provides the TCM with control over the L/R-CC
Solenoid. There are four output logic states that can
be applied as follows:
• No EMCC
• Partial EMCC
• Full EMCC
• Gradual-to-no EMCC
NO EMCC
Under No EMCC conditions, the L/R Solenoid is
OFF. There are several conditions that can result in
NO EMCC operations. No EMCC can be initiated
due to a fault in the transmission or because the
TCM does not see the need for EMCC under current
driving conditions.
PARTIAL EMCC
Partial EMCC operation modulates the L/R Solenoid (duty cycle) to obtain partial torque converter
clutch application. Partial EMCC operation is maintained until Full EMCC is called for and actuated.
During Partial EMCC some slip does occur. Partial
EMCC will usually occur at low speeds, low load and
light throttle situations.
FULL EMCC
During Full EMCC operation, the TCM increases
the L/R Solenoid duty cycle to full ON after Partial
EMCC control brings the engine speed within the
desired slip range of transmission input speed relative to engine rpm.
GRADUAL-TO-NO EMCC
This operation is to soften the change from Full or
Partial EMCC to No EMCC. This is done at midthrottle by decreasing the L/R Solenoid duty cycle.
OIL PUMP
DESCRIPTION
The oil pump (Fig. 10) is located at the front of the
transmission inside the bell housing and behind the
transmission front cover. The oil pump consists of
two independent pumps (Fig. 11), a number of valves
(Fig. 12), a front seal (Fig. 13), and a bolt on reaction
shaft. The converter clutch switch and regulator
valves, pressure regulator valve, and converter pressure limit valve are all located in the oil pump housing.
OPERATION
As the torque converter rotates, the converter hub
rotates the oil pump drive gear. As the drive gear
rotates both driven gears, the clearance between the
gear teeth increases in the crescent area, and creates
a suction at the inlet side of the pump. This suction
draws fluid through the pump inlet from the oil pan.
As the clearance between the gear teeth in the crescent area decreases, it forces pressurized fluid into
the pump outlet and to the oil pump valves.
45RFE AUTOMATIC TRANSMISSION
WJ
21 - 189
DESCRIPTION AND OPERATION (Continued)
Fig. 10 Oil Pump
Fig. 12 Oil Pump Valves
At low speeds, both pumps supply fluid to the
transmission. As the speed of the torque converter
increases, the pressure output of both pumps
increases until the primary pump pressure reaches
the point where it can close off the check valve
located between the two pumps. When the check
valve is closed, the secondary pump is shut down and
the primary pump supplies all the fluid to the transmission.
CONVERTER CLUTCH SWITCH VALVE
The converter clutch switch valve is used to control
the hydraulic pressure supplied to the front (OFF)
side of the torque converter clutch.
Fig. 11 Oil Pump Gears
CONVERTER CLUTCH REGULATOR VALVE
The converter clutch regulator valve is used to control the hydraulic pressure supplied to the back (ON)
side of the torque converter clutch.
TORQUE CONVERTER LIMIT VALVE
The torque converter limit valve serves to limit the
available line pressure to the torque converter clutch
to approximately 120 psi.
21 - 190
45RFE AUTOMATIC TRANSMISSION
WJ
DESCRIPTION AND OPERATION (Continued)
Fig. 13 Oil Pump Reaction Shaft and Seal
VALVE BODY
OPERATION
DESCRIPTION
NOTE: Refer to the Hydraulic Schematics for a
visual aid in determining valve location, operation
and design.
The valve body consists of a cast aluminum valve
body, a separator plate, and a transfer plate. The
valve body contains valves and check balls that control fluid delivery to the torque converter clutch,
bands, and frictional clutches. The valve body contains the following components (Fig. 14) and (Fig.
15):
• Solenoid switch valve
• Manual valve
• Low/reverse switch valve
• 5 Accumulators
• 7 check balls
SOLENOID SWITCH VALVE
The Solenoid Switch Valve (SSV) controls the direction of the transmission fluid when the L/R-TCC solenoid is energized.
The Solenoid Switch Valve controls line pressure
from the LR-TCC solenoid. In 1st gear, the SSV will
be in the downshifted position, thus directing fluid to
the L/R clutch circuit. In 2nd, 3rd, and 4th, it will be
in the upshifted position and directs the fluid into
the torque converter clutch (TCC) circuit.
45RFE AUTOMATIC TRANSMISSION
WJ
21 - 191
DESCRIPTION AND OPERATION (Continued)
Fig. 14 Valve Body Components
When shifting into 1st gear, a special hydraulic
sequence is performed to ensure SSV movement into
the downshifted position. The L/R pressure switch is
monitored to confirm SSV movement. If the movement is not confirmed (the L/R pressure switch does
not close), 2nd gear is substituted for 1st. A DTC will
be set after three unsuccessful attempts are made to
get into 1st gear in one given key start.
Fig. 15 Check Ball Locations
MANUAL VALVE
The manual valve is a relay valve. The purpose of
the manual valve is to direct fluid to the correct circuit needed for a specific gear or driving range. The
manual valve, as the name implies, is manually operated by the driver with a lever located on the top of
the valve body. The valve is connected mechanically
by a cable to the gearshift mechanism. The valve is
held in each of its positions by a roller detent spring
(Fig. 16) that engages the “roostercomb” of the TRS
selector plate.
LOW/REVERSE SWITCH VALVE
Allows the low/reverse clutch to be operated by
either the LR/CC solenoid or the MS solenoid.
21 - 192
45RFE AUTOMATIC TRANSMISSION
WJ
DESCRIPTION AND OPERATION (Continued)
Fig. 16 TRS Selector Plate and Detent Spring
PISTONS
DESCRIPTION
There are several sizes and types of pistons used in
an automatic transmission. Some pistons are used to
apply clutches, while others are used to apply bands.
They all have in common the fact that they are
round or circular in shape, located within a smooth
walled cylinder, which is closed at one end and converts fluid pressure into mechanical movement. The
fluid pressure exerted on the piston is contained
within the system through the use of piston rings or
seals.
OPERATION
The principal which makes this operation possible
is known as Pascal’s Law. Pascal’s Law can be stated
as: “Pressure on a confined fluid is transmitted
equally in all directions and acts with equal force on
equal areas”.
PRESSURE
Pressure (Fig. 17) is nothing more than force (lbs.)
divided by area (in. or ft.), or force per unit area.
Given a 100 lb. block and an area of 100 sq. in. on
the floor, the pressure exerted by the block is: 100
lbs. 100 in. or 1 pound per square inch, or PSI as it is
commonly referred to.
PRESSURE ON A CONFINED FLUID
Pressure is exerted on a confined fluid (Fig. 18) by
applying a force to some given area in contact with
the fluid. A good example of this is a cylinder filled
Fig. 17 Force and Pressure Relationship
with fluid and equipped with a piston that is closely
fitted to the cylinder wall. If a force is applied to the
piston, pressure will be developed in the fluid. Of
course, no pressure will be created if the fluid is not
confined. It will simply “leak” past the piston. There
must be a resistance to flow in order to create pressure. Piston sealing is extremely important in
hydraulic operation. Several kinds of seals are used
to accomplish this within a transmission. These
include but are not limited to O–rings, D–rings, lip
seals, sealing rings, or extremely close tolerances
between the piston and the cylinder wall. The force
exerted is downward (gravity), however, the principle
remains the same no matter which direction is taken.
The pressure created in the fluid is equal to the force
applied, divided by the piston area. If the force is 100
lbs., and the piston area is 10 sq. in., then the pressure created equals 10 PSI. Another interpretation of
Pascal’s Law is that regardless of container shape or
size, the pressure will be maintained throughout, as
long as the fluid is confined. In other words, the
pressure in the fluid is the same everywhere within
the container.
FORCE MULTIPLICATION
Using the 10 PSI example used in the illustration
(Fig. 19), a force of 1000 lbs. can be moved with a
force of only 100 lbs. The secret of force multiplication in hydraulic systems is the total fluid contact
area employed. The illustration, (Fig. 19), shows an
area that is ten times larger than the original area.
The pressure created with the smaller 100 lb. input
is 10 PSI. The concept “pressure is the same every-
45RFE AUTOMATIC TRANSMISSION
WJ
21 - 193
DESCRIPTION AND OPERATION (Continued)
PISTON TRAVEL
The relationship between hydraulic lever and a
mechanical lever is the same. With a mechanical
lever it’s a weight–to–distance output rather than a
pressure–to–area output. Using the same forces and
areas as in the previous example, the smaller piston
(Fig. 20) has to move ten times the distance required
to move the larger piston one inch. Therefore, for
every inch the larger piston moves, the smaller piston moves ten inches. This principle is true in other
instances also. A common garage floor jack is a good
example. To raise a car weighing 2000 lbs., an effort
of only 100 lbs. may be required. For every inch the
car moves upward, the input piston at the jack handle must move 20 inches downward.
Fig. 18 Pressure on a Confined Fluid
where” means that the pressure underneath the
larger piston is also 10 PSI. Pressure is equal to the
force applied divided by the contact area. Therefore,
by means of simple algebra, the output force may be
found. This concept is extremely important, as it is
also used in the design and operation of all shift
valves and limiting valves in the valve body, as well
as the pistons, of the transmission, which activate
the clutches and bands. It is nothing more than
using a difference of area to create a difference in
pressure to move an object.
Fig. 20 Piston Travel
Fig. 19 Force Multiplication
21 - 194
45RFE AUTOMATIC TRANSMISSION
WJ
DESCRIPTION AND OPERATION (Continued)
Fig. 21 Input Clutch Assembly-Part 1
INPUT CLUTCHES
OPERATION
DESCRIPTION
The three input clutches are responsible for driving
different components of the planetary geartrain.
Three hydraulically applied input clutches are used
to drive planetary components. The underdrive, overdrive, and reverse clutches are considered input
clutches and are contained within the input clutch
assembly (Fig. 21) and (Fig. 22). The input clutch
assembly also contains:
• Input shaft
• Input hub
• Clutch retainer
• Underdrive piston
• Overdrive/reverse piston
• Overdrive hub
• Underdrive hub
UNDERDRIVE CLUTCH
The underdrive clutch is hydraulically applied in
first, second, and third (direct) gears by pressurized
fluid against the underdrive piston. When the underdrive clutch is applied, the underdrive hub drives the
input sun gear.
45RFE AUTOMATIC TRANSMISSION
WJ
21 - 195
DESCRIPTION AND OPERATION (Continued)
Fig. 22 Input Clutch Assembly-Part 2
OVERDRIVE CLUTCH
The overdrive clutch is hydraulically applied in
third (direct) and overdrive gears by pressurized fluid
against the overdrive/reverse piston. When the overdrive clutch is applied, the overdrive hub drives the
reverse carrier/input annulus assembly.
REVERSE CLUTCH
The reverse clutch is hydraulically applied in
reverse gear by pressurized fluid against the overdrive/reverse piston. When the reverse clutch is
applied, the reaction annulus gear is driven.
21 - 196
45RFE AUTOMATIC TRANSMISSION
WJ
DESCRIPTION AND OPERATION (Continued)
Fig. 23 2C and 4C Clutches
HOLDING CLUTCHES
OPERATION
DESCRIPTION
2C CLUTCH
The 2C clutch is hydraulically applied in second
gear by pressurized fluid against the 2C piston.
When the 2C clutch is applied, the reverse sun gear
assembly is held or grounded to the transmission
case by holding the reaction planetary carrier.
Three hydraulically applied multi-disc clutches are
used to hold planetary geartrain components stationary while the input clutches drive others. The 2C,
4C, and Low/Reverse clutches are considered holding
clutches. The 2C and 4C clutches are located in the
4C retainer/bulkhead (Fig. 23), while the Low/Reverse clutch is located at the rear of the transmission
case (Fig. 24).
45RFE AUTOMATIC TRANSMISSION
WJ
21 - 197
DESCRIPTION AND OPERATION (Continued)
Fig. 24 Low/Reverse Clutch
4C CLUTCH
The 4C clutch is hydraulically applied in fourth
gear by pressurized fluid against the 4C clutch piston. When the 4C clutch is applied, the reaction
annulus gear is held or grounded to the transmission
case.
LOW/REVERSE CLUTCH
The Low/Reverse clutch is hydraulically applied in
park, reverse, neutral, and first gears by pressurized
fluid against the Low/Reverse clutch piston. When
the Low/Reverse clutch is applied, the input annulus
assembly is held or grounded to the transmission
case.
21 - 198
45RFE AUTOMATIC TRANSMISSION
WJ
DESCRIPTION AND OPERATION (Continued)
Fig. 25 Reaction Planetary Geartrain
PLANETARY GEARTRAIN
DESCRIPTION
The planetary geartrain is located behind the 4C
retainer/bulkhead, toward the rear of the transmission. The planetary geartrain consists of three primary assemblies:
• Reaction (Fig. 25).
• Reverse (Fig. 26).
• Input (Fig. 26).
OPERATION
REACTION PLANETARY GEARTRAIN
The reaction planetary carrier and reverse sun
gear of the reaction planetary geartrain are a single
component which is held by the 2C clutch when
required. The reaction annulus gear is a stand alone
component that can be driven by the reverse clutch
or held by the 4C clutch. The reaction sun gear is
driven by the overdrive clutch.
REVERSE PLANETARY GEARTRAIN
The reverse planetary geartrain is the middle of the
three planetary sets. The reverse planetary carrier can
be driven by the overdrive clutch as required. The
reverse planetary carrier is also splined to the input
annulus gear, which can be held by the low/reverse
clutch. The reverse planetary annulus, input planetary
carrier, and output shaft are all one piece.
INPUT PLANETARY GEARTRAIN
The input sun gear of the input planetary
geartrain is driven by the underdrive clutch.
GEARSHIFT MECHANISM
DESCRIPTION
The gear shift mechanism provides six shift positions which are:
• Park (P)
• Reverse (R)
• Neutral (N)
• Drive (D)
• Manual second (2)
• Manual low (1)
45RFE AUTOMATIC TRANSMISSION
WJ
21 - 199
DESCRIPTION AND OPERATION (Continued)
Fig. 26 Reverse/Input Planetary Geartrain
OPERATION
OPERATION
Manual low (1) range provides first gear only.
Overrun braking is also provided in this range. Manual second (2) range provides first and second gear
only.
Drive range provides first, second third and overdrive fourth gear ranges. The shift into overdrive
fourth gear range occurs only after the transmission
has completed the shift into D third gear range. No
further movement of the shift mechanism is required
to complete the 3-4 shift.
The fourth gear upshift occurs automatically when
the overdrive selector switch is in the ON position.
An upshift to fourth gear may not occur or may be
delayed in some of the possible shift schedules. Refer
to the Transmission Control Module information for
further details.
At key-on, overdrive operation is allowed. Pressing
the switch once causes the overdrive OFF mode to be
entered and the overdrive OFF switch lamp to be
illuminated. Pressing the switch a second time
causes normal overdrive operation to be restored and
the overdrive lamp to be turned off. The overdrive
OFF mode defaults to ON after the ignition switch is
cycled OFF and ON. The normal position for the control switch is the ON position. The switch must be in
this position to energize the solenoid and allow a 3-4
upshift. The control switch indicator light illuminates
only when the overdrive switch is turned to the OFF
position, or when illuminated by the transmission
control module.
OVERDRIVE OFF SWITCH
DESCRIPTION
The overdrive OFF (control) switch is located in
the shifter handle. The switch is a momentary contact device that signals the PCM to toggle current
status of the overdrive function.
BRAKE TRANSMISSION SHIFT INTERLOCK
MECHANISM
DESCRIPTION
The Brake Transmission Shifter/Ignition Interlock
(BTSI), is a cable and solenoid operated system. It
interconnects the automatic transmission floor
mounted shifter to the steering column ignition
switch (Fig. 27).
21 - 200
45RFE AUTOMATIC TRANSMISSION
WJ
DESCRIPTION AND OPERATION (Continued)
Fig. 27 Ignition Interlock Cable
1 – SHIFT MECHANISM
2 – SHIFTER BTSI LEVER
3 – ADJUSTMENT CLIP
4 – STEERING COLUMN ASSEMBLY
5 – INTERLOCK CABLE
OPERATION
The system locks the shifter into the PARK position. The interlock system is engaged whenever the
ignition switch is in the LOCK or ACCESSORY position. An additional electrically activated feature will
prevent shifting out of the PARK position unless the
brake pedal is depressed at least one-half an inch. A
magnetic holding device in line with the park lock
cable is energized when the ignition is in the RUN
position. When the key is in the RUN position and
the brake pedal is depressed, the shifter is unlocked
and will move into any position. The interlock system
also prevents the ignition switch from being turned
to the LOCK or ACCESSORY position, unless the
shifter is fully locked into the PARK position.
TRANSMISSION CONTROL MODULE
DESCRIPTION
The Transmission Control Module (TCM) is located
in the engine compartment on the right (passenger)
side and is mounted to the inner fender (Fig. 28).
Fig. 28 Transmission Control Module Location
OPERATION
The TCM is the controlling unit for all electronic
operations of the transmission. The TCM receives
information regarding vehicle operation from both
direct and indirect inputs, and selects the operational
mode of the transmission. Direct inputs are hardwired to, and used specifically by the TCM. Indirect
inputs originate from other components/modules, and
45RFE AUTOMATIC TRANSMISSION
WJ
21 - 201
DESCRIPTION AND OPERATION (Continued)
are shared with the TCM via the vehicle communication bus.
Some examples of direct inputs to the TCM are:
• Battery (B+) voltage
• Ignition “ON” voltage
• Transmission Control Relay (Switched B+)
• Throttle Position Sensor
• Crankshaft Position Sensor
• Transmission Range Sensor
• Pressure Switches
• Transmission Temperature Sensor
• Input Shaft Speed Sensor
• Output Shaft Speed Sensor
• Line Pressure Sensor
Some examples of indirect inputs to the TCM
are:
• Engine/Body Identification
• Manifold Pressure
• Target Idle
• Torque Reduction Confirmation
• Engine Coolant Temperature
• Ambient/Battery Temperature
• DRB Scan Tool Communication
Based on the information received from these various inputs, the TCM determines the appropriate
shift schedule and shift points, depending on the
present operating conditions and driver demand.
This is possible through the control of various direct
and indirect outputs.
Some examples of TCM direct outputs are:
• Transmission Control Relay
• Solenoids
• Torque Reduction Request
Some examples of TCM indirect outputs are:
• Transmission Temperature (to PCM)
• PRNDL Position (to BCM)
In addition to monitoring inputs and controlling
outputs, the TCM has other important responsibilities and functions:
• Storing and maintaining Clutch Volume Indexes
(CVI)
• Storing and selecting appropriate Shift Schedules
• System self-diagnostics
• Diagnostic capabilities (with DRB scan tool)
NOTE: If the TCM has been replaced, the “Quick
Learn Procedure” must be performed. Refer to
“Quick Learn Procedure” in Service Procedures of
this group.
CLUTCH VOLUME INDEXES
An important function of the TCM is to monitor
Clutch Volume Indexes (CVI). CVIs represent the volume of fluid needed to compress a clutch pack.
The TCM monitors gear ratio changes by monitoring the Input and Output Speed Sensors. The Input,
or Turbine Speed Sensor sends an electrical signal to
the TCM that represents input shaft rpm. The Output Speed Sensor provides the TCM with output
shaft speed information.
By comparing the two inputs, the TCM can determine transmission gear position. This is important to
the CVI calculation because the TCM determines
CVIs by monitoring how long it takes for a gear
change to occur (Fig. 29).
Fig. 29 Example of CVI Calculation
1
2
3
4
5
6
7
8
–
–
–
–
–
–
–
–
OUTPUT SPEED SENSOR
OUTPUT SHAFT
CLUTCH PACK
SEPARATOR PLATE
FRICTION DISCS
INPUT SHAFT
INPUT SPEED SENSOR
PISTON AND SEAL
Gear ratios can be determined by using the DRB
Scan Tool and reading the Input/Output Speed Sensor values in the “Monitors” display. Gear ratio can
be obtained by dividing the Input Speed Sensor value
by the Output Speed Sensor value.
For example, if the input shaft is rotating at 1000
rpm and the output shaft is rotating at 500 rpm,
then the TCM can determine that the gear ratio is
2:1. In direct drive (3rd gear), the gear ratio changes
to 1:1. The gear ratio changes as clutches are applied
and released. By monitoring the length of time it
takes for the gear ratio to change following a shift
request, the TCM can determine the volume of fluid
used to apply or release a friction element.
21 - 202
45RFE AUTOMATIC TRANSMISSION
WJ
DESCRIPTION AND OPERATION (Continued)
The volume of transmission fluid needed to apply
the friction elements are continuously updated for
adaptive controls. As friction material wears, the volume of fluid need to apply the element increases.
Certain mechanical problems within the input
clutch assembly (broken return springs, out of position snap rings, excessive clutch pack clearance,
improper assembly, etc.) can cause inadequate or outof-range element volumes. Also, defective Input/Output Speed Sensors and wiring can cause these
conditions. The following chart identifies the appropriate clutch volumes and when they are monitored/
updated:
SHIFT SCHEDULES
As mentioned earlier, the TCM has programming
that allows it to select a variety of shift schedules.
Shift schedule selection is dependent on the following:
• Shift lever position
• Throttle position
• Engine load
Schedule
CLUTCH VOLUMES
Clutch
When Updated
Proper Clutch
Volume
L/R
2-1 or 3-1
downshift
45 to 134
2C
3-2 kickdown
shift
25 to 85
OD
2-3 upshift
30 to 100
4C
3-4 upshift
30 to 85
UD
4-3 kickdown
shift
30 to 100
• Fluid temperature
• Software level
As driving conditions change, the TCM appropriately adjusts the shift schedule. Refer to the following chart to determine the appropriate operation
expected, depending on driving conditions.
Condition
Expected Operation
Extreme Cold
Oil temperature below -16° F
–Park, Reverse, Neutral and 1st
and 3rd gear only in D position, 2nd
gear only in Manual 2 or L
–No EMCC
Super Cold
Oil temperature between -12° F and
10° F
– Delayed 2-3 upshift
– Delayed 3-4 upshift
– Early 4-3 coastdown shift
– High speed 4-2, 3-2, 2-1 kickdown
shifts are prevented
– Shifts at high throttle openings
willl be early.
– No EMCC
Cold
Oil temperature between 10° F and
36° F
– Shift schedule is the same as
Super Cold except that the 2-3
upshifts are not delayed.
Warm
Oil temperature 40° F and 80° F
– Normal operation (upshift,
kickdowns, and coastdowns)
– No EMCC
Hot
Oil temperature above 80° F and
240° F
– Normal operation (upshift,
kickdowns, and coastdowns)
– Normal EMCC operation
Overheat
Oil temperature above 240° F or
engine coolant temperature above
244° F
– Delayed 2-3 upshift
– Delayed 3-4 upshift
– 3rd gear FEMCC from 30-48 mph
– 3rd gear PEMCC above 35 mph
– Above 25 mph the torque
converter will not unlock unless the
throttle is closed or if a wide open
throttle 2nd PEMCC to 1 kickdown
is made
WJ
45RFE AUTOMATIC TRANSMISSION
21 - 203
DESCRIPTION AND OPERATION (Continued)
SOLENOID AND PRESSURE SWITCH
ASSEMBLY
DESCRIPTION
The solenoid and pressure switch assembly is
internal to the transmission and mounted on the
valve body assembly (Fig. 30). The assembly consists
of six solenoids that control hydraulic pressure to the
six friction elements (transmission clutches), and the
torque converter clutch. The pressure control solenoid is located on the side of the solenoid and pressure switch assembly. The solenoid assembly also
contains five pressure switches that feed information
to the TCM.
this memory loss is detected by the TCM and a Diagnostic Trouble Code (DTC) is set.
TRANSMISSION CONTROL RELAY
DESCRIPTION
The relay is supplied fused B+ voltage, energized
by the TCM, and is used to supply power to the solenoid pack when the transmission is in normal operating mode.
OPERATION
When the relay is “off”, no power is supplied to the
solenoid pack and the transmission is in “limp-in”
mode. After a controller reset, the TCM energizes the
relay. Prior to this, the TCM verifies that the contacts are open by checking for no voltage at the
switched battery terminals. After this is verified, the
voltage at the solenoid pack pressure switches is
checked. After the relay is energized, the TCM monitors the terminals to verify that the voltage is
greater than 3 volts.
PRESSURE SWITCHES
DESCRIPTION
The pressure switches are located inside the solenoid and pressure switch assembly and are only serviced by replacing the assembly.
OPERATION
Fig. 30 SOLENOID AND PRESSURE SWITCH
ASSEMBLY
OPERATION
The solenoids within the assembly are supplied
voltage by the Transmission Control Relay. The solenoids are energized when the TCM grounds the
return wire for the solenoid that is needed. The pressure switches simply tell the TCM whether or not
pressure exists within a clutch circuit.
BATTERY FEED (TCM)
DESCRIPTION
A fused, direct battery feed to the TCM is used for
continuous power.
OPERATION
This battery voltage is necessary to retain adaptive
learn values in the TCM’s RAM (Random Access
Memory). When the battery (B+) is disconnected, this
memory is lost. When the battery (B+) is restored,
The TCM relies on five pressure switches to monitor fluid pressure in the L/R, 2C, 4C, UD, and OD
hydraulic circuits. The primary purpose of these
switches is to help the TCM detect when clutch circuit hydraulic failures occur. The switches close at 23
psi and open at 11 psi, and simply indicate whether
or not pressure exists. The switches are continuously
monitored by the TCM for the correct states (open or
closed) in each gear as shown in the following chart:
GEAR
L/R
2C
4C
UD
OD
R
OP
OP
OP
OP
OP
P/N
CL
OP
OP
OP
OP
1ST
CL*
OP
OP
CL
OP
2ND
OP
CL
OP
CL
OP
2ND
PRIME
OP
OP
CL
CL
OP
D
OP
OP
OP
CL
CL
OD
OP
OP
CL
OP
CL
*L/R is closed if output speed is below 100 rpm in
Drive and Manual 2. L/R is open in Manual 1.
21 - 204
45RFE AUTOMATIC TRANSMISSION
WJ
DESCRIPTION AND OPERATION (Continued)
A Diagnostic Trouble Code (DTC) will set if the
TCM senses any switch open or closed at the wrong
time in a given gear.
INPUT AND OUTPUT SPEED SENSORS
DESCRIPTION
The Input and Output Speed Sensors are two-wire
magnetic pickup devices that generate AC signals as
rotation occurs. They are mounted in the left side of
the transmission case and are considered primary
inputs to the Transmission Control Module (TCM).
OPERATION
The Input Speed Sensor provides information on
how fast the input shaft is rotating. As the teeth of
the input clutch hub pass by the sensor coil, an AC
voltage is generated and sent to the TCM. The TCM
interprets this information as input shaft rpm.
The Output Speed Sensor generates an AC signal
in a similar fashion, though its coil is excited by rotation of the rear planetary carrier lugs. The TCM
interprets this information as output shaft rpm.
The TCM compares the input and output speed
signals to determine the following:
• Transmission gear ratio
• Speed ratio error detection
• CVI calculation
The TCM also compares the input speed signal and
the engine speed signal to determine the following:
• Torque converter clutch slippage
• Torque converter element speed ratio
input to the calculation. The line pressure is set to a
predetermined value during shifts and when the
transmission is in the PARK and NEUTRAL positions. This is done to ensure consistent shift quality.
During all other operation, the actual line pressure is
compared to the desired line pressure and adjustments are made to the pressure control solenoid duty
cycle.
THROTTLE POSITION SENSOR
OPERATION
The Transmission Control Module (TCM) receives
the throttle position signal and its ground from the
Throttle Position Sensor (TPS). The TPS has a 5 volt
pull up supplied by the engine controller. The throttle signal is checked by the TCM for out-of-range as
well as intermittence (excessive signal changes).
TRANSMISSION RANGE SENSOR
DESCRIPTION
LINE PRESSURE CONTROL
The Transmission Range Sensor (TRS) is mounted
to the top of the valve body inside the transmission.
The Transmission Range Sensor (TRS) has six
switch contacts that:
• Determine shift lever position
• Supply ground to the Starter Relay in Park and
Neutral only.
• Supply ground to the TCM for backup lamp control in Reverse only.
The TRS also has an integrated temperature sensor (thermistor) that communicates transmission
temperature to the TCM and PCM.
DESCRIPTION
OPERATION
The TCM utilizes a closed-loop system to control
transmission line pressure. The system contains a
variable force style solenoid, the Pressure Control
Solenoid, mounted on the side of the solenoid and
pressure switch assembly. The solenoid is duty cycle
controlled by the TCM to vent the unnecessary line
pressure supplied by the oil pump back to the sump.
The system also contains a variable pressure style
sensor, the Line Pressure Sensor, which is a direct
input to the TCM. The line pressure solenoid monitors the transmission line pressure and completes the
feedback loop to the TCM. The TCM uses this information to adjust its control of the pressure control
solenoid to achieve the desired line pressure.
The Transmission Range Sensor (TRS) communicates shift lever position to the TCM as a combination of open and closed switches. Each shift lever
position has an assigned combination of switch states
(open/closed) that the TCM receives from four sense
circuits. The TCM interprets this information and
determines the appropriate transmission gear position and shift schedule.
There are many possible combinations of open and
closed switches (codes). Seven of these possible codes
are related to gear position and five are recognized
as “between gear” codes. This results in many codes
which should never occur. These are called
“invalid” codes. An invalid code will result in a DTC,
and the TCM will then determine the shift lever
position based on pressure switch data. This allows
reasonably normal transmission operation with a
TRS failure.
OPERATION
The TCM calculates the desired line pressure
based upon inputs from the transmission and engine.
The TCM calculates the torque input to the transmission and uses that information as the primary
45RFE AUTOMATIC TRANSMISSION
WJ
21 - 205
DESCRIPTION AND OPERATION (Continued)
GEAR
C5
C4
C3
C2
C1
Park
CL
OP
OP
CL
CL
Temp 1
CL
OP
OP
CL
OP
Reverse
OP
OP
OP
CL
OP
Temp 2
OP
OP
CL
CL
OP
Neutral 1
OP
OP
CL
CL
CL
Neutral 2
OP
CL
CL
CL
CL
Temp 3
OP
CL
CL
CL
OP
Drive
OP
CL
CL
OP
OP
Temp 4
OP
CL
OP
OP
OP
Manual 2
CL
CL
OP
OP
OP
Temp 5
CL
OP
OP
OP
OP
Manual 1
CL
OP
CL
OP
OP
TRANSMISSION TEMPERATURE SENSOR
DESCRIPTION
OPERATION
The solenoids receive electrical power from the
Transmission Control Relay through a single wire.
The TCM energizes or operates the solenoids individually by grounding the return wire of the solenoid as
necessary. When a solenoid is energized, the solenoid
valve shifts, and a fluid passage is opened or closed
(vented or applied), depending on its default operating state. The result is an apply or release of a frictional element.
The MS and UD solenoids are normally applied to
allow transmission limp-in in the event of an electrical failure.
The continuity of the solenoids and circuits are
periodically tested. Each solenoid is turned on or off
depending on its current state. An inductive spike
should be detected by the TCM during this test. If no
spike is detected, the circuit is tested again to verify
the failure. In addition to the periodic testing, the
solenoid circuits are tested if a speed ratio or pressure switch error occurs.
The transmission temperature sensor is a thermistor that is integral to the Transmission Range
Sensor (TRS).
SOLENOID SWITCH VALVE
OPERATION
The Solenoid Switch Valve (SSV) is located in the
valve body controls the direction of the transmission
fluid when the L/R-TCC solenoid is energized.
The transmission temperature sensor is used by
the TCM to sense the temperature of the fluid in the
sump. Since fluid temperature can affect transmission shift quality and convertor lock up, the TCM
requires this information to determine which shift
schedule to operate in.
Calculated Temperature
A failure in the temperature sensor or circuit will
result in calculated temperature being substituted for
actual temperature. Calculated temperature is a predicted fluid temperature which is calculated from a
combination of inputs:
• Battery (ambient) temperature
• Engine coolant temperature
• In-gear run time since start-up
SOLENOIDS
DESCRIPTION
Solenoids are used to control the L/R, 2C, 4C, OD,
and UD friction elements. The reverse clutch is controlled by line pressure and the position of the manual valve in the valve body. All the solenoids are
contained within the Solenoid and Pressure Switch
Assembly. The solenoid and pressure switch assembly
contains one additional solenoid, Multi-Select (MS),
which serves primarily to provide 2nd and 3rd gear
limp-in operation.
DESCRIPTION
OPERATION
The Solenoid Switch Valve controls line pressure
from the LR-TCC solenoid. In 1st gear, the SSV will
be in the downshifted position, thus directing fluid to
the L/R clutch circuit. In 2nd, 3rd, and 4th, it will be
in the upshifted position and directs the fluid into
the torque converter clutch (TCC) circuit.
When shifting into 1st gear, a special hydraulic
sequence is performed to ensure SSV movement into
the downshifted position. The L/R pressure switch is
monitored to confirm SSV movement. If the movement is not confirmed (the L/R pressure switch does
not close), 2nd gear is substituted for 1st. A DTC will
be set after three unsuccessful attempts are made to
get into 1st gear in one given key start.
DIAGNOSIS AND TESTING
EFFECTS OF INCORRECT FLUID LEVEL
A low fluid level allows the pump to take in air
along with the fluid. Air in the fluid will cause fluid
pressures to be low and develop slower than normal.
If the transmission is overfilled, the gears churn the
fluid into foam. This aerates the fluid and causing
the same conditions occurring with a low level. In
either case, air bubbles cause fluid overheating, oxi-
21 - 206
45RFE AUTOMATIC TRANSMISSION
WJ
DIAGNOSIS AND TESTING (Continued)
dation and varnish buildup which interferes with
valve, clutch and servo operation. Foaming also
causes fluid expansion which can result in fluid overflow from the transmission vent or fill tube. Fluid
overflow can easily be mistaken for a leak if inspection is not careful.
CAUSES OF BURNT FLUID
Burnt, discolored fluid is a result of overheating
which has two primary causes.
(1) A result of restricted fluid flow through the
main and/or auxiliary cooler. This condition is usually the result of a faulty or damaged main/auxiliary
cooler, or severe restrictions in the coolers and lines
caused by debris or kinked lines.
(2) Heavy duty operation with a vehicle not properly equipped for this type of operation. Trailer towing or similar high load operation will overheat the
transmission fluid if the vehicle is improperly
equipped. Such vehicles should have an auxiliary
transmission fluid cooler, a heavy duty cooling system, and the engine/axle ratio combination needed to
handle heavy loads.
FLUID CONTAMINATION
Transmission fluid contamination is generally a
result of:
• adding incorrect fluid
• failure to clean dipstick and fill tube when
checking level
• engine coolant entering the fluid
• internal failure that generates debris
• overheat that generates sludge (fluid breakdown)
• failure to reverse flush cooler and lines after
repair
• failure to replace contaminated converter after
repair
The use of non recommended fluids can result in
transmission failure. The usual results are erratic
shifts, slippage, abnormal wear and eventual failure
due to fluid breakdown and sludge formation. Avoid
this condition by using recommended fluids only.
The dipstick cap and fill tube should be wiped
clean before checking fluid level. Dirt, grease and
other foreign material on the cap and tube could fall
into the tube if not removed beforehand. Take the
time to wipe the cap and tube clean before withdrawing the dipstick.
Engine coolant in the transmission fluid is generally caused by a cooler malfunction. The only remedy
is to replace the radiator as the cooler in the radiator
is not a serviceable part. If coolant has circulated
through the transmission for some time, an overhaul
may also be necessary; especially if shift problems
had developed.
The transmission cooler and lines should be
reverse flushed whenever a malfunction generates
sludge and/or debris. The torque converter should
also be replaced at the same time.
Failure to flush the cooler and lines will result in
recontamination. Flushing applies to auxiliary coolers as well. The torque converter should also be
replaced whenever a failure generates sludge and
debris. This is necessary because normal converter
flushing procedures will not remove all contaminants.
45RFE AUTOMATIC TRANSMISSION GENERAL
DIAGNOSIS
CAUTION: Before attempting any repair on a 45RFE
automatic transmission, check for Diagnostic Trouble Codes with the DRB scan tool.
Transmission malfunctions may be caused by these
general conditions:
• Poor engine performance
• Improper adjustments
• Hydraulic malfunctions
• Mechanical malfunctions
• Electronic malfunctions
Diagnosis of these problems should always begin
by checking the easily accessible variables: fluid level
and condition, gearshift cable adjustment. Then perform a road test to determine if the problem has been
corrected or if more diagnosis is necessary. If the
problem persists after the preliminary tests and corrections are completed, hydraulic pressure checks
should be performed.
PRELIMINARY DIAGNOSIS
Two basic procedures are required. One procedure
for vehicles that are drivable and an alternate procedure for disabled vehicles (will not back up or move
forward).
VEHICLE IS DRIVABLE
(1) Check for transmission fault codes using DRB
scan tool.
(2) Check fluid level and condition.
(3) Adjust gearshift cable if complaint was based
on delayed, erratic, or harsh shifts.
(4) Road test and note how transmission upshifts,
downshifts, and engages.
(5) Perform stall test if complaint is based on sluggish acceleration. Or, if abnormal throttle opening is
needed to maintain normal speeds with a properly
tuned engine.
(6) Perform hydraulic pressure test if shift problems were noted during road test.
WJ
45RFE AUTOMATIC TRANSMISSION
21 - 207
DIAGNOSIS AND TESTING (Continued)
(7) Perform air-pressure test to check clutch operation.
GEARSHIFT CABLE
(1) Check fluid level and condition.
(2) Check for broken or disconnected gearshift
cable.
(3) Check for cracked, leaking cooler lines, or loose
or missing pressure-port plugs.
(4) Raise and support vehicle on safety stands,
start engine, shift transmission into gear, and note
following:
(a) If propeller shaft turns but wheels do not,
problem is with differential or axle shafts.
(b) If propeller shaft does not turn and transmission is noisy, stop engine. Remove oil pan, and
check for debris. If pan is clear, remove transmission and check for damaged driveplate, converter,
oil pump, or input shaft.
(c) If propeller shaft does not turn and transmission is not noisy, perform hydraulic-pressure test to
determine if problem is hydraulic or mechanical.
(1) The floor shifter lever and gate positions
should be in alignment with all transmission PARK,
NEUTRAL, and gear detent positions.
(2) Engine starts must be possible with floor shift
lever in PARK or NEUTRAL gate positions only.
Engine starts must not be possible in any other gear
position.
(3) With floor shift lever handle push-button not
depressed and lever in:
(a) PARK position—Apply forward force on center of handle and remove pressure. Engine starts
must be possible.
(b) PARK position—Apply rearward force on center of handle and remove pressure. Engine starts
must be possible.
(c) NEUTRAL position—Normal position. Engine
starts must be possible.
(d) NEUTRAL position—Engine running and
brakes applied, apply forward force on center of
shift handle. Transmission shall not be able to shift
from neutral to reverse.
BRAKE TRANSMISSION SHIFT INTERLOCK
ROAD TESTING
VEHICLE IS DISABLED
(1) Verify that the key can only be removed in the
PARK position
(2) When the shift lever is in PARK And the shift
handle pushbutton is in the “OUT” position, the ignition key cylinder should rotate freely from OFF to
LOCK. When the shifter is in any other gear or neutral position, the ignition key cylinder should not
rotate to the LOCK position.
(3) Shifting out of PARK should be possible when
the ignition key cylinder is in the OFF position.
(4) Shifting out of PARK should not be possible
while applying 25 lb. maximum handle pushbutton
force and ignition key cylinder is in the RUN or
START positions unless the foot brake pedal is
depressed approximately 1/2 inch (12 mm).
(5) Shifting out of PARK should not be possible
when the ignition key cylinder is in the ACCESSORY
or LOCK positions.
(6) Shifting between any gears, NEUTRAL or into
PARK may be done without depressing foot brake
pedal with ignition switch in RUN or START positions and vehicle stationary or in motion.
Before road testing, be sure the fluid level and control cable adjustments have been checked and
adjusted if necessary. Verify that all diagnostic trouble codes have been resolved.
Observe engine performance during the road test.
A poorly tuned engine will not allow accurate analysis of transmission operation.
Operate the transmission in all gear ranges. Check
for shift variations and engine flare which indicates
slippage. Note if shifts are harsh, spongy, delayed,
early, or if part throttle downshifts are sensitive.
Slippage indicated by engine flare, usually means
clutch or overrunning clutch problems.
A slipping clutch can often be determined by comparing which internal units are applied in the various gear ranges. The Clutch Application chart
provides a basis for analyzing road test results.
21 - 208
45RFE AUTOMATIC TRANSMISSION
WJ
DIAGNOSIS AND TESTING (Continued)
CLUTCH APPLICATION CHART
SLP
UD
OD
R
2C
4C
P–PARK
L/R
OVERRUNNING
ON
R–REVERSE
ON
ON
N-NEUTRAL
ON
D–OVERDRIVE
FIRST
ON
SECOND
ON
SECOND PRIME
ON
THIRD
ON
FOURTH
ON*
ON
ON*
ON
ON
ON
ON
ON
ON
ON
ON
LIMP-IN
ON
ON
2–FIRST
ON
SECOND
ON
ON
LIMP-IN
ON
ON
1–LOW
ON
*L/R clutch is on only with the output shaft speed below 150 rpm.
HYDRAULIC PRESSURE TEST
An accurate tachometer and pressure test gauges
are required. Test Gauge C-3293-SP has a 300 psi
range and is used at all locations where pressures
exceed 100 psi.
Pressure Test Port Locations
Only two pressure ports are supplied on the transmission case. The torque converter ON and torque
converter OFF ports are located on the right side of
the transmission case (Fig. 31).
ond method is to install Line Pressure Adapter 8259
(Fig. 33) into the transmission case and then install
the pressure gauge and the original sensor into the
adapter. This will allow a comparison of the DRB
readings and the gauge reading to make a determination regarding the accuracy of the feedback controls.
In order to access any other pressure tap locations,
the transmission oil pan must be removed, the pressure port plugs removed and Valve Body Pressure
Tap Adapter 8258 (Fig. 34) installed. The extensions
supplied with Adapter 8258 will allow the installation of pressure gauges to the valve body. Refer to
(Fig. 32) for correct pressure tap location identification.
Fig. 31 Torque Converter Pressure Locations
To determine the line pressure, there are two available methods. The DRB scan tool can be used to read
line pressure from the line pressure sensor. The sec-
Fig. 32 Pressure Tap Locations
45RFE AUTOMATIC TRANSMISSION
WJ
21 - 209
DIAGNOSIS AND TESTING (Continued)
the rear of this section to determine the correct pressures for each element in a given gear position.
NOTE: The 45RFE utilizes closed loop control of
pump line pressure. The pressure readings may
therefore vary greatly but should always follow line
pressure.
Some common pressures that can be measured to
evaluate pump and clutch performance are the
upshift/downshift pressures and the garage shift
pressures. The upshift/downshift pressure for all
shifts except the 3–4, 4–3, and 4–2prime shifts is 120
psi. The upshift/downshift pressure for the 3–4, 4–3,
and the 4–2prime shifts is 100 psi. The garage shift
pressure when performing a N–R shift is 220 psi.
The garage shift pressure for the R–N and N–1 shifts
is 120 psi.
AIR TESTING TRANSMISSION CLUTCH
OPERATION
Fig. 33 Line Pressure Adapter 8259
Air-pressure testing can be used to check transmission clutch operation. The test can be conducted with
the transmission either in the vehicle or on the work
bench, as a final check.
Air-pressure testing requires that the oil pan and
valve body be removed from the transmission. The
clutch apply passages are shown (Fig. 35).
Fig. 34 Valve Body Pressure Tap Adapter 8258
TEST PROCEDURE
All pressure readings should be taken with the
transmission fluid level full, transmission oil at the
normal operating temperature, and the engine at
1500 rpm. Check the transmission for proper operation in each gear position that is in question or if a
specific element is in question, check the pressure
readings in at least two gear positions that employs
that element. Refer to the Hydraulic Schematics at
Fig. 35 Air Pressure Test Passages
NOTE: The air supply which is used must be free
of moisture and dirt. Use a pressure of 30 psi to
test clutch operation.
Apply air pressure at each port. If the clutch is
functioning, a soft thump will be heard as the clutch
is applied. The clutch application can also be felt by
touching the appropriate element while applying air
21 - 210
45RFE AUTOMATIC TRANSMISSION
WJ
DIAGNOSIS AND TESTING (Continued)
pressure. As the air pressure is released, the clutch
should also release.
CONVERTER HOUSING FLUID LEAK
DIAGNOSIS
When diagnosing converter housing fluid leaks,
two items must be established before repair.
(1) Verify that a leak condition actually exists.
(2) Determined the true source of the leak.
Some suspected converter housing fluid leaks may
not be leaks at all. They may only be the result of
residual fluid in the converter housing, or excess
fluid spilled during factory fill or fill after repair.
Converter housing leaks have several potential
sources. Through careful observation, a leak source
can be identified before removing the transmission
for repair. Pump seal leaks tend to move along the
drive hub and onto the rear of the converter. Pump
cover O-ring leaks follow the same path as a seal
leak.
TORQUE CONVERTER LEAK POINTS
Possible sources of converter leaks are:
(1) Leaks at the weld joint around the outside
diameter weld (Fig. 36).
(2) Leaks at the converter hub weld (Fig. 36).
geartrain churns up foam and cause the same conditions which occur with a low fluid level.
In either case, air bubbles can cause overheating
and/or fluid oxidation, and varnishing. This can
interfere with normal valve, clutch, and accumulator
operation. Foaming can also result in fluid escaping
from the transmission vent where it may be mistaken for a leak.
Along with fluid level, it is important to check the
condition of the fluid. When the fluid smells burned,
and is contaminated with metal or friction material
particles, a complete transmission recondition is
needed. Be sure to examine the fluid on the dipstick
closely. If there is any doubt about its condition,
drain out a sample for a double check.
After the fluid has been checked, seat the dipstick
fully to seal out water and dirt.
The transmission fluid level should be inspected at
least every six months.
FLUID LEVEL CHECK PROCEDURE
The transmission has a dipstick to check oil level.
It is located on the right side of the engine. Be sure
to wipe all dirt from dipstick handle before removing.
The torque converter fills in both the P Park and N
Neutral positions. Place the selector lever in P Park
to be sure that the fluid level check is accurate. The
engine should be running at idle speed for at
least one minute, with the vehicle on level
ground. At normal operating temperature (approximately 82° C or 180° F), the fluid level is correct if it
is in the HOT region (cross-hatched area) on the oil
level indicator. The fluid level will be approximately
at the upper COLD hole of the dipstick at 70° F fluid
temperature.
NOTE: Engine and Transmission should be at normal operating temperature before performing this
procedure.
Fig. 36 Converter Leak Points—Typical
1
2
3
4
–
–
–
–
OUTSIDE DIAMETER WELD
TORQUE CONVERTER HUB WELD
STARTER RING GEAR
LUG
SERVICE PROCEDURES
FLUID LEVEL CHECK
Low fluid level can cause a variety of conditions
because it allows the pump to take in air along with
the fluid. As in any hydraulic system, air bubbles
make the fluid spongy, therefore, pressures will be
low and build up slowly.
Improper filling can also raise the fluid level too
high. When the transmssion has too much fluid, the
(1) Start engine and apply parking brake.
(2) Shift the transmission into Drive for approximately 2 seconds.
(3) Shift the transmission into Reverse for approximately 2 seconds.
(4) Shift the transmission into Park.
(5) Hook up DRB III scan tool and select transmission.
(6) Select sensors.
(7) Read the transmission temperature value.
(8) Compare the fluid temperature value with the
chart.
(9) Adjust transmission fluid level shown on the
dipstick according to the chart.
45RFE AUTOMATIC TRANSMISSION
WJ
21 - 211
SERVICE PROCEDURES (Continued)
Transmission Fluid Temperature Chart
NOTE: After adding any fluid to the transmission,
wait a minimum of 2 minutes for the oil to fully
drain from the fill tube into the transmission before
rechecking the fluid level.
(10) Check transmission for leaks.
FLUID AND FILTER REPLACEMENT
Refer to the Maintenance Schedules in Group 0,
Lubrication and Maintenance, for proper service
intervals. The fluid capacity of the 45RFE is approximately 13.25 liters (14.0 quarts).
(9) Remove screws holding filter to valve body
(Fig. 37).
(10) Separate filter from valve body and oil pump
and pour fluid in filter into drain pan.
(11) Remove and discard the oil filter seal from the
bottom of the oil pump.
(12) Using Oil Filter Wrench 8321, remove the
cooler return filter from the transmission.
(13) Dispose of used trans fluid and filter properly.
REMOVAL
(1) Hoist and support vehicle on safety stands.
(2) Place a large diameter shallow drain pan
beneath the transmission pan.
(3) Remove bolts holding front and sides of pan to
transmission.
(4) Loosen bolts holding rear of pan to transmission.
(5) Slowly separate front of pan away from transmission allowing the fluid to drain into drain pan.
(6) Hold up pan and remove remaining bolt holding pan to transmission.
(7) While holding pan level, lower pan away from
transmission.
(8) Pour remaining fluid in pan into drain pan.
Fig. 37 Transmission Filters
21 - 212
45RFE AUTOMATIC TRANSMISSION
WJ
SERVICE PROCEDURES (Continued)
INSPECTION
OIL PUMP VOLUME CHECK
Inspect bottom of pan and magnet for excessive
amounts of metal. A light coating of clutch material
on the bottom of the pan does not indicate a problem
unless accompanied by a slipping condition or shift
lag. If fluid and pan are contaminated with excessive
amounts or debris, refer to the diagnosis section of
this group.
Measuring the oil pump output volume will determine if sufficient oil flow to the transmission oil
cooler exists, and whether or not an internal transmission failure is present.
Verify that the transmission fluid is at the proper
level. Refer to the Fluid Level Check procedure in
this section. If necessary, fill the transmission to the
proper level with Mopart ATF+3, type 7176, Automatic Transmission Fluid.
(1) Disconnect the To cooler line at the cooler
inlet and place a collecting container under the disconnected line.
CLEANING
(1) Using a suitable solvent, clean pan and magnet.
(2) Using a suitable gasket scraper, clean original
sealing material from surface of transmission case
and the transmission pan.
INSTALLATION
(1) Install a new oil filter seal into the bottom of
the oi pump.
NOTE: Do not attempt to install the seal onto the
oil filter first and then into the oil pump. An unsatisfactory seal between the oil pump and filter will
result, allowing air to be drawn into the pump.
(2) Place replacement filter in position on valve
body and into the oil pump.
(3) Install screws to hold filter to valve body (Fig.
37). Tighten screws to 4.5 N·m (40 in. lbs.) torque.
(4) Install new cooler return filter onto the transmission. Torque the filter to 14.12 N·m (125 in. lbs.).
(5) Place bead of Mopart RTV sealant onto the
transmission case sealing surface.
(6) Place pan in position on transmission.
(7) Install screws to hold pan to transmission.
Tighten bolts to 11.8 N·m (105 in. lbs.) torque.
(8) Lower vehicle and fill transmission with
Mopart ATF Plus 3, type 7176 fluid.
TRANSMISSION FILL PROCEDURE
To avoid overfilling transmission after a fluid
change or overhaul, perform the following procedure:
(1) Remove dipstick and insert clean funnel in
transmission fill tube.
(2) Add following initial quantity of Mopart ATF
Plus 3 to transmission:
(a) If only fluid and filter were changed, add 10
pints (5 quarts) of ATF Plus 3 to transmission.
(b) If transmission was completely overhauled,
torque converter was replaced or drained, and
cooler was flushed, add 24 pints (12 quarts) of
ATF Plus 3 to transmission.
(3) Refer to the Fluid Level Check information in
this group for the proper fill procedures.
CAUTION: With the fluid set at the proper level,
fluid collection should not exceed (1) quart or internal damage to the transmission may occur.
(2) Run the engine at curb idle speed, with the
shift selector in neutral.
(3) If one quart of transmission fluid is collected in
the container in 20 seconds or less, oil pump flow volume is within acceptable limits. If fluid flow is intermittent, or it takes more than 20 seconds to collect
one quart of fluid, refer to the Hydraulic Pressure
tests in this section for further diagnosis.
(4) Re-connect the To cooler line to the transmission cooler inlet.
(5) Refill the transmission to proper level.
FLUSHING COOLERS AND TUBES
When a transmission failure has contaminated the
fluid, the oil cooler(s) must be flushed. The torque
converter must also be replaced. This will insure that
metal particles or sludged oil are not later transferred back into the reconditioned (or replaced) transmission.
The only recommended procedure for flushing coolers and lines is to use Tool 6906A Cooler Flusher.
WARNING: WEAR PROTECTIVE EYEWEAR THAT
MEETS THE REQUIREMENTS OF OSHA AND ANSI
Z87.1–1968. WEAR STANDARD INDUSTRIAL RUBBER GLOVES.
KEEP LIGHTED CIGARETTES, SPARKS, FLAMES,
AND OTHER IGNITION SOURCES AWAY FROM THE
AREA TO PREVENT THE IGNITION OF COMBUSTIBLE LIQUIDS AND GASES. KEEP A CLASS (B) FIRE
EXTINGUISHER IN THE AREA WHERE THE
FLUSHER WILL BE USED.
KEEP THE AREA WELL VENTILATED.
DO NOT LET FLUSHING SOLVENT COME IN CONTACT WITH YOUR EYES OR SKIN: IF EYE CONTAMINATION OCCURS, FLUSH EYES WITH WATER FOR
15 TO 20 SECONDS. REMOVE CONTAMINATED
CLOTHING AND WASH AFFECTED SKIN WITH
SOAP AND WATER. SEEK MEDICAL ATTENTION.
WJ
45RFE AUTOMATIC TRANSMISSION
21 - 213
SERVICE PROCEDURES (Continued)
COOLER FLUSH USING TOOL 6906A
(1) Remove cover plate filler plug on Tool 6906A.
Fill reservoir 1/2 to 3/4 full of fresh flushing solution.
Flushing solvents are petroleum based solutions generally used to clean automatic transmission components. DO NOT use solvents containing acids, water,
gasoline, or any other corrosive liquids.
(2) Reinstall filler plug on Tool 6906A.
(3) Verify pump power switch is turned OFF. Connect red alligator clip to positive (+) battery post.
Connect black (-) alligator clip to a good ground.
(4) Disconnect the cooler lines at the transmission.
NOTE: When flushing transmission cooler and
lines, ALWAYS reverse flush.
(5) Connect the BLUE pressure line to the OUTLET (From) cooler line.
(6) Connect the CLEAR return line to the INLET
(To) cooler line
(7) Turn pump ON for two to three minutes to
flush cooler(s) and lines.
(8) Turn pump OFF.
(9) Disconnect CLEAR suction line from reservoir
at cover plate. Disconnect CLEAR return line at
cover plate, and place it in a drain pan.
(10) Turn pump ON for 30 seconds to purge flushing solution from cooler and lines. Turn pump OFF.
(11) Place CLEAR suction line into a one quart
container of Mopart ATF Plus 3, type 7176 automatic
transmission fluid.
(12) Turn pump ON until all transmission fluid is
removed from the one quart container and lines. This
purges any residual cleaning solvent from the transmission cooler and lines. Turn pump OFF.
(13) Disconnect alligator clips from battery. Reconnect flusher lines to cover plate, and remove flushing
adapters from cooler lines.
• The throttle angle (TPS) must be less than 3
degrees
• The shift lever position must stay until
prompted to shift to overdrive
• The shift lever position must stay in overdrive
after the Shift to Overdrive prompt until the DRB
indicates the procedure is complete
• The calculated oil temperature must be above
60° and below 200°
ALUMINUM THREAD REPAIR
Damaged or worn threads in the aluminum transmission case and valve body can be repaired by the
use of Heli-Coils, or equivalent. This repair consists
of drilling out the worn-out damaged threads. Then
tap the hole with a special Heli-Coil tap, or equivalent, and installing a Heli-Coil insert, or equivalent,
into the hole. This brings the hole back to its original
thread size.
Heli-Coil, or equivalent, tools and inserts are readily
available from most automotive parts suppliers.
REMOVAL AND INSTALLATION
INPUT SPEED SENSOR
REMOVAL
(1) Raise vehicle.
(2) Place a suitable fluid catch pan under the
transmission.
(3) Remove the wiring connector from the input
speed sensor (Fig. 38).
(4) Remove the bolt holding the input speed sensor
to the transmission case.
(5) Remove the input speed sensor from the transmission case.
TRANSMISSION QUICK LEARN PROCEDURE
The quick learn procedure requires the use of the
DRB scan tool.
This program allows the electronic transmission
system to recalibrate itself. This will provide the best
possible transmission operation. The quick learn procedure should be performed if any of the following
procedures are performed:
• Transmission Assembly Replacement
• Transmission Control Module Replacement
• Solenoid Pack Replacement
• Clutch Plate and/or Seal Replacement
• Valve Body Replacement or Recondition
To perform the Quick Learn Procedure, the following conditions must be met:
• The brakes must be applied
• The engine speed must be above 500 rpm
Fig. 38 Input Speed Sensor
21 - 214
45RFE AUTOMATIC TRANSMISSION
WJ
REMOVAL AND INSTALLATION (Continued)
INSTALLATION
(1) Install the input speed sensor into the transmission case.
(2) Install the bolt to hold the input speed sensor
into the transmission case. Tighten the bolt to 11.9
N·m (105 in. lbs.).
(3) Install the wiring connector onto the input
speed sensor
(4) Verify the transmission fluid level. Add fluid as
necessary.
(5) Lower vehicle.
OUTPUT SPEED SENSOR
LINE PRESSURE SENSOR
REMOVAL
(1) Raise vehicle.
(2) Place a suitable fluid catch pan under
transmission.
(3) Remove the wiring connector from the
pressure sensor (Fig. 40).
(4) Remove the bolt holding the line pressure
sor to the transmission case.
(5) Remove the line pressure sensor from
transmission case.
the
line
senthe
REMOVAL
(1) Raise vehicle.
(2) Place a suitable fluid catch pan under the
transmission.
(3) Remove the wiring connector from the output
speed sensor (Fig. 39).
(4) Remove the bolt holding the output speed sensor to the transmission case.
(5) Remove the output speed sensor from the
transmission case.
Fig. 40 Line Pressure Sensor
INSTALLATION
Fig. 39 Output Speed Sensor
(1) Install the line pressure sensor into the transmission case.
(2) Install the bolt to hold the line pressure sensor
into the transmission case. Tighten the bolt to 11.9
N·m (105 in. lbs.).
(3) Install the wiring connector onto the line pressure sensor
(4) Verify the transmission fluid level. Add fluid as
necessary.
(5) Lower vehicle.
INSTALLATION
VALVE BODY
(1) Install the output speed sensor into the transmission case.
(2) Install the bolt to hold the output speed sensor
into the transmission case. Tighten the bolt to 11.9
N·m (105 in. lbs.).
(3) Install the wiring connector onto the output
speed sensor
(4) Verify the transmission fluid level. Add fluid as
necessary.
(5) Lower vehicle.
The valve body can be removed for service without
having to remove the transmission assembly.
The valve body can be disassembled for cleaning
and inspection of the individual components. Refer to
Disassembly and Assembly section for proper procedures.
REMOVAL
(1) Shift transmission into PARK.
(2) Raise vehicle.
45RFE AUTOMATIC TRANSMISSION
WJ
21 - 215
REMOVAL AND INSTALLATION (Continued)
(3) Disconnect wires at the solenoid and pressure
switch assembly connector.
(4) Position drain pan under transmission oil pan.
(5) Remove transmission oil pan.
(6) Remove the primary oil filter from valve body.
(7) Remove bolts attaching valve body to transmission case (Fig. 41).
(8) Lower the valve body and work the electrical
connector out of transmission case.
(9) Separate the valve body from the transmission.
SOLENOID AND PRESSURE SWITCH
ASSEMBLY
REMOVAL
(1) Remove the valve body from the transmission
(Fig. 42).
Fig. 42 Valve Body Bolts
Fig. 41 Valve Body Bolts
INSTALLATION
(1) Check condition of seals on valve body and the
solenoid and pressure switch assembly. Replace seals
if cut or worn.
(2) Place TRS selector plate in the PARK position.
(3) Place the transmission in the PARK position.
(4) Lubricate seal on the solenoid and pressure
switch assembly connector with petroleum jelly.
(5) Position valve body in transmission and align
the manual lever on the valve body to the pin on the
transmission manual shift lever.
(6) Seat valve body in case and install one or two
bolts to hold valve body in place.
(7) Tighten valve body bolts alternately and evenly
to 12 N·m (105 in. lbs.) torque.
(8) Install new fluid filter on valve body. Tighten
filter screws to 4.5 N·m (40 in. lbs.) torque.
(9) Connect the solenoid and pressure switch
assembly connector.
(10) Install oil pan. Tighten pan bolts to 12 N·m
(105 in. lbs.) torque.
(11) Lower vehicle and fill transmission with
Mopart ATF Plus 3, type 7176 fluid.
(12) Check and adjust gearshift cable, if necessary.
(2) Remove the screws holding the solenoid and
pressure switch assembly onto the valve body (Fig.
43).
(3) Separate the solenoid and pressure switch
assembly from the valve body.
Fig. 43 Solenoid and Pressure Switch Assembly
Screws
INSTALLATION
(1) Place TRS selector plate in the PARK position.
21 - 216
45RFE AUTOMATIC TRANSMISSION
WJ
REMOVAL AND INSTALLATION (Continued)
(2) Position the solenoid and pressure switch
assembly onto the valve body. Be sure that both
alignment dowels are fully seated in the valve body
and that the TRS switch contacts are properly positioned in the selector plate
(3) Install the screws to hold the solenoid and
pressure switch assembly onto the valve body.
(4) Tighten the solenoid assembly screws adjacent
to the arrows cast into the bottom of the valve body
first. Tighten the screws to 5.7 N·m (50 in. lbs.).
(5) Tighten the remainder of the solenoid assembly
screws to 5.7 N·m (50 in. lbs.).
(6) Install the valve body into the transmission.
TRANSMISSION
CAUTION: The transmission and torque converter
must be removed as an assembly to avoid component damage. The converter driveplate, pump bushing, or oil seal can be damaged if the converter is
left attached to the driveplate during removal. Be
sure to remove the transmission and converter as
an assembly.
Fig. 44 Transmission Collar
REMOVAL
(1) Disconnect the negative battery cable.
(2) Raise and support the vehicle
(3) Mark propeller shaft and axle yokes for assembly alignment.
(4) Remove the rear propeller shaft
(5) Remove the front propeller shaft.
(6) Remove the engine to transmission collar (Fig.
44).
(7) Remove the exhaust support bracket from the
rear of the transmission.
(8) Disconnect and lower or remove any necessary
exhaust components.
(9) Remove the starter motor.
(10) Rotate crankshaft in clockwise direction until
converter bolts are accessible. Then remove bolts one
at a time. Rotate crankshaft with socket wrench on
dampener bolt.
(11) Disconnect wires from solenoid and pressure
switch assembly, input and output speed sensors, and
line pressure sensor.
(12) Disconnect gearshift cable from transmission
manual valve lever (Fig. 45).
(13) Disconnect transfer case shift cable from the
transfer case shift lever (Fig. 46).
(14) Remove the clip securing the transfer case
shift cable into the cable support bracket.
(15) Disconnect transmission fluid cooler lines at
transmission fittings and clips.
(16) Disconnect the transmission vent hose from
the transmission.
Fig. 45 Transmission Shift Cable
(17) Support rear of engine with safety stand or
jack.
(18) Raise transmission slightly with service jack
to relieve load on crossmember and supports.
(19) Remove bolts securing rear support and cushion to transmission and crossmember (Fig. 47).
(20) Remove bolts attaching crossmember to frame
and remove crossmember.
(21) Remove transfer case (Fig. 48) and (Fig. 49).
(22) Remove all remaining converter housing bolts.
(23) Carefully work transmission and torque converter assembly rearward off engine block dowels.
(24) Hold torque converter in place during transmission removal.
(25) Lower transmission and remove assembly
from under the vehicle.
45RFE AUTOMATIC TRANSMISSION
WJ
21 - 217
REMOVAL AND INSTALLATION (Continued)
Fig. 46 Transfer Case Shift Cable
Fig. 48 Remove NV247 Transfer Case
Fig. 49 Remove NV242 Transfer Case
Fig. 47 Rear Transmission Crossmember
(26) To remove torque converter, carefully slide
torque converter out of the transmission.
INSTALLATION
(1) Check torque converter hub and hub drive
notches for sharp edges burrs, scratches, or nicks.
Polish the hub and notches with 320/400 grit paper
and crocus cloth if necessary. The hub must be
smooth to avoid damaging pump seal at installation.
(2) If a replacement transmission is being
installed, transfer any components necessary, such as
the manual shift lever and shift cable bracket, from
the original transmission onto the replacement transmission.
(3) Lubricate oil pump seal lip with transmission
fluid.
(4) Align converter and oil pump.
(5) Carefully insert converter in oil pump. Then
rotate converter back and forth until fully seated in
pump gears.
(6) Check converter seating with steel scale and
straightedge (Fig. 50). Surface of converter lugs
should be 1/2 in. to rear of straightedge when converter is fully seated.
(7) Temporarily secure converter with C-clamp.
(8) Position transmission on jack and secure it
with chains.
(9) Check condition of converter driveplate.
Replace the plate if cracked, distorted or damaged.
Also be sure transmission dowel pins are seated
in engine block and protrude far enough to
hold transmission in alignment.
(10) Apply a light coating of Mopart High Temp
Grease to the torque converter hub pocket in the rear
(11) Raise transmission and align converter with
drive plate and converter housing with engine block.
21 - 218
45RFE AUTOMATIC TRANSMISSION
WJ
REMOVAL AND INSTALLATION (Continued)
CAUTION: It is essential that correct length bolts
be used to attach the converter to the driveplate.
Bolts that are too long will damage the clutch surface inside the converter.
Fig. 50 Typical Method Of Checking Converter
Seating
1 – SCALE
2 – STRAIGHTEDGE
(12) Move transmission forward. Then raise, lower
or tilt transmission to align converter housing with
engine block dowels.
(13) Carefully work transmission forward and over
engine block dowels until converter hub is seated in
crankshaft.
(14) Install two bolts to attach converter housing
to engine.
(15) Install remaining torque converter housing to
engine bolts. Tighten to 68 N·m (50 ft. lbs.).
(16) Install
rear
transmission
crossmember.
Tighten crossmember to frame bolts to 68 N·m (50
ft.lbs.).
(17) Install rear support to transmission. Tighten
bolts to 47 N·m (35 ft. lbs.).
(18) Lower transmission onto crossmember and
install bolts attaching transmission mount to crossmember. Tighten clevis bracket to crossmember bolts
to 47 N·m (35 ft. lbs.). Tighten the clevis bracket to
rear support bolt to 68 N·m (50 ft. lbs.).
(19) Remove engine support fixture.
(20) Install new plastic retainer grommet on any
shift cable that was disconnected. Grommets should
not be reused. Use pry tool to remove rod from grommet and cut away old grommet. Use pliers to snap
new grommet into cable and to snap grommet onto
lever.
(21) Connect gearshift cable to transmission.
(22) Connect wires to solenoid and pressure switch
assembly connector, input and output speed sensors,
and line pressure sensor. Be sure transmission harnesses are properly routed.
(23) Install torque converter-to-driveplate bolts.
Tighten bolts to 31 N·m (270 in. lbs.).
(24) Install starter motor and cooler line bracket.
(25) Connect cooler lines to transmission.
(26) Install transmission fill tube.
(27) Install exhaust components.
(28) Install transfer case. Tighten transfer case
nuts to 35 N·m (26 ft. lbs.).
(29) Install the transfer case shift cable to the
cable support bracket and the transfer case shift
lever.
(30) Install the transmission collar onto the transmission and the engine. Tighten the bolts to 54 N·m
(40 ft. lbs.).
(31) Align and connect propeller shaft(s).
(32) Adjust gearshift cable if necessary.
(33) Lower vehicle.
(34) Fill transmission with Mopart ATF Plus 3,
Type 7176 fluid.
TORQUE CONVERTER
REMOVAL
(1) Remove transmission and torque converter
from vehicle.
(2) Place a suitable drain pan under the converter
housing end of the transmission.
CAUTION: Verify that transmission is secure on the
lifting device or work surface, the center of gravity
of the transmission will shift when the torque converter is removed creating an unstable condition.
The torque converter is a heavy unit. Use caution
when separating the torque converter from the
transmission.
(3) Pull the torque converter forward until the center hub clears the oil pump seal.
(4) Separate the torque converter from the transmission.
INSTALLATION
Check converter hub and drive notches for sharp
edges, burrs, scratches, or nicks. Polish the hub and
notches with 320/400 grit paper or crocus cloth if necessary. The hub must be smooth to avoid damaging
the pump seal at installation. Check that the torque
converter hub o-ring on the 45RFE torque converter
hub is not damaged. Replace if necessary.
(1) Lubricate oil pump seal lip with transmission
fluid.
WJ
45RFE AUTOMATIC TRANSMISSION
21 - 219
REMOVAL AND INSTALLATION (Continued)
(2) Place torque converter in position on transmission.
CAUTION: Do not damage oil pump seal or bushing
while inserting torque converter into the front of the
transmission.
INSTALLATION
(1) Clean seal bore of the oil pump of any residue
or particles from the original seal.
(2) Install new oil seal in the oil pump housing
using Seal Installer C-3860-A (Fig. 52).
(3) Align torque converter to oil pump seal opening.
(4) Insert torque converter hub into oil pump.
(5) While pushing torque converter inward, rotate
converter until converter is fully seated in the oil
pump gears.
(6) Check converter seating with a scale and
straightedge (Fig. 51). Surface of converter lugs
should be 1/2 in. to rear of straightedge when converter is fully seated.
(7) If necessary, temporarily secure converter with
C-clamp attached to the converter housing.
(8) Install the transmission in the vehicle.
(9) Fill the transmission with the recommended
fluid.
Fig. 52 Install Oil Pump Front Seal
ADAPTER HOUSING SEAL
REMOVAL
(1) Remove the transfer case from the transmission.
(2) Using a screw mounted on a slide hammer,
remove the adapter housing seal.
INSTALLATION
(1) Clean the adapter seal bore in the adapter
housing of any residue or particles remaining from
the original seal.
(2) Install new oil seal in the adapter housing
using Seal Installer C-3860-A (Fig. 53).
(3) Install the transfer case onto the transmission.
Fig. 51 Checking Torque Converter Seating–Typical
1 – SCALE
2 – STRAIGHTEDGE
GEARSHIFT CABLE
REMOVAL
OIL PUMP FRONT SEAL
REMOVAL
(1) Remove transmission from the vehicle.
(2) Remove the torque converter from the transmission.
(3) Using a screw mounted in a slide hammer,
remove the oil pump front seal.
(1) Shift transmission into Park.
(2) Raise vehicle.
(3) Remove the shift cable eyelet from the transmission manual shift lever (Fig. 54).
(4) Remove shift cable from the cable support
bracket.
(5) Lower vehicle.
(6) Remove shift lever bezel and necessary console
parts for access to shift lever assembly and shift
cable.
21 - 220
45RFE AUTOMATIC TRANSMISSION
WJ
REMOVAL AND INSTALLATION (Continued)
Fig. 55 Transmission Shift Cable at Shifter
Fig. 53 Adapter Housing Seal Installation
1
2
3
4
–
–
–
–
SHIFT LEVER PIN
ADJUSTMENT SCREW
SHIFT CABLE
SHIFTER ASSEMBLY BRACKET
Fig. 54 Remove Shift Cable From Transmission
(7) Disconnect cable at shift lever and shifter
assembly bracket (Fig. 55).
(8) Remove the nuts holding the shift cable seal
plate to the floor pan (Fig. 56).
(9) Pull cable through floor panel opening.
(10) Remove shift cable from vehicle.
INSTALLATION
(1) Route cable through hole in floor pan.
(2) Install seal plate to studs in floor pan.
(3) Install nuts to hold seal plate to floor pan.
Tighten nuts to 7 N·m (65 in. lbs.).
(4) Install the shift cable to the shifter assembly
bracket. Push cable into the bracket until secure.
(5) Place the floor shifter lever in park position.
(6) Loosen the adjustment screw on the shift cable.
(7) Snap the shift cable onto the shift lever pin.
(8) Raise the vehicle.
Fig. 56 Shift Cables at Floor Pan
1 – SEAL PLATES
2 – TRANSMISSION SHIFT CABLE
3 – TRANSFER CASE SHIFT CABLE
(9) Install the shift cable to the shift cable support
bracket.
(10) Shift the transmission into PARK. PARK is
the rearmost detent position on the transmission
manual shift lever.
(11) Snap the shift cable onto the transmission
manual shift lever.
(12) Lower vehicle.
(13) Verify that the shift lever is in the PARK position.
(14) Tighten the adjustment screw to 7 N·m (65 in.
lbs.).
(15) Verify correct shifter operation.
45RFE AUTOMATIC TRANSMISSION
WJ
21 - 221
REMOVAL AND INSTALLATION (Continued)
(16) Install shift lever bezel and any console parts
removed for access to shift lever assembly and shift
cable.
SHIFTER
REMOVAL
(1) Shift transmission into Park.
(2) Remove shift lever bezel and any necessary
console parts for access to shift lever assembly and
shifter cables.
(3) Disconnect the transmission shift cable at shift
lever and shifter assembly bracket (Fig. 57).
(4) Disconnect the brake transmission interlock
cable from the shifter BTSI lever and the shifter
assembly bracket.
(5) Disconnect the transfer case shift cable from
the transfer case shift lever pin (Fig. 59).
(6) Remove the clip holding the transfer case shift
cable to the shifter assembly bracket.
(7) Remove the transfer case shift cable from the
shifter assembly bracket.
(8) Disengage all wiring connectors from the
shifter assembly.
(9) Remove all nuts holding the shifter assembly to
the floor pan (Fig. 60).
Fig. 57 Transmission Shift Cable at Shifter
1
2
3
4
–
–
–
–
SHIFT LEVER PIN
ADJUSTMENT SCREW
SHIFT CABLE
SHIFTER ASSEMBLY BRACKET
(10) Remove the shifter assembly from the vehicle.
INSTALLATION
(1) Install shifter assembly onto the shifter assembly studs on the floor pan.
Fig. 58 Brake Transmission Interlock Cable
1 – SHIFT MECHANISM
2 – SHIFTER BTSI LEVER
3 – ADJUSTMENT CLIP
4 – STEERING COLUMN ASSEMBLY
5 – INTERLOCK CABLE
21 - 222
45RFE AUTOMATIC TRANSMISSION
WJ
REMOVAL AND INSTALLATION (Continued)
(7) Install the shift cable to the shifter assembly
bracket. Push cable into the bracket until secure.
(8) Place the floor shifter lever in park position.
(9) Loosen the adjustment screw on the shift cable.
(10) Snap the shift cable onto the shift lever pin.
(11) Verify that the shift lever is in the PARK position.
(12) Tighten the adjustment screw to 7 N·m (65 in.
lbs.).
(13) Verify correct shifter operation.
(14) Install shift lever bezel and any console parts
removed for access to shift lever assembly and shift
cables.
BRAKE TRANSMISSION SHIFT INTERLOCK
Fig. 59 Transfer Case Shift Cable
1
2
3
4
–
–
–
–
CLIP
SHIFTER
TRANSFER CASE SHIFT LEVER PIN
TRANSFER CASE SHIFT CABLE
REMOVAL
(1) Lower the steering column.
(2) Remove the transmission shift interlock cable
from steering column (Fig. 61).
(3) Remove the center console and related trim.
Refer to Group 23, Body, for proper procedures.
(4) Disconnect the BTSI cable from the shift BTSI
lever and remove the cable from the shifter assembly
bracket.
(5) Disengage the wire connector at the solenoid
on the cable
(6) Release the BTSI cable from any remaining
clips.
(7) Remove BTSI cable from the vehicle.
INSTALLATION
NOTE: The gearshift cable must be secured into
position and properly adjusted before the installation of the Brake Transmission Interlock Cable
(BTSI).
Fig. 60 Shifter Assembly
1 – FLOOR PLAN
2 – SHIFTER ASSEMBLY
(2) Install the nuts to hold the shifter assembly
onto the floor pan. Tighten nuts to 28 N·m (250 in.
lbs.).
(3) Install wiring harness to the shifter assembly
bracket. Engage any wire connectors removed from
the shifter assembly.
(4) Install the transfer case shift cable to the
shifter assembly bracket. Install clip to hold cable to
the bracket.
(5) Snap the transfer case shift cable onto the
transfer case shift lever pin.
(6) Install the brake transmission interlock cable
into the shifter assembly bracket and into the shifter
BTSI lever.
(1) Snap the BTSI cable assembly into the steering
column.
(2) Snap BTSI cable solenoid tie strap into hole in
steering column tube.
(3) Engage the wiring connector from brake light
switch into BTSI cable solenoid housing.
(4) Route BTSI cable to the shifter mechanism.
(5) Install the BTSI cable end fitting into shifter
BTSI lever.
(6) Pull rearward on the BTSI cable housing and
install the cable housing into the shifter assembly
bracket.
(7) Place the ignition key cylinder in the LOCK
position.
(8) Snap BTSI cable adjuster ears into floor shifter
bracket and
(9) Push the cable adjuster lock clamp downward
to lock it.
45RFE AUTOMATIC TRANSMISSION
WJ
21 - 223
REMOVAL AND INSTALLATION (Continued)
Fig. 61 Brake Transmission Shift Interlock
1 – SHIFT MECHANISM
2 – SHIFTER BTSI LEVER
3 – ADJUSTMENT CLIP
4 – STEERING COLUMN ASSEMBLY
5 – INTERLOCK CABLE
(10) Install the center console and related trim.
Refer to Group 23, Body, for proper procedures.
(11) Test the BTSI cable operation.
DISASSEMBLY AND ASSEMBLY
TRANSMISSION
DISASSEMBLY
(1) Drain fluid from transmission.
(2) Clean exterior of transmission with suitable
solvent or pressure washer.
(3) Remove the torque converter from the transmission.
(4) Remove the manual shift lever from the transmission.
(5) Remove the input, output, and line pressure
sensors from the transmission case (Fig. 62).
(6) Inspect the ends of the sensors for debris,
which may indicate the nature of the transmission
failure.
(7) Install Support Stand 8257 onto the transmission case (Fig. 63).
Fig. 62 Remove Input, Output, and Line Pressure
Sensors
(8) Using Adapter 8266-1 from End-Play Tool Set
8266 and Dial Indicator C-3339, measure and record
the input shaft end-play (Fig. 64).
21 - 224
45RFE AUTOMATIC TRANSMISSION
WJ
DISASSEMBLY AND ASSEMBLY (Continued)
C-3339, measure and record the output shaft endplay (Fig. 65).
Fig. 63 Install Support Stand—Tool 8257
Fig. 65 Measure Output Shaft End Play
(12) Remove the bolts holding the transmission oil
pan to the transmission case.
(13) Remove the transmission oil pan from the
transmission case.
(14) Remove the primary oil filter and the oil
cooler filter (Fig. 66).
(15) Remove the cooler bypass valve.
Fig. 64 Measure Input Shaft End Play
NOTE: When measuring the input shaft end-play,
two “stops” will be felt. When the input shaft is
pushed inward and the dial indicator zeroed, the
first “stop” felt when the input shaft is pulled outward is the movement of the input shaft in the input
clutch housing hub. This value should not be
included in the end-play measured value and therefore must be recorded and subtracted from the dial
indicator reading.
(9) Remove the bolts holding the transmission
extension/adapter housing to the transmission case.
(10) Remove the extension/adapter housing from
the transmission case.
(11) Using Alignment Plate 8261, Adapter 8266-17
from End-Play Tool Set 8266 and Dial Indicator
Fig. 66 Remove Primary Oil and Cooler Filters
(16) Remove the bolts holding the valve body to
the transmission case (Fig. 67).
(17) Remove the valve body from the transmission
case.
(18) Remove the outer snap-ring securing the
transmission front cover into the transmission case
(Fig. 68).
(19) Remove the inner snap-ring securing the
transmission front cover to the oil pump (Fig. 68).
45RFE AUTOMATIC TRANSMISSION
WJ
21 - 225
DISASSEMBLY AND ASSEMBLY (Continued)
Fig. 67 Remove Valve Body Assembly
Fig. 69 Remove Oil Pump
Fig. 68 Remove Transmission Front Cover
Fig. 70 Remove Input Clutch Assembly
(20) Reaching through a case opening in the valve
body area with a long blunted tool, remove the transmission front cover from the transmission case.
(21) Remove the bolts holding the oil pump into
the transmission case (Fig. 69).
(22) Remove the oil pump. Hold inward on the
input shaft to prevent pulling the input clutch
assembly with the oil pump (Fig. 69).
(23) Remove the number 1 bearing from the input
clutch assembly (Fig. 70).
(24) Remove the input clutch assembly from the
transmission case (Fig. 70).
(25) Remove the number 5 bearing and selective
thrust plate from the input clutch assembly (Fig. 70),
or the 4C clutch retainer/bulkhead.
(26) Remove the 4C clutch retainer/bulkhead
tapered snap-ring from the transmission case (Fig.
71).
(27) Remove the 4C clutch retainer/bulkhead from
the transmission case (Fig. 71).
(28) Remove the front 2C clutch pack snap-ring
from the transmission case (Fig. 72).
(29) Remove the 2C clutch pack from the transmission case (Fig. 72).
(30) Remove the rear selective plate and number 6
bearing from the reaction annulus (Fig. 73).
(31) Remove the reaction annulus from the reaction planetary carrier (Fig. 73).
(32) Remove the number 7 bearing (Fig. 73).
(33) Remove the reaction sun gear (Fig. 73).
(34) Remove the number 8 bearing from the reaction planetary carrier (Fig. 73).
(35) Remove the reaction planetary carrier (Fig.
73). Note that this planetary gear set has three pinion gears.
21 - 226
45RFE AUTOMATIC TRANSMISSION
WJ
DISASSEMBLY AND ASSEMBLY (Continued)
Fig. 71 Remove 4C Clutch Retainer/Bulkhead
Fig. 72 Remove 2C Clutch Pack
(36) Remove the number 9 bearing from the
reverse planetary gear set (Fig. 73).
(37) Remove the snap-ring holding the park sprag
gear onto the output shaft (Fig. 74).
(38) Remove the park sprag gear from the output
shaft (Fig. 75).
(39) Remove the input/reverse planetary assembly
(Fig. 76).
Fig. 73 Remove Reaction Annulus and Carrier
45RFE AUTOMATIC TRANSMISSION
WJ
21 - 227
DISASSEMBLY AND ASSEMBLY (Continued)
Fig. 74 Remove Park Sprag Snap Ring
Fig. 76 Remove Input/Reverse Planetary Assembly
Fig. 77 Remove Low/Reverse Clutch Retainer
Fig. 75 Remove Park Sprag Gear
(40) Remove the number 12 bearing from the
input/reverse planetary assembly (Fig. 76).
(41) Remove the snap-ring holding the low/reverse
clutch retainer into the transmission case (Fig. 77).
(42) Remove the low/reverse clutch retainer from
the transmission case (Fig. 77).
(43) Remove the park pawl rod and e-clip (Fig. 78).
(44) Remove the park pawl rod guide snap-ring
(Fig. 78).
(45) Remove the park pawl rod guide (Fig. 78).
(46) Remove the park pawl pivot shaft, park pawl,
and spring (Fig. 78).
(47) Remove the manual selector shaft (Fig. 78).
(48) Remove the manual selector shaft seal.
(49) Remove the dipstick tube seal.
ASSEMBLY
(1) Clean and inspect all components. Replace any
components which show evidence of excessive wear
or scoring.
(2) Install the cooler filter bypass valve.
(3) Torque the bypass valve to specification. The
valve uses a tapered pipe thread and excessive
torque can damage the transmission case. Tighten
the cooler filter bypass valve to 11.3 N·m (100 in.
lbs.).
(4) Install a new selector shaft seal using Seal
Installer 8253 (Fig. 79).
(5) Install the manual selector shaft and retaining
screw. Tighten the manual selector shaft retaining
screw to 28 N·m (250 in. lbs.).
(6) Install the park pawl, spring, and shaft (Fig.
78).
21 - 228
45RFE AUTOMATIC TRANSMISSION
WJ
DISASSEMBLY AND ASSEMBLY (Continued)
Fig. 80 Install Dipstick Tube Seal Using Tool 8254
Fig. 78 Manual Shaft/Park Lock Components
Fig. 79 Install Selector Shaft Seal Using Tool 8253
(7) Install the park rod and e-clip (Fig. 78).
(8) Install the park rod guide and snap-ring (Fig.
78).
(9) Install a new dipstick tube seal using Seal
Installer 8254 (Fig. 80).
NOTE: Before final assembly of transmission centerline, the 2C/4C clutch components should be
installed into position and measured/adjusted as
follows:
(10) Install the 2C reaction plate into the transmission case (Fig. 72). The reaction plate is selective
and directional. The plate must be installed with the
flat side toward the front.
(11) Install the 2C clutch pack into the transmission case (Fig. 72).
(12) Install the flat 2C clutch snap-ring into the
transmission case (Fig. 72).
(13) Install the 4C retainer/bulkhead into the
transmission case. Make sure that the oil feed holes
are pointing toward the valve body area.
(14) Install the 4C retainer/bulkhead tapered
snap-ring into the transmission case. Make sure that
the open ends of the snap-ring are located in the case
opening toward the valve body area.
(15) Using a feeler gauge through the opening in
the rear of the transmission case, measure the 2C
clutch pack clearance between the 2C reaction plate
and the transmission case at four different points.
The average of these measurements is the 2C clutch
pack clearance. Adjust the clearance as necessary.
The correct clutch clearance is 0.533–1.27 mm
(0.021–0.050 in.). The reaction plate is selective.
Install the chosen reaction plate and re-measure the
clutch clearance to verify the selection.
(16) Remove the 4C retainer/bulkhead and all of
the 2C clutch components from the transmission
case.
(17) Install the low/reverse clutch assembly (Fig.
81). Make sure that the oil feed hole points toward
the valve body area and that the bleed orifice is
aligned with the notch in the rear of the transmission case.
(18) Install the snap-ring to hold the low/reverse
clutch retainer into the transmission case (Fig. 81).
The snap-ring is tapered and must be installed with
the tapered side forward. Once installed, verify that
the snap-ring is fully seated in the snap-ring groove.
45RFE AUTOMATIC TRANSMISSION
WJ
21 - 229
DISASSEMBLY AND ASSEMBLY (Continued)
Fig. 81 Install Low/Reverse Clutch Retainer
Fig. 83 Install Park Sprag Gear
(19) Air check the low/reverse clutch and verify
correct overrunning clutch operation.
(20) Install the reverse/input planetary assembly
through the low/reverse clutch assembly (Fig. 82).
(21) Install the number 12 bearing over the output
shaft of the rear planetary gear set and onto the low/
reverse clutch assembly. The flat side of the bearing
goes toward the clutch assembly.
Fig. 84 Install Park Sprag Snap Ring
Fig. 82 Install Input/Reverse Planetary Assembly
(22) Install the park sprag onto the output shaft
(Fig. 83).
(23) Install the snap-ring to hold the park sprag
onto the output shaft (Fig. 84).
(24) Install the 2C reaction plate into the transmission case (Fig. 85). The reaction plate is selective
and directional. The plate must be installed with the
flat side toward the front.
(25) Install the 2C clutch pack into the transmission case (Fig. 85).
(26) Install the number 8 bearing inside the reaction carrier with the round side against the planetary carrier.
(27) Install the reaction planetary gear set and the
number 9 bearing into the transmission case (Fig.
86).
(28) Install the flat 2C clutch snap-ring into the
transmission case (Fig. 85).
(29) Install the reaction sun gear into the reaction
planetary gear set with the small shoulder facing the
front of the transmission (Fig. 86).
21 - 230
45RFE AUTOMATIC TRANSMISSION
WJ
DISASSEMBLY AND ASSEMBLY (Continued)
the annulus gear and the tabs and notches aligned as
shown in (Fig. 87).
Fig. 85 Install 2C Clutch Pack
(30) Install the number 7 bearing onto the reaction
sun gear with the flat side against the sun gear (Fig.
86).
(31) Install the output shaft selective thrust plate
onto the reaction annulus with the oil grooves facing
Fig. 87 Thrust Plate Alignment
Fig. 86 Install Reaction Annulus and Carrier
45RFE AUTOMATIC TRANSMISSION
WJ
21 - 231
DISASSEMBLY AND ASSEMBLY (Continued)
(32) Install the number 6 bearing against the output shaft selective spacer with the flat side against
the spacer (Fig. 86).
(33) Install the reaction annulus into the reaction
planetary gear set (Fig. 86).
(34) Install the 4C retainer/bulkhead into the
transmission case. Make sure that the oil feed holes
are pointing toward the valve body area. Rotate the
reaction annulus during the installation of the 4C
retainer/bulkhead to ease installation.
(35) Install the 4C retainer/bulkhead tapered
snap-ring into the transmission case (Fig. 88). Make
sure that the open ends of the snap-ring are located
in the case opening toward the valve body area.
Fig. 89 Measure Output Shaft End Play
(42) Install the number 1 bearing with the flat
side down in the pocket of the input clutch assembly
(Fig. 90).
Fig. 88 Install 4C Clutch Retainer/Bulkhead
(36) Air check the 2C and 4C clutch operation.
(37) Using Alignment Plate 8261, Adapter 8266-17
from End-Play Tool Set 8266 and Dial Indicator
C-3339, measure and record the output shaft endplay (Fig. 89). The correct output shaft end-play is
0.53–0.78 mm (0.021–0.031 in.). Adjust as necessary.
Install the chosen output shaft selective spacer and
re-measure end-play to verify selection.
(38) Apply a bead of RTV silicone and install the
extension/adapter housing onto the transmission
case.
(39) Install and torque the bolts to hold the extension/adapter housing onto the transmission case. The
correct torque is 54 N·m (40 ft. lbs.).
(40) Install the number 5 bearing and spacer onto
the 4C retainer/bulkhead (Fig. 90).
(41) Install the input clutch assembly into the
transmission case (Fig. 90). Make sure that the input
clutch assembly is fully installed by performing a
visual inspection through the input speed sensor
hole. If the tone wheel on the input clutch assembly
is visible, the assembly is fully installed.
Fig. 90 Install Input Clutch Assembly
(43) Install the oil pump into the transmission
case (Fig. 91).
(44) Install the bolts to hold the oil pump into the
transmission case. Tighten the oil pump bolts to 28
N·m (250 in. lbs.).
(45) Using Adapter 8266-1 from End-Play Tool Set
8266 and Dial Indicator C-3339, measure and record
the input shaft end-play (Fig. 92). The correct endplay is 0.79–1.07 mm (0.031–0.042 in.). Adjust as
necessary. Install the chosen spacer on the number 5
bearing and re-measure end-play to verify selection.
21 - 232
45RFE AUTOMATIC TRANSMISSION
WJ
DISASSEMBLY AND ASSEMBLY (Continued)
(48) Partially install the inner transmission front
cover snap-ring onto the oil pump (Fig. 93).
Fig. 91 Install Oil Pump
Fig. 93
(49) Using Installer 8255, install the inner transmission front cover snap-ring the remainder of the
way onto the oil pump (Fig. 94).
Fig. 92 Measure Input Shaft End Play
NOTE: When measuring the input shaft end-play,
two “stops” will be felt. When the input shaft is
pushed inward and the dial indicator zeroed, the
first “stop” felt when the input shaft is pulled outward is the movement of the input shaft in the input
clutch housing hub. This value should not be
included in the end-play measured value and therefore must be recorded and subtracted from the dial
indicator reading.
(46) Install the transmission front cover into the
transmission case (Fig. 93).
(47) Install the outer snap-ring to hold the transmission front cover into the transmission case (Fig.
93).
Fig. 94 Seat Snap Ring Using Tool 8255
(50) Install the valve body (Fig. 95). Tighten the
valve body to transmission case bolts to 12 N·m (105
in. lbs.).
(51) Install the primary oil filter and the oil cooler
filter (Fig. 96). Tighten the screws to hold the primary oil filter to the valve body to 4.5 N·m (40 in.
lbs.). Using Oil Filter Wrench 8321, tighten the
cooler return oil filter to the transmission case to 14
N·m (125 in. lbs.).
(52) Apply RTV silicone to the oil pan and install
the transmission oil pan. Tighten the bolts to 12 N·m
(105 in. lbs.).
45RFE AUTOMATIC TRANSMISSION
WJ
21 - 233
DISASSEMBLY AND ASSEMBLY (Continued)
Fig. 95 Install Valve Body Assembly
Fig. 97 Install Input, Output, and Line Pressure
Sensors
Fig. 96 Install Primary Oil and Cooler Filters
(53) Install the input, output, and line pressure
sensors (Fig. 97). Tighten the bolts to 12 N·m (105 in.
lbs.).
(54) Install the manual shift lever from the transmission. Torque the retaining cross-bolt to 16 N·m
(140 in. lbs.).
VALVE BODY
DISASSEMBLY
(1) Remove the screws holding the solenoid and
pressure switch assembly to the valve body (Fig. 98).
Do not remove the screws on the top of the solenoid
and pressure switch assembly.
(2) Separate the solenoid and pressure switch
assembly from the valve body.
(3) Remove the screw holding the detent spring
(Fig. 99) onto the valve body.
(4) Remove the detent spring from the valve body.
Fig. 98 Solenoid and Pressure Switch Assembly
Screws
(5) Remove the TRS selector plate from the valve
body and the manual valve.
(6) Remove the clutch passage seals from the valve
body, if necessary.
(7) Remove the screws holding the accumulator
cover onto the valve body (Fig. 100).
(8) Remove the accumulator springs and pistons
from the valve body. Note which accumulator piston
and spring belong in each location.
(9) Place the valve body on the bench with the
transfer plate upward.
21 - 234
45RFE AUTOMATIC TRANSMISSION
WJ
DISASSEMBLY AND ASSEMBLY (Continued)
(10) Remove
the valve body
(11) Remove
body. Note the
(12) Remove
Fig. 99 Valve Body External Components
NOTE: The valve body contains seven check balls.
The transfer plate must be placed upward to prevent losing the check balls when the transfer plate
is removed from the valve body.
the screws holding the valve body to
transfer plate.
the transfer plate from the valve
location of all check balls (Fig. 101).
the check balls from the valve body.
Fig. 101 Check Ball Locations
(13) Remove the retainers securing the solenoid
switch valve, manual valve, and the low/reverse
switch valve into the valve body and remove the
associated valve and spring. Tag each valve and
Fig. 100 Valve Body Components
45RFE AUTOMATIC TRANSMISSION
WJ
21 - 235
DISASSEMBLY AND ASSEMBLY (Continued)
spring combination with location information to aid
in assembly.
(6) Install the screws to hold the transfer plate to
the valve body. Tighten the screws to 4.5 N·m (40 in.
lbs.).
(7) Install the accumulator pistons and springs
into the valve body in the location from which they
were removed. Note that all accumulators except the
overdrive have two springs. The overdrive accumulator piston has only one spring.
(8) Position the accumulator cover onto the valve
body.
(9) Install the screws to hold the accumulator
cover onto the valve body. Tighten the screws to 4.5
N·m (40 in. lbs.).
(10) Install the TRS selector plate onto the valve
body and the manual valve.
(11) Install the solenoid and pressure switch
assembly onto the valve body.
(12) Install the screws to hold the solenoid and
pressure switch assembly onto the valve body.
Tighten the screws to 5.7 N·m (50 in. lbs.). Tighten
the screws adjacent to the arrows cast into the bottom of the transfer plate first.
(13) Position the detent spring onto the valve body.
(14) Install the screw to hold the detent spring
onto the valve body. Tighten the screw to 4.5 N·m (40
in. lbs.).
(15) Install new clutch passage seals onto the
valve body, if necessary
OIL PUMP
Fig. 102 Valve Body Components
ASSEMBLY
(1) Lubricate valves, springs, and the housing
valve bores with clean transmission fluid.
(2) Install solenoid switch valve, manual valve,
and the low/reverse switch valve into the valve body.
(3) Install the retainers to hold each valve into the
valve body.
(4) Install the valve body check balls into their
proper locations.
(5) Position the transfer plate onto the valve body.
DISASSEMBLY
(1) Remove the bolts holding the reaction shaft
support to the oil pump (Fig. 103).
(2) Remove the reaction shaft support from the oil
pump (Fig. 103).
(3) Remove all bolts holding the oil pump halves
together (Fig. 103).
(4) Using suitable prying tools, separate the oil
pump sections by inserting the tools in the supplied
areas and prying the halves apart.
NOTE: The oil pump halves are aligned to each
other through the use of two dowels. Be sure to pry
upward evenly to prevent damage to the oil pump
components.
21 - 236
45RFE AUTOMATIC TRANSMISSION
WJ
DISASSEMBLY AND ASSEMBLY (Continued)
Fig. 103 Oil Pump Assembly
(5) Remove the screws holding the separator plate
onto the oil pump body (Fig. 104).
(6) Remove the separator plate from the oil pump
body (Fig. 104).
(7) Mark all gears for location. The gears are
select fit and if the oil pump is to be reused, the
gears must be returned to their original locations.
(8) Remove the oil pump gears from the oil pump
case (Fig. 104).
(9) Remove the oil pump valve retainers and associated valve and spring one at a time (Fig. 105) (Fig.
106). Mark the combination of components as a
group and tag them as to the location from which
they were removed.
ASSEMBLY
(1) Clean and inspect all components. Make sure
that all passages are thoroughly cleaned and are free
from dirt or debris. Make sure that all valves move
freely in their proper bore. Make sure that all gear
pockets and bushings are free from excessive wear
and scoring. Replace the oil pump if any excessive
wear or scoring is found.
(2) Coat the gears with Mopart ATF+3, type 7176
and install into their original locations.
(3) Lubricate the oil pump valves with Mopart
ATF+3, type 7176 and install the valve, spring and
retainer into the appropriate oil pump valve body
bore (Fig. 105) (Fig. 106).
(4) Place the separator plate onto the oil pump
body (Fig. 104).
45RFE AUTOMATIC TRANSMISSION
WJ
21 - 237
DISASSEMBLY AND ASSEMBLY (Continued)
Fig. 104 Oil Pump Housing and Gears
(5) Install the screws to hold the separator plate
onto the oil pump body (Fig. 104). Tighten the screws
to 4.5 N·m (40 in. lbs.).
(6) Position the oil pump cover onto the locating
dowels (Fig. 103).
(7) Seat the two oil pump halves together and
install all bolts finger tight.
(8) Torque all bolts down slowly starting in the
center and working outward. The correct torque is
4.5 N·m (40 in. lbs.).
(9) Verify that the oil pump gears rotate freely and
smoothly.
(10) Position the reaction shaft support into the oil
pump (Fig. 103).
(11) Install and torque the bolts to hold the reaction shaft support to the oil pump (Fig. 103). The correct torque is 12 N·m (105 in. lbs.).
21 - 238
45RFE AUTOMATIC TRANSMISSION
WJ
DISASSEMBLY AND ASSEMBLY (Continued)
INPUT CLUTCH ASSEMBLY
DISASSEMBLY
(1) Remove the reverse reaction plate selective
snap-ring from the input clutch retainer (Fig. 107).
(2) Remove the reverse reaction plate from the
input clutch retainer.
(3) Remove the reverse hub and reverse clutch
pack from the input clutch retainer.
(4) Remove the number 4 bearing from the overdrive hub.
(5) Remove the overdrive hub from the input
clutch retainer (Fig. 107).
(6) Remove the number 3 bearing from the underdrive hub.
(7) Remove the OD/reverse reaction plate snapring from the input clutch retainer.
(8) Remove the underdrive hub, overdrive clutch,
and overdrive reaction plate from the input clutch
retainer (Fig. 107).
NOTE: The overdrive friction discs and steel discs
are thicker than the matching components in the
underdrive and reverse clutches.
Fig. 105 Oil Pump Valve Body
(9) Remove the number 2 bearing from the input
clutch hub.
(10) Remove the overdrive clutch wave snap-ring
from the input clutch retainer.
(11) Remove the UD/OD reaction plate tapered
snap-ring from the input clutch retainer.
(12) Remove the UD/OD reaction plate from the
input clutch retainer.
(13) Remove the UD/OD reaction plate flat snapring from the input clutch retainer (Fig. 107).
(14) Remove the underdrive clutch pack from the
input clutch retainer (Fig. 109).
(15) Using Spring Compressor 8251, compress the
UD/OD balance piston and remove the snap-ring
from the input clutch hub (Fig. 108).
(16) Remove the UD/OD balance piston and piston
return spring from the input clutch retainer (Fig.
109).
(17) Remove the underdrive piston from the input
clutch retainer (Fig. 109).
NOTE: Both the UD/OD balance piston and the
underdrive piston have seals molded onto them. If
the seal is damaged, do not attempt to install a new
seal onto the piston. The piston/seal must be
replaced as an assembly.
Fig. 106 T/C Switch Valve
(18) Remove the input clutch retainer tapered
snap-ring.
(19) Separate input clutch retainer from input
clutch hub.
45RFE AUTOMATIC TRANSMISSION
WJ
21 - 239
DISASSEMBLY AND ASSEMBLY (Continued)
Fig. 107 Input Clutch Assembly—Part I
(20) Separate OD/reverse piston from input clutch
hub retainer (Fig. 109).
(21) Remove all seals and o-rings from the input
shaft and input hub. The o-rings on the input hub
are color coded. Be sure to make note of which o-ring
belongs in which location.
ASSEMBLY
(1) Install all new seals and o-rings onto the input
shaft and input hub. The o-rings on the input hub
are color coded. Be sure to install the correct o-ring
in the correct location.
(2) Lubricate all seals with Mopart ATF+3, type
7176 prior to installation.
(3) Assemble the OD/reverse piston onto the input
clutch hub (Fig. 109).
(4) Assemble the input clutch retainer onto the
input clutch hub.
(5) Install the input clutch retainer tapered snapring with tapered side up onto the input clutch hub.
(6) Install Piston Guides 8504 into the input clutch
retainer (Fig. 110) and onto the input clutch hub to
guide the inner and outer underdrive piston seals
into position.
(7) Install the underdrive piston into the input
clutch retainer and over the input clutch hub (Fig.
109).
(8) Install the UD/OD balance piston return spring
pack into the input clutch retainer.
(9) Install Piston Guide 8252 into the input clutch
retainer (Fig. 111) to guide the UD/OD balance piston
seal into position inside the underdrive piston.
(10) Install the UD/OD balance piston into the
input clutch retainer and the underdrive piston.
21 - 240
45RFE AUTOMATIC TRANSMISSION
WJ
DISASSEMBLY AND ASSEMBLY (Continued)
Fig. 108 Compressing UD/OD Balance Piston Using
Tool 8251
Fig. 110 Install Underdrive Piston Using Tool 8504
Fig. 109 Input Clutch Assembly—Part II
WJ
45RFE AUTOMATIC TRANSMISSION
21 - 241
DISASSEMBLY AND ASSEMBLY (Continued)
(15) Install the UD/OD reaction plate upper
tapered snap-ring with tapered side up.
(16) Install the input clutch assembly into Input
Clutch Pressure Fixture 8260 (Fig. 113). Mount a
dial indicator to the assembly, push down on the
clutch discs and zero the indicator against the underdrive clutch discs (Fig. 114). Apply 20 psi of air pressure to the underdrive clutch and record the dial
indicator reading. Measure and record UD clutch
pack measurement in four (4) places, 90° apart. Take
average of four measurements and compare with UD
clutch pack clearance specification. The correct clutch
clearance is 0.76–1.16 mm (0.030–0.063 in.). Adjust
as necessary. Install the chosen reaction plate and remeasure to verify selection.
Fig. 111 Install Balance Piston Using Tool 8252
(11) Using Spring Compressor 8251, compress the
UD/OD return spring pack and secure the piston in
place with the snap-ring (Fig. 112).
Fig. 113 Input Clutch Assembly Mounted on Tool
8260
Fig. 112 Compressing UD/OD Balance Piston Using
Tool 8251
(12) Install the underdrive clutch pack into the
input clutch retainer (Fig. 109).
(13) Install the UD/OD reaction plate lower flat
snap-ring (Fig. 107). The correct snap-ring can be
identified by the two tabbed ears.
(14) Install the UD/OD reaction plate into the
input clutch retainer. The reaction plate is to be
installed with the big step down. The reaction plate
is also selectable and should be changed to achieve
the correct clutch clearances.
(17) Install the overdrive clutch pack into the
input clutch retainer (Fig. 107). The overdrive steel
separator plates can be identified by the lack of the
half-moon cuts in the locating tabs.
(18) Install the overdrive clutch wavy snap-ring
with the two tabbed ears into the input clutch
retainer.
(19) Install the OD/reverse reaction plate into the
input clutch retainer. The reaction plate is non-directional (Fig. 107).
(20) Install the OD/reverse reaction plate flat
snap-ring into the input clutch retainer.
(21) Mount a dial indicator to the assembly and
zero the indicator against the OD/reverse reaction
plate (Fig. 115). Apply 20 psi of air pressure to the
overdrive clutch and record the dial indicator reading. Measure and record OD clutch pack measure-
21 - 242
45RFE AUTOMATIC TRANSMISSION
WJ
DISASSEMBLY AND ASSEMBLY (Continued)
reverse clutch and record the dial indicator reading.
Measure and record Reverse clutch pack measurement in four (4) places, 90° apart. Take average of
four measurements and compare with Reverse clutch
pack clearance specification. The correct clutch clearance is 0.81–1.24 mm (0.032–0.049 in.). Adjust as
necessary. Install the chosen snap-ring and re-measure to verify selection.
Fig. 114 Measuring UD Clutch Clearance
ment in four (4) places, 90° apart. Take average of
four measurements and compare with OD clutch
pack clearance specification.Verify that the clutch
clearance is 1.016–1.65 mm (0.040–0.065 in.).
Fig. 116 Measuring Reverse Clutch Clearance
Fig. 115 Measuring OD Clutch Clearance
(22) Install the reverse clutch pack into the input
clutch retainer (Fig. 107).
(23) Install the reverse reaction plate into the
input clutch retainer.
(24) Install the reverse reaction plate selective
snap-ring into the input clutch retainer.
(25) Mount a dial indicator to the assembly, push
down on the clutch discs, pull up on the reaction
planetary plate to ensure the plate is properly seated
and zero the indicator against the reverse clutch
discs (Fig. 116). Apply 20 psi of air pressure to the
(26) Remove the reverse clutch pack from the
input clutch retainer.
(27) Install the number 2 bearing onto the underdrive hub with flat side up/forward with petroleum
jelly.
(28) Install the underdrive hub into the input
clutch retainer.
(29) Install the number 3 bearing into the overdrive hub with the flat side up/forward with petroleum jelly.
(30) Install the overdrive hub into the input clutch
retainer.
(31) Install the number 4 bearing into the reverse
hub with flat side up/forward with petroleum jelly.
(32) Install the reverse hub into the input clutch
retainer.
(33) Install the complete reverse clutch pack.
(34) Install the reverse reaction plate and snapring.
(35) Push up on reaction plate to allow reverse
clutch to move freely.
4C RETAINER/BULKHEAD
DISASSEMBLY
(1) Remove the 2C piston belleville spring snapring from the 4C retainer/bulkhead (Fig. 117).
45RFE AUTOMATIC TRANSMISSION
WJ
21 - 243
DISASSEMBLY AND ASSEMBLY (Continued)
Fig. 117 4C Retainer/Bulkhead Components
(2) Remove the 2C piston Belleville spring from
the retainer/bulkhead (Fig. 117).
(3) Remove the 2C piston from the retainer/bulkhead. Use 20 psi of air pressure to remove the piston
if necessary.
(4) Remove the 4C clutch snap-ring from the
retainer/bulkhead (Fig. 117).
(5) Remove the 4C clutch pack from the retainer/
bulkhead (Fig. 117).
(6) Using Spring Compressor 8250 and a suitable
shop press, compress the 4C piston return spring and
remove the snap-ring (Fig. 117).
(7) Remove the 4C piston return spring and piston
from the retainer/bulkhead (Fig. 117). Use 20 psi of
air pressure to remove the piston if necessary.
ASSEMBLY
(1) Clean and inspect all components. Replace any
components which show evidence of excessive wear
or scoring.
(2) Install new seals on the 2C and 4C pistons
(Fig. 117).
(3) Lubricate all seals with Mopart ATF+3, type
7176 prior to installation.
(4) Install the 4C piston into the 4C retainer/bulkhead (Fig. 117).
(5) Position the 4C piston return spring onto the
4C piston.
(6) Using Spring Compressor 8250 and a suitable
shop press, compress the 4C piston return spring and
install the snap-ring (Fig. 118).
(7) Assemble and install the 4C clutch pack into
the retainer/bulkhead (Fig. 117).
(8) Install the 4C reaction plate and snap-ring into
the retainer/bulkhead (Fig. 117). The 4C reaction
plate is non-directional.
(9) Measure the 4C clutch clearance. The correct
clutch clearance is 0.81–1.35 mm (0.032–0.053 in.).
The snap-ring is selectable. Install the chosen snapring and re-measure to verify the selection.
(10) Install the 2C piston into the retainer/bulkhead (Fig. 117).
(11) Position the 2C Belleville spring onto the 2C
piston.
(12) Position the 2C Belleville spring snap-ring
onto the 2C Belleville spring (Fig. 117).
(13) Using Spring Compressor 8249 and a suitable
shop press (Fig. 119), compress the belleville spring
21 - 244
45RFE AUTOMATIC TRANSMISSION
WJ
DISASSEMBLY AND ASSEMBLY (Continued)
PLANETARY GEAR SET
DISASSEMBLY
(1) Remove the snap-ring holding the input annulus into the input carrier (Fig. 120).
(2) Remove the input annulus from the input carrier (Fig. 120).
(3) Remove the number 9 bearing from the reverse
planetary carrier. Note that this planetary carrier
has four pinion gears.
(4) Remove the reverse planetary gear carrier (Fig.
120).
(5) Remove the number 10 bearing from the input
sun gear (Fig. 120).
(6) Remove the input sun gear from the input carrier (Fig. 120).
(7) Remove the number 11 bearing from the input
carrier (Fig. 120).
Fig. 118 Compress 4C Piston Return Spring Using
Tool 8250
until the snap-ring is engaged with the snap-ring
groove in the retainer/bulkhead.
Fig. 119 Compress 2C Belleville Spring Using Tool
8249
ASSEMBLY
(1) Clean and inspect all components. Replace any
components which show evidence of excessive wear
or scoring.
(2) Install the number 11 bearing into the input
planetary carrier with the flat side up and facing forward (Fig. 120).
(3) Install the input sun gear into the input carrier
(Fig. 120).
(4) Install the number 10 bearing onto the rear of
the reverse planetary carrier with the flat side
toward the carrier (Fig. 120).
(5) Install the number 9 bearing onto the front of
the reverse planetary carrier with the rounded side
toward the carrier and the flat side facing upward
(Fig. 120).
(6) Install the reverse planetary gear carrier into
the input carrier (Fig. 120).
(7) Install the input annulus gear into the input
carrier (Fig. 120).
(8) Install the snap-ring to hold the input annulus
gear into the input carrier (Fig. 120).
45RFE AUTOMATIC TRANSMISSION
WJ
21 - 245
DISASSEMBLY AND ASSEMBLY (Continued)
Fig. 120 Reverse/Input Planetary Carrier Assembly
LOW/REVERSE CLUTCH
DISASSEMBLY
(1) Remove the inner overrunning clutch snap-ring
from the low/reverse clutch retainer (Fig. 121).
(2) Remove the outer low/reverse reaction plate
flat snap-ring (Fig. 121).
(3) Remove the low/reverse clutch and the overrunning clutch from the low/reverse clutch retainer
as an assembly (Fig. 121).
(4) Separate the low/reverse clutch from the overrunning clutch.
(5) Remove the overrunning clutch snap-ring (Fig.
122).
(6) Remove the spacer from the overrunning clutch
(Fig. 122).
(7) Separate the inner and outer races of the overrunning clutch (Fig. 122).
21 - 246
45RFE AUTOMATIC TRANSMISSION
WJ
DISASSEMBLY AND ASSEMBLY (Continued)
Fig. 121 Low/Reverse Clutch Assembly
(8) Remove the overrunning clutch lower snap-ring
(Fig. 122).
(9) Using Spring Compressor 8285 and a suitable
shop press (Fig. 123), compress the low/reverse piston Belleville spring and remove the split retaining
ring holding the Belleville spring into the low/reverse
clutch retainer.
(10) Remove the low/reverse clutch Belleville
spring and piston from the low/reverse clutch
retainer. Use 20 psi of air pressure to remove the piston if necessary.
ASSEMBLY
(1) Clean and inspect all components. Replace any
components which show evidence of excessive wear
or scoring.
(2) Check the bleed orifice to ensure that it is not
plugged or restricted.
(3) Install a new seal on the low/reverse piston.
Lubricate the seal with Mopart ATF+3, type 7176
prior to installation.
(4) Install the low/reverse piston into the low/reverse clutch retainer.
(5) Position the low/reverse piston Belleville spring
on the low/reverse piston.
(6) Using Spring Compressor 8285 and a suitable
shop press (Fig. 123), compress the low/reverse piston Belleville spring and install the split retaining
ring to hold the Belleville spring into the low/reverse
clutch retainer.
(7) Install the lower overrunning clutch snap-ring
(Fig. 122).
(8) Assemble the inner and outer races of the overrunning clutch (Fig. 122).
(9) Position the overrunning clutch spacer on the
overrunning clutch.
45RFE AUTOMATIC TRANSMISSION
WJ
21 - 247
DISASSEMBLY AND ASSEMBLY (Continued)
(15) Install the overrunning clutch into the low/reverse clutch retainer making sure that the index
splines are aligned with the retainer.
(16) Install the overrunning clutch inner snapring.
CLEANING AND INSPECTION
VALVE BODY
Fig. 122 Overrunning Clutch
Fig. 123 Compress Low/Reverse Belleville Spring
Using Tool 8285
(10) Install the upper overrunning clutch snapring (Fig. 122).
(11) Assemble and install the low/reverse clutch
pack into the low/reverse clutch retainer (Fig. 121).
(12) Install the low/reverse reaction plate into the
low/reverse clutch retainer (Fig. 121). The reaction
plate is directional and must be installed with the
flat side down.
(13) Install the low/reverse clutch pack snap-ring
(Fig. 121). The snap-ring is selectable and should be
chosen to give the correct clutch pack clearance.
(14) Measure the low/reverse clutch pack clearance
and adjust as necessary. The correct clutch clearance
is 1.14–1.91 mm (0.045–0.05 in.).
Clean the valve housings, valves, plugs, springs,
and separator plates with a standard parts cleaning
solution only. Do not use gasoline, kerosene, or any
type of caustic solution.
Do not immerse any of the electrical components in
cleaning solution. Clean the electrical components by
wiping them off with dry shop towels only.
Dry all except the electrical parts with compressed
air. Make sure all passages are clean and free from
obstructions. Do not use rags or shop towels to
dry or wipe off valve body components. Lint
from these materials can stick to valve body
parts, interfere with valve operation, and clog
filters and fluid passages.
Inspect all of the valve body mating surfaces for
scratches, nicks, burrs, or distortion. Use a straightedge to check surface flatness. Minor scratches may
be removed with crocus cloth using only very light
pressure.
Minor distortion of a valve body mating surface
may be corrected by smoothing the surface with a
sheet of crocus cloth. Position the crocus cloth on a
surface plate, sheet of plate glass or equally flat surface. If distortion is severe or any surfaces are
heavily scored, the valve body will have to be
replaced.
Inspect the valves and plugs (Fig. 124) for
scratches, burrs, nicks, or scores. Minor surface
scratches on steel valves and plugs can be removed
with crocus cloth but do not round off the edges
of the valve or plug lands. Maintaining sharpness
of these edges is vitally important. The edges prevent
foreign matter from lodging between the valves and
plugs and the bore.
Inspect all the valve and plug bores in the valve
body. Use a penlight to view the bore interiors.
Replace the valve body if any bores are distorted or
scored. Inspect all of the valve body springs. The
springs must be free of distortion, warpage or broken
coils.
Trial fit each valve and plug in its bore to check
freedom of operation. When clean and dry, the valves
and plugs should drop freely into the bores.
Valve body bores do not change dimensionally with
use. If the valve body functioned correctly when new,
it will continue to operate properly after cleaning and
inspection. It should not be necessary to replace a
21 - 248
45RFE AUTOMATIC TRANSMISSION
WJ
CLEANING AND INSPECTION (Continued)
Fig. 125 Valve Body Seals
Fig. 124 Valve Body Components
valve body assembly unless it is damaged in handling.
Inspect all the accumulator bores in the valve body.
Use a penlight to view the bore interiors. Replace the
valve body if any bores are distorted or scored.
Inspect all of the accumulator springs. The springs
must be free of distortion, warpage or broken coils.
Inspect all the fluid seals on the valve body (Fig.
125). Replace any seals that are cracked, distorted, or
damaged in any way. These seals pass fluid pressure
directly to the clutches. Any pressure leak at these
points, may cause transmission performance problems.
TRANSMISSION
GENERAL INFORMATION
Heli-Coil inserts can be used to repair damaged,
stripped or worn threads in aluminum parts. These
inserts are available from most automotive parts
suppliers. Stainless steel inserts are recommended.
The use of crocus cloth is permissible where necessary, providing it is used carefully. When used on
shafts, or valves, use extreme care to avoid rounding
off sharp edges. Sharp edges are vital as they prevent foreign matter from getting between the valve
and valve bore.
Do not reuse oil seals, gaskets, seal rings, or
O-rings during overhaul. Replace these parts as a
matter of course. Also do not reuse snap rings or
E-clips that are bent or distorted. Replace these parts
as well.
Lubricate transmission parts with Mopart ATF
Plus 3, Type 7176, transmission fluid during overhaul and assembly. Use petroleum jelly, Mopart Door
Ease, or Ru-Glyde to prelubricate seals, O-rings, and
thrust washers. Petroleum jelly can also be used to
hold parts in place during reassembly.
TRANSMISSION CASE CLEANING AND
INSPECTION
Clean the case in a solvent tank. Flush the case
bores and fluid passages thoroughly with solvent.
Dry the case and all fluid passages with compressed
air. Be sure all solvent is removed from the case and
that all fluid passages are clear.
NOTE: Do not use shop towels or rags to dry the
case (or any other transmission component) unless
they are made from lint-free materials. Lint will stick
to case surfaces and transmission components and
circulate throughout the transmission after assembly. A sufficient quantity of lint can block fluid passages and interfere with valve body operation.
Inspect the case for cracks, porous spots, worn
bores, or damaged threads. Damaged threads can be
repaired with Helicoil thread inserts. However, the
case will have to be replaced if it exhibits any type of
damage or wear.
WJ
45RFE AUTOMATIC TRANSMISSION
21 - 249
CLEANING AND INSPECTION (Continued)
LOW/REVERSE CLUTCH ASSEMBLY
PLANETARY GEARTRAIN
Clean the overrunning clutch assembly, clutch cam,
and low-reverse clutch retainer. Dry them with compressed air after cleaning.
Inspect condition of each clutch part after cleaning.
Replace the overrunning clutch roller and spring
assembly if any rollers or springs are worn or damaged, or if the roller cage is distorted, or damaged.
Replace the cam if worn, cracked or damaged.
Replace the low-reverse clutch retainer if the
clutch race, roller surface or inside diameter is
scored, worn or damaged.
Clean the planetary components in solvent and dry
them with compressed air.
Check sun gear and driving shell condition.
Replace the gear if damaged or if the bushings are
scored or worn. The bushings are not serviceable.
Replace the driving shell if worn, cracked or damaged.
Replace planetary gear sets if gears, pinion pins, or
carrier are damaged in any way. Replace the annulus
gears and supports if either component is worn or
damaged.
Replace the output shaft if the machined surfaces
are scored, pitted, or damaged in any way. Also
replace the shaft if the splines are damaged, or
exhibits cracks at any location.
ACCUMULATOR
Inspect the accumulator piston and seal rings.
Replace the seal rings if worn or cut. Replace the piston if chipped or cracked.
Check condition of the accumulator inner and
outer springs. Replace the springs if the coils are
cracked, distorted or collapsed.
OIL PUMP AND REACTION SHAFT SUPPORT
Clean pump and support components with solvent
and dry them with compressed air.
Check condition of the seal rings and thrust
washer on the reaction shaft support. The seal rings
do not need to be replaced unless cracked, broken, or
severely worn.
Inspect the pump and support components. Replace
the pump or support if the seal ring grooves or
machined surfaces are worn, scored, pitted, or damaged. Replace the pump gears if pitted, worn
chipped, or damaged.
Inspect the pump bushing. Then check the reaction
shaft support bushing. Replace either bushing only if
heavily worn, scored or damaged. It is not necessary
to replace the bushings unless they are actually damaged.
Inspect the valves and plugs for scratches, burrs,
nicks, or scores. Minor surface scratches on steel
valves and plugs can be removed with crocus cloth
but do not round off the edges of the valve or
plug lands. Maintaining sharpness of these edges is
vitally important. The edges prevent foreign matter
from lodging between the valves and plugs and the
bore.
Inspect all the valve and plug bores in the oil
pump cover. Use a penlight to view the bore interiors. Replace the oil pump if any bores are distorted
or scored. Inspect all of the valve springs. The
springs must be free of distortion, warpage or broken
coils.
Trial fit each valve and plug in its bore to check
freedom of operation. When clean and dry, the valves
and plugs should drop freely into the bores.
ADJUSTMENTS
BRAKE TRANSMISSION SHIFT INTERLOCK
The park interlock cable is part of the brake/shift
lever interlock system. Correct cable adjustment is
important to proper interlock operation. The gear
shift and park lock cables must both be correctly
adjusted in order to shift out of Park.
Park Interlock Cable Adjustment Procedure
(1) Shift the transmission into the PARK position.
(2) Turn ignition switch to LOCK position. Be
sure ignition key cylinder is in the LOCK position. Cable will not adjust correctly in any
other position.
(3) Remove shift lever bezel and floor console as
necessary for access to the brake transmission shift
interlock cable.
(4) Pull cable lock button up to release cable (Fig.
126).
(5) Pull cable rearward. Then release cable and
press lock button down until it snaps in place.
BTSI FUNCTION CHECK
(1) Verify removal of ignition key allowed in park
position only.
(2) When the shift lever is in park, and the shift
handle push-button is in the out position, the ignition key cylinder should rotate freely from off to lock.
When the shifter is in any other position, the ignition
key should not rotate from off to lock.
(3) Shifting out of park should be possible when
the ignition key cylinder is in the off position.
(4) Shifting out of park should not be possible
while applying 25 lb. max. handle push-button force,
and ignition key cylinder is in the run or start positions, unless the foot brake pedal is depressed
approximately 1/2 inch (12 mm).
21 - 250
45RFE AUTOMATIC TRANSMISSION
WJ
ADJUSTMENTS (Continued)
Fig. 126 Brake Transmission Shift Interlock Cable
1 – SHIFT MECHANISM
2 – SHIFTER BTSI LEVER
3 – ADJUSTMENT CLIP
(5) Shifting out of park should not be possible
when the ignition key cylinder is in the accessory or
lock position.
(6) Shifting between any gears neutral or park
may be done without depressing foot brake with ignition switch in run or start positions and vehicle stationary or in motion.
(7) The floor shifter lever and gate positions
should be in alignment with all transmission detent
positions.
(8) Engine starts must be possible with shifter
lever in park or neutral gate positions only. Engine
starts must not be possible in any other gate positions other than park or neutral.
(9) With shifter lever handle push-button not
depressed and lever detent in:
• PARK POSITION- apply forward force on center
of handle and remove pressure. Engine start must be
possible.
• PARK POSITION- apply rearward force on center of handle and remove pressure. Engine start
must be possible.
• NEUTRAL POSITION- engine start must be
possible.
4 – STEERING COLUMN ASSEMBLY
5 – INTERLOCK CABLE
• NEUTRAL POSITION, ENGINE RUNNING
AND BRAKES APPLIED- Apply forward force on
center of shift handle. Transmission should not be
able to shift into reverse detent.
GEARSHIFT CABLE
Check adjustment by starting the engine in Park
and Neutral. Adjustment is OK if the engine starts
only in these positions. Adjustment is incorrect if the
engine starts in one but not both positions. If the
engine starts in any position other than Park or Neutral, or if the engine will not start at all, the park/
neutral position switch or TRS may be faulty.
Gearshift Adjustment Procedure
(1) Shift transmission into Park.
(2) Remove shift lever bezel and floor console as
necessary for access to the shift cable adjustment.
(3) Loosen the shift cable adjustment screw (Fig.
127).
(4) Raise vehicle.
(5) Unsnap cable eyelet from transmission shift
lever (Fig. 128).
45RFE AUTOMATIC TRANSMISSION
WJ
21 - 251
ADJUSTMENTS (Continued)
(10) Tighten the shift cable adjustment screw to 7
N·m (65 in. lbs.).
(11) Verify correct operation.
(12) Install the shifter bezel and any floor console
components removed for access.
Fig. 127 Shift Cable at the Shifter
1
2
3
4
–
–
–
–
SHIFT LEVER PIN
ADJUSTMENT SCREW
SHIFT CABLE
SHIFTER ASSEMBLY BRACKET
(6) Verify transmission shift lever is in Park
detent by moving lever fully rearward. Last rearward
detent is Park position.
(7) Verify positive engagement of transmission
park lock by attempting to rotate propeller shaft.
Shaft will not rotate when park lock is engaged.
(8) Snap cable eyelet onto transmission shift lever.
(9) Lower vehicle
Fig. 128 Shift Cable Attachment At Transmission
21 - 252
45RFE AUTOMATIC TRANSMISSION
WJ
SCHEMATICS AND DIAGRAMS
45RFE HYDRAULIC SCHEMATIC
HYDRAULIC SCHEMATICS
WJ
45RFE AUTOMATIC TRANSMISSION
21 - 253
45RFE HYDRAULIC SCHEMATIC
SCHEMATICS AND DIAGRAMS (Continued)
21 - 254
45RFE AUTOMATIC TRANSMISSION
WJ
45RFE HYDRAULIC SCHEMATIC
SCHEMATICS AND DIAGRAMS (Continued)
WJ
45RFE AUTOMATIC TRANSMISSION
21 - 255
45RFE HYDRAULIC SCHEMATIC
SCHEMATICS AND DIAGRAMS (Continued)
21 - 256
45RFE AUTOMATIC TRANSMISSION
WJ
45RFE HYDRAULIC SCHEMATIC
SCHEMATICS AND DIAGRAMS (Continued)
WJ
45RFE AUTOMATIC TRANSMISSION
21 - 257
45RFE HYDRAULIC SCHEMATIC
SCHEMATICS AND DIAGRAMS (Continued)
21 - 258
45RFE AUTOMATIC TRANSMISSION
WJ
45RFE HYDRAULIC SCHEMATIC
SCHEMATICS AND DIAGRAMS (Continued)
WJ
45RFE AUTOMATIC TRANSMISSION
21 - 259
45RFE HYDRAULIC SCHEMATIC
SCHEMATICS AND DIAGRAMS (Continued)
21 - 260
45RFE AUTOMATIC TRANSMISSION
WJ
45RFE HYDRAULIC SCHEMATIC
SCHEMATICS AND DIAGRAMS (Continued)
WJ
45RFE AUTOMATIC TRANSMISSION
21 - 261
45RFE HYDRAULIC SCHEMATIC
SCHEMATICS AND DIAGRAMS (Continued)
21 - 262
45RFE AUTOMATIC TRANSMISSION
WJ
45RFE HYDRAULIC SCHEMATIC
SCHEMATICS AND DIAGRAMS (Continued)
WJ
45RFE AUTOMATIC TRANSMISSION
21 - 263
45RFE HYDRAULIC SCHEMATIC
SCHEMATICS AND DIAGRAMS (Continued)
21 - 264
45RFE AUTOMATIC TRANSMISSION
WJ
45RFE HYDRAULIC SCHEMATIC
SCHEMATICS AND DIAGRAMS (Continued)
WJ
45RFE AUTOMATIC TRANSMISSION
21 - 265
45RFE HYDRAULIC SCHEMATIC
SCHEMATICS AND DIAGRAMS (Continued)
21 - 266
45RFE AUTOMATIC TRANSMISSION
WJ
45RFE HYDRAULIC SCHEMATIC
SCHEMATICS AND DIAGRAMS (Continued)
WJ
45RFE AUTOMATIC TRANSMISSION
21 - 267
45RFE HYDRAULIC SCHEMATIC
SCHEMATICS AND DIAGRAMS (Continued)
21 - 268
45RFE AUTOMATIC TRANSMISSION
WJ
45RFE HYDRAULIC SCHEMATIC
SCHEMATICS AND DIAGRAMS (Continued)
WJ
45RFE AUTOMATIC TRANSMISSION
21 - 269
45RFE HYDRAULIC SCHEMATIC
SCHEMATICS AND DIAGRAMS (Continued)
21 - 270
45RFE AUTOMATIC TRANSMISSION
WJ
45RFE HYDRAULIC SCHEMATIC
SCHEMATICS AND DIAGRAMS (Continued)
45RFE AUTOMATIC TRANSMISSION
WJ
SPECIFICATIONS
TRANSMISSION
GENERAL
Component
DESCRIPTION
TORQUE
Bolt, Reaction Shaft Support . . . . . . . . . . 11.8 N·m
(105 in. lbs.)
Bolt, Valve Body . . . . . . . . . . 11.8 N·m (105 in. lbs.)
Screw, Valve Body to Transfer Plate . . . . . . 4.5 N·m
(40 in. lbs.)
Screw, Solenoid Module
to Transfer Plate . . . . . . . . . 5.7 N·m (50 in. lbs.)
Screw, Accumulator Cover . . . . 4.5 N·m (40 in. lbs.)
Screw, Detent Spring . . . . . . . . 4.5 N·m (40 in. lbs.)
Bolt, Input Speed Sensor . . . 11.8 N·m (105 in. lbs.)
Bolt, Output Speed Sensor . . 11.8 N·m (105 in. lbs.)
Bolt, Line Pressure Sensor . . 11.8 N·m (105 in. lbs.)
Bolt, Extension Housing . . . . . . 54 N·m (40 ft. lbs.)
Fitting, Vent . . . . . . . . . . . . . . 12 N·m (100 in. lbs.)
Screw, Manual Valve Cam Retaining . . . . . 4.5 N·m
(40 in. lbs.)
Bolt, Manual Lever . . . . . . . 28.2 N·m (250 in. lbs.)
Metric
Inch
Output Shaft End Play
0.53-0.78
mm
0.021-0.031
in.
Input Shaft End Play
0.79-1.07
mm
0.031-0.042
in.
2C Clutch Pack
Clearance
0.53-1.27
mm
0.021-0.050
in.
4C Clutch Pack
Clearance
0.81-1.35
mm
0.032-0.053
in.
L/R Clutch Pack
Clearance
1.14-1.91
mm
0.045-0.075
in.
OD Clutch Pack
Clearance
1.016-1.65
mm
0.040-0.065
in.
SPECIAL TOOLS
UD Clutch Pack
Clearance
0.76-1.160
mm
0.030-0.063
in.
45RFE TRANSMISSION
Reverse Clutch Pack
Clearance
0.81-1.24
mm
0.032-0.049
in.
Recommended fluid
MoparT ATF Plus 3, type
7176
GEAR RATIOS
GEAR
1ST . . . . . . .
2ND . . . . . . .
2ND PRIME
3RD . . . . . . .
4TH . . . . . . .
REVERSE . .
.
.
.
.
.
.
.
.
.
.
.
.
.
.
.
.
.
.
.
.
.
.
.
.
.
.
.
.
.
.
.
.
.
.
.
.
.
.
.
.
.
.
.
.
.
.
.
.
.
.
.
.
.
.
.
.
.
.
.
.
.
.
.
.
.
.
.
.
.
.
.
.
.
.
.
.
.
.
.
.
.
.
.
.
.
.
.
.
.
.
.
.
.
.
.
.
.
.
.
.
.
.
.
.
.
.
.
.
.
.
.
.
.
.
.
.
.
.
.
.
.
.
.
.
.
.
.
.
.
.
.
.
.
.
.
.
.
.
.
.
.
.
.
.
RATIO
. 3.00:1
. 1.67:1
. 1.50:1
. 1.00:1
. 0.75:1
. 3.00:1
Pressure Gauge—C-3292
TORQUE
DESCRIPTION
TORQUE
Fitting, Cooler Line . . . . . . . 17.5 N·m (155 in. lbs.)
Bolt, Torque Convertor . . . . . . . 31 N·m (23 ft. lbs.)
Bolt, Driveplate . . . . . . . . . . . . . 75 N·m (55 ft. lbs.)
Bolt/nut, Crossmember . . . . . . . 68 N·m (50 ft. lbs.)
Bolt, Oil Pan . . . . . . . . . . . . 11.8 N·m (105 in. lbs.)
Screw, Primary Oil Filter . . . . 4.5 N·m (40 in. lbs.)
Filter, Cooler Return . . . . . . . . 14 N·m (125 in. lbs.)
Bolt, Oil Pump . . . . . . . . . . . 28.2 N·m (250 in. lbs.)
Bolt, Oil Pump Body to Cover . . . . . . . . . . 4.5 N·m
(40 in. lbs.)
Screw, Plate to Oil Pump Body . . . . 4.5 N·m (40 in.
lbs.)
Plug, Pressure Test Port . . . . . 5.1 N·m (45 in. lbs.)
21 - 271
Pressure Gauge—C-3293SP
Dial Indicator—C-3339
21 - 272
45RFE AUTOMATIC TRANSMISSION
WJ
SPECIAL TOOLS (Continued)
Seal Installer—C-3860–A
Spring Compressor—8251
Flusher—6906
Piston Installer—8252
Spring Compressor—8249
Seal Installer—8253
Spring Compressor—8250
45RFE AUTOMATIC TRANSMISSION
WJ
21 - 273
SPECIAL TOOLS (Continued)
Seal Installer—8254
Pressure Tap Adapter—8258
Installer—8255
Line Pressure Adapter—8259
Support Stand—8257
Input Clutch Pressure Fixture—8260
21 - 274
45RFE AUTOMATIC TRANSMISSION
WJ
SPECIAL TOOLS (Continued)
Alignment Plate—8261
Bearing Installer—8320
End Play Set—8266
Filter Wrench—8321
Spring Compressor—8285
Piston Installer—8504
NV242 TRANSFER CASE
WJ
21 - 275
NV242 TRANSFER CASE
TABLE OF CONTENTS
page
DESCRIPTION AND OPERATION
NV242 TRANSFER CASE. . . . . . . . . . .
LUBRICANT AND FILL LEVEL . . . . . . .
DIAGNOSIS AND TESTING
NV242 DIAGNOSIS . . . . . . . . . . . . . . .
REMOVAL AND INSTALLATION
TRANSFER CASE . . . . . . . . . . . . . . . .
FRONT OUTPUT SHAFT SEAL . . . . . .
NV242HD REAR RETAINER BUSHING
AND SEAL . . . . . . . . . . . . . . . . . . . .
. . . . . . . 275
. . . . . . . 276
. . . . . . . 276
. . . . . . . 277
. . . . . . . 278
page
TRANSFER CASE SHIFT CABLE .
DISASSEMBLY AND ASSEMBLY
NV242 TRANSFER CASE. . . . . . .
CLEANING AND INSPECTION
NV242 TRANSFER CASE. . . . . . .
SPECIFICATIONS
TORQUE . . . . . . . . . . . . . . . . . . .
SPECIAL TOOLS
NV242 . . . . . . . . . . . . . . . . . . . . .
. . . . . . . . . . . 279
. . . . . . . . . . . 280
. . . . . . . . . . . 303
. . . . . . . . . . . 306
. . . . . . . . . . . 306
. . . . . . . 278
DESCRIPTION AND OPERATION
NV242 TRANSFER CASE
DESCRIPTION
The NV242 is a full transfer case (Fig. 1). It provides full time 2-wheel, or 4-wheel drive operation.
A differential in the transfer case is used to control
torque transfer to the front and rear axles. A low
range gear provides increased low speed torque capability for off road operation. The low range provides a
2.72:1 reduction ratio.
Fig. 1 NV242 Transfer Case
The input gear is splined to the transmission output shaft. It drives the mainshaft through the planetary gear and range hub. The front output shaft is
operated by a drive chain that connects the shaft to a
drive sprocket on the mainshaft. The drive sprocket
is engaged/disengaged by the mode fork, which operates the mode sleeve and hub. The sleeve and hub
are not equipped with a synchro mechanism for shifting.
The geartrain is mounted in two aluminum case
halves attached with bolts. The mainshaft front and
rear bearings are mounted in aluminum retainer
housings bolted to the case halves.
TRANSFER CASE IDENTIFICATION
Two versions of the NV242 are used in the WJ
vehicles, NV242LD and NV242HD. The two transfer
cases can be distinguished from one another by the
rear output shaft retainer. The NV242LD uses a rubber boot to cover the rear output shaft, while the
NV242HD uses a cast aluminum housing. Other than
this difference, the two transfer cases are serviced
the same.
A circular ID tag is attached to the rear case of
each transfer case (Fig. 2). The ID tag provides the
transfer case model number, assembly number, serial
number, and low range ratio.
The transfer case serial number also represents
the date of build.
OPERATING RANGES
NV242 operating ranges are 2WD (2-wheel drive),
4x4 part-time, 4x4 full time, and 4 Lo.
The 2WD and 4x4 full time ranges can be used at
any time and on any road surface.
The 4x4 part-time and 4 Lo ranges are for off road
use only. The only time these ranges can be used on
hard surface roads, is when the surface is covered
with snow and ice.
SHIFT MECHANISM
Operating ranges are selected with a lever in the
floor mounted shifter assembly. The shift lever is con-
21 - 276
NV242 TRANSFER CASE
WJ
DESCRIPTION AND OPERATION (Continued)
Approximate lubricant fill capacity is 1.35 liters (2.85
pints).
The fill and drain plugs are both in the rear case
(Fig. 3). Correct fill level is to the bottom edge of the
fill plug hole. Be sure the vehicle is level to ensure
an accurate fluid level check.
Fig. 2 Fill/Drain Plug And I.D. Tag Locations
1 – I.D. TAG
2 – FILL PLUG
3 – DRAIN PLUG
nected to the transfer case range lever by an adjustable cable. A straight line shift pattern is used.
Range positions are marked on the shifter bezel.
LUBRICANT AND FILL LEVEL
Fig. 3 Fill/Drain Plug Locations
1 – I.D. TAG
2 – FILL PLUG
3 – DRAIN PLUG
DESCRIPTION
Recommended lubricant for the NV242 transfer
case is Mopart Dexron II, or ATF Plus, type 7176.
DIAGNOSIS AND TESTING
NV242 DIAGNOSIS
DIAGNOSIS CHART
CONDITION
Transfer case difficult to
shift or will not shift into
desired range.
POSSIBLE CAUSE
CORRECTION
1) Transfer case shift linkage binding.
1) Repair or replace linkage as
necessary.
2) Insufficient or incorrect lubricant.
2) Drain and refill transfer case with the
correct type and quantity of lubricant.
3) Internal transfer case components
binding, worn, or damaged.
3) Repair or replace components as
necessary.
Transfer case noisy in all
drive modes.
1) Insufficient or incorrect lubricant.
1) Drain and refill transfer case with the
correct type and quantity of lubricant.
Lubricant leaking from
transfer case seals or
vent.
1) Transfer case overfilled.
1) Drain lubricant to the correct level.
2) Transfer case vent closed or
restricted.
2) Clean or replace vent as necessary.
3) Transfer case seals damaged or
installed incorrectly.
3) Replace suspect seal.
NV242 TRANSFER CASE
WJ
21 - 277
DIAGNOSIS AND TESTING (Continued)
CONDITION
Transfer case will not shift
through 4X4 part time
range (light remains on)
POSSIBLE CAUSE
CORRECTION
1) Incomplete shift due to drivetrain
torque load.
1) Momentarily release the accelerator
pedal to complete the shift.
2) Incorrect tire pressure.
2) Correct tire pressure as necessary.
3) Excessive Tire wear.
3) Correct tire condition as necessary.
4) Excessive vehicle loading.
4) Correct as necessary.
REMOVAL AND INSTALLATION
TRANSFER CASE
REMOVAL
(12) Remove nuts attaching transfer case to transmission.
(13) Pull transfer case and jack rearward to disengage transfer case.
(14) Remove transfer case from under vehicle.
(1) Shift transfer case into Neutral.
(2) Raise vehicle.
(3) Remove transfer case drain plug and drain
transfer case lubricant.
(4) Mark front and rear propeller shaft yokes for
alignment reference.
(5) Support transmission with jack stand.
(6) Remove rear crossmember and skid plate, if
equipped (Fig. 4).
Fig. 5 Transfer Case Mounting
INSTALLATION
Fig. 4 Crossmember Removal/Installation
(7) Disconnect front/rear propeller shafts at transfer case. Refer to Group 3, Differential and Driveline
for the correct procedures.
(8) Disconnect transfer case cable from range
lever.
(9) Disconnect transfer case vent hose (Fig. 5) and
indicator switch harness, if necessary.
(10) Support transfer case with transmission jack.
(11) Secure transfer case to jack with chains.
(1) Mount transfer case on a transmission jack.
(2) Secure transfer case to jack with chains.
(3) Position transfer case under vehicle.
(4) Align transfer case and transmission shafts
and install transfer case on transmission.
(5) Install and tighten transfer case attaching nuts
to 35 N·m (26 ft. lbs.) torque (Fig. 5).
(6) Align and connect propeller shafts. Refer to
Group 3, Differential and Driveline, for proper procedures and specifications.
(7) Fill transfer case with correct fluid. Check
transmission fluid level. Correct as necessary.
(8) Install rear crossmember and skid plate, if
equipped. Tighten crossmember bolts to 41 N·m (30
ft. lbs.) torque.
(9) Remove transmission jack and support stand.
(10) Connect shift rod to transfer case range lever.
(11) Adjust transfer case shift cable.
21 - 278
NV242 TRANSFER CASE
WJ
REMOVAL AND INSTALLATION (Continued)
(12) Lower vehicle and verify transfer case shift
operation.
FRONT OUTPUT SHAFT SEAL
REMOVAL
(1) Raise vehicle.
(2) Remove front propeller shaft. Refer to Group 3,
Differential and Driveline, for proper procedure.
(3) Remove front output shaft companion flange.
(4) Remove seal from front case with pry tool
(Fig. 6).
Fig. 7 Front Output Seal Installation
1 – INSTALLER 6952–A
2 – TRANSFER CASE
(4) Using Remover 6957, remove bushing from
rear retainer (Fig. 8).
Fig. 6 Remove Front Output Shaft Seal
1 – OUTPUT SHAFT SEAL
2 – PRYBAR
INSTALLATION
(1) Install new front output seal in front case with
Installer Tool 6952-A as follows:
(a) Place new seal on tool. Garter spring on seal
goes toward interior of case.
(b) Start seal in bore with light taps from hammer (Fig. 7). Once seal is started, continue tapping
seal into bore until installer tool seats against case.
(2) Install companion flange and tighten nut to
122–176 (90–130 ft. lbs.) torque.
(3) Install front propeller shaft. Refer to Group 3,
Differential and Driveline for the correct procedure
and torque specification.
NV242HD REAR RETAINER BUSHING AND
SEAL
REMOVAL
(1) Raise vehicle.
(2) Remove rear propeller shaft. Refer to Group 3,
Differential and Driveline, for proper procedure.
(3) Using a suitable pry tool or slide-hammer
mounted screw, remove the rear retainer seal.
Fig. 8 Rear Retainer Bushing Removal
1 – REMOVER 6957
2 – REAR RETAINER BUSHING
INSTALLATION
(1) Clean fluid residue from sealing surface and
inspect for defects.
(2) Position replacement bushing in rear retainer
with fluid port in bushing aligned with slot in
retainer.
(3) Using Installer 8160, drive bushing into
retainer until installer seats against case (Fig. 9).
(4) Using Installer C-3995-A, install seal in rear
retainer (Fig. 10).
(5) Install propeller shaft.
(6) Verify proper fluid level.
(7) Lower vehicle.
NV242 TRANSFER CASE
WJ
21 - 279
REMOVAL AND INSTALLATION (Continued)
Fig. 9 Rear Retainer Bushing Install
1 – REAR RETAINER BUSHING
2 – INSTALLER 8160
Fig. 11 Transfer Case Shift Cable at Transfer Case
(8) Remove the nuts holding the shift cable seal
plate to the floor pan (Fig. 13).
(9) Pull cable through floor panel opening.
Fig. 10 Install Rear Retainer Seal
1 – SPECIAL TOOL C-4171
2 – SPECIAL TOOL C-3995-A
TRANSFER CASE SHIFT CABLE
REMOVAL
(1) Shift transfer case into neutral.
(2) Raise vehicle.
(3) Disconnect the shift cable eyelet from the
transfer case shift lever (Fig. 11).
(4) Remove shift cable from the cable support
bracket.
(5) Lower vehicle.
(6) Remove shift lever bezel and necessary console
parts for access to shift lever assembly and shift
cable.
(7) Disconnect cable at shift lever and shifter
assembly bracket (Fig. 12).
Fig. 12 Transfer Case Shift Cable at Shifter
1
2
3
4
–
–
–
–
CLIP
SHIFTER
TRANSFER CASE SHIFT LEVER PIN
TRANSFER CASE SHIFT CABLE
(10) Remove transfer case shift cable from vehicle.
INSTALLATION
(1) Route cable through hole in floor pan.
(2) Install seal plate to studs in floor pan.
(3) Install nuts to hold seal plate to floor pan (Fig.
13) Tighten nuts to 7 N·m (65 in. lbs.).
(4) Install the transfer case shift cable to the
shifter assembly bracket. Seat cable in bracket and
install clip (Fig. 12).
(5) Verify the transfer case shift lever (at console)
is in the NEUTRAL position.
21 - 280
NV242 TRANSFER CASE
WJ
REMOVAL AND INSTALLATION (Continued)
Fig. 14 Output Boot—Typical
Fig. 13 Shift Cables at Floor Pan
1 – SEAL PLATES
2 – TRANSMISSION SHIFT CABLE
3 – TRANSFER CASE SHIFT CABLE
1
2
3
4
–
–
–
–
SLINGER
BOOT
AWL
TRANSFER CASE
(6) Snap the cable onto the shift lever pin (Fig.
12).
(7) Raise the vehicle.
(8) Install the shift cable to the shift cable support
bracket and install clip (Fig. 11).
(9) Verify that the transfer case is still in the
NEUTRAL position.
(10) Snap the shift cable onto the transfer case
shift lever (Fig. 11).
(11) Lower vehicle.
(12) Verify correct transfer case operation in all
ranges.
(13) Install shift lever bezel and any console parts
removed for access to transfer case shift cable.
DISASSEMBLY AND ASSEMBLY
NV242 TRANSFER CASE
DISASSEMBLY
NV242LD REAR RETAINER
(1) Remove output shaft boot. Spread band clamp
that secures boot on slinger with a suitable awl.
Then slide boot off shaft (Fig. 14).
(2) Using puller MD-998056-A, remove rear slinger
(Fig. 15).
(3) Remove rear seal from retainer (Fig. 16). Use
pry tool, or collapse seal with punch to remove it.
(4) Remove rear output bearing I.D. retaining ring
(Fig. 17).
(5) Remove speedometer adapter.
(6) Remove rear retainer bolts.
Fig. 15 Rear Slinger Removal
1 – TRANSFER CASE
2 – SPECIAL TOOL MD998056–A
3 – SLINGER
(7) Remove rear retainer. Tap retainer with mallet
and pry upward to break sealer bead. Then slide
retainer off case and output shaft (Fig. 18).
NV242HD REAR RETAINER
(1) Remove extension housing bolts.
(2) Tap extension housing with plastic or rawhide
mallet to loosen sealer (Fig. 19).
(3) Separate extension housing from rear retainer.
(4) Remove rear bearing snap-ring (Fig. 20).
(5) Remove bolts holding rear retainer to rear case
half.
(6) Remove speedometer adapter.
NV242 TRANSFER CASE
WJ
DISASSEMBLY AND ASSEMBLY (Continued)
Fig. 16 Rear Seal Removal
1 – REAR RETAINER
2 – OUTPUT SHAFT SEAL
Fig. 18 Rear Retainer Removal
1 – MAINSHAFT
2 – REAR RETAINER
Fig. 17 Rear Bearing I.D. Retaining Ring Removal
1 – SNAP RING PLIERS
2 – REAR BEARING I.D. RETAINING RING
Fig. 19 Remove Extension Housing
(7) Loosen rear retainer with pry tool to break
sealer bead. Pry only against retainer boss as shown
(Fig. 21).
(8) Slide retainer off case and output shaft (Fig.
22).
1 – EXTENSION HOUSING
2 – PLASTIC HAMMER
3 – REAR RETAINER
21 - 281
21 - 282
NV242 TRANSFER CASE
WJ
DISASSEMBLY AND ASSEMBLY (Continued)
Fig. 20 Remove Rear Bearing Snap-ring
1 – REAR RETAINER
2 – SNAP RING
3 – REAR BEARING
Fig. 22 Remove Rear Retainer
1 – MAINSHAFT
2 – REAR RETAINER
Fig. 23 Oil Pump Removal
1 – OIL PUMP
Fig. 21 Loosening Rear Retainer
1
2
3
4
–
–
–
–
REAR RETAINER
TAB (2)
SCREWDRIVER
TAB
OIL PUMP AND REAR CASE HALF
(1) Remove rear bearing O.D. retaining ring with
snap ring pliers. Then tilt pump and slide it off output shaft (Fig. 23).
(2) Remove pickup tube O-ring from pump (Fig.
24) but do not disassemble pump; it is not a repairable part.
(3) Remove seal from oil pump with pry tool.
(4) Remove bolts attaching rear case to front case
(Fig. 25). Note position of the two black finish bolts
at each end of the case. These bolts go through the
case dowels and require a washer under the bolt
head.
Fig. 24 Pickup Tube O-Ring Location
1 – OIL PUMP
2 – O-RING
(5) Remove rear case from front case (Fig. 26).
Insert screwdrivers into slots cast into each end of
case. Then pry upward to break sealer bead and
remove rear case.
NV242 TRANSFER CASE
WJ
21 - 283
DISASSEMBLY AND ASSEMBLY (Continued)
Fig. 25 Spline And Dowel Bolt Locations
1 – DOWEL BOLT AND WASHER (2)
2 – CASE BOLT (5)
3 – SPLINE HEAD BOLT (1)
Fig. 27 Oil Pickup Screen, Hose And Tube Removal
1 – CONNECTING HOSE
2 – PICKUP SCREEN
3 – PICKUP TUBE
CAUTION: Do not pry on the sealing surface of
either case half as the surfaces will become damaged.
Fig. 28 Yoke Nut Removal
1 – IMPACT WRENCH
2 – SOCKET
3 – YOKE
Fig. 26 Loosening/Removing Rear case
1
2
3
4
5
–
–
–
–
–
MAINSHAFT
SCREWDRIVER
FRONT CASE
SCREWDRIVER
REAR CASE
(6) Remove oil pickup tube and screen from rear
case (Fig. 27).
YOKE AND RANGE LEVER
(1) Remove front yoke nut:
(a) Move range lever to 4L position.
(b) Remove nut with socket and impact wrench
(Fig. 28).
(2) Remove yoke. If yoke is difficult to remove by
hand, remove it with bearing splitter, or with standard two jaw puller (Fig. 29). Be sure puller tool is
positioned on yoke and not on slinger as slinger will
be damaged.
(3) Remove seal washer from front output shaft.
Discard washer as it should not be reused.
(4) Remove nut and washer that attach range
lever to sector shaft. Then move sector to neutral
position and remove range lever from shaft (Fig. 30).
21 - 284
NV242 TRANSFER CASE
WJ
DISASSEMBLY AND ASSEMBLY (Continued)
Fig. 29 Yoke Removal
1 – PULLER TOOL
2 – YOKE
Fig. 31 Drive Sprocket Snap-Ring Removal
1 – DRIVE SPROCKET
2 – DRIVE SPROCKET SNAP RING
Fig. 30 Range Lever Removal
1 – RANGE LEVER
2 – SECTOR SHAFT
FRONT OUTPUT SHAFT AND DRIVE CHAIN
(1) Remove drive sprocket snap-ring (Fig. 31).
(2) Remove drive sprocket and chain (Fig. 32).
(3) Remove front output shaft (Fig. 33).
SHIFT FORKS AND MAINSHAFT
(1) Remove shift detent plug, spring and pin (Fig.
34).
(2) Remove seal plug from low range fork lockpin
access hole. Then move shift sector to align low range
fork lockpin with access hole.
(3) Remove range fork lockpin with size number
one easy-out tool as follows:
(a) Insert easy-out tool through access hole in
side of transfer case and into lock-pin.
(b) Tap easy-out tool into lock-pin with hammer
until tool is securely engaged into the lock-pin.
(c) Install a t-handle, such as from a tap and die
set, onto the easy-out tool.
(d) Securely tighten the t-handle onto the tool.
(e) In one motion, pull upward and turn the
t-handle counter-clockwise to remove the lock-pin.
Fig. 32 Drive Sprocket And Chain Removal
1 – DRIVE SPROCKET
2 – DRIVE CHAIN
(4) Remove shift rail by pulling it straight up and
out of fork (Fig. 35).
(5) Remove mode fork and mainshaft as assembly
(Fig. 36).
NV242 TRANSFER CASE
WJ
21 - 285
DISASSEMBLY AND ASSEMBLY (Continued)
Fig. 33 Removing Front Output Shaft
1 – FRONT OUTPUT SHAFT
Fig. 35 Shift Rail Removal
1 – SHIFT RAIL
2 – MODE FORK
Fig. 34 Detent Component Removal
1
2
3
4
–
–
–
–
PLUNGER
O-RING
PLUG
SPRING
(6) Remove mode shift sleeve and mode fork
assembly from mainshaft (Fig. 37). Note position of
mode sleeve in fork and remove sleeve.
(7) Remove intermediate clutch shaft snap-ring
(Fig. 38).
(8) Remove clutch shaft thrust ring (Fig. 39).
(9) Remove intermediate clutch shaft (Fig. 40).
Fig. 36 Mode Fork And Mainshaft Removal
1 – MAINSHAFT ASSEMBLY
2 – MODE FORK
21 - 286
NV242 TRANSFER CASE
WJ
DISASSEMBLY AND ASSEMBLY (Continued)
Fig. 39 Clutch Shaft Thrust Ring Removal
1 – CLUTCH SHAFT THRUST RING
Fig. 37 Mode Fork And Sleeve Removal
1 – MAINSHAFT
2 – SLEEVE
3 – MODE FORK ASSEMBLY
Fig. 40 Intermediate Clutch Shaft Removal
1 – INTERMEDIATE CLUTCH SHAFT
Fig. 38 Intermediate Clutch Shaft Snap-Ring
Removal
1 – SNAP RING
2 – INTERMEDIATE CLUTCH SHAFT
(10) Remove differential snap-ring (Fig. 41).
(11) Remove differential (Fig. 42).
(12) Remove differential needle bearings and both
needle bearing thrust washers from mainshaft.
(13) Slide low range fork pin out of shift sector slot
(Fig. 43).
NV242 TRANSFER CASE
WJ
21 - 287
DISASSEMBLY AND ASSEMBLY (Continued)
Fig. 41 Differential Snap-Ring Removal
1 – DIFFERENTIAL SNAP RING
Fig. 43 Disengaging Low Range Fork
1
2
3
4
–
–
–
–
SHIFT SECTOR
LOW RANGE FORK
PIN
SLOT
Fig. 42 Differential Removal
1 – DIFFERENTIAL
2 – MAINSHAFT
Fig. 44 Low Range Fork And Hub Removal
(14) Remove low range fork and hub (Fig. 44).
(15) Remove shift sector (Fig. 45).
(16) Remove shift sector bushing and O-ring (Fig.
46).
1 – LOW RANGE FORK
2 – FORK HUB
INPUT GEAR/LOW RANGE ASSEMBLY
(1) Remove front bearing retainer bolts.
21 - 288
NV242 TRANSFER CASE
WJ
DISASSEMBLY AND ASSEMBLY (Continued)
(3) Remove input gear snap-ring (Fig. 48).
Fig. 47 Front Bearing Retainer Removal
Fig. 45 Shift Sector Position
1
2
3
4
–
–
–
–
SHIFT SECTOR
LOW RANGE FORK
PIN
SLOT
1 – FRONT BEARING RETAINER
2 – RETAINER SLOT
Fig. 48 Input Gear Snap-Ring Removal
1 – INPUT GEAR
2 – SNAP RING
Fig. 46 Sector Bushing And O-Ring Removal
1 – SHIFT SECTOR BUSHING
2 – O-RING
(2) Remove front bearing retainer. Carefully pry
retainer loose with screwdriver (Fig. 47). Position
screwdriver in slots cast into retainer.
(4) Remove input/low range gear assembly from
bearing with Tool Handle C-4171 and Tool 7829A
(Fig. 49).
(5) Remove low range gear snap-ring (Fig. 50).
(6) Remove input gear retainer, thrust washers
and input gear from low range gear (Fig. 51).
NV242 TRANSFER CASE
WJ
21 - 289
DISASSEMBLY AND ASSEMBLY (Continued)
Fig. 49 Input And Low Range Gear Assembly
Removal
1 – INPUT-LOW RANGE GEARS
2 – SPECIAL TOOL 7829A
3 – SPECIAL TOOL C-4171
Fig. 51 Low Range Gear Disassembly
1
2
3
4
–
–
–
–
THRUST WASHERS
LOW RANGE GEAR
INPUT GEAR
RETAINER
Fig. 52 Inspecting Low Range Annulus Gear
Fig. 50 Low Range Gear Snap-Ring Removal/
Installation
1 – LOW RANGE GEAR SNAP RING
(7) Inspect low range annulus gear (Fig. 52). Gear
is not a serviceable component. If damaged,
replace gear and front case as assembly.
(8) Remove oil seals from following components:
• front bearing retainer.
• rear retainer.
• oil pump.
• case halves.
1 – LOW RANGE ANNULUS GEAR
DIFFERENTIAL
(1) Mark differential case halves for reference.
(2) Remove differential case bolts.
(3) Invert differential on workbench.
(4) Separate top case from bottom case. Use slots
in case halves to pry them apart (Fig. 53).
(5) Remove thrust washers and planet gears from
case pins (Fig. 54).
21 - 290
NV242 TRANSFER CASE
WJ
DISASSEMBLY AND ASSEMBLY (Continued)
(6) Remove mainshaft and sprocket gears from
bottom case (Fig. 55). Note gear position for reference
before separating them.
Fig. 54 Planet Gears And Thrust Washer Removal
1 – BOTTOM CASE
2 – THRUST WASHERS (12)
3 – PLANET GEARS (6)
Fig. 53 Separating Differential Case Halves
1
2
3
4
5
–
–
–
–
–
TOP CASE
CASE BOLTS
CASE BOLTS
CASE SLOTS
CASE BOLTS
ASSEMBLY
Lubricate transfer case components with automatic
transmission fluid or petroleum jelly (where indicated) during assembly.
CAUTION: The bearing bores in various transfer
case components contain oil feed holes. Make sure
replacement bearings do not block the holes.
BEARING AND SEAL
(1) Remove snap-ring that retains front output
shaft front bearing in case (Fig. 56). Then remove
bearing. Use hammer handle, or hammer and brass
punch to tap bearing out of case.
Fig. 55 Mainshaft And Sprocket Gear Removal
1 – MAINSHAFT GEAR
2 – SPROCKET GEAR
3 – BOTTOM CASE
WJ
NV242 TRANSFER CASE
21 - 291
DISASSEMBLY AND ASSEMBLY (Continued)
(2) Install new front output shaft front bearing
with Tool Handle C-4171 and Installer 8033A with
the tapered cone upward (Fig. 57).
(4) Remove front output shaft seal using an appropriate pry tool (Fig. 58) or slide-hammer mounted
screw.
(5) Install new front output shaft oil seal with
Installer 6952-A (Fig. 59).
Fig. 58 Remove Front Output Shaft Seal
1 – OUTPUT SHAFT SEAL
2 – PRYBAR
Fig. 56 Front Output Shaft Front Bearing Snap-Ring
Removal
1 – FRONT BEARING SNAP RING
Fig. 59 Install Front Output Shaft Seal
1 – INSTALLER 6952–A
2 – TRANSFER CASE
Fig. 57 Front Output Shaft Front Bearing Installation
1 – SPECIAL TOOL C-4171
2 – SPECIAL TOOL 8033A
(3) Install front bearing snap-ring (Fig. 56).
(6) Remove input gear bearing with Tool Handle
C-4171 and Remover C-4210 (Fig. 60).
(7) Install snap-ring on new input gear bearing.
21 - 292
NV242 TRANSFER CASE
WJ
DISASSEMBLY AND ASSEMBLY (Continued)
(8) Install new input gear bearing with Tool Handle C-4171 and Remover C-4210. Install bearing far
enough to seat snap-ring against case (Fig. 61).
Fig. 60 Input Gear Bearing Removal
1 – SPECIAL TOOL C-4171
2 – SPECIAL TOOL C-4210
Fig. 62 Remove Input Gear Pilot Bearing
1 – DRIFT
2 – INPUT GEAR
Fig. 61 Seating Input Gear Bearing
1 – SNAP RING
2 – INPUT SHAFT BEARING
(9) Remove the input gear pilot bearing by inserting a suitably sized drift into the splined end of the
input gear and driving the bearing out with the drift
and a hammer (Fig. 62).
(10) Install new pilot bearing with Installer 8128
and Handle C-4171 (Fig. 63).
(11) Install new seal in front bearing retainer with
Installer 7884 (Fig. 64).
Fig. 63 Install Input Gear Pilot Bearing
1 – HANDLE C-4171
2 – INSTALLER 8128
3 – INPUT GEAR
(12) Remove output shaft rear bearing with the
screw and jaws from Remover L-4454 and Cup 8148
(Fig. 65).
WJ
NV242 TRANSFER CASE
21 - 293
DISASSEMBLY AND ASSEMBLY (Continued)
Fig. 64 Front Bearing Retainer Seal Installation
1 – FRONT BEARING RETAINER
2 – SPECIAL TOOL 7884
(13) Install new bearing with Tool Handle C-4171
and Installer 5066 (Fig. 66). Lubricate bearing after
installation.
Fig. 66 Install Front Output Shaft Rear Bearing
1 – HANDLE C-4171
2 – OUTPUT SHAFT INNER BEARING
3 – INSTALLER 5066
(14) Install new seal in oil pump feed housing with
Special Tool 7888 (Fig. 67).
Fig. 67 Oil Pump Seal Installation
1 – HOUSING SEAL
2 – SPECIAL TOOL 7888
3 – OIL PUMP FEED HOUSING
Fig. 65 Remove Front Output Shaft Rear Bearing
1 – REAR CASE
2 – SPECIAL TOOL L-4454–1 AND L-4454–3
3 – SPECIAL TOOL 8148
(15) Install new pickup tube O-ring in oil pump
(Fig. 68).
(16) Remove rear retainer bearing with Installer
8128 and Handle C-4171, NV242HD only.
(17) Install rear bearing in retainer with Handle
C-4171 and Installer 5064 (Fig. 69), NV242HD only.
21 - 294
NV242 TRANSFER CASE
WJ
DISASSEMBLY AND ASSEMBLY (Continued)
Fig. 68 Pickup Tube O-Ring Installation
1 – PICKUP TUBE O-RING
Fig. 70 Installing Differential Sprocket Gear
1 – SPROCKET GEAR
2 – BOTTOM CASE
Fig. 69 Installing Rear Bearing In Retainer
1 – SPECIAL TOOL C-4171
2 – SPECIAL TOOL 5064
3 – REAR RETAINER
DIFFERENTIAL
(1) Lubricate differential components with automatic transmission fluid.
(2) Install sprocket gear in differential bottom case
(Fig. 70).
(3) Install differential planet gears and new thrust
washers (Fig. 71). Be sure thrust washers are
installed at top and bottom of each planet gear.
(4) Install differential mainshaft gear (Fig. 71).
Fig. 71 Installing Mainshaft And Planet Gears
1 – MAINSHAFT GEAR
2 – THRUST WASHERS (12)
3 – PLANET GEARS (6)
(5) Align and position differential top case on bottom case (Fig. 72). Align using scribe marks made at
disassembly.
NV242 TRANSFER CASE
WJ
21 - 295
DISASSEMBLY AND ASSEMBLY (Continued)
(6) While holding differential case halves together,
invert the differential and start the differential case
bolts.
(7) Tighten differential case bolts to specified
torque.
Fig. 73 Low Range And Input Gear Assembly
1
2
3
4
–
–
–
–
THRUST WASHERS
LOW RANGE GEAR
INPUT GEAR
RETAINER
Fig. 72 Differential Case Assembly
1 – TOP CASE
2 – BOTTOM CASE
3 – CASE ALIGNMENT MARKS
INPUT GEAR/LOW RANGE ASSEMBLY
(1) Assemble low range gear, input gear thrust
washers, input gear and input gear retainer (Fig. 73).
(2) Install low range gear snap ring (Fig. 74).
(3) Lubricate input gear and low range gears with
automatic transmission fluid.
(4) Start input gear shaft into front case bearing.
(5) Press input gear shaft into front bearing.
(6) Install new input gear snap ring (Fig. 75).
(7) Apply 3 mm (1/8 in.) wide bead of Mopart gasket maker or silicone adhesive sealer to seal surface
of front bearing retainer.
(8) Install front bearing retainer (Fig. 76). Tighten
retainer bolts to 16 ft. lbs. (21 N·m) torque.
Fig. 74 Install Low Range Gear Snap Ring
1 – LOW RANGE GEAR SNAP RING
21 - 296
NV242 TRANSFER CASE
WJ
DISASSEMBLY AND ASSEMBLY (Continued)
Fig. 75 Input Gear Snap Ring Installation
1 – INPUT GEAR
2 – SNAP RING
Fig. 77 Sector O-Ring And Bushing Installation
1 – SECTOR BUSHING
2 – O-RING
(5) Position low range fork and hub in case. Be
sure low range fork pin is engaged in shift sector slot
(Fig. 79).
Fig. 76 Installing Front Bearing Retainer
1 – FRONT BEARING RETAINER
SHIFT FORKS AND MAINSHAFT
(1) Install new sector shaft O-ring and bushing
(Fig. 77).
(2) Install shift sector.
(3) Install new pads on low range fork, if necessary, (Fig. 78).
(4) Assemble low range fork and hub (Fig. 78).
Fig. 78 Assembling Low Range Fork And Hub
1 – LOW RANGE FORK
2 – PADS
3 – HUB
(6) Install first mainshaft bearing spacer on mainshaft (Fig. 80).
(7) Install bearing rollers on mainshaft (Fig. 80).
Coat bearing rollers with generous quantity of
petroleum jelly to hold them in place.
NV242 TRANSFER CASE
WJ
21 - 297
DISASSEMBLY AND ASSEMBLY (Continued)
(9) Install differential (Fig. 81). Do not displace
mainshaft bearings when installing differential.
(10) Install differential snap-ring (Fig. 82).
(11) Install intermediate clutch shaft (Fig. 83).
Fig. 79 Positioning Low Range Fork
1
2
3
4
–
–
–
–
SHIFT SECTOR
LOW RANGE FORK
PIN
SLOT
Fig. 81 Differential Installation
1 – DIFFERENTIAL
2 – MAINSHAFT
Fig. 80 Installing Mainshaft Bearing Rollers and
Spacers
1 – MAINSHAFT BEARING ROLLERS
2 – BEARING SPACERS
Fig. 82 Installing Differential Snap-Ring
1 – DIFFERENTIAL SNAP RING
(8) Install remaining bearing spacer on mainshaft
(Fig. 80). Do not displace any bearings while installing spacer.
(12) Install clutch shaft thrust washer (Fig. 84).
(13) Install clutch shaft snap-ring (Fig. 85).
21 - 298
NV242 TRANSFER CASE
WJ
DISASSEMBLY AND ASSEMBLY (Continued)
Fig. 85 Installing Clutch Shaft Snap-Ring
Fig. 83 Installing Intermediate Clutch Shaft
1 – INTERMEDIATE CLUTCH SHAFT
1 – SNAP RING
2 – INTERMEDIATE CLUTCH SHAFT
(14) Inspect mode fork assembly (Fig. 86). Replace
pads and bushing if necessary. Replace fork tube if
bushings inside tube are worn or damaged. Also
check springs and slider bracket (Fig. 86). Replace
worn, damaged components.
Fig. 86 Mode Fork Assembly Inspection
1
2
3
4
5
Fig. 84 Installing Clutch Shaft Thrust Washer
1 – CLUTCH SHAFT THRUST RING
–
–
–
–
–
SLIDER
MODE FORK
BUSHING/SPRING
TUBE
PADS
(15) Install mode sleeve in mode fork (Fig. 87).
Then install assembled sleeve and fork on mainshaft.
Be sure mode sleeve splines are engaged in differential splines.
NV242 TRANSFER CASE
WJ
21 - 299
DISASSEMBLY AND ASSEMBLY (Continued)
(16) Install mode fork and mainshaft assembly in
case (Fig. 88). Rotate mainshaft slightly to engage
shaft with low range gears.
Fig. 88 Assembled Mainshaft And Mode Fork
Installation
1 – MAINSHAFT ASSEMBLY
2 – MODE FORK
Fig. 87 Installing Mode Fork And Sleeve
1 – MAINSHAFT
2 – SLEEVE
3 – MODE FORK ASSEMBLY
(17) Rotate mode fork pin into shift sector slot.
(18) Install shift rail (Fig. 89). Be sure rail is
seated in both shift forks.
(19) Rotate shift sector to align lockpin hole in low
range fork with access hole in case.
(20) Insert an easy-out in range fork lockpin to
hold it securely for installation (Fig. 90). Lockpin is
slightly tapered on one end. Insert tapered end
into fork and rail.
(21) Insert lockpin through access hole and into
shift fork (Fig. 90). Then remove easy-out and seat
the pin with pin punch.
(22) Install plug in lockpin access hole.
(23) Install detent plunger, detent spring and
detent plug in case (Fig. 91).
Fig. 89 Shift Rail Installation
1 – SHIFT RAIL
2 – MODE FORK
21 - 300
NV242 TRANSFER CASE
WJ
DISASSEMBLY AND ASSEMBLY (Continued)
Fig. 90 Installing Low Range Fork Lockpin
1 – LOW RANGE FORK LOCK PIN
2 – ACCESS HOLE
3 – EASY-OUT
FRONT OUTPUT SHAFT AND DRIVE CHAIN
(1) Install front output shaft (Fig. 92).
(2) Install drive chain (Fig. 92). Engage chain with
front output shaft sprocket teeth.
(3) Install drive sprocket (Fig. 92). Engage drive
sprocket teeth with chain. Then engage sprocket
splines with mainshaft splines.
Fig. 91 Detent Pin, Spring And Plug Installation
1
2
3
4
–
–
–
–
PLUNGER
O-RING
PLUG
SPRING
Fig. 92 Drive Chain And Sprocket Installation
1 – FRONT OUTPUT SHAFT
2 – DRIVE CHAIN
3 – DRIVE SPROCKET
(4) Install drive sprocket snap-ring (Fig. 93).
Fig. 93 Drive Sprocket Snap-Ring Installation
1 – DRIVE SPROCKET
2 – DRIVE SPROCKET SNAP RING
NV242 TRANSFER CASE
WJ
21 - 301
DISASSEMBLY AND ASSEMBLY (Continued)
OIL PUMP AND REAR CASE
(1) Insert oil pickup tube in oil pump and attach
oil screen and connector hose to pickup tube. Then
install assembled pump, tube and screen in rear case
(Fig. 94). Be sure screen is seated in case slot as
shown.
(2) Install magnet in front case pocket (Fig. 95).
(3) Apply 3 mm (1/8 in.) wide bead of Mopar gasket maker or silicone adhesive sealer to seal surface
of front case.
(4) Align and install rear case on front case. Be
sure case locating dowels are in place and that mainshaft splines are engaged in oil pump inner gear.
(5) Install and tighten front case-to-rear case bolts
to 41 N·m (30 ft. lbs.) torque. Be sure to install a
washer under each bolt used at case dowel
locations.
NV242 LD REAR RETAINER
(1) Remove rear bearing in retainer using Installer
8128 and Handle C-4171.
(2) Install rear bearing in retainer with Tools
C-4171 and 5064 (Fig. 96).
Fig. 94 Oil Screen And Pickup Tube Installation
1
2
3
4
–
–
–
–
OIL PUMP
OIL SCREEN
CONNECTOR
PICKUP TUBE
Fig. 96 Installing Rear Bearing In Retainer
1 – SPECIAL TOOL C-4171
2 – SPECIAL TOOL 5064
3 – REAR RETAINER
Fig. 95 Installing Case Magnet
1 – MAGNET
(3) Install rear bearing O.D. retaining ring with
snap-ring pliers (Fig. 97). Be sure retaining ring is
fully seated in retainer groove.
(4) Apply bead of Mopart Sealer P/N 82300234, or
Loctitey Ultra Gray, to mating surface of rear
retainer. Sealer bead should be a maximum of 3/16
in.
(5) Install rear retainer on rear case. Tighten
retainer bolts to 20–27 N·m (15–20 ft. lbs.) torque.
(6) Install rear bearing I.D. retaining ring and
spacer on output shaft.
(7) Apply liberal quantity of petroleum jelly to new
rear seal and to output shaft. Petroleum jelly is
needed to protect seal lips during installation.
(8) Slide seal onto Seal Protector 6992 (Fig. 98).
Slide seal protector and seal onto output shaft.
(9) Slide Installer C-4076-B onto seal protector
with the recessed side of the tool toward the seal.
21 - 302
NV242 TRANSFER CASE
WJ
DISASSEMBLY AND ASSEMBLY (Continued)
Fig. 97 Rear Bearing Retaining Ring Installation
1 – REAR BEARING O.D. RETAINING RING
2 – SNAP RING PLIERS
Fig. 99 Rear Seal Installation
1 – SPECIAL TOOL C-4076–B
2 – SPECIAL TOOL MD998323
3 – TRANSFER CASE
Drive seal into rear bearing retainer with Installer
C-4076-B and Handle MD-998323 (Fig. 99).
Fig. 100 Slinger Boot Installation
Fig. 98 Output Shaft Seal and Protector
1 – OUTPUT SHAFT SEAL
2 – SPECIAL TOOL 6992
3 – TRANSFER CASE
(10) Install rear slinger with Installer 8408.
(11) Install boot on output shaft slinger and crimp
retaining clamp with tool C-4975-A (Fig. 100).
NV242HD REAR RETAINER
(1) Install rear bearing O.D. retaining ring with
snap-ring pliers (Fig. 101). Be sure retaining ring is
fully seated in retainer groove.
(2) Apply bead of Mopart Sealer P/N 82300234, or
Loctitey Ultra Gray, to mating surface of rear
retainer. Sealer bead should be a maximum of 3/16
in.
1
2
3
4
–
–
–
–
SPECIAL TOOL C-4975–A
SLINGER
BOOT
CLAMP
(3) Install rear retainer on rear case. Tighten
retainer bolts to 20–27 N·m (15–20 ft. lbs.) torque.
(4) Install new output shaft bearing snap-ring
(Fig. 102). Lift mainshaft slightly to seat snap-ring in
shaft groove, if necessary.
(5) Apply 3 mm (1/8 in.) wide bead of Mopart gasket maker or silicone adhesive sealer to mounting
surface of extension housing. Allow sealer to set-up
slightly before proceeding.
(6) Install extension housing on rear retainer.
(7) Install extension housing bolts and tighten to
35–46 N·m (26–34 ft. lbs.).
NV242 TRANSFER CASE
WJ
21 - 303
DISASSEMBLY AND ASSEMBLY (Continued)
vent residue from oil feed passages in the case
halves, retainers, gears, and shafts.
The oil pickup screen can be cleaned with solvent.
Shake excess solvent from the screen after cleaning
and allow it to air dry. Do not use compressed air.
MAINSHAFT/SPROCKET/HUB INSPECTION
Inspect the splines on the hub and shaft and the
teeth on the sprocket. Minor nicks and scratches can
be smoothed with an oilstone. However, replace any
part is damaged.
Check the contact surfaces in the sprocket bore
and on the mainshaft. Minor nicks and scratches can
be smoothed with 320–400 grit emery cloth but do
not try to salvage the shaft if nicks or wear is severe.
Fig. 101 Rear Bearing Retaining Ring Installation
1 – REAR BEARING O.D. RETAINING RING
2 – SNAP RING PLIERS
INPUT GEAR AND PLANETARY CARRIER
Check the teeth on the gear (Fig. 103). Minor nicks
can be dressed off with an oilstone but replace the
gear if any teeth are broken, cracked, or chipped. The
bearing surface on the gear can be smoothed with
300–400 grit emery cloth if necessary.
Examine the carrier body and pinion gears for
wear or damage. The carrier will have to be replaced
as an assembly if the body, pinion pins, or pinion
gears are damaged.
Check the lock ring and both thrust washers for
wear or cracks. Replace them if necessary. Also
replace the lock retaining ring if bent, distorted, or
broken.
SHIFT FORKS/HUBS/SLEEVES
Fig. 102 Install Output Bearing Snap-ring
1 – REAR RETAINER
2 – SNAP RING
3 – REAR BEARING
COMPANION FLANGE INSTALLATION
(1) Lubricate companion flange hub with transmission fluid and install flange on front shaft.
(2) Install new seal washer on front shaft.
(3) Install flange on front shaft and tighten nut to
122–176 N·m (90–130 ft. lbs.).
CLEANING AND INSPECTION
NV242 TRANSFER CASE
Clean the transfer case parts with a standard
parts cleaning solvent. Remove all traces of sealer
from the cases and retainers with a scraper and all
purpose cleaner. Use compressed air to remove sol-
Check condition of the shift forks and mode fork
shift rail (Fig. 104). Minor nicks on the shift rail can
be smoothed with 320–400 grit emery cloth.
Inspect the shift fork wear pads. The mode fork
pads are serviceable and can be replaced if necessary.
The range fork pads are also serviceable.
Check both of the sleeves for wear or damage,
especially on the interior teeth. Replace the sleeves if
wear or damage is evident.
REAR RETAINER/BEARING/ SEAL/SLINGER/BOOT
Inspect the retainer components (Fig. 105). Replace
the bearing if rough or noisy. Check the retainer for
cracks or wear in the bearing bore. Clean the
retainer sealing surfaces with a scraper and all purpose cleaner. This will ensure proper adhesion of the
sealer during reassembly.
Replace the slinger and seal outright; do not reuse
either part.
Inspect the retaining rings and washers. Replace
any part if distorted, bent, or broken. Reuse is not
recommended. Also replace the boot if cut or torn.
Replace the boot band clamps, do not reuse them.
21 - 304
NV242 TRANSFER CASE
WJ
CLEANING AND INSPECTION (Continued)
Fig. 103 Input Gear And Carrier Components
1 – PLANETARY CARRIER
2 – REAR THRUST WASHER
3 – FRONT THRUST WASHER
4 – CARRIER LOCK RING
5 – CARRIER LOCK RETAINING RING
6 – INPUT GEAR
faces. Rough threads on the shaft can be chased if
necessary. Replace the shaft if the threads are damaged, bearing surfaces are scored, or if any sprocket
teeth are cracked or broken.
Examine the drive chain and shaft bearings.
Replace the chain and both sprockets if the chain is
stretched, distorted, or if any of the links bind.
Replace the bearings if rough, or noisy.
LOW RANGE ANNULUS GEAR
Inspect annulus gear condition carefully. The gear
is only serviced as part of the front case. If the gear
is damaged, it will be necessary to replace the gear
and front case as an assembly. Do not attempt to
remove the gear (Fig. 107).
Fig. 104 Shift forks
1 – RANGE FORK
2 – MODE FORK AND RAIL
3 – MODE SPRING
REAR OUTPUT SHAFT/YOKE/DRIVE CHAIN
Check condition of the seal contact surfaces of the
yoke slinger (Fig. 106). This surface must be clean
and smooth to ensure proper seal life. Replace the
yoke nut and seal washer as neither part should be
reused.
Inspect the shaft threads, sprocket teeth, and bearing surfaces. Minor nicks on the teeth can be
smoothed with an oilstone. Use 320–400 grit emery
to smooth minor scratches on the shaft bearing sur-
FRONT-REAR CASES AND FRONT RETAINER
Inspect the cases and retainer for wear and damage. Clean the sealing surfaces with a scraper and all
purpose cleaner. This will ensure proper sealer adhesion at assembly. Replace the input retainer seal; do
not reuse it.
Check case condition. If leaks were a problem, look
for gouges and severe scoring of case sealing surfaces. Also make sure the front case mounting studs
are in good condition.
Check the front case mounting studs and vent
tube. The tube can be secured with Loctitey 271 or
680 if loose. The stud threads can be cleaned up with
a die if necessary. Also check condition of the fill/
drain plug threads in the rear case. The threads can
NV242 TRANSFER CASE
WJ
21 - 305
CLEANING AND INSPECTION (Continued)
Fig. 105 Rear Retainer Components
1
2
3
4
–
–
–
–
REAR RETAINER
REAR BEARING I.D. RETAINING RING
REAR SEAL
BOOT
Fig. 106 Seal Contact Surface Of Yoke Slinger
1 – FRONT SLINGER (PART OF YOKE)
2 – SEAL CONTACT SURFACE MUST BE CLEAN AND SMOOTH
be repaired with a thread chaser or tap if necessary.
Or the threads can be repaired with Helicoil stainless
steel inserts if required.
5
6
7
8
–
–
–
–
BAND
REAR
REAR
REAR
CLAMPS
SLINGER
BEARING O.D. RETAINING RING
BEARING
Fig. 107 Low Range Annulus Gear
1 – FRONT CASE
2 – LOW RANGE ANNULUS GEAR
OIL PUMP/OIL PICKUP
Examine the oil pump pickup parts. Replace the
pump if any part appears to be worn or damaged. Do
21 - 306
NV242 TRANSFER CASE
WJ
CLEANING AND INSPECTION (Continued)
not disassemble the pump as individual parts are not
available. The pump is only available as a complete
assembly. The pickup screen, hose, and tube are the
only serviceable parts and are available separately.
SPECIFICATIONS
Remover—C-4210
TORQUE
DESCRIPTION
Plug, Detent . . . . . . . . . . 16–24 N·m
Bolt, Diff. Case . . . . . . . . 17–27 N·m
Plug, Drain/Fill . . . . . . . 20–25 N·m
Bolt, Front Brg. Retainer . . . . . . . . . .
TORQUE
(12–18 ft. lbs.)
(15–24 ft. lbs.)
(15–25 ft. lbs.)
. . 16–27 N·m
(12–20 ft. lbs.)
Bolt, Case Half . . . . . . . . 35–46 N·m (26–34 ft. lbs.)
Nut, Front Yoke . . . . 122–176 N·m (90–130 ft. lbs.)
Screw, Oil Pump . . . . . 1.2–1.8 N·m (12–15 in. lbs.)
Nut, Range Lever . . . . . . 27–34 N·m (20–25 ft. lbs.)
Bolt, Rear Retainer . . . . 35–46 N·m (26–34 ft. lbs.)
Nuts, Mounting . . . . . . . . . . . . . 35 N·m (26 ft. lbs.)
Bolts, U-Joint . . . . . . . . . . . . . . 19 N·m (17 ft. lbs.)
Puller, Slinger—MD-998056–A
SPECIAL TOOLS
NV242
Installer—MD-998323
Installer—C-4076-B
Installer, Bearing—5064
Installer—8128
Handle, Universal—C-4171
NV242 TRANSFER CASE
WJ
21 - 307
SPECIAL TOOLS (Continued)
Installer—5066
Installer, Input Gear Bearing—7829-A
Installer—6952-A
Installer, Seal—7884
Remover—L-4454
Installer, Pump Housing Seal—7888
Cup—8148
Installer, Bearing—8033-A
Seal Protector—6992
Installer, Boot Clamp—C-4975-A
21 - 308
NV247 TRANSFER CASE
WJ
NV247 TRANSFER CASE
TABLE OF CONTENTS
page
page
DESCRIPTION AND OPERATION
NV247 TRANSFER CASE. . . . . . . . . . . . . . . . . . 308
TRANSFER CASE IDENTIFICATION. . . . . . . . . . 308
RECOMMENDED LUBRICANT AND FILL
LEVEL. . . . . . . . . . . . . . . . . . . . . . . . . . . . . . . 309
DIAGNOSIS AND TESTING
NV247 DIAGNOSIS . . . . . . . . . . . . . . . . . . . . . . 310
REMOVAL AND INSTALLATION
TRANSFER CASE . . . . . . . . . . . . . . . . . . . . . . . 311
TRANSFER CASE SHIFT CABLE . . . . . . . . . . . . 311
FRONT OUTPUT SHAFT SEAL . . . . . . .
REAR RETAINER BUSHING AND SEAL .
DISASSEMBLY AND ASSEMBLY
NV247 TRANSFER CASE. . . . . . . . . . . .
CLEANING AND INSPECTION
NV247 COMPONENTS . . . . . . . . . . . . . .
SPECIFICATIONS
TORQUE . . . . . . . . . . . . . . . . . . . . . . . .
SPECIAL TOOLS
NV247 TRANSFER CASE. . . . . . . . . . . .
. . . . . . 312
. . . . . . 313
DESCRIPTION AND OPERATION
The transfer case serial number also represents
the date of build.
. . . . . . 314
. . . . . . 328
. . . . . . 329
. . . . . . 330
NV247 TRANSFER CASE
DESCRIPTION
The NV247 (Fig. 1) is an on-demand 4-wheel drive
transfer case with two operating ranges and a neutral position. Operating ranges are 4-high and 4-low.
The 4-low range is used for extra pulling power in
off-road situations.
Fig. 2 Transfer Case I.D. Tag
OPERATION
Fig. 1 NV247 Transfer Case
TRANSFER CASE IDENTIFICATION
A circular I.D. tag is attached to the rear case of
each NV247 transfer case (Fig. 2). The tag indicates
the following information:
• Model number
• Serial number
• Assembly number
• Gear ratio
• Location of manufacture
Under normal driving conditions, the system operates conventionally, and the majority of available
torque is applied to the rear wheels. However, when
front-to-rear wheel speed variations exist, the progressive differential transfers torque to the axle with
the better traction, thus minimizing wheel spin and
maximizing control.
The key to this design is a progressive coupling
(Fig. 3), which is supplied with pressurized oil by a
gerotor style pump. The pump rotor and case are
driven by the front and rear driveshafts respectively,
and deliver pressurized oil flow to the coupling in
proportion to their speed difference. The progressive
coupling contains a multi-disc clutch pack that is
alternately splined to the front and rear driveshafts,
and controls torque variation between the front and
rear driveshafts as dictated by the pump.
WJ
NV247 TRANSFER CASE
DESCRIPTION AND OPERATION (Continued)
A set of orifices and valves control the speed-differential starting point and rate of torque transfer rise
in the clutch. This allows the system to disregard the
normal speed differences between axles that result
from variations in front-to-rear loading and typical
cornering.
Transfer case operating ranges are selected with a
floor mounted shift lever. The shift lever is connected
to the transfer case range lever by an adjustable
cable. Range positions are marked on the shifter
bezel plate.
RECOMMENDED LUBRICANT AND FILL LEVEL
DESCRIPTION
Mopart Transfer Case Lubricant is the only lubricant recommended for the NV247 transfer case.
Approximate fluid refill capacity is approximately 1.6
liters (3.4 pints).
The fill and drain plugs are both in the rear case.
Correct fill level is to the bottom edge of the fill plug
hole. Be sure that the vehicle is level to ensure an
accurate fluid level check.
Fig. 3 Progressive Coupling
21 - 309
21 - 310
NV247 TRANSFER CASE
WJ
DIAGNOSIS AND TESTING
NV247 DIAGNOSIS
CONDITION
TRANSFER CASE DIFFICULT TO
SHIFT OR WILL NOT SHIFT INTO
DESIRED RANGE
POSSIBLE CAUSE
CORRECTION
1. Vehicle speed too great to permit
shifting
1. Reduce speed to 3-4 km/h (2-3
mph) before attempting to shift
2. Transfer case external shift cable
binding
2. Lubricate, repair or replace cable,
or thighten loose components as
necessary
3. Insufficient or incorrect lubricant
3. Drain and refill to edge of fill hole
with correct lubricant
4. Internal components binding,
worn, or damaged
4. Disassemble unit and replace
worn or damaged components as
necessary
TRANSFER CASE NOISY IN ALL
MODES
1. Insufficient or incorrect lubricant
1. Drain and refill to edge of fill hole
with correct lubricant. If unit is still
noisy after drain and refill,
disassembly and inspection may
be required to locate source of
noise
NOISY IN—OR JUMPS OUT OF
4WD LOW RANGE
1. Transfer case not completely
engaged in 4WD LOW (possibly
from shift to 4L while rolling)
1. Stop vehicle, shift transfer case
to neutral, then shift back to 4WD
LOW
2. Shift linkage loose, binding, or is
misadjusted
2. Tighten, lubricate, or repair
linkage as necessary. Adjust linkage
if necessary
3. Range fork cracked, inserts
worn, or fork is binding on shift rail
3. Disassemble unit and repair as
necessary
4. Annulus gear or lockplate worn
or damaged
4. Disassemble unit and repair as
necessary
1. Transfer case over filled
1. Drain to correct level
LUBRICANT LEAKING FROM
OUTPUT SHAFT SEALS OR FROM
VENT
2. Vent closed or restricted
2. Clear or replace vent if necessary
3. Output shaft seals damaged or
installed correctly
3. Replace seals. Be sure seal lip
faces interior of case when installed.
Also be sure yoke seal surfaces are
not scored or nicked. Remove
scores and nicks with fine
sandpaper or replace yoke(s) if
necessary.
NV247 TRANSFER CASE
WJ
21 - 311
REMOVAL AND INSTALLATION
TRANSFER CASE
REMOVAL
(1) Shift transfer case into Neutral.
(2) Raise vehicle.
(3) Remove transfer case drain plug and drain
transfer case lubricant.
(4) Mark front and rear propeller shaft yokes for
alignment reference.
(5) Support transmission with jack stand.
(6) Remove rear crossmember and skid plate, if
equipped (Fig. 4).
Fig. 5 Transfer Case Mounting
INSTALLATION
Fig. 4 Crossmember Removal/Installation
(7) Disconnect front propeller shaft from transfer
case at companion flange. Remove rear propeller
shaft from vehicle. Refer to Group 3, Differential and
Driveline for the correct procedures.
CAUTION: Do not allow propshafts to hang at
attached end. Damage to joint can result.
(8) Disconnect transfer case cable from range
lever.
(9) Disconnect transfer case vent hose (Fig. 5).
(10) Support transfer case with transmission jack.
(11) Secure transfer case to jack with chains.
(12) Remove nuts attaching transfer case to transmission.
(13) Pull transfer case and jack rearward to disengage transfer case (Fig. 5).
(14) Remove transfer case from under vehicle.
(1) Mount transfer case on a transmission jack.
(2) Secure transfer case to jack with chains.
(3) Position transfer case under vehicle.
(4) Align transfer case and transmission shafts
and install transfer case on transmission.
(5) Install and tighten transfer case attaching nuts
to 35 N·m (26 ft. lbs.) torque (Fig. 5).
(6) Connect front propeller shaft and install rear
propeller shaft. Refer to Group 3, Differential and
Driveline, for proper procedures and torque specifications.
(7) Fill transfer case with correct fluid. Check
transmission fluid level. Correct as necessary.
(8) Install rear crossmember (Fig. 4) and skid
plate, if equipped. Tighten crossmember bolts to 41
N·m (30 ft. lbs.) torque.
(9) Remove transmission jack and support stand.
(10) Verify transfer case is in Neutral. Connect
shift cable to transfer case range lever.
(11) Lower vehicle and verify transfer case shift
operation.
(12) Adjust the transfer case shift cable, if necessary.
TRANSFER CASE SHIFT CABLE
REMOVAL
(1) Shift transfer case into neutral.
(2) Raise vehicle.
(3) Disconnect the shift cable eyelet from the
transfer case shift lever (Fig. 6).
(4) Remove shift cable from the cable support
bracket.
(5) Lower vehicle.
(6) Remove shift lever bezel and necessary console
parts for access to shift lever assembly and shift
cable.
21 - 312
NV247 TRANSFER CASE
WJ
REMOVAL AND INSTALLATION (Continued)
Fig. 6 Transfer Case Shift Cable at Transfer Case
(7) Disconnect cable at shift lever and shifter
assembly bracket (Fig. 7).
(8) Remove the nuts holding the shift cable seal
plate to the floor pan (Fig. 8).
(9) Pull cable through floor panel opening.
Fig. 8 Shift Cables at Floor Pan
1 – SEAL PLATES
2 – TRANSMISSION SHIFT CABLE
3 – TRANSFER CASE SHIFT CABLE
(5) Verify the transfer case shift lever (at console)
is in the NEUTRAL position.
(6) Snap the cable onto the shift lever pin (Fig. 7).
(7) Raise the vehicle.
(8) Install the shift cable to the shift cable support
bracket and install clip (Fig. 6).
(9) Verify that the transfer case is still in the
NEUTRAL position.
(10) Snap the shift cable onto the transfer case
shift lever (Fig. 6).
(11) Lower vehicle.
(12) Verify correct transfer case operation in all
ranges.
(13) Install shift lever bezel and any console parts
removed for access to transfer case shift cable.
FRONT OUTPUT SHAFT SEAL
Fig. 7 Transfer Case Shift Cable at Shifter
1
2
3
4
–
–
–
–
CLIP
SHIFTER
TRANSFER CASE SHIFT LEVER PIN
TRANSFER CASE SHIFT CABLE
(10) Remove transfer case shift cable from vehicle.
INSTALLATION
(1) Route cable through hole in floor pan.
(2) Install seal plate to studs in floor pan.
(3) Install nuts to hold seal plate to floor pan (Fig.
8). Tighten nuts to 7 N·m (65 in. lbs.).
(4) Install the transfer case shift cable to the
shifter assembly bracket. Seat cable in bracket and
install clip (Fig. 7).
REMOVAL
(1) Raise vehicle on hoist.
(2) Remove front propeller shaft. Refer to Group 3,
Differential and Driveline, for proper procedure.
(3) Remove front output shaft companion shaft.
(4) Remove seal from front case with pry tool (Fig.
9).
INSTALLATION
(1) Install new front output seal in front case with
Installer Tool 6952-A as follows:
(a) Place new seal on tool. Garter spring on seal
goes toward interior of case.
(b) Start seal in bore with light taps from hammer (Fig. 10). Once seal is started, continue tapping seal into bore until installer tool seats against
case.
NV247 TRANSFER CASE
WJ
21 - 313
REMOVAL AND INSTALLATION (Continued)
Fig. 9 Remove Front Output Shaft Seal
1 – OUTPUT SHAFT SEAL
2 – PRYBAR
Fig. 11 Rear Retainer Bushing Removal
1 – REMOVER 6957
2 – REAR RETAINER BUSHING
INSTALLATION
(1) Clean fluid residue from sealing surface and
inspect for defects.
(2) Position replacement bushing in rear retainer
with fluid port in bushing aligned with slot in
retainer.
(3) Using Installer 8145, drive bushing into
retainer until installer seats against case (Fig. 12).
(4) Using Installer C-3995-A, install seal in rear
retainer (Fig. 13).
Fig. 10 Front Output Seal Installation
1 – INSTALLER 6952–A
2 – TRANSFER CASE
(2) Install companion flange and torque nut to
122–176 N·m (90–130 ft. lbs.).
(3) Install front propeller shaft. Refer to Group 3,
Differential and Driveline for proper procedures and
torque specifications.
REAR RETAINER BUSHING AND SEAL
REMOVAL
(1) Raise vehicle on hoist.
(2) Remove rear propeller shaft. Refer to Group 3,
Differential and Driveline, for proper procedure.
(3) Using a suitable pry tool or slide-hammer
mounted screw, remove the rear retainer seal.
(4) Using Remover 6957, remove bushing from
rear retainer (Fig. 11).
Fig. 12 Rear Retainer Bushing Install
(5) Install rear propeller shaft. Refer to Group 3,
Differential and Driveline for proper procedures and
specifications.
(6) Verify proper fluid level.
(7) Lower vehicle.
21 - 314
NV247 TRANSFER CASE
WJ
REMOVAL AND INSTALLATION (Continued)
Fig. 13 Install Rear Retainer Seal
1 – SPECIAL TOOL C-4171
2 – SPECIAL TOOL C-3995-A
Fig. 15 Remove Rubber Access Plug
DISASSEMBLY AND ASSEMBLY
(b) Then slide retainer off mainshaft and rear
bearing (Fig. 18).
NV247 TRANSFER CASE
DISASSEMBLY
Position transfer case on shallow drain pan.
Remove drain plug and drain lubricant remaining in
case.
REAR RETAINER AND OIL PUMP REMOVAL
(1) Remove rear retainer bolts (Fig. 14).
(2) Remove rear bearing locating ring access plug
(Fig. 15).
Fig. 16 Loosening Rear Retainer
Fig. 14 Rear Retainer Bolt Removal
(3) Loosen rear retainer with pry tool to break
sealer bead. Pry only against retainer boss as shown
(Fig. 16).
(4) Remove rear retainer as follows:
(a) Spread rear bearing locating ring with snap
ring pliers (Fig. 17).
Fig. 17 Disengaging Rear Bearing Locating Ring
(5) Remove rear bearing snap-ring.
NV247 TRANSFER CASE
WJ
21 - 315
DISASSEMBLY AND ASSEMBLY (Continued)
Fig. 18 Rear Retainer Removal
Fig. 20 Pick-up Tube O-ring Location
(6) Remove rear bearing. Note position of bearing
locating ring groove for assembly reference.
(7) Disengage oil pickup tube from oil pump and
remove oil pump assembly (Fig. 19).
(8) Remove pick-up tube o-ring from oil pump (Fig.
20), if necessary. Do not disassemble the oil pump, it
is not serviceable.
Fig. 21 Progressive Coupling Removal
Fig. 19 Rear Bearing and Oil Pump Removal
PROGRESSIVE COUPLING REMOVAL
(1) Remove oil pump locating snap-ring and progressive coupling snap-ring from mainshaft (Fig. 21).
(2) Remove progressive coupling from mainshaft
(Fig. 21).
COMPANION FLANGE AND RANGE LEVER REMOVAL
(1) Remove front companion flange nut as follows:
(a) Move range lever to 4L position.
(b) Remove nut with socket and impact wrench.
(2) Remove companion flange. If flange is difficult
to remove by hand, remove it with bearing splitter, or
with standard two jaw puller. Be sure puller tool is
positioned on flange and not on slinger as slinger will
be damaged.
(3) Remove seal washer from front output shaft.
Discard washer as it should not be reused.
(4) Remove nut and washer that attach range
lever to sector shaft. Then move sector to neutral
position and remove range lever from shaft.
NOTE: Note position of range lever so it can be reinstalled correctly.
FRONT OUTPUT SHAFT AND DRIVE CHAIN REMOVAL
(1) Support transfer case so rear case is facing
upward.
(2) Remove bolts holding front case to rear case.
The case alignment bolt require flat washers (Fig.
22).
(3) Loosen rear case with flat blade screwdriver to
break sealer bead. Insert screwdriver blade only into
notches provided at each end of case (Fig. 23).
(4) Remove rear case (Fig. 24).
21 - 316
NV247 TRANSFER CASE
WJ
DISASSEMBLY AND ASSEMBLY (Continued)
Fig. 22 Rear Case Alignment Bolt Locations
1 – ALIGNMENT BOLT AND WASHER (AT EACH END OF CASE)
Fig. 24 Rear Case Removal
Fig. 23 Loosening Rear Case
1 – REAR CASE
2 – PRY TOOL
(IN CASE SLOT)
3 – FRONT CASE
(5) Remove oil pickup tube from rear case (Fig.
25).
(6) Remove drive gear snap-ring (Fig. 26).
(7) Disengage drive gear (Fig. 26). Pry gear
upward and off mainshaft as shown.
(8) Remove front output shaft, drive chain and
drive gear as assembly (Fig. 26).
(9) Remove output shaft drive gear snap ring.
(10) Remove output shaft drive gear from output
shaft.
SHIFT FORKS AND MAINSHAFT REMOVAL
(1) Remove detent plug, O-ring, detent spring and
detent plunger (Fig. 27).
(2) Remove shift rail from shift fork and transfer
case housing.
(3) Rotate range shift fork until it disengages from
shift sector.
(4) Remove mainshaft and shift fork from input
gear pilot bearing.
Fig. 25 Oil Pickup Tube Removal
NOTE: Loose needle bearings are used to support
the drive sprocket hub on the mainshaft. Do not lift
mainshaft by drive sprocket hub or needle bearings
will become dislodged.
(5) Wrap rag around mainshaft underneath drive
sprocket hub and remove drive sprocket hub from
mainshaft. Be sure to retrieve all the drive sprocket
hub needle bearings.
(6) Remove snap ring holding clutch sleeve onto
mainshaft.
(7) Remove range clutch sleeve, blockout spring,
locking clutch, and locking clutch spring from mainshaft (Fig. 28).
(8) Remove shift sector. Rotate and tilt sector as
needed to remove it (Fig. 29).
WJ
NV247 TRANSFER CASE
21 - 317
DISASSEMBLY AND ASSEMBLY (Continued)
(9) Remove shift sector bushing and O-ring (Fig.
30).
Fig. 26 Front Output Shaft, Drive Gear And Chain
Removal
Fig. 29 Shift Sector Removal
Fig. 27 Detent Plug, Spring And Plunger Removal
Fig. 30 Sector Bushing And O-Ring Removal
1 – SHIFT SECTOR BUSHING
2 – O-RING
Fig. 28 Range Clutch Sleeve, Blockout Spring,
Locking Clutch and Spring
21 - 318
NV247 TRANSFER CASE
WJ
DISASSEMBLY AND ASSEMBLY (Continued)
INPUT GEAR/LOW RANGE ASSEMBLY REMOVAL
(1) Turn front case on side so front bearing
retainer is accessible.
(2) Remove front bearing retainer bolts (Fig. 31).
(3) Remove front bearing retainer as follows:
(a) Loosen retainer with flat blade screwdriver
to break sealer bead. To avoid damaging case
and retainer, position screwdriver blade only
in slots provided in retainer (Fig. 32).
(b) Then remove retainer from case and gear.
Fig. 33 Input Gear Snap-Ring Removal
1 – INPUT GEAR
2 – SNAP RING
Fig. 31 Front Bearing Retainer Bolt Removal
1 – FRONT BEARING RETAINER
Fig. 34 Input And Low Range Gear Assembly
Removal
1 – INPUT AND LOW RANGE GEAR ASSEMBLY
Fig. 32 Front Bearing Retainer Removal
(4) Remove snap-ring that retains input gear shaft
in front bearing (Fig. 33).
(5) Remove input and low range gear assembly
(Fig. 34).
(6) Remove oil seals from following components:
• front bearing retainer.
• rear retainer.
• case halves.
INPUT AND LOW RANGE GEAR DISASSEMBLY
(1) Remove snap-ring that retains input gear in
low range gear (Fig. 35).
(2) Remove retainer (Fig. 36).
(3) Remove front tabbed thrust washer (Fig. 37).
(4) Remove input gear (Fig. 38).
(5) Remove rear tabbed thrust washer from low
range gear (Fig. 39).
NV247 TRANSFER CASE
WJ
21 - 319
DISASSEMBLY AND ASSEMBLY (Continued)
Fig. 35 Input Gear Snap-Ring Removal
Fig. 38 Input Gear Removal
1 – INPUT GEAR SNAP RING
1 – INPUT GEAR
2 – LOW RANGE GEAR
Fig. 36 Input Gear Retainer Removal
1 – INPUT GEAR
2 – LOW RANGE GEAR
3 – RETAINER
Fig. 39 Rear Tabbed Thrust Washer Removal
1 – LOW RANGE GEAR
2 – REAR TABBED THRUST WASHER
ASSEMBLY
Lubricate transfer case components with Mopart
Dexron II automatic transmission fluid or petroleum
jelly (where indicated) during assembly.
CAUTION: The bearing bores in various transfer
case components contain oil feed holes. Make sure
replacement bearings do not block the holes.
Fig. 37 Front Tabbed Thrust Washer Removal
1 – FRONT TABBED THRUST WASHER
BEARING AND SEAL INSTALLATION
(1) Remove front output shaft seal from front case
with pry tool (Fig. 40).
(2) Remove snap-ring that retains front output
shaft bearing in front case (Fig. 41).
(3) Using tool 6953, remove bearing from front
case (Fig. 42).
21 - 320
NV247 TRANSFER CASE
WJ
DISASSEMBLY AND ASSEMBLY (Continued)
Fig. 40 Remove Front Output Shaft Seal
1 – OUTPUT SHAFT SEAL
2 – PRYBAR
Fig. 42 Remove Output Shaft Front Bearing
Fig. 41 Output Shaft Front Bearing Snap-Ring
Removal
(4) Using tool 6953, install new bearing.
(5) Install snap-ring to hold bearing into case.
(6) Install new front output seal in front case with
Installer Tool 6952-A as follows:
(a) Place new seal on tool. Garter spring on
seal goes toward interior of case.
(b) Start seal in bore with light taps from hammer (Fig. 43). Once seal is started, continue tapping seal into bore until installer tool bottoms
against case.
Fig. 43 Front Output Seal Installation
1 – INSTALLER 6952–A
2 – TRANSFER CASE
(7) Remove the output shaft rear bearing with the
screw and jaws from Remover L-4454 and Cup 8148
(Fig. 44).
(8) Install new bearing with Tool Handle C-4171
and Installer 5066 (Fig. 45). The bearing bore is
chamfered at the top. Install the bearing so it is
flush with the lower edge of this chamfer (Fig.
46).
NV247 TRANSFER CASE
WJ
21 - 321
DISASSEMBLY AND ASSEMBLY (Continued)
Fig. 46 Output Shaft Rear Bearing Installation Depth
1 – BEARING (SEATED) AT LOWER EDGE OF CHAMFER
2 – CHAMFER
Fig. 44 Output Shaft Rear Bearing Removal
(9) Using Remover C-4210 and Handle C-4171,
drive input shaft bearing from inside the annulus
gear opening in the case (Fig. 47).
1 – REAR CASE
2 – SPECIAL TOOL L-4454–1 AND L-4454–3
3 – SPECIAL TOOL 8148
Fig. 47 Input Shaft Bearing Removal
1 – SPECIAL TOOL C-4171
2 – SPECIAL TOOL C-4210
Fig. 45 Output Shaft Rear Bearing Installation
1 – HANDLE C-4171
2 – OUTPUT SHAFT INNER BEARING
3 – INSTALLER 5066
(10) Install locating ring on new bearing.
(11) Position case so forward end is facing upward.
(12) Using Remover C-4210 and Handle C-4171,
drive input shaft bearing into case. The bearing
locating ring must be fully seated against case surface (Fig. 48).
(13) Remove input gear pilot bearing by inserting
a suitably sized drift into the splined end of the input
gear and driving the bearing out with the drift and a
hammer (Fig. 49).
(14) Install new pilot bearing with Installer 8128
and Handle C-4171 (Fig. 50).
21 - 322
NV247 TRANSFER CASE
WJ
DISASSEMBLY AND ASSEMBLY (Continued)
Fig. 48 Seating Input Shaft Bearing
1 – SNAP RING
2 – INPUT SHAFT BEARING
Fig. 50 Install Input Gear Pilot Bearing
1 – HANDLE C-4171
2 – INSTALLER 8128
3 – INPUT GEAR
Fig. 49 Remove Input Gear Pilot Bearing
1 – DRIFT
2 – INPUT GEAR
Fig. 51 Install Front Bearing Retainer Seal
(15) Remove front bearing retainer seal with suitable pry tool.
(16) Install new front bearing retainer with
Installer 7884 (Fig. 51).
1 – FRONT BEARING RETAINER
2 – SPECIAL TOOL 7884
INPUT AND LOW RANGE GEAR ASSEMBLY
(1) Lubricate gears and thrust washers (Fig. 52)
with recommended transmission fluid.
NV247 TRANSFER CASE
WJ
21 - 323
DISASSEMBLY AND ASSEMBLY (Continued)
(2) Install first thrust washer in low range gear
(Fig. 52). Be sure washer tabs are properly aligned in
gear notches.
(3) Install input gear in low range gear. Be sure
input gear is fully seated.
(4) Install remaining thrust washer in low range
gear and on top of input gear. Be sure washer tabs
are properly aligned in gear notches.
(5) Install retainer on input gear and install snapring.
Fig. 53 Input/Low Range Gear Installation
1 – ANNULUS GEAR
2 – INPUT/LOW RANGE GEAR
Fig. 52 Input/Low Range Gear Components
1
2
3
4
5
–
–
–
–
–
SNAP RING
RETAINER PLATE
INPUT GEAR
LOW RANGE GEAR
THRUST WASHERS
INPUT GEAR/LOW RANGE INSTALLATION
(1) Align and install low range/input gear assembly in front case (Fig. 53). Be sure low range gear
pinions are engaged in annulus gear and that input
gear shaft is fully seated in front bearing.
(2) Install snap-ring to hold input/low range gear
into front bearing (Fig. 54).
(3) Clean gasket sealer residue from retainer and
inspect retainer for cracks or other damage.
(4) Apply a 3 mm (1/8 in.) bead of Mopart gasket
maker or silicone adhesive to sealing surface of
retainer.
(5) Align cavity in seal retainer with fluid return
hole in front of case.
CAUTION: Do not block fluid return cavity on sealing surface of retainer when applying MoparT gas-
Fig. 54 Install Snap-Ring
1 – INPUT GEAR
2 – SNAP RING
ket maker or silicone adhesive sealer. Seal failure
and fluid leak can result.
(6) Install bolts to hold retainer to transfer case
(Fig. 55). Tighten to 21 N·m (16 ft. lbs.) of torque.
SHIFT FORKS AND MAINSHAFT INSTALLATION
(1) Install new sector shaft O-ring and bushing
(Fig. 56).
(2) Install shift sector (Fig. 57).
(3) Install locking clutch spring, locking clutch,
blockout spring, and range clutch sleeve, to mainshaft as shown in (Fig. 58). Install snap ring.
(4) Install drive sprocket hub to mainshaft and
manually load the needle bearings.
(5) Install new pads on range fork, if necessary.
21 - 324
NV247 TRANSFER CASE
WJ
DISASSEMBLY AND ASSEMBLY (Continued)
Fig. 55 Install Front Bearing Retainer
Fig. 57 Shift Sector Installation
1 – FRONT BEARING RETAINER
Fig. 58 Range Clutch Sleeve, Blockout Spring,
Locking Clutch and Spring
(11) Install detent plunger, spring and plug (Fig.
59).
(12) Verify that plunger is properly engaged in sector.
Fig. 56 Sector O-Ring And Bushing Installation
1 – SECTOR BUSHING
2 – O-RING
(6) Install range shift fork to range clutch sleeve.
Install mainshaft/range shift fork assembly into
transfer case and input planetary assembly. Rotate
fork until it engages with slot in shift sector.
(7) Install shift rail to shift range fork and transfer case housing.
(8) Rotate shift sector to Neutral position.
(9) Install new O-ring on detent plug (Fig. 59).
(10) Lubricate detent plunger with transmission
fluid or light coat of petroleum jelly.
FRONT OUTPUT SHAFT AND DRIVE CHAIN INSTALLATION
(1) Lubricate front output shaft-sprocket assembly,
drive chain and drive sprocket with transmission
fluid.
(2) Assemble drive chain, drive sprocket and front
output shaft (Fig. 60).
(3) Start drive sprocket on mainshaft.
(4) Guide front shaft into bearing and drive
sprocket onto mainshaft drive gear (Fig. 60).
(5) Install drive sprocket snap-ring (Fig. 61).
(6) Install roller bearings if removed.
(7) Install progressive coupling (Fig. 62).
(8) Install oil pickup tube in rear case. Be sure
tube is seated in case notch as shown (Fig. 63).
(9) Install magnet in front case pocket (Fig. 64).
NV247 TRANSFER CASE
WJ
21 - 325
DISASSEMBLY AND ASSEMBLY (Continued)
Fig. 59 Shift Detent Components
Fig. 61 Installing Drive Sprocket Snap-Ring
Fig. 62 Progressive Coupling Installation
Fig. 60 Installing Drive Chain, Front Output Shaft
And Drive Sprocket
1
2
3
4
–
–
–
–
FRONT OUTPUT SHAFT
DRIVE CHAIN
MAINSHAFT
DRIVE SPROCKET
(10) Clean sealing flanges of front case and rear
case with a wax and grease remover.
(11) Apply 3 mm (1/8 in.) wide bead of Mopart
gasket maker or silicone adhesive sealer to mounting
flange of front case. Work sealer bead around bolt
holes as shown (Fig. 65).
(12) Align and install rear case on front case (Fig.
66).
Fig. 63 Oil Pickup Tube Installation
(13) Verify that oil pickup tube is still seated in
case notch and tube end is pointed toward mainshaft
(Fig. 67).
21 - 326
NV247 TRANSFER CASE
WJ
DISASSEMBLY AND ASSEMBLY (Continued)
Fig. 67 Checking Position Of Oil Pickup Tube
Fig. 64 Installing Case Magnet
1 – MAGNET
(14) Install case attaching bolts. Alignment bolts
at each end of case are only ones requiring washers
(Fig. 68).
(15) Tighten case bolts to 27-34 N·m (20-25 ft. lbs.)
torque.
Fig. 68 Alignment Bolt Location
1 – ALIGNMENT BOLT AND WASHER (AT EACH END OF CASE)
Fig. 65 Applying Sealer To Front Case Flange
Fig. 66 Rear Case Installation
COMPANION FLANGE AND RANGE LEVER INSTALLATION
(1) Install range lever, washer and locknut on sector shaft (Fig. 69). Tighten locknut to 27-34 N·m
(20-25 ft. lbs.) torque.
(2) Install new seal washer on front output shaft
(Fig. 70).
(3) Lubricate flange hub with transmission fluid
and install flange on front shaft.
(4) Install new seal washer on front shaft.
(5) Install companion flange and new nut on front
output shaft.
(6) Tighten flange nut to 122-176 N·m (90-130 ft.
lbs.) torque. Use Tool C-3281, or similar tool to hold
flange while tightening yoke nut.
PROGRESSIVE COUPLER
(1) Install coupling on mainshaft (Fig. 71).
(2) Install coupling retaining snap-ring first (Fig.
71). Be sure snap ring is fully seated before proceeding.
NV247 TRANSFER CASE
WJ
21 - 327
DISASSEMBLY AND ASSEMBLY (Continued)
REAR RETAINER AND OIL PUMP INSTALLATION
(1) Install new O-ring on flanged end of oil pickup
tube.
(2) Install oil pump (Fig. 72).
(3) Insert oil pickup tube in pump (Fig. 73).
(4) Install rear bearing on mainshaft (Fig. 73).
Locating ring groove in bearing goes toward end of
mainshaft.
(5) Install rear bearing retaining snap-ring (Fig.
74).
Fig. 69 Range Lever Installation (Typical)
1 – RANGE LEVER
2 – WASHER
3 – LOCKNUT
Fig. 72 Installing Oil Pump
Fig. 70 Flange Seal Washer Installation
1 – YOKE SEAL WASHER
(3) Install oil pump locating snap-ring on mainshaft (Fig. 71).
Fig. 73 Rear Bearing Installation
Fig. 74 Rear Bearing Snap-Ring Installation
Fig. 71 Progressive Coupling And Oil Pump
Snap-Ring Installation
(6) Install rear bearing locating ring in rear
retainer, if ring was removed during overhaul.
(7) Apply 3 mm (1/8 in.) wide bead of Mopart gasket maker or silicone adhesive sealer to mounting
surface of rear retainer. Allow sealer to set-up
slightly before proceeding.
21 - 328
NV247 TRANSFER CASE
WJ
DISASSEMBLY AND ASSEMBLY (Continued)
(8) Slide rear retainer onto mainshaft (Fig. 75).
(9) Spread rear bearing locating ring and slide
rear retainer into place on rear case (Fig. 76).
(10) Install and tighten rear retainer bolts to 27-34
N·m (20-25 ft. lbs.).
(11) Install rubber access plug (Fig. 77).
Fig. 77 Installing Rubber Access Plug
CLEANING AND INSPECTION
NV247 COMPONENTS
GENERAL
Fig. 75 Rear Retainer Installation
Clean the transfer case components with parts
cleaning solvent. Flush the oil passages in the cases
and drivetrain components with solvent. This will
help remove dirt and particles from these passages.
Dry the transfer case components with compressed
air or allow them to air dry on clean shop towels.
Apply compressed air through all oil passages in
the cases and gear components to clear them of any
residue.
MAINSHAFT
Fig. 76 Engaging Rear Bearing Locating Ring
FINAL ASSEMBLY
(1) Install drain plug. Tighten plug to 41-54 N·m
(30-40 ft. lbs.) torque.
(2) Level transfer case and fill it with Mopart
Dexron II automatic transmission fluid. Correct fill
level is to bottom edge of fill plug hole.
(3) Install and tighten fill plug to 41-54 N·m
(30-40 ft. lbs.) torque.
Examine the mainshaft components carefully for
evidence of wear or damage.
Replace the thrust washers if worn or damaged.
Replace the mainshaft and sprocket gears if the
teeth or gear bores are worn or damaged.
Replace the mainshaft bearings if worn, flat spotted, brinelled, or damaged in any way.
Replace the mainshaft if it is bent, exhibits wear or
damage to the bearing surfaces, splines or gear teeth.
INPUT AND LOW RANGE GEARS
Inspect the low range gear pinions and pinion pins.
Replace the low range gear if any of the pins or pinions are worn or damaged.
Inspect the thrust washers, retainer, and snapring. Replace the snap-ring if bent, or distorted.
Replace the thrust washers and retainer if worn,
cracked or damaged in any way.
Examine the input gear carefully. Be sure the gear
teeth and bearing surfaces are in good condition.
Replace the gear if wear or damage is evident.
Check the input gear pilot bearing. Rotate the bearing and check for roughness or noise. Also check bear-
NV247 TRANSFER CASE
WJ
21 - 329
CLEANING AND INSPECTION (Continued)
ing position in the bore. The bearing should be
recessed approximately 2.5 mm (0.100 in.) below the
top edge of the bore. The bearing should not be seated
at the bottom of the bore. Replace the bearing if worn,
or roughness is evident. Replace both the gear and
bearing if the bearing is a loose fit in the bore.
GEAR CASE AND RETAINERS
Examine both case halves and retainers carefully.
Replace any retainer or case half if wear, cracks, or
other damage is evident.
Check condition of the low range annulus gear and
the shift rail bushing in the front case (Fig. 78). The
low range annulus gear is not a serviceable part.
Replace the gear and case as an assembly if the gear
is loose, worn, or damaged. The shift rail bushing is
a serviceable part and can be replaced if necessary.
age. Replace the shaft if necessary. do not attempt to
salvage it if damaged.
The shift rail and range fork are an assembly.
Replace both parts if either is damaged. However, the
nylon pads in the fork can be replaced if worn, or
cracked.
Inspect the transfer case snap rings closely. Do not
attempt to salvage a distorted snap ring by straightening or reshaping it. Replace any snap ring that is
distorted, or worn.
Inspect the low range gear, input gear and the gear
thrust washers retainer, and snap ring. The low
range gear is serviced as an assembly only. Replace
the gear if the case or pinions are damaged.
During inspection, also make sure the seal surface
of the input gear is in good condition. Minor nicks on
this surface can be reduced with crocus cloth. However, replace the gear if the seal surface is severely
scored or worn.
OIL PUMP AND PROGRESSIVE COUPLING
The oil pump and progressive coupling are not serviceable components. Replace the coupling as an
assembly if it is leaking or damaged. Replace the oil
pump as an assembly if the gear teeth are worn, or if
the pump has become damaged.
BEARINGS AND SEALS
The transfer case seals should be replaced during
overhaul. Use new seals in the input gear bearing
retainer, front case and rear retainer. Also replace
the yoke seal washer and the detent plug O-ring.
Check condition of each transfer case bearing.
Replace any bearing exhibiting signs of roughness,
wear, or damage.
SPECIFICATIONS
Fig. 78 Low Range Annulus Gear Location
Check the bushing in the rear retainer. Replace the
bushing if worn or scored.
Examine the sealing surfaces of both case halves
and retainers. Small burrs, or scratches on these surfaces can be reduced with crocus cloth or a fine tooth
file.
Examine condition of the shift rail bushing in the
front case. If the bushing is worn or damaged, it can
be removed with a blind hole type puller. A replacement bushing can be installed with a suitable size
driver. Recess the bushing slightly below the edge of
the bore but do not seat it all the into the case.
GEARTRAIN
Inspect the mainshaft splines, gear teeth and bearing surfaces carefully for evidence of wear, or dam-
TORQUE
DESCRIPTION
Bolt, crossmember . . . . 41-47 N·m
Plug, Detent . . . . . . . . . 16-24 N·m
Plugs, drain/fill . . . . . . . 41-54 N·m
Bolts, front brg. retainer . . . . . . . .
TORQUE
(30-35 ft. lbs.)
(12-18 ft. lbs.)
(30-40 ft. lbs.)
. . 16-24 N·m
(12-18 ft. lbs.)
Bolts, case half . . . . . . . 27-34 N·m (20-25 ft. lbs.)
Nut, companion flange . . . . . . . . . . 122–176 N·m
(90-130 ft. lbs.)
Bolts, rear extension . . 27-34 N·m (20-25 ft. lbs.)
Lock-nut, shift . . . . . . . 27-34 N·m (20-25 ft. lbs.)
Nuts, T-case mount stud . . . . . . . . . . . 33-41 N·m
(24-30 ft. lbs.)
21 - 330
NV247 TRANSFER CASE
WJ
SPECIAL TOOLS
NV247 TRANSFER CASE
Installer—C-3995-A
Installer—5066
Installer—6952-A
Handle—C-4171
Installer—6953
Installer—8145
Remover—6957
Remover—C-4210
NV247 TRANSFER CASE
WJ
SPECIAL TOOLS (Continued)
Installer—8128
Remover—L-4454
Installer—7884
Cup—8148
21 - 331