1
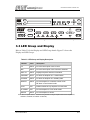
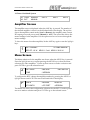
INSTALLATION
&
OPERATION
M A N U A L
RACK MOUNT REMOTE CONTROL UNIT (1RU)
Service Center Headquarters and Design Center
West Coast Operations
811 Hansen Way
Palo Alto, CA 94303
Manufacturing
East Coast Operations
45 River Drive
Georgetown, Ontario
Canada L7G 2J4
Doc. 01032319 Rev. 2
PROPRIETARY INFORMATION
The design and other information contained in this document are provided solely for the
purposes of operating and maintaining CPI equipment. Except for rights expressly
granted by contract, all such information is the exclusive property of CPI Satcom Division.
This document may not be duplicated, in whole or in part, or be used for manufacture
without written permission of CPI, Satcom Division.
Copyright © 2006 by Communications & Power Industries. All rights reserved.
Doc. 01032319 Rev. 2
RACK MOUNT REMOTE CONTROL UNIT
i-i
Table of Contents
SAFETY _____________________________________________________________ S-1
INTRODUCTION _____________________________________________________ S-1
HIGH VOLTAGE EQUIPMENT ________________________________________ S-1
PERSONNEL OPERATING GUIDELINES _____________________________________ S-1
WHEN IS VOLTAGE "HIGH"? ____________________________________________ S-2
GENERAL GUIDELINES _________________________________________________ S-2
MICROWAVE RADIATION____________________________________________ S-6
PERSONNEL OPERATING GUIDELINES _____________________________________ S-6
MICROWAVE DISCUSSION ______________________________________________ S-6
GENERAL MICROWAVE GUIDELINES ______________________________________ S-7
CHAPTER 1 INTRODUCTION _________________________________________ 1-2
1.1
OVERVIEW____________________________________________________ 1-2
1.2
ABOUT THIS MANUAL _________________________________________ 1-3
1.3
CONVENTIONS ________________________________________________ 1-4
NOTES AND CAUTIONS _________________________________________________ 1-4
WARNINGS __________________________________________________________ 1-4
TEXT CONVENTIONS __________________________________________________ 1-4
CHAPTER 2 UNPACKING & INSTALLATION ___________________________ 2-1
2.1
OVERVIEW____________________________________________________ 2-1
2.2
PRE-INSPECTION ______________________________________________ 2-1
2.3
UNPACKING___________________________________________________ 2-1
2.4
INSTALLATION________________________________________________ 2-1
2.4.1
2.4.2
2.4.3
RCU INSTALLATION __________________________________________ 2-1
ELECTRICAL POWER CONNECTIONS ______________________________ 2-2
REMOTE INTERFACES __________________________________________ 2-3
CHAPTER 3 OPERATION _____________________________________________ 3-1
3.1
OVERVIEW____________________________________________________ 3-1
3.2
CONTROL KEYS _______________________________________________ 3-2
3.3
LED GROUP AND DISPLAY _____________________________________ 3-3
3.4
MULTI-DROP OPERATION _____________________________________ 3-6
AMPLIFIER ADDRESS ASSIGNMENT _______________________________________ 3-6
OPERATIONAL SUMMARY OF THE REMOTE CONTROL UNIT (RCU) ______________ 3-7
3.5
REMOTE CONTROL PANEL SCREENS___________________________ 3-9
SYSTEM STATUS SCREEN _______________________________________________ 3-9
DOC.01032319 REV.2
i-i
RACK MOUNT REMOTE CONTROL UNIT
AMPLIFIER SCREEN___________________________________________________ 3-10
MENU SCREEN ______________________________________________________ 3-10
SETTINGS SCREENS ___________________________________________________ 3-11
METER READINGS SCREENS ____________________________________________ 3-11
METER LOG SCREENS _________________________________________________ 3-12
TIME SCREENS ______________________________________________________ 3-12
AMPLIFIER VERSION __________________________________________________ 3-13
REMOTE CONTROL UNIT CONFIGURATION ________________________________ 3-13
RF UNITS __________________________________________________________ 3-13
AUDIBLE BUZZER ____________________________________________________ 3-13
DISPLAY ___________________________________________________________ 3-14
IP CONFIGURATION __________________________________________________ 3-14
CIF PORT SETTINGS __________________________________________________ 3-14
VERSION ___________________________________________________________ 3-14
SET POWER SCREEN __________________________________________________ 3-15
REMOTE M&C ______________________________________________________ 3-15
3.6
FIRMWARE UPDATES _________________________________________ 3-16
UPDATING FIRMWARE USING HYPERTERMINAL IN WINDOWS _________________ 3-16
UPDATING FIRMWARE USING FTP FROM INTERNET EXPLORER ________________ 3-18
REMOTE PANEL JUMPER SETTINGS ______________________________________ 3-19
3.7
DETAILED SPECIFICATIONS __________________________________ 3-20
CHAPTER 4 DRAWINGS ______________________________________________ 4-1
APPENDIX A WARRANTY & SUPPORT_________________________________A-1
APPENDIX B TYPICAL FUNCTIONAL TREES ___________________________ B-1
List of Figures
FIGURE 1-1.
FIGURE 2-1.
FIGURE 3-1.
FIGURE 3-2.
FIGURE 3-3.
FIGURE 3-4.
FIGURE 3-5.
RACK MOUNT REMOTE (FRONT VIEW) ____________________ 1-3
RCU CONNECTOR LOCATIONS _____________________________ 2-3
REMOTE CONTROL UNIT FRONT AND REAR PANELS ________ 3-1
REMOTE CONTROL UNIT CONTROL KEYS __________________ 3-3
LED AND DISPLAY GROUP_________________________________ 3-4
REMOTE CONTROL UNIT MENU TREE ______________________ 3-5
REMOTE CONTROL UNIT JUMPER LOCATIONS _____________ 3-19
List of Tables
TABLE 2-1. J1, 4-WIRE RS-422/485 INTERFACE PIN-OUT___________________ 2-3
TABLE 2-2. J2, ETHERNET 10-BASE-T INTERFACE PIN-OUT _______________ 2-3
TABLE 2-3. J3, CAN-BUS INTERFACE PIN-OUT ___________________________ 2-4
TABLE 2-4. J4, RS-232/RS-485 M&C INTERFACE PIN-OUT__________________ 2-4
TABLE 3-1. FRONT PANEL CONTROL KEYS______________________________ 3-2
TABLE 3-2. LED GROUP AND DISPLAY DESCRIPTION ____________________ 3-3
i-ii
DOC.01032319 REV.2
RACK MOUNT REMOTE CONTROL UNIT
S-1
Safety
Introduction
In addition to the High Voltage Equipment Personnel Operating Guidelines given in
this chapter, included by reference are the following pertinent sections of the
International Standard EN60215, Safety Requirements for Radio Transmitting
Equipment:
•
Appendix D, Guidance on Assessing the Competence of Personnel
for Designation as Skilled, and also Sub-clause 3.1 of the Standard.
•
Appendix E, Guidance on Safety Precautions to be Observed by
Personnel Working on Radio Transmitting Equipment, and also
Sub-clauses 3.2, 3.7, and 22.1 of the Standard.
High Voltage Equipment
Personnel Operating Guidelines
This guideline document presents operating practices for operators and
technicians who work with high voltage equipment. In the context of this
discussion any voltage that is lethal is viewed as "high voltage." Therefore, even
prime power (115 to 440VAC) is dangerous because prime power potentials have
been known to cause death or injury.
Electrical circuits operate quickly and do not allow a careless individual a second
chance. When dealing with high voltage, the results are very consistent and
predictable and hazards associated with high voltage are always present. The fact
that the control switch says OFF does not mean you are safe.
NOTE: The guidelines presented in this chapter are not
academic. They are based on the experience of engineers and
technicians who have years of experience with high voltage
circuits.
DOC.01032319 REV.2
S-1
RACK MOUNT REMOTE CONTROL UNIT
When is Voltage "High"?
As stated earlier, any voltage that can kill you should be treated as high voltage.
Voltages associated with prime power generally do not jump the air gap between
people and the equipment. Usually exposed circuit elements such as a terminal,
bare piece of wire, or some non-insulated surface must be touched.
One of the problems associated with prime power is some equipment can be
"floating" above ground. In this case, if you place one hand on the equipment
chassis and the other on earth ground, you can be jolted, injured, or killed.
440VAC can stimulate an involuntary muscle response that will either literally
throw you across a room or seize and hold you across the voltage terminals. 600
or more volts can hold you indefinitely. If the potential is sufficient to drive 200
milliamps through your body you will be held indefinitely. Some people consider
the 200 to 600 volt range to be worse than potentials of thousands of volts.
General Guidelines
In addition to the above, the following practices have proven effective for
personnel who deal with high voltage equipment.
a. Hands off. Avoid contact with any potential source of high
voltage. Keep hands out of the equipment when it is operating.
b. Avoid accidental contact. Make sure that some other part of
your body does not come in contact with the high voltage
circuits. It is easy to forget the hazards when you are
concentrating on a frustrating or interesting task. Pens and
badges in shirt pockets could contact the equipment.
c. Never work on high voltage circuits when you are alone. If
anything should happen to you, your only chance may be
prompt action by some other person. Be sure someone else is
present and knows what to do in any emergency (e.g., how to
shut equipment off, first aid, who to call, etc.)
d. Use one hand when working with high voltage circuits. Many
people recommend that you put one hand in your pocket when
you use a probe or other piece of equipment inside a high
voltage section.
e. Do not float measuring equipment above ground. Make all
measurements with respect to ground. If you float an
instrument, do not reach inside the equipment. Although it is
more difficult to get the right setup, it is well worth the effort.
f.
S-2
Do not assume that the level of risk is a function of size.
Some large high power voltage equipment looks docile. One
reason the equipment is so big is to get the proper separation
between high voltage points. On the other hand, just because
DOC.01032319 REV.2
RACK MOUNT REMOTE CONTROL UNIT
the equipment is small is no assurance of safety. Dense
packaging results in more difficult access and increases the
chance that you will accidentally hit the wrong point.
g. Always discharge high voltage capacitors. High voltage
capacitors store a lot of energy for long periods of time. High
voltage capacitors also exhibit a "memory" in that they can
recover after discharge and reach lethal levels. In addition to
the "memory" problem, there have been instances where the
built-in safety features have failed or have been miswired. Each
and every time you go to work on a piece of high voltage
equipment, use a discharge device with a long handle to
discharge every high voltage capacitor.
h. Do not depend on the automatic features of the equipment to
save you. You never know when someone has left a circuit
disabled, if there has been a wiring error, or if a component has
failed.
i.
Take personal responsibility to assure that no one can turn on
the high voltage circuits when you are working on the
equipment. Precautions would include taping down (or
installing a keeper) on controls/circuit breakers and/or
disconnecting the power source to the high voltage circuits,
activating interlocks that prevent high voltage turn on, etc.
Know where the power disconnects are and use them. Do NOT
rely on anyone not to turn on the high voltage.
j.
Set up your test equipment with the power off. Conduct the
power-on operations when you have your hands out of the
equipment.
k. Do not use short probes for high voltage measurements. A
short probe does not allow any margin for error. If your hand
slips you could accidentally come into contact with a danger
point. A long probe avoids the whole problem.
l.
Read the instruction manual. The best insurance is
foreknowledge of hazards.
m. Create a favorable environment for safe operations. This
means that if people are crowding you, stop the operation if it
involves high voltage. Pressure can lead to carelessness. In the
same way, fatigue is also an enemy. STAY ALERT AT ALL
TIMES WHEN WORKING WITH HIGH VOLTAGE.
n. Do not become over-confident. Maintain a healthy respect for
high voltage.
o. A good operating practice is to check the potential between
the equipment chassis and earth ground before you complete
DOC.01032319 REV.2
S-3
RACK MOUNT REMOTE CONTROL UNIT
the circuit with your body. As voltage levels increase, the
protection you get from insulation and air gap diminishes. For
example, in a piece of equipment that involves beam voltages of
about 16kV, the beam transformers look very safe with massive
insulation on the outside of the coils. Physical contact with the
beam coil when the system is operating can be fatal. Although
the equipment is placard to warn people of the presence of high
voltage, it is virtually impossible to placard every point of
danger in a system.
p. If you do not know how the equipment works and what the
hazards associated with the equipment are in specific terms,
do NOT handle the equipment. The greatest protection you
can have when dealing with high voltage equipment is specific
detailed knowledge on that particular piece of equipment.
q. Avoid "haywire" test setups. It is easy to get in trouble if the
setup you are using has a jumble of wires.
r. Make sure your connections are secure. Do NOT allow leads
to slip off and move about in an uncontrolled fashion. Even if it
is not one of the high voltage leads, a free lead could (and
generally does) move exactly to where you do not want it. The
only safe connection is a mechanically secure one.
s. Watch out for unterminated high voltage leads. Some
connectors depend on circuit loading to avoid arcing between
closely spaced terminals. Unloaded high voltage lines or plugs
can lead to arcing situations.
t.
Shut off the high voltage when you are making low voltage
measurements. It does not make sense to increase danger
needlessly. While there may be times when you cannot shut off
the high voltage during a low voltage measurement, this is
generally not the case.
u. Remove the test equipment when you have finished a
measurement program. There have been many instruments
destroyed or damaged because a test program was conducted in
a haphazard manner, rather than in an orderly progression
from start to finish. Experience has shown in many instances
when a little order would have prevented a tragedy or avoided
an expensive mistake.
v. Be extremely wary when making filament voltage
measurements. The cathode of tubes is elevated above (or
below) ground and the filament voltages usually cannot be
measured with reference to ground. Do everything you can to
assure that the high voltage cannot be turned on when you are
making your measurements. This includes disconnecting the
high voltage drive source, shorting out appropriate leads,
S-4
DOC.01032319 REV.2
RACK MOUNT REMOTE CONTROL UNIT
taping down switches, and anything else you can think of to
protect yourself.
w. When troubleshooting a unit, assume that the switches and
components are defective. You may shut off the high-voltage
switch in some systems, but if the switch were defective, the
high voltage would still be on. Returned units are potential
booby traps.
x. Make sure that your workstation is stable. Flimsy work
surfaces or supports for the equipment or the test instruments
represent a real threat. Do NOT use a setup that you know is
unstable and/or dangerous.
y. Use a 1-minute rule. Wait 1 minute or more after you have
shut off the equipment before you work on a unit. Part of the
reason for a
1-minute rule is that some of the dielectrics (insulators) used for
high voltage circuits can store a charge. While the amount of
charge stored is a function of the size of the object, a 1-minute
rule provides an additional margin of safety.
z.
DOC.01032319 REV.2
Maintain a healthy respect for any kind of live circuit.
Complacency can hurt or kill you. Your continued wariness is
your best insurance against injury or death.
S-5
RACK MOUNT REMOTE CONTROL UNIT
Microwave Radiation
Personnel Operating Guidelines
This guideline presents operating practices appropriate for operators and
technicians who work with equipment involving microwave radiation. Keep in
mind that levels of microwave radiation that do not induce immediate physical
discomfort in most individuals can be sufficiently high to induce longer-term
effects.
CPI Satcom Division equipment usually is related to amplification of a RF signal
from an external source. Even if a source is not connected to the amplifier you are
working with, there are situations where the amplifier can go into a self-induced
mode and generate high levels of RF energy. This condition can exist if the unit is
operated with high voltage ON and without proper termination on the input and
output of the amplifier.
ELECTRICAL HAZARD! PROTECT YOURSELF AND THOSE
AROUND YOU FROM UNWANTED RF EXPOSURE. ALWAYS
TERMINATE THE AMPLIFIER INPUT AND OUTPUT WITH A RF
DUMMY LOAD BEFORE YOU TURN THE HIGH VOLTAGE ON.
THIS WILL REDUCE THE CHANCES OF OSCILLATION DUE TO
INTERNAL AMPLIFIER NOISE.
Microwave Discussion
Limit exposure to microwave radiation to prevent unwanted biological effects.
There are other effects that can lead to problems if you are careless in operating or
servicing microwave equipment. The permissible levels are quite low in
comparison to the power levels of the amplifiers built by CPI (e.g., less than 10
milliwatts vs. 20 to 10,000 Watts delivered by different units)
Local radiation levels can be detected with the proper equipment. The permissible
levels are currently being studied by a number of organizations. In the past the
U.S. Safety Codes established a dosage rate of 10mw/cm. Sq. Recently the
permissible level has been reduced to 1mw/cm. sq. in the United States, as has
been the case in several European countries.
S-6
DOC.01032319 REV.2
RACK MOUNT REMOTE CONTROL UNIT
General Microwave Guidelines
The purpose of these guidelines is to provide practical approaches to control
unwanted microwave energy associated with the operation and servicing of CPI
Satcom Division equipment.
The following approaches are effective in both laboratory or field environments:
a. Always terminate the output waveguide or coaxial connector
with a dummy RF load (capable of dissipating full CW RF
power). Similarly, terminate the input to avoid the possibility
of the amplifier being driven by stray leakage signals.
Incorporate the terminations prior to applying prime power to
the amplifier. This procedure prevents self-oscillation and
irradiation of the local equipment.
b. Do not look into the output port of the powered RF amplifier.
Treat the powered amplifier as though it is a loaded gun. Your
eyes are particularly vulnerable parts of your body.
c. Shut off the unit if you are trying to locate a RF leak. As noted
earlier, the levels of concern are very low. Examine the physical
unit with the high voltage OFF. If you have to survey the RF
runs with the power ON to find the leaky joint or component,
start by testing the system with low RF input and a radiation
meter.
If the microwave radiation exceeds 0.5mw/cm. sq., shut OFF
the high power voltage and consult your supervisor. Work
quickly (not at a panic pace) to minimize the dose level. The
dose you get is directly proportional to the power level and the
time you are exposed. Exposure to microwave radiation can
induce both thermal and non-thermal biological effects,
especially with the eyes. If you damage the lens of your eyes by
exposure to microwave radiation, cataracts can result. Consider
that small microwave ovens are very effective in cooking foods.
If you follow these guidelines you can minimize exposure of
yourself and other people in the operations that you control.
1-1
DOC.01032319 REV.2
S-7
RACK MOUNT REMOTE CONTROL UNIT
Chapter 1
Introduction
1.1 Overview
The CPI Rack Mount Remote Control Unit is packaged in a Single Rack Unit and is
designed to provide both direct control and/or interfacing with an M&C system.
The Remote is capable of full monitoring and control of up to 10 Amplifiers or a
Single Switch System (1:1, 1:1 Power Combined, 1:2).
The following are some of the general features of the RCU.
•
Compact Design: One Rack Unit High
•
Two dedicated ports (Serial And Ethernet) for simultaneous
connection to an M&C System
•
Dedicated system control point selection and display
•
Dedicated control for switch system status and configuration
functionality
•
Dedicated Amplifier unit number selection and display
•
Display of all Amplifier operating parameters and Event Log data
•
Full control of Amplifier parameter and configuration settings
•
Selectable Amplifier meter display on Amplifier Status screen
•
Automatic Multi-Amplifier recognition and identification
•
Built-in Amplifier address setting functionality
•
16X280 High Brightness Vacuum Fluorescent Display
The RCU operates with AC input (line) voltages of 100 - 240 ± 10% VAC at any
frequency between 47 and 63 Hz.
Figure 1-1 shows a front view of the Rack Mount Remote Control Unit.
1-2
DOC.01032319 REV.2
RACK MOUNT REMOTE CONTROL UNIT
Figure 1-1. Rack Mount Remote (Front View)
All of the RCUs are the same size weight. They weigh approximately 5 pounds
(2.2 kg.), the overall dimensions, excluding switches, connectors, and mounting
brackets, are 1.75 by 10.25 by 19.0 inches.
Detailed specifications for the Rack Mount RCU are provided in Chapter 4,
"Drawings”.
1.2 About This Manual
This manual describes the Rack Mount Remote Control Unit installation and
operation procedures.
The Safety section that precedes Chapter 1 provides practical guidelines regarding
High Voltage operating practices.
Chapter 1, "Introduction," contains a brief description of the Rack Mount Remote
Controller unit and this manual.
Chapter 2, “Unpacking and Installation”, contains procedures for unpacking and
installing Rack Mount RCU.
Chapter 3, “Initial Power ON, Checkout and Operation”, describes the controls and
indicators on the front panel of the RCU and a description of the operation of the
RCU. It also includes the procedures to use for initial checkout after the RCU has
been installed.
Chapter 4, “Drawings”, contains relevant engineering drawings and specifications
of the Hub Mount Low Power Amplifier.
The Appendices, “A” through “G”, contain additional topics such as “Service and
Warranty” information and optional features.
DOC.01032319 REV.2
1-3
RACK MOUNT REMOTE CONTROL UNIT
1.3 Conventions
The following symbols and conventions are used in this manual. These symbols
differ slightly from International symbols to emphasize the specific nature of the
hazards.
Notes and Cautions
NOTE: Notes provide additional commentary or technical information.
CAUTION! Cautions identify conditions, operations, or procedures
that could potentially damage the equipment.
Warnings
There are three different warnings, Electrical Hazards, Radiation (microwave)
Hazards, and Physical Hazards (mechanical, chemical, miscellaneous).
ELECTRICAL HAZARD! IDENTIFY CONDITIONS, OPERATIONS, OR
PROCEDURES THAT EXPOSE THE OPERATOR TO POTENTIALLY LETHAL
HIGH VOLTAGES.
PHYSICAL HAZARD! IDENTIFY CONDITIONS, OPERATIONS, OR
PROCEDURES THAT COULD INDUCE STRAIN, MAIM, OR KILL PEOPLE.
THIS INCLUDES HEAVY WEIGHTS, SHARP EDGES OR PROTRUSIONS,
AND CHEMICAL HAZARDS.
Text Conventions
When operator action is required for software entries, the action required is key-in
commands will be in Italics and items shown in the display will be in Bold. For
example, press ENTER.
1-4
DOC.01032319 REV.2
RACK MOUNT REMOTE CONTROL UNIT
This page is intentionally left blank.
DOC.01032319 REV.2
1-5
RACK MOUNT REMOTE CONTROL UNIT
2-1
Chapter 2
Unpacking & Installation
2.1 Overview
This chapter contains instructions for unpacking and installing the Rack Mount
Remote Control.
2.2 Pre-Inspection
Inspect the exterior of the shipping container(s) for evidence of damage in
shipment. If damage is evident, immediately contact the carrier that delivered the
equipment and submit a damage report. Failure to do so could invalidate future
claims.
2.3 Unpacking
Carefully unpack and remove all items from the shipping container(s). Inspect the
interior of the container for damage. Save all packing material until all inspections
are complete. It is recommended that all packing material be saved for potential
future use. Verify that all items listed on the packing slips have been received.
Inspect all items for evidence of damage in shipment. If damage seems evident,
immediately contact the carrier that delivered the equipment and file a claim.
Failure to do so could invalidate future claims.
2.4 Installation
Installation of the Rack Mount Remote Control includes:
2.4.1
•
Mechanical installation
•
Electrical power connection
•
Remote control interface connections
RCU Installation
Refer to the appropriate Outline Drawing in Chapter 4 “Drawings” for outline and
mounting information.
DOC.01032319 REV.2
2-1
RACK MOUNT REMOTE CONTROL UNIT
The RCU may be mounted using the four holes located on the front of the panel
(refer to the Outline Drawing). These holes are patterned to interface with a
standard 19-inch wide rack, one RU high.
It is recommended that the area directly behind the RCU be kept clear to provide
access for cabling.
The RCU requires no special cooling considerations, but it is recommended that
the Unit be isolated from outside heat or magnetic sources such as indoor
amplifiers that might be installed in the same rack.
2.4.2
Electrical Power Connections
All electrical and communications connections to the RCU are located on the rear
panel (Figure 2-1).
ELECTRICAL HAZARD! DO NOT APPLY POWER TO THE RCU
UNTIL YOU ARE DIRECTED TO DO SO IN THE PROCEDURE.
Prime power is applied to connector AC IN located on the rear panel of the
amplifier. Prime power is 100 - 240VAC +/- 10% (nominal), 47-63 Hz. A prime
power mating cable is supplied in the ship kit with the unit. Do not connect the
cable to the amplifier at this time.
Proper grounding of the RCU amplifier to the station ground bus or to earth
ground is necessary for personnel and equipment safety. The 6-32 threaded
ground screw on the amplifier front panel is used for grounding. #18AWG wire
or larger is recommended for the grounding cable.
The RCU should be protected against lightning.
J6 100-240VAC 1A 50-60HZ
RS-485
J4 RS-232 / RS-485
FROM M&C
J2 10BASE-T
J3 CAN BUS
LAN
2-2
R
S4
85
TO
ET
H
ER
N
ET
J1
SE
C
)
10
BA
SE
-T
BI
TS
/
J2
(1
00
K
BU
S
C
AN
J3
AC AC
P PO
FU OW W
SE ER ER
O IN
1
AM N
/
C
P OF
H
25 F
AS
0V
SI
J5
AC
S
R
G
M
S2
R
&C
O
32
U
SE
N
D
D
R
IA
IA
G
L
N
SE P
O
ST
LE OR
IC
C TR
TO S
J4
R 2
R
S2
SW 32
/
32
IT 485
/4
C
85
H
FR
O
M
M
&C
RS-232
J1 RS-485 TO PA
LINK
AM
PL
IF
IE
R
J5 RS-232
I
0
DOC.01032319 REV.2
RACK MOUNT REMOTE CONTROL UNIT
2.4.3 Remote Interfaces
J1 is the communication link to the Amplifier(s). It is a 9-pin socket, D-type DB9F
connector, with pin assignments as shown in Table 1.
Interconnect cables between the RCU and Amplifier(s) should be wired for RS422/485 (see table 1). A cable assembly similar to CPI drawing #01032322(if from
the DB9 connector of the RCU to the circular connector of the outdoor type
amplifier), or drawing #01023630 (if from the DB9 connector of the RCU to the
DB9 connector of the rack mount type amplifier) should be used (see Chapter 4).
The cable may be daisy-chained for up to 10 units in multi-drop configuration. All
amplifiers MUST have a unique address.
Table 2-1. J1, 4-wire RS-422/485 Interface Pin-out
Pin
Description
1
GND
2
3
RX-
4
TX-
5
6
TX+
7
-
8
-
9
RX+
J2 is an Ethernet connection used between the RCU and M&C via LAN. It is an RJ45 connector, with pin assignments as shown in Table 2. This connection may be
used for software updates from CPI.
Table 2-2. J2, Ethernet 10-BASE-T Interface Pin-out
DOC.01032319 REV.2
Pin
Description
1
TD+
2
TD-
3
RD+
4
TD-CT
5
RD-CT
6
RD-
7/8
-
2-3
RACK MOUNT REMOTE CONTROL UNIT
J3 is a CAN-BUS connection and is for factory use only. It is a 9-pin socket, D-type
DB9M connector, with pin assignments as shown in Table 3.
Table 2-3. J3, CAN-BUS Interface Pin-out
Pin
Description
1
-
2
CAN-L
3
GND
4
-
5
-
6
GND
7
CAN-H
8
-
9
-
J4 is a selectable RS-232/RS-485 connection used between the RCU and M&C. 9pin socket, D-type DB9F connector, with pin assignments as shown in Table 4.
Table 2-4. J4, RS-232/RS-485 M&C Interface Pin-out
2-4
Pin
Description
1
GND
2
RS-232TX
3
RS-232RX/RX-
4
TX-
5
GND
6
TX+
7
-
8
-
9
RX+
DOC.01032319 REV.2
RACK MOUNT REMOTE CONTROL UNIT
3-1
Chapter 3
OPERATION
3.1 Overview
The Rack Mount Remote Control Unit is normally operated in the REMOTE mode
via the one of three serial interface types connected to an M&C system (via LAN
for Ethernet).
•
The front and rear panels of the Remote Control Unit are shown in
Figure 3-1.
•
The functions of the unit are split as shown in Figure 3-2.
•
The Control Keys are discussed in Section 3.2.
•
The Display and LED group are discussed in Section 3.3.
•
Multi-drop functionality and Amplifier addressing are discussed in
Section 3.4.
•
Remote Control Panel Screens are discussed in Section 3.5.
•
Firmware Updates are discussed in Section 3.6.
SYSTEM
M
ENU
RESET
LCL
AMP
M&C
FAULT
J6 100-240VAC 1A 50-60HZ
J5 RS-232
RS-485
RS-232
J4 RS-232 / RS-485
FROM M&C
J3 CAN BUS
J2 10BASE-T
LAN
J1 RS-485 TO PA
LINK
Figure 3-1. Remote Control Unit Front and Rear Panels
The AC Power switch is on the left end of the rear panel. The power required is
100 – 240VAC 50/60 Hz, single phase, < 10Watts.
DOC.01032319 REV.2
3-1
RACK MOUNT REMOTE CONTROL UNIT
3.2 Control Keys
The Remote Control Unit Control Keys are functionally grouped as described in
Table 3-1. These keys are shown in Figure 3-2.
Table 3-1. Front Panel Control Keys
3-2
Key
Description
CONTROL
Sets the control point for the amplifier. Toggles between Local,
Serial and Ethernet.
In local mode the LCL LED will be lit and only the RCU can control
the amplifiers. An M&C system can still query on the Serial or
Ethernet ports.
In Serial or Ethernet mode the M&C LED will be lit and only the
Serial or the Ethernet port can control the amplifiers. The RCU can
still query the amplifiers.
SYSTEM
If a switch system is detected (1:1, 1:1 Power Combined, 1:2):
1st press: Switch system status screen
2nd press: Switch system configuration screen
AMP
Shows the amplifier status screen. When several amplifiers are
connected, use LEFT/RIGHT keys to switch amplifier as indicated
by the amplifier number on the left-hand side of the display.
TRANSMIT
If the RCU control point is local, a transmit command will be sent to
the amplifier.
STANDBY
If the RCU control point is local, a standby command will be sent to
the amplifier.
RF INHIBIT
Sets/ Resets the RF Inhibit state of the Amplifier.
RESET
Resets the fault state of the Amplifier.
MENU
Displays the menu selections for the amplifier. Repeat pressing
the key to show the menu for other amplifiers or to set RCU
configuration
(P shown on the left hand side of the display).
SET PWR
Displays the output power and attenuation set points of the
amplifier.
DOC.01032319 REV.2
RACK MOUNT REMOTE CONTROL UNIT
SYSTEM
M
ENU
RESET
LCL
AMP
M&C
FAULT
SYSTEM
MENU
RESET
LCL
AMP
M&C
FAULT
Figure 3-2. Remote Control Unit Control Keys
3.3 LED Group and Display
Refer to Table 3-2 for the Display and LED Group details. Figure 3-3 shows the
Display and LED Groups.
Table 3-2. LED Group and Display Description
Indicator
Color
Description
LCL
Amber
On if the control point is set to Local.
M&C
Amber
On if the control point is set to Serial or Ethernet.
DISPLAY
Amber
Displays Amplifier and RCU information.
TRANSMIT
Green
On when the amplifier is in Transmit state.
STANDBY
Amber
On when the amplifier is in Standby state.
REMOTE
Amber
On if the amplifier is in Remote control mode.
Off when in Local control mode.
FAULT
Red
Flashes whenever any amplifier is in fault state.
RF INHIBIT
Red
On if the amplifier is in RF Inhibit mode.
ONLINE
Amber
On if the amplifier is Online.
Note: When in System screen, Indicators showing the state of a single amplifier will be turned off (REMOTE,
TRANSMIT, STANDBY, RF INHIBIT and ONLINE).
DOC.01032319 REV.2
3-3
RACK MOUNT REMOTE CONTROL UNIT
SYSTEM
M
ENU
RESET
LCL
AMP
M&C
FAULT
MENU
RESET
FAULT
SYSTEM
1
LCL
RM
T TRANSM
IT
47. 8dBm M
ANUAL
REFL RF: 18W HELI X: 5m
A HELI X V: 6. 21kV
AMP
M&C
Figure 3-3. LED and Display Group
The menu tree shown in Figure 3-4 identifies the first level displayed messages
associated with each of the main Remote Control Unit display modes with an
Amplifier selected.
For a more complete Menu tree by individual product, refer to appendices in this
manual.
3-4
DOC.01032319 REV.2
RACK MOUNT REMOTE CONTROL UNIT
Control Screen
Amp Screen
Menu Screen
LOCAL
SERIAL
ETHERNET
AMPLIFIER #
REMOTE/ LOCAL STATUS
FTD MM:SS/STANDBY/
BEAM ON SEQUENCE/
TRANSMIT
RF OUT XXX W
POWER MODE ALC/MAN
SELECTABLE METERS
SETTINGS
METERS
METER LOG
TIME
VERSION
(TOGGLE CONTROL BUTTON)
System Screen
SYSTEM CONFIGURATION
SYSTEM STATUS
(TOGGLE SYSTEM BUTTON)
Set Pwr Screen
MANUAL RF OUT
ALC RF OUT
ATTENUATION
POWER MODE
Figure 3-4. Remote Control Unit Menu Tree
DOC.01032319 REV.2
3-5
RACK MOUNT REMOTE CONTROL UNIT
3.4 Multi-Drop Operation
Multi-Drop Functionality can control up to 10 units of the same type (types cannot
be mixed) or a Single Switch System (1:1, 1:1 Power Combined, 1:2). After
installation, the first step is to assign amplifier addresses.
Amplifier Address Assignment
The Remote Panel has a built-in utility to easily change the address (from 48 to
111) of the units to be connected together in any of the above modes. In order to
assign an address, only one unit can be operational at a time. All other amplifiers
must be powered off.
For simplification of this section, key-in commands will be in Italics and items
shown in the display will be in Bold.
After the first unit is powered up, press the MENU key until P is displayed at the
left end of screen. Use the arrow keys to highlight CIF Ports box then press ENTER
key twice. Use the up/down keys to highlight AMPLIFIER ADDRESS RESCAN:
NO. Press the up arrow to change the display from NO to YES then press ENTER.
The RCU will restart and rescan. Only one amplifier should be found. Press
MENU and verify unit 1 and SETTINGS are selected. Press ENTER and then
down arrow four times until UNIT ADDRESS: is displayed in the bottom left of
screen. Press ENTER and then the left arrow until UNIT ADDRESS: is
highlighted.
Use the up/down arrows to change to desired address. Press ENTER to set the
change. The new address will only take effect after power cycling the amplifier.
The Remote Panel can also monitor and control the optional internal 1:1, 1:1 Power
Combined or 1:2 switch controller in an amplifier if so equipped. The desired unit
can be selected using the AMP or left/right keys as described above. Switch
position is monitored using the SYSTEM key to scroll to the Status Screen until the
switch position (ON-line/OFF-line) is shown on the display. The Amplifier state
(STBY/XMIT/FLT), Output Power and switch mode (AUTO or MANUAL) is also
displayed in this screen.
Press the SYSTEM key a second time to acquire the Configuration screen. The
switch mode (Auto/Manual) and ON-line/OFF-line status of the selected unit can
be manually changed by pressing the ENTER key and then the left/right arrow
keys to toggle between positions to first place the units in Manual.
3-6
DOC.01032319 REV.2
RACK MOUNT REMOTE CONTROL UNIT
Once the desired amplifier is reached, pressing the up/down arrows followed by
the ENTER key will change the state of the selection. If the Manual mode is
selected, the switch position can be changed between A1 and A2 by using the
ENTER key followed by the left/right arrow keys to cycle to either amplifier ONline or OFF-line position. Once the desired amplifier is selected, use the up/down
arrows to change state followed by the ENTER key to activate the selection.
If the units are to be used in a switch system they must also be given a SYSTEM
ID number. After pressing ENTER to activate the UNIT ADDRESS, press ENTER
again to select SYSTEM ID:. Use up/down arrows to select SYSTEM ID: from 1 to
3. On a 1:2 switch system, the backup amplifier must be selected as AMPLIFIER
3. Press ENTER to activate selection. The amplifier power must now be recycled
to allow the address changes to be accepted and set.
Power down the first amplifier, and repeat the above process for the remaining
amplifiers, one at a time. Once all amplifiers in the chain have been assigned their
own address, apply power to the entire system, including recycling to power to
the RCU.
Operational Summary of the Remote Control
Unit (RCU)
At start up, the Panel will scan the full address range looking for units and
assigning a unit number to the units found (1 for the first, 2 for the second, etc).
SCANNING: 54
When an amplifier is found, the type and address will show briefly before
scanning resumes. Scanning stops at address 111 or restarts at 48 if no amplifiers
are found.
FOUND 400W AT 55
DOC.01032319 REV.2
3-7
RACK MOUNT REMOTE CONTROL UNIT
After the address scanning is complete, the display will show the Amplifier status
screen or the System screen if a switch system was found. The number on the lefthand side of the display shows which amplifier is currently being monitored.
System Screen:
A1: XMIT 53.3 dBm ON-line A2: FLT 00.0 dBm OFF-line
A3: XMIT 52.1 dBm ON-line MANUAL
Amplifier Screen:
1
RMT TRANSMIT
47.8 dBm MANUAL
REFL RF: 18 W HELIX I: 5 mA HELIX V: 8.61 kV
The RCU will continue to monitor the fault status of all units found but can only
display the settings and meter readings for one unit at a time. To select a different
unit, press the AMP key or press the left/right arrows. The address of the newly
selected unit is shown at the far left side of the display. Pressing the ENTER key
takes you to the Main menu for that unit.
If a fault occurs in a unit not currently selected, the Panel will automatically switch
to the faulted unit and display its fault status. Other units can be selected as
described above, but the alarm will sound as long as any unit has a fault.
If another fault occurs in a unit other than the first faulted one, the Panel will
switch to the second faulted unit. The Remote Panel will always switch if there is
a communication fault.
The Menu selections for the amplifier are shown when the MENU key is pressed.
Press the left/right arrows or repeat pressing the MENU key to show the menu
selections for other amplifiers. Use the up/down arrows to make a selection then
press ENTER to go to the selected screen.
1
□ SETTINGS
□ METERS
□ TIME
□VERSION
□METER LOG
To configure the RCU, change the amplifier number by pressing the MENU or
left/right arrows until a P is shown on left-hand side of the display. The Menu now
shows the configuration selections for the RCU. Use the up/down keys to make a
selection then press ENTER to go to the selected screen.
P
3-8
□UNITS
□IP CONFIG
□BUZZER
□CIF PORT
□DISPLAY
□VERSION
DOC.01032319 REV.2
RACK MOUNT REMOTE CONTROL UNIT
3.5 Remote Control Panel Screens
System Status Screen
If a switch system is detected when the RCU scans for amplifiers, the switch
system status will be shown when the SYSTEM key is pressed. The system screen
shows the current state, power output and the amplifier On-line/ Off-line status.
If the amplifier has a switch controller installed, the switch controller state will be
shown (Manual or Auto).
1:1 System
A1: XMIT 53.3 dBm MANUAL
A2: XMIT 53.2 dBm MANUAL
ON-line
Off-line
1:2 System
A1: XMIT 53.3 dBm ON-line A2: FLT 00.0 dBm OFF-line
A3: XMIT 52.1 dBm ON-line MANUAL
1:1 Power Combined System
A1: XMIT 53.3 dBm LOAD
A2: XMIT 53.2 dBm OUT
MANUAL
MANUAL
System Configuration Screen
To enter the system configuration screen, press the SYSTEM key again in the
System status screen.
In the system configuration screen the amplifiers can be set On-line or Off-line and
the switch control system can be set to Auto or Manual. The amplifier Online/Off-line status can only be changed if the switch control system is in Manual
mode.
1:1 System
A1: MANUAL
A3: MANUAL
ON-line
OFF-line
1:2 System
A1: ON-line
A3: MANUAL
A2: OFF-line
ON-line
For the 1:1 power combined system, also the individual switches can be toggled.
DOC.01032319 REV.2
3-9
RACK MOUNT REMOTE CONTROL UNIT
1:1 Power Combined System
A1: LOAD
A3: OUT
MANUAL
MANUAL
SW1: 2
SW2: 1
SW3:2
Amplifier Screen
The amplifier screen is displayed when the AMP key is pressed. The number of
the selected amplifier is shown on the left-hand side of the display. The top line
shows the amplifier control mode (Local or Remote), the amplifier state, current
RF output power and power mode (Manual or ALC). The second line shows the
meter readings for the amplifier. Use the up/down arrows to browse through the
meter readings.
To show the status of another amplifier, hit the AMP key again or use the left/right
keys.
1
RMT TRANSMIT
REFL RF: 18 W
47.8 dBm MANUAL
HELIX I: 5 mA HELIX V: 8.61 kV
Menu Screen
The Menu selections for the amplifier are shown when the MENU key is pressed.
Press the left/right arrows or repeat pressing the MENU key to show the menu
selections for other amplifiers. Use the up/down arrows to make a selection and
press ENTER to go to the selected screen.
2
□SETTINGS
□METERS
□TIME
□VERSION
□METER LOG
To configure the RCU, change the amplifier number by pressing the MENU or
left/right arrows until a ‘P’ is shown on left-hand side of the display.
P
□UNITS
□BUZZER
□DISPLAY
□IP CONFIG
□CIF PORT
□VERSION
The Menu now shows the configuration selections for the RCU. Use the up/down
arrows to make a selection and press ENTER to go to the selected screen.
3-10
DOC.01032319 REV.2
RACK MOUNT REMOTE CONTROL UNIT
Settings Screens
The settings screens show the current power set point, high/low alarm and fault
trip points and other configurable items for the Amplifier. These settings can only
be changed if the amplifier is in Remote mode (REMOTE LED is lit on the front
panel of the Amplifier) and the RCU control is set to Local (LCL LED is lit).
1
MANUAL RF OUT: 0.0 dBm ALC RF OUT: 0.0 dBm
1
LOW RF ALARM:
1
HLX O/V FLT: 12.70 kV HLX O/I FLT: 10 mA
HLX U/V FLT: 1.70 kV HLX V/STB FLT: 4.00 kV
1
RELAY 1:
5
AUTO LOG TIME: 1.0 M
REFL RF FAULT: 50 W
ATTENUATION: 20.0 dB
0W
LOW RF FAULT: 0 W
HIGH RF ALARM: 700 W
HIGH RF FAULT: 750 W
RELAY 2:
5
RST METERLOG? NO
If only 1 amplifier is connected to the RCU, the address of the amplifier (Unit
Address) can be changed (range 48-111). The address change takes effect when the
amplifier is re-powered. If the amplifier is a part of a switch system, also the
system ID must be set: 1 or 2 for AMP1 or AMP2 and 3 for the backup amplifier.
1
RST TO DFLTS? NO
To reset the settings to default, change the RST TO DFLTS field to YES and press
ENTER. All settings will be reset to factory defaults except for the following: Helix
Over Voltage Fault Trip Point, Helix Under Voltage Fault Trip Point, Helix Over
Current Fault Trip Point and CIF Unit Address.
Meter Readings Screens
Shows the meter readings for the selected amplifier.
1
DOC.01032319 REV.2
RF OUT: 47.8 dBm
REFLECTED RF: 18 W
HELIX V:
HELIX I:
8.61 kV
5 mA
3-11
RACK MOUNT REMOTE CONTROL UNIT
1
CABINET TEMP: 27°C
TUBE TEMP:
41°C
FAN CONTROL: 4.0 V
ATTENUATION: 20 dB
Meter Log Screens
To browse the meter log, press the ENTER key and then change the
meter log index using the up/down arrows. The time of entry and the
event will update as you scroll through the meter log. To browse the
meter readings for the selected meter log entry, press ENTER and then
use the up/down arrows to scroll through the meter readings.
1
METER LOG: 0011
STANDBY
11:57:12 1/29/2006
1
METER LOG: 0011
11:57:12 1/29/2006
RF OUT: 59 W REFL RF: 18 W ATTEN: 20 dB
1
METER LOG: 0011
11:57:12 1/29/2006
HLX I: 5 mA HLX V: 8.61 kV FAN CTRL: 4.0 V
1
METER LOG: 0011
11:57:12 1/29/2006
CABINET: 25 °C TUBE: 41°C
Time Screens
The first screen shows the current time on the selected amplifier.
To edit the time press ENTER and then use the left/right arrows to select a field and
up/down arrows to change the value. Press ENTER to set the time. The time will
be set on all amplifiers connected to the RCU.
Standby/Transmit or Unit on Time is shown in DAYS: HRS: MIN: SEC format.
3-12
1
TIME: 13:31:41 01/29/2006
STANDBY TIME: 001:10:52:22
1
UNIT ON TIME: 002:08:25:33
TRANSMIT TIME: 000:18:49:26
DOC.01032319 REV.2
RACK MOUNT REMOTE CONTROL UNIT
1
HEATER TIME DELAY: 00:00
Amplifier Version
The amplifier version screen shows the boot and main software versions of the
amplifier.
BOOT VERSION:
MAIN VERSION:
1
01.00.03
01.00.17
Remote Control Unit Configuration
To get to the RCU configuration menu, press the MENU button until a ‘P’ is
shown on the left-hand side of the display. Use the up/down arrows to make a
selection and press the ENTER key to go to the selected screen.
□UNITS
□IP CONFIG
P
□BUZZER
□CIF PORTS
□DISPLAY
□VERSION
RF Units
Set the RF output units shown on the System and Amplifier status screens to either
Watts or dBm.
RF OUTPUT UNITS: dBm
P
Audible Buzzer
This will Enable/Disable the Alarm and Keypad buzzer.
P
MUTE ALARM : NO
MUTE KEYPAD : NO
Display
This sets display brightness and enables/disables the screen saver. The screen
saver will turn the brightness of the display to the lowest setting (12.5%) and
reverse the display approximately every 3 seconds. The screen saver is activated
approximately 20 minutes after the last key-press. The screen saver is de-activated
when a key is pressed on the front panel.
DOC.01032319 REV.2
3-13
RACK MOUNT REMOTE CONTROL UNIT
P
DISPLAY BRIGHTNESS: 50%
SCREEN SAVER: YES
IP Configuration
Configures the IP parameters for the RCU.
P
IP ADDRESS:
IP MASK:
192.168.100.010
255.255.255.000
CIF Port Settings
The first line sets the baud rate for the serial CIF port (J4) to the M & C. The rate
can be set to 9600, 19200 or 38400 baud. The second line resets the RCU and starts
a new scan for amplifiers.
P
M&C SERIAL PORT BAUD RATE: 9600
AMPLIFIER ADDRESS RESCAN: NO
Serial communications at the amplifier are factory preset to the following:
BAUD RATE: 9600
CHECK SUM TYPE: Longitudinal
PARITY: Even
PROTOCOL: STX/ETX
WORD LENGTH: 7-Bit
Communications to ports J1 and J4 must be set to match these parameters, except
the baud rate from the RCU to J4 can be changed as noted above.
Version
This shows the version of the boot and main software of the RCU.
1
BOOT VERSION:
MAIN VERSION:
01.00.02
01.01.04
Set Power Screen
The RCU Power Screen shows the current RF output power and attenuation set
points of the amplifier. To make a change, press ENTER then use the left/right
arrows to select field to be modified. Use the up/down arrows to change the value.
3-14
DOC.01032319 REV.2
RACK MOUNT REMOTE CONTROL UNIT
The new setting is immediately sent to the amplifier (without pressing the ENTER
key).
The lower right corner of the display shows the current power mode status of the
amplifier (Manual or ALC).
1
MANUAL RF OUT: 52.1 dBm
ATTENUATION: 8.4 dB
ALC RF OUT: 52.1 dBm
POWER MODE: MANUAL
Remote M&C
The amplifiers can be monitored using either the serial port (RS-232/RS-422) on J4
or the LAN port on J2. When using the serial connection make sure to set the
switch at the rear panel to reflect the serial interface used. Also configure the CIF
Baud rate in the RCU configuration screen.
To monitor the amplifiers using a LAN connection, first set the appropriate IP
parameters in the RCU configuration screen. Then make a TCP connection on
socket 50000 to the RCU. The CIF protocol is the same as for the serial interface.
Although both the serial and the LAN interface can monitor the amplifiers at the
same time, only one interface has control at any one time. The control point can be
set using the CONTROL key on the front panel.
CIF CONTROL POINT:
□LOCAL □SERIAL □ETHERNET
DOC.01032319 REV.2
3-15
RACK MOUNT REMOTE CONTROL UNIT
3.6 Firmware Updates
The main code on the RCU can be updated either through the diagnostic port
(J5/RS-232) or by using FTP over the LAN (J2) connector.
Updating Firmware using HyperTerminal in
Windows
Turn off the RCU and connect a cable between J5 and the PC serial COM port.
Start HyperTerminal and set the communications parameters as shown below.
3-16
DOC.01032319 REV.2
RACK MOUNT REMOTE CONTROL UNIT
Next, open the Transfer/Send File dialog and select the file containing the
firmware update. Set the transfer protocol to 1K Xmodem.
Press the Send button, then turn on the RCU and the file transfer should start.
When the update is finished, the RCU will automatically reboot using the new
firmware.
DOC.01032319 REV.2
3-17
RACK MOUNT REMOTE CONTROL UNIT
Updating Firmware using FTP from Internet
Explorer
Set the IP parameters of the RCU to match the setting for the LAN it is to be
connected to.
Using Internet Explorer, make an FTP connection to the RCU by typing ftp:// and
then the IP address of the RCU. Press Enter to make a connection then drag and
drop the firmware file to the Internet Explorer window.
When the file transfer is done, close the Internet Explorer window and the RCU
will start programming the flash memory. When the flash memory has been
reprogrammed, the RCU will automatically restart.
Programming Flash, Please Wait...
3-18
DOC.01032319 REV.2
RACK MOUNT REMOTE CONTROL UNIT
Remote Panel Jumper Settings
There are three configurable termination jumpers on the RCU logic card. JP1 is
used to terminate the CAN Bus connection (J3 on rear panel). JP2 is used to
terminate the RS-485 connection to the amplifiers (J1 on rear panel). JP3 is used to
terminate the RS-485 connection from the M & C system (J4 on rear panel). Figure
3-5 shows the physical locations of the jumpers on the logic card.
JP3
JP1
JP2
Figure 3-5. Remote Control Unit Jumper locations
DOC.01032319 REV.2
3-19
RACK MOUNT REMOTE CONTROL UNIT
3.7 Detailed Specifications
ENVIRONMENTAL:
SIZE: One Rack Unit High X 19’’ Wide X 10’’ Deep
WEIGHT: 5 LBS (estimated)
POWER: 100 – 240VAC 50/60 Hz, < 10Watts
OPERATING TEMPERATURE: 0 - +50C
INTERFACES WITH THE FOLLOWING ODU’S:
200W, 250W, 400W, 750W
FRONT PANEL DISPLAY AND INDICATORS:
DISPLAY:
16X280 Vacuum Fluorescent Graphics Display
137X11MM Display Area
4.74X2.34MM Minimum Character Size (5X7 Dots)
Blue / Green Display Color
8 Levels of Brightness Control
DISPLAY SCREENS:
Switch System
Status
Configuration
Amplifier
Status
Settings
Menu
Meter Log
Meters
Time
Panel System Configuration
3-20
Units
IP Config
Buzzer
CIF Port
Display
Version
DOC.01032319 REV.2
RACK MOUNT REMOTE CONTROL UNIT
4-1
Chapter 4
Drawings
The Rack Mount Remote Control Unit drawings listed below are included in this
chapter.
Drawing Number
Title
01023630-XX
Cable Assembly, Remote Panel to PA
(XX refers to cable length-up to 10 feet)
01032300
Assembly, 1 RU Mimic CTRL*
01032301
Outline Drawing, 1 RU Mimic CTRL
01032303-00
Ship Kit, 1 RU Mimic CTRL
01032304
Interconnect Diagram, 1 RU Mimic CTRL
01032322-XX
Cable, Remote Single Drop, RS-422
(XX refers to cable length-up to 10 feet)
01039983-XX
Interconnect Diagram Cable, Remote
Multi-Drop, RS-422
(XX refers to cable length-up to 10 feet)
NOTE:
Paper Manual: Printed drawings follow this page.
CDROM Manual: Drawing files are in the “Drawing” folder.
* Refer to service manual for respective LM’s.
Drawings are in numerical order.
DOC.01032319 REV.2
4-1
RACK MOUNT REMOTE CONTROL UNIT
This page is intentionally left blank.
4-1
4-2
DOC.01032319 REV.2
RACK MOUNT REMOTE CONTROL UNIT
A-1
APPENDIX A
Warranty & Support
For details, refer to separate supplement included with this manual.
HARD COPY: Refer to Warranty and Support supplement located at the
front of this manual.
CD: Refer to separate folder titled “Warranty and Support”
DOC.01032319 REV.2
A-1
RACK MOUNT REMOTE CONTROL UNIT
This page is intentionally left blank
5-1
A-2
DOC.01032319 REV.2
RACK MOUNT REMOTE CONTROL UNIT
B-1
APPENDIX B
Typical Functional Trees
The trees displayed in Figures B-1 and B-2 are a roadmap to viewing, selecting and
modifying the various functions of the RCU. Figure B-1 describes the controls that
will be found using the MENU key. Figure B-2 describes the controls that will be
found using the AMP, SYSTEM, CONTROL and SET PWR keys.
Find the item on the tree that you wish to view or modify then follow the map,
pressing the appropriate keys as shown, until you reach the function you the item.
DOC. 01032319 REV.2
B-1
RACK MOUNT REMOTE CONTROL SYSTEM
This page is intentionally left blank.
B-2
DOC.01032319 REV.2