1
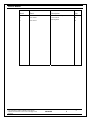
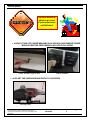
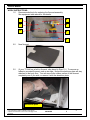
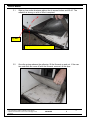
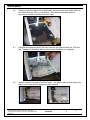
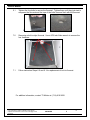
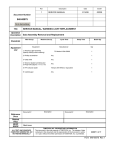
Rev
Description
1
SERVICE MANUAL
Date
ECO#
9/09/2008
00239
Document Number:
040-00063
Form Instructions
Title
Operation
Description
Standards
Equipment
List
SERVICE MANUAL, FLOORMAT REPLACEMENT (UPGRADE)
Sub Assembly Removal and Replacement
Man Occup.
Machine Occup.
Equipment
Cycle Time
Setup Time
Manufacturer
Batch Qty
Qty
1- Floormat Assembly 024-00042
T3 Motion
1
2- Pry bar
Any
1
3 – Hand Brush (optional)
Any
1
4- Power drill
Any
1
5- Drill bit size 1/8 inch to ¼ inch
Any
1
6- Drill bit size 7/16 inch
Any
1
7- 5/32 Hex bolt (long)
T3 Motion
4
8- 5/32 Hex (Allen) wrench
Any
1
9- Jacknut tool
Jacknut
1
10- Jacknut
Jacknut
4
11- Mallet
Any
1
Document #
Description
Description
Document #
Reference
Docs
Related
Files
RESP
ENGR
Mark Jones
ALL TEXT AND GRAPHICS
COMPUTER GENERATED, DO
NOT REVISE MANUALLY
T3MOTION, INC. PROPRIETARY INFORMATION
This document is the sole property of T3MOTION, Inc. The release of data
contained in this document and the reproduction of this document in whole
or in part, without the written permission of T3MOTION, Inc. is prohibited.
SHEET 1 of 8
Form 040-00063 Rev.2
SERVICE MANUAL
Item#
Part #
Description
Qty
1
500-00162
Floormat Assembly
1
2
100-10229
¼-20 Jacknuts
4
3
100-10135
Mounting Bolts
4
T3MOTION PROPRIETARY INFORMATION
Use or disclosure of data contained on this sheet is
subject to the restriction on the cover or title page of this
document.
Document No
Revision
040-00063
2
Sheet
2
SERVICE MANUAL
Serious electrical
shock can occur
if precautions are
not followed.
• ALWAYS TURN OFF POWER BREAKER IN GLOVE BOX AND REMOVE POWER
MODULES BEFORE PERFORMING ANY ELECTRICAL WORK.
Power breaker in glove box
Power modules
• ALSO SET THE PARKING BRAKE PRIOR TO ANY WORK.
Parking brake
T3MOTION PROPRIETARY INFORMATION
Use or disclosure of data contained on this sheet is
subject to the restriction on the cover or title page of this
document.
Document No
Revision
040-00063
2
Sheet
3
SERVICE MANUAL
WORK INSTRUCTIONS:
1.0
Recommended tools for replacing the floormat assembly.
See equipment table above for the details.
3
6
5
4
9
8
2
2.0
New floormat.
3.0
(If your T3 Unit has a bolt-in floormat, skip ahead to Step 7.0.) To remove an
adhesive mounted floormat, peel up an edge. Notice the aluminum plate will stay
attached to the body floor. You can remove the rubber portion of the floormat
completely now if you wish, or remove it with the aluminum plate.
Aluminum plate.
T3MOTION PROPRIETARY INFORMATION
Use or disclosure of data contained on this sheet is
subject to the restriction on the cover or title page of this
document.
Document No
Revision
040-00063
2
Sheet
4
SERVICE MANUAL
3.1
Slide pry bar under aluminum plate a few to several inches and lift off. The
adhesive is strong, so a bit of effort is required.
Pry bar.
Pry upward as the arrows show.
3.2
Once the prying releases the adhesive, lift the floormat up and out. If the rear
trim seal does not come off with the floormat, remove it at this time.
T3MOTION PROPRIETARY INFORMATION
Use or disclosure of data contained on this sheet is
subject to the restriction on the cover or title page of this
document.
Document No
Revision
040-00063
2
Sheet
5
SERVICE MANUAL
4.0
Place the new floormat into the vehicle and using the holes as a guide, drill four
pilot holes with the 1/8 to ¼ inch drill bit. Note that the batteries must be
removed to be able to drill the front two holes.
4.1
Remove the floormat and drill the four holes for the Jacknuts with the 7/16 inch
drill. Sweep out the debris with the brush once the drilling is completed.
5.0
Insert a Jacknut into each of the four holes. You may be able to push them in by
hand, or you may need to tap them in with a mallet.
T3MOTION PROPRIETARY INFORMATION
Use or disclosure of data contained on this sheet is
subject to the restriction on the cover or title page of this
document.
Document No
Revision
040-00063
2
Sheet
6
SERVICE MANUAL
5.1
Insert a bolt into the Jacknut Tool and thread it into the Jacknut.
5.2
Using the Allen wrench, tighten the bolt to seat the Jacknut. Do not over tighten.
Once seated, remove the bolt and tool. Repeat for the remaining three Jacknuts.
6.0
Place the floormat back onto the T3 vehicle and insert a bolt with a washer into
each of the four holes.
T3MOTION PROPRIETARY INFORMATION
Use or disclosure of data contained on this sheet is
subject to the restriction on the cover or title page of this
document.
Document No
Revision
040-00063
2
Sheet
7
SERVICE MANUAL
6.1
Tighten the four bolts to secure the floormat. Tighten them until they just start to
compress the floormat and the tops of the bolts become flush with the floormat.
7.0
Removing a bolt-in style floormat. Use a 5/32 inch Allen wrench to remove the
four fasteners.
7.1
Follow instruction Steps 6.0 and 6.1 for replacement of bolt-in floormat.
For addition information, contact T3 Motion at: (714)-619-3600.
T3MOTION PROPRIETARY INFORMATION
Use or disclosure of data contained on this sheet is
subject to the restriction on the cover or title page of this
document.
Document No
Revision
040-00063
2
Sheet
8