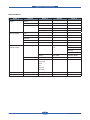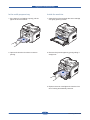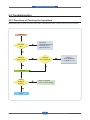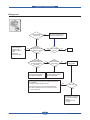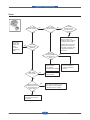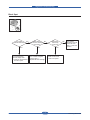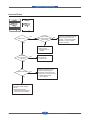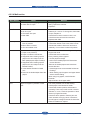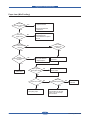
1
Alignment & Troubleshooting
4. Alignment & Troubleshooting
4.1 Alignment and Adjustments
4.1.1 Control panel overview
1
ID Copy
You can copy both sides of the ID Card like a driver’s license to a single side of
paper.
2
Direct USB
Allows you to directly print files stores on a USB memory device when it is
inserted into the USB memory port on your machine.
3
Display screen
Shows the current status and prompts during an operation.
4
Status
Shows the status of your machine.
5
Fax
Activates Fax mode.
6
Copy
Activates Copy mode.
7
Scan/Email
Activates Scan mode.
8
OK
Confirms the selection on the screen.
9
Arrow
Scroll through the options available in the selected menu, and increase or
decrease values.
10
Menu
Enters Menu mode and scrolls through the available menus.
11
Back
Sends you back to the upper menu level.
12
Numeric keypad
Dials fax number, and enters the number value for document copies or other
options.
13
Address Book
Allows you to store frequently used fax numbers and email addresses or
search for stored fax numbers or email addresses.
14
Redial/Pause
In standby mode, redials the last number. Also in edit mode, inserts a pause
into a fax number.
15
On Hook Dial
Performs same as you hold a handset under the telephone line is engaged.
16
Stop/Clear
Stops an operation at any time. The pop-up window appears on the screen
showing the current job that the user can stop or resume.
17
Power Saver
Sends the machine into power saver mode. You can also turn the power on
and off with this button.
18
Start
Starts a job.
Service Manual
4-1
Samsung Electronics
Alignment & Troubleshooting
4.1.2 Understanding The Status LED
The color of the Status LED indicates the machine’s current status.
Status
Description
Off
• The machine is off-line.
• The machine is in power saver mode. When data is received, or any
button is pressed, it switches to on-line automatically.
Green
Red
Service Manual
Blinking
• When the backlight slowly blinks, the machine is receiving data from the
computer.
• When the backlight blinks rapidly, the machine is printing data.
On
The machine is on-line and can be used.
Blinking
• A minor error has occurred and the machine is waiting for the error to be
cleared. Check the display message. When the problem is cleared, the
machine resumes.
• The toner cartridge is near the end of its life.
Order a new toner cartridge. You can temporarily improve print quality by
redistributing the toner.
On
• The toner cartridge is totally empty. Remove the old toner cartridge and
install a new one.
• A paper jam has occurred.
• The cover is opened. Close the cover.
• There is no paper in the tray. Load paper in the tray.
• The machine has stopped due to a major error.
4-2
Samsung Electronics
Alignment & Troubleshooting
4.1.3 Menu Overview
This chapter explains the menu item. If you want to know more information about the menu item, refer to the
User Guide.
4.1.3.1 Menu navigation and selection item
1. Press Menu button. Select the menu you want by using the arrow and OK button.
Paper Size
+Tray1
>Tray1
Paper Size
+Tray2
>Tray2
+Tray1
>Tray1
>Tray2
+Tray2
2. “√”
mark
Tray
2 indicates current setting value.
√Letter
Letter
Tray
2
Legal
√Letter
Letter
Legal
3. When you press up/down botton, inversion line will be moved.
When user press OK button, √mark will move to new selected item.
Tray 2:
Tray 2:
√Letter
Letter
Tray
2:
Legal
√Letter
Letter
Letter
Letter
Tray
2:
√Legal
Legal
Letter
Letter
Legal
√Legal
Legal
4. Press the OK button to process your selection, save your input or selection.
5. To exit the menu, press the Back button repeatedly, or the Stop button.
Service Manual
4-3
Samsung Electronics
Alignment & Troubleshooting
4.1.3.2 Menu Map
Fax Menus(Fax Feature)
Depth 1
Darkness
Depth 2
Depth 3
Normal *
Dark
Light
Resolution
Standard *
Fine
Super Fine
Photo Fax
Color Fax
Multi Send
Multi Send
Fax1:|
Fax2:
Another No.?
Yes / No
Delay Send
Delay Send
Fax1:|
Another No.?
Yes / No
Priority Send
Priority Send
Fax:|
Job Name
|
Forward
Fax
Send Forward
Rcv. Forward
E-mail
Send Forward
Rcv. Forward
Server
Send Forward
Rcv. Forward
Secure Receive
Add Page
On
Password [????]
Off *
Password [????]
Print
Password [????]
10:22Am DelayFax
ABC
Cancel Job
10:22Am DelayFax
ABC
Service Manual
4-4
Samsung Electronics
Alignment & Troubleshooting
Fax Menus(Fax Setup)
Depth 1
Sending
Depth 2
Redial Times
[0-13]times:7
Redial Term
[1-15]min:3
Prefix Dial
Prefix Dial
No.
Fax:|
ECM Mode
Depth 1
Depth 3
Change
Default
Standard *
Fine
Photo Fax
Color Fax
On *
Darkness
Normal*
Light
On-Error *
Dark
On
Auto
Report
Off
Image TCR
Resolution
Depth 3
Super Fine
Off
Send Report
Depth 2
On
Off
On *
Off
Dial Mode
Tone *
Pulse
Receiving
Receive Mode
Fax *
Tel
Ans/Fax
DRPD
Ring to Answer
[1-7]times:1
Stamp Rcv
Name
On
Rcv Start Code
[0-9]:9
Auto Reduction
On *
Off *
Off
Discard Size
[00-30]:20
Junk Fax Setup
Off *
On
DRPD Mode
Waiting Ring
Duplex Print
Off *
Long Edge
Short Edge
Service Manual
4-5
Samsung Electronics
Alignment & Troubleshooting
4.1.3.3 Fax Setup
Changing the fax setup options
Your machine provides you with various user-selectable options for setting up the fax system. You can
change the default settings for your preferences and needs.
To change the fax setup options:
1. Press Fax.
2. Press Menu on the control panel.
3. Press the up/down arrow to highlight Fax Setup and press OK.
4. Press the up/down arrow until the fax setup item you want highlights and press OK.
5. Press the up/down arrow until the option you want highlights and press OK.
6. Press the up/down arrow until the desired status appears or enter the value for the option you have
selected, and press OK.
7. If necessary, repeat steps 4 through 6.
8. Press Stop/Clear to return to ready mode.
Sending
OPTION
DESCRIPTION
Redial Times
You can specify the number of redial attempts. If you enter 0, the machine will not redial.
Redial Term
Your machine can automatically redial a remote fax machine if it was busy. You can set
an interval between attempts.
Prefix Dial
You can set a prefix of up to five digits. This number dials before any automatic dial
number is started. It is useful for accessing a PABX exchange.
ECM Mode
This mode helps with poor line quality and makes sure any faxes you send are sent
smoothly to any other ECM-equipped fax machine. Sending a fax using ECM may
take more time.
Send Report
You can set your machine to print a confirmation report showing whether a
transmission was successful, how many pages were sent, and more. The available
options are On, Off, and On-Error, which prints only when a transmission is not
successful.
Image TCR
This function allows users to know what fax messages have been sent by showing
sent messages in the transmission report.
The first page of the message is turned into an image file than is printed on the
transmission report so the users can see what messages have been sent.
However, you can not use this function when sending fax without saving the data in
the memory.
Dial Mode
This setting may not be available depending on your country. If you cannot reach
this option, your machine does not support this feature.
You can set the dial mode for your machine to either tone dialling or pulse dialling.
If you have a public telephone system or a private branch exchnage(PBX) system,
you may need to select Pulse. Contact your local telephone company if you are not
sure which dial mode to use.
If you select Pulse, some phone system features might not be available. It can also
take longer to dial a fax or phone number.
Service Manual
4-6
Samsung Electronics
Alignment & Troubleshooting
Receiving
OPTION
DESCRIPTION
Receive Mode
You can select the default fax receiving mode.
Ring to Answer
You can specify the number of times the machine rings before answering an incoming
call.
Stamp RCV Name
This option allows the machine to automatically print the page number, and the date
and time of reception at the bottom of each page of a received fax.
Rcv Start Code
This code allows you to initiate fax reception from an extension phone plugged into
the EXT socket on the back of the machine. If you pick up the extension phone and
hear fax tones, enter the code. It is preset to *9* at the factory.
Auto Reduction
When receiving a fax containing pages as long as or longer than the paper loaded
in the paper tray, the machine can reduce the size of the original to fit the size of
the paper loaded in the machine.
Turn on this feature if you want to automatically reduce an incoming page.
With this feature set to Off, the machine cannot reduce the original to fit onto one
page. The original will be divided and printed in actual size on two or more pages.
Discard Size
When receiving a fax containing pages as long as or longer than the paper in your
machine, you can set the machine to discard a specific length from the end of the
received fax. The machine will print the received fax on one or more sheets of
paper, minus the data that would have been on the specified discard segment.
When the received fax contains pages larger than the paper in your machine, and
Auto Reduction has been turned on, the machine will reduce the fax to fit on the
existing paper, and nothing will be discarded.
Junk Fax Setup
This setting may not be available depending on your country. Using this feature,
the system will not accept faxes sent from remote stations whose numbers are
stored in the memory as junk fax numbers. This feature is useful for blocking any
unwanted faxes.
When you turn on this feature, you can access the following options to set junk fax
numbers.
• Add: Allows you to set up to 10 fax numbers.
• Delete: Allows you to delete the desired junk fax number. If you select Delete All,
Allows you to delete all junk fax numbers.
DRPD Mode
This mode enables a user to use a single telephone line to answer several different
telephone numbers. In this menu, you can set the machine to recognize which ring
patterns to answer.
Duplex Print
Set this duplex feature to save paper. When the machine prints the received fax data, it
prints them on both sides of the paper.
Service Manual
4-7
Samsung Electronics
Alignment & Troubleshooting
Change Default
OPTION
Resolution
DESCRIPTION
Changing the resolution setting affects the appearance of the received document.
• Standard: Originals with normal sized characters.
• Fine: Originals containing small characters or thin lines or originals printed using a
dot-matrix printer.
• Super Fine: Originals containing extremely fine detail. Super Fine mode is enabled
only if the machine with which you are communicating also supports the Super Fine
resolution.
• For memory transmission, Super Fine mode is not available. The resolution
setting is automatically changed to Fine.
• When your machine is set to Super Fine resolution and the fax machine with
which you are communicating does not support Super Fine resolution, the
machine transmits using the highest resolution mode supported by the other
fax machine.
• Photo Fax: Originals containing shades of gray or photographs.
• Color Fax: Originals with colors. Sending a color fax is enabled only if the machine
with which you are communicating supports color fax reception and you send the fax
manually. In this mode, memory transmission is not available.
Darkness
You can select the default contrast mode to fax your originals lighter or darker.
Auto Report
You can set the machine to print a report with detailed information about the previous 50 communication
operations, including time and dates.
Service Manual
4-8
Samsung Electronics
Alignment & Troubleshooting
Copy Menus
Copy Feature
Reduce/Enlarge
Copy Setup
Org.(100%) *
Duplex Print
Off *
Custom
1->2Side Long
Auto Fit
1->2SideShort
LGL->LTR(78%)
Change
Default
LGL->A4(83%)
# of Copies
[1-99] : 1
Copy Collation
On
A4->A5(71%)
Off *
A4->LTR(94%)
Darkness
Original Type
Layout
Reduce/Enlarge Org.(100%) *
A5->A4(141%)
Custom
EXE->LTR(104%)
Auto Fit
25%
LGL->LTR(78%)
50%
LGL->A4(83%)
150%
A4->A5(71%)
200%
A4->LTR(94%)
400%
A5->A4(141%)
Normal *
EXE->LTR(104%)
Light
25%
Dark
50%
Text *
150%
Text/Photo
200%
Photo
400%
Normal *
Darkness
2-Up
Light
4-Up
Dark
ID copy
Service Manual
Normal *
Original Type
Text *
Poster Copy
Text/Photo
Clone Copy
Photo
4-9
Samsung Electronics
Alignment & Troubleshooting
4.1.3.4 Copy Setup
Changing the copy setup options
For copy output, you can set up several options in advance.
1. Press Copy on the control panel.
2. Press Menu on the control panel.
3. Press the up/down arrow to highlight Copy Setup and press OK.
4. Press the up/down arrow until the copy setup item you want highlights and press OK.
5. Press the up/down arrow until the setup option you want highlights and press OK.
6. Press the up/down arrow until the setting you want highlights and press OK.
7. Repeat steps 4 through 6, as needed.
8. Press Stop/Clear to return to ready mode.
Duplex Print
You can set the machine to print copies on both sides of paper.
Change Default
OPTION
DESCRIPTION
#of Copies
You can enter the number of copies using the number keypad.
Copy Collation
You can set the machine to sort the copy job.
Reduce/Enlarge
Reduces or enlarges the size of a copied image.
Darkness
Adjusts the brightness level to make a copy that is easier to read, when the original
contains faint markings and dark images.
Original Type
Improves the copy quality by selecting the document type for the current copy job.
Service Manual
4-10
Samsung Electronics
Alignment & Troubleshooting
Scan Menus (Scan Feature)
USB Feature
Scan Size
Original Type
Resolution
Scan Color
Scan Format
A4 *
E-mail Feature
Scan Size
A4 *
FTP Feature
Scan Size
A4 *
A5
A5
A5
B5
B5
B5
Letter
Letter
Letter
Legal
Legal
Legal
Executive
Executive
Executive
Folio
Folio
Folio
Oficio
Oficio
Oficio
Text *
Original Type
Text *
Original Type
Text *
Text/Photo
Text/Photo
Text/Photo
Photo
Photo
Photo
100 dpi
Resolution
100 dpi
Resolution
100 dpi
200 dpi
200 dpi
200 dpi
300 dpi *
300 dpi *
300 dpi *
Color *
Scan Color
Color
Scan Color
Color *
Gray
Gray
Gray
Mono
Mono *
Mono
BMP
SINGLE-TIFF
MULTI-TIFF
PDF
SMB Feature
Scan Size
A4 *
A5
JPEG*
B5
Letter
Legal
Executive
Folio
Oficio
Original Type
Text *
Text/Photo
Photo
Resolution
100 dpi
200 dpi
300 dpi *
Scan Color
Color *
Gray
Mono
Service Manual
4-11
Samsung Electronics
Alignment & Troubleshooting
Scan Menus (Scan Setup)
USB Default
Scan Size
Original Type
Resolution
Scan Color
Scan Format
E-Mail Default / FTP Default / SMB Default
A4 *
Scan Size
A4 *
A5
A5
B5
B5
Letter
Letter
Legal
Legal
Executive
Executive
Folio
Folio
Oficio
Oficio
Text *
Original Type
Text *
Text/Photo
Text/Photo
Photo
Photo
100 dpi
Resolution
100 dpi
200 dpi
200 dpi
300 dpi *
300 dpi *
Color *
Scan Color
Color
Gray
Gray
Mono
Mono *
BMP
Scan Format
SINGLE-TIFF
SINGLE-TIFF
MULTI-TIFF
MULTI-TIFF
PDF : MULTI-TIFF*
PDF
JPEG
JPEG*
Service Manual
4-12
Samsung Electronics
Alignment & Troubleshooting
4.1.3.5 Scan Setup
Changing the scan setup options
To avoid having to customize the scan settings for each job, you can set up default scan settings for each
scan type.
1. Press Scan/Email.
2. Press Menu on the control panel.
3. Press the up/down arrow to highlight Scan Setup and press OK.
4. Press OK when Change Default highlights .
5. Press the up/down until the scan type you want highlights and press OK.
6. Press the up/down until the scan setting option you want highlights and press OK.
7. Press the up/down arrow until the desired status highlights and press OK.
8. Repeat steps 6 and 7 to set other setting options.
9. When you have finished, press Stop/Clear to return to ready mode.
OPTION
DESCRIPTION
Scan Size
Sets the image size.
Original Type
Sets the original document’s type.
Resolution
Sets the image resolution.
Scan Color
Sets the color mode.
Scan Format
Sets the file format in which the image is to be saved. If you select TIFF or PDF,
you can select to scan multiple pages.
Service Manual
4-13
Samsung Electronics
Alignment & Troubleshooting
System Setup (Machine Setup)
Machine ID
ID:|
Machine Fax No.
Fax:|
10 Min
Date & Time
12-31-2004[MDY]
12:00 AM
15 Min
Clock Mode
12 Hours *
30 Min *
24 Hours
45 Min
English *
60 Min
FRANCAIS
120 Min
Language
Power Save
20 Min
Espanol
Scan Power Save
30 Min *
Portugues E.
60 Min
Portugues B.
120 Min
Deutsch
Timeout
Off
Italiano
15 Sec
Nederlands
30 Sec *
Русский
60 Sec
Norsk
120 Sec
Polski
180 Sec
Suomi
Job Timeout
[0-300]sec:15*
Magyar
Altitude Adj.
Normal *
Dansk
High 1
Cestina
Auto Continue
Svenska
On *
Off
Turkce
Auto Tray Switch
中國語
On *
Off
한국어
Default Mode
5 Min
Toner Save
Copy *
On
Off *
Fax
Import Setting
Address Book
Setup Data
Export Setting
Address Book
Setup Data
Service Manual
4-14
Samsung Electronics
Alignment & Troubleshooting
System Setup (Paper Setup)
Paper Size
Tray 1/ 2
Paper Type
Letter * (USA...)
Tray 1/2
Legal
Thick
Oficio
Thin
Folio
Preprinted
A4 * (UK…)
Recycled
ISO B5
Archive
JIS B5
MP Tray
Plain Paper *
MP Tray
Plain Paper *
Executive
Thick
A5
Thin
Letter * (USA...)
Cotton
Legal
Colored
Oficio
Preprinted
Folio
Recycled
A4 * (UK…)
Transparency
ISO B5
Labels
JIS B5
Card Stock
Statement
Bond
Executive
Archive
Letter>Legal>Oficio>Folio>A4>
IsoB5>JisB5>Statement>Execu
tive>A5>A6>Monarch ENV>DL
Env>C5 Env>C6 Env>No.10
Env>Post Card>Custom
Paper Source
Copy Tray
Tray 1
Tray 2
MP Tray
Tray1/2
Tray Confirm
Tray 1/2
Auto *
On *
Fax Tray
Off
Tray 1
Tray 2
Tray1/2
Auto *
Service Manual
4-15
Samsung Electronics
Alignment & Troubleshooting
System Setup (Sound/ Report/ Maintenance/ Clear Setting)
Sound/Volume
Key Sound
Alarm Sound
Maintenance
On
Off *
Off *
CLR Empty Msg(In case
of occuring Toner Low)
On *
Ignore Toner
Off *
Off
Speaker
Ringer
On
On
On
Supplies Life
Supplies Info
Off
Total
Comm. *
ADF Scan
Off
Platen Scan
Low
Transfer Belt
Mid *
Toner Low Alert
High
On *
Off
Serial Number
Serial No.
Paper Stacking
Off *
On
Toner low Notice
1%
5%
10% *
15%
Report
Clear Setting
All Reports
Printing? Yes/No
All Settings
Configuration
Printing? Yes/No
Fax Setup
Phone Book
Printing? Yes/No
Copy Setup
Address Book
Fax
Scan Setup
E-mail
System Setup
Send Report
Printing? Yes/No
Network Setup
Sent Report
Fax
Phone Book
E-mail
Address Book
Rcv Report
Printing? Yes/No
Fax Rcv Report
Printing? Yes/No
Schedule Jobs
Printing? Yes/No
User Auth List
Printing? Yes/No
Fax
Email
Sent Report
Fax
Email
Rcv Report
Fax Rcv Report
Service Manual
4-16
Samsung Electronics
Alignment & Troubleshooting
4.1.3.6 Clearing Memory
You can selectively clear information stored in your machine’s memory.
1. Press Menu on the control panel.
2. Press the up/down arrow to highlight System Setup and press OK.
3. Press the up/down arrow to highlight Clear Setting and press OK.
4. Press the up/down arrow until the item you want to clear highlights and press OK.
5. Press OK when Yes highlights to confirm clearing.
6. Repeat steps 4 through 5 to clear another item.
7. Press Stop/Clear to return to ready mode.
OPTION
DESCRIPTION
All settings
Clears all of the data stored in memory and resets all of your settings to the factory
default.
Fax Setup
Restores all of the fax options to the factory default.
Copy Setup
Restores all of the copy options to the factory default.
Scan Setup
Restores all of the scan options to the factory default.
System Setup
Restores all of the system options to the factory default.
Network Setup
Restores all of the network options to the factory default.
Address Book
Clears all of the email address entries stored in memory.
Sent Report
Clears all records of sent faxes and emails.
Fax Rcv Report
Clears all records of received faxes.
Service Manual
4-17
Samsung Electronics
Alignment & Troubleshooting
Network Menus
Depth 1
TCP/IP
Depth 2
Depth 3
Depth 4
Depth 5
DHCP *
BOOTP
Static
Ethernet Speed
IP Address
192.0.0.192
Subnet Mask
Primary DNS
0.0.0.0
Secondary DNS
0.0.0.0
Wizard *
Search ListTestSSID WLAN Security
List
Authentication
Auto *
10M Half
10M Full
100M Half
100M Full
Wireless(for only
wireless model)
WLAN Setting
WPA Key
Error
Custom
Edit SSID
WLAN Default
Restore
WLAN Signal
Excellent
Very Good
Good
Low
Very Low
No Signal
Clear Settings
Clearing? Yes/No
Clearing…
Network Info.
Printing? Yes/No
Printing...
Service Manual
4-18
Operation Mode
Samsung Electronics
Alignment & Troubleshooting
4.1.3.7 Network
You may set up the network with the machine’s touch screen. Before doing that, you must have the relevant
information concerning the type of network protocols and computer system you use. If you are not sure which
setting to use, contact your network administrator to configure this machine to the network.
1. Press Menu on the control panel.
2. Press the up/down arrow to highlight Network and press OK.
3. Press the up/down arrow until the setup option you want highlights and press OK.
4. Press the up/down arrow until the setting you want highlights and press OK.
5. Repeat steps 3 through 4, as needed.
6. Press Stop/Clear to return to ready mode.
OPTION
TCP/IP
Select appropriate protocol and configure
parameters to use the network environment.
Ethernet Speed
Wireless
DESCRIPTION
a
Configure the network transmission speed.
Configure the wireless network environments.
Clear Settings
Reverts the network settings to the default
values.
Network Info.
This list shows information on your machine’s
network connection and configuration.
a.This menu only appears when an optional wireless network interface has been installed.
Service Manual
4-19
Samsung Electronics
Alignment & Troubleshooting
4.1.4 Tech Mode
In service (tech) mode, the technician can check the machine and perform various test to isolate the cause of
a malfunction. While in Tech mode, the machine still performs all normal operations.
To enter the Tech Mode
To enter the Tech Mode, press “ Menu + # + 1 + 9 + 3 + 4 + Menu” in sequence, and the LCD briefly
displays ‘Tech Mode’, the machine has entered service tech mode.
After entering the tech mode, select the item you want by using a button on control panel.
Below picutre shows to select the motor item in Test Routine.
Tech Mode
Data Setup
Machine Test
Report
Machine Test
Pattern Test
Shading Test
EDC
EDC
NVM Read/Write
NVM Initial
Test Routines
Test Routines
100-Motor
101-Clutch
102-Sensor
Service Manual
4-20
Samsung Electronics
Alignment & Troubleshooting
Tech Mode Menu Map
Depth 1
Data Setup
Depth 2
Depth 3
Depth 4
Send Level
-9~-15
-12
DTMF Level
[Hi]=xx,[Lo]=xx
Pause Time
0~9
Dial Mode
Tone,Pulse
Tone
Modem Speed
33.6, 28.8, 14.4, 12.0, 9.6, 4.8
33.6
Error Rate
5%, 10%
10%
Clear All Mem.
Toner Low Level
[1-30]% : 10
Clear Count
Total Page Count
Enter Password
FLT Scan Count
ADF Scan Count
Engine Footer
Off*
On
Machine Test
Switch Test
REDUCE_PANEL
COMPLETE_PANEL
Test Param Set
Modem Test
Dram Test
Rom Test
Pattern Test
EDC
NVM Read/Write
NVM Initial
Test Routines
Shading Test
Adjust Shading ?
Shading&Print
Restart Machine
TEST USB HOST
Report
All Report
Protocol
Supplies Info
Configuration
Error Info
Usage Page
ComponentCheck
Service Support
Service Manual
4-21
Samsung Electronics
Alignment & Troubleshooting
Data Setup
Send Level
You can set the level of the transmission signal. Typically, the Tx level should be under -12 dBm.
Caution : The Send Fax Level is set at the best condition in the shipment from factory. Never change
settingsarbitrarily.
DTMF Level
This is a setting value of the High level tone and low level tone at DTMF mode. (Not dial mode)
Pause Time
It shows the delay time when receving the pause input at auto dial.
Dial Mode
This function can choose dial method.
*Default : Dial(Dial/Pulse)
Modem Speed
You can set the maximum modem speed.Communication is done with modem speed automatically set at
lower speed when communicating with a slower speed modem since communication is done on the standard
of the side where modem speed is low for transmission/reception. It is best set 33.6Kbps as default setting.
Error Rate
When the error rate is about exceed the set value, the Baud rate automatically adjusts to 2400 bps. This
ensures that the error rate remains below the set value.You can select the rate between 5% and 10%.
Clear All Memory
The function resets the system to factory default settings.This function is used to reset the system to the
initial value when the product is functioning abnor-mally . All the values are returned to the default values,
and all the information, which was set by the user, will be erased.
NOTICE : Always perform a memory clear after replacing the main board. Otherwise, the system may not
operate properly.
Toner Low Level
The function is to set up the time to inform toner low status. This function can provide user convenience for
replacing the toner cartridge.
Clear Count
This function resets Total Page Count, Flatbed Scan Count, ADF Scan Count.
Engine Footer
This function is for monitoring of the engine status. If you perform this function, at printing, the setting value
for engine is shown on the bottom of the printed page.
Service Manual
4-22
Samsung Electronics
Alignment & Troubleshooting
Machine Test
Switch Test
Use this feature to test all keys on the operation control panel. The result is displayed on the LCD window
each time you press a key.
Test Param Set (Handset Model only)
You can set the parmeter for handset standard.
Caution : The parameter value is set at the best condition in the shipment from factory.
Modem Test
Use this feature to hear various transmission signals to the telephone line from the modem and tocheck the
modem. If no transmission signal sound is heard, it means the modem part of the mainboard malfunctioned.
Dram Test
Use this feature to test the machine’s DRAM. The result appears in the LCD display.If all memory is working
normally, the LCD shows << O K >>ROM TEST
Use this feature to test the machine’S ROM. The result and the software version appear in the LCD display.
• FLASH VER : 1.00 V
• ENGINE VER :1.00V
Pattern Test
Using this pattern printout, you can check if the printer mechanism is functioning properly.It is needed in the
production progress. Service person doesn’t need to use it.
Shading Test
The function is to get the optimum scan quality by the
specific character of the CCD(ChargeCoupled Device).
If the copy image quality is poor, perform this function
to check the conditionCCD unit.
EDC
There are 3 sub item in this menu.
They are NVM Read/Write, NVM initial, Test Routines.
Use this function to check the status of the
components in the machine.
Restart Machine
You can reboot the machine by using a key without
mechanic rebooting.
Test USB HOST
Service Manual
4-23
Samsung Electronics
Alignment & Troubleshooting
Test Routines (EDC sub menu)
Depth 1
100-Motor
Depth 2
Meaning
State
Displayed
0000-Main BLDC
Main BLDC Motor is On/Off
On[Off]
0120-Exit Mot Fwd
Exit Motor Forward Fast On/Off
On[Off]
0140-Dup Mot Fwd
Duplex Motor Forward On/Off
On[Off]
0150-Dup Mot Bwd
Duplex Motor Backward On/Off
On[Off]
0160-Dup Fan1Run
Start/Stop Duplex Fan1 run
On[Off]
0260-SMPS Fan
Start/Stop Deve. Fan run
On[Off]
0000-MP Feed Clutch
Engages drive to pick up a paper from bypass
Tray(MP Tray).
On[Off]
0010-Tray1 Pickup
Engages drive to pick up a paper from tray1.
On[Off]
0020-Tray2 Pickup
Engages drive to pick up a paper from tray2.
(Optional)
On[Off]
0050-Registration
Engages drive to registartion rolls.
On[Off]
0130-Tray2 Feed Mot
Tray2 Feed Motor On/Off
On[Off]
0170-OutBin Full
Detect when paper is at outbin full sensor
On[Off]
0010-Tray1 Empty
Detect when paper is in Tray1.
High[low]
0080-Tray2 Empty
Detect when paper is in tray2.
High[low]
0280-MP Empty
Detects when paper is in Bypass Tray(MP
Tray).
High[low]
0290-Feed Sensor
Detect when a paper is at Feed sensor.
High[low]
0360-Regi Sens
Detect when a paper is at Regi. sensor.
High[low]
0370-Exit Sens
Detect when a paper is at Exit. sensor.
High[low]
0380-Dup Jam1
Detect when a paper is at Duplex Jam1 sensor. High[low]
105-MHV Bias
0030-B MHV Bias
Black MHV bias voltage on at normal drive
level
On[Off]
106-DEV Bias
0030-B Dev Bias
Black Dev bias voltage on at normal drive level
On[Off]
107-Transfer Bias
0030-B THV Bias
Black THV bias voltage on at normal drive level On[Off]
0070-B THV Read
Detect what the THV value is on the THV Roller Numeric 3 digits
0120-THV-Ve
ATTR plus bias voltage on at normal drive level
On[Off]
0000-Temp A
Detects what the temperature A is on fuser.
Numeric 3 digits
0040-Fan Run
Fuser Fan Motor On/Off
On[Off]
0050-Bias
Fuser bias voltage on at normal drive level
On[Off]
0090-Power On
It controls temperature of fuser as 180 degrees. On[Off]
0000-Motor1 Rdy
Detects if LSU motor1 runs at normal speed.
High[Low]
0060-Motor1 Run
LSU Motor1 On/Off
On[Off]
0110-LD Power4
LSU LD4 Power On/Off (black)
On[Off]
101-Clutch
102-Sensor
109-Fuser Heater
110-LSU
Service Manual
4-24
Samsung Electronics
Alignment & Troubleshooting
Report
All Report
You can print all report at the same time.
Protocol
Protocol list shows the sequence of the CCITTgroup 3 T.30 protocol during the most recent sending or
receivingoperation. Use this list to check for send and receive errors.
Supplies info
Supplies Information Report shows toner cartridge information such as toner remaining, toner capacity, toner
product date etc.
Configuration
Configuration report shows the status of the user-selectable options. You may print this list to confirm your
changes after changing settings. This page provides useful information for service.
Error Info
Error Information Report shows error records.
Usage page
Usage page report shows usage page counts since service date. It shows total counts of the simplex print
and dupex print.
Component Check
Component Check Report shows the operation procedure of the machine test in tech mode.
Service Support
Customer Assistance Report shows the country setting procedure, F/W upgrade procedure, printing a Test
pattern page.
Service Manual
4-25
Samsung Electronics
Alignment & Troubleshooting
Configuration Report
Service Manual
4-26
Samsung Electronics
Alignment & Troubleshooting
Supplies Information Report
Service Manual
4-27
Samsung Electronics
Alignment & Troubleshooting
4.1.5 Clearing Paper Jams
Occasionally, paper can be jammed during a print job. Some of the causes include:
• The tray is loaded improperly or overfilled.
• The tray has been pulled out during a print job.
• The front cover has been opened during a print job.
• Paper was used that does not meet paper specifications.
• Paper that is outside of the supported size range was used.
If a paper jam occurs, LCD window will show the error message. Find and remove the jammed paper. If
you don’t see the paper, open the covers.
Do not use a pinset or a sharp metal tool when removing a jam.
The covering of a metal part can be removed which can cause an electric leakage.
■ Description of ENGINE JAM type (Layout)
JAM- : Paper empty sensor ~ Feed sensor
(1) JAM-0
(2) JAM-1 : Feed sensor ~ Exit sensor
(3) JAM-2 : Exit sensor ~
3
(4) Duplex Jam-1 : ~ Duplex sensor
(5) Duplex Jam-0 : Duplex sensor ~ Feed sensor
FEED SENSOR
4
SCAN SENSOR
EXIT SENSOR
2
5
DUPLEX SENSOR
PAPER EMPTY
SENSOR
1
Service Manual
4-28
Samsung Electronics
Alignment & Troubleshooting
■ Description of ENGINE JAM type (Simplex)
Type
Case
Jam Removal
Jam Layout
FEED SENSOR
FEED SENSOR
Jam 0
Jam 1
Leading edge of media does
not arrive at registration within a
certain time after pick-up(If fails
at a time,it tries pick-up again)
1. Pull out cassette
2. Remove jammed paper
Leading edge of media does not
arrive at Exit Sensor within a
certain time after registration
1. Open front cover
2. Pull out toner cartridge
3. Remove jammed paper
FEED SENSOR
FEED SENSOR
SCAN SENSOR
EXIT SENSOR
FEED SENSOR
SCAN SENSOR
EXIT SENSOR
FEED SENSOR
SCAN SENSOR
EXIT SENSOR
Jam 2
1. Open rear cover
Trailing edge of media does not 2. Pull down jam lever on fuser
leave Exit Sensor within a certain
unit and open fuser cover)
time after touching registration
3. Remove jammed paper from
exit
EXIT SENSOR
EXIT SENSOR
EXIT SENSOR
■ Description of ENGINE JAM type (Duplex)
Type
Duplex
Jam 1
Duplex
Jam 0
Case
Jam Removal
1. Open rear cover
2. Remove jammed paper
Trailing edge of media leaves
OR
Exit Sensor, and does not arrive
1. Pull out duplex unit
at Duplex Sensor
2. Remove jammed paper from
duplex unit
Leading edge of media does
not arrive at registration within
a certain time after touching
Duplex Sensor
1. Open rear cover
2. Remove jammed paper
OR
1. Pull out duplex unit
2. Remove jammed paper from
duplex unit
Jam Layout
EXIT SENSOR
DUPLEX SENSOR
EXIT SENSOR
DUPLEX SENSOR
FEED SENSOR
DUPLEX SENSOR
FEED SENSOR
DUPLEX SENSOR
Service Manual
4-29
Samsung Electronics
Alignment & Troubleshooting
In Tray 1
In optional tray 2
1. Open and close the front door. The jammed
paper is automatically ejected from the machine.
If the paper does not exit, go to the next step.
1. Pull out optional tray 2.
2. Remove the jammed paper from the machine.
2. Pull out tray 1 .
3. Remove the jammed paper by gently pulling it
straight out.
If the paper does not move when you pull or if
you do not see the paper in this area, stop and
go to the next step.
3. Pull tray 1 half-way out.
4. Pull the paper straight up and out.
If the paper does not move when you pull, or if
you do not see the paper in this area, check the
fuser area around the toner cartridge.
4. Insert tray 1 back into the machine until it snaps
into place. Printing automatically resumes.
5. Insert the trays back into the machine. Printing
automatically resumes.
Service Manual
4-30
Samsung Electronics
Alignment & Troubleshooting
In the multi-purpose tray
Inside the machine
1. If the paper is not feeding properly, pull the
paper out of the machine.
1. Open the front door and pull the toner cartridge
out, lightly pushing it down.
2. Open and close the front door to resume
printing.
2. Remove the jammed paper by gently pulling it
straight out.
3. Replace the toner cartridge and close the front
door. Printing automatically resumes.
Service Manual
4-31
Samsung Electronics
Alignment & Troubleshooting
In exit area
5. Fully open the rear door, as shown.
1. Open and close the front door. The jammed
paper is automatically ejected from the machine.
If you do not see the jammed paper, go to next
step.
2. Gently pull the paper out of the output tray.
6. Unfold the duplex guide fully and release the
pressure lever on each side.
If you do not see the jammed paper or if there is
any resistance when
3. Open the rear door.
4. If you see the jammed paper, push the pressure
lever on each side up and remove the paper.
Skip to step 9.
7. While pushing the fuser lever to the right, open
the fuser door.
If you still do not see the paper, go to the next
step.
Service Manual
4-32
Samsung Electronics
Alignment & Troubleshooting
In the duplex unit area
8. Pull the jammed paper out.
If the duplex unit is not inserted correctly, a paper
jam may occur. Make sure that the duplex unit is
inserted correctly.
1. Pull the duplex unit out of the machine.
9. Return the lever, door, and guide to their original
position.
10. Close the rear door. Printing automatically
resumes.
2. Remove the jammed paper from the duplex unit.
If the paper does not come out with the duplex
unit, remove the paper from the bottom of the
machine.
Service Manual
4-33
Samsung Electronics
Alignment & Troubleshooting
Insert the duplex unit into the machine.
5. Pull the jammed paper out.
If you still do not see the paper, go to the next
step.
6. Fold the duplex guide and close the rear door.
3. Open the rear door.
4. Unfold the duplex guide fully.
Service Manual
4-34
Samsung Electronics
Alignment & Troubleshooting
4.1.6 Abnormal Image Printing and Defective Roller
If abnormal image prints periodically, check the parts shown below.
3
4
6
2
7
1
8
5
1
2
3
4
5
6
7
8
OPC Drum
Charge Roller
Supply Roller
Developing Roller
Transfer Roller
Heat Roller
Pressure Roller1
Pressure Roller2
No
Roller
Abnormal image period
Kind of abnormal image
1
OPC Drum
75.5mm
White spot, Block spot
2
Charge Roller
37.7mm
Black spot
3
Supply Roller
51mm
Horizontal density band
4
Develop Roller
39mm
Horizontal density band
5
Transfer Roller
47.1mm
Black side contamination/transfer fault
6
Heat Roller
77.8mm
Black spot and fuser ghost
7
Pressure Roller1
62.8mm
Black side contamination
8
Pressure Roller2
50.2mm
Black side contamination
Service Manual
4-35
Samsung Electronics
Alignment & Troubleshooting
■ Repetitive defect Image check page
Print this page. Align the this page and the printed defect image and find the defective roller.
Start line
Charge Roller
Develop Roller
Transfer Roller
Pressure Roller2
Supply Roller
Pressure Roller1
OPC Drum
Heat Roller
Service Manual
4-36
Samsung Electronics
Alignment & Troubleshooting
4.1.7 Error Message
Messages appear on the control panel display to indicate the machine’s status or errors. Some error
messages are shown with graphics to help you troubleshoot problem.
Checking display messages
1. When errors occur, Check Status appears on the display and press OK.
2. Check the display message to see what kind of error has occured.
If several messages appear, press the up/down arrow to highlight the message you want solve.
3. Press OK on the control panel.
Refer to the tables below to understand the messages’ and their meaning, and solve the problem, if
necessary.
• If Check Status still appears, repeat above steps.
• If a message is not in the table, reboot the power and try the printing job again. If the problem
persists, call for service.
• When you call for service, provide the service representative with the contents of display message.
• Some messages may not appear in the display depending on options or models.
• [xxx] indicates the media type.
Message
Meaning
Suggested Solutions
BOOTP problem
BOOTP has a
problem. Reconfigure
DHCP/static IP
There is a problem with the
network.
Check your network environment.
You can change the network setting to
DHCP or STATIC.
BOOTP problem
BOOTP has a
problem.
Switching to Auto IP
There is a problem with the
network.
Check your network environment.
You can change the network setting to
DHCP or STATIC.
Connection Error
Connection with the SMTP server
failed.
Check the server settings and the network
cable.
Data Read Fail
Check USB key
Time expired while reading date.
Try again.
Data Write Fail
Check USB key
Storing to the USB memory failed. Check the available
USB memory space.
DHCP problem
DHCP has a problem.
Reconfigure BOOTP/
static IP
There is a problem with the
network.
Check your network environment.
You can change the network setting to
BOOTP or STATIC.
DHCP problem
DHCP has a problem.
Switching to Auto IP
There is a problem with the
network.
Check your network environment.
You can change the network setting to
BOOTP or STATIC.
Door is open.
Close it
The front door is not securely
latched.
1. Close the door. If the message
is not disappeared, check the below
steps.
2. Check that the door switch is pushed.
3. Check that the LCD message is changed
by door switch action.
Service Manual
4-37
Samsung Electronics
Alignment & Troubleshooting
Message
Meaning
Suggested Solutions
Fax memory is
almost full
Fax memory is almost full.
Press the left/right arrow to highlight Cancel
or Start, then press OK. If you select Cancel
, the machine stops the fax job. If you select
Start, the machine only sends scanned
documents of the fax job.
Fax unit error
Error: #10-002
Turn off then on
The fax card is not installed
properly or is out of order.
1. Check the Fax card connector.
2. Replace the Fax Card.
3. If the problem persists, replace the PBAMAIN.
File Format is Not
Supported.
The selected file format is not
supported.
Use the correct file format.
Group Not Available
You have tried to select a group
location number where only a
single location number can be
used, such as when adding
locations for a multiple send
operation.
Use a speed dial number or dial number
manually using the number keypad.
IP Conflict
This IP address
conflicts with that
of other system
The IP address is used elsewhere. Check the IP address or obtain a new IP
address.
Jam bottom of duplex
Paper has jammed during duplex
printing.
1. Remove the duplex unit and remove the
jammed paper.
2. Open the rear door and remove the
jammed paper.
3. Check the duplex jam1 sensor on EDC
mode.
Jam in exit area
Paper has jammed in exit area.
1. Remove the jammed paper from output
tray. If you don't see the jammed paper,
open the rear door and remove the
jammed paper.
2. Check the exit sensor. If it is defective,
replace it.
Jam inside machine
Paper has jammed inside the
machine.
1. Open the front door and remove the toner
cartridge. Remove the jammed paper.
2. If the paper is removed but message is
displayed, check the Regi.sensor on EDC
mode. If it is defective replace it.
3. Check the exit sensor. If it is defective,
replace it.
Service Manual
4-38
Samsung Electronics
Alignment & Troubleshooting
Message
Meaning
Suggested Solutions
Jam top of duplex
Paper has jammed during duplex
printing.
1. Remove the duplex unit and remove the
jammed paper.
2. Open the rear door and remove the
jammed paper.
3. Check the duplex jam1 sensor on EDC
mode.
Junk Fax Error
Junk Fax Job
Cancelled
The machine has received a fax
from which is registered as a junk
fax.
The received fax data will be deleted.
Reconfirm junk fax setup.
Line Busy
The line is already
engaged. Try later
The receiving fax machine did
not answer or the line is already
engaged.
Try again after a few minutes.
Line Error
The Fax Line has a
problem. Try again
Your machine cannot connect with Try again. If the problem persists, wait an
the receiving fax machine or has
hour or so for the line to clear again. Or, turn
lost contact because of a problem the ECM mode on
with the phone line.
Low Heat error
Error: #02-001
Turn off then on
1. At warm up, the temperature
keep up the lower temperature
for regular time.
2. In case that the temperature
has not reached warm up
temperature after warm-up
time.
3. At ready, Less than target
temperature and for more than
10 sec.
4. At printing, Less than printing
Ref. temp and for more than 10
sec.
1. Measure the resistance value of the
thermostat. Is it infinite? Replace the
thermostat.
2. Measure the resistance value of the lamp.
Is it infinite? Replace the fuser unit.
3. Check that the fuser connector is
connected properly.
4. Measure the resistance value of the
thermistor. Is it infinite? Replace the
thermistor.
5. Replace the fuser unit.
LSU error
Error: #04-001
Turn off then on
After LD on, the Laser beam
detect signal is not occurred or
irregular.
1. Replace the Main board.
2. If the problem persists after replacing the
Main board, replace the LSU unit.
LSU error
Error: #04-002
Turn off then on
LSU motor does not operate or
the drive signal is abnormal.
1. Replace the LSU unit
2. Check the 24V power. If the voltage is not
occurred, replce the SMPS board.
3. Check the motor connector, MAIN-PBA
connector.
Mail Size Error
Mail exceeds than
server support
The mail size is larger than the
supported size by SMTP server.
Divide your mail or reduce the resolution.
Mail Size Error
One Page is
Too Large
Single page data exceeds the
configured mail size.
Reduce the resolution and try again.
Service Manual
4-39
Samsung Electronics
Alignment & Troubleshooting
Message
Meaning
Suggested Solutions
Memory Failure
Error: #10-001
Turn off then on
At system booting, memory is not
read.
Enter the Tech mode. Check the Dram Test.
If the memory is defective, replace it.
Memory Full
Fax memory is full.
Print or remove
received fax job
The memory is full.
Print or remove the received fax data in the
memory.
Network problem
Communication problem occurred
Communication
with network board.
problem occurred with
network board
Replace the PBA-MAIN.
Network Problem
Network cable is
not connected.
Check it
Network cable is not connected.
Connect the machine to the network with a
network cable.
Network Problem
Network card is
not installed.
Check it
Network card is not installed.
1. Turn off the machine and reboot it.
2. Replace the PBA-MAIN.
Output bin Full
The document output tray is full.
Output bin Full.
Remove printed paper
Remove the paper from output tray.
Original paper Jam
Original paper jam
inside of scanner.
Remove Jam
The load original has jammed in
the document feeder.
1. Remove all documents on DADF.
2. Open the DADF door and remove the
jammed paper.
Over Heat error
Error: #02-002
Turn off then on
1. At warm up, the temperature
keep up the lower temperature
for regular time.
2. At warm up, after temperature
checking time, more than
regular temperature and for
more 30 sec.
3. At standby or not sleep, more
than Top temp and for a few
minutes.
4. At power save mode, the
temperature keep up the
constant for regular time.
1. Measure the resistance value of the
thermostat. Is it infinite? Replace the
thermostat.
2. Measure the resistance value of the lamp.
Is it infinite? Replace the fuser unit.
3. Check that the fuser connector is
connected properly.
4. Measure the resistance value of the
thermistor. Is it infinite? Replace the
thermistor.
5. Replace the fuser unit.
Service Manual
4-40
Samsung Electronics
Alignment & Troubleshooting
Message
Meaning
Suggested Solutions
Paper Jam in MP tray
Paper has jammed in the feeding
area of the MP tray.
1. Remove the paper from MP tray.
2. If pick up roller does not rotate , check the
pick up clutch.
3. If Pickup roller is rotating but the paper is
not feeding, replace the pick up rubber.
4. Check the feed sensor. If it is defective,
replace it.
Paper Jam in tray1
Paper has jammed in the feeding
area of the tray1.
1. Remove the paper from tray1.
2. If pick up roller does not rotate , check the
pick up clutch.
3. If pickup roller is rotating but the paper is
not feeding, replace the pick up rubber.
4. Check the feed sensor. If it is defective,
replace it.
Paper Jam in tray2
Paper has jammed in the feeding
area of the tray2.
1. Remove the paper from tray2.
2. If pick up roller does not rotate , check the
pick up clutch.
3. If pickup roller is rotating but the paper is
not feeding, replace the pick up rubber.
4. Check the feed sensor. If it is defective,
replace it.
Paper Empty in MP
Paper is empty
in MP tray.
Load paper
There is no paper in the MP tray.
1. Load the papers in the MP Tray.
2. Check the MP empty sensor on EDC
mode.
3. If it is defective, replace it.
Paper Empty in tray1
Paper is empty
in tray1.
Load paper
There is no paper in the tray1.
1. Load the papers in the Tray1.
2. Check the Tray1 empty sensor on EDC
mode.
3. If it is defective, replace it.
Paper Empty in tray2
Paper is empty
in tray2.
Load paper
There is no paper in the tray2.
1. Load the papers in the Tray2.
2. Check the Tray2 empty sensor on EDC
mode.
3. If it is defective, replace it.
Paper mismatch MP
Load [A4] [Plain]
Continue ⊙ Cancel X
The paper size specified in the
printer properties does not match
the paper you are loading.
You can select the option between Continue
or Cancel. If you select Cancel , the printing
job will stop. Load the correct paper in the
tray. If you select Continue, printing job will
continue.
Paper mismatch Tray1 The paper size specified in the
Load [A4] [Plain]
printer properties does not
Continue ⊙ Cancel X match the paper you are loading.
You can select the option between Continue
or Cancel. If you select Cancel , the printing
job will stop. Load the correct paper in the
tray. If you select Continue, printing job will
continue.
Service Manual
4-41
Samsung Electronics
Alignment & Troubleshooting
Message
Meaning
Suggested Solutions
Paper mismatch Tray2 The paper size specified in the
Load [A4] [Plain]
printer properties does not match
Continue ⊙ Cancel X the paper you are loading.
You can select the option between Continue
or Cancel. If you select Cancel , the printing
job will stop. Load the correct paper in the
tray. If you select Continue, printing job will
continue.
Pickup roller is worn
MP pickup roller is
worn. Replace with
new one
The pickup roller has reached the
end of its lifespan.
Replace pick-up roller of MP tray
Pickup roller is worn
Tray pickup roller is
worn. Replace with
new one
The pickup roller has reached the
end of its lifespan.
Replace pick-up roller of tray1
Pickup roller is worn
Tray2 pickup roller is
worn. Replace with
new one
The pickup roller has reached the
end of its lifespan.
Replace pick-up roller of tray2.
Replace New Toner
Replace with New
Toner
The toner cartridge has reached
the end of its lifespan.
Replace the toner cartridge with a
Samsung-genuine toner cartridge.
Scanner door Open
Door of scanner
is open.
Close it
Door of scanner is open.
Close the scanner door.
Scanner locked
Scanner locking
switch is locked.
Release it
The scanner module is locked.
1. Unlock the scanner lock switch.
2. Check the CCDM is moving at power on.
3. Check the connection of CCDM module
flat cable.
4. Check the belt unit or gears.
5. Replace the ADF board.
Scanner problem
Communication problem occurred
Communication
with scanner unit
problem occurred with
scanner unit
1. Check the harness connecting ADF board
and PBA-MAIN.
2. Replace the ADF board.
3. Replace the PBA-MAIN.
System error
Error: #02-000
Turn off then on
Fuser has some problems.
1. Remove the fuser unit and re-install it.
2. Replace the fuser unit.
3. Replace the SMPS board.
System error
Error: #10-004
Turn off then on
Communication problem occurred. 1. Check the harness connecting OPE PBA
and PBA-MAIN.
2. Replace the OPE PBA.
3. Replace the PBA-MAIN.
Toner cartridge error
Error: #06-006/7/20
Open/close door
Toner Cartridge is not installed
properly or S-chip is defective.
Service Manual
4-42
1. Take out the toner cartridge and re-install
it.
2. Replace the toner cartridge.
Samsung Electronics
Alignment & Troubleshooting
Message
Meaning
Suggested Solutions
Too many Faxes
Too many faxes are
received. Print or
remove job
Too many faxes are received
Print or remove received fax.
Toner is worn
Toner is worn.
Replace with new one
The toner cartridge is near the
end of its lifespan.
You can select the option among Stop or
Continue. If you select Stop, the machine
stops printing. If you select Continue, the
machine keeps printing, but the quality
cannot be guaranteed.
Toner Not Compatible
Toner cartridge is not
compatible. Check
guide
The toner cartridge you have
installed is not for your machine.
Install a Samsung-genuine toner
cartridge designed for your machine.
Toner Not Installed
Toner cartridge is not
installed. Install it
The toner cartridge is not installed. Install the toner cartridge.
Tray2 has a problem
The machine cannot communicate 1. Check the cable connecting the machine
Communication
the optional tray 2.
and the optional tray 2.
problem occurred with
2. Replace the PBA of the tray2.
Tray2
3. Replace the MAIN-PBA.
Tray2 Not Installed
Tray2 is not installed
Service Manual
The optional tray2 is not installed.
4-43
1. Re-install the tray2.
2. Check the cable connecting the machine
and the optional tray 2.
3. Replace the PBA of the tray2.
4. Replace the MAIN-PBA.
Samsung Electronics
Alignment & Troubleshooting
4.2 Troubleshooting
4.2.1 Procedure of Checking the Symptoms
Before attempting to repair the printer first obtain a detailed description of the problem from the customer.
Power On
OP Panel
ON?
- No Power
- Power Module error
- Main PBA error
- LCD Panel error
Ready or
Power save
Indicate
Error Massage
Refer to
Error Massage
< Chapter 4.1.7 >
Test Print
printing
Quality is
Nomal?
Refer to "Solution
of 4.2.2.3 Print Quality"
END
Service Manual
4-44
Samsung Electronics
Alignment & Troubleshooting
4.2.2 Solution
4.2.2.1 Scanner
COPY
PROBLEM
White copy
Black copy
Defective image
quality
Abnormal noise
Service Manual
ITEMS TO BE CHECKED
HOW TO SOLVE
• Check the Scan-Cover open.
• Room light can transit a thin original.
• Check shading profile.
• Remake shading profile in the tech mode.
• Check the CCD problem in Main
PBA.
• Check the CCD harness contact.
• Check shading profile.
• Remake shading profile in the tech mode.
• Check shading profile.
• Remake shading profile in the tech mode.
• Check the gap between original and • T
he gap above 0.5mm can cause a blurred
scanner.
image.
• Check printing quality.
• See “Print” troubleshooting.
• Check the Scanner Motor and any
mechanical disturbance.
• Check the right position of the Scanner Motor,
and check the any mechanical dis turbance in
the CCD carriaging part.
• Check the Motor Driver in Driver
PBA.
• If any driver is defective, replace it.
4-45
Samsung Electronics
Alignment & Troubleshooting
PC-Scan
PROBLEM
Scanning Error
Defective image
Quality
Abnormal noise
Service Manual
ITEMS TO BE CHECKED
HOW TO SOLVE
• Check the printer cable installed.
• Check correct installation, and use standard
USB cable.
• Check how TWAIN driver is
installed.
• Remove any other scanner driver.
• Reboot after reinstallation of the TWAIN driver.
• Check the USB signal level.
• If USB signal level is defective, replace Main
PBA.
• Check shading profile.
• Remake shading profile in the tech mode.
• Check the gap between original and • T
he gap above 0.5mm can cause a blurred
scanner glass.
image.
• Check printing quality.
• See “Print” troubleshooting.
• Check the Scanner Motor and any
mechanical disturbance.
• Check the right position of the Scanner Motor,
and check the any mechanical dis turbance in
the CCD carriaging part.
• Check the Motor Driver in Driver
PBA.
• If any driver is defective, replace it.
4-46
Samsung Electronics
Alignment & Troubleshooting
4.2.2.2 FAX
FAX/TELEPHONE Precautions
PROBLEM
ITEMS TO BE CHECKED
HOW TO SOLVE
TEL LINE
CANNOT BE
ENGAGED
(NO DIAL TONE)
• When you press “ OHD” key:
a) Check line cord connection.
b) C
heck MAIN LIU harness, and
CN2 of the LIU PBA.
a) insert it correctly into the connection jack
called “line”.
b) Replace defective parts.
Cannot MF dial
• Check MAIN-LIU harness.
• Replace defective parts.
MF dial is
possible but
not DP dial.
• Check the LIU PBA.
• Replace LIU PBA.
Defective fax
transmission
• Check MAIN LIU harness.
• Check ‘hook off’ : Refer to ‘TEL
LINE CANNOT BE ENGAGED’
above.
• Check transmission path and
reception path of the LIU PBA.
• Replace defective parts.
• Refer to ‘TEL LINE CANNOT BE ENGAGED’
above.
• Replace main PBA, if abnormal.
• Replace LIU PBA.
Replace main PBA.
Defective
automatic fax
reception
• Is the ring checked?
• Refer to ‘Defective Transmission.’
• Replace LIU PBA if it cannot be checked.
• Refer to ‘Defective Transmission’.
Service Manual
4-47
Samsung Electronics
Alignment & Troubleshooting
4.2.2.3 Print Quality
Error Status
Check
Vertical black line
and band
1. Bad blade of Toner cartridge
2. LSU
3. Bad cleaning blade of drum cartridge.
1. Change Toner cartridge
2. Replace LSU
3. Replace drum cartridge.
Vertical white line
1. LSU window contamination
2. Toner cartridge
1. Clean LSU window
2. If not LSU, change Toner cartridge.
Digital Printer
Digital Printer
Digital Printer
Digital Printer
Digital Printer
No image
1. GND OPC is well grounded?
2. LSU running well?
3. BiasPrinter
voltage is normal?
Digital
Digital Printer
4. Lower
toner?
Digital
Printer
Digital Printer
5. Is there
video data
from Printer
Main PBA
Digital
Printer
Digital
Digital Printer
Digital Printer
Digital Printer
Digital Printer
Digital Printer
Digital Printer
Digital Printer
Digital
Light Printer
image
Digital Printer
Digital Printer
Digital
Printer
Digital Printer
Digital
Printer
Digital
Printer
Digital
Printer
Digital
Printer
Digital Printer
Digital
Printer
Digital
Printer
Digital
Printer
Digital
Printer
Digital
Printer
Digital
Printer
Digital
Printer
Digital
Printer
Digital
Printer
Digital
Printer
1. LSU light power normal?
Digital
Printer
Digital
Printer
Digital
Printer
Digital
Printer
Digital
Printer
Digital
Printer
Digital
Printer
Digital Printer
2. Enough toner?
Digital
Printer
Digital
Printer
Digital
3. HighPrinter
charger voltage? Digital Printer
4. Lower bias voltage
5. Contamination of high voltage
Digital
Printer
contact.
Digital
Printer
6. Transfer
volatge and roller.
Digital
Digital Pri
Digital Printer
Digital Printer
Digital Printer
Digital Printer
Digital Printer
Digital Printer
62.8 or 77.6mm
75.5mm
Digital Printer
Digital Printer
Digital Printer
Service
Manual
Digital
Printer
Digital Printer
Digital Printer
Digital Printer
Digital Printer
Digital Printer
Digital Printer
62.8 or 77.6mm
75.5mm
Digital Printer
Digital Printer
Digital Printer
Digital Printer
Digital Printer
Solution
4-48
Digital Printer
Digital Printer
Digital Printer
Digital Printer
Digital Printer
Digital Printer
Digital Printer
Digital Printer
Digital Printer
Digital Printer
1. Measure the resistance between
frame ground and the ground spring
attached frame.Digital Printer
Confirm stable Digital
ground.Printer
Unless bad
ground, detach Digital
cabinet,
check where
Printer
is bad point
Digital Printer
2. Adjust LSU or replace
it
Digital Printer
3. Normal Dev bias = -450V
4. Shake toner cartridge and print.If a
like good, toner is empty
5. Test
engine testDigital
pattern
, replace
Digital
Printer
Printer
Digital
Printer
Digital Printer
Main
PBA
Digital
Printer
1. LSU
light powerDigital
checkPrinter
is difficult.
Digital
Printer
Digital
Compare with new onePrinter
and check.
Digital
Printer
Digital
Printer
2. Check toner and the toner cartridge
counter 3~4. Measure all high voltage
output.
Digital
Printertoner cause
Digital
Printer
5. Leakage
bad
contact and
Digital
Printercontact Digital
Printer
increase
resistance.
Clean
Digital
Printer
Digital Printer
contaminated
area.
Digital Printer
Digital Printer
Digital Printer
Digital Printer
Digital Printer
Digital Printer
Digital Printer
Digital Printer
Digital Printer
Digital Printer
Digital Printer
Digital Printer
Samsung
Digital
PrinterElectronics
Digital Printer
Digital Printer
Digital Printer
Digital Printer
Digital Printer
Digital Printer
Error Status
Dark image
Digital Printer
Digital Printer
Digital Printer
Digital Printer
Digital Printer
Background
Digital Printer
Digital Printer
Alignment & Troubleshooting
Digital Printer
Digital Printer
Digital Printer
Digital Printer
Digital Printer
Digital Printer
Digital Printer
Digital Printer
Check
1. LSU light power normal?
2. Bias voltage output is high?
Digital Printer
Digital
Printer
3. Video
data is always
supplied?
Digital
Printer
Digital
Printer
Digital
Printer
Digital
Printer
Digital
Printer
4. Bad Printer
high charge Digital
voltage
contact.
Digital
Printer
Digital
Printer
Digital
Printer
Digital
Printer
Digital Printer
Digital Printer
Digital Printer
Digital
Printer
Digital
Printer
Digital
Printer
Digital
Printer
Digital
Printer
Digital
Printer
Digital
Printer
Digital
Printer
Digital
Printer
Digital
Printer
Digital
Printer
Digital
Printer
Digital
Printer
Digital
Printer
Digital Printer
1. High voltage output is normal?
Digital Printer
Digital Printer
Digital Printer
Digital Printer
Digital Printer
Solution
1. Check the rated level and replace.
2. Set to power rating.
3. Replace
board.
Digital
Printer defected
Digital
Printer
4. Check
the charge
voltage
or change
Digital
Printer
Digital
Printer
Digital
Printer
Digital Printer
the
drum cartridge.
Digital Printer
Digital Printer
Digital Printer
Digital Printer
1. Adjust to the rated status.
Digital
Digital Pri
Digital Printer
Digital Printer
Digital Printer
Digital
2. C/R Printer
of drum cartridge is
Digital
Printer
contaminated?
Digital Printer
Digital Printer
Digital Printer
Digital
Printerdrum cartridge.
Digital Printer
2. Replace
Digital Printer
Digital Printer
Digital Printer
Digital Printer
Digital Printer
Digital Printer
Digital Printer
Digital Printer
Ghost
Digital
Printer
Digital Printer
Digital Printer
Digital Printer
Digital Printer
1. High voltage output.
2. Pre-Transfer Lamp.
3. Bad high voltage contact.
1. Check
every highDigital
voltage.
Digital
Printer
Printer
2. Check
the turn-on
PTL, Printer
LED crash.
Digital
Printer
Digital
3. Clean
the inside Digital
machine
or replace
Digital
Printer
Printer
drum
cartridge. Digital Printer
Digital
Printer
Digital Printer
Digital Printer
Digital
Digital Printer
Printer
Digital Printer
Digital Printer
1. Contamination of transfer roller.
Digital
Printer
Digital Printer
2.
Stains
of
paper
path.
Digital Printer
Digital Printer
3. Pressure
Digital
Printerroller’s contamination.
Digital Printer
Digital Printer
Digital Printer
Digital Printer
Digital Printer
1. Clean the transfer roller with vacuum
Digital
Printer
Digital Printer
cleaner.
Digital Printer
Digital Printer
2. Clean
the area ofDigital
paperPrinter
path with
Digital
Printer
cloth
or
air
cleaner.
Digital Printer
Digital Printer
Stains
on back of
Digital
Digital Printer
Printer
paper
Digital Printer
Digital Printer
Digital
Digital Printer
Printer
Digital
Digital Printer
Printer
Poor Fusing
Partial blank image
(not periodic)
Service Manual
3. Remove fuser and replace it.
1. Use recommended paper?
2. Check fusing temperature.
3. The machine was under the low
tempera ture for a long time?
1. Should use recommended paper.
2. Check engine controller board. If you
have not thermometer, measure the
thermistor voltage to CPU, If 2.3V±5%
in printing CPU works well. Then,
disassemble fuser and check the
thermistor contact and thermistor.
3. Re-check after putting the machine in
the warm place for certain period.
1. Toner is low?
2. The toner cartridge is out of position?
1. Replace Toner cartridge.
2. Checkand adjust.
4-49
Samsung Electronics
Alignment & Troubleshooting
Error Status
Partial blank image
(periodic)
Check
Solution
1. Develop roller scar or particle.
2. Scar or particle. (94.3 mm)
3.Transfer roller scar or particle.
(56.6 mm)
1. Replace toner cartridge.
2. Replace drum cartridge.
3. Replace transfer roller.
1. Charge roller’s pressure force
1. Replace drum cartridge.
unbalance
2. Replace toner cartridge and drum
2. Dev. roller and OPC or Dev. roller and
cartridge.
blade’s pressure force unbalance
3. Check left and right spring of transfer
3. Transfer roller’s pressure force
roller and the spring pressing the
unbalance of each side
toner cartridge inside the machine
Horizonral band
1. Unstable high voltage contact
2. Charge roller’s contamination
3. Contamination of heat roller
4. Malfunction of LSU
62.8 or 77.6mm
Different image
density
(left and right)
Service Manual
4-50
1. Clean each contact and check good
contact
2. Clean charge roller
3. Replace fuser unit
4. Check Main PBA.
Samsung Electronics
No Image
Digital Printer
Digital Printer
Digital Printer
Digital Printer
Digital Printer
Digital Printer
Digital Printer
Digital Printer
Digital Printer
Digital Printer
Digital Printer
Digital Printer
Digital Printer
Digital Printer
Digital Printer
Digital Printer
Digital Printer
Digital Printer
Digital Printer
Digital Printer
Digital Printer
Digital Printer
Digital Printer
Digital Printer
Digital Printer
No image?
Digital Printer
Digital Printer
Digital Printer
YES
Digital Printer
Digital Printer
Digital Printer
Digital Printer
Digital Printer
Digital Printer
Digital Printer
NO
Digital Printer
Digital
Printer
Digital
Printer
Digital
Printer
Digital
Printer
Digital
Printer
Digital
Printer
Digital
Printer
Digital
Printer
Digital
Printer
Digital
Printer
Digital
Printer
Digital
Printer
Digital
Printer
Digital
Printer
Digital
Printer
Digital
Printer
Digital
Printer
Digital
Printer
Digital
Printer
Digital
Printer
Digital Printer
Digital
Printer
Digital Printer
Digital Printer
Self test
pattern prints?
NO
Digital
Digital Printer
Digital Pri
YES Digital Printer
Digital Printer
Digital Printer
DigitalCheck
Printer
Printer
connection Digital
to
Digitalcomputer
Printer or replace
Digital Printer
controller
Digital Printer
Digital Printer
Digital Printer
Digital Printer
Digital Printer
Digital
Digital Printer
Printer
Digital
Digital Printer
Printer
Digital
Printer
Digital Printer
Digital
Digital Printer
Printer
Digital
Digital Printer
Printer
Digital Printer
Digital Printer
Digital Printer
Digital Printer
Digital Printer
Digital Printer
Digital Printer
Digital Printer
Digital Printer
Digital Printer
Alignment & Troubleshooting
Digital Printer
Digital Printer
Digital Printer
Digital Printer
Digital Printer
A on
Digital
next
page Printer
Digital Printer
Digital Printer
Digital Printer
Digital Printer
Digital Printer
Self testing
is possible ?
NO
Digital Printer
Digital Printer
Digital Printer
Digital Printer
Retest after replacing the
connector or controller board
Digital Printer
Digital Printer
Digital Printer
Take out the cartridge Digital Printer
and prepare the tester Digital Printer
YES
for electronic connection
Digital Printer
Digital Printer
Digital Printer
Digital Printer
Digital Printer
Digital Printer
Digital Printer
Digital Printer
Digital Printer
Is the OPC
replacePrinter
the GND
NO PrinterRepair orDigital
terminal of machine Digital
terminal
is well-connected Digital Printer
Digital Printer
to Frame?
Digital Printer
Digital Printer
YES
Digital Printer
Digital Printer
Digital Printer
Digital Printer
Digital Printer
Digital Printer
Digital PrinterCheck theDigital
Printer
path between
Does the
Digital
Printer
Digital
Printer
Digital
Printer
Main board
video data line to
NO
and
HVPS.
Repair
or replace
Digital
Printer
Digital Printer
LSU transit
to High/Low Digital Printer
the
defective
component
when
printing?
Digital
Printer
Digital Printer
Digital Printer
or board
Digital Printer
Digital Printer
Digital Printer
YES
The mirror in LSU might be
misplaced so the light path to the
OPC deviates ->Repair or replace
LSU or remove any defective
matters in the machine
Service Manual
4-51
Samsung Electronics
Alignment & Troubleshooting
A
Transfer
voltage OK? (on the
transfer roller
shaft)
NO
YES
Are the
connection terminal
and connection
correct?
NO
Repair or replace terminal
YES
Replace HVPS or repair defective component
Developing
(-450V) and supplying
(-600V) voltage
are OK?
NO
Is the connection
terminal OK?
NO
Repair or replace terminal
YES
YES
Replace HVPS or repair
defective component
Does the
counter indicate over
the toner's guaranty
life
YES
NO
Transfer roller might be out of its location
-> Locate the roller into its place
This could occurs when he power of LSU is low or
the density is low due to the obstacles on the window
-> Replace LSU or clean the window
Replace the toner cartridge
Service Manual
4-52
Samsung Electronics
Digital Printer
Digital Printer
Digital Printer
Digital Printer
Digital Printer
Digital Printer
Digital Printer
Digital Printer
Digital Printer
Digital Printer
Digital Printer
Digital Printer
Digital Printer
Digital Printer
Digital Printer
Digital Printer
Digital Printer
Digital Printer
Digital Printer
Digital Printer
All Black
Digital
Digital Printer
Digital Printer
Digital Pri
All black in
NO
Digital Printer
printing area?Digital Printer
Digital Printer
Digital Printer
Digital Printer YES Digital Printer
Digital Printer
Digital Printer
Digital Printer
Digital Printer
Digital Printer
Digital Printer
Alignment
& Troubleshooting
Digital Printer
Digital Printer
Digital Printer
Digital Printer
Digital Printer
Digital
Printer
Digital
Printer
Digital
Printer
Digital
Printer
Digital
Printer
Digital
Printer
Digital
Printer
Digital
Printer
Digital
Printer
Digital
Printer
Digital
Printer
Digital
Printer
Digital
Printer
Digital
Printer
Digital
Printer
Digital
Printer
Digital
Printer
Digital
Printer
Digital
Printer
Digital
Printer
Digital
Printer
Digital
Printer
Digital
Printer
Digital Printer
YES
NO
Digital
Digital Printer
Printer YES Digital Printer
Digital
Digital Printer
Digital Printer
Printer
Digital
Printer
Digital Printer
Digital Printer
Digital
Digital Printer
Digital Printer
Printer
Digital
Printer
Digital Printer
Digital Printer
Is the
Hsync signal received
in LSU?
NO
Digital Printer
Digital Printer
Digital Printer
Digital Printer
Digital Printer
Digital Printer
Digital Printer
Digital Printer
Digital Printer
Digital Printer
Digital Printer
Digital Printer
Digital Printer
Digital Printer
Digital Printer
Digital Printer
Digital Printer
Does the
Digital Printer
video data line to LSU
NO
transit to High/Low whenDigital Printer
Digital Printer
printing?
Replace LSU
Is charge
voltage supplied
from HVPS?
Digital Printer
Digital Printer
Digital Printer
Digital Printer
Digital Printer
Digital Printer
Digital Printer
Digital Printer
Digital Printer
Digital Printer
CheckDigital
the pathPrinter
among video
controller,
engine
board,
Digital Printer
HVPS, LSU for the shortage
Digital
Printer
or open
-> Repair
or replace
Digital Printer the boards
Digital Printer
Repair or replace HVPS
Digital Printer
Digital Printer
Digital Printer
Digital Printer
Digital Printer
Digital Printer
Digital Printer
Digital Printer
Digital Printer
Digital Printer
Digital Printer
Digital Printer
Digital Printer
Digital Printer
Digital Printer
Replace LSU
YES
Charge part's contact
is bad -> Repair or
replace the drum cartridge
Service Manual
4-53
Samsung Electronics
Alignment & Troubleshooting
Vertical White Line (Band)
White line
missing definitely?
NO
YES
Dirt of dust stuck onto the
window of internal lens of LSU
-> Clean it or replace LSU
Preventive obstacles through
the path between OPC of
toner cartridge and LSU prevent the
path -> Remove the obstacles
Service Manual
Check if the
printout is still has the
NO
same problem even right after
passed through the
transfer roller
YES
The ribs in fuser or toner on the
roller may invoke the image
problem -> Replace the fuser
cover or the defective part
The image is originally black or the
black part is far close to the top
-> Use the pattern which has the
image below bigger than 10mm
from the top
Toner material might be stuck to
blade in the developer inside and it
prevents toner supply -> Replace
the toner cartridge
Check both if the toner cartridge's
counter is over its guaranty and
amount of the toner material
-> Replace the toner cartridge
4-54
Samsung Electronics
Digital Printer
Digital Printer
Digital Printer
Digital Printer
Digital Printer
Digital Printer
Digital Printer
Digital Printer
Digital Printer
Digital Printer
Digital Printer
Digital Printer
Digital Printer
Digital Printer
Digital Printer
Digital Printer
Digital Printer
Digital Printer
Digital Printer
Digital Printer
Digital
Digital Pri NO
Digital Printer
Digital Printer
Digital Printer
Digital Printer
Digital
Printer
Dark
selected
Digital
Printer
via RCP?
Digital Printer
YES
Digital Printer
Dark Image
Digital Printer
Alignment
& Troubleshooting
Digital Printer
Digital Printer
Digital Printer
Digital Printer
Digital Printer
Digital
Printer
Digital
Printer
Digital
Printer
Digital
Printer
Digital
Printer
Digital
Printer
Digital
Printer
Digital
Printer
Digital
Printer
Digital
Printer
Digital
Printer
Digital
Printer
Digital
Printer
Digital
Printer
Digital
Printer
Digital
Printer
Digital
Printer
Digital
Printer
Digital
Printer
Digital
Printer
Digital
Printer
Digital
Printer
Digital
Printer
Digital Printer
Digital Printer
Digital Printer
Digital Printer
Digital Printer
Digital Printer
Digital Printer
Digital Printer
Digital Printer
Digital Printer
Digital Printer
Digital Printer
Digital Printer
Digital Printer
Digital Printer
Digital Printer
Digital Printer
Digital Printer
Digital Printer
Digital Printer
Digital Printer
Digital Printer
Digital Printer
Digital Printer
Digital Printer
Digital Printer
Digital Printer
Digital Printer
Digital Printer
Digital Printer
END
Digital Printer
Digital Printer
Digital Printer
Digital Printer
Digital Printer
Digital Printer
Change to
Normal and test
Digital Printer
Digital Printer
Digital Printer
Digital Printer
Digital Printer
Same at Normal?
NO
YES
Digital
Digital Printer
Printer
Digital
Printer
Digital Printer
Digital
Digital Printer
Printer
Digital
Printer
Digital Printer
Digital
Digital Printer
Printer
Digital Printer
Digital
Printer
Works
correctly
withDigital
-450V Printer
of Bias
voltage?
Digital Printer
DigitalYES
Printer
Works
correctly after
replaced LSU?
Digital Printer
NODigital Printer
Digital Printer
Digital Printer
Digital Printer
Digital Printer
Digital Printer
Digital Printer
Digital Printer
Repair or replace the defective
Digital
Printer
Digital Printer
component
Digital Printer
Digital Printer
Digital Printer
Digital Printer
Toner over supply due to the
adjustment fault of metering
blade in toner cartridge
-> Replace toner cartridge
NO
YES
The power of LSU is set
high or internal problem
-> Replace LSU or adjust
volume
Service Manual
4-55
Samsung Electronics
Alignment & Troubleshooting
Barkground
Recommended
paper used?
NO
Print 20 to 30 pages using
the recommended paper
YES
- Adjust voltage or
replace HVPS
- Repair or replace
after
checking the
terminals' contacts
NO
Transfer,
charge and developing
voltage are OK?
YES
Same problem
occurs?
NO
END
NO
Replace the
toner cartridge
YES
Operating/
storage atmosphere is
too high temperature
/humidity?
NO
Dirty or
dust around the
charge roller?
YES
YES
Clean the charge roller
or replace step-up device
/terminal after check
Solve the problem under
the recommended condition
(10-32 degree Centigrade)
Check Terminals or contacts and "transfer roller springs"
are misplaced
-> Repair or replace transfer roller etc.
Check if the LED of PTL in front of the transfer roller
is on when it presses the top cover switch on purpose
-> If not, replace PTL
NO
Work OK?
YES
Internal blade or supplying
part of the toner cartridge
is defective
-> Replace the toner
cartridge
Service Manual
4-56
Samsung Electronics
Alignment & Troubleshooting
Ghost
Is it regular
interval of 76.5mm?
Is it regular
interval of 39mm?
NO
YES
Check HVPS
contacts and
HVPS's selfoutput
-> If failed,
repair/replace
HVPS
Is it regular
interval of 47mm?
(as transfer roller
interval)
NO
YES
YES
A specific part of the transfer
roller has ruined or its
resistance value is changed
-> Replace transfer roller
NO
Transfer roller cannot force
regularly due to the gears
eccentricity of transfer roller
-> Replace the defective
component
Transfer
voltage is set to
standard?
YES
Developing
/supplying voltage
normal? (-450V/
-650V)
NO
YES
Irregularity of NIP
between rollers in
toner cartridge
-> Replace toner cartridge
Bias voltage
is OK? (-450V)
NO
- Repair or replace HVPS
- Check and Repair or
replace the terminal
contacts
Adjust the Bias voltage
or replace HVPS
YES
Operating/storage
temperature is too low or
not recommended
paper used?
NO
There may be a problem in toner
layer control in toner cartridge
-> Replace the toner cartridge
YES
Use the machine with
recommended paper and
at condition
Service Manual
4-57
Samsung Electronics
Alignment & Troubleshooting
Black Spot
Is it regular
interval of 38.3mm?
NO
YES
The problem occured
since the obstacles
stuck to charge roller
-> Clean the Charge Roller
and then reprint.
Service Manual
When taking
NO
out the toner cartridge,
toner leaks?
Bad image
removes by
scratching?
YES
YES
Toner leaks and much
toner material dropped
onto the paper ->
Replace the toner cartridge
4-58
NO
The problem
randomly occurred
due to the toner
fallen -> Clean the
machine
Check toner is stuck onto
the P/R or H/R in fuser
-> Clean it or replace
Samsung Electronics
Alignment & Troubleshooting
Horzontal Band
Black band?
NO
Black band
is far about 76.5mm from
white band?
NO
YES
The OPC is damaged under the
direct sunlight for around 5
minutes -> If the same problem
persists in 10 hours, replace
the drum cartridge
Problem of internal
contacts in OPC
-> Replace the drum
cartridge
The black
band has regular
interval?
NO
This occurs when no
Hsync/ at LSU
-> Replace LSU
YES
76.5mm interval?
NO
YES
Problems of terminal contact,
transfer voltage supplying,
and transfer roller's due to the
charge roller is ruined (38.3mm)
-> Repair/replace HVPS,
drum cartridge
The OPC is damaged due to
the irregular transfer voltage
of HVPS
-> Repair/replace HVPS
-> If the same problem persists,
replace the drum cartridge
Service Manual
4-59
Samsung Electronics
Alignment & Troubleshooting
Irregular Density
62.8 or 77.6mm
OK after
taking out and
rocking the toner
cartridge?
YES
NO
When gray
pattern printing,
irregular density
persists?
transfer/
charge/developing
voltage drops while
printing?
NO
YES
YES
NO
Defective agitator in
the toner supplying part
of the toner cartridge
->Replace the toner cartridge
Check if the 'guide deve
spring' works OK and
repair/repalce
Check high voltage
output and repair/
replace terminals, HVPS
It is over the guaranty
life of toner cartridge
(Check the counter
and replace it)
Bad images
around the no image
area?
NO
Irregularity of toner
supply from the toner cartridge
-> Replace the toner cartridge
YES
1. Clean the window of LSU
2. Light distortion due to the mirror
ruined or LSU's diffused reflection
-> Replace LSU
Service Manual
4-60
Samsung Electronics
Alignment & Troubleshooting
White Spot
Is it regular
interval of 76.5mm?
NO
YES
62.8 or 77.6mm
75.5mm
Obstacles stuck on OPC's
surface
-> Clean the OPC and
machine or replace
toner cartridge
Transfer
voltage is normal?
NO
Too high voltage supplied
due to the setting error of
transfer voltage
-> Adjust/replace HVPS
YES
D/R in the toner cartridge
unit has the defect
-> Replace the toner cartridge
When putting in/out the
drum cartridge, scratch is made
-> Replace the drum cartridge
Service Manual
4-61
Samsung Electronics
Alignment & Troubleshooting
Trembling at the End When OHP Printing
Recommended
OHP film used?
NO
Use the recommended film
YES
Inserted over
than 10 films into
the MPF?
NO
When OHP
printing, does the fan
temporarily stops
and revolves?
YES
When multi-page OHP printng,
less than 10 films are
guranteed. (Reduce the
number of films and re-insert
after paper check LED if off)
Service Manual
NO
Use the recommended film
YES
Other parts are touching the
fan and prevents it from
revolution
-> Check and repair
4-62
Samsung Electronics
Alignment & Troubleshooting
Poor Fusing Grade
After printing
NO
completed, any error
related fuser?
YES
Both ends
of thermostat
open?
The machine
placed under the
severe low tempera
ture for a long
time?
NO
While printing,
NO
the voltage of pin 60
of U36 (CPU) on Main
PBA is 2.1V
- 2.6V?
YES
NO
Thermistor's
contact is OK?
NO
YES
YES
Re-assemble
thermistor
Place the machine
at normal
temperature and
re-test
YES
Replace thermostat
and re-test
Open the top
cover. When black
printing, is the fuser NIP
width is 3.03.5mm?
NO
Check if the hardness of
P/R, and spring force is OK?
(hardness: 24 degree,
spring's force: 3 Kg)
YES
Replace the control
component on Main
PBA
Check any contact
problem in thermistor
and repair
Service Manual
The paper used is too
thick or contains too
much cotton in it
-> Re-test with the
recommended paper
4-63
Samsung Electronics
Alignment & Troubleshooting
4.2.2.4 Malfunction
Error Status
Check
Solution
No power
1. Check power is supplying
2. Check fuse F1 open
1. If supplying power differs from machine’s power
rating, replace the machine.
2. Replace it.
Fuser Error
1. Thermostat open
2. AC wire open
3. Thermistor wire open
4. Main PBA
1. Detach AC connector and measure the resistane
between pin 1 and 2. If it is megohm, thermostat
is open, Replace it.
2. Check bad connector contact or wire is cut.
3. Check thermistor wire and its connection.
4. Replace Main PBA
Cover open
1. When close Side cover, check the
lever is pressed
2. Micro switch’s contact
3. CPU and related circuit
1. Open Side cover and press the lever with pen.
If Controller detects cover close, there is some
mechanical trouble in Side cover and lever’s
assembly. If not so there is electrical problem.
Jam 0
Check where Jam 0 happens
1. Paper is not picked up
2. Paper is located in feed sensor
3. Happened when inserting specific
papers such as envelope into the
MPF (Multipurpose Paper Feeder)?
4. Happened when inserting specific
papers such as envelope into the
Manual Feeder?
5. Is the Stacker Extender is folded
out?
6. Does not the Guide Adjust distort the
papers
1. Check whether solenoid is working or not by using
Engine test mode
2. Check feed sensor malfunction.
3. Re-try inserting a fewer papers.
• fan the papers and align
• take out the loaded papers and insert them
reverse direction
4. Take out the loaded papers and insert them
reverse direction
• inserted papers as recommended for Manual
Feeding?
•W
hen loading, tap the papers until paper detect
sensor senses loading
5. When using long papers, use the Stacker
Extender
6. Adjust Guide to fit the paper width
Jam 1
Paper is stopped in just after of fuser
unit.
1. It is mostly resulted from double feeding.
Check paper is well stocked in feeder.
2. Check feed actuator position and actuator’s
operating. There may be stiff movind or double
reflection. If not so, check the operation of feed
sensor by Engine test mode.
3. Check exit lever operation. Remore jam and
check actuator moving by hand. If actuator is
too stiff, paper is wrapped around the heat roller.
Remove obstacles or replace.
Service Manual
4-64
Samsung Electronics
Alignment & Troubleshooting
Error Status
Check
Solution
Jam 2
Check where Jam 2 happens
1. Paper is curled and cannot exit.
2. Paper is curled in the exit cover?
Jam 2 at facedown
tray
1. Then paper is not drawn in because 1. Load recommended quantity of papers
of the stack of papers in the Out tray. 2. O
pen the Cover Front and check whether roller or
2. Does it curl while coming out?
spring, which are related to paper out, is not out
of position. If so, re-locate or replace.
Clutch error
1. Check the spring of solenoid
2. Check the armature assembly/
cushion
3. Electrical check
1. Check whether the spring is expanded or not.
2. Check armature is well installed. It may be
unstable assemble.
3. Remove the Main PBA.
High voltage
error
1. Check the terminal output voltage
2. Check HVPS
1. Remove the Toner cartridge and open the cover
and press cover open switch lever and measure
the voltage with high voltage probe and sending
printing data. If the voltage is normal, change the
toner cartridge.
2. Disassemble the left side cover, and check HV of
the solder side of HVPS and change it.
Feeding
obstacles
Does the Plate-knockup prevent the
paper loading?
MPF :
Turn the power off and on. Open and close the Side
cover to return to the original state.
Cassette :
Adjust Guide to fit the paper width.
Skew
Is the Guide adjust set to the paper
width?
Fit the paper width using the Guide adjust.
Stacking
1. Took out the Stacker extender to
support long papers?
2. Stacked too many papers more than
Stacker can hold?
1. Use extender as per the paper length.
2. The Face-up stacker normally can hold 100 pages
when using 75g/m2, however, stacking capacity
can be lowered depending on the type of papers.
Engine Error
Check CBF Harness_CN7.(Main PBA
to LSU)
Refer to troubleshooring “ENGINE ERROR”.
Document Jam
Document is not picked up(in ADF).
1. Check document is well stocked in ADF.
2. Check whether document was been fastened
together by staple or clip.
3. Load recommended quantity of papers.
Document is stopped after it has fed
into the ADF.
1. Check whether the Reg. sensor is working or not.
2. Check whether the Feed Roller is working or not.
Does it curl while coming out?
1. Check the Open Cover whether there are bosses.
2. Check the ADF ass’y is well assemble.
Service Manual
1. Remove paper using pinset or some tool and
watch if separate claws have any troble.
Clean around fuser.
2. Check locking works wells. Watch whether the
ribs of exit cover hace any burr or resisitive edge.
If they do, remove obstacles or replace.
4-65
Samsung Electronics
Alignment & Troubleshooting
No Power (LCD NO display LED Off)
Plug in the
power cord?
NO
Check the voltage first and plug
the power cord
YES
The power
NO
voltage supplying is
the same as
rating?
Supply the power as the rating
YES
The fan
revolves when
powered on?
Connections
NO
on board are OK?
NO
YES
YES
LEDs blink
once when
powered on?
NO
Fuse of SMPS
if open?
YES
Repair/replace the
board
Service Manual
NO
Replace the fuse
YES
YES
Shortage on
the OPE panel
board?
Re-connect firmly
and re-test
NO
The connection
error between
controller board
and panel board
or malfunction
of boards.
-> Replace the
boards
Shortage
between 5V and
GND, or between
24V and
GND?
YES
Remove the shortage
or replace the board
4-66
NO
Toner cartridge
is in the set?
NO
Put in the
cartridge
YES
Detect failure due to the
board which detects side
cover open or switch error
-> Replace the board or switch
Samsung Electronics
Alignment & Troubleshooting
Fuser Error
Measure the resistance at the both ends
of AC(Con no.2 of the SMPS board)
Line with covers open
Less than 10Ω?
NO
Thermostat is open due to the heat etc.
-> Replace the thermostat
YES
Remove the covers
Check CN25 of the main board.
Is the conector inserted
right ways?
NO
Re-assemble the connector.
YES
Check CN29 of the main board.
Is the conector inserted
right ways?
NO
Re-assemble the connector.
Replace the main board.
Fuser Error eliminated?
YES
END
Service Manual
4-67
Samsung Electronics
Alignment & Troubleshooting
Paper Jam (Mis-Feeding)
Sounds the
solenoid on when starts
print?
NO
The solenoid defected
-> Replace it
YES
Does the
paper move?
The Main PBA board defected
-> Replace boards
NO
The pick-up unit is
assembled wrong
-> Re-assemble or replace
the unit
YES
Does the
paper move more than NO
100mm?
Too many
papers in the
feeder?
YES
Feeder
sensor is assembled
reverse?
YES
NO
The sensor and
Main PBA defected
-> Repair/replace
Reduce the amount
and re-test
YES
Switch them
Paper guides
fit the paper width?
NO
Take out the paper
and re-insert
YES
Paper end curled?
NO
YES
NO
Pull out the
extender
YES
<Recommendation>
Use the MPF for the thick
paper such as envelope
and cardstock
Use the recommended
and quality paper
Service Manual
Does the
extender pulled out?
4-68
Samsung Electronics
Alignment & Troubleshooting
Paper Jam (Jam 1)
Paper
NO
stopped before
the OPC?
Paper
NO
stopped before
the fuser?
YES
YES
The
actuator of
NO
paper exit sensor
works OK?
Check the actuator exists and its
operation and around the Main PBA
-> Replace
YES
Check the LSU and
if it has the defect
replace it
Is the paper
rolled around the
presseure
roller?
Feeds
NO
multiple pages?
NO
YES
YES
Remove the fuser, remove
the paper and replace the
pressure roller, if necessary
Severe skew
when feeding?
Remove any factors
The paper
came out through
between fuser and
developer?
NO
YES
Check the roller
and ribs of fuser
are in place, and
remove burrs, if
any
-> Remove the
factors of jam
NO
Check the input path
to the fuser (such as
mis-assembly)
YES
Too thin
or sensitive paper to
static electricity?
Adjust the paper guides to fit the
paper width
The force of springs pressing the
developer is weak
-> Check guide-DEVE
NO
Check guide transfer
is grounded Check
the shutter prevents
feeding
YES
Use the recommended
paper
Service Manual
4-69
Samsung Electronics
Alignment & Troubleshooting
4.2.2.5 The cause and solutions of bad environment of the software
NOTE - Always try to an internal page and a copy to be sure that the machines is working and the problem is
related to SW.
4.2.2.5(a) The printer is not working (1)
Description : While Power turned on, the printer is not working in the printing mode.
Check and Cause
1. C
heck if the PC and the printer is
properly connected and the toner
cartridge installed.
Solution
1. R
eplace the printer cable. If the problems not solved even after the cable
replaced, check the amount of the remaining tone.
2. C
heck if the connection between PC and printer port is proper. If you use
2. P
rinting is nor working in the Windows.
windows, check if the printer driver in the controller is set up. If the printer
3. C
heck if the printer cable is directly
driver is properly set up, check in which program the printing is not working.
connected to peripheral devices
The best way to find out is to open the memo pad to check the function
of printing. If it is not working in a certain program, adjust the setup the
program requires.
Sometimes, the printout is normal within the Windows basic programs, but
it’s not working in a particular program. In such case, install the new driver
again. If not working in the Windows basic program, Check the setup of the
port of CMOS is on ECP. And check the address of IRQ 7 and 378
3. If the scanner needs to be connected to the printer, first the remove the
scanner from the PC to see if the printer is properly working alone.
4.2.2.5(b) The printer is not working (2)
Description : A
fter receiving the printing order, no response at all or the low speed of printing occurs due to wrong
setup of the environment rather than malfunction of the printer itself.
Check and Cause
Solution
1. Secure more space of the hard disk.
1. N
ot working with the message ‘insufficient printer memory’ means hard disk
2. P
rinting error occurs even if there is
space problem rather than the RAM problem. In this case, provide more
enough space in the hard disk.
3. C
heck the parallel-port-related items in
the CMOS Setup.
4. Reboot the system to print.
space for the hard disk. Secure more space using the disk utilities program.
2. The connection of the cable and printer port is not proper. Check if the
connection is properly done and if the parallel port in CMOS is rightly set up.
3. As a printer port, Select ECP or SPP among SPP(Normal), ECP, and EPP
modes(increase printing speed) SPP normal mode support 8-bit data
transfer, while ECP Mode transfer the 12-bit data.
4. If the regular font is not printing, the cable or the printer driver may be
defective. Turn the PC and printer off, and reboot the system to print again.
If not solved, double-click the printer in my computer If the regular fonts are
not printed this time again. the cable must be defective so replace the cable
with new one.
Service Manual
4-70
Samsung Electronics
Alignment & Troubleshooting
4.2.2.5(c) Abnormal Printing
Description : T
he printing is not working properly even when the cable has no problem. (even after the cable is
replaced) If the printer won’t work at all or the strange fonts are repeated, the printer driver may be
defective or wrong setup in the CMOS Setup.
Check and Cause
1. S
et up the parallel port in the CMOS SETUP.
2. Printer Driver Error.
3. E
rror message from insufficient memory.
(The printing job sometimes stops or due
to insufficient virtual memory, but it actually
comes from the insufficient space of the hard
disk.)
Solution
1. Select SPP(Normal) or ECP LPT Port the among ECP, EPP or SPP in
the CMOS Setup.
2. Check the printer in My Computer.(to see if the printer driver is
compatible to the present driver or delete the old driver, if defective and
reinstall the new driver)
3. Delete the unnecessary files to secure enough space of the hard disk
and start printing job again.
4.2.2.5(d) SPOOL Error
Description : T
o spool which stands for “simultaneous peripheral operations online” a computer document or task
list (or “job”) is to read it in and store it, usually on a hard disk or larger storage medium so that it can
be printed or otherwise processed at a more convenient time (for example, when a printer is finished
printing its current document).
Check and Cause
1. Insufficient space of the hard disk in the
directory assigned for the basic spool.
2. If the previous printing error not solved.
Solution
1. Delete the unnecessary files to provide more space to start printing job.
2. If there are some files with the extension name of ****.jnl, Delete them
and Reboot the Windows to restart printing job.
3. W
hen expected to collide with other program.
3. Shut down all other programs except the current one, if possible.
4. W
hen an application program or the printer
4. Delete the printer driver completely and reinstall it.
driver is damaged.
5. W
hen some files related to OS are damaged
or virus infected.
5. After rebooting the computer, check for viruses, restore the damaged
files and reinstall the program to do the printing job.
6. Add up enough memory to the PC.
6. Memory is less than suggested one.
How to delete the data in the spool manager.
In the spool manager, the installed drivers and the list of the documents waiting to be printed are shown.
Select the document to be deleted and check the delete menu.
If you intend to delete the current document being printed, the data being transferred to the printer will be put out
and then the document is removed. Before choosing the document, the menu is still inactive.
Or put the document out of the list and repeat the routine as in the above or finish the spool manager.
Service Manual
4-71
Samsung Electronics