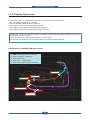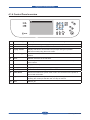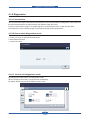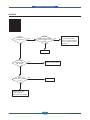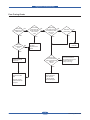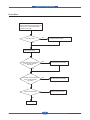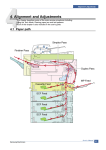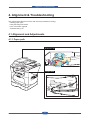
1
Alignment & Troubleshooting
4. Alignment & Troubleshooting
This chapter describes some of the main service procedures including;
- Clearing paper jams
- Using the Diagnostic mode
- How to firmware upgrade
- Troubleshooting. etc.
4.1 Alignment and Adjustments
4.1.1 Paper path
Scanner Part
PAPER EMPTY
SENSOR
FEED
SENSOR
SCAN
SENSOR
Engine Part
Roller-Exit
Roller-Heat
Roller-REGI
Roller-MP
OPC
Roller-Transfer
Roller-Feed
Service Manual
4-1
Roller-Pressure
Duplex
Roller-Pickup
Samsung Electronics
Alignment & Troubleshooting
4.1.2 Clearing Paper Jams
Occasionally, paper can be jammed during a print job. Some of the causes include:
• The tray is loaded improperly or overfilled.
• The tray has been pulled out during a print job.
• The front cover has been opened during a print job.
• Paper was used that does not meet paper specifications.
• Paper that is outside of the supported size range was used.
If a paper jam occurs, LCD window will show it’s speeds. Find and remove the jammed paper. If you don’t
see the paper, open the covers.
Do not use a pinset or a sharp metal tool when removing a jam.
The covering of a metal part can be removed which can cause an electric leakage.
■ Description of ENGINE JAM type (Layout)
(1) JAM-0
JAM- : Paper empty sensor ~ Feed sensor
(2) JAM-1 : Feed sensor ~ Exit sensor
(3) JAM-2 : Exit sensor ~
(4) Duplex Jam-1 : ~ Duplex sensor
(5) Duplex Jam-0 : Duplex sensor ~ Feed sensor
(3)
EXIT SENSOR
SCAN SENSOR
(2)
FEED SENSOR
(5)
DUPLEX SENSOR
(4)
(1)
PAPER EMPTY
SENSOR
Service Manual
4-2
Samsung Electronics
Alignment & Troubleshooting
■ Description of ENGINE JAM type (Simplex)
Type
Case
Jam Removal
Leading edge of media does
not arrive at registration within a
certain time after pick-up(If fails
at a time,it tries pick-up again)
1. Pull out cassette
2. Remove jammed paper
Jam 1
Leading edge of media does not
arrive at Exit Sensor within a
certain time after registration
1. Open front cover
2. Pull out toner cartridge
3. Remove jammed paper
Jam 2
1. Open rear cover
Trailing edge of media does not 2. Pull down jam lever on fuser
leave Exit Sensor within a certain
unit and open fuser cover)
time after touching registration
3. Remove jammed paper from
exit
Jam 0
Jam Layout
■ Description of ENGINE JAM type (Duplex)
Type
Case
Jam Removal
Duplex
Jam 1
Trailing edge of media leaves
Exit Sensor, and does not arrive
at Duplex Sensor
1. Open rear cover
2. Remove jammed paper
OR
1. Pull out duplex unit
2. Remove jammed paper from
duplex unit
Duplex
Jam 0
Leading edge of media does
not arrive at registration within
a certain time after touching
Duplex Sensor
1. Open rear cover
2. Remove jammed paper
OR
1. Pull out duplex unit
2. Remove jammed paper from
duplex unit
Service Manual
4-3
Jam Layout
Samsung Electronics
Alignment & Troubleshooting
■ Description of DADF JAM type
PAPER EMPTY
SENSOR
FEED
SENSOR
Type
Document Jam
Service Manual
SCAN
SENSOR
Case
All case of DADF Jam
Jam Removal
1. Open DADF open cover
2. Remove jammed paper
OR
1. Open DADF open cover and Lift up DADF middle
cover
2. Remove jammed paper
4-4
Samsung Electronics
Alignment & Troubleshooting
4.1.2.1 Tips for avoiding paper jams
By selecting the correct media types, most paper jams can be avoided. When a paper jam occurs, follow the
steps outlined on page 98.
• Ensure that the adjustable guides are positioned correctly.
Do not overload the tray. Ensure that the paper level is below the paper capacity mark on the inside of the
tray.
• Do not remove paper from the tray while your machine is printing.
• Flex, fan, and straighten paper before loading.
• Do not use creased, damp, or highly curled paper.
• Do not mix paper types in a tray.
• Use only recommended print media.
• Ensure that the recommended side of the print media is facing down in the tray, or facing down in the multipurpose tray.
• If paper jams occur frequently when you print on A5/B5-sized paper: Load the paper into the tray with the
long edge facing the front of the tray. If load the paper this way, printing both sides of the paper (Duplex) is
not supported.
In the Printer Preferences window, set the page orientation to be rotated 90 degrees.
Service Manual
4-5
Samsung Electronics
Alignment & Troubleshooting
4.1.2.2 Clearing Original Document Jams
When an original jams while passing through the document feeder, a warming message appears on the
display screen.
1. Remove any remaining pages from the
document feeder.
4. Gently remove the jammed paper from the
document feeder.
2. Seize the misfeed paper, and remove the paper
from the document output tray by carefully
pulling it to the right using both hands.
If you see no paper in this area, go to the next
step.
If you see no paper in this area, go to the next
step.
5. Open the document feeder cover. Gently remove
the jammed paper.
3. Open the document feeder cover.
Service Manual
4-6
Samsung Electronics
Alignment & Troubleshooting
6. Close the document feeder cover. Reload the
pages you removed, if any, in the document
feeder.
7. Open the scanner lid.
8. Grasp the misfeed paper and, using both hands,
remove the paper from the feed area by carefully
pulling it to the right.
9. Close the scanner lid. Load the removed pages
back into the document feeder.
Service Manual
4-7
Samsung Electronics
Alignment & Troubleshooting
4.1.2.3 Clearing paper jams
When a paper jam occurs, a warming message appears on the display screen. Refer to the table below to
locate and clear the paper jam.
In tray 1
In optional tray 2
1. Open and close the front cover. The jammed
paper is automatically ejected from the machine.
If the paper does not exit, go to the next step.
1. Pull out optional tray 2 open.
2. Remove the jammed paper from the machine.
2. Pull out tray 1.
3. Remove the jammed paper by gently pulling it
straight out.
If the paper does not move when you pull or if
you do not see the paper in this area, stop and
go to step
3. Pull tray 1 half-way out.
4. Pull the paper straight up and out.
If the paper does not move when you pull, or if
you do not see the paper in this area, check the
fuser area around the toner cartridge.
4. Insert tray 1 back into the machine until it snaps
into place. Printing automatically resumes.
Service Manual
5. Insert the trays back into the machine. Printing
automatically resumes.
4-8
Samsung Electronics
Alignment & Troubleshooting
In the multi-purpose tray
Inside the machine
1. If the paper is not feeding properly, pull the
paper out of the machine.
1. Open the front cover and pull the toner cartridge
out, lightly pushing it down.
2. Remove the jammed paper by gently pulling it
straight out.
2. Open and close the front cover to resume
printing.
3. Replace the toner cartridge and close the front
cover. Printing automatically resumes.
Service Manual
4-9
Samsung Electronics
Alignment & Troubleshooting
In exit area
5. Release the white strip, the rear cover stopper,
and fully open the rear cover, as shown.
1. Open and close the front cover. The jammed
paper is automatically ejected from the machine.
2. Gently pull the paper out of the output tray.
6. Unfold the duplex guide fully.
If you do not see the jammed paper or if there is
any resistance when you pull, stop and go to the
next step.
3. Open the rear cover.
4. If you see the jammed paper, push the pressure
lever on each side up and remove the paper.
Skip to step 9.
7. While pushing the fuser lever to the right, open
the fuser door.
If you still do not see the paper, go to the next
step.
Service Manual
4-10
Samsung Electronics
Alignment & Troubleshooting
In the duplex unit area
8. Pull the jammed paper out.If the jammed paper
does not move when you pull, push the pressure
lever on each side up to loosen the paper, and
then remove it.
If the duplex unit is not inserted correctly, a paper
jam may occur. Make sure that the duplex unit is
inserted correctly.
1. Pull the duplex unit out of the machine.
9. Return the lever, door, stopper, and guide to
their original position.
2. Remove the jammed paper from the duplex unit.
10. Close the rear cover. Printing automatically
resumes.
If the paper does not come out with the duplex
unit, remove the paper from the bottom of the
machine.
If you still do not see the paper, go to the next
step.
Service Manual
4-11
Samsung Electronics
Alignment & Troubleshooting
3. Open the rear cover.
4. Unfold the duplex guide fully.
5. Pull the jammed paper out.
Service Manual
4-12
Samsung Electronics
Alignment & Troubleshooting
4.1.3 Abnormal Image Printing and Defective Roller
If abnormal image prints periodically, check the parts shown below.
3
4
6
2
7
1
8
5
1
2
3
4
5
6
7
8
OPC Drum
Charge Roller
Supply Roller
Developing Roller
Transfer Roller
Heat Roller
Pressure Roller1
Pressure Roller2
No
Roller
Abnormal image period
Kind of abnormal image
1
OPC Drum
75.5mm
White spot, Block spot
2
Charge Roller
37.7mm
Black spot
3
Supply Roller
44.9mm
Horizontal density band
4
Develop Roller
35.2mm
Horizontal density band
5
Transfer Roller
47.1mm
Black side contamination/transfer fault
6
Heat Roller
77.8mm
Black spot and fuser ghost
7
Pressure Roller1
62.8mm
Black side contamination
8
Pressure Roller2
50.2mm
Black side contamination
Service Manual
4-13
Samsung Electronics
Alignment & Troubleshooting
■ Repetitive defect Image check page
Print this page. Align the this page and the printed defect image and find the defective roller.
Start line
Develop Roller
Charge Roller
Supply Roller
Transfer Roller
Pressure Roller2
Pressure Roller1
OPC Drum
Heat Roller
Service Manual
4-14
Samsung Electronics
Alignment & Troubleshooting
4.1.4 Control Panel overview
1
Machine Setup
Guides you to the machine setup and advanced settings.
2
Job Status
Shows jobs currently running, queued jobs and completed.
3
Status
Shows the status of your machine.
4
Display screen
Displays machine’s current status and prompts during an operation.
Set menus easily using the touch screen.
5
Numeric keypad
Dials fax number, and enters the number value for document copies or other
options.
6
Clear:
Deletes characters in the edit area.
7
Redial/Pause
In standby mode, redials the last number; or in edit mode, inserts a pause into
a fax number.
8
On Hook Dial
Engages the telephone line.
9
Interrupt
Stops a job in process to do an urgent copy job.
10
Clear All
Reverts the current settings to default values.
11
Power Saver
Sends the machine into power saver mode. You can also turn the power on
and off with this button.
12
Stop
Stops an operation at any time. The pop-up window appears on the screen
showing the current job that the user can stop or resume.
13
Start
Starts a job.
Service Manual
4-15
Samsung Electronics
Alignment & Troubleshooting
4.1.4.1 Introducing the touch screen and useful buttons
Touch screen
Machine Setup button
The touch screen allows for user-friendly operation
of the machine. Once you press the home icon
(
) on the screen, it shows the Main screen.
When you press Machine Setup button, you
can browse current machine settings or change
machine values.
• This button allows you to move to Copy, Fax,
Scan, Stored Documents menu directly.
• Machine Status: Shows the current status of the
machine.
• Admin Setting: Allows an administrator to set up
the machine.
• Usage Page Report:You can print the report on
the amount of printouts depending on the paper
size and type.
• : Shows Help. You can find the explanation by
feature contents.
• Copy: Enters the Copy menu.
• Fax: Enters the Fax menu. (Optional)
• Scan: Enters Scan to Email, NetScan, Scan to
Server menu.
• Stored Documents: Enters the Stored Documents
menu.
• USB: When USB memory is inserted into the USB
memory port on your machine, USB icon shows
on the display screen.
• SmarThru Workflow: Enters the SmarThru
Workflow menu.
(Optional)
• Toner Info.: Shows amount of toner used.
• LCD Brightness: Adjusts the brightness of the
touch screen.
• : You can change the display language.
• : Guides you to remove the USB memory
devices from the machine. Follow the instruction
on the LCD. This icon appears only when you
connect an USB memory module.
• Logout: Logs out from the currently logged in
account.
Service Manual
4-16
Samsung Electronics
Alignment & Troubleshooting
Job Status button
Power Saver button
When you press Job Status button, the screen
shows the lists of currently running jobs, queued
jobs and completed jobs.
When the machine is not in use, save electricity
with the provided power save mode. Pressing this
button puts the machine into power save mode.
If you press Power Saver button for more than two
seconds, a window appears, requesting that you
turn the power off. If you choose Yes, the power is
turned off.
This button can also be used to turn the button on.
Status
Off
• The machine is not in the power
save mode.
• Current Job tab: Shows the list of jobs in progress
and pending.
• Completed Job tab: Provides the list of completed
jobs.
• Active Notice tab: Displays any error codes that
have occurred.
• No.: Gives the order of jobs.
• Job Name: Shows job information like name and
type.
• Status: Gives the current status of each job.
• User: Provides user name, mainly computer
name.
• Job Type: Displays details of the active job, such
as job type, recipient phone number and other
information.
• Detail: Shows the detailed information of the
selected option on the Current Job, Completed
Job and Active Notice list.
• Delete: Removes the selected job from the list.
• Delete All: Removes all the jobs from the list.
• Close: Closes the job status window and switches
to previous view.
Service Manual
Description
• The machine is in the low power
save mode.
Blue
On
machine is in the power save mode.
Blink
The machine is in the ready power
save mode.
Interrupt button
When you press Interrupt button, the machine goes
into interrupt mode which means it stops a printing
job for urgent copy job. When the urgent copy job
completes, the previous printing job continues.
Status
Off
Description
The machine is not in interrupt
printing mode.
Blue
On
The machine is in interrupt printing
mode.
4-17
Samsung Electronics
Alignment & Troubleshooting
4.1.5 Understanding The Status LED
The color of the Status LED indicates the machine’s current status.
Status
Description
Off
• The machine is powered off-line.
• The machine is in power save mode. When data is received, or any
button is pressed, it switches to on-line automatically.
Green
Red
Service Manual
Blinking
• When the backlight slowly blinks, the machine is receiving data from the
computer.
• When the backlight blinks rapidly, the machine is printing data.
On
• The machine is powered on and can be used.
Blinking
• A minor error has occurred and the machine is waiting for the error to be
cleared. Check the display message. When the problem is cleared, the
machine resumes.
• The toner cartridge is near the end of its life. Order a new toner cartridge.
You can temporarily improve print quality by redistributing the toner.
On
• The toner cartridge is totally empty. Remove the old toner cartridge and
install a new one.
• A paper jam has occurred.
• The cover is opened. Close the cover.
• There is no paper in the tray. Load paper in the tray.
• The machine has stopped due to a major error. Check the display
message.
4-18
Samsung Electronics
Alignment & Troubleshooting
4.1.6 Menu overview
4.1.6.1 Menu Map
The control panel provides access to various menus to set up the machine or use the machine’s functions.
These menus can be accessed by pressing Machine Setup, Job Status, or touching menus on the display
screen. Refer to the following table.
NOTE - Some menus may not appear in the display depending on options or models. If so, it is not applicable
to your machine.
Main screen
The main screen is shown on the display screen on the control panel. Some menus are grayed out
depending on your model.
Copy Menu Map
Basic
Original Size
Reduce & Enlarge
Duplex
Output
Original Type
Darkness
Paper Supply
Advanced
Image
ID copy
N-Up
Poster Copy
Clone copy
Book Copy
Booklet
Covers
Transparencies
Edge Erase
Off
Border Erase
Small Original
Hole Punch Erase
Book Center and Edge Erase
Erase Background
Off
Auto
Enhance
Erase
Margin Shift
Off
Auto Center
Custom Margin
Scan Enhance
Fax Menu Map
Basic
Address
Duplex
Resolution
Service Manual
Image
Advanced
Original Size
Delay Send
Priority Send
Polling
Mail Box
4-19
Original Type
Darkness
Erase Background
Color Mode
Samsung Electronics
Alignment & Troubleshooting
Scan Menu Map
Scan to Email
Basic
Address
Duplex
Resolution
Advanced
Original Size
Image
Original Type
Color Mode
Darkness
Erase Background
Scan to Edge
Output
Quality
File Format
Scan Preset
Scan to Server
Scan to PC
No.
Application
Select
Basic
SMB Server List
FTP Server List
Duplex
Resolution
Advanced
Original Size
Image
Original Type
Color Mode
Darkness
Erase Background
Sacn to Edge
Output
Quality
Scan Preset
File Format
Stored Documents Menu Map
Public
Detail
Edit
Delete
Delete All
Print
Secured
Detail
Edit
Delete
Print
USB Menu Map
USB
USB Format
USB Print
Scan to USB
Basic
Advanced
Image
Output
Service Manual
4-20
Samsung Electronics
Alignment & Troubleshooting
Machine Setup button
When you press the Machine Setup button on the control panel, the screen displays two menus. Machine
Status shows the supplies life, billing, counters and reports. Admin Setting lets you set the advanced setup to
use your machine in depth and conveniently. Usage Page Report prints a report on the number of printouts
based on the paper size and type.
Admin setting
Machine Status
Supplies Life
Toner Cartridge
Cartridge-C
Fuser Kit
Feed Roller Kit-Tray 1
Feed Roller Kit-Tray 2
Feed Roller Kit-Bypass Tray
BTR Kit
Machine Info
Machine Details
Tray Status
Print/Report
Usage Counters
General
Device Info
Date&Time
Default Settings
Measurements
Timers
Language
Power Saver
Tray Management
Altitude Adjustment
Contention Management
SoundSupplies Management
Machine Test
On Demand Overwrite
HDD Spooling
Stored Job File Policy
Country
Setup
Copy Setup
Fax Setup
Network Setup
Authentication
Optional Service
Print/Report
Print
Accounting Reports
Report
Usage Page Report
Are you sure you want to print it?
Job Status button
This menu shows the job in process, jobs waiting and, in completed, and error messages.
Current Job
Detail
Delete
Delete All
Close
Service Manual
Completed Job
Detail
Close
Active Notice
Detail
Close
4-21
Samsung Electronics
Alignment & Troubleshooting
4.1.6.2 Understanding the Copy screen
When you press Copy on the Main screen, the Copy screen appears which has several tabs and lost of
copying options. All the options are grouped by features so that you can configure your selections easily. If
the screen displays an other menu, press Home button to go to the Main screen. If you want to know more
information for copy screen, please consult the user manual.
Basic Tab
• Original Size : Selects the size of the originals.
• Reduce/Enlarge : Reduces or enlarges the size of a copied image.
• Duplex : Sets the machine to print copies on both sides of the paper.
• Output : Selects Collated or Uncollated copy options.
• Original Type : Improves the copy quality by selecting the document type for the current copy job.
• Light, Dark : Adjusts the brightness level to make a copy that is easier to read, when the original contains
faint markings and dark images.
• Paper Supply : Selects the paper supply tray.
• Erase Edge : Allows you to erase punch holes, staple marks, and fold creases along any of the four
documents edges.
Service Manual
4-22
Samsung Electronics
Alignment & Troubleshooting
Advanced Tab
• ID Copy: Prints 2-sided originals on one sheet of paper. This feature is helpful for copying a small-sized
item, such as a business card.
• N-Up: Prints 2 or 4 original images, reduced to fit onto one sheet of paper.
• Poster Copy: Prints a large image into divided 9 pages.
• Clone Copy: Prints multiple image copies from the original document on a single page.
• Book Copy: Allows you to copy an entire book.
• Booklet: Creates booklets from a sequential set of either 1-sided or 2-sided originals.
• Covers: Automatically adds covers to your copied set using stock taken from a different tray.
• Transparencies: Adds a blank or printed divider between transparencies within a set.
Image Tab
• Erase Edge: Allows you to erase punch holes, staple marks, and fold creases along any of the four
documents edges.
• Erase Background: Prints an image with no background.
• Margin Shift: Creates a binding edge for the document.
Service Manual
4-23
Samsung Electronics
Alignment & Troubleshooting
4.1.6.3 Understanding the FAX screen
When you press Fax on the Main screen, the Fax screen appears which has several tabs and lost of fax
options. All the options are grouped by features so that you can configure your selections easily.If the screen
displays an other menu, press Home button to go to the Main screen. If you want to know more information
for Fax screen, please consult the user manual.
Basic Tab
• Fax number input area : Shows the recipient’s fax number using the number keypad on the control panel. If
you configured the phone book, press Individual or Group.
• Add No : Lets you add more destinations.
• ← : Deletes the last digit entered.
• C : Removes all digits of the selected entry.
• Remove : Removes the selected fax number entry.
• Remove All : Removes all the fax numbers in the input area.
• Address : Picks up the frequently used fax numbers directly from your machine or from SyncThru Web
Service.
• Duplex : Selects whether the machine send faxes one side of the original, both sides of the original.
• Resolution : Adjusts the resolution options.
Advanced Tab
• Original Size: Selects the size of the original document. Press OK to update current setting.
• Delay Send: Sets the machine to send a fax at a later time without your intervention.
• Priority Send: Sends an urgent fax before reserved operations.
• Polling: Used when the receiver requests the document to be faxed remotely at sender’s absence or vice
versa. In order to use the polling function, the originals must be previously stored in the machine.
• Mailbox: Used to store a received fax or originals in the machine memory which are ready to be polled. You
can use a mailbox on the same machine you are using, or the one on a remote machine. Each mailbox has
a corresponding mailbox number, name and password.
• Back: Returns to the Basic tab.
Image Tab
• Original Type: Enhances the fax quality based on the type of the original document being scanned.
• Darkness: Adjusts the level of lightness or darkness of the fax.
• Erase Background: Reduces dark backgrounds or paper patterns as in newspaper originals.
• Color Mode: Selects whether the user sends the fax in mono or color.
• Back: Returns to the Basic tab.
Service Manual
4-24
Samsung Electronics
Alignment & Troubleshooting
4.1.6.4 Understanding the SCAN screen
To use the scanning feature, press Scan on the Main screen. If the screen displays an other menu, press
home button to go to the Main screen.
If the message asking Auth. ID and Password, it means the network administrator has set the authentication
in SyncThru Web Service.
Press Scan to Email, Scan to PC Scan to Server.
• Scan to Email: Scans and sends the scanned output to the destination by email.
• Scan to PC : Scans and sends the scanned output to your PC.
• Scan to Server: Scans and sends the scanned output to the destination with SMB and FTP.
Service Manual
4-25
Samsung Electronics
Alignment & Troubleshooting
Basic tab
This section explains the Basic tab of Scan to Email and Scan to Server, and NetScan’s basic screen.
- Scan to Email
• From: Sender’s email address.
• To/Cc/Bcc: Recipients’ addresses. Cc is for copies to an additional recipient and Bcc is for the same as Cc
but without their name be displayed.
• Subject/Message: Subject and message of the email.
• Remove All: Erases everything in the input area.
• Address: Inputs the recipient’s address just by pressing stored addresses. You can store frequently used
email addresses from your computer using the SyncThru Web Service.
• Duplex: Selects whether the machine scans on one side of the paper (1 Sided), both sides of the paper (2
Sided), or both sides of paper but back is rotated 180 degrees (2 Sided, Rotate Side 2).
• Resolution: Selects the scanning resolution value.
• Back: Returns to the previous screen. If the network authentication is enabled, the log off confirmation
message popes up and closes Scan to Email.
- Scan to PC
If the authentication for network appears, you have to enter user name and password to enter the Scan to
PC screen.
• No.: Lists the number in order for application programs.
• Application: Shows the available application programs from your computer.
• Select: Moves to the application program you have selected.
Service Manual
4-26
Samsung Electronics
Alignment & Troubleshooting
- Scan to Server
• SMB: Sends the scanned file to SMB. Press SMB for that option.
• FTP: Sends the scanned file to FTP. Press FTP for that option.
• No.: Index number which you entered in SyncThru Web Service.
• Server: Alias name which you entered in SyncThru Web Service.
• Duplex: Selects whether the machine scans on one side of the paper (1 Sided), both sides of the paper (2
Sided), or both sides of paper but back is rotated 180 degrees (2 Sided, Rotate Side 2).
• Resolution: Selects the scanning resolution value.
• Back: Returns to the previous screen.
• Quality: Adjusts the display quality of the scan output.
• File Format: Selects the file format of the scan output.
• Scan Preset: Automatically changes some scan options such as file format, resolution, and more. You can
adjust options to fit each specific purpose.
• Back: Returns to the previous screen.
Advanced tab
• Original Size: Sets the originals to a specific fixed size. • Back: Returns to the previous screen.
Service Manual
4-27
Samsung Electronics
Alignment & Troubleshooting
Image tab
• Original Type: Selects whether the original is text or photo.
• Color Mode: Adjusts the color options of the scan output. If the original is color and you want to scan in
color, press Color Mode.
• Darkness: Adjusts the degree of darkness of the scan output. Use left/right arrow to adjust the values.
• Erase Background: Erases backgrounds like paper patterns.
• Scan to Edge: Scans originals from edge-to-edge.
• Back: Returns to the previous screen.
Output tab
• Quality: Adjusts the display quality of the scan output.
• File Format: Selects the file format of the scan output.
• Scan Preset: Automatically changes some scan options such as file format, resolution, and more. You can
adjust options to fit each specific purpose.
• Back: Returns to the previous screen.
Service Manual
4-28
Samsung Electronics
Alignment & Troubleshooting
4.1.6.5 Understanding the Stored Documents screen
• Public tab : Shows the job list of delay print and store print job.
• Secured tab : Shows the job list of secure print, secure receive, and secure store print job.
• User Name : Shows the user name who registered the job.
• File Name : Shows the job name which is registered as the job information. For the computer printing, the
file name shows.
• Date : Shows the date of the job registered.
• Page : Shows the total page number of the job.
• Detail : Pops the separate message showing the basic job information with the file size, the paper size and
the paper type, as well.
• Edit : Lets you to modify the file name.
• Delete : Deletes the selected list.
• Delete All : Deletes all the list.
• Print : Prints the selected list.
Service Manual
4-29
Samsung Electronics
Alignment & Troubleshooting
4.1.6.6 Understanding the USB screen
When USB memory is inserted into the USB memory port on your machine, USB icon shows on the display
• USB Format: You can delete image files stored on an USB memory device one by one or all at once by
reformatting the device.
• USB Print: You can directly print files stored on an USB memory device. You can print TIFF, BMP, JPEG,
PDF, and PRN files.
• Scan to USB: You can specify image size, file format, or color mode for each scanning to USB job.
Service Manual
4-30
Samsung Electronics
Alignment & Troubleshooting
4.1.7 Firmware Upgrade
• USB and Network port are used to F/W upgrade.
• Network applications (SWAS, SWS) can be used for network port upgrade.
4.1.7.1. Using the common method
① Download the firmware file in the temporary folder. And unzip the file.
② Delete all current jobs from Job Status window
③ Connect USB cable in the machine (idle state)
④ Send firmware file( *.hd ) by usblist2
-D
rag the f/w file and Drop down on the usbprn2.exe. And then f/w update will be started automatically.
SCX-5835FN
Drag and Drop
⑤ Please wait until end reboot.
Service Manual
4-31
Samsung Electronics
Alignment & Troubleshooting
4.1.7.2. F/W upgrade using SWAS (SyncThru Web Admin Service)
- Start the SWAS program.
(Windows Start menu > Programs > Samsung Netowork Printer Utilities > SyncThru Web Admin Service)
① Firmware Upgrade → Upgrade (check device using IP address)
1
1
1
2
2
2
3
3
3
② Maintenance → Firmware upload (register firmware)
1
1
1
2
2
2
3
3
3
③ Maintenance → Firmware Upload (upload firmware)
1
1
1
2
2
2
3
3
3
4
4
4
Service Manual
4-32
Samsung Electronics
Alignment & Troubleshooting
④ Maintenance → Firmware Upload (confirm uploaded firmware)
1
1
1
2
2
3
3
2
3
⑤ Maintenance → Firmware Upgrade → Upgrade (choose firmware)
1
1
1
2
2
3
3
2
3
⑥ Maintenance → Firmware Upgrade → Upgrade (choose firmware)
1
1
2
2
1
2
3
3
3
Service Manual
4-33
Samsung Electronics
Alignment & Troubleshooting
⑦ Maintenance → Firmware Upgrade → Upgrade
1
1
2
2
3
3
4
4
⑧ Maintenance → Firmware Upgrade → Upgrade (Done)
1
1
2
2
Service Manual
3
3
4-34
Samsung Electronics
Alignment & Troubleshooting
4.1.8 Diagnostics
4.1.8.1 Introduction
This document will capture the behavior specifications for the GUI Windows for Diagnostics. Each section of
this document describes one feature with a step window image and script.
However, used window image is not fixed image from the specification point of view. Acquire detail
information from script. Window image is just example image will be implemented.
4.1.8.2 How to enter diagnostics mode
1. Press (1,2,3) key on dial pad simultaneously.
2. Enter password(1934).
3. Press ‘OK’ button.
4.1.8.3 How to exit diagnostics mode
By pressing the Home button, exit Diagnostics mode.
When exit Diagnostics mode, a popup window shall display.
By default, Reset Counters is No, Reboot Copier is Yes.
Service Manual
4-35
Samsung Electronics
Alignment & Troubleshooting
4.1.8.4 Diagnostics Menu Map
Information
Fault History
Fault Log
Fault Counters
General
Machine Serial number
Network IP Address
Images since last call
Service started
HFSI
Software version
Usage Counters
Test Rountines
Copier
NVM Read/Write
NVM Initialization
Engine/DADF Routines
Fax
NVM Read/Write
NVM Initialization
Fax Routines
Protocol Report
Network
NVM Initialization
Other
Print Test Pattern
Shading Test
Scan Edge Test
Memory Clear
Print Report
Reset Admin Password
Service Manual
4-36
Samsung Electronics
Alignment & Troubleshooting
4.1.8.5 Information Tab
Information tab provides detail information of the machine.
General
• Diagnostics>Information>General
• When user selects General, OP displays Machine Serial Number, Network IP Address and Images since
last call.
HFSI (High Frequency Service Items)
• Diagnostics>Information>HFSI
• W
hen user selects General, OP displays the list of HFSI( High Frequency Service Items) read from the
MCB.
In the list, there are “ Item”, “Status”, “Actual”, and “Max Life”.
Service Manual
4-37
Samsung Electronics
Alignment & Troubleshooting
• User Behavior
- User can select one item in the list to reset the counter using “Reset” button or to edit the Max.Life and
threshold value using “Edit” button.
• Items in this column are:
DADF Roller / Rubber Pad Life Page
T1/T2/T3 P-up Roller Life Page
Retard Roller Life Page
Bypass Rubber Pad Life page
Transfer Roller Life Page
Fuser Roller / Fuser Unit Life Page
Heat Roller Life Page
Pressure Roller Life Page
• Status
- The possible values in this column are ‘OK’, ‘Check’, ‘Negative’ and ‘Off’.
- OK : Actual counter is smaller than the threshold value
- Check : Actual counter is bigger than threshold value but smaller than Max.Life
- Off : Actual counter exceeds Max.Life
- Negative : There is no counter to display. In this case, it shall display ‘-‘ in the
Status and Max Life column.
• Actual
- Values in this column are actual counts for HFSI usage
• Max. Life
Values in this column are maximum life limits set for HFSI.
• Reset
This button is used to reset the actual counter after replacing the HFSI unit.
This button is disabled before user select one item in the list and enabled once user select any of the items
in the list.
Once user presses, a confirmation window shall display to user confirm again. The window is displayed as
below.
If user confirms reset, it will reset the counter to 0.
If the counter of selected item is 0, ‘Reset’ button shall be disabled.
Service Manual
4-38
Samsung Electronics
Alignment & Troubleshooting
• Edit
“Edit” button is disabled until user select one item in the list.
Selecting “Edit” button causes edit window to be displayed.
There are two input filed for ‘Maximum Life’ and for ‘Threshold’.
Each data field shall display default value or the last-saved value entered by the service engineer. The data
field shall support the numeric characters of 0 to 9.
The hard keypad characters of ‘#’, ‘phone’ and ‘*’ are not supported and shall generate an invalid entry
message if selected.
The hard keypad characters of ‘c’ shall delete all characters displayed within the selected data field. By
selecting ‘Cancel’, window moves back to HSFI window without saving user’s setting. By selecting ‘OK’
button, window moves back to HSFI window saving user’s setting. Threshold value shall not be greater than
Maximum Life.
Software Version
• Diagnostics>Information>Software Version
• When user selects Software version, OP displays the version of the Main Controller, Image Output Terminal,
User Interface, Network Controller, Document Feeder, Tray 2 Firmware, Tray 3 Firmware
Service Manual
4-39
Samsung Electronics
Alignment & Troubleshooting
Usage Counter
• Diagnostics>Information>Usage Counter
• When user selects Usage Counter, OP displays the amount of the Items shown below.
• Total Impressions
• Black Impressions
• Black Copied Impressions
• Black Printed Impressions
• Sheets
• Copied Sheets
• Black Copied Sheets
• Printed Sheets
• Black Printed Sheets
• 2 Sided Sheets
• Copied 2 Sided Sheets
• Black Copied 2 Sided Sheets
Service Manual
• Printed 2 Sided Sheets
• Black Printed 2 Sided Sheets
• Fax Images Received
• Images Sent
• Server Fax Images Sent
• Network Scanning Images Sent
• Email Images Sent
• Maintenance Impressions
• Black Maintenance Impressions
• Known Jams in the IOT
• Known Jams in Finishing Device(s)
• Attempted Sheet Feeds from Internal trays
• Actual sheet feeds from Internal trays
• Normal Level Power On Hours
• Power Save Hours
• Attempted Original Sheet Feeds in the DADF
4-40
Samsung Electronics
Alignment & Troubleshooting
4.1.8.6 Fault History Tab
Fault History provides an error information occurred.
Fault Log
• Diagnostics>Fault History>Fault Log
• Fault log window shall display errors occurred while the product was operating.
• Diagnostics>Fault History>Fault Log>Clear
• When selecting “Clear” button, Pop-up will be displayed. If you want to delete the Fault history, touch the “OK”
button.
Service Manual
4-41
Samsung Electronics
Alignment & Troubleshooting
Fault Counters
• Diagnostics>Fault History>Fault Counters
• Fault counters window displays Fault group with number and name.
They are
• 01 Feeder
• 02 Fuser
• 03 Motor Fan
• 04 LSU
• 05 Option Interface
• 06 CRU
• 07 Finisher
• 08 DADF
User shall select one item in the list at a time and multiple selection shall not supported. User can select ‘Non
Zero’ or ‘All’. By default, ‘Non Zero’ shall be selected.
When press ‘OK’, Fault Counters Detail Window shall be displayed.
Service Manual
4-42
Samsung Electronics
Alignment & Troubleshooting
Fault Counters Detail window shall display Fault code, description and value (counter) among the selected
Fault Group. Items of displayed Fault codes are different based on the selection of ‘Non Zero’ or ‘All’. When
selected ‘Non Zero’, Fault codes in the selected Fault Group having non zero counter shall be displayed.
When selected ‘All’, all Fault codes in the selected Fault Group shall be displayed. Display order of Fault
code is upward.
Service Manual
4-43
Samsung Electronics
Alignment & Troubleshooting
4.1.8.7 Test Routines Tab
4.1.8.7(a) Copier
NVM Read/Write
• Diagnostics>Test Routines>Copier>NVM Read/Write
“Edit” button shall be disabled until any NVM item is selected.
“Edit” button shall be disabled when read only NVM is selected. Search edit box has 00-000 as a default.
User shall input the whole number to find a specific NVM by pressing Find button. (Refer to NVM Read/Write
table) If matching NVM is found, the page including the specified NVM shall be displayed and the NVM is
shown as selected. If matching NVM is not found, error message such as “Invalid NVM number” shall be
displayed on the status area and search edit box displays default number.
• Diagnostics>Test Routines>Copier>NVM Read/Write>Edit
Service Manual
4-44
Samsung Electronics
Alignment & Troubleshooting
NVM Initialization
• Diagnostics>Test Routines>Copier>NVM Initialization
• By default, none of items is selected and Initialize button shall be disabled.
There shall be Back button.
• Diagnostics>Test Routines>Copier>NVM Initialization>Initialize
If you want to initialize the NVM values, press OK button.
When press OK button, SR shall show the initialization progress status and result.
When the result is get, pop up window shall be disappeared.
-> When the result is finished, the pop up window will disappear.
Service Manual
4-45
Samsung Electronics
Alignment & Troubleshooting
Engine/DADF Test Routines
• Diagnostics>Test Routines>Copier>Engine/DADF Test Routines.
When exit this window, OP shall send exit command. (CMD_COPY_COMP_EXITMODE)
By default, all Test routines will be displayed.
By default, search edit box has 00 .
OK/Reset button shall be disabled until any test routine is selected.
Maximum number of selection is 3.
Reset will deselect all selected test routines.
User select test routine by touching the row and deselect touching it again.
User input chain number in search edit box and only all test routines in the chain shall be
displayed.
By default, Start/Stop/Stop All shall be disabled.
Start button shall be enabled when selected item is not running.
Multiple selection shall not be supported.
Stop shall be enabled only when the selected item is running.
Stop All shall be enabled when there is any running test item.
Back button shall be disable when there is any running test item.
Service Manual
4-46
Samsung Electronics
Alignment & Troubleshooting
4.1.8.7(b) Fax
NVM Read/Write
• Diagnostics>Test Routines>Fax>NVM Read/Write
For the behavior, refer to Copier-NVM Read/Write.
Service Manual
4-47
Samsung Electronics
Alignment & Troubleshooting
For the behavior, refer to Copier-NVM Read/Write-Edit.
NVM Initialization
• Diagnostics>Test Routines>Fax>NVM Initialization
• By default, none of items is selected and Initialize button shall be disabled.
There shall be Back button.
Service Manual
4-48
Samsung Electronics
Alignment & Troubleshooting
• Diagnostics>Test Routines>Fax>NVM Initialization>Initialize
If you want to initialize the NVM values, press OK button.
When press OK button, SR shall show the initialization progress status and result.
When the result is get, pop up window shall be disappeared.
Protocol Report
• Diagnostics>Test Routines>Fax>Protocol Report
• When selecting Protocol Report, the sub-item will be displayed. By pressing the print, you can print the
protocol report.
Service Manual
4-49
Samsung Electronics
Alignment & Troubleshooting
Fax Routines
• Diagnostics>Test Routines>Fax> Fax Routines
• For the behavior, refer to Engine/DADF Test Routines
4.1.8.7(c) Network
NVM Initialization
• Diagnostics>Test Routines>Network>NVM Initialization
Service Manual
4-50
Samsung Electronics
Alignment & Troubleshooting
• Diagnostics>Test Routines>Network>NVM Initialization>Initialize
If you want to initialize the NVM values, press OK button.
When press OK button, SR shall show the initialization progress status and result.
When the result is get, pop up window shall be disappeared.
Service Manual
4-51
Samsung Electronics
Alignment & Troubleshooting
4.1.8.7(d) Other
• Diagnostics>Test Routines>Other
• Diagnostics>Test Routines>Other>Print Test Pattern
You can print the test pattern by pressing the start test button.
By default, Test Pattern number shall be 1.
You can select paper source by selecting tray of the image.
You can select simplex/duplex printing option by selecting 1 sided /2 sided button.
Service Manual
4-52
Samsung Electronics
Alignment & Troubleshooting
• Diagnostics>Test Routines>Other>Shading Test
The function is used to set the optimum scan quality determined by the specific characteristics of the CCD
(Charge Coupled Device). If copy image quality is poor perform this function to check the condition of the
CCD unit.
• Diagnostics>Test Routines>Other>Scan Edge Test
Service Manual
4-53
Samsung Electronics
Alignment & Troubleshooting
• Diagnostics>Test Routines>Other>Memory Clear
The function resets the system to factory default settings.
This function is used to reset the system to the initial value. All the values are returned to the default values,
and all the information which was set by the user will be erased.
When select memory clear, user can select the country.
• Diagnostics>Test Routines>Other>Print Report
Service Manual
4-54
Samsung Electronics
Alignment & Troubleshooting
• Diagnostics>Test Routines>Other>Reset Admin. password
Service Manual
4-55
Samsung Electronics
Alignment & Troubleshooting
4.2 Troubleshooting
4.2.1 Procedure of Checking the Symptoms
Before attempting to repair the printer first obtain a detailed description of the problem from the customer.
Power On
OP Panel
ON?
- No Power
- Power Module error
- Main PBA error
- LCD Panel error
Ready or
Power save
Indicate
Error Massage
Refer to
Error Massage
< Chapter 4.2.2 >
Test Print
printing
Quality is
Nomal?
Refer to "Solution
of 4.2.3.3 Print Quality"
END
Service Manual
4-56
Samsung Electronics
Alignment & Troubleshooting
4.2.2 USING THE SMART PANEL PROGRAM
Smart Panel is a program that monitors and informs you of the machine status, and allows you to customize
the machine’s settings. Smart Panel is installed automatically when you install the machine software.
To use this program, you need the following:
• Windows. Check for windows operating system(s) compatible with your machine.
• Mac OS X 10.3 or higher
• Linux. Check for Linux systems that are compatible with your machine.
• Internet Explorer version 5.0 or higher for flash animation in HTML Help.
Understanding Smart Panel
If an error occurs while printing, Smart Panel appears automatically, showing the error.You can also launch
Smart Panel manually. Double-click the Smart Panel icon on the Windows task bar (in Windows), or
Notification Area (in Linux). You can also click it on the status bar (in Mac OS X).
Windows
Double-click this icon in Windows.
Macintosh
Click this icon in Mac OS X.
Linux
Click this icon in Linux.
If you are a Windows user, from the Start menu, select Programs or All Programs > your printer driver
name > Smart Panel.
• If you have already installed more than one Samsung machine, first select the correct machine model you
want in order to access the corresponding Smart Panel.
• Right-click (in Windows or Linux) or click (in Mac OS X) the Smart Panel icon and select your machine.
• The Smart Panel window and its contents shown in this user’s guide may differ depending on the machine
or operating system in use.
Service Manual
4-57
Samsung Electronics
Alignment & Troubleshooting
The Smart Panel program displays the current status of the machine, the level of toner remaining in the toner
cartridge(s), and various other types of information. You can also change settings.
1
Toner Level
View the level of toner remaining in the toner cartridge(s). The machine
and the number of toner cartridge(s) shown in the above window may differ
depending on the machine in use. Some machines do not have this feature.
2
Buy Now
Order replacement toner cartridge(s) online.
3
User’s Guide
This button changes to Troubleshooting Guide when error occurs. You can
directly open troubleshooting section in the user’s guide.
4
Printer setting
Configure various machine settings in the Printer Settings Utility window.
Some machines do not have this feature.
If you connect your machine to a network, the SyncThru™ Web Service
window appears instead of the Printer Settings Utility window.
5
Driver Setting
Set all of the machine options you need in the Printer Preferences window.
This feature is available only for Windows
Opening the Troubleshooting Guide
Find solutions for error status problems by using the troubleshooting guide. Right-click (in Windows or Linux)
or click (in Mac OS X) the Smart Panel icon and select Troubleshooting Guide.
Using Printer Settings Utility
Using the Printer Settings Utility, you can configure and check print settings.
1. Right-click (in Windows or Linux) or click (in Mac OS X) the Smart Panel icon and select Printer Setting.
2. Change the settings.
3. To send the changes to the machine, click the Apply.
If your machine is connected to a network, the SyncThruTM Web Service window appears instead of the
Printer Settings Utility window.
Using On screen Help File
For more information about Printer Settings Utility, click
Service Manual
4-58
Samsung Electronics
Alignment & Troubleshooting
4.2.3 Error Message
Messages appear on the control panel display to indicate the machine’s status or errors. Refer to the tables
below to understand the messages’ and their meaning, and correct the problem, if necessary. Messages and
their meanings are listed in alphabetical order.
[zzz] indicates the error code. When you contact the service center, this error code help to handle the
problem.
Message
Description
Suggested solutions
Fax memory is almost
There is no more available fax
full. Print or remove
memory. No more fax data can be
received fax Job./
received.
Fax memory is full. Print
or remove received fax
Job.
Delete the received fax data in the
memory to secure memory.
Fuser error: [zzz].
Please turn off then on
1. At warm up, the temperature keep
up the lower temperature for regular
time.
2. In case that the temperature has
not reached warm up temperature
after warm-up time.
3. At ready, Less than target
temperature and for more than 10
sec.
4. At printing, Less than printing Ref.
temp and for more than 10 sec.
1. Check the Thermostat. If it is
defective, replace it.
2. Check the Lamp. If it is defective ,
replace it.
3. Check the fuser connector.
Reconnect it.
4. In case of printer input voltage lower
than standard voltage.
5. Check the Thermistor.
6. If the Heat On signal is not occurred
from Power supply, replace it.
Fuser unit is not
installed correctly.
Install it.
The fuser unit is not installed or
correctly
Disassemble and reassemble the fuser
unit.
LSU error: [zzz]. Please
turn off then on
1. LSU motor does not operate.
2. After LD on, the Laser beam detect
signal is not occurred or irregular.
3. LSU motor does not operate or the
drive signal is abnormal.
* Case 1,3 : After checking the LSU
motor rotation noise, check the motor
signal.
* Case 2 :
1. Check the Beam Detecht signal.
If there is a BD signal, replace the
Main board. If or not, check the LD
contol signal.
2. Check the LD Power is normal.
3. If it is normal, check the light
receving part.
Original paper jam in
front of scanner duplex
path
Paper has jammed during duplex
printing in the DADF.
Remove the jammed paper in DADF
Original paper jam in
front of scanner
The originals are jammed in DADF
Remove the jammed paper in DADF
Service Manual
4-59
Samsung Electronics
Alignment & Troubleshooting
Message
Description
Suggested solutions
Original paper jam
inside of scanner
duplex path
1. The lead edge of the document
failed to actuate the reverse stack
sensor within the correct time after
actuating the gate sensor.
2. The edge of the document failed to
actuate the reverse stack sensor.
Open the DADF cover and remove the
jammmed paper
Original paper jam
inside of scanner
The lead edge of the document failed
to actuate the gate sensor within the
correct time after actuating the scan
sensor.
When the machine is on, jammed
paper is detected in the DADF.
Remove the jammed paper in DADF
Original paper jam
The lead edge of the document failed
while reversing paper in to actuate the duplex sensor within
scanner
the correct time when the document
was fed the wrong way.
Remove the jammed paper in DADF
Paper Jam at the
bottom of duplex path
Paper has jammed during duplex
printing.
1. Open the side door and remove the
jammed paper.
2. If there is not jammed paper but the
error message is occurred, check
the duplex sensor. (Component
Test)
Paper Jam at the top of
duplex path
Paper has jammed during duplex
printing.
1. Open the side door and remove the
jammed paper.
2. If there is not jammed paper but the
error message is occurred, check
the duplex sensor. (Component
Test)
Paper Jam in exit area
Paper has jammed in the fuser area.
1. Open the Side door and remove the
jammed paper.
2. If there is not jammed paper but the
error message is occurred, check
the Exit sensor. (Component Test
->Sensor Read -> Ex value)
Paper Jam in MP tray
Paper misfed from multi-purpose tray.
1. If pick up roller does not rotate ,
check the pick up clutch.
2. If Pickup roller is rotating but the
paper is not feeding, replace the
pick up rubber.
3. Check the feed sensor. If it is
defective, replace it.
Service Manual
4-60
Samsung Electronics
Alignment & Troubleshooting
Message
Description
Suggested solutions
Paper Jam in tray1
Paper has jammed in the feeding area 1. If pick up roller does not rotate ,
of the tray.
check the pick up clutch.
2. If Pickup roller is rotating but the
paper is not feeding, replace the
pick up rubber.
3. Check the feed sensor. If it is
defective, replace it.
Paper Jam in tray2
Paper has jammed in the feeding area 1. Open the side door and Tray2 door
of the tray.
and remove the jammed paper.
2. If there is not jammed paper but the
error message is occured, check the
Feed sensor or Hardware.
3. If the paper is feeding by rotating
the pick up roller, check the clutch
and clutch signal.
Paper Jam inside of
duplex path
Paper has jammed during duplex
printing.
1. Open the side door and remove the
jammed paper.
2. If there is not jammed paper but the
error message is occurred, check
the duplex sensor. (Component
Test)
Paper Jam inside of
machine
Paper has jammed in the registration
area
1. Open the Side door and remove the
jammed paper.
2. If there is not jammed paper but
the error is occured, Check the
Registration Sensor (Component
Test -> Sensor Read -> RG value)
3. If the paper stopped after actuating
the Exit sensor, Check the Exit
sensor (Component Test -> Sensor
Read -> EX value)
Scanner locking switch
is locked or another
problem occurred.
The CCD lock has been locked.
1. Unlock the CCD Lock
2. Check the CCDM. Is is moving
when scanning. Check the FFC
cable. If there is defective, change
it.
3. If the problem persists after
removing the FFC cable, replace
the DADF board.
4. Check the Scan-motor. If there is
defective, change it.
Sensor Failure [zzz].
Call for service
There is a problem in the sensor
signal
Find the defective sensor. And replace
the new one.
Service Manual
4-61
Samsung Electronics
Alignment & Troubleshooting
Message
Description
Suggested solutions
Shake toner cartridge.
The toner supply is low.
System error: #02-000.
Please turn off then on
1. At warm up, the temperature is less 1. In case of meaning 1, replace the
than reference temperature for 20
Fuser unit.
sec.
2. In case of meaning 3, replace the
2. Abnormal ADC has occurred.
Engine contol board or Fuser control
3. ZeroCross Signal detect error has
board or SMPS.
occurred.
System error: #02-003.
Please turn off then on
The communication error of the
MEGA88 Micom
1. Open the side cover and close it.
2. Check the envelope pressing
device.
System error: #10-004.
Please turn off then on
UI error
1. check the UI connector.
2. If the problem persists, replace the
OPE board.
3. If ther problem persists, replace the
maina board.
This IP address
conflicts with an IP
address already in use.
Check it
The IP address is used in other place
elsewhere.
Check the IP address or obtain a new
IP address.
Toner cartridge is not
compatible. Check
user's guide
The toner cartridge you have installed
is not for your machine.
Replace the toner cartridge.
Toner cartridge is not
installed. Install it.
The toner cartridge is not installed
or the CRUM in the cartridege is not
properly connected.
Check the connection between the
CRUM connector of the toner cartridge
and Set.
Toner cartridge is worn.
Replace with new one
The color toner cartridge has run out.
The machine stops printing.
Replace the toner cartridge.
Toner is empty. Replace The lifespan of the color toner
toner cartridge
cartridge which the arrow indicates is
reached.
Replace the toner cartridge.
Toner is low. Order new
toner cartridge
Replace the toner cartridge.
Toner Cartridge is almost empty.
Too much paper in
The printed papers are full on the
output bin tray. Remove output tray.
printed paper
Service Manual
4-62
Thoroughly roll the new cartridge five
or six times to distribute the toner
evenly inside the cartridge.
1. Remove the paper on outbin tray.
2. Check the Outbin Full Senosr
(Component Test -> Sensor Read ->
OB value)
Samsung Electronics
Alignment & Troubleshooting
4.2.4 Solution
4.2.4.1 Scanner
4.2.4.1(a)COPY
PROBLEM
White copy
Black copy
Defective image
quality
Abnormal noise
Service Manual
ITEMS TO BE CHECKED
HOW TO SOLVE
• Check the Scan-Cover open.
• Room light can transit a thin original.
• Check shading profile.
• Remake shading profile in the tech mode.
• Check the CCD problem in Main
PBA.
• Check the CCD harness contact.
• Check shading profile.
• Remake shading profile in the tech mode.
• Check shading profile.
• Remake shading profile in the tech mode.
• Check the gap between original and • T
he gap above 0.5mm can cause a blurred
scanner.
image.
• Check printing quality.
• See “Print” troubleshooting.
• Check the Scanner Motor and any
mechanical disturbance.
• Check the right position of the Scanner Motor,
and check the any mechanical dis turbance in
the CCD carriaging part.
• Check the Motor Driver in Driver
PBA.
• If any driver is defective, replace it.
4-63
Samsung Electronics
Alignment & Troubleshooting
4.2.4.1(b) PC-Scan
PROBLEM
Scanning Error
Defective image
Quality
Abnormal noise
Service Manual
ITEMS TO BE CHECKED
HOW TO SOLVE
• Check the printer cable installed.
• Check correct installation, and use standard
USB cable.
• Check how TWAIN driver is
installed.
• Remove any other scanner driver.
• Reboot after reinstallation of the TWAIN driver.
• Check the USB signal level.
• If USB signal level is defective, replace Main
PBA.
• Check shading profile.
• Remake shading profile in the tech mode.
• Check the gap between original and • T
he gap above 0.5mm can cause a blurred
scanner glass.
image.
• Check printing quality.
• See “Print” troubleshooting.
• Check the Scanner Motor and any
mechanical disturbance.
• Check the right position of the Scanner Motor,
and check the any mechanical dis turbance in
the CCD carriaging part.
• Check the Motor Driver in Driver
PBA.
• If any driver is defective, replace it.
4-64
Samsung Electronics
Alignment & Troubleshooting
4.2.4.2 FAX
4.2.4.2(a) FAX/TELEPHONE Precautions
PROBLEM
ITEMS TO BE CHECKED
HOW TO SOLVE
TEL LINE
CANNOT BE
ENGAGED
(NO DIAL TONE)
• When you press “ OHD” key:
a) Check line cord connection.
b) C
heck MAIN LIU harness, and
CN2 of the LIU PBA.
a) insert it correctly into the connection jack
called “line”.
b) Replace defective parts.
Cannot MF dial
• Check MAIN-LIU harness.
• Replace defective parts.
MF dial is
possible but
not DP dial.
• Check the LIU PBA.
• Replace LIU PBA.
Defective fax
transmission
• Check MAIN LIU harness.
• Check ‘hook off’ : Refer to ‘TEL
LINE CANNOT BE ENGAGED’
above.
• Check transmission path and
reception path of the LIU PBA.
• Replace defective parts.
• Refer to ‘TEL LINE CANNOT BE ENGAGED’
above.
• Replace main PBA, if abnormal.
• Replace LIU PBA.
Replace main PBA.
Defective
automatic fax
reception
• Is the ring checked?
• Refer to ‘Defective Transmission.’
• Replace LIU PBA if it cannot be checked.
• Refer to ‘Defective Transmission’.
Service Manual
4-65
Samsung Electronics
gital Printer
gital Printer
gital Printer
gital Printer
gital Printer
gital Printer
gital Printer
gital Printer
gital Printer
gital Printer
gital Printer
gital Printer
gital Printer
gital Printer
gital Printer
gital Printer
gital Printer
gital
al
PrinterPrinter
al
Printer
igital
Printer
gital
Printer
al
Printer
igital
Printer
Digital
Printer
al
Printer
igital
Printer
Digital
Printer
Digital
Printer
gital
Printer
al
Printer
igital
Printer
Digital
Printer
Digital
Printer
Digital
Printer
igital
Printer
Digital
Printer
gital
Printer
Digital
Printer
Digital
Printer
Digital
Printer
Digital
Printer
Digital Printer
gitalDigital
Printer
Printer
Digital Printer
Digital Printer
gital Printer
gital Printer
gital Printer
gital Printer
gital Printer
gital Printer
gital Printer
gital Printer
gital Printer
Printer
gital
gital Printer
Printer
gital
gital
Printer
gital Printer
gital Printer
gital Printer
Digital Printer
Digital Printer
Digital
Printer
igital Printer
Digital
Printer
igital Printer
Digital
Printer
igital Printer
igital Printer
igital Printer
Digital Printer
Digital Printer
Digital Printer
Alignment & Troubleshooting
4.2.4.3 Print Quality
Error Status
Check
Vertical black line
and band
1. Bad blade of Toner cartridge
2. LSU
3. Bad cleaning blade of drum cartridge.
1. Change Toner cartridge
2. Replace LSU
3. Replace drum cartridge.
1. LSU window contamination
2. Toner cartridge
1. Clean LSU window
2. If not LSU, change Toner cartridge.
Digital Printer
Digital Printer
Digital Printer
Digital Printer
Digital Printer
Vertical white line
Digital Printer
Digital Printer
Digital Printer
Digital Printer
Digital Printer
Digital Printer
Digital Printer
No image
Digital Printer
Digital Printer
Digital Printer
Digital Printer
Digital Printer
Digital Printer
Digital Printer
Digital Printer
Digital Printer
Digital Printer
Digital Printer
Digital Printer
Printer
Digital
Digital Printer
DigitalPrinter
Printer
Digital
Digital Printer
Digital
Printer
Digital
Printer
Digital
Printer
Digital
Printer
Digital
Printer
Digital
Printer
Digital
Printer
Digital
Printer
Digital
Printer
Digital
Printer
Digital
Printer
Digital
Printer
Digital
Printer
Digital
Printer
Digital
Printer
Digital
Printer
Digital
Printer
Digital
Printer
Digital
Printer
Digital
Printer
Digital
Printer
Digital
Printer
Digital
Printer
Digital
Printer
Digital
Printer
Digital
Printer
Digital
Printer
Light
image
Digital
Printer
Digital
Printer
Digital
Printer
Digital
Printer
Digital
Printer
Digital
Printer
Digital Printer
Digital
Printer
Digital Printer
Digital Printer
DigitalPrinter
Printer
Digital
Digital
Printer
Digital
Digital Printer
DigitalPri
Printer
Digital
Digital
Printer
Digital
Printer
Digital Printer
Digital
Printer
Digital Printer
Digital
Printer
Digital
Printer
Digital Printer
DigitalPrinter
Printer
Digital
Digital
Printer
DigitalPrinter
Printer
Digital
DigitalPrinter
Printer
Digital
Digital
Printer
DigitalPrinter
Printer
Digital
DigitalPrinter
Printer
Digital
Service Manual
Digital
Printer
Digital
Printer
Digital Printer
Digital Printer
Digital Printer
Digital Printer
Digital Printer
Digital Printer
Digital Printer
Digital Printer
Digital Printer
Digital Printer
Digital Printer
Digital Printer
Digital Printer
Digital Printer
Digital Printer
Digital Printer
Digital Printer
Digital Printer
Digital Printer
Digital Printer
Digital Printer
Digital Printer
Digital Printer
Digital Printer
Digital Printer
Digital Printer
Digital Printer
Digital Printer
1. GND OPC is well grounded?
2. LSUPrinter
running well?
Digital
Digital Printer
3. BiasPrinter
voltage is normal?
Digital
Digital Printer
Digital Printer
4. Lower
toner?
Digital Printer
Digital
Printer
Digital Printer
5. Is there
video data
from Printer
Main PBA
Digital
Printer
Digital
Digital Printer
Digital Printer
Digital Printer
Digital Printer
Digital Printer
Digital Printer
Digital Printer
DigitalPrinter
Printer
Digital
PrinterPrinter
Digital
Digital
Digital
Printer
Digital
Printer
Digital
Printer
Digital
Printer
Digital Printer
Digital
Printer
Digital
Printer
Digital
Printer
Digital
Printer
Digital
Printer
Digital
Printer
Digital
Printer
DigitalPrinter
Printer
Digital
Printer
Digital
Printer
Digital
Digital
Printer
Digital
Printer
Digital
Printer
Digital
Printer
Digital
Printer
Digital
Printer
Digital
Printer
Digital
Printer
1.
LSU
light
power
normal?
Digital
Printer
Digital
Printer
Digital Printer
Digital
Printer
Digital
Printer
Digital
Printer
Digital
Printer
Digital
Printer
Digital
Printer
Digital
Printer
2. Enough
toner? Digital
Digital
Printer
Printer
Digital
Printer
Digital
Printer
Digital
Printer
3. High charger voltage? Digital Printer
4. Lower bias voltage
Digital
Printer
5.Digital
Contamination
voltage
Printer of high
Digital
Printer
Digital
Printer
Digital
Printer
contact.
Digital
Printer
Digital Printer
Digital
Printer
Digital
Printer
6.Digital
Transfer
volatge and
roller.Printer
Printer
Digital
DigitalPrinter
Printer
Digital
Digital Printer
Digital
Printer
Digital Printer
Digital Printer
Digital Printer
Digital Printer
Digital Printer
Digital Printer
Digital Printer
Digital Printer
Digital Printer
Digital Printer
Digital Printer
Digital Printer
Digital Printer
Digital Printer
Digital Printer
Digital Printer
Digital Printer
Digital Printer
Digital Printer
Digital4-66
Printer
Solution
Digital Printer
Digital Printer
Digital Printer
Digital Printer
Digital Printer
Digital Printer
Digital Printer
Digital Printer
Digital Printer
Digital Printer
1. Measure the resistance between
frame ground and the ground spring
attached frame.Digital Printer
Confirm stable Digital
ground.Printer
Unless bad
ground, detach Digital
cabinet,
check where
Printer
is bad point
Digital Printer
2. Adjust LSU or replace
it
Digital Printer
3. Normal Dev bias = -450V
4. Shake toner cartridge and print.If a
like good, toner is empty
5. Test
engine testDigital
pattern
, replace
Digital
Printer
Printer
Digital
Printer
Digital Printer
Main
PBA
Digital
Printer
1. LSU
light powerDigital
checkPrinter
is difficult.
Digital
Printer
Digital
Printer
Compare with new one and check.
Digital
Printer
Digital
Printer
2. Check
toner and
the toner
cartridge
counter 3~4. Measure all high voltage
output.
Digital
Printertoner cause
Digital
Printer
5. Leakage
bad
contact and
Digital
Printercontact Digital
Printer
increase
resistance.
Clean
Digital
Printer
Digital Printer
contaminated
area.
Digital Printer
Digital Printer
Digital Printer
Digital Printer
Digital Printer
Digital Printer
Digital Printer
Digital Printer
Digital Printer
Digital Printer
Digital Printer
Digital Printer
Digital Printer
Samsung Electronics
Digital
Printer
gital Printer
gital Printer
gital Printer
gital Printer
gital Printer
gital Printer
gital Printer
gital Printer
gital Printer
gital Printer
igital Printer
igital Printer
igital Printer
igital Printer
igital Printer
igital Printer
igital Printer
igital Printer
igital Printer
igital Printer
igital Printer
igital Printer
Digital Printer
Digital Printer
Digital Printer
Digital Printer
Digital Printer
Digital Printer
DigitalPrinter
Printer
Digital
DigitalPrinter
Printer
Digital
Digital
Printer
Digital Printer
Error
Status
Digital Printer
Digital
Printer
Dark image
Digital Printer
Digital Printer
Digital Printer
Alignment & Troubleshooting
Digital Printer
Digital
Printer
Digital Printer
Digital Printer
Digital
Printer
Digital
Printer
Digital
Printer
DigitalPrinter
Printer
Digital Printer
Digital Printer
Digital
Printer
Digital
Digital
Printer
Digital
Printer
Digital
Printer
DigitalPrinter
Printer
Digital Printer
DigitalPrinter
Printer
Digital
Printer
Digital
Digital
Printer
Digital
Digital
Printer
Digital
Printer
Digital
Printer
Digital
Printer
Digital
Printer
Digital
Printer
Digital
Printer
Digital
Printer
Digital
Printer
Digital
Printer
Digital
Printer
Digital Printer
Digital
Printer
Digital Printer
Digital
Printer
Digital
Printer
Digital
Printer
Digital
Printer
Check
Solution
Digital
Printer
Digital
Printer
Digital Printer
Digital Printer
Digital Printer
Digital
Printer
Digital
Printer
Digital
Printer
Digital
Printer
Digital
Printer
Printer
1. LSU light power normal? Digital Printer
1. Check the ratedDigital
level and
replace.
Digital Printer
Digital Printer
Printer
Digital Pri
Digital Printer
Digital Printer
Digital Printer
Background
Digital Printer
Digital Printer
2. Bias voltage output is high?
Digital Printer
Digital
Printer
3. Video
data is always
supplied?
Digital
Printer
Digital
Printer
Digital
Printer
Digital
Printer
Digital
Printer
4.
Bad
high
charge
voltage
contact.
Digital
Printer
Digital Printer
Digital
Printer
Digital
Printer
Digital
Printer
Digital
Printer
Digital
DigitalPrinter
Printer
Digital
DigitalPrinter
Printer
Digital
DigitalPrinter
Printer
Digital Printer
Digital
Printer
Digital
Printer
Digital
Printer
Digital
Printer
Digital
Printer
Digital
Printer
Digital
Printer
Digital
Printer
Digital
Printer
Digital
Printer
Digital
Printer
Digital
Printer
Digital
Printer
Digital
Printer
Digital Printer
1. High voltage output is normal?
Digital Printer
Digital Printer
2. Set to power rating.
3. Replace
board.
Digital
Printer defected
Digital
Printer
4.
C
heck
the
charge
voltage
or change
Digital
Printer
Digital
Printer
Digital Printer
Digital
Printer
Digital
Printer
Digital
Printer
the
drum cartridge.
Digital
Printer
Digital
Printer
Digital
DigitalPrinter
Printer
Digital
DigitalPrinter
Printer
Digital Printer
Digital
Printer
Digital
Printer
Digital
Printer
Digital
Printer
Digital Printer
1. Adjust to the rated status.
Digital
Digital
Digital Pri
Printer
DigitalPrinter
Printer
Digital
Digital Printer
Digital
Printer
Digital
Digital Printer
Printer
Digital Printer
Digital
Digital Printer
Printer
Digital Printer
Digital Printer
Digital Printer
Digital
2. C/R Printer
of drum cartridge is
Digital
Printer
contaminated?
Digital Printer
Digital Printer
Digital Printer
Digital
Printerdrum cartridge.
Digital Printer
2. Replace
Digital Printer
Digital Printer
Digital
Printer
DigitalPrinter
Printer
Digital Printer
Digital
Digital
Printer
Digital
Printer
Digital Printer
Digital Printer
DigitalPrinter
Printer
DigitalPrinter
Printer
Digital
Digital
Digital Printer
Digital Printer
Digital Printer
Digital Printer
Ghost
Digital
Printer
Digital
Printer
Digital
Printer
Digital
Printer
Digital
Printer
Digital
Printer
Digital
Printer
Digital
Printer
Digital
Printer
Digital
Printer
Digital
Printer
Digital
Printer
DigitalPrinter
Printer
Digital
Digital
Printer
Digital
Printer
Digital
Printer
Digital
Printer
Digital
Printer
Digital Printer
1. High voltage output.
2. Pre-Transfer Lamp.
Digital
Printer
Digital Printer
3.
Bad high
voltage contact.
1. Check
every highDigital
voltage.
Digital
Printer
Printer
2.
Check
the
turn-on
PTL,
LED crash.
Digital Printer
Digital Printer
Digital
Printer
Digital
Printer
3.
C
lean
the
inside
machine
or replace
Digital Printer
Digital Printer
Digital
Printer
DigitalPrinter
Printer
drum
cartridge. Digital
Digital
Printer
Digital
Printer
Digital
Printer
Digital Printer
Digital Printer
Digital Printer
Digital Printer
Digital Printer
Digital Printer
Digital
Printer
Digitalon
Printer
Stains
back of
Digital
Printer
Digital
Printer
paper
Digital Printer
Digital
Printer
Digital Printer
1. Contamination
of transfer
roller.
Digital
Printer
Digital Printer
2. Stains of paper path.
Digital
Printerroller’s contamination.
Digital Printer
3. Pressure
Digital Printer
Digital Printer
Digital Printer
Digital Printer
Digital
Printer
Digital
1. Clean
the transfer
rollerPrinter
with vacuum
Digital
Printer
Digital
Printer
cleaner.
Digital
Printer
2. Clean
the area ofDigital
paperPrinter
path with
Digital
Printer
Digital
Printer
cloth or air cleaner.
Digital Printer
Digital Printer
Digital
Digital Printer
Printer
Digital
Printer
Digital
Printer
Digital Printer
Printer
Digital
Digital
Printer
Digital
Printer
Digital Printer
Digital
Printer
Poor Fusing
Digital Printer
Digital Printer
Digital Printer
Digital Printer
Digital Printer
Partial blank image
(not periodic)
Digital Printer
Digital Printer
Digital Printer
Digital Printer
Digital Printer
Service Manual
Digital Printer
Digital Printer
Digital Printer
Digital Printer
Digital Printer
Digital Printer
Digital Printer
Digital Printer
Digital Printer
Digital Printer
3. Remove fuser and replace it.
1. Use recommended paper?
2. Check fusing temperature.
3. The machine was under the low
tempera ture for a long time?
1. Should use recommended paper.
2. Check engine controller board. If you
have not thermometer, measure the
thermistor voltage to CPU, If 2.3V±5%
in printing CPU works well. Then,
disassemble fuser and check the
thermistor contact and thermistor.
3. Re-check after putting the machine in
the warm place for certain period.
1. Toner is low?
2. The toner cartridge is out of position?
1. Replace Toner cartridge.
2. Checkand adjust.
4-67
Samsung Electronics
Digital Printer
Digital Printer
Digital Printer
Digital Printer
Digital Printer
Error Status
Partial blank image
Digital
(periodic)
Digital Pri
Digital Printer
Digital Printer
Different
image
Digital
Printer
density
(left and right)
Digital Printer
Digital Printer
Digital Printer
Digital Printer
Digital Printer
Horizonral band
Digital Printer
Printer
Digital
Digital
Printer
Digital Printer
Printer
Digital
Digital
Printer
Digital Printer
Printer
Digital
Digital Printer
Printer
Digital
Digital
Printer
Digital
Printer
Digital Printer
Printer
Digital
Digital Printer
Digital Printer
Digital
Printer
Digital Printer
Digital Printer
Digital
Printer
Digital
Printer
Digital
Printer
Digital
& Printer
Troubleshooting
Digital Printer Alignment
Digital Printer
Digital
Printer
Digital
Printer
Digital
Printer
Digital
Printer
Digital
Printer
Digital
Printer
Digital
Printer
Digital
Printer
Digital Printer
Digital Printer
Digital Printer
Digital
Printer
Digital
Printer
Digital
Printer
Digital
Printer
Digital
Printer
Digital
Printer
Digital Printer
Digital Printer
Digital Printer
Digital
Printer
Digital
Printer
Digital Printer
Digital Printer
Digital Printer
Check
1. Develop roller scar or particle.
Digital
2.
Scar Printer
or particle. (94.3 mm)
Digital
Printer
3.
Transfer
roller scar or particle.
Digital
(56.6 Printer
mm)
Solution
1. Replace toner cartridge.
Digital
Printer
Digital Printer
2. Replace
drum cartridge.
Digital
Printer
Digital Printer
3. Replace
transfer roller.
Digital Printer
Digital Printer
Digital
Printer
Digital Printer
1. Replace
drum cartridge.
Digital
Printer
Digital Printer
2. Replace toner cartridge
and drum
Digital
Printer
1.
Charge
roller’s pressure force
Digital
Printer
unbalance
2. Dev. roller and OPC or Dev. roller and
cartridge.
blade’s pressure force unbalance
3. Check left and right spring of transfer
3.
Transfer
roller’s pressure
force
roller
and the spring
Digital
Printer
Digital Printer
Digital
Printer
Digitalpressing
Printer the
Digital Printer
Digital Printer
Digital
Printerof eachDigital
Digital
Printer
Digitalthe
Printer
unbalance
side Printer
toner
cartridge inside
machine
Digital Printer
Digital Printer
Digital Printer
Digital Printer
Digital Printer
Digital Printer
1. Unstable high voltage contact
2. Charge roller’s contamination
Digital Printer
Digital Printer
Digital
Printer
Digital
Printer
3.
Contamination
of heat
roller
Digital Printer
Digital Printer
Digital
Printer
Digital
Printer
4. Malfunction of LSU
Digital Printer
Digital Printer
Digital Printer
Digital Printer
Digital Printer
Digital Printer
Digital Printer
Digital Printer
Digital Printer
Digital Printer
Digital Printer
Digital Printer
Digital Printer
Digital Printer
Digital Printer
Digital Printer
Digital Printer
Digital Printer
Digital Printer
Digital Printer
Digital Printer
Digital Printer
Digital Printer
Digital
Printer
Digital
Printer
Digital
Printer
Digital
Printer
Digital
Printer
Digital
Printer
Digital
Printer
Digital
Printer
Digital
Printer
Digital
Printer
Digital
Printer
Digital
Printer
Digital
Printer
Digital
Printer
Digital
Printer
Digital
Printer
Digital
Printer
Digital
Printer
Digital
Printer
Digital
Printer
Digital
Printer
Digital
Printer
Digital
Printer
Digital Printer
Digital
Digital Pri
Digital Printer
Digital Printer
Digital Printer
Digital Printer
Digital Printer
Digital Printer
Digital Printer
Digital Printer
Digital Printer
Digital Printer
Digital Printer
Digital Printer
Digital Printer
Digital
Digital Printer
Printer
Digital
Printer
Service
Manual
Digital
Printer
Digital
Printer
Digital Printer
Digital
Digital Printer
Printer
Digital Printer
Digital Printer
Digital Printer
Digital Printer
Digital Printer
Digital Printer
Digital Printer
Digital Printer
Digital Printer
Digital Printer
Digital Printer
Digital 4-68
Printer
Digital Printer
Digital Printer
Digital Printer
Digital Printer
Digital Printer
Digital Printer
Digital Printer
Digital Printer
Digital Printer
Digital Printer
Digital Printer
Digital Printer
Digital Printer
Digital Printer
Digital Printer
Digital Printer
1. Clean each contact and check good
contact
Digital Printer
Digital
Printer
Digital Printer
2. Clean
charge roller
Digital Printer
Digital
Printer
3. Replace fuser unitDigital Printer
Digital Printer
Digital
Printer
4. Check
Main PBA.Digital Printer
Digital Printer
Digital Printer
Digital Printer
Digital Printer
Digital Printer
Digital Printer
Digital Printer
Digital Printer
Digital Printer
Digital Printer
Digital Printer
Digital Printer
Digital Printer
Digital Printer
Digital Printer
Digital Printer
Digital Printer
Digital Printer
Digital Printer
Digital Printer
Digital Printer
Digital Printer
Digital Printer
Digital Printer
Digital Printer
Digital Printer
Digital Printer
Digital Printer
Digital Printer
Digital Printer
Digital Printer
Digital Printer
Digital Printer
Digital Printer
Digital Printer
Digital Printer
Digital Printer
Digital Printer
Digital Printer
Digital Printer
Digital Printer
Digital
Printer
Samsung
Electronics
Digital Printer
Digital Printer
Alignment & Troubleshooting
Abnormal Image Printing and Defective Roller
No
Roller
Abnormal image period
Kind of abnormal image
1
OPC Drum
75.5mm
White spot, Block spot
2
Charge Roller
37.7mm
Black spot
3
Supply Roller
44.9mm
Horizontal density band
4
Develop Roller
35.2mm
Horizontal density band
5
Transfer Roller
47.1mm
Black side contamination/transfer fault
6
Heat Roller
77.8mm
Black spot and fuser ghost
7
Pressure Roller1
62.8mm
Black side contamination
8
Pressure Roller2
50.2mm
Black side contamination
Service Manual
4-69
Samsung Electronics
No Image
Digital Printer
Digital Printer
Digital Printer
Digital Printer
Digital Printer
Digital Printer
Digital Printer
Digital Printer
Digital Printer
Digital Printer
Digital Printer
Digital Printer
Digital Printer
Digital Printer
Digital Printer
Digital Printer
Digital Printer
Digital Printer
Digital Printer
Digital Printer
Digital Printer
Digital Printer
Digital Printer
Digital Printer
Digital Printer
No image?
Digital Printer
Digital Printer
Digital Printer
YES
Digital Printer
Digital Printer
Digital Printer
Digital Printer
Digital Printer
Digital Printer
Digital Printer
NO
Digital Printer
Digital
Printer
Digital
Printer
Digital
Printer
Digital
Printer
Digital
Printer
Digital
Printer
Digital
Printer
Digital
Printer
Digital
Printer
Digital
Printer
Digital
Printer
Digital
Printer
Digital
Printer
Digital
Printer
Digital
Printer
Digital
Printer
Digital
Printer
Digital
Printer
Digital
Printer
Digital
Printer
Digital Printer
Digital
Printer
Digital Printer
Digital Printer
Self test
pattern prints?
NO
Digital
Digital Printer
Digital Pri
YES Digital Printer
Digital Printer
Digital Printer
DigitalCheck
Printer
Printer
connection Digital
to
Digitalcomputer
Printer or replace
Digital Printer
controller
Digital Printer
Digital Printer
Digital Printer
Digital Printer
Digital Printer
Digital
Digital Printer
Printer
Digital
Digital Printer
Printer
Digital
Printer
Digital Printer
Digital
Digital Printer
Printer
Digital
Digital Printer
Printer
Digital Printer
Digital Printer
Digital Printer
Digital Printer
Digital Printer
Digital Printer
Digital Printer
Digital Printer
Digital Printer
Digital Printer
Alignment & Troubleshooting
Digital Printer
Digital Printer
Digital Printer
Digital Printer
Digital Printer
A on
Digital
next
page Printer
Digital Printer
Digital Printer
Digital Printer
Digital Printer
Digital Printer
Self testing
is possible ?
NO
Digital Printer
Digital Printer
Digital Printer
Digital Printer
Retest after replacing the
connector or controller board
Digital Printer
Digital Printer
Digital Printer
Take out the cartridge Digital Printer
and prepare the tester Digital Printer
YES
for electronic connection
Digital Printer
Digital Printer
Digital Printer
Digital Printer
Digital Printer
Digital Printer
Digital Printer
Digital Printer
Digital Printer
Is the OPC
replacePrinter
the GND
NO PrinterRepair orDigital
terminal of machine Digital
terminal
is well-connected Digital Printer
Digital Printer
to Frame?
Digital Printer
Digital Printer
YES
Digital Printer
Digital Printer
Digital Printer
Digital Printer
Digital Printer
Digital Printer
Digital PrinterCheck theDigital
Printer
path between
Does the
Digital
Printer
Digital
Printer
Digital
Printer
Main board
video data line to
NO
and
HVPS.
Repair
or replace
Digital
Printer
Digital Printer
LSU transit
to High/Low Digital Printer
the
defective
component
when
printing?
Digital
Printer
Digital Printer
Digital Printer
or board
Digital Printer
Digital Printer
Digital Printer
YES
The mirror in LSU might be
misplaced so the light path to the
OPC deviates ->Repair or replace
LSU or remove any defective
matters in the machine
Service Manual
4-70
Samsung Electronics
Alignment & Troubleshooting
A
Transfer
voltage OK? (on the
transfer roller
shaft)
NO
YES
Are the
connection terminal
and connection
correct?
NO
Repair or replace terminal
YES
Replace HVPS or repair defective component
Developing
(-450V) and supplying
(-600V) voltage
are OK?
NO
Is the connection
terminal OK?
NO
Repair or replace terminal
YES
YES
Replace HVPS or repair
defective component
Does the
counter indicate over
the toner's guaranty
life
YES
NO
Transfer roller might be out of its location
-> Locate the roller into its place
This could occurs when he power of LSU is low or
the density is low due to the obstacles on the window
-> Replace LSU or clean the window
Replace the toner cartridge
Service Manual
4-71
Samsung Electronics
Digital Printer
Digital Printer
Digital Printer
Digital Printer
Digital Printer
Digital Printer
Digital Printer
Digital Printer
Digital Printer
Digital Printer
Digital Printer
Digital Printer
Digital Printer
Digital Printer
Digital Printer
Digital Printer
Digital Printer
Digital Printer
Digital Printer
Digital Printer
All Black
Digital
Digital Printer
Digital Printer
Digital Pri
All black in
NO
Digital Printer
printing area?Digital Printer
Digital Printer
Digital Printer
Digital Printer YES Digital Printer
Digital Printer
Digital Printer
Digital Printer
Digital Printer
Digital Printer
Digital Printer
Alignment
& Troubleshooting
Digital Printer
Digital Printer
Digital Printer
Digital Printer
Digital Printer
Digital
Printer
Digital
Printer
Digital
Printer
Digital
Printer
Digital
Printer
Digital
Printer
Digital
Printer
Digital
Printer
Digital
Printer
Digital
Printer
Digital
Printer
Digital
Printer
Digital
Printer
Digital
Printer
Digital
Printer
Digital
Printer
Digital
Printer
Digital
Printer
Digital
Printer
Digital
Printer
Digital
Printer
Digital
Printer
Digital
Printer
Digital Printer
YES
NO
Digital
Digital Printer
Printer YES Digital Printer
Digital
Digital Printer
Digital Printer
Printer
Digital
Printer
Digital Printer
Digital Printer
Digital
Digital Printer
Digital Printer
Printer
Digital
Printer
Digital Printer
Digital Printer
Is the
Hsync signal received
in LSU?
NO
Digital Printer
Digital Printer
Digital Printer
Digital Printer
Digital Printer
Digital Printer
Digital Printer
Digital Printer
Digital Printer
Digital Printer
Digital Printer
Digital Printer
Digital Printer
Digital Printer
Digital Printer
Digital Printer
Digital Printer
Does the
Digital Printer
video data line to LSU
NO
transit to High/Low whenDigital Printer
Digital Printer
printing?
Replace LSU
Is charge
voltage supplied
from HVPS?
Digital Printer
Digital Printer
Digital Printer
Digital Printer
Digital Printer
Digital Printer
Digital Printer
Digital Printer
Digital Printer
Digital Printer
CheckDigital
the pathPrinter
among video
controller,
engine
board,
Digital Printer
HVPS, LSU for the shortage
Digital
Printer
or open
-> Repair
or replace
Digital Printer the boards
Digital Printer
Repair or replace HVPS
Digital Printer
Digital Printer
Digital Printer
Digital Printer
Digital Printer
Digital Printer
Digital Printer
Digital Printer
Digital Printer
Digital Printer
Digital Printer
Digital Printer
Digital Printer
Digital Printer
Digital Printer
Replace LSU
YES
Charge part's contact
is bad -> Repair or
replace the drum cartridge
Service Manual
4-72
Samsung Electronics
Alignment & Troubleshooting
Vertical White Line (Band)
al Printer
al Printer
al Printer
al Printer
al Printer
Digital Printer
Digital Printer
Digital Printer
Digital Printer
Digital Printer
al Printer
al Printer
al Printer
al Printer
al Printer
Digital Printer
Digital Printer
Digital Printer White line
missing definitely?
Digital Printer
Digital Printer
al Printer
al Printer
al Printer
al Printer
al Printer
al Printer
al Printer
al Printer
al Printer
al Printer
al Printer
al Printer
al Printer
al Printer
al Printer
Digital Printer
Digital Printer
Digital Printer
Digital Printer
Digital Printer
NO
YES
Digital Printer
Digital
Printer
Digital
Printer
Digital
Printer
Digital
Printer
Digital
Printer
Digital
Printer
Digital
Printer
Digital
Printer
Digital
Printer
Digital
Printer
Digital
Printer
Digital
Printer
Digital
Printer
Digital
Printer
Digital
Printer
Digital
Printer
Digital
Printer
Digital
Printer
Digital
Printer
Digital
Printer
Digital
Printer
Dirt
of Printer
dust
stuck onto the
Digital
Digital
Printer
Digitalof
Printer
window
internal lens of LSU
Digital Printer
Digital Printer
Digital Printer
Digital Printer
Digital Printer
-> Clean it or replace LSU
Preventive obstacles through
Printer
the path between OPCDigital
of
toner cartridge and LSU
preventPrinter
the
Digital
path -> Remove the obstacles
Digital Printer
Digital Printer
Digital Printer
Digital Printer
Digital Printer
Digital Printer
Digital Printer
Digital Printer
Service Manual
Digital Printer
Digital Printer
Digital Printer
Digital Printer
Digital Printer
Digital Printer
Check
if the
Digital
Printer
printout is still has the
NO
Digital Printer
same problem even right after
Digital
passedPrinter
through the
transfer
roller
Digital
Printer
YES
Digital Printer
Digital Printer
Digital Printer
Digital Printer
Toner material might be stuck to
Digital
blade
in the Printer
developer inside and it
The ribs in fuser or toner on the
roller may invoke the image
problem -> Replace the fuser
cover or the defective part
The image is originally black or the
black part is far close to the top
-> Use the pattern which has the
image below bigger than 10mm
from the top
prevents toner supply -> Replace
the toner cartridge
Printer
CheckDigital
both if the
toner cartridge's
Digital
counter
is overPrinter
its guaranty and
amount
of the Printer
toner material
Digital
-> Replace the toner cartridge
Digital Printer
Digital Printer
Digital Printer
Digital Printer
Digital Printer
Digital Printer
Digital Printer
Digital Printer
Digital Printer
Digital Printer
Digital Printer
Digital Printer
Digital Printer
Digital Printer
Digital Printer
Digital Printer
Digital Printer
Digital Printer
Digital Printer
Digital Printer
Digital Printer
Digital Printer
4-73
Samsung Electronics
Digital Printer
Digital Printer
Digital Printer
Digital Printer
Digital Printer
Digital Printer
Digital Printer
Digital Printer
Digital Printer
Digital Printer
Digital Printer
Digital Printer
Digital Printer
Digital Printer
Digital Printer
Digital Printer
Digital Printer
Digital Printer
Digital Printer
Digital Printer
Digital
Digital Pri NO
Digital Printer
Digital Printer
Digital Printer
Digital Printer
Digital
Printer
Dark
selected
Digital
Printer
via RCP?
Digital Printer
YES
Digital Printer
Dark Image
Digital Printer
Alignment
& Troubleshooting
Digital Printer
Digital Printer
Digital Printer
Digital Printer
Digital Printer
Digital
Printer
Digital
Printer
Digital
Printer
Digital
Printer
Digital
Printer
Digital
Printer
Digital
Printer
Digital
Printer
Digital
Printer
Digital
Printer
Digital
Printer
Digital
Printer
Digital
Printer
Digital
Printer
Digital
Printer
Digital
Printer
Digital
Printer
Digital
Printer
Digital
Printer
Digital
Printer
Digital
Printer
Digital
Printer
Digital
Printer
Digital Printer
Digital Printer
Digital Printer
Digital Printer
Digital Printer
Digital Printer
Digital Printer
Digital Printer
Digital Printer
Digital Printer
Digital Printer
Digital Printer
Digital Printer
Digital Printer
Digital Printer
Digital Printer
Digital Printer
Digital Printer
Digital Printer
Digital Printer
Digital Printer
Digital Printer
Digital Printer
Digital Printer
Digital Printer
Digital Printer
Digital Printer
Digital Printer
Digital Printer
Digital Printer
END
Digital Printer
Digital Printer
Digital Printer
Digital Printer
Digital Printer
Digital Printer
Change to
Normal and test
Digital Printer
Digital Printer
Digital Printer
Digital Printer
Digital Printer
Same at Normal?
NO
YES
Digital
Digital Printer
Printer
Digital
Printer
Digital Printer
Digital
Digital Printer
Printer
Digital
Printer
Digital Printer
Digital
Digital Printer
Printer
Digital Printer
Digital
Printer
Works
correctly
withDigital
-450V Printer
of Bias
voltage?
Digital Printer
DigitalYES
Printer
Works
correctly after
replaced LSU?
Digital Printer
NODigital Printer
Digital Printer
Digital Printer
Digital Printer
Digital Printer
Digital Printer
Digital Printer
Digital Printer
Repair or replace the defective
Digital
Printer
Digital Printer
component
Digital Printer
Digital Printer
Digital Printer
Digital Printer
Toner over supply due to the
adjustment fault of metering
blade in toner cartridge
-> Replace toner cartridge
NO
YES
The power of LSU is set
high or internal problem
-> Replace LSU or adjust
volume
Service Manual
4-74
Samsung Electronics
al Printer
al Printer
al Printer
al Printer
al Printer
al Printer
al Printer
al Printer
al Printer
al Printer
Alignment & Troubleshooting
Barkground
Digital Printer
Digital Printer
Digital Printer
Digital Printer
Digital Printer
Recommended
paper used?
Digital Printer
Digital Printer
Digital Printer
Digital Printer
Digital Printer
- Adjust voltage or
replace HVPS
- Repair or replace
afterPrinter
Digital
checking the
Digital
Printer
terminals'
contacts
Digital Printer
Digital Printer
Digital Printer
tal Printer
tal Printer
tal Printer
tal Printer
tal Printer
Digital Printer
Digital Printer
Digital Printer
Digital Printer
Digital Printer
tal Printer
tal Printer
tal Printer
tal Printer
tal Printer
Digital Printer
Digital Printer
Digital Printer
Digital Printer
Digital Printer
tal Printer
tal Printer
tal Printer
tal Printer
tal Printer
Digital Printer
Digital Printer
Digital Printer
Digital Printer
Digital Printer
Service Manual
NO
Print 20 to 30 pages using
the recommended paper
YES
NO
Transfer,
charge and developing
voltage are OK?
YES
Same problem
occurs?
NO
END
NO
Replace the
toner cartridge
YES
Operating/
storage atmosphere is
too high temperature
/humidity?
NO
Dirty or
dust around the
charge roller?
YES
YES
Clean the charge roller
or replace step-up device
/terminal after check
Solve the problem under
the recommended condition
(10-32 degree Centigrade)
Check Terminals or contacts and "transfer roller springs"
are misplaced
-> Repair or replace transfer roller etc.
Check if the LED of PTL in front of the transfer roller
is on when it presses the top cover switch on purpose
-> If not, replace PTL
NO
Work OK?
YES
Internal blade or supplying
part of the toner cartridge
is defective
-> Replace the toner
cartridge
4-75
Samsung Electronics
Digital Printer
Digital Printer
Digital Printer
Digital Printer
Digital Printer
Digital Printer
Digital Printer
Digital Printer
Digital Printer
Digital Printer
Digital Printer
Digital Printer
Digital Printer
Digital Printer
Digital Printer
Digital Printer
Digital Printer
Digital Printer
Digital Printer
Digital Printer
Digital Printer
Digital Printer
Digital Printer
Digital Printer
Digital Printer
Digital Printer
Is it regular
Is it regular
NO
NO
Digitalinterval
Printer
Digital
Printer
Digital Printer
of 94.3mm?
interval of 54.3mm?
Digital Printer
Digital Printer
Digital Printer
Digital
Printer
Is it regular
interval
of 56.6mm?
Digital
Printer
Alignment & Troubleshooting
Digital Printer
Ghost
Digital
Digital Printer
Printer
Digital
Printer
Digital Printer
Digital
Digital Printer
Printer
Digital
Printer
Digital Printer
Digital
Digital Printer
Printer
YES
Replace PTL
assembly
NO
YES
YES
A specific part of the transfer
roller has ruined or its
resistance value is changed
-> Replace transfer roller
PTL lamp
works OK?
YES
Check HVPS
contacts and
HVPS's selfoutput
-> If failed,
repair/replace
HVPS
NO
Transfer roller cannot force
regularly due to the gears
eccentricity of transfer roller
-> Replace the defective
component
Developing
/supplying voltage
normal? (-450V/
-600V)
Transfer
voltage is set to
standard?
NO
YES
YES
Irregularity of NIP
between rollers in
toner cartridge
-> Replace toner cartridge
Bias voltage
is OK? (-450V)
(as transfer roller
interval)
NO
- Repair or replace HVPS
- Check and Repair or
replace the terminal
contacts
Adjust the Bias voltage
or replace HVPS
YES
Operating/storage
temperature is too low or
not recommended
paper used?
NO
There may be a problem in toner
layer control in toner cartridge
-> Replace the toner cartridge
YES
Use the machine with
recommended paper and
at condition
Service Manual
4-76
Samsung Electronics
al Printer
al Printer
al Printer
al Printer
al Printer
al Printer
al Printer
al Printer
al Printer
al Printer
al
al Pri
al Printer
al Printer
al Printer
Alignment & Troubleshooting
Black Spot
Digital Printer
Digital Printer
Digital Printer
Digital Printer
Digital Printer
Digital Printer
Digital Printer
Digital Printer
Digital Printer
Digital Printer
Digital Printer
Digital Printer
Digital Printer
Digital Printer
Digital Printer
Digital Printer
Digital Printer
Digital Printer
Digital Printer
Digital Printer
Digital Printer
Digital Printer
Digital Printer
Digital Printer
Digital Printer
Digital Printer
When taking
NO
NO
Is it regular
Digitalinterval
Printer
Digital
Printer
out the toner cartridge,
of 38.3mm?
Digital Printer
Digital Printer toner leaks?
Digital Printer
Digital Printer
Digital Printer
Bad image
Digital
Printer
removes
by
scratching?
Digital Printer
YES
The problem
randomly occurred
due to the toner
fallen -> Clean the
machine
Digital Printer
Digital
Printer
Digital Printer
Digital Printer
Digital Printer
Digital
Printer
Digital
Printer
Digital
Printer
Digital
Printer
Digital Printer
Digital
Printer
Digital Printer
Digital
Printer
Digital
Printer
Digital
Printer
Digital
Printer
The problem occured
Toner leaks and much
Check toner is stuck onto
Digital
Printer
Digital
Printer
Digital
Printer
Digital
Printer
Digital Printer
Digital
Printer
Digital
Printer the P/R
Digital
Printer
since
the obstacles Digital
toner
material
dropped
Printer
or H/R in fuser
Digital
Printer
Digital
Printer
Digital
Printer
stuck
to charge roller Digital
Printer
onto
the
paper
->
Digital
Printer
Digital
Printer
Digital
Printer
Digital
Printer
->
Clean
it
or
replace
Digital Printer
Digital
Printer
Digital
Printer
-> Clean the Charge Roller
Replace
the toner cartridge
Digitaland
Printer
Digital Printer
Digital Printer
Digital Printer
then reprint.
Digital Printer
Digital Printer
Digital Printer
Digital Printer
Digital Printer
al Printer
al Printer
al Printer
al Printer
al Printer
al
al Printer
Printer
al
Printer
al Printer
al
al Printer
Printer
al
Printer
al Printer
al
al Printer
Printer
YES
YES
NO
Digital Printer
Digital Printer
Digital Printer
Digital Printer
Digital Printer
Service Manual
Digital Printer
Digital Printer
Digital Printer
Digital Printer
Digital Printer
Digital Printer
Digital Printer
Digital Printer
Digital Printer
Digital Printer
Digital Printer
Digital Printer
Digital Printer
Digital Printer
Digital Printer
Digital Printer
Digital Printer
Digital Printer
Digital Printer
Digital Printer
Digital Printer
Digital Printer
Digital Printer
Digital Printer
Digital Printer
Digital Printer
Digital Printer
Digital Printer
Digital Printer
Digital Printer
Digital Printer
Digital Printer
Digital Printer
Digital Printer
Digital Printer
4-77
Samsung Electronics
Alignment & Troubleshooting
Horzontal Band
Digital Printer
Digital Printer
Digital Printer
Digital Printer
Digital Printer
Digital Printer
Digital Printer
Digital Printer
Digital Printer
Digital Printer
Black band?
NO
Black band
is far about 94.3mm from
white band?
NO
YES
The OPC is damaged under the
direct sunlight for around 5
minutes -> If the same problem
persists in 10 hours, replace
the drum cartridge
Problem of internal
contacts in OPC
-> Replace the drum
cartridge
The black
band has regular
interval?
NO
This occurs when no
Hsync/ at LSU
-> Replace LSU
YES
94.3mm interval?
NO
YES
The OPC is damaged due to
the irregular transfer voltage
of HVPS
-> Repair/replace HVPS
-> If the same problem persists,
replace the drum cartridge
Service Manual
Does it appear
at every 83.6mm at
specific place?
YES
NO
Problems of terminal contact,
transfer voltage supplying,
and transfer roller's due to the
charge roller is ruined (38.3mm)
-> Repair/replace HVPS,
drum cartridge
Heat roller is ruined
-> Replace the roller
4-78
Samsung Electronics
Alignment & Troubleshooting
Irregular Density
Digital Printer
Digital Printer
Digital Printer
Digital Printer
Digital Printer
Digital Printer
Digital Printer
Digital Printer
Digital Printer
Digital Printer
Digital Printer
Digital Printer
Digital Printer
Digital Printer
Digital Printer
Digital Printer
OK after
out and
Digitaltaking
Printer
rocking the toner
Digital Printer
cartridge?
Digital Printer
YES
Digital Printer
Digital PrinterWhen gray
Digital Printer
transfer/
NO
NO
pattern printing,
Digital Printer
Digital Printer charge/developing
irregular density
voltage drops while
Digital Printer persists?Digital Printer
printing?
Digital Printer
Digital Printer
YES
Digital Printer
Digital Printer
YES
Digital Printer
Digital Printer
Digital Printer
Digital Printer
Digital Printer
Digital Printer
Digital Printer
Digital Printer
Digital Printer
Digital Printer
Digital Printer
Check high voltage
Digital
Printer
Digital
Printer
output and repair/
Digital
Printer
Digital
Printer
Digital
Printer
Digital
Printer
Digital
Printer
Digital
Printer
Digital
Printerreplace terminals, HVPS
Digital
Printer
Digital
Printer
Digital
Printer
Digital
Printer
Digital
Printer
Digital
Printer
Digital
Printer
Digital
Printer
Digital
Printer
Digital
Printer
Digital
Printer
Digital Printer
Digital
Printer
Digital
Printer
Digital Printer
It is over the guaranty
PTL lamp
life of toner cartridge
works
OK?
(Check the counter
and
replace
it)
Digital
Digital Printer
YES
Digital Pri
Digital Printer
Digital Printer
Digital Printer
Digital Printer
Digital Printer
Digital Printer
Digital Printer
Any obstacles
on the PTL lamp?
Digital Printer
Digital Printer
Digital Printer
Digital Printer
Digital Printer
NO
YES
Clean the window of PTL
Digital Printer
Digital Printer
Digital Printer
Digital Printer
Digital Printer
NO
Digital Printer
Digital Printer
Digital Printer
Digital Printer
Digital Printer
Defective
in
Digitalagitator
Printer
theDigital
toner supplying
Printerpart
of the toner cartridge
Digital the
Printer
->Replace
toner cartridge
Digital Printer
Check if the 'guide deve
Digital
Printer
spring'
works
OK and
repair/repalce
Digital Printer
Digital Printer
Digital Printer
Digital Printer
Digital Printer
Replace lamp
Digital Printer
Digital Printer
Digital Printer
Digital Printer
Digital Printer
Bad images
NO
around the no image
area?
NO
Digital
YES Printer
Digital Printer
Digital Printer
Digital Printer
Light distortion due to
Digital Printer
the mirror ruined or
Digital Printer
Digital Printer
Digital Printer
Digital Printer
Digital Printer
Irregularity of toner
supply from the toner cartridge
-> Replace the toner cartridge
Digital Printer
Digital Printer
Digital Printer
Digital Printer
Digital Printer
LSU's diffused reflection
-> Replace LSU
Digital
Digital Printer
Printer
Digital
Printer
Digital Printer
Digital
Digital Printer
Printer
Digital
Printer
Digital Printer
Digital
Digital Printer
Printer
Service Manual
Digital Printer
Digital Printer
Digital Printer
Digital Printer
Digital Printer
Digital Printer
Digital Printer
Digital Printer
Digital Printer
Digital Printer
4-79
Digital Printer
Digital Printer
Digital Printer
Digital Printer
Digital Printer
Digital Printer
Digital Printer
Digital Printer
Digital Printer
Digital Printer
Samsung Electronics
Alignment & Troubleshooting
White Spot
al Printer
al Printer
al Printer
al Printer
al Printer
Digital Printer
Digital Printer
Digital Printer
Digital Printer
Digital Printer
al Printer
al Printer
al Printer
al Printer
al Printer
Digital Printer
Is it regular
Digital Printer
interval of 94.3mm?
Digital Printer
Digital Printer
YES
Digital Printer
al Printer
al Printer
al Printer
al Printer
al Printer
NO
Obstacles stuck on OPC's
Digital Printer
surface
Digital
Printer
Digital
Printer
Digital
Printer
->Printer
Clean
Digital
Digital
Printer the OPC and
Digital
Printer
Digital
Printer
Digital
Printer
machine
or replace
Digital
Printer
Digital
Printer
Digital
Printer
Digital
Printer
Digital
Printer
Digital
Printer
toner
cartridge
Digital
Printer
Digital
Printer
Digital
Printer
Digital
Printer
Digital
Printer
Digital
Printer
Digital
Printer
When
putting
in/out the
Digital
Printer
Digital Printer
drum
cartridge,
scratch is
Digital Printer
Digital Printer
Digital Printer
Digital Printer
Digital Printer
Digitalmade
Printer
-> Replace the drum cartridge
al Printer
al Printer
al Printer
al Printer
al Printer
al Printer
al Printer
al Printer
al Printer
al Printer
Digital Printer
Digital Printer
Digital Printer
Digital Printer
Digital Printer
Digital Printer
Digital Printer
Digital Printer
Digital Printer
Digital Printer
Service Manual
Digital Printer
Digital Printer
Digital Printer
Digital Printer
Digital Printer
Digital Printer
Transfer
Digital
Printer
voltage
is normal?
Digital Printer
Digital PrinterYES
Digital Printer
NO
Too high voltage supplied
due to the setting error of
transfer voltage
-> Adjust/replace HVPS
D/R in the toner cartridge
unit
has the
defect
Digital
Printer
->Digital
Replace
the
Printertoner cartridge
Digital Printer
Digital Printer
Digital Printer
Digital Printer
Digital Printer
Digital Printer
Digital Printer
Digital Printer
Digital Printer
Digital Printer
Digital Printer
Digital Printer
Digital Printer
Digital Printer
Digital Printer
Digital Printer
Digital Printer
Digital Printer
Digital Printer
Digital Printer
Digital Printer
Digital Printer
Digital Printer
Digital Printer
Digital Printer
Digital Printer
Digital Printer
Digital Printer
Digital Printer
Digital Printer
Digital Printer
Digital Printer
Digital Printer
4-80
Samsung Electronics
Alignment & Troubleshooting
Trembling at the End When OHP Printing
Recommended
OHP film used?
NO
Use the recommended film
YES
Inserted over
than 10 films into
the MPF?
NO
When OHP
printing, does the fan
temporarily stops
and revolves?
YES
When multi-page OHP printng,
less than 10 films are
guranteed. (Reduce the
number of films and re-insert
after paper check LED if off)
Service Manual
NO
Use the recommended film
YES
Other parts are touching the
fan and prevents it from
revolution
-> Check and repair
4-81
Samsung Electronics
Alignment & Troubleshooting
Poor Fusing Grade
After printing
NO
completed, any error
related fuser?
YES
Both ends
of thermostat
open?
The machine
placed under the
severe low tempera
ture for a long
time?
NO
While printing,
NO
the voltage of pin 60
of U36 (CPU) on Main
PBA is 2.1V
- 2.6V?
YES
NO
Thermistor's
contact is OK?
NO
YES
YES
Re-assemble
thermistor
Place the machine
at normal
temperature and
re-test
YES
Replace thermostat
and re-test
Open the top
cover. When black
printing, is the fuser NIP
width is 3.03.5mm?
NO
Check if the hardness of
P/R, and spring force is OK?
(hardness: 24 degree,
spring's force: 3 Kg)
YES
Replace the control
component on Main
PBA
Check any contact
problem in thermistor
and repair
Service Manual
The paper used is too
thick or contains too
much cotton in it
-> Re-test with the
recommended paper
4-82
Samsung Electronics
Alignment & Troubleshooting
4.2.3.4 Malfunction
Error Status
Check
Solution
No power
1. Check power is supplying
2. Check fuse F1 open
1. If supplying power differs from machine’s power
rating, replace the machine.
2. Replace it.
Fuser Error
1. Thermostat open
2. AC wire open
3. Thermistor wire open
4. Main PBA
1. Detach AC connector and measure the resistane
between pin 1 and 2. If it is megohm, thermostat
is open, Replace it.
2. Check bad connector contact or wire is cut.
3. Check thermistor wire and its connection.
4. Replace Main PBA
Cover open
1. When close Side cover, check the
lever is pressed
2. Micro switch’s contact
3. CPU and related circuit
1. Open Side cover and press the lever with pen.
If Controller detects cover close, there is some
mechanical trouble in Side cover and lever’s
assembly. If not so there is electrical problem.
Jam 0
Check where Jam 0 happens
1. Paper is not picked up
2. Paper is located in feed sensor
3. Happened when inserting specific
papers such as envelope into the
MPF (Multipurpose Paper Feeder)?
4. Happened when inserting specific
papers such as envelope into the
Manual Feeder?
5. Is the Stacker Extender is folded
out?
6. Does not the Guide Adjust distort the
papers
1. Check whether solenoid is working or not by using
Engine test mode
2. Check feed sensor malfunction.
3. Re-try inserting a fewer papers.
• fan the papers and align
• take out the loaded papers and insert them
reverse direction
4. Take out the loaded papers and insert them
reverse direction
• inserted papers as recommended for Manual
Feeding?
•W
hen loading, tap the papers until paper detect
sensor senses loading
5. When using long papers, use the Stacker
Extender
6. Adjust Guide to fit the paper width
Jam 1
Paper is stopped in just after of fuser
unit.
1. It is mostly resulted from double feeding.
Check paper is well stocked in feeder.
2. Check feed actuator position and actuator’s
operating. There may be stiff movind or double
reflection. If not so, check the operation of feed
sensor by Engine test mode.
3. Check exit lever operation. Remore jam and
check actuator moving by hand. If actuator is
too stiff, paper is wrapped around the heat roller.
Remove obstacles or replace.
Service Manual
4-83
Samsung Electronics
Alignment & Troubleshooting
Error Status
Check
Solution
Jam 2
Check where Jam 2 happens
1. Paper is curled and cannot exit.
2. Paper is curled in the exit cover?
Jam 2 at facedown
tray
1. Then paper is not drawn in because 1. Load recommended quantity of papers
of the stack of papers in the Out tray. 2. O
pen the Cover Front and check whether roller or
2. Does it curl while coming out?
spring, which are related to paper out, is not out
of position. If so, re-locate or replace.
Clutch error
1. Check the spring of solenoid
2. Check the armature assembly/
cushion
3. Electrical check
1. Check whether the spring is expanded or not.
2. Check armature is well installed. It may be
unstable assemble.
3. Remove the Main PBA.
High voltage
error
1. Check the terminal output voltage
2. Check HVPS
1. Remove the Toner cartridge and open the cover
and press cover open switch lever and measure
the voltage with high voltage probe and sending
printing data. If the voltage is normal, change the
toner cartridge.
2. Disassemble the left side cover, and check HV of
the solder side of HVPS and change it.
Feeding
obstacles
Does the Plate-knockup prevent the
paper loading?
MPF :
Turn the power off and on. Open and close the Side
cover to return to the original state.
Cassette :
Adjust Guide to fit the paper width.
Skew
Is the Guide adjust set to the paper
width?
Fit the paper width using the Guide adjust.
Stacking
1. Took out the Stacker extender to
support long papers?
2. Stacked too many papers more than
Stacker can hold?
1. Use extender as per the paper length.
2. The Face-up stacker normally can hold 100 pages
when using 75g/m2, however, stacking capacity
can be lowered depending on the type of papers.
Engine Error
Check CBF Harness_CN7.(Main PBA
to LSU)
Refer to troubleshooring “ENGINE ERROR”.
Document Jam
Document is not picked up(in ADF).
1. Check document is well stocked in ADF.
2. Check whether document was been fastened
together by staple or clip.
3. Load recommended quantity of papers.
Document is stopped after it has fed
into the ADF.
1. Check whether the Reg. sensor is working or not.
2. Check whether the Feed Roller is working or not.
Does it curl while coming out?
1. Check the Open Cover whether there are bosses.
2. Check the ADF ass’y is well assemble.
Service Manual
1. Remove paper using pinset or some tool and
watch if separate claws have any troble.
Clean around fuser.
2. Check locking works wells. Watch whether the
ribs of exit cover hace any burr or resisitive edge.
If they do, remove obstacles or replace.
4-84
Samsung Electronics
Alignment & Troubleshooting
No Power (LCD NO display LED Off)
Plug in the
power cord?
NO
Check the voltage first and plug
the power cord
YES
The power
NO
voltage supplying is
the same as
rating?
Supply the power as the rating
YES
The fan
revolves when
powered on?
Connections
NO
on board are OK?
NO
YES
YES
LEDs blink
once when
powered on?
NO
Fuse of SMPS
if open?
YES
Repair/replace the
board
Service Manual
NO
Replace the fuse
YES
YES
Shortage on
the OPE panel
board?
Re-connect firmly
and re-test
NO
The connection
error between
controller board
and panel board
or malfunction
of boards.
-> Replace the
boards
Shortage
between 5V and
GND, or between
24V and
GND?
YES
Remove the shortage
or replace the board
4-85
NO
Toner cartridge
is in the set?
NO
Put in the
cartridge
YES
Detect failure due to the
board which detects side
cover open or switch error
-> Replace the board or switch
Samsung Electronics
Alignment & Troubleshooting
Fuser Error
Measure the resistance at the both ends
of AC(Con no.2 of the SMPS board)
Line with covers open
Less than 10W?
NO
Thermostat is open due to the heat etc.
-> Replace the thermostat
YES
Remove the covers
Check CN26 of the main board.
Is the conector inserted
right ways?
NO
Re-assemble the connector.
YES
Check CN23 of the main board.
Is the conector inserted
right ways?
NO
Re-assemble the connector.
Replace the main board.
Fuser Error eliminated?
YES
END
Service Manual
4-86
Samsung Electronics
Alignment & Troubleshooting
Paper Jam (Mis-Feeding)
Sounds the
solenoid on when starts
print?
NO
The solenoid defected
-> Replace it
YES
Does the
paper move?
The Main PBA board defected
-> Replace boards
NO
The pick-up unit is
assembled wrong
-> Re-assemble or replace
the unit
YES
Does the
paper move more than NO
100mm?
Too many
papers in the
feeder?
YES
Feeder
sensor is assembled
reverse?
YES
NO
The sensor and
Main PBA defected
-> Repair/replace
Reduce the amount
and re-test
YES
Switch them
Paper guides
fit the paper width?
NO
Take out the paper
and re-insert
YES
Paper end curled?
NO
YES
NO
Pull out the
extender
YES
<Recommendation>
Use the MPF for the thick
paper such as envelope
and cardstock
Use the recommended
and quality paper
Service Manual
Does the
extender pulled out?
4-87
Samsung Electronics
Alignment & Troubleshooting
Paper Jam (Jam 1)
Paper
NO
stopped before
the OPC?
Paper
NO
stopped before
the fuser?
YES
YES
The
actuator of
NO
paper exit sensor
works OK?
Check the actuator exists and its
operation and around the Main PBA
-> Replace
YES
Check the LSU and
if it has the defect
replace it
Is the paper
rolled around the
presseure
roller?
Feeds
NO
multiple pages?
NO
YES
YES
Remove the fuser, remove
the paper and replace the
pressure roller, if necessary
Severe skew
when feeding?
Remove any factors
The paper
came out through
between fuser and
developer?
NO
YES
Check the roller
and ribs of fuser
are in place, and
remove burrs, if
any
-> Remove the
factors of jam
NO
Check the input path
to the fuser (such as
mis-assembly)
YES
Too thin
or sensitive paper to
static electricity?
Adjust the paper guides to fit the
paper width
The force of springs pressing the
developer is weak
-> Check guide-DEVE
NO
Check guide transfer
is grounded Check
the shutter prevents
feeding
YES
Use the recommended
paper
Service Manual
4-88
Samsung Electronics
Alignment & Troubleshooting
4.2.3.5 The cause and solutions of bad environment of the software
NOTE - Always try to an internal page and a copy to be sure that the machines is working and the problem is
related to SW.
4.2.3.5(a) The printer is not working (1)
Description : While Power turned on, the printer is not working in the printing mode.
Check and Cause
1. C
heck if the PC and the printer is
properly connected and the toner
cartridge installed.
Solution
1. R
eplace the printer cable. If the problems not solved even after the cable
replaced, check the amount of the remaining tone.
2. C
heck if the connection between PC and printer port is proper. If you use
2. P
rinting is nor working in the Windows.
windows, check if the printer driver in the controller is set up. If the printer
3. C
heck if the printer cable is directly
driver is properly set up, check in which program the printing is not working.
connected to peripheral devices
The best way to find out is to open the memo pad to check the function
of printing. If it is not working in a certain program, adjust the setup the
program requires.
Sometimes, the printout is normal within the Windows basic programs, but
it’s not working in a particular program. In such case, install the new driver
again. If not working in the Windows basic program, Check the setup of the
port of CMOS is on ECP. And check the address of IRQ 7 and 378
3. If the scanner needs to be connected to the printer, first the remove the
scanner from the PC to see if the printer is properly working alone.
4.2.3.5(b) The printer is not working (2)
Description : A
fter receiving the printing order, no response at all or the low speed of printing occurs due to wrong
setup of the environment rather than malfunction of the printer itself.
Check and Cause
Solution
1. Secure more space of the hard disk.
1. N
ot working with the message ‘insufficient printer memory’ means hard disk
2. P
rinting error occurs even if there is
space problem rather than the RAM problem. In this case, provide more
enough space in the hard disk.
3. C
heck the parallel-port-related items in
the CMOS Setup.
4. Reboot the system to print.
space for the hard disk. Secure more space using the disk utilities program.
2. The connection of the cable and printer port is not proper. Check if the
connection is properly done and if the parallel port in CMOS is rightly set up.
3. As a printer port, Select ECP or SPP among SPP(Normal), ECP, and EPP
modes(increase printing speed) SPP normal mode support 8-bit data
transfer, while ECP Mode transfer the 12-bit data.
4. If the regular font is not printing, the cable or the printer driver may be
defective. Turn the PC and printer off, and reboot the system to print again.
If not solved, double-click the printer in my computer If the regular fonts are
not printed this time again. the cable must be defective so replace the cable
with new one.
Service Manual
4-89
Samsung Electronics
Alignment & Troubleshooting
4.2.3.5(c) Abnormal Printing
Description : T
he printing is not working properly even when the cable has no problem. (even after the cable is
replaced) If the printer won’t work at all or the strange fonts are repeated, the printer driver may be
defective or wrong setup in the CMOS Setup.
Check and Cause
1. S
et up the parallel port in the CMOS SETUP.
2. Printer Driver Error.
3. E
rror message from insufficient memory.
(The printing job sometimes stops or due
to insufficient virtual memory, but it actually
comes from the insufficient space of the hard
disk.)
Solution
1. Select SPP(Normal) or ECP LPT Port the among ECP, EPP or SPP in
the CMOS Setup.
2. Check the printer in My Computer.(to see if the printer driver is
compatible to the present driver or delete the old driver, if defective and
reinstall the new driver)
3. Delete the unnecessary files to secure enough space of the hard disk
and start printing job again.
4.2.3.5(d) SPOOL Error
Description : T
o spool which stands for “simultaneous peripheral operations online” a computer document or task
list (or “job”) is to read it in and store it, usually on a hard disk or larger storage medium so that it can
be printed or otherwise processed at a more convenient time (for example, when a printer is finished
printing its current document).
Check and Cause
1. Insufficient space of the hard disk in the
directory assigned for the basic spool.
2. If the previous printing error not solved.
Solution
1. Delete the unnecessary files to provide more space to start printing job.
2. If there are some files with the extension name of ****.jnl, Delete them
and Reboot the Windows to restart printing job.
3. W
hen expected to collide with other program.
3. Shut down all other programs except the current one, if possible.
4. W
hen an application program or the printer
4. Delete the printer driver completely and reinstall it.
driver is damaged.
5. W
hen some files related to OS are damaged
or virus infected.
5. After rebooting the computer, check for viruses, restore the damaged
files and reinstall the program to do the printing job.
6. Add up enough memory to the PC.
6. Memory is less than suggested one.
How to delete the data in the spool manager.
In the spool manager, the installed drivers and the list of the documents waiting to be printed are shown.
Select the document to be deleted and check the delete menu.
If you intend to delete the current document being printed, the data being transferred to the printer will be put out
and then the document is removed. Before choosing the document, the menu is still inactive.
Or put the document out of the list and repeat the routine as in the above or finish the spool manager.
Service Manual
4-90
Samsung Electronics