1
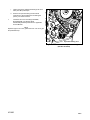
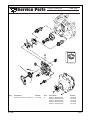
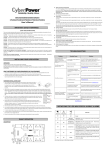
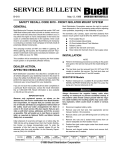
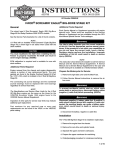
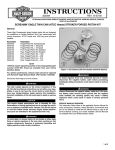
INSTRUCTIONS
®
REV. 3-23-99
-J01486
Kit Number 25446-99
SCREAMIN’ EAGLE TWIN-CAM 88 CAM DRIVE SPROCKET UPGRADE KIT
General
This cam drive sprocket upgrade kit is designed for
installation on all Twin Cam 88 engines equipped with
Screamin’ Eagle splined camshafts.
See Service Parts page for kit contents:
NOTE
A Service Manual for your motorcycle is available from your
Harley-Davidson Dealer.
1WARNING
The rider’s safety depends on the correct installation of
this kit. Follow the procedures listed in this Instruction
Sheet and in the appropriate Service Manual. If the
procedures are not within your capabilities, or if you do
not have the correct tools, have your Harley-Davidson
dealer perform the installation. Failure to follow
procedures could result in death or serious injury.
1WARNING
To avoid accidental start-up of vehicle and possible
personal injury, disconnect the battery cables (negative
cable first) before performing any of the following
procedures. If the battery should contact ground with the
negative cable installed, the resulting sparks may cause a
battery explosion resulting in death or serious injury.
1WARNING
Gasoline is extremely flammable and highly explosive
under certain conditions. Do not smoke or allow open
flame or sparks anywhere in the area when draining or
servicing the fuel system. Drain gasoline into approved
gasoline container only. Failure to follow these
instructions could result in death or serious injury.
NOTE
Verify alignment at crank and primary cam sprocket punch
marks as described in Service Manual.
NOTE
Verify alignment at crank and primary cam sprocket faces.
Use included spacers to maintain alignment at + or - 0.005”
4.
Obtain new cam drive sprocket flange bolt (P/N 996),
and new washer (P/N 6294).
5.
Obtain new crank flange bolt (P/N 898A) and new flat
washer (P/N 6278A).
NOTE
Sprocket flange bolt (P/N 996), washer (P/N 6294), crank
flange bolt (P/N 898A) and flat washer (6278A) are included
in Twin Cam 88 Screamin’ Eagle 203 cam and Stage 2
Performance kits.
6.
Install new flange bolts and washers as follows:
a.
Ensure all threads are clean and free from oil then
apply Loctite Primer 7649 (P/N 99813-97).
b.
Apply Loctite High Strength Threadlocker 262 (red,
P/N 94759-99), to threads of flange bolts.
CAUTION
Failure to use Loctite 262 (Red) may result in a joint that
will not maintain proper clamp load and may loosen
under certain circumstances. If the joint becomes loose,
engine damage could occur.
c.
Apply a thin film of clean H-D 20W50 engine oil to
both sides of flat washers.
d.
Start flange bolt with flat washer to secure crank
sprocket to end of crankshaft.
e.
Start flange bolt with flat washer to secure primary
cam sprocket to end of camshaft.
f.
See Figure 1. Position CRANKSHAFT/CAMSHAFT
SPROCKET LOCKING TOOL (HD-42314) between
the crank and primary cam sprockets to prevent
rotation. The handle of the tool is stamped “Crank”
and “Cam” to ensure proper orientation.
g.
Tighten the crank and primary cam sprocket flange
bolts to 15 ft-lbs (20.3 Nm).
h.
Loosen both flange bolts one full turn.
i.
Tighten the crank flange bolt to 24 ft-lbs (32.5 Nm)
final torque.
Installation Procedure
1.
Obtain and install new Screamin Eagle cams according
to the instructions provided with the cams.
2.
Apply a thin film of clean H-D 20W50 engine oil to the
splines of the rear cam.
3.
Install new (P/N 25716-99) splined sprocket to (drive)
camshaft according to ENGINE, BOTTOM END Cam
Support Plate, Removal and Disassembly/Assembly
(Camshaft, Camshaft Bearings) instructions in
applicable Service Manual. Use spacers, Item 2 listed
on Service Parts page of this Instruction Sheet, in place
of those listed in Service Manual.
1 of 3
7.
j.
Tighten the primary cam sprocket flange bolt to 34
ft-lbs (46.0 Nm) final torque.
k.
Remove the sprocket locking tool and follow
instructions in Service Manual for unloading the
primary cam chain tensioner.
Install the cam cover according to ENGINE,
BOTTOM END, Cam Support Plate,
Disassembly/Assembly instructions in applicable
Service Manual.
NOTE
Replace original cam cover gasket with new cam cover gasket (P/N 25244-99).
f1639x3x
Sprocket Locking Tool
Figure 1. Crankshaft/Camshaft Sprocket Locking Tool
(Part No. HD-42314)
J01486
2 of 3
®
Service Parts
Part No. 25446-99
Date 3/99
Twin Cam 88 Sprocket Upgrade Kit
io1337a-.eps
1
2
Item
1
J01486
Description
Sprocket, cam drive, 34 tooth (1)
Part No.
25716-99
Item
2
Description
Spacer (.230 thickness)
Spacer (.240 thickness)
Spacer (.250 thickness)
Spacer (.260 thickness)
Spacer (.270 thickness)
Part No.
25722-99
25723-99
25721-99
25719-99
25717-99
3 of 3