1
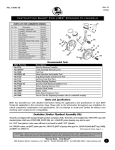
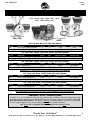
No.1932-IS
Rev F
2/04
Instruction Sheet For JIMS Twin Cam Flywheel Assemblies & Big Bore Kits
For the following part numbers
1501, 1501B, 1937, 1938, 1941, 1942,
1957, 1958, 1959, 1960
Big Bore Kit
“Alpha” Stroker Kit
(FLH, FXD)
“Beta” Stroker Kit
(FXST)
100" Big Bore Kit A or B Twin Cam Motors
Part No.
1501
1501B
Application
Use on Alpha or Beta ’99-Present
Use on Alpha Beta ’99-Present
Stroke
4"
4"
Bore
4"
4"
Compression Ratio
9.56:1
9.56:1
Cylinder Finish
Silver
Black Wrinkle
113" Twin Cam “Alpha” (FLH, FXD) Stroker Kits with Cylinders
Part No.
1937
1938
Application
Use on Alpha ’99-Pres
Use on Alpha ’99-Pres
Stroke
4 1/2"
4 1/2"
Bore
4"
4"
Compression Ratio
9.94:1
9.94:1
Cylinder Finish
Black Wrinkle
Silver
116" Twin Cam “Alpha” (FLH, FXD) Stroker Kits with Cylinders
Part No.
1941
1942
Application
Use on Alpha ’99-Pres
Use on Alpha ’99-Pres
Stroke
4 5/8 "
4 5/8"
Bore
4"
4"
Compression Ratio
10.19:1
10.19:1
Cylinder Finish
Black Wrinkle
Silver
WARNING! “Beta” Stroker kits must never be revved any higher than 6,200 RPM!*
113" Twin Cam “Beta” (FXST) Stroker Kits with Cylinders
Part No.
1957
1958
Application
Use on Softails 2000-present
Use on Softails 2000-present
Stroke
4 1/2"
4 1/2"
Bore
4"
4"
Compression Ratio
9.94:1
9.94:1
Cylinder Finish
Black Wrinkle
Silver
116" Twin Cam “Beta” (FXST) Stroker Kits with Cylinders
Part No.
1959
1960
Application
Use on Softails 2000-present
Use on Softails 2000-present
Stroke
4 5/8 "
4 5/8"
Bore
4"
4"
Compression Ratio
10.19:1
10.19:1
Cylinder Finish
Black Wrinkle
Silver
NOTE: 2003-Present Twin Cam Motor Cases will need H-D No.24004-03 Crank Shaft Bearing Kit.
*WARNING “BETA” STROKER USERS:
Your JIMS 116" & 113" "Balanced" Stroker Kit ships with a pressed on balancer drive gear. This gear was tested
and proven to protect against potential damage caused by over-revving the engine past 6,200 RPM. THIS GEAR
WILL MOVE DUE TO OVER-REVVING. Your flywheels will NOT be warranted against movement of this gear due
to over revving. In addition to this, the pressed on gear will NOT be available separately.
JIMS® insists that a 6,200 MAX RPM rev-limiting device be used at ALL times!
®
“From The Track... To The Street!”
555 Dawson Drive, Camarillo, CA 93012 • Phone 805-482-6913 • Fax 805-482-7422
1
No.1932-IS
Rev F
2/04
IMPORTANT PRODUCT INFORMATION FOR
BOTH “ALPHA” & “BETA” STROKERS KITS
The following components are recommend by
JIMS® for use with JIMS® stroker kits.
®
MANIFOLD FOR JIMS TWIN CAM
CARBURETED STROKER KITS
No.700 -
(Flange) for use with Part No.700
40mm CV or a 42mm Mikuni.
No.701 -
(Flange) for use with Part No.700
44mm CV or a 45mm Mikuni.
No.702 -
(Manifold) Use with S & S Super
“G” Carburetor. Includes aluminum
spacer. Customer must use his
bakelite spacer.
No.725 -
No.858 -
(Manifold) Use with Mikuni
Carburetor, Stock CV Carburetor
or Screamin’ Eagle CV Carburetor.
(See adapter below.)
No.703 -
®
GASKET KITS FOR JIMS TWIN CAM
STROKER KITS
No.859 -
113” & 116” Stroker Kits, 100” Big
Bore Kits, 4” bore. Use on Twin Cam
88™ (Softail & Dyna). .040” Head
Gasket, .020” Base Gasket.
113” & 116” Stroker Kits, 100” Big
Bore Kits, 4” bore, Use on Twin Cam
88™ (FL Models). .040” Head
Gasket, .020” Base Gasket.
COMPRESSION RELEASE VALVES
Compression release valves are a must when building large
displacement engines. These valves will manually vent cylinder compression to the atmosphere at startup.
Install JIMS® Compression Release Valves with JIMS®
installation tool No.1169 for Twin Cam, or use JIMS®
tapping tool No.1169-1 for all other engines.
No.727K - Use on all Big Twin, Sportsters and Buells.
(Head to Manifold Spacer) Use on
taller than stock motors 1984-present. Use to fill and seal the 0.080"
gap between the head and manifold, after you have installed
about 0.100" taller cylinders.
Comes with O-Rings. A must
for EFI manifolds.
IMPORTANT STARTER NOTE
IMPORTANT CYLINDER PREPARATION
Before installing cylinders on cases, the inner bores and gasket
area must be scrubbed and cleaned with hot soapy water.
Due to the higher compression ratio created by the 113” &
116” stroker kits, your starter system efficiency may be
reduced and may become prematurely damaged. JIMS® recommends installing high-output starter components (High
heavy-duty gauge cables, heavy-duty battery, and high-output starter) along with compression release valves to maintain
your starter system efficiency.
WARNING:
(Note: Read all instructions before performing work)
Prior to installation of this kit please read and follow the procedures and safety precautions to reduce the risk of personal injury.
Refer to H-D® Service Manual for specifications and for removal and installation of the engine. Read instructions completely so you understand before performing any steps. Always disconnect battery cables to prevent injury. Your work
place should be clean and well lit, wear safety glasses and protective clothing when working around power tools and
compressed air.
Use authorized H-D® Service Manual for reference. If you are not sure about the procedures in these instructions, have
a reputable H-D® repair shop perform those procedures for you.
“From The Track... To The Street!”
555 Dawson Drive, Camarillo, CA 93012 • Phone 805-482-6913 • Fax 805-482-7422
2
No.1932-IS
Rev F
2/04
Instruction Sheet For JIMS Twin Cam Flywheel Assemblies & Big Bore Kits
ATTENTION!: Please read all instructions completely and
thoroughly before performing any work.
1. Follow instructions in H-D® Service Manual for removal of engine for your year
and model. With engine removed from frame and sitting on the workbench, follow the disassembly instructions in the service manual to disassemble engine.
Clean all parts thoroughly including gasket surfaces, and inspect all parts for visible damage. Measure all parts for wear using the service wear limit section in
the H-D® Service Manual. Replace any worn or damaged parts with JIMS® engine
parts or equivalent.
Picture No.1
2. On 4" bore kits, 100", 113", and 116" you will be required to machine cases to
accept 4" bore cylinders (use JIMS® No.1177 Case Boring Fixture). See Picture
No.1 & 2. Bore to 4.220" +.03/-.00 diameter at a depth of 1.645” +.03/-.00 for
the 116” & 113” kits and 1.330” +.03/-.00 for the 100” kit measuring from the
gasket surface. Before machining cases, you must remove cylinder studs and
H.D®. piston oiling jets. Note: You will be using JIMS® piston oiling jets for
reassembly included with this kit. Mask off all bearings and oil holes. Bolt cases
together with H.D.® hardware. Tighten case bolts to factory spec. Check all cylinder studs and stud-threaded holes. Replace any damaged cylinder studs. JIMS®
suggest using the latest cylinder studs from H-D® or Screamin’ Eagle®.
3. After machine work is done, clean cases of all machine material. Follow H-D®
Service Manual for installation of studs.
4.
Picture No.2
Checking Clearances: connecting rod to case, cylinder to cylinder, piston to piston, and piston to case, below cylinder spigot (both front and rear) See Pic.3. To
make the job easier, use JIMS® No. 1745 Timken Bearing Simulator.
A. With flywheel assembly simulated in left case, install pistons without rings.
Pistons can be installed in either location, front or rear. Mount both cylinders
and pistons to left case. NOTE: On 4" bore cylinders; there is a relief area on
the cylinder spigot. Each 4" bore cylinder and piston must have the reliefs
on the cylinder spigot facing each other when installed on cases. See Picture
No. 4
B. Check and if necessary grind or file for a minimum clearance of .060 between
rod and case. See Picture No.3
NOTE: Only remove material from the case and not the rods!
C. Check and if necessary grind or file for a minimum clearance of .050
between cylinder spigots and a minimum clearance of .060 between piston
skirts. See Picture No.4
NOTE: Clean all machine material from cases.
CAUTION!: Only remove enough material to maintain the minimum clearance.
Picture No.3
Picture No.4
CAUTION: Wear safety glasses. Excessive force may damage parts and tool. See JIMS® catalog for
over 200 other top quality professional tools. The last tools you will ever need to buy.
“From The Track... To The Street!”
555 Dawson Drive, Camarillo, CA 93012 • Phone 805-482-6913 • Fax 805-482-7422
3
No.1932-IS
Rev F
2/04
®
Instruction Sheet For JIMS Twin Cam Flywheel Assemblies & Big Bore Kits
<--- Instructions continued from page 3
5. After checking all clearances for proper fitment, install piston oiling
jets into right case half. All kits are provided with new piston oiling
jets except the 100" Big Bore Kit. This kit will use the original H-D®
piston oiling jets. Before installing piston-oiling jets, clean threads in
case. Then apply a drop of loctite 222 (purple) to the last few
threads. (CAUTION: Keep all foreign material out of piston oiling
jets). Install the new o-rings in the groove on the piston oiling jets
and then apply a very thin film of clean 20-50 engine oil to the new
o-rings. Torque the new Allen screws to 20-30 (inch) lbs.
NOTE: These threads in the engine case are very delicate so be careful not to
cross thread these screws or over-torque.
NOTE: For future service of JIMS® piston oiling jets, use O.E.M. P/N 2643276A for o-ring replacement.
Ring End Gaps: For Ductile
moly rings TC 88™
Top compression ring
2nd compression ring
Oil control Ring rail
Piston Clearance Information
Minimum.
.002 Clearance
Maximum
.003 Clearance
Direction
(Directional Pistons Only)
Valve
Pockets
C.H.
6. Pistons and cylinders in these kits are clearanced for installment. Below is
the clearance information. Always check fitment and clearance before
final assembly. See Picture No.5
NOTE: Check H-D® service manual for ring positioning around each piston,
also read the instructions within your piston set box for installing rings
on pistons.
NOTE: When installing JIMS flywheel into a 2003 or later case, you must use
crankshaft roller bearing kit H-D No.24004-03 in the left side crankshaft bore.
.016" - .022"
.016" - .022"
.016" - .050"
O.D.
Picture No.5
When installing pistons, position the piston so that the arrow marked on the top
of the piston points in the direction of
the intake valve. See above picture.
7. Assemble per H-D®. Service Manual. NOTE: When assembling case halves
together, seal with High-Performance Sealant H-D No.99650-02 or equivalent.
A. Tighten case bolts to factory specs except top center case bolt
between cylinders.
B. Install top center bolt last after you have cylinders and heads
installed and torqued to H-D® specs. NOTE: When installing 4" bore
cylinders on cases, they need to have the relief on bottom of skirt facing each other when installed as shown in picture No.4
C. Apply High-Performance Sealant H-D No.99650-02 to shoulder of Picture No.6
top center case bolt and torque to 50-90-inch lbs maximum. See Picture No.6 You can use your stock manifold for 100" Big Bore Kit and 113” stroker kits. For 116" kits you will need JIMS® manifold (JIMS® No.700
or 702) or flange (JIMS® No.703, 701, or 725) for your carburetor application.
(See page 2)
Note: Before installing head gasket
If you are using a 3 layer riveted “EST” style head gasket and you have aftermarket heads, you may find that
you have interference with the rivet in the head gasket. If so, use a smooth jaw vice to reduce the thickness of
the rivet before installation.
Instructions continued on page 5 --->
NOTE: It is the engine builder’s responsibility to check and confirm all operating clearances when
installing any JIMS® products.
“From The Track... To The Street!”
555 Dawson Drive, Camarillo, CA 93012 • Phone 805-482-6913 • Fax 805-482-7422
4
No.1932-IS
Rev F
2/04
Instruction Sheet For JIMS Twin Cam Flywheel Assemblies & Big Bore Kits
BREAK IN PROCEDURE
After final assembly, the engine must be broken in. Over revving or lugging engine could cause damage to pistons and/or
other engine components.
On the initial start up, excessive heat build up can occur. Do not over heat by revving engine or running at a fast idle too
long.
To ensure proper head gasket seal upon first time engine start up, idle engine 1000-1500 R.P.M. until cylinder head temperature reaches about 250 degrees. Shut engine off and let cool. This procedure is necessary to properly seal top end components.
CAUTION: Improper initial engine start up may cause head gaskets to fail prematurely.
Because most engine damage could occur during the first 50 miles, keep the heat down by not exceeding 2800 R.P.M., but
do not lug engine.
Continue to vary speed for the next 500 miles and do not exceed 3800 R.P.M.. For the balance of the first 1000 miles, avoid
overheating engine. Do not lug engine or idle for long periods of time. No trailer towing, racing, etc.
Change oil and filter after the first 500 miles.
WARNING! “Beta” Stroker kits must never be revved any higher than 6,200 RPM!
Compression Table
Kit
Stock Head C.R.
96.2cc Swept Volume
.040” Gasket
Screamin’ Eagle Head C.R.
86.3cc Swept Volume
.040” Gasket
113”
9.94:1
10.88:1
116”
10.19:1
11.2:1
* Stock Twin Cam Head= 85.9cc
* Screamin’ Eagle Head = 76.0cc
Swept Volume=(Combustion
Chamber Volume + Gasket Volume +
Valve Pocket Volume)
WARRANTY
All JIMS® parts are guaranteed to the original purchaser to be free of manufacturing defects in materials and workmanship for a period of 6 (six) months from the date of purchase. Merchandise that fails to conform to these conditions will be repaired or replaced at JIMS® option if the parts are returned to us by the purchaser within the 6
(six) month warranty period or within 10 (ten) days thereafter. In the event warranty service is required, the original purchaser must call or write JIMS® immediately with the problem. Some problems can be rectified by a telephone call and need no further course of action. A part suspected of being defective must not be replaced by a
Dealer without prior authorization from JIMS®. If it is deemed necessary for JIMS® to make an evaluation to determine whether the part is defective, it must be packaged properly to prevent further damage and be returned prepaid to JIMS® with a copy of the original invoice of purchase and a detailed letter outlining the nature of the problem, how the part was used and the circumstances at the time of failure. If after an evaluation has been made by
JIMS ® and the part was found to be defective, repair, replacement or credit will be granted.
1.
2.
3.
4.
5.
ADDITIONAL WARRANTY PROVISIONS
JIMS® shall have no obligation in the event a JIMS® part is modified by any other person or organization.
JIMS® shall have no obligation if a JIMS® part becomes defective in whole or in part as a result of improper
installation, improper maintenance, improper use, abnormal operation, or any other misuse or mistreatment of the part.
JIMS® shall not be liable for any consequential or incidental damages resulting from the failure of a
JIMS® part, the breach of any warranties, the failure to deliver, delay in delivery, delivery in nonconforming condition, or for any other breach of contract or duty between JIMS® and a customer.
JIMS® parts are designed exclusively for use in Harley-Davidson® motorcycles. JIMS® shall have no warranty
or liability obligation if a JIMS® part is used in any other application.
Any parts which have been replaced for any reason become the property of JIMS®, and will not be
returned under any circumstances.
CAUTION: Wear safety glasses. Excessive force may damage parts and tool. See JIMS® catalog for
over 200 other top quality professional tools. The last tools you will ever need to buy.
“From The Track... To The Street!”
555 Dawson Drive, Camarillo, CA 93012 • Phone 805-482-6913 • Fax 805-482-7422
5
No.1932-IS
Rev F
2/04
Instruction Sheet For JIMS Twin Cam Flywheel Assemblies & Big Bore Kits
Recommended Tools:
Part No.
Description
JIMS® No.2234
Primary drive locking tool (A must)
JIMS® No.1288
Crankshaft guide (A must)
JIMS® No.1287
Cylinder torque plates (A must)
JIMS® No.1726-3
Wristpin bushing reamer tool (As needed)
JIMS® No.1051
Connecting rod bushing tool (As needed)
JIMS® No.1283
Cam chain tensioner tool (A must)
JIMS® No.1285
Cam crank sprocket lock tool (A must)
JIMS® No.1276
Wristpin remover (A must)
JIMS® No.1047TP
Crank assembly removing tool (A must)
JIMS® No.1048
Hard cap (A must)
JIMS® No.39361-69
Motor sprocket seal installation tool (A must)
JIMS® No.1022
Engine stand or base (1145) w/1140-"A" motor /1142-"B" (A must)
JIMS® No.97225-55
Sprocket shaft bearing installation tool (A must)
JIMS® No.1745
Timken bearing simulator (As needed)
JIMS® No.1236
Piston ring compressor tool (A must)
JIMS® No.1235
Ring expander tool
JIMS® No.1169
Compression Release Valves
JIMS® No.1177
Case Boring Tool
JIMS® No.1163
Balancer Shaft Retention Pins
Dial indicator
For measuring endplay of crankshaft
NOTE: It is the engine builder’s responsibility to check and confirm all operating clearances when
installing any JIMS® products.
“From The Track... To The Street!”
555 Dawson Drive, Camarillo, CA 93012 • Phone 805-482-6913 • Fax 805-482-7422
6