1
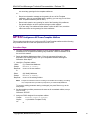
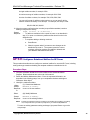
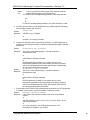
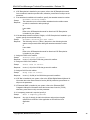
Mitel NuPoint Messenger Technical Documentation - Release 7.0
NP Forms Manual
Optional Feature
2700-0992-B1
Contents ©Copyright 2002, Mitel Networks Corporation
Distributed Courtesy of
8777 E. Via De Ventura Suite #340
Scottsdale, Arizona 85258
Main: (480) 998-9500
Fax: (480) 718-7355
http://www.legacyvoicemail.com
Support: [email protected]
Sales: [email protected]
General: [email protected]
©Copyright 2002, Mitel Networks Corporation
1
Mitel NuPoint Messenger Technical Documentation - Release 7.0
Overview
NP Forms is an optional voice forms feature for NuPoint Voice™ systems that allows callers to
leave messages in a way that simulates written information on paper forms. Applications include:
•
Order entry
•
Questionnaires
•
Routine requests for information
•
Overflow for busy ACD (Automatic Call Distributor) groups.
Callers accessing an NP Forms application are automatically moved through a series of
prerecorded questions. The system waits for the caller to record an answer before moving on to
the next question. System users can then log into a single mailbox and listen to the sequence of
answers.
A sample NP Forms session for ordering forms might go as follows:
NP Form:
Caller:
NP Form:
Caller:
NP Form:
Caller:
NP Form:
Caller:
NP Form:
You have reached the city government forms service. Please answer the
following questions to have forms mailed to you:
Please state the name or the type of form.
I need the application for a small business license.
Please state your full name and spell your last name after the tone.
Eric Meissner. M-E-I-S-S-N-E-R.
Please state your mailing address, including zip code, after the tone.
4210 Monterey Road, San Francisco, California, 91010
Please state a phone number where you can be reached during business
hours. Include the area code.
Area code 415, 555-1234
Thank you for calling. Good-bye.
Inside an NP Forms Application
A typical NP Forms application uses three types of NuPoint Voice mailboxes:
•
A rotational mailbox that plays an initial greeting and routes the call to one of several
template mailboxes
•
Template mailboxes with distribution lists that contain Greeting Only mailboxes and that
collect the recorded answers to the questions
•
Greeting Only mailboxes that contain the "questions" that callers will hear
The sample NP Form mentioned above would have a structure similar to that shown in Figure 1.
©Copyright 2002, Mitel Networks Corporation
2
Mitel NuPoint Messenger Technical Documentation - Release 7.0
Mailbox 100 (Rotational)
You have reached the city governemnt
forms service. Please answer the
following questions to have forms
mailed to you.
Mailbox 200 (Template)
Mailbox 201 (Greeting Only)
-- No Greeting --
Please state the name or the type of form.
(This mailbox will hold the responses
to the questions.)
Distribution List 01 containing:
mailbox 201, mailbox 202,
mailbox 203, mailbox 204
Mailbox 202 (Greeting Only)
Please state your full name and spell your
last name after the tone.
Mailbox 203 (Greeting Only)
Please state your mailing address,
including zip code after the tone.
Mailbox 204 (Greeting Only)
Please state a phone number where you
can be reached during business hours.
Include the area code.
Thank you for calling. Good-bye.
(This prompt is played by default from the
Template mailbox.)
Figure 1-1 Sample NP Form Mailbox Configuration
Note that Figure 1-1 is simplified to show only a single Template mailbox. In actual operation, an
NP Forms application needs enough Template mailboxes to hold all caller responses (see “NP
Forms Limitations”).
Distribution list 01 in the Rotational mailbox must contain all of the Template mailboxes. The first
Template mailbox must have a distribution list 01 that contains the Greeting Only mailboxes for
the MESA Form. The Rotational mailbox will pass control of each call to the first Template
mailbox until that mailbox is full. It then passes calls to the second template mailbox, and so
forth. Figure 1-2 shows this aspect of the sample NP Forms application.
Distribution list 01 in the Rotational mailbox must contain all of the Template mailboxes. The first
Template mailbox must have a distribution list 01 that contains the Greeting Only mailboxes for
the NP Form. The Rotational mailbox will pass control of each call to the first Template mailbox
until that mailbox is full. It then passes calls to the second template mailbox, and so forth. Figure
1-2 shows this aspect of the sample NP Forms application.
Figure 1-2 Multiple Template Mailboxes
©Copyright 2002, Mitel Networks Corporation
3
Mitel NuPoint Messenger Technical Documentation - Release 7.0
NP Forms Mailbox Interaction
The numbered steps below illustrate the sequence and interaction of the mailboxes in an NP
Forms call.
1. A caller dials a DID number or extension number that corresponds to the Rotational mailbox
2. The system plays the greeting/instructions recorded in the Rotational mailbox.
3. The Rotational mailbox transfers control of the call to one of the Template mailboxes.
4. The system plays the greeting in the first Greeting Only mailbox defined in distribution list 01
of the Template mailbox.
5. The system records the caller’s response.
6. The system repeats steps 4 and 5 for each Greeting Only mailbox in distribution list 01 of the
Template mailbox.
7. After recording the last caller response, the system plays a standard good-bye message or
presents the caller with further options, depending on the FCOS settings of the Template
mailbox.
8. At the end of the call, the system deposits all of the responses into the Template mailbox as a
single message.
Playback and Transcription
The Rotational mailbox serves as a single point of entry for retrieving all caller responses stored
in any of the Template mailboxes. A transcriber can listen to caller responses by logging in to the
NP Forms Rotational mailbox, which retrieves the stored responses from all the Template
mailboxes in its distribution list 01.
After login, the system prompts the transcriber to select either Unplayed or Saved messages.
The number of messages reflects the number of callers that responded to any of the questions.
When playing back the messages, the system separates responses to each question with a
“bloop” sound. Transcribers can save and replay the messages, and can pause, skip forward,
and skip backward during playback.
The system plays back responses in chronological order. Thus, it plays back all responses
stored in the first Template mailbox before playing the responses from other Template mailboxes.
More than one person can call into the Rotational mailbox at the same time to transcribe
messages.
NP Forms is compatible with the autoplay feature (FCOS bit 52). With this feature enabled, a
transcriber can listen to all responses without having to press the P key on the telephone to
advance through the messages. (Transcribers must still press K or D to keep or discard the
messages.)
Note: To retrieve NP Forms messages, a transcriber calls the Rotational mailbox, not the template
mailboxes.
Tree Mailboxes and NP Forms
Tree mailboxes allow callers to press DTMF keys to choose from several options, and can be
©Copyright 2002, Mitel Networks Corporation
4
Mitel NuPoint Messenger Technical Documentation - Release 7.0
used either before or after an NP Forms application.
When a Tree mailbox precedes an NP Forms Rotational mailbox, callers can select alternatives
to filling out the NP Form, such as transferring to a live attendant or leaving a message in another
mailbox. By setting the Rotational mailbox as the first mailbox in distribution list 01 and including
feature bit 120 (Default to First Child of Tree Mailbox) in the Tree mailbox FCOS, callers with
rotary dial phones are automatically transferred to the NP Form where they are prompted with the
first question.
If the last mailbox in distribution list 01 of the Template mailbox is a Tree mailbox, callers can
select additional options after completing an NP Form. (The Template mailbox must contains
FCOS bit 139.) The Template mailbox plays the greeting of the Tree mailbox, then allows callers
to select from the choices listed in the greeting. This way callers can return to a "higher menu" or
hold/transfer for live assistance. Again, if the FCOS for the Tree mailbox contains bit 120, callers
with rotary phones can be automatically transferred to a specific extension or mailbox.
NP Forms FCOS Configuration
The NuPoint Voice software includes a pre-defined FCOS for use with NP Forms, and predefined FCOSs for Rotational and Tree mailboxes. There are also several individual FCOS bits
that allow some flexibility in configuring NP Forms.
NP Forms FCOS Bits
The FCOS bits that are useful in NP Forms applications are:
135
Defines template mailbox
A mailbox with this feature plays the greetings stored in its child mailboxes, sequentially, and
records a response after each greeting.
136
Don’t say "End of Message"
When set to On for a Template mailbox, the system does not say "End of message" after
each message is played or recorded.
138
Don’t say "Message complete"
When set to On for a Template mailbox, the system does not say "Recording complete" after
each message is recorded.
139
Template: assume last greet mailbox FCOS
When set to On for a Template mailbox, the Template mailbox assumes the FCOS values of
the last mailbox in distribution list 01 after playing the greeting, and call flow is altered
accordingly. For example, if the last mailbox is a tree or chain mailbox, the caller can
continue to interact with the system after completing the NP Form.
When bit 139 is set to Off for a Template mailbox, callers always hear, "Thank you for calling,
good-bye," after completing the NP Form.
149
Log into template through rotational mailbox
When set to On for a Rotational mailbox, a transcriber can call into the Rotational mailbox
and automatically pick up the messages from all Template (child) mailboxes.
NP Forms Default FCOSs
Default FCOS 16 contains all of the feature bits necessary for a Template mailbox. Optionally,
©Copyright 2002, Mitel Networks Corporation
5
Mitel NuPoint Messenger Technical Documentation - Release 7.0
you can add bit 139 to allow callers to access other options after completing an NP Form.
Default FCOS 17 is predefined for a standard Rotational mailbox. Add feature bit 149 for
Rotational mailboxes that are used in NP Forms.
Default FCOS 06 contains all of the feature bits necessary for the Greeting Only mailboxes that
play the questions to NP Forms callers.
Default FCOS 15 is predefined to support Tree mailboxes. As an option, you can add feature bit
120 so that callers with rotary phones are automatically moved to the first Template (child)
mailbox.
NP Forms Limitations
A NP Forms application can generate a lot of responses from callers, and these responses must
be transcribed and taken off of the system or they will fill up the available voice storage. The NP
Forms application has some built-in limits to reduce the chances of this happening.
•
Each NP Forms application can have a maximum of 190 Template mailboxes.
•
There can be no more than 73 questions (Greeting Only mailboxes) in distribution list 01 of
the first Template mailbox. The other Template mailboxes in the NP Form do not need a
copy of the distribution list; the system uses the distribution list in the first Template mailbox.
•
Each Template mailbox can store a maximum of 73 responses. Since most NP Forms consist
of several questions, each caller leaves several responses. If an NP Form has four
questions, a single Template mailbox can store responses from 18 callers (73¸4=18+1).
•
NP Forms Rotational mailboxes automatically rotate on full. You cannot assign the Index or
Period type of rotation.
•
The system deposits caller responses in the first Template mailbox until it is full, then it
rotates to the second Template mailbox, and so on. It cycles through all of the Template
mailboxes before again putting responses in the first Template mailbox.
If all Template mailboxes in an NP Forms application are full, callers hear, "I’m sorry, I cannot
deliver your message now. Please try again later."
NP Forms Manual Procedures
Task List for Software Release 5.03C and later
Create an NP Forms Application ------------------------------------- GP 520
Configure an NP Forms Template Mailbox ----------------------------------------GP 522
Configure a Rotational Mailbox for NP Forms-------------------------------------GP 521
Configure a Standard Mailbox --------------------------------------------------------DP 5052
Copy a Mailbox Greeting ---------------------------------------------------------------DP 5051
Create a Tree Mailbox ------------------------------------------------------------------GP 311
Create or Modify a List for Mailbox Owners ---------------------------------------DP 5025
Customize a Default FCOS ------------------------------------------------------------DP 5008
Customize an FCOS Copy-------------------------------------------------------------DP 5007
©Copyright 2002, Mitel Networks Corporation
6
Mitel NuPoint Messenger Technical Documentation - Release 7.0
Perform an Online Optional Feature Installation----------------------------------DP 5402
GP 520 Create an NP Forms Application
This procedure provides all of the steps necessary to create an NP Forms application. You must
perform some of the steps at the AIP system console and some of the steps over the telephone.
Procedure Steps
1. Fill out an NP Forms diagram to document the greetings and questions that need to
be recorded and the maiboxes that will be used. Blank diagram sheets are located
at the end of this manual.
2. Define an FCOS to be used for the Rotational mailbox. You can add bit 149 to
either:
•
the default FCOS 17 - Reference: DP 5008
or
•
a copy of FCOS 17 - Reference: DP 5007
3. If you plan to use a Tree mailbox to offer callers some options before or after they
complete the NP Form, add bit 139 to an FCOS for the Template mailboxes. You
can add bit 139 to either:
•
the default FCOS 17 - Reference: DP 5008
or
•
a copy of FCOS 17- Reference: DP 5007
4. Create the Template mailboxes and the Greeting Only mailboxes, and assign the
Greeting Only mailboxes as members of distribution list 01 in each Template
mailbox.
Reference: GP 522
Note:
You only have to create the Greeting Only mailboxes once, but you must add them
to distribution list 01 in each Template mailbox.
5.
Create the Rotational mailbox, making sure to assign FCOS 17 (or the
FCOS that you modified in step 2).
Reference: GP 521
6.
Add the Template mailboxes as members of distribution list 01 in the
Rotational mailbox, and configure the rotation.
Reference: GP 521
7.
If you are using Tree mailboxes either before or after the NP Form, create
the Tree mailboxes.
Reference: GP 311
Note: If a Tree mailbox precedes the NP Form, you should probably make the
Rotational mailbox the first member of distribution list 01 in the Tree mailbox and
add bit 120 to the FCOS for the Tree mailbox. With this setup, the NuPoint Voice
system will transfer callers with rotary phones to the NP Form application.
8. Record greetings for all of the appropriate mailboxes:
•
Record an orientation message as the greeting for the Rotational mailbox. Do
©Copyright 2002, Mitel Networks Corporation
7
Mitel NuPoint Messenger Technical Documentation - Release 7.0
not record any greetings for the template mailboxes.
or …
•
Record an orientation message as the greeting for one of the Template
mailboxes. After you are satisfied with the greeting, you can copy it to all of the
other Template mailboxes (see DP 5051).
•
Record each question as a greeting for each of the Greeting Only mailboxes.
Pay special attention to which question belongs to which mailbox.
•
If you are using Tree mailboxes either before or after the NP Form, record the
caller instructions as the greetings for those mailboxes.
GP 522 Configure an NP Forms Template Mailbox
This procedure describes how to configure an NP Forms Template mailbox and the Greeting
Only mailboxes that will contain the questions for the NP Form.
Procedure Steps
1. Complete a Rotational Mailbox Diagram for each Template Mailbox, and a Mailbox
Worksheet for all Template and Greeting Only mailboxes. Blank worksheets are at
the end of this manual.
2. Reach the Mailbox Maintenance Menu. Enter the requested information, as
described in the following steps, from your completed worksheet and diagram.
Reference: Menu Map 3
3. Identify the Template mailbox.
(C) Create New Mailboxes
Select:
Mailbox to create:
Prompt:
Response: Number of the new mailbox.
or
Select:
(M) Modify Mailboxes
Prompt:
Response:
Mailbox to modify:
Number of the existing mailbox.
Note:
Prompts are almost the same for creating a new mailbox and modifying an existing
one, except that "New" precedes a prompt when you select Modify Mailboxes.
To leave an existing parameter setting unchanged, just press Return to go to the
next prompt.
4. Set the remaining mailbox parameters the same as for a standard mailbox, except
for the FCOS.
Reference: DP 5052
5. Assign an FCOS designed for a template mailbox.
Features class of service:
Prompt:
16 (the default Template FCOS)
Respon
se:
or
©Copyright 2002, Mitel Networks Corporation
8
Mitel NuPoint Messenger Technical Documentation - Release 7.0
The number of a customized FCOS that includes all the applicable bits
for a Template mailbox.
6. After responding to the last mailbox parameter, the system displays the mailbox
configuration, then prompts for the next mailbox number to modify or create. At this
point, the parameter settings for the template mailbox are saved.
7. Configure the first child mailbox (the Greeting Only mailbox that will play the first
question to callers).
Prompt:
Mailbox to create: or Mailbox to modify:
Response:
The number of the first child mailbox.
8. Set all applicable parameters for the child mailbox the same as for a standard
mailbox, except for the FCOS.
Reference: DP 5052
9. Assign an FCOS that makes the child mailbox a greeting-only mailbox.
Prompt:
Features class of service:
Response:
6 (the default Greeting Only FCOS)
or
The number of a customized FCOS that includes all the applicable bits
for a greeting-only mailbox.
10. Configure all remaining child mailboxes as just described.
11. When you have configured all child mailboxes, return to the Mailbox Maintenance
Menu.
Prompt:
Mailbox to create: or Mailbox to modify:
Response:
Press Return.
12. Go to the List Maintenance Menu.
13. Create distribution list 01 for the Template mailbox.
Select:
(C) Create, Modify, or Show Distribution Lists
Prompt:
Response:
Prompt:
Response:
Prompt:
Response:
Mailbox:
Number of the Template mailbox.
Distribution list:
01
(S)orted or (U)nsorted list ?
S
14. If desired, check the list to make sure the member is not already in the list.
Check for duplicate before add (y/n) [Y]?
Prompt:
Response: Y if you want the system to check the list.
N to bypass the check.
15. Add all of the Greeting Only mailboxes to the distribution list.
(A)dd, (D)elete, or (S)how list ?
Prompt:
Response: A to add a member
Member:
Prompt:
Response: The mailbox numbers of the Greeting Only mailboxes.
•
You can enter mailbox numbers in any of the formats shown below:
©Copyright 2002, Mitel Networks Corporation
9
Mitel NuPoint Messenger Technical Documentation - Release 7.0
A single mailbox number, for example 3788
A continuous range of mailbox numbers, for example 3001-3788
A series of mailbox numbers, for example 3781,3782,3786,3788
•
You can mix formats of mailbox number entries, so you can specify all the
mailbox numbers necessary in one attempt. For example, this entry is valid:
208,222-308,333,334,661
16. After the system confirms that the member just specified was added, continue
adding or complete the activity.
(A)dd, (D)elete, or (S)how list ?
Prompt:
Response: • To add more members to the current list, enter A as described in
step 15, or enter D to delete any mailboxes that should not be in the
distribution list.
• To complete adding or deleting members:
a. Press Return.
b. When the system asks if you want to save changes to the
distribution list, enter Y. The system reports the current
members, reflecting members just added or deleted, and
your additions and deletions are saved.
GP 521 Configure a Rotational Mailbox for NP Forms
This procedure describes how to configure a rotational mailbox for use with NP Forms, including
setting index-type rotation and adding the template mailboxes to distribution list 01.
Procedure Steps
1. Complete a Mailbox Worksheet for each mailbox and a Rotational Mailbox
Diagram. Blank worksheets are at the end of this manual.
2. Reach the Mailbox Maintenance Menu. Enter the requested information, as
described in the following steps, from your completed worksheet and diagram.
Reference: Menu Map 3
3. Identify the rotational mailbox.
(C) Create New Mailboxes
Select:
Mailbox to create:
Prompt:
Response: Number of the new mailbox.
or
Select:
(M) Modify Mailboxes
Prompt:
Response:
Mailbox to modify:
Number of the existing mailbox.
Note:
Prompts are almost the same for creating a new mailbox and modifying an existing
one, except that "New" precedes a prompt when you select Modify Mailboxes.
To leave an existing parameter setting unchanged, just press Return to go to the
next prompt.
©Copyright 2002, Mitel Networks Corporation
10
Mitel NuPoint Messenger Technical Documentation - Release 7.0
4. Set the remaining mailbox parameters the same as for a standard mailbox,
except for the FCOS.
Reference: DP 5052
5. Assign an FCOS designed for a rotational mailbox.
Features class of service:
Prom
pt:
Respo
nse:
17 (the default Rotational FCOS)
or
The number of a customized FCOS that includes all the applicable bits
for a rotational mailbox.
6. After responding to the last mailbox parameter, the system displays the mailbox
configuration, then prompts for the next mailbox number. At this point, the
parameter settings for the rotational mailbox are saved. Press Return to reach the
Mailbox Maintenance Menu.
7. Go to the List Maintenance Menu.
8. Create distribution list 01 for the Template mailbox.
Select:
(C) Create, Modify, or Show Distribution Lists
Prompt:
Response:
Prompt:
Response:
Prompt:
Response:
Mailbox :
Number of the Rotational mailbox from step 3
Distribution list:
01.
(S)orted or (U)nsorted list ?
S
9. If desired, check the list to make sure the members are not already in the list.
Prompt:
Check for duplicate before add (y/n) [Y]?
Response:
Y if you want the system to check the list,
N to bypass the check.
10. Add all of the Template mailboxes to the distribution list.
Prompt:
(A)dd, (D)elete, or (S)how list ?
Response:
A to add a member
Prompt:
Member:
Response:
The mailbox numbers of the Template mailboxes.
•
You can enter mailbox numbers in any of the formats shown below:
A single mailbox number, for example 3788
A continuous range of mailbox numbers, for example 3001-3788
A series of mailbox numbers, for example 3781,3782,3786,3788
•
You can mix formats of mailbox number entries, so you can specify all the
mailbox numbers necessary in one attempt. For example, this entry is valid:
208,222-308,333,334,661
©Copyright 2002, Mitel Networks Corporation
11
Mitel NuPoint Messenger Technical Documentation - Release 7.0
11. After the system confirms that the member just specified was added, continue
adding or complete the activity.
(A)dd, (D)elete, or (S)how list ?
Prompt:
Response: • To add more members to the current list, enter A as described in
step 11, or enter D to delete any mailboxes that should not be in the
distribution list.
• To complete adding or deleting members:
a. Press Return.
b. When the system asks if you want to save changes to the
distribution list, enter Y. The system reports the current
members, reflecting members just added or deleted, and
your additions and deletions are saved.
DP 5052 Configure a Standard Mailbox
This procedure describes how to configure a standard mailbox in NuPoint Voice. You can use it
either to create a new mailbox or to modify an existing mailbox.
Procedure Steps
1. Reach the Mailbox Maintenance Menu. Enter the requested information, as
described in the following steps, from your completed Mailbox Worksheet.
Reference: Menu Map 3
2. Identify the mailbox to be created or modified.
(C) Create New Mailboxes
Select:
Mailbox to create:
Prompt:
Response: Number of the new mailbox you want to configure.
or
Select:
(M) Modify Mailboxes
Prompt:
Response:
Mailbox to modify:
Number of the existing mailbox you want to reconfigure.
Note:
Prompts are almost the same for creating a new mailbox and modifying an existing
one, except that "New" precedes each prompt when you select Modify Mailboxes.
To leave an existing parameter setting unchanged, just press Return to go to the
next prompt.
3. Name the mailbox.
Name:
Prom
pt:
Respo
nse:
A name of up to 31 alphanumeric characters that describe the
purpose, membership, ownership, or function of the mailbox.
4. If a department code or alternate code is required for message waiting indication,
specify it.
Department code:
Prom
pt:
©Copyright 2002, Mitel Networks Corporation
12
Mitel NuPoint Messenger Technical Documentation - Release 7.0
Respo
nse:
The string (directory number) which is the alternate code the
system transmits after the pre-DN ON string.
For DTMF-to-PBX message waiting indication, valid characters are:
0-9
*
#
For RS-232 message waiting indication, any ASCII character is valid.
5. If a prefix (access code) must be dialed before any mailbox-specific dial strings
when making outgoing calls, specify it.
Prompt:
Access code:
Response:
A DTMF string (1-10 digits)
or
a period (.) if no string is needed.
6. If callers are allowed to press # then dial an extension, or if NP Receptionist is
installed, use the Receptionist Day Treatment and Receptionist Night Treatment
parameters.
Prompt:
Receptionist day treatment:
Response:
The number of the treatment type (1-16) that contains the
#.authorization code
or
Prompt:
Response:
press Return to skip the parameter
or
If NP Receptionist is installed in your system and you want
Receptionist capabilities other than pressing # to dial an extension,
refer to the NP Receptionist document (part number 2700-0844-00)
for information about these parameters.
Receptionist night treatment:
The number of the treatment type (1-16) that contains the
#.authorization code
or
press Return to skip the parameter
or
If NP Receptionist is installed in your system and you want
Receptionist capabilities other than pressing # to dial an extension,
refer to the NP Receptionist document (part number 2700-1286-01)
for information about these parameters.
7. If this mailbox uses DTMF-to-PBX message waiting indication or if NP Receptionist
is installed in your system, specify the mailbox’s extension number.
Mailbox’s extension number:
Prompt:
Response: Leave blank if the extension number is the same as the mailbox
number
or
The PBX extension number plus dial string codes from Table 1 at the
end of this procedure
or
A string as explained in the NP Receptionist manual, if NP
Receptionist is installed in your system
©Copyright 2002, Mitel Networks Corporation
13
Mitel NuPoint Messenger Technical Documentation - Release 7.0
8. If NP Receptionist is installed in your system, refer to the NP Receptionist manual
for the mailbox’s extension pre-dial index; otherwise, press Return to skip over the
parameter.
9. If an attendant is available to this mailbox, specify the attendant extension number.
Attendant extension number:
The extension number of the mailbox attendant that the mailbox owner
or caller is transferred to after pressing 0
or
Prompt:
Response:
Leave blank
or
Refer to the NP Receptionist manual for directions if NP Receptionist
is installed in your system.
10. If the attendant extension exceeds 15 digits, or if NP Receptionist is installed in your
system, specify the excess dial string.
Attendant extension pre-dial index:
Prompt:
Response: The dial string characters (Table 1) that point to the dial string that the
system must process before dialing the attendant extension number
or
Leave blank
or
Refer to the NP Receptionist manual for directions if NP Receptionist
is installed in your system.
11. Assign an FCOS to this mailbox.
Features class of service:
Prompt:
Response: Number (1-64) of the FCOS that governs this mailbox.
12. Assign an LCOS to this mailbox.
Prompt:
Limits class of service:
Response:
Number (1-64) of the LCOS that governs this mailbox.
13. Assign a GCOS to this mailbox.
Prompt:
Group class of service:
Response:
Number (1-32,000) of the GCOS that governs this mailbox.
14. If NP Net is installed in your system, refer to the NP Net Digital Network Manual for
information about the network class of service (NCOS) otherwise, press Return to
skip over the parameter.
15. If Enhanced SMDI is installed in your system, refer to the Enhanced SMDI
Integration Manual for information about the tenant class of service (TCOS)
otherwise, press Return to skip over the parameter.
16. If a temporary passcode is required, specify it.
Prompt:
Enter a temporary passcode:
Response:
Any digits 0 through 9, within the minimum and maximum lengths
specified in the NuPoint Voice application or DID NuPoint Voice
application
or
©Copyright 2002, Mitel Networks Corporation
14
Mitel NuPoint Messenger Technical Documentation - Release 7.0
R to have the system generate a passcode for you (and display it in
the mailbox configuration report that automatically appears after you
respond to the last mailbox parameter)
or
S to make the passcode the same as the mailbox number.
or
Press Return to leave the temporary passcode unchanged.
17. If desired, enable or disable the standard tutorial (also called new user tutorial, user
tutorial, and NuPoint Voice tutorial). The standard tutorial is set to play be default
when a new mailbox is created.
Tutorial (y/n):
Prompt:
Response: Enter Y to enable the tutorial or N to disable it.
or
Press Return for no change.
18. Specify the type of message waiting indication.
Prompt:
Message waiting type #1:
Response:
A number from 2 through 22, from Table 2 at the end of this
procedure. If more than one type of message waiting indication is
used, this is the primary type.
or
0 for none.
Prompt:
Message waiting type #2:
Response:
Same as for the first message waiting type parameter, but this is the
secondary type.
If message waiting type 5 was specified at the first or second message waiting
type parameter, set the mailbox parameters for paging or message delivery, or
both.
19.
If you need a third type of message waiting indication, specify it.
Message waiting type #3:
Promp
t:
Respo
nse:
Message waiting type 9 or 17.
20. If a time zone offset is needed, specify it.
Prompt:
Time zone offset:
Response:
The hours of difference, from -23 through 23, between the mailbox
owner’s time zone and the NuPoint Voice module time zone.
21. If desired, allow the mailbox owner to have review rights or change rights, or both,
for the mailbox owner’s distribution lists.
Note:
Prompt:
This mailbox parameter alone does not allow change rights; you must also include
FCOS bit 74 (Create or modify user distribution list) in the FCOS.
Lists with review rights:
©Copyright 2002, Mitel Networks Corporation
15
Mitel NuPoint Messenger Technical Documentation - Release 7.0
Respon
Any of the following entries:
s
e
:
A for all distribution lists
A single list, for example 2
A series of lists, for example, 1,3,4,6,
A range of lists, for example 1-6
A combination of any of the above entries, for example
1-5,8,12,50-70,90
Prompt:
Response:
Lists with change rights:
Same as just described for review rights.
22. After the last entry, the system displays the mailbox configuration, then prompts for
the next mailbox number.
At this point, the parameter settings are saved and you can continue with mailbox
configuration or exit.
Character
0-9, *, #
A-D
()
+
E
F
G
H
L
N
O
P
S
T
V
Number
0
1
2
3
4
5
6
7
8
Table 1 Access Codes and Dial String Characters
Explanation
Keys on a standard touchtone telephone
Fourth column DTMF keys
Dial pulse (10 PPS) the digits between the parentheses
Pause for one second
Go off-hook, wait for dial tone or other steady tone (pager go-ahead or
confirmation tone, for example), then do next item in string
Switch hook flash and wait for dial tone
Greet −Wait for a voice or computer tone answer
Hang up (go on-hook)
Wait for an answer supervision signal that indicates the receiving phone
has gone off-hook, then dial remaining characters after receiving the
signal. Valid only with four-wire connections, not with loop start or
ground start phone lines.
Start a new activity; do not go off-hook
Ring once
Go off-hook, do not wait for dial tone
Switch hook flash, no wait required
Go off-hook, wait for dial tone
Play three seconds of the message for voice pager
Table 2 Message Waiting Types
Type
None
Not available
AC message lamp
DTMF to PBX
Fixed RS-232
Pager
SL-1
Program RS-232
Tip & Ring RS-232
©Copyright 2002, Mitel Networks Corporation
16
Mitel NuPoint Messenger Technical Documentation - Release 7.0
9
10
11
12
13
14
15
16
17
18
19
20
21
22
23
Centrex RS-232
Intecom RS-232
NEC RS-232
Video Dispatch
ITT RS-232
Citywide SMDI (no longer used)
AT&T System 75
HIS PMS
Unified integrations
ROLM
Mitel
SL-1 Message Waiting
Hitachi PMS
SL-1 Enhanced Meridian
Fujitsu 960
DP 5051 Copy a Mailbox Greeting
This procedure describes how to copy a mailbox greeting, name, or fax cover page from one
mailbox to another. You must perform this procedure at the console, and after a greeting has
been recorded for the source mailbox.
Procedure Steps
1. Reach the Main Menu, then go to the Mailbox Maintenance Menu.
Reference: Menu Map 3
2. Choose to copy a mailbox greeting.
(K) Copy/Delete/Enable Mailbox Greetings
Select:
COMMAND (Copy, Delete, or Enable ?):
Prompt:
Response: C
3. Identify the source and destination mailboxes.
Enter mailbox to copy name/greeting from:
Prompt:
Response: The mailbox number of the source mailbox.
Enter mailbox to copy name/greeting to:
Prompt:
Response: The mailbox number of the target mailbox. You can copy the greeting
to more than one mailbox by using any of the formats shown below:
• A single mailbox number, for example 3788
•
A continuous range of mailbox numbers, for example 3001-3788
•
A series of mailbox numbers, for example 3781,3782,3786,3788
You can mix formats of mailbox number entries, so you can specify all
the mailbox numbers necessary in one attempt. For example, this
entry is valid:
208,222-308,333,334,661
4. Identify what is to be copied.
©Copyright 2002, Mitel Networks Corporation
17
Mitel NuPoint Messenger Technical Documentation - Release 7.0
P
0
Name
1-4 Greeting 1-4
5
Fax Cover Sheet
COMMAND (Enter source name/greeting number (0-5)
[1]):
Response:
For a user’s mailbox:
enter 1 for the Personal greeting.
For an administrator’s mailbox:
enter 1 for the Day company greeting,
enter 2 for the Night company greeting,
enter 4 for the Alternate greeting.
For an attendant’s mailbox:
enter 1 for the Message of the Day,
enter 2 for the Site tutorial,
enter 4 for the Alternate greeting.
For all mailboxes:
enter 0 for the Name.
enter 5 for the Fax Cover Sheet.
COMMAND (Enter destination name/greeting number (0Prompt:
5) [1]): 1
Response: Enter one of the same values as above.
5. The system confirms that the greeting/name has been copied. You can choose to
copy more greetings, or press Return to exit to the Mailbox Maintenance Menu.
GP 311 Configure a Tree Mailbox
This procedure describes how to configure a simple tree mailbox and a nested tree mailbox.
Procedure Steps
1. Complete a Mailbox Worksheet and a Tree Mailbox Diagram. Blank worksheets
are at the end of this manual.
2. Reach the Mailbox Maintenance Menu. Enter the requested information, as
described in the following steps, from your completed Mailbox Worksheets.
Reference: Menu Map 3
3. Identify the tree mailbox.
(C) Create New Mailboxes
Select:
Mailbox to create:
Prompt:
Response: Number of the new mailbox.
or
Select:
(M) Modify Mailboxes
Prompt:
Response:
Mailbox to modify:
Number of the existing mailbox.
Note:
Prompts are almost the same for creating a new mailbox and modifying an existing
one, except that "New" precedes each prompt when you select Modify Mailboxes.
©Copyright 2002, Mitel Networks Corporation
18
Mitel NuPoint Messenger Technical Documentation - Release 7.0
To leave an existing parameter setting unchanged, just press Return to go to the
next prompt.
4. Set the remaining mailbox parameters the same as for a standard mailbox,
except for the FCOS.
Reference: DP 5052
5. Assign an FCOS designed for a tree mailbox.
Features class of service:
Prom
pt:
Respo
nse:
15 (the default Tree FCOS)
or
The number of a customized FCOS that contains all the features of a
typical tree mailbox.
•
If you want callers who do not enter a digit promptly after the tree mailbox
greeting to be routed to the first member of the distribution list, include FCOS
bit 120 (Default to first child of tree mailbox).
•
If you want these callers to be routed to the last child mailbox, include FCOS
bit 186 (Default to last child of tree mailbox).
6. After responding to the last mailbox parameter, the system displays the
mailbox configuration, then prompts for the next mailbox number. At this
point, the parameter settings for the tree mailbox are saved.
7. Configure the first child mailbox (the mailbox that callers should be routed to
through the tree mailbox).
Mailbox to create:
or
Mailbox to modify:
Pr
o
m
pt
:
Response:
The number of the first child mailbox.
8. Set all applicable parameters for the child mailbox the same as for a standard
mailbox.
9. Configure all child mailboxes as just described in steps 7 and 8.
10. When all child mailboxes have been configured, return to the Mailbox
Maintenance Menu.
Mailbox to create: or Mailbox to modify:
Prompt:
Response: Press Return.
11. Go to the List Maintenance Menu.
a. Create distribution list 01 for the tree mailbox just configured.
Reference: DP 5025
b. Add as members all the child mailboxes.
12. Disable the tutorials in the child mailboxes. (The following procedure disables both
the standard tutorial and any site tutorial that might have been enabled.)
(P) Set Passcode/Tutorial
Select:
Set passcode for mailbox:
Prompt:
©Copyright 2002, Mitel Networks Corporation
19
Mitel NuPoint Messenger Technical Documentation - Release 7.0
Response:
To disable the tutorial in a single mailbox, enter the number of the
mailbox you want to disable.
To delete the tutorial in a range of mailboxes, enter the first and last
numbers of the mailboxes in the range to be disabled, separated by a
hyphen. For example, 101-203.
New passcode:
Prompt:
Response: Press Return.
Tutorial (y/n):
Prompt:
Response: N
Clear bad passcode count (y/n):
Prompt:
Response: Press Return.
Set passcode for mailbox:
Prompt:
Response: Press Return.
13. Record an appropriate greeting in the tree mailbox and in all child mailboxes.
Nested Tree Mailbox
1. Choose the child mailbox that you want to be a tree mailbox.
2. Configure the mailbox through the Mailbox Maintenance Menu as described earlier
in this procedure.
3. Go to the List Maintenance Menu.O,CE>
a. Create distribution list 01 for the nested tree mailbox just configured.
Reference: DP 5025
b. Add as members all the child mailboxes related to the nested tree mailbox.
4. Record a greeting in the nested tree mailbox and its child mailboxes.
DP 5025 Create or Modify a List for Mailbox Owners
This procedure shows how to add members or delete members in a single distribution list.
Procedure Steps
1. Reach the Mailbox Maintenance Menu, then go to the List Maintenance Menu.
Reference: Menu Map 3
2. Identify the distribution list.
(C) Create, Modify, or Show Distribution Lists
Select:
Mailbox:
Prompt:
Response: Number of the mailbox that contains the list you want to add to or
delete from.
Distribution list:
Prompt:
Response: Number of the list you want to add to or delete from (1-99). For
mailboxes that rotate on full, tree mailboxes, NP Forms mailboxes,
and broadcast mailboxes, specify 1. For a name greet mailbox,
specify 9.
(S)orted or (U)nsorted list ?
Prompt:
Response: U if the list is in a tree mailbox; otherwise, S. Keep in mind that
sorting of lists longer than 190 members can be slow.
3. If desired, check the list to make sure the member is or is not already in the list.
©Copyright 2002, Mitel Networks Corporation
20
Mitel NuPoint Messenger Technical Documentation - Release 7.0
Prompt:
Response:
Check for duplicate before add (y/n) [Y]?
Y(es) if you want the system to check the list.
N(o) to bypass the check.
4. Add or delete the desired member.
(A)dd, (D)elete, or (S)how list ?
Prompt:
Response: A to add a member
or
D to delete a member.
Member:
Prompt:
Response: The member you want to add or delete. All of the following are valid
members:
Mailbox number
M and a remote mailbox with a telephone number for AMIS
Analog; the remote mailbox and telephone number are separated
by a comma (for example, M3788,4283788)
N and a remote mailbox for networking
T and a telephone number for off-system messaging
D and a distribution list number, except in a broadcast mailbox
S and a master distribution list number, except in a broadcast
mailbox
•
Mailbox numbers can be entered in any of the formats shown below; the other
numbers must be entered one at a time:
A single mailbox number, for example 3788
A continuous range of mailbox numbers, for example 3001-3788
A series of mailbox numbers, for example 3781,3782,3786,3788
•
You can mix formats of mailbox number entries, so you can specify all the
mailbox numbers necessary in one attempt. For example, this entry is valid:
208,222-308,333,334,661
5. After the system confirms that the member just specified was added or deleted,
continue adding or deleting or complete the activity.
(A)dd, (D)elete, or (S)how list ?
Prompt:
To add or delete more members from the current list, enter A
Response: •
or D as described in step 4.
• To complete adding or deleting members:
a. Press Return.
b. When the system asks if you want to save changes to the
distribution list, enter Y. The system reports the current
members, reflecting members just added or deleted, and
your additions and deletions are saved.
DP 5008 Customize a Default FCOS
This procedure describes how to customize an FCOS by modifying one of the default FCOSs
supplied by your distributor by renumbering one of these default FCOSs.
Procedure Steps
©Copyright 2002, Mitel Networks Corporation
21
Mitel NuPoint Messenger Technical Documentation - Release 7.0
Modifying the Default Itself
1. Choose the default FCOS you wish to modify.
2. Complete an FCOS Worksheet. Blank worksheets are near the end of this manual.
3. Reach the System Configuration Menu, then go to the Feature Class of Service
Menu. Enter the requested information, as described in the following steps, from
your completed FCOS Worksheet.
Reference: Menu Map 11
Note: You can quit at any point in the following steps before you exit the Feature Class of
Service Menu. Quitting discards all entries you have made and leaves the FCOS
settings the way they were before you reached the Feature Class of Service Menu
To quit:
Make sure the Feature Class of Service Menu is displayed (short form or long form).
Select:
(Q) Quit – Forget Changes
Quit and forget changes? (y/n) =
Response: Y to quit.
Prompt:
4.
Specify the default FCOS to modify.
(C) Current FCOS
Select:
FCOS to modify =
Prompt:
Response: The number (1-17) of the default FCOS.
5. Change the name if desired.
(N) Name FCOS
Select:
Enter FCOS name (0 - 15 chars) =
Prompt:
Response: Enter a descriptive name to accompany the modified default FCOS.
6. Add FCOS bits to the default FCOS, as desired.
(A) Add Features
Select:
Features to add (? for help) =
Prompt:
Response: The 1-to-3-digit numbers of the FCOS bits to be added.
• You can enter bits in any of the formats shown below:
A single bit, for example 208
A range of bits, for example 202-208
A series of bits, for example, 39,40,207,208
•
You can mix types of entries, so you can specify all the bits necessary in one
attempt. For example, this entry is valid:
208,1-7,50,53,55,6
•
Do not enter spaces after commas, and do not end the entry with a comma.
7. Delete FCOS bits from the default FCOS, as desired.
(D) Delete Features
Sel
ect:
Features to delete (? for help) =
Prompt:
Response: The 1-to-3-digit numbers of the FCOS bits to be deleted. The same
rules apply to deleting bits as explained for adding bits.
8. Verify that the information you have entered so far matches your worksheet.
(S) Show FCOS
Select:
©Copyright 2002, Mitel Networks Corporation
22
Mitel NuPoint Messenger Technical Documentation - Release 7.0
Prompt:
Response:
FCOS to show (? for help) =
The number of the default FCOS you have been working with.
9. If the information matches your worksheet, customization is completed and you can
save it. If the information does not match your worksheet, make the necessary
corrections.
10. After verifying that your entries are correct, save the modified default FCOS by
exiting from the Feature Class of Service Menu.
Renumbering a Default FCOS
1. Choose the default FCOS you wish to renumber. (Renumbering a default FCOS
does not destroy the original default FCOS; the original default FCOS can be
restored through the Use Template FCOS option in the Feature Class of Service
Menu.)
2. Complete an FCOS Worksheet. Blank worksheets are near the back of this
manual.
3. Reach the System Configuration Menu, then go to the Feature Class of Service
Menu. Enter the requested information, as described in the following steps, from
your completed FCOS Worksheet.
Reference: Menu Map 11
Note:
You can quit at any point in the following steps before you exit the Feature Class of
Service Menu. Quitting discards all entries you have made and leaves the FCOS
settings the way they were before you reached the Feature Class of Service Menu.
To quit:
Make sure the Feature Class of Service Menu is displayed (short form or long form).
Select:
Prompt:
Response:
4.
Select:
(Q) Quit – Forget Changes
Quit and forget changes? (y/n) =
Y to quit.
Specify the new number for the FCOS.
(C) Current FCOS
Prompt:
Response:
FCOS to modify =
The new FCOS number (18-20 or 25-64).
5. Assign the chosen default FCOS to this number.
(U) Use Template FCOS
Select:
Overwrite current FCOS with a template (y/n) =
Prompt:
Response: Y for yes.
The system displays a list of the default (template) FCOSs.
Prompt:
Choose a number (1-17, 21-24) from the menu:
Response:
The number of the default (template) FCOS (1-17 or 21-24) that you
want to be assigned to the current FCOS number.
The system displays a confirmation that the default (template) FCOS just specified
has been renumbered. The default FCOS is now customized.
6. Save the customized FCOS by exiting to the System Configuration Menu.
©Copyright 2002, Mitel Networks Corporation
23
Mitel NuPoint Messenger Technical Documentation - Release 7.0
DP 5007 Customize an FCOS Copy
This procedure describes how to customize an FCOS by modifying a copy of an existing FCOS.
Procedure Steps
1. Choose the existing FCOS you wish to use as a basis for your customized FCOS.
2. Complete an FCOS Worksheet. Blank worksheets are near the end of this manual.
3. Reach the System Configuration Menu, then go to the Feature Class of Service
Menu. Enter the requested information, as described in the following steps, from
your completed FCOS Worksheet.
Note:
You can quit at any point in the following steps before you exit the Feature Class of
Service Menu. Quitting discards all entries you have made and leaves the FCOS
settings the way they were before you reached the Feature Class of Service Menu.
To quit:
Make sure the Feature Class of Service Menu is displayed (short form or long form).
Select:
(Q) Quit – Forget Changes
Prompt:
Response:
Quit and forget changes? (y/n) =
Y(es)
4. Number and name the customized FCOS.
(C) Current FCOS
Select:
FCOS to modify =
Prompt:
Response: A number from 18 through 64.
(N) Name FCOS
Select:
Enter FCOS name (0 - 15 chars) =
Prompt:
Response: Enter a descriptive name to accompany the customized FCOS.
5. Make a copy of the existing FCOS.
(K) Copy FCOS
Select:
FCOS to copy (? for help) =
Prompt:
Response: The number of the existing FCOS chosen to be the basis for your
customized FCOS. A copy of this FCOS is created and given the
number and name you assigned above.
6. Add FCOS bits to the FCOS copy, as desired.
(A) Add Features
Select:
Features to add (? for help) =
Prompt:
Response: The 1-to-3-digit numbers of the FCOS bits to be added.
©Copyright 2002, Mitel Networks Corporation
24
Mitel NuPoint Messenger Technical Documentation - Release 7.0
•
You can enter bits in any of the formats shown below:
A single bit, for example 208
A range of bits, for example 202-208
A series of bits, for example, 39,40,207,208
•
You can mix types of entries, so you can specify all the bits necessary in one
attempt. For example, this entry is valid:
208,1-7,50,53,55,6
•
Do not enter spaces after commas, and do not end the entry with a comma.
7. Delete FCOS bits from the FCOS copy, as desired.
(D) Delete Features
Select:
Features to delete (? for help) =
Prompt:
Response: The 1-to-3-digit numbers of the FCOS bits to be deleted. The same
rules apply to deleting bits as explained for adding bits.
8. Verify that the information you have entered so far matches your worksheet.
(S) Show FCOS
Select:
FCOS to show (? for help) =
Prompt:
Response: The number of the FCOS copy that you specified in step 4.
9. If the information matches your worksheet, customization is completed and you can
save it. If the information does not match your worksheet, make the necessary
corrections.
10. After verifying that your entries are correct, save the customized FCOS by exiting
from the Feature Class of Service Menu.
DP 5402 Perform an Online Optional Feature Installation
The procedure describes how to install an optional feature.
WARNING!
This process causes the system to reboot, resulting in an interruption to
call processing. It is recommended that you perform this procedure
during periods of low call traffic.
Procedure Steps
1. Go to the Installation and Service Manual, Chapter 3.
Model 70
Model 120
Model 640
©Copyright 2002, Mitel Networks Corporation
25
Mitel NuPoint Messenger Technical Documentation - Release 7.0
Worksheets
FCOS Worksheet
Mailbox Individual Worksheet
NP Form Diagram
Rotational Mailbox Diagram
Tree Mailbox Diagram
©Copyright 2002, Mitel Networks Corporation
26