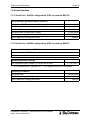
1
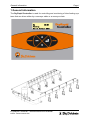
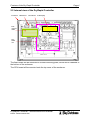
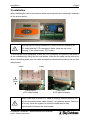
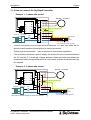
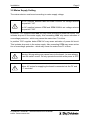
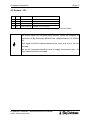
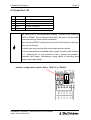
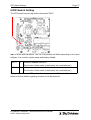
Service/installation manual DryRapid Controller Code-No.: 99-97-5031 Edition: 05/2005 M5031GB Copyright This software is property of Big Dutchman Pig Equipment GmbH and is protected by Copyright. It may not be copied onto another medium or be duplicated without a specific license agreement or by permission in the sales agreement. The operating manual or parts of it may not be copied or reproduced in any way without prior agreement. It is also prohibited to misappropriate the described products and the respective information or to submit these to third parties. Big Dutchman holds the right to change products and software as well as the operating manuals without prior notice. We cannot guarantee that you will receive notice about changes in products/software and their manuals. Copyright 2005 Big Dutchman Liability The manufacturer or distributor of the described hardware and software is not liable for any harm and damage (such as the loss or illness of animals or the loss of further profit opportunities) caused through failure of the system or through improper application and operation of the products and/or software. We do not accept the responsibility for damages caused through errors in the operating manual. We are constantly working on the further development of the computer and software also considering particular suggestions and wishes of our customers. If you should have suggestions for modification or improvement, please let us know. Big Dutchman Pig Equipment GmbH P. O. Box 1163 49360 Vechta Germany Tel: +49(0)4447-801-0 Fax: +49(0)4447-801-237 e-mail: [email protected] Table of content Page 1 1 General information . . . . . . . . . . . . . . . . . . . . . . . . . . . . . . . . . . . . . . . . . . . . . . . .1 2 Features of the Dry Rapid Controller . . . . . . . . . . . . . . . . . . . . . . . . . . . . . . . . . .3 2.1 Front view of the DryRapid Controller . . . . . . . . . . . . . . . . . . . . . . . . . . . . . . . . . . . . . . . . . . . . 2.2 Internal view of the DryRapid Controller . . . . . . . . . . . . . . . . . . . . . . . . . . . . . . . . . . . . . . . . . . 2.3 Detailed view of the DryRapid Controller PCB’s . . . . . . . . . . . . . . . . . . . . . . . . . . . . . . . . . . . . 2.3.1 The mainboard . . . . . . . . . . . . . . . . . . . . . . . . . . . . . . . . . . . . . . . . . . . . . . . . . . . . . . . . . . 2.3.2 The CPU or Display Board . . . . . . . . . . . . . . . . . . . . . . . . . . . . . . . . . . . . . . . . . . . . . . . . 3 4 5 5 5 3 Installation . . . . . . . . . . . . . . . . . . . . . . . . . . . . . . . . . . . . . . . . . . . . . . . . . . . . . . .6 3.1 How to connect mains supply and motors . . . . . . . . . . . . . . . . . . . . . . . . . . . . . . . . . . . . . . . . . 7 3.1.1 Switch-Disconnector . . . . . . . . . . . . . . . . . . . . . . . . . . . . . . . . . . . . . . . . . . . . . . . . . . . . . 7 3.1.2 How to connect the DryRapid Controller . . . . . . . . . . . . . . . . . . . . . . . . . . . . . . . . . . . . . . 8 3.2 Mains Supply Setting . . . . . . . . . . . . . . . . . . . . . . . . . . . . . . . . . . . . . . . . . . . . . . . . . . . . . . . . . 9 3.3 Prefusing . . . . . . . . . . . . . . . . . . . . . . . . . . . . . . . . . . . . . . . . . . . . . . . . . . . . . . . . . . . . . . . . . 10 3.4 How to connect Big Dutchman MS-45R sensors and passive status switches . . . . . . . . . . . 10 3.5 Important note regarding Board Replacement . . . . . . . . . . . . . . . . . . . . . . . . . . . . . . . . . . . . . 10 4 Connector Description . . . . . . . . . . . . . . . . . . . . . . . . . . . . . . . . . . . . . . . . . . . .11 4.1 Relay - X1 . . . . . . . . . . . . . . . . . . . . . . . . . . . . . . . . . . . . . . . . . . . . . . . . . . . . . . . . . . . . . . . . 4.2 Sensor - X2 . . . . . . . . . . . . . . . . . . . . . . . . . . . . . . . . . . . . . . . . . . . . . . . . . . . . . . . . . . . . . . . 4.3 Serial Port - X3 . . . . . . . . . . . . . . . . . . . . . . . . . . . . . . . . . . . . . . . . . . . . . . . . . . . . . . . . . . . . . 4.4 Mains connections P11-P12-P13 . . . . . . . . . . . . . . . . . . . . . . . . . . . . . . . . . . . . . . . . . . . . . . . 11 12 13 14 5 LED indicators . . . . . . . . . . . . . . . . . . . . . . . . . . . . . . . . . . . . . . . . . . . . . . . . . . .16 6 DIP-Switch Setting . . . . . . . . . . . . . . . . . . . . . . . . . . . . . . . . . . . . . . . . . . . . . . . .17 7 Technical specifications . . . . . . . . . . . . . . . . . . . . . . . . . . . . . . . . . . . . . . . . . . .18 7.1 Power Supply Input . . . . . . . . . . . . . . . . . . . . . . . . . . . . . . . . . . . . . . . . . . . . . . . . . . . . . . . . . 7.2 Relay Outputs . . . . . . . . . . . . . . . . . . . . . . . . . . . . . . . . . . . . . . . . . . . . . . . . . . . . . . . . . . . . . 7.3 Contactor Outputs . . . . . . . . . . . . . . . . . . . . . . . . . . . . . . . . . . . . . . . . . . . . . . . . . . . . . . . . . . 7.4 Current supervision (Phase L1, L2 and L3) . . . . . . . . . . . . . . . . . . . . . . . . . . . . . . . . . . . . . . . 7.5 Serial Interface . . . . . . . . . . . . . . . . . . . . . . . . . . . . . . . . . . . . . . . . . . . . . . . . . . . . . . . . . . . . . 7.5.1 Serial Port - RS232 configuration (SW1 in position RS232) . . . . . . . . . . . . . . . . . . . . . . 7.5.2 Serial Port - RS485 configuration (SW1 in position RS485) . . . . . . . . . . . . . . . . . . . . . . 7.6 Sensor Inputs . . . . . . . . . . . . . . . . . . . . . . . . . . . . . . . . . . . . . . . . . . . . . . . . . . . . . . . . . . . . . . 7.7 Miscellaneous specifications . . . . . . . . . . . . . . . . . . . . . . . . . . . . . . . . . . . . . . . . . . . . . . . . . . 7.8 EMC compliance and safety . . . . . . . . . . . . . . . . . . . . . . . . . . . . . . . . . . . . . . . . . . . . . . . . . . DryRapid Controller service/installation manual Edition: 05/2005 M5031GB 18 18 19 19 20 20 20 21 21 21 General information Page 1 1 General information The DryRapid Controller is used for controlling and monitoring of tube feeding systems that are driven either by a conveyor cable or a conveyor chain. On 10:30 Feeding Mon 21 October 2005 DryRapid Controller - installation/service manual Edition: 05/2005 M5031GB General information Page 2 The purpose of this document is to give technical information for the DryRapid Controller. This information may be utilized as reference when installing and operating the unit. The document includes: • Description of features • Installation information • Connector functions listing • LED indicator functions listing • Trouble Shooting information • Specifications Documentation concerning the application and test programs is not included in this document. Please refer to separate documentation for information regarding these issues. The DryRapid Controller was designed to target competeting similar products on the marked. It is indented to be used as a dry feeder for pig farms, but due to it's versatile design it could be used for a variety of other applications. DryRapid Controller - installation/service manual Edition: 05/2005 M5031GB Features of the Dry Rapid Controller Page 3 2 Features of the Dry Rapid Controller • Compact design: 250 x 180 x 100 mm (w x h x d) • LCD Display: 3 lines with each 20 characters • Sealed keyboard: 6 keys (see drawing below) • High power output: 3 Phases ; Switching power 4kW at up to 500V 2. Features of the DryRapid Controller: • Relay outputs: 7 relays x 275VAC 2A (5 n.o. contacts with shared common and 2 potential free n.o. / n.c. contacts) • Digital inputs: 4 inputs designed for Big Dutchman low voltage MS-45R sensors or simple external switches. • Wide Supply range: 90-130V / 170-270V AC (voltage selector - 115V / 230V) • Microprocessor controlled - functional changes may easily be implemented by just updating the units software (EPROM/FLASH chip change) • Real Time Clock with supply backup - maintains clock during a power down. • Data memory with supply backup - maintains data during a power down. • Current monitor for high power outputs L1,L2 and L3 (Range 0-14Arms, accuracy 5%) • Serial Port (RS232 or RS485 - switch selectable) - for remote control, status print outs or connection to Big Dutchman MC99 RS485 network etc. (Support for serial ports is not a part of the current software) • Reliable design using high quality components, and design with good margins. • EMC designed to meet or exceed requirements. 2.1 Front view of the DryRapid Controller On 10:30 Feeding Mon 21 October 2005 DryRapid Controller - installation/service manual Edition: 05/2005 M5031GB Features of the Dry Rapid Controller Page 4 2.2 Internal view of the DryRapid Controller Enclosure Mainboard CPU Board LCD Display Interconnect cable Keyboard con. The Main board will be mounted on a metal mounting plate, which will be fastened to the bottom of the enclosure. The CPU-board will be mounted onto the top cover of the enclosure. DryRapid Controller - installation/service manual Edition: 05/2005 M5031GB Features of the Dry Rapid Controller Page 5 2.3 Detailed view of the DryRapid Controller PCB’s 2.3.1 The mainboard Transformer Current Sense Transformers Piezzo beeper Contactor Connector - cable to CPU board Power LED Mains Voltage Selector & Mains Fuse Serial Port configuration switch (RS232 or RS485) Serial Port RS232 or RS485 Sensor Inputs I1-I4 RL1 RL2 RL3, 4, 5, 6, 7 Mains Input PE Motor 2.3.2 The CPU or Display Board LCD Display (window) Connector - cable To CPU board Keyboard Connector Reset buttom DryRapid Controller - installation/service manual Edition: 05/2005 M5031GB EPROM/FLASH IC (in DIP socket) Installation Page 6 3 Installation When installing the unit we recommend either removing the top or mounting it as shown on the picture below: Securing top part during installation in order to prevent stressing the FCC cable and the FCC connectors. Never leave the top cover "hanging" in the interconnect FCC-cable ! To remove top cover completely, unlock the FCC-connector on either the top board or on the mainboard by lifting the two lock latches. After this the cable can be pulled out. When reinstalling make sure the cable is properly inserted before pushing the two lock latches back. Latch Latch × Ø × Open Close Ø Latch locked (FCC cable locked) Latch open (FCC cable unlocked) Always make sure that the FCC-cable is properly inserted and that the latches are pushed down (cable locked) - see pictures above. Failure to do so may cause the system to become instable due to bad interconnection between the two boards ! DryRapid Controller - installation/service manual Edition: 05/2005 M5031GB Installation Page 7 3.1 How to connect mains supply and motors 3.1.1 Switch-Disconnector A Switch-Disconnector has to be installed in front of the DryRapid Controller in the mains supply. DryRapid Controller - installation/service manual Edition: 05/2005 M5031GB Installation Page 8 3.1.2 How to connect the DryRapid Controller Example 1 - 3 phase with neutral MOTOR - 3 PHASES CONTACTOR T3 L2 T2 L1 T1 Voltage Selector Transformer 115V / 230V L1 MOTOR L3 Contacts 500V 4KW L2 1 MAINS / NETZ A2(-) (See specs for supply range information) A1(+) L3 P11 PE PE 1 L3 P12 L2 Fuse L1 1 Earth (Protecti L3 L2 L1 Neutral N P13 P1 Recommended Pre Fusing (may be required by seftely regulations) • Current must always flow through all three switches, of if less than three are required unused switches should placed in series connection. • Prefusing is recommended - may be required in local safety regulations. • The on-board transformer used to supply the electronics are connected between the "N" and the "L1" terminals. Voltage between these terminals must always be present and within the specified limits. In some cases an external transformer may be required. Example 2 - 2 phase with neutral MOTOR - 2 PHASES CONTACTOR T3 L2 T2 L1 T1 Voltage Selector Transformer 115V / 230V L1 MOTOR 1 L3 Contacts 500V 4KW L2 MAINS / NETZ L3 A2(-) (See specs for supply range information) A1(+) P11 PE PE 1 L3 P12 L2 Fuse L1 1 N Earth (Protecti L2 L1 Neutral P13 P1 Notice: Phase L2 current flows trough two contacts T2/L2 and T3/L3 DryRapid Controller - installation/service manual Edition: 05/2005 M5031GB Recommended Pre Fusing (may be required by seftely regulations) Installation Page 9 3.2 Mains Supply Setting The mains selector must be set according to mains supply voltage: For AC supplies between 90V and 130V 50/60Hz set voltage selector into position "115" For AC supplies between 170V and 270V 50/60Hz set voltage selector into position "230" In position "115" supplies below 90V AC may cause activation of power-fail circuit. This includes drop-out in the mains supply. Also exceeding 130V may cause activation of overvoltage protection - which may cause the mains fuse F1 to blow. In position "230" supplies below 170V AC may cause activation of power-fail circuit. This includes drop-outs in the mains supply. Also exceeding 275V may cause activation of overvoltage protection - which may cause the mains fuse F1 to blow. Warning: Wrong setting may cause harm to the board - be sure always to set the switch correct. Do only operate the switch while power is OFF. Notice: AC mains for supplying the board is connected via the "N" and "L1" terminals ! DryRapid Controller - installation/service manual Edition: 05/2005 M5031GB Installation Page 10 3.3 Prefusing For safety reasons the mains supply for the DryRapid Controller should include a fuse in each used phase. Fuse rating and type must be selected according to local regulations. Cable used for internal wiring between the contactor and the PCB must be proper type according to local safely regulations. Also cable dimensions must be selected according to local regulation. Maximum outer dimensions will be limited by the size of the hole in the current sense transformers. For US/Canadian use of UL-approved cable is required. Also in some countries the motor protection provided by the DryRapid Controller may not be sufficient (or allowed to use). In such cases an external motor protection unit must be used. The status output of the external motor protection can be connected to the DryRapid controller via the "Ext. Overload" input. 3.4 How to connect Big Dutchman MS-45R sensors and passive status switches Unit with status switch ! For example an external motor protection DryExact Controller IN1 IN1 IN2 IN3 Black Brown IN4 AC Black Blue Big Dutchman MS-45R sensor Sensor Input Electronics Mains Supply AC Connector X2 3.5 Important note regarding Board Replacement Since setup/calibration data is stored in the top board, it may be required to make new setup/calibration when replacing the boards. Extent of this issue has to be examined before final directions can be setup. DryRapid Controller - installation/service manual Edition: 05/2005 M5031GB Connector Description Page 11 4 Connector Description 4.1 Relay - X1 Pin# Name Function 1 NC1 Relay #1 normally connected contact. 2 NO1 Relay #1 normally open contact. 3 NC1 Relay #1 common contact. 4 NC2 Relay #2 normally connected contact. 5 NO2 Relay #2 normally open contact. 6 NC2 Relay #2 common contact. 7 NO3 Relay #3 normally open contact 8 NO4 Relay #4 normally open contact 9 NO5 Relay #5 normally open contact 10 NO6 Relay #6 normally open contact 11 NO7 Relay #7 normally open contact 12 COM3-7 Relay #3 - #7 common contact. (For information about relay functions please refer to application program documentation) Do not remove the X1 connector while power is on. The Power should always be switched off before removing or inserting the X1 connector. Never mix low voltage (SELF) and mains voltage on the relay contacts either use all relays for low voltage circuits or use all relays for mains voltage circuits. • Low-voltage circuits are circuits which are isolated from the mains, and which are safe to touch. • Mains voltage circuits are circuits which are not isolated or whose isolation distances are insufficient when compared to the requirements. They are NOT safe to touch. DryRapid Controller - installation/service manual Edition: 05/2005 M5031GB Connector Description Page 12 4.2 Sensor - X2 Pin# Name Function 1 IN1 Sensor input #1 Standard use: Full sensor 2 IN2 Sensor input #2 Standard use: Drive Unit 3 IN3 Sensor input #3 Standard use: External overload signal 4 IN4 Sensor input #4 Standard use: Full Sensor (For information about sensor functions please refer to application program documentation) * The sensor inputs are not galvanically isolated. Inputs are designed for connection of Big Dutchman MS-45R low voltage sensors (10-30VAC/ DC) Input signal should be applied between the input and one of the AC terminals. The two AC terminals should be used to supply the sensors only - no other loads should be connected. DryRapid Controller - installation/service manual Edition: 05/2005 M5031GB Connector Description Page 13 4.3 Serial Port - X3 Pin# Name Function 1 GND Ground/Shield 2 TxD/A1 RS232 Transmit Data / RS485 A1 3 RxD/B1 RS323 Receive Data / RS485 B1 4 NC/A2 Not used* / RS485 A2 5 NC/B2 Not used* / RS485 B2 The serial port is not galvanically isolated. Interface may either be RS232 or RS485. Type is selected using SW1. Be sure to set the switch correct according to used interface standard. * When selecting RS232 interface pins 4 and 5 should always be left open (they are not floating) All signal pins are protected with overvoltage transient diodes. It is recommended that a shielded cable is used. Connect cable shield to pin 1 - keep pig-tail, i.e. the connection to pin 1 as short as possible preferable zero length. Alternatively clamp shield to mounting plate using a metal cable clamp. Interface configuration switch: Select "RS232" or "RS485" DryRapid Controller - installation/service manual Edition: 05/2005 M5031GB Connector Description Page 14 4.4 Mains connections P11-P12-P13 P12-P13 - "Mains connections" --P13-1---2---3 Pin# --P12-1---2---3 --P11-1---2---3 Name Function (connection for standard use)* P11-1 L1 Switched output to motor - phase L1 P11-2 L2 Switched output to motor - phase L1. P11-3 L3 Switched output to motor - phase L1 P12-1 L3 Mains supply - phase L3 (if three phases are required only) P12-2 PE Protective Earth - PE wire in power cable ! P12-3 PE Protective Earth - PE wire in power cable ! P13-1 N Mains supply - Neutral wire (always required*) P13-2 L1 Mains supply - phase L1 (always required*) P13-3 L2 Mains supply - phase L3 (if two or three phases are required only) * The electronics are supplied via neutral (P13 pin 1) and phase L1 (P13 pin 2). These two connections are always required. Voltage between these two pins must be within the limits specified (90-130VAC for position "115" and 170-270VAC for position "230". Be sure to set the mains voltage selection switch according to used mains voltage. • For mains voltages between 90-130VAC select position "115" • For mains voltages between 170-270VAC select position "230" DryRapid Controller - installation/service manual Edition: 05/2005 M5031GB Connector Description Page 15 Always connect protective earth wire ! • Connect earth wire (yellow/green wire) in mains power cable to PE terminal (P12 pin 2) • Connect earth wire (yellow/green wire) in motor cable to PE terminal (P12 pin 3) PE terminals are also labeled with the earth symbole Always check that the earth wire (yellow/green wire) in the mains cable has a proper earth connection. DryRapid Controller - installation/service manual Edition: 05/2005 M5031GB LED indicators Page 16 5 LED indicators 4. LED indicators The System has a number of LED's. Power indicator LED (+12V) Relay RL1 – RL7 indicator LED’s Contactor LED LED indicating activity on RS485 interface (ignore unless RS485 communication is used) (TxE = RS485 transmitter enabled when on) LED indicating activity on RS232 interface (ignore unless RS232 communication is used) (TxD = RS232 transmission when blinks ; RxD = RS232 reception when blinks) Power indicator LED (+5V) DryRapid Controller - installation/service manual Edition: 05/2005 M5031GB . LED indicators DIP-Switch Setting . Dip-Switch Setting Page 17 6 DIP-Switch Setting The CPU board has one dip-switch referenced "SW1". SW1 is a two pole dip-switch. The use of the switch will differ depending on the used software. It is used for system setup and battery disable. SW1-1 SW1-2 "1" Software readable switch #1 "2" The function of this switch is defined by the used software*) Software readable switch #2 The function of this switch is defined by the used software*) *) Keep dip-switches in OFF position for normal operation. Refer to software documentation for further details regarding function of the dip-switches. DryRapid Controller - installation/service manual Edition: 05/2005 M5031GB Technical specifications Page 18 7 Technical specifications Operating temperature range Storage temperature range Relative humidity (without dewing) Dimensions enclosure (l x h x d) 0oC...+50oC -25oC...+70oC 15%...95% 255 x 180 x 103 mm 7.1 Power Supply Input AC input voltage Selector in position "115" 90 - 130 V AC. 50-60Hz *) Selector in position "230" 170 - 270 V AC. 50-60Hz *) *)Exceeding maximum may cause activation of transient protection, which again may cause the mains fuse (F1) to blow. Important: The upper limits do not take limits for MS45R sensors into consideration. Electronics power consumption (L1 / N) 5 - 30 VA *) *) Actual power consumption will depend on mains voltage and board status (number of active relays etc.) 7.2 Relay Outputs Seven relays in different configurations. Potential free. 1) Switch rating Voltage/Current (ohmic and inductive loads) 275V AC / 2 A 2) 1) Mixing of low-voltage (SELV) and mains referred potentials on the relays is NOT allowed !!! 2) Refer to relay specification for more details about relay contact capabilities. DryRapid Controller - installation/service manual Edition: 05/2005 M5031GB Technical specifications Page 19 7.3 Contactor Outputs Three pole contact for phases L1, L2 and L3. Switch rating: Voltage/Power (ohmic and inductive loads) 500V AC/4KW 1+2) Current per phase 16A max 1) Refer to relay specification for more details. 2) Blow fuses should be inserted in the cable supplying the DryRapid Controller. Use one fuse in each phase. 7.4 Current supervision (Phase L1, L2 and L3) Current measuring range 0-14RMS Current measuring accuracy (LEM sensor or calibrated Coilcraft sensor) +/- 5% of full scale reading DryRapid Controller - installation/service manual Edition: 05/2005 M5031GB Technical specifications Page 20 7.5 Serial Interface 7.5.1 Serial Port - RS232 configuration (SW1 in position RS232) Non insulated high Speed RS232 interface With Txd and RxD signal (no handshake signals) Max Differential input voltage (Input to GND) Max Baud Rate Max Baud Rate (limited cable length) Input voltage range Input Capacitive Loading (EMI filter) +/- 15 V DC 19200 Baud 115200 Baud +/-5 --- +/-12 Volt 2200 pF 7.5.2 Serial Port - RS485 configuration (SW1 in position RS485) Non insulated high Speed RS485 interface Two wire interface - MC99 system network slave. Outputs are short circuit protected. Absolute Maximum Ratings Max Differential input voltage (A1,A2,B1,B2 to GND) +/- 15 V DC *) *) 15V is clamping level. Normally 0V --- +5V range should not be exceeded. Operating Conditions Max Baud Rate Input voltage range (A to B) Input Capacitive Loading (EMI filter) DryRapid Controller - installation/service manual Edition: 05/2005 M5031GB 115200 Baud 0 --- +/-5 Volt 2200 pF Technical specifications Page 21 7.6 Sensor Inputs The DryRapid Controller is designed for connection of up to four MS-45R (Big Dutchman) or compatible sensors. AC supply output for the sensors are provide (AC terminals). The inputs are NOT galvanic isolated neither to the electronics nor between each other. Absolute Maximum Ratings Max Potential to groundplane (GND) +/- 68 V DC Operating Conditions Input resistance Max Baud Rate (limited cable length) Input voltage range Input Capacitive Loading (EMI filter) 15KΩ 115200 Baud +/-5 --- +/-12 Volt 2200 pF 7.7 Miscellaneous specifications Power backup interval Real Time Clock accurancy (@25oC) Minimum two days Max deviation +/- min(month) 7.8 EMC compliance and safety EMC standards EN50081-1/-2 (emission) EN50082-1 (immunity) EN61000-6-2 (immunity) CISPR 22 Class B (emission) EN 61010-1:2001 (safety CE) ICE 61010-1:2000 (safety UL) This device complies with Part 15 of the FCC Rules. Operation is subject to the following two conditions: (1) this device may not cause harmful interference, and (2) this device must accept any interference received, including interference that may cause undesired operation. DryRapid Controller - installation/service manual Edition: 05/2005 M5031GB Index 22 C Connector Description 11 Contactor Outputs 19 CPU 5 Current supervision 19 D Digital inputs 3 DIP-Switch 17 Display Board 5 RS232 RS485 13, 20 13, 20 S Sensor - X2 12 Sensor Inputs 21 Serial Interface 20 Serial Port - X3 13 Storage temerature 18 Supply range 3 Switch-Disconnector 7 E EMC 21 Enslosure 18 F FCC 6 G General information 1 I Installation 6 Interface configuration switch 13 K keyboard 3 L LCD Display LED 16 3 M mainboard 5 Mains connections 14 Mains Supply Setting 9 MS-45R sensor 10 O Operating temperature 18 P PCB 5 Power backup interval 21 power output 3 Power Supply Input 18 Prefusing 10 R Real Time Clock (RTC) Relative Humidity 18 Relay - X1 11 Relay Outputs 18 Relay outputs 3 21 DryRapid Controller - installation/service manual Edition: 05/2005 M5031GB