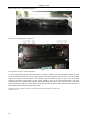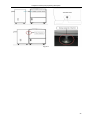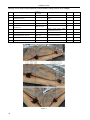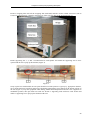
1
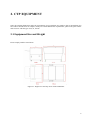
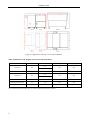
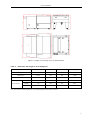
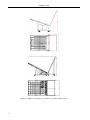
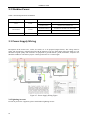
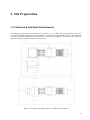
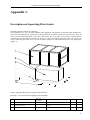
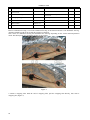
TP26/36/46
UVP26/36/46
Computer to Plate (CTP)
Installation Guide
Version 2010
Hangzhou CRON Machinery & Electronics Co.,Ltd.
No.99, Jinyi Road, Xiaoshan Economic and Technical Development Zone, Hangzhou, PRC
TEL: 0571-8283 8989 FAX: 0571-8283 8877
Contents
Overview................................................................................................................... 1
1. Accessory Equipment .......................................................................................... 3
1.1 Computer Equipment ............................................................................................................................. 3
1.2 UPS ........................................................................................................................................................ 4
1.3 Magnifying Glass ................................................................................................................................... 4
1.4 Plate Material Densitometer ................................................................................................................... 4
1.5 Constant Temperature and Humidity Equipment ................................................................................... 4
1.6 Level Gauge ........................................................................................................................................... 4
1.7 Dust Catcher ........................................................................................................................................... 4
1.8 Hydraulic Lift ......................................................................................................................................... 4
2. CTP EQUIPMENT ............................................................................................. 5
2.1 Equipment Size and Weight ................................................................................................................... 5
2.2 Machine Power..................................................................................................................................... 10
2.3 Power Supply Wiring ........................................................................................................................... 10
3. Site Preparation ................................................................................................. 11
3.1 Floorboard and Work Environment ......................................................................................................11
3.2 Floorboard and Corridor....................................................................................................................... 12
3.3 Work Environmental Conditions.......................................................................................................... 12
3.4 Power System Engineering .................................................................................................................. 12
3.5 Plate Processor ..................................................................................................................................... 12
4. Handling and Disassembly ............................................................................... 13
4.2 Shipment .............................................................................................................................................. 13
4.3 Handling Equipment ............................................................................................................................ 13
4.4 Installation Personnel ........................................................................................................................... 13
5. Inspection ........................................................................................................... 15
6. Basic Process for Installation ........................................................................... 17
Appendix 1. ............................................................................................................ 21
Description on Unpacking Plate Feeder ..................................................................................................... 21
Appendix 2. ............................................................................................................ 27
Computer to Plate (CTP) Unpacking Description ...................................................................................... 27
I
II
Overview
The Installation guide gives a description to the accessory equipment, installation environmental requirements,
workflow of installation and instruction for the unpacking, etc., that should be prepared before installing
CRON series CTP device and the inspection to be conducted at installation site. Please carefully read the
contents of this manual before installation.
Installation Guide describes CRON series CTP device. Before installation, the following conditions at site for
customers should be provided:
Accessory Equipment
CTP Equipment
Site Requirements
Handling and Disassembly
Installation shall not be conducted until customer site meets above conditions.
(The pictures in the Guide are provided for reference only. Please comply with the actual items.)
The workflow of installation should be strictly followed by the customer engineer on the field installation.
1
Installation Guide
2
1. Accessory Equipment
In ensure the regular installation and operation; customer must prepare the following equipment:
1.1 Computer Equipment
1.1.1 Process Master Server: Used for installing CTP workflow module.
Recommended server type: Dell 2900 server, HP 300 server and servers with equivalent performance
Or branded computer with same functions
Recommended server configuration:
CPU
Single Quad-Core Intel Xeon Processor 2.3GHz or higher performance CPU
Memory Bar
2G or superior
Hard Disk
300G Ultre SCSI 15000rpm or superior
Network Card
Gigabit Ethernet NIC
CD-ROM
DVD ROM or CD ROM
Display
17” + display, 1024×768 24 bit true color
USB Port
USB2.0 Port
OS
Windows 2000 Server with SP4 or Windows 2003 with SP1
1.1.2 Output-end Computer: Used for output
Type: DELL vostro 220s-n or equivalent branded computers.
CPU
Intel Dual Core E5200/7400
Memory Bar
2G
Hard Disk
10000rmp WD Raptor HD (Note: No such HD on Dell, purchase separately)
Display Card
256M
USB Port
USB2.0 Port
OS
Windows XP
Display
19” or others
Keyboard and Mouse
Standard keyboard and mouse
3
Installation Guide
1.1.3 One set of 100\1000M switch, network cables, and two or more mains jacks
1.1.4 Set up a wireless network within 25m around the equipment.
1.2 UPS
Online 5kVA UPS, to ensure quality of power.
1.3 Magnifying Glass
It is recommended to adopt 40X magnifying glass.
1.4 Plate Material Densitometer
It can be used for measurement of mesh point and density.
1.5 Constant Temperature and Humidity Equipment
Air conditioning equipment
Dehumidifier/humidifier
1.6 Level Gauge
Used for checking the level of the equipment.
1.7 Dust Catcher
In order to maintain the cleanness of equipment and the work environment, dust catcher should be provided.
1.8 Hydraulic Lift
Used for moving equipment. Lifting capacity: 1.5T.
4
2. CTP EQUIPMENT
Since the external dimensions and work environment of UVP machine are similar to that of TP machine, the
later will be introduced as an example, mainly on external dimensions of platemaker, plate feeder, plate stacker
and crossover with the type of 26, 36, and 46.
2.1 Equipment Size and Weight
Please comply with the actual items.
Figure 2-1: Right View and Top View of TP-26 Machine
5
Installation Guide
Figure 2-2: Right View and Top View of TP-36 Machine
Table 1: Dimensions and Weights of TP-26 and TP-36 Machines
W(cm)
L(cm)
H(cm)
Weight (kg)
106
800
102
270
106
940
97
Host TP-26
140
137 (plate bed)
Plate Feeder TPF-36A50
159
Host TP-36
163
90
98
138 (plate bed)
Plate Processor PT-90*
130
126
108
450
Plate Processor PT-130*
171
130
108
500
Plate Stacker TPS-33*
166
108
137
100
Note: The dimensions and weights may vary with the equipment selected by customer.
6
CTP EQUIOMENT
Figure 2-3: Right View and Top View of TP46 Machine
Table 2: Dimension and Weight of TP-46 Equipment
W(cm)
L(cm)
H(cm)
Weight (kg)
Plate feeding TPF-46A50
184.5
92
102
350
Host TP-46
189.5
105
106
1240
Plate Processor PT-130*
171
130
108
500
TPS-33*
166
108
137
100
CSP-90
172
103
130
82.5
CSP-130
204
148
141
105
Plate Stacker
Note: The dimensions and weights may vary with the equipment selected by customer.
7
Installation Guide
Figure 2-4: Right View and Top View of TPS-33*, CSP/130 Plate Stacker
8
CTP EQUIOMENT
Figure 2-5: Top View of TPB-4690 Angle Adjuster
Figure 2-6: Top View of TPB-46 Crossover
Table 3: Dimension and Weight of Crossover Equipment
W(cm)
L(cm)
H(cm)
Weight(kg)
Angle Adjuster TPB-4690
147
125
99
105
Crossover TPB-46
98
100
89
55
9
Installation Guide
2.2 Machine Power
Table 4: Power Requirements of Machine
Name of Equipment
Rated Power (kW)
TP-26
4.6kW
TP-36/TP-46
PT-90/PT-130
Requirements on Power Capacity
A (master control)
AC220V±5% 50/60Hz 16A (5KV UPS)
B (main motor)
AC220V±5% 50/60Hz 18A
A (master control)
AC220V±5% 50/60Hz 16A (5KV UPS)
B (main motor)
AC220V±5% 50/60Hz 20A
5.3 kW
5.5kW
AC220V±5% 24A
2.3 Power Supply Wiring
Description on the electric wire, socket, air switch, etc. to be prepared (Figure below): The voltage must be
stable. The ground wire (galvanized metal with the diameter of no less than 10mm, buried in depth of 1.5m)
should be in good quality. The resistance of equipment to ground shall be ≤0.5Ω; meanwhile, computer case
should be earthed as well. Please prepare a 4mm2 ground wire at a certain length.
Figure 2-7: Power Supply Wiring Figure
2.4 Lightning Arrester
In order to protect the equipment, please install indoor lightning arrester.
10
3. Site Preparation
3.1 Floorboard and Work Environment
According to the dimensions of machines given in Tables 1, 2, 3, 4 and 5 and in consideration of the space
reserved surrounding machine, the minimum distance from wall to machine should be 100cm. The dimension
of room required for installation can be worked out. A certain space should be reserved near the location of
machine for placing the plate materials used at any time.
Figure 2-8: Example of Installation Space (for TPB-4690 or TPB-46)
11
Installation Guide
Table 5: Room size for Installation (Recommended Size)
Configuration Scheme
W(m)
L(m)
1
TPF-26 +TPB-46+PT-90+TPS-33*
3.5
7.5
2
TPF-36A50+TP-36+TPB-46+PT-90+TPS-33*
4
8
3
TPF-36A50+TP-36+TPB-4690+PT-90+TPS-33*
6.5
5
4
TPF-46A50+TP-46+TPB-46+PT-130+TPS-33*
4
8
5
TPF-46A50+TP-46+TPB-4690+PT-90+TPS-33*
6.9
5
3.2 Floorboard and Corridor
The door and corridor of the installation site must be sufficient wide and ≥145cm so as to move machines into
room. The leveling of floorboard should be maintained at ±4mm; if installs above the first floor, the industrial
elevator with the carrying capacity greater than 1500kg must be provided. After the machine is installed in
place, the machine should be leveled with level gauge.
3.3 Work Environmental Conditions
Operating environment for CTP machine:
Temperature: 18°C~26°C (recommended precision: approximately at 23°C)
Humidity: 40%~60%
(recommended approximately at 50%), non-condensing
Air quality: Meet the National Air Quality Specification LevelⅡ, i.e., API value is greater than 50 and smaller
than or equal to 100;
Following equipments should be installed in the room: Air conditioner, dehumidifier/humidifier, and air
purifier.
Note: The temperature and humidity of the operation and storage of the plate materials provided by
manufacturer should be taken into account. Do not install plate maker in printing workshop. The complete set
of system should be installed in a clean, constant-temperature and constant-humidity preprinting environment.
Important: Since plate-making equipment has higher requirements on environment, especially the lens, with
higher cleanness requirement, customer should install the equipment in an independent and closed
environment to keep the equipment clean and maintain the operating quality of the equipment.
3.4 Power System Engineering
Ensure the power of plate-making and output computer power to share the same AC power to ensure that they
have the same ground potential difference; the resistance to ground is smaller than 0.5Ω.
Customer must provide an UPS (>5KVA) to guarantee the power quality.
3.5 Plate Processor
Customer must provide external water pipe system, inflow pipe and drain pipe according to the requirements
of plate processor manufacture. Waste liquid should be treated according to the national laws and regulations.
12
4. Handling and Disassembly
4.1 Conditions Provided by Customer during Handling
Customer should provide the equipment and tools for handling machine and ensure the machine to be moved
to installation site safely. At the same time, CRON engineer will assist in the handling and dismantling (For
packaging removal, see the description in Appendix).
4.2 Shipment
Generally the plate-making machine is handled with 3-4 Boxes. The table below lists out the size of road
transportation of some equipment.
Table 6: Packing Size and Weight of CRON CTP System
Articles of Box
Length (cm)
Width (cm)
Height (cm)
Weight (Kg)
TP-26
210
136
138
907
TPF-36A50
181
136
138
365
TPF-46A50
196
136
147
453
TP-46
210
156
147
1359
4.3 Handling Equipment
Customer must provide forklift or crane. The minimum carrying capacity of forklift or crane should be greater
than 1500kg and the length of the fork should be greater than 150cm. The span between two forks may be
adjusted to appropriate width according to the structure of wood box and machine.
4.4 Installation Personnel
CRON recommends that customer provides professional handling personnel to carry the machine to
installation site and unpack the packaging box. CRON professionals will assist in the operation on the spot.
13
Installation Guide
14
5. Inspection
CRON customer service engineer must inspect the installation site, environment, electric power, etc. of
customer and fax the inspection form to the company. The machine should not be installed until approved by
customer service manager.
If the site of the customer fails to meet standard, customer service engineer should bring forward strong
request to customer manager and submit rectification plan to customer. If customer strongly asks to install,
customer service engineer should submit declaration. The statement must be signed by customer manager and
put on record.
Basic environment requirements of CTP
Basic environment requirements
1
2
3
4
5
6
7
8
9
10
11
12
13
Reserve sufficient space for plate-making machine, and 2m space should be reserved
according to the requirements of the models and external dimensions,
Pass through the door and corridor smoothly according to the requirements of the models
and appropriate dimensions,
Range of ambient temperature and humidity of plate-making machine: Temp: 20-30ºC
Humidity:40-60RH%. Are there thermometer and humidometer in the full position? And:
Temperature range: __________ Humidity Range: ____________
The surface flatness where the machine is located within ±4mm.
The configuration of the computer: 2G internal memory or superior Hard drive:10000
WD Raptor hard drive(Not found in Dell computers, should be bought separately and
installed) Display card: 256M or superior OS: Windows XP/Win7 USB port:
USB2.0 port CPU: Intel Core Duo E5200/7400
Are there any large scale factories or highways, which may cause noise and vibration that
could affect the patemeker?
Have lightning arrester and ground wire been properly installed?
A. Ground wire specific for the equipment, with the requirements of stable voltage, the
diameter of the high-quality wire is 4mm (the diameter of galvanized wire should not be
less than 10mm, deep-seat in the wet soil below 1.5m). the resistance to ground is less than
1.5Ω , meanwhile the computer chassis should be connected to the ground; B. a wire of
4mm2 should be prepared for the grounding of the chassis.
Has UPS power supply meeting requirements been configured for CTP master control
part?
Have 4 35A air switches and connection wire (earth) been prepared for the plate-making
machine according to power supply wiring chart?
Air cleaner should be equipped in the workshop
Working conditions of the plate processor: water inlet (with filter), 4 separate sewer
pipes( with the diameter of 50mm), pump should be equipped according to the water
pressure.
Can the handling equipment be provided on the exact day of installation?
14
The requirements of the dust extraction should meet the national grade 2 standard, i.e.
50<PAI≤100
15
The computer furniture and LAN should be reconstructed at the need of the installation
16
17
Practical
Standard
Have operating personnel participated in the training on application maintenance
equipment in our company? And do they have the Cron certificates of the training.
Have operating personnel participated in equipment installation and supported the test?
15
Installation Guide
18
During the installation and test the equipment should be used in printing in time, or the
waiting time of the engineer surpasses 1 day should be charged RMB 500yuan/day.
19
Plate processor brand and model: __________
20
Model of plate materials commonly used by customer:
21
Are the consumables such ad plates for testing, lotion etc, ready?
__________
All the site environment and the requirements of the engineer are clear, and the above terms are all accepted, then
sign and confirm!
Signature of the client:
Date:
16
Signature of the engineer:
Date:
6. Basic Process for Installation
In pre-sales service, the equipment layout plan has been established with client and client has prepared water
inflow, drainage, and ventilation pipes. Once the equipment arrives at the site and is dismantled, the equipment
to be installed should be pre-placed. A certain space should be reserved between devices so as to check the
correctness of the installation plan formulated originally. Among system equipment, the mainframe is the most
important one and difficult to handle. Plate processor has to be connected with the water inflow and drainage
pipes pre-installed. Once plate processor is filled with liquid, it cannot be operational. Therefore, before adding
liquid to plate processor, both the plate outlet of the mainframe and the plate inlet of plate processor should be
centered so as to enable plate material to move smoothly.
I. Preparation and Check
Item
Specific Execution Items
1.
Environment
verification
2.
check
Equipment
3.
Equipment
delivery from box
4. Equipment
place
in
Verify the environment of the operating room to see if it is
consistent with the table in the Basic Environmental
Requirements; if there is any nonconforming item, please
communicate with client and strongly ask client to execute
according to the requirements of environmental standard.
A. Once the equipment arrives at the premise of client, first
check the appearance of wooden box to see if there is any
damage, collision, and the integrity of the entire wooden box;
B. After dismantling the wooden box, check the surface of
equipment to see if there is any peeling, scratch, depressed
enclosure, water mark, displacement of top cover, etc.
A. Dismount two retaining screws (diagonal) of air pump;
B. Remove the fixing screw of the vacuum pump of plate
feeder in the same way;
C. Check the supporting software, tool kit, accessory kit,
simple plate feeding platform, etc. of the equipment against the
accompanied list.
A. Move the equipment into the working room of the
equipment safely and make sure the placement position and
direction;
B. Ensure the equipment free from collision and vibration
during transportation.
Confirm
Fill in Confirmation
Sheet of Packaging
Box and Equipment
Appearance
II. Installation and Debugging
Item
of
Specific Execution Item
A. Make sure to reserve spatial position of the crossover
between the mainframe and plate processor before fixing
equipment;
B. Lift the three lifting feet of the mainframe and ensure the
caster wheels off the ground;
C. Place the level bar on the surface of drum and make sure the
left and right level;
D. Place the level bar on the surface of wall board to make sure
the front and back level;
2.
Crossover
installation
Assemble the crossover or angle indicator and place it at the
place in parallel with the plate outlet of the mainframe to
ensure the plate outlet to pass through the crossover or angle
1. Fixation
mainframe
equipment
Confirm
17
Installation Guide
indicator smoothly.
3.
Processor
installation
4. Internal check
before
electrification
A. Plate processor must be placed by taking the position of the
mainframe as the reference, to enable both plate outlet of
mainframe and the plate inlet of plate processor to be in the
center and ensure the process of plate delivery to be conveyed
smoothly.
B. For the fixation, installation, placement, and horizontal
mode of plate processor, refer to the Installation Guide for
Plate Processor and execute strictly according to the guide
C. Equipment supplier should be responsible for the debugging
of plate processor.
A. Open the top cover of CTP mainframe, remove appropriate
fixing ribbon, and check all moving parts within the equipment
to see if they are in good conditions;
B. Check balance block, plate tail clip, and plate roller, etc. to
see if they are in normal conditions.
III. Testing, Use, and Training of Plate Delivery
Item
Preparatory check
on power supply
before
electrification
Software
installation
Mainframe
electrification
Equipment self-test
Equipment test
18
Specific Execution Item
A. Test the mainframe with multimeter – the grounding is
normal;
B. Prepare the power socket used by supporting UPS and
computer, crossover, and other devices;
C. Grounding (earth) equipment and computer according to the
requirements in the Installation Guide, the diameter of the
ground wire section should not be smaller than 4mm2.
Install computer and CTP supporting LaBoo output software,
equipment driver, laser testing driver, etc.; for more details, see
the Instructions for LaBoo Installation and Operation.
A. Power on CTP mainframe equipment, connect grey power
line with UPS, connect black wire directly to external air
switch or 16A socket;
B. Observe and listen to the equipment to see if there is any
abnormal noise or other abnormal phenomenon.
A. Open LaBoo software, read in control parameters from
equipment, and select appropriate mode and confirm according
to the equipment;
B. Execute platform movement and make sure that the
platform moves left and right in normal condition;
C. Create necessary template, enter command function
operation, and select appropriate template and conduct
equipment self-test;
D. When the equipment executes appropriate action, engineer
should closely observe the related mechanisms to see if there is
any abnormal action and sound.
A. Enter engineer mode to perform movement test procedures;
run testing items and check step by step by referring to the
Service Manual and make sure that all mechanisms operate
normally;
B. The linearity of the front guide rail should be controlled
within 0.006MM for the items required for check during
installation; this may be judged by way of focal distance test
mode in Item 10;
C. Check the multiple switching between the largest template
and the smallest template (ensure balance block and plate tail
clip free from any abnormal operation and abnormal sound);
D. CTP loading and unloading test; check the edging of plate
head and plate tail to see if they are within normal range (the
edging width of plate tail is 4-5MM).
Confirm
Fill in the Data
Detection
Record
Form
The basic process installed
Laser test
Plate
processor
debugging
Plate
processor
electrification
Plate
processor
installation
Focal
length
verification
Plate delivery test
A. Open light locking software → test connection → light
locking feedback, check the temperature of frame and laser box
(normal range: 25±3℃);
B. Execute the command for the maximum value of light
locking according to equipment model and make sure that laser
power is normal.
Feed
back
laser
information
(Including
testing
connection,
light
locking feedback, and
maximum
power
value)
A. Adjust and make sure the pressure of the brush of plate
processor: Cut a PS plate and insert into the brush for
adjustment until the pressure is appropriate for contact state
and the left and right pressure is consistent;
B. Pressure of rubber roller: Rotate clockwise for 180°when
the pressure adjusting screw just contacts the sleeve of rubber
roller; for other precautions, the Installation and Operating
Guide for Plate Processor must be strictly observed.
A. Plate processor electrification test and addition of
refrigerating liquid: Add liquid medicine according to the
proportion of the supporting liquid medicine of plate material;
set liquid medicine temperature and developing time;
replenishing liquid should be mixed according to normal liquid
medicine;
B. Use thermometer to make sure that the actual temperature is
consistent with the temperature displayed;
C. Observe the cycling state of liquid medicine to see if it is
normal.
A. The plate feeding outlet of plate feeder must be accurately
docked with the plate inlet of the mainframe and the left and
the right should be in parallel;
B. Taking a plate material and the left edge of the plate
material must be at the place 3MM right to the point of the side
gauge after feeding the plate manually; make sure that the roll
pull guide pulls the plate other than pushing the plate;
C. Execute according to the adjusting process of automatic
plate feeder;
A. Deliver plate at 2400DPI and find the best focal length
position; subject to one frame skewed to the left for the best
focal length (before test, micrometer must be used for
measuring the actual thickness of the plate material to ensure it
in accord with the template);
B. The developing conditions should be accelerated during
focal length test;
C. Increase or decrease the parameter values appropriately
according to the reference adjusted precision of 2400 for other
precision;
D. The linearity of guide rail can be judged with the focal
length of the entire plate. For example, the focal length chart is
clear in the middle but unclear at both sides. If the deviation of
50% screen dot (left, middle, and right) is above 2%, it means
that there is some problem with the linearity of the guide rail.
In this case, the linearity should be measured with meter and
the error should be controlled within 0.006MM.
A. Find appropriate conditions of the development and
exposure of the plate material;
B. The plate made must ensure 2%-98% dot visible and
without bottom ash;
C. Position the left, middle, and right accurately according to
the seam of file;
D. Check the back of plate material to see if there is any
19
Installation Guide
scratch, which may affect the plate delivered;
E. Make sure that the fan separation blade of barometer fully
keeps out the sensor during plate delivery.
V. Acceptance
Item
Complete
installation
Specific Execution Item
Confirm
A. Back up the control parameters of the equipment after
completing debugging and back up LaBoo output software;
B. Transmit laser data back to the company for filing after
completing installation;
C. Select to provide refined training for client after executing
above items;
D. Fill in the Installation Acceptance Sheet and ask client to
sign for confirmation.
V. Materials and Archival Records
Item
Filling of forms
and relevant data
20
Specific Execution Item
A. Filling in Installation Environment Confirmation Sheet;
B. Confirmation sheet for packaging box and equipment
appearance;
C. Filling in Data Detection Log Sheet;
D. Filling in Unpacking Laser Data Record;
E. Filling in Installation Acceptance Sheet;
F. Filling in Equipment Installation Question Feedback
(acceptance rate sheet);
G. Site environment pictures.
Confirm
Computer to Plate (CTP) Unpacking Description
Appendix 1.
Description on Unpacking Plate Feeder
Procedures and precautions for unpacking:
Check package to see if it is in good condition when unpacking. The pigment of anti-pitch mark should not be
spoiled out of standard scale. If find any problem, should be recorded. Unpack the external box: Loosen 18
cross recessed countersunk head wood screws and remove the cover plate of external box upward and the
component at the side board of external box (Figure 1). Unpack packaging fixing plate: Move off 4 groups of
screws connecting the fixing device of host as shown in Figure 2 with wrench and remove the fixing plate
(Figure 2).
Figure 1 Schematic Drawing for Unpacking External Box
Drawing 1: List of Parts and Components of External Box
No.
Name of Part and Component
1
Component of outer Box
2
Aluminum foil bag
3
Host
Drawing
No./Model
Material/Specification
Quantity
Remark
1
250g
1
1
21
Installation Guide
4
Nut M10
GB/T 6710 M10
4
5
Cross recessed countersunk head
wood screws
GB/T 951 6*60
18
6
Outer Box bottom plate
TP36-3002
40mm solid wood plate, 100*80mm
solid wood
1
7
Packaging fixing plate
CTP4-2001A
5.0 cold plate
4
8
Socket head screw M6*12
GB/T 70.1
12.9 class alloyed steel
8
9
Plain cushion
GB/T97.1 6
10
Square neck bolt M10*65
8
4
Remove aluminum foil bag: Cut off the aluminum foil bag at the bottom and move off aluminum foil bag.
Attention should be paid not to scratch the enclosure of the host.
Note: There are aluminum foil bag and aluminum-free foil bag depending on the season and transportation
mode. This description uses aluminum foil bag as an example.
Figure 2
5. Remove wrapping film: Find the end of wrapping film, pull the wrapping film directly, thus remove
wrapping file (Figure 3).
22
Computer to Plate (CTP) Unpacking Description
Figure 3
Rotate supporting feet 1, 2, and 3 counterclockwise with spanner and enable the supporting feet to move
upward and the feet to prop up the machine (Figure 4).
Figure 4
Scoop up the plate feeder with forklift; the tine point should exceed the position of gravity by appropriate
distance; move off the bottom of wood box and loosen 2 pneumatic pump fixing screws M5*65 at the bottom
of plate feeder (Figure 5); keep the equipment stable during forklift and transportation and move the equipment
to installation position, then put down plate feeder with care.
Figure 5
23
Installation Guide
Remove top cover of equipment (Figure 6).
Figure 6
Cut off 6 red wrapping tapes (Figure 7).
Figure 7
10. Put on the top cover of the equipment.
11. First of all, properly design the locating place, fix the host and plate feed. The installation method for plate
feeder is described as follows: Closely connect plate feeder with Computer to Plate (CTP), rotate the rotating
disk of the fixing foot on the wheel of the machine, and descend the fixing feet and fix on the ground.
Attention: The plate feeding wheel of plate feeder should be kept on the same horizontal line with plate
feeding guide plate of plate-making machine and align feeding in position sensor with the orifice on the CTP
guide plate directly (Figure 8), then connect the power line and serial data cable with the power interface of
plate-making machine and serial port respectively.
Alignment between Computer to Plate (CTP) guide plate orifice and feeding in position sensor
Same Horizontal Line
24
Computer to Plate (CTP) Unpacking Description
Figure 8
25
Installation Guide
26
Computer to Plate (CTP) Unpacking Description
Appendix 2.
Computer to Plate (CTP) Unpacking Description
Procedures and precautions for unpacking:
1. Check the package box to see if it is in good condition when unpacking. The pigment of anti-pitch mark
should not be spoiled out of standard scale. If find any problem, it should be recorded.
Unpack the external box: Loosen 18 cross recessed countersunk head wood screws and remove the cover plate
of external box upward and the component at the side board of external box (Figure 2). Unpack packaging
fixing plate: Move off 6 groups of screws connecting the fixing device of host as shown in Figure 2 with
wrench and remove the fixing plate (Figure 2). Remove aluminum foil bag: Cut off the aluminum foil bag at
the bottom and move off aluminum foil bag. Attention should be paid not to scratch the enclosure of the host
(Figure 1).
Note: There are aluminum foil bag and aluminum-free foil bag depending on the season and transportation
mode. This description uses aluminum foil bag as an example.
Figure 1: Schematic Drawing for Unpacking External Box
27
Installation Guide
Drawing 1: List of Parts and Components of External Box (Taking CTP 36 as an example)
Drawing
No./Model
No.
Name of Part and Component
1
Component of outer Box
2
Aluminum foil bag
3
Host
4
Nut M10
GB/T 6710 M10
6
5
Cross recessed countersunk head
wood screws
GB/T 951 6*60
18
6
Outer Box bottom plate
TP36-3002
40mm solid wood
100*80mm solid wood
7
Packaging fixing plate
CTP4-2001A
5.0 cold plate
6
8
Socket head screw M6*12
GB/T 70.1
12.9 class alloyed steel
12
9
Plain cushion
GB/T97.1 6
10
Square neck bolt M10*65
Quantity
1
250g
1
1
plate,
1
12
6
Figure 2
28
Material/Specification
Remark
Computer to Plate (CTP) Unpacking Description
Remove wrapping film: Pull off the wrapping film with hand, and take off the related accessories such as
Crossover 1and Crossover 2 from the software box of the accessory box of the tool kit (Figure 3).
Figure 3
Rotate supporting feet 1, 2, and 3 counterclockwise with spanner and enable the supporting feet to move
upward and the feet to prop up the machine (Figure 4).
Figure 4
Scoop up the host with forklift; the tine point should exceed the position of gravity by appropriate distance;
move off the bottom of wood box and loosen 2 pneumatic pump fixing screws M5*65 at the bottom of host on
the left (Figure 5); keep the equipment stable during forklift and transportation and move the equipment to
installation position, then put down host with care. Rotate 3 supporting feeds clockwise with wrench and
enable 3 supporting feet to prop up the machine with force.
29
Installation Guide
Figure 5
Remove the upper enclosure before and after the equipment (Figure 6).
Figure 6
Snip off 2 red strapping tapes on the shaft of publishing rack (Figure 7).
Figure 7
Put back the top cover.
30