1
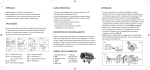
CONSOLE CONNECTOR KIT 8000 INSTALLATION INSTRUCTIONS
FOR USE WITH: LESLIE Speaker Models 122, 122V, 122RV, 222, 22RV
HAMMOND Organ Models A, B, C, D, E, BV, CV, B-2, B-3, C-2, C-3, RT-2, RT-3
KIT CONTENT
Console Connector Assembly
Adapter, 6 x 4, 7-pin
Adapter, 6 x 5, 8-pin
Oiler
Tremolo Control
brown
ebony
ivory
018432
048082
048090
053025
015594
015602
015610
Hardware Package
Screw, machine, 8 x 1/2,
Phillips head (2)
Screw, wood, 6 x 1/2,
black oxide,
Phillips head (2)
Insulated staples (6)
Wire Nuts (2)
011353
029132
029124
028464
028076
CAUTION
Due to the presence of electrical potential and the danger of moving mechanical
parts, installation procedures or adjustments requiring work inside the LESLIE speaker
cabinet or the organ console should be performed ONLY BY a service man authorized
by the dealer or factory to perform such work.
INSTALLATION
CAUTION: DISCONNECT ORGAN POWER BEFORE PROCEEDING:
1. Detach the back cover from the organ.
2. Mount the console connector within the tone generator compartment near the
organ pre-amplifier. Use the cadmiumplated screws provided.
3. Mount the tremolo control switch case on the wooden rail in front of the lower
manual. Use the black oxide wood screws.
4. Pass the tremolo control cable from the switch to the console connector in one of
the following ways.
a. Slip a small screwdriver over the felt dust seal between the lower manual and the
knee panel. Pass the cord through this opening into the organ. From the rear of
the organ, reach behind the tone generator and pull the cable into the organ
interior.
b. Run the cord along the corner where the knee panel and the end of the organ
join; then run the cable under the tone generator compartment to the back. Cut
a small notch in the edge of the bottom shelf and pass the control cable into the
organ interior.
Page 1 of 4
5. Using one of the wire nuts provided, fasten together the stripped ends of the AC
wires from the tremolo control and the console connector (A, figure 1). It is not
necessary to twist the wires together before inserting them in the wire nut.
6. Remove the wires from the terminals marked G, on the organ pre-amplifier.
Connect the wires to the screw terminals on the console connector chassis (B,
figure 1).
NOTE: Either wire may be fastened to either terminal.
7. Attach the red and black wires from the console connector to the G terminals on
the pre-amplifier (C, figure 1).
NOTE: On newer organ models the G terminals are solder lugs. If this is the case,
cut off the wire lugs and solder the wires to the terminals.
8. Attach the yellow wire from the console connector to the GND (ground) terminal
on the organ pre-amplifier (D, figure 1).
9. a. HAMM0ND A, B, C, D, E, BV, CV installations:
Attach the brown wire from the console connector directly to the B+ terminal on
the pre-amplifier. Leave the original B+ terminal wire attached.
b. HAMMOND B-2, C-2, RT-2 installations:
Attach the brown wire from the console connector to the black wire from the 8pin B+ adapter supplied in the kit (E, figure 1). Cover this connection with the
insulating sleeve. Remove the 6X5 rectifier tube from its socket. Insert the 8-pin
adapter into this socket; then plug the tube into the adapter (F).
c. HAMMOND B-3, C-3, RT-3 installations:
Attach the brown wire from the console connector to the black wire of the 7-pin
miniature B+ adapter supplied in the kit (E). Cover this connection with the
insulating sleeve. Remove the 6X4 rectifier tube from its socket. Insert the 7-pin
adapter into this socket; then plug the tube into the adapter (F).
10. Connect the organ to the LESLIE speaker with the cable supplied with the organ.
Insert the plug end of the cable into the socket on the HAMMOND junction box.
Connect the socket end of the cable to the speaker plug at the rear of the LESLIE
speaker
11. Replace the back cover on the organ.
12. Adjust the volume of the LESLIE speaker according to the instructions in the
speaker owner's manual. Installation is now complete.
Page 2 of 4
Page 3 of 4
ORDERING PARTS
Standard hardware, connectors, and electronic components should be purchased
locally. Non-standard items may be obtained through a LESLIE speaker dealer. Orders
should include part numbers listed.
PARTS LIST
CONSOLE CONNECTOR ASSEMBLY
Capacitor, electrolytic, 10 mfd, 250V
Resistor, 82K, 2W, 10% (Rl)
Resistor, 15K, 112W, 10% (R2)
Resistor, 47K, 1W, 10% (R3)
Transformer, line
Washer, flat, .125 x .312 x .020
018093
018465
048157
018457
048025
025189
TREMOLO CONTROL
Tremolo Switch Case
brown
ebony
ivory
103750
103760
103770
Switch Case Cover
brown
ebony
ivory
048702
048710
048728
Switch Knob
brown
ebony
048066
048074
Switch Retainer (2)
Switch Only
Switch and Cable Assy
Screw, thread-cutting
6-32 x 3/8
Label (CHORALE/TREM)
048744
042911
028704
029140
103640
MULTIPLE SPEAKER INSTALLATION
For complete information, see the service manual for the LESLIE speaker to be added.
Page 4 of 4