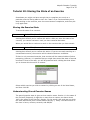
1
KAPELLE DICTATION VERSION 1.0
User Manual I: Tutorials
TABLE OF CONTENTS
CONVENTIONS USED IN THIS MANUAL........................................................................................................6
M ENU COMMANDS...................................................................................................................................................... 6
COMMANDS.................................................................................................................................................................. 6
WHAT IS KAPELLE DICTATION? ......................................................................................................................7
PRELIMINARY: TAKE A LOOK AROUND......................................................................................................8
ONLINE AND CONTEXT -SENSITIVE HELP ................................................................................................................ 8
THE M AIN W INDOW AND ITS PARTS........................................................................................................................ 9
TOOLBARS.................................................................................................................................................................... 9
M ENU BAR ................................................................................................................................................................. 10
CONTEXT M ENUS...................................................................................................................................................... 11
STATUS BAR............................................................................................................................................................... 11
DOCUMENT PANE ...................................................................................................................................................... 11
FILE PANE................................................................................................................................................................... 11
TUTORIAL 1: MELODIC DICTATION I..........................................................................................................12
OPEN TUTORIAL : TUTORIAL M ELODIES #01......................................................................................................... 12
PLAY THE ENTIRE MELODY..................................................................................................................................... 12
PLAY THE FIRST MEASURE ...................................................................................................................................... 12
PLAY THE SECOND M EASURE ................................................................................................................................. 12
PLAY THE FIRST AND SECOND M EASURES............................................................................................................ 13
STOP PLAYBACK........................................................................................................................................................ 13
HOW TO CHANGE THE PLAYBACK VOLUME......................................................................................................... 13
NOTATE THE EXERCISE ............................................................................................................................................ 14
SCROLL THROUGH AND PROOFREAD YOUR NOTATION...................................................................................... 20
EVALUATE YOUR NOTATION .................................................................................................................................. 22
COMPARE WITH PLAYBACK.................................................................................................................................... 23
SUMMARY OF TUTORIAL 1....................................................................................................................................... 24
FOR M ORE INFORMATION ........................................................................................................................................ 24
TUTORIAL 2: YOUR PROGRESS REPORT I................................................................................................25
SORTING ENTRIES ..................................................................................................................................................... 25
CLOSING YOUR PROGRESS REPORT ....................................................................................................................... 26
TUTORIAL 3: MELODIC DICTATION II........................................................................................................27
OPEN TUTORIAL : TUTORIAL M ELODIES #02......................................................................................................... 27
SET THE PLAYBACK TEMPO..................................................................................................................................... 27
PLAY THE FIRST MEASURE...................................................................................................................................... 27
PLAY A TONIC TRIAD ............................................................................................................................................... 27
PLAY THE TONIC PITCHES........................................................................................................................................ 28
NOTATE A D-SHARP .................................................................................................................................................. 29
INSERT A NOTE.......................................................................................................................................................... 29
NOTATE A B-FLAT ..................................................................................................................................................... 30
SUMMARY OF TUTORIAL 3....................................................................................................................................... 30
TUTORIAL 4: CHORD DICTATION..................................................................................................................31
OPEN TUTORIAL : TUTORIAL CHORDS #01 ............................................................................................................ 31
PLAY THE EXERCISE ................................................................................................................................................. 31
NOTATE THE FIRST NOTE......................................................................................................................................... 31
NOTATE THE REST OF THE CHORD ......................................................................................................................... 31
NOTATE THE REMAINING CHORDS......................................................................................................................... 31
SUMMARY OF TUTORIAL 4....................................................................................................................................... 32
TUTORIAL 5: RHYTHMIC DICTATION I......................................................................................................33
OPEN TUTORIAL : TUTORIAL RHYTHMS #01 ......................................................................................................... 33
SET A DIFFERENT CLICK TRACK............................................................................................................................. 33
LISTEN TO THE FIRST M EASURE ............................................................................................................................. 34
NOTATE THE RHYTHM.............................................................................................................................................. 34
OVERRIDE PITCH EVALUATION .............................................................................................................................. 34
EVALUATE YOUR W ORK.......................................................................................................................................... 35
SUMMARY OF TUTORIAL 5....................................................................................................................................... 35
TUTORIAL 6: RHYTHMIC DICTATION II: LAYERS ................................................................................36
OPEN TUTORIAL : TUTORIAL RHYTHMS #02 ......................................................................................................... 36
PLAY THE EXERCISE ................................................................................................................................................. 36
NOTATE THE UPPER VOICE ...................................................................................................................................... 36
TIES AND RESTS......................................................................................................................................................... 36
CHANGE TO LAYER 2................................................................................................................................................ 37
NOTATE THE LOWER VOICE .................................................................................................................................... 37
OVERRIDE EVALUATION OPTIONS FOR PITCH...................................................................................................... 37
SET RHYTHMIC EVALUATION OPTIONS................................................................................................................. 37
EVALUATE YOUR W ORK.......................................................................................................................................... 38
TUTORIAL 7: CHORALES AND HARMONIC ANALYS IS I....................................................................39
OPEN TUTORIAL : TUTORIAL CHORALES #01........................................................................................................ 39
DISABLE THE CLICK TRACK .................................................................................................................................... 39
CHANGE THE OUTPUT PROGRAM............................................................................................................................ 39
LISTEN TO THE EXERCISE ......................................................................................................................................... 40
NOTATE THE SOPRANO............................................................................................................................................. 40
NOTATE THE BASS .................................................................................................................................................... 40
HARMONIC A NALYSIS PLACEHOLDERS................................................................................................................. 40
A NALYZE THE FIRST CHORD W ITH A HARMONIC PLACEHOLDER..................................................................... 41
A NALYZE THE SECOND CHORD WITH ADD A NALYSIS COMMAND................................................................... 42
A BOUT CONTINUOUS A NALYSIS............................................................................................................................. 43
CONTINUE TO THE END OF THE EXERCISE ............................................................................................................. 43
NOTATE AND ANALYZE TUTORIAL: TUTORIAL CHORALES #02 ........................................................................ 44
FIRST A NALYSIS: ENTERING THE KEY................................................................................................................... 44
THIRD MEASURE : CADENTIAL 64........................................................................................................................... 44
EDIT AN A NALYSIS W ITH A HARMONIC PLACEHOLDER..................................................................................... 44
SUMMARY OF TUTORIAL 7....................................................................................................................................... 45
FOR M ORE INFORMATION ........................................................................................................................................ 45
TUTORIAL 8: CHORALES AND HARMONIC ANALYS IS II ..................................................................46
OPEN TUTORIAL : TUTORIAL CHORALES #03........................................................................................................ 46
SET EVALUATION OPTIONS TO ALL VOICES......................................................................................................... 46
PIVOT POINTS............................................................................................................................................................. 46
A NOTE A BOUT NOTATING IN FOUR VOICES........................................................................................................ 47
NOTATE THE SOPRANO VOICE ................................................................................................................................ 47
NOTATE THE BASS VOICE ........................................................................................................................................ 47
NOTATE THE A LTO VOICE ....................................................................................................................................... 47
NOTATE THE TENOR VOICE ..................................................................................................................................... 47
ENTER THE HARMONIC A NALYSIS FOR M EASURES 1 & 2 .................................................................................. 47
LISTEN TO MEASURE 3............................................................................................................................................. 48
EDIT THE FOURTH CHORD ....................................................................................................................................... 48
A NALYZE THE REMAINDER OF THE EXERCISE ...................................................................................................... 49
EVALUATE YOUR W ORK.......................................................................................................................................... 49
NOTATE AND ANALYZE TUTORIAL: TUTORIAL CHORALES #04 ........................................................................ 49
HOW TO BE A HERO A BOUT HARMONIC PLACEHOLDERS AND PIVOT POINTS................................................ 50
SHORT DIGRESSION: HOW HARMONIC PLACEHOLDERS CAN HELP .................................................................. 50
SUMMARY OF TUTORIAL 8....................................................................................................................................... 51
TUTORIAL 9: YOUR PROGRESS REPORT II...............................................................................................52
SUMMARY OF TUTORIAL 9....................................................................................................................................... 54
TUTORIAL 10: STORING THE STATE OF AN EXERCISE.....................................................................55
STORING THE EXERCISE STATE............................................................................................................................... 55
UNDERSTANDING STORED EXERCISE NAMES....................................................................................................... 55
A N EXERCISE IS RESTORED ONLY ONCE .............................................................................................................. 56
Kapelle Dictation Tutorials
Page 6 of 57
Conventions Used in this Manual
Menu Commands
All menu commands are given in the form Menu | Command, in which the word
to the left of the | mark is the name of the menu and the word to the right is the
command name.
Thus Edit | Paste would mean the Paste command on the Edit Menu.
In some instances, a command might be in a hierarchical menu (menus that
open to produce other menus). In such situations, each individual menu is
followed by a vertical line, like so: Note | Modify Note | Move Up.
Commands
Most of the commands in Kapelle Dictation are available via toolbars, menus, and
keyboard shortcuts. Directions for carrying out an individual command will be
given in a multiple-row table; you may select which technique you wish, whether
it be from a menu selection, by clicking a toolbar icon, or using a keyboard
shortcut. This multiple-row table will look like this:
Menu
Toolbar
Keyboard
Context
Select Menu | Command
Picture of the icon
Press Keyboard shortcut (such as Ctrl+K)
Select Menu | Command from the right-mouse-button menu
Kapelle Dictation Tutorials
Page 7 of 57
What is Kapelle Dictation?
Kapelle Dictation is an application for notating dictation exercises. It reads music
notation files created by the Kapelle master program and presents them as
dictation exercises: you play the exercise using the onscreen commands, notate
it using the set of music notation tools provided (which include the ability to input
harmonic analysis), and receive an evaluation of your work.
Kapelle Dictation is designed to be easy to use although full-featured. This set of
tutorials, as well as the online help system, should help you to master the
program’s many features.
It is recommended that you work through this tutorial chapter by chapter,
although you may find that you do not need all of the tutorial chapters provided.
For example, if you are not being asked to do any chorale dictation exercises,
you probably do not need to go through tutorials 7 & 8.
However, all users should go through the preliminary chapter and the first two
tutorials in order to acquire basic competence using the program. These early
chapters are the most complete in their descriptions and contain the most
illustrations.
Most of the tutorial chapters are quite short, consisting of a single exercise and
only a few points to be learned about the program. The primary exception is
Tutorial 1, which is relatively lengthy, serving as it does as the primary and most
fundamental of the tutorials.
Kapelle Dictation Tutorials
Page 8 of 57
Preliminary: Take a Look Around
Kapelle Dictation is a Single-Document Interface (SDI) program, meaning that all
of the program’s operations and information are presented in one single window.
That window is divided into a number of different areas and features a number of
different components. This chapter is about understanding and recognizing those
components.
Online and Context-Sensitive Help
Probably the most important thing to find is the Help system, which is quite
extensive. There are two components to the Help system: online help, and
context-sensitive help.
Online Help
To activate the Online Help:
Menu
Keyboard
Select Help | Help Topics
Press F1
You will be presented with the main table of contents for the online Help system.
To expand a topic, double-click on it. To display an article, double-click on it. The
Online Help system includes an extensive index: click on the “Index” tab and
select a topic from the list. You can also search for words in the help text, by
using the “Find” tab.
Context-Sensitive Help
Context -Sensitive help can be invoked to explain the use of a particular menu
command, toolbar button, window component, or the like.
To enable context-sensitive help:
Kapelle Dictation Tutorials
Page 9 of 57
Toolbar
Keyboard
Press Shift+F1
After you enable context-sensitive help, the next item you click will bring up a
context-sensitive help screen regarding that item.
Try using Context -Sensitive help. Click on the icon to enable Context -Sensitive
help (or Press Shift+F1), then click on one of the toolbar icons at the top of the
main window. A help window will pop up telling you what the icon is, and may
lead you to further information about the icon and what it does.
Enabling Context -Sensitive help and clicking on the main window (empty when
the program first starts) will produce the master index to the help system.
The Main Window and Its Parts
Following this illustration are descriptions of the main window’s individual parts.
Menu Bar
Toolbar
File Pane
Document
Pane
Status Bar
Toolbars
There are six toolbars in Kapelle Dictation. Toolbars contain icons which you can
click in place of menu commands.
Each icon on the toolbar will identify itself in two ways: first by a Tooltip, which
will appear underneath the icon if you hold the mouse pointer over the icon for a
few seconds. Second, the leftmost Status Bar pane (at the bottom of the window)
will describe the icon if you hold the mouse pointer over it.
Toolbars can be docked or floated.
Kapelle Dictation Tutorials
Page 10 of 57
Docked toolbars
A docked toolbar is anchored to one of the edges of the window. When Kapelle
Dictation first starts up, the toolbars are anchored to the top of the main window.
You may dock any floating toolbar by dragging it by its title bar towards any of
the four edges of the window, then releasing the mouse button. The toolbar will
dock itself onto the window edge.
In this illustration, the Tuplets Toolbar is docked directly below the menu bar:
In this illustration, the Playback Toolbar has been docke d along the right-hand
side of the main window:
Floating toolbars
A floating toolbar is a free-floating palette with a close box. Float a docked
toolbar by positioning the mouse over any portion of the toolbar which is not an
icon, then dragging the toolbar free. When a toolbar has been floated, you can
resize it by positioning the pointer over any of the edges and dragging the
toolbar into a new shape.
In this illustration, the Tuplets Toolbar is free-floating:
In this illustration, the Note Values Toolbar is free-floating, and has been resized.
Menu Bar
The menu bar runs along the top of the window and contains all of the program’s
available commands. Many of these commands are also available on a toolbar.
Many of Kapelle Dictation’s command can be given via keyboard shortcuts. The
keyboard shortcut for a particular command will always be listed immediately to
Kapelle Dictation Tutorials
Page 11 of 57
the right of the command’s name on the menu, such as Ctrl+K, meaning to hold
down the Control key and type the letter ‘k’.
Some menus are hierarchical: that is, choosing a command from a menu results
in the presentation of another menu. Simply move the mouse pointer to the
second menu and choose your command from there.
Context Menus
A context menu results from clicking the alternate mouse button (usually the
right button). This menu will contain the most likely-to-be-used commands for
the object below the pointer. Many commands that are found on the Note and
Playback menus are also found on the context menu for the document pane, for
example.
Status Bar
The status bar runs along the bottom of the window. The leftmost pane displays
information about individual commands as you choose them from a toolbar or a
menu. The group of panes on the right side of the status bar give you information
about your current position in the document.
Document Pane
The document pane is the large pane on the right-hand side of the main window.
This is the area in which you will notate your work. When you first open Kapelle
Dictation, this pane is empty, but once you have opened your first exercise, this
pane will always contain notated musical data.
File Pane
The file pane is a tree control that c ontains all of the files available to you in
Kapelle Dictation. To expand the tree, click on the plus signs next to the entries.
The items in the File Pane are categorized into three types: folders, sets, and
files.
A folder is the same as a standard Windows directory.
A set is a group of files that share similar characteristics and have been
grouped together, like individual examples within a collection.
A file is an individual exercise.
Kapelle Dictation Tutorials
Page 12 of 57
Tutorial 1: Melodic Dictation I
Open Tutorial: Tutorial Melodies #01
To open this file, expand the Tutorial tree in the File Pane by clicking on its plus
sign, then expand the Tutorial Melodies tree by clicking on its plus sign. The File
Pane should look like this:
To open the file “Tutorial Melodies: #01”, double-click on the icon
you prefer, you can click once on the icon, then:
Menu
Context
. Or, if
Select File | Open
Select Open
Play the Entire Melody
Having opened the exercise, you will want to play it. Here’s how:
Menu
Toolbar
Select Playback | Play Document
Keyboard
Context
Spacebar
Select Play Document
Play the First Measure
You can play any individual measure in a document. To do this, first select the
measure you wish to play by clicking anywhere within it, then:
Menu
Toolbar
Select Playback | Play Measure
Keyboard
Context
Ctrl+Spacebar
Select Play Measure
Play the Second Measure
In addition to clicking within measures to select them, you can use the arrow
keys on the keyboard to move the cursor from measure to measure. Try selecting
Kapelle Dictation Tutorials
Page 13 of 57
the second measure by pressing the right and left arrow keys until the cursor is
located within the second measure, then follow the above instructions for playing
the first measure.
Play the First and Second Measures
You can also select a group of measures to play if you prefer. First, press and
hold the left mouse button, then drag a rectangular selection around the first two
measures. Then use the following command:
Menu
Toolbar
Select Playback | Play Document Range
Context
Select Play Document Range
After you have selected this command, you can use the slider controls in the
dialog box to select which measures you wish to hear. If you’ve selected the first
two measures, the sliders will be set as follows (note that you can move them if
you wish):
Stop Playback
Playback will stop automatically when you reach the end of the document (or the
end of the current playback selection if you are playing individual measures or a
range of measures.) If you wish to stop playback manually, here’s how:
Menu
Toolbar
Select Playback | Stop
Keyboard
Context
Spacebar
Select Stop
How To Change the Playback Volume
If the volume is either too loud or too soft, you can change it by clicking once on
the Volume Control, which is located on the Windows Taskbar, down at the lower
right-hand portion of your screen.
If you need to make more adjustments to the volume, open the “Volume Control”
Control Panel, by double-clicking on the Volume Control. You will find a control on
that panel called “Synthesizer Balance” (or something similar—different MIDI
drivers have different control panels), which you can use to adjust the MIDI
synthesizer volume relative to other sound outputs in the system.
Kapelle Dictation Tutorials
Page 14 of 57
Notate the Exercise
You will learn basic notation skills in Kapelle Dictation by notating the first tutorial
melody, Beethoven’s “Ode to Joy” in D-Major.
Notate the First Measure
Start by listening to the first measure again. Position the cursor in the first
measure, then play the first measure only.
Position the Cursor
The onscreen cursor controls both time and pitch. Time, as you have already
seen, is controlled by the horizontal location of the cursor, and you move the
cursor by using the right and left arrows (or by clicking). Pitch is vertical; you
move the cursor by using the up and down arrows (or by clicking, although
precise positioning can be difficult).
The first note is F#, a quarter note. Use the up and down arrows to position the
cursor so that it is precisely over the first space on the treble clef:
Practice Selecting Note Values
You can select note rhythmic values in a number of ways. Before you do this,
however, you need to disable the Auto Entry feature, which combines selecting a
note value with entering a note.
To disable Auto Entry:
Menu
Keyboard
Select Note | Auto Entry (it should be unchecked afterwards)
Press Ctrl+E
Once Auto Entry has been disabled, you can practice selecting note and rest
values without unintentionally adding notes to the measure.
To select note values:
Menu
Toolbar
Keyboard
Context
Select Note | Note Values | (Any command)
Click on a note value icon
Press keys 1-9 for different note values
Select Note Values | (Any command)
Using the keyboard to select note values is the fastest. As you press the keys,
notice how the toolbar icons are pressed and released to reflect your choices.
Kapelle Dictation Tutorials
Page 15 of 57
Rests are considered more note values. To select rest values:
Menu
Toolbar
Keyboard
Context
Select Note | Rest Values | (Any command)
Click on a rest value icon
Press keys Shift+1 through Shift+9 for different rest values
Select Rest Values | (Any command)
Like selecting note values, using the keyboard to select rest values is the fastest.
A rest value is the same as its corresponding note value, but using the Shift key
with the number.
Now, re-enable Auto Entry, which will make notation much faster:
Menu
Keyboard
Select Note | Auto Entry (It should be checked afterwards)
Press Ctrl+E
Add the Note
“Adding” a note means to add a note to the end of the current measure. You can
use the Add Note command to add the first note. Here’s how:
Menu
Toolbar
Select Note | Add Note
Keyboard
Keyboard
Context
Press Enter
Press 5 (If Auto Entry is enabled)
Select Add Note
NOTE: there are two keyboard commands given above. Pressing ‘5’ is possible
when you have activated the Auto Entry feature: selecting the note value will
simultaneously enter a note of that value to the end of the measure.
After you have entered the first note, the cursor will be centered precisely over
the note’s head:
Continue Adding Notes
Remember that the Add Note command always adds a note to the end of the
measure. (If you wish to insert a note at some point in the measure other than
the end, use the Insert Note command.) Therefore you can use the Add Note
command to add the remaining three notes of this measure, which are F#, G,
and A. Use the up and down arrow keys to position the cursor vertically, then
choose the Add Note command to add those notes. The measure should look like
this when you have finished:
Kapelle Dictation Tutorials
Page 16 of 57
Notice that the cursor has jumped to the downbeat of the next measure: this is a
convenience to allow you to notate continuously throughout a document with the
Add Note command. You can, if you wish, disable this feature. Here’s how:
Menu
Select Note | Jump to Next Measure to toggle the feature
Notate Measures 2 and 3
Continue using the Add Note command to notate measures 2 and 3. Remember
that pressing the ‘5’ key on the keyboard simultaneously selects the quarter note
rhythm (all the notes in these measures are quarter notes) and adds the note to
the end of the measure. Or, if you prefer, you can press the Enter key since there
is no need to select a new rhythmic value for the notes you are entering.
When you have completed measures 2 and 3, they should look like this:
Undo Your Actions
You may undo (take back) any number of editing actions. Every editing action
you carry out (such as adding a note) is stored and can be taken back, all the
way back to the very first action since opening the document. You may undo
single actions or an entire group of actions at once.
To undo a single action:
Menu
Keyboard
Select Edit | Undo
Press Ctrl+Z
To undo multiple actions:
Menu
Select Edit | Undo Multiple
After you select Undo Multiple, you are presented with a dialog box that lists your
actions one at a time. If your actions have been to enter the notes in the first
three measures, there should be twelve actions listed, all called “Add Note”:
Kapelle Dictation Tutorials
Page 17 of 57
You may select as many of these to Undo as you want by clicking on any action
or actions in the dialog box. Note that the dialog box will automatically ensure
that all the actions from your selection to the latest action have been selected.
Click OK, and see the results in your document.
Redo Your Actions
You may Redo any undone action (Redo means to “take back” an Undo, or to
Undo the Undo if you prefer.) The Redo commands are much the same as the
Undo commands; you may Redo a single undo or multiple undos.
To redo a single undo:
Menu
Keyboard
Select Edit | Redo
Press Ctrl+R
To redo multiple undos:
Menu
Select Edit | Redo Multiple
After you have selected Redo Multiple, you will be presented with a dialog box
that is identical to the one for Undo Multiple. Use this dialog box to Redo all of
the Undo actions you carried out in the previous step, and your document should
return to the way it was before you used the Undo command.
Notate Measure 4
Notating measure 4 includes operations which are different from measures 1
through 3: one of the notes is dotted (the first note) and there are rhythmic
values other than quarter notes.
Add the First Note
The first note of the measure is an F#, dotted quarter note. In Kapelle Dictation,
you enter dotted notes precisely the same way as you would write them on
paper: first the basic note value (a quarter note in this case) then you dot it.
Start out by entering a quarter-note F# on the first beat of measure 4 by using
the Add Note command.
Kapelle Dictation Tutorials
Page 18 of 57
Dot the First Note
To dot this first note:
Menu
Toolbar
Select Note | Modify Note | Dot Up
Keyboard
Context
Press F9
Select Modify Note | Dot Up
Notate an Eighth Note
The next note is an E-natural eighth note. This is the first time you have entered
a note value other than a quarter note.
First, check to see that “Auto Entry” on the Note Menu is enabled: if it is enabled,
there will be check mark beside it. If it is not enabled, select it to enable it. Then
position the cursor over the E-natural on the first line of the staff:
Now:
Keyboard
Press ‘4’.
If “Auto Entry” is enabled, this will result in an eighth note being added to the
end of the measure, like so:
This is the quickest way to add a note to the measure: you have selected the
eighth note value and entered the note, using just one keyboard command.
If you disable the “Auto Entry” command, then pressing ‘4’ on the keyboard will
select the eighth note as the rhythmic value, but will not add the note: for that
you will have to give the Add Note command explicitly, using one of the methods
outlined earlier in this tutorial.
Notate a Half Note
Assuming that you have left “Auto Entry” enabled, entering the E-natural half
note that finishes this measure is done by first making sure that the cursor is still
positioned over the E-natural on the first line of the staff, then:
Keyboard
Press ‘6’
Kapelle Dictation Tutorials
Page 19 of 57
Just as before, if you have disabled “Auto Entry” then pressing ‘6’ will select the
half note as the rhythmic value, but will not add the note.
NOTE: rhythmic values are selected via number keys 1-9. 1 is the 64th note;
notes lengthen as the number increases. There is one exception: ‘9’ is the 128th
note.
Users of “Finale”, from Coda Music Software, will recognize these keyboard
shortcuts as being the same as those used in that program. Kapelle Dictation is
different in one aspect, though: Shift+number creates a rest, unlike Finale.
Notate Measures 5, 6, and 7 with Copy/Paste
Measures 5, 6, and 7 are identical to measures 1, 2, & 3. (Try playing measures
1-3 using the “Play Document Range” command, then measures 5-7 using the
same command, to confirm this.) Of course you can notate these measures over
again using the techniques already covered.
But there’s not much point in doing that: you can simply copy the first three
measures and paste their contents into measures 5-7.
Use the horizontal scroll bar at the bottom of the window to scroll the window so
that the first three measures are visible onscreen.
Now, enclose the first three measures within a selection rectangle, by holding
down the left mouse button and dragging the gray rectangle around the three
measures—be sure to include all of the noteheads in those measures. When you
release the mouse button, the selected area will be highlighted in reverse video:
You will now copy these selected notes to the Windows clipboard, like so:
Menu
Keyboard
Select Edit | Copy
Press Ctrl+C
Now, scroll so that measure 5 is visible in the window, and click the mouse
anywhere within measure 5.
If you prefer, you can use the arrow keys to move the selection point to measure
5.
Kapelle Dictation Tutorials
Page 20 of 57
It might help to keep an eye on the “Measure” pane in the Status Bar, to make
sure you have positioned the cursor in the correct measure:
Now, choose the “Paste” command to paste in the copied material:
Menu
Keyboard
Select Edit | Paste
Press Ctrl+V
Once you have pasted in the material, measures 5-7 should look like this:
Notate Measure 8
Measure 8 should contain no surprises for you at this point. It contains a dotted
quarter note, an eighth note, and a half note. When you have finished measure
8, it should look like this:
Scroll Through and Proofread Your Notation
You can scroll through the document by using the horizontal scroll bar for
horizontal motion and the vertical scroll bar for vertical motion (you probably
won’t need to worry about vertically scrolling with this exercise.)
You can also move through the document just by moving the onscreen cursor
horizontally as well. Now would be a good time to learn a “speed” cursor
movement. Normally when you use the left and right arrows, the cursor stops on
the position of each note. But you can take a shortcut by moving the cursor in
one- measure increments.
To move the cursor backwards by one- measure increments:
Kapelle Dictation Tutorials
Page 21 of 57
Keyboard
Press Ctrl+Left Arrow
To move the cursor forwards by one- measure increments:
Keyboard
Press Ctrl+Right Arrow
After your notation has been entered, it is fully editable. Here are some of the
actions you can carry out.
NOTE: don’t be afraid to carry out editing actions as experiments. Don’t forget
that you can Undo everything you do!
Selecting Notes for Editing
To select notes, you can either position the cursor directly over the note’s head
(by clicking or using the arrow keys), or you can drag a selection rectangle
around noteheads. This second method is used primarily to select multiple notes.
Deleting Notes
To delete a note, select the note or notes you wish to delete, then:
Menu
Toolbar
Select Note | Delete Note
Keyboard
Context
Press Backspace
Select Delete Note
If you haven’t selected any notes, this command will be disabled.
Changing the Pitch
To modify the pitch of a note, you can move it downwards and upwards on the
staff by either single position increments or by arbitrary distances.
To move notes one line or space upwards on the staff, first select them, then:
Menu
Toolbar
Select Note | Modify Note | Move Up
Keyboard
Context
Press Ctrl+Shift+Up Arrow
Select Modify Note | Move Up
To move notes one line or space downwards on the staff, first select them, then:
Menu
Toolbar
Select Note | Modify Note | Move Down
Keyboard
Press Ctrl+Shift+Down Arrow
Kapelle Dictation Tutorials
Page 22 of 57
Context
Select Modify Note | Move Down
To move notes by a larger amount, either upwards or downwards, first select
them, then:
Menu
Keyboard
Context
Select Note | Modify Note | Move
Press F11
Select Modify Note | Move
This command produces the Move dialog box, which you can use to move the
note either upwards or downwards by an interval amount, plus any extra octave
distances you wish.
Changing the Rhythmic Note Value
To change the note value of a note, first ensure that “Auto Entry” has been
disabled.
Changing the note value is a two-step process: first you have to select a new
note value, then you have to give the command to change the selected note’s
value.
First, select a new note value:
Menu
Toolbar
Keyboard
Select a note value from Note | Note Value or Note | Rest
Value
Click on a note value icon or a rest value icon
Press 1-9 for a note value, Shift+1-9 for a rest value
Having established a new note value, select the note or notes you wish to modify,
then:
Menu
Keyboard
Select Note | Modify Note | Set Value
Press Ctrl+U
Evaluate Your Notation
After you have completed your notated version of this melody, you will want to
find out how well you did with it.
Kapelle Dictation Tutorials
Page 23 of 57
To evaluate your work:
Menu
Toolbar
Select File | Evaluate
After you evaluate your work, a summary dialog box will be presented to you
showing you how you have performed with your notation. Any errors will be
indicated by type—rhythmic errors, pitch errors, errors in harmonic analysis
(which aren’t germane to this exercise), and so forth.
In addition, any errors you have made will be marked with small icons on your
notated version.
Finally, the correct notated version will be displayed in the document pane
directly beneath your notated version.
Here’s an example of a summary dialog:
Note that there was one pitch, resulting in a total score of 98.33% for this
exercise. To find where the error occurred in the notation, look for the note with
a small icon next to it:
NOTE: the above example does not necessary match your notated version!
Compare With Playback
Once you have evaluated an exercise, you can compare your notated version to
the original by playing both of them.
After you have evaluated an exercise, the commands on the User Playback
Toolbar will be enabled. This toolbar looks like this:
The icons look almost identical to those on the Playback toolbar, except for the
small “degree” signs on the upper right side of the toolbar.
Kapelle Dictation Tutorials
Page 24 of 57
If you right-click the mouse on the document pane to produce the context menu,
you will find it has changed: the note-editing commands are no longer available,
while the second set of playback commands have been added.
Summary of Tutorial 1
In this tutorial, you have learned how to do the following:
•
•
•
•
•
•
•
•
Open an exercise for editing
Add notes to the measure
Play an exercise either whole or in part
Undo and Redo actions
Copy and paste musical notation
Delete notes
Change the pitch or rhythmic value of notes
Evaluate a completed exercise
For More Information
You may consult the Online Help system for more information, with special
emphasis on the following topics:
•
•
•
Note Entry Techniques
Playback
Evaluating an Exercise
Kapelle Dictation Tutorials
Page 25 of 57
Tutorial 2: Your Progress Report I
Every time you evaluate an exercise in Kapelle Dictation, the program will make
an entry in your progress report as to that evaluation. Your progress report is a
special file that Kapelle Dictation created for you the first time you used the
program.
To see your progress report:
Menu
Toolbar
Select File | Show Report
The dialog box that is displayed to you will show you the complete contents of
your progress report. Here is a sample progress report with a large number of
entries:
Each row in the list window of the progress report contains one entry.
The name of the entry is in the leftmost column; it matches the name of an
exercise you have notated and evaluated.
The second column gives your grade as a percentage of correct answers out of
the total possible points.
The third column gives the time and date when the evaluation was made.
The final column, “Items Evaluated”, lists the kinds of musical entries that were
subject to evaluation. This can vary by the exercise, depending upon the settings
in the Evaluation Options property sheet. (In some cases you can override those
settings, but sometimes you can’t—it depends on the author of the original file.)
Sorting Entries
Kapelle Dictation Tutorials
Page 26 of 57
You can sort the entries in your progress report by clicking on the headers for
each of the columns: clicking on the “Name” column header will sort by name,
clicking on the “Grade” column header will sort by grade, and so forth.
Closing Your Progress Report
To close your progress report, click on the “Close” button, or on the “Save and
Close” button if you have made any changes. (For now you can just click on the
“Close” button.)
Kapelle Dictation Tutorials
Page 27 of 57
Tutorial 3: Melodic Dictation II
In this tutorial, you will learn some more advanced notation techniques, including
accidentals and inserting notes.
Open Tutorial: Tutorial Melodies #02
See the first tutorial for help on opening a specific exercise if you don’t remember
how.
Set the Playback Tempo
You can change the tempo for playback to suit yourself. To change the tempo:
Menu
Toolbar
Select Playback | Default Tempo
Keyboard
Press Ctrl+T
This command will produce the Set Tempo dialog box, which contains a slider for
setting the tempo:
The available settings are from 1 beat per minute to 255 beats per minute.
Play the First Measure
This exercise is in 6/8 meter, in the key of a-minor. Start out by playing the first
measure.
Play a Tonic Triad
Kapelle Dictation allows you to play a tonic triad at any time in order that you
might orient yourself within the key center. However, Kapelle Dictation does not
play the tonic triad without a bit of prompting from you; you must tell the
program the key of the exercise. (This is an educational program, after all!).
To play a tonic triad:
Menu
Keyboard
Context
Select Playback | Play Tonic Triad
Press Cntl+I
Select Play Tonic Triad
Kapelle Dictation Tutorials
Page 28 of 57
You will be presented with the Identify Key dialog box, from which identify the
key of the composition:
Select the tonic from the list on the left and the mode by clicking either of the
two radio buttons, then click OK (or press Return).
NOTE: the key you have selected is retained while the document remains in
memory, so if you wish to repeat the tonic triad, you don’t have to indicate which
chord to play again—just select the command.
Play the Tonic Pitches
It can be quite helpful to have a sense of the location of the melody on the staff.
To that end, Kapelle Dictation will play three ‘tonic pitches’ for you—low,
medium, and high in pitch relative to the current clef.
To play the tonic pitches:
Menu
Keyboard
Select Playback | Play Tonic Pitches
Press Cntl+L
Kapelle Dictation doesn’t know automatically which key the piece is in (that’s up
to you to determine) and so you must tell it which key the piece is in. If you’re
going through this tutorial step-by-step, then you have already chosen a key in
the previous step (playing a tonic triad). If you haven’t chosen a key yet, you will
be presented with the Identify Key dialog box (see above.)
The tonic pitches are played, one after another, and displayed onscreen. In this
illustration, the second pitch is being played (it’s drawn in red):
Kapelle Dictation Tutorials
Page 29 of 57
NOTE that you can change the speed at which the tonic pitches are played, as
well as the duration of the tonic triad when it is played. See the command Tonic
Options on the Playback Menu.
Notate a D-sharp
Instead of notating directly from the beginning, let’s begin by notating the second
note in the measure (so you can learn how to insert a note before it.)
The second note is a D-sharp on the fourth line of the staff. Begin by using the
Add Note command to place an eighth-note D on the fourth line of the staff:
This note needs to be raised a half-step, or sharped. To do this, make sure that
the cursor is still positioned squarely over the notehead (or enclose the notehead
in a selection rectangle), then:
Menu
Toolbar
Select Note | Modify Note | Sharp
Keyboard
Context
Press F8
Select Modify Note | Sharp
Insert a Note
Since you have notated the second note rather than the first, you will need to
insert the first note, which is an E-natural the half-step directly above the Dsharp you just notated.
Position the cursor on the fourth space of the staff:
Then:
Menu
Toolbar
Select Note | Insert Note
Keyboard
Context
Press Shift+Enter
Select Insert Note
There is nothing new to discuss for the rest of this measure, or for measure 2. Go
ahead and notate them by listening to the measures and writing down what you
hear.
Kapelle Dictation Tutorials
Page 30 of 57
Notate a B-flat
In measure 3, there is a B-flat on the fourth eighth-note beat of the measure. To
flat the B on this fourth-eighth note beat, first select the note by either positioned
the cursor directly over the notehead or by enclosing the notehead within a
selection rectangle, then:
Menu
Toolbar
Select Note | Modify Note | Flat Note
Keyboard
Context
Press F7
Select Modify Note | Flat Note
Continue notating the exercise, and when you are finished, evaluate it.
Summary of Tutorial 3
In this tutorial, you have learned how to:
•
Sharp and flat individual notes
•
Insert a note into a measure
Kapelle Dictation Tutorials
Page 31 of 57
Tutorial 4: Chord Dictation
In this tutorial, you will learn how to create chords with the use of the Add Note
To Chord command.
Open Tutorial: Tutorial Chords #01
If you do not remember how to open an exercise, refer to Tutorial 1.
Play the Exercise
Instead of being a melody, this exercise consists of four chords of a half-note’s
duration each.
Notate the First Note
You notate a chord in Kapelle Dictation by using either the Add Note or Insert
Note command to add the first note to the chord, and then you use the Add
Chord Note command to add the remaining notes to the chord.
The first chord is a C-Major triad in root position with the bottom note middle ‘c’.
Begin by using the Add Note command to notate the middle ‘c’—you don’t have
to start with the bottom note if you don’t want. Position the cursor on middle ‘c’
(keep an eye on the Status Bar “Note” panel to make sure you’re on the correct
pitch), then:
Keyboard
Press ‘6’.
It is assumed that you are using the Auto Entry technique. If Auto Entry has been
disabled, you must first select a half-note note value, then the Add Note
command via a menu, toolbar, or keyboard shortcut.
Notate the Rest of the Chord
Position the cursor on the ‘e’ on the first line of the staff. Then:
Menu
Toolbar
Select Note | Add Chord Note
Keyboard
Context
Press Ctrl+Enter
Select Add Chord Note
Repeat this action for the top note of the chord, the ‘g’ on the second line of the
staff.
Notate the Re maining Chords
Go through the remaining three measures and notate the chords using the above
techniques. Remember that you do not have to enter the chord notes in any
particular order. Start by using Add Note or Insert Note to enter the first note,
then use Add Chord Note to enter the remaining notes of the chords.
Kapelle Dictation Tutorials
Page 32 of 57
When you have finished, evaluate your work.
Summary of Tutorial 4
In this tutorial, you have learned how to:
•
Notate chords by using the Add Chord Note command
Kapelle Dictation Tutorials
Page 33 of 57
Tutorial 5: Rhythmic Dictation I
In this tutorial, you will learn about notating basic rhythms in Kapelle Dictation,
adjusting the click track, and overriding an evaluation option.
Open Tutorial: Tutorial Rhythms #01
If you do not remember how to open an exercise, refer to Tutorial 1.
You’ll notice that this exercise looks a bit different from the previous examples:
the staff is rhythmic, having a single line only.
Set a Different Click Track
For this tutorial, try changing the pitches used for the underlying click track that
accompanies playback by default.
Open the Click Track Dialog
Start by opening the Click Track dialog box:
Menu
Select Playback | Click Track Settings
You will see the Click Track Settings dialog box, which allows you to set and
modify the way Kapelle Dictation uses an underlying click track:
Set the Downbeat Pitch to 48
You can set a separate pitch for both the downbeat and the upbeat pitches as
well as control the channel used for a click track and a number of countoff
measures to be heard prior to the beginning of playback.
Kapelle Dictation Tutorials
Page 34 of 57
Move the “Downbeats” slider to the left until the pitch is listed as 48—that’s the
‘c’ one octave below middle ‘c’.
Set the Upbeat Pitch to 48
Move the “Upbeats” slider to the left until the pitch is listed as 48.
Add a One-Measure Countoff
Click in the “Countoff” check box to enable countoff measures, and either type in
‘1’ in the edit box or click the spin control arrows to set the number of countoff
measures to 1:
Then, click OK to apply your settings.
Listen to the First Measure
Now, listen to the first measure of the rhythm. Note that it is preceded by a
single measure of countoff beats (we’re in 5/8 with an inner division of 3+2, so
you’re hearing a dotted-quarter followed by a quarter beat.)
When you notate rhythm, there is no need to worry about pitch, although you
can notate in pitch if you want to—pitch information is ignored.
Notate the Rhythm
Notating pure rhythm without pitch is the same as any other Kapelle Dictation
notation, although you can ignore pitch elements; just notate right on the center
line. (There is nothing lost if you choose to notate on a different line or even give
the rhythm a melodic contour.)
Notate the rhythm for the composition all the way through.
Override Pitch Evaluation
By default, Kapelle Dictation evaluates the pitch of notes. But in this instance,
you don’t want the pitch evaluated since you are concerned only with rhythm.
Most of the time, the author of the exercise you are doing will have set the
Evaluation options for an exercise. You may or may not be able to override those
options. In this case, you can.
To override evaluation options:
Menu
Select File | Evaluation Options
Kapelle Dictation Tutorials
Page 35 of 57
The Evaluation Options property sheet will be displayed. This consists of five
different property pages with evaluation settings. For the purposes of this tutorial
you are only concerned with the first of those pages, having to do with Pitch
evaluation:
This particular property page determines whether or not the evaluation routines
will consider the pitch of the notes as subject to checking, as well as if
enharmonic equivalents will be considered as the same pitch or not.
Click in the “Evaluate pitch” check box to de-select this option, then click OK.
Evaluate Your Work
Now you can evaluate your rhythmic notation without having any worry that the
program will consider pitch along with the evaluation. Had you left that option
enabled, and had your notated pitches strayed from the single line on the staff,
the program would have considered your notation incorrect.
Summary of Tutorial 5
In this tutorial, you have learned how to:
•
Notate single-line rhythms
•
Adjust the pitches used for a click track
•
Enable countoff measures
•
Set an evaluation option
Kapelle Dictation Tutorials
Page 36 of 57
Tutorial 6: Rhythmic Dictation II: Layers
In this tutorial, you will learn how to notate in a two-voice polyphonic texture.
Open Tutorial: Tutorial Rhythms #02
If you do not remember how to open an exercise, refer to Tutorial 1.
After opening this exercise, you see that the staff looks the same as a melodic
dictation, although it is a two-voice rhythm. The staff lines and clefs used for an
exercise are not dictated by Kapelle Dictation, but are up to the discretion of the
original author of the file. This file has been written using a treble clef and a fiveline staff.
Play the Exercise
In playing the exercise, you will notice that the two-voice rhythm has been
notated on the notes ‘e’—the upper voice is pitched to the ‘e’ on the fourth space
of the staff, while the lower voice is pitched to the ‘e’ on the first line of the staff.
Remember that this is not any setting in Kapelle Dictation: the original author of
the file wrote the notes on these pitches.
Notate the Upper Voice
You are not required to notate the rhythms on the same pitch as the author
wrote them, but there’s no harm in doing so.
In notating a two-voice rhythmic texture, it’s a good practice to notate the upper
voice higher than the lower one (which avoids confusion.) For now, go ahead and
notate the upper-voice rhythm on the pitch ‘e’ on the fourth space of the staff.
Ties and Rests
As you notate the upper voice, you will ascertain that there are some rests in the
rhythm as well as some tied notes.
To notate rests, choose a ‘rest’value instead of a ‘note’ value:
Menu
Toolbar
Keyboard
Select Note | Rest Values | value
Click on a rest icon
Press Shift+number (same numbers as for notes)
To notate a tie, first position the cursor over the note you wish to tie, or enclose
the note within a selection rectangle. Then:
Menu
Toolbar
Select Note | Modify Note | Tie
Keyboard
Press F10
Kapelle Dictation Tutorials
Page 37 of 57
To remove a tie from a note, select the note then:
Menu
Toolbar
Select Note | Modify Note | Untie
Keyboard
Press Shift+F10
Change to Layer 2
Now you need to notate the lower voice. Kapelle Dictation can accommodate two
polyphonic voices per staff, each in its own layer. Think of layers as being
measures superimposed on each other, one layer being for one of the polyphonic
voice, and the other layer being for the other polyphonic voice.
To change to Layer 2:
Menu
Keyboard
Select View | Layer 2
Press F6
To change to Layer 1:
Menu
Keyboard
Select View | Layer 1
Press F5
Notate the Lower Voice
Now that you have enabled Layer 2 for input, notate the lower voice. You will
discover that as soon as there are notes in both layers of a particular measure,
the stemming automatically changes to polyphonic stemming. This is automatic
and cannot be overridden.
Override Evaluation Options for Pitch
For the purposes of practice, this exercise has left the “Pitch” evaluation option
enabled for this exercise, although the rhythmic dictation exercises you do as
part of your daily work should have disabled pitch evaluation.
Be sure to open the “Evaluation Options” property sheet and disable Pitch
evaluation. See the previous tutorial if you don’t know how to do this.
Set Rhythmic Evaluation Options
Since this is a tutorial, let’s have Kapelle Dictation treat you a bit more severely
on the subject of rhythmic evaluation. By default, rhythmic evaluation is quite
lax: only starting times for notes are considered. Thus if your notated durations
are different from the original, yours won’t be counted as incorrect.
It’s worth learning how to change rhythmic evaluation options, even if doing so
will result in the program making it harder for you to get a high score on your
work. (After all, you could change the options to give yourself an easier time of it
with rhythm.)
Kapelle Dictation Tutorials
Page 38 of 57
To set the rhythmic evaluation options:
Menu
Select File | Evaluation Options
In the Evaluation Options property sheet, click on the Rhythm tab. You will see
the Rhythm property page:
Change the value in the “Level” drop-down list to “2 – Starting times and
durations”. Under this method of evaluation, Kapelle Dictation will consider the
total duration of notes as part of the evaluation. This does not mean that you
have to agree completely with the original notation: a pair of tied quarter notes
will be considered as the same as a half note, for example.
Level 3, “Require identical notation”, will count any rhythmic notation as incorrect
that does not precisely match the original. Normally you would not want to use
this level of evaluation, primarily because rhythmic notation is by no means
etched in cement and there are different ways to notate the same rhythm
correctly.
Evaluate Your Work
Now, evaluate your work. Any rhythmic errors will be indicated. If you have
selected Level 2, you might have more errors than had you selected Level 1, and
more yet had you selected Level 3.
AN IMPORTANT NOTE ABOUT EVALUATION OPTIONS: It is up to the original
author of the exercise whether you will be able to override any of the exercise’s
evaluation options. If the “Evaluation Options” command on the File Menu is
disabled (i.e., grayed-out), then the author has chosen to disallow any overriding
of the original evaluation options.
Kapelle Dictation Tutorials
Page 39 of 57
Tutorial 7: Chorales and Harmonic Analysis I
Open Tutorial: Tutorial Chorales #01
This exercise is a typical four- measure chorale phrase, notated in half notes, four
voices, with the final measure consisting of single whole-note chord. In most
situations you will be asked to notate the outer voices (soprano and bass) and
provide a harmonic analysis below the staff.
Disable the Click Track
Given that there is no rhythmic component to speak of in this exercise, you may
wish to turn off the click track altogether—it can be annoying. To do this:
Menu
Select Playback | Click Track Settings
Then uncheck “Use click track”:
Change the Output Program
For this tutorial, try changing the output sound to something else. By default, all
the exercises up to now have used the sound at program 1 on your sound card.
To change the output program:
Menu
Select Playback | MIDI Settings
The MIDI Settings dialog box is displayed:
You are primarily concerned with the “Program” slider in the left-hand “MIDI Output”
pane. You can choose a different program simply by moving this slider, but you can
also select a new program by name. Click on the “Select by name…” button. You will
see this dialog box:
Kapelle Dictation Tutorials
Page 40 of 57
Click on “Electric Piano 2” and then click the OK button. When the dialog box closes,
note that the output slider has changed to reflect your new choice:
Listen to the Exercise
Play through the exercise so you can hear the four-voice texture with the new
program sound. If you don’t like the sound quality, you can experiment with the
MIDI Settings dialog until you find a sound that you like.
Notate the Soprano
Now, notate the soprano line. If you are notating outer voices only, you needn’t
concern yourself with the program’s understanding which voice you are notating:
by default Kapelle Dictation will consider that you are notating outer voices only,
and that the upper of those voices you notate is the soprano voice.
Position the cursor in the upper staff line—be sure to click in the upper staff,
or press Ctrl+Up Arrow a few times—and notate the upper staff line.
Notate the Bass
Position the cursor in the lower staff line—be sure to click in the lower staff,
or press Ctrl+Down Arrow a few times—and notate the bass line. Again you
do not need to worry whether the program will understand that you are notating
the bass voice: it will.
Harmonic Analysis Placeholders
Kapelle Dictation Tutorials
Page 41 of 57
Below the staff you’ll notice small light-blue squares. Each of these is a harmonic
analysis placeholder, whic h shows you the location of a harmonic analysis symbol
in the exercise.
These placeholders serve two purposes: first to show you where the original
(source) exercise places an analysis symbol, and second to allow you to enter a
harmonic analysis at this point—whether or not there is actually a note at that
location.
Analyze the First Chord With a Harmonic Placeholder
Now it is time to input your harmonic analysis. Kapelle Dictation contains a very
rich harmonic analysis system that inputs a simple text string, then formats and
displays it as a harmonic analysis.
To enter a harmonic analysis, click on the very first harmonic analysis
placeholder:
A small dialog box is displayed, consisting of an edit text field plus OK and Cancel
buttons:
You enter your analysis into this text field.
For this first chord, you need to indicate the key center as well as the first
harmony. Type the following in the text box:
C: I
What you’ve typed is as follows:
C: indicates the key center, which is C Major. Kapelle Dictation treats anything
preceding a colon (:) as being a key center. You may type M or ‘m’ to indicate
major or minor if you want, but the best thing to do is to type uppercase for
major keys and lowercase for minor keys.
Kapelle Dictation Tutorials
Page 42 of 57
I indicates the root and inversion. In this case the chord is a tonic triad in root
position. You could have also typed: I53 if you wanted, but Kapelle Dictation
understands that, in the absence of any Arabic numerals, the chord is a triad in
root position.
After you click OK or press Enter, your analysis will be entered and properly
formatted:
Analyze the Second Chord With Add Analysis Command
The second chord in the example is a dominant triad in first inversion. To enter
this analysis, position the cursor over the second note in the bass, and then:
Menu
Keyboard
Context:
Select Note | Add Analysis
Press Ctrl+H
Select Add Analysis
In the Analysis dialog box, type in the following:
V6
You have indicated the following:
V indicates that the root is dominant. Case distinction can be important,
depending on the evaluation options set by the author of the exercise. In this
case it is uppercase, indicating a major chord.
6 indicates the inversion, in this case first inversion. You could have typed 63 as
well, which would be understood by the program as being equivalent to 6.
After you click OK, your entry is formatted as follows:
NOTE: had you typed V63, the formatted product would have looked like this:
Kapelle Dictation Tutorials
Page 43 of 57
The evaluation routines treat the two as equivalent.
About Continuous Analysis
When you enter harmonic analysis using the Add Analysis command, if
“Continuous Analysis” is selected (the command is on the Note Menu), then the
cursor will automatically jump to the next note in the current staff and layer.
That way you can add your harmonic analysis one chord at a time, continuously,
without having to give the command over and over.
Note, however, that continuous analysis doesn’t happen when you’re adding
analysis using harmonic placeholders. (There are some confusing actions that can
occur as a result of doing this, although that might not make any sense when
you’re still just learning how to use the program.)
Continue to the End of the Exercise
Continue adding analyses, using the Add Analysis command with continuous
analysis, or by clicking on each of the harmonic placeholders—your choice. The
following list gives you the appropriate strings to type into the Analysis dialog
box for the entire exercise, with possible variants listed:
Chord
Analysis String
1
C: I or C: I53
2
V6 or V63
3
V65
4
I or I53
5
ii6 or ii63
6
V7
7
I or I53
Now evaluate your work. If you have made any errors in your analysis (perhaps
from a typo?) they will be indicated as small onscreen ic ons in addition to being
listed in the evaluation summary dialog box.
Kapelle Dictation Tutorials
Page 44 of 57
Notate and Analyze Tutorial: Tutorial Chorales #02
The second chorale in the series is provided to give you more practice with
entering harmonic analysis. Of special interest to this chorale is the key and the
use of a cadential 64 in the next -to-last measure.
Open the exercise and notate the outer voices.
Rather than giving you a full set of instructions for the operation, we will restrict
the discussion to the following points:
First Analysis: Entering the Key
The key of this exercise is E-flat major. To indicate a key center with an
accidental (sharp or flat), use the characters ‘#’ and ‘b’ respectively.
The first chord of this exercise is the tonic triad, first inversion, in E-flat major.
Therefore, you should enter the following string for the harmonic analysis:
Eb: I6
(You can also enter Eb: I63 if you prefer.)
Third Measure: Cadential 64
The cadential 64 presents some notational and evaluational difficulties. There are
two schools of thought as to the proper notation of this figure: either it is a tonic
64 triad followed by a dominant or dominant seventh chord, or it is a dominant
triad with a double (possibly triple) suspension.
Rather than get caught up in the fray concerning this trivial issue, Kapelle
Dictation can understand and evaluate either notation—unless you specifically
override that capability in the evaluation options (or the original author has done
so.)
To notate the harmonic analysis for the third measure (a cadential 64 without a
following V7), here are some strings you could write that would all be acceptable
to Kapelle Dictation:
First Chord
I64
I864
V64
V864
Second Chord
V
V53
53
853
If the second chord contains a V7, you may include that in your analysis as well,
using whatever method you prefer.
Edit an Analysis With a Harmonic Placeholder
Kapelle Dictation Tutorials
Page 45 of 57
Harmonic placeholders have another hidden talent: if you click on the harmonic
placeholder that accompanies an already-entered analysis, the dialog box will
come up already in Edit Analysis mode—so you can edit an analysis you’ve
already entered.
Try clicking on the placeholder for some of the analyses you’ve entered and see
how that works.
Summary of Tutorial 7
In this tutorial, you have learned how to:
•
•
•
•
Change the output program for playback
Disable a click track
Enter the outer voices of a polyphonic chorale
Enter basic harmonic analysis symbols
For More Information
In the Online Help system, see the following articles:
•
•
•
Click Track
MIDI Settings
Harmonic Analysis
Kapelle Dictation Tutorials
Page 46 of 57
Tutorial 8: Chorales and Harmonic Analysis II
For a more advanced look at harmonic analysis and chorale dictation, with this
tutorial we will take down all four voices of the chorale as well as handle pivot
chord modulations and secondary (applied) harmonies in the harmonic analysis.
Open Tutorial: Tutorial Chorales #03
See Tutorial 1 if you have forgotten how to open an exercise.
Set Evaluation Options to All Voices
For the purposes of learning the program, let’s notate all four voices of the
chorale this time. (Remember this is a tutorial—a lot of people have difficulty
taking down the inner voices of a chorale, but this is just for learning the
program.)
Open the Evaluation Options property sheet:
Menu
Select File | Evaluation Options
Then click on the “Voices” tab. You will see the Voices property page:
Click on the “Evaluate all voices” radio button, then click OK.
Pivot Points
Looking at this exercise, you will notice something new in addition to the usual
collection of harmonic analysis placeholders:
Kapelle Dictation Tutorials
Page 47 of 57
That little jobber that looks like a traffic light
is an indicator that tells you that
there is a pivot point in the harmonic analysis at this point.
Unlike a harmonic analysis placeholder, a pivot point indicator isn’t a button that
you can click—it’s just an indicator. It tells you where the pivot point in the
original document is located so you aren’t counted off for indicating a pivot point
at a different location that might nonetheless be perfectly valid.
A Note About Notating in Four Voices
When notating in four voices, each of the voices must be in a particular staff and
layer, as follows:
•
•
•
•
Soprano: upper staff, layer 1
Alto: upper staff, layer 2
Tenor: lower staff, layer 1
Bass: lower staff, layer2
Think in terms of upstemmed notes being in layer 1 and downstemmed notes
being in layer 2, and this arrangement should make sense.
Notate the Soprano Voice
Notate the soprano voice in Layer 1 of the upper staff.
Notate the Bass Voice
Change to Layer 2:
Menu
Keyboard
Select View | Layer 2
Press F6
Then notate the bass voice in the lower staff.
Notate the Alto Voice
The Alto voice is notated in Layer 2 of the upper staff. You are already in Layer 2
from the previous step, so all you have to do is notate in the upper staff. (If you
aren’t in layer 2, change to layer 2 before notating.)
Notate the Tenor Voice
Change to Layer 2:
Menu
Keyboard
Select View | Layer 1
Press F5
Now, notate the Tenor voice in the lower staff.
Enter the Harmonic Analysis for Measures 1 & 2
Kapelle Dictation Tutorials
Page 48 of 57
After having entered the analysis for the first two measures, your work thus far
should look like this (harmonic placeholders and pivot points have been omitted
for clarity):
Listen to Measure 3
Listen to measure 3 and it’s clear enough that the harmony has modulated from
A-Major to E-Major. The final harmony of Measure 2 is acting as a pivot chord:
I63 in A-Major, pivoting as IV63 in E-Major. (If you didn’t hear that, the pivot
point indicator makes it clear enough.) Change the harmonic analysis on the
fourth chord to indicate a pivot chord modulation.
Edit the Fourth Chord
Position the cursor over a note in the fourth chord of the example, then:
Menu
Keyboard
Select Note | Edit Analysis
Press Ctrl+Shift+H
Or:
Mouse
Click on the harmonic analysis placeholder
This command brings back up the Analysis dialog box containing your entry for
the fourth chord (I63 or I6).
Change this entry to read as follows:
I63pE:IV63
Here’s what you’ve written:
•
•
•
•
•
•
I is the original root.
63 is the original inversion.
p indicates that what follows is a pivot chord.
E: is the new key center for the pivot chord (E Major)
IV is the pivot root.
63 is the pivot inversion.
After you click OK, the second measure will look like this:
Kapelle Dictation Tutorials
Page 49 of 57
NOTE: when Kapelle Dictation parses the input text string for a harmonic
analysis, it completely ignores any spaces. Therefore, feel free to use some
spaces in your input string if you find that they help you to think more clearly
about your analysis. For example, the string entered above: I63pE:IV63 could
have been written: I63 p E: IV63 and would have worked precisely the same
way.
Analyze the Remainder of the Exercise
The rest of the analysis is in the key of E-Major, consisting of a cadential 64
followed by V7, and then the tonic. When you have completed your analysis your
work should look like this, excepting the differing methods of indicating
inversions and the cadential 64:
NOTE: the sixth chord is notated without an explicit root. The entry string is 753.
During evaluation, Kapelle Dictation will “carry over” the previous root, and
understand that this chord is a continuation of a dominant harmony. The same
situation would arise if you were to notate a tonic root position triad followed by
the first inversion as I and then 6 for the second chord. Such harmonic analysis
is perfectly acceptable and will not result in an evaluation error.
ALSO NOTE: the harmonic analysis placeholders and pivot point indicators are
not shown for clarity’s sake.
Evaluate Your Work
Remember that you have chosen to evaluate all four voices this time around, so
you might have more mistakes. However, with more voices being evaluated,
individual mistakes count for less than they do with fewer voices—there being
more total points in the evaluation.
Notate and Analyze Tutorial: Tutorial Chorales #04
Kapelle Dictation Tutorials
Page 50 of 57
You are on your own with Chorale #04: it is included primarily for practice
purposes.
Chorale #04 does contain one item that we haven’t covered yet, and that is the
use of a secondary (or applied) chord. The applied chord is the second chord in
the chorale, an applied vii7 of iv.
To notate an applied (secondary) chord, write it precisely the way you normally
would: follow the chord with a slash (/) and then indicate the target. So, to
analyze the second chord, you would write:
vii7/iv.
How to Be a Hero About Harmonic Placeholders and Pivot
Points
You don’t have to use the training wheels that harmonic placeholders and pivot
points provide. You can turn them off and then do the analysis completely
unaided by any visual clues. (However, you might be risking an inadvertent error
about the pivot points—Kapelle Dictation doesn’t know how to make allowances
for differing opinions on pivot point locations, unlike flesh-and-blood evaluators.)
To turn off harmonic placeholders:
Menu
Select View | Show Harmony Placeholders
The command is checked if the placeholders are showing, and unchecked if they
are hidden. Repeated selections of this command will show or hide the
placeholders.
To turn off pivot points:
Menu
Select View | Show Pivot Points
The command checks and un-checks itself just like “Show Harmony
Placeholders.”
Short Digression: How Harmonic Placeholders Can Help
To ponder the need for a harmonic placeholder, consider the following situation
after listening to, notating the outer voices, and analyzing this simple exercise:
Kapelle Dictation Tutorials
Page 51 of 57
There is something wrong: you hear clearly that there is a passing V7 on the 4th
beat of the first measure. But, the passing note occurs in an inner voice, which
you haven’t notated and thus there isn’t any way to enter an analysis on the
fourth beat—because there isn’t a note on the fourth beat that provides the
location of a harmonic analysis symbol.
The harmonic placeholder solves the problem. Since you have a placeholder for
each harmony in the original (answer) document:
you have a place to click to enter the analysis.
Summary of Tutorial 8
In this tutorial, you have learned to:
•
•
•
Enter harmonic analysis with pivot modulations
Enter harmonic analysis with secondary dominants
Understand the rationale behind harmonic placeholders
Kapelle Dictation Tutorials
Page 52 of 57
Tutorial 9: Your Progress Report II
In this tutorial, we take a closer look at your progress report and learn how to use it.
There is a great deal more to the progress report than just a listing of your
evaluations: you have quite a bit of control over what gets displayed or printed, and
in what order.
You already know how to sort the entries in your progress report (see Tutorial 2), so
let’s discover some more possibilities. Open your progress report and let’s look at the
row of buttons along the top, find out what they do.
Filtering Entries
A progress report can grow long and unwieldy very quickly. This can be all the
more aggravating if you are printing out a progress report and want to display
only a very few items —say, those exercises you have done in the past few days,
or maybe only those from a particular folder or set of exercises. By using filters,
you can do just that.
To filter your entries, click on the Filters button in the progress report. The
Filters property sheet is displayed:
Filtering by Date
Use the “Dates” property page to select those evaluations for display which have
been done only within a particular time frame. You may filter entries occurring at
any time from one year ago (12 months) to one day ago. Click on the appropriate
radio button and choose the value you wish in the associated text box.
Filtering by Directories and Sets
Use the “Directories and Sets” property page to limit display to only those
exercises which belong to a particular group of exercises. Place a check mark
next to those which you wish displayed:
Kapelle Dictation Tutorials
Page 53 of 57
Filtering by Score
Use the “Score” property page to filter your evaluations by only those whose
grades lie between certain outward limits. Select the low end and high end from
the Score property page:
Deleting Entries
To delete entries in your progress report, select the entry by clicking on the
Name column for that entry, and then click on the Delete button.
You can choose multiple contiguous entries by shift-clicking (click on the first
entry you wish to select, then hold down the Shift key and click on the last).
If you hold down the Control key while clicking, you can select multiple noncontiguous entries.
Deleting entries isn’t final until you close the Progress Report dialog box and
confirm that you want to save your changes.
Printing a Progress Report
You may print out your progress report by clicking on the Print button. If you
have filtered your report, you will be asked whether you want to print your entire
progress report or just the filtered set.
It’s generally a good idea to filter your evaluations prior to printing: you can use
a lot of paper otherwise!
Kapelle Dictation Tutorials
Page 54 of 57
Exporting a Progress Report
You may export your progress report to a tab-delimited text file which is suitable
for importing into a database or spreadsheet program. To export the report, click
on the Export button and then use the standard File Save As dialog box to
determine the location for the text file.
Summary of Tutorial 9
In this tutorial, you have learned how to:
•
•
•
•
Filter progress report entries by date, directory, and/or grade
Delete progress report entries
Print a progress report
Export a progress report
Kapelle Dictation Tutorials
Page 55 of 57
Tutorial 10: Storing the State of an Exercise
Sometimes you might not have enough time to complete your work on a
particular exercise. Being able to store the “state” of an exercise allows you to
stop working on the exercise, save its current state of completion, and then pick
it up again later.
Storing the Exercise State
To store the state of an exercise:
Menu
Select File | Save Exercise State
A dialog box will ask you to confirm this action. After you store the state of an
exercise, you cannot evaluate it until you have restored that state.
When you would like to continue to work on the exercise that you have stored:
Menu
Select File | Restore Exercise State
A dialog box will ask you to confirm this action. If you are currently working on n
unevaluated exercise, the exercise will be closed without an evaluation.
If there is only one saved exercise, that exercise will be restored without further
prompting. However, it is possible that you might have saved the state of several
exercises. If that is the case, you will be presented with a dialog box that allows
you to choose which exercise to restore:
Select which exercise you wish to restore by clicking on one of the listed items,
and then click OK.
Understanding Stored Exercise Names
The stored exercise state is given a three-section name. Section 1 is the name of
the file itself (frequently it might be no more than a number, as above where
#03 is the name of the first file.) Section 2 is the month, day, and year on which
the state was stored (thus 010398 means January 3, 1998). The third section is
the time in hours, minutes, seconds, and AM/PM.
Kapelle Dictation Tutorials
Page 56 of 57
Thus the third stored state is a file named #22, stored on January 3, 1998, at
11:20:58 AM.
An Exercise Is Restored Only Once
You can restore a saved exercise state only once. When you select the “Restore”
exercise command, and restore an exercise, the disk file is erased.
However, you may save the state of the exercise again at any point.
A
Add Chord Note ................................................... 30
add note ................................................................... 15
Auto Entry..................................................14, 18, 30
Auto Entry, disable ................................................ 14
C
click track................................................................ 32
click track, disabling.............................................. 38
click track, downbeat............................................. 32
click track, upbeats ................................................ 33
clipboard .................................................................. 19
context menu........................................................... 11
Context -Sensitive help ............................................ 8
copy.......................................................................... 19
cursor........................................................................ 14
D
delete note............................................................... 21
dot............................................................................. 18
E
evaluate.................................................................... 23
Evaluation Options...................................33, 36, 45
exercise, restoring the state.................................. 54
exercise, storing the state...................................... 54
exercises, opening.................................................. 12
exercises, playing................................................... 12
F
harmonic analysis, showing pivot points ........... 45
help ............................................................................. 8
help, context -sensitive............................................. 8
help, online................................................................ 8
I
insert note................................................................ 29
J
Jump to Next Measure, disable ........................... 16
L
layer.......................................................................... 36
M
menu bar .................................................................. 10
menu commands ...................................................... 6
menu, context ......................................................... 11
N
notating in four voices........................................... 46
note values, keyboard selection........................... 14
note values, selecting............................................. 14
note, add .................................................................. 15
note, delete.............................................................. 21
note, dot................................................................... 18
note, flat................................................................... 29
note, insert............................................................... 29
note, modify pitch.................................................. 21
note, rhythmic value .............................................. 22
note, sharp ............................................................... 28
file pane ................................................................... 11
flat............................................................................. 29
O
H
Online Help ............................................................... 8
output program....................................................... 38
harmonic analysis .................................................. 40
harmonic analysis, applied (secondary) chords 49
harmonic analysis, cadential 64........................... 43
harmonic analysis, continuous analysis feature 42
harmonic analysis, editing with harmonic
placeholder......................................................... 43
harmonic analysis, harmo nic analysis
placeholders....................................................... 39
harmonic analysis, key center.............................. 43
harmonic analysis, modulation............................ 47
P
paste.......................................................................... 20
play........................................................................... 12
play, comparing versions...................................... 23
play, measure .......................................................... 12
play, range of measures ........................................ 13
play, stop................................................................. 13
play, volume ........................................................... 13
progress report........................................................ 25
Kapelle Dictation Tutorials
Page 57 of 57
progress report, deleting entries .......................... 52
progress report, exporting..................................... 53
progress report, filtering ....................................... 51
progress report, printing........................................ 52
progress report, show............................................ 25
R
redo, multiple actions............................................ 17
redo, single action.................................................. 17
rest’........................................................................... 35
S
sharp note................................................................ 28
Single-Document Interface..................................... 8
status bar.................................................................. 11
stop ........................................................................... 13
summary dialog...................................................... 23
T
tempo........................................................................ 27
tie 35
tonic triad, play....................................................... 27
toolbars ...................................................................... 9
toolbars, docked..................................................... 10
toolbars, floating .................................................... 10
U
undo, multiple actions........................................... 16
undo, single action................................................. 16
V
volume ..................................................................... 13