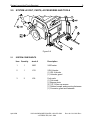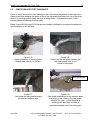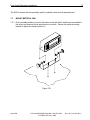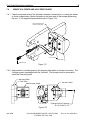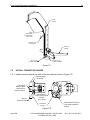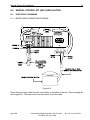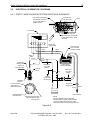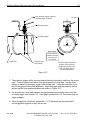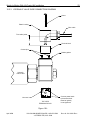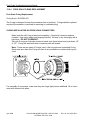
1
Table Of Contents
1
FRONT FORK SCALE INSTALLATION & SERVICE MANUAL
Table Of Contents
1.0
INTRODUCTION ............................................................................................ 7
1.1
2.0
System Specifications ......................................................................................8
SYSTEM LAYOUT, PARTS, ACCESSORIES AND TOOLS.................................... 9
2.1
System Components ........................................................................................9
2.2
Accessories....................................................................................................10
2.3
Replacement Parts.........................................................................................11
2.4
Service Repair Parts ......................................................................................11
2.5
Installation Tools ............................................................................................11
2.5.1
Shop Tools Required For Mounting A Fork System With A Scale
Ready Cross Tube.............................................................................11
2.5.2
Shop Tools Required For Mounting A Fork System On An Existing
Cross Tube Assembly........................................................................11
3.0
4.0
5.0
2.6
Troubleshooting Equipment ...........................................................................12
2.7
Vulcan Fork Scale Dimensions When Mounted To Different Cross Tubes ....12
UNPACKING FORKS .................................................................................... 15
3.1
Unpacking Notes ............................................................................................15
3.2
How To Identify And Use The Two Types Of 1 inch – 14 Nuts Supplied........15
INSTALL SCALE READY CROSS TUBE (RECOMMENDED BY VULCAN)............. 17
4.1
What Is A Scale Ready Cross Tube? .............................................................17
4.2
Installing The Scale Ready Cross Tube .........................................................18
INSTALL FORK MOUNTING CLAMPS ON EXISTING CROSS TUBE .................... 19
5.1
Preinstallation Measurements ........................................................................19
5.2
Measure Existing Configuration .....................................................................20
5.3
Remove Existing Forks And Related Hardware .............................................22
5.4
Recommended Procedure For Welding Fork Mounting Clamps ....................24
5.5
Welding Mounting Clamps To Cross Tube.....................................................25
April 2008
VULCAN ON-BOARD SCALES 1-800-237-0022
© STRESS-TEK, INC. 2008
Doc. 44-10112-001 Rev. -
Table Of Contents
6.0
7.0
8.0
INSTALL FORK ASSEMBLY ON CROSS TUBE ................................................ 29
6.1
Install Forks To Mounting Clamps With Washer Plate ...................................29
6.2
Assemble Bumper Plate and Bumper ............................................................29
6.3
Minimum Maintenance Requirement..............................................................31
6.4
Check Cab Guard Clearance .........................................................................32
6.5
Check Exhaust Port Clearance ......................................................................33
FORK SCALE ELECTRONICS INSTALLATION ................................................. 35
7.1
Electronics System Overview.........................................................................35
7.2
Descriptions of The Three Electronics Options For The Fork Scale...............35
7.3
Mount Meter In Cab .......................................................................................37
7.4
Mount Vulcoder And Vulcoder Guard.............................................................38
7.5
Route Vulcoder Black And Orange Cables ....................................................39
7.6
Install Connector Guards................................................................................41
MANUAL CONTROL KIT INSTALLATION ........................................................ 43
8.1
Electrical Diagrams ........................................................................................43
8.1.2
8.2
9.0
2
Connection To Truck Battery .............................................................44
Meter Setup And System Test .......................................................................45
8.2.1
Start Up Display Meter.......................................................................45
8.2.2
Erasing the Meter and Vulcoder ........................................................46
8.2.3
Verify Fork Operation.........................................................................48
8.3
Calibration ......................................................................................................49
8.4
Manual Control Kit Driver Card ......................................................................49
STATIC / WEIGH-IN-MOTION CONTROL KIT INSTALLATION ............................ 51
9.1
Proximity Switch Installation...........................................................................51
9.2
Electrical Schematics / Diagrams...................................................................55
9.3
9.2.1
Static / Weigh-In-Motion System Electrical Schematic.......................55
9.2.2
Meter Wire Connection Diagram........................................................56
9.2.3
Connection To Truck Battery .............................................................57
Meter Setup And System Test .......................................................................58
9.3.1
April 2008
Operation Check Of Proximity Switch ................................................58
VULCAN ON-BOARD SCALES 1-800-237-0022
© STRESS-TEK, INC. 2008
Doc. 44-10112-001 Rev. -
Table Of Contents
3
9.3.2
Start Up Display Meter.......................................................................59
9.3.3
Erasing The Meter And Vulcoder .......................................................60
9.3.4
Using the Static System as Weigh-in–Motion ....................................62
9.3.5
Meter Setup For Static Or Weigh-In-Motion .......................................63
9.3.6
Verify Fork Operation.........................................................................64
9.4
Calibration ......................................................................................................64
9.5
Static / Weigh-In-Motion Control Kit Driver Card ............................................64
9.6
Centerline Locating Tool ................................................................................67
10.0 WEIGH-IN-MOTION WITH LIFT CONTROL KIT INSTALLATION .......................... 69
10.1 Proximity Switch Installation..........................................................................69
10.2 Hydraulic Flow Control Valve Installation And Configuration.........................73
10.3 Electrical Schematics / Diagrams ..................................................................75
10.3.1 Weigh-In-Motion With Lift Control System Electrical Schematic .......75
10.3.2 Meter Wire Connection Diagram.......................................................76
10.3.3 Hydraulic Valve Wire Connection Diagram .......................................78
10.3.4 Connection To Truck Battery ............................................................79
10.4 Meter Setup And System Test ......................................................................80
10.4.1 Operation Check Of Proximity Switch And Hydraulic Valve..............80
10.4.2 Start Up Display Meter......................................................................81
10.4.3 Erasing the Meter and Vulcoder........................................................82
10.4.4 Meter Setup For Weigh-In-Motion.....................................................83
10.4.5 Verify Fork Operation........................................................................84
10.5 Calibration .....................................................................................................85
10.6 Weigh-In-Motion With Lift Control Kit Driver Card .........................................85
10.7 Centerline Locating Tool ...............................................................................87
11.0 FORK SCALE FINAL INSPECTION CHECKLIST ............................................... 89
11.1 Front Fork Scale Assembly ...........................................................................89
11.2 Electronics Assembly ....................................................................................89
11.2.1 Manual Method Weigh Systems .......................................................90
11.2.2 Static / Weigh-In-Motion Method Weigh Systems .............................90
11.2.3 Weigh-In-Motion With Lift Control Method Weigh Systems ..............91
April 2008
VULCAN ON-BOARD SCALES 1-800-237-0022
© STRESS-TEK, INC. 2008
Doc. 44-10112-001 Rev. -
Table Of Contents
4
11.3 Documentation ..............................................................................................91
12.0 FORK SCALE MAINTENANCE ...................................................................... 93
12.1 Front Fork Scale Assembly ...........................................................................93
12.2 Electronics Assembly ....................................................................................94
12.3 Manual Weigh System ..................................................................................94
12.4 Static / Weigh-In-Motion System ...................................................................94
12.5 Weigh-In-Motion With Lift Control System.....................................................95
13.0 FORK SCALE TROUBLESHOOTING AND REPAIR ............................................ 97
13.1 Driver Lockout Password Feature .................................................................98
13.2 Switch the Meter Between BASIC and CUSTOMER Mode.........................100
13.3 Re-Sequence the Vulcoder .........................................................................101
13.4 Loose Bolt Test ...........................................................................................102
13.5 Vulcan Check-Out Box ................................................................................104
13.6 Fork Scale Evaluation Tests........................................................................105
13.6.1 Leakage Test Procedure.................................................................105
13.6.2 Tare Test Procedure .......................................................................106
13.6.3 Resistance Test Procedure.............................................................109
13.7 V600 Meter Error Codes .............................................................................110
13.7.1 Err 01 ..............................................................................................110
13.7.2 Err 02 ..............................................................................................110
13.7.3 Err 03 ..............................................................................................111
13.7.4 Err 04 ..............................................................................................111
13.7.5 Err 05 ..............................................................................................111
13.7.6 Err 06 ..............................................................................................112
13.7.7 Err 07 ..............................................................................................112
13.7.8 Err 08 / Err 09 .................................................................................113
13.7.9 Err 10 ..............................................................................................113
13.7.10 Err 11 ..............................................................................................113
13.8 System Malfunctions ...................................................................................114
13.8.1 Meter Displays ERR 3.....................................................................114
13.8.2 Sum Of The Pickup Weights Don’t Match The Landfill ...................114
April 2008
VULCAN ON-BOARD SCALES 1-800-237-0022
© STRESS-TEK, INC. 2008
Doc. 44-10112-001 Rev. -
Table Of Contents
5
13.8.3 Weight Not Returning to Zero After Lifting ......................................115
13.8.4 Meter Displays ERR 6 Or ERR 1 ....................................................115
13.8.5 Not Advancing To Next Customer Or Not Computing Net Weight ..116
13.8.6 Meter Displays LO-LO ....................................................................116
13.8.7 Unable To Enter Tare Or Calibration Numbers ...............................118
13.8.8 No Indicator Display Or Function Lights..........................................118
13.8.9 IDLE – Next Cust # n ......................................................................119
13.8.10 Password? .....................................................................................119
13.9 Repair Techniques ......................................................................................121
13.9.1 How To Repair The Black Vulcoder Cable......................................121
13.9.2 How To Repair The Orange VSL Cable..........................................122
13.9.3 Fork Scale Connector Replacement ...............................................124
13.9.4 Fork Scale O-ring Replacement......................................................126
13.9.5 How To Repair A Vulcoder Connector ............................................127
13.10 System Test Menu ....................................................................................129
13.10.1 Test Keypad..................................................................................130
13.10.2 Test LEDs .....................................................................................131
13.10.3 Test Memory .................................................................................131
13.10.4 Test VSL Comm............................................................................132
13.10.5 Exiting The Program Menu ...........................................................133
April 2008
VULCAN ON-BOARD SCALES 1-800-237-0022
© STRESS-TEK, INC. 2008
Doc. 44-10112-001 Rev. -
Table Of Contents
April 2008
6
VULCAN ON-BOARD SCALES 1-800-237-0022
© STRESS-TEK, INC. 2008
Doc. 44-10112-001 Rev. -
Introduction
1.0
7
INTRODUCTION
The Vulcan Front Fork Weighing System consists of two weight measuring forks, two
mounting kits welded to the cross tube, V600 electronics package and associated
accessories for protecting the system. It is designed to measure individual commercial
collection weights and can monitor net or gross weight by summing the pickup weights.
Commercial pickup weights can be measured each time or by using an audit approach. This
allows operators to optimize pricing of commercial accounts and improve their competitive
position. The Front Fork Scale also allow operations to eliminate overweight fines, minimize
legal liabilities, and reduce maintenance expenses by assuring the vehicles are not
overloaded.
The V600 Fork Scale User Manual details how to operate the system. This small bound
manual comes packaged with the V600 meter and should be included with every installed
system.
There are three types of electronic kits that can be used with the fork scale. From the most
basic push button auditing system to a complete Weigh-In-Motion system.
The three electronic systems are:
P/N
Description
A01: A simple Manual push button - primarily used for specific customer auditing.
A04: Static weighing method - driver pauses the fork motion, then the weight is taken
automatically.
A02: Full Weigh-In-Motion with lift control method - no pausing the forks motion, weight is
taken automatically.
Vulcan recommends that a scale ready cross tube be used for installation. It simplifies the
installation process, saves 8-10 hours of installation time and better assures a properly
aligned system. Scale ready cross tubes are available from Vulcan for Heil and McNeilus
refuse bodies. They can also be purchased from the OEM. Other OEM’s may also have
scale ready cross tubes available.
This installation manual details mounting a fork system with both a scale ready cross tube,
and mounting a fork system on an existing cross tube assembly.
A CD is included with this manual. It contains a PDF version of this manual. There is also a
second CD which contains the V600 Fork Scale User Manual and A video of How to
Download Data from the V600 meter.
This Installation Manual is available from the Vulcan website at www.vulcanscales.com.
April 2008
VULCAN ON-BOARD SCALES 1-800-237-0022
© STRESS-TEK, INC. 2008
Doc. 44-10112-001 Rev. -
Introduction
1.1
8
SYSTEM SPECIFICATIONS
•
SYSTEM CAPACITY:
10,000 lb
•
FORK SCALE:
Material:
Finish:
Operating Temperature:
Mounting Fasteners:
ASTM A514, heat treated high strength alloy steel
Plated for corrosion resistance
-40 to +140° F
Grade 8 hex cap screws
•
FORK MOUNTING CLAMPS:
Through Hole Design, Material: ASTM A36, mild steel
Threaded Hole Design, Material: ASTM A514, heat treated high strength alloy steel
All mounting blocks are painted with a weld through primer.
•
•
VULCODER:
Operating Temperature:
Environment:
-40 to +180° F
Sealed for environmental protection
METER:
Operating Temperature:
Input Voltage Requirement:
-40 to +180° F
10.5 to 29 Vdc
.
April 2008
VULCAN ON-BOARD SCALES 1-800-237-0022
© STRESS-TEK, INC. 2008
Doc. 44-10112-001 Rev. -
System Layout And Tools Required
2.0
9
SYSTEM LAYOUT, PARTS, ACCESSORIES AND TOOLS
Figure 2-A
2.1
SYSTEM COMPONENTS
Item Quantity
stock #
Description
1
1
M60
V600 meter
2
1
V33
VSL Vulcoder
(1) VSL Vulcoder
(1) Vulcoder guard
3
2
L38
Fork scale
(1) Fork scale
(1) Bumper plate
(3) 7/8"-14 hex cap screws
(1) Rubber bumper and mounting fasteners
(1) Connector guard and fasteners
April 2008
VULCAN ON-BOARD SCALES 1-800-237-0022
© STRESS-TEK, INC. 2008
Doc. 44-10112-001 Rev. -
System Layout And Tools Required
Item Quantity
stock #
10
Description
Mounting Kit Options: (One set of either through hole or threaded kit is required)
Threaded Mounting Clamp:
4
2
H41R/L
H42R/L
H44R/L
3-1/2" Round mounting kit, right and left
4" Round mounting kit, right and left
4-1/2" Round mounting kit, right and left
All mounting kits include:
(2) Cross tube mounting clamps
(6) 1"-14 Grade 8, hex cap screws
(1) Hardened steel washer plate
(1) Connector guard and fasteners
Through Hole Mounting Clamp:
4
2
H31
H36
H53
H35
3-1/2" Round mounting kit
4" Square mounting kit
5" Square mounting kit
Universal mounting kit
All mounting kits include:
(2) Cross tube mounting clamps
(6) 1"-14 Grade 8, hex cap screws
(6) 1"-14 Grade C hex nuts
(1) Hardened steel washer plate
(2) Connector guard and fasteners
Electronic Kit Options: (One required)
5
2.2
1
A01
A04
A02
Manual button weigh method
Static / Weigh-In-Motion weigh method
Weigh-In-Motion with lift control weigh
method
ACCESSORIES
Item Quantity
Stock # or P/N
6
1
H55
7
7
1
1
H56
H57
1
1
59-30030-001
59-30029-002
April 2008
Description
Cross tube cable guard (required by Vulcan
Scales)
Heil, scale ready cross tube 4.5" ∅
McNeilus, scale ready cross tube 3.5" ∅,
Atlantic body style
Printer, with signal and power cable
Printer mounting bracket
VULCAN ON-BOARD SCALES 1-800-237-0022
© STRESS-TEK, INC. 2008
Doc. 44-10112-001 Rev. -
System Layout And Tools Required
2.3
REPLACEMENT PARTS
Stock # or P/N
H55
59-30042-001
59-30042-002
59-30045-001
A04R
A02R
21-10003-001
2.4
2.5
11
Description
Cross tube cable guard
Connector guard
Vulcoder guard
Proximity switch
Static, proximity switch upgrade kit
W.I.M. proximity switch upgrade kit
Relay for proximity switch, static and W.I.M.
SERVICE REPAIR PARTS
Stock # or P/N
Description
59-30050-001
59-20223-001
53-20130-001
59-20370-001
27-10086-001
Fork connector replacement kit
Fork connector O-ring replacement kit (7 O-rings)
Vulcoder connector replacement pigtail kit
Black Vulcoder cable splice kit
Orange VSL cable displacement connector
INSTALLATION TOOLS
Stock # or P/N
Description
47-10192-001
47-10105-001
30-90024-001
47-10211-001
47-10217-001
S21
3/4" Drive torque wrench
Torque multiplier
Threaded insert
Threaded insertion tool
Threaded insert tap drill
Threaded insert replacement kit (6 threaded inserts, insertion tool,
thread tap drill)
2.5.1 SHOP TOOLS REQUIRED FOR MOUNTING A FORK SYSTEM WITH A SCALE
READY CROSS TUBE:
1000 ft-lb torquing capabilities.
A typical well stocked shop, no special shop equipment required.
2.5.2 SHOP TOOLS REQUIRED FOR MOUNTING A FORK SYSTEM ON AN EXISTING
CROSS TUBE ASSEMBLY:
1000 ft-lb torquing capabilities.
Structural steel welding and cutting capabilities and a typical well stocked shop.
April 2008
VULCAN ON-BOARD SCALES 1-800-237-0022
© STRESS-TEK, INC. 2008
Doc. 44-10112-001 Rev. -
System Layout And Tools Required
2.6
2.7
12
TROUBLESHOOTING EQUIPMENT
Stock # or P/N
Description
S20
S22
56-30066-001
Multi-meter
Check-Out Box
VSL Zero Offset Plug
VULCAN FORK SCALE DIMENSIONS WHEN MOUNTED TO DIFFERENT CROSS
TUBES
The Vulcan Front Fork Scale is designed to mount directly to a front loader cross tube.
The Front Fork Mounting Kit is used in conjunction with the Front Fork Scale, replacing the
original manufacturer’s front fork. There are currently mounting kits for five different standard
cross tube dimensions. Three mounting kits were designed for round cross tubes, 3-1/2", 4",
and 4-1/2". Mounting kits were also designed for a 4" and 5" square cross tube. The kits
have either a bolt/nut, through hole fastening configuration or a bolt/threaded insert fastening
configuration.
In addition, a universal mounting kit is designed for through hole mounting only. The installer
can configure this kit as required to meet the geometry needs of special installations.
All forks are 1-1/2" thick and the height tapers from 5-1/2" at the bumper to 2-1/2" towards
the tip. The height at the end of the tip is 4".
Cross tube mounting clamps are shown in the following pictures with dashed lines.
For 10 yard bins and other very large containers, make sure the fork scale configuration will
allow the bin contents to be dumped into the hopper without overshooting or undershooting.
Configuration adjustments may have to be made to correct any problems that may develop
from dumping such large containers. Spacers can be added to the fork scale bumper blocks
as required.
Figure 2-B:
3-1/2" Round Tube Mounting Kit
Through Hole Mounting Kit: H31
Tapped Hole Mounting Kit: H41 Right / Left
April 2008
VULCAN ON-BOARD SCALES 1-800-237-0022
© STRESS-TEK, INC. 2008
Doc. 44-10112-001 Rev. -
System Layout And Tools Required
13
Figure 2-C:
4" Round Tube Mounting Kit
Tapped Hole Mounting Kit: H42 Right / Left
Figure 2-D:
4" Square Tube Mounting Kit
Through Hole Mounting Kit: H36
Figure 2-E:
4-1/2" Round Tube Mounting Kit
Tapped Hole Mounting Kit: H44 Right / Left
April 2008
VULCAN ON-BOARD SCALES 1-800-237-0022
© STRESS-TEK, INC. 2008
Doc. 44-10112-001 Rev. -
System Layout And Tools Required
14
Figure 2-F:
5" Square Tube Mounting Kit
Through Hole Mounting Kit: H53
Figure 2-G:
Universal Mounting Kit
Through Hole Mounting Kit (Only): H35
April 2008
VULCAN ON-BOARD SCALES 1-800-237-0022
© STRESS-TEK, INC. 2008
Doc. 44-10112-001 Rev. -
Unpacking Forks
15
3.0
UNPACKING FORKS
3.1
UNPACKING NOTES
When unpacking the Front Fork Scales from the shipping pallet, take special note for the
following parts:
3.1.1 Save the two 7/8"-14 bolts that hold the Front Fork Scale to the pallet. These will
be used later to mount the bumper plate to the Front Fork Scale. One more 7/8”-14
bolt is packaged with the other fasteners.
3.1.2 The 7/8"-14 nuts from this packaging assembly are not used and are to be discarded.
3.2
HOW TO IDENTIFY AND USE THE TWO TYPES OF 1"-14 NUTS SUPPLIED
1.50
Ø1.95
.85
.87
GRADE 2
PLAIN NUT
NO FINISH (GREY COLOR)
MAXIMUM TORQUE: 250 lb-ft
GRADE G (SAE GRADE 8)
LOCKING FLANGE NUT
ZINC PLATED (SILVER COLOR)
SPECIFIED TORQUE: 1000 lb-ft
Used only for initial assembly
of forks and mounting clamps
for alignment and welding
Used only for final assembly
of forks after mounting clamps
are completely welded
USE OF TORQUE MULTIPLIER
IS REQUIRED
April 2008
VULCAN ON-BOARD SCALES 1-800-237-0022
© STRESS-TEK, INC. 2008
Doc. 44-10112-001 Rev. -
Unpacking Forks
April 2008
16
VULCAN ON-BOARD SCALES 1-800-237-0022
© STRESS-TEK, INC. 2008
Doc. 44-10112-001 Rev. -
Install Scale Ready Cross Tube
4.0
17
INSTALL SCALE READY CROSS TUBE (RECOMMENDED BY VULCAN)
Scale ready cross tubes can be purchased from Stress-Tek, Inc. for both McNeilus and Heil
front loader vehicles. The scale ready cross tube for McNeilus is for the Atlantic Coast truck
model. The Pacific Coast truck model is designed for the California market specifically and
has a 9000 lb capacity fork vs. a 10,000 lb capacity fork used on the Atlantic model.
Other OEM’s may sell a scale ready cross tube as well.
4.1
WHAT IS A SCALE READY CROSS TUBE?
A Scale ready cross tube includes:
•
•
•
•
•
•
•
Complete cross tube sub assembly with the fork mounting clamps welded to the
cross tube for the Heil and McNeilus front loaders.
Strengthening coupler tube, welded between the fork mounting clamp and bell
crank.
A cross tube cable protector for running cable between the fork scales.
Complete assembly is painted with an industrial primer finish.
Assembly is a direct bolt in replacement, all the major welding and alignment is
done for you by Vulcan Scales.
Once this assembly is installed, the fork scales are simply bolted to it.
The scale ready cross tube simplifies the installation and saves 8-10 hours by
eliminating fabrication and welding steps. It also assures the scale system is
properly aligned.
Fork mounting
clamps (2 places)
Cross tube cable
protector
Strengthening coupler tube (2 places)
Figure 4-A:
Scale Ready Cross Tube
April 2008
VULCAN ON-BOARD SCALES 1-800-237-0022
© STRESS-TEK, INC. 2008
Doc. 44-10112-001 Rev. -
Install Scale Ready Cross Tube
4.2
18
INSTALLING THE SCALE READY CROSS TUBE
Unbolt and drop out the existing fork cross tube. Keep the cap plates matched to the sides
where they came from. They are a matched pair and may not be interchangeable.
Inspect bushings for excessive wear. Replace as required. Grease bushings before
installing scale ready cross tube.
Bolt in the scale ready cross tube. Align and torque all bolts to secure new cross tube.
After bolting on the cross tube assembly, go to section 6.0 “Install Fork Assembly on Cross
Tube” and complete the fork installation.
April 2008
VULCAN ON-BOARD SCALES 1-800-237-0022
© STRESS-TEK, INC. 2008
Doc. 44-10112-001 Rev. -
Install Fork Mounting Clamps On Existing Cross Tube
19
5.0
INSTALL FORK MOUNTING CLAMPS ON EXISTING CROSS TUBE
5.1
PREINSTALLATION MEASUREMENTS
5.1.1 Measure the existing cross tube cross-section to ensure the proper fork mounting kit
was ordered. If the tube is round, measure the diameter. If the tube is square,
measure one side (refer to Figure 5-A).
5.1.2 Verify the new fork assembly when installed, still dumps the bin contents without
overshooting (refer back to Figures 2-B through 2-F). This is especially important if
lifting 10 yard containers. Although all trucks do not have the same size forks, the
Vulcan Front Fork is designed to be similar to the typical OEM fork dimensions.
5.1.3 If the installation of the Front Fork System is on a new truck without factory forks
installed, consult body manufacturer for the fork hydraulic extension dimension that is
ideal for their truck (refer forward to Figure 5-B).
Diameter Ø
Side
Square tube
Round tube
Figure 5-A:
Cross Tube measurement
April 2008
VULCAN ON-BOARD SCALES 1-800-237-0022
© STRESS-TEK, INC. 2008
Doc. 44-10112-001 Rev. -
Install Fork Mounting Clamps On Existing Cross Tube
5.2
20
MEASURE EXISTING CONFIGURATION
5.2.1 Lower arms so the cross tube is waist level. Use a level to position the fork on a
horizontal plane. Measure how far the fork hydraulic cylinder is extended (refer to
Figure 5-B). Record this dimension, (A). This dimension will be used in aligning the
fork scale.
Figure 5-B:
Measuring Fork Cylinder Extension, (A)
April 2008
VULCAN ON-BOARD SCALES 1-800-237-0022
© STRESS-TEK, INC. 2008
Doc. 44-10112-001 Rev. -
Install Fork Mounting Clamps On Existing Cross Tube
21
5.2.2 Measure the internal dimensions between the two existing forks as shown in Figure
5-C. Record each dimension, B, C, D, E. Note: Front fork thickness dimensions vary
from manufacturer to manufacturer. The Vulcan Front Fork Scale is 1-1/2" thick. Be
sure to measure the inside dimension of the forks to ensure the forks will fit in all of
the container lifting sleeves.
Figure 5-C:
Measuring Internal Fork Dimensions, (B, C, D, E)
April 2008
VULCAN ON-BOARD SCALES 1-800-237-0022
© STRESS-TEK, INC. 2008
Doc. 44-10112-001 Rev. -
Install Fork Mounting Clamps On Existing Cross Tube
5.3
22
REMOVE EXISTING FORKS AND RELATED HARDWARE
Note: Instead of removing the existing fork, some operations remove the existing
cross tube and fork assembly to use as a spare. This is replaced with just the OEM
cross tube, which these mounting clamps are then welded to.
5.3.1 It is recommended to remove the existing factory mounted fork assemblies from the
cross tube by using an air arc (carbon arc). Note: Removing the cross tube and fork
assembly from the truck before starting the work is recommended. This allows the
fork mounting clamps to be welded in a flat position creating a better weld. This also
protects the truck from cutting and welding splatter and other damage.
5.3.2 Prepare the cross tube for installing the Front Fork Mounting Kit by grinding smooth
any excess welds, slag, or burrs. If the cross tube’s structural integrity is diminished
due to gouging or other actions during the removal of fork components, the cross tube
must be replaced.
5.3.3 Most truck body manufacturers use a reinforcement coupler support between the fork
and coupler plate. There are various types of coupler supports being installed by
OEM’s. The two most common types are illustrated below (refer to Figure 5-D). This
coupler support will need to be removed to allow welding access when installing the
fork mounting clamp on the cross tube. This coupler support must be reinstalled on
the fork scales so the final fork assembly is equivalent in strength to the original OEM
design.
April 2008
VULCAN ON-BOARD SCALES 1-800-237-0022
© STRESS-TEK, INC. 2008
Doc. 44-10112-001 Rev. -
Install Fork Mounting Clamps On Existing Cross Tube
Bell Crank
23
Bell Crank
Coupler support
"tubular shape"
Coupler support
"non-tubular shape"
Existing Fork
Cross Tube
Existing Fork
Cross Tube
Cross Tube
Cross Tube
Existing Fork
Existing Fork
Coupler support
"non-tubular shape"
Coupler support
"tubular shape"
Figure 5-D
April 2008
VULCAN ON-BOARD SCALES 1-800-237-0022
© STRESS-TEK, INC. 2008
Doc. 44-10112-001 Rev. -
Install Fork Mounting Clamps On Existing Cross Tube
5.4
24
RECOMMENDED PROCEDURE FOR WELDING FORK MOUNTING CLAMPS
There are two types of fork mounting brackets:
Threaded insert design, made from ASTM A514 (T-1) steel.
Through bolt design, made from ASTM A36 steel.
Below are general welding recommendations for all welding processes and specific welding
recommendations for welding on the ASTM A514 (T-1) steel parts.
5.4.1 General Recommendations:
1. Recommended weld process: Flux core arc welding (FCAW-G).
2. Recommend weld wire: UltraCore™ 712C, .045" minimum diameter, (larger
diameter desirable) mfg: Lincoln Arc Welding. This wire requires using 100% CO2
gas.
3. Recommend a weld machine with a 450A minimum capacity.
4. Use a 3 stringer minimum weld pass configuration. No weave pattern allowed.
5. All welds shall be free of cracks, overlaps, and unacceptable profiles shown in
Figure 5.4 in AWS D1.1 2006. Acceptable weld profiles are shown in this figure.
Full weld penetration required.
6. Preheat weld area to 250° F to remove all moisture from weld area.
7. Parts must be free of moisture, organic compounds, oils, rust and other welding
contaminates prior to welding.
8. Grind off mill scale on mounting clamps in the weld area.
9. Welding shall not be done when the immediate environment temperature is below
32° F.
10. It is recommended to remove the cross tube for welding fork mounting clamps and
stand on end to create a flat welding condition.
5.4.2 Additional specific recommendations for low hydrogen welding on ASTM A514 (T-1)
steel. This is for mounting clamps with threaded inserts.
1. Follow AWS D1.1 2006 for procedures, workmanship, technique, inspection, and
contractor obligations for low hydrogen welding on ASTM A514 (T-1) steel.
2. The weld wire is usable for only 7 days after sealed package is opened. Once
removed from original package, wire shall be protected and stored in a moisture
free environment so the welded metal properties are not negatively affected.
3. Minimum preheat temperature for ASTM A514 steel is 250° F. Maximum interpass
temperature is 450° F.
4. Subsequent weld inspection for cracking to be performed a minimum of 48 hours
after weld completion.
5. No thermal stress relieving permitted.
April 2008
VULCAN ON-BOARD SCALES 1-800-237-0022
© STRESS-TEK, INC. 2008
Doc. 44-10112-001 Rev. -
Install Fork Mounting Clamps On Existing Cross Tube
5.5
25
WELDING MOUNTING CLAMPS TO CROSS TUBE
Bolt the Front Fork Scales to the mounting clamps and the cross tube using the
1"-14 X 3" Grade 8 cap screws and the hardened steel washer plate. The cap screws do not
have to be tightened to their specified torque, 400-500 ft-lb is sufficient to create enough
clamping force between the mounting clamps and the fork. Note: This is the alignment stage
of the assembly. The bolts will be torqued to specification during final assembly. Use the
dimensions B, C, D, and E taken from the factory fork assembly (refer to Figure 5-C) to
position the Front Fork Scales in the same location and check for squareness. Make sure
both forks are level. The mounting clamps should fit snug around the cross tube when bolted
in place. Shimming should not be required. Note: Do not shim between Mounting Clamps
and Front Fork Scales (refer to Figure 5-E).
Bell Crank
Cross Tube
2"
Mounting
Clamp
No shimming between
Front Fork Scale and
Mounting Clamp
1-1/2"
Front Fork Scale
(Bolted to Mounting Clamp)
Figure 5-E
5.5.2 It is recommended to build a weld jig for holding the forks together and creating good
alignment between the forks and the cross tube. An optional method of fork alignment
is to tack weld an appropriate length (refer to Figure 5-C) of bar stock steel to the
Front Fork Scale tips to eliminate any possible movement during bracket tack welding
(refer to Figure 5-F).
April 2008
VULCAN ON-BOARD SCALES 1-800-237-0022
© STRESS-TEK, INC. 2008
Doc. 44-10112-001 Rev. -
Install Fork Mounting Clamps On Existing Cross Tube
26
Front Fork Scale
Mounting Clamp
Clamp
Spacer
here
Tack
Spacer
here
Mounting Clamp
Front Fork Scale
Figure 5-F
5.5.3 Tack weld the Mounting Clamps to the cross tube (refer to Figure 5-G). Note: DO
NOT tack the Front Fork Scale to the mounting clamp.
Note: The tack welds must be sufficient so the Mounting Clamps do not pull out of position
during the final welding stage. If the Mounting Clamps do not remain square, the forks will
not mount correctly. It is recommended to use a weld jig.
Caution! Arcing on the body of the Front Fork Scale may seriously damage its
structural integrity and must NOT be installed if this occurs. This also voids
manufacturer’s warranty. It is OK to tack weld installation jigs to the fork tip.
1/2" Length
Tack Weld
4 Places
Per Fork
Top View
Figure 5-G
April 2008
VULCAN ON-BOARD SCALES 1-800-237-0022
© STRESS-TEK, INC. 2008
Doc. 44-10112-001 Rev. -
Install Fork Mounting Clamps On Existing Cross Tube
27
5.5.4 Remove the Front Fork Scales from the mounting clamps and completely weld the
Mounting Clamps to the cross tube using a minimum three pass, 3/8" fillet weld (refer
to Figures 5-H and 5-I).
Note: Tape up fastener holes in the mounting clamps to prevent weld spatter from
entering the fastener holes.
Weld Leg
Weld Leg
Figure 5-H
Must have continuous
weld beads through this
this area.
No weld starts or stops.
3 Pass Weld
3/8
3/8
Must have continuous
weld on top and bottom.
If necessary,
start or stop
weld beads
here - ONLY.
Top View
Weld bead must be
deposited continuously
on the top and bottom
of mounting clamps.
Start and stop weld bead
on sides as required.
Figure 5-I
April 2008
VULCAN ON-BOARD SCALES 1-800-237-0022
© STRESS-TEK, INC. 2008
Doc. 44-10112-001 Rev. -
Install Fork Mounting Clamps On Existing Cross Tube
28
5.5.5 Trim the original coupler support length to fit between the mounting clamp and coupler
plate or make a new coupler support. Weld coupler supports in place (refer to Figure
5-J).
Both Ends
Figure 5-J
April 2008
VULCAN ON-BOARD SCALES 1-800-237-0022
© STRESS-TEK, INC. 2008
Doc. 44-10112-001 Rev. -
Install Fork Assembly On Cross Tube
29
6.0
INSTALL FORK ASSEMBLY ON CROSS TUBE
6.1
INSTALL FORKS TO MOUNTING CLAMPS WITH WASHER PLATE
Re-attach the Front Fork Scales to the mounting clamps using the supplied 1"-14 hex cap
screws and hardened steel washer plate. Torque the 1"-14 hex cap screws to 1000 ft-lb.
Note: Ensure that the Mounting Clamp surfaces are clean and smooth before fastening the
fork to it. Use “Never Seize” or equivalent thread lubricant when installing all mounting cap
screws (refer to Figure 6-A). DO NOT use the “Never Seize” or any other grease on the
load cell connectors. Note: If bolts are not torqued to proper value, scale inaccuracies may
result. Torque stripes are recommended.
6.2
ASSEMBLE BUMPER PLATE AND BUMPER
6.2.1 Assemble the bumper plate with the 7/8"-14 hex cap screws provided. Remember
that two of these cap screws were used to package the fork scale to the shipping
pallet. Use “Never Seize” or equivalent thread lubricant when installing all mounting
fasteners. Torque the bumper plate hex cap screws to 700 ft-lb (refer to Figure 6-A).
Install the rubber bumpers using the four, ½" bolts, washers and locking flange nuts.
Check all fork scale mounting fastener torque values after the first week of operation
and periodically, using a normal maintenance schedule.
After torquing the 1" cap screws, weld each of the hardened steel washer plates to the
cross tube using a 3/16" fillet weld.
When installing the Vulcoder in section 7.4.2, one of these bumpers must be removed
to install a Vulcoder guard.
April 2008
VULCAN ON-BOARD SCALES 1-800-237-0022
© STRESS-TEK, INC. 2008
Doc. 44-10112-001 Rev. -
Install Fork Assembly On Cross Tube
Fillet Weld
30
3/16
Hardened
Washer Plate
Torque 700 ft-lb
3 Places
per fork scale
Torque 1000 ft-lb
6 Places
per fork scale
Figure 6-A
Note: If bolts are not torqued to proper value, or thread lubricant is not used, scale
inaccuracies will result. If you cannot obtain a torque multiplier, contact Vulcan Customer
Service at 800-237-0022.
April 2008
VULCAN ON-BOARD SCALES 1-800-237-0022
© STRESS-TEK, INC. 2008
Doc. 44-10112-001 Rev. -
Install Fork Assembly On Cross Tube
31
Do not add any support bracing from the backside of the bumper plate to the Cross Tube
(refer to Figure 6-B). This will cause scale inaccuracies.
Fork Cover Plates
Minimum
Area For
Undercoating
Front Fork Scale
Cross Tube
Bumper Plate
NO SUPPORT BRACING
between Bumper Plate
and Cross Tube
Figure 6-B
6.3
MINIMUM MAINTENANCE REQUIREMENT
Certain minimum maintenance will be necessary to claim warranty of Front Fork Scales.
Apply high quality paint to the Front Fork Scales and Mounting Clamps. For environments
where high concentrations of salts are used on road surfaces, undercoating is recommended
(3M, Universal Rubberized Undercoating, 3M P/N: 8883). Areas between the bumper plate
and cross tube are most critical and should be well coated. This specifically includes the
connector area, fork cover plate areas and mounting clamp contact areas. Note: Spray
undercoating only when Front Fork Scales are fully assembled to the Mounting Clamps and
are connected to the electronics.
April 2008
VULCAN ON-BOARD SCALES 1-800-237-0022
© STRESS-TEK, INC. 2008
Doc. 44-10112-001 Rev. -
Install Fork Assembly On Cross Tube
6.4
32
CHECK CAB GUARD CLEARANCE
With the fork scales completely assembled on the cross tube, lift the cross tube/fork scale
assembly and check the clearance between the cab guard and the fork scales (refer to
Figure 6-C). There can be no interference here. The cab guard must be modified, as
required, to allow clearance.
Fork scale
cross tube
assembly
Cab guard
Check for
adequate
clearance
Figure 6-C
April 2008
VULCAN ON-BOARD SCALES 1-800-237-0022
© STRESS-TEK, INC. 2008
Doc. 44-10112-001 Rev. -
Install Fork Assembly On Cross Tube
6.5
33
CHECK EXHAUST PORT CLEARANCE
Check to verify the exhaust is not blowing on the forks where they attach to the cross tube.
Some trucks have exhaust exit ports on top of the cab guard that blow onto one of the forks
when it is in the up position while the truck is being driven. Prolonged exposure to hot
exhaust gases will damage the fork scale.
Below, figures 6-D through 6-G illustrate one possible modification to redirect the exhaust to
avoid exposure to hot exhaust.
Figure 6-D:
Existing condition of exhaust gases
blowing back directly on the fork.
Figure 6-E:
View under the cab guard showing the
rerouted exhaust pipe to the
center of cab guard.
New perforation
Figure 6-F:
View under the cab guard showing
the rerouted exhaust pipe.
April 2008
Figure 6-G:
Cab guard modification so the exhaust gases
are exiting in the center of the cab guard,
between the forks. In this example, a
welding torch was used to create a
perforated exhaust exit in the cab guard.
VULCAN ON-BOARD SCALES 1-800-237-0022
© STRESS-TEK, INC. 2008
Doc. 44-10112-001 Rev. -
Install Fork Assembly On Cross Tube
34
The existing exhaust pipe is cut below the cab guard. Another section of exhaust pipe is
welded to the remaining exhaust system such that the exhaust exits through the cab guard
toward the center of the truck, between the two forks. A new hole is cut in the cab guard to
allow the exhaust to exit. This new hole must have a screen or use perforated steel to
prevent debris from going into it. The new exhaust port must be sufficiently large so no
backpressure is created on the exhaust system.
Modifications are only required to those trucks that have exhaust blowing directly in the path
of the fork motion.
April 2008
VULCAN ON-BOARD SCALES 1-800-237-0022
© STRESS-TEK, INC. 2008
Doc. 44-10112-001 Rev. -
Fork Scale Electronics Installation
35
7.0
FORK SCALE ELECTRONICS INSTALLATION
7.1
ELECTRONICS SYSTEM OVERVIEW
Hydraulic Valve
(Weigh-In-Motion)
(A02)
Weight Capture
Button
(Manual System)
(A01)
Front Fork Scale
Proximity Switch
(Static System A04)
(Weigh-In-Motion A02)
V600 Meter
VSL
Vulcoder
Truck Battery
10.5-29 Vdc
Front Fork Scale
Figure 7-A
7.2
DESCRIPTIONS OF THE THREE ELECTRONICS OPTIONS FOR THE FORK
SCALE
All Vulcan Front Fork Scales include a V600 Meter, VSL Vulcoder and offer three
control options for the scale system.
7.2.1 THE MANUAL METHOD (P/N: A01)
The Manual Method requires the installation of a “Weight Capture” button. The driver
lifts and levels a full bin, then presses the Weight Capture button to tell the meter to take a
weight reading. Similarly, on lowering the bin, before placing it on the ground, the driver
levels the empty bin and once again presses the Weight Capture button. Both the up and
down weights are captured and the net weight is calculated and displayed. This allows the
driver to take weights on all customers or complete audits on specific customers. This
system is recommended for auditing routes where not every customer is weighed.
The A01 kit comes with the Weight Capture button and all required parts.
April 2008
VULCAN ON-BOARD SCALES 1-800-237-0022
© STRESS-TEK, INC. 2008
Doc. 44-10112-001 Rev. -
Fork Scale Electronics Installation
36
7.2.2 THE STATIC METHOD (P/N: A04)
The Static Method requires the installation of a proximity switch to tell the meter when
a bin is lifted. The driver controls the fork speed to allow a weight to be taken. There is no
button to push to record weights. Instead, when the driver lifts and levels a full bin, the meter
detects when the weight is stable, takes a reading and produces an audible signal letting the
driver know a stable weight has been captured and to continue the lift. When returning the
empty bin, the driver levels the bin before placing it on the ground. The meter will once again
signal that a stable empty weight has been captured, and the driver can set the bin on the
ground. Both the up and down weights are automatically captured and the net weight is
calculated and displayed.
If the motion of the bin while lifting in the weigh zone is too rough, uncontrolled or generally
not smooth enough, the meter will not capture a weight and will display an “error” code. This
condition is acknowledged by multiple audible beeps from the meter when the bin exits the
weigh zone.
This same bin can be re-entered into the weigh zone to get a successful weight capture.
If the bin does not re-enter the weigh zone, no weight will be recorded for that customer and
an error message will be stored in meter memory for that customer.
The “static” system will not capture a weight value for a customer if the lift conditions are not
steady in the weigh zone.
The A04 kit comes with the proximity switch and all required parts.
7.2.3 THE WEIGH-IN-MOTION WITH LIFT CONTROL METHOD (P/N: A02)
The Weigh-In-Motion with Lift Control Method requires the installation of a proximity
switch to tell the meter that a bin has been lifted. A hydraulic valve is installed in the
lift arms hydraulic line which “softens” the movement of the arms. There is no need for
the driver to do anything other than a normal lift. The V600 Meter will capture the up and
down weights automatically while the bin is in motion. Both the up and down weights are
captured and the net weight is calculated and displayed. This is a completely automated
system.
When a successful up or down weight capture is made, it is acknowledged by two audible
beeps or a single beep from the meter.
If the motion of the bin while lifting in the weigh zone is too rough, uncontrolled or generally
not smooth enough, the meter will acknowledge this condition by multiple audible beeps
when the bin exits the weigh zone. In this case, the meter will still capture a weight, but the
weight captured may not be as accurate as it could be if lifted smoothly.
This same bin can be re-entered into the weigh zone to get a potentially more accurate
weight reading.
The Weigh-In-Motion with Lift Control “motion” system will always capture a weight value for
every customer no matter what the lifting conditions are in the weigh zone.
April 2008
VULCAN ON-BOARD SCALES 1-800-237-0022
© STRESS-TEK, INC. 2008
Doc. 44-10112-001 Rev. -
Fork Scale Electronics Installation
37
The A02 kit comes with the proximity switch, hydraulic valve and all required parts.
7.3
MOUNT METER IN CAB
7.3.1 Find a suitable location to mount the meter in the cab that is visible and accessible to
the driver and does not block any mirrors or controls. Secure the meter mounting
bracket in place and fasten meter to it.
Figure 7-B
April 2008
VULCAN ON-BOARD SCALES 1-800-237-0022
© STRESS-TEK, INC. 2008
Doc. 44-10112-001 Rev. -
Fork Scale Electronics Installation
7.4
38
MOUNT VULCODER AND VULCODER GUARD
7.4.1 Tape the exposed ends of the Vulcoder connector sockets prior to routing the cables
to avoid contamination. Mount Vulcoder on the back side of the bumper plate using
the two, ¼"-20 tapped holes provided (refer to Figure 7-C).
Verify steel bushings are
in each mounting hole.
VSL Vulcoder
Bumper Plate
Tape this area
Figure 7-C
7.4.2 Add protective Vulcoder guard to the bumper plate where Vulcoder is mounted. The
Vulcoder guard is packaged with the Vulcoder. The bumper must be removed to
install the Vulcoder guard.
Mounting Block
Fork Scale
Vulcoder Guard
Vulcoder Guard
Exitsing Bumper Fasteners
4X 1/2-13UNC X 3.5"
Figure 7-D
April 2008
VULCAN ON-BOARD SCALES 1-800-237-0022
© STRESS-TEK, INC. 2008
Doc. 44-10112-001 Rev. -
Fork Scale Electronics Installation
7.5
39
ROUTE VULCODER BLACK AND ORANGE CABLES
7.5.1 There are two black cable lengths, a short one and a longer one. The shorter length
cable is to be connected to the Front Fork Scale where the VSL Vulcoder is mounted.
The longer black cable is routed along the backside of the cross tube to the fork
opposite of the VSL Vulcoder. This cable has an added jacket for protection. Do not
trim, nick, or cut the black cables to length.
7.5.2 A mechanical cable guard must be installed to protect the black cable as it runs
across the cross tube. A cable guard can be made by the installer or purchased from
Vulcan Scales, (P/N: H55). Figure 7-E illustrates the cable guard that can be
purchased from Vulcan Scales.
Cross Tube
Weld
Cable Guard, H55
Fork
Vulcoder connector/cable
45°
Weld
Weld Cable Guard in place.
Use weld tabs designed into
the Cable Guard.
Position Cable Guard for
adequate clearance to
allow passage of the Vulcoder
connector/cable assembly.
Route Vulcoder cable
inside Cable Guard.
To
Load Cell
Weld
Tabs
Grind burs.
Cable Guard
67" Long
Cut to shorter length as needed.
Weld to cross tube using weld tabs.
Grind burs.
Figure 7-E
April 2008
VULCAN ON-BOARD SCALES 1-800-237-0022
© STRESS-TEK, INC. 2008
Doc. 44-10112-001 Rev. -
Fork Scale Electronics Installation
40
7.5.3 Inspect the connectors on the VSL Vulcoder black cables by doing the following; verify
the connector has an O-ring, check the connectors on the Front Fork Scale and VSL
Vulcoders to make sure they are clean and dry. Important: Do not get moisture,
contact cleaner or any other substance inside the connectors. Do not grease or
lubricate inside the Front Fork Scale connector or VSL Vulcoder connector. These
components are highly sensitive to foreign substances and inaccurate readings will
occur if these components are contaminated. Your manufacturer’s warranty does
not cover the failure of VULCAN components due to contamination (use of
grease or other conductive substance) in either of these component
connectors.
7.5.4 Attach the black VSL Vulcoder cable connectors to the bulkhead connectors on the
Front Fork Scales. Make sure they are finger tight plus an additional 1/8 turn with
channel lock pliers. The additional tightening is necessary to correctly compress the
O-ring. This prevents scale errors, which can occur from moisture entering through
the connector. Caution: Do not over tighten the connectors as this can damage
them. Slide the heavy protective jacket up against the connector so the black cable
has maximum protection. Tape in place.
7.5.5 Route the 2-wire orange VSL Vulcoder cable from the Front Fork Scale to the arm,
allowing enough slack for cross tube rotation (refer to Figure 7-F). Route orange
cable by following the arm hydraulic lines to the arm pivot point. For extra protection,
we recommend welding a steel tube to the lift arm and routing the orange cable
through it. A tube 5/8" ∅ with a 1/16" wall is adequate size. The orange cable can be
pulled through using weld wire. A wire pulling lubricant can also be used to make it
easier to pull the cable through. Small clamps can be welded to the arm to hold the
steel tube in place.
The orange cable can also be routed inside the tube arm for protection. Protect the
cable inside an air line or hydraulic line when running inside the arm.
Route the orange cable to the inside of the arm when meeting the cross tube. The
cable is more vulnerable to damage if routed on the outside of the arm. For bodies
that tip for service, the orange cable must be routed from the arm pivot point through
the rear hinge pin and to the cab. Follow existing wire harness where possible. If the
cab is a front tilt model, route the cables through the hinge point to enter the cab,
preferably through a grommet.
April 2008
VULCAN ON-BOARD SCALES 1-800-237-0022
© STRESS-TEK, INC. 2008
Doc. 44-10112-001 Rev. -
Fork Scale Electronics Installation
41
Full Up
Position
2-Wire
Orange VSL
Vulcoder Cable
in steel tube
Clamps to hold
tube in place
Full Down
Position
No Loop @
Full Up Position
Small Loop @
Full Down Position
Figure 7-F
7.6
INSTALL CONNECTOR GUARDS
7.6.1 Install connector guards on each of the two forks as shown in Figure 7-G.
Mounting Block
Fork Scale
Tack weld to
Mounting Block
after fastening
Connector Guard.
Wire Tie
Fastening Holes
5/16-24UNF X 1"
Hex Cap Screw,
Washer,
and Locknut
Connector
Guard
Add 5/16"Ø lock washers
under existing fasteners.
2 Places
Figure 7-G
April 2008
VULCAN ON-BOARD SCALES 1-800-237-0022
© STRESS-TEK, INC. 2008
Doc. 44-10112-001 Rev. -
Fork Scale Electronics Installation
April 2008
VULCAN ON-BOARD SCALES 1-800-237-0022
© STRESS-TEK, INC. 2008
42
Doc. 44-10112-001 Rev. -
Manual Control Kit Installation
43
8.0
MANUAL CONTROL KIT (A01) INSTALLATION
8.1.
ELECTRICAL DIAGRAMS
8.1.1 METER WIRE CONNECTION DIAGRAM
Figure 8-A
Route the grey power cable from the truck battery to the meter in the cab. Route through the
cab hinge point. The fuses must be at the battery end of the cable.
April 2008
VULCAN ON-BOARD SCALES 1-800-237-0022
© STRESS-TEK, INC. 2008
Doc. 44-10112-001 Rev. -
Manual Control Kit Installation
44
In the truck cab, strain relief and cut the VSL Vulcoder cable, meter power cable and Weight
Capture button cable to ideal lengths. Unplug the terminal blocks from the back of the meter,
strip the wires, and connect to the terminal blocks (refer to Figure 8-A). Be careful that stray
wires DO NOT contact adjacent terminals. Twist conductor strands together (refer to
Figure 8-B). Do not plug the terminal block into the meter at this time.
1/4"
Twist Tightly
Do Not Solder
Figure 8-B
8.1.2 CONNECTION TO TRUCK BATTERY
Disassemble the positive fuse holder, (red wire). Apply grease to the positive connector at
the battery post to inhibit corrosion. Crimp ringed terminals to the power leads. Connect
fused power leads directly to battery posts for best operation. Power must be connected
directly to battery. Maximum power is 29 Vdc. Note: The Vulcan V600 meter is configured
to be used in a 12 Vdc system using 2 amp fast blow fuses in both power leads. Do not
connect the power cable to a power source activated by the key switch.
Remember: Turn meter off while making any wire connections.
WARNING: If installing the meter in a vehicle with a positive ground electrical system, the
meter chassis, mounting bracket, and mounting fasteners MUST be electrically isolated from
the vehicle chassis.
April 2008
VULCAN ON-BOARD SCALES 1-800-237-0022
© STRESS-TEK, INC. 2008
Doc. 44-10112-001 Rev. -
Manual Control Kit Installation
8.2
45
METER SETUP AND SYSTEM TEST
8.2.1 START UP DISPLAY METER
Note: If there are any problems with the following quick system tests, contact Vulcan
Customer Service.
1. Start the truck.
Bring the arms down and put the forks in a level position.
Level Forks
Figure 8-C
April 2008
VULCAN ON-BOARD SCALES 1-800-237-0022
© STRESS-TEK, INC. 2008
Doc. 44-10112-001 Rev. -
Manual Control Kit Installation
46
2. Turn the meter on and let it complete its startup routine.
Press the PWR / MENU button for less than 2 seconds.
After the meter has completed its startup routine, the meter will display READY TO LIFT.
If the meter does not have the display shown above, but instead has the display shown
below, the meter is not in BASIC mode, it is in CUSTOMER mode. See section 13.2 for
instructions on how to put the meter back into BASIC mode before continuing. See the
Vulcan V600 Fork Scale User Manual for a description of customer mode.
Below is the display shown when the meter is in CUSTOMER mode.
8.2.2 ERASING THE METER AND VULCODER
Press the PWR / MENU button to enter the Program menu.
Press the CYCLE button until SEQUENCE CHANLS is displayed.
April 2008
VULCAN ON-BOARD SCALES 1-800-237-0022
© STRESS-TEK, INC. 2008
Doc. 44-10112-001 Rev. -
Manual Control Kit Installation
47
Note: When trying to “SEQUENCE CHANLS”, if the lower display shows “Password?”
with the cursor blinking, the Driver Lock Password feature is activated and the Configure
System, Setup/Calibrate, Sequence Channels, and System Test menus are not accessible.
Refer to section 13.1 to unlock the system.
Press the ENTER button to select the SEQUENCE CHANLS menu option.
Press the ENTER button to enter the DISPLAY SEQUENCE menu option. The
meter will display the truck Vulcoder as a rear <R> designator.
Press and hold the ENTER button for two seconds to erase the Vulcoder. The
meter will display <->. This shows that the Vulcoder has been erased.
Press and hold the ENTER button again to erase the meter. The meter will display
all dashes on the upper display and ---Wait--- on the lower display.
Press and hold the PWR / MENU button until the meter powers off. Once the power
is off, press the PWR / MENU button again to power the meter back up.
After the meter has completed its startup routine, the meter will display READY TO LIFT.
The meter is now set up in the BASIC mode, using the manual method of weighing.
April 2008
VULCAN ON-BOARD SCALES 1-800-237-0022
© STRESS-TEK, INC. 2008
Doc. 44-10112-001 Rev. -
Manual Control Kit Installation
48
8.2.3 VERIFY FORK OPERATION
Verify the forks are working by either sitting or standing on each fork. The scales should
read the amount of weight on each fork.
Level container
in weighing zone
No ground
Weighing zone contact
6 ft.
Figure 8-D
1. Lift a bin off the ground within the weigh zone, keeping the forks level. It is best if the
bin has weight but it’s not required. Press the “Weight Capture” button. Wait for the
“two beep” audible signal from the meter to verify weight capture. The bin weight will
be displayed.
2. With the bin in the same position, again hit the “Weight Capture” button. Wait for the
“two beep” audible signal from the meter to verify weight capture. A net weight of
about zero should be displayed by the meter. If there are no beeps, recheck electrical
connections per section 8.1 and/or call Vulcan Scales.
3. Set the bin down and disengage the forks from the bin so there is no contact. The
meter display should return to zero, within 50 lb.
4. Repeat the first 3 steps 2 times to verify the full weights displayed and zero net
weights displayed are repeated within 50 lb.
5. All the up weight readings should be close to the same weight (within 50 lb) and all the
net weights should be close to zero (within 50 lb), although they may not be equal to
the exact pound or kilogram. If not, retorque fork mounting bolts per section 12.1
and/or call Vulcan Scales.
6. Activate the Driver Lockout Password feature. Vulcan Scales recommends the
activation of this password feature to prohibit the driver from changing the scale
system setup parameters. See section 13.1 to activate this feature.
April 2008
VULCAN ON-BOARD SCALES 1-800-237-0022
© STRESS-TEK, INC. 2008
Doc. 44-10112-001 Rev. -
Manual Control Kit Installation
8.3
49
CALIBRATION
The Front Fork Scale comes calibrated from the factory. There is no need for further
calibration by the installer. Once the system is working in the field, fine tuning the calibration
may be desired to obtain a higher accuracy. This can only be done after the system is
working in the field.
The V600 Fork Scale User Manual (P/N: 44-10115-001) has complete details on the
calibration methods.
8.4
MANUAL CONTROL KIT DRIVER CARD
The following page has a copy of the driver card used for the Manual Control Kit. This driver
card also comes packaged with the Manual Control Kit, (P/N: A01). If driver card cannot be
found, copy this page, fold in half and laminate. Put this card in the truck for the driver to
reference as needed. This driver card is also available from the Vulcan website at
www.vulcanscales.com.
April 2008
VULCAN ON-BOARD SCALES 1-800-237-0022
© STRESS-TEK, INC. 2008
Doc. 44-10112-001 Rev. -
Manual Control Kit Installation
50
DAILY DRIVER OPERATING GUIDE: FRONT FORK, MANUAL
GUIDELINES TO MAXIMIZE PICKUP WEIGHT ACCURACY
•
Just before bin engagement with forks in level position, if the meter reads more than 50 lb, press
the TARE / ZERO button to rezero.
•
Lift the full bin completely off of the ground smoothly, stop the forks in a level position within the 6'
weigh zone. Press the “weight capture” button, wait for a “two beep” audible signal from the
meter, then dump the full bin.
•
Lower the empty bin and stop within the 6' weigh zone with level forks, press the “weight capture”
button, wait for a “two beep” audible signal from the meter, then gently return empty bin to the
ground.
•
When the meter emits “two beeps”, the weight has been captured.
•
If picking a bin from a dock, bring it down within the 6' weigh zone before pressing the “weight
capture” button.
UP AND DOWN LIFT CYCLE
Level container
in weighing zone
Weighing zone
6 ft.
No ground
contact
INSTALLATION NOTE:
DRIVER NOTE:
Please wire tie this driver card to the
Vulcan V600 Meter bracket.
Please place this driver card on visor or
clipboard to use as a quick reference guide.
April 2008
VULCAN ON-BOARD SCALES 1-800-237-0022
© STRESS-TEK, INC. 2008
Doc. 44-10112-001 Rev. -
Static / Weigh-In-Motion Control Kit Installation
51
9.0
STATIC / WEIGH-IN-MOTION CONTROL KIT (A04) INSTALLATION
9.1
PROXIMITY SWITCH INSTALLATION
Torque tube
Arm
Cross tube
Fork scale
6'
Area where the
weight is measured.
Recess proximity switch in
nut up to 1/8".
Body structure
Height adjustment
screws
Proximity switch
MUST point to
the center of
the torque tube.
1.0"
2 nuts
Tightening screw
for hose clamp
Lock washer
Mechanical stop
ASSEMBLED
PROXIMITY SWITCH
IN BRACKET
Rotation of
torque tube
when arms
are lowered
Torque tube
1/4" gap
Stainless steel hose clamp
Proximity
trigger
Figure 9-A
April 2008
VULCAN ON-BOARD SCALES 1-800-237-0022
© STRESS-TEK, INC. 2008
Doc. 44-10112-001 Rev. -
Static / Weigh-In-Motion Control Kit Installation
52
1. Raise the cross tube until it is six feet above the ground. Locate a position on the
truck body structure, near the torque tube, where the supplied bracket can be
installed. Proximity switch must be installed on truck body, not on truck chassis. The
base of the nut must be 1" from the surface of the torque tube.
Scribe line
on body structure
along this edge
Drawn center line
Align tick marks
on bracket with
drawn center line
Torque tube
Torque tube
Center line
locating tool
Figure 9-B
1.0"
Figure 9-C
2. Remove the “Center Line Locating Tool” pattern from section 9.6. Place the “Center
Line Locating Tool” on the torque tube and mark a line on the body structure where
the bracket will be installed, see Figure 9-B.
3. Use the tick marks on the angle bracket to align it with the line drawn on the truck
structure. This aligns the center of the bracket with the center of the torque tube. The
base of the nut must be 1" from the surface of the torque tube. The bracket can be
cut down or additional bracketry can be welded to it so it fits properly in the desired
area, see figure 9-C.
April 2008
VULCAN ON-BOARD SCALES 1-800-237-0022
© STRESS-TEK, INC. 2008
Doc. 44-10112-001 Rev. -
Static / Weigh-In-Motion Control Kit Installation
53
Proximity switch
Torque tube
Torque tube
1.0"
Recess switch up to 1/8"
inside protection nut.
Figure 9-D
Figure 9-E
4. Weld bracket to the truck structure and set a 1" gap between the nut and torque tube,
see Figure 9-D.
5. Install the proximity switch in the bracket nut. Tighten in place so the sensor is
recessed in the nut up to 1/8" maximum, see Figure 9-E.
April 2008
VULCAN ON-BOARD SCALES 1-800-237-0022
© STRESS-TEK, INC. 2008
Doc. 44-10112-001 Rev. -
Static / Weigh-In-Motion Control Kit Installation
54
Align proximity trigger under the
proximity switch as shown
1/4" gap
Proximity switch
Proximity trigger
Torque tube
IMPORTANT!
Arrow indicates
rotation of torque
tube as arms
are lowered
Torque tube
Stainless steel
hose clamps
The above figure shows the
position of the proximity
trigger when the fork cross
tube is 6' above ground
and is being lowered
Figure 9-F
6. The proximity trigger will be mounted directly below the proximity switch on the torque
tube. Clean off grease and debris from the torque tube in this area. Use the hose
clamps to fasten the proximity trigger to the torque tube. Verify the cross tube is six
feet off the ground before final alignment. Align the trigger with the proximity switch
and set up the final installed distances as shown in Figure 9-F.
7. As the arms are raised and lowered, the gap between the proximity sensor and the
proximity trigger must remain 1/4". If the gap is greater than 1/4", the sensor may not
trigger properly.
8. When the position is finalized, tighten the two, ¼-20 fasteners and tack weld the two
mounting plates together so they will not slip.
April 2008
VULCAN ON-BOARD SCALES 1-800-237-0022
© STRESS-TEK, INC. 2008
Doc. 44-10112-001 Rev. -
Static / Weigh-In-Motion Control Kit Installation
9.2
55
ELECTRICAL SCHEMATICS / DIAGRAMS
9.2.1 STATIC / WEIGH-IN-MOTION SYSTEM ELECTRICAL SCHEMATIC
Junction Box
(Lid not shown.)
Use clamp and fasteners
included with enclosure
to secure all cables in
location shown.
Relay
Junction box
White
Black
Green
Red
3
2
5
1
Use the white wire from
the Stress-Tek orange cable
to hold other wires in place,
as shown.
Relay
Stress-Tek
orange cable
Green
Green
White
White
Accessory port
8-pin connector
on back of meter
Black
Brown
8 5
Red
-+
Black
Yellow light
showing that
trigger has
been detected
Blue
Cab-mounted
Vulcan V600 Meter
Stress-Tek
grey cable
(fused)
Proximity
switch
Black
Red
Stress-Tek
grey cable
(fused)
Battery
cut-off switch
(shown "off")
Mounting
bracket
Torque tube that
arms rotate on
(behind truck cab)
Stress-Tek
orange cable
-
+
Green
White
12 Vdc
Rotation direction
when lifting bin
Truck battery
Proximity trigger location
with cross tube six feet
above ground
From Vulcoder
NOTE:
Red ring terminals are provided with
proximity switch. Fasten these terminals
to both proximity switch and grey power
cable wires where connected in junction box.
Figure 9-G
April 2008
VULCAN ON-BOARD SCALES 1-800-237-0022
© STRESS-TEK, INC. 2008
Doc. 44-10112-001 Rev. -
Static / Weigh-In-Motion Control Kit Installation
56
1. Mount the junction box in a protected location on the truck body structure.
2. Route and secure the proximity switch wires to the junction box. For trucks that tip to
eject and tip for service, route and secure the orange and grey cables through the
body rear hinge point to the junction box.
3. The junction box comes with the relay already wired to the proper terminals. Wire the
orange and grey cables to the junction box as shown in Figure 9-G.
9.2.2 METER WIRE CONNECTION DIAGRAM
Power +
Power -
Power Cable
(grey)
Green
Green
(Pin 5)
White
VSL Vulcoder
Communication
Cable
(Comm Link)
(orange)
White
(Pin 8)
Orange Cable from
Junction Box
Figure 9-H
Route the grey power cable from the truck battery to the meter in the cab. Route through the
cab hinge point. The fuses must be at the battery end of the cable.
In the truck cab, strain relief and cut the VSL Vulcoder cable, meter power cable and junction
box cables to ideal lengths. Unplug the terminal blocks from the back of the meter, strip the
wires, and connect to the terminal blocks (refer to Figure 9-H). Be careful that stray wires
DO NOT contact adjacent terminals. Twist conductor strands together (refer to Figure 9-I).
Do not plug the terminal block into the meter at this time.
April 2008
VULCAN ON-BOARD SCALES 1-800-237-0022
© STRESS-TEK, INC. 2008
Doc. 44-10112-001 Rev. -
Static / Weigh-In-Motion Control Kit Installation
57
1/4"
Twist Tightly
Do Not Solder
Figure 9-I
9.2.3 CONNECTION TO TRUCK BATTERY
Disassemble the positive fuse holder, (red wire). Apply grease to the positive connector at
the battery post to inhibit corrosion. Crimp ringed terminals to the power leads. Connect
fused power leads directly to battery posts for best operation. Power must be connected
directly to battery. Maximum power is 29 Vdc. Note: The Vulcan V600 meter is configured
to be used in a 12 Vdc system using 2 amp fast blow fuses in both leads. Do not connect
the power cable to a power source activated by the key switch.
Remember: Turn meter off while making any wire connections.
WARNING: If installing the meter in a vehicle with a positive ground electrical system, the
meter chassis, mounting bracket, and mounting fasteners MUST be electrically isolated from
the vehicle chassis.
April 2008
VULCAN ON-BOARD SCALES 1-800-237-0022
© STRESS-TEK, INC. 2008
Doc. 44-10112-001 Rev. -
Static / Weigh-In-Motion Control Kit Installation
9.3
58
METER SETUP AND SYSTEM TEST
9.3.1 OPERATIONAL CHECK OF PROXIMITY SWITCH
Range where no weights
are taken
6'
Range in which the weight
is captured in both the up
and down motions.
A "two beep" audible signal
indicates weight capture.
The yellow indicator light in
the switch housing illuminates
when the switch is activated
and the forks are in the weigh zone.
3/16" gap
Stainless steel
bands are tight
Rotation of
torque tube
when arms
are lowered
Proximity switch
Torque tube
Proximity
trigger
Figure 9-J
April 2008
VULCAN ON-BOARD SCALES 1-800-237-0022
© STRESS-TEK, INC. 2008
Doc. 44-10112-001 Rev. -
Static / Weigh-In-Motion Control Kit Installation
59
9.3.2 START UP DISPLAY METER
Note: If there are any problems with the following quick system tests contact Vulcan
Customer Service.
1. Start the truck.
Bring the arms down and put the forks in a level position.
Level Forks
Figure 9-K
April 2008
VULCAN ON-BOARD SCALES 1-800-237-0022
© STRESS-TEK, INC. 2008
Doc. 44-10112-001 Rev. -
Static / Weigh-In-Motion Control Kit Installation
60
2. Turn the meter on and let it complete its startup routine.
Press the PWR / MENU button for less than 2 seconds.
After the meter has completed its startup routine, the meter will display READY TO LIFT.
If the meter does not have the display shown above, but instead has the display shown
below, the meter is not in BASIC mode, it is in CUSTOMER mode. See section 13.2 for
instructions on how to put the meter back into BASIC mode before continuing. See the
Vulcan V600 Fork Scale User Manual for a description of customer mode.
Below is the display shown when the meter is in CUSTOMER mode.
9.3.3 ERASING THE METER AND VULCODER
Press the PWR / MENU button to enter the Program menu.
Press the CYCLE button until SEQUENCE CHANLS is displayed.
April 2008
VULCAN ON-BOARD SCALES 1-800-237-0022
© STRESS-TEK, INC. 2008
Doc. 44-10112-001 Rev. -
Static / Weigh-In-Motion Control Kit Installation
61
Note: When trying to “SEQUENCE CHANLS”, if the lower display shows “Password?”
with the cursor blinking, the Driver Lock Password feature is activated and the Configure
System, Setup/Calibrate, Sequence Channels, and System Test menus are not accessible.
Refer to section 13.1 to unlock the system.
Press the ENTER button to select the SEQUENCE CHANLS menu option.
Press the ENTER button to enter the DISPLAY SEQUENCE menu option. The
meter will display the truck Vulcoder as a rear <R> designator.
Press and hold the ENTER button for two seconds to erase the Vulcoder. The
meter will display <->. This shows that the Vulcoder has been erased.
Press and hold the ENTER button again to erase the meter. The meter will display
all dashes on the upper display and ---Wait--- on the lower display.
Press and hold the PWR / MENU button until the meter powers off. Once the power
is off, press the PWR / MENU button again to power the meter back up.
After the meter has completed its startup routine, the meter will display READY TO LIFT.
April 2008
VULCAN ON-BOARD SCALES 1-800-237-0022
© STRESS-TEK, INC. 2008
Doc. 44-10112-001 Rev. -
Static / Weigh-In-Motion Control Kit Installation
62
9.3.4 Using the Static System as Weigh-In–Motion
The Static System (A04) can be used with the Static meter software or the Weigh-In-Motion
software. The user can select either software method. If the static scale system is used with
the Weigh-In-Motion software, the driver must be careful to make a smooth lift in the weigh
zone. There is no hydraulic valve to automatically smooth out the arm motion in the weigh
zone. The hydraulic valve only comes with the Weigh-In-Motion kit, (A02).
How the “Static” software system works:
The driver controls the fork speed to allow a weight to be taken. If a successful up or down
weight capture is made, it is acknowledged by two audible beeps from the meter.
If the motion of the bin while lifting in the weigh zone is too rough, uncontrolled or generally
not smooth enough, the meter will not capture a weight and will display an “error” code. This
condition is acknowledged by multiple audible beeps from the meter when the bin exits the
weigh zone.
This same bin can be re-entered into the weigh zone to get a successful weight capture.
If the bin does not re-enter the weigh zone, no weight will be recorded for that customer and
an error message will be stored in meter memory for that customer.
The “Static” system will not capture a weight value for a customer if the lift conditions are to
uncontrolled in the weigh zone.
How the “Weigh-In-Motion” software system works:
There is no need for the driver to do anything other than a normal lift. The V600 Meter will
capture the up and down weights automatically while the bin is in motion. If a successful up
or down weight capture is made, it is acknowledged by two audible beeps or a single beep
from the meter.
If the motion of the bin while lifting in the weigh zone is too rough, uncontrolled or generally
not smooth enough, the meter will acknowledge this condition by multiple audible beeps
when the bin exits the weigh zone. In this case, the meter will still capture a weight, but the
weight captured may not be as accurate as it could be if lifted smoothly.
This same bin can be re-entered into the weigh zone to get a potentially more accurate
weight capture.
The “Motion” system will always capture a weight value for every customer no matter what
the lifting conditions are in the weigh zone.
April 2008
VULCAN ON-BOARD SCALES 1-800-237-0022
© STRESS-TEK, INC. 2008
Doc. 44-10112-001 Rev. -
Static / Weigh-In-Motion Control Kit Installation
63
9.3.5 METER SETUP FOR STATIC OR WEIGH-IN-MOTION
With the meter already on and displaying “Ready to lift”.
Press the PWR / MENU button to enter the Program menu.
Press the CYCLE button until CONFIGURE SYSTEM is displayed.
Press the ENTER button to select the CONFIGURE SYSTEM menu option.
Press the CYCLE button until CONF: METHOD is displayed.
Press the ENTER button to select the CONF: METHOD menu option.
Press either the UP or DOWN ARROW buttons until METHOD:
[STATIC] or [MOTION] is displayed. You can choose either method, see
section 9.3.4.
April 2008
VULCAN ON-BOARD SCALES 1-800-237-0022
© STRESS-TEK, INC. 2008
Doc. 44-10112-001 Rev. -
Static / Weigh-In-Motion Control Kit Installation
64
Press the ENTER button to store the method.
9.3.6 VERIFY FORK OPERATION
Verify the forks are working by either sitting or standing on the each fork. The scales should
read the amount of weight on each fork.
1. With a bin on the forks (empty or full), run the lift arms up and down and verify the
meter gives the “two beep” signal for weight capture for both up and down directions.
If not:
• Verify the proximity switch illuminates its yellow light indicating the detection of the
weigh zone.
• Verify the weigh position of the proximity switch is triggered up to 6' off the ground.
2. Lift a bin (with weight is preferred, but empty is OK) through the up and down cycle 5
times without dumping and check the repeatability of the meter’s computed readings.
Note each up and down reading the meter computes. All up readings should be close
to the same weight (within 50 lb) and all down readings should be close to the same
weight (within 50 lb), although they may not be equal to the exact pound or kilogram.
3. Activate the Driver Lockout Password feature. Vulcan Scales recommends the
activation of this password feature to prohibit the driver from changing the scale
system set up parameters. See section 13.1 to activate this feature.
9.4
CALIBRATION
The Front Fork Scale comes calibrated from the factory. There is no need for further
calibration by the installer. Once the system is working in the field, fine tuning the calibration
may be desired to obtain a higher accuracy. This can only be done after the system is
working in the field.
The V600 Fork Scale User Manual has complete details on the calibration methods.
9.5
STATIC / WEIGH-IN-MOTION CONTROL KIT DRIVER CARD
The following page has a copy of the driver card used for the Static / Weigh-In-Motion
Control Kit. This driver card also comes packaged with the Static / Weigh-In-Motion control
kit (P/N: A04). If driver card cannot be found, copy this page, fold in half and laminate. Put
this card in the truck for the driver to reference as needed. This driver card is also available
on the Vulcan website at www.vulcanscales.com.
April 2008
VULCAN ON-BOARD SCALES 1-800-237-0022
© STRESS-TEK, INC. 2008
Doc. 44-10112-001 Rev. -
Static / Weigh-In-Motion Control Kit Installation
65
DAILY DRIVER OPERATING GUIDE: FRONT FORK,
STATIC / WEIGH-IN-MOTION SYSTEM
GUIDELINES TO MAXIMIZE PICKUP WEIGHT ACCURACY
•
Just before bin engagement with forks in level position, if the meter reads more than 50 lb, press
the TARE / ZERO button to rezero.
•
Lift the full bin completely off of the ground smoothly, stop the forks in a level position within the 6'
weigh zone. Wait for a “two beep” audible signal from the meter indicating weight capture, then
dump the full bin.
•
Lower the empty bin and stop within the 6' weigh zone with level forks, wait for a “two beep”
audible signal indicating weight capture, and return empty bin to the ground.
•
If continuous beeping occurs while lifting the bin to dump or setting it on the ground, bring the bin
back into the weighing zone and wait for the “two beep” signal.
•
If maneuvering a bin to get in the lifting position, momentarily set the bin back on the ground
before weighing. This will reset the weighing cycle.
•
If picking a bin from a dock, bring it down within the 6' weigh zone and wait for the “two beep”
audible signal before dumping.
UP AND DOWN LIFT CYCLE
Level container
in weighing zone
No ground
Weighing zone contact
6 ft.
INSTALLATION NOTE:
DRIVER NOTE:
Please wire tie this driver card to the
Vulcan V600 Meter bracket.
Please place this driver card on visor or
clipboard to use as a quick reference guide.
April 2008
VULCAN ON-BOARD SCALES 1-800-237-0022
© STRESS-TEK, INC. 2008
Doc. 44-10112-001 Rev. -
Static / Weigh-In-Motion Control Kit Installation
April 2008
VULCAN ON-BOARD SCALES 1-800-237-0022
© STRESS-TEK, INC. 2008
66
Doc. 44-10112-001 Rev. -
Static / Weigh-In-Motion Control Kit Installation
9.6
67
CENTERLINE LOCATING TOOL
April 2008
VULCAN ON-BOARD SCALES 1-800-237-0022
© STRESS-TEK, INC. 2008
Doc. 44-10112-001 Rev. -
Static / Weigh-In-Motion Control Kit Installation
April 2008
VULCAN ON-BOARD SCALES 1-800-237-0022
© STRESS-TEK, INC. 2008
68
Doc. 44-10112-001 Rev. -
Weigh-In-Motion With Lift Control Kit Installation
69
10.0 WEIGH-IN-MOTION WITH LIFT CONTROL KIT (A02) INSTALLATION
10.1
PROXIMITY SWITCH INSTALLATION
Torque tube
Arm
Cross tube
Fork scale
6'
Area where the
weight is measured.
Recess proximity switch in
nut up to 1/8".
Body structure
Height adjustment
screws
Proximity switch
MUST point to
the center of
the torque tube.
1.0"
2 nuts
Tightening screw
for hose clamp
Lock washer
Mechanical stop
ASSEMBLED
PROXIMITY SWITCH
IN BRACKET
Rotation of
torque tube
when arms
are lowered
Torque tube
1/4" gap
Stainless steel hose clamp
Proximity
trigger
Figure 10-A
April 2008
VULCAN ON-BOARD SCALES 1-800-237-0022
© STRESS-TEK, INC. 2008
Doc. 44-10112-001 Rev. -
Weigh-In-Motion With Lift Control Kit Installation
70
1. Raise the cross tube until it is six feet above the ground. Locate a position on the
truck body structure, near the torque tube, where the supplied bracket can be
installed. Proximity switch must be installed on truck body, not on truck chassis. The
base of the nut must be 1" from the surface of the torque tube.
Scribe line
on body structure
along this edge
Drawn center line
Align tick marks
on bracket with
drawn center line
Torque tube
Torque tube
Center line
locating tool
Figure 10-B
1.0"
Figure 10-C
2. Remove the “Center Line Locating Tool” pattern from the section 10.7. Place the
“Center Line Locating Tool” on the torque tube and mark a line on the body structure
where the bracket will be installed, see Figure 10-B.
3. Use the tick marks on the angle bracket to align it with the line drawn on the truck
structure. This aligns the center of the bracket with the center of the torque tube. The
base of the nut must be 1" from the surface of the torque tube. The bracket can be
cut down or additional bracketry can be welded to it so it fits properly in the desired
area, see Figure 10-C.
April 2008
VULCAN ON-BOARD SCALES 1-800-237-0022
© STRESS-TEK, INC. 2008
Doc. 44-10112-001 Rev. -
Weigh-In-Motion With Lift Control Kit Installation
71
Proximity switch
Torque tube
Torque tube
1.0"
Recess switch up to 1/8"
inside protection nut.
Figure 10-D
Figure 10-E
4. Weld bracket to the truck structure and set a 1" gap between the nut and torque tube,
see Figure 10-D.
5. Install the proximity switch in the bracket nut. Tighten in place so the sensor is
recessed in the nut up to 1/8" maximum, see Figure 10-E.
April 2008
VULCAN ON-BOARD SCALES 1-800-237-0022
© STRESS-TEK, INC. 2008
Doc. 44-10112-001 Rev. -
Weigh-In-Motion With Lift Control Kit Installation
72
Align proximity trigger under the
proximity switch as shown
1/4" gap
Proximity switch
Proximity trigger
Torque tube
IMPORTANT!
Arrow indicates
rotation of torque
tube as arms
are lowered
Torque tube
Stainless steel
hose clamps
The above figure shows the
position of the proximity
trigger when the fork cross
tube is 6' above ground
and is being lowered
Figure 10-F
7. The proximity trigger will be mounted directly below the proximity switch on the torque
tube. Clean off grease and debris from the torque tube in this area. Use the hose
clamps to fasten the proximity trigger to the torque tube. Verify the cross tube is six
feet off the ground before final alignment. Align the trigger with the proximity switch
and set up the final installed distances as shown in Figure 10-F.
8. As the arms are raised and lowered, the gap between the proximity sensor and the
proximity trigger must remain 1/4". If the gap is greater than 1/4", the sensor may not
trigger properly.
9. When the position is finalized, tighten the 2, ¼-20 fasteners and tack weld the 2
mounting plates together so they will not slip.
April 2008
VULCAN ON-BOARD SCALES 1-800-237-0022
© STRESS-TEK, INC. 2008
Doc. 44-10112-001 Rev. -
Weigh-In-Motion With Lift Control Kit Installation
10.2
73
HYDRAULIC FLOW CONTROL VALVE INSTALLATION AND CONFIGURATION
Install the Vulcan hydraulic control valve between the main valve manifold and the “T”
connection, as shown in Figure 10-G. The valve must be installed where it can affect both
arm hydraulic cylinders.
It does not matter whether the arm cylinders are single acting or double acting. The valve
will work for both types. On double acting cylinders, the valve must be installed in the return
line when the cylinder is extending.
Arm hydraulic
actuator
Power and/or
return line
Vulcan flow
control valve
"T" connection
Arm hydraulic
actuator
S.A.E. #16 Port
Main
valve
manifold
Mounting holes
2 Places
S.A.E. #16 Port
S.A.E. #16 Port
Flow
direction
Vulcan
flow control
valve diagram
Hydraulic
valve manifold
Flow
direction
Flow direction of oil
when lifting bin to dump
Figure 10-G
Use the two holes in the valve manifold to mount the unit to the truck body structure. It may
be helpful to bolt the valve to a larger piece of steel angle or tube, then bolt or weld the angle
or tube to the truck body structure.
April 2008
VULCAN ON-BOARD SCALES 1-800-237-0022
© STRESS-TEK, INC. 2008
Doc. 44-10112-001 Rev. -
Weigh-In-Motion With Lift Control Kit Installation
74
Flow control screw
1/4" hex key required
Locknut
Hydraulic valve
Figure 10-H
Factory recommended setting for Weigh-In-Motion: Flow control screw open 1-3/4 turns
counterclockwise.
Procedure for adjusting flow control screw to factory recommended setting:
Step 1:
Loosen the flow control screw locknut.
Step 2:
Turn the flow control screw clockwise until tight. This fully closes the valve.
Step 3:
Turn the flow control screw counterclockwise 1-3/4 turns and tighten the
locknut. The flow control valve is now at the recommended setting of open 13/4 turns.
April 2008
VULCAN ON-BOARD SCALES 1-800-237-0022
© STRESS-TEK, INC. 2008
Doc. 44-10112-001 Rev. -
Weigh-In-Motion With Lift Control Kit Installation
10.3
75
ELECTRICAL SCHEMATICS / DIAGRAMS
10.3.1 WEIGH-IN-MOTION WITH LIFT CONTROL SYSTEM ELECTRICAL SCHEMATIC
Junction Box
(Lid not shown.)
Use clamp and fasteners
included with enclosure
to secure all cables in
location shown.
Relay
White (+)
Hydraulic
Valve
Black (-)
Use a black wire to
hold other wires in place,
as shown.
Junction box
Red
Black
White
White w/Blk stripe
Blue
1
4
16
10
9
Relay
Accessory port
8-pin connector
on back of meter
Brown
Green
White
White
8 5
Stress-Tek
orange cable
-+
Blue
Black
Green
Yellow light
showing that
trigger has
been detected
Cab-mounted
Vulcan V600 Meter
Stress-Tek
grey cable
(fused)
Black
Red
Proximity
switch
Stress-Tek
grey cable
(fused)
Battery
cut-off switch
(shown "off")
Mounting
bracket
Torque tube that
arms rotate on
(behind truck cab)
Stress-Tek
orange cable
Green
-
White
+
12 Vdc
Truck battery
Rotation direction
when lifting bin
Proximity trigger location
with cross tube six feet
above ground
From Vulcoder
NOTE:
Red ring terminals are provided with
proximity switch. Fasten these terminals
to both proximity switch and grey power
cable wires where connected in junction box.
Figure 10-I
April 2008
VULCAN ON-BOARD SCALES 1-800-237-0022
© STRESS-TEK, INC. 2008
Doc. 44-10112-001 Rev. -
Weigh-In-Motion With Lift Control Kit Installation
76
1. Mount the junction box in a protected location on the truck body structure.
2. Route and secure the proximity switch cables to the junction box. For trucks that tip to
eject, and tip for service, route and secure the orange and grey cables through the
body rear hinge point to the junction box.
3. The junction box comes with the relay already wired to the proper terminals. Wire the
orange and grey cables to the junction box as shown in Figure 10-I.
10.3.2 METER WIRE CONNECTION DIAGRAM
Power +
Power -
Power Cable
(grey)
Green
Green
(Pin 5)
White
VSL Vulcoder
Communication
Cable
(Comm Link)
(orange)
White
(Pin 8)
Orange Cable from
Junction Box
Figure 10-J
April 2008
VULCAN ON-BOARD SCALES 1-800-237-0022
© STRESS-TEK, INC. 2008
Doc. 44-10112-001 Rev. -
Weigh-In-Motion With Lift Control Kit Installation
77
Route the grey power cable from the truck battery to the meter in the cab. Route through the
cab hinge point. The fuses must be at the battery end of the cable.
In the truck cab, strain relief and cut the VSL Vulcoder cable, meter power cable, and
junction box cables to ideal lengths. Unplug the terminal blocks from the back of the meter,
strip the wires, and connect to the terminal block (refer to Figure 10-J). Be careful that stray
wires DO NOT contact adjacent terminals. Twist conductor strands together (refer to Figure
10-K). Do not plug the terminal block into the meter at this time.
1/4"
Twist Tightly
Do Not Solder
Figure 10-K
April 2008
VULCAN ON-BOARD SCALES 1-800-237-0022
© STRESS-TEK, INC. 2008
Doc. 44-10112-001 Rev. -
Weigh-In-Motion With Lift Control Kit Installation
78
10.3.3 HYDRAULIC VALVE WIRE CONNECTION DIAGRAM
Screw
Plastic housing
Blue cable
Trim cable jacket
1"
Terminal block
Contact pins
Rubber gasket
Hydraulic
control valve
Not used
TOP VIEW
Connect power leads
to these terminals.
Electrical polarity
is not significant.
TERMINAL BLOCK
Figure 10-L
April 2008
VULCAN ON-BOARD SCALES 1-800-237-0022
© STRESS-TEK, INC. 2008
Doc. 44-10112-001 Rev. -
Weigh-In-Motion With Lift Control Kit Installation
79
Connect the cable from the junction box to the hydraulic control valve terminal block (refer to
Figure 10-L). Electrical polarity is not significant on the hydraulic terminal block.
10.3.4 CONNECTION TO TRUCK BATTERY
Disassemble the positive fuse holder, (red wire). Apply grease to the positive connector at
the battery post to inhibit corrosion. Crimp ringed terminals to the power leads. Connect
fused power leads directly to battery posts for best operation. Power must be connected
directly to battery. Maximum power is 29 Vdc. Note: The Vulcan V600 meter is configured
to be used in a 12 Vdc system using 2 amp fast blow fuses in both leads. Do not connect
the power cable to a power source activated by the key switch.
Remember: Turn meter off while making any wire connections.
WARNING: If installing the meter in a vehicle with a positive ground electrical system, the
meter chassis, mounting bracket, and mounting fasteners MUST be electrically isolated from
the vehicle chassis.
April 2008
VULCAN ON-BOARD SCALES 1-800-237-0022
© STRESS-TEK, INC. 2008
Doc. 44-10112-001 Rev. -
Weigh-In-Motion With Lift Control Kit Installation
10.4
80
METER SETUP AND SYSTEM TEST
10.4.1 OPERATIONAL CHECK OF PROXIMITY SWITCH AND HYDRAULIC VALVE
Arms at normal speed
in this range
6'
Range in which the arms
may be slowed by the hydraulic
control valve in both the
up and down motions
The yellow indicator light in
the switch housing illuminates
when the switch is activated,
the hydraulic valve is engaged,
and the motion of the arms
is slowed.
3/16" gap
Stainless steel
bands are tight
Rotation of
torque tube
when arms
are lowered
Proximity switch
Torque tube
Proximity
trigger
Figure 10-M
April 2008
VULCAN ON-BOARD SCALES 1-800-237-0022
© STRESS-TEK, INC. 2008
Doc. 44-10112-001 Rev. -
Weigh-In-Motion With Lift Control Kit Installation
81
10.4.2 START UP DISPLAY METER
Note: If there are any problems with the following quick system tests contact Vulcan
Customer Service.
1. Start the truck.
Bring the arms down and put the forks in a level position.
Level Forks
Figure 10-N
2. Turn the meter on and let it go through its startup routine.
Press the PWR / MENU button for less than 2 seconds.
After the meter has completed its startup routine, the meter will display READY TO LIFT.
April 2008
VULCAN ON-BOARD SCALES 1-800-237-0022
© STRESS-TEK, INC. 2008
Doc. 44-10112-001 Rev. -
Weigh-In-Motion With Lift Control Kit Installation
82
If the meter does not have the display shown above, but instead has the display shown
below, the meter is not in BASIC mode, it is in CUSTOMER mode. See section 13.2 for
instructions on how to put the meter back into BASIC mode before continuing. See the
Vulcan V600 Fork Scale User Manual for a description of customer mode.
Below is the display shown when the meter is in CUSTOMER mode.
10.4.3 ERASING THE METER AND VULCODER
Press the PWR / MENU button to enter the Program menu.
Press the CYCLE button until SEQUENCE CHANLS is displayed.
Note: When trying to “SEQUENCE CHANLS”, if the lower display shows “Password?”
with the cursor blinking, the Driver Lock Password feature is activated and the Configure
System, Setup/Calibrate, Sequence Channels, and System Test menus are not accessible.
Refer to section 13.1 to unlock the system.
Press the ENTER button to select the SEQUENCE CHANLS menu option.
April 2008
VULCAN ON-BOARD SCALES 1-800-237-0022
© STRESS-TEK, INC. 2008
Doc. 44-10112-001 Rev. -
Weigh-In-Motion With Lift Control Kit Installation
83
Press the ENTER button to enter the DISPLAY SEQUENCE menu option. The
meter will display the truck Vulcoder as a rear <R> designator.
Press and hold the ENTER button for two seconds to erase the Vulcoder. The
meter will display <->. This shows that the Vulcoder has been erased.
Press and hold the ENTER button again to erase the meter. The meter will display
all dashes on the upper display and ---Wait--- on the lower display.
Press and hold the PWR / MENU button until the meter powers off. Once the power
is off, press the PWR / MENU button again to power the meter back up.
After the meter has completed its start up routine, the meter will display READY TO LIFT.
10.4.4 METER SETUP FOR WEIGH-IN-MOTION
Press the PWR / MENU button to enter the Program menu.
Press the CYCLE button until CONFIGURE SYSTEM is displayed.
Press the ENTER button to select the CONFIGURE SYSTEM menu option.
April 2008
VULCAN ON-BOARD SCALES 1-800-237-0022
© STRESS-TEK, INC. 2008
Doc. 44-10112-001 Rev. -
Weigh-In-Motion With Lift Control Kit Installation
84
Press the CYCLE button until CONF: METHOD is displayed.
Press the ENTER button to select the CONF: METHOD menu option.
Press either the UP or DOWN ARROW buttons until METHOD: [MOTION] is
displayed.
Press the ENTER button to store the method and return to the CONF: METHOD
menu option.
Press the PWR / MENU button twice to exit and the meter will return to its operating
mode. The scale system is now ready to weigh.
10.4.5 VERIFY FORK OPERATION
Verify the forks are working by either sitting or standing on the each fork. The scales should
read the amount of weight on each fork.
1. Run the lift arms up and down and make sure they are slow and smooth in the
weighing range.
If not:
• Check the hydraulic valve setting. It should be 1-3/4 turns open, see section 10.2.
• Hydraulic trip point should be about 6 feet off the ground and should be the same
spot going up and down.
• Check to see where the hydraulics engages on the up cycle.
• If arms are moving too fast, turn hydraulic valve setting ¼ turn clockwise (cw) and
retest.
April 2008
VULCAN ON-BOARD SCALES 1-800-237-0022
© STRESS-TEK, INC. 2008
Doc. 44-10112-001 Rev. -
Weigh-In-Motion With Lift Control Kit Installation
85
2. Lift a bin (with weight is preferred, but empty is OK) through the up and down cycle 5
times without dumping and check the repeatability of the meter’s computed readings.
Note each up and down reading the meter computes. All up readings should be close
to the same (within 50 lb) and all down readings should be close to the same (within
50 lb), although they may not be equal to the exact pound or kilogram.
3. Activate the Driver Lockout Password feature. Vulcan Scales recommends the
activation of this password feature to prohibit the driver from changing the scale
system set up parameters. See section 13.1 to activate this feature.
10.5
CALIBRATION
The Front Fork Scale comes calibrated from the factory. There is no need for further
calibration by the installer. Once the system is working in the field, fine tuning the calibration
may be desired to obtain a higher accuracy. This can only be done after the system is
working in the field.
The V600 Fork Scale User Manual has complete details on the calibration methods.
10.6
WEIGH-IN-MOTION WITH LIFT CONTROL KIT DRIVER CARD
The following page has a copy of the driver card used for the Weigh-In-Motion with Lift
Control Kit. This driver card also comes packaged with the Weigh-In-Motion with Lift Control
Kit (P/N: A02). If driver card cannot be found, copy this page, fold in half and laminate. Put
this card in the truck for the driver to reference as needed. This driver card is also available
from the Vulcan website at www.vulcanscales.com.
April 2008
VULCAN ON-BOARD SCALES 1-800-237-0022
© STRESS-TEK, INC. 2008
Doc. 44-10112-001 Rev. -
Weigh-In-Motion With Lift Control Kit Installation
86
DAILY DRIVER OPERATING GUIDE: FRONT FORK,
WEIGH-IN-MOTION WITH LIFT CONTROL
GUIDELINES TO MAXIMIZE PICKUP WEIGHT ACCURACY
•
Just before bin engagement with forks in level position, if the meter reads more than 50 lb, press
the TARE / ZERO button to rezero.
•
Lift the full bin off of the ground smoothly and maintain a smooth motion through the 6' weigh
zone. Lower the empty bin smoothly through the 6' weigh zone.
While lifting the bin, keep the forks level in the weigh zone until a single or double beep is emitted
by the meter.
Set the bin down gently on the ground.
If maneuvering a bin into the lifting position, momentarily set the bin back on the ground before
lifting to dump. This will reset the weigh cycle.
If picking a bin from a dock, bring it down to a few feet off the ground, this will reset the weighing
cycle.
If continuous beeping occurs while lifting the bin to dump, bring the bin back into the weigh zone
until the meter emits a single or double beep.
•
•
•
•
•
UP AND DOWN LIFT CYCLE
Non-weighing zone
Arms at normal speed
Weighing zone
Arms slowed
Forks level
Smooth motion
6 ft.
INSTALLATION NOTE:
DRIVER NOTE:
Please wire tie this driver card to the
Vulcan V600 Meter bracket.
Please place this driver card on visor or
clipboard to use as a quick reference guide.
April 2008
VULCAN ON-BOARD SCALES 1-800-237-0022
© STRESS-TEK, INC. 2008
Doc. 44-10112-001 Rev. -
Weigh-In-Motion With Lift Control Kit Installation
10.7
87
CENTERLINE LOCATING TOOL
April 2008
VULCAN ON-BOARD SCALES 1-800-237-0022
© STRESS-TEK, INC. 2008
Doc. 44-10112-001 Rev. -
Weigh-In-Motion With Lift Control Kit Installation
April 2008
VULCAN ON-BOARD SCALES 1-800-237-0022
© STRESS-TEK, INC. 2008
88
Doc. 44-10112-001 Rev. -
Fork Scale Final Inspection Checklist
89
11.0 FORK SCALE FINAL INSPECTION CHECKLIST
This section can be photocopied and used repeatedly as a checklist for inspecting
installations.
11.1
FRONT FORK SCALE ASSEMBLY
The Front Fork Scales are mounted parallel and square to the cross tube with
correct spacing between them, section 5.2.2
The cross tubes structural integrity has not been diminished during the removal
of fork components, section 5.3.2.
Coupler support is installed to meet strength requirements of OEM design,
section 5.3.3.
There is a complete 3-pass weld wrapped around the Mounting Clamps,
section 5.5.4.
All mounting cap screws are torqued to specification, section 6.1, and 6.2.1.
Rubber bumpers are installed, section 6.2.
The Front Fork Scale and Mounting Clamp assembly is painted with a high
quality paint, section 6.3.
There is adequate clearance between cross tube, cab guard and fork scale
during lift cycle, section 6.4.
System dumps bin in the hopper without overshooting or undershooting,
especially important for 10 yard bins, section 2.7.
Connector guard, Vulcoder guard, and cross tube cable guards are installed,
section 7.6, 7.4.2, 7.5.2.
Fork does not pass through truck exhaust when passing above the cab, section
6.5.
11.2
ELECTRONICS ASSEMBLY
The V600 Meter in the cab does not block mirrors or other in-cab equipment.
Wires have adequate strain relief, section 7.3.
There is adequate strain relief for the VSL Vulcoder orange cable between the
cross tube and arm when the Front Fork Scale is rotated in the full up and full
down position, section 7.5.5, Figure 7-F.
April 2008
VULCAN ON-BOARD SCALES 1-800-237-0022
© STRESS-TEK, INC. 2008
Doc. 44-10112-001 Rev. -
Fork Scale Final Inspection Checklist
90
Cable from Vulcoder running up the arm is completely protected in steel
conduit, section 7.5.5, Figure 7-F.
Meter is powered from the battery, Manual System - section 8.1.2, Static
System - 9.2.3, Weigh-In-Motion System - section 10.3.4.
Orange VSL Vulcoder cable is routed through the rear hinge point of body and
through hinge point of front tilt cab, use a grommet to protect cable from
abrasion, section 7.5.5.
Black cable routed from the VSL Vulcoder to the Front Fork Scale on the
opposite side of the truck is protected, section 7.5, Figure 7-E.
If the vehicle has a positive ground electrical system, the meter chassis
mounting bracket and mounting fasteners must be electrically isolated from the
vehicle chassis, Manual System - section 8.1.2, Static System - 9.2.3, WeighIn-Motion System - section 10.3.4.
Power cable has the fused ends near the battery, not by the meter in the cab,
Manual System - section 8.1.2, Static System - 9.2.3, Weigh-In-Motion System
- section 10.3.4.
Meter mounting screws are secure and rear meter connections are in place.
V600 meter terminal connections are protected from clipboard use and other in
cab equipment.
V600 Meter is set in BASIC mode, section 13.2.
Driver Lockout Password feature is activated. This prevents the driver from
modifying the scale systems setup parameters, section 13.1.
11.2.1 MANUAL METHOD WEIGH SYSTEMS
Accessory port is wired correctly for the Weight Capture button, section 8.1.1.
Weight Capture button is in a desirable location and is strain relieved.
11.2.2 STATIC / WEIGH-IN-MOTION METHOD WEIGH SYSTEMS
Accessory port is wired correctly, section 9.2.2. and Figure 9-G.
Proximity switch triggers in the proper location, section 9.1.
Junction box wires are routed through the body’s tipping hinge point, section
9.2.1.
April 2008
VULCAN ON-BOARD SCALES 1-800-237-0022
© STRESS-TEK, INC. 2008
Doc. 44-10112-001 Rev. -
Fork Scale Final Inspection Checklist
91
Proximity switch is mechanically protected inside the protective mounting
bracket nut, section 9.1. and Figure 9-E.
11.2.3 WEIGH-IN-MOTION WITH LIFT CONTROL METHOD WEIGH SYSTEMS
Accessory port is wired correctly, section 10.3.2. and Figure 10-J.
Proximity switch triggers in the proper location, section 10.1. and Figure 10-F.
Junction box wires are routed through the body’s tipping hinge point, section
10.3.1. and Figure 10-E.
Proximity switch is mechanically protected inside the protective mounting
bracket nut, section 10.1.
Hydraulic valve engages and disengages only in the proximity trigger area
determined by the proximity switch and the arms move smoothly through this
area, section 10.4.1.
Hydraulic valve flow control screw is set correctly, section 10.2., Figure 10-H.
11.3
DOCUMENTATION
Appropriate driver card (Manual, Static / Weigh-In-Motion, or Weigh-In-Motion
with lift control) is sent with the truck.
V600 Fork Scale User Manual (P/N: 44-10115-001) is sent with truck.
Warranty cards are sent with the truck (if not filled out by dealer).
April 2008
VULCAN ON-BOARD SCALES 1-800-237-0022
© STRESS-TEK, INC. 2008
Doc. 44-10112-001 Rev. -
Fork Scale Final Inspection Checklist
April 2008
VULCAN ON-BOARD SCALES 1-800-237-0022
© STRESS-TEK, INC. 2008
92
Doc. 44-10112-001 Rev. -
Fork Scale Maintenance
93
12.0 FORK SCALE MAINTENANCE
This section can be photocopied and used repeatedly as a checklist for maintenance
inspections.
Preventative Maintenance
In order to keep any system functioning properly, it is important that the system be properly
maintained. This includes daily vehicle inspection and preventative maintenance during
regular scheduled maintenance periods.
Certain minimum maintenance will be necessary to claim warranty of fork scales and other
scale components.
12.1
FRONT FORK SCALE ASSEMBLY
Check all Front Fork Scale fastener torques after the first week of operation
and then periodically and whenever the truck is being serviced.
Torque fork mounting bolts:
1”-14 Grade 8, hex cap screws and Grade G, locking flange nuts
Torque bumper block mounting bolts:
7/8”-14 Grade 8, hex cap screws
1000 ft-lb
700 ft-lb
Inspect rubber bumpers for excessive wear.
Verify the connector guard, Vulcoder guard and cross tube cable guards are
intact and undamaged.
Check for signs of overloading in the cross tube bell crank area.
Check and repaint or undercoat areas that show excessive corrosion and rust.
Verify there is adequate clearance between the cross tube/fork scale assembly
and cab guard during a lift cycle.
Torque striping bolts:
It is recommended to apply torque stripes to bolt heads to make sure they
remain properly torqued. To apply a torque stripe: Use a durable, brightly
colored paint. Paint a stripe crossing the head of the fastener, continuing down
the fastened structure, as shown in Figure 12-A.
April 2008
VULCAN ON-BOARD SCALES 1-800-237-0022
© STRESS-TEK, INC. 2008
Doc. 44-10112-001 Rev. -
Fork Scale Maintenance
94
Figure 12-A: Painting a Torque Stripe
Verify the Driver Lockout Password feature is activated to prevent the driver from
modifying scale system setup parameters.
12.2
ELECTRONICS ASSEMBLY
Check the orange cable strain relief loop at the cross tube/arm junction to make sure
it’s not getting damaged.
Verify V600 Meter in cab cable routing is strain relieved and secure.
Verify cable running up the arm is undamaged and protected in conduit and the
conduit is securely in place.
Verify orange cable to the meter is routed through the front hinge point of the cab,
through a grommet and is not damaged.
12.3
MANUAL WEIGH SYSTEM
Verify Weight Capture button is in a desirable location and is strain relieved.
Verify Weight Capture button functions properly and a weight is obtained when used.
12.4
STATIC / WEIGH-IN-MOTION SYSTEM
Verify proximity switch triggers in the proper location.
Verify junction box wires are routed through the body’s tipping hinge point and are
undamaged.
Verify proximity switch is mechanically protected inside the protective mounting
bracket nut.
Verify system measures a weight when a bin is dumped.
April 2008
VULCAN ON-BOARD SCALES 1-800-237-0022
© STRESS-TEK, INC. 2008
Doc. 44-10112-001 Rev. -
Fork Scale Maintenance
12.5
95
WEIGH IN MOTION WITH LIFT CONTROL SYSTEM
Verify proximity switch triggers in the proper location.
Verify junction box wires are routed through the body’s tipping hinge point.
Verify proximity switch is mechanically protected inside the protective mounting
bracket nut.
Verify hydraulic valve engages and disengages only in the trigger area determined by
the proximity switch and the arms move smoothly through this area.
Verify system measures a weight when a bin is dumped.
If you need additional assistance, parts, or service, give us a call at:
VULCAN CUSTOMER SERVICE
1-800-237-0022
HOURS:
7:30 a.m. - 5:00 p.m.
PACIFIC TIME
April 2008
VULCAN ON-BOARD SCALES 1-800-237-0022
© STRESS-TEK, INC. 2008
Doc. 44-10112-001 Rev. -
Fork Scale Maintenance
April 2008
96
VULCAN ON-BOARD SCALES 1-800-237-0022
© STRESS-TEK, INC. 2008
Doc. 44-10112-001 Rev. -
Fork Scale Troubleshooting And Repair
97
13.0 FORK SCALE TROUBLESHOOTING AND REPAIR
FORK SCALE TROUBLESHOOTING
In general, troubleshooting is a systematic process of testing and eliminating potential
problem sources until the one that is causing the problem is found. The problem can then be
fixed by repairing or replacing the faulty part.
With a little knowledge and by following a step by step procedure, most of the problems that
you may encounter will be easy to diagnose and solve. In this section, you will find
guidelines on how to troubleshoot the system, some characteristics of a properly functioning
system, and where to look when certain problems occur.
Occasionally, someone has a problem that is not described here. By approaching the
problem systematically, you will be able to eliminate potential sources of trouble until you find
the one that is causing the problem.
The following section covers an explanation of V600 Test Procedures, Fork Scale Evaluation
Test Procedures and Vulcan Error Codes.
Recommended equipment for complete system troubleshooting:
Stock # or P/N
S20
S22*
56-30066-001*
Description
Multi-Meter
Check-Out Box
VSL Zero Offset Plug
Isopropyl Alcohol
Cotton Swabs
Hair Dryer
* Indicates part is available only from Vulcan On-Board Scales.
April 2008
VULCAN ON-BOARD SCALES 1-800-237-0022
© STRESS-TEK, INC. 2008
Doc. 44-10112-001 Rev. -
Fork Scale Troubleshooting And Repair
13.1
98
DRIVER LOCKOUT PASSWORD FEATURE
This feature “locks” the meter and allows drivers to access the “Driver Entries” menu only. It
prohibits modification of any of the Configure System, Setup/Calibrate, Sequence Channels,
or the System Test menus without entering the proper password. All meters have the same
password. The meter comes from the factory with the password lock inactive. Vulcan
Scales recommends the activation of this password feature after the installation and setup
process is complete.
How the Password works in BASIC mode (if not in BASIC mode refer to section 13.2)
Press the PWR / MENU button to turn on the meter.
After the meter has completed its startup routine and is running, press the PWR /
MENU button to enter the program menu.
If the password feature is active, the display now shows “Password?” with the cursor
blinking. Without entering the correct password there is no access to other menu options.
To return to the normal operating mode if password is not known
Press the ENTER button.
Press the PWR / MENU button to return to the normal operating mode. The scale
system is now ready to weigh.
To Activate or Deactivate the Driver Lockout Password Feature
Press the PWR / MENU button to turn on the meter.
After the meter has completed its startup routine and is running, press the PWR /
MENU button to enter the program menu.
Press the CYCLE button until CONFIGURE SYSTEM is displayed.
April 2008
VULCAN ON-BOARD SCALES 1-800-237-0022
© STRESS-TEK, INC. 2008
Doc. 44-10112-001 Rev. -
Fork Scale Troubleshooting And Repair
99
Press the ENTER button to select the CONFIGURE SYSTEM menu.
Press the CYCLE button until CONF: PASSWORD is displayed.
Press the ENTER button to select the CONF: PASSWORD option.
Or
With the cycle button depressed, press the UP ARROW button to switch between
the two options.
Press the ENTER button to save the selection.
Press the PWR / MENU button twice to exit and the meter will return to its operating
mode. The scale system is now ready to weigh.
April 2008
VULCAN ON-BOARD SCALES 1-800-237-0022
© STRESS-TEK, INC. 2008
Doc. 44-10112-001 Rev. -
Fork Scale Troubleshooting And Repair
100
Definition of the Password
The password is a series of button presses. Press these buttons: TARE/ZERO, CYCLE, S,
T, ENTER – in that order. Any other sequence of button presses will leave the meter
“locked.” Enter this sequence of button presses when prompted by the meter to obtain full
access to all the meter’s menus. If a mistake is made when entering the password code,
press the ENTER button and restart entering the password code.
13.2
SWITCH THE METER BETWEEN BASIC AND CUSTOMER MODE
Vulcan Scales recommends the meter be set in BASIC mode. The meter factory default
setting is BASIC mode, but this should be verified.
Press the PWR / MENU button to turn on the meter.
After the meter has completed its startup routine and is running, press the PWR /
MENU button to enter the program menu.
If the meter display shows “Ready To Lift”, the meter is in BASIC mode.
Press the CYCLE button until CONFIGURE SYSTEM is displayed.
Press the ENTER button to select the CONFIGURE SYSTEM menu.
Press the CYCLE button until CONF: CUST MODE is displayed.
April 2008
VULCAN ON-BOARD SCALES 1-800-237-0022
© STRESS-TEK, INC. 2008
Doc. 44-10112-001 Rev. -
Fork Scale Troubleshooting And Repair
101
Press the ENTER button to select the CONF: CUST MODE option.
Press either the UP or DOWN ARROW buttons to turn the CUSTOMER
mode to [OFF] or [ON].
Press the PWR / MENU button twice to exit and the meter will return to normal
operation in BASIC mode, and it is now ready to weigh. See the Vulcan V600 Fork
Scale User Manual for a description of customer mode.
13.3
RE-SEQUENCE THE VULCODER
Press the PWR / MENU button to turn on the meter.
After the meter has completed its start up routine and is running, press the PWR /
MENU button to enter the program menu.
Press the CYCLE button until SEQUENCE CHANLS is displayed.
Press the ENTER button to select the SEQUENCE CHANLS option.
Press the CYCLE button to start the channel sequence process.
April 2008
VULCAN ON-BOARD SCALES 1-800-237-0022
© STRESS-TEK, INC. 2008
Doc. 44-10112-001 Rev. -
Fork Scale Troubleshooting And Repair
102
Press the ENTER button.
The channel in now re-sequenced.
Press the PWR / MENU button twice to return to the normal operation mode. The
scale system is now ready to weigh.
13.4
LOOSE BOLT TEST
Loose bolt test
To see if the fork mounting bolts are loose, a loaded bin (2000 lb or more) is lifted up and
down several times. The meter should return to zero within 50 lb. If not, the fork mounting
bolts need to be torqued to 1000 ft-lb.
Forks level
April 2008
VULCAN ON-BOARD SCALES 1-800-237-0022
© STRESS-TEK, INC. 2008
Doc. 44-10112-001 Rev. -
Fork Scale Troubleshooting And Repair
103
Obtain a bin that weighs at least 2000 lb.
Press the PWR / MENU button to turn on the meter.
•
Forks must be down, level, and ready to stab a bin. Be sure the meter reads zero with
no load on the forks. If the meter does not read zero, then press the TARE/ZERO
button.
No ground
contact
•
Pick up the bin so that the bin is off of the ground completely. Do not dump bin.
Return bin to the ground. Lift the bin 2 more times.
•
Return the bin to the ground and completely disengage the forks, keeping the forks
level.
•
The meter display should read zero, within 50 lb
•
If not, torque the bolts to 1000 ft-lb and re-test.
•
Call Vulcan Scales if problem continues.
April 2008
VULCAN ON-BOARD SCALES 1-800-237-0022
© STRESS-TEK, INC. 2008
Doc. 44-10112-001 Rev. -
Fork Scale Troubleshooting And Repair
13.5
104
VULCAN CHECK-OUT BOX
The Vulcan Check-Out Box can be used to check the fork scales and electronics. It works as
an extension to bring fork scale connector pins to the side of truck where readings can be
conveniently made. It can also simulate an applied load to the VSL Vulcoder. The CheckOut Box is an optional equipment item for the Leakage and Resistance Tests. Vulcan Scales
recommends every installer and troubleshooter has one.
Before using the Check-Out Box, make sure the meter fuses are good. Use a multi-meter to
ensure there is a minimum of 10.4 Vdc from the input power connections at the back of the
meter when the system is running. (Make sure the green plug is plugged in and the meter is
turned on.) If there are any error messages displayed, refer to section 13.7 “V600 Meter
Error Codes”.
To order a Check-Out Box (P/N: S22), contact your Vulcan dealer.
Figure 13-A: Vulcan Check-Out Box
April 2008
VULCAN ON-BOARD SCALES 1-800-237-0022
© STRESS-TEK, INC. 2008
Doc. 44-10112-001 Rev. -
Fork Scale Troubleshooting And Repair
13.6
105
FORK SCALE EVALUATION TESTS
The tests listed below will help identify and locate any problem you may encounter with your
Vulcan fork scales.
Leakage Test
Tare Test
Resistance Test
13.6.1 LEAKAGE TEST PROCEDURE
Required Equipment: Digital Multi-Meter With Conductivity Scale
Isopropyl Alcohol
Cotton Swabs
Hair Dryer
Optional Equipment:
Vulcan Check-Out Box
The Leakage Test detects the presence of moisture that could cause erratic meter readings.
The way to measure leakage is to use a digital multi-meter that has a conductivity scale.
Electrical isolation is measured between any pin and an unpainted clean surface on the fork
scale or the connector body. Electrical isolation must not exceed 2.0 nS (nano-siemens) or
be less than 500 Meg Ohms. Nano-siemens and Meg Ohms are two different units of
measure for evaluating electrical leakage.
Refer to Figure 13-B for the Leakage Test equipment setup.
For proper operation, the power and signal leads from the fork scale must have a very high
resistance to the fork scale body. An electrical path between the wires and the body would
indicate moisture in the fork or shorting to the body. This would result in erratic, fluctuating,
or even out of range weight displays.
If the fork scale fails (electrical isolation is greater than 2.0 nS or is less that 500 Meg Ohms),
check the inside of the fork scale connector with a dry cotton swab to make sure it is clean
and dry. If not, clean with isopropyl alcohol, dry with a hair dryer, and check the electrical
isolation again.
If the fork scale cannot be brought to Vulcan specifications, contact Vulcan customer service
or your Vulcan dealer.
April 2008
VULCAN ON-BOARD SCALES 1-800-237-0022
© STRESS-TEK, INC. 2008
Doc. 44-10112-001 Rev. -
Fork Scale Troubleshooting And Repair
106
Caution: Do not touch the multi-meter probes with your hands when making measurements.
This could cause an error in the meter reading. A person’s body can have 10 times the
allowable conductivity of a fork scale.
MULTI-METER
MULTI-METER
OR
CHECK-OUT BOX
FORK SCALE
FORK SCALE
Figure 13-B: Leakage Test
Leakage Test Specifications:
Measure between any pin and an unpainted clean surface of the fork scale or connector
body. Electrical Isolation must not be greater than 2.0 nS or less than 500 Meg Ohms.
13.6.2 TARE TEST PROCEDURE
This test checks each fork scale for a high preload number caused by mechanical damage or
moisture. Both forks must be connected to the Vulcoder.
With the truck empty and no bin on the forks, lower the arms and extend forks to a level
position.
Press the PWR / MENU button to turn on the meter and let it complete it’s startup
routine.
Record the current truck Tare weight. The Tare weight is the weight displayed when the
vehicle is empty and there is no bin on the forks. For trucks that use 0 for a Tare weight, this
step can be omitted.
Current Tare Weight: ______________
April 2008
VULCAN ON-BOARD SCALES 1-800-237-0022
© STRESS-TEK, INC. 2008
Doc. 44-10112-001 Rev. -
Fork Scale Troubleshooting And Repair
107
Press the PWR / MENU button to enter the program menu.
Note: If the PWR / MENU button is held too long, the meter display will display all 8’s and the
meter will turn off.
Press the CYCLE button until SETUP/CALIBRATE is displayed.
Note: When trying to enter the SETUP/CALIBRATE menu, if the lower display shows
“Password?” with the cursor blinking, the Driver Lock Password feature is activated and
the Configure System, Setup/Calibrate, Sequence Channels, and System Test menus are
not accessible. Refer to section 13.1 to unlock the system.
Press the ENTER button to select the SETUP / CALIBRATE menu option.
Press the CYCLE button until SET: TARE WEIGHT is displayed.
Press the ENTER button to select the SET: TARE WEIGHT option.
Example: 20,000 lb Tare weight is shown.
Press either the UP or DOWN ARROW buttons to adjust the number to "0".
Press the ENTER button to save the new Tare weight and return to the SET: TARE
WEIGHT menu option.
April 2008
VULCAN ON-BOARD SCALES 1-800-237-0022
© STRESS-TEK, INC. 2008
Doc. 44-10112-001 Rev. -
Fork Scale Troubleshooting And Repair
108
Press the PWR / MENU button twice to go directly to the normal operating mode.
Note: Pressing the PWR / MENU button before pressing the ENTER button will cancel that
configuration change.
Disconnect one fork scale from the VSL Vulcoder of the channel to be tested.
The meter will display the “still connected” fork scale preload number. The preload number
should not exceed +2,000 lb to -2,000 lb.
If the preload number is between +2,000 lb to -2,000 lb, the fork scale is within specification.
Test the other fork scale using the same method. If the preload number is within
specification for both fork scales, reconnect and secure all fork scale leads. Reset the Tare
weight if required. Note: If the preload number is out of specification, clean the fork scale
connector and cable connector with cotton swabs and isopropyl alcohol and dry thoroughly
with a hair dryer. DO NOT OVERHEAT the connector. This procedure will remove any
moisture that may have been causing the problem.
Check the electrical isolation of the fork scale by performing the Leakage Test, (section
13.6.1).
Check the preload number again to see if it is within the +2,000 lb to -2,000 lb range. If the
fork scale is still out of range, it may be faulty. Perform the Resistance Test, (section 13.6.3).
If the fork scale cannot be brought to Vulcan specifications, contact Vulcan customer service
your Vulcan dealer.
April 2008
VULCAN ON-BOARD SCALES 1-800-237-0022
© STRESS-TEK, INC. 2008
Doc. 44-10112-001 Rev. -
Fork Scale Troubleshooting And Repair
109
13.6.3 RESISTANCE TEST PROCEDURE
Required Equipment: Digital Multi-Meter With Conductivity Scale
Optional Equipment: Vulcan Check-Out Box
Please refer to drawing below in setting up the Resistance Test. The resistance in the pins
should correspond to the Vulcan specifications listed below. Refer to acceptable resistance
ranges as shown below.
OR
MULTI-METER
CHECK-O UT BO X
MULTI-METER
2k
FORK SCALE
FO RK
Figure 13-C: Resistance Test
Pins
Terminal
Color Code
A to D
B to C
Red to Black
Green to White
Acceptable
Resistance Range
349 to 450 Ohms
349 to 352 Ohms
Pin B (Green) to Pin A (Red) should be the same number as Pin B (Green) to Pin D (Black)
within 1 Ohm.
Pin C (White) to Pin A (Red) should be the same number as Pin C (White) to Pin D (Black)
within 1 Ohm.
If the fork scale is not within Vulcan specifications, contact Vulcan customer service or your
Vulcan dealer.
April 2008
VULCAN ON-BOARD SCALES 1-800-237-0022
© STRESS-TEK, INC. 2008
Doc. 44-10112-001 Rev. -
Fork Scale Troubleshooting And Repair
13.7
110
V600 METER ERROR CODES
13.7.1 Err 01
Indicates that the VSL Vulcoder is processing an over-ranged signal. An over-ranged signal
means the fork scale output is greater than the maximum the VSL Vulcoder will accept.
Possible Causes:
1.
2.
3.
4.
5.
The fork scales are being overloaded.
There is moisture in a fork scale connector.
One of the black VSL Vulcoder to fork scale cables has been damaged.
A fork scale has a large preload number.
A fork scale is faulty.
What to Do:
1. Inspect Vulcoder cables.
2. Clean connectors with isopropyl alcohol and dry with a hair dryer.
3. Perform the Tare Test, (section 13.6.2).
4. Perform the Leakage Test, (section 13.6.1).
5. Check the fork scales. Check by disconnecting one fork scale at a time. When the
faulty fork scale has been disconnected, the meter will read a number instead of the
error code.
13.7.2 Err 02
Indicates the reading to be displayed is beyond the limitations of the meter’s display.
Possible Causes:
1. Calibration number set too high.
2. Tare weight set too high.
What to Do:
1. Check and reset the Calibration number and Tare weight.
April 2008
VULCAN ON-BOARD SCALES 1-800-237-0022
© STRESS-TEK, INC. 2008
Doc. 44-10112-001 Rev. -
Fork Scale Troubleshooting And Repair
111
13.7.3 Err 03
Indicates that the meter is not receiving a weight from the VSL Vulcoder.
Possible Causes:
1.
2.
3.
4.
5.
Break in the orange cable.
Green and white leads reversed on VSL Vulcoder line where connected to the meter.
Vulcoder is not sequenced.
Faulty VSL Vulcoder.
Faulty meter.
What to Do:
1. Reconnect any cables that have become disconnected.
2. Re-sequence Vulcoder, (section 13.3).
3. Inspect VSL Vulcoder communication line for cut or broken wires. Inspect the pivot
point on the fork cross tube area.
4. Inspect and clean meter connectors.
5. VSL Vulcoder is damaged. Replace VSL Vulcoder.
6. Meter is damaged. Replace meter.
13.7.4 Err 04
Indicates the VSL Vulcoder is not calibrated.
Possible Causes:
1. Calibration or Tare number is not entered.
What to Do:
1. Check and reset the Calibration number and Tare weight.
13.7.5 Err 05
Indicates the VSL Vulcoder has a hardware problem.
Possible Causes:
1. VSL Vulcoder hardware component is damaged.
April 2008
VULCAN ON-BOARD SCALES 1-800-237-0022
© STRESS-TEK, INC. 2008
Doc. 44-10112-001 Rev. -
Fork Scale Troubleshooting And Repair
112
What to do:
1. Press and hold the PWR / MENU button to turn the meter off and then press PWR /
MENU again to turn it on. This may reset the meter and eliminate the error.
2. Inspect VSL Vulcoder communication line for cut or broken wires.
3. VSL Vulcoder is damaged. Replace VSL Vulcoder.
13.7.6 Err 06
Indicates the VSL Vulcoder is processing an under-ranged signal. An under-ranged signal
means the fork scale output is less than the minimum the VSL Vulcoder will accept.
Possible Causes:
1.
2.
3.
4.
There is moisture in a fork scale connector.
One of the black VSL Vulcoder to fork scale cables has been damaged.
No fork scales are connected to the VSL Vulcoder.
A fork scale is faulty.
What to Do:
1. Check to see that the fork scales are properly connected to the VSL Vulcoder.
2. Clean fork scale connectors with isopropyl alcohol and dry with a hair dryer.
3. Perform the Tare Test, (section 13.6.2).
4. Perform the Leakage Test, (section 13.6.1).
5. Check the fork scales. Check by disconnecting one fork scale at a time. When the
faulty fork scale has been disconnected, the meter will read a number instead of the
error code.
13.7.7 Err 07
Indicates a new VSL Vulcoder has been detected.
Possible Causes:
1. Line noise.
2. Faulty Vulcoder.
April 2008
VULCAN ON-BOARD SCALES 1-800-237-0022
© STRESS-TEK, INC. 2008
Doc. 44-10112-001 Rev. -
Fork Scale Troubleshooting And Repair
113
What to Do:
1. Vulcoder needs to be manually re-sequenced, (section 13.3).
2. Turn the meter off and then back on to cycle power in the system.
3. VSL Vulcoder is damaged. Replace VSL Vulcoder.
13.7.8 Err 08 / Err 09
Indicates there is electrical noise in the system.
Possible Causes:
1. Radio frequency interference from other equipment or faulty electrical connections.
What to Do:
1. Re-sequence the VSL Vulcoder, (section 13.3).
2. See electronics installation section for proper installation procedure, Manual system section 8.0, Static system - section 9.0, Weigh-In-Motion system – section 10.0.
Check integrity of electrical connections.
13.7.9 Err 10
Communication error between the meter and the VSL Vulcoder. The VSL Vulcoder is in a
“locked” state.
Possible Causes:
1. Faulty VSL Vulcoder.
What to Do:
1. VSL Comm test from the V600 Meter Test Menu, (section 13.10.4).
2. Replace VSL Vulcoder.
13.7.10 Err 11
The meter “watchdog” circuit system is not running.
Possible Causes:
1. New or recently repaired meter.
April 2008
VULCAN ON-BOARD SCALES 1-800-237-0022
© STRESS-TEK, INC. 2008
Doc. 44-10112-001 Rev. -
Fork Scale Troubleshooting And Repair
114
What to Do:
1. Turn the meter off and then back on to cycle power in system.
3. If Err 11 is still displayed, replace meter.
13.8
SYSTEM MALFUNCTIONS
13.8.1 CONDITION: Meter displays ERR 3
Indicates the meter is not receiving a weight from the VSL Vulcoder.
Possible Causes:
1.
2.
3.
4.
5.
Break in the orange cable.
Green and white leads reversed on VSL Vulcoder line where connected to the meter.
Vulcoder is not sequenced.
Faulty VSL Vulcoder.
Faulty meter.
What to Do:
1. Reconnect any cables that have become disconnected.
2. Re-sequence the Vulcoder, (section 13.3).
3. Inspect VSL Vulcoder communication line for cut or broken wires. Inspect the pivot
point on the fork cross tube area.
4. Inspect and clean meter connectors.
5. VSL Vulcoder is damaged. Replace VSL Vulcoder.
6. Meter is damaged. Replace meter.
13.8.2. CONDITION: Sum of the pickup weights don’t match the landfill
Possible Causes:
1.
2.
3.
4.
Fork mounting bolts are loose.
Further calibration is required.
Not following the lift procedure.
Pickups not being recorded.
What to Do:
1. Retorque fork mounting bolts to 1000 ft-lb.
April 2008
VULCAN ON-BOARD SCALES 1-800-237-0022
© STRESS-TEK, INC. 2008
Doc. 44-10112-001 Rev. -
Fork Scale Troubleshooting And Repair
115
2. Verify fork operation, Manual System – section 8.2.3, Static System – section 9.3.6,
Weigh-In-Motion System – section 10.4.5.
3. For a single trip to the landfill, every lift must be recorded before comparing to the
landfill weight.
4. Fine tune the calibration, see V600 Fork Scale User Manual.
13.8.3 CONDITION: Weight not returning to zero after lifting a bin
Possible Causes:
1. Fork mounting bolts are loose.
2. Not zeroing the scale properly.
3. Not following the lift procedure.
What to Do:
1. Retorque fork mounting bolts to 1000 ft-lb.
2. Review the operational procedure in the V600 Fork Scale User manual or the driver
card for correct lift procedure and how to zero the display properly.
13.8.4 CONDITION: Meter displays ERR 6 or ERR 1
Indicates the VSL Vulcoder is processing an out of range signal. This means the fork scale
output is beyond the limits the VSL Vulcoder will accept.
Possible Causes:
1.
2.
3.
4.
5.
There is moisture in a fork scale connector.
One of the black VSL Vulcoder to fork scale cables has been damaged.
No fork scales are connected to the VSL Vulcoder.
A fork scale has a large preload number.
A fork scale is faulty.
What to Do:
1. Check to see the fork scales are properly connected to the VSL Vulcoder.
2. Clean connectors with isopropyl alcohol and dry with a hair dryer.
3. Perform the Tare Test, (section 13.6.2).
4. Perform the Leakage Test, (section 13.6.1).
April 2008
VULCAN ON-BOARD SCALES 1-800-237-0022
© STRESS-TEK, INC. 2008
Doc. 44-10112-001 Rev. -
Fork Scale Troubleshooting And Repair
116
5. Check the fork scales. Check by disconnecting one fork scale at a time. When the
faulty fork scale has been disconnected, the meter will read a number instead of the
error code.
13.8.5 CONDITION: Not advancing to next customer or not computing net weight
Possible Causes:
1. Proximity switch sensor needs adjustment.
2. Proximity switch sensor has failed.
3. Holding the manual Weight Capture button down too long.
What to Do:
1. Check the correct trip location for the proximity sensor.
2. Failed proximity sensor. Replace the proximity sensor.
3. Review the operational procedure or the driver card for correct lift procedure, Manual
System – section 8.4, Static System – section 9.5, Weigh-In-Motion System – section
10.6.
13.8.6 CONDITION: Meter displays LO-LO
If the meter encounters a low voltage situation, either on the power input lead or the VSL
line, the meter will display "LO-LO" and then switch to "1 90", “1” indicates the input
power is low and the “90” being the amount of voltage (9.0 Vdc) being read by the meter. If
the meter displays "LO-LO" and then switches to "2 0", “2” indicates the VSL line is low
and the other number being the amount of voltage read by the meter.
Possible Causes For "LO-LO" and "1
1.
2.
3.
4.
XX":
Corroded fuses or corroded/bad meter cable connections to the battery.
Battery is low (under 10.5 Volts).
Damaged power or ground cable.
Faulty Meter.
April 2008
VULCAN ON-BOARD SCALES 1-800-237-0022
© STRESS-TEK, INC. 2008
Doc. 44-10112-001 Rev. -
Fork Scale Troubleshooting And Repair
117
What to Do:
1. Using a multi-meter, check the power at the back of the meter. When the meter is
turned on and off, the power should not change more than 1/2 Volt. Turn off the meter
either by the key or truck battery switch for a few seconds and then turn on again. If
the meter still does not work, proceed to step 2.
2. Check the fuses for both negative and positive leads. Use 2 amp fast blow fuses for
12 Vdc applications and 1 amp fast blow fuses for 24 Vdc applications.
3. Check the power supply wires are attached correctly at the 12 or 24 Volt power source
and to the green connector at the back of the meter. Check the battery connections
for corrosion.
4. If a spare meter is available, the quickest and easiest next step is to exchange the
meter. If the new meter works, try the old meter again. If the old meter now works,
the problem was likely the meter’s internal circuit breaker. If both the old meter and
the new meter do not work, the problem is most likely in the power source (battery,
meter power cable, or fuses). If the new meter works, but the old one doesn’t, the old
meter is faulty.
If you do not have a spare meter, disconnect then reconnect the green power plug on
the back of the meter. If the meter doesn’t work, then check the power source
(battery, meter power cable, or fuses). If the power source checks out OK, then the
meter is faulty.
Possible Causes For "LO-LO" and "2
X":
1. VSL line (orange cable) is pinched or shorted.
2. VSL line incorrectly wired.
3. Damaged VSL plug or receptacle.
What to Do:
1. Using a multi-meter, check the voltage at the back of the meter when the meter is
turned on and off. The power should not change more than 1/2 Volt. Turn off the
meter either by the key or truck battery switch for a few seconds and then turn on
again. If the meter still shows the error, proceed to step 2.
2. Check the fuses for both negative and positive leads. Use 2 amp fast blow fuses for
12 Vdc applications and 1 amp fast blow fuses for 24 Vdc applications. Blown fuses
could indicate a shorted VSL line. Check for a shorted line by disconnecting the green
and white wire from the back of the meter. Measure the resistance between the green
and white wire. It should be greater than 1000 Ohms.
3. Faulty meter. Replace meter.
April 2008
VULCAN ON-BOARD SCALES 1-800-237-0022
© STRESS-TEK, INC. 2008
Doc. 44-10112-001 Rev. -
Fork Scale Troubleshooting And Repair
118
13.8.7 CONDITION: Unable To Enter Tare Or Calibration Numbers
Possible Causes:
1. Meter may be in the Driver Lockout Password mode, which does not allow the Tare
weight, Cal number, or Cal weight to be changed.
2. Faulty Meter.
What to Do:
1. See section 13.1 for setting the Driver Lockout Password feature, or call Vulcan
Scales at 1-800-237-0022. It is required to be unlocked to change the Cal and Tare
numbers.
2. Make sure the Vulcoder is connected to both fork scales.
3. Unplug the green connector at the back of the meter for a few seconds, re-plug it in
and try to enter the Tare or Cal numbers again.
4. Possible faulty meter buttons. Run the meter keypad test, section 13.10.1.
5. Faulty meter. Replace meter.
13.8.8 CONDITION: No indicator display or function lights
Possible Causes:
1.
2.
3.
4.
5.
6.
7.
8.
Power switch turned off.
Power to the meter has been disconnected.
Bad meter cable connections to the battery.
Battery is low (under 10.5 Volts).
A fuse is blown in the power or ground cable.
Faulty power switch.
Faulty meter.
Reversed polarity.
What to Do:
1. Check the power to the meter. When the meter is turned on and off, the power should
not change more than 1/2 Volt. Turn off the meter either by the key or truck battery
switch for a few seconds and then turn on again. If the meter still does not work,
proceed to step 2.
2. Check the fuses for both negative and positive leads. Use 2 amp fast blow fuses for
12 Vdc applications and 1 amp fast blow fuses for 24 Vdc applications.
April 2008
VULCAN ON-BOARD SCALES 1-800-237-0022
© STRESS-TEK, INC. 2008
Doc. 44-10112-001 Rev. -
Fork Scale Troubleshooting And Repair
119
3. Check the power supply wires are attached correctly at the 12 Volt power source and
to the green connector at the back of the meter. Check the battery connections for
corrosion.
4. If a spare meter is available, the quickest and easiest next step is to exchange the
meter. If the new meter works, try the old meter again. If the old meter now works,
the problem was likely the meter’s internal circuit breaker. If both the old meter and
the new meter do not work, the problem is most likely in the power source (battery,
meter power cable, or fuses). If the new meter works, but the old one doesn’t, the old
meter is faulty.
If you do not have a spare meter, disconnect then reconnect the green power plug on
the back of the meter. If the meter doesn’t work, then check the power source
(battery, meter power cable, or fuses). If the power source checks out OK, then the
meter is faulty.
13.8.9 IDLE – Next Cust # n
IDLE- Next Cust # n is not an error condition. It indicates the system is ready to download
data.
To download data from the V600 Meter, the forks must be out of the weigh zone and have
less than 200 lb on the display. Data cannot be downloaded without these conditions being
met. When these conditions are met, the meter will display “IDLE – Next Cust # n” indicating
data can be downloaded. The word “IDLE” will be flashing.
Refer to the V600 Fork Scale User Manual for details on how to download data from the
V600 Meter.
13.8.10 PASSWORD?
“Password?” showing on the lower display is not an error condition. It indicates the Driver
Password Lockout feature is activated. It prohibits modification of any of the Configure
System, Setup/Calibrate, Sequence Channels, or the System Test menus without entering
the proper password. The meter comes from the factory with the password lock inactive.
To return to the normal operating mode if password is not known
Press the ENTER button.
Press the PWR / MENU button to return to the normal operating mode. The scale
system is now ready to weigh.
For activating and deactivating the Driver Lockout Password feature, see section 13.1.
April 2008
VULCAN ON-BOARD SCALES 1-800-237-0022
© STRESS-TEK, INC. 2008
Doc. 44-10112-001 Rev. -
Fork Scale Troubleshooting And Repair
April 2008
VULCAN ON-BOARD SCALES 1-800-237-0022
© STRESS-TEK, INC. 2008
120
Doc. 44-10112-001 Rev. -
Fork Scale Troubleshooting And Repair
13.9
121
REPAIR TECHNIQUES
13.9.1 HOW TO REPAIR THE BLACK VULCODER CABLE
How To Repair The Black Vulcoder Cable
This black cable runs between the Vulcoder and the fork scales.
Vulcan has a splice kit available with all the parts required.
4-wire splice kit, p/n: 59-20370-001.
Caution: Make certain power to the system is turned off before beginning splice procedure.
1. Cut cable to remove damaged section.
2. Remove approx. 2" of outer jacket, being careful not to cut individual wire insulation.
3. Pull back shield(s) from splice area.
4. Strip insulation back 1/2" from each wire and gently twist each exposed wire end.
5. Slip heat shrink tubing on each wire.
6. Twist wire leads together, color to color.
7. Solder individual twisted wire.
8. Slide shrink tubing over soldered area and apply heat.
9. Apply butyl-rubber moisture barrier over each wire, insulating the wires from each
other.
10. Wrap completed splice with electrical tape.
11. Fold cable as shown to create strain relief and secure with tie-wraps.
2
April 2008
3
4
6
5
8
7
9
11
VULCAN ON-BOARD SCALES 1-800-237-0022
© STRESS-TEK, INC. 2008
10
Doc. 44-10112-001 Rev. -
Fork Scale Troubleshooting And Repair
122
13.9.2 HOW TO REPAIR THE ORANGE VSL CABLE
How To Repair The Orange VSL Cable
The orange VSL cable can be easily repaired with common wire repair tools and methods.
Crimp connecting and soldering are both acceptable processes.
Caution: Make sure power to the system is turned off before beginning splicing procedure.
•
Cut the orange cable at least 2” away form each side of the damaged section. If cable
is too short due to extensive damage, common extension cord wire can be used to
replace a section.
2"
.5"
•
Remove 2” of the outer jacket, being careful not to cut individual wire insulation.
•
Strip insulation back ½” from each wire.
•
If soldering, put heat shrink over the wires.
•
Solder or crimp splice the like color wires together.
•
If heat shrink was used, slide over soldered area and apply heat to shrink.
•
Wrap completed splice with electrical tape. Tape the connection and all the wires with
the orange insulation stripped off to help seal and prevent wires from chaffing which
can cause a wire to short.
•
Fold cable as shown to create strain relief and secure with wire ties.
April 2008
VULCAN ON-BOARD SCALES 1-800-237-0022
© STRESS-TEK, INC. 2008
Doc. 44-10112-001 Rev. -
Fork Scale Troubleshooting And Repair
123
You can also use the Vulcan VSL 3M connectors for making the cable splice. These
connectors are available from Vulcan Scales, p/n: 27-10086-001.
•
When using the Vulcan supplied 3M connector, do not strip the insulation from each
wire.
•
Be sure to insert wires completely into the connector and check their position by
looking through the translucent connector body.
•
Crimp the connector cap down flush with the top edge of the connector body, ensuring
a good connection.
•
Tape the connection and all of the wires with the orange insulation stripped off to help
seal and prevent wire chaffing that can cause a wire to short.
•
Wire tie the splice so the connection is strain relieved.
April 2008
VULCAN ON-BOARD SCALES 1-800-237-0022
© STRESS-TEK, INC. 2008
Doc. 44-10112-001 Rev. -
Fork Scale Troubleshooting And Repair
124
13.9.3 FORK SCALE CONNECTOR REPLACEMENT
Fork Scale Connector Replacement
Kit p/n: 59-30050-001
•
•
Remove the four 4-40 screws that hold the connector in place.
Gently pull the connector away from the housing. There is 2-3 inches of extra wire
inside to allow for connector removal.
Fork connector
block bulkhead
Remove screws
and gently pull out
•
Trim away the sealant from the 4 pins that are soldered into the connector. Use
tweezers as required. Keep the small circuit board and any resistors intact as they
are.
•
Once cleaned, use a solder gun to remove the pins from the connector cups. Keep
track of what pin came from what cup. The cups are identified as A, B, C, D.
Key
A
+ Power
Red
D
- Power
Black
C
- Signal
White
Connector
cups
A
D
B
C
B
+ Signal
Green
Connector Front
Connector Back
•
Clean all four pins. Apply new heat shrink if the existing heat shrink was damaged.
Cut heat shrink to size as required. Fill each of the connector solder cups with solder.
Solder each connection wire into the correct cup in the new connector.
•
Coat all the new solder joints, connector cups and connector back area with silicone
sealant.
April 2008
VULCAN ON-BOARD SCALES 1-800-237-0022
© STRESS-TEK, INC. 2008
Doc. 44-10112-001 Rev. -
Fork Scale Troubleshooting And Repair
125
•
Clean steel bulkhead face where connector gasket will seat.
•
Remove enough sealant from inside the bulkhead housing so the assembly fits back
in easily. Too much insertion force will bend the pins.
•
Apply a new gasket by stretching over assembly. Push the connector back in the
housing and secure in place with four mounting screws.
Clean steel bulkhead face
•
Apply a silicone bead to the perimeter of the new connector. Let dry completely.
Apply silicone bead all
around connector
where it meets the
steel bulkhead face
•
When completely dry, put red cap over the connector to protect threads and spray
with a rubberized undercoating (3M, Universal Rubberized Undercoating, 3M p/n:
8883).
April 2008
VULCAN ON-BOARD SCALES 1-800-237-0022
© STRESS-TEK, INC. 2008
Doc. 44-10112-001 Rev. -
Fork Scale Troubleshooting And Repair
126
13.9.4 FORK SCALE O-RING REPLACEMENT
Fork Scale O-ring Replacement
O-ring kit p/n: 59-20223-001
The O-ring is designed to keep the connectors free of moisture. O-rings shall be replaced
anytime the connector is removed for servicing or troubleshooting.
O-RING INSTALLATION ON FORK SCALE CONNECTORS
Make sure the old O-ring is removed completely. Clean both connector ends as
required. Use cotton swabs and isopropyl alcohol. Be sure to dry thoroughly with a
hair dryer. DO NOT OVERHEAT.
Slip one O-ring over Vulcoder connector barrel (see figure below) and push down 1/4”
to 1/2”. O-ring will seat itself when connector parts are mated.
Note: There are two types of O-rings used, a flat ring style and a standard O-ring.
Never use more than one O-ring at a time in any connector no matter which type is
used.
For assembly of connectors, make sure they are finger tight plus an additional 1/8 of a turn
more with channel lock pliers.
April 2008
VULCAN ON-BOARD SCALES 1-800-237-0022
© STRESS-TEK, INC. 2008
Doc. 44-10112-001 Rev. -
Fork Scale Troubleshooting And Repair
127
13.9.5 HOW TO REPAIR A VULCODER CONNECTOR
How to Repair a Vulcoder Connector
If a Vulcoder connector is damaged, it can be replaced without replacing the entire Vulcoder.
Purchase a “Vulcoder Connector Pigtail Replacement Kit” form Vulcan Scales,
p/n: 53-20130-001. This kit includes a Vulcoder connector completely sealed with the black
signal cable. A Vulcoder black cable splice kit (P/N: 59-20370-001) is also included as an
item in this kit.
Splice cable.
Replacement
Vulcoder Connector
This new connector assembly is then spliced onto the existing Vulcoder’s black cable by
following the “How to Repair the Black Vulcoder Cable” section 13.9.1. A bulletin also
comes with the cable replacement kit detailing how to properly make the splice.
April 2008
VULCAN ON-BOARD SCALES 1-800-237-0022
© STRESS-TEK, INC. 2008
Doc. 44-10112-001 Rev. -
Fork Scale Troubleshooting And Repair
128
If you need additional assistance, parts, or service, give us a call at:
VULCAN CUSTOMER SERVICE
1-800-237-0022
HOURS:
7:30 a.m. - 5:00 p.m.
PACIFIC TIME
April 2008
VULCAN ON-BOARD SCALES 1-800-237-0022
© STRESS-TEK, INC. 2008
Doc. 44-10112-001 Rev. -
Fork Scale Troubleshooting And Repair
13.10
129
SYSTEM TEST MENU
Note: When trying to enter the SYSTEM TEST menu, if the lower display shows
“Password?” with the cursor blinking, the Driver Lockout Password feature is activated
and the Configure System, Setup/Calibrate, Sequence Channels, and System Test menus
are not accessible. Refer to section 13.1 to unlock the system.
Five diagnostic tests are available with the Vulcan V600 Meter. The tests are called Test:
Keypad, which performs the keypad test, Test: Leds, which performs the LED display test,
Test: Memory, which performs a test on the storage memory inside the meter, Test: VSL
Comm, which performs the VSL communications test.
To Enter the Meter Program Menu:
Press the PWR / MENU button to turn on the meter. Let it complete its startup
routine.
Note: If the PWR / MENU button is held too long, the meter will display all 8’s and the meter
will turn off.
Press the PWR / MENU button to enter the program menu.
Press the CYCLE button until SYSTEM/TEST is displayed.
Press the ENTER button to select the SYSTEM TEST menu.
April 2008
VULCAN ON-BOARD SCALES 1-800-237-0022
© STRESS-TEK, INC. 2008
Doc. 44-10112-001 Rev. -
Fork Scale Troubleshooting And Repair
130
13.10.1 TEST KEYPAD
TEST: KEYPAD, the keypad test, can be used to determine whether all of the keys on the
keypad are operating properly.
Procedure to Test the Keypad:
Enter the SYSTEM TEST menu, (section 13.10).
Press the CYCLE button until TEST: KEYPAD is displayed.
Press the ENTER button to begin the selected TEST: KEYPAD test. A “0” will be
displayed, indicating that no buttons are being pushed.
The buttons (keys) are labeled “1” through “6” with “1” being the PWR / MENU button and “6”
being the CYCLE button. Press each button, one at a time, the corresponding number
should be displayed indicating the button (key) is functioning. The small alpha-numeric
display will also indicate which button is being pressed.
Press the UP and DOWN ARROW buttons at the same time to exit and
return to the TEST: KEYPAD menu option.
AND
Press the CYCLE button to advance to the next SYSTEM TEST menu option.
April 2008
VULCAN ON-BOARD SCALES 1-800-237-0022
© STRESS-TEK, INC. 2008
Doc. 44-10112-001 Rev. -
Fork Scale Troubleshooting And Repair
131
13.10.2 TEST LEDs
TEST: LEDs can be used to determine if the LEDs are operating properly.
Procedure To Test The LEDs:
Enter the SYSTEM TEST menu, (section 13.10).
Press the CYCLE button until TEST: LEDs is displayed.
Press the ENTER button to begin the selected TEST: LEDs test.
This tests all the combinations of segment on/off conditions, which might produce an error in
the display. There are several patterns, which are run. If seeing any deviation from this
pattern, contact your Vulcan dealer.
Press the TARE / ZERO button to exit and return to the TEST: LEDs menu option.
Press the CYCLE button to advance to the next SYSTEM TEST menu item.
13.10.3 TEST MEMORY
TEST: MEMORY, performs a test on the internal memory storage on the V600 Meter. When
the test is finished, the meter will display MEMORY TEST OK!, if each memory location
passes the test, otherwise an ERROR will be displayed.
April 2008
VULCAN ON-BOARD SCALES 1-800-237-0022
© STRESS-TEK, INC. 2008
Doc. 44-10112-001 Rev. -
Fork Scale Troubleshooting And Repair
132
Procedure To Test The Memory:
Enter the SYSTEM TEST menu, (section 13.10).
Press the CYCLE button until TEST: MEMORY is displayed.
Press the ENTER button to begin the selected TEST: MEMORY test.
Press the TARE / ZERO button to exit and return to the TEST: MEMORY menu
option.
Press the CYCLE button to advance to the next SYSTEM TEST menu item.
13.10.4 TEST VSL COMM
TEST: VSL COMM, the communications test, can be used to determine if the electronics are
communicating properly.
Procedure To Test The VSL COMM:
Enter the SYSTEM TEST menu, (section 13.10).
Press the CYCLE button until TEST: VSL COMM is displayed.
April 2008
VULCAN ON-BOARD SCALES 1-800-237-0022
© STRESS-TEK, INC. 2008
Doc. 44-10112-001 Rev. -
Fork Scale Troubleshooting And Repair
133
Press the ENTER button to begin the selected TEST: VSL COMM communications
test. The smaller alpha-numeric display will indicate which channel is currently
monitored.
Press the CYCLE button to advance to a different channel.
The display will show “n” in the left most position and you should see a number on the right
hand side, which will be counting up. As you press the UP or DOWN arrow keys, you will
cycle through the various readings listed below:
n
o
F
t
C
Number of transmission attempts
Number of buffer overruns detected
Number of framing errors detected
Number of timeouts detected
Number of checksum errors detected
Note: Intermittent communications such as a bad cable connection while running the truck,
will show up by the number of timeouts detected, for example "t 6".
Some errors are inherent in any communication system. The VSL system is designed to
recover from most error conditions. If the error rate becomes excessive (greater than 1% of
the total transmissions), contact your Vulcan dealer.
Press the TARE / ZERO button to exit and return to the TEST: VSL COMM menu
option.
Press the CYCLE button to advance to the next SYSTEM TEST menu item.
13.10.5 EXITING THE PROGRAM MENU
To Exit the Meter Program Menu:
Press the PWR / MENU button once to exit from the main program menu at any time
to return to the normal operating mode.
Note: If the PWR / MENU button is held too long the meter will display all 8’s and the meter
will turn off.
April 2008
VULCAN ON-BOARD SCALES 1-800-237-0022
© STRESS-TEK, INC. 2008
Doc. 44-10112-001 Rev. -