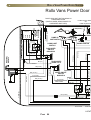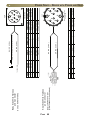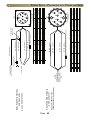
1
Chrysler / Dodge Minivan
Service Manual
2005 - 2007
Main: Local: Fax: (800) 956-6668
(952) 890-7851
(952) 890-1903
Your Life. Your Ride.
6591 W. Hwy 13
Savage, MN 55378
www.rollxvans.com
TM
Chrysler / Dodge Minivan
2005 - 2007
Service Manual
#07274-007
April 2010
TaBle oF conTenTS
Important Item Locations ...................................................................................................................... 4
Door
Rollx Vans Remote Power Door Trooubleshooting .............................................................................. 8
Rollx Vans Power Door Replacement Parts ......................................................................................... 9
OEM Power Door Troubleshooting ..................................................................................................... 10
Door Modifications ...............................................................................................................................11
Exhaust System
Exhaust System.................................................................................................................................. 15
Exterior
Exterior - Ground Effects .................................................................................................................... 18
Fuel System
Fuel System........................................................................................................................................ 19
Interior
Interior ................................................................................................................................................ 27
Kneeler
Kneeler Troubleshooting..................................................................................................................... 30
Kneeler Replacement Parts................................................................................................................ 31
Kneel Switch Adjustment Process ...................................................................................................... 32
One Touch System
One Touch System Troubleshooting................................................................................................... 35
One Touch System Overview ............................................................................................................. 36
One Touch System - v6.0 Interface .................................................................................................... 38
Ramps
In The Floor (Gas Spring) Troubleshooting ........................................................................................ 44
In the Floor (Gas Spring) Replacement Parts .................................................................................... 45
In The Floor (Metal Springs) Troubleshooting .................................................................................... 46
In The Floor (Metal Springs) Replacement Parts ............................................................................... 47
Folding Ramp Troubleshooting........................................................................................................... 48
Page D
TaBle oF conTenTS
Folding Ramp Replacement Parts...................................................................................................... 49
Folding Ramp Adjustment Process .................................................................................................... 51
Folding Ramp Motor Install / Ramp Removal Instructions ................................................................. 52
Rear Heat & Air
Rear Heat & Air................................................................................................................................... 54
Suspension
Suspension ......................................................................................................................................... 55
Wiring
OTC System - 6.0 After 3/21/07 ......................................................................................................... 56
OTC System - 4.05 and 6.0 Before 3/21/07 ....................................................................................... 58
Passenger Door Snake - In The Floor Ramp (#07017-001)............................................................... 60
Passenger Door Snake - Folding Ramp (#07018-001) ...................................................................... 62
Rollx Vans Power Door System.......................................................................................................... 64
Occupant Control Module / Seat Sensor Resistors ............................................................................ 66
Power Seats - Driver with Power Only ............................................................................................... 67
Power Seats - Driver with Power and Heat ........................................................................................ 68
Power Seats - Passenger with Power and Heat................................................................................. 69
Power Seats - Driver with Memory ..................................................................................................... 70
Maintenance Information
Maintenance Information .................................................................................................................... 72
Warranty
Warranty ............................................................................................................................................. 73
Page e
iMPorTanT iTeM locaTionS
Page 4
iMPorTanT iTeM locaTionS
Occupant Control Module (OCM)
OTC Remote Receiver
OEM Wire Harness 1
OEM Wire Harness 2
Rollx Vans Main Wire Harness 1
Page 5
Rollx Vans Main Wire Harness 2
iMPorTanT iTeM locaTionS
Main Fuse
OTC Fuse Panel (Under Glove Box)
ITF Door Open Switch
ITFRamp Access Plate
Rear Heat
Rear AC
Page 6
iMPorTanT iTeM locaTionS
Kneeler and OTC Control Board
OTC Relay Board
Kneeler Cover
Power Seat Connector
OTC Door Control Relay
Page 7
rollX vanS reMoTe TrouBle ShooTingS
* If remote does not work first try to operate door and ramp from any interior Rollx Vans user button. If
interior Rollx Vans user button operates normally, see below for remote system troubleshooting
Symptom
Door does not open when
One Touch remote is pressed.
Neither One Touch remote
works.
OTC Remote Receiver
(Before 1/8/2009)
Possible Cause
Remedy
Receiver out of range.
Try remote within 10 feet of van.
Overhead on/off switch is turned to the
OFF position.
Turn switch to ON position.
Remote battery is dead.
Remove case by loosening screw on
back and prying open. Replace battery
with battery type A23. Use second
remote or Rollx Vans user button.
Remote lost its program
Reprogram remote with receiver or install
new chip (all receivers with #910R-08
sticker on the chip have the possibility
of needing replacement. Call Customer
Service..
Blown fuse.
Locate fuse box under glove box and
check / replace fuse.
Receiver malfunction.
Review display on OTC board and
contact customer service.
OTC Remote Receiver
(Rear View)
OTC Remote Transmitter Opened
Red LED
Indicator Light
OTC Remote Receiver
(After 1/8/2009)
A23 Battery
Each Rollx Vans Transmitter has a unique code. These codes are applied to the transmitter either by a trace cutting method
or a DIP switch programming method. This is done at the Rollx Vans Factory. In order to program the transmitter(s)
to the receiver the following process must be done!
Learning a New Button Code (channel 1)
1. Press mode switch #1 for three seconds. The green LED will start to flash quickly. If no green LED lights, ensure power is getting to
the unit through the 1 Amp fuse in the Rollx Vans Fuse Panel.
2. While the green LED is flashing quickly, press a button on a compatible transmitter. The green LED will flash once and then turn off
to show that button was learned.
3. Repeat steps 1 and 2 to learn more buttons into channel 1.
NOTE — The green LED will flash a maximum of 15 seconds. If no transmitter button is pressed during this time, the receiver will exit
the code-learning mode, and the green LED will turn off.
Note Regarding Code Learning
1. The receiver will only learn the code of a particular button once. Once a button’s code is learned, if you try to
code-learn that button again, whether it is for the same channel or not, the receiver will exit code learning mode.
2. Each channel can learn the codes of a maximum of 15 transmitter buttons. If you attempt to learn a sixteenth
button, the earliest code learned will be deleted.
3. To clear all codes — Press the appropriate mode switch (#1 or #2) for three seconds. When the LED starts
flashing, press that switch again for three seconds. The LED flashes twice to indicate that all codes associated
with that channel are now deleted.
*From SECO-LARM Manual
Page 8
Page 9
2
3
4
5
1
1
1
1
Item Qty.
1
1
1
1
1
1
15
8
11
17
4
10
9
Description
Part #
DOOR BAR ASM (INCLUDES THE 3 FOLLOWING)
10026ASM
MTR BAR DOOR OPENER (RACK AND ASSEMBLY)
10026
WIRE HARNESS 5.5" FOR
310-1059
MTR 12V 10NM 10MM DOUBLE
210-1011
GEAR RACK (SPECIFY LONG OR SHORT)*
10026-4
LONG BAR
1126318
3/8 X 1 STRIP
ARM BAR (FOR MOTOR BAR)
10026-22
WIRE HARNESS 5.5" FOR
310-1059
10026-15ASM
MOTOR ONLY W/GEAR ASM (INCLUDES WIRE HARNESS AND SHIMS**)
* LONG USED BEFORE ~2001 IF NO REAR HEAT & AIR
** SHIMS ONLY NEEDED IF BEFORE ~2003 BUT ALWAYS SENT WITH MOTOR
1
2
3
Item Qty.
6
1
7
1
8
1
9
1
10
2
11 N/A
12 N/A
13
2
14
1
15
1
16
1
17
2
18
1
5
16
18
6
13
7
Description
BRKT MTR BAR LIMIT SWITCH
SWITCH DPDT (CHERRY)
HANDLE CHROME INSIDE
DOOR BRACKET A (DOOR BRACKET B - )
DOOR ARM PLATE
MANUAL RELEASE TENSION ADJUSTMENT
1/4-20 NYLOCK NUT
#6 NYLOCK NUT
1/4-20X3/4 HEX HEAD SCREW
5/8-20X1 HEX HEAD SCREW (ADJUSTMENT)
SHIM KIT FOR DOOR OPENERS (INCLUDES ALL 3 - VARYING SIZES)
#10-32X2 HEX HEAD (5/32) PARTIALLY THREADED SCREW
#10-32X2-1/2 HEX HEAD (5/32) PARTIALLY THREADED SCREW (NUT ON BACK)
12
14
12
COM
COM
Part #
MB1006
E19-50H
6022
MB1001 (MB1002)
MB1005
NA
SHOP SUPPLY
SHOP SUPPLY
SHOP SUPPLY
SHOP SUPPLY
10026-12
SHOP SUPPLY
SHOP SUPPLY
NC
NO
NC
NO
Rollx Vans Power Door Exploded View
rrollX
ollX v
vanS
anS P
PoWer
oWer D
Door
oor rePlaceMenT
ePlaceMenT ParTS
oeM PoWer Door TrouBleShooTing
Symptom
Possible Cause
Van is NOT in park or neutral.
Overhead on/off switch is turned to the OFF
position.
OTC program failure.
Remedy
Place van into park or neutral.
Turn switch to ON position.
Press OTC reset button.
OTC reads low voltage.
Start van's engine and press OTC reset button. If
door still does not open review OTC board
display and contact customer service.
Relay power fuse (1 amp) is blown.
Replace fuse in OTC fuse panel located behind
glove box.
Bad OTC board.
Watch the Door Control Status LED as you start
an Open Cycle. It should light for about one
second at which time you should see the door
open. If it does not, replace the OTC board.
B-pillar door control relay is bad.
Check the Door Control Relay located in the BPillar. Wrap you hand around the relay and start
an Open Cycle. You should feel the relay
operate with your hand when the Door Control
LED lights. If you do not, replace the relay.
Main OTC fuse (40 amp) is blown.
Replace fuse under by battery.
OEM overhead ON / OFF switch is OFF.
Turn switch to ON position. This switch enables /
disables the OEM buttons located on the B pillars
that operate the sliding doors.
Defective OEM door opener.
Operate door manually and contact customer
service.
OEM Door Ajar Pin Switch (Rollx Vans Door
Close signal) is not released.
If the OTC does not see the OEM door has begun
to open it will reverse the cycle. Examine switch /
wiring.
Ramp up limit switch is not being activated
properly.
Close door manually, press OTC reset button,
and press Rollx Vans user button to operate
system again. If door still does not attempt to
close after ramp is stowed, review OTC board
display and contact customer service.
Ramp sliding door attempts to close
(door motor runs) after ramp stows,
but door does not move
Defective OEM door opener.
Press OTC reset button, press interior OEM push
button to see if door will close automatically. If
door still does not respond, review OTC board
display and contact customer service.
Ramp sliding door does NOT OPEN
manually.
Door is locked.
Unlock door. When pulling door handle, pull
handle out and then slide door to open.
Ramp sliding door does NOT OPEN
manually from interior handle, but
does from exterior handle.
Child safety lock is activated.
See OEM owner manual to deactivate child
safety lock.
Door handle is not releasing.
Pull handle to disengage latch and slide to close.
Obstruction.
Check door track for any debris and remove.
Door open drive mechanism has moved beyond
stop bracket.
Lift rear section of door while pressing forward to
release door. Contact customer service.
Passenger sliding door does NOT
OPEN with interior Rollx Vans user
button.
Ramp sliding door does NOT OPEN
with interior OEM push buttons after
pressing OTC reset button.
While door is opening and kneeling,
van unkneels and door closes
(reverses).
Ramp sliding door does NOT
attempt to CLOSE after ramp stows.
Ramp sliding door will NOT CLOSE
manually.
Page 10
D
Door
oor M
MoDiFicaTionS
oDiFicaTionS
Door Extensions
#10002 Passenger
#10001 Driver
Form door extensions. Grind to
smooth transitions.
Install door extensions
using rivets
Install T nuts (STD)
Install T nuts (ITF)
Install angle bracket using rivets. #10504—1x1 x 14
gauge angle (mounted on outside of extension) *
Door track installed with factory
bolts. Extension attached with
3/16 rive as shown.
*Starting 8/11/2009 the Metal Angle Bracket was replaced by a Plastic Angle Bracket.
Refer to Service Bulletin #09168 (Order Qty 1 #B08180-DP6, Qty 5 #10269 – 3/16
Rivets per door, each with #1133074 - #10 Washer)
Page 11
Door MoDiFicaTionS
Door open brackets on driver and passenger door tracks
Power Doors
In the Floor vans:
Passenger #N05028ASM
Driver #N05029ASM
Fold Out vans:
Passenger #B2032
Driver #BRKT-LDTDS
Manual Door
Driver #BRKT-LDTPS-MANUAL
Door cables for Fold Out and In The Floor vans
Door open latch cable
In the Floor vans:
OEM cable
Fold Out vans:
Non power door # AV-100
Power door #AV-100P
Door drive cable
Power door only: PX3879BR
Page 12
Door
oor MoDiFicaTionS
10” In The Floor only
Weld latch open. Install latch to door spaced out with
washers. Relocate door drive motor.
Weld latch as
shown in the
open position
Relocate motor and wire
as shown.
Page 13
Door MoDiFicaTionS
Fold out ramps only
Drill hole and add rivet main plate on door open latch. The rivet stops the latch when
locked by latch lock.
Door open latch and switch
Latch lock
Rivet
Rivet
OEM Hold Open Latch ASM:
RT - #68030816AA
LT - #68030817AA
Page 14
eXhauST SySTeM
Rollx Vans Weld
OEM Catalytic Converter /
O2 Sensor
OEM Hanger
Rollx Vans Exhaust
#32-3
(Aluminized Tubing)
Rollx Vans Exhaust
#32-3
(Aluminized Tubing)
Page 15
eXhauST SySTeM
OEM Fuel Filler Neck (Gas Cap)
OEM Fuel Fill Neck
OEM Fuel Fill Vent Line
Rollx Vans Fill Neck Extension
#B05102
(Aluminized Steel Tubing)
Rollx Vans Filler Neck Hose
#049020201
(1-1/4 2BD Redwing Fuel by Goodyear)
Rollx Vans 9/16 Clamp
#OET 1315
(OETIKER 9/16 CLAMP)
Rollx Vans 1-1/2
#705-10
Rollx Vans Fuel Fill Vent Hose
#10929-00832
(5/16 Fuel/Emissions Hose,SAE 30R7, Goodyear)
Rollx Vans welds a Fill Neck Extension onto OEM Fuel Fill Neck to extend the OEM Fuel Fill Neck to
the Rollx Vans Filler Neck Hose. The modified filler neck is smoke tested for possible pin hole leaks.
Rollx’s Vans Fill Neck Extension is clamped to the Rollx Vans Filler Neck Hose.
Rollx Vans attaches a Fuel Fill Vent Hose that begins at the gas tank to the OEM Fuel Fill Vent Line
with a 9/16 clamp. This hose is routed underneath the frame.
Page 16
eXhauST SySTeM
Rollx Vans Main Fuel Hose
#H-212
(3/8 Fuel Injection Hose,SAE 30R9,180 PSI,WP,
CARB #c-u-06-002, Gates Corp.)
Rollx Vans Fuel Fill Vent Hose
#10929-00832
(5/16 Fuel/Emissions Hose,SAE 30R7, Goodyear)
OEM Clamp
Rollx Vans Charcoal C
Vent Hose
#10929-00834
(5/8 Fuel/Emissions H
SAE 30R7, Goodye
OEM Clamp
Rollx Vans Clamp #OET
Tank Fuel Intake
Fuel Line Adapter (3/8 to 5/16)
#10929-0824
with two Rollx Vans clamps
#OET 1518 (3/8) + #OET 1315 (5/16)
Rollx Vans Main Fuel Hose
#H-211
(5/16 Fuel Injection Hose,SAE 30R9,
180 PSI,WP,CARB #c-u-06-002, Gates Cor
Rollx Vans reuses the OEM Gas Tank.
Rollx Vans replaces OEM Fuel Fill Vent Hose with Rollx Vans Fuel Fill Vent Hose that is 48 inc
long and runs to OEM Fuel Vent Line near Filler Neck top (Gas Cap).
Rollx Vans replaces OEM Charcoal Canister Vent Hose with Rollx Van Charcoal Canister Ven
that runs to Rollx Vans Charcoal Canister Vent Metal Line.
Rollx Vans replaces OEM Main Fuel Hose with Rollx Vans Main Fuel Hose that begins with 3/
high pressure hose, goes through an adapter, changes to 5/16 high pressure hose and runs to
Vans Main Fuel Metal Line where it is clamped with a Rollx Vans Clamp after being flared.
OEM Clamp
Rollx Vans Filler Neck HosePage 17
#049020201
(1-1/4 2BD Redwing Fuel by Goodyear)
Rollx Vans Charcoal Canister Vent Metal
#B2103
(5/8 x .049 3003-0 Aluminum)
To Charcoal Canister
To Engine
eXTerior - grounD eFFecTS
B05150-P4
B05150-P3
B05150-D1
B05150-P2
B05150-D2
Page 18
B05150-D3
B05150-P1
B05150-D4
Fuel SySTeM
Rollx Vans Fuel / Emission System Overview
OEM Fuel Quick
Disconnect
To Engine
Rollx Vans Main Fuel
Metal Line (5/16)
Rollx Vans Charcoal
Canister Vent Hose
OEM Charcoal
Canister
Pre-modified
OEM Setup
Rollx Vans Charcoal
Canister Vent Metal Line
Rollx Vans Main Fuel Metal Line (5/16)
Rollx Vans Main Fuel Line (5/16)
Rollx Vans Main Fuel Line Adapter
(3/8 to 5/16)
OEM Filler Neck Top
(Gas Cap)
Rollx Vans Filler Neck Hose
OEM Fuel Fill
Vent Line
Rollx Vans Main Fuel Line (3/8)
Rollx Vans Fuel Fill
Vent Line
OEM Fuel
Tank
Rollx Vans Charcoal
Canister Vent Hose
OEM Fuel Pump /
Oem Fuel Filter
Page 19
Fuel SySTeM
OEM Fuel Filler Neck (Gas Cap)
OEM Fuel Fill Neck
OEM Fuel Fill Vent Line
Rollx Vans 9/16 Clamp
#OET 1315
(OETIKER 9/16 CLAMP)
Rollx Vans Fill Neck Extension
#B05102
(Aluminized Steel Tubing)
Rollx Vans Filler Neck Hose
#049020201
(1-1/4 2BD Redwing Fuel by Goodyear)
Rollx Vans 1-1/2 Hose Clamp
#705-1017
Rollx Vans Fuel Fill Vent Hose
#10929-00832
(5/16 Fuel/Emissions Hose,SAE 30R7, Goodyear)
Rollx Vans welds a Fill Neck Extension onto OEM Fuel Fill Neck to extend the OEM Fuel Fill Neck to
the Rollx Vans Filler Neck Hose. The modified filler neck is smoke tested for possible pin hole leaks.
Rollx’s Vans Fill Neck Extension is clamped to the Rollx Vans Filler Neck Hose.
Rollx Vans attaches a Fuel Fill Vent Hose that begins at the gas tank to the OEM Fuel Fill Vent Line
with a 9/16 clamp. This hose is routed underneath the frame.
Page 20
Fuel SySTeM
Rollx Vans Main Fuel Hose
#H-212
(3/8 Fuel Injection Hose,SAE 30R9,180 PSI,WP,
CARB #c-u-06-002, Gates Corp.)
OEM Clamp
Rollx Vans Charcoal Canister
Vent Hose
#10929-00834
(5/8 Fuel/Emissions Hose,
SAE 30R7, Goodyear)
OEM Clamp
Rollx Vans Fuel Fill Vent Hose
#10929-00832
(5/16 Fuel/Emissions Hose,SAE 30R7, Goodyear)
Rollx Vans Clamp #OET 1315 (5/16)
Tank Fuel Intake
Rollx Vans Main Fuel Hose
#H-211
(5/16 Fuel Injection Hose,SAE 30R9,
180 PSI,WP,CARB #c-u-06-002, Gates Corp.)
Fuel Line Adapter (3/8 to 5/16)
#10929-0824
with two Rollx Vans clamps
#OET 1518 (3/8) + #OET 1315 (5/16)
Rollx Vans reuses the OEM Gas Tank.
Rollx Vans replaces OEM Fuel Fill Vent Hose with Rollx Vans Fuel Fill Vent Hose that is 48 inches
long and runs to OEM Fuel Vent Line near Filler Neck top (Gas Cap).
Rollx Vans replaces OEM Charcoal Canister Vent Hose with Rollx Van Charcoal Canister Vent Hose
that runs to Rollx Vans Charcoal Canister Vent Metal Line.
Rollx Vans replaces OEM Main Fuel Hose with Rollx Vans Main Fuel Hose that begins with 3/8 inch
high pressure hose, goes through an adapter, changes to 5/16 high pressure hose and runs to Rollx
Vans Main Fuel Metal Line where it is clamped with a Rollx Vans Clamp after being flared.
OEM Clamp
Rollx Vans Charcoal Canister Vent Metal Line
#B2103
(5/8 x .049 3003-0 Aluminum)
Rollx Vans Filler Neck Hose
#049020201
(1-1/4 2BD Redwing Fuel by Goodyear)
To Charcoal Canister
To Engine
Rollx Vans Clamp
#OET 1315 (5/16)
Rollx Vans Main Fuel Metal Line
#126229
(5/16 x .028 Fusion, Weld Procoat, J526)
Page 21
Fuel SySTeM
Rollx Vans 1-1/2 Hose Clamp
#705-1017
Attach Rollx Vans Filler Neck Hose to OEM Fuel Tank with Rollx Vans Clamp as
shown.
Page 22
Fuel SySTeM
Rollx Vans attaches their metal
lines to the floor using 1 inch
Rubberized Metal Clamps.
Rollx Vans Main Fuel Metal Line (5/16)
Rollx Vans Charcoal Canister Vent Metal Line (5/8)
Rollx Vans Clamp
#770-1162
(1” Rubberized Metal Clamp
Page 23
Fuel SySTeM
Rollx Vans Main Fuel Metal Line (5/16)
Rollx Vans Charcoal Canister
Vent Hose
#10929-00834
(5/8 Fuel/Emissions Hose,
SAE 30R7, Goodyear)
OEM Clamp
Rollx Vans Charcoal Canister Vent Metal Line (5/8)
Rollx Vans metal lines continue underneath the driver’s side of the van as shown. The Rollx
Vans Charcoal Canister Vent Metal Line is clamped using an OEM Clamp onto the Rollx
Vans Charcoal Canister Hose.
The Rollx Vans Main Fuel Metal Line continues toward the OEM Quick Disconnect on the
OEM Fuel Rail.
Rollx Vans Main Fuel Metal Line (5/16)
Rollx Vans Charcoal Canister
Vent Hose
#10929-00834
(5/8 Fuel/Emissions Hose,
SAE 30R7, Goodyear)
OEM Clamp to
OEM Charcoal Canister
The Rollx Vans Charcoal Canister Hose is routed up to the OEM Charcoal Canister and
attached with an OEM Clamp.
Page 24
Fuel SySTeM
Rollx Vans Main Fuel Metal Line (5/16)
Rollx Vans Main Fuel Metal Line continues along the OEM frame and is routed
as shown.
OEM Fuel Quick Disconnect
Rollx Vans Main Fuel Metal Line (5/16)
Rollx Vans flares the Rollx Vans Main Fuel Metal Line and attaches to the Oem
Fuel Quick Disconnect as shown.
Page 25
Fuel SySTeM
Rollx Vans Charcoal Canister Bracket
#B1040
Rollx Vans relocates the OEM Charcoal Canister as shown using Rollx Vans Charcoal Canister
Bracket. The canister is moved slightly towards the center of the van as well as being rotated 90
degrees.
Page 26
inTerior
Slate Grey #B2204
Grey Stone #B2204-GS
Khaki #B2204-K
Slate Grey #B2202
Grey Stone #B2202-GS
Khaki #B2202-K
Slate Grey #B2200
Grey Stone #B2200-GS
Khaki #B2200-K
Slate Grey #B2201
Slate Grey #B2203
Grey Stone #B2201-GS Grey Stone #B2203-GS
Khaki #B2201-K
Khaki #B2203-K
Tire cover
Kneeler Cover
Page 27
inTerior
Power seat and heated seat connectors
assemblies (include plug, pins, ad
wires)
Seat side assembly #07079-003
Body side assembly #07079-004
Power seat only connector assemblies
Seat side assembly #07079-001
Body side #07079-002
Memory seat connectors assemblies
(if equipped)
Seat side assembly #07079-005
Body side assembly #07079-006
Main base includes all parts
Minivan #4003std
Full size #4003full
Foot rest #10033
Front dog bone hook
Rod end
Connecting rod
Cross bar
Latch handle #56030
Caster wheel
Page 28
Page 29
Kneeler TrouBleShooTing
Symptom
Van does NOT LOWER to
ground while door is opening
after Rollx Vans user button
is pressed.
After van is lowered to
ground the kneeler makes a
loud ratcheting sound.
Van will NOT RAISE when
ramp is stowed.
Van raises and while door
closing the kneeler ratchets.
Possible Cause
Remedy
Kneel on / off switch is turned OFF.
Turn kneel switch to the ON position.
Kneel motor.
Review display board. Turn kneel
switch to the OFF position and press
OTC reset button. Temporarily operate
sytem without kneel option enabled.
Contact customer service.
Kneel down limit switch was not
activated.
Adjust kneel down limit switch. Replace
if broken.
Kneel on / off switch is turned OFF.
Turn kneel switch to the ON position.
Kneel motor .
Review display board. Manually unkneel van, turn kneel switch to the OFF
position and press OTC reset button.
Contact customer service.
Kneel up limit switch is activated
incorrectly.
Adjust kneel up limit switch. Replace if
broken.
Kneel up limit switch is not activated.
Once door is closed and van is at
normal height, turn kneeling switch to
the OFF position.
Page 30
Item
1
2
3
3A
4
5
6
7
8
9
10
11
12
13
14
Page 31
1
1
0.17
1
Qty.
1
2
1
1.5
1
1
2
1
1
1
2
3
4
4
1
Description
Part #
K2XG20-12V-08RX-ASM
ACTUATOR KNEELING ASM
626AK194
50 CONN LINK
6261K534ASM
KNEEL CHAIN ASM
6261K534
CHAIN 50 ROLLER
K05012
KNEEL CHAIN SWIVEL
98338A220
COTTER PIN
10FDU06
FLANGE BRG
LTR-075M-6-2ASM
SPRING TORSION ASM
6280K249
SPROCKET FOR #50 CHAIN
03220-003
KNEEL LIMIT SWITCH ASM
6X284
SWITCH TANG BZ-2RW80-A2
3/8-16X1 HEX BOLT
SHOP SUPPLY
#6X1 PH SELF TAPPING SCREW
SHOP SUPPLY
#10 NYLOCK NUT
SHOP SUPPLY
K05006ASM
ACTUATOR GUIDE ASM
Parts on Van (Not Shown)
800-0072
RATCHET REVERSIBLE
4PW71
SOCKET 3/8"
AL200
ALUM PIPE 2'X10'
152303
BOOT BLK "2005" KNEELACT
1
13
11
11
7
2
9
10
12
3
6
3A
8
6
5
2
4
Service
#KNEEL SNG OT-01 - KNEEL OTC SNG COMPLETE ASM
14
Kneeler rePlaceMenT ParTS
Kneel SWiTch aDJuSTMenT ProceSS
Remove tire cover located in rear of
vehicle.
Remove kneeler cover.
Page 32
Kneel SWiTch aDJuSTMenT ProceSS
Page 33
Kneel SWiTch aDJuSTMenT ProceSS
Page 34
one Touch SySTeM TrouBleShooTing
Symptom
Remedy
Check that OTC power switch is on. For OTC v6.0 boards the
power switch is on the actual board. For v4.02 to v4.05 boards,
the switch is located on the dash by the drivers left knee.
No power to One Touch Controller (OTC).
Insure the connections on the back of the OTC board are tight.
Check the OTC main fuse (40 amp) located near the vehicles
main battery.
Reset the OTC. For OTC v6.0 boards the reset is located on the
dash by the drivers left knee. For 4.02 to 4.05 boards reset by
turning the On/Off switch by the drivers left knee Off (O) for 60
seconds, then back On (I).
Check battery voltage.
OTC beeps 4 times each time the user
tries to run a normal open/close cycle.
Battery is low. Turn off the OTC and charge battery. Note: The
alarm will sound when the battery voltage receaches below 11.4
vdc. The is to prevent the OTC system from draining the battery
far enough as to prevent the vehicle from starting. On the OTC
v6.0 board, this level is adjustable.
Van has been sitting for an extended period of time. Charge the
battery.
The van's battery is dead.
Check the current draw by placing an ammeter in series with the
negative terminal on the battery with all doors closed and engine
off. The draw varies, but awake the system should be less than
.850 amps and when sleeping, less than .050 amps. Additional
equitpment installed will also vary these numbers.
OTC beeps 3 times, pauses, and beeps 2 Ramp limit switch was missed during last cycle. Check to make
times over and over.
sure both ramp limit switches are adjusted properly.
OTC beeps 3 times, pauses, and beeps 3 Kneel limit switch was missed during last cycle. Check to make
times over and over.
sure both kneel limit switches are adjusted properly.
For a OTC v4.05 to 6.0 the door unlock relay is built into the
board. Replace board.
Doors do not unlock when using a Rollx
For a 4.02 to 4.04 board, check the relay power fuse located on
user button.
the OTC fuse panel behind the glove box. Also check the relay
located ontop of the dash on the passenger side.
3 Beeps - Pause - 1 Beep
3 Beeps - Pause - 2 Beep
3 Beeps - Pause - 3 Beep
3 Beeps - Pause - 4 Beep
3 Beeps - Pause - 5 Beep
3 Beeps - Pause - 6 Beep
4 Beeps - 4 Beeps - 4 Beeps
Alarm Warning Codes
Sliding Door Error
Kneel System Error
Ramp System Error
Memory Error
Com Error
Power Supply Error
Low Battery Voltage
Page 35
one Touch SySTeM overvieW
The Rollx Vans One Touch Controller, known as the OTC, is a Single Board Computer
specifically designed for the Rollx Vans system.
The OTC system was design to be independant to the operation of the Chrysler computer
system. When power is removed from the OTC, it has no effect on the operation of the
Chrysler system.
The OTC is a low power system. When the OTC is in Sleep Mode with the Display disabled,
it typically draws less then 10ma of current from the battery. When awake in Idle Mode (not
running a cycle) with the Display enabled, it typically draws around 200ma of current from the
battery.
The current state of the OTC can be determined by viewing the Display. During and open or
close operation the progress of the system can be tracked by watching the Display.
OTC V4.02, v4.04, and v4.05
OTC V6.0
Page 36
one Touch SySTeM overvieW
INPUTS
Note: Input Status LEDs are all green in color on the v4.02 to v4.05 OTC boards.
KNEEL DISABLE SWITCH (Violet wire) Allows the user to enable (the “I” position) or disable (the “O”
position) the kneeling system. There is no display for this input.
USER SWITCH INPUT (Blue wire) Active while any Rollx Vans user button or Rollx Vans remote is
pressed.
IGNITION INPUT (Pink/White wire) Indicates the status of the van ignition switch. When active it indicates
the ignition switch is off and the OTC will go into sleep mode when not in use. When not active it indicates
the van ignition switch is on and the OTC will not go into sleep mode.
NEUTRAL INPUT (Green wire) Indicates the status of the gear shifter. When active, the van is in either
neutral or park. The OTC system will not run a operational cycle unless the van is in neutral or park.
DOOR CLOSE LIMIT INPUT (Violet/Yellow wire) Active when the right side sliding door is fully shut.
DOOR OPEN LIMIT INPUT (Orange/Red wire) Active when the right side sliding door is fully open.
RAMP DOWN LIMIT INPUT (Red/White wire) Active when the ramp is in the down position.
RAMP UP LIMIT INPUT (Red/Green wire) Active when the ramp in the up position.
KNEEL DOWN LIMIT INPUT (Yellow/Green wire) Active when the kneeler is in the down position.
KNEEL UP LIMIT INPUT (Yellow/White wire) Active when the kneeler is in the up position.
OUTPUTS
Note: Output status LEDs are all red and yellow in color on the v4.02 to v4.05 OTC boards.
System Status: Indicates if the system is ready to except a command. It is off when the OTC is in sleep
mode.
V4.02 to v4.05 - LED will normally be flashing on and off when the OTC is in Idle Mode.
v6.0 - Display will show Rollx Vans: Idle.
RAMP DOWN MOTOR OUTPUT (Red wire) Active when the OTC is driving the ramp down (v4.05 and v6.0
OTC boards have obstacle detection monitoring this output).
RAMP UP MOTOR OUTPUT (Red/Black wire) Active when the OTC is driving the ramp up (v4.05 and v6.0
OTC boards have obstacle detection monitoring this output).
RAMP DISABLE OUTPUT (Red/Blue wire) Active anytime when the OTC is driving the ramp up or down. It
indicates the ramp manual mode is disabled.
KNEEL UP MOTOR OUTPUT (Yellow/Red wire) Active when the OTC is driving the kneeler up.
KNEEL DOWN MOTOR OUTPUT (Yellow/Black wire) Active when the OTC is driving the kneeler up.
DOOR DISABLE OUTPUT (Orange/Blue) Used by the OTC to disable the Chrysler right side door
controller anytime it wants to open the ramp. This prevents the right side door controller from banging the
right side sliding door against the ramp.
DOOR CONTROL OUTPUT (Orange) OTC sends a command to the Chrysler system to open or close the
right Side sliding door (LED on v4.02-v4.05 OTC boards lights for about one second).
DOOR UNLOCK OUTPUT (Yellow/Brown) OTC sends a command to the Chrysler system to unlock the
doors at the beginning of an open cycle (LED on v4.02 to v4.05 OTC boards lights for about one second).
Page 37
Page 38
ESC
Scrolls
Last Error
Kneel Down
ESC
DOWN
ENTER
UP
ENTER
START
Rollx Vans
Idle
DOWN
UP
Manual
Kneeler
Kneel Up
Rollx Vans Service
Information
DOWN
ENTER
ESC
ESC
ENTER
Password
Required
DOWN
UP
ENTER
Data Logger
Setup
DOWN
UP
#02 0000:00:00
Status: Err# XX
ESC
UP
#03 0000:00:00
Status: Err# XX
(Move to next Log Entry)
DOWN
ENTER
#01 0000:00:00
Scrolls Error Info
To get into setup a password is required. Setup options
include Cycle Tester, Battery Alarm Level, Debugger,
Cycle Counter, Ramp Type, Kneeler Mode, and Obstacle
Detection Level. Also see OTC 6.0 User Interface
Flowchart for more in depth information.
ESC
UP
#01 0000:00:00
Status: Err# XX
(Move to previous Log Entry)
#02 0000:00:00
Scrolls Error Info
#03 0000:00:00
Scrolls Error Info
one Touch SySTeM - v6.0 inTerFace
one Touch SySTeM - v6.0 error coDeS
System Failures
Error 0 - Cycle operated correctly.
User: No errors detected. Cycle operated correctly
Error 1 - Van battery voltage low.
User: Start engine to charge battery. If engine fails to start, charge the battery using a Battery
Charger or have someone give you a Jump Start...
Tech: Check system current draw. If High Draw remove ALL Rollx Vans fuse, Test draw again. If still
high problem is in Chrysler System. Check the Rollx Vans Harness Extensions, wire by wire,
for shorts and proper wire-to-wire extension. If Wire Extensions are ok problem is in one of
the Chrysler circuits. If after pulling Rollx Vans fuse, the high draw goes away, problem is in
one of the Rollx Vans circuits. Unplug OTC and retest draw. If still high isolate all other Rollx
Vans circuits one at a time until High Draw goes away. If no high draw is found, test Van
battery. Charge or replace Van Battery as required...
Error 2 - Clock backup battery low.
User: Reset system and try operation again. If problem reoccurs, call Customer Service...
Tech: Realtime Clock Backup Battery is low. Reset system and try operation again. If problem
reoccurs, replace OTC...
Error 3 - Slave MPU Watchdog Reset.
User: Reset system and try operation again. If problem reoccurs, call Customer Service...
Tech: OTC Electronic Error, Check Power & GND connections, Reset system and try operation
again. If problem reoccurs, replace OTC...
Error 4 - Slave MPU Missing Clock Detected.
User: Reset system and try operation again. If problem reoccurs, call Customer Service...
Tech: OTC Electronic Error, Check Power & GND connections, Reset system and try operation
again. If problem reoccurs, replace OTC...
Error 5 - Slave MPU Voltage Regulator error.
User: Reset system and try operation again. If problem reoccurs, call Customer Service...
Tech: OTC Electronic Error, Check Power & GND connections, Reset system and try operation
again. If problem reoccurs, replace OTC...
Error 6 - Slave MPU Flash error.
User: Reset system and try operation again. If problem reoccurs, call Customer Service...
Tech: OTC Electronic Error, Check Power & GND connections, Reset system and try operation
again. If problem reoccurs, replace OTC...
Error 7 - Real Time Clock error.
User: Reset system and try operation again. If problem reoccurs, call Customer Service...
Tech: OTC Electronic Error, Check Power & GND connections, Reset system and try operation
again. If problem reoccurs, replace OTC...
Error 8 - Hardware Reset error.
User: Reset system and try operation again. If problem reoccurs, call Customer Service...
Tech: OTC Electronic Error, Check Power & GND connections, Reset system and try operation
again. If problem reoccurs, replace OTC...
Page 39
one Touch SySTeM - v6.0 error coDeS
Door Errors
Error 9 - Door Open Switch Failure.
User: Close Door manually. Reset system and try operation again. If problem reoccurs, call
Customer Service...
Tech: Check Door Open Switch using "Setup-Debug-Input Test Mode". Check OR/RED, High-Flex
ORG, (and High-Flex BLU on ITF) wires & connections. Check Snake wire continuity and wire
solder connections...
Error 10 - Door Close Switch failure
User: Close Door manually, Reset system and try operation again. If problem reoccurs, call
Customer Service...
Tech: Check Door Close Switch using "Setup-Debug-Input Test Mode". Check VLT/YLW Solder Tap
to Chrysler VLT/YLW wire...
Error 11 - Door Control Output error.
User: Insure Door is fully shut. Reset system and try operation again. If problem reoccurs, call
Customer Service...
Tech: Check Door Control Output using "Setup-Debug-Output Test Mode". Check ORG Tap to
Chrysler VLT/YLW (B-Pilar). Check operation of Chrylser Door Switches. Check Overhead
Console Disable Switch...
Error 12 - Door Disable Relay failure.
User: Insure Door is fully shut. Reset system and try operation again. If problem reoccurs, call
Customer Service...
Tech: Check Door Disable Relay using "Setup-Debug-Output Test Mode". Check ORB/BLU to
Relay, Red Power wire to Relay, and both Chrysler VLT/GRY wires on Relay (B-Pilar)...
Error 13 - Door Unlock Failure.
User: Reset system and try operation again. If problem reoccurs, call Customer Service...
Tech: Check Door Unlock Relay using "Setup-Debug-Output Test Mode". Check YLW/BRN to
Unlock Relay. Check 2.2K Resistor from Relay to GND. Check YLW/BRN to Chrysler VLT/LG
Solder Tap. Check Passenger Unlock Switch and Overhead Console Enable Switch...’
Ramp Errors
Error 14 - Ramp Down Limit Switch error.
User: Close Ramp manually (use Manual Override Switch), close Door. Reset system and try
operation again. If problem reoccurs, call Customer Service...
Tech: Check Ramp Down Limit Switch using "Setup-Debug-Input Test Mode". Check RED/GRN, &
BLK (GND) wire. Check Molex Connector and Limit Switch connections...
Error 15 - Ramp Up Limit Switch failure.
User: Close Ramp manually (use Manual Override Switch), close Door. Reset system and try
operation again. If problem reoccurs, call Customer Service...
Tech: Check Ramp Up Limit Switch using "Setup-Debug-Input Test Mode". Check RED/WHT, & BLK
(GND) wire. Check Molex Connector and Limit Switch connections...
Error 16 - Ramp Down Motor failure.
User: Close Ramp manually (use Manual Override Switch), close Door. Reset system and try
operation again. If problem reoccurs, call Customer Service...
Tech: Check Ramp Down Motor Output using "Setup-Debug-Output Test Mode". Check BLK & YLW
wires, Molex Connector, connections and Status LEDs on Relay Bd. 'Check RED wire
between OTC and Relay Bd...
Page 40
one Touch SySTeM - v6.0 error coDeS
Error 17 - Ramp Up Motor failure.
User: Close Ramp manually (use Manual Override Switch), close Door. Reset system and try
operation again. If problem reoccurs, call Customer Service...
Tech: Check Ramp Up Motor Output using "Setup-Debug-Output Test Mode". Check BLK & YLW
wires, Molex Connector, connections and Status LEDs on Relay Bd...Check RED/BLK wires
between OTC and Relay Bd...
Error 18 - Ramp Obstacle or bad Limit Switch detected. Push Remote or User Switch to continue.
User: Ramp hit an obstacle. Remove Obsticle, Raise kneeler (use Manual OverRide Control on
OTC. Reset system and try operation again. If problem reoccurs, call Customer Service...
Tech: Check for repeated OB Dectection Failure.. If repeated errors, adjust OB Dect Level using
"Setup-OB Dect"...
Kneeler Errors
Error 19 - Kneel Down Limit Switch or Kneel Motor failure.
User: Raise Kneeler (Use Manual Override Control on OTC), close Ramp and Door manually.
Reset system and try operation again. If problem reoccurs, call Customer Service...
Tech: Check Kneel Down Limit Switch using "Setup-Debug-Input Test Mode". Check YLW/WHT &
GND wires. Check Molex Connector and Limit Switch connections...
Error 20 - Kneel Up Limit Switch or Kneel Motor failure.
User: Raise Kneeler (Use Manual Override Control on OTC), close Ramp and Door manually. Reset
system and try operation again. If problem reoccurs, call Customer Service...
Tech: Check Kneel Up Limit Switch using "Setup-Debug-Input Test Mode". Check YLW/GRN & GND
wires. Check Molex Connector and Limit Switch connections...
Error 21 - Kneel Down Motor or Kneel Motor failure.
User: Raise Kneeler (Use Manual Override Control on OTC), close Ramp and Door manually.
Reset system and try operation again. If problem reoccurs, call Customer Service...
Tech: Check Kneel Motor Down Output using "Setup-Debug-Output Test Mode". Check RED & BLK
wires, Molex Connector, Relay Bd. connections and Status LEDs. Check YLW/RED wire from
OTC to Relay Bd...
Error 22 - Kneel Up Motor or Kneel Motor failure...
User: Raise Kneeler (Use Manual Override Control on OTC), close Ramp and Door manually.
Reset system and try operation again. If problem reoccurs, call Customer Service...
Tech: Check Kneel Up Motor Output using "Setup-Debug-Output Test Mode". Check RED & BLK
wires, Molex Connector, Relay Bd. connections and Status LEDs. Check YLW/BLK wire from
OTC to Relay Bd...
Operational Errors
Error 23 - Transmission is not in Neutral or Park...
User: Put Van in Neutral or Park. Reset system and try operation again. If problem reoccurs, call
Customer Service...
Tech: Check Neutral Status Switch using "Setup-Debug-Input Test Mode". Check GRN to Chrysler
GRN/GRY Solder Tap at Transmission. Check GRN from Transmission to Solder Tap above
Rollx Fuse Panel. Check GRN from same Solder Tap to OTC...
Error 24 - Ignition on.
User: Reset system and try operation again. If problem reoccurs, call Customer Service...
Tech: Check Ignition Status Switch using "Setup-Debug-Input Test Mode". Check PNK/WHT to
Chrysler PNK/WHT Solder Tap under Steering Wheel (There are 2 Chrysler PNK/WHT wires.
Use either one)...
Page 41
one Touch SySTeM - v6.0 error coDeS
Error 25 - Emergency Stop
User: User pressed Rollx Van Switch or Remote while running a cycle. This is a safety feature.
Please check you Owners Manual for more details...
Tech: User pressed Rollx Vans Switch or Remote while running a cycle...
Watchdog System Errors
Error 26 - PCA Error.
User: Reset system and try operation again. If problem reoccurs, call Customer Service...
Tech: OTC Electronic Error, Check Power & GND connections, Reset system and try operation
again. If problem reoccurs, replace OTC...
Error 27 - Ramp Motor Failure error.
User: Reset system and try operation again. If problem reoccurs, call Customer Service...
Tech: Ramp Limit Switch or Motor failed. Check Limit Switch and Motor connections. Check Limit
Switch function using "Setup-Debug-Input Test Mode". Check RED/WHT, RED/GRN, and
GND wires on Limit Switches. Test Motor using '"Setup-Debug-Output Test Mode". Check
YLW and BLK Motor wires. Check Molex Connector on Motor Wires. DB'Reset system and
try operation again. If problem reoccurs, replace OTC...
Error 28 - Door failed to open. OTC in Manual Mode, close door, push Remote or User Switch to run
Open Cycle.
User: Reset system and try operation again. If problem reoccurs, call Customer Service...
Tech: While running an Open Cycle either the Door was stopped by the User or the Chrysler Door
Obstacle Detection Circuit stop it. Close the Door, Reset system and try operation again. If
problem reoccurs and it is not caused by the Door being stopped manually, check the Door
operation using just the Chrysler Door Controls. Check for obstacles in the Door Tracks. If
equipped with Rollx Vans Fold Ramp System, insure the Ramp is not interfering with the Door
operation...
Error 29 - Kneeler Limit Switch or Motor Failure error.
User: Reset system and try operation again. If problem reoccurs, call Customer Service...
Tech: Kneeler Limit Switch or Motor failed. Check Limit Switch and Motor connections. Check Limit
Switch function using "Setup-Debug-Input Test Mode". YLW/WHT, YLW/GRN, and GND wires
on Limit Switches. Test Motor using "Setup-Debug-Output Test Mode". Check RED and BLK
Motor wires. Check Molex Connector on Motor Wires. Reset system and try operation again.
If problem reoccurs, replace OTC...
Error 30 - CCF3 Error.
User: Reset system and try operation again. If problem reoccurs, call Customer Service...
Tech: OTC Electronic Error, Check Power & GND connections, Reset system and try operation
again. If problem reoccurs, replace OTC...
Error 31 - PCA IRQ Error.
User: Reset system and try operation again. If problem reoccurs, call Customer Service...
Tech: OTC Electronic Error, Check Power & GND connections, Reset system and try operation
again. If problem reoccurs, replace OTC...
Error 32 - Door Obstacle Detection error.
User: Check for dirt or other obstacles in or around the Right Side Sliding-Door and Door Tracks.
Close Door and try again. If problem reoccurs call Customer Service...
Tech: The Chrysler Door Obstacles Detection has triggered. Check Door Tracks for dirt or other
obstacles. Check the Door Alignment.
Page 42
one Touch SySTeM - v6.0 error coDeS
Error 33 - Door Ajar error.
User: Door Ajar Error. Insure the Sliding Door is fully closed and latched then try operation again. If
problem reoccurs, call Customer Service...
Tech: The OTC will not run an Open Cycle if the door is Ajar. Insure the door is fully closed and
latched. Using the "Setup-Debug-Input Test Mode" check the Door Closed Switch Input with
the door both open and closed. If the test fails, check the wiring between the OTC and the
Chrysler Cinch Mechanism. This includes the wiring from the OTC to the Snake, the Snake
wiring and the wiring in the Door from the Snake to the Cinch Mechanism. Check the
operation of the Cinch Mechanism.
Page 43
in The Floor (gaS SPring) TrouBleShooTing
Symptom
Possible Cause
Door open limit switch is not being
activated.
Ramp will NOT DEPLOY
after door opens
automatically.
Ramp will NOT STOW
automatically.
Remedy
When a Open Cycle starts, the OTC
will send a command to the Chrysler
System to unlock the doors. It then
sends a second command to the
Chrysler System to open the Right Side
Sliding Door. The OTC Computer then
waits two seconds and checks the Door
Closed Limit Switch. If it finds it still
indicates the door is closed, it assumes
that a person (or and obstacle) stopped
the door opening sequence. It then
ends the open cycle and goes back
into Idle Mode. After ten to fifteen
seconds it goes back into Sleep Mode.
This is the sequence of events you will
see if the Door Closed Limit Switch
malfunctions (sticks closed). This
switch is located in the towards the rear
of the lower door track.
Ramp motor not engaged.
Engage ramp motor. Refer to the
“Manual Operation” section of owner’s
manual.
Ramp down limit switch needs
adjustment to deactivate.
Press Rollx Vans user button again to
unkneel van and close door. Review
display on OTC board and contact
customer service.
Ramp motor.
Review display on OTC board and
contact customer service.
OTC program failure.
Press OTC reset button.
Ramp motor not engaged.
Engage ramp motor. Refer to the
“Manual Operation” section of this
manual.
Ramp motor.
Review display on OTC board and
contact customer service.
Low voltage from the battery.
Start vehicle. Press OTC reset button
and press Rollx Vans user button again.
Gas spring is not assisting ramp to
stow.
Assist ramp in early phases of stowing
by pushing ramp in. Contact customer
service.
Clear obstruction and press Rollx Vans
user button.
Ramp will STOP AND
REVERSE mid-cycle.
Obstacle is detected.
Ramp will start to deploy or
stow then stop functioning.
Pressure on cover plate.
Page 44
Review display on OTC board and
contact customer service.
Ensure that there are no objects on top
of cover plate.
in The Floor (gaS SPring) rePlaceMenT ParTS
Page 45
in The Floor (MeTal SPringS) TrouBleShooTing
Symptom
Possible Cause
Remedy
Door open limit switch is not being
activated.
When a Open Cycle starts, the OTC
will send a command to the Chrysler
System to unlock the doors. It then
sends a second command to the
Chrysler System to open the Right Side
Sliding Door. The OTC Computer then
waits two seconds and checks the Door
Closed Limit Switch. If it finds it still
indicates the door is closed, it assumes
that a person (or and obstacle) stopped
the door opening sequence. It then
ends the open cycle and goes back
into Idle Mode. After ten to fifteen
seconds it goes back into Sleep Mode.
This is the sequence of events you will
see if the Door Closed Limit Switch
malfunctions (sticks closed). This
switch is located in the towards the rear
of the lower door track.
Ramp motor not engaged.
Engage ramp motor. Refer to the
“Manual Operation” section of owner’s
manual.
Ramp down limit switch needs
adjustment to deactivate.
Press Rollx Vans user button again to
unkneel van and close door. Review
display on OTC board and contact
customer service.
Ramp motor.
Review display on OTC board and
contact customer service.
OTC program failure.
Press OTC reset button.
Ramp motor not engaged.
Engage ramp motor. Refer to the
“Manual Operation” section of this
manual.
Ramp motor.
Review display on OTC board and
contact customer service.
Low voltage from the battery.
Start vehicle. Press OTC reset button
and press Rollx Vans user button again.
Ramp will NOT DEPLOY
after door opens
automatically.
Ramp will NOT STOW
automatically.
Ramp will STOP AND
REVERSE mid-cycle.
Obstacle is detected.
Ramp will start to deploy or
stow then stop functioning.
Pressure on cover plate.
Page 46
Clear obstruction and press Rollx Vans
user button.
Review display on OTC board and
contact customer service.
Ensure that there are no objects on top
of cover plate.
in The Floor (MeTal SPringS) rePlaceMenT ParTS
Page 47
FolDing raMP TrouBleShooTing
Symptom
Ramp will NOT DEPLOY
after door opens
automatically.
Ramp will NOT STOW
automatically.
Ramp will STOP AND
REVERSE mid-cycle.
Possible Cause
Remedy
Ramp fuse or circuit breaker is blown.
Press Rollx Vans user button again to
unkneel van and close door. Reset
circuit breaker or check ramp fuse and
replace if needed with 15 amp glass
fuse located in glove box.
Door open limit switch is not being
activated.
When a Open Cycle starts, the OTC
will send a command to the Chrysler
System to unlock the doors. It then
sends a second command to the
Chrysler System to open the Right Side
Sliding Door. The OTC Computer then
waits two seconds and checks the Door
Closed Limit Switch. If it finds it still
indicates the door is closed, it assumes
that a person (or and obstacle) stopped
the door opening sequence. It then
ends the open cycle and goes back
into Idle Mode. After ten to fifteen
seconds it goes back into Sleep Mode.
This is the sequence of events you will
see if the Door Closed Limit Switch
malfunctions (sticks closed). This
switch is located in the Right Side
Sliding Door Latch Assembly.
Ramp down limit switch needs
adjustment to deactivate.
Press Rollx Vans user button again to
unkneel van and close door. Review
display on OTC board and contact
customer service.
Ramp motor.
Press Rollx Vans user button again to
unkneel van and close door. Review
display on OTC board and contact
customer service.
OTC program failure.
Press OTC reset button.
Ramp fuse or circuit breaker is blown.
Press Rollx Vans user button again to
unkneel van and close door. Reset
circuit breaker or check ramp fuse and
replace if needed with 15 amp glass
fuse located in glove box.
Ramp motor.
Review display on OTC board and
contact customer service.
Obstacle is detected.
Page 48
Clear obstruction and press Rollx Vans
user button.
Review display on OTC board and
contact customer service.
FolDing raMP rePlaceMenT ParTS
Page 49
FolDing raMP rePlaceMenT ParTS
Page 50
FolDing raMP aDJuSTMenT ProceSS
Page 51
FolDing raMP MoTor inSTall / raMP reMoval inSTrucTionS
Folding Ramp Motor Install (steps 1—19)
Ramp Removal Instructions (steps 1-4 + 15-19)
1. Remove carpeted motor panel. This is held on by two Phillip head screws.
2. Disconnect wires going to limit switches and motor.
3. Unbolt ramp. There are two bolts (3/8) that go into the side of the van above
ramp motor and two nuts (3/8) on the floor of the van-one nut is by the motor
and one nut is by b-pillar.
4. Remove ramp from van.
5. Extend ramp so it is laying flat.
6. Remove roller from pick up arm. Also, remove cable bolt.
7. Remove set screw from pick up arm. Then insert 5/16 bolt into pick up arm
to pull pick up arm off of motor shaft. If this does not work, cut motor shaft
with a saw and punch out scrap piece from pick up arm.
8. Remove limit switches off of ramp.
9. Take out the four Allen head bolts (3/16) holding ramp motor. Remove motor.
10. Insert new motor. Reinstall the four Allen head screws with lock tight.
11. Reinstall limit switches.
12. Remove cams off of old motor and install on the new ramp motor. You will
need to adjust these cams at step 16.
13. Reinstall pick up arm. Line up pick up arm and key way. Ensure Woodruff
key is all the way inserted into the pick up arm.
14. Reinstall set screw (3/16) with lock tight.
15. Reinstall ramp in the van. Secure ramp with original hardware.
16. Install wiring for limit switches and motor.
17. Adjust ramp cams. Refer to Ramp Adjustment Instructions.
18.Test ramp for proper limit switch adjustment.
19.Reinstall carpeted motor cover.
Page 52
FolDing raMP MoTor inSTall / raMP reMoval inSTrucTionS
Page 53
rear heaT & air
Low pressure AC line
2004 #B2102
2005 #B05101
2006 # B06101
High Pressure (3/8) AC line
2004 #B2101
2005 #B05100
2006 #B06100
Rear heat lines #B2100
AC Lines to AC Unit using O ring.
Torque to 110 in-lb
Rear heat lines #B2100
Page 54
SuSPenSion
Shackle extensions
#B2016
#B05020
Not used on 10” In The Floor vans
Welded OEM nut
(from OEM seatbase).
Reuse OEM shock
bolt and washer.
Folding ramp vans—OEM shocks
In The Floor van shocks
#YB1844182
Trailer Tow Prep van shocks (not shown)
#58620HD
Page 55
oTc SySTeM - 6.0 aFTer 3/21/07
DASH
RESET SWITCH
(8/21/06)
USER KNEEL DISABLE ROCKER SWITCH
AND WIRE HARNESS
(ASM #03220-001)
DB / YL
(20 GA.)
VT
(20 GA.)
BK (20 GA.)
N/C
4
N/C
VT (20 GA.)
YL / BR (20 GA.)
1
1=OFF
2=UNLOCK
3=LOCK
2
DB / YL (20 GA.)
BLACK
13K
3
2
TAP TO
OEM VT / LG
3
2K
1
3.3K
PASSENGER DOOR
LOCK SWITCH
WT / RD (20 GA.)
BK (20 GA.)
RIGHT PASSENGER DOOR
SWITCH UNLOCK CONTROL
DB / YL (20 GA.)
BK (10 GA.)
(2
WT / RD (20 GA.)
DB
(20 GA.)
VT / BL
1
N/C
DB (20 GA.)
PK / WT (20 GA.)
N/C
DG
(20 GA.)
OR / RD (20 GA.)
VT / YL (20 GA.)
RD / DG (20 GA.)
RD / DG
RD / WT (20 GA.)
14
YL / DG (20 GA.)
N/C
RD / WT (20 GA.)
YL / WT (20 GA.)
BLACK
RD
(20 GA.)
RD / BK (20 GA.)
YL / BK (20 GA.)
YL / RD (20 GA.)
1
OR / DB (20 GA.)
OR
(20 GA.)
RD / DB (20 GA.)
12
BK
B-PILAR
SWITCH
BK
YL (12 GA.)
TAP TO
OEM VT / YL
RELAY
J1
YL / DG
LIMIT SWITCHES WITH
WIRE HARNESS
KNEEL
(ASM #03220-003)
UP LIMIT
NO
BK
YL / WT
YL / WT
OR
COM
GY (12 GA.)
DB (20 GA.)
HIGH FLEX
OR (20 GA.)
HIGH FLEX
RD (20 GA.)
HIGH FLEX
RD (12 GA.)
BK
DWN LIMIT
NO
COM
YL / DG
BLACK
RD / DB
YL / BK
YL / RD
RD / BK
RD
YL / BR (20 GA.)
WT
N/C
BLACK
BK (12 GA.)
RD (12 GA.)
YL (12 GA.)
Page 56
oTc SySTeM - 6.0 aFTer 3/21/07
ROLLX USER SWITCHES
SWITCH AND WIRE HARNESS
(ASM #03220-005)
BK
(20 GA.)
DB
(20 GA.)
BK
(20 GA.)
DB
(20 GA.)
POWER OVERRIDE SWITCH
IN THE FLOOR RAMP ONLY
(FRONT PASSENGER DOOR JAM)
OUT
DB (20 GA.)
DB (20 GA.)
BK (20 GA.) HIGH FLEX
BK (20 GA.)
BK (20 GA.)
BK (20 GA.)
INSTALL 1 AMP ATO/ATC
AUTOMOTIVE FUSE FOR EACH
RD (20 GA.)
HIGH FLEX
FUSE PANEL
(BEHIND GLOVE BOX)
RD (20 GA.)
RD (8 GA.)
BK (20 GA.)
WT / RD
IN
OR (20 GA.)
HIGH FLEX
BK
(20 GA.)
DB
(20 GA.)
DASH
C-PILAR
REAR PANEL
DB (20 GA.)
HIGH FLEX
BK (8 GA.)
BK (10 GA.)
RD (8 GA.)
BK (8 GA.)
BATT
RD / WT
(20 GA.)
NO COM
RD / DG
(20 GA.)
BK
(20 GA.)
ONE TOUCH SYSTEM
REMOTE KEYLESS ENTRY (RKE)
ROLLX VANS RKE
REMOTE MODULE
RD (20 GA.)
RD (12 GA.)
RAMP
RELAY PANEL #06300-001
J2
R
N
87
VT / YL
TAP TO
OEM BK / DG
GRN
TAP
GRN/GRY
DOOR
DETAILED DIAGRAM
#07017-001 - ITF
#07018-001 - FOLDING
87A
BK / WT
30
BK / WT
86
D
2
85
OR / DB
TAP TO
OEM PK / WT
NEUTRAL SAFE
DOOR CONTROL
RELAY
OR / RD
VT / YL
BK (12 GA.)
YL (12 GA.)
RD (12 GA.)
IGNITION
P
BK (10 GA.)
BK (12 GA.)
PK / WT (20 GA.)
RD (10 GA.)
BK (12 GA.)
1
POWER OVERRIDE BUS
DB (20 GA.)
BK (20 GA.)
RD (20 GA.)
LIMIT SWITCHES WITH WIRE HARNESS
(FOLDING RAMP ASM #03220-004)
(ITF RAMP ASM #03220-004A)
UP LIMIT
DOWN LIMIT
COM NO
INLINE MINI
AUTOMOTIVE
FUSE HOLDER
(40 AMP)
FOLDING RAMP - BLUE WIRE
ITF RAMP - ORANGE WIRE
Page 57
OEM HARNESS
DOOR
SNAKE
FR - BL
ITF - BL + RD
oTc SySTeM - 4.05 anD 6.0 BeFore 3/21/07
Page 58
oTc SySTeM - 4.05 anD 6.0 BeFore 3/21/07
WT / RD
ROLLX VANS RKE
REMOTE MODULE
Page 59
PaSSenger Door SnaKe - in The Floor raMP
RD (20 GA.) #PO1575
DB (20 GA.) #PO1546
TO ROLLX VANS CONNECTOR
IN DOOR
OR (20 GA.) OEM
OR (20 GA.) OEM
#A1448-ND - FEMALE
CONNECTOR
#A1439-ND - SOCKET
#A1449-ND - MALE
CONNECTOR
#A1438-ND - PINS
CHRYSLER RIGHT SIDE
DOOR CONTROLLER
(IN DOOR)
ORIGINAL CHRYSLER
DOOR OPEN SWITCH
(RELOCATED FROM
PAWL TO DOOR)
OEM BLACK CONNECTOR
TO OEM CONNECTOR
IN DOOR
#N05028ASM
DOOR OPEN LIMIT SWITCH BRKT ASM
(INCLUDES BRACKET)
#38042 - BLACK CONNECTOR
#30034 - PIN
ROLLX VANS ADDS 6.2 FEET OF
#39000 - CABLE SEAL
HIGH FLEX ORANGE WIRE
#05082-002
DOOR OPEN SWITCH ASM, 3 TOWER
(DOES NOT INCLUDE BRACKET)
OR #PO1576
N / O OR / RD (20 GA.) #3017
DB #PO1546
OR / RD (20 GA.) #3017
OR (20 GA.) #3010
RD #PO1575
COM
#SW429-ND
SWITCH LEVER SPDT .1A
Foldout Ramp or 8 Inch ITF
10 Inch ITF Ramp
Ramp
Rollx Vans Part #
#07018-001
#07017-001
OEM Snake #
4874 122AE
4874 122AE
Foldout Ramp or 8 Inch ITF
10 Inch ITF Ramp w/ Side
Ramp w/ Side Curtain
Curtain Airbags (SCA)
Airbags (SCA)
Rollx Vans Part #
#07018-002
#07017-002
OEM Snake #
4874 484AD
4874 484AD
OEM GREY CONNECTOR
(GREEN IF VAN HAS SIDE CURTAIN AIRBAGS)
TO FRONT DASH
#LCP625 - LOOM 5/8
Page 60
PaSSenger Door SnaKe - in The Floor raMP
TO ROLLX VANS MAIN HARNESS
(DOOR OPEN INPUT)
OR / RD (20 GA.) #3017
ROLLX VANS ADDS 7.7 FEET
OF RED AND BLUE HIGH
FLEX WIRE
#A1449-ND - MALE
CONNECTOR
#A1438-ND - PINS
#11208 - LOOM 1/4
ROLLX VANS EXTENDS ALL 7 OEM WIRES INSIDE
PLASTIC TUBING 7 FEET EXCEPT THE BL / WT
WIRE THAT IS EXTENDED 10 FEET
TO ROLLX VANS MAIN HARNESS
(DOOR DISABLE OUTPUT)
RD (20 GA.) #10616
DOOR CONTROL RELAY
“B” PILLAR
#5-1393302-8
OR / DB (20 GA.) #2033
BK / RD #2007
BK / VT #2015
BK / WT #2016
BK / LB #2013
BK / BR #2010
BK / DG #2011
BK #10592
Page 61
#10223 - RING
CONN BLUE 3/8’
BK / WT (20 GA.) #2016
BK / DG (20 GA.) #2011
OR (20 GA.) #PO1576
BK / LB (20 GA.) OEM
BK / BR (20 GA.) OEM
BK / DG (20 GA.) OEM
BK
(16 GA.) OEM
TO ROLLX VANS MAIN HARNESS
(DOOR CLOSE INPUT)
“B” PILLAR
BK / RD (16 GA.) OEM
BK / VT (20 GA.) OEM
BK / WT (20 GA.) OEM
VT / YL (20 GA.) #2040
DB (20 GA.) #PO1546
RD (20 GA.) #PO1575
TO FUSE PANEL
(POWER)
#A1448-ND - FEMALE
CONNECTOR
#A1439-ND - SOCKET
ROLLX VANS “T” TAPS INTO
BK / GN WIRE WITH 2 FEET
BK / GN WIRE
PaSSenger Door SnaKe - FolDing raMP
DB (20 GA.) #PO1546
TO ROLLX VANS CONNECTOR
IN DOOR
OR (20 GA.)
CHRYSLER RIGHT SIDE
DOOR CONTROLLER
(IN DOOR)
ROLLX VANS “T” TAPS
INTO
OEM ORANGE WIRE WITH
ROLLX VANS ORANGE
#A1448-ND - FEMALE
CONNECTOR
#A1439-ND - SOCKET
ORIGINAL CHRYSLER
DOOR OPEN SWITCH
(RELOCATED FROM
PAWL TO DOOR)
#A1449-ND - MALE
CONNECTOR
#A1438-ND - PINS
OEM BLACK CONNECTOR
TO OEM CONNECTOR
IN DOOR
Foldout Ramp or 8 Inch ITF
Ramp
Rollx Vans Part #
#07018-001
OEM Snake #
4874 122AE
Foldout Ramp or 8 Inch ITF
Ramp w/ Side Curtain
Airbags (SCA)
Rollx Vans Part #
#07018-002
OEM Snake #
4874 484AD
TO R
DIS
OEM GREY CONNECTOR
(GREEN IF VAN HAS SIDE CURTAIN AIRBAGS)
TO FRONT DASH
#LCP625 - LOOM 5/8
Page 62
BK / RD (16 GA.)
BK / VT (20 GA.)
BK / WT (20 GA.)
#200
#2015
#2016
BK / LB (20 GA.)
BK / BR (20 GA.)
BK / DG (20 GA.)
#2013
#2010
#2011
BK
#1059
(16 GA.)
PaSSenger Door SnaKe - FolDing raMP
TO ROLLX VANS MAIN HARNESS
(DOOR OPEN INPUT)
OR / RD (20 GA.) #3017
#A1448-ND - FEMALE
CONNECTOR
#A1439-ND - SOCKET
ROLLX VANS ADDS 7.7 FEET
OF RED AND BLUE HIGH
FLEX WIRE
DB #PO1546
#A1449-ND - MALE
CONNECTOR
#A1438-ND - PINS
ROLLX VANS EXTENDS ALL 7 OEM WIRES INSIDE
PLASTIC TUBING 7 FEET EXCEPT THE BL / WT
WIRE THAT IS EXTENDED 10 FEET
TO FUSE PANEL
(POWER)
RD (20 GA.) #10616
DOOR CONTROL RELAY
“B” PILLAR
MAIN #5-1393302-8
O ROLLX VANS
HARNESS
(DOOR
DISABLE OUTPUT)
#10223 - RING
CONN BLUE 3/8’
OR / DB (20 GA.) #2033
#2007
#2015
#2016
2013
#2010
2011
#10592
Page 63
BK / WT (20 GA.) #2016
“B” PILLAR
BK / DG (20 GA.) #2011
DB (20 GA.) #PO1546
BK / LB OEM
BK / BR OEM
BK / DG OEM
BK OEM
TO ROLLX VANS MAIN HARNESS
(DOOR CLOSE INPUT)
VT / YL (20 GA.) #2040
BK / RD OEM
BK / VT OEM
BK / WT OEM
ROLLX VANS “T” TAPS INTO
BK / GN WIRE WITH 2 FEET
BK / GN WIRE
rollX vanS PoWer Door SySTeM
Rollx Vans Power Door
COM
10 AMP CIRCUIT BRE
OR
15 AMP GLASS FU
OPEN
ON
BUTT CONNECT
WT (14)
BR (14 GA.)
YL (14 GA.)
DG (14 GA.)
OFF
FUSE
15 A
KNEEL
26 24 25
TN (14 GA.)
RD (10 GA.)
CLOSE
RD (10)
OPEN
NEUTRAL
SAFETY
RAMP
POWER SWITCH
DASH KNEEL
DOWN L.E.D.
RD (14)
FUSE
30 A
COM
DASH USER
SWITCH
#8981K520
DOOR
BR
NC NO
DOWN LIMIT
SWITCH
13 11 12
DG (14)
RMP
DWN
GY (14 GA.)
PK (14)
COM
CP
USER
DB (14 GA.)
85
87
NC NO
WT (14 GA.)
87A
RAMP UP
LIMIT SWITCH
VT (16 GA.)
86
BK (16 GA.)
BK (14)
30
RAMP
OEM VT/DG (14)
FOR DOOR AJAR
BK (14)
BR (14 GA.)
YL (14 GA.)
RD (14)
YL (14)
RD (16 GA.)
RD (14 GA.)
PK #3
BK #8
VT #2
RD #1
TOUCHTRONICS
MODULE
ROLLX VANS
REMOTE
(BEHIND
GLOVE BOX)
VT (14)
CLOSE
NC NO
DOOR LOCK LIMIT SWITCH #6X284 IN
PASSENGER DOOR
(WHEN CLOSED, SENDS POWER TO
HARDWIRED SWITCHES)
KNEEL ON/OFF
SWITCH
#8981K519
GY (16 GA.)
GREY WRAP
BK (14)
WT (14)
30
86
87A
8
87A
87
FIREWALL
30
85
87
8
RD (14 GA.)
BK (14 GA.)
DOOR OPEN
DOOR CL
LOCA
Page 64
rollX vanS PoWer Door SySTeM
or (Motor Bar) Wiring Diagram
T BREAKER
SS FUSE
YL (16 GA.)
TO OEM
DOOR AJAR
NC
VT (14)
NO
MOTOR BAR
DG
TO DASH
L.E.D.
KNEEL UP LIMIT
SWITCH
NC
NO
NC
NO
COM
COM
TN (16 GA.)
DG
YL
KNEEL
DN LIMIT
SWITCH
OR CLOSE
30
86
87A
85
86
87A
87
85
30
WT (16 GA.)
86
87A
87
85
87
85
DG (16 GA.)
87
30
YL (16 GA.)
86
BR (16 GA.)
30
OR (16 GA.)
YL (14 GA.)
87A
85
YL (14 GA.)
BK (14 GA.)
GY (14 GA.)
87
86
PK (14 GA.)
BR (16 GA.)
RAMP DOWN
RAMP UP
KNEEL DOWN
KNEEL UP
RELAYS (#5-1393302-8)
OCATED IN OEM SPARE TIRE KIT COMPARTMENT
Page 65
JONES BLOCK
5
3
1
6
4
2
YL
KNEELER
GY (16 GA.)
YL (16 GA.)
12
11
13
BR
WT
RD (16 GA.)
COM
DG
CH
COM
NC
NO
YL
RD
#310-1059
DOOR OPEN
LIMIT SWITCH
(CHERRY)
#E19-50H
BR
C PILLAR
USER SWITCH
NC NO COM
DG (16 GA.)
DB
DOOR
13 11 12
BR(16 GA.)
occuPanT conTrol MoDule / SeaT SenSor reSiSTorS
Page 66
Driver Seat with Power and Heat
Passenger Seat with Power and Heat
Driver Seat with Memory (Body Side)
Driver Seat with Memory (Seat Side)
Power Seat Configuration #3
Driver Seat with Power and Heat
Passenger Seat with Power and Heat
Power Seat Configuration #2
Driver Seat with Power
Power Seat Configuration #1
(Click on Desired Topic)
Power Seat Connectors and Wiring
PoWer SeaTS - Driver WiTh PoWer only
Page 67
Service Kit #07079-001
(OEM connector not included)
Seat Side Wire Harness
and Connector
Service Kit #07079-002
Body Side Wire Harness
and Connector
CAV
2
9
CAV
2
9
Page 68
1
9
OEM CAV
COLOR
BK / OR
OR / RD
COLOR
BK / OR
OR / RD
TO OEM WIRING
PART #
OEM
OEM
#LCP625
OR / RD (12 GA.)
10
3
6
9
2
5
8
1
4
5
9
2
6
10
3
7
PIN PART #
A25068-ND
A25068-ND
SEAT SIDE CONNECTOR
# A25787-ND
8
FUNCTION
SEAT GRD
SEAT PWR
LOOM 5/8
4
1
TOP
SOCKET PART #
A25069-ND
A25069-ND
BODY SIDE CONNECTOR
# A25785-ND
7
FUNCTION
SEAT GRD
SEAT PWR
LOOM 1/2
LOOM 3/8
CAP, PLASTIC
SHRINK WRAP
EXTENTION (FT.)
0
0
3
EXTENTION (FT.)
4
0
2.6
2
1
0.125
BK / OR (12 GA.)
PART #
#2003
OEM
#10939
#10940
#A16040
#22204
OR / RD (12 GA.)
WIRE EXTENDED AT GROUND POINT ON “A” PILLAR
BK / OR (12 GA.)
TOP
PoWer SeaTS - Driver WiTh PoWer anD heaT
Page 69
Service Kit #07079-003
(OEM connector not included)
Seat Side Wire Harness
and Connector
Service Kit #07079-004
Body Side Wire Harness
and Connector
CAV
2
9
4
7
1
7
4
6
OEM CAV
TO OEM WIRING
CAV
2
9
4
7
COLOR
BK / OR
OR / RD
LG / DG
WT / PK
EXTENTION (FT.)
4
0
0
8.5
2.6
2
1
0.25
PART #
OEM
OEM
OEM
2044
#LCP625
#22204
EXTENTION (FT.)
0
0
0
3
3
0.125
4
9
5
8
1
4
5
9
2
TOP
6
10
3
LOOM 5/8
SHRINK WRAP
7
PIN PART #
A25068-ND
A25068-ND
A1648-ND
A1648-ND
SEAT SIDE CONNECTOR
# A25787-ND
8
1
HEAT PWR (IGN. HOT)
OEM WIRE EXTENDED INSIDE SEAT SIDE PLUG WIRE HARNESS
WT / PK (20 GA.)
LG / DG (22 GA.)
OR / RD (12 GA.)
BK / OR (12 GA.)
PART #
#2003
OEM
OEM
2044
#10939
#10940
#A16040
#22204
10
6
2
TOP
BODY SIDE CONNECTOR
# A25785-ND
FUNCTION
SOCKET PART #
SEAT GRD
A25069-ND
SEAT PWR
A25069-ND
HEAT SWITCH
A1661-ND
HEAT PWR (IGN. HOT)
A1661-ND
LOOM 1/2
LOOM 3/8
CAP, PLASTIC
SHRINK WRAP
7
3
FUNCTION
SEAT GRD
SEAT PWR
HEAT SWITCH
TAP INTO OEM WIRE
AT KICK PLATE
NEAR “A” PILLAR
EXTENDED AT CENTER DASH
WT / PK (20 GA.)
LG / DG (22 GA.)
OR / RD (12 GA.)
BK / OR (12 GA.)
OR / RD (14 GA.)
COLOR
BK / OR
OR / RD
LG / DG
WT / PK
WIRE EXTENDED AT GROUND
POINT ON “A” PILLAR
TO PASSENGER SEAT
(PASSENGER SEAT SHARES
POWER FROM DRIVERS SEAT)
PoWer SeaTS - PaSSenger WiTh PoWer anD heaT
Service Kit #07079-005
(OEM connector not included)
Seat Side Wire Harness
and Connector
Service Kit #07079-006
Body Side Wire Harness
and Connector
TO OEM WIRING
TO DRIVER SEAT
(PASSENGER SEAT SHARES
POWER FROM DRIVERS SEAT)
CAV
2
9
4
7
Page 70
1
8
2
15
OEM CAV
CAV
2
9
4
7
BK / OR (12 GA.)
OR / RD (14 GA.)
PART #
#2003
#2004
#2057
#2044
#10939
#A16040
#22204
EXTENTION (FT.)
7
18
7
7
2.6
1
0.5
OEM WIRE EXTENDED AT CENTER DASH
COLOR
BK / OR
OR / RD
GR / WT
WT / PK
PART #
#2003
#2004
#2057
#2044
#LCP625
#22204
WT / PK (20 GA.)
GR / WT (20 GA.)
EXTENTION (FT.)
3
3
3
3
3
0.5
OEM WIRE EXTENDED INSIDE SEAT SIDE PLUG WIRE HARNESS
COLOR
BK / OR
OR / RD
GR / WT
WT / PK
WT / PK (20 GA.)
GR / WT (20 GA.)
BK / OR (12 GA.)
OR / RD (14 GA.)
10
6
9
2
5
8
1
4
5
9
2
TOP
6
10
3
LOOM 5/8
SHRINK WRAP
HEAT PWR (IGN. HOT)
PIN PART #
A25068-ND
A25068-ND
A1648-ND
A1648-ND
7
SOCKET PART #
A25069-ND
A25069-ND
A1661-ND
A1661-ND
SEAT SIDE CONNECTOR
# A25787-ND
8
FUNCTION
SEAT GRD
SEAT PWR
HEAT SWITCH
4
1
LOOM 1/2
CAP, PLASTIC
SHRINK WRAP
HEAT PWR (IGN. HOT)
FUNCTION
SEAT GRD
SEAT PWR
HEAT SWITCH
BODY SIDE CONNECTOR
# A25785-ND
7
3
TOP
PoWer SeaTS - Driver WiTh MeMory
TO OEM WIRING
Body Side Wire Harness
and Connector
CAV
1
2
3
4
5
6
7
8
9
10
11
12
13
14
(22 GA.)
6
5
1
14 13 12
11 10 9
7
TOP
3 2
8
4
SOCKET PART #
A25069-ND
A25069-ND
A1661-ND
A1661-ND
A1661-ND
A1661-ND
A1661-ND
A1661-ND
A1661-ND
A1661-ND
A1661-ND
A1661-ND
A1661-ND
A1661-ND
BODY SIDE CONNECTOR
# A1362-ND
COLOR PART # EXT. (FT.)
FUNCTION
LG / TN
OEM
0
ADJUSTABLE PEDALS MOTOR REARWARD
LG / DB
OEM
0
ADJUSTABLE PEDALS MOTOR FORWARD
OR / LG
OEM
0
ADJUSTABLE PEDALS MOTOR FORWARD
TN / VT
OEM
0
LEFT MIRROR HORIZONTAL POSITION
TN / YL
OEM
0
RIGHT MIRROR HORIZONTAL POSITION
TN / DB
OEM
0
LEFT MIRROR SENSOR GROUND
TN / DG
OEM
0
LEFT MIRROR UP DRIVER
WT / VT
#2046
10
PCI BUS
OR / BL
OEM
0
ADJUSTABLE PEDALS SWITCH REARWARD
TN / LG
OEM
0
RIGHT MIRROR SENSOR GROUND
VT / WT
OEM
0
ADJUSTABLE PEDAL RETURN SIGNAL
VT / TN
OEM
0
ADJUSTABLE PEDALS SENSOR FEED
VT / BR
OEM
0
ADJUSTABLE PEDALS SENSOR SIGNAL
TN
OEM
0
LEFT MIRROR VERTICAL POSITION SIGNAL
#A16040
1
CAP, PLASTIC
#22204
0.125
SHRINK WRAP
EXTENDED NEAR DRIVERS “A” PILLAR
TN
VT / BR (22 GA.)
VT / TN (22 GA.)
VT / WT (20 GA.)
TN / LG (20 GA.)
OR / BL (16 GA.)
WT / VT (20 GA.)
TN / DG (20 GA.)
TN / DB (22 GA.)
TN / YL (22 GA.)
TN / VT (22 GA.)
OR / LG (18 GA.)
LG / DB (14 GA.)
LG / TN (14 GA.)
PoWer SeaTS - Driver WiTh MeMory
Page 71
MainTenance inForMaTion
Doors
Door track - Periodically make sure lower door track is free of debris and vacuum track out. Make
certain to clear out any water and ice that may be present.
Rollx Vans power door (If equipped) - Every 6 months lube the gear rack (bar) with a high quality
white lithium grease. Make sure to clean off any old grease first.
Kneel System
Kneel chain - Every 6 months spray the chain inside the rubber boot with a high quality oil to lubricate
and protect.
Ramps
Folding ramp - Every 6 months spray the ramp’s lower and upper hinge with high quality silicon lubricant.
In The Floor ramp - Every 6 months spray the ramp access cover’s flap hinge with a high quality silicon lubricant.
Page 72
WarranTy
New Rollx Vans Van Warranty Coverage Information
Rollx Vans provids a limited warranty on its minivan against defects in material or workmanship for
a period of 3 years or 36,000 miles, whichever comes first. For warranty specifics please refer to an
Owner’s Manual or contact Rollx Vans customer service.
For all warranty or reimbursement needs, you must have prior authorization by the Rollx Vans Service
Department.
1.
Call 1-800-956-6668, and a Rollx Vans Customer Service Representative will assist you
in any concerns or issues you have with your van.
2.
The service representative will evaluate what repair is needed, and either set up
an appointment with an “At Home” service technician or direct you to a nearby service facility.
An authorization number must be issued.
Rollx Vans will work with many repair facilities. Rollx Vans reserves the right to approve a repair shop
or recommend an alternative.
Rollx Vans may request that defective parts be returned to our customer service department for inspection. If defective parts are found to be defective because of abuse or neglect, reimbursement for
the new replacement parts may be denied. Rollx Vans reserves the right to use rebuilt components.
Rollx Vans will ship all warranted replacement parts by nationwide carrier. In most cases, shipment
will be by ground transport and absorbed by Rollx Vans. Any other mode of transportation will be at
the expense of the customer.
Our Mission
To improve the quality of life of people with disabilities of all income levels by delivering the best modified vehicle.
We intend to keep that customer for life by following up with a level of service that exceeds all of their
expectations.
Our Values
Quality • Compassion • Honesty • Integrity • Fairness
Page 73