1
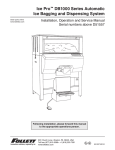
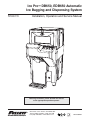
Ice Pro™ DB650, EDB650 Automatic
Ice Bagging and Dispensing System
Order parts online
www.follettice.com
Installation, Operation and Service Manual
Following installation, please forward this manual
to the appropriate operations person.
801 Church Lane • Easton, PA 18040, USA
Toll free (800) 523-9361 • (610) 252-7301
Fax (610) 250-0696 • www.follettice.com
220V 60Hz
models only
230V 50Hz
models only
00913509R02
Contents
Welcome to Follett. . . . . . . . . . . . . . . . . . . . . 3 Replacement parts & accessories . . . . . . 19
Before you begin. . . . . . . . . . . . . . . . . . . . . . . . . . . . 3
Accessories . . . . . . . . . . . . . . . . . . . . . . . . . . . . . .
Upper chassis. . . . . . . . . . . . . . . . . . . . . . . . . . . . .
Lower chassis. . . . . . . . . . . . . . . . . . . . . . . . . . . . .
Lower chassis (cont.). . . . . . . . . . . . . . . . . . . . . . .
Dispense auger . . . . . . . . . . . . . . . . . . . . . . . . . . .
Electrical system, upper box. . . . . . . . . . . . . . . . . .
Electrical system, lower box. . . . . . . . . . . . . . . . . .
Specifications . . . . . . . . . . . . . . . . . . . . . . . . 4
Electrical . . . . . . . . . . . . . . . . . . . . . . . . . . . . . . . . .
Plumbing. . . . . . . . . . . . . . . . . . . . . . . . . . . . . . . . . .
Clearance and access information. . . . . . . . . . . . . .
Ice type . . . . . . . . . . . . . . . . . . . . . . . . . . . . . . . . . .
Icemaker weight limit . . . . . . . . . . . . . . . . . . . . . . . .
Environment . . . . . . . . . . . . . . . . . . . . . . . . . . . . . . .
Container sizes. . . . . . . . . . . . . . . . . . . . . . . . . . . . .
Bag pins. . . . . . . . . . . . . . . . . . . . . . . . . . . . . . . . . .
Dimensions and clearances. . . . . . . . . . . . . . . . . . .
4
4
4
4
4
4
4
4
5
Installation. . . . . . . . . . . . . . . . . . . . . . . . . . . 6
Location . . . . . . . . . . . . . . . . . . . . . . . . . . . . . . . . . . 6
Leveling. . . . . . . . . . . . . . . . . . . . . . . . . . . . . . . . . . . 6
Utility connections. . . . . . . . . . . . . . . . . . . . . . . . . . . 6
Bag pin installation. . . . . . . . . . . . . . . . . . . . . . . . . . 7
Foot pedal accessory. . . . . . . . . . . . . . . . . . . . . . . . 7
Bag installation. . . . . . . . . . . . . . . . . . . . . . . . . . . . . 7
Adjusting drain pan. . . . . . . . . . . . . . . . . . . . . . . . . . 9
Brush bracket. . . . . . . . . . . . . . . . . . . . . . . . . . . . . . 9
Sanitize. . . . . . . . . . . . . . . . . . . . . . . . . . . . . . . . . . . 9
Icemaker. . . . . . . . . . . . . . . . . . . . . . . . . . . . . . . . . . 9
Filling other containers. . . . . . . . . . . . . . . . . . . . . . 10
Operation. . . . . . . . . . . . . . . . . . . . . . . . . . . . 11
How the dispenser works. . . . . . . . . . . . . . . . . . . . 11
Control functions. . . . . . . . . . . . . . . . . . . . . . . . . . . 12
Power switch. . . . . . . . . . . . . . . . . . . . . . . . . . . . . . 12
Cleaning and sanitizing . . . . . . . . . . . . . . . . . . . . . 13
DB650 wiring diagram, upper control box . . . . . . . 14
DB650 wiring diagram, lower control box. . . . . . . . 15
EDB650 wiring diagram, upper control box. . . . . . 16
EDB650 wiring diagram, lower control box . . . . . . 17
Before calling for service . . . . . . . . . . . . . . . . . . . . 18
Follett Corporation
Equipment Return Policy
Follett equipment may be returned for credit under the following conditions:
1. The equipment is new and unused.
2. A return authorization number has been issued by customer service within 30 days after shipment.
3. Follett receives the equipment at the factory in Easton, PA within 30 days after issuance of the return authorization number.
4. The equipment must be returned in Follett packaging. If the packaging has been damaged or discarded, Follett will forward, at the customer’s
expense, new packaging.
Note:
Return freight charges are the responsibility of the customer. If equipment is returned and is damaged because of improper packaging,
Follett Corporation will not be held responsible.
Credit will be issued when:
The equipment has been inspected by Follett and deemed suitable to be returned to stock.
Note:
A 15% restocking charge will be deducted from the credit. If the cost to return the product to stock exceeds 15%, the actual cost will be
deducted.
2
19
20
21
22
23
24
25
Welcome to Follett
Follett ice dispensers enjoy a well-deserved reputation for excellent performance, long-term reliability and
outstanding after-the-sale support. To ensure that this dispenser performs as intended, we ask that you take
a moment to review this manual before beginning the installation of the dispenser. Should you have any
questions or require technical help at any point, please call our technical service group, (800) 523-9361 or
(610) 252-7301.
Before you begin
After uncrating and removing all packing material, inspect the equipment for concealed shipping damage. If
damage is found, notify the shipper i mmediately and contact Follett Corporation so that we can help in the
filing of a claim, if necessary.
Check your paperwork to determine which model you have. Follett model numbers are designed to provide
information about the type and capacity of Follett ice dispensing equipment. Following is an explanation of the
different model numbers in the Ice Pro series.
DB650SA
SA = Semi-Automatic ice dispensing and bagging
650 – 650 lbs maximum bin capacity
DB – Dispensing bin - 220/60 Hz
EDB – Dispensing bin - 230/50 Hz
!
Important cautions
Storage area of dispenser contains mechanical, moving parts. Keep hands and arms clear of
this area at all times. If access to this area is required, power to unit must be disconnected first.
Ice is slippery. Maintain counters and floors around dispenser in a clean and ice-free condition.
Ice is food. Follow recommended cleaning instructions to maintain cleanliness of delivered ice.
Should local codes require a hard-wired connection and/or shielded wiring, eliminate the cord(s)
and plug(s) and follow the appropriate wiring diagram.
Dispenser can accommodate most cube or cubelet ice up to 1" square. Crushed, flake, or nugget
ice cannot be used. Use of these ice types can jam dispenser and will void warranty. For
questions about ice compatibility, call Follett’s customer service group toll free at (800) 523-9361
or (610) 252-7301.
Always disconnect power before cleaning or servicing the dispenser.
This appliance is not intended for use by persons (including children) with reduced physical,
sensory or mental capabilities, or lack of experience and knowledge, unless they are supervised
or provided instruction concerning use of the appliance by a person responsible for their safety.
Children should be supervised to ensure that they do not play with the appliance.
3
Specifications
Electrical
DB650 – The Ice Pro DB650 dispenser requires a separate electrical circuit from the icemaker. Equipment
ground required. Standard electrical - 220V, 60Hz, 1 phase, maximum fuse – 5 amps, 15 amp circuit, NEMA
6-15 receptacle. The cord length is approximately 7' from right rear. A plug is provided.
EDB650 – The Ice Pro DB650 dispenser requires a separate electrical circuit from the icemaker.
Equipment ground required. Standard electrical - 230V, 50Hz, 1 phase, maximum fuse – 5 amps, 15 amp circuit,
max power - 3450 watts. The cord length is approximately 7' from right rear. A plug is not provided.
Plumbing
Drain1" PVC FPT for bin drain – run to floor drain.
Note: Drains should be hard-piped and insulated. Maintain at least 1/4" per foot (1 cm per 48 cm run) slope on drain line run. Do not tee into icemaker drain line.
Clearance and access information
Door entry – Installation sites must have an unobstructed path to installation location with door openings no
less than 34.5" (877 mm).
Service clearance – A minimum of 12" (305 mm) to right of unit is necessary for service.
Ice type Dispenser can accommodate most cube/cubelet ice up to 1" square as well as Follett Horizon™ Chewblet ice.
Crushed, flake, or other manufacturers nugget ice cannot be used. Use of these ice can jam dispenser and will
void warranty. For questions about ice compatibility, call Follett’s technical service group toll free at
(800) 523-9361 or (610) 252-7301.
®
Icemaker weight limit Icemaker mounted directly on top of bin must not exceed 800 lbs (363 kg).
Environment Intended for indoor use only - operating temperature range of 40 - 100 F (4 – 38 C). Not suitable for installation
in an area where a water jet could be used. (The dispenser should not be cleaned with a water jet or be
exposed to water jet used to clean surrounding areas) The dispenser has to be placed in a horizontal position.
The dispenser is only to be installed in locations where it can be overseen by trained personnel.
Container sizes Unit acco mmodates bag sizes up to 20 lbs (9 kg) / 27.35" (695 mm) high.
Dispense chute compatible with carts and containers up to 28" (712 mm) high.
Bag pins Bag pins may be adjusted to accommodate bag hole centers from 5" (127 mm) to 10" (254 mm).
4
Dimensions and clearances
Side view
Front view
33.75" (858 mm)
48.25" (1226 mm)
30.75" (782 mm)
29.75" (756 mm)
12" (305 mm)
Service
Clearance
65"
(1651 mm)
28"
26"
(712 mm) (661 mm)
max. cart max. bag
19.88"
(505 mm)
8.63"
(220 mm)
34.25" (870 mm)
1" FPT drain
1" FPT drain
Notes
Follett Horizon icemakers and other icemakers less than 30" wide require a top that adds 2" to standard
unit height.
5
Installation
Fig. 1
Bottom view
Location
A minimum of 12" (305 mm) to the right of the unit must be available
for service clearance (see dimensions and clearances - page 5).
Allow access to front of unit for bagging operation and dispensing.
Leveling
Leveling the unit is important for the proper operation of any
top mounted icemaker. The dispenser is shipped with the legs in the
fully retracted position. Each leg may be adjusted independently by
turning clockwise to lower the leg or counterclockwise to raise the
leg. Do not remove legs; interference will occur with the bag stand
and dispense chute.
Utility connections
Bin drain
Drain connection is made to the 1" FPT PVC fitting (Fig. 1). Leave a
minimum of 1/4" per foot (1 cm per 46 cm run) slope on drain line run.
Insulate the entire run length to prevent condensation from forming on
outside of drain line.
Note: Avoid excessive tightening force when connecting to this fitting.
Note: Do not apply excessive heat if any sweating of fittings is
necessary. Heat conduction through metal may melt threads in
plastic drain.
Drain pan
The drain pan on the bag stand may be drilled out and plumbed
if desired. Use an 11/16" drill bit, a 3/4" FPT elbow and PVC glue.
Plumb with flexible tubing to allow for height adjustment.
Electrical
Electrical connections to be in accordance with local and NEC
codes. Each dispenser and icemaker require separate circuits.
Equipment ground required.
Note: If the supply cord is damaged, it must be replaced by the
manufacturer, its service agent or similarly qualified persons in order to
avoid a safety hazard.
DB650
220V, 60Hz, 1 phase. Max. fuse – 5 amps, 15 amp circuit.
Provide NEMA 6-15 receptacle within 7' of right rear corner. Cord
and plug provided.
EDB650
230V, 50Hz, 1 phase. Max. fuse – 5 amps, 15 amp circuit, max
power - 3450 watts. Provide means of connection within 7' of right
rear corner. Cord provided without plug.
6
8.25"
(210 mm)
13.5"
(343 mm)
drain
Bag pin installation
Fig. 2
1. Position plastic bag pin nuts onto the rear slots of the bag stand
(Fig. 2).
2. Thread in and tighten bag pins.
Foot pedal accessory
Fig. 3
Bag installation
Fig. 4
The optional foot pedal accessory allows dispensing of ice while
keeping your hands free. The pedal is placed on floor near bag
stand in front of the dispenser. It plugs into the 3-pin connector
located just under the control panel behind the blower motor
(Fig. 3).
Note: Bag pins are designed to be used with bags mounted on wire
wickets. Do not install more than one wicket of bags at a time.
1. Move chute lever to up position (Fig. 4).
7
2. Adjust bag pin width to match that of the bag wicket
(Fig. 5). Center bag pins evenly.
Fig. 5
3. Remove rubber keepers from wicket and insert wicket wires
into bag pins. Transfer bags from wicket to bag pins. Slide 15
to 20 bags onto pins at a time until pins are full (Fig. 6).
Fig. 6
4. Return chute lever to down position (Fig. 7). The
back of the chute holds bags to prevent more
than one opening at a time.
Fig. 7
8
Adjusting drain pan
Fig. 8
The drain pan may be raised or lowered to accommodate different
bag sizes and helps to support the bag while filling (Fig. 8). The
bottom of bags should rest on the tray when adjustment is correct.
1. Lift drain pan up and out of receiving slot on bag
stand base.
2. Insert drain pan in and down into desired receiving
slot on bag stand.
3. Marking the drain pan position makes future positioning easier.
Brush bracket
Mount the cleaning brush bracket to the top front left or right side
of the bin in one of the threaded inserts and hang cleaning brush
(Fig. 9).
Fig. 9
Sanitize
Follow cleaning and sanitizing instructions before use - see
page 13.
Icemaker
Fig. 10
Follow icemaker manufacturer’s recommendations for installation.
Note: Icemaker mounted on top may not exceed 800 lbs (363 kg).
Ensure that the drop zone of the ice does not fall onto the upper
right hand section of the bin (See shaded area in Fig. 10). Ice
falling from ice machine can hit this area of the bin and cause
damage to the icemaker.
9
5.0"
(127 mm)
4.5"
(114 mm)
6.0"
(152 mm)
Filling other containers
Fig. 11
1. Ensure blower is off.
2. Move chute lever to up position (Fig. 11).
3. Adjust drain pan as needed.
4. Containers up to 28.75" (731 mm) tall may be
used by removing drip tray (Fig. 12).
Fig. 12
10
Operation
How the dispenser works
Follett’s Ice Pro bagging and dispensing system can operate in manual or semi-automatic ice dispensing and
bagging configurations. The Ice Pro dispenser features a blower to open bags for high volume, hands-free
dispensing, bag holder pins for use with wicketed bags, and a programmable dispense timer.
Ice is stored in the bin above the dispense auger. The upper and lower agitators break fused ice and direct it
into the auger for dispensing. When the timed or manual button is pressed, the dispense motor is activated.
This causes the auger assembly in the storage area to move ice to the dispense chute where it drops by
gravity into a bag or other container.
Window interlock switch
Prevents agitation and
dispensing when open
Window locks
Prevents unintended
access to ice
storage area
Agitators
Upper and lower
agitators driven
by independent
gearmotors
Dispense auger
Easily removable
for cleaning
Control panel
See detailed
description on
next page
Blower motor
Opens bags for
automatic dispensing
Bag stand assembly
Drain pan may be removed to
empty water or to adjust for
bag height. Pan should support
bottom of bag. Bag stand
assembly may be removed to
fill other container types.
Power switch
System ON/OFF
11
Control functions
1. Open bag
Press to turn on blower. Automatically blows open one bag at a time
Press again to turn
blower off. Blower
automatically turns
off after 10 minutes.
1. Open bag
2. Adjust time
Press +/– to change
timed dispense duration
in seconds - maximum
time: 30 seconds
2. Adjust time
+
-
3. Dispense ice
Press Timed once to
dispense automatically.
Hold Manual to top off
bag or fill other containers
3. Dispense ice
Timed
Manual
STOP
Ice Pro
™
dispensing bin
Stop
Press to stop timed
dispense
Power switch
Note: Do not turn power OFF during normal operation. Turning power OFF disables periodic agitation
cycle which may lead to fused ice and damage to dispenser that may void warranty.
12
Cleaning and sanitizing
Note: Do not clean with water jet.
Exterior care
A mild detergent cleaner may be used to clean the exterior plastic
sides of the bin. Stainless steel portions of the bin can be cleaned
with a stainless cleaner such as 3M Stainless Steel Cleaner &
Polish or equivalent.
Fig. 13
13.2
Interior care
The interior should be cleaned and sanitized every six months,
or more often as conditions dictate, with the solutions A and B
shown below.
13.3
Solution A – Cleaning solution:
Combine 1 oz (30ml) bleach with 2 gal (7.6L) hot water
or use Ecolab *Mikro-chlor sanitizer and mix for 200 ppm
available chlorine.
Solution B – Sanitizing solution:
Combine 1/4 oz (7ml) bleach with 2 gal (8L) hot water or
use Ecolab Mikro-chlor sanitizer and mix for 50 ppm available
chlorine.
Cleaning brush
A long-handled cleaning brush should be used to access the
bottom of the Ice Pro bin.
Cleaning and sanitizing procedure
1. Remove all ice from bin
13.1
Fig. 14
14.1
14.2
2. Disconnect power from icemaker and dispenser (Fig. 13.1).
3. Remove ice storage window (Fig. 13.2).
4. Remove front cover by loosening side thumb screws and lifting
off of top guide pins (Fig. 13.3).
14.3
5. Detach gearmotor's two latches and set motor and attached
auger coupling aside. (Fig. 14.1).
6. Remove blower duct by loosening thumb screw rotating clip
and lifting up (Fig. 14.2).
7. Remove ice chute assembly (Fig. 14.3).
Fig. 15
8. Pull out auger (Fig. 15.1).
9. Remove auger tube by unscrewing thumb screw on left side, lift
up on retaining clamp and pull tube out of bin. Note position of
locating slot on upper end for reinstallation (Fig. 15.2).
10. Remove drip tray from bag stand (Fig. 15.3).
15.1
11. Clean all components, inner bin storage surfaces and dispense
chute surfaces with a brush and cleaning solution A. Rinse
thoroughly with clean water.
12. Sanitize all components and bin storage surfaces with solution
B - do not rinse.
Drain line care
After cleaning and sanitizing procedure, and before refilling bin with
ice, pour a solution of one cup (8oz / 237ml) bleach mixed with one
gallon (3.8L) hot water into drain to help prevent algae growth in the
drain lines.
13
*Mikro-chlor is a registered trademark of ECOLAB in the United States and other countries.
15.3
15.2
DB650 wiring diagram, upper control box (220V, 60Hz)
14
DB650 wiring diagram, lower control box (220V, 60Hz)
Note: Both upper and lower agitator motors turn counter clockwise.
Drive rotation
00938738R00
15
EDB650 wiring diagram, upper control box (230V, 50Hz)
OPERATOR CONTROL PANEL
PB5
TIMED MODE
INCREASE
PB6
BAG OPEN
START/STOP
PB3 - TIMED MODE
START/STOP
LED TIME DISPLAY
LED1
BLOWER MOTOR
ON INDICATOR
PB1
MANUAL
START/STOP
PB4
TIMED MODE
DECREASE
14 12
52 09 05 06
J30
J10
J29
J9
J8
J13
J12
UPPER N/C N/C COM AUGER
AGIT
MOTOR
LOWER
AGIT
J15
J14
13 15
J31
J11
PB2 - TIMED MODE
STOP
BLOWER
MOTOR
RS485 J17
1
14
12
52
09
05
06
220VAC
UPPER N/C N/C COM AUGER BLOWER
AGIT
MOTOR MOTOR
LOWER
AGIT
PROG
PORT
J20
J2 17
J1 16
J7
J30
J10
J29
J9
J8
J13
J12
J15
J14
FOOT
SWITCH
J31 13
J11 15
J6 04
J5 03
MOTOR
OVERLOAD (4AMP)
OPERATOR CONTROL ENCLOSURE
LWR UPR N/A
J3
WINDOW J4
SWITCH
WINDOW
SW
AUGER BLOWER
J21
GROUND
01
02
POWER
M3
M4
BLOWER
MOTOR
16
FOOT SWITCH
(OPTIONAL)
WINDOW
SWITCH
18
16
17
02
01
BLK
BLK
WHT
1 2
BLK
04
03
07
1 2 3
GRN
BLK
AUGER
MOTOR
WHT
1 2 3 4
GRN
(X) BLU
(V) RED
(U) BLK
06
05
10
08
09
WHT
21 BLK
19 BLK
22 RED
1 2 3 4 5
BLK
13
15
14
52
12
1 2 3 4 5 6
20 RED
08
11
EDB650 wiring diagram, lower control box (230V, 50Hz)
LOWER CONTROL ENCLOSURE
18
20
22
21
19
21
19
BLK
L2 T2 T8
M1
51
16 F6
5A
Note: Both upper and lower agitator motors turn counter clockwise.
00938738R00
17
UPPER AGITATOR
MOTOR
L3 T3 T9
L2 T2 T8
L1 T1 T7
M2
36
35
38
34
60
61
LINE
FILTER
GRN
GRN
GRN
WHT
BLK
RED
L1 T1 T7
Drive rotation
10A
39
1
4
2
5
FERRITE
RINGS
G
L1
BLU
L3 T3 T9
1
2 3 4
T4 T5 T6
RED
LOWER AGITATOR
MOTOR
T4 T5 T6
GRN
WHT
28 F5
MAIN
POWER
BLK-1
BLK-2
BLK-3
GRN
BLK-1
BLK-2
BLK-3
1
2 3 4
10A
C2 A2
L1 L2
55
50
30 F4
GRN
54
5A
59
W
58
V
17 F3
40
BLU
LINE
REACTOR
U
10A
BRN
LINE
REACTOR
C2 A2
L1 L2
29 F2
29
28
C1 A1
57
W
C1 A1
56
V
31
F SR
30
F SR
U
10A
BRN
UPPER AGITATOR
MOTOR CONTROL
20
22
LOWER AGITATOR
MOTOR CONTROL
31 F1
L2
1PH 230VAC / 50HZ
Before calling for service
1. Check that ice is in the dispenser and that fused cubes are not causing a jam.
2. Check that circuit breaker and switches are in ON position. Display will show time setting.
3. Check that window is on securely. If window is ajar, dispenser will not operate. Display shows three
dashes when window is ajar.
4. Check that the drain is clear.
Troubleshooting guide
Symptom
Ice does not dispense
Possible cause
Solution
1. No ice in bin.
1. Check operation of icemaker.
2. Dispense switch not
closing.
2A. Press manual dispense to check operation.
3. Auger motor not operating.
3A.Check for power to motor.
2B.Check LED's on board.
3B.Check LED's on board.
3C.Check fuses for 220 V. (EDB 230V)
3D.Check auger motor cable connection.
3E.Check auger motor connection to board.
3F. Check circuit breaker.
4. Agitator motors not
operating.
4A.Check for power at fuse block.
4B.Press manual dispense. Display on VFD (Variable
frequency drive – agitator motor controller) should
show numbers. Check for loose connections.
4C.Check for output from corresponding VFD.
5. Auger motor & agitator
motors not operating.
5A.Check that window is in place. Display shows three
dashes when window is removed.
5B.Check interlock wires and connection.
Bags tear off pins
during filling
More than one bag
opens when blower is on
Bags won’t open
6. Optional foot pedal
not operating.
6. Check for contact closure of switch inside foot pedal
enclosure.
1. Drip tray not adjusted
properly.
1. Adjust drip tray to one notch above where bottom of
bag contacts platform.
2. Poor quality bags.
2. Try bags from another supplier.
1. Stainless steel chute is not
resting against bags.
1. Move chute lever to down position to position
stainless steel chute against bags.
2. Bag pins not centered.
2. Adjust bag pins so bags are centered under chute.
1. Blower switch not on.
1. Press OPEN BAG. Blower turns off after 10 minutes
without use.
2. Blower duct missing or out
of position.
2. Reinstall/re-position blower duct.
3. No power to blower motor.
3A.Verify output LED lights on board.
3B.Check for loose connections.
4. Bag pins not centered.
4. Adjust bag pins so bags are centered under chute.
5. Wet bags.
5. Install new wicket of bags.
If problems persist after following this basic troubleshooting guide, call Follett’s technical
service department at (800) 523-9361 or (610) 252-7301.
18
Replacement parts & accessories
Accessories
1
2
3
4
5
6
7
8
Reference #
Description
Part #
1
8 lb Bags, (case of 1000)
00116434
1
20 lb Bags, (case of 500)
00138370
2
Bostitch P-7 C-Ring Plier
00137711
Not Shown
Aluminum Blunt End C Rings (box of 2500)
00137729
3
Foot Pedal Control Accessory
00115055
4
Follett Totes™ Ice Carrier
206950
5
Follett SmartCart™ 75 ice cart
00112771
6
Follett SmartCart™ 125 ice cart
LSC125
7
Follett SmartCart 240™ ice cart
00122770
8
Ice Bin Paddle
PB502871
Not Shown
Cleaning Brush, DB650 (with bracket)
00924555
19
Upper chassis
12
11
13
10
2
16
1
8
3
15
14
17
18
4
7
5
6
9
Reference #
Description
Part #
1
Cover, Upper Motor (with handle)
00924100
2
Guard, Drip Assy
00924118
3
Box, Upper Agitator Motor (with plates)
00924126
4
Catch, Upper Housing (one)
00924134
5
Brush Bracket
00924142
6
Motor, Upper Agitator (with cable)
00924209
7
Shaft, Upper Drive (with key)
00924217
8
Key, Upper Drive Shaft
00924225
9
Bolt, Upper Drive Shaft (with washer)
00924233
10
Agitator, Upper (with thrust washer)
00924308
11
Seal, Shaft, Upper Right Assy
00924316
12
Seal, Shaft, Upper Left Assy
00924324
13
Bearing, Upper Left (includes thrust washer)
00924332
14
Door, Bin Access (with latch and magnet)
00924506
15
Latch, Door Lock Assy
00924514
16
Plate, Door Strike (with hardware)
00924522
17
Sensor, Door Assy
00924530
18
Magnet, Door
00924548
20
Lower chassis
11
1
12
2
7
9
10
3
4
6
8
5
Reference #
Description
Part #
1
Knobs, Front Cover (two)
00925008
2
Clip, Blower Duct (with knurled nut)
00925016
3
Drain, Bin Assy
00925057
4
Frame, Bag Stand (with bag pins and handles)
00925115
5
Cover, Lower Control Box
00925156
6
Cover, Lower Cable
00925164
7
Blower Motor (with cable)
00925248
8
Drain Pan
00925503
9
Bag Pin Set
00925511
10
Handles (two)
00925529
11
Blower Duct
00925545
12
Front Cover
00925552
21
Lower chassis (cont.)
24
22
26
23
13
15
25
16
20
19
21
14
17
18
Reference #
Description
Part #
13
Cover, Lower Motor (with handle)
00925107
14
Box, Lower Agitator Motor (with plates)
00925123
15
Latch, Draw (one)
00925131
16
Plate, Guide (one)
00925149
17
Leg, Adjustable (one)
00925172
18
Motor, Lower Agitator (with cable)
00925206
19
Shaft, Lower Drive (with key)
00925214
20
Key, Lower Drive Shaft
00925222
21
Bolt, Lower Drive Shaft (with washer)
00925230
22
Agitator, Lower (with thrust washer)
00925305
23
Seal, Shaft, Lower Right Assy
00925313
24
Seal, Shaft, Lower Left Assy
00925321
25
Bearing, Lower Left (includes thrust washer)
00925339
26
Seal, Auger Tube Assy
00925537
22
Dispense auger
4
6
1
9
10
7
13
8
1
3
14
2
11
5
12
Reference #
Description
Part #
1
Clamp, Auger Tube Assy (with knob)
00925024
2
Pivot, Rear Chute Assy
00925032
3
Pivot, Front Chute Assy
00925040
4
Knob, Auger Clamp
00925065
5
Chute, Rear Stainless
00925180
6
Motor, Auger (with cable)
00925255
7
Coupling, Auger Drive Assy
00925263
8
Auger, DB650
00925347
9
Mount, Auger Motor (with bolts)
00925354
10
Frame, Auger Tube (with latches)
00925362
11
Frame, Dispense
00925370
12
Chute, Front Clear
00925560
13
Tube, Auger Assy
00925578
14
Cradle, Auger Tube
00925586
23
Electrical system, upper box
DB650 and EDB650
1
2
3
DB650 only
4
5
6
7
8
Reference #
Description
Part #
1
Control Panel (mounted on cover)
00924621
2
Circuit Board
00924639
3
Circuit Breaker
00924647
4
VFD Motor Controller, Lower Agitator, DB650
00925602
5
VFD Motor Controller, Upper Agitator, DB650
00924605
6
Fuse Block
00925610
7
Fuse, Kit (4 10-amp, 2 5-amp)
00925628
8
Switch, Rocker
00925636
Not shown
Wiring Harness, Agitator Motor
00924613
24
Electrical system, lower box
(EDB650 only)
1
1
2
3
4
5
6
6
Reference #
Description
Part #
1
VFD Motor Controller, Upper and Lower Agitator, EDB650
00925651
2
Fuse Block
00925610
3
Fuse, Kit (4 10-amp, 2 5-amp)
00925628
4
Filter, Line
00925677
5
Switch, Rocker
00925636
6
Reactor, Line
00925685
Not shown
Wiring Harness, Agitator Motor
00924613
25
26
27
SmartCART and Totes are trademarks of Follett Corporation.
Chewblet is a registered trademark of Follett Corporation, registered in the US.
Follett reserves the right to change specifications at any time without obligation. Certifications may vary depending on country of origin.
801 Church Lane • Easton, PA 18040, USA
Toll free (800) 523-936128
• (610) 252-7301
Fax (610) 250-0696 • www.follettice.com
220V 60Hz
models only
230V 50Hz
models only
00913509R02
10/10