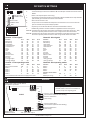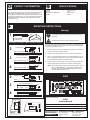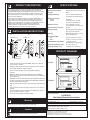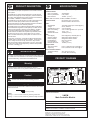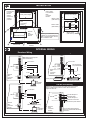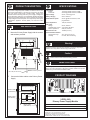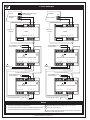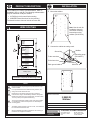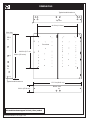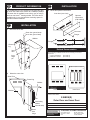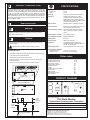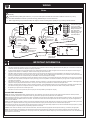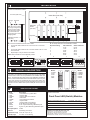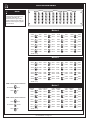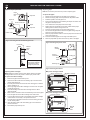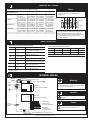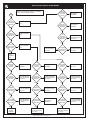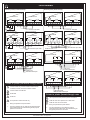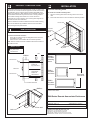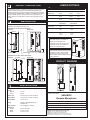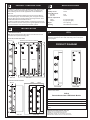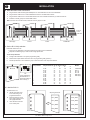
1
EST2 Installation Sheets P/N 3100056 • Rev 1.0 • 30NOV00 DEVELOPED BY Edwards Systems Technology 6411 Parkland Drive Sarasota, FL 34243 (941) 739-4300 COPYRIGHT NOTICE Copyright © 2000 Edwards Systems Technology, Inc. This manual is copyrighted by Edwards Systems Technology, Inc. (EST). You may not reproduce, translate, transcribe, or transmit any part of this manual without express, written permission from EST. CREDITS This manual was designed and written by the EST Technical Services - Documentation Department, Sarasota. DOCUMENT HISTORY Date Revision Reason for change 30NOV00 1.0 Initial release Content Installation sheet title P/N 2-3ANN/D and 2-6ANN/D Remote Annunciator Cabinet Doors 387478 2-AAC Audio Control Module 387345 2-CMDN/SMDN(-C) Remote Alphanumeric Display Annunciator 270649 2-CPU Central Processor Unit 387469 2-DFK(R) Semi-flush Trim Kit 387569 2-DLM Data Line Monitor 387471 2-ISO Isolator Module 270498 2-LCD Liquid Crystal Display 270212 2-LCX Expander Loop Module 270213 2-LFK Semi-flush Trim Kit 387570 2-LSRA(-C) Life Safety Remote Annunciator 387414 2-MCM Main Controller Module 270210 2-MCMN Network Main Controller Module 387472 2-MIC Microphone Module 387562 2-PPS(-220) Primary Power Supply 270211 2-PPS/6A(-220) Primary Power Supply 387222 2-SANCOM Remote Network Control Module 387186 2-SMK Smoke Power Converter Module 387199 2-TEL Firefighter Telephone Module 387344 2-WB(R) Semi-flush Mount Wallbox 387565 2-WB3(R) Long Wallbox 387567 2-WB3D(R) Outer Door and Inner Door, 2-WB3DF Dead Front Door 387339 2-WB7(R) Double-wide Wallbox 387568 2-WB7D(R) Outer Door and Inner Door, 2-WB7DF Dead Front Door 387340 2-WBD(R) Outer Door and Inner Door 270209 2-WBDS(R) Outer Door and Inner Door 387218 2-WBS(R) Surface Mount Wallbox 387566 6ANN/B(-S) and 10ANN/B(-S) Remote Annunciator Cabinet Wallboxes 387586 CDR-3 Bell Coder 3100023 CMDN, SMDN, 2-CMDN(-C), 2-SMDN(-C) Enclosure Installation 270650 EST2 Component Installation Sheets i Contents Installation sheet title P/N DL2 Dialer 387132 Front Panel LED/Switch Modules 270214 IOP3A Isolator 232 card 270758 ISP-96-2/ISP-96-3 Annunciator/Switch Panel 3100029 LSRA-232 Printer/Programming Port LSRA-PROG Programming Port 387361 RACCDR Remote Equipment Cabinet Door 387341 RACCR Remote Equipment Cabinet 387578 RSAN-PRT Strip Printer 61000-0011 SAN Series Remote Annunciator Enclosures 3100046 SAN-CPU Annunciator Controller 387200 SAN-MICII Microphone 3100028 SDR-32 Remote Annunciator Display Module 387208 SHO-4 Remote Annunciator Lamp and Switch Module 387205 SIGA-AA30/SIGA-AA50 Audio Amplifiers 387343 SIGA-APS(-220) Auxiliary Power Supply 387342 SIN-16 Remote Annunciator Input Receiver Module 387206 SLU-16R/Y Remote Annunciator Lamp Module 387203 SRU-8 Remote Annunciator Relay Module 387207 SWU-8(/3) Remote Annunciator Lamp and Switch Module 387204 ii EST2 Component Installation Sheets Contents Introduction About this manual This manual contains copies of the EST2 installation sheets. The sheets are arranged in alphabetical order by title. The part number listed in Content is the installation sheet part number. The EST2 library A library of related documents supports the EST2 product line. Here is a complete list of the EST2 library: • • • • • • • EST2 Installation and Service Manual (P/N 270186) EST2 Network Site Manual (P/N 270895) EST2 Network Supplement Manual (P/N 270894) EST2 System Operations Manual (P/N 270188) EST2 System Programming Manual (P/N 270187) EST2 Installation Sheets (P/N 3100056) 2-SDU Help (P/N180902) Our technical writers constantly update the information in this manual. Your comments during our training classes, technical support phone calls, and field trips improve this document. Related documents The Signature Series Intelligent Smoke and Heat Detectors Applications Bulletin (P/N 270145) provides instructions and illustrations for various arrays of smoke and heat detectors. The Signature Series Component Installation Manual (P/N 270497) supports the installation of the Signature Series detectors and modules. The Serial Number Log Book (P/N 270267) provides a convenient means for recording the serial number of each Signature device installed in the fire alarm system. The SAN Annunciator Installation Guide (P/N 250084) supports the SAN annunciators mentioned in this manual. The EST Speaker Application Guide (P/N 85000-0033) provides information about the placement and layout of speakers for fire alarm signaling and emergency voice communications. The EST Strobe Applications Guide (P/N 85000-0049) provides information for the placement and layout of strobes for fire alarm signaling. The Microline 182 Turbo Printer Handbook, by Okidata provides all the necessary information for the maintenance and configuration of the PT1-S Form Printer. The Okidata handbook comes with the Form Printer. EST2 Component Installation Sheets iii Contents iv EST2 Component Installation Sheets PRODUCT DIAGRAM PRODUCT DESCRIPTION 2-3ANN/D 2-3ANN/D The 2-3ANN/D is a set consisting of an outer door and an inner door. The outer door and the inner door mount on the remote annunciator wallbox. The outer door has a TM Lexan viewing window. The inner door provides mounting space for a liquid crystal display and three LED/switch modules. Outer Door 2-6ANN/D The 2-6ANN/D is a set consisting of an outer door and an inner door. The outer door and the inner door mount on the remote annunciator wallbox. The outer door has a TM Lexan viewing window. The inner door provides mounting space for a liquid crystal display and six LED/switch modules. INSTALLATION A Inner Door Install the outer door. 1 Align the outer door mounting holes with the four wallbox mounting studs. 2 Mount the outer door with the washers and nuts provided. 2-6ANN/D Outer Door See Detail A. Inner Door INSTALLATION SHEET: Detail A Wallbox mounting stud Outer door mounting hole Washer Nut 2-3ANN/D and 2-6ANN/D Remote Annunciator Cabinet Doors INSTALLATION SHEET P/N: 387478 FILE NAME: 387478.CDR REVISION LEVEL: 2.0 APPROVED BY: K. Patterson DATE: 30MAR00 CREATED BY: B. Graham EDWARDS SYSTEMS TECHNOLOGY, INC. SARASOTA, FL: 941-739-4300 FAX 941-753-1806 CHESHIRE, CT: 203-699-3000 FAX 203-699-3075 OWEN SOUND, CANADA: 519-376-2430 FAX 519-376-7258 INTERNATIONAL, CANADA: 905-270-1711 FAX 905-270-9553 INSTALLATION B Install the inner door. On the semi-flush mount wallbox On the surface mount wallbox 1 Align the inner door mounting holes with the three inner door mounting studs on the wallbox. 1 Align the inner door mounting holes with the three inner door mounting holes in the wallbox. 2 Secure the inner door to the wallbox with the washers and nuts provided. 2 Secure the inner door to the wallbox with the screws provided. Detail B Semi-flush mount Wallbox mounting stud Inner door mounting hole Washer Nut See Detail B. Surface mount Wallbox mounting hole Inner door mounting hole Screw C Connect the ground strap. 1 Secure the ground strap to the outer door ground lug with the nut and washer provided. 2 Run a wire connected to earth ground through a knockout in the wallbox. 3 Secure the ground strap and the earth ground wire to the wallbox with the nut and washer provided. Ground strap See Detail C. Wallbox Ground lug Ground lug Outer door Typical knockout Earth ground wire Detail C Ground strap Backbox Ground lug Outer door Ground lug Typical knockout Earth ground wire 387478.CDR REV 2.0 Page 2 of 2 PRODUCT DESCRIPTION The Audio Control Module is a dual channel electronics package, which interfaces with the paging microphone operator interface (2-MIC) and the firefighter telephone (2-TEL). Two integral tone generators provide alert and evacuation signaling. Two auxiliary pre-amp level (1 V) inputs handle pre-recorded messages or other external sources. Each of the two audio output channels has a Class B or Class A, pre-amp level (1 V) output, to feed the audio amplifiers. The Audio Control Module mounts on the rear of the enclosure and provides terminals for the external audio inputs, two audio risers, and RS-485 data. INSTALLATION Warning! Disconnect power to cabinets before installing or removing components. Failure to do so may result in serious injury or loss of life. ! Caution! Observe static-sensitive material handling practices. SPECIFICATIONS Power requirements Power Standby with 2-MIC Standby with 2-TEL Active with 2-MIC Active with 2-TEL 24 Vdc 75 mA 75 mA 110 mA 120 mA Frequency response 400 Hz to 4 kHz Output Level Distortion Wiring configuration Maximum load Maximum resistance Maximum capacitance Maximum wire size Auxiliary inputs Configuration Input impedance Input level Supervision Audio output (dc) Audio output (ac) Internal Communication Maximum wire size Internal Generator tones Primary Power Supply Main Controller Module Expander Loop Module Environmental conditions Temperature Humidity Audio Control Module 1.0 Vrms < 3% 2 channels, Class B (Style Y) or Class A ( Style Z) 15 SIGA-AAxx amplifiers 100 W 0.2 mF 14 AWG (1.5 mm2) 2 electrically isolated channels (selected via programming) 10 KW 0.5 to 1.75 Vrms 47KW EOL Audio pulse 1 kHz ac audio pulse Internally through RS-485 data 14 AWG (1.5 mm2) Slow whoop Fast whoop 1 kHz steady 1 kHz march time 1 kHz Morse U Hi-Lo Chime Horn Low tone Hi-Lo horn Fast Hi-Lo horn Temporal (3-3-3) 4-4 code 1 kHz @ 20 bpm 1 kHz @ 120 bpm 32 to 120 °F (0-49 °C) 0 to 93%, non-condensing PRODUCT DIAGRAM Audio Control Module INSTALLATION SHEET: Note: See the installation sheets of the following wallboxes for other locations to mount the Audio Amplifier: WB3(R) WB7(R) RACCR Jumper Settings 2-AAC Audio Control Module INSTALLATION SHEET P/N: 387345 FILE NAME: 387345.CDR REVISION LEVEL: 2.0 APPROVED BY: J. Massing DATE: 30MAR00 CREATED BY: B. Graham Related documentation: Installation and Service Manual EDWARDS SYSTEMS TECHNOLOGY, INC. Leave JP1 installed in the absence of a 2-TEL Firefighter Telephone. The removal of JP1 enables supervision for the 2-TEL option board. SARASOTA, FL: 941-739-4300 FAX 941-753-1806 CHESHIRE, CT: 203-699-3000 FAX 203-699-3075 OWEN SOUND, CANADA: 519-376-2430 FAX 519-376-7258 INTERNATIONAL, CANADA: 905-270-1711 FAX 905-270-9553 DIP SWITCH SETTINGS S1 S2 J4 JP1 S3 S4 See the 2-TEL installation sheet See the 2-MIC installation sheet J1 Mode Description 0 Tones selected by S1 and S3 are available at TB1 and TB3 upon activation of the Audio Control Module. 1 Boston code sequence (Evac channel only). 2 The signals connected to the auxiliary input terminals (TB4) are available at the output terminals (TB1 and TB3) upon activation of the Audio Control Module. 3 Silence for five minutes on fire. 4 The pre-announce tone disables the microphone and sounds the horn tone for five seconds upon the activation of the push-to-talk (PTT) switch. 5 Supervisory tone on TB3 and TB4 when the Audio Control Module is inactive. 6 Disables the generation of trouble conditions for applications without a microphone. DS1 ON Zone 23 Generated upon the activation of the Audio Control Module and the Evac circuit (Ch 1, TB2) whenever an operator pushes the Phone to Evac or Page to Evac switch at the 2-MIC. 1 2 3 4 Zone 24 Generated upon the activation of the Audio Control Module and the Alert circuit (Ch 2, TB3) whenever an operator pushes the Phone to Alert or Page to Alert switch at the 2-MIC. Channel 1: Evac signals Channel 2: Alert signals Function S1-1 S1-2 S1-3 S1-4 Function S3-1 S3-2 S3-3 S3-4 Slow whoop Fast Whoop 1 kHz steady 1 kHz march time 1 kHz Morse U Hi-Lo Chime Horn Low tone Hi-Lo Horn Fast Hi-Lo Horn Temporal 4-4 code 1 kHz @ 20 bpm 1 kHz @ 120 bpm off ON off ON off off off ON off ON off ON off ON off off off ON ON off off ON ON off off ON ON off off ON off off off off ON ON ON ON off off off off ON ON ON off off off off off off off off ON ON ON ON ON ON ON Slow whoop Fast Whoop 1 kHz steady 1 kHz march time 1 kHz Morse U Hi-Lo Chime Horn Low tone Hi-Lo Horn Fast Hi-Lo Horn Temporal 4-4 code 1 kHz @ 20 bpm 1 kHz @ 120 bpm off ON off ON off off off ON off ON off ON off ON off off off ON ON off off ON ON off off ON ON off off ON off off off off ON ON ON ON off off off off ON ON ON off off off off off off off off ON ON ON ON ON ON ON Channel 1: Evac operating modes Channel 2: Alert operating modes Function S2-1 S2-2 S2-3 S2-4 Function S4-1 S4-2 S4-3 S4-4 Zone 23 and 24 enable Mode 0 Mode 1 Mode 2 Mode 3 Mode 4 ON X X X X X X X off off off ON X off ON off ON off X off off ON ON off Mode 0 Mode 2 Mode 3 Mode 4 X X X X X off off ON off off ON off off ON ON off Channel 1 and 2 modes Mode 5 Mode 6 (Ch 2 only) ON X X off X ON X off An X indicates that the switch does not apply to the mode. WIRING Ribbon cable to Main Controller Module or Expander Loop Module Data in Data out Notes 1 All wiring is supervised and power-limited. J2 TB1 + _ + 2-AAC 2 Shields shall be continuous and isolated from ground, except at the orignating panel. _ TB2 + _ Channel 1 audio output (47 kW resistor required for Class B wiring) + _ Channel 1 audio return (Class A only) TB3 J3 Ribbon cable to additional modules TB4 + _ Channel 2 audio output (47 kW resistor required for Class B wiring) + _ Channel 2 audio return (Class A only) AUX. input 1 AUX. input 2 P/N: 387345 REV: 2.0 Page 2 of 2 SPECIFICATIONS PRODUCT DESCRIPTION The Remote Alphanumeric Display Annunciators are modules that consist of indicators and controls for monitoring the system away from the control panel. The -C models include switches that provide limited operator functions over the system. Custom messages and front panel switch functions are uniquely programmable. Power Nominal 24 Vdc @ 80mA Host quantity and addressing Up to 4 network addresses per annunciator Printer port format RS-232 Note: See the related documentation listed in the title block for mounting instructions. Printer baud rate 2400, 4800, 9600 Annunciators per circuit 31 Message capacity 88 messages per panel address 352 maximum per annunciator Maximum wire length 50 ft (15 m) DIP SWITCH SETTINGS Switch Function Position S1-1 S1-2 S1-3 S1-4 Auto acknowledge option Stealth buzzer option Not used Not used On On Off Off PRODUCT DIAGRAM 2-CMDN 2-CMDN-C 2-SMDN 2-SMDN-C JUMPER SETTINGS JP1 and JP2 are RS-485 terminating jumpers and should be installed only at the last annunciator connection. Function JP1 JP2 Class A Class B Channel 0 Channel 0 Channel 1 N/A LEDs LED Indication DS1 - DS4 DS5 DS6 See the System Operations Manual. Data transmitting on Channel 0 Data transmitting on Channel 1 Circuit board assemblies Notes 1 Remove the LED/Switch assembly to access to JP1 and JP2. 2 These control switches are included on -C models only. 3 The circuit board mounts behind the faceplate of the module. 4 The 2-CMDN(-C) also includes a backbox assembly. 5 See the related documentation listed in the title block for operator instructions on S2 - S8. DS1(top) - DS4 (bottom) Note: The remote alphanumeric display annunciators will only work with the EST2 fire alarm system. DS6 DS5 INSTALLATION SHEET: S1 2-CMDN(-C), 2-SMDN(-C) S7 Rear view S6 S2 S3 S4 Front view P1 INSTALLATION SHEET P/N: 270649 S5 2 TB1 Remote Alphanumeric Display Annunciators S8 FILE NAME: 270649.CDR REVISION LEVEL: 2.0 APPROVED BY: J. Massing DATE: 30MAR00 CREATED BY: B. Graham L1 JP1 1 LED/switch assembly Main board assembly JP2 2 Related documentation: System Operations Manual EDWARDS SYSTEMS TECHNOLOGY, INC. SARASOTA, FL: 941-739-4300 FAX 941-753-1806 CHESHIRE, CT: 203-699-3000 FAX 203-699-3075 OWEN SOUND, CANADA: 519-376-2430 FAX 519-376-7258 INTERNATIONAL, CANADA: 905-270-1711 FAX 905-270-9553 FIELD WIRING TB6 + Ch 0 _ RS-485 + Remote Alphanumeric Display Annunciator (rear view) Remote Alphanumeric Display Annunciator (rear view) Ch 1 _ 1 Main Controller Module 1 3 24 Vdc in + 3 24 Vdc in 1 2 3 4 5 6 7 8 9 10 TB1 1 2 3 4 5 6 7 8 9 10 + TB1 Class B (+) To (-) next device Class A 2 4 (+) To next (-) device 2 3 7 Note 1 2 24 Vdc supply must have dedicated riser from auxiliary 24 Vdc source. Power-limited if the source is power-limited. If the source is nonpower-limited, maintain a space of 1/4 inch (6.4 mm) from power-limited wiring or use FPL, FPLP, FPLR, or equivalent in accordance with the National Electric Code. To Form printer 4 1 14 13 25 DB25 male (rear view) Warning! Provide physical separation between two wire bundles to ensure network survivability. Disconnect power to cabinets before installing or removing components. Failure to do so may result in serious injury or loss of life. 3 See the TB1 connection table below. 4 Supervised and power-limited ! Caution! Observe static-sensitive material handling practices. TB1 connection table Terminal Function Connection TB1-1 +24 Vdc +24 Vdc power supply TB1-2 24 Vdc common 24 Vdc common TB1-3 Earth ground Local earth ground TB1-4 RS-232 RX in RS-232: To TX out on printer to Data TX on PC serial port (downloading) TB1-5 RS-232 TX out RS-232: To RX in on printer to Data RX on PC serial port (downloading) TB1-6 RS-232 common RS-232 Common on printer to common on PC serial port (downloading) TB1-7 RS-485 Ch 0 (+) To/from TB1-7 of additional 2-CMDN(-C)s/2-SMDN(-C)s TB1-8 RS-485 Ch 0 (-) To/from TB1-8 of additional 2-CMDN(-C)s/2-SMDN(-C)s TB1-9 RS-485 Ch 1 (+) To/from TB1-9 of additional 2-CMDN(-C)s/2-SMDN(-C)s TB1-10 RS-485 Ch 1 (-) To/from TB1-10 of additional 2-CMDN(-C)s/2-SMDN(-C)s P/N: 270649 REV: 2.0 Page 2 of 2 PRODUCT DESCRIPTION SPECIFICATIONS The Central Processor Unit (CPU) consists of the microprocessor and the circuits, which act as the primary interface between the network and the remote annunciators. Two RS-485 communication ports provide network and annunciator loop connections. An RS-232 port provides a connection for the printer or the download cable to the fire alarm control panel. Relay contacts provide supervision for alarms, supervisory conditions, and trouble conditions. Input power The CPU functions as a node on a Class A (Style 6) or Class B (Style 4) network. It also functions as a controller by sending and receiving tokens (in peer-topeer fashion) to other network controllers. RS-232 The CPU receives its power from a listed Primary or Auxiliary Power Supply. The CPU also provides its own protection from transient spikes, which may arise from any source, including the power supply. 18 to 26.4 Vdc, 92 mA - Standby 110 mA - Active RS-485 NET Maximum device capacity Maximum line impedance Maximum wire size 10 nodes 0.44 mf/100W 14 AWG (1.5 mm2) RS-485 ANN Maximum device capacity Maximum line impedance Maximum wire size 30 addresses 0.44 mf/100W 14 AWG (1.5 mm2) Non-isolated, 50 ft. (15.2 m) max. Must be located in the same room. Relay contacts Alarm and Trouble Supervisory Form C, rated at 24 Vdc nominal @ 1 A Form A, rated at 24 Vdc nominal @ 1 A Temperature range 32 to 100 °F (0 to 38 °C) Humidity range 0 to 93% RH Warning! LEDs Disconnect power to cabinets before installing or removing components. Failure to do so may result in serious injury or loss of life. LED Indication Color DS1: Internal communications Green DS2: CH2 TXD Green DS3: CH1 TXD Green Caution! Observe static-sensitive material handling practices. Wire Stripping Guide Strip 1/4" from the ends of ALL wires that connect to the terminal blocks of the module. DS3 DS2 1/4" (6.4 mm) CAUTION: Exposing more than 1/4" of wire may cause a ground fault. Exposing less than 1/4" of wire may result in a faulty connection. DS1 J2 J1 J5 JE PRODUCT DIAGRAM CPU 2-ISO J3 J8 J7 J4 Note: J7 and J8 of the 2-ISO plug into J7 and J8 of the CPU. JACKS Jack Function J1 24 Vdc in (not used) J2 Data cable to the 2-LCD (front panel display module) J3 24 Vdc out (not used) J4 RJ-45 (download) J5 Not used J6 Not used J7 2-ISO J8 2-ISO INSTALLATION SHEET: 2-CPU Central Processor Unit INSTALLATION SHEET P/N: 387469 FILE NAME: 387469.CDR REVISION LEVEL: 2.0 APPROVED BY: B. Wanek DATE: 22AUG00 CREATED BY: B. Graham EDWARDS SYSTEMS TECHNOLOGY, INC. SARASOTA, FL: 941-739-4300 FAX 941-753-1806 CHESHIRE, CT: 203-699-3000 FAX 203-699-3075 OWEN SOUND, CANADA: 519-376-2430 FAX 519-376-7258 INTERNATIONAL, CANADA: 905-270-1711 FAX 905-270-9553 MOUNTING INSTRUCTIONS Stud [1] [1] [2] [1] [1] [1] [1] stud [2] footprint [1] Backbox Mounting hole Standoff 6/32 x 3/8 pan head screw CPU #6 interlocking washer *Wallbox *Mount the 2-CPU in a 6ANN/B(-S) or 10ANN/B(-S) wallbox. See the 6ANN/B(-S)/10ANN/B(-S) installation sheet for details about the placement of power-limited wiring. Inner door (rear view) CPU J2 J1 Front panel display module 1. Screw the standoffs onto the designated backbox studs [1]. 2. Align the CPU mounting holes with the standoffs in the designated footprint [2]. 3. Secure the CPU to the standoffs with the screws and washers provided. 4. Make the appropriate connections to TB2 through TB5. (See Internal wiring and Network wiring, on the following pages, for more detail.) 5. Attach the ribbon cable from the CPU (J2) to the front panel display module (J1). INTERNAL WIRING Download Wiring TB2 Note: Disconnect the printer while downloading data. TB2 Pin Function CPU J4 TXD RXD RS-232 RTS COM Pin Function CPU TB3 TB3 RXD TXD J4 COM 5 32 TXD RS-232 RXD RTS COM To Pin 1 9 DB9 Female (Front View) IBM Compatible Computer 387469.CDR Rev 2.0 Page 2 of 4 RXD TXD COM To Pin 7 32 13 1 25 14 DB25 Female (Front View) IBM Compatible Computer INTERNAL WIRING Printer Wiring RS-485 Port Wiring Caution: Any wiring that exits one building and enters another requires a Ditek surge protector module. See the Network Supplement Manual. TB2 TB2 CPU J4 + NET _ RS-485 + ANN _ Pin Function TB3 RS-232 Non-supervised and power-limited RXD TXD TXD RXD RTS COM COM TB3 23 1 14 Form printer To RS-485 port of Network Node To RS-485 port of Remote Annunciator J4 To Pin 7 Supervised and power-limited CPU 13 25 DB25 Male (Front View) RS-232 Port Wiring with IOP3A Isolator Module 1 TB1 1 2 3 4 5 6 + 24 Vdc _ Listed primary or auxiliary power supply SW1 IBM Compatible Computer Form Printer OR JB1 To Peripheral Device To Peripheral Device DB25 Male (Front View) DB9 Female (Front View) TB2 JB4 IOP3A 1 14 CPU J4 TB3 2 JB3 JB2 IN IN TXD RXD RS-232 RTS COM TB3 23 7 1 2 3 4 COM RXD TXD + _ OUT SUPV COM IN RXD OUT TXD 1 24 VDC 2 3 4 RS-232-2 IN 5 6 387469.CDR Rev 2.0 Page 3 of 4 5 32 COM RXD TXD OR Detail B Detail A TB1 1 9 To Pin Pin Function Pin Function TB2 1 2 3 4 1 13 25 2 TB3 TB2 RS-232-2 OUT RS-232-1 OUT COM 1 1 2 2 SUPV COM TXD RXD 3 3 4 4 TXD RXD SUPV INTERNAL WIRING RPM wiring RPM Jumper Settings Notes 1 2 Power-limited if the source is power-limited. If the source is nonpower-limited, maintain a space of 1/4 inch (6.4 mm) from power-limited wiring. Otherwise, use FPL, FPLP, FPLR, or an equivalent in accordance with the National Electric Code. Circuits* JP1 Separate Circuits* UL/ULC Listed 3.9 kW EOL resistor (P/N 260001) required. Circuit not used. Single Circuit* 24 Vdc + _ NC COM NO NO Listed Primary or Auxiliary power supply Supervisory Trouble In TB1-3,4: Reverse Polarity TB1-7,8: Reverse Polarity TB1-5,6: Reverse Polarity Out TB1-3,4: Reverse Polarity TB1-3,4: 0.0 Vdc** TB1-3,4: 0.0 Vdc** *Alarm, Supervisory, and Trouble ** Alarm overrides supervisory and trouble. TB4 1 Alarm ALARM SUPERVISORY TB5 COM NO COM NC TROUBLE CPU SUPV REVERSE POLARITY TRANSMITTERS RPM 2 TRBL CITY BOX ALARM TROUBLE SUPV ALRM No Connection JP1 TRBL IN 1 COM +24 2 3 4 5 6 7 8 TB1 NETWORK WIRING Fire alarm control panel 24 Vdc + _ Listed primary or auxiliary power supply Notes 1 2 Cabinets and components do not appear in proportion to their actual dimensions. 3 The RS-485 signal may be multi-dropped to the next controller on the network. 4 This RS-485 line is multi-dropped from a previous controller on the network. 5 The network can support up to ten controllers (i.e., £ five Network Main Controller Modules and £ five 2-CPU-CCs). 6 RS-232 signal to peripheral devices: printers and download cables. 2-3ANN/B(-S) or 2-6ANN/B(-S) 7 1 4 _ _ + + TB2 TB1 NET + _ ANN + _ RS-485 3 CPU 2 5 TB3 RS-232 TXD RXD RTS COM 6 Power may be daisy-chained to the next device. 7 Power-limited if the source is power-limited. If the source is nonpower-limited, maintain a space of 1/4 inch (6.4 mm) from power-limited wiring. Otherwise, use FPL, FPLP, FPLR, or an equivalent in accordance with the National Electric Code. 387469.CDR Rev 2.0 Page 4 of 4 INSTALLATION PRODUCT INFORMATION The 2-DFK(R) is a trim kit that prepares double-wide wall boxes for semi-flush mounting. The trim kit is available in two colors: grey or red(R). 3 Secure the wallbox to the frame. INSTALLATION 1 Install the trim kit with the nuts provided. DIMENSIONS Top view Trim kit Side view Note: The trim kit is 3/4 inch wide (1.9 cm). 2 Prepare the nail knockouts. Front view 29.9 in (75.94 cm) 27.13 in (68.91 cm) Trim kit Nail knockouts Bottom view INSTALLATION SHEET: 2-DFK(R) Semi-Flush Trim Kit Nail knockouts INSTALLATION SHEET P/N: 387569 FILE NAME: 387569.CDR REVISION LEVEL: 1.0 APPROVED BY: B. Shivers DATE: 11/19/98 CREATED BY: B. Graham A UNIT OF GENERAL SIGNAL GS BUILDING SYSTEMS CORPORATION GS BUILDING SYSTEMS CORPORATION 6411 Parkland Drive Sarasota, FL 34243 USA 625 6th Street East Owen Sound, Ontario Canada N4K 5P8 PRODUCT DESCRIPTION SPECIFICATIONS The 2-DLM Data Line Monitor is designed to create a Class A (Style 6) RS-485 line when used with Network Main Controller Modules and 2-CPU(s). The 2-DLM also creates a Class A (Style 6) Annunciator RS-485 when used with a Network Main Controller Module or 2-CPU and local annunciation devices. The purpose of the 2-DLM is to detect and repair opens on the RS-485 lines. Input Power 18 - 26.4Vdc, 18mA Network Data Lines (Both) Class (Style) Maximum Line Impedance Maximum Wire Size Class A (Style 6) 0.44 mF/100 W 14 AWG (1.5 mm ) The 2-DLM consists of a microprocessor and the necessary support circuitry to communicate with the two ends of the RS-485 lines over two separate channels. If communication stops on either of the two channels, indicating a line break, the 2-DLM will connect the channels and repair the broken communication lines. Temperature Range Humidity Range 32 to 100 °F (0 to 38 °C) 0 to 93% RH 2 Dip Switch Functions The 2-DLM receives 24 Vdc from a 2-PPS/XX(-220) or a SIGA-APS. In addition, the 2-DLM is transient protected on all terminal connections. The 2-DLM side mounts to a WB series cabinet or back mounts to a network annunciator cabinet. Switch Function SW1-1 On for operating on the annunciator loops SW1-2 Future Use SW1-3 On for testing the 2-DLM SW1-4 Future Use INSTALLATION: REMOTE ANNUNCIATOR CABINET ! Caution! Warning! Disconnect power to cabinets before installing or removing components. Failure to do so may result in serious injury or loss of life. Observe static-sensitive material handling practices. Remote annunciator wallbox installation TOP To back mount the Data Line Monitor in a remote annunciator wallbox: 1 Screw standoffs onto the appropriate backbox studs. 2 Align the 2-DLM mounting holes with the appropriate studs and standoffs in the backbox. 3 Mount the 2-DLM with the 6/32 x 3/8 pan head screws and #6 interlocking washers provided. 4 Make the appropriate connections to TB1 through TB4. (See the following pages for more detail.) Standard wallbox installation Data Line Monitor To side mount the Data Line Monitor in a standard wallbox: 1 Align the 2-DLM mounting holes with the appropriate standoffs on either side of the backbox. 2 Snap the 2-DLM onto the standoffs. 3 Make the appropriate connections to TB1 through TB4. (See the following pages for more detail.) 1 1 2 2 3 3 Primary Power Supply Network Main Controller Module Expander Loop Module 2-DLM Data Line Monitor 1 1 4 1 Snap-top Standoff 2 Data Line Monitor Battery Battery INSTALLATION SHEET: 3 Snap-on Circuit Board Support (PST-6-01) 4 Wallbox interior surface INSTALLATION SHEET P/N: 387471 FILE NAME: 387471.CDR REVISION LEVEL: 2.0 APPROVED BY: P. Decker DATE: 30MAR00 CREATED BY: B. Graham EDWARDS SYSTEMS TECHNOLOGY, INC. SARASOTA, FL: 941-739-4300 FAX 941-753-1806 CHESHIRE, CT: 203-699-3000 FAX 203-699-3075 OWEN SOUND, CANADA: 519-376-2430 FAX 519-376-7258 INTERNATIONAL, CANADA: 905-270-1711 FAX 905-270-9553 FIELD WIRING 2-DLM back mounted in a network annunciator cabinet 24 Vdc 24 Vdc + _ 8 TB2 TB1 _ _ + + 24 Vdc + NET _ RS-485 + ANN _ + - Listed primary power supply 6 2 7 Remote Battery Cabinet 2-CPU J1 4 J1 3 TB2 _ 6 7 RS-485 _ CH1 + _ + 24V Network Main Controller Module TB3 TB1 Network Annunciator Cabinet 3 8 TB6 + NET _ RS-485 + ANN _ _ TB4 CH2 + 2-DLM + 24V 1 + 24 Vdc _ 4 5 + _ 5 Caution! Any wiring that exits one building and enters another requires a Ditek surge protector module. See the appropriate panel installation manual for wiring WB series cabinet 5 1 _ _ + + 24V 24V TB1 TB2 4 2-DLM 2-DLM side mounted in a WB series cabinet 8 4 1 24 Vdc 24 Vdc + 24 Vdc _ 3 + _ TB2 TB1 _ _ + + + + NET _ RS-485 + ANN _ - 2 6 Remote Battery Cabinet 5 + Listed 24 Vdc _ primary power J1 supply 7 J1 2-CPU Network Annunciator Cabinet 8 TB6 + NET _ RS-485 + ANN _ 5 3 RS-485 Network Main Controller Module Notes 1 Power may be daisy-chained to the next device. 2 The network annunciator cabinet draws power from a listed primary or auxiliary power supply. 5 RS-485 signal may be multi-dropped to the next device. The network can support up to ten controllers (i.e., £ five Network Main Controller Modules and £ five 2-CPUs). Cabinets and components do not appear in proportion to their actual dimensions. 6 To SAN annunciators, 2-LSRAs, and 2-SMDNs. 7 The wiring and functions of the 2-DLM for the RS-485 ANN lines are identical to the RS-485 NET lines. Make sure SW1-1 is on. 3 4 8 9 Class A (Style 6) All wiring is supervised and power-limited. 5 6 TB3 TB4 CH1 _ CH2 _ + + 7 WB Series cabinet Wire Stripping Guide Strip 1/4" from the ends of ALL wires that connect to the terminal blocks of the module. 1/4" (6.4 mm) CAUTION: Exposing more than 1/4" of wire may cause a ground fault. Exposing less than 1/4" of wire may result in a faulty connection. 387471.CDR REV 2.0 Page 2 of 2 PRODUCT INFORMATION SPECIFICATIONS Description Voltage Current Maximum line parameters Isolation The 2-ISO Isolator Module is an option card that mounts directly to either a Main Controller Module or a 2-CPU. Its purpose is to provide electrical isolation between RS-485 devices and the control panel's primary power supply. The 2-ISO also isolates the primary power supply from other system power supplies and electrical interference events. 5 Vdc, nominal 25mA 0.44mF/100 W 500 Vac MOUNTING INSTRUCTIONS Snapping support posts to the 2-ISO 1 Warning! Disconnect power to cabinets before installing or removing components. Failure to do so may result in serious injury or loss of life. 2-ISO Support Posts (P/N 362351) Support Posts Observe static-sensitive material handling practices. Mounting the 2-ISO on a Main Controller Module The 2-ISO is an integral sub-assembly of the Main Controller Module and the 2-CPU. If the need arises to replace the 2-ISO, follow the steps below to install the replacement module. Shorting Plugs 2 Main Controller Module J8 2-ISO Main Controller Module J8 J7 Main Controller Module J8 J7 2-ISO 4 Snap the support posts to the holes located opposite J7 and J8 in the component side of the isolator module. 2 Remove the shorting plugs from J7 and J8 of the control module.* 3 Align J7, J8, and the support posts of the Isolator Module with J7, J8, and the appropriate holes on the control module (component side of the Isolator Module facing the controller module). 4 Mate the isolator module's jacks with the control module's jacks and snap the support posts into the control module's mounting holes. J7 Component side toward Main Controller Module 3 1 *Note: The control module, in these mounting instructions is either a Main Controller Module or a 2-CPU. Step 1 applies to both modules. Steps 2 through 4 will differ slightly for the Main Controller Module and the 2-CPU. Mounting the 2-ISO on a 2-CPU 2 Shorting Plugs 2-CPU 2-ISO J8 J7 Component side toward 2-CPU 3 2-ISO 4 2-CPU J8 J7 2-CPU J8 2-ISO J7 INSTALLATION SHEET: 2-ISO Isolator Module J7 J8 J8 2-ISO 2-ISO Main Controller Module J7 INSTALLATION SHEET P/N: 270498 FILE NAME: 270498.CDR REVISION LEVEL: 1.1 APPROVED BY: JM DATE: 07/30/98 CREATED BY: B. GRAHAM 2-CPU A UNIT OF GENERAL SIGNAL GS BUILDING SYSTEMS CORPORATION GS BUILDING SYSTEMS CORPORATION 6411 Parkland Drive Sarasota, FL 34243 USA 625 6th Street East Owen Sound, Ontario Canada N4K 5P8 DESCRIPTION SPECIFICATIONS The Liquid Crystal Display Module (LCD) is the primary operator interface with the system. The liquid crystal display features a back-lit screen, with 4-lines (20 alphanumeric characters each). LEDs provide status information. Front panel switches and a numeric keypad provide access to system operation and maintenance functions. Input Power Voltage Standby current Alarm current 4 line, 20 character, back-lit, alphanumeric, super-twist, liquid crystal Display INSTALLATION 1 Mount the LCD a. Push a grommet through the mounting holes of the LCD and the inner door. b. Insert a plunger into the grommet. c. Repeat steps 1 and 2 until you have installed all six sets of grommets and plungers. Plunger Grommet 24 Vdc 20 mA 130 mA Environmental Conditions Temperature Range Humidity Indicators LEDs 32 to 120 °F (0 to 49 °C) 0 to 93%, Non-condensing AC Power, Alarm, Supervisory, Trouble, Monitor, Disable, Ground Fault, CPU Fail, Test, Reset, Trouble Silence, Alarm Silence, Drill, and User Option Controls Numeric keypad 0 - 9, Enter, and Delete Message review switches Alarm, Supervisory, Trouble, and Monitor Status, Program, Enable, Disable, Function switches Activate, Restore, Reports, and Test User option switch The programmer determines the function of this switch. LCD Note: Do not try to insert the plunger and grommet into the mounting holes at the same time. Insert the grommet first and then the plunger to avoid damaging them. Warning! Disconnect power to cabinets before installing or removing components. Failure to do so may result in serious injury or loss of life. Inner door 2 a. b. Connect the ribbon cables Connect the ribbon cable from J1 on the LCD to J2 on the Main Controller Module. ! Caution! Observe static-sensitive material handling practices. PRODUCT DIAGRAM Connect the ribbon cable from J3 of the LCD to J1 on the first LED/switch module (address 0). Note: See the LED/Switch module installation sheet for ribbon cable connections between modules and dip switch settings. Typical inner door (rear view) Main Controller Module J1 J2 INSTALLATION SHEET: LCD 2-LCD Liquid Crystal Display INSTALLATION SHEET P/N: 270212 FILE NAME: 270212.CDR REVISION LEVEL: 4.0 APPROVED BY: J. Massing DATE: 29MAR00 CREATED BY: B. Graham Related documentation: Installation and Service Manual EDWARDS SYSTEMS TECHNOLOGY, INC. SARASOTA, FL: 941-739-4300 FAX 941-753-1806 CHESHIRE, CT: 203-699-3000 FAX 203-699-3075 OWEN SOUND, CANADA: 519-376-2430 FAX 519-376-7258 INTERNATIONAL, CANADA: 905-270-1711 FAX 905-270-9553 PRODUCT DESCRIPTION The Expander Loop Module (LCX) provides the standalone system an additional multiplexed Signature Data Circuit (SDC) and two Notification Appliance Circuits (NACs). The SDC and the NACs can operate on Class A or Class B wiring. The SDC can support 96 Signature Series detectors and 94 Signature Series modules. The NACs have separate input terminals, which are rated at 24 Vdc @ 3.5 A or 100 W @ 25 Vrms or 70 Vrms audio. The NAC terminals may share power or receive it from a listed fire alarm power supply. Wire Stripping Guide Strip 1/4 inch from the ends of ALL wires that connect to the terminal blocks of the module. 1/4 inch (6.4 mm) SPECIFICATIONS Input Power 24 Vdc @ 20 mA, standby;130 mA active NACs Quantity/Style Voltage NAC Current Rating Line Resistance EOL Resistor Maximum Wire Size Two Class A (Style Z) or Class B (Style Y) 24 Vdc, Nominal 3.5 A or 100 W @ 25/70 Vrms per circuit 50 W max. 15 kW , ½ W 12 AWG (2.5 mm2) SDC Class (Style) Detector Capacity Module Capacity Line Resistance Line Capacitance Maximum Wire Size Class A (Style 7) or Class B (Style 4) 96 Signature Series detectors 94 Signature Series modules 65 W max. full load (50 mA) 0.33 mf, max. 14 AWG (1.5 mm2) Environmental Conditions Temperature Range Humidity 32 to 120 °F (0 to 49 °C) 0-93%, Non-condensing Caution: Exposing more than 1/4 inch of wire may cause a ground fault. Exposing less than 1/4 inch of wire may result in a faulty INSTALLATION 1 Mount the Expander Loop Module with the screws and washers provided. Warning! Disconnect power to cabinets before installing or removing components. Failure to do so may result in serious injury or loss of life. ! Primary Power Supply Caution! Observe static-sensitive material handling practices. Main Controller Module WIRE ROUTING Expander Loop Module The routing of power-limited and nonpower-limited wiring differs with each cabinet. For more information on the routing of power-limited and nonpowerlimited wiring, see the cabinet’s installation sheet. Expander Loop Module PRODUCT DIAGRAM #6 interlocking washers 6/32 x 3/8 pan head screws 2 Connect the ribbon cables to the Expander Loop Module. Primary Power Supply J1 Ribbon Cable (P/N 250213) J5 Ribbon Cable (P/N 250214) Ribbon Cable (P/N 250213) J1 Main Controller Module J3 J3 J1 Expander Loop Module INSTALLATION SHEET: 2-LCX Expander Loop Module INSTALLATION SHEET P/N: 270213 FILE NAME: 270213.CDR REVISION LEVEL: 3.0 APPROVED BY: J. Massing DATE: 31MAR00 CREATED BY: B. Graham Related documentation: Installation and Service Manual EDWARDS SYSTEMS TECHNOLOGY, INC. SARASOTA, FL: 941-739-4300 FAX 941-753-1806 CHESHIRE, CT: 203-699-3000 FAX 203-699-3075 OWEN SOUND, CANADA: 519-376-2430 FAX 519-376-7258 INTERNATIONAL, CANADA: 905-270-1711 FAX 905-270-9553 FIELD WIRING Notification Appliance Circuits (NACs) / Signature Data Circuit SDC Wiring Notes 1 2 Legend Supervised. Signature Series module/pull station Power-limited when connected to a power-limited source. If the source is nonpower-limited, maintain a space of 1/4 inch (6.4 mm) from power-limited wiring or use FPL, FPLP, FPLR, or an equivalent in accordance with the National Electric Code. 3 15 kW resistor Required for Class B (Style Y) wiring only. 4 Supervised and power-limited. 5 No T-taps when wired as a Class A (Style 7) circuit. 6 For maximum wire resistance, see the Installation and Service Manual. 7 Contacts shown with system power applied. S D C Signature Series smoke detector Notification appliance _ _ _ _ _ + + + + + Expander Loop Module TB1 TB2 NAC1/B NAC1/A SOURCE NAC2/B NAC2/A SOURCE + _ + _ + _ + _ + _ + _ + _ + _ SIGA/B SIGA/A 5 TB3 4 Class A (Style 7) configuration only NAC 2 Source: listed fire alarm 2 power supply or amplifier 3 N A C s UL/ULC Listed 15 kW EOL NAC 2 NAC 1 Source: listed fire alarm power supply or amplifier 2 NAC 1 UL/ULC 3 Listed 15 kW EOL 2 2 1 Class A (Style Z) configuration only. 1 270213.CDR REV 3.0 Page 2 of 2 INSTALLATION PRODUCT INFORMATION The 2-LFK(R) is a trim kit that prepares the WB3 series wall box for semi-flush mounting. The trim kit is available in two colors: grey or red(R). 3 Secure the wallbox to the frame. INSTALLATION 1 Install the trim kit with the nuts provided. DIMENSIONS Top view Side view Trim kit 2 Prepare the nail knockouts. Front view 29.9 in (75.94 cm) 16 in (40.6 cm) Trim kit Nail knockouts Note: The trim kit is 3/4 inch wide (1.9 cm). Nail knockouts Bottom view INSTALLATION SHEET: 2-LFK(R) Semi-Flush Trim Kit INSTALLATION SHEET P/N: 387570 FILE NAME: 387570.CDR REVISION LEVEL: 1.0 APPROVED BY: K. Patterson DATE: 01/26/99 CREATED BY: B. Graham A UNIT OF GENERAL SIGNAL GS BUILDING SYSTEMS CORPORATION GS BUILDING SYSTEMS CORPORATION 6411 Parkland Drive Sarasota, FL 34243 USA 625 6th Street East Owen Sound, Ontario Canada N4K 5P8 SPECIFICATIONS PRODUCT DESCRIPTION The 2-LSRA(-C) features a 4-line, 20-character back-lit alphanumeric liquid crystal display for use with the fire alarm panel. An optional RS-232 printer/download port is available for a local printer connection, depending on annunciator configuration. The printer provides a hard copy of the information on the annunciator display. The annunciators require 24 Vdc for operation. Power 18.4 - 26.4 Vdc @ 80 mA RS-485 communications Class B (Style 4) or Class A (Style 7) Baud rate 9600 Quantity/addressing Up to 4 network addresses per annunciator (30 addresses max.) All annunciator front panels include Normal, Alarm, Supervisory, and Trouble LEDs. The 2-LSRA is a reduced complement annunciator, which provides only the Next/Acknowledge and Back switches. The 2-LSRA-C is a full complement annunciator, which provides password protected Reset, Alarm Silence, Trouble Silence, Drill/All Call, Next/Acknowledge, and Back switches. The password protect Enable/Disable switch is located on the rear of the unit. Maximum wire length RS-232 RS-485 INSTALLATION INSTRUCTIONS A B Maximum wire size One 14 AWG (1.5 sq mm) or two 18 AWG ( or 0.75 sq mm) Optional printer port format RS-232 Message capacity 88 messages per panel address 352 max. per annunciator Mounting North American 2-gang or 4-inch square electrical box C Dimensions (HWD) U.S. Metric 2-LSRA(-C) Mounting ring RS-485 wiring 50 ft (15 m) 7,700 ft (2,348 m), 18 AWG (0.75 sq mm) Twisted Pair 5-5/8 in x 8-3/8 in x 1-5/16 in 14.29 cm x 21.27 cm x 3.33 cm LSRA-RK Remote Key Switch 1-5 Vdc @ 1.06 mA power-limited, non-supervised Operating temperature range 32 - 120 °F (0-49 °C) Operating humidity range 0-93% RH, non-condensing PRODUCT DIAGRAM RS-485 wiring Screw Electrical box 1. Secure the mounting ring (P/N P-039964-1243) to the electrical box, as shown in panel A. 2. Install the LSRA-232 Printer/Programming Port in the annunciator. 3. Set the DIP switches according to Table 1. 4. Connect the RS-485 wires to the appropriate 2-LSRA(-C) terminals. 2-LSRA Note: See Table 2 and the wiring diagrams on this installation sheet. Leave enough wire to permit the lowering of the 2-LSRA(-C) for programming. 5. Download annunciator data from the Systems Definition Utility. See the SDU online help and the LSRA-232/2-LSRA-PROG installation sheet for downloading instructions. 6. Slide the top of the annunciator onto the top flange of the mounting ring. 7. Push the bottom of the annunciator over the stud-nut, as shown in panel B. 8. Secure the bottom of the annunciator to the adapter ring using the screw provided, as shown in panel C. 9. Cover the screw hold with the label provided. Warning! Disconnect power to cabinets before installing or removing components. Failure to do so may result in serious injury or loss of life. ! Caution! Observe static-sensitive material handling practices. 2-LSRA-C INSTALLATION SHEET: 2-LSRA(-C) Life Safety Remote Annunciator INSTALLATION SHEET P/N: 387414 FILE NAME: 387414.CDR REVISION LEVEL: 2.0 APPROVED BY: K. Johnson DATE: 11MAY00 CREATED BY: B. Graham Related documentation: Installation and Service Manual; System Operations Manual; SDU online help; LSRA-232/LSRA-PROG installation sheet EDWARDS SYSTEMS TECHNOLOGY, INC. SARASOTA, FL: 941-739-4300 FAX 941-753-1806 CHESHIRE, CT: 203-699-3000 FAX 203-699-3075 OWEN SOUND, CANADA: 519-376-2430 FAX 519-376-7258 INTERNATIONAL, CANADA: 905-270-1711 FAX 905-270-9553 INSTALLATION Removable access door Remove for LSRA-232 Configuration dip switch Mounting slot ON 1 2 J2 S1 3 Life Safety Remote Annunciator (rear view) 4 TB1 Connection Terminals Rx LED Tx LED 1 23 4 5 6 7 89 Table 1: DIP switch settings Description Switch positions S1-1 S1-2 S1-3 S1-4 Annunciator programming mode OFF OFF OFF ON* Password programming mode OFF OFF ON* OFF Buzzer enabled and auto acknowledge disabled OFF OFF OFF OFF Buzzer disabled and auto acknowledge disabled OFF ON OFF OFF Buzzer enabled and auto acknowledge enabled ON OFF OFF OFF Buzzer disabled and auto acknowledge enabled ON ON OFF OFF * = Toggle ON and OFF Wire Stripping Guide Caution: Strip 1/4 inch from the ends of ALL wires that connect to the terminal blocks of the module. Exposing more than 1/4 inch of wire may cause a ground fault. Exposing less than 1/4 inch of wire may result in a faulty connection. 1/4 inch (6.4 mm) Table 2: Connection terminals Terminal Connection TB1-1 (+) External key switch TB1-2 (-) External key switch TB1-3 RS-485, CH0 (+) TB1-4 RS-485, CH0 (-) TB1-5 RS-485, CH1 (+) TB1-6 RS-485, CH1 (-) TB1-7 (+) 24 VDC TB1-8 24 VDC Common TB1-9 Earth Ground Setting annunciator passwords The steps below apply only to the 2-LSRA-C. 1. 2. 3. Remove the access door on rear of annunciator. Set DIP switch S1-3 to the ON position. At the control keys, enter a five (5) digit password. 4. 5. 6. Enter the same five digit password again. Return DIP switch S1-3 to the OFF position. Install the access door on the rear of the annunciator. 7. If the keyswitch is not used, connect a jumper wire from TB1-1 to TB1-2. Note: See Preventing unauthorized use of LSRA control switches in the SDU online help for more instructions about LSRA passwords. More details about the 2-LSRA(-C) may be found with the keyword LSRA in the online search utility. P/N: 387414 REV: 2.0 Page 2 of 4 WIRING Wiring the 2-LSRA(-C) to a Main Controller Module TB6 + Ch 0 _ RS-485 Ch 1 + _ + _ 24 Vdc 2 1 TB1 Main Controller Module 1 2 3 4 5 6 7 8 9 3 2-LSRA(-C) rear view Provide physical separation between two wire bundles to ensure network survivability Wiring required for Class A circuits only + _ 24 Vdc 2 TB1 1 2 3 4 5 6 7 8 9 4 2-LSRA(-C) rear view 4 + _ 24 Vdc 2 1 TB1 1 2 3 4 5 6 7 8 9 3 2-LSRA(-C) rear view Notes 1 All wiring supervised and power-limited. 2 Power-limited when connected to a power-limited source. Remove power-limited mark if nonpower-limited. 3 100W EOL resistor (P/N EOL-100) required on last device 4 To balance of RS-485 components 5 All wiring 18 AWG, twisted-pair. 6 Route power-limited wiring separate and away from nonpower-limited wiring. P/N: 387414 REV: 2.0 Page 3 of 4 WIRING Wiring the 2-LSRA(-C) to a Network Main Controller Module TB6 RS-485 + NET _ ANN 1 + _ + _ 24 Vdc 2 + _ 24 Vdc 2 + _ 24 Vdc 2 Network Main Controller Module TB1 1 2 3 4 5 6 7 8 9 2-LSRA(-C) rear view 1 TB1 1 2 3 4 5 6 7 8 9 2-LSRA(-C) rear view TB1 1 2 3 4 5 6 7 8 9 3 2-LSRA(-C) rear view Notes 1 All wiring supervised and power-limited. 2 Power-limited when connected to a power-limited source. Remove power-limited mark if nonpower-limited. 3 100W EOL resistor (P/N EOL-100) required on last device 4 All wiring 18 AWG, twisted-pair. 5 Route power-limited wiring separate and away from nonpower-limited wiring. P/N: 387414 REV: 2.0 Page 4 of 4 PRODUCT DESCRIPTION The Main Controller Module (MCM) is the foundation of the system and contains the principal microprocessor and controls for the fire alarm system. The MCM has two dual purpose RS-485 ports. The RS-485 port provides Class A (Style 6) or Class B (Style 4) communications for the system. Each RS-485 terminal also provides communications for 2-LSRAs, 2-SMDNs, and SAN Annunciators. The MCM also has an RS-232 port to provide communications for printers. A modular jack provides a means for downloading programmed data from an IBM compatible computer to the MCM. All external connections are transient-protected. The MCM provides one multiplexed Signature Data Circuit (SDC) and two Notification Appliance Circuits (NACs). The SDC and the NACs can both operate on Class A or Class B wiring. The SDC can support 96 Signature Series detectors and 94 Signature Series modules. The NACs have separate input terminals, which are rated at 24 Vdc @ 3.5 A or 100 W @ 25 Vrms or 70 Vrms audio. The NAC terminals may share power or receive it from an external source. During alarm, supervisory, and trouble conditions the MCM relay contacts close to report the off-normal conditions. There are two Form C relays and a Form A relay. The Form C relays handle alarm and trouble conditions and operate on 24 Vdc, nominal @ 1 A. The Form A relay handles supervisory conditions and operates on 24 Vdc, nominal @ 1 A. WIRE ROUTING SPECIFICATIONS Input Power 24 Vdc @ 150 mA, standby; 275 mA active RS-485 Terminals Max. Line Capacity Max. line parameters Max. Wire Size 30 addresses* 0.44 mf/100W 14 AWG (1.5 mm2) *Note: SAN annunciators, 2-LSRAs, 2-SMDNs, or 2-AACs. RS-232 Terminal Non-isolated, 50 ft. (15.2 m) max. Must be located in the same room. NACs Quantity/Style Voltage Available NAC Current NAC Current Rating EOL Resistor Maximum Wire Size Two Class A (Style Z) or Class B (Style Y) 24 Vdc, Nominal 3.5 A for all NACs 3.5 A or 100 W @ 25/70 Vrms per circuit 15 kW , ½ W 12 AWG (2.5 mm2) SDC Class (Style) Detector Capacity Module Capacity Line Resistance Line Capacitance Maximum Wire Size Class A (Style 6) or Class B (Style 4) 96 Signature Series detectors 94 Signature Series modules 65 W max. full load 0.33 mf, max. 14 AWG (1.5 mm2) Relay Contacts Alarm and Trouble Supervisory Form C, rated at 24 Vdc nominal @ 1 A Form A, rated at 24 Vdc nominal @ 1 A Environmental Conditions Temperature Range Humidity 32 to 120 °F (0 to 49 °C) 0 to 93%, Non-condensing The routing of power-limited and nonpower-limited wiring differs with each cabinet. For more information on the routing of power-limited and nonpower-limited wiring, see the cabinet’s installation sheet. PRODUCT DIAGRAM Warning! Disconnect power to cabinets before installing or removing components. Failure to do so may result in serious injury or loss of life. ! Caution! Observe static-sensitive material handling practices. Wire Stripping Guide Strip 1/4 inch from the ends of ALL wires that connect to the terminal blocks of the module. 1/4 inch (6.4 mm) Caution: Exposing more than 1/4 inch of wire may cause a ground fault. Exposing less than 1/4 inch of wire may result in a faulty connection. INSTALLATION SHEET: 2-MCM Main Controller Module INSTALLATION SHEET P/N: 270210 FILE NAME: 270210.CDR REVISION LEVEL: 3.0 APPROVED BY: B. Wanek DATE: 24APR00 CREATED BY: B. Graham Related documentation: Installation and Service Manual EDWARDS SYSTEMS TECHNOLOGY, INC. SARASOTA, FL: 941-739-4300 FAX 941-753-1806 CHESHIRE, CT: 203-699-3000 FAX 203-699-3075 OWEN SOUND, CANADA: 519-376-2430 FAX 519-376-7258 INTERNATIONAL, CANADA: 905-270-1711 FAX 905-270-9553 INSTALLATION 1 Mount the Main Controller Module with the screws and washers provided. 2 Primary Power Supply Connect the ribbon cables to the Main Controller Module. Primary Power Supply J1 Ribbon Cable (P/N 250213) J1 Main Controller Module J3 Main Controller Module J5 Ribbon Cable (P/N 250214) J3 J1 Expander Loop Module Main Controller Module Mount the DL2 here. 6/32 x 3/8 Pan Head Screws Ribbon Cable (P/N 250213) Note: If you install a DL2, mount it before you mount the Main Controller Module. See the DL2 installation sheet. #6 Interlocking Washers INTERNAL WIRING Download Wiring TB6 Printer Wiring TB6 Note: Disconnect the printer while downloading. Pin Function Pin Function RS-232 RXD TXD TXD RXD RTS COM RS-232 COM To Pin Main Controller Module 7 32 DB25 Female (Front View) TB6 7 To Pin 13 25 DB25 Male (Front View) RS-485 Port Wiring TB6 COM RS-485 9 J4 1 14 Form printer RXD TXD 5 32 Main Controller Module COM Caution: Any wiring that exits one building and enters another requires a Ditek surge protector module. See the Installation and Service Manual. Pin Function TXD RXD RTS COM Non-supervised and power-limited 23 1 14 IBM Compatible Computer RS-232 RXD TXD Main Controller Module 13 25 J4 TXD RXD RTS COM To Pin 1 + Ch 0 _ To primary port of RS-485 remote annunciator or 2-AAC Ch 1 + _ To secondary port of RS-485 remote annunciator Supervised and power-limited DB9 Female (Front View) IBM Compatible Computer Main Controller Module 270210.CDR REV 3.0 Page 2 of 4 See the Installation and Service Manual for detailed RS-485 wiring information. INTERNAL WIRING RPM Wiring RPM Jumper Settings Notes 1 2 Power-limited if the source is power-limited. If the source is nonpower-limited, maintain a space of 1/4 inch (6.4 mm) from power-limited wiring. Otherwise, use FPL, FPLP, FPLR, or an equivalent in accordance with the National Electric Code. Circuits* JP1 Alarm Supervisory Trouble Separate Circuits* In TB1-3,4: Reverse Polarity TB1-7,8: Reverse Polarity TB1-5,6: Reverse Polarity UL/ULC Listed 3.9 kW EOL resistor (P/N 260001) required. Circuit not used. Single Circuit* Out TB1-3,4: Reverse Polarity TB1-3,4: 0.0 Vdc** TB1-3,4: 0.0 Vdc** *Alarm, Supervisory, and Trouble ** Alarm overrides supervisory and trouble. TB4 NC COM ALARM NO NO 1 24 Vdc Listed Primary or Auxiliary power supply SUPERVISORY TB5 COM NC COM TROUBLE NO Main Controller Module SUPV RPM TRBL CITY BOX 2 REVERSE POLARITY TRANSMITTERS ALARM TROUBLE SUPV ALRM TRBL IN JP1 1 COM 2 3 +24 4 5 6 7 8 TB1 No Connection MTM Wiring 24 Vdc 24 Vdc Listed Primary or Auxiliary power supply 1 Detail A TB1 _ _ + _ + + NAC1/B NAC1/A SOURCE _ _ + _ + + NAC1/B NAC1/A SOURCE TB1 TB2 1 TB4 TB1 1 24V 2 3 4 5 6 7 8 COM K2 COM K3 NC C NO NC COM NO NO Morse U: K2 and K3 jumpered to COM March Time: K3 jumpered to COM Temporal: No jumpers Contact Ratings: 24Vdc @ 4A (0.35 pf) pilot duty MTM ALARM SUPERVISORY TB5 COM NC COM NO TROUBLE 270210.CDR REV 3.0 Page 3 of 4 Main Controller Module FIELD WIRING Notification Appliance Circuits (NACs) / Signature Data Circuit SDC Wiring Notes 1 2 Legend Supervised Signature Series module/pull station Power-limited if the source is power-limited. If the source is nonpowerlimited, maintain a space of 1/4 inch (6.4 mm) from power-limited wiring. Otherwise, use FPL, FPLP, FPLR, or an equivalent in accordance with the National Electric Code. 3 15 kW EOL required for Class B (Style Y) wiring only. 4 Supervised and power-limited 5 No T-taps when wired as a Class A (Style 6) circuit. 6 For maximum wire resistance, see the Installation and Service Manual. 7 Contacts shown with system power applied. Signature Series smoke detector Notification appliance UL/ULC Listed 15 kW EOL NAC 1 2 1 3 Class A (Style Z) configuration only NAC 1 Source: listed fire alarm power supply or amplifier N A C s 2 UL/ULC Listed 15 kW EOL NAC 2 2 1 3 NAC 2 Source: listed fire alarm 2 power supply or amplifier TB6 + _ + _ + _ NAC1/B NAC1/A SOURCE + _ + _ + _ NAC2/B NAC2/A SOURCE TB1 TB2 SIGA/B Main Controller Module SIGA/A + _ + _ 5 Class A (Style 6) configuration only S D C 270210.CDR REV 3.0 Page 4 of 4 4 PRODUCT DESCRIPTION The Network Main Controller Module (MCMN) is the foundation of the network and contains the principal microprocessor and controls for the fire alarm system. The MCMN has a dual-purpose RS-485 port. The network terminals (NET) provide Class A (Style 6) or Class B (Style 4) communications for the network. The annunciator terminals (ANN) provide communications with 2-LSRAs, 2-SMDNs, and SAN Annunciators. The MCMN also has an RS-232 port to provide communications for printers. An RJ-11 jack provides a means for downloading programmed data from an IBM compatible computer to the MCMN. All external connections are transient-protected. The MCMN provides one multiplexed Signature Data Circuit (SDC) and two Notification Appliance Circuits (NACs). The SDC and the NACs can both operate on Class A or Class B wiring. The SDC can support 96 Signature Series detectors and 94 Signature Series modules. The NACs have separate input terminals, which are rated at 24 Vdc @ 3.5 A or 100 W @ 25 Vrms or 70 Vrms audio. The NAC terminals may share power or receive it from an external source. During alarm, supervisory, and trouble conditions the MCMN relay contacts close to report the off-normal conditions. There are two Form C relays and a Form A relay. The Form C relays handle alarm and trouble conditions and operate on 24 Vdc, nominal @ 1 A. The Form A relay handles supervisory conditions and operates on 24 Vdc, nominal @ 1 A. WIRE ROUTING The routing of power-limited and nonpower-limited wiring differs with each cabinet. For more information on the routing of power-limited and nonpower-limited wiring, see the cabinet’s installation sheet. Warning! SPECIFICATIONS Input Power 24 Vdc @ 147 mA, standby; 216 mA active Ground Fault Detection 10 kW to earth, all field wiring except common relay contacts RS-485 NET Terminal Max. Line Capacity Max. Line Impedance Max. Wire Size *Note: five 2-MCMNs and five 2-CPUs RS-485 ANN Terminal Max. Line Capacity Max. Line Impedance Max. Wire Size 30 addresses* 0.44 mf/100W 2 14 AWG (1.5 mm ) *Note: SAN annunciators, 2-LSRAs, and 2-SMDNs. RS-232 Terminal Non-isolated, 50 ft. (15.2 m) max. Must be located in the same room. NACs Quantity/Style Voltage Available NAC Current NAC Current Rating EOL Resistor Maximum Wire Size Two Class A (Style 6) or Class B (Style 4) 24 Vdc, Nominal 3.5 A for all NACs 3.5 A or 100 W @ 25/70 Vrms per circuit 15 KW , ½ W 2 12 AWG (2.5 mm ) SDC Class (Style) Detector Capacity Module Capacity Line Resistance Line Capacitance Maximum Wire Size Class A (Style 7) or Class B (Style 4) 96 Signature Series detectors 94 Signature Series modules 65 W max. full load 0.33 mf, max. 2 14 AWG (1.5 mm ) Relay Contacts Alarm and Trouble Supervisory Form C, rated at 24 Vdc nominal @ 1 A Form A, rated at 24 Vdc nominal @ 1 A Environmental Conditions Temperature Range Humidity 32 to 100 °F (0 to 38 °C) 93%, Non-condensing Disconnect power to cabinets before installing or removing components. Failure to do so may result in serious injury or loss of life. ! 10 nodes* 0.44 mf/100W 2 14 AWG (1.5 mm ) PRODUCT DIAGRAM Caution! Observe static-sensitive material handling practices. Wire Stripping Guide Strip 1/4 inch from the ends of ALL wires that connect to the terminal blocks of the module. 1/4 inch (6.4 mm) Caution: Exposing more than 1/4 inch of wire may cause a ground fault. Exposing less than 1/4 inch of wire may result in a faulty connection. INSTALLATION SHEET: 2-MCMN Network Main Controller Module INSTALLATION SHEET P/N: 387472 FILE NAME: 387472.cdr REVISION LEVEL: 2.0 APPROVED BY: K. Johnson DATE: 22AUG00 CREATED BY: B. Graham Related documentation: Network Supplement Manual EDWARDS SYSTEMS TECHNOLOGY, INC. SARASOTA, FL: 941-739-4300 FAX 941-753-1806 CHESHIRE, CT: 203-699-3000 FAX 203-699-3075 OWEN SOUND, CANADA: 519-376-2430 FAX 519-376-7258 INTERNATIONAL, CANADA: 905-270-1711 FAX 905-270-9553 INSTALLATION 1 Mount the Network Main Controller Module with the screws and washers provided. 2 Primary Power Supply Network Main Controller Module Connect the ribbon cables to the Network Main Controller Module. Ribbon Cable (P/N 250213) Primary Power Supply J1 J5 Ribbon Cable (P/N 250214) Network J1 Main Controller J3 Module J3 J1 Expander Loop Module Network Main Controller Module Mount the DL2 here. 6/32 x 3/8 Pan Head Screws Ribbon Cable (P/N 250213) Note: If you install a DL2, mount it before you mount the Network Main Controller Module. See the DL2 installation sheet. #6 Interlocking Washers INTERNAL WIRING Printer Wiring Download Wiring TB6 TB6 Note: Disconnect the printer while downloading. Pin Function Pin Function RS-232 TXD RXD RTS COM RXD TXD COM To Pin Network Main Controller Module 7 32 DB25 Female (Front View) RS-232 13 25 DB25 Male (Front View) TB6 RS-485 COM + NET _ ANN 9 J4 To Pin RS-485 Port Wiring RXD TXD 5 32 Network Main Controller Module 7 Caution: Any wiring that exits one building and enters another requires a Ditek surge protector module. See the Network Supplement Manual. Pin Function TXD RXD RTS COM COM 1 14 Form printer IBM Compatible Computer Non-supervised and power-limited 23 1 14 TB6 RXD TXD Network Main Controller Module 13 25 J4 TXD RXD RTS COM RS-232 To Pin + _ To RS-485 port of Network Node To RS-485 port of Remote Annunciator Supervised and power-limited 1 DB9 Female (Front View) IBM Compatible Computer Network Main Controller Module 387472.CDR REV 2.0 Page 2 of 4 See the Network Supplement Manual for detailed RS-485 wiring information. INTERNAL WIRING RPM Wiring RPM Jumper Settings Notes 1 2 Power-limited if the source is power-limited. If the source is nonpower-limited, maintain a space of 1/4 inch (6.4 mm) from power-limited wiring. Otherwise, use FPL, FPLP, FPLR, or an equivalent in accordance with the National Electric Code. Circuits* JP1 Alarm Supervisory Trouble Separate Circuits* In TB1-3,4: Reverse Polarity TB1-7,8: Reverse Polarity TB1-5,6: Reverse Polarity UL/ULC Listed 3.9 kW EOL resistor (P/N 260001) required. Circuit not used. Single Circuit* Out TB1-3,4: Reverse Polarity TB1-3,4: 0.0 Vdc** TB1-3,4: 0.0 Vdc** *Alarm, Supervisory, and Trouble ** Alarm overrides supervisory and trouble. 24 Vdc TB4 NC COM ALARM NO NO 1 + _ Listed Primary or Auxiliary power supply SUPERVISORY TB5 COM NC COM TROUBLE NO SUPV Network Main Controller Module RPM TRBL CITY BOX 2 REVERSE POLARITY TRANSMITTERS ALARM TROUBLE SUPV ALRM TRBL IN JP1 1 COM 2 3 +24 4 5 6 7 8 TB1 No Connection MTM Wiring 24 Vdc + _ 24 Vdc + _ Listed Primary or Auxiliary power supply 1 Detail A TB1 _ _ + _ + + NAC1/B NAC1/A SOURCE _ _ + _ + + NAC1/B NAC1/A SOURCE TB1 TB2 1 TB4 TB1 1 24V 2 3 4 5 6 7 8 COM K2 COM K3 NC C NO NC COM NO NO Morse U: K2 and K3 jumpered to COM March Time: K3 jumpered to COM Temporal: No jumpers Contact Ratings: 24Vdc @ 4A (0.35 pf) pilot duty MTM ALARM SUPERVISORY TB5 COM NC COM NO TROUBLE 387472.CDR REV 2.0 Page 3 of 4 Network Main Controller Module FIELD WIRING Notification Appliance Circuits (NACs) / Signature Data Circuit SDC Wiring Notes 1 2 Legend Supervised M Power-limited if the source is power-limited. If the source is nonpowerlimited, maintain a space of 1/4 inch (6.4 mm) from power-limited wiring. Otherwise, use FPL, FPLP, FPLR, or an equivalent in accordance with the National Electric Code. 3 15 kW EOL required for Class B (Style Y) wiring only. 4 Supervised and power-limited 5 No T-taps when wired as a Class A (Style 7) circuit. 6 For maximum wire resistance, see the Installation and Service Manual. 7 Contacts shown with system power applied. Signature Series module/pull station Signature Series smoke detector Notification appliance UL/ULC Listed 15 kW EOL NAC 1 2 1 3 Class A (Style Z) configuration only NAC 1 Source: listed fire alarm power supply or amplifier N A C s 2 UL/ULC Listed 15 kW EOL NAC 2 2 1 3 NAC 2 Source: listed fire alarm 2 power supply or amplifier TB6 _ + + _ + _ NAC1/B NAC1/A SOURCE + _ + _ + _ NAC2/B NAC2/A SOURCE TB1 TB2 SIGA/B SIGA/A + _ + _ Network Main Controller Module 5 Class A (Style 7) configuration only S D C 387472.CDR REV 2.0 Page 4 of 4 4 PRODUCT DESCRIPTION The 2-MIC is a microphone module that issues pages over the emergency communication system. The microphone module consists of a dynamic push-to-talk (PTT) microphone and the following page controls: SPECIFICATIONS Environmental conditions Temperature Humidity 32-120 °F (0-49 °C) 0-93%, Non-condensing Note: See the 2-AAC installation sheet for standby and alarm currents. Phone to Evac Phone to Alert Page to Evac Page to Alert Evac Alert Warning! Disconnect power to cabinets before installing or removing components. Failure to do so may result in serious injury or loss of life. INSTALLATION Mounting the Microphone Module WB7D(R) lower inner door (rear view) ! Caution! Observe static-sensitive material handling practices. Mounting space Microphone mounting space PRODUCT DIAGRAM Door hinge INSTALLATION SHEET: 2-MIC Microphone Module INSTALLATION SHEET P/N: 387562 WB3D(R) inner door (rear view) FILE NAME: 387562.CDR REVISION LEVEL: 1.0 APPROVED BY: J. Massing DATE: 30MAR00 CREATED BY: B. Graham EDWARDS SYSTEMS TECHNOLOGY, INC. SARASOTA, FL: 941-739-4300 FAX 941-753-1806 CHESHIRE, CT: 203-699-3000 FAX 203-699-3075 OWEN SOUND, CANADA: 519-376-2430 FAX 519-376-7258 INTERNATIONAL, CANADA: 905-270-1711 FAX 905-270-9553 WIRING 2-AAC 2-MIC (rear view) J1 Note J2 See the 2-AAC installation sheet for more information about the audio controller module. P/N: 387562 REV: 1.0 Page 2 of 2 PRODUCT DESCRIPTION The 2-PPS(-220) Primary Power Supply is a switch-mode power source, which energizes system modules, monitors the AC line, and performs ground fault testing. In the event of a brownout or AC power failure, the primary power supply provides battery charging and automatic transfer to backup power. The power supply is designed to prevent total battery discharge, and automatically disables the battery charger during an alarm. MOVs and a common mode choke protect the AC input voltage from transient spikes. The output also provides power for Notification Appliance Circuits (NACs) and four-wire smoke detectors. INSTALLATION 1 Mount the Primary Power Supply with the screws and washers provided. SPECIFICATIONS Input voltage 2-PPS 2-PPS-220 120 Vac @ 300 W maximum, 50/60 220 Vac @ 300 W maximum, 50/60 Hz Output voltage 24 Vdc, nominal @ 5.0 A Battery charging 24 Ah, maximum Smoke detector power 24 Vdc @ 500 mA maximum, reset programmable Device capacitance 1000 mF, maximum NAC power Voltage Available NAC Current Device capacitance 24 Vdc, Nominal 3.5 A total for all NACs 5000 mF, maximum Maximum wire size 12 AWG (2.5 mm2) Environmental Conditions Temperature range Humidity 32 to 120 °F (0 to 49 °C) 0 to 93%, Non-condensing Primary Power Supply Warning! Disconnect power to cabinets before installing or removing components. Failure to do so may result in serious injury or loss of life. ! Caution! Observe static-sensitive material handling practices. WIRE ROUTING #6 interlocking washers The routing of power-limited and nonpower-limited wiring differs with each cabinet. For more information on the routing of power-limited and nonpowerlimited wiring, see the cabinet’s installation sheet. 6/32 x 3/8 pan head screws 2 PRODUCT DIAGRAM Connect the ribbon cables to the Primary Power Supply. Primary Power Supply J1 Ribbon Cable (P/N 250213) J5 Ribbon Cable (P/N 250214) J1 Main Controller Module J3 J3 J1 Expander Loop Module Ribbon Cable (P/N 250213) INSTALLATION SHEET: 2-PPS(-220) Primary Power Supply Module INSTALLATION SHEET P/N: 270211 FILE NAME: 270211.CDR REVISION LEVEL: 3.0 APPROVED BY: J. Massing DATE: 29MAR00 CREATED BY: B. Graham EDWARDS SYSTEMS TECHNOLOGY, INC. SARASOTA, FL: 941-739-4300 FAX 941-753-1806 CHESHIRE, CT: 203-699-3000 FAX 203-699-3075 OWEN SOUND, CANADA: 519-376-2430 FAX 519-376-7258 INTERNATIONAL, CANADA: 905-270-1711 FAX 905-270-9553 INSTALLATION 3 Set the Smoke/Aux power select jumper. Install the jumper for auxiliary power or 2-wire smoke detectors on Signature UM modules with 2-SMKs. Settings Remove the jumper for 4-wire smoke detectors. In: Maintain continuous smoke/aux. power. 24 Vdc Aux output to 24 Vdc terminals of 4-wire smoke detectors. Maximum current: Out: Interrupt smoke/aux. power upon reset. 500 mA when the SMK/AUX select jumper is removed 1 A when the SMK/AUX select jumper is installed Nonsupervised WIRING To dedicated 220 Vac, 7.5 Amp, 50/60 Hz supervised branch circuit Wire Stripping Guide Line 1 Line 2 Ground 2 4 Strip 1/4 inch from the ends of ALL wires that connect to the terminal blocks of the module. TB1 L1 1/4 inch (6.4 mm) Caution: Exposing more than 1/4 inch of wire may cause a ground fault. Exposing less than 1/4 inch of wire may result in a faulty connection. L2 G Primary Power Supply (220 Vac) To dedicated 120 Vac, 15 Amp, 50/60 Hz supervised branch circuit 1 TB3 TB1 Hot H Neutral N G Ground 2 4 BATTERY SMK/AUX PWR + 24 Vdc _ Smoke Power NAC PWR + 24 Vdc _ NAC power J1 TB2 Primary Power Supply (120 Vac) 2 3 See the details below for the battery terminal wiring. See the ribbon cable connections in step 2. Primary Power Supply Route the battery wiring harness (P/N 250181) through the plastic channel under the Main Controller Module and the Expander Loop Module to the battery terminals. Notes 1 Power-limited 2 Nonpower-limited 3 Supervised 4 Nonsupervised TB2 Battery _ + TB2 Main Controller Module Plastic channel Expander Loop Module red wire _ + + Battery _ + _ + _ Battery black wire Top view 270211.CDR REV 3.0 Page 2 of 2 PRODUCT DESCRIPTION The 2-PPS/6A(-220) Primary Power Supply is a switch-mode power source, which energizes system modules, monitors the AC line, and performs ground fault testing. In the event of a brownout or AC power failure, the primary power supply provides battery charging and automatic transfer to backup power. The power supply is designed to prevent total battery discharge, and automatically disables the battery charger during an alarm. MOVs and a common mode choke protect the AC input voltage from transient spikes. The output also provides power for Notification Appliance Circuits (NACs). INSTALLATION 1 Mount the Primary Power Supply with the screws and washers provided. SPECIFICATIONS Input voltage 2-PPS/6A 2-PPS/6A-220 120 Vac @ 300 W maximum, 50/60 Hz 220 Vac @ 300 W maximum, 50/60 Hz Output voltage 24 Vdc, nominal @ 6.4 A total Battery charging 24 Ah, maximum Device capacitance 1000 mF, maximum NAC1 output Voltage Available current Device capacitance 24 Vdc, Nominal 3.2 A maximum 5000 mF, maximum NAC2 output Voltage Available current Device capacitance 24 Vdc, Nominal 3.2 A maximum 5000 mF, maximum Maximum wire size 12 AWG (2.5 mm2) Environmental Conditions Temperature range Humidity 32 to 120 °F (0 to 49 °C) 0 to 93%, Non-condensing Primary Power Supply Warning! Disconnect power to cabinets before installing or removing components. Failure to do so may result in serious injury or loss of life. ! Caution! Observe static-sensitive material handling practices. WIRE ROUTING #6 interlocking washers 6/32 x 3/8 pan head screws 2 The routing of power-limited and nonpower-limited wiring differs with each cabinet. For more information on the routing of power-limited and nonpowerlimited wiring, see the cabinet’s installation sheet. PRODUCT DIAGRAM Connect the ribbon cables to the Primary Power Supply. Primary Power Supply J1 Ribbon Cable (P/N 250213) J5 Ribbon Cable (P/N 250214) J1 Main Controller Module J3 J3 J1 Expander Loop Module Ribbon Cable (P/N 250213) INSTALLATION SHEET: 2-PPS/6A(-220) Primary Power Supply Module INSTALLATION SHEET P/N: 387222 FILE NAME: 387222.CDR REVISION LEVEL: 2.0 APPROVED BY: J. Massing DATE: 30MAR00 CREATED BY: B. Graham EDWARDS SYSTEMS TECHNOLOGY, INC. SARASOTA, FL: 941-739-4300 FAX 941-753-1806 CHESHIRE, CT: 203-699-3000 FAX 203-699-3075 OWEN SOUND, CANADA: 519-376-2430 FAX 519-376-7258 INTERNATIONAL, CANADA: 905-270-1711 FAX 905-270-9553 WIRING Wire Stripping Guide Strip 1/4 inch from the ends of ALL wires that connect to the terminal blocks of the module. 1/4 inch (6.4 mm) Caution: Exposing more than 1/4 inch of wire may cause a ground fault. Exposing less than 1/4 inch of wire may result in a faulty connection. To dedicated 220 Vac, 7.5 Amp, 50/60 Hz supervised branch circuit TB1 Line 1 Line 2 Ground 2 L1 L2 G 4 220 Vac Primary Power Supply To dedicated 120 Vac, 15 Amp, 50/60 Hz supervised branch circuit 1 TB3 2 4 TB1 + 24 Vdc _ NAC1 power Hot Neutral + 24 Vdc _ NAC2 power BATTERY Ground 2 3 J1 TB2 120 Vac Primary Power Supply See the details below for the battery terminal wiring. See the ribbon cable connections in step 2. Primary Power Supply Route the battery wiring harness (P/N 250181) through the plastic channel under the Main Controller Module and the Expander Loop Module to the battery terminals. TB2 Battery _ + Main Controller Module TB2 red wire _ + Battery 1 Power-limited 2 Nonpower-limited 3 Supervised 4 Nonsupervised Plastic channel Expander Loop Module + Notes _ + _ + _ Battery black wire Top view 387222.CDR REV 2.0 Page 2 of 2 SPECIFICATIONS PRODUCT DESCRIPTION The 2-SANCOM is an operator interface, which provides indicators and controls in a SAN series package for use anywhere on the network. The 2-SANCOM requires a SAN-CPU, which is connected to it on a ribbon cable chain along with other SAN series modules. See the drawings on the reverse side of this installation sheet. Indicators LED Power Alarm Supervisory Trouble Security Alarm Silence Trouble Silence Drill/All Call Sounder Buzzer Resound Trouble feature: Description A green LED that functions according to position of JP3. A red LED that flashes to indicate system alarm conditions. A yellow LED that flashes to indicate supervisory conditions. A yellow LED that flashes to indicate system trouble conditions. A yellow LED that flashes to indicate security conditions. A yellow LED that indicates the silencing of audible devices. A yellow LED that indicates the silencing of the system-wide trouble buzzer(s). A yellow LED that indicates the activation of the drill/all call function. Description Operates in conjunction with the sounder on the control panel. Power From SAN-CPU Current Stanby Alarm Trouble Address requirements Inputs Outputs 22 mA 7 mA 15 mA 1 (1 group of eight) 1 (1 group of eight) Weight 3.3 oz (93.5 g) Mounting See the related documentation listed in the title block for the approved enclosures. Warning! Disconnect power to cabinets before installing or removing components. Failure to do so may result in serious injury or loss of life. ! Caution! Observe static-sensitive material handling practices. PRODUCT DIAGRAM Activation of local silence in either location will silence the buzzer until a new condition is sensed on the system. Controls Switch Reset Alarm Silence Local Silence Drill/All Call Lamp Test Enable/Disable Description A momentary toggle switch that resets the system. A momentary toggle switch that silences audible circuits. A momentary toggle switch that silences the system-wide trouble buzzer. A momentary toggle switch that activates all audible/visual circuits. A maintained toggle switch that tests all indicators on SAN option modules. A key switch that disables the 2-SANCOM controls. JUMPER SETUP Jumper JP1 Zone Report Jumper In the Enable position: In the Disable position: JP2 Continuity Jumper JP3 Region Jumper In the USA position: In the Europe position: Activation of the enable/ disable keyswitch will generate a zone (xx05) Activation of the enable/ disable keyswitch will not generate a zone. JP2 designates the 2-SANCOM as the last module installed in the SAN/RSAN series modules. The 2-SANCOM will light the programdriven Power LED. The Power LED will operate in conjunction with 24 Vdc power. Disable Europe JP1 INSTALLATION SHEET: 2-SANCOM Remote Network Control Module INSTALLATION SHEET P/N: 387186 FILE NAME: 387186.CDR REVISION LEVEL: 2.0 APPROVED BY: J. Massing DATE: 30MAR00 CREATED BY: B. Graham Related documentation: SAN-CPU installation sheet, SAN Series Annunciator Enclosures installation sheet EDWARDS SYSTEMS TECHNOLOGY, INC. JP3 Enable Rear view Front view Function USA SARASOTA, FL: 941-739-4300 FAX 941-753-1806 CHESHIRE, CT: 203-699-3000 FAX 203-699-3075 OWEN SOUND, CANADA: 519-376-2430 FAX 519-376-7258 INTERNATIONAL, CANADA: 905-270-1711 FAX 905-270-9553 INSTALLATION 1 Mount the 2-SANCOM. Note: See the related documentation listed in the title block for more information about specific mounting units. In a 4-unit or 8-unit enclosure On a 6-unit, 19-inch rack mount 2-SANCOM JP3 SAN series module SAN series module JP1 JP2 P2 P1 2-SANCOM Side view Rear view Side view Front view 2 Make the ribbon cable connections. A. Plug the ribbon cable assembly (P/N 250080) from P1 of the SAN-CPU into P2 of the 2-SANCOM. B. Plug the ribbon cable from P1 of the 2-SANCOM to P2 of the next SAN series module. C. Plug the ribbon cable from P1 of each SAN module to P2 of the next SAN module until you reach the last one. D. Install the continuity jumper on the last SAN module. Note: If the 2-SANCOM is the last module, install the continuity jumper on JP2. SWU-8(/3) JP1 P1 P2 SLU-16 P1 SHO-4 P2 P1 2-SANCOM P1 P2 P2 JP2 From P1 on the SAN-CPU Addresses 33 - 40 Addresses 17 - 32 For programming purposes, remember that: The first input address group and the first output address group belong to the 2-SANCOM regardless of its physical location. Each address group consists of eight addresses. All other SAN modules must start at must start at address 09 for input and output groups. You must install J2 if the 2-SANCOM is the last module on the ribbon cable chain. Addresses 09 - 16 Group Number 1 2 3 4 5 6 7 8 9 10 11 12 Addresses 01-08 09-16 17-24 25-32 33-40 41-48 49-56 57-64 65-72 73-80 81-88 89-96 P/N: 387186 REV: 2.0 Page 2 of 2 Addresses 01 - 08 S1 dip switch settings 1 2 3 4 on off on off on off on off on off on off off off off off off off off on on on on on off on on off off on on off off on on off off off off on on on on off off off off on Module 2-SANCOM SHO-4 SLU-16 SLU-16 SWU-8(/3) SWU-8(/3) PRODUCT INFORMATION The 2-SMK Smoke Power Module is a backup power source for 2-wire smoke circuits connected to a Signature Data Circuit. The Smoke Power Module monitors the operating power from the power supply. When power begins to degrade, the 2-SMK provides the necessary operating voltage to the 2-wire smoke detection circuits. SPECIFICATIONS Input power 24 Vdc, nominal per UL Output power 22.0 to 26.4 Vdc @ 425 mA, maximum Wire size 14 AWG (1.5 mm2) to 18 AWG (0.75 mm2) Environmental Conditions Temperature Range Humidity 32 to 120 °F (0 to 49 °C) 0 to 93%, Non-condensing INSTALLATION Note: Do not disassemble the 2-SMK. It is shipped from the factory as an assembled unit and contains no user-serviceable parts. Warning! Disconnect power to cabinets before installing or removing components. Failure to do so may result in serious injury or loss of life. To mount the 2-SMK 1 Verify that all field wiring is free of opens, shorts, and ground faults. 2 Make all wiring connections as shown in the wiring diagrams on the reverse side of this sheet. 3 Using the four 6-32 x 3/8 inch machine screws provided, mount the module to the electrical box. 4 Using the four 4-24 x 5/16 inch self-tapping screws provided, mount the wall plate to the module. ! Caution! Observe static-sensitive material handling practices. Wire Stripping Guide Strip 1/4 inch from the ends of ALL wires that connect to the terminal blocks of the module. 1/4 inch (6.4 mm) Caution: Exposing more than 1/4 inch of wire may cause a ground fault. Exposing less than 1/4 inch of wire may result in a faulty connection. PRODUCT DIAGRAM INSTALLATION SHEET: White 2-gang wall plate 2-SMK Smoke Power Converter Module INSTALLATION SHEET P/N: 387199 Compatible electric boxes FILE NAME: 387199.CDR REVISION LEVEL: 2.0 APPROVED BY: J. Massing DATE: 17APR00 CREATED BY: B. Graham Related documentation: Signature Series Component Installation Manual North American 2-1/2 inch (64 mm) deep 2-gang box Standard 4: Square 1-1/2 inch (38 mm) deep box European 100 mm square box EDWARDS SYSTEMS TECHNOLOGY, INC. SARASOTA, FL: 941-739-4300 FAX 941-753-1806 CHESHIRE, CT: 203-699-3000 FAX 203-699-3075 OWEN SOUND, CANADA: 519-376-2430 FAX 519-376-7258 INTERNATIONAL, CANADA: 905-270-1711 FAX 905-270-9553 FIELD WIRING 2-PPS TB3 SMOKE/AUX Select jumper must be installed 2-PPS/6A SMOKE/AUX + _ POWER TB3 NAC POWER Power in Maximum of 1 volt drop + _ Power in 8 7 6 5 _ _ + + Maximum of 1 volt drop 2-SMK 8 7 6 5 _ _ + + 2-SMK _ _ + + Power out 4 3 2 1 _ _ + + Power out 4 3 2 1 To compatible 2-wire smoke detectors To compatible 2-wire smoke detectors 16 15 14 13 4 3 21 JP1 12 11 10 9 _ + 16 15 14 13 3 4 Signature Series Universal Module + _ + _ 4 3 2 1 8 7 6 5 3 21 JP1 12 11 10 9 _ + 3 Signature Series Universal Module + _ + _ 4 3 2 1 8 7 6 5 5 5 Data in (+) (-) Data in (+) (-) To next Universal Module To next Universal Module To compatible 2-wire smoke detectors To compatible 2-wire smoke detectors 16 15 14 13 3 21 12 11 10 9 _ + 16 15 14 13 4 JP1 Signature Series Universal Module 8 7 6 5 To next Signature device Data out 3 3 21 12 11 10 9 _ + 4 JP1 Signature Series Universal Module + _ + _ 4 3 2 1 8 7 6 5 (-) (+) To next Signature device Data out 3 + _ + _ 4 3 2 1 (-) (+) Notes 1 2 All wiring is supervised and power-limited. 3 Signature-UMs set to personality code 13, 14, 20, or 21 See the Signature Series Component Installation Manual for more information about the Universal Module and its configuration. 4 Jump pins 1 and 2 on JP1. 5 From the Signature loop controller at the fire alarm control panel or the previous Signature device 387199.CDR REV 2.0 Page 2 of 2 PRODUCT DESCRIPTION The 2-TEL is the operator interface for the firefighter telephone system. The module houses the master telephone handset, the silence call-in switch, and the phone call-in silenced LED. The 2-AAC Audio Control Module with a 2-TEL option board provides the electrical terminations for the module. The module communicates with up to five handsets simultaneously. LED Annunciator/switch modules provide selection of the telephone circuits. SPECIFICATIONS Riser wiring configuration Two Class B (Style Y) risers Output voltage 18 Vdc EOL resistor 10 kW Maximum remote phones on line Five (total) on both risers Environmental conditions Temperature Humidity 32-120 °F (0-49 °C) 0-93%, Non-condensing INSTALLATION Warning! Mounting the 2-TEL Disconnect power to cabinets before installing or removing components. Failure to do so may result in serious injury or loss of life. WB7D(R) lower inner door (rear view) ! 2-TEL mounting space 2-MIC mounting space Caution! Observe static-sensitive material handling practices. Mounting the 2-TEL option board 1. Snap the plastic standoffs into the appropriate holes on the 2-AAC. Plastic standoff 2-AAC 2-TEL option board 2. Align J1 of the 2-TEL option board with J4 of the 2-AAC. J1 J4 3. Snap the 2-TEL option board to the plastic standoffs on the 2-ACC. PRODUCT DIAGRAM WB3D(R) inner door (rear view) INSTALLATION SHEET: 2-TEL Firefighter Telephone Module INSTALLATION SHEET P/N: 387344 FILE NAME: 387344.CDR REVISION LEVEL: 2.0 APPROVED BY: J. Massing DATE: 30MAR00 CREATED BY: B. Graham Related documentation: 2-AAC installation sheet; Signature Series Component Installation Manual EDWARDS SYSTEMS TECHNOLOGY, INC. SARASOTA, FL: 941-739-4300 FAX 941-753-1806 CHESHIRE, CT: 203-699-3000 FAX 203-699-3075 OWEN SOUND, CANADA: 519-376-2430 FAX 519-376-7258 INTERNATIONAL, CANADA: 905-270-1711 FAX 905-270-9553 INSTALLATION 2-AAC with 2-TEL option board 2-AAC without 2-TEL option board Note: Remove JP1, on the 2-AAC to enable supervision for the 2-TEL option board. JP1 J4 J1 WIRING Typical telephone circuit 2-AAC 3 1 4 Style Y (Class B) - + TB3 J2 2-TEL option board terminals 10 9 1 2 34 5 TB1 Terminal Function CC1 UL/ULC Listed 10 KW EOL on unused riser 4 3 2 1 8 7 6 5 TB2 TB1 TB1-1 TB1-2 TB1-3 TB1-4 TB1-5 Data out (-) 2 Data out (+) Phone 1 (+) Phone 1 (-) Shield Phone 2 (+) Phone 2 (-) To next device Data in (-) From Signature loop Data in (+) controller or previous device 2-TEL RJ45 CHANNEL 2 TROUBLE CHANNEL 1 TROUBLE 1 4 2 3 5 URSM 6 TB1 7 Primary or Auxiliary Power Supply + _ 4 Red 8 9 10 _ 11 12 13 14 _ + + TELEPHONE CHANNEL 2 4 Black TB1 functions for the URSM Notes Terminal 1 Twisted-shield wire 2 Shields shall be continuous and isolated from ground except at the originating panel. 3 See the 2-AAC installation sheet (P/N 387345). 4 UL/ULC listed 47 KW EOL 5 Signature Series dual input module (personality code 3) 6 All wiring is supervised and power-limited. 7 Set CC1s to personality code 6. From Signature loop controller or previous device TELEPHONE CHANNEL 1 1, 2, 3 7 8 9 10 8 7 6 5 Terminal CT2 5 4 3 2 1 4, 5, 6 11 12 13 14 Data in (+) Data out (+) Data in (-) Data out (-) P/N: 387344 REV: 2.0 Page 2 of 2 Channel 1 functions Trouble contacts 70 Vrms audio riser input 25 Vrms audio riser input Firefighter telephone riser input Common Channel 2 functions Trouble contacts 70 Vrms audio riser input 25 Vrms audio riser input Firefighter telephone riser input Common To next Signature device INSTALLATION PRODUCT DESCRIPTION The 2-WB(R) is a semi-flush mount wallbox, which is available in two colors: grey or red (R). 1 Mount the wallbox. WIRE ROUTING 1 Nail knockouts 1 Primary Power Supply 4 4 2 Main Controller Module Expander Loop Module 2 Connect the cabinet to earth ground. 3 Wallbox Ground lug Battery space 3 Grounding strap (P/N 260077) To the outer door To the inner door Permissible nonpower-limited wiring areas Lock washer #8-32 nut Earth ground cable Notes 1 Run the AC power only through the top left knockout or top center knockout. 2 If a nonpower-limited source feeds the relay contacts, the wiring must remain within this area. 3 4 5 6 Route wiring to the power supply through a protective channel when using a remote battery enclosure. Nonpower-limited wiring must stay in the shaded area, and must remain ¼ inch (6.4 mm) from power-limited wiring. The snap-top standoffs, located on both sides of the wallbox, can support any module that requires a one-half footprint mounting space. The battery space supports up to two 12 Vdc, 17 Ah batteries. Do not install conduit in this area. See the Installation and Service Manual for the mounting of modules in this equipment enclosure. INSTALLATION SHEET: 2-WB(R) Semi-flush Mount Wallbox INSTALLATION SHEET P/N:387565 FILE NAME: 387565.CDR REVISION LEVEL: 1.0 APPROVED BY: K. Patterson DATE: 02/03/99 CREATED BY: B. Graham A UNIT OF GENERAL SIGNAL GS BUILDING SYSTEMS CORPORATION GS BUILDING SYSTEMS CORPORATION 6411 Parkland Drive Sarasota, FL 34243 USA 625 6th Street East Owen Sound, Ontario Canada N4K 5P8 DIMENSIONS Typical conduit knockout Finished wall Top view Wall frame 11 in (27.9 cm) Side view 13 in (33.3 cm) 21 in (53.3 cm) 22.5 in (57.2 cm) Front view 16 in (40.6 cm) Typical conduit knockout Bottom view 4.5 in (11.4 cm) All conduit knockouts support 3/4 inch (1.9 cm) conduit. 387565.CDR REV 1.0 Page 2 of 2 14.125 in (35.9 cm) INSTALLATION PRODUCT DESCRIPTION The 2-WB3(R) is a surface mounted wallbox, which is available in grey or red (R). The following subassemblies may be ordered to modify the wallbox. 1 Mount the wallbox. 2-LFK(R) trim kit for semi-flush mounting 2-WB3D/DF dead front door for the (red only) The dead front door does not include an inner door. WIRE ROUTING Note: See the trim kit installation sheet for semi-flush mounting instructions on this wallbox (P/N 387570). 1 Primary Power Supply 2 4 2 Connect the cabinet to earth ground. Main Controller Module 4 Wallbox Ground lug Expander Loop Module Grounding strap (P/N 260077) To the outer door Audio Control Module To the inner door Audio Amplifier Lock washer #8-32 nut Earth ground cable 3 Battery space 3 Permissible nonpower-limited wiring areas Notes 1 Run the AC power only through the top left knockout or top center knockout. 2 If a nonpower-limited source feeds the relay contacts, the wiring must remain within this area. 3 4 Route wiring to the power supply through a protective channel when using a remote battery enclosure. Nonpowerlimited wiring must stay in the shaded area, and must remain 1/4 inch (6.4 mm) from power-limited wiring. The snap-top standoffs, located on both sides of the wallbox, can support any module that requires a one-half footprint mounting space. 5 The battery space supports up to two 12 Vdc, 17 Ah batteries. Do not install conduit in this area. 6 See the Installation and Service Manual for the mounting of modules in this equipment enclosure. INSTALLATION SHEET: 2-WB3(R) Wallbox INSTALLATION SHEET P/N:387567 FILE NAME: 387567.CDR REVISION LEVEL: 1.0 APPROVED BY: K. Patterson DATE: 02/03/99 CREATED BY: B. Graham A UNIT OF GENERAL SIGNAL GS BUILDING SYSTEMS CORPORATION GS BUILDING SYSTEMS CORPORATION 6411 Parkland Drive Sarasota, FL 34243 USA 625 6th Street East Owen Sound, Ontario Canada N4K 5P8 DIMENSIONS Top view Side view 11 in (27.9 cm) Front view 29.9 in (75.94 cm) 16 in (40.6 cm) Bottom view 5.1 in (12.95 cm) All conduit knockouts support 3/4 inch (1.9 cm) conduit. 387567.CDR REV 1.0 Page 2 of 2 22.875 in (58.1 cm) INSTALLATION PRODUCT INFORMATION The 2-WB3D(R) is a set consisting of an outer door and two inner doors. The doors mount on a 2-WB3(R) wallbox. The outer door is available in two colors: grey or red (R), TM and has one Lexan viewing window. The inner doors are available only in grey and provide mounting space for operator interface modules and emergency communications equipment. The 2-WB3D/DF is a dead front outer door, which does not include an inner door. The dead front door is available only in red. 3 Mount the operator instructions. Inner door (rear view) Operator instructions (P/N 260323) INSTALLATION Grommet 1 Mount the inner door. Plunger Outer door ground strap Inner door ground strap Wallbox Grommet Plunger Ground lug Inner door Operator instructions Related Documentation See the following installation sheets for the mounting of inner door components: Inner hinge pin 2 Inner door Liquid Crystal Display LED/Switch modules Firefighter Telephone Microphone (P/N 270212) (P/N 270214) (P/N 387344) (P/N 387562) Mount the outer door. Outer door or dead front door Ground lug Wallbox Outer Door Inner Door INSTALLATION SHEET: 2-WB3D(R) Outer Door and Inner Door 2-WB3D/DF Dead Front Door INSTALLATION SHEET P/N: 387339 Nut Interlocking washer Outer door hinge REVISION LEVEL: 2.0 APPROVED BY: K. Patterson DATE: 02/03/99 CREATED BY: B. Graham A UNIT OF GENERAL SIGNAL Ground strap FILE NAME: 387339.CDR GS BUILDING SYSTEMS CORPORATION GS BUILDING SYSTEMS CORPORATION 6411 Parkland Drive Sarasota, FL 34243 USA 625 6th Street East Owen Sound, Ontario Canada N4K 5P8 INSTALLATION PRODUCT DESCRIPTION The 2-WB7(R) is a surface mounted wallbox, which is available in grey or red (R). The following subassemblies may be ordered to modify the wallbox. Detail 1 Mount the wallbox. Wallbox mounting hole 2-DFK(R) trim kit for semi-flush mounting 2-WB7D/DF dead front door for the (red only) The dead front door does not include an inner door. Detail WIRE ROUTING Detail 1 1 5 Grommet for power lines Nonpower-limited area Auxiiary Power Supply Primary Power Supply Main Controller Module Expander Loop Module A A A B A 3 A B B Expander Loop Module Audio Control Module Audio Amplifier 5 2 Note: See the trim kit installation sheet for semi-flush mounting instructions on this wallbox (P/N 387569). 2 Connect the cabinet to earth ground. Wallbox Ground lug Grounding strap (P/N 260077) To the outer door Audio Amplifier Audio Amplifier 4 To the inner door 4 Battery space Battery space Lock washer #8-32 nut Earth ground cable Permissible nonpower-limited wiring areas Notes 1 Run the AC power only through the top left knockout or top center knockout. 2 If a nonpower-limited source feeds the relay contacts, the wiring must remain within this area. 3 Install spacers on stud A to mount an Audio Amplifier Module. Install spacers on stud B to mount a Main Controller Module. 4 Route wiring to the power supply through a protective channel when using a remote battery enclosure. Nonpowerlimited wiring must stay in the shaded area, and must remain 1/4 inch (6.4 mm) from power-limited wiring. INSTALLATION SHEET: 2-WB7(R) Double-wide Wallbox 5 The snap-top standoffs, located on both sides of the wallbox, can support any module that requires a one-half footprint mounting space. INSTALLATION SHEET P/N:387568 REVISION LEVEL: 1.0 APPROVED BY: B. Shivers 6 The battery space supports up to two 12 Vdc, 17 Ah batteries. Do not install conduit in this area. DATE: 11/19/98 CREATED BY: B. Graham 7 See the Installation and Service Manual for the mounting of modules in this equipment enclosure. A UNIT OF GENERAL SIGNAL GS BUILDING SYSTEMS CORPORATION FILE NAME: 387568.CDR GS BUILDING SYSTEMS CORPORATION 6411 Parkland Drive Sarasota, FL 34243 USA 625 6th Street East Owen Sound, Ontario Canada N4K 5P8 DIMENSIONS Typical conduit knockout Top view 24.13 in (61.3 cm) Side view Front view 20.35 in (51.7 cm) 29.9 in (75.94 cm) Typical conduit knockout 27.13 in (68.91 cm) Bottom view 5.33 in (27.93 cm) All conduit knockouts support 3/4 inch (1.9 cm) conduit. 387568.CDR REV 1.0 Page 2 of 2 INSTALLATION PRODUCT DESCRIPTION The 2-WB7D(R) is a set consisting of an outer door and two inner doors. The doors mount on a 2-WB7(R) wallbox. The outer door is available in two colors: grey or red (R), TM and has one Lexan viewing window. The inner doors are available only in grey and provide mounting space for operator interface modules and emergency communications equipment. The 2-WB7D/DF is a dead front outer door, which does not come with an inner door. The dead front door is available only in red. 2 Mount the outer door. Mounting stud Outer door or dead front door (rear view) Wallbox INSTALLATION 1 Washer Mount the inner doors. Nut Wallbox (rear view) Secure the outer door with ten #8/32 nuts and lock washers, as shown in Detail B. Wallbox stud Inner door hinge Detail B Upper inner door Outer door (rear view) Washer Nut Nut Wallbox hinge Washer Wallbox hinge Upper Inner Door Lower inner door Washer Nut Secure the inner doors with five #8/32 nuts and lock washers each, as shown in Detail A. Detail A Outer Door Lower Inner Door Inner door hinge INSTALLATION SHEET: Wallbox stud 2-WB7D(R) Outer Door and Inner Doors 2-WB7D/DF Dead Front Door INSTALLATION SHEET P/N: 387340 Nut Washer FILE NAME: 387340.CDR REVISION LEVEL: 2.0 APPROVED BY: K. Patterson DATE: 02/03/99 CREATED BY: B. Graham A UNIT OF GENERAL SIGNAL GS BUILDING SYSTEMS CORPORATION GS BUILDING SYSTEMS CORPORATION 6411 Parkland Drive Sarasota, FL 34243 USA 625 6th Street East Owen Sound, Ontario Canada N4K 5P8 INSTALLATION 3 Mount the operator instructions Upper inner door (front view) Operator instructions (P/N 260232) Grommet Plunger Plunger Grommet Operator instructions (P/N 260232) Upper inner door Related Documentation See the following installation sheets for the mounting of inner door components: Liquid Crystal Display LED/Switch modules Firefighter Telephone Microphone 387340.CDR REV 2.0 Page 2 of 2 (P/N 270212) (P/N 270214) (P/N 387344) (P/N 387562) INSTALLATION PRODUCT INFORMATION The 2-WBD(R) is a set consisting of an outer door and an inner door. Both doors mount on a 2-WB(R) wallbox. The outer door is available in two colors: grey or red (R), and TM has one Lexan viewing window. The inner door is available only in grey and provides mounting space for operator interface modules. 3 Mount the operator instructions. Inner door (rear view) Operator instructions (P/N 260323) INSTALLATION 1 Mount the inner door. Grommet Plunger Outer door ground strap Inner door ground strap Wallbox Grommet Plunger Ground lug Operator instructions Inner door Related Documentation See the following installation sheets for the mounting of inner door components: Inner hinge pin 2 Inner door Liquid Crystal Display LED/Switch modules (P/N 270212) (P/N 270214) Mount the outer door. Outer Door Ground lug Wallbox Outer Door Window Inner Door INSTALLATION SHEET: Nut 2-WBD(R) Outer Door and Inner Door Interlocking washer INSTALLATION SHEET P/N:270209 Ground strap REVISION LEVEL: 3.0 APPROVED BY: K. Patterson DATE: 02/03/99 CREATED BY: B. Graham Outer door hinge A UNIT OF GENERAL SIGNAL GS BUILDING SYSTEMS CORPORATION FILE NAME: 270209.CDR GS BUILDING SYSTEMS CORPORATION 6411 Parkland Drive Sarasota, FL 34243 USA 625 6th Street East Owen Sound, Ontario Canada N4K 5P8 INSTALLATION PRODUCT INFORMATION The 2-WBDS(R) is a set consisting of an outer door and an inner door. Both doors mount on a 2-WBS(R) wallbox. The outer door is available in two colors: grey or red (R), TM and has one Lexan viewing window. The inner door is available only in grey and provides mounting space for operator interface modules. 3 Mount the operator instructions. Inner door (rear view) Operator instructions (P/N 260323) INSTALLATION 1 Mount the inner door. Grommet Outer door ground strap Inner door ground strap Plunger Wallbox Grommet Plunger Ground lug Operator instructions Related Documentation Inner door See the following installation sheets for the mounting of inner door components: Inner hinge pin 2 Inner door Liquid Crystal Display LED/Switch modules (P/N 270212) (P/N 270214) Mount the outer door. Outer Door Ground lug Wallbox Outer Door Window Inner Door INSTALLATION SHEET: Nut 2-WBDS(R) Outer Door and Inner Door Interlocking washer INSTALLATION SHEET P/N: 387218 Ground strap REVISION LEVEL: 2.0 APPROVED BY: K. Patterson DATE: 02/03/99 CREATED BY: B. Graham Outer door hinge A UNIT OF GENERAL SIGNAL GS BUILDING SYSTEMS CORPORATION FILE NAME: 387218.CDR GS BUILDING SYSTEMS CORPORATION 6411 Parkland Drive Sarasota, FL 34243 USA 625 6th Street East Owen Sound, Ontario Canada N4K 5P8 INSTALLATION PRODUCT DESCRIPTION The 2-WBS(R) is a surface mount wallbox, which is available in two colors: grey or red (R). 1 Mount the wallbox. WIRE ROUTING 1 1 Primary Power Supply 3 Main Controller Module 4 4 2 Expander Loop Module 3 2 Connect the cabinet to earth ground. 3 Wallbox Ground lug Battery space Grounding strap (P/N 260077) To the outer door 3 To the inner door Permissible nonpower-limited wiring areas Lock washer #8-32 nut Earth ground cable Notes 1 Run the AC power only through the top left knockouts. 2 If a nonpower-limited source feeds the relay contacts, the wiring must remain within this area. 3 4 5 6 Route wiring to the power supply through a protective channel when using a remote battery enclosure. Nonpower-limited wiring must stay in the shaded area, and must remain ¼ inch (6.4 mm) from power-limited wiring. The snap-top standoffs, located on both sides of the wallbox, can support any module that requires a one-half footprint mounting space. The battery space supports up to two 12 Vdc, 17 Ah batteries. Do not install conduit in this area. See the Installation and Service Manual for the mounting of modules in this equipment enclosure. INSTALLATION SHEET: 2-WBS(R) Surface Mount Wallbox INSTALLATION SHEET P/N:387566 FILE NAME: 387566.CDR REVISION LEVEL: 1.0 APPROVED BY: K. Patterson DATE: 02/03/99 CREATED BY: B. Graham A UNIT OF GENERAL SIGNAL GS BUILDING SYSTEMS CORPORATION GS BUILDING SYSTEMS CORPORATION 6411 Parkland Drive Sarasota, FL 34243 USA 625 6th Street East Owen Sound, Ontario Canada N4K 5P8 DIMENSIONS Typical conduit knockout Top view 11 in (27.9 cm) Side view Front view 22.5 in (57.2 cm) Typical conduit knockout 16 in (40.6 cm) 5.1 in (12.95 cm) Bottom view All conduit knockouts support 3/4 inch (1.9 cm) conduit. 387566.CDR REV 1.0 Page 2 of 2 13.1 in (33.3 cm) PRODUCT DESCRIPTION The 6ANN/B(-S) and the 10ANN/B(-S) are wallboxes constructed of 16 guage steel with a textured, gray enamel finish. The wallboxes house remote annunciator CPUs and optional modules that interface with other network components. WIRE ROUTING If a nonpower-limited source feeds the 2-CPU relay contacts, the wiring must remain within this area. All other wiring shall be powerlimited. Typical knockout 6ANN/B(-S) 2-CPU The following models identify the same wallbox: Model Mounting 6ANN/B 6ANN/B-S Surface Semi-flush Optional module Typical knockout 10ANN/B(-S) 2-CPU The following models identify the same wallbox: Model Mounting 10ANN/B 10ANN/B-S Surface Semi-flush Optional module Earth ground connection DIMENSIONS See Detail. 6ANN/B(-S) 1 Semi-flush 3 14.48 in (36.78 cm) 2 6 3 2.75 in (6.99 cm) 16.1 in (40.9 cm) 4 5 12.1 in (30.7 cm) 13.19 in (33.5 cm) Detail 1 2 3 4 5 6 Surface mount 16.1 in (40.9 cm) Ground Strap Wallbox Ground Lug Typical Knockout Earth Ground Wire Outer Door 3 1 6 2 3 4 5 2.75 in (7.0 cm) INSTALLATION SHEET: 6ANN/B(-S) and 10ANN/B(-S) Remote Annunciator Cabinet Wallboxes 13.19 in (33.5 cm) INSTALLATION SHEET P/N: 387586 FILE NAME: 387586.CDR REVISION LEVEL: 1.0 APPROVED BY: K. Patterson DATE: 07DEC99 CREATED BY: B. Graham EDWARDS SYSTEMS TECHNOLOGY, INC. SARASOTA, FL: 941-739-4300 FAX 941-753-1806 CHESHIRE, CT: 203-699-3000 FAX 203-699-3075 OWEN SOUND, CANADA: 519-376-2430 FAX 519-376-7258 INTERNATIONAL, CANADA: 905-270-1711 FAX 905-270-9553 DIMENSIONS 10ANN/B(-S) Semi-flush 23.86 in (60.60 cm) 2.75 in (6.99 cm) 25.47 in (64.7 cm) 13.19 in (33.5 cm) Surface mount 2.75 in (7.0 cm) 25.47 in (64.7 cm) 13.19 in (33.5 cm) All conduit knockouts support 3/4 inch (1.9 cm) conduit. P/N 387586 REV 1.0 Page 2 of 2 12.1 in (30.73 cm) SPECIFICATIONS PRODUCT DESCRIPTION The CDR-3 Coder is a microcomputer-based module that provides coded outputs in response to alarm conditions. The CDR-3 is used with systems that require either march time, temporal, or unique coded outputs for separate zones. The CDR-3 decodes alarm codes embedded in printer messages that it receives through its RS-232 input. WARNINGS This module will NOT operate without electrical power. As fires frequently cause power interruption, we suggest you discuss further safeguards with your local fire protection specialist. Disconnect power before installing or removing the module. Dangerous voltages may be present at terminals even when power is disconnected. ! Input voltage 24 Vdc Standby current 60 mA Alarm current 100 mA Supervised tone outputs (isolated) Output impedance Output voltage EOL 1.2 kW 3.5 Vrms 10 kW Tone outputs Temporal Coded Dry contact (coded output) Output rating Observe static-sensitive material handling practices. INSTALLATION INSTRUCTIONS Note: Mount the CDR-3 so that its terminal blocks do not face the corner of the enclosure. Terminal blocks must face out for wiring to be installed and removed easily. CDR-3 Enclosure CDR-3 Terminal blocks Terminal blocks Wiring is difficult to install and remove. 30 Vdc @ 4 A max (Pf .35), 25 Vrms @ 100 W max, 70 Vrms @ 100 W max 60 or 90 bpm 4 rounds, 1-4 digits, 0-9 each 3 rounds, 1-3 digits, 1 digit 0-15, 2 digits 0-9 each March-time Normal coding range Extended digit range Caution! Enclosure March time (60 or 90 bpm) @ 1kHz, 10 Vrms 1 kHz @ 10 Vrms Wiring is easy to install and remove. PSNI Queue 50 most recent alarms RS-232 Input baud rates 600, 1200, 2400, 4800 Installation 1/2 footprint mounting studs Maximum wire size 14 AWG (1.5 mm ) 2 NOTES Printer connections If a printer and a CDR-3 are connected to the system: • • • Program both devices as enabled. Connect both devices in parallel or to separate ports (if available). Program the same baud rate for both devices when they share the same port. Wire stripping Strip 1/4 inch from the ends of ALL wires that connect to the terminal blocks of the module. To mount the CDR-3: 1. 2. Secure the plastic spacers to back of the main board with the screws and washers provided. Snap the main board onto the snap-top standoffs of any half footprint in the enclosure. 1/4 inch (6.4 mm) Exposing more than 1/4 inch of wire may cause a ground fault. Exposing less than 1/4 inch of wire may result in a faulty connection. Snap-top standoff Plastic spacer INSTALLATION SHEET Screw CDR-3 Bell Coder Washer Main board INSTALLATION SHEET P/N: 3100023 FILE NAME: 3100023.CDR REVISION LEVEL: 1.0 APPROVED BY: R. Wolf DATE: 17APR00 CREATED BY: B. Graham EDWARDS SYSTEMS TECHNOLOGY, INC. Enclosure SARASOTA, FL: 941-739-4300 FAX 941-753-1806 CHESHIRE, CT: 203-699-3000 FAX 203-699-3075 OWEN SOUND, CANADA: 519-376-2430 FAX 519-376-7258 INTERNATIONAL, CANADA: 905-270-1711 FAX 905-270-9553 DIP SWITCH SETUP Function DIP Switch Position 1 2 3 4 5 6 7 8 Temporal Tone On On On [1] [1] [1] [1] [1] March Tones Fast (90 beats per minute) Slow (60 beats per minute) Off On [2] [2] [1] [1] [1] [1] [1] [1] [1] [1] [1] [1] [1] [1] Code Operations Normal 4-digit code Extended first digit (adds digits 1 and 2) Extended second digit (adds digits 2 and 3) Extended third digit (adds digits 3 and 4) [1] [1] [1] [1] [1] [1] [1] [1] [1] [1] [1] [1] Off On Off On Off Off On On [1] [1] [1] [1] [1] [1] [1] [1] [1] [1] [1] [1] Baud Rates [3] 600 1200 2400 (default) 4800 [1] [1] [1] [1] [1] [1] [1] [1] [1] [1] [1] [1] [1] [1] [1] [1] [1] [1] [1] [1] [1] [1] [1] [1] Off On Off On Off Off On On Systems CCS-1 All other systems [1] [1] [1] [1] [1] [1] [1] [1] [1] [1] On Off [1] [1] [1] [1] Mode of Operation Input Output Code Normal operation Extended first digit Extended second digit Extended third digit 1234 1234 1234 1234 1234 0334 0154 0127 Digit 1, Digit 2, Digit 3, Digit 4 0, (Digit 1 + Digit 2), Digit 3, Digit 4 0, Digit 1, (Digit 2 + Digit 3), Digit 4 0, Digit 1, Digit 2, (Digit 3 + Digit 4) Name* Function TB1 connectors: main board (Figure 1) 1-3 4, 5 6, 7 DURATION TEMPORAL BELL CODE Duration relay contacts March time code output contacts Coded output contacts TB1 connectors: daughter board (Figure 1) 1, 2 TEMPORL TONE 3 4 5, 6 7 8 9, 10 EARTH GRND 24V COMMON RS232 INPUT PRINT SUPV TRBL OUT 11, 12 CODED TONE March time or temporal tone output signal (10 kW EOL required) Earth ground + 24 Vdc power input DC Common RS-232 input Printer supervision Module trouble relay (contacts close on trouble) Coded tone output (10 kW EOL required) *Names are listed here exactly as they appear on the board. [2] The On position configures the CDR-3 to generate march tones upon the receipt of an alarm signal. The Off position configures the CDR-3 to generate march tones upon power-up. [3] Program the CDR-3 and the RS-232 to the same baud rate. Code Format For unique alarm codes, each digit can be any value between 0 and 9. For extended digits, the two added digits may be any values that, when added, equal the desired value. If the sum of two digits is greater than 15, use a value of 15. For a zero, insert a pause in the tone sequence. JUMPER SETUP INTERNAL WIRING Connector [1] indicates that the DIP switch does not apply to the function. The CDR-3 provides two relay jumpers: JP1 and JP2. JP1 sets JP2 Bell Code relay contacts to either normally open (NO) or normally closed (NC). JP2 sets the Temporal relay contacts to NC COM NO either NO or NC. See Figure 1 for the locations of JP1 and JP2. To TB1-4, TB1-5 main board JP1 NC COM NO To TB1-6, TB1-7 main board Figure 1: CDR-3 terminals, LEDs, and dip switches JP2 D4 D5 D3 Daughter board JP1 D2 D1 Main board DIP switch TB1-1 through TB1-7 TB1-1 through TB1-12 Terminal wiring types: main board Wiring types TB1 connectors Power-limited* 1-7 1 2 3 4 5 6 7 1 2 3 4 5 6 7 8 9 10 11 12 Terminal wiring types: daughter board Wiring types TB1 connectors Earth ground Power-limited* Supervised, power-limited 3 4, 5, 6, 9, 10 1, 2, 7, 8, 11, 12 LEDs *Use power-limited wiring if the source is power-limited. If the source is nonpower-limited, maintain a space of 1/4 inch from power-limited wiring. Otherwise, use FPL, FPLP, FPLR, or an equivalent in accordance with the National Electric Code. LED Color Status D1 D2 D3 D4 D5 Red Red Red Yellow Green Bell code relay active Temporal relay active Duration relay active Module trouble Power on P/N: 3100023 REV: 1.0 Page 2 of 2 DIMENSIONS Surface mount backbox Knockout for 0.75 in (1.9 cm) conduit (both sides) 3.75 in (9.5 cm) Annunciator faceplate Knockout for 0.75 in (1.9 cm) conduit (both sides) 7.0 in (17.8 cm) 8 in (20.3 cm) 7.25 in (18.4 cm) 6.1 in (15.5 cm) 3.75 in (9.5 cm) Four module enclosure 11.25 in (28.6 cm) Knockout for 0.75 in (1.9 cm) conduit (both sides) Top view 2.5 in (6.4 cm) 1.4 in (3.6 cm) Cover 16.25 in (41.3 cm) Front view Side view 11.5 in (29.2 cm) 16.0 in (40.6 cm) RELATED PARTS 9.5 in (24.1 cm) 2.5 in (6.4 cm) INSTALLATION SHEET: CMDN, SMDN 2-CMDN(-C), 2-SMDN(-C) Enclosure Installation Designator Description Surface Mount Backbox CMDN housing SAN-4 Four module enclosure SAN-8 Eight module enclosure INSTALLATION SHEET P/N: 270650 RSAN-6 Six module mounting frame REVISION LEVEL: 2.0 APPROVED BY: K. Patterson BP-A SAN blank panel DATE: 30MAR00 CREATED BY: B. Graham FILE NAME: 270650.CDR EDWARDS SYSTEMS TECHNOLOGY, INC. SARASOTA, FL: 941-739-4300 FAX 941-753-1806 CHESHIRE, CT: 203-699-3000 FAX 203-699-3075 OWEN SOUND, CANADA: 519-376-2430 FAX 519-376-7258 INTERNATIONAL, CANADA: 905-270-1711 FAX 905-270-9553 DIMENSIONS Six module mounting frame Front view 10.5 in (26.7 cm) 19 in (48.3 cm) Eight module enclosure 22.37 in (56.8 cm) Top view Knockout for 0.75 in (1.9 cm) conduit (both sides) 1.4 in (3.6 cm) Cover 27.41 in (69.6 cm) Front view 27.12 in (68.9 cm) P/N: 270650 REV: 2.0 Page 2 of 2 11.5 in (29.2 cm) Side view 9.5 in (24.1 cm) 2.5 in (6.4 cm) PRODUCT DESCRIPTION The DL2 is a dialer module, which contains a Digital Alarm Communicator Transmitter (DACT). The dialer sends alarm, supervisory, and trouble information to a compatible Digital Alarm Communicator Receiver (DACR) through one or two dial-up telephone lines (two per NFPA 72). The dialer supports 20 PPS 4/2 format and Dual Tone Multi-Frequency (DTMF) or Pulse mode dialing. Every 24 hours, the dialer performs an automatic test call to verify communications between the fire alarm panel and the Central Monitoring Station (CMS). INSTALLATION Warning! Disconnect external ac power and battery power to cabinets before installing or removing components. Failure to do so may result in serious injury or loss of life. ! Caution! Carefully match mounting holes up with spacers to ensure proper connector mating. Observe static-sensitive material handling practices. Mounting the DL2 1 Install three metal spacers (P/N 362329) with the screws provided in the three locations indicated below. 2 Mount the DL2 on the three metal spacers. 3 Mate connector P1 on the DL2 with connector JE on the Main Controller Module. 4 Secure the DL2 to the spacers with the screws provided. JE SPECIFICATIONS Input power Supervisory Active 10 mA 20 mA Mounting Mounts on the Main Controller Module Phone line One/two loop start lines on public switched telephone network, pulse or DTMF dialing. Party, ground start, and PBX start lines are not acceptable. NFPA 72 requires two phone lines. Wall connector Standard RJ31X or RJ38X phone jack Line supervision Trouble when line voltage less than 10 V and line current less than 5 mA. Communications protocol SIA pulse format 20 PPS 4/2 double round, 1400 Hz handshake, 1900 Hz carrier CMS telephone numbers Two 24-digit numbers FCC registration number 4Z2USA-22549-AL-E Dialing retries five to ten Clock accuracy Within one hour/year Compliance Communications Canada, CS-03; FCC/CFR 47 parts 15 and 68; NFPA 72; UL 864; ULC S527-M87 Programming phone Any tone dial phone with an RJ11 plug Environmental conditions Temperature range Humidity range 32 to 120 °F (0 to 49 °C) 0 to 93%, non-condensing Dialer codes Event Code Fire alarm report codes Fire alarm restore codes Normal 24 hr check-in Abnormal 24 hr check-in Supervisory alarm Trouble Trouble / supervisory restore AC power fail Battery trouble Telephone line trouble Dialer disabled 01-32 41-72 90 91 92 93 94 96 97 98 99 Install metal spacers here. PRODUCT DIAGRAM Main Controller Module P1 Dialer DL2 P1 4-40X 5/16 panhead screw INSTALLATION SHEET: DL2 Dialer Module Digital Alarm Communicator Transmitter INSTALLATION SHEET P/N: 387132 4-40X Metal spacer JE FILE NAME: 387132.CDR REVISION LEVEL: 4.0 APPROVED BY: M. Slack DATE: 24AUG00 CREATED BY: B. Graham EDWARDS SYSTEMS TECHNOLOGY, INC. Main Controller Module SARASOTA, FL: 941-739-4300 FAX 941-753-1806 CHESHIRE, CT: 203-699-3000 FAX 203-699-3075 OWEN SOUND, CANADA: 519-376-2430 FAX 519-376-7258 INTERNATIONAL, CANADA: 905-270-1711 FAX 905-270-9553 WIRING Notes 1 Connect J1 and J2 to RJ31X or RJ38X telephone jacks installed by an authorized telephone company representative (CA31A or CA38A in Canada). Install the RJ31X (RJ38X) jacks within 5 ft (1.5 m) of the control panel and allow two extra feet of cable for a total of 7 ft (2.13 m). 2 3 The dialer installation kit includes a protective bushing (P/N 362316) for enclosure knockouts. 4 Before programming can proceed, the dialer will notify the central monitoring station (CMS) for any previously entered numbers. Ring (red) Ring (red) Surge protector Surge protector Tip (green) Tip (green) 4 5 3 6 2 7 1 RJ31X 8 pin modular connector for 1 phone line 1 4 3 6 2 7 1 8 Yellow 5 RJ31X 8 pin modular connector for phone line 2 1 2 3 4 5 6 7 8 9 * 0 # The phone key pad is only for module programming. Rotary dial phones will not work. See dialer programming, on the following pages, for more information. Programming phone 1 8 No T-taps! Enable/disable switch Black J3 To phone line 2 wired same as phone line 1 Premises phones 2 J2 Dialer J1 7 ft (2.13 m) Use J1 when using only one phone circuit Status LED IMPORTANT INFORMATION FCC information 1 The dialer complies with Part 68 of the FCC rules. The Dialer's FCC registration number and Ringer Equivalence Number (REN) are on the back of the dialer. This information must be provided to the telephone company if requested. 2 An FCC compliant telephone cord and modular plug cord is supplied with the dialer. The dialer is designed to be connected to the telephone network using the supplied cord and an RJ31X or RJ38X jack, which must also comply with FCC Part 68 rules. 3 The REN is used to determine the quantity of devices which may be connected to the telephone line. Excessive RENs on the telephone line may result in the devices not ringing in response to an incoming call. In most, but not all areas, the sum of RENs should not exceed five (5). To be certain of the number of devices that may be connected to a line as determined by the total RENs, contact the local telephone company. 4 If the dialer causes harm to the telephone network, the telephone company will notify you an advance that temporary discontinuance of service may be required. If advance notice is not practical, the telephone company will notify you as soon as possible. You will also be advised of your right to file a complaint with the FCC, if you believe it is necessary. 5 The telephone company may make changes in it's facilities, equipment, operations, or procedures that could affect the operation of the dialer. If this happens, the telephone company will provide advance notice in order for you to make necessary modifications to maintain uninterrupted service. 6 If trouble is experienced with the dialer, for repair or warranty information, contact GS Building Systems Corp. 6411 Parkland Drive, Sarasota, Florida USA 34243. If the dialer is causing harm to the telephone network, the telephone company may request you disconnect the dialer until the problem is resolved. 7 No repairs may be performed on the dialer by the user. 8 The dialer can not be used on public coin phones or party line service provided by the telephone company. Canada DOC information Notice: The Industry Canada label identifies certified equipment. This certification means that the equipment meets certain telecommunications network protective, operational, and safety requirements. The Department does not guarantee the equipment will operate to the user's satisfaction. Before installing this equipment, users should ensure that it is permissible to be connected to the facilities of the local telecommunications company. The equipment must also be installed using an acceptable method of connection. The customer should be aware that compliance with the above conditions may not prevent degradation of service in some situations. Repairs to certified equipment should be made by an authorized Canadian maintenance facility designated by the supplier. Any repairs or alterations made by the user to this equipment, or equipment malfunctions, may give the telecommunications company cause to request the user to disconnect the equipment. Users should ensure for their own protection that the electrical ground connections of the power utility, telephone lines, and internal metallic water pipe system, if present, are connected together. This precaution may be particularly important in rural areas. Caution: Users should not attempt to make connections themselves, but should contact the appropriate electric inspection authority, or electrician, as appropriate. Notice: The Load Number (LN) assigned to each terminal device denotes the percentage of the total load to be connected to a telephone loop which is used by the device to prevent overloading. The temination on a loop may consist of any combination of devices subject only to the requirements that the sum of the Load Numbers of all devices does not exceed 100. P/N: 387132 REV: 4.0 Page 2 of 4 DIALER PROGRAMMING Notes 1 A confirmation tone indicates the correct entry of a program item. 2 Phone lines must be loop start on a public-switched network. PBX, party lines, and ground start lines are not acceptable. 3 The dialer does not place calls, monitor the panel, or monitor the phone lines during the programming process. 4 After initial programming, the dialer notifies the central monitoring station that it is disabled before programming can proceed. 5 Two phone lines are required to comply with NFPA 72. 6 The dialer will automatically switch to pulse dialing after three consecutive failures using tone mode. It will switch back to tone dialing after failing to connect using pulse mode, upon re-programming, or upon enabling disconnect switch. Entering the programming mode 1 Connect the phone to J3. 2 Take the handset off the hook. 3 The status LED will display two rapid green flashes, and then turn solid green. 2 Listen for the confirmation tone to verify that the dialer has accepted the password. 3 Before programming can proceed, the dialer will notify the CMS for any previously entered numbers. The status LED will display a slow green flash during the dialing process. J3 J2 J1 Entering the password the Status LED 1 When turns solid green, press 4727 (GSBS) on the telephone keypad. 4 The status LED will display a steady green LED to indicate that the dialer is ready for programming. Entering the dialer data Note: Enter the required information for all 8 programming items in sequence. Programming the primary site ID number (item 01) 1 Press the following telephone keys: * 0 2 Listen for the confirmation tone to verify that you entered 01. 3 Make sure that the status LED displays a steady green pattern interrupted by amber flashes. 4 Enter the 4-digit ID number on the telephone keypad. Use leading zeroes as required. 3 Make sure that the status LED displays a steady red pattern interrupted by amber flashes. 4 Enter a 7 to 24-digit number on the telephone keypad to specify the primary CMS number. Make sure that the status LED displays a steady green pattern interrupted by double amber flashes. 4 Enter the 4-digit ID number on the telephone keypad. Use leading zeroes as required. Make sure that the status LED displays a steady red pattern interrupted by double amber flashes. 4 Enter a 7 to 24-digit number on the telephone keypad to specify the secondary CMS number. 1 Programming the primary CMS number (item 02) 1 Press the following telephone keys: * 0 2 Listen for the confirmation tone to verify that you entered 02. 2 Programming the secondary site ID number (item 03) 1 Press the following telephone keys: * 0 2 Listen for the confirmation tone to verify that you entered 03. 3 3 Programming the secondary CMS number (item 04) 1 Press the following telephone keys: * 0 4 2 Listen for the confirmation tone to verify that you entered 04. 3 - Continued P/N: 387132 REV: 4.0 Page 3 of 4 Programming 1 or 2 line operation (item 05) 1 Press the following telephone keys: * 2 0 5 Listen for the confirmation tone to verify that you entered 05. 3 Make sure that the status LED displays a steady green pattern interrupted by rapid amber flashes. 4 Enter 01 or 02 on the telephone keypad. The default setting is 2. Programming the number of CMS retry calls (item 06) 1 Press the following telephone keys: * 0 2 Listen for the confirmation tone to verify that you entered 06. 3 Make sure that the status LED displays rapid green flashes. 4 Enter 05, 06, 07, 08, 09, or 00 on the telephone keypad. The default is 00 (10). 3 Make sure that the status LED displays double green flashes. 4 Enter 0, 30, or 60 on the telephone keypad to specify the number of seconds. The default is 0. Make sure that the status LED displays a slow amber flash. 4 Enter a 2-digit number on the telephone keypad to specify the delay period (in hours). The default is 12. 6 Programming the retry interval (item 07) 1 Press the following telephone keys: * 0 2 Listen for the confirmation tone to verify that you entered 07. 7 Programming the daily supervision delay (item 08) 1 Press the following telephone keys: * 0 2 Listen for the confirmation tone to verify that you entered 08. 3 8 Exiting the programming mode 1 Disconnect the phone from J3. 2 Put the handset on the hook. Status LED indications during dialer operations Color Green Green Amber Amber J3 J2 J1 Pattern Rapid flash Single flashes Single flashes Double flashes Description Waiting for password entry Call to CMS in progress Dialer in trouble Dialer disabled Restoring default values 1 Enter the password according to the preceding instructions on this installation sheet. 2 Press the following telephone keys: 3 * 0 Make sure that the status LED displays a steady green pattern. The dialer resets to its default values and returns it to item 01 of the programming mode. 0 Verifying programmed entries 1 Enter the password according to the preceding instructions on this installation sheet. 2 Press the following telephone keys: 3 * 0 Programming item number # Listen for the confirmation tone to verify that it sounds the contents of the selected item through the handset. 1 2 3 4 Testing the dialer 1 Activate and open an SDC and an NAC to verify that the CMS receives the proper signal. that failure of the primary signal 2 Verify path results in the transmission of a * trouble signal 3 through the secondary signal path within 4 minutes. Verify that failure of the secondary signal path results in the transmission of a trouble signal through the primary signal path within 4 minutes. Notes The primary signal path is along the phone line connected to J1. The secondary signal path is along the phone line connected to J2. P/N: 387132 REV: 4.0 Page 4 of 4 INSTALLATION 1 Mount the LED/switch modules. Inner door (side view) Plunger Inner door (rear view) Grommet LED/switch module (rear view) Note: Do not try to insert the plunger and grommet into the mounting holes at the same time. Insert the grommet first and then the plunger to avoid damaging them. J1 5 4 3 2 To Main Controller Module 0 1 2-LCD Dip switch J2 J1 LED/switch module (side view) J2 J1 J2 J1 J2 J1 J2 J1 J2 J1 J3 2 Connect the LED/Switch Module ribbon cables 3 1 Connect the ribbon cable from J3 on the 2-LCD to J1 on the first module. Dip switch setting LED addresses Switch addresses 2 Connect the ribbon cable from J2 on the first module to the J1 on the second module. 3 Repeat step 2 until you reach the last module. 0 1 2 3 4 5 01-16 17-32 33-48 49-64 65-80 81-96 01-08 09-16 16-24 25-32 33-40 41-48 Note: White indicates the correct dipswitch position. 4 5 ON 3 ON 1 2 3 4 2 ON 1 2 Set the dip switches on the LED/switch modules. 3 4 1 ON 1 2 3 4 PRODUCT DESCRIPTION The front panel LED/switch modules consist of 16 individual LEDs for point annunciation. The LED/switch modules provide eight groups of two LEDs combined with a switch. See the specifications for available LED color options. The protected slip-in label next to each LED/switch identifies its function. Communication with the Main Controller Module requires no point to point wiring, because it is multiplexed using plug-in ribbon cables. Any combination of three annunciator and switch modules may be mounted on the panel's inner door. Blank Plates (model 2-FBP) fill unused inner door spaces. 0 ON 1 2 3 4 ON 1 Models 2-12R4Y 2-16G 2-16R 2-16Y 2-8RY 2 4 3 2-FBP 1 2 3 4 Models 2-16G8S 2-16R8S 2-16Y8S 2-8GYS 2-8RYS SPECIFICATIONS LED/switch options Model 2-12R4Y 2-16G 2-16G8S 2-16R 2-16R8S 2-16Y 2-16Y8S 2-8RY 2-8RYS 2-8GYS Description 12 red LEDs over 4 yellow LEDs 16 green LEDs 16 green LEDs and 8 switches 16 red LEDs 16 red LEDs and 8 switches 16 yellow LEDs 16 yellow LEDs and 8 switches 8 red LEDs over 8 yellow LEDs 8 red / 8 yellow alternating LED/switch pairs 8 green / 8 yellow alternating LED/switch pairs Blank plate option 2-FBP Switches Momentary push button Temperature range 32 to 120 °F (0 to 49 °C) Humidity range 0 to 93%, non-condensing INSTALLATION SHEET: Front Panel LED(/Switch) Modules INSTALLATION SHEET P/N: 270214 FILE NAME: 270214.CDR REVISION LEVEL: 4.0 APPROVED BY: J. Massing DATE: 21JUN00 CREATED BY: B. Graham Related documentation: 2-LCD installation sheet EDWARDS SYSTEMS TECHNOLOGY, INC. SARASOTA, FL: 941-739-4300 FAX 941-753-1806 CHESHIRE, CT: 203-699-3000 FAX 203-699-3075 OWEN SOUND, CANADA: 519-376-2430 FAX 519-376-7258 INTERNATIONAL, CANADA: 905-270-1711 FAX 905-270-9553 PRODUCT INFORMATION SPECIFICATIONS The IOP3A isolator card is designed to electrically isolate a fire alarm control panel's RS-232 ports from peripheral devices. The IOP3A provides two isolated RS232 connections, as well as a DB9 and RJ12 connector for downloading. A select mode allows both a printer and modem to be connected when used on EST2 systems. The IOP3A should be used in ALL applications which require the connection of external devices (CCA, CGP, VDU, and external modems) to properly isolate the fire alarm control panel from earth ground connections. Current Requirement JUMPER SETUP JB1 1-2 2-3 Select Mode Supervision Mode JB2 IN Output #1 supervision disable / (+) 12VDC on TB2-1 Output #1 supervision enable (TB2) OUT INSTALLATION The IOP3A module requires 1/2 standard module footprint. 60mA JB3 IN JB4 OUT Output #2 supervision disable / (+) 12VDC on TB3-1 Output #2 supervision enable (TB3) IN OUT Supervision Mode Select Mode FIELD WIRING: NOTE: JB1 and JB4 settings must agree. To Control Module: TB1-1 TB1-2 TB1-3 TB1-4 TB1-5 TB1-6 (+) 24VDC (-) 24VDC Port Selection/Supervision Common RXD IN TXD OUT To Peripheral Device: TB2/3-1 TB2/3-2 TB2/3-3 TB2/3-4 Supervision / (+) 12VDC Common TXD OUT RXD IN IRC-3 Printer Mode: JB1 2-3 IN JB2 IN JB3 IN JB4 IN RDU Mode: JB1 1-2 JB2 JB3 JB4 P1 on 2-MCM FireWorks Mode: JB1 2-3 IN JB2 IN JB3 IN JB4 IN P1 on 2-MCM OUT IN OUT OUT OUT IN Notes: 1. When in RDU mode, TB2 must be used for the modem and TB3 must be used for a printer. IOP3A 2. All RS-232 connections should be within the same room or within 50 feet of the fire panel they are connected to. 1 2 3 4 5 6 DOWN Outputs 1 and 2 enabled. RJ12 and DB9 connectors disabled. Download setting. RJ12 and DB9 connectors enabled. Outputs 1 and 2 disabled. Note diagram below for UP and DOWN switch positions. COM UP 1 JB2 JB3 1 UP SW1 + - SUPV 24VDC OUT SW1 SUPVCOMTXD RXD 3 2 1 TB1 SWITCH SETUP RS232 #1 OUT JB4 JB1 RXD TXD IN OUT RS232 IN 2 3 2 3 4 TB2 TB3 4 PROGRAM SUPVCOMTXD RXD RS232 #2 OUT INSTALLATION SHEET: IOP3A Isolator RS-232 Card INSTALLATION SHEET P/N: 270758 FILE NAME: 270758.CDR REVISION LEVEL: 1.0 APPROVED BY: D.P. DATE: 10/04/99 CREATED BY: DRM A UNIT OF GENERAL SIGNAL GS BUILDING SYSTEMS CORPORATION GS BUILDING SYSTEMS CORPORATION 6411 Parkland Drive Sarasota, FL 34243 USA 625 6th Street East Owen Sound, Ontario Canada N4K 5P8 APPLICATION DRAWINGS IOP3A to CM motherboard wiring IOP3A to 3-CPU1 wiring TB1 3-CPU1 Panel controller COM 4 R X 1 P1 COMMON 2 1 T X 1 C O M 1 R T S 1 R X 2 C O M 2 R T S 2 T X 2 3 TB1 5 IOP3A TB2 6 P3 TB1 RXD TXD IN OUT 1 2 3 P4 2 3 4 3 2 1 JB1 Switch shown in UP position. CM Motherboard UP SW1 PROGRAM JB4 P7 J2 6 J1 5 9 10 IOP3A 1 24 Vdc RXD TXD IN OUT Switch shown in UP position. + - SUPV 24VDC OUT JB1 3 2 1 UP SW1 PROGRAM 4 5 6 7 8 COM RS232 IN + - SUPV 24VDC OUT +24 VDC JB2 INSTALLED (PROVIDES 12V TO POWER MODEM) 2 3 3 4 TB2 TB3 4 RS232 #1 OUT 2 SUPVCOMTXD RXD 1 JB2 JB3 1 RS232 #2 OUT SUPVCOMTXD RXD GREEN BLACK GREEN BLACK RED WHITE WHITE RED JUMPER 7-8 JUMPER 1,4,6 NOTE: The IOP3A must be configured in supervision mode. PIN 1 2 3 4 5 GREEN BLACK RED WHITE JUMPER 4-5 JUMPER 6, 8, 20 20 7 8 7 3 2 PIN 1 PIN 1 DOWNLOAD CONFIGURATION DB-9 FEMALE DOWNLOAD CONFIGURATION DB-25 FEMALE PRINTER CONFIGURATION DB-25 MALE IOP3A to 2-MCM(N) wirng COM 4 3 JB1 on 1-2 6 3 2 1 JB1 2-PPS 5 PROGRAM 2-PPS/6A 2 NAC POWER UP SW1 NAC POWER RXD TXD IN OUT SMOKE/AUX POWER 1 TB3 NAC POWER + - SUPV 24VDC OUT TB3 TB1 Power Limited Not supervised Switch shown in UP position. JB4 NOTE: The RTS line is connected only when the IOP3A is used in Select Mode. IOP3A RS-232 TXD RXD 3 3 4 TB2 TB3 4 RS232 #1 OUT 2 SUPVCOMTXD RXD 2 P/N: 270758 REV: 1.0 Page 2 of 2 RS232 #2 OUT 2-MCM(N) SUPVCOMTXD RXD COM 1 JB2 JB3 1 RTS Note: When in RDU mode, TB2 on the IOP3A must be used for the modem and TB3 must be used for a printer. SPECIFICATIONS PRODUCT DESCRIPTION The ISP96 series multiplexed annunciator/switch panels consist of 48 LED/switch groups and a metal face plate that mounts to a 19-inch rack. Each LED/switch group contains one switch and two LEDs. All LEDs and switches are independently programmed and controlled. The ISP96-2 LED/switch groups provide a two-position toggle switch for every two LEDs. The up position generates an active (off-normal) condition. The down position is the normal state. Each LED requires one output address. Each switch requires one input address. The ISP96-3 LED/switch groups provide a three-position toggle switch for every two LEDs. The up and down positions will generate one of two active (off-normal) conditions. The center position is the normal state. Each ISP96 series panel interfaces with the rest of the system through a dedicated SAN-CPU. It may use RS485, 20 mA, or Fiber optic communication formats. The ISP96 panels are also fully compatible with regenerative networks that use RS-485 lines. APPLICATIONS Voltage 24 Vdc Standby current 60 mA Current per active LED 6 mA, 268 mA total draw Fully loaded current 680 mA Temperature range 32 to 120 °F (0 to 49 °C) Humidity 85 % non-condensing Dimensions Height Width Depth 5.25 in (13.3 cm) 19 in (48.3 cm) 2 in (5 cm) Warning! Disconnect power to cabinets before installing or removing components. Failure to do so may result in serious injury or loss of life. ! Caution! Observe static-sensitive material handling practices. ISP96 series panels provide a generic LED/switch matrix for operator interface with the system. The panels may be used for life safety functions, which require control and annunciation. Such functions include, but are not limited to: PRODUCT DIAGRAM Front view HVAC control Firefighter telephone circuits Audio evacuation and paging systems In HVAC applications, the switches function as HOA (hand-off automatic) controls that override automatic control of the system. HVAC controls include fans and dampers. The LEDs indicate the status of the fans and dampers, which use monitored limit switches and run/stop contacts. Rear view In firefighter telephone applications, the switches select incoming calls. One LED will light to indicate that a circuit is calling in. The other LED will light to indicate the circuit has been connected to the master handset. In audio evacuation and paging systems, the switches allow the operator to control paging and silencing circuits. The LEDs indicate the silenced or active status of the speaker circuit. INSTALLATION SHEET ISP96-2/ISP96-3 Annunciator/Switch Panel INSTALLATION SHEET P/N: 3100029 FILE NAME: 3100029.CDR REVISION LEVEL: 1.0 APPROVED BY: K. Johnson DATE: 22AUG00 CREATED BY: B. Graham Related documentation: SAN-CPU installation sheet EDWARDS SYSTEMS TECHNOLOGY, INC. SARASOTA, FL: 941-739-4300 FAX 941-753-1806 CHESHIRE, CT: 203-699-3000 FAX 203-699-3075 OWEN SOUND, CANADA: 519-376-2430 FAX 519-376-7258 INTERNATIONAL, CANADA: 905-270-1711 FAX 905-270-9553 INSTALLATION INSTRUCTIONS Note: ISP96 series panels require 5.25 inches of vertical height and 2 inches of rear clearance in the enclosure. ISP96 series panel 19-inch rack Screw FIELD WIRING ISP-96 (rear view) SAN-CPU terminals (See Table 1 and Detail A.) See Table 1 and Detail B. Metal faceplate LED/switch board I/O Select LED/switch board JP25 is located on the inside of this board, facing the metal faceplate. Install the jumper. JP25 is located on the inside of this board, facing the metal faceplate. Remove the jumper. P/N: 3100029 REV: 1.0 Page 2 of 4 FIELD WIRING Table 1: ISP-96 data line wiring (SAN-CPU terminals) TB1-1 TB1-2 +24 Vdc 24 Vdc common Format Class B (Style 4) RS-485 TB1-3 TB1-4 Class A (Style 7) TB1-3 TB1-4 TB1-5 TB1-6 + RS-485 - RS-485 + + - Notes RS-485 RS-485 RS-485 RS-485 Install JP1/JP2 if the SAN-CPU is the last device on the RS-485 data line. 20 mA loop Replace U3 with the header/ribbon cable from the SO-20D, P3. Replace U3 with the header/ribbon cable from the SO-20D, P3. Replace U4 with the header/ribbon cable from SO-20D, P2. Fiber optic Replace U3 and U4 with the header/ribbon cable from the SO-FIB's, P4. Replace U3 with the header/ribbon cable from the SO-FIB, P4. Two SO-20s many be used instead of an SO-20D. Detail A Detail B From power supply RS-485 from previous panel RS-485 to next panel TB1 1 2 3 4 _ _ + + 24 Vdc Ch 1 5 6 _ + Ch 2 TB1 SAN-CPU Note: All wiring is power-limited. JUMPER SETUP SAN-CPU JP1 JP2 Install JP1 when the communications format is Class B (Style 4) or Class A (Style 7) RS-485 and the ISP-96 is the last device on the data line. Install JP2 when the communications format is Class A (Style 7) RS-485 and the ISP-96 is the last device on the data line. LED/switch boards JP25 Each of the two LED/switch boards includes a continuity jumper, labeled JP25. Locate each jumper on the side of the board that faces the rear side of the metal faceplate. Install the jumper on JP25 of the right LED/switch board (rear view). Remove the jumper from JP25 of the left LED/switch board (rear view). Note: If the jumpers are not properly installed, an xx99 open will appear at the fire alarm control panel. See the illustration of the ISP-96 (rear view) on this installation sheet. P/N: 3100029 REV: 1.0 Page 3 of 4 SAN-CPU JP1 U3 JP2 U4 ? ISP96 ADDRESSING Matrix A Notes Matrix B Matrix C All switches and LEDs are independently programmed and controlled. Therefore, the addresses for the upper switch positions and the lower LEDs are different even though they appear to be the same. Matrix A Switches LEDs Switches LEDs Switches LEDs Switches LEDs XX02 XX01 XX10 XX09 XX18 XX17 XX26 XX25 XX01* XX02 XX09* XX10 XX17* XX18 XX25* XX26 XX04 XX03 XX12 XX11 XX20 XX19 XX28 XX27 XX03* XX04 XX11* XX12 XX19* XX20 XX27* XX28 XX06 XX05 XX14 XX13 XX22 XX21 XX30 XX29 XX05* XX06 XX13* XX14 XX21* XX22 XX29* XX30 XX08 XX07 XX16 XX15 XX24 XX23 XX32 XX31 XX07* XX08 XX15* XX16 XX23* XX24 XX31* XX32 LEDs Switches XX41 XX50 LEDs Switches XX49 XX58 LEDs XX57 *ISP96-3 only Matrix B Switches XX34 LEDs Switches XX42 XX33 XX33* XX34 XX41* XX42 XX49* XX50 XX57* XX58 XX36 XX35 XX44 XX43 XX52 XX51 XX60 XX59 XX35* XX36 XX43* XX44 XX51* XX52 XX59* XX60 XX38 XX37 XX46 XX45 XX54 XX53 XX62 XX61 XX37* XX38 XX45* XX46 XX53* XX54 XX61* XX62 XX40 XX39 XX48 XX47 XX56 XX55 XX64 XX63 XX39* XX40 XX47* XX48 XX55* XX56 XX63* XX64 *ISP96-3 only ISP96-2 switch position addresses Matrix C No address XX02 Down Up ISP96-3 switch position addresses XX02 No address XX01 Down Center Up Switches XX66 LEDs Switches XX74 XX65 LEDs Switches XX73 XX82 LEDs Switches XX81 XX90 LEDs XX89 XX65* XX66 XX73* XX74 XX81* XX82 XX89* XX90 XX68 XX67 XX76 XX75 XX84 XX83 XX92 XX91 XX67* XX68 XX75* XX76 XX83* XX84 XX91* XX92 XX70 XX69 XX78 XX77 XX86 XX85 XX94 XX93 XX69* XX70 XX77* XX78 XX85* XX86 XX93* XX94 XX72 XX71 XX80 XX79 XX88 XX87 XX96 XX95 XX71* XX72 XX79* XX80 XX87* XX88 XX95* XX96 *ISP96-3 only P/N: 3100029 REV: 1.0 Page 4 of 4 INSTALLATION LSRA-PROG Programing Port 1. 2. 3. 4. 5. Remove the access door on the rear of the annunciator. Firmly mate the LSRA-PROG's connector with the connector on the annunciator circuit board. Connect modular cable from RJ12 jack on the LSRA-PROG to the PC adapter. Connect the adapter to the PC setting the number 4 dip switch to ON and then back to OFF. Download information using the data entry program. Remove the LSRA-PROG from the annunciator and re-install the access door. LSRA-232 Printer/Programming Port 1. 2. 3. 4. 5. Remove the access door on the rear of the annunciator Insert two nylon spacers in the holes in the annunciator circuit board located above and to the left of the DIP switch. Firmly mate the LSRA-232 board connector with the connector on the annunciator circuit board, and secure the option board to the two nylon standoffs. Remove the knockout on the access door, then re-install the door on the annunciator so the RJ12 jack is visible through the knockout. Connect the modular cable from the RJ12 jack to the printer or download adapter. RS-232 RJ12 Jack LSRA-PROG Programming Port Annunciator Access Door LSRA-232 Programming/Printer Port Stand-Off Annunciator Mounting Slot LSRA-232 Programming/Printer Port RS-232 RJ12 Jack Configuration Dip Switch Connnecton Terminals Rx LED Tx LED PRODUCT INFORMATION The LSRA-232 is an optional printer/programming port board for LSRA annunciators, providing a connection to the host system or a local printer, and for down loading data into the annunciator. The LSRA-PROG Programming Port is a tool used for downloading data from a PC, and is removed once the annunciator is configured. WIRING Download & Local Printer RJ12 on LSRA-232 Option Board for printer & download RJ12 on LSRA-PROG Programming Port for download only PROGRAMING & INSTALLATION NOTE 1. PC Connection to the LSRA-232 or LSRA-PROG Port requires Modular Cable P/N 360163 and Adaptor P/N 240506 or P/N 240507.( Each ordered separately.) 2. When installing annunciator, leave enough wire to permit lowering the annunciator to facilitate programming. SPECIFICATIONS Port Format Baud Rate Maximum Wire Length Connector INSTALLATION SHEET: RJ12 to DB9 P/N 240507 TO PC OR PRINTER SERIAL PORT P/N 360163 OR RJ12 to DB25 P/N 240506 TO PC OR PRINTER SERIAL PORT RS-232 2400, 4800, 9600 50 ft (15 M) RJ12 LSRA-232 Printer/Programming Port LSRA-PROG Programming Port INSTALLATION SHEET P/N: 387361 FILE NAME: 387361.CDR REVISION LEVEL: 1.2 APPROVED BY: RW. DATE: 03/11/98 CREATED BY: GJC A UNIT OF GENERAL SIGNAL GS BUILDING SYSTEMS CORPORATION GS BUILDING SYSTEMS CORPORATION 6411 Parkland Drive Sarasota, FL 34243 625 6th Street East Owen Sound, ON, Canada INSTALLATION Mount the dead front door Wallbox Dead front door PRODUCT DIAGRAM INSTALLATION SHEET: RACCDR Remote Audio Closet Cabinet Door (Red) PRODUCT DESCRIPTION The RACCDR is a red, dead front outer door that mounts on the RACCR wallbox. The RACCDR does not include an inner door. INSTALLATION SHEET P/N: 387341 FILE NAME: 387341.CDR REVISION LEVEL: 2.0 APPROVED BY: J. Massing DATE: 30MAR00 CREATED BY: B. Graham EDWARDS SYSTEMS TECHNOLOGY, INC. SARASOTA, FL: 941-739-4300 FAX 941-753-1806 CHESHIRE, CT: 203-699-3000 FAX 203-699-3075 OWEN SOUND, CANADA: 519-376-2430 FAX 519-376-7258 INTERNATIONAL, CANADA: 905-270-1711 FAX 905-270-9553 DIMENSIONS PRODUCT DESCRIPTION The RACCR is a red, surface mount wallbox that houses an auxiliary power supply, up to two audio amplifiers, and up to two 10 Ah batteries. Top View Side View WIRE ROUTING 1 Auxiliary Power Supply Audio Amplifier Front View 21.0 in (53.3 cm) Audio Amplifier 2 16.2 in (41.15 cm) Battery space Shading represents areas that permit nonpower-limited wiring. 3.45 in (8.76cm) Notes 1 2 Bottom View Run the AC power only through the top left knockouts. Route battery wiring to the power supply through a protective channel. Wiring must stay within this area, and must remain 1/4 inch (6.4 mm) from power-limited wiring. 3 See the appropriate module installation sheets for detailed mounting and wiring instructions. 4 All conduit knockouts support 1/2 or 3/4 inch (1.3 or 1.9 cm) conduit. PRODUCT DIAGRAM INSTALLATION Mount the wallbox INSTALLATION SHEET: RACCR Remote Audio Closet Cabinet (Red) INSTALLATION SHEET P/N: 387578 FILE NAME: 387578.CDR REVISION LEVEL: 1.0 APPROVED BY: J. Massing DATE: 30MAR00 CREATED BY: B. Graham EDWARDS SYSTEMS TECHNOLOGY, INC. SARASOTA, FL: 941-739-4300 FAX 941-753-1806 CHESHIRE, CT: 203-699-3000 FAX 203-699-3075 OWEN SOUND, CANADA: 519-376-2430 FAX 519-376-7258 INTERNATIONAL, CANADA: 905-270-1711 FAX 905-270-9553 SPECIFICATIONS PRODUCT DESCRIPTION The Rack Mounted Strip Printer is a supervised, two-color, 40-column impact printer that mounts to the RSAN-6 mounting rack. Voltage 24 Vdc Current Standby Printing 0.057 A 1.5 A Note: The Rack Mounted Strip Printer is referred to as the Printer from here forward. Baud rate 1200, 2400, 4800, 9600 Print speed 2 lines per second Print colors Red (alarm) and black Print format 40 column Message buffer 32 Kbytes (200 messages) Dimensions Height Width Depth 10.375 in (26.4 cm) 8.3125 in (21.1 cm) 5.25 in (13.3 cm) Communications format RS-232 RS-485 Fiber optic 20 mA Loop Card FCOM-232, 2-CPU, MCM(N) series FCOM-485 FCOM-FIB FCOM-20 APPLICATIONS The Printer is designed for applications which require a hard copy of activity from a compact printer. Printer communication circuit distance and wiring are subject to the limitations of the port connection on the fire alarm control panel. Note: See the Application Flowchart to determine FCOM card placement and jumper settings for the printer. PRODUCT DIAGRAM INSTALLATION INSTRUCTIONS Mounting the printer To mount the printer: 1. 2. Align the mounting holes of the printer to the pem studs on the rear side of the mounting rack (Figure 1). Thread and tighten the locknuts provided with the printer to the pem studs on the mounting rack. Message printed here PAPER TAKE UP TROUBLE PAPER OUT Figure 1: Mounting the printer Mounting rack PAPER ADVANCE Pem stud Printer INSTALLATION SHEET RSAN-PRT Rack Mounted Strip Printer Nut Locking pin INSTALLATION SHEET P/N: 61000-0011 FILE NAME: 61000-0011.CDR REVISION LEVEL: 4.0 APPROVED BY: K. Johnson DATE: 24AUG00 CREATED BY: B. Graham EDWARDS SYSTEMS TECHNOLOGY, INC. SARASOTA, FL: 941-739-4300 FAX 941-753-1806 CHESHIRE, CT: 203-699-3000 FAX 203-699-3075 OWEN SOUND, CANADA: 519-376-2430 FAX 519-376-7258 INTERNATIONAL, CANADA: 905-270-1711 FAX 905-270-9553 INSTALLATION INSTRUCTIONS Replacing paper Figure 2: Paper replacement Note: Do not remove power from the printer to replace paper. Paper take-up reel To replace the paper: Paper slot 1. 2. 3. 4. Remove the printed paper from the take-up reel (Figure 2). Remove the empty paper roll and spindle from the printer cradle. Install the spindle in the new paper roll. Pull out enough paper to avoid activating the Paper Out sensor until the paper is in the print head. 5. Cut or fold the end of the paper into a clean edge. 6. Set the paper roll and spindle in the printer cradle with the paper feeding from the lower front edge of the roll. 7. Insert the end of the paper into the print head (Figure 3). 8. Turn the manual paper feed to advance the paper through the print head and out the lower paper slot. 9. Press the paper advance switch to route the paper from the lower slot to the upper paper slot. 10. Insert the end of the paper into the edge of the take-up reel. 11. Press the paper take-up switch to remove any slack in the paper. Paper roll Printer mechanism Paper Paper slot Spindle Printer cradle Face plate Figure 3: Printing mechanism/manual paper feed Figure 4: Pivoting the printer cradle Print head Paper Manual paper feed Ribbon cartridge Printing mechanism Paper Locking pin Printer cradle Turn the manual paper feed counter-clockwise to advance the paper through the print head. Retaining clip Figure 5: Printing mechanism With printer cartridge installed Replacing ribbon cartridges Warning: Remove power from the printer before replacing the ribbon cartridge. Failure to do so may result in serious injury or loss of life. Ribbon advance knob Lift here to remove the ribbon cartridge. To replace the ribbon cartridge: Remove the paper from the take-up reel. Remove the ribbon cable from the retaining clip on the back of the printer cradle (Figure 4). 3. Pivot the printer cradle around the two silver locking pins so that the ribbon cartridge is up. 4. Lift the right edge of the ribbon cartridge to remove it from the printer mechanism (Figure 5). 5. Place the left edge of the new ribbon cartridge over the ribbon advance spindle. 6. Make sure the new ribbon enters the slot directly in front of the paper. 7. Press the right side of the ribbon cartridge down until it locks. 8. Turn the ribbon advance knob on the left side of the ribbon cartridge until the ribbon moves freely in the printer mechanism. 9. Pivot the printer mechanism around the two silver locking pins back into its normal position. 10. Insert the ribbon cable under the retaining clip on the back of the printer mechanism. 11. Re-install the paper take-up reel. Ribbon cartridge 1. 2. The ribbon should be directly in front of the paper. With printer cartridge removed Advance spindle P/N: 61000-0011 REV: 4.0 Page 2 of 6 Manual paper feed JUMPER SETTINGS Notes Table 1: FCOM card requirements and jumper settings 1. Install JP1 and JP2 on FCOM-485 cards. Outgoing format Incoming format RS-232 RS-485 20 mA loop Fiber optic RS-232 P1: FCOM-232 P2: None Code: 000001 P1: FCOM-232 P2: FCOM-485 Code: 110101 P1: FCOM-232 P2: FCOM-20 Code: 110001 P1: FCOM-232 P2: FCOM-FIB Code: 110001 RS-485 P1: FCOM-485 P2: FCOM-232 Code: 111010 P1: FCOM-485 P2: FCOM-485 Code: 111111 P1: FCOM-485 P2: FCOM-20 Code: 111011 P1: FCOM-485 P2: FCOM-FIB Code: 111011 0 (Off) 20 mA loop P1: FCOM-20 P2: FCOM-232 Code: 110010 P1: FCOM-20 P2: FCOM-485 Code: 110111 P1: FCOM-20 P2: None Code: 000011 P1: FCOM-20 P2: FCOM-FIB Code: 110011 1 (On) Fiber optic P1: FCOM-FIB P2: FCOM-232 Code: 110010 P1: FCOM-FIB P2: FCOM-485 Code: 110111 P1: FCOM-FIB P2: FCOM-20 Code: 110011 P1: FCOM-FIB P2: None Code: 000011 2. Install JP1 and JP2 on FCOM-FIB cards in position 2/3. 1 J6 1 J5 0 J4 1 0 J3 J2 1 J1 The example above shows the configuration of a printer that receives an RS-232 format signal and retransmits an RS-485 formatted signal (address 110101). For more information on choosing FCOM card placement and jumper settings, see the Application Flowchart. SWITCH SETUP Table 2: Printer function selection switches Table 3: Baud rate selection switches Switch Position Function U10-1 Off* On 3.1 mm character height 2.2 mm character height U10-2 Off* On Handstand characters Normal character print Switch 1200 2400 4800 9600 U10-3 Off Off* On On U10-4 Off On* Off On *Factory default U10-3 See Table 2. U10-4 See Table 2. U10-5 Off* On Normal Pulse width adjust on (factory use) U10-6 Off* On Even parity (future use) Odd parity (future use) U10-7 Off* On 1 stop bits (future use) 2 stop bits (future use) *Factory default INTERNAL WIRING Black wire Red wire RESET P5 Paper Take Up switch To paper take up reel Warning! FCOM JUMPERS 1 S102 LD1 LD2 P1 FCOM card (incoming communications) Disconnect power to cabinets before installing or removing components. Failure to do so may result in serious injury or loss of life. 2 U10 ! P2 COM 24V Observe static-sensitive material handling practices. FCOM card (outgoing communications) Black stripe Paper Advance switch P3 Ribbon cable to printer mechanism P4 Red stripe Ribbon cable to printer cradle From a dedicated power supply output P/N: 61000-0011 REV: 4.0 Page 3 of 6 Caution! ! Notes 1 See Jumper settings in Table 1. 2 See Switch setup in Tables 2 and 3. APPLICATION FLOWCHART Use this flowchart to determine the FCOM card placement and the jumper settings on the printer. See the Jumper Settings in Table 3. Is the signal sent to another printer? Start Yes Set jumpers at 000001. Yes Set jumpers at 000001. Yes Install FCOM-485 in P2. Set jumpers at 110101. Yes Install FCOM-FIB in P2. Set jumpers at 110001. Yes Set jumpers at 111111. No Is incoming signal format RS-232? Yes Install FCOM-232 in P1. Is outgoing signal format RS-232? No No Is incoming signal format RS-485? Yes Install FCOM-485 in P1. Is outgoing signal format RS-485? No No Is incoming signal format fiber optic? Yes Install FCOM-FIB in P1. Install FCOM-20 in P2. Set jumpers at 110001. No No Is outgoing signal format fiber optic? Install FCOM-20 in P1. Is the signal sent to another printer? Yes Set jumpers at 000011. No Is outgoing signal format RS-232? Yes Install FCOM-232 in P2. Set jumpers at 110010. No Set jumpers at 000011 Is outgoing signal format RS-232? Yes Install FCOM-485 in P2. Set jumpers at 110111. Is outgoing signal format RS-485? Yes Install FCOM-232 in P2. Set jumpers at 110010. Yes Is outgoing signal format fiber optic? Is outgoing signal format RS-232? Yes Install FCOM-232 in P2. Set jumpers at 111010. No Yes Install FCOM-485 in P2. Set jumpers at 110111. No Install FCOM-FIB in P2. Set jumpers at 110011. Is the signal sent to another printer? No No No Is outgoing signal format fiber optic? Yes Set jumpers at 000011. No No Is outgoing signal format RS-485? Is the signal sent to another printer? Is outgoing signal format RS-485? Yes Install FCOM-485 in P2. Set jumpers at 111111. Yes Install FCOM-FIB in P2. Set jumpers at 111011. No Yes Set jumpers at 000011. No Install FCOM-20 in P2. Set jumpers at 110011. P/N: 61000-0011 REV: 4.0 Page 4 of 6 Is outgoing signal format fiber optic? No Install FCOM-20 in P2. Set jumpers at 111011. FIELD WIRING Printer-to-printer connection Printer 1 Printer 2 Printer 3 Printer 32 DCPU to printer Printer connector P1 DCPU Control module* 1 *Control modules include network controllers (CM1[N]/CM2[N][D]), 2-CPU modules, and main controller modules (MCM[N] series). Control modules provide only RS-232 format. FCOM-232 FCOM-232 CH A CH B T R T/R C T R T/R C CH A CH B T R T/R C T R T/R C The first printer connected to a control module must have an FCOM card installed in connector P1. 50 ft max. #22 AWG Network controller connection Printer connector P1 DCPU Printer connector P1 1 C CH B CH A FCOM-232 FCOM-FIB TB1 T/R R 1 (Supv) T C 2 (C) 3 (R) T/R 4 (T) R T FCOM-FIB CH B CH A T CH B CH A R R T T R 2 R T Network controller 62.5/125 Fiber optic cable 10 dB max. loss DCPU 2-CPU connection Printer connector P1 Printer C connector T/R P1 CH B R T C T/R CH A R FCOM-232 T FCOM-485 1 FCOM-485 CH A CH B + - + - CH A CH B + - + 3 7,500 ft max. #18 AWG twisted pair TB3 TXD 1 RXD 2 RS-232 RTS 3 DCPU Printer connector P1 1 FCOM-20 CH A In Out + - + - COM 4 2-CPU FCOM-20 CH B In Out + - + - CH A In Out + - + - CH B In Out + - + - Main Controller Module connection Printer C connector T/R P1 CH B R T C T/R CH A R T FCOM-232 TB6 TXD 5 RXD 6 RS-232 RTS 7 COM 8 Main Controller Module 9,600 ft max. #22 AWG twisted pair DCPU to printer notes 1 Channel A or B may be used for DCPU connections. 2 Install JP1 and JP2 in position 2/3 on both cards. 3 Install JP1 and JP2 on both cards. 4 Wiring is supervised and power-limited. 5 The wiring diagrams do not reflect the physical placement of the FCOM cards. See Internal Wiring for the physical placement of the cards. P/N: 61000-0011 REV: 4.0 Page 5 of 6 FIELD WIRING Printer to printer (no format change) Printer connector P1 Printer to printer (format change) Printer connector P1 Printer connector P2 FCOM-232 FCOM-232 CH A CH B T R T/R C T R T/R C CH A CH B T R T/R C T R T/R C Printer connector P1 FCOM-232 1 CH B CH A T R T/R C T R T/R C FCOM-232 CH B CH A T R T/R C T R T/R C 2 5 2 50 ft max. #22 AWG Printer connector P1 1 CH A T Printer connector P1 FCOM-FIB T CH B CH A R T R T R Printer connector P1 FCOM-FIB 1 CH B CH A FCOM-FIB CH B R 50 ft max. #22 AWG Printer connector P2 T R T FCOM-FIB CH B CH A R T R T R 2 3 62.5/125 Fiber optic cable 62.5/125 Fiber optic cable 10 dB max. loss Printer connector P1 Printer connector P2 Printer connector P1 Printer connector P1 FCOM-20 FCOM-20 FCOM-485 1 CH A In Out + - + - CH B In Out + - + - CH A In Out + - + - FCOM-485 CH A CH B + - + - CH B In Out + - + - CH A CH B + - + 3 4 9,600 ft max. #22 AWG twisted pair 7,500 ft max. #18 AWG twisted pair Printer connector P1 Printer connector P2 1 FCOM-20 CH A CH B In Out In Out + - + - + - + - FCOM-20 CH A In Out + - + - CH B In Out + - + - Printer to printer (no format change) notes 1 Control module only. Control modules include network controllers, 2-CPUs, and main controller modules. 2 Control module or FCOM-232 3 FCOM-FIB 4 FCOM-20 9,600 ft max. #22 AWG twisted pair Printer to printer (format change) notes 5 For supervision of IRC-3 devices only 6 Wiring is supervised and power-limited. 7 The wiring diagrams do not reflect the physical placement of the FCOM cards. See Internal Wiring for the physical placement of the cards. 1 Use only Channel A for printer-to-printer connections. 2 Install JP1 and JP2 in position 2/3 on both cards. 3 Install JP1 and JP2 on both cards. 4 Wiring is supervised and power-limited. 5 The wiring diagrams do not reflect the physical placement of the FCOM cards. See Internal Wiring for the physical placement of the cards. P/N: 61000-0011 REV: 4.0 Page 6 of 6 PRODUCT DESCRIPTION The semi-flush enclosures are assemblies that consist of a wallbox and a front door. The 4 module enclosure supports four SAN series modules and a SAN-CPU. The 8 module enclosure supports eight SAN series modules and a SAN-CPU. Both wallboxes are constructed of 16 gauge TM steel and feature doors with key locks and Lexan viewing windows. The 6 module mounting frame mounts to a 19-inch rack and is constructed of 0.125 inch aluminum. The mounting frame supports six SAN series modules and a SAN-CPU. INSTALLATION 6 module mounting frame To mount the 6 module mounting frame: 1. 2. Align the mounting frame to the mounting holes on the 19-inch rack. Secure the frame to the 19-inch rack with the hardware provided. A special L-bracket is mounts the SAN-CPU to the 6 module mounting frame. See the SAN-CPU(F) installation sheet for more information. 19-inch rack Note: All wiring shall be power-limited. 6 module mounting frame INSTALLATION Semi-flush enclosures To mount a semi-flush enclosure: 1. 2. Drive nails or screws through the designated mounts to secure the wallbox to the wall. Secure the door to the wallbox with the hardware provided. Note: See the reverse side of this installation sheet for the location of the wallbox mounts. Wallbox mounts Washer Screw Key hole mount Nail knockout Wall Wallbox RSAN-6 6 module mounting frame Nail or screw Approximate location of key hole mount Side view Nail or screw Approximate location of nail knockout 4 or 8 module enclosure SAN-4 4 module enclosure Semi-flush enclosures SAN-8 8 module enclosure Wallbox INSTALLATION SHEET Door SAN Series Remote Annunciator Enclosures INSTALLATION SHEET P/N: 3100046 FILE NAME: 3100046.CDR REVISION LEVEL: 1.0 APPROVED BY: K. Patterson DATE: 30MAR00 CREATED BY: B. Graham Pem stud Lock nut EDWARDS SYSTEMS TECHNOLOGY, INC. SARASOTA, FL: 941-739-4300 FAX 941-753-1806 CHESHIRE, CT: 203-699-3000 FAX 203-699-3075 OWEN SOUND, CANADA: 519-376-2430 FAX 519-376-7258 INTERNATIONAL, CANADA: 905-270-1711 FAX 905-270-9553 DIMENSIONS Six module mounting frame 10.5 in (26.7 cm) Front view 19 in (48.3 cm) Four module enclosure Knockout for 0.75 in (1.9 cm) conduit (both sides) 11.25 in(28.6 cm) Top view 2.5 in (6.4 cm) 1.4 in (3.6 cm) Front door 16.25 in (41.3 cm) Side view Key hole mounts 11.5 in (29.2 cm) Front view SAN-CPU goes here. 9.5 in (24.1 cm) Nail knockouts 16.0 in (40.6 cm) 2.5 in (6.4 cm) Eight module enclosure 22.37 in (56.8 cm) Top view Knockout for 0.75 in (1.9 cm) conduit (both sides) 1.4 in (3.6 cm) Front door 27.41 in (69.6 cm) Key hole mounts SAN-CPU goes here. Front view 11.5 in (29.2 cm) Side view Nail knockouts 27.12 in (68.9 cm) 2.5 (6.4 cm) P/N: 3100046 REV: 1.0 Page 2 of 2 9.5 in (24.1 cm) PRODUCT DESCRIPTION The SAN-CPU(F) is an Annunciator Controller. All SAN series annunciator modules require the SAN-CPU to provide an interface to the network data lines. The SAN-CPU features Class A (Style 7) and Class B (Style 4) communication circuits. Communications formats for RS-485, fiber optic, and 20 mA Loop are also available with the SAN-CPU. The SAN-CPUF comes with a blank face plate and a blank filler plate for jobs with limited mounting depth. SPECIFICATIONS Power requirements 24 Vdc @ 54 mA Communications formats RS-485, Fiber optics, 20 mA current loop Data line wiring Class A (Style 7) or Class B (Style 4) Network capacity 96 inputs or outputs Network requirement 1 panel address Mounting See the related documentation listed in the title block for the approved enclosures. INSTALLATION Mounting the SAN-CPU 6-unit, 19-inch rack mount (rear view) Note: See the related documentation listed in the title block for more information about specific mounting units. INSTALLATION Mounting the SAN-CPUF and blank plate Side view Rear view SAN-CPUF Filler plate Mounting bracket 2-SANCOM Top view 6-unit, 19-inch rack mount SAN-CPU SAN-CPUF Filler plate PRODUCT DIAGRAM 4-unit enclosure INSTALLATION SHEET: Note: The SAN-CPU footprint in the 8-unit enclosure is identical to the 4-unit enclosure. SAN-CPU(F) Annunciator Contoller INSTALLATION SHEET P/N: 387200 FILE NAME: 387200.CDR REVISION LEVEL: 2.0 APPROVED BY: J. Massing DATE:30MAR00 CREATED BY: B. Graham SAN Series Annunciator Enclosures installation sheet EDWARDS SYSTEMS TECHNOLOGY, INC. SARASOTA, FL: 941-739-4300 FAX 941-753-1806 CHESHIRE, CT: 203-699-3000 FAX 203-699-3075 OWEN SOUND, CANADA: 519-376-2430 FAX 519-376-7258 INTERNATIONAL, CANADA: 905-270-1711 FAX 905-270-9553 WIRING + _ 1 + _ 3 + _ 5 24 Vdc from the primary power supply or power riser PWR 1 2 3 2 4 3 4 Ch 1 Ch 2 2 RS-485 data line from the previous panel 4 Required for Class B (Style 4) and Class A (Style 7) RS-485 data line from the previous panel 6 24 Vdc to the next SAN annunciator or auxiliary module power TB1 JP2 JP1 RS-485 data line to the next panel Required only for Class A (Style 7) RS-485 data line to the next panel U4 U3 Fiber Optic 20 mA current loop LD2 LD1 The dip switch appears upside down in this view of the SAN-CPU. Replace U3 with the header/ribbon cable from the SO-20 (P3) for Class B (Style 4) communications. Replace U3 with the header/ribbon cable from the SO-FIB (P4) for Class B (Style 4) communications. Replace U3 and U4 with the header/ribbon cables from the SO-20 (P2) for Class A (Style 7) communications. Replace U3 and U4 with the header/ribbon cables from two SO-FIBs (P3) for Class A (Style 7) communications. ON 1 2 3 4 5 6 7 8 SAN-CPU Addressing Switch SW1 SW2 SW3 SW4 SW5 SW6 Jumper Settings Address weight 01 02 04 08 16 32 Jumper JP1 P1 Use For Class B (Style 4) when the SAN-CPU is the last device on the data line. For Class A (Style 7) when the SAN-CPU is the last device on the data line. JP2 Baud rate selection SW7 Off On Off On SW8 Off Off On ON Baud rate 9600 4800 2400 19200 To SAN Annunciator Modules Lamp test LEDs LED LD1 Color Red LD2 Red Indication On indicates activity on Channel 1. Off indicates activity on Channel 2. On indicates that the SAN-CPU is transmitting data on either channel 1 or channel 2. Notes 1 Power-limited if the source is power-limited. If the source is nonpower-limited, maintain a space of 1/4 inch from power-limited wiring or use FPL, FPLP, FPLR, or equivalent in accordance with the National Electric Code. 2 Use twisted pair wires. 3 20 mA current loop and fiber optics do not require TB1-3 through TB1-6. 4 Supervised and power-limited Warning! Disconnect power to cabinets before installing or removing components. Failure to do so may result in serious injury or loss of life. ! Caution! Observe static-sensitive material handling practices. 387200.CDR REV 2.0 Page 2 of 2 JUMPER SETTINGS PRODUCT DESCRIPTION The SAN-MICII module is a supervised microphone and tone generator capable of operating remotely from the audio power amplifier. The SAN-MIC II provides a pre-amp level signal, which may be transmitted over 2,000 feet of shielded cable. In addition, the SAN-MICII provides a PTT (Push-to-talk) dynamic microphone, three tone generators, an auxiliary audio input, a solid state VU meter, and a supervisory pulse generator. INSTALLATION Note: See the related documentation listed in the title block for more information about specific mounting units. Installation in a 4-unit or 8-unit enclosure Switch activation Supervisory tone Slow whoop Steady 1 kHz Alarm/Activate switch tone J5 out J6 out J5 in J6 out J5 out J6 in Emergency tone 1 J7 out J8 out J7 in J8 out J7 out J8 in Emergency tone 2 J3 out J4 out J3 in J4 out J3 out J4 in Switch activation 90 bpm for 1 kHz march time 120 bpm for 1 kHz march time Alarm/Activate switch tone J5 in J6 in J5 in J6 in Emergency tone 1 J7 in J8 in J7 in J8 in Emergency tone 2 J3 in J4 in J9 out J3 in J4 in J9 in Front view Side view Washer Screw J1: Install for 0.25 Vrms level pre-amp audio output on TB1-14 and TB1-15. Remove 2.0 Vrms output level. J1 J2 J2: Install for 0.25 Vrms level pre-amp audio output on TB1-16 and TB1-17. Remove 2.0 Vrms intput level. J9 SAN-MICII Enclosure SAN-MICII Installation in a 6-unit, 19-inch rack mount Side view Front view Pemstud J9 J9 is located on the small, forward PC board assembly. Remove power from the microphone and use a pair of needle nose pliers to remove or replace the jumper. Observe static-sensitive material handling practices. J3 J5 J7 15 16 17 18 19 20 TB1 J4 J6 J8 Locknut PRODUCT DIAGRAM Front view Rear view J9 Rack mount Locknut SAN-MICII Rack mount SPECIFICATIONS Voltage 24 Vdc Current Standby Active 0.0 mA 90 mA Audio input 0.25 Vrms or 2.0 Vrms into 600 W Audio output 0.25 Vrms or 2.0 Vrms into 600 W EOL resistors 1.8 kW, 1/2 W Wiring 2000 ft of 18 AWG twisted pair, shielded max. Relay contacts Dimensions Height Width Depth 120 Vac @0.5 A, resistive INSTALLATION SHEET SAN-MICII Remote Microphone INSTALLATION SHEET P/N: 3100028 FILE NAME: 3100028.CDR REVISION LEVEL: 1.0 APPROVED BY: K. Johnson DATE: 30MAR00 CREATED BY: B. Graham Related documentation: SAN-CPU installation sheet 8.875 in (22.5 cm) 2.75 in (7.0 cm) 2.75 in (7.0 cm) EDWARDS SYSTEMS TECHNOLOGY, INC. SARASOTA, FL: 941-739-4300 FAX 941-753-1806 CHESHIRE, CT: 203-699-3000 FAX 203-699-3075 OWEN SOUND, CANADA: 519-376-2430 FAX 519-376-7258 INTERNATIONAL, CANADA: 905-270-1711 FAX 905-270-9553 INTERNAL WIRING TB1 Warning! ACTIVATE ALARM Disconnect power to cabinets before installing or removing components. Failure to do so may result in serious injury or loss of life. SILENCE STEADY WHOOP SELECT AUX INPUT SELECT ! STEADY TONE SELECT Caution! TROUBLE Observe static-sensitive material handling practices. SPEAKER ACTIVATE Notes 1 AUDIO OUTPUT All circuits are supervised and power-limited unless otherwise noted. 2 1.8 kW EOL P/N 260044 AUX AUDIO INPUT 3 Tone select must be connected to dc common during external alarm activation 1 2 3 4 5 6 7 8 1 kHz 9 10 11 12 13 14 15 16 17 18 + 19 24 Vdc - 20 N.O. local alarm contact N.O. local 2 silence switch TS1 (-) 2 3 N.O. local auxiliary input active switch TS2 (-) To supervisory zone (Non-supervised) 2 Closes on SAN-MIC II activity (Non-supervised) To audio power amplifier input From external audio source To 24 Vdc 4 Jump TB1-5 and TB1-8 for March Time. FIELD WIRING TB1 TB2 2-AAC TB3 Aux. input 1 2 Note: The CC1 must be in the same enclosure or within 3 feet of the SAN-MICII and its wiring must be in conduit. TB4 UL/ULC listed 47 kW EOL 1 2 9 3 10 4 5 6 7 8 CC1 UL/ULC listed 47 kW EOL From previous Signature device SAN-MICII TB1 Trouble + 9 _ 10 Audio output + 14 _ 15 CT1 1 7 2 8 3 4 TB1 P/N: 3100028 REV: 1.0 Page 2 of 2 To next Signature device PRODUCT DESCRIPTION SPECIFICATIONS The SDR-32 is a remote annunciator lamp driver module, which comes in four models and consists of 32 open collector driver circuits. The SDR-32, the SDR-32K, the SDR-32C, and the SDR-32KC are designed for remote annunciator applications with the SAN-CPU or RSA4-CPU. All SDR-32 models provide lamp drivers for LED or incandescent lamp annunciators. The high circuit density makes the SDR-32 modules ideal for driving graphic annunciators. Power From SAN-CPU Standby current 1 mA Current sink SDR-32 SDR-32K 16 mA maximum 100 mA maximum Lamp supply 24 Vdc, maximum The SDR-32 features current-limited outputs with LEDs. The SDR-32K provides no current limiting for use as an external relay driver. The SDR-32C and the SDR-32KC consist of the circuit card only with the option of mounting in graphic annunciators. Address requirements Inputs Outputs None 32 (4 groups of eight) Weight 3.3 oz (93.5 g) Mounting See Related documentation. INSTALLATION Warning! 1 Mount the SDR-32(K). Note: See the related documentation listed in the title block for more information about specific mounting units. Disconnect power to cabinets before installing or removing components. Failure to do so may result in serious injury or loss of life. On a 6-unit, 19-inch rack mount SDR-32(K) SAN-CPU (mounted on L bracket) PRODUCT DIAGRAM SDR-32 and SDR-32K SDR-32(K) Side view In a 4-unit or 8-unit enclosure SDR-32(K) SDR-32C and SDR-32KC SDR-32(K) Rear view SDR-32(K) SDR-32(K) Front view Rear view INSTALLATION SHEET: SDR-32 Remote Annunciator Relay Module INSTALLATION SHEET P/N: 387208 FILE NAME: 387208.CDR REVISION LEVEL: 2.0 APPROVED BY: J. Massing DATE: 31MAR00 CREATED BY: B. Graham Related documentation: SAN Series Remote Annunciator Enclosures installation sheet EDWARDS SYSTEMS TECHNOLOGY, INC. Side view Front view SARASOTA, FL: 941-739-4300 FAX 941-753-1806 CHESHIRE, CT: 203-699-3000 FAX 203-699-3075 OWEN SOUND, CANADA: 519-376-2430 FAX 519-376-7258 INTERNATIONAL, CANADA: 905-270-1711 FAX 905-270-9553 INSTALLATION 2 Make the ribbon cable connections. A. B. C. D. Plug the ribbon cable assembly (P/N 250080) from P1 of the SAN-CPU into P2 of the 2-SANCOM. Plug the ribbon cable from P1 of the 2-SANCOM to P2 of the next SAN series module. Plug the ribbon cable from P1 of each SAN module to P2 of the next SAN module until you reach the last one. Install the continuity jumper on the last SAN module. SIN-16 SDR-32(K) P1 P2 SHO-4 P1 P2 Note: If the SDR-32(K) is the last module, install the continuity jumper on JP1. 2-SANCOM P1 P1 P2 P2 From P1 on the SAN-CPU JP1 3 Set the SDR-32(K) dip switches. Remember that the SDR-32(K): Cannot occupy the 2-SANCOM addresses (01 through 09). Requires four output address groups, which consist of eight addresses each. ON 1 2 3 4 Group number SDR-32(K) S1 In this example, the SIN-16 does not require any output addresses. The SDR-32(K) start address is 17 and the dip switches are set to a binary 3. S1 To set the dip switches: A. Configure the SAN-CPU in the system programming utility. B. Note the start output address of the SDR-32(K) in the programming utility (09 to 65). C. Set the dip switches on S1 to the group number of the SDR-32(K)’s start output address. 1 2 3 4 5 6 7 8 9 10 11 12 Output addresses S1 dip switch settings 1 2 3 4 01-08 09-16 17-24 25-32 33-40 41-48 49-56 57-64 65-72 73-80 81-88 89-96 off off off off off off off on on on on on on off on off on off on off on off on off off on on off off on on off off on on off off off off on on on on off off off off on Module 2-SANCOM SHO-4 SDR-32(K) SDR-32(K) SDR-32(K) SDR-32(K) FIELD WIRING SDR-32(K) + _ P01 External device power supply + _ External device power supply 3 1 To SAN-CPU 24 Vdc power in (-) terminal SDR-32 LED connections 8 P02 SDR-32K LED connections 9 ! Observe static-sensitive material handling practices. Resistor value to be sized for 100 mA maximum current per output 2 16 P03 SDR32K Auxiliary relay connection 17 Cautions Use some current limiting for the incandescent lamps. Momentary current surges can exceed the 100 mA rating on the switching transistor and cause permanent damage. Notes 24 P04 25 2 SDR-32K EXR relay connection 32 P/N: 387208 REV: 2.0 Page 2 of 2 1 All wiring is power-limited. 2 Nonsupervised connection 3 Connect the (-) terminal of the external device power supply to the SAN-CPU (-) power input terminal. PRODUCT DESCRIPTION The SHO-4 is a remote annunciator LED/Switch module, which consists of four rotary switches and twelve LEDs. The SHO-4 is designed for remote switching and annunciator applications with the SAN-CPU or RSA4-CPU. Each rotary switch has three positions and sits next to three LEDs to form a functional group. The center LED is green; the upper and lower LEDs are yellow. The front panel protects a slip-in legend sheet, which identifies individual switch and LED functions. The SHO-4 provides point status indication and switching functions at a location remote from the main control panel. Typical applications include "hands-off-automatic" control/override of automatic systems. SPECIFICATIONS Power From SAN-CPU Standby current 25 mA Active LED current Per LED Full load 6 mA 96 mA Address requirements Inputs Outputs 8 (1 group of eight) 8 (1 group of eight) Weight 3.3 oz (93.5 g) Mounting See Related documentation. INSTALLATION 1 Mount the SHO-4 LEDs Note: See the related documentation listed in the title block for more information about specific mounting units. On a 6-unit, 19-inch rack mount SHO-4 The LEDs indicate programmed points and functions. Operation of the switches is independent of the LEDs, both being under control of the system program. SAN-CPU (mounted on L bracket) PRODUCT DIAGRAM SHO-4 Side view SHO-4 Rear view In a 4-unit or 8-unit enclosure SHO-4 SHO-4 SHO-4 Front view Rear view INSTALLATION SHEET: SHO-4 Remote Annunciator LED/Switch Module INSTALLATION SHEET P/N: 387205 FILE NAME: 387205.CDR REVISION LEVEL: 2.0 APPROVED BY: J. Massing DATE: 31MAR00 CREATED BY: B. Graham Related documentation: SAN Series Remote Annunciator Enclosures installation sheet EDWARDS SYSTEMS TECHNOLOGY, INC. Side view Front view SARASOTA, FL: 941-739-4300 FAX 941-753-1806 CHESHIRE, CT: 203-699-3000 FAX 203-699-3075 OWEN SOUND, CANADA: 519-376-2430 FAX 519-376-7258 INTERNATIONAL, CANADA: 905-270-1711 FAX 905-270-9553 INSTALLATION 2 Make the ribbon cable connections. A. Plug the ribbon cable assembly (P/N 250080) from P1 of the SAN-CPU into P2 of the 2-SANCOM. B. Plug the ribbon cable from P1 of the 2-SANCOM to P2 of the next SAN series module. C. Plug the ribbon cable from P1 of each SAN module to P2 of the next SAN module until you reach the last one. D. Install the continuity jumper on the last SAN module. Note: If the SHO-4 is the last module, install the continuity jumper on JB1. SWU-8(/3) JP1 P1 SLU-16 P2 SHO-4 P1 P2 2-SANCOM P1 P1 P2 P2 From P1 on the SAN-CPU JB1 3 Set the SHO-4 dip switches Remember that the SHO-4: Cannot occupy addresses 01 through 09 because they belong to the 2-SANCOM. Requires one input address group and one output address group, which consist of eight addresses each. To set the dip switches: A. B. C. Configure the SAN-CPU in the system programming utility. Note the start input and output addresses of the SHO-4 in the programming utility (09 to 81). Set the dip switches on S5 and S6 to match the group numbers of the SHO-4’s start input and start output addresses. ON 1 2 3 4 S5 SHO-4 S6 S5 In this example, the start address is 09 for inputs and outputs, so both dip switches are set to a binary 2. ON 1 2 3 4 S6 Group number Input addresses S1 dip switch settings 1 2 3 4 on off on off on off on off on off on off off off off off off off off on on on on on 1 2 3 4 5 6 7 8 9 10 11 12 01-08 09-16 17-24 25-32 33-40 41-48 49-56 57-64 65-72 73-80 81-88 89-96 Group number Output addresses S1 dip switch settings 1 2 3 4 01-08 09-16 17-24 25-32 33-40 41-48 49-56 57-64 65-72 73-80 81-88 89-96 off off off off off off off on on on on on 1 2 3 4 5 6 7 8 9 10 11 12 on off on off on off on off on off on off off on on off off on on off off on on off off on on off off on on off off on on off off off off on on on on off off off off on Module off off off on on on on off off off off on Module 4 Label the SHO-4 switches and LEDs To label the SHO-4: A. Identify each LED/switch group on the SHO-4 according to its programmed function. B. Write the functions on the slip-in legend sheet next to the appropriate LED/switch group. C. Insert the label under the SHO-4 face plate. P/N: 387205 REV: 2.0 Page 2 of 2 2-SANCOM SHO-4 SLU-16 SLU-16 SWU-8/3 SWU-8/3 Slip-in label 2-SANCOM SHO-4 SWU-8/3 SWU-8/3 PRODUCT DESCRIPTION The SIGA-AAXX is a high-efficiency, dual-input, switch-mode audio amplifier. The amplifier comes in two versions: 30 watt (SIGA-AA30) and 50 watt (SIGA-AA50), and has both 1 V and 25 V input levels. The output is supervised, power-limited, and user-selectable for 25 Vrms or 70 Vrms output voltage. An integral Signature module under software control selects the amplifier input channel. The amplifier reports its status to the Main Controller Module to reduce the need for additional field wiring. The amplifier also features a backup amplifier connection, which supports one-to-one or banked backup amplifiers. INSTALLATION 1 Mount the amplifier with the screws and washers provided. Primary Power Supply SPECIFICATIONS Power requirements Standby Active SIGA-AA30 Active SIGA-AA50 1 mA @ 24 Vdc 1.7 A @ 24 Vdc 3.2 A @ 24 Vdc Frequency response 400 Hz to 4 kHz at -3 dB (ULC) 800 Hz to 2.8 kHz (ULI) Harmonic distortion < 5% Input Channel 1 dual input Channel 2 dual input 1 Vrms or 25 Vrms maximum 1 Vrms or 25 Vrms maximum Output SIGA-AA30 SIGA-AA50 Configuration EOL resistor 30 watts @ 25 Vrms or 70 Vrms 50 watts @ 25 Vrms or 70 Vrms Class B (Style Y) or Class A (Style Z) 47 kW Signature Data Circuit Addresses Emulation 2 module addresses Signature series CC2 module Maximum wire size 12 AWG (2.5 mm2) Backup tone 1 kHz Operating temperature 32 to 120 °F (0 to 49 °C) Humidity 0 to 93%, noncondensing Warning! Main Controller Module Expander Loop Module Disconnect power to cabinets before installing or removing components. Failure to do so may result in serious injury or loss of life. ! Audio Control Module Caution! Observe static-sensitive material handling practices. LED indicators Audio Amplifier LED DS1 DS2 DS3 DS4 DS5 Color Green Yellow Green Green Red Pattern Steady Steady Steady Flashing Flashing Description Power amp disabled Backup mode Amplifier active Normal communications (daughterboard) Active condition (daughterboard) Audio Amplifier Interlocking washer Screw Note: See the installation sheets listed in the title box for other places to mount the Audio Amplifier. 2 INSTALLATION SHEET: Configure the amplifier a. Set JP2 (output voltage) to 25 Vrms or 70 Vrms as required. b. Set JP3 on the back of the daughter board for the backup mode. SIGA-AA30/SIGA-AA50 Audio Amplifiers INSTALLATION SHEET P/N: 387343 Jumper Settings JP2 Pins 1 and 2: 70 Vrms Pins 2 and 3: 25 Vrms JP3 In: TB5 signal before 1 kHz backup tone Out: 1 kHz backup tone before TB5 signal FILE NAME: 387343.CDR REVISION LEVEL: 2.0 APPROVED BY: J. Massing DATE: 30MAR00 CREATED BY: B. Graham Related documentation: WB3(R) Wallbox installation sheet, WB7(R) Wallbox installation sheet, RACCR Remote Audio Closet Cabinet installation sheet EDWARDS SYSTEMS TECHNOLOGY, INC. SARASOTA, FL: 941-739-4300 FAX 941-753-1806 CHESHIRE, CT: 203-699-3000 FAX 203-699-3075 OWEN SOUND, CANADA: 519-376-2430 FAX 519-376-7258 INTERNATIONAL, CANADA: 905-270-1711 FAX 905-270-9553 WIRING 3 Wire the amplifier 25 Vrms input wiring a. Connect the power, the Signature Data Circuit (SDC) , the input risers, and the backup risers as required. To the Ch 1 input of the next amplifier 25 V COM b. Test the circuit before you connect the amplifier to the output wiring. From the Ch 1 output of the source amplifier 25 V COM c. Connect the circuits that check out good to the appropriate amplifier terminals. TB1 To the Ch 2 input of the next amplifier 25 V COM From the Ch 2 output of the source amplifier 25 V COM _ + _ Daughterboard TB2 Out DS1 Audio Amplifier 3 Notes Data out To next device if required + 3 In 1 Vrms input wiring TB1 DS5 DS4 Out In Note: The terminal blocks indicate the polarity for normal monitoring of the circuit’s electrical integrity. Data in JP3 on reverse side 1 Signature series module: CC1, CC2, or UM 2 UL/ULC Listed 47 kW EOL 3 The actual placement of the TB1 and TB2 output terminals is almost directly behind the input terminals. Note also that the output terminals are taller than the input terminals. TB2 CH1 + _ AUDIO OUT 2-AAC Detail 4 See the detail for 1 volt connections. 5 All wiring is supervised and power-limited. 1 volt connections COM 1V Out COM 1V In TB3 CH2 + AUDIO OUT _ Audio Amplifier TB1 4 TB4 Audio riser out 3 4 TB2 From the SDC TB3 SIGA In_ Out_ + + 3 JP2 70 V TB5 TB6 2 2 25 V + _ 24 Vdc from a listed fire alarm power supply TB1 4 2 Class B only Audio riser return Class A only Audio Amplifier TB4 JP2 70 V TB5 1 2 1 2 Typical audio riser out 1 3 4 TB2 TB3 SIGA In_ Out_ + + 3 TB6 25 V 24 Vdc from a listed + _ fire alarm power supply 3 TB1 Audio Amplifier 2 Typical audio riser return (Class A only) TB4/TB5 wiring DS3 DS2 4 3 2 4 To the rest of the Signature devices JP2 70 V B SH + _ A + _ TB4 NAC TB3 TB2 SIGA In_ Out_ + + TB4 TB5 Audio Amplifier TB5 TB6 25 V In + _ Out + _ Backup 24 Vdc from a listed + _ fire alarm power supply P/N: 387343 REV: 2.0 Page 2 of 2 PRODUCT DESCRIPTION The SIGA-APS is a switch-mode auxiliary power supply designed to provide additional power for audio components and external Notification Appliance Circuits (NACs). The power supply monitors the AC line, performs ground fault testing, and charges batteries (up to 10 Ah). The SIGA-APS also provides a smooth and uninterrupted transition to batteries in the event of an AC power loss. All trouble conditions detected by the SIGA-APS are transmitted to the fire alarm control panel through its connection to the Signature Data Circuit (SDC), eliminating the need for additional devices. All connections intended to leave the cabinet are fully protected against direct and induced transient voltage conditions. SPECIFICATIONS AC Input voltage SIGA-APS SIGA-APS-220 Maximum wire size Output voltage Nominal rating Output circuits Maximum wire size 120 Vac @ 300 W maximum, 50/60 Hz 220 Vac @ 300 W maximum, 50/60 Hz 12 AWG (2.5 mm2) 24 Vdc @ 6.75 A total Two power-limited circuits rated at 24 Vdc @ 3.2 A each 12 AWG (2.5 mm2) Battery charging Charge current Charge capacity 1.0 A 10 Ah Signature Addressing Personality Code Maximum wire size Two module addresses 03 (Emulates SIGA-CT2) 14 AWG (1.5 mm2) Environmental Conditions Temperature range Humidity 32 to 120 °F (0 to 49 °C) 93%, Non-condensing INSTALLATION Warning! Mount the SIGA-APS with the screws and washers provided. Disconnect power to cabinets before installing or removing components. Failure to do so may result in serious injury or loss of life. Auxiliary Power Supply ! Caution! Observe static-sensitive material handling practices. WIRE ROUTING The routing of power-limited and nonpower-limited wiring differs with each cabinet. For more information on the routing of power-limited and nonpowerlimited wiring, see the cabinet’s installation sheet. PRODUCT DIAGRAM #6 interlocking washers 6/32 x 3/8 pan head screws INSTALLATION SHEET: SIGA-APS (-220) Auxiliary Power Supply Module INSTALLATION SHEET P/N: 387342 FILE NAME: 387342.CDR REVISION LEVEL: 2.0 APPROVED BY: J. Massing DATE: 30MAR00 CREATED BY: B. Graham EDWARDS SYSTEMS TECHNOLOGY, INC. SARASOTA, FL: 941-739-4300 FAX 941-753-1806 CHESHIRE, CT: 203-699-3000 FAX 203-699-3075 OWEN SOUND, CANADA: 519-376-2430 FAX 519-376-7258 INTERNATIONAL, CANADA: 905-270-1711 FAX 905-270-9553 WIRING Wire Stripping Guide Strip 1/4 inch from the ends of ALL wires that connect to the terminal blocks of the module. 1/4 inch (6.4 mm) Caution: Exposing more than 1/4 inch of wire may cause a ground fault. Exposing less than 1/4 inch of wire may result in a faulty connection. To dedicated 220 Vac, 7.5 Amp, 50/60 Hz supervised branch circuit TB1 Line 1 Line 2 Ground 2 L1 L2 G 4 220 Vac Auxiliary Power Supply To dedicated 120 Vac, 15 Amp, 50/60 Hz supervised branch circuit 2 1 TB3 + 24 Vdc _ NAC1 power 4 TB1 Hot Neutral 2 Ground BATTERY 3 TB2 120 Vac Auxiliary Power Supply TB4 See the details below for the battery terminal wiring. + 24 Vdc _ NAC2 power _ + Data out 1 Signature Data 3 Circuit _ + Data in Auxiliary Power Supply Route the battery wiring harness (P/N 250181) through the plastic channel under the SIGA-AAXX amplifiers to the battery terminals. Notes TB2 Battery _ + SIGA-AAXX 1 Power-limited 2 Nonpower-limited 3 Supervised 4 Nonsupervised TB2 Plastic channel SIGA-AAXX red wire _ + + Battery _ + _ + Battery _ black wire Top view 387342.CDR REV 2.0 Page 2 of 2 PRODUCT DESCRIPTION SPECIFICATIONS The SIN-16 is a remote annunciator input receiver module, which consists of sixteen optically isolated, unsupervised input circuits. The SIN-16 is designed for remote annunciator applications with the SAN-CPU or RSA4-CPU. Power From SAN-CPU Standby current 1 mA Input current 7 mA per circuit The SIN-16 provides input circuits for normally-open dry relay contacts or open collector transistor inputs. The high circuit density makes the SIN-16 module ideal for connecting multiple switching functions from graphic annunciators or interfacing to outside systems. Input voltage 24 Vdc, maximum Address requirements Inputs Outputs 16 (2 groups of eight) None Weight 3.3 oz (93.5 g) Mounting See Related documentation. Note: Active SIN-16 inputs generate a supervisory open condition. INSTALLATION Warning! 1 Mount the SIN-16. Note: See the related documentation listed in the title block for more information about specific mounting units. Disconnect power to cabinets before installing or removing components. Failure to do so may result in serious injury or loss of life. On a 6-unit, 19-inch rack mount SAN-CPU (mounted on L bracket) SIN-16 ! Caution! Observe static-sensitive material handling practices. PRODUCT DIAGRAM SIN-16 Side view SIN-16 Rear view In a 4-unit or 8-unit enclosure SIN-16 SIN-16 SIN-16 Front view Rear view INSTALLATION SHEET: SIN-16 Remote Annunciator Input Receiver Module INSTALLATION SHEET P/N: 387206 FILE NAME: 387206.CDR REVISION LEVEL: 2.0 APPROVED BY: J. Massing DATE: 31MAR00 CREATED BY: B. Graham Related documentation: SAN Series Remote Annunciator Enclosures installation sheet EDWARDS SYSTEMS TECHNOLOGY, INC. Side view Front view SARASOTA, FL: 941-739-4300 FAX 941-753-1806 CHESHIRE, CT: 203-699-3000 FAX 203-699-3075 OWEN SOUND, CANADA: 519-376-2430 FAX 519-376-7258 INTERNATIONAL, CANADA: 905-270-1711 FAX 905-270-9553 INSTALLATION 2 Make the ribbon cable connections. A. B. C. D. Plug the ribbon cable assembly (P/N 250080) from P1 of the SAN-CPU into P2 of the 2-SANCOM. Plug the ribbon cable from P1 of the 2-SANCOM to P2 of the next SAN series module. Plug the ribbon cable from P1 of each SAN module to P2 of the next SAN module until you reach the last one. Install the continuity jumper on the last SAN module. SWU-8(/3) JP1 SIN-16 SHO-4 Note: If the SIN-16 is the last module, install the continuity jumper on JP1. 2-SANCOM JP1 P1 P2 P1 P2 P1 P1 P2 P2 From P1 on the SAN-CPU 3 Set the SIN-16 dip switches. Remember that the SIN-16: To set the dip switches: A. Configure the SAN-CPU in the system programming utility. B. Note the start input address of the SIN-16 in the programming utility (09 through 81). C. Set the dip switches on S1 to the group number of the SIN-16’s start input address. Cannot occupy the 2-SANCOM addresses (01 through 09). Requires two input address groups, which consist of eight addresses each. S1 ON 1 2 3 4 SIN-16 S1 In this example, the start address is 17 and the dip switches are set to a binary 3. Group number 1 2 3 4 5 6 7 8 9 10 11 12 Input addresses 01-08 09-16 17-24 25-32 33-40 41-48 49-56 57-64 65-72 73-80 81-88 89-96 S1 dip switch settings 1 2 3 4 on off on off on off on off on off on off off off off off off off off on on on on on off on on off off on on off off on on off Module off off off on on on on off off off off on 2-SANCOM SHO-4 SIN-16 SIN-16 SWU-8(/3) SWU-8/3 FIELD WIRING System power supply 24 Vdc output + _ 24 Vdc output Notes 1 2 System power supply SIN-16 + _ - IN 1 2 3 External inputs 4 5 6 7 Nonsupervised inputs. TB2 provides + common for the inputs in the following groups: Inputs 1-4 (TB1-1 to TB1-4) Inputs 5-8 (TB1-5 to TB1-8) Inputs 9-12 (TB1-9 to TB1-12) Inputs 13-16 (TB1-13 to TB1-16) Dry contacts Open collector transistor 8 9 10 11 12 13 14 15 Dry contacts TB2 3 1-4 5-8 9-12 13-16 +COM Each group of four inputs must share the same power supply positive and negative. 4 All connections are power-limited. 16 1 P/N: 387206 REV: 2.0 Page 2 of 2 TB1 2 TB2 +COM PRODUCT DESCRIPTION The SLU-16 is a remote annunciator, which provides individual point status indications. The front panel consists of 16 LEDs and a slip-in legend sheet to identify LED functions. The SLU-16 comes in three models: Model SLU-16R SLU-16Y SLU-16R/Y Description 16 red LEDs 16 yellow LEDs 8 red LEDs/8 yellow LEDs INSTALLATION 1 SPECIFICATIONS Power From SAN-CPU Standby current 1 mA Active LED current Per LED Full load 6 mA 96 mA Address requirements Inputs Outputs None 16 (2 groups of eight) Weight 3.3 oz (93.5 g) Mounting See Related documentation. Mount the SLU-16. Note: See the related documentation listed in the title block for more information about specific mounting units. On a 6-unit, 19-inch rack mount SAN-CPU (mounted on L bracket) SLU-16 LEDs The LEDs indicate programmed points and functions. Operation of the switches is independent of the LEDs, both being under control of the system program. PRODUCT DIAGRAM SLU-16 Side view SLU-16 Rear view In a 4-unit or 8-unit enclosure SLU-16 SLU-16 SLU-16 Front view Rear view INSTALLATION SHEET: SLU-16R/Y Remote Annunciator INSTALLATION SHEET P/N: 387203 FILE NAME: 387203.CDR REVISION LEVEL: 2.0 APPROVED BY: J. Massing DATE: 31MAR00 CREATED BY: B. Graham Related documentation: SAN Series Remote Annunciator Enclosures installation sheet EDWARDS SYSTEMS TECHNOLOGY, INC. Side view Front view SARASOTA, FL: 941-739-4300 FAX 941-753-1806 CHESHIRE, CT: 203-699-3000 FAX 203-699-3075 OWEN SOUND, CANADA: 519-376-2430 FAX 519-376-7258 INTERNATIONAL, CANADA: 905-270-1711 FAX 905-270-9553 INSTALLATION 2 Make the ribbon cable connections. A. Plug the ribbon cable assembly (P/N 250080) from P1 of the SAN-CPU into P2 of the 2-SANCOM. B. Plug the ribbon cable from P1 of the 2-SANCOM to P2 of the next SAN series module. C. Plug the ribbon cable from P1 of each SAN module to P2 of the next SAN module until you reach the last one. D. Install the continuity jumper on the last SAN module. Note: If the SLU-16 is the last module, install the continuity jumper on JB1. JP1 P1 JB1 P2 P1 P2 P1 P1 P2 P2 From P1 on the SAN-CPU SWU-8(/3) SLU-16 SHO-4 2-SANCOM 3 Set the SLU-16 dip switches. Remember that the SLU-16: Cannot occupy addresses 01 through 09 because they belong to the 2-SANCOM. Requires two address groups, which consist of eight points each. To set the dip switches: A. Configure the SAN-CPU in the system programming utility. B. Note the start output address of the SLU-16 in the programming utility (09 to 81). C. Set the dip switches on S1 to match the group number of the SLU-16’s output start address. ON 1 2 3 4 SLU-16 S1 S1 In this example, the start address is 17 and the dip switch is set to a binary 3. Group Number 1 2 3 4 5 6 7 8 9 10 11 12 Output addresses S1 dip switch settings 1 2 3 4 01-08 09-16 17-24 25-32 33-40 41-48 49-56 57-64 65-72 73-80 81-88 89-96 off off off off off off off on on on on on on off on off on off on off on off on off off on on off off on on off off on on off off off off on on on on off off off off on Module 2-SANCOM SHO-4 SLU-16 SLU-16 SWU-8(/3) SWU-8(/3) 4 Label the SLU-16. To label the SLU-16: A. Identify each LED on the SLU-16 according to its programmed function. B. Write the functions on the slip-in legend sheet next to the appropriate LEDs. C. Insert the label under the SLU-16 face plate. Slip-in legend sheet FLR1_SMK1 FLR1_SMK1 FLR1_SMK2 FLR1_SMK2 FLR1_SMK3 FLR1_SMK3 FLR2_SMK1 FLR2_SMK1 P/N: 387203 REV: 2.0 Page 2 of 2 PRODUCT DESCRIPTION The SRU-8 is a remote annunciator relay module, which consists of eight single pole double throw (SPDT) relays. These dry contact relays are normally open/normally closed. See the reverse side of this installation sheet for more detail. The SRU-8 is designed for applications with the SAN-CPU or RSA4-CPU. INSTALLATION 1 Mount the SRU-8. Note: See the related documentation listed in the title block for more information about specific mounting units. SPECIFICATIONS Power From SAN-CPU Standby current 1 mA Input current 20 mA per circuit Input voltage 24 Vdc, maximum Address requirements Inputs Outputs None 8 (1 group of eight) Weight 3.3 oz (93.5 g) Mounting See Related documentation. Warning! On a 6-unit, 19-inch rack mount SAN-CPU (mounted on L bracket) SRU-8 Disconnect power to cabinets before installing or removing components. Failure to do so may result in serious injury or loss of life. ! Caution! Observe static-sensitive material handling practices. PRODUCT DIAGRAM SRU-8 Side view SRU-8 Rear view In a 4-unit or 8-unit enclosure SRU-8 SRU-8 SRU-8 Front view Rear view INSTALLATION SHEET: SRU-8 Remote Annunciator Relay Module INSTALLATION SHEET P/N: 387207 FILE NAME: 387207.CDR REVISION LEVEL: 2.0 APPROVED BY: J. Massing DATE: 31MAR00 CREATED BY: B. Graham Related documentation: SAN Series Remote Annunciator Enclosures installation sheet Side view Front view EDWARDS SYSTEMS TECHNOLOGY, INC. SARASOTA, FL: 941-739-4300 FAX 941-753-1806 CHESHIRE, CT: 203-699-3000 FAX 203-699-3075 OWEN SOUND, CANADA: 519-376-2430 FAX 519-376-7258 INTERNATIONAL, CANADA: 905-270-1711 FAX 905-270-9553 INSTALLATION 2 Make the ribbon cable connections. A. B. C. D. Plug the ribbon cable assembly (P/N 250080) from P1 of the SAN-CPU into P2 of the 2-SANCOM. Plug the ribbon cable from P1 of the 2-SANCOM to P2 of the next SAN series module. Plug the ribbon cable from P1 of each SAN module to P2 of the next SAN module until you reach the last one. Install the continuity jumper on the last SAN module. SWU-8(/3) JP1 P1 SRU-8 P2 SHO-4 P1 P2 JP1 Note: If the SIN-16 is the last module, install the continuity jumper on JP1. 2-SANCOM P1 P1 P2 P2 From P1 on the SAN-CPU 3 Set the SRU-8 dip switches. To set the dip switches: Cannot occupy the 2-SANCOM addresses (01 through 09). A. Configure the SAN-CPU in the system programming utility. Requires one output address group, which consists of eight B. Note the start output address of the SRU-8 in the programming utility (09 to 89). addresses. C. Set the dip switches on S1 to the group number of the SRU-8’s start output address. Remember that the SRU-8: ON 1 2 3 4 Group number S1 SRU-8 S1 In this example, the start address is 17 and the dip switches are set to a binary 3. 1 2 3 4 5 6 7 8 9 10 11 12 Output addresses S1 dip switch settings 1 2 3 4 01-08 09-16 17-24 25-32 33-40 41-48 49-56 57-64 65-72 73-80 81-88 89-96 off off off off off off off on on on on on on off on off on off on off on off on off off on on off off on on off off on on off Module off off off on on on on off off off off on 2-SANCOM SHO-4 SRU-8 SWU-8(/3) SWU-(8/3) FIELD WIRING Note: Power-limited if the source is power-limited. If the source is nonpower-limited, maintain a space of 1/4 inch from power-limited wiring. Otherwise, use FPL, FPLP, FPLR, or an equivalent in accordance with the National Electric Code. TB1 K1 K2 K3 K4 TB2 1 1 2 2 3 3 4 4 5 5 6 6 7 7 8 8 9 9 10 11 10 11 12 12 K5 K6 SRU-8 Relay Table Terminal Relay Description Terminal Relay Description TB1-1 TB1-2 TB1-3 TB1-4 TB1-5 TB1-6 TB1-7 TB1-8 TB1-9 TB1-10 TB1-11 TB1-12 NC COM NO NC COM NO NC COM NO NC COM NO TB2-1 TB2-2 TB2-3 TB2-4 TB2-5 TB2-6 TB2-7 TB2-8 TB2-9 TB2-10 TB2-11 TB2-12 NC COM NO NC COM NO NC COM NO NC COM NO K1 K1 K1 K2 K2 K2 K3 K3 K3 K4 K4 K4 K5 K5 K5 K6 K6 K6 K7 K7 K7 K8 K8 K8 Detail K7 K8 To the control circuit 24 Vdc, 4A max. rated for pilot duty P/N: 387207 REV: 2.0 Page 2 of 2 Typical layout for a single pole double throw (SPDT) relay terminal NC COM NO PRODUCT DESCRIPTION The SWU-8 and the SWU8/3 are remote annunciator LED/Switch modules, which consist of eight switches and sixteen yellow LEDs. Both models are designed for remote switching and annunciator applications with the SAN-CPU or RSA4-CPU. The SWU-8 provides two-position toggle switches; the SWU-8/3 provides three-position toggle switches. Two LEDs sit next to each switch to form a functional group. The front panel protects a slip-in legend sheet, which identifies individual switch and LED functions. The SWU-8 provides point status indication and switching functions at a location remote from the main control panel. Typical applications include audio or fire fighter telephone zone select, audio zone silence, and manual control/override of automatic systems. SPECIFICATIONS Power From SAN-CPU Standby current 1 mA Active LED current Per LED Full load 6 mA 96 mA Address requirements SWU-8 inputs SWU-8 outputs SWU-8/3 inputs SWU-8/3 outputs 8 (1 group of eight) 16 (2 groups of eight) 16 (2 groups of eight) 16 (2 groups of eight) Weight 3.3 oz (93.5 g) Mounting See Related documentation. INSTALLATION 1 LEDs Mount the SWU-8(/3). Note: See the related documentation listed in the title block for more information about specific mounting units. On a 6-unit, 19-inch rack mount The LEDs indicate programmed points and functions. Operation of the switches is independent of the LEDs, both being under control of the system program. SAN-CPU (mounted on L bracket) SWU-8(/3) PRODUCT DIAGRAM SWU-(8/3) Side view In a 4-unit or 8-unit enclosure SWU-8(/3) SWU-(8/3) Rear view SWU-(8/3) SWU-(8/3) Front view Rear view INSTALLATION SHEET: SWU-8 / SWU-8/3 Remote Annunciator LED/Switch Module INSTALLATION SHEET P/N: 387204 FILE NAME: 387204.CDR REVISION LEVEL: 2.0 APPROVED BY: J. Massing DATE: 31MAR00 CREATED BY: B. Graham Related documentation: SAN Series Remote Annunciator Enclosures installation sheet EDWARDS SYSTEMS TECHNOLOGY, INC. Side view Front view SARASOTA, FL: 941-739-4300 FAX 941-753-1806 CHESHIRE, CT: 203-699-3000 FAX 203-699-3075 OWEN SOUND, CANADA: 519-376-2430 FAX 519-376-7258 INTERNATIONAL, CANADA: 905-270-1711 FAX 905-270-9553 INSTALLATION 2 Make the ribbon cable connections. A. Plug the ribbon cable assembly (P/N 250080) from P1 of the SAN-CPU into P2 of the 2-SANCOM. B. Plug the ribbon cable from P1 of the 2-SANCOM to P2 of the next SAN series module. C. Plug the ribbon cable from P1 of each SAN module to P2 of the next SAN module until you reach the last one. D. Install the continuity jumper on the last SAN module. Note: If the SWU-8(/3) is the last module, install the continuity jumper on JP1. SWU-8(/3) JP1 P1 SLU-16 JB1 P2 SHO-4 P1 P2 2-SANCOM P1 P1 P2 P2 From P1 on the SAN-CPU 3 Set the dip switches. Remember that the SWU-8/3: Remember that the SWU-8: Cannot occupy the 2-SANCOM addresses (01 through 09). Requires two input address groups and two output address groups, which consist of eight addresses each. Cannot occupy the 2-SANCOM addresses (01 through 09). Requires one input address group and two output address groups, which consist of eight addresses each. To set the dip switches: A. Configure the SAN-CPU in the system programming utility. B. Note the start input and output addresses of the SWU-8(/3) in the programming utility (09 to 81). C. Set the dip switches on S9 and S10 to match the group numbers of the SWU-8’s start input and start output addresses. ON 1 S9 2 3 4 S9 In this example, the start address is 33 and the dip switch is set to a binary 5. SWU-8(/3) ON 1 2 3 4 S10 S10 In this example, the start address is 17 and the dip switch is set to a binary 3. Note: The SWU-8 only requires addresses 17 to 24. Group number Output addresses S1 dip switch settings 1 2 3 4 1 2 3 4 5 6 7 8 9 10 11 12 01-08 09-16 17-24 25-32 33-40 41-48 49-56 57-64 65-72 73-80 81-88 89-96 on off on off on off on off on off on off off off off off off off off on on on on on Group number Input addresses S1 dip switch settings 1 2 3 4 on off on off on off on off on off on off off off off off off off off on on on on on 1 2 3 4 5 6 7 8 9 10 11 12 01-08 09-16 17-24 25-32 33-40 41-48 49-56 57-64 65-72 73-80 81-88 89-96 4 Label the SWU-8(/3). off on on off off on on off off on on off off on on off off on on off off on on off off off off on on on on off off off off on off off off on on on on off off off off on Module Module Slip-in label To label the SWU-8(/3): A. Identify each LED/switch group on the SWU-8(/3) according to its programmed function. B. Write the functions on the slip-in legend sheet next to the appropriate LED/switch group. C. Insert the label under the SWU-8(/3) face plate. P/N: 387204 REV: 2.0 Page 2 of 2 2-SANCOM SHO-4 SLU-16 SLU-16 SWU-8(/3) SWU-8(/3) 2-SANCOM SHO-4 SWU-8(/3) SWU-8/3