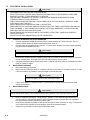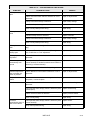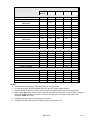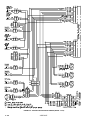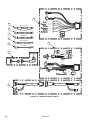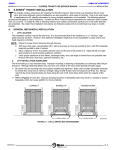
1
®
Innovator ™
Personal Use
Wheelchair Lift
PRINT
Service Manual
10/13/03
32DFL02.E
©1995 – 2003 RICON CORPORATION
U.S. and Foreign Patents Pending
Printed in the United States of America
All Rights Reserved
This Ricon service manual is for use by qualified service
technicians, and is not intended for use by nonprofessionals (do-it-yourselfers). The manual provides essential instructions and reference information, which supports qualified technicians in the correct installation and
maintenance of Ricon products.
Qualified service technicians have the training and knowledge to perform maintenance work properly and safely. For
the location of a Ricon authorized service technician in your
area, call Ricon Product Support at 1-800-322-2884.
Customer Name:
Installing Dealer:
Date Installed:
Serial Number:
32DFL02.E
i
REVISION RECORD
REV
DATE
32DFL02.
E
10/13/03
PAGES DESCRIPTION OF CHANGE
3-1
Edited Table 3-1. “Maintenance Checklist”.
3-3
Edited Table 3-2, “Troubleshooting Guide”.
3-7
Edited section C.2 “Electrical System Diagnostic Display”.
3-10
Added Table 3-4 “Numerical Display Descriptions”.
3-11
Edited Table 3-5 “Display Number Descriptions for Deploy Motion”.
3-12
Edited Table 3-6 “Display Number Descriptions for Down Motion”.
3-13
Edited Table 3-7 “Display Number Descriptions for Up Motion”.
3-14
Edited Table 3-8 “Display Number Descriptions for Stow Motion”.
4-5
4-8/4-9
Changed p/n for the following items: 2- from 21205 to 29080; 10- from 19066 to
29297; 14- V2-ES-93 to offering it in kit V2-ES-61.
Added item 20- V2-ES-82.
Changed p/n for item 13- from 29241 to 25550.
Callouts for Items 12-15 were missing from the drawing.
Removed item 16-29051 from list.
4-15
Switched item 1 with item 2.
Switched item 4 with item 13.
4-16
Changed items 8 and 15.
4-17
Switched item 10 with item 11.
4-19
Changed item 8- from 24581 to 29745.
4-21
Changed item 5- from 29216 to 29747.
4-28 &
4-29
4-2
5191
5123
5067
Added figure and parts list for pump assembly.
Changed part number for item 2, from 21205 to PM212000008.
END OF TABLE
ii
ECO
32DFL02.E
5191
5198
TABLE OF CONTENTS
Chapter
Page
I. INTRODUCTION.....................................................................................................................1-1
A.
B.
C.
D.
E.
RICON SERVICE SUPPORT ............................................................................................................1-1
RICON ONE-YEAR WARRANTY ......................................................................................................1-1
SHIPMENT INFORMATION...............................................................................................................1-3
GENERAL SAFETY PRECAUTIONS ...............................................................................................1-3
INNOVATOR COMPONENT TERMS................................................................................................1-4
II. INSTALLATION ......................................................................................................................2-1
A. MECHANICAL INSTALLATION ........................................................................................................2-2
1. VEHICLE PREPARATION ........................................................................................................................ 2-2
2. LIFT INSTALLATION NOTES .................................................................................................................. 2-2
3. LIFT INSTALLATION ................................................................................................................................ 2-2
B. ELECTRICAL INSTALLATION .........................................................................................................2-4
1.
2.
3.
4.
CONTROL INTERFACE AND DOOR OPERATOR ................................................................................. 2-4
MAIN CIRCUIT BREAKER ....................................................................................................................... 2-4
MAIN POWER CABLE ............................................................................................................................. 2-4
LIFT ELECTRICAL GROUNDING ............................................................................................................ 2-5
C. FINAL ADJUSTMENTS .....................................................................................................................2-6
1. PLATFORM LIMIT SWITCHES ................................................................................................................ 2-6
2. ANTI-STOW PRESSURE SWITCH .......................................................................................................... 2-7
D. VERIFY INSTALLATION ...................................................................................................................2-8
1. LOAD TEST............................................................................................................................................... 2-8
2. DECAL INSPECTION................................................................................................................................ 2-8
3. MISCELLANEOUS.................................................................................................................................... 2-8
E. CUSTOMER ORIENTATION .............................................................................................................2-8
III. MAINTENANCE AND TROUBLESHOOTING ........................................................................3-1
A. CLEANING .........................................................................................................................................3-1
B. MAINTENANCE CHECKLIST ...........................................................................................................3-1
C. TROUBLESHOOTING.......................................................................................................................3-2
1. TROUBLESHOOTING GUIDE.................................................................................................................. 3-2
2. ELECTRICAL SYSTEM DIAGNOSTICS DISPLAY.................................................................................. 3-7
D. HYDRAULIC SYSTEM.....................................................................................................................3-13
E. LIFT ELECTRICAL WIRING............................................................................................................3-14
1.
2.
3.
4.
DIAGRAM LEGENDS ............................................................................................................................. 3-14
ELECTRICAL CONNECTORS ............................................................................................................... 3-15
WIRING DIAGRAM LABELS .................................................................................................................. 3-15
WIRING DIAGRAMS ............................................................................................................................... 3-16
IV. SPARE PARTS .......................................................................................................................4-1
FIGURE 4-1:
FIGURE 4-2:
FIGURE 4-3:
FIGURE 4-4:
FIGURE 4-5:
FIGURE 4-6:
FIGURE 4-7:
FIGURE 4-8:
DECAL PART NUMBERS AND LOCATIONS ..............................................................4-2
TOWER ASSEMBLY.................................................................................................. …4-4
TOWER ELECTRICAL CABLES...................................................................................4-6
TRAVELING FRAME ASSEMBLY ................................................................................4-8
PLATFORM LEVELING ASSEMBLY..........................................................................4-10
REAR PLATFORM ASSEMBLY..................................................................................4-12
FRONT PLATFORM ASSEMBLY SHEET-1 ...............................................................4-14
FRONT PLATFORM ASSEMBLY SHEET-2 ...............................................................4-16
32DFL02.E
iii
FIGURE 4-9:
FIGURE 4-10:
FIGURE 4-11:
FIGURE 4-12:
FIGURE 4-13:
FIGURE 4-14:
FRONT PLATFORM ASSEMBLY SHEET-3 ...............................................................4-18
FRONT PLATFORM ASSEMBLY SHEET-4 ...............................................................4-20
PLATFORM WRAP MOTOR ASSEMBLY ..................................................................4-22
ROLLSTOP AND SIDE BARRIER MOTOR ASSEMBLY ...........................................4-24
BRIDGEPLATE MOTOR ASSEMBLY.........................................................................4-26
PUMP ASSEMBLY.......................................................................................................4-28
APPENDIX 1 ..........................................................................................................................................4-30
iv
32DFL02.E
I.
INNOVATOR INTRODUCTION
T
his manual provides basic descriptions and maintenance instructions for the Ricon Innovator Wheelchair Lift.
The platform on the Innovator is raised and lowered by a single arm. The single-arm design keeps the vehicle
doorway clear, which maximizes available space inside the vehicle and allows the front passenger seat to fully
recline. The front rollstop and side barriers on the platform automatically lower when the platform contacts the
ground. The lowered side barriers allow entry onto the platform from a wide angle. The Innovator lift is operated by
either a trained attendant or the wheelchair occupant.
Force to raise the platform is provided by a self-contained electrohydraulic pump, which has a minimum lifting capacity of 660
pounds (300 kilograms). The pump assembly houses a built-in
manual backup pump that is used to raise the platform if the lift
loses power.
The platform is unfolded from the vehicle (deployed) by pressing a
switch on the control pendant. A second switch is then pressed to
lower the platform to the ground. An auxiliary switch located on the
platform handrail can be used to raise or lower the platform independently of the control pendant.
When the wheelchair lift is no longer needed, the platform is raised
and folded into the vehicle (stowed). If necessary, the platform can
be stowed in a partially folded position, allowing a wide object to be
placed inside the vehicle.
The operating instructions must be read thoroughly to promote passenger and operator safety (operating instructions are in the Ricon
operator manual 32DFL01). It is important to follow the Ricon recommendations for cleaning, inspecting, and lubricating the wheelchair lift.
A.
RICON SERVICE SUPPORT
If there are questions about this manual, or you need copies, please contact Ricon Product Support:
Ricon Corporation
7900 Nelson Road
Panorama City, CA 91402
Telephone:................................................................................................................................... (818) 267-3000
Outside (818) Area Code ............................................................................................................ (800) 322-2884
World Wide Website ..........................................................................................................www.riconcorp.com
B.
RICON ONE-YEAR LIMITED WARRANTY (refer to following page)
32DFL02.E
1-1
RICON CORPORATION
ONE-YEAR LIMITED WARRANTY
Ricon Corporation (Ricon) warrants to original purchaser of this product that Ricon will repair or replace, at
its option, any part that fails due to defective material or workmanship as follows:
• Repair or replace parts for a period of one year from date of purchase.
• Labor costs for specified parts replaced under this warranty for a period of one year from date of purchase.
A Ricon rate schedule determines the parts covered and labor allowed.
If You Need to Return a Product: Return this product to Ricon. Please give as much advance notice as
possible and allow a reasonable amount of time for repairs.
This Warranty Does Not Cover:
• Malfunction or damage to product parts caused by accident, misuse, lack of proper maintenance, neglect,
improper adjustment, modification, alteration, the mechanical condition of vehicle, road hazards, overloading, failure to follow operating instructions, or acts of Nature (i.e., weather, lightning, flood).
NOTE: Ricon recommends that this product be inspected by an authorized Ricon service technician at least
once every six months or sooner if necessary. Any required maintenance should be performed at
that time.
WARNING!
THIS PRODUCT HAS BEEN DESIGNED AND MANUFACTURED TO EXACT SPECIFICATIONS.
MODIFICATION OF THIS PRODUCT IN ANY RESPECT CAN BE DANGEROUS.
This Warranty is Void if:
• Product has been installed or maintained by someone other than an authorized Ricon service technician.
• Product has been modified or altered in any respect from its original design without written authorization by
Ricon.
Ricon disclaims liability for any personal injury or property damage that results from operation of a Ricon product that has been modified from the original Ricon design. No person or company is authorized to change the design of this Ricon product without written authorization by Ricon.
Ricon's obligation under this warranty is exclusively limited to the repair or exchange of parts that fail
within the applicable warranty period.
Ricon assumes no responsibility for expenses or damages, including incidental or consequential damages. Some states do not allow the exclusion or limitation of incidental or consequential damages, so
the above limitation or exclusion may not apply.
Important: The warranty registration card must be completed and returned to Ricon within 20 days after installation of this Ricon product for the warranty to be valid. The warranty is not transferable.
The warranty gives specific legal rights, and there may be other rights that vary from state to state.
1-2
32DFL02.E
C.
SHIPMENT INFORMATION
Ricon does not sell directly to the user because of the specialized nature of this product. Instead, the product is distributed through a worldwide network of authorized Ricon dealers who perform the actual sale and installation.
•
•
D.
When the product is received, unpack the product and check for freight damage. Claims for any damage
should be made to the carrier immediately.
Be sure the installation kit contains all items listed on the included packing list. Please report any missing items
immediately to Ricon Product Support. Save packing list for future reference. The warranty and owner registration cards must be completed and returned to Ricon within 20 days to validate the warranty.
GENERAL SAFETY PRECAUTIONS
The following general safety precautions must be followed during installation, operation, service, and maintenance:
•
•
•
•
•
•
•
•
•
•
•
•
Under no circumstances should installation, maintenance, repair, or adjustments be attempted without the immediate presence of a person capable of rendering aid.
An injury, regardless of how slight, must be attended to. Administer necessary first aid or seek medical attention immediately.
Protective eye shields and appropriate clothing must be worn at all times.
To avoid injury, always exercise caution when operating and be certain that hands, feet, legs, and clothing are
not in the path of platform movement.
Batteries contain acid that can burn. If acid comes in contact with skin, flush affected area with water and wash
with soap immediately.
Always work in a properly ventilated area. Do not smoke or use an open flame near battery.
Do not place anything metallic on top of battery.
Check under vehicle before drilling to avoid drilling into frame, subframe members, wiring, hydraulic lines, fuel
lines, fuel tank, etc.
Read and thoroughly understand the operating instructions before attempting to operate.
Inspect the product before each use. If an unsafe condition, unusual noises or movements exists, do not use
the product until the problem is corrected.
Keep others clear during operation.
The product requires regular periodic maintenance. Ricon recommends a thorough inspection at least once
every six months. The product must always be maintained at the highest level of performance.
32DFL02.E
1-3
E.
INNOVATOR COMPONENT TERMS
The references used throughout this manual are illustrated in Figure 1-1 and defined in Table 1-1. Figure 1-2
shows electrical and hydraulic control details on the lift tower. Figure 1-3 shows the lift with its platform in the
folded position (with the platform not wrapped). Figure 1-4 shows the lift fully stowed (with platform folded and
wrapped). Refer to Chapter IV, SPARE PARTS, for more details. Refer to Figure 1-5 for locations of the limit
switches that provide input signals to the two controllers.
MANUAL BACKUP
PUMP HANDLE
HYDRAULIC PUMP ASSEMBLY
(inside tower)
REAR
PARALLEL ARM,
UPPER
RIGHT
BRIDGEPLATE SECTIONS
HANDRAIL
TOWER
HANDRAIL SWITCH
REAR PLATFORM SECTION,
RIGHT SIDE
MAIN CONTROLLER
(inside tower)
FRONT PLATFORM SECTION,
RIGHT SIDE
PARALLEL ARM,
LOWER
RIGHT SIDE
BARRIER
VERTICAL ARM
REAR PLATFORM SECTION,
LEFT SIDE
CONTROL
PENDANT
ROLLSTOP
SECTIONS
BARRIER RELEASE
LEFT
REMOTE CONTROLLER
(beneath platform)
LEFT SIDE
BARRIER
FRONT PLATFORM SECTION,
LEFT SIDE
FIGURE 1-1: INNOVATOR LIFT COMPONENTS
MANUAL PUMP
HANDLE SOCKET
MANUAL PUMP
RELEASE VALVE
MANUAL BACKUP
PUMP HANDLE
CONTROL SYSTEM
CIRCUIT BREAKER
INTERLOCK
INDICATOR LIGHT
OPTIONAL POWER
DOOR OPERATOR
CIRCUIT BREAKER
WRAP DISABLE
SWITCH
FIGURE 1-2: INNOVATOR TOWER DETAILS
1-4
32DFL02.E
FRONT
FIGURE 1-4: INNOVATOR FOLDED
AND WRAPPED
FIGURE 1-3: INNOVATOR FOLDED
BUT NOT WRAPPED
FIGURE 1-5: LIMIT SWITCH LOCATIONS
32DFL02.E
1-5
TABLE 1-1: INNOVATOR LIFT MAJOR COMPONENTS
NAME
DESCRIPTION
Left, Right, Front, and Rear
Lift reference when viewing installation from outside of vehicle.
Control pendant
Hand-held control box used to operate lift.
Tower
Houses hydraulic pump assembly, circuit breakers, and manual back-up pump.
Hydraulic pump assembly
Electric motor driven hydraulic pump that produces pressure used to raise platform; includes a manual backup pump.
Manual backup pump handle
Used to operate the manual back-up pump (located on hydraulic pump assembly).
Parallel arms
Upper and lower links connecting vertical arm to tower.
Vertical arm
Connects platform to parallel arms.
Handrail
Provides handhold for user. Handrail may vary from that shown.
Handrail switch
Toggle switch allows platform occupant to raise and lower platform. Switch does
not stow or deploy platform.
Bridgeplate
Plate that bridges gap between platform and lift baseplate when platform is at floor
level. Also acts as a rear rollstop when platform is in motion.
Platform sections
Curbed area for passenger; transports passenger between ground and
vehicle floor; breaks into four sections.
Side barriers
Side barriers help confine passenger to platform. They unfold automatically when
platform contacts ground, allowing access to platform from sides.
Barrier release
Mechanical latch that holds side barriers in vertical position. One per barrier.
Front rollstop
Front barrier prevents wheelchair from slow, inadvertent rolling off of platform.
Unfolds automatically when platform contacts ground. Two sections.
Manual pump handle socket
Accepts manual backup pump handle used to operate manual backup pump.
Manual pressure release valve
Relieves hydraulic pressure in hydraulic system.
Control system circuit breaker
Provides electrical power to lift.
Power door operator circuit
breaker
Provides electrical power to optional power door operator (if door operator is installed).
Wrap disable switch
Rocker switch at base of tower selects one of two available platform stow positions. When switch is ON, platform folds into vertical (upright) position and stops
(Figure 1-3). When switch is OFF, platform stows fully into vehicle (Figure 1-4).
Controllers
Two electronic controllers process input signals from the pendant and limit
switches and send command signals to the hydraulic pump, motors, valves, etc.
The main controller is located in the base of the tower and the remote controller is
on the bottom right side of the front platform section.
END OF TABLE
1-6
32DFL02.E
II.
INNOVATOR INSTALLATION
T
his chapter contains instructions for installing the RICON Innovator Series Personal Use Wheelchair Lift. The
installation kit for the Innovator Series Lift (provided with lift) contains detailed installation instructions. Contact
Ricon Product Support for applications not covered by the included installation instructions or the instructions
that follow. Be certain that installation instructions are followed exactly and do not eliminate any steps or modify
product.
WARNING!
THIS PRODUCT MUST BE INSTALLED BY A TRAINED, AUTHORIZED RICON SERVICE TECHNICIAN.
NOTE: Refer to Figure 2-1. Verify the serial number of this product. Record number on page i of this manual.
CORPORATION
7900 Nelson Road, Panorama City, CA 91402
mfg. date:
Made in U.S.A.
SERIAL NUMBER
DECAL
FIGURE 2-1: SERIAL NUMBER LOCATION
Lift installation consists of the following four steps, each of which is briefly explained in this chapter. Refer to the kit
installation instructions for more detailed installation information.
A. Mechanical installation
B. Electrical installation
C. Final adjustments
D. Installation verification
32DFL02.E
2-1
A.
MECHANICAL INSTALLATION
1.
VEHICLE PREPARATION
WARNING!
§
WEAR PROTECTIVE CLOTHING AND EYE PROTECTION AT ALL TIMES. BATTERIES CONTAIN
ACID THAT CAN BURN. IF ACID COMES INTO CONTACT WITH SKIN, IMMEDIATELY FLUSH
AFFECTED AREA WITH WATER AND WASH WITH SOAP.
§
DO NOT SMOKE OR USE OPEN FLAME IN THE VICINITY OF BATTERY. WORK IN A PROPERLY
VENTILATED AREA.
§
DO NOT PLACE ANYTHING METALLIC ON TOP OF BATTERY.
•
The lift is designed to carry the weight of one wheelchair and its passenger. The vehicle structure must be
capable of supporting all loads produced during lift operation, as well as those forces caused by motion of
the vehicle when it is driven.
• Safely park vehicle on a flat, level surface and turn engine off.
• Disconnect the cable from the negative battery terminal at vehicle engine compartment.
• The lift installation surface must be flat, with a total variation of less than ¼”.
• Perform the procedures in the order that they are presented here.
• Remove vehicle stepwell cover.
• Install power door operators, if used, before installing lift; door operators may influence lift location. Refer to
power door operator installation instructions for more information.
2.
LIFT INSTALLATION NOTES
The correct lift mounting is very important. Improper mounting and/or fastening of lift can adversely affect lift
performance. Although installation details vary amongst vehicle makes, the following principle applies to all
vehicles:
•
The lift must be fastened directly to the vehicle floor. Remove door trim, carpet, plywood, molding, wall
paneling or any other material that may interfere with the installation. If subflooring is present, you must cut
out an area in the subfloor of sufficient size to accommodate the stepwell bracket and baseplate. Use the
bracket as a template to determine the size of the area to be cut.
NOTE: Refer to vehicle-specific installation instructions for appropriate dimensions and fastening details.
3.
LIFT INSTALLATION
a. Install power door operators, if used. Refer to the installation instructions provided with the door
operators for more information.
NOTE: Refer to installation instructions, as necessary.
b. Assemble aluminum baseplate to lift as shown in installation instructions.
c. Check location of lift.
CAUTION!
CHECK VEHICLE BEFORE DRILLING. DO NOT DRILL INTO FACTORY
WIRING, HYDRAULIC LINES, FUEL LINES, FUEL TANK, ETC.
d. If necessary, cut a hole in subflooring to accommodate baseplate installation.
e. Refer to installation instructions. Using stepwell bracket as a template, drill mounting holes for
baseplate as follows:
1) Drill two ¼” holes in side of stepwell. Install two ¼” screws to secure bracket.
2) Drill four 3/8” holes in stepwell. Install four 3/8” screws in stepwell.
3) Drill two ½” mounting holes.
4) Cut two 1-1/8” holes using hole saw as shown in the installation instructions.
f. Install the wall mounting brackets.
2-2
32DFL02.D
WARNING!
LIFT WEIGHT IS APPROXIMATELY 330 LBS. USE EXTREME CARE WHEN
POSITIONING. POSITIONING MUST BE PERFORMED BY AT LEAST TWO PEOPLE.
g. Position lift; align the rear mounting holes of lift with holes in floor bracket.
h. Secure lift:
1) Insert two ½-13 screws through holes.
2) Loosely install below-floor reinforcement brackets.
3) Install the front ¾-10 x 4” studs through the reinforcement brackets and secure with flat washers,
lock washers, and nuts.
4) Tighten all ½” and ¾” hardware.
i. Install mounting support bracket.
j. Install vertical support.
32DFL02.E
2-3
B.
ELECTRICAL INSTALLATION
CAUTION!
•
•
•
•
•
•
•
•
DISCONNECT BATTERY BEFORE STARTING WORK.
ROUTE ELECTRICAL CABLES AWAY FROM ANY MOVING PARTS, FUEL/HYDRAULIC LINES AND
EXHAUST SYSTEM. ATTACH SECURELY TO VEHICLE.
USE SUITABLE GROMMETS TO PROTECT CABLES FROM DAMAGE WHEN ROUTING THEM
THROUGH VEHICLE FLOOR OR WALLS.
CHECK VEHICLE BEFORE DRILLING. DO NOT DRILL INTO FACTORY WIRING, HYDRAULIC LINES,
FUEL LINES, FUEL TANK, ETC.
MOUNT MAIN CIRCUIT BREAKER WITHIN 12” OF BATTERY.
WEAR PROTECTIVE CLOTHING AND EYE PROTECTION AT ALL TIMES. BATTERIES CONTAIN ACID
THAT CAN BURN. IF ACID COMES INTO CONTACT WITH SKIN, IMMEDIATELY FLUSH AFFECTED
AREA WITH WATER AND WASH WITH SOAP.
DO NOT SMOKE OR USE OPEN FLAME IN THE VICINITY OF BATTERY. WORK IN A PROPERLY
VENTILATED AREA.
DO NOT PLACE ANYTHING METALLIC ON TOP OF BATTERY.
1.
CONTROL INTERFACE AND DOOR OPERATOR
Connect appropriate RICON lift interface control (control pendant, etc.) to lift connector. Secure
interface control cable to lift bracket with supplied strain relief kit.
b.
Connect power door operator to lift connector. If a power door operator is not used, install a shorting
plug (included in installation kit) here.
a.
CAUTION!
Check control interface and door operator cables for interference with moving lift parts.
c.
d.
2.
a.
b.
Route control interface and door operator cables and secure them so that moving lift parts or lift users
will not entangle them. Use nylon cable ties and cable clamps to secure cables.
Install the pendant mounting clip on interior wall. Locate the clip where it will be accessible from either
inside or outside of vehicle.
MAIN CIRCUIT BREAKER
Disconnect battery ground lead.
Mount main circuit breaker within 12" of battery and use no more than 12” of cable to connect. Locate
it as near to battery as possible to minimize length of unprotected cable.
CAUTION!
Do not over tighten circuit breaker mounting hardware.
c.
3.
Fasten circuit breaker to supplied bracket. Fasten bracket to vehicle structure with sheet metal
screws or blind rivets.
MAIN POWER CABLE
CAUTION!
Check vehicle before drilling. Do not drill into factory wiring, hydraulic lines, fuel lines, fuel tank, etc.
a.
b.
c.
2-4
Refer to installation instructions. Using hole saw, drill two 1.0" dia. holes through vehicle floor to
provide routing for heavy power cables to power terminals located on base at left side of lift tower.
Use split plastic grommets (supplied) to protect cable.
Crimp #4 ring terminal (supplied) on each end of short power cable (minimum 12" long). Connect one
end of cable to BAT terminal on circuit breaker; leave other end disconnected.
Install one ring terminal on end of long 4 AWG power cable.
32DFL02.D
CAUTION!
Route electrical cables away from moving parts, fuel/ hydraulic lines, and exhaust system.
d.
e.
f.
4.
Connect long power cable to main circuit breaker AUX terminal. Route power cable beneath vehicle
floor, back to lift and up through hole near lift baseplate. Secure cable to vehicle with nylon clamps
and/or cable ties.
Cut cable about one foot beyond power terminals (located at base of tower). Install ring terminal on
cable and fasten it to red (positive) power terminal.
Connect short cable from main circuit breaker BAT terminal to positive battery terminal.
LIFT ELECTRICAL GROUNDING
Refer to installation instructions. Connect the black (negative) power terminal (located at lower left of
lift) to vehicle chassis. Grounding point on chassis must be free of paint and other material.
b.
Make connection using an appropriate length of 4 AWG cable. Install two #4 ring terminals (supplied)
on cable, and fasten one end to black (negative) power terminal on lift. Route other end through
vehicle floor, using a grommet to protect cable.
c.
Fasten ground cable to chassis with a #14 (1/4”) hex head sheet metal screw. Clean area of electrical
contact to bare metal before fastening.
a.
32DFL02.E
2-5
C.
FINAL ADJUSTMENTS
It may be necessary to adjust the PLATFORM ABOVE FLOOR and PLATFORM BELOW FLOOR limit switches
after installation if the platform does not deploy and stow properly. The ANTI-STOW PRESSURE SWITCH may
require adjustment after replacement or when major lift repair work is done.
CAUTION!
Be certain the area is clear of obstruction before operating lift.
1.
PLATFORM LIMIT SWITCHES
NOTE: To avoid operational “dead spots”, always adjust PLATFORM ABOVE FLOOR switch before PLATFORM
BELOW FLOOR switch.
NOTE: When loosening adjustment screws, apply enough pressure to screw to move block instead of screw.
(The block might stick if insufficient pressure is applied to screw.)
NOTE: If lift does not operate after 1-2 full turns of adjustment screw, cycle platform UP and DOWN (the
PLATFORM BELOW FLOOR switch is less sensitive than the PLATFORM ABOVE FLOOR switch).
NOTE: Contact Ricon Product Support for assistance, if needed.
a. Be certain that area is clear and the vehicle is parked on a flat, level surface.
b. Deploy lift using control pendant DEPLOY button until lift platform is at vehicle floor level.
c. Refer to Figures 2-2 and 2-3. Rotate PLATFORM ABOVE FLOOR and PLATFORM BELOW
FLOOR adjustment screws 6-8 turns counter-clockwise, and then slowly push both screws toward
rear of lift (interior of vehicle) until they hit the mechanical stops.
FIGURE 2-2: PLATFORM ABOVE FLOOR AND BELOW FLOOR LIMIT SWITCHES
d. Push control pendant STOW button, then push and hold control pendant DEPLOY button until
platform stops moving.
e. Push and hold control pendant DEPLOY button. Slowly turn PLATFORM ABOVE FLOOR adjustment
screw clockwise until platform moves down to vehicle floor level.
f. Push and hold control pendant DOWN button until platform is at ground level.
g. Push and hold control pendant UP button until platform stops moving.
h. Push and hold control pendant UP button. Slowly turn PLATFORM BELOW FLOOR adjustment
screw clockwise until platform moves up to vehicle floor level. Release UP button.
i. Repeat steps d-h until platform stops at floor level.
j. Cycle platform through all functions (DEPLOY, DOWN, UP, and STOW) to verify correct adjustment.
2-6
32DFL02.D
2.
ANTI-STOW PRESSURE SWITCH
An adjustable, pressure-sensitive, electrical switch is installed in the body of the hydraulic pump. When properly
adjusted, the switch protects platform occupants by preventing the accidental stow or deploy of the platform; the
platform cannot be stowed if a weight of 50 pounds, or greater, is on the platform. The switch changes state
when a 50 lb load is on the deployed platform.
a.
CHECK SWITCH
1) Apply power to lift and deploy platform.
2) Lower platform to ground, and place a 50 lb weight in center of platform.
3) Press STOW button. Platform should stop at stow height but not enter enclosure. Proceed to next
step if platform moves into enclosure.
b.
ADJUST SWITCH
1) Refer to Figure 2-3. The adjusting screw is on the end face of the pressure switch body, between
the two lead wires. There is a setscrew locking the adjustment screw in place, and this setscrew
must be removed before you can access the adjustment screw.
FIGURE 2-3: ANTI-STOW PRESSURE SWITCH
2) Remove locking setscrew (requires hex key) and turn adjustment screw 1/8 turn CCW to increase
sensitivity.
3) Repeat above steps until the 50 lb weight inhibits stowing of platform. Repeat test from floor height;
platform should stop at stow height and not enter enclosure.
4) Remove test weight and check platform stow function from ground height and floor height. Platform
should stow properly from either level. Replace locking setscrew.
NOTE: Normal platform operation (platform does not stow when a weight that is significantly less than 50 lb
is present) is not possible if the pressure switch adjustment is too sensitive. Turn adjusting screw
CW to decrease pressure switch sensitivity. Also, if erratic platform movement occurs because the
setting of the pressure switch is marginal, correct this by turning adjusting screw 1/16 turn in the
appropriate direction.
32DFL02.E
2-7
D.
VERIFY INSTALLATION
1.
LOAD TEST
CAUTION!
•
This load test is designed to test the vehicle structure and the lift mounting method, not the lift
capacity.
•
Do not operate lift while test weight is on platform. Remove test weight immediately after test.
•
Vehicle suspension will compress and vehicle will lean when test weight is placed on platform.
If weighted platform contacts ground, remove weight, raise platform, and retest.
•
Test weight requirement is 825 lbs. Use great care when handling weight. Positioning must
be performed by at least two people.
a.
Verify that neither the vehicle structure nor any other components interfere with movement of the
platform.
b.
Verify integrity of lift installation by test loading the platform at 125% of its rated load capacity of 660
pounds. Position lift platform 2" - 6" above ground. Place 825 pound test weight in center of platform
and inspect lift mounting points for deformation or loosening of hardware. REMOVE TEST WEIGHT.
2.
DECAL INSPECTION
Verify that all decals are properly located and affixed as shown in Figure 2-4 on following page.
3.
MISCELLANEOUS
•
•
•
•
Reinstall stepwell cover.
Reinstall plastic moisture barriers on doors.
Reinstall door trim, carpet, plywood, molding, wall paneling, or any other material that was removed.
Perform several cycles of operation with the control pendant. During each cycle, check for the following
conditions:
• Operation must be smooth and free of wobble or hesitation.
• If power door operators are installed, doors must open and close in proper sequence.
• Bridgeplate must deploy when platform reaches vehicle floor level. Bridgeplate must be stowed at all
other positions.
• Front rollstops and side barriers must lower when platform contacts ground. Rollstops and barriers
must be raised at all other platform positions.
NOTE: If you observe unusual movements or noise during any cycle of operation, stop the cycle immediately.
Check that the lift is installed as specified in the installation instructions. Refer to Chapter III for detailed
troubleshooting information.
• Set WRAP DISABLE switch to on position. Perform one cycle of operation (deploy, lower, raise, stow)
while observing lift. When STOW button is pressed, the platform must fold into vertical position and
move into vehicle, but not wrap.
• Set WRAP DISABLE switch to off position. Perform one cycle of operation while observing lift. Platform
must fully fold and wrap into vehicle when control pendant STOW button is pressed.
E.
CUSTOMER ORIENTATION
IMPORTANT CUSTOMER ORIENTATION
Ricon Sales or Service personnel must review the Warranty and Operator Manual with
customer to be certain he or she understands the safe operation of lift. Instruct customer to
follow operating instructions without exception.
2-8
32DFL02.D
32DFL02.E
2-9
CORPORATION
Made in U.S.A.
12450 Montague St., Pacoima, CA 91331
DECAL,
PRESSURE
RELEASE
VALVE
29200
Refer to manual operation instructions on
tower cover or in Operator Manual.
27525.A
MANUAL OPERATION:
To Deploy Platform:
Push and hold DEPLOY button and platform
will unfold at floor level.
To Enter Vehicle:
1. Deploy platform.
2. Push and hold DOWN button until platform
is on ground and front rollstop is open.
3. Place wheelchair in center of platform,
facing outward, and LOCK WHEELCHAIR
BRAKES. Be certain wheelchair is within
perimeter of platform and cannot interfere
with operation of front rollstop.
4. Push and hold UP button until platform
stops at floor level.
5. Release wheelchair brakes and carefully
enter vehicle.
To Exit Vehicle:
1. Deploy platform.
2. Place wheelchair in center of platform,
facing outward, and LOCK WHEELCHAIR
BRAKES.
3. Push and hold DOWN button until platform
is on ground and front rollstop is open.
4. Release wheelchair brakes and carefully
exit platform.
To Stow Lift:
Push and hold STOW button until platform is
completely within vehicle.
OPERATING INSTRUCTIONS:
Be certain vehicle is safely parked on a level
area away from traffic before operating lift.
Engage the vehicle-to-lift safety interlock
system (e.g., transmission and parking
brake, if so equipped) before operating lift.
Prior to use, inspect lift for proper function,
required maintenance, and damage. Do not
use lift if a problem exists, and contact your
dealer for repair information.
Do not exceed rated load capacity of 300 lbs
(600kg).
This lift is for use by wheelchair occupants,
only. Do not use for standing passengers.
Do not lower platform onto a curb.
Ricon Corporation disclaims liability for
damage or personal injury that results from lift
modification, lack of maintenance, negligence,
abuse, or failure to follow the lift operating
instructions.
THE RICON CORPORATION
7900 NELSON ROAD
PANORAMA CITY, CA 91402
(818) 267-3000 or (800) 322-2884
CAUTION!
Improper use of lift can result in personal
injury.
Users must read and follow the operating
instructions in Operator Manual. The
Operator Manual is available from:
FREEDOM
PERSONAL USE
WHEELCHAIR LIFT
OPERATING INSTRUCTIONS
WARNING!
DECAL,
OPERATING INST.
FREEDOM
27525
DECAL,
SECOND SOLENOID
18669
BEI UNUNTERBROCHENER
WARNLICHT ANZEIGE IST
WARTUNG ERFORDERLICH
MANTENIMIENTO ES
REQUERIDO SI PERMANECE
CONTINUAMENTE ILUMINADO
MAINTENANCE DOIT ETRE
FAITE SI CETTE LUMIERE
RESTE ALLUMEE EN
PERMANENCE
mfg. date:
Made in U.S.A.
12450 Montague St., Pacoima, CA 91331
CORPORATION
T-HANDLE
Deploy Platform:
A
B
MANUAL
PUMP
SOCKET
Lower Platform:
C
TURN VALVE
CW BEFORE
RAISING
PLATFORM
D
MANUAL
PUMP
SOCKET
27524.A
1) Lift side barriers to vertical position; each front rollstop section will rise at same time.
2) Refer to C. Push bridgeplate release pin in. Open both bridgeplate sections by
pushing down to horizontal position.
3) Refer to D. Turn pressure release valve CW to close; do not over-tighten valve. Insert
backup pump handle into manual pump socket. Operate pump to raise platform as
high as possible (which will be slightly above floor level).
4) Refer to A. Pull firmly on T-handle and hold. Swing right platform section back
towards tower until it locks and then release T-handle.
Stow Platform:
1) Refer to B. Open pressure release valve 1/4 turn CCW and leave open until platform
is fully settled on ground.
2) Push side barriers out and down; front rollstop sections will unfold at same time.
3) Carefully exit platform.
BRIDGEPLATE
RELEASE PIN
1) Refer to A. Pull T-handle out and hold. Swing the right-side platform section outward
until it locks, and then release T-handle.
2) Refer to B. Open pressure release valve by turning it 1/4 turn CCW. Close valve
when platform reaches floor level; do not over-tighten valve.
3) Place wheelchair in center of platform.
4) Refer to C. Push bridgeplate release pin inward. Close both bridgeplate sections by
lifting to vertical position.
TURN VALVE CCW
TO DEPLOY
PLATFORM
Park vehicle in a level area that is away from traffic.
If the vehicle cannot be moved under its own power, summon emergency assistance
to move vehicle to a safe operating area.
Provide space for lift operation and passenger deboarding. Verify that the path of the
platform, as it moves, is free of obstacles.
Open vehicle doors manually. If equipped with a power door operator, refer to its
Operator Manual for manual operation instructions.
Caution people in vicinity that platform is about to deploy.
FREEDOM PERSONAL USE
WHEELCHAIR LIFT MANUAL OPERATING INSTRUCTIONS
Preparation:
U.S. and Foreign patents pending.
DECAL,
SWITCH LABEL,
UP/DOWN
27530
FIGURE 2-4: DECAL LOCATIONS
DECAL, CAUTION,
PINCH POINT
18618
DECAL,
MAXIMUM LOAD
27531
DECAL, PATENT
PENDING
32-10-171
CAUTION
PART OF SERIAL
NUMBER DECAL.
(ONLY RICON
REPLACEABLE)
32-10-166
DECAL,
MANUAL
OPERATION
27524
DECAL,
RICON, VERT.
SILVER
32-10-152
PART OF SERIAL
NUMBER DECAL.
(ONLY RICON
REPLACEABLE)
32-10-166
MAINTENANCE REQUIRED IF
CONTINUOUSLY ILLUMINATED
PRESSURE RELEASE
VALVE
1/4 TURN CCW
TO OPEN
mfg. date:
DOWN
UP
27527.A
CAUTION
DECAL, CAUTION
STAND CLEAR
26181
DECAL, CAUTION
PINCH POINT ON
FOLD
27527
DECAL,
PLATFORM MANUAL
RELEASE RING
27528
PLATFORM MANUAL
RELEASE RING
DECAL,
DO NOT LOWER
ONTO CURB
27529
This page intentionally left blank.
2 - 10
32DFL02.D
III.
MAINTENANCE AND TROUBLESHOOTING
R
egular maintenance of the Ricon Innovator Wheelchair Lift will reduce the frequency of repairs and contribute
to optimum performance and safe operation. This chapter contains cleaning and lubrication instructions, a
maintenance schedule, a troubleshooting section, plus hydraulic and electrical diagrams.
WARNING!
THIS RICON PRODUCT IS HIGHLY SPECIALIZED. MAINTENANCE AND REPAIRS MUST BE PERFORMED
BY A RICON AUTHORIZED SERVICE TECHNICIAN USING RICON REPLACEMENT PARTS. MODIFYING
OR FAILING TO PROPERLY MAINTAIN THIS PRODUCT WILL VOID THE WARRANTY, AND MAY RESULT
IN UNSAFE OPERATING CONDITIONS. AFTER THE WARRANTY PERIOD, RICON RECOMMENDS THAT
TROUBLESHOOTING BE CONTINUED BY A RICON AUTHORIZED SERVICE TECHNICIAN.
A.
CLEANING
Regular cleaning with mild soap and water (i.e. liquid dish soap or liquid car wash soap) and then drying thoroughly
will protect painted lift surfaces. Cleaning the lift is especially important in areas of the country where roads are
salted in winter or when dirt, mud, snow, etc. can be tracked into vehicle.
B.
MAINTENANCE CHECKLIST
Under normal operating conditions, maintenance inspections are required at least every six months (1750 cycles)
and a thorough inspection should be performed as specified in Table 3-1. Service should be more frequent when
the lift is used ten times per day, or more.
TABLE 3-1: MAINTENANCE CHECKLIST
SERVICE POINT
ACTION TO PERFORM
Decals
Refer to Figure 2-5. Verify that all lift decals are properly affixed, clearly visible, and legible.
Replace if necessary.
Overall condition
Inspect lift for damaged or missing parts.
Control pendant
Check control pendant for damage and verify that its cable connections are secure.
Electrical wiring
Inspect all accessible electrical wiring for damaged wires (cut, frayed, unsecured) and loose
connectors.
Handrail
Verify that handrail fasteners are properly tightened.
Lift mounting
points
Main lifting pivots
Hydraulic system
• Verify that the mounting hardware is secure and undamaged.
• Verify that mounting bracket screws are properly tightened.
Check that all traveling frame pins are in place, free from damage, and locked in position.
• Check for hydraulic fluid leakage along all lines.
• Check that backup pump manual release valve is lightly closed.
• Check hydraulic cylinder for leaks.
• Inspect hydraulic hoses for damage.
• Verify that all fittings are tightly secured.
CAUTION
Add hydraulic fluid when platform is at ground level. Filling reservoir when platform is above
ground level will result in overflow from reservoir when platform is lowered.
• Lower platform to ground level and check hydraulic fluid level. If level is below FULL mark,
add Texaco 01554 Aircraft Hydraulic Oil, or equivalent fluid per U.S. Mil Spec H5606G.
32DFL02.E
3-1
TABLE 3-1: MAINTENANCE CHECKLIST
SERVICE POINT
ACTION TO PERFORM
Operation
• Operate lift through several full cycles (deploy, lower, raise, stow) using control pendant.
Note unusual noises or movements.
• Deploy lift to floor level. Set Wrap Disable switch to on position and stow lift using control
pendant. Platform must fold into vertical position and move into vehicle, but not wrap
(Figure 1-3).
• Deploy lift to floor level. Set Wrap Disable switch to off position and stow lift using control
pendant. Platform must fully fold and wrap into vehicle (Figure 1-4).
Handrail mounted
control switch
• Verify switch moves platform from floor level to ground when held in Down position.
• Verify switch moves platform from ground to floor level when held in Up position.
Platform rollstop
Check for proper rollstop operation when platform contacts ground; side barriers and front
rollstop must deploy (unfold) fully and lay flush against ground.
Manual operation
1) Manually unfold platform by using manual release T-handle as specified in Chapter III of the
Operator Manual. Platform must unfold smoothly, with no binding or jamming.
2) Lower platform to vehicle floor level using manual backup pump release valve. Close release
valve when platform reaches vehicle floor level. Platform must deploy smoothly, with no
binding or hesitation.
3) With platform at floor level, attempt to lower (unfold) bridgeplate without pushing bridgeplate
release lever. Bridgeplate must resist unfolding. Push bridgeplate release lever and deploy
bridgeplate to its horizontal position. Check that bridgeplate moves into horizontal position.
Raise and lock bridgeplate in vertical position.
4) Verify that side barriers and front rollstop resist deployment (unfolding) when not at ground
level.
5) Verify that side barriers and front rollstop can be fully deployed (unfolded) manually when
platform is at ground level.
6) Manually stow platform as specified in Chapter III of the Operator Manual. Platform must
lock in place when T-handle is released.
Cleaning and
lubrication
Clean exposed lift surfaces with mild soap and water; dry thoroughly. Inhibit rust by using a
clean, soft cloth to apply a light film of oil to all surfaces. Remove excess oil.
END OF TABLE
C.
TROUBLESHOOTING
1.
TROUBLESHOOTING GUIDE
The troubleshooting guide is intended to provide a logical starting point for general lift problems. However, not all
possible problems or combinations of problems are listed. The guide assumes that the vehicle battery is fully
charged and its connections are clean and tight.
WARNING!
THE TROUBLESHOOTING GUIDE DOES NOT INCORPORATE ROUTINE SAFETY PRECAUTIONS
OR PRELIMINARY PROCEDURES. TROUBLESHOOTING MUST BE PERFORMED BY A
TRAINED, AUTHORIZED RICON SERVICE TECHNICIAN DURING THE RICON WARRANTY
PERIOD. IT IS RECOMMENDED THAT TROUBLESHOOTING ALSO BE PERFORMED BY AN
AUTHORIZED RICON SERVICE TECHNICIAN AFTER THE WARRANTY PERIOD.
3-2
32DFL02.E
TABLE 3-2: TROUBLESHOOTING GUIDE
SYMPTOM
POSSIBLE CAUSE
Main Circuit Breaker (located in engine compartment)
Lift does not operate
when Deploy button is has tripped.
pressed
Control System Circuit Breaker (located on lift tower)
has tripped.
Faulty lift power wiring.
Platform does not
unfold or fold
completely
Reset circuit breaker.
Reset circuit breaker.
Repair wiring.
Lift does not operate
Safety interlock not engaged.
when Deploy button is
pressed; circuit
Control pendant Stow–Deploy switch is defective
breakers have not
(deploy contacts open).
tripped
Lift wrap motor is defective.
Lift unwraps but does
not unfold when
Deploy button is
pressed
REMEDY
Engage safety interlock.
Replace stow/deploy switch.
Replace motor.
Controller unwrap circuit is defective.
Replace controller.
Loose or faulty wiring.
Repair wiring.
Down Valve is defective.
Replace down valve.
Controller down valve circuit is defective.
Replace controller.
Loose or faulty wiring.
Repair wiring.
Platform folding linkage (connected to fold bracket)
requires adjustment.
Adjust linkage rod ends.
Debris between folding platform cam follower and track Clean cam follower and track.
(part of platform folding bracket).
Wrap motor continues Platform Unwrapped limit switch is defective (contacts
to run when platform open) or out of adjustment.
is fully unwrapped
Faulty Platform Unwrapped limit switch wiring.
Lift moves down
automatically from
floor
Platform stops above
or below vehicle floor
level when Deploy
button is pressed
Replace switch.
Repair wiring.
Controller platform wrapping circuit is defective.
Replace controller.
Control pendant Up–Down switch is defective (down
contacts shorted).
Replace switch.
Handrail-mounted control switch is defective (down
contacts shorted).
Replace switch.
Faulty pendant or control switch wiring.
Repair wiring.
Platform Above Floor limit switch is defective or out of
adjustment.
Repair or adjust switch.
Platform Below Floor limit switch is defective or out of
adjustment.
Repair or adjust switch.
Loose or faulty floor level switch wiring.
Repair wiring.
32DFL02.E
3-3
TABLE 3-2: TROUBLESHOOTING GUIDE
SYMPTOM
Up function
inoperative; pump
motor does not
operate
Up function
inoperative; pump
motor operates
Bridgeplate does not
stow or does not
deploy
3-4
POSSIBLE CAUSE
REMEDY
Hydraulic pump motor is defective.
Replace motor.
Front and rear platform contacts are dirty or do not
touch.
Clean or adjust platform
contacts.
Rollstop and Barrier Up limit switch is defective (left or
right side) or out of adjustment.
Repair or adjust switch.
Side Barrier Locked limit switch (left or right side) is
defective or out of adjustment.
Repair or adjust switch.
Loose or faulty wiring.
Repair wiring
Controller pump circuit is defective.
Replace controller.
Control pendant Up–Down switch is defective (up
contacts open).
Replace control pendant.
Handrail-mounted control switch is defective (up
contacts open).
Replace control switch.
Pump motor solenoid is open
Replace solenoid.
Platform overloaded.
Load must not exceed 660 lbs
(300 kg).
Backup pump manual release valve open.
Close valve lightly, taking care
not to over-tighten.
Hydraulic fluid level low.
Check fluid level; add fluid as
necessary.
Down valve open.
Replace down valve.
Air in hydraulic system.
Cycle lift several times or bleed
system.
Leak in hydraulic system.
Check lines and fittings; repair
or tighten as necessary.
Bridgeplate motor is defective.
Replace motor.
Platform Above Floor or Platform Below Floor limit
switches are defective or out of adjustment.
Repair or adjust switches.
Controller bridgeplate circuit is defective.
Replace controller.
Bridgeplate mechanism is jammed or defective.
Repair or replace bridgeplate
mechanism.
Loose or faulty bridgeplate motor wiring.
Repair wiring.
32DFL02.E
TABLE 3-2: TROUBLESHOOTING GUIDE
SYMPTOM
Rollstop does not
open
POSSIBLE CAUSE
REMEDY
Rollstop motor is defective.
Replace rollstop motor.
Platform On Ground limit switch is defective or out of
adjustment.
Repair or adjust switch.
Rollstop mechanical linkage is defective.
Repair rollstop linkage.
Controller rollstop lowering circuit is defective.
Replace controller.
Loose or faulty rollstop motor wiring.
Repair wiring.
Rollstop motor is defective.
Replace motor.
Controller rollstop circuit is defective.
Replace controller.
Rollstop mechanical linkage is defective.
Repair rollstop linkage.
Loose or faulty rollstop motor wiring.
Repair wiring.
Rollstop does not
latch
Debris in latch mechanism (part of actuator shoe
assy).
Remove debris.
Lift operates with
rollstop open
Rollstop and Barrier Up limit switches (left or right
side), is defective or out of adjustment.
Repair or adjust switch.
Rollstop opens at any
lift position
Platform On Ground limit switch, is defective or out of
adjustment.
Repair or adjust switch.
Lift moves up
automatically from
ground
Control pendant Up–Down switch is defective (up
Replace switch.
contacts shorted) or handrail-mounted control switch is
defective (up contacts shorted).
Rollstop does not
close
Control pendant or control switch faulty wiring.
Repair wiring.
Platform stops above
floor level when Up
button is pressed
Platform Below Floor limit switch is defective or out of
adjustment.
Repair or adjust switch.
Pump solenoids
chatter
Poor electrical connection between negative bus bar,
pump block, or solenoid plate.
Tighten or clean connections.
Lift will not stow
Fold Cutoff limit switch is defective or out of
adjustment.
Repair switch or wiring.
Control pendant Stow–Deploy switch is defective (stow Replace switch wiring.
contacts open).
Platform Pressure Switch is defective.
Replace pressure switch.
Loose or faulty wiring.
Repair wiring.
Control pendant Stow–Deploy switch is defective (stow Replace switch.
Lift stows
automatically when at contacts shorted).
floor level or above
Faulty control pendant wiring.
Repair wiring.
32DFL02.E
3-5
TABLE 3-2: TROUBLESHOOTING GUIDE
SYMPTOM
Pump motor runs
after lift is stowed
POSSIBLE CAUSE
Fold Cutoff limit switch is defective or out of
adjustment.
Repair switch or wiring.
Faulty Fold Cutoff limit switch wiring.
Repair wiring.
Controller Fold Cutoff circuit is defective.
Replace controller.
Wrap motor runs after Platform Wrapped limit switch is defective or out of
lift is stowed
adjustment.
Platform folds into
vehicle but does not
wrap when Stow
button is pressed
REMEDY
Repair switch or wiring.
Controller platform wrapping circuit is defective.
Replace controller.
Loose or faulty wiring.
Repair wiring.
Wrap Disable switch set to ON.
Set Wrap Disable switch to
OFF.
Wrap Disable switch, or its wiring, faulty.
Repair switch or wiring.
Platforms fully wraps Wrap Disable switch, or its wiring, faulty.
into vehicle with Wrap
Disable switch set to
ON
Replace switch.
Power door operators Power door operator circuit breaker (located on lift
do not open vehicle
tower) is tripped.
doors
Left power door operator motor is defective.
Reset circuit breaker.
Loose or faulty wiring.
Repair wiring.
Power door operator mechanical linkage is defective.
Repair door operator linkage.
Controller vehicle door operator circuit is defective.
Replace controller.
Power door operators Power door operator mechanical linkage is defective.
do not close vehicle
doors
Loose or faulty wiring.
Repair door operator linkage.
Repair wiring.
Platform Wrapped limit switch is defective or out of
adjustment.
Repair switch or wiring.
Controller vehicle door operator circuit is defective.
Replace controller.
END OF TABLE
3-6
Replace power door operator.
32DFL02.E
2.
ELECTRICAL SYSTEM DIAGNOSTIC DISPLAYS
Observe the LED display on the main controller board (located at the lower front of the tower) to monitor
electrical events that occur in the lift. These lights provide an indication of what the lift status is, such as the
position of components (rollstop up, platform wrapped, platform below floor level, etc), or occurrence of output
signals that energize electrical components (hydraulic pump, rollstop motor, etc), or the need for precaution
(high current in certain circuits, vehicle door open, etc). Refer to Figure 3-1 and Table 3-3 on the following
pages for the location of each light and a description of what each light indicates.
Refer to Tables 3-4 through 3-8 on the following pages. Also located on the main controller board is a
numerical LED display that is useful for troubleshooting electrical problems. Each platform motion (deploy,
lower, raise, stow) can be divided into a series of steps, and one or more events occur during that step. Each
event has input and output signals associated with it. If a problem occurs during one of those steps, a number
representing the step will be shown on the display.
Table 3-4 describes the main controller’s numerical display. Tables 3-5 through 3-8 describe each platform
motion. When one of the motions begins, all of the numbers listed at the top of the appropriate platform motion
table will quickly flash in sequence. If a problem occurs during that motion, the number for the faulty step will
be displayed continuously. Refer to the table column below the number displayed for the events that occur
during that step. The problem could be caused by one of the controllers, an input signal switch, an output
component (motor, valve, etc), or the related wiring and connectors.
Each platform motion table is formatted to reflect lift operation. The table has a status number at the top of a
column with a list of input switches, controller commands, and output relays. The state of each input and output
is specified for a given step. If the state is specified as ON, then the switch must be closed, the controller
command must be active, or the output relay coil must be energized during that step. If the state is specified as
OFF, then the switch must be open, the controller command must be inactive, or the output relay coil must be
de-energized (no power applied). A blank space means that the input or output is ignored during that step.
32DFL02.E
3-7
3-8
32DFL02.E
FIGURE 3-1: MAIN CONTROLLER DIAGNOSTIC LED LAYOUT
TABLE 3-3: DIAGNOSTIC LED DISPLAY GUIDE
LED LABEL
DESCRIPTION
Bridgeplate is down
On when bridgeplate is fully lowered.
Bridgeplate is up
On when bridgeplate is fully folded (perpendicular to platform).
Close vehicle doors
On when controller sends a close signal to door operators.
Com 1 circuit is shorted
On when a high-current condition occurs in COM1 circuit.
Com 2 circuit is shorted
On when a high-current condition occurs in COM2 circuit.
Communications failure
On if remote controller does not respond to commands from main controller.
Deploy signal
On when Deploy button is pressed on control pendant.
Down signal
On when Down button is pressed on control pendant.
Lower bridgeplate
On when controller sends a lower signal to bridgeplate motor.
Lower rollstop
On when controller sends a lower signal to left and right rollstop motors.
Lift status
Counter display provides lift status number.
Open down valve
On when controller energizes the down valve.
Open vehicle doors
On when controller sends an open signal to power door operators.
Platform-below-floor
warning
On when platform is lower than floor level; 12VDC will be available at pin 5 of P2.
Platform is above floor
level
On when platform is higher than floor level.
Platform is below floor
level
On when platform is lower than floor level.
Platform is folded
On when platform is fully folded.
Platform is on ground
On when platform has fully settled on ground.
Platform is unwrapped
On when the platform is fully folded but not wrapped.
Platform is wrapped
On when platform is fully folded and wrapped.
Platform occupied
On when there is no weight present on platform; off when 50 lbs, or more, is present.
Processor status
Blinks when controller microprocessor is operating normally.
Raise bridgeplate
On when controller sends a raise signal to bridgeplate motor.
Raise rollstop
On when controller sends a raise signal to left and right rollstop motors.
Remote error
On if main controller receives a communications error signal from remote controller
(commands not accepted).
Rollstop is up
On when both front rollstops are raised.
Side barriers are locked
On when both side barriers are raised and locked.
Stow signal
On when Stow button is pressed on the control pendant.
Turn hydraulic pump on
On when controller energizes hydraulic pump solenoids.
Unwrap platform
On when controller sends an unwrap signal to the platform wrap motor.
Up signal
On when Up button is pressed on the control pendant.
Vehicle doors are open
On when power door operator (if installed) detects that vehicle doors adjacent to lift are
open, indicating that lift can be deployed. This light is on continuously when the power
door operator jumper is connected to J5.
Vehicle engine is running On when vehicle engine speed is at idle, or higher.
32DFL02.E
3-9
TABLE 3-3: DIAGNOSTIC LED DISPLAY GUIDE
LED LABEL
DESCRIPTION
Wrap enable
On when wrap disable switch is off. When switch is off, the platform wraps normally.
Wrap platform
On when controller sends a wrap signal to the platform wrap motor.
TABLE 3-4: NUMERICAL DISPLAY DESCRIPTIONS
STATUS
NUMBER
FUNCTION LIFT CONDITION
00
None
selected
05
UP
Platform on ground; rollstops in transition (moving from horizontal to vertical position).
07
UP
Front platform assembly not in contact with ground; rear platform assembly still in contact
with ground.
10
UP
Platform off ground and moving up to vehicle floor level.
15
UP
Platform at vehicle floor level; bridgeplate moving from vertical to horizontal position.
20
UP
Platform at vehicle floor level; bridgeplate is in horizontal position.
26
DOWN
Platform in motion from vehicle floor level to ground level.
30
DOWN
Rear platform assembly in contact with ground; front platform assembly settling to ground
level.
35
DOWN
Platform is on ground; rollstops are down (horizontal).
50
DEPLOY
Displayed only if vehicle door operators are installed. Platform is fully wrapped; Open
Door command sent to vehicle door operators.
60
DEPLOY
Platform in motion from fully wrapped to fully unwrapped position.
62
DEPLOY
Platform fully unwrapped and still in vertical position.
65
DEPLOY
Platform unfolding from vertical to horizontal position.
70
DEPLOY
Platform at vehicle floor level.
75
STOW
Error message; displayed only when platform is at floor level and there is no
communication between front and rear platform assemblies (contact switch assembly is
open).
76
STOW
Error message; displayed only when platform is below vehicle floor level and there is no
communication between front and rear platform assemblies (contact switch assembly is
open).
77
STOW
Platform in motion from floor level to vertical position.
78
STOW
Platform in vertical position and is unwrapped.
80
STOW
Platform in motion from fully unwrapped to fully wrapped position.
82
STOW
Platform fully wrapped.
85
STOW
Platform fully wrapped. Close Door command sent to door operators (if installed).
3 - 10
Default display; control pendant and handrail control switch are not in use. Platform is at
rest in any position.
32DFL02.E
TABLE 3-5: DISPLAY NUMBER DESCRIPTIONS FOR DEPLOY MOTION
STATUS NUMBER
50 (SEE
NOTE 5)
60
62
65
70
ON
ON
ON
ON
ON
ON
ON
ON
ON
ON
ON
ON
INPUT SWITCHES (SEE NOTE 4)
GROUND CONTACT
ROLLSTOP IS UP
PLATFORM IS WRAPPED
(SEE NOTE 1)
ON
ON
PLATFORM IS UNWRAPPED
BRIDGEPLATE IS DOWN
BRIDGEPLATE IS UP
ROLLSTOP IS LOCKED
REMOTE ERROR
PLATFORM OCCUPIED
VEHICLE DOORS ARE OPEN
(SEE NOTE 6)
ON
ON
PLATFORM BELOW FLOOR LEVEL
PLATFORM ABOVE FLOOR LEVEL
PLATFORM IS FOLDED
WRAP ENABLE (SEE NOTE 2)
ON
ON
ON
ON
ON
ON
ON
ON
ON
ON
ON
OFF
ON
ON
CONTROLLER COMMANDS (SEE NOTES 3 AND 4)
CLOSE DOORS
OPEN DOORS
LOWER ROLLSTOP
RAISE ROLLSTOP
LOWER BRIDGEPLATE
RAISE BRIDGEPLATE
UNWRAP PLATFORM
WRAP PLATFORM
ON
ON
ON
OFF
OUTPUT RELAYS (SEE NOTE 4)
OPEN DOWN VALVE
HYDRAULIC PUMP ON
CLOSE DOORS
OPEN DOORS
BELOW FLOOR ALARM
SPEED
ON
ON
ON
ON
OFF
ON
ON
ON
NOTES:
1. Lit momentarily at beginning of sequence if platform is fully wrapped.
2. Lit continuously when WRAP DISABLE switch is in the OFF (wrap enabled) position.
3. Command LEDs illuminate only while controller sends command to lift and are off at all other times.
4. When marked ON: switch must be closed, controller command must be active, or relay must be energized.
When marked OFF: switch must be open, controller must not issue command, or relay must not be
energized. Blank: Don’t care.
5. Displayed only when power door operators are installed.
6. Lit continuously when the power door operator jumper is connected to J5.
32DFL02.E
3 - 11
TABLE 3-6: DISPLAY NUMBER DESCRIPTIONS
FOR DOWN MOTION
STATUS NUMBER
25
26
30
35
ON
ON
ON
OFF
ON
ON
ON
ON
ON
ON
ON
OFF
ON
ON
ON
ON
ON
ON
ON
ON
ON
ON
INPUT SWITCHES (SEE NOTE 3)
GROUND CONTACT
ROLLSTOP IS UP
PLATFORM IS WRAPPED
PLATFORM IS UNWRAPPED
BRIDGEPLATE IS DOWN
BRIDGEPLATE IS UP
ROLLSTOP IS LOCKED
REMOTE ERROR
PLATFORM OCCUPIED
VEHICLE DOORS ARE OPEN
(SEE NOTE 4)
PLATFORM BELOW FLOOR LEVEL
PLATFORM ABOVE FLOOR LEVEL
PLATFORM IS FOLDED
WRAP ENABLE
(SEE NOTE 1)
OFF
ON
CONTROLLER COMMANDS (SEE NOTES 2 AND 3)
CLOSE DOORS
OPEN DOORS
LOWER ROLLSTOP
RAISE ROLLSTOP
LOWER BRIDGEPLATE
RAISE BRIDGEPLATE
UNWRAP PLATFORM
WRAP PLATFORM
ON
ON
OUTPUT RELAYS (SEE NOTE 3)
OPEN DOWN VALVE
HYDRAULIC PUMP ON
CLOSE DOORS
OPEN DOORS
BELOW FLOOR ALARM
SPEED
ON
ON
OFF
ON
ON
ON
ON
ON
NOTES:
1. Lit continuously when WRAP DISABLE switch is in the OFF (wrap enabled) position.
2. Command LEDs illuminate only while controller sends command to lift and are off at all other times.
3. When marked ON: switch must be closed, controller command must be active, or relay must be energized.
When marked OFF: switch must be open, controller must not issue command, or relay must not be
energized. Blank: Don’t care.
4. Lit continuously when the power door operator jumper is connected to J5.
3 - 12
32DFL02.E
TABLE 3-7: DISPLAY NUMBER DESCRIPTIONS FOR UP MOTION
STATUS NUMBER
05
07
10
15
20
OFF
ON
INPUT SWITCHES (SEE NOTE 3)
GROUND CONTACT
ROLLSTOP IS UP
PLATFORM IS WRAPPED
PLATFORM IS UNWRAPPED
BRIDGEPLATE IS DOWN
BRIDGEPLATE IS UP
ROLLSTOP IS LOCKED
REMOTE ERROR
PLATFORM OCCUPIED
VEHICLE DOORS ARE OPEN
(SEE NOTE 4)
PLATFORM IS BELOW
FLOOR LEVEL
PLATFORM IS ABOVE
FLOOR LEVEL
PLATFORM IS FOLDED
WRAP ENABLE
(SEE NOTE 1)
ON
ON
ON
ON
ON
ON
ON
ON
ON
ON
ON
ON
ON
ON
ON
ON
ON
ON
ON
ON
ON
ON
ON
ON
ON
ON
ON
ON
OFF
OFF
ON
ON
ON
ON
ON
CONTROLLER COMMANDS (SEE NOTES 2 AND 3)
CLOSE DOORS
OPEN DOORS
LOWER ROLLSTOP
RAISE ROLLSTOP
LOWER BRIDGEPLATE
RAISE BRIDGEPLATE
UNWRAP PLATFORM
WRAP PLATFORM
ON
ON
ON
OUTPUT RELAYS (SEE NOTE 3)
OPEN DOWN VALVE
HYDRAULIC PUMP ON
CLOSE DOORS
OPEN DOORS
BELOW FLOOR ALARM
SPEED
ON
ON
ON
ON
ON
ON
ON
ON
ON
ON
NOTES:
1. Lit continuously when WRAP DISABLE switch is in the OFF (wrap enabled) position.
2. Command LEDs illuminate only while controller sends command to lift and are off at all other times.
3. When marked ON: switch must be closed, controller command must be active, or relay must be energized.
When marked OFF: switch must be open, controller must not issue command, or relay must not be
energized. Blank: Don’t care.
4. Lit continuously when the power door operator jumper is connected to J5.
32DFL02.E
3 - 13
TABLE 3-8: DISPLAY NUMBER DESCRIPTIONS FOR STOW MOTION
STATUS NUMBER
75 (SEE
NOTE 1)
76 (SEE
NOTE 2)
77
78
80
82
85
ON
ON
ON
ON
ON
ON
ON
INPUT SWITCHES (SEE NOTE 8)
GROUND CONTACT
ROLLSTOP IS UP
PLATFORM IS WRAPPED
PLATFORM IS UNWRAPPED
ON
ON
ON
ON
ON (SEE
NOTE 5)
ON
ON
ON
BRIDGEPLATE IS UP
ROLLSTOP IS LOCKED
REMOTE ERROR
ON
ON
ON
ON
ON
PLATFORM OCCUPIED
ON (SEE
NOTE 6)
ON
ON
ON
ON
ON
ON
ON
ON
ON
ON
ON
ON
ON
ON
ON
ON
ON
ON
ON
ON
ON
ON
ON
ON
BRIDGEPLATE IS DOWN
VEHICLE DOORS ARE OPEN
(SEE NOTE 9)
PLATFORM BELOW FLOOR LEVEL
PLATFORM ABOVE FLOOR LEVEL
PLATFORM IS FOLDED
WRAP ENABLE (SEE NOTE 3)
ON
OFF
ON (SEE
NOTE 7)
ON
ON
CONTROLLER COMMANDS (SEE NOTES 4 AND 8)
CLOSE DOORS
OPEN DOORS
LOWER ROLLSTOP
RAISE ROLLSTOP
LOWER BRIDGEPLATE
RAISE BRIDGEPLATE
UNWRAP PLATFORM
WRAP PLATFORM
ON
ON
ON
OUTPUT RELAYS (SEE NOTE 8)
OPEN DOWN VALVE
HYDRAULIC PUMP ON
CLOSE DOORS
OPEN DOORS
BELOW FLOOR ALARM
SPEED
ON
ON
NOTES:
1. Error message is displayed only when platform is at floor level and there is no communication between front
and rear platform assemblies (contact switch assembly is open).
2. Error message is displayed only when platform is below vehicle floor level and there is no communication
between front and rear platform assemblies (contact switch assembly is open).
3. Lit continuously when WRAP DISABLE switch is in the OFF (wrap enabled) position.
4. Command LEDs illuminate only while controller sends command to lift and are off at all other times.
5. LED is turned off when spring-loaded contacts open.
6. LED will blink momentarily, and then is turned off.
7. LED will illuminate when platform is above vehicle floor level.
8. When marked ON: switch must be closed, controller command must be active, or relay must be energized.
When marked OFF: switch must be open, controller must not issue command, or relay must not be
energized. Blank: Don’t care.
9. Lit continuously when the power door operator jumper is connected to J5.
3 - 14
32DFL02.E
HYDRAULIC SYSTEM
FIGURE 3-2: HYDRAULIC SYSTEM
32DFL02.E
3 - 15
D.
LIFT ELECTRICAL WIRING
1.
DIAGRAM LEGENDS
a.
Wire Color Codes
TABLE 3-4: WIRE COLOR CODES
LETTER
COLOR
LETTER
COLOR
BLK
Black
RED
Red
BLU
Blue
WHT
White
BRN
Brown
YEL
Yellow
GRN
Green
YEL/BLK
Yellow w/ black stripe
VIO
Violet
ORG
Orange
WHT/ORG
White w/ orange stripe
GRY
Grey
GRN/BLK
Green w/ black stripe
END OF TABLE
b.
Electrical Symbols
-
(P)
(J)
FIGURE 3-3: ELECTRICAL SYMBOLS
3 - 16
32DFL02.E
2.
ELECTRICAL CONNECTORS
Refer to Figure 3-4 for standard pin arrangements of several plugs and receptacles used in the lift electrical
wiring. Note that receptacles are designated on the electrical diagram with the letter J, and plugs with the
letter P.
FIGURE 3-4: PIN ARRANGEMENTS FOR ELECTRICAL CONNECTORS
3.
WIRING DIAGRAM LABELS
TABLE 3-5: WIRING DIAGRAM LABEL DEFINITIONS
LABEL
DESCRIPTION
+12 VDC
System operating voltage.
BRIDGEPLATE
Electric motor; raises and lowers bridgeplate.
BRIDGEPLATE DOWN
Limit switch; closes when bridgeplate is lowered (horizontal).
BRIDGEPLATE UP
Limit switch; closes when bridgeplate is fully stowed (perpendicular to platform).
CLOSE VEHICLE DOOR
Signal; from controller to power door operator; closes doors adjacent to lift.
CONTROL PENDANT
Hand-held device; controls platform motions of deploy, stow, up, and down.
DEPLOY SIGNAL
Signal; from control pendant; unfolds platform and lowers it to floor height.
DOWN SIGNAL
Signal; from control pendant or handrail switch; lowers platform from any height.
DOWN VALVE
Signal; from controller; opens down valve.
FOLD CUTOFF
Limit switch; closes when platform is fully folded.
GROUND
Common point for electrical system.
HYDRAULIC PUMP
Electric motor; coupled to hydraulic pump.
HYDRAULIC PUMP
SOLENOIDS
Signal; from controller to pump solenoids; solenoids provide current to hydraulic
pump motor.
LEFT ROLLSTOP
Electric motor; raises and lowers left side barrier and left front rollstop.
LEFT SIDE BARRIER LOCKED Limit switch; closes when barrier on left side is upright and locked.
LEFT SIDE ROLLSTOP AND
BARRIER UP
Limit switch; closes when rollstop is fully raised (upright).
MAIN CONTROLLER
Electronic component; located in base of tower; controls lift functions and
processes inputs from limit switches. Linked to remote controller by data bus.
32DFL02.E
3 - 17
TABLE 3-5: WIRING DIAGRAM LABEL DEFINITIONS
LABEL
DESCRIPTION
OPEN VEHICLE DOOR
Signal; from controller to power door operator; opens doors adjacent to lift.
PLATFORM ALARM
Signal; +12 VDC 1A output available to vehicle for passenger warning.
PLATFORM OCCUPIED
Pressure switch; opens when platform is loaded with 50 lbs or more.
PLATFORM ON GROUND
Limit switch; closes when platform contacts ground.
PLATFORM UNWRAPPED
Limit switch; closes when platform is fully unwrapped (Figure 1-3).
PLATFORM UP-DOWN
Toggle switch; mounted on handrail; raises or lowers platform.
PLATFORM WRAP
Electric motor; unwraps or wraps platform.
PLATFORM WRAPPED
Limit switch; closes when platform is fully wrapped in stow position.
POWER DOOR OPERATOR
JUMPER
Connector; installed in absence of power door operator; enables deploy
function.
REMOTE CONTROLLER
Electronic component; located on bottom side of platform; controls lift functions
and processes inputs from limit switches. Linked to main controller by data bus.
RIGHT ROLLSTOP
Electric motor; raises and lowers right side barrier and right front rollstop.
RIGHT SIDE BARRIER
LOCKED
Limit switch; closes when barrier on right side is upright and locked.
RIGHT SIDE ROLLSTOP AND
BARRIER UP
Limit switch; closes when rollstop is fully raised (upright).
RX+, RX-, TX+, and TX-
Signals; data bus signals transfer data between main and remote controllers.
STOW SIGNAL
Signal; from control pendant; raises platform and folds it into vehicle.
UP SIGNAL
Signal; from control pendant or handrail switch; raises platform from any height.
VEHICLE DOORS ARE OPEN
Signal; from power door operator; enables deploy function.
WRAP DISABLE
Control switch; user operated to prevent platform from wrapping after it has
been folded.
END OF TABLE
4.
WIRING DIAGRAMS
Refer to Figures 3-5 and 3-6 on the following pages.
3 - 18
32DFL02.E
This page intentionally left blank.
32DFL02.E
3 - 19
FIGURE 3-5: INNOVATOR ELECTRICAL WIRING (SHEET 1 OF 2)
3 - 20
32DFL02.E
FIGURE 3-6: INNOVATOR ELECTRICAL WIRING (SHEET 2 OF 2)
32DFL02.E
3 - 21
This page intentionally left blank.
3 - 22
32DFL02.E
IV.
SPARE PARTS
T
his chapter contains parts diagrams and parts list for the RICON Innovator Wheelchair Lift. Each exploded view
of a major lift assembly shows individual components, or components that comprise an assembly or kit, referenced by a number. On each associated list is the reference number, a part description, the quantity used, and
the Ricon part number.
NOTE: To order a part: Locate the part or assembly on an exploded view, note its reference number, find this number
on the associated parts list (following page), and order the part number in the far right column. Most kits contain a single part (plus hardware). Therefore, you may need to order more than one kit if the part is used more
than once on a major assembly.
Diagram
Page
FIGURE 4-1:
DECAL PART NUMBERS AND LOCATIONS ................................................................................. 4-2
FIGURE 4-2:
TOWER ASSEMBLY ....................................................................................................................…4-4
FIGURE 4-3:
TOWER ELECTRICAL CABLES ..................................................................................................... 4-6
FIGURE 4-4:
TRAVELING FRAME ASSEMBLY................................................................................................... 4-8
FIGURE 4-5:
PLATFORM LEVELING ASSEMBLY............................................................................................. 4-10
FIGURE 4-6:
REAR PLATFORM ASSEMBLY .................................................................................................... 4-12
FIGURE 4-7:
FRONT PLATFORM ASSEMBLY – SHEET 1............................................................................... 4-14
FIGURE 4-8:
FRONT PLATFORM ASSEMBLY – SHEET 2............................................................................... 4-16
FIGURE 4-9:
FRONT PLATFORM ASSEMBLY – SHEET 3............................................................................... 4-18
FIGURE 4-10:
FRONT PLATFORM ASSEMBLY – SHEET 4............................................................................... 4-20
FIGURE 4-11
PLATFORM WRAP MOTOR ASSEMBLY..................................................................................... 4-22
FIGURE 4-12
SIDE BARRIER MOTOR ASSEMBLY ........................................................................................... 4-24
FIGURE 4-13
BRIDGEPLATE MOTOR ASSEMBLY ........................................................................................... 4-26
FIGURE 4-14
PUMP ASSEMBLY ........................................................................................................................ 4-28
APPENDIX 1
LIFT SPECIFICATIONS ................................................................................................................ 4-30
32DFL02.E
4-1
FIGURE 4-1: DECAL PART NUMBERS AND LOCATIONS
4-2
32DFL02.E
CORPORATION
Made in U.S.A.
12450 Montague St., Pacoima, CA 91331
DECAL,
PRESSURE
RELEASE
VALVE
29200
Refer to manual operation instructions on
tower cover or in Operator Manual.
27525.A
MANUAL OPERATION:
To Deploy Platform:
Push and hold DEPLOY button and platform
will unfold at floor level.
To Enter Vehicle:
1. Deploy platform.
2. Push and hold DOWN button until platform
is on ground and front rollstop is open.
3. Place wheelchair in center of platform,
facing outward, and LOCK WHEELCHAIR
BRAKES. Be certain wheelchair is within
perimeter of platform and cannot interfere
with operation of front rollstop.
4. Push and hold UP button until platform
stops at floor level.
5. Release wheelchair brakes and carefully
enter vehicle.
To Exit Vehicle:
1. Deploy platform.
2. Place wheelchair in center of platform,
facing outward, and LOCK WHEELCHAIR
BRAKES.
3. Push and hold DOWN button until platform
is on ground and front rollstop is open.
4. Release wheelchair brakes and carefully
exit platform.
To Stow Lift:
Push and hold STOW button until platform is
completely within vehicle.
OPERATING INSTRUCTIONS:
Be certain vehicle is safely parked on a level
area away from traffic before operating lift.
Engage the vehicle-to-lift safety interlock
system (e.g., transmission and parking
brake, if so equipped) before operating lift.
Prior to use, inspect lift for proper function,
required maintenance, and damage. Do not
use lift if a problem exists, and contact your
dealer for repair information.
Do not exceed rated load capacity of 300 lbs
(600kg).
This lift is for use by wheelchair occupants,
only. Do not use for standing passengers.
Do not lower platform onto a curb.
Ricon Corporation disclaims liability for
damage or personal injury that results from lift
modification, lack of maintenance, negligence,
abuse, or failure to follow the lift operating
instructions.
THE RICON CORPORATION
7900 NELSON ROAD
PANORAMA CITY, CA 91402
(818) 267-3000 or (800) 322-2884
CAUTION!
Improper use of lift can result in personal
injury.
Users must read and follow the operating
instructions in Operator Manual. The
Operator Manual is available from:
FREEDOM
PERSONAL USE
WHEELCHAIR LIFT
OPERATING INSTRUCTIONS
WARNING!
DECAL,
OPERATING INST.
FREEDOM
27525
DECAL,
SECOND SOLENOID
18669
BEI UNUNTERBROCHENER
WARNLICHT ANZEIGE IST
WARTUNG ERFORDERLICH
MANTENIMIENTO ES
REQUERIDO SI PERMANECE
CONTINUAMENTE ILUMINADO
MAINTENANCE DOIT ETRE
FAITE SI CETTE LUMIERE
RESTE ALLUMEE EN
PERMANENCE
mfg. date:
Made in U.S.A.
12450 Montague St., Pacoima, CA 91331
CORPORATION
A
TURN VALVE CCW
TO DEPLOY
PLATFORM
B
MANUAL
PUMP
SOCKET
BRIDGEPLATE
RELEASE PIN
C
D
MANUAL
PUMP
SOCKET
Lower Platform:
1) Refer to B. Open pressure release valve 1/4 turn CCW and leave open until platform
is fully settled on ground.
2) Push side barriers out and down; front rollstop sections will unfold at same time.
3) Carefully exit platform.
Stow Platform:
1) Lift side barriers to vertical position; each front rollstop section will rise at same time.
2) Refer to C. Push bridgeplate release pin in. Open both bridgeplate sections by
pushing down to horizontal position.
3) Refer to D. Turn pressure release valve CW to close; do not over-tighten valve. Insert
backup pump handle into manual pump socket. Operate pump to raise platform as
high as possible (which will be slightly above floor level).
4) Refer to A. Pull firmly on T-handle and hold. Swing right platform section back
towards tower until it locks and then release T-handle.
27524.A
TURN VALVE
CW BEFORE
RAISING
PLATFORM
Deploy Platform:
1) Refer to A. Pull T-handle out and hold. Swing the right-side platform section outward
until it locks, and then release T-handle.
2) Refer to B. Open pressure release valve by turning it 1/4 turn CCW. Close valve
when platform reaches floor level; do not over-tighten valve.
3) Place wheelchair in center of platform.
4) Refer to C. Push bridgeplate release pin inward. Close both bridgeplate sections by
lifting to vertical position.
T-HANDLE
FREEDOM PERSONAL USE
WHEELCHAIR LIFT MANUAL OPERATING INSTRUCTIONS
Preparation:
Park vehicle in a level area that is away from traffic.
If the vehicle cannot be moved under its own power, summon emergency assistance
to move vehicle to a safe operating area.
Provide space for lift operation and passenger deboarding. Verify that the path of the
platform, as it moves, is free of obstacles.
Open vehicle doors manually. If equipped with a power door operator, refer to its
Operator Manual for manual operation instructions.
Caution people in vicinity that platform is about to deploy.
U.S. and Foreign patents pending.
DECAL, CAUTION,
PINCH POINT
18618
DECAL,
SWITCH LABEL,
UP/DOWN
27530
DECAL,
MAXIMUM LOAD
27531
DECAL, PATENT
PENDING
32-10-171
CAUTION
PART OF SERIAL
NUMBER DECAL.
(ONLY RICON
REPLACEABLE)
32-10-166
DECAL,
MANUAL
OPERATION
27524
DECAL,
RICON, VERT.
SILVER
32-10-152
PART OF SERIAL
NUMBER DECAL.
(ONLY RICON
REPLACEABLE)
32-10-166
MAINTENANCE REQUIRED IF
CONTINUOUSLY ILLUMINATED
PRESSURE RELEASE
VALVE
1/4 TURN CCW
TO OPEN
mfg. date:
DOWN
UP
27527.A
CAUTION
DECAL, CAUTION
STAND CLEAR
26181
DECAL, CAUTION
PINCH POINT ON
FOLD
27527
DECAL,
PLATFORM MANUAL
RELEASE RING
27528
PLATFORM MANUAL
RELEASE RING
DECAL,
DO NOT LOWER
ONTO CURB
27529
DO NOT LOWER PLATFORM ONTO CURB
This page intentionally left blank.
32DFL02.E
4-3
FIGURE 4-2: TOWER ASSEMBLY
4-4
32DFL02.E
12
10
11
9
8
1
VIEW
"A"
4
7
6
2
3
5
19
13
16
13
20
VIEW "A"
14
15
17
18
FIGURE 4-2: TOWER ASSEMBLY
REF
DESCRIPTION
QTY
1
2
3
4
5
HYDRAULIC HOSE, HYDRAULIC PUMP ASSEMBLY
PUMP ASSEMBLY, 12V
KIT, BUSHINGS, FLANGED, TOWER
BUSHING RETAINER, TOP
GAS SPRING, 22MMOD
1
1
1
1
1
28690
PM212000008
28733
24591
23539
6
7
8
9
10
BUSHING RETAINER, BOTTOM
KIT, MAIN CONTROLLER
KIT, TERMINAL, BLACK
KIT, TERMINAL, RED
KIT, SOLENOID, 12V, SGL POLE SGLTHROW
1
1
1
1
2
24593
28734
28731
28732
29297
11
12
13
14
15
COVER, TOWER, PLASTIC
HANDLE, MANUAL BACK-UP PUMP
SWITCH, LIMIT, PLATFORM-FLOOR
KIT, LIMIT SWITCH BLOCK REPLACEMENT
KIT, ACTUATOR, LIMIT SWITCH
1
1
2
2
1
22841
V2-SH-111
V2-ES-110
V2-ES-61
29238
16
17
18
19
20
SWITCH, ROCKER, SPST
ADAPTOR, .625 D-HOLE TO .484 ROUND
CIRCUIT BREAKER, 30 AMP
SWITCH, LIMIT, FOLD CUTOFF
SWITCHBLOCK ASSY
1
2
2
1
2
28530
V2-ES-059
26510
V2-ES-111
V2-ES-82
32DFL02.E
PART NO.
4-5
1
WHT/ORG 18 AWG
GRN/BLK 18 AWG
9
RED 4 AWG 24"
ORG 18 AWG
BLU 18 AWG
8
GRN 18 AWG
BLK 4 AWG 24"
WHT 18 AWG
7
BLK 4 AWG 6"
6
BLK 10 AWG 19"
2
5
BLK 10 AWG 4"
RED 10 AWG 6 IN.
4
RED 10 AWG 6 IN.
RED 10 AWG
RED 10 AWG
RED 10 AWG
BLK 18 AWG
GRY 18 AWG
YEL 18 AWG
BLK 10 AWG
BRN 18 AWG
RED 18 AWG
WHT 18 AWG
RED 18 AWG
RED 10 AWG
BLK 10 AWG
3
FIGURE 4-3: TOWER ELECTRICAL CABLES
4-6
32DFL02.E
FIGURE 4-3: TOWER ELECTRICAL CABLES
REF
NO.
DESCRIPTION
QTY
PART
1
2
3
4
5
HARNESS, MAIN CONTROLLER–CONTROL PENDANT, J1
HARNESS, MAIN CONTROLLER–HYDRAULIC PUMP, J2
HARNESS, POWER AND DATA BUS
HARNESS, HANDRAIL SWITCH
CABLE ASSY, SOLENOID GND, 10 AWG BLK, 4”
1
1
1
1
1
24332
24331
24327
23941
24338
6
7
8
9
CABLE ASSY, SOLENOID GND, 10 AWG BLK, 19”
CABLE ASSY, SOLENOID PWR, 4 AWG RED, 6”
CABLE ASSY, PUMP GND, 4 AWG BLK, 24”
CABLE ASSY, PUMP PWR, 4 AWG RED, 24”
1
1
1
1
24337
24315
24314
24313
32DFL02.E
4-7
13
6
4
12
1
11
8
3
2
10
5
15
7
14
9
16
FIGURE 4-4: TRAVELING FRAME ASSEMBLY
4-8
32DFL02.E
FIGURE 4-4: TRAVELING FRAME ASSEMBLY
REF
DESCRIPTION
QTY
1
2
3
4
5
KIT, HYDRAULIC CYLINDER ASSY
KIT, PIVOT PIN, 1.0OD
LINK ASSY, HYDRAULIC CYLINDER
KIT, HANDRAIL ASSY
KIT, SHAFT, PLATFORM PIVOT
1
2
1
1
1
27511
27512
27061
27513
27514
6
7
8
9
10
HARNESS, HANDRAIL, W/SWITCH
KIT, GAS SPRING
BUSHING, FLANGED, 1.00IDx.75W,
BUMPER, RUBBER, BAG OF 10
KIT, ACCESS COVER
1
1
4
1
1
23941
28735
27071
19784
28736
11
12
13
14
15
KIT, FOLD CAM
BUSHING, FLANGED, .75IDx.5W
CAP, ROUND, BLK, CAPLUG MFG. NO, FCR-2
SPRING, TORSION
BUMPER, RUBBER, BAG OF 10
1
2
1
1
1
28737
27074
25550
27068
20653
16
KIT, COVER, VERTICAL ARM
1
30115
32DFL02.E
PART NO.
4-9
1
9
8
3
2
4
7
5
6
FIGURE 4-5: PLATFORM LEVELING ASSEMBLY
4-10
32DFL02.E
FIGURE 4-5: PLATFORM LEVELING ASSEMBLY
REF
NO.
DESCRIPTION
QTY
1
2
3
4
5
KIT, BLOCK, ALIGNMENT
LINK, PLATFORM, FOLD, REAR
PUSHROD, FOLD LINKAGE
ROD END, .375 ID, LH THD
KIT, PIN, W/HDWR
1
1
1
1
1
28738
21553
22875
24596
27518
6
7
8
9
BRACKET, FOLD LINKAGE
KIT, LINKS, PLATFORM FOLD, W/PIN
KIT, KNEE ASSY, FOLD ACCELERATOR
KIT, ROLLERS, PLATFORM FOLD CAM
1
1
1
1
23544
27517
27516
27515
32DFL02.E
PART
4-11
FIGURE 4-6: REAR PLATFORM ASSEMBLY
4-12
32DFL02.E
4
Part of 3
Part of 7
1
17
7
3
6
13
15
10
19
18
2
8
14
9
Part of 10
5
12
16
11
FIGURE 4-6: REAR PLATFORM ASSEMBLY
REF
DESCRIPTION
QTY
1
2
3
4
5
KIT, BRIDGEPLATE, LEFT SIDE SECTION
KIT, BRIDGEPLATE, RIGHT SIDE SECTION
KIT, HINGE, BRIDGEPLATE
PLATFORM ASSY, REAR, LEFT SIDE AND RIGHT SIDE SECTIONS
SAFETREAD, PLATFORM, REAR, RIGHT SIDE
1
1
1
1
1
27519
27520
27521
21442
21438
6
7
8
9
10
SAFETREAD, PLATFORM, REAR, LEFT SIDE
KIT, HINGE, BRIDGEPLATE, LEFT SIDE SECTION
KIT, SWITCH ASSY, BRIDGEPLATE UP
KIT, SWITCH ASSY, BRIDGEPLATE DOWN
KIT, HINGE, BRIDGEPLATE, RIGHT SIDE SECTION
1
1
1
1
1
21439
28720
28721
28722
28723
11
12
13
14
15
KIT, COVER, REAR PLATFORM, BOTTOM
MOTOR ASSY, W/CLUTCH
KIT, RODENDS, W/SCREW
KIT, BELLCRANK, W/OFFSET LINK AND HDWR
KIT, WHEEL, REAR PLATFORM
1
1
1
1
1
28724
29055
28725
28726
28727
16
17
18
19
KIT, ELECTRICAL CONTACTS, SPRING-LOADED
SAFETREAD, BRIDGEPLATE, LEFT SIDE SECTION
SAFETREAD, BRIDGEPLATE, RIGHT SIDE SECTION
SPRING, TORSION, BRIDGEPLATE
3
1
1
4
28728
21448
21449
25463
32DFL02.E
PART NO.
4-13
5
4
3
2
4-14
32DFL02.E
10
11
13
12
5
8
9
7
6
14
1
FIGURE 4-7: FRONT PLATFORM ASSEMBLY – SHEET 1
FIGURE 4-7: FRONT PLATFORM ASSEMBLY – SHEET 1
REF
DESCRIPTION
QTY
1
2
3
4
5
SAFETREAD, LEFT SIDE PLATFORM, FRONT
SAFETREAD, RIGHT SIDE PLATFORM, FRONT
GROMMET, SPLIT, 1”, BAG OF 10
BARRIER, LEFT SIDE
EDGING, PROTECTIVE, SIDE BARRIER
1
1
1
1
2
21435
21434
19778
23243
29039
6
7
8
9
10
SAFETREAD, RIGHT SIDE BARRIER
SAFETREAD, RIGHT SIDE ROLLSTOP
ROLLSTOP, RIGHT SIDE
EDGING, PROTECTIVE, RIGHT SIDE ROLLSTOP
EDGING, PROTECTIVE, LEFT SIDE ROLLSTOP
1
1
1
1
1
21447
21450
21465
29057
29058
11
12
13
14
ROLLSTOP, LEFT SIDE
SAFETREAD, LEFT SIDE ROLLSTOP
BARRIER, RIGHT SIDE
SAFETREAD, LEFT SIDE BARRIER
1
1
1
1
21436
21451
21529
21446
32DFL02.E
PART NO.
4-15
9
8
19
7
PART OF 8
3
6
5
4
14
13
11
18
16
22
10
17
12
15
21
3
20
2
1
FIGURE 4-8: FRONT PLATFORM ASSEMBLY – SHEET 2
4-16
32DFL02.E
FIGURE 4-8: FRONT PLATFORM ASSEMBLY – SHEET 2
REF
DESCRIPTION
QTY
1
2
3
4
5
CONTROLLER, ELECTRONIC
HARNESS, PLATFORM
KIT, MOTOR ASSY, ROLLSTOP & SIDE BARRIER, W/HDWR
KIT, MOTOR ASSY, PLATFORM WRAP, W/HDWR
KIT, CONTACT ASSY, PLATFORM, W/HDWR
1
1
2
1
1
28515
24328
29212
28761
29235
6
7
8
9
10
KIT, SWITCH ASSY, PLATFORM UNWRAPPED, W/HDWR
KIT, PIVOT LINK, LEFT SIDE BARRIER
KIT, RELEASE FOOT, LEFT SIDE BARRIER
KIT, SWITCH ASSY, LEFT SIDE BARRIER LOCKED, W/HDWR
KIT, PIVOT LINKS, RIGHT ROLLSTOP
1
1
1
1
1
28758
28745
28762
29232
28764
11
12
13
14
15
KIT, PIVOT LINKS, LEFT ROLLSTOP
KIT, PIVOT LINK, RIGHT SIDE BARRIER
SPRING, TORSION, SIDE BARRIER
KIT, HINGE, SIDE BARRIER
KIT, RELEASE FOOT, RIGHT SIDE BARRIER
1
1
8
2
1
28741
28746
25463
28739
28763
16
17
18
19
20
KIT, SWITCH ASSY, RIGHT SIDE BARRIER LOCKED, W/HDWR
T-HANDLE, MANUAL RELEASE, PLATFORM
KIT, COVER, SENSOR W/HDWR, LH
KIT, COVER, SENSOR W/HDWR, RH
KIT, REST, ARM HANDRAIL
1
1
1
1
1
29233
24915
30116
30117
30118
21
22
BUMPER, RUBBER #315-009 (BAG OF 10)
SCREW, BHS M4X12MM, SST (BAG OF 10)
2
2
19784
30119
32DFL02.E
PART NO.
4-17
9
8
6
7
5
4
5
4
12
10
13
11
1
2
3
FIGURE 4-9: FRONT PLATFORM ASSEMBLY – SHEET 3
4-18
32DFL02.E
FIGURE 4-9: FRONT PLATFORM ASSEMBLY – SHEET 3
REF
DESCRIPTION
QTY
1
2
3
4
5
PIN, .38ODx.65L
BELLCRANK, RIGHT SIDE PLATFORM
BUSHING, FLANGED, .38IDx.25L
LINK, BELLCRANK, PLATFORM
KIT, SWITCH ASSY, ROLLSTOP & BARRIER UP, W/HDWR
5
1
4
2
2
23555
21481
253845
24521
28758
6
7
8
9
10
PIN, .38ODx1.38L
BELLCRANK, LEFT SIDE PLATFORM
LINK, ASSY, FRONT ROLLSTOP R/H
KIT, SWITCH ASSY, LEFT SIDE BARRIER LOCKED
KIT, RELEASE FOOT, ROLLSTOP
2
1
1
1
1
23553
21482
29745
29232
28757
11
12
13
SPRING, TORSION
LINK ASSY, FRONT ROLLSTOP, LH
MANUAL PLATFORM RELEASE ROLLER ASSY
1
1
1
27078
29746
29001
32DFL02.E
PART NO.
4-19
1
2
1
3
4
5
FIGURE 4-10: FRONT PLATFORM ASSEMBLY – SHEET 4
4-20
32DFL02.E
FIGURE 4-10: FRONT PLATFORM ASSEMBLY – SHEET 4
REF
DESCRIPTION
1
2
3
4
5
SCREW, FHP, M6-1.0x16MM, (BAG OF 10)
KIT, COVER, PLATFORM, BOTTOM, RIGHT
KIT, COVER, PLATFORM, BOTTOM, LEFT
KIT, LINKAGE, PLATFORM, WRAPPING
NUT, TRI-LOBULAR, FOLDOVER, M6-1.0
32DFL02.E
QTY
PART NO.
14
1
1
1
14
29240
29237
29236
28760
29747
4-21
FIGURE 4-11: PLATFORM WRAP MOTOR ASSEMBLY
4-22
32DFL02.E
FIGURE 4-11: PLATFORM WRAP MOTOR ASSEMBLY
REF
DESCRIPTION
QTY
1
2
GEARMOTOR, HIGH TORQUE
KIT, TRANSMISSION, PLATFORM FOLD MOTOR
1
1
32DFL02.E
PART NO.
27069
29213
4-23
2
1
FIGURE 4-12: SIDE BARRIER MOTOR ASSEMBLY
4-24
32DFL02.E
FIGURE 4-12: SIDE BARRIER MOTOR ASSEMBLY
REF
DESCRIPTION
QTY
1
2
GEARMOTOR, HIGH TORQUE
KIT, TRANSMISSION, SIDE BARRIER MOTOR
32DFL02.E
1
1
PART NO.
27069
29214
4-25
2
1
FIGURE 4-13: BRIDGEPLATE MOTOR ASSEMBLY
4-26
32DFL02.E
FIGURE 4-13: BRIDGEPLATE MOTOR ASSEMBLY
REF
DESCRIPTION
QTY
1
2
GEARMOTOR, HIGH TORQUE
KIT, TRANSMISSION, BRIDGEPLATE, MOTOR
32DFL02.E
1
1
PART NO.
27069
29215
4-27
9
4
1
2
5
3
3
ON
RIC
8
7
10
FIGURE 4-14: PUMP ASSEMBLY
4-28
32DFL02.E
6
FIGURE 4-14: PUMP ASSEMBLY
REF
DESCRIPTION
QTY
1
2
3
4
5
MOTOR ASSY, 12V, 3”, ISKRA
KIT, RETRO, SWCH, PRESS, ADJ 300-13000 PSI
KIT, SPOOL VALVE, W/DCLR, 12V
MANUAL BACK-UP PUMP ASSY
SEAL KIT, MANUAL BACK-UP PUMP
1
1
1
1
1
14332
16640
01176
V2-SH-210
V2-SH-220
6
7
8
9
10
RESERVOIR, PUMP, PLASTIC W/DECAL AND PLUG
PLUG, 3/8 NPT, PLASTIC
CLAMP, WORM, #52 SST
MANUAL PUMP HANDLE
PUMP ASSEMBLY, 12V
1
1
1
1
1
30938
10333
V2-SH-109
V2-SH-111
PM212000008
32DFL02.E
PART NO.
4-29
APPENDIX 1
LIFT SPECIFICATIONS
INNOVATOR LIFT
Lifting system.....................................................................................electro-hydraulic pump and hydraulic cylinder
Hydraulic pump rating...........................................................................................................................1250±25 PSI
Operating voltage .......................................................................................................................................... 12VDC
Current, max..............................................................................................................................................120 amps
Current peak (inrush) ................................................................................................................................350 amps
Load capacity, max ...........................................................................................................................660 lbs (300kg)
Lift weight, typical..............................................................................................................................350 lbs (159kg)
D
I
A
J
B
E
C
H
F
G
DIMENSIONS – inches (cm)
MODEL
INNOVATOR
4-30
A
B
C
D
E
Usable Platform
Length
Usable Platform
Width
Overall Width
Tower Height
Side-entry Width
51.5 (130.8)
30.5 (77.5)
48.6 (123.4)
30.0 (76.2)
40.0 (101.6)
F
G
H
I
J
Install Depth
Install Width
Install Height
Travel, Floorto-Ground
Traveling
Frame Width
22.5 (57.2)
27.0 (68.6)
48.0 (121.9)
31.0 (78.7)
32.0 (81.3)
32DFL02.E
®