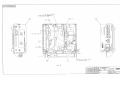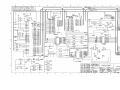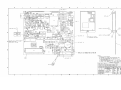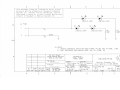
1
PRELIMINARY OXYPLETH ® Service Manual Pulse Oximeter Model 520A June 5, 2001 Catalog Number 5693-90-01 Novametrix Medical Systems Inc. Wallingford, Connecticut, U.S.A. 06492. Copyright 1992-2001. All rights reserved. No part of this manual may be reproduced without the written permission of Novametrix Medical Systems Inc. Section PRELIMINARY Guarantee Equipment manufactured or distributed by Novametrix Medical Systems Inc., is fully guaranteed, covering materials and workmanship, for a period of one year from the date of shipment, except for certain disposable products and products with stated guarantees other than one year. Novametrix reserves the right to perform guarantee service(s) at its factory, at an authorized repair station, or at the customer’s installation. Novametrix’ obligations under this guarantee are limited to repairs, or at Novametrix’ option, replacement of any defective parts of our equipment, except fuses, batteries, and calibration gasses, without charge, if said defects occur during normal service. Claims for damages during shipment must be filed promptly with the transportation company. All correspondence concerning the equipment must specify both the model name and number, and the serial number as it appears on the equipment. Improper use, mishandling, tampering with, or operation of the equipment without following specific operating instructions will void this guarantee and release Novametrix from any further guarantee obligations. Service Department For factory repair service, call toll free 1-800-243-3444 In Connecticut, call Collect (203) 265-7701 Facsimile (203) 284-0753 World Wide Web: http://www.novametrix.com Internet: [email protected] Caution: Federal (U.S.A.) law restricts this device to sale, distribution, or use by or on the order of a licensed medical practitioner. Copyright© 1992-2001 Novametrix Medical Systems Inc. This document contains information which is proprietary and the property of Novametrix Medical Systems Inc., and may not be reproduced, stored in a retrieval system, translated, transcribed, or transmitted, in any form, or by any means, without prior explicit written permission from Novametrix Medical Systems Inc. Novametrix and OXYPLETH are a registered trademarks. SuperBright is a trademark of Novametrix Medical Systems Inc. The OXYPLETH® monitor and its sensors and accessories are covered by the following US patents: 5,190,038 5,398,680 5,448,991 5,820,550 5,999,834 5,891,026 6,073,038 6,149,481. Other patents pending i Model 520A Service Manual 5693-90-01 PRELIMINARY Revision History August 31, 1992 Release 00. This manual replaces all preliminary versions. Based on Revision 2.0 CPU software. June 5, 2001 Revision 01. R-N905 Declaration of Conformity with European Union Directives The authorized representative for Novametrix Equipment is: European Compliance Services Limited Oakdene House Oak Road Watchfield Swindon, Wilts SN6 8TD UK Manufacturing, Quality and Safety Novametrix manufacturing facility is certified to ISO 9001 and EN46001 (MDD93/ 42/EEC Annex II). Novametrix Medical Systems Inc. products bear the “CE 0086” mark. The product is certified by Underwriter’s Laboratories (UL) to bear the UL mark; and tested by TUV Rheinland to IEC601-1 / EN60601-1. 5-Jun-01 Model 520A Service Manual ii PRELIMINARY C Contents Contents ............................................................................................... iii List of Figures ..................................................................................... vii List of Tables...................................................................................... viii Introduction ........................................................................................... 1 Purpose ................................................................................................. Technology Description ......................................................................... Conventions Used In This Manual......................................................... Acknowledgments ................................................................................. 1 1 2 2 Patient Safety ........................................................................................ 3 Warnings................................................................................................ 4 Cautions................................................................................................. 5 Front Panel ............................................................................................ 6 Rear & Top Panels ................................................................................ 7 Summary of Operation ......................................................................... 8 Menu Trees ............................................................................................ 9 Electronic Theory of Operation ......................................................... 15 2472 Power Supply Board ................................................................... AC Mains and Battery Operation Overview ................................... AC Mains Operation ...................................................................... Battery Operation........................................................................... 2726 Power Supply Board ................................................................... AC Mains and Battery Operation Overview ................................... AC Mains Operation ...................................................................... Battery Operation........................................................................... 2471 & 2775 Main Board ..................................................................... Power On/Off Control Circuitry ...................................................... Power Supplies.............................................................................. Voltage References ....................................................................... Preserving RAM and Real Time Clock Data.................................. iii Model 520A Service Manual 15 15 16 16 17 17 17 18 19 19 20 20 21 5693-90-01 Contents PRELIMINARY Low Battery Voltage Shutdown...................................................... Timing Sequencer.......................................................................... Data Sampling Controller............................................................... Sensor LED Drive Circuits ............................................................. Sensor Photodiode Return Path .................................................... Calibrating the 20-Bit Analog-to-Digital Convertors ....................... 20-Bit Analog-to-Digital Conversion............................................... Sensor Status Decoding and Conversion...................................... Sensor Status Parameters............................................................. Microprocessor .............................................................................. Memory.......................................................................................... Real Time Clock (RTC).................................................................. Sound generator ............................................................................ Keypanel Interface......................................................................... Display Interface ............................................................................ I/O Device Controller ..................................................................... Watchdog Timer ............................................................................ Serial I/O Controller ....................................................................... RS232 Serial Communication........................................................ 21 22 22 23 24 25 26 26 27 28 28 29 29 30 30 31 31 32 33 Maintenance ........................................................................................ 35 General ................................................................................................ Maintenance Schedules ...................................................................... Cleaning and Sterilization .................................................................... Model 520A Monitor....................................................................... Finger Sensor ................................................................................ Y-SENSOR™ and Y-STRIP™ Taping System.............................. Battery Life and Maintenance .............................................................. Mains Voltage Configuration ............................................................... Fuse Replacement......................................................................... Changing the Mains Voltage Setting ............................................. AC Mains on older style assemblies.............................................. Replacing the AC Mains Fuse(s) ................................................... Changing the AC Mains Voltage.................................................... Assembly Exchanges .......................................................................... Changing System Software ................................................................. Changing System Software on 2471 Main Board.......................... 35 35 36 36 36 36 37 37 37 38 39 40 40 41 44 44 Troubleshooting.................................................................................. 47 Functional Test ................................................................................... 51 Introduction .......................................................................................... 51 Monitor Functional Test ....................................................................... 51 Special Power Up Functions ............................................................... 53 5-Jun-01 Model 520A Service Manual iv Section Contents PRELIMINARY Accuracy Test ..................................................................................... 55 Introduction .......................................................................................... 55 Monitor Accuracy Test ......................................................................... 55 Calibration Tests................................................................................. 59 Introduction .......................................................................................... Equipment Required and Test Setup .................................................. Test Procedure .................................................................................... Safety Testing...................................................................................... 59 59 60 63 Connecting to other Equipment ........................................................ 65 Connecting the Seiko DPU-414 Thermal Printer ................................. Configuring the Seiko DPU-414 Printer ......................................... Setting the DIP switches:............................................................... Connecting the ThinkJet Printer .......................................................... Connecting the Model 315 Printer ....................................................... Connecting Seiko DPU-411 Thermal Printer ....................................... Analog Output Module ......................................................................... Analog Output Setup ........................................................................... 65 65 65 67 67 68 69 70 Specifications...................................................................................... 73 General ................................................................................................ Oxygen Saturation (SpO2) Section ..................................................... Pulse Rate Section .............................................................................. General Specifications......................................................................... Additional Features.............................................................................. 73 73 73 74 74 Accessories......................................................................................... 76 Model 520A ......................................................................................... 76 Parts Lists............................................................................................ 81 Family Tree.......................................................................................... 5693-01 MAIN ASSEMBLY ................................................................. 6538-01 REAR PANEL ASSY ............................................................. 5673-01 REAR PANEL ASSY ............................................................. 2726-01 POWER SUPPLY BD ASSY ................................................. 2472- 01 POWER SUPPLY BOARD ................................................... 5719-01 FRONT PANEL ASSY........................................................... 2473-01 ALERT BOARD ASSY .......................................................... 5720- 01 DISPLAY ASSY.................................................................... 5713-01 SPEAKER ASSY ................................................................... 5714-01 BATTERY HARNESS ASSY ................................................. 5728-01 CABLE ASSY ........................................................................ 5765-01 TOP COVER ASSY............................................................... 5766-01 BOTTOM COVER ASSY....................................................... v Model 520A Service Manual 81 81 82 82 83 84 85 85 85 85 85 86 86 86 5693-90-01 Contents PRELIMINARY 2755-01 TONE GEN REPL BOARD ................................................... 2775-01 MAIN BOARD ASSY ............................................................. 2471-28 MAIN BD KIT (part of 2775-01) ............................................. 2471-01 MAIN BOARD ASSY ............................................................. 87 87 89 91 Schematic and Assembly Drawings ................................................. 93 Notes .................................................................................................... 95 5-Jun-01 Model 520A Service Manual vi PRELIMINARY F Figure 1. Figure 2. Figure 3. Figure 4. Figure 5. Figure 6. Figure 7. Figure 8. Figure 9. Figure 10. Figure 11. Figure 12. Figure 13. Figure 14. Figure 15. Figure 16. Figure 18. Figure 17. Figure 19. vii Model 520A Service Manual List of Figures Front Panel Description ................................................................... 6 Rear and Top Panel Descriptions.................................................... 7 Figure 1. Front-End Timing............................................................ 23 Power Entry Fuse Access Door Opening ...................................... 40 Fuse Removal................................................................................ 40 Power Entry Module Voltage Selector Drum Removal .................. 41 Power Entry Module Voltage Selection Adjustment ...................... 41 Removing the Top Cover............................................................... 42 Monitor Assembly .......................................................................... 42 520A Assembly with 2471 Main Board Removed.......................... 43 Changing the System Software EPROM ....................................... 45 Softkey Identification...................................................................... 54 Connecting the ThinkJet Printer .................................................... 67 Connecting the Model 315 Printer ................................................. 68 Configuration of Seiko Thermal Printer.......................................... 68 Connecting the Seiko Model DPU-411 Printer. ............................. 69 Analog Output Module Pinouts ...................................................... 70 Analog Output Module ................................................................... 70 Analog Output Setup ..................................................................... 71 5693-90-01 PRELIMINARY T Table 1. Table 2. Table 3. Table 4. Table 5. 5-Jun-01 List of Tables Display Command/Data table. ....................................................... CSI/O Decode Lines ...................................................................... SpO2 Display tolerances for TB500B settings............................... Analog Output Module Voltage Tolerances ................................... Schematic and Assembly Drawings .............................................. Model 520A Service Manual 30 32 57 71 93 viii Section List of Tables PRELIMINARY ix Model 520A Service Manual 5693-90-01 PRELIMINARY 1 Introduction Purpose 1.1 This manual has been prepared for technicians servicing the Novametrix Model 520A Pulse Oximeter monitor. It presents technical information relating to the monitor’s theory of operation, maintenance, calibration and repair. Refer to the Pulse Oximeter Model 520A User’s Manual (Catalog Number 5693-23) for additional information. Technology Description 1.2 Pulse oximetry is a non-invasive method of monitoring the oxygen saturation of arterial blood. Oxygen saturation monitoring is intended to be used in a variety of clinical situations including, respiratory therapy, anesthesia, the intensive care unit (ICU) and neonatal (NICU) and pediatric (PICU) intensive care units. The Model 520A Pulse Oximeter provides reliable continuous measurement, display, and alerts for oxygen saturation (SpO2) and pulse rate. The monitor can be powered from its rechargeable internal battery or from the AC Mains. The Model 520A utilizes sensors containing two light emitting diodes (LEDs) and a photodiode. Each LED emits a specific wavelength of light (660 and 940 nanometers) through a pulsating vascular bed to the photodiode. Oxygen saturated blood absorbs different amounts of light at each wavelength as compared to unsaturated blood. Therefore, the amount of light absorbed by the blood in each pulse can be used to calculate saturation. The Model 520A is calibrated to display “functional” saturation. This differs from the “fractional” saturation value displayed by most co-oximeters. Functional saturation is defined as: HbO2 Functional Saturation = 100 - (COHb + METHb) HbO2 = Fractional Hemoglobin COHb = Carboxyhemoglobin METHb = Methemoglobin This can be considered to represent the amount of oxyhemoglobin as a percentage of the hemoglobin that can be oxygenated. Dysfunctional hemoglobins (COHb and METHb) are not included. 5-Jun-01 Model 520A Service Manual 1 Section 1 Introduction PRELIMINARY Pulse Rate is calculated by measuring the time interval between detected peaks of the infrared light waveform. The inverse of this measurement is displayed as pulse rate. The oxygen saturation and pulse rate values are displayed on monitor’s displays. The displayed values are updated once each second. Presence of a pulse is shown as a waveform on the display and indicated audibly by a user selectable “beep”. The Model 520A must be used in conjunction with SuperBright™ Sensors. These sensors have an 8700 series part number (e.g., 8776 or 8791). An INCOMPATIBLE PROBE display message will indicate a non-SuperBright™ Sensor (e.g., 86xx series) is in use. Conventions Used In This Manual 1.3 The following conventions will be used throughout this manual: • Normal text will be shown in this type. • Message Center alerts and displays will be shown in this type. • The names of the front panel pushbuttons (keys) will be shown in this type. Acknowledgments 1.4 SuperBright, Y-STRIP and Y-SENSOR are trademarks of Novametrix Medical Systems Inc. SARAcap is a registered trademark of Allegheny International Medical Technology, Inc. (PPG Biomedical Systems). 2 Model 520A Service Manual 5693-90-01 PRELIMINARY 2 Patient Safety The OXYPLETH Pulse Oximeter Monitor, Model 520A, SpO2 Input is electrically isolated. Patient leakage current flowing from the instrument to ground is limited to less than 10 µA at 120 VAC, 60 Hz. Patient isolation is greater than 10 MΩ, 2500 VAC rms at 60 Hz. For maximum patient and operator safety, the following are recommended: • Failure of Operation: If the monitor fails to respond as described, do not use it until the situation has been corrected by qualified personnel. • Keep OXYPLETH and its accessories clean. • Do not operate OXYPLETH when it is wet due to spills or condensation. • Do not operate OXYPLETH if it appears to have been dropped or damaged. • Connect the line cord only to a grounded hospital-grade outlet. OXYPLETH should be connected to the same electrical circuit as other equipment in use on the patient. Outlets on the same circuit can be identified by the hospital’s engineering department. • Care should be exercised to assure continued peripheral perfusion distal to the SpO2 sensor site after application. • Components of this product and its associated accessories which may have patient contact are free of latex. 5-Jun-01 Model 520A Service Manual 3 PRELIMINARY ! 3 Warnings WARNING Indicates a potentially harmful condition that can lead to personal injury • Explosion Hazard: Do NOT use OXYPLETH in the presence of flammable anesthetics. Use of this instrument in such an environment may present an explosion hazard. • Electrical Shock Hazard: Always turn OXYPLETH off and remove line cord before cleaning it. Do NOT use a damaged sensor or one with exposed electrical contacts. Refer servicing to qualified service personnel. • Do not operate OXYPLETH when it is wet due to spills or condensation. • Do not operate OXYPLETH if it appears to have been dropped or damaged. • Patient Safety: Extreme care should be exercised with neonates to assure continued circulation distal to the sensor site after application. • Failure of Operation: If the monitor fails to respond as described, do not use it until the situation has been corrected by qualified personnel. • Patient Safety: Care should be exercised to assure continued peripheral perfusion distal to the SpO2 sensor site after application. • Data Validity: Inaccurate SpO2 and/or Pulse Rate measurements can be caused by any of the following: • Incorrect application or use of a sensor • Significant levels of dysfunctional hemoglobin such as carboxyhemoglobin or methemoglobin • Significant levels of indocyanine green, methylene blue, or other intravascular dyes • Exposure to excessive illumination such as surgical lamps—especially ones with a xenon light source, or direct sunlight • Excessive patient movement, venous pulsations, electrosurgical interference • Data Validity: The Pulse Oximeter should not be used as a substitute for an ECG monitor. The oximeter’s Pulse Rate display reflects the pulsatile flow found at the patient extremity connected to the sensor. This rate can be affected by many factors and may occasionally be “frozen.” • Do NOT attach an SpO2 sensor distal to a blood pressure cuff. Valid data CANNOT be processed when the cuff is inflated. Attach the sensor to the limb opposite to the site used for the blood pressure cuff. • Do NOT apply Y-Sensor tapes or wraps so tightly that the circulation is restricted. Inspect site often for adequate circulation - at least once every four hours. When applying sensors take note of the patient’s physiological condition. For example, burn patients may exhibit more sensitivity to heat and pressure and therefore additional consideration such as more frequent site checks may be appropriate. 4 Model 520A Service Manual 5693-90-01 PRELIMINARY 4 Cautions CAUTION Indicates a condition that may lead to equipment damage or malfunction. • • • • • • Do not operate OXYPLETH when it is wet due to spills or condensation. Do not operate OXYPLETH if it appears to have been dropped or damaged. Never sterilize or immerse the monitor in liquids. Do not sterilize or immerse sensors except as directed in this manual. Tension should not be applied to the sensor cable. Overstretching the pulse oximeter finger sensor can damage the sensor and potentially affect pulse oximeter readings. Do not stretch the finger sensor open beyond the limit for which it was designed. Overstretching can be prevented: avoid opening the sensor by any means other than squeezing the grips; Do NOT force the sensor onto large objects such as the bed rail. • Do not store the monitor or sensors at temperatures less than 14° F (-10° C) or greater than 131° F (55° C). • Do not operate the monitor or sensors at temperatures less than 50° F (10° C) or greater than 104° F (40° C). • Federal (U.S.A.) law restricts this device to sale, distribution, or use by or on the order of a licensed medical practitioner. 5-Jun-01 Model 520A Service Manual 5 PRELIMINARY 5 Front Panel 3 5 6 1 13 2 17 15 14 12 1. 2. 3. 4. 5. 6. 7. 7 8 9 11 10 Saturation% Display Area; SpO2 and alert limit settings are displayed here. Pulse Rate Display Area; Pulse Rate and alert limit settings are displayed here. Message Center; area where system messages are displayed. The functions of the softkeys (#4) are annotated here. Softkeys # 1-5; Softkeys 1-5 (left to right) cause the action annotated in the lower half of the Message Center to occur. Carrying Handle; monitor carrying handle molded into case Sensor Input Connector; Connect SuperBright™ Sensors here. Press tab on sensor connector to remove sensor. Do not twist connector. Two Minute Silence Indicator; Illuminates (yellow) when the AUDIO key is pressed. SpO2 and Pulse Rate alarms are silenced for two minutes. 18 4 16 8. Audio key; Press and release AUDIO to turn on/off the two minute silence function. Press and hold (approx. 3 seconds) AUDIO to enable the Audio Off feature (unless disabled via Options Menu). Press and release to disable Audio Off. 9. Audio Off Indicator; Flashes (yellow) as a warning that the audible alarms have been disabled. 10. Alert Indicator; Flashes (red) when an alert/alarm occurs. Continues to flash until condition corrected and ALERT RESET is pressed. 11. Alert Reset key; Press ALERT RESET to disable any active alert indicators. Alerts will reactivate if alert condition still exists. 12. AC Power Indicator; Illuminates (green) when the monitor is connected to an AC (Mains) power source and the rear panel power switch is set to “|”. 13. Power key; Press POWER to turn the monitor off and on. 14. Low Battery Indicator; Illuminates (red) when the monitor is powered from its internal battery and less than 30 minutes of battery power remain. 15. Red Alert Bar; Flashes (red) when an alert/alarm occurs (unless disabled via Options Menu). Continues to flash until condition corrected and ALERT RESET is pressed (unless “unlatched” by the user via the Options Menu). 16. Front Feet; Rubber tipped front feet (2). Kickstand; Two position kickstand (not shown) lifts front of monitor for viewing from above. 17. Contrast; Press and hold for display contrast adjustment, release when desired contrast is obtained. 18. Event; Press to mark an event in trend memory. Figure 1. Front Panel Description 6 Model 520A Service Manual 5693-90-01 PRELIMINARY 6 1 Rear & Top Panels 2 3 4 5 7 6 9 10 11 8 1. 2. 3. 4. Line Cord Clip; This clip can be set around the line cord strain relief so that the cord cannot be pulled out of the connector. Line Cord Connector; The AC (Mains) line cord attaches to the monitor here. Fuse Compartment; The AC (Mains) line fuse(s) are inside this compartment. Pry open with small screwdriver. AC Mains Voltage; The currently selected AC Mains input voltage is identified here. 5. 6. 7. AC Mains Power Switch; With switch in “O” position, AC Mains voltage does not enter monitor. With switch in “|” position, AC Mains voltage allowed into monitor to power unit and/or charge internal battery. Rear Feet; Rubber tipped rear feet (2). Serial Output Connector; Serial (RS232) data output here for use with Tele-Sat™ telemetry system, optional analog output module, and other RS232 interfaces. A female 25- pin “D” connector serves as the interface connector. 8. Top Cover 9. Carrying Handle; Monitor carrying handle molded into case. 10. Warning Label; Explosion and electrical shock warnings. 11. Patient Isolation Label; The Model 520A is Type BF equipment. Figure 2. Rear and Top Panel Descriptions 5-Jun-01 Model 520A Service Manual 7 PRELIMINARY 7 Summary of Operation This section summarizes the operation of the Model 520A Pulse Oximeter. It is intended as a quick reference and refresher for persons who have thoroughly reviewed the Model 520A User’s Manual (PN: 5693-23). Persons unfamiliar with the Model 520A should thoroughly examine the User’s Manual before referencing the steps listed here. 1. If powering the monitor from the AC line voltage; Connect the line cord to the monitor and plug into a properly grounded 3-wire outlet. Set the rear panel power (Mains) switch to the | (on) position. 2. Press the front panel POWER key to turn the monitor on. Verify the Message Center displays Connect SPO2 Probe after the self-tests are complete. 3. Use the Menu System to modify the operation of the monitor to best suit your application. The Menu System menus include: • ALRT softkey - Use SEL to select SpO2 or Pulse limits, then use the ↑ or ↓ to set the limit to the desired value. Note that the monitor will maintain a spread of at least 5 digits between the upper and lower limit values. • TRND softkey - enters Trend mode and draws trend memory on display. • MENU then AUDIO softkeys - Select Pulse to turn on/off and control the volume of the audible beep with each detected pulse. Select ALERT to control alert volume. • MENU then AVG - Select either 2 second or 8 second SpO2 averaging time. • MENU then LITE softkeys - toggles backlight between bright and dim. 4. Verify that the SpO2 and Pulse Rate alert limit settings are consistent with your monitoring application. 5. Connect a SuperBright™ (87xx series) sensor to the front panel input. Apply the sensor to the patient. 6. Check that within several seconds the patient’s SpO2 and Pulse Rate are displayed on the monitor. 7. As necessary, refer to the appropriate sections within the User’s Manual for detailed operating instructions and explanations. 8 Model 520A Service Manual 5693-90-01 PRELIMINARY 8 Menu Trees The OXYPLETH menus are described on the following pages. 5-Jun-01 Model 520A Service Manual 9 SEL ↓ MAIN MENU AUTO ALERT LIMITS SET yes AUTO ? for Auto Limits Enough Data Will increase/decrease limits on selected parameter ↑ Press to select Upper and Lower Limits for Saturation and Pulse Rate. MAIN MENU RUN SET ALERT LIMITS TREND ERASED YES no TREND RETAINED SET AUTO LIMITS NOT ENOUGH DATA TO NO ERASE STORED TRENDS ? ERASING TREND PLEASE WAIT POWER ON TRND NO TREND RETAINED TRENDS ERASED ERASING TRENDS PLEASE WAIT YES <- * ERASE VIEW <- *SCALE PREV Moves Cursor Left/Right D DUAL XX HR EXPAN Will select one of four settings: 12Hr, 8Hr, 2Hr, 30m MAIN MENU RUN PULSE Select FULL or HALF SPO2 SCALE will appear only when DUAL is selected from Trend View Options MAIN MENU RUN P -> TREND OPTIONS: Moves Cursor Left / D MMMDD HH:MM:SS S EXPAN Will change XX value XX= one of four settings: 12Hr, 8Hr, 2Hr, 30m MAIN MENU RUN MENU DRAWING TREND PLEASE WAIT TREND ERASE STORED TRENDS ? ALRT MAIN MENU message center -> DUAL <- Moves Cursor Left/ D Previous Menu -> Displays HISTOGRAM SpO2 XX Hr PREV EXPAN HIST Will select one of four settings: 12Hr, 8Hr, 2Hr, 30m MAIN MENU RUN SpO2 TREND VIEW: Previous Menu OXYPLETH™ Menu Tree Revision 2.7 Software 7-Feb-97 MAIN MENU RUN Varies volume where XX=00 through 07 ↑ X X ↓ SET PULSE VOLUME Previous Menu PREV MAIN MENU RUN PULSE ALERT PREV MAIN MENU X↓ Varies volume where XX=00 through 07 ↑X PREV LITE Toggles Backlight On/Off. AUDIO AVG SYSTEM OPTIONS MENU Previous Menu MAIN MENU RUN message center TRND SET ALERT VOLUME Previous Menu RUN SET AUDIO FEATURES ALRT MAIN MENU IABP * OFF 8s Select option 2s SELECT SPO2 AVERAGING Activates IABP mode ON SELECT IABP MODE selected in SpO2 SETUP OPTIONS menu. * IABPwill appear only if OXYPLETH™ Menu Tree Revision 2.7 Software 7-Feb-97 no ALRT CANNOT RESIZE SIGNAL Signal present for resizing? yes MAIN MENU RUN MAIN MENU RUN 1/2 1/4 PREV no ALL TAB PART RESET RESET PREV ↓ ↑ ↓ PREV PREV Previous Menu PRINT Previous Menu ENTER SET STOP - XX : XX ↑ SET START - XX : XX Previous Menu WAVE PRINT TREND TRND yes A serial printer interface must be selected in MONITOR OPTIONS 2 menu. MENU Printing in progress? PRNT message center TRND SELECT PRINT OPTIONS ALRT Previous Menu PAGE SELECT PRINT COMPRESSION NONE MAIN MENU RESIZING PLETH MAIN MENU MENU WAVEFORM AUTO SIZE must be turned ON in the SPO2 SETUP OPTIONS menu. SIZE message center TRND MAIN MENU CONT MAIN MENU PRINTOUT STARTED TERMINATING PRINTOUT STOP PRINT IN PROGRESS SET MAIN MENU RUN MENU ID CLR SEL SELECTS: FROM LAST LAST 30 MINS LAST 1 HR LAST 2 HRS LAST 4 HRS LAST 8 HRS LAST 12 HRS LAST 24 HRS Accepts patient ID Clears patient ID Selects ID fields from 1-9 Sequences from 0-9 ↑ ↓ TIME Erases info in NOVACARD module ERASE PATIENT ID: _ _ _ _ _ _ _ _ _ Stores info to NOVACARD module STORE NOVACARD MENU CARD message center TRND OXYPLETH™ Menu Tree Revision 2.7 Software 7-Feb-97 the setup menu. CARD will appear if NOVACARD interface is selected. * PRINT and SIZE will appear only if selected in NOVACARD option must be programmed in MONITOR OPTIONS 2 menu. * The ALRT MAIN MENU RUN IABP SIZE SPO2 SETUP OPTIONS MODE NEXT OFF NO NICU ANST Select desired mode ICU PREV Previous Menu SLEEP SELECT OPERATING MODE Allows IABP mode, if selected the IABP softkey will appear in the SYSTEM OPTIONS YES IABP MODE AVAILABLE ? Select the option to have the Pleth waveform automatically scaled to fit in the display window ON WAVEFORM AUTO SIZE MAIN MENU RUN HELD SPEC BAD NEXT ON OFF ALERT ON BAD SIGNAL 60s 15s 30s 60s DISPLAY HELD TIMER Selects the alert on bad signal time, current selection will flash 0s 45s Selects the special alert delay time, current selection will flash 30s SPECIAL ALERT DELAY 90s VER NEXT MAIN MENU RUN Displays Current Revision KLCK MONITOR OPTIONS 1 DISP Inverts display color MAIN MENU RUN Press and hold MENU key for 5 seconds MENU Selects the display held timer option 15s message center TRND SPO2 TIMERS ALRT Continued next page Varies volume from 00-07 ↑X X ↓ PREV Previous Menu SET KEYCLICK VOLUME ❶ OXYPLETH™ Menu Tree Revision 2.7 Software 7-Feb-97 MAIN MENU RUN SER CLOCK REC MONITOR OPTIONS 2 ❶ From previous page FULL SEL ↑ ↓ HH : MM DD/MMM / YY SET SET SET SET SET SET SET NEXT NEXT NEXT NEXT NEXT NEXT NEXT Selects NOVACARD Interface PREV NOVACARD INTERFACE Selects NOVACOM1 Interface PREV NOVACOM1 INTERFACE PREV PRINTER INTERFACE Selects NO Interface PREV INTERFACE UNUSED Selects 1260/1010 Interface PREV 1260/1010 INTERFACE Selects SARACAP Interface PREV SARACAP INTERFACE PREV FULL FORMAT MODE PREV Previous Menu Sets output of Analog Module to respective values: 0-.5-1V HALF CALIBRATE RECORDER ZERO Use SEL to select parameter, set value with arrow keys. Press SET to Accept changes SET MAIN MENU RUN NEXT MAIN MENU RUN SET SET SET SET MUTE NEXT NEXT NEXT NEXT NEXT Select option TJET 315 SELECT PRINTER TYPE SEIKO NO NO Select option YES ALERTS LATCHED Select option YES RETAIN ALERT LIMITS Select option NO ALLOW AUDIO OFF YES Selects FULL FORMAT MODE Interface PREV SELECT STOP BITS = 1 PREV SELECT DATA BITS = 8 PREV SELECT PARITY = NONE PREV SELECT BAUD RATE = 1200 DFLT ALERT OPTIONS 1 LATCH MAIN MENU RUN Displays SPO2 SETUP OPTIONS menu Select option NO OFF NO Select option YES 10 SEC ALERT LIMIT DELAY YES ALERT BAR LATCHED NEXT Previous Menu PREV OXYPLETH™ Menu Tree Revision 2.7 Software 7-Feb-97 BAR ALERT OPTIONS 2 DELAY PRELIMINARY 9 Electronic Theory of Operation The electronic theory of operation of the Model 520A Pulse Oximeter monitor is detailed in the subsections below. Refer to Section 19, Schematic and Assembly Drawings, on page 93 for further information. 2472 Power Supply Board 9.1 The 2472 Power Supply Board contains the circuitry needed to power the monitor from the AC Mains (line voltage). The power supply board also connects to the battery and contains the battery charging circuitry. AC Mains and Battery Operation Overview 9.1.1 The Model 520A can be powered from its internal 12 volt battery or from the AC Mains. The green (sine wave shaped) front panel indicator illuminates when the line cord is connected and the rear panel power switch is in the “|” (On) position. This indicates that AC Mains power is reaching the power supply, that the battery is being charged, and that if the monitor is turned on, it is being powered from the line voltage. If AC Mains power is removed by unplugging the line cord or setting the rear panel power switch to the “0” (Off) position, the monitor will operate for up to four hours from its internal 12 volt lead-acid battery. As the battery voltage runs low (≈11.5 volts), the red (battery indicator) on the front panel illuminates. At this point, the AC Mains should be reconnected to power the monitor and charge the battery. If the monitor continues to be powered from a battery in a low voltage situation, at approximately 11 volts, a continuous alarm sounds for thirty seconds while the Message Center displays BATTERY EXHAUSTED CONNECT LINE CORD. If this alarm/message is ignored, the monitor displays will shut down and the battery indicator will flash on and off about every 5 seconds. If AC power is now restored, the monitor will re-initialize (go through the power up and self-test routines) and resume normal operation. However, continued battery operation will eventually activate a hardware low voltage circuit (≈8.5 volts) that shuts the monitor off to prevent damage to the battery. Once the unit is shut down with the hardware circuit, 5-Jun-01 Model 520A Service Manual 15 Section 9 Electronic Theory of Operation PRELIMINARY the AC Mains must be connected and the front panel POWER key pressed before the monitor will turn back on. AC Mains Operation 9.1.2 The AC Mains voltage enters the monitor at the rear panel Power Entry Module (PEM). This device contains a built in RFI power line filter, a double-pole singlethrow switch that opens and closes both AC input lines, fuses, and an input voltage selection card. The filtered, switched and fused output of the Power Entry Module is fed to the primary coils of the rear panel mounted system transformer, T301. The secondary output from T301 is rectified by D1 (bridge rectifier) and filtered by C1. The (loaded) DC voltage at this point is approximately 20 volts. The 20 DC volts is fed to the 2471 main board through fuse F301 to connector E302, and is switched to the battery charging regulator IC1 (pin 5) through Q1. Biasing for Q1 is accomplished by D2, R1 and R2 when AC power is applied. When running on battery power Q1 is biased off by R1, R2 and D3, this prevents the battery from trying to power the battery charger regulator and IC2 that informs the monitor of the loss of AC. The output of switching regulator IC1 pin4 is rectified and filtered by D4, C4 and L1 then fed to the battery through current sense resistor R3 and fuse F302 to J302 pin 1 (VBAT+). The battery float charge voltage is maintained at 13.2 volts except for fast charge which is regulated at 14.4 volts. The output is also monitored for over current conditions. These parameters are controlled by IC3 and associated circuitry. When the battery charge current exceeds 120mA of current IC3 pin 7 goes high which biases Q2 on, this in turn shorts out R12 which affects the feedback control (FB) to IC1 (pin 1). With R12 shorted out the control resistors R14 and R13 set the output voltage to 14.4 volts. When the charge current lowers IC3 pin 7 goes low which biases Q2 off, this puts R12 back into the feedback control which now consists of R12, R13 and R14 setting the voltage to 13.2 volts. When more than 600mA of current flows through R3, IC3 pin 1 shorts IC1 pin 2 to ground which shuts IC1 off until its next switching cycle, when the current reaches a safe level IC3 pin 1 allows IC1 to remain on. The voltage switched by Q1 is also fed to IC2 as VCH (Voltage Charge). The output of this 5 volt regulator provides the LINEST (Line Status) signal to the main board at E302 pin 3. With AC applied, LINEST is high. LINEST goes low when the AC is disconnected. The LINEST line is also routed to the power on/off circuitry. See Power On/Off Control Circuitry on page 19. Battery Operation 9.1.3 Without AC power there will be no secondary voltage rectified by D1. Power for the monitor will be supplied from the battery at J302 pins 1 (VBAT+) and 2 16 Model 520A Service Manual 5693-90-01 2726 Power Supply Board PRELIMINARY (VBAT-). The battery power will conduct through D3 and F301 to VIN at E302 pin 1 to the 2471 main board. The arrangement of R1, R2 and D2 bias Q1 off in this condition which prevents power from reaching IC1, IC2 and IC3. The output of IC1 is also protected by D5 which is now reverse biased, the bridge D1 is also reverse biased and prevents T301 from discharging the battery. With no voltage at IC2 the LINEST will be low which indicates to the main board that there is no AC power. 2726 Power Supply Board 9.2 The 2726 Power Supply Board contains the circuitry needed to power the monitor from the AC Mains (line voltage). The power supply board also connects to the battery and contains the battery charging circuitry. AC Mains and Battery Operation Overview 9.2.1 The Model 520A can be powered from its internal 12 volt battery or from the AC Mains. The green (sine wave icon) front panel indicator illuminates when the line cord is connected and the rear panel power switch is in the “|” (On) position. This indicates that AC Mains power is reaching the power supply, that the battery is being charged, and that if the monitor is turned on, it is being powered from the line voltage. If AC Mains power is removed by unplugging the line cord or setting the rear panel power switch to the “0” (Off) position, the monitor will operate for up to four hours from its internal 12 volt lead-acid battery. As the battery voltage runs low (<11.5 volts), the red battery indicator on the front panel illuminates. At this point, the AC Mains should be reconnected to power the monitor and charge the battery. If the monitor continues to be powered from a battery in a low voltage situation, at approximately 11 volts, a continuous alarm sounds for thirty seconds while the Message Center displays BATTERY EXHAUSTED CONNECT LINE CORD. If this alarm/message is ignored, the monitor displays will shut down and the battery indicator will flash on and off about every 5 seconds. If AC power is now restored, the monitor will re-initialize (go through the power up and self-test routines) and resume normal operation. However, continued battery operation will eventually activate a hardware low voltage circuit (<8.5 volts) that shuts the monitor off to prevent damage to the battery. Once the unit is shut down with the hardware circuit, the AC Mains must be connected and the front panel POWER key pressed before the monitor will turn back on. AC Mains Operation 9.2.2 The AC Mains voltage enters the monitor at the rear panel Power Entry Module (PEM). This device contains a built in RFI power line filter, a double-pole singlethrow switch that opens and closes both AC input lines, fuses, and an input voltage selection card. 5-Jun-01 Model 520A Service Manual 17 Section 9 Electronic Theory of Operation PRELIMINARY The filtered, switched and fused output of the Power Entry Module is fed to the primary coils of the rear panel mounted system transformer, T301. The secondary output from T301 is rectified by D1 (bridge rectifier) and filtered by C1. The loaded DC voltage at this point is approximately 20 volts. The 20 DC volts is fed to the main board through fuse F301 to connector E302, and is switched to the battery charging regulator IC1 (pin 5) through Q1B. Biasing for Q1B is accomplished by C2, R1, R2, C8 and Q1A when AC power is applied. When running on battery power Q1B is biased off by R2 and Q1A, this prevents the battery from trying to power the battery charger regulator and IC2 that informs the monitor of the loss of AC. The output of switching regulator IC1 pin4 is rectified and filtered by D4, C4 and L1 then fed to the battery through current sense resistor R3 and fuse F302 to VBAT+ (J302 pin 1). The battery float charge voltage is maintained at 13.2 volts except for fast charge which is regulated at 14.4 volts. The output is also monitored for over current conditions. These parameters are controlled by IC3 and associated circuitry. When the battery charge current exceeds 120mA of current IC3 pin 7 goes high which biases Q2 on, this in turn shorts out R12 which affects the feedback control (FB) to IC1 (pin 1). With R12 shorted out the control resistors R14 and R13 set the output voltage to 14.4 volts. When the charge current lowers IC3 pin 7 goes low which biases Q2 off, this puts R12 back into the feedback control which now consists of R12, R13 and R14 setting the voltage to 13.2 volts. When more than 600mA of current flows through R3, IC3 pin 1 shorts IC1 pin 2 to ground which shuts IC1 off until its next switching cycle, when the current reaches a safe level IC3 pin 1 allows IC1 to remain on. The voltage rectified by D1, D2 and filtered by C2 is fed to IC2 as VCH (Voltage Charge). The output of this 5 volt regulator provides the LINEST (Line Status) signal to the main board at E302 pin 3. With AC applied, LINEST is high. LINEST goes low when the AC is disconnected. The LINEST line is also routed to the power on/off circuitry. Battery Operation 9.2.3 Without AC power there will be no secondary voltage rectified by D1. Power for the monitor will be supplied from the battery at J302 pins 1 (VBAT+) and 2 (VBAT-). The battery power will conduct through D3 and F301 to VIN at E302 pin 1 to the main board. R2 and Q1A bias Q1B off in this condition which prevents power from reaching IC1, IC2 and IC3. The output of IC1 is also protected by D5 which is now reverse biased, the bridge D1 is also reverse biased and prevents T301 from discharging the battery. With no voltage at IC2 the LINEST will be low which indicates to the main board that there is no AC power. 18 Model 520A Service Manual 5693-90-01 2471 & 2775 Main Board PRELIMINARY 2471 & 2775 Main Board 9.3 The Main Board contains all the analog and digital circuitry that controls the sensor, external communication and front panel display. The isolated power supplies, microprocessor circuits and memory are all contained on this board. The earlier 2471 Main Board and newer 2775 Main Board are identical with exceptions noted in the text. Power On/Off Control Circuitry 9.3.1 The Model 520A power on/off control circuitry consists of the VBACK supply (regulated by IC12), IC10, IC11 and the POWER key. (See page 4 2471 schematic, page 4 on 2775 schematic.) When the battery or AC Mains is first applied to the power supply board (via VIN J102 pin 1), VBACK goes to +5 volts, provides power to IC10 and IC11, and through the C26 and RP4 (pins 3,4) network at IC10 pin 8, sets IC10 pin 2 to a logic Low. The ON/OFF line is brought Low each time the front panel POWER key is pressed. This sends the output at IC11 pin10 High. This Low-to-High transition clocks the (#1) D flip-flop portion of IC10. The /Q1 output at IC10 pin 2 goes High and with each successive press of the POWER key, this output toggles to the opposite level (Low or High). A High turns the Model 520A on and a Low shuts it off. While the /Q1 output at IC10 pin 2 is High, the MOSFET Q7 is turned on and pulls the gate of MOSFET Q8 to ground, thus causing Q8 to conduct as well. With Q8 conducting, the currently active monitor power source—either the AC Mains derived supply or the battery supply will flow through Q8 to the voltage input (pin 7) of the Pulse Width Modulator IC9. The output IC9 pin 6 will oscillate (at the frequency set by R13 and C15). This causes Q5 to switch on and off and provide a path to ground through the primary coils of T1 for the supply (Mains or battery) at T1 pin 12. Current flowing in the primary is measured at IC9 pin 3 and the duty cycle of the pin 6 output will vary with the load on the transformer. Current flow in the transformer primary induces current in the three secondary coils and creates the ± 12 volt analog supplies (+V12 and -V12), the VRAWI that powers the isolated RS232 circuitry, and the +5 volt VCC supply that power the remaining circuits in the monitor. The Model 520A turns on. The +V12 and -V12 supplies are rectified and filtered by D2, D4, C10, C11, C12 and C13. The +V12 is regulated by IC7 and the -V12 by IC8. The VDD supply is rectified by D3, filtered by L1, C9 and C20 and fused at F1, and in addition, a feedback loop to IC9 contains VR1 which is factory adjusted to produce a +5.00 volt ± 0.05 volt VCC supply (measured under load). Once the monitor powers up, a SYNC signal toggles Q9 on and off causing a timing pulse to be transmitted across C19 and C15 to the input at IC9 pin 4. This has the 5-Jun-01 Model 520A Service Manual 19 Section 9 Electronic Theory of Operation PRELIMINARY effect of synchronizing the output of the pulse width modulator with the data sampling operations of the analog board and keeps power supply switching spikes from interfering with those operations. Power Supplies 9.3.2 The secondary pins 7, 8, 9 of T1 form a center tap transformer, the voltage is rectified by D2 and D4 then filtered by C10, C11, C12 and C13. The dual 12 volt supplies, +V12 and -V12 which are generated from this voltage are regulated by IC7 and IC8 respectively. The secondary winding of pins 5 and 6 of T1 are rectified by D3 and filtered by C9, L1 and C20, this voltage designated as VCC (+5 volts) acts as reference for IC9, supplies power for the opto isolator non-isolated side and powers other circuitry on the board. The secondary winding consisting of pins 2 and 3 are rectified and filtered by D1 and C1. The rectified voltage at this point is approximately 7 volts DC and is regulated to 5 volts by IC2. This isolated supply powers the isolated portion of the opto-isolators and the RS232 driver chip IC1. The unregulated voltage VRAWI is sent to the rear panel connector J101. The backup voltage (VBACK) is regulated by IC12 from the VIN supply. Capacitors C22 and C27 serve as filters and D17 allows VCC to power VBACK circuitry when the monitor is on. At this point D18 is biased off so IC12 is idle. When the monitor is turned off and VCC collapses D18 is then forward biased and IC12 now supplies VBACK circuitry, D17 at this time is reverse biased and prevents power from reaching VCC. The saturation sensor LEDs derive their power (LEDSRC) from the current regulator IC32. (See sheet 3 on 2471 schematic, page 2 on 2775 schematic.) Resistor R31 limits the maximum current draw to 45 mA (nominal draw 35 mA). Regulator output is filtered by C85 and L2. The charge stored on capacitor C1 supplies the 290-350 mA peak currents that can occur when the sensor LEDs are turned on. Diode D12 prevents the regulator output from exceeding +7.5 volts while the fuse, F2, provides current limit protection in the event of a regulator circuitry failure. The RP10 (pins 1,8 and 5,6) divider network provides the CPU (via IC33) with a means to monitor the LEDSRC status. The +VA and -V12 supplies are regulated to +V5 (+5 volts) and -V5 (-5 volts) by IC44 and IC43 respectively. These supplies are used by the 20 bit ADCs, the 8 bit ADC and other circuits associated with them. Voltage References 9.3.3 A +2.5 volt precision reference supply, generated by IC35 from the 12 volt +V12 supply, is used as a reference voltage for the ADC chips IC37 and IC34. 20 Model 520A Service Manual 5693-90-01 2471 & 2775 Main Board PRELIMINARY The +2.5 volt output from IC35 pin 6 is fed to the non-inverting input of amplifier IC36 pin 3. Resistors R32 and R33 combine for a gain of 1.617 that provides a +4.096 volt reference (approximately) supply, 4VREF, at IC31 pin 1. The 4VREF is fed to IC30 pin 13 which is set up as a unity gain inverting buffer amplifier, therefore the output at IC30 pin 14 is -4 volts. This -4 volts is used by IC29 as a reference voltage for VLED (Voltage LED) and CNTRST (Contrast) controls. (See sheet 4 on 2471 schematic, sheet 3 on 2775 schematic.) Preserving RAM and Real Time Clock Data 9.3.4 The NAND gate output at IC11 pin11 will be Low when the monitor is on (IC10 pin 2 is High) and High when the monitor is off (IC10 pin 2 is Low). (See sheet 4 of 5 on schematic.) This PWRON* (Power On) signal is used to prevent corruption of RAM and clock data when the monitor is turned off. It does this by going High and therefore denying CPU access to the RAM and clock chips so that as the power supplies crash when the monitor is turned off, the CPU cannot send erroneous data to the chips. Whenever the CPU is writing information to the RAM or Real Time Clock chips, the CPU momentarily sends the OFFDIS (Off Disable) line High. The High going level appears at IC11 pin 2. Since the monitor is powered on, IC11 pin1 will be High. This means IC11 pin3 momentarily goes Low, Q6 starts to conduct and IC10 pin 4 goes High. In this reset condition the /Q1 output #1 flip-flop of IC10 (pin 2) will be held high even if the user presses the POWER key and clocks the flip-flop. In effect, the CPU is not allowing the monitor to be turned off. The Low at IC11 pin3 will last for the duration of the RC time constant set by C21 and RP4 (pins 5,6). These values were chosen to produce a time-out longer than the time necessary to complete the write to RAM or Real Time Clock operation. After the RC time-out, IC10 pin 4 returns Low and a press of the POWER key will toggle the /Q1 output of IC10 and the monitor will turn off. This is done to prevent corruption of RAM and Real Time Clock data. Low Battery Voltage Shutdown 9.3.5 The CPU monitors the battery voltage and provides the user with a low battery indicator ( ), messages and alarms. However, if these are ignored, a hardware circuit will take over and shut off the monitor before the battery is damaged. The pulse width modulator IC9 requires at least 7.6 volts at pin 7, its voltage supply, in order to operate. This pin typically draws 10 mA of current. The resistance of the R63 and Q8 combination is approximately 114 ohms. This equates to a voltage drop of approximately1.14 volts. Therefore if the battery voltage drops under 9.0 volts (approximately), IC9 will not have sufficient voltage to operate and will shut down. Shutdown of IC9 stops current flow through transformer T1 and the secondary supplies shut down, effectively turning off the monitor. 5-Jun-01 Model 520A Service Manual 21 Section 9 Electronic Theory of Operation PRELIMINARY When IC9 shuts down, its VREF output at pin 8 is pulled Low. This forward biases D6 and causes the NAND gate output at IC11 pin4 to go High. The #2 flip-flop of IC10 is clocked, and the High at the D2 input (because /Q1 is High) is transferred to the Q2 output at pin 13. The High at pin 13 Sets the #1 flip-flop causing the /Q1 pin 2 output to go Low. This Low shuts off both MOSFETs Q7 and Q8, thereby blocking any supply voltage from IC9 pin 7. Normally, pressing the front panel POWER key would clock flip-flop #1 (at pin 3) and return the pin 2 output High— but the High output at pin 13 keeps the #1 flip-flop Set—and the POWER key has no effect. If at this point the AC MAINS is reconnected, MOSFET Q8 continues to block current from IC9 pin 7 and the monitor remains off. Connecting the AC Mains does however send the LINEST signal High. This High Line Status signal is brought to IC10 pin10 where it Resets the #2 flip-flop, sending IC10 pin 13 Low and removing the Set condition from flip-flop #1. Now, if the front panel POWER key is pressed, flip-flop #1 is clocked, IC11 pin11 goes High, MOSFETs Q7 and Q8 turn on, the supply to IC9 pin 7 is restored, the pulse width modulator restarts, energizes T1, and the monitor turns back on. Timing Sequencer 9.3.6 A 14 stage divider, IC39, acts as a timing sequencer. (See sheet 3 on 2471 schematic, sheet 2 on 2775 schematic.) A 3.276 MHz crystal Y2, provides a Clock Sequence (CLKSEQ) to IC39 pin 10. The IC39 pin 11 RESET input line resets IC39 on monitor power up. The IC39 pin 9 Q1,output provides a clock input signal to the tone generator board located at IC27. The IC39 pin 3 Q14 output provides a 5 ms interrupt (INT5MS) for IC18. The Q4-Q11 outputs of IC39 become inputs to the Data Sampling Controller IC42. Data Sampling Controller 9.3.7 The IC39 Timing Sequencer’s Q4-Q11 outputs become inputs to IC42, a PEEL (Programmable Electrically Erasable Logic) device. The PEEL uses the CLK and D0-D6 inputs, and the SC1 and SC2 inputs, to control data sampling by providing sensor LED drive signals and demultiplexing for the signals returning from the saturation sensor. The waveforms in Figure 3.(with the exception of CLK) are only valid when both the SC1 and SC2 inputs are low. The System Calibration inputs (SC1 and SC2) generated by the microprocessor, are kept low, except that they are toggled high/ 22 Model 520A Service Manual 5693-90-01 2471 & 2775 Main Board PRELIMINARY low, during a Probe Off Patient alert, and during a system power up self-test. See Calibrating the 20-Bit Analog-to-Digital Convertors on page 25. Figure 3. Figure 1. Front-End Timing The data sampling sequence consists of: a. turn on the Red LED (RDLED*) and the Analog Sample line (ASAMP*) c. sample the Red LED return signal (RDSMP*) e. turn on the Infrared LED (IRLED*) and the Analog Sample line (ASAMP*) f. sample the Infrared LED return signal (ISMP*) h. turn off the Infrared LED, the Analog Sample line, and stop sampling i. repeat the process starting at step a. The Analog Sample (ASAMP*) line is used to nullify the effects of any ambient light signals returning from the sensor. See Sensor Photodiode Return Path on page 24. The IC42 INSIG* and SIGND* outputs are used in conjunction with the SC1 and SC2 inputs. See Calibrating the 20-Bit Analog-to-Digital Convertors on page 25. The IC42 pin 14 external sequencer (SYNC) line is equivalent to the PEEL’s D1 input. It provides a “sync” pulse to the pulse width modulator on the power supply board in order to keep power supply switching spikes from interfering with data sampling operations. Sensor LED Drive Circuits 9.3.8 The VLED line voltage is derived from IC30 pin 8 which is controlled by the Digital to Analog Converter IC29. (See sheet 4 on 2471 schematic, sheet 3 on 2775 schematic.) When address line A0 is high (IC29 pin 6) and both WR* (IC29 pin 16) and DACCS* (IC29 pin 15) are low the D/A Converter is enabled. The data on lines 5-Jun-01 Model 520A Service Manual 23 Section 9 Electronic Theory of Operation PRELIMINARY D0-D7 (IC30 pins 14-7) now control the output voltage of IC30 pin 8 (VLED) based on the VREFB voltage on IC29 pin 18. When the RDLED* signal at IC42 pin 18 goes low (logic 0), Q14 turns off and the Red LED signal (VLED from IC30 pin 8) at R37 is divided by R37 and R41, finally causing IC36 pin8 to go high. This positive output turns Q11 on and current flows from the LED source (LEDSRC), through the Red LED in the sensor (it turns on) returning as LED1SK (LED1 sink) across Q11 and the current limiting resistor R53 to ground. (See sheet 3 on 2471 schematic, sheet 2 on 2775 schematic.) When RDLED* returns high (logic 1), Q14 is biased on, forcing IC36 pin8 to ground potential: Q11 is biased off, and as a result, the Red LED in the sensor is also off. The Infrared LED drive circuit operates in the same manner as the Red LED drive discussed above. The IRLED* signal at IC42 pin 17 activates Q13 the LED2S signal causes a positive signal at IC36 pin 14, and current can flow from the LEDSRC supply through the sensor’s Infrared LED, Q12, and the current limiting R52 to ground. Sensor Photodiode Return Path 9.3.9 Light, from the sensor’s Red or Infrared LED, shines through the pulsating vascular bed (the patient’s finger, toe, etc.) placed between the LEDs and the photodiode. Some of this light emerges from the tissue and impinges on the photodiode, causing the photodiode to conduct current. IC40 pins 1-3 is set up as a differential amplifier that converts this input current to a voltage at the amplifier output. The sensors are wired such that photodiode current produces a positive voltage at IC40 pin 11. The voltage at IC40 pin 1 is presented to an analog switch IC41 pin 6. This switch is controlled at pin8 by INSIG* (Input Signal) from IC42, and will be closed (IC41 pins6 and7 connected) except if the monitor is in a Probe Off Patient condition or is undergoing its Self-Test at system power up. The switch IC41 pins 9-11, controlled from SIGND* (Signal Ground) at IC42 will be open (no connection between IC41 pins10 and 11) except as noted above for the switch at IC41 pins 68. As a result, the IC40 pin 1 voltage passes undisturbed to the high pass filter consisting of R59 and C90. As shown in Figure 3., the ASAMP* signal is active whenever either sensor LED is turned on. This causes Q15 to turn off and the charge at C90 passes through the unity gain buffer to IC40 pin 7. If the signal at IC40 pin 7 is the product of the Red LED being turned on, then RDSMP* from IC42 pin 12 will go low and close the switch at IC41 pins 2-3, thereby presenting the signal to a sample and hold circuit consisting of R54 and 1. The Model 520A uses SuperBright™ sensors. If a non-SuperBright™ sensor is connected, IC40 pin 1 will go negative—a condition that causes an “Incompatible Probe” message to be displayed. 24 Model 520A Service Manual 5693-90-01 2471 & 2775 Main Board PRELIMINARY C100 (that maintains the signal until next sample pulse arrives), a gain stage, (IC38 pin 1), a filter/divider network (C87, R45 and R46), and finally, to the Red channel Analog-to-Digital Convertor (ADC) IC34. If the signal at IC40 pin 7 is the product of the Infrared LED being turned on, then ISMP* from IC42 pin 13 will go low and close the switch at IC41 pins 14-15, thereby presenting the signal to a sample and hold circuit consisting of R55 and C96 (that maintains the signal until next sample pulse arrives), a gain stage, (IC38 pin 7), a filter/divider network (C88, R49 and R50), and finally, to the Infrared channel Analog-to-Digital Convertor IC37. Again referencing Figure 3., the ASAMP* line returns to a logic high when neither LED is being driven, causing Q15 to turn on. With Q15 conducting, any charge at C90 is discharged to ground and the next pulse will charge C90 from a known level. If it were not for Q15, any charge remaining on C90 from the previous pulse or from ambient light reaching the photodiode would be added to the charge from a new pulse—creating measurement errors. Calibrating the 20-Bit Analog-to-Digital Convertors 9.3.10 The 20-bit ADCs are calibrated as part of the system self-test which occurs each time the monitor is turned on. At power up, the microprocessor sets the CAL line high. The System Calibrations input SC1 is set high and SC2 is reset to a logic low. The CS5503 ADC will not operate while the CAL line is high. On the falling edge of the CAL signal, the ADC will initiate a calibration cycle determined by the state of the SC1 and SC2 inputs. The high at SC1 and the low at SC2 cause the Data Sampling Controller, IC42, to set INSIG* high and reset SIGND* to a logic low. The high INSIG* opens the switch at IC41 pin8 so that IC41 pins 6 and 7 are no longer connected— disconnecting the returning photodiode signal from the rest of the circuitry. The low SIGND* signal closes the switch at IC41 pin9 and as a result, the input to the C90R59 high pass filter (and thus the entire ADC input circuitry) is brought to ground potential. The CAL line (which went high at power up) is reset low and ADCs IC34 and IC37 begin their calibration cycles. Because the analog input circuitry is grounded via SIGND*, only circuit offset voltages can be present at the (pin 9 AIN) input. The calibration cycle sets the ADC “zero” point to equal this voltage, thus compensating for any circuitry offsets. The ADC then sets its “full scale” point to equal the voltage at its VREF (pin 10) input. This completes the calibration cycle. The ADC can now start sampling its input and converting it to a 20-bit digital word. The processor resets SC1 to a logic low, causing IC41 pin9 to open and IC41 pin8 to close. The photodiode signal can now reach the ADCs. See Sensor Photodiode Return Path on page 24. 5-Jun-01 Model 520A Service Manual 25 Section 9 Electronic Theory of Operation PRELIMINARY 20-Bit Analog-to-Digital Conversion 9.3.11 Data from the Red and Infrared channels is sampled by the 20-bit measurement ADCs, IC34 and IC37 respectively. The analog input at pin 9 is converted to a digital representation with 20-bit resolution based on the input magnitude. The CS5503 convertor continuously samples its input, converts the value to a digital word, puts the word in its output buffer (overwriting previous buffer contents), then repeats the process by again sampling its input. The frequency of the sample/convert/overwrite-buffer sequence is based on the 3.2768 MHz clock signal at the ADC pin 3 (CLKSEQ) input. The microprocessor starts a read cycle of the Infrared channel by bringing IC37 pin 16 (Chip Select Channel 1) low. A Red channel read starts when IC34 pin 16 (Chip Select Channel 2) is brought low. On the falling edge of the ADC’s CS*, the output word’s MSB (most significant bit) appears at the pin-20 SDATA (Serial Data) output. The SDATA line connects directly to the microprocessor’s serial input (RXS) pin. The remaining bits (in descending order) are output from SDATA with subsequent falling edges of the Serial Clock (SCLK) input at pin 19. The SDATA output automatically goes to a 3state (high impedance) condition after completing a word transmission, thus freeing the data line for other uses (i.e., the other ADC channel). The Serial Clock speed is controlled through the digital board PEEL IC18. This clock rate is significantly slower than the ADC sampling rate. As a result, the ADC rewrites its output buffer with new information at a faster rate than the data can be read from the buffer. No conflict occurs, however, because while CS* is low (during the read cycle), the ADC does not update its output buffer—the current word is not overwritten. After the processor receives the entire word, it allows the convertor’s CS* to return high, and the ADC resumes its sample/convert/overwritebuffer cycle. Sensor Status Decoding and Conversion 9.3.12 The microprocessor monitors several sensor parameters in addition to the Red and Infrared data channels. It monitors the status parameters, as well as the voltage of the monitor’s internal battery. The 8-to-1 multiplexor, IC33, decodes the A0AUX-A2AUX input address lines and connects one of eight status parameter inputs (labeled channels 0-7 at IC33) to the multiplexor output at IC33 pin 3. Resistor R29 and diode D13 prevent negative voltages from reaching the input to the analog-to-digital convertor, IC31. IC31 is an 8-bit analog-to-digital convertor with a serial data output. While the IC31 Chip Select (CS) input is high, the CLK input and DOUT output are in 3-state mode. When CS is brought low (under processor control), the most significant bit (D7) of the PREVIOUS data conversion becomes available at the DOUT pin. The 26 Model 520A Service Manual 5693-90-01 2471 & 2775 Main Board PRELIMINARY remaining bits (D6-D0) are shifted out on subsequent falling edges of the CLK input. On the clock pulse following the one that shifts out the least significant bit (D0), the CLK and DOUT lines are returned to 3-state and the ADC performs a new conversion based on the input it receives from the IC33 channel selected by the A0AUX-A2AUX input address lines. The ADC sample/convert/store-result cycle is based on internal chip timing and not the CLK input which (along with CS) only controls serial data output. Thus the CS line is free to return high once the ADC cycle begins. Sensor Status Parameters 9.3.13 The sensor (and battery) status parameters input to the multiplexor IC33 are described below. Note that channel number refers not to the IC33 pin number, but to the signal label (e.g., channel I0 signal resides at IC33 pin 13). Channel I0: ADCV12. This is an extra input to the multiplexer IC33 pin 13. It is unused as of this writing. Channel I1: Auxiliary Input. This is an extra input to the multiplexer IC33 pin 14. It is unused as of this writing. Channel I2: Photodiode DC Level. Resistors R40, RP8 (pins 1, 2) and capacitor C97 form a voltage divider and low pass filter that provide a measure of the mean DC level at the output of the photodiode current-to-voltage amplifier IC40 pin 1. This channel (IC33 pin 15) is used in determining ambient light interference. If this line is examined while the sensor’s Red and Infrared LEDs are turned off, then any DC level at IC40 pin 1 must be the result of ambient light impinging on the photodiode. If the DC shift is in excess of limits set in the software, a Light Interference message appears on the monitor’s display. Channel I3: Sensor LED Supply Voltage. This channel, at IC33 pin 12, monitors the sensor LED supply voltage through a voltage divider consisting of RP10 (pins 5, 6) and RP8 (pins 1, 8). If a fault occurs that causes the LED supply fuse F2 to blow, or if the sensor wires are shorted, this channel reports the condition and the Message Center displays PROBE FAILURE. Channel I4: Incompatible Probe Detection The input at IC33 pin 1 provides the processor with an incompatible probe indicator (words probe and sensor are interchangeable). The photodiode output voltage at IC40 pin 1 will be positive if a SuperBright™ sensor is connected to the monitor. This positive signal passes through the high pass filter of C73 and RP10 (pins 7, 8) to the amplifier inverting input IC36 pin 6, where it is summed with the -5 volt output from IC43. The resultant voltage at IC33 pin 1 will be approximately +2.81 volts with no photodiode input. This voltage drops as the (positive) photodiode signal at IC40 pin 1 increases. If the IC40 pin 1 signal goes negative, as would happen if a non-SuperBright™ 8600 series sensor were connected to the monitor, 5-Jun-01 Model 520A Service Manual 27 Section 9 Electronic Theory of Operation PRELIMINARY the cumulative effect of the -5 volts and the negative photodiode signal passing through D14 and R34 would be to send the IC36 pin7 output to its positive rail (+12 volts). The processor recognizes this higher voltage and causes an INCOMPATIBLE PROBE message to displayed in the Message Center. Channel I5: Infrared LED Cathode Voltage. A low pass filter consisting of RP10 (pins 3, 4), RP8 (pins 1, 7) and C89 provides a means to measure the cathode voltage of the sensor’s Infrared LED. If the channel at IC33 pin 5 is sampled the monitor can determine if the LED is open circuit (zero volts at IC33 pin 5) or operational (approximately 2.5 volts at IC33 pin 5). If not operational, display messages such as PROBE I.R. LED FAILED or ERROR FAULTY PROBE are generated. Channel I6: Battery Supply Voltage The monitor’s internal battery voltage is divided down by RP3 (pins 7, 8) and RP8 (pins 1, 5). The voltage at IC33 pin 2 is monitored and if its magnitude is less than a predetermined value (encoded in the software) the monitor lights and/or flashes its front panel battery indicator. This provides the user with a low battery warning. Channel I7: Red LED Cathode Voltage. A low pass filter consisting of RP10 (pins 1, 2), RP8 (pins 1, 8), and C92 provides a means to measure the cathode voltage of the sensor’s Red LED. If the channel at IC33 pin 4 is sampled the monitor can determine if the LED is open circuit (zero volts at IC33 pin 4) or operational (approximately 2.5 volts at IC33 pin 4). If not operational, display messages such as PROBE RED LED FAILED or ERROR FAULTY PROBE are generated. Microprocessor 9.3.14 A Hitachi HD64180RP microprocessor directs the actions of the Model 520A Pulse Oximeter. (See sheet 2 on 2471 schematic, sheet 1 on 2775 schematic.) The processor, IC16, is operated at 6.144 MHz (half the12.288 MHz frequency of crystal Y1), has an 8-bit data bus and a 19-bit address bus (the 520A uses only 18bits). The microprocessor also provides two asynchronous serial communication channels, a clocked serial I/O port and various interrupt and control signals. The +5 volt VCC supply to the processor is first sent through inductor FB1, a ferrite bead, before powering the chip at IC16 pin 32. Memory 9.3.15 The Model 520A system software is located at IC17, a 27C010 EPROM. The 32 K byte RAM, IC20, stores trend data, system power up settings (averaging times, serial output parameters, etc.), and provides an area for system (scratchpad) memory requirements. Since IC20 is powered from the VBACK supply, RAM memory is retained when the monitor is turned off and it becomes available again when the monitor is turned back on. 28 Model 520A Service Manual 5693-90-01 2471 & 2775 Main Board PRELIMINARY The ROM at IC17 is read when its Chip Enable line (IC17 pin 22) is brought low by the ROMCS* signal at IC25 pin 3, and the processor brings its Read line (IC16 pin 63) low—thereby activating the ROM Output Enable line at IC17 pin 24. Under these conditions, ROM data from the specified address bus location is made available to the data bus for use by the processor. The RAM (IC20) is activated when its Chip Select line RAMCS* (IC20 pin 20) is brought low, via IC25 pin 8. When the ME* line at IC25 pin 5 is low, and the inverse of address line A17 at IC25 pin 4 is low, output pin 6 of IC25 will go low. This in turn will drive IC25 pin 10 low, with PWRON* low at IC25 pin 9, IC25 pin 8 will be low (RAMCS*). If at that time, OE (IC20 pin 22) is low, a RAM Read occurs, whereas a RAM Write will occur if WE (IC20 pin 27) is low. Real Time Clock (RTC) 9.3.16 A Real Time Clock provides the Model 520A the ability to time stamp collected (printed) trend data. (See sheet 4 on 2471 schematic, sheet 3 on 2775 schematic.) The 32.768 kHz crystal, Y3, provides the timing signals for the clock chip, IC24, which is powered from the VBACK supply so that the clock can continue to keep time when the monitor is turned off (provided the monitor’s 12 volt internal battery is connected and maintains at least a nominal charge). The RTC is activated when its Chip Select line (CS0*) at IC24 pin 2 is brought low. With the monitor on PWRON* will be low (IC25 pin 13), the RTC* line will be brought low by the processor through IC22 pin 14, these lines drive RTCCS (Real Time Clock Chip Select IC25 pin 11) low. If at this time, the RD* (IC24 pin 8) input is low, a RTC Read occurs, whereas a RTC Write will occur if the WR* (IC24 pin 10) input is low. Addressing is handled by A0-A3 (pins 4-7) and data I/O through D0-D3 (pins 14-11). Sound generator 9.3.17 The programmable tone controller IC27 is replaced with the Tone Generator Replacement board 2755-01, this is used to drive the monitor’s audio circuit. The tone generator is clocked by IC39 pin9 from the 1.638 MHz signal, Q1. The tone generator is enabled by the processor when IC22 pin12 is brought low. While CE* is low, WR* is brought low and data bus information including frequency (pitch) and attenuation (volume) is accepted by the tone generator. The Ready signal (IC27 pin 4) goes low while accepting data and the processor is put into a Wait state until IC27 finishes its task; then Ready returns high and the processor continues its operations. The AUDOUT output at IC27 pin 7 drives the audio amplifier IC26. The amplifier output is coupled through capacitors C55 and brought to J109 as the SNDOUT (Sound Out) line. The speaker which is mounted in the chassis is connected to J109, LS1 is not installed on the 2471 Main Board. 5-Jun-01 Model 520A Service Manual 29 Section 9 Electronic Theory of Operation PRELIMINARY Keypanel Interface 9.3.18 The12 keys (switches) on the Model 520A front panel are connected to the 2471 Main Board through a ribbon cable at J104. Each key (except POWER) is connected to an 8-bit latch (either IC14 or IC15). When any of these keys is pressed, the corresponding latch input is brought low. The processor continually reads the status of these latch outputs, the RDKEY* enables IC14 when low and the RDKEY_2* line enables IC15 when brought low. The POWER key ON/OFF signal is sent through J104 pin 15. The AC Line Status signal, LINEST, is generated by the power supply, and is high (+5 volts) when the monitor is connected to the AC Line (Mains) and the rear panel switch is set to “|”. This +5 volt level is sent to LED D2 (the green indicator) on the keypanel via J104 pin 16. The LINEST signal is also input to the latch at IC14 pin 8 so that the CPU can detect if the unit is operating on AC line power (IC14 pin 8 high) or on battery power (IC14 pin 8 low). Diode D9 keeps current from backfeeding into IC14 when the monitor is turned off but still connected to the AC line. The 2MIN (D3), AUDIO OFF (D4), ALERT (D5), and LOW BAT (D1) LEDs are driven by the 8-bit latch IC13. When each of the corresponding signals is driven high the appropriate LED on the keypanel is illuminated. See I/O Device Controller on page 31. Display Interface 9.3.19 The display is connected to the 2471 Main Board at J107. It is controlled by the processor using the RD* (Read), WR* (Write), and DISPCS* (Display Chip Select) lines. Data bits D0-D7 are used as input/output lines and A0 is used in conjunction with the RD* and WR* lines to distinguish between read and write operations as listed below. A0 RD* Low WR* Low High Status Read Command Write Low Data Read Data Write Table 1. Display Command/Data table. The CNTRST (Contrast) line is controlled by pressing the front panel key. When depressed and held the processor controls the digital to analog converter IC29, line A0 is brought low along with WR* and DACCS*, the data on D0-D7 controls the voltage at IC30 pin 7 which can vary from 0-4 volts. The output of IC30 pin 7, along with 4VREF feeds a summing amplifier (IC30 pins 1, 2, 3). The output of the summing amplifier IC30 pin 3 controls the base of Q10 which in turn controls the contrast of the display through a variable negative voltage. 30 Model 520A Service Manual 5693-90-01 2471 & 2775 Main Board PRELIMINARY The backlight for the display is controlled by the DSPBR (Display Bright) line. When DSPBR is high the gate of Q16 is biased off, current flows from Vcc through R51 to IC45. This sets the backlight for low illumination. The illumination of the backlight is made greater when DSPBR is made low, this biases Q16 on which essentially shorts out R51 allowing more current to flow into IC45 creating a full backlight. I/O Device Controller 9.3.20 The A/D Converter Chip Selects, serial A/D Chip Selects, Sensor Status Decoding and NEXT* line are all controlled by IC28 when selected by the OPORT line (IC21 pin 10). The OPORT line will go high when the L1* and WR* line both go low at IC23 pins 13 and 12, this will send output pin IC23 pin 11 low which drives inverter IC21 pin 10 high enabling IC28. A 3 to 8 decoder is used to control the DACCS*, RTC*, DISPC*, AUD*, KEYS*, L1*, L2*, 2KEYS* lines. when the IOE* line goes low and the LIR* line goes high being inverted by IC21 pin 2 and presented to IC22 pin 5 as a low enable line IC22 is enabled, Q0-Q7 will be driven low depending upon the A4, A5 and A6 lines on pins 1, 2, 3 respectively on IC22. With the LPORT line high IC13 is enabled, this latches the data on lines D0-D7 (1D-8D pins 2-9) on its output pins 19-12 (1Q-8Q respectively), the outputs correspond to the following eight lines: CAL-used by the A/D Convertors on power up to compensate for front end voltage offsets. TML-Two Minute LED drives the LED on the front display. AOL-Audio Out LED drives the LED on the front panel. ARL-Alert LED drives the LED on the front panel. KJL*-drives Q17 when high which in turn drives the Alert Bar LEDs via J105. BTL-Battery Low LED on the front panel. DSPBR-(not used on the 520A) OFFDIS-sent to the Power On/Off section of the circuitry to prevent the monitor from being turned off while writing to RAM. Watchdog Timer 9.3.21 The Watchdog Timer provides a system reset function in the event a hardware or software “glitch” occurs. The PEEL IC18 forms the heart of the Watchdog circuit. (See sheet 2 on 2471 schematic, sheet 1 on 2775 schematic.) At powerup and at specific intervals thereafter, the microprocessor outputs a logic high to IC18 pin 8, WDOG (Watchdog). The WDOG signal combines with other signals within the PEEL and as a result the Watchdog Clear (WDCLR) open drain output at IC18 pin 12 is continually brought low. This discharges the capacitor C46 before it can charge up (via RP2 pins 1 and 2) past the input threshold of IC21 pin 9. 5-Jun-01 Model 520A Service Manual 31 Section 9 Electronic Theory of Operation PRELIMINARY If the WDOG pulse does not appear at regular intervals, as the result of a software or hardware problem, the RC charges up and IC21 pin 8 goes low producing a Watchdog Time-out (WDTO*) input at IC18 pin 11. WDTO* combines with other signals within the PEEL and causes the open drain Master Reset (MR) output at IC18 pin 13 to be brought low. A low MR causes C45 to discharge, forcing IC21 pin6 high. This sends a reset pulse to the system. It also sets the Reset Input (RESIN) signal at IC18 pin 9 high which causes RESET* at IC18 pin 19 to activate low. The active RESET line causes the microprocessor (IC16 pin 7) and the display module to be reset. The monitor then performs its powerup self-test routines, and if the “glitch” has been cleared, the monitor resumes normal operation. If the problem still exists, a self-test or other error should be displayed. Serial I/O Controller 9.3.22 Digital data from the three Analog-To-Digital Convertors is read by the CPU through its clocked serial data input (RXS) at IC16 pin 52. The PEEL IC18 acts as the Clocked Serial I/O (CSI/O) Controller. Except during powerup or Watchdog Timer reset,IC39 pin 3 provides an interrupt to the CSI/O controller in the form of a 5 millisecond period square-wave input to IC18 pin 7 (INT5MS). On the rising edge of INT5MS, a CPU interrupt request is generated when IC18 pin 18 (CPUINIT*) goes low. The CPU responds by sending the clock input to CSI/O controller (CKS) at IC18 pin 6 low. (This CKS line is inactive high unless a serial receive operation is in progress.) The CPU also sets up the ADC decode lines AA1 and AA0 at IC18 pins 5 and 4, and as a result, one of the ADC chip select lines (CSADC1*, CSADC2*, CSADC3*) is brought low, and the CPUINIT* line is disabled. On the rising CKS signal a CLKS output pulse at IC18 pin 14 is sent as a serial clock input to the ADC selected by the decode lines. Decode results are shown below. AA1 AA0 Decode 0 0 Red LED 20-bit ADC 0 1 Infrared LED 20-bit ADC 1 1 Sensor Status 8-bit ADC 1 0 Internal CSI/O signal (TEND) Table 2. CSI/O Decode Lines Successive CKS/CLKS pulses cause the ADC data to be shifted out of the ADC (most significant bit first) along the serial data line (SDATA) to the CPU serial input (RXS) at IC16 pin 52. 32 Model 520A Service Manual 5693-90-01 2471 & 2775 Main Board PRELIMINARY After receiving the correct number of bits for the ADC being read, the CPU changes the AA1 and AA0 decode lines and exerts the Next line (NEXT*) at IC18 pin 9 low. This restarts the serial data shifting out of the newly selected ADC. After all three ADCs have been read, the CPU sets the AA1 and AA0 decode lines to exert the internal TEND signal and set the 8-bit ADC to the next channel (so that it has time to settle before the next read of the ADC). This re-enables the CPUINIT line. At this point the CSI/O controller is reset awaiting an INT5MS pulse to begin the cycle again. RS232 Serial Communication 9.3.23 The Model 520A supports serial (RS232) communication with external devices via the monitor’s rear panel connector. Signals to and from the rear panel RS232 connector are electrically isolated from the rest of the Model 520A electronics by four opto-isolators (IC3-IC6). (See sheet 5 on 2471 schematic, sheet 4 on 2775 schematic.) An isolated secondary coil from transformer T1 is rectified and filtered by D1 and C1 before being input to the +5 volt regulator IC2. The regulated output of IC2 is sent to pin 25 of the 25-pin D connector on the rear panel in order to power the optional Analog Module or Telemetry transmitter. The supply also powers IC1. The Dual RS232 Transmitter/Receiver, IC1, uses a single +5 volt supply (pin 16). The two Receive (Rx) inputs can accept ±30 volt levels, while the two Transmit (Tx) lines output ±9 volt levels. The four level translators within the chip turn the RS232 level signals to 5 volt TTL/CMOS compatible levels. Two signals lines TX0 and TX1 transmit data from the CPU across the optoisolators ICs 3 and 4 to IC1. Here the signals are level shifted to the standard ±9 volt levels and sent to the rear panel connector. When the CPU brings the TX0 signal at R62 Low, the LED portion of IC3 becomes forward biased and illuminates and causes the transistor portion of the device to conduct. Therefore, when TX0 is Low, IC1 pin 11 is Low and when TX0 is High, IC1 pin 11 is also High. All four opto-isolators work in the same way. IC1 level shifts its input at pin 11 and outputs RS232 standard ±9 volt levels at the TX signal at J101 pin 3. This transmit signal is used to output data to RS232 devices including the Hewlett-Packard ThinkJet Printer and the Novametrix Model 315 Printer. The CPU TX1 signal crosses the isolation barrier at IC4. The 0-5 volt opto-isolator output at IC4 pin 5 is used to bring data to the Optional 9622-01 Analog Module. The IC4 pin 5 output is also brought to IC1 pin 10. The level shifted output at IC1 pin 7 is unused (except for factory test use). The Receive (RX) line at J101 pin 2 and the Clear To Send (CTS) line at J101 pin 6 are input signals to the Model 520A. They are level shifted by IC1 and sent across the isolation barrier by ICs5 and 6 respectively. 5-Jun-01 Model 520A Service Manual 33 Section 9 Electronic Theory of Operation PRELIMINARY The transmit signal TX1, is dedicated to communication with the Optional Analog Module (Catalog Number 9622-01) which when connected to the rear panel connector, provides analog representations of the SpO2 and Pulse Rate values, a plethysmogram signal, and a pass through port for the RS232 connector. The transmit output TX0 from the CPU and the Receive (RX0) and Clear To Send (CTS*) inputs to the CPU are connected to the rear panel RS232 connector. 34 Model 520A Service Manual 5693-90-01 PRELIMINARY 10 Maintenance General 10.1 This section presents recommended maintenance schedules for the Model 520A and information on general maintenance, such as battery and fuse replacement, disassembly and assembly instructions, and system software updates. Maintenance Schedules 10.2 The electronic circuits within the Novametrix Model 520A Pulse Oximeter monitor do not require scheduled calibration or service. However, in order to maximize battery life, the monitor’s internal battery should be exercised monthly. Novametrix recommends the following maintenance schedules.1 • Cleaning and Sterilization: Perform as required. See Cleaning and Sterilization on page 36. • Battery Life and Maintenance: See Battery Life and Maintenance on page 37. • Functional Test: The test may also be used as a “spot check” to verify system operation if reports of malfunctions are received. The test verifies overall functional integrity of the monitor and sensors. Section 12, Functional Test, on page 51 • Accuracy Test: This test, which requires the use of the Model TB500B Sensor Simulator, verifies the performance accuracy of the Model 520A. If the monitor does not pass the accuracy test, the Calibration and Adjustment test should be performed. See Section 13, Accuracy Test, on page 55. • Calibration Tests: These tests contain information on calibrating the electronic circuits within the Model 520A and should only be performed if the monitor fails to pass the Functional and/or Accuracy Tests. Only qualified service personnel should attempt to perform the Calibration and Adjustment Test. See Section 14, Calibration Tests, on page 59. 1. At the customer’s request, Novametrix will provide repair and calibration services under the terms of a Service Contract. Contact the Novametrix Service Department for contract details. 5-Jun-01 Model 520A Service Manual 35 Section 10 Maintenance PRELIMINARY Cleaning and Sterilization 10.3 Model 520A Monitor • • • • 10.3.1 Turn the monitor off and unplug from the AC (Mains) line before cleaning. The monitor can be cleaned and disinfected with solutions such as a 70% isopropyl alcohol, 2% glutheralhyde, or 10% bleach solution. Then wipe down with a water-dampened clean cloth to rinse. Dry before use. Do not immerse the monitor. Do not attempt to sterilize the monitor. Finger Sensor • • • • • 10.3.2 The sensor can be cleaned and disinfected with solutions such as a 70% isopropyl alcohol, 2% glutheralhyde, or 10% bleach solution. Then wipe down with a water-dampened clean cloth to rinse. Dry before use. Make certain that the finger sensor windows are clean and dry before reuse. Do not immerse the finger sensor. Do not attempt to sterilize the finger sensor. After cleaning the finger sensor, verify that the sensor is physically intact, with no broken or frayed wires or damaged parts. Make certain that the connectors are clean and dry, with no signs of contamination or corrosion. Do not use a broken or damaged sensor or one with wet, contaminated or corroded connectors. Y-SENSOR™ and Y-STRIP™ Taping System 10.3.3 • Do not immerse connector on the Y-Sensor. • The Y-Sensor may be immersed—up to, but not including, the connector, in a 2% glutheralhyde solution, or 10% bleach solution. Refer to manufacturer’s instructions and standard hospital protocols to determine recommended times for disinfection and sterilization. • Rinse thoroughly with water and dry before use (do not rinse the connector). • Do not attempt to sterilize Y-Sensor except as stated above. • After cleaning or sterilizing the Y-Sensor, verify that the sensor is physically intact, with no broken or frayed wires or damaged parts. Make certain that the connectors are clean and dry, with no signs of contamination or corrosion. Do not use a broken or damaged sensor or one with wet, contaminated, or corroded connectors. • Treat Y-Strip Tapes and foam wraps in accordance with hospital protocol for single-patient use items. 36 Model 520A Service Manual 5693-90-01 Battery Life and Maintenance PRELIMINARY Battery Life and Maintenance 10.4 The monitor was shipped from the factory with a fully charged battery. Since the monitor draws some battery power even while turned off, it is recommended that the monitor be operated on line power for the first 24 hours to allow ample time for the battery to fully recharge. The monitor may be operated on line power while the battery is recharging. Approximately 16 hours are required to fully recharge a discharged battery. During prolonged periods of storage or shipment, the battery may discharge enough to prevent the unit from turning on while operated from battery power. If this occurs, plug in the line cord, set the switch on the rear panel to the “|” On position, ensure that the green indicator on the front panel is illuminated, and allow the monitor to charge for 24 hours before switching it on. Mains Voltage Configuration 10.5 The rear panel power entry module indicates the mains voltage setting for the monitor. Check that the voltage is correct before attaching the AC line cord and powering the monitor. The Model 2001 can be set to operate from 100-120 VAC 50/60Hz or 200-240VAC 50/60Hz. Instructions for fuse replacement and changing the mains voltage setting follow. CAUTION: Replace fuses with same type and rating. Verify proper fuse value for mains voltage setting (see table below). Fuse Replacement 10.5.1 1. Check that the monitor is OFF. 2. Set the rear panel power entry module switch to OFF (“O”). Remove the AC line cord from the power entry module. 3. Using a flat blade screwdriver, pry the fuse access door open to expose the fuse housing. Note the orientation of the fuse housing (this determines the mains operating voltage). 5-Jun-01 Mains Voltage Fuses (Slo Blo) 100-120 VAC 0.5 A 250V 200-240 VAC 250mA 250V Model 520A Service Manual 37 Section 10 Maintenance PRELIMINARY Power entry module Fuse housing Fuse access door 4. Pry the fuse housing out from the power entry module. Fuse housing NOTE: 5 mm X 20 mm fuses are installed toward the “back” of the fuse housing as shown OR 3AG type 5 X 20mm type 5. Replace the blown fuse(s) with the proper type and rating. 6. Reinstall the fuse housing. When positioning the housing into the power entry module make sure that it is oriented correctly. Press the fuse housing back into the power entry module. 7. Close the fuse access door and verify that the proper mains operating voltage is displayed. Line operating voltage 115V Changing the Mains Voltage Setting 10.5.2 1. Check that the monitor is OFF. 2. Set the rear panel power entry module switch to OFF (“O”). Remove the line cord from the power entry module. CAUTION: Replace fuses with same type and rating. Verify proper fuse value for mains voltage setting (see table below). 38 Model 520A Service Manual Mains Voltage Fuses (Slo Blo) 100-120 VAC 0.5 A 250V 5693-90-01 Mains Voltage Configuration PRELIMINARY 200-240 VAC 250mA 250V 3. Using a flat blade screwdriver, pry the fuse access door open to expose the fuse housing. Pry the fuse housing out from the power entry module. Fuse housing Fuse access door 4. Install the proper type and rating fuse for the mains voltage setting required. 5. Position the housing into the power entry module so that the desired voltage is furthest away from the switch (see below). Set for 200-240V Operation Set for 100-120V operation 6. Close the fuse access door and verify that the proper mains operating voltage is displayed. 115V AC Mains on older style assemblies 230V Line operating voltage 10.5.3 The Model 520A will operate on line voltages of 100, 120, 220 or 240 VAC ± 10% at 50/60 Hz. At 100/120 VAC,two 0.5 Amp, 250 Volt, Slo-Blo (time delay) AC Mains fuses are required, while Two T 250 mA, 250 Volt fuses are required when operating at 220 or 240 VAC. For continued protection against fire hazard, replace only with fuse(s) of the same type and rating. The rear panel Power Entry Module (PEM) houses the AC Mains fuses and is where the input voltage is selected. It also houses the AC Mains Power switch: set to “|”, AC Mains power is presented to the internal circuitry; set to the “0” position, power does not pass through the PEM. 5-Jun-01 Model 520A Service Manual 39 Section 10 Maintenance PRELIMINARY Replacing the AC Mains Fuse(s) 10.5.4 1. Turn off the Model 520A. Set the rear panel AC Mains power switch to “0” and disconnect the line cord from the monitor. 2. Place a screwdriver into the Fuse Access Slot and pry open the Fuse Access Door. Power Switch Line Cord Receptacle 115Vac Voltage Select Indicator O Fuse Acces Slot Figure 4. Power Entry Fuse Access Door Opening 3. With the Fuse Access Door open pull the fuse(s) out by pulling on the point of the arrow indicator, the fuse holder assembly will slide out. Fuse Holder Assembly 115Vac O Fuse Holder Assembly Figure 5. Fuse Removal 4. After replacing the fuse(s), snap the fuseholder assemblies into the PEM and shut the Fuse Access Door. Changing the AC Mains Voltage 10.5.5 1. Turn off the Model 520A. Set the rear panel AC Mains power switch to “0” and disconnect the line cord from the monitor. 2. Place a screwdriver into the Fuse Access Slot and pry open the Fuse Access Door. 40 Model 520A Service Manual 5693-90-01 Assembly Exchanges PRELIMINARY 3. Using needle-nosed pliers, pull the Voltage Selector Drum from the PEM. Note the orientation of the drum; the proper voltage should face out. Voltage Selector Drum 115Vac O Figure 6. Power Entry Module Voltage Selector Drum Removal 4. Set the Voltage Selector Drum so that the printed side of the correct voltage faces you. The voltage selections are pictured below. 115Vac OR 230Vac 115Vac O Figure 7. Power Entry Module Voltage Selection Adjustment 5. Snap the Voltage Selector Drum back into the PEM. Be sure that the Voltage Setting Indicator shows the proper voltage. Close the Fuse Access Door. Assembly Exchanges 10.6 Disassembly should be performed by qualified personnel. Follow proper grounding procedures to avoid damage to internal components from static discharge. 5-Jun-01 Model 520A Service Manual 41 Section 10 Maintenance PRELIMINARY 1. Turn the Model 520A Off. Disconnect the line cord and sensor. Remove the four cover screws from the bottom cover. Holding both case halves together, flip the monitor right-side up. Remove Line Cord Remove these (4) four screws. Figure 8. Removing the Top Cover 2. Lift the top cover from the monitor. Use a gentle rocking motion to lift first one side and then the other side a little at a time. Set the Red Alert Bar lens aside with the cover for safe keeping. P109 Speaker P102 Power Supply 2471 Main Board P105 Alert Bar P108 Sensor P104 Keyboard P106 Backlight P103 Display Figure 9. Monitor Assembly 3. Unplug P102 The Power Supply connector from the 2471 Main Board, disconnect P109 (Speaker), P108 (Sensor), P104 (Keypanel), P106 (Backlight), P105 (Alert Bar), and P103 (Display). Unscrew 2471 Main 42 Model 520A Service Manual 5693-90-01 Assembly Exchanges PRELIMINARY Board from the rear panel. Remove the front Bezel assembly then slide the 2471 Main Board out, the 2472 Power Supply Board and Battery should be exposed. 4. The separate sections of the monitor can now be removed. Battery Connection to Power Supply P302 2472 Power Supply Board Battery SpO2 Input Assy Figure 10. 520A Assembly with 2471 Main Board Removed 5. IMPORTANT. The battery is connected to the Power Supply Board through connector J302. Before attempting to apply power to the monitor ensure all connections are properly made, then connect the AC mains and turn the PEM switch to “|”, ensure that the on the front panel illuminates before powering up. 6. Remove/replace the various assemblies as needed. IMPORTANT: The monitor will be damaged if power is applied to it while cables or assemblies are improperly connected. 7. After the monitor is fully assembled perform safety checks. Reconnect the line cord to the AC Mains and to the monitor. Set the AC Mains switch to the “|” (On) position. Verify the indicator illuminates. Turn the monitor on. 8. Measure the AC leakage current from the monitor’s chassis to earth ground with the monitor grounded, ungrounded, and ungrounded reverse polarity. When operating from 100/120 VAC, no leakage current may be greater than 25 µA. If operating at 220/240 VAC, no leakage current may be greater than 50 µA. 9. With the monitor grounded, measure from the AC line to the SaO2 Input connector pins. When operating from 100/120 VAC, no leakage current may be greater than 25 µA. If operating at 220/240 VAC, no leakage current may be greater than 50 µA. 5-Jun-01 Model 520A Service Manual 43 Section 10 Maintenance PRELIMINARY Changing System Software 10.7 The system software is contained in EPROM IC17 on the 2775 Main Board. New software releases are made available from time-to-time. These new releases may add features or be maintenance upgrades. To install a new EPROM: 1. Follow the steps listed in Assembly Exchanges on page 41 to open the monitor. Be sure to disconnect J102 from the 2775 Main Board to ensure that there is no power on the board while changing the system software. 2. Use a PLCC extraction tool to carefully pry the EPROM IC17 from the socket. 3. Install the update EPROM into the socket. Align the EPROM so that IC17 pin-1 is inserted into pin 1 of the socket. Changing System Software on 2471 Main Board 10.7.1 The system software is contained in EPROM IC17 on the 2471 Main Board. New software releases are made available from time-to-time. These new releases may add features or be maintenance upgrades. To install a new EPROM: 1. Follow the steps listed in Assembly Exchanges on page 41 to open the monitor. Be sure to disconnect J102 from the 2471 Main Board to ensure that there is no power on the board while changing the system software. 44 Model 520A Service Manual 5693-90-01 Changing System Software PRELIMINARY 2. Use a small flat-blade screwdriver (or IC extraction tool) to pry the EPROM IC17 from the socket—be careful not to bend the pins. IC17 System Software Pin 1 orientation Figure 11. Changing the System Software EPROM 3. Install the new EPROM into the socket. Align the EPROM so that IC17 pin1 is inserted into pin 1 of the socket. 4. Reverse the above steps to reinstall the assembly into the monitor. 5-Jun-01 Model 520A Service Manual 45 Section 10 Maintenance PRELIMINARY [This page intentionally blank] 46 Model 520A Service Manual 5693-90-01 PRELIMINARY 11 Troubleshooting Fault, alert and error messages that can appear on the Model 520A Message Center display are described below. Paragraphs marked with a “☞” are intended for qualified service personnel only. Message Center Display Possible Explanation AUDIO OFF DISABLED Displayed if user tries to enable Audio Off mode (by pressing and holding the AUDIO key) while the “Allow Audio Off” portion of the Options Menu is set to “No”. BAD SIGNAL TIMEOUT Monitor not receiving valid signals from sensor. May be caused by excessive motion, cardiac arrhythmia or other situations leading to poor signal. Check patient status, reposition sensor. BATTERY EXHAUSTED CONNECT LINE CORD Monitor is running on battery power and the battery power has been depleted. Connect line cord to AC Mains power source and set the rear panel switch to “|”. ☞ Monitor’s rear panel fuse has blown, monitor switched over to battery power and has depleted battery life. Sensor is placed on too thick of a site. Reposition the sensor on a thinner (less opaque) section of tissue. CAN’T I.D. PROBE A non-SuperBright™ sensor is connected, use only 87xx series sensors. Sensor is faulty. Remove sensor from use and contact qualified service personnel. Sensor is disconnected from the monitor. CONNECT SP02 PROBE Sensor is faulty. Remove sensor from use and contact qualified service personnel. ☞ Both sensor LEDs have failed or the cable connections are open or shorted. Sensor faulty. Remove sensor from use and contact qualified service personnel. PROBE FAULTY EVENT MARKED 5-Jun-01 ☞ This error traps intermittant faults such as Probe Red LED or Infrared LED failures caused by frayed or broken wires in the sensor cable. Whereas PROBE RED or I.R LED FAILED is displayed for as long as the error lasts, Faulty Probe is displayed if those errors cease without the user replacing the faulty sensor. An event was successfully entered into trend memory. Model 520A Service Manual 47 Section 11 Troubleshooting PRELIMINARY Message Center Display INCOMPATIBLE PROBE Possible Explanation A non-SuperBright™ sensor is connected, use only 87xx series sensors. Sensor is faulty. Remove sensor from use and contact qualified service personnel. INSUF. LIGHT ** Insufficient Light, where ** is time in seconds (after 99 seconds display shows “--”). Sensor placed on a site too thick (or opaque) for adequate light transmission. Reposition the sensor. A non-SuperBright™ sensor is connected, use only 87xx series sensors. LIGHT INTERF.** Light Interference, where ** is the time in seconds (after 99 seconds display shows “--”) ambient light sources (sunlight, warming lights, etc.) are interfering with sensor light sources. Shield the sensor from ambient light sources. LOW SIGNAL ** Low Signal Strength, where ** is the time in seconds (after 99 seconds display shows “--”) that the pulse strength as detected by sensor is too weak for proper monitor operation. Reposition sensor. Monitor faulty. Record error message (appearing on bottom line of display) and contact qualified service personnel. ☞ “RAM SELF TEST FAILED” - Ram failed the power up self-test. ☞ “ROM SELF TEST FAILED” - Calculated EPROM checksum not does not equal stored value. Bad EPROM. ☞ “BAD STACK POINTER” - Stack pointer base not at top of stack. MONITOR ERROR ☞ “CORRUPT SYSTEM MMU” - The CPU MMU pointing to an illegal address map. Digital Bd fault. ☞ STACK OVERFLOW” - Stack pointer exceeded allocated stack size. ☞ “DISP BUFFER OVERFLOW” - Display buffer queue exceeded its allocated size. ☞ “HARDWARE ERROR 1” - (1)Main Bd PEEL is defective, (2) Main Bd 20-bit ADCs exceeded acceptable calibration thresholds. ☞ “XXms INT.TIMEOUT” where XX is 10 or 25. The interrupt has interrupted itself. ☞ “ERROR UNDEFINED” - Failed in an unknown state. MONITOR PERFORMING SELF TEST. Parameters Reset To Factory Default 48 Model 520A Service Manual Monitor is performing its power up system diagnostic tests. Displayed when monitor is turned on while pressing the ALERT RESET key. Monitor now using factory default settings. 5693-90-01 PRELIMINARY Message Center Display PROBE FAULTY RD PROBE FAULTY IR PROBE OFF PATIENT Sensor faulty. Remove sensor from use and contact qualified service personnel. ☞ Sensor Red LED has failed or the cable connections are open or shorted. Sensor faulty. Remove sensor from use and contact qualified service personnel. ☞ Sensor Red LED has failed or the cable connections are open or shorted. Sensor disconnected from patient, improperly applied, or placed on an area too translucent for proper sensor operation. Reposition sensor. PULSE-HIGH Selected pulse rate high alert limit has been violated. PULSE-LOW Selected pulse rate low alert limit has been violated. PULSE OUT OF RANGE Revision 2.0 APR/28/92 5-Jun-01 Possible Explanation Pulse rate is less than 30 bpm or is greater than 250 bpm. Monitor software revision level. Displayed when monitor is turned on while pressing AUDIO key. SpO2-HIGH Selected saturation high alert limit has been violated. SpO2-LOW Selected saturation low alert limit has been violated. Model 520A Service Manual 49 Section 11 Troubleshooting PRELIMINARY [This page intentionally blank] 50 Model 520A Service Manual 5693-90-01 PRELIMINARY 12 Functional Test Introduction 12.1 The test verifies overall functional integrity1 of the monitor and sensors. If the monitor or sensors do not pass these tests, remove from use and contact the Novametrix Service Department for repair/replacement assistance. This procedure assumes the technician performs each step as indicated - leaving the monitor in a known state prior to performing the next step. If steps are omitted or performed out of order, be sure that the monitor is set to the correct state beofre continuing. Monitor Functional Test 12.2 12.2.1 Equipment Required: Model 520A to be tested AC Mains Line Cord (supplied with monitor) Finger Sensor (Cat. No. 8776) or Y-Sensor™ (Cat. No. 8791) 12.2.2 Visually inspect the monitor and line cord. Verify there is no external damage. Shake the unit to check that there is no loose hardware inside. 12.2.3 Inspect the sensor(s). Verify mechanical integrity. 12.2.4 Check the rear panel power entry module. Verify that it is set to the proper voltage. 12.2.5 Set the AC Mains switch to the “0” (Off) position. Connect the line cord to the monitor and to the AC Mains. 12.2.6 Verify the 12.2.7 Set the AC Mains switch to the “|” (On) position. Verify the illuminates. 12.2.8 Depress and hold the ALERT RESET key. Press the front panel POWER key then release both keys. The monitor will; • Briefly illuminate all displays and indicators2 • Produce an audible “beep” indicating the audio is operational (AC Mains) indicator is not illuminated. indicator 1. See Section 13, Accuracy Test, on page 55 for tests that check the accuracy of the monitor. 2. The AC indicator will illuminate only when the monitor is connected to line power and the rear panel Power switch is On (|). 5-Jun-01 Model 520A Service Manual 51 Section 12 Functional Test PRELIMINARY • Briefly display Parameters Reset To Factory Default.3 • Briefly display MONITOR PERFORMING SELF TEST.4 • The message center will display ERASE STORED TRENDS ? for approximately 10 seconds. 12.2.9 Verify the Message Center flashes CONNECT SPO2 PROBE while no sensor is connected to the monitor. 12.2.10 Press the ALRT key to display the SET ALERT LIMITS menu. Press the ↓ (down arrow) key several times and verify the Saturation display upper alert limit decreases each time the key is pressed. 12.2.11 Press the RUN key. Note the displayed Saturation alert limit settings. Turn the monitor off and back on again. After the self-test is complete, verify the monitor “remembered” the alert limit values. 12.2.12 Press the Menu key and then the AUDIO key. Press the ALERT key to display the SET ALERT VOLUME menu. Press and hold the ↓ key and verify the volume of the tone decreases as the volume display decreases to 01. Press the ↑ key to return to maximum (07) volume. Press RUN. 12.2.13 Press MENU then press LITE, verify the backlight toggles between dim and bright with each depression. Press RUN. 12.2.14 Press the Menu key and then the AUDIO key. Press the PULSE key to display the SET AUDIO FEATURES menu. Press the ↑ key to set the value to 01 then press RUN. 12.2.15 Do not apply the sensor to yourself. If using a Y-Sensor, fold the sensor heads so that the windows face (or even touch) each other. Connect the sensor to the monitor. Verify the Message Center flashes PROBE OFF PATIENT and no alarm sounds. 12.2.16 If using a Finger sensor, apply it to your index finger, and if using a YSensor, tape the sensor to your index finger. Verify that after several seconds, reasonable Pulse Rate and Saturation (>95%) values are displayed. 12.2.17 Check that the Message Center displays a Pulse Activity Bar and that a tone sounds with each pulse beat. (Note that the pitch of the tone will vary with the Saturation display value.) 12.2.18 Remove the sensor from your finger. Verify the Saturation and Pulse Rate displays blank out, an alarm sounds and PROBE OFF PATIENT is displayed. (If using a Y-Sensor, you may have to fold the heads so that the windows face each other in order to make the alarm and message activate.) 3. This message is only displayed if the ALERT RESET key is depressed at power up. 4. If “Monitor Error” appears, turn the monitor off and back on. If the message reappears, contact qualified service personnel. See Section 11, Troubleshooting, on page 47. 52 Model 520A Service Manual 5693-90-01 Special Power Up Functions PRELIMINARY 12.2.19 Press and release the AUDIO key. The (Two Minute Silence) indicator should illuminate and the alarm should be silenced. After two minutes the indicator turns off and the alarm sounds again (providing the alarm condition still exists). 12.2.20 With the alarm sounding, press and hold the AUDIO key until the dio Off) indicator illuminates. Verify that the alarm is silenced. 12.2.21 Press and release the AUDIO key. Verify the alarm sounds. 12.2.22 (Au- indicator shuts off and the With the PROBE OFF PATIENT alarm still sounding, press the ALERT REand alert indicators continue to flash but the alarm is silenced. SET key. Verify the message 12.2.23 Set the AC Mains switch to the “0” (Off) position. Verify the unit operates from battery power (provided the battery is substantially charged). Place the AC Mains switch back to the “|” position. 12.2.24 Press the POWER key to turn the monitor off and disconnect the sensor. 12.2.25 Depress and hold the ALERT RESET key. Press the front panel POWER key then release both keys. The monitor will power up with the factory default settings in place. After the self-test is complete, turn the monitor off. 12.2.26 This completes the Functional Test. If the monitor and sensor performed as described above, they are functionally operational. If the monitor is to be returned to clinical use, be sure to let the user know that the monitor is now using its default settings—as these may differ from the user’s “normal” settings. Special Power Up Functions 12.3 Each of the Model 520A front panel pushbutton keys is linked to a special “hidden” power up function. To initiate the special function, start with the monitor off and press a front panel key. While still holding that key, press the POWER key to turn the monitor on. AUDIO = Software (EPROM) Revision Level Turn the monitor on while holding the AUDIO key and the monitor’s software revision level is displayed in the message center for as long as the AUDIO is pressed. Release the key and the monitor continues with its normal power up sequence. ALERT RESET = Return to factory default settings Turn the monitor on while holding the ALERT RESET key and the monitor resets all its control settings (including alert limits, averaging times, etc.) to the factory default values. A Parameters Reset To Factory Default message is briefly displayed and the monitor continues with its 5-Jun-01 Model 520A Service Manual 53 Section 12 Functional Test PRELIMINARY normal power up sequence. Note that the system date and time are not affected by this action. Softkey #1 Softkey #2 Figure 12. Softkey Identification Softkey #1 = EPROM Checksum Test, Production Test Mode Turn the monitor on while holding Softkey #1 (the leftmost softkey) and the monitor calculates and displays the checksum value of the EPROM containing the system software. Press and hold Softkey #3 while the checksum is displayed and the monitor enters Production Test Mode. Softkey #2 =Extended Display and Watchdog Test Turn the monitor on while holding Softkey #2 (second from left) and all front panel indicators and display segments illuminate for several seconds. The watchdog now resets the monitor which should then execute its normal power up sequence. Note that the indicator will illuminate only if the monitor is being powered from the AC Mains. 54 Model 520A Service Manual 5693-90-01 PRELIMINARY 13 Accuracy Test Introduction 13.1 The Accuracy Test verifies the performance accuracy of the Model 520A Pulse Oximeter monitor. If the monitor does not pass the accuracy test, the monitor should be recalibrated. Refer to Section 14, Calibration Tests, on page 59, or contact the Novametrix Service Department for repair/replacement assistance. The test requires the use of the Model TB500B Sensor Simulator.1 This is the same device used by the factory technicians to calibrate the monitor prior to shipping. The TB500B is an updated version of the TB500A Test Box. Owners of TB500A should contact the Novametrix Service Department for details on upgrading to the TB500B. Note that the TB500A, used in conjunction with the Cat. No. 5453-00 Adapter Cable, may be substituted for the TB500B in most parts of this test. Monitor Accuracy Test 13.2 13.2.1 Equipment Required: Model 520A to be tested AC Mains Line Cord (supplied with monitor) TB500B Sensor Simulator (Cat. No. 5530-00) 13.2.2 Press and release the front panel POWER key. The monitor will; • Briefly illuminate all displays and indicators2 • Produce an audible “beep” indicating the audio is operational • Briefly display MONITOR PERFORMING SELF TEST.3 • Display the Message Center flashes ERASE STORED TRENDS? for ten seconds then displays CONNECT SPO2 PROBE while no sensor is connected to the monitor. 13.2.3 Press the Menu key and then press AVG. The SELECT SPO2 AVERAGING menu should be displayed. Press 2s and then press RUN to return to the Main Menu. This sets the SpO2 averaging to 2-seconds for the quickest response to changing TB500B settings. 1. Available through the Novametrix Service Department. 2. The AC indicator will illuminate only when the monitor is connected to line power and the rear panel Power switch is On (|). 3. If “Monitor Error” appears, turn the monitor off and back on. If the message reappears, contact qualified service personnel. Refer to Section 11, Troubleshooting, on page 47. 5-Jun-01 Model 520A Service Manual 55 Section 13 Accuracy Test PRELIMINARY 13.2.4 Set the TB500B to these settings; Power - On, Sensor Type4 - 87xx, Signal Attenuation - 3, Saturation - 92. 13.2.5 Connect the TB500B to the Model 520A SpO2 Input Connector. Verify a Pulse Activity Bar appears in the Message Center. Verify SpO2 and Pulse Rate values appear after several “pulses”. 13.2.6 Set the Signal Attenuation to 1. Verify the Saturation and Pulse Rate displays blank out, an alarm sounds and PROBE OFF PATIENT is displayed. Set the Signal Attenuation to 3 and verify the displays and Pulse Activity Bar return. 13.2.7 Set the Saturation to 0. Verify that after a short delay, LOW SIGNAL appears in the Message Center. Set the Saturation to 100 and verify the displays and Pulse Activity Bar return. 13.2.8 Press and hold the TB500B RED push-button. Verify the monitor alarms and displays PROBE FAULTY RD. Release the button. 13.2.9 Press and hold the TB500B INFRARED push-button. Verify the monitor alarms and displays PROBE FAULTY IR. Release the button. Verify the displays and Pulse Activity Bar return. 13.2.10 Press and hold both the TB500B RED and INFRARED push-buttons. Verify the displays blank out and CONNECT SPO2 PROBE is displayed. Release the buttons. Verify the displays and Pulse Activity Bar return. 13.2.11 Disconnect the TB500B from the monitor. Set the Sensor Type switch to 86xx.5 Reconnect the simulator to the monitor. Verify the message INSUFFICIENT LIGHT is replaced in approximately 10 seconds by CAN’T I.D. PROBE, which is itself replaced later by PROBE FAULTY. Disconnect the TB500B from the monitor, return the Sensor Type switch to 87xx and then plug it back in. Verify the displays and Pulse Activity Bar return. 13.2.12 Press and hold the AUDIO key until the (Audio Off) indicator illuminates. This will keep the monitor silent for the remainder of the test. 13.2.13 Verify the displayed SpO2 value is within the tolerances stated below for each setting of the Signal Attenuation and Saturation switches. Verify a Pulse Rate of 60 bpm ± 1bpm for all switch settings. (Note that alert 4. The 5453-00 Adapter Cable is used instead of the Sensor Type switch for the TB500A. 5. If using a TB500A, disconnect the Adapter Cable and plug the TB500A directly into the Model 520A. The Message Center should display “INCOMPATIBLE PROBE”. Install the Adapter Cable between the TB500A and the Model 520A and move on to the next step. 56 Model 520A Service Manual 5693-90-01 Monitor Accuracy Test PRELIMINARY messages will be generated and displayed as the saturation value violates the alert limit settings.) TB500B 520A 520A SpO2 SAT ATTEN SpO2 (w/ TB500A) 100 3 99 ± 1 99 ± 1 92 3 92 ± 2 92 ± 2 82 3 82 ± 2 84 ± 2 72 3 72 ± 2 77 ± 2 62 3 62 ± 2 69 ± 2 100 7 99 ± 1 99 ± 1 92 7 92 ± 4 92 ± 4 82 7 82 ± 4 84 ± 4 72 7 72 ± 4 77 ± 4 62 7 N/A N/A Table 3. SpO2 Display tolerances for TB500B settings 5-Jun-01 13.2.14 Press the Menu key and then press AVG. Press the appropriate key to return the averaging to its pretest value. Press RUN to return to the Main Menu. 13.2.15 This completes the Monitor Accuracy Test. If the monitor does not meet the above listed specifications, refer to Section 14, Calibration Tests, on page 59, or contact the Novametrix Service Department for recalibration, repair, or replacement information. Model 520A Service Manual 57 Section 13 Accuracy Test PRELIMINARY [This page intentionally blank] 58 Model 520A Service Manual 5693-90-01 PRELIMINARY 14 Calibration Tests Introduction 14.1 The Calibration Tests verify the calibration and operation of the electronic circuits within the Model 520A Pulse Oximeter. These tests do NOT need to be performed on a regular (preventative maintenance) basis. Perform these tests only if the monitor fails to operate as expected and/or fails the Functional Test on page 51 and/ or the Accuracy Test on page 55. Calibration Tests should be performed only by qualified service personnel. The Model 520A contains static sensitive devices. Follow proper grounding procedures when handling the internal components to avoid damage from static discharge. The test requires the use of the Model TB500B1 Sensor Simulator Test Box. This is the same device used by the factory technicians to calibrate the monitor prior to shipping. The TB500B is an updated version of the TB500A2 Test Box. If the monitor does not pass the Calibration Tests, remove it from use and contact the Novametrix Service Department for repair/replacement assistance. This procedure assumes the technician performs each step as indicated—leaving the monitor in a known state prior to performing the next step. If steps are omitted or performed out of order, be sure that the monitor is set to the correct state before continuing. Equipment Required and Test Setup 14.2 14.2.1 Model 520A to be tested AC Mains Line Cord (supplied with monitor) TB500B Sensor Simulator (Cat. No. 5530-00) or TB500A Sensor Simulator and Adapter Cable 5453-00. RS232 test fixture, PN: 5479-01 Saturation test jack, PN: 5942-00 Digital Voltmeter Small Flat-blade screwdriver 14.2.2 With the Model 520A Off. Disconnect any line cord and sensor from the monitor. 1. Available through the Novametrix Service Department. 2. The TB500A, used in conjunction with the Cat. No. 5453-00 Adapter Cable, may be substituted for the TB500B in most parts of this test. 5-Jun-01 Model 520A Service Manual 59 Section 14 Calibration Tests PRELIMINARY 14.2.3 Flip the monitor over to expose the bottom cover and remove the four cover screws. Holding both the top and bottom halves together, flip the monitor over again and set it on its bottom cover. 14.2.4 Lift the top cover from the monitor and set it aside. Set the Red Alert Bar lens aside with the cover for safe keeping. Test Procedure 14.3 Unless otherwise specified all measurements are with respect to isolated ground. Use the top of R4 (end closest to IC2) as ground reference. 60 14.3.1 Attach a line cord and place the mains switch to the “|” position. Verify that the green LED on the front panel illuminates. The monitor may power up when the Mains switch is set to“|”, if this occurs turn the monitor off with the front panel button. 14.3.2 Measure the voltage at J102 pin 2 and verify 13.2 VDC ± 0.4 volts. This voltage is dependent on a fully charged battery installed. If an installed battery is less than fully charged, the measured voltage will not match the expected voltage. 14.3.3 Simultaneously press the leftmost softkey and the power button. While Calculating Checksum is displayed, press and hold the third softkey from the right until Novametrix Inc Production Test appears. 14.3.4 Measure the voltage at TP1. Verify 5.000V ± 50mV. Adjust VR1 if necessary. 14.3.5 Verify the following voltages: Model 520A Service Manual Location Signal Name Voltage IC40 pin 4 -VA -12.00V ± 500mV IC40 pin 8 +VA 12.00V ± 500mV IC20 pin 28 VBACK 4.75V ± 250mV IC37 pin 14 +V5 5.00V ± 250mV IC37 pin 7 -V5 -5.00V ± 250mV IC37 pin 10 VREF 2.500V ± 5mV IC36 pin 1 4VREF 4.045V ± 50mV IC30 pin 14 -4VREF -4.045V ± 100mV 5693-90-01 Test Procedure PRELIMINARY Short out capacitor C90 by installing a jumper wire from R59 to R56. 14.3.6 Back of Unit 2471 / 2775 Bd Component Side Front of Unit 5-Jun-01 14.3.7 Connect the RS232 test fixture to J101 and the saturation test jack to the saturation input connector. 14.3.8 Run monitor test 1. Press the Test softkey, Automatic Test will appear. Press the Test softkey again to initiate the test, follow the prompts in each test and verify each test passes. Note: A series of auto tests will be performed, if any failures are encountered the monitor will default to MONITOR TEST 2. Of the list below only the tests with * next to them are performed in the auto test. Upon completion of the auto test the monitor will default to MONITOR TEST 2. The following is a list of the monitor tests available; Test# Description 1 Auto Test 2* RAM Test 3* ROM Test 4* Real Time Clock Test 5* Audio Volume Test 6* Audio Frequency Test 7* RS232 Loopback Test 8 Keyboard Test 9 Mains Test 10* 20 Bit ADC Test 11* 8 Bit ADC Test 12 Display ADC Channels Test 13 515A-> PC Interface Test 14.3.9 Disconnect the jumper wire, the RS232 test fixture, and the saturation test jack. 14.3.10 Connect the TB500B to the saturation input connector. Set the saturation to 0 and the attenuation to 5. Model 520A Service Manual 61 Section 14 Calibration Tests PRELIMINARY 14.3.11 Using the Next softkey increment to monitor test 12 (Display ADC channels). Press the Test softkey, Display ADC channels will appear. Press the Test softkey to initiate the test. Press the Prev softkey. Verify the LED pwr=20. Press the Prev softkey until IR Adc=xxxxx appears, verify the value displayed is within the limits specified below. Press the Prev softkey again, RED Adc=xxxxx will appear. Verify the value displayed is within the limits specified. Press the exit softkey and set the TB500B saturation to 100 and attenuation to 3. RED ADC IR ADC 5B32-88CB hex 3324-4CB7 hex 14.3.12 Power the monitor down. 14.3.13 Power up the monitor by pressing the power button. Verify a Monitor performing self test message is displayed then is immediately followed by the main monitoring screen. 14.3.14 Press the Menu softkey followed by the Avg and 2s softkey then press Run. 14.3.15 Set the TB500B to the settings in the chart. Verify the saturation values are within the specified tolerance: TB500B Settings Board Parameters Saturation Attenuation Saturation Pulse Rate 100 3 98 - 100 60 ± 1 82 3 80 - 84 60 ± 1 62 3 60 - 64 60 ± 1 72 7 68 - 76 60 ± 1 92 7 88 - 96 60 ± 1 Note: Verify a visual (alert bar flashing) and audible alert condition occurs when the saturation is set to 82. Press and hold the audio alert key. Verify the audio off LED turns on and the audible alert is silenced. 62 14.3.16 Change the TB500B power switch to OFF. Verify an Insufficient Light error message is displayed. 14.3.17 Change the TB500B power switch to ON. Verify the error message clears and a saturation and pulse value are displayed. 14.3.18 Set the TB500B Signal Attenuation to “1”. Verify a Probe Patient message is displayed. 14.3.19 Set the TB500B Signal Attenuation to “3”. Verify the error message clears and a saturation and pulse value are displayed. Model 520A Service Manual Off 5693-90-01 Safety Testing PRELIMINARY 14.3.20 Set the TB500B Saturation to “0”. Verify a Low Signal Strength message is displayed. 14.3.21 Set the TB500B Saturation to “100”. Verify the error message clears and a saturation and pulse value are displayed. 14.3.22 Press the TB500B Red Open button. Verify a Probe Faulty message is displayed. 14.3.23 Release the Red Open button. Verify the error message clears and a saturation and pulse value are displayed. 14.3.24 Press the TB500B Infrared Open button. Verify a Probe message is displayed. 14.3.25 Release the Infrared Open button. Verify the error message clears and a saturation and pulse value are displayed. 14.3.26 Disconnect the TB500B from the saturation input connector. Verify a Connect SPO2 Probe message is displayed. 14.3.27 Set the current time / date. Press and hold the Menu softkey. Press the Next softkey until Monitor Options 2 appears. Press the Clock softkey. Use the appropriate softkeys to set the correct Time, Mins, Day, Month and Year. 14.3.28 Set the mains switch from“|” to “O”, verify the green LED on the front panel goes out. Verify that the monitor continues to function on battery power without interruption. Power down the monitor by pressing the power button. Faulty Safety Testing 5-Jun-01 14.4 14.4.1 Apply 1.5 KV for 60 seconds between the shorted hot and neutral leads of the power cord and chassis ground. 14.4.2 Apply 4 KV for 60 seconds between the shorted hot and neutral leads of the power cord and shorted saturation test jack. 14.4.3 Apply 1.5 KV for 60 seconds between the shorted saturation test jack and the chassis. 14.4.4 Measure the leakage from chassis gnd. to ref. gnd. with the monitor; -grounded -ungrounded -polarities reversed ungrounded With the monitor grounded measure the leakage from shorted probe to 120VAC 60Hz Model 520A Service Manual 63 Section 14 Calibration Tests PRELIMINARY [This page intentionally blank] 64 Model 520A Service Manual 5693-90-01 PRELIMINARY 15 Connecting to other Equipment The Model 520A Pulse Oximeter communicates with external equipment via its rear panel (25 pin D style female) connector. The monitor can be connected to RS232 compatible (digital) equipment. If the optional Analog Output Module is connected, the monitor can output to analog devices such as strip chart recorders. Refer to the Model 520A Pulse Oximeter User’s Manual (Catalog No. 5693-23) for further information on the RS232 and analog outputs listed below. Connecting the Seiko DPU-414 Thermal Printer 15.1 To connect a Seiko DPU-414 Thermal Printer (PN: 9140-00) to the OXYPLETH: 1. Connect the 9085-00 interface cable to the monitor‘s RS232 connector and to the printer’s serial input connector—the 9 pin D connector. 2. Connect the AC adapter and turn the printer on. Configuring the Seiko DPU-414 Printer 15.1.1 The Seiko DPU-414 Thermal Printer (Cat. No. 9140-00) must be configured to communicate with the OXYPLETH. When properly configured, the Seiko printer will retain the settings, even when turned off. 1. Slide the printer’s power switch to OFF “O”. 2. Press and hold the ON LINE button, then slide the power switch ON “|”. Release the ON LINE button after the list of current settings starts printing out. Setting the DIP switches: 15.1.2 1. The printout of the current settings is followed by the prompt: “Continue? : Push On-line SW” “Write? : Push Paper feed SW” To change the DIP switch settings, push the ON LINE button (to leave the DIP switch settings unchanged, push the FEED button). 5-Jun-01 Model 520A Service Manual 65 Section 15 Connecting to other Equipment PRELIMINARY 2. “DIP SW-1” will print. Enter the new settings for switches 1-8. “ON” is set by pushing the ON LINE button once “OFF” is set by pushing the FEED button once The printer will confirm each selection. Repeat for DIP SW 2 and 3. The DIP switch settings for the Model 520A are as follows: [ DIP SW settings mode ] Dip SW-1 1 2 3 4 5 6 7 8 (OFF) : Input = Serial (ON ) : Printing Speed = High (ON ) : Auto Loading = ON (OFF) : Auto LF = OFF (ON ) : Setting Command = Enable (OFF) : Printing (ON ) : Density (ON ) : = 100 % Dip SW-2 1 2 3 4 5 6 7 8 (ON ) : Printing Columns = 40 (ON ) : User Font Back-up = ON (ON ) : Character Select = Normal (ON ) : Zero = Normal (ON ) : International (ON ) : Character (ON ) : Set (OFF) : = U.S.A. Dip SW-3 1 2 3 4 5 6 7 8 (ON ) (ON ) (ON ) (ON ) (OFF) (ON ) (ON ) (ON ) : : : : : : : : Data Length = 8 bits Data Parity = No Parity Condition = Odd Busy Control = H/W Busy Baud Rate Select = 9600 bps Continue ? : Push ‘On-line SW’ Write ? : Push ‘Paper feed SW’ CAUTION: DIP SW Set Mode cannot be cancelled once it is initiated. Answer “ON” or “OFF” for every setting. Note: More information about DIP switch settings can be found in the Seiko “DPU414 Thermal Printer Operation Manual.” 3. When the printer finishes writing the new settings to memory, “DIP SW setting complete!!” is printed out and the printer returns to ON LINE mode. CAUTION: Never turn the printer off while it is writing the new settings to memory. Wait until “DIP SW setting complete!!” is printed, then the printer power may be turned off. 66 Model 520A Service Manual 5693-90-01 Connecting the ThinkJet Printer PRELIMINARY Connecting the ThinkJet Printer 15.2 To connect the Hewlett-Packard ThinkJet Printer to the Model 520A: 1. The Hewlett-Packard ThinkJet must be a Model 2225D (RS-232C interface). 2. Set the dip switches on the rear panel of the ThinkJet. Mode switches = 1, 2, 5, 6 up (on) and 3, 4, 7, 8 down (off). RS-232C switches = 1 up (on) and 2, 3, 4, 5 down (off). DIP SWITCHES MODE RS-232C 1 2 3 4 5 6 7 8 1 2 3 4 5 MODEL 520A REAR PANEL MODEL 2225D AC POWER ThinkJet PRINTER 5331-00 CABLE RS232-C INTERFACE CONNECTOR POWER SWITCH Figure 13. Connecting the ThinkJet Printer 3. Connect the interface cable, PN:5331-00, to the Model 520A RS232C connector and to the ThinkJet. (If Model 520A has an Analog Module attached, connect to the module’s RS232C connector.) 4. Connect the printer’s AC input and turn the printer on. 5. Select T-Jet (ThinkJet) from the Ser. (Serial) portion of the Model 520A Options Menu. 6. Refer to the ThinkJet Owner’s Manual for further printer details. Connecting the Model 315 Printer 15.3 To connect the Model 315 Printer to the Model 520A: 1. Set the dip switches on the Model 315 rear panel. The settings are; 1-5 up (off), 6-7 down (on), and 8 up (off). 5-Jun-01 Model 520A Service Manual 67 Section 15 Connecting to other Equipment PRELIMINARY 2. Connect the printer interface cable, PN:4913-00, to the RS232C connector1 on the Model 520A. Connect the other end of the cable to the Model 315. DIP SWITCHES MODEL 520A REAR PANEL 1 2 3 4 5 6 7 8 MODEL 315 REAR PANEL 4913-00 CABLE RS232-C INTERFACE CONNECTOR AC ADAPTER POWER SWITCH Figure 14. Connecting the Model 315 Printer 3. Connect the printer’s AC adapter (if desired). 4. Turn the printer on first, then turn the Model 520A on. 5. Select 315 from the Ser. (Serial) portion of the Model 520A Options Menu. 6. Refer to the Model 315 documentation for further printer details. Connecting Seiko DPU-411 Thermal Printer 15.4 To connect the SIEKO Model DPU-411 Thermal Printer to the Model 520A: 1. Set the DIP switches located on the bottom of the DPU-411. First bank of eight switches; 1,2 down (off), 3,4 up (on), 5,6 down (off), 7,8 up (on). Second bank of six switches; 1-3 up (on), 4-6 down (off). Seiko DPU-411 bottom view Figure 15. Configuration of Seiko Thermal Printer. 68 Model 520A Service Manual 5693-90-01 Analog Output Module PRELIMINARY 2. Connect the printer interface cable, PN:5861-00, to the RS232C connector on the Model 520A. Connect the 25 pin connector at the other end to the 25 pin D connector on the rear panel of the DPU-411 (upper connector). Plug the cable DC power plug into the rear jack of the Model DPU-411. Seiko Model DPU-411 Model 520A INTERFACE CABLE PN:5861-00 DC POWER PLUG (part of 5861-00 cable) Figure 16. Connecting the Seiko Model DPU-411 Printer. 3. Turn the printer on first, then turn the Model 520A on. 4. Select Seiko from the Ser. (Serial) portion of the Model 520A Monitor Options 2 Menu. 5. Refer to the Seiko Model DPU-411 documentation for further printer details. Analog Output Module 15.5 The optional Analog Output Module (Catalog Number 9622-01), provides the necessary analog output voltages for use with analog instruments such as strip chart recorders. (The Model 520A does not directly support analog devices.) The Analog Output Module attaches to the connector on the rear panel of the Model 520A and provides analog output voltages, via a 9-pin connector, and RS232C pass through, via a 25-pin connector, so that both analog and serial devices can be used simultaneously. Two screws, supplied with the module, are passed through the module and screw into the pre-tapped holes in the rear panel of the Model 520A to secure the Analog 5-Jun-01 Model 520A Service Manual 69 Section 15 Connecting to other Equipment PRELIMINARY Figure 17. Analog Output Module Output Module in place. The pinouts of the 9-pin analog and 25-pin RS232C connector are shown below. GNDI SAT PR 5 1 9 6 PLETH Pin 1 Pin 2-3 Pin 4-5 Pin 8-9 CTS GNDI TX RX 13 1 25 14 VDI Pulse Rate, 4mV/bpm, 0-1V GNDI (Interface ground) Saturation, 10mV/%, 0-1V Plethysmogram, 0-1V (Auto Gain Control) Pin 2 Pin 3 Pin 6 Pin 7 Pin 20 Pin 21-22 Pin 24-25 GNDI DTR RX (Receive In) TX (Transmit Out) CTS (Clear To Send (input)) GNDI (Interface ground) DTR (Data Transmit Ready (output)) GNDI (Interface ground) VDI (Interface +5 volts) Figure 18. Analog Output Module Pinouts Analog Output Setup 15.6 A CALIBRATE RECORDER menu within the Model 520A software allows the user to easily calibrate analog recorders to the voltage levels produced by the Analog Output Module. To access this feature: 1. With the monitor in normal running mode press and hold the MENU key until SPO2 SETUP OPTIONS appears on the display. Press the NEXT key until 70 Model 520A Service Manual 5693-90-01 Analog Output Setup PRELIMINARY MONITOR OPTIONS 2 appears on the display. Select REC for CALIBRATE RECORDER menu. Press and hold for 5 seconds while in normal running mode Figure 19. Analog Output Setup 2. The Recorder Outputs menu will be displayed. CALIBRATE RECORDER RUN ZERO HALF FULL PREV • RUN - return to Monitoring Mode • ZERO - set analog outputs to 0 volts (0% = 0 volts, 0 bpm = 0 volts, pleth = 0 volts) set analog output voltages to half scale (50% = 0.50 volts, 125 bpm = 0.50 volts, pleth = 0.50 volts) • FULL - set analog output voltages to full scale (100% = 1.00 volt, 250 bpm =1.00 volts, pleth =1.00 volts) • PREV - returns to MONITOR OPTIONS 2 menu. • HALF - 3. Press the ZERO key and adjust the analog baselines on the recorder. Press the FULL key and adjust the recorder full scale deflection. Press the HALF key and check that the recorder registers at half scale. Signal Analog Connector Pin # Min-Max Voltages (Referenced to Pins 2 + 3) ZERO HALF FULL Pulse Rate 1 0.000-0.012 0.477-0.520 0.955-1.030 Saturation 4+5 0.000-0.012 0.477-0.520 0.955-1.030 Plethysmogram 8+9 0.000-0.012 0.477-0.520 0.955-1.030 Table 4. Analog Output Module Voltage Tolerances Note: Earlier versions of the Analog Output Module have a 2.5 volt maximum scale for the Plethysmogram and Pulse Rate (1.25 volt half scale). 5-Jun-01 Model 520A Service Manual 71 Section 15 Connecting to other Equipment PRELIMINARY 4. When the recorder is properly adjusted, press the RUN key. The monitor will return to Monitoring Mode and automatically begin outputting analog data to the Analog Output Module. Note: This setup procedure does not have to be performed each time the monitor is turned on—the monitor will always automatically output analog information via the Analog Output Module, this procedure simply helps to calibrate the recorder to the Model 520A signals. 72 Model 520A Service Manual 5693-90-01 PRELIMINARY 16 Specifications General 16.1 Specifications for the Novametrix OXYPLETH Pulse Oximeter, Model 520A, are listed for informational purposes only, and are subject to change without notice. Oxygen Saturation (SpO2) Section 16.2 • Range, 0-100% • Accuracy, 80-100% ± 2%, 0-79% unspecified (Approximately 68% of the observations are within the accuracy claim.) • Display Resolution, 1% • Averaging Time, menu selectable times of 2 and 8 seconds • Audible SpO2 Trend Feature Pitch of (user selectable) Pulse Rate “beep” tracks the SpO2 value (i.e., decreasing SpO2 values are signalled by lower pitched “beeps”). • Settling Time Display settles to within 1% of the final reading less than 15 seconds after the sensor is properly applied. • Alerts Continuously displayed. Menu selectable high and low limits (100-50). Visible alarm is immediate. Audible alarm occurs after 10 seconds of continuous violation of the set limit, or immediately. Limit values are retained in memory when monitor is turned off, or the monitor can be set to use its default settings each time it is turned on. Pulse Rate Section 16.3 • Range, 30-250 beats per minute (bpm) • Accuracy, ± 1% of full scale (Approximately 68% of the observations are within the accuracy claim.) • Display Resolution, 1 bpm • Averaging Time, fixed at 8 seconds • Settling Time Display settles to within 1% of the final reading less than 15 seconds after the sensor is properly applied. 5-Jun-01 Model 520A Service Manual 73 Section 16 Specifications PRELIMINARY • Alerts Continuously displayed. Menu selectable high and low limits (249-30 or Off). Visible alarm is immediate. Audible alarm occurs after 10 seconds of continuous violation of the set limit or immediately. Limit values are retained in memory when monitor is turned off, or the monitor can be set to use its default settings each time it is turned on. General Specifications 16.4 • Operating Environment 50-104° F (10-40 °C), 0-90% relative humidity (non-condensing) • Weight, 7 lbs 5 oz. (3.32 kg) • Dimensions Height, 3.3 inches (8.38 cm) Width, 9 inches (22.86 cm) Depth, 8 inches (20.32 cm) • Power, 100-120/200-240 VAC, 50/60 Hz • Fuse Rating U.S.A.: 0.5 A, 250 V, Slo-Blo (x2) European: T 250 mA/250 V (x2) • Battery Type, lead-acid gel-cell Battery Life, 3 hours (Note: Excessive alerting reduces battery life.) When 15 minutes of battery life remain, the (low battery) indicator illuminates. When the battery becomes exhausted, the monitor display shuts down. Connect to AC power to recharge battery. Recharge Time, battery fully recharged in 12-15 hours max. Additional Features 16.5 • 2 Minute Silence When AUDIO key is pressed, deactivates audible alerts for two minutes. Indicated by illuminated (2 Min LED). • Audio Off Feature user selectable. If enabled, press and hold AUDIO key for 3 seconds, and audible alarms will not activate. Indicated by flashing (OFF LED). • Battery Backed Trend Memory Trend memory print of any 30 minutes, 2 hours, 8 hours 12 hours or 24 hours when used with the Seiko DPU-414, Seiko DPU-411, Hewlett-Packard ThinkJet, or Model 315 Printer. • Analog (Recorder) Output Module—Optional Provides analog output for strip chart applications at the following levels; Oxygen Saturation value, 10mV/% (100% = 1 V) Pulse Rate value, 4mV/bpm (250 bpm = 1 V) Plethysmograph pulse waveform, 0-1V max (AGC) 74 Model 520A Service Manual 5693-90-01 Additional Features PRELIMINARY • Serial (RS232) Data Output Provides RS232 data interface compatible with; Seiko DPU-414 Thermal Printer Seiko DPU-411 Thermal Printer Hewlett-Packard ThinkJet Printer Novametrix Model 315 Printer Novametrix Model 1260 Capnograph Novametrix Model 1010 Telemetry Central Station SARACAP monitor RS232 computer interface NOVACARD Memory Module NOVACOM1 Interface • Internal Real Time Clock • Alert Bar 5-Jun-01 Model 520A Service Manual 75 PRELIMINARY 17 Accessories Model 520A Catalog No. 17.1 Description SuperBright™ SpO 2 SENSORS 8793-00 OxySnap™ Y-Sensor™ (use with OxySnap™ Extension Cable), 90 day warranty 8744-00 OxySnap™ Finger Sensor (use with OxySnap™ Extension Cable), 1 yr. warranty 8853-00 OxySnap™ Extension Cable (use with OxySnap™ sensors), 8 feet, 1 yr. warranty 8898-00 OxySnap™ Extension Cable (use with OxySnap™ sensors), 12 feet, 1 yr. warranty 8776-00 SuperBright™ Finger Sensor (10 ft sensor cable), 1 yr. warranty 8791-00 SuperBright™ Y-Sensor™ (10 ft sensor cable), 90 day warranty 9768-00 Finger Sensor (use with DB-9 Sensors), 6 feet, 1 yr. warranty 9168-00 Finger Sensor (use with DB-9 Sensors), 3 feet, 1 yr. warranty 9769-00 Y-Sensor™ (use with DB-9 Sensors), 6 feet, 90 day warranty 9169-00 Y-Sensor™ (use with DB-9 Sensors), 3 feet, 90 day warranty SENSOR MANAGEMENT PLANS Select a Finger Sensor or Y-Sensor™ Management Plan for each SuperBright™ Pulse Oximeter. The plan you select determines the length of coverage—36 or 60 months. How the Plans Work: Included in each Plan are TWO sensors—one for immediate use, the other one for back-up. If a sensor becomes inoperative, place the backup sensor into use and return the inoperative sensor in the convenient prepaid mailer. A replacement sensor will be shipped within two business days of receipt of the inoperative sensor. This simple return/replacement method will be used for the entire warranty period, thereby, guaranteeing your costs and virtually eliminating sensor tracking hassles. Warranty: For each Pulse Oximeter a plan is purchased for, the warranty on the monitor is also extended to the length of the Plan (a pre-contract inspection may be required). Replacement sensors provided under terms of the Plan shall carry the remaining Plan warranty—replacements do not extend the warranty. 8791-36 76 Model 520A Service Manual Y-36 Plan The Plan length is 36 months. Includes 9 boxes of any Y-Strip Taping Systems 5693-90-01 Model 520A PRELIMINARY Catalog No. 8791-60 Description Y-60 Plan The Plan length is 60 months. Includes 15 boxes of any Y-Strip Taping Systems 8776-36 Finger-36 Plan The Plan length is 36 months 8776-60 Finger-60 Plan The Plan length is 60 months Y-SENSOR™ APPLICATORS 8828-00 20mm Wrap Style Taping System (100 per box) Use on neonatal foot and hand, or on pediatric toe or finger, color coded blue 8829-00 25mm Wrap Style Taping System (100 per box) Use on neonatal foot and hand, color coded green 8831-00 20mm Finger Style Taping System (100 per box) Use on pediatric finger or on small adult finger, color coded blue 8832-00 25mm Finger Style Taping System (100 per box) Use on adult finger, color coded green 6929-00 Adhesive Foam Wraps, Large (25 per box) 6968-00 Adhesive Foam Wraps, Small (25 per box) 8836-00 Non-Adhesive Foam Wraps, Large (25 per box) 8943-00 Non-Adhesive Foam Wraps, Small (25 per box) 6131-50 Ear Clips (5 per box) 6131-25 Ear Clips (25 per box) 8700-00 Adhesive Dots (200 per box) OUTPUT OPTIONS—ANALOG, DIGITAL & PRINTER 5-Jun-01 5963-00 Analog Output Module, for Model 2001 9622-01 Analog Output Module, for OXYPLETH®, includes RS232 pass-thru 6045-00 Cable, for 5963-00 Analog Output Module (open ended, 6 ft) 5333-00 Cable, for 9622-00 Analog Output Module (open ended, 6 ft) 2736-00 Analog/RS232 Output Option Kit for Model 515B (if ordered at time of purchase) 6659-00 Cable, for 2736-00 Analog Output Option Kit (open ended, 6 ft) Model 520A Service Manual 77 Section 17 Accessories PRELIMINARY Catalog No. Description 5334-00 Cable, Serial Output to Personal Computer (PC with 25-pin connector) 5335-00 Cable, Serial Output to Personal Computer (PC with 9-pin connector) 5726-00 Cable, Analog Output Module (9622-01) to Aequitron 9500 Series Monitor 9140-00 Thermal Printer, Seiko DPU-414 (with battery pack) 400052 AC Adapter, for Seiko DPU-414 Printer, 120 VAC 300017 Printer Paper, for Seiko DPU-411/414 Printer (2 rolls per box) 9085-00 Printer Cable, for Seiko DPU-414 Printer, 9-to-25 pin (Models 515B/520A/ 860/1265/7100/2001) PULSE OXIMETRY ACCESSORIES 420034 Model 515B/C Inservice Video, VHS video tape (NTSC format) 420016 OXYPLETH® Model 520A Inservice Video, VHS video tape (NTSC format) 7106-10 Transport Pouch, for Models 515/520A/860/1265/7100/2001 7104-10 Side Accessory Pouch, (included with monitor) 600026 Power Cord, (included with monitor) 4941-00 Saturation Sensor Extension Cable (4 feet) 4942-00 Saturation Sensor Extension Cable (6 feet) 4943-00 Saturation Sensor Extension Cable (10 feet) 5266-00 Saturation Sensor Extension Cable (25 feet) 6147-00 Saturation Sensor Extension Cable (50 feet) 6455-00 Single Patient Use Pediatric/Adult Sensor (10 per box) 6455-25 Single Patient Use Pediatric/Adult Sensor (25 per box) 6480-00 Single Patient Use Neonatal/Pediatric Sensor (10 per box) 6480-25 Single Patient Use Neonatal/Pediatric Sensor (25 per box) 8933-00 Sensor Extension Cable, for use with Single Patient Use Sensors (DB-9 connectors) 8936-00 Sensor Jumper Cable, for use with Single Patient Use Sensors (DB9 to OxySnap™ connector) EXTENDED WARRANTY Normal warranty: Monitor—1 year 9400-81 Model 2001 warranty extended an additional 1 year(s) at time of purchase 5693-81 OXYPLETH® warranty extended an additional 1 year(s) at time of purchase 6500-81 Model 515B warranty extended an additional 1 year(s) at time of purchase 6550-81 Model 515C warranty extended an additional 1 year(s) at time of purchase BIOMEDICAL EQUIPMENT & TRAINING 78 Model 520A Service Manual 5693-90-01 Model 520A PRELIMINARY Catalog No. Description Service Test Kits include items and materials qualified service personnel may require to determine the functional integrity and/or accuracy of the system. 5777-00 Test Kit, Pulse Oximeter 9999-96 “focus” Technical Training Seminar (1 day course) For class schedules call: 1-800-243-3444 Ext. 2565 MOUNTING SYSTEMS ROLLSTAND 140098 Rollstand, includes base, casters, tilt swivel head, post, poll, handle, utility basket. Requires either 140095 or 140101 Mounting Plate Kit. ROLLSTAND AND MOUNTING ACCESSORIES 5-Jun-01 140095 Adapter Plate Kit, for 515B/C, 520A, 2001, 1265/7100, 860, and CO2SMO Plus!® 140099 Laptop Tray with Adapter Plate 140030 Wall Mount 140031 Wall Mount (less Wall Channel) 140032 Pivot Block Mount 140036 Countertop Mount (5 inch Base) 140100 Swivel C-Clamp Hanger 140067 Clamping Block 140068 Counterweight, for Rollstand 140070 Pole Mount Bracket, (for 2” pole), for Models 515B/C, 520A, 2001, 1265/7100, 860, and CO2SMO Plus!® 140093 Mounting Plate Upgrade Kit, contains Mounting Plate Only 140094 Pole Mount, (for 3/4” - 2” dia. pole), for Models 515B/C, 520A, 2001, 1265/7100, 860, and CO2SMO Plus!® 140097 6” Utility Basket, for Rollstand Model 520A Service Manual 79 Section 17 Accessories PRELIMINARY [This page intentionally blank] 80 Model 520A Service Manual 5693-90-01 PRELIMINARY 18 Parts Lists Family Tree 18.1 The Model 520A diagram below shows the individual assemblies of the finished product— the 5693-00 Final Assembly. 5765 TOP COVER ASSY 2471/2775 MAIN BD ASSY 5673/6538 REAR PANEL ASS 5714 BATTERY HARNESS ASSY 2473 ALERT BD ASSY 5728 SPO2 INPUT ASSY 5720 DISPLAY ASSY 5713 SPEAKER ASSY 5766 BOTTOM COVER ASSY 5719 FRONT PANEL ASSY 5693-01 MAIN ASSEMBLY Seq 5-Jun-01 Item Nbr Description 18.2 Qty 013 140002 CARD GUIDE, 2.5” L 2 005 5713-01 SPEAKER ASSY 1 007 5719-01 FRONT PANEL ASSY 1 014 161067 TAPE, CL CELL 0 Model 520A Service Manual 81 Section 18 Parts Lists PRELIMINARY Seq Item Nbr Description Qty 010 5766-01 BOTTOM COVER ASSY 1 008 5728-01 CABLE ASSY, SPO2 IN 1 001 2471-01 MAIN BOARD ASSY, 1 012 9621-16 LENS, ALERT 1 017 286220 SCREW, 6-32 X 3/16 0 003 6538-01 REAR PANEL ASSY 1 002 5664-10 CHASSIS, MODEL 520A 1 016 286205 6-32 x 3/4 S.B.H. 0 006 5714-01 BATTERY HARNESS ASSY 1 015 284200 #4-40 x 1/4 SLOTTED 0 018 400024 BATTERY, 12VDC, 2.3A 1 009 5765-01 TOP COVER ASSY 1 001 2775-01 MAIN BOARD ASSY 1 6538-01 REAR PANEL ASSY 18.3 Seq Item Nbr Description Qty 007 6538-17 REAR PANEL SUBASSY 1 018 285001 LOCK WASHER, NO. 6 0 019 285005 FLAT WASHER, NO. 8 0 003 5812-10 SPACER, SUPPORT 2 002 4109-10 SUPPORT BRACKET, PC 1 024 161092 ADHESIVE, 262 0 006 9090-01 POWER CABLE ASSY 1 001 2726-01 POWER SUPPLY BD ASSY 1 014 280188 STANDOFF, 3/8 DIA 0 004 5820-01 GROUND WIRE ASSY 1 1 012 210149 POWER ENTRY MODULE, 023 285013 NYL WASH, #4 NATURAL 0 017 285000 LOCK WASHER, NO. 4 0 022 608033 WIRE CLIP & BUSHING 1 013 216059 CONNECTOR, PLUG 1 011 161008 ADHESIVE, 242 0 021 515023 FUSE, 1/2A, 250V 2 020 286219 SCREW, 6-32 X 1 1/4 0 008 6549-01 GROUND WIRE ASSY 1 016 281501 NUT, HEX, NO. 6-32 0 015 281500 NUT, HEX, NO. 4-40 0 5673-01 REAR PANEL ASSY Seq 82 Model 520A Service Manual Item Nbr Description 18.4 Qty 016 285001 LOCK WASHER, NO. 6 0 007 5812-10 SPACER, SUPPORT 2 002 4109-10 SUPPORT BRACKET 1 019 5819-01 GROUND WIRE ASSY 1 022 285046 WASHER, FLAT, NO. 6 0 5693-90-01 2726-01 POWER SUPPLY BD ASSY PRELIMINARY Seq Item Nbr Description Qty 005 5673-32 REAR FACEPLATE 1 006 5743-10 POWER ENTRY MODULE 1 013 280188 STANDOFF, 3/8 DIA 0 020 5820-01 GROUND WIRE ASSY 1 003 5229-11 WIRE CLIP MOD 1 017 285013 NYL WASH, #4 NATURAL 0 015 285000 LOCK WASHER, NO. 4 0 011 216059 CONNECTOR, PLUG 1 023 161008 ADHESIVE, 242 0 008 9308-11 BUSHING MOD, LINECORD 2 021 515023 FUSE, 1/2A, 250V 2 018 286219 SCREW, 6-32 X 1 1/4 0 004 5673-10 REAR PANEL 1 012 281501 NUT, HEX, NO. 6-32 0 001 2472-01 POWER SUPPLY BOARD 1 014 281500 NUT, HEX, NO. 4-40 0 2726-01 POWER SUPPLY BD ASSY Seq 5-Jun-01 Item Nbr 18.5 Description Qty 1 000 211505 CONNECTOR, 5 PIN 000 474145 RESISTOR, 215 OHM 000 481530 DIODE, KBU4G, 4 AMP 000 474214 RESISTOR, 332K OHM 000 474137 RESISTOR, 1M OHM 1 000 481549 DIODE, MBRS14OT3 1 000 152096 CAPACITOR, 220UF 1 000 484529 VOLTAGE REGULATOR 1 000 180014 INDUCTOR, 2SUH 1 000 474165 RESISTOR, 10K OHM 1 000 152081 CAPACITOR, 6BOOUF 1 000 474162 RESISTOR, 61.9K OHM 1 000 5918-10 XFMR, MAINS, PWR SPL 1 000 470026 RESISTOR, 150 OHM 1 000 474215 RESISTOR, 2.21K OHM 1 1 000 486805 IC, LM393M, DUAL VOL 1 000 2725-02 RAE, POWER SUPPLY BD 1 000 515085 FUSE W FUSEHOLDER 1 000 474141 RESISTOR, 249K OHM 1 000 2726-04 TEST PROCEDURE, PWR 0 000 600034 RIBBON CABLE ASSY 1 000 474181 RESISTOR, 4.3 OHM 1 000 474166 RESISTOR, lOOK OHM 4 000 474216 RESISTOR, 4.99K OHM 1 000 485543 TRANSISTOR, MOSFET 1 000 211213 CONNECTOR, 2 PIN 1 000 481552 DIODE, MBRS34OT3 3 000 154072 CAPACITOR, .1UF 4 Model 520A Service Manual 83 Section 18 Parts Lists PRELIMINARY Seq Item Nbr Description Qty 000 474151 RESISTOR, 37.4K OHM 1 000 484559 VOLT RGLR, LT1O76CT 1 000 515083 FUSE W FUSEHOLDER 1 000 2726-17 POWER SUPPLY BOARD 1 000 154079 CAP, 1OUF, 2EV, 20%, 1 000 474218 RESISTOR, 47.5K OHM 1 000 280114 SNAP RIVET, .118 0 000 152029 CAPACITOR, 220UF 20% 1 000 485532 TRANSISTOR, 2N7002T1 1 000 474211 RESISTOR, 49.9K OHM 1 000 481561 DIODE, ULTRAFAST, 3A 1 000 474341 RESISTOR, 4.3 OHM 1 000 481563 DIODE, SCHOTTKY, 5A 2 2472- 01 POWER SUPPLY BOARD 84 Model 520A Service Manual 18.6 Seq Item Nbr Description Qty 024 472065 RESISTOR, 200K OHM 1 016 211505 CONNECTOR, 5 PIN 1 1 036 484539 VOLTAGE REGULATOR 001 2472-02 FAB, POWER SUPPLY BD 1 032 481530 DIODE, KBU4G, 4 AMP 1 040 515046 FUSE, 2A, 250V 1 020 472022 RESISTOR, 4.99K OHM 1 044 161049 ADHESIVE, HOT MELT 0 028 472185 RESISTOR, 61.9K OHM 1 035 484529 VOLTAGE REGULATOR 1 014 180014 INDUCTOR, 25UH, .25 1 027 472140 RESISTOR, 332K OHM 1 012 152081 CAPACITOR, 6800UF 1 037 485517 TRANSISTOR, VN1OKM 1 041 515035 FUSE, 1/2A, 250V 1 034 481542 DIODE, UF5400 2 033 481541 DIODE, 100V, 1A 1 004 5918-10 XFMR, MAINS, PWR SPL 1 017 470026 RESISTOR, 150 OHM 1 023 472058 RESISTOR, lOOK OHM 3 018 472005 RESISTOR, 249 OHM 1 043 600034 RIBBON CABLE ASSY 1 030 474181 RESISTOR, 4.3 OHM 1 039 486716 LM393N DUAL COMPARATOR 1 022 472049 RESISTOR, 49.9K OHM 1 019 472016 RESISTOR, 2.21K OHM 1 038 485527 MOSFET, IRF9523 1 031 481022 DIODE, ZENER, BZY88C 1 026 472146 RESISTOR, 47.5K OHM 1 042 515503 FUSE HOLDER, FOR 5MM 4 021 472030 RESISTOR, 10K OHM 1 5693-90-01 5719-01 FRONT PANEL ASSY PRELIMINARY Seq Item Nbr Description Qty 015 211213 CONNECTOR, 2 PIN 1 013 154016 CAPACITOR, .1UF 5 011 152029 CAPACITOR, 220UF 1 025 472109 RESISTOR, 37.4K OHM 1 029 472270 RESISTOR, 1.2M OHM 1 5719-01 FRONT PANEL ASSY Seq Item Nbr Description 18.7 Qty 006 280033 SPACER *4 X 1/8 0 003 5720-01 DISPLAY ASSY 1 001 2473-01 ALERT BOARD ASSY 1 010 285000 LOCK WASHER, NO. 4 0 002 5676-27 MEMBRANE KEYPANEL 1 008 284200 *4-40 X 1/4 SLOTTED 0 007 280187 STANDOFF, .187 DIA 0 004 6278-10 SHIELD, VFD 1 009 284204 *4-40 X 1/2 SLOTTED 0 2473-01 ALERT BOARD ASSY Seq Item Nbr Description 18.8 Qty 006 482565 LED, CLEAR, ROUND 4 005 470024 RESISTOR, 100 OHM 2 007 600038 RIBBON CABLE ASSY 1 001 2473-02 FAB, ALERT BOARD 1 5720- 01 DISPLAY ASSY 18.9 Seq Item Nbr Description Qty 001 482573 LCD MODULE, DOT MATRIX 1 002 600033 RIBBON CABLE ASSY 1 5713-01 SPEAKER ASSY 18.10 Seq Item Nbr Description Qty 001 130010 SPEAKER, 8 OHM 15%, 1 002 211225 CONNECTOR, 2 PIN 1 005 5855-10 FOAM LINER 1 004 608003 TUBING, HEAT SHRINK 0 003 605060 WIRE, 26AWG, PVC INS 0 5714-01 BATTERY HARNESS ASSY 5-Jun-01 18.11 Seq Item Nbr Description Qty 004 605163 WIRE, 22AWG, BLACK 0 Model 520A Service Manual 85 Section 18 Parts Lists PRELIMINARY Seq Item Nbr Description Qty 001 211215 CONNECTOR, 2 PIN 1 002 216068 TERMINAL LUG, RECEPT 0 005 608001 CABLE TIE 0 003 605162 WIRE, 22AWG, RED 0 5728-01 CABLE ASSY Seq Item Nbr 18.12 Description Qty 1 004 211704 CONNECTOR, RCPT 011 605063 WIRE, 26AWG, PVC INS 0 015 608005 TUBING, HEAT SHRINK 0 0 006 210098 CONTACT, FEMALE 008 605059 WIRE, 26AWG, PVC INS 0 007 280108 SNAP RIVET 0 001 5606-16 DRESS BEZEL, SAO2 IN 1 014 608001 CABLE TIE 0 010 605061 WIRE, 2EAWG, PVC INS 0 003 180009 FERRITE SLEEVE 1 013 605065 WIRE, 26AWG, PVC INS 0 012 605064 WIRE, 26AWG, PVC INS 0 002 161060 EPOXY, 2 PART (5/7) 0 005 211630 CONNECTOR, 6 PIN 1 009 605060 WIRE, 26AWG, PVC INS 0 016 608011 TUBING, HEAT SHRINK 0 002 161110 EPOXY, 2 PART (1/1) 0 017 9779-33 ASSY PROC, EPOXY MIX 0 5765-01 TOP COVER ASSY Seq Item Nbr Description 18.13 Qty 005 5862-10 SHIELD, MYLAR 1 001 5765-13 TOP COVER 1 002 5827-32 WARNING LABEL 1 004 5823-32 LABEL, INSTRUCTIONS 1 003 5828-32 LABEL, ISOLATION 1 5766-01 BOTTOM COVER ASSY Seq 86 Model 520A Service Manual Item Nbr Description 18.14 Qty 016 161007 ADHESIVE 0 010 284261 SCREW, 4-40 X 5/8 L 0 009 4727-10 KICKSTAND, BEDRAIL 1 005 5826-10 FOOT PAD 4 003 5766-13 BOTTOM COVER 1 015 284264 SCREW, 4-40 X 1/4 L 0 011 161064 TAPE, 3/4 X 60 YDS 0 012 5405-10 SHIELD, BATTERY 1 5693-90-01 2755-01 TONE GEN REPL BOARD PRELIMINARY Seq Item Nbr Description Qty 007 5760-16 LEFT FOOT, WHITE 2 008 5761-16 RIGHT FOOT, WHITE 2 013 5849-10 BRACKET, SUPPORT 1 002 5409-32 LABEL, WARNING, POLE 1 006 315052 LABEL, EARTHING SYMB 13 2755-01 TONE GEN REPL BOARD Seq Item Nbr Description 18.15 Qty 022 486358 IC, NC7SZ32MS, 2-IN 1 018 474241 RESISTOR, 150K OHM 1 023 486825 IC, LMC7101BIM5X 1 020 474300 RESISTOR, 402K OHM 1 014 474228 RESISTOR, 1.21K OHM 1 001 2755-02 FAB, TONE GENERATOR 1 3 017 474240 RESISTOR, lOOK OHM 012 474197 RESISTOR, 49.9K OHM 1 013 474224 RESISTOR, 100 OHM 1 011 211814 CONNECTOR, 8 PIN 2 4 010 154104 CAPACITOR, .O1UF 002 2755-03 SCHEM, TONE GEN REPL 0 003 9074-07 IC, TONE GENERATOR 1 016 474235 RESISTOR, 24.9K OHM 2 019 474270 RESISTOR, 200K OHM 1 011 211815 CONN, 8 PIN, HDR 2 2775-01 MAIN BOARD ASSY Seq 5-Jun-01 Item Nbr Description 18.16 Qty 000 472121 RESISTOR, 3.74K OHM 1 000 483017 TRANSISTOR, BC214C 4 000 474032 RESISTOR, 10 OHM 1 000 472041 RESISTOR, 20K OHM 2 000 472063 RESISTOR, 162K OHM 1 000 472200 RESISTOR, 5.6 OHM 1 000 487064 IC, CNY17-III, PHOTO 4 000 154058 CAPACITOR, .022UF 1 000 472011 RESISTOR, 1K OHM 5 000 474089 RESISTOR PACK, lOOK 2 000 474131 RESISTOR PACK, 10K 1 000 211306 CONNECTOR, 3 PIN 1 000 180033 EMI FILTER, 22PF 1 000 472255 RESISTOR, 1 OHM 2 000 154065 CAP, .1UF, 63V 5 000 152040 CAPACITOR, 2.2UF 3 000 472007 RESISTOR, 475 OHM 6 000 154081 CAPACITOR, 100PF 5 Model 520A Service Manual 87 Section 18 Parts Lists PRELIMINARY Seq 88 Model 520A Service Manual Item Nbr Description Qty 000 472021 RESISTOR, 4.75K OHM 1 000 210144 JUMPER, 2 POSITION 1 000 153003 CAPACITOR, .O1UF 1 000 472193 RESISTOR, 23.7K OHM 1 000 481541 DIODE, bOy, 1A 4 000 475034 POTENTIOMETER, 2K OHM 1 000 483002 2N3906 PNP SILICON 1 000 472058 RESISTOR, lOOK OHM 7 000 154060 CAPACITOR, .22UF, 1 000 481501 DIODE, 1N4148, SIGNAL 9 000 472274 RESISTOR, 26.7 OHM 1 000 472105 RESISTOR, 3.92K OHM 2 000 470109 RESISTOR, 470K OHM 1 000 481534 DIODE, BAT82, SCHOTT 2 000 2471-28 MAIN BD KIT 1 000 472227 RESISTOR, 47 OHM 2 009 285000 LOCK WASHER, NO. 4 0 000 474134 RESISTOR PACK, 41K 1 000 486299 IC, CS5SO3JP, 20-BIT 2 000 472170 RESISTOR, 22.1K OHM 1 000 474132 RESISTOR PACK, 41K 2 000 472276 RESISTOR, 6.49K OHM 2 000 470016 RESISTOR, 22 OHM 1 000 472268 RESISTOR, 8.66K OHM 1 000 5833-01 GROUND WIRE ASSY 1 000 472003 RESISTOR, 100 OHM 2 000 472146 RESISTOR, 47.5K OHM 1 000 152072 CAPACITOR, 1OUF 1 000 472246 RESISTOR, 66.5K OHM 2 000 472198 RESISTOR, 3.3 OHM 1 000 474098 RESISTOR PACK, lOOK 4 000 153027 CAPACITOR, 220PF 1 000 472030 RESISTOR, 10K OHM 7 000 474133 RESISTOR PACK, 10 OH 1 000 474086 RESISTOR PACK, 10K 1 000 472034 RESISTOR, 12.1K OHM 1 000 153063 CAPACITOR, 220PF 2 000 152075 CAPACITOR, 47UF, 25V 2 000 474138 RESISTOR, 100 OHM, 4 000 154016 CAPACITOR, .1UF 59 000 216029 TEST POINT, SPRING 2 000 152045 CAPACITOR, 1OUF 16V 6 000 153052 CAPACITOR, .022UF 1 000 152073 CAPACITOR, 100UF 4 007 280023 SPACER HEX #4-40 0 000 153021 CAPACITOR, .47UF 1 000 472195 RESISTOR, 41.2K OHM 4 000 180011 FERRITE BEAD, 22 AWG 1 5693-90-01 2471-28 MAIN BD KIT (part of 2775-01) PRELIMINARY Seq Item Nbr Description Qty 000 153051 CAPACITOR, .22UF, 1 000 474135 RES PACK, 100 OHM 1 000 481031 DIODE, ZENER, BZX79- 1 001 2755-01 TONE GEN REPL BOARD 1 000 472037 RESISTOR, 13.7K OHM 2 008 284217 SCREW, 4-40 X 3/16 0 000 180067 FERRITE BEAD, 600 uH 15 000 215080 SOCKET, 32 PIN, PLCC 1 000 481050 ESD SUPPRESSOR 2 002 2775-02 FAB, MAIN BD 1 000 212136 CONN, 10 PIN, HDR 1 000 5715A-07 PROGRAM, SPO2, 520A 1 000 211237 CONNECTOR, 2 PIN 1 000 486845 IC, 2.SV OR 3.OV V R 1 006 161039 FOAM TAPE, 1/32THK 0 010 5712-10 TRANSFORMER, MAIN BD 1 010 5711-10 TRANSFORMER, MAIN BD 0 2471-28 MAIN BD KIT (part of 2775-01) 5-Jun-01 18.17 Seq Item Nbr Description Qty 001 180012 FERRITE BEAD 1 000 484535 VOLTAGE REGULATOR, L 1 1 000 486295 IC, MM74HC4OS1N 000 484534 VOLTAGE REGULATOR 1 000 486625 MC74HC32N I.C. QUAD 3 000 211414 CONNECTOR, 4 PIN 1 000 152085 CAPACITOR, 1500UF 2 000 515511 FUSEHOLDER, VERT 2 000 484533 VOLTAGE RGLTR 1 000 484523 VOLTAGE REGULATOR 1 000 484529 VOLTAGE REGULATOR 1 000 487061 IC, TBA82OM, MONOLIT 1 000 486300 IC, TLC549IP, 8-BIT 1 000 487069 IC, LT1O19CN8-2.5 1 000 486712 TLO74CN QUAD F FET 2 000 152086 CAPACITOR, 1000UF 2 000 485528 MOSFET, N-CH 1 000 486651 MM74HC138 I.C. 1 000 471400 RESISTOR, lOOM OHM 1 000 153006 CAPACITOR, 47PF, 63V 4 000 486298 IC, MM74HC4O2ON 1 000 486680 IC, MM74HC573AN 4 000 9715-07 PROGRAM, PEEL ASSY 1 000 9716-07 PROGRAM, PEEL ASSY 1 000 154076 CAPACITOR, .O1UF 2 000 481542 DIODE, UF5400 1 000 215060 SOCKET, IC, 32 PLN 1 Model 520A Service Manual 89 Section 18 Parts Lists PRELIMINARY 90 Model 520A Service Manual Seq Item Nbr Description Qty 000 230006 CRYSTAL,3.2768MHZ 1 000 152084 CAPACITOR, 470UF 2 000 230018 CRYSTAL, 12.288MHZ 1 000 486268 IC, DG444DJ, SPST 1 000 486305 IC, MSM6242BRS, CMOS 1 002 153013 CAPACITOR, 33PF 3 02A 153013 CAPACITOR, 33PF 1 000 210097 CONNECTOR, 16 PIN 1 000 230016 CRYSTAL, 32.768K HZ 1 000 486600 IC, CD4O13B 1 000 484531 VOLTAGE REGULATOR 1 000 486285 IC, HD64180R1P6 1 000 515071 FUSE, 1/1OA, 125V 1 000 180010 INDUCTOR, 18UH 1 003 153012 CAPACITOR, 22PF 4 03A 153012 CAPACITOR, 22PF 6 000 212501 CONNECTOR, 20 PIN 1 000 486675 MM74HC14N, IC,CMOS 2 000 486685 IC, DUAL 8-BIT 1 000 486256 IC, K6TO8O8C1D-DB7O 1 000 485529 TRANSISTOR, VNO61OL 7 000 154057 CAPACITOR, 470pF 1 000 485527 MOSFET, 1RF9523 1 000 211412 CONNECTOR, 4 PIN 1 000 484014 NPN TRANSISTOR ZTX1O 1 000 486276 IC, LT1O81CN 1 000 180004 CHOKE, 100UH, 10% 1 000 215031 SOCKET, 20 PIN, DIP 2 000 211213 CONNECTOR, 2 PIN 2 000 211629 CONNECTOR, 6 PIN 1 000 470111 RESISTOR, .33 OHM 3 000 153046 CAPACITOR, 4700PF 1 000 486606 CD4O93BE 1 000 152066 CAPACITOR, 220uF 1 000 485520 TRANSISTOR, BS2SO 2 000 212529 CONNECTOR, 20 PIN 1 000 484515 LM317LZ REGULATOR 1 000 215055 SOCKET, IC 1 000 515072 FUSE, 1A, 125V 1 000 487065 IC, UC3843N, CURRENT 1 000 400035 IN\JERTER, DC TO AC 1 000 210051 CONNECTOR, 25 PIN 1 000 180011 FERRITE BEAD, 22 AWG 1 004 487053 IC, AD712JN, DUAL BI 2 004 486717 LF353N 2 5693-90-01 2471-01 MAIN BOARD ASSY PRELIMINARY 2471-01 MAIN BOARD ASSY Seq 5-Jun-01 Item Nbr Description 18.18 Qty 067 472121 RESISTOR, 3.74K OHM 1 153 483017 TRANSISTOR, BC214C 4 082 474032 RESISTOR, 10 OHM 1 062 472041 RESISTOR, 20K OHM 2 064 472063 RESISTOR, 162K OHM 1 073 472200 RESISTOR, 5.6 OHM 1 130 487064 IC, CNY17-III, PHOTO 4 151 154058 CAPACITOR, .022UF 1 057 472011 RESISTOR, 1K OHM 5 083 474089 RESISTOR PACK, lOOK 2 009 6344-07 PROGRAM, EPROM ASSY 0 085 474131 RESISTOR PACK, 10K 1 149 472255 RESISTOR, 1 OHM 2 032 154065 CAP, .1UF, 63V 5 150 486255 IC, SN76496AN 1 011 152040 CAPACITOR, 2.2UF 3 056 472007 RESISTOR, 475 OHM 6 002 2471-03 SCHEMATIC, MAIN BD 0 058 472021 RESISTOR, 4.75K OHM 1 004 5715-07 PROGRAM, SPO2, 520A 1 001 2471-02 FAB, MAIN BOARD 1 020 153003 CAPACITOR, .O1UF 1 070 472193 RESISTOR, 23.7K OHM 1 094 481541 DIODE, bOy, 1A 4 090 475034 POTENTIOMETER, 2K 1 096 483002 2N3906 PNP SILICON 1 063 472058 RESISTOR, lOOK OHM 7 155 153062 CAPACITOR, 15OPF 3 152 154060 CAPACITOR, .22UF 1 092 481501 DIODE, 1N4148, SIGNAL 10 080 472274 RESISTOR, 26.7 OHM 1 066 472105 RESISTOR, 3.92K OHM 2 079 472272 RESISTOR, 59K OHM 1 093 481534 DIODE, BAT82, SCHOTT 2 008 2471-28 MAIN BD KIT 1 075 472227 RESISTOR, 47 OHM 2 088 474134 RESISTOR PACK, 41K 1 003 5712-10 TRANSFORMER, MAIN BD 1 117 486299 IC, CSS5O3JP, 20-BIT 2 069 472170 RESISTOR, 22.1K OHM 1 086 474132 RESISTOR PACK, 41K 2 081 472276 RESISTOR, 6.49K OHM 2 077 470016 RESISTOR, 22 OHM 1 078 472268 RESISTOR, 8.66K OHM 1 138 5833-01 GROUND WIRE ASSY 1 055 472003 RESISTOR, 100 OHM 4 Model 520A Service Manual 91 Section 18 Parts Lists PRELIMINARY 92 Model 520A Service Manual Seq Item Nbr Description Qty 068 472146 RESISTOR, 47.5K OHM 1 014 152072 CAPACITOR, 1OUF 1 076 472246 RESISTOR, 66.5K OHM 2 072 472198 RESISTOR, 3.3 OHM 1 010 6266-57 PROGRAM, DISK ASSY 0 084 474098 RESISTOR PACK, lOOK 4 148 153027 CAPACITOR, 220PF 1 059 472030 RESISTOR, 10K OHM 6 087 474133 RESISTOR PACK, 10 OHM 1 145 474086 RESISTOR PACK, 10K 1 003 5711-10 TRANSFORMER, MAIN BD 0 060 472034 RESISTOR, 12.1K OHM 1 025 153038 CAPACITOR, .OO1UF 1 016 152075 CAPACITOR, 47UF, 25V 2 028 154016 CAPACITOR, .1UF 59 142 216029 TEST POINT 2 012 152045 CAPACITOR, 1OUF 16v 6 144 153052 CAPACITOR, .022UF 1 015 152073 CAPACITOR, 100UF 4 024 153021 CAPACITOR, .47UF 1 071 472195 RESISTOR, 41.2K OHM 4 027 153051 CAPACITOR, .22UF 1 089 474135 RES PACK, 100 OHM 1 091 481031 DIODE, ZENER 1 154 2755-01 TONE GEN REPL BOARD 1 061 472037 RESISTOR, 13.7K OHM 2 5693-90-01 PRELIMINARY 19 Schematic and Assembly Drawings Drawing Description 5693-09 Overall Wiring Diagram 2726-01 PSU Board Assy 2726-03 PSU Board Schematic 2472-01 PSU Board Assy 2472-03 PSU Board Schematic 5693-01 Oximeter Unit Assy 2471-01 Main Board Assy 2471-03 Main Board Schematic 2775-01 Main Board Assy 2775-03 Main Board Schematic 2755-01 Tone Generator Replacement Bd 2755-03 Tone Generator Replacement Bd 5728-01 Cable Assy, SpO2 Input 2473-03 Alert Lamp Board 5676-27 Keypanel Schematic 5693-00 Main Assy, Model 520A Optional Analog Module 9622-01 Analog/RS232 Module 2289-01 Analog/RS232 Bd. Assy 2289-03 Analaog/RS232 Bd. Schematic Table 5. Schematic and Assembly Drawings 5-Jun-01 Model 520A Service Manual 93