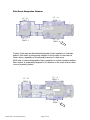
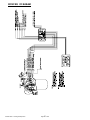
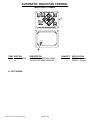
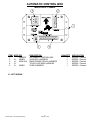
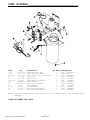
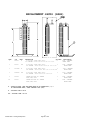
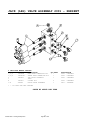
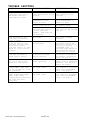
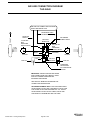
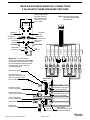
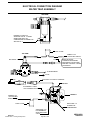
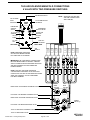
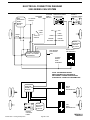
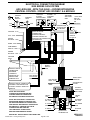
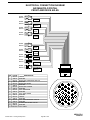
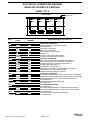
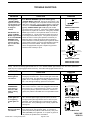
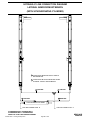
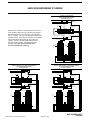
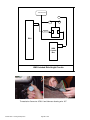
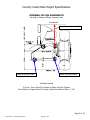
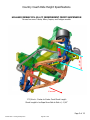
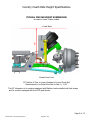
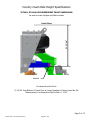
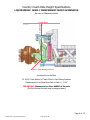
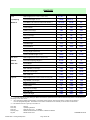
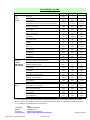
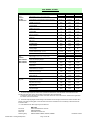
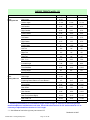
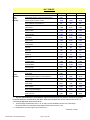
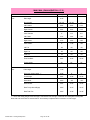
1
Section 2:
Leveling & Suspension
Service Technician
Workshop
January 2008
Blank Page
Slide Room Designation Schemes
CC – A
HWH - 1
CC – D
HWH - 2
CC – C
HWH - 3
CC – B
HWH - 4
Country Coach uses an alphabetical designation that is applied in a clockwise
pattern. Each letter is permanently assigned to the location on the coach as
shown above, regardless of the physical presence of a slide room.
HWH uses a numerical designation that is applied in a counter-clockwise pattern.
Each number is sequentially assigned to the location on the coach where a slide
room is physically present.
CC – A
HWH - 1
CC – D
HWH - 2
CC – B
HWH - 3
Chassis STW - Leveling & Suspension
Page 3 of 126
Blank Page
Chassis STW - Leveling & Suspension
Page 4 of 126
OPERATION MANUAL for AUTOMATIC
LEVELING SYSTEMS
WITH
TOUCH PAD # 500629CONTROL BOX # 500630
CONTENTS
1217 E. 7th St.
Mishawaka IN
46544
800-334-4712
fax (574) 256-6743
Chassis STW - Leveling & Suspension
Before you level your coach
Operating Instructions
Retracting your leveling jacks
Manually operating your jacks
Preventive maintenance
Warranty information
Troubleshooting guide
www.powergearus.com
Page 5 of 126
Page
2
3
3
4
5
5
6-7
82-L0XXX
2
Before You Level Your Coach
•
Park brake must be set and transmission must be in “park” (“neutral” for diesel
coaches) before jacks will operate.
•
Check leveling site to make sure obstructions have been cleared away for proper jack
operation.
•
Selecting a site: When the coach is parked on an excessive slope the leveling
requirements may exceed the jack lift stroke capability. If the coach is parked on an
excessive slope, the coach should be moved to a more level surface before the
leveling system is deployed.
--CAUTION-Keep people clear of coach prior to turning the leveling system on and while leveling
system is in use.
--CAUTION-Never expose hands or other parts of the body near hydraulic leaks. High-pressure oil
leaks may cut and penetrate the skin causing serious injury.
--CAUTION-If your coach is equipped with a slide out(s) always level your unit first, and then operate
the slide out room(s). When retracting the slide(s), always retract the room(s) first then
retract the leveling jacks. Following this procedure will produce the least amount of
stress on your chassis.
--CAUTION-Please read the owners’ manual from the manufacturer who built and designed your
motor home for further leveling and slide out room operating information and safety
features.
WARNING
THIS IS A LEVELING SYSTEM ONLY AND IS NOT INTENDED TO LIFT YOUR COACH’S
TIRE OR TIRES COMPLETELY OFF THE GROUND. ATTEMPTING TO LIFT YOUR COACH
COMPLETELY OFF THE GROUND (FOR EXAMPLE, TO USE THIS LEVELING SYSTEM TO
CHANGE A TIRE) COULD CAUSE DAMAGE TO THE SYSTEM AND SERIOUS INJURY TO
THE PARTIES INVOLVED. IF A TIRE SHOULD REQUIRE CHANGING PLEASE HAVE THE
PROPER EQUIPMENT AND CONTACT A PROFESSIONAL.
Chassis STW - Leveling & Suspension
Page 6 of 126
3
Operating Instructions
Automatic
mode button
Front Jacks
Button
Manual operation
button (push and
hold for 5-7
seconds)
Right Jack
Button
Left Jack
Button
Rear Jacks
Button
LEVELING YOUR COACH
1. Turn on the ignition and start the coach. Your leveling control will start a self check sequence indicated
by the lights on the panel blinking in a rotating pattern. It will turn off when it has finished it’s self check.
2. Push the "On/Off" button on control panel. The system is now operational and the “On/Off” LED will
turn on.
3. Check to see that the engage park brake light is not illuminated. If so, engage the parking brake. (Your
coach will have to be in neutral or park to operate the system).
4. Push the “AUTO” button. The automatic leveling system will begin it’s leveling procedure. Please avoid
movement in the coach during automatic leveling as it can cause errors in the results. It will signal that
it has completed the process by illuminating the center green “LEVEL” light. Check to make sure that all
jacks are on the ground. Also check to make sure that no tire is off the ground. If so, your leveling
process is complete. If further adjustments are needed, refer to the “Manual Operation” section.
5. You can then turn the system off by pushing the on/off button again.
Retracting Your Leveling Jacks
1. Turn on the ignition
2. Turn on the system by pushing the “on/off” button. The system is now operational and the “On/Off” LED
will turn on.
3. Push the “RETRACT-ALL JACKS” button. When the “JACKS DOWN” light turns off, visually check to
make sure that all jacks have fully retracted. If so, your coach leveling system is ready to travel.
Chassis STW - Leveling & Suspension
Page 7 of 126
4
Manually Operating Your Leveling Jacks
There are certain conditions where manually leveling your coach may be desirable. Conditions
where large amounts of side to side leveling are necessary may work better using the manual
leveling procedures that follows.
1. Turn on the ignition and start the coach.
2. Push the “On/Off” button to turn on the system.
3. Push and hold the “MAN” button for 5-7 seconds in order for the system to switch to the manual mode.
It will signal that it is in the manual mode when the light under the “MAN” button is illuminated.
4. Push “FRONT” button until the front of the coach rises at least 3 “. This is important and necessary to
allow the coach to pivot when leveling side to side. If there is insufficient jack stroke to lift the front of
the coach at least 3 inches the coach will have to be moved to an area with less front to back slope, or a
weight distribution block will have to be placed under the jack.
5. Push the “REAR” button until jacks contact the ground.
6. Level the coach from front to rear by pushing the “REAR” button if the light under the “REAR” button is
illuminated. If the light is illuminated above the “FRONT JACKS” button, push the “FRONT” button. In
either case, keep button depressed until the green center “LEVEL” light is illuminated, or both front and
rear lights are dark.
7. Level the coach from side to side by pushing the “RIGHT” button if the light beside the “RIGHT” button
is illuminated. If the light beside the “LEFT” button is illuminated, push the “LEFT” button until the
“LEVEL” light is illuminated.
NOTE: The right and left rear jacks are used to level the coach side to side. Pushing the “LEFT”
button on the control panel will extend the left rear jack. Pushing the “RIGHT” button on the control
panel will extend the right rear jack. There is no individual control of the right or left front jacks on 4
jack systems. The automatic pressure equalization built into the system automatically shifts the
front jacks.
8. Repeat steps 6 and 7 if needed.
9. Turn power off to leveling system by pushing “ON/OFF” button.
10. Visually inspect jacks to ensure all pads are touching ground. Should one of the rear jacks not be
touching the ground, press the corresponding left or right rear jack buttons to lower the appropriate jack
to the ground. Never lift the wheels off the ground to level the coach. This can lead to an unsafe
condition and damage to the leveling system or coach.
NOTE: If the “Wait” LED is ever flashing by itself, it means the control is busy and you cannot
operate the jacks. After a short period of time (from 5 to 30 seconds), the “Wait” LED will go off
again, and you can resume operation as normal.
Chassis STW - Leveling & Suspension
Page 8 of 126
5
PREVENTATIVE MAINTENANCE
POWER GEAR
LIMITED WARRANTY
Power Gear warrants to the original retail
purchaser that the product will be free from defects
in material and workmanship for a period of (2)
years following the retail sales date. Power Gear
will, at its option, repair or replace any part
covered by this limited warranty which, following
examination by Power Gear or its authorized
distributors or dealers, is found to be defective
under normal use and service. No claims under
this warranty will be valid unless Power Gear or its
authorized distributor or dealer is notified in writing
of such claim prior to the expiration of the warranty
period.
Warranty is transferable pending
documentation of original sale date of product.
THIS WARRANTY SHALL NOT APPLY TO:
• Failure due to normal wear and tear, accident,
misuse, abuse, or negligence.
• Products which are modified or altered in a
manner not authorized by Power Gear in writing.
• Failure due to misapplication of product.
• Telephone or other communication expenses.
• Living or travel expenses.
• Overtime labor.
• Failures created by improper installation of the
product’s slide out system or slide out room to
include final adjustments made at the plant for
proper room extension/retraction; sealing
interface between slide out rooms and side
walls; synchronization of inner rails; or improper
wiring or ground problems.
• Failures created by improper installation of
leveling systems, including final adjustments
made at the plant, or low fluid level, wiring or
ground problems.
• Replacement of normal maintenance items.
There is no other express warranty other than the
foregoing warranty. THERE ARE NO IMPLIED
WARRANTIES OF MERCHANTABILITY OR
FITNESS FOR A PARTICULAR PURPOSE. IN
NO EVENT SHALL POWER GEAR BE LIABLE
FOR ANY INCIDENTAL OR CONSEQUENTIAL
DAMAGES. This warranty gives you specific legal
rights, and you may also have other rights, which
vary from state to state. Some states do not allow
the limitations of implied warranties, or the
exclusion of incidental or consequential damages,
so the above limitations and exclusions may not
apply to you.
For service contact your nearest Power Gear
authorized warranty service facility or call 1-800334-4712. Warranty service can be performed only
by a Power Gear authorized service facility. This
warranty will not apply to service at any other
facility. At the time of requesting warranty service,
evidence of original purchase date must be
presented.
WARNING
Your coach should be supported at both front and rear axles
with jack stands before working underneath, failure to do so
may result in personal injury or death.
1. Check and/or fill the reservoir with the jacks and room(s) in the
fully retracted position, each month. The fluid should be ¾” onto
the dipstick (on models so equipped) or to the bottom of the fill
port on models without dipsticks.
2. Change fluid every 24 months.
3. Inspect and clean all hydraulic pump electrical connections every
12 months.
4. Remove dirt and road debris from jacks as needed.
5. If jacks are down for extended periods, it is recommended to
spray exposed leveling jack chrome rods with a silicone lubricant
every 5 to 7 days for protection.
6. If your coach is located in a salty environment (within 60 miles of
coastal areas), it is recommended to spray the rods every 2 to 3
days with a silicone lubricant.
7. Grease the fitting on the bottom of each jack cylinder with Lithium
grease every 20-30 uses.
RECOMMENDED HYDRAULIC FLUIDS FOR YOUR
HYDRAULIC PUMP
The fluids listed here are acceptable to use in your pump assembly.
Contact coach manufacturer or selling dealer for information about what
specific fluid was installed in your system.
It is not recommended that hydraulic fluid and automatic transmission
fluids be mixed in the reservoir.
In most applications, Type A automatic transmission fluid (ATF, Dexron
III, etc.,) will work satisfactorily. Mercon V is also recommended as an
alternative fluid for Power Gear hydraulic systems.
If operating in cold temperatures (less than -10° F) the jacks may extend
and retract slowly.
For cold weather operation, fluid specially-formulated for low
temperatures may be desirable. Mobil DTE 11M, Texaco Rando
HDZ-15HVI, Kendall Hyden Glacial Blu, or any Mil. Spec. H5606
hydraulic fluids are recommended for cold weather operation.
Please consult factory before using any other fluids than those specified
here.
Power Gear
th
1217 E. 7 Street
Mishawaka, IN 46544
800/334-4712
www.powergearus.com
Chassis STW - Leveling & Suspension
Page 9 of 126
6
TROUBLESHOOTING TIPS
Locations of breakers, fuses, fuse panels, etc. are coach specific. Consult your coach owner’s manual
or the coach manufacture for locations of these components.
The following information will guide you to repairs that may be made on site. For problems not
covered here, contact your service center or our website for more extensive troubleshooting
information in the service manual for your system.
SYSTEM WILL NOT TURN ON, INDICATOR LIGHT DOES NOT LIGHT
PROBABLE CAUSE
CORRECTIVE ACTION
COACH IGNITION NOT IN RUN
POSITION
TRANSMISSION NOT IN PARK OR
NEUTRAL
PARKING BRAKE NOT SET
TURN IGNITION TO RUN POSITION
CONTROL HAS BEEN LEFT ON
FOR MORE THAN FOUR
MINUTES, AUTO SHUT OFF
PLACE TRANSMISSION IN PARK OR
NEUTRAL
SET BRAKE
PUSH ON/OFF BUTTON TWICE
JACKS WILL NOT EXTEND, PUMP IS NOT RUNNING
PROBABLE CAUSE
CORRECTIVE ACTION
BATTERY VOLTAGE IS LOW
RECHARGE BATTERY
JACKS WILL NOT EXTEND, PUMP IS RUNNING
PROBABLE CAUSE
CORRECTIVE ACTION
FLUID LEVEL LOW
FILL TANK TO PROPER LEVEL WITH
AUTOMATIC TRANSMISSION FLUID SEE TIP
SHEET 140
ALL JACKS WILL NOT RETRACT OR WILL NOT RETRACT FULLY
PROBABLE CAUSE
CORRECTIVE ACTION
SYSTEM OVERFILLED WITH
FLUID
DRAIN FLUID TO RECOMMENDED LEVELSEE TIP 140
ANY ONE OR TWO JACKS WILL NOT RETRACT AT ALL
PROBABLE CAUSE
CORRECTIVE ACTION
BROKEN JACK SPRING (S)
REPLACE JACK SPRING SEE TIP SHEET 34
JACK ROD GUIDE IS RUSTED OR
DIRTY
CLEAN CHROME ROD, GREASE ROD GUIDE
IF EQUIPPED WITH GREASE FITTINGS.
OTHERWISE LUBRICATE WITH SILICONE
FLUID. IT MAY BE NECESSARY TO RESEAL
JACK OR REPLACE.
Chassis STW - Leveling & Suspension
Page 10 of 126
7
ANY JACK RETRACTS VERY SLOWLY
PROBABLE CAUSE
CORRECTIVE ACTION
JACK ROD GUIDE IS RUSTED OR
DIRTY
CLEAN CHROME ROD, GREASE ROD GUIDE
IF EQUIPPED WITH GREASE FITTINGS.
OTHERWISE LUBRICATE WITH SILICONE
FLUID. IT MAY BE NECESSARY TO RESEAL
JACK OR REPLACE.
ANY JACK RETRACTS WITH NO POWER, WITH POSSIBLE POPPING SOUND
PROBABLE CAUSE
CORRECTIVE ACTION
AIR IN SYSTEM
CHECK FOR COILS IN HOSE. REMOVE THE
COIL IF PRESENT THEN EXTEND ALL JACKS
TO FULL EXTENSION, THEN RETRACT
FULLY, REPEAT 4 CYCLES WAITING A FEW
MINUTES BETWEEN CYCLES, CHECK FLUID
LEVEL IN BETWEEN CYCLES
CONTAMINATED FLUID
REPLACE FLUID, SEE PAGE A3, TIP SHEET
140 AND 141.
EXTEND JACK LEGS, CLEAN ROD,
LUBRICATE WITH LIGHT WEIGHT GREASE IF
EQUIPPED WITH GREASE FITTINGS OR
LUBRICATE WITH SILICONE SPRAY
JACK LEGS CREATE POPPING
SOUND
DUE TO CHANGES IN TEMPERATURE,
EXPANDING AND CONTRACTING OF FLUID
WILL MAGNIFY THE PROBLEM OF POPPING
JACKS, TO HELP MINIMIZE THIS REPLACE
FLUID WITH MERCON V FLUID
PANEL JACKS DOWN LIGHT ILLUMINATED, BUZZER IS ON- JACKS ARE RETRACTED
PROBABLE CAUSE
CORRECTIVE ACTION
LOW FLUID LEVEL
FILL TANK WITH DEXRON III AUTOMATIC
TRANSMISSION FLUID SEE PAGE TIP SHEET
140
PANEL JACKS DOWN LIGHT AND ALARM WILL GO ON WHILE DRIVING, JACKS RETRACTED
PROBABLE CAUSE
CORRECTIVE ACTION
LOW FLUID LEVEL
FILL TANK WITH DEXRON III AUTOMATIC
TRANSMISSION FLUID SEE TIP SHEET 140
Chassis STW - Leveling & Suspension
Page 11 of 126
Blank Page
Chassis STW - Leveling & Suspension
Page 12 of 126
OPERATORS AND SERVICE
MANUAL
for
AUTOMATIC RV SYSTEM
82-L0330 Rev. 0
May, 2002
Chassis STW - Leveling & Suspension
Page 13 of 126
TABLE OF CONTENTS
OPERATION AND
MAINTENANCE........................................1
OPERATION CAUTION NOTES..........................1
BEFORE YOU OPERATE THE SYSTEM .....................2
SELECTING A SITE .................................2
LEVELING PROCEDURES................................2
RETRACTION PROCEDURES..............................3
AUTOMATIC SAFETY SHUTOFF AND MOTOR HOT FEATURES..3
DRIVE AWAY PROTECTION SYSTEM.......................4
RECOMMENDED FLUIDS.................................4
PREVENTATIVE MAINTENANCE...........................4
ORDERING
INFORMATION..............................5
REPLACEMENT PARTS
3 JACK SYSTEM....................................6
4 JACK SYSTEM....................................7
WIRING DIAGRAM...................................8
CONTROL SYSTEM...................................9
PUMP DIAGRAM....................................11
REPLACEMENT JACKS ..............................12
VALVE BLOCK DIAGRAM ............................13
TROUBLE SHOOTING..................................15
WARRANTY..........................................16
Chassis STW - Leveling & Suspension
Page 14 of 126
OPERATION AND MAINTENANCE
- The Power Gear leveling system on your coach is designed and built to give you
years of trouble free leveling and stabilizing operation. The Power Gear system
reflects the latest state of the art technology in both hydraulic and electronic
components. Please read and study this manual before you operate the leveling
system.
SYSTEM DESCRIPTION - The Power Gear automatic electro-hydraulic leveling system
consists of the following major components:
(A)Power Gear supplies spring return jacks rated at a lifting capacity appropriate
for your coach. Each jack has a large diameter shoe for maximum surface area on
soft surfaces.
(B)Each jack is powered from a central 12VDC motor/pump assembly which also includes
the hydraulic oil reservoir tank, control valve manifold, and solenoid valves.
(C)The system is controlled by the solid state touch pad located by the driver and a
control box mounted on the top of a storage bin, centrally located in the coach.
WARNING
DO NOT USE LEVELING JACKS (OR AIR SUSPENSION) TO SUPPORT VEHICLE WHILE
UNDER COACH OR CHANGING TIRES. THE HYDRAULIC LEVELING SYSTEM IS
DESIGNED AS A LEVELING SYSTEM ONLY. DO NOT USE AS A JACK OR IN
CONJUNCTION WITH A JACK. IT IS HIGHLY RECOMMENDED THAT, SHOULD A TIRE
CHANGE BE REQUIRED, THAT IT BE PERFORMED BY A KNOWLEDGEABLE, TRAINED
PROFESSIONAL. ATTEMPTS TO CHANGE TIRES WHILE SUPPORTING THE VEHICLE
WITH THE HYDRAULIC SYSTEM COULD RESULT IN DAMAGE TO THE MOTOR HOME AND
RISK CAUSING SERIOUS INJURY OR DEATH.
OPERATION CAUTION NOTES!
CAUTION - CHECK THAT POTENTIAL JACK CONTACT LOCATIONS ARE CLEAR OF OBSTRUCTIONS OR
DEPRESSIONS BEFORE OPERATION.
CAUTION - KEEP PEOPLE CLEAR OF COACH PRIOR TO TURNING THE LEVELING SYSTEM ON AND
WHILE LEVELING SYSTEM IS IN USE.
CAUTION - NEVER EXPOSE HANDS OR OTHER PARTS OF THE BODY NEAR HYDRAULIC LEAKS.
HIGH PRESSURE OIL LEAKS MAY CUT AND PENETRATE THE SKIN CAUSING SERIOUS
INJURY.
CAUTION - PARK COACH ON REASONABLY SOLID SURFACE OR JACKS MAY SINK INTO GROUND.
ON EXTREMELY SOFT SURFACES USE LOAD DISTRIBUTION PADS UNDER EACH JACK.
CAUTION - NEVER LIFT THE WHEELS OFF THE GROUND TO LEVEL THE COACH.
Chassis STW - Leveling & Suspension
1
Page 15 of 126
BEFORE YOU OPERATE THE SYSTEM
The leveling system shall only be operated under the following conditions:
(A)The
(B)The
(C)The
(D)The
coach
coach
coach
coach
is parked on a reasonably level surface.
"PARKING BRAKE" is engaged.
transmission is engaged in "Neutral or Park".
engine is running.
EXCESS SLOPE
When the coach is parked on an excessive slope the leveling requirements may exceed
the jack lift stroke capability. When this occurs, the 4 orange jack lights and the
center all level green light will blink. The coach must be moved to a more level
surface before the leveling jacks are deployed.
LEVELING PROCEDURES
STEP 1 - Push "ON/OFF" pad on control panel. The system is now operational and
the electronic level lights will become active.
STEP 2 – Check to see that the touch-pad parking brake light is not
flashing.
NOTE: Engage parking brake if parking brake light is flashing.
STEP 3 – Push the “Auto” pad to begin the automatic leveling cycle.
CAUTION: After starting the automatic leveling cycle it is
do not move around in the coach until the unit is
Gear Level light illuminates in the center of the
remain still during the leveling cycle could have
performance of the leveling system.
very important that you
level and the green Power
touch pad. Failure to
an affect on the
STEP 4 – If further adjustments are necessary, simply push and hold the “MAN” pad
for approximately 5 seconds until the light under this button is illuminated.
Push the appropriate leg pad to override the system and level the coach to
your liking.
CAUTION: Never lift the wheels off the ground when leveling the motorhome.
STEP 5 – Push “ON/OFF” pad to de-energize the system.
NOTE: When in the manual mode, if the retract button is pushed the jacks will only
retract as long as the button is depressed.
Chassis STW - Leveling & Suspension
2
Page 16 of 126
CONTROL TOUCH PAD #500629
JACK RETRACT PROCEDURES
NOTE: Coach ignition must be on.
STEP 1 - Energize the system by pushing "ON/OFF" pad on control panel. The
"ON/OFF" and “JACKS DOWN” lights will be lit.
STEP 2 - Push and release the "RETRACT ALL JACKS" pad. All the jacks will start to
retract and return to the full retract position automatically. When all jacks return
to full retract position the "JACKS DOWN" light will go out.
STEP 3 - When the "JACKS DOWN" light goes out push the "ON/OFF" pad on the control
panel to de-energize the system. After a visual inspection around the coach to
verify the jacks are fully retracted, you may proceed to travel.
AUTOMATIC SAFETY SHUTOFF FEATURE
If the touch panel is left on and inactive for four minutes it will shut off
automatically.
To reset the system the coach ignition must be turned off, then back on.
Chassis STW - Leveling & Suspension
3
Page 17 of 126
DRIVE AWAY PROTECTION SYSTEM
If the ignition is in the “RUN” position, jacks are down, and the operator takes the
transmission out of neutral or park, or releases the parking brake, the “JACKS DOWN”
indicator will flash and the alarm beeper will activate. The system will then
automatically retract the jacks until the jacks are fully retracted.
RECOMMENDED HYDRAULIC FLUIDS FOR YOUR POWER GEAR LEVELING SYSTEM
In most applications, Type A automatic transmission fluid (ATF, Dexron III, etc.,)
will work satisfactorily. Mercon V is also recommended as an alternative fluid for
Power Gear leveling systems
If operating in cold temperatures (less than -10° F) the jacks may extend and
retract slowly.
For cold weather operation, fluid specially-formulated for low temperatures may be
desirable. Mobil DTE 11M, Texaco Rando HDZ-15HVI, Kendall Hyden Glacial Blu, or any
Mil. Spec. H5606 hydraulic fluids are recommended for cold weather operation.
Please consult factory before using any other fluids.
PREVENTATIVE MAINTENANCE PROCEDURES
1. Change fluid every 36 months.
• Fill the reservoir with the jacks in the fully retracted position.
• On 1998 - PRESENT model year coaches, the fluid should be within 1/4 inch of the
fill port lip and checked only with all jacks retracted. On pre-1998 model year
coaches the fluid level should be approximately 1/8 inch on the dipstick and
checked only with all jacks retracted.
2. Check the fluid level every month.
3. Inspect and clean all hydraulic pump electrical connections every 12 months.
4. Remove dirt and road debris from jacks as needed.
WARNING:
Your coach should be supported at both front and rear axles with jack stands
before working underneath.
5. If jacks are down for extended periods, it is recommended to spray exposed chrome
rods with a silicone lubricant every seven days for protection. If your coach is
located in a salty environment, it is recommended to spray every 2 to 3 days.
Chassis STW - Leveling & Suspension
4
Page 18 of 126
REQUIRED INFORMATION FOR ORDERING PARTS FROM YOUR LOCAL DEALER
When ordering parts, please provide the following
information:
1) Your Name
2) Company Name
3) Phone Number
4) Shipping Address
5) Billing Address
6) Purchase Order Number
For each part needed
1) Coach
I.D.#
Make
Model
Wheel Base
Mileage
2) Part Number
3) Description
4) Quantity
ALL REPAIRS MUST BE MADE BY AN AUTHORIZED SERVICE CENTER. SYSTEMS
THAT HAVE BEEN TAMPERED WITH, MODIFIED, ADJUSTED OR REPAIRED BY ANY
PARTY OTHER THAN AN AUTHORIZED SERVICE CENTER WILL VOID ALL
WARRANTIES.
Chassis STW - Leveling & Suspension
5
Page 19 of 126
GENERAL ARRANGEMENT
ITEM
1
2
3
4
5
PART NO
500629
500630
NOTE 1
NOTE 2
NOTE 2
3 JACK SYSTEM
DESCRIPTION
TOUCHPAD CONTROL - AUTO SYSTEM
CONTROL CENTER - AUTO. SYSTEM
PUMP / MOTOR ASSEMBLY
REAR JACKS
FRONT JACK
QTY
1
1
1
2
1
NOTE 1: THE PUMP / MOTOR ASSEMBLY AND HOSES USED VARY BY COACH MODEL.
PLEASE REFER TO YOUR COACH MAKE, MODEL AND YEAR WHEN ORDERING.
NOTE 2: THE PARTICULAR JACKS USED VARY BY COACH MODEL. PLEASE
INDICATE THE MODEL AND YEAR OF YOUR COACH TO IDENTIFY WHICH JACKS ARE
USED.
Chassis STW - Leveling & Suspension
6
Page 20 of 126
GENERAL ARRANGEMENT
ITEM
1
2
3
4
5
PART NO
500629
500630
NOTE 1
NOTE 2
NOTE 2
4 JACK SYSTEM
DESCRIPTION
TOUCHPAD CONTROL - AUTO SYSTEM
CONTROL CENTER - AUTO. SYSTEM
PUMP / MOTOR ASSEMBLY
REAR JACKS
FRONT JACK
QTY
1
1
1
2
2
NOTE 1: THE PUMP / MOTOR ASSEMBLY AND HOSES USED VARY BY COACH MODEL.
PLEASE REFER TO YOUR COACH MAKE, MODEL AND YEAR WHEN ORDERING.
NOTE 2: THE PARTICULAR JACKS USED VARY BY COACH MODEL. PLEASE
INDICATE THE MODEL AND YEAR OF YOUR COACH TO IDENTIFY WHICH JACKS ARE
USED.
Chassis STW - Leveling & Suspension
7
Page 21 of 126
WIRING DIAGRAM
Chassis STW - Leveling & Suspension
8
Page 22 of 126
AUTOMATIC TOUCH PAD CONTROL
March 2002 - Present
ITEM NOTE P/N
1
500629S
2
N
DESCRIPTION
AUTOMATIC CONTROL PANEL
TOUCH PAD WIRE HARNESS
N - NOT SHOWN
Chassis STW - Leveling & Suspension
9
Page 23 of 126
QUANTITY APPLICATION
1
03/2002 - Present
1
03/2002 - Present
AUTOMATIC CONTROL BOX
March 2002 - Present
ITEM
1
2
3
4
5
NOTE P/N
500630S
N
500663
N
5020-XXX
N
N
500661
DESCRIPTION
AUTOMATIC CONTROL BOX
AUXILIARY HARNESS
MAIN POWER COACH HARNESS
TOUCH PAD WIRE HARNESS
PUMP HARNESS
N - NOT SHOWN
Chassis STW - Leveling & Suspension
10
Page 24 of 126
QUANTITY
1
1
1
1
1
APPLICATION
03/2002 - Present
03/2002 - Present
03/2002 - Present
03/2002 - Present
03/2002 – Present
PUMP DIAGRAM________________________________
ITEM
1-18
1,2,3
4,12,14
12
14
5,9,10,11
7,8
15
6
13,16
17
18
P/N
see note
see note
see note
07-1238
07-1239
14-1136
500661
500633
500310
500511
see note
500634
DESCRIPTION
COMPLETE POWER UNIT
VALVE BLOCK ASSEMBLY
TANK, FILL PLUG, DRAIN PLUG
FILL PLUG
DRAIN PLUG
FLOAT SWITCH ASSEMBLY
PUMP HARNESS
DUMP VALVE SOLENOID
MOTOR SOLENOID
AIR BREATHER
MOTOR/PUMP ASSEMBLY
LEG VALVE AND SOLENOID
QTY EACH
1
1
1
1
1
1
1
1
1
1
1
1
APPLICATION
2001 - PRESENT
SEE PAGE 12
2001 - PRESENT
2001 - PRESENT
2001 - PRESENT
2001 - PRESENT
2001 - PRESENT
2001 - PRESENT
2001 - PRESENT
2001 - PRESENT
2001 - PRESENT
2001 - PRESENT
NOTE: Contact authorized service facility or Power Gear for correct part
number.
ORDER BY MODEL AND YEAR
Chassis STW - Leveling & Suspension
11
Page 25 of 126
REPLACEMENT JACKS (LEGS)
ITEM
1
P/N
500145
NOTE
N
DESCRIPTION
16,000 LBS. JACK (LEG) ASSY.
16” STROKE
A=22-5/16” B=4” C=20”
QTY EACH
1
APPLICATION
1994 PRESENT
MODEL YEAR
1
500385TH
N
12,000 LBS. JACK (LEG) ASSY.
16” STROKE
A=22-5/16” B=3-5/8” C=20-1/8”
1
1999 PRESENT
MODEL YEAR
1
500620
N
24,000 LBS. JACK (LEG) ASSY.
16” STROKE
A=22-3/8” B=4-1/2” C=20-3/32”
1
1999 PRESENT
MODEL YEAR
N - ORDER BY MODEL, YEAR, AND WHEEL BASE OR BY DIMENSIONS A, B, C
NO SERVICEABLE PARTS, ORDER COMPLETE JACK (LEG)
Chassis STW - Leveling & Suspension
12
Page 26 of 126
REPLACEMENT JACKS (LEGS)
ITEM
1
P/N
NOTE
500146
N
DESCRIPTION
9,000 LBS. JACK (LEG) ASSY.
15” STROKE - A=20-3/4” B=3-1/4” C=17-3/8”
QTY EACH
APPLICATION
1
1994 - PRESENT
MODEL YEAR
1
500235
NN
9,000 LBS. JACK (LEG) ASSY.
1
12” STROKE - A=18-15/16” B=3-1/4” C=17-3/8”
1
500384H
N
6,000 LBS. JACK (LEG) ASSY.
1
14” STROKE - A=21-5/16” B=2-7/8” C=17-15/16”
1
500482H
NN
6,000 LBS. JACK (LEG) ASSY.
12” STROKE - A=18” B=2-5/8” C=15-3/8”
1
1999 - PRESENT
MODEL YEAR
2
500094
SPRING KIT FOR 15” STROKE
JACK (LEG) ASSY.
1
1994 - PRESENT
MODEL YEAR
2A
500252
SPRING KIT FOR 12” STROKE
JACK (LEG) ASSY.
1
1994 - PRESENT
MODEL YEAR
N - ORDER BY MODEL, YEAR AND WHEEL BASE OR BY DIMENSIONS A, B, C
NO SERVICEABLE PARTS, ORDER COMPLETE JACK (LEG)
N - INCLUDES ITEM 2 OR 2A
NN - INCLUDES ITEM 2 OR 2A
Chassis STW - Leveling & Suspension
13
Page 27 of 126
1994 - PRESENT
MODEL YEAR
1999 - PRESENT
MODEL YEAR
JACK (LEG) VALVE ASSEMBLY 2001 – PRESENT
3 JACK WITH MANUAL OVERIDE
ITEM
P/N
DESCRIPTION
1,3,4
500636S
REAR HOSE CONNECTOR KIT
1,3,6
500637S*
FRONT HOSE CONNECTOR KIT
5
500634
LEG VALVE SOLENOID
7
PLUG
8
500523
O-RING KIT
1-8
500633
VALVE BLOCK ASSEMBLY
QTY EACH
1
1
1
2
1
* - “F” PORT HAS TWO SPRINGS
ORDER BY MODEL AND YEAR
Chassis STW - Leveling & Suspension
14
Page 28 of 126
APPLICATION
2001 - PRESENT
2001 - PRESENT
2001 – PRESENT
2001 - PRESENT
2001 – PRESENT
TROUBLE SHOOTING
PROBLEM
PROBABLE CAUSE
CORRECTIVE ACTION
System will not turn on
and ON/OFF indicator
light does not light
Coach ignition not in run
position.
Turn ignition to run
position.
Transmission not in
neutral or park.
Place transmission in
neutral or park.
Parking brake not set.
Set parking brake.
Panel has been left on
for more than four
minutes. Auto time out
has occurred.
Turn ignition key off and
back on.
Touch pad turns on, but,
turns itself off when leg
button is pushed.
Low voltage.
Start coach to charge
batteries.
Touch pad turns on, but,
coach will not level using
the automatic feature
Jacks down light is on, even
though all of the jacks are
retracted
Low fluid level
Check fluid level in the
reservoir, if fluid is low
fill to port rim with
recommended fluid. If
jacks down light remains on
with fluid level full see
service center for repair.
Jacks will not extend to
ground, pump is running.
No fluid or not enough
fluid in reservoir.
Fill reservoir with Dexron
III automatic transmission
fluid. See page 4.
Any one or two of the
jacks will not retract.
Broken spring(s).
Secure jack in retracted
position. See service
center for repair.
“JACKS DOWN” light does
not go out when all jacks
are retracted.
Low fluid level.
Fill reservoir to proper
level with recommended
fluid. See page 4.
Alarm sounds and “JACKS
DOWN” light starts
flashing while traveling.
The jacks are fully
retracted.
Low fluid level.
Fill reservoir to proper
level with recommended
fluid. See page 4.
Chassis STW - Leveling & Suspension
15
Page 29 of 126
POWER GEAR
LIMITED WARRANTY
Power Gear warrants to the original retail purchaser that the product will be
free from defects in material and workmanship for a period of one (1) year
following the retail sales date.
Power Gear will, at its option, repair or
replace any part covered by this limited warranty which, following examination by
Power Gear or its authorized distributors or dealers, is found to be defective
under normal use and service. No claims under this warranty will be valid unless
Power Gear or its authorized distributor or dealer is notified in writing of such
claim prior to the expiration of the warranty period.
Warranty is nontransferable.
THIS WARRANTY SHALL NOT APPLY TO:
•
•
•
•
•
•
•
•
•
Failure due to normal wear and tear, accident, misuse, abuse, or negligence.
Products which are modified or altered in a manner not authorized by Power
Gear in writing.
Failure due to misapplication of product.
Telephone, telegraph, teletype or other communication expenses.
Living or travel expenses of person performing service.
Overtime labor.
Failures created by improper installation of the product’s slideout system or
slideout room to include final adjustments made at the plant for proper room
extension/retraction; sealing interface between slideout rooms and side walls;
synchronization of inner rails; or improper wiring or ground problems.
Failures created by improper installation of leveling systems, including final
adjustments made at the plant, or low fluid level, wiring or ground problems.
Replacement of normal maintenance items including lubricants and fuses.
There is no other express warranty other than the foregoing warranty. THERE ARE
NO IMPLIED WARRANTIES OF MERCHANTIBILITY OR FITNESS FOR A PARTICULAR PURPOSE. IN
NO EVENT SHALL POWER GEAR BE LIABLE FOR ANY INCIDENTAL OR CONSEQUENTIAL DAMAGES.
This warranty gives you specific legal rights, and you may also have other rights
which vary from state to state.
Some states do not allow the limitations of
implied warranties, or the exclusion of incidental or consequential damages, so
the above limitations and exclusions may not apply to you.
For service contact your nearest Power Gear authorized warranty service facility
or call 1-800-334-4712. Warranty service can be performed only by a Power Gear
authorized service facility.
This warranty will not apply to service at any
other facility. At the time of requesting warranty service, evidence of original
purchase date must be presented.
Power Gear
1217 East Seventh Street
Mishawaka, IN 46544
800/334-4712
1
Chassis STW - Leveling & Suspension
Page 30 of 126
th
1217 E. 7 Street
Mishawaka, IN 46544
Phone: 1-800-334-4712
1-888-339-2539
Fax:
574-256-6743
T.I.P. Troubleshooting Information on Power Gear
AUTOMATIC LEVELING SYSTEM SET-UP PROCEDURE
Initial Zero Mode:
Zero mode is indicated on the control touch pad by all lights on the pad flashing.
1)
First, place a carpenter’s level on the floor in the center of the coach
2)
Next, manually level the coach:
• Push the front leg button until the jacks contact the ground
• Push the rear leg button until jacks contact the ground
• Push the left and the right button to verify all of the jacks are on the
ground
• Using the carpenters level complete the leveling process manually by
pushing the appropriate buttons on the touch pad.
3)
After it has been verified that the coach is level the zero level point (this is
the point that the control sees as level) can be set
• To set zero level, push the retract button three consecutive times
• After the “retract” button has been pushed three times all of the lights
on the touch pad will stop blinking except the on off light.
• The on off button light will flash for 20 seconds. This mode is
prompting the user to tell the automatic control box if the chassis has
a air bag suspension system.
• If the chassis has an air bag suspension system press the
RETRACT button again three times within 20 seconds from the time
the zero level position was programmed ( during the time the on off
light is blinking
• If the unit does not has air bag suspension system DO NOT
TOUCH ANY BUTTONS within the 20 seconds the on off light is
blinking.
Resetting initial zero point
If the zero point has been set and the control is functioning normally, the user
can reset the zero point by following the steps below.
1)
First, the control box has to be put back into the zero mode.
• This is done be pushing the front button 5 consecutive times followed
by the rear button 5 consecutive times within 10 seconds.
• All of the lights on the touch pad will begin flashing. This indicates that
you have successfully returned the control box to zero mode.
2)
Last, follow the instructions above to set the new zero point.
TIP Sheet #153
82-L0317-T-Rev1
08-02
Chassis STW - Leveling & Suspension
Page 31 of 126
Chassis STW - Leveling & Suspension
Page 32 of 126
3-Way air control valve for Inspire
w/ Powergear leveling system
Chassis STW - Leveling
Page
& Suspension
33 of 126
Blank Page
Chassis STW - Leveling & Suspension
Page 34 of 126
HW H
R
CORPORATION
OPERATOR’S MANUAL
HWH COMPUTER-CONTROLLED
2000 SERIES LEVELING SYSTEM
AND
SPACEMAKER ROOM EXTENSION SYSTEMS
R
R
FEATURING:
Touch Panel Leveling Control
Air Leveling (With Tag Axle)
Four Room Extensions
HWH COMPUTERIZED LEVELING
LEVEL
AIR
EXCESS
SLOPE
NOT IN
PARK/
BRAKE
TRAVEL
MODE
DUMP
EMERGENCY
STOP
TRAVEL
MODE
RAISE
CAUTION!
UNDERSTAND OPERATOR’S MANUAL BEFORE USING. BLOCK FRAME AND TIRES
SECURELY BEFORE REMOVING TIRES OR CRAWLING UNDER VEHICLE.
HWH CORPORATION
(On I-80, Exit 267 South)
2096 Moscow Road | Moscow, Iowa 52760
Ph: 800/321-3494 (or) 563/724-3396 | Fax: 563/724-3408
www.hwh.com
AP31811
Chassis STW - Leveling & Suspension
Page 35 of 126
ML31812/MP05.992G
15DEC03
OPERATOR’S MANUAL
CAUTION !
READ THE ENTIRE OPERATOR’S MANUAL BEFORE OPERATING.
BLOCK FRAME AND TIRES SECURELY BEFORE CRAWLING UNDER VEHICLE. DO NOT USE LEVELING JACKS OR AIR
SUSPENSION TO SUPPORT VEHICLE WHILE UNDER VEHICLE OR CHANGING TIRES. VEHICLE MAY DROP AND/OR
MOVE FORWARD OR BACKWARD WITHOUT WARNING CAUSING INJURY OR DEATH.
KEEP ALL PEOPLE CLEAR OF VEHICLE WHILE LEVELING SYSTEM AND ROOM EXTENSION ARE BEING OPERATED.
NEVER PLACE HANDS OR OTHER PARTS OF THE BODY NEAR HYDRAULIC LEAKS. OIL MAY PENETRATE SKIN
CAUSING INJURY OR DEATH.
DO NOT OPERATE THE LEVELING SYSTEM OR USE THE DUMP OR RAISE BUTTONS IF THE VEHICLE IS MOVING
IN EXCESS OF 5 MPH.
WEAR SAFETY GLASSES WHEN INSPECTING OR SERVICING THE SYSTEM TO PROTECT EYES FROM DIRT, METAL
CHIPS, OIL LEAKS, ETC. FOLLOW ALL OTHER APPLICABLE SHOP SAFETY PRACTICES.
IMPORTANT: IF COACH IS EQUIPPED WITH A ROOM EXTENSION, READ ROOM EXTENSION SECTION BEFORE
OPERATING LEVELING SYSTEM.
HOW TO OBTAIN WARRANTY SERVICE
THIS IS NOT TO BE INTERPRETED AS A STATEMENT OF WARRANTY
HWH CORPORATION strives to maintain the highest level of
customer satisfaction. Therefore, if you discover a defect or
problem, please do the following:
FIRST: Notify the dealership where you purchased the
vehicle or had the leveling system installed. Dealership
management people are in the best position to resolve
the problem quickly. If the dealer has difficulty solving
the problem, he should immediately contact the Customer
Service Department, at HWH CORPORATION.
SECOND: If your dealer cannot or will not solve the problem,
notify the Customer Service Department:
HWH CORPORATION 2096 Moscow Rd. Moscow IA. 52760
(563) 724-3396 OR (800) 321-3494. Give your name and
address, coach manufacturer and model year, date the
coach was purchased, or the date of system installation,
Chassis STW - Leveling & Suspension
description of the problem, and where you can be reached
during business hours (8:00 a.m. till 5:00 p.m. c.s.t.).
HWH CORPORATION personnel will contact you to
determine whether or not your claim is valid. If it is, HWH
CORPORATION will authorize repair or replacement of the
defective part, either by appointment at the factory or by the
authorization of an independent service facility, to be
determined by HWH CORPORATION. All warranty repairs
must be performed by an independent service facility
authorized by HWH CORPORATION, or at the
HWH CORPORATION factory, unless prior written approval
has been obtained from proper HWH CORPORATION
personnel.
Page 36 of 126
MP15.4501
30MAY01
CONTROL IDENTIFICATION
"EXCESS SLOPE"
LIGHT
HARD RESET SWITCH
(SEE HWH LIGHTED RESET SWITCH)
"NOT IN PARK"
LIGHT
MASTER WARNING LIGHT
LEVELING SYSTEM
ACTIVE LIGHT
LOWER FRONT BUTTON
"AIR" (ON) BUTTON
RAISE FRONT BUTTON
HWH COMPUTERIZED LEVELING
DUMP LIGHT
WARNING LIGHTS
(4 - Red)
EXCESS
SLOPE
AIR
"TRAVEL MODE" BUTTON
LIGHT (Red)
RAISE RIGHT SIDE BUTTON
NOT IN
"TRAVEL MODE" BUTTON
PARK /
BRAKE
TRAVEL
MODE
LOWER RIGHT SIDE BUTTON
DUMP
"DUMP" BUTTON
"EMERGENCY STOP" BUTTON
EMERGENCY
STOP
LEVELING LIGHTS
(4 - Yellow)
TRAVEL
MODE
RAISE
CAUTION!
UNDERSTAND OPERATOR’S MANUAL BEFORE USING. BLOCK FRAME AND TIRES
RAISE LIGHT
SECURELY BEFORE REMOVING TIRES OR CRAWLING UNDER VEHICLE.
RAISE REAR BUTTON
"RAISE" BUTTON
"TRAVEL MODE"
LIGHT (Green)
LOWER REAR BUTTON
RAISE LEFT SIDE
BUTTON
LOWER LEFT SIDE
BUTTON
CONTROL FUNCTIONS
CONTROL BUTTONS
INDICATOR LIGHTS
"AIR" BUTTON: This is the system active and automatic
operation button. It works if the ignition is in the "ON" position.
LEVEL SYSTEM ACTIVE LIGHT: ON when the system is
active, and flashes during automatic leveling.
"EMERGENCY STOP" BUTTON: This button turns the
system OFF but does NOT control power to the "DUMP" or
"RAISE" buttons. Pushing this button will NOT put the system
in the TRAVEL mode.
DUMP LIGHT: Flashes when "DUMP" button is pushed.
"TRAVEL MODE" BUTTON: This button will put the Leveling
System in the TRAVEL mode. The ignition must be "ON" for
the vehicle to return to proper ride height for traveling.
"DUMP" BUTTON: This button will lower the whole coach by
dumping air from the suspension system.
"RAISE" BUTTON: This button will raise the whole coach
by adding air to the suspension system.
IMPORTANT: Read "DUMP AND RAISE FUNCTIONS"
before using the "DUMP" or "RAISE" buttons.
UP ARROWS (RAISE BUTTONS): These momentary
buttons are used for manually operating the air leveling
systems. Sides or ends of the vehicle will raise while these
buttons are pushed.
DOWN ARROWS (LOWER BUTTONS): These momentary
buttons are used for manually operating the air leveling
systems. Sides or ends of the vehicle will lower while these
buttons are pushed.
Chassis STW - Leveling & Suspension
RAISE LIGHT: Flashes when "RAISE" button is pushed.
"EXCESS SLOPE" LIGHT: ON if the leveling system
can NOT level the coach.
"TRAVEL MODE" BUTTON LIGHT (RED): Light flashes
for 3 seconds after the "TRAVEL MODE" button is pushed.
"TRAVEL MODE" LIGHT (GREEN): ON if the ignition is in
the "ON" position, the system is not being used, and there is
sufficient air pressure in the suspension.
See PREPARATION FOR TRAVEL.
WARNING LIGHTS: Function with the ignition in the
"ON" position. ON when the LEVELING SYSTEM ACTIVE
LIGHT is ON. See PREPARATION FOR TRAVEL.
LEVELING LIGHTS: One or two yellow lights can be on
indicating the side, end or corner of the coach is low.
"NOT IN PARK/BRAKE" LIGHT: ON while the "AIR" button
is being pushed if the Park Brake is NOT set. The light will go
out when the "AIR" button is released.
MASTER WARNING LIGHT: ON any time the
"TRAVEL" light is not ON, if the ignition is in the
"ON" position.
MP25.998D
Page 37 of 126
31OCT02
CONTROL IDENTIFICATION
ROOM EXTENSION OPERATOR’S PANEL
PUMP ON INDICATOR
LIGHT (RED)
HW H
READY TO OPERATE
LIGHT (AMBER)
R
CORPORATION
FLASH / WAIT
STEADY / READY TO
OPERATE
PUMP ON
HYDRAULIC ROOM EXTENSION
KEY SWITCH
EXTEND
OFF
ROOM CONTROL
SWITCH
ON
CAUTION!
UNDERSTAND OPERATOR’S MANUAL BEFORE
USING. KEEP PEOPLE AND OBSTRUCTIONS
CLEAR OF ROOM WHEN OPERATING.
RETRACT
CONTROL FUNCTIONS
KEY SWITCH: The KEY SWITCH controls power to the ROOM
CONTROL SWITCH. When the KEY SWITCH is in the "ON"
POSITION the room can be operated, and the key cannot be
removed. When the KEY SWITCH is in the "OFF" position
the room cannot be operated, and the key can be removed.
NOTE: Any time the KEY SWITCH is ON, the network will
be active and will not power down.
ROOM CONTROL SWITCH: The ROOM CONTROL SWITCH
is a two position momentary switch. Pressing the switch in the
EXTEND POSITION will extend the room. Pressing the switch
in the RETRACT POSITION will retract the room. Releasing
the ROOM CONTROL SWITCH will halt the operation of the
room.
PUMP ON INDICATOR LIGHT: This light will be on when the
pump is running.
READY TO OPERATE LIGHT: After the KEY SWITCH
is turned on the READY TO OPERATE LIGHT will glow
steady. Except for EXCESS SLOPE situations, the room
cannot be extended or retracted if this light is flashing.
If the "EXCESS SLOPE" light on the leveling system
control panel is on, the READY TO OPERATE light will flash
continously after the key switch is turned ON. The room
will not extend. The room will retract if the room control
switch is pushed to "RETRACT".
If the PARK BRAKE is not set, the READY TO OPERATE
light will not turn on and flash when the KEY SWITCH is
turned "ON".
If a RAISE or LOWER function of the Leveling System is in
use, MANUAL or AUTOMATIC operation, the READY TO
OPERATE light will flash if the KEY SWITCH is in the "ON"
position. The room will not operate.
MASTER WARNING LIGHT
This light is on the dash, separate from the control panels.
It can be on only if the ignition key is in the "ON" position.
Chassis STW - Leveling & Suspension
The light will be on if a HWH low air pressure switch is on,
if the Leveling System is on, or if the Leveling System is not
in the TRAVEL mode.
Page 38 of 126
MP25.998J
19JUN02
OPERATING PROCEDURES
NETWORK INFORMATION
The HWH 2000 series CAN system is a computerized
modular network. It controls all functions of the leveling
system and the room extensions. The network is active any
time the ignition is in the "ON" or "ACC" position or when
any room extension control panel key is "ON". Certain
functions and indicator lights for the leveling system will work
when the network is active. Certain functions and lights will
work ONLY if the the ignition is in the "ON" or "ACC" position
to start the function.
NOTE: The network will stay active for 10 minutes after the
ignition key and all room extension control panel keys have
been turned "OFF". If the leveling system was turned "ON",
the network will stay active for 10 minutes after automatic
leveling is complete or the system goes "EXCESS SLOPE".
If manual leveling buttons were used, the network stays
active for 10 minutes after the last manual button is released.
GENERAL INSTRUCTIONS
Maintain adequate clearance in all directions for vehicles,
room extensions, doors, steps, etc.. Vehicle may move in any
direction due to raising or lowering of vehicle during leveling,
settling of vehicle, equipment malfunction, etc..
The "DUMP" and "RAISE" buttons will function with the
leveling system and park brake off, if the ignition is in the
"ON" or "ACC" position or if the network is active. See AIR
DUMP AND RAISE FUNCTIONS section of this manual.
The MASTER WARNING LIGHT will be on if an air bag has
low pressure, if the ignition is in the "ON" position.
If the Park Brake is not set, the Leveling System cannot
be turned ON and the room extension will not operate.
CAUTION: DO NOT MOVE THE VEHICLE IF A ROOM IS
EXTENDED. DO NOT MOVE THE VEHICLE AT SPEEDS
IN EXCESS OF 5 MPH IF THE MASTER WARNING LIGHT
IS ON.
If a ROOM CONTROL SWITCH is being pushed, no other
room or the Leveling System can be operated. If any Leveling
System raise or lower function is being operated, no room
control switch will work.
HWH LIGHTED RESET SWITCH
The HWH lighted reset switch is located on the vehicle dash.
If there is a failure at any time in the HWH CAN network, the
network will shut down. The leveling system and all room
extensions will not operate. If the ignition is off, no indicator
lights will come on. If the ignition is in the "ON" or "ACC"
position, the lighted reset switch and the MASTER WARNING
Light will come on.
If the lighted reset switch is on, the switch must be pushed
before any room or the leveling system can be operated.
A network problem with one room will not inhibit the use of
the other rooms or leveling system after the reset switch is
pushed.
Chassis STW - Leveling & Suspension
A network problem with the leveling system will not inhibit
the use of the room extensions after the reset switch is
pushed.
If the lighted reset switch will not go out when pushed, there
is a problem with the central control module of the network
system. No rooms or the Leveling System will operate.
The vehicle suspension will return to the travel mode if the
ignition key is in the "ON" position.
CAUTION: IF THE IGNITION IS IN THE "ON" POSITION
AND THE LIGHTED RESET SWITCH IS ON, THE VEHICLE
CAN RETURN TO RIDE HEIGHT WITHOUT RELEASING
THE PARK BRAKE.
Page 39 of 126
MP35.103C
25SEP01
OPERATING PROCEDURES
PREPARATION FOR TRAVEL
Check that all room extensions are fully retracted.
CAUTION: IT IS THE OPERATOR’S
DO NOT move the vehicle unless the room extensions
are retracted.
RESPONSIBILITY TO CHECK THAT THE VEHICLE IS AT
PROPER RIDE HEIGHT AND THE SLIDE-OUT IS FULLY
RETRACTED BEFORE TRAVELING.
Visually check that the vehicle is at the proper ride height for
traveling.
The ignition must be in the "ON" position for the vehicle
suspension to be in the travel mode. Also the "TRAVEL
MODE" button must be pushed or the park brake released
for the suspension to be in the travel mode if the Leveling
System was used.
Before traveling, the MASTER WARNING light must be off
and the "TRAVEL MODE" light must be ON.
NOTE: Low air pressure can turn the green
"TRAVEL MODE" light off and turn the
MASTER WARNING light on.
Refer to "DUMP" and "RAISE" FUNCTIONS operating
procedures when moving the vehicle with the suspension
NOT at the proper ride height.
A lit "TRAVEL MODE" LIGHT indicates that the HWH
Leveling System is in the TRAVEL MODE. It does not
indicate that the suspension is at ride height or that the
coach is ready to travel.
AUTOMATIC AIR OPERATION
NOTE: The ignition must be in the "ON" or "ACC"
position to use the "AIR" button. Once the operation is
started, the ignition can be moved to the "OFF" position
and the operation will continue. If a ROOM CONTROL
switch is being pushed, the Leveling System can not be
operated.
1. Place the transmission in the proper position for parking
and set the park brake. The air leveling system can only be
turned on if the ignition is in the "ON" or "ACC" position.
Leaving the engine running during leveling is recommended.
This will provide a better air supply for leveling.
NOTE: If the TAG DUMP SWITCH is in the DUMP
position, it is recommended that it is returned to the
TRAVEL position before starting the leveling procedure.
2. Press the "AIR" button once to enter the air mode. The
LEVELING SYSTEM ACTIVE LIGHT will glow steady.
The four red WARNING lights on the panel will come on.
This indicates that the height control valves have been
locked out. The vehicle should not be moved when these
lights are on.
NOTE: If the park brake is not set, the "NOT IN
PARK/BRAKE" light will be on while the "AIR" button
is being pushed.
3. Press the "AIR" button a second time. The LEVELING
SYSTEM ACTIVE LIGHT will start flashing and air leveling
will begin. The system will attempt to level the vehicle by
exhausting air from the air bags. If a level position is not
achieved by lowering the vehicle, the low side and/or end of
the vehicle will be raised by adding air to the air bags.
When all four yellow LEVEL SENSING lights are out the
leveling is complete.
NOTE: Only one or two yellow LEVEL SENSING lights
may be ON at one time.
Chassis STW - Leveling & Suspension
4. When all four yellow level lights are out, the LEVELING
SYSTEM ACTIVE LIGHT will stop flashing and start pulsating
dimly. The Leveling System is now in the SLEEP MODE.
The vehicle’s engine/ignition may now be turned OFF.
NOTE: After the ignition and all room extension KEY
SWITCHES are turned OFF, the CAN Network stays
active for 10 minutes before shutting down. Leveling
System touch panel lights will stay ON during this time
and go out when the CAN Network shuts down. If the
Leveling System is in the SLEEP MODE when the
Network shuts down, the computer will stay ON. The
Leveling System touch panel lights will all be OFF, but
the Leveling System will still be in the SLEEP MODE.
5. During the Sleep Mode, after 30 minutes the processor
checks the Level Sensing Unit inputs. If no input for a
yellow level light is seen, the processor remains dormant
and will recheck the level unit inputs every 30 minutes. If
the yellow light input stays on for one minute continuously,
the processor will relevel the vehicle. If a yellow level light
input is flickering, the processor will monitor the level
sensing unit inputs continuously. If the yellow light input
stays off for one minute, the processor reverts to checking
the inputs every 30 minutes.
NOTE: No lights, including yellow level lights, on the
Touch Panel will be ON unless the Network is actively
trying to level the vehicle.
6. If the vehicle needs to be releveled, the CAN Network will
become active. The LEVELING SYSTEM ACTIVE LIGHT
will flash. One or two yellow LEVELING LIGHTS will be ON.
When the yellow LEVELING LIGHTS are all out, the
LEVELING SYSTEM ACTIVE LIGHT will stop flashing and
start pulsating dimly. The Leveling System will remain in the
SLEEP MODE with the computer monitoring the LEVELING
SENSING UNIT every 30 minutes,
MP35.203C
releveling the vehicle as needed.
Page 40 of 126
12DEC03
OPERATING PROCEDURES
AUTOMATIC AIR OPERATION (Continued)
NOTE: The CAN Network will stay active for 10 minutes
after releveling the vehicle and then shut down, turning the
touch panel lights OFF. This happens every time the system
relevels the vehicle.
7. The SLEEP MODE will continue until the "EMERGENCY
STOP" button is pushed or the park brake is released, if the
ignition is in the "ON" position.
EXCESS SLOPE: The system will attempt to level the
vehicle for approximately 15 to 20 minutes. After the 15 to 20
minutes, if a LEVEL SENSING light is still on, the "EXCESS
SLOPE" light will come on. The LEVEL LIGHT indicator light
will go out. The "EXCESS SLOPE" light will be on whenever
the network is active.
The "EXCESS SLOPE" light will be on whenever the network
is active until the vehicle is leveled with all yellow LEVEL
indicator lights off.
TAG AXLE DUMP
The tag axle dump switch is supplied by Country Coach.
IMPORTANT: Refer to Country Coach for proper use of the
TAG DUMP feature.
The tag dump switch will work only with the ignition switch
in the "ON" position and the Leveling System panel off. The
transmission must be in the R, N or 1 position.
Chassis STW - Leveling & Suspension
NOTE: If the TAG DUMP switch is in the DUMP position and
the ignition key is turned ON (with the Leveling System panel
OFF) the tag axle air bags will go into the dump mode.
The TAG DUMP switch, in either the DUMP or TRAVEL
position, will not interfere with any air leveling operations.
Page 41 of 126
MP35.303C
25SEP01
OPERATING PROCEDURES
MANUAL AIR OPERATION
NOTE: The ignition must be in the "ON" or "ACC"
position to use the "AIR" button. Once the operation
is started, the ignition can be moved to the "OFF"
position and the operation will continue.
1. Place the transmission in the proper position for parking
and set the park brake. The air leveling system can only be
turned on if the ignition is in the "ON" position. Running the
vehicle engine during leveling is recommended. This will
provide a better air supply for leveling. The vehicle will level
with the engine shut off, however more time will be required
for leveling.
NOTE: If the "NOT IN PARK/BRAKE" light is on,
the leveling system cannot be turned on.
2. Press the "AIR" button once to enter the air mode. The
LEVELING SYSTEM ACTIVE LIGHT indicator light will glow
steady. When the ignition is in the "ON" position, the four red
WARNING lights on the panel will come on. This indicates
that the height control valves have been locked out. The
vehicle should not be moved when these lights are on.
3. The vehicle can now be leveled using the RAISE (up arrow)
and LOWER (down arrow) buttons on the right half of the
panel in conjunction with the yellow LEVEL indicator lights.
Any side to side leveling should be done, if needed,
before leveling the vehicle front to rear. The yellow LEVEL
indicator light indicates that side or end is low. When all yellow
lights are out the vehicle is level. Try leveling the vehicle by
lowering the high side or end (opposite of the lit yellow level
lights). If a level position is not achieved use the RAISE
(up arrow) button to raise the low side or end.
NOTE: In either manual or automatic leveling when
either front air manifold air bag pressure switch is on
a front lower procedure is halted. When either rear air
manifold air bag pressure switch is on, a rear lower
procedure is halted. Air bag pressure switches will
not interfere with either a right or left lower procedure.
4. Turn the ignition to the "OFF" position.
5. Turn the system off.
NOTE: If the "DUMP" or "RAISE" buttons are pushed
while manually leveling the vehicle with air and the
ignition is in the "ON" position, the system will latch
into the dump or raise mode until the "EMERGENCY
STOP" button is pushed or the ignition is turned off.
"DUMP" AND "RAISE" FUNCTIONS
The "DUMP" and "RAISE" functions are provided for operator
convenience for purposes such as dumping the air
suspension when parked.
Leave the engine running if the "RAISE" function is to be
used. The park brake does not have to be set to use the
"DUMP" or "RAISE" buttons.
IMPORTANT: If the ignition is ON and the park brake is
OFF, the "DUMP" and "RAISE" features will latch in and
remain on. If the vehicle exceeds 10 MPH, the "DUMP"
or "RAISE" functions will automatically turn off and the
system will return to the TRAVEL MODE. If the park
brake is set, the "TRAVEL MODE" button must be
pushed before the vehicle can return to ride height.
CAUTION:
REREAD CAUTIONS ON THE FIRST
PAGE OF THIS MANUAL. THE VEHICLE MAY DROP OR
RAISE AND/OR MOVE FORWARD OR BACKWARD
WITHOUT WARNING CAUSING INJURY OR DEATH.
DO NOT OPERATE THE VEHICLE UNLESS
THE AIR SUSPENSION IS AT THE PROPER
HEIGHT FOR TRAVEL.
If the ignition is in the "ON" position and the park brake is off,
the "RAISE" or "DUMP" buttons will latch in. The vehicle will
raise or lower completely and stay in that position.
The vehicle can not return to ride height until the "TRAVEL
MODE" button or the "EMERGENCY STOP" button is pushed
or the vehicle exceeds 10 M.P.H, putting the system in the
TRAVEL MODE.
If the ignition is in the "OFF" position the "RAISE" and
"DUMP" buttons will not latch in. The vehicle will remain in
the position it was when the button was released. The
vehicle can return to ride height when the ignition is turned
to "ON" if the park brake is released or the "TRAVEL MODE"
button is pushed.
DO NOT operate the vehicle for extended distances
unless the air suspension is at the proper height for
travel. The vehicle can not return to ride height until
the "EMERGENCY STOP" button is pushed or the
vehicle exceeds 10 MPH, putting the system in the
TRAVEL MODE.
CAUTION:
IT IS THE OPERATOR’S
RESPONSIBILITY TO CHECK THAT THE VEHICLE
IS AT PROPER RIDE HEIGHT BEFORE TRAVELING.
The "RAISE" and "DUMP" buttons can be used at any time
the network is active. The park brake does not have to be on.
Chassis STW - Leveling & Suspension
Page 42 of 126
MP35.485Q
29JUL04
OPERATING PROCEDURES
ROOM EXTEND PROCEDURE
IMPORTANT: It is recommended to level and stabilize
the vehicle before extending the room.
IMPORTANT: Extending or retracting any leveling jacks
when the room is extended is not recommended.
1. The park brake must be set for the room to be operated.
IMPORTANT: If the "EXCESS SLOPE" light is ON,
the vehicle should be re-leveled so all yellow LEVEL
indicator lights on the touch panel are OFF. If any of the
four yellow LEVEL indicator lights cannot be put out, the
vehicle should be moved to a more level location before
using the room extension.
CAUTION: KEEP PEOPLE AND OBSTRUCTIONS
CLEAR OF ROOM WHEN OPERATING.
NOTE: Make sure there is adequate clearance to fully
extend the room.
2. Insert the KEY into the KEY SWITCH on the room
extension operator’s panel and turn it to the "ON" position.
The READY TO OPERATE light will come on steady.
NOTE: If the Leveling System is being operated, the
room will not extend. If the room panel KEY SWITCH is
on, the "READY TO OPERATE" light will flash while the
Leveling System is being operated.
3. To extend the room, push and hold the ROOM CONTROL
SWITCH in the "EXTEND" position. The red "PUMP ON" light will
come on. Hold the ROOM CONTROL SWITCH to "EXTEND"
until the room is fully extended. Releasing the switch will
halt room operation and turn the "PUMP ON" light off.
NOTE: Hold the switch to "EXTEND" three or four seconds
after the room is fully extended. This assures proper
pressurization of the cylinders. During normal operation
of the room, do not reverse direction of the room until
the room is fully extended. If necessary, the direction
of the room may be reversed, but watch for binding of
the room. If the direction of the room has been
reversed, DO NOT re-extend the room until the room
has been fully retracted.
IMPORTANT: Do not hold the ROOM CONTROL SWITCH
in the "EXTEND" position for more than ten seconds
after the room is fully extended or stops moving.
If either side of the room stops moving, release the
room control switch immediately. DO NOT force the
room. DO NOT reverse direction of the room, contact
HWH Customer Service for assistance 1-800-321-3494.
4. Turn the KEY SWITCH to the "OFF" position and remove
the key. The READY TO OPERATE light will go out.
NOTE: If the KEY SWITCH is left "ON" The Network will
stay active and not power down.
ROOM RETRACT PROCEDURE
CAUTION:
KEEP PEOPLE AND OBSTRUCTIONS
CLEAR OF ROOM WHEN OPERATING.
1. The park brake must be set for the room to be operated.
IMPORTANT: It is recommended that the room is level
before retracting the room.
2. Insert the KEY into the KEY SWITCH on the room
extension operator’s panel and turn it to the "ON" position.
The READY TO OPERATE light will come on steady.
NOTE: If the Leveling System is being operated, the
room will not retract. If the room panel KEY SWITCH is
ON, the READY TO OPERATE light will flash while the
Leveling System is being operated.
3. To retract the room, push and hold the ROOM CONTROL
SWITCH in the "RETRACT" position. The red "PUMP ON" light will
come on. Hold the ROOM CONTROL SWITCH to "RETRACT"
until the room is fully retracted. Releasing the switch will
halt room operation and turn the "PUMP ON" light off.
Chassis STW - Leveling & Suspension
NOTE: Hold the switch to "RETRACT" three or four seconds
after the room is fully retracted. This assures proper
pressurization of the cylinders. During normal operation
of the room, do not reverse direction of the room until
the room is fully retracted. If necessary, the direction
of the room may be reversed, but watch for binding of
the room. If the direction of the room has been
reversed, DO NOT retract the room until the room
has been fully extended.
IMPORTANT: Do not hold the ROOM CONTROL SWITCH
in the "RETRACT" position for more than ten seconds
after the room is fully retracted or stops moving.
If either side of the room stops moving, release the
room control switch immediately. DO NOT force the
room. DO NOT reverse direction of the room, contact
HWH Customer Service for assistance 1-800-321-3494.
4. Turn the KEY SWITCH to the "OFF" position and remove
the key. The READY TO OPERATE light will go out.
NOTE: If the KEY SWITCH is left "ON" The Network will
stay active and not power down.
Page 43 of 126
MP35.720C
08DEC03
FRONT
AIR LINE CONNECTION DIAGRAM
FRONT AND DRIVE AXLE
LINE FROM HEIGHT
CONTROL VALVE
LINE FROM HEIGHT
CONTROL VALVE
FRONT AIR
MANIFOLD
LF AIR BAG
PRESSURE
SWITCH
FRONT
AXLE
RF AIR BAG
PRESSURE
SWITCH
LINE TO
AIR BAG
AIR BAG
LINE TO
AIR BAG
AIR SUPPLY
VEHICLE
AIR SUPPLY
HCV
COUNTRY
COACH
COMPRESSOR
HEIGHT
CONTROL
VALVE
FILTER
N.O.
HWH WATER TRAP
IMPORTANT: MANIFOLDS ARE
PRE-WIRED AND CONNECTIONS
ARE LABELED. RIGHT AND LEFT
CONNECTIONS MUST BE
PROPERLY MAINTAINED.
VEHICLE
AIR SUPPLY
AIR BAG
DRIVE
AXLE
LR AIR BAG
PRESSURE
SWITCH
TO TAG MANIFOLD
AIR SUPPLY
SEE AIR LINE
CONNECTION
DIAGRAM
TAG AXLE
Chassis STW - Leveling & Suspension
HCV
HCV
DRIVE
AXLE
MANIFOLD
RR AIR BAG
PRESSURE
SWITCH
SYSTEM
AIR
PRESSURE
SWITCH
SEE AIR LINE
CONNECTION
DIAGRAM
TAG AXLE
SEE SPECIFIC MANIFOLD
DIAGRAMS FOR CONNECTION
INFORMATION
TO TAG ENABLE
CONNECTION
Page 44 of 126
MP75.010J
09OCT01
AIR LINE CONNECTION DIAGRAM
TAG AXLE
SEE AIR LINE CONNECTION DIAGRAM
FRONT AND DRIVE AXLE
FROM DRIVE AXLE
AIR BAGS
FRONT
FROM AIR
SUPPLY
TAG AXLE
MANIFOLD
LS TAG AIR
BAG
PRESSURE
SWITCH 20 PSI
RS TAG AIR
BAG
PRESSURE
SWITCH 20 PSI
LINES TO
AIR BAGS
TAG
AXLE
AIR BAG
TAG ENABLE
CONNECTIONS
AIR
SUPPLY
TO TAG
LIFT
TAG LIFT
EXHAUST
TAG LIFT
AIR BAG
TAG LIFT
PRESSURE
REGULATOR
BY FORETRAVEL
100 PSI
IMPORTANT: MANIFOLDS ARE PRE WIRED
AND CONNECTIONS ARE LABELED. RIGHT
AND LEFT CONNECTIONS MUST BE
PROPERLY MAINTAINED
SEE SPECIFIC MANIFOLD DIAGRAMS FOR
CONNECTION INFORMATION
VALVE REPLACEMENT NOTE: THE TAG DUMP/LOWER
AIR SOLENOID VALVES ARE A DIFFERENT VALVE THAN
THE OTHER VALVES ON THE MANIFOLD. ALL OTHER
AIR SOLENOID VALVES ON THE FRONT, DRIVE AND
TAG MANIFOLD ASSEMBLIES ARE THE SAME.
Chassis STW - Leveling & Suspension
Page 45 of 126
MP75.110J
03FEB03
AIR LEVEL SCHEMATIC
4-POINT AIR LEVELING - FRONT AND DRIVE AXLE
PRESSURE SWITCHES FRONT, REAR AND TAG
HEIGHT
CONTROL
VALVE
AUXILIARY
AIR COMPRESSOR
(BY COUNTRY COACH)
AIR SUPPLY
EXH
FRONT MANIFOLD ASSEMBLY
FILTER
TRAVEL
VALVE
TRAVEL
VALVE
EXH
EXH
LOWER
VALVE
LOWER
VALVE
AIR BAG
20 PSI PRESS
SWITCH
20 PSI PRESS
SWITCH
AIR BAG
FRONT
RAISE
VALVE
RAISE
VALVE
FRONT
N.O.
HWH WATER
TRAP
VEHICLE
AIR
SUPPLY
HCV
HCV
VEHICLE
AIR
SUPPLY
DRIVE AXLE MANIFOLD ASSEMBLY
EXH
AIR BAG
DRIVE
AXLE
TRAVEL
VALVE
TRAVEL
VALVE
EXH
EXH
LOWER
VALVE
LOWER
VALVE
20 PSI PRESS
SWITCH
20 PSI PRESS
SWITCH
RAISE
VALVE
AIR BAG
TO TAG
ENABLE
CONNECTION
EXH
RAISE
VALVE
Chassis STW - Leveling & Suspension
DRIVE
AXLE
AIR BAG
TO TAG
ENABLE
CONNECTION
85 PSI
PRESS SWITCH
TAG AXLE
AIR MANIFOLD
AIR SUPPLY
AIR BAG
SEE AIR LEVEL SCHEMATIC
4-POINT AIR LEVELING - TAG AXLE
Page 46 of 126
MP75.210J
04APR02
AIR LEVEL SCHEMATIC
4-POINT AIR LEVELING - TAG AXLE
PRESSURE SWITCHES FRONT, REAR AND TAG
SEE AIR LEVEL SCHEMATIC
4-POINT AIR LEVELING
FRONT AND DRIVE AXLE
AIR
SUPPLY
FROM DRIVE
AXLE AIR BAG
AIR LINE
FROM DRIVE AXLE
AIR BAG AIR LINE
TAG AXLE MANIFOLD ASSEMBLY
TAG
ENABLE
VALVE
TAG
ENABLE
VALVE
20 PSI
PRESS
SWITCH
AIR BAG
20 PSI
PRESS
SWITCH
TAG
DUMP
VALVE
TAG AXLE
TAG
DUMP
VALVE
EXH
AIR BAG
TAG AXLE
EXH
TAG LIFT
EXHAUST VALVE
TAG LIFT
VALVE
EXH
AIR SUPPLY
TAG LIFT
Chassis STW - Leveling & Suspension
TAG LIFT
Page 47 of 126
MP75.310J
04APR02
FRONT AIR SOLENOID MANIFOLD CONNECTIONS
6 VALVE WITH TWO PRESSURE SWITCHES
SYS
PSW
LS
TRAVEL
LS
PSW
LS
RAISE
LS
LOWER
RS
LOWER
RS
RAISE
A B
A B
A B
B A
B A
A B
B A
B A
B A
B A
B A
B A
LS
TRAVEL
LS
PSW
LS
RAISE
LS
LOWER
RS
LOWER
RS
RAISE
RS
PSW
LINE FROM HEIGHT
CONTROL VALVE (MAY BE
TEED TOGETHER IF ONE
HCV IS USED)
AIR
SUPPLY
RS
TRAVEL
MOUNTING HOLES
RS
PSW
IMPORTANT: LEFT AND RIGHT
CONNECTIONS MUST BE MAINTAINED
AS SHOWN. GROUND SUPPLY WIRES
FOR AIR PRESSURE SWITCHES AND
AIR SOLENOID VALVES CANNOT
BE INTERCHANGED.
RIGHT SIDE
RS
TRAVEL
LEFT SIDE
A B
LINE TO LF
AIR BAG
PRESSURE
SWITCH-20 PSI
LINE TO RF
AIR BAG
A B
PRESSURE
SWITCH-20 PSI
EXHAUST
PORT
A B
EXHAUST
PORT
A B
REAR
VIEW
A B
3.400"
LINES FROM HEIGHT
CONTROL VALVES TWO MAY BE TEE’D
TOGETHER IF ONE
HCV IS USED.
RIGHT SIDE
VIEW
EXHAUST PORTS
(2 LEFT AND RIGHT)
RIGHT TRAVEL
SOLENOID VALVE (LEFT
VALVE NOT SHOWN)
PRESSURE SWITCH
20 PSI (2 LEFT AND RIGHT)
RIGHT LOWER
SOLENOID VALVE (LEFT
VALVE NOT SHOWN)
LINE TO AIR BAGS
(2 LEFT AND RIGHT)
AIR SUPPLY
NOTE: SOLENOID VALVES AND AIR
LINE CONNECTIONS ARE
LABELED.
Chassis STW - Leveling & Suspension
CHECK
VALVE (2)
Page 48 of 126
RIGHT RAISE
SOLENOID VALVE (LEFT
VALVE NOT SHOWN)
MP75.410J
04APR02
REAR AIR SOLENOID MANIFOLD CONNECTIONS
6 VALVE WITH THREE PRESSURE SWITCHES
SYS
PSW
LS
TRAVEL
LS
PSW
B A
LS
RAISE
A B
B A
LS
LOWER
RS
LOWER
RS
RAISE
A B
A B
B A
B A
B A
B A
B A
B A
SYS
PSW
LS
TRAVEL
LS
PSW
LS
RAISE
LS
LOWER
RS
LOWER
RS
RAISE
RS
PSW
LINE FROM HEIGHT
CONTROL VALVE (MAY BE
TEED TOGETHER IF ONE
HCV IS USED)
B A
RS
TRAVEL
MOUNTING HOLES
RS
PSW
IMPORTANT: LEFT AND RIGHT
CONNECTIONS MUST BE MAINTAINED
AS SHOWN. GROUND SUPPLY WIRES
FOR AIR PRESSURE SWITCHES AND
AIR SOLENOID VALVES CANNOT
BE INTERCHANGED.
AIR
SUPPLY
RS
TRAVEL
PRESSURE
SWITCH-85 PSI
RIGHT SIDE
A B
LEFT SIDE
A B
LINE TO LR
AIR BAG
PRESSURE
SWITCH-20 PSI
LINE TO RR
AIR BAG
A B
PRESSURE
SWITCH-20 PSI
EXHAUST
PORT
A B
EXHAUST
PORT
A B
REAR
VIEW
NOTE: SOLENOID VALVES AND
AIR LINE CONNECTIONS
ARE LABELED.
A B
3.400"
LINES FROM HEIGHT
CONTROL VALVES TWO MAY BE TEE’D
TOGETHER IF ONE
HCV IS USED.
RIGHT SIDE
VIEW
EXHAUST PORTS
(2 LEFT AND RIGHT)
RIGHT TRAVEL
SOLENOID VALVE (LEFT
VALVE NOT SHOWN)
PRESSURE SWITCH
20 PSI (2 LEFT AND RIGHT)
RIGHT LOWER
SOLENOID VALVE (LEFT
VALVE NOT SHOWN)
LINE TO AIR BAGS
(2 LEFT AND RIGHT)
AIR SUPPLY
PRESSURE
SWITCH-85 PSI
CHECK
VALVE (2)
Chassis STW - Leveling & Suspension
Page 49 of 126
RIGHT RAISE
SOLENOID VALVE (LEFT
VALVE NOT SHOWN)
MP75.510J
04APR02
ELECTRICAL CONNECTION DIAGRAM
WATER TRAP ASSEMBLY
SIDE VIEW
NORMALLY OPEN 12V
SOLENOID VALVE. CLOSES
WHEN AUXILIARY AIR
COMPRESSOR IS TURNED ON
SEE DETAIL A
FUSE 15 AMP
TOP VIEW
CONNECT TO
+12 BATTERY SUPPLY
SEE DETAIL A
9700
SEE ELECTRICAL
CONNECTION DIAGRAM
2000 SERIES CAN SYSTEM
CENTRAL CONTROL / FRONT
AIR MODULE
TO SUSPENSION
FLOW
9700
SWITCHED +12V RELAY CONTROL
GROUND
TO NORMALLY OPEN
+12V SOLENOID VALVE
DETAIL A
CONNECT TO
+12V BATTERY
SUPPLY
FUSE 15 AMP
SWITCHED +12
POWER FOR
COMPRESSOR
SWITCHED +12V
FOR NORMALLY
OPEN SOLENOID
VALVE
MP85.154J
Chassis
STW - Leveling & Suspension
Page 50 of 126
MP85.6038
22SEP04
TAG AIR SOLENOID MANIFOLD CONNECTIONS
6 VALVE WITH TWO PRESSURE SWITCHES
MOUNTING HOLES
TO LS DRIVE
AXLE
AIR BAGS
3.400"
TO RS DRIVE AXLE
AIR BAGS
REAR
VIEW
PRESSURE
SWITCH20 PSI
PRESSURE
SWITCH-20 PSI
TO LS TAG
AIR BAG
TO RS TAG
AIR BAG
LS TAG
DUMP
RS TAG
DUMP
TO TAG
LIFT
TAG LIFT
EXHAUST
RIGHT SIDE
LS TAG
ENABLE
LS
PSW
LS
DUMP
TAG
LIFT
P.E.D
P.E.D
P.E.D
P.E.D
P.E.D
P.E.D
P.E.D
B A
B A
B A
B A
B A
B A
B A
B A
LS TAG
ENABLE
LS
PSW
LS
DUMP
RIGHT SIDE TAG ENABLE SOLENOID VALVE
TAG
LIFT
RIGHT
SIDE
VALVES
TAG LIFT
EXHAUST
RS
DUMP
RS
PSW
RS TAG
ENABLE
NOTE: THE TWO TAG DUMP SOLENOID
VALVES ARE A DIFFERENT VALVE THEN THE
OTHER FOUR VALVES ON THE MANIFOLD. MAKE
SURE THE CORRECT VALVE IS OBTAINED
FOR REPLACEMENT.
TAG LIFT
EXHAUST
IMPORTANT: LEFT AND RIGHT CONNECTIONS
MUST BE MAINTAINED AS SHOWN. GROUND
SUPPLY WIRES FOR AIR PRESSURE SWITCHES
AND AIR SOLENOID VALVES CANNOT BE
INTERCHANGED.
RS
DUMP
NOTE: PRESSURE SWITCHES
ON TAG AXLE MANIFOLD ARE
NOT USED ON ALL SYSTEMS.
RS
PSW
RS TAG
ENABLE
AIR
SUPPLY
P.E.D
LEFT SIDE
NOTE: SOLENOID VALVES AND
AIR LINE CONNECTIONS
ARE LABELED.
LEFT
SIDE
VALVES
LEFT SIDE TAG ENABLE SOLENOID VALVE
RIGHT SIDE TAG DUMP SOLENOID VALVE
CHECK
VALVE (1)
LEFT SIDE TAG DUMP SOLENOID VALVE
TAG LIFT EXHAUST SOLENOID VALVE
TAG LIFT SOLENOID VALVE
Chassis STW - Leveling & Suspension
Page 51 of 126
MP75.610J
04APR02
AIR LINE CONNECTION DIAGRAM
WATER TRAP ASSEMBLY
TOP VIEW
AIR SUPPLY FROM
AUXILIARY COMPRESSOR
SUPPLIED BY
COUNTRY COACH
TO SUSPENSION
FLOW
CHECK VALVE
SEE ELECTRICAL CONNECTION
DIAGRAM - WATER TRAP
ASSEMBLY FOR CONNECTION
INFORMATION
SIDE VIEW
ADJUSTABLE
RELIEF VALVE
SET AT 130 PSI
NORMALLY OPEN
+12 VOLT SOLENOID
VALVE
Chassis STW - Leveling & Suspension
Page 52 of 126
MP75.710J
05OCT01
ELECTRICAL CONNECTION DIAGRAM
2000 SERIES CAN SYSTEM
HWH
HYDRAULIC
PUMP/
MASTER
RELAY
TO SPEED
SWITCH
WARNING
LIGHT
LIGHTED
RESET
SWITCH
LEVELING SYSTEM
TOUCH PANEL
HWH COMPUTERIZED LEVELING
EXCESS
SLOPE
LEVEL
AIR
CYLINDER RUN
READY TO
OPERATE
LUBE
ROOM EXTENSION
DUMP
HWH
STEP
CORPORATION
ON
EMERGENCY
STOP
TRAVEL
MODE
RAISE
CAUTION!
IGN
+12 BY
OEM
CAUTION!
UNDERSTAND OPERATOR’S MANUAL BEFORE
USING. KEEP PEOPLE AND OBSTRUCTIONS
CLEAR OF ROOM WHEN OPERATING.
RETRACT
ACC.
PARK
BRAKE
GRND
TAG LIFT
SWITCH
EXTEND
OFF
NOT IN
PARK /
BRAKE
TRAVEL
MODE
UNDERSTAND OPERATOR’S MANUAL BEFORE USING. BLOCK FRAME AND TIRES
SECURELY BEFORE REMOVING TIRES OR CRAWLING UNDER VEHICLE.
GRND
STUD
ROOM 1
CONTROL PANEL
ENGINE
BATTERY
HOUSE
BATTERY
ROOM
SELECTOR
SWITCH
BY O.E.M.
2000 SERIES
CAN TRUNK
LINE
CENTRAL CONTROL
ROOM 1 & 4 FRONT
AIR MODULE
FRONT AXLE
AIR MANIFOLD
TO HWH
WATER
TRAP
ASSEMBLY
NOTE: THIS DIAGRAM SHOWS
HWH EQUIPMENT ON THE VEHICLE.
SEE CORRECT CONNECTION DIAGRAM
FOR SPECIFIC CONNECTION INFORMATION.
DRIVE
AXLE
AIR MANIFOLD
REAR AIR
ROOM 2 & 3
MODULE
READY TO
OPERATE
CYLINDER RUN
ROOM EXTENSION
EXTEND
OFF
HWH
CORPORATION
ON
CAUTION!
UNDERSTAND OPERATOR’S MANUAL BEFORE
USING. KEEP PEOPLE AND OBSTRUCTIONS
CLEAR OF ROOM WHEN OPERATING.
RETRACT
ROOM
SELECTOR
SWITCH
BY O.E.M.
ROOM 2
CONTROL
PANEL
Chassis STW - Leveling & Suspension
Page 53 of 126
TAG
AXLE
AIR MANIFOLD
MP85.0111
22SEP04
ELECTRICAL CONNECTION DIAGRAM
2000 SERIES CAN SYSTEM
AIR LEVELING - WITH TAG AXLE - 4 ROOM EXTENSIONS
CENTRAL CONTROL / FRONT AIR / ROOMS 1 & 4 MODULE
LED
LIGHTED
RESET
SWITCH
LEVELING
SYSTEM
TOUCH PANEL
WARNING
LIGHT
TAG DUMP
SWITCH BY
OEM
+12 BY OEM
ONLY IN
1ST GEAR
OR
REVERSE
HWH COMPUTERIZED LEVELING
AIR
7550
7599
ROOMS 1 & 4
CONTROL
PANEL
EXCESS
SLOPE
READY TO
OPERATE
CYLINDER RUN
ROOM EXTENSION
6100
6121
EXTEND
OFF
NOT IN
PARK
TRAVEL
HWH
DUMP
7699
EMERGENCY
STOP
7521
CORPORATION
ON
TRAVEL
CAUTION!
CAUTION!
UNDERSTAND OPERATOR’S MANUAL BEFORE USING. BLOCK FRAME AND TIRES
SECURELY BEFORE REMOVING TIRES OR CRAWLING UNDER VEHICLE.
UNDERSTAND OPERATOR’S MANUAL BEFORE
USING. KEEP PEOPLE AND OBSTRUCTIONS
CLEAR OF ROOM WHEN OPERATING.
RETRACT
TERMINATION
RESISTOR DO
NOT MODIFY
6230
6805
SEE ELECTRICAL
CONNECTION
DIAGRAM-CENTRAL
CONTROL /FRONT AIR
MODULE FOR CONNECTION
INFORMATION
IGNITION - 6110
ACC - 6120
HOUSE
BATTERY - 6100
ROOM
6807
SELECTOR
SWITCH
BY O.E.M.
GRND - 6230
PARK BRAKE
SWITCH - 9000
ENGINE
BATTERY - 6101
GROUND
STUD
SEE ELECTRICAL
CONNECTION
DIAGRAMS
HYDRAULIC
MANIFOLD OR
MASTER AND
PUMP RELAYS
SPEED
SWITCH
9900
2000 SERIES
CAN TRUNK
LINE
FRONT AXLE
HARNESS
HWH WATER
TRAP - 9700
AIR MANIFOLD
PIGTAIL
SEE ELECTRICAL CONNECTION
DIAGRAM - 2000 SERIES CAN
SYSTEM - ROOM 2 / REAR AIR
MODULE.
P.E.D
P.E.D
P.E.D
P.E.D
P.E.D
P.E.D
P.E.D
B A
B A
B A
B A
B A
B A
B A
B A
TRAVEL
1700
LF PRESS.
SW. 1210
RF PRESS.
SW. 2210
LF LOWER
1600
RF LOWER
2600
LF RAISE
1500
RF RAISE
2500
IMPORTANT: DO NOT MODIFY CAN TRUNK LINE.
Chassis STW - Leveling & Suspension
P.E.D
NOTE: SEE ELECTRICAL CONNECTION
DIAGRAM-AIR MANIFOLD PIGTAILS AND
AIR SOLENOID MANIFOLD CONNECTIONS
FOR SPECIFIC AIR MANIFOLD CONNECTION
INFORMATION. HARNESS AND VALVE
CONNECTIONS ARE LABELED.
LEFT AND RIGHT CONNECTIONS
MUST BE MAINTAINED AS SHOWN.
TRAVEL
1700
P.E.D
NOTE: SEE ELECTRICAL
CONNECTION DIAGRAM-CENTRAL
CONTROL MODULE CONNECTION
INFORMATION FOR WIRE FUNCTIONS.
SYSTEM
PRESS. SW.
NOT USED
Page 54 of 126
FRONT AXLE
AIR MANIFOLD
MP85.0115
22SEP04
ELECTRICAL CONNECTION DIAGRAM
2000 SERIES CAN SYSTEM
AIR LEVELING - WITH TAG AXLE - 4 ROOM EXTENSIONS
REAR AIR / ROOMS 2 & 3 MODULE
SEE ELECTRICAL
CONNECTION
DIAGRAM - REAR
AIR / ROOM 2
MODULE FOR
CONNECTION
INFORMATION
ROOM 2 CONTROL PANEL
CYLINDER RUN
READY TO
OPERATE
ROOM EXTENSION
EXTEND
OFF
HWH
CORPORATION
ON
CAUTION!
UNDERSTAND OPERATOR’S MANUAL BEFORE
USING. KEEP PEOPLE AND OBSTRUCTIONS
CLEAR OF ROOM WHEN OPERATING.
RETRACT
GROUND - 6230
REAR AIR
HARNESS
6807
6805
2000 SERIES
CAN TRUNK LINE
SWITCHED
BATTERY - 6801
ROOM
SELECTOR
SWITCH
BY O.E.M.
DRIVE
LOADS
IMPORTANT - TERMINATION
RESISTOR - DO NOT ALTER
CAN TRUNK LINE
P.E.D
P.E.D
P.E.D
P.E.D
P.E.D
P.E.D
P.E.D
P.E.D
TRAVEL
3700
P.E.D
NOTE: SEE ELECTRICAL
CONNECTION DIAGRAM-AIR
MANIFOLD PIGTAILS AND
AIR SOLENOID MANIFOLD
CONNECTIONS FOR SPECIFIC
AIR MANIFOLD CONNECTION
INFORMATION. HARNESS
AND VALVE CONNECTIONS
ARE LABELED. LEFT AND
RIGHT CONNECTIONS MUST
BE MAINTAINED AS SHOWN.
B A
B A
B A
B A
B A
B A
B A
B A
B A
AIR MANIFOLD
PIGTAIL
TRAVEL
3700
LR PRESS.
SW. 4210
RR PRESS.
SW. 3210
LR LOWER
4600
RR LOWER
3600
LR RAISE
4500
RR RAISE
3500
SYSTEM
PRESS. SW.
3215
DRIVE AXLE
AIR MANIFOLD
TAG
LOADS
P.E.D
P.E.D
P.E.D
P.E.D
P.E.D
P.E.D
P.E.D
P.E.D
TAG ENABLE
3701
B A
B A
B A
B A
B A
B A
B A
B A
AIR MANIFOLD
PIGTAIL
TAG ENABLE
3701
LEFT SIDE TAG PRESSURE
SWITCH - 4211
RIGHT SIDE TAG PRESSURE
SWITCH - 3211
LEFT SIDE TAG
DUMP - 4601
RIGHT SIDE TAG DUMP
3601
TAG LIFT
3800
TAG LIFT EXHAUST
3701
TAG AXLE
AIR MANIFOLD
Chassis STW - Leveling & Suspension
Page 55 of 126
MP85.0118
22SEP04
ELECTRICAL CONNECTION DIAGRAM
HYDRAULIC MANIFOLD CONNECTIONS
ROOM 1 - ROOM 2 - ROOM 3 - ROOM 4
P.E.D
B
2R
3E
3R
4E
4R
P.E.D
P.E.D
A
2E
A
B
A
P.E.D
5053
5052
5051
5050
B
A
A
CYL 1
RETRACT
6245
B
A
CYL 2
RETRACT
6246
B
A
CYL 3
RETRACT
TO HWH
GROUND
STUD ON
PUMP
B
CYL 4
RETRACT
CYL 4
EXTEND
CYL 3
EXTEND
CYL 2
EXTEND
CYL 1
EXTEND
1E - ROOM 1 CYL EXTEND - ROOM EXTEND
1R - ROOM 1 CYL RETRACT - ROOM RETRACT
2E - ROOM 2 CYL EXTEND - ROOM EXTEND
2R - ROOM 2 CYL RETRACT - ROOM RETRACT
3E - ROOM 3 CYL EXTEND - ROOM RETRACT
3R - ROOM 3 CYL RETRACT - ROOM EXTEND
4E - GEN CYL EXTEND - SLIDE RETRACT
4R - GEN CYL RETRACT - SLIDE EXTEND
P.E.D
B
1R
P.E.D
A
1E
P.E.D
B
CYLINDER
RETRACT VALVES
TOP VIEW
P.E.D
CYLINDER
EXTEND VALVES
6248
6247
5153
5152
5151
5150
CENTRAL CONTROL/
FRONT AIR/
ROOMS 1 & 4 MODULE
TOP
RING
ROOM EXTENSION
MANIFOLD
CYLINDER EXTEND
VALVE
BLACK
BOTTOM
RING
Chassis STW - Leveling & Suspension
CYLINDER
RETRACT
VALVE
HWH GROUND
STUD
Page 56 of 126
MP85.0131
22SEP04
ELECTRICAL CONNECTION DIAGRAM
2000 SERIES ROOM EXTENSION SYSTEM
MASTER AND PUMP RELAY
TO 2000 SERIES CAN TRUNK LINE
GROUND
STUD
FUSE
20 AMP
6800
RELAY (A)
(MASTER RELAY)
FROM
BATTERY
RELAY
GROUND 6231
SWITCHED BATTERY
FROM MASTER RELAY 6800
FUSE
40 AMP
RELAY
GROUND 6231
TO GRAY CONNECTOR
CENTRAL CONTROL /
FRONT AIR / ROOM 1
MODULE MIDDLE RING
RELAY (B)
(PUMP RELAY)
TO PUMP
MOTOR
TO CN9 CONNECTOR
CENTRAL CONTROL /
FRONT AIR / ROOM 1
MODULE TOP RING
SWITCHED BATTERY
FROM PUMP RELAY
PUMP RELAY
CONTROL
9901
MASTER RELAY
CONTROL
8600
8500
3000 LB PRESS SWITCH
8100
SPEED
SWITCH
9900
RELAY A
RELAY A
FROM
BATTERY
RELAY B
RELAY B
SIDE VIEW
REAR VIEW
Chassis STW - Leveling & Suspension
Page 57 of 126
MP85.035K
22SEP04
WHITE
BLACK
B A
WHITE
BLACK
B A
WHITE
BLACK
B A
WHITE
BLACK
B A
WHITE
BLACK
B A
WHITE
BLACK
B A
WHITE
BLACK
B A
WHITE
BLACK
B A
WHITE
BLACK
B A
ELECTRICAL CONNECTION DIAGRAM
AIR MANIFOLD PIGTAIL
FRONT AND DRIVE AXLES
TRAVEL
RS PRESS
SWITCH
RS
RAISE
RS
LOWER
LS
RAISE
LS
LOWER
TRAVEL
LS PRESS
SWITCH
SYS PRESS
SWITCH
DESCRIPTION
PIN COLOR
TRAVEL
1
BLACK
GROUND
2
WHITE
RIGHT SIDE PRESSURE SWITCH
3
BLACK
GROUND
WHITE
4
RIGHT SIDE RAISE
BLACK
5
GROUND
6
WHITE
RIGHT SIDE LOWER
7
BLACK
GROUND
8
WHITE
LEFT SIDE RAISE
BLACK
9
GROUND
WHITE
10
LEFT SIDE LOWER
BLACK
11
GROUND
12
WHITE
TRAVEL
13
BLACK
GROUND
WHITE
14
LEFT SIDE PRESSURE SWITCH
15
BLACK
GROUND
WHITE
16
SYSTEM PRESSURE SWITCH
BLACK
17
GROUND
18
WHITE
19 THROUGH 31 NOT USED
Chassis STW - Leveling & Suspension
20
21
31
9
19
2
10
3
22
17
16
15
13
27
14
25
28
6
5
24
29
7
4
12
Page 58 of 126
18
1
11
23
30
8
26
MP85.070J
15JUL02
WHITE - 6258
BLACK - 3701
B A
WHITE - 6231
BLACK - 3211
B A
WHITE - 6258
BLACK - 3800
B A
WHITE - 6258
BLACK - 3601
B A
WHITE - 6258
BLACK - 3701
B A
WHITE - 6258
BLACK - 4601
B A
WHITE - 6258
BLACK - 3701
B A
WHITE - 6231
BLACK - 4211
B A
ELECTRICAL CONNECTION DIAGRAM
AIR MANIFOLD PIGTAIL
TAG AXLE
RS
ENABLE
RS PRESS
SWITCH
TAG
LIFT
RS
DUMP
TAG LIFT
EXHAUST
LS
DUMP
LS
ENABLE
LS PRESS
SWITCH
WIRE#
PIN COLOR
DESCRIPTION
RIGHT SIDE ENABLE
1
BLACK
3701
2
WHITE
6258
GROUND
3
BLACK
3211
RIGHT SIDE PRESSURE SWITCH
6231
GROUND
4
WHITE
TAG LIFT
BLACK
3800
5
GROUND
6
WHITE
6258
7
BLACK
3601
RIGHT SIDE DUMP
8
WHITE
6258
GROUND
3701
TAG LIFT EXHAUST
9
BLACK
GROUND
WHITE
6258
10
4601
LEFT SIDE DUMP
11
BLACK
GROUND
12
WHITE
6258
13
BLACK
3701
LEFT SIDE ENABLE
WHITE
6258
GROUND
14
15
BLACK
4211
LEFT SIDE PRESSURE SWITCH
WHITE
6231
GROUND
16
17 THROUGH 31 NOT USED
Chassis STW - Leveling & Suspension
Page 59 of 126
20
21
31
9
19
2
10
3
22
18
4
12
17
16
15
13
27
14
25
28
6
5
24
29
7
1
11
23
30
8
26
MP85.080J
08OCT01
ELECTRICAL CONNECTION DIAGRAM
CENTRAL CONTROL / FRONT AIR / ROOMS 1 & 4 MODULE
PAGE 1 OF 7
CLEAR TOP
FRONT VIEW
CN1
CN10
PIN 8
PIN 1
PIN 6
PIN 1
CN11
CN9
PIN 12
PIN 1
PIN 8
PIN 1
TOP RING
PAGE 1 OF 3
CN1
1 AND 2
3
4
5
6
7
8
CN10
1
2
3
4
5
6
CN11
1
2 THRU 4
5
6
7
8 THRU 10
11
12
CN9
1
2
3
4
5
6
7 AND 8
WIRE
COLOR
RED
WHITE
GREEN
YELLOW
WIRE
NUMBER
6800
6230
-
BLACK
RED
BLACK
RED
WHITE
BLACK
7599
6100
7550
6121
6230
7699
RED
6110
RED
RED
WHITE
6120
6100
6230
BLACK
RED
9000
6101
BLACK
BLACK
8500
8100
BLACK
BLACK
BLACK
8600
9900
9901
Chassis STW - Leveling & Suspension
NEUTRAL
HOLD
LEVEL
SENSING
ADJUSTMENT
MIDDLE RING
PAGE 2 OF 3
BOTTOM RING
PAGE 3 OF 3
PIN #
SIDE VIEW
110 NEUTRAL HOLD ENABLED
220 NEUTRAL HOLD DISABLED
WIRE DESCRIPTION AND FUNCTION
8 PIN BLACK CONNECTOR
NO CONNECTION
SWITCHED +12 BATTERY TO TOUCH PANEL
GRND TO TOUCH PANEL
SHIELD WIRE FOR CAN CABLE
NO CONNECTION
CAN DATA LINE LOW-DO NOT MODIFY
CAN DATA LINE HIGH-DO NOT MODIFY
6 PIN GRAY CONNECTOR
RESET SWITCH LIGHT CONTROL-SWITCHED +12
RESET SWITCH SUPPLY +12
RESET SWITCH OUTPUT +12
WARNING LIGHT SUPPLY +12
RESET SWITCH LIGHT GROUND
WARNING LIGHT CONTROL - SWITCHED GROUND
12 PIN GRAY CONNECTOR
SWITCHED +12 FROM IGNITION
NO CONNECTION
SWITCHED +12 FROM ACCESSORY
HOUSE BATTERY +12
GROUND FOR PROCESSOR FROM GROUND STUD
NO CONNECTION
FROM PARK BRAKE SWITCH - SWITCHED GROUND
ENGINE BATTERY +12
8 PIN GREEN CONNECTOR
MASTER RELAY CONTROL - SWITCHED +12
SYSTEM PRESSURE SWITCH-SWITCHED GROUND
NO CONNECTION
PUMP RELAY CONTROL - SWITCHED +12
SPEED SWITCH - ( +12 WITH IGN ON BELOW 5MPH)
PUMP MONITOR-SWITCHED +12 FROM PUMP RELAY
NO CONNECTION
Page 60 of 126
MP85.1001
22SEP04
ELECTRICAL CONNECTION DIAGRAM
CENTRAL CONTROL / FRONT AIR / ROOMS 1 & 4 MODULE
PAGE 2 OF 7
FRONT VIEW
CLEAR TOP
SIDE VIEW
TOP RING
PAGE 1 OF 3
MIDDLE RING
PAGE 2 OF 3
BOTTOM RING
PAGE 3 OF 3
PIN #
BROWN
1
2
3
4
5
6
7
8
9
10
11
12
GRAY
1
2
3
4
BLACK
1
2
3
4
5
6
7&8
9
10
11 & 12
WIRE
COLOR
WIRE
NUMBER
BLACK
BLACK
BLACK
BLACK
BLACK
1500
1600
2500
2600
9700
BLACK
1700
WHITE
6254
BLACK
BLACK
WHITE
WHITE
6800
6800
6230
6230
BLACK
BLACK
BLACK
BLACK
BLACK
BLACK
5050
5150
5051
5151
5052
5152
BLACK
BLACK
5153
5053
Chassis STW - Leveling & Suspension
BROWN
PIN 12
PIN 1
GRAY
PIN 4
PIN 1
BLACK
PIN 12
PIN 1
WIRE DESCRIPTION AND FUNCTION
12 PIN BROWN CONNECTOR
NO CONNECTION
LEFT FRONT RAISE AIR VALVE CONTROL - SWITCHED +12
LEFT FRONT LOWER AIR VALVE CONTROL - SWITCHED +12
RIGHT FRONT RAISE AIR VALVE CONTROL - SWITCHED +12
RIGHT FRONT LOWER AIR VALVE CONTROL - SWITCHED +12
AUXILARY AIR COMPRESSOR CONTROL - SWITCHED +12
NO CONNECTION
FRONT AIR MANIFOLD TRAVEL VALVES CONTROL - SWITCHED +12
NO CONNECTION
NO CONNECTION
GROUND FOR AIR SOLENOID VALVES
NO CONNECTION
4 PIN GRAY CONNECTOR
SWITCHED +12 FROM MASTER RELAY
SWITCHED +12 FROM MASTER RELAY
GROUND FROM GROUND STUD - FOR SOLENOID VALVES
GROUND FROM GROUND STUD - FOR SOLENOID VALVES
12 PIN BLACK CONNECTOR
ROOM 1 CYLINDER EXTEND SOLENOID VALVE SWITCHED +12
ROOM 1 CYLINDER RETRACT SOLENOID VALVE SWITCHED +12
ROOM 2 CYLINDER EXTEND SOLENOID VALVE SWITCHED +12
ROOM 2 CYLINDER RETRACT SOLENOID VALVE SWITCHED +12
ROOM 3 CYLINDER EXTEND SOLENOID VALVE SWITCHED +12
ROOM 3 CYLINDER RETRACT SOLENOID VALVE SWITCHED +12
NO CONNECTION
ROOM 4 CYLINDER RETRACT SOLENOID VALVE SWITCHED +12
ROOM 4 CYLINDER EXTEND SOLENOID VALVE SWITCHED +12
NO CONNECTION
Page 61 of 126
MP85.1031
22SEP04
ELECTRICAL CONNECTION DIAGRAM
CENTRAL CONTROL / FRONT AIR / ROOMS 1 & 4 MODULE
PAGE 3 OF 7
CLEAR TOP
FRONT VIEW
SIDE VIEW
TOP RING
PAGE 1 OF 3
PIN 8
PIN 1
CN9
PIN #
CN9
1
2
3
4
5
6
7
8
CN10
1
2
3
4
5
6
7
8
CN12
1 THRU 5
6
7
8 AND 9
10
11
12
CN11
1 THRU 5
6
7 THRU 9
10
11 AND 12
PIN 8
PIN 1
CN10
PIN 12
PIN 1
PIN 12
PIN 1
CN12
CN11
WIRE
COLOR
WIRE
NUMBER
BLACK
7696
RED
WHITE
6800
6230
RED
GREEN
YELLOW
6110
BLACK
BLACK
BLACK
BLACK
BLACK
RED
BLACK
WHITE
6807
7510
7530
7501
7502
6805
7696
6230
WHITE
BLACK
6236
6800
BLACK
BLACK
2210
7521
WHITE
6235
BLACK
1210
Chassis STW - Leveling & Suspension
MIDDLE RING
PAGE 2 OF 3
BOTTOM RING
PAGE 3 OF 3
WIRE DESCRIPTION AND FUNCTION
8 PIN BLACK CONNECTOR
SYSTEM WAKE UP SWITCHED GROUND
NO CONNECTION
SWITCHED +12 BATTERY
GROUND
SHIELD WIRE FOR CAN CABLE
IGNITION +12
CAN DATA LINE LOW - DO NOT MODIFY
CAN DATA LINE HIGH - DO NOT MODIFY
8 PIN GRAY CONNECTOR
SWITCHED +12 FROM FRONT ROOM SELECT SWITCH
READY TO OPERATE LIGHT CONTROL SWITCHED +12
PUMP ON LIGHT CONTROL - SWITCHED +12
ROOM EXTEND SWITCHED +12
ROOM RETRACT SWITCHED +12
SWITCHED +12 BATTERY TO ROOM PANEL KEY SWITCH
SYSTEM WAKE UP - SWITCHED GROUND
GROUND TO ROOM PANEL KEY SWITCH
12 PIN GRAY CONNECTOR
NO CONNECTION
GROUND FOR AIR MANIFOLD PRESSURE SWITCHES
SWITCHED +12 FOR TAG DUMP SWITCH (NOT USED)
NO CONNECTION
RIGHT FRONT AIR PRESSURE SWITCH INPUT SWITCHED GROUND
TAG LIFT-SWITCHED +12 FROM TAG DUMP SWITCH
NO CONNECTION
12 PIN GREEN CONNECTOR
NO CONNECTION
GROUND FOR AIR MANIFOLD PRESSURE SWITCHES
NO CONNECTION
LEFT FRONT AIR PRESSURE SWITCH INPUT SWITCHED GROUND
NO CONNECTION
Page 62 of 126
MP85.1051
22SEP04
ELECTRICAL CONNECTION DIAGRAM
LED - FUSE LOCATION AND DESCRIPTION
CENTRAL CONTROL / FRONT AIR / ROOMS 1 & 4 MODULE (TOP RING)
PAGE 4 OF 7
CENTRAL CONTROL MOTHER BOARD
11-RED
PARK BRAKE
8-RED
NEUTRAL
HOLD
9-NOT USED
10-RED
PRESS SW
F5
5-RED
SPEED SWITCH
2-RED PUMP
RELAY CONTROL
1-RED
2-RED
3-RED
5AMP
PUMP RELAY
CONTROL
F6
F2
F1
F3
F4
F8
CN1
1-RED MASTER
RELAY CONTROL
LED
5AMP MASTER
RELAY CONTROL
3-RED
SWITCHED 12V - IN
5AMP
IGNITION - IN
6-NOT USED
15AMP
HOUSE BATT - IN
15AMP SWITCHED
BATTERY FROM
MASTER RELAY
5AMP
ENGINE BATT - IN
4-RED HOUSE
BATTERY - IN
3AMP
RESET OUT
7-RED
LINK LIGHT
CN10
F7
CN11
CN9
3AMP
ACCESSORY
DESCRIPTION
CN AND PIN
MASTER RELAY CONTROL
PUMP RELAY CONTROL
SWITCHED 12V FROM
MASTER RELAY
4-RED
ENGINE BATTERY - IN
5-RED
SPEED SWITCH
6-NOT USED NOT USED
7-RED
LINK LIGHT
8-RED
NEUTRAL HOLD
9-NOT USED NOT USED
10-RED
3000 LBS PRESS SWITCH - ON
11-RED
PARK PRAKE - ON
CN 9 - PIN 1
CN 9 - PIN 4
CN 1 - PIN 3
CN 11 - PIN 12
CN 9 - PIN 5
NOT USED
CN 1 - PIN 7 & 8
CN 11 - PIN 8 & 9
NOT USED
CN 9 - PIN 2
CN 11 - PIN 11
FUSE DESCRIPTION
F1 - 5AMP IGNITION - IN
F2 - 15AMP HOUSE BATTERY - IN
F3 - 5AMP MASTER RELAY CONTROL
F4 - 5AMP PUMP RELAY CONTROL
F5 - 15AMP SWITCHED BATTERY - IN
F6 - 3AMP RESET OUT
F7 - 3AMP IGNITION - IN
F8 - 5AMP ENGINE BATTERY - IN
NOTE: FOR DETAILED INPUT / OUTPUT INFORMATION ABOUT PIN
CONNECTIONS SEE ELECTRICAL CONNECTION DIAGRAM - CENTRAL
CONTROL / ROOM 1 MODULE CONNECTION INFORMATION - PAGE 1 OF 7.
Chassis STW - Leveling & Suspension
Page 63 of 126
MP85.1201
22SEP04
ELECTRICAL CONNECTION DIAGRAM
LED - FUSE LOCATION AND DESCRIPTION
CENTRAL CONTROL / FRONT AIR / ROOMS 1 & 4 MODULE (MIDDLE RING)
PAGE 5 OF 7
AIR LEVEL OUTPUT BOARD
TRAVEL
12
19
11
10
F10
9
COMP
RESSOR
7
F6
F5
8
RIGHT
FRONT
LOWER
FUSE
5
6
F4
F3
F2
3
RIGHT
FRONT
RAISE
LEFT
FRONT
LOWER
LEFT
FRONT
RAISE
4
20
LED
MIDDLE RING BROWN CONNECTOR
LED
3-RED
4-YELLOW
5-YELLOW
6-RED
7-RED
8-YELLOW
9-YELLOW
10-RED
11-RED
12-YELLOW
19-YELLOW
20-RED
RELAY DESCRIPTION
LEFT FRONT RAISE
LEFT FRONT RAISE
LEFT FRONT LOWER
LEFT FRONT LOWER
RIGHT FRONT RAISE
RIGHT FRONT RAISE
RIGHT FRONT LOWER
RIGHT FRONT LOWER
COMPRESSOR
COMPRESSOR
TRAVEL
TRAVEL
FUSE
BROWN
F2-5 AMP
PIN 2
F3-5 AMP
F4-5 AMP
PIN 3
PIN 4
NOTE: A LIT YELLOW LED INDICATES THERE
IS A GROUND SIGNAL TO TURN THE
CORRESPONDING RELAY ON.
F5-5 AMP
F6-5 AMP
PIN 5
PIN 6
A LIT RED LED INDICATES THERE IS
VOLTAGE ON IT’S CORRESPONDING CN1 PIN.
F10-7.5 AMP PIN 8
NOTE: THE TRAVEL RELAY IS WIRED AS A
NORMALLY CLOSED RELAY. WHEN THE YELLOW
LED (19) IS ON THE RELAY CONTACTS WILL OPEN.
THE RED LED (20) WILL NOT BE ON. THE RED LED
WILL BE ON IF THE LEVELING SYSTEM IS IN THE
TRAVEL MODE AND THE IGNITION IS ON.
Chassis STW - Leveling & Suspension
NOTE: FOR DETAILED INPUT / OUTPUT
INFORMATION ABOUT PIN CONNECTIONS
SEE ELECTRICAL CONNECTION DIAGRAM CENTRAL CONTROL / FRONT AIR / ROOMS
1 & 4 MODULE CONNECTION INFORMATION PAGE 2 OF 7.
Page 64 of 126
IF A YELLOW LED IS LIT AND THE
CORRESPONDING RED LED IS OFF, EITHER
IT’S FUSE IS BLOWN OR THE RELAY IS BAD.
IF THE YELLOW LEDS ARE WORKING BUT
NO RED LED IS COMING ON THERE IS A
PROBLEM WITH INPUT VOLTAGE IN THE
4-PIN CONNECTOR ON THE TOP RING.
IF A YELLOW LED IS NOT LIT, THIS
INDICATES A PROBLEM WITH A MODULE.
MP85.1205
23SEP04
ELECTRICAL CONNECTION DIAGRAM
LED - FUSE LOCATION AND DESCRIPTION
CENTRAL CONTROL / FRONT AIR / ROOMS 1 & 4 MODULE (TOP RING)
PAGE 6 OF 7
ROOM 1 AND 2 OUTPUT BOARD
ROOM 4
CYL RET
ROOM 4
CYL EXT
ROOM 3
CYL RET
ROOM 3
CYL EXT
ROOM 2
CYL RET
ROOM 2
CYL EXT
ROOM 1
CYL RET
ROOM 1
CYL EXT
F1
FUSE
12
11
14
13
F8
9
10
F7
8
7
F6
5
6
F5
3
F4
4
F3
2
F2
1
15
16
LED
MIDDLE RING BLACK CONNECTOR
LED
1-YELLOW
2-RED
3-RED
4-YELLOW
5-YELLOW
6-RED
7-RED
8-YELLOW
9-YELLOW
10-RED
11-RED
12-YELLOW
13-RED
14-YELLOW
15-YELLOW
16-RED
RELAY DESCRIPTION
ROOM 1 CYL EXTEND
ROOM 1 CYL EXTEND
ROOM 1 CYL RETRACT
ROOM 1 CYL RETRACT
ROOM 2 CYL EXTEND
ROOM 2 CYL EXTEND
ROOM 2 CYL RETRACT
ROOM 2 CYL RETRACT
ROOM 3 CYL EXTEND
ROOM 3 CYL EXTEND
ROOM 3 CYL RETRACT
ROOM 3 CYL RETRACT
ROOM 4 CYL EXTEND
ROOM 4 CYL EXTEND
ROOM 4 CYL RETRACT
ROOM 4 CYL RETRACT
F1-15 AMP PIN 1
F2-15 AMP PIN 2
NOTE: FOR DETAILED INPUT / OUTPUT
INFORMATION ABOUT PIN CONNECTIONS
SEE ELECTRICAL CONNECTION DIAGRAM CENTRAL CONTROL / FRONT AIR / ROOMS
1 & 4 MODULE CONNECTION INFORMATION PAGE 2 OF 7.
F3-15 AMP PIN 3
F4-15 AMP PIN 4
NOTE: A LIT YELLOW LED INDICATES THERE
IS A GROUND SIGNAL TO TURN THE
CORRESPONDING RELAY ON.
FUSE
CN1
F5-15 AMP PIN 5
F6-15 AMP PIN 6
F7-15 AMP PIN 10
F8-15 AMP PIN 9
A LIT RED LED INDICATES THERE IS
VOLTAGE ON IT’S CORRESPONDING CN1 PIN.
IF A YELLOW LED IS LIT AND THE
CORRESPONDING RED LED IS OFF, EITHER
IT’S FUSE IS BLOWN OR THE RELAY IS BAD.
IF THE YELLOW LEDS ARE WORKING BUT
NO RED LED IS COMING ON THERE IS A
PROBLEM WITH INPUT VOLTAGE IN THE
4-PIN CONNECTOR ON THE TOP RING.
IF A YELLOW LED IS NOT LIT, THIS
INDICATES A PROBLEM WITH A MODULE.
Chassis STW - Leveling & Suspension
Page 65 of 126
MP85.1208
23SEP04
ELECTRICAL CONNECTION DIAGRAM
LED - FUSE LOCATION AND DESCRIPTION
CENTRAL CONTROL / FRONT AIR / ROOMS 1 & 4 MODULE (BOTTOM RING)
PAGE 7 OF 7
ROOM 2 I/O BOARD
30-NOT USED
LINK LIGHT
21
20
19
24
20-RED SWITCHED
BATTERY - IN
2AMP
SEE FUSE
DESCRIPTION
3AMP
SW BATT IN
CN9
F4
21-RED PUMP
INDICATOR
23
22
F3
22-RED READY
TO OPERATE
2AMP SW BATT OUT
F2
23-NOT USED
30
29
F1
F5
29-NOT USED
28
28-RED TAG LIFT
27-NOT USED
1-RED EXTEND
2-RED RETRACT
3-NOT USED
4-NOT USED
5-NOT USED
6-NOT USED
7-NOT USED
8-NOT USED
9-GREEN LF PRESSURE SWITCH
10-GREEN RF PRESSURE SWITCH
11-NOT USED
12-NOT USED
13-NOT USED
14-YELLOW ROOM 4 SELECT
15-NOT USED
16-NOT USED
17-NOT USED
18-NOT USED
CN10
CN12
27
1
2
3
4
5
6
7
8
9
10
11
12
13
14
15
16
17
18
CN11
19-RED SWITCHED
BATT 12V - OUT
24-RED SYSTEM
WAKE UP
LED
1-RED
2-RED
3 THRU 8-NOT USED
9-GREEN
10-GREEN
11 THRU 13-NOT USED
14-YELLOW
15 THRU 18-NOT USED
19-RED
20-RED
21-RED
22-RED
23-NOT USED
24-RED
27-NOT USED
28-RED
29-NOT USED
30-NOT USED
LINK LIGHT
DESCRIPTION
CN AND PIN
EXTEND
RETRACT
NOT USED
LEFT FRONT PRESS SW
RIGHT FRONT PRESS SW
NOT USED
ROOM 4 SELECT
NOT USED
SWITCHED BATT 12V - OUT
SWITCHED BATTERY - IN
PUMP INDICATOR
READY TO OPERATE
NOT USED
SYSTEM WAKE UP
NOT USED
TAG LIFT SWITCH
NOT USED
NOT USED
Chassis STW - Leveling & Suspension
CN 10 - PIN 4
CN 10 - PIN 5
NOT USED
CN 11 - PIN 10
CN 12 - PIN 10
NOT USED
CN 10 - PIN 1
NOT USED
CN 11 & CN12 - PIN 7
CN 9 - PIN 3
CN 10 - PIN 3
CN 10 - PIN 2
NOT USED
CN 10 - PIN 7
NOT USED
CN 12 - PIN 11
NOT USED
NOT USED
Page 66 of 126
FUSE DESCRIPTION
F1 - 2AMP SW BATTERY OUT
F2 - 2AMP NOT USED
F3 - 2AMP READY TO OPERATE
LIGHT
F4 - 2AMP PUMP ON INDICATOR
LIGHT
F5 - 3AMP SWITCHED BATTERY IN
NOTE: FOR DETAILED
INPUT / OUTPUT INFORMATION
ABOUT PIN CONNECTIONS SEE
ELECTRICAL CONNECTION
DIAGRAM - CENTRAL CONTROL /
FRONT AIR / ROOMS 1 & 4
MODULE CONNECTION
INFORMATION - PAGE 3 OF 7.
MP85.1311
23SEP04
ELECTRICAL CONNECTION DIAGRAM
REAR AIR / ROOMS 2 & 3 MODULE
PAGE 1 OF 4
FRONT VIEW
PIN 8
PIN 1
CN9
PIN #
CN9
1
2
3
4
5
6
7
8
CN10
1
2
3
4
5
6
7
8
CN12
1
2
3
4 AND 5
6
7 THRU 12
CN11
1
2
3
4 AND 5
6
7 THRU 12
WIRE
COLOR
WIRE
NUMBER
BLACK
7696
RED
WHITE
RED
GREEN
YELLOW
6800
6230
6110
-
BLACK
BLACK
BLACK
BLACK
BLACK
RED
BLACK
WHITE
6807
7510
7530
7501
7502
6805
7631
6230
BLACK
BLACK
BLACK
4211
3211
3215
WHITE
6231
BLACK
BLACK
4210
3210
WHITE
6232
Chassis STW - Leveling & Suspension
PIN 8
PIN 1
CN10
PIN 12
PIN 1
CN12
CLEAR TOP
PIN 8
PIN 1
CN11
WIRE DESCRIPTION AND FUNCTION
8 PIN BLACK CONNECTOR
SYSTEM WAKE UP - SWITCHED GROUND
NO CONNECTION
SWITCHED +12 BATTERY
GRND TO TOUCH PANEL
SHIELD WIRE FOR CAN CABLE
IGNITION +12
CAN DATA LINE LOW-DO NOT MODIFY
CAN DATA LINE HIGH-DO NOT MODIFY
8 PIN GRAY CONNECTOR
SWITCHED +12 FROM REAR ROOM SELECT SWITCH
READY TO OPERATE LIGHT CONTROL SWITCHED +12
ACTUATOR RUN LIGHT CONTROL SWITCHED +12
ROOM EXTEND SWITCHED +12
ROOM RETRACT SWITCHED +12
SWITCHED +12 BATTERY TO ROOM PANEL KEY SWITCH
SYSTEM WAKE UP - SWITCHED GROUND
GROUND TO ROOM PANEL KEY SWITCH
12 PIN GRAY CONNECTOR
LEFT SIDE TAG PRESSURE SWITCH INPUT SWITCHED GROUND
RIGHT SIDE TAG PRESSURE SWITCH INPUT SWITCHED GROUND
SYSTEM PRESSURE SWITCH INPUT SWITCHED GROUND
NO CONNECTION
GROUND FOR PRESSURE SWITCHES
NO CONNECTION
12 PIN GREEN CONNECTOR
NO CONNECTION
LEFT REAR PRESSURE SWITCH INPUT SWITCHED GROUND
RIGHT REAR PRESSURE SWITCH INPUT SWITCHED GROUND
NO CONNECTION
GROUND FOR REAR PRESSURE SWITCHES
NO CONNECTION
Page 67 of 126
MP85.1315
23SEP04
ELECTRICAL CONNECTION DIAGRAM
REAR AIR / ROOMS 2 & 3 MODULE
PAGE 2 OF 4
FRONT VIEW
SIDE VIEW
CLEAR TOP
BROWN
PIN 12
PIN 1
PIN #
BROWN
1
2
3
4
5
6
7
8
9
10
11
12
GRAY
1
2
3
4
WIRE
COLOR
WIRE
NUMBER
BLACK
BLACK
BLACK
BLACK
BLACK
3800
4500
4600
3500
3600
BLACK
BLACK
BLACK
BLACK
WHITE
3701
3700
3601
4601
6258
BLACK
BLACK
WHITE
WHITE
6800
6800
6230
6230
Chassis STW - Leveling & Suspension
GRAY
PIN 4
PIN 1
WIRE DESCRIPTION AND FUNCTION
12 PIN BROWN CONNECTOR
TAG LIFT SWITCHED +12 FROM TAG DUMP SWITCH
LEFT REAR RAISE SWITCHED +12
LEFT REAR LOWER SWITCHED +12
RIGHT REAR RAISE SWITCHED +12
RIGHT REAR LOWER SWITCHED +12
NO CONNECTION
TAG ENABLE SWITCHED +12
REAR TRAVEL SWITCHED +12
RIGHT SIDE TAG DUMP SWITCHED +12
LEFT SIDE TAG DUMP SWITCHED +12
GROUND FOR SOLENOID VALVES
NO CONNECTION
4 PIN GRAY CONNECTOR
SWITCHED +12 FROM MASTER RELAY
SWITCHED +12 FROM MASTER RELAY
GROUND FROM GROUND STUD
GROUND FROM GROUND STUD
Page 68 of 126
MP85.1318
22SEP04
ELECTRICAL CONNECTION DIAGRAM
LED - FUSE LOCATION AND DESCRIPTION
REAR AIR / ROOM 2 & 3 MODULE (BOTTOM RING)
PAGE 3 OF 4
ROOM 1 I/O BOARD
28
28-RED TAG LIFT SWITCH
27-NOT USED
1-RED EXTEND
2-RED RETRACT
27
3 & 4 NOT USED
30-NOT USED
LINK LIGHT
21
19
24
20-RED SWITCHED
BATTERY - IN
3
4
5
6
7
8
9
10
11
12
13
14
15
20
3AMP SW
BATTERY - IN
CN9
15 THRU 18 NOT USED
F4
21-RED PUMP
INDICATOR
22
F3
22-RED READY
TO OPERATE
2 AMP SEE
FUSE
DESCRIPTION
23
F2
23-NOT USED
30
29
F1
F5
29-NOT USED
3AMP SW
BATT - OUT
5-YELLOW LR PRESSURE SWITCH
6-YELLOW RR TAG PRESSURE SW
7-GREEN RR PRESSURE SWITCH
8-GREEN SYSTEM PRESSURE SW
9-GREEN LF PRESSURE SWITCH
10-GREEN RF PRESSURE SWITCH
11-NOT USED
12-YELLOW LR TAG PRESSURE SW
13-NOT USED
14-YELLOW ROOM 3 SELECT
1
2
16
17
18
CN10
CN12
CN11
19-RED SWITCHED
BATT 12V - OUT
24-RED SYSTEM
WAKE UP
LED
DESCRIPTION
1-RED
2-RED
3 & 4-NOT USED
5-YELLOW
6-YELLOW
7-GREEN
8-GREEN
9-GREEN
10-GREEN
11-NOT USED
12-YELLOW
13-NOT USED
14-YELLOW
15 THRU 18-NOTUSED
19-RED
20-RED
21-RED
22-RED
23-NOT USED
24-RED
27-NOT USED
28-RED
29 & 30-NOT USED
LINK LIGHT
EXTEND
RETRACT
NOT USED
LR PRESSURE SWITCH
RR TAG PRESS SWITCH
RR PRESSURE SWITCH
SYSTEM PRESSURE SW
LF PRESSURE SWITCH
RF PRESSURE SWITCH
NOT USED
LR TAG PRESSURE SW
NOT USED
ROOM 3 SELECT
NOT USED
SWITCHED BATT 12 - OUT
SWITCHED BATTERY
PUMP INDICATOR
READY TO OPERATE
NOT USED
SYSTEM WAKE UP
NOT USED
TAG LIFT SWITCH
NOT USED
Chassis STW - Leveling & Suspension
CN AND PIN
CN 10 - PIN 4
CN 10 - PIN 5
NOT USED
CN11 - PIN 2
CN12 - PIN 2
CN 11 - PIN 3
CN 12 - PIN 3
CN 11 - PIN 10
CN 12 - PIN 10
NOT USED
CN 12 - PIN 1
NOT USED
CN 10 - PIN 1
NOT USED
CN 11/CN 12 - PIN 7
CN 9 - PIN 3
CN 10 - PIN 3
CN 10 - PIN 2
NOT USED
CN 10 - PIN 7
NOT USED
CN 12 - PIN 11
NOT USED
Page 69 of 126
FUSE DESCRIPTION
F1 - 3AMP SW BATTERY OUT
F2 - 2AMP NOT USED
F3 - 2AMP READY TO OPERATE
LIGHT
F4 - 2AMP PUMP ON INDICATOR
LIGHT
F5 - 3AMP SWITCHED BATTERY IN
NOTE: FOR DETAILED
INPUT / OUTPUT INFORMATION
ABOUT PIN CONNECTIONS SEE
ELECTRICAL CONNECTION
DIAGRAM - REAR AIR/ ROOMS
2 & 3 MODULE CONNECTION
INFORMATION - PAGE 1 OF 4.
MP85.1511
22SEP04
ELECTRICAL CONNECTION DIAGRAM
LED - FUSE LOCATION AND DESCRIPTION
REAR AIR / ROOM 2 & 3 MODULE (TOP RING)
PAGE 4 OF 4
AIR LEVEL OUTPUT BOARD
NOT
USED
LEFT
TAG
LOWER
RIGHT
TAG
LOWER
TAG
ENABLE
TRAVEL
REAR
MANIF
RIGHT
REAR
LOWER
RIGHT
REAR
RAISE
LEFT
REAR
LOWER
LEFT
REAR
RAISE
TAG
LIFT
12
14
15
17
19
F1
FUSE
16
18
F10
13
F9
11
F8
9
10
F7
8
7
F6
5
6
F5
3
F4
4
F3
2
F2
1
20
LED
TOP RING BLACK
LED
1-YELLOW
2-RED
3-RED
4-YELLOW
5-YELLOW
6-RED
7-RED
8-YELLOW
9-YELLOW
10-RED
11-RED
12-YELLOW
13-RED
14-YELLOW
15-YELLOW
16-RED
17-YELLOW
18-RED
19-YELLOW
20-RED
RELAY DESCRIPTION
TAG LIFT
TAG LIFT
LEFT REAR RAISE
LEFT REAR RAISE
LEFT REAR LOWER
LEFT REAR LOWER
RIGHT REAR RAISE
RIGHT REAR RAISE
RIGHT REAR LOWER
RIGHT REAR LOWER
NOT USED
NOT USED
LEFT TAG LOWER
LEFT TAG LOWER
RIGHT TAG LOWER
RIGHT TAG LOWER
TAG ENABLE
TAG ENABLE
TRAVEL - REAR MANIFOLD
TRAVEL - REAR MANIFOLD
F1-5 AMP
F2-5 AMP
PIN 1
PIN 2
NOTE: FOR DETAILED INPUT / OUTPUT
INFORMATION ABOUT PIN CONNECTIONS
SEE ELECTRICAL CONNECTION DIAGRAM REAR AIR / ROOM 2 & 3 MODULE CONNECTION
INFORMATION - PAGE 2 OF 4.
F3-5 AMP
F4-5 AMP
PIN 3
PIN 4
NOTE: A LIT YELLOW LED INDICATES THERE
IS A GROUND SIGNAL TO TURN THE
CORRESPONDING RELAY ON.
F5-5 AMP
F6-5 AMP
PIN 5
PIN 6
F7-5 AMP
PIN 10
F8-5 AMP
PIN 9
F9-3 AMP
PIN 7
F10-3 AMP
PIN 8
FUSE
BLACK
NOTE: THE TWO TRAVEL RELAYS ARE WIRED AS
NORMALLY CLOSED RELAYS. WHEN THE YELLOW
LED (19) IS ON THE RELAY CONTACTS WILL OPEN.
THE RED LED (20) WILL NOT BE ON. THE RED LED
WILL BE ON IF THE LEVELING SYSTEM IS IN THE
TRAVEL MODE AND THE IGNITION IS ON.
Chassis STW - Leveling & Suspension
Page 70 of 126
A LIT RED LED INDICATES THERE IS
VOLTAGE ON IT’S CORRESPONDING CN1 PIN.
IF A YELLOW LED IS LIT AND THE
CORRESPONDING RED LED IS OFF, EITHER
IT’S FUSE IS BLOWN OR THE RELAY IS BAD.
IF THE YELLOW LEDS ARE WORKING BUT
NO RED LED IS COMING ON THERE IS A
PROBLEM WITH INPUT VOLTAGE IN THE
4-PIN CONNECTOR ON THE TOP RING.
IF A YELLOW LED IS NOT LIT, THIS
INDICATES A PROBLEM WITH A MODULE.
MP85.1518
22SEP04
MAINTENANCE
OIL LEVEL
All maintenance should be done as part of the normal
servicing of the coach.
The oil level should be checked when the vehicle is first
purchased and then once every two years. More often if
there is an oil leak in the system.
The oil reservoir is part of the pump/manifold assembly.
The oil level is checked and filled through the breather cap.
Clear any dirt away from the breather/filler cap before
removing. The oil level should be within one inch of the
top of the reservoir. Most breather caps have a dipstick.
NOTE: Overfilling the tank can cause leakage of oil
through the breather cap.
Refer to the "HYDRAULIC LINE CONNECTION
DIAGRAM - MULTIPLE ROOM EXTENSIONS" page
for information concerning the correct position of each
room before checking the oil level.
FLUID: HWH Specialty Hydraulic Oil is recommended. In an
emergency Dexron automatic transmission fluid can be used.
NOTE: Dexron automatic transmission fluid contains red dye
and can cause staining should a leak occur. DO NOT USE
brake fluid or hydraulic jack fluid. Use of these can damage
seals.
ELECTRICAL SYSTEM
The batteries should be in good condition and fully charged.
Weak batteries can cause erratic operation. Battery cable
terminals and battery posts and connections should be kept
clean.
All electrical connections, especially ground connections,
should be clean, tight, free from corrosion and protected
from weathering.
ROOM EXTENSIONS
The HWH room mechanisms need no maintenance.
DO NOT grease or lubricate any parts of the HWH
mechanism.
Any visible mechanism can be kept clean by washing
with water. Refer to the vehicle manufacturer for
correct maintenance of the room seals.
OPERATIONAL CHECK
Review the OPERATOR MANUAL. Run the system
according to the SYSTEM OPERATION (LEVELING) Section.
Note any abnormal operation.
Chassis STW - Leveling & Suspension
Check that all lights work according to the "INDICATOR
LIGHT" Section. Correct function of the red "WARNING"
light is important.
Page 71 of 126
MP45.3004
23SEP04
MAINTENANCE
NOT IN PARK/BRAKE CHECK
CAUTION:
WHEN MAKING THIS CHECK, BLOCK
THE COACH WHEELS SECURELY SO THE COACH
CANNOT ROLL FORWARD OR BACKWARD.
If any of the above checks or inspections reveal a problem
or if there are other problems or questions, consult a
qualified RV repair center, your vehicle or coach
manufacturer, or HWH CORPORATION for service or repair.
Set the park/brake. Switch the ignition to the "ACC" or "ON"
position. Push the "ON/OFF" switch toward "ON". Release
the parking brake and confirm that the "PARK" indicator light
comes on. Reset the parking brake. The "PARK" indicator
light should go out. Switch the ignition to "OFF".
SENSING UNIT ADJUSTMENT
Level the vehicle by placing a bubble level in the center of
the freezer floor or upon whichever surface within the vehicle
that is to be level. Using the Leveling System and the bubble
level, ignoring the yellow LEVEL lights on the Touch Panel,
level the vehicle until the bubble is centered.
When the vehicle is level according to the bubble level, if
there are no yellow lights lit on the Touch Panel, the sensing
unit is properly adjusted.
the LED out, there may be a problem with the Sensing Unit
or the mounting of the Control Box. Be careful to not turn
the adjustment screw out to far or over tighten it. If two
LED’s are on, either adjustment may be made first.
NOTE: If opposing LED’s are lit, there is a problem with
the Sensing Unit.
If LED (A) is lit: Turn the adjustment screw COUNTER
CLOCKWISE until the LED is off.
If there are yellow LEVEL lights lit on the Touch Panel,
manual adjustments to the Sensing Unit are needed. A 7/8"
socket w/driver and a philips screw driver will be needed.
If LED (C) is lit: Turn the adjustment screw CLOCKWISE
until the LED is off.
The Sensing Unit is mounted inside the Control Box. The
Control Box is mounted to the power unit/valve assembly.
If LED (B) is lit: Turn the adjustment nut COUNTER
CLOCKWISE until the LED is off.
There are four LED’s on the Sensing Unit, A,B,C and D.
Refer to the drawing below. The Sensing Unit is adjusted
by turning the adjustment nut to turn out LED’s B and D.
The adjustment screw will turn out LED’s A and C. If the
adjustment nut has to be turned more than 1/2 flat to turn
If LED (D) is lit: Turn the adjustment nut CLOCKWISE
until the LED is off.
When all 4 LED’s are off, the Sensing Unit is adjusted.
TOP VIEW - SENSING UNIT
SIDE VIEW - CONTROL BOX
A
B
D
LED’S - LOCATION
MAY BE DIFFERENT
ADJUSTMENT
NUT
C
ADJUSTMENT
SCREW
CONTROL
BOX WALL
ADJUSTMENT
NUT
Chassis STW - Leveling & Suspension
ADJUSTMENT
SCREW
Page 72 of 126
MP45.3259
07AUG03
TROUBLE SHOOTING
TROUBLE SHOOTING BASICS
Please read before continuing.
the tag manifold are used as low air warning devices only and
will not affect any leveling procedures.
When trouble shooting the 2000 series leveling system, it is
best to run the system in the manual mode to check individual
functions before operating the system in the automatic mode.
The drive axle manifold has a pressure switch that monitors
the air pressure in the suspension system. This switch is
also used only as a low air warning device.
Start the engine and push the "TRAVEL" button. Let air
pressure build and allow the vehicle to return to travel height.
If the vehicle is equipped with a tag axle, make sure the TAG
DUMP switch is in the normal travel position. This will make
the following procedures easier to perform. If the vehicle will
not return to ride height see step 1c.
If the vehicle is on a reasonably flat surface, unplug the
pressure switch connector (CN100) at the control box. This
will allow the air bags to deflate completely when using down
arrows in the manual mode.
When trouble shooting raise, lower or travel mode problems,
do not watch the vehicle. Watch the air bags. Make sure air
bags will deflate completely when dumping or re-inflate when
raising. Check all four sets of up and down arrows. Do a
lower then raise check for one set of arrows at a a time. It is
important to do only one set of arrows at a a time to avoid
twisting unless this manual calls for a specific operating
procedure.
Each air manifold is equipped with two 20 P.S.I. pressure
switches. The contacts in these switches will close if the air
pressure in the corresponding bag(s) is 20 P.S.I. or less.
These switches are used as low air warning devices and
also protect the vehicle from twisting while air is being
dumped during manual or automatic leveling. Any time
either front pressure switch is on, a manual or automatic
front lower procedure will cease. Any time either rear (drive
axle) pressure switch is on, a manual or automatic rear lower
procedure will cease. Side lower procedures, either manual
or automatic will not be affected by low air pressure in any
air bag(s).
If the vehicle is equipped with a tag axle, there will be an air
manifold for the tag axle also. The two pressure switches on
IMPORTANT: Do not run the system in the automatic
mode with the pressure switches unplugged. Be careful
to not twist the vehicle when manually operating the
down arrows.
The control box is equipped with LED’s to indicate inputs and
outputs. Lit LEDs are not used to indicate a problem. Refer to
the ELECTRICAL CONNECTION DIAGRAM - LED - FUSE
LOCATION AND DESCRIPTION for LED functions.
IMPORTANT: Unplug the power connectors, CN98 and
CN11, before separating the rings at the control box to
check fuses or perform tests. This eliminates the
possibility of shorting interior components of the
control box.
In the following repair guide, each "Part" describes an
operation or function of the leveling system. Below each
"Part" there are three columns. The left hand column
describes a possible symptom. The center column gives a
diagnostic procedure and solution. The right hand column
shows a diagram or refers to a diagram in the diagram section.
It is important to remember it is possible to encounter a
problem not listed in this guide. If this occurs, contact HWH
Corporation Customer Service for assistance.
Part 1. With the engine running, push the "TRAVEL MODE" button. The "TRAVEL MODE"
light should flash a few times. The vehicle should return to travel height.
PROBLEM
1a. The (red)
"TRAVEL MODE"
button light will not
flash. The HWH reset
switch light is on.
SOLUTION
DIAGRAM
Push the reset switch. If the reset light comes back on or
comes back on after pushing the "TRAVEL MODE" button,
replace the control box. CAUTION: The vehicle will
return to travel height if the reset switch light is on and
the ignition is in the "ON" position.
Chassis STW - Leveling & Suspension
Page 73 of 126
MI91.232A
01MAY06
TROUBLE SHOOTING
PROBLEM
SOLUTION
1b. The (red)
"TRAVEL MODE"
button light will not
flash, the HWH
reset switch light
is not lit.
LED #3 on the central control module should be lit. If LED #3
is lit, replace the touch panel. If LED #3 is not lit, check
fuse F5 on the Central Control Module. If F5 is blown, there is
a problem with the touch panel or the touch panel cables. If
F5 is not blown, check fuses F1, F2, F6 (or F8) on the Central
Control Module. If F1, F2, F6 (or F8) are blown the problem is
most likely the control box. If F1, F2, F6 (or F8) are OK, check
that there is +12 volts power on pins 1,6 and 12 of CN11 gray
connector. If power is present on all pins, replace the box. If
power is not present on a pin, trace that wire to it’s source and
repair.
DIAGRAM
CENTRAL CONTROL MOTHER BOARD
F5
5AMP
IGNITION - IN
5AMP
ENGINE BATT - IN
15AMP SWITCHED
BATTERY FROM
MASTER RELAY
3-RED
SWITCHED 12V - IN
15AMP
HOUSE BATT - IN
SENSING UNIT
+12V
REAR
RIGHT SIDE
FRONT
LEFT SIDE
GROUND
F2
F1
F6
F3
F4
F8
CN1
CN10
CN11
F7
CN9
REFER TO MP85.050V
FRONT VIEW
CLEAR TOP
PIN 12
PIN 1
CN1
CN10
CN11
CN9
REFER TO MP85.030C
TRAVEL
9
19
12
F10
8
7
F6
5
6
F5
3
FUSE
F4
4
F3
11
10
20
LED
CN1 BROWN
REFER TO MP85.060V
AIR LEVEL OUTPUT BOARD
TAG
TRAVEL
TRAVEL
REAR
MANIF
17
19
FUSE
14
13
15
16
F9
11
18
F10
12
F8
9
10
F7
8
7
6
F6
5
F5
3
F4
4
F3
1
2
F2
20
LED
CN1/1 BLACK
REFER TO MP85.080V
RIGHT SIDE VIEW
PIN 4
PIN 1
PIN 1
CN98
CN1 BROWN
CN1/1 BLACK
PIN 1
PIN 12
PIN 12
CN100
REFER TO MP85.040C
B A
B A
B A
B A
B A
B A
B A
B A
LS
PSW
LS
TRAVEL
LS
RAISE
LS
LOWER
RS
LOWER
RS
PSW
LINE FROM HEIGHT
CONTROL VALVE (MAY BE
TEED TOGETHER IF ONE
HCV IS USED)
RS
RAISE
MOUNTING HOLES
RS
TRAVEL
CAUTION: The vehicle will drop quickly when an air
line is removed. The vehicle frame must be supported
properly before crawling under the vehicle or removing
any air lines.
AIR LEVEL OUTPUT BOARD
F1
Check LED’s 19 (YELLOW) and 20 (RED) on both air level
output boards. If the vehicle is equipped with a tag axle,
check LED’s 17 (YELLOW) AND 18 (RED) on the rear output
board. The (YELLOW) LED’s should NOT be lit. The (RED)
LED’s should be lit. If any (YELLOW) Travel LED (or LED 17)
is lit replace the control box. If any (RED) Travel LED is not
lit, check fuse F10 for that board. If LED 18 (RED) for Tag
Axle is not lit check fuse 9. If the fuse is OK, replace the box.
If the fuse is blown, there is a short in the harness or one of
the travel valves on that fuse. If all (RED) Travel LED’s (and
LED 18) are lit, check for +12 volts power on pin 8 of the 12
pin CN1 brown connector and pins 7 and 8 of the 12 pin CN1
black connector. Pin 7 is for Tag Axle Travel. Check for
ground on pin 11 of these connectors. The harness can be
unplugged to check these pins. If there is a problem with any
of these pins, replace the control box. (Make sure there is a
good ground on the two white wires in the 4 pin CN98
connector). If the proper pins have power and ground, the
problem is the harness, harness connectors or the travel
valves. Check for +12 volts power and ground at the travel
valves. If power and ground is present, the travel valve may
be bad. This can be checked by removing an air line from the
height control valve or the air bag at the HWH manifold. Air
should flow through the manifold when the travel valve is
open. If the travel valve is OK, the problem is in the
suspension or height control valve. Refer to the vehicle
manufacturer for assistance.
F2
1c. The (red)
"TRAVEL MODE"
button light flashes,
the vehicle will not
return to ride height.
RIGHT SIDE
VIEW
REFER TO MP75.030C
SEE ALSO MP75.040C
SEE ALSO MP75.050C
Chassis STW - Leveling & Suspension
Page 74 of 126
MI91.232C
01MAY06
TROUBLE SHOOTING
PROBLEM
SOLUTION
1d. The (green)
"TRAVEL MODE"
light will not come
on, the vehicle is at
ride height and all
air bags are
inflated.
If the MASTER WARNING light is off and the (green)
"TRAVEL MODE" light is off, remove the touch panel. If the
link light is not blinking, there is a problem with the touch panel
cable or the control box. If the link light is blinking, replace the
control box. If the MASTER WARNING light is on and the
(green) "TRAVEL MODE" light is off,unplug the CN100
connector from the control box. If the (green) "TRAVEL MODE"
light remains off, replace the control box. If the (green) "TRAVEL
MODE" light comes on, an air pressure switch on one of the
air manifolds is on. The air bag pressure switch will come on
if an air bag has less than 20 p.s.i. The system air pressure
switch will come on if the system pressure is below 85 p.s.i.
Make sure there is ample air bag and system air pressure.
There should be no continuity between pin 6 (pressure switch
ground supply) and pins 2,3,4,5 and 8 (individual air pressure
switches) of connector CN100. Also pins 9 and 10 if the
vehicle is equipped with a tag axle. Replace any pressure
switch that has continuity to pin 6.
NOTE: Either the
(green) "TRAVEL
MODE" light should
be on or the MASTER
WARNING light
should be on any
time the ignition
key is in the "ON"
position.
DIAGRAM
LINK LIGHT
TOUCH PANEL
CABLE CONNECTOR
TOUCH PANEL - REAR
REFER TO MP85.030C
RIGHT SIDE VIEW
CN98
CN1 BROWN
CN1/1 BLACK
CN100
PIN 1
PIN 12
REFER TO MP85.040C
REAR
VIEW
PRESSURE
SWITCH-20 PSI
PRESSURE
SWITCH-20 PSI
LEFT SIDE
RIGHT SIDE
REFER TO MP75.030C
SEE ALSO MP75.040C
SEE ALSO MP75.050C
Part 2. With the vehicle engine running push the "AIR" button one time. The Leveling System Active light should come on
steady. The four red warning lights should come on. The "TRAVEL MODE" light should go out. One or two yellow level
lights may be on (opposing lights should not be on). The master warning light should come on.
PROBLEM
2a. The System
Active light will
not come on.
2b. The "NOT IN
PARK/BRAKE"
light comes on
while the "AIR"
button is being
pushed.
SOLUTION
DIAGRAM
FRONT VIEW
Make sure there is power and ground to the control box in the
12 pin gray connector CN11. There is a link light on the back
of the touch panel. This light should be flashing whenever the
ignition is on. If the link light is not blinking, replace the control
box. If the link light is blinking, replace the touch panel.
CN1
CN10
CN11
CN9
REFER TO MP85.030C
There should be a ground on the number 11 pin of connector
CN11 at the control box. With CN11 plugged in there should
be a minimum of 7.5 volts between pin 1 and pin 11 of CN11.
If a ground is present, replace the control box. If there is no
ground, the problem is the 9000 wire or the park brake switch.
CENTRAL CONTROL MOTHER BOARD
SENSING UNIT
+12V
REAR
RIGHT SIDE
FRONT
LEFT SIDE
GROUND
F6
F2
F1
F3
F4
F5
F8
CN1
2c. More than 2
yellow lights are
lit or opposing
yellow lights are
lit.
CLEAR TOP
PIN 12
PIN 1
PIN 1
PIN 6
The sensing unit is inside the control box. Unplug the sensing
unit. Use a test light to apply a ground to pins 2,3,4 and 5.
The appropriate yellow light should come on when it’s pin is
grounded. If the yellow lights do not work properly, replace
the control box. If the yellow light work correctly, replace the
sensing unit.
CN10
CN11
F7
CN9
REFER TO MP85.050V
LEVELING SYSTEM
TOUCH PANEL
LIGHTED
RESET
SWITCH
WARNING
LIGHT
HWH COMPUTERIZED LEVELING
AIR
EXCESS
SLOPE
NOT IN
PARK
TRAVEL
DUMP
EMERGENCY
STOP
TRAVEL
CAUTION!
6121
7699
UNDERSTAND OPERATOR’S MANUAL BEFORE USING. BLOCK FRAME AND TIRES
SECURELY BEFORE REMOVING TIRES OR CRAWLING UNDER VEHICLE.
FUSE
20 AMP
TO CN10 (6 PIN GRAY)
POWER HARNESS
TO
CN11
AND
CN98
6103
7699
6121
7699
6121
SEE
ELECTRICAL
CONNECTION
DIAGRAM CENTRAL
CONTROL/
AIR MODULE
CONNECTION
INFORMATION
9000
2d. The Master
Warning light does
not come on.
Check for +12 volts power on pin 4 of connector CN10. Check
for a ground on pin 6 of connector CN10. If +12 power or
ground is present the problem is with wire 6121 (+12V), wire
7699 (GROUND) or the light itself. If +12 power or ground is
not present, the problem is the Control Box.
Chassis STW - Leveling & Suspension
Page 75 of 126
DETAIL (A)
REFER TO MP85.010C
MI91.232E
12DEC03
TROUBLE SHOOTING
Part 3. Unplug CN100, see page MP85.xxxx. Be careful to not twist the frame of the vehicle while operating the leveling
system manually. Only operate one set of LOWER then RAISE buttons at a time.
Push a LOWER (Down Arrow) button. Hold until all of the air is exhausted from the air bags. Check that the appropriate air
bags are completely deflated. Push the corresponding RAISE (Up Arrow) button. Check that the appropriate air bags have
inflated raising the vehicle. Repeat this process for the other three sets of LOWER and RAISE buttons. When pushing a
manual button, it will always operate two corners of the vehicle at the same time, both front, both rear, right front and rear or
left front and rear.
NOTE: FOR VEHICLES EQUIPPED WITH A TAG AXLE. The tag axle manifold valves work in conjunction with the
drive axle manifold valves. The tag axle manifold raise valves, are tied together in the harness with the drive axle
manifold raise valves. The tag axle manifold dump valves each have it’s own relay on the output board in the control
box. When pushing either side LOWER button, there will be three sets of yellow and red LED’s. When pushing the
rear LOWER button, there will be four sets of yellow and red LED’s. When pushing the front LOWER button, there
will be two sets of yellow and red LED’s. When pushing any RAISE button, there will be four sets of yellow and red
LED’s. This includes a red and yellow LED for the auxiliary air compressor on each output board.
PROBLEM
SOLUTION
DIAGRAM
AIR LEVEL OUTPUT BOARD
10
19
12
F10
9
F6
8
7
F5
6
RIGHT
FRONT
LOWER
5
F4
F3
3
FUSE
RIGHT
FRONT
RAISE
4
LEFT
FRONT
LOWER
The air bags will
not inflate when the
RAISE (Up Arrow)
button is pushed.
F2
OR
Check the yellow and red LED’s on the output boards for the
solenoid valves that are being operated. Both LED’s should
be lit while a LOWER or RAISE button is being pushed. If a
yellow LED is not lit, replace the control box. If no red LED’s
are lit, check for +12 power on pins 1 and 2 of CN98. If power
is not present, trace the wires to their source or repair the
wires. If power is present, check the fuses for these relays.
If the fuses are OK, replace the control box. If the fuses are
blown, the wires or solenoid valves are shorted.
LEFT
FRONT
RAISE
3a. The air bags will
not deflate when
the LOWER (Down
Arrow) button is
pushed.
11
20
LED
CN1 BROWN
REFER TO MP85.060V
SEE ALSO MP85.080V
RIGHT SIDE VIEW
If not all the proper red LED’s are lit, check the fuse for
that relay. If the fuse is OK replace the control box. If the
fuse is blown the wire or solenoid valve is shorted.
PIN 4
CN98
CN1 BROWN
CN1/1 BLACK
PIN 1
A B
A B
A B
A B
B A
B A
B A
A B
B A
SYS
PSW
LS
TRAVEL
LS
PSW
A B
A B
B A
LS
RAISE
B A
LS
LOWER
A B
A B
B A
RS
LOWER
RS
RAISE
LS
PSW
LS
TRAVEL
LS
RAISE
LS
LOWER
RS
LOWER
RS
PSW
RS
RAISE
3c. The correct air
Because the correct air bags deflate when the LOWER button
bags will not
is pushed, it an be assumed the air line plumbing is correct.
inflate when a
Check the electrical connections and wire locations in plugs
RAISE button is
according to the proper diagrams.
pushed.
Chassis
STW - Leveling & Suspension
Page 76 of 126
B A
RS
TRAVEL
The problem is either an air line connection or electrical
connection that is not in the correct position. Check all air line
connections, electrical connections and wire locations in plugs
according to the proper diagrams.
REFER TO MP85.040C
RS
PSW
3b. The correct air
bags will not
deflate when a
LOWER button is
pushed.
CN100
PIN 1
PIN 12
RS
TRAVEL
If the proper yellow and red LED’s are lit, check for +12
and ground at the solenoid valve on the manifold. If ground
is not present, check for a ground on pin 11 in the black or
brown CN1 connector at the control box if ground is not
present, check for a ground on pins 3 and 4 of CN98. If
ground is present replace the control box. If ground is not
present, the problem is the 6231 (white) wires or their
connection to the ground studs. If ground is present on pin 11
of the CN1 connectors, the problem is in the harness or
harness plugs.
If +12 is not present at the solenoid valve, the problem is the
harness or the harness plugs.
If +12 and ground is present at the solenoid valve the problem
is the valve.
NOTE: If using a DOWN button, check that the exhaust
port at the manifold is not plugged. If using a RAISE
button, make sure that there is good air pressure to the
manifold.
REFER TO MP75.030C
FRONT VIEW
CLEAR TOP
PIN 8
PIN 1
CN1
CN10
CN11
CN9
REFER TO MP85.030C
MI91.232G
12DEC03
TROUBLE SHOOTING
PRESSURE SWITCH TEST
Part 4. Plug in the pressure switch connector, CN100. Make sure the vehicle is at ride height and all air bags have adequate
air pressure. Push either side LOWER button until the air bags for that side are deflated. Push the front LOWER button.
Nothing should happen. Push the rear LOWER button. Nothing should happen. Allow the vehicle to return to ride height
and repeat the process with the other side LOWER button. If the vehicle is equipped with a tag axle, the tag axle lower
solenoid valves will work with the drive axle valves. The tag axle pressure switches will not effect the lowering procedure.
PROBLEM
4a. The air bags will
deflate completely
with CN100 plugged
in when the front or
rear LOWER button
is pushed.
SOLUTION
DIAGRAM
CN98
Make sure all air bags are completely deflated. Unplug CN100.
Check for continuity between pin 6 (ground) and pins 2 (left
front pressure switch), 3 (right front pressure switch), 4 (right
rear pressure switch) and 5 (left rear pressure switch).
If there is no continuity between pin 6 and another pin, there is
a bad pressure switch or a problem with the wire or connection
to that pressure switch.
CN1 BROWN
CN1/1 BLACK
CN100
PIN 1
PIN 12
REFER TO MP85.040C
SEE ALSO MP75.030C
SEE ALSO MP75.040C
SEE ALSO MP75.050C
Part 5. Any time a raise function is performed, there is a +12 volt signal to turn the HWH auxiliary air compressor on. Push any
RAISE (UP ARROW) button to check the air compressor. Some compressors have a pressure switch which will not allow the
compressor to run if the vehicle has adequate air pressure in the suspension. Check the air compressor with the engine off
and the system air pressure below 90 p.s.i.
This manual shows a common compressor arrangement used. Other compressors may be used. Consult the owners manual
or HWH Technical Service for specific diagrams.
COMP
RESSOR
8
7
9
19
12
F10
5
6
F6
3
FUSE
F5
4
F4
11
10
20
LED
CN1 BROWN
REFER TO MP85.060V
CHECK VALVE (4)
AIR LINE TO SUSPENSION
FLOW
PRESSURE SWITCH (1)
NORMALLY CLOSED
(OPEN AT 115 PSI)
(CLOSED AT 105 PSI)
AIR FILTER
A
If both LED’s are lit, check for +12 power on the 9700 wire at
the compressor. If power is not present, there is a problem
with the 9700 wire. If +12 power is present, check for +12
battery power on the 6104 wire at the compressor relay.
Check the 15 amp fuse. The compressor and compressor
relay are grounded through the compressor mounting bracket.
Make sure the bracket has a good frame ground. If the 9700
wire goes to a pressure switch before the relay, make sure
there is power through the pressure switch. If there is +12
battery power to the relay and +12 power and ground to the
coil of the relay but no power through the relay, the relay is
bad. If there is +12 power through the relay and a good
ground for the compressor, the compressor is bad.
AIR LEVEL OUTPUT BOARD
F3
Check the yellow LED (12) and red LED (11) on the front
air output board, both LEDs should be on. If the yellow LED
is not lit, replace the control box. If the yellow LED is lit but the
red LED is not, check fuse 6. If fuse 6 is OK, replace the
control box. If fuse 6 is blown, there is a short on the 9700 wire
or the relay on the compressor is bad.
DIAGRAM
F2
5a. The compressor
will not run when
a RAISE button is
pushed.
SOLUTION
B
PROBLEM
NORMALLY OPEN
AIR SOLENOID (3)
GROUND TO RELAY MOUNTING BOLT
P.E.D
+12 BATTERY
POWER - 6104
SWITCHED +12 COMPRESSOR CONTROL - 9700
COMPRESSOR HARNESS
FROM CONTROL BOX - 9700
REFER TO MP75.060C
FUSE
15 AMP
FROM AIR
SOLENOID
5b. The compressor
will not shut off.
+12 SIGNAL FROM
PRESSURE SWITCH
GROUND
A
There is a +12 volt normally open solenoid on the compressor
water trap. Any time the compressor is turned on, this solenoid
will close. Check for +12 and ground to the solenoid when the
compressor is running. If either is not present, there is a problem
with the wiring. If +12 and ground is present, replace the
solenoid
Chassis STW - Leveling & Suspension
Page 77 of 126
12 VOLT RELAY (2)
B
Some compressors have auxiliary control which allows the
compressor to run at times other than when leveling. Refer to
the owners manual or HWH Technical Services for specific
compressor wiring diagrams. Check LED’s 11 and 12 on the
front air output board. If the LED’s are lit, and the leveling
system is not in the automatic mode, replace the control box.
If the LED’s are not lit, the compressor relay is stuck and
should be replaced.
REFER TO MP75.060C
5c. The compressor
will not build
pressure.
MI91.232J
01MAY06
TROUBLE SHOOTING
Part 6 Sensing unit diagnostics. The sensing unit is mounted in the control box and must be working properly and be
adjusted properly for the system to function in the automatic mode. Refer to MPxxxxxx for proper adjustment procedures.
A lit yellow level light indicates a side or end of the vehicle is low. When all yellow level lights are out, the vehicle should be
level within the tolerances of the sensing unit, about 1 inch side to side and about 3 to 4 inches front to rear.
Use the manual buttons or move the vehicle to different locations to make sure each yellow level light will come on and can be
made to go out.
PROBLEM
SOLUTION
6a. One or more
yellow level lights
will not come on
Unplug the sensing unit. Pin 1 supplies ground for the sensing
unit. Pins 2,3,4 and 5 supply a ground from the sensing unit to
turn the yellow lights on. Pin 6 supplies +12 power for the
sensing unit. Use a test light to check pin 1 for ground and
pin 6 for +12. Use the test light connected to ground to apply
a ground to pins 2,3,4 and 5 one at a time. Ground one pin
and one yellow light should come on. If any pin does not
function correctly, replace the control box. If the pins function
correctly replace the sensing unit.
OR
One or more
yellow level lights
will not go out.
DIAGRAM
CENTRAL CONTROL MOTHER BOARD
SENSING UNIT
+12V
REAR
RIGHT SIDE
FRONT
LEFT SIDE
GROUND
F6
F2
F1
F3
F4
F5
F8
CN1
CN10
CN11
F7
CN9
REFER TO MP85.050V
Part 7 Tag Dump diagnostics. The tag dump switch is supplied by the vehicle manufacturer. Power for the tag dump switch
is supplied +12 power by the HWH control box on wire 6801. The tag dump signal is wire number 7521. The tag dump switch
will only work with the ignition on and the leveling system off. When the tag dump switch is in the DUMP position the tag axle
manifold travel valves are turned off and the tag axle manifold lower valves are turned on.
PROBLEM
7a. The tag axle
will not dump.
SOLUTION
With the engine running put the tag dump switch in the DUMP
position. The red LED 18 for tag travel should be off. The
yellow LED 17 should be on. The left tag lower yellow LED 14
and red LED 13 along with the right tag lower yellow LED 15
and red LED 16 should be on. If the LED’s are correct there is
a problem with the connections, wires or valves on the tag axle
manifold. If the LED’s are not correct, check for +12 on wire
7521, connector CN100, pin 11 at the control box. If +12 is
present replace the control box. If +12 is not present, check
for +12 on pin 7 of CN100. If +12 is not present, replace the
control box. If +12 is present, the problem is wire 6801, the
tag dump switch or wire 7521.
DIAGRAM
LEVELING SYSTEM
TOUCH PANEL
HWH COMPUTERIZED LEVELING
AIR
EXCESS
SLOPE
TO CN1 (8 PIN BLACK)
NOT IN
PARK
TRAVEL
DUMP
EMERGENCY
STOP
TRAVEL
CAUTION!
UNDERSTAND OPERATOR’S MANUAL BEFORE USING. BLOCK FRAME AND TIRES
SECURELY BEFORE REMOVING TIRES OR CRAWLING UNDER VEHICLE.
TO CN10 (6 PIN GRAY)
POWER HARNESS
FUSE
20 AMP
TO
CN11
AND
CN98
6103
SEE
ELECTRICAL
CONNECTION
DIAGRAM CENTRAL
CONTROL/
AIR MODULE
CONNECTION
INFORMATION
7521
6801
DETAIL (A)
REFER TO MP85.010C
RIGHT SIDE VIEW
7b. The tag axle
will not lift.
Not all coaches will use the 3800 wire supplied by HWH for
the Tag Lift.
CN1/1 BLACK
CN100
PIN 1
PIN 12
REFER TO MP85.040C
B A
B A
B A
B A
B A
B A
B A
B A
LS
PSW
LS
RAISE
LS
TRAVEL
LS
LOWER
RS
PSW
RS
RAISE
LINE FROM TAG
PRESSURE REGULATOR
(TEE’D TO BOTH
FITTINGS)
RS
LOWER
MOUNTING HOLES
RS
TRAVEL
If the HWH 3800 wire is used, check that there is power on
the 7521 wire, connector CN 100 pin 11. If there is no power
on the 7521 wire refer to 7a. If there is power on the 7521
wire, check LED’s 1 (YELLOW) and 2 (RED). If both are on,
there should be power on the 3800 wire. If not, there is a
problem with the connectors or wire. If there is power on the
3800 wire at the box, the problem is with the wire, connection
to the Tag lift or the Tag lift.
CN98
CN1 BROWN
RIGHT SIDE
VIEW
LINE TO AIR BAGS
(2 LEFT AND RIGHT)
If LED 1 (YELLOW) is on and not LED 2 (RED), check fuse
F!. If the fuse is good replace the box. If the fuse is blown,
there may be a problem with the 3800 wire or the Tag lift.
If LED 1 (YELLOW) is not on, replace the control box.
EXHAUST PORTS
(2 LEFT AND RIGHT)
RIGHT TRAVEL
SOLENOID VALVE (LEFT
VALVE NOT SHOWN)
PRESSURE SWITCH
20 PSI (2 LEFT AND RIGHT)
RIGHT LOWER
SOLENOID VALVE (LEFT
VALVE NOT SHOWN)
AIR SUPPLY
CHECK
VALVE (2)
RIGHT RAISE
SOLENOID VALVE (LEFT
VALVE NOT SHOWN)
REFER TO MP75.050C
Chassis STW - Leveling & Suspension
Page 78 of 126
MI91.232M
27SEP05
TROUBLE SHOOTING
AUTOMATIC LEVELING
Part 8 Automatic Leveling Procedures and Diagnostics. Push the "LEVEL" (AIR) button once to turn the panel on.
Push the "LEVEL" button a second time. This will start the automatic leveling process. The system will attempt to level
the vehicle by lowering the high side and/or end of the vehicle (opposite side/end of lit yellow level indicators). If a pair
of "LOWER" valves are on continuously for 45 seconds, the system will attempt to finish leveling by raising the low side
or end of the vehicle (lit yellow level indicators). Once the system is in the raise mode it will not try to lower the vehicle
again in that leveling sequence. If the front or rear of the vehicle is being lowered, and a pressure switch for that end
comes on indicating low air pressure, the system will stop lowering the vehicle and go immediately into raise mode. It
will not wait for the 45 second timer.
When all yellow level indicators are out the "LEVELING SYSTEM ACTIVE LIGHT" will stop flashing and start pulsating
dimly. The system is now in the sleep mode. There is no delay between the yellow lights going out and the SYSTEM
ACTIVE light pulsating dimly. The ignition key can be turned off. The SYSTEM ACTIVE light will continue to pulsate
for 10 minutes. At that time the panel will turn off but the system will remain in the SLEEP mode.
SLEEP MODE: After all yellow lights have gone out, the system may be turned off or left in the SLEEP MODE. In the
SLEEP MODE the touch panel will be off but the processor will check the level sensing unit every half hour. If an input
for a yellow level indicator is on continuously for 1 minute, the processor will wake up the system, turn the touch panel on
and relevel the vehicle according to lit yellow indicators. The system will attempt to level the vehicle by first lowering, then
raising the vehicle as necessary. When a level position is achieved the system will return to the SLEEP MODE
with the touch panel turning off 10 minutes after leveling is achieved.
EXCESS SLOPE: During any leveling sequence, if a level position is not achieved, the EXCESS SLOPE light will come
on. EXCESS SLOPE is when any pair of raise valves have been on continuously for 15 minutes. 10 minutes after the
EXCESS SLOPE light comes on the panel will turn off if the ignition is off. Any time the ignition is turned on the EXCESS
SLOPE light will come on until the "TRAVEL" button is pushed, the Park Brake is released if the ignition is on, or the vehicle
is leveled using manual air leveling.
If the leveling system does not operate properly in the Automatic mode, recheck the system in the Manual mode
starting with Part 1. If the system works properly in the Manual Mode, it should work in the Automatic mode.
After rechecking the system, if it works manually but not automatically, contact HWH customer service for assistance.
Chassis STW - Leveling & Suspension
Page 79 of 126
MI91.232P
12DEC03
HYDRAULIC LINE CONNECTION DIAGRAM
MULTIPLE EXTENSIONS
ROOM 4 (PASSENGER SIDE FRONT)
EXTEND ROOM TO
CHECK OIL LEVEL
ROOM 1 (DRIVER SIDE FRONT)
RETRACT ROOM TO
CHECK OIL LEVEL
SEE HYDRAULIC LINE
CONNECTION DIAGRAM
DUAL CYLINDER
"X - ARM"
ROOM EXTENSION
CAP END
CONNECTION - A
SEE HYDRAULIC LINE
CONNECTION DIAGRAM
DUAL CYLINDER ROOM
EXTENSION WITH
SYNCHRONIZING CYL.
CAP
POPPET
CAP END
CONNECTION - A
ROD END
CONNECTION - B
ROD END
CONNECTION - B
SPRING
O-RING
DETAIL A
VALVE FUNCTION
1E - ROOM 1 CYLINDER
EXTEND - ROOM EXTEND
1R - ROOM 1 CYLINDER
RETRACT - ROOM RETRACT
2E - ROOM 2 CYLINDER
EXTEND - ROOM EXTEND
1 R
2R
3R 4 R
1E
2E
3E
2R - ROOM 2 CYLINDER
RETRACT - ROOM RETRACT
3E - ROOM 3 CYLINDER
EXTEND - ROOM RETRACT
3R - ROOM 3 CYLINDER
RETRACT - ROOM EXTEND
4E - ROOM 4 CYLINDER
EXTEND - ROOM RETRACT
4R - ROOM 4 CYLINDER
RETRACT - ROOM EXTEND
4E
CHECK VALVE
DETAIL A
VALVE
RELEASE
NUT
ROD END
CONNECTION - B
ROD END
CONNECTION - B
CAP END
CONNECTION - A
SEE HYDRAULIC LINE
CONNECTION DIAGRAM
SINGLE CYLINDER
ROOM 2 (DRIVER SIDE REAR)
"GUIDED" ROOM
RETRACT ROOM TO
EXTENSION
CHECK OIL LEVEL
NOTE: HYDRAULIC PUMP SHOWN WITH ROOM
EXTENSION MANIFOLD ONLY. THE LEVELING
SYSTEM MANIFOLD (NOT SHOWN) IS MOUNTED
ONSTW
TOP- Leveling
OF THE&ROOM
EXTENSION MANIFOLD.
Chassis
Suspension
CAP END
CONNECTION - A
Page 80 of 126
SEE HYDRAULIC LINE
CONNECTION DIAGRAM
DUAL CYLINDER
"LATERAL ARM"
ROOM EXTENSION
ROOM 3 (PASSENGER SIDE)
EXTEND ROOM TO
CHECK OIL LEVEL
MP65.6026
22SEP04
CYLINDER CONNECTION DIAGRAM
DUAL CYLINDER ROOM EXTENSIONS
(WITH SYNCRONIZING CYLINDER)
HIGH
PRESSURE HOSE (B1)
CAP END
CONNECTION - A
ROD END
CONNECTION - B
STEEL TUBE
HYDRAULIC CYLINDER
SYNCHRONIZING CYLINDER
CAP END
ROD END
NOTE: THESE CONNECTIONS ARE (A1)
THE SAME FOR EACH ROOM EXTENSION
WITH DUAL ROOM CYLINDERS AND
SYNCHRONIZING CYLINDER. NOT ALL
ROOM EXTENSIONS WITH
TEE
DUAL CYLINDERS USE THE
STEEL TUBE.
(A1)
HIGH PRESSURE HOSE (B1)
CYLINDER EXTEND - ROOM EXTEND
CYLINDER RETRACT - ROOM RETRACT
CHECK OIL WITH ROOM RETRACTED
STEEL TUBE
HYDRAULIC CYLINDER
CAP END
ROD END
VIEW 1
DUAL CYLINDER ROOM EXTENSION
IMPORTANT: THE LINES (A1) BETWEEN THE CAP END OF THE HYDRAULIC CYLINDERS AND THE TEE
MUST BE THE SAME LENGTH AND DIAMETER.
THE LINES (B1) BETWEEN THE ROD END OF THE HYDRAULIC CYLINDERS AND THE SYNCHRONIZING
CYLINDER MUST BE THE SAME LENGTH AND DIAMETER. THE B1 LINES MUST BE HIGH PRESSURE HOSE.
NOTE: DIFFERENT TYPES OF HOSE, ESPECIALLY HIGH PRESSURE HOSE, HAS BEEN USED. THE PRINTING ON A
1/8" OR 3/16" HOSE BEING REPLACED MUST MATCH THE ORIGINAL HOSE. ALL HWH 1/4" HOSE IS THE SAME.
VIEW 1
ROD END
HIGH PRESSURE
HOSE CONNECTION
CAP END
HOSE CONNECTION
HOSE CONNECTION AT REAR OF
ROOM EXTENSION TUBE
MP65.3225
Chassis
STW - Leveling & Suspension
Page 81 of 126
MP65.7021
22SEP04
HYDRAULIC LINE CONNECTION DIAGRAM
REAR SINGLE CYLINDER "GUIDED" ROOM EXTENSION
NOTE: THE ROD END CONNECTION
FROM THE MANIFOLD TO THE ROOM
CYLINDER IS ALWAYS PRESSURIZED.
CAP END
CONNECTION - A
ROD END
CONNECTION - B
CYLINDER EXTEND - ROOM EXTEND
CYLINDER RETRACT - ROOM RETRACT
CHECK OIL LEVEL WITH ROOM RETRACTED.
Chassis STW - Leveling & Suspension
Page 82 of 126
MP65.930C
17JUN04
HYDRAULIC LINE CONNECTION DIAGRAM
LATERAL ARM ROOM EXTENSION
(WITH SYNCHRONIZING CYLINDER)
A HOSES MUST MAINTAIN EQUAL LENGTH
AND DIAMETER.
B HOSES MUST BE HIGH PRESSURE HOSES
OF EQUAL LENGTH AND DIAMETER.
A CAP END
A CAP END
B ROD END
B ROD END
SYNCHRONIZING CYLINDER
ROD END CONNECTION - B
CAP END CONNECTION - A
CYLINDER EXTEND - ROOM RETRACT
CYLINDER RETRACT - ROOM EXTEND
CHECK OIL LEVEL WITH ROOM EXTENDED
Chassis STW - Leveling & Suspension
Page 83 of 126
MP65.943D
06AUG03
HYDRAULIC LINE CONNECTION DIAGRAM
X-SLIDE ROOM EXTENSION
(WITH SYNCHRONIZING CYLINDER)
STEEL TUBE
BOTTOM OF
CYLINDER
CAP END
CONNECTION
ROD END
CONNECTION
A CAP END
A CAP END
B ROD END
B ROD END
SYNCHRONIZING CYLINDER
A HOSES MUST MAINTAIN EQUAL LENGTH
AND DIAMETER.
B HOSES MUST BE HIGH PRESSURE HOSES
OF EQUAL LENGTH AND DIAMETER.
CAP END CONNECTION - A
CYLINDER EXTEND - ROOM RETRACT
CYLINDER RETRACT - ROOM EXTEND
CHECK OIL LEVEL WITH ROOM EXTENDED
Chassis STW - Leveling & Suspension
Page 84 of 126
ROD END CONNECTION - B
MP65.944D
06AUG03
HYDRAULIC LINE CONNECTION DIAGRAM
UNIVERSAL (USO) ROOM EXTENSION
(WITH SYNCHRONIZING CYLINDER)
CAP END
CONNECTION
STEEL TUBE
CONNECTING
TOP AND BOTTOM
ROD CONNECTIONS
ROD END
CONNECTION
A CAP END
A CAP END
B ROD END
B ROD END
SYNCHRONIZING CYLINDER
A HOSES MUST MAINTAIN EQUAL LENGTH
AND DIAMETER.
B HOSES MUST BE HIGH PRESSURE HOSES
OF EQUAL LENGTH AND DIAMETER.
IMPORTANT: WITH THIS ROOM EXTENSION WHEN
THE CYLINDER IS RETRACTED THE ROOM EXTENDS.
WHEN THE CYLINDER IS EXTENDED THE ROOM
RETRACTS. THE ROOM SHOULD BE EXTENDED
WHEN CHECKING THE OIL LEVEL IN THE POWER UNIT.
ROD END CONNECTION - B
CAP END CONNECTION - A
CYLINDER EXTEND - ROOM RETRACT
CYLINDER RETRACT - ROOM EXTEND
CHECK OIL LEVEL WITH ROOM EXTENDED
Chassis STW - Leveling & Suspension
Page 85 of 126
MP65.945D
30SEP05
HWH SYNCHRONIZING CYLINDER
The synchronizing cylinder is used in most multiple cylinder room extension mechanisms manufactured by HWH Corporation.
The cylinder is most often referred to as the SYNC cylinder. The purpose of the sync cylinder is to keep all the cylinders
in a mechanism moving at the same speed.
There are many issues that can have an effect on the movement of a room extension. Trying to make two cylinders move at
the same speed, even when not attached to anything, can be difficult. Adding a room to the equation compounds these
issues. Hose size and routing techniques can cause problems. The weight of the room from end to end or top to bottom is
a major problem. Even the manufacturing of the cylinders due to manufacturing tolerances will create problems. Other things
such as room seals or wipers and room awnings will add to the problem.
The theory behind the sync cylinder is really very simple. If you make the same volume of fluid move at the same rate of flow
to or allow coming from the each cylinder in the mechanism, all cylinders in that mechanism have to move the same distance
at the same speed. The hydraulic property that allows this to be possible is that fluid, for practical purposes, cannot be
compressed. If you put the exact same volume of fluid into each cylinder of the exact same diameter, those cylinders
will move the exact same distance. If the fluid is put in the cylinders at the same rate of flow, those cylinders will
move at the same speed.
SAME AMOUNT - SAME DISTANCE
DIFFERENT AMOUNT - DIFFERENT DISTANCE
The sync cylinder is actually several cylinders all tied together in one unit. There is one cylinder or chamber in the sync
cylinder for each room mechanism cylinder. There is a piston in each chamber to move the fluid. The pistons are tied
together with a rod. When one piston moves, the other piston has to move the exact same distance at the same speed.
The "cap" sides of the sync cylinder pistons are tied together hydraulically. The rods connecting the pistons are hollow,
which allows fluid to flow, to or from the cap sides of the sync cylinder pistons. The rod sides of the synch cylinder pistons
are isolated. When the sync cylinder moves, the same volume of fluid has to move to or from the rod sides of the
sync cylinder. The room mechanism cylinders have to move the same distance at the same speed.
SYNC CYLINDER
HOLLOW
ROD
CAP SIDE
OF PISTON
ROD SIDE
OF PISTON
Chassis STW - Leveling & Suspension
CAP SIDE
OF PISTON
Page 86 of 126
ROD SIDE
OF PISTON
ML37955/MP65.9914
13APR06
HWH SYNCHRONIZING CYLINDER
HYDRAULIC FLOW DIAGRAM
VERTICAL ARM OR DUAL CYLINDER ROOM EXTENSION
WITH SYNCHRONIZING CYLINDER
STATIONARY POSITION
FRONT CYLINDER
FIXED TO
VEHICLE
SYNCHRONIZING
VALVE
Note the sync cylinder is connected to the rod end of the
room cylinders. When the room cylinders are extended,
fluid is forced from the rod end on the room cylinders to
the sync cylinder. The sync cylinder retracts as the room
cylinders extend. When the room cylinders are retracted,
the manifold directs fluid to the cap end of the sync
cylinder. The sync cylinder pushes fluid to the rod
end of the room cylinders. This retracts the room
cylinders. The sync cylinder extends when
the room cylinders are retracting.
SYNCHRONIZING
VALVE
SYNCHRONIZING CYLINDER
FIXED TO
VEHICLE
REAR CYLINDER
CYLINDER
EXTEND
VALVE
CYLINDER
RETRACT
VALVE
RETURN
PRESSURE
HYDRAULIC FLOW DIAGRAM
VERTICAL ARM OR DUAL CYLINDER ROOM EXTENSION
WITH SYNCHRONIZING CYLINDER
EXTEND POSITION
HYDRAULIC FLOW DIAGRAM
VERTICAL ARM OR DUAL CYLINDER ROOM EXTENSION
WITH SYNCHRONIZING CYLINDER
RETRACT POSITION
FRONT CYLINDER
FRONT CYLINDER
FIXED TO
VEHICLE
SYNCHRONIZING
VALVE
FIXED TO
VEHICLE
SYNCHRONIZING
VALVE
SYNCHRONIZING
VALVE
SYNCHRONIZING CYLINDER
SYNCHRONIZING
VALVE
SYNCHRONIZING CYLINDER
FIXED TO
VEHICLE
FIXED TO
VEHICLE
REAR CYLINDER
REAR CYLINDER
REAR CYLINDER
EXTEND
VALVE
RETRACT
VALVE
EXTEND
VALVE
RETRACT
VALVE
RETURN
RETURN
PRESSURE
Chassis STW - Leveling & Suspension
PRESSURE
Page 87 of 126
ML37955/MP65.9917
13APR06
ELECTRICAL CONNECTION DIAGRAM
ROOM EXTENSION PANEL
FRONT VIEW
BACK VIEW
PUMP ON
ROOM EXTENSION
7631
EXTEND
5
HWH
2
OFF
READY TO
OPERATE
CORPORATION
6
3
6806
CAUTION!
UNDERSTAND OPERATOR’S MANUAL BEFORE
USING. KEEP PEOPLE AND OBSTRUCTIONS
CLEAR OF ROOM WHEN OPERATING.
7501
1
4
ON
7531
7502
RETRACT
7631
7511
6805
6806
6230
PIN 8
8
6
7
5
7530
DEUTSCH
7510
PIN 1
1
2
3
4
CONNECTOR
PIN #
WIRE
NUMBER
1
6806
SWITCHED +12 FROM KEY SWITCH FOR ROOM CONTROL SWITCH
2
7510/7511
READY TO OPERATE LIGHT CONTROL WIRE SWITCHED +12V
3
7530/7531
PUMP ON LIGHT CONTROL WIRE SWITCHED +12
4
7501
ROOM EXTEND - SWITCHED +12V FROM ROOM CONTROL SWITCH
5
7502
ROOM RETRACT - SWITCHED +12V FROM ROOM CONTROL SWITCH
6
6805
SWITCHED +12V TO ROOM PANEL KEY SWITCH
7
7631
SWITCHED GROUND FROM ROOM PANEL KEY SWITCH
FOR PANEL INDICATOR LIGHTS AND SYSTEM WAKE UP
8
6230
GROUND SUPPLY FOR ROOM PANEL
KEY SWITCH
Chassis STW - Leveling & Suspension
WIRE DESCRIPTION AND FUNCTION
Page 88 of 126
MP85.602C
21JAN02
BREATHER CAP - DIPSTICK - 1/4" NUT DRIVER
VALVE RELEASE
NUT
THE 1/4" NUT DRIVER IS USED TO OPEN
THE VALVE RELEASE NUT ON THE 1 1/2"
DIAMETER SOLENOID VALVES.
1 1/2" DIAMETER
SOLENOID VALVE
NOTE: DO NOT turn the valve
release nut more than 4 and 1/2
(four and one half) turns counter
clockwise. Damage to the valve
may result.
NOTE: THE BREATHER CAP IS LOCATED
ON THE TOP SIDE OF THE POWER UNIT RESERVOIR.
1/4" NUT DRIVER
OIL LEVEL GROOVES
OIL LEVEL
BREATHER CAP
IMPORTANT: PRIOR TO REMOVING THE BREATHER CAP,
EITHER TO CHECK THE OIL LEVEL OR TO USE THE 1/4" NUT DRIVER,
CLEAN ANY DEBRIS FROM THE TOP OF THE RESERVOIR.
BEFORE RETURNING THE BREATHER CAP TO THE RESERVOIR,
REMOVE ANY PAINT CHIPS OR OTHER DEBRIS FROM THE DIPSTICK
INCLUDING DEBRIS INSIDE THE 1/4" NUT DRIVER.
Chassis STW - Leveling & Suspension
Page 89 of 126
MP85.999X
27MAR02
Blank Page
Chassis STW - Leveling & Suspension
Page 90 of 126
HWH Latching Raise and Dump Feature – Pre 2008 (with VIM)
HWH leveling system provides the ability to temporarily adjust the height, up or down,
of a coach thus allowing the operator to avoid obstacles, either on the ground or above
the coach, encountered during low speed maneuvers.
Below is a breif description of how the latching, raise & dump feature on the HWH
control board works, and what is needed to incorporate this feature, now available on
all coaches that use the HWH Part No. AP22070 boards (HWH500 Series).
In the past manual dump and raise actions have been momentary functions. All current
HWH AP22070 Leveling Control Boards contain the logic and wiring necessary to latch
and hold any manual height adjustments made at the control panel. In order to provide
for this feature an output from the transmission must be used in conjunction with a
relay.
This procedure will require splicing into the transmission output wire (V-5) (Pin V), wire
no. 167 (White), in the VIW-V connector loom, located in the front steering
compartment, running this wire to terminal 85 of a high quality SPDT Relay. Pin 87 of
the relay is then wired to pin 9900 of the HWH control board. Pin 86 is connected to a
12 volt switched power source and jumpered to terminal 30 of the relay.
The system will operate as follows:
Below the programmed speed “set point”, the transmission ECU output pin V-5 is open
which allows the relay to apply a 12 volt signal to the HWH "Speed Switch - 9900" pin
on the Leveling Control Board. This signals the leveling control board to allow manually
adjusted heights to be latched without the operator holding ether the raise or dump
button. Above the programmed speed set-point, the V-5 pin is grounded, energizing the
relay and removing the 12 volt signal from the 9900 pin, allowing the leveling controller
to release the hold feature, returning the coach to normal (travel) ride height.
Programming the Transmission requires turning on the appropriate output and setting
the speed at which the switching to ground will occur. This set point is calculated using
transmission tail shaft RPM, differential gear ratio, and tire revolutions per mile
(available from the tire manufacture). In this case a calculated set point for the
recommended 15 MPH. will be 541 for the MAC products and 610 for the Allure.
The transmission harness output wire (V-5) used to signal the HWH control board
terminates at the blue VIW-V connector in the front run board compartment at pin “V”.
See the included detail sheets for both the VIW Connector and the Harnesses.
Chassis STW - Leveling & Suspension
Page 91 of 126
Switched Power
NO
NC
COM
Pin V-5
Wire 167
85
86
ECU
Pin 9900
HWH
Control
Box
HWH Latched Ride Height Circuits
Transmission Connector VIW-V and Harness showing wire 167
Chassis STW - Leveling & Suspension
Page 92 of 126
Chassis STW - Leveling & Suspension
Page 93 of 126
Checking & Adjusting the HWH Leveling Disc.
01.
Verify the current leveling adjustment by placing the coach in an off level
condition with the HWH touch pad. If the coach has a slide out room, extend the
room fully.
02.
Place a bubble level on the floor directly in front of the refrigerator or on a level
edge of the refrigerator cabinet.
03.
Initiate an auto level sequence on the HWH touch pad.
04.
Once the sequence is complete, check the bubble level and note the low points. It
will be necessary to move the level to three different tiles or wood planks to get
an average level.
05.
If an adjustment is necessary, access the level disc on Intrigues and Allures in the
second storage bay passenger side on the ceiling between the frame rails. On
Magna, Affinity and Concepts, the disc is located on the ceiling in the electrical
compartment . In Prevost buses, the Disc is located on the floor in the generator
bay behind the wall access panel.
06.
The disc is adjusted by tightening or loosening the three spring loaded mount
screws.
07.
Loosen the disc mount screws which correspond to the coaches low points.
Adjustments are made in ¼” turn increments. Retest the system in the same
manner until the coach is level.
Chassis STW - Leveling & Suspension
Page 94 of 126
Country Coach Ride Height Specifications
BACKGROUND:
Accurate ride height settings and maintenance are critical to proper coach operation.
Industry standard definition of Ride Height is the vertical distance between the center of the
wheel and the bottom of the frame rail over top of the axle.
Since this theoretical dimension is never easy to measure, other corresponding measurements
are given to easily set the suspension to the position that the theoretical specification dictates.
All late model Country Coaches use a tripod arrangement of three height control valves: with
one valve controlling the front suspension, and two valves on the rear drive axle.
Tag axles are not individually set, but rather are regulated to correspond to the drive axle.
Ride Heights are given per the suspension used, regardless of the coach it is installed on.
BASIC REQUIREMENTS:
• Coach tires are on a level even surface
• Tires and pressures correspond to the “Federal Tire Tag”
• Coach is loaded and fueled in a normal operating (traveling) state
• Leveling system is in the “TRAVEL MODE”
• Ignition key is “ON”
• Air system is pressurized to air governor cut out pressure
PROCEDURE:
Follow procedure Country Coach MPGENERAL82004 Ride Height Adjustment procedure
when setting ride height.
INDEX:
Ridewell IFS 284 Suspensions
Holland/Neway IFS-114-CC Independent Front Suspension
Tuthill IFS1260 Front Suspension
Tuthill IFS 1660S-SB Independent Front Suspension
Liquid Spring IS200C IFS
Neway AD-200 Drive Axle Suspensions
Neway ADL-120 & ADL-123 Drive Axle Suspensions
Tuthill RD2300 Rear Suspension
Ridewell 227 Series Drive Axle Suspensions
Ridewell 246 Series Two Air Spring - Drive/Tag Axle Suspensions
Ridewell 246 Series Four Air Spring - Drive/Tag Axle Suspensions
Ridewell 246 Series Four Air Spring - Drive/Steerable Tag Axle Suspensions
Page
Page
Page
Page
Page
Page
Page
Page
Page
Page
Page
Page
2
3
4
5
6
7
8
9
10
11
12
13
Page 1 of 13
Chassis STW - Leveling & Suspension
Page 95 of 126
Country Coach Ride Height Specifications
RIDEWELL IFS 284 SUSPENSION
As used on Magna, Affinity, Concept, Lexa
Coach Floor
3/4”
Equal side to side +/- 1/8”
Inner Pivot Pin Center
Outer Pivot Pin Center
Looking Forward
3/4 inch - Inner Pivot Pin Centers to Outer Pivot Pin Centers
Floor Bottom to Upper Pivot Pin Center, Equal from Side to Side +/- 1/8”
Page 2 of 13
Chassis STW - Leveling & Suspension
Page 96 of 126
Country Coach Ride Height Specifications
HOLLAND/NEWAY IFS-114-CC INDEPENDENT FRONT SUSPENSION
17 3/4”
As used on some Tribute, Allure, Inspire, and Intrigue models
Forward
17 3/4 inch - Center-to-Center Front Shock Length
Shock Length to be Equal from Side to Side +/- 1/16”
Page 3 of 13
Chassis STW - Leveling & Suspension
Page 97 of 126
Country Coach Ride Height Specifications
TUTHILL IFS1260 FRONT SUSPENSION
As used on some Tribute models
32”
Coach Floor
Viewed from Front
32” Bottom of Floor to Lower Quadrant of Lower Shock Bolt
Measurement to be Equal from Side to Side +/- 1/16”
This 32” dimension is for coaches equipped with Bilstein shocks installed with limit straps
and for coaches equipped with Koni FSD gold shocks.
Page 4 of 13
Chassis STW - Leveling & Suspension
Page 98 of 126
Country Coach Ride Height Specifications
TUTHILL IFS 1660-SB INDEPENDENT FRONT SUSPENSION
As used on some Intrigue and Allure models
21 13/16”
Coach Floor
Bar Pin
As viewed from the Front
21 13/16” from Bottom of Coach Floor to Lower Quadrant of Upper A-arm Bar Pin
Measurement to be Equal from Side to Side +/- 1/16”
Page 5 of 13
Chassis STW - Leveling & Suspension
Page 99 of 126
Country Coach Ride Height Specifications
LIQUIDSPRING IS002-C INDEPENDENT FRONT SUSPENSION
As used on Rhapsody models
32 15/16”
Coach Floor
Part Mating Surfaces
As viewed from the Rear
32 15/16” from Bottom of Coach Floor to Part Mating Surfaces
Measurement to be Equal from Side to Side +/- 1/16”
IMPORTANT: Measure to the floor AHEAD of the axle
(The floor behind the axle may be stepped down)
Page 6 of 13
Chassis STW - Leveling & Suspension
Page 100 of 126
Country Coach Ride Height Specifications
NEWAY AD-200 DRIVE AXLE SUSPENSION
As used on some Allure and Intrigue models
10 13/16”
Forward
10 13/16 inches nominal- Bottom of Frame Rail to Bottom of Air Spring Piston
Measured vertically adjacent to, and behind of, the air spring
Bottom of Frame Rail to Bottom of Air Spring Piston to average 10 13/16" between left and right
side
Each side to be more than 10 3/8" and less than 11 13/16" as necessary to adjust front
suspension to level
Page 7 of 13
Chassis STW - Leveling & Suspension
Page 101 of 126
Country Coach Ride Height Specifications
NEWAY ADL-120 & ADL-123 DRIVE AXLE SUSPENSION
As used on some Allure, Inspire, and Tribute models.
19”
Forward
19 inches nominal - Bottom Frame Rail to Bottom of Equalizing Beam near axle
Measured vertically adjacent to, and behind of, the axle tube
Bottom Frame Rail to Bottom of Equalizing Beam height to average 19" between left side and
right side
Each side to be more than 18 1/2" and less than 19 1/2" as necessary to adjust front suspension
to level
Page 8 of 13
Chassis STW - Leveling & Suspension
Page 102 of 126
Country Coach Ride Height Specifications
TUTHILL RD2300 REAR SUSPENSION
As used on some Tribute models
20 1/2”
Forward
20 1/2” Bottom of Frame Rail to Bottom of Equalizing Beam
Measured vertically just rearward of drive axle
Bottom of Frame Rail to Bottom of Equalizing Beam to average 20 1/2” between left and right
side
Each side to be more than 20" and less than 21" as necessary to adjust front suspension to level
Page 9 of 13
Chassis STW - Leveling & Suspension
Page 103 of 126
Country Coach Ride Height Specifications
RIDEWELL 227 SERIES DRIVE AXLE SUSPENSIONS
As used on Lexa and some Intrigue, Magna, Affinity, and Concept, models
8 3/8”
Forward
8 3/8 inches nominal - Bottom of Frame Rail to Bottom of Lower Air Spring Mounting Plate
Drive Axle Measurement to average 8 3/8" between left and right.
Each side to be more than 8" and less than 9" as necessary to adjust front suspension to level
Page 10 of 13
Chassis STW - Leveling & Suspension
Page 104 of 126
Country Coach Ride Height Specifications
RIDEWELL 246 TWO AIR SPRING-DRIVE/TAG AXLE SUSPENSIONS
As used on some Allure, Intrigue and Tribute models
12 1/2”
Forward
12 1/2 inches nominal- Bottom of Frame Rail to Bottom of Air Spring Piston
Measured vertically adjacent to, and behind of, the air spring
Bottom of Frame Rail to Bottom of Air Spring Piston to average 12 1/2" between left and right
side
Each side to be more than 12" and less than 13" as necessary to adjust front suspension to level
Page 11 of 13
Chassis STW - Leveling & Suspension
Page 105 of 126
Country Coach Ride Height Specifications
RIDEWELL 246 FOUR AIR SPRING-DRIVE/TAG AXLE SUSPENSIONS
As used on some Affinity, Magna, Intrigue and Allure models
8-3/8”
Forward
8 3/8 inches nominal - Bottom of Frame Rail to Bottom of Lower Air Spring Mounting Plate
Drive Axle Measurement to average 8 3/8" between left and right.
Each side to be more than 8" and less than 9" as necessary to adjust front suspension to level
Page 12 of 13
Chassis STW - Leveling & Suspension
Page 106 of 126
Country Coach Ride Height Specifications
RIDEWELL 246 DRIVE/STEERABLE TAG AXLE SUSPENSIONS
As used on Rhapsody models
8-1/2”
Forward
8 1/2 inches nominal - Bottom of Frame Rail to Bottom of Lower Air Spring Mounting Plate
Drive Axle Measurement to average 8 1/2" between left and right.
Each side to be more than 8" and less than 9" as necessary to adjust front suspension to level
Page 13 of 13
Chassis STW - Leveling & Suspension
Page 107 of 126
RHAPSODY
Target
Front:
Ride Height (bottom of frame to wheel center)
LiquidSpring
Front Shock length cen-cen
IS200C-A
Floor Bottom to Lower Knuckle Post Surface **
Min.
Max.
6 7/16" **
16 3/4"
Reference
32 15/16"
32 7/8"
33"
0.26°
0.01°
0.51°
0°
-0.5°
0.5°
3.60°
3.01°
4.01°
0°
-0.75°
0.50°
Toe (Left and Right)
.02"
.02"
.02"
Total Toe
.04"
.04"
.04"
SAI *****
6.25
5.25
7.25
Included Angle
6.5
5.5
7.5
Front Set Back
0.00°
-0.50°
+0.50°
Moment Link Length (set back determinant)
26.8"
Camber (Left and Right)
Cross Camber
Caster (Left and Right)
Cross Caster
Turning Angle (Inside Wheel)
preadjusted & marked
55°
53°
55
Center Tie-Rod Length cen-cen
19.00"
18 7/8"
19 1/8"
Rear Drive:
Ride Height (bottom of frame to wheel center)
16 3/4"
Ridewell
Drive Axle Airspring Height ***
8 7/16"
8"
9"
RADT 246
Thrust Angle
0.00°
-0.02°
+0.02°
Rear Offset
0.00"
-1/8"
+1/8"
Rear Camber (Left and Right)
0.00°
-0.50°
+0.50°
Rear Toe (Left and Right)
0.00"
-0.15"
+0.15"
Rear Total Toe
0.00"
-0.30"
+0.30"
Tag Axle:
Ride Height (bottom of frame to bottom air spring plate)
11.375
Reference
Tag Camber (Left and Right)
0.75
0.25
1.00
Caster (Left and Right)
0.70°
0.00°
1.70°
0°
-1.00°
1.00°
Tag Toe (Left and Right)
0.02"
0.01"
0.03"
Tag Total Toe
0.04"
0.03"
0.05"
Tag Scrub Angle
0.00°
-0.01°
+0.01°
Cross Caster
**
Front Ride Height can be set by setting the 'Bottom of Coach Floor' (measured in front of the axle to avoid a step) to the 'Lower Knuckle Post
Part Mating Surface' to 32 15/16".
***
Drive Axle Airspring Height should average 8 7/16" between the left and right, measured from 'Bottom of Frame Rail' to "Bottom of
Lower Air Spring Mounting Plate'. Each side to be more than 8" and less than 9" as necessary to level the front end side to side.
***** SAI difference from left to right may not exceed 0.75°
Front Hubs
Front Susp.
Drive Axle
Drive/Tag Susp.
Tag Axle
Westport
LiquidSpring IS200C-A
Dana S23-190, 4.30:1 pn 0888251
Ridewell RADT-246-20/14 FS 2460017, 2460022 or 2460028
Weweler IM-097 ETS
Chassis STW - Leveling & Suspension
Page 108 of 126
Revised 10-12-07
2008 INTRIGUE, ALLURE
Target
Front:
Tuthill
IFS 1660
6.61"
Air Spring Height
9.25"
9.25"
9.25"
21 13/16"
21 13/16"
21 13/16"
Camber, Left and Right
0.25°
0.15°
0.40°
Cross Camber
0.00°
-0.40°
0.40°
Caster, Left and Right
3.00°
2.50°
3.50°
0°
-0.50°
0.50°
Toe, Left and Right
.06"
.05"
.07"
Total Toe
.12"
.11"
.13"
SAI ******
6.50°
6.00°
7.00°
Included Angle
6.75°
6.15°
7.40°
Front Set Back
0.00°
-0.30°
+0.30°
Turning Angle
55°
54°
55°
Ride Height (bottom of frame to wheel center)
12"
8 3/8" **
8"
9"
Thrust Angle
0.00°
-0.06°
+0.06°
Rear Offset
0.00"
-1/8"
+1/8"
Rear Camber (Left and Right)
0.00°
-0.50°
+0.50°
Rear Toe (Left and Right)
0.00"
-0.15"
+0.15"
Rear Total Toe
0.00"
-0.30"
+0.30"
Tag Camber (Left and Right)
0.75°
0.50°
1.00°
Tag Toe (Left and Right)
0.04"
0.02"
0.06"
Tag Total Toe
0.08"
0.04"
0.12"
Tag Scrub Angle
0.00°
-0.06°
+0.06°
Cross Caster
Tag Axle:
Max.
Ride Height
Floor Bottom to Upper A-arm Bar Pin Lower Quadrant
Drive Axle:
Ridewell
RADT 2460024
RADT 2460027
Min.
Drive Axle Airspring Height
*** Drive Axle Airspring Height should average 8 3/8" between the left and right, measured from bottom of frame rail to
bottom of air spring mounting plate. Each side to be more than 8" and less than 9" as necessary to level the front end from
***** SAI difference from left to right may not exceed 0.75°
Front Susp.
Engine
Drive Axle
Drive/Tag Susp.
Chassis STW - Leveling & Suspension
MIT
Tuthill IFS 1660S-SB
Caterpillar C-13
Dana S23-190 or S25-170
Ridewell RADT-2460024 or RDT-2460027
Page 109 of 126
Revised 6-14-2007
2008 MAGNA, AFFINITY
Coach #6850 thru
Target
Front:
Ridewell
IFS 284
Dana/Kirkstall
Min.
Max.
22 5/8" **
22 9/16"
22 3/4"
0.50°
0.25°
0.75°
0°
-0.5°
0.5°
2.75°
2.00°
3.50°
0°
-1.00°
1.00°
Toe (Left and Right)
.02"
.02"
.02"
Total Toe
.04"
.04"
.04"
SAI *****
6.00°
5.25°
7.00°
Included Angle
6.50°
5.50°
7.50°
Front Set Back
0.00°
-0.20°
+0.20°
Turning Angle
55°
54°
55°
22 5/8"
22 1/2"
22 3/4"
8 3/8" ***
8"
9"
Thrust Angle
0.00°
-0.06°
+0.06°
Rear Offset
0.00"
-1/8"
+1/8"
Rear Camber (Left and Right)
0.00°
-0.50°
+0.50°
Rear Toe (Left and Right)
0.00"
-0.15"
+0.15"
Rear Total Toe
0.00"
-0.30"
+0.30"
Tag Camber (Left and Right)
0.75°
0.50°
1.00°
Tag Toe (Left and Right)
0.04"
0.02"
0.06"
Tag Total Toe
0.08"
0.04"
0.12"
Tag Scrub Angle
0.00°
-0.06°
+0.06°
Ride Height (bottom of frame to wheel center)
Floor Bottom to Knuckle Post Upper Pivot Center
Camber (Left and Right)
Cross Camber
Caster (Left and Right)
Cross Caster
Center Tie-Rod Length (cen-cen)
Rear:
Ridewell
RADT 2460020
RADT 2460023
RADT 2460026
Tag Axle:
Ride Height (bottom of frame to wheel center)
Drive Axle Airspring Height
6 1/2"
12"
** To set ride height equal from side to side, a plumb bob measurement, from the bottom of the house floor to the
knuckle post upper pivot center, can be made on each side in the front wheel wells.
To reference correct ride height; the centers of the Outer Pivot Pins of the Lower A-Arms, should be 3/4" higher than
the centers of the Inner Pivot Pins.
*** Drive Axle Airspring Height should average 8 3/8" between the left and right, measured from bottom of frame rail to
bottom of air spring mounting plate. Each side to be more than 8" and less than 9" as necessary to level the front end
from side to side.
***** SAI difference from left to right may not exceed 0.75°
Front Axle
Front Susp.
Drive Axle
Drive/Tag Susp.
Chassis STW - Leveling & Suspension
MMT- MAT
Dana / Kirkstall IFS 84U F5017E
Ridewell 2840006
Dana S23-190 or S25-170
Ridewell RADT 2460020, 2460023, 2460026
Page 110 of 126
Revised 6-15-2007
INSPIRE, TRIBUTE w/ADL-123
Target
Front:
Neway IFS 144
Rear:
Neway ADL-123
Min.
Max.
Ride Height
6 1/2"
Shock Length
17 3/4"
17 3/4"
17 7/8"
Left Camber
0.50°
0.30°
0.70°
Right Camber
0.50°
0.30°
0.70°
Cross Camber
0.00°
-0.40°
0.40°
Left Caster
2.75°
1.75°
3.75°
Right Caster
2.75°
1.75°
3.75°
Cross Caster
0°
-1.00°
1.00°
Left Toe
.02"
.02"
.02"
Right Toe
.02"
.02"
.02"
Total Toe
.04"
.04"
.04"
SAI ******
6.50°
5.50°
7.50°
Included Angle
7.00°
5.75°
8.00°
Front Set Back
0.00°
-0.20°
+0.20°
Turning Angle
50°
49°
50°
19"
18.5"
19.5"
Thrust Angle
0.00°
-0.06°
+0.06°
Rear Offset
0.00"
-1/8"
+1/8"
Rear Camber
0.00°
-0.50°
+0.50°
Rear Toe (Left and Right)
0.00"
-0.15"
+0.15"
Rear Total Toe
0.00"
-0.30"
+0.30"
Ride Height
7 1/2"
Equalizing Beam Bottom to Frame Bottom**
** Equalizing Beam Bottom to Frame Bottom height should average 19" between left side and right side,
measured adjacent to and behind the axle tube. Each side to be more than 18 1/2" and less than 19 1/2" as
necessary to adjust both front shocks to 17 3/4" length.
***** SAI difference from left to right may not exceed 0.75°
Revided 6-14-2007
Chassis STW - Leveling & Suspension
Page 111 of 126
2007 TRIBUTE
Target
Front:
Tuthill
IFS1260
Max.
Ride Height (bottom of frame to wheel center)
6.75"
Shock Length Center to Center
16.36
16.36
16.36
32"
32"
32"
Left Camber
0.25°
0.15°
0.40°
Right Camber
0.25°
0.15°
0.40°
Cross Camber
0.00°
-0.15°
0.15°
Left Caster
3.00°
2.50°
3.50°
Right Caster
3.00°
2.50°
3.50°
Cross Caster
0°
-.30°
0.30°
Left Toe
.06"
.05"
.07"
Right Toe
.06"
.05"
.07"
Total Toe
.12"
.11"
.13"
SAI ******
6.50°
5.50°
7.50°
Included Angle
7.00°
5.75°
8.00°
Front Set Back
0.00°
-0.20°
+0.20°
Turning Angle
57°
55°
57°
Floor to Bottom of Shock Bolt ***
Tuthill
RD 2300
Min.
Ride Height
8.25"
Equalizing Beam Bottom to Frame Bottom**
20.5
19.5"
21.5"
Thrust Angle
0.00°
-0.06°
+0.06°
Rear Offset
0.00"
-1/8"
+1/8"
Rear Camber
0.00°
-0.50°
+0.50°
Rear Toe (Left and Right)
0.00"
-0.15"
+0.15"
Rear Total Toe
0.00"
-0.30"
+0.30"
**
Equalizing Beam Bottom to Frame Bottom height should average 20 1/2" between left side and right side,
measured adjacent to and behind the axle tube. Each side to be more than 19 1/2" and less than 21 1/2" as
necessary to adjust both sides of front to 32"
***
Front ride height measurement was 31 1/4" for early coaches with Bilstein shocks and no limit straps.
All coaches with front shock limiting straps OR Koni FSD shocks to be set to 32"
***** SAI difference from left to right may not exceed 0.75°
Revised 6-14-2007
Chassis STW - Leveling & Suspension
Page 112 of 126
2007 INTRIGUE 16600
Coach #12119 to #12193
Target
Front:
Tuthill
IFS 1660
Ride Height
6.61"
Air Spring Height
9.25"
Floor Bottom to Upper A-arm Bar Pin Lower Quadrant 21 13/16"
Tag Axle:
Ridewell
RIT2070002
Max.
9.25"
9.25"
21 13/16"
21 13/16"
Camber, Left and Right
0.25°
0.15°
0.40°
Cross Camber
0.00°
-0.40°
0.40°
Caster, Left and Right
3.00°
2.50°
3.50°
0°
-0.50°
0.50°
Toe, Left and Right
.06"
.05"
.07"
Total Toe
.12"
.11"
.13"
SAI ******
6.50°
5.75°
7.25°
Included Angle
6.75°
5.90°
7.65°
Front Set Back
0.00°
-0.30°
+0.30°
Turning Angle
55°
54°
55°
Cross Caster
Drive Axle:
Ridewell
RD2270007
Min.
7 1/2" Nominal
Ride Height (bottom of frame to wheel center)
Drive Axle Airspring Height ***
8 3/8"
8"
9"
Thrust Angle
0.00°
-0.06°
+0.06°
Rear Offset
0.00"
-1/8"
+1/8"
Rear Camber (Left and Right)
0.00°
-0.50°
+0.50°
Rear Toe (Left and Right)
0.00"
-0.15"
+0.15"
Rear Total Toe
0.00"
-0.30"
+0.30"
Tag Camber (Left and Right)
0.75°
0.50°
1.00°
Tag Toe (Left and Right)
0.04"
0.02"
0.06"
Tag Total Toe
0.08"
0.04"
0.12"
Tag Scrub Angle
0.00°
-0.06°
+0.06°
*** Drive Axle Airbag Height should average 8 3/8" between left and right, measured from bead plate to bead plate.
Each side to be more than 8" and less than 9" as necessary to adjust both sides of front to 21 13/16".
***** SAI difference from left to right may not exceed 0.75°
Front Susp.
Engine
Drive Axle
Drive Susp.
Tag Axle Assy.
Chassis STW - Leveling & Suspension
MIT
Tuthill IFS 1660-SB
Caterpillar C-13
Meritor 23165
Ridewell RD-2270007
Ridewell RIT-2070001
Page 113 of 126
Revised 6-14-2007
MHI, MHL, MIN w/ADL-120
Target
Front:
Neway IFS 144
Rear:
Neway ADL-120
Min.
Max.
Ride Height
6 1/2"
Shock Length
17 3/4"
17 3/4"
17 7/8"
Left Camber
0.50°
0.30°
0.70°
Right Camber
0.50°
0.30°
0.70°
Cross Camber
0.00°
-0.40°
0.40°
Left Caster
2.75°
1.75°
3.75°
Right Caster
2.75°
1.75°
3.75°
Cross Caster
0°
-1.00°
1.00°
Left Toe
.02"
.02"
.02"
Right Toe
.02"
.02"
.02"
Total Toe
.04"
.04"
.04"
SAI ******
6.50°
5.50°
7.50°
Included Angle
7.00°
5.75°
8.00°
Front Set Back
0.00°
-0.20°
+0.20°
Turning Angle
50°
49°
50°
19"
18.5"
19.5"
Thrust Angle
0.00°
-0.06°
+0.06°
Rear Offset
0.00"
-1/8"
+1/8"
Rear Camber
0.00°
-0.50°
+0.50°
Rear Toe (Left and Right)
0.00"
-0.15"
+0.15"
Rear Total Toe
0.00"
-0.30"
+0.30"
Ride Height
7 1/2"
Equalizing Beam Bottom to Frame Bottom**
** Equalizing Beam Bottom to Frame Bottom height should average 19" between left side and right side, measured
adjacent to and behind the axle tube. Each side to be more than 18 1/2" and less than 19 1/2" as necessary to adjust
both front shocks to 17 3/4" length.
***** SAI difference from left to right may not exceed 0.75°
Used through Model Year 2006
Model Year 2007 uses ADL-123
Chassis STW - Leveling & Suspension
Revised 6-14-2007
Page 114 of 126
INTRIGUE, ALLURE, INSPIRE, TAG AXLE COACHES
with Ridewell 2 Air Spring 246 rear suspensions
Target
Front:
Neway IFS 144
Tag Axle:
Max.
Ride Height
6 1/2"
Shock Length
17 3/4"
17 3/4"
17 7/8"
Camber, Left and Right
0.50°
0.30°
0.70°
Cross Camber
0.00°
-0.40°
0.40°
Caster, Left and Right
2.75°
1.75°
3.75°
0°
-1.00°
1.00°
Toe, Left and Right
.02"
.02"
.02"
Total Toe
.04"
.04"
.04"
SAI ******
6.50°
5.50°
7.50°
Included Angle
7.00°
5.75°
8.00°
Front Set Back
0.00°
-0.20°
+0.20°
Turning Angle
50°
49°
50°
Cross Caster
Drive Axle:
Ridewell
RADT 2460014
RADT 2460016
Min.
Ride Height
7 1/2"
Drive Axle Airbag Height ***
12 1/2"
12"
13"
Thrust Angle
0.00°
-0.06°
+0.06°
Rear Offset
0.00"
-1/8"
+1/8"
Rear Camber (Left and Right)
0.00°
-0.50°
+0.50°
Rear Toe (Left and Right)
0.00"
-0.15"
+0.15"
Rear Total Toe
0.00"
-0.30"
+0.30"
Tag Camber (Left and Right)
0.75°
0.50°
1.00°
Tag Toe (Left and Right)
0.04"
0.02"
0.06"
Tag Total Toe
0.08"
0.04"
0.12"
Tag Scrub Angle
0.00°
-0.06°
+0.06°
*** Drive Axle Airbag Height should average 12 1/2" between left and right, measured from bead plate to bead plate.
Each side to be more than 12" and less than 13" as necessary to adjust both front shocks to 17 3/4" length.
Coincidentally, the bottom of the air bag should be parallel to the ground
***** SAI difference from left to right may not exceed 0.75°
Front Susp.
Engine
Drive Axle
Drive/Tag Susp.
Tag Axle
Chassis STW - Leveling & Suspension
MIT- MLT
NEWAY IFS-114-CC
Cummins 6 ISL (325-400)
Caterpillar C9
Meritor/Rockwell RS-21145
Ridewell RADT-2460014 and RADT-2460016
Meritor/Rockwell TR3671LH2325
Page 115 of 126
Revised 6-14-2007
MHI, MHL, MIN, NRV w/AD200
Target
Front:
Neway IFS 144
Rear:
Neway AD200
Min.
Max.
Ride Height
6 1/2"
Shock Length
17 3/4"
17 3/4"
17 7/8"
Left Camber
0.50°
0.30°
0.70°
Right Camber
0.50°
0.30°
0.70°
Cross Camber
0.00°
-0.40°
0.40°
Left Caster
2.75°
1.75°
3.75°
Right Caster
2.75°
1.75°
3.75°
Cross Caster
0°
-1.00°
1.00°
Left Toe
.02"
.02"
.02"
Right Toe
.02"
.02"
.02"
Total Toe
.04"
.04"
.04"
SAI ******
6.50°
5.50°
7.50°
Included Angle
7.00°
5.75°
8.00°
Front Set Back
0.00°
-0.20°
+0.20°
Turning Angle
50°
49°
50°
10 13/16"
10 5/16"
11 13/16"
Thrust Angle
0.00°
-0.06°
+0.06°
Rear Offset
0.00"
-1/8"
+1/8"
Rear Camber
0.00°
-0.50°
+0.50°
Rear Toe (Left and Right)
0.00"
-0.15"
+0.15"
Rear Total Toe
0.00"
-0.30"
+0.30"
Ride Height
7 1/2"
Drive Axle Airbag Height **
** Drive Axle Airbag Height should average 10 13/16" between left and right, measured from bead plate to bead plate.
Each side to be more than 10 3/8" and less than 11 13/16" as necessary to adjust both front shocks to 17 3/4" length.
***** SAI difference from left to right may not exceed 0.75°
Used through July 2003
- - - EARLY SPECIFICATIONS- - NEWAY I.F.S. ALIGNMENT SPECIFICATIONS
CASTER:
CAMBER:
TOE IN:
RIDE HEIGHT:
AIR BAG RIDE HEIGHT:
SHOCK ABSORBER LENGTH @ RIDE HEIGHT:
SUSPENSION TRAVEL:
Chassis STW - Leveling & Suspension
Page 116 of 126
3 + 1 (NON-ADJUSTABLE)
1/2 POSITIVE (ADJUSTABLE)
1/32” + 1/32” (ADJUSTABLE)
7”
9”
17.75” EYE TO EYE
3” UP & 3” DOWN
Revised 6-14-2007
INTRIGUE TAG with CAT ENGINE to #12118
Target
Front:
Neway IFS 144
Tag Axle:
Ridewell
RIT2070002
Max.
Ride Height
6 1/2"
Shock Length
17 3/4"
17 3/4"
17 7/8"
Camber, Left and Right
0.50°
0.30°
0.70°
Cross Camber
0.00°
-0.40°
0.40°
Caster, Left and Right
2.75°
1.75°
3.75°
0°
-1.00°
1.00°
Toe, Left and Right
.02"
.02"
.02"
Total Toe
.04"
.04"
.04"
SAI ******
6.50°
5.50°
7.50°
Included Angle
7.00°
5.75°
8.00°
Front Set Back
0.00°
-0.20°
+0.20°
Turning Angle
50°
49°
50°
Cross Caster
Rear:
Ridewell
RD2270007
Min.
7 1/2" Nominal
Ride Height (bottom of frame to wheel center)
Drive Axle Airspring Height ***
8 3/8"
Thrust Angle
0.00°
-0.06°
+0.06°
Rear Offset
0.00"
-1/8"
+1/8"
Rear Camber (Left and Right)
0.00°
-0.50°
+0.50°
Rear Toe (Left and Right)
0.00"
-0.15"
+0.15"
Rear Total Toe
0.00"
-0.30"
+0.30"
Tag Camber (Left and Right)
0.75°
0.50°
1.00°
Tag Toe (Left and Right)
0.04"
0.02"
0.06"
Tag Total Toe
0.08"
0.04"
0.12"
Tag Scrub Angle
0.00°
-0.06°
+0.06°
*** Drive Axle Airbag Height should average 8 3/8" between left and right, measured from bead plate to bead plate.
Each side to be more than 8" and less than 9" as necessary to adjust both front shocks to 17 3/4" length.
***** SAI difference from left to right may not exceed 0.75°
Front Susp.
Engine
Drive Axle
Drive Susp.
Tag Axle Assy.
Chassis STW - Leveling & Suspension
MIT
NEWAY IFS-114-CC
Caterpillar C-12 & C-13
Meritor 23165
Ridewell RD-2270007
Ridewell RIT-2070001
Page 117 of 126
Revised 6-14-07
MAT, MMT, MHX, (DANA-KIRKSTALL I.F.S.)
Coach #6255 thru #6850
Target
Front:
Ride Height (bottom of frame to wheel center)
Camber (Left and Right)
6 1/2" **
0.25°
0.75°
0°
-0.5°
0.5°
2.75°
2.00°
3.50°
0°
-1.00°
1.00°
Toe (Left and Right)
.02"
.02"
.02"
Total Toe
.04"
.04"
.04"
SAI *****
6.00°
5.25°
7.00°
Included Angle
6.50°
5.50°
7.50°
Front Set Back
0.00°
-0.20°
+0.20°
Turning Angle
55°
54°
55°
22 1/2"
22 1/4"
22 3/4"
Caster (Left and Right)
Cross Caster
Center Tie-Rod Length cen-cen
Tag Axle:
Max.
0.50°
Cross Camber
Rear:
Min.
Ride Height (bottom of frame to wheel center)
7 1/2" Nominal
Drive Axle Airspring Height ***
8 3/8"
8"
9"
Thrust Angle
0.00°
-0.06°
+0.06°
Rear Offset
0.00"
-1/8"
+1/8"
Rear Camber (Left and Right)
0.00°
-0.50°
+0.50°
Rear Toe (Left and Right)
0.00"
-0.15"
+0.15"
Rear Total Toe
0.00"
-0.30"
+0.30"
Tag Camber (Left and Right)
0.75°
0.50°
1.00°
Tag Toe (Left and Right)
0.04"
0.02"
0.06"
Tag Total Toe
0.08"
0.04"
0.12"
Tag Scrub Angle
0.00°
-0.06°
+0.06°
** To set ride height equal from side to side, a plumb bob measurement, from the bottom of the house floor to the ground
line, can be made from similar locations in the front wheel wells,
To reference correct ride height; the centers of the Outer Pivot Pins of the Lower A-Arms, should be 3/4" higher than
the centers of the Inner Pivot Pins.
*** Drive Axle Airspring Height should average 8 3/8" between the left and right, measured from bead plate to bead plate.
Each side to be more than 8" and less than 9" as necessary to level the front end side to side.
***** SAI difference from left to right may not exceed 0.75°
Front Axle
Front Susp.
Drive Axle
Drive Axle
Drive Susp.
Tag Axle Assy.
Chassis STW - Leveling & Suspension
MMT- MAT
Dana / Kirkstall IFS 84U F5017E
Ridewell 2840006
Rockwell 61143WX295 456
Meritor 23165
Ridewell RD-2270007
Ridewell RIT-2070001
Page 118 of 126
MHX
Dana / Kirkstall IFS 84U F5017E
Ridewell 2840006
Rockwell 61143WX295 456before 3-03
Meritor 23165
after 3-03
Ridewell RD-2270045
Ridewell RIT-2070004
Checked 6-15-2007
MAT, MMT, MHX, MC (DANA-KIRKSTALL I.F.S.)
Target
Front:
Ride Height (bottom of frame to wheel center)
Camber (Left and Right)
6 1/2" **
0.25°
0.75°
0°
-0.5°
0.5°
2.75°
2.00°
3.50°
0°
-1.00°
1.00°
Toe (Left and Right)
.02"
.02"
.02"
Total Toe
.04"
.04"
.04"
Front Set Back
0.00°
-0.20°
+0.20°
Turning Angle
55°
54°
55°
25 1/4"
23 1/4"
25 3/16"
23 3/16"
25 5/16"
25 5/16"
Caster (Left and Right)
Cross Caster
Center Tie-Rod Length cen-cen
96 inch Track vehicles
94 inch Track vehicles
Tag Axle:
Max.
0.50°
Cross Camber
Rear:
Min.
Ride Height (bottom of frame to wheel center)
7 1/2" Nominal
Drive Axle Airspring Height ***
8 3/8"
8"
9"
Thrust Angle
0.00°
-0.06°
+0.06°
Rear Offset
0.00"
-1/8"
+1/8"
Rear Camber (Left and Right)
0.00°
-0.50°
+0.50°
Rear Toe (Left and Right)
0.00"
-0.15"
+0.15"
Rear Total Toe
0.00"
-0.30"
+0.30"
Tag Camber (Left and Right)
0.75°
0.50°
1.00°
Tag Toe (Left and Right)
0.04"
0.02"
0.06"
Tag Total Toe
0.08"
0.04"
0.12"
Tag Scrub Angle
0.00°
-0.06°
+0.06°
** To set ride height equal from side to side, a plumb bob measurement, from the bottom of the house floor to the ground
line, can be made from similar locations in the front wheel wells,
To reference correct ride height; the centers of the Outer Pivot Pins of the Lower A-Arms, should be 3/4" higher than
the centers of the Inner Pivot Pins.
*** Drive Axle Airspring Height should average 8 3/8" between the left and right, measured from bead plate to bead plate.
Each side to be more than 8" and less than 9" as necessary to level the front end side to side.
Front Axle
Front Susp.
Drive Axle
Drive Susp.
Tag Axle Assy.
Chassis STW - Leveling & Suspension
MMT- MAT - MC
Dana / Kirkstall IFS 84
Ridewell 2840001
Rockwell 61143WX295 456
Ridewell RD-2270007
Ridewell RIT-2070001
Page 119 of 126
MHX
Dana / Kirkstall IFS 84
Ridewell 2840006
Rockwell 61143WX295 456
Ridewell RD-2270045
Ridewell RIT-2070004
UPDATED 10-03-02
NON-TAG MAGNA, AFFINITY (DANA-KIRKSTALL I.F.S.)
Target
Front:
Ride Height (bottom of frame to wheel center)
Camber (Left and Right)
Max.
6 1/2" **
0.50°
0.25°
0.75°
0°
-0.5°
0.5°
2.75°
2.00°
3.50°
0°
-1.00°
1.00°
Toe (Left and Right)
.02"
.02"
.02"
Total Toe
.04"
.04"
.04"
Front Set Back
0.00°
-0.20°
+0.20°
Turning Angle
55°
54°
55°
25 1/4"
25 3/16"
25 5/16"
Cross Camber
Caster (Left and Right)
Cross Caster
Center Tie-Rod Length cen-cen
96 inch Track vehicles
Rear:
Min.
Ride Height (bottom of frame to wheel center)
7 1/2" Nominal
Drive Axle Airspring Height ***
8 3/8"
8"
9"
Thrust Angle
0.00°
-0.06°
+0.06°
Rear Offset
0.00"
-1/8"
+1/8"
Rear Camber (Left and Right)
0.00°
-0.50°
+0.50°
Rear Toe (Left and Right)
0.00"
-0.15"
+0.15"
Rear Total Toe
0.00"
-0.30"
+0.30"
** To set ride height equal from side to side, a plumb bob measurement, from the bottom of the house floor to the
ground line, can be made from similar locations in the front wheel wells,
To reference correct ride height; the centers of the Outer Pivot Pins of the Lower A-Arms, should be 3/4" higher than
the centers of the Inner Pivot Pins.
*** Drive Axle Airspring Height should average 8 3/8" between the left and right, measured from bead plate to bead
plate. Each side to be more than 8" and less than 9" as necessary to level the front end side to side.
Front Axle
Front Susp.
Drive Axle
Drive Susp.
MMT- MAT - MC
Dana / Kirkstall IFS 84
Ridewell 2840001
Rockwell 61143WX295 456
Chassis STW - Leveling & Suspension
UPDATED 10-03-02
Page 120 of 126
MHM, MHA, (DANA-KIRKSTALL I.F.S.)
OBSOLETE
Target
Front:
Rear:
Min.
Max.
Ride Height
6 1/2"
Shock length
16 7/8"
16 7/8"
17"
Left Camber
0.50°
0.25°
0.75°
Right Camber
0.50°
0.25°
0.75°
Cross Camber
0°
-0.5°
0.5°
Left Caster
2.75°
2.00°
3.50°
Right Caster
2.75°
2.00°
3.50°
Cross Caster
0°
-1.00°
1.00°
Left Toe
.02"
.02"
.02"
Right Toe
.02"
.02"
.02"
Total Toe
.04"
.04"
.04"
Front Set Back
0.00°
-0.20°
+0.20°
Turning Angle
55°
54°
55°
Ride Height
7 1/2"
Drive Axle Airbag Height ***
8 3/8"
8"
9"
Thrust Angle
0.00°
-0.06°
+0.06°
Rear Offset
0.00"
-1/8"
+1/8"
Rear Camber
0.00°
-0.50°
+0.50°
Rear Toe (Left and Right)
0.00"
-0.15"
+0.15"
Rear Total Toe
0.00"
-0.30"
+0.30"
*** Drive Axle Airbag Height should average 8 3/8" between left and right, measured from bead plate to bead plate.
Each side to be more than 8" and less than 9" as necessary to adjust both front shocks to 16 7/8" length.
Chassis STW - Leveling & Suspension
Page 121 of 126
MAT, MMT, MHX, MC (DANA-KIRKSTALL I.F.S.)
OBSOLETE
Target
Front:
Min.
Max.
0.50°
0.25°
0.75°
0°
-0.5°
0.5°
2.75°
2.00°
3.50°
0°
-1.00°
1.00°
Toe (Left and Right)
.02"
.02"
.02"
Total Toe
.04"
.04"
.04"
Front Set Back
0.00°
-0.20°
+0.20°
Turning Angle
55°
54°
55°
Ride Height
6 1/2" **
Camber (Left and Right)
Cross Camber
Caster (Left and Right)
Cross Caster
Rear:
Tag Axle:
7 1/2" Nominal
Ride Height
Drive Axle Airbag Height ***
8 3/8"
8"
9"
Thrust Angle
0.00°
-0.06°
+0.06°
Rear Offset
0.00"
-1/8"
+1/8"
Rear Camber (Left and Right)
0.00°
-0.50°
+0.50°
Rear Toe (Left and Right)
0.00"
-0.15"
+0.15"
Rear Total Toe
0.00"
-0.30"
+0.30"
Tag Camber (Left and Right)
0.75°
0.50°
1.00°
Tag Toe (Left and Right)
0.04"
0.02"
0.06"
Tag Total Toe
0.08"
0.04"
0.12"
Tag Scrub Angle
0.00°
-0.06°
+0.06°
** At Ride Height, the lower A-Arms should have the centers of the Outer Pivot Pins 3/4" higher than the centers of the
Inner Pivot Pins
*** Drive Axle Airbag Height should average 8 3/8" between left and right, measured from bead plate to bead plate.
Each side to be more than 8" and less than 9" as necessary to level front end left to right.
Front Axle
Front Suspension
Drive Axle
Drive Suspension
Tag Axle Assy
MMT- MAT - MC
Dana / Kirkstall IFS 84
Ridewell 2840001
Rockwell 61143WX295 456
Ridewell RD-2270007
Ridewell RIT-2070001
Chassis STW - Leveling & Suspension
Page 122 of 126
MHX
Dana / Kirkstall IFS 84
Ridewell 2840006
Rockwell 61143WX295 456
Ridewell RD-2270045
Ridewell RIT-2070004
MHM MHA I-BEAM AXLE
(NON I.F.S.)
Target
Front:
7 1/2"
Camber (Left and Right)
0.25°
-0.25°
0.75°
0°
-1.0°
1.0°
3.00°
2.50°
3.50°
0°
-.50°
.50°
Toe (Left and Right)
.04"
.04"
.04"
Total Toe
.08"
.08"
.08"
Front Set Back
0.00°
-0.20°
+0.20°
Turning Angle
45°
42°
45°
Caster (Left and Right)
Cross Caster
Chassis STW - Leveling & Suspension
Max.
Ride Height
Cross Camber
Rear:
Min.
King Pin Inclination Angle
6.25°
Front Axle Travel Up
3.18"
Front Axle Travel Down
3.75"
Ride Height
7 1/2"
Drive Axle Airbag Height ***
8 3/8"
8"
9"
Thrust Angle
0.00°
-0.06°
+0.06°
Rear Offset
0.00"
-1/8"
+1/8"
Rear Camber (Left and Right)
0.00°
-0.50°
+0.50°
Rear Toe (Left and Right)
0.00"
-0.15"
+0.15"
Rear Total Toe
0.00"
-0.30"
+0.30"
Page 123 of 126
CONCEPT (MC) I-BEAM AXLE
(NON I.F.S.)
Target
Front:
7 1/2"
Camber (Left and Right)
0.25°
-0.25°
0.75°
0°
-1.0°
1.0°
3.00°
2.50°
3.50°
0°
-.50°
.50°
Toe (Left and Right)
.04"
.04"
.04"
Total Toe
.08"
.08"
.08"
Front Set Back
0.00°
-0.20°
+0.20°
Turning Angle
45°
42°
45°
Caster (Left and Right)
Cross Caster
Tag Axle:
Max.
Ride Height
Cross Camber
Rear:
Min.
King Pin Inclination Angle
6.25°
Front Axle Travel Up
3.18"
Front Axle Travel Down
3.75"
Ride Height
7 1/2"
Drive Axle Airbag Height ***
8 3/8"
8"
9"
Thrust Angle
0.00°
-0.06°
+0.06°
Rear Offset
0.00"
-1/8"
+1/8"
Rear Camber (Left and Right)
0.00°
-0.50°
+0.50°
Rear Toe (Left and Right)
0.00"
-0.15"
+0.15"
Rear Total Toe
0.00"
-0.30"
+0.30"
Tag Camber (Left and Right)
0.75°
0.50°
1.00°
Tag Toe (Left and Right)
0.04"
0.02"
0.06"
Tag Total Toe
0.08"
0.04"
0.12"
Tag Scrub Angle
0.00°
-0.06°
+0.06°
*** Drive Axle Airbag Height should average 8 3/8" between left and right, measured from bead plate to bead plate.
Each side to be more than 8" and less than 9" as necessary to adjust front.
Front Axle
Front Suspension
Drive Axle
Drive Suspension
Tag Axle Assy
Chassis STW - Leveling & Suspension
Dana 161BN204
Ridewell 227008
Rockwell 61143WX295 456
Ridewell RD-227
Ridewell RIT-207
Page 124 of 126
HYDRAULIC REBOUND/
ADJUSTABILITY
HYDRAULIC REBOUND STOP (88, 90, 91, AND 92 SERIES)
Our hydraulic rebound stop is designed to protect
the components of today's low friction suspensions, including the shock mounts, air springs (on
an air suspension), and the shocks themselves.
Benefits of Koni Hydraulic Rebound
• No dead length is added to the shock
• Insignificant weight penalty for this feature
• Velocity and position sensitive, which reduces
stress on the shock and chassis frame
• Dramatically increases the forces in the last
3/4” (20mm) of travel. This reduces the force at
which the piston tops out.
KONI ADJUSTABILITY
Koni shock absorbers have up to
100% reserve damping that can be
applied by simple adjustment procedures. Through this adjustment, it is
possible to compensate for loss of
damping force and lengthen the optimal service life two to three times.
This adjustment feature can also be
used to compensate for added weight
on a vehicle.
Unique to Koni, each adjustment
position represents increased damping forces over the entire force/veloc-
ity range. This feature allows proportionate damping at low and high
speeds. Below is a force velocity
graph of a Koni shock absorber.
Koni shocks are designed for optimal
performance at minimum position,
and should be fitted as received.
Once you have tested your vehicle,
you can modify the damping characteristics as necessary.
Remember that adjustments must
always be carried out in pairs.
Failure to adjust the shocks the same
amount on one axle will lead to problems such as uneven tire wear.
Please follow the procedures on the
following page to adjust Koni shock
absorbers.
2
Coach Care STW
113 of 114
Leveling & Suspension
ADJUSTMENT PROCEDURES
ADJUSTMENT PROCEDURES – 30 SERIES
1. This adjustment is made with the shock fully extended. Remove the plastic dust cover to expose the
adjusting button as in figure 1.
2. Hold the damper body by hand where the piston rod
emerges from the cylinder. Push the button carefully and hold it in (excessive force is not needed) see
fig. 2.
3. The adjusting device operates with four distinct
clicks, each of which marks an adjustment position
(figure 4).
figure 1
figure 2
4. The damper may have already been adjusted, so
check to see if it is at minimum position. Gently turn
it counterclockwise until a stop is felt. Do not use
force.
5. To increase rebound, turn the piston rod one or more
clicks to the right, and release the adjusting button.
6. Be sure that the adjusting button fully springs back
into position. Once the button has retracted, the piston rod may be turned freely, and the damper can be
refitted.
figure 3
figure 4
ADJUSTMENT PROCEDURES – 88, 90 AND 92 SERIES
In many cases, the twin tube shock can be adjusted
while still on the vehicle. Remove the lower mount (you
may have to loosen the upper mount), and follow the
steps below.
1. Fully collapse the shock absorber while turning it
counterclockwise until you feel the cams of the
adjusting nut engage in the recesses of the footvalve
(figure 1).
2. The damper may have already been adjusted so
check to see if it is set at minimum position. Gently
turn it counterclockwise, keeping track of half turns,
until a stop is felt (figure 2). Do not use force.
figure 1
figure 2
3. Increase the force in the damper by turning it clockwise in increments of half-turns. If the damper had
been previously adjusted, add the number of half
turns found in step two (figure 3 & 4).
4. Pull the shock absorber apart vertically without turning for at least 1/2” to disengage the adjusting mechanism. The piston rod may now be turned freely and
the shock absorber can be refitted.
Coach Care STW
114 of 114
figure 3
figure 4
Leveling & Suspension
3