1
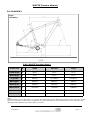
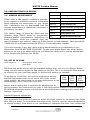
Electric Range
eC-7 Men’s & Women’s: Coniston
eR-7: Clifton
Supplementary Service Manual
2016 Edition 1
Page 2
2016 Edition 1
Table of Contents
1.0
Introduction
2.0
Geometry:
2.01: Coniston Men’s
2.02: Coniston Ladies
2.03: Clifton
3.0
Preparations for riding:
3.1
Making Adjustments
3.2
Set up of Fork
3.3
Battery maintainance
4.0
Safety
5.0
Lubrication:
5.1
General Lubrication
6.0
Torque Settings
7.0
Notes.
2016 Edition 1
Page 3
WHYTE Service Manual
1.0: INTRODUCTION
Thanks for choosing to purchase this Whyte product. We hope you will enjoy all the benefits its advanced design and engineering will bring to your riding experience.
This particular range of Electric bikes are fitted with electric pedal assistance, which depends upon how much force you will exert on the pedals. The following specific components are what makes these bikes different from a conventional pedal cycle:
•
A battery pack fitted above the downtube.
•
•
An electric motor fitted to the bottom-bracket, output power of up to 250 Watts
maximum.
A controlling system fitted to the handlebars.
This manual will guide you through the set-up, safety and maintenance procedures that
are specific to your Whyte bike. For other more general information, we strongly advise
that you also read thoroughly the General Instruction Manual that is also supplied with
your new bike.
Also, please note that the specification of all the components that are fitted to your bike as
standard may be obtained from the Whyte Bikes Brochure or alternatively from the Whyte
Bikes website www.whytebikes.co.uk
Please remember, if you are in any doubt about your ability to safely service or repair your
Whyte bike, do not ride it and instead arrange for a professional bicycle mechanic at your
local Whyte dealer to do the job correctly.
Bundled with this manual, are the respective manufacturers instructions and manuals for
the branded parts that are fitted to your Whyte bike. Please take time to study all the relevant instruction manuals to ensure you have a continually safe and well set-up bike before
every ride, and to help you build up a relationship of knowledge between you and your
Whyte Dealer.
Happy and safe riding,
Whyte design team. May 2015.
Page 4
2016 Edition 1
WHYTE Service Manual
2.0: GEOMETRY
Fig.1:
Geometry
2.01: WHYTE Coniston Men’s
Frame Size
X
Small
Medium
Large
Head Angle
A
69.5°
70.0°
70.0°
Seat Angle
B
74.0°
73.5°
73.0°
Top Tube
C
591mm
617.6mm
637.8mm
BB Height*
D
288mm
288mm
288mm
Stand Over
E
767mm
821mm
825mm
Wheel Base
F
1107mm
1123mm
1138mm
Chain Stay
G
445mm
445mm
445mm
Seat Post Ø
H
30.9mm
30.9mm
30.9mm
Note:
Geometry shown here is ’Showroom’ i.e. without rider aboard the bicycle. ’With Sag’ geometry is with rider after correct
sag is set at the front. Please refer to suspension set up for information on how to achieve the correct sag of the fork.
*BB height with Ø706mm tyres fitted (35mm / 37-622)
2016 Edition 1
Page 5
WHYTE Service Manual
2.02: WHYTE Coniston Ladies
Frame Size
X
Small
Medium
Head Angle
A
68.0°
69.0°
Seat Angle
B
74.5°
74.0°
Top Tube
C
557mm
584mm
BB Height*
D
288mm
288mm
Stand Over
E
716mm
748mm
Wheel Base
F
1093mm
1106mm
Chain Stay
G
445mm
445mm
Seat Post Ø
H
30.9mm
30.9mm
Note:
Geometry shown here is ’Showroom’ i.e. without rider aboard the bicycle. ’With Sag’ geometry is with rider after correct
sag is set at the front. Please refer to suspension set up for information on how to achieve the correct sag of the fork.
*BB height with Ø706mm tyres fitted (35mm / 37-622)
2.03: WHYTE Clifton
Frame Size
X
Small
Medium
Large
Head Angle
A
70.0°
70.0°
70.0°
Seat Angle
B
73.5°
73.5°
73°
Top Tube
C
592mm
606mm
625.4mm
BB Height*
D
277mm
277mm
277mm
Stand Over
E
766mm
796mm
823mm
Wheel Base
F
1100mm
1115mm
1130mm
Chain Stay
G
450mm
450mm
450mm
Seat Post Ø
H
30.9mm
30.9mm
30.9mm
Note: * BB height with Ø716mm tyres fitted (42-622)
Page 6
2016 Edition 1
WHYTE Service Manual
3.0: PREPARATIONS FOR RIDING
3.1: MAKING ADJUSTMENTS
Please refer to the specific component manufacturers manual or published technical information
about adjusting the components on your Whyte
bike. Instructions may be downloaded from the
relevant manufacturer’s internet site, as shown in
the table to the right.
DT
www.dtswiss.com
Ergon
www.ergon-bike.com
FSA
www.fullspeedahead.com
Jagwire
www.jagwireusa.com
Shimano
www.shimano.com
SR Suntour
www.srsuntour-cycling.com
Tektro
www.tektro.com
www.vittoria.com
This electric range of bikes are fitted with the Vittoria
Shimano Steps E6000 series of components.
VP
www.vpcomponents.com
Shimano publish comprehensive instructions for
these products, which are available from the
http://si.shimano.com website, under the E-Bike section on that webpage. User manual UM70H0A-002-00 and Dealer manual DM-SP0001-03 are particularly relevant.
If you are uncertain in any way, about making adjustments to any components on you
Whyte bike, then DO NOT RIDE YOUR BIKE. Contact your Whyte dealer who will be able to
advise you on how to go about setting up you Whyte for riding, and or making adjustments
to the components fitted to your Whyte.
3.2: SET UP OF FORK
Tools Required:
Good Quality Shock Pump.
Small Ruler
The front fork will be pre-set with the standard settings when you buy your Whyte. Before
riding, you will need to adjust the Sag setting on the fork. This is to ensure the forks are setup correctly for your own body weight, so the fork will perform as intended.
To set Sag on a front fork, you need to measure the amount
the fork compresses when you sit on the bike in the normal
riding position. We recommend for the best performance to run
approximately (20%) Sag on the front fork.
Fork
Travel
Sag
(15% Firm)
Sag
(25% Plush)
60mm
9mm
15mm
Sag on and air sprung fork is controlled by adjusting the Air
Spring pressure. We recommend you refer to your forks owners manual or relevant website
for detailed information about your fork set up and performance relating to all controls and
features of your fork.
Rebound Damping adjustment:
This adjustment fine-tunes the speed at which the wheel returns to its normal ride height
after hitting a bump. To demonstrate the effect of this function, turn the rebound adjuster to
its slowest setting. Press down on the handlebars to compress the forks, then release the
2016 Edition 1
Page 7
WHYTE Service Manual
load. The suspension recovers very slowly to its original position.
Repeat the above with the adjuster turned to the fastest setting and the difference will be
seen immediately the load is released. We recommend the optimum setting is to adjust
the re-bound damping to be as slow as possible, but not so slow that the normal ride
height is not recovered. On very rough terrain, if the bike becomes progressively lower as
more bumps are hit then the re-bound damping is set too slow. On the other hand if the
bike feels choppy and not plush then the re-bound damping is too fast. A bit of trial and
error is needed to get the exact setting. WARNING. Only make adjustments to your fork
while stationary, and not when riding.
3.3: BATTERY MAINTAINENCE
Tools Required:
Shimano charging equipment.
Given that the combined mass of the electric power system makes these bikes significantly heavier than equivalent pedal cycles, it is important to avoid running out of battery
power whilst riding. Otherwise the bike will be quite a challenge to continue riding!
Therefore it is advised to implement the recommendations made by Shimano concerning
battery maintenance, charging regime and replacement/disposal, as detailed within the
Shimano STEPS User manual UM-70H0A-002-00 and Dealer manual DM-SP0001-03.
4.0: SAFETY
IMPORTANT: The following are intended to be advisory notes on the safe use of your
Whyte bike. You should also read thoroughly the General Instruction Manual also supplied
with your new bike. If at any stage you are uncertain about the safety or safe operation of
the bike as a whole, or any specific component, then DO NOT RIDE YOUR WHYTE and
instead please consult the specific component manufacturers instruction manual or your
Whyte Dealer for advice.
Maximum Rider Weight Limit for this range of Whyte Bikes: 19 Stone/120kg
WARNING: As is the case with all mechanical components, the bicycle is subjected
to wear and high stresses. Different materials and components may react to wear
and stress fatigue in different ways. If the design life of a component has been exceeded, it may fail suddenly causing possible injury to the rider. Any form of crack,
scratches and decolouring in highly stresses areas are showing that the component
has exhausted its life time and has to be replaced. If you are in any doubt about
one or more components on your Whyte DO NOT RIDE YOUR BIKE. Consult the
specific component manufacturers literature, or take your bike to your local Whyte
Dealer.
CAUTION: These bikes have disc brakes as standard equipment. It is NOT PERMITTED to convert the braking system to a rim brake type, since the frame has only
been tested for disc brake use and also because the wheel rims are not suitable to
be used as a braking surface. Making such a modification of components will also
void the warranty.
Page 8
2016 Edition 1
WHYTE Service Manual
WARNING: There are specific safety instructions for the Shimano STEPS electric
power system, which are detailed in the Shimano STEPS User manual UM-70H0A002-00 and Dealer manual DM-SP0001-03. In particular, certain potential hazards associated with handling/disposal of the battery and also how to safely
utilise the electric motor assistance whilst riding your bicycle. We therefore
strongly recommend that these points are studied with great care, to ensure safe
operation of your Whyte electric bicycle.
Designed for the following use:
The bicycles in the Whyte eC-7 & eR-7 series’ have all been designed, tested and comply
with ISO 4210-2 Safety Standard, for typical road or path cycling use. They have not been
designed or tested for mountain biking or for use in competition.
5.0: LUBRICATION
5.1: GENERAL LUBRICATION
For the correct lubrication regime and maintenance of all parts on a Whyte bicycle, please
refer to the specific component manufacturers detailed instructions bundled with this manual or for further information visit the specific manufacturers website.
6.0: TORQUE SETTINGS
IMPORTANT: For all torque settings, refer to the specific manufacturers information bundled with this manual, or alternatively, refer to the specific manufacturers website for further information.
7.0: NOTES
2016 Edition 1
Page 9
WHYTE Service Manual
NOTES (continued)
Page 10
2016 Edition 1
WHYTE Service Manual
NOTES (continued)
2016 Edition 1
Page 11