1
Contents
GETTING STARTED .............................................................................................................. 9
Exclaimer Signature Manager Exchange Edition Overview ................................................................... 10
Signature Content .............................................................................................................................. 10
Signature Rules .................................................................................................................................. 10
Complete Control ............................................................................................................................... 11
How It Works ..................................................................................................................................... 11
System Requirements .......................................................................................................................... 12
Hardware ........................................................................................................................................... 12
Software ............................................................................................................................................. 12
System Changes ................................................................................................................................... 13
File Location(s) ................................................................................................................................... 13
Downloading Signature Manager Exchange Edition ............................................................................. 14
The Installation Process ....................................................................................................................... 15
The Setup Wizard................................................................................................................................. 19
Setting Up Multiple Servers ................................................................................................................. 25
Closing Signature Manager Exchange Edition ...................................................................................... 26
INSTALLATION & DEPLOYMENT ..........................................................................................27
Uninstalling Signature Manager Exchange Edition ............................................................................... 28
Preparation ........................................................................................................................................ 29
Running the Uninstall Process ........................................................................................................... 29
THE EXCLAIMER CONSOLE ..................................................................................................30
Introduction......................................................................................................................................... 31
Understanding the Exclaimer Console Window ................................................................................... 32
Exclaimer Console Summary .............................................................................................................. 33
Console Menu ................................................................................................................................ 33
Console Toolbar ............................................................................................................................. 34
Console Tree .................................................................................................................................. 35
Content Pane ................................................................................................................................. 36
Selection Tabs ................................................................................................................................ 36
Actions Pane .................................................................................................................................. 36
Exclaimer Console Settings .................................................................................................................. 37
Exclaimer Console Licensing................................................................................................................. 38
The Licensing Process ........................................................................................................................ 39
Licensing Information ........................................................................................................................ 39
USER MANUAL
Exclaimer Signature Manager Exchange Edition
Page | 2
The Licensing Toolbar ........................................................................................................................ 39
Remote Deployment............................................................................................................................ 40
How It Works ..................................................................................................................................... 40
The Remote Deployment Folder ........................................................................................................ 41
Folder Permissions (Easy Method) ................................................................................................ 41
Folder Permissions (Secure Method) ............................................................................................ 41
Remote Deployment Timings ............................................................................................................ 42
Changing an Existing Remote Deployment Folder ............................................................................. 43
Saving Changes in the Exclaimer Console ............................................................................................. 44
Configuration Backups ....................................................................................................................... 45
Accessing the Windows Event Log ..................................................................................................... 46
Exporting Configuration Settings ....................................................................................................... 47
Importing Configuration Settings ......................................................................................................... 48
GENERAL SETTINGS & INFORMATION .................................................................................50
Introduction......................................................................................................................................... 51
Accessing General Settings & Information ........................................................................................... 52
Signature Manager Exchange Edition Settings ..................................................................................... 53
Available Settings ............................................................................................................................... 54
Advanced Settings.............................................................................................................................. 55
Fault Tolerance .............................................................................................................................. 55
Diagnostics..................................................................................................................................... 57
AD Cache........................................................................................................................................ 58
The Settings Toolbar .......................................................................................................................... 59
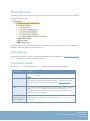
Signature Manager Exchange Edition Policies List ................................................................................ 60
The Policy List..................................................................................................................................... 61
Policy Options ................................................................................................................................ 61
The Policies Toolbar ....................................................................................................................... 61
View Options ................................................................................................................................. 62
WORKING WITH SIGNATURE POLICIES ................................................................................63
Introduction......................................................................................................................................... 64
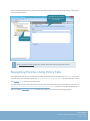
Accessing Existing Policies ................................................................................................................... 65
Navigating Policies Using the Console Tree ....................................................................................... 65
Navigating Policies Using Policy Tabs................................................................................................. 66
General Signature Policy Settings ........................................................................................................ 67
Signature Policy Settings .................................................................................................................... 68
Using Custom Reply Separators ......................................................................................................... 69
USER MANUAL
Exclaimer Signature Manager Exchange Edition
Page | 3
Underscores ................................................................................................................................... 70
Hyphens ......................................................................................................................................... 70
HTML Tags ..................................................................................................................................... 71
HTML Style Attributes.................................................................................................................... 72
Spaces ............................................................................................................................................ 72
Regular Expressions ....................................................................................................................... 73
The Policies List .................................................................................................................................. 74
The List of Policies ......................................................................................................................... 75
The Policy Setup Pane ................................................................................................................... 75
The Policies Toolbar ....................................................................................................................... 76
View Options ................................................................................................................................. 76
The Anatomy of a Policy ...................................................................................................................... 77
General............................................................................................................................................... 78
Template ............................................................................................................................................ 79
Right-Click Options ........................................................................................................................ 80
The Template Breadcrumb Trail .................................................................................................... 81
Signature Options .............................................................................................................................. 82
vCard .................................................................................................................................................. 86
Customizing vCards ....................................................................................................................... 88
Conditions .......................................................................................................................................... 90
Available Options for Setting Conditions ....................................................................................... 92
Creating Queries With the Configure Attributes Window ........................................................... 100
Exceptions ........................................................................................................................................ 102
Available Options for Setting Exceptions ..................................................................................... 103
Date Range ....................................................................................................................................... 112
Using the advanced schedule ...................................................................................................... 113
Next Policy ....................................................................................................................................... 114
Example Scenario ........................................................................................................................ 115
Adding a New Policy .......................................................................................................................... 116
The Add Policy Wizard ..................................................................................................................... 117
Step 1: Enter General Information .............................................................................................. 117
Step 2: Associate the Policy with a Template .............................................................................. 118
Step 3: Set Conditions for the Policy ........................................................................................... 119
Step 4: Finish Up .......................................................................................................................... 120
Step 5: Save Changes ................................................................................................................... 121
Cloning a Policy .................................................................................................................................. 122
Changing a Policy ............................................................................................................................... 123
USER MANUAL
Exclaimer Signature Manager Exchange Edition
Page | 4
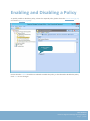
Enabling and Disabling a Policy .......................................................................................................... 124
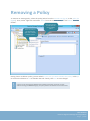
Removing a Policy .............................................................................................................................. 125
How To... ........................................................................................................................................... 126
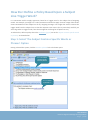
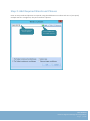
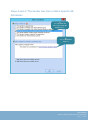
How Do I Create a Policy Chain? ...................................................................................................... 127
How do I Create a Policy for All Internal or All External Emails? ..................................................... 131
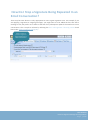
How Do I Stop a Signature Being Repeated In an Email Conversation? .......................................... 134
How Do I Define a Policy Based Upon a Subject Line Trigger Word? .............................................. 135
Step 1: Select 'The Subject Contains Specific Words or Phrases' Option .................................... 135
Step 2: Add Required Words and Phrases ................................................................................... 136
Step 3: Set options for words and phrases .................................................................................. 137
How Do I Create A Policy Based Upon Specific Active Directory Attributes? .................................. 138
Steps 1 and 2: 'The Sender Is Someone' ...................................................................................... 138
Steps 3 and 4: 'The Sender Has One or More Specific AD Attributes' ......................................... 139
Steps 5 and 6: Enter Basic Details for the Query ......................................................................... 140
Steps 7 and 8: Browse and Select an Active Directory Container ............................................... 141
Steps 9 and 10: Choose a Start Point and Select Required Attribute .......................................... 142
Step 11: Choose How Matching Should Be Made ....................................................................... 143
Step 12: Enter the Required Attribute Value for Matching ......................................................... 144
How Do I Change The Sequence In Which Policies Run? ................................................................. 145
How Do I Change The Template Associated With a Policy?............................................................. 146
Steps 1 - 3: Access the Template Library From Within a Policy ................................................... 146
Steps 4 - 6: Browse and Select New Templates ........................................................................... 147
SENT ITEMS UPDATE ........................................................................................................ 148
Introduction....................................................................................................................................... 149
Sent Items Settings ............................................................................................................................ 150
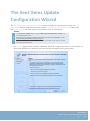
The Sent Items Update Configuration Wizard .................................................................................... 153
Sent Items Update Service - Manual Configuration ............................................................................ 156
Step 1: Create a User ....................................................................................................................... 156
Use Exchange Management Console .......................................................................................... 156
Use a PowerShell Script ............................................................................................................... 157
Additional Guidelines for Creating a New User ........................................................................... 157
Step 2: Grant Rights ......................................................................................................................... 158
Exchange 2007 ............................................................................................................................. 158
Exchange 2010 / Exchange 2013 ................................................................................................. 159
Step 3: Configure the Service to Use Credentials ............................................................................ 159
Use the Services Applet ............................................................................................................... 159
USER MANUAL
Exclaimer Signature Manager Exchange Edition
Page | 5
Use a PowerShell Script ............................................................................................................... 160
THE POLICY TESTER .......................................................................................................... 161
Introduction....................................................................................................................................... 162
Understanding the Policy Tester Window .......................................................................................... 163
The Policy Tester Toolbar ................................................................................................................. 164
The Formatting Toolbar ................................................................................................................... 164
Additional Options ....................................................................................................................... 165
Creating a New Policy Test ................................................................................................................. 167
Saving & Re-Using a Policy Test ......................................................................................................... 168
Saving a Policy Test .......................................................................................................................... 168
Re-Using a Saved Policy Test .............................................................................................................. 169
Working With Rules Applied Information .......................................................................................... 170
Checking the Reason Why A Signature Policy Is or Is Not Applied .................................................. 172
Previewing the Message at Any Stage in the Process ...................................................................... 173
Working with Test Messages ............................................................................................................. 174
THE TEMPLATE LIBRARY ................................................................................................... 175
The Template Library ......................................................................................................................... 176
Understanding the Template Library Window ................................................................................... 177
Console Tree .................................................................................................................................... 178
The Template Library Toolbar .......................................................................................................... 178
The Template Library Content Pane ................................................................................................ 178
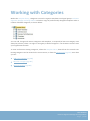
Working with Categories ................................................................................................................... 179
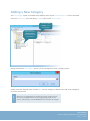
Adding a New Category ................................................................................................................... 180
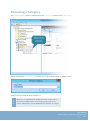
Renaming a Category ....................................................................................................................... 181
Removing a Category ....................................................................................................................... 182
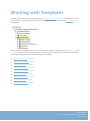
Working with Templates .................................................................................................................... 183
Previewing a Template ...................................................................................................................... 184
Adding a New Template..................................................................................................................... 185
Cloning a Template ............................................................................................................................ 188
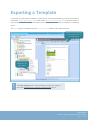
Exporting a Template ......................................................................................................................... 190
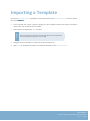
Importing a Template ........................................................................................................................ 192
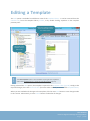
Editing a Template ............................................................................................................................. 193
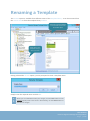
Renaming a Template ........................................................................................................................ 194
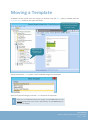
Moving a Template ............................................................................................................................ 195
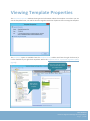
Viewing Template Properties ............................................................................................................. 196
Removing a Template ........................................................................................................................ 197
USER MANUAL
Exclaimer Signature Manager Exchange Edition
Page | 6
THE TEMPLATE EDITOR .................................................................................................... 198
Introduction....................................................................................................................................... 199
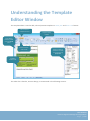
Understanding the Template Editor Window ..................................................................................... 200
The Content Area ............................................................................................................................. 201
Switching Between Different Views ................................................................................................. 201
Switching Between Different Format Types .................................................................................... 201
The Template Editor Toolbar ........................................................................................................... 201
The Fields Panel ............................................................................................................................... 202
The Properties Pane ......................................................................................................................... 202
Template Editor - Toolbar Variations ................................................................................................. 203
The HTML Editor Toolbar ................................................................................................................. 204
The RTF Editor Toolbar..................................................................................................................... 205
The Plain Text Editor Toolbar ........................................................................................................... 206
Placement of Signature Content ........................................................................................................ 207
Placing Signature Content at the Very End of Original Messages .................................................... 208
Placing Signature Content Above Original Messages ...................................................................... 209
Placing Signature Content Below The Latest Message In An Email Conversation ........................... 210
Tips for Working with Original Message Fields ................................................................................ 211
Using Spaces Between Original Message Fields .......................................................................... 211
Copying and Pasting Original Message Fields .............................................................................. 211
Formatting Original Message Fields ............................................................................................ 211
Tables ................................................................................................................................................ 212
Smart table - Contact Block ............................................................................................................. 213
Smart Table - Custom....................................................................................................................... 213
Standard HTML Table....................................................................................................................... 213
Fields ................................................................................................................................................. 215
Working with the Fields Panel ......................................................................................................... 216
Working with Fields ......................................................................................................................... 217
Using Spaces Between Original Message Fields .......................................................................... 217
Copying & Pasting Original Message Fields ................................................................................. 217
Formatting Original Message Fields ............................................................................................ 217
Available Fields ................................................................................................................................ 218
Message Fields............................................................................................................................. 219
Message Sender Fields ................................................................................................................ 222
Dynamic Content Fields ............................................................................................................... 231
Server Fields ................................................................................................................................ 269
USER MANUAL
Exclaimer Signature Manager Exchange Edition
Page | 7
Advanced Fields ........................................................................................................................... 270
General Fields .............................................................................................................................. 308
Properties .......................................................................................................................................... 309
Working With the Properties Pane .................................................................................................. 310
Understanding How Properties are Inherited.................................................................................. 311
Examples of Properties in Use ......................................................................................................... 313
Field Properties............................................................................................................................ 313
Hyperlink Properties .................................................................................................................... 313
Text Properties ............................................................................................................................ 314
Table Properties .......................................................................................................................... 314
How To... ........................................................................................................................................... 315
How Do I Create a Dynamic Signature Template? ........................................................................... 316
How Do I Suppress Blank Lines If Fields Are Not Populated? .......................................................... 317
Use a contact block...................................................................................................................... 317
Use a Smart Table ........................................................................................................................ 317
Use a Field Prefix ......................................................................................................................... 318
How Do I Create a Contact Block? ................................................................................................... 319
How It Works ............................................................................................................................... 320
Adding Fields to a Contact Block ................................................................................................. 320
Updating an Existing Contact Block ............................................................................................. 321
How do I Insert an Image at the Start of Messages? ....................................................................... 322
How do I Add a Signature to the Very End of Email Messages? ...................................................... 324
How Do I Add a Signature After the Latest Reply In An Email Conversation? ................................. 326
How Do I Set the Font for Text In a Template? ................................................................................ 328
Copyright Notice ................................................................................................................................ 329
USER MANUAL
Exclaimer Signature Manager Exchange Edition
Page | 8
Chapter 1
Getting Started
USER MANUAL
Exclaimer Signature Manager Exchange Edition
Page | 9
Exclaimer Signature Manager
Exchange Edition Overview
Exclaimer Signature Manager Exchange Edition allows you to create great looking, professional
signatures centrally (including company branding, legal disclaimers and promotional content) and to
control the circumstances (i.e. rules) under which these signatures should be applied to email
messages that are sent from your organization.
Signature Content
With the ability to create rich, highly creative templates [pg.183] (including tables, images and
dynamic Active Directory fields) and to add these before or after original email messages, a signature
has the potential to be so much more than just contact details. With Exclaimer Signature Manager
Exchange Edition, you can consistently apply personalized signature details, legal disclaimers,
corporate branding, banners (e.g. for sales promotions and corporate events) and so much more...the
possibilities are immense.
Exclaimer Signature Manager Exchange Edition includes a library of professionally designed templates
which can be used 'out of the box', or as a start point for creating your own versions. New templates
can be created and existing templates are edited using an intuitive template editor [pg.190], which
will be familiar to anyone who has worked with Microsoft Outlook.
Templates are created in HTML, RTF and Plain Text formats to cater for all situations, with an instant
preview [pg.184] feature so you can see, at a glance, how your template will be displayed within email
messages.
Signature Rules
Having created any number of signature templates, it is likely that you will want to specify criteria (i.e.
rules) which must be met to determine which signature should be applied to messages.
At a basic level, this might be as simple as saying 'apply this template to all messages' - but other times
you may have more complex requirements. For example, you might choose to apply different
signatures according to the sender, or according to the day of the week, or dependent upon the
content of the email body and/or subject line...a vast range of scenarios can be achieved using
signature policies [pg.64].
A signature policy can be thought of as a set of rules which are specified to control how signatures are
applied to email messages. With a range of conditions [pg.90] and exceptions [pg.102] (which can be
applied to messages sent and received both internally and externally), you determine if, when and
how signatures are applied.
USER MANUAL
Exclaimer Signature Manager Exchange Edition
Page | 10
Complete Control
Perhaps one policy isn't enough - perhaps you need to apply (or not apply) certain signatures according
to whether or not a previous signature has already been applied. With Exclaimer Signature Manager
Exchange Edition, you can create policy chains [pg.114] to define such dependencies.
And there's no need to worry about complicated testing processes, since Exclaimer Signature Manager
Exchange Edition includes an intuitive policy tester [pg.162] which will simulate the process of sending
and receiving email messages so you can quickly see if policies are defined correctly.
How It Works
Signature templates and associated policies are defined centrally, by an administrator.
When a user sends an email message, the message is checked against all defined signature policies
and, if it matches specified criteria for a policy, that policy is applied and associated signature content
is added to the message.
All of this happens 'behind the scenes' - the message that is finally received at the other end can be
quite different to the one that the user sees when they press 'send'. Depending on how signature
policies and templates are defined, the final message might be displayed in a different way, and
signature content will be included.
If required, the sent items update [pg.149] feature can be used to store sent messages exactly as they
were received (i.e. the processed version), or to store the original version of the message AND the
processed version.
USER MANUAL
Exclaimer Signature Manager Exchange Edition
Page | 11
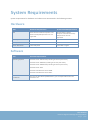
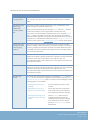
System Requirements
System requirements for hardware and software are summarized in the following sections.
Hardware
Item
Minimum Requirements
Recommended Requirements
x64 architecture-based computer. Intel
Itanium family IA64 processor are not
supported.
x64 architecture-based
computer. Intel Itanium family
IA64 processor are not
supported.
Memory
2GB
4GB
Disk Space
350MB
500MB
Screen Resolution
1024 x 768 pixels
1152 x 864 or higher
CPU
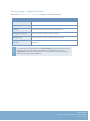
Software
Item
Minimum Requirements
Operating Systems
Windows Server 2003 R2 x64 (including all service pack levels).
Windows Server 2008 x64 (including all service pack levels).
Windows Server 2008 R2 x64 (including all service pack levels).
Windows Server 2012.
Windows Small Business Server 2008.
Windows Small Business Server 2011.
Microsoft .NET
Framework
Note: For the Sent Items Update feature, you will require Microsoft .Net
Framework 3.5.
USER MANUAL
Exclaimer Signature Manager Exchange Edition
Page | 12
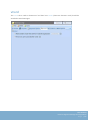
System Changes
The installation process makes the following changes to your system.
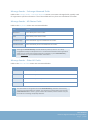
File Location(s)
As part of the installation process, you are asked to specify a destination folder, into which program
files will be installed. The default folder is C:\Program Files\Exclaimer Ltd\Mail Disclaimers
In addition to program files, a number of configuration files are copied to your system. The location
of these files is shown below:
Item
File Location
Windows Server 2003 R2 x64
\Documents and Settings\All Users\Application Data\Exclaimer
Ltd\Mail Disclaimers
Windows Server 2008 x64
\ProgramData\Exclaimer Ltd\Mail Disclaimers
Windows Server 2008 R2 x64
Windows Server 2012
Windows Small Business Server 2008
Windows Small Business Server 2011
USER MANUAL
Exclaimer Signature Manager Exchange Edition
Page | 13
Downloading Signature
Manager Exchange Edition
The Exclaimer Signature Manager Exchange Edition installation file is named setup.exe and can be
downloaded from the Exclaimer products page:
http://www.exclaimer.com/signature-manager-exchange-edition/download
Once downloaded, Setup.exe should be run on the required Microsoft Exchange Servers that meets
the system requirements [pg.12] [pg.12].
USER MANUAL
Exclaimer Signature Manager Exchange Edition
Page | 14
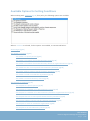
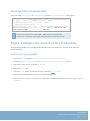
The Installation Process
The Exclaimer Signature Manager Exchange Edition installation process is comprised of two parts installation [pg.26] and setup [pg.19]. Both stages are quick and easy to complete, using a familiar
'wizard' approach to guide you through each process, step-by-step.
The installation process includes the Exclaimer license agreement and copies files to your preferred
destination folder. Once complete, the setup wizard is launched, so you can configure basic settings
for Exclaimer Signature Manager Exchange Edition, which will enable you to get started as soon as the
wizard is complete.
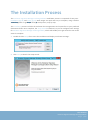
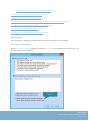
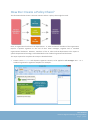
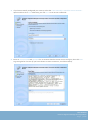
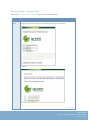
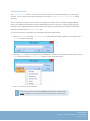
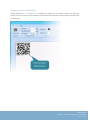
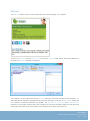
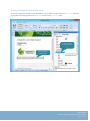
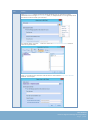
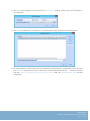
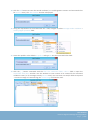
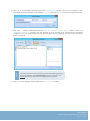
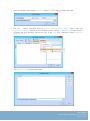
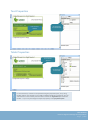
1. Double click the setup file to start the installation and display a welcome message:
2. Click setup to launch the setup wizard:
USER MANUAL
Exclaimer Signature Manager Exchange Edition
Page | 15
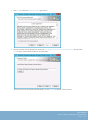
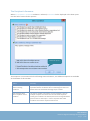
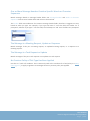
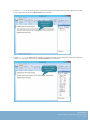
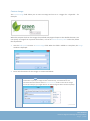
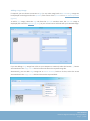
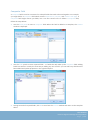
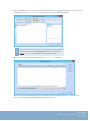
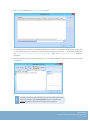
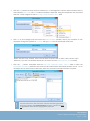
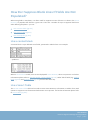
3. Click next to view the end-user license agreement:
4. Having read the license agreement, check the I accept the terms in the license agreement box and click
next to select a destination folder for installed files:
From here you can accept the default folder, or click change to specify a new location.
USER MANUAL
Exclaimer Signature Manager Exchange Edition
Page | 16
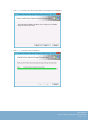
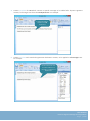
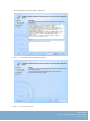
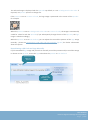
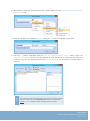
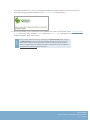
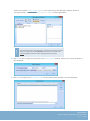
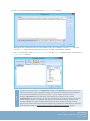
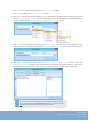
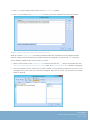
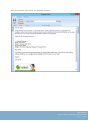
5. Click next to confirm the destination folder and prepare the installation:
6. Click install to perform the installation:
USER MANUAL
Exclaimer Signature Manager Exchange Edition
Page | 17
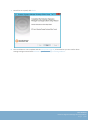
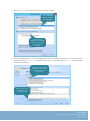
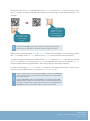
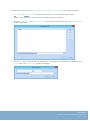
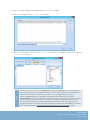
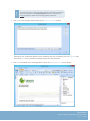
7. Once files are copied, click finish:
8. The installation is now complete and the setup wizard [pg.19] is launched so you can confirm basic
settings and get started with Exclaimer Signature Manager Exchange Edition.
USER MANUAL
Exclaimer Signature Manager Exchange Edition
Page | 18
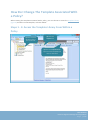
The Setup Wizard
Having installed Exclaimer Signature Manager Exchange Edition, the setup wizard must be completed.
This wizard takes you through the basic setup required to get started with the product, as shown
below.
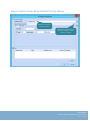
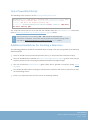
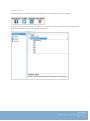
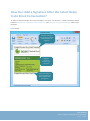
1. The first stage of the setup wizard displays summary information about the process:
USER MANUAL
Exclaimer Signature Manager Exchange Edition
Page | 19
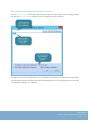
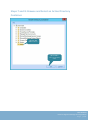
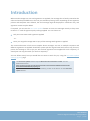
2. Click next to move to the next stage to view an introduction to the policy setup that you are about
to complete:
USER MANUAL
Exclaimer Signature Manager Exchange Edition
Page | 20
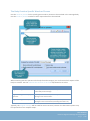
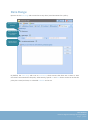
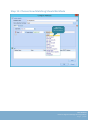
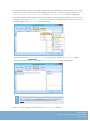
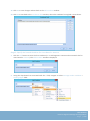
3. Click next to move to the next stage and set conditions [pg.90] for your first signature policy.
For testing purposes, default, conditions are set so that the policy will be triggered for any
emails where both the sender and the recipient are set to be the currently logged-in user. You
can update these conditions now, or at any time after the installation, so if you are not sure
what to set at this point, simply accept default conditions and continue:
USER MANUAL
Exclaimer Signature Manager Exchange Edition
Page | 21
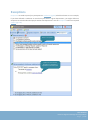
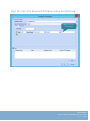
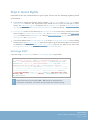
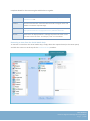
4. Click next to move to the next stage and select a template [pg.176] to associate with your first
policy. A number of standard templates are provided but you can update this template [pg.146]
at any time after the installation. If you are not sure what to select at this point, simply accept
the default and continue:
USER MANUAL
Exclaimer Signature Manager Exchange Edition
Page | 22
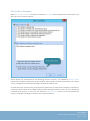
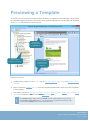
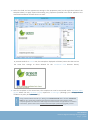
5. Click next to preview the selected template, to see how it would be presented in the context of
an email message:
If the selected template contains Active Directory fields, the preview might vary depending on
which user is associated with the message. If required, you can select a specific user via the
display data from user option at the bottom of the preview window.
6. If you wish to edit the selected template, click the edit button to open the template editor
[pg.190] and make required changes.
USER MANUAL
Exclaimer Signature Manager Exchange Edition
Page | 23
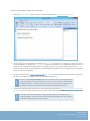
7. Click next to complete the process and start Exclaimer Signature Manager Exchange Edition in
the Exclaimer console [pg.31]:
NOTE
Having completed the installation process, it is a good idea to check Exclaimer console settings
[pg.37]. If you wish to manage multiple servers, you should also check remote deployment options.
[pg.40]
USER MANUAL
Exclaimer Signature Manager Exchange Edition
Page | 24
Setting Up Multiple Servers
Exclaimer Signature Manager Exchange Edition can be run on multiple servers and managed from a
single location. This means that (even on very large systems) you can ensure all of your email systems
have the same policies and signature templates installed, so email is processed consistently across the
entire organization.
To achieve this, the installation [pg.26] and setup [pg.19] must be run on each physical server and the
same remote deployment [pg.40] folder should be specified on each of these. Once Exclaimer
Signature Manager Exchange Edition has been installed and remote deployment options have been
set, any changes made on one server can be deployed to others (each time configuration changes are
saved, you are prompted to deploy them to other configured servers).
USER MANUAL
Exclaimer Signature Manager Exchange Edition
Page | 25
Closing Signature Manager
Exchange Edition
The Exclaimer Signature Manager Exchange Edition application does not need to be running for
policies [pg.64] [pg.64] to be processed. To close Exclaimer Signature Manager Exchange Edition,
select exit from the file menu at the top of the Exclaimer console [pg.31] [pg.31].
USER MANUAL
Exclaimer Signature Manager Exchange Edition
Page | 26
Chapter 2
Installation &
Deployment
USER MANUAL
Exclaimer Signature Manager Exchange Edition
Page | 27
Uninstalling Signature Manager
Exchange Edition
The uninstall process removes the following items for Exclaimer Signature Manager Exchange Edition:
Application program files
The Exclaimer Signature Manager Configuration Service
The Exclaimer Signature Manager Remote Deployment Service
The Exclaimer Signature Manager Sent Items Update Service
Configuration files are not removed as part of the uninstall process. The location of these files on your
system depends upon which operating system is in use, as summarized below:
Item
File Location
Windows Server 2003 R2 x64
\Documents and Settings\All Users\Application Data\Exclaimer
Ltd\Mail Disclaimers
Windows Server 2008 x64
\ProgramData\Exclaimer Ltd\Mail Disclaimers
Windows Server 2008 R2 x64
Windows Server 2012
Windows Small Business Server 2008
Windows Small Business Server 2011
USER MANUAL
Exclaimer Signature Manager Exchange Edition
Page | 28
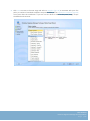
Preparation
As a precaution you may wish to export your configuration before running the uninstall process.
The export includes all settings for Exclaimer Signature Manager Exchange Edition. These are written
to an econfig file, a proprietary file type for Exclaimer products. To export current settings, follow the
steps below:
1. Open the Exclaimer Console.
2. Ensure that Exclaimer is selected in the console tree (i.e. the topmost branch).
3. Select export configuration from the actions pane, or from the action menu. The export configuration
window is displayed.
4. Navigate to the required drive and folder, to which the export file should be saved.
5. Specify the required file name for the export file.
6. Click save to complete the export.
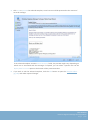
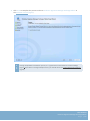
Running the Uninstall Process
There are two ways to start the uninstall process for Exclaimer Signature Manager Exchange Edition:
Activate the original setup.exe and choose the uninstall option; then follow on-screen instructions.
Use programs and features then follow on-screen instructions.
USER MANUAL
Exclaimer Signature Manager Exchange Edition
Page | 29
Chapter 3
The Exclaimer Console
USER MANUAL
Exclaimer Signature Manager Exchange Edition
Page | 30
Introduction
The Exclaimer console can be thought of as the 'control center' for Exclaimer Signature Manager
Exchange Edition. From here, you can define general settings which are applicable to the system as a
whole, and access each section of the application. This section explains how the Exclaimer console is
used, including:
Understanding the Exclaimer Console window [pg.49]
Exclaimer console settings [pg.37]
Exclaimer console licensing [pg.38]
Remote deployment [pg.40]
Exporting configuration settings [pg.47]
Importing configuration settings [pg.48]
If you already know about the console and wish to get started with Exclaimer Signature Manager
Exchange Edition, see the Signature Manager Exchange Edition General Settings & Information [pg.51]
section of this guide.
USER MANUAL
Exclaimer Signature Manager Exchange Edition
Page | 31
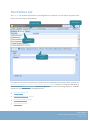
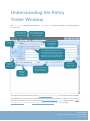
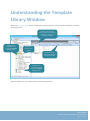
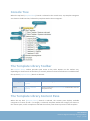
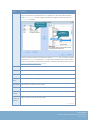
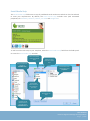
Understanding the Exclaimer
Console Window
The Exclaimer console window is split into three panes, as shown and summarized below:
Menu
Toolbar
Actions pane
Selection tabs
Content pane
Console tree
USER MANUAL
Exclaimer Signature Manager Exchange Edition
Page | 32
Exclaimer Console Summary
Available options in the Exclaimer console are summarized in the following sections:
Console menu [pg.33]
Console toolbar [pg.34]
Console tree [pg.35]
Content pane [pg.36]
Selection tabs [pg.36]
Actions pane [pg.36]
Console Menu
The console menu provides access to key areas and tasks within the Exclaimer Console. Available
options are summarized below:
Menu
Summary
File
Save
Use this option to save any changes made in the current content pane [pg.36].
Exit
Use this option to close the console. If any unsaved changes are detected, you are
prompted to save before exiting.
Action
New
Use this option to access the new Signature Manager Exchange Edition policy option
and create a new policy [pg.116].
Export configuration...
Use this option to export current configuration settings [pg.47] for the console (for
example, if you wish to use the same settings to set up another server within your
organization).
Import configuration...
Use this option to import current configuration settings [pg.48] for the console (for
example, if you are setting up a server using the settings from another server within
your organization).
…/continued
USER MANUAL
Exclaimer Signature Manager Exchange Edition
Page | 33
Menu
Summary
Window
New Window
Use this option to open another instance of the console - for example, if you need to
refer to settings made in one tab whilst updating another. All open windows are listed
at the bottom of the window menu, so you can easily switch between sessions. The
new window option is also available from the action menu.
Cascade
If you have used the new window option to open multiple instances of the console, use
this option to display all windows in a 'cascade'.
Tile Horizontally
If you have used the new window option to open multiple instances of the console, use
this option to display all windows horizontally, across the screen.
Contents
Help
Use this option to open the help system.
About
Use this option to display version information for the console.
Console Toolbar
The console toolbar provides quick access to key tasks. These tasks are also available from the console
menu [pg.36], but have been placed on the toolbar for faster access. Options on this toolbar vary,
depending on which branch of the console tree [pg.35] is currently selected. Those listed below are
available when the top level (Exclaimer) branch is selected:
Option
Function
Summary
Back
Whilst navigating through the console tree, use this
option to go back one level.
Forward
If you are navigating the console tree and used the back
button, use this option to go forward again (i.e. to
return to the point reached before you went back).
Up
Whilst navigating through the console tree, use this
option to move up to the parent of the current branch.
Show /Hide
Console Tree
Use this toggle option to show the console tree if it is
currently hidden, or hide the console tree if it is
currently shown.
Show /Hide
Actions Pane
Use this toggle option to show the actions pane if it is
currently hidden, or hide the actions pane if it is
currently shown.
USER MANUAL
Exclaimer Signature Manager Exchange Edition
Page | 34
Console Tree
To navigate the Exclaimer console (and all applications within it), a familiar tree structure is used. The
Exclaimer console is always at the topmost level, from which any number of parent / child branches
(also known as nodes) are displayed.
Having selected a node from the tree, the content pane displays information and options that are
relevant for that node. Options on the toolbar [pg.34] can be used to quickly navigate between
branches within the console tree.
When a branch is selected and changes are made but not saved, the branch is displayed with an
asterisk (*) symbol; you will see this at parent level (indicating that the branch contains child branches
with unsaved changes) and also at child level:
Parent branch with
unsaved changes
Child Parent/child branch
with unsaved changes
Child branch with
unsaved changes
Child Parent/child branch
with unsaved changes
Child branch with
unsaved changes
The asterisk symbol is cleared from a branch once its settings have been saved.
NOTE
The console tree can be hidden or shown using the hide / show console tree button on
the toolbar. For quick navigation, use back, forward and up buttons from the toolbar.
USER MANUAL
Exclaimer Signature Manager Exchange Edition
Page | 35
Content Pane
Having selected a node in the console tree, any information and settings associated with that node
are displayed in the content pane. These settings are accessed using a series of selection tabs [pg.36]
at the top of the pane.
Selection Tabs
Information and settings are organized into a series of tabs, accessed from the top of the content
pane. Available tabs vary, depending on which branch of the console tree is currently selected. Those
shown here are available when the top level (Exclaimer) branch is selected (settings [pg.37], licensing
[pg.38] and remote deployment [pg.40]).
Actions Pane
The actions pane displays quick access to common tasks for the selected node. Available actions vary,
depending on which branch of the console tree is currently selected.
NOTE
The actions pane can be hidden or shown using the hide / show actions
pane [pg.34] option on the toolbar.
USER MANUAL
Exclaimer Signature Manager Exchange Edition
Page | 36
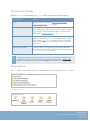
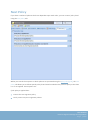
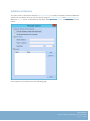
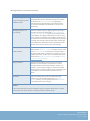
Exclaimer Console Settings
The settings tab contains options for the Exclaimer console:
Each time that configuration changes are saved, a backup of the previous configuration is created and
details of this are stored in the Windows event log. The Keep a copy of the last... option is used to
specify the maximum number of backups that will be retained, or set this value to zero if you do not
wish such backups to take place.
Specific settings [pg.53] for Exclaimer Signature Manager Exchange Edition are available when the
Signature Manager Exchange Edition branch is selected in the console tree.
NOTE
Changes are retained if you move to other tabs within the content pane. When you are
satisfied that all tabs have been updated correctly, click the save button to save changes
[pg.44] across all tabs. Alternatively, use the cancel button to abandon all changes.
USER MANUAL
Exclaimer Signature Manager Exchange Edition
Page | 37
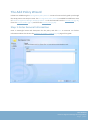
Exclaimer Console Licensing
The licensing tab contains information and options regarding licenses for installed Exclaimer products:
Licensing toolbar
License contact
information
License details
for Exclaimer
products
Licensing information is summarized in the following sections:
The licensing process [pg.39]
Licensing information [pg.39]
The licensing toolbar [pg.34]
USER MANUAL
Exclaimer Signature Manager Exchange Edition
Page | 38
The Licensing Process
Our aim is to get you working with Exclaimer software as quickly as possible, with minimal restrictions.
As such, we have implemented a flexible licensing policy.
If you have installed Exclaimer software for the first time, you can use it for five days without any form
of registration. After five days, you are prompted to register for a 30 day trial. Having completed this
trial, you can:
Purchase the product from the Exclaimer website or by contacting the Exclaimer sales team
Contact the Exclaimer sales team to extend your trial
Licensing Information
The licensing tab shows any contact details associated with this Exclaimer license, together with
installed products, features and version information. You can also see the type of license that is
currently in place and the license status (for example, the number of days remaining for a trial).
The Licensing Toolbar
When the licensing tab is displayed, the licensing toolbar contains the following options:
Toolbar Option
Summary
New > Signature policy
See adding a new policy [pg.116] for details.
Register for 30 day trial
Before using this software, you must register your installation of
the Exclaimer Console and its associated products. Click this
option to open the register for 30 day trial wizard and follow onscreen instructions to register your trial.
Extend trial
This option is only displayed if you have registered for a 30 day
trial. To extend a trial, you need to email the Exclaimer sales
team.
Activate full license
Having purchased a license, you will receive an email which
includes a product activation key. Use the activate full license
option to activate your license.
Buy now
Access the Exclaimer website products page
(http://www.exclaimer.com) to purchase a license.
-
NOTE
Changes are retained if you move to other tabs within the content pane. When you are
satisfied that all tabs have been updated correctly, click the save button to save changes
[pg.44] across all tabs. Alternatively, use the cancel button to abandon all changes.
USER MANUAL
Exclaimer Signature Manager Exchange Edition
Page | 39
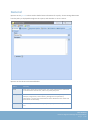
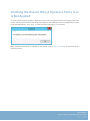
Remote Deployment
If you have multiple Exclaimer installations on your network (for example, you might have servers in
different offices around the country), you can manage configuration in a single location and deploy
this to all other servers. To do this, use the remote deployment tab to specify a shared location:
Then, whenever you save any changes to the configuration, you are asked to confirm if you would like
to deploy them to other servers. If you opt to deploy changes, a file is written to the remote
deployment folder and imported by the other installations.
NOTE
Initially, Exclaimer software must be installed on each server - installation cannot be
completed via remote deployment. Once installed, specify a remote deployment folder
to manage subsequent configuration changes with remote deployment (each installation
must have the same remote deployment folder).
NOTE
Changes are retained if you move to other tabs within the content pane. When you are
satisfied that all tabs have been updated correctly, click the save button to save changes
[pg.44] across all tabs. Alternatively, use the cancel button to abandon all changes.
-
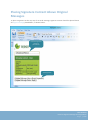
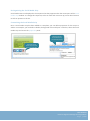
How It Works
The remote deployment folder is defined using the remote deployment tab within the Exclaimer
Console. The specified folder must be a shared folder on the network (only one remote deployment
folder should be used on an entire domain). When configuration changes are saved, the computer (on
which those changes have been saved) pushes new configuration data to the remote deployment
folder.
Remote machines receive notification from the operating system when new configuration data is
detected in the shared folder, and they then pull (i.e. import) that data into their local installation.
Push and pull operations are completed via the Exclaimer Signature Manager Exchange Edition
Remote Deployment service.
USER MANUAL
Exclaimer Signature Manager Exchange Edition
Page | 40
The Remote Deployment Folder
Create a shared folder on your network that will be accessible by all machines that are running
Exclaimer Signature Manager Exchange Edition.
If you do not want the share to be visible to users, you should use a hidden share. This is done by
adding a dollar ($) symbol to the end of the share name. Hidden shares cannot be viewed when
browsing the network with Explorer, for example.
Ensure that the user who is logged into the Exclaimer console (that is saving data) has read and write
access to this folder.
The following sections detail two methods of applying folder permissions. These are applicable for
both the sharing and the NTFS Security permissions of the shared folder - i.e. you must make the same
permission changes in both the sharing and security tabs of the folder’s properties dialog.
Folder Permissions (Easy Method)
Allow the Everyone group to have Read permissions.
Folder Permissions (Secure Method)
Allow Read permissions only for the computer account of each server with Exclaimer Signature
Manager Exchange Edition installed upon it.
This is essential because the Exclaimer Signature Manager Exchange Edition Remote Deployment
service runs under the LocalSystem account; this account (as the name suggests) only has access to
the local system of the machine that it is running on - not to any network resources.
The only way this account can ever see a network resource is when the computer account is given
specific access to that resource - i.e. the folder on the network resource allows itself to be accessed
by the LocalSystem account of a specific remote machine. In this case, access is restricted to only
reading data from the remote deployment folder.
Example permission settings are shown in the following page.
USER MANUAL
Exclaimer Signature Manager Exchange Edition
Page | 41
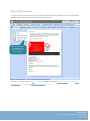
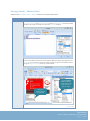
Example permission settings
Share Permissions
Security Permissions
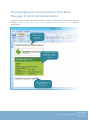
Remote Deployment Timings
As soon as the Exclaimer Signature Manager Exchange Edition Remote Deployment service notices
that there has been a change to the remote deployment folder, it starts a timer. Every ten seconds a
check is made to see if the file has been written to in the last five seconds. If it has not, the file is added
to a queue which will perform the actual import; otherwise the file remains in the timer list.
This means that the import should begin a maximum of ten seconds after the save finishes, though in
practice it could be a little more than this depending on server load and how quickly the import thread
is given control by the operating system. Similarly, the import could begin sooner, depending on when
the save completes relative to the timer interval.
Before checking that configuration changes have been applied successfully on remote machines,
sufficient time should be allowed for those machines to actually perform the import (the import can
take some time with complex configurations).
USER MANUAL
Exclaimer Signature Manager Exchange Edition
Page | 42
Changing an Existing Remote Deployment Folder
If all Signature Manager Exchange Edition installations are set to point to a specific remote deployment
folder and you later decide to change that folder, there is no need to manually change every server to
point to the new location.
Having changed the location on one machine and saved the configuration, that machine will write a
copy of the configuration data to both the old AND the new locations. Any servers pointing to the old
location will import the configuration which includes the new remote deployment folder path so on
subsequent deployments, they will pull data from the new location.
As such, you are advised NOT to delete the old remote deployment folder until enough time has
elapsed for all remote machines to import the configuration file that contains the new folder location.
USER MANUAL
Exclaimer Signature Manager Exchange Edition
Page | 43
Saving Changes in the Exclaimer
Console
If a tab contains any unsaved changes (irrespective of which branch in the console tree [pg.49] is
active), it is displayed with an asterisk (*) symbol - for example:
Asterisk (*) symbol
indicates unsaved changes
on the associated tab
Changes are retained if you move to other tabs within the content pane. When you are satisfied that
all tabs have been updated correctly, click the save button to save changes across all tabs. If you are
unsure about any changes that have been made, use the cancel button to abandon all changes.
USER MANUAL
Exclaimer Signature Manager Exchange Edition
Page | 44
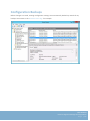
Configuration Backups
Before changes are saved, existing configuration settings are automatically backed up. Details of any
backups are written to the Windows event log - for example:
USER MANUAL
Exclaimer Signature Manager Exchange Edition
Page | 45
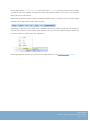
Accessing the Windows Event Log
To access the Windows event log from within the Exclaimer console, simply select the status option
from the actions pane:
The status option
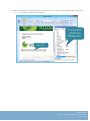
Alternatively, you can access the Windows event log from Windows. To do this, follow the steps below:
1. On the appropriate computer, click Start.
2. Select administrative tools.
3. Select event viewer.
USER MANUAL
Exclaimer Signature Manager Exchange Edition
Page | 46
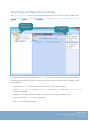
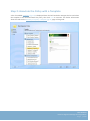
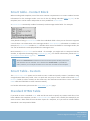
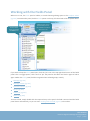
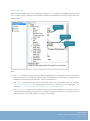
Exporting Configuration Settings
The export configuration option is used to export all settings for the Exclaimer console, together with
settings [pg.53], policies [pg.64] and templates [pg.176] for Exclaimer Signature Manager Exchange
Edition:
Right-click on the
topmost branch of
the console tree
Use the actions
pane
The export process writes all settings to an econfig file; this is a proprietary file type for Exclaimer
products and is required if you wish to import settings from a file. To export current settings, follow
the steps below:
1. Ensure that Exclaimer is selected in the console tree (i.e. the topmost branch)
2. Select export configuration from the actions pane, or from the action menu. The export configuration
window is displayed.
3. Navigate to the required drive and folder, into which the export file should be saved.
4. Enter the required file name for the export file.
5. Click save to complete the export.
USER MANUAL
Exclaimer Signature Manager Exchange Edition
Page | 47
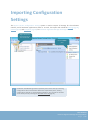
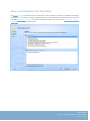
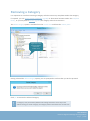
Importing Configuration
Settings
The import current configuration settings option is used to import all settings for the Exclaimer
console, and all Exclaimer applications within it. As such, the import will include all settings [pg.53],
policies [pg.64] and templates [pg.176] for Exclaimer Signature Manager Exchange Edition:
Right-click on the
topmost branch of
the console tree
Use the actions
pane
NOTE
Remember that all settings will be imported, which means that your existing
configuration will be overwritten. Before the import takes place, existing
configuration settings are automatically backed up; you can find the location
of this backup file by checking the Windows event log [pg.45].
USER MANUAL
Exclaimer Signature Manager Exchange Edition
Page | 48
Settings must be imported from an econfig file; this is a proprietary file type for Exclaimer products,
and is created whenever the export configuration settings [pg.47] option is used. To import
configuration settings, follow the steps below:
1. Ensure that you have backed up existing settings by exporting the current configuration.
2. Ensure that Exclaimer is selected in the console tree (i.e. the topmost branch).
3. Select import current configuration settings from the actions pane, or from the action menu. The import
configuration window is displayed.
4. Navigate drives and folders to select the econfig file to be imported.
5. Click open to complete the import.
USER MANUAL
Exclaimer Signature Manager Exchange Edition
Page | 49
Chapter 4
General Settings &
Information
USER MANUAL
Exclaimer Signature Manager Exchange Edition
Page | 50
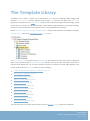
Introduction
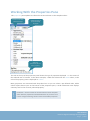
The Signature Manager Exchange Edition branch (within the Exclaimer console [pg.31] tree) is where
all work with signatures is completed:
When the parent branch (Signature Manager Exchange Edition) is selected, settings [pg.52] and
information can be viewed and updated. Below this, a number of child branches are used to access
the main elements of Exclaimer Signature Manager Exchange Edition:
Signature policies [pg.64]
Sent items update [pg.149]
The policy tester [pg.162]
The template library [pg.176]
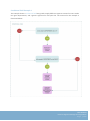
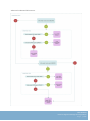
As you work with Signature Manager Exchange Edition, you will develop your own strategy for using
these options to set up policies and templates, however the basic workflow is summarized below:
USER MANUAL
Exclaimer Signature Manager Exchange Edition
Page | 51
Accessing General Settings &
Information
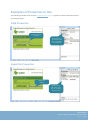
When the parent branch (Signature Manager Exchange Edition) is selected (within the Exclaimer
console [pg.31]), general settings [pg.53] and information can be viewed and updated:
The Signature Manager
Exchange Edition branch
is selected
Selection tabs provide
access to options and
information
Signature Manager
Exchange Edition
actions
From here, you can:
Navigate the console tree to access signature policies [pg.64], sent items update [pg.149], the
policy tester [pg.162] and the template library [pg.176]
Update general settings [pg.53] for Signature Manager Exchange Edition from the settings tab
View and manage existing policies [pg.60] from the policies tab (or via the actions pane)
Add a new signature policy [pg.116] via the actions pane
NOTE
For further information about the Exclaimer console (including the menu, toolbar
and actions pane), see understanding the Exclaimer console window [pg.36].
USER MANUAL
Exclaimer Signature Manager Exchange Edition
Page | 52
Signature Manager Exchange
Edition Settings
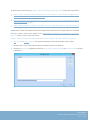
The settings tab contains general settings for Exclaimer Signature Manager Exchange Edition:
Settings toolbar
Settings
Advanced
settings
Available options are summarized in the following sections:
Available settings [pg.54]
Advanced settings [pg.55]
The settings toolbar [pg.59]
USER MANUAL
Exclaimer Signature Manager Exchange Edition
Page | 53
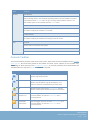
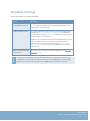
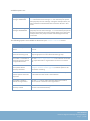
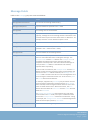
Available Settings
Fields on this tab are summarized below:
Option
Summary
Enable Signature Manager
Exchange Edition Policies
Enable or disable all signature policies. If this option is not set to
enabled, Exclaimer signature policies will not be applied to your
organization's email messages.
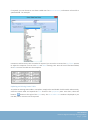
Handled message classes
This section determines the type (class) of messages that will be
handled by Signature Manager Exchange Edition. By default, the
class for email messages (IPM.Note.*) is defined and under typical
circumstances, this is sufficient.
However, some organizations may wish to add signatures to other
types of Outlook items - for example, to meeting requests or
calendar appointments. If you wish to apply Signature Manager
Exchange Edition to other items, use the add option to add the
relevant class.
Show unhandled messages
in status view
Select this option to report unhandled messages in the Windows
event log [pg.46].
-
NOTE
Changes are retained if you move to other tabs within the content pane. When you are
satisfied that all tabs have been updated correctly, click the save button to save changes
[pg.44] across all tabs. Alternatively, use the cancel button to abandon all changes.
USER MANUAL
Exclaimer Signature Manager Exchange Edition
Page | 54
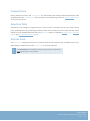
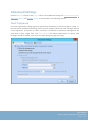
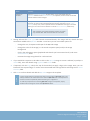
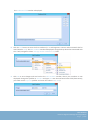
Advanced Settings
Click the advanced button on the settings tab to access additional settings for fault tolerance [pg.55],
diagnostics [pg.57] and AD cache [pg.58], as summarized in the following sections.
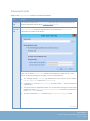
Fault Tolerance
For some organizations, adding signatures (particularly disclaimers) to email messages is critical - to
the extent that the Microsoft Exchange server must be stopped rather than send messages without
correct signatures, in the event of a fault. For others, it is sufficient to quarantine messages but still
send them in their original form. The fault tolerance tab allows administrators to specify how
messages should be handled in the event of a fault during message processing:
USER MANUAL
Exclaimer Signature Manager Exchange Edition
Page | 55
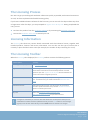
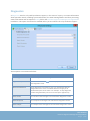
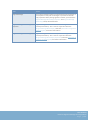
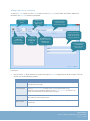
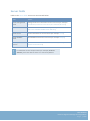
These options are summarized below:
Option
Summary
When a fault is encountered during the processing of a message
Deliver the message
anyway
In the event of a fault, deliver the message at whichever point it
got to through Signature Manager Exchange Edition processing
and do not take a quarantine copy. In this situation, the only
indication that something went wrong would be an error in
the Windows event log [pg.46].
Quarantine the message
In the event of a fault, quarantine the message and do not
attempt delivery.
Quarantine the message
and deliver the original
In the event of a fault, quarantine the message and deliver the
message in its original form. In this situation, a copy of the
message is stored in the quarantine folder for later analysis, and
the message is sent at whichever point it got to through
processing.
If quarantine fails
Deliver the message
anyway
If a quarantine setting is selected but quarantine is not possible at
the time of a fault, deliver the message anyway.
Stop the Microsoft
Exchange Transport Service
If a quarantine setting is selected but quarantine is not possible at
the time of a fault, stop the Microsoft Exchange Transport Service
so that all incoming and outgoing messages are stopped. To apply
this setting, account credentials must be provided for a user with
appropriate permissions to stop this service.
Quarantine will fail if there
are more than xx messages
in the quarantine folder
Use this option to specify a number of messages to be
quarantined before quarantine fails and any 'if quarantine fails'
actions come into force.
Quarantine Folder
Use the browse button - to select a folder in which
quarantined messages are stored.
USER MANUAL
Exclaimer Signature Manager Exchange Edition
Page | 56
Diagnostics
A diagnostics email is only used by Exclaimer support, in the event of a query. It contains information
about particular emails, including system information, the email message before and after processing,
status information and an exported econfig file for the Exclaimer Signature Manager Exchange Edition
installation. This option should not be enabled unless you are asked to do so by Exclaimer support:
These options are summarized below:
Option
Summary
Enable diagnostics
Select this option to enable diagnostics.
Diagnostic Recipients
Use the browse button the diagnostics email.
Attachment Extension
Some diagnostic information is sent as an attachment with the
diagnostics email. This is a standard extension to apply to all
attachments (this can be useful - for example - to stop diagnostic
emails being blocked by anti-virus and anti-spam applications).
Match Sender
The sender of the messages to be matched for diagnostics emails.
Match Recipients
The recipient of messages to be matched for diagnostics emails.
Match Subject
The subject of the messages to be matched for diagnostics emails.
- to select people who should receive
USER MANUAL
Exclaimer Signature Manager Exchange Edition
Page | 57
AD Cache
To optimize performance, Signature Manager Exchange Edition caches information from your Active
Directory. Use AD cache options to determine how cached information is handled:
These options allow you to specify cache thresholds for different Active Directory elements as
summarized below:
Option
Summary
User Data
This data is used to populate fields [pg.215] that may be defined within
signature templates [pg.176].
Group Expansion
This data is concerned with any nested groups - i.e. a group within another
group.
Group
Membership
This data is concerned with a list of users and groups that belong to a group.
USER MANUAL
Exclaimer Signature Manager Exchange Edition
Page | 58
The Settings Toolbar
When the settings tab is displayed, the settings toolbar contains the following options:
Toolbar Option
Summary
New
Select this option to access the new signature policy [pg.116] option.
USER MANUAL
Exclaimer Signature Manager Exchange Edition
Page | 59
Signature Manager Exchange
Edition Policies List
The policies tab contains quick access to existing policies and options for completing key tasks relating
to policies:
Policies toolbar
View options
Policies list
It is important to note that policies are processed in the order that they are listed here. You can use
move up / move down or move to top / move to bottom [pg.61] options to change the sequence of
this list, and use next policy [pg.114] options for greater control over processing sequence.
Available options are summarized in the following sections:
The policy list [pg.61]
Policy options [pg.61]
The policies toolbar [pg.61]
View options [pg.62]
USER MANUAL
Exclaimer Signature Manager Exchange Edition
Page | 60
The Policy List
All existing policies are listed in the main content area; these are the same policies that you will see
listed in the console tree:
It does not matter if you access policies from the console tree; or from the policy list - use whichever
method is most convenient for the task in hand.
Policy Options
Double-click any policy in the list to access available options for that policy. See the anatomy of a policy
[pg.77] for further information about these options.
The Policies Toolbar
When the policies tab is displayed, the policies toolbar contains the following options:
Toolbar Option
Summary
New
Select this option to access the new Signature Manager Exchange Edition
policy [pg.116] option.
Delete
Use this option to remove [pg.125] the currently selected policy. Select a
policy from the list and use this option to delete it - the policy is removed
from the list but is only permanently deleted when changes are saved
[pg.44].
Clone
If you need to create a policy which is similar to an existing policy, use this
option to clone [pg.122] (duplicate) the existing policy and then edit [pg.123]
the duplicate version as required (this can be much quicker than creating a
new policy from first principles).
Move Up / Move
Down / Move to Top
/ Move to Bottom
Use these options to reorganize the policy list and determine the order in
which policies are applied. Select a policy and click move up or move down
as required.
-
USER MANUAL
Exclaimer Signature Manager Exchange Edition
Page | 61
NOTE
Changes are retained if you move to other tabs within the content pane. When you are satisfied
that all tabs have been updated correctly, click the save button to save changes [pg.44] across
all tabs. Alternatively, use the cancel button to abandon all changes.
View Options
The view option can be used to determine whether policies are displayed in list (details) form...
... or as large icons:
USER MANUAL
Exclaimer Signature Manager Exchange Edition
Page | 62
Chapter 5
Working with
Signature Policies
USER MANUAL
Exclaimer Signature Manager Exchange Edition
Page | 63
Introduction
Exclaimer Signature Manager Exchange Edition allows you to define any number of templates [pg.176]
which can include signatures, disclaimers, branding and email formatting. However, 'one size' rarely
fits all - for example, an organization with locations around the country may need a standard company
signature for all messages but in addition to this:
Each office location may require its own email layout, signature style and branding
Each department within the organization may require supplementary disclaimers or sign-off
messages
Certain people within a department may require additional signature information
At weekends, certain departments may need to apply alternative signature information
Using Exclaimer Signature Manager Exchange Edition, you can create policies to control the
circumstances under which templates are used. In short, a policy can be thought of as a set of rules or
conditions that must be met for a template to be applied to email messages.
Policies can be as simple or as complex as required. For example, a plain text signature for all outgoing
messages might be sufficient for one organization, whereas others may have more complex
requirements, incorporating heavily formatted templates and a series of connected rules created with
a policy chain [pg.127].
This section contains key information for working with policies, including:
Accessing existing policies [pg.148]
General policy settings [pg.68]
The anatomy of a policy [pg.77]
Adding a new policy [pg.116]
Cloning a policy [pg.122]
Changing a policy [pg.123]
Enabling and disabling a policy [pg.124]
Removing a policy [pg.125]
You can also learn more about specific tasks, using the how to [pg.126] section for signature policies.
USER MANUAL
Exclaimer Signature Manager Exchange Edition
Page | 64
Accessing Existing Policies
Within Exclaimer Signature Manager Exchange Edition, policies are accessed via the Exclaimer console
tree [pg.35], or by using policy tabs [pg.36] from other branches of the console tree.
Navigating Policies Using the Console Tree
All work with policies is completed from the signature policies branch of the Exclaimer console tree
[pg.49]:
From here you can view any existing policies (as child branches within the tree). Select any policy from
the tree and right-click to view actions that can be taken with that policy:
USER MANUAL
Exclaimer Signature Manager Exchange Edition
Page | 65
Having selected a policy from the tree, use the content pane to access all setup options and actions
from the content pane:
All settings for the selected
policy are displayed across a
series of tabs
Selected policy
NOTE
See the anatomy of a policy [pg.77] for further information about policy setup options.
Navigating Policies Using Policy Tabs
Existing policies can also be accessed from other branches of the console tree, via a policy tab in the
content pane. For example, select the Signature Manager Exchange Edition branch and then select
the policies [pg.74] tab in the content pane.
It is important to note that policies are processed in the order that they are listed here. You can use
move up / move down or move to top / move to bottom [pg.61] options to change the sequence of
this list, and use next policy [pg.114] options for greater control over processing sequence.
USER MANUAL
Exclaimer Signature Manager Exchange Edition
Page | 66
General Signature Policy
Settings
When the signature policies branch is selected (within the Exclaimer console [pg.31]), general
signature policy settings and information can be viewed and updated:
The signature
policies branch
is selected
View options
Policies toolbar
Policies list
Policy setup
pane
From here, you can:
Navigate the console tree to access signature policies [pg.77], the policy tester [pg.162] and the
template library [pg.176]
Update general settings [pg.68] for signature policies from the settings tab
View existing policies [pg.60] from the policies tab
Add a new signature policy [pg.116] via the actions pane
NOTE
For further information about the Exclaimer Console (including the menu, toolbar and
actions pane), see understanding the Exclaimer Console window [pg.36].
USER MANUAL
Exclaimer Signature Manager Exchange Edition
Page | 67
Signature Policy Settings
When the signature policies branch is selected (within the Exclaimer console [pg.31]), the settings tab
is displayed so that reply separator information can be viewed or updated:
When designing signature templates [pg.176], you have the opportunity to specify whether signatures
are placed before or after the original message [pg.207]. For example, when replying to a message, it
is preferable to place the signature after the reply, rather than at the end of the email.
A reply separator contains information which determines how Exclaimer Signature Manager Exchange
Edition identifies a message reply or a forwarded message, so that signatures are correctly placed.
When Exclaimer Signature Manager Exchange Edition is installed, a range of common reply separators
are included. Under normal circumstances, administrators do not need to change this information
unless a custom reply separator [pg.69] is required.
USER MANUAL
Exclaimer Signature Manager Exchange Edition
Page | 68
Using Custom Reply Separators
When Exclaimer Signature Manager Exchange Edition is installed, standard reply separators [pg.68]
are included. Under normal circumstances, administrators do not need to change this information
unless a custom reply separator is required.
To add a new reply separator, access the signature policy settings [pg.68] tab and click the add button
to open the add/edit reply separator window:
When defining custom separators, you can use:
Underscores [pg.70]
Hyphens [pg.70]
HTML tags [pg.71]
HTML style attributes [pg.72]
Spaces [pg.72]
Regular expressions [pg.73]
USER MANUAL
Exclaimer Signature Manager Exchange Edition
Page | 69
Underscores
Character
Description
Exclaimer Interpretation.
_
Single
underscore
Look for one or more consecutive underscores.
__
Double
underscore
Look for two underscores, one after the other,
followed by more consecutive underscores.
___
Triple
underscore
Look for three underscores, one after the other,
followed by more consecutive underscores.
Hyphens
Character
Description
Exclaimer Interpretation.
-
Single hyphen
Look for one or more consecutive hyphens.
--
Double hyphen
Look for two hyphens, one after the other, followed by
more consecutive hyphens.
---
Triple hyphen
Look for three hyphens, one after the other, followed
by more consecutive hyphens.
When searching for the specific string '-Original Message-' as a
reply separator, Exclaimer Signature Manager Exchange Edition
matches one or more hyphens at the start and end of the text
'original message'. It will also accept a trailing line space before the
text, 'Original Message'. For example, Exclaimer Signature Manager
Exchange Edition will match:
- - - - - - -Original Message- - - - - - - - -Original Message- - -Original Message-
USER MANUAL
Exclaimer Signature Manager Exchange Edition
Page | 70
HTML Tags
Exclaimer Signature Manager Exchange Edition can resolve HTML tags as reply separators. It matches
first the element, then the attribute (if present in the search string) and finally the attribute value (if
present in the search string). This matching process is illustrated below:
First, match the element:
<hr tabIndex=-1>
Next, match the attribute for the element:
<hr tabIndex=-1>
Finally, match the attribute value:
<hr tabIndex=-1>
Example
Suppose that the tag below was specified as a separator:
<hr tabIndex=-1>
For this string, Exclaimer Signature Manager Exchange Edition will match any horizontal rule with a
tabindex of -1. The horizontal rule can include other attributes and values but it must have the
attribute and value of tabIndex=-1. As such, the following elements would be matched:
<hr tabIndex=-1 color=#333333 size=1>
...or
<hr color=#333333 tabIndex=-1>
However, the following element would not be matched (because the attribute value is set to -2 rather
than -1):
<hr tabIndex=-2>
USER MANUAL
Exclaimer Signature Manager Exchange Edition
Page | 71
HTML Style Attributes
Style attributes are resolved in a similar way to HTML tags, described in the previous section.
Example
Suppose that the tag below was specified as a separator:
<div style='border:none\;border-top:solid #B5C4DF 1.0pt\;padding:'>
For this text string, Exclaimer Signature Manager Exchange Edition will match any div tag containing a
style attribute of 'border:none\;border-top:solid #B5C4DF 1.0pt\;padding:’.
The div tag can include other attributes but it must include the attribute and values
style='border:none\;border-top:solid #B5C4DF 1.0pt\;padding:'. As such, the following style
attributes would be matched:
<div style='border:none;border-top:solid #B5C4DF 1.0pt;padding:10pt 0pt 0pt 10pt'>
...or
<div id=default style='border:none;border-top:solid #B5C4DF 1.0pt;padding:10pt 0pt 0pt 10pt'>
However, the following element would not be matched
<div style='border:solid #333333 1.0pt'>
Spaces
Exclaimer Signature Manager Exchange Edition will handle spaces when searching for a specific string.
A match will be made if a tab occurs within the space and if a space rolls over into a line break. For
example, Exclaimer Signature Manager Exchange Edition will match:
-Original Message...or
-Original Message...or
-Original
Message-
USER MANUAL
Exclaimer Signature Manager Exchange Edition
Page | 72
Regular Expressions
Many common reply separators are static - i.e. a given string of text and/or characters. However, with
the proliferation of email applications on mobile devices, variances between regions, etc., relying on
static reply separators may not always be sufficient.
If required, dynamic reply separators can be handled using regular expressions. Regular expressions
are used to express how the software should look for a specified pattern in text and then what to do
when a pattern match is found.
The composition of regular expressions is an advanced task, which may require some knowledge of
programming. If this is a requirement, please contact Exclaimer support [pg.11].
USER MANUAL
Exclaimer Signature Manager Exchange Edition
Page | 73
The Policies List
The policies tab contains quick access to existing policies. From here, you can select any policy from
the list to view or edit its setup details:
Policies toolbar
View options
Policies list
Policy setup
pane
It is important to note that policies are processed in the order that they are listed here. You can use
move up / move down or move to top / move to bottom [pg.61] options to change the sequence of
this list, and use next policy [pg.114] options for greater control over processing sequence. Available
options are summarized in the following sections:
The policy list [pg.75]
The policy setup pane [pg.75]
The policies toolbar [pg.76]
View options [pg.76]
USER MANUAL
Exclaimer Signature Manager Exchange Edition
Page | 74
The List of Policies
All existing policies are listed in the upper section of the main content area; these are the same policies
that you will see listed in the console tree:
It does not matter if you access policies from the console tree, or from the policy list shown here - use
whichever method is most convenient for the task in hand.
The Policy Setup Pane
When a policy is selected in the policy list (the upper section of the content pane), all setup options
for that policy are available in the lower section of the content pane. These options are organised
across a series of tabs:
General [pg.78]
Template [pg.79]
Signature options [pg.82]
vCard [pg.86]
Conditions [pg.90]
Exceptions [pg.102]
Date range [pg.112]
Next policy [pg.114]
USER MANUAL
Exclaimer Signature Manager Exchange Edition
Page | 75
The Policies Toolbar
When the policies tab is displayed, the policies toolbar contains the following options:
Toolbar Option
Summary
New
Select this option to access the new Signature Manager
Exchange Edition policy [pg.116] option.
Delete
Use this option to remove [pg.125] the currently selected
policy. Select a policy from the list and use this option to delete
it - the policy is removed from the list but is only permanently
deleted when changes are saved [pg.44].
Clone
If you need to create a policy which is similar to an existing
policy, use this option to clone [pg.122] (duplicate) the existing
policy and then edit [pg.123] the duplicate version as required
(this can be much quicker than creating a new policy from first
principles).
Move Up / Move Down
Use these options to reorganize the policy list and determine
the order in which policies are applied. Select a policy and click
move up or move down as required.
-
NOTE
Changes are retained if you move to other tabs within the content pane. When you are
satisfied that all tabs have been updated correctly, click the save button to save changes
[pg.44] across all tabs. Alternatively, use the cancel button to abandon all changes.
View Options
The view option can be used to determine whether policies are displayed in list (details) form...
... or as large icons:
USER MANUAL
Exclaimer Signature Manager Exchange Edition
Page | 76
The Anatomy of a Policy
A signature policy is comprised of a range of settings which control how signatures look and behave.
These settings are organized across a series of tabs, displayed in the content pane when a policy is
selected:
These options are summarized in the following sections:
General [pg.78]
Template [pg.79]
Signature options [pg.82]
vCard [pg.86]
Conditions [pg.90]
Exceptions [pg.102]
Date range [pg.112]
Next policy [pg.114]
USER MANUAL
Exclaimer Signature Manager Exchange Edition
Page | 77
General
Options on the general tab are used to define basic information for a policy. These settings determine
how the policy is displayed throughout the system, and whether or not it is active:
Options on this tab are summarized below:
Option
Summary
Name
Each policy must have a unique name. The name entered here is displayed
in the Exclaimer console tree, and on any other policy lists.
Description
This field can be used to add any useful information for the policy - for
example, usage notes, version history, background or explanatory
information. The first line of description text is displayed in any policy lists
(but not the console tree).
Enabled
Select this option to activate the policy. If a policy is not enabled, it will not
run.
USER MANUAL
Exclaimer Signature Manager Exchange Edition
Page | 78
Template
The template tab shows which template is associated with the selected policy:
The associated template is previewed in the content pane. Here, a sample email is used to show how
any content, layout, formatting, and signature properties in the template will be applied to messages.
From here you can:
Double click anywhere in the content pane to edit the template in the template editor [pg.190]
Use the breadcrumb trail at the bottom of the window to navigate templates
NOTE
Changes are retained if you move to other tabs within the content pane. When you are
satisfied that all tabs have been updated correctly, click the save button to save changes
[pg.44] across all tabs. Alternatively, use the cancel button to abandon all changes.
USER MANUAL
Exclaimer Signature Manager Exchange Edition
Page | 79
Right-Click Options
For quick access to key tasks that you may wish to complete for the template that is associated with
a policy, simply right-click anywhere within the template tab:
Right-click anywhere in
the template tab to
quickly access key tasks
for this template
From here, you can choose to edit [pg.193] this template, open the template library [pg.177], export
the template [pg.190] or view template properties [pg.196].
USER MANUAL
Exclaimer Signature Manager Exchange Edition
Page | 80
The Template Breadcrumb Trail
At the bottom of the template preview, a breadcrumb trail displays the name of the template being
used, together with its parent category [pg.179] in the template gallery:
Template
breadcrumb trail
Click an entry in the breadcrumb trail to navigate to that branch of the Exclaimer console tree.
USER MANUAL
Exclaimer Signature Manager Exchange Edition
Page | 81
Signature Options
The signature options tab is used to determine how the signature is applied:
USER MANUAL
Exclaimer Signature Manager Exchange Edition
Page | 82
Options on this tab are summarized below:
Option
Summary
Don't add signature
if already present
Check this option if you do not wish to add this signature more than once
- for example, during an email 'conversation' where there are multiple
replies.
Populate template
{fields} using
SENDER data
instead of FROM
data
This option is used to handle cases where a user is delegated to send
email messages on behalf of another user.
Convert Plain Text
messages to HTML
before applying
signature
Check this option if you wish to convert plain text messages to HTML.
Since this setting is defined per policy, you have full control over whether
incoming, outgoing or both types should be converted. When this option
is selected, you should choose the font type and size to be applied when
the conversion takes place.
HTML Character Set
Select a character set for any HTML messages to which this policy is
applied. This setting is typically used where a signature contains extended
characters which may not be present in the original email. The
recommended setting is UTF-8 because this can encode all characters in a
space efficient manner.
Text Character Set
Select a character set for any Plain Text messages to which this policy is
applied. This setting is typically used where a signature contains extended
characters which may not be present in the original email. The
recommended setting is UTF-8 because this can encode all characters in a
space efficient manner.
Message Type Normal
Select how you would like the signature to be added to normal emails. A
normal email is one which is unsigned and unencrypted. Typically, the add
signature to body of message option is used for normal messages, but the
following options are available:
Under normal circumstances, the message sender and the from address
are the same however, if your organization includes users with
permissions to send messages on behalf of other users, message sender
and from details may differ. In this case, you can choose which details
should be used to populate any signature template fields when the policy
is applied. For a more detailed explanation of the message sent on behalf
scenario, please refer to the message fields [pg.219] section of this guide.
Add signature to body of
message
Insert the signature into the email
content.
Add plain text version of
signature as an attachment
Do not alter the email content but
send a text version of the signature
as an attachment with the message.
Add original message as an
attachment of the message
below
Use the message field to enter a
message that will be sent to the
recipient, with the original message
as an attachment. You should also
specify an attachment name for the
attached file.
USER MANUAL
Exclaimer Signature Manager Exchange Edition
Page | 83
Option
Summary
….continued
USER MANUAL
Exclaimer Signature Manager Exchange Edition
Page | 84
Option
Summary
Message Type Encrypted
In simple terms, encryption is a way of protecting an email message so
that only intended recipients can view it. It is not feasible to alter
encrypted emails by adding signatures into the content, therefore the
following options are available:
Message Type Signed
Don't add signature
Don’t apply any signatures when
sending encrypted emails.
Add original message as an
attachment of the message
below
Use the message field to enter a
message that will be sent to the
recipient, with the encrypted
message as an attachment.
In simple terms, a signed email is one where a sender has a security
certificate installed which enables them to digitally sign emails. This
means that recipients of signed emails can be certain that the email was
genuinely sent from the email address given, and that the content of the
email has not been altered since it was first sent.
It is not feasible to alter signed emails by adding signatures into the
content, therefore the following options are available:
Don't add signature
Don’t apply any signatures when
sending signed emails.
Add original message as an
attachment of the message
below
Use the message field to enter a
message that will be sent to the
recipient, with the signed message as
an attachment.
-
NOTE
Changes are retained if you move to other tabs within the content pane. When you are
satisfied that all tabs have been updated correctly, click the save button to save changes
[pg.44] across all tabs. Alternatively, use the cancel button to abandon all changes.
USER MANUAL
Exclaimer Signature Manager Exchange Edition
Page | 85
vCard
The vCard tab is used to determine if and then how vCards (electronic business cards) should be
attached to email messages:
USER MANUAL
Exclaimer Signature Manager Exchange Edition
Page | 86
Options on this tab are summarized below:
Option
Summary
Attach sender's
vCard when sent
from within the
organization
Select this option if, when this policy is applied, the sender's vCard
should be attached to email messages that they send from within the
organization. If required, click the customize [pg.88] button to change
the content of vCards.
Remove any
previously applied
vCards
If you have chosen to attach the sender's vCard, it is advisable to also
select this option; otherwise multiple copies of the same vCard could
be attached within a conversation.
-
NOTE
Changes are retained if you move to other tabs within the content pane. When you are
satisfied that all tabs have been updated correctly, click the save button to save changes
[pg.44] across all tabs. Alternatively, use the cancel button to abandon all changes.
USER MANUAL
Exclaimer Signature Manager Exchange Edition
Page | 87
Customizing vCards
Having chosen to attach vCards, the customize button is enabled. If required, you can use this option
to view/update vCard properties:
vCard details are taken from the Active Directory. Available details are listed on the left-hand side and
associated properties (i.e. Active Directory fields) are selected from the right-hand side.
Properties are selected in different ways, depending on the nature of the field. For example, to update
the name that is displayed on vCards, click anywhere in the right-hand field (to activate it):
Define this field by
selecting the
browse (…) button
USER MANUAL
Exclaimer Signature Manager Exchange Edition
Page | 88
Then, select the browse (...) button to choose which Active Directory fields associated with the
sender's name should be used to form the name displayed on vCards:
Alternatively, other vCard details can be simply selected from a drop down list, as shown in the
example below:
Define this field by
selecting the arrow
NOTE
Any customizations will be used if this policy is applied (therefore you
could apply different vCard settings for different situations, if required).
USER MANUAL
Exclaimer Signature Manager Exchange Edition
Page | 89
Conditions
The conditions tab is used to set criteria [pg.92] that determine the circumstances under which a
signature is applied to messages:
Select a condition
Options for the selected
condition are displayed as
hyperlinks in the lower pane
For multiple conditions,
choose whether ALL
conditions must be met or if
ANY can be met (to trigger
the policy)
USER MANUAL
Exclaimer Signature Manager Exchange Edition
Page | 90
Once a condition is selected, any options [pg.92] for that condition are displayed as hyperlinks in the
lower pane - select these links to refine the condition. For instance, selecting the someone link in the
example above displays further options to refine the recipient is someone condition:
Each time a selection is made, confirmation of the selection and any further options [pg.92] are
displayed in the lower pane.
NOTE
At least one condition must be set to apply signatures. If a condition is not
selected, the default condition of all messages is used. See the conditions options summary [pg.92] page for a summary of available conditions.
USER MANUAL
Exclaimer Signature Manager Exchange Edition
Page | 91
Available Options for Setting Conditions
When working with conditions [pg.90] for a policy, the following options are available:
When a condition is selected, further options are available, as summarized below:
All messages [pg.93]
The sender is someone [pg.93]
The sender is a specific person [pg.94]
The sender is a member of an Active Directory group [pg.94]
The sender is a member of an Active Directory domain or organizational unit [pg.94]
The sender has one or more specific Active Directory attributes [pg.94]
The sender address contains specific character sequences [pg.94]
The sender is inside or outside the organization [pg.94]
The sender is an Active Directory contact [pg.94]
The recipient is someone [pg.95]
The recipient is a specific person [pg.96]
The recipient is a member of an Active Directory group [pg.96]
The recipient is a member of an Active Directory domain or organizational unit [pg.96]
The recipient has one or more specific Active Directory attributes [pg.96]
The recipient address contains specific character sequences [pg.96]
The recipient is inside or outside the organization [pg.96]
The recipient is an Active Directory contact [pg.96]
USER MANUAL
Exclaimer Signature Manager Exchange Edition
Page | 92
The Recipient is in the To or Cc field of the message [pg.96]
The subject contains specific words or phrases [pg.97]
The body contains specific words or phrases [pg.98]
One or more message headers contains specific words or character sequences [pg.99]
The message is a meeting request, update or response [pg.99]
The message is a task request or update [pg.99]
No previous policy of this type has been applied [pg.99]
All Messages
This is a blanket or 'wildcard' condition which will apply the signature to all messages.
The Sender Is Someone
When the sender is someone condition is selected, a someone link is displayed in the lower pane. Use
this link to access further options:
Identify sender
options
USER MANUAL
Exclaimer Signature Manager Exchange Edition
Page | 93
These options are summarized in the following sections however, two additional identify sender
options are available at the bottom of this window. These options can be used to handle cases where
a user is delegated to send email messages on behalf of another user.
An example of this is where a PA (Jane Smith) has permission to send email messages on behalf of a
Company Director (Alice Jones). When received, these messages would be shown as ' from Jane Smith
on behalf of Alice Jones'. In this case, you would use identify sender options to control whether the
policy is evaluated according to the PA or the Company Director.
Available options are:
Option
Summary
Identify sender using the
message's FROM field
If selected, the 'sender' will be considered to be the person in the
from field of the email message - i.e. not necessarily the person who
physically sent the message. Taking the example above, the policy
would be evaluated against the Company Director, Alice Jones.
Identify sender using the
message's SENDER field
If selected, the 'sender' will be considered to be the person who
physically sent the email message - i.e. not necessarily the person that
the recipient will see as the message being from. Taking the example
above, the policy would be evaluated against the PA, Jane Smith.
The following options are available to determine your sender is someone criteria:
Option
Summary
The sender is a specific
person
Use the list of users link to browse and select a user from the user
list.
The sender is a member of
an Active Directory group
Use the Active Directory group link to browse and select the
required group from a list of Active Directory groups.
The sender is a member of
an Active Directory domain
or organizational unit
Use the domain or organizational unit link to browse and select the
required domain or organizational unit from a container list.
The sender has one or
more specific Active
Directory attributes
Use the Active Directory attribute values link to open the configure
attributes window [pg.100] to define queries to be resolved for
matching.
The sender address
contains specific character
sequences
Use the character sequences link to define character sequences to
be matched in the sender's email address.
The sender is inside or
outside the organization
Use the inside link to match messages where the sender is either
internal or external to the organization.
The sender is an Active
Directory contact
Use the is link to match messages if the sender is or is not present in
the Active Directory.
USER MANUAL
Exclaimer Signature Manager Exchange Edition
Page | 94
The Recipient Is Someone
When the recipient is someone condition is selected, a someone link is displayed in the lower pane.
Use this link to access further options:
Additional options
These options are summarized in the following sections however, two additional options are available
at the bottom of this window:
Option
Summary
Expand distribution lists
before checking
conditions
If selected, any distribution lists specified as recipients will be
expanded and the conditions will be checked against the users
within those lists instead of the list/group as a whole.
Split messages when
some recipients meet a
condition
This option handles cases where an email message is sent to
multiple recipients and some but not all of those recipients
match given conditions. If selected, the email message would be
split so there are two copies - one for recipients who meet
conditions and one for recipients who do not
USER MANUAL
Exclaimer Signature Manager Exchange Edition
Page | 95
The following options are available to refine your recipient is someone criteria:
Option
Summary
The recipient is a specific
person
Use the list of users or distribution lists link to browse and
select a user or distribution list from the user list.
The recipient is a member
of an Active Directory
group
Use the Active Directory group link to browse and select the
required group from a list of Active Directory groups.
The recipient is a member
of an Active Directory
domain or organizational
unit
Use the domain or organizational unit link to browse and select
the required domain or organizational unit from a container
list.
The recipient has one or
more specific Active
Directory attributes
Use the Active Directory attribute values link to open the
configure attributes window [pg.100] to define queries to be
resolved for matching.
The recipient address
contains specific character
sequences
Use the character sequences link to define character sequences
to be matched in the sender's email address.
The recipient is inside or
outside the organization
Use the inside link to match messages where the recipient is
either internal or external to the organization.
The recipient is an Active
Directory contact
Use the is link to match messages if the recipient is or is not
present in the Active Directory.
The recipient is in the To or
Cc field of the message
Use the to or cc field to match messages where the recipient is
in the To or the Cc field of the email, or where the recipient is
only in the to field, or where the recipient is only in the cc field.
USER MANUAL
Exclaimer Signature Manager Exchange Edition
Page | 96
The Subject Contains Specific Words or Phrases
Use the words or phrases link to specify given words or phrases to be matched in the message subject
line. Use the words or phrases window to enter required items to be matched:
If a single entry contains multiple words, it is considered to be a phrase. Use check boxes at the bottom
of the window to choose whether matching should take place if any or all words/phrases are matched,
and whether matching is case sensitive.
USER MANUAL
Exclaimer Signature Manager Exchange Edition
Page | 97
The Body Contains Specific Words or Phrases
Use the words or phrases link to specify given words or phrases to be matched in the message body.
Use the words or phrases window to enter required items to be matched:
When matching words or phrases in the body of email messages, you can choose which aspects of the
body to consider. Use the evaluate the contents of this field drop-down list to select:
Option
Summary
Original message
Match specified words or phrases anywhere within the
entire body of the message.
Original message above reply
separator
Match specified words or phrases only within the latest
message in the conversation.
Original message below reply
Match specified words or phrases only within previous
messages in the conversation (excluding the latest one).
Typically, the original message will be used for most scenarios; however the alternative options may
be required for more complex setups.
USER MANUAL
Exclaimer Signature Manager Exchange Edition
Page | 98
One or More Message Headers Contains Specific Words or Character
Sequences
Match messages based on message header fields. Use message headers and words or character
sequences links to enter header fields and values to be matched.
The header field uses intellisense for common message header fields, therefore it suggests an entry
based on what you type. For example, if you type the letter 'T' into this field, the header 'To' is
prompted., whereas if you type 'f' into the field, the ‘Followup-To' and 'From' headers are prompted:
The Message is a Meeting Request, Update or Response
Match messages if they are a meeting request, an updated meeting request, or a response to a
meeting request.
The Message is a Task Request or Update
Match messages if they are a task request or an update to a task request.
No Previous Policy of This Type Has Been Applied
Use this is a 'catch all' condition. This is commonly used as the condition for a final policy in a policy
chain [pg.127], to apply a signature to messages where no previous policy was applied.
NOTE
At least one condition must be set to apply signatures. If a condition is
not selected, the default condition of all messages is used.
USER MANUAL
Exclaimer Signature Manager Exchange Edition
Page | 99
Creating Queries With the Configure Attributes Window
The configure attributes window allows you to define conditions [pg.90] and exceptions [pg.102]
based on queries that are run on Active Directory user attributes - for example, you might want to
define a policy to match all users within a given department, or a specific country, or with a certain
manager.
With Exclaimer Signature Manager Exchange Edition, you can define queries based on the full range
of Active Directory attributes. The configure attributes window is opened when defining a condition
[pg.90] or an exception [pg.102] using the sender/recipient is someone and then the sender/recipient
has one or more specific Active Directory attributes options:
Start the query with
all Active Directory
users, or no users
Display name for
the query
The selected
Active Directory
container
Browse Active
Directory
containers
Remove query
Add query
Choose to add or
remove matched
users
Select an Active
Directory field to
be queried
Select how the
field is queried
Type the value to
be matched
Test the query
Test results are listed
in the Test pane
USER MANUAL
Exclaimer Signature Manager Exchange Edition
Page | 100
Options shown here are summarized below:
Field
Summary
Condition
name
Enter a name for this query. This name is displayed in the main condition/exception
window:
It is advisable to specify a name that summarizes the purpose of the query. If you
have multiple administrators, you might also choose to add version change dates
here.
Active
Directory
container
Use the browse button to select an Active Directory container, or leave blank to
search the entire Active Directory.
Start with
Choose to start the query with no one (so the query will start with nothing and add
matched users) or everyone (so the query will start with all Active Directory users
and remove matched users):
Use this icon to remove a query line.
Use this icon to add a new query line.
then...
Choose to add or remove matched users:
Defaults to add if you have chosen to start with no one and remove if you have
chosen to start with everyone.
users
where...
Select the Active Directory field to be queried, then how it should be queried (equal
to, does not equal, starts with, ends with, etc.) and finally enter a value to be
matched against.
Test
Use the test option to run the query and view matched users in the test pane.
NOTE
See how do I create a policy based on specific Active Directory attributes? [pg.138] for a
working example of a policy based on an attribute query.
-
USER MANUAL
Exclaimer Signature Manager Exchange Edition
Page | 101
Exceptions
Exceptions are used to specify any exceptions to conditions [pg.90] which have been set. For example,
if you have defined a condition to match everyone within a given department, you might define an
exception to exclude individual people within that department. Use the exceptions tab to set required
criteria [pg.103]:
Select an exception
Options for the selected
exception are displayed as
hyperlinks in the lower pane
USER MANUAL
Exclaimer Signature Manager Exchange Edition
Page | 102
Once an exception is selected, any options [pg.103] for that exception are displayed as hyperlinks in
the lower pane - select these links to refine the exception. For instance, selecting the someone link in
the example above displays further options to refine the sender is someone exception.
Each time a selection is made, confirmation of the selection and any further options [pg.103] are
displayed in the lower pane. See the exceptions - options summary [pg.103] page for a summary of
available exceptions.
Available Options for Setting Exceptions
When working with exceptions [pg.102] for a policy, the following options are available:
When an exception is selected, further options are available, as summarized below:
The sender is someone [pg.105]
The sender is a specific person [pg.106]
The sender is a member of an Active Directory group [pg.106]
The sender is a member of an Active Directory domain or organizational unit [pg.106]
The sender has one or more specific Active Directory attributes [pg.106]
The sender address contains specific character sequences [pg.106]
The sender is inside or outside the organization [pg.106]
The sender is an Active Directory contact [pg.106]
The recipient is someone [pg.107]
The recipient is a specific person [pg.108]
The recipient is a member of an Active Directory group [pg.108]
The recipient is a member of an Active Directory domain or organizational unit [pg.108]
USER MANUAL
Exclaimer Signature Manager Exchange Edition
Page | 103
The recipient has one or more specific Active Directory attributes [pg.108]
The recipient address contains specific character sequences [pg.108]
The recipient is inside or outside the organization [pg.108]
The recipient is an Active Directory contact [pg.108]
The recipient is in the To or Cc field of the message [pg.108]
The subject contains specific words or phrases [pg.109]
The body contains specific words or phrases [pg.110]
One or more message headers contains specific words or character sequences [pg.111]
The message is a meeting request, update or response [pg.111]
The message is a task request or update [pg.111]
No previous policy of this type has been applied [pg.111]
USER MANUAL
Exclaimer Signature Manager Exchange Edition
Page | 104
The Sender Is Someone
When the sender is someone exception is selected, a someone link is displayed in the lower pane. Use
this link to access further options:
These options are summarized in the following sections however, two additional identify sender
options are available at the bottom of this window. These options can be used to handle cases where
a user is delegated to send email messages on behalf of another user.
An example of this is where a PA (Jane Smith) has permission to send email messages on behalf of a
Company Director (Alice Jones). When received, these messages would be shown as ' from Jane Smith
on behalf of Alice Jones'. In this case, you would use identify sender options to control whether the
policy is evaluated according to the PA or the Company Director.
USER MANUAL
Exclaimer Signature Manager Exchange Edition
Page | 105
Available options are:
Option
Summary
Identify sender using the
message's FROM field
If selected, the 'sender' will be considered to be the person in the
from field of the email message - i.e. not necessarily the person
who physically sent the message. Taking the example above, the
policy would be evaluated against the Company Director, Alice
Jones.
Identify sender using the
message's SENDER field
If selected, the 'sender' will be considered to be the person who
physically sent the email message - i.e. not necessarily the person
that the recipient will see as the message being from. Taking the
example above, the policy would be evaluated against the PA,
Jane Smith.
The following options are available to determine your sender is someone criteria:
Option
Summary
The sender is a specific
person
Use the list of users link to browse and select a user from the
user list.
The sender is a member of
an Active Directory group
Use the Active Directory group link to browse and select the
required group from a list of Active Directory groups.
The sender is a member of
an Active Directory domain
or organizational unit
Use the domain or organizational unit link to browse and select
the required domain or organizational unit from a container
list.
The sender has one or
more specific Active
Directory attributes
Use the Active Directory attribute values link to open the
configure attributes window [pg.100] to define queries to be
resolved for matching.
The sender address
contains specific character
sequences
Use the character sequences link to define character sequences
to be matched in the sender's email address.
The sender is inside or
outside the organization
Use the inside link to match messages where the sender is
either internal or external to the organization.
The sender is an Active
Directory contact
Use the is link to match messages if the sender is or is not
present in the Active Directory.
USER MANUAL
Exclaimer Signature Manager Exchange Edition
Page | 106
The Recipient Is Someone
When the recipient is someone exception is selected, a someone link is displayed in the lower pane.
Use this link to access further options:
Recipient options are summarized in the following sections however, two additional options are
available at the bottom of this window:
Option
Summary
Expand distribution lists
before checking
conditions
If selected, any distribution lists specified as recipients will be
expanded and the exceptions will be checked against the users
within those lists instead of the list/group as a whole.
Split messages when
some recipients meet a
condition
This option handles cases where an email message is sent to
multiple recipients and some but not all of those recipients
match given exceptions. If selected, the email message would be
split so there are two copies - one for recipients who match
exceptions and one for recipients who do not.
USER MANUAL
Exclaimer Signature Manager Exchange Edition
Page | 107
The following options are available to refine your recipient is someone criteria:
Option
Summary
The recipient is a specific
person
Use the list of users or distribution lists link to browse and
select a user or distribution list from the user list.
The recipient is a member
of an Active Directory
group
Use the Active Directory group link to browse and select the
required group from a list of Active Directory groups.
The recipient is a member
of an Active Directory
domain or organizational
unit
Use the domain or organizational unit link to browse and select
the required domain or organizational unit from a container
list.
The recipient has one or
more specific Active
Directory attributes
Use the Active Directory attribute values link to open the
configure attributes window [pg.100] to define queries to be
resolved for matching.
The recipient address
contains specific character
sequences
Use the character sequences link to define character sequences
to be matched in the sender's email address.
The recipient is inside or
outside the organization
Use the inside link to match messages where the recipient is
either internal or external to the organization.
The recipient is an Active
Directory contact
Use the is link to match messages if the recipient is or is not
present in the Active Directory.
The recipient is in the To or
Cc field of the message
Use the to or cc field to match messages where the recipient is
in the To or the Cc field of the email, or where the recipient is
only in the to field, or where the recipient is only in the cc field.
USER MANUAL
Exclaimer Signature Manager Exchange Edition
Page | 108
The Subject Contains Specific Words or Phrases
Use the words or phrases link to specify given words or phrases to be matched in the message subject
line. Use the words or phrases window to enter required items to be matched:
If a single entry contains multiple words, it is considered to be a phrase. Use check boxes at the bottom
of the window to choose whether matching should take place if any or all words/phrases are matched,
and whether matching is case sensitive.
USER MANUAL
Exclaimer Signature Manager Exchange Edition
Page | 109
The Body Contains Specific Words or Phrases
Use the words or phrases link to specify given words or phrases to be matched in the message body.
Use the words or phrases window to enter required items to be matched:
When matching words or phrases in the body of email messages, you can choose which aspects of the
body to consider. Use the evaluate the contents of this field drop-down list to select:
Option
Summary
Original message
Match specified words or phrases anywhere within the
entire body of the message.
Original message above reply
separator
Match specified words or phrases only within the latest
message in the conversation.
Original message below reply
Match specified words or phrases only within previous
messages in the conversation (excluding the latest one).
Typically, the original message will be used for most scenarios; however the alternative options may
be required for more complex setups.
USER MANUAL
Exclaimer Signature Manager Exchange Edition
Page | 110
One or More Message Headers Contains Specific Words or Character
Sequences
Match messages based on message header fields. Use message headers and words or character
sequences links to enter header fields and values to be matched.
The header field uses intellisense for common message header fields, therefore it suggests an entry
based on what you type. For example, if you type the letter 'T' into this field, the header 'To' is
prompted., whereas if you type 'f' into the field, the 'Followup-To' and 'From' headers are prompted:
The Message is a Meeting Request, Update or Response
Match messages if they are a meeting request, an updated meeting request, or a response to a
meeting request.
The Message is a Task Request or Update
Match messages if they are a task request or an update to a task request.
No Previous Policy of This Type Has Been Applied
Use this as a 'catch all' condition. This is commonly used as the condition for a final policy in a policy
chain [pg.127], to apply a signature to messages where no previous policy was applied.
USER MANUAL
Exclaimer Signature Manager Exchange Edition
Page | 111
Date Range
Options on the date range tab are used to set any date / time limitations for a policy:
No date criteria
specified
Policy can be set
to run between
two dates
Specify precise
days and times
By default, the date range tab is set to continuous, which means that there are no date or time
restrictions associated with the policy. Alternatively, specific to and from dates can be set so that the
policy has a start/end time, or a detailed schedule can be set.
USER MANUAL
Exclaimer Signature Manager Exchange Edition
Page | 112
Using the advanced schedule
The advanced schedule works by selecting days of the week that the policy is active or inactive. Each
day is split into time intervals, which can be adjusted using a sliding scale at the bottom of the window;
this means that policies can be set to run on precise days at precise times.
To use the advanced schedule, click the use advanced schedule radio button and then click add. The
example below shows how the schedule is used to create a policy that is only active at weekends:
Specify a meaningful
display name
An end date is set far into the
future as the policy needs to run
for the foreseeable future
The schedule scale
(shown here in 30
minute intervals)
All weekdays have
been selected
The schedule scale
can be increased or
decreased
Making the policy inactive for
the selected days means that
it is only active at weekends
Having made required date and time selections, click OK to exit back to the updated date range tab:
To update an existing schedule, select its name and click edit. Similarly, click delete to remove the
selected schedule.
USER MANUAL
Exclaimer Signature Manager Exchange Edition
Page | 113
Next Policy
If you have a number of policies which are dependent upon each other, you can create a 'policy chain'
using the next policy tab:
Whilst you control the sequence in which policies are processed using the policy tab [pg.60], the next
policy tab allows you to define specific policy chains based on whether the previous policy in the chain
is or is not applied. These options are:
If this policy is applied then:
Process the next signature policy
Don't process any more signature policies
USER MANUAL
Exclaimer Signature Manager Exchange Edition
Page | 114
If this policy is not applied then:
Process the next signature policy
Don't process any more signature policies
If this policy is not applied because an exception was matched:
Process the next signature policy
Don't process any more signature policies
You can use these options for a wide range of scenarios, creating policy chains as simple or as complex
as required. For example, you might use the if this policy is applied then > don't process any more
signature policies option to prevent more than one policy being applied. Conversely, you might define
a policy to select a specific group of users and then use the if this policy is not applied then > process
the next signature as a way of excluding groups of users without the need to add multiple exceptions.
Example Scenario
The illustration below shows a common scenario where a policy chain might be used:
Here, an organization has three main departments - IT, Sales and HR. All members of the organization
require a dynamic signature at the end of their email messages, together with a standard
organizational disclaimer. However, members of the IT, Sales and HR departments also require a
specific departmental message to be added before the standard organizational disclaimer.
To see how this policy chain would be defined, see how do I create a policy chain? [pg.127]
USER MANUAL
Exclaimer Signature Manager Exchange Edition
Page | 115
Adding a New Policy
Policies are added using the new signature policy wizard - a series of screens which guide you through
the setup process one step at a time. The new signature policy wizard is available from various areas
of Exclaimer Signature Manager Exchange Edition - it can be accessed from the console tree [pg.35],
from the console toolbar [pg.34] and from the actions pane [pg.36]:
Right-click on the
signature policies branch
of the console tree
Look for the toolbar
option
Use the actions pane
Having selected the new signature policy option, the new signature policy [pg.117] wizard is displayed.
USER MANUAL
Exclaimer Signature Manager Exchange Edition
Page | 116
The Add Policy Wizard
Policies are added using the new signature policy wizard - a series of screens which guide you through
the setup process one step at a time. The new signature policy wizard is available from different areas
of Exclaimer Signature Manager Exchange Edition - it can be accessed from the console tree [pg.35],
from the console toolbar [pg.34] and from the actions pane [pg.36].
Step 1: Enter General Information
Enter a meaningful name and description for the policy and click next to continue. For further
information about this tab see the anatomy of a policy - general [pg.78] page of this guide.
USER MANUAL
Exclaimer Signature Manager Exchange Edition
Page | 117
Step 2: Associate the Policy with a Template
A list of available templates [pg.176] is displayed down the left-hand side. Navigate this list and select
the template to be associated with this policy, then click next to continue. For further information
about this tab see the anatomy of a policy - template [pg.79] page of this guide:
USER MANUAL
Exclaimer Signature Manager Exchange Edition
Page | 118
Step 3: Set Conditions for the Policy
Set criteria [pg.92] to determine the circumstances under which the signature is applied to messages,
then click next to continue. Having created the policy, you can update the conditions at any time, and
also add exceptions [pg.102]. For further information about this tab see the anatomy of a policy conditions [pg.90] page of this guide:
USER MANUAL
Exclaimer Signature Manager Exchange Edition
Page | 119
Step 4: Finish Up
Click finish to exit the wizard and return to the Exclaimer console:
USER MANUAL
Exclaimer Signature Manager Exchange Edition
Page | 120
Step 5: Save Changes
Having exited from the add new policy wizard, the new policy is added to the list of signatures in the
console tree, but it is not yet saved (unsaved entries are displayed with an asterisk (*) to the left of
the name).
Click save to save changes. From here you can use selection tabs [pg.36] to update settings for the
policy, and choose to enable/disable the policy (if a policy is not enabled it will not be processed):
Click save to save
the new policy
The new policy is
added to the console
tree
Refine settings using
tabs in the content
pane
USER MANUAL
Exclaimer Signature Manager Exchange Edition
Page | 121
Cloning a Policy
If you need to create a new policy which has similar settings to an existing policy, it is quicker to take
a copy of the existing policy and then update required settings for that copy (as opposed to creating a
new policy from first principles [pg.116]). The clone option is used to create a copy of an existing policy
for this purpose, and is available from the console toolbar [pg.34], or the right-click menu:
Select the policy to
be cloned and use
the toolbar option
Select the policy to
be cloned and rightclick to display
available options
To clone an existing policy, select the policy to be copied from the console tree, then either click clone
from the toolbar, or right click and select clone from the context menu. A copy of the selected policy
is added to the console tree, ready to be updated - from here you can change the name, description
and any other required settings.
When a policy is cloned, a duplicate copy of the template associated with that policy is also made and
added to the template library [pg.176]. You can edit and save this template, or associate a different
template [pg.146] with the new policy, as required.
Having updated the cloned policy, click save to save changes.
USER MANUAL
Exclaimer Signature Manager Exchange Edition
Page | 122
Changing a Policy
To update an existing policy, simply select the policy (either from the console tree [pg.35]or the policy
list [pg.60]) and update settings on selection tabs [pg.36] as required.
When a policy has been changed but not saved, the branch is displayed with an asterisk (*) symbol.
You can see which tabs contain these unsaved changes, by looking for an asterisk to the right of the
tab name.
When you are satisfied that all required changes have been made correctly, click save to save the new
settings. All asterisk symbols are cleared once changes have been saved.
USER MANUAL
Exclaimer Signature Manager Exchange Edition
Page | 123
Enabling and Disabling a Policy
To quickly enable or disable a policy, select the required policy (either from the console tree [pg.35]
or from the policy list [pg.60]):
Enable/disable
policy
Ensure that the enabled check box is selected to enable the policy, or de-selected to disable the policy.
Click save to save changes.
USER MANUAL
Exclaimer Signature Manager Exchange Edition
Page | 124
Removing a Policy
To remove an existing policy, select the policy (either from the console tree [pg.35] or the policy list
[pg.60]). Then, either right-click and select delete from the context menu, or click delete from the
toolbar:
Select the policy to
be removed and
right-click to display
available options
Select the policy to
be removed and
use the toolbar
option
Having chosen to delete a policy, you are asked are you sure you want to delete this policy?. Click yes
to confirm the deletion or no to abandon the task. Finally, click save to save changes.
NOTE
A policy is not permanently deleted until settings have been saved. If you exit
without saving (or cancel changes), the policy will be reinstated in the console tree.
USER MANUAL
Exclaimer Signature Manager Exchange Edition
Page | 125
How To...
This section contains instructions for completing a selection of common tasks with policies, within
Exclaimer Signature Manager Exchange Edition:
How do I create a policy chain? [pg.127]
How do I create a policy for all internal or all external emails? [pg.131]
How do I stop a signature being repeated in an email conversation? [pg.134]
How do I define a policy based upon a subject line trigger word? [pg.135]
How do I create a policy based upon specific Active Directory attributes? [pg.138]
How do I change the sequence in which policies run? [pg.145]
How do I change the template associated with a policy? [pg.146]
USER MANUAL
Exclaimer Signature Manager Exchange Edition
Page | 126
How Do I Create a Policy Chain?
The illustration below shows a common scenario where a policy chain might be used:
Here, an organization has three main departments - IT, Sales and HR. All members of the organization
require a dynamic signature at the end of their email messages, together with a standard
organizational disclaimer. However, members of the IT, Sales and HR departments also require a
specific departmental message, to be added before the standard organizational disclaimer.
The steps required to complete this setup are detailed below:
1. Create a main template with dynamic signature content, to be applied to all messages sent - i.e. a
standard organization signature template. For example:
Fields are used to
add sender details to
the signature
USER MANUAL
Exclaimer Signature Manager Exchange Edition
Page | 127
2. Create a template for IT which contains a specific message to be added after dynamic signature content,
for messages sent from the IT department. For example:
A specific message is
added for the IT
department
3. Create a template for Sales which contains a specific message to be added after dynamic signature
content, for messages sent from the Sales department. For example:
A specific message is
added for the Sales
department
USER MANUAL
Exclaimer Signature Manager Exchange Edition
Page | 128
4. Create a template for HR which contains a specific message to be added after dynamic signature
content, for messages sent from the HR department. For example:
A specific message is
added for the HR
department
5. Create a template with standard organization disclaimer content, to be applied to all messages sent.
For example:
Standard disclaimer text
should be added to all
messages, irrespective of
department
USER MANUAL
Exclaimer Signature Manager Exchange Edition
Page | 129
6. Create a signature policy, associate it with the main signature template (created in step 1) and set
conditions so that the policy applies to all messages:
7. Set next policy options to process the next policy in sequence (which will be the IT department policy).
8. Create a signature policy for the IT department, associate it with the IT department template (created
in step 2) and set conditions so that the policy only applies to messages from users within the IT
department.
9. Set next policy options to process the next policy in sequence (which will be the Sales department
policy).
10. Create a signature policy for the Sales department, associate it with the Sales department template
(created in step 3) and set conditions so that the policy only applies to messages from users within the
Sales department.
11. Set next policy options to process the next policy in sequence (which will be the HR department policy).
12. Create a signature policy for the HR department, associate it with the HR department template
(created in step 4) and set conditions so that the policy only applies to messages from users within the
HR department.
13. Set next policy options to process the next policy in sequence (which will be the standard organization
disclaimer policy).
14. Create a signature policy for the standard organization disclaimer, associate it with the standard
organization disclaimer template (created in step 5) and set conditions so that the policy applies to all
messages.
15. Set next policy options so that no further policies are processed.
16. In the policies tab, ensure that policies are sequenced [pg.145] as Standard Organization Signature
Policy > IT Department Policy > Sales Department Policy > HR Department Policy > Standard
Organization Disclaimer Policy.
USER MANUAL
Exclaimer Signature Manager Exchange Edition
Page | 130
How do I Create a Policy for All Internal or All
External Emails?
In some cases, you may wish to treat internal and external email messages differently when applying
signatures. One way to do this is to define a policy for only internal emails and another policy for only
external emails. Alternatively, you might incorporate this as an exception [pg.102] - for example apply a signature for email messages except where the recipient is outside of the organization (and
define a separate policy to manage the exceptions).
The following example shows how to use a condition [pg.90] to handle internal/external emails:
1. Access policy conditions and select the sender is someone option:
Select the sender is
someone
Click the someone
link
USER MANUAL
Exclaimer Signature Manager Exchange Edition
Page | 131
2. Click the someone link in the lower pane for further options:
Select sender is
inside or outside of
the organization
Ensure that the sender is
set to inside (if it is not,
click the link here to
change this setting)
3. Ensure that the setting is inside the organization (this is the default setting but, if required, click the
hyperlink to access inside / outside options), then click OK to exit back to the conditions tab.
4. Select the recipient is someone option:
Select the recipient
is someone
Click the someone
link
USER MANUAL
Exclaimer Signature Manager Exchange Edition
Page | 132
5. Click the someone link in the lower pane for further options:
Select recipient is
inside or outside of
the organization
Ensure that the
recipient is set to inside
(if it is not, click the link
here to change this
setting)
6. Ensure that the setting is inside the organization (this is the default setting but, if required, click the
hyperlink to access inside / outside options), then click OK to exit back to the conditions tab where both
conditions are defined:
The policy will be triggered
if BOTH the sender and the
recipient are within the
organization
Ensure that the policy
is applied when all
conditions are met
USER MANUAL
Exclaimer Signature Manager Exchange Edition
Page | 133
How Do I Stop a Signature Being Repeated In an
Email Conversation?
There may be times where it is only appropriate to insert a given signature once. For example, if you
are applying a signature to outgoing messages, you might want it to be added the first time that a
message is sent, but prefer not to add it at the end of any subsequent replies if the email turns into a
conversation. This is simple to achieve by selecting the don't add signature if already present check
box on the signature options tab [pg.82]:
Use this option to
prevent a signature
being repeated in an
email 'conversation'
USER MANUAL
Exclaimer Signature Manager Exchange Edition
Page | 134
How Do I Define a Policy Based Upon a Subject
Line Trigger Word?
It is sometimes useful to apply signatures, based on a 'trigger word' in the subject line of outgoing
emails. For example, you might run a sales promotion and need to apply a banner image if the sender
enters SALE-DEC13 in the subject line of any outgoing messages. You might also wish to remove the
trigger word from the subject line, so that the recipient never sees it (this is particularly useful if you
are using codes as trigger words, since these might be confusing for recipients to see).
To achieve this, define a policy where the conditions [pg.90] are set for subject contains specific words
or phrases, as shown below:
Step 1: Select 'The Subject Contains Specific Words or
Phrases' Option
Having selected this option, click the words or phrases link in the lower pane:
Select the subject
contains specific
words or phrases
Click the words
or phrases link
USER MANUAL
Exclaimer Signature Manager Exchange Edition
Page | 135
Step 2: Add Required Words and Phrases
Enter as many words and phrases as required, using the add button to confirm each one. If you specify
multiple words in a single line, they are treated as a phrase:
Enter the required
word or phrase
Click the add button
to confirm the entry
USER MANUAL
Exclaimer Signature Manager Exchange Edition
Page | 136
Step 3: Set options for words and phrases
Choose whether all or any words / phrases must be present to trigger the signature. Also choose
whether or not to ignore case, and whether or not to remove trigger words / phrases:
The word is added
to the list. Add any
additional words or
phrases required.
If required, edit or
remove selected
words / phrases
Select this option to remove the
specified trigger words/phrases from
the email subject line when delivered
to recipients (so recipients never see
the trigger word / phrase)
USER MANUAL
Exclaimer Signature Manager Exchange Edition
Page | 137
How Do I Create A Policy Based Upon Specific
Active Directory Attributes?
The configure attributes window [pg.100] allows you to define conditions [pg.90] and exceptions
[pg.102] based on queries that are run on Active Directory user attributes.
The following example shows how to set a policy condition which uses an Active Directory attribute
query. In this scenario, a policy is required to apply a signature for everyone within the 'IT' department
of an organization.
Steps 1 and 2: 'The Sender Is Someone'
(1)
Select the sender is
someone option
(2)
Click the someone
link
USER MANUAL
Exclaimer Signature Manager Exchange Edition
Page | 138
Steps 3 and 4: 'The Sender Has One or More Specific AD
Attributes'
(3)
Select the sender has
one or more specific AD
attributes option
(4)
Click the AD attribute
values link
USER MANUAL
Exclaimer Signature Manager Exchange Edition
Page | 139
Steps 5 and 6: Enter Basic Details for the Query
(5) Enter a meaningful
name for the query
(6) Click the browse button to
browse and select an Active
Directory container
USER MANUAL
Exclaimer Signature Manager Exchange Edition
Page | 140
Steps 7 and 8: Browse and Select an Active Directory
Container
(7) Select the
users container
(8) Click OK to
return to the query
editor
USER MANUAL
Exclaimer Signature Manager Exchange Edition
Page | 141
Steps 9 and 10: Choose a Start Point and Select Required
Attribute
(9) Set start with
to no one
(10) Select
department from the
list of attributes
USER MANUAL
Exclaimer Signature Manager Exchange Edition
Page | 142
Step 11: Choose How Matching Should Be Made
(11) Select
equals from the
list of conditions
USER MANUAL
Exclaimer Signature Manager Exchange Edition
Page | 143
Step 12: Enter the Required Attribute Value for Matching
(12) Enter the value
to be matched
USER MANUAL
Exclaimer Signature Manager Exchange Edition
Page | 144
How Do I Change The Sequence In Which Policies
Run?
Policies are processed in the order that they are listed in the policies tab [pg.60] (this sequence is also
reflected in the console tree [pg.35]). To change the sequence in which policies are listed, access the
policies tab and use move up, move down, move to top, move to bottom buttons as required:
The selected
policy
Use ‘move’ options to
change the position of the
selected policy in the list
USER MANUAL
Exclaimer Signature Manager Exchange Edition
Page | 145
How Do I Change The Template Associated With
a Policy?
When viewing the template associated with a policy, you can choose to access the template library
[pg.176] and select a new template, as shown below.
Steps 1 - 3: Access the Template Library From Within a
Policy
(1) Select required
signature policy in
the console tree
(2) Select the
template tab
(3) Select the template library
option to browse templates and
select an alternative
USER MANUAL
Exclaimer Signature Manager Exchange Edition
Page | 146
Steps 4 - 6: Browse and Select New Templates
(5) Preview the
template
(4) Browse existing
templates
(6) Click OK to
apply the template
to the policy
USER MANUAL
Exclaimer Signature Manager Exchange Edition
Page | 147
Chapter 6
Sent Items Update
USER MANUAL
Exclaimer Signature Manager Exchange Edition
Page | 148
Introduction
When email messages are sent and signatures are applied, the message that is finally received at the
other end can be quite different to the one you saw when pressing 'send'. Depending on how signature
policies and templates were defined, the final message might be displayed in a different way, and
signature content may be added.
If required, you can use the sent items update feature to store sent messages exactly as they were
received - i.e. with all signature policy settings applied. You can choose to:
Only store sent items with signatures applied
-or-
Store your original message AND a copy of that message with signatures applied
This scenario becomes a little more complex where messages are sent to multiple recipients and
different signatures are applied. Should the system split the original email and retain a copy for every
person the message is sent to (so you will see how signatures were applied for each recipient), or
should just one copy be saved (for the first recipient)?
You can define exactly how you would like sent items to work for you, using the sent items update
settings [pg.150] page.
NOTE
The sent items update feature requires Microsoft .Net Framework 3.5 SP1. You can
download this from:
http://www.microsoft.com/downloads/details.aspx?familyid=AB99342F-5D1A-413D8319-81DA479AB0D7&displaylang=en
If you do not have this version of the framework, you will not be able to use the sent items
update feature.
USER MANUAL
Exclaimer Signature Manager Exchange Edition
Page | 149
Sent Items Settings
The sent items update feature is configured using the settings tab:
These options are summarized on the following page.
USER MANUAL
Exclaimer Signature Manager Exchange Edition
Page | 150
Sent items settings are summarized below:
Option
Summary
General
Enable Sent Items
Update
Use this option to enable or disable sent items functionality.
Exclaimer Store Access Service Settings
Service Settings
Use the configure sent items update service button to launch the sent items
update configuration wizard [pg.153] and setup the service for this feature.
Connectivity
Choose whether to allow the system to automatically detect your Exchange server
settings, or to add these settings manually. Typically, manual settings are used if
you need to troubleshoot a connectivity problem. If you choose to add settings
manually, additional options are displayed:
Here, you must provide your Exchange version and URL. The URL is for the
Exchange Web Service URL, which should be located under IIS on the Client Access
Server.
Sent Item Handling
Action
Use these settings to determine how sent items should be handled. Choose from:
Replace the original Sent Item with the modified version of the message. Use this
option if you only wish to keep the modified version of original messages.
Do not modify original Sent Item but create new item(s) instead. Select this option
to retain the original version of messages and add new items for modified
version(s). In this case, you can choose to prepend or append text to the subject
line of new (modified) messages, so that they are easier to identify in your Sent
Items folder.
Another way to help identify new messages in your sent items folder is to apply an
Outlook category to them. Select the Add a category to modified/new messages
option and specify the required category / color:
Note that category colors are only available for users with a mailbox on an
Exchange 2010 server (this feature is not available in Exchange 2007).
…/continued
USER MANUAL
Exclaimer Signature Manager Exchange Edition
Page | 151
Option
Split Mail
Summary
When a message is sent to multiple recipients and different signatures are
required, the message is 'split' for each recipient so that appropriate signatures
are applied. Use split mail options to determine what should happen in these
cases:
If you choose to Keep one copy for all split messages in the Sent Items folder, only
one modified message will be saved - this will be the message for the first
recipient processed.
If you choose to Record all split messages in the Sent Items folder, a modified
message will be saved for each recipient.
Temporary Files
Folder
In order to process sent items, Exclaimer Signature Manager Exchange
Edition needs a location in which temporary files can be processed. Use
this option to specify the required folder for these files.
-
NOTE
The sent items update feature requires Microsoft .Net Framework 3.5 SP1. You can
download this from:
http://www.microsoft.com/downloads/details.aspx?familyid=AB99342F-5D1A-413D8319-81DA479AB0D7&displaylang=en
If you do not have this version of the framework, you will not be able to use the sent items
update feature.
USER MANUAL
Exclaimer Signature Manager Exchange Edition
Page | 152
The Sent Items Update
Configuration Wizard
The sent items update configuration wizard is used to configure the service that is used by the sent
items update feature. To access this wizard, click the configure sent items update service button from
the settings [pg.150] tab, then follow on-screen instructions as shown below.
NOTE
The sent items update feature requires Microsoft .Net Framework 3.5 SP1. You
can download this from:
http://www.microsoft.com/downloads/details.aspx?familyid=AB99342F-5D1A413D-8319-81DA479AB0D7&displaylang=en
If you do not have this version of the framework, you will not be able to use the
sent items update feature.
1. The welcome page provides summary information about the configuration process. It also includes an
option that should only be selected if you have manually configured your service account:
USER MANUAL
Exclaimer Signature Manager Exchange Edition
Page | 153
2. If you have manually configured your service, select the I have manually created the service account...
option and then click next. Otherwise, just click next to set service credentials:
3. Enter an account name and password for an account that this service can use to log on, then click next
to grant rights for this user (if you have chosen to create a new user, it will be created):
USER MANUAL
Exclaimer Signature Manager Exchange Edition
Page | 154
Processing takes place and rights are granted:
4. Click next to complete the configuration wizard:
5. Click finish to exit the wizard.
USER MANUAL
Exclaimer Signature Manager Exchange Edition
Page | 155
Sent Items Update Service Manual Configuration
To configure the Sent Items Update Service manually, the following steps are required:
1. Create a user [pg.156]
2. Grant rights [pg.158]
3. Configure the service to use new credentials [pg.159]
These steps are detailed in the following sections.
Step 1: Create a User
There are two possible ways to create a new user - use ONE of the methods detailed below:
Use Exchange Management Console
A new user can be created by completing a Microsoft Exchange wizard:
1. From Microsoft Exchange, select Recipient Configuration > Mailbox > New Mailbox
2. Set User Mailbox as a mailbox type.
3. Having completed this wizard, it is advisable to hide the new mailbox from the Global Address List (this
ensures that people will not be able to see this user from their email clients). To do this, run the
following script:
Set-Mailbox -HiddenFromAddressListsEnabled $true -Identity "### Enter
The Users Identity ###"
-
NOTE
Note that elements surrounded by ’### ... ###’ should be substituted with
information as indicated - remove the hash (#) symbols and maintain spacing. Please
also refer to additional guidelines for creating a new user [pg.157] on the following
page.
-
USER MANUAL
Exclaimer Signature Manager Exchange Edition
Page | 156
Use a PowerShell Script
The following script can be run in the Exchange Management Shell:
New-Mailbox -Name "### Enter a username ###" -UserPrincipalName "###
Enter the domain username ###" -ResetPasswordOnNextLogon $false Database "### Enter the Mailbox Database ###"
Set-Mailbox -HiddenFromAddressListsEnabled $true -Identity "### Enter
The Users Identity ###"
This script will create the user and hide the new mailbox from the Global Address List. Please also
refer to additional guidelines for creating a new user [pg.157] below.
NOTE
Note that elements surrounded by ’### ... ###’ should be substituted with
information as indicated - remove the hash (#) symbols and maintain spacing. Please
also refer to additional guidelines for creating a new user [pg.157] below.
Additional Guidelines for Creating a New User
The following guidelines should be considered when creating a new user using either of the methods
described above:
The user should have no password expiration policy (i.e. the password should never expire).
The user should NOT be a member of Domain Admins or Enterprise Admins groups, since they are
explicitly denied access to Exchange mailboxes by default Exchange settings.
The user should have LogonAsService rights (these will be granted if necessary during step 3
[pg.159]).
Care should be taken when creating this user because it will have full access to email for all users
on the Exchange server.
There is no requirement for the user to have an Exchange mailbox.
USER MANUAL
Exclaimer Signature Manager Exchange Edition
Page | 157
Step 2: Grant Rights
PowerShell scripts are provided below to grant rights. Please note the following regarding mixed
environments:
If you have a mixed environment which includes Exchange 2007 and Exchange 2010 and/or
Exchange 2013 machines, the appropriate script should be run on one of each type. In other
words, the 2007 script [pg.158] should be run on Exchange 2007 and the 2010 / 2013 script
[pg.159] should be run on Exchange 2010 / Exchange 2013 (see next point).
Exchange 2013 works in the same way as Exchange 2010. So, if you have a mixed environment
which includes Exchange 2007, Exchange 2010, and Exchange 2013 machines, the 2007 script
[pg.158] should be run on Exchange 2007 and the 2010 / 2013 script [pg.159] should be run on
Exchange 2010 or Exchange 2013.
If you have added a new Exchange 2007 server or a new Exchange 2007 database to the existing
infrastructure, the 2007 script [pg.158] must be run again to grant necessary rights to new servers
or databases. Similarly, the 2010 / 2013 script [pg.159] must be run again if you add a new
Exchange 2010 / 2013 server or a new Exchange 2010 / 2013 database.
Exchange 2007
If you are using Exchange 2007, use the Grant Exchange Rights script below:
Get-ExchangeServer | where {$_.IsClientAccessServer -eq $true} | where
{$_.IsValid -eq $true} | where {$_.IsExchange2007OrLater -eq $true} |
where { $_.AdminDisplayVersion.Major -eq 8 } | ForEach-Object {AddADPermission -Identity $_.distinguishedname -User (Get-User -Identity
"### Enter The Users Identity ###" | select-object).identity accessRights GenericRead, GenericWrite -extendedRights Send-As, ReceiveAs, ms-Exch-Store-Admin, ms-Exch-EPI-Impersonation -InheritanceType All }
Get-MailboxDatabase | ForEach-Object {Add-ADPermission -Identity
$_.DistinguishedName -User (Get-User -Identity "### Enter The Users
Identity ###" | select-object).identity -ExtendedRights ms-Exch-EPIMay-Impersonate}
-
NOTE
Note that elements surrounded by ’### ... ###’ should be substituted with
information as indicated - remove the hash (#) symbols and maintain spacing.
USER MANUAL
Exclaimer Signature Manager Exchange Edition
Page | 158
Exchange 2010 / Exchange 2013
If you are using Exchange 2010 or Exchange 2013, use the Grant Exchange Rights script below:
$ExchangeServer = Get-ExchangeServer | where {$_.IsClientAccessServer
-eq $true} | where {$_.IsValid -eq $true} | where
{$_.IsExchange2007OrLater -eq $true} | where {
$_.AdminDisplayVersion.Major -ge 14 }
$ExchangeServer | ForEach-Object { New-ManagementRoleAssignment -Role
ApplicationImpersonation -User (Get-User -Identity "### Enter The
Users Identity ###" | select-object).identity }
-
NOTE
Note that elements surrounded by ’### ... ###’ should be substituted with
information as indicated - remove the hash (#) symbols and maintain spacing.
Step 3: Configure the Service to Use Credentials
There are two possible ways to configure the service to use new credentials - use ONE of the methods
described below:
Use the Services Applet
1. Access the Services applet (Control Panel > Administrative Tools > Services).
2. Locate the Exclaimer Signature Manager Exchange Edition Sent Items Update service.
3. Right click on this service and select Properties.
4. Select the Log On tab.
5. Click the Browse button and locate the user created in step 1 [pg.156].
6. Type the user's password and click OK to complete the process.
7. Ensure that the service starts with the new user's credentials and that its startup type is set to
Automatic.
USER MANUAL
Exclaimer Signature Manager Exchange Edition
Page | 159
Use a PowerShell Script
The following script can be run in the Exchange Management Shell:
Exchange 2007
If you are using Exchange 2007, use the Set Service Rights script below:
Get-WMIObject Win32_Service | where { $_.Name -eq "Exclaimer Signature
Manager Exchange Edition Sent Items Update Service"} | ForEach-Object
{ $_.Change($null, $null, $null, $null, "Automatic", $null, "### Enter
the domain username ###", password) }
Restart-Service "Exclaimer Signature Manager Exchange Edition Sent
Items Update Service"
Exchange 2010 / Exchange 2013
If you are using Exchange 2010 or Exchange 2013, use the Set Service Rights script below:
Get-WMIObject Win32_Service | where { $_.Name -eq "Exclaimer Signature
Manager Exchange Edition Sent Items Update Service"} | ForEach-Object
{ $_.Change($null, $null, $null, $null, "Automatic", $null, "### Enter
The Users Identity ###", password) }
Restart-Service "Exclaimer Signature Manager Exchange Edition Sent
Items Update Service"
-
NOTE
Note that elements surrounded by ’### ... ###’ should be substituted with
information as indicated - remove the hash (#) symbols and maintain spacing. Also
note that the instance of password should be replaced with the appropriate
password for the user account.
USER MANUAL
Exclaimer Signature Manager Exchange Edition
Page | 160
Chapter 7
The Policy Tester
USER MANUAL
Exclaimer Signature Manager Exchange Edition
Page | 161
Introduction
The policy tester is used to create a test email and simulate the sending process. When a test is run,
any defined policies are processed, so you can ensure that the correct signatures are applied to
messages.
Messages generated in the policy tester are never actually sent, so you can select whichever sender
and recipient is most appropriate for testing a policy, without concern. Using the policy tester, you
can:
Define a test message [pg.167]
Save a test message for later use [pg.168]
Load a saved message for testing [pg.168]
Then, having run a test, you access a process diagram [pg.170] and:
View which signature policies have and have not been applied [pg.170]
Check the reason why a signature policy is or is not applied [pg.172]
Preview the message at any stage in the process [pg.173]
Finally, you can view original messages and their final output [pg.174].
USER MANUAL
Exclaimer Signature Manager Exchange Edition
Page | 162
Understanding the Policy
Tester Window
The policy tester is designed to emulate Microsoft Outlook as closely as possible, so it will be familiar
to most users:
Load a policy test
email that was
saved previously
Save the existing policy
test message so that it
can be used later
Clear all settings
and text entered
in the policy
tester
Run the
test
Enter from, to, CC, BCC, subject and
attachment information as you would
for a standard email (click buttons to
browse for users). The message will not
actually be sent to the given recipient.
Choose the
required
email format
Browse for
attachment files
Additional
message
settings
Use the formatting
toolbar to format the
test email message
The upper section provides access to the policy tester toolbar [pg.164], and is used to define standard
email details (such as sender and recipient) and the lower section contains an editor, so you can type
the body of the test email. From here you can create a new message [pg.167] using the editor, save a
message for re-use [pg.168], or load a previously saved message [pg.168] for testing.
USER MANUAL
Exclaimer Signature Manager Exchange Edition
Page | 163
The Policy Tester Toolbar
Toolbar option
Summary
Run Test
Having set required test criteria, use this option to run the
current policy test (or use the large run test button in the main
section of the policy tester)
Load Message
Rather than create a new policy test, choose this option to reuse a previously saved test [pg.169].
Save Message
Having set required criteria, use this option to save the existing
test for re-use [pg.168].
Reset
Use this option to clear all settings in the policy tester and start
from a 'clean' point.
The Formatting Toolbar
The policy tester editor incorporates familiar word processing functionality, using a formatting
toolbar:
subscript
undo
redo
cut
copy
paste
font
bold
font size
underline
italic
strikethrough
Font color
indent
s
highlight
numbers
superscript
align
message options
bullets
USER MANUAL
Exclaimer Signature Manager Exchange Edition
Page | 164
Additional Options
The policy tester is designed to emulate Microsoft Outlook as closely as possible, therefore additional
options are provided so that you can test the full range of conditions [pg.90] and exceptions [pg.102].
When the options button is selected from the editor toolbar, message options are displayed, as shown
below:
These options are summarized on the following page.
USER MANUAL
Exclaimer Signature Manager Exchange Edition
Page | 165
Message options are summarized below:
Toolbar option
Summary
Security Settings
Select this option to encrypt the test message and any
associated attachments. Selecting this option simulates
the behavior of Microsoft Outlook, encrypting the
message (and any attachments) so that the message
cannot be intercepted and examined en-route to the
recipient(s).
Encrypt message contents
and attachments
Add digital signature to
this message
Select this option to apply a digital signature to the test
message. Not to be confused with Exclaimer Signature
Manager Exchange Edition signatures, this option refers
to the addition of a digital certificate (from one of many
online providers). Messages with a digital certificate may
be examined en-route to the recipient(s) but any attempt
to change the message, attachments and/or recipient(s)
will invalidate the certificate and the recipient(s) will be
warned of this as soon as they open the message.
Send Options
If you are testing a signature policy which has been
defined with a sender is someone condition and you need
to test send on behalf of behavior (for example, where a
secretary sends emails on behalf of a manager), you can
specify a particular 'sender' here. For further information
please refer to sender is someone [pg.93] and conditions
- options summary [pg.92].
Sender address
Reply to address
Specify an email address to which replies should be
directed. In some situations, responses to an email
message need to be directed to another mailbox - for
example, a sales mailshot might be sent from the Sales
Director but any replies should be sent to a general 'Sales'
email address, to be handled by the Sales team as a
whole.
Send date
If you are testing a policy which is date critical (for
example, if you have defined particular date range
[pg.112] criteria), you can specify a particular send date
to be applied to the test message.
Headers
If you are testing a policy which is defined to apply a signature based upon a specific
email header, use these options to add that header to the test email.
-
USER MANUAL
Exclaimer Signature Manager Exchange Edition
Page | 166
Creating a New Policy Test
To create a new policy test, follow the steps below:
1. Ensure that policies are in the correct sequence on the policy list [pg.74].
2. Select the policy tester.
3. Enter to and from information.
4. Enter CC and BCC information, if required.
5. Add attachments, if required.
6. Choose whether to test the email in HTML, RTF or plain text format.
7. Compose and format required email text in the policy tester editor [pg.163].
8. Set security, delivery and header [pg.165] options, if required.
9. Select the run test option.
USER MANUAL
Exclaimer Signature Manager Exchange Edition
Page | 167
Saving & Re-Using a Policy Test
Settings for the policy tester are retained until you close Exclaimer Signature Manager Exchange
Edition. If required, you can choose to save the current settings for use at a later date [pg.169].
Saving a Policy Test
To save a policy test, ensure that options are set as required and click save message from the policy
tester toolbar [pg.164], then choose a location and filename for the saved policy test:
NOTE
Saved policy test files have an .MDM file extension.
USER MANUAL
Exclaimer Signature Manager Exchange Edition
Page | 168
Re-Using a Saved Policy Test
When a saved policy is loaded into the policy tester, fields within the policy are automatically
populated with settings from the saved file.
To load a saved policy into the policy tester, click load message from the policy tester toolbar [pg.164];
then navigate drives and folders to select the required policy test file.
USER MANUAL
Exclaimer Signature Manager Exchange Edition
Page | 169
Working With Rules Applied
Information
Having run a policy test, an additional tab named rules applied is displayed. From here, you can view
the outcome of the policy test as a process diagram. Here, each policy processed is displayed with a
yes or no indicator, so you can see if the policy was applied. When you hover the cursor over a segment
of the diagram, additional options are displayed:
USER MANUAL
Exclaimer Signature Manager Exchange Edition
Page | 170
At the bottom of the rules applied window, summary information is available. From here, you can
view basic settings for the policy test, and an explanation of how the selected policy has been
processed (at a selected stage):
USER MANUAL
Exclaimer Signature Manager Exchange Edition
Page | 171
Checking the Reason Why A Signature Policy Is or
Is Not Applied
To view a brief summary of why a signature was or was not applied to the test message, hover the
cursor over the relevant section of the process diagram until additional icons are displayed (as shown
in the example above). Then, click to view summary information - for example:
More detailed information is available at the bottom of the rules applied tab, as described in the
previous section.
USER MANUAL
Exclaimer Signature Manager Exchange Edition
Page | 172
Previewing the Message at Any Stage in the
Process
To view a preview of the test email message at a particular stage of processing, hover the cursor over
the relevant section of the process diagram until additional icons are displayed. Then, click
view the message at this point:
to
If you click the final message node in the rules applied diagram and choose the preview option, you
will see what (if any) signature is applied once all processing is complete. Alternatively, you can click
the messages tab [pg.174] and check the output entry for this test.
USER MANUAL
Exclaimer Signature Manager Exchange Edition
Page | 173
Working with Test Messages
Having run a policy test, an additional tab named messages is displayed. From here, you can view the
original test message and also the final output:
View the original test
message as it was before
policies were processed and
signatures were applied
Message content
View the output test
message after all policies
and associated signatures
have been applied - i.e. as it
would be received
USER MANUAL
Exclaimer Signature Manager Exchange Edition
Page | 174
Chapter 8
The Template Library
USER MANUAL
Exclaimer Signature Manager Exchange Edition
Page | 175
The Template Library
Templates can be used to create rich, sophisticated HTML layouts (including tables, images and
dynamic Active Directory fields), together with simpler RTF versions and then basic Plain Text
signatures. Templates can be placed [pg.207] before, after or between original email messages, which
means they can be used to consistently apply contact details, legal disclaimers, corporate branding,
banners for sales promotions and corporate events...the possibilities are immense.
Within Exclaimer Signature Manager Exchange Edition, all work with templates is completed using the
template library (within the Exclaimer console [pg.31] tree):
The template library is organized using categories, so that templates of the same type are grouped.
When the topmost branch (template library) is selected, you can browse templates and work at
category level. Below this, you can select specific categories to browse, edit and add templates. This
section explains how the template library is used, including:
Understanding the template library window [pg.177]
Working with categories [pg.179]
The template editor [pg.190]
Adding a new template [pg.185]
Cloning a template [pg.188]
Exporting a template [pg.190]
Importing a template [pg.192]
Editing a template [pg.193]
Renaming a template [pg.194]
Moving a template [pg.195]
Removing a template [pg.194]
You can also learn more about specific tasks, using the how to [pg.315] section for templates.
USER MANUAL
Exclaimer Signature Manager Exchange Edition
Page | 176
Understanding the Template
Library Window
When the template library branch is selected in the console tree, you can browse templates and work
at category level:
Options on the template
library toolbar vary according
to whether a category or a
template is selected
Categories are
displayed from the
root of the template
library branch
Templates are
listed for each
category
Browse templates
within each category
using content tabs
Categories are
displayed from the
root of the template
library branch
Options shown here are summarized in the following sections.
USER MANUAL
Exclaimer Signature Manager Exchange Edition
Page | 177
Console Tree
When the top level (template library) branch is selected in the console tree, any template categories
are shown as child branches, followed by templates within those categories:
The Template Library Toolbar
The template library toolbar provides quick access to key tasks. Options on this toolbar vary,
depending on which branch of the library is currently selected. Those listed below are available when
the top level (template library) branch is selected:
Option
Function
Notes
New Category
Create new category
[pg.180]
Adds a new category to the bottom of the tree
Import
Import a template
[pg.192]
Imports previously exported [pg.190] template files into the
template library.
The Template Library Content Pane
When the top level (template library) branch is selected, the content pane displays available
categories as a series of tabs. If a category is selected, templates within that category are shown in
the content pane, and if a template is selected the content pane shows a preview of that template.
USER MANUAL
Exclaimer Signature Manager Exchange Edition
Page | 178
Working with Categories
Within the template library, categories are used to organise templates into logical groups. Exclaimer
Signature Manager Exchange Edition includes a range of professionally designed templates within a
number of default categories, as shown below:
You can add, change and remove categories and templates, as required (at least one category must
always be present). There is no right or wrong way to define categories - use whatever structure suits
your organizational needs.
To view and browse existing categories, select the template library branch from the console tree.
Existing categories can be viewed in the tree structure, or from the content pane [pg.178]. From here
you can:
Add a new category [pg.180]
Rename a category [pg.181]
Remove category [pg.182]
USER MANUAL
Exclaimer Signature Manager Exchange Edition
Page | 179
Adding a New Category
The new category option is available from different areas of the template library - it can be accessed
from the console tree, from the library toolbar and from the actions pane:
Look for the new
category option
on the toolbar
Right-click on the
template library
branch and use the
context menu
Having selected the new category option, you are prompted to enter a category name:
Simply enter the required name and click OK. The new category is added to the end of the categories
list in the console tree.
NOTE
When you are satisfied that all changes have been made correctly,
click the main save button to save changes [pg.44] made in this
session. Alternatively, use the cancel button to abandon all changes.
USER MANUAL
Exclaimer Signature Manager Exchange Edition
Page | 180
Renaming a Category
The rename category option is available from the console tree and from the actions pane:
Right-click on the
required category
and use the
context menu
Having selected the rename category option, you are prompted to enter a category name:
Simply enter the required name and click OK.
NOTE
When you are satisfied that all changes have been made correctly,
click the main save button to save changes [pg.44] made in this
session. Alternatively, use the cancel button to abandon all changes.
USER MANUAL
Exclaimer Signature Manager Exchange Edition
Page | 181
Removing a Category
It is important to note that removing a category will also remove any templates within that category.
If required, you can move existing templates [pg.195] to alternative locations within the template
library, or you may wish to rename [pg.181] the category rather than remove it.
The delete category option is available from the console tree and from the actions pane:
Right-click on the
required category
and use the
context menu
Having selected the delete category option, you are prompted to confirm that you wish to proceed:
Click yes to remove the selected category.
NOTE
A category is not permanently deleted until settings have been saved. If you exit
without saving (or cancel changes), the category will be reinstated in the console tree.
USER MANUAL
Exclaimer Signature Manager Exchange Edition
Page | 182
Working with Templates
All work with templates is completed within the template library [pg.177]. The appearance of the
library will vary, depending on how you have chosen to organize templates into categories [pg.179].
For example:
Having selected a template, you can preview and edit content in different formats (HTML, RTF and
Plain Text) using an intuitive template editor, and of course you can add new templates to the library.
This section explains how to work with templates, including:
The template editor [pg.190]
Adding a new template [pg.185]
Cloning a template [pg.188]
Exporting a template [pg.190]
Importing a template [pg.192]
Editing a template [pg.193]
Renaming a template [pg.194]
Moving a template [pg.195]
Removing a template [pg.194]
USER MANUAL
Exclaimer Signature Manager Exchange Edition
Page | 183
Previewing a Template
To quickly see how a particular template will look when it is applied to email messages, simply select
the required template from the console tree. The template is applied to a test message and displayed
in the preview tab (within the content pane):
See how the
template looks in
the preview tab
Select required
template in the library
Use the template
breadcrumb trail
to access parent
categories
From here you can:
Double click anywhere in the preview tab to edit the template [pg.193] in the template editor
[pg.190]
Select a template category [pg.179] from the template breadcrumb trail to view other templates
in that category
Use toolbar options to edit [pg.193], delete [pg.197], clone [pg.188], rename [pg.194] or move
[pg.195] the template, or view associated properties [pg.196]
NOTE
This preview option always shows the HTML version of the template. If you wish to
preview RTF or Plain Text versions, you should choose to edit the template [pg.193]
and select the preview mode for the required format.
USER MANUAL
Exclaimer Signature Manager Exchange Edition
Page | 184
Adding a New Template
The new template option is available from different areas of the template library - it can be accessed
from the console tree, from the library toolbar and from the actions pane:
Use the
toolbar option
Right-click on a category
or on the top level
template library branch
USER MANUAL
Exclaimer Signature Manager Exchange Edition
Page | 185
To add a new template, follow the steps below:
1. Select the new template option to open a blank template in the template editor [pg.190]:
2. At this stage, the new template is added to the template library with a temporary name. This name
varies, depending on where the new template option was selected. If you added the template from a
category, the template name will reflect the category name. If you started from the top level template
library branch of the tree, the template is automatically assigned to the first category and is assigned a
name to reflect that category.
3. Position and format the original message fields [pg.207] so that the signature is inserted in the required
position, and original message content is formatted as required.
NOTE
The way in which original message fields are formatted controls the formatting of the
original message. For example, the font type, color, size, etc. applied to the fields will
be reflected in email messages. So (for instance) if you want original messages to be
formatted in Arial font, you would select these fields and apply the Arial font.
4. Create your template with required text and formatting; taking care to place the original message fields
[pg.207] correctly so that the signature is inserted in the required position.
NOTE
Remember that you can use tables, images, dynamic fields and properties when
creating templates. Please refer to the template editor [pg.190] section of this guide
for detailed information about editor options.
USER MANUAL
Exclaimer Signature Manager Exchange Edition
Page | 186
5. Switch between HTML, RTF and Plain Text tabs to create the template in each format.
6. Click save and close (from the editor toolbar) to return to the template library. If you have not updated
all format tabs (HTML, RTF and Plain Text), warnings are displayed. You must enter content for all
formats before you can save the template.
7. If required, rename [pg.194] the new template.
8. If required, move [pg.195] the template to a different category [pg.179].
9. Click the main save button to save changes [pg.44] made in this session. Alternatively, use the cancel
button to abandon all changes.
USER MANUAL
Exclaimer Signature Manager Exchange Edition
Page | 187
Cloning a Template
If you need to create a new template which has similar settings to an existing template, it is quicker
to take a copy of the existing template and then update that copy (as opposed to creating a new
template from first principles [pg.185]). The clone option is used to create a copy of an existing
template for this purpose, and is available from the template library toolbar or the right-click menu:
Select the required template
in the console tree and use
the toolbar option
Right-click on the
template that you
wish to copy
(clone)
USER MANUAL
Exclaimer Signature Manager Exchange Edition
Page | 188
To clone an existing template, select the template to be copied from the console tree, then either click
clone from the toolbar or right-click and select clone from the context menu. A copy of the selected
template is added to the console tree, ready to be updated:
The cloned
template is
added to the
console tree
From here you can change the name [pg.194] and edit template content [pg.193]t as required. Having
updated the cloned template, click the main save button to save changes [pg.44] made in this session.
Alternatively, use the cancel button to abandon all changes.
USER MANUAL
Exclaimer Signature Manager Exchange Edition
Page | 189
Exporting a Template
If required, you can export a template to a file. This is useful (for example) if you have chosen not to
implement remote deployment [pg.40] and need to import a template [pg.192] on another server, or
if you wish to delete a template but wish to take a copy first, just in case the template is needed in
future.
The export option is available from the template library toolbar or the right-click menu:
Select the required template
in the console tree and use
the toolbar option
Right-click on the
template that you
wish to export
NOTE
The export template option is also available if you right-click anywhere
within the template tab for a particular signature policy [pg.79].
USER MANUAL
Exclaimer Signature Manager Exchange Edition
Page | 190
To export a template:
1. Select the export option for the required template to open the save as window.
NOTE
The file name defaults to the name of the selected template and the file
type is a zip. A zip file is used because there are multiple parts to a template
file - it is not a single document. The contents of the zip file are in a
proprietary format; only templates exported from Exclaimer Signature
Manager Exchange Edition can be imported [pg.192].
2. Navigate drives and folders to select the required location for the template file.
3. Click save to complete the export.
USER MANUAL
Exclaimer Signature Manager Exchange Edition
Page | 191
Importing a Template
Previously exported [pg.190] templates can be imported into the template library. To do this, follow
the steps below:
1. In the console tree, select a parent category for the template. Notice that import and export
options are now activated on the toolbar.
2. Select import to display the open window.
NOTE
When a template is exported, the exported file format is .zip. Notice
that the default file type here is set to .zip.
3. Navigate drives and folders to select the required import file.
4. Click open to complete the import and add the template to the template library.
USER MANUAL
Exclaimer Signature Manager Exchange Edition
Page | 192
Editing a Template
The edit option is available from different areas of the template library - it can be accessed from the
console tree, from the template library toolbar, or by double clicking anywhere in the template
preview pane:
Select the required template
in the console tree and use
the toolbar option
Right-click on the
template that you
wish to edit
NOTE
The edit template option is also available if you right-click anywhere
within the template tab for a particular signature policy [pg.79].
Having selected the edit option, the template is opened in the template editor [pg.190]. Simply make
required changes, then click save and close (from the editor toolbar) to return to the template library.
When you are satisfied with changes to the template, click the main save button to save changes made
in this session. Alternatively, use the cancel button to abandon all changes.
USER MANUAL
Exclaimer Signature Manager Exchange Edition
Page | 193
Renaming a Template
The rename option is available from different areas of the template library - it can be accessed from
the console tree or from the template library toolbar:
Select the required template
in the console tree and use
the toolbar option
Right-click on the
template that you
wish to rename
Having selected the rename option, you are prompted to enter a template name:
Simply enter the required name and click OK.
NOTE
When you are satisfied that with your changes, click the save button to save
changes [pg.44] made in this session. Alternatively, use the cancel button to
abandon all changes.
USER MANUAL
Exclaimer Signature Manager Exchange Edition
Page | 194
Moving a Template
Templates can be moved from one category to another using the move option, available from the
template library toolbar or the right-click menu:
Select the required template
in the console tree and use
the toolbar option
Right-click on the
template that you
wish to move
Having selected the move option, a list of available categories is displayed:
Select the required category and click OK to complete the operation.
NOTE
When you are satisfied that with your changes, click the save button to save
changes [pg.44] made in this session. Alternatively, use the cancel button to
abandon all changes.
USER MANUAL
Exclaimer Signature Manager Exchange Edition
Page | 195
Viewing Template Properties
The template properties window shows general information about the template. From here you can
see the template name, size and file location together with a list of policies that are using the template:
The properties option is available from the template library toolbar and from the right-click menu (it
is also available if you right-click anywhere within the template tab for a particular signature policy
[pg.79]):
Select the required template
in the console tree and use
the toolbar option
Right-click on
the required
template
USER MANUAL
Exclaimer Signature Manager Exchange Edition
Page | 196
Removing a Template
Templates can be removed using the delete option, available from the template library toolbar or the
right-click menu:
Select the required template
in the console tree and use
the toolbar option
Right-click on the
template that you
wish to remove
Having selected the delete option, you are prompted to confirm that you wish to proceed:
Click yes to remove the selected template.
NOTE
A template is not permanently deleted until settings have been saved.
If you exit without saving (or cancel changes), the category will be
reinstated in the console tree.
USER MANUAL
Exclaimer Signature Manager Exchange Edition
Page | 197
Chapter 9
The Template Editor
USER MANUAL
Exclaimer Signature Manager Exchange Edition
Page | 198
Introduction
The template editor is used to add, edit and preview templates in HTML, RTF and Plain Text formats.
With a look and feel that will be familiar to Microsoft Outlook users, you can create templates which
are as basic or as sophisticated as required.
This section provides an introduction to the template editor, including:
Understanding the template editor window [pg.200]
Template editor - toolbar variations [pg.203]
Placement of signature content [pg.207]
Fields [pg.215]
Properties [pg.309]
USER MANUAL
Exclaimer Signature Manager Exchange Edition
Page | 199
Understanding the Template
Editor Window
The template editor is used to add, edit and preview templates in HTML, RTF and Plain Text formats:
Switch between
template formats
Template editor
toolbar
Insert Active
Directory fields
using the fields
panel
Switch between
view modes
Apply formatting
and define controls
for content using
properties
Template
content area
The editor has a familiar, intuitive design, as summarized in the following sections.
USER MANUAL
Exclaimer Signature Manager Exchange Edition
Page | 200
The Content Area
All content is added to the main content area of the template editor. When you choose to add a new
template, the editor is opened with original text placeholders, which are used to determine where
your signature content should be placed in relation to message content [pg.207].
It is also important to note that the way in which these fields are formatted controls the formatting of
the original message. For example, the font type, color, size, etc. applied to the fields will be reflected
in email messages. So (for example) if you want original messages to be formatted in Arial font, you
would select these fields and apply the Arial font. You can add text, or insert additional content using
toolbar options.
Switching Between Different Views
Toolbar options are available for switching between design, source and preview modes, where:
The design option shows the template design in WYSIWYG (What You See Is What You Get) mode,
so you can edit content in situ.
The source option displays HTML source code for the template.
The preview option shows how the template will be displayed using a sample email message. If
required, you can choose a specific user to see how the template would be displayed using details
for that sender.
Switching Between Different Format Types
Tabs at the top of the editor are used to switch between different formats for a template (HTML, RTF
and Plain Text). When a new template is added, all three formats must be updated.
The Template Editor Toolbar
If you are used to working with Microsoft Outlook, the template editor toolbar will be very familiar.
When switching between format tabs, toolbar options will change, since some options are only
applicable to a given format (for example, you can insert tables into HTML templates, but not in RTF
or Plain Text versions). For a summary of the different toolbar options, see template editor - toolbar
variations [pg.203].
USER MANUAL
Exclaimer Signature Manager Exchange Edition
Page | 201
The Fields Panel
The fields option is used to insert dynamic content from the Active Directory. Click on the fields option
to activate the fields panel - a list of available fields that can be inserted into the template. Once a
field has been inserted, this panel is automatically hidden so that the template editor is not cluttered.
Fields can be used in all template formats (HTML, RTF and Plain Text). For further information, see the
fields [pg.215] section of this guide.
The Properties Pane
Properties are used to format and control template content. Almost every piece of content added to
a template will have properties associated with it - for example, text, tables, images, fields, hyperlinks,
etc. The properties pane changes to reflect the current selection in the template editor - see the
properties [pg.309] section of this guide for further information.
USER MANUAL
Exclaimer Signature Manager Exchange Edition
Page | 202
Template Editor - Toolbar
Variations
When working with the template editor, templates are created in three formats - HTML, RTF and Plain
Text. You must define all three formats for each template; this ensures that all scenarios are catered
for.
With Exclaimer Signature Manager Exchange Edition, creating different versions of a template is made
simple, using the HTML, RTF and Plain Text tabs at the top of the template editor. When a tab is
selected, toolbar options are updated to show options that are relevant for that format.
This section summarizes toolbar options for each format:
The HTML editor toolbar [pg.204]
The RTF editor toolbar [pg.205]
The Plain Text editor toolbar [pg.206]
USER MANUAL
Exclaimer Signature Manager Exchange Edition
Page | 203
The HTML Editor Toolbar
HTML templates can be sophisticated and feature-rich, utilizing many of the options and techniques
that you would expect from web pages (including tables, images, hyperlinks and dynamic content
fields):
These options are summarized below:
Toolbar
Option
Summary
Actions
Save and close the current template and return to the template library.
Mode
Mode options are used to switch between different view modes. Choose
from:
Editor
preview - preview the template applied to a test message
undo - undo the last action in the editor
redo - redo the last action in the editor
Clipboard options are used to manipulate text. Choose from:
Font
source - view and work with the HTML source
Editor options are used to perform key editorial tasks. Choose from:
Clipboard
design - view and work with the WYSIWYG editor
copy - copy currently selected text to the Windows clipboard
cut - remove currently selected text and copy it to the Windows clipboard
paste - paste previously copied text at the current cursor position
Font options are used to apply formatting to text.
font name - select the required font from the drop-down list
font size - select the required font size from the drop-down list
Remaining options are summarized below, listed from left to right:
bold, italic, underline, strike through, sub script, super script, highlight color,
font color.
Paragraph
Paragraph options are used to apply paragraph formatting. Options are
summarized below, listed from left to right:
numbered list, bulleted list, outdent, indent, align left, center, align right,
justify.
Insert
Insert options are used to apply more detailed formatting and interactive
content. Options are summarized below, listed from left to right:
insert table, insert image, insert horizontal line, insert hyperlink, insert fields.
USER MANUAL
Exclaimer Signature Manager Exchange Edition
Page | 204
The RTF Editor Toolbar
RTF templates can include standard formatting options and dynamic content fields:
These options are summarized below:
Toolbar
Option
Summary
Actions
Save and close the current template and return to the template library.
Mode
Mode options are used to switch between different view modes. Choose
from:
Editor
Font
preview - preview the template applied to a test message
Editor options are used to perform key editorial tasks. Choose from:
Clipboard
design - view and work with the WYSIWYG editor
undo - undo the last action in the editor
redo - redo the last action in the editor
Clipboard options are used to manipulate text. Choose from:
copy - copy currently selected text to the Windows clipboard
paste - paste previously copied text at the current cursor position
cut - remove currently selected text and copy it to the Windows
clipboard
Font options are used to apply formatting to text.
font name - select the required font from the drop-down list
font size - select the required font size from the drop-down list
Remaining options are summarized below, listed from left to right:
bold, italic, underline, strike through, sub script, super script, highlight
color, font color.
Paragraph
Paragraph options are used to apply paragraph formatting. Options are
summarized below, listed from left to right:
numbered list, bulleted list, outdent, indent, align left, center, align right,
justify.
Insert
Insert options are used to insert Active Directory fields into the template.
USER MANUAL
Exclaimer Signature Manager Exchange Edition
Page | 205
The Plain Text Editor Toolbar
Plain text templates are composed without any formatting information, however you can still include
Active Directory fields. When the template editor is set to Plain Text mode, the toolbar is shown as
below:
These options are summarized below:
Toolbar
Option
Summary
Actions
Save and close the current template and return to the template library.
Mode
Mode options are used to switch between different view modes. Choose
from:
Editor
preview - preview the template applied to a test message
Editor options are used to perform key editorial tasks. Choose from:
Clipboard
design - view and work with the WYSIWYG editor
undo - undo the last action in the editor
redo - redo the last action in the editor
Clipboard options are used to manipulate text. Choose from:
copy - copy currently selected text to the Windows clipboard
cut - remove currently selected text and copy it to the Windows clipboard
paste - paste previously copied text at the current cursor position
View
View options are used to help when working with plain text. Select the
whitespace option to view paragraph markers within the editor and click
word wrap to wrap text to accommodate the window size. These options do
not change the way in which the template will be viewed by recipients.
Insert
Insert options are used to insert Active Directory fields into the template.
USER MANUAL
Exclaimer Signature Manager Exchange Edition
Page | 206
Placement of Signature Content
When creating a new template, two fields are automatically inserted:
These fields can be thought of as placeholders for original email content; together they represent the
structure of an email 'conversation', where:
Field
Summary
{Original Message Above Reply Separator}
The latest original message
{Original Message Below Reply Separator}
The previous message(s) in the 'conversation'
By default, placeholders are arranged so that signature content is added after the latest reply in the
email thread (as shown in the example above). However, you can re-arrange the placeholders to suit
your own needs.
USER MANUAL
Exclaimer Signature Manager Exchange Edition
Page | 207
Placing Signature Content at the Very End of
Original Messages
To place a signature at the very end of an email message, signature content should be placed below
all original message fields, as shown below:
The latest message will
be displayed above this
message field
Previous messages will
be displayed below this
message field
The graphic is placed after both original
message fields and will be displayed at
the very end of the email (after all
messages in the conversation)
USER MANUAL
Exclaimer Signature Manager Exchange Edition
Page | 208
Placing Signature Content Above Original
Messages
To place a signature at the very top of an email message, signature content should be placed above
all original message placeholders, as shown below:
Insert the signature
above all
placeholders
Message fields
USER MANUAL
Exclaimer Signature Manager Exchange Edition
Page | 209
Placing Signature Content Below The Latest
Message In An Email Conversation
To place the signature below the latest message in an email 'conversation', content should be placed
between {Original Message Above Reply Separator} and {Original Message Below Reply} fields, as
shown below:
The latest message
will be displayed
above this
message field
The signature is placed
after the latest reply but
before any previous
replies
Previous messages will be
displayed below this
message field
USER MANUAL
Exclaimer Signature Manager Exchange Edition
Page | 210
Tips for Working with Original Message Fields
Using Spaces Between Original Message Fields
The placement of signature content will be made exactly as displayed in the editor. For example, if
you enter three blank lines between an original message field and your signature content, there will
be three blank lines at the end of email messages, followed by the signature.
Copying and Pasting Original Message Fields
You can copy and paste original message fields to new positions within the template, but care should
be taken to ensure you copy/paste the entire field rather than just the text element. When you click
on a field, it behaves like a table cell. For a correct selection, you should see the borders of the cell
clearly marked:
...or
Formatting Original Message Fields
The way in which original message fields are formatted controls the formatting of the original
message. For example, the font type, color, size, etc. applied to the fields will be reflected in email
messages. So (for instance) if you want original messages to be formatted in Arial font, you would
select these fields and apply the Arial font.
USER MANUAL
Exclaimer Signature Manager Exchange Edition
Page | 211
Tables
When working with HTML templates, using the table option from the editor toolbar displays an insert
table options window:
Use a smart table to
insert a contact
block or to define a
custom smart table
If you are familiar
with HTML, you can
choose to insert a
standard HTML
table
From here, you can choose the type of table to be inserted - choose from:
A smart table - contact block [pg.213]
A smart table - custom [pg.213]
A standard HTML table [pg.213]
These options are summarized in the following sections.
USER MANUAL
Exclaimer Signature Manager Exchange Edition
Page | 212
Smart table - Contact Block
When working with templates, one of the most common requirements is to insert standard contact
information for the message sender. You can do this by adding individual fields [pg.215] to the
template, but it can be neater and quicker to use a predefined contact block.
A contact block is essentially a table of commonly used message sender fields - for example:
A key benefit of using a contact block rather than individual fields is that you can choose to suppress
a row if there is no information in the message sender's Active Directory information to include. For
example, if a contact block includes a {fax} field but there are no fax details for a message sender, the
'fax' row of the block is not displayed when the message is sent.
Once inserted, a contact block can be edited - for example, you might wish to swap one field for
another, or adjust the formatting (using properties [pg.309]). For further information, please see how
do I create a contact block? [pg.319]
NOTE
When the contact block is selected from the insert table options window, table rows
and attributes are not available. This is because the contact block is a predefined
table; however you can adjust the table once it has been inserted into the template.
Smart Table - Custom
The custom smart table option can be used to insert a table and specify content / attributes using
straightforward data entry fields. This is a quick and easy way to insert a table and include Active
Directory fields (or other content) at the same time; the alternative would be to insert a standard
HTML table and add fields or other content manually.
For further information, please see the smart tables [pg.267] page.
Standard HTML Table
If you wish to insert a standard HTML table and do not wish to specify any content until after it has
been added to the template, use the standard HTML table option. This is useful (for example) if you
wish to insert a basic table to form the basic layout of a template, or if you wish to include tabular
data which is not comprised of fields.
USER MANUAL
Exclaimer Signature Manager Exchange Edition
Page | 213
Having selected the standard HTML table option from the insert table window, you can set the number
of columns and rows, together with border, autofit and spread attributes. Then, click OK to insert the
table and start to add content.
When working with any kind of table in the HTML template editor, it may be useful to note the 'HTML
element trail' at the bottom of the editor window:
Depending on the size of your table, it can sometimes be tricky to select a particular row, column or
cell, but you can do this very easily from the element trail - just click the required element. When you
click on an element, further options are displayed:
Selecting properties will show properties for this table element in the properties pane [pg.309].
USER MANUAL
Exclaimer Signature Manager Exchange Edition
Page | 214
Fields
Signatures can include a wide range of dynamic information using Active Directory fields. These fields
are inserted into templates (via the template editor [pg.190]) and then dynamically updated when
messages are sent or received.
For example, you might define a template for a standard signature, which uses fields for the message
sender's name, department and telephone number. Each time this template is applied to messages,
the fields are replaced with the Active Directory content for these fields, for the sender.
Fields can be inserted into all template types - HTML, RTF and Plain Text. This section contains useful
information for working with fields, including:
Working with the fields panel [pg.216]
Working with fields [pg.217]
Available fields [pg.218]
USER MANUAL
Exclaimer Signature Manager Exchange Edition
Page | 215
Working with the Fields Panel
When not in use, the fields panel is hidden, to avoid cluttering editing space in the template editor
[pg.190]. To activate this panel, click the fields option on the top, left-hand side of the template editor:
Click the fields
option to activate
the fields panel
Toggle the 'pin' icon to
pin the fields panel to
the window or to hide it
when not in use
If you wish to keep the fields panel open, click the 'pin' icon in the top right-hand corner of the fields
panel. This is a toggle option, click it once to 'pin' the panel to the editor and click it again to hide it
again. Within the fields panel, fields are organized into related groups, namely:
Message [pg.219]
Message sender [pg.223]
Dynamic content [pg.231]
Server [pg.269]
Advanced [pg.270]
General [pg.308]
To insert a field, simply double click the required entry in the panel. The field is inserted and the fields
panel closes automatically, so you can start working with the field [pg.217] in the editor.
USER MANUAL
Exclaimer Signature Manager Exchange Edition
Page | 216
Working with Fields
The following tips may be useful when you are working with fields.
Using Spaces Between Original Message Fields
The placement of signature content will be made exactly as displayed in the editor. For example, if
you enter three blank lines between an original message field and your signature content, there will
be three blank lines at the end of email messages, followed by the signature.
Copying & Pasting Original Message Fields
You can copy and paste original message fields to new positions within the template, but care should
be taken to ensure you copy/paste the entire field rather than just the text element. When you click
on a field, it behaves like a table cell. For a correct selection, you should see the borders of the cell
clearly marked:
...or
Formatting Original Message Fields
The way in which original message fields are formatted controls the formatting of the original
message. For example, the font type, color, size, etc. applied to the fields will be reflected in email
messages. So (for instance) if you want original messages to be formatted in Arial font, you would
select these fields and apply the Arial font.
USER MANUAL
Exclaimer Signature Manager Exchange Edition
Page | 217
Available Fields
This section summarizes all fields that can be used when defining templates in Exclaimer Signature
Manager Exchange Edition:
Message [pg.219]
Message sender [pg.223]
Dynamic content [pg.231]
Server [pg.269]
Advanced [pg.270]
General [pg.308]
USER MANUAL
Exclaimer Signature Manager Exchange Edition
Page | 218
Message Fields
Fields in the message group are summarized below:
Field
Inserts...
Message Attachment Name
The name of the message attachment(s).
Message CC Recipients
Any email addresses specified in the CC field.
Message Date
The message sent or received date.
Message From
Displays the email address in the 'from' field in the message.
Typically, 'message from' and 'message sender' information is the
same but there may be occasions where there is a difference - for
example, when the 'sent on behalf of' option is used.
Message Headers
Header information from the email message.
Message Recipients
The email address of all recipients of the email (i.e. those
specified in the To field and the CC field).
Message Sender
The email address of the message sender.
Message Sent On Behalf Of
Behind the scenes, every sent email includes two addresses
which are associated with who is sending the message - the
envelope sender and the from address. The envelope sender is
the address that physically sent the message (and where
computers should respond in the case of bounced messages or
errors) and the from address is the address to be used by
recipients when responding.
Under normal circumstances, the envelope sender and the from
address are the same and signature content is generated for the
user found in the from address. However, the message sent on
behalf of field is used for cases where a user is delegated to send
email messages on behalf of another user. In this scenario, from
and sender details will be different.
For example, suppose a PA (Jane Smith) has permission to send
email messages on behalf of a Company Director (Alice Jones).
When received, these messages would be shown as ' from Jane
Smith on behalf of Alice Jones'. Behind the scenes, the from
address will have details for Alice Jones and the sender will have
details for Jane Smith.
The message sent on behalf of field retrieves the name of the
person found in the from field, but only if it is different to data
found in the envelope sender - otherwise it will be blank. Taking
our example, the message sent on behalf of field would generate
details for the Company Director, Alice Jones.
Message Subject
The content of the message subject line.
USER MANUAL
Exclaimer Signature Manager Exchange Edition
Page | 219
Field
Inserts...
Message To Recipients
The email address of all recipients entered in the To field.
…/continued
USER MANUAL
Exclaimer Signature Manager Exchange Edition
Page | 220
Field
Inserts...
Original Message
The original message content. Use this field to place signatures at
the very start or very end of messages. If you wish to consider
reply separators when placing signature content, you should use
Original Message Above Reply Separator and Original Message
Below Reply fields, described below.
Original Message Above Reply
Separator
Original message content from the latest message in an email
thread (conversation). This is used in conjunction with the
{Original Message Below Reply } field. See placement of signature
content [pg.207] for further information.
Original Message Below Reply
Original message content from the previous message in an email
thread (conversation). This is used in conjunction with the
{Original Message Above Reply Separator} field. See placement of
signature content [pg.207] for further information.
USER MANUAL
Exclaimer Signature Manager Exchange Edition
Page | 221
Message Sender Fields
This section summarizes message sender fields which can be used when defining templates in
Exclaimer Signature Manager Exchange Edition:
General [pg.223] [pg.223]
Address [pg.226] [pg.226]
Telephones [pg.228] [pg.228]
Organization [pg.229] [pg.229]
Exchange Advanced [pg.230] [pg.230]
AD Photos [pg.230]
Other AD Fields [pg.230]
USER MANUAL
Exclaimer Signature Manager Exchange Edition
Page | 222
Message Sender - General Fields
Fields in the message sender - general section are summarized below:
Field
Inserts...
Contact
Block
A block of contact information for the sender in tabular form. Use this option to select
fields to be grouped in a table as a standard contact block - for example:
produces...
…/continued
USER MANUAL
Exclaimer Signature Manager Exchange Edition
Page | 223
Field
Inserts...
This is the best way to add a signature to an email, since you can suppress fields if
they are blank and so avoid blank lines in a signature (or any other block of fields).
Once a contact block has been added, double-click anywhere inside it to open the
contact block window:
Select a field to
view properties
The hide if
blank property
Use this window to add/remove fields and update properties (you can select any field
and set the hide if blank property to true if you wish to suppress this line for contacts
where no information is present for the field). For further information please refer to
how do I create a contact block? [pg.319]
First Name
The first name of the message sender.
Initials
Initials for the message sender.
Last name
The last name of the message sender.
Display
name
Display name for the message sender.
Description
Description information for the sender.
Office
Office information for the sender.
Telephone
Number
Telephone number for the sender.
Other
Telephone
Number
Other telephone number for the sender.
…continued
USER MANUAL
Exclaimer Signature Manager Exchange Edition
Page | 224
Field
Inserts...
E-mail
E-mail address for the sender.
E-mail (as
hyperlink)
E-mail address presented as a hyperlink, for the sender.
Web Page
Web page address for the sender.
Web Page
(as
hyperlink)
Web page address for the sender, presented as a hyperlink.
Other Web
Page
Alternative web page for the sender.
Personal
Block
A short block of Active Directory fields presented in tabular form.
-
NOTE
This information is being taken from the Active Directory; therefore content may vary from
one organization to another. For example, one organization may use the office field to
indicate the office location in which a user is based, whilst another may use this field for
something completely different.
USER MANUAL
Exclaimer Signature Manager Exchange Edition
Page | 225
Message Sender - Address Fields
Fields in the message sender - address section are summarized below:
Field
Inserts...
Address Block
A block of address information for the sender in tabular form. Includes street,
city, state/province and zip/postal code. Once an address block has been added,
double-click anywhere inside it to open the content window:
Items in the address block will vary between different regions (the default is for
US style). You can easily change the region (and thus items in the address block)
using the regional format property, shown below:
Use the regional
format property to
change the address
block setup for a
different region
Select the
address block in
the template
…/continued
USER MANUAL
Exclaimer Signature Manager Exchange Edition
Page | 226
Field
Inserts...
Street
Street information for the sender.
P.O. Box
P.O. Box information for the sender.
City
City information for the sender.
State/Province
State/province information for the sender.
Zip/Postal Code
Zip/postal code information for the sender.
Country/Region
Country/region information for the sender.
Country/Region
(2 letters)
Two letter country abbreviation for the sender (e.g. UK).
NOTE
This information is being taken from the Active Directory; therefore content may
vary from one organization to another. For example, one organization may use
the P.O. Box field to indicate a genuine box number, whilst another may use this
field for something completely different.
USER MANUAL
Exclaimer Signature Manager Exchange Edition
Page | 227
Message Sender - Telephone Fields
Fields in the message sender - telephone section are summarized below:
Field
Inserts...
Home
Home telephone number for the sender.
Other Home
Other home telephone number for the sender.
Pager
Pager number for the sender.
Other Pager
Other pager number for the sender.
Mobile
Mobile telephone number for the sender.
Other Mobile
Other mobile number for the sender.
Fax
Fax number for the sender.
Other Fax
Other fax number for the sender.
IP Phone
IP phone number for the sender.
Other IP Phone
Other IP phone number for the sender.
Notes
Notes for the sender.
NOTE
This information is being taken from the Active Directory; therefore content may
vary from one organization to another. For example, one organization may use the
notes field to enter telephone related notes, whilst another may use this field for
something completely different.
USER MANUAL
Exclaimer Signature Manager Exchange Edition
Page | 228
Message Sender - Organization Fields
Fields in the message sender - organization section are summarized below:
Field
Inserts...
Title
The message sender's job title.
Department
The department in which the message sender works.
Company
The company for whom the message sender works.
Manager Display Name
The name of the message sender's manager.
Manager E-mail
The email address of the message sender's manager.
Manager E-mail (as
hyperlink)
The email address of the message sender's manager, presented as a
hyperlink.
NOTE
This information is being taken from the Active Directory; therefore content may vary
from one organization to another. For example, one organization may use the
department field to enter true department information, whilst another may use this
field for something completely different.
USER MANUAL
Exclaimer Signature Manager Exchange Edition
Page | 229
Message Sender - Exchange Advanced Fields
Fields in the message sender - exchange advanced section are custom exchange fields, typically used
for organization-specific information. Use of these fields will vary from one installation to another.
Message Sender - AD Photos Fields
Fields in the AD photos section are summarized below:
Field
Inserts...
JPEG Photo
Insert JPEG photo of the sender.
Photo
Insert other photo of the sender.
Thumbnail Logo
Insert thumbnail logo associated with the sender.
Thumbnail Photo
Insert thumbnail photo associated with the sender.
NOTE
Although the Active Directory includes fields for pictures, there is no in-built,
straightforward way to add pictures to it. The Exclaimer Outlook Photos application
allows you to create and manage images for all objects in your Active Directory please contact us if you would like further information.
Message Sender - Other AD Fields
Fields in the other AD fields section are summarized below:
Field
Inserts...
Home Address
Insert the sender's personal home address.
Personal Title
Insert the sender's personal title.
Postal Address
Insert the sender's personal postal address.
AD Field
Insert information held in the custom AD field for the sender.
NOTE
This information is being taken from the Active Directory; therefore content may
vary from one organization to another. For example, one organization may use the
postal address field to enter a genuine alternative address, whilst another may use
this field for something completely different.
USER MANUAL
Exclaimer Signature Manager Exchange Edition
Page | 230
Dynamic Content Fields
This section summarizes dynamic content fields which can be used when defining templates in
Exclaimer Signature Manager Exchange Edition:
Content from file [pg.232]
Custom hyperlink [pg.233]
Custom image [pg.235]
QR code [pg.237]
Rotating banner ad [pg.246]
RSS feed [pg.248]
Composite field [pg.251]
Social media strip [pg.252]
List of fields [pg.260]
Custom smart table [pg.267]
USER MANUAL
Exclaimer Signature Manager Exchange Edition
Page | 231
Content From File
The content from file field is used to insert content from an external document, by specifying a
location for the required document (documents can be in HTML, Rich Text, Plain Text or image
formats).
This is useful (for example) if you need to use signature content that is constantly being updated rather than adding text directly into the template editor each time there is a change, simply specify a
location to the original file and the latest content will always be included. The file location specified
must be accessible to the network service user.
To use content from an existing file in a template, follow the steps below:
1. Use the fields panel to insert a content from file field. When this field is added to a template, the file
location window is displayed:
2. Click the browse button to navigate drives and folders to locate the required file. Alternatively, use the
insert button to select an Active Directory field to insert as the file source:
3. Click OK to confirm your selections.
NOTE
Remember that you can switch to preview mode (from the template editor
toolbar [pg.200]) to see the effect of any dynamic fields you have inserted.
USER MANUAL
Exclaimer Signature Manager Exchange Edition
Page | 232
Custom Hyperlink
A custom hyperlink can be used to insert a standard hyperlink (i.e. a URL for a web page), and any
other kind of link (for example, a mailto email link) - for example:
Additionally, it has the option to include other Active Directory fields. This means that you can create
a custom hyperlink and insert (for example) the message sender > web page field to insert a link to
the sender's own web page in the signature. To insert a custom hyperlink and specify a field within it,
follow the steps below:
1. Use the fields panel to insert a custom hyperlink field. When this field is added to a template, the
hyperlink window is displayed:
2. Click the down arrow associated with this field to select the required Active Directory field to insert as
the link target (for example, you might wish to use the message sender's web page):
USER MANUAL
Exclaimer Signature Manager Exchange Edition
Page | 233
3. Enter text that users click to activate the link. Note that this text is only displayed when the template is
in preview mode [pg.200], or when the template is applied to email messages.
4. Click OK to confirm details.
USER MANUAL
Exclaimer Signature Manager Exchange Edition
Page | 234
Custom Image
The custom image field allows you to insert an image and use it as a trigger for a hyperlink - for
example:
When the recipient clicks on the image, the specified web page will open in their default browser. You
can specify an image from a specific file location, or from an Active Directory field. To do this, follow
the steps below:
1. Use the fields panel to insert a custom image field. When this field is added to a template, the image
window is displayed:
2. Enter link information for the image, as summarized below:
Item
Summary
Location
Click the browse - button to the right of the location field to navigate drives
and folders to specify an image location. Alternatively, click the down arrow
associated with this field to select an Active Directory field to insert as the image
source (for example, you might wish to use the message sender's thumbnail photo):
…/continued
USER MANUAL
Exclaimer Signature Manager Exchange Edition
Page | 235
Item
Summary
Hyperlink
Use this option to add a hyperlink for the image.
Type the required URL into the hyperlink field (i.e. the web address that should be
displayed when a user clicks the image in the message. Alternatively, click the down
arrow associated with this field to select an Active Directory field to insert as the link
(for example, you might wish to use the message sender's web page).
Alt Text
Enter text to be displayed when the recipient hovers their mouse over the image, or
if the image cannot be displayed.
-
NOTE
Remember that you can switch to preview mode (from the template editor
toolbar [pg.200]) to see the effect of any dynamic fields you have inserted.
USER MANUAL
Exclaimer Signature Manager Exchange Edition
Page | 236
QR Code
The QR code (Quick Response code) field is used to insert special barcode type images which can be
scanned by QR scanners and smartphones - for example:
These images contain information comprised of text and/or other fields - for example, you might
include contact information, website details, etc. Using Exclaimer Signature Manager Exchange
Edition, you can add a QR code [pg.238] and in doing so, specify:
The type of QR code that is required (i.e. the type of information to be encapsulated - URL, contact,
calendar event, etc.)
How the QR code should be displayed (size, sharpness, shape, color and background)
Any text, Active Directory fields and hyperlink details to be associated with the QR code
If required, you can also use logo options [pg.242] to display a given logo with the QR code. You can
choose to display the logo as a background, in the center of the QR code or in a user defined position.
USER MANUAL
Exclaimer Signature Manager Exchange Edition
Page | 237
Adding a QR Code to a Template
To add a QR code image, use the fields panel to insert a QR code field. When this field is added to a
template, the QR code window is displayed:
Access logo
options
Choose the type
of QR code
required to add it
to the pane below
Change the
color of the QR
code image
and/or
Change the
appearance of
the QR code
image
Add fields to insert
dynamic content for
QR code image
information
Preview the image
using a specified
Active Directory user
Displays information
added for the image
(these details can be
changed if required)
To apply a hyperlink
to the QR code
image, enter link
details here
From here:
1. Use the code type drop-down list to choose the type of QR code image that you wish to create. You can
choose one of the following options:
Action
Summary
URL
Displays a URL window - enter the full URL for the website that you wish to
include within the image.
Contact Details
Displays a contact details window which is pre-populated with name,
telephone, email and address fields from the Active Directory. If required, use
arrows associated with each field to make changes.
Calendar Event
Displays a calendar event window so you can add event name, location, time
zone and the event start/end times.
Map Location
Displays a map location window so you can enter latitude and longitude
coordinates.
USER MANUAL
Exclaimer Signature Manager Exchange Edition
Page | 238
Action
Summary
Telephone
Number
Displays a telephone number window which is pre-populated with the
telephone field from the Active Directory. If required, use the arrow associated
with this field to make changes.
SMS Text
Displays the SMS text window. Here, enter the required telephone number (if
required, use the arrow associated with this field to populate it via an Active
Directory field). Then, enter required text for the SMS text message in the field
below (you can use the insert button to include Active Directory fields here).
NOTE
Text messages are limited to 160 characters in length any content after 160 characters will be truncated.
-
2. Having selected the code type and entered associated details, the image and any details that you
entered are added to the QR code window. From here you can use toolbar options to:
-
Change the size, sharpness and shape of the QR code image
-
Change the color of the image (i.e. the actual composite parts) and/or the image
background
-
Click in the information pane (populated with details you have entered so far) and insert
Active Directory fields
-
Preview the image using details for a selected user
3. If you would like recipients to be able to click on the QR code image to access a website (or perhaps a
mailto link), enter link details using hyperlink and alt text fields.
4. If required, click the logo tab (at the top of the window) to apply a logo to the image. Here, you can
browse for the required logo, or use the arrow associated with the logo field to add a logo via an Active
Directory field.
5. Click OK to confirm details and add the QR code image to the template.
NOTE
Certain combinations of images and colors may produce a QR code that is not
always readable. We advise customers test the QR code with a smartphone to
ensure it works as expected, before releasing it in a signature.
To edit the properties of an existing QR code image in a template, simply
double-click the image to access the QR code window.
USER MANUAL
Exclaimer Signature Manager Exchange Edition
Page | 239
Changing the Size of the QR Code
Having defined a QR code in the QR code window, the image can be resized as required. To resize the
image, hover your cursor over the marker in the bottom left-hand corner of the image to enable sizing
grab handles:
Hover the cursor over the
marker in the bottom
right-hand corner to
enable grab handles
USER MANUAL
Exclaimer Signature Manager Exchange Edition
Page | 240
Having done this, you can simply drag the image to the required size:
USER MANUAL
Exclaimer Signature Manager Exchange Edition
Page | 241
Adding a Logo Image
If required, you can choose to associate a logo (or any other image) with a QR code. A logo image can
be displayed as a background for the QR code, in the center of the QR code or in a user defined position
[pg.243].
To add a logo image, select the logo tab from the QR code window. Here, the QR code image is
displayed (but cannot be adjusted [pg.243]) so you can see how it will look with your selected image:
If you are adding a logo image from a file on your computer or network, select the browse [...] button
associated with the image source field to locate and select the required image file.
Alternatively, you can add a logo image via an Active Directory field. To do this, select the arrow
associated with the image source field and choose the required field:
USER MANUAL
Exclaimer Signature Manager Exchange Edition
Page | 242
The selected image is displayed with the QR code. By default, it is set as background to the code - if
required, use position options to change this.
If the position is set to in center of code, the logo image is positioned in the center of the QR code for example:
When the position is set to as background to the code or in center of code, the image is automatically
scaled for a best fit with the QR code (if you subsequently change the size of the QR code, the logo
image is scaled accordingly).
When the position is set to user defined, you can adjust the size and the position of the logo image
manually - please see repositioning a QR code and logo manually [pg.243] for further information
about this option.
Repositioning a QR Code and Logo Manually
If you have added a logo image and you wish to manually control the position and/or size of that image
in relation to the QR code, access the logo tab and set the position to user defined:
Ensure that the
logo tab is
selected
Set the logo
position to user
defined
USER MANUAL
Exclaimer Signature Manager Exchange Edition
Page | 243
Having done this, the logo is separated from the QR code. To move the logo, hover your cursor over
the logo image to enable positioning grab handles and simply drag it to the required position - for
example:
Hover the cursor over
the image to enable
positioning grab
handles
The image can be
dragged to any new
position - i.e. above,
below, adjacent to or
behind the QR code
NOTE
Notice that the logo image is displayed with resizing 'handles' (one in
each corner). If required, use these to scale the image up or down.
When you are repositioning the logo, the QR code image is also displayed so you can easily position
the logo in relation to the QR code. However, the QR code cannot be moved or adjusted here.
To adjust the position (and other settings) for the QR code, select the QR code tab. Here you will see
the QR code and the logo, but only the QR code can be adjusted. Hover your cursor over the QR code
image to enable positioning grab handles - then, simply drag it to the required position.
In summary, although the QR code and the logo image are associated with each other, each of these
items can only be adjusted within its respective QR code or logo tab.
NOTE
Keep in mind that you are positioning the logo in relation to the QR code
(or vice versa) - you are not specifying where these items are positioned
within the template.
Once the QR code and any associated logo are confirmed (and the QR
code window is closed), their ultimate position and alignment within the
template is controlled by any settings and properties associated with the
QR code element in the template editor, as with any other field.
USER MANUAL
Exclaimer Signature Manager Exchange Edition
Page | 244
Optimizing the display of QR codes and logos
Each QR code is comprised of cells, as shown below:
The composite
parts of a QR code
are known as cells
Using cell appearance and color settings for the QR code, you can control the size, sharpness, shape,
color and background of these cells:
When a QR code is first added, these settings are automatically defined to display the code with
optimal clarity. However, if you are also using a logo image, you may need to adjust these settings to
ensure that the logo is displayed clearly.
This is particularly relevant where the position of the logo image is set to as background to the code
or user defined. With default cell appearance settings, the logo image is typically obscured by the QR
code however, reducing the cell size and cell sharpness will increase transparency, making the logo
image clearer. You may also find that adjusting the cell shape and color settings for the QR code also
helps with the clarity of a logo image.
USER MANUAL
Exclaimer Signature Manager Exchange Edition
Page | 245
Rotating Banner Ad
The rotating banner ad field allows you to place multiple images in a given folder location so when
displayed in messages, the image changes (rotating through images in the given folder). Images can
be associated with a (single) hyperlink so, when clicked, the given web address is displayed. Image
rotation can be set to either random or sequential.
To add a rotating banner ad, follow the steps below:
1. Use the fields panel to insert a rotating banner ad field.
2. Select the newly inserted field and check the properties pane - properties for the image are shown:
Properties for
the rotating
banner ad
The rotating
banner ad
placeholder
3. Select the drop-down list to the right of the banner chooser field.
USER MANUAL
Exclaimer Signature Manager Exchange Edition
Page | 246
4. Scroll down to the sequence section and choose whether to display images in sequence, or randomly:
5. Set remaining properties as follows:
Action
Summary
Folder
Location
Click the browse - button to open the folder location window and click
browse to navigate drives and folders to specify a folder location. Alternatively,
click insert to navigate available fields and select an Active Directory field to
insert as the location.
Filter
If required, you can use wildcards so that only certain images are used (for
example, you might wish to use a series of images which start with '13' and
would therefore specify '13*.*' or you might only wish to use JPEG images and
therefore specify '*.JPG'.
Address
Use this option to apply a hyperlink to banner images. Click the browse button to open the address window and type the required URL into the address
field (i.e. the web address that should be displayed when a user clicks the image
in the message).
Alternatively, click insert to navigate available fields and select an Active
Directory field as the link target (for example, you might wish to use the
message sender's web page).
Hover Text
Enter text to be displayed when a user hovers the cursor over a rotating banner
ad image.
Alt Text
Enter text to be displayed if images cannot be displayed.
-
NOTE
Remember that you can switch to preview mode (from the template editor
toolbar [pg.200]) to see the effect of any dynamic fields you have inserted.
USER MANUAL
Exclaimer Signature Manager Exchange Edition
Page | 247
RSS Feed
The RSS feed field is used to insert an RSS feed into email messages - for example:
To insert an RSS feed, use the fields panel to insert an RSS feed field. When this field is added to a
template, the content window is displayed:
This window is used to determine which RSS feed elements should be included in the template - i.e.
what RSS details should be displayed when the email message is received. An RSS feed is comprised
of a number of different elements. By default, the RSS Title (as hyperlink) and RSS Description
elements are included, which means that recipients of the email message would see each RSS item
with a title and summary text (as shown in the example at the start of this section).
USER MANUAL
Exclaimer Signature Manager Exchange Edition
Page | 248
If required, you can change the composition of the RSS feed field via the fields panel in this window:
All RSS fields are available for selection and, as with any other field, properties are displayed in the
right-hand pane when a field is inserted and then selected. However, these properties relate to each
element of the RSS feed. Please refer to RSS feed properties [pg.250] for further information about
defining properties for the RSS feed as a whole (i.e. to specify a URL and a channel).
USER MANUAL
Exclaimer Signature Manager Exchange Edition
Page | 249
RSS Feed Properties
Having added an RSS feed field and confirmed the required composite parts (as above), the RSS feed
element is added to your template. When this element is selected, general settings for the RSS feed
can be defined in the properties pane, within the content section:
RSS feed settings
Select the RSS
feed element
Key properties are summarized below:
Action
Summary
RSS URL
Enter required URL for the feed.
RSS
Channel
Some organizations have feeds with multiple channels - for example, one channel
for news and another for announcements. Use this option if a specific channel
selection is required.
RSS Item
Choose whether to display a random feed entry, or a sequential number. Use the
drop-down list and scroll down to the sequencers section to change this setting.
Content
Any fields that have been included in the RSS feed element (as defined when the
RSS feed field was added to the template [pg.248]) are shown here. If you wish to
change these fields, click to activate this property and then select the browse button to open the content window.
-
NOTE
Remember that you can switch to preview mode (from the template editor
toolbar [pg.200]) to see the effect of any dynamic fields you have inserted.
USER MANUAL
Exclaimer Signature Manager Exchange Edition
Page | 250
Composite Field
A composite field is used as a container for multiple fields that need to be used together. For example,
you might define a composite field which contains department, company and sender's web page. A
composite field might contain just fields, but it can also contain text. To define a composite field,
follow the steps below:
1. Use the fields panel to insert a composite field. When this field is added to a template, the content
window is displayed:
2. Use the fields panel to insert required fields - i.e. fields that will make up the composite field. Adding
fields here works in exactly the same way as adding any sort of field - you can select any field that has
been added and update properties in the right-hand pane:
3. Having entered all required fields, click OK to exit from the content window and return to the template
editor.
USER MANUAL
Exclaimer Signature Manager Exchange Edition
Page | 251
Social Media Strip
The social media strip field inserts a strip of predefined social media icons which can then be tailored
to meet your requirements. By default, the social media strip includes icons (and associated
properties) for Facebook, Linked In, Twitter, You Tube and Google Plus:
To add a social media strip to your template, select the social media strip field from the fields panel
to access the social media strip window:
Add a completely
new social media
item
Delete an item
from the current
strip
Add an item from
the list of
available icons
Personalize social
media items using
properties
Social media
items chosen to
be included in
your strip
Reorganize the
strip
Common social
media items are
included in the
available icons list
USER MANUAL
Exclaimer Signature Manager Exchange Edition
Page | 252
From here you can:
Add an existing item to the social media strip [pg.253]
Personalize items in the social media strip [pg.254]
Add a new item to the social media strip [pg.257]
Remove an item from the social media strip [pg.258]
Re-organize the social media strip [pg.259]
Customize the social media strip [pg.259]
Adding an Existing Item to the Social Media Strip
A list of common social media items is displayed in the available icons pane, on the left-hand side of
the social media strip window. To add one of these items to your social media strip, simply select it
from this list and click the add button:
Click the add
button to add the
selected item to
your strip
Select the required
item
The selected item is added to the end of the social media strip, shown in the center pane. The item is
added with an icon and generic properties which you then need to personalize [pg.254] with your own
details. If required, you can also choose to reorganize items [pg.259] in this pane to change the
sequence of the completed social media strip.
USER MANUAL
Exclaimer Signature Manager Exchange Edition
Page | 253
Personalizing a Social Media Item
When a social media item is added from the available icons list, it is added with an icon and generic
properties. For example, when the Facebook item is added, the default hyperlink associated with the
icon is http://www.facebook.com, therefore you will need to update this with the link to your own
Facebook page.
Properties for each item are listed within two main categories - field and label:
Field properties [pg.255] are concerned with the behavior and appearance of the item - for example,
what image is used for the icon, what hyperlink is used when the recipient clicks on the icon, etc. Label
properties [pg.256] can be used if you wish to add some text to be displayed with an icon in the strip.
USER MANUAL
Exclaimer Signature Manager Exchange Edition
Page | 254
Field Properties
When an item is added to the social media strip, a range of field properties is available however, there
are a number of key properties that should be checked and updated as required. These items are
shown below:
Hover text
Hyperlink
Image location
Here:
The alt text property contains text that will be displayed when a message recipient hovers their
cursor over the icon for that item. Default text is provided but you may wish to change this to
something more personal (for example, 'Visit us on Facebook!').
The hyperlink property contains a link to the main site for the social media item - for example,
http://www.facebook.com. You should update this link to reflect your own feed/page - for
example, http://www.facebook.com/pages/Exclaimer/148766371817678.
The image location property shows where the icon for the social media item is stored. If you are
happy to use the default icon then there is no need to change this however, if you wish to use an
alternative icon, you should change this property accordingly.
USER MANUAL
Exclaimer Signature Manager Exchange Edition
Page | 255
Label Properties
Label properties can be used if you wish to add text to a social media item - for example:
To do this, click anywhere within the topmost label field to activate it and then click the associated
down-arrow to open the text box and add required text:
USER MANUAL
Exclaimer Signature Manager Exchange Edition
Page | 256
Adding a New Item to the Social Media Strip
If you need to add a social media item which is not shown in the available icons list, click the add new
option at the top of the social media strip window:
Add a new item
From here, the add icon window is displayed:
USER MANUAL
Exclaimer Signature Manager Exchange Edition
Page | 257
Complete details for this item using the table below as a guide:
Toolbar option
Summary
Icon Name
Enter a name for this item. This name is used to identify this item in the
available icons list.
Location
Click the browse button associated with this field to navigate drives and
folders to locate the required image.
Hyperlink
Enter the full URL associated with this item - for example,
http://www.facebook.com/pages/Exclaimer/148766371817678.
Alt Text
Enter text to be displayed when a message recipient hovers their cursor
over the icon for this item - for example, 'Visit us on Facebook!'.
Removing an Item from the Social Media Strip
To remove an item from the social media strip, simply select the required item (in the center pane)
and click the cross icon at the top of the social media strip window:
Remove an existing item
USER MANUAL
Exclaimer Signature Manager Exchange Edition
Page | 258
Re-Organizing the Social Media Strip
Social media items are displayed in the sequence that they appear within the center pane of the social
media strip window. To change this sequence, select an item and use move up/ move down buttons
to shift its position in the list.
Customizing the Social Media Strip
Once a social media strip has been added to a template, you can define properties for the strip as a
whole. For example, you can define a border, background color and layout. To do this, select the social
media strip and access the properties panel:
Choose how the
social media strip
should be displayed
Select the social
media strip element
within the template
USER MANUAL
Exclaimer Signature Manager Exchange Edition
Page | 259
List of Fields
The list of fields field is used to choose a number of fields to be added [pg.260], together with
associated labels.
Having added a list of fields, you can specify font properties for all labels [pg.263], so there is no need
to format each label individually unless you have a particular need for doing so. You can also choose
how the fields and labels should be displayed [pg.264] - for example, you might choose to use a tabular
layout or as a single line with a given separator.
The example below shows an extract from a template in both design and preview modes. Here, a list
of fields element has been added to insert three fields with associated labels, displayed as a single line
with a separator:
Design Mode
Preview Mode
Adding a List of Fields
1. To add a list of fields, use the fields panel to insert a list of fields field. When this field is added to a
template, the list of fields window is displayed:
USER MANUAL
Exclaimer Signature Manager Exchange Edition
Page | 260
2. Click the add button to add the first required field. The add field window is displayed:
3. Enter a label for the field and use the arrow associated with field to choose the required field:
USER MANUAL
Exclaimer Signature Manager Exchange Edition
Page | 261
4. Add as many fields as required in this way and then click OK to return to the template editor, where the
list of fields element is added to the template:
Each of the included fields
can be updated in the
properties pane (or
double-click the list of
fields element to open the
list of fields window)
Select the list of
fields element
USER MANUAL
Exclaimer Signature Manager Exchange Edition
Page | 262
Changing the Appearance of All Field Labels
To quickly change the appearance of all labels in a list of fields, simply select the list of fields element
and update font settings within the label font section of the properties pane:
Set font properties
for all labels in the
list
Select the list of
fields element
USER MANUAL
Exclaimer Signature Manager Exchange Edition
Page | 263
Choosing How a List of Fields Is Arranged
By default, a list of fields is presented in tabular form, with labels in the left-hand column and fields
on the right. If required, you can change the arrangement using layout > arrangement settings in the
properties pane:
Select the list of
fields element
Choose how the
fields are arranged
Available options are summarized below:
Action
Summary
In a table with
each field and
each label in
separate cells
This is the default setting with field labels in the left-hand column and fields
on the right:
With this option, additional properties are available so you can also specify
how the table should be displayed:
…/continued
USER MANUAL
Exclaimer Signature Manager Exchange Edition
Page | 264
Action
Summary
In a table with
each label and
field in the
same cell
Arranges the label and field in the same cell:
With this option, additional properties are available so you can also specify
how the table should be displayed:
One field after
another with
an optional
separator
With this option, each label and field is arranged in a continuous line,
optionally delimited by a separator:
The separator is defined using the field separator property, which is available
when this option is selected:
Having added a separator, you can apply formatting for your chosen character
using separator font properties:
…/continued
USER MANUAL
Exclaimer Signature Manager Exchange Edition
Page | 265
Action
Summary
Each field on a
new line
Use this option to display each label and field together on a new line:
Allow fields to
control the
layout
Select this option to accept the most appropriate layout as determined by
fields you have selected for inclusion:
USER MANUAL
Exclaimer Signature Manager Exchange Edition
Page | 266
Smart Tables
The custom smart tables field can be used to insert a table and specify content / attributes using
straightforward data entry fields. This is a quick and easy way to insert a table and include Active
Directory fields (or other content) at the same time; the alternative would be to insert a standard
HTML table [pg.212] and add fields or other content manually.
Having selected the custom smart tables field, the smart table rows window is displayed:
By default, a two column table is added. If you need a smart table with more (or fewer) columns you
can continue with the setup for two columns and adjust the number of columns after the table is
inserted, or you may prefer to cancel this operation and use the table [pg.212] option from the HTML
toolbar (since this option allows you to specify the required number of rows and columns at the
outset).
From here, click add to start adding rows to the table. The smart table row editor allows you to define
content for each column in the row - you can add text or fields, as required. If you are adding a field,
you can choose to suppress this row if no Active Directory information is found for the field when the
signature is processed:
Type a label for the
field in the first
column
Use the insert option to select
the required AD field and
then use the properties
option to set properties for
that field
Do not show this row if
no AD information is
present for this field
USER MANUAL
Exclaimer Signature Manager Exchange Edition
Page | 267
If required, you can choose to not show a table row if no Active Directory information is found for a
specified field - for example:
Continue to add as many rows as needed. If required, you can select a row and use up / down options
to adjust the sequence. You can also edit and delete existing rows. Once all rows have been added,
click OK to insert the table into the template.
Updating an Existing Smart Table
To update an existing smart table in a template, simply select and double-click the table. Alternatively,
select the entire table and expand the misc section in the properties pane. From here, select the
browse - button to the right of the rows entry. The smart table rows window is displayed so you
can add, edit or remove rows as required.
USER MANUAL
Exclaimer Signature Manager Exchange Edition
Page | 268
Server Fields
Fields in the server fields section are summarized below:
Field
Inserts...
Server Distinguished
Name
Distinguished name information for the mail server (for example:
CN=HELPDC,OU=Domain Controllers,DC=network26,DC=local)
Server IP Address
IP address details for the mail server (for example:
fe80::e5ce:af42:688c:d2d8%10 192.168.26.1)
Server Locale
Locale information for the mail server (for example: en-US)
Server NETBIOS
Name
The NETBIOS name for the mail server (for example: HelpDC)
Server Qualified
Domain
Qualified domain information for the mail server (for example:
HelpDC.network26.local)
-
NOTE
For fields that contain multiple values (for example, Server IP
Address), each value will be shown on a new line by default.
USER MANUAL
Exclaimer Signature Manager Exchange Edition
Page | 269
Advanced Fields
Fields in the advanced fields section are summarized below:
Field
Inserts...
Conditional
field
Set conditions under which Active Directory information will or will not be included. For
further information please refer to conditional field [pg.272].
Other
User's AD
field
Add Active Directory information for another (specified) user. Once this field is added, the
other user's AD field window is displayed so you can choose what Active Directory
information to include and for whom:
Here, you can select Active Directory details to be included for another user (i.e. a user
who is not actually sending the message). You can include details for:
The message sender's manager (as identified from the content of the sender's
manager display name field in the Active Directory)
A specified user from the Active Directory (click the browse [...] button to select the
required user)
The person who has delegated another user to send email messages on their behalf
(please refer to the fields > message sent on behalf [pg.219] section for an explanation
of the sent on behalf scenario)
The user matched for a query defined using exchange advanced [pg.230] fields
…/continued
USER MANUAL
Exclaimer Signature Manager Exchange Edition
Page | 270
Field
Inserts...
Using field content options (at the top of this window) you can choose to include
information from a single Active Directory field, or multiple fields. For a single field, select
the down arrow and make your selection:
For multiple fields, click the [...] button to open the expandable field editor and then
select all required fields:
Click OK to confirm your selections and exit back to the updated other user's AD field
window - for example:
USER MANUAL
Exclaimer Signature Manager Exchange Edition
Page | 271
Conditional Field Examples
The conditional field allows you to set conditions under which defined signature content will or will
not be included. Often, you can achieve the same results by creating different signature templates
[pg.183] and associated signature policies [pg.64] however, the conditional field allows you to specify
and control content variations within a single template.
For large organizations dealing with complex signature variations, this can be a great advantage since
it allows you to minimize the number of templates and associated policies required and yet still specify
highly detailed conditional content. To help you gain an understanding of how the conditional field
can be used, the three sample scenarios and detailed instructions are available:
Conditional Field Example 1 [pg.273] - shows a conditional field being used to apply different
signature content for users within two given departments, and a generic signature for everyone
else
Conditional Field Example 2 [pg.282] - shows a conditional field being used to apply different
signature content (including an image) for users in France and Germany, and a generic signature
for everyone else
Conditional Field Example 3 (Advanced) [pg.291] - shows advanced use of the conditional field
being used to apply different signature content incorporating nested conditional fields (i.e. one
conditional field within another conditional field)
USER MANUAL
Exclaimer Signature Manager Exchange Edition
Page | 272
Conditional Field Example 1
This example shows a conditional field being used to apply different signature content for users within
two given departments, and a generic signature for everyone else. The scenario for this example is
illustrated below:
USER MANUAL
Exclaimer Signature Manager Exchange Edition
Page | 273
To achieve this scenario using Exclaimer Signature Manager Exchange Edition, follow the steps below:
1. Edit [pg.193] or create [pg.185] the required template so that the template editor is open.
2. Position your cursor at the position where conditional content is required.
3. Using the fields panel, insert a conditional field (listed in the advanced section). The conditional field
window is displayed:
4. Click the add button to enter the first condition (i.e. to add signature content and associated rules for
the IT department). The add condition window is displayed:
USER MANUAL
Exclaimer Signature Manager Exchange Edition
Page | 274
5. Using the drop-down lists associated with the if field, navigate to select message sender > organization
> department field:
6. Leave the qualifier as the default is equal to and type IT into the associated value field:
7. Click the [...] button associated with the then this conditional field's value is field to open the
expandable field editor window. Use this window to enter content to be inserted if the associated
condition is met (i.e. for messages sent by the IT department). You can enter text and/or fields as
required:
NOTE
Any text entered here will inherit font and other formatting properties
which are applied to the conditional field element as a whole. See
step 20 [pg.280] for details about changing these properties.
USER MANUAL
Exclaimer Signature Manager Exchange Edition
Page | 275
8. Click OK to save changes and exit back to the add condition window, where your first condition is now
displayed:
9. Click OK to exit back to the conditional field window:
10. Click the add button to enter the second condition (i.e. to add signature content and associated rules
for the Sales department). The add condition window is displayed:
USER MANUAL
Exclaimer Signature Manager Exchange Edition
Page | 276
11. Using the drop-down lists associated with the if field, navigate to select message sender > organization
> department field:
12. Leave the qualifier as the default is equal to and type Sales into the associated value field:
13. Click the [...] button associated with the then this conditional field's value is field to open the
expandable field editor window. Use this window to enter content to be inserted if the associated
condition is met (i.e. for messages sent by the Sales department). You can enter text and/or fields as
required:
NOTE
Any text entered here will inherit font and other formatting properties
which are applied to the conditional field element as a whole. See
step 20 [pg.280] for details about changing these properties.
USER MANUAL
Exclaimer Signature Manager Exchange Edition
Page | 277
14. Click OK to save changes and exit back to the add condition window, where your second condition is
now displayed:
15. Click OK to exit back to the conditional field window where both conditions are now displayed:
16. To define signature content that should be applied for everyone else (i.e. people who are not in either
the IT or Sales departments), move to the bottom of this window and click the [...] button associated
with the if none of the above apply then this field's value is field. The expandable field editor window
is displayed.
USER MANUAL
Exclaimer Signature Manager Exchange Edition
Page | 278
17. Use this window to enter content to be used if neither of the specified conditions are met (i.e. for
messages sent by non IT/Sales users). You can enter text and/or fields as required:
NOTE
Any text entered here will inherit font and other formatting properties
which are applied to the conditional field element as a whole. See
step 20 [pg.280] for details about changing these properties.
18. Click OK to save changes and exit back to the conditional field window:
Settings for the conditional field are now complete, with two conditions (one for IT users and one
for Sales users) and then required content for everyone else.
USER MANUAL
Exclaimer Signature Manager Exchange Edition
Page | 279
19. Click OK to exit back to the template editor, where the conditional field is now shown:
20. Select this field and use appearance settings in the properties pane (on the right-hand side of the
template editor) to apply required formatting. Any properties specified here will be applied to the
associated conditional content when it is used:
USER MANUAL
Exclaimer Signature Manager Exchange Edition
Page | 280
In preview mode for an IT user, this example is displayed as follows (notice that the text has the
same font settings as those defined for the conditional field element above):
21. Save the template in the normal way. The template can now be associated with a signature policy
[pg.64], where the only condition [pg.90] required is all messages (although you can apply further
conditions at policy level, if necessary).
NOTE
Using nested conditional fields (i.e. adding one conditional field within another
conditional field) can be a particularly powerful approach for advanced users
who need to create complex signatures to cater for a wide range of scenarios
within an organization. For further information, please refer to the conditional
field example 3 (advanced) [pg.291] section.
USER MANUAL
Exclaimer Signature Manager Exchange Edition
Page | 281
Conditional Field Example 2
This example shows a conditional field being used to apply different signature content for users in:
France (add a French flag image and a Paris address)
Germany (add a German flag image and a Berlin address)
Everyone else (add a globe image and a US address)
In this example, conditional content is added in the form of text and a custom image. The scenario for
this example is illustrated below:
USER MANUAL
Exclaimer Signature Manager Exchange Edition
Page | 282
To achieve this scenario using Exclaimer Signature Manager Exchange Edition, follow the steps below:
1. Edit [pg.193] or create [pg.185] the required template so that the template editor is open.
2. Position your cursor at the position where conditional content is required.
3. Using the fields panel, insert a conditional field (listed in the advanced section). The conditional field
window is displayed:
4. Click the add button to enter the first condition (i.e. to add signature content and associated rules for
French users). The add condition window is displayed:
USER MANUAL
Exclaimer Signature Manager Exchange Edition
Page | 283
5. Using the drop-down lists associated with the if field, navigate to select message sender > address >
country/region (2 letters) field:
6. Leave the qualifier as the default is equal to and type FR into the associated value field:
7. Click the [...] button associated with the then this conditional field's value is field to open the
expandable field editor window. Use this window to enter content to be inserted if the associated
condition is met (i.e. for messages sent by French users). You can enter text and/or fields as required to enter an image of a French flag, the custom image field can be used:
USER MANUAL
Exclaimer Signature Manager Exchange Edition
Page | 284
Select the required custom image [pg.235] in the normal way and add Paris address details as
text (alternatively, you could use Active Directory address fields if applicable):
NOTE
Any text entered here will inherit font and other formatting properties
which are applied to the conditional field element as a whole. See
step 20 [pg.290] for details about changing these properties.
8. Click OK to save changes and exit back to the add condition window, where your first condition is now
displayed:
9. Click OK to exit back to the conditional field window:
USER MANUAL
Exclaimer Signature Manager Exchange Edition
Page | 285
10. Click the add button to enter the second condition (i.e. to add signature content and associated rules
for German users). The add condition window is displayed:
11. Using the drop-down lists associated with the if field, navigate to select message sender > address >
country/region (2 letters) field:
12. Leave the qualifier as the default is equal to and type DE into the associated value field:
13. Click the [...] button associated with the then this conditional field's value is field to open the
expandable field editor window. Use this window to enter content to be inserted if the associated
condition is met (i.e. for messages sent by German users). You can enter text and/or fields as required
- to enter an image of a German flag, the custom image field can be used:
USER MANUAL
Exclaimer Signature Manager Exchange Edition
Page | 286
Select the required custom image [pg.235] in the normal way and add Berlin address details as
text (alternatively, you could use Active Directory address fields if applicable):
NOTE
Any text entered here will inherit font and other formatting properties
which are applied to the conditional field element as a whole. See
step 20 [pg.290] for details about changing these properties.
14. Click OK to save changes and exit back to the add condition window, where your second condition is
now displayed:
15. Click OK to exit back to the conditional field window where both conditions are now displayed:
USER MANUAL
Exclaimer Signature Manager Exchange Edition
Page | 287
16. To define signature content that should be applied for everyone else (i.e. people who are not in France
or Germany), move to the bottom of this window and click the [...] button associated with the if none
of the above apply then this field's value is field. The expandable field editor window is displayed.
17. Use this window to enter content to be used if neither of the specified conditions are met (i.e. for
messages sent by non-French/German users). You can enter text and/or fields as required - to enter an
image of a globe, the custom image field can be used:
Select the required custom image [pg.235] in the normal way and add the Head Office address
details as text (alternatively, you could use Active Directory address fields if applicable):
NOTE
Any text entered here will inherit font and other formatting properties
which are applied to the conditional field element as a whole. See
step 20 [pg.290] for details about changing these properties.
18. Click OK to save changes and exit back to the conditional field window:
USER MANUAL
Exclaimer Signature Manager Exchange Edition
Page | 288
Settings for the conditional field are now complete, with two conditions (one for French users
and one for German users) and then required content for everyone else.
19. Click OK to exit back to the template editor, where the conditional field is now shown:
USER MANUAL
Exclaimer Signature Manager Exchange Edition
Page | 289
20. Select this field and use appearance settings in the properties pane (on the right-hand side of the
template editor) to apply required formatting. Any properties specified here will be applied to the
associated conditional content when it is used:
In preview mode for a French user, this example is displayed as follows (notice that the text has
the same font settings as those defined for the conditional field element above):
21. Save the template in the normal way. The template can now be associated with a signature policy
[pg.64] where the only condition [pg.90] required is all messages (although you can apply further
conditions at policy level, if necessary).
NOTE
Using nested conditional fields (i.e. adding one conditional field within another conditional
field) can be a particularly powerful approach for advanced users who need to create
complex signatures to cater for a wide range of scenarios within an organization. For further
information, please refer to the conditional field example 3 (advanced) [pg.291] section.
USER MANUAL
Exclaimer Signature Manager Exchange Edition
Page | 290
Conditional Field Example 3 (advanced)
This example shows advanced use of the conditional field being used to apply different signature
content for users. In the case, nested conditional fields (i.e. one conditional field within another
conditional field) are used to achieve the example scenario below:
If a user's country is equal to England then insert a Conditional Field where:
-
If a user's country is equal to America then insert a Conditional Field where:
-
If the user's town contains York then insert the York address
If the user's state is equal to Surrey then insert the Guildford address
Otherwise insert the London address
If the user's town contains York then insert the New York address
If the user's state contains Texas then insert the Dallas address
Otherwise insert the Dubai head office address
For clarity, this example is illustrated on the following page.
USER MANUAL
Exclaimer Signature Manager Exchange Edition
Page | 291
Advanced conditional field scenario:
USER MANUAL
Exclaimer Signature Manager Exchange Edition
Page | 292
To achieve this scenario using Exclaimer Signature Manager Exchange Edition, follow the steps below:
Stage 1: Add a conditional field and specify the first condition for users based in England (via a
nested conditional field to refine by city/state) [pg.293]
Stage 2: Specify the second condition for users based in America (via a nested conditional field to
refine by city/state) [pg.300]
Stage 3: Specify signature content for all other users (i.e. users who are not in England or America)
[pg.305]
Additionally, further information about how appearance properties for nested fields are inherited
from the 'master' field can be found in the understanding inheritance of appearance properties
[pg.307] section, at the end of this section.
Stage 1: Add a Conditional Field & Specify the First Condition for Users Based in England
1. Edit [pg.193] or create [pg.185] the required template so that the template editor is open.
2. Position your cursor at the position where conditional content is required.
3. Using the fields panel, navigate to select the advanced > conditional field. The conditional field window
is displayed:
USER MANUAL
Exclaimer Signature Manager Exchange Edition
Page | 293
4. Click the add button to enter the first condition (i.e. to add signature content and associated rules for
users based in England). The add condition window is displayed:
5. Using the drop-down lists associated with the if field, navigate to select message sender > address >
country/region field:
6. Leave the qualifier as the default is equal to and type England into the associated value field:
7. Click the [...] button associated with the then this conditional field's value is field to open the
expandable field editor window. Use this window to enter another conditional field to determine the
city/state and thus signature content for users in England. First, navigate to select advanced >
conditional field:
USER MANUAL
Exclaimer Signature Manager Exchange Edition
Page | 294
The conditional field window is displayed:
8. Click the add button to enter the first condition (i.e. to add signature content and associated rules for
users based in York). The add condition window is displayed. Using the drop-down lists associated with
the if field, navigate to select message sender > address > city field:
9. Click OK to save changes and exit back to the add condition window, where your condition is now
displayed. Change the qualifier to contains and type York into the associated value field (alternatively,
you could use the equal to qualifier and enter the value as New York):
USER MANUAL
Exclaimer Signature Manager Exchange Edition
Page | 295
10. Click the [...] button associated with the then this conditional field's value is field to open the
expandable field editor window. Use this window to enter content to be inserted if the associated
condition is met (i.e. for messages sent by users based in York, England). You can enter text and/or
fields as required:
NOTE
By default, any text entered here will inherit font and other formatting properties which
are applied to the 'master' conditional field element as a whole (as defined at the very
end of this process). However, if you wish to apply specific appearance properties for
England signatures, you can define them in step 21 [pg.299].
For further information about how appearance properties for nested fields are inherited
from the 'master' field, see understanding inheritance of appearance properties [pg.307].
11. Click OK to save changes and exit back to the add condition window.
12. Click OK to exit back to the conditional field window.
13. Click the add button to enter the condition (i.e. to add signature content and associated rules for users
based in Surrey). The add condition window is displayed. Using the drop-down lists associated with the
if field, navigate to select message sender > address > state/province field:
USER MANUAL
Exclaimer Signature Manager Exchange Edition
Page | 296
14. Click OK to save changes and exit back to the add condition window, where your condition is now
displayed. Leave the qualifier as the default is equal to and type Surrey into the associated value field:
15. Click the [...] button associated with the then this conditional field's value is field to open the
expandable field editor window. Use this window to enter content to be inserted if the associated
condition is met (i.e. for messages sent by users based in Surrey, England). You can enter text and/or
fields as required:
NOTE
Any text entered here will inherit font and other formatting properties
which are applied to the conditional field element as a whole. See
step 21 [pg.299] for details about changing these properties.
16. Click OK to save changes and exit back to the add condition window.
USER MANUAL
Exclaimer Signature Manager Exchange Edition
Page | 297
17. Click OK to exit back to the conditional field window:
18. To define signature content that should be applied for all other users based in England (i.e. people who
are not in York or Surrey), move to the bottom of this window and click the [...] button associated with
the if none of the above apply then this field's value is field. The expandable field editor window is
displayed.
19. Use this window to enter content to be used - i.e. the London address. You can enter text and/or fields
as required:
NOTE
Any text entered here will inherit font and other formatting properties
which are applied to the conditional field element as a whole. See
step 21 [pg.299] for details about changing these properties.
USER MANUAL
Exclaimer Signature Manager Exchange Edition
Page | 298
20. Click OK to save changes and exit back to the conditional field window:
Settings for the conditional field are now complete, with two conditions (one for York users and
one for Surrey users) and then required content for all other users based in England.
21. Click OK to exit back to the expandable field editor for the England condition, which now contains a
conditional field element:
If required, select this field and use appearance settings in the properties pane (on the right-hand
side of the window) to apply required formatting. Any properties specified here will be applied to
the associated conditional content when it is used - i.e. to all 'English' signature content.
NOTE
However, appearance property settings for nested fields are inherited from the 'master'
conditional field, so if you intend to use the same formatting for all signature content (i.e. for users
based in England, America or anywhere else) then you can leave these settings as they are and
update properties for the final conditional field at the end of this process (see stage 3, step 5
[pg.307]). For further information about how appearance properties for nested fields are inherited
from the 'master' field, see understanding inheritance of appearance properties [pg.307].
USER MANUAL
Exclaimer Signature Manager Exchange Edition
Page | 299
22. Click OK to save changes and exit back to the add condition window.
23. Click OK to exit back to the conditional field window, where the condition for England is now shown:
Stage 2: Specify the Second Condition for Users Based in America
1. Click the add button to enter the first condition (i.e. to add signature content and associated rules for
users based in America). The add condition window is displayed:
2. Using the drop-down lists associated with the if field, navigate to select message sender > address >
country/region field:
USER MANUAL
Exclaimer Signature Manager Exchange Edition
Page | 300
3. Leave the qualifier as the default is equal to and type USA into the associated value field:
4. Click the [...] button associated with the then this conditional field's value is field to open the
expandable field editor window. Use this window to enter another conditional field to determine the
city/state and thus signature content for users in the USA. First, navigate to select advanced >
conditional field:
The conditional field window is displayed:
USER MANUAL
Exclaimer Signature Manager Exchange Edition
Page | 301
5. Click the add button to enter the first condition (i.e. to add signature content and associated rules for
users based in New York). The add condition window is displayed. Using the drop-down lists associated
with the if field, navigate to select message sender > address > city field:
6. Click OK to save changes and exit back to the add condition window, where your condition is now
displayed. Change the qualifier to contains and type York into the associated value field:
Notice we have only entered 'York' here because we know that no other cities contain 'York'.
However, if you are not confident about this, be precise and use equal to / New York instead).
7. Click the [...] button associated with the then this conditional field's value is field to open the
expandable field editor window. Enter content to be inserted if the associated condition is met - i.e. for
messages sent by users based in New York, USA. You can enter text and/or fields as required:
NOTE
Any text entered here will inherit font and other formatting properties
which are applied to the conditional field element as a whole. See step
15 [pg.304] for details about changing these properties.
USER MANUAL
Exclaimer Signature Manager Exchange Edition
Page | 302
8. Click OK to save changes and exit back to the add condition window.
9. Click OK to exit back to the conditional field window.
10. Click the add button to enter the condition (i.e. to add signature content and associated rules for users
based in Texas). The add condition window is displayed. Using the drop-down lists associated with the
if field, navigate to select message sender > address > state/province field:
11. Click OK to save changes and exit back to the add condition window, where your condition is now
displayed. Leave the qualifier as the default is equal to and type Texas into the associated value field:
12. Click the [...] button associated with the then this conditional field's value is field to open the
expandable field editor window. Enter content to be inserted if the associated condition is met (i.e. for
messages sent by users based in Texas, America). You can enter text and/or fields as required:
NOTE
Any text entered here will inherit font and other formatting properties
which are applied to the conditional field element as a whole. See step
15 [pg.304] for details about changing these properties.
USER MANUAL
Exclaimer Signature Manager Exchange Edition
Page | 303
13. Click OK to save changes and exit back to the add condition window.
14. Click OK to exit back to the conditional field window:
15. Click OK to exit back to the expandable field editor for the USA condition, which now contains a
conditional field element:
If required, select this field and use appearance settings in the properties pane (on the right-hand
side of the window) to apply required formatting. Any properties specified here will be applied to
the associated conditional content when it is used - i.e. to all 'English' signature content.
NOTE
However, appearance property settings for nested fields are inherited from the 'master'
conditional field, so if you intend to use the same formatting for all signature content (i.e. for users
based in England, America or anywhere else) then you can leave these settings as they are and
update properties for the final conditional field at the end of this process (see stage 3, step 5
[pg.307]). For further information about how appearance properties for nested fields are inherited
from the 'master' field, see understanding inheritance of appearance properties [pg.307].
USER MANUAL
Exclaimer Signature Manager Exchange Edition
Page | 304
16. Click OK to save changes and exit back to the add condition window.
17. Click OK to exit back to the conditional field window, where the condition for USA is now shown:
Stage 3: Specify Signature Content for All Other Users
With the 'master' conditional field window now defined with two conditions (one for England and the
other for USA), the final requirement is to define signature settings for 'everyone else' - i.e. users who
are not based in England, New York or Texas. To do this:
1. Move to the bottom of the conditional field window and click the [...] button associated with the if
none of the above apply then this field's value is field. The expandable field editor window is displayed.
2. Use this window to enter content to be used if neither of the specified conditions are met (i.e. for
messages sent by users who are not based in England, New York or Texas). You can enter text and/or
fields as required:
USER MANUAL
Exclaimer Signature Manager Exchange Edition
Page | 305
NOTE
Any text entered here will inherit font and other formatting properties
which are applied to the conditional field element as a whole. See
step 5 [pg.307] for details about changing these properties.
3. Click OK to save changes and exit back to the conditional field window:
Settings for the conditional field are now complete, with two conditions (one for England users
and one for USA users) and then required content for everyone else.
4. Click OK to exit back to the template editor, where the conditional field is now shown:
USER MANUAL
Exclaimer Signature Manager Exchange Edition
Page | 306
5. Select this field and use appearance settings in the properties pane (on the right-hand side of the
template editor) to apply required formatting. Any properties specified here will be applied to the
associated conditional content when it is used (see below for further information about how nested
conditional fields inherit appearance properties).
Understanding Inheritance of Appearance Properties
Having added the 'master' conditional field to the template, you can select it and then set appearance
properties (on the right-hand side of the template editor) to apply required formatting:
Any properties specified here will be applied to the associated conditional content when it is used.
However, in this case, we know that the conditional field contains other conditional fields, so it is
important to understand how nested fields inherit properties from the 'master' field.
If you choose to set appearance properties for nested conditional fields, content for those nested
fields will be formatted as per those properties - they will not inherit the appearance properties of this
'master' conditional field.
For example, suppose that you wanted to format signatures as follows:
England address to be formatted as: Arial, 8pt, Green (you would define these properties at stage
1, step 21 [pg.299])
USA address to be formatted as: Arial, 10pt, Red (you would define these properties at stage 2,
step 15 [pg.304])
Address for everyone else to be formatted as: Grey (you would define these properties at stage 3,
step 5 [pg.307])
USER MANUAL
Exclaimer Signature Manager Exchange Edition
Page | 307
General Fields
Fields in the general fields section are summarized below:
Field
Inserts...
Current Date
The current date (which may not necessarily be the same as the message sent date)
USER MANUAL
Exclaimer Signature Manager Exchange Edition
Page | 308
Properties
Properties are used to format and control template content. Almost every piece of content added to
a template will have properties associated with it. For example, a section of text will have various font
properties, a table cell will have border and background color properties and a hyperlink will have URL
and target properties.
Properties are used in all template types - HTML, RTF and Plain Text. This section contains useful
information for working with properties, including:
Working with the properties pane [pg.310]
Examples of properties in use [pg.313]
USER MANUAL
Exclaimer Signature Manager Exchange Edition
Page | 309
Working With the Properties Pane
The properties pane updates to reflect the current selection in the template editor:
Parent branch with
unsaved changes
Shows the type of
properties being
displayed
Summary
information for the
active property
The title at the top of the properties panel shows the type of properties displayed - i.e. the nature of
the selected item of content. In the above example, a table was selected in the HTML editor, so the
title of the property pane is displayed as <table>.
Many properties are associated with drop-down lists so you can select a pre-defined value, whilst
others require direct input. At the bottom of the properties pane, a small information area displays
summary text for the currently selected property.
NOTE
Remember - almost all items of content entered into the template
editor will have properties associated with them. If you aren't sure
how to change something, select it and check available properties.
USER MANUAL
Exclaimer Signature Manager Exchange Edition
Page | 310
Understanding How Properties are Inherited
As noted above, almost all items of content (i.e. text, images and fields) added to templates will have
properties that can be used to define formatting and/or behavior. However, when you are working
with content for templates, it is likely that you will encounter fields which are comprised of other
fields. For example:
The contact block [pg.223] field is typically comprised of multiple message sender [pg.222] fields
The address block [pg.226] field is typically comprised of multiple message sender [pg.222] >
address [pg.226] fields
A list of fields [pg.260] is comprised of any range of other fields
A conditional field [pg.270] might include other fields (and indeed other conditional fields)
Where one field (i.e. the 'master' field) contains another field, any properties associated with the
'master' field will be inherited by the fields contained within it. This is illustrated in the example below,
where a list of fields item contains a number of fields, including telephone number.
When the list of fields item is selected, the properties pane shows that font settings for this item are
set to Arial, 9pt, Blue. Then, when the fields section of the properties panel is expanded, each of the
fields contained within this item are shown with their own properties - by default, these are inherited
from the main list of fields item and this is explicitly stated in the property values:
Top-level appearance
properties to be applied to
the 'master' field and all
elements within it
Elements within the 'master'
field automatically inherit
properties from the 'master'
but these can be changed on
an individual basis
USER MANUAL
Exclaimer Signature Manager Exchange Edition
Page | 311
If required, you can change the values associated with inherited properties on an individual basis, as
shown below:
Top-level appearance
properties to be applied to
the 'master' field and all
elements within it
The telephone field has some
inherited properties from the
'master' list of fields field but
bold and font color properties
have been changed
USER MANUAL
Exclaimer Signature Manager Exchange Edition
Page | 312
Examples of Properties in Use
The following examples show how the properties pane [pg.310] updates to reflect selected content in
the template editor:
Field Properties
Address block field
is selected
Set properties for
the output of the
field - for example,
font attributes
Hyperlink Properties
Hyperlink is
selected
Update the link
URL, name, hover
text, etc. using the
properties pane
USER MANUAL
Exclaimer Signature Manager Exchange Edition
Page | 313
Text Properties
Set properties
for selected text
Item of text is
selected
Table Properties
Entire table is
selected
Set properties
for the table
NOTE
In some instances, content can be updated using the properties pane, or by using
toolbar options. For example, if you need to update the URL for a hyperlink, you can
select the link in the content pane and either choose the hyperlink option from the
toolbar - or you can just change the required property in the properties pane.
USER MANUAL
Exclaimer Signature Manager Exchange Edition
Page | 314
How To...
This section contains instructions for completing a selection of common tasks with templates, within
Exclaimer Signature Manager Exchange Edition:
How do I create a dynamic signature template? [pg.316]
How do I suppress blank lines if fields are not populated? [pg.317]
How do I create a contact block? [pg.319]
How do I insert an image at the start of messages? [pg.322]
How do I add a signature to the very end of email messages? [pg.324]
How do I add a signature after the latest reply in an email conversation? [pg.326]
How do I set the font for text in a template? [pg.328]
USER MANUAL
Exclaimer Signature Manager Exchange Edition
Page | 315
How Do I Create a Dynamic Signature Template?
To create a dynamic signature template, simply create a new template and add message sender
[pg.223] Active Directory fields in the required sequence and format. When working in HTML format,
you can be as creative as you like with tables, images, shading, etc.
To help you get started, a number of custom designs are included with the Exclaimer Signature
Manager Exchange Edition installation - an example is shown below.
Tapestry signature business card example
In this example, a template has been designed in tabular (business card) form. Font attributes are set
for certain fields to be displayed in blue and/or bold and images are also included within the table:
Design mode
Preview mode
USER MANUAL
Exclaimer Signature Manager Exchange Edition
Page | 316
How Do I Suppress Blank Lines If Fields Are Not
Populated?
When using fields in templates, it is often useful to suppress an item if there is no data in the Active
Directory to populate the field for a given user. There are a number of ways to suppress blank lines
when defining templates - you can:
Use a contact block [pg.317]
Use a smart table [pg.317]
Use a field prefix [pg.318]
Use a contact block
A contact block is a pre-defined set of fields, presented in tabular form. For example:
...produces:
When a contact block is used, rows are not displayed if Active Directory data is not present. For further
information please refer to message sender - general fields [pg.223]. Other 'block' fields (e.g. address
block [pg.226] and personal block [pg.225]) work in the same way.
Use a Smart Table
The custom smart tables field can be used to insert Active Directory information in tabular form, with
options to suppress rows if associated information is not present. For further information please refer
to smart tables [pg.267].
USER MANUAL
Exclaimer Signature Manager Exchange Edition
Page | 317
Use a Field Prefix
An alternative approach is to place all required fields on a single line, but use the prefix property to
insert a carriage return before each one (shown below):
(1)
Select a field in the
line
(2)
Select the prefix
property
(3)
Select press enter to
begin a new line
USER MANUAL
Exclaimer Signature Manager Exchange Edition
Page | 318
How Do I Create a Contact Block?
A contact block is a block of contact information for the sender which is presented in tabular form for example:
When email messages are processed, fields in the contact block are replaced with Active Directory
details for the sender - for example:
USER MANUAL
Exclaimer Signature Manager Exchange Edition
Page | 319
How It Works
When the contact block field is added to a template, the contact block window is displayed. Here,
default fields are included as a start point:
Default fields in
the contact
block
Move the
selected field up
or down in the
contact block
Add a field to
the contact
block
Properties for
the selected
field
Remove field
from the
contact block
When a field is selected in the left-hand pane, its associated properties are displayed (and can be
amended) in the right-hand pane. For further information, please refer to the properties [pg.309]
section of this guide.
Adding Fields to a Contact Block
To add a field to the contact block, click the add button to display the add field window:
Simply enter the required label (i.e. the text to be displayed alongside this field (in design view and
when the template is used in signatures) and choose the associated Active Directory field. Click OK to
add the field to the bottom of the contact block and, if required, use up/down buttons to change its
position.
A contact block can be arranged as required but a typical layout has a field label in the left column and
the corresponding field in the right column.
USER MANUAL
Exclaimer Signature Manager Exchange Edition
Page | 320
Updating an Existing Contact Block
To update an existing contact block in a template, simply double-click anywhere inside the block to
open the contact block window. Use this window to add/remove fields and update properties (you
can select any field and set the hide if blank property to true if you wish to suppress this line for
contacts where no information is present for the field):
Select a field to
view properties
The hide if
blank property
USER MANUAL
Exclaimer Signature Manager Exchange Edition
Page | 321
How do I Insert an Image at the Start of
Messages?
To insert an image at the very start of email messages, simply insert the required image above all
original message fields in the relevant template.
For example:
Insert the image
above the original
message above reply
separator field
The latest message in the
conversation will be
displayed beneath the image
and above the signature
Signature content
is between reply
separators
Previous messages in
the conversation will
be included beneath
the signature
USER MANUAL
Exclaimer Signature Manager Exchange Edition
Page | 322
When this template is previewed, it is displayed as follows:
NOTE
If you have a selection of banner images, you can take this a step further and use the
rotating banner ad [pg.246] field to switch between all images in a given folder.
USER MANUAL
Exclaimer Signature Manager Exchange Edition
Page | 323
How do I Add a Signature to the Very End of
Email Messages?
To place a signature at the very end of an email message, signature content should be placed below
all original message fields in the template.
For example:
Signature content is after
all reply separators and will
be displayed after the
entire conversation
USER MANUAL
Exclaimer Signature Manager Exchange Edition
Page | 324
When this template is previewed, it is displayed as follows:
USER MANUAL
Exclaimer Signature Manager Exchange Edition
Page | 325
How Do I Add a Signature After the Latest Reply
In An Email Conversation?
To place a signature below the latest message in an email conversation, content should be placed
between {Original Message Above Reply Separator} and {Original Message Below Reply} fields in the
template.
For example:
The latest message in
the conversation will be
displayed above the
signature
Signature
content is
between reply
separators
Previous messages in
the conversation will
be included beneath
the signature
USER MANUAL
Exclaimer Signature Manager Exchange Edition
Page | 326
When this template is previewed, it is displayed as follows:
USER MANUAL
Exclaimer Signature Manager Exchange Edition
Page | 327
How Do I Set the Font for Text In a Template?
To set the font (and any other formatting attributes) for field items in a template, select the required
field and use appearance properties in the properties panel (shown below). You can also apply
formatting via the template editor toolbar [pg.200].
Font settings
Select field (or
other textual
item in the
template)
USER MANUAL
Exclaimer Signature Manager Exchange Edition
Page | 328
Copyright Notice
The information in this document is subject to change without notice. Exclaimer Ltd assumes no
responsibility for any errors that may appear in this document. Unless otherwise noted, the example
companies, organizations, products, domain names, e-mail addresses, logos, people, places and
events depicted herein are fictitious and not associated with any real company, organization, product,
domain name, e-mail address, logo, person, place or event.
Exclaimer Signature Manager Exchange Edition and other Exclaimer devices are either registered
trademarks or trademarks of Exclaimer Ltd in the United Kingdom and/or other countries. Exclaimer
may have trademarks, copyrights or other intellectual property rights covering subject matter in this
document. All other company and product names are acknowledged as being the trademarks or
registered trademarks of their respective companies.
Unless expressly provided in a written license agreement from Exclaimer Ltd, the furnishing of this
document does not give you any license to these trademarks, copyrights or other intellectual property.
This document was last updated: 03 February 2014
Copyright 2014, Exclaimer Ltd. All rights reserved. This document may not be copied, photocopied, reproduced, translated, or converted
to any electronic or machine-readable form in whole or in part without the express written permission of Exclaimer Ltd. Complying with all
applicable copyright laws is the responsibility of the user.
USER MANUAL
Exclaimer Signature Manager Exchange Edition
Page | 329