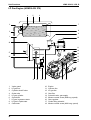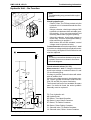
1
Service Manual KM R KM R 0 12 5 12 5 0 R HE RC KA ER CH R KA Serv ice-M anu al 4-S Com trok e bus tionIntern Eng al ine s 5.905- 122 5.905-122 KMR 1250 (KMR 1250 B, KMR 1250 LPG, KMR 1250 D) 1.091- . . . 5.905-262 09.02 Foreword KMR 1250 B, LPG, D Foreword Good servicing requires extensive and relevant training as well as comprehensible reference documents. We therefore offer basic and advanced training courses for the full range of our products to all service technicians on a regular basis. In addition, we produce service manuals for the major units in our product line. While these are ideal for initial use as instruction manuals, they are designed to serve as an essential reference in the future. To augment our product-related communications, we regularly distribute service information bulletins providing details about ongoing product development. Copyright Notice Copyright 2002 by Alfred Kärcher GmbH & Co. All rights reserved. No part of this publication may be reproduced, stored in a retrieval system, or transmitted in any form or by any means, i.e., electronic, mechanical, photocopying, recording or otherwise, without the written permission of Alfred Kärcher GmbH & Co. ALFRED KÄRCHER GmbH & Co. Customer Service Training P.O. Box160 71349 Winnenden, Germany http://www.karcher.de 2 KMR 1250 B, LPG, D Table of Contents Contents Unit functions ........................................................................................................... 4-15 Overview ............................................................................................................................... 4-5 View from front .......................................................................................................................... 6 Controls ..................................................................................................................................... 7 Gasoline Engine (HONDA GX 270) ........................................................................................ 8-9 LP Gas Engine (HONDA GX 270) ....................................................................................... 10-11 Diesel Engine (YANMAR L 70 AE-DE) ............................................................................... 12-13 Steering and Drive Power ........................................................................................................ 14 Sweeping system .................................................................................................................... 15 Troubleshooting Information ................................................................................... 4-15 Starter Fails to Turn Engine ............................................................................................... 16-18 Starter Turns Engine but Engine Fails to Start ................................................................... 19-20 Engine Runs but Machine Fails to Move ............................................................................ 21-25 Maintenance Procedures (gasoline and LPG engine) ....................................................... 26-27 Maintenance Procedures (LPG engine) ............................................................................ 28-29 Maintenance Procedures (diesel engine) .......................................................................... 30-31 Parking Brake – No Function ................................................................................................... 32 Brush Roller – Poor Performance ..................................................................................... 33-34 Brush Roller – No Rotation ...................................................................................................... 35 Side Brushes – Poor Sweeping Performance ......................................................................... 36 Excessive Unit Dusting ...................................................................................................... 37- 41 Filter cleaning Motor – No Function ......................................................................................... 42 Hydraulic Unit – No Function ................................................................................................... 43 Debris Container – Very Slow Ascent ...................................................................................... 44 Debris Container – No Full Ascent ........................................................................................... 45 Excessive Steering Free Play .................................................................................................. 46 Hydraulic Block Diagram ....................................................................................... 48-49 Electrical Circuit Diagram ...................................................................................... 50-55 Maintenance Procedures for B, LPG & D Models ................................................ 56-57 Technical Specifications ........................................................................................ 58-59 Special Tools ........................................................................................................... 60-62 Index ........................................................................................................................ 63-65 3 Unit Functions KMR 1250 B, LPG, D Drive system Suction and filtering system – When the hood is lifted up toward the rear, all components become accessible for maintenance purposes. – Dust pickup at brush roller. – Hydrostatic transmission with mechanical freewheeling device provides variable control of forward and reverse driving speeds. – Parking brake lever actuates transmissionmounted disc brake. – No foot brake required. Transmission provides braking effect. – Transmission, impeller fan, brush roller and side brushes are belt-driven. – Rear wheels are chain-driven. – To start engine, driver must occupy operator seat (seat contact switch). – Discharge of debris container via electrically driven hydraulic unit. Sweeping system – Brush roller counter-rotates against direction of unit motion (throw-over principle). – Debris container is located at rear of brush roller. – Two-position adjustment of brush roller via control lever: Center position: Rigid brush roller suspension for level surfaces. Bottom position: Floating brush roller suspension for uneven surfaces. – Quick-change brush roller replacement. No tools required. – Side brush automatically extends outward when lowered. – Coarse-dirt flap accommodates pickup of beverage cans, etc. – Hydraulic discharge of debris container in raised position (two-hand operation). 4 – Large-capacity dust filter with mechanical dust removal. – Each time engine is shut off, dust filter is subjected to automatic cleaning cycle of approx. 15-second duration. – Impeller fan with closeable exhaust-air hatch for wet-sweeping operation. – Quick-change dust filter replacement. No tools required. – Impeller fan driven by elastic belt. No tension adjustment required. KMR 1250 B, LPG, D Unit Functions Engine KMR 1250 B – Single-cylinder, air-cooled gasoline engine (HONDA GX 270) w/ electric starter. Uses standard grade unleaded gasoline. – Engine features oil level sensor. Engine 1250 LPG With the exception of the conversion to run on liquefied petroleum gas (LPG), the unit is identical to the basic KMR 1250 B version. – The gasoline engine is the same as in the KMR 1250 B (HONDA GX 270). – The LP gas cylinder is mounted behind the driver’s seat. As the gasoline tank is disconnected, its use is strictly prohibited. – The carburetor has been converted to LP gas operation. – The engine compartment accommodates an additional gas regulator required to adjust the air/fuel mixture for the engine. – The mechanical choke has been converted to electrical control; it acts upon the gas regulator. Engine 1250 D With the exception of the different engine type, the unit is identical to the basic KMR 1250 B version. – Single-cylinder, air-cooled diesel engine (YANMAR L 70 AE-DE) w/ electric starter. – Features compression release for short-term operation to help overcome top dead center when starting the engine. 5 Unit Functions KMR 1250 B, LPG, D View from front 1 2 3 4 KM R 0 12 5 ER CH R KA KM R 0 12 5 ER 12 1 2 3 4 5 6 7 8 9 10 11 12 6 11 10 Gas cylinder (LP Gas) Steering wheel Driver seat Lifting mechanism for debris container Rear wheel, chain-driven Fuel tank for KMR B / D Engine KMR B / LPG / D LH side brush (option) Front wheel Head lights RH side brush Controls (see page 7) 9 CH R KA 8 7 6 5 KMR 1250 B, LPG, D Unit Functions Controls 11 12 13 14 15 16 17 16 14 15 16 14 15 10 17 9 8 7 6 5 4 3 2 1 18 1 2 3 4 5 6 7 8 9 10 11 Lever dust pickup, Close / Open Button clean dust filter (S2) Button lower debris container (S6)* Button raise debris container (S8)* Button tilt debris container (S7)* Lever parking brake Lever coarse-dirt flap Headlight switch (S4) Operating hours counter Button two-hand operation, hydraulic (S5) Lever LH side brush, Raise / Lower (option) 18 12 Lever brush roller, Raise / Lower (suspension: rigid or floating) 13 Lever RH side brush, Raise / Lower 14 Throttle lever 15 Button horn (S10) 16 Ignition switch (S1) 17 Choke 18 Drive pedal ORIGINAL and REVISED * Function available only in conjunction with two-hand operation button (10). ( ) See circuit diagram. 7 Unit Functions KMR 1250 B Gasoline Engine (HONDA GX 270) 2 3 3 4 5 6 7 1 8 9 10 11 3 12 13 21 1 2 3 4 5 6 7 8 9 10 11 8 20 19 18 Stop screw, throttle valve Idle jet Bypass Throttle valve Idle orifice Idle jet bore and idle air channel Carburetor throat (venturi) Idle air inlet Choke valve Main air jet Idle system 17 16 5 12 13 14 15 16 17 18 19 20 21 15 Emulsion tube Air orifice Float chamber Main jet Adjusting screw, idle mixture Fuel inlet Inlet, float valve Float Float valve w/ float needle Float 14 KMR 1250 B Unit Functions Gasoline Engine (HONDA GX 270) Float system When float chamber (14) is empty, fuel passes from fuel tank into float chamber (14) via the float valve inlet (18). The rising fuel level causes the float (21) to be raised. The inflow of fuel is interrupted when the float (21) causes the float valve to close. Drawing fuel for engine operation from the float chamber (14) causes the float (21) to be lowered, which in turn opens the float valve (18). This cyclical procedure ensures a constant level of fuel inside the float chamber (14). Float chamber equalization On the carburetor side, the airspace inside the float housing is connected with the outside atmosphere by means of a channel. This facilitates the equalization of the pressure equilibrium inside the float chamber as the fuel level rises or falls. Idling operation When the engine is idling, the throttle valve (4) is fully closed. – This causes negative pressure to occur between the throttle (4) and the crown of the engine piston, with the latter moving toward bottom dead center while the intake valve is open. – The atmospheric pressure inside the float chamber (14) then causes fuel to be conveyed through the main jet (15) and idle jet (2). – The idle jet (2) controls the flow of fuel through the idle bypass channel (3). The fuel then blends with the air being drawn in through the idle air channel (6). – The resulting air/fuel mixture then flows into the engine. – The idle mixture adjusting screw (16) controls the volume of air/fuel mixture that is allowed to flow through the idle orifice (5). Full load operation In full load operation, the throttle is wide (4) open: – Air flows through the carburetor throat, or venturi (7). Because the diameter of the venturi outlet is smaller than that of the intake, the air is accelerated as it passes through. This increased flow velocity causes negative pressure to occur at the outlet side of the main jet (15). – Pressure inside the float chamber (14) is equalized via an atmospheric relief channel. Because atmospheric pressure is higher than the pressure in the carburetor throat (7), fuel is transported from the float chamber (14), and pressed through the main jet (15) into the emulsion tube (12). – The air flowing through the main air jet (10) is blended with the fuel that is flowing through the orifices of the emulsion tube (12). – This mixture is then drawn into the carburetor throat (7), where it is enriched with more air before passing into the engine. Choke system function The choke valve (9) should be closed only when starting a cold engine. This causes the following to happen: – The closed choke valve (9) allows less air to be drawn into the carburetor throat (7). – However, the fuel volume being drawn in through the main jet (15) remains the same. – This causes the fuel component in the air/ fuel mixture to rise, with the richer mixture providing easier engine starting. Note: For information on other maintenance and adjustments of the engine, refer to the Service manual „4-Stroke Internal Combustion Engines“ (5.905-122). Partial load operation Engine speed rises when the throttle valve (4) opens, and the volume of the air/fuel mixture being drawn through the idle jet (2) increases. 9 Unit Functions KMR 1250 B, LPG, D LP Gas Engine (HONDA GX 270) 4 5 6 3 7 2 8 9 1 10 18 11 18 17 14 13 16 16 15 15 1 2 3 4 5 6 7 8 9 10 Valve guard LP gas line Cylinder shutoff valve Outlet tube LP gas cylinder Sun shield LP gas in gaseous state LP gas in liquid state Carburetor 14 13 12 10 11 12 13 14 15 16 17 18 11 12 Engine Vacuum line LP gas line Gas filter Solenoid valve, gas supply Mixture control screw (MIN eng. speed) Gas regulator Choke lifting solenoid Mixture control screw (MAX eng. speed) KMR 1250 B, LPG, D Unit Functions LP Gas Engine (HONDA GX 270) Gas system – Opening the shutoff valve (3) on the LP gas cylinder (5) causes gas to flow through the gas filter (13). At this point, possible contaminants are trapped in a paper filter, and metallic particles from gas cylinder are removed by means of a small magnet. – Setting ignition key to Pos. 1 (ON) opens solenoid valve (14), allowing LP gas to flow from gas filter (13) into primary chamber of gas regulator (16). Here, a spring-loaded valve reduces gas pressure to approximately 150 mbar (2.2 psi). – When starter begins to crank engine (10), a vacuum is created in the suction channel. Through vacuum line (11), this vacuum acts on low-pressure diaphragm in secondary stage of gas regulator. Diaphragm opens low-pressure valve, and gas can be drawn into engine. – Pressing choke button causes choke lifting solenoid (17) to open low-pressure valve, allowing gas to flow directly through carburetor and into engine. This function is particularly important in cold-starting situations. To prevent high-level enrichment of intake mixture with LP gas, choke button should not be pressed for longer than 3-5 seconds. – The presence of frost on any part of the LP gas system indicates a possible leak. Close the cylinder shutoff valve (3) immediately. Apply suitable leak detection medium (soapy water or Leak Detecting Spray 6.282-033) to gas lines, solenoid valve, gas regulator and gas hose to carburetor. Open cylinder shutoff valve (3), and check for formation of bubbles. The unit may be returned to service only after thorough repairs have been carried out by approved specialists. Note: The LP gas system of the unit must be inspected by a licensed expert in 6-month intervals. The results of each inspection must be made available in the form of a test certificate. – An expert is deemed to be a person who, based on his professional education and skills, possesses sufficient knowledge of, and expertise in, the field of LP gas systems, and who is sufficiently familiar with applicable working directives and accident prevention regulations, as well as commonly accepted procedures of this technology, all of the above enabling him to evaluate, determine and assess the safe operational state of LP gas systems. Note: The connection on cylinder shutoff valve (3) must face straight up (extraction of LP gas in gaseous state). Note: For information on other maintanance and adjustments of the engine, refer to the Service manual “4-Stroke Internal Combustion Engines” (5.905-122). Gas regulator – Engines using LP gas as a fuel are equipped with a gas regulator which feeds LP gas to the carburetor of a gasoline engine. The carburetor generates an air/fuel mixture which is drawn into the combustion chamber for ignition. 1 2 3 4 5 Gas inlet Air intake Air/fuel mixture outlet Mixing chamber Gas jet Carburetor in LP gas operation (example) 11 Unit Functions KMR 1250 B, LPG, D Diesel Engine (YANMAR L 70 AE-DE) 5 6 4 7 3 2 8 9 10 11 1 1 2 3 4 5 6 7 8 9 10 11 12 Drive shaft Housing, engine Piston Cylinder head Injector Fuel feed line Fuel line from fuel tank Injection pump Shim Housing, injection pump Cam shaft Injection system The injection pump (8) delivers fuel to the injector nozzle (5) via fuel line (6). The fuel, is then injected into the combustion chamber above the engine piston (3), where the extreme engine compression causes the fuel to self-ignite. Note: For information on other maintenance and adjustments of the engine, refer to the Service manual „4-Stroke Internal Combustion Engines“ (5.905-122). KMR 1250 B, LPG, D Unit Functions Diesel Engine (YANMAR L 70 AE-DE) 6 5 7 8 4 3 Injection pump The injection cam on the camshaft shuttles the injection pump piston (1) back and forth. Fuel is conveyed to the injection nozzle via pressure valve (7). Injection timing is determined by the thickness and number of shims (2) in shim pack. Note: Checking injection timing and related fine adjustment are the exclusive domain of a licensed service facility. In the event that the injection pump fails to deliver fuel, the entire injection pump assembly must be removed and checked. 2 1 9 10 Note: Injection pump service and repair are the exclusive domain of a licensed service facility. Injection pump (cross-section) Injector assembly The fuel that is conveyed to the injector by the injection pump is transported through the feed channel (14), past the nozzle valve (13), and then sprayed into the engine combustion chamber. 11 12 14 13 1 2 3 4 5 6 7 8 9 10 11 12 13 14 Pump piston Shim pack Flange Fuel inlet Pressure valve holder Valve spring Pressure valve Housing, injection pump Piston spring Holder, piston spring Housing, injector Valve spring Nozzle valve Fuel feed line Injector assembly (cross-section) 13 Unit Functions KMR 1250 B, LPG, D Steering and Drive Power 1 2 3 15 4 5 6 14 M 13 7 12 8 11 9 10 1 2 3 4 5 6 7 8 9 14 RH drive chain Impeller fan Drive belt, impeller fan Drive belt, hydrostatic transmission Hydrostatic transmission LH drive chain Brush roller Drive belt, brush roller Drive belt, LH side brush 10 11 12 13 14 15 M (option) LH side brush (option) Chain, steering RH side brush Drive belt, brush roller Drive belt, RH side brush Steering wheel Engine KMR 1250 B, LPG, D Unit Functions Sweeping system 4 3 5 2 6 7 1 14 1 2 3 4 5 6 7 13 Hydraulic unit Engine B / LPG / D Steering wheel Operator seat Debris container, raised Impeller fan Dust filter 12 11 10 8 9 10 11 12 13 14 9 8 Rear wheel Debris container, lowered Hydrostatic transmission Brush roller Coarse-dirt flap Front wheel Side brush 15 Troubleshooting Information KMR 1250 B, LPG, D Starter Fails to Turn Engine A1 F1 (10A) F2 Check fuse F1/F2 Fuse F2 protects the entire control voltage circuitry. This fuse is located on the A1 circuit board. – Check fuse and replace as required. A1 Circuit board F1 Fuse, motor filter cleaning (10 A) F2 Fuse, control voltage (7,5 A) (7,5A) Check battery voltage – Check battery voltage with voltmeter. – Check electrolyte level on low-maintenance battery. – If required, recharge battery using external battery charger (e.g., P/N 6.654-046). Fuses F1/F2 on A1 circuit board F4 (15A) Check fuse F4 and wiring When the engine is running, the battery receives a steady charge current from the alternator. The fuse F4 (15 A rating) protects this circuit. The fuse is located beneath the electrical box. – Check fuse and replace as required. – Check all wiring and connections between alternator and battery. F4 Fuse, generator Fuse F4 in electrical box 4 ) /5 50 15 15/ ( 30/1 30 50 Check ignition switch S1 – Remove screws on instrument panel (2), and carefully lift off instrument panel. – Check ignition switch (1) for continuity at its various positions (0, 1, 2). Key position 0 1 2 15 3 Connection Function 30/1 - 15 30 - 15/54 30 - 50 Engine Stop In operation Starter 2 1 Checking ignition switch S1 while removed from unit 16 1 2 3 Ignition switch (S1) Screws, instrument panel Ignition switch, bottom view KMR 1250 B, LPG, D Troubleshooting Information Starter Fails to Turn Engine V Check starter M1 – Hold ignition switch in position II. – If a voltage is present but starter fails to turn, starter is defective and must be replaced. Checking voltage on starter motor M1 SW Check voltage on starter solenoid – Hold ignition switch in position II. – Measure the voltage between solenoid terminal and vehicle ground. – If the meter fails to indicate a voltage, wiring must be checked for possible defect. – If a voltage is present but starter fails to turn, starter is defective and must be replaced. Note: The connecting wiring for the starter solenoid are not shown in electrical diagram. V Checking voltage on starter solenoid 17 Troubleshooting Information KMR 1250 B, LPG, D Starter Fails to Turn Engine ws A 1 rt A Check regulator ORIGINAL When the engine is running, the alternator generates a continuous current flow. The regulator automatically adapts this current as required (depending on battery charge status and electrical load). – Start engine and allow to run. – Using a clip-on ammeter, measure regulator charging current on X1 plug coupling (white wire on male connector or red wire on female coupling of X1 connector). If a charging current cannot be measured, this indicates that the alternator is faulty and must be replaced. Checking regulator charging current Check regulator REVISED Units of recent manufacture no longer feature the X1 plug coupling. Wires are connected by individual round plug couplings instead. – Start engine and allow to run. – Using a clip-on ammeter, measure regulator charging current on red-and-white wire coupling. If a charging current cannot be measured, this indicates that the alternator is faulty and must be replaced. A rt A ws 2 Checking regulator charging current ws rt 1 2 18 White wire Red wire Plug coupling Round male plug w/ female coupling KMR 1250 B, LPG, D Troubleshooting Information Starter Turns Engine but Engine Fails to Start Checking S3 seat contact switch Note: Actuating the starter without a load on the seat will crank the engine but not start it! – - S3 – – – – Checking seat contact switch S3 0,70 - 0,80 mm 0.028 - 0.031 in. Disconnect wire connections from seat contact switch. Connect an ohmmeter to check seat contact switch for continuity. With a physical load on the seat cushion, the switch opens, and there is no continuity. In the absence of a physical load on the seat cushion, switch contacts are closed. Adjust or replace seat contact switch as required. Check spark plug (gasoline and LPG engine) – If ceramic insulator shows signs of breakage of cracking, spark plug must be replaced. – Heavily fouled spark plugs must be replaced. – Using a feeler gauge, measure electrode gap, and bend electrodes to adjust as required. – To compress captive seal washer on new spark plug, screw in plug hand-tight, then tighten 1/2 turn. Tighten used spark plugs only by 1/8 to 1/4 turn. Checking spark plug (gasoline & LPG engine) Check oil level switch S9 (gasoline and LPG engine) In the event that the engine oil level drops down too far, the oil level switch cuts out the ignition. This causes the engine to stall and will prevent engine restarts. – Remove the terminal of the yellow wire. – Using the ohmmeter, check the connecting terminal for continuity. – If the oil level is sufficiently high, there will be no continuity. – If the oil level is too low, there must be continuity. – Top up engine oil or replace oil level switch as required. Checking oil level switch S9 (gasoline & LPG engine) 19 Troubleshooting Information KMR 1250 B, LPG, D Starter Turns Engine but Engine Fails to Start Check compression release lever (diesel engine) – Engine is equipped with compression release lever. During engine starting, it can be actuated for a short while to ease overcoming engine resistance at top dead center. 1 Note: To enable engine to start with hood open, seat contact switch must be jumpered. Jumper must again be removed once engine has started. 4 3 2 Compression release lever (diesel engine) 5 6 7 Fuel filter (diesel engine only) 1 2 3 4 5 6 7 20 Oil filler neck Lever, compression release Injector line Injector Tank filler cap Seal ring Fuel filter Using Diesel fuel (diesel engine) Exceptionally low outdoor temperatures may cause diesel fuel to congeal. In this condition, fuel is no longer supplied to the engine. – To prevent this condition occurring, add viscosity agents (winterized diesel fuel or denatured alcohol) to the tank before cold weather sets in. – If the fuel congeals, replace fuel tank content with winterized diesel fuel or add viscosity agents. – Continue by allowing the power sweeper to warm up in a cold environment, with engine idling. KMR 1250 B, LPG, D Troubleshooting Information Engine Runs but Machine Fails to Move Transmission drive belt The transmission drive belt tension is adjusted by means of the tension roller. The drive belt must be sufficiently tight so that it will not wow through more than 3 to 8 mm (0.12-0.32 in) when applying a force of 2 kg ( 20 N) to the center of the longest span. Replace drive belt as required, ensuring that tension roller has first been relaxed. Transmission drive belt with tension roller 1 ON 2 OFF Freewheeling lever on transmission Check freewheeling function The transmission features a freewheeling lever which can be used to engage or disengage the drive power. Starting with S/N 10121, this freewheeling lever is permanently mounted on the transmission linkage. It is held in place in the engaged position by a stop bracket. Even with the drive engaged, the unit may be slowly pushed by hand. However, the drive must be disengaged (clockwise rotation) if the unit is to be moved over extended distances. – Position 1: Transmission engaged – Position 2: Transmission disengaged Note: It is important to prevent inadvertent disengagement of the freewheeling lever. Otherwise, no drive power can be applied, and engine braking will be ineffective. 21 Troubleshooting Information KMR 1250 B, LPG, D Engine Runs but Machine Fails to Move Checking drive pedal ORIGINAL A linkage connects the drive pedal to the shift lever (2) on the transmission (7). When the drive pedal is not actuated, the shaft-mounted leg spring (6) always returns this lever to the center position . When at the center position, the drive pedal adjustment should provide for equal angles from the horizontal for both forward and return footrests. An adjusting screw (8) beneath the drive pedal limits pedal travel and, at the same time, the max. drive speed (see technical specifications). Shift lever on transmission Note: This limit must be observed especially in the case of units licensed for road travel. It is essential that the shaft-mounted leg spring (6) securely rests against the dog pin (4) and stop pin (5), and that it does not slip past these two limiters (check intermediate plate (3)). With the drive pedal at center position and with the parking brake released, the unit may move neither forward nor backward. The drive pedal must travel without jerking or binding. 8 Note: All adjusting screws must be fixed with sealing lacquer. Adjusting drive pedal 1 2 3 4 5 6 7 8 22 Drive pedal linkage Shift lever Intermediate plate Dog pin in shift lever Stop pin in transmission Shaft-mounted leg spring Transmission Adjusting screw KMR 1250 B, LPG, D Troubleshooting Information Engine Runs but Machine Fails to Move Checking drive pedal REVISED A linkage connects the drive pedals to the shift lever (4) on the transmission (1). When the drive pedals are not actuated, the pull spring (3) always returns this lever to the center position. When at the center position, the drive pedals should be adjusted so that the forward and reverse pedals at equal angles from the horizontal. Two adjusting screws (5 and 6) beneath the drive pedals limit pedal travel and, at the same time, determine the max. drive speed (see technical specifications). 4 3 2 Note: These limits must be observed especially in the case of units licensed for road travel. 1 Shift lever on transmission 5 With the drive pedals at center position and with the parking brake released, the unit may move neither forward nor backward. The drive pedal must travel without jerking or binding. Note: All adjusting screws must be fixed with sealing lacquer. 8 6 Adjusting drive pedals 1 2 3 4 5 6 Transmission Drive pedal linkage Pull spring Shift lever Adjusting screw, FWD drive Adjusting screw, REV drive 23 Troubleshooting Information KMR 1250 B, LPG, D Engine Runs but Machine Fails to Move 1 2 3 2 Adjusting hydrostatic transmission fer to service bulletin no. 2001-042) 1 2 3 24 Hydrostatic transmission Bolt w/ stop nut Holding bracket, hydrostatic transmission Adjust hydrostatic transmission Starting with serial no. 11482 to serial no. 11882, the hydrostatic transmission (1) is installed in a slanted position. As the slant is not adjustable, engine and transmission drive belts may fail after a short while. Starting with serial no. 11883, it is possible to adjust the incline of the hydrostatic transmission. To this end, the holding bracket (3) was provided with an elongated hole. – Loosen adjusting bolt (2). – Position hydrostatic transmission so that drive belts run straight in belt pulleys. – Securely tighten adjusting bolt and seal with safety paint (2). Note: Retrofitting kit 2.882-530 is available for units with serial no’s. 11482 through 11883. (Re- KMR 1250 B, LPG, D Troubleshooting Information Engine Runs but Machine Fails to Move Insert hydrostatic transmission Note: Starting with serial no. 10 053, the transmission is slanted forward, putting less strain on the drive belt. Check and observe parking brake effectiveness and belt tension when a new transmission is installed. Transmission, thru S/N 10366 Note: The KMR 1250 is fitted with three different transmission shafts. Owing to their different properties and physical construction, these transmissions are not interchangeable. Part no. 6.454-074 6.454-088 6.454-116 Serial no. thru 10336 10337 thru 11481 11482 and up Features 1 pedal 2 pedals slanted installation Transmission, S/N 10337 thru 11481 Transmission, serial no. 11482 and up 25 Troubleshooting Information KMR 1250 B, LPG, D Maintenance Procedures (gasoline and LPG engine) Note: For operating and maintenance instructions, consult the Operator Manual for this engine. Check engine oil level – Engine oil level must be between the MIN and MAX markings on the dipstick. Top up engine oil – The dipstick hole is used to add new oil to the engine. For oil type and required volume, check unit “Specifications”. Oil dipstick Change engine oil – Place a suitable catch tray beside the unit. – While holding oil drain hose in catch tray, remove oil plug and allow engine oil to drain. – Securely replace oil drain plug. – Fill engine with new oil. For oil type and required volume, refer to “Specifications”. Note: Ensure environmentally safe disposal of used engine oil. Draining engine oil 1 2 Clean air filter element When filter element is dirty, replace the paper filter element (2). To clean filter element, blow through with compressed air from the inside out, or firmly tap on hard surface to dislodge cakedon dust. Do not brush off because this would press dust particles into paper fibers. Wash foam ring (2) with a mild solution of household detergent. Rinse thoroughly and allow to dry. Immerse foam insert in clean engine oil, and squeeze to remove excess oil. If too much oil is allowed to remain in foam insert the engine will smoke while running. 1 2 Air cleaner w/ foam insert and paper element 26 Foam ring Paper element KMR 1250 B, LPG, D Troubleshooting Information Maintenance Procedures (gasoline and LPG engine) Operating RPM adjustment The engine operating speed (refer to „Specifications“) is set by means of the adjustment screw (1). Once the setting is correct, the screw must be fixed with sealing lacquer. 1 Adjusting engine operating speed 2 3 Clean sediment bowl – Set fuel cock (2) to OFF position. – Remove sedimentation cup (3) complete with O-ring, and wash out with nonflammable cleaner or inert cleaning solvent. Allow to dry thoroughly, then install and tighten securely. – Set fuel cock (2) again to OPEN position. Check for possible leaks around sedimentation cup. Note: Ensure that no spilled fuel remains in area around carburetor before starting engine. When engine has started, check sedimentation cup for leaks. Carburetor w/ fuel cock and sediment bowl 1 2 3 Adjusting screw, engine operating RPM Fuel cock Sedimentation cup 27 Troubleshooting Information KMR 1250 LPG Maintenance Procedures (LPG engine) Set CO value (LPG engine) To adjust CO value, the following measuring devices will be needed: – Tachometer, P/N 6.491-361 – Exhaust analyser. Procure suitable CO analyser locally; requires measuring range up to 2% CO. 1 Removing muffler guard 1. Set CO value at idle speed – Start engine, and set accelerator lever on instrument panel to MIN position. Idle speed should be between 1250 and 1550 RPM (see also “technical specifications”). – Let engine warm up for a few minutes. – Using a floor jack, raise front of unit, and remove muffler guard (1). There is no other way to access the muffler outlet. – Measure CO value inside muffler tailpipe (2). – Using the mixture control screw idle speed) (5), set CO value on gas regulator (4) (nominal CO value is 0.5%). 2 Measuring CO value inside muffler tailpipe – – 3 4 5 Setting CO value w/ mixture control screw (idle speed) 28 With the correct adjustment, engine must run smoothly and quietly, and provide reliable starting. With adjustment completed, fix mixture control screw (5) by applying sealing lacquer. 1 2 3 Muffler guard Muffler Solenoid valve 4 5 Gas regulator Mixture control screw (idle speed) KMR 1250 LPG Troubleshooting Information Maintenance Procedures (LPG engine) 6 2. Set CO value at operating speed – Set accelerator lever on instrument panel to MAX position (operating speed). – Measure operating RPM and adjust via stop screw (6) on carburetor as required. Operating speed has to be between 2600 and 2700 RPM (see also “technical specifications”). – With adjustment completed, fix carburetor stop screw (6) by applying sealing lacquer. – Check CO value inside muffler tailpipe. Adjusting operating speed – 7 – 3 – Using the mixture control screw (idle speed) (7) (operating speed), set CO value on gas regulator (4) (nominal CO value is 0.5%). With the correct adjustment, engine must run smoothly and quietly, and provide reliable starting. With adjustment completed, fix mixture control screw (7) by applying sealing lacquer. 4 5 Setting CO value w/ mixture stop screw (oper. speed) 3 4 5 6 7 Solenoid valve Gas regulator Mixture control screw (idle speed) Carburetor stop screw Mixture control screw (operating speed) 29 Störungshilfe KMR 1250 D Maintenance Procedures (diesel engine) Note: For operating and maintenance instructions, consult the Operator Manual for this engine. Check engine oil level – Engine oil level must be between the MIN and MAX markings on the dipstick. Top up engine oil – The dipstick hole is used to add new oil to the engine. For oil type and required volume, refer to “Specifications”. Oil dipstick, diesel engine Change engine oil – Place a suitable catch tray beside the unit. – While holding oil drain hose in catch tray, remove oil plug and allow engine oil to drain. – Securely replace oil drain plug. Note: Ensure environmentally safe disposal of used engine oil. – Fill engine with new oil. For oil type and required volume, refer to “Specifications”. Draining engine oil, diesel engine Check air filter element When filter element is dirty, replace the paper filter element. To clean filter element, blow through with compressed air from the inside out, or firmly tap on hard surface to dislodge caked-on dust. Do not brush off because this would press dust particles into paper fibers. Air cleaner w/ paper element, diesel engine 30 KMR 1250 D Störungshilfe Maintenance Procedures (diesel engine) Operating RPM adjustment Engine operating speed (refer to “technical specifications”) is set by means of the adjusting screw (1). With adjustments completed, the screw must be fixed by applying sealing lacquer. Governor adjusting screw CAUTION Governor spring (6) must be hooked into hole on governor lever (3) exactly as shown. 1 Adjusting screw (4) must be fixed with sealing lacquer. Screw may not be tampered with as this would change the entire engine setup. 2 Adjusting engine operating speed, diesel engine Check fuel solenoid valve Upon engine shutdown at the ignition switch, the fuel solenoid valve (8) shuts off fuel supply through the injector line (7). If the engine fails to shut off: – Check connecting wire (9) for secure connection. – Use magnetic field tester (11) to determine if a magnetic field is generated upon actuating the ignition switch (confirmation by beep tone on magnetic field tester). OR – Use Clip-on ammeter (10) to determine switching on/off at ignition switch will cause a current at connecting wire (9). In the absence of a current flow, the fuel solenoid valve (8) is defective and must be replaced. 3 6 5 4 2 Governor adjusting screw, diesel engine 6 40 7 8 9 z kH 6V 40 6V 60 A 06 10 406A d Hol k Pea 10 11 1 2 3 4 5 6 7 8 9 10 11 Adjusting screw, operating speed Throttle control cable Governor lever Adjusting screw, governor Governor spring Governor spring Injector line Fuel solenoid valve Connecting wire Clip-on ammeter (Multimeter) Magnetic field tester Checking fuel solenoid valve, diesel engine 31 Troubleshooting Information KMR 1250 B, LPG, D Parking Brake – No Function 4 Adjust parking brake 5 6 3 Note: With the parking brake released, there must be NO braking effect, and the wire and casing cable (1) must be fully relaxed. 2 The parking brake is required to securely hold the unit in place when applied on a grade of 25%, and with the unit loaded to capacity. At the same time, tension (X) of the pull spring (7) may not extend by more than 5 to 10 mm (0.200.40 in). Brake adjustment is accomplished with adjusting nut (5). 7 X 1 Adjusting parking brake 4 5 6 7 - Starting with serial no. 10600, a pull spring is installed on the operating lever (9). This ensures a more easy movement of the brake when the operating lever (9) is actuated. 1 2 3 4 5 6 7 8 9 10 Wire and casing cable Brake caliper Brake piston Brake pulley Adjusting nut Brake lever Pull spring Pull spring Operating lever, parking brake Pull spring 8 3 X 2 1 Adjusting parking brake 9 10 10 1 Parking brake w/ pull spring 32 KMR 1250 B, LPG, D Troubleshooting Information Brush Roller – Poor Performance 1 2 A B 5 3 4 Removing brush roller arm 1 5 3 6 Check tire pressure Uneven tire pressure in the rear wheels causes the power sweeper to tilt sideways and run lopsided. The result may be a substandard sweeping pattern and the cleaning result is not satisfying. Check control cables The combination of excessive strains at deflection pulleys and repeated road soiling exert considerable stresses on mechanical control cables. If required, check cable routing, clean cables, and lubricate with new grease (P/N 6.288-107). Replace brush roller – Stop and park the machine, engage parking break. – Using the operating lever, lower brush roller to center position. – Swing RH side hatch (3) upward. – Remove safety bolt (2) at lower end of fork head (A, B), and pivot rod toward the rear. – Turn knurled screw (3) counterclockwise. – Remove brush roller arm (4). – Open turn-lock latch (5), and swing hinged brush roller hatch toward front of unit. – Extract brush roller (6). – Turn brush roller adjustment screw clockwise until seated. – Install new brush roller, then replace brush roller arm. 4 Note: Ground clearance of raised brush roller must be at least 10 mm (0.40 in). Extracting brush roller 1 2 3 4 5 6 Side hatch Safety bolt Knurled screw Brush roller arm Turn-lock latch for hinged brush roller hatch Brush roller Brush roller, installed position. Arrow points FWD. 33 Troubleshooting Information KMR 1250 B, LPG, D Brush Roller – Poor Performance Check sweeping pattern – Close dust pickup hatch. – Drive mobile sweeper onto dusty surface, and set parking brake. – Lower brush roller (lever in center position), and allow to run in place for a few seconds. – Raise brush roller and, with coarse debris hatch open, reverse a few feet. 30 Note: Sweeping pattern width should be between 30 and 50 mm (1.18-1.97 in). Parallel deviation should be less than 15 mm (0.60 in). -5 0 m m Checking sweeping pattern Modify sweeping pattern The sweeping pattern is modified by means of the central adjustment screw: – To increase pattern contact area: Turn out adjusting screw counterclockwise (+). – To increase pattern contact area: Turn in adjustment screw clockwise (–). + Modifying sweeping pattern 1 Set correct sweeping pattern A wedge-shaped sweeping pattern may be set by adjusting brush roller suspension on the fork head (1). This may be accomplished by manipulating the fork head on either left-hand or righthand side, or on both sides. 1 Setting sweeping pattern 34 Fork head KMR 1250 B, LPG, D Troubleshooting Information Brush Roller – No Rotation 1 2 4 3 Check / replace Brush roller In the event that wrap-around string or banded materials block the brush roller, the latter must be deinstalled and obstructions removed. Adjust drive belt tension rollers to allow approx. 10 mm depression of the respective drive belts. 5 Check / replace brush roller drive belt (4) This drive belt (4) is located on the vehicle left in the brush well. If required, replace drive belt after relaxing tension roller (2). Checking brush roller drive belt 8 9 7 6 M 10 Checking drive belts for sweeper 6 1 11 12 3 Removing intermediate shaft 4 Check / replace sweeping drive belt (6) This drive belt (6) is located on the smaller sheave of the belt pulley (7). - Loosen tension roller (2), remove drive belt (4) and brush roller arm (3). - Loosen tension rollers (8) and (10), remove drive belt (9). Disconnect the drive belt (6) from the belt pulley (7). - Remove drive belt (11). - Loosen intermediate shaft at the flange mounting (11). The drive belt (6) can now be removed. - Place new drive belt (6) on intermediate shaft (12), and on the smaller of the two sheaves on pulley (7). - Reinstall all previously removed components in reversed sequence, then tighten drive belts. 1 2 3 4 5 6 7 8 9 10 11 12 M Belt pulley, intermediate shaft Tension roller, main roller drive Brush roller arm Drive belt, brush roller Belt pulley, brush roller Drive belt, sweeping drive Belt pulley, engine Tension roller, hydrostatic transmission Drive belt, hydrostatic transmission Tension roller, sweeping drive belt Flange mounting Intermediate shaft Driving engine 35 Troubleshooting Information KMR 1250 B, LPG, D Side Brushes – Poor Sweeping Performance 1 2 3 4 5 6 Check drive belt side brush The side brush is driven by elastic drive belt (5) via intermediate shaft (6). Belt replacement necessitates deinstallation of intermediate shaft (6) (see page 35, pos. 12). Check control cable side brush The control cable (3) is subjected to considerable strain through exposure to road soiling. If required, check cable routing via deflection pulley (2) for ease of movement. Clean and lubricate with new grease, P/N 6.288-107. 8 7 Replace side brush The side brush is attached to the underside of the transmission by means of three bolts. Side brush drive belt (shown at right) 5 3 4 L R 4 5 3 2 4 Sweeping pattern – Check / adjust – Sprinkle a level surface evenly with fine sand. Drive machine onto this surface, and set parking brake. – Lower side brush, and allow to run for approx. 15 to 30 seconds. Continue by raising side brush, backing sweeper off test surface. – The bottom position of the side brush is adjusted by means of the stop screw (7). The sweeping pattern should be shaped like a half-moon sickle. – The top position of the side brush is adjusted by manipulating the control cable adjustment (4). Ground clearance of raised side brush must be approx. 10 to 15 mm (0.40-0.60 in). Adjusting LH and RH side brushes Note: The side brush must be easily moved down and up by means of the control lever. When operating, it extends approx. 15 cm (5.9 in) beyond the machine footprint, with extension radius limited by a chain (1). 1 2 3 4 5 6 7 8 Checking sweeping patterns 36 Chain Deflection pulley Control cable Control cable adjustment, ground clearance Drive belt Intermediate shaft Stop screw, contact pressure Side brush KMR 1250 B, LPG, D Troubleshooting Information Excessive Unit Dusting Replace dust filter A noticeable deposit of dust at the impeller fan exhaust indicates a poorly installed or defective dust filter. – Raise debris container (1) to half of its travel, and secure against dropping. – Unsnap clip fasteners (2) on filter enclosure. – Swing filter enclosure (3) forward, then lift off. – Unfold hand grip (4), pull out, and unlock by means of a 90-degree turn. – Remove old dust filter (5). – Insert new dust filter (6). – Return hand grip (4) to original position, and snap into place. – Install filter enclosure (3), and lock clip fasteners (2). 3 2 2 1 Lifting filter box 5/6 Check rubber sleeve To prevent filter replacement problems caused by premature corrosion of the locator pin (7) in the filter receptacle, a rubber sleeve (9) was installed on units with S/N 10518 and up. Defective or missing rubber sleeve (9) should be replaced or retrofitted (refer to service bulletin no. 1998-045). 4 Replacing dust filter 2 1 3 1 2 3 4 5/6 7 8 9 Debris container Filter enclosure clip fasteners Filter enclosure Hand grip Replace dust filter Locator pin Compression spring Rubber sleeve Installing rubber sleeve 37 Troubleshooting Information KMR 1250 B, LPG, D Excessive Unit Dusting Check filter receptacle A noticeable accumulation of dust in the engine compartment indicates a leaky filter receptacle. The seal ring (1) is defective or the three openings on flange (2) are too large, and protrude beyond the welded ring (3). – Pull off seal ring (1), check and replace as required. – To seal the openings, apply silicon sealer around the entire circumference outside the welded ring (3). – Replace seal ring (1), ensure proper seating. 3 2 1 Sealing shaker motor flange Check coarse debris flap When the coarse dirt flap is open, the brush roller flings the dirt and dust away toward the front without sweeping it up. The coarse debris flap (5) must open and shut easily. If required, clean the control cable (7), and lubricate with new grease (P/N 6.288-107) or spray in with teflon spray (P/N 6.288-125). When opened, the gap of the coarse debris flap (5) should be at least 40 mm (1.58 in) wide. In its lowered state, it should trail by approx. 10 to 20 mm (0.40-0.80 in). The coarse debris flap (5) is adjusted with the adjusting screw (6). 8 7 5 6 4 Coarse debris flap in open position 1 2 3 4 5 6 7 5 38 Seal ring Flange assembly Welded ring (mating rim for seal ring) Retainer, control cable Coarse debris flap Adjusting screw, coarse debris flap Control cable Sheet metal guard Note: If the coarse debris flap trails excessively, it may get caught in the brush roller. When replacing the control cable (7), care must be taken that the retainer (4) remains in the original horizontal position. This prevents the coarse debris flap from being pulled inward again after a short while, breaking the control cable as a result. To straighten out the retainer (4) or to access the adjusting screw (6), the sheet metal guard (8) must be removed. KMR 1250 B, LPG, D Troubleshooting Information Excessive Unit Dusting 1 2 5 3 4 Dustpickuphatch 7 3 6 Check dust pickup – When sweeping on dry ground, the hatch (4) will be opened with the lever (8) to allow air to enter the impeller fan. – When sweeping on moist or wet ground, the hatch must be closed again to prevent moisture from entering the dust filter. – When the sweeping debris container is raised, it also automatically closes the hatch (4). This prevents dust or objects to be drawn into the large open intake opening (7) in this state. The right-hand side panel conceals a forked, spring-loaded lever (6). When lowered almost to the bottom position, the container presses the lever forward. This causes the container to be locked up in its end position so that it cannot swing out inadvertently during travel in mountainous terrain. The control cable (3) for the hatch (4) is attached to the lever (6). Pressing the lever backward while raising the debris container closes the hatch. Pressing the lever forward while lowering the debris container causes the hatch (4) again to be opened by the coil spring (5). Note: When the lever is set to the “SUN” position (8), the hatch (4) must be fully open. The lever (4) operating the hatch must travel easily enough to allow it to be opened by the coil spring (5) without problems. 6 3 Container locking lever 8 1 2 3 4 5 6 7 8 Housing, impeller fan Control cable connected from lever (8) on instrument panel to hatch (4) Control cable connected from lever (6) to hatch (4) Hatch Coil spring Debris container locking lever Intake opening Lever, dust pickup close / open Lever, dust pickup close / open 39 Troubleshooting Information KMR 1250 B, LPG, D Excessive Unit Dusting Check seal on filter housing Up until S/N 10033, the seal was applied to the impeller fan inlet. Later, in an effort to improve seal effectiveness, it was attached to the filter housing. With the filter housing lowered, the seal must reliably seal off the transition to the housing. Seal on filter housing Check seals on brush well The three seals shown at left serve to seal off the brush roller well from the debris container. The seals must be replaced as required. Check impeller fan drive belt The drive belt (see page 14 pos. 3) is elastic and cannot be adjusted. Replace belt as required. Seals on brush well (rear view with raised container) R HE RC KA Checking tire pressure 40 Check tire pressure A too low tire pressure causes a sinking of the sealing lips and sealing strips and thus a worse sweeping result. (See “Specifications” for tire pressures.) KMR 1250 B, LPG, D Troubleshooting Information Excessive Unit Dusting Adjust sealing lips / sealing strips in the sweeping area The sealing lips and sealing strips serve essential functions. They maintain the vacuum level in the sweeping area required for proper functioning, ensuring dust-free sweeping operations at the same time. Damaged or worn sealing lips / sealing strips must be replaced. – The front sealing lip (1) cannot be adjusted. If worn, it should be replaced as soon as possible. – Adjust lateral sealing strips (3) to provide a ground clearance of approx. 1 to 3 mm (0.040.12 in). – Adjust rear sealing lip (4) with an afterrunning clearance of approx. 10 to 20 mm (0.40-0.80 in). 1-3 mm 10-20 mm 1 3 5 4 Adjusting sealing lips & sealing strips Note: Always consider the weight of the driver when doing setup work. 2 5 3 5 Lateral sealing lip 1 2 3 On original units, the lateral sealing lips (3) were cut in such a way that a gap existed between these and the rear sealing lip (4). It provided access for fine dust to be drawn into the engine compartment and engine proper, and enter the engine. Replace older sealing lips with new lateral sealing lips (4). They are cut differently at the back. Check sealing lips at engine air intake Together, the sealing lip (6 and 7) on the airchannel carburetor and the seal on the air channel blower provide dust-free air to be drawn into the engine. The cross-section of the sealing lip (6 and 7) on the air-channel carburetor was optimized. Sealing strip must be checked for the new crosssection and possible damage, and must be replaced as required. The seal (8) on the air-channel carburetor must be checked for damage and deformation, and replaced as required. 1 2 3 4 5 6 7 Sealing lips, air intake 8 Front sealing lip Lateral sealing strip ORIGINAL Lateral sealing strip ORIGINAL Rear sealing lip Direction of motion Sealing lip ORIGINAL , air-channel carburetor Sealing lip REVISED , air-channel carburetor Seal, air-channel blower 41 Troubleshooting Information KMR 1250 B, LPG, D Filter cleaning Motor – No Function 1 2 Check terminals (X 10 / X 11) in filter housing Power for the filter cleaning motor is supplied via two spring-loaded contact terminals (1). With the debris container lowered, spring-loaded contact points (1) mounted on the divider baffle must reliably make connection with rigid mating contacts (2) on debris container, being depressed by approx. 3 to 4 mm (0.12-0.16 in) in the process. Clean contacts, adjust contact position by installing flat washers, or replace contacts as required. 1 2 Contacts on divider baffle, spring-loaded Contact points on debris container, rigid Contact points filter housing X4 X5 -F2 -F1 A1 (10 A) (7,5A) X1 X2 -K1 X3 X6 V X10 X11 M -M3 Checking M3 motor input voltage A1 F1 (10A) Fuse F1 (filter cleaning motor) on A1 circuit board 42 Check input voltage at M3 filter cleaning motor Each time ignition switch is set to “0” position, filter cleaning motor automatically runs for approx. 15 seconds. Pressing filter cleaning button while engine is running ( ignition switch in “I” position) starts 15-second filter cleaning cycle. To prevent dislodged dust from being drawn into suction turbine, air flap must be closed beforehand. – Raise debris container. – Press filter cleaning button. – Check voltage on contact terminals X10/X11. – If there is no voltage present, start by checking fuse F1 (10 A) on A1 circuit board, then check terminals X2/X3. – If a voltage is present without shaker motor running, check motor for ohmic resistance. KMR 1250 B, LPG, D Troubleshooting Information Hydraulic Unit – No Function Note: Troubleshooting may proceed with engine shut off. F3 (60A) Checking F3 fuse + -F3 (60A) -S10 2 -H2 1 qmm (rt/bl) 1 qmm (rt/bl) (rt/bl) (rt/bl) 1 -S6 2 -S7 1 4 2 5 4 -S8 5 1,5 qmm (rt) 0,75 qmm (ws) 2,5 qmm (rt) 0,75 qmm (br) 4 3 1 1 2 2 - + M - -Y2 -Y1 -M2 10 qmm Note: The wiring connections between relay and hydraulic motor are not shown in the electrical circuit diagram. Check solenoid valves (Y1 / Y2) Measurements and : Using the voltmeter, check input voltage on solenoid valves Y1 and Y2 at connecting plug. If voltage is present, solenoid valves will switch with an audible click. If there is no voltage present, check power supply, vehicle ground connections and both buttons (S5 and S8) for proper functioning. The solenoid valves are not available as spare parts. If a defect is found, the entire hydraulic assembly must be replaced. 1 -S5 Check hydraulic unit - Check F3 fuse. The F3 fuse protects only the hydraulic unit. It is located beneath the electrical box. - Using a voltmeter, check input voltage of M2 hydraulic unit between thick red cable (positive polarity, 10 sq. mm cross-section) and matching black cable (negative polarity). - Using the voltmeter, check input voltage on motor relay. Perform measurement with ignition switch set to position “I”. With buttons S5 and S8 actuated, control voltage must be present at relay. If measurements removed components and produce a voltage reading but hydraulic motor is not running, the hydraulic unit is defective and must be replaced. 1 2 F3 M2 S5 S6 S7 S8 Y1 Y2 Fuse, hydraulic unit Hydraulic unit Button, Two-Hand Operation Button, Lower Debris Container Button, Tilt Debris Container Button, Raise Debris Container Solenoid valve, Tilt Debris Container Solenoid valve, Raise / Lower Container Checking voltage on hydraulic unit 43 Troubleshooting Information KMR 1250 B, LPG, D Debris Container – Very Slow Ascent Check hydraulic unit By contamination within the hydraulic system, the debris container can no longer be raised after a brief operating period. The fine orifices in the hydraulic unit are blocked. As the hydraulic unit is maintenance-free and should not be opened. It must be replaced as an assembly if required. With the debris container lowered, the hydraulic fluid level should be approx. 2 to 3 cm (0.80-1.18 in) below the edge of the filler neck. Y1 1 Note: Extremely clean working conditions and work habits are a prerequisite for working on the hydraulic system. Y2 Hydraulic unit Y1 1 Y2 After a replacement, all hydraulic system components automatically purge themselves when the raising mechanism is actuated repeatedly. As a result, only the lifting cylinder must be purged separately. 1 Hydraulic fluid filler neck Y1 Solenoid valve, Tilt Container Y2 Solenoid valve, Raise / Lower Container Check hydraulic fluid When the unit is cold, the use of nonstandard hydraulic fluid will cause the debris container to be raised only very slowly. The correct choice of hydraulic fluid (see “Specifications”) facilitates working at temperatures to -10 °C (14 °F) without difficulty. Hydraulic unit Purge lifting cylinder – Raise container to the top position, and support to prevent inadvertent descent. – Press Raise Container button again, while at the same time cracking the purge screw on the lifting cylinder. When all air has escaped and hydraulic fluid exits without bubbles, tighten purge screw. – Wipe up hydraulic fluid runoff, and check fluid level in reservoir. DANGER – FATAL INJURY HAZARD Raised container must be reliably supported while personnel is working underneath. Bleeding (purging) air from lifting cylinder 44 KMR 1250 B, LPG, D Troubleshooting Information Debris Container – No Full Ascent Adjust pressure relief valve Raise empty or full debris container to maximum attainable height (two-hand operation). In this position hold on the two buttons and measure the current draw of the hydraulic unit (see “technical specification”). The current draw provides a measure of the opening pressure set on the pressure relief valve. Hydraulic unit w/ pressure relief valve 1 2 3 Adjusting pressure relief valve 4 5 Hydraulic unit, adjust pressure relief valve ORIGINAL – Remove hydraulic unit but do not disconnect hydraulic hoses. – Holding valve insert (3) with wrench, unscrew cap of pressure relief valve (1). The cap conceals the valve adjusting screw. – Continue to hold valve insert (3) with wrench, loosen lock nut (2) on valve adjusting screw. – Using a flat screwdriver, turn adjusting screw: One-half CW turn increases current draw by roughly 4 to 5 A (approx. 10 bar, approx. 145 psi). – Finish by tightening lock nut on adjusting screw, again installing screw cap (1). – Install hydraulic unit: Perform function test, and measure current draw. Hydraulic unit, adjust pressure relief valve REVISED – Remove hydraulic unit but do not disconnect hydraulic hoses. – Remove screw cap (4). Cap conceals adjusting screw (5). – Using a stubby screwdriver, turn adjusting screw: One-half CW turn increases current draw by roughly 4 to 5 A (approx. 10 bar, approx. 145 psi). – Finish by installing screw cap (4). – Install hydraulic unit: Perform function test, and measure current draw. 1 2 3 4 5 Cap Lock nut Valve insert Screw cap Adjusting screw Adjusting pressure relief valve 45 Troubleshooting Information KMR 1250 B, LPG, D Excessive Steering Free Play Adjust steering free play Wear and tear and stretching of the steering chain (1) may cause excessive steering free play. If steering free play becomes too large, the steering chain must be tighted, replaced as required Tighten steering chain – Loosen nuts of mounting bolts (2), and tighten chain (1) by shifting steering column (3) in elongated holes. – Retighten mounting nuts. 3 2 1 Adjusting steering free play 1 2 3 46 Steering chain Mounting bolts w/ nuts Steering column (shaft inside) Replace chain – Loosen nuts of mounting bolts (2), and shift steering column (3) in elongated holes far enough to allow removal of steering chain (1). – Install new steering chain, ensuring that front wheel points straight ahead when steering wheel is in center (non-deflected) position. – Tighten chain (1) by shifting steering column (3) in elongated holes. – Retighten mounting nuts KMR 1250 B, LPG, D Troubleshooting Information 47 KMR 1250 B, LPG, D Hydraulic Block Diagram 0.087-964 ORIGINAL through S/N 10441 Z1 Z2 RB D3 B A R1 Y2 HP Y1 R2 DB M P M2 F D1 A, B D1 D2 D3 DB HP M2 P 48 Pressure connection, hydraulic unit Throttle valve Throttle valve Throttle valve Pressure relief valve Hydraulic unit Electric motor, hydraulic unit Hydraulic pump D2 R1/R2 RB Y1 Y2 Z1 Z2 Non-return valve Pipe-break valve Solenoid valve – Tilt debris container Solenoid valve – Raise/Lower debris container Lifting cylinder Tilting cylinder w/ gas strut damper KMR 1250 B, LPG, D Hydraulic Block Diagram 0.088-234 REVISED from S/N 10442 Z1 Z2 RB B A D Y2 HP Y1 S R DB M M2 P F A, B D DB E F HP M2 P Pressure connection, hydraulic unit Throttle valve Pressure relief valve Filler / purge screw Filter Hydraulic unit Electric motor, hydraulic unit Hydraulic pump E R RB S Y1 Y2 Z1 Z2 Non-return valve Pipe-break valve Throttle valve Solenoid valve – Tilt debris container Solenoid valve – Raise/Lower debris container Lifting cylinder Tilting cylinder w/ gas strut damper 49 -F4 -F3 (60A) (15A) 2,5 qmm (rt/sw) -V1 1,5 qmm (bl/sw) 50a 15/50 15 2 (ge) 0 I II -S9 0,1 16 qmm (rt) -X1 -S3 1,5 qmm (sw) -A1 12V/44 Ah 1,5 qmm (ge/rt) -A2 4 ws (sw/ws) 30 -S2 X3 2,5 qmm (ge/rt) (rt/sw) 50a M 5 1 qmm (rt/bl) 1 -S6 2 2 X6 2,5 qmm (gr/sw) (rt/bl) (rt/bl) 1,5 qmm (ge) -S7 1 4 2 5 1 qmm (ge) (rt/gr) -P1 h X10 X11 M 3 -X1 -X1 (sw) -M3 (gr) Note: Unmarked wiring has cross-section of .75 sq. mm 1,5 qmm (sw) -S8 5 1,5 qmm (rt) 2,5 qmm (rt) -E3 1 qmm (ge/sw) 1 qmm (ge) -E2 gn (sw) -E1 4 -E4 0,75 qmm (ws) 0,75 qmm (br) 1 1 + M - -Y2 2 -Y1 2 -M2 10 qmm KMR 1250 B, LPG, D G -M1 -G2 H1 1 qmm (rt/bl) -X1 -X1 -X1 6 1 16 qmm (sw) 1 6 4 3 -K1 (7,5A) 2,5 qmm (ge/rt) (ws) -S10 -H2 -S4 X5 -F2 (10A) 2 1,5 qmm (rt/sw) 2 X1 X2 5 -G1 -S5 -V4 1,5 qmm (rt) X4 -F1 + 10 qmm (rt) 1 -V3 3 2,5 qmm (rt) 1 qmm (rt/sw) -V2 30.1 30 -S1 1,5 qmm (rt) 0,75 qmm (sw/rt) Electrical Circuit Diagram 0.087-963 (KMR 1250 B) 50 B/=SLP STVZO/2.1 10 qmm (rt) KMR 1250 B, LPG, D Electrical Circuit Diagram 0.087-963 (KMR 1250 B) A1 Filter cleaning control A2 Ignition E1-E4 Headlights F1 Fuse - Filter cleaning motor F2 Fuse - control voltage F3 Fuse - Hydraulic unit F4 Fuse - Alternator G1 Battery G2 Alternator H1 Indicator lamp - Headlights H2 Horn K1 Relay - filter cleaning motor M1 Starter M2 Hydraulic unit M3 Filter cleaning motor P1 Operating hours counter S1 Ignition switch S2 Button - Filter cleaning S3 Switch - Seat contact S4 Switch - Headlights S5 Button - Hydraulics S6 Button - Lower Container S7 Button - Tilt Container S8 Button - Raise Container S9 Oil level switch S10 Button - Horn V1-V4 Diode X1 Plug, 6-pin X10/11 Contacts - Filter cleaning motor Y1 Solenoid valve - Tilt debris container Y2 Solenoid valve - Raise / Lower debris container Detachable wiring connection Graphic symbol for wiring connection Vehicle earth/ground Female coupling (X1 connecting plug) Male coupling (X1 connecting plug) bl bn ge gr gn rt or rs sw ws = = = = = = = = = = blue brown yellow grey green red orange rose (pink) black white 51 2 -F4 1,5 qmm (bl/sw) (15A) 2,5 qmm (rt/sw) -X1 -F3 (60A) -V1 1 qmm (rt/sw) 50a 15/50 -V2 (ge) 15 0 I II 1 0,1 30 30.1 -S1 -S3 -S2 -S9 1 1 -V3 2 -S11 2 -S5 2 -S10 10 qmm (rt) -V4 -H2 1,5 qmm (rt) 6 qmm t) -A1 0,75 qmm (sw/rt) X5 X4 -F2 (10A) (7,5A) X1 X2 (rt/bl) 1 6 4 3 -F1 + X3 -A2 1 qmm (rt/bl) 1 (rt/bl) 1 4 2 5 4 -S6 -S4 2 2 H1 5 X4 -S7 -S8 5 1,5 qmm (ge) 12V/44 Ah G1 1,5 qmm (sw) 1,5 qmm (rt) 2,5 qmm (rt) 1 qmm (rt/bl) 1,5 qmm (rt/sw) 1,5 qmm (ge/rt) 1 6 qmm w) -X1 30 4 -X1 (ws) (sw/ws) (ws) 50a M 6 M -G2 -X1 -X1 5 (sw) 3 2,5 qmm (rt) -E1 -M3 Note: Unmarked wiring has cross-section of .75 sq. mm 1 qmm (ge/sw) 1 qmm (ge) -E2 (gr) -E3 -E4 -Y4 1,5 qmm (sw) 1 2 1 -Y3 2 -Y2 0,75 qmm (ws) 0,75 qmm (br) 1 1 2 -Y1 2 + M -M2 10 qmm KMR 1250 B, LPG, D -P1 h X11 X10 (gn) -M1 1 qmm (ge) -X1 (rt/sw) G 2,5 qmm 2,5 qmm (rt/gr) (gr/sw) (ge/rt) 2,5 qmm (sw) 1,5 qmm (rt) Electrical Circuit Diagram 0.088-151 (KMR 1250 LPG) 52 10 qmm (rt) KMR 1250 B, LPG, D Electrical Circuit Diagram 0.088-151 (KMR 1250 LPG) A1 Filter cleaning control A2 Ignition E1-E4 Headlights F1 Fuse - Filter cleaning motor F2 Fuse - control voltage F3 Fuse - Hydraulic unit F4 Fuse - Alternator G1 Battery G2 Alternator H1 Indicator lamp - Headlights H2 Horn M1 Starter M2 Hydraulic unit M3 Filter cleaning motor P1 Operating hours counter S1 Ignition switch S2 Button - Filter cleaning S3 Switch - Seat contact S4 Switch - Headlights S5 Button - Hydraulics S6 Button - Lower Container S7 Button - Tilt Container S8 Button - Raise Container S9 Oil level switch S10 Button - Horn S11 Button - Choke V1-V4 Diode X1 Connecting plug, 6-pin X10/11 Contacts - Filter cleaning motor Y1 Solenoid valve - Tilt debris container Y2 Solenoid valve - Raise / Lower debris container Y3 Solenoid valve - Fuel shutoff valve Y4 Choke lifting solenoid Detachable wiring connection Graphic symbol for wiring connection Vehicle earth/ground Female coupling (X1 connecting plug) Male coupling (X1 connecting plug) bl bn ge gr gn rt or rs sw ws = = = = = = = = = = blue brown yellow grey green red orange rose (pink) black white 53 2,5 qmm (rt/sw) -F4 (15A) -F3 1 qmm 1 qmm (rt/sw) (rt/sw) 1 qmm (rt/sw) -V1 (60A) -V2 -V3 50a 15/54 0 I II -V4 1 -S5 0,1 30 -S1 -S3 -S9 2 (br) (br) 1 -H2 -Y3 2 1,5 qmm (rt) 5 qmm t) 2,5 qmm (rt) 1,5 qmm (rt/sw) 1,5 qmm (rt) 1,5 qmm (rt/sw) 1 qmm (rt/bl) 10 qmm (sw) 1,5 qmm (rt/ge) X4 + G1 -A1 - X5 -F2 -F1 (10A) /44Ah 3 K1 (7,5A) X1 X2 -S2 X3 3 1 6 4 2 -S6 X6 2 H1 1 4 2 5 -S7 1 4 2 5 4 -S8 5 5 -S4 5 qmm w) (rt) 30 2,5 qmm (sw) (gn/ws) -X1. (ws) -G2 (rt/gr) 1,5qmm (ge) -E1 (rt/sw) G (br) -E2 Note: Unmarked wiring has cross-section of .75 sq. mm + 1 -E4 M -M3 (br) M X11 X10 (gn/ws) (ws) -E3 (rt) - -Y2 1,5 qmm (sw) 1 2 -Y1 2 -M2 10 qmm KMR 1250 B, LPG, D h -P1 (gn) -M1 2,5 qmm (gr/sw) (gn) 50a M 2,5 qmm (ge/rt) Electrical Circuit Diagram 0.088-097 (KMR 1250 D) 54 10 qmm (rt) KMR 1250 B, LPG, D Electrical Circuit Diagram 0.088-097 (KMR 1250 D) A1 Filter cleaning control A2 Ignition E1-E4 Headlights F1 Fuse – Filter cleaning motor F2 Fuse - control voltage F3 Fuse – Hydraulic unit F4 Fuse – Alternator G1 Battery G2 Alternator H1 Indicator lamp – Headlights H2 Horn M1 Starter M2 Hydraulic unit M3 Filter cleaning motor P1 Operating hours counter S1 Ignition switch S2 Button – Filter cleaning S3 Switch – Seat contact S4 Switch – Headlights S5 Button – Hydraulics S6 Button – Lower Container S7 Button – Tilt Container S8 Button – Raise Container S9 Button – Horn V1-V4 Diode X1 Connecting plug, 4-pin X10/11 Contacts – Filter cleaning motor Y1 Solenoid valve – Tilt Container Y2 Solenoid valve – Raise/Lower Contain Y3 Solenoid valve – Fuel shutoff valve Detachable wiring connection Graphic symbol for wiring connection Vehicle earth/ground Female coupling (X1 connecting plug) Male coupling (X1 connecting plug) bl bn ge gr gn rt or rs sw ws = = = = = = = = = = blue brown yellow grey green red orange rose (pink) black white 55 KMR 1250 B, LPG, D Maintenance Procedures for B, LPG & D Models Täglich Daily 6 bar max min Wartung Maintenance KMR 1250 1-5 mm 1020 mm 1-3 mm Wöchentlich Alle 100 h Weekly Every Maintenance intervals Maintenance procedures are performed at the following intervals: Daily by operator – Check oil level – Check tire pressure – Check brush roller for wear and snagged strings, banding, etc. – Check air cleaner/filter for damage Weekly by operator – Check sealing lips in sweeping system for wear and proper adjustment 56 Every 100 hours – Check air cleaner/filter for damage – Change engine oil – Check brush roller and side brushes for wear, and replace as required. By service specialist – after 8 hours – every 100 hours – every 300 hours – every 500 hours – every 1000 hours (Refer to table on opposite page.) KMR 1250 B, LPG, D Maintenance Procedures for B, LPG & D (after operating hours) Maintenance procedures 8 100 200 300 400 500 600 700 800 900 1000 Engine oil - check O O O O O O O O O O O Main drive belt tension - check O O O O O O O O O O O O Main drive belt - replace O O O O O O O O O O Drive chains check for wear and tension O O O O O O O O O O Cooling air intake - check seal O O O O O O O O O O Spark plugs - check / clean (B and LPG only) O O O O O O O O O O Engine air cleaner - clean / replace O O Spark plugs - replace (B and LPG only) O O O Fuel sediment cup - clean (B only) O O O O O O O O O O LP gas cylinder - check; connection must point up (LPG only) O O O O O O O O O O LP gas system - check for leaks (LPG only) O O O O O O O O O O Tire pressure - check O O O O O O O O O O Hydraulic hoses - check O O O O O O O O O O Hydraulic system fluid level - check O O O O O O O O O O Control cables & all moving parts check for easy travel O O O O O O O O O O Unit drive system functions - check (forward, reverse, freewheeling) O O O O O O O O O O Parking brake function - check O O O O O O O O O O Debris container functions - check O O O O O O O O O O Debris container seals - check O O O O O O O O O O Filter shaker function - check O O O O O O O O O O Dust filter - check / replace O O O O O O O O O O Sealing strips in sweeping system check for adjustment & wear O O O O O O O O O O Coarse-dirt hatch function - check O O O O O O O O O O Brush roller & side brushes - check O O O O O O O O O O Sweeping pattern, main brush roller & side brushes - check O O O O O O O O O O Exhaust system - check O O O O O O O O O O Vehicle lighting - check O O O O O O O O O O Live electrical wiring and contact points - check O O O O O O O O O O Fuel filter - change (B and LPG only) O O O Valve clearance - check O O O Drive chains - replace O CO emissions - check / analyze (LPG only) O 57 KMR 1250 B, LPG, D Technical specifications Service weight (operational) Permitted gross weight Length Width Height Driving speed, forward, max. Driving speed, reverse, max. Climbing ability, max. Width, sweeping path w/o side brush Width, sweeping path w/ 1 side brush Width, sweeping path w/ 2 side brushes Debris container, usable capacity, max. Debris container, lifting height (min.) Debris container, surface area, dust filter Debris container, lifting weight Debris container, filter cleaning cycle (after-running time) Main brush, ground clearance, raises Sweeping pattern, width Main brush, diameter Main brush, speed (at engine operating speed) Side brush, diameter Side brush, speed (at engine operating speed) Coarse dirt flap, raised (min.) Coarse dirt flap, after-running Side sealing strips, ground clearance Rear selling strip, after-running Tires, diameter Tires, designation Tire pressure, front Tire pressure, rear Tires, torque, wheel stud make-up Fuses, filter cleaning motor (F1) Fuses, control voltage (F2) Fuses, hydraulic motor (F3) Fuses, generator (F4) Steering, turns, full LH / RH deflection Steering free play (on steering wheel, max.) Parking brake, brake lever, tension at spring (at hydrostatic drive) Impeller fan, vacuum with closed suction hose 58 420 600 1650 1000 1270 7-8 4-6 18 750 1000 1300 80 1400 6 105–115 10–15 10 30 - 50 285 560–580 450 57–63 50 10 - 20 1-3 10 - 20 300 4.00-4 6 6 44 10 7,5 60 15 1 3 /4 5° 5 - 10 10 - 12 kg kg mm / mm / mm / km/h km/h % mm / mm / mm / l mm / m2 kg sec mm / mm / mm / RPM mm / RPM mm / mm / mm / mm / mm / GPR bar bar Nm A A A A 64.96 in 39.37 in 50 in 29.53 in 39.97 in 51.18 in 55.12 in 0.39 in 1.17-1.95 in 11.22 in 17.72 in 1.95 in 0.39-0.78 in 0.04-0.12 in 0.39-0.78 in 11.81 in 87 psi 87 psi mm / 0.20-0.39 in mbar / 0.1-0.2 psi KMR 1250 B, LPG, D Technical specifications Engine, KMR 1250 B / LPG (P/N 6.491-573) Designation Type No. of cylinders Displacement Drive belt engine, clearance with 20 N Operating speed Idle speed Output (9 bhp at 3600 RPM) fuel tank capacity (standard grade, lead-free gasoline) Engine oil capacity (SAE 15 W 40) Battery, maintenance-free Starter Exhaust value Engine, KMR 1250 D (P/N 6.491-604) Designation Type No. of cylinders Displacement Drive belt engine, clearance with 20 N Operating speed Idle speed Output (9 bhp at 3600 RPM) fuel tank capacity (Diesel) Engine oil capacity (SAE 15 W 40) Battery, maintenance-free Starter Hydraulic unit Class, hydraulic fluid Type, hydraulic fluid System capacity Protection category Current draw, hydraulic motor, max. (Current draw of 70 A permits lifting container loadoff approx. 105–115 kg.) HONDA GX 270 4-Stroke 1 270 3-8 2.600 - 2.700 1.250 - 1.550 6,6 6 1,1 12 V / 44 electrical 0,5 YANMAR L 70 AE-DE 4-Stroke 1 270 3-8 2.600 - 2.700 1.250 - 1.550 6,6 6 1,1 12 V / 44 electrical cm 3 mm / 0.12-0.32 in RPM RPM kW l l Ah % cm 3 mm / 0.12-0.32 in RPM RPM kW l l Ah DIN HVLP 51524/2 HV 46 1,5 l splash-water protected 70 A Noise level Measured in accordance with DIN 45 635 T36 and DIN 45 648 standards at operating speed of 2700 RPM, subjective reading at operator position is 79,5 dB(A). 59 KMR 1250 B, LPG, D Special Tools Ignition spark tester (for gasoline and LP gas engine) Remove spark plug connector from spark plug and push onto spark tester. Connect clamp to suitable conductor (e.g., engine cooling fins). If ignition is in good working condition, cranking engine with starter will produce visible sparks between points of spark tester. P/N 6.491-359 Ignition spark tester, gasoline & LP gas engine Mechanical tachometer for gasoline, LP gas, and diesel engine Engine speed is determined by reading engine vibrations. Tachometer is placed at suitable location on engine (e.g., valve cover). When resonance spring is extended until deflection is largest with engine running, scale indicates engine speed. P/N 6.491-361 Mechanical tachometer (all engines) Digital tachometer for gasoline and LP gas engine From a distance of approx. 100 mm (4 in.), point this digital tachometer at spark plug wire, and switch on tester. Set to 4-Stroke (“4-Taktmotor”) position to read speed of running engine. P/N 6.803-012 Digital tachometer for gasoline and LP gas engine 60 KMR 1250 B, LPG, D Special Tools Multimeter Multimeter must meet the following minimum requirements: – AC / DC measuring (amps, volts) – Diode test function – Resistance measuring (0-15 kΩ) FT F F RA O 40 0 kH 40 z 0V 60 0V 10 00 40 A 0A P H ea old k P/N 6.803-022 V 11 3 C O M D C /A C C H z LA M P M E T E R C LT VO Multimeter w/ test probes Magnetic field tester For testing magnetic fields on solenoid valves. P/N 6.803-003 Magnetic field tester Spark plug wrench for gasoline and LP gas engine Unscrews spark plug from cylinder head. P/N 6.815-088 Spark plug wrench for gasoline and LP gas engine 61 KMR 1250 B, LPG, D Special Tools CO tester Measures CO component in exhaust emissions. – Measuring range > 2% CO content – Resolution: 0.01% – Includes suction pump – LCD display CO Tester for LPG engine Dual-function hand pump For checking integrity of diaphragm in LP gas regulators (LP gas engines). Hand pump features switchover valve to generate vacuum or pressure (Pressure / Vacuum mode). P/N 6.473-400 Dual-function hand pump Leak detection spray (for LP gas engines) Indispensable when checking LP gas system for leaks. P/N 6.282-033 Leak detection spray 62 KMR 1250 B, LPG, D Index A Adjust hydrostatic transmission 24 parking brake 32 pressure relief valve 45 sealing lips / sealing strips 41 steering free play 46 Adjusting screw, idle mixture 8 Alternator 51, 53, 55 B Battery 51, 53, 55 Brush Roller No Rotation 35 Poor Performance 33, 34 Brush roller 14, 15 Button Choke 53 clean dust filter 7 Filter cleaning 53, 55 Filter shaker 51 Horn 7, 51, 53, 55 Hydraulics 51, 53, 55 Lower Container 51, 53, 55 lower debris container 7 Raise Container 51, 53, 55 raise debris container 7 Tilt Container 51, 53, 55 tilt debris container 7 two-hand operation, hydraulic 7 C Carburetor 10 Chain, steering 14 Change engine oil 26, 30 Check air cleaner element 30 battery voltage 16 coarse debris flap 38 compression release lever 20 control cable 33, 36 drive belt side brush 36 drive pedal 22, 23 dust pickup 39 engine oil level 26, 30 filter receptacle 38 freewheeling function 21 fuel solenoid valve 31 fuse 16 hydraulic unit 43, 44 ignition switch 16 input voltage 42 oil level switch 19 regulator 18 rubber sleeve 37 seal 40 sealing lips 41 seat contact switch 19 solenoid valves 43 spark plug 19 starter M1 17 terminals 42 tire pressure 33, 40 voltage 17 Check / replace Brush roller drive belt 35 Sweeping drive belt 35 Choke 7 lifting solenoid 53 system function 9 Clean air filter element 26 Clean sediment bowl 27 CO tester 62 Coarse-dirt flap 15 Connecting plug, 4-pin 55 Connecting plug, 6-pin 53 Contacts - Filter cleaning motor 51, 53, 55 Controls 7 D Debris Container No Full Ascent 45 Very Slow Ascent 44 Debris container 58 Debris container, lowered / raised 15 Descent stop valve 49 Diesel Engine (YANMAR L 70 AE-DE) 12, 13 Diesel fuel 20 Digital tachometer 60 Diode 51, 53, 55 Drive belt brush roller 14 hydrostatic transmission 14 LH side brush 14 RH side brush 14 impeller fan 14 drive chain RH 14 Drive pedal 7 Drive shaft 12 Drive system 4 Driver seat 6 Driving and sweeping data 58 Dual-function hand pump 62 Dust filter 15 E Electric motor, hydraulic unit 48, 49 Electrical Circuit Diagram 50, 51, 52, 53, 54, 55 Engine 6, 10, 14, 15 KMR 1250 B 5 KMR 1250 B / LPG 59 KMR 1250 D 5, 59 KMR 1250 LPG 5 63 KMR 1250 B, LPG, D Engine Runs but Machine Fails to Move 21, 22, 23, 24, 25 Excessive Steering Free Play 46 Excessive Unit Dusting 37, 38, 39, 40, 41 F Filter 49 Filter cleaning control 51, 53, 55 Filter cleaning motor 51, 53, 55 No Function 42 Flange 13 Float chamber equalization 9 Float system 9 Front wheel 6, 15 Fuel feed line 12, 13 Fuel tank for KMR B / D 6 Full load operation 9 Fuse 58 Alternator 51, 53, 55 control voltage 51, 53, 55 Filter cleaning motor 51, 53, 55 Hydraulic unit 51, 53, 55 G Gas cylinder (LP Gas) 6 Gas regulator 11 Gas system 11 Gasoline Engine (HONDA GX 270) 8, 9 H L Leak detection spray 62 Lever brush roller 7 coarse-dirt flap 7 dust pickup 7 LH side brush 7 parking brake 7 RH side brush 7 Side brush 6 LH drive chain 14 LH side brush 14 Lifting cylinder 48, 49 Lifting mechanism 6 LP Gas Engine (HONDA GX 270) 10, 11 M Magnetic field tester 61 Maintenance intervals 56 Maintenance Procedures (diesel engine) 30, 31 (gasoline and LPG engine) 26, 27 (LPG engine) 28 B, LPG & D Model 57 B, LPG & D Models 56 Mechanical tachometer for gasoline, LP gas, and di 60 Mixture control screw (MAX eng. speed) 10 Mixture control screw (MIN eng. speed) 10 Multimeter 61 Head lights 6 Headlight switch 7 Headlights 51, 53, 55 HONDA GX 270 5 Horn 51, 53, 55 Hydraulic Block Diagram 48, 49 Hydraulic Unit No Function 43 Hydraulic unit 15, 48, 49, 51, 53, 55, 59 adjust pressure relief valve 45 Hydrostatic transmission 14, 15, 25 N I Parking Brake No Function 32 Partial load operation 9 Pipe-break valve 48, 49 Plug, 6-pin 51 Pressure connection, hydraulic unit 48, 49 Pressure relief valve 48, 49 Purge lifting cylinder 44 Idling operation 9 Ignition 51, 53, 55 Ignition spark tester 60 Ignition switch 7, 51, 53, 55 Impeller fan 14, 15, 39 Indicator lamp Headlights 51, 53, 55 Injection pump 13 Injection system 12 Injector assembly 13 64 Noise level 59 Non-return valve 48, 49 O Oil level sensor 51, 53 Operating hours counter 7, 51, 53, 55 Operating time 59 Operator seat 15 P R Rear wheel 15 Rear wheel, chain-driven 6 Relay - filter cleaning motor 51 KMR 1250 B, LPG, D Replace brush roller 33 chain 46 dust filter 37 Side brush 6 S Set CO value 28, 29 Operating RPM adjustment 27, 29, 31 Set engine operating speed 31 Side brush 15 Poor Sweeping Performance 36 side brush 6, 14 Solenoid valve Fuel shutoff valve 53, 55 Raise/Lower Container 48, 49, 51, 53, 55 Tilt Container 48, 49, 51, 53, 55 Spark plug wrench 61 Special Tools 60, 61 Starter 51, 53, 55 Fails to Turn Engine 16, 17, 18 Turns Engine but Engine Fails to Start 19, 20 Steering 58 Steering and Drive Power 14 Steering wheel 6, 14, 15 Suction and filtering system 4 Sweeping mechanism 58 Sweeping pattern – Check / adjust 36 Sweeping system 4, 15 Switch Headlights 51, 53, 55 Seat contact 51, 53, 55 T tank capacity 59 Technical specifications 58, 59 Throttle lever 7 Throttle valve 48, 49 Tighten steering chain 46 Tilting cylinder w/ gas strut assist 48, 49 Tires 58 Top up engine oil 26, 30 Transmission drive belt 21 two-hand operation 4, 7, 43, 45 V View from front 6 W Weights and dimensions 58 Y YANMAR L 70 AE-DE 5, 12, 13, 59 65