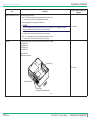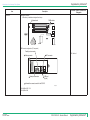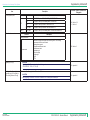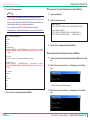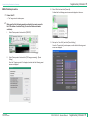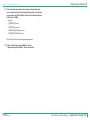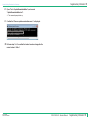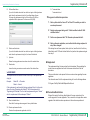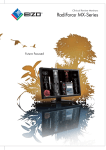
1
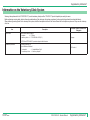
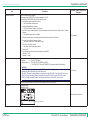
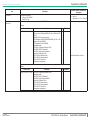
FCR CAPSULA V VIEW / FCRView VETERINARY CR-IR 355V CL Service Manual Document No. 014-214-08E First Edition : Jun. 29, 2007 8 th Edition : Aug. 30, 2013 Printed in Japan Export Restrictions Applying to CR-IR 355V CL Japanese export restrictions and foreign exchange regulations apply to this equipment. Therefore, government approval obtained through due procedure is required in order to export or otherwise remove such equipment from Japan. Note that the same restrictions apply not only to the main unit but also to after-sale parts, service manuals and service training (for exporting or transferring technology) when such items are dispatched or shipped to foreign countries and when service training is given for trainees from foreign countries. The correlation between mR (milliroentgen), a unit of radiation dose, and μC/kg (microcoulomb/kilogram), an international unit of radiation dose, is 1mR=0.258μC/kg. FCR is a trademark or a registered trademark of FUJIFILM Corporation. Copyright © 2007-2013 FUJIFILM Corporation. All rights reserved. No part of this publication may be reproduced, stored in a retrieval system, or transmitted in any form or by means, electronic, mechanical, photocopying, recording or otherwise, without the prior written permission of FUJIFILM Corporation. CR-IR 355V CL Service Manual 014-214-08E 08.30.2013 FM5927 Supplementary Information 1 Information on the Veterinary Clinic System Servicing tasks performed for the “CR-IR 355V CL” (used at veterinary clinics) and the “CR-VW 674” (used at hospitals) are nearly the same. Before performing servicing tasks, obtain a thorough understanding of the veterinary clinic system procedures, functions and other pertinent items described herein. When performing servicing tasks for the veterinary clinic system, read the descriptions included in the Service Manual for the hospital use system as if they were for veterinary clinic use. Item Product name Affected Chapters, Sections and Paragraphs Description Product names used are different. For hospitals aFCRView For veterinary clinics a FCR CAPSULA V VIEW (*1) All pages (*1) “FCRView VETERINARY” for products shipped to North America. Reinstallation procedure ● Installing a Settings File Type of facilities are different. MC:Section 1 - For hospitals a “Hospital/Medical Clinic” - For veterinary clinics a “Veterinary Hospital” 014-214-07E 04.20.2011 FM5926 CR-IR 355V CL Service Manual Supplementary Information 1 Supplementary Information 2 Information on the Veterinary Clinic System Item Reinstallation procedure (continued) Affected Chapters, Sections and Paragraphs Description •CR-IR 346V/391V Image Processing Software Installation CAUTION Be sure to reinstall this software after mother board replacement, because this software is inactivated, same as with the option key software, when mother board is replaced. NOTE The image processing software for veterinary to be attached on the device is CR-IR 391V Image Processing Software for FCR CAPSULA V VIEW V5.0 or later and is CR-IR 346V Image Processing Software for FCR CAPSULA V VIEW V4.0 or earlier. To install, you must use the software attached on the device. Also, The CR-IR 346V Image Processing Software is available both for the CR-IR 355V CL and CR-IR 346V CL systems. CR-IR 391V Image Processing Software is available both for the CR-IR 355V CL and CR-IR 391V CL systems. Note however that the CR-IR 355V CL requires CR-IR 346V Image Processing Software V2.0. MT:Section 4 MC:Section 1 1. Insert the Image Processing Software CD into the DVD drive. a The “Image Processing Software” starts running automatically.(*1) 2. Click [Continue]. a A window opens to indicate completion of the installation processing. 3. Click [OK]. 4. Remove the CD from the DVD drive. (*1)If a window like that shown below opens, it indicates that the necessary software is not installed. In such cases, reinstall the OS so that the Image Processing Software is installed appropriately. 014-214-07E 04.20.2011 FM5926 CR-IR 355V CL Service Manual Supplementary Information 2 Supplementary Information 3 Information on the Veterinary Clinic System Item Installation procedure Affected Chapters, Sections and Paragraphs Description •355V CL Software Version Upgrade Uninstalling Roxio CREATOR Plus (for version upgrade from V2.0) Uninstall Roxio CREATOR Plus from the DVD driver as follows. ● 1. From the [Start] menu, select [Control Panel]. a The “Control Panel” window opens. 2. Double-click [Add/Remove Programs]. a The “Add or Remove Programs” window opens. 3. From the “Currently installed programs:” list, select a program that includes the name of “Roxio Creator.” Click then [Remove]. a The selected program will be uninstalled. 4. Using the same procedure, uninstall all programs that include the name of “Roxio Creator.” MC:Appendix 2 5. Close the “Add or Remove Programs” window. a The system returns to the “Control Panel” window. 6. Close the “Control Panel” window. a The system returns to the desktop window. 7. Restart the PC. 8. Input the following on the login window that opens, and click [OK]. Username: “fujicr” Password : “system” User interface Initial windows used are different. For hospitals a CR-VW 674 [FCRView] For veterinary clinics a CR-IR 355V CL [FCR CAPSULA V VIEW] (* “CR-IR 355V CL [FCRView VETERINARY]” for the systems used in North America.) NOTE “CR-IR 346V Image Processing Software” or “CR-IR 391V Image Processing Software” appears in the ready-made software items listed in the bottom-right of the initial window. The CR-IR 346V Image Processing Software is available both for the CR-IR 355V CL and CR-IR 346V CL systems. CR-IR 391V Image Processing Software is available both for the CR-IR 355V CL and CR-IR 391V CL systems. CR-IR 391V Image Processing Software is the software which attached to CR-IR 355V CL V5.0 or later. IN :Section 5 The icons that include contours of humans have been changed to those of an animal (dog). Name plate •Identification label Attached to the PC. Safety Precautions : Section 1 Sample year of manufacture 014-214-07E 04.20.2011 FM5926 CR-IR 355V CL Service Manual Supplementary Information 3 Supplementary Information 4 Information on the Veterinary Clinic System Item Affected Chapters, Sections and Paragraphs Description Part numbers Part numbers are different AP Key : 114Y5154002A IMAGE OUT Key Shipped components Product code Components shipped for the veterinary clinic system (CR-IR 355V CL) are as shown below. IN :Section 2 Appendixes 2, 3, 4, 5, 6, 12 and 13 Hardware Product Code IR 355 CL VE A6-V2.3 B E Description Q’ty Control Unit PC control unit (HP Compaq 6300Pro SF/Core i3-3220 Non-RAID WIN 7) DisplayPort-DVI converting connector OS Reinstallation Disk for 6200/6300/8200/8300 (Win7 SP1 + IE8) Resource Disk for 6300/8300 PC Diagnostics Disk for 6300/8300 Identification label CR-IR 355V CL Application Software V2.3(B) CR-IR 355CL/355V CL Standard Kit CR-IR 391V Image Processing Software Manual Kit for Veterinary Clinics CR-IR 355V CL Reference Guide CR-IR 355V CL Operation Manual CR-IR 355V CL Quick Guide Software License Agreement Remarks 1 1 1 1 1 1 1 1 1 Product Specifications : Section 1 1 1 1 1 Software Product Code Description IR 355 CL VE SOFT V2.3 B E CR-IR 355V CL Application Software V2.3(B) Identification label CR-IR 355CL/355V CL Standard Kit CR-IR 391V Image Processing Software Manual Kit for Veterinary Clinics CR-IR 355V CL Reference Guide CR-IR 355V CL Operation Manual CR-IR 355V CL Quick Guide Software License Agreement 014-214-08E 08.30.2013 FM5927 Q’ty Remarks 1 1 1 1 1 1 1 1 CR-IR 355V CL Service Manual Supplementary Information 4 Supplementary Information 5 Information on the Veterinary Clinic System Item Optional components Affected Chapters, Sections and Paragraphs Description Optional components shipped for the veterinary clinic system (CR-IR 355V CL) are as shown below. Product Code Description Q’ty IR 355 CLNT VE A6-V2.3 B E Control unit PC control unit (HP Compaq 6300Pro SF/Core i3-3220 Non-RAID WIN 7) DisplayPort-DVI converting connector OS Reinstallation Disk for 6200/6300/8200/8300 (Win7 SP1 + IE8) Resource Disk for 6300/8300 PC Diagnostics Disk for 6300/8300 Identification label CR-IR 355V CL Client Application Software V2.3(B) CR-IR 355CL/355V CL Client Activate Key 1 1 1 1 1 1 1 1 OPTIPLEX MEM 4GB TYPE 11 E Expansion memory (2GB) for Optiplex 780/790/990 (authentic product of DELL) 2 IR 674 LCD-17 E 17inch LCD(Nanao FlexScan S1721-XSHBK) 1 IR 674 LCD-22W E 22inch Wide LCD (Nanao FlexScan S2242W) 1 IR 674 LCD-24W E 24inch Wide LCD (Nanao FlexScan MX240W) 1 IR 674 LCD-2M C E 21.3inch LCD (RadiForceRX220) 1 IR 674 LCD-MLT23W E 23inch multi-touch screen monitor (Nanao RadiForce MS231WT) 1 IR 355 BD FOR DUAL MONITOR A E Video Card for Dual Monitor (ATI FirePro V3800) 1 IR 355 MFP A E CR-IR 355CL/355V CL MFP Key Software 1 IR 355 DICOM PRINT A E CR-IR 355CL/355V CL DICOM Print Key Software 1 IR 355 IMAGE OUT A E CR-IR 355CL/355V CL JPG/BMP/DCM File Output Key 1 IR 355 DICOM STORAGE A E CR-IR 355CL/355V CL DICOM Standard CR Storage Key 014-214-08E 08.30.2013 FM5927 Product Specifications : Section 1 MT: Section 4 IN : Section 3 1 IR 355 CLNT SOFT V2.3 B E CR-IR 355V CL Client Application Software V2.3(B) CR-IR 355CL/355V CL Client Activate Key 1 1 IR 355 F-LAYOUT PRINT E CR-IR 355CL/355V CL Free Layout for DICOM Standard Print 1 IR 355 VE IMPORT US A E CR-IR 355CL/355V CL DICOM US Storage SCP Key Software 1 IR 355 VE IMPORT IMAGE A E CR-IR 355CL/355V CL General-Purpose Image Importer Key Software 1 IR 355 VE DICOM ID MWM E CR-IR 355CL/355V CL DICOM ID MWM Key Software 1 IR 355 VE ORDER MWM/ MPPS E CR-IR 355CL/355V CL DICOM ORDER MWM/MPPS Key Software 1 IR 355 VE IMPORT ES E CR-IR 355CL/355V CL Endoscope Image Importer Key Software 1 IR 355 VE IMPORT CT/MRI E CR-IR 355CL/355V CL DICOM CT Storage SCP Key Software Remarks 1 CR-IR 355V CL Service Manual Supplementary Information 5 Supplementary Information 6 Information on the Veterinary Clinic System Item Settings for connection to a client PC Affected Chapters, Sections and Paragraphs Description •Implementing SetupForClient.bat 3. Enter “2” (Veterinary Hospital) from the keyboard and press the <Enter> key. a A window opens, where a desired language is to be selected. 4. Select a language you want and press the <Enter> key. NOTE Select the same language as that selected on the server side, as determined in “4.2 Changing the Displayed Language and Replacing the Menu Database” under “IN: Installation.” IN :Appendix 3 a A window opens, where a type of product model is to be selected. 5. Enter “1” (Cansole Application) from the keyboard and press the <Enter> key. a A window opens, where a type of monitor type is to be selected. Connectors This section shows locations of the connectors and memory slots of the PCs below. •Dell OptiPlex 745 •Dell OptiPlex 755 •Dell OptiPlex 760 •Dell OptiPlex 780 ■Dell OptiPlex 745 ●System board location System board MD: Section 1 Diagnostic lights System lights (power light and hard disk light) MD000261.EPS 014-214-07E 04.20.2011 FM5926 CR-IR 355V CL Service Manual Supplementary Information 6 Supplementary Information 7 Information on the Veterinary Clinic System Item Connectors Affected Chapters, Sections and Paragraphs Description ●Memory modules 1GB memory is installed and shipped from factory. System board DIMM sockets MD000260.EPS ●Connector configuration (PC rear panel) Parallel port connector Video connector Serial port connector MD: Section 1 NIC connector USB port (6-port) Indicates the connector used for the 355V CL MD000262.EPS ■Dell OptiPlex 755 / 760 ■Dell OptiPlex 780 014-214-07E 04.20.2011 FM5926 CR-IR 355V CL Service Manual Supplementary Information 7 Supplementary Information 8 Information on the Veterinary Clinic System Item Format application path OS XP Vista / 7 Software function overview Affected Chapters, Sections and Paragraphs Description Version File path V2.0 C:\WINDOWS\system32\DLA\DLACMD_W.EXE FORMAT D: V3.0 C:\Program Files\FujiFilm\Hobbit\System\FFUdfFmtTool D V4.0 C:\Program Files\FujiFilm\HBT\FFUdfFmtTool /E D: V5.0 or later C:\Program Files\FujiFilm\BHA\FFUdfFmtTool.exe /E D: V5.0 or later C:\Program Files\FujiFilm\Hobbit\System\FFUdfFmtToolForVista.exe D Function MU: Section 5, 6 IN : Section 4 Description Adding Annotations Measurement Upgrading to V2.0(B) Installing the Disc Burning Module (upgrading from V3.2 or earlier to V4.0 or later) [Windows XP only] 014-214-08E 08.30.2013 FM5927 Measures the image and displays the measuring result. The following measurement functions can be used. •Measure line segment •Simplified cardiothoracic ratio •Cardiothoracic ratio •Interline angle •Dual line angle •Cobb angle •VHS •TPA NOTE Upgrading to V2.0(B) can only perform from following version. •CR-IR 355V CL : V5.0, V5.1, V1.1(B) MD: Section 3 MC: Appendix 2 9. Remove the Disc Burning Module CD from the DVD drive. NOTE When upgrading CR-IR 355V CL from V3.2 or earlier to V4.0 or later, perform the step 10. CR-IR 355V CL Service Manual MC: Appendix 2 Supplementary Information 8 Supplementary Information 9 Various Setting Procedures for Veterinary Various Setting Procedures for Veterinary 1. 1. 3. Select [All] for “Filtering setup items”. 4. Select an appropriate value for 4-3 “Display unit of size measurement:”. The selectable setup values are 0:m, 1:cm, 2:inch, and 3:feet. 5. Select an appropriate value for 4-4 “Display unit of weight measurement:”. The selectable setup values are 0:kg, 1:g, 2:stone, and 3:pound. Unit Setting in Service Utility Start up the service utility. a The “Service Utility top” window opens. Animal001.AI 2. Click the [System] button. a The “System setting” window opens. Animal002.AI 014-214-05E 01.08.2010 FM5652 CR-IR 355V CL Service Manual Supplementary Information 9 Supplementary Information 10 Various Setting Procedures for Veterinary 2. 1. Importing and Exporting Species and Breed Data in User Utility Start up the user utility. 4. Click the [Export] or [Import] button. 2 files with specific names are exported or imported. Specifications of files are shown below. I. Common specification • The first line is a header line, the 2nd line and later are the actual data. a The “Main Menu” window opens. • Headers cannot be changed from the specified character strings. • A format is tab-delimited format. • Character code is Unicode. • Enclose an item including “,” with double quotation marks(“”). • A tab cannot be a part of an item. • An entire line cannot be enclosed with double quotation marks. Please note that the file is saved in this format by the editor. • It is recommended to edit the exported csv files and import them. • Back up the exported csv files before editing. Animal002.AI 2. Click the [Input/output of Veterinary DB] button. a The “Import/export of Species Breed” window opens. II.Species.csv [SPECIES_SEQ] Integer from 1 through 2147483647, which does not overlap with other SPECIES_SEQ. When currently used SPECIES_SEQs are changed, patient information registered as the species are also changed. Do not make the unintended changes. [DATA_TYPE] 0: DICOM defined / 1: FUJIFILM defined record / 2: User defined record For newly added items, enter “2”. [CODING_SCHEME_DESIGNATOR] Follow DICOM Standard Part16 CID 7454 only when DATA_TYPE is “0”. Up to 16 characters. Animal004.AI 3. Click the [Selection of folder] button, and select a file or folder to be imported or exported. 014-214-05E 01.08.2010 FM5652 [CODE_VALUE] Follow DICOM Standard Part16 CID 7454 only when DATA_TYPE is “0”. Up to 16 characters. [CODE_MEANING] Follow DICOM Standard Part16 CID 7454 only when DATA_TYPE is “0”. Up to 64 characters. * Confirm “Prohibited characters” described later. CR-IR 355V CL Service Manual Supplementary Information 10 Supplementary Information 11 Various Setting Procedures for Veterinary [DISPLAYED_NAME] A name used in the system. Duplicated name cannot be used. Up to 64 characters. Space alone cannot be used. * Confirm “Prohibited characters” described later. [CODE_VALUE] Follow DICOM Standard Part16 CID 7454 only when DATA_TYPE is “0”. Up to 16 characters. [CODE_MEANING] Follow DICOM Standard Part16 CID 7454 only when DATA_TYPE is “0”. Up to 64 characters. * Confirm “Prohibited characters” described later. [USE_RECORD] A flag to specify whether to make this record a search target in the Input ID window. TRUE : Become the search target FALSE : Does not become the search target [DISPLAYED_NAME] A name used in the system. A name duplicated in the same SPECIES_SEQ cannot be used. Up to 64 characters. Space alone cannot be used. * Confirm “Prohibited characters” described later. [DELETE_FLAG] A flag to specify whether to use this item in the system, including species customizing window. * An item deleted in customizing become usable when it is set to “FALSE”. TRUE : Use FALSE : Do not use [USE_RECORD] A flag to specify whether to make this record a search target in the Input ID window. TRUE : Become the search target FALSE: Does not become the search target III.Breed.csv [BREED_SEQ] Integer from 1 through 2147483647, which does not overlap with other SPECIES_SEQ. When currently used SPECIES_SEQs are changed, patient information registered as the species are also changed. Do not make the unintended changes. [SPECIES_SEQ] This record corresponds to SPECIES_SEQ in Species.csv, and indicates to which species this record belongs. Values that do not exist in SPECIES_SEQ in Species.csv will be an error. An error also occurs if a corresponding DELETE_FLAG of SPECIES_SEQ in Species.csv is “TRUE”. When currently used SPECIES_SEQs are changed, patient information registered as the species are also changed. Do not make the unintended changes. [DELETE_FLAG] A flag to specify whether to use this item in the system, including breed customizing window. * An item deleted in customizing becomes usable when it is set to “FALSE”. TRUE : Use FALSE : Do not use Prohibited characters *, @, ?, “, %, &, +, ¥, < Characters above cannot be used. 5. Click [Completion] to finish. [DATA_TYPE] 0: DICOM defined / 1: FUJIFILM defined record / 2: User defined record For newly added items, enter “2”. [CODING_SCHEME_DESIGNATOR] Follow DICOM Standard Part16 CID 7454 only when DATA_TYPE is “0”. Up to 16 characters. 014-214-05E 01.08.2010 FM5652 CR-IR 355V CL Service Manual Supplementary Information 11 Supplementary Information 12 Various Setting Procedures for Veterinary 3. 4. Verifying Importing Operation Click the [Edit breed Info.] button. a The “Edit breed Info.” window opens. 1. Select “Customize” from “Utilities” at the lower right of the patientoriginated window. a The “Display setting” window opens. Animal005.AI 2. Click the [Edit species Info.] button. Animal007.AI a The “Edit species Info.” window opens. 5. Confirm that the contents of “Breed.csv” are reflected, and click the [OK] button. a The system returns to the “Display setting” window. 6. Click the [OK] or [Cancel] button. a The system returns to the desktop screen. Animal006.AI 3. Confirm that the contents of “Species.csv” are reflected, and click the [OK] button. a The system returns to the “Display setting” window. 014-214-05E 01.08.2010 FM5652 CR-IR 355V CL Service Manual Supplementary Information 12 Supplementary Information 13 Various Setting Procedures for Veterinary 4. The Procedure for Correcting the Error that Disables Lumber Vertebrae Preset for Veterinary Use ■Overview It has been reported from a veterinary clinic that an error disabled displaying selectable preset menus even though preset was selected while viewing a lumber vertebrae image in the viewer screen. As a result of the investigation, an inconsistency was found in a part of the preset menu management database. To solve this problem, this section provides the procedure for correcting the preset menu data. ■Applicable Conditions • CR-IR 355V CL V5.0 or later • CR-IR 391V CL V1.0 or later ■Procedure NOTES •Perform the procedure only on the Sever PC. •Terminate both Server application and Client application before performing the procedure. ●Preparation of the batch file (UpdateveterinaryPresetDB.bat) NOTE In this procedure, creating and executing file are required. If you copy texts from the PDF, line feeds and spaces may exist at unintended places. If you can see ECN, the operation in accordance with the contents of the following ECN is recommended. “ECN 2012-E-0127 The Procedure for Correcting the Error that Disables Lumber Vertebrae Preset for Veterinary Use” If you cannot see ECN, you have to perform the operation in accordance with this procedure. Carefully confirm that there is no error in the created file before executing the file. Especially pay attention to the positions of line breaks and spaces. 1. 014-214-08E 08.30.2013 FM5927 Open a new Notepad. CR-IR 355V CL Service Manual Supplementary Information 13 Supplementary Information 14 Various Setting Procedures for Veterinary 2. Input the following contents. NOTE •The red string in the following file contents is the string which extends across multiple lines when being shown here but has to be in one line on the file. If you copied the contents from the PDF to the Notepad, delete the line feed character so that the red string becomes one line. ●Preparation of the script file (UpdateveterinaryPresetDB.sql) 1. Open a new Notepad. 2. Input the following contents. -- Update T_MPRESET UPDATE T_MPRESET SET REGION_CODE = 3 WHERE REGION_CODE = 16 •If you copy texts from the PDF, line feeds and spaces may exist at unintended places. Carefully confirm that there is no error in the created file. @echo ---- Veterinary PresetDB Update ---@echo. @echo Start @echo. @echo off pause REM --Before Execute bcp Preset.dbo.T_MPRESET out T_MPRESET_before.csv -U SA -P fcr-dms -c -t "," > tmp.log bcp Preset.dbo.T_MPRESET_REGION out T_MPRESET_REGION_before.csv -U SA -P fcr-dms -c -t "," > tmp.log -- Update T_MPRESET_REGION UPDATE T_MPRESET_REGION SET NAME = 46939 WHERE CODE = 3 UPDATE T_MPRESET_REGION SET NAME = 0 WHERE CODE = 16 Go 3. Save the file as “UpdateveterinaryPresetDB.sqlt”. ●Executing the batch file (UpdateveterinaryPresetDB.bat) REM --Execute osql -U SA -P fcr-dms -d Preset -i UpdateveterinaryPresetDB.sql -o result.log 1. REM --After Execute bcp Preset.dbo.T_MPRESET out T_MPRESET_after.csv -U SA -P fcr-dms -c -t "," > tmp.log bcp Preset.dbo.T_MPRESET_REGION out T_MPRESET_REGION_after.csv -U SA -P fcr-dms -c -t "," > tmp.log Double-click the batch file (UpdateveterinaryPresetDB.bat) on the desk top. 2. When “Press any key to continue...” is displayed, press the <Enter> key. REM -- Delete log del tmp.log @echo. @echo Finish @echo. Animal008.AI :END pause 3. Save the file as “UpdateveterinaryPresetDB.bat”. a Wait untill the message “Finish” appears. 3. When “Press any key to continue...” is displayed, press the <Enter> key. Animal009.AI 014-214-08E 08.30.2013 FM5927 CR-IR 355V CL Service Manual Supplementary Information 14 Supplementary Information 15 Various Setting Procedures for Veterinary ■Verification procedure 1. III. Select “Other” tab and click [Preset all]. Confirm that the following preset menus are displayed on the menu. Restart the PC. a The “Image viewer” window opens. 2. Make sure that the following operations display the preset menus for the FCR studies of vertebral body (Cervical vertebrae and lumber vertebrae). I. Select “Basic operation” tab and click [PRESET]. Animal012.AI IV. Start up the “User Utility” and click [Preset Setting]. Once the “Preset setting” window opens, confirm that the following preset menus are displayed. Animal010.AI II. Select “Basic operation” tab and click [FCR image processing] - [Preset Setting]. Once the “Organize preset list” is displayed, confirm that the following preset menus are displayed. Animal013.AI Animal011.AI 014-214-08E 08.30.2013 FM5927 CR-IR 355V CL Service Manual Supplementary Information 15 Supplementary Information 16 Various Setting Procedures for Veterinary 3. If the verification procedure 2 above does not display the preset menus, make copies of the following files generated on the desktop and send them to FujiFilm Quality Assurance Div. Medical Systems R&D Center via TIMS. • result.log • T_MPRESET_after.csv • T_MPRESET_before.csv • T_MPRESET_REGION_before.csv • T_MPRESET_REGION_after.csv Delete the files if the menus are displayed appropriately. 4. Delete “UpdateveterinaryPresetDB.bat” file and “UpdateveterinaryPresetDB.sql” file on the desktop. 014-214-08E 08.30.2013 FM5927 CR-IR 355V CL Service Manual Supplementary Information 16 Supplementary Information 17 Various Setting Procedures for Veterinary 5. Procedure of Modifying the Study Menu for Veterinary Clinics 5. Click “Menu Setting” and confirm the exposure menus included in the following study menus. Table1 ■Overview ●Background and purpose No. 1 At veterinary clinics, inappropriate study menus are selected in some study menus, and modification to turn them to the appropriate study menus is required. This section describes the procedure of modifying the study menus mentioned above. 2 ●Applicable Conditions Confirmation items of study menus Study menu Exposure menu Normal value STOMACH:C CANINE -8KG STOMACH:C 2R STOMACH:C LAT CANINE CANINE -8KG -8KG PREGNANT,2R FELINE -8KG PREGNANT,FELINE -8KG PREGNANT,LAT FELINE -8KG Anomalous value LO.LEG,FELINE -8KG STOMACH:C LAT CANINE -8KG ABDOMEN,GEN.VD,FELINE -8KG PREGNANT,LAT FELINE -8KG • CR-IR 355V CL devices upgraded from Server V2.0(B), V2.1(B) or V2.2(B) NOTES • CR-IR 391V CL devices upgraded from Server V2.2(B) •If an anomalous value has been included even just one, perform the procedure from step 6. ■Procedure •If all values in both study menus are normal, the following steps are not required. Modify study menus with the following procedure. 1. Start up CR-IR 355V CL (CR-IR 391V CL) and click . 6. If an anomalous value was included at step 5, terminate the User Utility. Also terminate the Server application starts after that. 7. Insert “CR-IR 355CL/355V (CR-IR 391V) CL Application Software-B V2.3” into the DVD drive. a The “Select Server Application Behavior” window opens. 2. Select “User Utility”. a A confirmation window opens. 3. 4. Click [OK]. r REFERENCES a The “User authentication” window opens. •If Install Launcher starts up, select “Open CD Root Folder” from “Tool Application Setup”. Input the username and password, and click [OK]. •In any other cases, double-click the DVD drive. a The “Main Menu” window opens. 014-214-08E 08.30.2013 FM5927 CR-IR 355V CL Service Manual Supplementary Information 17 Supplementary Information 18 Various Setting Procedures for Veterinary 8. Open “Tool -> UpdateExaminationMenu”, and execute “UpdateExaminationMenu.bat”. a The command prompt starts up. 9. Confirm that “Success update examination menu.” is displayed. Ani-018.ai 10. Perform steps 1 to 5 to confirm that values have been changed to the normal values in Table 1. 014-214-08E 08.30.2013 FM5927 CR-IR 355V CL Service Manual Supplementary Information 18 Supplementary Information 19 Various Setting Procedures for Veterinary 6. String/Message Replace Tool ■Explanation of the Main window ■Overview I. II. This section describes the usage, confirmation procedure and precautions at installation of the service tool “String/message replace tool”. III. ●Applicable Conditions V2.3(B) Server/Client IV. V. ■Usage ●Startup method 1. Double-click the tool in the following folder in both the Server PC and Client PC. C:\Program Files\FujiFilm\Hobbit\System\ResouceEditingTool.exe a The String replace tool starts up and the Main window opens. VI. VII. IX. VIII. Ani-019.ai I. Conversion string list Strings which are targets of replacement and strings after replacement are displayed. II. Add condition button If you click this button, the “Add Dialog” will opens. When you input the target strings into the “Before replacement/After replacement” text boxes and then click [Add], the replacement strings will be registered. Ani-020.ai 014-214-08E 08.30.2013 FM5927 CR-IR 355V CL Service Manual Supplementary Information 19 Supplementary Information 20 Various Setting Procedures for Veterinary IX. Terminate button III. Edit condition button If you click this button when the item which is a target of editing has been select from the replacement string list, the editing dialog will open. To change the replacement strings, edit the strings in the “Before replacement/After replacement” text boxes and click [Edit]. Ani-021.ai IV. Delete condition button If you click this button when the item which is a target of editing has been select from the replacement string list, the item will be deleted. Terminates the tool. ●Usage and confirmation procedure 1. Start up the tool at the Server PC or Client PC on which you wish to execute replacement. 2. Register replacement strings with “II. Add condition button/III. Edit condition button”. 3. Perform a replacement with “VIII. Execute replacement button”. 4. Start up the main application, and confirm that the strings replaced at step 2 have changed. If the strings have not been replaced, start up the tool, reset the tool to the factory default status with “VII. Reset to default button” and perform the replacement again from step 2. V. Up button Raises the string replacement execution order of the selected item. VI. Down button Lowers the string conversion execution order of the selected item. r REFERENCE The replacement will be executed in order from the top of the replacement string list. Example: Patient ID → ID number Patient → Animal If the replacement is performed with strings registered to the list in the order above, the string “Registering the Patient ID” will first be replaced with “Registering the ID number”. It will not be the replacement target of “Animal” which is a replacement of the subsequent “Patient”. VII. Reset to default button ■Supplement The replacement string list is save when the tool terminates. When restarting the system, items are registered on the list in the same state as that of the last termination. This save information is also passed to the new version when upgrading the main application. The information save file of the replacement string list is on the following address. C:\Program Files\FujiFilm\Hobbit\ReplaceWordList.xml ■Precautions/Restrictions String will be reset to the factory default status of the new version due to the version upgrade of the main application. Thus, execute the tool again after version upgrade at the institutions where procedures in this section were performed. Reset all of the strings and messages to factory default status. VIII.Execute replacement button Executes the replacements registered on the list. 014-214-08E 08.30.2013 FM5927 CR-IR 355V CL Service Manual Supplementary Information 20