1
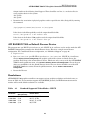
ATI RADEON® 7500 PCI Graphics Controller
Installation Guide
Third Edition
Manufacturing Part Number: AB551-90003
AB551-90003
September 2006
© Copyright 2004-2006 Hewlett-Packard Development Company, L.P.
ATI RADEON 7500 PCI Graphics Controller Installation Guide
Legal Notices
Copyright Notices. © Copyright 2004-2006 Hewlett-Packard Development Company, L.P.
The information contained herein is subject to change without notice. The only warranties for HP
products and services are set forth in the express limited warranty statements accompanying such
products and services. Nothing herein should be construed as constituting an additional warranty. HP
shall not be liable for technical or editorial errors or omissions contained herein.
Radeon® is a registered trademark of ATI.
2
ATI RADEON 7500 PCI Graphics Controller Installation Guide
Contents
PREFACE...........................................................................................................................5
Intended Audience .............................................................................................................................................................5
Document Structure ...........................................................................................................................................................5
Notational Conventions .....................................................................................................................................................5
Reader Comments and Feedback.......................................................................................................................................6
Related Information ...........................................................................................................................................................6
Diagnostics and Event Monitoring: Hardware Support Tools .................................................................. 7
Books about HP-UX Published by Prentice Hall ....................................................................................... 7
Printing History..................................................................................................................................................................7
1
OVERVIEW...................................................................................................................8
Introduction........................................................................................................................................................................8
Module Description ...........................................................................................................................................................8
Connector Pinouts............................................................................................................................................................10
2
INSTALLATION..........................................................................................................11
Introduction......................................................................................................................................................................11
Unpacking........................................................................................................................................................................11
Installation Procedure ......................................................................................................................................................11
3 HP OPENVMS I64 – GRAPHICS SOFTWARE INSTALLATION AND
CUSTOMIZATION ............................................................................................................13
Video Resolutions Supported ..........................................................................................................................................13
Restrictions, Limitations and Defaults.............................................................................................................................14
Minimum Console Revision....................................................................................................................... 14
No VGA Console Support .......................................................................................................................... 14
HP Integrity Platform Slot Restrictions................................................................................................... 14
Default Depth (24 Bits Per Pixel) ............................................................................................................. 14
Multiple Colormaps (8 Bits Per Pixel) ...................................................................................................... 15
Single Pixel Depth (No Mixed Depth Windows) ...................................................................................... 15
Visual Types ............................................................................................................................................... 15
PCI Bus Performance Under Load............................................................................................................ 15
Open3D Support......................................................................................................................................... 15
Transformation, Clipping and Lighting Support..................................................................................... 16
Threads Restriction.................................................................................................................................... 16
No Backing Store/Save Under for 3D Windows ....................................................................................... 16
Multiple Graphics Cards Support ....................................................................................................................................16
Multi-Screen Versus XINERAMA............................................................................................................. 16
Screen Order and Forcing Single Headed Operation .............................................................................. 17
Modifying the Graphics Configuration............................................................................................................................17
ATI RADEON 7500 Default Graphics Settings ....................................................................................... 17
Determining Current Settings .................................................................................................................. 17
Overriding the Default Settings................................................................................................................ 17
Server Startup and Configuration Messages ....................................................................................................................18
Troubleshooting ...............................................................................................................................................................19
3
ATI RADEON 7500 PCI Graphics Controller Installation Guide
4
HP-UX CONFIGURATION..........................................................................................21
Including the gvid Module in the Kernel .........................................................................................................................21
Verification of Software Installation................................................................................................................................21
Verification of Hardware Installation ..............................................................................................................................22
ATI RADEON 7500 as Default Xserver Device .............................................................................................................23
Resolutions ......................................................................................................................................................................23
Restrictions and Limitations ............................................................................................................................................24
No Accelerated 3D Support ....................................................................................................................... 24
Multiple Colormaps.................................................................................................................................... 24
Default Visual Information ....................................................................................................................... 24
Configuring Graphics Resolution or Vertical Refresh Rate for HP-UX..........................................................................26
Current Graphics Resolution .................................................................................................................... 26
How to Change the Resolution and Refresh Rate.................................................................................... 26
Multihead Support ...........................................................................................................................................................26
Multi-screen................................................................................................................................................ 26
XF86Config Changes ................................................................................................................................. 26
Messages..........................................................................................................................................................................29
Troubleshooting ...............................................................................................................................................................29
FIGURES
1-1 ATI RADEON 7500 PCI Graphics Controller ..........................................................................................................9
TABLES
1-1 Option Numbers.........................................................................................................................................................8
1-2 Standard 15-Pin VGA Connector Pinout .................................................................................................................10
3-1 Supported Video Modes – HP OpenVMS ...............................................................................................................13
3-2 Troubleshooting Criteria ..........................................................................................................................................19
4-1 Standard Supported Video Modes – HP-UX ...........................................................................................................23
4-2 Troubleshooting Criteria ..........................................................................................................................................29
4
Preface
This preface contains the following sections:
•
•
•
•
•
•
Intended Audience
Document Structure
Notational Conventions
Reader Comments and Feedback
Related Information
Printing History
Intended Audience
This manual is for managers and operators of HP AlphaServer systems and HP-UX server systems
with ATI RADEON 7500 PCI graphics controllers.
Document Structure
This manual has the following chapters.
Chapter 1, Overview, provides a brief overview of the ATI RADEON 7500 PCI graphics controllers.
Chapter 2, Installation, describes the installation of the ATI RADEON 7500 PCI graphics controller
module in a supported HP product.
Chapter 3, HP OpenVMS I64 - Graphics Software Installation and Customization, provides
information for installing and modifying the software required to support 2D (two-dimensional) and 3D
graphics with the ATI RADEON 7500 PCI graphics controllers under the HP OpenVMS I64 operating
system.
Chapter 4, HP-UX Configuration, provides information for installing and modifying the software
required to support 2D (two-dimensional) graphics with the ATI RADEON 7500 PCI graphics
controllers under the HP-UX operating system.
Notational Conventions
The following notational conventions are used in this publication.
CAUTION: A caution provides information required to avoid losing data or avoid losing
system functionality.
NOTE
A note highlights useful information such as restrictions, recommendations, or important
details about HP product features.
•
Commands and options are represented using this font.
•
Text that you type exactly as shown is represented using this font.
5
Preface
ATI RADEON 7500 PCI Graphics Controller Installation Guide
•
Text to be replaced with text that you supply is represented using this
font.
Example:
“Enter the ls -l filename command” means you must replace filename with your own
text.
•
Keyboard keys and graphical interface items (such as buttons, tabs, and menu items) are represented
using this font.
Examples:
The Control key, the OK button, the General tab, the Options menu.
•
Menu —> Submenu represents a menu selection you can perform.
Example:
“Select the Partition —> Create Partition action” means you must select the Create Partition menu
item from the Partition menu.
•
Example screen output is represented using this font.
Reader Comments and Feedback
HP welcomes your feedback on this publication. Please address your comments to
[email protected] and note that you will not receive an immediate reply. All comments
are appreciated.
Related Information
Visit the HP Web site at www.hp.com for service tools and more information about ATI RADEON 7500
PCI graphics controller.
You can find other information on HP server hardware management, Microsoft® Windows®, and
diagnostic support tools in the following publications.
Web Site for HP Technical Documentation:
http://docs.hp.com
The main Web site for HP technical documentation is http://docs.hp.com, which has complete
information available for free.
Server Hardware Information:
http://docs.hp.com/hpux/hw/
The http://docs.hp.com/hpux/hw/ web site is the systems hardware portion of the docs.hp.com
web site and provides HP nPartition server hardware management details, including site preparation,
installation, and more.
6
Preface
ATI RADEON 7500 PCI Graphics Controller Installation Guide
Diagnostics and Event Monitoring: Hardware Support Tools
Complete information about HP’s hardware support tools, including online and offline diagnostics and
event monitoring tools, is at the http://docs.hp.com/hpux/diag/ Web site. This site has manuals,
tutorials, FAQs, and other reference material.
Web Site for HP Technical Support:
http://us-support2.external.hp.com
HP’s IT resource center Web site at http://us-support2.external.hp.com/ provides
comprehensive support information for IT professionals on a wide variety of topics, including software,
hardware, and networking.
Books about HP-UX Published by Prentice Hall
The http://www.hp.com/hpbooks/ Web site lists the HP books that Prentice Hall currently
publishes, including such HP-UX books as:
HP-UX 11i System Administration Handbook
http://www.hp.com/hpbooks/prentice/ptr_0130600814.html
HP-UX Virtual Partitions
http://www.hp.com/hpbooks/prentice/ptr_0130352128.html
HP books are available worldwide through bookstores, online booksellers, and office and computer
stores.
Printing History
The printing history below identifies the edition dates of this manual. Updates are made to this
publication on an unscheduled, as needed, basis.
First Edition………………………………………………………………………………………………..April 2005
Second Edition…………………………………………………………………………………………….April 2006
Third Edition…………………………………………………………………………………..…….September 2006
7
1 Overview
Introduction
This chapter provides a brief overview of the ATI RADEON 7500 PCI graphics controller.
Module Description
The ATI RADEON 7500 PCI graphics controller/accelerator module is a single expansion-slot 32 bit,
66/33 MHz Universal PCI option that provides 2D and 3D graphics acceleration for supported HP
systems running HP OpenVMS I64 and 2D for supported HP-UX systems
The ATI RADEON 7500 graphic card is based on ATI’s RV200 graphics chip.
Table 1-1
Option Numbers
Option
Description
AB551A
ATI RADEON 7500 PCI graphics controller with 64 MB of DDR SDRAM memory.
For current minimum operating system and firmware revision information supported for the ATI
RADEON 7500 graphics controllers, refer to the system QuickSpecs located at http://www.hp.com.
8
Overview
ATI RADEON 7500 PCI Graphics Controller Installation Guide
Figure 1-1
ATI RADEON 7500 PCI Graphics Controller
27300
CRT
S-VIDOUT
2
DVI
R
1
4
3
5
MR0494
X
Y
Z
[
\
ATI RADEON 7500 PCI graphics controller
DVI-I VGA connector adaptor
S-Video connector
DVI-I connector
Standard 15-pin VGA connector
The ATI RADEON 7500 PCI graphics controller has a standard 15-pin VGA connector, a DVI-I
connector and an S-Video connector. The S-Video functionality is not supported by either HP OpenVMS
I64 or HP-UX. There is no VGA switch; VGA functions are automatically configured through the
console firmware and software.
DVI-I to VGA Connector Adaptor
HP OpenVMS I64 does not support direct DVI to DVI operation on the ATI RADEON 7500 card. The
DVI port is only usable with a DVI to analog (VGA) adapter or cable (this part was supplied on the
AlphaServer version of the card, but is not supplied for HP Itanium). If a DVI to analog adapter or
cable is used, OpenVMS drives both the VGA and DVI interface with the same image.
HP-UX does support all video connections, including direct DVI to DVI, DVI to analog (VGA) and VGA
to VGA.
9
Overview
ATI RADEON 7500 PCI Graphics Controller Installation Guide
Connector Pinouts
Table 1-2 contains a listing of the pins and signals found on the standard 15-pin VGA connector and
the DVI-I to VGA adaptor (part number 209815-001 not included in kit).
Table
1-2
Standard 15-Pin VGA Connector Pinout
Pin No.
Signal
1
RED VIDEO
2
GREEN VIDEO
3
BLUE VIDEO
4
No connector
5
GROUND
6
GROUND
7
GROUND
8
GROUND
9
+5V SUPPLY
10
GROUND
11
No connector
12
BI-DIRECTIONAL DATA
13
HORIZONTAL SYNC or COMPOSITE SYNC
14
VERTICAL SYNC (VCLK)
15
DATA CLOCK
10
2 Installation
Introduction
This chapter provides information on unpacking the graphic controller and installing the ATI
RADEON 7500 PCI graphics controller module in a supported HP product.
Unpacking
The graphics option hardware is packaged in a single carton that contains one graphic controller and
one installation guide.
Qty
1
1
Description
ATI RADEON Graphics Controller, 64MB PCI
Part Number
AB551A
ATI RADEON Installation Guide
AB551-90001
Installation Procedure
CAUTION: Static electricity can damage sensitive electronic components. When handling
your graphics option, use an anti-static wrist strap that is connected to a
grounded surface on your computer system.
NOTE: Before installing the module, check your monitor specification for signal compatibility and
supported features offered by the ATI RADEON 7500 PCI graphics controllers.
The following section describes how to install the ATI RADEON 7500 PCI graphics controller. To install
the module, perform the following steps:
1. Perform a normal power-down of your computer system and disconnect the monitor cable.
2. Disconnect all AC power cables from the wall outlet (or turn off the circuit breakers if applicable to
your system) to remove power from the system.
3. Put on an anti-static wrist strap.
4. Remove the cover from your computer (refer to your system documentation).
5. If your computer has an existing graphics module, remove the screw that secures it and then
remove the module.
6. The slot to be selected depends on the graphic controller you are about to install. If your system had
a previously installed graphics option, you can use that expansion slot. Remove the slot cover if you
are using a new slot. Refer to your system owner’s guide for information about graphics option slots.
7. Grasp the top edge of the graphics option, carefully insert it into the slot, and seat it firmly.
11
Installation
ATI RADEON 7500 PCI Graphics Controller Installation Guide
8. Secure the module.
9. Replace the computer cover.
10. Ensure that the monitor cable is connected to the video output connector located on the back of the
graphics option.
11. Reconnect the AC power cables to the wall outlet (or turn on the circuit breakers if applicable to
your system) to restore power to the system.
12. Perform a normal power-up of your computer system.
12
3 HP OpenVMS I64 – Graphics Software
Installation and Customization
This chapter provides information for installing and modifying the software required to support 2D and
3D graphics with the ATI RADEON 7500 PCI graphics controller under the HP OpenVMS I64
operating system.
The ATI RADEON 7500 PCI graphics controller is directly supported by HP OpenVMS I64 without
additional software. Bug fixes and new feature support are supplied using the standard OpenVMS
downloadable patch support mechanism, and with new versions of the Operating System.
The behavior of the ATI RADEON 7500 PCI graphics controller’s support software may be modified
after installation on OpenVMS by editing the appropriate files and issuing DCL commands (see
Multiple Graphics Cards Support on page 16).
Video Resolutions Supported
The ATI RADEON 7500 PCI graphics controller is capable of supporting the graphics resolutions, color
depths, and refresh rates shown in Table 3-1:
Table
3-1
Resolution
640 x 480
800 x 600
1024 x 768
1024 x 864
1152 x 864
1280 x 1024
1600 x 1200
1792 x 1344
1856 x 1392
1920 x 1080
1920 x 1200
1920 x 1440
2048 x 1536
2048 x 2048
Supported Video Modes – HP OpenVMS
Color Depths
(Bits per Pixel)
8, 16, 24
8, 16, 24
8, 16, 24
8, 16, 24
8, 16, 24
8, 16, 24
8, 16, 24
8, 16, 24
8, 16, 24
8, 16, 24
8, 16, 24
8, 16, 24
8, 16, 24
8, 16, 24
Refresh Rates
(Hertz)
60, 72, 75, 85
60, 72, 75, 85
60, 70, 75, 85
60, 70, 75, 85
60
60, 72, 75, 85
60, 65, 75, 85
60, 75
60, 75
60, 75
60, 75
60, 75
60, 65, 70, 75
57
The video mode chosen should match your monitor’s capabilities. In general, refresh rates below 70 Hz
are discouraged on CRT monitors, as they tend to show flicker based on the lighting source and
surrounding equipment. Flat Panel displays generally prefer a 60Hz refresh rate.
The available resolutions are monitor dependent.
The default video mode is 1024X768 @70HZ and 24 bits per pixel depth.
13
HP OpenVMS I64 – Graphics Software Installation & Customization
ATI RADEON 7500 PCI Graphics Controller Installation Guide
Restrictions, Limitations and Defaults
This section of the document contains limitations, restrictions and defaults for the ATI RADEON 7500
hardware and software.
Minimum Console Revision
The minimum console firmware version for support of the ATI RADEON 7500 graphics controller
under HP OpenVMS I64 is system dependent. Please consult your platform option information for
minimum requirements.
No VGA Console Support
The initial HP OpenVMS I64 production release (V8.2) does not support the use of a graphics card
(VGA mode) as a console terminal device. This is expected to be allowed in a subsequent release. A
serial line console, or other Management Processor attached device is required.
HP Integrity Platform Slot Restrictions
The Version V8.2 release of HP OpenVMS I64 supports three HP Itanium platform types: The
RX1600, RX2600 and RX4640 (along with speed and CPU variants). The following are the known
restrictions on populating slots with ATI RADEON 7500 cards:
•
RX1600 – Only one slot (the top slot) allows an ATI RADEON 7500 card, the bottom slot is
mechanically obstructed. Do not attempt to force a card into the lower slot.
•
RX2600 – No restrictions. Up to four ATI RADEON 7500 cards may be placed in any of the
slots.
•
RX4640 – Up to 4 ATI RADEON 7500 cards may be used, with restrictions on the use of slots 3
and 4, and 5 and 6:
o
One card in slot 3 or 4, but not both
o
One card in slot 5 or 6, but not both
o
One card in slot 7
o
One card in slot 8
If ATI RADEON 7500 cards are plugged into slot 3 and 4, or 5 and 6, the following error
message may be displayed during system startup, and the system will not function correctly:
WARNING[2]: Insufficient resources to assign one or more I/O devices
Default Depth (24 Bits Per Pixel)
HP OpenVMS I64 has traditionally set the default pixel depth to 8 bits per pixel on 2D graphics
options, and 24 bits per pixel on 3D options. With the expanding use of applications such as MOZILLA
and increased use of various types of images such as GIF and JPEG, the default depth for both 2D and
3D has been changed to 24 bits per pixel.
NOTE: Many older applications may assume a specific depth and visual type – in particular 8 bits per
pixel and PsuedoColor. If your graphics application or a utility depends upon the depth, you
can either modify the application, or change the default pixel depth. For example, the PAINT
program which ships on DECwindows Motif currently only support 8 bits per pixel.
For instructions on changing the pixel depth, see “Overriding the Default Settings” on page 17.
14
HP OpenVMS I64 – Graphics Software Installation & Customization
ATI RADEON 7500 PCI Graphics Controller Installation Guide
Multiple Colormaps (8 Bits Per Pixel)
Multiple colormaps are not supported by the hardware. The ATI RADEON 7500 PCI graphics
controllers support only one installed colormap at one time. Exceeding this limit in 8 bits per pixel
depth, may cause colormap ‘flashing’, also known as "Technicolor".
Applications should not install or de-install colormaps themselves. The window manager should
perform these actions. However, the application is responsible for providing the window manager with
hints as to which colormaps to install or de-install.
Single Pixel Depth (No Mixed Depth Windows)
Some workstation 3D graphics options in the past provided the ability to mix windows of different pixel
depths on the same screen. The ATI RADEON 7500 board can only support a single pixel depth at a
time. This means that all windows on a specific screen must all have the same pixel depth (no mixed
depth windows).
Visual Types
A visual type defines how the X11 server interprets the contents of a pixel. While the ATI RADEON
7500 hardware only supports a single pixel format at a time, the X11 server can emulate various visual
types depending on the pixel depth. For example, when using 24 bits per pixel both DirectColor and
TrueColor can be used, and at 8 bits per pixel all visual types are available.
The default visual types are: TrueColor for 16 and 24 bits per pixel, and PseudoColor for 8 bits per
pixel.
For information on changing the default visual, see “Overriding the Default Settings” on page 17.
PCI Bus Performance Under Load
Under heavy load - typically mixed high output 2D and 3D - the RADEON 7500 may consume too much
bus bandwidth, and has been observed to sometimes hang the graphics output. The DMA fetch size can
be adjusted to use less bandwidth, at the cost of performance (typically 3D performance).
To reduce the DMA fetch size, modify DECW$PRIVATE_SERVER_SETUP.COM to include the line:
$ DEFINE/SYSTEM DECW$RADEON_FAST_DMA 0
This can be set to the values 0-2, where 0 is the lowest DMA fetch size. The default on Itanium systems
is fast (2).
Open3D Support
The ATI RADEON 7500 supports hardware accelerated 3D support when the pixel depth is set to 24
bits per pixel. Hardware 3D drawing is not available when using 8 or 16 bits per pixel.
Previous versions of HP OpenVMS I64 provided hardware accelerated 3D graphics and an OpenGL
compatible programming interface for selected option cards through the Open3D license. Starting with
HP OpenVMS I64 V8.2 on both Alpha and I64 systems, the Open3D license will no longer be required
for 3D operation (for POWERSTORM 300 and 350, and ATI RADEON 7000 and 7500 graphics
controllers). The license for use of 3D is included as part of the base Operating System.
The HP OpenVMS I64 ATI RADEON 7500 graphics support includes a Mesa3D based graphics library
providing an OpenGL V1.2 compatible programming interface, and GLX V1.2. Among other features,
15
HP OpenVMS I64 – Graphics Software Installation & Customization
ATI RADEON 7500 PCI Graphics Controller Installation Guide
the libraries provide support for the ATI RADEON 7500 TCL hardware, hardware alpha and stencil
planes, 3D multi-texturing, and 3D cube map textures.
The RADEON 7500 Mesa3D software will, by default, force a direct-rendered 3D context whenever the
3D client requests connection to the X11 server using the LOCAL transport. Direct rendering is a
highly desirable performance feature for 3D applications.
You can override this default behavior and force the default to always be indirect rendering (indirect
rendering means that all 3D operations are executed by the X11 OpenGL server extension) by defining
the following logical name before running the 3D application:
$ DEFINE LIBGL_ALWAYS_INDIRECT 1
This can also be achieved by using the DECNET or TCPIP transports.
Hardware acceleration can be disabled entirely by defining the system logical:
$ DEFINE/SYSTEM/NOLOG DECW$SERVER_NOACCEL TRUE
HP recommends that the direct rendering interface be used for 3D operation.
Transformation, Clipping and Lighting Support
The Mesa3D driver for the RADEON 7500 contains support for the on-board transformation, clipping,
and lighting (TCL) hardware of the RADEON 7500 for increased primitive rendering performance.
The embedded graphics typically found on HP Integrity systems is based on the ATI RADEON 7000,
and also provides 3D capability, but does not have TCL hardware capability.
Threads Restriction
The RADEON 7500 Mesa3D library for HP OpenVMS I64 is not thread safe. However, Mesa3D can be
used in a multithreaded program if the use of Mesa3D is restricted to a single thread within the
program.
No Backing Store/Save Under for 3D Windows
Backing store and save under features are not supported when 3D is in use.
Multiple Graphics Cards Support
The ATI RADEON 7500 software has been tested for up to 4 cards per system. All operations, including
hardware accelerated 3D graphics, are supported on every card in the system. Consult your Integrity
system options documentation for detailed information on number of cards supported and configuration
limitations.
The embedded graphics available on most HP Integrity systems based on the ATI RADEON 7000 is
compatible with multi-head operation with the ATI RADEON 7500 option card, and can be combined
when using multi-head operation.
Multi-Screen Versus XINERAMA
By default, multiple screens are handled as traditional X11 multiple screens. However, the screens can
be handled as a single “virtual” screen using the XINERAMA extension. This is documented both in the
DECW$PRIVATE_SERVER_SETUP.COM procedure, and in the Motif documentation.
NOTE: Only 2D operation is possible when using XINERAMA. 3D operation will not function
correctly, or will use software only (no acceleration).
16
HP OpenVMS I64 – Graphics Software Installation & Customization
ATI RADEON 7500 PCI Graphics Controller Installation Guide
Screen Order and Forcing Single Headed Operation
Screen order is determined by the bus ordering of devices, and will vary across platforms. The
DECW$PRIVATE_SERVER_SETUP.COM file allows the user to override the ordering of screens, or to
force single headed operation. See the documentation in the file, and in the Motif documentation for
more information. For example, to force a specific graphics option to be used in single head mode (in
this case GHB0), add the line:
$ DEFINE/SYSTEM/NOLOG DECW$PRIMARY_DEVICE “GHB0”
Modifying the Graphics Configuration
ATI RADEON 7500 Default Graphics Settings
The default graphics resolution is 1024 x 768. The default refresh rate is 70 Hz. The default pixel depth
is 24 bits per pixel and the default visual type is TrueColor.
Determining Current Settings
To find the current settings under HP OpenVMS I64, issue the following commands, in order, at the
DCL prompt:
$ @decw$utils:decw$define_utils
$ xdpyinfo
In addition, you can show the following logical names at the DCL prompt:
$
$
$
$
$
SHOW
SHOW
SHOW
SHOW
SHOW
LOGICAL/SYSTEM DECW$SERVER_PIXEL_DEPTH
LOGICAL/SYSTEM DECW$SERVER_REFRESH_RATE
LOGICAL/TABLE=DECW$SERVER* DECW$XSIZE_IN_PIXELS
LOGICAL/TABLE=DECW$SERVER* DECW$YSIZE_IN_PIXELS
LOGICAL/TAB=DECW$SERVER* DECW$SERVER_DEFAULT_VISUAL_CLASS
If any logical name is not defined, then the respective default is in effect.
You can also confirm the settings and any errors in the setup by examining the server error log file:
$ TYPE SYS$MANAGER:DECW$SERVER_0_ERROR.LOG
Overriding the Default Settings
The SYS$MANAGER:DECW$PRIVATE_SERVER_SETUP.COM procedure contains
documentation for many of the default X11 server settings that may be changed. For more information
on making changes to the default settings, symbols, and system-wide logical names, refer to the
manual titled Managing DECwindows Motif for HP OpenVMS I64 Systems. An online version of this
document is available at:
http://h71000.www7.hp.com/DOC/73final/6300/6300PRO.HTML
A complete list of available DECwindows Motif V1.3-1 documentation is available at:
http://h71000.www7.hp.com/DOC/decwin131.html
For newer releases of documentation, check the main HP OpenVMS I64 Systems
Documentation site at:
http://h71000.www7.hp.com/doc/index.html
HP OpenVMS Alpha and I64 use the same implementation of X11 and Motif and
documentation for one generally applies to the other, unless otherwise noted.
17
HP OpenVMS I64 – Graphics Software Installation & Customization
ATI RADEON 7500 PCI Graphics Controller Installation Guide
To override the default settings, follow these steps:
1. Copy or rename the SYS$MANAGER:DECW$PRIVATE_SERVER_SETUP.TEMPLATE file to
create a new command (.com) file called DECW$PRIVATE_SERVER_SETUP.COM.
2. Now make the edits for the settings you want to change using a text editor, and save the file.
3. For the changes to take effect immediately you must restart the X server so that the new command
file and changed settings will be used. The command to do this is as follows:
$ @SYS$MANAGER:DECW$STARTUP RESTART
The new file settings will now override the original default settings.
NOTE: By renaming this template file to .COM you will enable multi-head operation. Many HP
Integrity servers provide an embedded graphics option (currently based on the ATI RADEON
7000). The order of the screens is based on the bus order of the options, and will vary based on
platform. See “Restrictions, Limitations and Defaults” on page 14 for information and
restrictions on configuring multiple heads. See “Screen Order and Forcing Single Headed
Operation” on page 17 for information on how to force single headed operation.
Additional system logical names are described in
SYS$MANAGER:DECW$DEVICE_CONFIG_GH.COM
However, this file should not be modified. If you wish to make changes to the default logical names,
redefine them in the DECW$PRIVATE_SERVER_SETUP.COM file. These changes will supersede the
values assigned in the device configuration file.
Many common items are changed by symbolic values in this file, however items are graphics card
specific, and are modified by defining system logical names. The settings include the following items:
DECW$XSIZE_IN_PIXELS
DECW$YSIZE_IN_PIXELS
DECW$SERVER_REFRESH_RATE
DECW$SERVER_PIXEL_DEPTH
For example, to change the default settings from 1024x768, 24 bits per pixel and 70Hz to 1280x1024, 8
bits per pixel and 60Hz:
$
$
$
$
DEFINE/SYSTEM/EXEC/NOLOG
DEFINE/SYSTEM/EXEC/NOLOG
DEFINE/SYSTEM/EXEC/NOLOG
DEFINE/SYSTEM/EXEC/NOLOG
DECW$XSIZE_IN_PIXELS 1280
DECW$YSIZE_IN_PIXELS 1024
DECW$SERVER_PIXEL_DEPTH 8
DECW$SERVER_REFRESH_RATE 60
Note that all of these logical names can also be specified as a comma separated list of values. A single
value will be applied to all screens. If a list of values is provided they are applied to the individual
screens in order starting at screen 0.
Note that the visual class automatically defaults to PseudoColor at the 8 depth, which is generally
what most users want. To change the visual type to TrueColor for example, add:
$ DECW$SERVER_DEFAULT_VISUAL_CLASS == 4
Server Startup and Configuration Messages
Server messages are typically logged to the DECW$SERVER_0_ERROR.LOG file located in the
SYS$MANAGER directory. When having problems during setting up the X11 server defaults, or when a
problem is encountered during normal use, be sure to check this file first for messages.
18
HP OpenVMS I64 – Graphics Software Installation & Customization
ATI RADEON 7500 PCI Graphics Controller Installation Guide
More extensive logging of server events can be enabled by modifying the
DECW$PRIVATE_SERVER_SETUP.COM DCL procedure and setting:
$ DECW$SERVER_AUDIT_LEVEL == “n”
Where n is a value between 0 and 4 (with 0 being none, and 4 being high).
Troubleshooting
Table
3-2
Troubleshooting Criteria
Description
Solution
Cannot boot using VGA console
Problem
The EFI console displays and
takes input by default from all
connected console devices.
However, HP OpenVMS I64 only
supports use of serial consoles (or
a network console using the
server management option.
Connect a serial console, or setup
a network console.
X11/Motif does not start on the
graphics display, and the screen
remains blank.
After booting OpenVMS, no
DECW$SERVER process is seen.
Did you install Motif when
OpenVMS was installed?
Check the console log for
incorrect SYSGEN parameters or
quotas.
Is a Keyboard and Mouse
connected? Both must be
connected when X11/Motif is
started. Messages will be
displayed on the console for 15
seconds waiting for the devices.
This can sometimes be caused by
KVM switches.
Look at the contents of:
SYS$MANAGER:DECW$SERVER_0_
ERROR.LOG for possible error
messages.
No Motif login box is displayed
After booting HP OpenVMS I64,
DECW$SERVER is running, but
there is no login box
Check for a valid Motif license
using the command LICENSE
LIST
Check the console log for
incorrect SYSGEN parameters or
quotas.
Some 2D applications do not run
Application errors with Bad
Window, or colormap errors
Your application may be
expecting an 8-bit PseudoColor
default. The ATI RADEON 7500
defaults to 24-bit TrueColor.
Either change the setting (see
earlier chapters) or fix the
application.
OpenGL applications do not work
3D applications fail to run
3D requires 24-bit TrueColor
mode to be set.
Blank or corrupt screen display
The DECW$SERVER_0 process
is running, as is DTGREET, but
the screen is blank or corrupt.
Is the screen saver active? Press
a KB key or move the mouse.
Is the monitor connected to the
VGA output on the ATI RADEON
7500?
Does the monitor support the
19
HP OpenVMS I64 – Graphics Software Installation & Customization
ATI RADEON 7500 PCI Graphics Controller Installation Guide
Problem
Description
Solution
resolution and refresh rate being
used? Some monitors may need
to be manually adjusted using
their front panel controls.
Are you connected to the ATI
RADEON 7500 or to the
embedded graphics option?
Visual noise or anomalies on the
screen
Flashes of dots, or other random
artifacts on the screen
At high resolutions and refresh
rates, this type of problem can
arise.
Use only high quality cables and
connectors.
Re-orient the monitor which may
be seeing RF interference.
Lower the refresh rate, or the
resolution.
20
4 HP-UX Configuration
This chapter describes how to configure the ATI RADEON 7500 graphics controller in a system running the
HP-UX operating system.
NOTE: Chapter 4 pertains to the HP-UX operating system only. If you are running the HP OpenVMS I64
operating system see Chapter 3.
The following slot restrictions are applicable to the rp3410/40 and rp4410/40 HP-UX servers:
rp3410 – The AB551A graphics card can be placed in PCI slot 1 or 2.
rp3440 – The AB551A graphics card must be placed in PCI slot 4 only.
rp4410/40 – The AB551A graphics card must be placed in PCI slots 7 & 8 for dual use and PCI
slot 7 when using a single card.
The examples in this manual show version numbers applicable at publication. To determine the
most recent version of the operating system or video driver refer to the Release Notes on the CDROM or on the web at www.hp.com.
Including the gvid Module in the Kernel
In order to be able to use graphics on an HP-UX server, the kernel must have the gvid module configured in
it. This will happen automatically if you have graphics hardware present in the machine while system
software is initially installed. Installing an ATI RADEON 7500 display card will ensure this. So will any
machine with built-in graphics.
But some machines may have optional graphics. If you install the system software without any graphics
present, the gvid module will not be configured into the kernel.
To find out if the gvid module is configured into your kernel, execute the following command:
what /stand/vmunix | grep gvid
If you have gvid installed, you will see output similar to:
gvid.c $Date: 2005/03/09 14:52:08 $Revision: r11.23/4 PATCH_11.23 (PHKL_32853)
gvid_buf.c $Date: 2002/02/19 07:30:00 $Revision: AAS
gvid_debug.c $Date: 2005/03/09 14:52:08 $Revision: r11.23/3 PATCH_11.23(PHKL_32853)
To ensure that gvid is installed during system software installation, make sure you have some graphics
present in your machine. To install gvid after system software has been installed, use the Kernel
Configuration section in the sam utility (pre HP-UX 11.31 release) or the smh utility (HP-UX 11.31 and
later).
Verification of Software Installation
To use the ATI RADEON 7500 graphics controller, you must have installed the Xserver fileset with an upto-date patch version. The patch version must be at least the following:
HP-UX 11.11: PHSS_32971 or newer
HP-UX 11.23: PHSS_32960 or newer
21
HP-UX Configuration
ATI RADEON 7500 PCI Graphics Controller Installation Guide
HP-UX 11.31: No patches are necessary
To check the patch version, run the following command:
swlist –l patch | grep “Xserver cumulative patch”
The output will look similar to this output:
# PHSS_32960
B.11.23.12 Xserver cumulative patch
The patch version will have a format of PHSS_?????, where ????? is the patch number. If this version is
equal or greater than the required level indicated above, the system is ready to use the ATI RADEON 7500.
If the patch version is less than the required level, install the latest Xserver patch.
1. Log into the HP patch catalog. The URL is www2.itrc.hp.com/service/patch/mainPage.do
2. Go to the find a specific patch search, enter its name (e.g. PHSS_32960) and press Enter. This
brings up a new screen. If there is a newer patch that supersedes this patch, it will be listed under
the Most Recent heading. You will need to download the newest patch.
3. Click in the box next to the patch and click the add to selected patch list button. This brings up a new
screen that displays the patch along with any other dependent patches.
4. Click the download selected button. This brings up a new screen.
5. Choose the server to use and the format of the patch bundle. Once these options are chosen, click
the download button.
6. This downloads the patch bundle to your system. Save the patch bundle to a convenient place on
your system. For this example, we will assume the patch bundle is downloaded into the
/tmp/PHSS_32960 directory.
7. Once the patch bundle is downloaded, unzip/gunzip/tar the patch bundle depending on the format of
the patch bundle. This extracts the patch bundle. Each bundle is a shar file. To create a depot for
loading, run the create_depot_hp-ux_11 script as root. This creates a bundle in
/tmp/PHSS_32960/depot.
8. As root, run the swinstall command using the newly created bundle.
swinstall –s /tmp/PHSS_32960/depot
Verification of Hardware Installation
After the ATI RADEON 7500 graphics controller has been installed and the system has rebooted, verify the
graphics card was correctly installed and identify which device file corresponds to which card.
1. Run the command
ioscan –fun –C graphics
Output similar to the following should appear. There should be one line for every graphics device in
the system. Each device should have gvid_core for a driver and the S/W State should be CLAIMED.
Class
I H/W Path
Driver
S/W State H/W Type
Description
graphics
0 0/3/1/0
gvid_core
CLAIMED INTERACE
PCI Display (10025157)
2. Display the contents of /dev/gvid_info by running the command
cat /dev/gvid_info
22
HP-UX Configuration
ATI RADEON 7500 PCI Graphics Controller Installation Guide
Output similar to the following should appear. There should be one line (i.e. one device file) for
every graphics device in the system.
/dev/gvid0
/dev/gvid1
3. Determine the association of physical graphics cards to special device files (/dev/gvid?) by running
the command
/opt/graphics/common/bin/setmon -N /dev/gvid0
If the device is the Manageability card, the output should look like:
Device /dev/gvid0 is a ATI Radeon 7000
If the device is the Radeon 7500 graphics card, the output should look like:
Device /dev/gvid0 is a ATI Radeon 7500 QW
ATI RADEON 7500 as Default Xserver Device
The program sam (pre HP-UX 11.31 release) or smh (HP-UX 11.31 and later) can be used to make the ATI
RADEON 7500 graphics controller the default Xserver device. This is for a single-screen Xserver
configuration. For a multihead Xserver configuration, see “Multihead Support” on page 26.
1. Log in as root
2. Run /usr/sbin/sam (pre HP-UX 11.31 release) or /usr/sbin/smh (HP-UX 11.31 and later).
Choose Display->Xserver Configuration. All graphics cards in the system are listed. Choose the
graphics device that is the current Xserver device. This device may or may not be the ATI RADEON
7500. From the pull-down menu, select Actions->Remove Screen from Configuration. Choose the new
device you would like to be the default Xserver device. The new device should be one of the ATI
RADEON 7500 device entries. From the pull-down menu, choose Actions->Add Screen to
Configuration.
3. Restart the Xserver.
Resolutions
ATI RADEON 7500 graphics controllers can support various graphics resolutions and refresh rates as
shown in Table 4-1. If your monitor supports the DDC/EDID protocol, the EDID information from the
monitor will override which resolutions are available.
Table
4-1
Standard Supported Video Modes – HP-UX
Resolution
Color Depths
(Bits per Pixel)
Refresh Rates
1024x768
1280x1024
1600x1200
1920x1200
8, 24
8, 24
8, 24
8, 24
60, 70, 75, 85 Hz
60, 75, 85 Hz
60, 65, 75, 85 Hz
60, 75 Hz
23
HP-UX Configuration
ATI RADEON 7500 PCI Graphics Controller Installation Guide
Restrictions and Limitations
This section provides information on the limitations and restrictions of the ATI RADEON 7500 hardware
and software.
No Accelerated 3D Support
The ATI RADEON 7500 graphics controller does not support accelerated 3D (e.g. OpenGL).
Multiple Colormaps
Multiple installed colormaps in depth 8 PseudoColor visual are not supported. The ATI RADEON 7500
graphics controllers support only one installed colormap at one time. Exceeding this limit will cause
colormap flashing, also known as "technicolor".
Applications should not install or de-install colormaps themselves. The window manager should perform
these actions. However, the application is responsible for providing the window manager with hints as to
which colormaps to install or de-install. You provide this information using the Xlib function
XSetWMColormapWindows(). This function sets the WM_COLORMAP_WINDOWS property for a given window.
Default Visual Information
The ATI RADEON 7500 graphics controller can only support one visual type at one time. Supported default
visual types are 8-bit PseudoColor and 24-bit TrueColor. The default depth and visual class is 24-bit
TrueColor. To change the default visual, you must edit the Xserver's configuration file which is located at
/etc/X11/XF86Config.
The depth is set in the Screen section of the Xf86 configuration file. There also needs to be a Display
subsection with the correct depth. For example, the following lines will select a 24-bit default depth visual:
Section “Screen”
Identifier “Screen 0”
DefaultDepth 24
[…]
SubSection “Display”
Depth 24
[…]
EndSubSection
SubSection “Display”
Depth 8
[…]
EndSubSection
EndSection
The following lines will select an 8-bit default depth visual:
Section “Screen”
Identifier “Screen 0”
DefaultDepth 8
[…]
SubSection “Display”
Depth 24
[…]
EndSubSection
SubSection “Display”
Depth 8
[…]
24
HP-UX Configuration
ATI RADEON 7500 PCI Graphics Controller Installation Guide
EndSubSection
EndSection
Restart the Xserver after editing the Xserver configuration file for the new default depth to take affect.
25
HP-UX Configuration
ATI RADEON 7500 PCI Graphics Controller Installation Guide
Configuring Graphics Resolution or Vertical Refresh Rate for HPUX
Use the sam (pre HP-UX 11.31 release) or smh (HP-UX 11.31 and later) program to modify the graphics
resolution or refresh rate.
Current Graphics Resolution
The default graphics resolution and refresh rate are 1280x1024 at 75Hz. The current graphics resolution
and refresh rate of a running system can be obtained by executing the command
/opt/graphics/common/bin/setmon –p.
How to Change the Resolution and Refresh Rate
1. Log in to the system as root.
2. Run /usr/sbin/sam (pre HP-UX 11.31 release) or /usr/sbin/smh (HP-UX 11.31 and later). Choose
Display-> Monitor Configuration. All graphics cards in the system are listed. Choose the graphics device
that is to be updated. From the pull-down menu, choose Actions->Modify Monitor Type. A new menu
appears that contains all of the possible resolutions and refresh rates. Choose the new setting and press
OK. The selected values will be the new resolution and refresh rate for the Xserver.
NOTE: See Table 4-1 for supported resolutions and refresh rates.
3. Restart the Xserver.
Multihead Support
Multihead support is provided through changes to the Xserver’s configuration file which is located at
/etc/X11/XF86Config. In order to do this correctly, you will need to know which device files to use. See
“Verification of Hardware Installation“ on page 22 for details on how to determine which device files to use.
Multi-screen
By default, an ATI RADEON 7500 appears as a single screen device. You can configure your system so two
or more screens are created. The following example will show you how to configure three screens.
XF86Config Changes
There are three sections in the configuration file you need to change:
1. ServerLayout section. The ServerLayout section contains references to the Screen: sections.
2. Screen sections. The Screen sections in turn contain references to the Device sections.
3. Device sections.
For this example, we will assume there are two ATI RADEON 7500 graphics controllers in the system.
These graphics cards have the device files /dev/gvid0 and /dev/gvid1. We will change the XF86Config file
to allow for a three-screened multi-head system. In this configuration two screens will come from the first
graphics card (e.g. /dev/gvid0) and the remaining screen will come from the second graphics card (e.g.
/dev/gvid1).
The lowest level is the Device section. This maps a physical device to a device identifier. The three Device
sections for this example are as follows:
26
HP-UX Configuration
ATI RADEON 7500 PCI Graphics Controller Installation Guide
Section “Device”
Identifier
DeviceFile
EndSection
“ATI Radeon 7500 QW(0) Connector 1”
“/dev/gvid0”
Section “Device”
Identifier
DeviceFile
Screen
EndSection
“ATI Radeon 7500 QW(0) Connector 2”
“/dev/gvid0”
1
Section “Device”
Identifier
DeviceFile
EndSection
“ATI Radeon 7500 QW(1) Connector 1”
“/dev/gvid1”
The first device, ATI Radeon 7500 QW(0) Connector 1 is the first screen on the first device. The second
device, ATI Radeon 7500 QW(0) Connector 2 is the second screen on the first device. Note that it has the
Screen 1 field, which selects the second video output on the graphics card. The third device, ATI Radeon
7500 QW(1) Connector 1 is the first screen on the second device.
Once the Device sections are defined, you can define the Screen section, which maps a screen to a physical
device. The Screen sections use the Identifier field that was defined for each of the Device sections. The
three Screen sections for this example are as follows:
Section Screen
Identifier “Screen 0-1”
Device
“ATI Radeon 7500 QW(0) Connector 1”
Monitor
“Monitor 0”
# Include other Screen info here, including other SubSections
EndSection
Section Screen
Identifier “Screen 0-2”
Device
“ATI Radeon 7500 QW(0) Connector 2
Monitor
“Monitor 0”
# Include other Screen info here, including other SubSections
EndSection
Section Screen
Identifier “Screen 1-1”
Device
“ATI Radeon 7500 QW(1) Connector 1”
Monitor
“Monitor 0”
# Include other Screen info here, including other SubSections
EndSection
The first Screen section maps the screen Screen 0-1 to the physical device ATI Radeon 7500 QW(0)
Connector 1. The second Screen section maps the screen Screen 0-2 to the physical device ATI Radeon 7500
QW(0) Connector 2. The third Screen section maps the screen Screen 1-1 to the physical device ATI Radeon
7500 QW(1) Connector 1.
Once you have the Screen sections set up, you can set up the ServerLayout section. The ServerLayout
section uses the Identifier field that was defined for each of the Screen sections. The ServerLayout section
describes all of the screens used by the Xserver. The ServerLayout section for this example is as follows:
27
HP-UX Configuration
ATI RADEON 7500 PCI Graphics Controller Installation Guide
Section ServerLayout
Identifier “Main Layout”
Screen
0
“Screen 0-1” 0 0
Screen
1
“Screen 0-2” RightOf “Screen 0-1”
Screen
2
“Screen 1-1” RightOf “Screen 0-2”
InputDevice “Mouse0” “CorePointer”
InputDevice “Keyboard0” “CoreKeyboard”
EndSection
This ServerLayout has three screens associated with it. These screens are accessed through the 0.0, 0.1 and
0.2 displays. The first screen is associated with the Screen 0-1 Section and is the anchor screen (at location
0, 0). The second screen is associated with the Screen 0-2 Section and its screen coordinates are to the right
of the first screen. The third screen is associated with the Screen 1-1 Section and its screen coordinates are
to the right of the second screen.
28
HP-UX Configuration
ATI RADEON 7500 PCI Graphics Controller Installation Guide
Messages
Xserver messages are typically logged to /var/X11/Xserver/logs. The two files that contain the
messages are:
/var/X11/Xserver/logs/Xf86.*.log
/var/X11/Xserver/logs/Xstartup.*.log
Where * is the display instance of the Xserver, which is usually 0. The Xstartup.*.log file contains messages
from the X loader. The Xf86.*.log file contains messages from the Xf86 Xserver. The Xf86.*.log file is the file
that should be checked first, should problems arise.
Troubleshooting
Table
4-2
Troubleshooting Criteria
Problem
Can not boot using VGA
console.
CDE does not start on the
graphics display.
Description
Solution
The EFI console has the ability
to display output to any of the
VGA devices. Console output is
only supported on the serial
console for systems with ATI
Radeon 7500 cards installed.
After booting CDE does not
come up on the ATI Radeon
7500 display.
Connect a serial console and
choose the serial console device
as the Console Output at the
EFI level.
OpenGL applications do not
work.
3D applications fail to run or
run very slowly.
Blank or corrupt screen.
The dtlogin process is running
but the monitor is blank or
corrupted.
Visual noise is present on the
monitor.
Flashes, dots, or other random
artifacts are present on the
monitor.
Is a keyboard and mouse
attached? The Xserver will not
start unless a mouse and
keyboard are attached.
Is the Xserver configured with
the correct /dev/gvid devices?
Accelerated 3D is not supported
on the ATI Radeon 7500
graphics card. Some 3D
applications may run through
emulation mode at greatly
reduced performance.
Is the monitor connected to the
correct display connection on
the ATI Radeon 7500 graphics
card?
Does the monitor support the
resolution and refresh rate that
the Xserver is running at?
At high resolutions and refresh
rates this type of problem can
occur on some monitors.
Use only the cables provided
with the monitors.
Lower the refresh rate and/or
resolution.
29