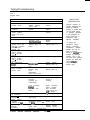
1
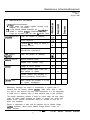
,
Q National Draeger, Inc. 1996
General
Section i
Rev.1
August 1996
Notice
Proprietary
Information
This service manual contains confidential
information in which National Draeger, Inc.
claims proprietary rights. The information is
disclosed in confidence, and may not be used,
reproduced or disclosed in whole or in part
except as authorized in writing by National
Draeger, Inc. This information is the property of
National Draeger, Inc., and is provided solely for
the use intended, and shall be returned upon
demand.
1 NIOSH
Both the ProAir and the AirBoss are approved
by NIOSH/MSHA (gold label) in accordance with
the code of Federal Regulations, Title 30,
Chapter 11,
Repairs/Modifications
In addition, the AirBoss is certified by the Safety
Equipment Institute (red label) as meeting the
requirements of NFPA 1981 Standard for OpenCircuit, Self-Contained Breathing Apparatus for
Fire Fighters, 1992 ed.
Repairs on this unit should be performed only by
National Draeger, inc., or its Authorized Service
Technicians. information about repairs can be
obtained from National Draeger, Inc., by
contacting the Technical Service Department at
P.O. Box 120, Pittsburgh, Pennsylvania 15230,
(412) 787-8383. National Draeger, Inc., will not
be responsible for injury to persons or damage
to property arising, directly or indirectly, from
unauthorized repairs or modifications to this unit.
Furthermore, any unauthorized repairs or
modifications voids any warranty extended by
National Draeger, Inc.
This service manual is provided for your
information only, updates will be sent out
periodically. All information subject to
change without notice.
i
-
i
PA-90 Series Service Manual
General
Section i
Rev. 1
August 1996
Important Information
1. The ProAir and AirBoss are approved by
NIOSWMSHA
and the AirBoss meets NFPA
standards. Any modifications, changes or
deviations from the documentation contained
herewith, will void the approval and may
cause a safety hazard. Contact National
Draeger for additional information concerning
approval requiremen Is.
2. This unit is intended for those purposes
specified in the operating manual. Any
deviations are not authorized,
3. Only original National Draeger replacement
parts may be used in the maintenance and
servicing of this unit. Deviation from this shall
void any and all warranties and approvals.
4. All repairs to be accomplished by a National
Draeger certified Level II technician.
5. Authorized repair facilities and their personnel
shall assume all responsibility for timely and
reliable repair actions.
6. All governing specifications and regulations
must be observed in the repair, testing and
operation of this equipment.
IMPORTANT
For further information on any
supportive documentation contained in
this manual please contact National
Draeger, Inc. Technical Service
Department.
PA-90 Series Service Manual
i - i
General
Section i
Rev. 1
August 1996
Table of Contents
Notice ..............................................................
Proprietary Information .......................................
Repairs/Modifications .........................................
important Information ........................................
i
i
i
ii
II Disassembly/Assembly
1
I Theory of Operation
Backplate .....................................................
1.1 Purpose ...............................................
1.2 Construction ........................................
1.3 Features ..............................................
2 Harness .......................................................
2.1 Purpose ...............................................
2.2 Construction ........................................
2.3 Features ..............................................
3 Pressure Reducer .......................................
3.1 Purpose ...............................................
3.2 Construction ........................................
3.3 Features ..............................................
3.4 Technical Data ....................................
4 Chest Mounted Whistle Warning Unit.. ........
4.1 Purpose ...............................................
4.2 Construction ........................................
4.3 Technical Data ....................................
5 Chest Gauge ...............................................
5.1 Purpose ...............................................
5.2 Construction ........................................
5.3 Features ..............................................
6 Lung Demand Regulator .............................
6.1 Purpose ...............................................
6.2 Features ..............................................
6.3 Technical Data. ...................................
7 Panorama Nova Mask .................................
7.1 Purpose ...............................................
7.2 Construction ........................................
7.3 Features ..............................................
7.4 Technical Data ....................................
8 Cylinder and Valve Assembly ....................
8.1 Purpose .............................................
.
8.2 Features ...........................................
8.3 Technical Data ..................................
1
Cc
2
2
2
2
2
2
2
2
3
3
3
3
3
4
4
4
4
5
5
5
5
7
7
7
7
9
9
9
9u
9 ’
10
10
10
10
i
2
3
4
5
-
iii
Pneumatic Arrangement Maintenance ........ 2
1 .l Replacing Pressure Gauge ................. 2
1.2 Disassembly/Assembly of Whistle.. .......
3
Warning Unit ........................................
1.3 Replacing High Pressure Hose ........... 4
1.4 Replacing Medium Pressure Hose.. .... 5
Demand Regulator Maintenance ................. 6
6
2.1 Replacing Diaphragm ..........................
2.2 Replacing Balanced Piston Unit .......... 7
2.3 Replacing/Refitting PP Arm Return
8
Spring ..................................................
2.4 Replacing Balanced Piston Springs .... 9
2.5 Replacing Demand Regulator Hose . . 11
12
Panorama Nova Mask.. .............................
3.1 Changing the Mask Lens ................... 1 2
3.2 Changing the Exhalation Valve ......... 1 3
3.3 Changing the Speech Diaphragm ..... 1 3
3.4 Changing the Connector.. .................. 1 4
15
Backplate/Pneumatic Lines .......................
16
Cylinder Valve ...........................................
16
5.1 High Pressure Gauge ........................
16
5.2 Burst Disc ..........................................
17
5.3 Handwheel ........................................
17
5.4 Valve Removal ..................................
PA-90 Series Service Manual
General
Section i
Rev. 1
August 1996
V Service Reporting
III Testinflroubleshooting
1
2
Testing/Troubleshooting ..,...,.....*.........,.*.....
2
1 .l Test Kit Operations ,....,.,#.....................
1.1.1 LeakTest . . . . . . . . ..**..*...........I*..*.. 2
1 .1.2 High Pressure Cylinder Test . . . . 2
1 .1.3 High Pressure Leak Test ,........ 2
1 -1.4 Medium Pressure Test . . . . . . . . . . . . 2
1 .1.5 Whistle Activation . . . . . . . . . . . . . . . . . . . . 3
1 .1.6 LDV Positive Pressure Leak
Test . . . . . . . . . . . . . . . . . . . ..I................... 3
1 .1.7 LDV Static Positive Pressure . . . . .
Test . . . . . . . . . . . . . . . . . ..,... . . . . . . . . . . . . . . . . . .3
1 .1.8 LDV Negative Pressure Leak . . . .
Test . . . . . . ..*...............................* 3
1 .1.9 LDV Bypass Function . . . . . . . . . . . . . . 3
1.1.10 Mask Leak Test . . . . . . . ..-.......... 4
1 .l .l 1 Exhalation Valve Opening Test 4
1
2
3
4
5
6
7
VI Service Instruction History
IV Maintenance Schedules/
Equipment
1 .l Maintenance Procedures .................... 2
2
1.1.1 Facepiece ................................
1.1.2 Lung Demand Valve (LDV) ...... 3
1.1.3 Pressure Reducer and Hose
Assembly .................................
5
1.1.4 After Each Use ,.,.:. .................. 5
1.1.5 Functional Test ........................
5
1.2 Maintenance Schedule ........................
7
1.3 Maintenance Equipment.. .................... 8
1.3.1 Maintenance Support
Equipment ...............................
8
1.3.2 Torque Specifications ............ 1 0
1.3.3 Lubricants and Adhesives.. .... 11
PA-90 Series Service Manual
Service Reporting . . . . . . . . . . . . . . . . . . . . . . . . . . . . . . . . . . . . . . . . 2
SCBA Service Log . . . . . . . . . . . . . . . . . . . . . . . . . . . . . . . . . . . . . . . 3
Terms of Payment ..,....................................
4
Return Goods Policy . . . . . . . . . . . . . . . . . . . . . . . . . . . . . . . . . . . 4
Emergency and Rush Orders . . . . . . . . . . . . . . . . . . . . . . 4
Return Goods Authorization . . . . . . . . . . . . . . . . . . . . . . . . 5
National Draeger’s Product Service
In The U.S.A . . . . . . . . . . . . . . . . . . . . . . . . . . . . . . . . . ..m..*......... 6
i
-
iv
,
,
I
- 1
Theory of Operation
Section I
Rev. 1
August 1996
1
Bat kplate
2
Harness
1 .I Purpose
2.1 Purpose
The PA-90 Series backplate is ergonomically
designed to provide maximum comfort and
minimum stress on the back!
The harness is designed to be easily and quickly
donned and adjusted to fit each individual.
2.2 Construction
1.2 Construction
The ProAir harness is composed of polyester
webbing. The AirBoss harness webbing is
composed of a Kevlar/Nomex
PBI composite
material. This material has unparalleled
strength, fire retardation and wear resistance. It
can be easily removed and washed if necessary
for decontamination. Washing will not affect the
above mentioned characteristics.
The PA-90 Series backplate is made of composite materials for maximum strength and minimum weight. The ProAir backplate may be blue
or gray and is composed of nylon and fiberglass
filaments. The AirBoss is black and is composed
of nylon and carbon filaments.
1.3 Features
2.3 Features
The PA-90 Series backplates have a shock
absorbing rubber bumper on the base. The
backplate also has convenient carrying handles
on both sides and is highly chemically resistant.
The AirBoss
The ProAir is fully adjustable for both the
shoulder straps and waist strap. It can be easily
removed from the backplate for cleaning if
necessary. The ProAir has a highly fire retardant
polymeric buckle.
backplate is anti-static.
*
\
PA-90 Series Service Manual
The AirBoss is fully adjustable for both the
shoulder straps and waist strap. The AirBoss
harness has a pull-forward waist belt adjustment
and a waist pad to transfer weight away from the
shoulders for additional support and comfort. It
also comes equipped with shoulder pads. A lung
demand regulator (LDR) holder is provided on
the waist belt for convenient stowage when not
in use. The entire pneumatic system can be
re,adily removed for decontamination. The waist
belt buckle is either a push-button, stainless
steel, automotive-type or highly fire retardant
polymeric buckle.
* - 2
J
Theory of Operation
Section I
Rev. 1
August 1998
3
Pressure
3.4 Technical Data
Reducer
3.1 Purpose
First Stage Reducer
Outlet to High Pressure Manifold
~25 Ipm @ 2900 psi
87-130 psi
Medium Pressure
180-230 psi
Relief Valve
The purpose is to reduce the cylinder pressure
from a maximum 4500 psi down to a medium
pressure between 87-130 psi while delivering
high flow when needed.
3.2 Construction
The pressure reducer is a balanced piston type
which provides a controlled medium pressure
regardless of cylinder pressure. It contains a
pressure relief valve to prevent over pressurization of the medium pressure chamber. It is
connected to the cylinder by CGA fittings.
3.3 Features
High pressure air enters the reducer via a
cylinder connector which is fitted with a sintered
bronze filter.
The high pressure air flows through the piston
into the reducer body which forms a medium
pressure chamber. As the air flows into the
medium pressure chamber, it forces the piston
to close against the plunger,the
medium
pressure should read between 87-130 psi.
On inhalation, medium pressure air
the medium pressure chamber. As
within the chamber is now reduced,
reopens the piston allowing the cycle
repeated.
flows from
the pressure
the spring.
to be
*
An optional pigtail with a female Cejn connector
is available. When provided, it permits both
buddy breathing or the connection of an external
breathing air line. The pigtail is supported on the
left side of the waist belt.
I
-
3
PA-90 Series Service Manual
‘*
I-1.
.
L
I.
I
.
.
.,
:;.,_
.._
Theory of Operation
Section I
Rev. 1
August 1996
4
Chest Mounted Whistle
Warning Unit
4.1 Purpose
The purpose is to audibly alert the user when
the air supply reaches approximately 25% of full
cylinder capacity.
4.2 Construction
The high pressure whistle warning unit is fitted
to a manifold block. The manifold block is fitted
to the gauge line. The whistle is located on the
left shoulder harness, close to the ear, making it
easier to hear the whistle.
Critical orifice
4.3 Technical Data
Mean Flow Rate = 2 lpm
Figure 1
PA-90 Series Service Manual
1 - 4
Theory of Operation
Section I
Rev.1
August 1996
5
Chest Gauge
5.1 Purpose
The chest gauge allows the wearer to monitor
the cylinder pressure at all times.
5.2 Construction
The chest gauge is a Bourdon type with a
heavy-duty stainless steel case.
5.3 Features
The chest gauge has a large dial face for easy
readability and luminous markings for visibility in
low light conditions. The gauge is attached to
the chest manifold.
I
-
5
PA-90 Series Service Manyal
Theory of Operation
Section I
Rev. 1
August 1996
Lung Demand Regulator
Air
Retaining
screw
7
Retaining cap _
Plug-in
connection
lSilicon diaphragm
To
LDV cover
Balanced piston assembly
-1
M e d i u m pressure banjo sealing rings -
LDV housing
Sealing ring J
*
\
Figure 2
PA-90 Series Service Manual
1 - 6
Sealing ring J
Theory of Operation
Section I
Rev. 2
August 1996
6
Lung Demand Regulator
6.1 Purpose
The lung demand regulator has two main
functions:
1. To provide the air demanded by the respiratory system
2. To always provide a positive pressure to the
mask interior
6.2 Features
w
The lung demand regulator (LDR) has automatic
first breath activation to positive pressure. The
bypass control on the right side of the housing
can be depressed and locked in position to
provide a constant flow of air. The donning lever
is also on the right side. The lung demand
incorporates a simple, effective “push-in”
connection to the face mask port, and is sealed
by a silicone o-ring.
6.3 Technical Data
Input pressure
output flow
Bypass flow range
Static Positive Pressure
Positive Pressure
Activation
87-130 psi
500 Ipm
80-130Ipm
1 - 3.75 mbar
@-5mbar
5
*
I
-
7
PA-90 Series Service Manual
Theory of Operation
Section I
Rev. 1
August 1996
Panorama Nova Mask
f
seal mask body
Speech diaphragm O-ring ’
Exhalation valve
Bridge and spring assembly /\
Diagram Field of Vision
Figure
PA-90 Series Service Manual
I
-
6
Theory of Operation
Section I
Rev. 1
August 1996
7
National Draeger uses a speech diaphragm
made from stainless steel (stamped with the
letter N). This material provides excellent sound
transmittance and is less susceptible to chemical deterioration.
Panorama Nova Mask
7.1 Purpose
The Panorama Nova Mask is used with the
quick disconnecting LDR to provide compressed
air to the user’s respiratory system.
7.2
Construction
The mask is constructed with a double face seal
to ensure a good fit over a wide range of facial
features. One size fits all.
I
7.4 Technical Data
The Panorama Nova Mask is available in three
materials:
Material(s)
Exhalation Valve
Opening
View Area
Lens material(s)
1, EPDM (Ethylene Propylene Dimonomer)
2. Silicone
EPDM, Neoprene, Silicone
2 4.5 mbar
90 % of peripheral vision
Polycarbonate, Plexiglass
3. Neoprene
Mask construction is the same for all materials.
b
7.3 Features
The Panorama Nova Mask uses a lens design
that features 90% peripheral vision availability.
The mask utilizes a five-point harness for proper
sealing. Four of the harness points go on the
sides of the head and one harness goes over
the center of the head. A neck strap is also
provided for transporting the mask.
The input connecting section is manufactured so
that the incoming air is flushed past the lens and
into the respiratory system. This system helps
prevent fogging of the lens.
The mask comes standard with a nosecup that
also helps reduce fogging, takes up dead-air
space and channels the voice into the speech e
diaphragm. Nosecup usage is required by
’
NIOSH when temperatures are below 32 *F.
I
-
9
PA-90 Series Service Manual
Theory of Operation
Section I
Rev. 1
August 1996
8
Cylinder and Valve
Assembly
8.1 Purpose
The PA-90 Series cylinders are used as lightweight storage containers for the breathing air.
To ensure the wearer’s safety and that the
cylinder remains free of contaminants, Grade D
or better gaseous air, as specified by the
Compressed Gas Association Commodity
Specification for Air, G-7.1, ANSI 286.1 must be
used in the cylinders.
8.2 Features
The cylinders use aluminum valves with CGA
connectors. The valves have safety discs (burst
discs) installed that are designed to prevent
over-pressurization. These discs are designed
to rupture at approximately 513 the rated service
pressure. The valves utilize a straight thread
design that permits the use of an o-ring seal
when attaching to a reducer. This seal system
ensures that the connection between the
cylinder and the reducer need only be handtightened.
8.3 Technical Data
Pressure/
Minutes
Weight,
Lbs w/Air
4500/30 F G ................
4500/45 F G ................
4500/60 F G ................
4500130 Kv.. ...............
4500145 W.. ...............
4500160 KV.. ...............
2800145 FG ................
2216/30 FG HW .........
2216/30 FG FW.. ........
2216130ALUM ...........
13.2 ...........
20.2 ...........
25.0 ...........
12.1 ...........
17.0 ...........
21.7 ...........
19.2 ...........
16.1 ...........
13.2.. .........
21.3 ...........
SCW
Liter
51.7/1457
74.8/2108
98.9/2790
51.7/1457
74.812108
98.912790
68.4/1930
46.5/1311
46.1/1300
45.911295
PA-90 Series Service Manual
:
1 - 10
c
I I
- 1
Disassembly/Assembly
Section II
Rev. 1
August 1996
1
Pneumatic Arrangement
Maintenance
Tools required
14 mm AF open ended spanner
20 mm AF open ended spanner or adjustable
spanner
1 .I
Replacing Pressure Gauge
Hold manifold block (7) using either adjustable
or 20 mm AF open ended spanner.
Use 14 mm AF open ended spanner or
adjustable to unscrew gauge (9) from manifold
block.
Remove gauge cover (10) (Figure 1).
Remove sealing washer (8) from bore of
manifold block and inspect bore thread for
damage.
Insert new sealing washer into manifold block.
Refit gauge cover.
Screw new gauge into manifold using
spanners. Ensure correct orientation as
shown in Figure 1.
NOTE
Hold assembly with gauge vertical and
apply Loctite 290 sparingly around
gauge thread, following initial thread
engagement,
Figure 1
PA-90‘ Series Service Manual
II
- 2
Disassembly/Assembly
Section II
Rev. 1
August 1996
1.2 Disassembly/Assembly of
Whistle Warning Unit
l
.
Tools required
Inspect seal (8). Replace if necessary. Ensure
replacement seal is refitted with open end
facing outward as shown in Figure 2.
Reassemble whistle in reverse order of
dismantling.
16 mm AF open5 ended spanner
20 mm AF open ended spanner or adjustable
spanner
l
Replace capillary tube assembly if damaged.
To adjust whistle activation point, attach a
fully charged cylinder.
Hold manifold block using adjustable or 20
mm AF open ended spanners and unscrew
whistle assembly from manifold block using
16 mm AF pen ended spanner.
Attach lung demand regulator.
Open cylinder.
Close cylinder valve and using the lung
demand slowly bleed pressure down to the
activation point (25% f 2% of full)
Refer to Figure 2
Using 16 mm AF open ended spanner, loosen
locknut (6) and unscrew adjusting nut (1) from
main body (7).
. Holding pressure at activation pressure,
tighten adjusting nut (1) until whistle activates.
Remove whistle tube (2) inspect o-ring (3)
replace if necessary.
. Apply Loctite 242 to lock nut and lock in place
by adjusting locking nut (6).
Remove spring (4) from main body.
1
Extract capillary assembly (5) by pushing
through seal (8) in direction of arrow .
I
CAUTION!
Capillary Assembly (5, Sa) is factory
set by Driiger. Do not affempt to
adjust.
Figure 2
Whistle Warning Unit
Item No.
1-8
1-8
1
2
3
4
4a
5
5a
6
7
8
Description
Whistle Complete 4500
Whistle Complete 2216
Adjusting Nut
Whistle Tube
O-ring
Spring (4500)
Spring (2216)
Capillary Assembly (4500)
Capillary Assembly (2216)
Locknut
Main Body
Seal
\
Part No.
3336143s
3336142s
3330674
3330679
3330997
3336141
3330999
3331018
3336 146
3330675
3330673
3331696
*
II
- 3
PA-90 Series Service Manua
Disassembly/Assembly
Section II
Rev. 1
August 1996
1.3 Replacing High Pressure
Hose
Pull back plastic sleeve (5) if fitted, and hold
hexagon using 17 mm AF open ended spanner.
Tools required
Using 20 mm AF open ended spanner on
manifold block, unscrew hose from block (7)
and remove sealing washer (6).
10 mm AF open ended or 6” adjustable spanner
5 mm hexagon socket key
Holding tool P/N R27986
17 mm AF open ended spanner
20 mm open ended spanner
Torque spanner P/N Pi51 338
17 mm open ended socket PIN FE1 334
Discard disassembled hose.
To assemble new hose reverse the above
procedure.
NOTE
Fit new copper washer (3) and copper
sea/jng ring (6) (Figure 3).
Unfasten hose loop on shoulder pads and
backplate to release hoses.
Tighten hose to pressure reducer using
torque spanner - Tjghten to 20nm.
NOTE
For the ProAir
retaining ties.
cut, remove and replace
Ensure correct orientation of gauge
when tightening manifold block to new
hose.
Using 10 mm AF spanner and 5 mm hexagon
socket key, unscrew hexagon locknut on
reducer securing bracket; remove socket
head screw and washers to release pressure
reducer.
Note orientation as shown in Figure 3.
9
11
Using 10 mm AF spanner, remove nut from
end of reducer mounting pin.
Remove mounting pin from pressure reducer,
along with spacer and plastic sleeve from hole
in mounting pin.
Grip pressure reducer holding tool in vice and
screw reducer handwheel into holding tool.
Unscrew pressure gauge hose (HP) from
pressure reducer using 17 mm AF open
ended spanner and remove copper
washer (3).
+
\
PA-90 Series Service Manual
11 - 4
Figure 3
Disassembly/Assembly
Section II
Rev. 1
August 1996
1.4 Replacing Medium Pressure
Hose
Tools required
10 mm AF open ended spanner or 6”
adjustable spanner
5 mm hexagon socket key
Holding tool P/N R27986
17 mm AF open ended spanner
l
Unfasten hose loops on shoulder pads and
backplate to release hoses.
NOTE
For the ProAir
re raining ties.
l
l
l
l
l
cut, remove and replace
Using 10 mm AF spanner and 5 mm hexagon
socket key, unscrew hexagon locknut on
reducer securing bracket; remove socket
head screw and washers to release pressure
reducer.
Using 10 mm AF spanner, remove nut from
end of reducer mounting pin.
Remove mounting pin from pressure reducer,
along with spacer and plastic sleeve from hole
in mounting pin.
Grip pressure reducer holding tool in vice and
screw reducer handwheel into holding tool.
Unscrew medium pressure hose (12) from
pressure reducer using 17 mm AF open
ended spanner and rem ve sealing
washer (4). ( fl@4d?)
NOTE
This procedure is slightly different on
the ProAir. The medium pressure line is
a one piece unit into the LDR,
l
l
I
t
Discard disassembled hose.
To assemble new hose reverse above instructions.
NOTE
Fit new sealing washer (4) (Figure 3).
II - 5
PA-90 Series Service Manual
Disassembly/Assembly
Section
Rev. 1
August 1996
II
Demand Regulator
Maintenance
2
5
1
6
2
NOTE
Before starting disassembly, disconnect
demand regulator from apparatus.
Tools
Required
Peg spanner P/N 1628089
2.1 Replacing Diaphragm
(Figure 4)
l
l
l
l
l
l
Figure 4
Remove rubber cover (4) and using peg
spanner (P/N 1628089) unscrew bayonet cap
(3).
Depress donning lever (6).
Carefully remove diaphragm (2) by unhooking
it from its central location on lever of balanced
piston assembly.
Relocate new diaphragm onto balanced piston
lever inserting outer bead of diaphragm into
locating groove in demand regulator body (1).
For correct orientation see Figure 5.
Moisten lip of bayonet cap with water - refit
bayonet cap (3) and tighten with peg spanner
(P/N 1828089). Check diaphragm position
(Figure 5). Note alignment of arrows.
Press reset lever (6) - positive pressure type
only - to lift diaphragm towards bayonet cap release reset lever and check that diaphragm
has remained in position.
l
Fit rubber cover (4).
l
Carry out leak and functional tests.
PA-90 Series Service Manual
II
- 6
3
4
Disassembly/Assembly
Section II
Rev. 1
August 1996
2.2 Replacing Balanced Piston
Unit
Balanced piston unit is factory set by
Driger, do not attempt to adjust or
dismantle this unit. Should problems
occur - other than requirement to
replace springs on positive pressure
type units; units to be replaced with new
factory set unit.
To replace complete balanced piston unit or
springs, follow these instructions:
Figure 6
Tools required
Peg spanner P/N 1628089
Fine point tweezers P/N 3333326
Fine point circlip pliers
l
l
l
l
Remove rubber cover (4) and using peg
spanner (P/N 1828089) unscrew bayonet cap.
(3) (Figure 4)
Depress reset lever (6) (Figure 4) - positive
pressure type only.
Carefully remove diaphragm (2) (Figure 4) by
unhooking it from its central location on lever
of balanced piston assembly.
Using Posi-drive screwdriver, remove retaining screw. (1) (Figure 6)
a) Unscrew push-in connector (5) (Figure 4)
counterclockwise from demand regulator
body.
b) Using peg spanner (P/N 16 23089), unscrew.
Screw in connector counterclockwise from *
demand regulator body.
\
NOTE
DO NOT attempt to remove push-in
connector unless screw (1) (Figure 6) is
removed from demand regulator body.
II - 7
PA-90 Series Service Manual
Disassembly/Assembly
Section II
Rev. 1
August 1996
Remove O-ring (5) from bypass button.
6
Use a small screwdriver and remove the two
small screws (6) located on the bypass button
(1) and remove the bypassassembly. (Figure 7)
Remove circlip (2) using finepoint circlip pliers
and remove washer. (3) (Figure 7)
Push end of banjo (2) and extract banjo/hose
assembly (2) from demand regulator. (Figure 6)
4
32
1
Figure 7
NOTE
Ensure o-ring (I) is fitted to banjo.
Remove balanced piston unit (1) from demand regulator body. (2) (Figure 9)
NOTE
Remove old grease using a lint free cloth
from circumference of banjo and remove
seals. It is recommended that all seals be
replaced. Refit new seals and apply thin
film of (Molykote 111) grease.
2
1
Figure 8
2.3 Replacing/Refitting PP Arm
Return Spring
Ensure PP arm (1) is in position with arm
pointing as shown in Figure 10.
Insert return spring (2) (Figure 10) over PP
arm (1) and into housing recess with radial
arm of spring correctly located in radial slot in
demand regulator body.
Hook axial arm of spring into radial slot in
lever (4) (Figure 7) but not onto hexagon,
NOTE
Using finger inside demand regulator
body press end of PP arm to hold in
position and prevent axial movement.
J
\
Figure 9
*,
1
Carefully rotate lever arm, counterclockwise
against spring tension until first hexagon flat
aligns with hexagon on PP arm and press
lever onto PP arm.
Figure 10
PA-90 Series Service Manual
n - 6
2
5
Disassembly/Assembly
Section II
Rev. 1
August 1996
l
l
Rotate lever, counterclockwise and carefully
lift lever stop to opposite side of rib on demand regulator body.
Check assembly by pressing lever.
(4) (Figure 7) Lever should return easily.
2.4 Replacing Balanced Piston
Springs
l
l
l
Unhook each spring loop from location on
balanced piston lever.
Unhook each spring loop from location pins
on block.
Refit new springs to pins on block.
NOTE
Use fine point tweezers (P/N 3333326)
to stretch spring to locate on lever arm.
l
l
l
l
l
Figure II
Hook each spring loop to location arm on
balanced piston lever.
Insert balanced piston unit into demand
regulator body ensuring correct location onto
internal location boss (Figure 11).
Ensure banjo seals have fresh grease applied.
Carefully insert banjo (2) (Figure 8) into bore
of demand regulator body and align through
bore in balanced piston block i.e., reverse
Figure 8.
Refit washer (3) and new circlip (2) (Figure 7).
NOTE
Check banjo swivels freely in assembly.
l
l
l
L
‘:
Insert bypass assembly (1) (Figure 7) and
snug smalls screws. Ensure bypass operates
smoothly.
Replace O-ring over small screws.
Orientate and hold demand regulator with
outlet port in vertical position. Insert antiinjector pipe into port while ensuring positive
and correct location, (Figure 12)
II - 9
PA-90 Series Service Manual
Disassembly/Assembly
Section II
Rev. 1
August 1996
l
Locate and screw connector into demand
regulator body.
l
NOTE
l
Replace o-ring prior to fitting.
l
l
l
l
l
l
l
l
l
l
If lever does not retract easily, remove screw
(1) (Figure 6), rotate connector counterclockwise to next space in castellation.
Following satisfactory assembly, carry out
leak and functional tests.
Tighten push-in connector hand tight until
anti-injector pipe is secure. Do not overtighten.
Carefully turn connector, counterclockwise
until first space in castellations on connector
aligns with retaining screw hole.
Refit retaining screw (1) (Figure 6) ensuring it
enters aligned space in castellation.
If fitted, check action of positive pressure
mechanism. i.e., press reset lever
(4) (Figure 7) checking that balanced piston
spring loaded lever lifts and holds in position
after releasing reset lever.
Gently press end of balanced piston lever to
check lever releases under spring load.
Repeat.
Figure 72
Press reset lever and locate diaphragm
(2) (Figure 4) onto end of balanced piston
lever - insert outer bead of diaphragm into
locating groove in demand regulator body.
Ensure correct orientation. (Figure 5)
Moisten lip of bayonet cap with water - refit
bayonet cap (3) (Figure 4) and tighten with
peg scanner (P/N 16 28089). Check position
of diaphragm. (Figure 5) Note alignment of
arrows.
Press reset lever (4) (Figure 7) to lift diaphragm towards bayonet cap - release reset
lever checking that diaphragm remains in
position. Gently press center of diaphragm to
ensure that it releases and retracts. Repeat
action.
*
’
Fit rubber cover (4) (Figure 4).
Press lever (4) (Figure 7) to check action and
ensure lever returns easily after releasing.
PA-90 Series Service Manual
a
- 10
Disassembly/Assembly
Section II
Rev. 1
August 1996
2.5 Replacing Demand
Regulator
Hose
Tools required
11 mm AF open ended spanner
14 mm AF open ended spanner
or 6” adjustable spanner
l
l
l
l
Hold banjo flange across flats using 14 mm
AF open ended spanner.
Grip elbow on hose assembly, using 11 mm
AF open ended spanner and unscrew elbow/
hose assembly from banjo (counter clockwise).
Discard disassembled hose.
Before assembling new hose assembly,
check that:
a) threaded bore in banjo is clean and
undamaged
b) new O-ring is fitted to threaded end of banjo
l
l
l
Apply one drop of Loctite 638 (P/N 3335389)
To elbow thread (Ensure that Loctite does not
enter bore.)
Screw elbow to banjo and tighten using
14 mm AF spanner to grip banjo and 11 mm
AF spanner to grip elbow.
Leak test completed assembly.
(Section III, 1 .1.6)
f
II
- 11
PA-90 Series Service Manual
Disassemblv/Assemblv
Section II
Rev. 1
August 1996
3
Panorama Nova Mask
Tools
Required
7 mm open end wrench
Screwdriver, flat tip
Diaphragm spanner (P/N R26817)
End crimp pliers
3.1
Changing the Mask Lens
. Remove lens screws by turning them counter-
clockwise with a screwdriver, while at the
same time holding hexagon nuts.
. Carefully loosen both clamping frame halves
(if necessary, by pushing the blade of screwdriver between the clamping pins) and remove
them.
. Remove lens for reconditioning or replace-
ment.
I1
fl
-.
. First insert new lens in the top of retaining
area.
. The center marks on the lens must coincide at
the top and bottom with corresponding center
marks on lens holder.
Frame center point
. Thoroughly moisten the outside of lens
retaining area and the inside of lens frame
(e.g. with soapy water).
Body center molding
. Place the frames over the lens retaining area.
Take care to align the center marks of the
lens frame with the center mold marking of the
body.
Lens center line
. Bring the two frames (upper and lower) as
close as possible.
. Screw set screws into hexagon nut.
. Hold hexagon nut and tighten set screws until
*
’
0
the protruding end of screw is flush with the
lower edge of hexagon nut.
Figure 13
PA-90 Series Service Manual
11 - 12
Disassembly/Assembly
Section II
Rev. 1
August 1996
3.2 Changing the Exhalation
Valve
Exhalation valve
Remove plastic cap from connector.
Slide bridge assembly to one side. Take it and
spring out of the connector.
Remove valve discfrom guide and insert new
one.
Check opening pressure (min. 4.5 mbar). If it
is not correct, install a new spring into bridge.
3.3 Changing the Speech
Diaphragm
Figure 14
. Remove nosecup,
unscrew threaded ring by
turning it counterclockwise with wrench
(R26617).
. Lightly tap face of mask until speech dia-
phragm falls out. Check the condition of the
speech diaphragm.
i
If the speech diaphragm is deformed or shows
signs of damage, it must be replaced. The
speech diaphragm is a very thin foil, which could
easily contribute to considerable leakage if it is
damaged.
Retalnlng
When inserting the speech diaphragm, always
ensure that the gasket is present and in good
condition.
Speech
diaphragm
NOTE
Take care not to crush the perforated
section of the diaphragm.
If the perforated section of the diaphragm is
crushed it will decrease the sound transmittan&
properties of the diaphragm.
l
l
l
Figure 15
Insert diaphragm with perforated section
facing the interior of mask.
Install threaded ring and tighten with spanner
wrench (R26817).
Reinsert nosecup.
II
- 13
ring
PA-90 Series Service Manual
Disassembly/Assembly
Section II
Rev. 1
August 1996
3.4 Changing the Connector
Screw Type Clamp
Loosen screw of clamping collar with screwdriver and remove clamping collar with
support plate.
Take connector out of mask body.
Mask body
Insert new connector such that the center
marks on the connector and on mask body
coincide.
Clamp
Clamp support plate under collar and onto
clamping frame and align it.
Tighten screw until the protruding portion of
screw is flush with the end of retaining nut.
Crimp Type Clamp
l Remove clamping band and discard band.
l
l
l
l
l
Figure 16
Remove plastic protection band and gusset.
Lift connector from mask body.
insert new connector such that the center
marks align with the mold marks on the center
of mask body.
Install plastic band around connector and
insert gusset under lens frame and on top of
plastic band.
Place a new crimp style band over connector
and plastic band and, using a set of end
crimps, crimp band tightly.
NOTE
Ensure the mask body is not punctured
at any time during this procedure.
“P” Mask Maintenance Kit
Part No.
Description
Mask Maintenance Kit
\
4054420
Kit includes:
RM08304
Disc, Control Valve
Disc, Exhalation Valve
R50073
O-ring, Speech Diaphragm
T10549
Diaphragm, Speech SS Mask
R51102
PA-90 Series Service Manual ~
II
- 14
Disassembly/Assembly
Section II
Rev. 1
August 1996
4
l
l
l
l
l
l
Backplate/Pneumatic
Lines
Using a 3 mm allen key, loosen and remove
the ballnose o-ring P/N 4054431. Replace oring and tighten allen screw until tight.
Using a 17 mm wrench, loosen the medium
pressure line. Remove and replace rubber
sealing ring P/N R16456. Tighten until snug.
Using a 17 mm wrench, loosen the pressure
line assembly at the reducer, remove the
pressure line assembly and copper washer
and replace with the new copper washer
P/N D15436. Screw until tight.
Using a 17 mm and 14 mm wrench, loosen
the pressure gauge and remove it from the
pressure line. Remove the copper washer
from the pressure line and replace with a new
copper washer P/N R50457. Screw until tight.
Using a 13 mm wrench, loosen the buddy
breather connection and remove. Lubricate
with Molykote 111 and replace manifold o-ring
P/N 4059265. To reinstall, apply a drop of
Loctite 222 to the connection threads and
tighten.
Perform a high pressure leak test.
(Section III, 1 -1.3)
*
II
- 15
PA-90 Series Service Manual
Disassembly/Assembly
Section II
Rev. 1
August 1996
Cylinder
5
5.2 Burst Disc
Valve
(Figure 17)
Tools
5.1. High Pressure Gauge
310” socket
Tools
Required
Torque wrench (O-l 0 nm)
Required
CAUTION
Flat tip screwdriver
Cut-out l/2” socket
Small square key
(only on newer gauge covers)
Philips screwdriver
Ensure cylinder is completely empty
before removing the seal.
Remove 3/8”
protective cap (10) with-socket.
Remove copper disk (4) and sealing ring (9).
CAUTION
Replace sealing ring (9).
Ensure cylinder pressure has been
complete/y drained before removing
gauge.
l
l
l
Replace burst disk (4).
Apply Loctite 290 to protective cap (10).
Install protective cap (10) and torque to
65 in/lbs (7 nm).
Remove screws (14) in top of rubber
protective cap.
Lift off cap (13), wave washer (12) and
protective plastic cover (1 I);
Place l/2” cut-out socket on gauge nut.
NOTE
Make sure gauge indicating needle is
not damaged.
l
l
Remove gauge (2).
Replace sealing o-ring P/N 4598340 or entire
gauge assembly.
Install gauge assembly
l
Apply Loctite 222 sparingly to gauge threads.
l
Tighten gauge assembly in valve (1).
NOTE
Ensure pressure indicators are properly
aligned.
e
\
CAUTION
Do not over tighten gauge assembly.
l
Replace covers and washer in reverse order
of disassembly.
PA-90 Series Service Manual
11 - 16
Disassembly/Assembly
.
Section II
Rev. 1
August 1996
5.3 Handwheel
5.4 Valve Removal
Tools
Tools
Required
Required
Cylinder vise
l/2” drive valve replacement socket
l/2” drive torque wrench (O-l 50 nm)
1’ crows foot
Slotted l/2” flat tip torque wrench
(O-40 nm)
CAUTION
CAUTION
Ensure cylinder is completely empty
before disassembly.
Ensure cylinder is completely empty
before removing components.
l
Remove handwheel retaining nut (8),
handwheel (7), spring (21) and plate (20).
l
l
l
l
l
Remove retaining bonnet (19) using 1’
crowsfoot.
l
Remove valve from cylinder.
l
l
Replace o-rings (5) as necessary.
l
l
Insert valve socket over cylinder valve.
Installation
Replace sealing ring (3) on lower valve
><
section.
Remove all internal components o-ring (18)
gasket (17) stem (16) and valve and plug
seat (15).
Installation
l
Secure cylinder.
Torque valve housing to cylinder
(80~lOftIlbs)(110~14nm).
Apply pressure and check for leaks.
Screw in closing bolt (15) completely. Then
screw out one turn.
Insert all internal components, stem (16),
gasket, (17) and o-ring (18).
./”
/’
/
NOTE
Inspect copper sealing ring (17). If it is
damaged or leaks develop contact
National Draeger Technical Service for
replacement information.
l
l
l
Torque retaining bonnet (19) to 24 ft/lbs
(33 nm).
Install spring plate (20) spring (21) and
handwheel (7).
*
’
Apply loctite 222 to retaining nut (8). Tighten
until flush with upper spindle.
II
,.
- 17
-,c
PA-90 Series Service Manual
Disassembly/Assembly
Section II
Rev.1
August 1996
Cylinder Valve
Figure 17
PA-90 Series Service Manual
11 - 16
Disassembly/Assembly
Section II
Rev. 1
August 1996
Cylinder
Valve
5
Half Washer
6
Drain Tube
7
Handwheel
6
Stem Nut
9
4059154
4059154
4059154
Washer
4059019
40590 19
4059019
10
Plug, Safety
4052098
4052098
4052098
11
Gauge Cover
12
Spring Wave Washer
13
Bumper and Guard Assembly
14
Screw
15
Valve and Plug Seat
4052 103
4052 103
4052103
16
Stem
17
Gasket
4052104
4052104
\
4052104 \
18
O-Ring
4059222
4059222
4059222
19
Bonnet
20
Wear Washer
21
Spring
\
*
II - 1 9
PA-90 Series Service Manual
‘.
III - 1
Testing/Troubleshooting
Section III
Rev. 2
August 1996
1
Testing/Troubleshooting
1 .I .3 High Pressure Leak Test
1 .I
Test Kit Operations
Test Complete Unit for Leakage
l
NOTE
Before using the Test Kit P/N 4052350
the kit must be leak tested.
l
1.1.1 Leak Test “mr )<17’ ”
l
l
l
l
l
Connect tubing to low pressure gauge.
Close one open end and clamp. insert
squeeze bulb in other end.
l
l
l
Observe high pressure gauge and ensure
pressure does not decrease
200 osi in 1 minute. ;F G 1
After test, drain pressure from the system.
Test Medium Pressure
Attach a high pressure cylinder to the
reducer. Ensure there is enough air in the
cylinder (>60%) for operation.
Ensure reading does not change in 60
seconds.
Insert the medium pressure gauge in the
medium pressure quick disconnect used for
the LDV or the buddy breather.
Check High Pressure in dylinder
l
Ensure LDV is in donning mode. Open and
close cylinder valve twice.
1 .I .4 Medium Pressure Test
Provide pressure (7 to 10 mbar) to the gauge
and clamp off bulb.
1 .I .2 High Pressure Cylinder Test
l
Attach all components to backplate (LDV 8
cylinder).
Connect the high pressure gauge to the high
pressure cylinder.
Ensure the gauge relief valve is closed and
open the cylinder valve.
Ensure that relief valve is closed on the
gauge and slowly open the cylinder valve.
Note the initial reading on the gauge and
ensure that it falls within 87-130 psi.
Note the reading on the SCBA test kit gauge
and compare to the readings on the PA-90
Series high pressure e4es.t gauge. The kit
gauge should agree within f 5%. q &$lUI
Close the cylinder valve and slowly open the
SCBA test kit gauge relief valve.
CAUTION
Ensure that the vent on the gauge is
pointed away from face and hands.
PA-90 Series Service Manual
e
\
III - 2
Close the cylinder valve. Open the relief
valve on the gauge and bleed the pressure
from the unit. Close the gauge relief valve.
Disconnect gauge and reconnect the LDV to
the medium pressure line.
i
I
Testing/Troubleshooting
Section III
Rev. 2
August 1996
1 .I .5 Whistle Activation
l
Switch LDV to donning mode.
l
Open cylinder valve.
l
Listen for chirp and close cylinder valve.
l
l
l
l
l
Close cylinder valve.
1 .I .8 LDV Negative Pressure Leak Test
Test LDV for Leakage
Cover the LDV connector with the palm of
your hand and depress the center of the blue
LDV cover.
Slowly move your palm away from the
connector to allow a small amount of air to
escape.
.
Disconnect LDV from unit@&]
.
Connect LDV to test kit using connector
adapter and hose.
.
Block hose inlet to LDV. (USE STWPER)
Attach squeeze bulb, and create negative
pressure (-7 to -10 mbar).
Observe the chest gauge to determine the
whistle activation point.
1 .1.6
Return LDV to donning mode and disconnect
from tester.
Ensure pressure does not drop more than
0.5 mbar in 30 seconds.
LDV Positive Pressure Leak Test
Test LDV for Leakage
Disconnect test kit and attach LDV to unit.
.
With LDV in donning mode, open cylinder
valve.
.
Test Function if’the Bypass Control
Connect LDV to test kit using connector
_ . \
adapter and hose. + m7”/&;c GJGU$~~) . Ensure the LDV is disconnected from the
test kit.
Attach squeeze bulb and apply positive
.
1 .1.9 LDV Bypass Function
pressure (7 to 10 mbar).
.
.
.
Clamp off bulb and ensure pressure drop is
c 1 mbar/min.
NOTE
Ensure that the pressure does not in
on the gauge. [rwcm blf
This test checks the bypass function. If
bypass function knob has been removed
antior replaced, this flow must be reset
to 80 - 730 LPM (2.8 - 4.5 SCFM).
Contact National Draeger Technical
Service Department for details.
1 .I .7 LDV Static Positive Pressure Test
Test LDV for Static Positive Pressure
.
Open cylinder valve and depress bypass to
ensure air flow. USE RCW-ER
.
Leave test setup same as in leak test above.
*
Reverse squeeze bulb to create negative ’
pressure.
.
Depress and slowly release bu1b.C )BCD wflo
.
&%
Close cylinder valve and depress bypass to
relieve pressure.
BULD krrr @a)
.
.
Connect test tubing t
gauge indicates between “1 and 3.75 mbar”.
III - 3
PA-90 Series Service Manual
STEPS TO S&TlNG WHISTLE
1.
Put LDV in “Donning” mode.
2.
Open cylinder valve; then close cylinder valve.
3.
Bleed down LDV to 600 psi (2216 SCBA’s) or 1200 psi (4500 SCBA’s).
4.
Put LDV back in “Donning” mode at desired setting.
5.
Use 16 mm wrench and turn adjusting nut in clockwise direction
until a steady whistle sound is heard.
6.
Put LDV back in “Donning” mode.
7.
Reopen cylinder valve; then close cylinder valve.
8.
Bleed down LDV to check set point.
9.
If no good, back out nut and go back to Step #I.
If good setting, lock in locking nut with 16 mm wrenc
ME cscmn~ &.@ (Do
11.
Check setting 1 more time.
Testing/Troubleshooting
Section III
Rev. 1
August 1996
1.1.10 Mask Leak Test
Leak Test Panorama Mask
l
l
Inflate and moisten mask balloon. m 607
04x
wtm !
Moisten mask exhalation valve and attach
mask to balloon. GmTwuc
7a wGimc!
: .‘ ‘
NOTE
Ensure the balloon seams are not on
the mask sealing surface.
l
l
l
Connect mask.to the test kit using the
connector and hose.
Attach squeeze bulb and create negative
pressure (-7 to -10 mbar) in the mask.
Clamp off the bulb and not that the pressure
does not change more than 1 mbar/min.
1 .l .l 1 Exhalation Valve Opening Test
Test Exhal&lon
l
l
l
l
Opening Point
Leave test setup as in the previous leak test.
Reverse the squeeze bulb and slowly apply
positive pressure.
The bressure’gaugeneedle
will stop rising
when the exhalation valve opens.
The exhalation valve must not open before
4.5 mbar is indicated.
.I
_;.
A
:
IS.
PA-90 Series Service Manual
T-i
4
.,~
,i
III
j ..I.
)
- 4
Testing/Troubleshooting
Section III
Rev. 2
August 1996
SCBA TEST DATA LOG
UNIT SERIAL #
HIGH PRESSURE
REGULATOR SERIAL #
LDV
SERIAL #
MASK SERIAL #
HYDRO-DATE
c
DATE
HIGH PRESSURE
LEAK TEST
(200 psi/l min.)
LDV NEGATIVE
PRESSURE LEAK TEST
(< 0.5 mbar/30 seconds)
LDV POSITIVE
PRESSURE LEAK TEST
(c 1 mbar/l min.)
POSITIVE PRESSURE
ACTIVATION
(z-5 mbar)
STATIC
POSITIVE PRESSURE
(1 .O - 3.75 mbar)
See NOTE
FUNCTION OF
Section 1.1.9
BYPASS VALVE
180 - 130 LPM) (2.8 - 4.5 SCFMI
WARNING WHISTLE
ACTIVATION
(25% f 2% of full cyln.)
MEDIUM PRESSURE
(87 - 130 osij (6 - 9barj
-bSJ I
MASK LEAK TEST
(e 1 mbar/l min.)
EXHALATION VALVE
OPENING
(2 4.5 mbar)
L
III - 5
PA-90 Series Service Manual
Testing/Troubleshooting
Section III
Rev. 1
August 1996
Fault
Pressure Reducer*
Audible leak from
pressure reducer
High/low medium
pressure
Continuous creep
medium pressure
Above 10 psi in one
minute.
Lung Demand Regulator
Inward/outward leak
Static pressure test
Demand valve in test
Mode i.e. non-positive
pressure mode
Pressure rise
Demand valve in
positive pressure
mode - high static
pressure
Demand valve in
positive pressure
mode - low static
pressure
No supplementary
supply
Demand valve fails to
switch to positive
pressure mode.
Facepiece
Inward leak
Outward leak
(to atmosphere)
Facepiece - will not
hold/maintain
positive pressure
Exhalation
resistance too high
Unable to maintain
headstrap
1 adjustment
Cause
Remedy
Pressure relief valve
operates indicating
reducer failure
Reducer out of
tolerance
High pressure leak
Replace
reducer
complete
Replace
reducer
Replace
reducer
complete
Connection o-ring
Diaphraam damaaed
Banjo o-rings leaking
Balanced piston unit
leaking
Replace
Replace
Replace complete
balanced piston unit
Spring(s) too strong
Replace
springs
Spring(s) too weak
Replace
springs
BentIdamagad
Balanced piston
lever
Bent/damaged
Balanced piston
Lever
Bent/damaged
switch “off” wire form
Replace complete
balanced piston unit
*IMPORTANT
INFORMATION
complete
Replace complete
balanced piston unit
Face seals leaking
Facepiece
perforated (pin
holes/cracking)
inspect for damage
Replace if
necessary
Loose connections
(claw)
Exhalation valve
leaking
Tighten connections
replace exhalation
valve disc/rubber
Inspect seat in front
port for damage
A; above
As above
Weak exhalation
valve spring
Replace
spring
Exhalation Spring ~
Replace spring
too strono
Strap ratchets worn
Replace headstrap
Buckle rollers
Assemble correctly
reversed i.e. incorrectly fitted
PA-90 Series Service Manual
III - 6
Pressure reducers of
certified apparatus are
sealed by National
Draeger. If original seal
cap has been broken,
or removed, apparatus
is not guaranteed as
being operational in
accordance with
approval standards.
To achieve full
operational status:
through authorized
maintenance
National
Draeger can only be
liable if pressure
reducer is serviced and
resealed by National
Draeger. This is only
the case when pressure
reducers are fitted with
original Dtiger
components and
sealing caps.
.
including tool list
IV - 1
Maintenance Schedules/Equipment
Section IV
Rev. 1
August 1996
1.1 Maintenance Procedures
SAFETY NOTE
Refer to manufacturers’ usage
instructions when using cleaning and
disinfecting agents. It is important to pay
attention to the concentration and
reaction times. Do not use organic
solvents such as acetone, alcohol,
white spirit, trichloroethylene
or similar.
IMPORTANT
The following standards must be met
when performing any maintenance
procedure.
-
-
Visually inspect and hydrotest
all cylinders at a DOT certified
hydrotest facility. Composite
cylinders must be hydrotested
every three years; metal cy/inders every five years.
Accurate documentation should
be recorded and filed, by serial
number, as each unit is tested
or maintained.
If required, Drager recommends the following:
Cleaning
Draeger Safety Wash
Do not exceed a temperature of 86 “F.
Disinfecting
Desi/EW80-Des
Do not exceed a temperature of 86 “F.
Protection against pathogens is important. With
Draeger SCBAs, all exhaled air vents through
the exhalation valve in the facepiece. Since no
exhaled air contacts the LDV only the facepiece
requires disinfecting against pathogens. The
LDV only needs cleaning annually unless the
unit has been subjected to unusual contamination.
Details of cleaning and disinfecting agents are
available from Drager on request.
Rinsing and Drying
Remove cleaning and disinfecting solutions by
rinsing in clean water, followed by,,drying.
Do not exceed a temperature of 140 “F when
drying components.
Carefully clean, disinfect and thoroughly dry
contaminated dirty components as necessary.
Use only Drager Safety Wash for cleaning and
Desi/EW80-Des
for disinfecting baths. Immerse
and manually agitate components in baths.
Drager recommends that no form of mechanical,
electrical or ultrasonic agitation be used.
1.1.1 Facepiece
l
l
l
NOTE
If lung demand regulator assemblies are
regularly immersed in solutions, Drager
recommends that banjo O-rings are regreased after 100 clean and disinfect
cycles, by a proper/y trained technician.
(Level I technician using an SCBA Test
\
Kit).
PA-90 Series Service Manual
*
\
l
l
IY - 2
Disengage LDV from facepiece.
Lift off the exhalation valve protective
cover from the facepiece.
Examine the exhalation valve for visible
damage and ensure that the valve is free
from dirt or debris.
Check the ease of movement of the
exhalation valve and ensure it is not
sticking to the valve seat.
Check the headstraps, body, nosecup and
speech diaphragm. There should be no
damage or signs of degradation.
Maintenance Schedules/Equipment
Section IV
Rev. 1
August 1996
NOTE
Wear suitable eye protection.
l
Clean and disinfect all components of the
facepiece.
1. Immerse, and manually agitate facepiece
in Drager Safety Wash. (Refer to Drager
Safety Wash instructions).
2. After cleaning, rinse components in clean
water.
3. Immerse and manually agitate facepiece in
Desi/EW80-Des. (Refer to Desi/EWBO-Des
instructions).
4. After disinfection, rinse components in
clean water.
5. Dry at temperature less than 140 “F.
t
6. During
in the
rinsing
leaking
drying, avoid accumulation of water
exhalation valve housing. Improper
and drying can result in sticking or
of the exhalation valve.
7. Reinstall protective cover over exhalation
valve.
1.1.2 Lung Demand Valve (LDV)
It is important to follow these instructions to
internally clean and disinfect the lung demand
regulator (Refer to Figure 1).
5
1
6
2
3
4
1. Press reset lever (Figure 1; 6) of lung
demand regulator. Do not press center of
rubber cover (Figure 1; 4) while pressing
reset lever, or force lever against stop.
2. Remove rubber cover (Figure 1; 4). Using
plate spanner (P/N R26817), unscrew
bayonet cap (Figure 1; 3).
3. Carefully unhook diaphragm (Figure 1; 2)
from lever of balanced piston lever.
Figure 1
IV - 3
PA-90 Series Service Manual
Maintenance Schedules/Equipment
Section IV
Rev. 1
August 1996
NOTE
Wear suitable eye protection.
4. Assemble rubber cover (Figure 1; 4) to
demand valve body to protect balanced
piston lever.
5. If required, immerse and manually agitate
lung demand regulator in Drager Safety
Wash (Refer to Drager Safety Wash
instructions).
6. After cleaning, rinse in clean water.
Figure 2
7. If, required, immerse and manually agitate
lung demand regulator in Desi/EW80-Des.
(Refer to Desi/EW80-Des
instructions).
8. After disinfection, remove rubber cover
(Figure 1; 4) and rinse components in
clean water. Take care not to damage
balanced piston lever.
9. Press reset lever of lung demand
regulator. Turn ‘ON’ air supply.
10. Gently depress balance piston lever,
blowing out fluid residue.
11. Disconnect from air supply, dry
components and, if necessary, remove
excess fluid.
12.After drying, insert balanced piston lever
into hole in center boss of diaphragm
(Figure 1; 2) (chamfered side of boss
towards lever) and carefully locate outer
bead of diaphragm into groove in demand
valve body - note orientation (Figure 2).
13. Moisten lip of bayonet cap (Figure 1; 3)
with clean water. Re-fit bayonet cap.
NOTE
Re-check orientation
(See Figure 2).
14.Assemble
of
diaphragm.
.
-
t
,
A negative pressure leak test must be
performed by a properly trained technician (Level I technician using a SCBA
Test Kit). Refer to published service
manual for details.
rubber cover (Figure 1; 4).
15. Press reset lever of lung demand
regulator. Do not press center of rubber
cover while pressing reset lever, or force
lever against stop.
PA-90 Series Service Manual
IMPORTANT
rv - 4
Maintenance Schedules/Equipment
Section IV
Rev. 1
August 1998
1 .1.3 Pressure Reducer and Hose
Assem biy
1 .I .4 After Each Use
Recharge orreplace the cylinder with a
National Draeger approved cylinder
charged to full service pressure. Use only
cylinders with current hydrostatic test
pressure dates.
NOTE
These procedures must be performed
by a properly trained technician
(Level I, using a SCBA Test Kit).
Inspect the unit for worn or damaged parts
with particular focus on the pressure
reducer o-ring, LDV o-ring and the
exhalation valve. Check these parts for
damage or debris
which may jeopardize its seal. Remove
any debris that may be present. REP
E
T
\
ALL WORN OR DAMAGED PARTS
IMMEDIATELV
1. For cleaning and disinfecting, remove
pressure reducer and hose assembly
from backplate.
2. Unfasten hose loops, releasing hoses
and remove reducer and hose assembly.
NOTE
Do not immerse pressure reducer in
cleaning or disinfecting baths.
Check the LDV connector o-ring for
lubrication. If dry, apply a thin film of Dow
Corning 111.
3. Using a clean cloth moistened in Drager
I
Safety Wash or Desi/EW80-Des,
remove
dirt and contaminants from pneumatic
assembly.
1.1.5 Functional Test
*
4. Using a clean cloth moistened in clean
water, remove cleaning or disinfecting
residue. Dry.
NOTE
Do Not exceed a temperature of
140 “F when drying components.
l
Ensure that a properly trained technician
(Level I technician using an SCBA Test
Kit) tests any component whose function
or seal may have been altered due to
service by cleaning or replacement.
Perform a function test on the apparatus.
1. Cylinder Pressure and Gauges:
5. Reassemble reducer and .hose assembly
to backplate.
Open the cylinder valve and note the
pressure reading on the cylinder pressure
gauge. Compare chest gauge reading to
the cylinder gauge reading. The two values
must be within f 10% of the full scale.
For example: the gauges on a 4500 unit
read O-5000 psi. Each gauge has an
accuracy of f 5% or 250 psi. When
comparing gauges, total accuracy is f 10%
or 500 psi.
IV - 5
PA-90 Series Service Manual
Maintenance Schedutes/EauiDment
. .
Section IV
Rev. 1
August 1996
2. High Pressure Leak Test:
Close the cylinder valve and observe the
pressure gauge on the apparatus. After
one minute, reopen the cylinder valve and
observe the pressure gauge needle for
movement. If the needle moves less than
one graduation on the gauge (200 psi),
proceed to step 3.
3. Whistle Operation:
Ensure that operation and activation of the
whistle is satisfactory by opening the
cylinder valve to pressurize the system
then closing the cylinder valve. Place the
palm of the hand over the connection port
of the LDV and activate. Move palm of
hand from regulator connector until only a
small volume of air can escape. This will
allow the pressure to drop slowly. Observing the apparatus pressure gauge while the
pressure is dropping slowly, ensures that
the whistle activates when the pressure
reaches 25 f 2% of rated cylinder
pressure.
4. LDV Operation:
Set the regulator to the donning mode,
simply depress the donning switch. Open
cylinder. Depress bypass to ensure air
flow. Close cylinder valve.
5. Low Pressure Leak Test:
Close cylinder valve. Depress the bypass
to bleed air from the system. Once this is
done no more air should be able to be
drawn from the system.
6. LDV and Facepiece Connection:
Connect the LDV to the facepiece and
check for a snug fit. Uncouple the regulator
by depressing the button on the facepiece
connector and pulling the regulator out of
the facepiece. Check that the o-ring on the
regulator connector is in good condition
and lightly lubricated.
PA-90 Series Service Manual
’
Iv -
6
Maintenance Schedules/Equipment
Section IV
Rev. 1
August 1996
1.2 Maintenance Schedule
.
0 Drager Recommendation.
n Lightly grease lung demand regulator connector o-ring
(Molykote 111) as required.
a If lung demand regulator assemblies are regul;ly ;mmersed in solutions, Drager recommends that banjo
o-rings are re-greased after 100 clean & disinfect cycles,
Complete
Apparatus
Clean and disinfect as necessary
Visual inspection
Functional & leak testing (as defined in
operating manual)
0
Bypass flow and static test per
manufacturer’s instructions
0
,ung Demand
qegulator
Clean and disinfect as necessary
0
‘ressure
Medium pressure check
0
Replace CGA connector o-ring
0
Reducer
Cylinder
Charge to correct pressure
Charged pressure check. Check test
date stamped on cylinder.
0
0
Cylinder pressure test (according to
national standards). Recertification
Cylinder
Valve
Basic overhaul (as necessary or at time
of cylinder recertification)
NOTES
Maintenance procedures are subject to recommended or required laws or
standards from the following agencies: NIOSH, OSHA, NFPA, ANSI. In addition, state or local agencies may have other requirements. It is the responsibility
of SCBA users to determine which of these standards apply in their jurisdiction.
This periodic maintenance schedule is based on normal usage and wear. Heavy
usage, use where harmful chemicals are present, or damage may require more
frequent service. Accurate documentation should be recorded as each unit is
tested and maintained.
Repairs or replacement of parts shall be performed only by National Draeger
certified technicians. Please contact National Draeger Service if there are
further questions.
\
IV - 7
PA-90 Series Service Manual
Maintenance Schedules/Equipment
Section IV
Rev. 1
August 1996
I .3 Maintenance Equipment
The following is a list of Level I and II tools which are available for
maintenance of our SCBAs. Please refer to this chart when determining
which tools are needed for your specific SCBA.
1.3.1 Maintenance Support Equipment
Operational - Level I - Level II
Part #
Description
4052512
Adjustable Wrench l-l /8”
4052024
SCBA Tool Kit
1628084A
R26817
R21402
4059039
1627244-A
4053480
4053479
4053478
4053481
4053482
4053483
4053705
4052511
1618946
4054839
4053476
4054838
(includes the following)
Lung Demand Spanner
Face Mask Spanner
Seal Ring Lifters
3 mm Allen Key
Flat Tip Screwdriver
Wrench 7 x 6 mm
Wrench 10 x 8 mm
Wrench 12x 12 mm
Wrench 14x 15 mm
Wrench 17x 19 mm
Needle Nose Pliers
Reg. Phillips Tip Driver
Ring Spreaders
2 mm Allen Key
16 mm wrench
Jewelers
Screwdriver
Small Phillips Tip Driver
PA-90 Series Service Manual
Comments
Use on all respiratory
equipment
All Lung Demands
All Panorama Masks
Use for all o-rings
All Ballnose o-rings
l/4” Blade Width
All Equipment
All Equipment
All Equipment
All Equipment
All Equipment
All Equipment
All Equipment
Plus/SO L D R
Plus/SO LDR
Plus/SO Whistle
Plus/90 LDR
Plus/SO L D R
IV
- 8
Maintenance
Schedules/Equipment
Section IV
Rev. 2
August 1996
PA-80 “Pius/90”
Service Tool List
Part #
Description
Comments ,
4054142
Torque Wrench
O-l 00 ft/lbs
Torque Wrench
O-l 50 in/lbs
l/2” Drive Socket
Cut-Out l/2” Socket
318” Socket
Cyl. Valve Replacement
40525 14
4052530
4052532
40525 13
Maintenance
Part #
4052350
4054001
D20700-R
4054968
Test
Burst Disl$Removal
Cyl. Valve Replacement
Valve Gauge Removal
Burst Disk Replacement
Equipment
Description
SCBA Test Kit
Aerotest Kit
Aerotest Kit
Bypass Flow Meter
Comments
Mandatory for Levels I & II
Low Pressure 150 psi max
High Pressure 4500 psi max
LDV Bypass Flow
80 to 130 Ipm
(2.8 to 4.5 SCFM)
(Mandatory for bypass
adjustment)
Recommended But Not Mandatory Equipment
Ultra-sonic Cleaner
MFG Branson,
IV - 9
Model 5200
PA-90 Series Service Manual
Maintenance Schedules/Equipment
Section IV
Rev. 1
August 1996
1.3.2 Torque Specifications
A.
Cyttnder
Valve to Cylinder
Valves and Components
Torque
Comments
PA-90 22 16
4052006
PA-90 4500
4052012
replace and relubricate
o-ring, 4059037
replace and relubricate
o-ring 4059027
Safety Plug to Valve
Torque
Safety Plug, 4052098 65 f 10 in. Ibs,
(all PA-80 Series)
Comments
add drop of Loctite 290,
4054087
NOTE
Prior to tightening; inspect threads and sealing surface for
damage. Threads and sealing surface must be clean and
undamaged before tightening, otherwise damage to
components may occur.
Exceeding recommended specification may result in damage to
components.
PA-90 Series Service Manual
I v - 10
1
Maintenance
Schedules/Equipment
Section IV
Rev. 1
August 1996
1.3.3 Lubricants and Adhesives
A.
Lubricants
Lubricant
Dow Corning
Molykote 111
B.
Adhesive
Part Number
Comments
4059123
use sparingly on all rubber
o-rings, recommended
for
use on silicone o-rings
Part Number
Comments
Adhesives
Loctite 222
4054086
Loctite 290
4054087
Loctite 242
Loctite 638
-apply to reducer threads
prior to tightening ballnose
-apply to PA-80 Plus valve
gauges, 4059026 and
4059036, prior to tightening
-apply to nut, 1335022,
following adjustment of
bypass flow of all lung
demand regulators
-apply to safety plug,
4052098, prior to assembly,
-apply to chest gauge threat
-apply to whistle locking nut
-apply to LDV hose
connection
NOTE
Use adhesive only on fittings noted by National Draeger.
Excessive or improper use may result in damaged components
or reduced performance of apparatus.
IV - 11
PA-90 Series Service Manual
,
V
- 1
Service Reporting
Section V
Rev. 1
August 1996
1
Service
Repotting
National Draeger, Inc. strives to improve the
quality of our products at all times. One
method used to accomplish the highest quality
possible is to periodically review the service
logs for our devices and determine what, if
anything, needs to be modified or improved to
increase the quality of the device. As a certified service technician for the PA-90 Series,
your input into our continuous improvement is
vital. After servicing a unit in the PA-90 Series
we ask you to complete the following procedure:
1. Make copies of the attached “SCBA Service
Log” form.
2.Complete
the form.
3. Return the form to the following address:
National Draeger, Inc.
Attn: Technical Service Department
101 Technology Drive
Pittsburgh, PA 15275
Upon receipt of the log form, we will enter
the data into our service database along with
the data from our internal service department. This will ensure that we have a
complete understanding of the service
history, leading to improvements in design,
durability, or robustness. By actively patticipating in this effort you are helping us to
improve our products for your continued
satisfaction.
PA-90 Series Service Manual
V
- 2
Service Repotting
Section V
Rev. 1
August 1996
2
SCBA Service Log
\
Unit Serial Number
Problem or Part Replaced
Sub Assembly(s) Serial
Number or Loct Number
Corrective
Action
1
2
3
4
5
6
7
8
Please mail or fax a copy of this completed form for each SCBA repaired to:
National Draeger, Inc.
Attn: Technical Service Department
101 Technology Drive
Pittsburgh, PA 15275
Fax: 412-787-2207
V
-
3
PA-90 Series Service Manual
Service Reporting
Section V
Rev. 1
August 1996
3
Terms of Payment
1% discount within ten (10) days after invoice
date (contingent upon credit approval).
l
Net 30 days after invoice date.
l
. For payments later than 30 days, a finance
charge is applied at 1 -l/2% per month.
4
Return Goods Policy
A “Return Goods Authorization” (RGA) must
be issued by National Draeger prior to any
materials being returned. Contact National
Draeger’s customer service department for
necessary
authorization.
l
5
. All emergency orders will be shipped the
same day, if called in by 3:00 P.M. eastern
standard time. WE CONSIDER AN ORDER
AN EMERGENCY ONLY WHEN AIR
FREIGHT IS REQUESTED. UPS Second Day
Service is not considered an emergency
order.
l
l
No materials can be returned for credit if value
is less than $60.00 at invoiced price unless
National Draeger is in error.
l
All materials being returned
result of shipping error on
Draeger must be returned
within ten (10) days after
material.
l
Emergency and Rush
Orders
All emergency and rush orders (air freight and
next day services) will be subject to a special
handling charge.
All next day emergency orders placed after
the cutoff time will be assessed a $25.00
handling fee.
for credit as a
part of National
to National Draeger
receipt of incorrect
On items ordered incorrectly or no longer
needed by the customer, a minimum
restocking charge of 15% will be assessed,
unless it is a detection tube; then a minimum
restocking charge of 30% or $50.00,
whichever is greater, will be assessed.
l
Return of parts older than one year subject to
refusal due to shelf life of parts.
l
Goods must be received in the same condition
as originally shipped.
l
l
Repair orders must be accompanied by a
purchase order number. This includes
warranty repairs.
I
PA-90 Series Service Manual
V - 4
Service Reporting
Section V
Rev. 1
August 1996
6
,
Return Goods Authorization
1. Return Goods Authorizations @GA’s) are
issued to a customer who requests to return a
product to National Draeger for the following
reasons:
a.
Ordering error
b.
Shipping error
C.
Duplicate order
d.
Damaged merchandise
e.
Processing error
\
4
An RGA number must be acquired from
National Draeger’s Customer Service
Department before returning and shipping any
goods.
P.The following information is required by our
Customer Service Department to issue an
RGA.
a.
Customer’s company name
b.
Customer contact name and telephone
number
c.
Customer’s purchase order number
d.
Part number and quantity of item being
returned
8.
Reason for return
3.After receiving an RGA number, please
reference that number on the outside of the
package being returned to National Draeger.
4.All discrepancies on an order must be
reported to National Draeger within ten days
of receipt of that order.
5.On items ordered incorrectly or no longer
needed by the customer, a minimum
restocking charge of 15% or $50.00,
whichever is greater, will be assessed.
6.An RGA will not be issued if the value of the
item being returned is less than $60.00 at
invoiced price, unless National Draeger is in
error.
V
-
5
PA-90 Series Service Manual
Service Reporting
Section V
Rev. 1
August 1996
7
National Draeger’s Product
Service In The U.S.A.
l
Technical Service Department
SRA#
National Draeger, Inc.
101 Technology Drive
Pittsburgh, PA 15275
If it becomes necessary to return an instrument
to National Draeger for repair in the United
States, follow these guidelines:
Contact National Draeger’s Technical Service
Department at (412) 7665527 or (412) 7885525 and ask for a Service Return
Authorization (SRA) Number. This number
tells our receiving department to forward the
package to the service department for repair,
and also allows our technicians to match
repairs to work orders. SRA numbers are
valid for 30 days from the date they are
assigned.
l
l
When you request your SRA number, please
have the following information handy:
the purchaser’s name and address,
the model number of the instrument to be
repaired,
the serial number of the instrument to be
repaired,
the purchase order number for the repair
along with any other applicable information or
confirmation including warranty repair period,
the phone numbers of persons in your
company who National Draeger should
contact about the product or repairs,
l
l
l
l
Place this information inside the shipping
package.
Include a short note inside the package that
explains the symptoms or cause of the
damage. For example, if the instrument was
immersed in water just before it
malfunctioned, tell us that.
*
’
Include all necessary options and accessories
in the package you are returning.
Ship the unit in sturdy packaging.
PA-90 Series Service Manual
Send the package to:
V - 6
VI
-
1