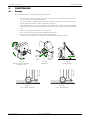
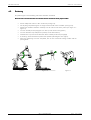
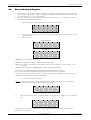
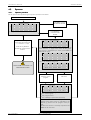
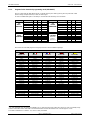
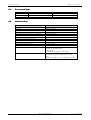
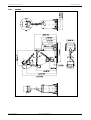
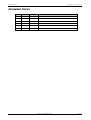
1
Revision: 2
Version: March 26, 2004
File:
[M_30010E00R02.doc]
User’s Manual
WARNING: The information that is printed within this manual is vital for the correct use of the
equipment; please read it carefully before use.
User's Manual - Visitor T15
Villa Sistemi Medicali
(This page is intentionally left blank)
[File: M_30010E00.doc]
Villa Sistemi Medicali
Visitor T15 - User's Manual
TABLE OF CONTENTS
1.
SAFETY AND COMPLIANCE
COMPLIANCE ................................................................
................................................................................................
..................................................................
.................................. 2
1.1.
Electrical safety ..................................................................................................................2
1.2.
Mechanical safety .............................................................................................................. 2
1.3.
Electromagnetic compatibility (EMC) ....................................................................................3
1.4.
Protection against ionizing radiation.....................................................................................3
1.5.
General disposal................................................................................................................3
1.6.
Application & final destination .............................................................................................4
1.7.
Interfaceability ...................................................................................................................4
1.8.
Classification .....................................................................................................................4
1.9.
Compliance ......................................................................................................................5
1.10. Copyright .........................................................................................................................5
2.
COMPONENT IDENTIFICA
IDENTIFICATION
TION ................................................................
............................................................................................
............................................................ 6
2.1.
Overview ..........................................................................................................................6
2.2.
Collimator.........................................................................................................................6
2.3.
Control panel ....................................................................................................................7
2.4.
Audible signals ..................................................................................................................8
2.5.
Signals and error messages.................................................................................................9
3.
MESSAGES ON THE DISP
DISPLAY
LAY................................
LAY ................................................................
................................................................................................
................................................................10
................................ 10
4.
FUNCTIONING ................................................................
................................................................................................
..................................................................................
..................................................12
.................. 12
4.1.
Transport ........................................................................................................................ 12
4.2.
Positioning ...................................................................................................................... 13
4.3.
Collimator adjustment ...................................................................................................... 14
4.4.
Start up and checks at the ignition ..................................................................................... 15
4.5.
Exposures........................................................................................................................ 16
4.5.1. Operative procedure......................................................................................................... 16
4.5.2. Programs for the Anatomical programming mode (APR MODE)........................................... 17
4.5.3. Perform an exposure ......................................................................................................... 18
4.5.4. Useful information ............................................................................................................ 18
4.5.5. Optional: dosimeter (DAPmeter) ........................................................................................ 19
4.5.6. Optional: Radiography with examination table and Potter Bucky grid ................................... 20
4.6.
Shutdown procedure ........................................................................................................ 20
5.
MAINTENANCE ................................................................
................................................................................................
..................................................................................
..................................................21
.................. 21
5.1.
General Warnings............................................................................................................ 21
5.2.
Checks and inspection by the user ..................................................................................... 21
5.3.
Cleaning......................................................................................................................... 22
5.4.
Disinfection ..................................................................................................................... 22
6.
TECHNICAL DATA ................................................................
................................................................................................
...............................................................................
...............................................23
............... 23
6.1.
Electrical data.................................................................................................................. 23
6.2.
Functioning features ......................................................................................................... 23
6.3.
Radiological data............................................................................................................. 24
6.4.
Environmental data .......................................................................................................... 25
6.5.
Mechanical data .............................................................................................................. 25
6.5.1. Unit sizes.......................................................................................................................... 26
6.6.
Components specifications................................................................................................ 27
6.6.1. Generator ........................................................................................................................ 27
6.6.2. Tube-Housing Assembly .................................................................................................... 28
6.6.3. Collimator ........................................................................................................................ 30
6.6.4. DAP meter (dose-area product meter) (optional)................................................................. 30
6.7.
Accessories and options.................................................................................................... 30
6.8.
Compliance with Directives and Technical Standards ........................................................... 30
6.9.
Labels and symbols .......................................................................................................... 31
6.9.1. Labels of the unit .............................................................................................................. 31
6.9.2. Internal symbols................................................................................................................ 32
6.9.3. Various symbols................................................................................................................ 32
6.9.4. Packing label.................................................................................................................... 32
DOCUMENT STATUS
STATUS................................
................................................................
................................................................................................
......................................................................................
......................................................I
...................... I
[File: M_30010E00.doc]
Rev.1 - Pag. 1/32
User's Manual - Visitor T15
1.
Villa Sistemi Medicali
SAFETY AND COMPLIANCE
The purpose of this user's manual is to provide a set of easy to use instructions for the proper use of the
system. All of the information contained herein is based on the current version of the system. Villa Sistemi
Medicali reserves the right to improve and implement changes to the information herein to reflect any
changes necessitated by technological enhancements to the system.
•
•
This x-ray unit must be used in strict compliance with the safety instructions contained in this
manual and must not be used for purposes other those for which it was intended
The x-ray unit may only be operated by skilled, properly trained personnel with the required
knowledge of x-ray safety practices and the proper use of x-ray equipment.
The operator is responsible for the use of the system in compliance with the applicable standards concerning
installation and use.
•
•
•
•
•
The unit must not be operated when electrical, mechanical, or radiological faults are present
or when any of the indicators or alarm devices are malfunctioning.
When used in conjunction with other apparatus, components, or modules, whose
compatibility is uncertain, it is necessary to ensure the absence of any danger to the patient
or operator. Consult Villa Sistemi Medicali for information.
Villa Sistemi Medicali is responsible for the safety of its products only when maintenance,
repairs, or modifications have been performed by Villa Sistemi Medicali or by personnel
authorized by Villa Sistemi Medicali in writing.
As with any technical apparatus, this x-ray unit must be used properly with periodic checks
and maintenance as specified in the chapter “Programmed maintenance”.
The system safety circuits and devices must not, for any reason, be moved, modified, or
omitted.
Villa Sistemi Medicali cannot be held liable for any malfunction, damage, or danger resulting from improper
use of the system or nonnon-compliance with the rules for proper maintenance.
maintenance.
1.1.
Electrical safety
•
•
•
•
1.2.
Only trained service personnel authorized by Villa Sistemi Medicali may remove the unit
covers and only in accordance with the instructions contained in the Service Manual.
This X-ray unit may only be used in environments or medical rooms in compliance with the
applicable IEC standards.
The X-ray unit must not be used in areas where there exists a danger of explosion.
Cleaning and disinfecting agents, including those used on patients, may create an explosive,
gaseous mixture. Use only those products in compliance with the applicable rules.
Mechanical safety
•
•
•
Pag. 2/32- Rev.1
After positioning the unit, engage the parking brakes.
Only use the proper handles to move the unit.
Avoid collision with obstacles.
[File: M_30010E00.doc]
Villa Sistemi Medicali
1.3.
Visitor T15 - User's Manual
Electromagnetic
Electromagnetic compatibility (EMC)
This apparatus is in compliance with the applicable rule regarding EMC, Directive 89/336, that defines the
max. allowed emission levels from electronic devices and the required immunity from interference caused by
externally generated electromagnetic fields
It is not, however, possible to exclude radio signals coming from transmitters such as mobile phones or
similar mobile radio devices. These and other transmitting devices, including those in compliance with the
EMC standards, may influence the proper functioning of medical apparatus when used in proximity and with
a relatively high transmitting power. Therefore, the use of radio equipment proximity to electronically
controlled systems must be avoided in order to eliminate any interference risk.
Explanation:
The electronic apparatus that meets the EMC standards has been designed so that, under normal conditions,
any malfunctioning risk, caused by electromagnetic interferences, is avoided.
However, if radio signals coming from high frequency transmitters with a relatively high transmitting power are
used near the electronic apparatus, the risk of electromagnetic incompatibility cannot be completely
controlled.
Any transmissions by mobile radio equipment must be avoided.
Mobile phones must be switched off in zones close to the unit.
These rules must be applied when the unit is switched on (that is to say connected to the mains
and ready for use).
1.4.
Protection against ionizing radiation
Before any x-ray exposure, ensure that all the necessary protective precautions have been
taken.
During the use of x-rays, personnel present in the room must comply with the following rules concerning
protection against ionizing radiation:
•
•
•
•
•
When necessary, use protective shielding against radiation in addition to the shielding already provided
on the unit.
Use protective aprons containing a material equivalent to 0,35mm of lead. Material of this nature
reduces radiation at 50kV by 99,95% and at 100kV by 94,5%.
The best protection against radiation is distance. It is therefore recommended that you stay as far as
possible from the x-ray source and the exposure target. For this purpose, use all of the cable length
provided for the foot-switch.
Avoid walking or standing directly in the x-ray beam.
Always use the smallest possible field of exposure by closing properly the collimator diaphragms. The
scatter dose produced depends principally on the volume of the irradiated object.
Never modif
modifyy or disconnect the safety circuits or devices designed to prevent accidental
exposures.
1.5.
General disposal
Villa Sistemi Medicali produces radiological systems that are advanced in terms of safety and environmental
protection. Assuming that the unit is properly used, there is no risk to people or the environment.
In order to comply with applicable safety requirements, it is necessary to use materials that may be harmful to
the environment (for example: monobloc oil, protective lead, boards and electronic components). Therefore,
where necessary, proper disposal methods, according to the regulations of the country where the unit is
installed, should be followed.
For this reason, the unit may not be d
disposed
isposed of along with industrial or domestic waste and
must be regarded as hazardous waste.
For additional information, contact Villa Sistemi Medicali.
[File: M_30010E00.doc]
Rev.1 - Pag. 3/32
User's Manual - Visitor T15
1.6.
Villa Sistemi Medicali
Application & final destination
This unit is a portable x-ray system aimed to fulfil a wide range of clinical applications; it must be operated
exclusively by qualified, trained personnel who have been informed of the risks linked to the use of ionizing
radiation.
The compactness and maneuverability of the unit enables the operator to navigate through obstacles such as
doors, small rooms, narrow aisles and lifts with ease and allows accurate positioning between patient beds.
The ergonomic design of the unit allows the operator excellent visibility during operation and movement.
The perfectly balanced monobloc arm allows free movement and positioning even in the more awkward
positions. The shape of the base allows easy positioning and handling under the patient beds. The position
and shape of the four antistatic wheels make the system easy to move even on coarse surfaces.
The system does not belong to the category of equipment designed for continuous operation.
The system is not used in direct contact with the patient; however, accidental contact of some unit parts with
the patient
patient and operator is possible.
Contact with the patient is nonnon-invasive.
Contact with the operator is strictly for reasons linked to the use of the equipment (normal operation).
The unit is suitable to be used for x-ray examinations and diagnosis dedicated to:
•
Operating theater
•
Sport medicine
•
Plaster room
•
First aid
•
Pediatrics
•
Orthopaedics
This xx-ray unit must not be used in areas where danger of explosion exists.
1.7.
Interfaceability
The device does not foresee any interaction with medicines; instead it's possible to apply to the unit the
ionization chamber dosimeter as optional (mod. DIAMENTOR PX). It complies with the safety requirements
foreseen by the 93/42/EEC Directive. However, the liability of the interface, if it has not been evaluated and
authorized by Villa Sistemi Medicali in writing, is of the operator and/or the person who has performed the
interface.
1.8.
Classification
Protection against electrical hazards .................. …Class I
Protection against direct and indirect contact...... … Unit, Type B with Type B applied part
Protection against water penetration .................. … Common protection (IPXO)
Use condition protection .................................. … Continuous use with intermittent load
Pag. 4/32- Rev.1
[File: M_30010E00.doc]
Villa Sistemi Medicali
1.9.
Visitor T15 - User's Manual
Compliance
This x-ray unit is in compliance with the electromedical devices Directive 93/42 EEC and with the other
national and international standards in force.
The distributor (according to the European Directive 93/42/EEC) of the unit Visitor T15 is:
Villa Sistemi Medicali
Via delle Azalee, 3
20090 - Buccinasco - (MI) - Italia
Tel: +39-02-48.859.1
Fax: +39-02-48.81.844
E-mail: [email protected]
Information concerning the compliance can be required to Villa Sistemi Medicali.
The manufacturer (according to the European Directive 93/42/EEC) of the unit Visitor T15 is:
Technix S.p.A.
Via E. Fermi, 26
24050 Grassobbio, BG - ITALY
Tel: +39 035 33 56 78
Fax: +39 035 33 56 75
1.10.
Copyright
The original release of this manual is in Italian language (file: AD30013I00RXX.doc). For further information,
please refer to the Italian version.
The software contained in the unit belongs to Technix S.p.A. Upon receipt of the unit, the user acquires the
right to use the software in combination with the unit. This right is neither exclusive nor transferable.
Written authorization to Technix S.p.A. is mandatory prior to any modifications for the unit use with functions
other than the ones foreseen.
[File: M_30010E00.doc]
Rev.1 - Pag. 5/32
User's Manual - Visitor T15
Villa Sistemi Medicali
2.
COMPONENT IDENTIFICATION
2.1.
Overview
1.
2.
3.
4.
5.
6.
7.
8.
9.
Monobloc
Goniometer
Monobloc handle
Collimator
Supply cable-winding
Equipotential node
Connector for Potter
X-ray handswitch
Foot brake
10.
11.
12.
13.
14.
15.
16.
17.
Cassette holder
Magneto-thermic switch
Supply cable
Handle for unit movement
Control panel
Arm safety lock for transport
Monobloc support arm
Safety lock for monobloc rotation
Figure 1
2.2.
Collimator
1.
2.
3.
Longitudinal collimation
Extensible meter for focus-skin distance check.
Transversal collimation
4.
5.
Lamp switching ON for the luminous
irradiation field indication
Guides for the accessories positioning (filters
or DAP dosimeter)
4
1
3
2
5
Figure 2
Pag. 6/32- Rev.1
[File: M_30010E00.doc]
Villa Sistemi Medicali
2.3.
Visitor T15 - User's Manual
Control panel
Figure 3
Here is a brief description of the keys function in standard use and the signals meaning.
OFF
Unit OFF.
ON
Unit ON, the green led indicates that the unit is connected to the
mains and supplied.
POTTER
External potter selection, only if the potter is inserted in the proper
connector.
COLLIMATOR
Collimator lamp ON.
(the lighting is timed for about 30s)
POWER
HIGH or LOW POWER selection. The led ON indicates the HIGH
POWER selection.
MENU
Allows scrolling through pages in systems with more than one page.
[File: M_30010E00.doc]
Rev.1 - Pag. 7/32
User's Manual - Visitor T15
Villa Sistemi Medicali
kV+ kV-
mAs+ mAs-
RESET
F#
2.4.
To modify KV value
To modify mAs value
Return to the main menu.
Function keys: F1, F2, F3, F4
They refer to the display line number (4 lines display).
READY
ON when the unit is ready for radiography.
X-RAY
When this led is ON there is x-ray emission
Audible signals
Here is the list of the most important audible signals:
2 BEEPS
Storage ok
3 BEEPS
Exposure ok
A LONG BEEP
Pag. 8/32- Rev.1
Alarm, malfunction
[File: M_30010E00.doc]
Villa Sistemi Medicali
2.5.
Visitor T15 - User's Manual
Signals and error messages
The unit foresees three types of alarm that can appear on the display:
•
•
•
Warnings
Errors
Fatal Errors
(WARN)
(ERR)
(FERR)
Warnings (WARN)
When this alarm appears, after taking the proper precautions, it is enough to press RESET on the control
panel to go on to work with the same modes set. In order to interpret the alarm, refer to the tables indicated
successively.
Errors (ERR)
When this alarm appears, after taking the proper precautions, it is enough to press RESET on the control
panel to go on to work with the same modes set. In order to interpret the alarm, refer to the tables indicated
successively. This type of alarm always leaves a trace, in fact the unit stores information about the error (date,
time, kV and mAs) so that the service intervention is made easier.
Fatal Error (FERR)
(FERR)
This alarm does not allow operations to continue on the unit. It’s necessary to switch the unit OFF. This type
of alarm always leaves a trace, in fact the unit stores information about the error (date, time, kV and mAs) so
that the service intervention is made easier.
For the unit operator
Every signal is displayed and appears in the language according to the unit configuration (“ITA”, “ENG”,
“FRE”, “GER”, “SPA”)
WARNING SIGNAL
ERR o r
MANUA L
6 3
FATAL ERROR SIGNAL
WA R N
FATA L
ERROR
4
The display shows error or warning messages on
the first line, whilst the other lines show the unit
status.
In this condition press “RESET” on the keyboard
(see Figure 3) to go on to work with the same set
modes.
The display shows the error message on the first
line, whilst the other lines are blank.
In this condition it is necessary to turn the unit off,
wait for some minutes, turn the unit on again and
repeat the operations performed previously.
If the same error appears again, it is necessary to
stop the unit use and call Service.
In order to interpret the unit messages, refer to the following pages.
[File: M_30010E00.doc]
Rev.1 - Pag. 9/32
User's Manual - Visitor T15
3.
Villa Sistemi Medicali
MESSAGES ON THE DISPLAY
F = fatal error
W = alarm
S = unit status
Text
READY
BUSY
MANUAL
CLOCK OFF
F
POWER FAULT
Charger or Chopper error
Energy not available
F
V3 FAULT
Absence of V3 power supply
W
W
RESET APR
APR OUT OF RANGE
W
TUBE SEASONING
F
FILAMENT
W
HOT TUBE
F
V2 FAULT
F
STARTER INTERLOCK
F
CHOPPER FAULT
W
TIME OUT
F
LACK OF X-RAY
F
MAX TIME
F
DATA ERR.
W
MAN STOP RX
F
INVERTER KV ERROR
F
F
F
INVERTER OVERLOAD
INVERTER FAULT
ERR. TUBE CALIB.
F
HAND SWITCH ERR
W
DAP INACTIVE
-
MAX DOSE
APR checksum error
An APR value is out of range
After a long idle period (3 months or more)
it is necessary to proceed with the x-ray Press RESET to proceed, call Service
tube seasoning in order to avoid severe for the tube seasoning
damages
Turn off, wait for some minutes, turn
Absence of filament current
on and if the error appears again,
call Service
The monobloc temperature has achieved
Wait for the monobloc cooling
the max. allowed value
Turn off, wait for some minutes, turn
Absence of V2 power supply in the set mA
on and if the error appears again,
and kV circuit
call Service
Press RESET to proceed and repeat
Error during the start time
exposure
Chopper error
Press RESET to proceed, repeat x-rays
The x-ray handswitch has been pressed at Release the handswitch and repeat
the 1st step for more than 15 secs.
radiography
kV don't reach the 75% of the set value
Press RESET to proceed and repeat
within the first 10ms of exposure or lack of
exposure
x-rays.
The max. exposure time has been achieved Press RESET to proceed and repeat
(2s)
exposure
Turn off, wait for some minutes, turn
Memory error, data checksum error
on and if the error appears again,
call Service
The x-ray handswitch has been released
Press RESET to proceed
before the end of exposure
During x-ray emission kV decrease under
75% or increase over 110% of the set
Press RESET and repeat exposure
value or the H.V. circuit has unbalanced
during exposure
Inverter power out of range
Press RESET and proceed
IGBT drivers error
Press RESET and proceed
X-ray tube calibration error
Call Service
Check the x-ray handswitch integrity,
turn off and on again the unit, then
Faulty x-ray handswitch
try again. If the error appears again,
call Service
The dosimeter is not connected
The doses meter has reached the
Press F1+RESET to reset the value
max.value that can be displayed
The dosimeter is ready
The dosimeter is connected, but in fault
Press RESET and call Service
The sum of the product-area doses have
been reset
S
W
Dosimeter
S
S
S
W
-
Pag. 10/32- Rev.1
DAP READY
DAP ERROR
DAP RESET
Meaning
The unit is ready to perform an exposure
Preparation phase
System clock error
[File: M_30010E00.doc]
Action
Wait for “READY” message
Press RESET to proceed
Turn off, wait for some minutes, turn
on and if the error appears again,
call Service
Turn off, wait for some minutes, turn
on and if the error appears again,
call Service
Press RESET to proceed
Set differently the parameters
Villa Sistemi Medicali
Visitor T15 - User's Manual
The table below shows all the messages and signals in the five languages that can be set.
English (GB)
Italian (I)
French (F)
German (D)
Spanish (ES)
ENG
ITA
FRE
SPA
CLOCK OFF
ERR.OROLOGIO
CHRONO DEF.
POWER FAULT
POTENZA GUASTA
BAT.DEFECT.
FALLO ACUMUL.
V3 FAULT
ERRORE V3
V3 DEFECT.
RESET APR
INI.APR
INI.APR
GER
TAKTGEBER
DEFEKT
STROMVERSORG.
DEF
V3 DEFEKT
APR-DATEN
DEFEKT
ERRORE IN APR
APR DEFECT.
APR-WERT FALSCH
FALLO APR
TIME OUT
READY
BUSY
FORM.DEL TUBO
FILAMENTO
TUBO CALDO
ERRORE V2
STARTER
BLOCCATO
CHOPPER
GUASTO
TEMPO SCADUTO
PRONTO
ATTESA
FORM. DU TUBE
FILAMENT
TUBE CHAUD
V2 DEFECT.
BLOCAGE
DEMARREUR
HACHEUR
DEFECT.
TEMPS EXPIRE
PRET
ATTENDRE
LACK OF X-RAY
ERRORE RAGGI
FAUTE RAYON
MAX TIME
DATA ERR.
TEMPO MAX
ERR. DATI
TEMPS MAX
FAULE DE VALEUR
MAN STOP RX
STOP MANUALE
STOP MANUAL
INVERTER KV ERR.
ERR.KV INVERTER
INVERTER
OVERLOAD
SOVRACCARICO
INV.
INVERTER FAULT
ERRORE INVERTER
ERR.TUBE CALIBR.
ERR. CALIB.TUBO
CALIB.DEFECT.
MANUAL
HAND SWITCH
ERR
INACTIV
ACTIV
NOT OK
MAXDOSE
MANUALE
MANUAL
APR OUT OF
RANGE
TUBE SEASONING
FILAMENT
HOT TUBE
V2 FAULT
STARTER
INTERLOOK
CHOPPER FAULT
ERR.PULSANTE RX
INATTIV
ATTIVO
NON OK
MAXDOSE
TRANSF.KV
DEFECT
TRANSF.SURCHAR
GE
TRANSF.DEFECTUE
USE
[File: M_30010E00.doc]
FALLO V3
INI.APR
RÖHRE ENFAHREN AJUSTE DEL TUBO
HEIZKREIS-FEHLER
FILAMENTO
RÖHRE HEISS
TEMPER.
V2 DEFEKT
FALLO V2
BLOQUEO
ANLAUF-FEHLER
CEBADOR
CHOPPER-FEHLER
FALLO PULSADOR
PREP ZU LANG
BEREIT
WARTEN
KEINE
STRAHLUNG
MAX EXP ERREICHT
DATEN-FEHLER
EXP
UNDERBROCHEN
WANDLER KV
FEHLER
WANDLER
ÜBERLAST
FUERA TIEMPO
LISTO
ESPERA
WANDLER FEHLER
RÖHRE
KALIBRIEREN
MANUELL
BOUTON DEFECT. HANDSCHALT.DEF
INACTIF
ACTIF
NON OK
MAXDOSE
FALLO RELOJ
INAKTIV
AKTIV
NOT OK
MAXDOSE
SIN RADIACION
TIEMPO MAX
FALLO DATO
INTERRUP.
MANUAL
FALLO KV TRANSF
SOBRECARGA
TRANSF
FALLO TRANSF
FALLO CALIB.
MANUAL
FALLO MANDO
INACTIV
ACTIV
NO OK
MAXDOSE
Rev.1 - Pag. 11/32
User's Manual - Visitor T15
Villa Sistemi Medicali
4.
FUNCTIONING
4.1.
Transport
For the transport of the unit, consider the following instructions:
•
•
•
•
•
•
•
•
The unit must be OFF, the supply plug must be removed from the socket outlet and the cable
wound. (See Par. 4.6 “Shutdown procedure”).
Place the monobloc - collimator group vertically and activate its rotation safety lock (see Figure 4).
Pull the safety knob and rotate it till it is taken out (see Figure 5).
Move downwards the arm by using the handles and by keeping in vertical position the monobloccollimator group; when the parking position is reached (see Figure 6) rotate and engage the safety
lock.
Release the parking brake (see Figure 7 and Figure 8)
Move the unit by using only the proper handles for the transport.
Don't move the unit on surfaces with inclination higher than 10°.
In order to overtake obstacles, it is possible to use the handle placed on the column.
Figure 4
Movements of the monobloc collimator group
Pag. 12/32- Rev.1
Figure 5
Safety knob
Figure 6
Parking position
Figure 7
Figure 8
pos.1: deactivated brake
pos.2: activated brake
[File: M_30010E00.doc]
Villa Sistemi Medicali
4.2.
Visitor T15 - User's Manual
Positioning
For positioning the unit the following instructions should be considered:
Don't move the unit when the brakes are activated. For the movements use the proper handles.
•
•
•
•
•
•
•
•
Pull the safety knob and turn it till it is taken out (see Figure 5).
For adjusting and positioning the arm height use the handle on the monobloc. (see Figure 8).
Position the monobloc-collimator assembly over the relevant area of the patient (see Figure 10 Figure 11).
Turn the unit ON (see the paragraph “4.4 “Start up and checks at the ignition”)
Turn the collimator lamp ON (the lamp will stay on for about 30secs).
Collimate the x-ray beam to the dimension of the cassette (see the next paragraph)
If necessary, release the brake to perform this operation (don't forget to set it again!).
When the positioning has been completed, lock all the movements braking handles and the
parking brake.
Figure 9
Figure 10
[File: M_30010E00.doc]
Figure 11
Rev.1 - Pag. 13/32
User's Manual - Visitor T15
4.3.
Villa Sistemi Medicali
Collimator adjustment
1.
On the frontal panel of the collimator, there are two knobs for the beam adjustment (width and
length) as well as the push-button to turn ON the collimator lamp (see Figure 12). It is possible to turn
the lamp ON by pressing the COLLIMATOR push-button placed on the control panel.
Figure 12
The extensible meter allows to measure with accuracy the focus-film distance (FFD).
2.
If necessary, rotate the collimator (see Figure 13).
Figure 13
Pag. 14/32- Rev.1
[File: M_30010E00.doc]
Villa Sistemi Medicali
4.4.
Visitor T15 - User's Manual
Start up and checks at the ignition
1.
2.
Connect the unit to the mains. Voltage presence is indicated by the lightening ON of the yellow led
placed aside the ON button. If, while it is plugged, the red light is off, check that the automatic switch
lever, placed aside the unit, is up (ON position)
Turn the unit ON, pressing the ON button, follow step by step the Start up phase and verify its
performance by the following comparison:
•
check of the display: every digit is completely ON (every pixel is dark);
•
check of leds and beepers: all the leds of the keyboard turn ON and the beeper emits a
prolonged sound;
software version:
•
without dosimeter
UN I T N AME
VER X . XX . XX
with dosimeter
XXXXXXXX
UN I T N AME
VER X . XX . XX
>>>>>>>>>>>>>>>>>>
DAP
XXXXXXXX can have the following values:
READY: the reading of the chamber is enabled and it works properly
ERROR: the reading of the chamber is enabled but it does not work properly, it is not present or it is not
connected.
INACTIVE: status displayed after ERROR signal and after pressing the key RESET.
If the DAP is accepted to the test, the writing READY appears and the system goes on.
If it is not accepted, the writing ERROR appears and the audible error alarm is activated.
At this point it is necessary that the operator intervenes; by pressing the key RESET it is possible to go on
with the start up of the unit by indicating DAP INACTIVE.
•
phase of capacitors battery charge:
Start Up: on the unit it is possible to set the radiological data, including the APR, but it is not possible to
perform an exposure till the writing “READY” appears on the display
BUSY
MANUA L
6 3
1.
4
When the Start up is finished, the writing “READY” will appear on the display, the unit is ready for
use.
RE A D Y
MANUA L
6 3
4
If it does not occur, it is probable that the unit is faulty or that there are some malfunctions, contact the
authorized service personnel.
[File: M_30010E00.doc]
Rev.2 - Pag. 15/32
User's Manual - Visitor T15
4.5.
Exposures
4.5.1.
Operative procedure
Villa Sistemi Medicali
Set the exposure data by following the operative procedure here below.
IGNITION & START UP
Press RESET to return
to MANUAL MODE
MANUAL MODE
R E ADY
MANU A L
63
4
Upon ignition the unit is in MANUAL MODE
Adjust the radiological
parameters by pressing kV
+/- and mAs +/- keys.
Press the key DOSE to
disable the reduction dose
function.
PRESS X-RAY HANDSWITCH TO
PERFORM EXPOSURES
Press MENU to
proceed to APR
MODE
ANATOMIC PROGRAMMED MODE (APR)
S K U L L / A B D OM E N
1 / 4
T ho r a x a p
S k u l l
d Ce r v i c a l
S p i n e
The first line shows the name of the exams group, the
others show the 1st page of the exams of that group.
Every group is composed by 6 exams, press MENU to
shift to the 2nd page.
S K U L L / A B D OM E N
1 / 4
c L umb a r S p i n e a p
A b d ome n a p
P e l v i s a p
Press F1 to shift to the next group.
U P P E R E X T R EM I T .
S hou l d e r a p
C l a v i c l e
d Hume r u s / e l b ow
Press F2, F3 or F4 to
select the proper
program
2 / 4
Press F2 to return to
APR menu
PROGRAM DISPLAY
R E ADY
P ED I A T R I CS
I n f a n t
L u n g 1 . 5 k g
60
0 . 4
1st line: reserved to messages
2nd line: selected group
3rd line: program name
4th line: radiological parameters (kV & mAs)
The modification of some x-ray parameters in
respect of the stored values is indicated by the
asterisk (*) placed near the program name (3rd
line).
To store new values it is necessary to press F3 and
MENU at the same time.
Pag. 16/32- Rev.1
[File: M_30010E00.doc]
Villa Sistemi Medicali
4.5.2.
Visitor T15 - User's Manual
Programs for the Anatomical programming mode (APR MODE)
Here is a table with the APR default values. Consider that they are valid by placing the x-ray tube with a SID
(Source-Image receptor Distance) of 100 cm without grid.
In case of cassettes with grid it is necessary to increase the mAs values by four increments.
Folder
Part of Body
Thorax ap
1/4
Skull
SKULL /
ABDOMEN Cervical Spine
Lumbar Spine ap
Abdomen ap
Pelvis ap
Shoulder ap
2/4
Clavicle
UPPER
Humerus/elbow
EXTREMITIES
Forearm
Wrist
Hand ap
kV
85
78
66
78
85
77
66
66
60
52
48
46
mAs SC [DIN]1
3.2
200
5.0
400
6.3
400
6.3
400
5.0
400
3.2
400
16.0
200
10.0
200
4.0
200
3.2
200
2.5
200
2.5
200
Cartella
Part of Body
Hip/Femur
3/4
Knee
LOWER
EXTREMITIES Lower Leg
Ankle
Calcaneus
Foot
Thorax 1.0 Kg
4/4
Thorax 2.0 Kg
CHILDREN
Thorax 4.0 Kg
Added Filter
Thorax 6.0 Kg
1mmAl +
Thorax 8.0 Kg
0,2mmCu 2
Thorax 10 Kg
kV
74
66
60
55
52
48
60
62
72
74
76
76
mAs SC [DIN]1
5.0
400
4.0
200
4.0
200
4.0
200
3.2
200
2.0
200
0.2
400
0.4
400
0.4
400
0.4
400
0.4
400
0.63
400
Here is the list of the APR programs and groups names in the five settable languages.
APR Groups and programs
English (GB)
Italian (I)
French (F)
German (D)
Spanish (ES)
SKULL/ABDOMEN
Thorax ap
Skull
Cervical Spine
Lumbar Spine ap
Abdomen ap
Pelvis ap
UPPER EXTREMIT.
Shoulder ap
Clavicle
Humerus/elbow
Forearm
Wrist
Hand ap
LOWER EXTREMIT.
Hip/Femur
Knee
Lower Leg
Ankle
Calcaneus
Foot
CHILDREN
Thorax 1.0 Kg
Thorax 2.0 Kg
Thorax 4.0 Kg
Thorax 6.0 Kg
Thorax 8.0 Kg
Thorax 10 Kg
CRANIO/ADDOME
Torace ap
Cranio
Spina Dorsale
Spina Lombare
Addome ap
Bacino ap
ESTREMITÁ SUP.
Spalla ap
Clavicola
Omero/Gomito
Avambraccio
Polso
Mano ap
ESTREMITÁ INF.
Fianco/Femore
Ginocchio
Gamba inf.
Anca
Calcagno
Piede
BAMBINI
Torace 1.0 Kg
Torace 2.0 Kg
Torace 4.0 Kg
Torace 6.0 Kg
Torace 8.0 Kg
Torace 10 Kg
CRANE/ABDOMEN
Thorax ap
Crane
Col.Cervical
Col.Lumbaire
Abdomen ap
Bassin ap
EXTREMITES SUP.
Epaule ap
Clavicule
Humerus/Coude
Bras inf.
Poignet
Main ap
EXTREMITES INF.
Hanche/Femur
Genou
Jamb inf.
Art.Tibio Tors.
Calcaneum
Pied
ENFANTS
Thorax 1.0 Kg
Thorax 2.0 Kg
Thorax 4.0 Kg
Thorax 6.0 Kg
Thorax 8.0 Kg
Thorax 10 Kg
SCHÄDEL/ABDOMEN
Thorax ap
Schädel
HWS
LWS ap
Abdomen ap
Becken ap
OBERE EXTREMIT.
Schulter ap
Schluesselbein
OA/Ellenbogen
Unterarn
Handgelenk
Hand ap
UNTERE EXTREMIT.
Huefte/OS
Knie
US
Fussgelenk
Fersenbein
Fuss
KINDER
Thorax 1.0 Kg
Thorax 2.0 Kg
Thorax 4.0 Kg
Thorax 6.0 Kg
Thorax 8.0 Kg
Thorax 10 Kg
CRANEO/ABDOMEN
Thorax ap
Craneo
Vertebras Cerv.
Vertebras Lumb.
Abdomen ap
Pelvis ap
EXTREM. SUPERIOR
Hombro
Clavicula
Humero/Codo
Antebrazo
Muneca
Mano ap
EXTREM. INFERIOR
Coxal/Femur
Rodilla
Pierna inf.
Tobillo
Calcaneus
Pie
NINOS
Thorax 1.0 Kg
Thorax 2.0 Kg
Thorax 4.0 Kg
Thorax 6.0 Kg
Thorax 8.0 Kg
Thorax 10 Kg
1 SC is the sensitivity class. According to DIN 6867-10, a class 400 film/screen system (SC=400) can cover a sensitivity range
of Smin=320 DIN to Smax=560 DIN. From the derived dose value Ks the tolerance for S will be approx. ±30%.
2 The filter combination of 1 mmAl + 0,1 mmCu is also permissible
[File: M_30010E00.doc]
Rev.2 - Pag. 17/32
User's Manual - Visitor T15
4.5.3.
Villa Sistemi Medicali
Perform an exposure
Before performing an exposure, make sure that all the necessary precautions against radiation
have been taken.
After a long idle period (3 months or more) it is very important to proceed with the XX-RAY TUBE
SEASONING. It is necessary to avoid high voltage discharges that could be destructive for the XXray tube. The seasoning procedure is described in the Service Manual.
•
•
•
•
•
Keep away as much as possible from the x-ray
source
If on the display "READY" appears and the READY
led is ON, the exposure can be controlled.
The emission control is made up of a two-steps
switch.
1°step: preparation (about 1 s)
2°step: exposure control
It is possible to press the exposure control at once
(second step). Then there is a delay of about 1.2
s before the real exposure.
Hold the x-ray control down till the exposure has
been performed properly (3 beeps).
1° step “prep”
2° step “rad”
Figure 14
The x-ray handswitch activates both the x-ray preparation phase “prep” and the emission phase “rad”. The
Figure 14 shows how to operate the handswitch to activate the preparation and the emission phases. It is not
possible to activate the emission phase “rad” without preparation; however, it is possible to perform
preparation without activating the emission.
The most frequent alarms during the use of the x-ray handswitch are the following:
1.
2.
4.5.4.
TIME OUT – The x-ray handswitch has been pressed at the “1st step” (preparation) for more than 15s. In order
to perform radiography, it is necessary to release the handswitch and repeat the procedure.
MAN STOP RX – The x-ray handswitch has been released before the end of exposure. In this case, the display
will show the radiological data obtained. In order to repeat the exposure, it is necessary to press RESET.
Useful information
•
•
•
•
•
Pag. 18/32- Rev.1
Only if the display shows the writing “READY” and the READY led is ON, it is possible to
perform an exposure.
The 1st line of the display shows the use messages and the error signals.
The 4th line of the display shows the radiological parameters.
After every exposure, the 4th line shows the radiological parameters and, in the middle, the
exposure time.
While shifting from APR MODE (Anatomical programming) to the MANUAL MODE,
radiological parameters do not change.
[File: M_30010E00.doc]
Villa Sistemi Medicali
4.5.5.
Visitor T15 - User's Manual
Optional: dosimeter (DAPmeter)
The unit can be supplied, on request, with a ionizing chamber dosimeter (dose-area product meter, DAP
meter) installed. The DAPmeter function is to measure the dose-area product [cGgcm2] in output towards the
patient.
The device that can be installed is type PTW-Freiburg DIAMENTOR PX - T11020-00011.
Only authorized service personnel can perform the installation and the maintenance of the dosimeter.
If DAPmeter has been installed and it works properly, the first line of the display shows alternatively the
measures summation and the measurement unit [cGycm2]:
READY
0 0 0 0 0 . 0
READY
c G y cm2
The measures summation is the sum of all the dose-area products read by the chamber. By pressing
F1+RESET, the value resets.
n
∑ dosei ⋅ areai
i =1
“n” is the number of exposures performed after the last time that F1+RESET has been pressed.
In order to determine the correct Dose Area Product to which the patient has been exposed, it is necessary to
press F1+RESET before performing any exposures.
The possible measuring range is included between 00000.0cGycm2 and 99999.9cGycm2. When the
measures summation exceeds 99999.9cGycm2, the message “MAXDOSE” will appear. The presence of this
message does not exclude the possibility to perform exposures.
[File: M_30010E00.doc]
Rev.1 - Pag. 19/32
User's Manual - Visitor T15
4.5.6.
Villa Sistemi Medicali
Optional: Radiography with examination table and Potter Bucky grid
The examination
examination table or the Potter Bucky that can be connected to the unit must be according
to the Medical Devices Directive EEC 93/42.
After positioning the cassette and the patient, follow these instructions:
1.
connect the Potter Bucky grid or the table for the examination to the socket outlet placed on the
frontal unit part;
2. press the push-button for the Potter Bucky selection, if the potter works properly the led of the key
turns on;
3. place monobloc and collimator, set the exposure field as shown previously;
4. lock the parking brake;
5. select manually the values of kV and mAs or in APR mode, by choosing the data about the
examination that you need to perform;
6. pick up the x-ray handswitch;
7. keep away at least 2m from the x-ray tube;
8. press and hold down the handswitch in "prep" position for the preparation (about 1.2s);
9. press the x-ray handswitch in "rad" position;
10. hold down the x-ray handswitch till the exposure time is finished. The end of the exposure is
indicated by three Beeps emitted by the audible signal of the unit.
Note: occasionally when the potter grid has been selected “non consent to proceed” may appear, in this case
check the connection.
Note: it is possible to press the x-ray handswitch fully ("rad" position) from the beginning. In this case the x-ray
exposure will be performed automatically after the preparation.
4.6.
Shutdown procedure
Ensure unit is switched off before removing the connector from the mains outlet
When finished the examination, do the following:
1.
2.
3.
Turn the unit off by acting on the dedicated button OFF placed on the control console.
Disconnect the cable and wrap it on the wire-wrap.
Place the unit in parking position (lowered, with activated mechanical brakes).
Pag. 20/32- Rev.1
[File: M_30010E00.doc]
Villa Sistemi Medicali
5.
Visitor T15 - User's Manual
MAINTENANCE
Villa Sistemi Medicali can supply, on request, a programmed maintenance plan to be performed on the unit.
5.1.
General Warnings
As with any medical device, this system requires:
•
proper use;
•
regular checks by the user;
•
maintenance and repairs by the authorized personnel.
Operational reliability of the unit is kept by following these precautions.
Villa Sistemi Medicali can provide, on request, circuit drawings, parts list, adjustment instructions or further
information for the unit repair.
As users of xx-ray units it is necessary to take these precautions in compliance with the
prevention standards formulated by the laws concerning the medical equipment.
The unit needs regular checks and maintenances. The purpose of the following warnings is to keep a good
operating and safety level.
The unit includes mechanical parts that are subjected to wear during normal use of the equipment. After a
long period of use, it is possible that the safety of the system may decrease due to the parts wear.
Regular checks and maintenance are necessary to protect the patient and the operator from damage as a
result of the breakage of any mechanical parts..
The correct adjustment of the electro-mechanical and electronic modules is essential, as this has a direct
influence on the unit operation, the image quality, the electrical safety and the exposure level of radiation to
which the medical personnel and patients are subjected
The maintenance plan includes checks and prevention measures to be done by expressly authorized
personnel and at the unit owner's charge.
In the replacement of any parts that can affect the units safe operation, use only original spare
parts.
5.2.
Checks and inspection by th
the
e user
The user must check the x-ray unit as indicated in the table below. In the event of operational faults or other
deviations in respect of the standard operative behaviour, the user must turn off the unit. The unit may only be
operated after repairs have been made.
If a faulty or malfunctioning unit is used, risks to the operators and patients can increase.
Daily:
Weekly:
Every 6 months:
Yearly:
Summary of the periodical checks
Check the functionality of alarms, displays and indicators.
Check the warning and danger labels integrity.
Check for oil leakage from the monobloc.
Check unusual noises in the monobloc during x-ray emission
Check the x-ray tube and collimator centering
Check the brakes and the directional handle functionality.
Contact the technical after-sale service to perform the constancy and
reproducibility tests, as indicated by IEC 1223-2 and IEC 1223-11 standards,
as well as the other operating tests of the unit, as instructed in the programmed
maintenance plan. (see Service Manual).
[File: M_30010E00.doc]
Rev.1 - Pag. 21/32
User's Manual - Visitor T15
5.3.
Villa Sistemi Medicali
Cleaning
Please take the following information into consideration before choosing a detergent:
•
To clean plastic surfaces, simply use water and soap, and nothing else. If other detergents are used (e.g.
with a high alcoholic content, or corrosive solvents, or abrasive detergents), the material will tend to
break or opacify.
•
To clean enameled parts and aluminium surfaces, simply rub them with a wet cloth and a delicate
detergent, after that rub them with a dry wool cloth.
•
As regards, chromium-plated surfaces, only rub them using dry wool clothes; do not use any detergent.
•
To clean the other surfaces of the equipment, never use highly alcoholic products, corrosive or abrasive
detergents and solvents
Before cleaning the unit,
unit, please take the following actions:
•
Turn off the unit and unplug the mains power supply cable.
•
Ensure that no liquid seeps into the unit, so as to avoid shortshort-circuiting or corroding the electrical and
electromechanical parts.
parts
5.4.
Disinfection
To disinfect the equipment it’s advisable to use a common liquid solution featuring an aldehyde base or
disinfectants featuring an ampholytic surface-active agent base (e.g. Tego 103, Korsolin).
Substitute disinfectants releasing chlorine or based on phenols are likely to weaken the materials, hence they
are much to be avoided. The same limitations apply to undiluted solutions featuring a high alcoholic content.
Do not use disinfectant spray; it might penetrate the system, and its safety would not be guaranteed any
longer (damages possibly affecting electrical and electromechanical parts, formation of flammable air
mixtures and vapor solutions).
In cases where there is a danger that disinfection products may form inflammable or explosive
gaseous mixtures, always ensure that such gases have dispersed before rere-using the
equipment.
Pag. 22/32- Rev.1
[File: M_30010E00.doc]
Villa Sistemi Medicali
Visitor T15 - User's Manual
6.
TECHNICAL DATA
6.1.
Electrical data
Description
Voltage
Data
115/230Vac ±10% standard monophase with automatic unit prearrangement in
function of the mains (plug & play).
Frequency
50/60Hz standard
Absorbed current
Values of current absorbed by the unit in the different operative conditions and in
the two power supply values:
Operative condition
115 Vac / 50Hz 230 Vac / 50Hz
Charger On
5,5 AMAX
3,4AMAX
Stand By
0,87A
0,58A
Stand By + Collimator Lamp
2,3A
1,5A
Stand By + Charger On
5,1A
3,0A
Stand By + Collimator Lamp + Charger On
6,7A
3,8A
Preparation
4,3A
5,5A
Preparation + Collimator Lamp
5,5A
7,3A
X-ray emission + Collimator Lamp
3APK
3APK
Line compensation
Automatic
Line resistance
<1Ω @115/230Vac
Standard socket outlet
16A @230Vac
Isolation class
Class I with applied parts type B
Use conditions
Continuous functioning with intermitting load
The unit is not suitable to the use where danger of inflammable mixtures with air or nitrous oxide exists.
6.2.
Functioning features
Description
User’s interface
Settable languages
Radiography control
Safeties
Data
Keyboard with LCD alphanumeric display, 4 lines X 20 characters for all the
operative parameters and messages of possible faulty status.
Service program for faults finding.
Microprocessor management.
Italian, English, French, German, Spanish, through configuration program
By handswitch with extendible cable. It is proposed the use of the last kV
value used in manual mode or APR.
Upon the ignition, the unit is in manual mode with default values.
Filament current
Monobloc temperature
Overload
Max kV or H.V. fault
Stored data check
Microcontroller auto test
[File: M_30010E00.doc]
Rev.1 - Pag. 23/32
User's Manual - Visitor T15
6.3.
Villa Sistemi Medicali
Radiological data
Characteristic
Working technique
APR anatomic program
Exposure control
Power reduction
Generator power in DC current
Inverter frequency
Max. inverter frquency in high voltage
Max.ripple
Rise time
mA variation range @115/230Vac
mAs variation range @115/230Vac
Range times @115/230Vac
kV Range
mA Range @115/230Vac
mAs value in function of kV @115/230Vac
Pag. 24/32- Rev.1
Performances
2 points technique with kV and mAs setting
24 exams memorization (4 programs each of 6 exams)
available in the 5 different selectable languages.
Constant kV and mA during the whole exposure
It can be selected of L.P. (50%) or H.P. (100%)
15kW @100kV
20kHz
40kHz
<2% @100kV
<2ms @100kV
40 ÷ 200 mA automatically associated to kV
0.2 ÷ 200 mAs in 61 steps with increases of 12,5%
0.002 ÷ 2s in function of the set mAs and dose select.
40 ÷ 125kVp in step of 1kV
mA
mAs>0,63
mAs<0,63
kV
(t<100ms) (t>100ms)
MODE
MODE1
MODE 1/2
1/2
40
200
100
100
50
200
100
100
60
190
95
95
70
180
90
90
80
170
85
85
90
160
80
80
100
160
80
80
110
130
65
65
120
110
55
55
125
120
50
50
0,2 ÷ 200mAs in 61 steps with increases of 12,5%
mAs
kV
40
0,2 ÷ 200
0,2 ÷ 180
41 ÷ 45
0,2 ÷ 160
46 ÷ 52
0,2 ÷ 140
53 ÷ 62
0,2 ÷ 125
63 ÷ 72
0,2 ÷ 100
73 ÷ 92
0,2 ÷ 80
93 ÷ 112
0,2 ÷ 71
113 ÷ 125
[File: M_30010E00.doc]
Villa Sistemi Medicali
6.4.
Environmental data
Description
Temperature
Relative humidity
Pressure
6.5.
Visitor T15 - User's Manual
Normal use
From +10°C to +40°C
From 30% to 75% non condensing
From 700 to 1060hPa
Transport and storage
From -25°C to +70°C
From 10% to 90% non condensing
From 500 to 1060hPa
Mechanical data
Description
Weight
Max. width
Length in transport position
Max. height in transport position
Max. height with the arm at the max. extension
Control panel height
Focus-floor distance
Arm rotation around the vertical axis
Monobloc rotation around the arm axis
Monobloc rotation around its axis
Max. height of the front unit leg
Cassette holder
Movement
Wheels diameter
Data
approx.185 Kg (408 Lb)
700mm (27,56in.)
1338mm (52,68in.)
1458mm (57,40in.)
2258mm (88,90in.)
1000mm (39,37in.)
456 ÷ 2018mm (17,95 ÷ 79,45in.)
n.a.
±180°
151° (+133° ÷ -18° in respect of the vertical axis)
105mm (4,13in.)
5 cassettes format 35 x 43cm (12x15in.)
Manual.
Double front swiveling wheel.
Parking brake
Handle for tilting (obstacles overcoming)
Rear:
wheel Ø250mm (9,84in.) width 50mm (1,97in.)
Front:
double wheel Ø 80mm (3,15in.) width 22mm (0,87in.)
[File: M_30010E00.doc]
Rev.1 - Pag. 25/32
User's Manual - Visitor T15
6.5.1.
Villa Sistemi Medicali
Unit sizes
Figure 15
Pag. 26/32- Rev.1
[File: M_30010E00.doc]
Villa Sistemi Medicali
6.6.
Components specifications
6.6.1.
Generator
Visitor T15 - User's Manual
Description
Inverter
Working frequency
Max. inverter frquency in high voltage
Power supply
Dimensions
Max. absorbed current
Technology
Safeties
Generator power in constant DC current (IEC 601-1)
Data
IHF 2015
20kHz max
40kHz
350Vdc max
190x130x140 mm (7,48x5,12x5,51 in.)
50A
IGBT
overcurrent
overvoltage
IGBT driver fault
15kW
Max. voltage to the tube
Max. ripple at 100kVp
Rise time at 100kVp
Max. current in radiography
125kVp
<2%
<2 ms
200mA
(150mA @ 100kV per 0.1s)
[File: M_30010E00.doc]
Rev.1 - Pag. 27/32
User's Manual - Visitor T15
6.6.2.
Villa Sistemi Medicali
TubeTube-Housing Assembly
X-Ray Tube
Description
Type
Nominal anode power (IEC 613, EN 60613)
Nominal foci size (IEC 336, EN 60336)
Speed of rotation
Anode diameter
Anode material
Anode angle
Min. inherent filtration (IEC 522)
Thermal anode capacity
Max. continuous anode dissipation
Max. anode cooling speed
Nominal high-voltage
Max. filament current
Data
X22 0.8/1.3
16kW/32kW
0.8mm – 1.3 mm
2850 rpm @ 50Hz
64mm (2,52in.)
Tungsten
15°
0.7mmAl eq.
80kJ (107kHU)
300W
22kJ/min (29.5kHU/min)
130kV
5.4A
Tube seasoning
After a long idle period (3 months or more), it is necessary to proceed to the X-RAY TUBE SEASONING. The
procedure and the tube seasoning modes are described in the Service Manual.
Dimensions
Heating and cooling curves of anode
Stored energy (kJ) / Time (min)
Energia Accumulata - Stored Energy - Energie Emmagas
(kJ)
80
800 W
500 W
70
300 W
60
200 W
50
100 W
40
30
20
10
0
0
5
10
15
Tempo - Time - Temps (min)
Figure 16
Figure 17
Single load curves
0.8 - 3~ - 3000min-1
Anodic current (mA) / Exposure Time (s)
Single load curves
1.3 - 3~ - 3000min-1
Anodic current (mA) / Exposure Time (s)
700
300
250
50 kV
60 kV
70 kV
80 kV
90 kV
100 kV
110 kV
120 kV
130 kV
200
150
100
50
0
0.01
0.1
1
10
Corrente Anodica - Tube Current - Intensit Anodique
(mA)
Corrente Anodica - Tube Current - Intensité Anodiqu
(mA)
350
600
500
400
300
200
100
0
0.01
0.1
1
Tempo di esposizione - Time - Temps (sec)
Tempo di esposizione - Time - Temps (sec)
Figure 19
Figure 18
Pag. 28/32- Rev.1
50 kV
60 kV
70 kV
80 kV
90 kV
100 kV
110 kV
120 kV
130 kV
[File: M_30010E00.doc]
10
Villa Sistemi Medicali
Visitor T15 - User's Manual
Monobloc
Description
Monobloc
Weight
Dimensions
X-ray tube
Anode
External thermostat
Thermal monobloc capacity
Max continuous thermal dissipation of monobloc
Total filtration
Leakage radiation
Loading, heating and cooling curves
H.V. transformer insulation
Data
MHF 2015
19 Kg (41,89Lb)
320x140x255mm (12,60x5,51x10,04in.)
X22 0.8/1.3 (Large focus not used)
Rotating (2850rpm at 50Hz)(3400rpm at 60Hz)
57°
600kJ (800kHU)
55W
2.7mm Al
<1mGy/h according to IEC 601-1-3
See the enclosed diagrams
Oil bath
Dimensions
Figure 20
Heating and cooling curves of monobloc
Stored energy (kJ) / Time (min)
Figure 21
[File: M_30010E00.doc]
Rev.1 - Pag. 29/32
User's Manual - Visitor T15
6.6.3.
Villa Sistemi Medicali
Collimator
Description
Type, brand and model
Collimator
Light source
X-ray field
Luminous intensity
Contrast ratio
Measurement of focus-film distance
Rotation
Weight
Sizes
Accessories
Max protection against leaked radiation
(EN60601-1-3 par.29.204.3)
Indicator accuracy
(EN60601-1-3 par.29.202.8)
Inherent filtration
(EN60601-1-3 par.29.201.2/29.201.6)
Light field accuracy
(EN60601-1-3 par.29.202.9)
Classification EN60601-1 par.5
Protection against electrical hazards
Protection against direct and indirect contacts
Protection against water penetration
6.6.4.
Data
Manual with internal light source (Ralco R221)
Square field, multilayers
Halogen Lamp 12V 100W with timed switching-on at
approx. 30s
43x43cm (16,93x16,93in.) at 1m (39,37in.) DFF
160lux at 1m (39,37in.) DFF
4:1
Extractable meter
±115°
8,4kg (18,52Lb)
183x168x256mm (7,20x6,61x10,08in.)
Prearrangement to insert the dosimeter
125kV 4mA
It corresponds to the x-ray fields with tolerance lower than
2% of used FFD
2.0mmAl eq.
It corresponds to the x-ray fields with tolerance lower than
2% of the used FFD.
Class I
Unit with applied part Type B
Common protection (IPXO)
DAP meter (dose(dose-area product meter) (optional)
This device is installed only on request.
Description
Type, brand and model
Measurement unit
Resolution
Dose-area product range
Dose-area product summation range
Max. measuring range
6.7.
Data
Dosimeter with ionization chamber, PTW-Freiburg
DIAMENTOR PX - T11020-00011
cGycm2
0.1cGycm2
0.3 ÷ 15000 cGycm2
00000.0 ÷ 99999.9cGycm2
118mm x 118mm (4,65x4,65in.)
Accessories and options
Description
X-ray handswitch with extendible cable
Ionization chamber dosimeter, mod. DIAMENTOR PX
6.8.
Compliance with Directives and Technical Standards
Reference
MDD 93/42/EEC
IEC 60601-1
IEC 60601-1-2
IEC 60601-1-3
IEC 60601-2-7 2nd edition
IEC 60601-2-28
IEC 60336
Pag. 30/32- Rev.1
Description
Medical Devices Directive (CE mark)
Medical devices safety
Electromagnetic compatibility
Protection against ionizing radiation
High voltage generators
Tube – housing groups
X-ray tubes focus
[File: M_30010E00.doc]
Standard
Optional
Villa Sistemi Medicali
Visitor T15 - User's Manual
6.9.
Labels and symbols
6.9.1.
Labels of the unit
unit label
external monobloc label
collimator label
inverter label
Figure 22
[File: M_30010E00.doc]
Rev.1 - Pag. 31/32
User's Manual - Visitor T15
6.9.2.
Villa Sistemi Medicali
Internal symbols
Protective ground clamp
Dangerous voltage
Precautionary warning
6.9.3.
Various symbols
Unit OFF
Unit Type B
Unit ON
Total filtration
Ionizing radiation
Alternate voltage
Large focus
Equipotential node
Small focus
6.9.4.
Packing label
It is stuck outside the packing with red writings on white background.
Fragile
Pag. 32/32- Rev.1
Protect from rain
Upper edge of the
packing
[File: M_30010E00.doc]
Document status
Visitor T15 – User's Manual
DOCUMENT STATUS
Rev.
Date
Pages
Modification description
0
26.08.03
-
1
14.01.04
all
Documents general revision.
2
26.03.04
17
Performed modification of the APR values in the unit software.
Document approval
3
4
5
[File: M_30010E00R02.doc]
Pag. I/I