1
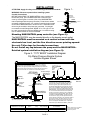
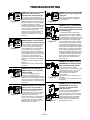
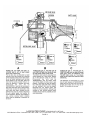
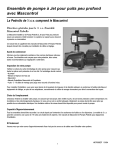
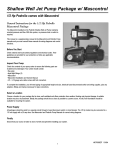
Bulletin 1-SK50BOSS1/SK75BOSS125 (32 PSI) Effective FEB 2014 INSTALLATION, OPERATING AND SERVICE MANUAL CITY BOSS™ RESIDENTIAL CITY WATER PRESSURE BOOSTER SYSTEM CITY BOSS™ is a city water pressure booster system utilizing the MASCONTROL® pump controller and a single stage pressure booster pump. The pump controller monitors both flow and pressure, controlling the operation of the pump automatically. The system maintains constant boosted water pressure during operation. No pressure tank or switch required. No adjustment or maintenance is needed. CAREFULLY READ THE LITERATURE PROVIDED BEFORE INSTALLATION! Familiarize yourself with the specific details regarding installation and use. Leave this manual with the system for future reference. LANCASTER PUMP RECOMMENDS A QUALIFIED PROFESSIONAL TO INSTALL THIS SYSTEM. INSPECT THE SYSTEM COMPONENTS: Occasionally, products are damaged during shipment. If a component is damaged, contact the transportation company or your dealer. Save the product’s packing materials until the claim is settled. The system package includes pump, pump controller, and rubber grommets. For systems utilizing 1¼ MNPT pump controller, pipe fittings are included to connect pump to pump controller. SAFETY INSTRUCTIONS 1. WARNING – HIGH PRESSURE. The pump can boost to high pressure. Verify the incoming water pressure BEFORE installing the booster system. Make sure the incoming water pressure plus the pressure boost developed by the pump is a SAFE psi for the application’s piping and fixtures. If required, a pressure reducing valve can be installed in line after the booster system to reduce water pressure to a safe level. A pressure relief valve piped to a suitable drain is recommended for overall system protection. Never install or service the pump or system without relieving the internal pressure. 2. WARNING – HAZARDOUS VOLTAGE. Voltage can shock, burn or cause death. Install, ground and wire pump and controller according to local and national electrical code requirements that apply. The pump’s single phase motor is equipped with automatic resetting thermal protection. The motor may re-start unexpectedly causing the leads to energize or pump to turn. DISCONNECT ELECTRICAL POWER SUPPLY BEFORE INSTALLING OR SERVICING THE PUMP. Capacitor voltage may be hazardous. To discharge motor capacitor, hold insulated handle screwdriver (BY THE HANDLE) and short the capacitor terminals together. Do not touch metal screwdriver blade or capacitor terminals. 3. Install the water pressure booster system according to all plumbing code requirements. 4. Pump only water with this system. Pump can be severely damaged if run dry. The pump controller will detect a run-dry condition and shut off the pump. Do not pump water above 120° F, due to internal pump components temperature limitations. Do not allow pump, pump controller, piping or any other system component to freeze. Freezing may damage system, leading to injury or flood. 5. Pipe joint compound can cause cracking in plastics. Use only Teflon tape when sealing threaded plastic pipe or connecting pipe to plastic components such as the pump controller. PAGE 1 PRE-INSTALLATION PREPARATION MAKE SURE YOU HAVE READ THE SAFETY INSTRUCTIONS PRECEEDING THIS SECTION! LOCATION- The water pressure booster system (pump and pump controller) should be installed in any convenient location that provides sufficient space for installation and servicing. A clean, dry basement or utility room to avoid dampness and temperature extremes are excellent choices when allowed by law. Check with state and local agencies to determine restrictions in your area. A pressure relief valve piped to a suitable drain is recommended for overall system protection. PIPE CONNECTIONS- Always follow state and local plumbing codes. Lancaster Pump does not sell or specify pipe types or materials, consult with your pipe supplier to determine the best pipe for your installation. Use Teflon tape on male threads of plastic pipe. Do not use pipe joint compound on plastic piping because it will damage piping (crack) over time. Use minimum ¾” pipe size to the pump inlet. Provide a drain cock at a low point in the service line for draining the system. If the booster system is inactive for any length of time, it is advisable to completely drain the system to prevent freezing. Drain all piping to a point below the freeze line. Remember the pump controller has an internal check valve and will not drain through. Lancaster Pump recommends installing unions or slip couplings on the inlet side of pump and discharge side of pump controller for ease of disconnecting booster system for service or to protect from freezing. ELECTRICAL CONNECTIONS- Wiring to this booster system must be installed and maintained in accordance with both the National Electrical Code and state /local codes. Make sure motor voltage rating matches available power supply. See the motor nameplate. Dual voltage motors have a label on them that identifies the factory pre-wired voltage. If needed, the motor voltage is changed inside the motor cover. See the motor nameplate for instruction. Make sure the breaker or disconnect is OFF before entering the motor cover. CUSTOMER SIDE VOLTAGE CHANGE SWITCH LOCATED INSIDE REAR END OF MUST BE MOUNTED IN ORIENTATION EXACTLYREMOVE AS SHOWN MOTOR. MOTOR COVER TO ACCESS SWITCH. VOLTAGE CONNECTION MUST MATCH POWER SUPPLY VOLTAGE OT. 1/2 MAIN WHT/BLK TRACER L1 SAE PBT 12:00 YELLOW CONNECTION SHOWN FOR 230 V TO CHANGE TO 115 V, SLIDE SWITCH UP TO SHOW L2 PURPLE 115 TERMINAL BOARD ASSEMBLY BLACK START CAPACITOR Properly sized copper wire from service to pump controller willAUX avoid over-heating wire and excessive voltage drop at the RED RED motor. Pump controller should be connected to a separate branch circuit with no other appliances on it. Consult dealer or WHT/BLK TRACER electrician. 1/2 MAIN YELLOW ORANGE 3 MOTOR SIDE BLUE WHITE BLUE 1 2 PURPLE BLACK ORANGE BLUE 3 2 1 L2 PURPLE 1/2 MAIN WHITE YELLOW L1 B66763094 X RED BLUE WHITE 3:00 BLACK BLUE 4 5 6 K WHT/BLK L1 1/2 MAIN LINE YELLOW LINE START SWITCH BLUE 6:00 ROTATION: CW LEAD END AUX WHITE REVISION DESCRIPTION FOR: WHITE SCALE UNITS TOLERANCES ON DIMENSIONS (UNLESS OTHERWISE SPECIFIED) STARTING SWITCH (MOTOR SIDE) MATERIAL: NIDEC CONFIDENTIAL NIDEC MOTOR CORPORATION 20-Sep-13 MUST BE COMPLIANT TO RoHS DIRECTIVE EU 2002/95/IEC AND REGULATION EC 1907/2006 (REACH) AS AMENDED INCHES mm REV. A TITLE NIDEC MOTOR CORPORATION ISSUED BY CODE ANGLES X°= ±1° J L2 PAGE 2 DWG NO. APPROVED BY REVISION DATE REV A SHEET NUMBER 1 OF DWG SIZE 2 B SOLIDEDGE HOW IT WORKS UNDERSTAND THE SYSTEMS MAJOR COMPONENTS AND THEIR FUNCTIONS… BOOSTER PUMP- The pump increases water pressure using an impeller located inside the pump body. The impeller rotates with the motor shaft, drawing water into its center opening. Water exiting the impeller goes to discharge, entering the pump controller. This pump is NOT intended to lift water from a well. Well pumps require a nozzle/venturi device, known as an injector or jet. The booster pump included in the CITY BOSS system is not fitted with an injector. The pump is only meant to boost incoming city water pressure. MASCONTROL- The MASCONTROL pump controller operates the pump within the pressure range of city supply pressure or 32 psi (whichever is greater) to the maximum operating pressure of the “CITY BOSS” system (city supply pressure PLUS pump pressure boost). The MASCONTROL pump controller allows the booster pump to provide constant boosted water pressure during operation to the service piping, unlike the 20 psi differential “cyclic” pressure provided by a conventional pressure tank and switch system. The MASCONTROL pump controller is equipped with an internal check valve, spring-loaded diaphragm pressure switch and a stainless steel flow switch. After the “CITY BOSS” pressure booster system is installed and the start-up procedure is completed, the service piping will be pressurized to the maximum operating pressure. When a service tap is opened, service pressure will drop very quickly... MASCONTROL has a factory calibrated non-adjustable 32 psi re-start pressure as indicated on the rear of the device. If city supply pressure is less than 32 psi: MASCONTROL’s internal pressure switch will start the booster pump when service pressure drops to 32 psi. If city supply pressure is greater than 32 psi: MASCONTROL’s internal flow switch will start the booster pump when service pressure drops to city supply pressure. MASCONTROL will keep the booster pump running to provide constant boosted water pressure until all service taps are closed. After the service taps are closed, MASCONTROL will continue running the booster pump for approximately 8 seconds before shutting off, to avoid “quick cycling”. The “CITY BOSS” booster system is on “standby” until water is again demanded at the service tap. If all service taps are closed and the booster pump does not shut off after approximately 8 seconds, the MASCONTROL’s internal flow switch may be detecting leakage in the service piping greater than 0.21 GPM (the value of the minimum flow below which the flow switch stops the booster pump). MASCONTROL will protect the booster pump from damage if the city supply piping to the booster pump inlet is dry or blocked. MASCONTROL will detect irregular city water supply conditions and shut off the booster pump. The red Failure light will be on. After the problem is corrected, the user needs only to press and hold the red Restart button for 3 to 5 seconds (with a service tap opened) to restore normal operation. If power is lost, MASCONTROL will reset and restart automatically when power is restored. MASCONTROL is not adjustable and does not require maintenance. Note: Maximum operating pressure (city supply pressure PLUS pump pressure boost) at close-off (service taps closed) cannot be less than 55 psi. Note: The column of water between MASCONTROL and the highest service tap must NOT EXCEED 70 feet. If the column of water above MASCONTROL exceeds 70 feet, reposition MASCONTROL higher so the water column is less than 70 feet. MOTOR- The booster pump’s motor is a single phase, capacitor start, open drip proof type with a 14/3 SJTW cord set attached for connection to the pump controller. The motor bearings are permanently lubricated, therefore no maintenance is required. The motor is a dual voltage design utilizing a “voltage selector switch” in its rear housing. Use this switch to match the motor voltage setting with the power supply line voltage. OPTIONAL PRESSURE REDUCING VALVE (PRV)- Not supplied with “CITY BOSS”. Install PRV in-line after the pressure booster system if city supply pressure PLUS pump pressure boost exceeds SAFE service pressure. Follow PRV manufacturer’s instructions regarding installation and adjustment. If PRV adjustment is necessary, Lancaster Pump suggests this is done accurately with the use of a pressure gauge while the booster pump is running with only the closest service tap open, allowing only 2 to 3 GPM flow. See page 4, Figure 2. OPTIONAL PRESSURE TANK- Not supplied with “CITY BOSS”. Install pressure tank in-line after the pressure booster system if reducing the amount of pump start-ups is desired. Use of a small pressure tank (a.k.a. expansion tank) can SUBSTANTIALLY DELAY the pump start-up. For suggested tank size and air pre-charge, see page 4, Figure 2. Note: Many local plumbing codes mandate backflow prevention. The MASCONTROL pump controller has a built-in check valve also. Thermal expansion can cause pressure buildup in the closed hot water system, causing relief valves to open. Follow all local plumbing codes regarding use of an expansion tank. PAGE 3 INSTALLATION Figure 1 ATTENTION: Apply all safety rules dictated by professional standards. WARNING: Disconnect power before installing system. Conduit Connections: Ball valve BEFORE MOUNTING THE MASCONTROL pump controller on for system maintenance the booster pump, open the MASCONTROL's electronic box cover by removing the six screws (refer to the MASCONTROL LEVEL Flow arrows manual packaged with the pump controller). Press the two rubber MASCONTROL pump controller Electronic box grommets (supplied) into the 1/2" conduit connection holes located on the side of MASCONTROL's electronic box. A flat blade screwNO driver may be needed to help insert the grommets. "Liquid-tight" non-metallic conduit fittings rated "NEMA 12" or "UL type 12" can be used (not supplied) to achieve NEMA type 12 enclosure rating. Booster Pump Use of metallic conduit is not recommended. Mounting MASCONTROL pump controller (see Figure 1): The MASCONTROL may be mounted directly on the booster pump's outlet. MASCONTROL must be mounted on a vertical column with the electronic box level, and the flow direction arrows pointing upward. Use only Teflon tape for threaded connections. Do not install any tap between the pump and the MASCONTROL. Detailed system installation diagram (see Figure 2): Figure 2 - "CITY BOSS" Installation Diagram City Water Pressure Booster System Isolation Bypass Shown OPTIONAL Pressure Reducing ValveInstall a PRV if incoming city pressure PLUS pump's maximum pressure boost exceeds SAFE service pressure. If city pressure flucuates, use highest pressure reading and add pump's maximum pressure boost (see chart below) to arrive at total service pressure. Follow all local codes on maximum in-house water pressure. OPTIONAL OPTIONAL Pressure GaugeTotal Service Pressure Pressure Reducing Valve Pressure Tank and Relief Valve Isolating Ball Valve Pressure Gauge City Pressure Ball valve for system maintenance Union MASCONTROL Pump Controller Union Minimum 3/4" pipe size city main to pump inlet Check Valve Minimum incoming city pressure REQUIRED for CITY BOSS 16 PSI 12 PSI Booster Pump CITY BOSS System Booster MASCONTROL = Pump + Pump Controller 1-SK50BOSS1 = 1-SK50 + 1-BOSS1 1-SK75BOSS125 = 1-SK75 + 1-BOSS125 4 PAGE 4 OPTIONAL Pressure Tank and Relief ValveCITY BOSS provides "on demand" pump control. To prevent the pump from starting for small water uses such as ice makers, glasses of water, etc., install a 2.0 gallon gross volume pressure tank AFTER the MASCONTROL and pressure reducing valve (if one is installed). Adjust the pressure tank air pre-charge to minimum 28 PSI (slightly below the MASCONTROL 32 PSI calibrated re-start pressure); do not exceed 20 PSI below total service pressure (as set by the pressure reducing valve, if installed). The tank will "feed" small demands. When the tank is emptied, the MASCONTROL will start the pump and continue to supply constant pressure and flow until the demand is stopped. The small tank will NOT cause pump cycling. On larger homes (3 or more bathrooms) a 4.6 gallon gross volume tank may be used. Pre-charge as described above. A pressure relief valve may be added as dictated by local code. CITY BOSS Maximum Pressure Boost (at 0 GPM flow) 39 PSI 43 PSI To Service Note: Remember that incoming city pressure plus CITY BOSS pressure boost equals service pressure. Wiring the system: Make sure you have read and understand the SAFETY INSTRUCTIONS concerning HAZARDOUS VOLTAGE and the ELECTRICAL CONNECTIONS portion of the PRE INSTALLATION section in this manual before proceeding! Refer to Figures 3 & 4 for wiring diagrams. Replace MASCONTROL's electronic box cover, using the six screws, upon completion of wiring the system. If cover is not securely fastened, RESTART button will not operate. Figure 3 - 115VAC Single Phase Wiring Diagram Figure 4 - 230VAC Single Phase Wiring Diagram 5 PAGE 5 START-UP AND OPERATION After the booster system has been installed by following this manual’s installation instructions and diagrams, the city water supply can be released into the booster system, filling the pump and MASCONTROL pump controller, etc. with water. If a bypass line was also installed around the booster system, the isolation valve should now be closed (refer to Figure 2). BEFORE turning the power supply ON to the MASCONTROL pump controller, open the faucet closest to the booster system so air can escape from the system. After air has escaped the system and a steady flow of water occurs, close faucet. When the booster system is first installed, all indicator lights on the MASCONTROL panel are off (see Figure 5). NOW turn the power supply ON to the MASCONTROL. Indicator lights will illuminate and pump will run (see Figure 6). Re-open faucet. If the faucet is not open within approximately 8 seconds, the MASCONTROL will simply shut off the pump. Re-open faucet in any case. The green POWER ON light indicates the presence of power in the MASCONTROL, the yellow PUMP ON light indicates that the pump is running (see Figure 7). After the faucet is closed, the pump will shut off after approximately 8 seconds and the MASCONTROL will go to the “stand by” mode with POWER ON light illuminated (see Figure 8). The CITY BOSS water pressure booster system is correctly installed and ready to operate automatically. Using the RESTART Button: If water does not enter the pump and MASCONTROL, the red FAILURE light will illuminate and the MASCONTROL will shut-off the pump within 20-30 seconds. This is the run-dry protection feature, preventing damage to the pumps internal components. See Figure 9. After the water supply problem is corrected (is a check valve installed backwards? - did you open valve to allow city water into booster system?), the RESTART button must be depressed and held in for a suitable length of time to allow pump to pressurize system, thus overriding the run-dry protection feature. Do not override the circuit and run the pump until water supply is confirmed and no pump inlet line obstructions exist. Figure 5 Figure 6 Figure 7 Figure 8 Figure 9 TROUBLE SHOOTING NOTE: The pump’s single phase motor is equipped with automatic resetting thermal protection. Constant “cutting-out” of this overload device indicates a problem such as low voltage at the motor, excessive temperature in a pump house, etc. This protection is separate and independent of the “MASCONTROL” pump controller. The motor may re-start unexpectedly causing the leads to energize or pump to turn. WARNING- DISCONNECT ELECTRICAL POWER SUPPLY BEFORE SERVICING THE SYSTEM. WARNING- RELIEVE INTERNAL WATER PRESSURE BEFORE SERVICING THE SYSTEM. Although the “MASCONTROL” pump controller can be used with jet pumps on well systems, the CITY BOSS pressure booster system pump provided is NOT intended to be used for wells. The booster pump provided is meant to boost city water pressure. PAGE 6 TROUBLESHOOTING Low PSI Figure 10 Low PSI Figure 11 Figure 12 Low PSI Figure 13 POWER ON, PUMP ON and FAILURE lights all off. Tap opened, no pressure boost, pump off (Fig.10). Power supply is on but no lights are lit. Turn off power supply to the Mascontrol and remove the electronic box cover. Check all electrical connections to be certain they are tightly fastened to the proper terminals for the voltage needed (115V or 230V). Refer to the schematic in the electronic box. If all electrical connections are secure and correct, test electrical terminals with meter to ensure power is present at all terminals. If power is at the terminals, the electronic box has failed and must be replaced (power must be on to unit to test terminals). POWER ON and FAILURE light on, PUMP ON light is off. Tap opened, no pressure boost, pump off (Fig.11) The unit has detected one of the following: 1. Loss of suction - check water supply. 2. Blockage in pipe from water supply to pump and Mascontrol - remove blockage. 3. If a pump has a thermal protection switch, check to make sure the switch has not been tripped by the pump. If pump has been switched off due to the thermal switch, check pump for proper operation and condition and reset thermal switch. Press restart button on Mascontrol. Pump should start up. 4. The pump capacitor has failed or is not adequate. 5. Electronic box failed - replace box (rare occurrence). POWER ON and FAILURE light on, PUMP ON light is off. Tap closed, pump off (Fig.12). 1. Pump cannot attain at least 55 psi (incoming psi + boost) at close-off check pump pressure reading with pressure gauge. Pump must be able to attain at least 55 psi to work properly with Mascontrol unit. 2. Electronic box failure - replace box (rare occurrence). POWER ON, PUMP ON and FAILURE lights are all on. Tap opened, no pressure boost, pump off (Fig.13). The tap is open and the pump is not operating. Check the wiring in the electronic box to make sure all wires are securely fastened to the proper terminals. Also recheck voltage for correct application (115V or 230V). Press the restart button. If all lights remain on and the pump still does not operate, the electronic box has failed and should be replaced. 7 PAGE 7 Figure 14 POWER ON, PUMP ON and FAILURE lights are all on. Tap closed, pump on (Fig.14). The pump is operating and all taps are closed, the electronic box has failed and must be replaced. POWER ON light on, FAILURE light off and PUMP ON light short cycles on and off. Tap closed, pump cycles on and off (Fig.15). Figure 15 1. Leakage less than 0.21 gpm may be present in piping. The higher the leakage rate (but less than 0.21 gpm) the faster the pump cycles. Make sure all taps are closed and all toilet valves are functioning properly. After tap inspection check all piping and valves connected to the system for leakage. To help determine leak location, close the shut-off valve after the Mascontrol. If pump cycling stops, leak is located after the Mascontrol in the water supply. Shut off power to Mascontrol and locate and fix leak. Restore power to Mascontrol (Mascontrol will start the pump automatically) and monitor system to determine that leak has been corrected. 2. If pump cycling still occurs after closing the shut-off valve behind Mascontrol, the bottom check valve is obstructed from closing properly. POWER ON and PUMP ON light on, FAILURE light off. All taps closed, pump runs continuously (Fig.16). Figure 16 Figure 17 1. The condition may be similar to condition 1 (Fig.15) above but leak flow rate is greater than 0.21 gpm. In this case the leak simulates an open tap condition. Follow instructions for condition 1, figure 15 above. 2. The top flow valve to the Mascontrol is obstructed. 3. The electronic box has failed and should be replaced. POWER ON light on, PUMP ON and FAILURE light off. Tap open, no flow or no pressure boost, pump off (Fig.17). The column of water between Mascontrol and the highest tap exceeds 70 feet, therefore the column of water has created a pressure higher than the cut-in pressure of Mascontrol (32 psi). This prevents the unit from working properly. Reposition Mascontrol higher so the water column height is less than 70 feet. LANCASTER PUMP A DIVISION OF C-B TOOL 1340 Manheim Pike • Lancaster PA 17601-3196 • Tel: 717-397-3521 • Fax: 717-392-0266 • www.lancasterpump.com PAGE 8