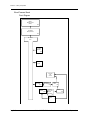
1
Scholar® III
Model 507ELC2
Service Manual
Cat. No. 1408
Date 07/05
Part No. 39154B101
Revision 2
Copyright
COPYRIGHT © CRITICARE SYSTEMS, INC., 2004--2005
CRITICARE SYSTEMS, INC. (Criticare) owns all rights to this unpublished work
and intends to maintain this work as confidential. Criticare may also seek to
maintain this work as an unpublished copyright. This publication is to be used solely for
the purposes of reference, operation, maintenance, or repair of Criticare equipment.
No part of this publication may be reproduced in any manner or disseminated for
other purposes.
In the event of inadvertent or deliberate publication, Criticare intends to enforce its
rights to this work under copyright laws as a published work. Those having access
to this work may not copy, use, or disclose the information in this work unless
expressly authorized by Criticare to do so.
All product specifications, as well as information contained in this publication, are
subject to change without notice.
All information contained in this publication is believed to be correct. Criticare
Systems, Inc., shall not be liable for errors contained herein nor for incidental or
consequential damages in connection with the furnishing, performance, or use of
this material.
This publication may refer to information and products protected by copyrights or
patents and does not convey any license under the patent rights of Criticare
Systems, Inc., nor the rights of others. Criticare Systems, Inc., does not assume
any liability arising out of any infringements of patents or other rights of third
parties.
PROPERTY OF CRITICARE SYSTEMS, INC.
ALL RIGHTS RESERVED
Scholar® III, DOX™ Digital Oximetry, ComfortCuff™ NIBP and Multi-Site™ SpO2
Sensors are trademarks of Criticare Systems, Inc.
Page ii
Scholar® III 507ELC2 Service Manual
Criticare Systems, Inc.
Contents
Copyright................................................................................................................ ii
Contents................................................................................................................ iii
Warranty............................................................................................................... vii
Service Return Policy.......................................................................................... viii
EC Declaration of Conformity................................................................................ ix
Section 1 - Introduction
Description .................................................................................................................... 1-1
Intended Use................................................................................................................. 1-1
Pulse Oximetry Measurement (SpO2)........................................................................... 1-2
Definition ............................................................................................................ 1-2
DOX™ Digital Oximetry ..................................................................................... 1-2
Method ............................................................................................................... 1-2
SpO2 Clinical Testing and Accuracy .................................................................. 1-3
Heart Rate..................................................................................................................... 1-3
ECG Measurement ....................................................................................................... 1-4
Method ............................................................................................................... 1-4
Stability of Accuracy........................................................................................... 1-4
Respiration.................................................................................................................... 1-4
Non-Invasive Blood Pressure (NIBP)............................................................................ 1-5
Comfort Cuff™ Technology................................................................................ 1-5
Description of NIBP Measurement..................................................................... 1-5
NIBP Clinical Testing and Accuracy................................................................... 1-5
Cuff Inflation and Pressure Protection ............................................................... 1-6
Temperature Measurement .......................................................................................... 1-7
Specifications................................................................................................................ 1-8
Symbols ...................................................................................................................... 1-11
Safety.......................................................................................................................... 1-12
Leakage Current .............................................................................................. 1-12
Voltage Fluctuations......................................................................................... 1-12
Software Error Related Hazard Mediation ....................................................... 1-13
Potential Interference ....................................................................................... 1-13
Use of Anesthetics ........................................................................................... 1-13
Biocompatibility ................................................................................................ 1-13
Latex Content................................................................................................... 1-13
Section 2 - Service Interface
Service Mode ................................................................................................................ 2-1
Self Tests ........................................................................................................... 2-1
System Checks .................................................................................................. 2-1
Criticare Systems, Inc.
Scholar® III 507ELC2 Series Service Manual
Page iii
Section 3 - Theory of Operation
General.......................................................................................................................... 3-1
Main Board .................................................................................................................... 3-1
Microprocessor Circuitry..................................................................................... 3-1
Power Management/Watchdog Circuit ............................................................... 3-1
LCD Controller.................................................................................................... 3-1
LED Drivers ........................................................................................................ 3-1
Keypad Interface ................................................................................................ 3-1
NIBP Module Interface ....................................................................................... 3-2
External RS-232 Serial Data Port....................................................................... 3-2
Analog Output Interface...................................................................................... 3-2
Internal Recorder................................................................................................ 3-2
Speaker Control.................................................................................................. 3-2
Power Management ........................................................................................... 3-3
Software Design: Main Board............................................................................. 3-3
System Drivers ................................................................................................... 3-3
External Service Tools .................................................................................................. 3-4
Main Board Software Upgrade ........................................................................... 3-4
NIBP Module Software Upgrade ........................................................................ 3-4
NIBP Module Service Tool ................................................................................. 3-4
Power Supply ................................................................................................................ 3-5
ECG............................................................................................................................... 3-6
Non-Invasive Blood Pressure........................................................................................ 3-6
SpO2 Board ................................................................................................................... 3-6
Temperature.................................................................................................................. 3-6
Impedance Respiration ................................................................................................. 3-6
Block Diagrams ............................................................................................................. 3-7
System Level Block Diagram.............................................................................. 3-7
Hardware Block Diagram.................................................................................... 3-8
Main Board, Display Board, and SpO2 Board Circuit Diagram........................... 3-9
Blood Pressure Board Circuit Diagram............................................................. 3-10
Block Diagram ............................................................................................................. 3-11
Section 4 - Cleaning and Disinfecting
Cleaning and Disinfecting.............................................................................................. 4-1
Pulse Oximeter Sensors..................................................................................... 4-1
Blood Pressure Cuffs.......................................................................................... 4-1
ECG Cable ......................................................................................................... 4-2
Temperature Cable............................................................................................. 4-2
Accidental Wetting......................................................................................................... 4-3
Section 5 - Preventative Maintenance
Incoming Inspection ...................................................................................................... 5-1
Maintenance Schedule.................................................................................................. 5-1
Monitor Safety Testing .................................................................................................. 5-2
Equipment and Tools.......................................................................................... 5-3
Accessory Testing .............................................................................................. 5-3
Battery Safety................................................................................................................ 5-4
Battery Replacement..................................................................................................... 5-4
Removing the Battery ......................................................................................... 5-4
Installing the New Battery................................................................................... 5-5
Battery Maintenance ..................................................................................................... 5-5
Long-term Storage ........................................................................................................ 5-5
Disposal......................................................................................................................... 5-5
Page iv
Scholar® III 507ELC2 Series Service Manual
Criticare Systems, Inc.
Electrical Safety Testing ............................................................................................... 5-6
Scholar III Withstanding Voltage Hi-Pot Test ..................................................... 5-6
Equipment Needed ............................................................................................ 5-6
Hi-Pot Performance............................................................................................ 5-6
Leakage ............................................................................................................. 5-8
Functional Testing....................................................................................................... 5-11
Interface Inspection.......................................................................................... 5-11
Manual Controls Check.................................................................................... 5-11
Alarms Verification ........................................................................................... 5-13
Vital Sign Modules Verification ................................................................................... 5-14
ECG Verification............................................................................................... 5-14
Oximeter (SpO2) Verification............................................................................ 5-16
NIBP Verification .............................................................................................. 5-17
Temperature Verification.................................................................................. 5-18
Printer Testing............................................................................................................. 5-18
Scholar III Final Test Check Sheet ............................................................................. 5-19
Section 6 - Service Testing and Calibration
Field Service Testing Safety ......................................................................................... 6-1
Field Service Test Matrix .............................................................................................. 6-2
Equipment Required ..................................................................................................... 6-3
NIBP Calibration ........................................................................................................... 6-5
NIBP Module Setup............................................................................................ 6-6
Calibration for Analog Output........................................................................................ 6-8
Power Supply Performance .......................................................................................... 6-9
Charger Operation ............................................................................................. 6-9
Verify Centered ECG Baseline........................................................................... 6-9
Verify Low Battery ............................................................................................ 6-10
Verify Shut off................................................................................................... 6-10
Display Check .................................................................................................. 6-10
Check DB-9 Connector for Telemetry Compatibility ........................................ 6-10
Set Time and Date ........................................................................................... 6-10
Mechnical Inspection .................................................................................................. 6-11
Section 7 - Disassembly
General Caution............................................................................................................ 7-1
Battery Replacement .................................................................................................... 7-2
Battery Removal................................................................................................. 7-2
Battery Installation.............................................................................................. 7-3
Main Board Replacement ............................................................................................. 7-4
Main Board Removal.......................................................................................... 7-4
Main Board Installation....................................................................................... 7-8
Recorder/Printer Replacement ..................................................................................... 7-9
Recorder/Printer Removal.................................................................................. 7-9
Recorder/Printer Installation............................................................................. 7-11
Loudspeaker Replacement ......................................................................................... 7-13
Loudspeaker Removal ..................................................................................... 7-13
Loudspeaker Installation .................................................................................. 7-13
ECG Board Replacement ........................................................................................... 7-14
ECG Board Removal........................................................................................ 7-14
ECG Board Installation..................................................................................... 7-14
Blood Pressure Board Replacement........................................................................... 7-15
Blood Pressure Board Removal....................................................................... 7-15
Blood Pressure Board Installation.................................................................... 7-16
Air Pump Replacement ............................................................................................... 7-17
Air Pump Removal ........................................................................................... 7-17
Air Pump Installation ........................................................................................ 7-19
Criticare Systems, Inc.
Scholar® III 507ELC2 Series Service Manual
Page v
Solenoid Valve Replacement ...................................................................................... 7-20
General............................................................................................................. 7-20
Solenoid Valve Removal .................................................................................. 7-20
Solenoid Valve Installation ...............................................................................7-21
Pressure Switch Replacement .................................................................................... 7-22
Pressure Switch Removal ................................................................................ 7-22
Pressure Switch Installation .............................................................................7-22
Display Interface Board and 7-segment LED Board Replacement ............................. 7-24
Front Bezel Removal ........................................................................................ 7-24
Display Interface Board and 7-segment LED Board Removal ......................... 7-25
Display Interface Board and 7-segment LED Board Installation ...................... 7-26
Keypad Membrane Replacement................................................................................ 7-28
General............................................................................................................. 7-28
Keypad Membrane Removal ............................................................................ 7-28
Keypad Membrane Installation ......................................................................... 7-28
SpO2 Sensor Receptacle ............................................................................................ 7-29
General............................................................................................................. 7-29
Section 8 - Troubleshooting
Troubleshooting Table................................................................................................... 8-1
Troubleshooting and Repair .......................................................................................... 8-2
ComfortCuff NIBP Module............................................................................................. 8-2
ECG/Respiration/Temperature Module ......................................................................... 8-3
Board Settings and Module Software ................................................................. 8-3
Respiration ......................................................................................................... 8-3
Temperature ....................................................................................................... 8-3
DOX SpO2 Module ........................................................................................................ 8-4
Main Board .................................................................................................................... 8-4
CAT 924 Battery Charger.............................................................................................. 8-5
Section 9 - Drawings and Schematics
List of Drawings............................................................................................................. 9-1
Final Assembly .............................................................................................................. 9-2
Front Bezel-Active ......................................................................................................... 9-3
Chassis Assembly ......................................................................................................... 9-4
Main/ECG-Resp-Temp Assembly ................................................................................. 9-5
NIBP Assembly ............................................................................................................. 9-6
NIBP Mounting Base .......................................................................................... 9-6
Printer/Recorder Assembly ........................................................................................... 9-7
Page vi
Scholar® III 507ELC2 Series Service Manual
Criticare Systems, Inc.
Warranty
Workmanship &
Materials
Criticare Systems, Inc. (CSI), warranties new equipment to be free
from defects in workmanship and materials for a period of one (1)
year from date of shipment under normal use and service. The 940
Series Multi-SiteTM Sensor and the 644 O2 Sensor carry a six month
warranty. CSI’s obligation under this warranty is limited to repairing or
replacing, at CSI’s option, any part which upon CSI’s examination
proves defective.
EXCEPT AS DESCRIBED IN THE PARAGRAPH ABOVE, CSI
MAKES NO WARRANTIES, EXPRESS OR IMPLIED, INCLUDING
ANY WARRANTY OF MERCHANTABILITY OR FITNESS FOR A
PARTICULAR PURPOSE.
Exemptions
CSI’s obligation or liability under this warranty does not include any
transportation or other charges or liability for direct, indirect or
consequential damages or delay resulting from the improper use or
application of the product or the substitution upon it of parts or
accessories not approved by CSI or repair by anyone other than a
CSI authorized representative.
This warranty shall not extend to any instrument which has been
subjected to misuse, negligence or accident; any instrument from
which CSI’s original serial number tag or product identification
markings have been altered or removed; or any product of any other
manufacturer.
Safety, Reliability &
Performance
Criticare Systems, Inc., is not responsible for the effects on safety,
reliability and performance of the Scholar III 507ELC2 patient monitor
if: assembly operations, extensions, readjustments, modifications or
repairs are carried out by persons other than those authorized by
Criticare Systems, Inc., or
the Scholar III 507ELC2 patient monitor is not used in accordance
with the instructions for use, or
the electrical installation of the relevant room does not comply with
NFPA 70: National Electric Code or NFPA 99: Standard for Health
Care Facilities (Outside the United States, the relevant room must
comply with all electrical installation regulations mandated by the
local and regional bodies of government).
In Case of Emergency
Contact
CRITICARE SYSTEMS, INC.
20925 Crossroads Circle
Waukesha, WI 53186
USA
Telephone: (262) 798-8282
Tech Support: (800) 458-2697
Orders: (800) 458-4615
Fax: (262) 798-8290
Internet: www.csiusa.com
Criticare Systems, Inc.
Scholar®III 507ELC2 Service Manual
Page vii
Service Return Policy
Return Procedure
In the event that it becomes necessary to return a unit to Criticare
Systems, Inc., the following procedure should be followed:
Obtain return authorization. Contact the CSI Service Department
at 800-458-2697 to obtain a Customer Service Authorization (CSA)
number. (Outside the US, call 001-262-798-8282.) The CSA number
must appear on the outside of the shipping container. Return
shipments will not be accepted if the CSA number is not clearly
visible. Please provide the model number, serial number, and a brief
description of the reason for return.
Freight policy. The customer is responsible for freight charges when
equipment is shipped to CSI for service (this includes customs
charges).
Loaner service. In the U.S.: If it is necessary to provide a loaner
system, CSI will ship a loaner by overnight courier. The loaner system
must be returned to CSI at the customer’s expense within one week
after receipt of the repaired goods. If the unit is not returned to CSI
within that time, the customer will be invoiced for the full purchase
price of the equipment.
Outside the U.S.: No loaners are available from CSI internationally.
Contact your local CSI representative.
Incoming Inspection
The following incoming inspection is required whether it is a first time
arrival or a return from service. Prior to clinical use, inspect the
instrument for the following.
1. The quality inspection seal on the instrument should be
unbroken. This seal indicates that the instrument has been
tested according to manufacturers specifications.
2. No physical damage is observed.
3. The instrument’s battery is to be charged by connecting the
instrument to a power outlet for a minimum of 6 hours prior to
clinical use.
4. When connecting the instrument to a power outlet and then
turning the instrument on, all displays appear to function
correctly and no system errors occur.
If a discrepancy to these inspection items is observed, do not use the
instrument and immediately report the discrepancy to the CSI
Service Department.
Page viii
Scholar®III 507ELC2 Service Manual
Criticare Systems, Inc.
EC Declaration of Conformity
Scholar III 507ELC2
Patient Monitor
To view the Declaration of Conformity, visit the Criticare website at
www.csiusa.com. A copy of the Declaration can also be faxed.
Contact Criticare’s customer service department at (262) 798-8282 to
obtain a faxed copy of the Declaration.
Representative in the
European Union
Frank Henaghan
Criticare Systems Inc.
P.O. Box 48
Heswall
CH616TZ - United Kingdom
Criticare Systems, Inc.
Scholar®III 507ELC2 Service Manual
Frank Henaghan
Fax: 44 151 342 7208
[email protected]
Page ix
Section 1 — Introduction
Description
The Scholar III model 507ELC2 series patient monitors interpret and
display real time physiological data including waveforms and
numerical data. The monitor is designed for multi-parameter
measurements, including ECG, NIBP, SpO2, temperature and
respiration. For all these vital parameters, the 507ELC2 monitor has
limit alarms and alerts. The model 507ELC2 series comes equiped
with a TFT color display. The 507ELC2 monitor also prints strip chart
recordings and stores tabular trends for review. The 507ELC2-EX
does not have print capabilities.
NOTE: All illustrations in this manual are of the Model 507ELC2.
Intended Use
The 507ELC2 series monitor is intended to monitor physiological
parameters of patients within clinical care settings. It is intended that
the user is a professional health care provider. Physiological data,
system alarms, and patient data analysis are available to the care
provider from the monitor.
The user is responsible for the interpretation of the monitored data
that is made available. Physiological data should be reviewed by a
qualified clinical personnel prior to any medical intervention.
Figure 1-1: Model 507ELC2 Vital Signs Monitor
Criticare Systems, Inc.
Scholar® III 507ELC2 Service Manual
Page 1-1
Section 1 —Introduction
Pulse Oximetry
Measurement (SpO2)
The monitor uses Digital Oximetry (DOX™) technology to measure
blood oxygen saturation (SpO2).
Definition Hemoglobin exists in the blood in several forms:
• Oxygenated (Oxyhemoglobin)
• Reduced (Deoxyhemoglobin)
• Dyshemoglobins (carboxyhemoglobin and methemoglobin.)
In the monitor, SpO2 (pulse arterial oxygen saturation) is the ratio of
oxygenated hemoglobin to the sum of oxygenated hemoglobin plus
hemoglobin which is available for binding to oxygen, as expressed in
the following formula:
oxyhemoglobin
percent oxygen saturation = ------------------------------------------------------------------------------------------------------- × 100
oxyhemoglobin + deoxyhemoglobin
Dyshemoglobins, such as carboxyhemoglobin and methemoglobin,
are not directly measured and therefore are not factored into the
measurement.
DOX™ Digital Oximetry The monitor does not use analog circuitry for signal processing.
Digital signal processing in the microprocessor results in lower noise
from circuitry components, resulting in a cleaner signal and better
performance under low perfusion conditions. There is also improved
rejection of noise from the patient and environment, due to the
availability of the “true,” unfiltered sensor signal for digital signal
processing.
Method The digital pulse oximeter measures oxygen saturation and pulse rate
using the principles of spectrophotometry and plethysmography. The
sensor is completely non-invasive, and there is no heat source that
could burn the patient.
The pulse oximeter sensor contains two types of LEDs; each type
emits a specific wavelength of light. Since oxygenated hemoglobin
and deoxygenated hemoglobin absorb light selectively and
predictably, the amounts of these two compounds can be determined
by measuring the intensity of each wavelength that passes through
the measuring site.
The light from the LEDs shines into a pulsating vascular bed. A
photodetector located opposite or alongside the LEDs measures the
intensity of each wavelength transmitted through the monitoring site.
The light intensity is converted to an electrical signal, which is input to
the monitor. The effects of skin pigmentation, venous blood, and
other tissue constituents are eliminated by separating out the
pulsating absorption data.
Page 1-2
Scholar® III 507ELC2 Service Manual
Criticare Systems, Inc.
Section 1 —Introduction
SpO2 Clinical Testing All Criticare oximeters (DOX™ compatible) have SpO2 calibration
and Accuracy tables which were originally generated by monitoring desaturated
human patients or volunteers and matching their displayed SpO2
value to the value determined by sampling arterial blood and
measuring functional SaO2 with a clinical laboratory grade multi
wavelength optical oximeter (i.e. CO-oximeter). The final SpO2
calibration curve was then generated based upon numerous patients'
data over the range of 40 to 99% SaO2. All accepted data were taken
from patients with dyshemoglobin (i.e., carboxyhemoglobin,
methemoglobin) concentrations near zero.
This oximeter is a two-wavelength device, which is calibrated to
measure functional SpO2 only when dyshemoglobin concentrations
are near zero. The accuracy specifications of this device will not be
met with high concentrations of dyshemoglobins. Significant
concentrations of carboxyhemoglobin will result in a higher displayed
SpO2 value than is actually present in the patient.
Heart Rate
The heart rate is determined primarily from the ECG waveform data.
A beat detection algorithm is used to identify QRS beats.
The monitor has a user selectable smart heart rate function. It will
automatically use alternate sources to determine heart rate, if the
primary source becomes unmeasurable. The plethysmograph (SpO2
waveform) is used if the ECG heart rate is unavailable. In the
absence of SpO2 and ECG data, the NIBP oscillometric data is the
final default source for a heart rate measurement.
NOTE: The accurracy of the heart rate depends upon the source. The
range of the measurable NIBP based heart rate will not extend as far
as the range available in other modules used by the smart heart rate
feature.
NOTE: The NIBP based heart rate is not a continuous measurement
and is only current during an NIBP measurement.
Criticare Systems, Inc.
Scholar® III 507ELC2 Service Manual
Page 1-3
Section 1 —Introduction
ECG Measurement
The electrocardiogram (ECG or EKG) records the changing potential
generated by electrical activity of the heart.
Method To obtain an overall view of the heart’s electrical activity three
electrodes are attached to lead wires detecting electrical impulses
from the patient's heart to the skin. The monitor calculates the
difference in electrical force between two electrode sites. Electrode
polarity (positive, negative, or ground) depends on the cable
receptacle the lead wire is attached to and the lead selected on the
monitor screen.
The ECG design uses the standard (conventional bipolar limb leads)
leads I, II, III using a 3-lead cable accessory.
Stability of Accuracy The monitor is equipped with pacemaker detection and user
selectable pacer rejection. There are no known safety hazard due to
the operation of a cardiac pacemaker or other electrical stimulators
when used with this patient monitor.
The accuracy of the monitor is not affected by arrhythmia or other
physiological conditions where the electrocardiogram amplitude and
heart rate are within the detectable limits specified for the monitor.
The monitor has user selectable signal filtering in the 60 Hz and 50
Hz bands that reduce electrical interference from the AC (mains)
power sources. User selectable filters are also available.
Respiration
Respiration can be measured via the ECG electrodes.
When determining respiration from the ECG, the monitor measures
patient respiration by impedance pneumography. As the patient’s
chest changes size and shape during inspiration and expiration, the
resistance between two chest (or abdomen) ECG electrodes
changes. Respiration rate is calculated from this change in
resistance. The monitor uses ECG data from lead I for the impedance
measurement.
Page 1-4
Scholar® III 507ELC2 Service Manual
Criticare Systems, Inc.
Section 1 —Introduction
Non-Invasive Blood
Pressure (NIBP)
Comfort Cuff™
Technology
The monitor uses ComfortCuff™ technology to determine noninvasive blood pressure by means of oscillometry. The oscillometric
method detects volume displacements within the artery and senses
pressure variations within the blood pressure cuff during inflation.
The monitor uses cuffs ranging in size from neonate cuffs to thigh
cuffs.
ComfortCuff technology measures NIBP while the cuff inflates.
Consequently, a measurement is obtained more quickly and with less
discomfort than with monitors, which measure NIBP during cuff
deflation.
Description of NIBP The NIBP cuff begins to inflate at the beginning of the NIBP
Measurement measurement cycle. As the cuff pressure approaches the diastolic
pressure of the patient, the cuff pressure waveform begins to indicate
the pulse waveform. The cuff pressure at this point is equal to the
patient's diastolic pressure, which is stored by the monitor.
As cuff pressure continues to increase, the pulse waveform (as
measured from BP cuff pressure fluctuation) becomes stronger,
reaching its maximum at the patient's mean arterial pressure (i.e.,
when cuff pressure = mean BP). The monitor stores this value as
mean pressure.
As cuff pressure increases further, it approaches the patient's systolic
pressure, and the cuffs pulse waveform decreases in amplitude. The
cuff pulse waveform disappears at the point where cuff pressure is
equal to the patient’s systolic pressure.
When the monitor determines that the cuff waveform has decreased
to zero amplitude, it stores the cuff pressure value as the systolic
pressure, and releases the pressure from the cuff. This typically
occurs at about 10 mmHg over the patient's systolic pressure. The
cuff then rapidly deflates.
NIBP Clinical Testing This device was clinically tested per the requirements of AAMI SP-10
and Accuracy and is compliant with EN1060. The NIBP module as installed in the
507ELC2 monitor has been tested to meet the performace
specifications listed in this manual.
Criticare Systems, Inc.
Scholar® III 507ELC2 Service Manual
Page 1-5
Section 1 —Introduction
Cuff Inflation and The maximum cuff inflation rate is 15 mmHg/sec. The software limits
Pressure Protection inflation to 300 mmHg adult or 150 neonate. A secondary circuit limits
maximum possible cuff pressure to 316 mmHg. Cuff pressure is
allowed to remain above 30 mmHg for a maximum of two minutes.
The monitor automatically deflates the cuff if the time limit is violated.
The monitor contains hardware protection for overpressure
conditions, pressure transducer failures, or microprocessor and pump
control circuit failures.
B.P Cuff Inflation Pressure
(Shown during inflation)
Systolic Pressure
Pressure in mmHg
Actual Blood
Pressure Waveform
Diastolic Pressure
Cuff deflates rapidly
after monitor determines
systolic pressure
Time
Pulse Waveform
(Measured from B.P.
Cuff Pressure
Fluctuation)
Diastolic
Pressure
Mean
Pressure
Systolic
Pressure
Figure 1-2: NIBP Cuff Pressure and Pulse over Time
Page 1-6
Scholar® III 507ELC2 Service Manual
Criticare Systems, Inc.
Section 1 —Introduction
Temperature
Measurement
Body temperature is measured by the monitor using a thermistor
(temperature sensing elements in the temperature probe). The
thermistor can sense change in body temperature by changing
electrical resistance.
• Unusual, fast artificial variations in temperature readings may
occur with accompanying applications of an electrocautery
system.
• Electrical leakage current of the cable when used with the
monitor and sensor comply with IEC 601-1/EN 60601-1.
The monitor is compatible with any YSI-400 series temperature
probe.
Criticare Systems, Inc.
Scholar® III 507ELC2 Service Manual
Page 1-7
Section 1 —Introduction
Specifications
ECG
Connector:
Lead Selection:
Frequency Response:
Sweep Speed:
Electrosurgery Protection:
Defibrillator Protection:
Pacer Rejection:
Standard AAMI
3-Lead; I, II, III
Filter Off; 0.05 - 100 Hz
Filter On; 0.50 - 40 Hz
25, 50 mm/sec
Yes
Yes
Yes
SpO2
Range:
Resolution:
Accuracy:
Indications
Method:
Modes:
Operation:
Sensor Wavelength:
Sensor Power:
1-99%
1%
70-99% range; ± 2%;
50-69% range; ± 3%
<50%; unspecified;
Statistical, represents one st. dev. (~66%)
of clinical samples.
Plethysmograph, Numerical, Audible
(pulse tone pitch varies with SpO2)
Dual wavelength LED
Adult/Neonate
Continuous Use
660nm/905nm
<80mW
Heart Rate
Source:
Range:
Accuracy:
Pulse Tone:
Page 1-8
Smart Switching, Selectable;
ECG(primary), Pleth, NIBP,
30-300 bpm(ECG, Pleth)
30-240 bpm (NIBP)
± 1 bpm or 1%
Selectable, On/Off
Scholar® III 507ELC2 Service Manual
Criticare Systems, Inc.
Section 1 —Introduction
Respiration
Source:
Rate Range:
Resolution:
Accuracy:
Impedance ECG
9 to 150 breaths/minute
1 breath/minute
> of ± 1% or ± 1 breath/minute
NIBP
Technique:
Measurement Time:
Automatic Measurement Cycles:
Inflation Pressure Range:
Resolution:
Accuracy:
STAT mode:
Oscillometric measure upon inflation
<40 seconds average; standard adult cuff
1, 2, 3, 5, 10, 15, 30, 45, 60 min; 2, 4 hrs
Adult; 0 to 300 mmHg
Neonatal; 0 to 150 mmHg
1 mmHg
± 2 mmHg or 2% of reading
5 min of consecutive readings
Range:
Accuracy:
Probe Type:
68° to 113°F, 20° to 45°C
± 0.1°C
YSI-400
Temperature
Alarms
Characteristics:
Indication:
Levels:
Alarm Modes:
Volume:
Silence:
EN 475, Adjustable
Audible; Visual
High, Medium, Low, Informational
Adult/Neonate,
High and low limit settings for each mode.
User Adjustable (1-10)
Yes; 2 minutes or permanent
Trend Reports
Types:
Trend memory:
Tabular Intervals:
Data Types:
Tabular
24 hours
1 , 2, 5, 10, 15, 30, 60 minutes,
2, 4 hours
HR, SpO2, Temp., Resp.,
NIBP (Systolic, Diastolic, Mean)
Recorder (507ELC2 only)
Recorder Type:
Data Formats:
Paper Speed:
Criticare Systems, Inc.
Internal thermal line printer
Single or dual waveform; Tabular
25mm/sec (fixed) Tabular printing;
25 or 50 mm/sec (selectable) Waveform
recording, fixed-length or continuous.
Scholar® III 507ELC2 Service Manual
Page 1-9
Section 1 —Introduction
Controls
Screen:
Resolution:
Wave Slots:
Waveform Display Gain:
Waveform Sweep Speed:
Keys:
Languages:
5.9" passive LCD or active color TFT,
(121mm × 91mm)
320 x 240 pixels
3 (maximum waveforms 2)
0.5×, 1×, 2×, 4× user selectable
25 or 50 mm/sec, selectable
11; membrane-activated
English
System Outputs
Communication Port:
Defibrillation Sync:
RS 232-compatible; digital DB-9
BNC connector
(analog output ±1V range)
Mechanical/Electrical
Weight:
Size:
Voltage (external power supply):
Voltage (monitor):
Battery:
Battery Life:
Recharge time:
8.5 lb; 3.83 kg
7.6" (H) x 10.1" (W) x 10.7" (D)
19cm (H) x 26 cm (W) x 27cm (D)
90 to 260 VAC; 47 to 63 Hz
16V DC
Sealed lead acid
1 hour, typical
6 hours
Environmental
Operating Temperature:
Storage Temperature:
Operating and Storage Humidity:
Type of Protection:
Degree of Protection:
Protection against ingress:
59° - 104°F, 15° - 40°C
23° - 122°F, -5° - 50°C
15% to 90%; non-condensing
Class I Equipment
Type CF, Defibrillator-Proof
IPX1, drip-proof equipment
All specifications are subject to change without notice.
Page 1-10
Scholar® III 507ELC2 Service Manual
Criticare Systems, Inc.
Section 1 —Introduction
Symbols
Symbol
Definition
Refer to Operator’s Manual for Information
European Community Mark
Electrical Testing Laboratories (ETL) Mark
Not For Use with Flammable Anesthetic Gasses
Do not dispose of in municipal waste. Wheeled bin symbol
indicates separate collection for electrical and electronic
equipment. (WEEE Directive 2002/96/EEC)
Type CF Equipment, defib proof
Shock Hazard
Technical Support Phone Number
Non-Invasive Blood Pressure
Temperature Monitoring
Not a Sensor Connection
Definitions for Warning and Caution symbols:
Criticare Systems, Inc.
!
WARNING !
!
CAUTION !
Designates a possible dangerous situation.
Non-observance may lead to death or the most
severe injuries.
Designates a possible dangerous situation.
Non-observance may lead to minor injuries or
damage to the product.
Scholar® III 507ELC2 Service Manual
Page 1-11
Section 1 —Introduction
Safety
!
WARNING !
• Read this manual entirely before attempting clinical use of the
monitor.
• A possible explosion hazard exists! Do not use the monitor in
the presence of flammable anesthetics.
• Cables, cords, and leadwires may present a risk of
entanglement or strangulation! Verify safe and proper
positioning of these items after patient application.
• Unapproved modifications to the monitor may cause unexpected
results and present a hazard to the patient.
• Risk of electrical shock! Do not remove cover. Refer servicing to
qualified personnel.
• U.S. Federal law restricts this device to sale by or on the order
of a physician.
!
CAUTION !
• Use the monitor only with recommended accessories! Use of
unapproved accessories may cause inaccurate readings.
• Equipment accuracy may be affected at extreme temperatures.
• Do not store equipment at extreme temperature. Temperatures
exceeding specified storage temperatures could damage the
system.
• Do not press on the keys with surgical instruments or other
tools. Sharp or hard objects could damage the keys. Use only
your fingertips to press on the keys.
• Changes or modifications not expressly approved by Criticare
Systems, Inc., may void the user's authority to operate the
equipment and may also void the warranty.
Leakage Current The monitor complies with leakage current limits required by medical
safety standards for patient-connected devices. Conforms to EN
60601-1. A hazard caused by the summation of leakage currents is
possible, when several pieces of equipment are interconnected.
Voltage Fluctuations When operated in the line voltage range specified in this manual any
fluctuation will have a negligible effect. Very low line voltage will
cause the monitor to revert to battery power. Very high line voltage
may cause damage to the charger circuits. The monitor is designed
with circuitry that will turn the unit off before spurious readings can be
caused by a low battery condition.
Page 1-12
Scholar® III 507ELC2 Service Manual
Criticare Systems, Inc.
Section 1 —Introduction
Software Error Related Criticare Systems, Inc., has quality control practices and procedures
Hazard Mediation in place to review potential hazards as they relate to software. The
monitor is Year 2001 Compliant and utilizes a two-digit year for all
date, time, and leap year calculations.
Potential Interference This device has been successfully tested to IEC 60601-1-2 specified
levels for emissions of and resistance to electromagnetic energy
fields. External disturbances which exceed these levels may cause
operational issues with this device. Other devices which are sensitive
to a lower level of emissions than those allowed by IEC 60601-1-2
may experience operational issues when used in proximity to this
device.
MAGNETIC FIELDS
Use of the monitor in an MRI environment may interfere with MRI
image quality. Use of MRI may interfere with the monitor.
RADIO FREQUENCY INTERFERENCE
The monitor conforms with IEC 61000-4-3 for radio frequency
interference, and will operate with negligible adverse effects.
CONDUCTED TRANSIENTS
The monitor conforms with IEC 61000-4-4, and IEC 61000-4-5 for
conducted transients, and will operate with negligible adverse effects.
X-RAY
The monitor will operate with negligible adverse effects in an x-ray
environment. However, the monitor should not be placed directly in
the x-ray beam, which could damage the internal electronics of the
monitor.
OTHER INTERFERENCE
There is a negligible adverse effect to the monitor from electrocautery
and electrosurgery, infrared energy, and defibrillation.
Use of Anesthetics Do not use this device in conjunction with flammable anesthetics
such as cyclopropane and ether. The monitor can sample from pure
oxygen environments, but the monitor itself should never be placed
inside an oxygen tent or gas containment apparatus. Proper
anesthetic gas waste recovery should be used.
Biocompatibility All patient-contact or user-contact materials in this monitor and it's
accessories have passed ISO 10993-5, -10, & -11 biocompatibility
tests or have been in use in clinical environments in large numbers
over an extended period of time predating these standards.
Latex Content All Criticare Systems, Inc., products, including patient monitors and
accessories, are free from latex in any location that may result in
patient contact.
Criticare Systems, Inc.
Scholar® III 507ELC2 Service Manual
Page 1-13
Section 2 — Service Interface
Service Mode
!
WARNING !
• Never service a monitor while it is attached to a patient.
• Never enter the service menu while monitoring a patient.
Self Tests To verify the built-in self tests:
1. Press the ON/OFF key and the DOWN ARROW key of the
monitor at the same time. The monitor displays the message:
CHECKING FOR SERVICE TOOLS . . .
If no communications cable is attached the monitor should
continue to the self tests. The following message displays:
SELECT A TEST . . .
2. The software revision and the serial number display on the
monitor. Verify that the serial number is the same as the name
plate on the bottom of the monitor.
3. Press the DISPLAY key. Observe that the LEDs display an 8 on
all 14-segment LEDs, then 0 and count to 9. Make sure that all
the proper numbers display.
4. Press the PRINT key. The monitor should print a full character
set and four lines of test bars.
System Checks Verify the general settings of the monitor.
1. Restart the monitor. Press the ON/OFF key while holding the
SETUP key. Confirm that the background of the LCD display
illuminates a bright green color when the monitor turns on. The
message CONFIG TO DEFAULT should appear.
2. Enter the second Setup menu. Set the correct TIME and DATE.
3. Confirm that the line frequency (LINE FREQ:) is set correctly.
The value should be set to 60 in the United States.
Criticare Systems, Inc.
Scholar® III 507ELC2 Service Manual
Page 2-1
Section 3 — Theory of Operation
General
The Scholar III consists of a single main processor supporting all
technologies except NIBP. The software design supports this
hardware philosophy by employing an RTOS to simplify prioritization
of the many functions resident on the main processor.
Main Board
The Main Board incorporates the system microprocessor, memory,
and peripherals, as well as the pulse oximetry circuitry and power
management functions. Most system functions are controlled by
software running on the microprocessor.
Microprocessor Circuitry The microprocessor circuitry handles the Main Board computational
functions. It also provides integrated I/O functions, including timers,
I/O pins, and two serial interfaces.
SERIAL INTERFACES
The Scholar III incorporates two mark-high logic-level asynchronous
serial communications interfaces.
Power Management/ The power management/watchdog circuit provides a power fail and/or
Watchdog Circuit low battery level detection mechanism, manual reset input, and a
hardware-based check on software operation. The watchdog resets
the Main Board, and hence the entire system, if the main processor
software fails to clear it within a certain time interval.
LCD Controller This circuit interfaces the main processor with the graphics LCD
display on the front panel and the display memory.
The greeting screen is painted as a form of functional test of the LCD
display. Messages on the screen indicate power-on operations which
are available, and which have been selected.
LED Drivers The LED drivers control the multi-segment, multi-digit LEDs used for
display of certain vital signs data. The ability to blink individual LED
elements is provided in software. The blinking of all display elements
is synchronized.
LEDs provide data on heart rate (BPM), systolic blood pressure (SYS
mmHg), diastolic blood pressure (DIA mmHg), and Mean blood
pressure with red LEDs and SpO2 with green LEDs.
Keypad Interface A matrix keypad interface connects the front panel display controls to
the Main Board. There are four column drive outputs and three row
sense inputs.
Criticare Systems, Inc.
Scholar® III 507ELC2 Service Manual
Page 3-1
Section 3 —Theory of Operation
NIBP Module Interface The NIBP technology module is controlled from the microprocessor
through a logic-level serial interface. The microprocessor has a
POWER ON control line which, when asserted, switches on power to
the NIBP module. This line is inactive at power-up and asserted by
the initialization software which permits a staged powerup of this
major system component.
External RS-232 The Scholar III provides one patient-isolated external RS-232 serial
Serial Data Port data port (TX, RX, and ground). This is compatible with Central
Station and ASCII printer applications.
RF MODEM SUPPORT
For wireless Central Station applications, the interface must be
capable of powering an external RF modem (+5VDC, 100 mA
maximum).
Analog Output Interface The Scholar III has one patient-isolated external analog output. This
will provide a 1 v output capable of driving a high-level input, such as
a defibrillator or chart recorder. The microprocessor includes a PWM
timer to generate the analog signal.
Internal Recorder The model 507ELC2 contains an internal recorder as standard
equipment; the 507ELC2-EX does not have an internal printer. This
recorder contains of a single stepper motor for paper movement while
the formation of text and graphs is accomplished through a line of 384
thermal dots. This design permits higher recording speed.
Because of the enhanced recording capability, the 507ELC2 provides
real-time graphical waveform recording at either 25 or 50 mm/sec.
Tabular printing (demand or interval) is always at 25 mm/sec.
The internal printer control consists of three components:
• Initialization,
• A rasterizing print engine, and
• A print driver in the interrupt service routine.
The functions are inactive if the printer is not installed; this is
determined during initialization. The functional interface of the
PRINT_TASK activates the rasterizing of text and graphics and
controls the print driver.
Speaker Control The speaker drive circuit is a DAC controlling speaker volume, and an
output pin to control frequency. The speaker is driven by a
square-wave signal generated by a software-controlled timer; hence,
any drive frequency has harmonic components and no “pure tones”
are generated. This reduces the risk of an alarm being missed by an
individual with a “notch” hearing deficit.
Page 3-2
Scholar® III 507ELC2 Service Manual
Criticare Systems, Inc.
Section 3 —Theory of Operation
Power Management This circuit:
• Monitors power sources and utilization,
• Informs the main processor of an impending power outage, and
• Permits the shutdown of selected sub-systems to reduce power
consumption when line power is not available.
Software Design: The Scholar III Main Board software is a collection of initialization
Main Board routines, interrupt service routines, drivers, and RTOS tasks. The
interrupt service routines communicate directly with the RTOS by
signaling events, and indirectly by filling circular data buffers to be
consumed by RTOS tasks.
In “C” programming, the following suffixes are used:
_SVC
_TASK
_MAIL
_TIMER
_EVENT
_RESOURCE
an interrupt service routine
an RTOS task number
an RTOS mailbox number
an RTOS timer
an RTOS event number
an RTOS resource number
The software design description is organized as follows:
• Data elements, including key data structures; initialization and
reset self-test code;
• Interrupt service routines (ISRs);
• Drivers; and
• Tasks.
System Drivers System drivers are low-level, non-ISR functions primarily responsible
for hardware interfacing.
LCD DISPLAY DRIVER
This driver communicates to the LCD controller in a synchronized
fashion to perform graphics plane and text plane updates without
undesirable side effects.
LCD CONTRAST DRIVER
This driver interacts with digital potentiometer circuitry to provide LCD
contrast initialization and adjustment via software.
WATCHDOG DRIVER
The watchdog timer must be periodically cleared to prevent a system
reset from taking place. Since the Main Board software is built around
an RTOS, it is desirable to make the watchdog clear logic dependent
upon recognition of proper operation of several execution paths.
Criticare Systems, Inc.
Scholar® III 507ELC2 Service Manual
Page 3-3
Section 3 —Theory of Operation
REAL-TIME CLOCK (RTC) DRIVER
The real-time clock (RTC) circuit is a battery-backed source of date
and time-of-day information independent of the microprocessor. The
RTC driver provides for reading the RTC contents, testing date and
time integrity, updating the RTC, and managing the RTC alarm event
interrupt. In the Scholar III, this interrupt is employed as an
independent time-base check.
ANALOG OUTPUT DRIVER
The analog output is a patient-isolated external output signal
programmed through a PWM timer to reproduce a selected
waveform. The functional interface to the analog output update
function consists of init_analog_out(), set_mode_wave() and
update_analog_wave(). The PWM hardware is initialized by the
init_analog_out() routine. Analog output signal selection is controlled
through the set_mode_wave() function. The dynamic analog output
update is accomplished via the update_analog_wave() function,
called 300/sec from the system timer service ISR, which also scales
and stores signal data for analog output directly into the wave[] global
array.
The analog output waveform is reproduced with 100 Hz bandwidth.
Simulated pacer pulses are omitted from the analog reproduction of
the ECG signal.
External Service Tools
Upon activating the service mode at power-up the monitor attempts
to locate any service tool attached to the external serial port. If it
locates a service tool, the Scholar III is under control of the service
tool, permitting execution of diagnostic or software upgrades.
Main Board The initial software installation, and all subsequent software
Software Upgrade upgrades is in flash memory and is downloaded through the external
serial port. The monitor shall not perform patient monitoring during
software downloads. Initiate the Main Board software installation
operation by holding the DOWN arrow key while you apply power to
the unit. The software installation screen appears with the message
"SERVICE TOOL IN PROGRESS...".
NIBP Module Upgrade the NIBP module through the external serial port. The
Software Upgrade monitor shall not perform patient monitoring during software
downloads. The NIBP module software installation operation is
initiated by holding the NIBP START/STAT/STOP key while you apply
power to the unit. The software installation screen appears with the
message "NIBP SERVICE TOOL IN PROGRESS...".
NIBP Module
Service Tool
Page 3-4
The NIBP module Service tool permits execution of the inflation/
deflation speed test, leakage test, calibration, and safety checks
through a program running on an attached PC. The software
installation screen appears with the message "NIBP SERVICE TOOL
IN PROGRESS...".
Scholar® III 507ELC2 Service Manual
Criticare Systems, Inc.
Section 3 —Theory of Operation
Power Supply
A universal switching power supply simplifies operation in
international markets.
The power supply is an external universal switching power supply. It
provides 1.6 A at 16 VDC. The LCD display requires a negative power
source (typically -24 V) which is supplied by an inverter on the main
board. The power supply satisfies international operational
requirements by functioning with either 90-260 VAC at 47-63 Hz line
frequency. The power supply is fused inside the monitor.
The battery is a rechargeable lead-acid in a compartment accessible
for replacement without opening the main chassis. It has a maximum
capacity of 2.0 Amp-hours.
In order to monitor the status of the line power, and condition of the
battery pack, the internal power supply circuitry drives several status
lines available to the main module. The power management/
watchdog circuit provides a low battery level detection mechanism,
manual reset input, and a hardware-based check on software
operation (watchdog timer).
Criticare Systems, Inc.
Scholar® III 507ELC2 Service Manual
Page 3-5
Section 3 —Theory of Operation
ECG
The ECG module uses a differential amplifier to extract surface ECG
activity from a pair of electrodes. Input to the amplifier is protected
against damage from excessive voltages. Passive filtering is used to
reduce high power RF interference from electrosurgical devices.
Filtering for monitor vs diagnostic modes, lead selection, lead off
detection, and pacer pulse detection are performed in hardware,
under software control. Gain control, notch filtering to remove line
frequency interference, pacer artifact handling, noise detection, beat
detection, heart rate calculation, and serial communications are
performed in software.
Non-Invasive
Blood Pressure
The Criticare NIBP module is an oscillometric, continuous-ramping,
inflate-mode design, with a single-lumen hose for both pressurization
and sensing. The general principles of oscillometric NIBP are
well-described in “Handbook of Blood Pressure Measurement”
(Geddes). However, the inflate-mode design of the Criticare NIBP
module distinguishes it somewhat from the systems described in
Geddes’ book.
SpO2 Board
The SpO2 is measured using Criticare’s DOX™ digital oximetry. This
circuit design is proprietary to Criticare Systems, Inc., and therefore
is not described here.
Temperature
The temperature probe produces a resistive change in response to
temperature which is inversely related to temperature in an
approximately exponential fashion. A precision calibration resistor is
used auto-calibrate the circuitry. Linearization and conversion to
temperature units is performed in software via table translation. The
temperature facility is a circuit on the ECG board.
Impedance Respiration
The TTI respiration circuit uses a transformer to generate a lowcurrent, high frequency stimulus through the Lead I electrodes. The
resulting voltage variations reflect impedance variations across the
thorax, which in turn reflect respiration activity (as well as other
phenomena including cardiogenic artifact and motion artifact).
Page 3-6
Scholar® III 507ELC2 Service Manual
Criticare Systems, Inc.
Section 3 —Theory of Operation
Block Diagrams
The following pages contain the block diagrams for the Scholar III
507ELC2 patient monitor.
System Level Block
Diagram
EXTERNAL AC/DC
POWER PACK
LCD
DISPLAY
AUDIO
KEYPAD
LED's
BATTERY
POWER
SUPPLY
SERIAL
PORT
MAIN CPU
ANALOG
OUT
NIPB
MODULE
ECG
BOARD
OXIM
TEMP
RESP
INTERNAL
PRINTER
(507ELC2 only)
AR42
RECORDER
Criticare Systems, Inc.
Scholar® III 507ELC2 Service Manual
Page 3-7
Section 3 —Theory of Operation
Hardware Block Diagram
NIBP
MODULE
RAM
CLOCK
MAIN CPU
PROGRAM MEM
AUDIO
LED Board
POWER SUPPLY
CIRCUIT
KEY MEMBRANE
LCD Module
OXIM
TEMP
Temp Board
MAIN PC BOARD
INTERNAL
PRINTER
(507ELC2 only)
ANALOG
OUTPUTS
EXT
SERIAL PORT
Printer/Communcate
Bus Board
Page 3-8
Scholar® III 507ELC2 Service Manual
Criticare Systems, Inc.
Section 3 —Theory of Operation
Main Board, Display Board,
and SpO2 Board Circuit
Diagram
Charge
Plug
Microprocessor
(MPU)
U16
MPU
Bus
16 Volt
Battery
Power Supply
System
VR1, VR2, VR3, VR4,
VR5, VR6, VR7, U4,
U17, U33
Battery
Charger
U26, Q3, Q5
EPROM
U25
RAM
U24
Analog to
Digital
Converter
U2
Digital to
Analog
Converter
LCD
SRAM
U35
LCD
Driver
U34
Liquid
Crystal
Display
U8
Digital to
Analog
Converter
U36
Sensor Amplifier
And Filter
MUX
U9, U11, U13, U12
U1
Sensor
Receptacle
Sensor
LED Drivers
U16, Q4
(Oximeter)
Speaker
(Alarms, Pulse
Tones, Key
I.D.'s)
Audio
Amplifier
U37, U38, Q11,
Q12, Q13, Q14
Real-Time
Clock
U23
7-Segment
Latch
U21
Pushbutton
Matrix
7-Segment
LED Display
Drivers
U29, U30
7-Segment
LED Digits
Front Panel Switches
U22, U28
Optical
Isolators
U9, U11
Optical
Isolator
U8, U10
Printer
Interface
Transmitting
RS232 Signal
(DB-9 Connector)
RS232
Driver
U6
Membrane
Switches
(Top Panel)
Receiving
RS232 Signal
(DB-9 Connector)
Printer
Module
(507ELC2
only)
(Monitor Top Cover)
Hardware and Circuit Block Diagram
Criticare Systems, Inc.
Scholar® III 507ELC2 Service Manual
Page 3-9
Section 3 —Theory of Operation
Blood Pressure Board
Circuit Diagram
Master
Microprocessor
(MPU)
U16
B.P. Board
Microprocessor
U18
B.P. Board
Bus
B.P. Board
EPROM
U27
B.P. Board
RAM
U17
Air Pump
and
Valves
A to D
Converter
U14
Multiplexer,
Demultiplexer
U21
Air Pressure
Sensor
PR1
8 Bit
Latch
Pressure,
Time, and
Sensor
Interlocks
U2
U22
Buffer
U13
Blood
Pressure
Cuff
Page 3-10
Scholar® III 507ELC2 Service Manual
Criticare Systems, Inc.
Criticare Systems, Inc.
Active
LCD Display
Passive
LCD Display
(Stanley)
Passive
LCD Display
(Data Int'l)
P8
P3
Scholar® III 507ELC2 Service Manual
J3
J4
J7
J5
NIBP
Board
Pump
(NIBP)
J2
J1
J4
J3
J2
J6
J8
J5
Motor
Jumper
P5
Speaker
J1
J4
on d
ly) e
r
Paper
Feed
Button
J6
J7
Main Board
J17
J3
2
J1
J8
J15
NC
J9
J10
J11
J12
J13
J14
J3
Battery
DB9
Connection
J2
Battery
Charger
J1
ECG/
Resp./
Temp.
Jumper
LED
BOARD
J1
J2
MEMBRANE
SWITCHES
P1
J6
P4
Interconnect
J7 Board
J10
P9
Printer
Membrane
Switch
P1
J2
EL o
C r
07
ec
(5
R
Print Head
Backlight Inverter
AC
Temp
Probe
ECG
Section 3 —Theory of Operation
Block Diagram
SpO2
Probe
Analog
Output
Jumper
Page 3-11
Section 4 — Cleaning and Disinfecting
Cleaning and
Disinfecting
!
WARNING !
• Shock Hazard! Turn the power off and disconnect the AC power
cable before cleaning the monitor and sensor.
• Shock Hazard! Never immerse the monitor. The monitor has an
internal power source that is active when the unit is unplugged.
Do not use abrasive cleaners on the monitor or on any sensors or
probes. Abrasive cleaners can damage the monitor, sensors, and
probes.
The exterior surface of the monitor, except for the display screen,
may be wiped clean with alcohol and dried with a soft, dry cloth. It is
best to use a cotton cloth to clean the monitor. Paper towels or
tissues can scratch the surface of the display.
Do not use full strength alcohol on the display screen. Repeated use
of strong cleaners can damage the screen. Clean the display window
by wiping it with a clean, soft, lint-free cloth sprayed with common
glass cleaner. Do not spray glass cleaner directly on the display.
Pulse Oximeter Sensors
!
CAUTION !
• Do not immerse any Criticare pulse oximeter sensor connector
in any liquid. Doing so may damage the connector.
You can wipe the SpO2 sensor clean with alcohol. To disinfect the
SpO2 sensor place the finger clip and cable in a 2% glutaraldehyde
solution. Place only the sensor finger clip and cable in the solution; do
not place the sensor electrical connector in the solution.
Blood Pressure Cuffs To clean the reusable blood pressure cuff wipe it with a damp cloth or
sponge. If necessary, the cuff may be disinfected by wiping with 70%
alcohol, mild bleach solution, or other disinfectant. Disposable blood
pressure cuffs are for single patient use and are not intended to be
disinfected.
You can sterilize the cloth cuff and neoprene bag with commercially
available disinfectants such as ethylene oxide (ETO). Rinse
thoroughly to remove any residual disinfectants. Do not allow liquids
to enter the neoprene bag. The cloth cuff may also be sterilized in an
autoclave.
If the cuffs become grossly soiled with blood or other body fluids,
launder the cloth cuffs by hand or machine. You can launder or
sterilize the dacron cloth cuff. First, remove the neoprene inflation
bag. Then, feed the inflation tube back through the hole and then pull
out the cloth flap.
Criticare Systems, Inc.
Scholar® III 507ELC2 Service Manual
Page 4-1
Section 4 —Cleaning and Disinfecting
Flap
Figure 4-1: Remove Inflation Bag from Cuff
Roll up the inflation bag and slide it out the open slot in the cloth cuff.
Be sure to observe the following laundering precautions (disposable
cuffs and neoprene inserts should not be laundered.)
• Remove the inflatable bag from the cuff before laundering or
sterilizing the cuff.
• Strong bleach solutions will damage the cuff.
• Temperatures over 275° F (135° C) will damage the cuff.
• Close the Velcro® fastener before laundering the cuff.
• Soaking the cuff in dark-colored solutions may stain or discolor
the cuff.
Hand laundering (as opposed to machine laundering) prolongs the
life of the cuff. Wash the cuff in warm, soapy water. Rinse the cuff
thoroughly. After you clean the cuff allow the cuff to air dry and then
insert the inflation bag in the cuff.
ECG Cable You can clean the ECG cable and leads with alcohol. Do not immerse
the connections.
Temperature Cable Clean the cable according to hospital protocol for cleaning of
reusable equipment cables. Typically this protocol consists of the
following:
1. Disconnect the cable from the monitor and temperature sensor.
2. Wipe the cable with a nonabrasive cloth moistened with a mild
detergent and warm water or a disinfectant. Dry thoroughly.
3. Do not use alcohol or solvents to clean the cable.
4. Do not allow the cable connectors and contact points to come in
contact with liquids.
5. Do not fully immerse the cable in liquids.
6. Do not autoclave or ETO sterilize the cable.
Page 4-2
Scholar® III 507ELC2 Service Manual
Criticare Systems, Inc.
Section 4 —Cleaning and Disinfecting
Accidental Wetting
!
WARNING !
• Shock Hazard! The monitor is an AC powered device and an
immersed monitor presents a danger to anyone who handles
the device.
The action to be taken following accidental wetting of the equipment
is as follows:
1. Turn the power off! Disconnect the AC power cord from the
monitor.
2. If monitoring a patient, transfer the patient to another monitor as
quickly as possible.
3. Use a clean, dry towel or cloth to remove the liquid from the
monitor housing.
4. as soon as possible, a service technician should inspected the
monitor.
5. If the internal mechanism is saturated, allow the liquid to drain
out for 24 hours before shipping.
6. If liquid has entered the monitor, it needs to be dried and
cleaned internally. Full testing is required before you can use
the monitor. Contact the CSI Service Department as soon as
possible.
Time is critical! The longer any liquid remains in the monitor, the
more damage it can do. It is important to service the monitor
immediately after any liquid is spilled into it.
Criticare Systems, Inc.
Scholar® III 507ELC2 Service Manual
Page 4-3
Section 5 — Preventative Maintenance
Incoming Inspection
You must inspect monitors coming back from service for shipping
damage before you place them into operation just like newly
purchased monitors. The monitor should be free from dents, cracks,
or other physical damage. The quality inspection seal of the monitor
should be unbroken, indicating that the monitor has been tested
according to manufacturer’s specifications.
If further incoming inspection or testing is required, the manufacturer
recommends that you use the “Alarms Verification” on page 5-13 as
an incoming inspection test. You can perform additional electrical
safety testing in this section as part of an incoming inspection in
accordance with the policies of the health care provider.
Maintenance Schedule
Every Patient
• Clean and disinfect the NIBP cuff as needed.
• Inspect, clean, and disinfect the oximeter sensor.
• Inspect the accessories and charger for damage.
Every Day
Every 3 Months
Every Year
Criticare Systems, Inc.
• Charge the monitor’s battery as necessary.
• Clean the exterior of the unit (or clean as needed).
• Perform the annual safety tests described in the service
manual.
Scholar® III 507ELC2 Service Manual
Page 5-1
Section 5 —Preventative Maintenance
Monitor Safety Testing
You can perform the following tests as part of a periodic safety check.
The following safety tests are designed so that the monitor’s warranty
seal does not have to be broken. If the monitor fails any portion of
these tests, contact the CSI service department.
The contents of this section include the following verifications and
safety tests:
• Electrical Safety Testing
• Withstanding Voltage (Hi-Pot)
• Electrical Leakage
• Functional Testing, including:
• Interface Inspection
• Manual Controls Check
• Alarm Verification
• Vital Sign Modules Verification:
• ECG
• SpO2
• NIBP
• Temperature
• Internal Printer
• Communications
Criticare recommends that you run a serviced monitor for 24 hours
(less 4 hours for shipping) before you perform the tests listed above
and place the monitor back into service. Repaired modules could
require more extensive testing.
Always follow ESD precautions when performing a procedure
discussed in this section.
!
WARNING !
• Because test procedures require working with exposed
electrical circuits, only experienced electrical or biomedical
technicians should perform the procedures.
• After a monitor is altered through repair or hardware
adjustment, you must fully test it before use.
Page 5-2
Scholar® III 507ELC2 Service Manual
Criticare Systems, Inc.
Section 5 —Preventative Maintenance
Equipment and Tools The following procedures assume that the technician has an ESD
safe workbench, a set of electronic hand tools, and a digital
multimeter with a 10-amp setting. At the beginning of each test,
special equipment can be listed. A variety of customized cables, clips,
and test fixtures are also needed to complete the tests. For more
information, contact the CSI Service Department.
Accessory Testing Check patient cables (e.g., temperature cables, printer cables)
monthly for damage, loose wires/connections, loose connectors,
cracked housing, etc.
Check the electrical safety of the charger as part of the monitor safety
testing.
Check the cuffs for leakage as part of the NIBP verification.
Criticare Systems, Inc.
Scholar® III 507ELC2 Service Manual
Page 5-3
Section 5 —Preventative Maintenance
Battery Safety
The batteries require no maintenance. For more information, refer to
the Scholar® III Model 507ELC2 Series Operator’s Manual.
!
CAUTION !
• Do not short circuit the battery terminals! The resulting
high-current discharge can cause burns.
• Charge the battery completely after extended battery use to
ensure a fully-charged battery is available for the next use.
• Explosion hazard! Keep lighted cigarettes, sparks, and flames
away from the battery.
• The battery contains sulfuric acid electrolyte that can cause
severe burns and eye damage, as well as illness from sulfur
oxide fumes.
• Do not crack, cut, burn, or dissolve (with solvents) the battery
case. Damaging the battery case can cause the release of
sulfuric acid. If sulfuric acid is released from the battery, wear
eye protection and rubber gloves to handle the battery, and use
a solution of baking soda in water to neutralize the sulfuric acid.
• The used battery is a potential environmental hazard and must
be disposed of properly. Dispose the old battery in accordance
with local and federal laws. Do not incinerate.
Battery Replacement
The battery access door is on the bottom of the monitor.
Removing the Battery 1.
Turn the monitor off and disconnect the charger cord from the
back of the monitor.
2. Turn the unit upside down and place it on the work surface.
3. Pull the rubber inserts straight up to remove them from the feet
4. Remove the three Phillips screws.
5. Tilt the battery cover up from the front edge. You may need to
gently pry the cover open with a small flathead screwdriver.
6. Lift the battery cover straight up to remove it.
!
CAUTION !
• In the next step, be sure to pull only on the battery end of the
cable, NOT the end of the cable that is connected to the
monitor.
7. Gently pull on the wires attached to the battery terminals to lift
the battery out of the battery compartment.
Page 5-4
Scholar® III 507ELC2 Service Manual
Criticare Systems, Inc.
Section 5 —Preventative Maintenance
8. Release the latch on the battery cable connector.
9. Disconnect the battery cable at the connector.
!
WARNING !
• The used battery is a potential environmental hazard and you
must dispose of it according to local requirements or return it to
CSI.
Installing the New Battery
1. Connect the cable from the new battery to the battery cable
connector on the monitor.
2. Position the battery cable so that it is not pinched or excessively
pulled. Slide the new battery into position in the battery
compartment.
3. Reattach the battery compartment door with the three Phillips
screws. The short screw goes in the middle.
4. Reattach the rubber inserts to the feet.
NOTE: When you replace the feet, be sure to align the small
projection on each foot with the matching depression in the
case.
5. Reconnect the power cord to the monitor. Allow the battery to
charge for 10 hours before you operate the monitor on battery
power.
Battery Maintenance
The battery requires no maintenance.
Long-term Storage
No special preparation is necessary for long-term storage of the
monitor.
Disposal
At the end of its useful life, the monitor and its accessories may be
disposed of according to your institution’s policies and procedures for
disposal of patient-contact medical waste.
Alternately, the monitor and its accessories may be returned to
Criticare Systems, Inc., for safe disposal. The shipping address is:
Criticare Systems, Inc.
20925 Crossroads Circle, Suite 100
Waukesha, WI 53186
Criticare Systems, Inc.
Scholar® III 507ELC2 Service Manual
Page 5-5
Section 5 —Preventative Maintenance
Electrical Safety
Testing
Scholar III Withstanding Perform this test whenever opening the monitor housing and before
Voltage Hi-Pot Test using the monitor on patients.
!
WARNING !
• Shock Hazard! Because dangerous and lethal voltages are
present during the withstanding voltage, leakage, and ground
continuity test, all leakage and voltage testing must be done
with the monitor housing in place. For complete information
about the proper operating and safety procedures, refer to the
Operator’s Manual.
Equipment Needed The following are needed to complete this procedure:
• Associated Research 3565D Dielectric Withstand Tester (or
equivalent Hi-Pot tester)
Hi-Pot Performance NOTE: Do not power up the 507ELC2 monitor during Hi-Pot steps.
MAINS INPUT TO POWER GROUND TEST
1. Connect the red lead of the tester to the shorted (black, white)
of the AC input test connector. Plug the test connector into the
Cat. 924 AC input. Connect the black lead of the tester to the
power ground (green) wire of the AC input test connector.
NOTE: Do not connect to the capacitor. Connect directly to
ground.
2. Turn on the tester power. Press the “TEST” switch. 1500 VAC is
applied to the 507EL monitor for 1 second. No voltage
breakdown (HI-POT FAIL) indication should occur.
3. Hi-Pot hot and neutral to ground with 1500VAC @ 2mA for 1
second.
a.
Connect the CSI CORD HI-POT SETUP CABLE into the
Transformer (CAT 924), with the RED lead of the Hi-Pot
connected to the shorted black and white (hot and neutral)
of the CSI CORD HI-POT SETUP CABLE.
Page 5-6
b.
Place the BLACK lead of the hipot tester to the green wire
(ground) of the CSI CORD HI-POT SETUP CABLE.
c.
Conduct the test and verify that the Hi-Pot tester indicates
pass.
Scholar® III 507ELC2 Service Manual
Criticare Systems, Inc.
Section 5 —Preventative Maintenance
4. Hi-Pot BNC to ground with 1500VAC @ 2mA for 1 second.
a.
With the same setup as above, move the RED lead of the
Hi-Pot tester to the BNC connector.
b.
Conduct the test and verify that the Hi-Pot tester indicates
pass.
MAINS INPUT TO PATIENT / EXTERNAL EQUIPMENT CONNECTION
TEST
NOTE: For the following series of tests, use the CHARGER /507E/
EL HI-POT SETUP device.
NOTE: For the following series of tests, the 2200 pf Y-capacitor is
connected between the power ground of the Cat. 924 and the specific
input being tested during any one test (see "Connecting the YCapacitor"). The tester black lead is also connected to the input
under test. The function of the 2200 pf capacitor is to form part of an
AC voltage divider in conjunction with a 1000 pf capacitor which is
internal to the Cat. 924 in order to protect the output circuitry and the
1000 pf capacitor in the Cat. 924 from over load.
2.2nFY cap
7.7M 1/2W
Red
Lug
3.3M 1/2W
Shorted Hot/Neutral
Black
Lug
Earth Ground
(Hi-Pot Alligator Clip) A
924 Hi-Pot Case
AC Receptacle
to Cat 924
Figure 5-1: Connecting the Y-Capacitor
1. Connect the test connector for ECG to the 507EL monitor
Criticare Systems, Inc.
Scholar® III 507ELC2 Service Manual
Page 5-7
Section 5 —Preventative Maintenance
2. Hi-Pot CHARGER /507E/EL HIPOT SETUP to ECG with
5700VDC @ 2mA for 1 second. (Switch to DC)
a.
Connect the F-PIN ECG HI-POT CABLE to the 507ELC2
monitor.
b.
Now connect CHARGER/507E/EL HI-POT SETUP to the
924 with the Hi-Pot leads connected to the terminals on
the setup marked with red and black markers.
c.
Connect the black wire from CHARGER/507E/EL HI-POT
SETUP to the ECG connector of the 507EL monitor.
d.
Conduct the test and verify that the Hi-Pot tester indicates
pass.
3. Hi-Pot CHARGER /507E/EL HI-POT SETUP to BNC with
5700VDC @ 2mA for 1 second.
a.
With the same setup, connect the black wire from
CHARGER /507E/EL HI-POT SETUP to the BNC
connector found on the back of the unit.
b.
Conduct the test and verify that the Hi-Pot tester indicates
pass.
4. Hi-Pot ECG to DB-9 with 4000VAC @ 2mA for 1 second.
(Switch to AC)
a.
Connect the Red lead of the Hi-Pot tester to the F-PIN
ECG CABLE.
b.
Connect the black lead of the Hi-Pot tester to the DB-9
HI-POT ISO/GND CABLE connected to the interface
connector located on the back of the 507EL monitor.
c.
Conduct the test and verify that the Hi-Pot tester indicates
pass.
Leakage NOTE: The cover should stay on for the leakage tests. Perform a self
test on the Dynatech 232D.
1. Turn on the unit. Set the MODE switch to SELF test. The display
should read 1000 ±20 and the current source active lamp
should be on.
!
CAUTION !
• If these conditions are not met, do not continue with the leakage
test.
2. Set the MODE switch on the Dynatech to L1-L2. The display
should read 110 to 130 VAC. Set the MODE switch to L1-GND.
The display should read no more than 5% of the previous line
voltage measurement. Set the MODE switch to L2-GND. This
reading should be the same as the first reading, ±5 VAC.
Page 5-8
Scholar® III 507ELC2 Service Manual
Criticare Systems, Inc.
Section 5 —Preventative Maintenance
3. Set the “MODE” switch to “CASE LEAKAGE/GROUND
CONDUCTOR.” Connect the AC cord from the Dynatech to the
AC input of the Scholar III patient monitor. Turn the Scholar III
patient monitor on for the remaining leakage tests. With the
“POLARITY” switch in the “NORMAL” position, monitor the
readout for less than 50 µA.
4. Change the “POLARITY” switch to the “REVERSE” position and
accept a reading of less than 50 µA.
5. With the “POLARITY” switch in the “NORMAL” position. Press
the “OPEN NEUTRAL” switch and accept a reading of less than
90 µA.
6. Change the “POLARITY” switch to the “REVERSE” position and
press the “OPEN NEUTRAL” switch and accept less than 90 µA.
7. Press the “OPEN GROUND” button. Accept a reading of less
than 50 µA.
8. Set the “POLARITY” switch to the “REVERSE” position. Accept
a reading of less than 50 µA.
9. Connect the Dynatech to the Scholar III patient monitor using
the 3 lead ECG cable. Set the “MODE” switch to “ECG to GND.”
For the rest of the leakage tests, ensure that the leads are
dressed away from any ground planes, the AC power cord, and
the chassis. Set the “MODE” switch to “ECG TO GND.” Set the
“LEADS” switch to “ALL.” Set the “POLARITY” switch to
“NORMAL.” Accept a reading of less than 50 µA.
10.Press the “OPEN NEUTRAL” button. Accept a reading of less
than 50µA. The green AC light turns off.
11.Press the “OPEN GROUND” button. Accept a reading of less
than 50 µA.
12.Set the “POLARITY” switch to the “REVERSE” position. Press
the “OPEN NEUTRAL” button. Accept a reading of less than 50
µA.
13.Press the “OPEN GROUND” button. Accept a reading of less
than 50 µA.
14.Set the “LEADS” switch to the “RA-LA INTERLEAD” position.
Set the “POLARITY” switch to the “NORMAL” position. Accept a
reading of less than 20 µA.
15.Set the “LEADS” switch to the “RA-RL INTERLEAD” position.
Accept a reading of less than 20 µA.
16.Set the “LEADS” switch to the “LA-RL INTERLEAD” position.
Accept a reading of less than 20 µA.
17.Set the “LEADS” switch to the “ISO” position. Press the
“ISOLATION TEST” button. Accept a reading of less than 20 µA.
Criticare Systems, Inc.
Scholar® III 507ELC2 Service Manual
Page 5-9
Section 5 —Preventative Maintenance
18.Connect the bare wire end of the temperature leakage cable to
any of the ECG test terminals on the Dynatech. Plug the other
end of the leakage cable into the TEMP input of the Scholar III
patient monitor. Accept a reading of less than 20 µA. (See
“Figure 5-2: Temperature Receptacle Test Plug” to fabricate).
Jack
Terminal B
Wire
Lead
Terminal A
Figure 5-2: Temperature Receptacle Test Plug
Page 5-10
Scholar® III 507ELC2 Service Manual
Criticare Systems, Inc.
Section 5 —Preventative Maintenance
Functional Testing
Interface Inspection This procedure is primarily for monitors with TFT active displays.
1. Verify that a readable screen displays. For a guide to proper
screen layout, refer to Section 3, “Setup Procedures,” in the
Scholar® III Model 507ELC2 Series Operator’s Manual for
sample screens.
2. Verify that the screen display is clear and bright when directly
facing the monitor.
3. Verify the image quality. There should be no intermittence or
jittering of pixels. The maximum amount of pixels missing from
any display are as follows:
• Maximum number of bad dots allowed per screen is 7.
• Maximum number of bad dots within any 20mm circle is 2.
Manual Controls Check
1. Press the FREEZE key to freeze the bottom two ECG
waveforms. The top ECG waveform remains in real time. Verify
that you get an audible response from the speaker. Press the
DISPLAY key to unlock the waveforms.
2. Press the START/STAT/STOP key. Verify that you get an audible
response from the speaker. The pump should operate.
3. Press the SET ALARM key. Verify that you get an audible
response from the speaker. A Set Alarm window appears on the
display. Press the SET ALARM key and verify that the curser
moves from item to item on the menu. Press the DISPLAY key to
close the Set Alarm window.
4. Press the SETUP key. Verify that you get an audible response
from the speaker. A Setup window appears on the display. Press
the SETUP key and verify that the curser moves from item to
item on the menu. Press the DISPLAY key to close the Setup
window.
5. Press and hold the SETUP key. Verify that you get an audible
response from the speaker, followed by a double beep and the
second Setup window displays. Press the SETUP key and verify
that the curser moves from item to item on the menu. Set the
DATE and TIME for the real time clock. Press the DISPLAY key
to close the Setup window.
6. Press the DISPLAY key. Verify that you get an audible response
from the speaker. An ECG 50MM window appears on the
display. Press the DISPLAY key again. Verify an audible
response from the speaker. A Numerical Display window
appears on the display. Press the DISPLAY key again. Verify an
audible response from the speaker. A Three-lead window
appears on the display. The three leads should be ECG/
Cascade and SpO2.
Criticare Systems, Inc.
Scholar® III 507ELC2 Service Manual
Page 5-11
Section 5 —Preventative Maintenance
7. Press the TREND key. Verify an audible response from the
speaker. A Trend window appears on the display. Press the
DISPLAY key to close the Trend window.
8. Press the PRINT key. Verify an audible response from the
speaker. The printer prints a test strip.
SPEAKER
Verify speaker operation.
1. Plug an SpO2 sensor into the SpO2 port on the 507ELC2.
2. Wait for the SpO2 to detect a pulse.
3. Press the SETUP key to open the Setup window.
4. Press the SETUP key to highlight Pulse Vol:. Use the UP
ARROW and the DOWN ARROW keys and verify that the
speaker increases and decreases in sound at a constant rate.
5. Press the DOWN ARROW key to select OFF. Verify that the tone
stops.
LED TEST
1. Press the ON/OFF key and the DOWN ARROW key of the
monitor at the same time. The Service tools screen appears.
2. Press the DISPLAY key.
3. Observe the LED’s. They display an “8” on all 7-segment LED’s,
then “0” and count to “9.” Observe that all the proper numbers
display.
TIME AND DATE
With the unit powered up:
1. Press the SETUP key.
2. Go to the second Setup screen and cursor over to the time and
date using the SETUP key.
3. Set the TIME: and DATE: using the UP and DOWN ARROW
keys.
Page 5-12
Scholar® III 507ELC2 Service Manual
Criticare Systems, Inc.
Section 5 —Preventative Maintenance
Alarms Verification To verify alarm circuitry, perform the following procedure.
1. Press the SET ALARM key to enter the Set Alarm menu. Set the
ALARM VOLUME to 10 in the Set Alarm menu.
2. Enter the Setup menu and turn off temperature monitoring
(TEMP). The display for TEMP: should read OFF.
3. With no cuff attached press the START/STAT/STOP key. The
monitor attempts to inflate and responds with a BP: CHECK
CUFF message.
4. Listen for the low level alarm tone, a burst of two pulses at the
same pitch. The bursts should repeat every 10 seconds.
5. Set the ALARM LEVEL to 1 and cause another CHECK CUFF
alarm. The volume should be decreased but still audible.
6. Set the ALARM VOLUME to OFF and cause another CHECK
CUFF alarm. No alarm tone should be audible. Confirm that the
ALARM SILENCE LED is flashing red.
7. Return the ALARM VOLUME setting to 5.
8. Press the SET ALARM key to enter the Set Alarm menu. Check
the NIBP alarm settings. Set the high diastolic setting (DIA:) to
60.
9. Attach an NIBP simulator to the monitor.
10.Set the simulator’s diastolic to 100 (above the setting of the
monitor’s alarm).
11.Listen for the medium level alarm tone. It should appear at a
higher pitch than the low level alarm tone. It is a burst of three
pulses all at the same pitch. The bursts should repeat every 25
seconds.
12.In the SET ALARM window adjust the SpO2 low alarm level
above the saturation reading to cause an alarm condition.
13.Verify that the message LOW SPO2 appears at the bottom of
the display in red letters.
14.Verify that you get an audible response. The alarm should be a
high priority alarm tone consisting of 3 beeps followed shortly by
two beeps.
15.Return the monitor to its standard default settings.
ALARM LED’S
Power the unit off, then on. Upon power-up, the speaker should
provide a power-up tone. When pressing each front panel key, there
should be a tone from the speaker (except for ALARM SILENCE).
Along with that selected function should be a change in the operation
of the Unit. When pressing ALARM SILENCE, either the 2 minute
LED (solid red) or the OFF LED (flashing red) illuminates depending
on the length of time the key is pressed.
Criticare Systems, Inc.
Scholar® III 507ELC2 Service Manual
Page 5-13
Section 5 —Preventative Maintenance
Vital Sign Modules
Verification
ECG Verification
1. Verification that the ECG baseline is centered.
a.
To verify the ECG baseline is centered, press the UP
ARROW key to set up the unit to the X4 scale.
b.
Press the SETUP key to set up the unit for the Lead II
configuration.
c.
Press the UP ARROW key to set up the unit for 1mv ECG.
d.
Press the SETUP key and set up the unit for input FILTER:
OFF.
e.
Verify that the ECG baseline is centered with an ECG
signal present (±4 pixels). See “Figure 5-3: ECG
Baseline”.
Figure 5-3: ECG Baseline
2. Check the DB-9 connector for telemetry compatibility. Verify +5V
is present at pin 4 of the DB-9 connector.
3. Connect an ECG patient cable to the ECG jack on the Scholar
III patient monitor. Connect an ECG simulator to the snap ends
of the patient cable as follows:
RED
WHITE
BLACK
LL
RA
LA
Set the ECG output to 60 BPM, then set the RESPIRATION
RATE to 60.
• The HEART RATE (BPM) 7-segment displays indicate the
setting of the pulse setting of the simulator. The HEART
RATE should be ±2 counts of what the ECG simulator is set
for.
• The SpO2% 7-segment displays flashes a bar across each of
the numbers.
• The RESPIRATION RATE (RESP:) displays on the upper
right corner of the LCD with a numeric value.
4. The Scholar III patient monitor can use (3) different lead
configurations for the ECG. Press the SETUP key until the
LEAD selection is highlighted. Press the UP ARROW key to
cycle through LEAD: I, II, or III. The lead configuration displays
on the top of the display.
Page 5-14
Scholar® III 507ELC2 Service Manual
Criticare Systems, Inc.
Section 5 —Preventative Maintenance
5. With the Scholar III patient monitor set up for LEAD I, verify the
ECG waveform. (See “Figure 5-4: Lead I ECG Waveform”).
Figure 5-4: Lead I ECG Waveform
6. Disconnect the white lead from the simulator. The waveform
should disappear and the base line should return to the middle
of the display. The HEART RATE should decay and a RA LEAD
OFF message appears.
7. Reconnect the white lead and the waveform should return to
normal, with a normal heart rate.
8. Disconnect the black lead from the simulator. The waveform
should disappear and the base line should return to the middle
of the display. The HEART RATE should decay and the LA
LEAD OFF message appears.
9. Reconnect the black lead and the waveform should return to
normal.
10.Disconnect the red lead from the simulator. The waveform
should disappear and the base line should return to the middle
of the display. The HEART RATE should decay and a LEADS
OFF message appears.
11.Reconnect the red lead and the waveform should return to
normal.
12.With the Scholar III patient monitor set up for LEAD II, verify the
ECG waveform (See “Figure 5-5: Lead II ECG Waveform”).
Figure 5-5: Lead II ECG Waveform
13.With the Scholar III patient monitor set up for LEAD III, verify
the ECG waveform. (See “Figure 5-6: Lead III ECG Waveform”).
Figure 5-6: Lead III ECG Waveform
14.With the Scholar III patient monitor set up in LEAD II with a
stable waveform and heart rate, turn the simulator off. In less
than 10 seconds the ECG LOST alarm should sound.
Criticare Systems, Inc.
Scholar® III 507ELC2 Service Manual
Page 5-15
Section 5 —Preventative Maintenance
15.Press the TREND key and review the Trend screen. Verify that
the Trend screen is holding data. Power down the unit. Power up
the unit and press the TREND key and review the trend data.
The unit should retain trend data. Observe the data that is
stored from the previous tests.
Oximeter (SpO2)
Verification
1. With the unit powered up and with no sensor connected to the
receptacle, the message NO SENSOR displays at the bottom of
the Scholar III patient monitor display.
2. Connect the Cat. 511 Finger Sensor to the sensor receptacle
and position it on a finger. Within 15 seconds, valid and stable
O2 saturation and pulse rate readings display on the Scholar III
LED display and within the SpO2 waveform box and Rate
parameter box on the LCD. The waveform box also displays a
characteristic plethysmograph waveform without noise,
oscillation, or other distortion or artifacts. Saturation and pulse
values as well as wave shape may vary somewhat from one test
subject to another. There shall be no error messages except
possible alarm limit violations present on the display (SpO2
TOO LOW/HIGH or HEART RATE TOO LOW/HIGH are alarm
violations).
3. Remove the sensor from the finger and install an optical load
(such as a foam peanut) into the sensor. After a time delay
specified by the SEARCH DELAY setting in the SpO2 parameter
box menu (default = 20 seconds), the SpO2 LOST message
appears.
4. Remove the optical load from the finger clip and slowly open the
sensor finger clip while holding the sensor near a fluorescent
light source. It may be necessary to move the sensor back and
forth slightly in order to induce signal saturation. The SpO2
HIGH AMBIENT message appears on the display. Remove the
sensor from the light source and reposition it on the finger. The
message disappears from the display.
Page 5-16
Scholar® III 507ELC2 Service Manual
Criticare Systems, Inc.
Section 5 —Preventative Maintenance
NIBP Verification For both the 120/80 operation setting and the 80/50 operation setting,
the monitor is connected to a Dynatech Nevada NIBP Analyzer.
1. Use the T-connection with the dummy cuffs for these tests.
Connect them to the 0-300 mmHg port of the NIBP analyzer.
2. Connect the monitor to an AC (mains) power source and turn on
the monitor.
3. Press the monitor’s CYCLE TIME key. The monitor’s cycle time
window appears.
4. Select the NIBP Cycle Time to two minutes.
120/80 OPERATION SETTING
Use an adult dummy cuff for this test. Set the initial Dynatech Nevada
NIBP simulator settings of Adult at 120/80 (90) and Heart Rate at 80
bpm.
1. Press the SETUP key. In the monitor’s SETUP 1 window set the
Patient Size to Adult mode.
2. For the Pressure Cure Adjustments, set SHIFT to 0 (zero) and
GAIN to 100%.
3. Press the NIBP START/STAT/STOP key.
4. Allow the monitor to take at least three readings. Systolic and
diastolic readings should appear. The average of the three
readings should be within 4% or 4mmhg of all the readings
taken.
5. Recalibrate the monitor if necessary.
80/50 OPERATION SETTING
Use a neonate dummy cuff for this test. Set the initial Dynatech
Nevada NIBP simulator settings of Neo at 80/50 (62).
1. Set the monitor to the Neonate mode.
2. To verify STAT mode operation, press and hold the NIBP
START/STAT/STOP key.
3. Allow the monitor to take at least three readings. Systolic and
diastolic readings should appear on the display.
4. Take the average of the three readings. Each reading should be
within 4% or 4mmhg of all the readings taken.
Criticare Systems, Inc.
Scholar® III 507ELC2 Service Manual
Page 5-17
Section 5 —Preventative Maintenance
Temperature Verification
1. Press the SETUP key to enter the SETUP MENU 1.
2. Press the SETUP key until TEMPERATURE highlights.
3. Using the UP or DOWN Arrow turn the temperature function on.
4. Press the DISPLAY key to return to the waveform display.
5. Verify the TEMP: NO PROBE message appears when no probe
is attached.
6. Connect a FOGG TP-400 temperature simulator to the TEMP
input.
7. Set the TP-400 to the temperature settings in the table below.
Verify that the temperature display is within the table limits.
Table 1:
TP-400 Setting
8. Verify LOW TEMP
message appears.
9. Verify HIGH TEMP
message appears.
Printer Testing
Display Limits
68 °F
67.8- 68.2 °F
77 °F
76.8 - 77.2 ° F
86 °F
85.8 - 86.2 °F
95 °F
94.8 - 95.2 °F
96.8 °F
96.6-- 97.0 °F
98.6 °F
98.4 - 98.8 °F
100.4 °F
100.2 -100.6 ° F
102.2 °F
102.0 - 102.4 °F
104 °F
103.8 - 104.2 ° F
113 ° F
112.8 - 113.2 °F
NOTE: These steps apply only to the 507ELC2 monitor.
1. Press the PRINT key on the keypad. Ensure that a strip prints
with the monitor model number, software revision, date, and
time.
2. Press the PAPER FEED key and ensure the paper feeds
through the roller.
3. Press and hold the SETUP key to configure SETUP MENU 2.
4. Press the SETUP key until WAVEFORM: is highlighted.
5. Press the UP arrow key to select WAVEFORM: 8 SEC. Press
the DISPLAY key to return.
6. Connect an ECG simulator set for 60 bpm.
7. Print out an ECG waveform.
Page 5-18
Scholar® III 507ELC2 Service Manual
Criticare Systems, Inc.
Section 5 —Preventative Maintenance
Scholar III Final Test
Check Sheet
Unit serial number______________________________________________________
Software Rev._________________________________________________________
Tested by_____________________________________________________________
Date___________________________________________________
Test
PassFail
Electrical Safety Testing
Withstanding Voltage Hi-Pot Test
Mains Input to Power Ground Test
Hi-Pot 1500 V to ground.
PASS_____
FAIL_____
Hi-Pot HOT and NEUTRAL to ground with 1500VAC @ 2mA (1 second)
Hi-Pot BNC to ground with 1500VAC @ 2mA (1 second)
Hi-Pot CHARGER/507E/EL HI-POT SETUP to ECG with 5700VDC @ 2mA
(1 second; switch to DC)
Hi-Pot CHARGER/507E/EL HI-POT SETUP to ECG with 5700VDC @ 2mA
(1 second)
Hi-Pot ECG to DB-9 with 4000VAC @ 2mA (1 second; switch to AC)
PASS_____
PASS_____
FAIL_____
FAIL_____
PASS_____
FAIL_____
PASS_____
PASS_____
FAIL_____
FAIL_____
PASS_____
PASS_____
PASS_____
PASS_____
PASS_____
PASS_____
PASS_____
PASS_____
PASS_____
PASS_____
PASS_____
PASS_____
PASS_____
PASS_____
PASS_____
PASS_____
PASS_____
FAIL_____
FAIL_____
FAIL_____
FAIL_____
FAIL_____
FAIL_____
FAIL_____
FAIL_____
FAIL_____
FAIL_____
FAIL_____
FAIL_____
FAIL_____
FAIL_____
FAIL_____
FAIL_____
FAIL_____
Leakage
Leakage Open ground
Mode Switch Reading
Reverse position polarity Switch.
Open Neutral Normal (<90µA)
Open Neutral Reverse (<90µA)
Leakage Open Ground (<50µA)
Polarity Reverse (<50µA)
All Leads Normal (<50µA)
Open Neutral (<50µA)
Open Ground (< 50µA)
Open Neutral (<50µA)
Open Neutral (<50µA)
RA-LA
RA- RL
LA-RL
Isolation Test
Leakage Temperature (<20uA)
Criticare Systems, Inc.
Scholar® III 507ELC2 Service Manual
Page 5-19
Section 5 —Preventative Maintenance
Functional Testing
Interface Inspection
Shut Off: Verify Unit Shut down. (10.9 ±0.2VDC)
Speaker: Perform the Speaker Test.
LED Functionality: Perform LED DISPLAY Test.
Time and Date: Set date and time in the Setup screen.
PASS_____
PASS_____
PASS_____
PASS_____
PASS_____
PASS_____
FAIL_____
FAIL_____
FAIL_____
FAIL_____
FAIL_____
FAIL_____
Alarms Testing
Alarm Volume
Alarm LEDs: Verify Operation of all membrane switch key.
PASS_____
PASS_____
FAIL_____
FAIL_____
ECG Functionality
Verify ECG Baseline
Perform Analog Output Calibration
Verify 5V at DB-9 pin 4
Verify HR and RR Readings
Verify Lead I ECG Waveform
Verify Lead Off Message(White Lead)
Reconnect (White Lead) observe ECG waveform
Verify Lead Off Message (Black Lead)
Reconnect (Black Lead) observe ECG waveform
Verify Lead II ECG waveform
Verify Lead III ECG waveform
Verify ECG Lost
PASS_____
PASS_____
PASS_____
PASS_____
PASS_____
PASS_____
PASS_____
PASS_____
PASS_____
PASS_____
PASS_____
PASS_____
FAIL_____
FAIL_____
FAIL_____
FAIL_____
FAIL_____
FAIL_____
FAIL_____
FAIL_____
FAIL_____
FAIL_____
FAIL_____
FAIL_____
Oximeter Functionality
Verify NO Sensor
Verify SpO2 Readings
Verify SpO2 Lost
Verify High Ambient Condition
Perform Computer SPO2 Simulator Test
PASS_____
PASS_____
PASS_____
PASS_____
PASS_____
FAIL_____
FAIL_____
FAIL_____
FAIL_____
FAIL_____
NIBP Functionality
Verify 1.75 Hour Trend
Perform the Adult & Neonate Simulator Test.
PASS_____
PASS_____
FAIL_____
FAIL_____
Temperature Functionality
Verify Temperature Limits.
PASS_____
FAIL_____
Printer Testing (507ELC2 only)
PRINT key
PAPER FEED key
ECG Waveform printout
PASS_____
PASS_____
PASS_____
FAIL_____
FAIL_____
FAIL_____
Manual Controls Check
DATE ON_____________________
TIME _________
CERTIFICATION THAT THE UNIT IS CALIBRATED AND FUNCTIONING PROPERLY.
NAME_______________________________________DATE ____________
This checklist may be copied as needed to record field testing
Page 5-20
Scholar® III 507ELC2 Service Manual
Criticare Systems, Inc.
Section 6 —Service Testing and Calibration
Field Service Testing
Safety
!
WARNING !
• Service testing procedures require working with exposed
electrical circuits and should only be attempted by experienced
electrical or biomedical technicians.
• When a monitor is altered through repair or hardware
adjustment, it should be fully tested before use.
!
CAUTION !
• Always follow ESD precautions when performing any procedure
discussed in this section.
• The manufacturer recommends that a serviced monitor be
allowed to run for 24 hours before the monitor is placed back
into operation.
• Modules and PCBs that have been repaired may require more
extensive testing than what is described in this manual.
The pre-assembly testing of printed circuit boards (PCBs) is not
covered in this manual. Disassembly of surface mounted components
on PCBs is not recommended. Tests provided here are only for the
identification of damaged or degraded PCBs.
Criticare Systems, Inc.
Scholar® III 507ELC2 Service Manual
Page 6-1
Section 6 —Service Testing and Calibration
Field Service Test
Matrix
Any time you open a monitor’s case you must perform electrical
safety tests before you return the monitor to operation. If you service
the monitor, you should also perform the functional tests.
No Fault (case opened)
NIBP Pump and Board
SPO2 Board
ECG-Resp.-Temp Board
Main Board
Key Pad
Printer and/or Board (507ELC2 only)
Instrument Dropped
Software Download
Annual Safety Test
Page 6-2
✔
✔
✔
✔
●
●
✔
✔
●
✔ ● ✔
Main Board Testing
Temperature Check
NIBP Module Calibration
SpO2 Performance Test
Temperature Verification
NIBP Verification
SPO2 Verification
●
●
●
●
●
●
●
✔
ECG Verification
✔
✔
✔
✔
✔
✔
✔
✔
Functional Testing
Electrical Leakage
● Required Test
✔ Recommended Test
Withstanding Voltage (Hipot)
Field Service Testing
Printer Testing (507ELC2 only)
You should perform additional tests that are specific to modules and
assemblies when you service, adjust, calibrate, or disassemble
assemblies. See the following table.
●
●
●
●
● ✔
●
●
●
● ● ● ✔ ● ● ● ● ●
✔ ✔ ✔ ✔ ✔
✔
✔ ✔ ✔ ✔ ✔
✔ ✔ ✔ ✔ ✔
✔ ✔ ✔ ✔ ✔
Scholar® III 507ELC2 Service Manual
Criticare Systems, Inc.
Section 6 —Service Testing and Calibration
Equipment Required
The following tools are needed:
• Digital voltmeter
• Variable DC power supply 10-15 VDC/ 5A
• Manometer
• Power test cable (See “Power Test Cable” on page 6-4 to
fabricate)
• Dynatech model 232 leakage tester
• Cat. 924 power supply
• Battery load simulator cable
• Dynatech cufflink w/neonatal and adult cuff
• 700 cc factory test block.
• "TEE" connector K. Dynatech 217A or Medsim 300 ECG
simulator
• Fogg TP 400 temperature simulator
• Cat. 913 SpO2 simulator
• Frequency counter
• Oscilloscope
• 3 Lead ECG cable, LL2314
• Pigtail test cable Ay
• Associated Research 3565D Dielectric Withstand Tester (or
equivalent Hi-Pot tester)
• Scholar III 507ELC2 monitor, including Cat. 924 power supply
module (connected)
• AC Input Test Connector (see “AC Input Test Connector” on
page 6-4 to fabricate) with 2200 pf Y-capacitor (CSI
pn 20004B019) attached to power ground (green) wire
• Hi-Pot Test connector for ECG, SpO2, Temp, and DB-9
• NIBP Setup Computer, CSI tool #1331 (For CSI in-house use
only)
Criticare Systems, Inc.
Scholar® III 507ELC2 Service Manual
Page 6-3
Section 6 —Service Testing and Calibration
Plug
Into
Harness
Plug
Into
Board
Insulation
Removed
Red
Wire
Battery
Ground (-)
Positive (+)
Battery
Voltage
Rear View of Connector Half
That Plugs Into Board
Battery
Ground
Wire (-)
Positive (+)
Battery
Voltage
Figure 6-1: Power Test Cable
Black - Hot
Green/Yellow - Ground
White - Neutral
AC Test Cord
Figure 6-2: AC Input Test Connector
Page 6-4
Scholar® III 507ELC2 Service Manual
Criticare Systems, Inc.
Section 6 —Service Testing and Calibration
NIBP Calibration
NOTE:
• The NIBP Functionality test is intended for CSI in-house use
only.
• Before you proceed any further into the final test of the Scholar
III patient monitor you must meet the following conditionst:
— Pressure calibration is to be performed ONLY under the
temperature conditions outlined below. Failure to do so may result
in pressure calibration errors. After calibration, the calibration
reading available on the service screen should remain in the range
of ±0.5mmHg, if the monitor has been in the operating
temperature range for at least two hours.
— Ensure that the temperature of the NIBP module matches ambient
air temperature (defined to be between 19 degrees and 24
degrees C). If power has been applied to the monitor within the
last two hours, expose the module to ambient air for one
continuous hour with the power turned off. To expose the module
to ambient air, it must either be outside of the monitor or you must
remove the top of the monitor.
— Bring the NIBP module to mid-range operating temperature.
Attach a line cord, verify that the ON/OFF (Power) LED on the
front panel is lit, and turn power on to the NIBP module. Leave
power applied, with the module still exposed to ambient air at
temperature between 19 degrees and 24 degrees C, for not less
than fifteen minutes nor more than one hour before proceeding
with calibration. To expose the module to ambient air, it must
either be outside of the monitor or you must remove the top of the
monitor. Replace the top of the monitor after you complete the
calibration.
Criticare Systems, Inc.
Scholar® III 507ELC2 Service Manual
Page 6-5
Section 6 —Service Testing and Calibration
NIBP Module Setup Equipment Required:
• PC computer configured for use with CSI Service Software
• 507EL serial download cable
• Digital manometer (0.01 resolution or better)
• 700cc dummy cuff
• Plastic tuning tool
• ESD protected workbench
• Dynatech Nevada NIBP Analyzer
1. Connect a serial download cable from the PC serial port to the
Scholar III INTERFACE connection. Set the DIN download cable
to NIBP/USER
2. Open the service tool on the computer. Select Start > Programs
> CSI NIBP Service > NIBPSvc. Close the disclaimer dialogue
box.
3. Click on Connection and select Options.
4. Select COM1 for the port and select Scholar III 507EL for the
model. Click on OK.
5. Click on Connection and select Open in Service Mode.
6. Press the Scholar III monitor ON/OFF key to start the monitor.
7. Connect a 700cc dummy cuff and manometer to the NIBP fitting
on the unit.
8. On the LCD window of the monitor verify that the message NBP
SERVICE TOOL and the pressure reading appears.
9. Verify that the monitor’s serial number appears on the ID box.
Click OK.
10.Click on the Calibrate button to calibrate the NIBP module.
11.Check the cuff pressure as indicated on the service screen of
the computer. The cuff pressure should be zero ±1 mmHg. If the
zero base point is out of range, the NIBP module must be
calibrated.
If the zero base point is out of range, manually set the NIBP
module.
If the zero base point is within ±1 mmHg of zero, proceed to the
next step.
12.To perform the service test for speed, click on the Speed button,
then click on Start. When the unit passes the speed test, press
Done.
13.To perform the service test for leakage, click on the Leak
button, then click on Start. When the unit passes the leakage
test, press Done.
Page 6-6
Scholar® III 507ELC2 Service Manual
Criticare Systems, Inc.
Section 6 —Service Testing and Calibration
14.To perform the service test for inflation safety, click on the
Safety button, then click on Start. When the unit passes the
safety test, press Done.
15.Turn the monitor off. Click on Abort if an error message appears
on the computer once the monitor is off.
16.Exit the service program on the computer. Remove the
download cable. Click No to exit the program; click Yes to save
the data to a user-specified location.
17.Seal pots R1 & RV1 on the BP Module. Seal pots R86 and R17
on the Scholar III NIBP Board assembly.
18.Using the Dynatech Cufflink simulator, take two sets of readings
at 120/80 for the adult mode during a cycle time of one minute.
Take two sets of readings at 100/65 for the neonatal mode in the
Stat mode.
Criticare Systems, Inc.
Scholar® III 507ELC2 Service Manual
Page 6-7
Section 6 —Service Testing and Calibration
Calibration for
Analog Output
1. Set the ECG simulator for ECG performance 2Hz square wave
@ 1mV.
2. Connect and display 1mV ECG on the LCD screen, choose the
filter setting: OFF and Lead II configuration.
3. Use a BNC to BNC cable to monitor the analog output on the
oscilloscope.
4. Adjust R112 for 1mV ECG peak on the oscilloscope.
5. Adjust R113 for zero voltage baseline on the oscilloscope.
6. Repeat steps 2 and 3 until both 1mV peak and zero base line
are seen simultaneously.
7. Disconnect the BNC cable.
8. Check DB-9 connector for telemetry compatibility. Verify +5V is
present at pin 9 of the DB-9 connector.
Page 6-8
Scholar® III 507ELC2 Service Manual
Criticare Systems, Inc.
Section 6 —Service Testing and Calibration
Power Supply
Performance
Charger Operation
1. Place unit on your bench. Remove the cover of the Scholar III.
Disconnect the power cable, speaker wire, NIBP cable and
hose, analog, and DB-9 cables from the Main Board. Flip the
bezel upside down and place the component side up. Use the
power test cable to connect the board and the base of the
507EL monitor.
2. Insert an ammeter in series with the battery using the power test
cable. Measure the quiescent current. Verify that it is less than
0.350mA.
3. Turn the unit on and run it until the battery is drained enough to
cause the battery charger to go into bulk charge mode. Plug in
the Cat. 924 charger and measure the charge current. The
current should be 175 - 350mA.
4. Verify that the green POWER LED illuminates when the Cat.
924 charger is connected to the unit. Remove the Cat. 924
charger and the ammeter.
Verify Centered
ECG Baseline
1. Connect the Variable Power Supply to the power test cable.
2. Set the power supply to 12.5VDC.
3. Power up the unit.
4. Insert a CAT 853 (or equivalent) ECG cable into the connector
and connect the leads to the ECG simulator.
5. Set the simulator for 60BPM.
6. Press the UP arrow key two times to set the scale to X4.
7. Verify the monitor reads 1/2mV ECG on the X4 scale.
8. Press the DISPLAY key once to enter the ECG only display.
9. Press SETUP to enter SETUP MENU 1 and verify that LEAD: II
displays.
10.Set the input filter to OFF.
11.Adjust R78 on the ECG/Resp./Temp. Board to center the
baseline of the ECG.
12.This is what it looks like when the ECG is centered.
13.Place GLPT or equivalent varnish on R78 of the ECG/Resp./
Temp. Board.
Criticare Systems, Inc.
Scholar® III 507ELC2 Service Manual
Page 6-9
Section 6 —Service Testing and Calibration
Verify Low Battery With unit on slowly decrease the Variable Power Supply voltage to
11.70 VDC ±0.2VDC. Verify that the LOW BATTERY message
appears on the display. There is a long delay before this appears.
Verify Shut off
1. Adjust the Variable Power supply to 11.40VDC.
2. Adjust R92 until the voltage at TP 18 equals 1.3 VDC. GND is at
TP 2.
3. Slowly decrease the Variable Power Supply voltage to 10.9VDC
±0.2 VDC, to verify that the unit turns off.
4. Disconnect power from the unit.
5. Assemble unit back to its original configuration. Make sure all
cables are connected and every thing is secured and fastened.
6. Place GLPT or equivalent varnish on R92.
Display Check There should be no intermittence or jittering of pixels. The maximum
amount of pixels missing from any display are as follows:
Seven dots are the maximum allowed per screen
Only 1 dot within a 20mm radius circle
Check DB-9 Connector for
Telemetry Compatibility
1. Verify +5V is present at PIN 4 f the DB-9 connector. Ground is
PIN 5.
2. Install the DB-9 cover.
Set Time and Date
1. With the unit powered up. Press and hold the SETUP key to
enter SETUP MENU 2.
2. Press the SETUP key to highlight TIME and DATE.
3. Change them to the current time and date using the UP and
DOWN arrows.
Page 6-10
Scholar® III 507ELC2 Service Manual
Criticare Systems, Inc.
Section 6 —Service Testing and Calibration
Mechnical Inspection
1. Using the steps below, perform a mechanical inspection of the
unit.
a. Ensure that all connectors are secure and locked.
b. Ensure that all fasteners are in place and secure.
c.
Ensure that the internal pneumatics are correctly routed and
secured.
d. Ensure all internal wiring is correctly routed and secured.
e. Ensure that all external surfaces are free from defects,
scratches, and marks.
2. Place final test sticker on the top of the NIBP MOD PCB AY.
bracket.
Criticare Systems, Inc.
Scholar® III 507ELC2 Service Manual
Page 6-11
Section 7 —Disassembly
General Caution
Observe the following caution during all removal and installation
procedures in this section.
!
WARNING !
• Possible safety hazard. Read the battery safety information
provided in “Introduction” in Section 1
!
CAUTION !
• Static-sensitive device! To prevent damage to the monitor,
observe the following precautions:
a. Perform the procedure on an antistatic mat
b. Wear a wrist-grounding strap
c. You should connect both the wrist strap and mat through a
resistor (1 megohm typical) to a good earth ground
• Remove the main battery before you perform any service,
testing, or maintenance procedures.
Criticare Systems, Inc.
Scholar® III 507ELC2 Service Manual
Page 7-1
Section 7 —Disassembly
Battery Replacement
Battery Removal
1. Follow the caution for static-sensitive devices on page 7-1.
2. Turn the monitor off and disconnect the charger cord from the
back of the monitor.
3. Turn the unit upside down and place it on the work surface.
4. Remove the rubber inserts from the feet by pulling the inserts
straight up (see "Figure 7-1: Battery Removal"). There is a
Phillips-head screw beneath each insert.
Rubber
Insert
Phillips
Head
Screw
Rubber
Insert
Phillips
Head
Screw
Phillips
Head
Screw
Front
Foot
Front
Foot
Battery
Cover
Figure 7-1: Battery Removal
5. Remove the three Phillips-head screws that secure the battery
cover to the case.
6. Tilt the battery cover up from the front edge. (use a small
screwdriver to gently pry the battery cover open.)
7. Remove the battery cover from the case by lifting it straight up.
Page 7-2
Scholar® III 507ELC2 Service Manual
Criticare Systems, Inc.
Section 7 —Disassembly
!
CAUTION !
• In the next step, be sure you pull only on the battery end of the
cable, NOT the end of the cable that is connected to the
monitor.
8. To lift the battery out of the battery compartment gently pull on
the wires attached to the battery terminals.
9. Release the latch on the battery cable connector then
disconnect the battery cable at the connector.
!
WARNING !
• The used battery is a potential environmental hazard and you
must dispose of it properly. Refer to the safety instructions in
“Introduction” in Section 1
Battery Installation
1. Connect the cable from the new battery to the battery cable
connector on the monitor.
2. Position the battery cable so that it does not pinch or pull
excessively. Slide the new battery into position in the battery
compartment.
3. Replace the battery compartment door and secure it with the
three screws. (The short screw goes in the middle.)
NOTE: When you replace the feet be sure to align the small
projection on each foot with the matching depression in the
case.
4. Replace the rubber inserts in each foot.
5. Reconnect the power cord to the monitor. Charge the battery for
ten hours before you operate the monitor on battery power.
Criticare Systems, Inc.
Scholar® III 507ELC2 Service Manual
Page 7-3
Section 7 —Disassembly
Main Board
Replacement
Main Board Removal
1. Follow the caution for static-sensitive devices in “General
Caution” on page 7-1.
2. Turn the monitor off. Unplug the AC adapter/charger from the
AC wall receptacle. Then unscrew the adapter cord and remove
it from the back of the monitor.
3. One of the four Phillips screws that retains the monitor top cover
is located beneath the battery (see Figure 7-2). Turn the monitor
upside-down. Perform the battery removal procedure at “Battery
Removal” on page 7-2.
Top
Cover
Screw
Top
Cover
Screw
Top
Cover
Screw
Top
Cover
Screw
Figure 7-2: Top Cover Removal
4. Remove the Phillips screw located beneath the battery.
5. Remove the other three Phillips screws that are in wells at the
corners of the monitor.
6. Turn the monitor right-side up.
7. 507ELC2 monitors only:
a. The recorder/printer module of the 507ELC2 is secured in
place by one of the top cover screws that were just removed.
The module should now be somewhat loose. Detach the
module in order to disconnect its cable from the Main Board.
b. Open the paper door by pressing in on the tab on the rear of
the paper door while lifting the door up and forward. It is not
necessary to remove the roll of paper.
Page 7-4
Scholar® III 507ELC2 Service Manual
Criticare Systems, Inc.
Section 7 —Disassembly
c. Using a long flat-blade screwdriver, insert the blade into the
hole where the tab of the paper door was resting (see "Figure
7-3: Recorder Module Removal"). Press the blade firmly
between the module housing retaining tab and the cutout in
the top cover of the 507ELC2. At the same time, gently lift up
on the module housing. The recorder/printer module should
dislodge from the top cover at this time. Close the paper door
to prevent the roll of paper from escaping.
NOTE: Do not remove the recorder/printer module before
disconnecting the flat flex cable.
Insert
screwdriver
in this slot.
Figure 7-3: Recorder Module Removal
NOTE: The left and right sides of the monitor are the same as the left
and right sides of the viewer when you face the front panel of the
monitor.
J 14
JP2
J6
Main Board
ECG,
Temp.,
Resp.
Board
J12
J13
JM 1
J7
Inverter
Housing
J2
J2
ECG Board
J11
J1
J5
J4
J1
J3
J8
J9
Figure 7-4: Main Board and ECG Board Connectors
Criticare Systems, Inc.
Scholar® III 507ELC2 Service Manual
Page 7-5
Section 7 —Disassembly
!
CAUTION !
• J17 is somewhat delicate. The locking mechanism of J17 is not
removable from the body of the connector. Should it detach, it
cannot be repaired.
8. 507ELC2 monitors only: J17 resides on the Main Board directly
beneath the recorder/printer module. Using either the fingers or
a small flat-blade screwdriver, gently open J17 by pushing/
pulling the two ears of J17 towards the front of the 507ELC2
until it stops. The flat flex cable from the recorder/printer module
can now easily be removed from J17. Place the recorder/printer
module aside on an ESD protective surface.
9. Begin to slide the monitor cover upward to remove the cover
from the chassis. It may be necessary to use a screwdriver to
gently pry upward on the right and left front edges of the cover.
10.Slide the front bezel upward approximately 3/4 inch. Place a
small wood block beneath the front bezel to hold it in the raised
position so you can unplug the Main Board from the bezel
without hitting the Main Board components on objects inside the
monitor chassis.
Figure 7-5: Scholar III Open, Main Board Exposed
Page 7-6
Scholar® III 507ELC2 Service Manual
Criticare Systems, Inc.
Section 7 —Disassembly
11.Label and disconnect the ECG connector (J1) and the
temperature connector (J2) from the ECG Board (see “Main
Board and ECG Board Connectors” on page 7-5).
12.Label and disconnect connectors J8 and J9 (front panel) from
the Main Board at the left front of the monitor (see “Main Board
and ECG Board Connectors” on page 7-5).
13.On monitors with a recorder, label and disconnect J7 and the
connector to the remote battery from the Main Board.
14.Label and disconnect connectors J2 (speaker) and J11
(backlight inverter) from the Main Board. Remove the speaker.
15.Support the Main Board at the front and at the rear. Slide the
Main Board backward and away from the front bezel. Label and
disconnect connectors J1, J3, and J4. These are located at the
front of the Main Board and are connected to the
Interconnection Board. (See “Main Board and ECG Board
Connectors” on page 7-5.)
16.Label and disconnect the ribbon connector which connects the
NIBP assembly to the Main Board at J5. (See “Main Board and
ECG Board Connectors” on page 7-5.)
The Main Board should now be free from the monitor chassis
and front bezel. Set the front and rear edges on supports that
are raised 1 1/2 inches from the storage surface. The
component side of the Main Board must face up to prevent the
printer and printer wires from resting on the storage surface and
being damaged.
Main Board Installation
1. Slide the front bezel upward approximately 3/4 inch. Place a
small wood block beneath the front bezel to hold it in the raised
position so you can plug the Main Board into the bezel without
hitting the Main Board components on objects inside the
monitor chassis.
2. Partially turn the Main Board upside down. Connect the ribbon
connector at J5 with the NIBP assembly. Note pin 1.
3. Connect the front panel to Main Board connectors J8 and J9.
4. Connect the front of the Main Board into the front bezel at
connectors J1, J3, and J4.
5. Connect connectors J6 (analog output) and J13 (DB-9
connector) at the rear of the Main Board.
6. Connect both connectors (J1 and J2 on the ECG Board) at the
left front of the monitor.
7. Connect the power cable connector at J12 of the Main Board.
8. Connect connectors J2 (speaker) and J11 (backlight inverter) on
the edge of the motherboard near the speaker. Install the
speaker.
Criticare Systems, Inc.
Scholar® III 507ELC2 Service Manual
Page 7-7
Section 7 —Disassembly
9. Remove the wood block from beneath the bezel. Slide the bezel
down into the chassis.
10.Slide the top cover down onto the monitor.
11.Turn the monitor upside-down. Install and tighten the four
Phillips screws that hold the top cover to the monitor.
12.Perform the battery installation procedure found at “Battery
Installation” on page 7-3.
13.On monitors with a printer, start the end of the paper roll into
the printer. The paper must feed out from the bottom of the roll
because the printer uses a heat activation method of printing
and only one side of the printer paper contains a heat sensitive
coating. Slide the paper as far as it can go into the printer. Press
the PAPER FEED key to thread the paper through the printer
(see “Installing Paper Roll” on page 7-12).
Page 7-8
Scholar® III 507ELC2 Service Manual
Criticare Systems, Inc.
Section 7 —Disassembly
Recorder/Printer
Replacement
It is not necessary to remove the top cover of the ELC2 to replace the
recorder/printer.
NOTE: This applies only to the 507ELC2 models.
Recorder/Printer Removal
1. Follow the caution for static-sensitive devices in “General
Caution” on page 7-1.
2. Turn the monitor off. Unplug the AC adapter/charger from the
AC wall receptacle. Then unscrew the adapter cord and remove
it from the back of the monitor.
3. Turn the monitor upside down and remove only the screw
located towards the rear of the monitor on the side of the handle
(see "Figure 7-6: Recorder/Printer Module Retaining Screw").
Top
Cover
Screw
Top
Cover
Screw
Top
Cover
Screw
Top
Cover
Screw
Figure 7-6: Recorder/Printer Module Retaining Screw
Criticare Systems, Inc.
Scholar® III 507ELC2 Service Manual
Page 7-9
Section 7 —Disassembly
4. Turn the monitor right-side up. The recorder/printer module
should now be somewhat loose. However, the module must be
detached in order to disconnect its cable from the Main Board.
Open the paper door by pressing in on the tab on the rear of the
paper door while lifting the door up and forward. Remove the roll
of paper by first raising the paper release lever. Then remove
the roll of paper from the chamber.
NOTE: Do not remove the recorder/printer module before
disconnecting the flat flex cable.
Insert
screwdriver
in this slot.
Figure 7-7: Recorder Module Removal
5. Using a long flat-blade screwdriver, insert the blade into the hole
where the tab of the paper door was resting (see "Figure 7-7:
Recorder Module Removal").Press the blade firmly between the
module housing retaining tab and the cutout in the top cover of
the 507ELC2. At the same time, gently lift up on the module
housing. The recorder/printer module should dislodge from the
top cover at this time. Close the paper door to prevent the roll of
paper from escaping.
!
CAUTION !
• J17 is delicate. The locking mechanism of J17 is not removable
from the body of the connector. Should it detach, it cannot be
repaired.
6. J17 resides on the Main Board directly beneath the recorder/
printer module. Using either the fingers or a small flat-blade
screwdriver, gently open J17 by pushing/pulling the two ears of
J17 towards the front of the 507ELC2 until it stops. The flat flex
cable from the recorder/printer module will now easily remove
from J17. Place the recorder/printer module aside on an ESD
protective surface.
Page 7-10
Scholar® III 507ELC2 Service Manual
Criticare Systems, Inc.
Section 7 —Disassembly
Recorder/Printer
Installation
1. Follow the caution for static-sensitive devices in “General
Caution” on page 7-1.
2. Ensure that the locking mechanism of J17 is in the open
position in order that it may accept the flat flex cable from the
recorder/printer module. If necessary, pull the locking
mechanism forward towards the front of the monitor until it
stops.
3. Note the end of the flat flex cable of the recorder/printer module
has exposed contacts on one side. The flat flex cable must be
installed with this side of the flex cable facing down towards the
Main Board of the monitor (that is, contact side down).
4. While holding the recorder/printer module in one hand, insert
the flat flex cable (contact side down) into the opened J17
connector. The cable must be inserted all the way into J17 until
it stops.
5. Without pulling the flex cable out of J17, gently push forward on
the locking mechanism until it snaps closed. This can be tricky.
NOTE: Ensure that both sides of the locking mechanism are
fully closed.
6. Test the flex cable connection by gently tugging on the cable. It
must not move in the J17 connector. If it does move or pulls out,
then the locking mechanism must be reopened and steps 4, 5,
and 6 repeated.
7. Install the recorder/printer module onto the top cover of the
monitor by first inserting the front end of the module (the end
with the PAPER FEED switch) into the cut out. Allow the back
end of the module to rest on the top cover over the cut out.
8. Apply gentle downward pressure on both sides of the rear of the
recorder/printer module as it snaps into place on the top cover.
The module is loose but is captured by the snap tabs on the
module.
9. Turn the monitor upside down. Install and tighten the recorder/
printer retaining screw (see "Figure 7-6: Recorder/Printer
Module Retaining Screw").
10.Plug the AC adapter/charger into the wall socket. Screw the
adapter cord into the monitor.
11.Press the ON/OFF key to power-up the monitor.
12.To install a roll of paper, open the paper door by pressing in on
the tab on the rear of the paper door while lifting the door up and
forward.
Criticare Systems, Inc.
Scholar® III 507ELC2 Service Manual
Page 7-11
Section 7 —Disassembly
13.Either install the roll previously removed or install a new roll (50
mm paper, CSI cat. no. 1121). New rolls will have a short length
of hold-down tape that must be removed from the fresh roll.
Ensure that the end of the paper is cut straight. Use scissors, if
necessary to square up the end. (Torn paper does not feed
correctly.)
14.Ensure the paper release lever on the side of the recorder
housing is in the closed (down) position.
15.Ensure that the paper dispenses from the bottom of the roll, as
shown below. (See "Figure 7-8: Installing Paper Roll".)
Figure 7-8: Installing Paper Roll
16.Insert the end of the paper squarely beneath the roller of the
recorder. If properly inserted, the recorder should begin to Auto
Feed after about one second. If this does not occur, then the
paper may be manually started.
a) Raise the paper release lever, inserting the paper beneath
the roller,
b) Lower the paper release lever,
c) Press the PAPER FEED key located on top of the recorder
housing.
17.Center the paper on the roller, if necessary, by using the paper
release lever and repositioning the paper.
18.Feed the paper through the slot of the paper door and close the
paper door over the new roll of paper.
19.Ensure that the paper door latches shut.
Page 7-12
Scholar® III 507ELC2 Service Manual
Criticare Systems, Inc.
Section 7 —Disassembly
Loudspeaker
Replacement
Loudspeaker Removal
1. Follow the caution for static-sensitive devices in “General
Caution” on page 7-1.
2. Perform the battery removal procedure at “Battery Removal” on
page 7-2.
3. Perform the first 12 steps of the Main Board removal procedure
found in “Main Board Removal” on page 7-4.
4. Label and disconnect connector J2 on the Main Board that
connect to the speaker (see “Main Board and ECG Board
Connectors” on page 7-5).
5. Remove the speaker from the monitor.
Loudspeaker Installation
1. Take the connector for the new speaker and connect it to J2 on
the Main Board (see “Main Board and ECG Board Connectors”
on page 7-5).
2. Perform the Main Board installation procedure found in “Main
Board Installation” on page 7-7.
3. Slide the top cover down onto the monitor.
4. Turn the monitor upside-down. Install and tighten the four
screws that hold the top cover to the monitor.
5. Perform the battery installation procedure in “Battery
Installation” on page 7-3.
Criticare Systems, Inc.
Scholar® III 507ELC2 Service Manual
Page 7-13
Section 7 —Disassembly
ECG Board
Replacement
ECG Board Removal
1. Follow the caution for static-sensitive devices in “General
Caution” on page 7-1.
2. Perform the battery removal procedure at “Battery Removal” on
page 7-2.
3. Perform the Main Board removal procedure found in “Main
Board Removal” on page 7-4.
4. Remove the four plastic screws from the solder side of the ECG
board (see “Main Board and ECG Board Connectors” on
page 7-5). You must label and disconnect the printer flex cable
to expose one of the screws.
5. Label and disconnect the ECG cable at J2 on the ECG Board.
6. Label and disconnect the temperature connector at J1 on the
ECG Board.
7. Gently shake and pull up the ECG assembly from the Main
Board.
8. To get access to the board-level components, remove the top
four nylon screws, then open the shield.
ECG Board Installation
1. Plug the ECG board into the Main Board (see “Main Board and
ECG Board Connectors” on page 7-5).
2. Install the plastic screw through the ECG board and tighten it.
3. Perform the Main Board installation procedure found in “Main
Board Installation” on page 7-7.
4. Slide the top cover down onto the monitor.
5. Turn the monitor upside-down. Install and tighten the four
screws that hold the top cover to the monitor.
6. Perform the battery installation procedure in “Battery
Installation” on page 7-3.
Page 7-14
Scholar® III 507ELC2 Service Manual
Criticare Systems, Inc.
Section 7 —Disassembly
Blood Pressure Board
Replacement
Blood Pressure Board
Removal
1. Follow the caution for static-sensitive devices in “General
Caution” on page 7-1.
2. Perform the battery removal procedure at “Battery Removal” on
page 7-2.
3. Perform the Main Board removal procedure found in “Main
Board Removal” on page 7-4.
4. Remove the four plastic screws from the corners of the Blood
Pressure (BP) Board (see Figure 7-8). A plastic spacer is
positioned at each screw point, between the circuit board and
the metal bracket. Retain the plastic spacers for board
installation.
Plastic
Screw
PR1
Blood
Pressure
Board
J7
Plastic
Spacer
Plastic Tube
Figure 7-9: Blood Pressure Board Replacement
5. At the rear of the Blood Pressure Board, label and disconnect
J7 (an 8-pin connector). Also label and disconnect the plastic
tube from PR1, the pressure transducer.
6. Lift the blood pressure board out of the monitor chassis.
Criticare Systems, Inc.
Scholar® III 507ELC2 Service Manual
Page 7-15
Section 7 —Disassembly
Blood Pressure Board
Installation
1. Connect the plastic tube onto pressure transducer PR1, at the
rear of the new Blood Pressure Board (see “Blood Pressure
Board Replacement” on page 7-15).
2. Connect connector J7 into the rear of the new Blood Pressure
Board.
3. Place a plastic spacer on each of the four metal mounting
brackets.
4. Set the new Blood Pressure Board down onto the plastic
spacers. Install the four plastic screws through the board and
the plastic spacers and tighten them.
5. Perform the Main Board installation procedure found in “Main
Board Installation” on page 7-7.
6. Slide the top cover down onto the monitor.
7. Turn the monitor upside-down. Install and tighten the four
screws that hold the top cover to the monitor.
8. Perform the battery installation procedure in “Battery
Installation” on page 7-3.
Page 7-16
Scholar® III 507ELC2 Service Manual
Criticare Systems, Inc.
Section 7 —Disassembly
Air Pump Replacement
Air Pump Removal
1. Follow the caution for static-sensitive devices in “General
Caution” on page 7-1.
2. Perform the battery removal procedure at “Battery Removal” on
page 7-2.
3. Perform the Main Board removal procedure found in “Main
Board Removal” on page 7-4.
4. Perform the Blood Pressure Board removal procedure found in
“Blood Pressure Board Removal” on page 7-15.
5. Label and disconnect (at the elbow) the plastic hose that
extends to the Quick-Connect fitting on the display panel (see
Figure 7-9).
J7
Connector
Air
Pump
Outlet Hose
Wire
Ties
Mounting
Tray
Support
Bracket
Retaining
Screw
MPL
Locking
Tab
Elbow
Unplug
Hose
Figure 7-10: Air Pump Installation
6. Remove the retaining screw that holds the mounting tray to its
support bracket.
Criticare Systems, Inc.
Scholar® III 507ELC2 Service Manual
Page 7-17
Section 7 —Disassembly
7. Lift slightly the open end of the mounting tray until it clears the
locking tab on the support bracket. At the same time, slide the
tray toward the locking tab until the tray pulls free of the two
other tabs that hold the tray to the support bracket. Lift the tray
out of the monitor.
8. Cut the two wire ties that hold the air pump to the mounting tray.
9. Label and disconnect the outlet hose from the plastic nipple in
the center of the air pump.
10.The two wires that supply the air pump are plugged into the J7
connector. If the pump is being replaced, the two wires must be
removed from this connector (see Figure 7-10). To free the
pump wires, first remove the wire tie from the harness that
contains them.
11.Use a thin object with a fine point (e.g., a very small
screwdriver) to depress the latch on the female terminal end
while pulling gently on the wire to remove it from the J7
connector.
Terminal
Latch
J7
Purple
(Air Pump)
Brown
(Pressure Switch)
Yellow
(Air Pump)
Green
(Pressure Switch)
Red
(2 Way Valve)
Black
(3 Way Valve)
Black
(2 Way Valve)
Red
(3 Way Valve)
Wire
Tie
Figure 7-11: Wire Position and Removal from J7
Connector
Page 7-18
Scholar® III 507ELC2 Service Manual
Criticare Systems, Inc.
Section 7 —Disassembly
Air Pump Installation
1. Install the two wire ties through the slots in the bottom of the
mounting tray (see “Air Pump Installation” on page 7-17).
2. Slide the terminal end of each pump wire into connector J7 until
the terminal latch locks into its slot (see “Wire Position and
Removal from J7 Connector” on page 7-18). Be certain that the
purple wire is in the first position in the J7 connector and that
the yellow wire is in the second position.
3. Plug the outlet hose onto the plastic nipple at the center of the
pump.
4. Set the pump onto the vibration damping pad and tighten the
wire ties around the pump.
5. Install a new wire tie around the wire harness.
6. Pick up the mounting tray and set it onto the support bracket so
that the two tabs at the rear of the bracket slide into the slots on
the tray.
7. Press down on the open end of the tray until the edge of the tray
locks behind the tab on the support bracket.
8. Install the screw that holds the mounting tray to the support
bracket.
9. Plug the hose from the display panel onto the elbow that leads
to the solenoid valves.
10.Perform the Blood Pressure Board installation procedure found
in “Blood Pressure Board Installation” on page 7-16.
11.Perform the Main Board installation procedure found in “Main
Board Installation” on page 7-7.
12.Slide the top cover down onto the monitor.
13.Turn the monitor upside-down. Install and tighten the four
screws that hold the top cover to the monitor.
14.Perform the battery installation procedure in “Battery
Installation” on page 7-3.
Criticare Systems, Inc.
Scholar® III 507ELC2 Service Manual
Page 7-19
Section 7 —Disassembly
Solenoid Valve
Replacement
General Two solenoid valves in the air system control the blood pressure cuff
inflation and deflation. (See "Figure 7-12: Solenoid Valve and
Pressure Switch Installation".) The same installation and removal
procedures can be used for both valves.
J7
Connector
Wire
Tie
2 Way
Valve
Pressure
Switch
3 Way
Valve
Screw
Screw
Figure 7-12: Solenoid Valve and Pressure Switch
Installation
Solenoid Valve Removal
1. Follow the caution for static-sensitive devices in “General
Caution” on page 7-1.
2. Perform the battery removal procedure at “Battery Removal” on
page 7-2.
3. Perform the Main Board removal procedure found in “Main
Board Removal” on page 7-4.
4. Perform the Blood Pressure Board removal procedure found in
“Blood Pressure Board Removal” on page 7-15.
5. Label and disconnect the plastic tubes from the valve.
6. To remove the valve from the monitor you must remove the two
wires from the J7 connector that supply the valve. Free the wires
from the harness that contains them by clipping the wire ties
that hold the harness together (see “Air Pump Installation” on
page 7-17).
7. Label the connector at J7. Use a thin object with a fine point
(e.g., a very small screwdriver) to depress the latch on the
female terminal end and pull gently on the wire to remove it from
the J7 connector. Be sure to note the positions of the red and
black wires in the connector before removing them. You must
return the wires to the original positions when you reassemble.
Page 7-20
Scholar® III 507ELC2 Service Manual
Criticare Systems, Inc.
Section 7 —Disassembly
8. Remove the screws from the valve block. Retain the plastic
spacer that is beneath each screw. The spacers are used for
reassembly. Lift the solenoid valve out of the monitor.
Solenoid Valve Installation
1. Plug the hoses onto the valve (see “Solenoid Valve and
Pressure Switch Installation” on page 7-20).
2. Set the valve into position in the monitor.
3. Apply Loctite 425 (CSI Cat. No. 41157B001) to the valve
retaining screws. Insert the screws into the valve block. Place a
plastic spacer beneath each screw. Tighten the screws.
4. Slide the terminal ends of the valve wires into connector J7
(“Wire Position and Removal from J7 Connector” on page 7-18).
Be sure that the terminal latch on each wire locks into its slot.
Be sure that all wires are in their original positions in the
connector.
5. Install new wire ties on the wire harness.
6. Perform the Blood Pressure Board installation procedure found
in “Blood Pressure Board Installation” on page 7-16.
7. Perform the Main Board installation procedure found in “Main
Board Installation” on page 7-7.
8. Slide the top cover down onto the monitor.
9. Turn the monitor upside-down. Install and tighten the four
screws that hold the top cover to the monitor.
10.Perform the battery installation procedure in “Battery
Installation” on page 7-3.
Criticare Systems, Inc.
Scholar® III 507ELC2 Service Manual
Page 7-21
Section 7 —Disassembly
Pressure Switch
Replacement
Pressure Switch Removal
1. Follow the caution for static-sensitive devices in “General
Caution” on page 7-1.
2. Perform the battery removal procedure at “Battery Removal” on
page 7-2.
3. Perform the Main Board removal procedure found in “Main
Board Removal” on page 7-4.
4. Perform the Blood Pressure Board removal procedure found in
“Blood Pressure Board Removal” on page 7-15.
5. Two wires supply the pressure switch (see “Solenoid Valve and
Pressure Switch Installation” on page 7-20). To remove the
pressure switch you must unplug these wires from the J7
connector. First clip the wire tie that holds the pressure switch
wires in the wire harness (see “Wire Position and Removal from
J7 Connector” on page 7-18).
6. Label the connector at J7. Use a thin object with a fine point
(e.g., a very small screwdriver) to depress the latch on the
female terminal end and pull gently on the wire to remove it from
the J7 connector. Be sure to note the positions of the red and
black wires in the connector before removing them. You must
return the wires to the original positions when you reassemble.
7. Remove the two screws that hold the pressure switch in place.
8. Label and remove the hose from the pressure switch. Remove
the pressure switch from the monitor.
Pressure Switch Installation
1. Plug the hose onto the plastic nipple on the pressure switch.
2. Set the pressure switch down into position in the monitor.
3. Apply Loctite 425 (CSI Cat. No. 41157B001) to the switch
retaining screws.
4. Slide the screws through the switch and thread them into the
mounting tray.
5. Slide the terminal end of each switch wire into the J7 connector
until the terminal latch locks into its slot (see “Wire Position and
Removal from J7 Connector” on page 7-18). Be certain that the
switch wires are in their original positions in the J7 connector.
6. Perform the Blood Pressure Board installation procedure found
in “Blood Pressure Board Installation” on page 7-16.
7. Perform the Main Board installation procedure found in “Main
Board Installation” on page 7-7.
8. Slide the top cover down onto the monitor.
Page 7-22
Scholar® III 507ELC2 Service Manual
Criticare Systems, Inc.
Section 7 —Disassembly
9. Turn the monitor upside-down. Install and tighten the four
screws that hold the top cover to the monitor.
10.Perform the battery installation procedure in “Battery
Installation” on page 7-3.
Criticare Systems, Inc.
Scholar® III 507ELC2 Service Manual
Page 7-23
Section 7 —Disassembly
Display Interface Board
and 7-segment LED
Board Replacement
Front Bezel Removal
1. Follow the caution for static-sensitive devices in “General
Caution” on page 7-1.
2. Perform the procedure in “Battery Replacement” on page 7-2.
3. Perform the Main Board removal procedure in “Main Board
Replacement” on page 7-4.
4. Disconnect the grounding connector lead to the front bezel
assembly.
5. Unplug at the elbow, the hose that runs to the Quick-Connect
fitting for the blood pressure cuff on the front bezel (see Figure
7-11).
6. Disconnect the temperature cable, the ECG cable, the SpO2
cable, and the backlight cable. Mark each cable so that it can
later be properly reconnected.
7. Remove the loudspeaker from the monitor chassis.
8. Remove the four Phillips screws that hold the bezel to the
chassis—two at the top and two at the bottom. (See "Figure 713: Remove the Front Bezel".)
Bottom View
Top View
Remove the four screws
Below battery door.
Figure 7-13: Remove the Front Bezel
9. Slide the front bezel upward and out of the monitor chassis.
Page 7-24
Scholar® III 507ELC2 Service Manual
Criticare Systems, Inc.
Section 7 —Disassembly
Display Interface Board
and 7-segment LED Board
Removal
1. Follow the caution for static-sensitive devices in “General
Caution” on page 7-1.
2. Perform the battery removal procedure at “Battery Removal” on
page 7-2.
3. Perform the Main Board removal procedure found in “Main
Board Removal” on page 7-4.
4. Label and disconnect the grounding connector lead to the front
bezel assembly.
5. Label and disconnect (at the elbow) the hose that runs to the
Quick-Connect fitting for the blood pressure cuff on the front
bezel. (See "Figure 7-14: Disconnecting Blood Pressure Cuff
Hose at Elbow".)
Elbow
QR
C26
NIBP
NIBP QuickLuer fitting Fitting
Connect
C27
MADE IN U.S.A.
CRITICARE SYSTEMS, INC.
C29
91255A001 -
Hose
Figure 7-14: Disconnecting Blood Pressure Cuff Hose
at Elbow
6. Label and disconnect the temperature cable, the ECG cable, the
SpO2 cable, and the backlight cable.
7. Remove the speaker from the monitor chassis.
8. Slide the front bezel upward and out of the monitor chassis.
9. Remove the two nuts that hold the EMI shield to the Display
Interface Board (see “Front Bezel Assembly” on page 7-27).
10.Remove the four screws that secure the EMI shield to the
Display Interface Board. Remove the EMI shield from the
Display Interface Board.
Criticare Systems, Inc.
Scholar® III 507ELC2 Service Manual
Page 7-25
Section 7 —Disassembly
11.Label the cable connected to P7. Reach underneath the edge
of the Display Interface Board near the P7 header connector
and gently lift upward until P7 unplugs. As a single unit, lift the
Display Interface Board and the 7-segment LED board out of the
front bezel.
12.To separate the 7-segment LED Board from the Display
Interface Board, label and disconnect the header connectors
marked P1and P2 on the Display Interface Board.
Display Interface Board
and 7-segment LED Board
Installation
1. Join the 7-segment LED Board with the Display Interface Board
by plugging together the header connectors marked P1 and P2
on the Display Interface Board (see “Front Bezel Assembly” on
page 7-27).
2. Set the assembled boards into the front bezel. Carefully align
the pins and then plug the P7 header connector on the Display
Interface Board into the header block inside the front bezel.
3. Install and tighten the four screws that hold the Display Interface
Board to the threaded supports inside the front bezel.
4. Set the EMI shield down onto the Display Interface Board. The
top and bottom edges of the shield must fit inside the front
bezel. Install the two screws that hold the shield to the Display
Interface Board.
5. Slide the front bezel down into the monitor chassis.
6. Set the loudspeaker into position inside the monitor chassis.
7. Plug the hose from the blood pressure cuff fitting onto the elbow
that extends out of the mounting tray (See “Disconnecting Blood
Pressure Cuff Hose at Elbow” on page 7-25).
8. Perform the Main Board installation procedure found in “Main
Board Installation” on page 7-7.
9. Slide the top cover down onto the monitor.
10.Turn the monitor upside-down. Install and tighten the four
screws that hold the top cover to the monitor.
11.Perform the battery installation procedure in “Battery
Installation” on page 7-3.
Page 7-26
Scholar® III 507ELC2 Service Manual
Criticare Systems, Inc.
Criticare Systems, Inc.
NIBP Receptacle
SpO2 Receptacle
Temperature
Receptacle
Scholar® III 507ELC2 Service Manual
Display
Chassis
EMI Shield
LED Ribbon
Cable
Interconnect Board
Figure 7-15: Front Bezel Assembly
Keypad Membrane
Front Bezel
7 Segment
LED Board
Display Panel
Display
Cable
ECG Receptacle
Ground Cable
Section 7 —Disassembly
Page 7-27
Section 7 —Disassembly
Keypad Membrane
Replacement
General If any of the keys on the front of the monitor fail to operate, you must
replace the membrane that contains the keys.
The keypad membrane also contains the following LEDs:
• Lights for ALARM SILENCE (red) and ON/OFF (Power; green)
and
• 7-segment numeric displays for BPM (red), SpO2% (green), and
NIBP (red) for SYS mm Hg, DIA mm Hg, and Mean mm Hg.
If it becomes necessary to replace one of these LEDs, it is necessary
to replace the entire keypad membrane. The keypad membrane
contains all the LEDs identified in this paragraph.
Keypad Membrane
Removal
1. Follow the caution for static-sensitive devices in “General
Caution” on page 7-1.
2. Perform the Display Interface Board and LED Board removal
procedure found in “Display Interface Board and 7-segment
LED Board Removal” on page 7-25.
3. On the front side start at the upper left corner of the front bezel
and use a thin blade to get beneath the plastic membrane. After
you lift the corner of the membrane pull with your fingers to peel
the entire membrane off the front of the bezel.
4. Put some denatured alcohol on a clean cloth to clean any
places on the front bezel where glue remains from the
membrane that you removed.
!
CAUTION !
• Be certain that the bezel is completely dry before installing a
new keypad membrane. The solvent can damage the traces on
the backside of the new membrane.
Keypad Membrane
Installation
1. Follow the caution for static-sensitive devices in “General
Caution” on page 7-1.
2. Peel the backing sheet from a new keypad membrane to expose
the glued surface on the back of the membrane.
3. Carefully align the connector block on the membrane and the
LEDs on the membrane with the openings in the front bezel.
Press down on all areas of the membrane to make sure that the
glue has made a strong and complete bond with the bezel.
Page 7-28
Scholar® III 507ELC2 Service Manual
Criticare Systems, Inc.
Section 7 —Disassembly
4. Install the Display Interface Board and LED boards by
performing the “Display Interface Board and 7-segment LED
Board Installation” on page 7-26.
SpO2 Sensor
Receptacle
General If the SpO2 sensor receptacle is defective you must replace the front
bezel (see “Wire Position and Removal from J7 Connector” on
page 7-18). A new bezel contains a new SpO2 sensor receptacle and
a new keypad membrane.
To replace the bezel, perform the Display Interface Board and LED
Board removal procedure (found in “Display Interface Board
and 7-segment LED Board Removal” on page 7-25) on the old bezel.
Then install the boards into the new bezel, by performing the Display
Interface Board and LED Board installation procedure found in
“Display Interface Board and 7-segment LED Board Installation” on
page 7-26.
Criticare Systems, Inc.
Scholar® III 507ELC2 Service Manual
Page 7-29
Section 8 — Troubleshooting
Troubleshooting Table
This section lists the possible causes of monitor problems. Use these
tables and the schematics in “Drawings and Schematics” in Section 9
to identify and locate components that malfunction.
Symptom
Unit won’t power up
Problem
Solution
• Battery is discharged
Connect AC charger
• AC charger is not securely
connected to monitor
Connect charger cord securely to rear panel
connector
• AC power cord is not securely
connected to charger
Connect cord to charger
• AC outlet is not “live”
Connect the power cord to a live outlet
• Fuses F1 and/or F2 (on Main Board)
are blown
Replace fuses
• J12 on Main Board is disconnected
Connect J12
• J1, J3, J4, and/or J11 on Main Board
are disconnected or loose
Connect J1, J3, J4, and/or J11
Leaks in NIBP system • NIBP cuff connector is loose at front
Tighten connector
panel
NIBP not functioning
• Defective cuff
Replace cuff
• Defective hose
Replace hose
• NIBP module is not communicating
with Main Board
Power unit off, then on while watching the
display. If the screen is blank for ten seconds after the logo displays, the NIBP module is not communicating with the Main
Board. Check for the following:
• A good connection at J8 on the
NIBP Board
• Flash PROM U27 is completely
seated in socket
• Good connection at each end of
ribbon cable between Main
Board J5 and NIBP module J8
No sound from
speaker
Display backlight
doesn’t work
• J2 on Main Board is disconnected or
loose
Connect J2
• Speaker wire broken at speaker
terminals
Check speaker wires
• J11 on Main Board is disconnected
or loose
Connect J11
Display is blank or not • Contrast is misadjusted
readable
• J1, J3, and/or J4 on Main Board are
disconnected or loose
Criticare Systems, Inc.
Adjust display contrast in Setup menu
Connect J1, J3, and/or J4
Scholar® III 507ELC2 Service Manual
Page 8-1
Section 8 —Troubleshooting
Symptom
RS-232 interface
doesn’t work
LEDs don’t come on
Problem
Solution
• Cable to DB-9 connector on rear
panel is disconnected or loose
Connect cable
• J13 on Main Board is disconnected
or loose
Connect J13
• LEDs are turned off in software
Enter Setup menu, set LEDs to ON. (Refer
to Operator’s Manual)
Troubleshooting and
Repair
Before attempting to repair a damaged monitor the technician must
fully understand the functions of the monitor. The service technician
should have read and understood all the previous sections of this
manual.
You must fully repair, calibrate, and test all damaged monitors before
you use them on patients. The monitor must meet the original
operating specifications before you use it on a patient.
Always follow ESD precautions when performing any of the
procedures discussed in this section.
ComfortCuff NIBP
Module
The NIBP module (pn 93755A005) consists of a pneumatic pump
assembly (pn 90772A001) and control circuitry located on the NIBP
Board (pn 91255A005).
The pneumatic assembly is mounted on a mounting plate that is
mounted to the frame of the monitor. A large diameter tube
(pn 41700B002) connects to the Quick-Connect hardware fixture. A
small diameter tube (pn 41700B001) connects to the transducer on
the NIBP Board.
The remaining pneumatics links connect the two control valves
(pn 90774A001 and 90775A001), the pump (pn 84500B001), and the
check valve (pn 41579B003). As the tubing ages it may lose its seal.
Old tubing can be re-seated or replaced as necessary.
When any major pneumatic component such as a pump or valve is
replaced, the NIBP module must be re-calibrated as in “Service
Testing and Calibration” in Section 6 of this manual. The
manufacturer recommends that the monitor be returned to a CSI
authorized service facility if pump replacement is required.
Page 8-2
Scholar® III 507ELC2 Service Manual
Criticare Systems, Inc.
Section 8 —Troubleshooting
ECG/Respiration/
Temperature Module
The ECG module is located on the ECG-Resperation-Temperature
Board assembly (pn 91295A001) that is attached to the Main Board.
The ECG-Resp.-Temp. Board fits directly on to the Main Board
through a socketed 20-pin connection on the component side of the
Main Board assembly. There is also a shielded cable assembly that
extends from the top of the board to the external ECG port. Check
each of these connection points if the monitor fails to produce an
accurate ECG waveform.
The ECG-Resp.-Temp. Board has a foil shield to reduce noise from
other portions of the monitor. Noise can be introduced by worn cable
assemblies and degraded power supplies. Test the analog ECG
waveform signal and the input power where they enter the
ECG-Resp.-Temp. Board for interference noise.
You can replace the ECG-Resp.-Temp. Board as an assembly with
the Main Board as a serviceable component. Replacement Main
Board/ECG-Resp.-Temp. Board assemblies, (pn 95536A002) are pretested, software loaded, and calibrated. The monitor requires
complete safety testing after reassembly.
NOTE: Always check line frequency, filter settings and the ECG lead
cables as part of any ECG trouble shooting. Always use the
recommended simulators for performance testing.
Board Settings and There is one pot under the shielding at locations R78. This is factory
Module Software set and should not be adjusted.
Respiration The respiration circuit is located on the ECG-Resp.-Temp. Board.
There is no separate calibration or testing for the impedance
respiration.
Temperature The temperature module is located on the ECG-Resp.-Temp. Board.
There are no on-board settings or service calibrations. The
temperature module is auto-calibrating upon start-up.
Criticare Systems, Inc.
Scholar® III 507ELC2 Service Manual
Page 8-3
Section 8 —Troubleshooting
DOX SpO2 Module
The DOX SpO2 module is included on the Main Board.
The plethysmograph input signal enters the Main Board through a
shielded cable that runs between the board and the SpO2 connection
on the front of the monitor.
The DOX SpO2 module is composed of digital components that are
not effected by noise. There is also no signal degradation or loss of
calibration due to analog components. Interference or noisy signal
can be due to a worn cable assembly or DB-9 connector. Replace the
connector and cable assembly if necessary.
Always check the sensor when intermittent problems are reported.
Stretched or otherwise damaged sensor cables must be replaced.
NOTE: The line frequency setting of the monitor must be set correctly
for optimal SpO2 monitoring.
Main Board
The Main Board (pn 91369A001) contains the primary processors,
storage memory, NIBP circuitry, communication interfaces, audio
driver, vital signs module connections, power regulation, and video
generation and keypad inputs (User I/O).
The main ground cable (pn 95637A001) and the display ground cable
(pn 95642A001) are part of the Main Board assembly.
There are two CPUs on the Main Board that you must program from a
CSI Service Download Station. The programmable settings remain in
non-volatile memory. Repair or improper handling of the Main Board
can corrupt this software. See procedure 91340T003 for more
information.
There is one replacable 3-amp fuse (pn 82004B001) for the battery
input at F1. There is one replaceable fuse (pn 82003B001) for the
power supply module at F2.
Page 8-4
Scholar® III 507ELC2 Service Manual
Criticare Systems, Inc.
Section 8 —Troubleshooting
CAT 924
Battery Charger
The CAT 924 Battery Charger (pn 90250A001) consists of of a
transformer, a fixed cord that attaches to the 507ELC2 monitor, and a
detachable cord that plugs into the wall. The detachable cord should
be correct for your country’s power grid. If you have the wrong cord,
contact Criticare Systems for the correct cord.
The transformer box is not field reparable. If the transformer has
failed, return it to Criticare.
Replace broken, cracked, or loose AC receptacles. Replace the
receptacle if the external pins are bent or broken. Do not attempt to
remove or modify the ground pin!
Check the transformer and cables for damage before replacement.
Measure the icoming and outgoing voltages and assure they match
the specifications printed on the transformer box.
Criticare Systems, Inc.
Scholar® III 507ELC2 Service Manual
Page 8-5
Section 9 — Drawings and Schematics
List of Drawings
Criticare Systems, Inc.
Title
Drawing Number
Final Assembly
93971A001
Front Bezel-Active
92522A001
Chassis Assembly
92791A001
Main/ECG-Resp-Temp Assembly
95722A001
NIBP Assembly
NIBP Mounting Base
NIBP Valve-Pump Assembly
NIBP Valve/Switch Assembly
93755A005
93251A002
91753A002
91754A002
Printer/Recorder Assembly
95721A001
Main Board PCB
91369A003
Main Board Schematic
91369S003
ECG-Resp-Temp Daughter PCB
91295A001
ECG-Resp-Temp Daughter PCB Schematic
91295S001
NIBP PCB
91255A005
NIBP PCB Schematic
91255S005
Interconnection PCB
91367A001
Interconnection PCB Schematic
91367S001
LED Display PCB
91366A001
LED Display PCB Schematic
91366S001
Scholar® III 507ELC2 Service Manual
Page 9-1
Section 9 —Drawings and Schematics
Final Assembly
93971A001
Item #
01
05
09
11
13
16
17
18
20
21
22
23
24
27
28
29
30
31
Page 9-2
FINAL AY 507ELC2
CSI Part #
Description
40496B001
45006B004
95723A001
46036B101
92791A001
40180C007
41891B001
40995B005
46162B001
40065B002
92522A001
95722A001
90815A001
42324B001
42065B002
40296B002
95721A001
40496B004
P.H.M.S. 6-32X.375 SEMS
COVER 507EL
LABEL SET 507ELC2 ENG
LABEL QLTY SEAL CSI LOGO
AY CHASSIS SCHOLAR III
F.H.M.S. COATED COOL GRAY
DB9 COVER PLATE
P.H.M.S. 4-40X.25 SEMS
LABEL CSI MON BAR CODE
PAPER THERMAL 2.283 WIDE
AY BEZEL SCHOLAR III ACT
AY MAIN /ECG-TEMP 507ELC2
AY CABLE 4 WIRE EMI CHOKE
BACK COVER PLATE 507EL
F.H.M.S 4-40 X.250 PH PNT
TUBING SILC BLU .125X.250
PRINTER AY 507ELC2
P.H.M.S. 6-32X.500 SEMS
Scholar® III 507ELC2 Service Manual
Criticare Systems, Inc.
Section 9 —Drawings and Schematics
Front Bezel-Active
92522A001
Item #
01
02
03
04
05
07
08
09
10
11
12
13
14
15
16
18
19
20
22
23
24
25
26
27
28
29
30
31
32
33
34
Criticare Systems, Inc.
AY BEZEL SCHOLAR III ACT
CSI Part #
Description
45141B001
45142B001
46333B001
81518B001
42322B001
83401B001
42323B001
91366A001
91367A001
40995B003
83402B001
83400B001
90899A001
40284B002
90900A001
42014B001
40284B005
42384B001
40086B001
41458B001
40995B005
42335B001
81517C001
42237B001
42236B001
90793A002
90901A001
42352B001
42353B001
82550B001
41955B001
FRONT BEZEL 507EL
MEMBRANE 507EL
LBL FRNT CONN 507EL
DISPLAY FILTER ACTIVE
DISPLAY CHASSIS ACTIVE
EMI SHIELD INTERCONNECT
MOUNTING BLOCK 507EL
AY PCB LED DISPLAY 507EL
AY PCB INTERCONNECT 507EL
P.H.M.S. 4-40X.500 SEMS
FLEX CBL NEC DISPLAY ACT
RIBBON CBL SAMTEC FFSD
AY CBL 507EL GROUND
NUT 6-32 KEPS PL
AY CBL 507EL SPO2/TEMP
FITNG, QUICK CON. HH NIBP
NUT 10-32 KEPS PL
STANDOFF 4-40 X .625 M/F
WASHER FLAT PL .125X.219
P.H.M.S. 4 X .250 HI/LO
P.H.M.S. 4-40X.25 SEMS
METRIC PAN HEAD M3X8
DISPLAY NEC MODIFIED
NUT NYLON JAM 3/8 X 32
WASHER MYLAR 3/8 .015THK
AY CABLE ECG 507E
AY CBL BACK LIGHT NEC
DRIP GUARD MEMBRANE TAIL
SHOULDER WASHER #4
FERRITE FLST CABLE
FOAM TAPE 1.0 X 2.12
Scholar® III 507ELC2 Service Manual
Page 9-3
Section 9 —Drawings and Schematics
Chassis Assembly
92791A001
Item #
01
02
03
04
05
06
07
08
09
10
11
12
13
14
15
16
17
19
20
21
22
28
29
30
31
35
36
Page 9-4
AY CHASSIS SCHOLAR III
CSI Part #
Description
40995B001
40182B002
40281B007
40284B002
40496B004
41438B001
41525B001
41527B001
41537B001
41537B002
41592B001
41691B001
45005B004
90755A001
90798A002
90796A001
92250A001
93250A001
93755A005
95002A002
95250A001
90813A001
80122B001
40119B001
40041B007
40041B003
40041B001
P.H.M.S. 4-40X.312 SEMS
MTG HARDWARE SUB-D SILVER
P.H.M.S. 6-32X.375 PL PH
NUT 6-32 KEPS PL
P.H.M.S. 6-32X.500 SEMS
CLIP TUBING
SPRING LOC FOLDING LEG
FEET ADHESIVE HEMISPHERE
FOAM DISK 1.38 DIA .25THK
FOAM DISK 1.38 DIA .12THK
RIVET SNAP BLK K236
BRACKET MTG 507N NIBP
CHASSIS FOR 507EL
AY CABLE 1100 NIBP RIB
AY CABLE DB-9 SCHOLAR II
AY CABLE PWR INTFC 507E
AY BATT MODEL 602-10/11
AY BATTERY DOOR POET TE
AY FNL NIBP MOD KEYED
AY CBL AC CHRGR W/CN 507E
AY SPEAKER MODEL 602-10/1
AY CABLE ANALOG OUT 507E
SOCKET DB-9 PNL MT
RECEPT BNC IS0 PNL MT
TUBING SHRINK .062 CLR
TUBING SHRINK .125 CLR
TUBING SHRINK .250 CLR
Scholar® III 507ELC2 Service Manual
Criticare Systems, Inc.
Section 9 —Drawings and Schematics
Main/ECG-Resp-Temp
Assembly
95722A001
Item #
01
02
03
04
05
06
07
08
09
Criticare Systems, Inc.
AY MAIN /ECG-TEMP 507ELC2
CSI Part #
Description
40123B004
40557B009
41647B003
41785B001
41786B001
91369A003
91295A001
82510B001
42349B001
P.H.M.S. 4-40X.250 NY WHT
SPACER HEX 4-40X.75L NY
SPCR HEX 4-40X.500 M/F NY
SHIELD ECG 507E
SHIELD OXIMETER 507E
AY PCB MAIN BOARD 507ELC2
AY PCB 507E ECG DAUGHTER
EMI CONNECTOR PLATE
DRIP SHEILD MAIN BRD
Scholar® III 507ELC2 Service Manual
Page 9-5
Section 9 —Drawings and Schematics
NIBP Assembly
93755A005
Item #
AY FNL NIBP MOD KEYED
CSI Part #
40283B001
40883B001
41263B001
42292B001
42295B001
91255A005
93251A002
93755T005
NIBP Mounting Base
93251A002
Item #
01
02
03
04
05
06
07
08
09
10
11
12
13
21
22
Description
WASHER FLAT #4 NY .062
NUT HEX 4-40 NYLON
LABEL GENERIC SERIAL NO
BAXTER NIBP BOX
BAXTER MODULE FOAM
AY PCB NIBP BAXTER
AY NIBP MTG BASE
NIBP MODULE AY TEST PROC
AY NIBP MTG BASE
CSI Part #
Description
40067B001
40874B004
41669B001
41574B001
41575B001
41577B001
90772A001
90773A001
90774A001
90775A001
91753A002
91754A002
40006B002
41579B003
40296B002
CABLE TIE 4.0"LG NYLON
P.H.M.S. 4-40X.750 PL PH
BRKT NIBP MTG
CABLE TIE .187X7.5LG
FOAM ADH BACK .188X.75X2
SWITCH PRESSURE N/C
AY MOTOR/PUMP NIBP
AY PRESSURE SWITCH NIBP
AY 2WAY VALVE NIBP
AY 3WAY VALVE NIBP
AY PNEU VALVE-PUMP NIBP
AY PNEU VALVE\SWITCH NIBP
SPACER NY #4/.250D/.125L
CHECK VALVE
TUBING SILC BLU .125X.250
NIBP VALVE-PUMP ASSEMBLY
91753A002
Item #
02
03
04
AY PNEU VALVE-PUMP NIBP
CSI Part #
Description
41571B002
41700B001
41700B002
L CONNECTOR, WHT NYLON
TUBING POLYU .094IDX.187O
TUBE POLYU .125X.250 85DU
NIBP VALVE/SWITCH ASSEMBLY
91754A002
Item #
01
02
03
04
Page 9-6
AY PNEU VALVE\SWITCH NIBP
CSI Part #
Description
40324B008
41571B002
41700B001
41700B002
T CONNECTOR, WHT NYLON
L CONNECTOR, WHT NYLON
TUBING POLYU .094IDX.187O
TUBE POLYU .125X.250 85DU
Scholar® III 507ELC2 Service Manual
Criticare Systems, Inc.
Section 9 —Drawings and Schematics
Printer/Recorder
Assembly
95721A001
Item #
01
02
03
04
05
06
07
08
09
10
11
12
Criticare Systems, Inc.
PRINTER AY 507ELC2
CSI Part #
Description
45152B001
45151B001
91373A001
84005B002
83279B001
42171B002
42158B001
42159B001
42187B001
40995B005
83111B003
83443B001
PRINTER HOUSING 507ELC2
MEMBRANE PAPER FEED
AY PCB LTP1245 PRNTR I/F
PRINTER SEIKO W/O KNOB
PRINTER DOOR 8100/9100
PRINTER MOUNT
UPPER SHIELD PRINTER
LOWER SHIELD PRINTER
STANDOFF.25 4-40 X .437LG
P.H.M.S. 4-40X.25 SEMS
507ELC2 PRINTER CBL
MOUNTING BRKT PRINTER
Scholar® III 507ELC2 Service Manual
Page 9-7