1
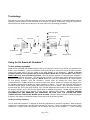
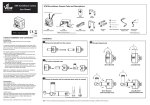
2240 Elmhurst Road
Elk Grove Village, IL 60007
USA
847 545 9999 Fax: 847 545 0275
www.airamerica.com
Guardian
tm
Universal Regulator Tester.
Service Manual
Congratulations on your purchase of the Air America® Guardian™ Universal Regulator Tester. Precision
machined and anodized, from certified quality aerospace aluminum alloy, your Guardian™ Universal Regulator
Tester is an indispensable field or bench tool specifically designed to provide a fast fail-safe accurate way to
tune your Air/Nitrogen delivery and regulation systems.
Introduction
The Air America® Limited Lifetime Warranty guarantees a lifetime of trouble free service and accuracy while
providing the highest safety and equipment standards in the sport of Paintball.
Guardian™ Standard features include:
• Low pressure safety to prevent over pressurization of the system
• Rotational bleed valve that will allow you to cycle your system.
• Marker discharge simulation.
• 180 degree sweep gauge for accurate pressure readings
• Exterior knurling to allow one had operation
• Skirted knob to direct air flow during the bleed phase
• Internationally famous Air America® Limited Lifetime Warranty
SAFETY ALERT!!
ALWAYS DE-GAS YOUR SYSTEM
BEFORE YOU ATTEMPT ANY SERVICE OR REPAIR.
NOTE: To achieve maximum benefit from your factory replacement parts, have them
installed by an authorized AIR AMERICA® technician. Additional technical assistance
is available through the internet at www.airamerica.com.
Page 1 of 4
Terminology
Take the time and use the following exploded view of the Air America® Guardian™ Universal Regulator tester to
familiarize yourself with the names and locations of the parts you will be working with. Doing so will make the
instructions for use clearer and enable you to be more proficient in your testing procedures.
Safety Orifice Washer
Safety Burst Disk
Seat
ASA O’ Ring
Orifice Washer
Regulator Valve Pin
Safety Burst Disk
Male Q/Disconnect
Jam Hex Nut
Main Body
Gauge
ASA Adapter
Rotary Bleed Valve
Using the Air America® Guardian™
To test primary regulators
Install the Air America® ASA Adapter supplied with your Guardian™ tester into the female port located on the
bottom of the Guardian™. Using a combination of hose and fittings to match your current air delivery system,
connect the output side of your air system to the ASA Adapter on the Guardian™. NOTE: to prevent
premature bleed off of the systems tank pressure the Rotary Bleed Valve on the Guardian™ must be in a
HAND TIGHT fully closed (clockwise) position. Once the primary regulator is connected to the Guardian™
you may then pressurize the system. The gauge on the Guardian™ will read output system pressure (pressure
going into the marker or secondary regulator). NOTE: Before you make any adjustments to the output pressure
of your primary regulator, cycle the Guardian™ several times by rotating the rotary bleed valve
counterclockwise; it is NOT necessary to rotate the valve more than a quarter turn, purging any trapped air in
the regulator passages and allowing the system pressure to stabilize. You can also utilize this procedure to
simulate firing the marker, thereby judging the response time of your air system. After cycling the Guardian™
several times take note of the gauge reading, if you feel that adjustments are needed to the output pressure of
the primary regulator, do so and cycle the system again to stabilize the pressure. Repeat this procedure until
you reach the desired output pressure of the primary regulator being tested. CAUTION: BEFORE
DISCONNECTING AND REMOVING THE GUARDIAN™ BE SURE THAT THE SYSTEM HAS BEEN
TURNED OFF AND THE ROTARY BLEED VALVE IS OPEN. This shut down procedure will allow any trapped
pressure in the system to escape and enable a safe removal of the primary regulator.
Testing secondary regulators
The Air America® Guardian™ is designed to allow easy adjustment of secondary regulators. Most secondary
regulators are equipped with a standard ASA male fitting on one end. Testing a regulator with this type of fitting
requires you to simply screw the regulator into the female ASA port on the Guardian™. If your secondary
Page 2 of 4
regulator requires a different configuration, use the Air America® ASA adapter and fittings supplied with your
Guardian™ to attach the output port of the regulator to the inlet side of your Guardian™. Once the proper ASA
connections are made and your secondary regulator is connected to the Guardian™ you may then pressurize
the system; follow the same procedures as outlined for the testing of the primary regulator. NOTE: to prevent
premature bleed off of the systems tank pressure the Rotary Bleed Valve on the Guardian™ must be in a
HAND TIGHT fully closed (clockwise) position.
Servicing the Air America® Guardian™
The Air America® Guardian™ has been engineered for a lifetime reliable service. If service is ever required Air
America® will service your tester upon request. If you choose to do the repairs yourself the following
procedures and safeguards should be utilized. The Guardian™ has been designed to use many of the standard
Air America® replacement parts currently available in the Air America® parts kits. The standard Air America®
Regulator Seat and Valve Pin Assembly are located in the main body of the tester. These are the only service
replacement parts you will need to bring your Guardian™ back to “like new” condition.
The Guardian™ can be completely disassembled with the following tools; 3/16 inch Allen key and a 1/4 inch
Allen key. Start the disassembly by removing the Rotary Bleed Valve from the tester entirely. Turning the tester
over will allow the Valve Pin assembly to fall out of the tester body. Once Valve Pin assembly has been remove
rotate the tester so that the ASA side faces up, insert the 1/4-inch Allen key in the jam nut. Remove the jam nut
followed by the Stainless Steel Orifice Washer. Once these parts are removed the Regulator Seat should fall
out, if not, gently press it out from the Bleed Valve side with the 3/16-inch Allen key.
Prior to installing your new Regulator Seat and Valve Pin, it is best to clean the housing. Take a cotton swab
and dip the end into some alcohol, now wipe the inside of the Tester body and Bleed Valve. Repeat this
process until the cotton swab comes out clean, this may take several applications. Caution: Be sure not leave
any cotton residue in the tester. To install the new Regulator Seat and Valve Pin start by inserting the
Regulator Seat narrow side first, then install the Stainless Steel Orifice Washer smooth side facing the seat.
Use the 1/4-inch Allen key to install and sufficiently tighten the jam nut to prevent a Regulator Seat leak. NOTE:
Regulator Seats have a taper to them with one side being wider than the other.
Rotate the Main Body till the ASA adapter portion is facing down. Now insert the Valve Pin (long narrow end
first) into the bore for the Rotary Bleed Valve. BEFORE installing the Bleed Valve use a cotton swab to put a
small amount of Anti-seize lubricant onto the valves thread area and onto the pin bore located at the bottom of
the Bleed Valve. Now install the Rotary Bleed Valve by screwing it in (clockwise), do not worry about the pin
assembly, it’s self-centering.
If the Safety Burst Disc requires service start by contacting Air America® for a proper replacement disc. Using
another disc assembly could result in harm to the Guardian™ and/ or individuals. Begin by removing the safety
jam nut with a 3/16-inch Allen key, exposing the orifice washer and ruptured disc assembly. Turn the tester over
to allow the disc and washer to fall out. If they do not come out easily take a pick and CAREFULLY pry them
out. CAUTION: DO NOT DAMAGE OR SCORE THE BOTTOM OF THE SAFETY POCKET. Damage to the
bottom of the safety pocket will result in an improper seal and premature failure of the new safety burst disc.
Prior to installing your new safety burst disc, orifice washer and jam nut, it is best to clean the tester body. Take
a cotton swab and dip the end into some alcohol, now wipe the inside of the tester body and thread area.
Repeat this process until the cotton swab comes out clean, this may take several applications. Caution: Be
sure not leave any cotton residue in the tester. Install the burst disc covered by the orifice washer. The
orifice washer should be placed rounded side up for best results. IMPORTANT NOTE: Do not replace the
orifice washer with ANYTHING other than an Air America® orifice washer. The dimensions have been
specifically calculated. After the bust disc and washer are in place install the hex head jam nut and torque to
15-20 ft lbs. to complete the procedure.
Page 3 of 4
Guardian
tm
Trouble Shooting Guide
Note: The following chart is for reference purposes only. Air America® recommends that all safety precautions, as
outlined in the Service Manual, are strictly adhered to before any repairs or testing procedures are attempted. In the
event, repairs are required certified Air America® technicians using factory replacement parts should be relied upon to
achieve maximum performance from your system. Additional technical assistance is available at www.airamerica.com.
Bleed Valve Position
Closed
Cycled 1/16 To 1/4
Turn
Closed
Closed
Cycled 1/16 To 1/4
Turn
Closed
Closed
Cycled 1/16 To 1/4
Turn
Gauge Action
Steady-No Leaks
Drops Slightly &
Rapidly. Returns
To Preset
Pressure & Holds
Steady
Reads Zero
Slowly Rises
(Creeps) Past Set
Pressure.
Pressure Drops
Then Slowly
Climbs Back To
Preset Pressure
Steady Beyond
Preset Pressure
System Leaks
Out Of Regulator
Nut Until Tank
Reaches
Approximately
1200 PSI. Safety
Functioning
Properly-Ignore
Leak.
Steady-System
Leaks Out
Regulator Nit
Drops & Stays
Low
Possible Cause
Probable System Repair
Normal
Normal
Normal
Normal
System Obstruction
Regulator Adjustment Nut Out
Of Adjustment. Improperly Set
Faulty Pin/Seat
Dirt/Debris In Regulator
Remove Obstruction & Clean Regulator
Turn On System
Adjust Regulator Output Pressure.
Replace With Factory Replacement Parts
Clean Regulator
Non-Air America® Regulator
Seat & Pin.
Wrong Piston O' Ring
Wrong Spring Pack
Improper Piston/Spring Pack
Lubricant.
Defective Spring Pack
Dirt/Debris In Regulator
Bad Seat & Pin
Wrong Piston O' Ring
Piston Binding In Housing
Dirt In Regulator
Regulator Set To High
Replace With Air America® Seat & Pin
Replace With Air America® O'ring
Replace With Air America® Spring Pack
Clean Assemblies & Relubicate With Proper
Lubricant
Replace Spring Pack
Clean Regulator
Defective O'Ring
Piston Safety Failure
Replace With Air America® O'ring
Replace Piston Assembly
Internal Obstruction To
Regulator
Non Air America® Regulator
Seat & Pin
Dirt/Debris In Regulator
Remove Obstruction & Clean Regulator
Replace With Air America® Seat & Pin
Clean Regulator.
© ALL RIGHTS RESERVED, AIR AMERICA, INC., 20
Page 4 of 4
Replace Seat & Pin
Replace With Air America® O'ring
Free Bind & Clean Assembly, Replace O' Ring &
Lubricate.
Clean Regulator
Reset Output Pressure To Lower Pressure.