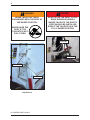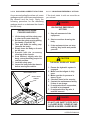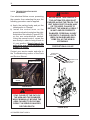
1
OPERATOR
MANUAL
Right-HandTM Arm Edition
RELEASE DATE: December2006
Part #55473, rev. 1
FOREWORD
Here is the Operator Manual for the Labrie Automizer
Right-HandTM unit. We sincerely hope that you will find it easy
to use.
We have designed it in a way that will allow you to easily make
it available to drivers, mechanics, and to parts department
personnel.
Any time that you have a problem with a Labrie unit, you
should contact your distributor first. He should be able to
provide you with the proper help required (parts or technical
advice).
FIRST THINGS FIRST:
DO NOT FORGET TO COMPLETE THE OWNER
REGISTRATION FORM AND TO SEND IT TO LABRIE
EQUIPMENT, MAKING SURE TO INDICATE THE “IN
SERVICE” DATE. THIS DATE WILL BE USED TO START
THE WARRANTY PERIOD. OTHERWISE, THE DATE OF
DELIVERY FROM THE FACTORY WILL BE USED.
OPERATOR MANUAL
AUTOMIZER RIGHT-HANDTM
Table of contents
1.0
INTRODUCTION ................................................................................................. 9
1.1
1.2
2.0
OBJECTIVE .......................................................................................................... 9
USEFUL ADDRESS AND PHONE NUMBERS ................................................... 9
SAFETY AND OPERATIONAL PRECAUTIONS ............................................. 11
2.1
2.2
2.3
2.4
2.5
GENERAL PRECAUTIONS ............................................................................... 11
GENERAL RESPONSIBILITIES OF THE EMPLOYER ...................................13
GENERAL RESPONSIBILITIES OF THE EMPLOYEE ...................................13
LOCKOUT/TAGOUT PROCEDURE .................................................................14
LABELS AND LOGOS .......................................................................................14
2.5.1
2.5.2
2.5.3
2.5.4
3.0
LABELS ON BODY ...........................................................................................
LABELS ON TAILGATE ....................................................................................
ILLUSTRATION OF LABELS ON CAB CONSOLE .........................................
ILLUSTRATION OF LABELS INSIDE CAB .....................................................
14
18
19
20
OPERATOR MANUAL ...................................................................................... 24
3.1
GENERAL SAFETY PRECAUTIONS ...............................................................24
3.1.1
3.1.2
3.1.3
3.1.4
3.1.5
3.1.6
3.1.7
3.1.8
3.1.9
PRIOR TO START UP ......................................................................................
FIRE PROTECTION .........................................................................................
CLEANLINESS .................................................................................................
SHUTDOWN .....................................................................................................
DRIVING THE VEHICLE ..................................................................................
DRIVING SPEED ..............................................................................................
RIGHT-HAND SIDE DRIVING POSITION ......................................................
ENGAGING THE HYDRAULIC SYSTEM ........................................................
SEARCH EYE SYSTEM ...................................................................................
25
26
26
26
27
27
27
29
30
OPERATOR MANUAL
AUTOMIZER RIGHT-HANDTM
Table of contents
3.2
CAB CONTROLS REVIEW ...............................................................................32
3.2.1
3.2.2
3.2.3
3.2.4
3.2.5
3.2.6
3.2.7
3.2.8
3.2.9
3.2.10
3.2.11
3.2.12
3.2.13
3.3
32
32
32
32
32
32
33
34
36
36
36
37
38
DAILY INSPECTION ..........................................................................................39
3.3.1
3.3.2
3.3.3
3.3.4
3.3.5
3.4
CAB CONSOLE ................................................................................................
EMERGENCY STOP CONTROL .....................................................................
PACKER START CYCLE CONTROL ..............................................................
PACKER RETRACTION CONTROL ...............................................................
MULTI-CYCLE CONTROL ..............................................................................
HOIST CONTROL ............................................................................................
TAILGATE CONTROL (SINGLE AND DUAL) .................................................
GRAB PACK .....................................................................................................
WATER TRAP BLEED ......................................................................................
PUMP SWITCH ................................................................................................
MONITOR AND CAMERA ................................................................................
ARM EXTEND WARNING LIGHTS .................................................................
ARM AUXILIARY CONTROL ..........................................................................
APPROACHING THE VEHICLE ......................................................................
TRUCK STARTING PROCEDURE ..................................................................
BODY INSPECTION PROCEDURE ................................................................
CAB DRIVING CONTROLS INSPECTION PROCEDURE .............................
INSPECTION SHEET EXAMPLE ...................................................................
39
39
40
40
41
LOADING, COMPACTING AND UNLOADING .................................................42
3.4.1 PLANNING YOUR ROUTE ..............................................................................
3.4.2 SAFETY WHILE USING THE PACKING SYSTEM .........................................
3.4.3 HOPPER DESCRIPTION AND LOADING ......................................................
3.4.4 PACKER DESCRIPTION .................................................................................
3.4.5 LOADING PROCEDURE .................................................................................
3.4.6 LOADING CORRECTIVE ACTIONS ...............................................................
3.4.7 EMERGENCY ACTIONS ..................................................................................
3.4.8 PACK ON THE GO ...........................................................................................
3.4.9 STANDARD UNLOADING PROCEDURE .......................................................
3.4.10 UNLOADING CORRECTIVE ACTIONS ..........................................................
3.4.11 UNLOADING EMERGENCY ACTIONS ...........................................................
3.4.12 TROUBLESHOOTING QUICK REFERENCE .................................................
3.4.13 CRUSHER PANEL ............................................................................................
3.4.14 GRIPPER AUTO-CLOSE OVERRIDE ..............................................................
42
42
43
43
44
46
46
46
47
49
49
50
51
51
OPERATOR MANUAL
AUTOMIZER RIGHT-HANDTM
Table of contents
3.5
END OF THE DAY CLEANING AND INSPECTION .........................................53
3.5.1
3.5.2
3.6
HOPPER DAILY CLEANING ............................................................................ 53
CHASSIS DAILY CLEANING ........................................................................... 54
CO-MINGLE SPLIT BODY OPERATION..........................................................55
3.6.1
3.6.2
3.6.3
3.6.4
3.6.5
3.6.6
3.6.7
3.6.8
3.6.9
3.6.10
INTRODUCTION ..............................................................................................
JOYSTICK DESCRIPTION ..............................................................................
TAILGATE SELECTOR SWITCH ....................................................................
SAFETY SYSTEM ............................................................................................
SINGLE CHUTE OPERATION .........................................................................
CHUTE OVERRIDE ..........................................................................................
SPLIT-CART .....................................................................................................
DUAL CHUTE OPERATION .............................................................................
SEPARATING THE CHUTE .............................................................................
CO-MINGLE UNLOADING PROCEDURE ......................................................
55
56
57
58
59
60
61
61
63
64
8
AUTOMIZER RIGHT-HANDTM
9
1.0
INTRODUCTION
1.1
OBJECTIVE
1.2
USEFUL ADDRESS AND
PHONE NUMBERS
Labrie Customer Support Center
The objective of this manual is to provide,
to the end user, the essential information
on the operation and maintenance
requirements for the AutomizerTM.
The AutomizerTM is an automated side
loading refuse truck operated by only one
person. After many years of experience
with side loading units, Labrie has
developed the AutomizerTM. A unit that will
achieve excellent performance and
reliability with a simpler but rugged
construction.
Parts, Service and Warranty
(during business hours)
Technical Support Service
(24 hours)
1-800-231-2771
54 Park Place (Upper)
Appleton, WI 54914
Web Site: www.labriegroup.com
E-mail: [email protected]
The Operator Manual and general safety
instructions introduce the operator to
different operating methods of the vehicle
as well as the safety precautions to be
taken. By the end of reading this manual,
the operator should be able to perform all
necessary tasks required to be done with
the equipment. IT IS TO BE
COMPLETELY UNDERSTOOD BY THE
OPERATOR BEFORE HE STARTS
WORKING WITH THE AUTOMIZERTM
SIDE LOADING GARBAGE TRUCK.
ENSURE
THAT
THE
SAFETY
REQUIREMENTS ARE STRONGLY
EMPHASIZED.
The whole information in this manual was up to date at the time of publication. Labrie reserves itself the right to change text
and illustration without notice. For further references, this manual should be kept inside the cab.
INTRODUCTION
10
AUTOMIZER RIGHT-HANDTM
11
2.0
SAFETY AND OPERATIONAL
PRECAUTIONS
DANGER, WARNING, CAUTION notations
appear throughout this manual and on labels
on and inside of the vehicle.
DANGER
The word DANGER precedes
information, which indicates an
imminently hazardous situation,
which if not avoided, WILL result in
death or serious injury of the user or
others.
WARNING
The word WARNING precedes
information, which indicates a
potentially hazardous situation,
which if not avoided, COULD result
in personal injury or death of the
user or others.
CAUTION
The word CAUTION precedes
information, which indicates a
potentially hazardous situation or
unsafe practice, which if not avoided,
MAY result in minor to moderate
injury to user or damage to the
equipment.
The word NOTE also appears in this
manual and precedes information, which
is vital to the proper operation and
maintenance of the vehicle equipment.
2.1
GENERAL PRECAUTIONS
In spite of our efforts to build a vehicle that
is as safe as possible, the operator’s safety
certainly depends on the precautionary
measures taken while operating the
vehicle. If in doubt, question your
supervisor. Supervisors or Maintenance
Department personnel with questions
should contact the Labrie Service Center.
It is the employer’s responsibility to be
assured that their employees are qualified
and capable of operating this equipment.
THE FOLLOWING IS GENERAL SAFETY
AND OPERATIONAL PRECAUTIONS,
WHICH SHOULD BE ADHERED TO BY
OPERATORS (AND/OR MAINTENANCE
PERSONNEL) AT ALL TIMES.
1. Do not operate this vehicle before
having read and completely understood
this manual and the safety labels on
the vehicle. Maintenance personnel
must also read and understand the
Parts and Service Manual that applies
to this vehicle (and the maintenance
related information in this manual). In
case of any doubt, see your supervisor
for clarification.
2. The AutomizerTM units equipped with
the Right-HandTM arm are primarily
designed to be operated by only one
person.
3. The operator of the Right-HandTM arm
must be in full and clear view of the
operation of the lifting arm at all times.
The operator must be able to stop the
motion of the arm at any time, in order
to prevent injury to surrounding people,
damage to property or to the lifting arm
itself.
GENERAL SAFETY PRECAUTIONS
12
4. The operator of the Right-Hand TM arm
shall make sure that any people or
obstructions are far away from the arm
before moving it. Failure to do so may
result in unit and / or property
damages, personal injury or even
death.
For additional information, please
contact Labrie Customer Support
Center at 1-800-231-2771.
5. At the beginning of every working day,
inspect the body, the packing system
and any system that might endanger
the safety of the public and/or the
operator.
6. Verify that the mirrors, brakes,
accelerator pedal, steering wheel and
turn signals are in good working order.
7. Do not operate this equipment if there
are any signs of damage or incomplete
repairs.
8. Report any doubts and any equipment
safety service requirements to your
supervisor.
9. Keep both hands on the steering wheel
at all times for better control.
10.Do not leave the driving position until
the vehicle is completely stopped and
the parking brake applied.
11.When the vehicle is parked, the parking
brake must be applied.
AUTOMIZER RIGHT-HANDTM
12.For any work, cleaning or inspecting
being done between the body and the
chassis, the body safety prop MUST
be used. The vehicle must also be on
level ground.
13.Watch and be sure that there are no
people at the rear of the vehicle when
opening and closing the tailgate(s) and/
or when raising the body.
DANGER
14.Do not get into the hopper compartment
or try to repair anything behind the
packer when it is working or when the
hydraulic pump is still running.
Personnel authorized to get into the
hopper MUST first complete the
lockout/tagout procedures required by
the employer.
15.NEVER stand underneath a raised arm/
grabber, since no arm cylinder is
equipped with a holding valve. Should
a hydraulic component break, such as
an hydraulic hose, failure to stay away
from the arm may result in personal
injury or even death.
13
2.2
GENERAL RESPONSIBILITIES
OF THE EMPLOYER
(Ref. Norm ANSI Z 245.1 1999).
It is the employer’s responsibility to be
familiar with and ensure that operation is
in accordance with safety requirements
and codes including all applicable
regulations, including the Occupational
Safety and Health Act (OSHA) and the
American National Standards Institute
(ANSI).
It is also the employer’s responsibility to
properly maintain all mobile equipment to
meet provincial/state and federal safety
standards. The employer also has the
following responsibilities:
1. Supply adequate instructions and
training for the safe use of the vehicle
before assigning the employee to such
equipment.
2. The employer must keep the vehicle
maintained and properly adjusted to
meet the manufacturer’s standards and
recommendations. If in doubt, contact
the manufacturer or any authorized
representative.
3. The employer must keep a record of
any breakdowns or malfunctions of the
vehicle, and keep records of all
inspections and maintenance.
6. Regularly, accompany the operator of
the vehicle and take measures to insure
the smooth and safe operation of the
vehicle. Respect all safety measures.
7. Make sure that the backup alarm works
properly when the vehicle is in reverse,
while body is rising up or while the
tailgate is opening.
2.3
GENERAL RESPONSIBILITIES
OF THE EMPLOYEE
1. The employee must enforce all of the
safety requirements for mobile
equipment supplied by the employer.
2. Equipment is to be operated only after
having received instructions and
training in accordance to chapter 3.0 .
3. The employee has the responsibility to
report any damages or malfunctions of
the vehicle to his employer or his
supervisor without any delay. The
employer will then take the necessary
measures before the re-operation of
the vehicle to insure its safe operation.
4. The employee must make sure that
there is nobody near the vehicle before
activating any of the controls and must
be prepared to stop anything in case of
danger.
4. Any breaks or malfunctions that can
affect the safe usage of the vehicle
must be repaired before the vehicle is
to be used again.
5. Meet the appropriate lighting
requirements for working at night (if
permitted).
GENERAL SAFETY PRECAUTIONS
14
2.4
LOCKOUT/TAGOUT
PROCEDURE
It is the employer’s responsibility to
establish and apply a “Lockout / Tagout
Procedure” for any inspection, repairs or
maintenance being done on the vehicle,
whether it be on the road or in the
employer’s establishment.
SUGGESTED
LOCKOUT/TAGOUT PROCEDURE
1.
2.
3.
4.
5.
6.
Apply parking brake.
Shut off engine.
Remove keys from ignition switch.
Put keys in a safe controlled area.
Tape ignition switch keyhole.
Turn
off
master
switch
(Figure #2.3) or disconnect
batteries.
7. Put an “Off Service” tag on
steering wheel(s).
8. Put an “Off-Service” sign in
windshield.
9. Block any system that could move
by inertia with a proper easy to
see safety prop (open tailgate,
lifted body, arm, etc.).
10. Move all control handles to release
any residual pressure in the
system.
11. Chock wheels on both sides.
MASTER SWITCH
FIGURE #2.3
AUTOMIZER RIGHT-HANDTM
2.5
LABELS AND LOGOS
2.5.1
LABELS ON BODY
DANGER, WARNING, AND CAUTION
LABELS
See the following figures for the location
and content of all safety labels. Labels on
the vehicle may change depending on
what special feature was installed on the
vehicle and the type of body and cab
configuration. Refer to Labrie Parts and
Service Department for replacement.
1) Notes and Warning on these labels
must be obeyed at all times.
2) These labels must be in place at all
times. Report any damaged or missing
labels to the proper authority at once.
3) Replacement of safety labels can be
ordered, free of charge, from Labrie
Equipment Ltd., for the duration of the
guarantee.
NOTE: LABELS MAY CHANGE
DEPENDING ON WHAT SPECIAL
FEATURES WERE INSTALLED ON
THE VEHICLE.
15
2.5.1
LABELS ON BODY (Continued)
#47312
#47280
#43800
#47282
#43817
#47286
#47308
#47304
FIGURE #2.4
GENERAL SAFETY PRECAUTIONS
16
2.5.1
LABELS ON BODY (Continued)
#47314
#47348
#47350
#47352
#47260
#47262
#47422
#47270
FIGURE #2.4 (continued)
AUTOMIZER RIGHT-HANDTM
17
2.5.1
LABELS ON BODY (Continued)
#47424
#47554
#47702
#47877 (optional, Co-mingle)
#47562
#47564
#47878 (optional)
FIGURE #2.4 (continued)
GENERAL SAFETY PRECAUTIONS
18
2.5.2
LABELS ON TAILGATE
#47266
#47268
#32307
FIGURE #2.5
AUTOMIZER RIGHT-HANDTM
19
2.5.3
ILLUSTRATION OF LABELS ON CAB CONSOLE
NOTE:
LABELS ON CAB CONSOLE MAY CHANGE DEPENDING
ON WHAT SPECIAL FEATURES WERE INSTALLED ON
THE VEHICLE.
#43862
#43874
#47451
#43876
#43878
#43880
#43888
#43934
#47362 (Co-mingle)
GENERAL SAFETY PRECAUTIONS
20
2.5.4
ILLUSTRATION OF LABELS INSIDE CAB
NOTE:
THE LABELS INSIDE CAB MAY CHANGE DEPENDING ON
WHAT TYPE OF CHASSIS AND/OR SPECIAL FEATURES
INSTALLED ON THE VEHICLE.
#47412
#47440
#43912
#43764
#43882
#43798
#43910
#43816
AUTOMIZER RIGHT-HANDTM
21
2.5.4
ILLUSTRATION OF LABELS INSIDE CAB (Continued)
#47600
#55363
#43852
#43856
#47250
#43892
GENERAL SAFETY PRECAUTIONS
22
2.5.4
ILLUSTRATION OF LABELS INSIDE CAB (Continued)
#47998
#43794
#47284
#47276
#43972
#43790
#43856
AUTOMIZER RIGHT-HANDTM
23
OPERATOR MANUAL
24
3.0
OPERATOR MANUAL
3.1
GENERAL
PRECAUTIONS
WARNING
SAFETY
The Right-Hand TM automated arm is
efficient in its operation but if it is operated
incorrectly, it may result in serious damage
to property, equipment and even cause
injury or death.
DO NOT OPERATE OR SERVICE
THE LIFTING ARM UNTIL YOU
HAVE BEEN FULLY TRAINED, AND
HAVE READ AND UNDERSTOOD
THE ENTIRE OPERATION AND
MAINTENANCE MANUAL
SUPPLIED WITH THIS
EQUIPMENT.
For general safety precautions, refer to
chapter 2.0 of the Operator Manual.
Never operate machinery wearing jewelry
or loose clothing, which may catch on
moving parts. Always wear safety
equipment as specified by your employer.
NEVER OPERATE MACHINERY UNDER
THE INFLUENCE OF ALCOHOL OR
DRUGS.
Any doubts about the function of a control,
refer to section 3.2. “Cab Controls Review”
It is the employer’s responsibility to ensure
that the employees are qualified on the
equipment’s operations and safety
measures before working with this
equipment.
It is the employee’s responsibility to apply
proper procedures and safety measures
at all times.
Nobody should operate the Automizer TM
without having read and completely
understood the Operator Manual.
Never start, move or operate the
equipment without ensuring that the
surrounding area is clear of any person or
object preventing safe movement or
operation.
AUTOMIZER RIGHT-HANDTM
WARNING
MAKE SURE THAT ALL PEOPLE
OR ANY OBSTRUCTIONS ARE
SUFFICIENTLY CLEARED FROM
THE AUTOMATED ARM BEFORE
MOVING IT. FAILURE TO DO SO
MAY RESULT IN UNIT AND/OR
PROPERTY DAMAGES,
PERSONAL INJURY OR DEATH.
WARNING
MAKE SURE THERE IS ENOUGH
CLEARANCE BETWEEN RAISED
CONTAINER AND OVERHEAD
POWER LINES. THE AUTOMATED
ARM OR THE CONTAINER MUST
NOT COME IN DIRECT CONTACT
WITH THE ELECTRICAL CABLES
FOR THE POWER TO GO
THROUGH THE UNIT. IF THE UNIT
COMES IN CONTACT WITH A
POWER LINE, STAY IN THE CAB
AND KEEP AWAY FROM ANY
METAL PARTS.
25
3.1
GENERAL SAFETY
PRECAUTIONS (cont’d)
DANGER
NEVER DRIVE THIS VEHICLE IF
THE LIFTING ARM IS NOT FULLY
RETRACTED ALONGSIDE THE
TRUCK. THE UNIT WOULD BE
TOO HIGH AND/OR TOO WIDE.
FAILURE TO RETRACT THE ARM
WILL RESULT IN UNIT AND/OR
PROPERTY DAMAGES,
PERSONAL INJURY OR DEATH.
FLASHING LIGHTS (RED) ON
DASHBOARD WILL CAME ON, AS
THE ARM IS EXTENDING.
WARNING
PRIOR TO CHANGING DRIVING
POSITION, STOP THE VEHICLE,
APPLY PARKING BRAKE, PUSH
EMERGENCY RED BUTTON AND
STOP THE ENGINE. PROPERLY
ADJUST MIRRORS AND SET
DRIVING CONTROL SWITCHES
INCLUDING ARM CONTROL
JOYSTICK (IF APPLICABLE) TO
THE NEW DRIVING POSITION
BEFORE STARTING THE ENGINE.
THIS WILL ENSURE THAT THE
AUTOMATED ARM IS
COMPLETELY INOPERATIVE.
3.1.1
PRIOR TO START UP
WARNING
REMOVE ALL CONTROL LEVERS
FROM THE PROPORTIONAL
VALVE. THESE CONTROL LEVERS
SHOULD BE USED FOR
MAINTENANCE PURPOSES ONLY.
Before starting the vehicle, ensure that no
system will engage and start to operate as
you are starting the engine. All electrical
controls should be turned off and the
hydraulic pump disengaged.
The main valve on the hydraulic tank
should be open (Figure #3.5). See section
3.1.8 “Engaging the Hydraulic System”.
Once the engine is started, wait until the
air pressure is above 70 PSI; the audible
alarm will stop as the air pressure reaches
70 PSI. You can then operate the
equipment.
OPERATOR MANUAL
26
3.1.2
FIRE PROTECTION
It is suggested that one ABC type fire
extinguisher be easily accessible
outside of the truck just behind the cab
area (Figure #3.1).
See section 3.5 “End of the Day Cleaning
and Inspection”.
If the truck is equipped with cameras
without lens protector, make sure that all
lenses are clean.
CLEANING TRAP
ABC TYPE
FIRE EXTINGUISHER
FIGURE #3.2
3.1.4
SHUTDOWN
If the truck is parked for an extended
period of time, follow the chassis
manufacturer’s shutdown procedure as
well as maintenance requirements and
ensure the following procedure:
SHUTDOWN PROCEDURE
FIGURE #3.1
3.1.3
CLEANLINESS
Cleanliness is part of safety. Ensure that
the equipment works properly by removing
any compacted garbage in the packer
area after each body unloading.
Clean all the truck’s lights and safety
stickers, so you and the surrounding
pedestrians and vehicles will be aware of
the truck at all times. Use the hoe to rake
dirt in cleaning traps (Figure #3.2) on each
side of the vehicle.
AUTOMIZER RIGHT-HANDTM
1. Park on a hard level ground.
2. Put the parking brake ON.
3. Ensure all moving parts are in
stored position (tailgate(s), arm,
body, packer, etc.).
4. Disengage hydraulic.
5. Turn OFF electrical.
6. Turn engine OFF.
7. Turn OFF battery master switch
(if equipped).
27
3.1.5
DRIVING THE VEHICLE
The Automizer TM side loader may be
equipped with two (2) steering wheels,
one on the left and the other one on the
right. The right-hand side steering wheel
is to make waste collection easier by a
single person. It is provided along with an
accelerator pedal, a foot brake pedal, turn
signal control and a horn. Before using the
right-hand side driving position make sure
that all controls are properly set.
3.1.6
DRIVING SPEED
If the cab of the vehicle is modified by
LABRIE (right-hand side driving position)
for door-to-door waste collection, the
maximum speed limit while driving at the
right-hand side is, if permitted, 20 mph.
(32 km/h). Therefore, it is recommended
to drive on the left-hand side for any long
distance driving (if the truck is equipped
with a left-hand side driving position).
NOTE: If the cab is modified by the chassis
manufacturer, the operator MUST follow
the recommandations of the chassis
manufacturer.
WARNING
IF THE VEHICLE HAS TO BE
PARKED FOR AN EXTENDED
PERIOD OF TIME, ALWAYS APPLY
THE PARKING BRAKE.
3.1.7
RIGHT-HAND SIDE DRIVING
POSITION
The following procedure applies ONLY to
cabs modified by LABRIE. It must be
followed at the beginning, but also at the
end of the collection route in order to
revert to the left-hand side driving position1.
If the cab is modified by the chassis
manufacturer, the operator MUST forget
the following procedure and follow the
recommandations of
the chassis
manufacturer.
BEFORE USING THE
RIGHT-HAND SIDE STEERING
WHEEL
1. Drive the vehicle to the beginning
of the waste collection route.
2. Stop the vehicle, and apply the
parking brake (Figure #3.2).
3. Press the red button on the
console packer control.
4. Turn off engine.
5. Change to proper driving position
(left to right).
6. Change the “SHIFT MODE” control
switch to the proper driving side
(left or right). This switch will
enable all electrical accessories
on the selected driving side.
7. Move the arm control joystick
accordingly.
8. Adjust mirrors as illustrated
(Figure #3.3).
9. Start the engine.
10. Check the accelerator pedal and
the foot brake.
11. Release
parking
brake
(Figure #3.4).
12. You are now set to begin waste
collection.
1
This procedure applies only on vehicle modified by LABRIE equipped with dual driving
position. Some units are designed only with a single driving position.
OPERATOR MANUAL
28
CAB MODIFIED BY LABRIE
PARKING BRAKE
PARKING BRAKE
FIGURE #3.4
FIGURE #3.2
MIRRORS ADJUSTMENT
Right-hand side
mirror field of
view
Convex
Mirror
Operator
Camera
view *
Bus type
mirrors (on
conventional
cabs only)
R-H DRIVING
POSITION
Left-hand side
mirror field of
view
Convex
Mirror
* Optional
Right-hand side
mirror field of
view
Convex
Mirror
Camera
view *
Bus type
mirrors (on
conventional
cabs only)
Operator
Convex
Mirror
Left-hand side
mirror field of
view
FIGURE 3.3
AUTOMIZER RIGHT-HANDTM
L-H DRIVING
POSITION
29
3.1.8
ENGAGING THE HYDRAULIC SYSTEM
The pump is engaged by the rocker switch
located on the console. This switch is also
called PTO switch (Figure #3.5). When
the switch is activated, a pilot light comes
on when the hydraulic system is engaged.
At this time, all hydraulic functions on the
vehicle are enabled and ready to work.
It is important to note that, even if the PTO
switch is turned off, the pump is always
turning whatever the engine’s RPM. IT IS
VERY IMPORTANT NOT TO LET THE
PUMP RUN DRY OR WITHOUT OIL.
OTHERWISE, THE PUMP WILL BE
SERIOUSLY DAMAGED OR EVEN
DESTROYED.
P.T.O.
SWITCH
PILOT LIGHT
FIGURE #3.5
MAIN VALVE
WARNING
DO NOT CLOSE THE MAIN VALVE
ON THE HYDRAULIC TANK
(FIGURE #3.6), EVEN IF THE PTO
SWITCH IS TURNED OFF, THE
PUMP IS ALWAYS TURNING
WHAT EVER THE ENGINE’S RPM.
OTHERWISE, THE PUMP WILL BE
SERIOUSLY DAMAGED OR EVEN
DESTROYED.
FIGURE #3.6
(cylindrical tank shown)
NOTE:
In case of a leak in the hydraulic system,
and if the vehicle has to be driven
somewhere else, take off the drive shaft
between the pump and the engine. Call
maintenance facility and refer to the Parts
and Service Manual.
OPERATOR MANUAL
30
3.1.9
SEARCH EYE SYSTEM
WARNING
This OPTIONAL safety system is used to
detect objects located behind the truck.
This system is turned on by placing the
transmission in reverse.
WARNING
THE OPERATOR MUST READ THE
INSTALLATION MANUAL OF THE
SYSTEM MANUFACTURER
BEFORE USING THE SYSTEM
The main components of this system are
a control box , located in the cab, sensors,
located on the rear bumper and the
solenoid valve located on the chassis.
When the system is on, a green light on
the cab control box illuminates to indicate
that the system is operating. When an
object is detected, a yellow light comes
on, an audible alarm is heard, and the
vehicle brakes are automatically applied.
The brakes can be disabled by pressing
the AUTO BRAKE OFF switch on the
control box. This will cause a red warning
light to illuminate indicating the brakes will
not automatically engage. The yellow light
and audible alarm will still operate in this
mode as a safety precaution.
THE LENSES OF THE SENSORS
MUST BE KEPT CLEAN TO
ENSURE PROPER OPERATION OF
THE SYSTEM. IF THE LENSES
ARE ALLOWED TO BECOME
DIRTY, THE SYSTEM RANGE WILL
BE DECREASE.
The sensors are installed on the rear
bumper and adjusted in order to obtain
low coverage to ground.
To adjust the sensors, refer to the
Installation Manual of the manufacturer.
Troubleshooting and Maintenance:
Refer to the Troubleshooting Guide of
Gobal Sensor Systems Inc.
SENSORS
CONTROL BOX
AUTOMIZER RIGHT-HANDTM
31
MOUNTING
BOX
AREA NOT SENSING
45” A
PPRO
SENSOR
BRACKET
X.
SENSING AREA
SENSOR
8”
APPROX.
13°
42”
AREA NOT SENSING
SIDE VIEW
GROUND LEVEL
AREA NOT SENSING
36”
APPROX.
AREA NOT SENSING
SENSING AREA
TOP VIEW
10”
APPROX.
SENSORS
NOTE: Illustrations taken from the Installation Manual of Global Sensor Systems Inc.
OPERATOR MANUAL
32
3.2
CAB CONTROLS REVIEW
3.2.4 PACKER
CONTROL
RETRACTION
3.2.1 CAB CONSOLE
The cab console is located in the middle of
the cab for easy access during waste
collection and operation. See next page.
The following sections provide an overview
of the console controls with some optional
features. The layout of the console may
change depending on features installed
on the vehicle.
The packer retract button (yellow) will
retract the packer at the beginning of its
stroke. This control is useful when the
body is full and the material prevents the
packer from reaching the end of its stroke.
Manual retraction of the packer is
necessary to bring back the packer.
3.2.5
MULTI-CYCLE CONTROL
3.2.2 EMERGENCY STOP CONTROL
This optional function allows the packer to
cycle a preset number of cycles (from 2 to
8, 3 being the standard) by pressing the
green button one time. Cycles can be
stopped anytime by pressing the red button
or if the multi-cycle control button is turned
off.
3.2.6 HOIST CONTROL
The Emergency Stop button (red) will stop
all hydraulic functions on the truck (tailgate,
arm etc.). By pressing the red button, the
packer and the arm will stop where they
stand. The red button has to be manually
pulled back to reactivate the hydraulic
system.
The body hoist control lever is located on
the cab console (Figure #3.7). The lever
has a spring activated sleeve which locks
the handle to prevent any accidental body
hoist. This lever has to be pulled towards
left or right in order to raise or to lower the
body.
3.2.3 PACKER
CONTROL
If the main valve of the truck is electrical,
a 3-position switch (instead of a joystick)
allows the operator to control the body.
The switch is covered with a plastic cap in
order to prevent any accidental body hoist
(see picture on next page).
The Automizer TM has a single packer
control station located on the cab
console (Figure #3.7). Here is the
description of all the controls and buttons
found on the packer control station.
START
CYCLE
The packer start cycle button (green)
activates the packer for one complete
cycle. A complete cycle will take about 12
seconds.
AUTOMIZER RIGHT-HANDTM
33
3.2.7 TAILGATE CONTROL (SINGLE
AND DUAL)
Also on the console, the tailgate control
lever has a spring activated sleeve which
locks the handle to prevent any accidental
opening of the tailgate (Figure #3.7). The
sleeve needs to be pulled up before moving
the lever to the proper side, no matter if it
is to open or close the tailgate.
When the truck is equipped with two
tailgates, an electrical switch allows the
operator to choose between the right or
the left tailgate. The same lever, with a
lock, is used for both tailgates.
If the main valve of the truck is electrical,
a 3-position switch (instead of a lever)
allows the operator to control the tailgate.
The switch is covered with a plastic cap in
order to prevent any accidental opening of
the tailgate and (see the illustration).
3-POSITION
SWITCHES FOR BODY
AND TAILGATE
OPERATOR MANUAL
34
3.2.8 GRAB PACK
The Grab Pack switch (see Figure #3.33)
enables the packer to automatically start
cycling about 4 seconds after the grabber
is closed. This will give the arm enough
time to reach the hopper and dump the
cart before the packer starts to pack.
With a multi-cycle system, if the packer is
set to perform three(3) cycles (set in factory
to 3 cycles, adjustable from 2 to 8; see
section 3.2.5 Multi-Cycle Control), the
packer will complete all its cycles until the
next time the operator closes the grabber.
When the operator closes the grabber,
the multi-cycle function is reset.
If the grabber is closed in the middle of a
cycle, the packer will interrupt its current
cycle, return to its fully retracted position,
and then restart the next cycle. When a
cycle is interrupted and the packer has
returned, there is no delay before the
packer restarts the next cycle. The foursecond reset will apply only when the
packer has completed all its cycles (2 to 8)
and when it has returned to its fully
retracted position.
Interrupting a cycle prevents dumping carts
directly over the packer. Piled material
over the packer could reduce the packer
efficiency.
AUTOMIZER RIGHT-HANDTM
35
CAB CONSOLE
WORK
LIGHT(S)
(Optional)
CART
COUNTER
(Optional)
LIGHTBAR
(Optional)
TAILGATE FULLY OPEN OR
BODY RAISED
INDICATOR
TAILGATE
CONTROL LEVER
STROBE
LIGHT(S)
(Optional)
BODY
CONTROL LEVER
PUMP SWITCH
(PTO)
PACKER
MULTI-CYCLE
ENGINE
SPEED-UP
PACKER
RETRACT
PACKER START
CYCLE
GRAB PACK
(Optional)
EMERGENCY
STOP
CONTROL
FIGURE #3.7
OPERATOR MANUAL
36
3.2.9
WATER TRAP BLEED
Located in front of the console (Figure
#3.8), the water trap bleed must be drained
at the end of every working day. Using a
rag, unscrew the tip to collect the water
that will come out. This water trap helps to
keep moisture out of the air system.
NOTE:If the truck is equipped with an
electrical valve, there’s no water trap.
WATER TRAP
The operator can choose between the
camera on the tailgate, the one inside the
hopper and the one aimed at the arm. The
monitor controls each of those cameras
using a camera selector switch (Figure
#3.9 & #3.10). There’s also an automatic
mode (when the truck is equipped with 3
cameras) that allows the cameras to switch
automatically (rear camera when the truck
is in reverse, camera in the hopper when
the arm is lifting, camera aimed at the arm
when he arm is going down).Since many
types of monitors and cameras can be
installed on the vehicle, refer to the camera
manufacturer manual provided with the
vehicle.
CAMERA LENS
FIGURE #3.8
3.2.10 PUMP SWITCH
The pump switch engages the hydraulic
pump and enables all the body functions
(packer, tailgate, body hoist) as well as
the joystick that controls the arm (See
section 3.1.8 “Engaging the hydraulic
system”).
FIGURE #3.9
MONITOR
CAMERA
SELECTOR
3.2.11 MONITOR AND CAMERAS
Optional monitor and cameras can be
installed inside the cab and through out
the vehicle. The Automizer TM can be
equipped with up to three (3) cameras.
AUTOMIZER RIGHT-HANDTM
FIGURE #3.10
37
3.2.12 ARM EXTEND WARNING LIGHTS
Two warning lights on the dashboard
(Figure #3.11) indicate to the operator
when the arm is out. Do not move the
vehicle until these lights stop flashing.
The dashboard varies according to the
chassis.
ARM EXTEND
WARNING LIGHT
IMPORTANT: The packer must be fully
retracted to allow the crusher panel to
moves down. the crusher panel needs to
be in the parked position to let the arm
dump a cart.
The following figure presents the control
buttons of the crusher panel. The model
of the control station varies according to
the options installed.
FIGURE #3.11
DANGER
NEVER DRIVE THIS VEHICLE IF
THE AUTOMATED ARM IS NOT
PARKED ALONG THE TRUCK. THE
UNIT WOULD BE TOO HIGH AND/
OR TOO WIDE. FAILURE TO
RETRACT THE ARM WILL RESULT
IN UNIT AND/OR PROPERTY
DAMAGES, PERSONAL INJURY
OR DEATH. FLASHING LIGHTS
(RED) ON DASHBOARD WILL
COME ON, AS THE ARM IS
EXTENDING.
CRUSHER PANEL
UP
CRUSHER
PANEL DOWN
3.2.13 CRUSHER PANEL CONTROL (if
installed)
The control for the crusher panel is fully
manual (standard unit) and is located
inside the cab on the packer control
station. One button will lower the
crusher panel and one button will move
it up.
OPERATOR MANUAL
38
3.2.14
ARM AUXILIARY CONTROL
Some trucks are equipped with an auxiliary
control under the right-hand side seat,
which allows tthe operator to control the
arm from outside the cab.
This auxiliary control has the same
functions as the joystick. It contains buttons
and switches that allows the operator to
control the arm, the grabber and the AutoDump function (if equipped). To use this
auxiliary control, the operator has to select
it (on the console).
Below is the sticker of the auxiliary control,
which presents the position of all it’s
buttons and switches.
DEAD MAN
SWITCH
GRABBER
CLOSING/
OPENING
AUTOMIZER RIGHT-HANDTM
AUTO-DUMP
(COOL HAND
ARM ONLY)
GRABBER
UP/DOWN
ARM
EXTEND/
RETRACT
39
3.3
DAILY INSPECTION
3.3.1
APPROACHING THE VEHICLE
As you approach, look for any object under
or against the vehicle, the surroundings for
people, other vehicles, under and overhead
obstructions. Ensure that the truck is parked
at the most convenient place where you will
have all the clearance required to perform
the complete “Start of the Day Inspection”.
During the daily inspection, look for any
structural damage. Inspect the tires and
check the hydraulic tank for air leaks (when
the hydraulic tank is under the pump level).
3.3.2
TRUCK STARTING PROCEDURE
Enter the cab and proceed as per the truck
manufacturer manual start up procedures.
TRUCK STARTING PROCEDURE:
1. Put
the
transmission
in
“NEUTRAL” (Truck using shifter
lever only).
2. Parking brake is “ON”.
3. Hydraulic system is “OFF”.
4. Start engine.
5. Engage the hydraulic system (the
air pressure has to be at a
minimum of 70 PSI).
6. Turn on all lights, (marker lights,
headlights, work lights, flashing
light, etc.).
7. If required, move the truck to an
appropriate area to perform the
daily inspection.
8. Report any defective system to
the maintenance personnel.
OPERATOR MANUAL
40
3.3.3
BODY INSPECTION PROCEDURE
Exit the cab to continue your inspection.
Bring a rag along to clean all accessible
lights, stickers, camera lens etc. See for
mechanical problems: rollers, hinges, door
lock mechanisms, wear items etc. Report
any defective system to the maintenance
personnel.
BODY INSPECTION PROCEDURE:
1. Activate the packer for a full cycle;
2. Check the automated arm
operation.
3. Check if the tailgate safety pins
are in place. Put them in place to
lock the tailgate properly. If the
body is Co-Mingle, apply this
procedure for both safety props.
4. As you walk along the side, clean
all safety labels.
5. Check the frame area, fuel tank,
air tanks (air tanks must be drained
every day), cleaning traps and
wheels for leaks, cracks or other
type of problems.
6. At the front end, check lights,
mirrors, and pump.
7. Go around and, check lights, clean
camera, labels, lights etc.
8. Check for hydraulic leaks.
AUTOMIZER RIGHT-HANDTM
3.3.4
CAB DRIVING CONTROLS
INSPECTION PROCEDURE
Enter the right-hand side extension (if
equipped) and operate the right-hand side
driving controls: Report any defective
system to maintenance personnel.
RIGHT-HAND SIDE DRIVING
POSITION INSPECTION
PROCEDURE:
1. Test the steering wheel by turning
it left and right as you are slowly
moving the truck forward.
2. Move forward and stop the vehicle
by applying the foot brake.
3. Apply the parking brake, engage
the transmission to “Drive” and
try to get the vehicle moving by
throttling up with the right-hand
side accelerator pedal.
4. Throttle down to idle, apply foot
brake and remove parking brake.
5. Reapply the parking brake.
41
3.3.5
INSPECTION SHEET EXAMPLE
The following is an example of an
inspection sheet. The operator MUST
follow the inspection sheet provided by his
employer. If the employer doesn’t have
any, ask his permission before using this
example.
OPERATOR MANUAL
42
3.4
LOADING, COMPACTING AND
UNLOADING
3.4.1
PLANNING YOUR ROUTE
It is important to plan your route in order to
be efficient. Planning your route will
shorten your collection time, prevent from
being caught in traffic jam. Remember
that the Automizer TM was designed
exclusively to pick up roller carts.
3.4.2
SAFETY WHILE USING THE PACKING
SYSTEM
WARNING
WARNING
WEAR PROTECTIVE SAFETY
EQUIPMENT, LIKE SAFETY
GLASSES AND GLOVES WHEN
YOU ARE WORKING CLOSE TO
THE HOPPER AREA, AT ALL
TIMES.
IF YOU HAVE TO ENTER THE
HOPPER AREA, COMPLETE THE
TAGOUT PROCEDURE BEFORE
DOING SO (SEE SECTION 2.4).
SAFETY GLASSES AND GLOVES
ALWAYS KEEP THE WARNING
LIGHTS AND/OR FOUR WAY
FLASHERS ON, WHEN
COLLECTING REFUSE.
DANGER
NEVER ATTEMPT TO REACH
INSIDE THE HOPPER AREA WHEN
EITHER THE PACKER BLADE OR
THE ARM IS IN MOTION. SEVERE
INJURY OR DEATH MAY OCCUR.
AUTOMIZER RIGHT-HANDTM
SAFETY LABELS
43
3.4.3
HOPPER DESCRIPTION AND
LOADING
3.4.4
The AutomizerTM side loader refuse truck
has a packer swept volume of 1.75 cubic
yards (Figure #3.13). The packer swept
volume is reached by using a 24-inch
height packer blade with a 52-inch stroke.
Using the arm to load the hopper, fill up
garbage as high as the packer and then
press the green button to get a complete
cycle. Be careful of explosive projectile
objects and watch for over spill. See
section 3.4.8 “Pack on the Go”.
PACKER DESCRIPTION
The packer (Figure #3.13) is made of high
strength steel traveling the hopper to push
the refuse into the body. If any piece of
garbage exceeds above the packer, it will
be crushed or bent against the crusher
bar, located just above the opening of the
body. Whatever it is not push inside the
body on a given stroke of the packer,
refuse material will fall back in the hopper
as the packer will retract. As another cycle
is activated by the operator, what was left
in the hopper in the previous stroke of the
packer will be pushed into the body.
While collecting roller carts, you should
start cycle the packer every time you have
finished emptying one cart in the hopper.
Refer to section 3.4.5 “Loading Procedure”.
24-INCH HEIGHT
PACKER BLADE
HOPPER WITH A SWEPT
VOLUME OF 1.75 CU.YD.
FIGURE #3.13
FIGURE #3.14
OPERATOR MANUAL
44
3.4.5
LOADING PROCEDURE
LOADING PROCEDURE
1. Stop the vehicle so that the arm is lined up with the roller cart.
2. The distance between the vehicle and the roller cart should be at least one foot.
3. With the arm parked along the truck, use the joystick to extend the arm to reach
the cart. The operator MUST push on the trigger in order to enable the joystick
functions.
4. Close the grabber by pressing on the push-button switch (Figure #3.15).
5. Raise the roller cart at about 12 inches above the ground.
6. Fully retract the arm.
7. Pull the joystick to raise the grabber inside the hopper. The garbage should then
fall down.
8. Ensure that the roller cart is empty before returning the cart back to the ground.
9. Retract the arm near the vehicle.
WARNING
WARNING
DO NOT OPEN THE GRABBER
WHILE LIFTING UP THE ROLLER
CART; IT WILL FALL DOWN. THIS
MAY RESULT IN DAMAGING THE
ROLLER CART, THE EQUIPMENT
AND/OR CAUSE INJURY.
DO NOT MOVE THE VEHICLE IF
THE ARM IS NOT FULLY
RETRACTED ALONG THE
HOPPER.
Arm Control joystick
Close
Grabber
Open
Grabber
Pushbutton
Trigger
GRABBER
CLOSE
GRABBER
OPEN
GRABBER
DOWN
ARM
EXTEND
ARM
RETRACT
GRABBER
UP
REV. 0
FIGURE #3.15
AUTOMIZER RIGHT-HANDTM
LABRIE
47600
45
Minimum reach: less than 12”
Maximum reach: up to 110”
FIGURE #3.16
OPERATOR MANUAL
46
3.4.6
LOADING CORRECTIVE ACTIONS
DANGER
PACKER WILL
NOT CYCLE:
1. Ensure the hydraulic system is
engaged.
2. Check the emergency red button.
3. Press the yellow button to ensure
the packer is completely retracted.
4. Check around the packer for any
obstruction preventing it to move
freely.
5. Check fuses in the console.
6. Report your findings to the
maintenance personnel.
3.4.7
SOMEONE IS TRAPPED IN
PACKER SYSTEM
1.
Hit the emergency stop button
(red).
2.
Call for help then proceed with
first aid.
3.4.8
PACK ON THE GO
It may be useful to expedite your work and
be more efficient : “Pack on the go” or
make the packer to cycle when driving.
EMERGENCY ACTIONS
HYDRAULIC OIL SPILL
1. Press the emergency red button.
2. Turn off the pump switch and stop
the truck’s engine.
3. Close the main valve on the
hydraulic tank.
4. Carefully inspect and find the
cause of the leak.
5. Call the maintenance facility and
report your findings.
6. If the leak cannot be repaired on
site, and the vehicle cannot be
towed, remove the pump drive
shaft before restarting the engine.
7. When the time has come to restart
the pump, ensure that the valve
on the hydraulic tank is fully open
and that there is sufficient oil in
the hydraulic tank.
AUTOMIZER RIGHT-HANDTM
As you are finished loading the hopper,
you can activate the Multi-Cycle button
(see section 3.2.5), and press the Start
Cycle button (green). This will allow the
packer to cycle, even if you are moving the
vehicle to the next pick up. When moving
the vehicle, the hydraulic pump will turn at
engine’s RPM, which depends on the truck
speed.
The Multi-Cycle electronic module allows
the packer to perform up to eight (8) cycles
when pressing the Start Cycle button
(green). Standard factory preset of the
module is three (3) cycles. Refer to General
Maintenance for programming parameters
table of the module.
47
3.4.9
STANDARD UNLOADING
PROCEDURE
Once you have finished your route, make
sure that the arm is parked along the truck
and that the crusher panel is lowered (if
installed). Keep some garbage not
compacted in front of the packer in order
to help during the “unloading procedure”.
DUMPING HEIGHT
264” (22’-0 or 6.7 meters)
FIGURE #3.17
WARNING
ENSURE THE OVERHEAD IS
CLEAR BEFORE OPENING THE
TAILGATE(S) AND RAISING THE
BODY.
STANDARD UNLOADING
PROCEDURE1
1. Drive the vehicle to the landfill.
2. Ensure the vehicle is on safe,
stable and level ground.
3. Check the overhead clearance
(22 feet) before opening the
tailgate and raising the body.
MAKE SURE THAT THE AIR
SUSPENSION IS DROPPED OR
THE TAG AXLE IS DOWN (IF
EQUIPPED).
4. Remove tailgate safety pins.
5. Fully open the tailgate.
6. Raise the body.
7. The material should slide out .
8. Slowly move the vehicle forward
to prevent the garbage from piling
up under the tailgate. This is the
only time you can move the truck
with body raised. Do it very
cautiously and cover the shortest
distance possible. Always be
aware of the overhead clearance.
9. Cycle the packer blade to help
eject the garbage. It may be helpful
to have some garbage left in the
hopper to enhance the effect of
the packer blade cycle on the
garbage.
10. Lower the body and close the
tailgate.
11. Put safety pins back in place
(Figure #3.18).
12. Drive away from the unloading
site.
13. See section 3.5 “End of the day
cleaning and inspection.”
1. If the truck is equipped with a Co-Mingle body,
repeat the procedure for the second compartment.
OPERATOR MANUAL
48
WARNING
NEVER MOVE THE TRUCK
BACKWARDS WITH THE BODY IN
THE RAISED POSITION.
NEVER RAISE THE
BODY IF THE
TAILGATE IS NOT
FULLY OPEN.
DANGER
ALWAYS USE THE SAFETY PROP
WHILE WORKING UNDER A
RAISED TAILGATE. THE SAFETY
PROP SHOULD BE INSTALLED
EVEN IF THE TAILGATE IS IN THE
FULLY RAISED POSITION.
PROP
SAFETY PINS
SAFETY PROP
FIGURE #3.19
SAFETY PIN
SAFETY PROP
FIGURE #3.18
AUTOMIZER RIGHT-HANDTM
49
3.4.10 UNLOADING CORRECTIVE ACTIONS
3.4.11 UNLOADING EMERGENCY ACTIONS
As you are unloading the refuse unit, some
garbage may fall or be blown away between
the chassis and the body. Apply the
following procedure for the remaining
garbage stuck on or between the chassis
and the body:
If the truck starts to sink on one side as
you unload:
GARBAGE BETWEEN
CHASSIS AND BODY:
1. Lift the body until the safety prop
is clear to tilt under the body.
2. Release the safety prop by pulling
the handle (Figure #3.20).
3. Then pull down the safety prop
(towards the body).
4. Slowly lower the body so it rests
on the prop.
5. Proceed with the necessary
cleaning of the chassis.
6. Once finished, slightly raise the
body; return the safety prop to its
vertical position.
7. Lock the safety prop.
8. Lower the body onto the chassis
before moving the vehicle.
BODY SAFETY PROP
SAFETY PROP
HANDLE
DANGER
UNLOADING EMERGENCY
ACTIONS
1. Stop all movement of the
equipment.
2. Start or continue lowering the
body.
3. If the equipment does not stop
sinking, stay inside and protect
yourself.
CAUTION
THE BODY DOES NOT RAISE
1. Ensure the hydraulic system is
engaged.
2. Make sure the tailgate is fully
open.
3. Make sure the air pressure is
above 70 psi.
4. Check all fuses in the console.
5. Contact the maintenance facility
if there is no change.
6. If equipped with air suspension,
it needs to be dropped.
7. If equipped with a tag axle, it
must be lowered.
DANGER
FIGURE #3.20
DO NOT USE SAFETY PROP WITH
A LOADED BODY. NEVER STAND
UNDER A RAISED LOADED BODY.
OPERATOR MANUAL
50
3.4.12 TROUBLESHOOTING QUICK
REFERENCE
If an electrical failure occurs preventing
the operator from retracting the arm, the
following procedure can be applied.
a) Apply the parking brake and put the
transmission in “Neutral”.
b) Install the control lever on the
proportional valve located on the righthand side of the vehicle (Figure #3.22),
on the arm extend/retract section.
Using the manual control, retract the
arm slowly in order to bring it back to
it’s rest position. Stand clear of the
path of the arm and do not open the
grabber in midair.
Contact your service center and refer to
the Troubleshooting section of the Parts
and Service Manual.
CONTROL
LEVERS (removed)
DANGER
NEVER DRIVE THIS VEHICLE IF
THE AUTOMATED ARM IS NOT
PARKED ALONG THE TRUCK. THE
UNIT WOULD BE TOO HIGH AND/
OR TOO WIDE. FAILURE TO
RETRACT THE ARM WILL RESULT
IN UNIT AND/OR PROPERTY
DAMAGES, PERSONAL INJURY
OR DEATH. FLASHING LIGHTS
(RED) ON DASHBOARD WILL
COME ON, AS THE ARM IS
EXTENDING.
PROPORTIONAL VALVE
GRABBER OPEN
ARM EXTEND
GRABBER UP
GRABBER CLOSE
ARM RETRACT
GRABBER DOWN
PROPORTIONAL
VALVE
FIGURE #3.21
DANGER
STAY CLEAR OF THE PATH OF
THE ARM AND THE GRABBER
WHILE MANUALLY MOVING THE
ARM. FAILURE TO DO SO MAY
RESULT IN SERIOUS INJURIES
OR EVEN DEATH.
AUTOMIZER RIGHT-HANDTM
FIGURE #3.22
51
3.4.13 CRUSHER PANEL
3.4.14 GRIPPER AUTO-CLOSE OVERRIDE
The crusher panel is an option that may be
installed on the vehicle. If it is installed we
suggest you to use it only for bulky items
and breaking the load. In many cases,
unnecessary use will slow down the
operation. Bulky items can be maintained
in place with the crusher panel while the
packing ram crushes them.
The Gripper Auto-Close Override function
(optional) allows the operator to open the
gripper in the hopper in order to throw
away the grabbed object directly in it.
The crusher panel can be lowered upon
the refuse to prevent the refuse from
popping up in front of the packing ram,
increasing the compaction at any time and
also during the load breaking sequence
To help during the unloading sequence,
you should leave a good amount of
garbage in front of the packing ram and
under the lowered crusher panel, as you
finish your route. Once you are at the
landfill and that the body is raised, you can
activate the packing ram to help clear
whatever could be jammed in the hopper.
This procedure can also be done without
the crusher panel.
To enable the Gripper Auto-Close Override
function, push on the Gripper Auto-Close
Override button on the cab console (see
illustration on the next page).
The Gripper Auto-Close Override function
allows the gripper to be open during
10 seconds. After 10 seconds, the gripper
closes automatically.
To adjust the delay, turn the potentiometer
on the corresponding timer relay (located
in the console). To know exactly which
relay controls the Gripper Auto-Close
Override function, see the electrical
schematics supplied with the truck.
Prior to beginning waste collection, make
sure that the crusher panel is fully raised
and the right-hand side hopper door is
closed and locked in place. An interlock
system (proximity switch and/or limit
switch) prevents the arm from working if
the door is open or if the crusher panel is
not up.
OPERATOR MANUAL
52
TIMER RELAY
DELAY
ADJUSTMENT
FINE TUNING
GRIPPER AUTOCLOSE OVERRIDE
BUTTON
AUTOMIZER RIGHT-HANDTM
53
3.5
END OF THE DAY CLEANING AND INSPECTION
3.5.1
HOPPER DAILY CLEANING
Cleanliness is a key part of safety and critical to the vehicle’s maintenance.
Daily cleaning of the hopper and chassis is crucial because it will minimize breakdowns
and maintenance expenses. Daily wiping down of all truck lights, warning lights and
safety stickers will make your vehicle more visible so that surrounding pedestrians and
vehicles will be safer around the vehicle.
The procedures described in this section are necessary for the vehicle to be well
maintained and for the operator to be safe while cleaning the vehicle.
HOPPER CLEANING PROCEDURE
1. Park the vehicle on a level ground
and apply the parking brake.
CLEAN ALL ACCUMULATED DIRT
UNDER CYLINDER BRACKETS
2. Fully extend the arm and the
packer.
3. Lower the crusher panel and clean
all accumulated dirt. Then, raise
the crusher panel all way (if
installed).
4. Proceed with the lockout/tagout
procedure (section 2.4).
5. Open the cleaning trap on each
side of the hopper (Figure #3.26).
FIGURE #3.24
6. Clean all accumulated dirt under
cylinder brackets and inside the
side tracks using the hoe and
pressurize water if necessary. Be
careful with limit switches to
prevent misalignment.
7. Perform a visual inspection for
leaks or wear in this area.
8. Rake small pieces of garbage out
of the cleaning traps using the
hoe (Figure #3.26).
9. Finish cleaning the area with
pressurized water.
OPERATOR MANUAL
54
3.5.1
HOPPER DAILY CLEANING (cont’d)
CLEANING TRAP
FIGURE #3.26
CLEAN ALL ACCUMULATED DIRT
UNDER CYLINDER BRACKETS
3.5.2
CHASSIS DAILY CLEANING
CHASSIS DAILY CLEANING
PROCEDURE
1. Start the engine.
2. Raise the body until the safety
prop is free to tilt under the body.
3. Release the safety prop using the
prop handle (Figure #3.28).
4. Apply lockout/tagout procedure.
5. Clean with pressurized water
between the body and the frame.
6. Clean the rear of cab.
7. Perform a visual inspection for
leaks or wear in this area.
8. When finished, start the engine,
lift the body and bring the safety
prop back to its vertical position,
then lower the body.
9. Clean the body all around with
water and soap; Rinse.
BODY SAFETY
PROP
CLEANING TRAP
(one on each side)
FIGURE #3.27
SAFETY PROP
HANDLE
FIGURE #3.28
AUTOMIZER RIGHT-HANDTM
55
3.6
CO-MINGLE SPLIT BODY OPERATION
3.6.1
INTRODUCTION
The Co-Mingle version of the AutomizerTM is a dual compartment unit equipped with a
hopper divider and dual tailgate (Figure #3.29). The vehicle was designed to collect
different materials on the same route.
A mobile chute located in the middle of the hopper (Figure #3.30) diverts material into
either side of the hopper.
The chute is controlled by the operator from inside the cab, using push buttons located
on top of the joystick (Figure #3.31). Refer to section 3.6.2 “Joystick Description” and
section 3.6.5 “Single Chute Operation”. Also available in option, the split chute
operation and description is outlined in section 3.6.8 “Dual chute operation”.
FIGURE #3.29
Mobile chute in the hopper section
Joystick with chute control
FIGURE #3.30
FIGURE #3.31
OPERATOR MANUAL
56
3.6.2
JOYSTICK DESCRIPTION
In this section, you will find the description
of the joystick installed on the AutomizerTM.
Other Automizer TM cab controls are
outlined too in section 3.2 “Cab Controls
Review”.
The joystick, which controls the arm, is
equipped with six push buttons (Figure
#3.32 and 3.33). Two of these buttons
allow the operator to control the position
of the chute inside the hopper. There’s
also two other buttons that allow to open
and close the grabber of the arm. Finally,
the two buttons located at the front of the
joystick are used for the Auto-Dump TM
function (on Cool Hand TM only).
FIGURE #3.32
TOWARDS
DRIVER
FRONT OF THE
TRUCK
LEFT
CHUTE
CLOSE
GRIPPER
AUTO-DUMP
BUTTONS (COOL
HAND TM ONLY)
RIGHT
OPEN
FRONT OF THE TRUCK
TOWARS DRIVER
FIGURE #3.33
AUTOMIZER RIGHT-HANDTM
57
3.6.3
TAILGATE SELECTOR SWITCH
Located on the console,
the tailgate selector
switch (Figure #3.34)
enables the operator to
choose
between
unloading the right or the
left side of the body.
Before opening one
tailgate, the operator
moves the switch
towards the left or right
and then uses the
tailgate control lever,
also located on the
console.
CAB CONSOLE
Tailgate selector
switch
Chute lock
mechanism control*
Note that only one
tailgate can be open at a
time. Refer to section 3.4.9 “Standard
Unloading procedure”.
Grab pack
switch
FIGURE #3.34
Note:
For some units equipped with an optional
split chute, a lock mechanism switch is
added on the console (Figure #3.34). Refer
to section 3.6.8 “Dual chute operation”.
* Available only with dual chute. See section 3.6.8 “Dual Chute Operation”.
OPERATOR MANUAL
58
3.6.4
SAFETY SYSTEM
The AutomizerTM Co-Mingle is equipped
with an interlock system designed to
prevent the arm from colliding with the
chute. The system uses proximity switches
to detect the position of the chute and the
arm.
If the chute is not in the proper position
(Figure #3.35), the proximity switch in the
hopper (Figure # 3.37) will stop the arm
before the collision occurs with the chute.
The limit switch on the side of the RightHandTM arm for auto-closing and camera
switching will stop the arm from dumping
if the chute is not in the proper position.
Two other proximity switches are used to
detect the position of the chute (left and
right position). They are located behind
the hopper front wall (Figure #3.37). Refer
to the Parts and Service Manual for limit
switch adjustment procedure.
Limit
switch
Chute not in
proper position
FIGURE #3.36
FIGURE #3.35
Proximity
switches
FIGURE #3.37
AUTOMIZER RIGHT-HANDTM
59
3.6.5
SINGLE CHUTE OPERATION
The chute located in the middle of the
hopper diverts material to the left or the
right side of the hopper (Figure #3.38).
Before collecting material, the operator
must know exactly what type of material to
load in, and to change the position of the
chute accordingly. Loading material on
the wrong side of the hopper can
contaminate recycling material with
unwanted substance.
light does not light up after that delay, this
indicate that the chute is stuck somewhere
along piled material in the hopper and that
it cannot reach the desired position.
Chute control buttons
(left or right)
Single chute
FIGURE #3.39
FIGURE #3.38
Before dumping a cart, change the position
of the chute to the proper side of the
hopper using one of the yellow buttons on
top of the joystick (Figure #3.39).
Push the button once and wait until the
warning light on the dashboard lights up
(Figure #3.40). There is no need to hold
the button until the chute comes into
position.
If that happens, it will NOT be possible to
bring back the chute to the other side
unless overriding the chute.
Note that if the chute is not positioned
properly, the arm is no longer capable of
reaching the hopper. An interlock system
prevents the grabber from colliding with
the chute inside the hopper. Refer to
section 3.6.4 “Safety System”.
Chute position
indicators
The time required by the chute to change
from on side to another is about 3 to 4
seconds. Afterwards the warning light on
the dashboard lights up indicating the chute
has reached its position. If the warning
FIGURE #3.40
OPERATOR MANUAL
60
3.6.6
CHUTE OVERRIDE
The chute override button is used when
the chute cannot reach its position (Caused
by piled material in the hopper). It is
possible to operate the chute manually by
pressing the chute override button on the
console (Figure #3.41).
When the override button is pressed, the
operator can return the chute back to its
original position by pressing one of the
two yellow buttons on the joystick and wait
until the packer finished packing material
allowing the chute to move freely.
CHUTE OVERRIDE
BUTTON
FIGURE #3.41
The push button on the console is spring
return and must be held to give full control
of the chute in both directions. When
holding the override, the operator can
move the chute back and forth to help
unblock pilled material.
AUTOMIZER RIGHT-HANDTM
61
3.6.7
SPLIT-CART
The split cart has a center divider that
allows collection of two different types of
material.
For that purpose, the vehicle is equipped
with a dual chute system (Figure #3.42)
that enables the operator to collect splitcart and put different types of recyclable
material simultaneously in both sides of
the hopper without moving the chute (Refer
to section 3.6.8 “Dual Chute Operation”).
DUAL CHUTE
3.6.8
DUAL CHUTE OPERATION
When recycling material requires being
loaded in both side of the hopper at the
same time (when dumping split-cart), an
air locking mechanism is used to release
the rear section of the chute allowing the
operator to move front section of the chute
to the opposite side of the hopper.
One half of the chute will divert material
curbside and the other section to the street
side. The lock mechanism is controlled
from inside the cab, using the toggle switch
located on the console (Figure #3.43).
CAB CONSOLE
Chute lock
mechanism control
FIGURE #3.43
FIGURE #3.42
OPERATOR MANUAL
62
3.6.8
DUAL CHUTE OPERATION (cont’d)
Note that the chute can be unlocked
whether it is positioned on the left or the
right side of the hopper.
The dual chute is operated using two
yellow buttons on top of the joystick (Figure
#3.44). Before dumping a cart, change the
position of the chute to the proper side of
the hopper. Push the button once and wait
until the warning light on the dashboard
lights up. There is no need to hold the
button until the chute comes into position.
Note that if the chute is not positioned
properly, the arm is no longer capable of
reaching the hopper. An interlock system
prevents the grabber from colliding with
the chute inside the hopper. Refer to
section 3.6.4 “Safety System”.
Chute position
indicators
FIGURE #3.45
FIGURE #3.44
The time required by the chute to change
from one side to the other is about 3
seconds. Afterwards the warning light on
the dashboard lights up, indicating that
the chute has reached its position (Figure
#3.45). If the warning light did not light up
after that delay, this indicates that the
chute is stuck somewhere with piled
material in the hopper and cannot reach
the desired position.
If that happens, it will NOT be possible to
bring back the chute to the other side
unless overriding the chute. Refer to
section 3.6.6 “Chute Override”.
AUTOMIZER RIGHT-HANDTM
63
3.6.9
SEPARATING THE CHUTE
To separate the chute, bring it to the
proper side of the hopper (either street
side or curbside), flip the rocker switch on
the console (Figure #3.43). Move back the
front part of the chute to the other side.
Releasing the rear part of the chute
enables the operator to load split-cart
simultaneously into both sides of the
hopper. When the chute is separated, the
warning light on the dashboard will indicate
only the position of the forward part of the
chute. Make sure to align the front part of
the chute with the rear part before locking
both sections.
FIGURE #3.46
OPERATOR MANUAL
64
3.6.10 CO-MINGLE UNLOADING
PROCEDURE
Once you have finished your route, make
sure that the arm is parked along the
truck. Keep some garbage not compacted
in front of the packer in order to help you
during “unloading procedure”.
DUMPING HEIGHT
CO-MINGLE UNLOADING
PROCEDURE
Step 1
•
Drive the vehicle to the landfill or
the material recycling facility;
•
Make sure that the vehicle is on a
safe, stable and level ground;
•
Check the overhead clearance and
the back of the vehicle before
opening the tailgate and raising
the body;
•
Remove both tailgate safety pins
(Figure #3.47);
•
Select the proper tailgate (Left or
right) using the tailgate selector
switch on the console;
•
Fully open the tailgate;
264” (22’-0 or 6.7 meters)
FIGURE #3.47
WARNING
ENSURE THE OVERHEAD IS CLEAR
BEFORE OPENING THE TAILGATE
AND RAISING THE BODY.
AUTOMIZER RIGHT-HANDTM
65
•
•
•
•
•
FIGURE #3.48
FIGURE #3.49
CO-MINGLE UNLOADING
PROCEDURE
CO-MINGLE UNLOADING
PROCEDURE
Step 2
Step 3
Raise the body (Figure #3.48);
The material should slide out;
Move slowly the vehicle forward
to prevent the garbage from piling
up under the tailgate (Figure
#3.48). This is the only time you
can move the truck with body
raised. Do it very cautiously and
cover the shortest distance
possible. Always be aware of the
overhead clearance;
Cycle the packer blade to help
eject the garbage. It may be helpful
to have some garbage left in the
hopper to enhance the effect of
the packer pushing on the
garbage;
Lower the body and close the
tailgate;
•
•
•
•
Repeat the procedure for the other
side of the body;
Put safety pins back in place
(Figure #3.19);
Drive away from the unloading
site;
See section 3.5 “End of the day
cleaning and inspection”.
OPERATOR MANUAL
66
NOTES
AUTOMIZER RIGHT-HANDTM