1
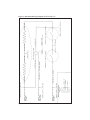
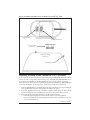
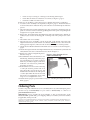
Soothes and softens hands,
elbows, feet, and more
Service Manual for
• Model TB4 (220-volt), Snap Action Thermostat (S.A.S.) Assembly Replacement
Version 1.0, item no. MR81, rev. 2/21/05
Contents
General Operating Instructions ............................................................. 3
Technical Specifications .......................................................................... 3
Service Procedures .................................................................................. 3
Equipment Needed ............................................................................................... 3
Visual Inspection ................................................................................................... 4
Checking the Temperature of the Bath .............................................................. 4
Removing the Paraffin or Mineral Oil ............................................................... 5
Replacing the Snap Action Thermostat (S.A.S.) Assembly ............................ 7
Ordering Parts ......................................................................................... 8
List of Figures
Schematic/Wiring Diagram of Therabath®Pro™ ................................................................................ 6
Bottom and Side Views of Inside Therabath®Pro™ Tank ............................... 7
Cross Section of Case Groove and Tank Lip ................................................... 8
Important Safeguards
— READ ALL INSTRUCTIONS BEFORE REPAIRING—
WARNING
• Repairs must be done by a qualified technician only.
• Failure to properly repair this device may cause injury to the user.
• This device must be repaired so that the bath maintains the temperature of the
paraffin between the temperature limits stated within this manual.
• If the unit is repaired by anyone other than WR Medical Electronics Co. personnel,
all warranties are voided.
CAUTION
• Because specialized equipment and techniques are required in order to properly repair this product, we recommend that all units be returned to the factory for repair.
• For repair advice, contact the factory service department at:
WR Medical Electronics Co.
123 North Second Street, Stillwater, MN 55082 USA
Phone: (651) 430-1200
FAX: (651) 439-9733
E-mail: [email protected]
Web Site: www.wrmed.com
• Read all of these instructions before attempting to begin repairs.
• The specifications in this manual are subject to change without notice.
— Save These Instructions —
Page 2 • Therabath PRO Model TB4 (220-volt) Service Manual
®
®
General Operating Instructions
• Therabath®Pro™ paraffin baths are designed for a wide variety of medical and cosmetic
applications. They are normally used in hospitals, clinics, sports facilities, nursing homes,
beauty salons, spas, and in the home.
• Users dip their hands, elbows, or feet into the bath to form a layer of paraffin on their skin.
The paraffin provides a long-lasting heat treatment for the appropriate area. After the paraffin cools, the user removes the solidified paraffin and discards it.
• For more specific user instructions including indications and contraindications, see the
Therabath®Pro™Operator’s Manual, which is included with every new unit.
Technical Specifications
• Unit Capacity ................................................
• Average Operating Temperature ...............
• Absolute Operating Temperature ..............
• Paraffin Wax Melt Time ...............................
• Energy Usage ................................................
• Ambient Operating Air Temperature .......
• Control Thermostat ......................................
• High Limit (Safety) Thermostat .................
2.72 kg of paraffin wax
52.2–56.7 degrees C
51.1–59.4 degrees C
8–10 hours
0.5 kwh per 24 hours
18.33–29.4 degrees C
Bimetallic Snap Action
Bimetallic Snap Action (manual reset)
Service Procedures
Equipment Needed
In order to service a Therabath®Pro™ paraffin bath, you will need the following items:
• 3/8” nut driver;
• Flat blade screwdriver with blade width of 4.0–5.5 mm and a shaft length of 10 cm.;
• A pair of pliers;
• Thermometer: We recommend a thermometer with temperature scale range of 32–82
degrees C., divisions every 0.1 degree C., and with an immersion depth of 79 mm.,
suitable for measuring paraffin wax melt points. Thermometers that meet the ASTM
14C standard are ideal;
• Four liters of mineral oil for testing the Therabath®Pro™ (if not testing with Theraffin®
paraffin);
• Snap Action Thermostat (S.A.S.) Assembly [Part Number 840-wo-34020]: Includes
Control Snap Action Thermostat (S.A.S.), High Limit S.A.S., 0.090 Aluminum Plate,
0.150 CPVC spacer under High Limit S.A.S., 0.125 CPVC spacer under Control S.A.S.,
four 4-40 x 3/8” nylon screws, four 4-40 nylon nuts, and one Thermopaper for under
the S.A.S. assembly.
Therabath PRO Model TB4 (220-volt) Service Manual • Page 3
®
®
Visual Inspection
Inspect the Therabath®Pro™ unit for any of the following problems:
• Make sure the lid and grille are not damaged. If they are, you may purchase new ones
from the factory. See “Ordering Parts,” page 8.
• Check the power cord. If it is damaged, it should be replaced.
• Check that the white plastic case is not broken and that it fits together properly.
• Check to see that there are no scratches in the enamel coating on the tank and that
there is no rust in the tank.
If there are any problems, contact the factory for further advice.
Checking the Temperature of the Bath
Follow this procedure to test the temperature calibration of the Therabath®Pro™ unit. If
the temperature of the unit is within tolerances and the unit is operating normally, no
repairs are necessary.
Note: Mineral oil may be used in place of paraffin for calibration testing purposes. Average melt time for paraffin is 8–10 hours. Average warm-up time for mineral oil is 2–3
hours.
1. Place 2.72 kg. (6 lbs.) of solid paraffin in the bath, or carefully pour 4 liters of mineral
oil into the tank. Plug in the unit and let it warm up to operating temperature (8–10
hours for paraffin, or 2–3 hours for mineral oil).
2. Place a very accurate thermometer in the bath. The thermometer used to measure the
bath temperature should be a laboratory quality thermometer for measuring wax melt
points, such as the one listed in “Equipment Needed,” page 3.
Hint: Take a sheet of cardboard large enough to cover the entire bath opening and,
using a pencil, punch a hole just large enough for the thermometer probe to fit through.
Lay the cardboard across the unit and place the thermometer through the hole so that
the probe tip is held about 2.5 cm from the bottom of the tank and is centered relative
to the sides of the tank. Fasten the thermometer in this position using adhesive tape
(this will eliminate calibration errors due to cold or hot air drafts).
3. After inserting the thermometer, wait approximately 30 minutes for the temperature
of the bath to stabilize. (Opening and closing the cover and adding a cool object such
as a thermometer will cause the temperature in the bath to change. In addition, the
thermometer will need to warm up, making necessary the 30-minute wait.)
4. Record the temperature reading when the pilot light comes on, and also record the
highest temperature of the bath during one entire heating and cooling cycle (approximately 10–15 minutes). The temperature should read between 51.1–59.4 degrees C.
(the absolute operating temperature range).
5. Repeat steps 3 and 4 three or four more times to determine if the unit is operating
properly.
CAUTION: Because temperature measurements are critical in determining if the
Therabath®Pro™ unit is operating correctly, it is important that you use a calibrated thermometer and that you have the calibration of the thermometer periodically checked.
If the pilot light remains illuminated continuously for more than the normal cycle time
(10–15 minutes), if the pilot light does not come on at all, or if the unit does not fall within
the absolute operating temperature limits, the unit is not operating correctly. Disconnect
the unit, remove the paraffin or mineral oil (see “Removing the Paraffin or Mineral Oil,”
Page 4 • Therabath PRO Model TB4 (220-volt) Service Manual
®
®
page 5) and follow the procedure for replacing the S.A.S. Assembly, page 7.
Note: If the unit does not heat up at all and you are unable to remove the paraffin, the
S.A.S. Assembly can be replaced with the solidified paraffin left inside the bath.
Removing the Paraffin or Mineral Oil
CAUTION: Do not pour liquid paraffin or mineral oil out of tank, as some will run down
the joint between the tank and the lip of the case, causing the unit to deteriorate and fail.
Do not use a glass or metal cup to empty the tank as these may scratch the surface of the
tank, causing it to corrode.
Removing Mineral Oil
• If you have used mineral oil to test your Therabath®Pro,™ use a plastic or paper cup to
empty it. Fill the cup by dipping it in the mineral oil, then emptying the cup into your
container of mineral oil. When the bath is nearly empty, you can tilt it on its side so
that it is easier to remove the last cupfuls of the oil. After you have emptied as much as
you can with the cup, soak up the residue of oil and wipe the tank clean with paper
towels.
• Be sure to avoid dripping mineral oil on the seam of the tank and the case, so that oil
does not enter the inside of the unit.
Removing Paraffin Wax
• If you have used Theraffin® paraffin to check the operating temperature, and the operating temperature of the unit is correct, the unit can be left on for normal use.
• If the unit is working correctly but you need to relocate the unit, or if testing dictates
replacement of the S.A.S. assembly due to an improper operating temperature, the
following method should be followed for removing the paraffin:
• Remove the grille from inside the tank (if present).
• Unplug the Therabath®Pro™ and allow the paraffin to solidify overnight.
• After the paraffin is solid, plug in the unit for a few minutes, or just until the cake
of paraffin loosens from the sides and bottom of the unit.
• After the paraffin is slightly loosened from the sides, unplug the unit.
• Press down firmly on one end of the paraffin, tipping the opposite end up. Then
lift out the cake of paraffin. Be careful to avoid dripping.
• Blot up any remaining paraffin in the tank with paper towels. If any solidified
paraffin remains inside or on the outside of the unit, soften it carefully with a hair
drier or heat gun, and blot it with a paper towel.
• Clean the unit with a soapy cloth, and rinse with a clean cloth wrung out in hot
water. Then wipe the unit dry.
Therabath PRO Model TB4 (220-volt) Service Manual • Page 5
®
®
Figure 1: Schematic/Wiring Diagram of Therabath®Pro™
Page 6 • Therabath PRO Model TB4 (220-volt) Service Manual
®
®
Figure 2: Bottom and Side Views of Inside Therabath®Pro™ Tank
High Limit Thermostat
(manual reset)
Control Thermostat
S.A.S. Assembly
(side view)
Tank, S.A.S. Design
(side view)
Grounding Stud
Replacing the Snap Action Thermostat (S.A.S.) Assembly
If it is necessary to replace the thermostat assembly in your Therabath®Pro™bath, call the
factory to order a Snap Action Thermostat (S.A.S.) Assembly Kit. IMPORTANT: Please
provide the serial number of the Therabath®Pro™ unit so the proper kit can be sent.
The following are instructions for replacing the thermostat assembly in a Therabath®Pro™
unit. Refer to Figure 2, located on page 7, for drawings of the inside of the unit.
1. Open the Therabath®Pro™ paraffin bath case by removing the four screws holding the
case together. Take care not to damage the case when you open it.
2. Locate the alignment pins in the case halves and note where they are. They will be
reused when the unit is reassembled. Do not remove them unless they are loose.
3. Inspect the inside of the Therabath®Pro™ paraffin bath for damage.
• Check the general appearance of the inside of the case for any problems.
• Check for matting of any of the fiberglass insulation due to paraffin wax or mineral oil in the insulation.
— continued, next page
Therabath PRO Model TB4 (220-volt) Service Manual • Page 7
®
®
• Check for any loosening of or damage to the heating element pad.
• Check that all electrical connections are normal (see Figure 1, page 6).
• Check the condition of all the wires.
If there are any problems, contact the factory for further advice before continuing.
4. Locate the S.A.S. Assembly to be replaced (see Figure 2, page 7). The thermostats are
located on the bottom of the bath. They are mounted on an aluminum plate and CPVC
spacers.
5. Disconnect the wires from the old thermostats. The connections to the thermostats are
push-on connectors. Remove them by grabbing them with a pliers and pulling them
straight off. Do not pull on the wires.
6. Remove the 10-32 nut between the High Limit and Control thermostats. (NOTE: Assembly may be stuck to the heating pad. A twisting motion may help loosen assembly.)
7. Discard the old S.A.S. Assembly.
8. Place the new S.A.S. Assembly over the 10-32 stud on the bottom of the tank. The
High Limit thermostat (with manual reset button) must be closest to the end of the
heating pad (see Figure 2). Thread on the 10-32 nut and torque to 10 inch-pounds.
9. Attach the short black lead between the thermostats on one side as shown in Figure 1,
page 6.
10. Attach the long black lead to the High Limit thermostat, and attach the joined red and
white/black lead to the Control thermostat as shown in Figure 1.
11. Replace any of the four alignment pins reFigure 3: Cross Section of Case
ferred to in step 2.
Groove and Tank Lip
12. Reassemble the unit so the insulation is not
bunched up, and the lip of the tank is properly seated in the groove on the case halves
all the way around (see Figure 3). The wires
inside the case must not be pinched between the case halves.
13. Re-thread the four screws removed in step
1. It may be useful to put the unit on its
side, thread the screw from the top and
hold the nut from the bottom with a pencil
or other object which fits into the recessed
hole in the case. Tighten the screws until
snug. Do not overtighten the screws.
14. Test the unit for proper operation before using (see “Checking the Temperature of the
Bath,” page 4).
Ordering Parts
To order a Snap Action Thermostat (S.A.S.) Assembly Kit or any other needed part, please
call the factory at 651-430-1200; fax your order to 651-439-9733; or e-mail us at
[email protected].
IMPORTANT: Please include the serial number or date of manufacture of the
Therabath®PRO® paraffin bath, your shipping address, fax number, and e-mail address
(if applicable) with your order.
Copyright © 1994-2005 by WR Medical Electronics Co. All rights reserved. Trademarks and registered trademarks of WR Medical Electronics Co.
include (but are not limited to): Therabath,® Theraffin,® ComforKit,™ ScentFree,™ Therabath®Pro,®and The Paraffin Specialist.™ Thinsulate is a
registered trademark of 3M Corporation.
Page 8 • Therabath PRO Model TB4 (220-volt) Service Manual
®
®